

Page 1

Model 485
Gradient Former
Instruction
Manual
Catalog Number
165-4120
For Technical Service Call Your Local Bio-Rad Office or in the U.S. Call 1-800-4BIORAD (1-800-424-6723)
Page 2

Table of Contents
Page
Section 1 Introduction..................................................................................................1
Section 2 Pouring Multiple Gradient Gels in the Multi-Casting Chamber...........2
2.1 Calculate the Volume of Acrylamide to Prepare.......................................................2
2.2 Calculate the Chamber Volumes ...............................................................................2
2.3 Reassemble the Multi-Casting Chamber...................................................................2
2.4 Pour the Gels ..............................................................................................................2
2.4.1 Pour Linear Gradient Gels ............................................................................2
2.4.2 Pour Convex Exponential Gradient Gels......................................................3
Section 3 Pouring One Large-Format Linear Gradient Gel ...................................4
3.1 Calculate the Volume of Acrylamide to Prepare.......................................................4
3.2 Calculate the Chamber Volumes ...............................................................................4
3.3 Set Up the Glass Plate for Casting.............................................................................4
3.4 Pour the Gel................................................................................................................4
3.4.1 Pour a Linear or Concave Gradient Gel from the Top.................................4
3.4.2 Pour a Linear or Convex Gradient Gel from the Bottom.............................5
Section 4 Gradient Former Car e and Maintenance.................................................6
Section 5 Product Inf ormation....................................................................................6
Appendix A Estimated Volume of Acrylamide for 12 Mini-PROTEAN 3 Gels.........6
Page 3
Section 1
Introduction
The Model 485 Gradient Former is primarily used to construct reproducible linear and
exponential polyacrylamide gradient gels. It has a 175 ml capacity, making it ideal for
preparation of up to 12 identical Mini-PROTEAN®3 gradient gels. It can also be used to
prepare PROTEAN II gels.
The mixing (labeled "light") and reservoir (labeled "heavy") chambers have identical
dimensions. The outlet from the mixing chamber leads into a multi-casting chamber. The
exponential piston is available as an accessory; it is used to fix the volume in the mixing
chamber to produce concave or convex exponential gradients.
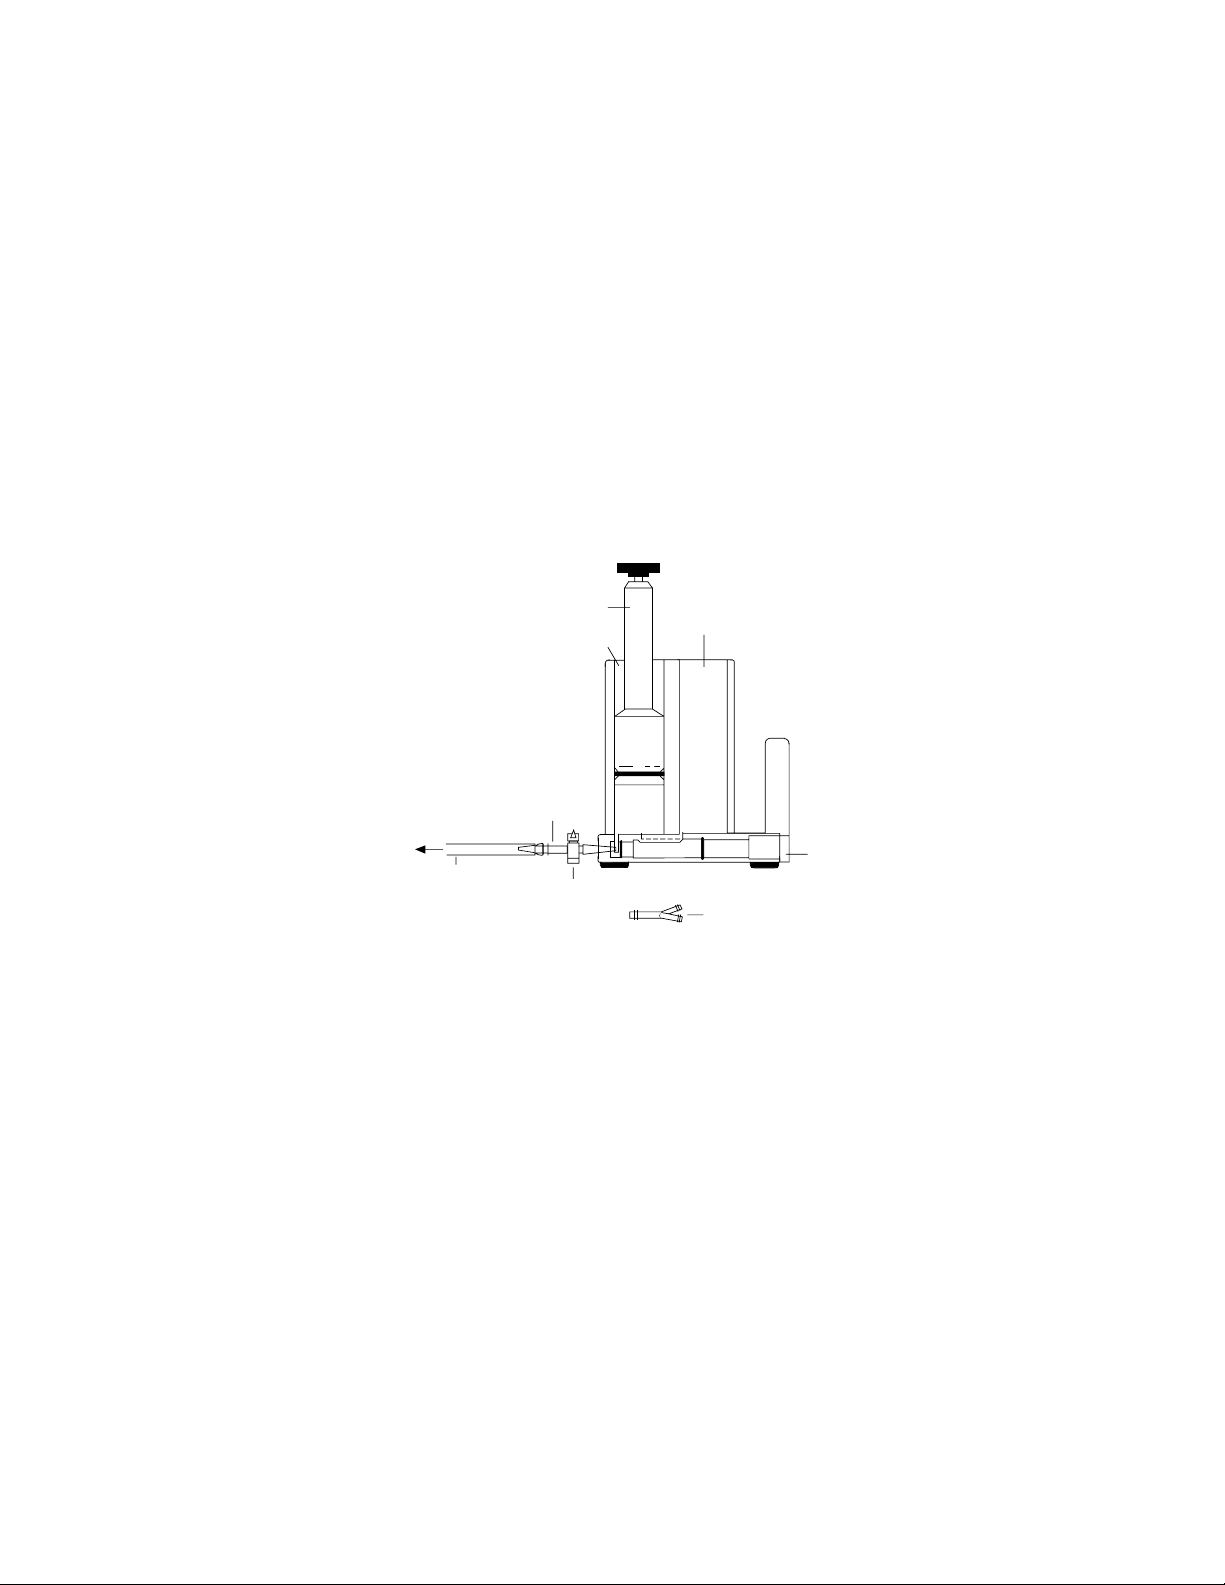
Figure 1.1 Model 485 Gradient Former, major parts
1.1 Specifications
Overall size 10 cm x 10 cm x 16 cm (W x L x H)
Weight 500 g
Capacity 40–175 ml
Materials of construction
Body Machined from an acrylic block
Valve stem Delrin
®
Stopcock Plastic
Piston Delrin
Tubing Tygon
®
1/8” ID
1
Exponential piston
Mixing chamber
(light)
Reservoir chamber
(heavy)
Luer taper coupling
Valve stem
Y-connector
Stopcock
Tubing
Multi-casting
Chamber
Page 4

2
Section 2
Pouring Multiple Gradient Gels in the Multi-Casting
Chamber
Note: This procedure can be used to produce gels with either a linear or a convex
exponential gradient. Cast a minimum of 4 Mini-PROTEAN 3 gels using this procedure.
An inexperienced user should practice all steps ahead of time so that the procedure is
completed quickly. The best guarantee of reproducibility from gradient to gradient is
careful technique on the part of the operator.
Wear rubber gloves to prevent exposure to unpolymerized acrylamide, a neurotoxin.
2.1 Calculate the Volume of Acrylamide to Prepare
The first time gels of a certain thickness are cast, it is necessary to empirically determine
the required volume of acrylamide. If you are using the Mini-PROTEAN 3 multi-casting
chamber, assemble the stack of Mini-PROTEAN 3 sandwiches (as described in the
multi-casting chamber manual) and inject a measured volume of water through the stopcock.
You will prepare this volume (+5 ml) of acrylamide. (A minimum working volume of 40 ml
is required for the gradient former.) Disassemble the chamber and dry all components.
See Appendix A for additional information.
2.2 Calculate the Chamber Volumes
To create a linear gradient, the volume in each chamber is ½ the total gel volume required
(or 20 ml, whichever is greater.)
For a convex exponential gradient, the light solution in the mixing chamber will be ¼
the total gel volume (minimum 10 ml) and the heavy solution in the reservoir chamber will
be equal to the total gel volume (minimum 40 ml).
Combine all reagents except the initiators (usually APS and TEMED), and degas each
solution under vacuum for at least 15 minutes.
2.3 Reassemble the Multi-Casting Chamber
Refer to the Mini-PROTEAN 3 multi-casting chamber instruction manual. Be certain
that all of the parts are clean and dry.
2.4 Pour the Gels
Note: If the flow rate is kept constant, the gradients will be reproducible. Tubing size, the
volume of acrylamide in the chambers, and the rate of stirring must be kept constant. If the rate
of stirring changes, then the amount of acrylamide pulled into the front chamber from the
back chamber when the connection between the two chambers is opened will vary. This will
change the gradient.
2.4.1 To Pour Linear Gradient Gels
a. Arrange the tubing so that there is as short a distance as possible between the stopcock
opening and the inlet to the gel casting chamber.
Note: The level of the gradient former stopcock must be placed above the top of the gel
sandwich. This creates a hydrostatic head large enough to pour the gels within 10 minutes
from the time the initiators are added to the light solution. To create uniform gradients, all of
the acrylamide must be in the gel sandwich before polymerization begins.
Page 5

b. Add a 1" stirbar in the mixing chamber (with the valve stem closed.) The mixing
chamber is labeled "light". Place the gradient former on a magnetic stir plate.
c. Add the initiators to the light solution, swirl it 8 to 10 times, and pour the mixture into the
mixing chamber. This is the start of the 10 minutes.
d. Add the initiators to the heavy solution, swirl it 8 to 10 times, and pour it into the
reservoir chamber. Start the stir plate and adjust the speed so that you get good mixing;
the bottom level of the vortex should be nearly the same as the acrylamide level in the
reservoir chamber.
e. Quickly open the valve stem and stopcock. The acrylamide will flow down the tubing to
the gel sandwich. Do not allow air bubbles to enter the gel. Overlay the acrylamide with
water or water-saturated isobutanol. Note: each gel must have the same volume of
overlay solution. For a continuous buffer system, insert a comb at an angle (this reduces
the chance of bubble formation.)
f. Close the stopcock on the multi-casting chamber after the gels are cast. Remove the
tubing. Immediately flush the system with water to prevent polymerization of residual
acrylamide within the gradient former.
2.4.2 To Pour Convex Exponential Gradient Gels
a. Arrange the tubing so that there is as short a distance as possible between the stopcock
opening and the inlet to the gel casting chamber.
Note: The level of the gradient former stopcock must be placed above the top of the gel
sandwich. This creates a hydrostatic head large enough to pour the gels within 10 minutes
from the time the initiators are added to the light solution. To create uniform gradients, all of
the acrylamide must be in the gel sandwich before polymerization begins.
b. Add a 1" stirbar in the mixing chamber (with the valve stem closed.) The mixing
chamber is labeled "light". Place the gradient former on a magnetic stir plate.
c. Add the initiators to the light solution, swirl 8 to 10 times, and pour into the mixing
chamber, leaving the valve stem closed. This is the start of the 10 minutes.
d. Immediately fix the volume with the exponential piston by inserting the piston into the
chamber to 1 cm above the level of the acrylamide and tightening the screw-top handle
to hold the piston in place.
e. Add the initiators to the heavy solution, swirl it 8 to 10 times, and pour it into the
reservoir chamber. Start the stir plate and adjust the speed so that you get good mixing;
the bottom level of the vortex should be nearly the same as the acrylamide level in the
reservoir chamber.
f. Quickly open the valve stem and stopcock. The acrylamide will flow down the tubing to
the gel sandwich. Do not allow air bubbles to enter the gel. Overlay the acrylamide with
water or water-saturated isobutanol. Note: each gel must have the same volume of
overlay solution. For a continuous buffer system, insert a comb at an angle (this reduces
the chance of bubble formation.)
g. Close the stopcock on the multi-casting chamber after the gradient is cast. Remove the
tubing. Immediately flush the system with water to prevent polymerization of residual
acrylamide within the gradient former.
3
Page 6

Section 3
Pouring One Large-Format Gradient Gel
Pouring a single Mini-PROTEAN 3 gradient gel is not recommended. The minimum
volume for the gradient former is 40 ml, and you should use nearly all of the solution in pouring
a gradient gel. These instructions are intended for casting large-format polyacrylamide gels.
An inexperienced user should practice all steps ahead of time so that the procedure is
completed quickly. The best guarantee of reproducibility from gradient to gradient is careful
technique on the part of the operator.
Wear rubber gloves to prevent exposure to unpolymerized acrylamide, a neurotoxin.
Note: If the rate of flow is kept constant, then the gradients will be reproducible. Tubing
size, the needle size and size of the hole in the needle, the volumes in the chambers, and the
rate of stirring of the stir plate must be kept constant. If the rate of stirring changes, then the
amount of acrylamide pulled into the front chamber from the back chamber when the
connection between the two chambers is opened will vary. This will change the gradient.
3.1 Calculate the Volume of Acrylamide to Prepare
The first time gels of a certain thickness are cast, it is necessary to empirically determine
the required volume of acrylamide. Inject a measured volume of water into the gel sandwich.
You will prepare this volume (+5 ml) of acrylamide. (A minimum working volume of 40 ml
is required for the gradient former.) Disassemble the chamber and dry all components.
3.2 Calculate the Chamber Volumes
To create a linear gradient, the volume in each chamber is ½ the total gel volume required
(or 20 ml, whichever is greater.)
For a convex exponential gradient, the light solution in the mixing chamber will be ¼
the total gel volume (minimum 10 ml) and the heavy solution in the reservoir chamber will
be equal to the total gel volume (minimum 40 ml).
For a concave exponential gradient, the heavy solution in the mixing chamber will be ¼
the total gel volume (minimum 10 ml) and the light solution in the reservoir chamber will be
equal to the total gel volume (minimum 40 ml).
Combine all reagents except the initiators (usually APS and TEMED), and degas each
solution under vacuum for at least 15 minutes.
3.3 Assemble the Glass Plate Sandwich
Set up the glass plate for casting (as indicated in the electrophoresis cell instruction
manual.)
3.4 Pour the Gel
Note: The level of the gradient former stopcock must be placed above the top of the gel
sandwich. This creates a hydrostatic head large enough to pour the gel within 10 minutes
from the time the initiators are added to the light solution. To create uniform gradients, all of
the acrylamide must be in the gel sandwich before polymerization begins.
3.4.1 Pour a Linear or Concave Gradient Gel from the Top
The heavy solution is poured into the mixing chamber since it enters the sandwich first,
flowing to the bottom. The light solution, which flows into the gel last, is poured into the
4
Page 7

reservoir chamber. Note: For this application, the heavy solution will be poured in the
mixing chamber labeled "light", and the light solution will be poured in the mixing chamber
labeled "heavy".
a. Arrange the tubing so that there is as short a distance as possible between the stopcock
opening and the needle at the end of the tubing. (Alternatively, you can cut the end of
the tubing at an angle.) The end of the needle or tubing will lie against the glass plate
while the acrylamide is being poured into the sandwich.
b. Place a 1" stirbar in the mixing chamber (with the valve stem closed.) The mixing
chamber is labeled "light".
c. Add the initiators to the light solution, swirl it 8 to 10 times, and pour the mixture into the
reservoir chamber (which is labeled "heavy"). This is the start of the 10 minutes. Leave
the valve stem closed.
d. Add the initiators to the heavy solution, swirl it 8 to 10 times, and pour it into the mixing
chamber (which is labeled "light"). Start the stir plate and adjust the speed so that you
get good mixing; the bottom level of the vortex should be nearly the same as the
acrylamide level in the reservoir chamber.
For a concave gradient, insert the exponential piston into the mixing chamber to 1 cm above
the level of the acrylamide, tighten the screw top handle to hold the piston in place, and then
start the stir plate.
e. Quickly open the valve stem and stopcock. The acrylamide will flow through the tubing
and needle to the gel sandwich. Do not allow air bubbles to enter the gel. Overlay the
acrylamide with water or water-saturated isobutanol. For a continuous buffer system,
insert a comb. (The comb should be inserted at an angle to prevent the formation of
bubbles.)
f. Remove the tubing and disassemble the gradient former. Immediately flush the system
with water to prevent polymerization of residual acrylamide within the gradient former.
3.4.2 Pour a Linear or Convex Gradient Gel from the Bottom
In this case, the light solution goes into the mixing chamber (labeled "light") and the
heavy solution goes into the reservoir (labeled "heavy"). The light solution enters the gel from
the bottom and travels to the top, and the heavy solution follows, filling in the bottom of the
gel.
An inexperienced user should practice all steps ahead of time so that the procedure is
completed quickly. The best guarantee of reproducibility from gradient to gradient is careful
technique on the part of the operator.
Wear rubber gloves to prevent exposure to unpolymerized acrylamide, a neurotoxin.
a. Arrange the tubing so that there is as short a distance as possible between the stopcock
opening and the needle at the end of the tubing. Insert the needle into the gel sandwich
through the gasket on the bottom of the casting stand.
b. Place a 1" stirbar in the mixing chamber (with the valve stem closed.) The mixing
chamber is labeled "light".
c. Add the initiators to the light solution, swirl it 8 to 10 times, and pour the mixture into the
mixing chamber (which is labeled "light"). This is the start of the 10 minutes. Leave the
valve stem closed.
For a convex gradient, insert the exponential piston into the mixing chamber to 1 cm
above the level of the acrylamide, tighten the screw top handle to hold the piston in place.
5
Page 8

d. Add the initiators to the heavy solution, swirl it 8 to 10 times, and pour it into the
reservoir chamber (which is labeled "heavy"). Start the stir plate and adjust the speed so
that you get good mixing; the bottom level of the vortex should be nearly the same as the
acrylamide level in the resevoir chamber.
e. Quickly open the valve stem and stopcock. The acrylamide will flow through the tubing
and needle to the gel sandwich. Do not allow air bubbles to enter the gel. Overlay the
acrylamide with water or water-saturated isobutanol. For a continuous buffer system, insert
a comb. (The comb should be inserted at an angle to prevent the formation of bubbles.)
f. Remove the tubing and disassemble the gradient former. Immediately flush the system
with water to prevent polymerization of residual acrylamide within the gradient former.
Section 4
Gradient Former Care and Maintenance
After use, disassemble the gradient former and rinse all parts with distilled water. If the
gel polymerizes in the gradient former during casting or before the system can be flushed
with water, remove the valve stem and stopcock and rinse thoroughly. The needle can be
replaced (catalog number 165-2007). A Tubing Connection Kit (catalog number 165-2008)
includes replacement Tygon tubing, a luer fitting, stopcock, and a Y connector. Do not use
organic solvents, strong acid solutions or ethanol in the gradient former.
Section 5
Product Information
Catalog
Number Description
165-4120 Model 485 Gradient Former
165-2006 Exponential Piston
165-2007 Gradient Pouring Needles, 2
165-2008 Tubing Connection Kit, includes stopcock, tapered luer coupling,
tubing (1/8 inch ID, 3 feet), and Y-connector
Appendix A
Estimated V olume of Acrylamide for
12 Mini-PROTEAN 3 Gels
The first time gels of a certain thickness are cast, it is necessary to empirically determine
the required volume of acrylamide. Assemble the stack, and inject a measured volume of
water through the stopcock. Prepare this volume (+5 ml) of acrylamide.
As a guideline, this is the estimated volume of acrylamide for 12 Mini-PROTEAN 3 gels:
Spacer plates Volume for 12 gels Volume to prepare
0.5 mm 70 ml 75–80 ml
0.75 mm 80 ml 85–90 ml
1.0 mm 100 ml 105–110 ml
1.5 mm 140 ml 145–150 ml
6
Page 9

Sample calculation: preparing twelve 1.0 mm 4–20% gradient gels:
Casting twelve 1.0 mm gels requires 100 ml; prepare 110 ml.
Divide the total volume by 2 to get the volume required for each chamber. (For this example,
make 55 ml for the light chamber and 55 ml for the heavy chamber.)
Solution Volume Calculations:
Light Solution (4%)
Acrylamide
30% stock solution
(30%) (X ml) = (4%) (55 ml) X = 7.3 ml
Tris-Cl Buffer
1.5M Tris-Cl stock buffer pH 8.8
(1.5M) (X ml) = (.375M) (55 ml) X = 13.8 ml
Water
(55 ml)–(7.3 ml + 13.8 ml) = XX= 34 ml
APS
10% Stock solution
(500 µl) / (100 ml) = (X µl) / (55 ml) X = 275 µl
TEMED
10% of the APS volume; (275 µl) / 10 = XX= 27.5 µl
Heavy Solution (20%)
Acrylamide
30% Stock solution
(30%) (X ml) = (20%) (55 ml) X = 36.7 ml
Tris-Cl Buffer
1.5M Tris-Cl Stock Buffer pH 8.8
(1.5M) (X ml) = (.375M) (55 ml) X = 13.8 ml
Water
(55 ml)–(36.7 ml + 13.8 ml) = XX= 4.5 ml
APS
(500 µl) / (100 ml) = ( X µl) / (55 ml) X = 275 µl
TEMED
10% the APS volume; (275 µl) / 10 = XX= 27.5 µl
7
Page 10

Bio-Rad
4006192 Rev A
Laboratories
Life Science
Group
Website www.bio-rad.com Bio-Rad Laboratories Main Office 2000 Alfred Nobel Drive, Hercules, CA 94547, Ph. (510) 741-1000, Fx. (510)741-5800
Also in: Australia Ph. 02 9914 2800, Fx. 02 9914 2889 Austria Ph. (01) 877 89 01, Fx. (01) 876 56 29 Belgium Ph. 09-385 55 11, Fx. 09-385 65 54
Canada Ph. (905) 712-2771, Fx. (905) 712-2990 China Ph. 86-10-62051850/51, Fx. 86-10-62051876 Denmark Ph. 45 39 17 99 47, Fx. 45 39 27 16 98
Finland Ph. 358 (0)9 804 2200, Fx. 358 (0)9 804 1100 France Ph. 01 43 90 46 90, Fx. 01 46 71 24 67 Germany Ph. 089 318 84-0, Fx. 089 318 84-100
Hong Kong Ph. 852-2789-3300, Fx. 852-2789-1257 India Ph. (91-11) 461-0103, Fx. (91-11) 461-0765 Israel Ph. 03 951 4127, Fx. 03 951 4129
Italy Ph. 39-02-216091, Fx.39-02-21609-399 Japan Ph. 03-5811-6270, Fx. 03-5811-6272 Korea Ph. 82-2-3473-4460, Fx. 82-2-3472-7003
Latin America Ph. 305-894-5950, Fx. 305-894-5960 Mexico Ph. 514-2210, Fx. 514-2209 The Netherlands Ph. 0318-540666, Fx. 0318-542216
New Zealand Ph. 64-9-4152280, Fx. 64-9-4152284 Norway Ph. 22-74-18-70, Fx. 22-74-18-71 Russia Ph. 7 095 979 98 00, Fx. 7 095 979 98 56
Singapore Ph. 65-2729877, Fx. 65-2734835 Spain Ph. 34-91-661-7085, Fx. 34-91-661-9698 Sweden Ph. 46 (0)8-55 51 27 00, Fx. 46 (0)8-55 51 27 80
Switzerland Ph. 01-809 55 55, Fx. 01-809 55 00 United Kingdom Ph. 0800-181134, Fx. 01442-259118
00-000 0099 Sig 031799Bulletin 0000 US/EG Rev A
 Loading...