

Page 1
h1000 pilot
introduction
overview
Congratulations on your purchase of the
autopilots from B&G and represents B&G’s commitment to providing our customers with the finest
marine navigation systems. The
electronic autopilot system designed as a sophisticated navigation aid and provides many useful
features.
Before you begin using your new
achieve the full potential
from your new system.
h1000 Pilot
h1000 Pilot
h1000 Pilot
from B&G. The
is an easy to use, state-of-the-art computerised
, please take the time to read this manua l to help you
h1000 Pilot
is the latest in
features
features
features
featuresfeatures
The
h1000 Pilot
integrated into an instrument system.
• Steer to Compass heading, COMP Mode
• Steer to Wind angle, Wind Mode, when connected to the h1000 Wind Interface
• Steer to Waypoint, Nav Mode, either from the
• Advanced Control Processor (ACP) with self-learning capabilities
• Red background illumination level in 3 steps from zero to full brightness
www.bandgservice.co.uk Page 1
is a fully functional autopilot which can be used either as a stand-alone system or
h1000 CND
or NMEA via the Universal Interface
Page 2

introduction
h1000 pilot
certification
warnings & precautions:
WARNING:
WARNING:
WARNING:WARNING:
DO NOT USE AN ALCOHOL BASED CLEANER ON THIS DISPLAY.
DO NOT USE AN ALCOHOL BASED CLEANER ON THIS DISPLAY.
DO NOT USE AN ALCOHOL BASED CLEANER ON THIS DISPLAY.DO NOT USE AN ALCOHOL BASED CLEANER ON THIS DISPLAY.
Note:
Note:
Note:Note:
This equipment generates, uses, and can radiate radio frequency energy and, if not installed and
used in accordance with the instructions, may cause harmful interference to radio
communications. However, there is no guarantee that interference will not occur in a particular
installation. If this equipment does cause harmful interference, the user is encouraged to try to
correct the interference by relocating the equipment or connecting the equipment to a different
circuit. Consult an authorised dealer or other qualified technician for additional help if these
remedies do not
This device meets requirements for CFR47 Part 15 of the FCC limits for Class B equipment.
The
h1000 Pilot
for maritime navigation and radiocommunication equipment and systems.
h1000
The
repairs. Unauthorised repairs or modifications will void your warranty.
correct the problem.
meets the standards set out in European Standard EN 60945: 1997 IEC 945: 1996
contains no user-serviceable parts. An authorised service centre should only make
trademarks
All rights reserved. No part of this manual may be reproduced or transmitted in any form or by any
means including photocopying and recording, for any purpose without the express written
permission of B&G.
Information in this document is subject to change without notice. B&G reserves the right to change
or improve its products and to make changes in the content without o bligation to notify any person
or organisation of such changes.
h1000
B&G and
express permission of B&G.
Page 2
are all trademarks of Brookes & Gatehouse Ltd. and may not be used without the
Page 3

h1000 pilot
Overview
Overview 1
OverviewOverview
Features
Features 1
FeaturesFeatures
Certification
Certification 2
CertificationCertification
Trademarks
Trademarks 2
TrademarksTrademarks
Contents
Contents 3
ContentsContents
Controls
Controls 5
ControlsControls
Getting Started
Getting Started 5
Getting StartedGetting Started
Engaging Pilot 6
Disengaging Pilot 6
Pilot mode selection
Pilot mode selection 6
Pilot mode selectionPilot mode selection
Compass Mode 7
Navigate Mode 9
Wind Mode 10
Main menu
Main menu 11
Main menuMain menu
Main Menu 11
Tack 11
Memories 11
Pilot Memories 11
Resume 11
Tack 12
TWA Mode 12
Speed Source 12
Memories Menu
Memories Menu 13
Memories MenuMemories Menu
Compass 13
Reset trip log 13
Alarms 13
Lighting 14
Timer 15
Calibration
Calibration 16
CalibrationCalibration
Entering Secure Mode 16
Installation
Installation 17
InstallationInstallation
Precautions 17
Panel mounting 17
Electrical Connections
Electrical Connections 18
Electrical ConnectionsElectrical Connections
External Connections 18
Accessories
Accessories 19
AccessoriesAccessories
Hand-Held Contoller 19
Joystick 20
Engaging the Pilot in Joystick Mode 20
Disengaging the Pilot in Joystick Mode 21
contents
contents
1
11
1
11
2
22
222
333
5
55
5
55
6
66
11
1111
13
1313
16
1616
17
1717
18
1818
19
1919
Page 3
Page 4

contents
contents
Man Overboard (MOB) Mode
Man Overboard (MOB) Mode 22
Man Overboard (MOB) ModeMan Overboard (MOB) Mode
Man Overboard Key 22
Power Boats 22
Sail Boats 22
MOB Manual Recovery: For All Boats, Pilot OFF 23
Manual Recovery: for all Boats, Pilot ON 23
MOB Automatic Recovery: Power Only, Pilot ON 24
Technical Specifications
Technical Specifications 25
Technical SpecificationsTechnical Specifications
Warranty
Warranty 26
WarrantyWarranty
22
2222
25
2525
26
2626
h1000 pilot
Page 4
Page 5
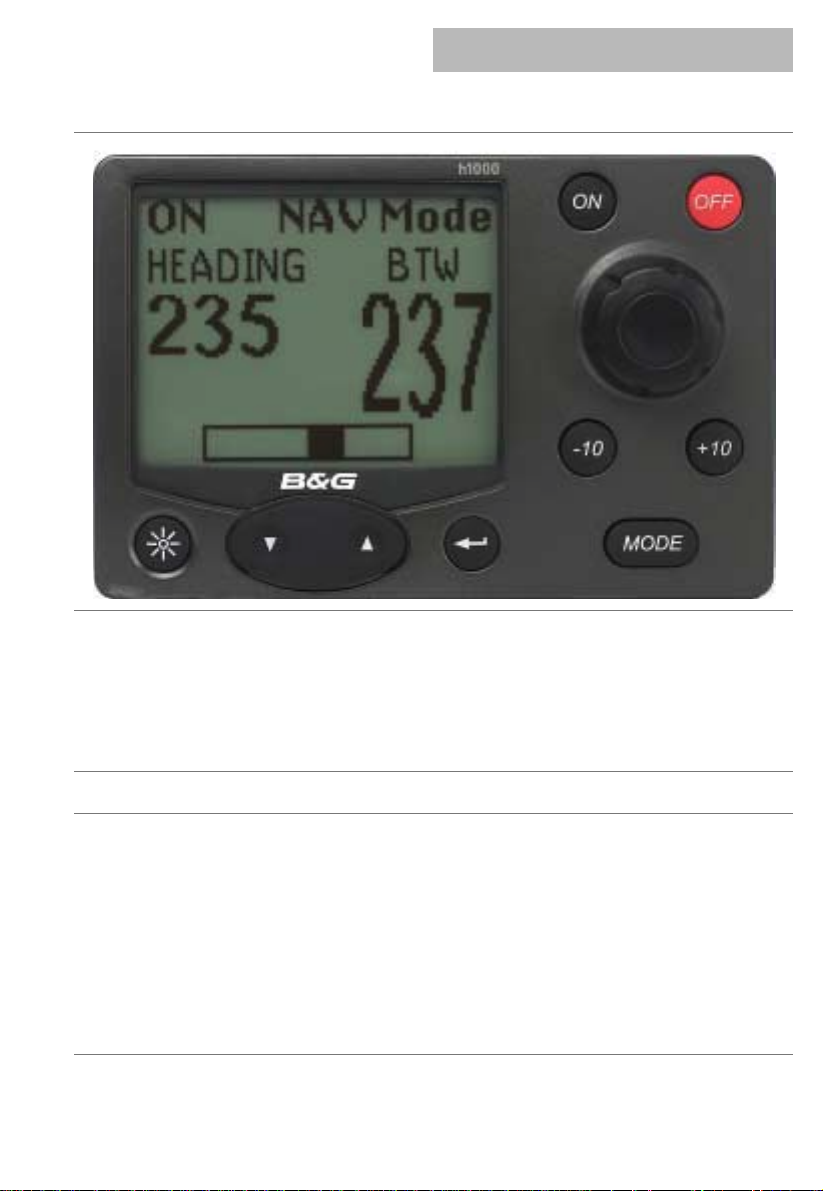
h1000 Pilot
controls
controls
Light control
The lighting level can be changed at any time by pressing the LIGHTS key.
This causes the lighting level to cycle in the sequence high – medium –
low – off and then back to high.
The UP/DOWN keys are used to move through data pages, scroll through
items in a list, and alter numerical values.
Press the ENTER key to select the Main Menu from a data page, select
items from a list entry, and store values to memory.
ON engages the Pilot in the selected mode.
OFF disengages the Pilot from all modes.
The rotary knob is used to alter the Pilot course in 1° increments, scroll
through items in a list, and alter numerical values.
Alters the Pilot course by 10° to port. Multiple key presses are used for
large course changes.
Alters the Pilot course by 10° to starboard. Multiple key presses are used
for large course changes.
Successively cycles through Compass, Wind and Nav modes if available.
Page 5
Page 6
getting started
getting started
h1000 pilot
Before switching the Pilot on for the first
time, check that the installation has been
wired according to the instructions
contained in the
Manual.
After initial power-up the Pilot displays
Comp Mode and shows the Pilot status as
OFF.
Pressing the MODE key with the Pilot OFF
scrolls through the available Pilot modes
Comp, Wind and Nav providing the data is
available on the system.
Pressing the UP/DOWN keys with the Pilot
OFF the display scrolls through the six user
pages returning to OFF Comp Mode.
h1000 Pilot
Installation
engaging pilot
Pressing the ON key activates the Pilot in the sele cted mode.
Pressing the UP/DOWN keys with the Pilot ON, the display scrolls through the fixed Pilot pages for
the selected mode.
Note
Note: Compass Mode shown above. Wind and Navigation modes are similar (see Pages 7 to 10).
NoteNote
disengaging pilot
Disengages the Pilot.
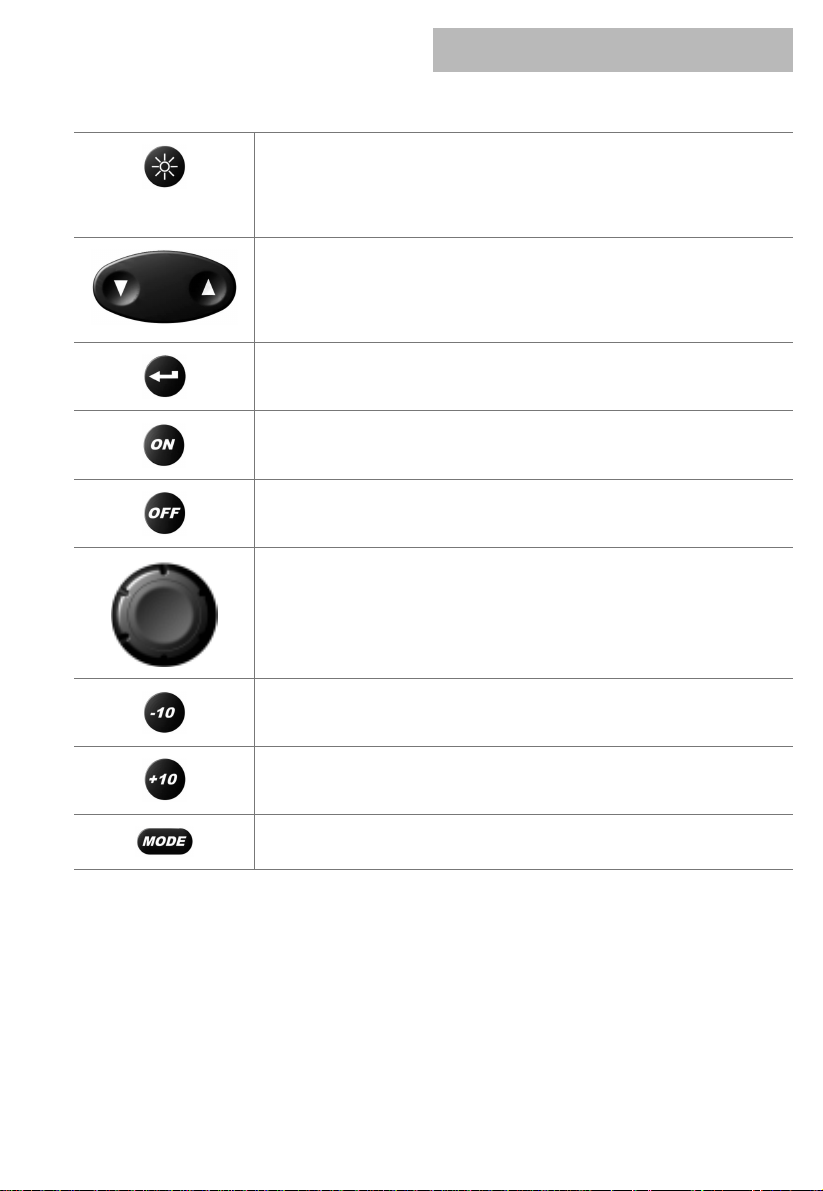
compass mode
Page 6
Page 7

h1000 pilot
pilot mode selection
compass mode
With Compass Mode selected and the Pilot
switched OFF, steer the boat onto the desired
heading and allow the boat to settle. Engage the
Pilot in Compass Mode by pressing the ON key
once.
The display changes to Heading and Set CRS
(Course). A rudder position indicator bar is also
displayed at the bottom of the screen.
Course changes can now be made by turning
the rotary knob, or by pressing the –10° and
+10° increment keys.
dodging
Press the -10°,,,, key or turn the rotary knob
anti-clockwise to alter course to port in 10
0
increments.
1
Press the +10 key or turn the rotary knob
clockwise to alter course to starboard in 10
0
increments.
1
Multiple presses of the keys are added together
to give the required course change; e.g. for 20
to port press -10° twice, for 11
press +10° then one “click” of the rotary knob
clockwise. Alternatively, the rotary knob can be
used exclusively to dodge around objects.
The previous autopilot course is automatically
stored in memory. Pr ess the ON key twice within
four seconds to resume the previous course.
0
to starboard
0
or
0
or
0
memorising the new course
Press and hold the ON key for two seconds to
update and store the new course in the
autopilot course memory. It is suggested that
this be carried out after every permanent course
change; i.e. not when you have just dodged
around an obstacle.
Page 7
Page 8

pilot mode selection
compass mode
2nd page
rd
3
page
h1000 pilot
additional compass pa ge s
With the pilot ON pressing the UP/DOWN keys
will scroll the display to a second and third
Compass Mode page.
Page 2 displays boat speed, course and rudder
position.
Page 3 displays a track screen of the current
data, if position information is available.
Page 8
Page 9
h1000 pilot
2nd page
pilot mode selection
wind mode
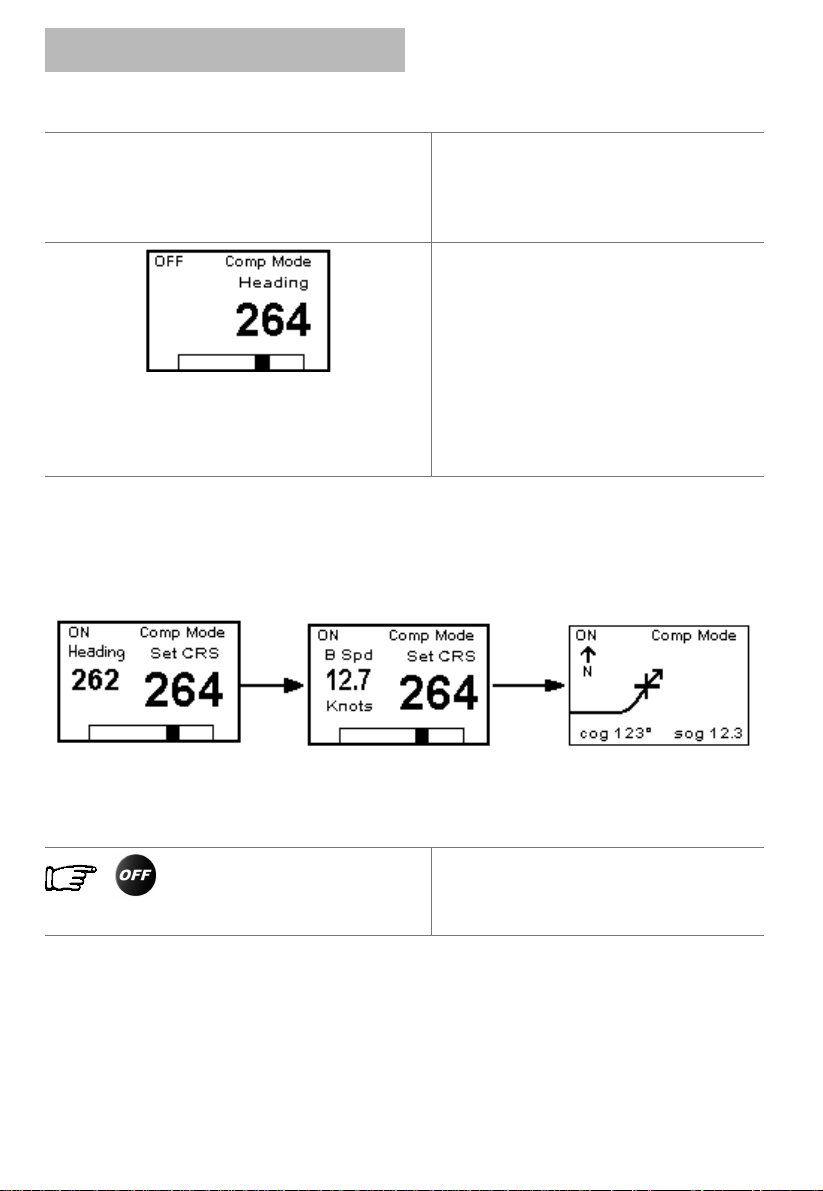
wind mode
In Wind Mode, the Pilot will steer a course that
maintains a set target Apparent Wind Angle
(Set AWA) or True Wind Angle (Set TWA). If the
rd
3
page
wind shifts, the Pilot will alter course so that
the actual wind angle to the boat remains the
same.
With Wind Mode selected, steer the boat until
the desired AWA is displayed and allow the boat
to settle. Activate the Pilot in Wind Mode by
pressing the ON key once. Wind angle changes
are made by turning the rotary knob the
desired number of degrees, or by pressing the
10° keys to achieve the desired correction.
true wind angle
If a boat speed input from a paddlewheel sensor
is available, the Pilot has the ad ded facility to
steer to TWA. This gives increased steering
stability, particularly downwind. Steer to TWA is
selected by setting TWA Mode to ON, which is
found in the Pilot Memories menu. Refer to
Page 11 of this manual.
automatic tack
The
h1000 Pilot
automatic tack, which is particularly useful
when sailing short-handed
The auto tack function is selected by pressing
the ENTER key once, choosing Tack, and
selecting now or after delay. Selecting now will
immediately tack the boat whilst after delay
will tack the boat after a pre-set countd own
period. The Tack Countdown time can be
adjusted within the Pilot Memories menu.
additional wind mode pages
With the pilot ON pressing the UP/DOWN keys
will scroll the display to a second and third
Wind Mode page.
Page 2 displays actual wind angle, target wind
angle and rudder position.
Page 3 displays a track screen of the current
data, provided that position information is
available.
has the ability to perform an
Page 9
Page 10

pilot mode selection
navigate mode
2nd page
rd
3
page
h1000 pilot
navigate mode
In Nav Mode, the Pilot can be used to steer to a
waypoint created by the
Navigation Di splay
via NMEA.
With Nav Mode selected and the Pilot switched
OFF, steer the boat onto the Bearing to
Waypoint (BTW), ensure that the cross track
error is less than 0.1Nm, and allow the boat to
settle. Activate the Pilot in Nav Mode by
pressing the ON key once. When engaged in
Nav Mode, the Pilot will steer a course that
aims to keep the cross track error to a
minimum and will allow the boat to safely arrive
at the next waypoint.
automatic waypoint advance
Many position fixers will automatically switch to
the next waypoint in a sail plan. For reasons of
safety however, the
automatically steer to the next waypoint until
instructed by the user. If the position fixer is
transmitting valid waypoint route information,
and automatically switches to the next waypoint
in a route, the Pilot will prompt the user with
the message Next Waypoint ?. When it is safe
to do so, press the ENTER key within four
seconds to instruct the Pilot to start navigating
to the next waypoint in the route.
additional navigate mode pages
With the pilot ON pressing the UP/DOWN keys
will scroll the display to a second and third Nav
Mode page.
Page 2 displays navigation information relative
to the selected Waypoint.
Page 3 displays a track screen of the current
data. A circle on the screen indicates the active
waypoint.
h1000 CND (Central
) or from an external source
h1000 Pilot
will not
Page 10
Page 11

h1000 pilot
main menu
main menu
main menu
The Main menu is accessed by pressing the
ENTER key. The items listed in this menu differ
slightly dependent upon the boat type and units
connected to the system. The ‘tack’ item will
only be listed if the wind interface is connected
and the Pilot configured for sail in Dockside
Calibration.
Tack (see also Page 9 of this manual)
cancel aborts the tack function
now will immediately start the automatic tack
function
after delay starts the automatic tack functi on
after an adjustable time period.
memories
The Memories menu contains functions which
are accessed more frequently and can be
changed with the Pilot OFF or ON.
The memories menu may be accessed to
configure the settings for the Pilot, Compass,
Alarms and Lighting, and to reset the trip log.
Page 11
Page 12

main menu
pilot memories
h1000 pilot
Pilot Memories
Pressing the ENTER key with Pilot
highlighted takes the user into the
Pilot Memories pages.
(see also Page 9 of this
Tack
manual)
Pressing the ENTER key with this
option highlighted displays the auto
tack function delay time setting,
adjustable between 0 and 99
seconds. The default setting is 10
seconds.
TWA mode
manual)
Pressing the ENTER key displays
the status for TWA mode.... Selecting
ON configures the Pilot to use TW A
information when steering in Wind
Mode. This function is particularly
useful for optimising downwind
steering performance
(see also Page 9 of this
Speed source
The speed source option allows the
source for speed data to be
selected. Pressing the ENTER key
displays the three options available,
Page 12
paddle, SOG (from a GPS) and
manual. Pressing the UP/DOWN
key toggles between the options.
Selecting the manual option
activates a further screen, which
allows adjustment of the three
manual speed settings, slow,
medium and fast. Alter these
settings to the most appropriate
values for the particular boat.
Page 13

h1000 pilot
main menu
memories menu
Compass
The compass memory allows a pre-set heading to be defined and any deviation from that course
will be shown as an error on the Tactical Compass page. This course can be updated by one of
three methods. The first method, is simply by pressing the ENTER key whilst the display is showing
the Tactical Compass page. The second is by using the drop down box in the Memories →
Compass → Course, drop down menu. The drop down box offers Use heading which sets the
course to the heading the boat is presently steering to and User defined which allows a pre-set
value to be entered.
PORT and STBD courses (sailboats only) are retained and updated at each press of the ENTER key
whilst in the Tactical Compass page. When OK is selected, control returns to the Memories Menu.
reset trip log (this function is only available if a speed input is present)
Reset trip log clears the trip log value back to zero. The stored log however is unaffected by this
operation. Pressing the UP/DOWN
key toggles between OK and Cancel.
alarms
Alarm levels for various measured functions can be set, or inhibited. All the alarms default to OFF
on a factory reset.
If available on the system, the Wind speed, Shallow depth, and Off course alarms can be set from
the Alarms menu. Selecting Pilot activates the Pilot Alarms screen where the Watch timer and
Pilot off course alarms can be set.
It should be noted that two Off course alarms are available with the
which is located directly on the Alarms menu, is triggered from the Tactical Compass page. The
second Off course alarm, located within the Pilot Alarms menu triggers only when the Pilo t
deviates from the Pilot Set Course.
h1000 Pilot
system. The first,
Page 13
Page 14

main menu
h1000 pilot
alarms
The setting procedure for the wind speed alarm is shown. The other alarms are set in a similar
manner.
Note: The low battery alarm is pre-set at 10.5 volts, and can only
be turned ON or OFF.
lighting
lighting
Display lighting levels are controlled by the lights key in normal operation, but the exact level of
illumination can be adjusted for each of the three settings from this menu.
The levels are numbered in the order they appear when the lights key is pressed, and each level
can be set as a percentage from 00% (off) to 99% (maximum).
This menu page also allows the lighting control to be applied either as local (this display unit only),
or system (the entire system) and is useful when zoning particular displays on the boat. For
example, cockpit display lighting can be isolated from a display located down below.
The OK command returns to the Main Menu.
Page 14
Page 15

h1000 pilot
main menu
timer
timer
The timer can be used for counting down to the start of a race and to reco rd elapsed time. The
timer can be set to countdown anywhere from 1 minute to a maximum of 59 minutes in 1-minute
increments. Once started, the timer will continue to run in the background, even if the timer
configuration page is exited. The Timer function can be displayed in any of the User Pages.
Page 15
Page 16

calibration
h1000 pilot
calibration
Note: For full details of calibrations for your h1000 pilot r e fer t o t he Inst allation
Manual supplied with your unit.
Calibration
Calibration values take time and effort to
set up and it is often necessary to perform
various manoeuvres with the boat. For this
reason, an optional security check is
provided before entry into the calibration
menus to save accidental resets. Refer to
entering secure mode
This feature is optional and can be disabled.
The security check uses a four digit Personal Identification Number or PIN. If security has been
activated, this PIN must be entered every time to access the Calibrations menu.
After a factory reset the PIN is set to 0000 and in this condition security checking is disabled.
Security is an option on the Calibrations menu, which allows a new PIN to be set. Once a non-zero
PIN has been set the security checking is enabled, and all subsequent access to the Calibration
menu is restricted.
Note: Once the PIN has been entered for any given session the PIN entry screen is
automatically by-passed when re-entering the calibration menu. Upon cycling the power,
the PIN is once again required to enter the cal i bration menu.
the h1000 Pilot Installation Ma nua l for full
details covering Compass, Dockside and
Sea trial calibrations.
Security
disabled
Security
Page 16
enabled
Page 17

h1000 pilot
installation
installation
precautions
To avoid electromagnetic interference, it is
recommended that the Pilot display be installed
no less than 0.3 metres from a compass and 1
metre from a GPS.
The Pilot is water resistant, but not waterproof.
Use the cover when not in use. The rear
connectors that are not connected to cables
must remain protected by their appropriate
caps.
panel mounting
Ensure there is sufficient room behind the panel to accommodate the fixings and connections, and
using the template supplied, cut a hole in the panel in the desired position.
Fix the mounting bracket into the hole using the screws supplied.
Note: The sealing ring is fitted to the unit during manufacture. Its purpose is to prevent moisture
penetration and reduce the effects of any vibration transmitted through the instrument panel.
Press the Pilot Display firmly into the mounting bracket; an audible ‘click’ will indicate that the
case is correctly located.
Secure the unit to the instrument panel by fitting the studs and thumbnuts supplied.
Caution: To avoid damaging the casing, fixing studs must only be tightened ‘finger-tight’.
Sealing Ring
(Fitted at Manufacture)
Protective
Cover
Mounting
Bracket
Pilot Display
Unit
Page 17
Page 18

installation
electrical connections
2 3
5
41
Front view of
male connector pins
h1000 pilot
external connections
Two Fastnet² connectors are provided at the
rear of the unit.
The table below shows pin functions.
Pin Number Signal
1 12 volts
2 Busy
3
4
5 0 volts
Fastnet²Fastnet²+
Page 18
Page 19

h1000 pilot
accessories
accessories
Hand-held cont roller
The Hand-Held Controller provides remote
control over the
the six dedicated keys are as follows:
o
(a) 10
Starboard
(b) <10
o
> One degree turn to
(c) 1
Starboard
o
(d) <1
(e) auto/resume Switch the Pilot ON/
Resume the previous
course
(f) off Switch OFF the Pilot
The Hand-Held Controller has an LED indicator
that flashes to indicate the
operating correctly.
h1000 Pilot
> Ten degree turn to
o
Ten degree turn to Port
One degree turn to Port
. The functions of
h1000 Pilot
is
Page 19
Page 20

accessories
accessories
Jojstick Control
h1000 pilot
joystick control
The Joystick allows direct control of the rudder
via the autopilot computer for quick and
responsive steering. The Joystick has two
modes of operation available to the helmsman,
giving different steering control as follows:
normal
In this mode the rudder moves in the direction
of the joystick movement, when th e joystick is
returned to the central posi tion, the rudder
movement stops. The greater the movement of
the joystick, the faster the response of the
rudder.
proportional
In this mode the position of the rudder imitates
the position of the joystick. When the joystick is
returned to the central position the rudder
returns to its initial position.
engaging the pilot in joystick mode
To engage the Pilot:
• Turn rudder to amidships position
• Press the joystick key to engage the
Pilot
• Move the joystick to Port or Starboard
to move the rudder
Note that when the Pilot is engaged using the
joystick key, the rudder position at the moment
of engaging will be the central position of the
joystick.
Page 20
Page 21

h1000 pilot
accessories
accessories
disengaging the pilot from joystick mode
The joystick can be de-activated by either:
• Pressing the Joystick key
• Pressing the Red OFF key on the Pilot
display
• Pressing the Red OFF key on the
When the Pilot is disengaged from the Joystick
mode, the
selected prior to the joystick being engaged.
Note: The Joystick Mode can only be accessed
when the Pilot is in the OFF state in Compass,
Wind or NAV modes and cannot be selected if
the Pilot is already engaged.
Hand-Held Controller
h1000 Pilot
will return the mode
Page 21
Page 22

mob procedure
man overboard (mob) mode
h1000 pilot
man overboard key
The Man Overboard key is an optional extra
which activates the
procedure.
For the MOB function to operate, the Pilot
system must have a boat speed input from a
paddlewheel sensor. The procedure will not
operate when the Pilot is set to manual pre-set
speed bands or from speed over ground (SOG).
There are two distinct differences in the MOB
procedure dependent on the configuration of the
Pilot, which is either Power Boat or Sail Boat.
h1000 Pilot’s
man overboard
power boats
When the
the Pilot can be used for automatic recovery.
The Pilot controls the steering of the boat and
executes a “Williamson Turn” to steer the boat
on a reciprocal heading (course) back to the
point at which the MOB key was initially pressed.
h1000 Pilot
is installed on powerboats,
sail boats
When the
for safety reasons and the need for the boat to
tack and gybe back onto the reciprocal course,
automatic recovery is disabled. The user must
follow the dead-reckoned distance and course
displayed on the Pilot screen to manually return
the boat to the point at which the MOB key was
initially pressed.
h1000 Pilot
is installed on a sail boat,
Page 22
Page 23

h1000 pilot
mob procedure
mob procedure
mob manual recovery: for all boats, pilot off
1. Press the MOB key as soon as the person is lost overboard.
2. All digital displays will flash the MOB Alarm Messa ge and the alarm will sound (if connected).
3. Pressing any key on the
alarm screen and the display now shows the bearing and distance to where the incident
occurred. The bearing and distance to the casualty are shown under the title “Steer” on the
right hand side of the LCD.
4. The boat should now be manually steered back to where the in cident occurred by following the
bearing and distance shown on the Pilot display.
5. Recover the person(s).
6. The MOB feature can be disabled, by pressing and holding down the MOB key for five seconds
until the display clears. The Pilot will now default to OFF Compass Mode.
h1000 Pilot
display silences the MOB alarm. This action clears the
mob manual recovery: for all boats, pilot on
1. Press the MOB key as soon as the person is lost overboard.
2. All digital displays will flash the MOB Alarm Messa ge and the alarm will sound (if connected).
3. Pressing any key on the
alarm screen and the display now shows the bearing and distance to where the incident
occurred. The bearing and distance to the casualty are shown under the title “Steer” on the
right hand side of the LCD.
4. The boat should now be manually steered under autopi lot control back to where the incident
occurred. This is done with the use of the -10°, +10° keys (display or hand-held) and the rotary
knob and following the on-screen bearing and distance to where the incident occurred.
5. Recover the person(s).
6. The MOB feature can be disabled, by pressing and holding down the MOB key for five seconds
until the display clears. The Pilot will now default to OFF Compass Mode
h1000 Pilot
display silences the MOB alarm. This action clears the
.
Page 23
Page 24

mob procedure
h1000 pilot
mob procedure
mob automatic recovery: power only, pilot on
1. Press the MOB key as soon as the person is lost overboard.
2. All digital displays will flash the MOB Alarm Messa ge and the alarm will sound (if connected).
3. Pressing any key on the
alarm screen and the display now shows the bearing and distance to where the incident
occurred. The bearing and distance to the casualty are shown under the title “Steer” on the
right hand side of the LCD.
4. If necessary, reduce the boat speed to less than 8 knots.
5. Press the MOB key three times in quick succession to initiate the MOB automatic recovery.
6. The autopilot will no w control the steering and perform the Williamson Turn b ack onto the
reciprocal heading.
7. Press the OFF key to disengage the Pilot as you appro ach the incident and recover the
person(s).
8. Press and hold the MOB key for five seconds to cancel the MOB function and clear the disp lay
of MOB data.
9. The Pilot will now default to OFF Compass Mode.
h1000 Pilot
display silences the MOB alarm. This action clears the
Notes:
1. Activating the MOB Alarm via the Pilot MOB k e y will also activate the MOB feature on the CND
if connected via the Fastnet
2. Activating the MOB Alarm via the CND MOB key wil l also activate the MOB feature on the Pilot
if connected via the Fastnet
3. The Automatic Recovery procedure cannot be initiated from the CND.
2
.
2
.
Page 24
Page 25

h1000 Pilot
Dimensions: 110mm x 170mm
Power Supply 10-16 volts dc
Power consumption (Display): 50mA (Lights OFF)
200mA (Lights ON)
Power Consumption(Processor): 50mA (Excludes Ram & Accessories)
Autopilot Interface: NMEA 0183 ver 2.3 (via Universal
Interface)
Display: LCD Panel FSTN
Display Resolution: 120 x 80 pixels
Temperature range: -10/+60 degrees Celsius
Memory: EEPROM
Keyboard: Silicon rubber, backlight
Accessories: Joystick
Hand-held Remote Control
MOB Button
Paddlewheel
External Alarm
Specification
technical specifications
Page 25
Page 26

warranty
warranty
h1000 pilot
1. warranty
Brookes & Gatehouse Lim i ted (“B&G”) guarantees this product against defects in materials or
workmanship on the terms and conditions set out below (the “Warranty”).
2. warranty period
The Warranty continues for 24 months from the date of purchase by the user’s (excluding
mechanical items, including but not li mited to, autopilot drive units which are subject to 12 m ont hs
warranty). It is the users responsibility t o demonstrate the date of purchas e by s howing a valid
warranty card or proof of purchase. If t he user cannot do this the date of purchase shall be
deemed to be the date of m anuf acture as evidenced by the serial number of the product.
3. repair and replacement
During the Warranty period and subject to the terms and conditions set out below B&G will repair
or, if it so chooses, replac e t he product. It is the user’s responsibility to arrange and pay for
transport of the product to the nearest authorized B&G representat i ve and any re-i nstallation
required following repair. B&G shall not be responsible for any such costs, including (but not
limited to):
3.1. Boat sl i ppi ng or l i f ting;
3.2. Freight shipping charge;
3.3. Engineer’s travelling time and expenses;
3.4. Instal l ation labour costs ass ociated with the Warranty claims; and
3.5. Loss or damage of products or boats in t ransit.
4. conditions
The Warranty will not apply in the following circumstances:
4.1. Where the product has been install ed i n a manner or location other than that specified
in the installation instructions;
4.2. Where the product has been serviced or repai red by anyone ot her than an authorized
representative;
4.3. Where the product has been used for purposes for which it is not intended;
4.4. Where the product has been used in a m anner other than that described in the manual
supplied; or
4.5. Where the damage is caused by excepti onal events such as (but not limited to):
o Abnormal levels of magnetic, electrical or acoustic interf erence;
o Lightning strikes;
o Accidents;
o Intentional damage; or
o Negligent use.
5. wear and tear
The Warranty is li mited to defects i n materials or workmanshi p and does not cover normal wear
and tear such as (but not limited to) corrosion and dam age caused through the day to day running
of the boat.
Page 26
Page 27

h1000 Pilot
warranty
warranty
6. software
B&G shall not be liable under thi s Warranty or otherwise for any def ect in software incorporated
within the product.
7. further warranties
The Warranty set out in this document is the only Warranty offered by B&G. B&G makes no further
promises in relation t o this product such as (but not limited to):
7.1. That it is suitable for any particular use; or
7.2. That it c onforms to any particular qual i ty standards.
8. transfer
This Warranty is not transferable.
9. consequential loss
B&G shall not be liable for any damage to persons, yachts , equipment or any other property or for
any other kind of consequential l oss.
10. governing law
This document is governed by and shall be construed in accordanc e with E ngl i sh law.
11. statutory rights
This Warranty is offered as an extra benefit and does not affect your statutory rights against the
party who sold you the product.
Page 27
 Loading...