

B&G h1000 CND User Manual

MANUAL
h1000 CND
Chartplotter
HB-1000C-02 English
WARNING!
Use of solvent based or chemical
cleaners on displays will result in
damage and invalidate your
warranty.
introduction
cnd
Page 2
overview
Congratulations on your purchase of the Central Navigation Display (CND) from B&G. The CND is
the latest in chart plotting and navigation displays from B&G and represents B&G’s commitment to
providing customers the finest mari ne navigation s ystems. The CND is a state-of-the-art
computerised electro nic chart system designed as a sophisticated navigation aid. Yo ur CND
provides many useful features and is easy to use.
Before you be gi n usi ng yo ur ne w CND, please take the time to read this manual to help you
achieve the full potential
from your ne w s yste m.
features
All calculations and information necessary for navigation are performed and displayed on the
screen quickly and accurately providing all of the facilities of a conventional GPS but with the
added benefit of a powerful electronic chart display.
Features
The Central Navigation Display (CND) is a fully functioned colour Chart Plotter which can be used
either as a stand-alone system or integrated into an instrument system.
• Daylight viewable transflective ¼ VGA colour screen gives excellent clarity eve n in bright
sunlight
• Latest presenta tion of C-Map NT Cartography, hot-swap cartridges
•
Highest specification C-Map NT feature implementation
• Utilises C-Map User-Card technology to enable backup of waypoi nts, tracks, routes and
marks. Also ca n be used for home route p lanni ng (with optional C-Map PC-Planner Kit)
Instrumentation data repeater
- any NMEA instrument source (see “ Interfacing” for details),
custom pages provide easy to use presentation of instrument data.
User informa tion like Waypoints, Marks and tracks ca n be stored o n a User
, and
can be recalled at any time. The
CND
will also display available instrument data in dedicated
display formats. On the screen are shown navigation data a nd cartographic information obtained
from
electronic charts.

cnd
introduction
Page 3
certification
warnin gs & precautions
WARNING:
The GPS system is operated by the United States governme nt, which is solely responsible for its
accuracy & maintenance. The system is subject to changes that could affect the accuracy and
performance of all GPS equipment. Although the B&G CND is a precision electronic NAVigation
AID (NAVAID), any NAVAID can be misused or misinterpreted and, therefore , become unsafe.
Use the
CND
at your own risk. To reduce the risk of unsafe operation, carefully review and
understand all aspects of this Owner’s Manual – and thoroughly practice operation using the
simulator mode prior to actual use. When in actual use, carefully compare indications from the
CND
to all available navigation resources, i ncluding the information from other NAVAIDs, visual
sightings, charts, etc. For safety, always resolve a ny discrepancies before continuing navigation.
CAUTION:
The unit meets the requirements of IP67 sealing, only when the door is closed.
Do not use an alcohol based cleaner on this display.
Note:
This equipment generates, uses, and can radiate radio frequency energy and, if not installed and
used in accordance with the instructions, ma y cause harmful interference to radio
communications. However, there is no g uara ntee that interfere nce will not occ ur in a particular
installation. If this equipment does cause harmful interference, the user is encouraged to try to
correct the inter ference by relocati ng the equipment or connecting the eq uipment to a differe nt
circuit. Consult an authorised dealer or other qualified technician for additional help if these
remedies do not
correct the problem.
This device meets requirements for CFR47 Part 15 of the FCC limits for Class B equipment.
The CND meets the sta ndards set out in Europea n Standard EN 60945: 1997 IEC 945: 1996 for
maritime navigation and radiocommunication equipment and systems .
The
CND
contains no user-serviceable parts. Repairs should only be made by an authorised
service centre. Unauthorised repairs or modificatio ns will void your warra nty.
trademarks
All rights reserved. No part of this manual may be reproduced or transmitted in any form or by any
means including photocopying and recording, for any purpose without the express written
permission of B&G.
Information in this document is subject to change without notice. B&G reserves the right to change
or improve its products and to make changes in the content without obligation to notify any person
or organisation of such changes.
B&G, Central Navigation Display, CND are all trademarks of Brookes & Gatehouse Ltd and may
not be used without the express permission of B&G.
C-MAP, C-MAPNT and CF-95 are all trademarks of C-MAP Italy srl and may not be used without
the express permission of C-MAP.

contents
cnd
Page 4
contents
Overview 1
Features 2
Features 2
Certification 3
Warnings & Precautions 3
Trademarks 3
Display overview 7
Switching on and off 8
Switching On 8
Switching Off 8
Backlight 8
C-CARD 9
Inserting the Card 9
Remo ving the card 9
System settings 9
Overview of the display 10
Navigate to a single destination 10
Distance to bearing 10
Steer 10
Deleting a Destination 10
Navigating on a route 11
Adding a Waypoint 11
Creating a route 11
Deleting a waypoint 11
Moving Waypoint 12
Inserting a Waypoint 12
Editing Waypoi nts 13
Finding information 14
Time To Go 14
C-MAPNT Information 14
Getting Quick Information 14
Getting Port Information 15
Getting Tidal Information 16
Finding Port Services. 17
Finding Port b y Name 19
Searching by name 19
Searching by list 20
Finding Tide Stations 21
Data pages 22
Speed/Depth 22
Navigation 23
Wind 23
Multi F unctio n 24
Data Logs 25

cnd
contents
Page 5
contents
GPS mode 26
GPS Mode 26
Status Page 26
GPS Page 26
Road Page 27
XTE Page 27
XTE Options 27
Routes 28
Main Setup Scree n 28
Selecting a ro ute 28
Selecting a ro ute to work 28
Deleting a route 29
Route Colour selection 29
Reversing a route 29
Route Report 30
Changing Speed & Fuel values 30
Route Report from the chart. 31
Finding information on Waypoints 31
Deleting a Waypoi nt from the list 32
Viewing Waypoint/Marks in a Route list 32
Findi ng a Wa ypoi nt/Mark o n t he c hart 33
Marks 34
Adding a Mark 34
Converting a MARK to a Waypoint 34
Deleting a Mark 34
Man O ver Board 34
Setup menu 35
Selecting Alarms 35
Anchor Drag Alarm 35
HDOP Ala rm 35
Cross Track Alarm 35
Waypoint Arri val Alarm 35
Selecti ng S ystem Settings 36
To set the Lang uage 36
To set the GPS/NMEA 36
To set the Units 37
Selecting Chart Plotter settings 37
To set the Display Options 1 38
To set the Display Options 2 38
Selecting Abo ut 39
Position correction 39
Position Correction 39

contents
cnd
Page 6
contents
Track functions 40
Track functions 40
Enabling Track Storing 40
Selecting Active Track 40
Displaying Track 40
Selecting Track Colo ur 40
Selecting Time Interval 41
Selecting Vector 41
Delete Current Track 41
Memory menu 42
Memor y Menu 42
Saving a File 42
User C-CARD menu 43
Loading a File 43
Deleting a Fi le 43
Sort the User C-CARD Directory 43
Reading the User C-CARD 43
Selecting slot 43
Formatting User C-CARD 44
Technical Specifications 45
Installation 46
Precautions 46
Panel mounting 46
Electrical Connections 46
Electrical Connection 46
Power/Data 47
NMEA In (Instrument Interface) 47
Fastnet2 47
Terms and functions 48
Troubleshooting 59
Warranty 60
cnd
getting started
Page 7
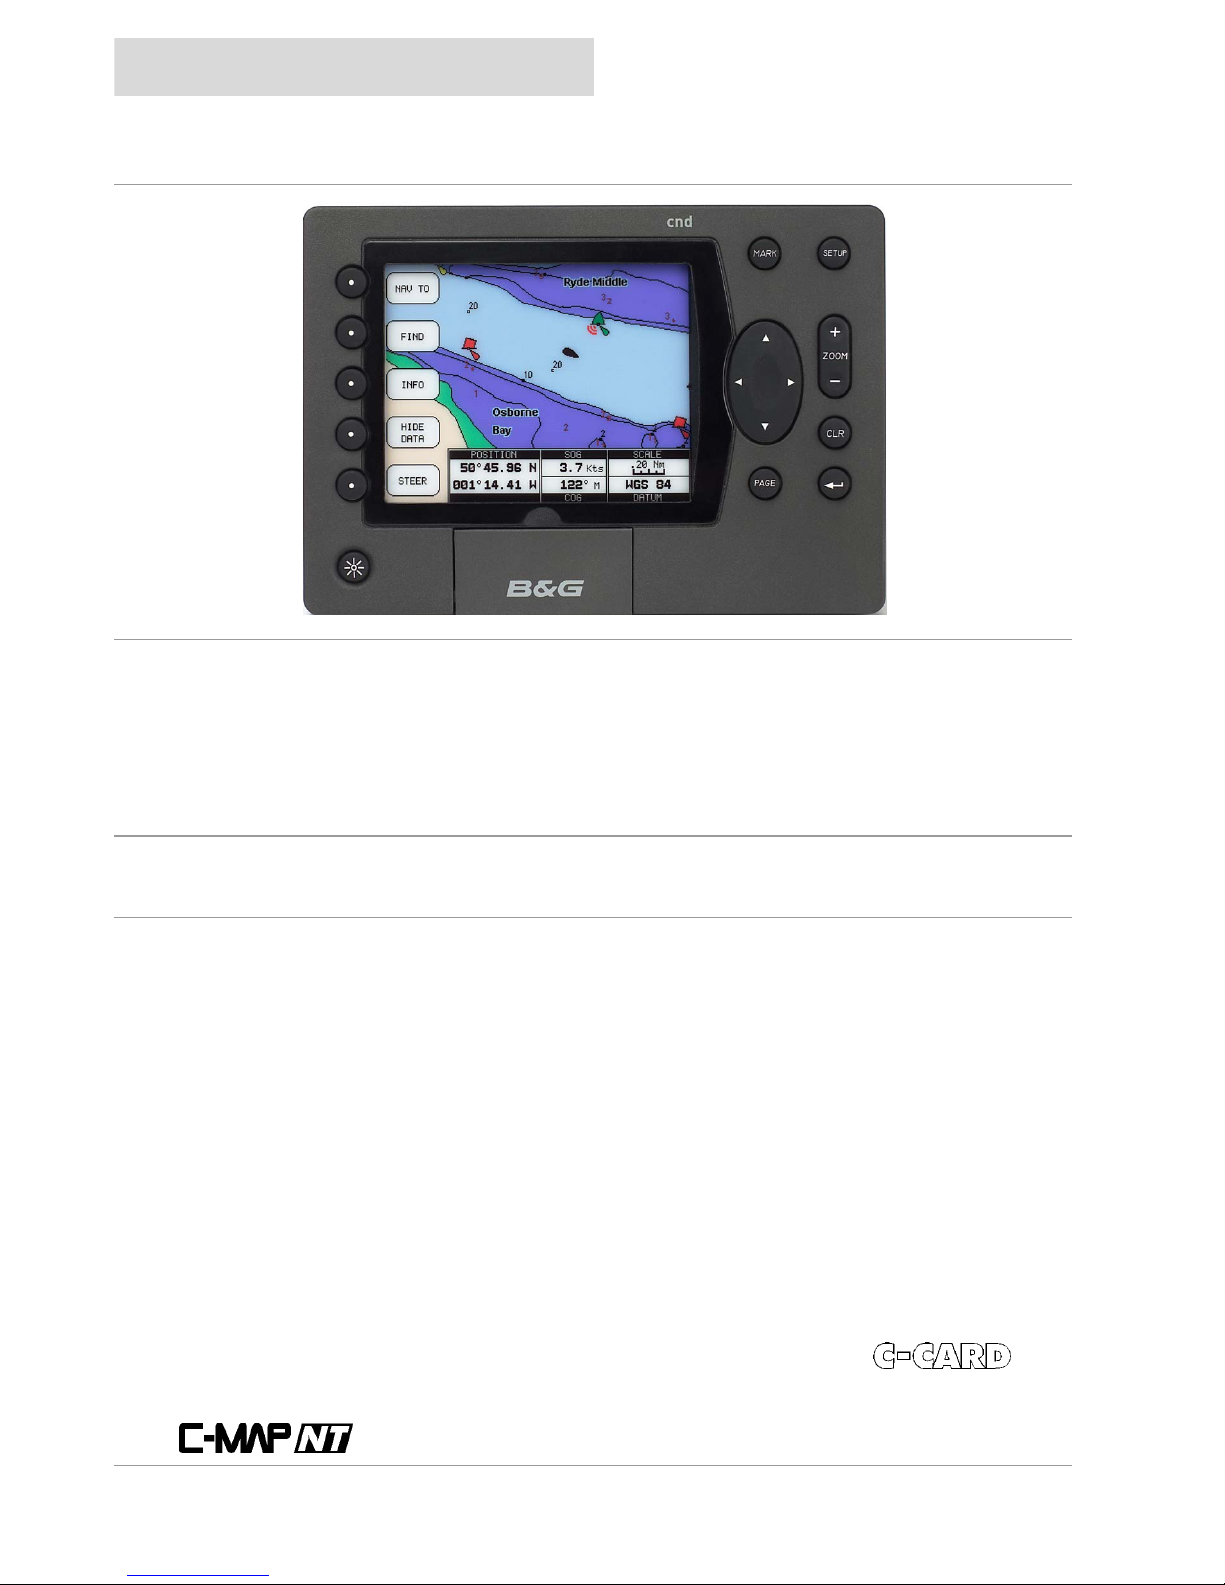
display o verview
Press the
PWR
key to turn the CND On
There are 5 Softkeys, which have different functions when you select
different modes of operation, the labels for the current functions are shown
on the screen immediately adjacent to the keys.
Press the
MARK
key to place a Mark at your boat’s current position.
Press the
SETUP
key to enter the Setup pages.
Press the
ZO OM +
key to display more details of a smaller area, by
changing the chart scale and zooming in o n your display. Press the
ZOOM
–
key to change the scale and display a wider view.
The
CURSOR
keypad moves the cursor about on the display screen,
quickly and accurately. It also scrolls the desired option in the menu
page(s).
Press the
CLR
key to exit from menu or to leave a menu without making
changes.
Press the
ENTER
key to selec t a function or enter a wa ypoint.
Press the
PAGE
key to scroll through the three different sets of pages:
Data (Speed & Depth, Nav, Wind, Multi)GPS (Status, Position, Road, XTE),
and C hart Plotter.
CURSOR
ENTER
C-MAP Cover
SOFTKEYS
POWER KEY
getting started
cnd
Page 8
switching on and off
Before turning the CND on, check that the
installation instructions in Appendix B have
been correctly followed.
Switching On
Pressing the
PWR
key for one second switches
on the
CND
, you will first be presented with the
B&G logo screen and software version
information.
The CND will then perform a short self test
procedure that checks internal memory and
displays any failure detected on the screen.
If installed, the C-CARD will also be tested.
After a few seconds, a Caution page is
displayed, reminding you that the chart plotter
is only an aid to navigation, and should be used
in co nj unctio n wi t h nor mal na vig ati ona l
practices.
Pressi ng any key wi ll the n di splay t he
cartographic screen with a position if an
external GPS is connected.
The display can be customised for your
personal preferences using the System
Settings section.
Switching Off
Press the
PWR
key and hold for three seconds,
a countdown timer appears on the screen,
when this reaches zero it will power off.
If you release the key before the countdown
timer reaches zero, the CND will remai n on.
backlight
There are three levels of backlighting. To alter
the level of backlighting, press and release the
PWR
key until the desired level.
cnd
getting started
Page 9
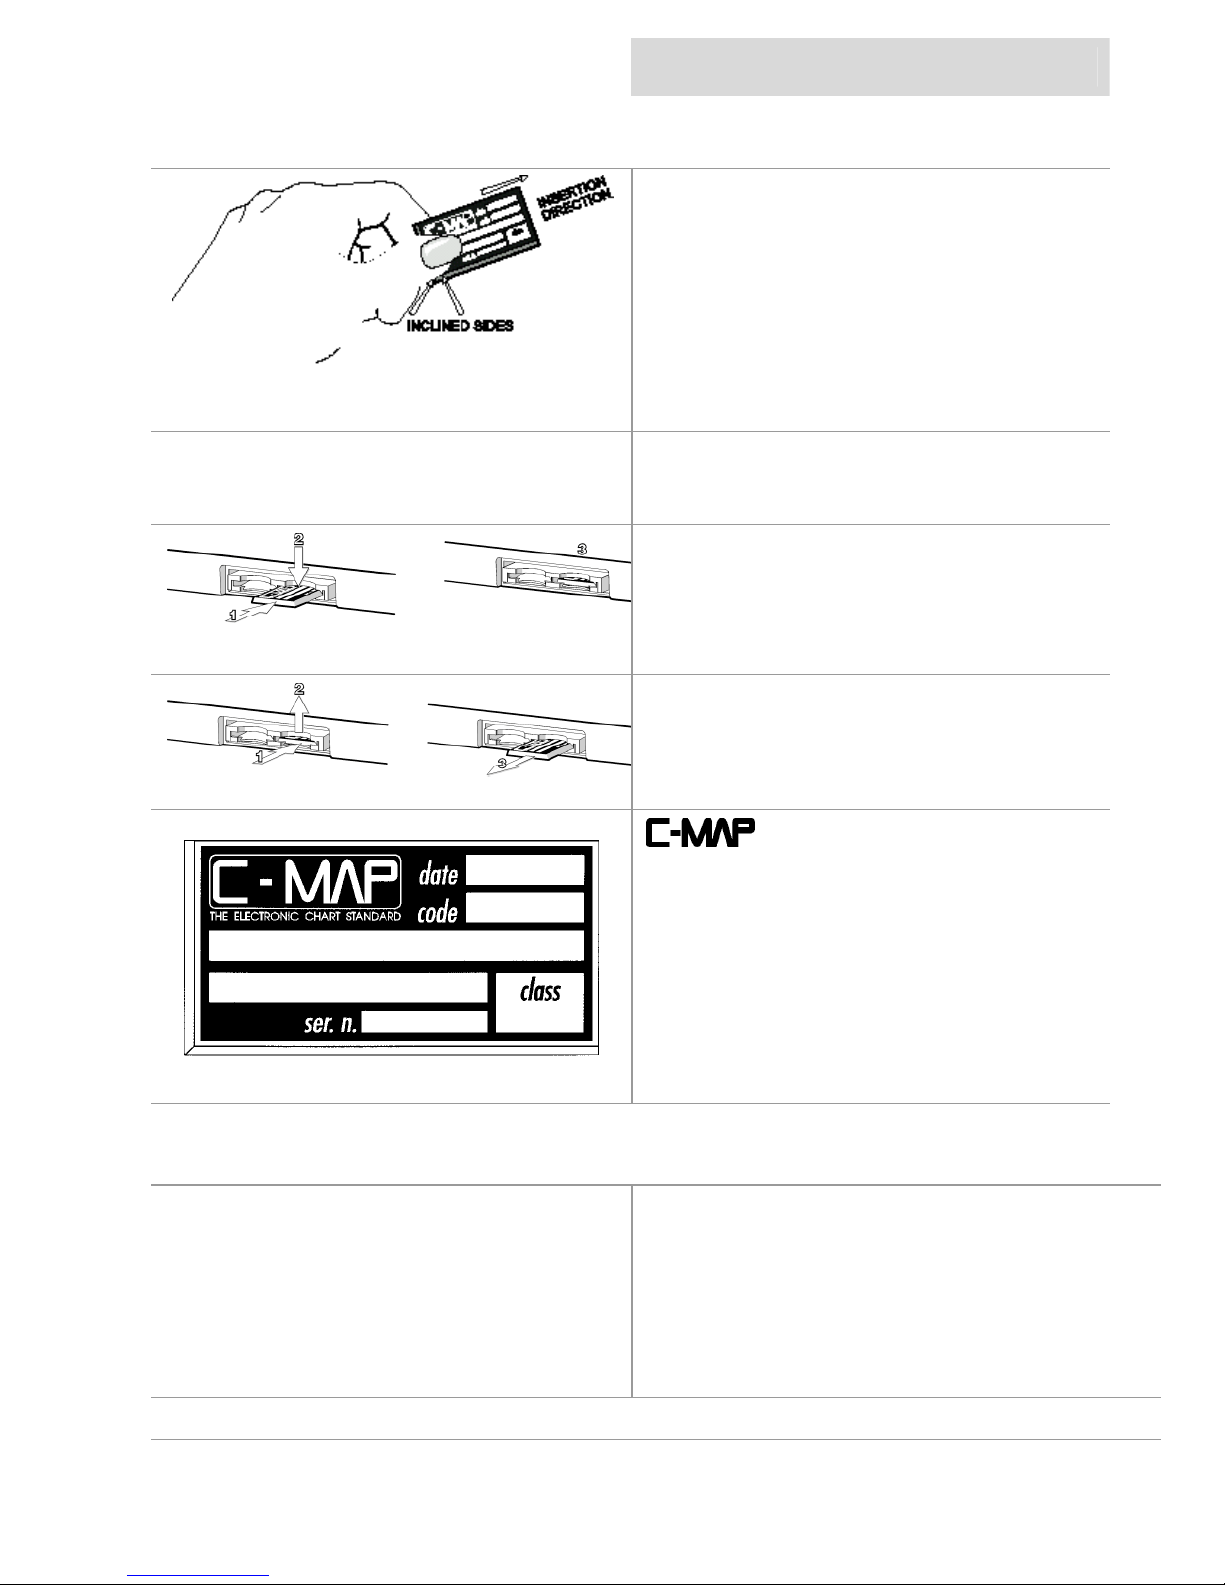
c-card
The CND uses two types of C-MAPNT
cartridges,
The C-CARD, contains detailed charts of the
area covered.
The User C-CARD can be used to permanently
store your routes, Waypoints, Marks and
tracks.
Hold the C-CARD by the short inclined side so
tha t you can see the C-MAP label.
WARNING: To prevent ingress of water,
ensure C-Card door area is dry. Failure to
comply ma y result i n invalidation of warranty.
Inserting the Card
Gently push the C-CARD into one of the slots
(1), push the C-CARD in as far as it will go,
then gently move it to the bottom position (2) to
hold it in the slot (3).
Removing the card
Press the C-CARD gently inward (1) and move
it upwards (2) until you hear a click, t he
C-CARD will then eject out of the slot (3).
is continuously crea ting new charts
and revising old ones. If you wish to receive
informa tion on the newest available charts, you
can write for a catalogue of available charts or
ask at your dealer.
system settings
Keypad Beep: On
Language: English
Speed/Distance Units: Nautical Miles
Depth Units: Metres
Wind Speed Units: Knots
Bearing Reference: Magneti c
Date Format: Day-Month-Year
Time Reference: UTC
Coordinate System: degrees and
mi nutes (2 dec. places)
To change a ny of these settings, please refer to the S ystem Settings section.
getting started
cnd
Page 10
over v i ew of the di s pl ay
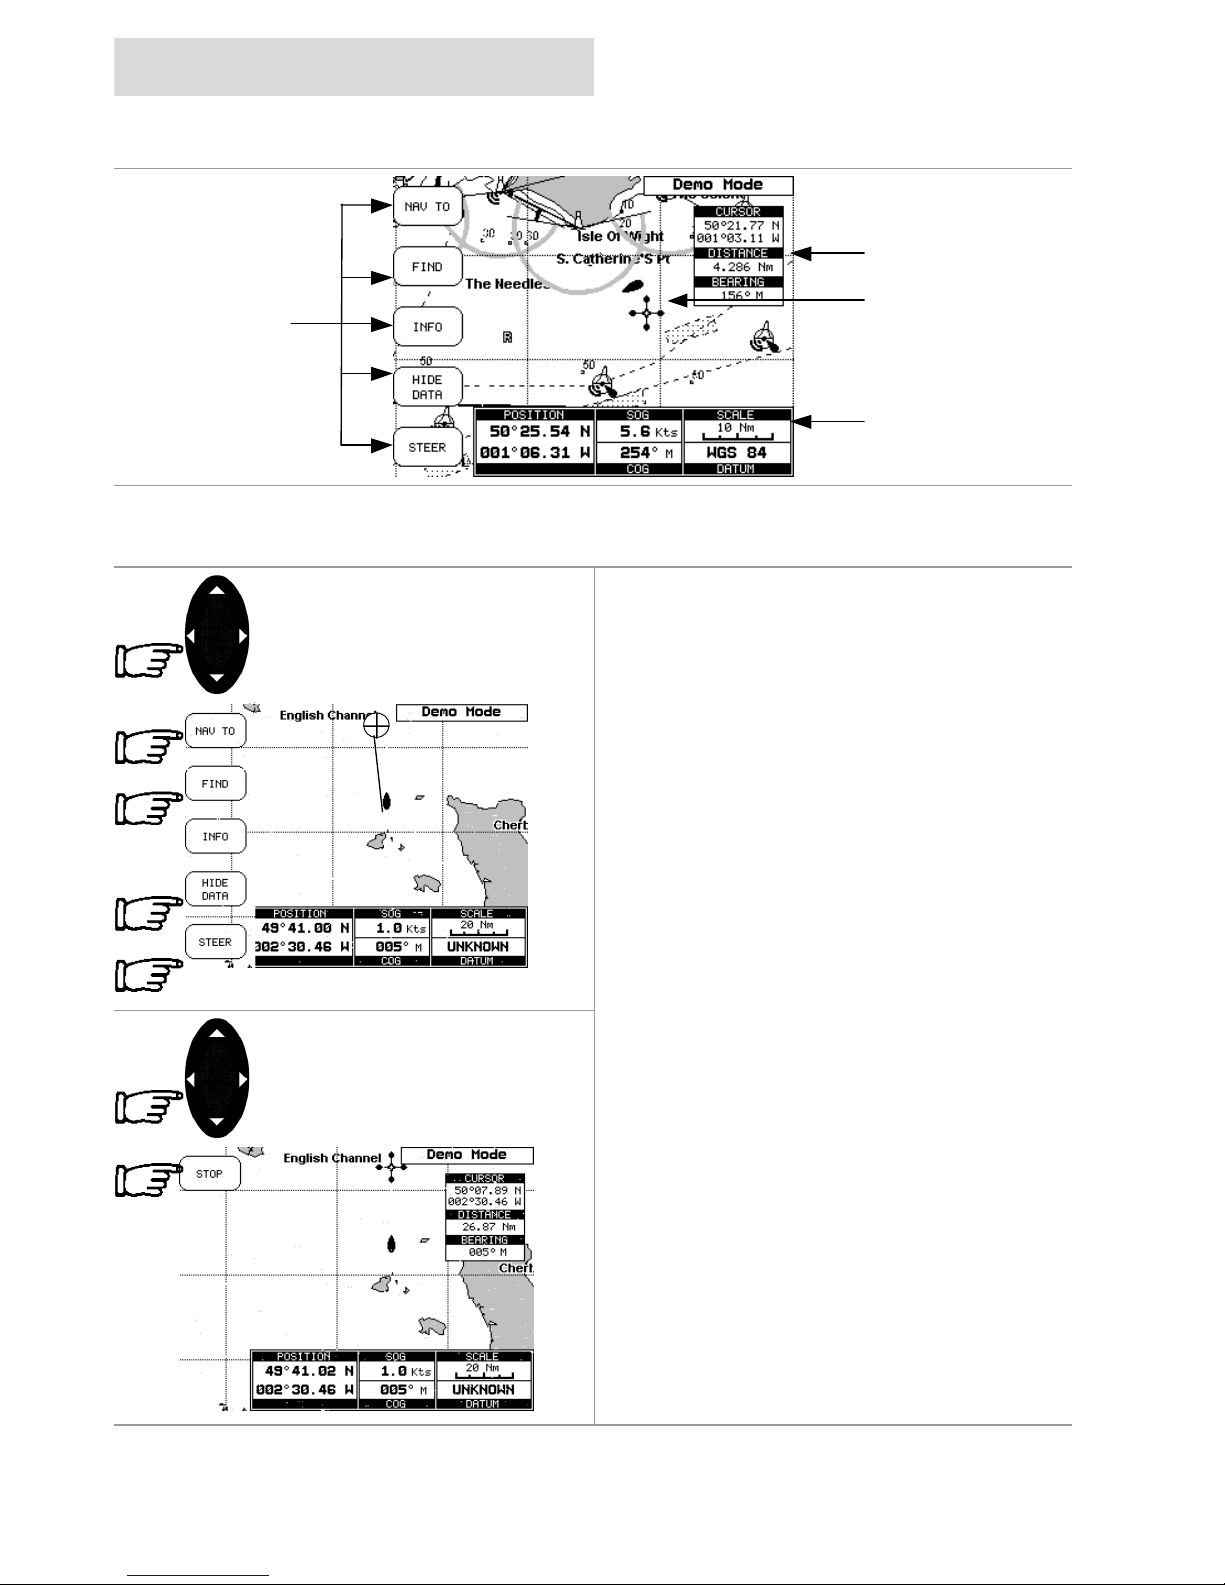
navigate to a single destination
Using the
CURSOR
keypad move the cursor to
your desired destination then press the NAV
TO softkey, this softkey will then change to the
START softkey, pressing the START softkey
will then create the Direct Target.
A line is drawn connecting the Direct Target
symbol with the boat’s position, all navigation
data is now refer red to this Target.
Distance to bearing
Position the cursor on the Direct Target symbol
and the Cursor i nformation box will contain the
Latitude/Longitude, the distance and the
bearing from your boat’s position.
Steer
Pressing the STEER Softkey will displa y the
Destination text box in place of the Position text
box.
Hide Data
Pressing the HIDE DATA Softkey will remove
the i nformation box and displa y a full screen
chart and the softkeys.
Deleting a Destination
Using the
CURSOR
keypad to place the cursor
on the Direct Target symbol, the softkey will
then change to the STOP softkey, press the
STOP softkey a nd the Direct Target symbol
disappears from the screen.
Cursor Box
Cursor
Text Bo x
Softkeys
Label
cnd
getting started
Page 11
navigating on a route
If you prefer to navigate following a route
towards its end point, you can define a series
of locations (Waypoints) in sequence to make a
route.
Adding a Waypoint
Using the
CURSOR
keypad place the cursor
on the desired position, pressing the
ENTER
key will insert a Waypoint symbol on the chart,
press the ADD TO ROUTE Softkey to make it
the first point on your route.
Viewing Information on Waypoints
Position the cursor on the Waypoint and the
Cursor information box will change to the
Waypoint information box displayi ng the
Waypoint name and Latitude/Longitude.
Note:
Waypoints may be added by uploading
data fro m a PC, refer to Page 27 – Advanced
Features – Uploading wa ypoints from a PC.
Creating a route
Repeat the “Adding a Waypoint” procedure as
shown above until you reach your fina l
destination. The lines connecti ng the
Waypoints are known as a leg, a circle
surroundi ng the first Wa ypoint of the route
identifies the starting point.
Deleting a waypoint
Using the
CURSOR
keypad place the cursor
on the Waypoint to be deleted and press the
DELETE Softkey, a window opens to advise
tha t the Waypoint is being used in a route,
press the ACCEPT Softkey to delete it, the
Waypoint i s deleted and a new line be twee n
previous a nd ne xt Wa ypoint is s hown.
Pressing the CANCEL Softkey returns to the
chart.
getting started
cnd
Page 12
naviga ting on a route
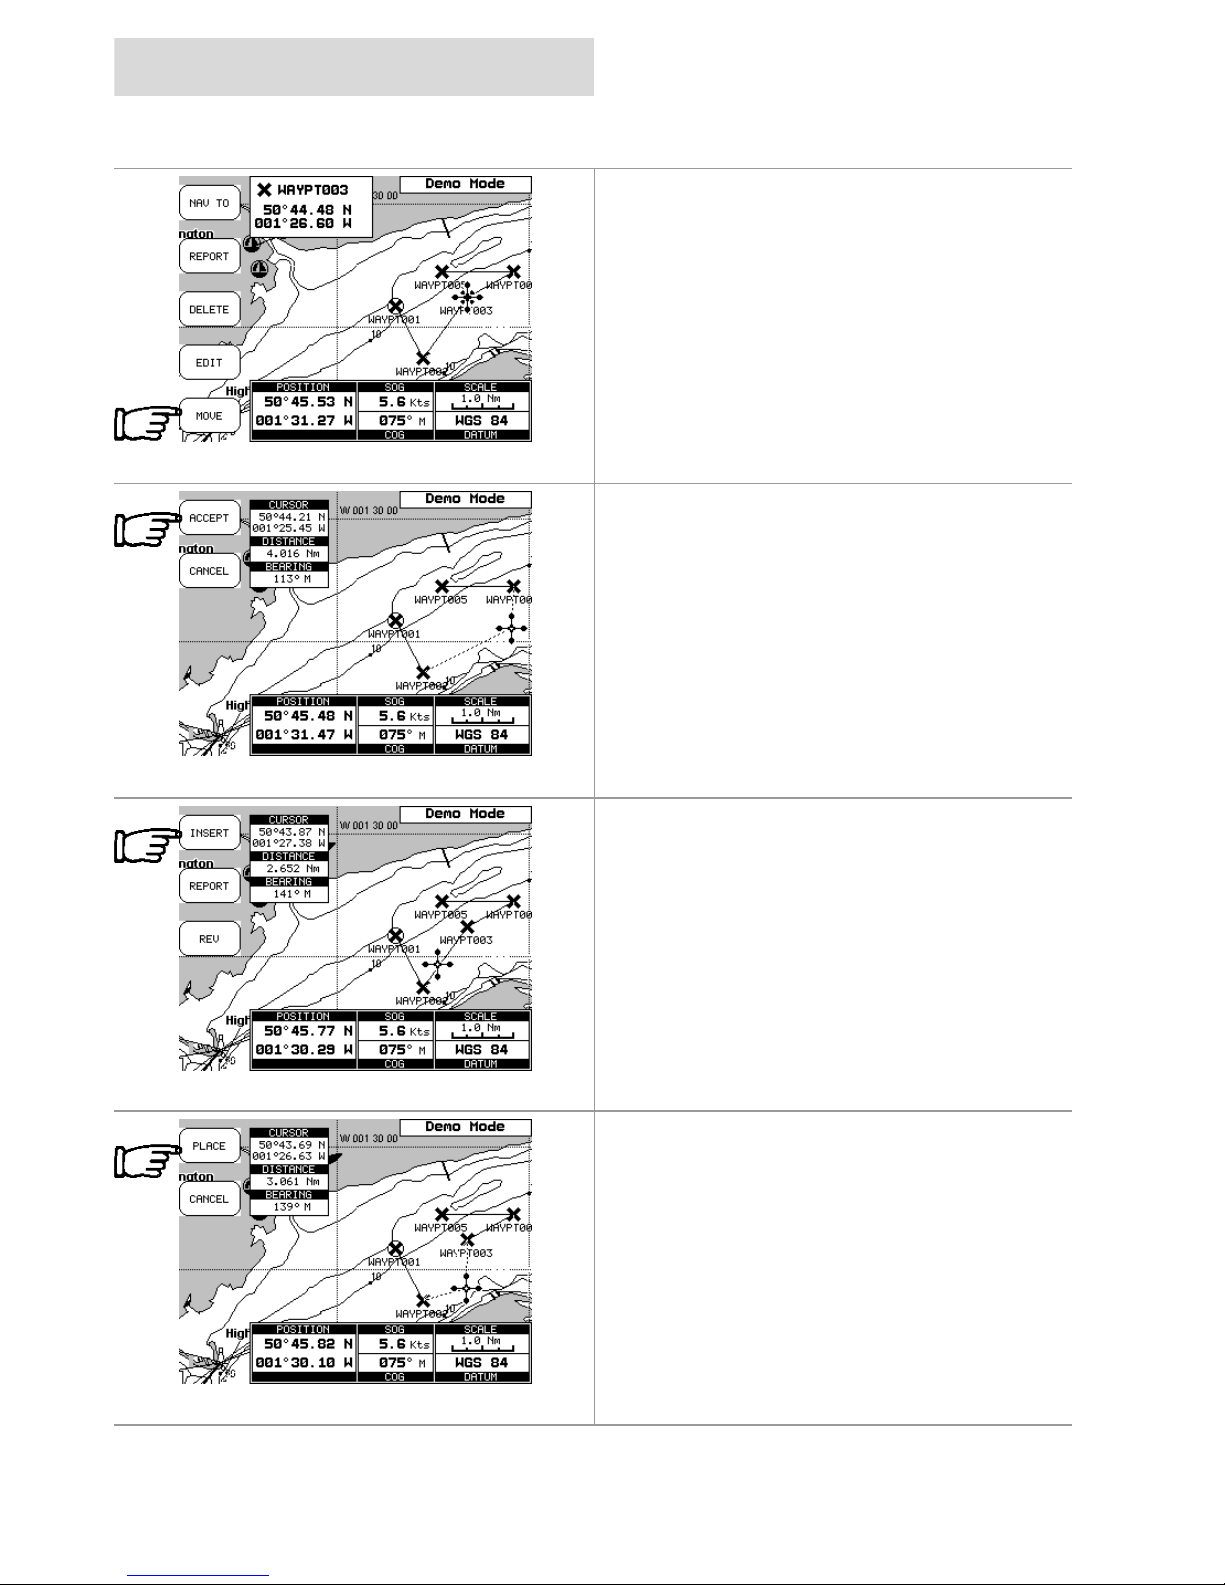
Moving Waypoint
Place the cursor on the Waypoi nt and press the
MOVE Softkey, using the
CURSOR
keypad
move the Waypoint, a dotted line connecting
the Waypoint to the new position, is s hown.
To place the Waypoint in the new position,
press the ACCEPT Softkey.
Inserting a Way point
Place the cursor o n t he ro ute leg a nd press the
INSERT Softke y.
The line between the two Waypoints is turned
into a dotted line (rubber-band), now move the
cursor to the new position.
Once yo u ha ve posi t i o ned the curso r at ne w
location, press the PLACE Softkey.
cnd
getting started
Page 13
navigating on a route
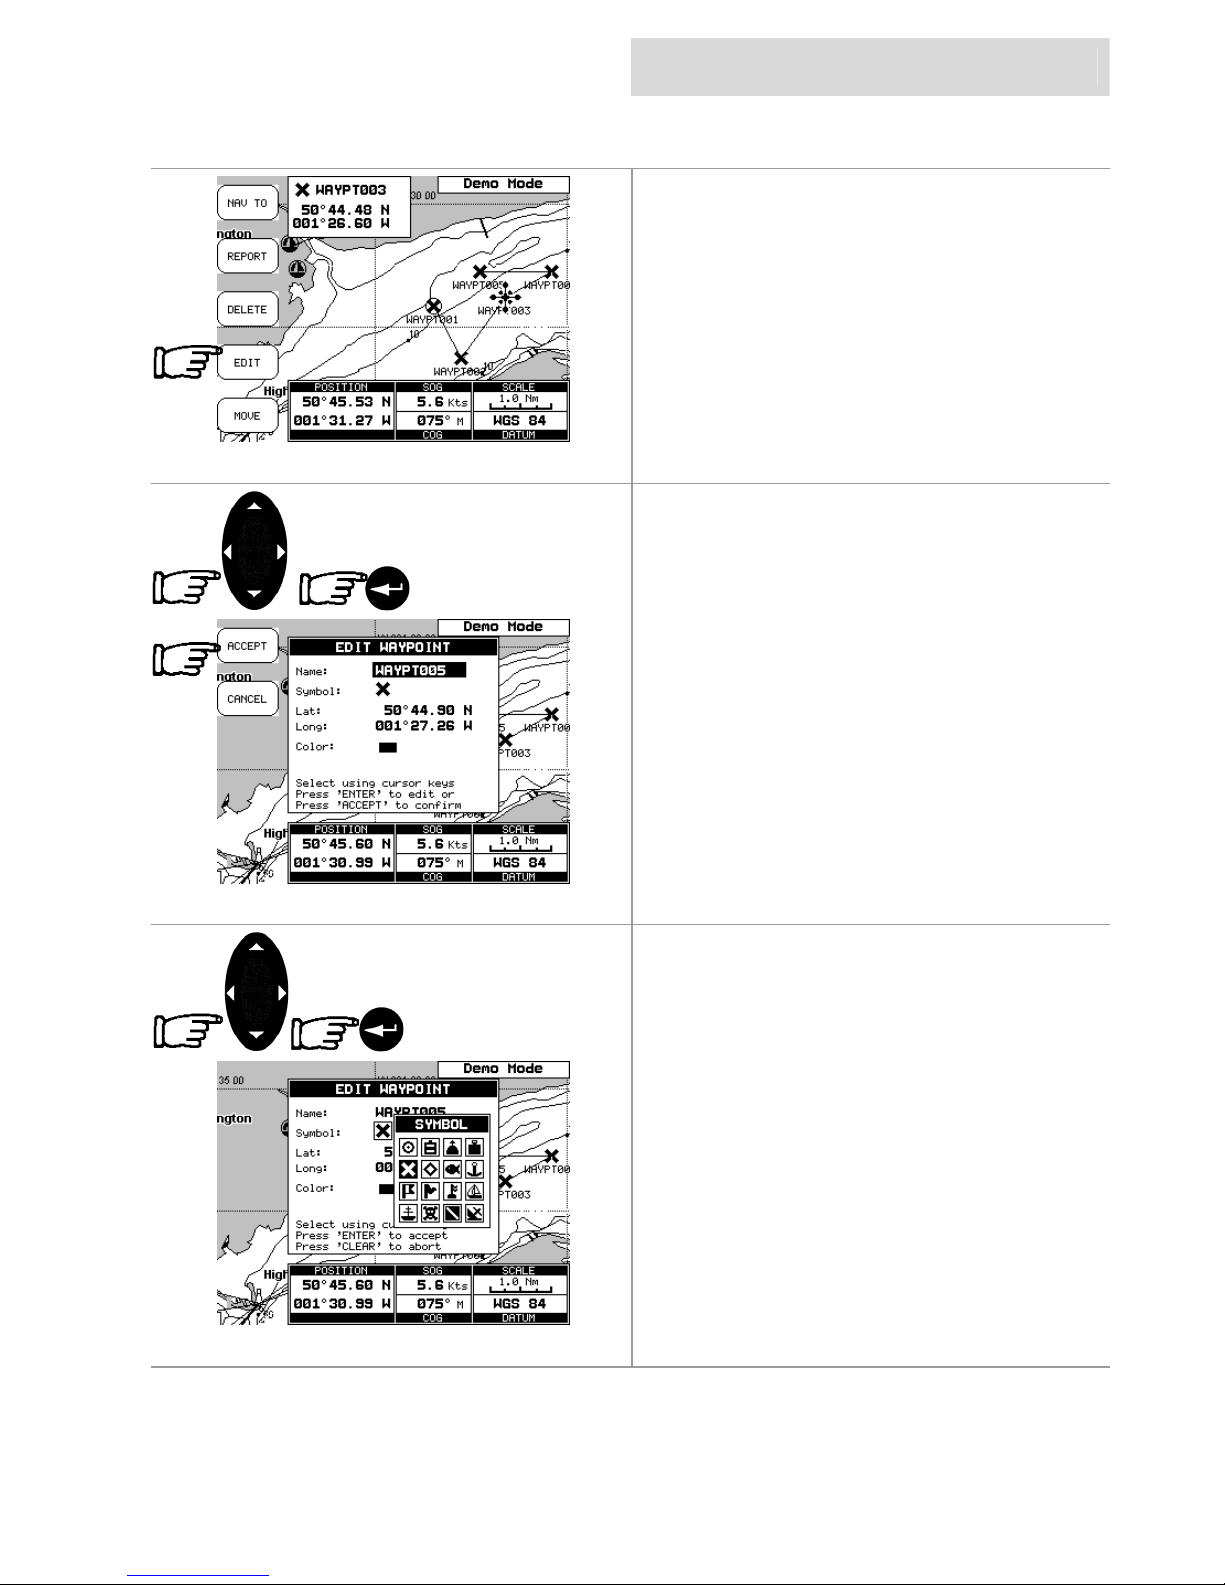
Editing Waypoints
Move the cursor onto the Waypoint and press
the EDIT Softkey
Use the
CURSOR
keypad to select the field
and press the
ENTER
key.
To e nte r a na me use the
CURSOR
keypad to
insert the characters, then press the ACCEPT
Softkey.
To change the Symbol, use the
CURSOR
keypad to select the Icon and press the
ENTER
key.
If the Coordinates field is selected, press the
ENTER
key and then use the
CURSOR
keypad
to insert the value.
If the Colour field is selected, pressing the
ENTER
key will display a window with 8
different colour, use the
CURSOR
keypad to
select the desired colour and press the
ENTER
key.
Then press the ACCEPT Softke y.
getting started
cnd
Page 14
finding information
Time To Go
TTG value is displayed on the Display Page,
available by pressing the
PAGE
key twice and
the XTE Softkey.
C-MAPNT Information
On the display you will see a variety of Icons
and s ymbols.
Refer to the
Handbook for
their explanation (example shown).
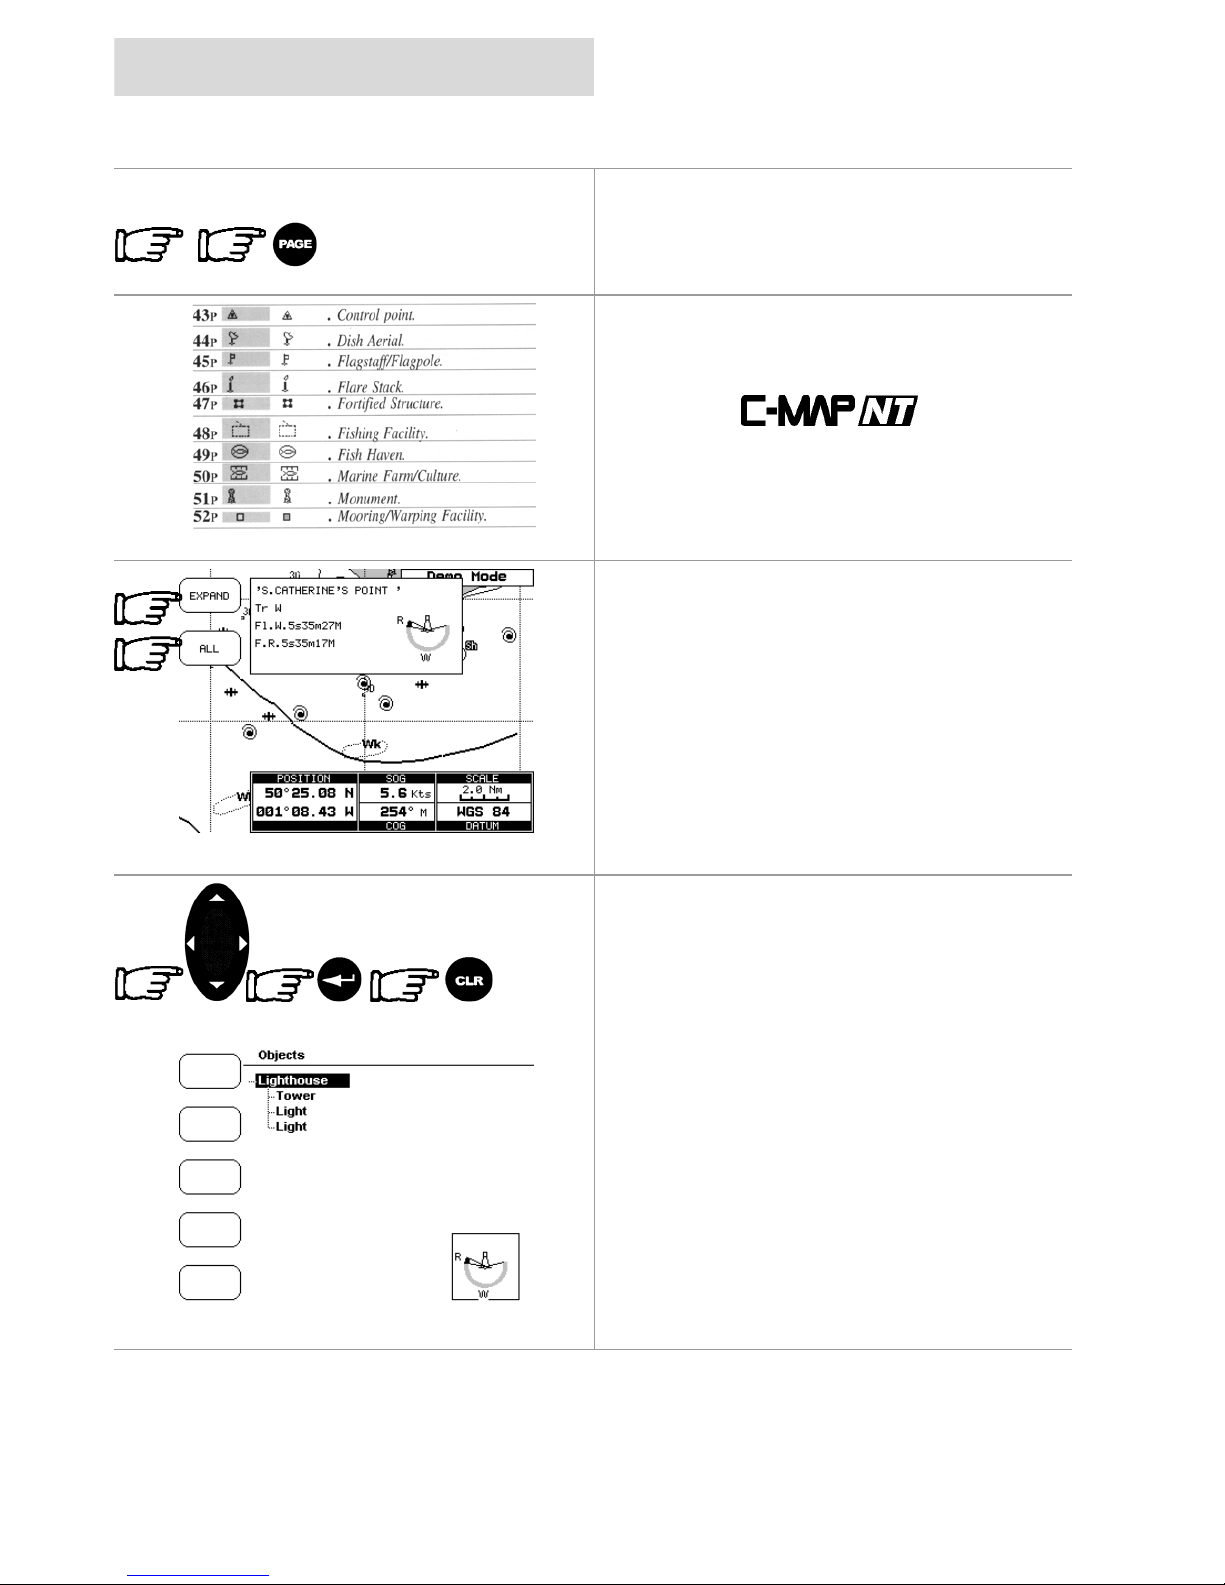
Getting Quick Information
Place the cursor on a chart symbol such as a
Nav-Aid, Wreck, etc. and a special pop-up
window is displayed. This feature called “Quick
Info” identifies the symbo l and di splays the
information about Nav-Aids.
To expand information about that object press
the EX PAND Softkey.
Pressing the ALL Softkey displays all available
information about that cartographic point.
Use the
CURSOR
keypad to scroll through the
list, press the
ENTER
key to expand, If the
information is in several pages use the
CURSOR
keypad to scroll through the following
pages.
To return to the previous page and to exit press
the
CLR
key.
At the bottom right hand corner a window
displays the selected objects icon.
cnd
getting started
Page 15
finding information
By pressing the INFO softkey while the chart is
displayed will display a list of all objects found
in the range of the cursor.
If there are complex objects you will also find a
list of the components.
Use the
CURSOR
keypad to scroll throug h the
list, press the
ENTER
key to expand.
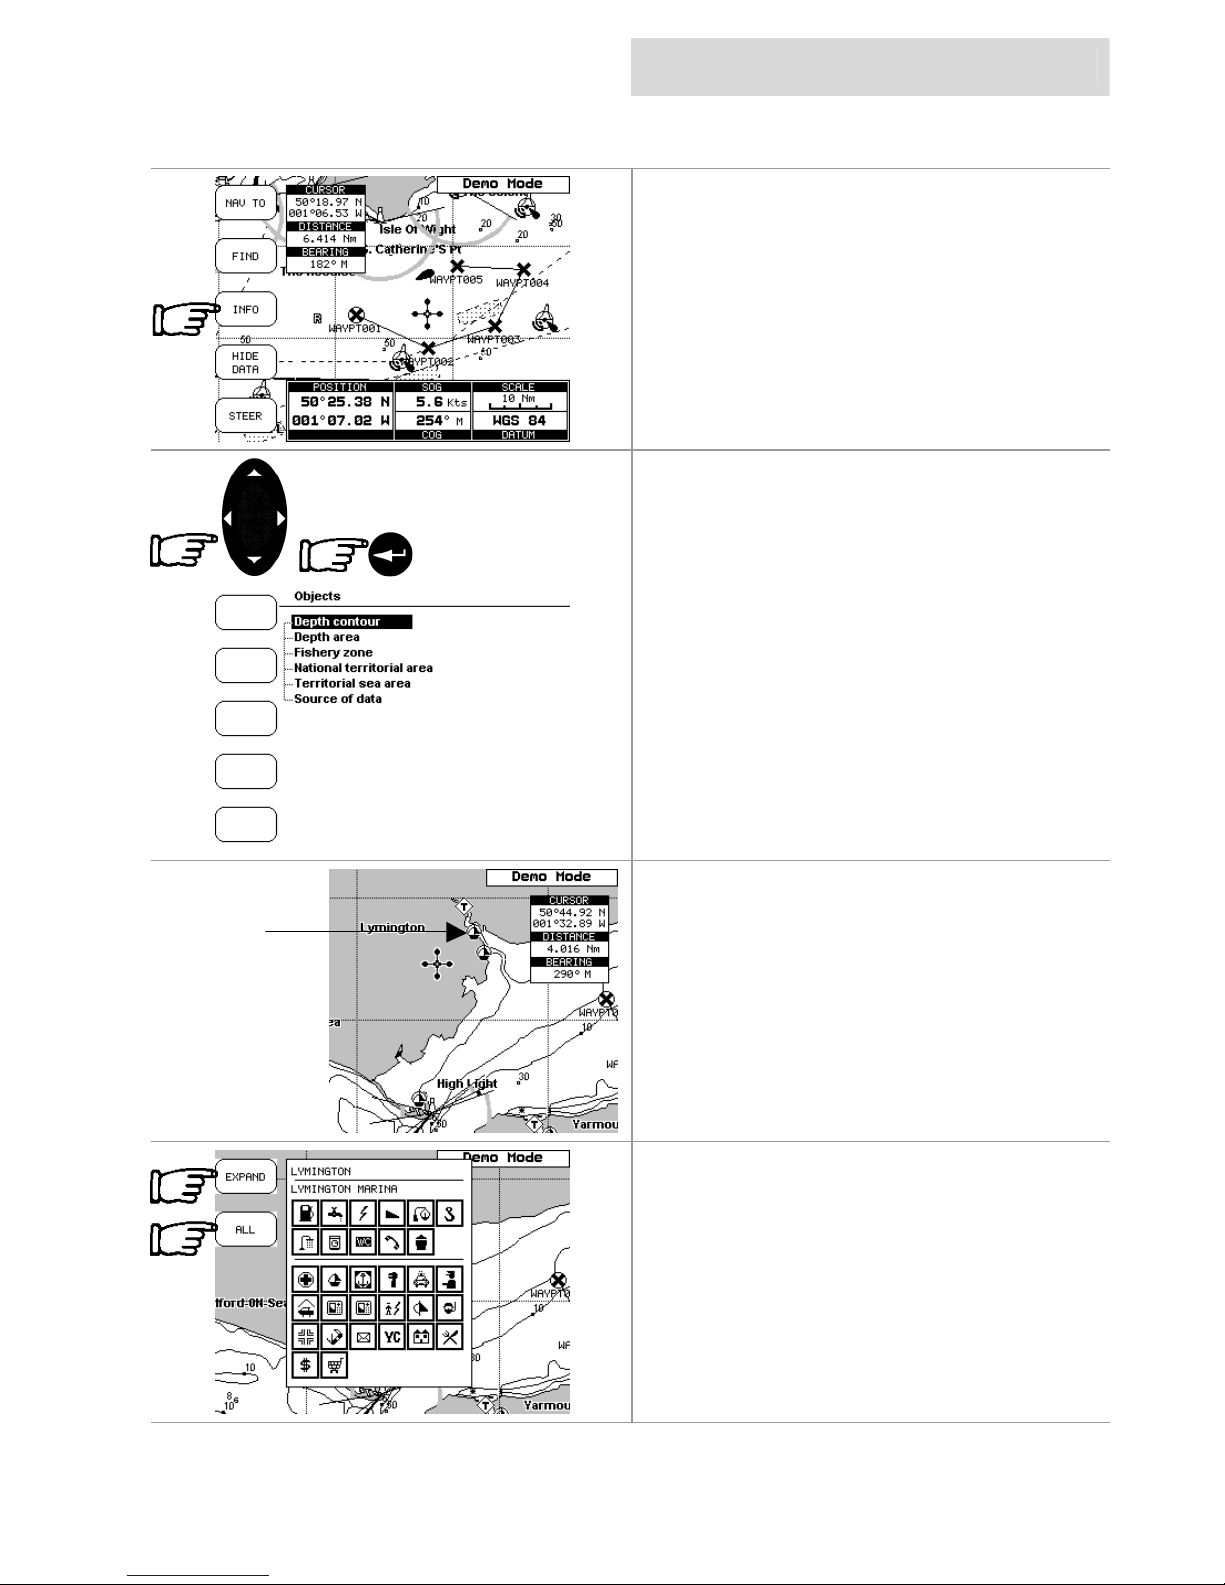
Getting Port Information
When viewing the chart of a port or harbo ur,
you will see a Port Info icon, placing the cursor
on the symbol will display the available
information.
The Port Info symbol is visible only if the Ports
+ Services option is On (default setting).
Information is displayed with icons of the
available services.
Ensure the Info Level setting is detailed (default
setting).
To expand the information about the port press
the EXPAND Softkey, to di splay all a vailable
informa tion for that cartographic point press the
ALL Softke y.
Port Info
I
co
n
getting started
cnd
Page 16
finding information
Select the service using the
CURSOR
keypad
and then press the
ENTER
key.
Detailed information on the services (opening
and closing time of the Fuel station, telephone
number of local amenities, etc) are displayed.
This is available for all countries, where such
information exists on the paper chart. You will
also see accurately positioned symbols that
show where many useful facilities are located.
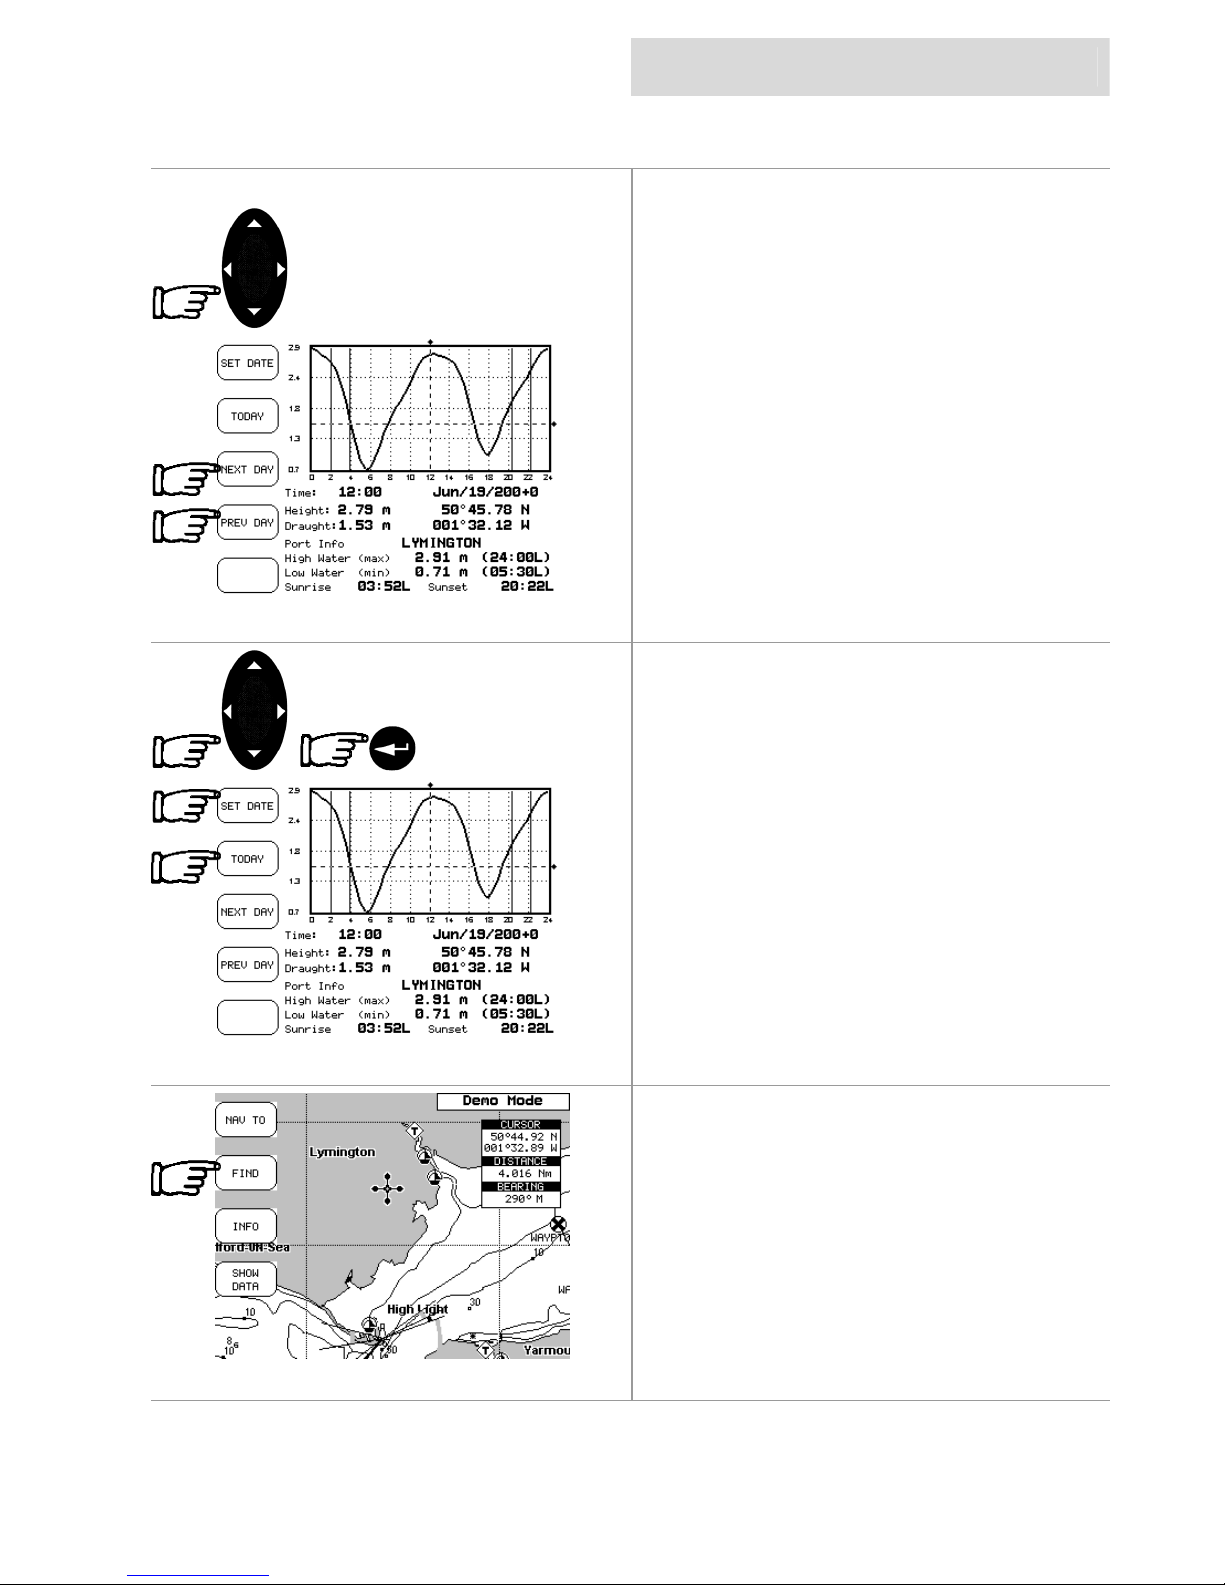
Getting Tidal Information
Some charts display a Tidal Diamond symbol
“T”, placing the cursor on the Tide symbol
displays the available information in the Quick
Information window.
To display the Tide Graph page press the
EXPAND Softkey.
Pressing the ALL Softkey selects a ll available
information.
cnd
getting started
Page 17
finding information
The screen will display today’s Tide Height
graph for the area where the Tidal symbol was
located.
The
CND
displays a mo ve able Vertical a nd
Horizontal slider. Using the
CURSOR
keypad,
move the horizontal slider to correspond with
the draft of your boat.
Using the Vertical slider you can then read the
times at which the graph dips below the
horizontal line i.e. the times when you will be in
danger of grounding.
Pressing the NEXT DAY or PREV DAY
Softke ys di spla ys fut ure o r pa st ti des .
Pressing the SETDATE softkey and entering
the required date using the
CURSOR
keypad,
followed by the
ENTER
ke y d is plays the ti de for
that date.
Pressing the TODAY softke y returns to the
current day’s tide graph
Note
Tide graphs are an approximation of the tide
and they should be used in conjunction with
traditional tide tables and navigational
methods.
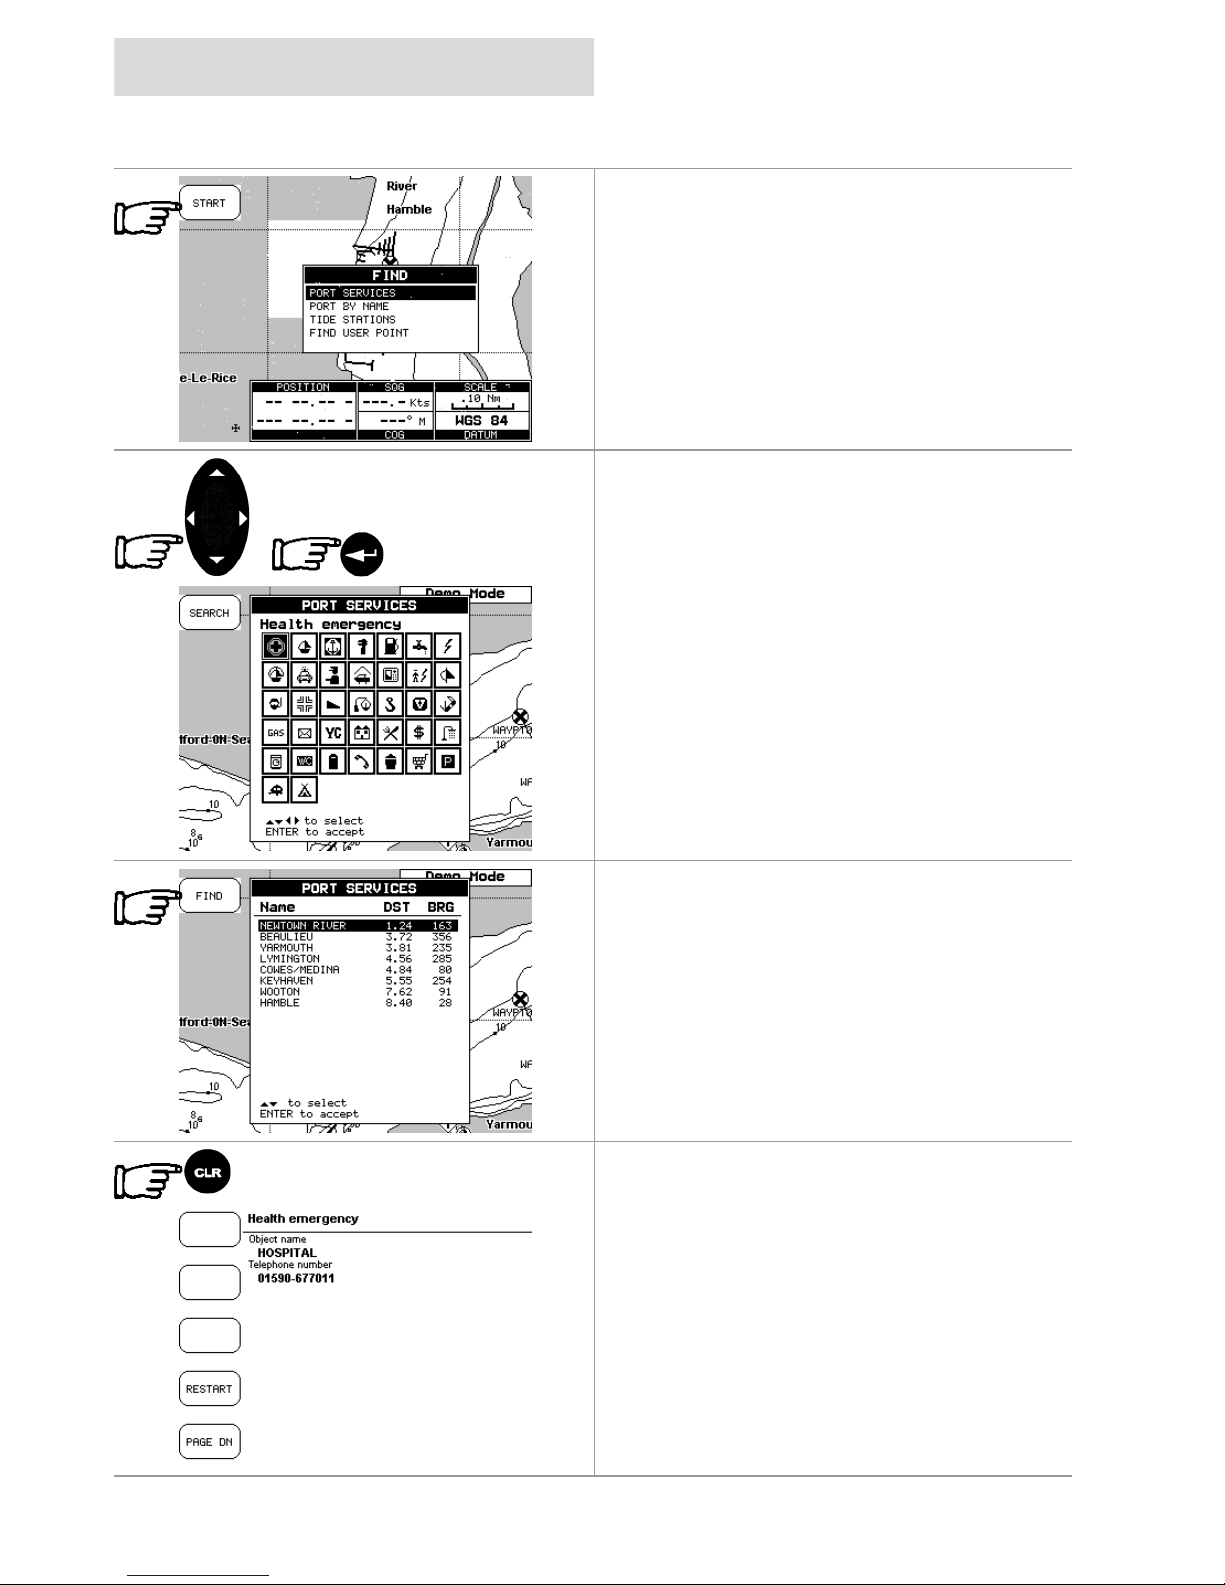
Finding Port Services.
Press the FIND Softkey.
getting started
cnd
Page 18
finding information
When the find display appears press the
START Softkey to displays the nearest
available facilities (i.e. the nearest Hospital, sail
maker, bank, etc.).
The icons list is shown of the available
services.
Select the facility using the
CURSOR
keypad
and then press the
ENTER
key. Displayed is a
list of ports nearest (up to 10) in which this
facility is present.
Choose the port you want and press the FIND
Softkey.
A list of tha t par ticular facility at the port is
displayed.
Pressing the
CLR
key returns to the chart with
the cursor located on the chosen facility.
cnd
getting started
Page 19
finding information
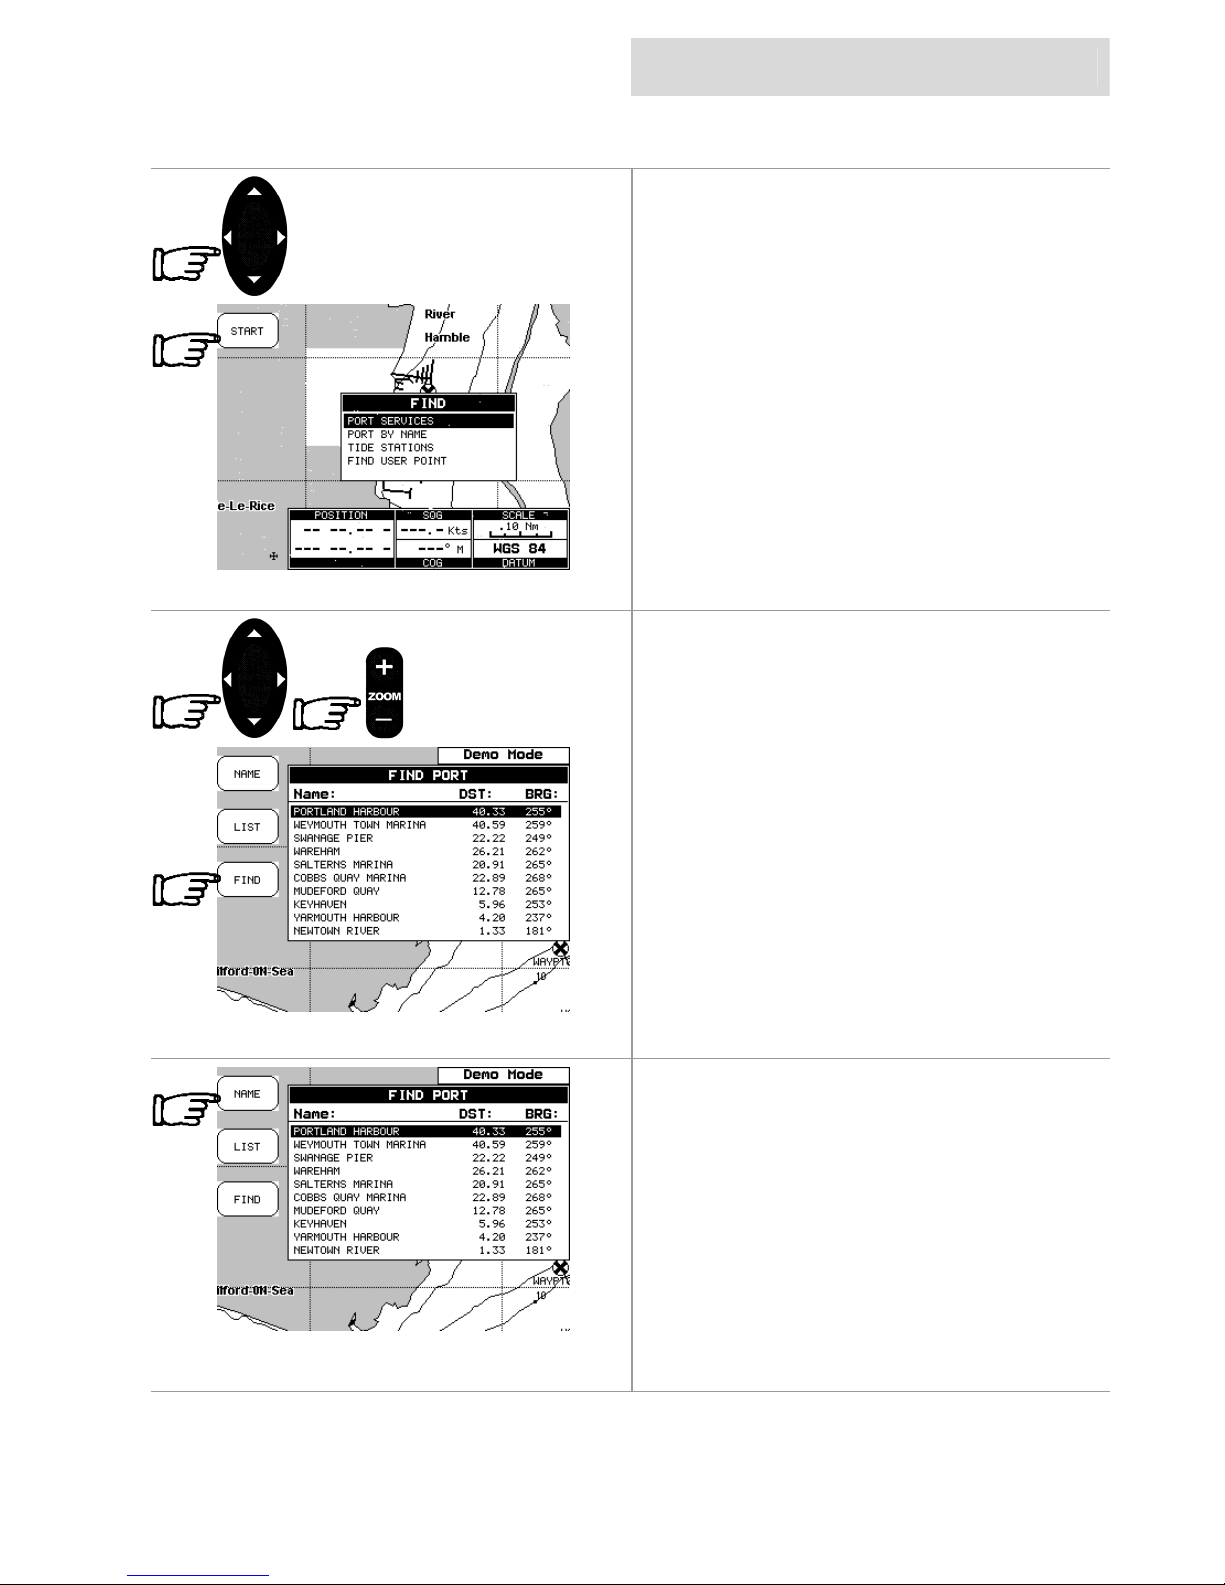
Finding Port by Name
Pressing the FIND Softkey displays the find
screen.
Using the
CURSOR
keypad select “Find Port
by Name” and press the
START Softkey to
display a list of all ports stored on the C-CARD.
Use the
CURSOR
keypad to select the port
and the
ZOOM +/-
ke y to s elec t ne xt/p re vious
page.
Pressing the FIND S oftke y to loca te the
selected por t on the chart.
Note
A
Warning message is shown if there is no
C-CARD inserted or there are no ports on the
C-CARD.
Searching by name
Go to the “Find Port by Name” screen as
above, and press the NAME Softkey
 Loading...