

Bernina Artista 640, Artista 630 User Manual

1Safety Instructions
IMPORTANT SAFETY INSTRUCTIONS !
DANGER
To r educe the risk of electrical shock:
1. An appliance should never be left
unattended when plugged in.
2. Always unplug this sewing computer from
the electrical outlet immediately after
using and before cleaning.
WARNING
To r educe the risk of burns, fire, electric shock
or injury to persons:
1. Do not allow to be used as a toy. Close
attention is necessary when this sewing
computer is used by or near children and
infirm persons.
2. Use this sewing computer only for its
intended use as described in this manual.
Use only attachments recommended by
the manufacturer as contained in this
manual.
3. Never operate this sewing computer if:
• it has a damaged cord or plug,
• it is not working properly
• it has been dropped or damaged,
• it has fallen into water
Return the sewing computer to the
nearest authorized BERNINA dealer or
service center for examination, repair,
electrical or mechanical adjustment.
4. Never operate the sewing computer with
any air vents blocked. Keep ventilation
openings of the sewing computer and
foot controller free from accumulation of
lint, dust and fabric remnants and the like.
5. Keep fingers away from all moving parts.
Special care is required around the sewing
needle.
When using an electrical appliance, basic safety precautions should always
be followed, including the following:
Read all instructions before using this sewing computer. When the sewing
computer is not in use, it should be disconnected from the electricity supply
by removing the plug from the outlet.
6. Always use the BERNINA original stitch
plate. The wrong plate can cause needle
breakage.
7. Do not use bent needles.
8. Do not pull or push fabric while stitching,
which may deflect the needle, causing it
to break.
9. Turn power switch to «0» (off) when
making any adjustments in the needle
area, such as threading or changing the
needle, threading the bobbin or changing
the presser foot etc.
10. Always unplug the sewing computer from
the electrical outlet when removing
covers, lubricating or when making any
other user servicing adjustments
mentioned in this instruction manual.
11. Never drop or insert any object into any
openings on the sewing computer.
12. Do not use the sewing computer
outdoors.
13. Do not operate where aerosol (spray)
products are being used or where oxygen
is being administered.
14. To disconnect, turn all controls to the off
(«0») position then remove the plug from
the outlet.
15. Do not unplug by pulling on the cord,
instead, grasp the plug before pulling.
16. No responsibility will be taken on behalf
of BERNINA for any possible damage as
the result of misuse of the sewing
computer.
17. Under no circumstances should the
sewing computer be left unattended
when using the embroidery module.
18. This sewing computer is provided with
double insulation (except USA / Canada).
Use only identical replacement parts. See
instructions for servicing of doubleinsulated machines.
SERVICING
DOUBLE-
INSULATED
PRODUCTS
In a double-insulated product, two systems of
insulation are provided instead of grounding.
No grounding means is provided on a doubleinsulated product nor should a means for
grounding be added to the product. Servicing
a double-insulated product requires extreme
care and knowledge of the system and should
only be done by qualified service personnel.
Replacement parts for a double-insulated
product must be identical to those parts in the
product. A double insulated product is
marked with the words «DOUBLE
INSULATION» or «DOUBLE INSULATED».
The symbol may also be marked on the
product.
This sewing and embroidery computer is
intended for household use only.
SAVE THESE
INSTRUCTIONS!
031508.50.04_0601_a640_EN

2
Dear artista Customer,
BERNINA continues the long-standing tradition of the famous artista
family with the model range artista 630 and 640.
The name "artista" stands for something outstanding, artistic - an
inspiring element.
With the new artista generation we would like to enable you to
become an artist by giving you everything a sewing and embroidery
system offers to allow your creativity to blossom and grow.
The modern design and high functionality of the artista 630 and
640 guarantee you sewing satisfaction, ease of use and frustrationfree sewing enjoyment.
The artista 630 is the best sewing computer on the world market
with outstanding stitch quality, but you also have the option of
embroidery. The artista 640, with the Bernina rotary hook system,
offers endless possibilities in embroidery. Bernina's exclusive
embroidery rescaling gives you the freedom and control you need
and deserve.
Both models have a beautiful color screen which is located in the
center of the machine-right where you need it-and the user interface
is extremely intuitive and easy to use.
For artista customers we recommend the optional BERNINA
Embroidery Software, the Bernina Stitch Regulator (BSR) and the
wonderful variety of accessories available at your local Bernina
dealer.
We wish you lots of fun with our newest additions in the wonderful
line of Bernina machines.
H.P. Ueltschi
President
BERNINA Sewing Machine Manufacturers
BERNINA
CH-8266 Steckborn
www.bernina.com
031508.50.04_0601_a640_EN
3Contents
Personal Program 84 - 86
Saving and Deleting Stitches and
Stitch Combinations 87 - 91
Setup Program 92 - 101
Sewing and Sewing Computer Support 102 - 108
Safety Instructions 1
Your Sewing Computer 4 - 20
Screen / Function Buttons 21 - 33
Applications of Practical and
Decorative Stiches 34 - 58
Alphabets 59 - 61
Buttonholes 62 - 76
Quilting 77 - 83
Preparing for Embroidery /
Important Information 109 - 119
Working on Motifs and Embroidering 120 - 147
Embroidery Support 148 - 153
Peripherals and Accessories 154 - 156
Glossary 157 - 158
Summary Stitches and motivs 159 - 174
Index 175 - 177
Key to Signs
Caution!
Very important!
Risk of damage!
!
Please refer to the safety
instructions! Risk of injury!
Supplementary information!
Helpful tips!
27
28
Additional information on the
corresponding subject you will
find on the relevant page.
031508.50.04_0601_a640_EN
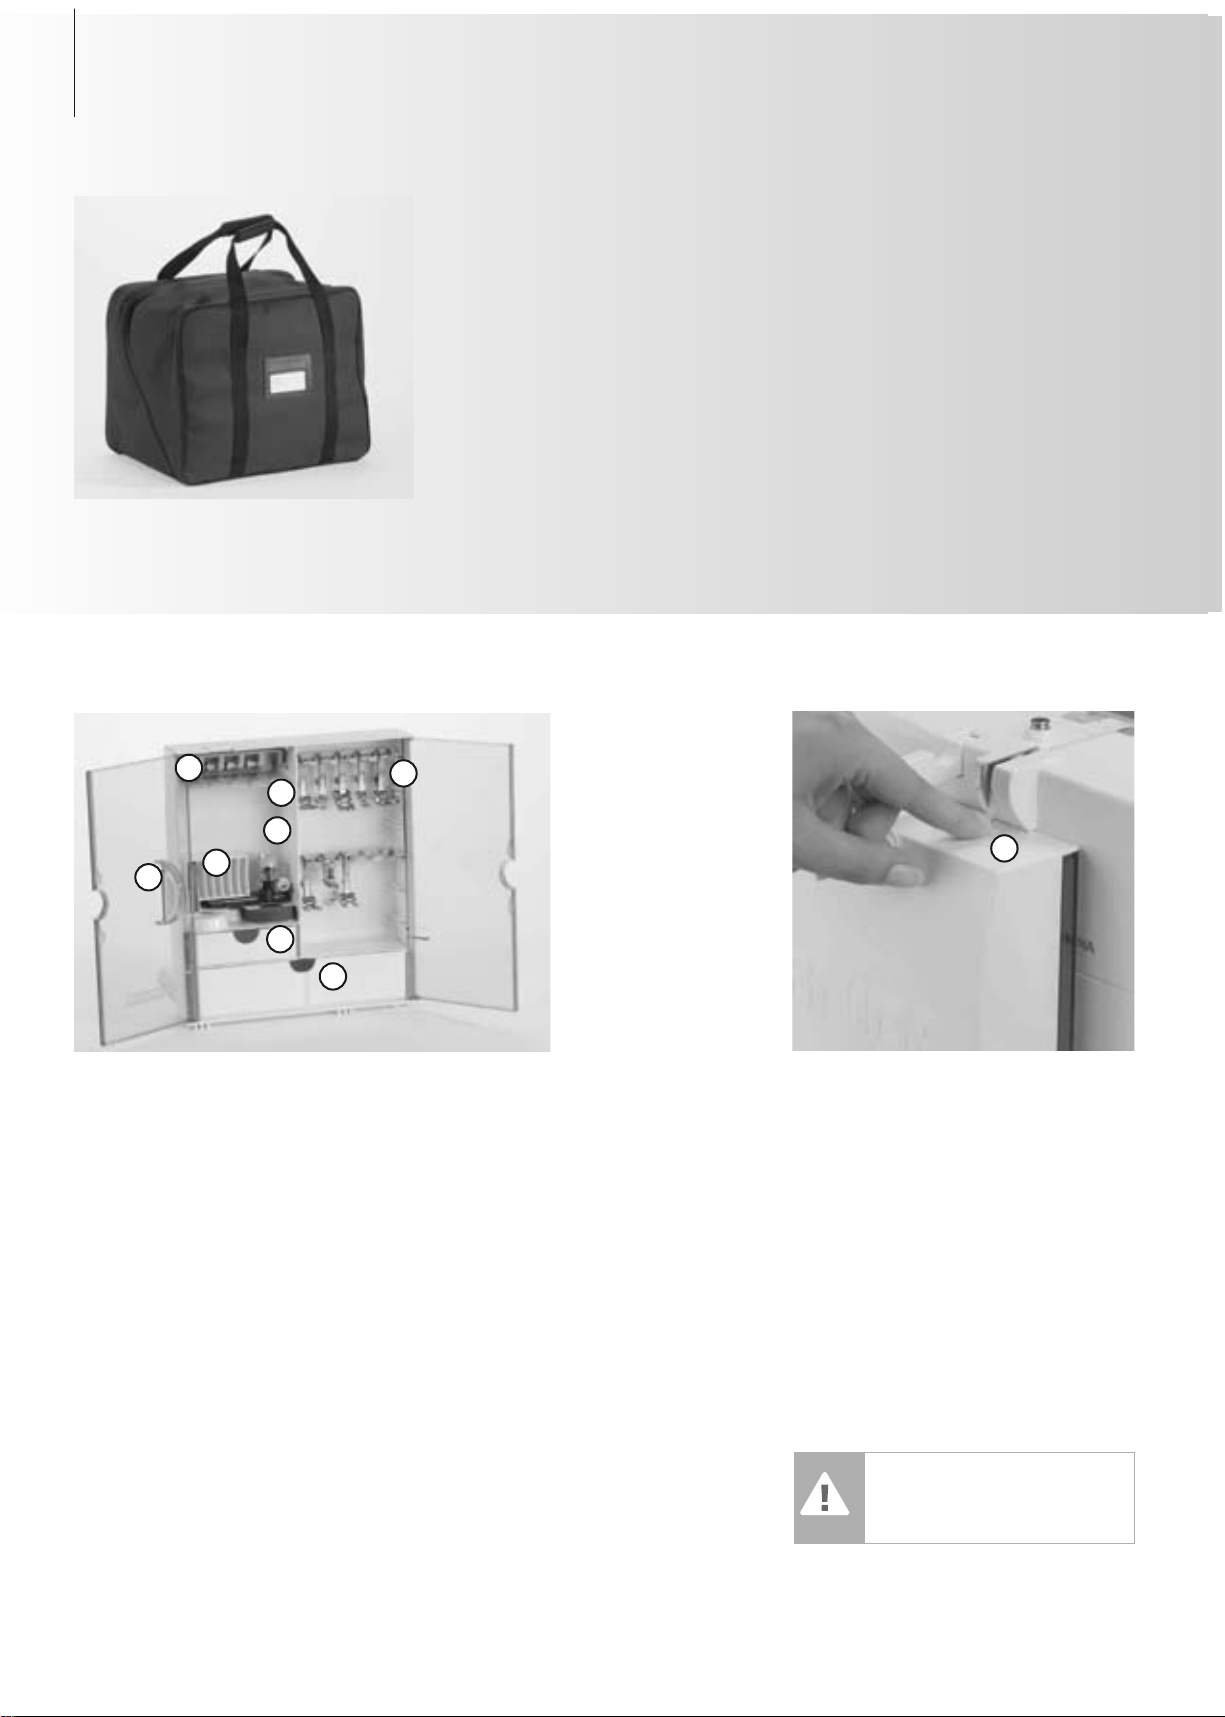
Carrier Bag
•protects from dust and dirt
• this bag can be used to transport the
sewing computer. The accessories can be
stored in the corresponding compartments
Accessories*
Free Standing Accessory Box
• on the back side of the box, pull both feet
out until they click into place
• stand box in chosen position
Storing Accessories
Standard accessories are supplied in a plastic
bag. The box is equipped with one small and
one large drawer (B and C) as well as compartments for bobbin holders D and presser
feet E. (Additional compartments and drawers
are available as optional extras.)
• push the bobbins into the compartments
provided
• to remove a bobbin, press the
compartment holder F lightly
• insert the presser feet into the slot
• Buttonhole foot with slide No. 3A can be
stored in the left compartment G
• the needle selection box can be stored in
compartment H
Accessory Box
Attaching the Accessory Box to the
Sewing Computer
• close the doors
• push feet back into position
• attach the box to the sewing computer
(catch A must engage); inserting the
presser foot lifter into the opening J
C
E
H
A
G
Removing the Accessory Box
•press catch A on the top of the box
•remove box to the rear
Caution:
First lower the presser foot
lifter!
4 Accessories
Accessories
The following accessories are arranged in the
styrofoam packing:
• foot control
• instruction manual
• power cable
• warranty card
• FHS presser foot lifter (Free Hand System)
• slide-on table
• seam guide for slide-on table
• Instructional / Presentation CD-ROM
• carrier bag
•Touch Screen Stylo
*can vary from country to country
J
B
D
F
031508.50.04_0601_a640_EN
5Accessories
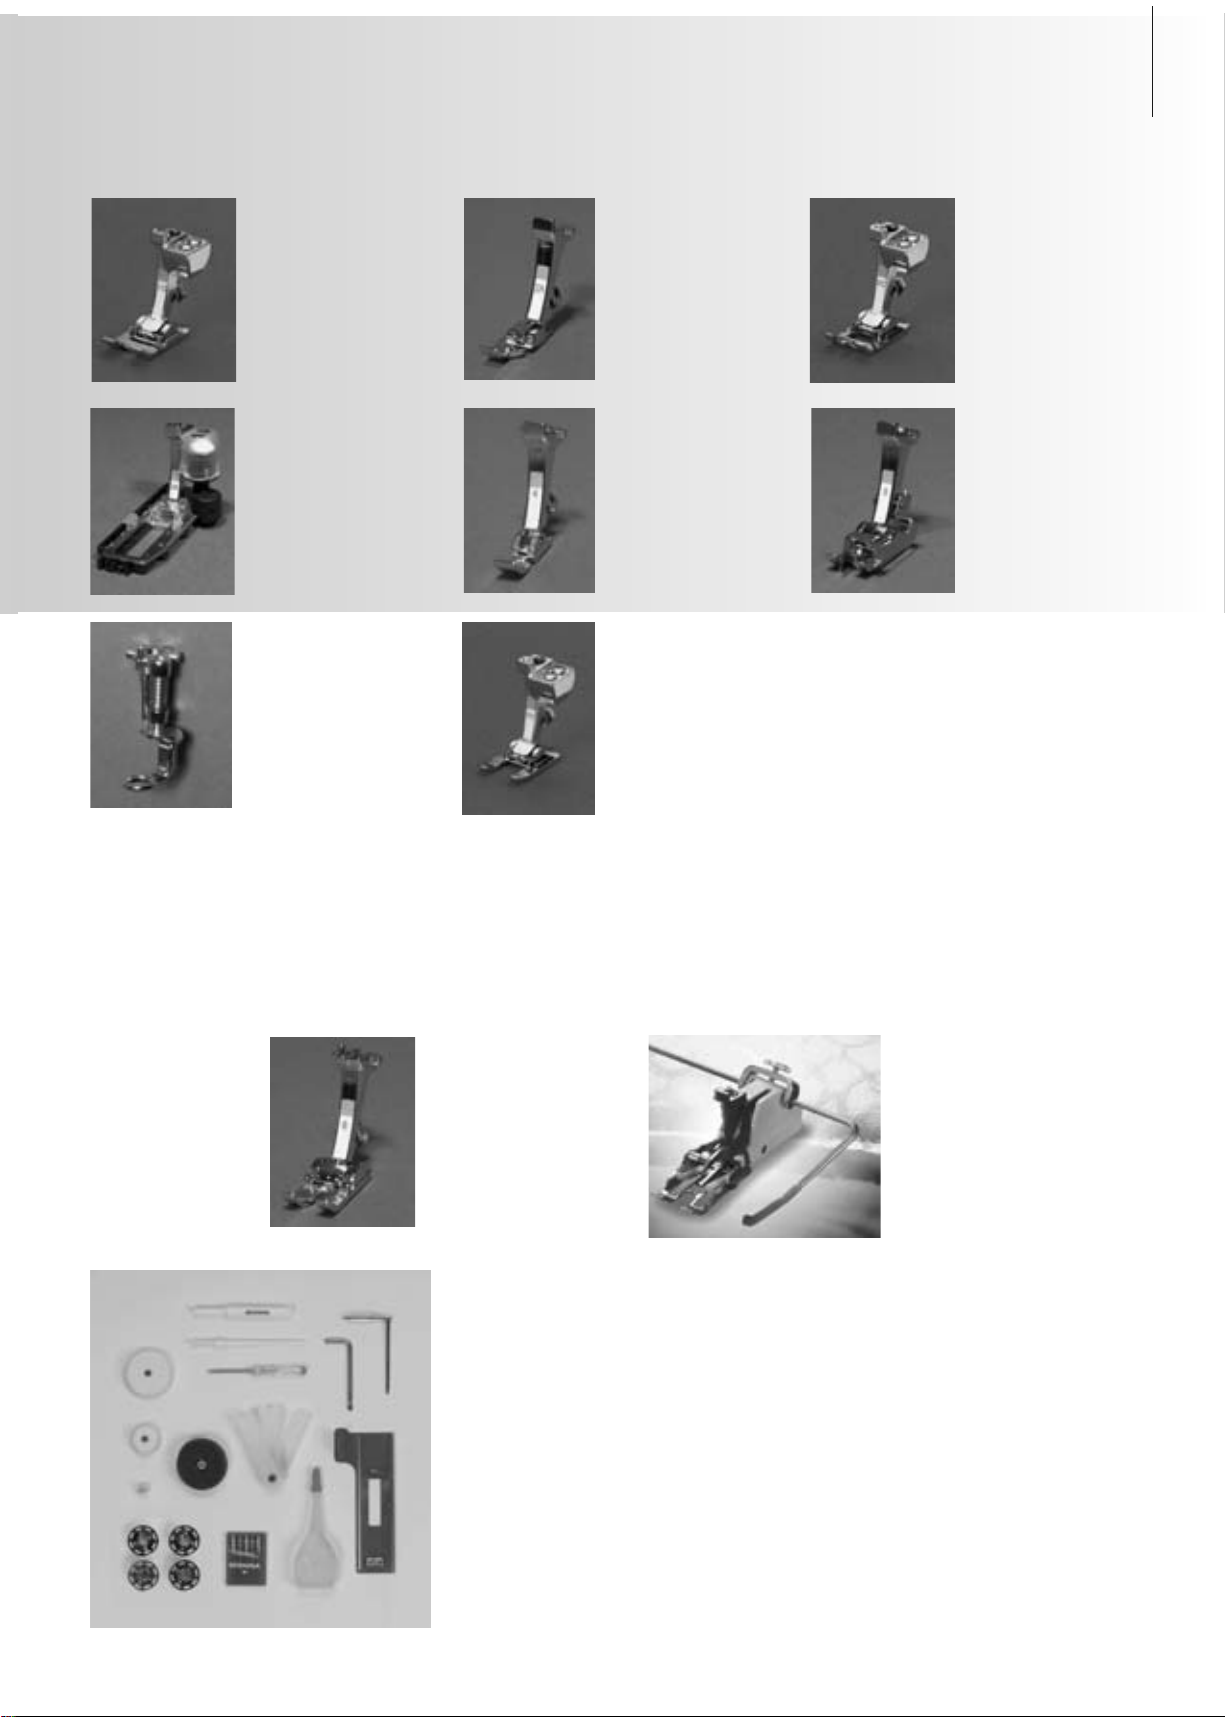
Standard Accessories*
• four bobbins
(+ one in bobbin case)
• selection of 130/705 H needles
• seam ripper
• small screwdriver
• angular Torx key
• lint brush
• seam guide
• foam pad
Presser Feet*
1C
Reverse pattern foot
Practical and decorative
stitches
4
Zipper foot
Sewing in zippers
5
Blindstitch foot
Blind hems,
edge stitching
3A
Automatic
Buttonhole foot with
slide
Buttonholes on smooth
fabrics, darning
2A
Overlock foot
Overlock seams, hems,
clean finishing edges,
narrow satin stitch
9
Darning foot
Used with the feed dog
in a lowered position
for darning,
monograms, and
freehand embroidery
20C
Open embroidery
foot
Embroidery, appliqué,
satin stitch seams,
monograms
50
Walking foot
For fabrics which stick or tend to
slip and for quilting
8
Jeans foot
Straight stitching in
thick, firm fabrics
• height compensating tool
• three spool discs
• oiler
• compensation plate for sewing
buttonholes
*can vary from country to country
3C
Buttonhole foot
Buttonholes
BERNINA Specialty Presser Feet
The standard selection of presser feet covers most normal sewing requirements, but we
recommend the use of BERNINA specialty presser feet for specific sewing tasks such as quilting,
heirloom sewing, home decorating, tailoring, etc.
They are available from your BERNINA dealer.
031508.50.04_0601_a640_EN
2
1
3
4
5
6
7
8
9
10
11
12
13
14
15
16
17
18
19
21
20
22
23
24
25
2627282930
31
32
33
34
35
36
37
38
39
40
6
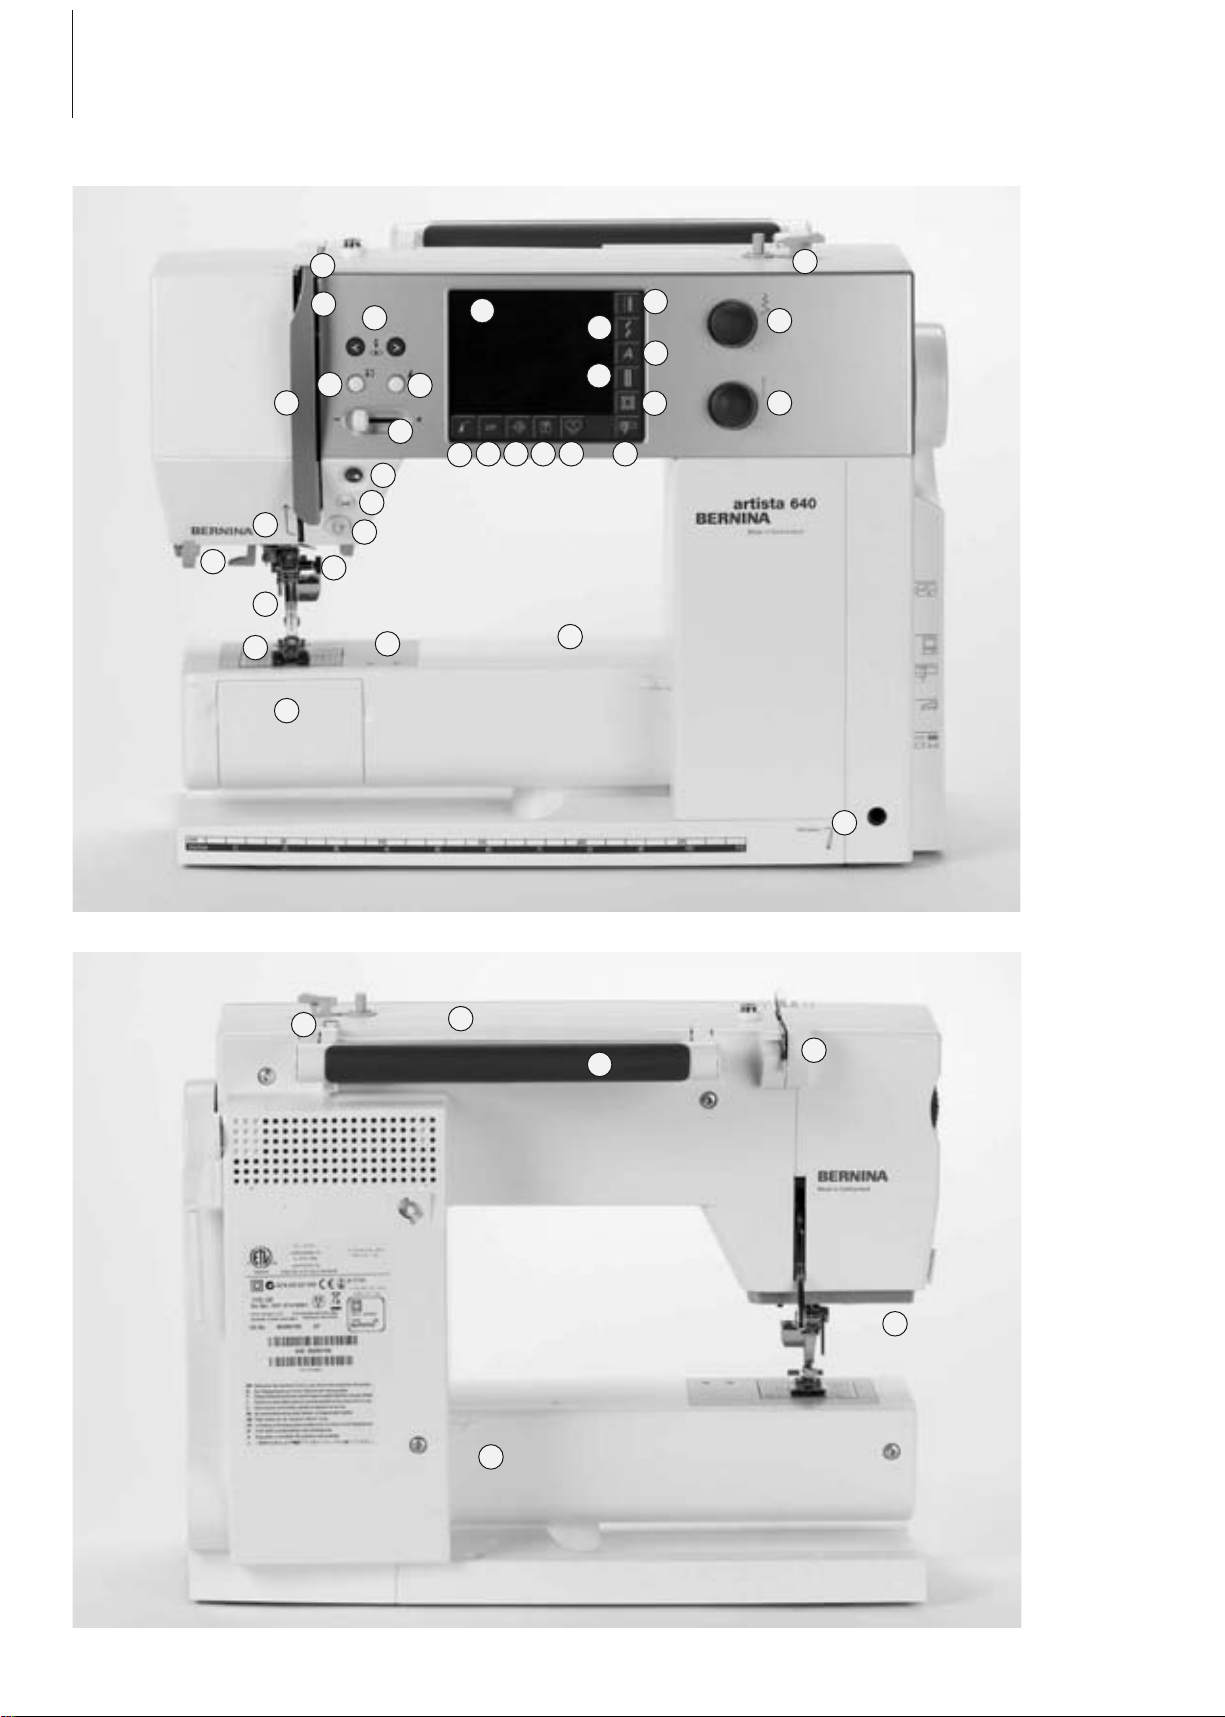
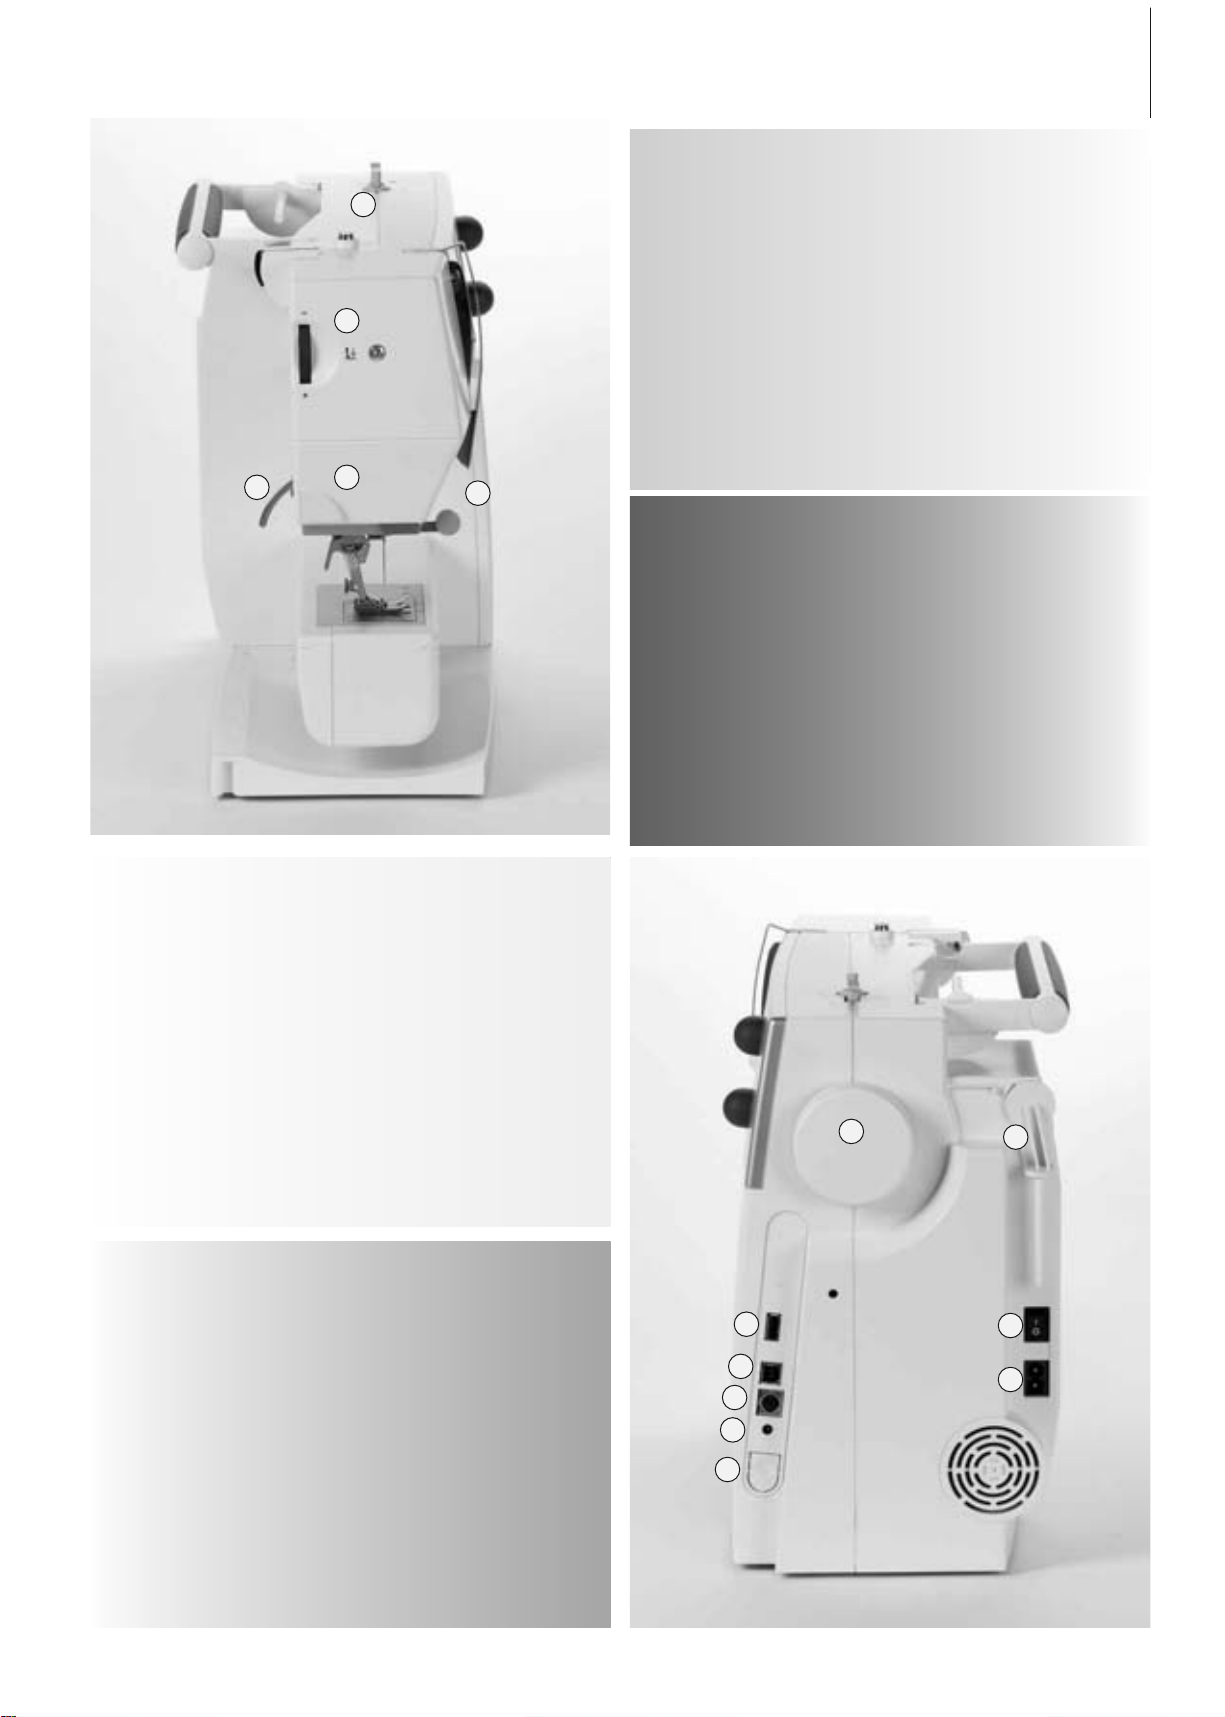
Details
Details artista 640
Front view
Back view
031508.50.04_0601_a640_EN
46
47
48
49
50
51
52
53
54
41
42
43
44
45
7
Details
Bobbin cover
Stitch plate
Attachment base for special accessories
Darning hoop connection
Presser foot
Needle clamp
Thread guide
Needle threader
Thread take-up cover
Thread path
Thread take-up
Quick reverse button
Automatic thread cutter
Start / Stop - button
Slide speed control
Needle stop up/down button
Pattern end button
Needle position buttons
Screen
Bobbin winder with on/off switch and
thread cutter
Practical stitch button
Decorative stitch button
Alphabet button
Buttonhole button
Quilt stitches button
Sewing mode/Embroidery mode button
Personal program button
Tutorial button (only in embroidery mode)
Setup button
«clr» (clear) button
Pattern begin button
Stitch width knob
Stitch length knob
FHS (Free Hand System) connection
Thread guide (while winding the bobbin
when sewing and embroidering)
Horizontal spool pin
Carrying handle
Rear thread guide
CFL (Cool Fluorescent Light) sewing light
Slide-on table socket
Bobbin pre-tension
Presser foot pressure dial
Presser foot lifter
Thread cutter on head frame
Magnifying glass holder
Handwheel
Spool pin (vertical, collapsible)
Power switch on/off («0»)
Power plug socket
USB connection
PC connection
Embroidery module connection
Foot control socket
Drop feed dog
1
2
3
4
5
6
7
8
9
10
11
12
13
14
15
16
17
18
19
20
21
22
23
24
25
26
27
28
29
30
31
32
33
34
35
36
37
38
39
40
41
42
43
44
45
46
47
48
49
50
51
52
53
54
Side view right
Side view left
031508.50.04_0601_a640_EN
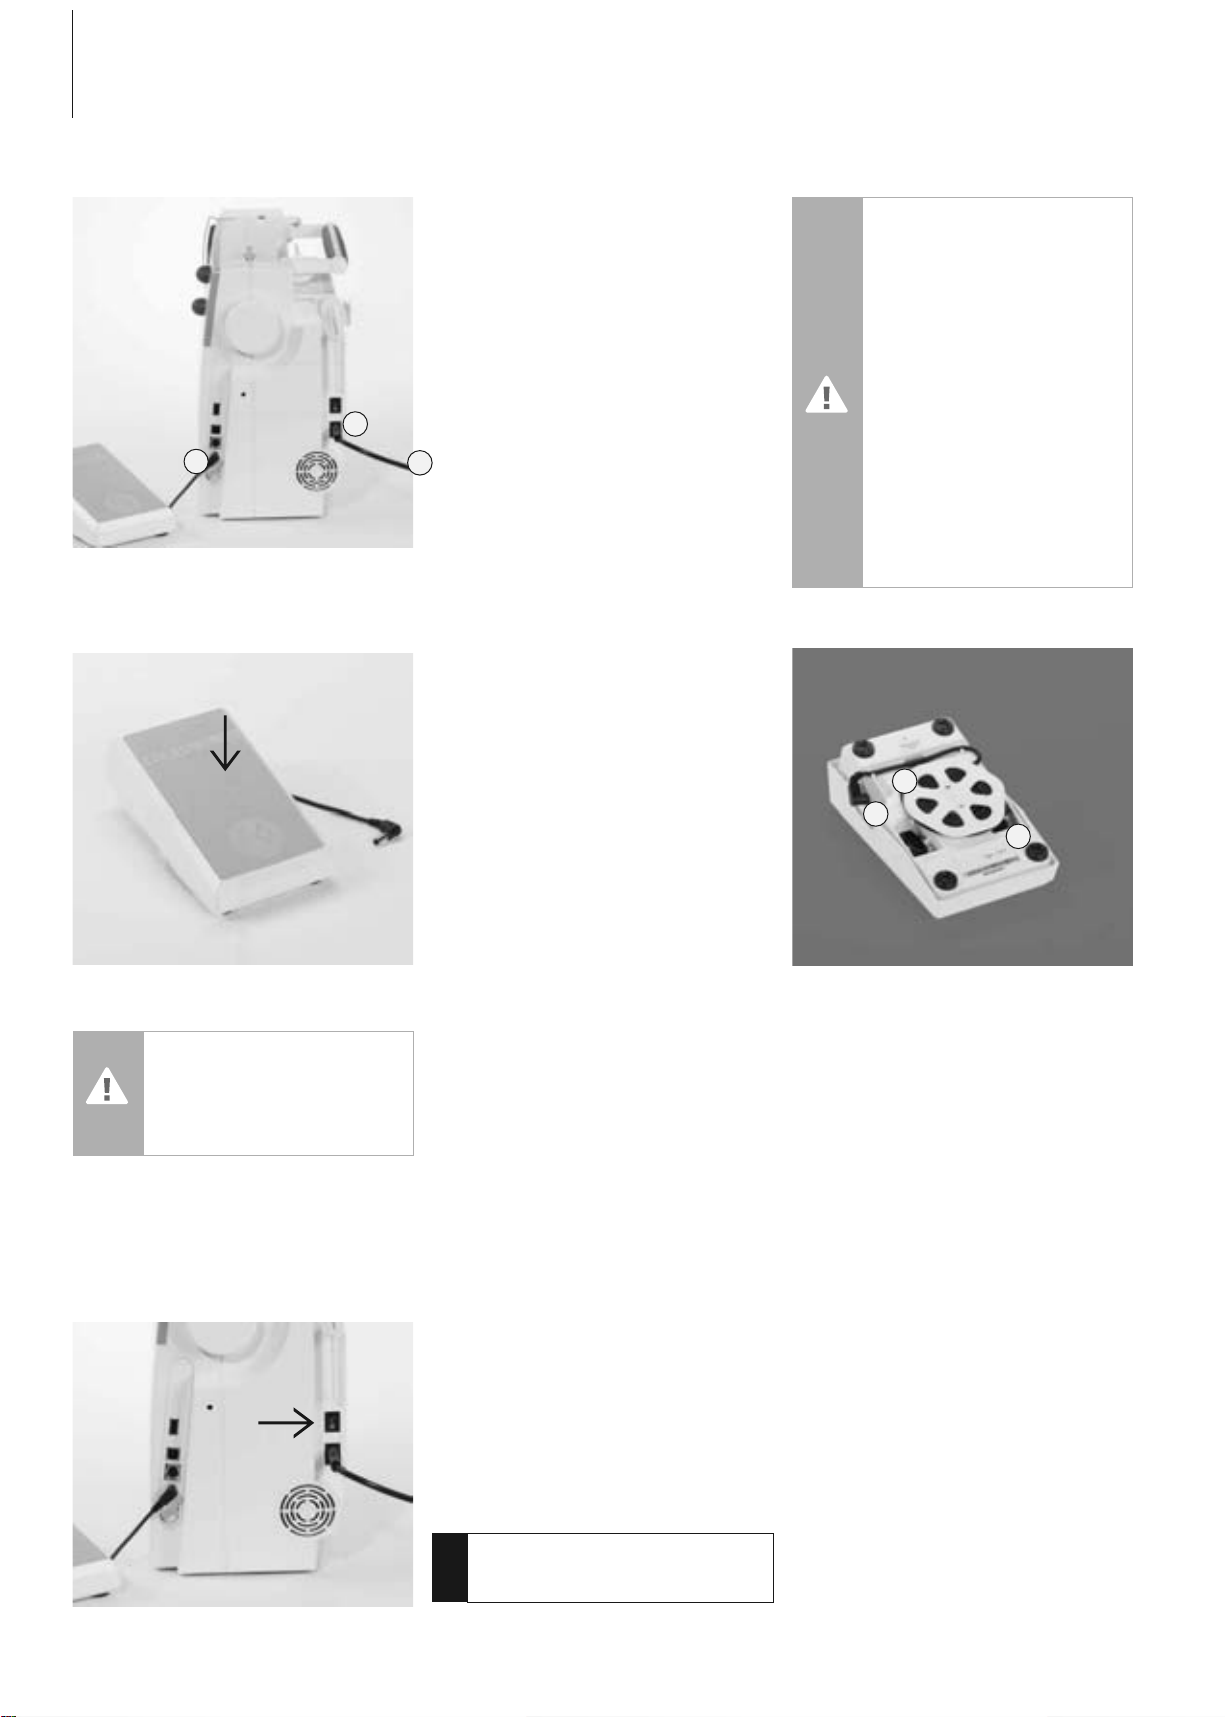
8 Operating Instructions
Power Cable
The Power Cable
• plug A into sewing computer
• plug B into wall socket
Foot Control Cable
• plug C into sewing computer
Foot Control
Sewing Speed
• control the sewing speed by depressing the
foot control
• raise or lower the needle by tapping on the
foot control with your heel
Cable Tidy
• wind the cable around the spool
• insert the plug into A
When Sewing
• unwind the cable to the desired length and
slip into B or C
The switch is on the handwheel side of
the sewing computer
I the sewing computer is switched on («I»)
0 the sewing computer is switched off («0»)
The sewing light is switched on and off with
the power switch.
Power Switch
!
Refer to the
safety instructions!
Important!
(USA/Canada only):
Use only foot controller type
LV1 with sewing computer
model artista 640.
Important!
(USA/Canada only):
The sewing computer has a
polarized plug (one blade
wider than the other). To
reduce the risk of electrical
shock, this plug is intended to
fit in a polarized outlet only
one way. If the plug does not
fit fully in the outlet, reverse
the plug. If it still does not fit,
contact a qualified electrician
to install the proper outlet. do
not modify the plug in any
way!
C
B
A
C
B
A
031508.50.04_0601_a640_EN
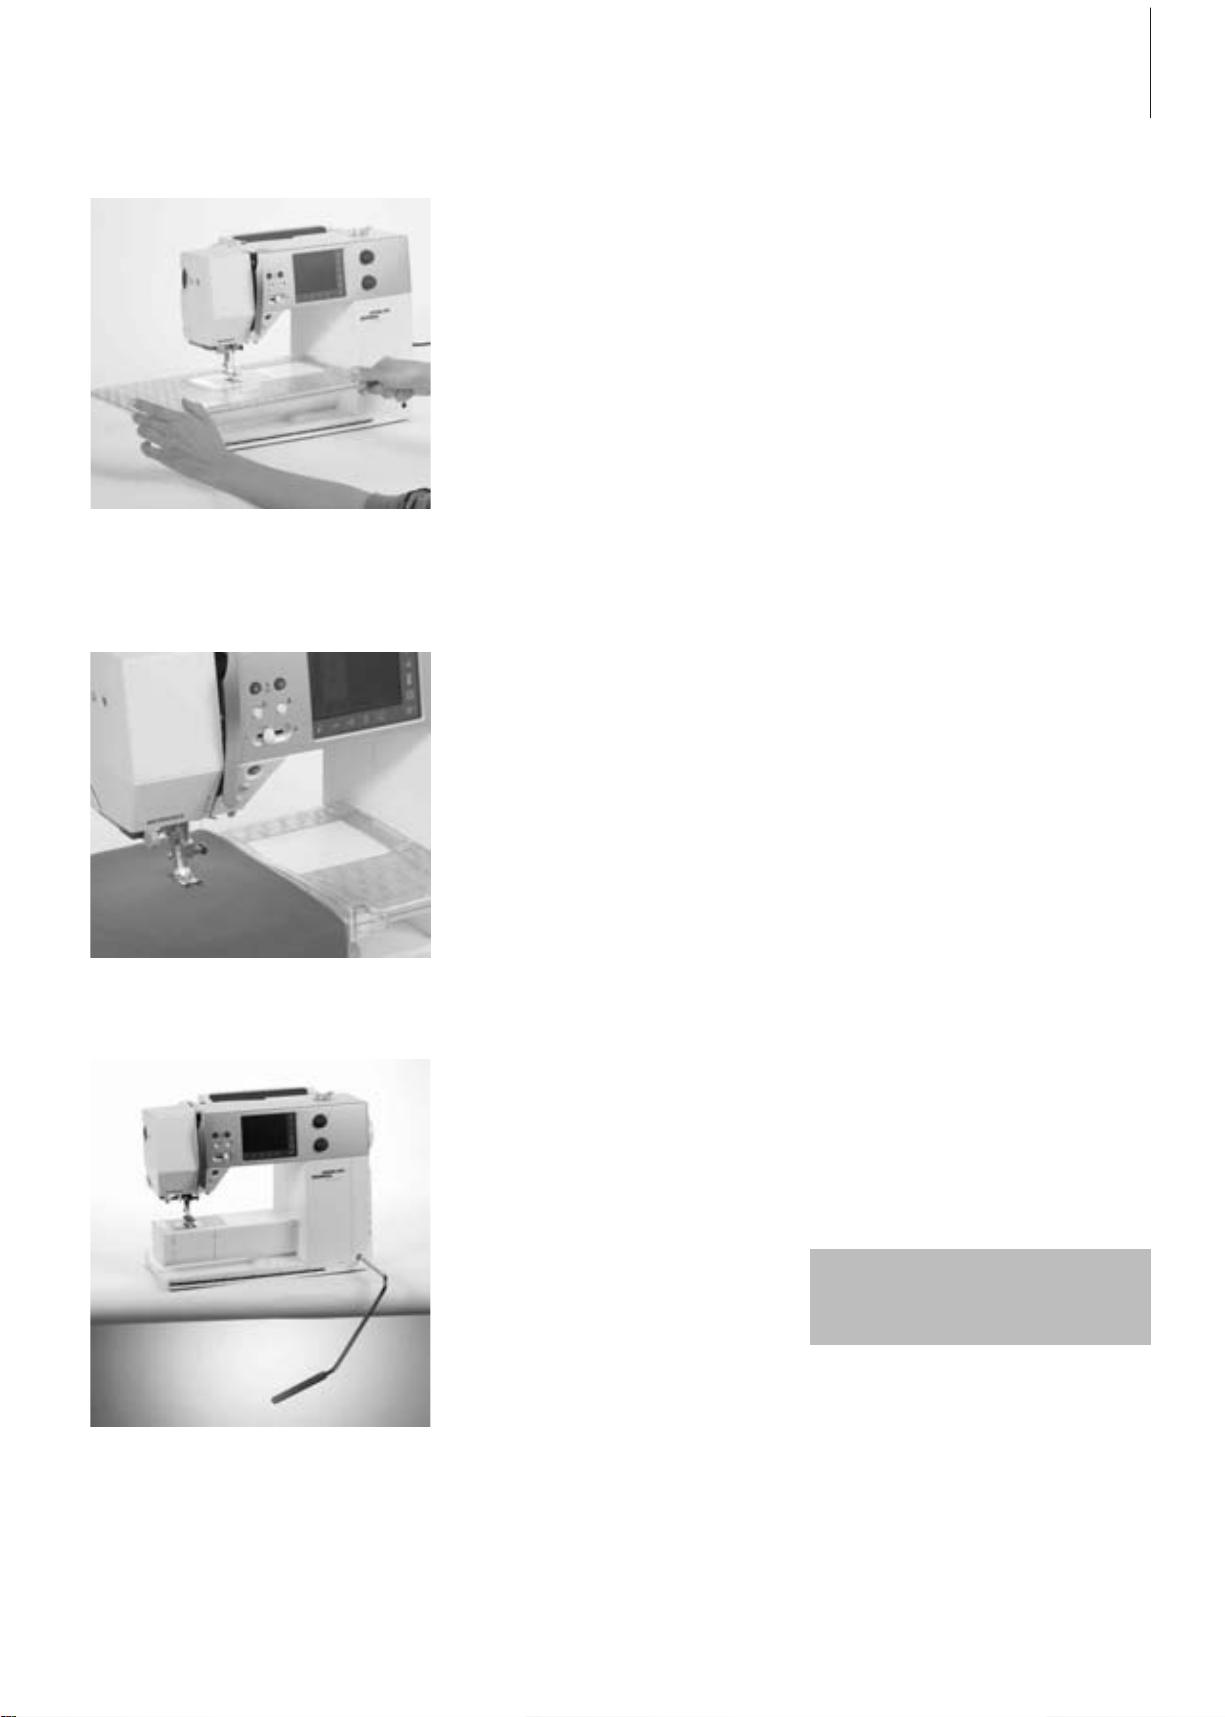
9Operating Instructions
Slide-on Table
• the slide-on table increases the sewing
surface
•free arm for large tubular items such as
pant legs and waistbands
To Attach
• raise the needle and presser foot
• place the table to the right over the free
arm and press firmly so that it engages on
the fixing cam
To Remove
• raise needle and presser foot
• pull the table out of the fixing cam
•remove to the left
Slide-on Table
Seam Guide
• insert into the groove (underside of table)
from left or right
• it can be adjusted over the whole width of
the table
Scale
• «0» corresponds to the center needle
position
Presser Foot Lifter
• the FHS raises and lowers the presser foot
• push to the right
• the presser foot is raised
• the feed dog is lowered simultaneously
• the feed dog is raised as soon as the first
stitch is sewn
Free Hand System (FHS) Presser Foot Lifter
Attaching the Presser Foot Lifter
• insert into the opening; you should be able
to operate the FHS with your knee in your
normal sitting position
Your dealer can adjust the FHS if
necessary.
031508.50.04_0601_a640_EN
10 Operating Instructions
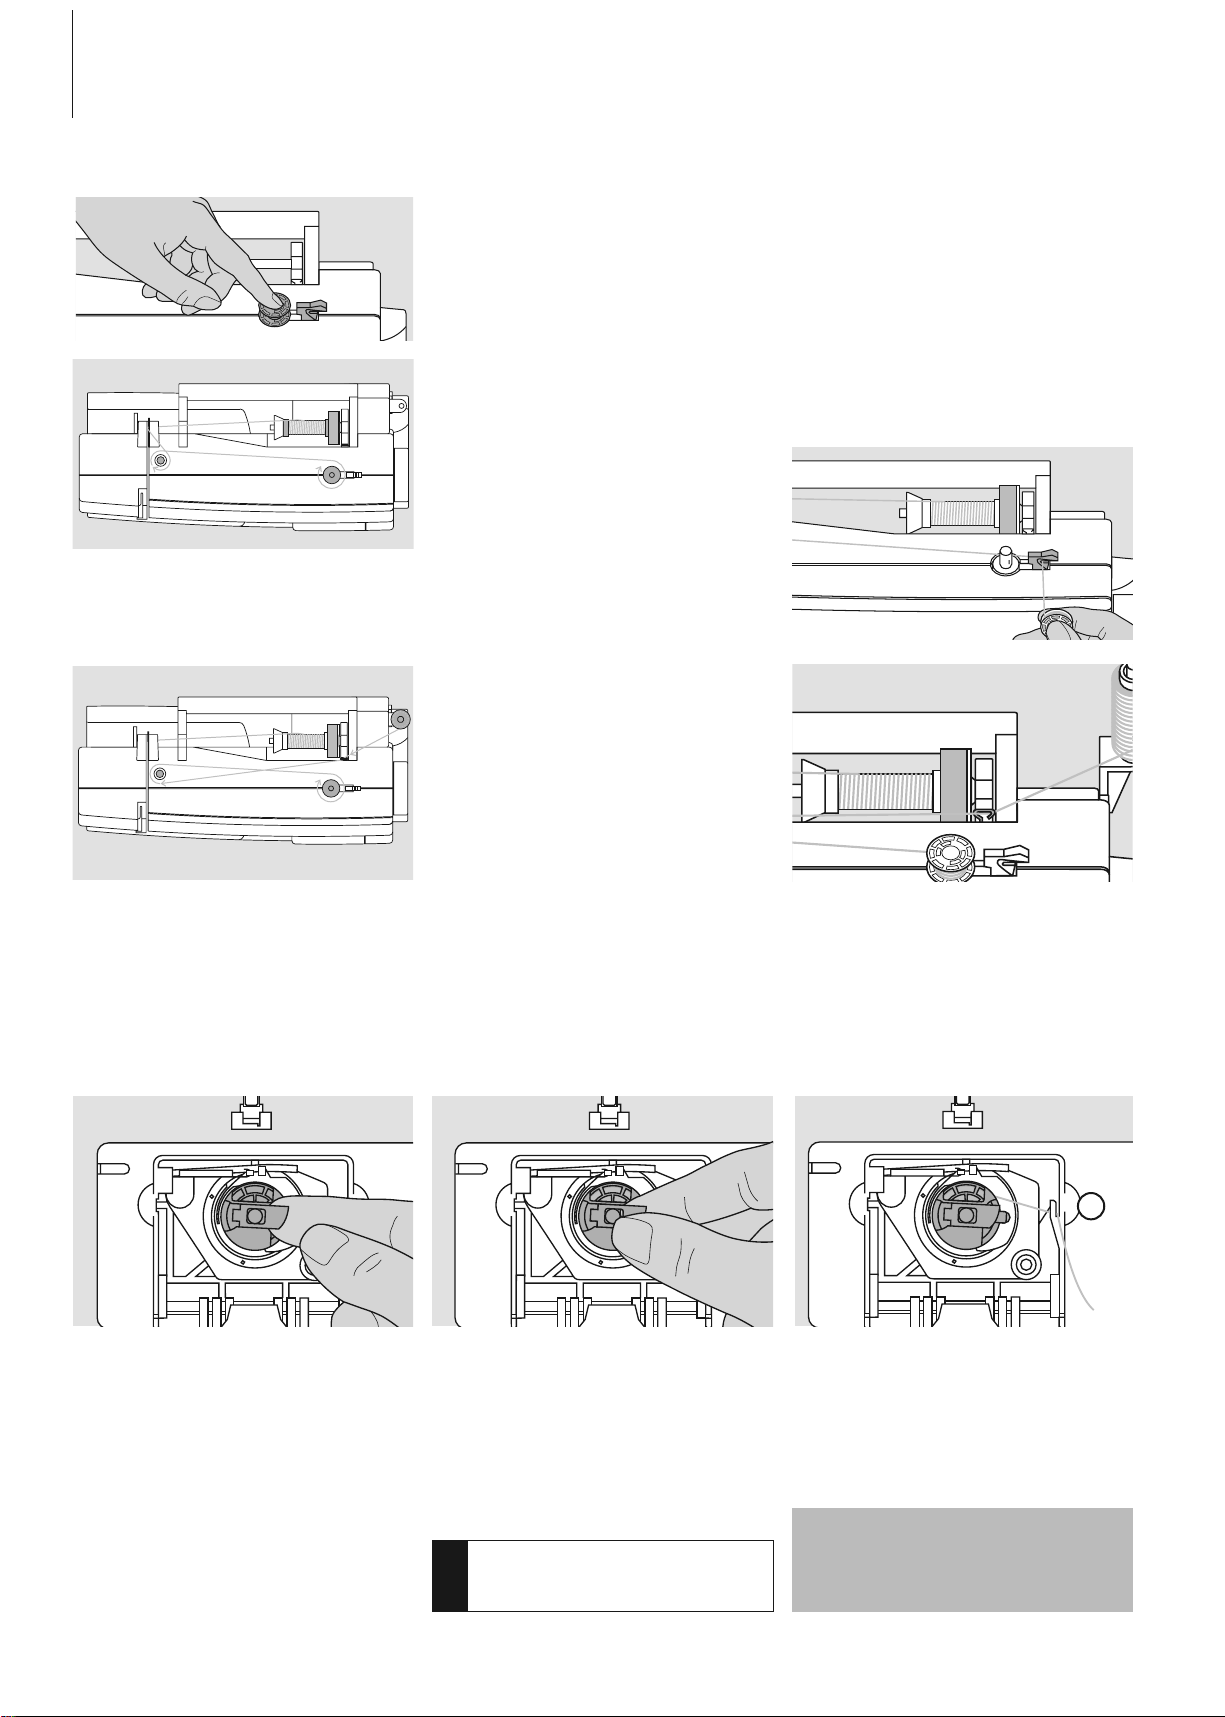
Winding the Bobbin
• the winding speed can be adjusted with
the «+» or «-» in the opened screen or by
turning the stitch width knob
• the motor will stop automatically when the
bobbin is full
•remove the bobbin
Thread Cutter
• cut the thread with the thread cutter
A
To Remove the Bobbin Case
• raise the needle
• turn power switch to «0» (off)
• open the bobbin cover
• grasp the latch of the bobbin case
•remove case
Bobbin Case
To Insert the Bobbin Case
• hold the bobbin case latch
• the opening on the bobbin case should be
at the top
• insert bobbin case so that it engages
• close the bobbin cover
Bobbin Thread Cutter
• insert the bobbin case
• take the thread over cutter A and cut the
thread
The bobbin thread does not
have to be brought up as the
loose end is just the right length
to start sewing.
!
Refer to the
safety instructions!
Winding the Bobbin
• turn power switch to «I» (on)
• place empty bobbin on spindle
Threading the Bobbin
• place thread on spool pin
• attach appropriate spool disc - diameter of
thread spool determines disc size
• following the direction of the arrow, take
thread through the rear guide and around
the pre-tension stud
•wind the thread two to three times around
the empty bobbin and cut off any excess
thread on the thread cutter
•press the engaging lever against the bobbin
• the bobbin winder works automatically
Winding the Bobbin While Sewing or
Embroidering
• place thread spool on vertical spool then,
following the direction of the arrow, take
thread through the thread guide and
around the pre-tension stud
• follow the instructions as described above
for the next steps of winding the bobbin
031508.50.04_0601_a640_EN
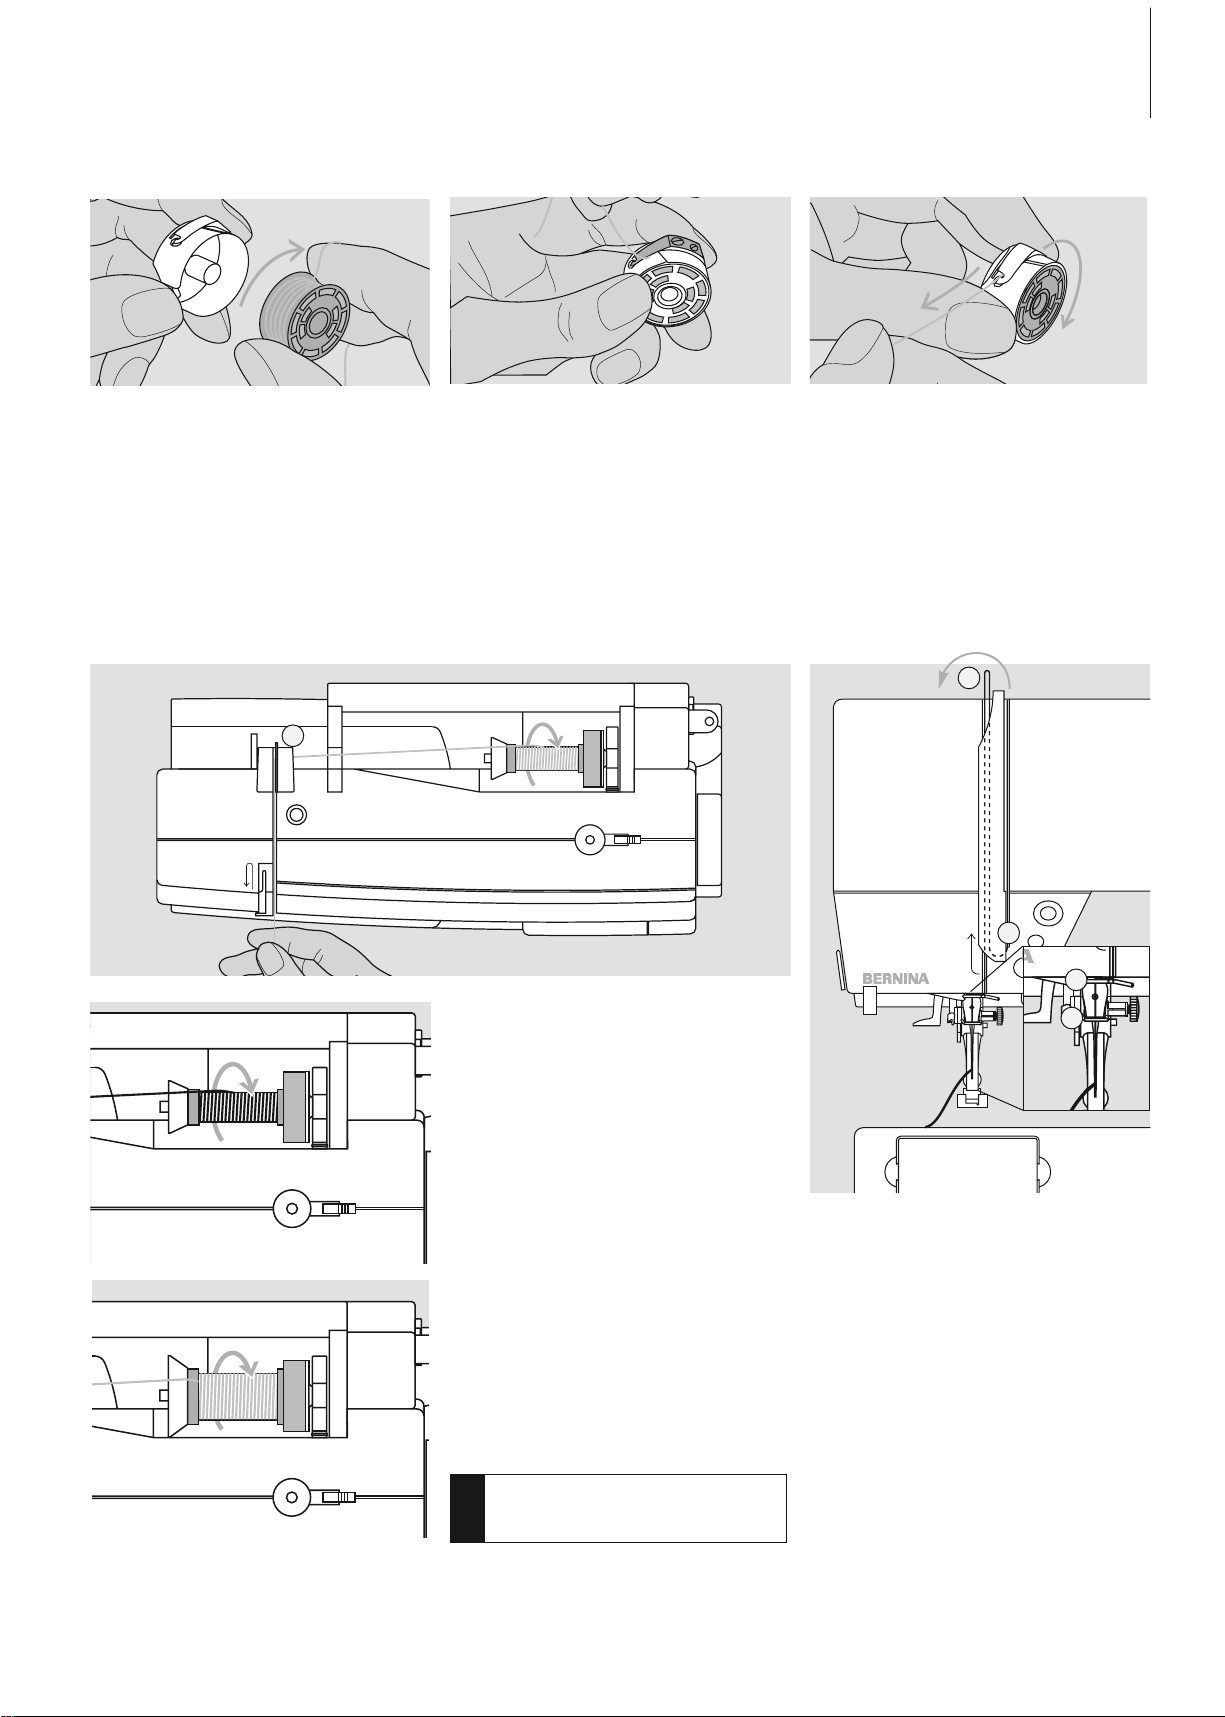
11Operating Instructions
Inserting the Bobbin
Clockwise Turning of the Bobbin
The bobbin must turn clockwise.
Inserting the Bobbin
Insert the bobbin so that the thread winds
clockwise.
Pulling the Thread Under the Spring
Pull the thread to the left under the spring
until it lies in the T-shaped slit at the end of
the spring.
Threading the Upper Thread
Attaching the Thread Spool
• raise the needle and presser foot
• turn the power switch to «0» (off)
• attach the foam pad
• place spool on pin (thread winds clockwise)
• attach the appropriate spool disc -
diameter of spool determines disc size.
There must be no clearance between the
disc and the spool
• take thread through rear guide A
• then into slit of upper thread tension
A
Down
• pull thread down to the right of the take-
up cover to B
Up
• take thread up to the left of the cover to C
in the direction of the arrow, placing it in
the take-up lever
Down
• take thread down and through guides D
and E
!
Refer to the
safety instructions!
C
B
D
E
031508.50.04_0601_a640_EN
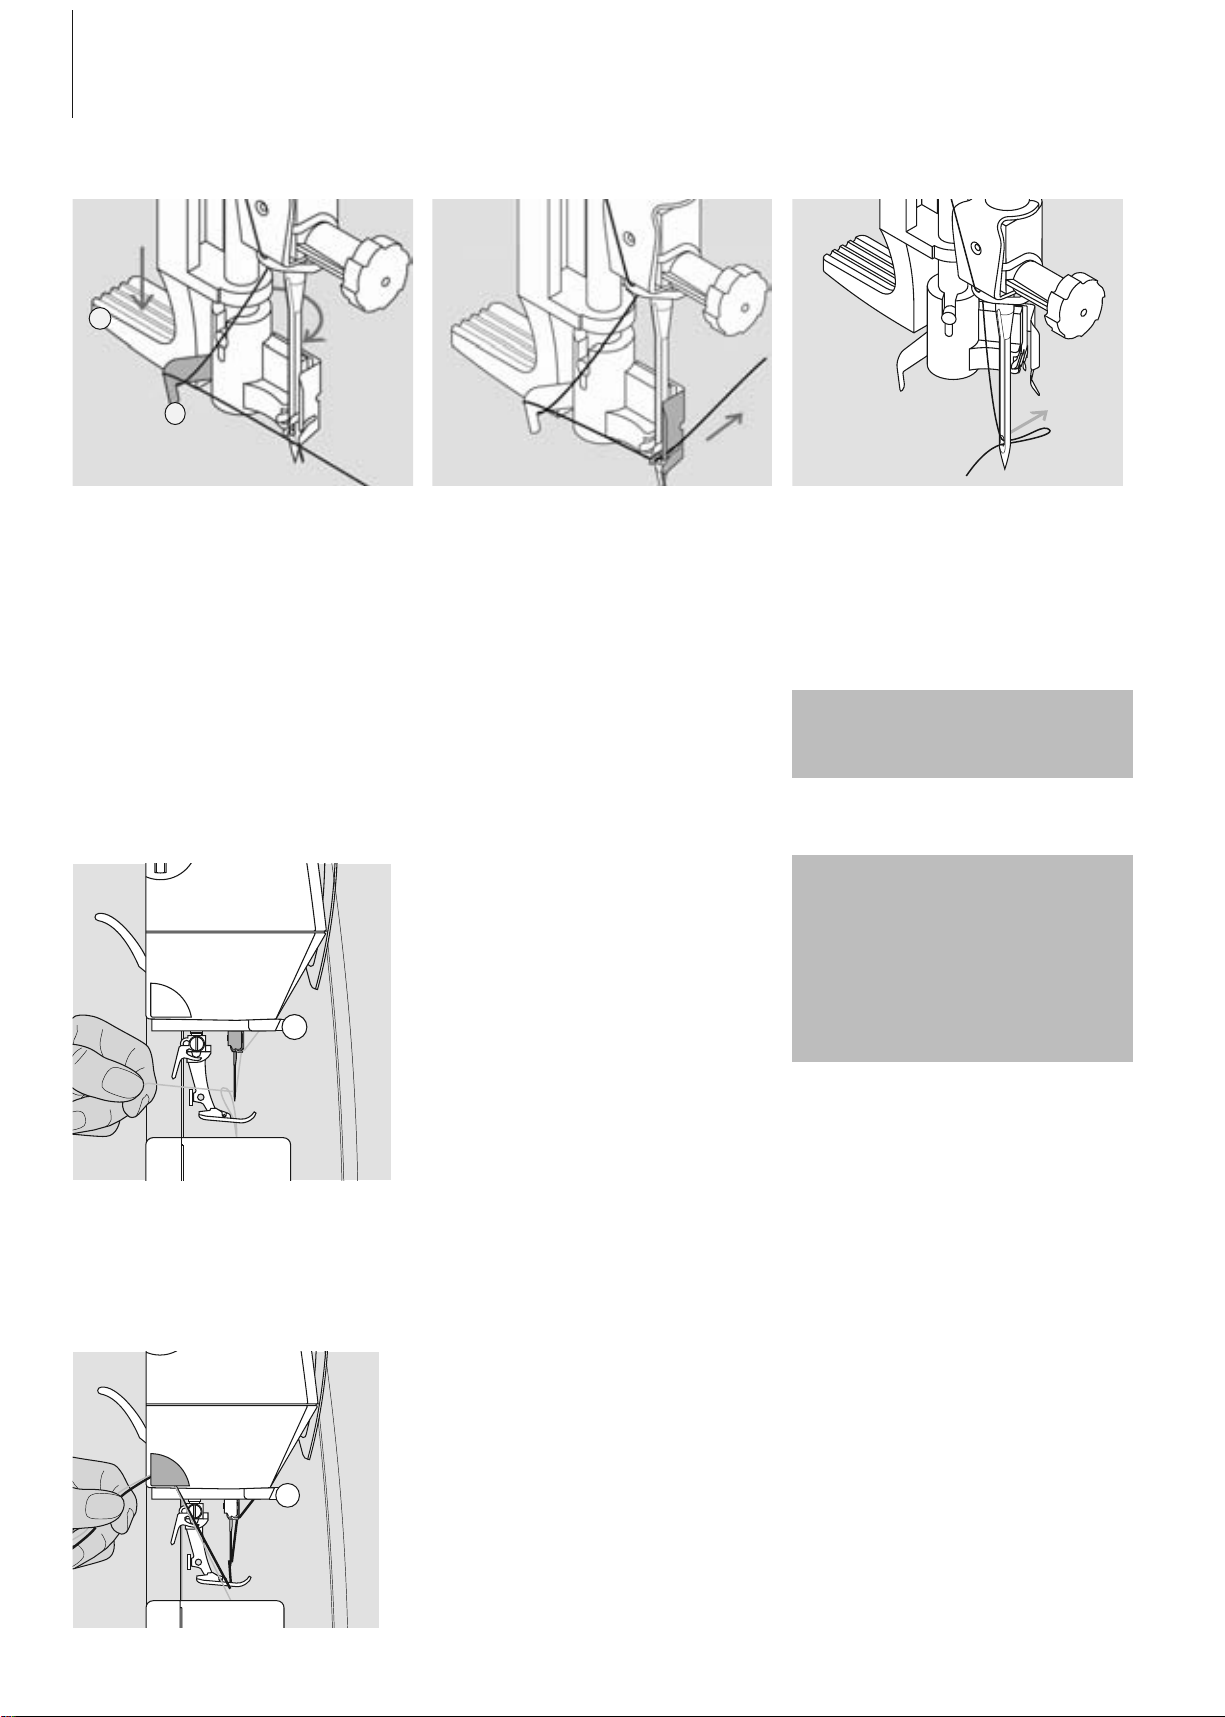
12 Operating Instructions
Needle Threader
Lever Down and Thread in Hook
• raise the needle
• lower the presser foot
• press lever A down and simultaneously
guide the thread around hook B to the
right of the needle
Thread in Front of Needle
• put the thread from the front into the
guide until it catches in the hook
Release the Lever and Thread
• let go of lever A and thread
• pull the thread loop through the needle
eye
B
A
Thread Cutter
Thread Cutter on Head Frame
•pull both threads from front to back over
the cutter
• the threads release automatically as soon
as the first stitch is sewn
Bringing up the Lower Thread
• hold the upper thread
• sew one stitch by tapping on the foot
control twice
• pull the upper thread to bring the lower
thread up through the stitch plate hole
• take both threads through the slit on the
presser foot to the back
• pull threads over the head frame cutter
The bobbin thread must be
brought up through the stitch
plate for certain types of work.
The length of thread is sufficient
for most normal work if the lower
thread cutter has been used.
Special needles such as double
and triple needles must be
threaded by hand
031508.50.04_0601_a640_EN
13Operating Instructions
Collapsible Vertical Spool Pin
• found on the back of the sewing computer
behind the handwheel
• essential aid for sewing with more than one
thread, i.e. double needle work
• raise the pin until it clicks into its vertical
position
• add the foam pad A for stability, this
prevents the thread from getting caught on
the spool pin
Supplementary Spool Pin
A
Removing the Needle
• raise the needle
• turn power switch to «0» (off)
• lower the presser foot
• loosen the needle clamp screw
• pull the needle down to remove
Inserting the Needle
• flat side of needle to the back
• insert the needle as far as it will go
• tighten the needle clamp screw
Changing the Needle
!
Refer to the
safety instructions!
CFL Sewing Light (CFL = Cool Fluorescent Light)
Contrary to an ordinary bulb, the CFL sewing
light has a better illumination and a longer
life.
Caution:
Please note that a defective
CFL sewing light must ONLY
be replaced by an authorized
technician. The sewing
computer must be brought to
an authorized BERNINA
dealer!
031508.50.04_0601_a640_EN
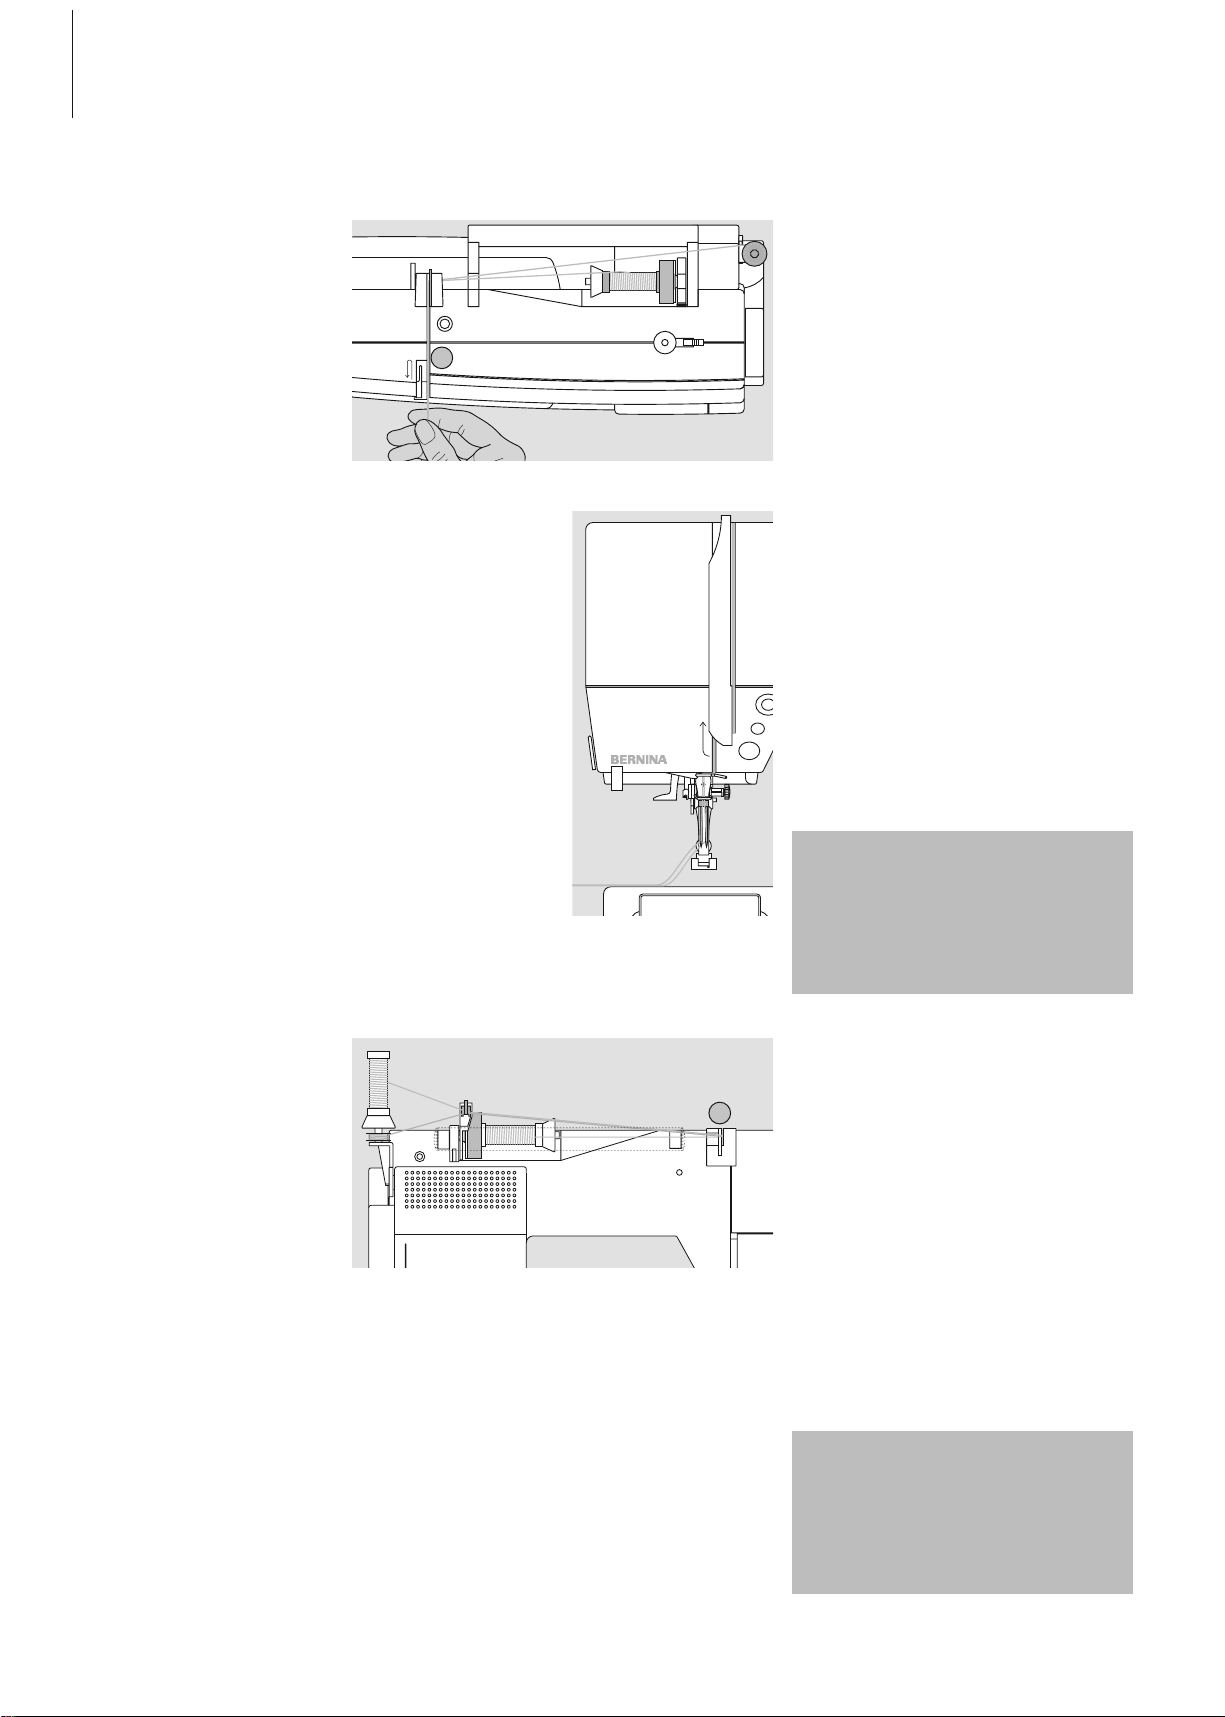
14 Operating instructions
Threading the First Thread
• place thread spool on horizontal spool pin
and thread
• guide the thread to the front in the slit and
past the tension disc A on the right side
• thread sewing computer as usual and
thread the right needle
Threading the Second Thread
• place thread spool on the additional spool
pin and thread
• guide the thread to the front in the slit and
past the tension disc A on the left side
• thread the left needle
• threads must not be twisted together
Threading the Double Needle
When using the supplementary
spool pin (vertical) always attach
the foam pad (prevents the
thread from getting caught on
the spool pin)
By using the Supplementary
thread guide (special
accessories), thread winds off
the spool much easier.
Threading the Triple Needle
• two thread spools and one full bobbin are
needed
• place one thread spool on horizontal spool
pin
• place second thread spool and the bobbin,
separated by a spool disc, on additional
spool pin (both spools have to turn in the
same direction)
• thread as usual by guiding two threads on
the left side of the tension disc A and one
thread on the right side of the disc
A
A
031508.50.04_0601_a640_EN

15Operating instructions
Important Facts About Thread and Needles
With the right combination of thread and needle optimum sewing results are
achieved.
Thread
The thread is chosen according to use. For a
perfect sewing result, thread and fabric quality
play an important role. It is recommended to
use quality brands.
Cotton Thread
• cotton thread has the advantage of a
natural fiber and therefore is especially
suitable for sewing cotton fabrics
• if cotton thread is mercerized it will have a
slight sheen
Polyester Thread
• polyester thread is suitable for practically all
sewing needs
• it has a high tensile strength and is
particularly colorfast
• polyester thread is more flexible and is
recommended where a strong and elastic
seam is required
Needle, Thread and Fabric
Care must be taken when choosing needle
and thread.
The correct needle size does not only depend
on the chosen thread, but also has to be wellsuited to the fabric used. The fabric weight
determines the thread weight and needle size
and point form.
The following are the guidelines: Needle No.
fine fabrics:
fine thread (darning thread,
embroidery thread) 70–75
mediumweight fabrics:
normal thread 80–90
heavyweight fabrics:
heavier thread 100, 110, 120
031508.50.04_0601_a640_EN

16 Operating Instructions
Needle/Thread Combination
In order to check the needle/thread compatibility, the correct size thread must correspond with the correct size needle.
Needle Summary
BERNINA requires needle system
130/705 H. This system number refers to
shank shape as well as to length and form of
the needle point.
130/705 H S 70
Checking the Needle Condition
The needle condition should be checked and
the needle replaced regularly. A defective
needle not only damages the fabric but also
the sewing computer.
The following are the guidelines: replace
needle when starting a new sewing project or
as required.
Correct Needle/Thread
Combination
When sewing, the thread should travel
smoothly down the long groove on the front
of the needle.
Too Thin Thread or too Thick Needle
The thread has too much clearance in the
groove. Skipped stitches and damage to the
thread can occur.
Too Thick Thread or too Fine Needle
The thread rubs on the edges of the groove
and can get jammed. This can break the
thread.
Shank diameter
= 0.7 mm
(needle size)
Needle point
e.g. medium
ball point
Needle scarf
Flat shank
Shank length
031508.50.04_0601_a640_EN

17Operating Instructions
Needle size
60–100
70–90
90–100
80–110
60–90
75–90
75–90
75-90
80–100
100–120
100
70–100
80
Model
Normal point, slightly rounded
Ball point
Cutting point
Very fine point
Especially fine point
Fine point
Large eye, slight ball point
Large eye
Small ball point, long eye
Wide needle (wing)
Needle distance: 1.0 / 1.6 / 2.0 / 2.5 /
3.0 / 4.0 / 6.0 / 8.0
Needle distance 3.0
Many materials are easier to sew if the appropriate needle is used.
Type of needle
Universal
130/705 H
Jersey/Stretch
130/705 H-S
130/705 H-SES
130/705 H-SUK
Leather
130/705 H-LL
130/705 H-LR
Jeans
130/705 H-J
Microtex
130/705 H-M
Quilting
130/705 H-Q
Embroidery
130/705 H-E
Metafil
130/705 H-MET
Cordonnet
130/705 H-N
Wing needle
130/705 HO
Double wing
needle
130/705 H-ZWI-HO
Double needle
130/705 H-ZWI
Triple needle
130/705 H-DRI
Suitable for
For nearly all natural and
synthetic fabrics (woven and
knitted)
Jersey, stretch fabrics
Natural and synthetic leather and
plastic
Heavyweight fabrics such as denim,
canvas, overalls
Micro fiber fabrics and silk
Straight and topstitching
Embroidery on all natural and
synthetic fabrics
Sewing with metallic threads
Topstitching with thick thread
Hemstitching
Special effects with hemstitch
embroidery
Visible hems in stretch fabrics,
pintucks, decorative sewing
Decorative sewing
Special needles are available at your BERNINA dealer.
Needle Summary
031508.50.04_0601_a640_EN
18 Operating Instructions
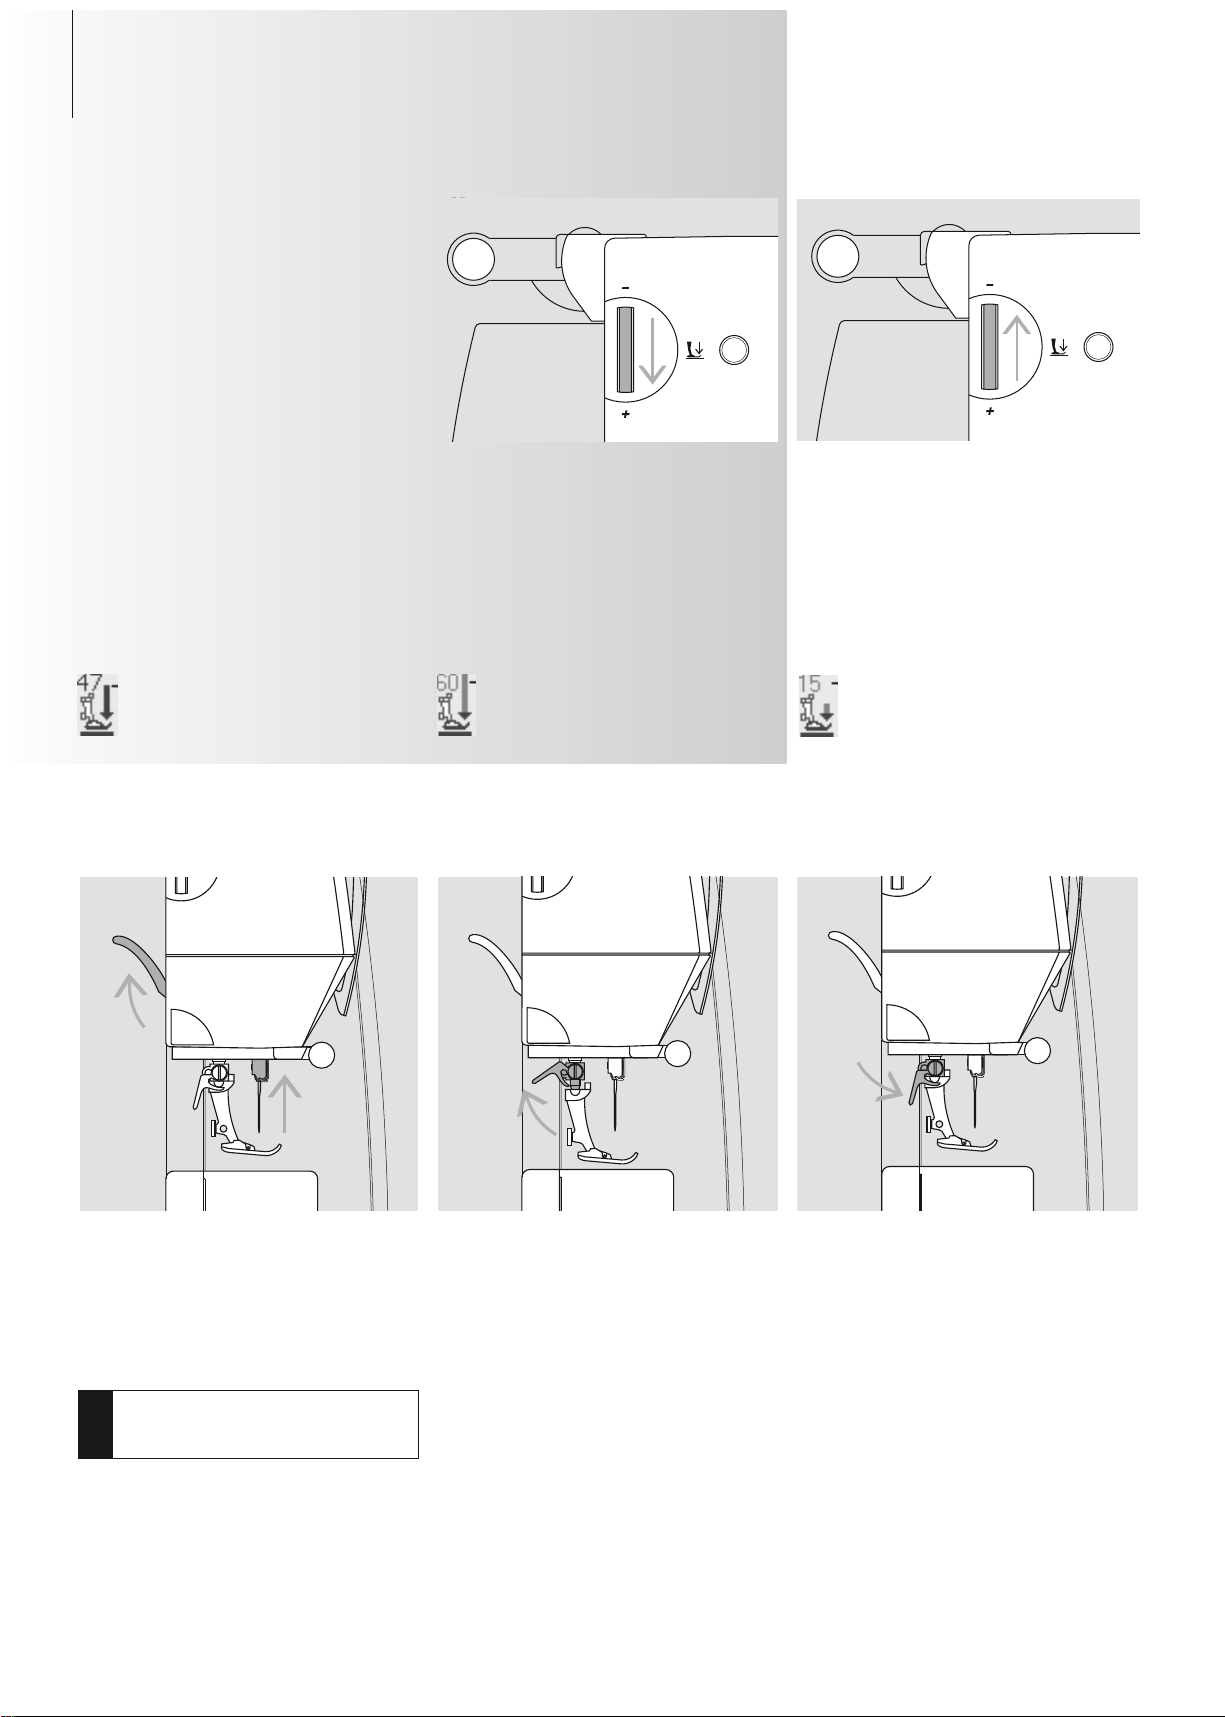
Presser Foot Pressure
Dial on Head Frame
• the pressure is adjusted at the left side of
the head frame
• the original setting (47) will be indicated
on the screen in blue
• an adjusted presser foot pressure will be
indicated by a red blinking number and a
red bar
• the original setting (47) will be indicated in
black alternately with the adjusted setting
• the original setting is displayed by a
blinking black line on the right side of the
red bar
Standard Pressure
• for normal sewing work
Reduced Pressure
• for jerseys and loose knits
• to prevent fabric from stretching
• adjust pressure so that the fabric still feeds
correctly
Increased Pressure
• for firm fabrics
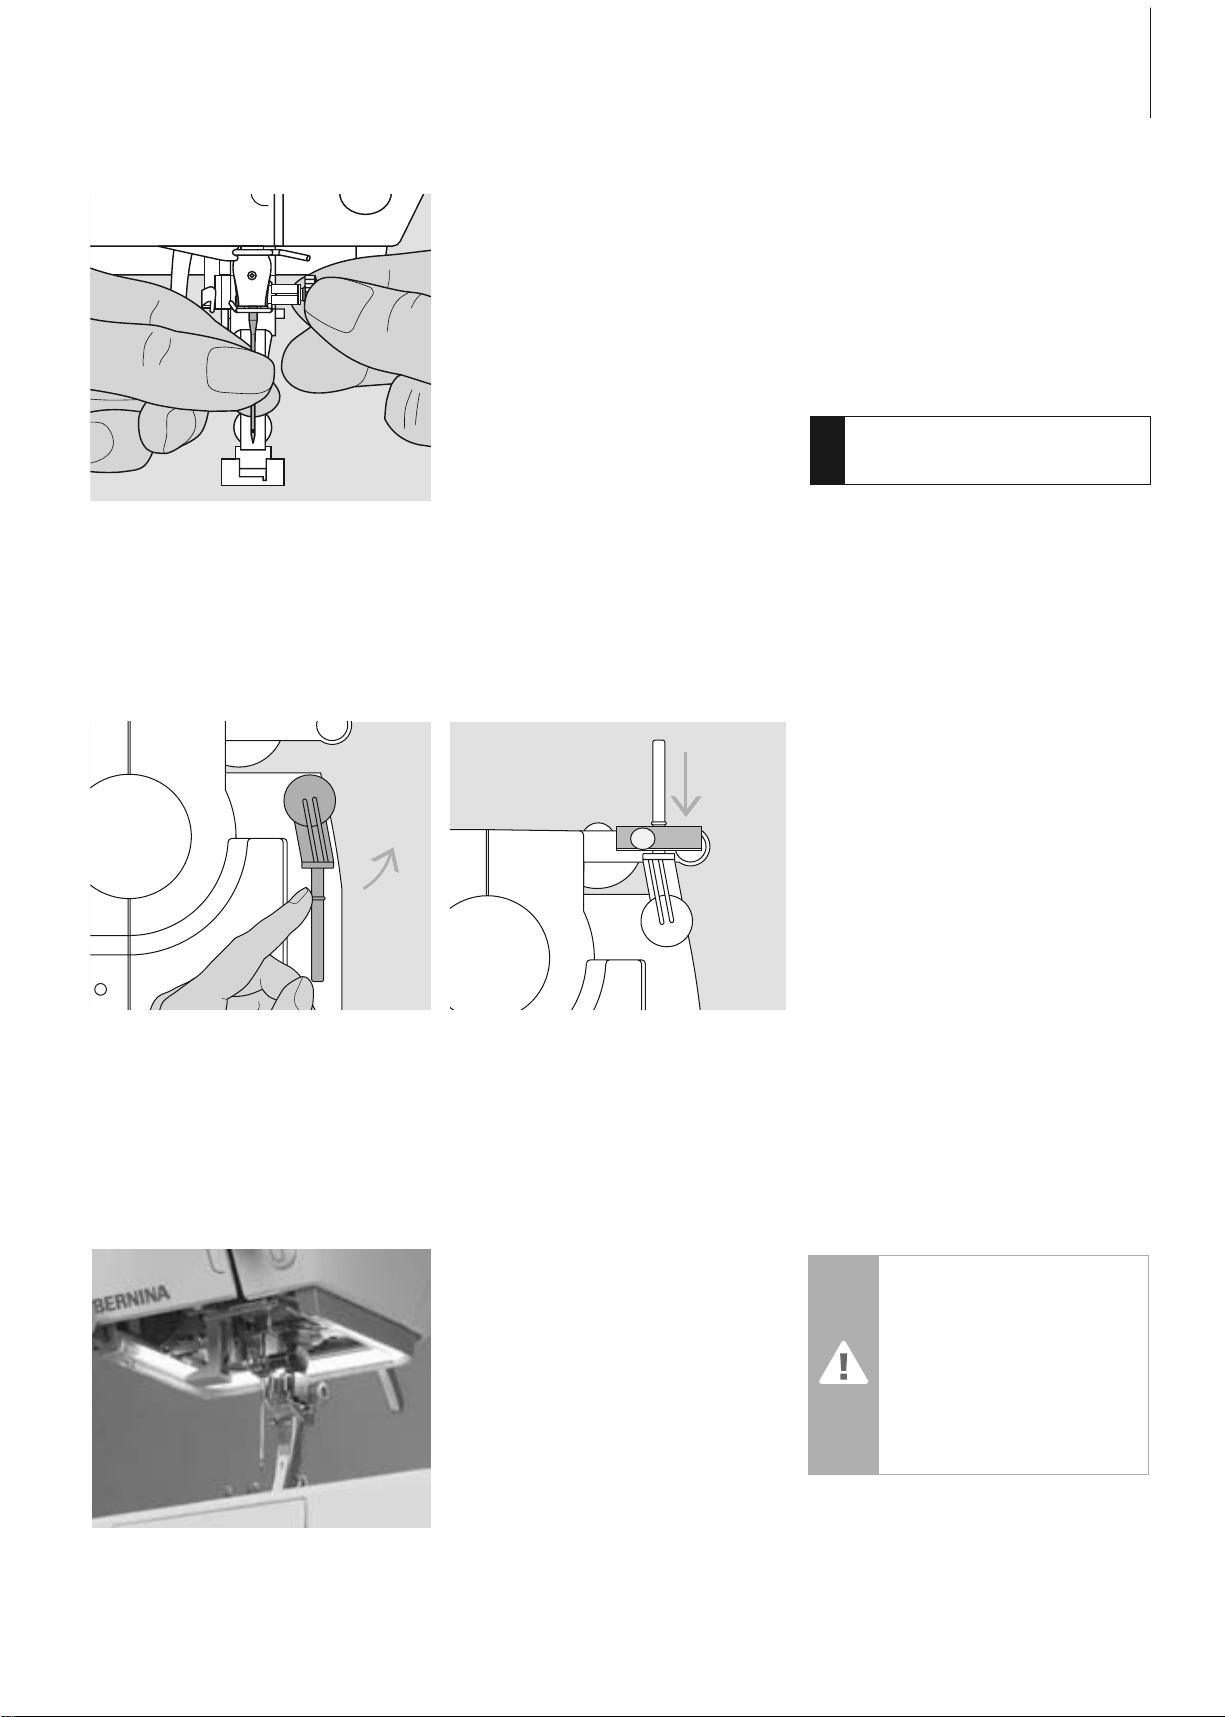
• improves fabric feed
Changing the Presser Foot
• raise the needle and presser foot
• turn power switch to «0» (off)
Attaching the Presser Foot
• guide the foot upwards over the cone
•press the clamping lever down
Raising the Lever
• raise the clamping lever
•remove the presser foot
Changing the Presser Foot
!
Refer to the
safety instructions!
031508.50.04_0601_a640_EN
A
A
A
19Operating instructions
Feed Dog
Button on handwheel side
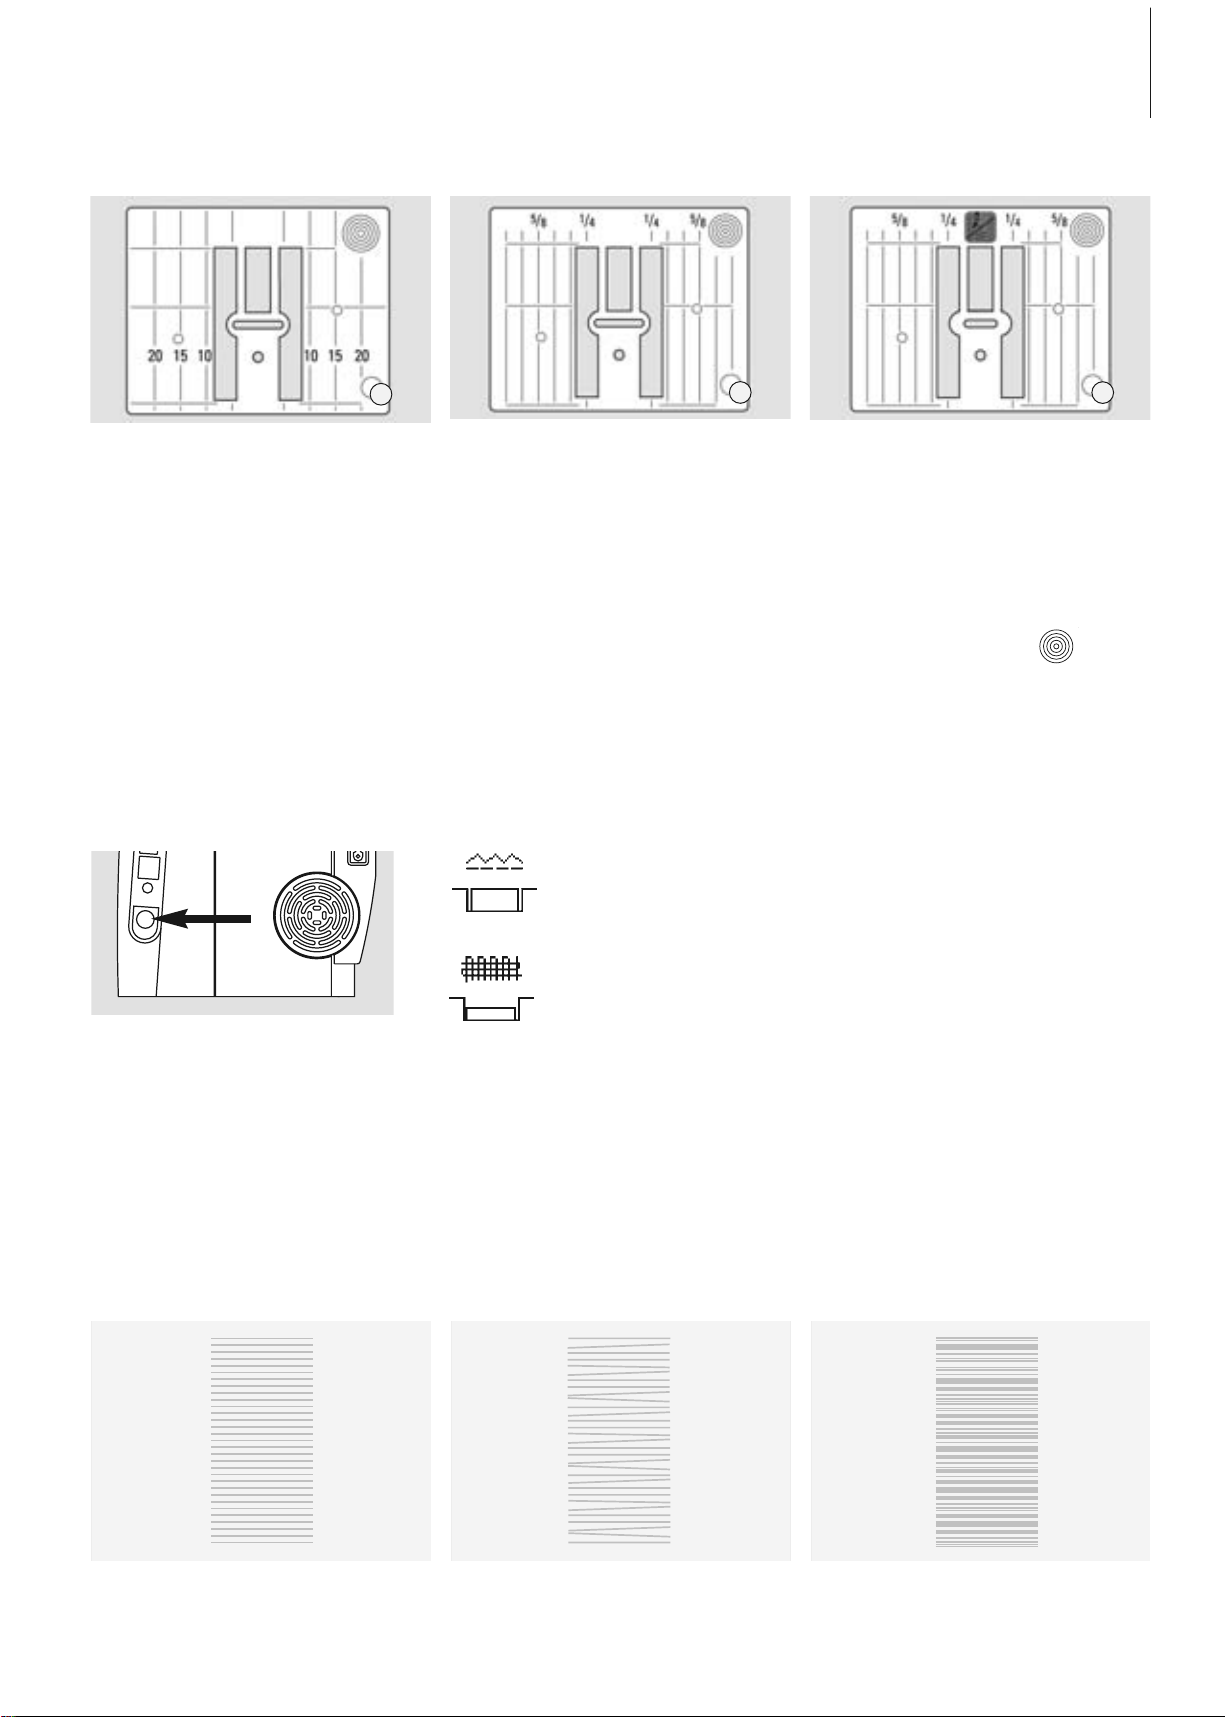
Stitch Plate
Stitch Plate Markings
• the stitch plates are marked with vertical
lines in millimeters or inches
• mm measurements are at the front
• inch measurements are at the back
• the measurements correspond to the
distance from the needle to the line
• needle insertion point is position 0 (center
needle position)
• the measurements are marked to the right
and left
• the lines help to guide the fabric e.g. for
sewing seams and for topstitching
• the horizontal markings are helpful for
sewing corners and buttonholes, etc.
Removing the Stitch Plate
• turn power switch off («0»)
• raise the presser foot and needle
• lower feed dog
•press the stitch plate down at the back
right corner until it flips up
•remove the stitch plate
Replacing the Stitch Plate
• place the stitch plate over the opening A
and press down until it clicks into place
Button depressed = feed dog is lowered (darning position)
• for freehand sewing (darning, freehand embroidery, freehand quilting)
• for embroidery with the embroidery module
Button flush with housing = feed dog is raised (sewing position)
Feed Dog and Fabric Feed
Let the fabric feed evenly!
Feed Dog and Stitch Length
With each stitch the feed dog moves forward
by one step. The length of this step is
determined by the stitch length selected.
With an extremely short stitch length, the
steps are also very short. The fabric moves
under the foot quite slowly, even at full
Pulling, pushing or holding back the fabric will result in uneven stitches
9mm (mm measurements)
9mm (inch measurements)
5,5 mm (inch or mm, optional)
sewing speed. Buttonholes, satin stitch and
decorative stitches are all sewn with a very
short stitch length.
031508.50.04_0601_a640_EN
20 Operating instructions
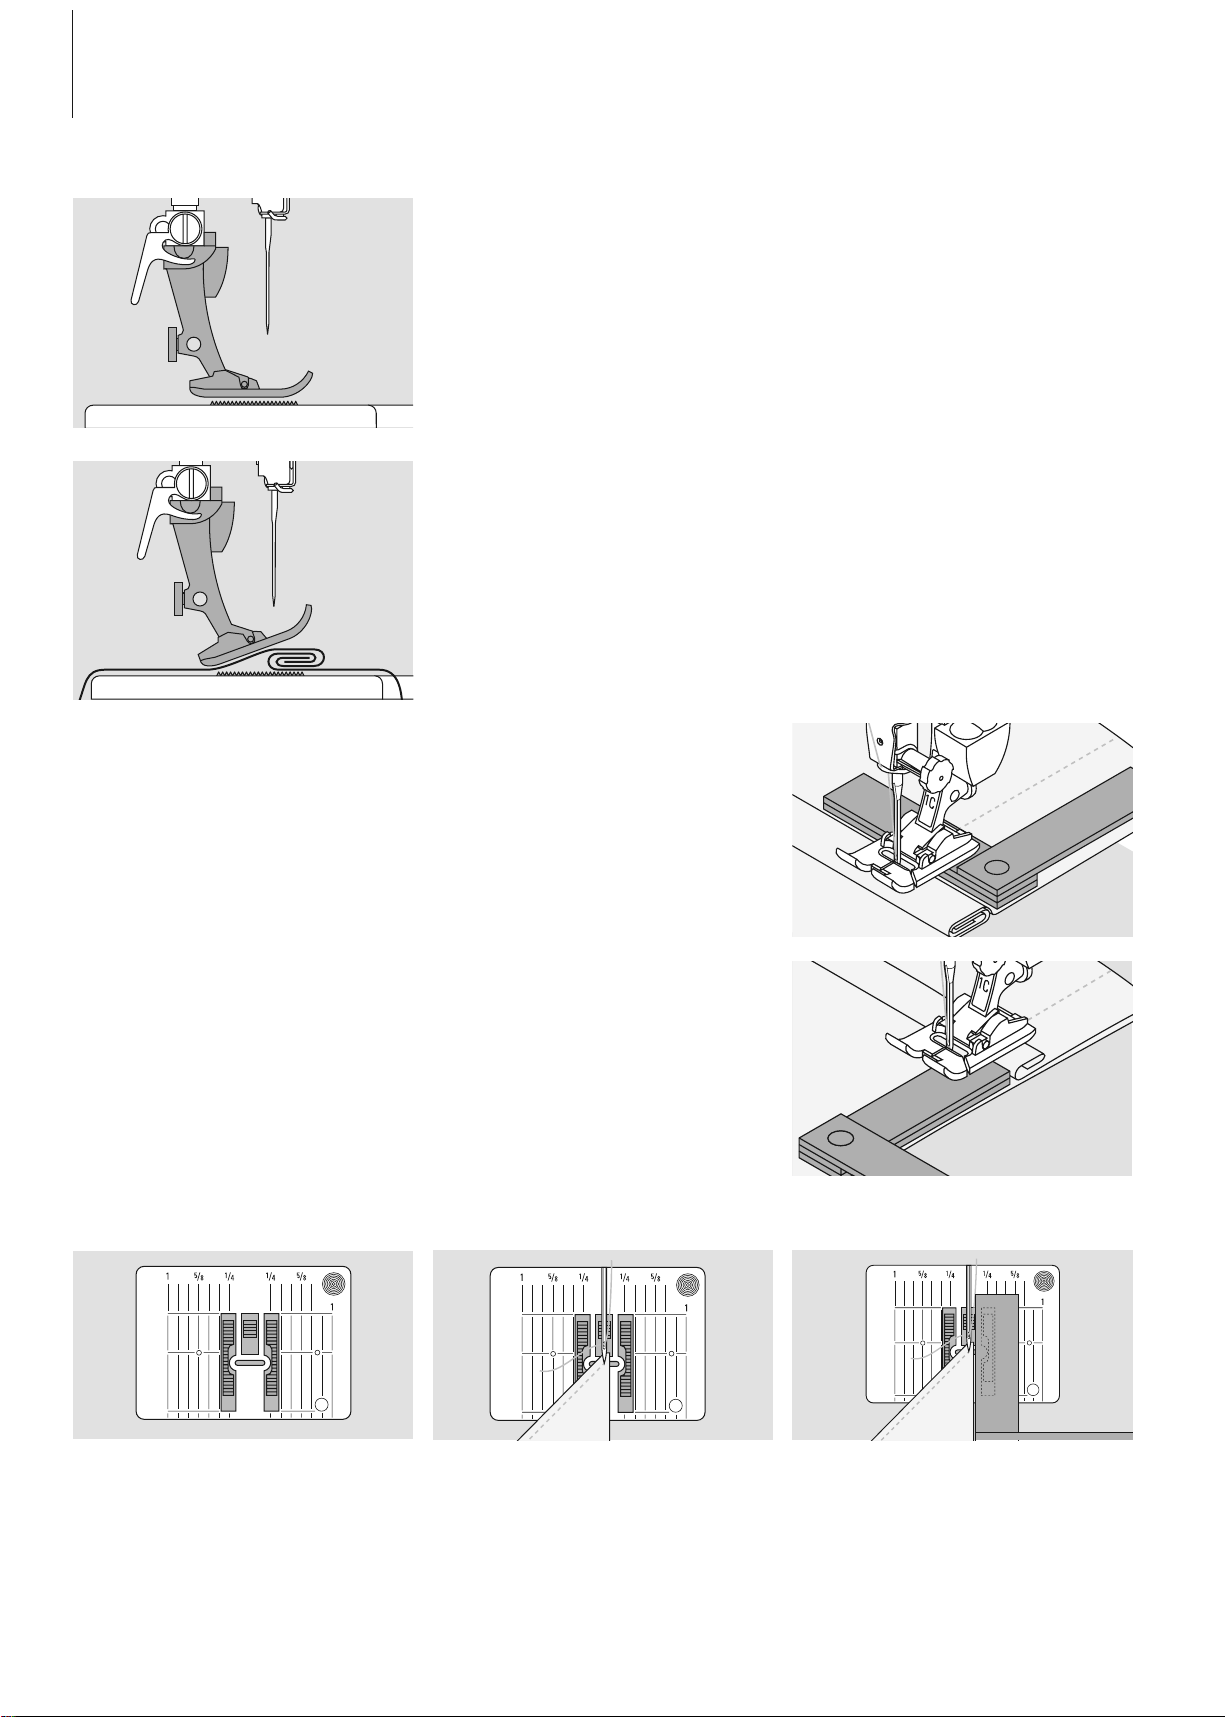
Feed Dog and Fabric Feed with Height Compensating Tool
Feed Dog and Sewing Corners
The feed dog works accurately when the foot
is level.
If the foot is at an angle, e.g. when sewing
over thick to thin or vice-versa, the feed dog
cannot grip and feed the fabric and the fabric
might jam.
Uneven layers
To solve this problem, place one, two or three
compensating plates as required behind the
needle under the presser foot to level it.
Correct this by placing one or more compensating plates as close as possible to the edge
of the fabric.
When sewing corners only a small section of
the fabric is actually on the feed dog, so that
it cannot grip the fabric well.
The space between the two rows of feed
dogs is relatively large due to the width of
the stitch plate hole.
To correct the height in front of the foot,
place one or more plates to the right of the
foot close to the needle. Sew until the foot is
level again and remove the plates.
031508.50.04_0601_a640_EN
21Displays on Screen
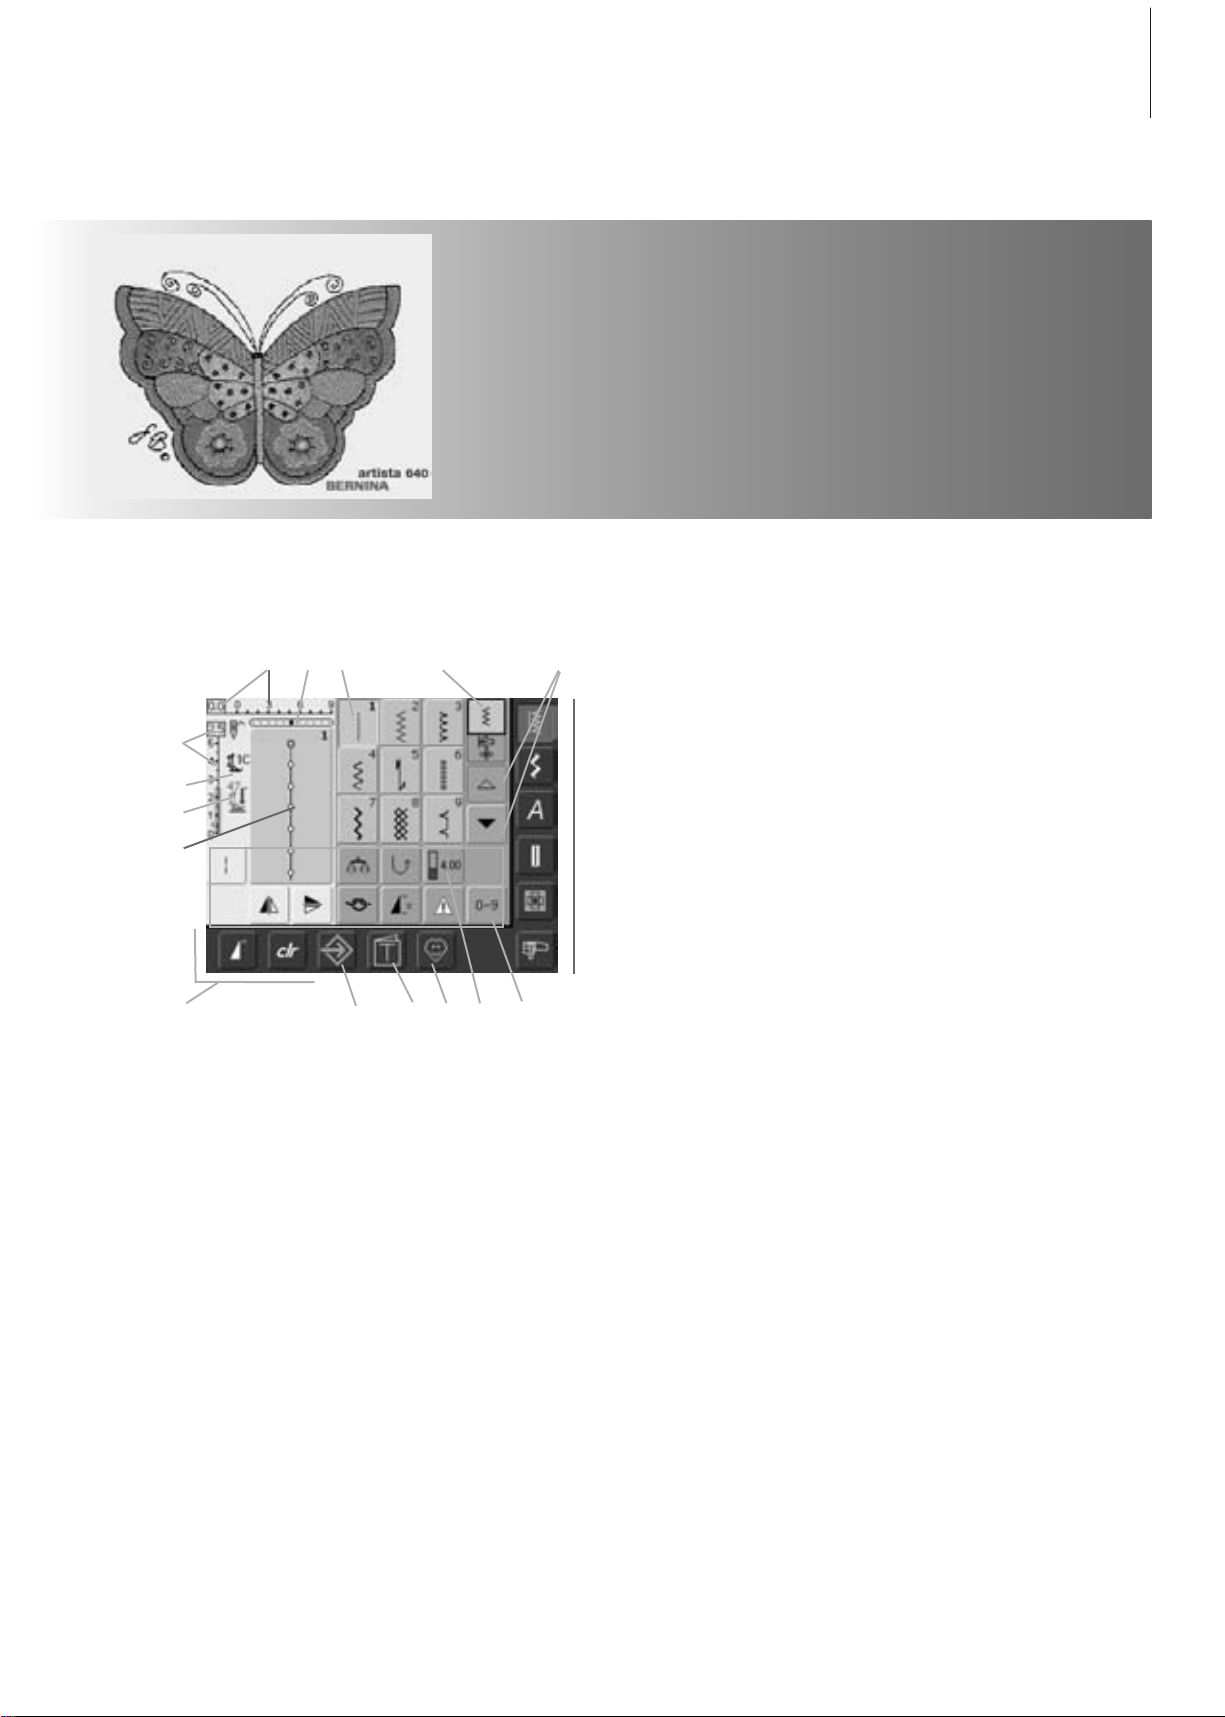
Screen
H
ABC D
Q
K
F
J
E
O
M NL P
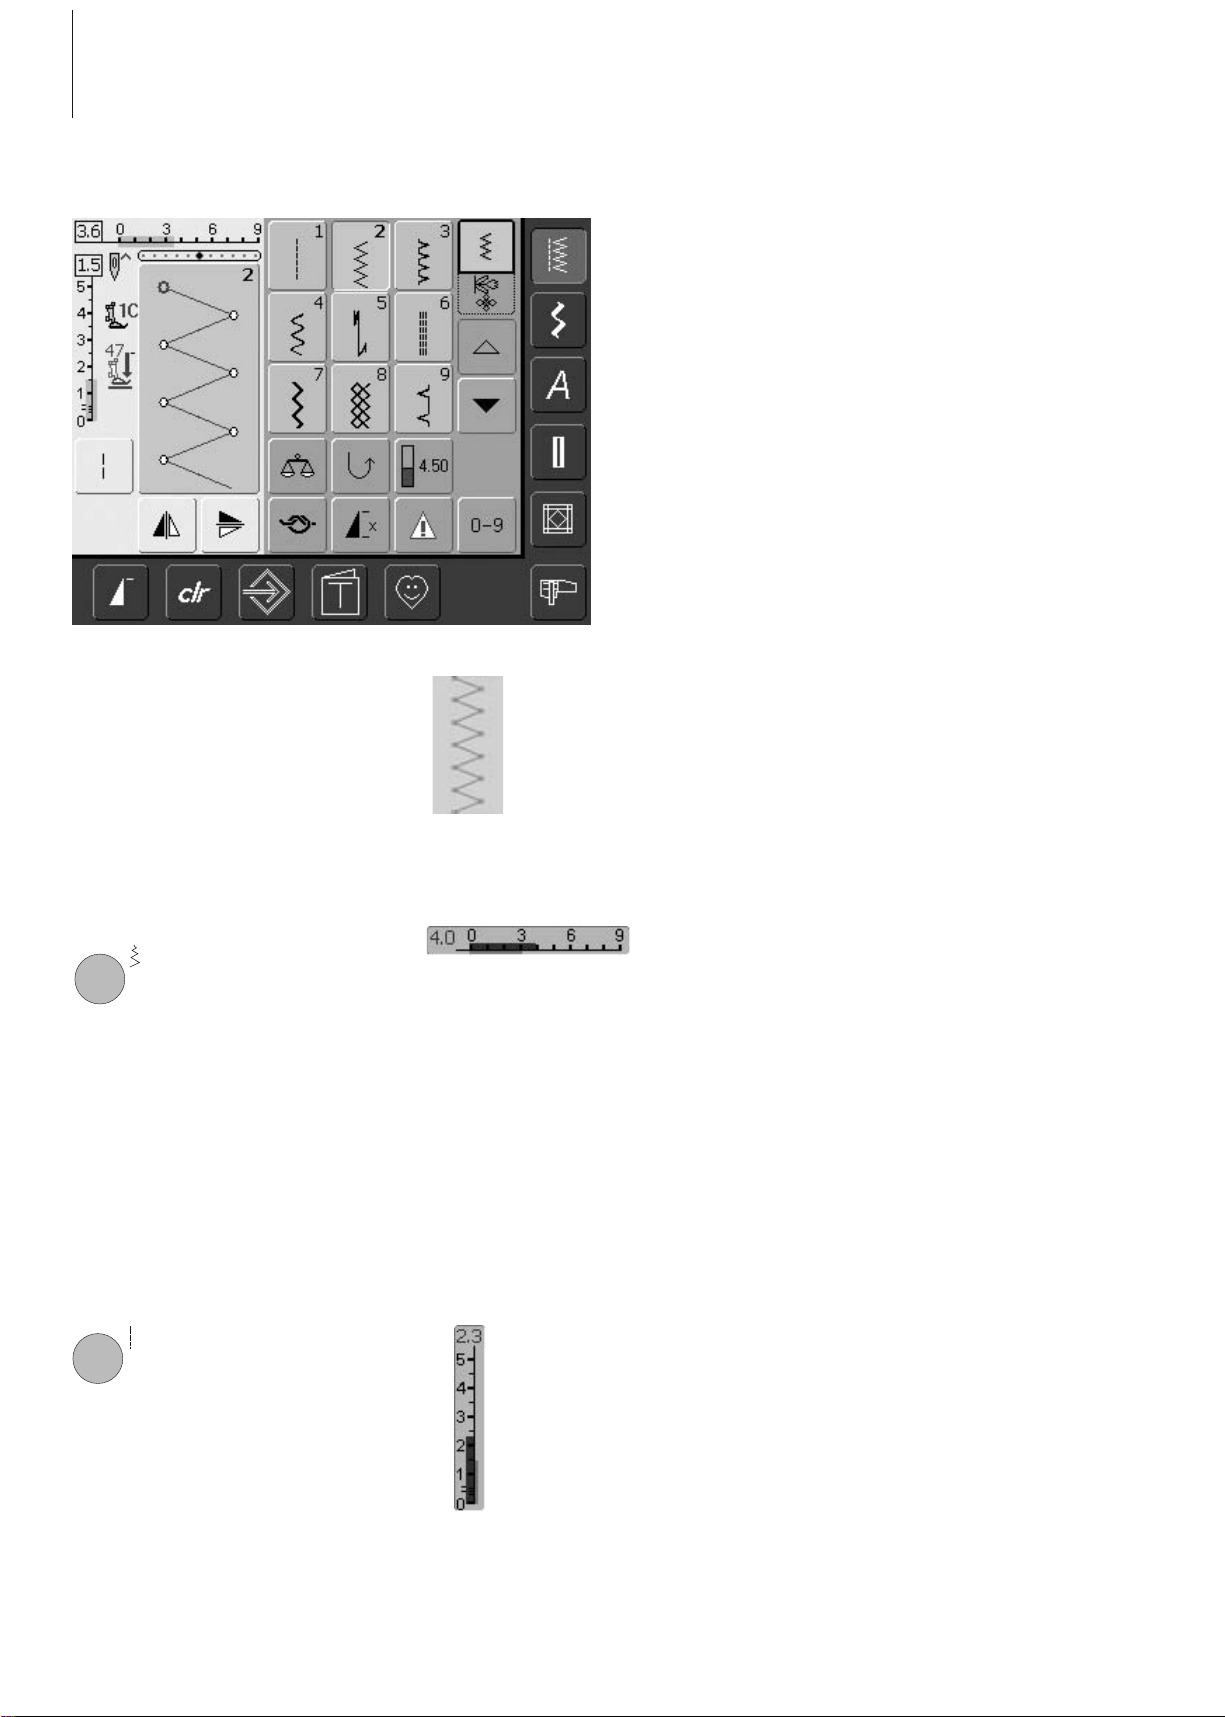
Practical Stitch Screen
After the Welcome, the Practical Stitch
(Menu) appears automatically on the screen,
which shows:
A Stitch width (basic setting always visible)
B Needle Position (11 possibilities)
C Selected, active stitch and number
D Single Mode / Combi Mode
E Up/down scroll arrows
F Stitch length (basic setting always visible)
G Presser Foot Indicator
H Presser Foot Pressure Indicator
J Picture of selected, active stitch and
number (Stitch Altering Area)
K External functions
L Setup Program
M Tutorial (only for embroidery)
N Personal Program
O Functions
P Stitch Selection by Number
Q Main category buttons
The artista 640 is operated with a combination of external buttons and knobs and a touch
screen.
Welcome Screen
• switch sewing computer on: power switch to «I» (on)
•Welcome screen appears for a few seconds, as long as text was entered in the Setup
Program. Without text the Practical Stitch screen appears directly
•the start of the Welcome screen can be canceled by touching the screen and the Practical
Stitch Screen appears
• can be personalized in the Setup Program
G
031508.50.04_0601_a640_EN
Stitch Selection – Stitch Display – Functions
Stitch Selection
• touch the stitch of your choice
• the stitch is highlighted in blue
• every stitch in the Stitch Altering Area (SAA) is displayed with its
number
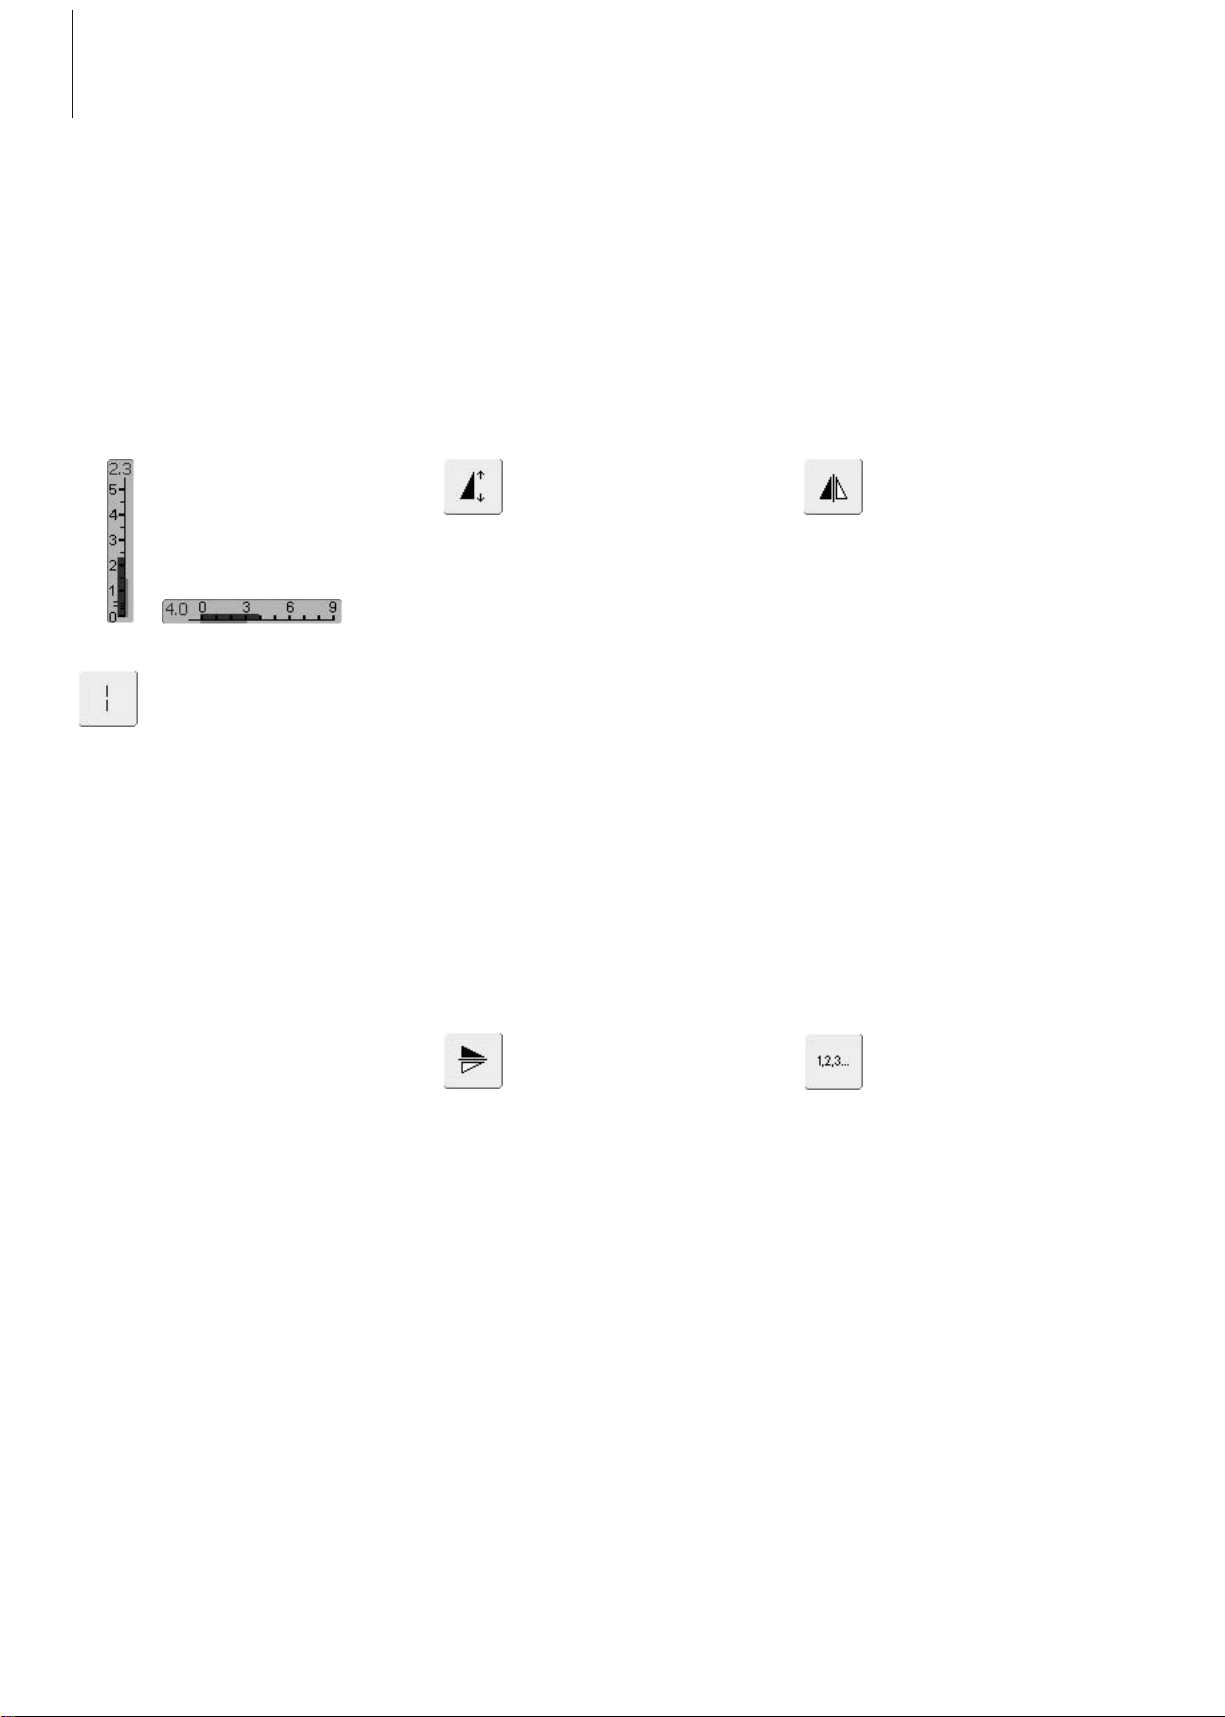
Altering the Stitch Width
• turn the upper knob
The altered stitch length is shown in
two different ways:
• stitch length bar 0-5 is displayed
as blue area
• altered length is visible on stitch
length bar (dark blue bar), in
addition the actual setting is
shown (blue number on top)
Display of Selected Stitch
•a graphic of the selected stitch
is visible in the left portion of
the screen
• changes to stitches can be
seen on screen
The altered stitch width is shown in
two different ways:
• stitch width bar 0-9 is displayed
as blue area
• altered width is visible on stitch
width bar (dark blue bar), in
addition the actual setting is
shown (blue number left)
Altering the Stitch Length
• turn the lower knob
• the basic setting is always visible when a
change has been made, e.g. 3.0mm (black
bar)
• the stitch width can be altered from 0mm
to 9mm
• the basic setting is always visible when a
change has been made, e.g. 1.5mm (black
bar)
• stitch length can be altered from 0mm to
5mm on most stitches
22 Displays on Screen
031508.50.04_0601_a640_EN
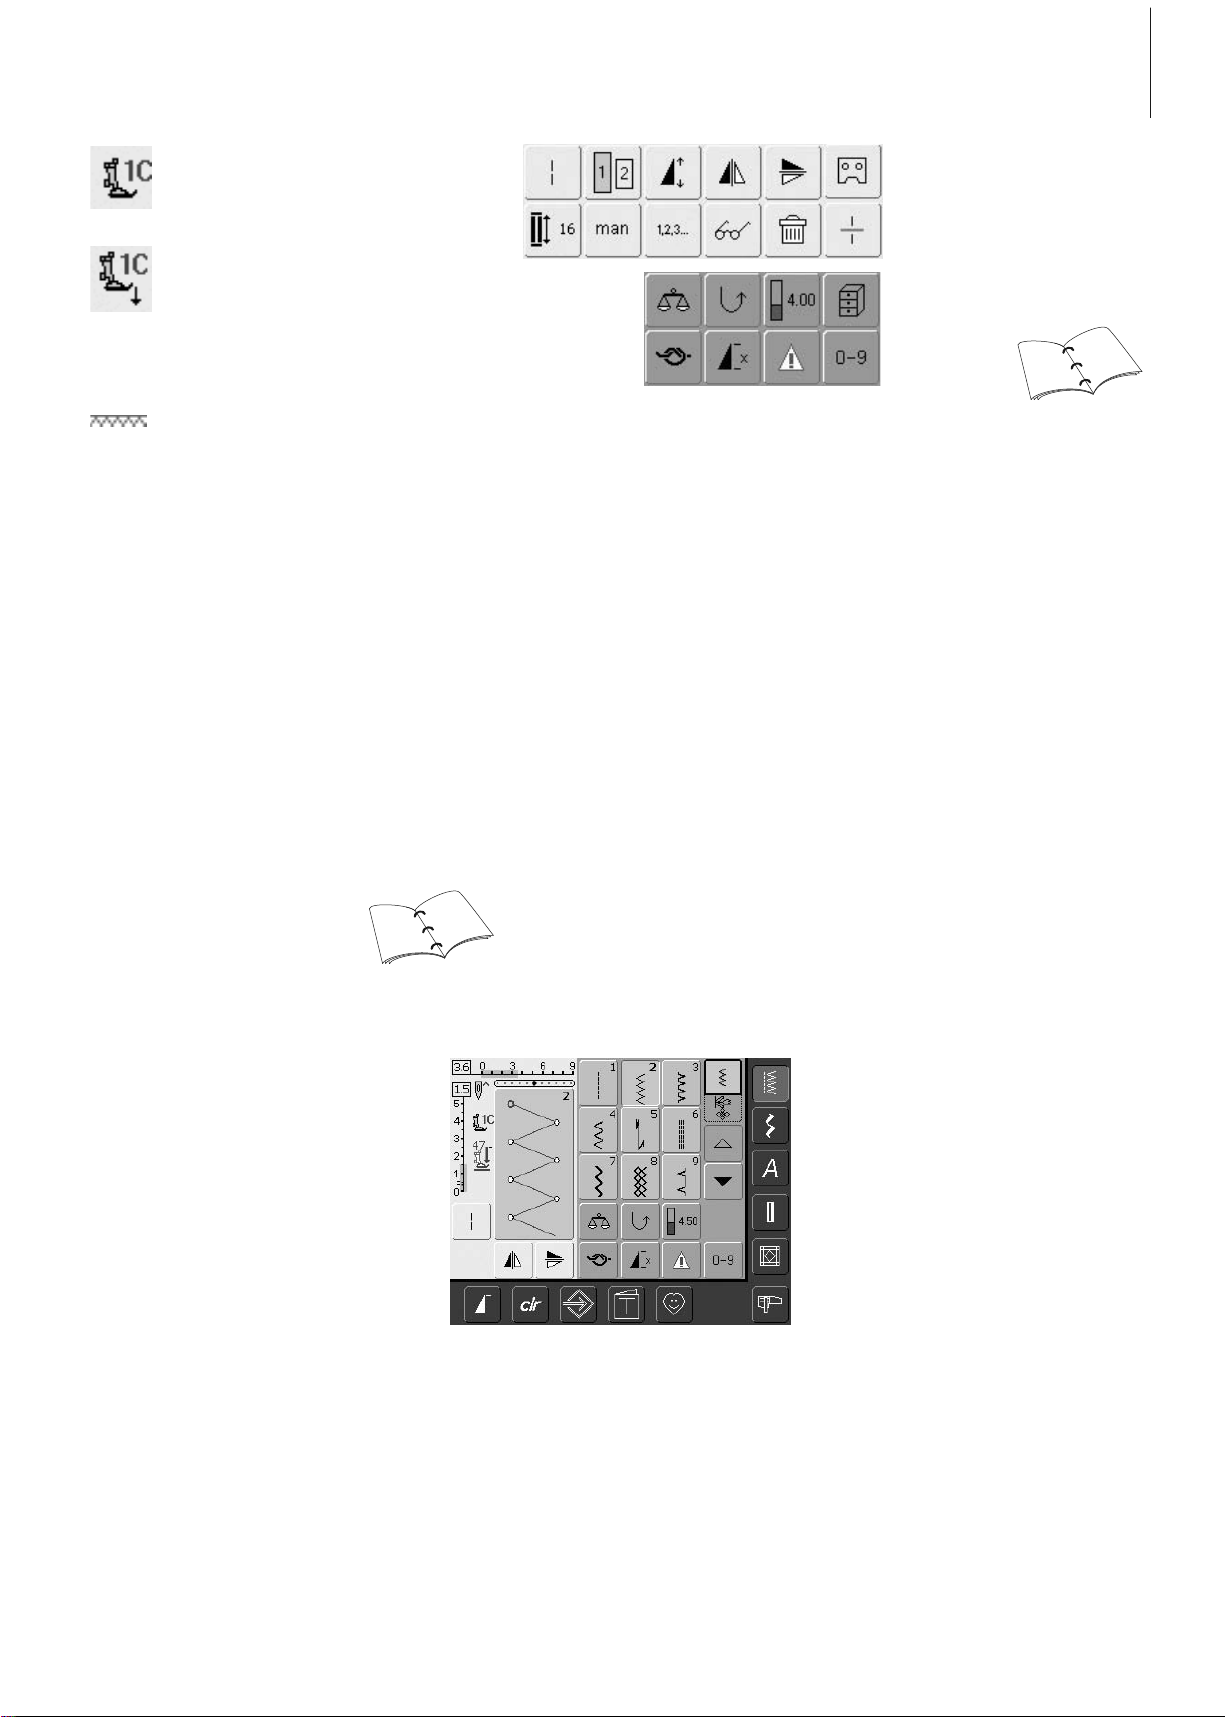
23Displays on Screen
Presser Foot Indicator
• the recommended presser foot
for the selected stitch is
displayed by number
• an arrow pointing down
indicates that the presser foot
is still raised
Lowered Feed Dog
• if the feed dog is lowered this
blinking symbol appears
underneath the Presser Foot
Indicator
Selecting Functions
• touch the function of your
choice
• the selected function is
highlighted in blue (a number
of different functions can be
selected simultaneously)
Stitch length, stitch width, needle position,
etc. are automatically saved. When the sewing
computer is turned off («0») or the «clr»
(clear) button is pressed, the changes are
deleted.
Changing Settings
• select stitch (e.g. zig-zag)
• alter the stitch width and stitch length with
the external knobs
• alter the needle position with the external
buttons
• touch the Stitch Altering Area (light blue)
Temporary Altered Stitch Memory
The basic settings programmed by BERNINA
can be changed and stored in the SAA. They
will stay saved even after the sewing
computer is turned off («0»). The basic
settings are always visible.
Saving Altered Settings Permanently
28
33
37
37
031508.50.04_0601_a640_EN
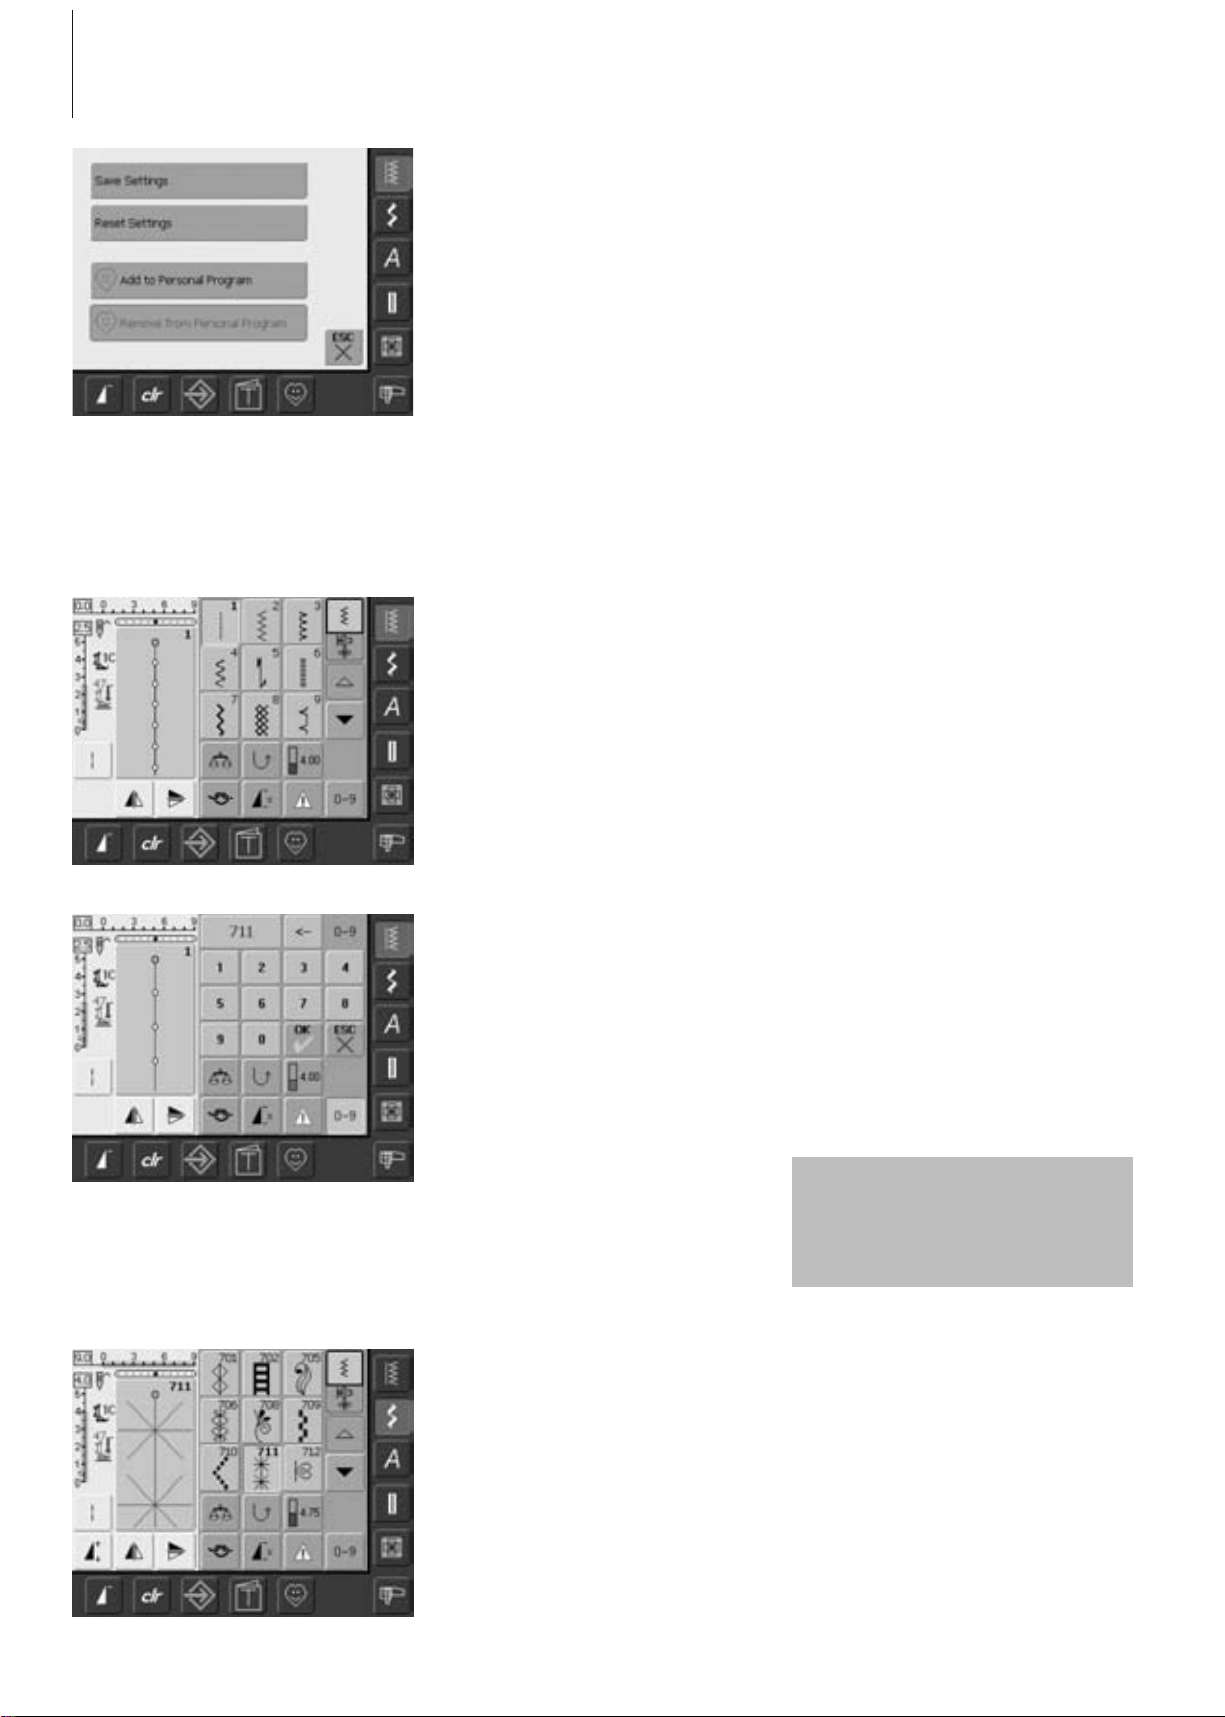
Stitch Selection
Saving Changes
•a special screen opens
• touch «Save Settings» = all changes are
saved
• touch «Reset Settings» to return to basic
settings
• touch «ESC» and the screen closes without
anything being saved or altered
Direct Selection by Scrolling up/down
Within a Stitch Category
• touch the arrow (down)
• the top row disappears
• the next two rows move up
•a new row appears at the bottom
Confirm Number and Go to Next Screen
•touch «OK» to confirm
• the selected stitch is displayed in the Stitch
Altering Area
• touch «ESC»
• the screen displays the selected stitch
• the selected stitch is active (highlighted in
blue)
If an unavailable number is
entered, it will be indicated with
three question marks in the field
above the numeric pad.
Stitches can be selected using one of the two
methods listed below.
• touch the arrow (up)
• the first row of stitches appears again
• the Scroll function (up/down) is used to
find and view all the sewing computer’s
stitches
Correcting Mistakes
• to correct mistakes or deselect, touch
function top right (arrow)
• the number is deleted from right to left
•touch the broad field above the numeric
pad
• the entire number is deleted
• enter new number
Stitch Selection by Number
• touch the function «0–9»
• the screen changes to a numeric pad
• touch numbers to select the stitch of your
choice
• the number of the selected stitch appears
in the upper screen
Back to Previous Screen
• do not confirm the entered stitch number
with «OK»
• touch «ESC» or «0-9»
• the previous screen appears
• the stitch selected by number will be
ignored
24 Displays on Screen
031508.50.04_0601_a640_EN
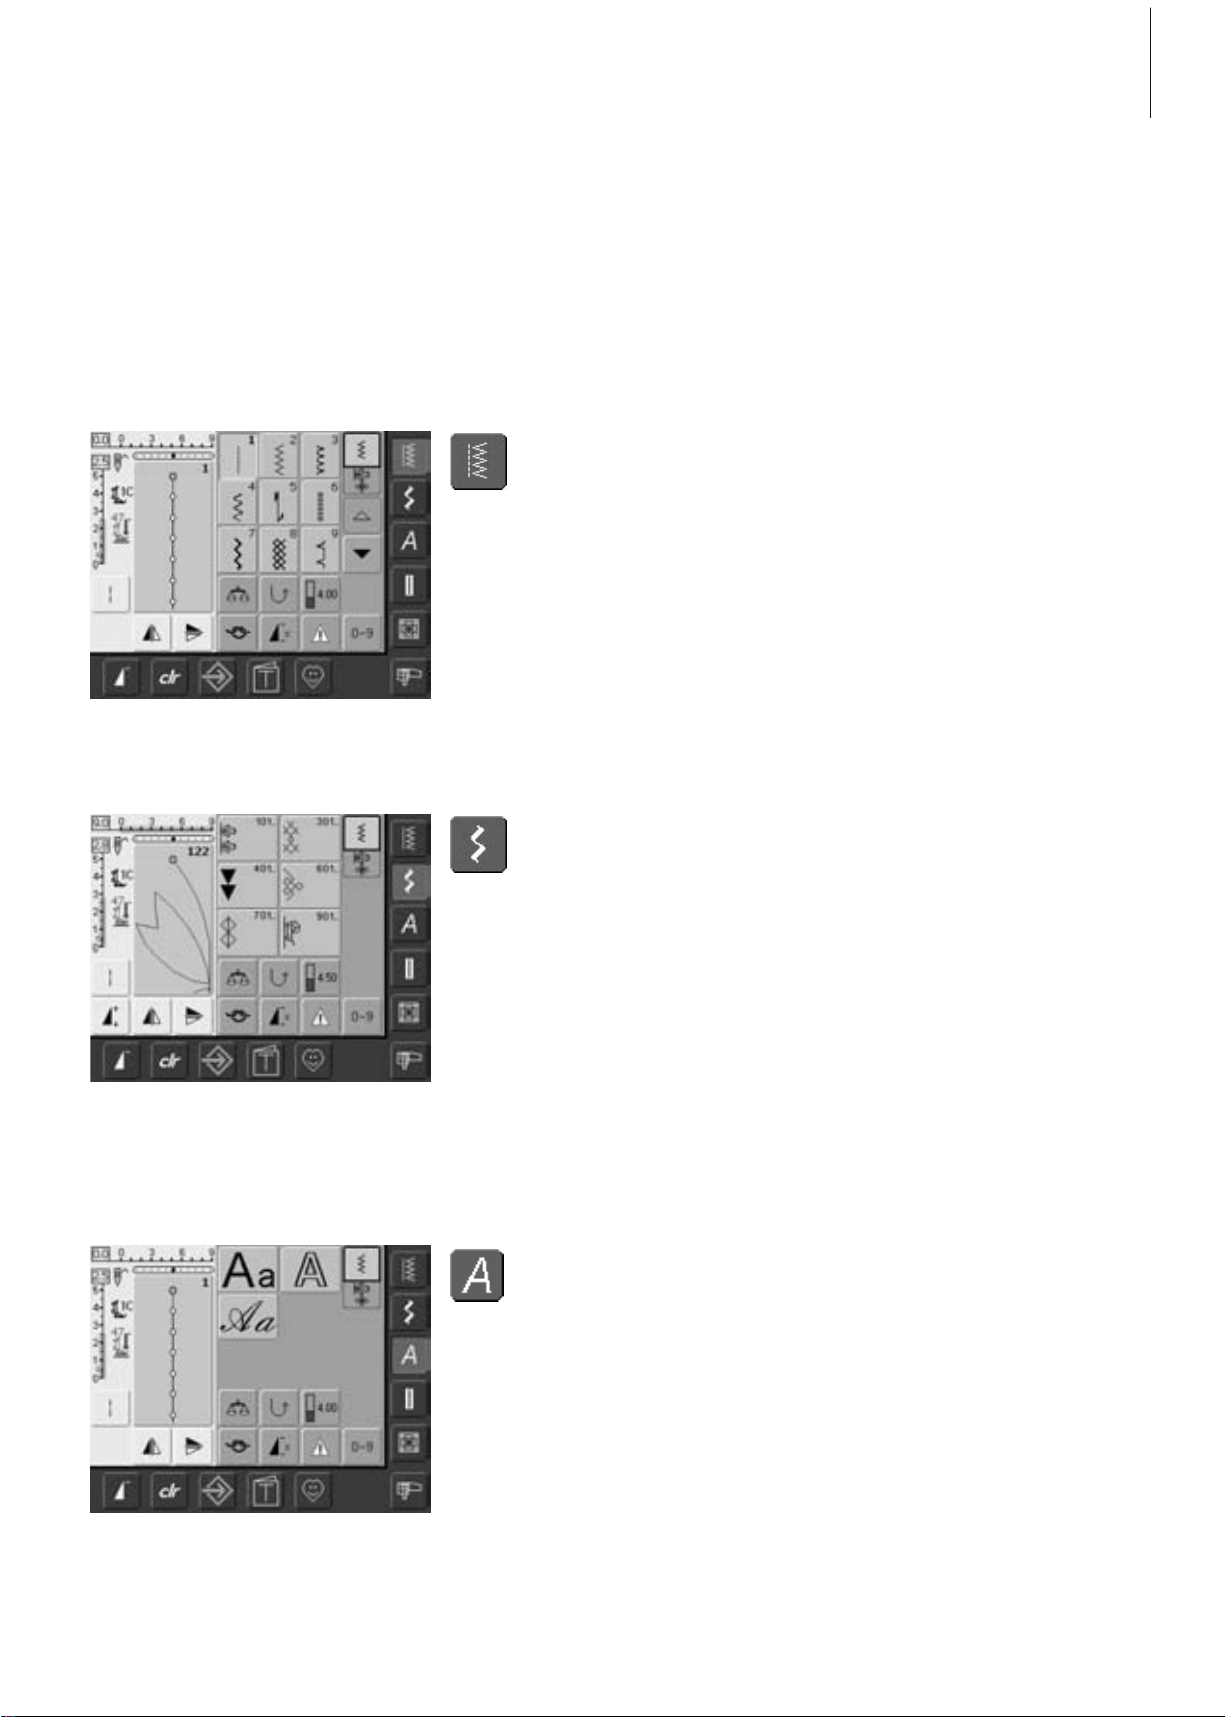
25Displays on Screen
Alphabets
Alphabet Button
Simple Menu Selection
Main Category Buttons
•press a button to select the desired menu
• the corresponding stitch category is
selected immediately
• the stitches or the stitch summary appear
on the screen
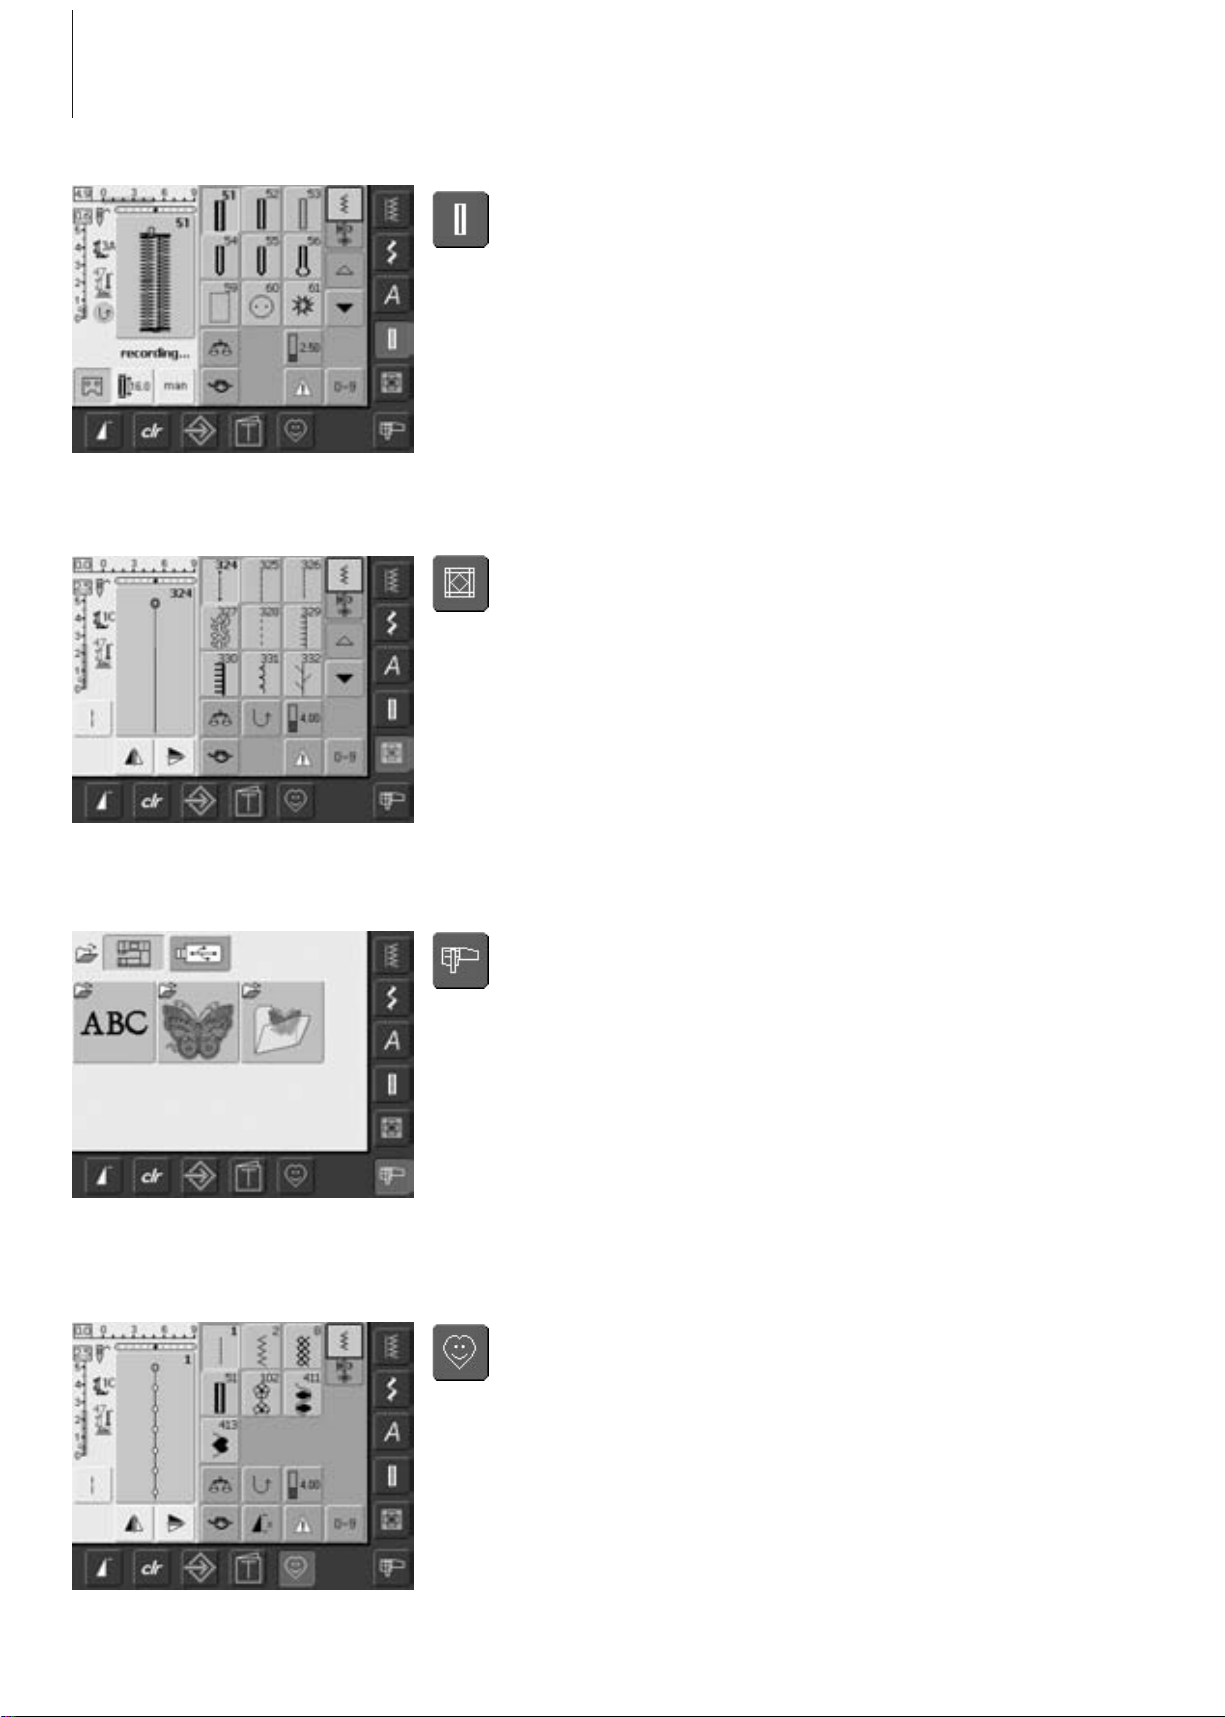
Practical Stitch Button
Practical Stitches
Decorative Stitches
Decorative Stitch Button
• the Practical Stitch menu appears
•9 practical stitches appear on the screen
• use arrows to scroll for viewing additional
stitches
• the Decorative Stitch menu appears
• the 6 categories appear on screen
• touch to select the desired stitch group
• the selected stitch group appears
• the Alphabet menu appears on the screen
• touch to select the alphabet of your choice
031508.50.04_0601_a640_EN
Buttonholes
Buttonhole Button • the Buttonhole screen appears
• touch to select
• by scrolling the straight stitch eyelet and
hand-look buttonhole will be visible
Quilting
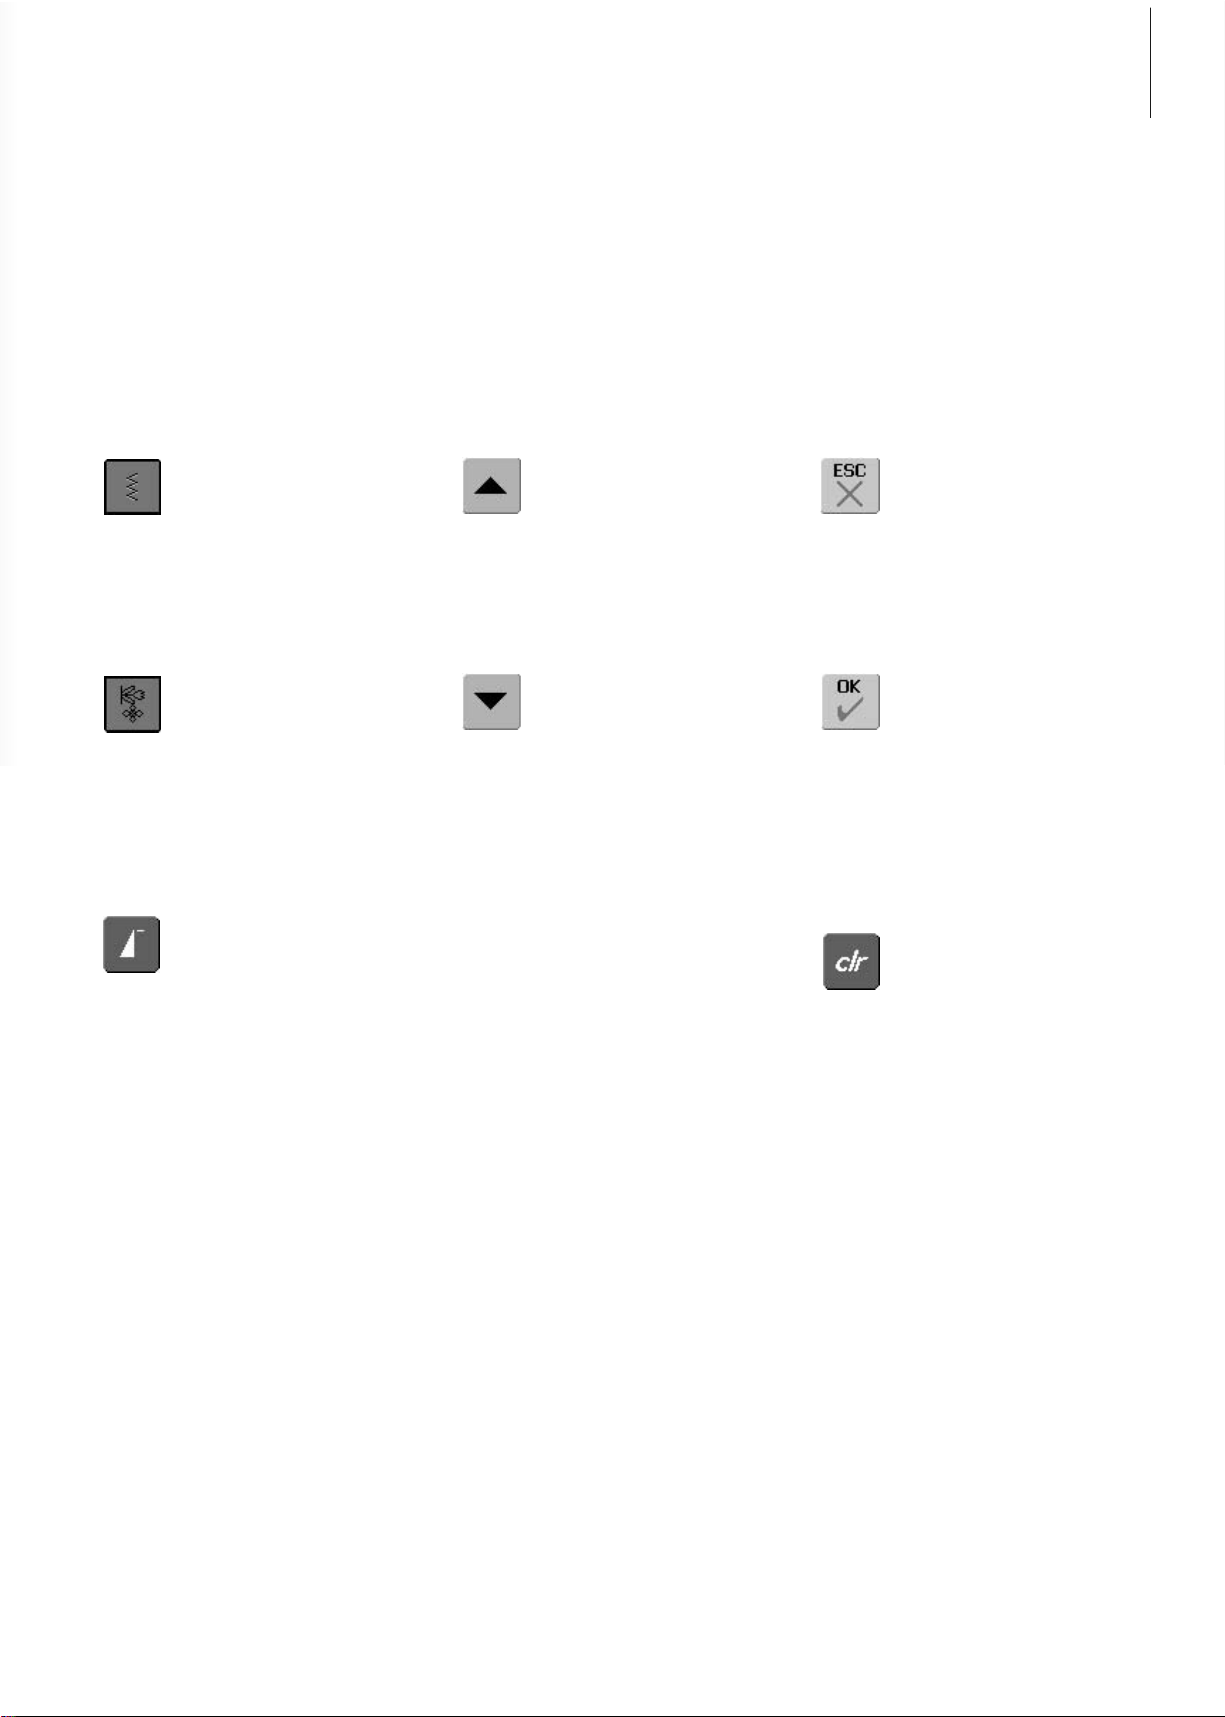
Personal Program
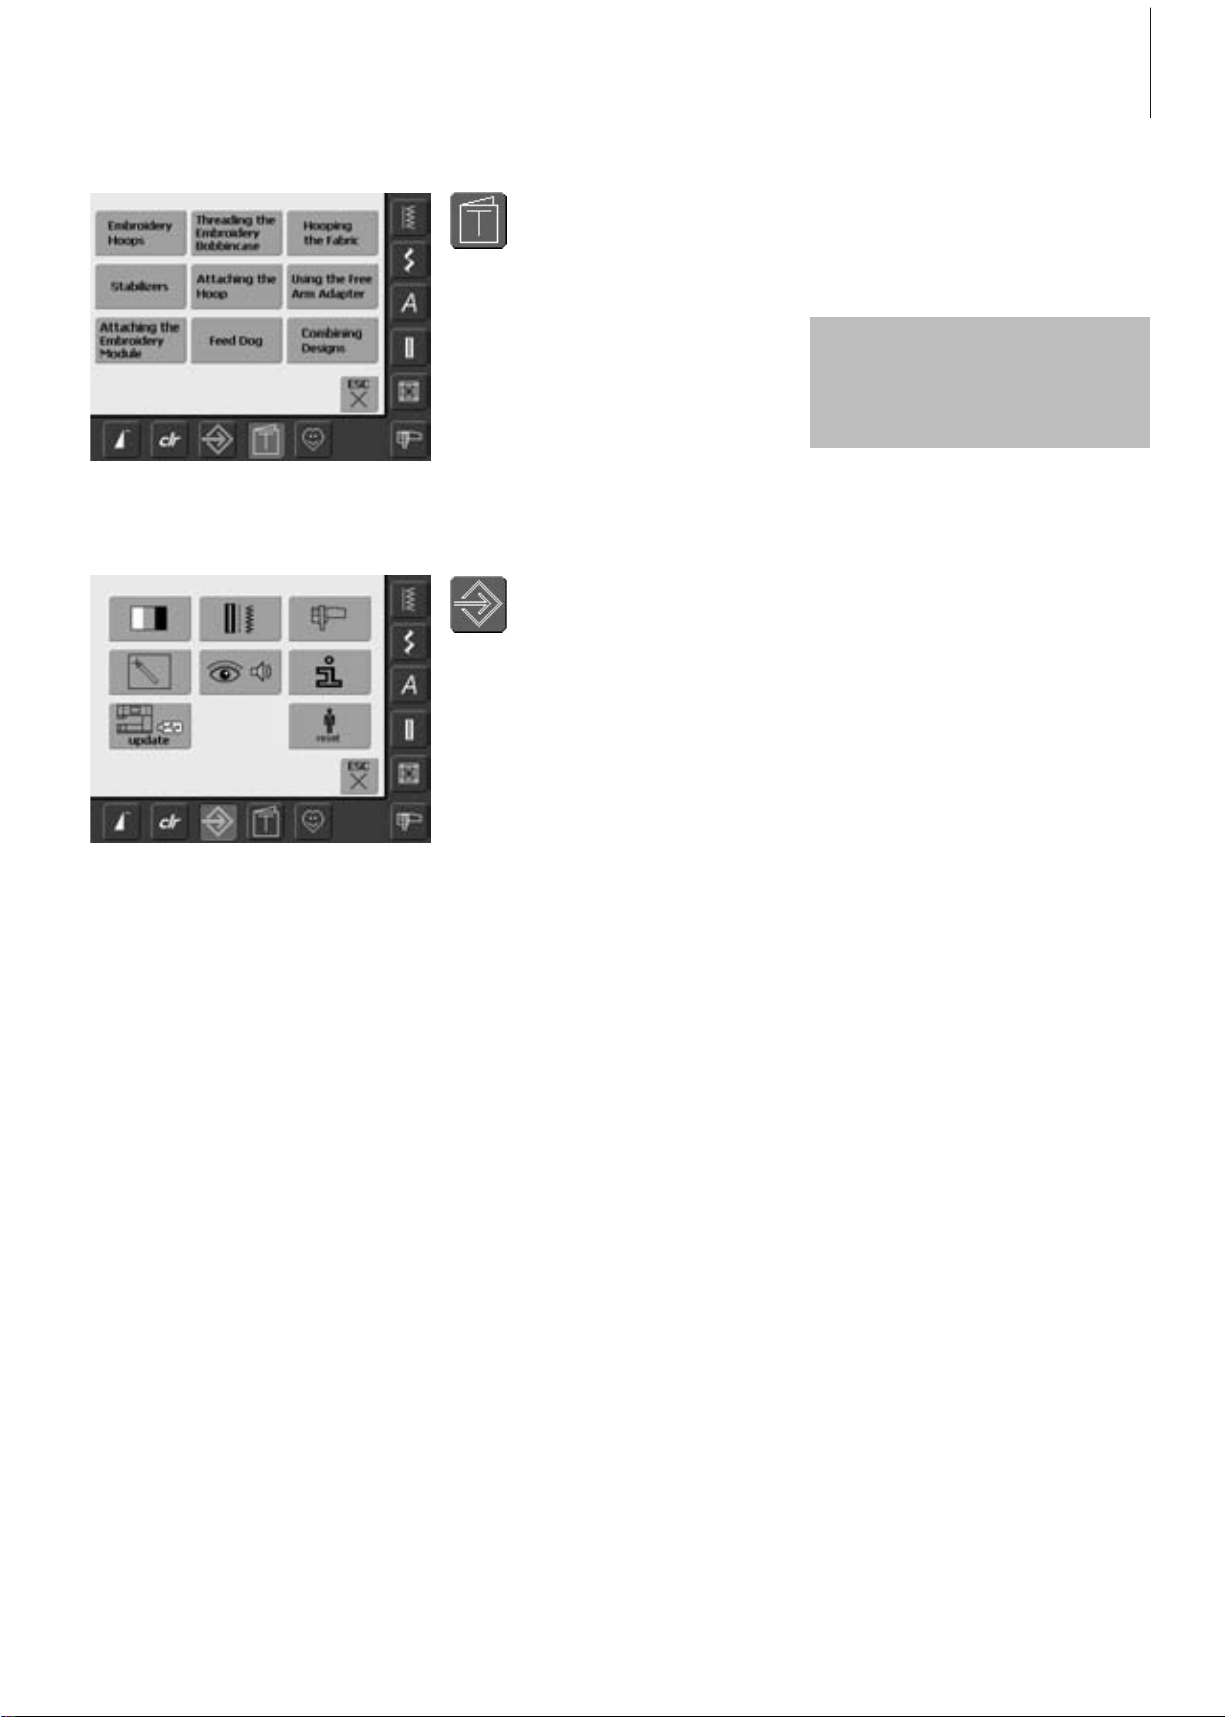
Quilt Stitch Button
Personal Program Button
• the Quilt Stitch screen appears
•9 quilt stitches are visible on screen
• use arrows to scroll for additional stitches
• Personal screen appears (customized
settings)
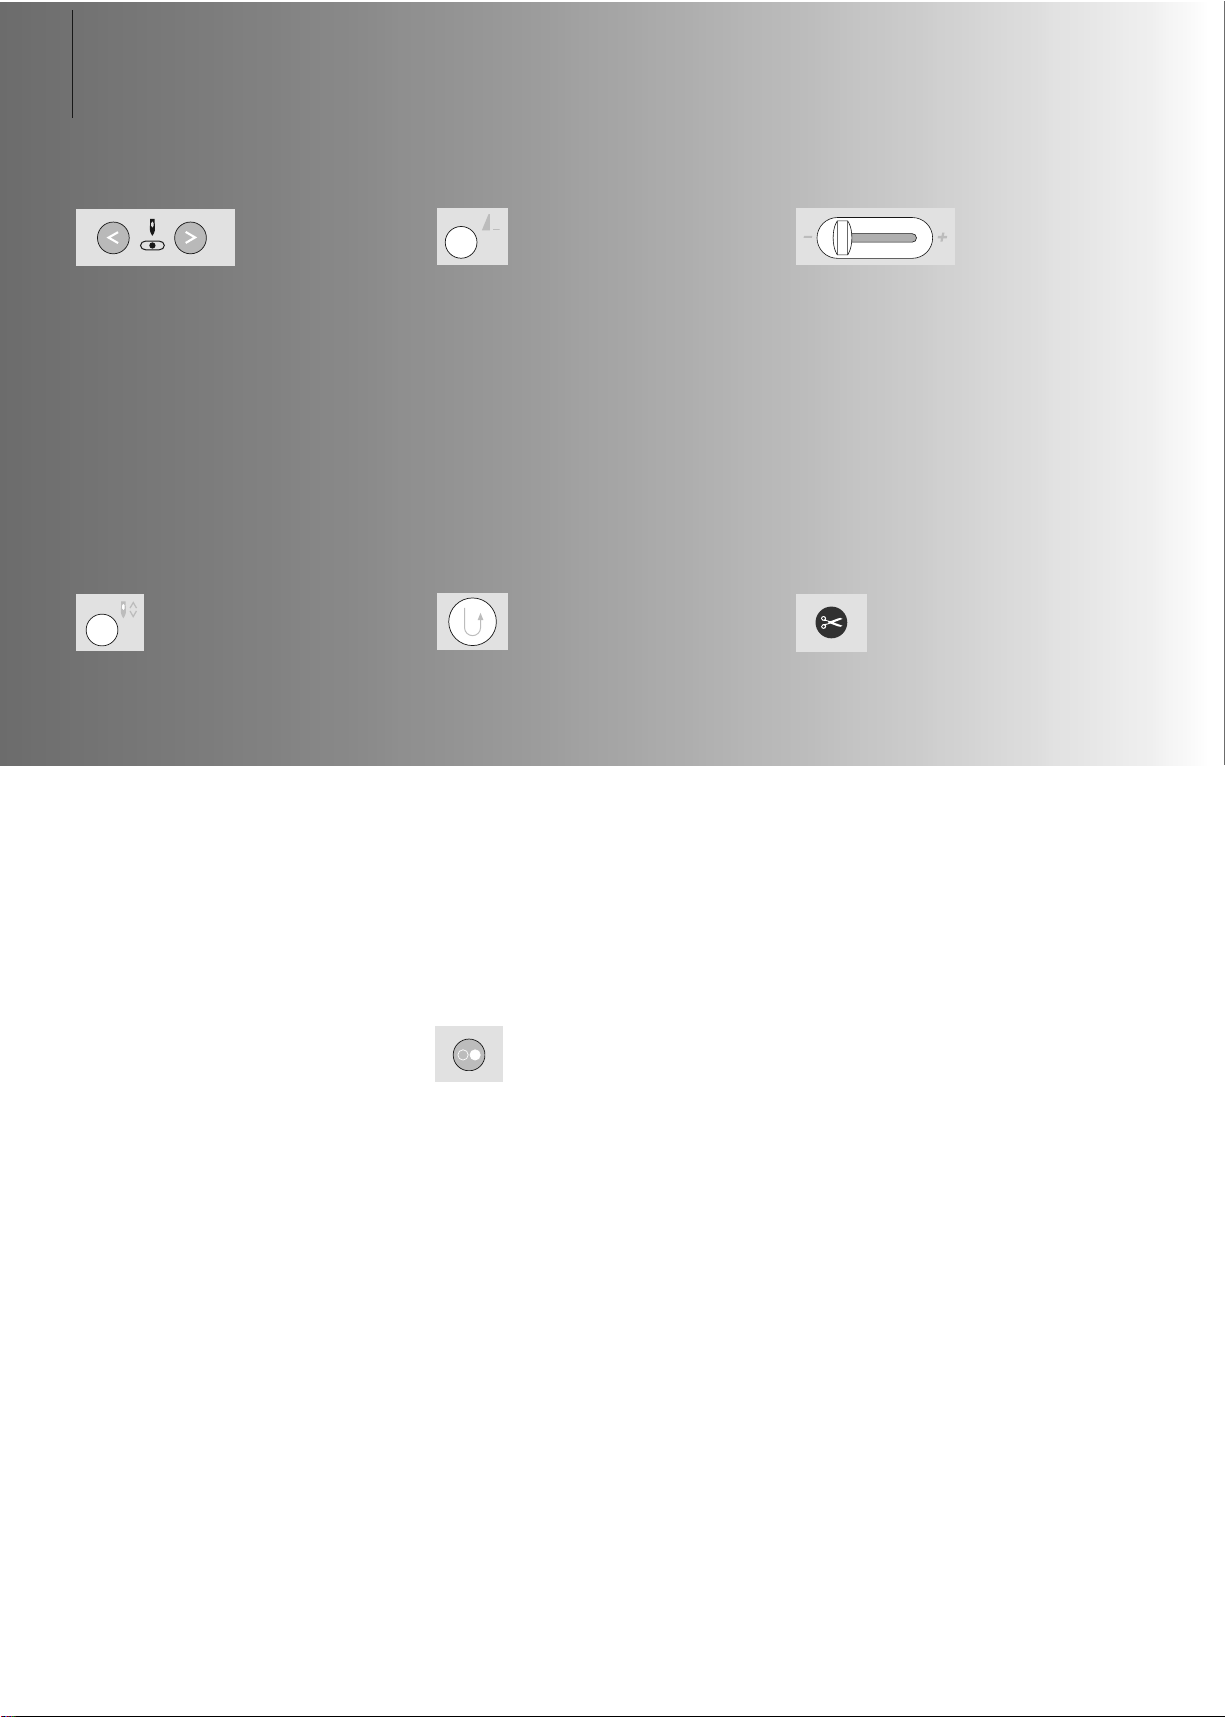
Embroidery Mode / Sewing Mode
Embroidery Mode / Sewing
Mode Button
• change between Embroidery and Sewing
Mode and vice versa
26 Displays on Screen
031508.50.04_0601_a640_EN
27Displays on Screen
Setup Program
Tutorial for Embroidery
Tutorial Button
Setup Program
• the Selection menu (menu summary)
appears
•9 menus for advice on embroidery are
available on the screen
• options appear
• use Setup to customize your sewing
computer’s settings
• customized settings can be reprogrammed
at any time or reset to BERNINA factory
settings
Can only be selected
when embroidering
031508.50.04_0601_a640_EN
Quick Reverse Button on Head Frame
•press the Quick Reverse button on head
frame
• secure the seam beginning and end: sews
in reverse as long as button is depressed
• used to program buttonhole length
• used to program darning length
• used to designate end of stitching in
straight stitch Securing stitch No. 5
• securing with Quilters Securing Program
No. 324
Start-Stop Button
• starts and stops the sewing computer when
operating it without foot control
• starts and stops the sewing/ embroidery
computer in the embroidery mode with
attached embroidery module
• starts and stops the BSR function (optional)
when BSR foot is attached and plugged in
External Function Buttons
Altering Needle Position
• left button = needle to the left
• right button = needle to the right
• keep button pressed to quickly change
needle positions
• total of 11 needle positions: 5 left, 5 right
and 1 center
Needle Up/Down
• basic setting needle stop up
• touch the symbol briefly:
• the needle is raised or lowered (as
when tapping on the foot control
with your heel)
• touch the symbol longer:
• the needle is lowered
• the arrow on the screen points down
• the sewing computer stops with the
needle down
• touch the symbol again (also longer):
• the needle is raised
• the arrow on the screen points up
• the sewing computer stops with the
needle up
Slide Speed Control
• the motor speed can be freely adjusted
with the slide
Pattern End
•press the Pattern End button
•a stop symbol in the right part of the
screen indicates that the function was
activated
• sewing computer stops at the end of the
active single pattern or the active pattern of
a combination
Automatic Thread Cutter
•press external button
• upper and bobbin thread are cut
automatically
28 Displays on Screen
031508.50.04_0601_a640_EN
29External Functions
General Functions
The following functions are found on various
screens and programs of the artista 640
sewing computer.
Scroll Up
• touch symbol one or more
times
• stitches within a stitch category
scroll up to show more options
• touch the symbol continuously
to scroll quickly
Scroll Down
• touch symbol one or more
times
• stitches within a stitch category
scroll down to show more
options
• touch the symbol continuously
to scroll quickly
Closing Special Applications
• touch «ESC»
• the special application closes
•returns to previous screen
OK
• touch symbol
• adjustment/selection is
activated or confirmed, e.g.
stitch selection by number
•programmed adjustment/
selection is ready to sew
Single Mode
• the Single Mode is always
active (green) when turning on
the sewing computer and only
the selected stitch can be sewn
«clr» (Clear) Button
•press the «clr» button
• stitch length, width and needle
position are returned to basic
settings
• all active functions will be
deleted
Exception:
Safety functions (e.g. double
needle limitation, alphabet size)
Combi Mode
• touch symbol
• the Combi Mode is active
(green) and stitch combinations
can be programmed
Pattern Begin
• touch symbol
• the needle moves to the
beginning of a stitch or stitch
program
Applications:
• decorative stitches,
buttonholes, working in Combi
Mode
031508.50.04_0601_a640_EN
Special Functions
The following functions are found on the artista 640 sewing computer. Each function which
can be used in the selected program is either shown in the yellow part of the screen or on the
two bottom rows of the gray part of the screen.
Horizontal Mirror Image
(left/right)
• touch symbol
• sewing computer sews selected
stitch in Horizontal Mirror
Image (left/right – determined
by the sewing direction)
• can be programmed and saved
in Combi Mode
Applications:
• blindstitch for shell edging
• decorative stitching
• stitch combinations
Vertical Mirror Image
(up/down)
• touch symbol
• sewing computer sews selected
stitch in Vertical Mirror Image
(up/down – determined by the
sewing direction)
• can be programmed and saved
in Combi Mode
Applications:
• decorative stitching
• stitch combinations
Pattern Extend 2–5 x
• touch one or more times
• the numbers 2–5 appear
depending on the type of
stitch selected
• the length of selected stitch
will be increased by 2–5 times
• stitch integrity is maintained
• lengthened stitches can be
programmed and saved in
Combi Mode
• touch the symbol longer and
the function is turned off. The
symbol is inactive (yellow)
Applications:
• lengthen existing stitches
without affecting the stitch
density
• combine stitches
Indication of the Altered Stitch
Width or Stitch Length
•return to basic setting by
touching the stitch width/stitch
length bar
Langstich
• touch symbol
• sewing computer sews every
second stitch (max. stitch
length 10mm)
• can be activated for all
practical, decorative, and
directional stitches except
buttonholes
• functions and stitches can be
combined
• can be programmed in
Combi Mode and saved in
File Drawers
Applications:
• combine with straight stitch
to baste
• combine with triple straight
stitch for Topstitching
Stitch Counter for Darning
Program
• touch symbol
• when the desired length is
reached (e.g. straight stitch),
press the external Quick
Reverse button
• the display (or indicator)
changes to «auto»
• the Darning Program is
programmed
30 Functions
031508.50.04_0601_a640_EN
 Loading...