

Page 1
KC9211F/cppl!!Qbhf!j!!Uvftebz-!Nbsdi!3-!3115!!22;51!BN
Joybook 8100 User's Manual
Welcome
Page 2

KC9211F/cppl!!Qbhf!jj!!Uvftebz-!Nbsdi!3-!3115!!22;51!BN
Copyright
Copyright 2003 by BENQ Corporation. All rights reserved. No part of this publication may be reproduced, transmitted, transcribed, stored in a retrieval system or
translated into any language or computer language, in any form or by any means,
electronic, mechanical, magnetic, optical, chemical, manual or otherwise, without
the prior written permission of this company.
Disclaimer
BENQ Corporation makes no representations or warranties, either expressed or
implied, with respect to the contents hereof and specifically disclaims any warranties,
merchantability or fitness for any particular purpose. Further, BENQ Corporation
reserves the right to revise this publication and to make changes from time to time in
the contents hereof without obligation of this company to notify any person of such
revision or changes.
Windows, Internet Explorer and Outlook Express are trademarks of Microsoft Corporation. Others are copyrights of their respective companies or organizations.
This product incorporates copyright protection technology that is protected by
method claims of certain U.S. patents and other intellectual property rights owned
by Macrovision Corporation and other rights owners. Use of this copyright protection technology must be authorized by Macrovision Corporation and is intended for
home and other limited viewing uses only unless otherwise authorized by Macrovision Corporation. Reverse engineering or disassembly is prohibited.
Page 3

KC9211F/cppl!!Qbhf!j!!Uvftebz-!Nbsdi!3-!3115!!22;51!BN
Table of Contents
Joybook 8100 Features ..............................................................................1
Super DJ Control Panel ..................................................................... 5
Wireless Remote Control ................................................................... 6
Using Super DJ ................................................................................... 8
Function Hotkeys ............................................................................... 9
Getting Started with Windows XP ........................................................... 11
Using the Q-Media Bar .............................................................................12
Setting Up QMedia Bar ...................................................................... 13
Your Digital Entertainment Center - BenQ Joybook 8100 .....................14
QMedia Center ................................................................................... 15
Sending and Receiving E-mail ........................................................... 20
Getting Online .................................................................................... 21
Listening to Music and Creating Custom Music Collections .......... 22
Making Your Own Movies ................................................................ 23
Burning CDs ..................................................................................... 24
Wireless Magic - Using the Built-In Wireless LAN Function .......... 27
Chatting over the Air - Using EZQ ................................................... 28
The Good Partner of Your Personal Mobile Devices - QSync ........ 30
Attaching External Display Devices .........................................................31
Attaching a VGA Display Device ....................................................... 31
S-Video Out ........................................................................................ 32
Installing Additional Memory ..................................................................33
Recovering Your System ...........................................................................35
Recovering From Your Hard Disk .................................................... 35
Recovering Using the Recovery CDs ................................................. 35
Reinstalling Software or Driver ......................................................... 35
Recommendations and Troubleshooting ................................................ 39
Information on Safety, Cleaning, and Battery Maintenance ..................40
Safety ................................................................................................... 40
Battery Maintenance .......................................................................... 40
Cleaning Your Joybook 8100 ............................................................. 40
Table of Contents i
Page 4

KC9211F/cppl!!Qbhf!jj!!Uvftebz-!Nbsdi!3-!3115!!22;51!BN
< Memo >
Table of Contentsii
Page 5
KC9211F/cppl!!Qbhf!2!!Uvftebz-!Nbsdi!3-!3115!!22;51!BN
Joybook 8100 Features
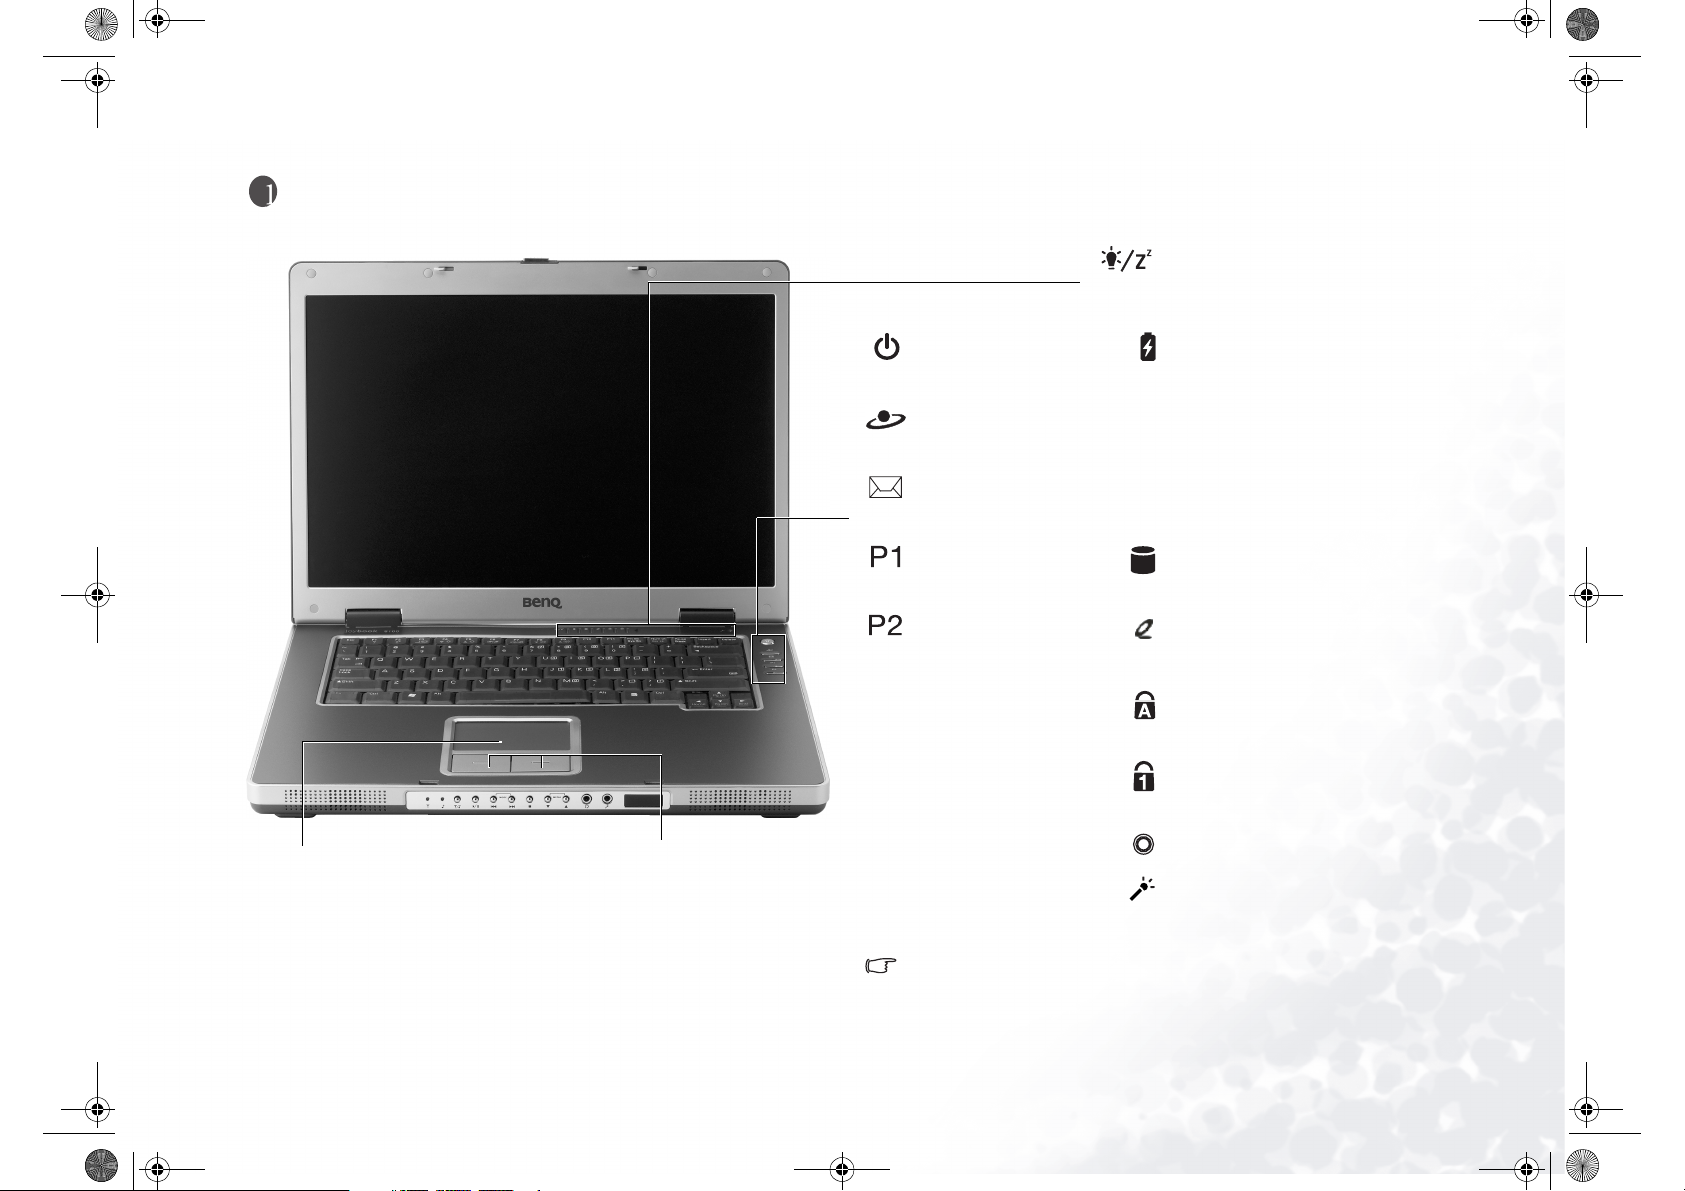
Touch Pad
You can use the touch pad to conveniently control
the cursor on the screen.
To move the cursor, gently move your finger on the
touch pad. The cursor will move accordingly.
Tap on the touch pad once to execute the same
action as clicking on the left button of a mouse. Tap
twice to execute the same action as double-clicking.
Left and Right Selection Buttons
Equivalent to the left and right
buttons on a mouse.
Power Indicator
Lights up in blue when Joybook 8100
is turned on. When Joybook 8100
enters sleep mode, turns orange.
Power Button
Turns Joybook 8100 on or
off.
Internet Hotkey
Starts up the Internet
Explorer Web browser.
E-Mail Hotkey
Starts up the Outlook
Express e-mail client.
Customizable Hotkey 1
Can be customized to
open an application.
Customizable Hotkey 2
Can be customized to
open an application.
For more information about how to configure the customizable hot keys, please
refer to"Customizing the hotkeys" on page 13.
Battery Indicator!
When Joybook 8100 is in use, lights
up in blue. When the battery is charging, turns orange. Flashing blue indicates that the battery is running low.
Flashing orange indicates that the
battery is malfunctioning, in which
case you should contact service personnel.
Hard Disk Drive Activity Indicator
Flashes in blue when Joybook 8100 is
reading the data in the hard disk.
Optical Drive Activity Indicator
Flashes in blue when the optical drive
is accessing data on a disk.
Caps Lock Indicator
Lights up in blue when the Caps Lock
function is activated.
Num Lock Indicator
Lights up in blue when the Num Lock
function is activated.
Cover Switch
Microphone
Joybook 8100 Features 1
Page 6
KC9211F/cppl!!Qbhf!3!!Uvftebz-!Nbsdi!3-!3115!!22;51!BN
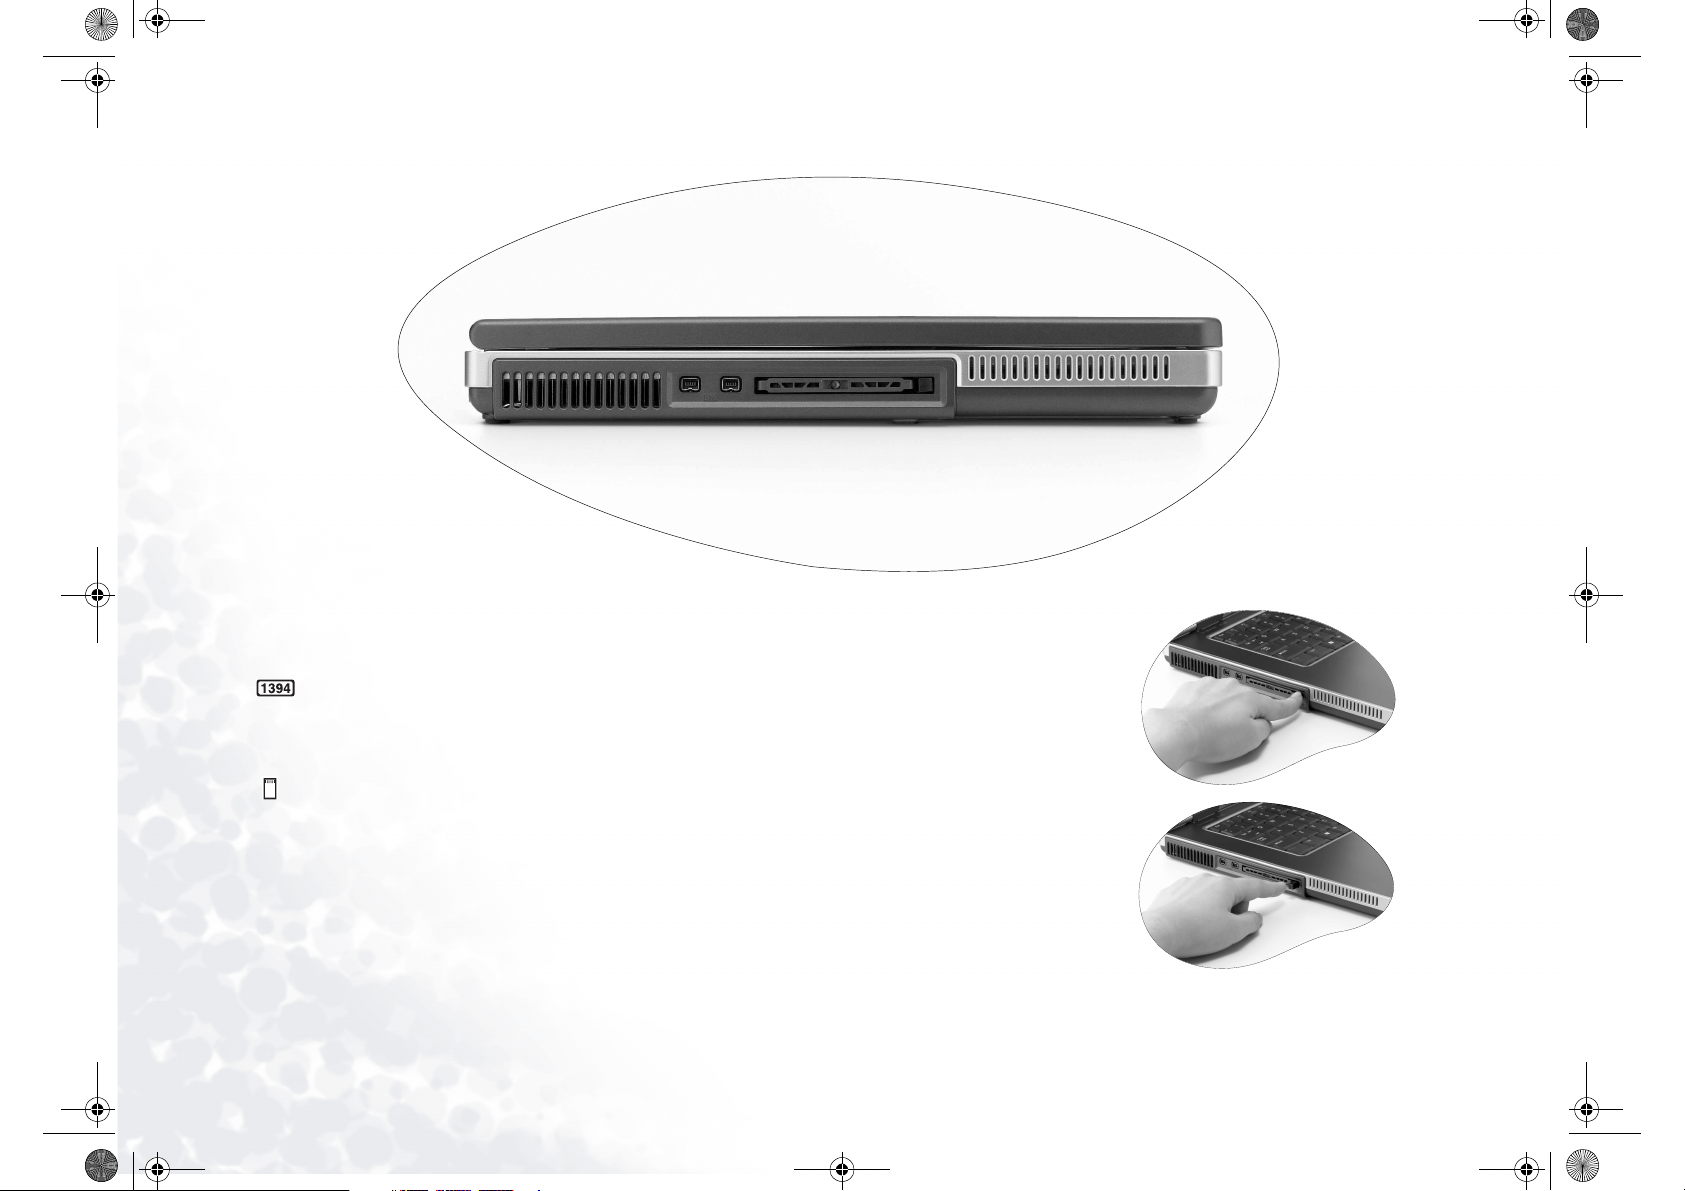
Ventilation Holes
For dissipating heat and keeping Joybook 8100 at an optimal tem-
perature.
IEEE 1394 (FireWire)!Port
For connecting high-speed peripherals such as digital video cameras and other consumer electronics devices that use the IEEE 1394
(FireWire) interface.
PC Card Expansion Slot
This PC Card slot accepts one Type-II PC Card. You can use it and
various PC Cards on the market to further expand the capabilities
of your Joybook 8100.
Insert the PC Card into the slots following the direction indicated
on the card and complete related driver settings.
Joybook 8100 Features2
PC Card Ejection Button
Before ejecting a PC Card:
1. Quit all PC Card applications and shut
down all PC Card functions.
2. Push in, then release the PC Card eject
button, causing it to pop out.
3.!When the button has popped out, push it
in again to eject the PC Card.
Page 7
KC9211F/cppl!!Qbhf!4!!Uvftebz-!Nbsdi!3-!3115!!22;51!BN
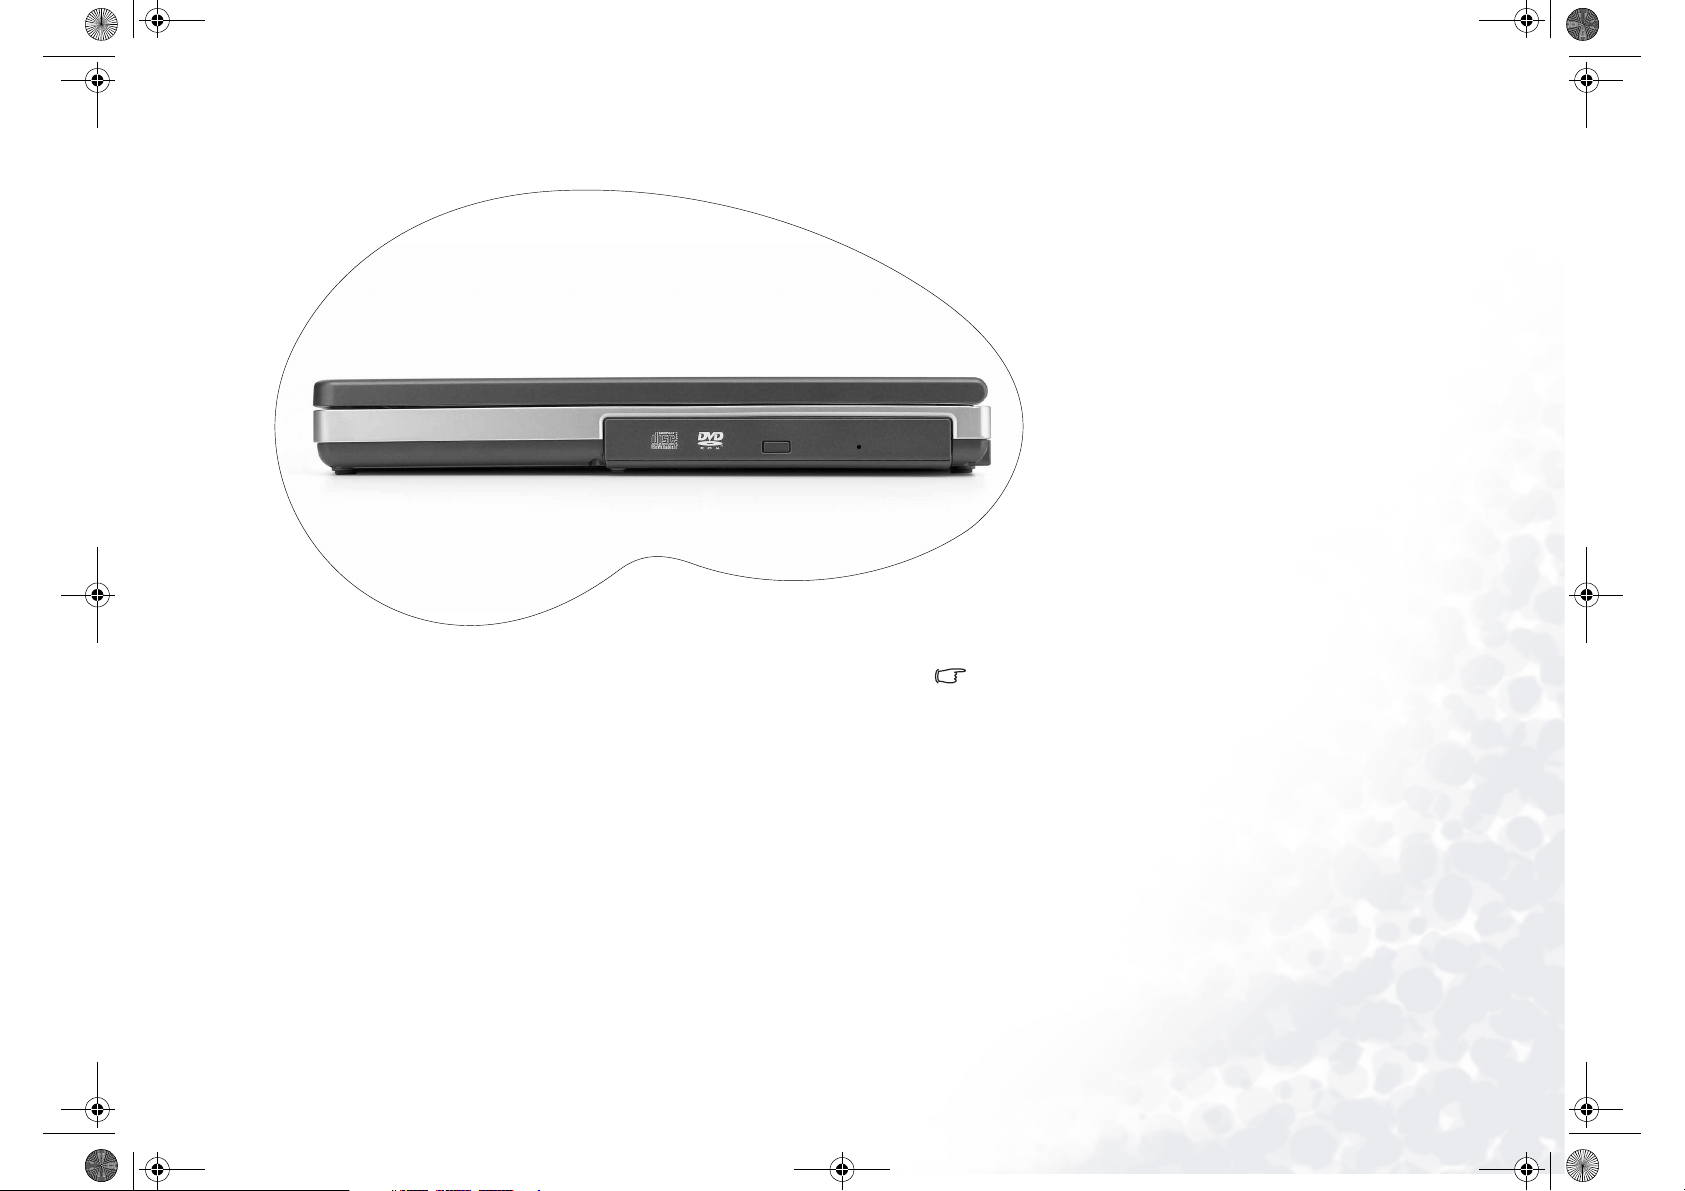
DVD+RW/DVD & CD-RW Combo Drive (Optional)
Supports multi-functional optical module for reading music
CDs, VCDs and DVDs or burning CD-R/CD-RW or DVD+R/
DVD+RW (Optional) discs. Discs can be inserted/ejected by
pressing the small ejection button on the drive.
If you want to open the disc tray of the DVD+RW/DVD & CD-RW
Combo Drive when your Joybook power is off, or it can't be opened
using the ejection button, insert a pointed object into the tray ejection hole next to the ejection button to force open the disc tray.
Joybook 8100 Features 3
Page 8
KC9211F/cppl!!Qbhf!5!!Uvftebz-!Nbsdi!3-!3115!!22;51!BN
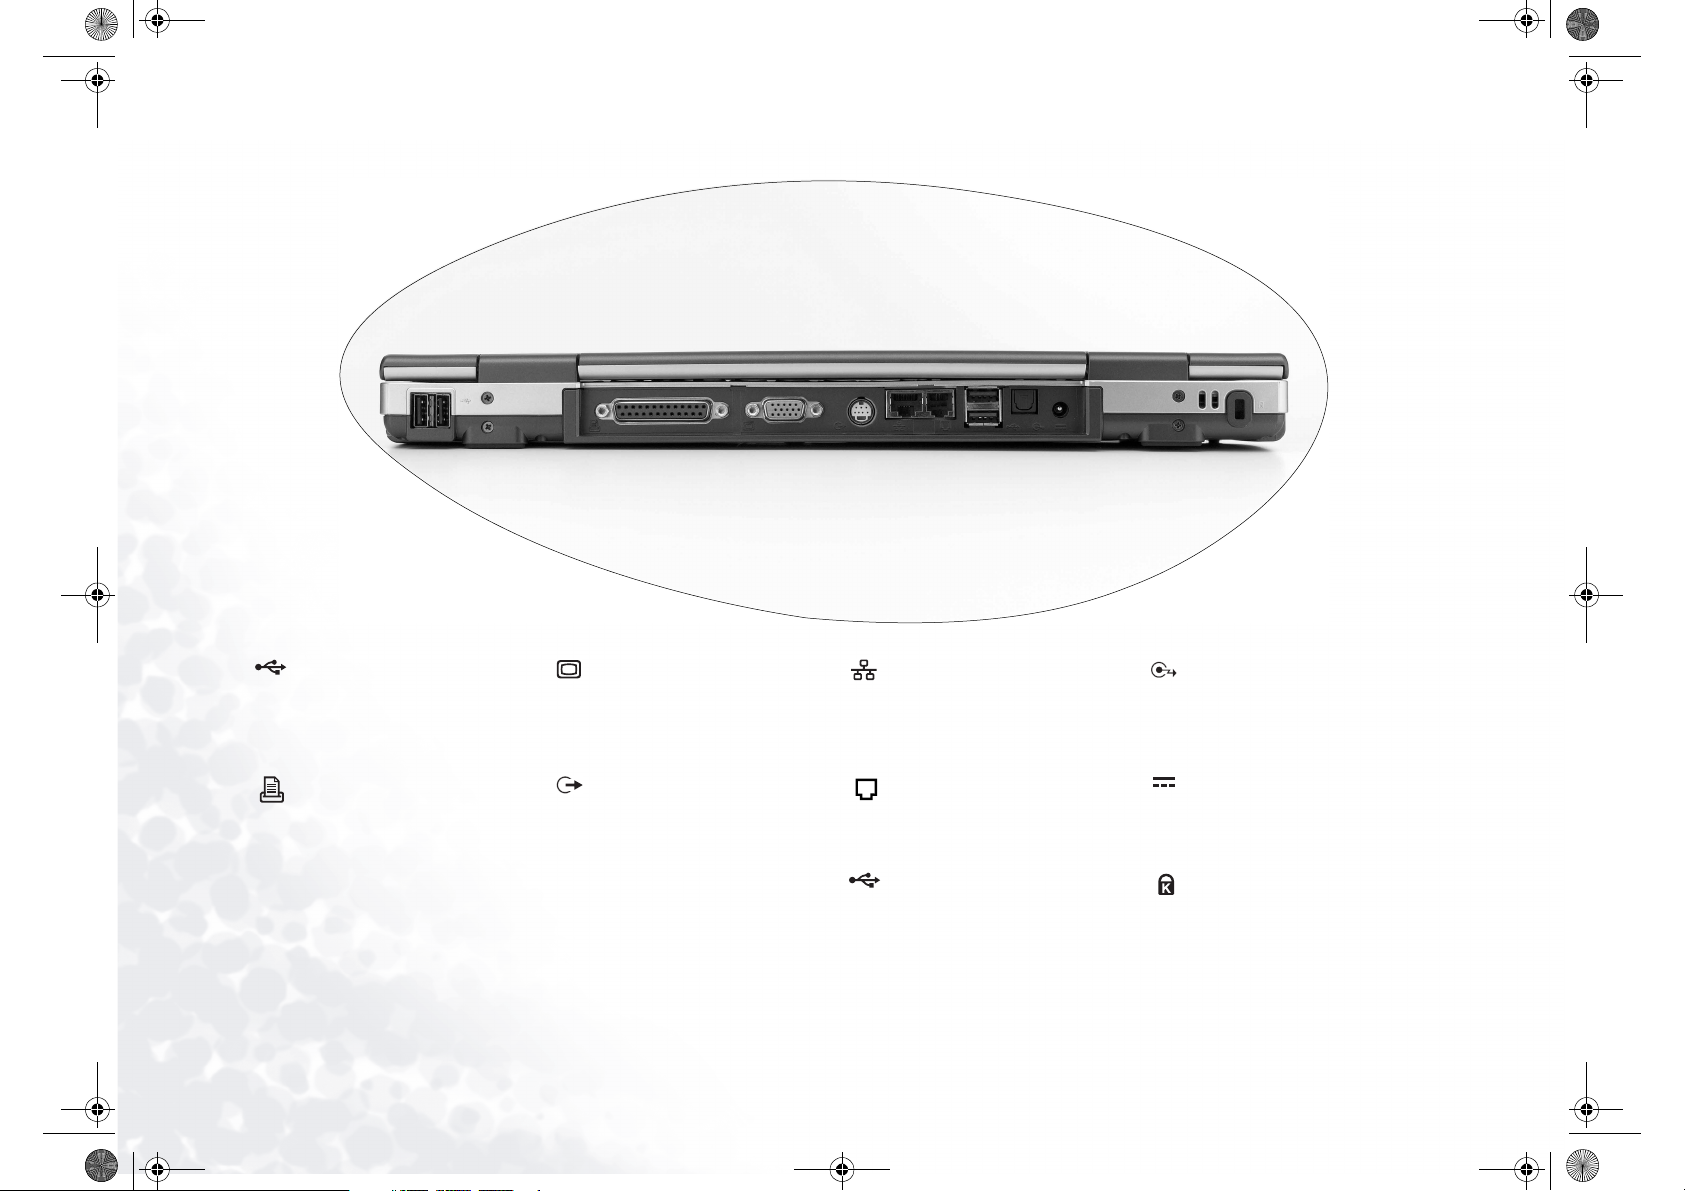
USB Port
For connecting peripherals such
as mice, digital cameras and
MP3 players that use the USB
interface
Parallel Port
For connecting devices such as
printers that use the parallel port
interface.
Joybook 8100 Features4
VGA Port
For connecting external display
devices, such as monitors and
projectors.
S-Video Out
Outputs an display signals to a
television set or VCR.
Ethernet Port
Allows Joybook 8100 to connect
to an Ethernet 10/100BaseT network.
Modem Port
Accepts an analog telephone line
for use with the internal modem.
USB Port
For connecting peripherals such
as mice, digital cameras and
MP3 players that use the USB
interface
Optical Audio (S/PDIF) Jack
Outputs sound to digital audioenabled speakers or devices.
Power Jack
For connecting the AC adapter.
Kensington Lock
For installing the Kensington
lock available on the market to
prevent theft.
Page 9
KC9211F/cppl!!Qbhf!6!!Uvftebz-!Nbsdi!3-!3115!!22;51!BN
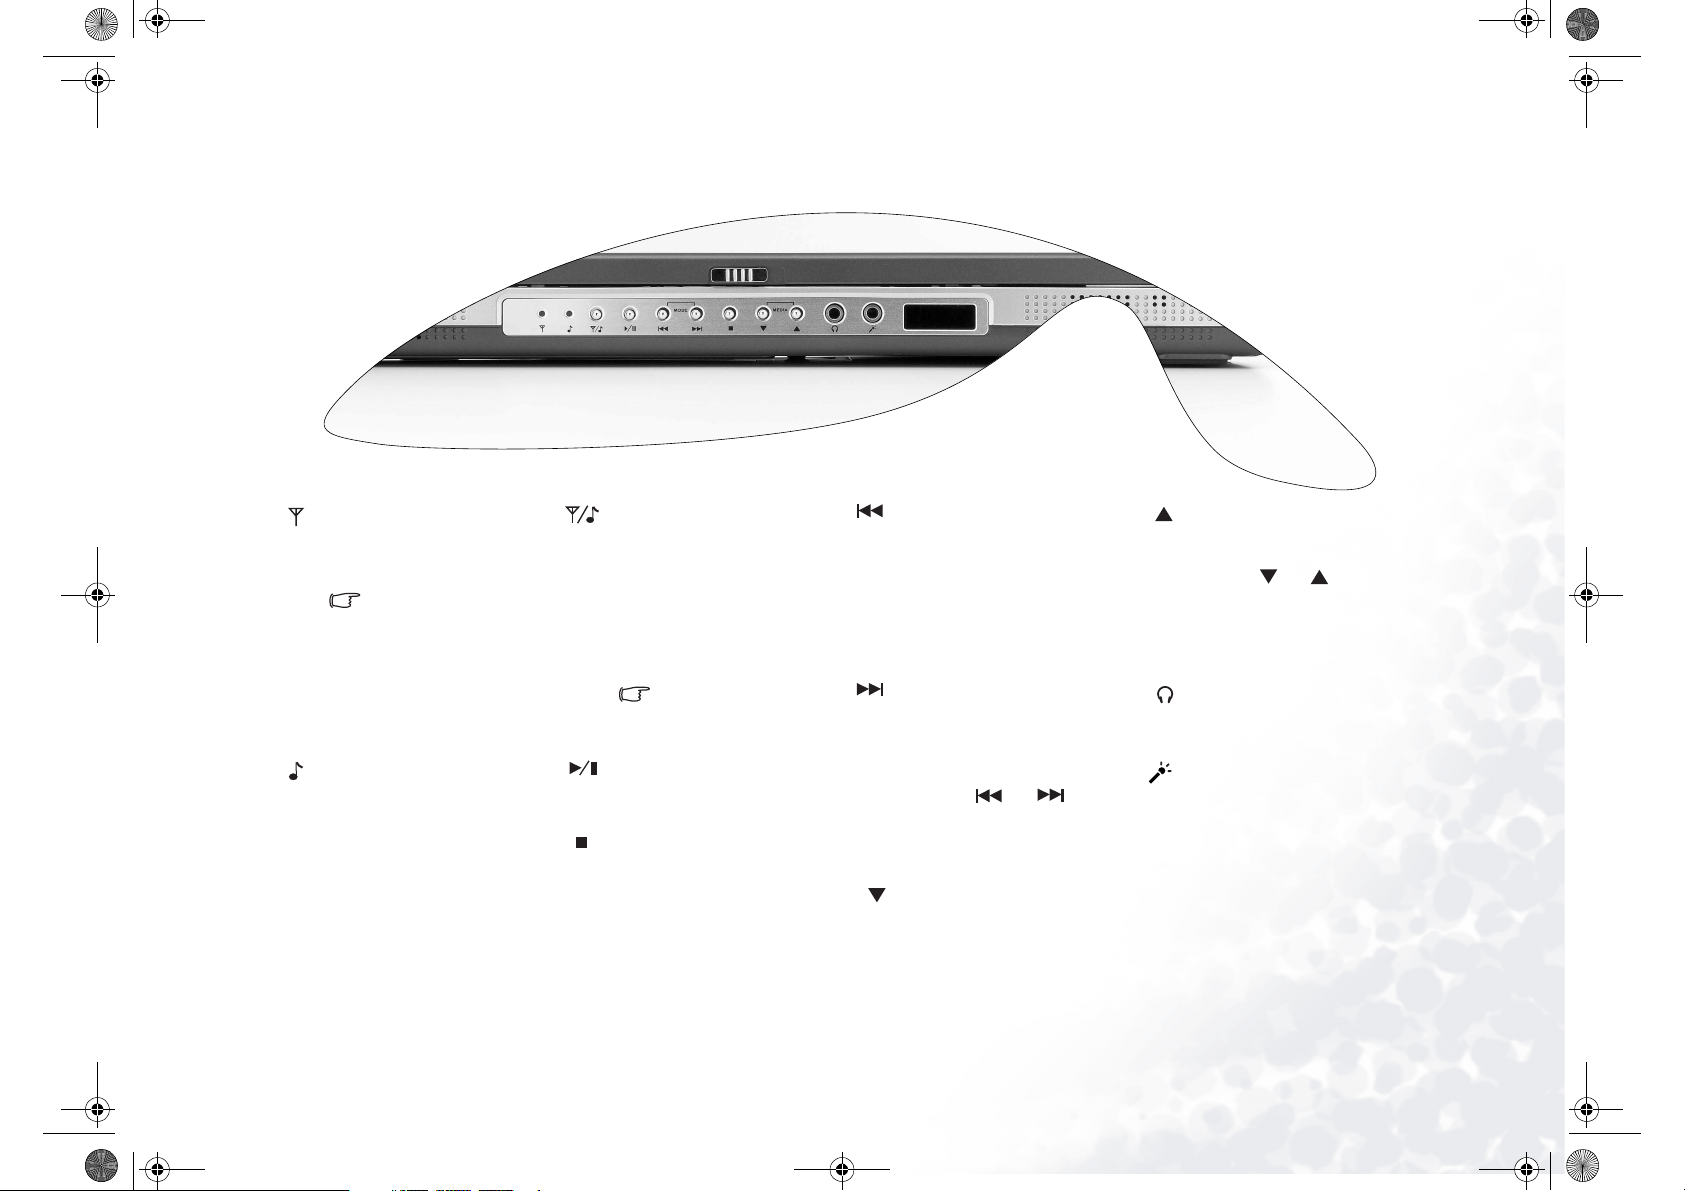
Super DJ Control Panel
Wireless Network!Card Activity Indicator
Lights up in blue when the
wireless network card is active.
Not every Joybook is builtin a wireless network card.
Refer to the specification
label on the shipping box
if you are not sure about
the standard equipment of
your Joybook.
Super DJ Power Indicator
Lights up in blue when the
Super DJ is turned on.
Super DJ Power Switch/Wireless Network Card Switch
When Joybook 8100 is shut
down, can be used to turn the
Super DJ on and off. When Joybook 8100 is on, activates or
deactivates the wireless networking card.
When Joybook 8100 is
turned off, press this key
to turn on Super DJ.
Play/Pause
Plays or pauses playing music.
Stop
Stops music playback.
Previous song/Backward search
Press this button to go back to
the previous song.
Press and hold this button to
start backward search.
Next song/Forward search
Press this button to go to the
next song.
Press and hold this button to
start forward search.
Press the and buttons
simultaneously during Super
DJ mode to change playback
mode.
Volume Down
Decreases the volume of CD
playback.
Volume Up
Increases the volume of music
playback.
Press the and buttons simultaneously during stop mode (music
playback stopped) to change playback media.
Speaker/Earphone Jack
For connecting external speaker or
earphone.
Microphone
For recording audio on Joybook
8100.
Infrared Port and Remote Control
Receiver
The interface for infrared communications, allowing Joybook 8100
to transfer data to and from PDAs
or other devices with infrared
capabilities. It also functions as a
receiver to receive signals from the
wireless remote control.
Joybook 8100 Features 5
Page 10
KC9211F/cppl!!Qbhf!7!!Uvftebz-!Nbsdi!3-!3115!!22;51!BN
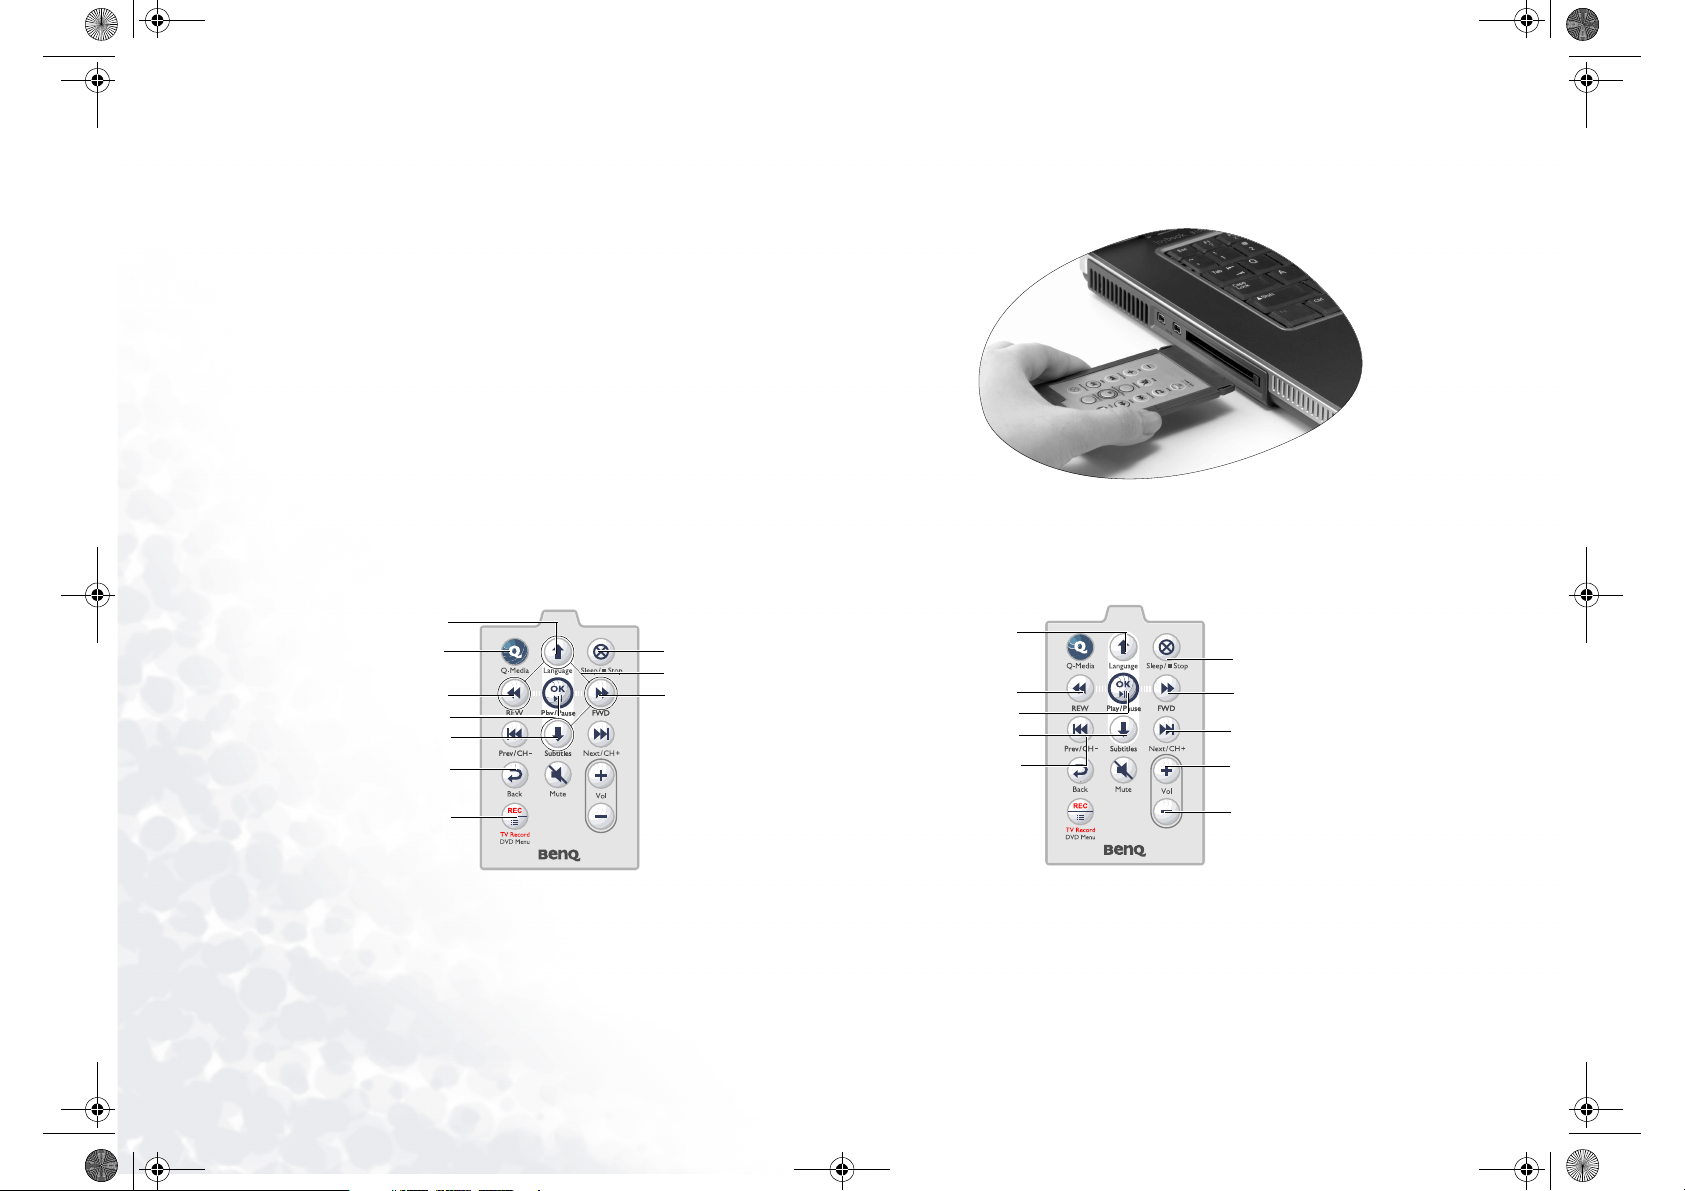
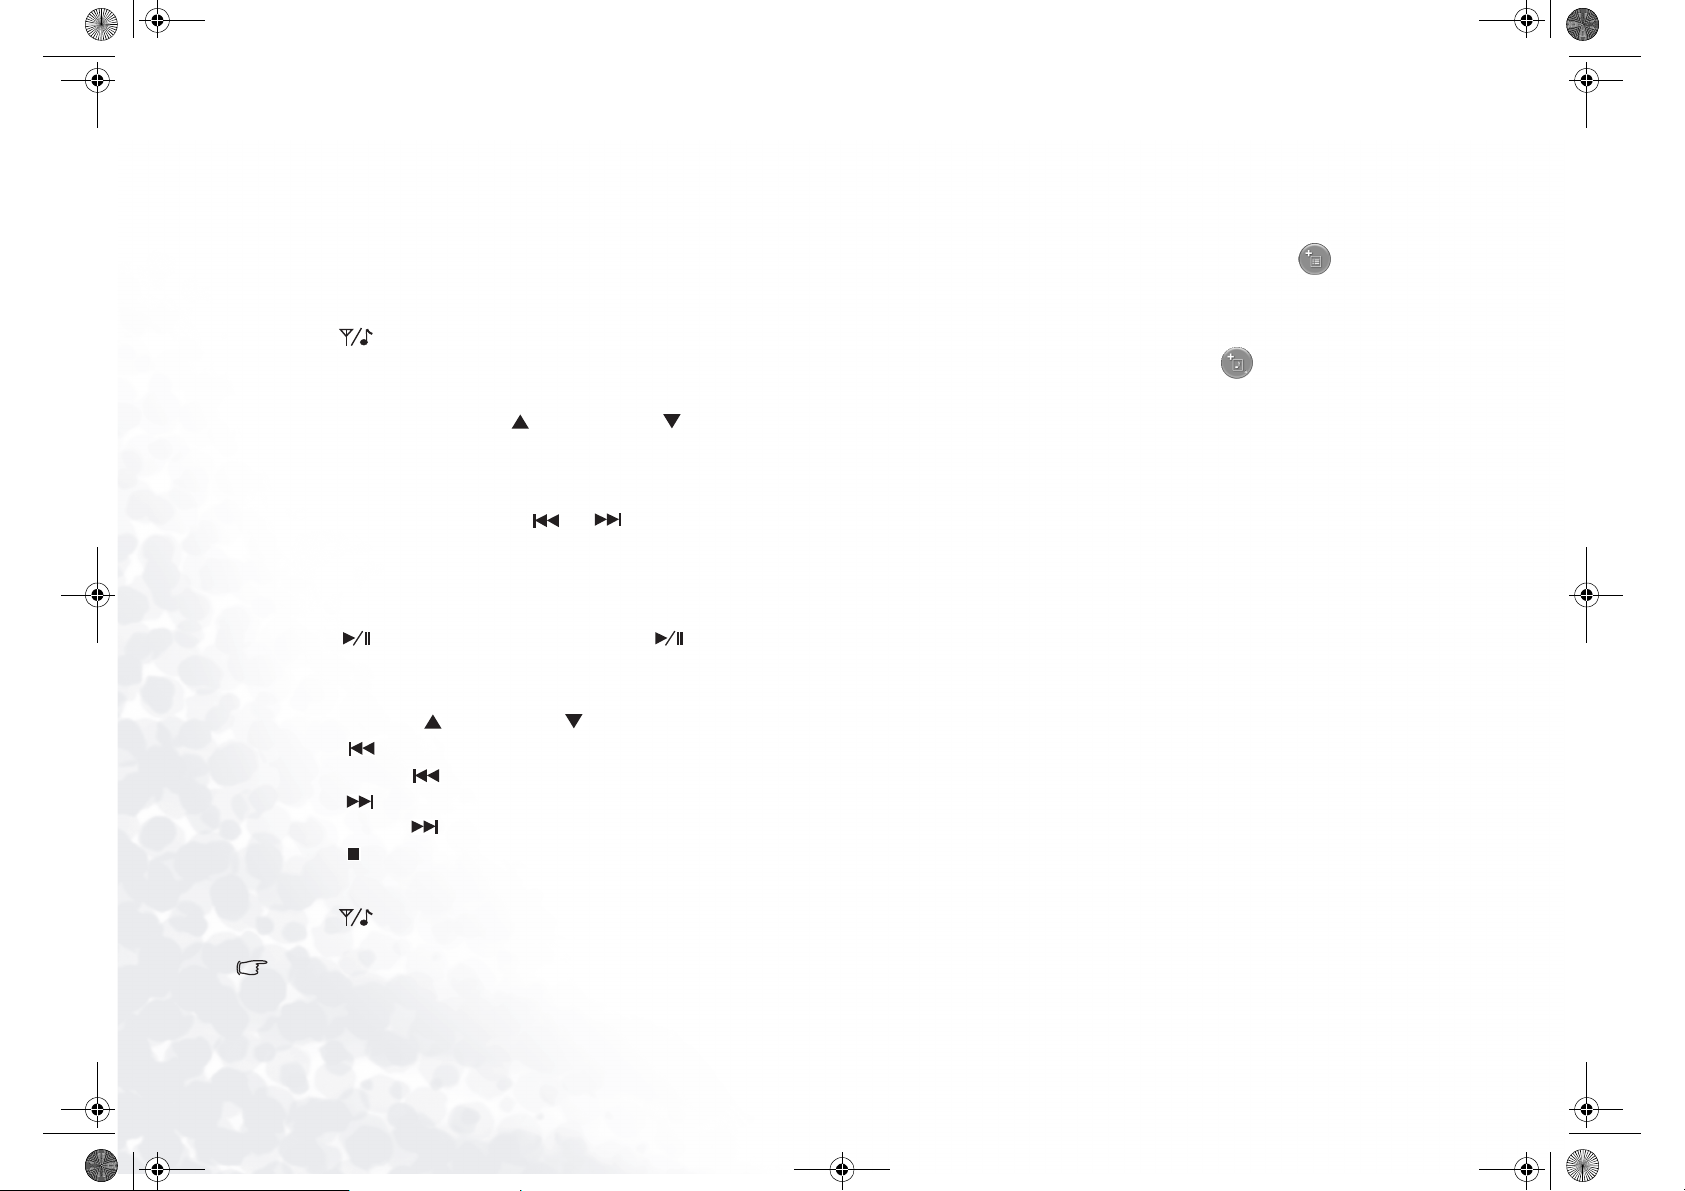
Wireless Remote Control
The wireless remote control allows you to use the multimedia functions of your Joybook 8100
remotely. It can be inserted into the PC Card slot for easy storage and access.
The function of each button on the remote control varies in different modes. For details, please
refer to the description below.
To navigate the QMedia Center...
Move selection focus up
Enter or exit QMedia Center/
Wake Joybook 8100 up from
Move selection focus left
Move selection focus down
Return to the previous
Start recording TV pro-
grams in QMedia Center**
*Press and hold this button for approximately 5 seconds to put Joybook 8100 in
sleep mode.
**The TV and TV recording functions are to be available through future updates.
Joybook 8100 Features6
sleep mode
Confirm selection
screen/menu
Put Joybook 8100 in
sleep mode*
(Directional buttons)
Move selection focus
right
When playing music using Super DJ...
Select playback media
Backward search
Play/Pause
Select playback mode
Previous song
Stop
Forward search
Next song
Increase volume
Decrease volume
Page 11
KC9211F/cppl!!Qbhf!8!!Uvftebz-!Nbsdi!3-!3115!!22;51!BN
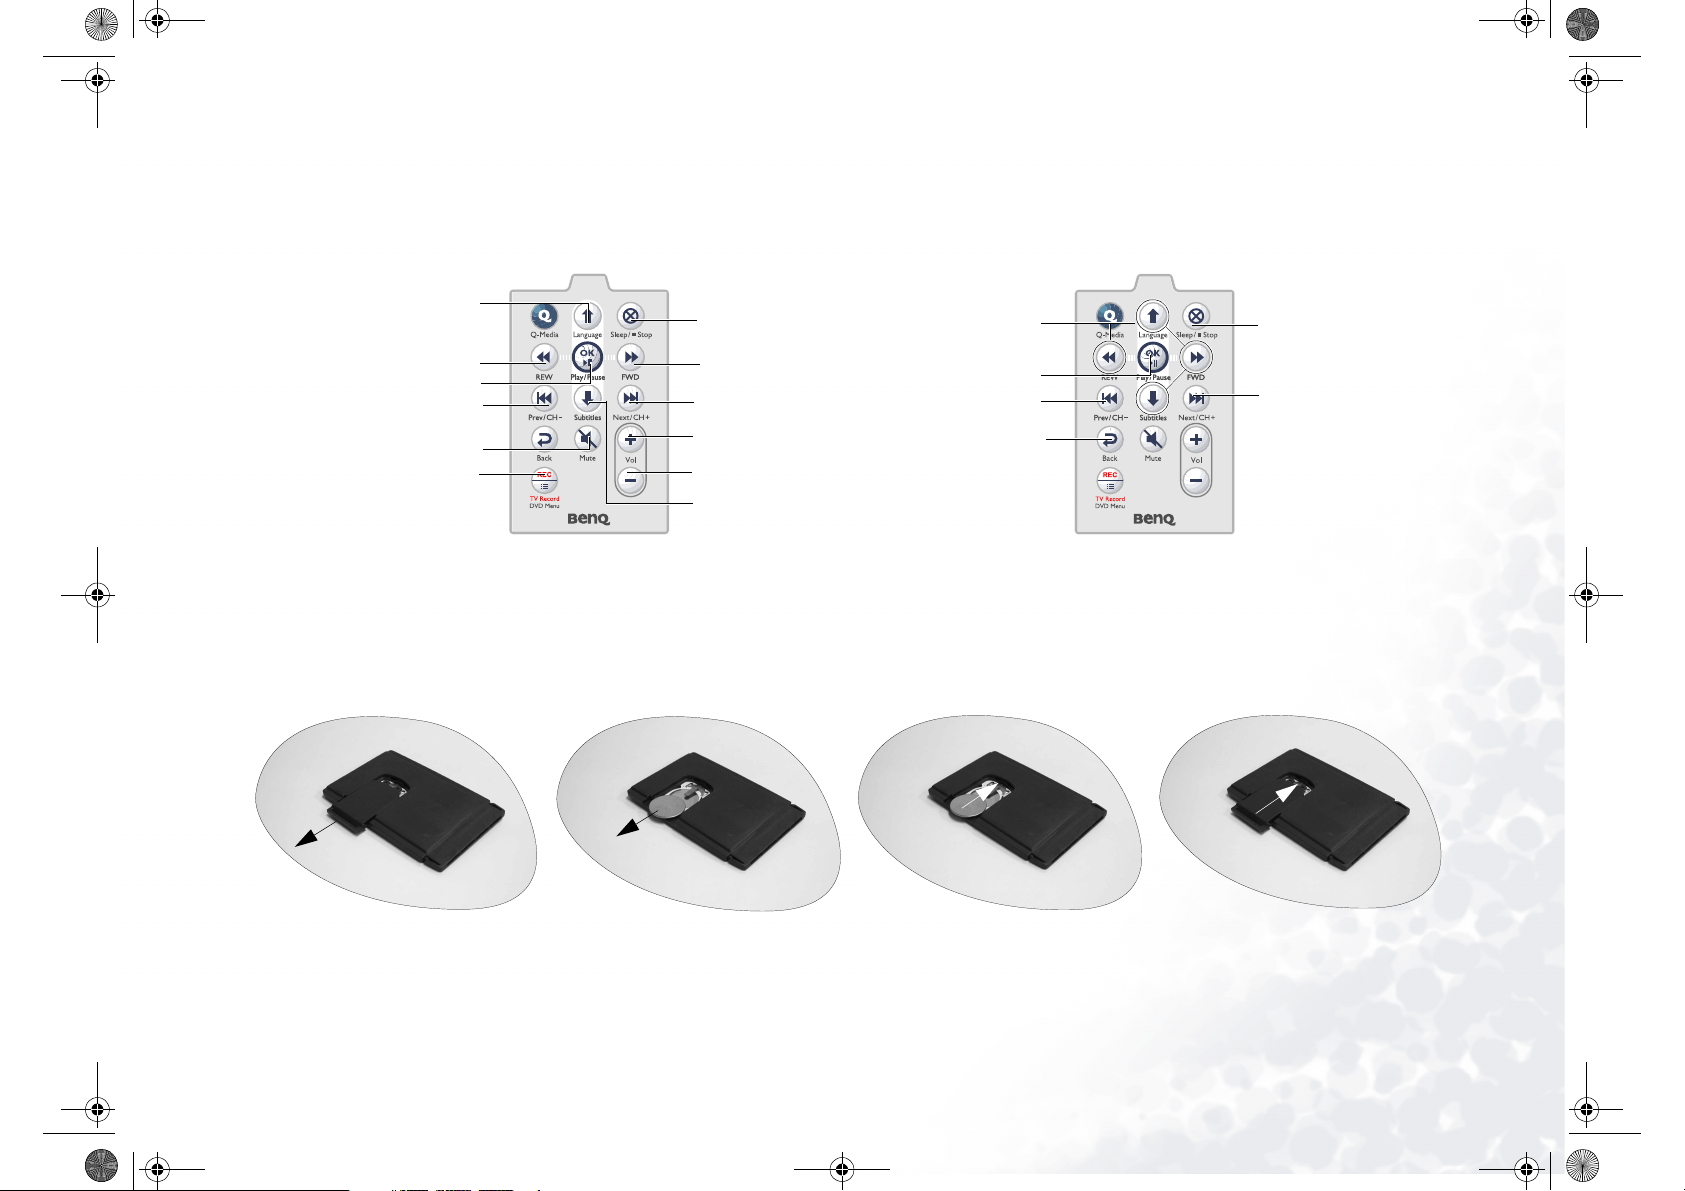
When playing DVD/VCD movies in QMedia Center...
Select playback language
Backward search
Play/Pause
Fast rewind/Previous
Chapter
Mute
Open DVD menu
Changing the battery
1. Open the battery compartment cover by
sliding it in the direction shown by the
arrow below.
Stop
Forward search
Fast forward/Next
Chapter
Increase volume
Decrease volume
Select subtitle
2. Remove the old battery from the battery
retainer.
When viewing digital pictures in QMedia Center...
Go to a picture/picture
folder
Open a picture/picture
folder
Previous picture
Return to the contents
screen
3. Install the new battery. Pay attention to
the polarities when you install.
Stop slideshow
Next picture
4. Replace the battery compartment cover.
Joybook 8100 Features 7
Page 12
KC9211F/cppl!!Qbhf!9!!Uvftebz-!Nbsdi!3-!3115!!22;51!BN
Using Super DJ
With Super DJ, you can play music CDs or music files in MP3 or WAV formats on
the hard disk/optical drive/USB flash drive or USB MP3 player (such as Joybee
MP3 Player)/flash drive without having to enter Windows. Besides, you can also
set up different playback modes.
Turning on Super DJ
Press the button on the Super DJ Control Panel. The Super DJ Power Indi-
cator lights up and you are entering the Super DJ mode.
Selecting media
In stop mode, press the volume up and volume down buttons simultaneously. Super DJ will cycle the media by optical drive -!hard disk - USB. Release
the buttons when you get a desired media.
Changing playback mode
In Super DJ mode, press and hold the and buttons simultaneously.
Super DJ will cycle the playback modes by normal playback - repeat all songs -
repeated a single song - random playback. Release the buttons when you get a
desired playback mode.
Playing/pause playing music
Press the button to start playing music. Press the button during playback to pause.
Music playback operations
• Press the volume up or volume down button to adjust playback volume.
• Press the button to go to the previous song.
• Press and hold the button to scan the track backward.
• Press the button to go to the next song.
• Press and hold the button to scan the track forward.
• Press the button to stop.
Turning off Super DJ
Press the button, or press the power button of Joybook 8100. The Super DJ
Power Indicator will go out.
You can also use the wireless remote control to access the playback functions
described above.
Creating Playlists Using QMusic
1. Click SSuper DJ on the left column of QMusic and then the button.
2. Enter the name of the playlist and click O
will appear under Super DJ on the left column of QMusic. You can create up to
9 playlists following the same method.
3. Click the playlist you just created, and then the button. In the dialog that
appears, browse to select the songs you want to include in the playlist and click
Open. The songs you selected will appear on the right column of QMusic. Now
you are done with the creation of a playlist ready for Super DJ playback.
OK. A new playlist will be created and it
Notes
1. If the music files on the USB flash drive can not be recognized by Super DJ,
check the format of the drive.
2. Do not delete or move the MMy Music folder in Joybook 8100 D:/ disk. Other-
wise, Super DJ will not be able to play music files in the hard disk normally.
3. A playlist can contain up to 999 songs. Super DJ supports up to 9 playlists.
4. Although Super DJ also supports playback of music files in an external highcapacity hard disk drive,!it can take a lot of time for Super DJ to search and
locate all music files. Therefore we would recommend that you move the music
files to a smaller capacity media, or to the internal hard disk and create a playlist
for these files for better playback efficiency.
Joybook 8100 Features8
Page 13
KC9211F/cppl!!Qbhf!:!!Uvftebz-!Nbsdi!3-!3115!!22;51!BN
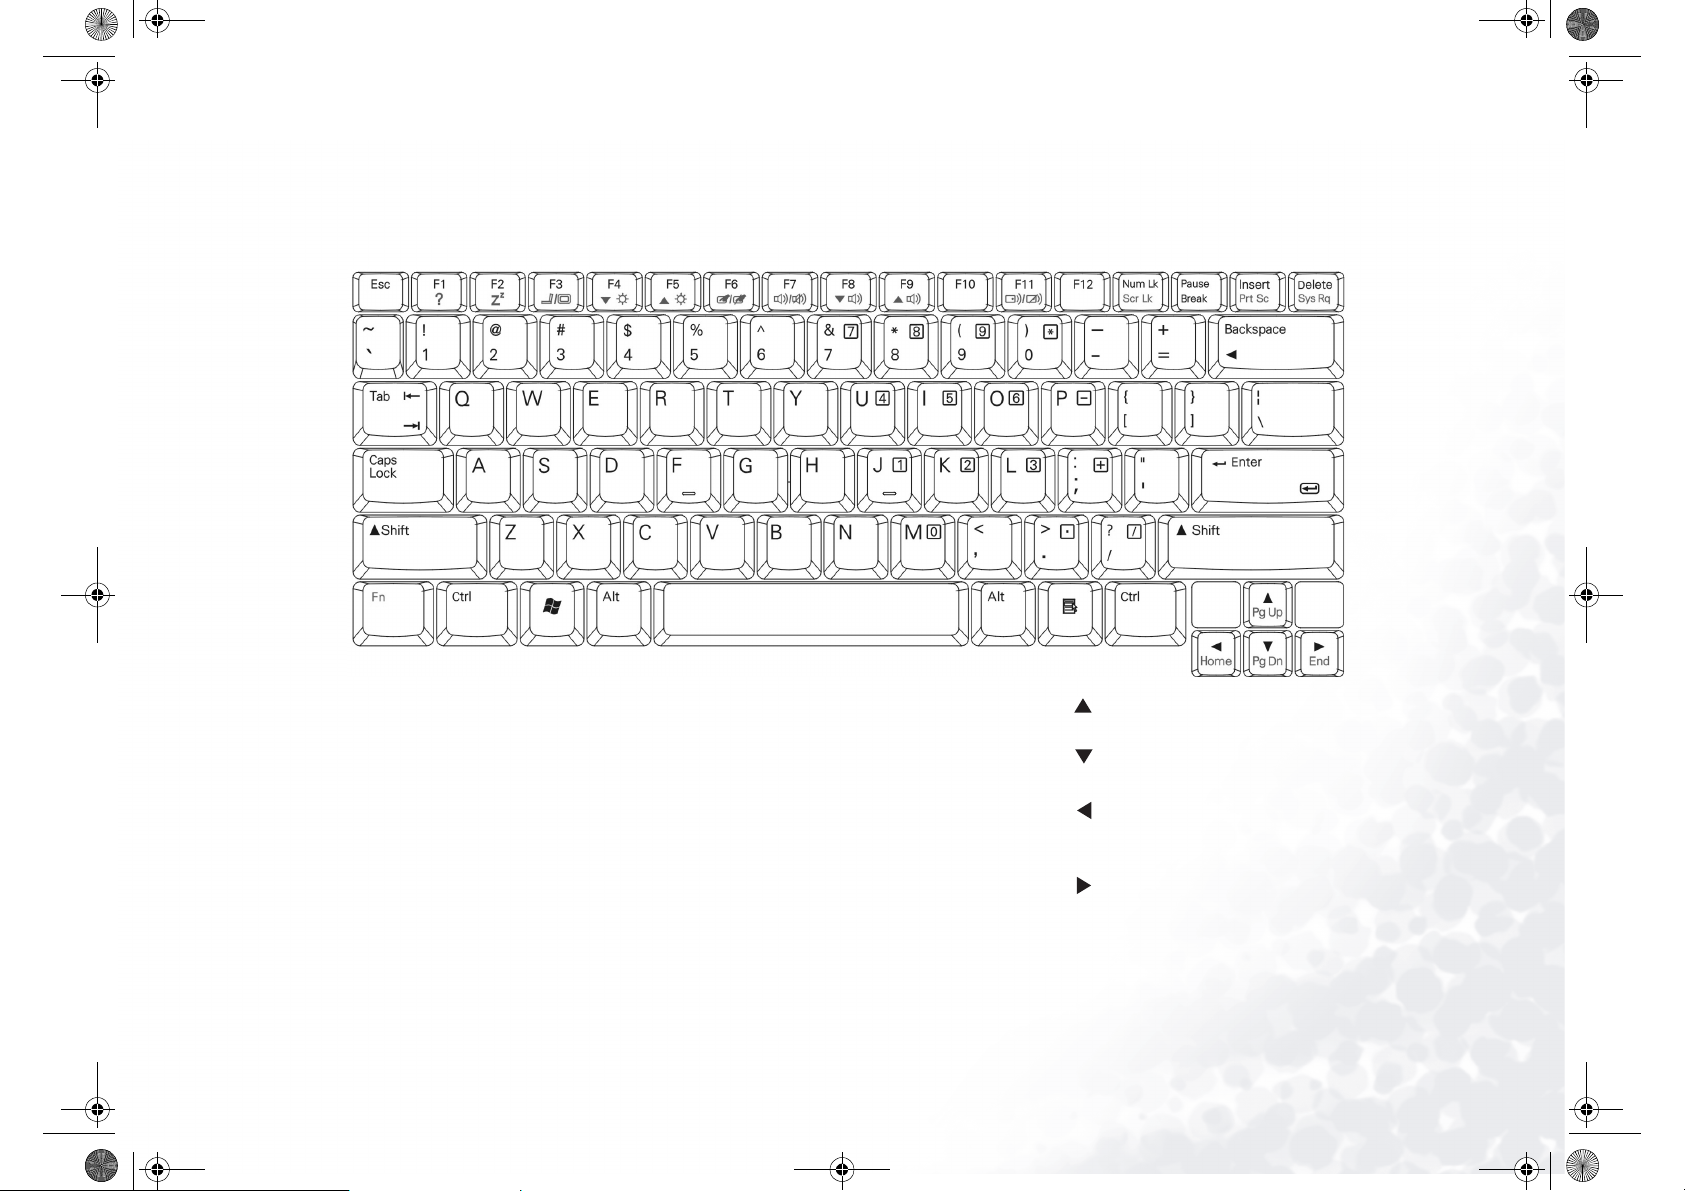
Function Hotkeys
You can use the function hotkeys to access commonly used functions or make quick settings. To use the hotkeys, press and hold the Fn key at the lower left corner of the keyboard, and then press the desired hotkey.
Fn + F1 Opens hotkey online help. FFn + F6 Activates or deactivates the touch pad.
Fn + F2 Puts Joybook 8100 into sleep mode. F
Fn + F3 Switches display between the screen and
an external monitor, or allows simultaneous display.
Fn + F4 Decreases screen brightness. F
Fn + F5 Increases screen brightness. F
Fn + F7 Activates or deactivates the speakers.
Fn + F8 Decreases speaker volume.
Fn + F9 Increases speaker volume.
Fn + F11 Deactivates QMedia Center.
Fn + Pg Up
Fn + Pg Dn
Fn + Home
Fn + End
Moves the cursor to the previous page in a
document.
Moves the cursor to the next page in a document.
Moves the cursor to the front of the current line.
Moves the cursor to the end of the current
line.
Joybook 8100 Features 9
Page 14
KC9211F/cppl!!Qbhf!21!!Uvftebz-!Nbsdi!3-!3115!!22;51!BN
Shift + + M
Joybook 8100 Features10
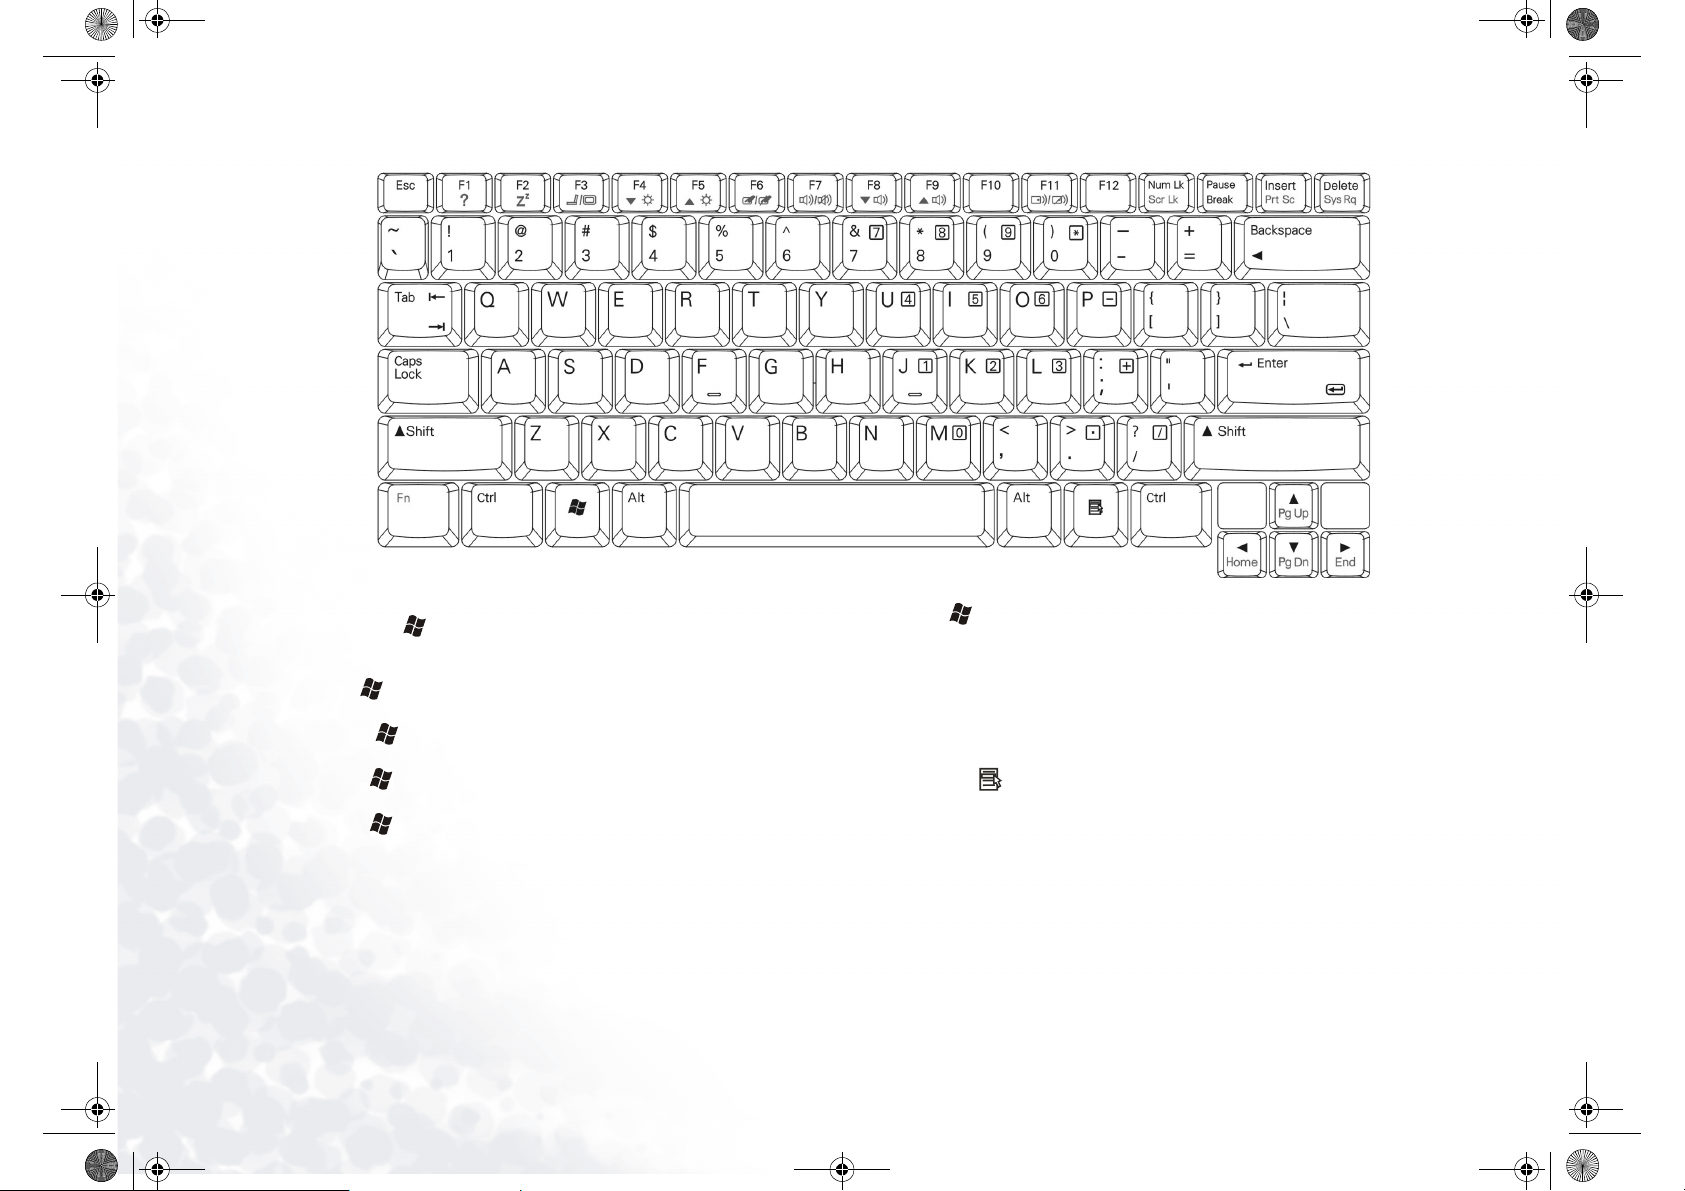
Windows Key
Functionally equivalent to clicking the Start button on the
Windows desktop.
+ Tab
Makes the next item on the Windows task bar active.
+ E
Opens the My Computer window for browsing disks and files.
+ M
Minimizes all windows.
Cancels minimization of all windows.
Activates the RRun dialog.
+ R
Num Lock Activates the numeric keypad integrated in the keyboard.
Caps Lock Capitalizes all text entered.
Application Key
Provides the same function as the right touch pad button,
bringing up a contextual pop-up menu.
Page 15
KC9211F/cppl!!Qbhf!22!!Uvftebz-!Nbsdi!3-!3115!!22;51!BN
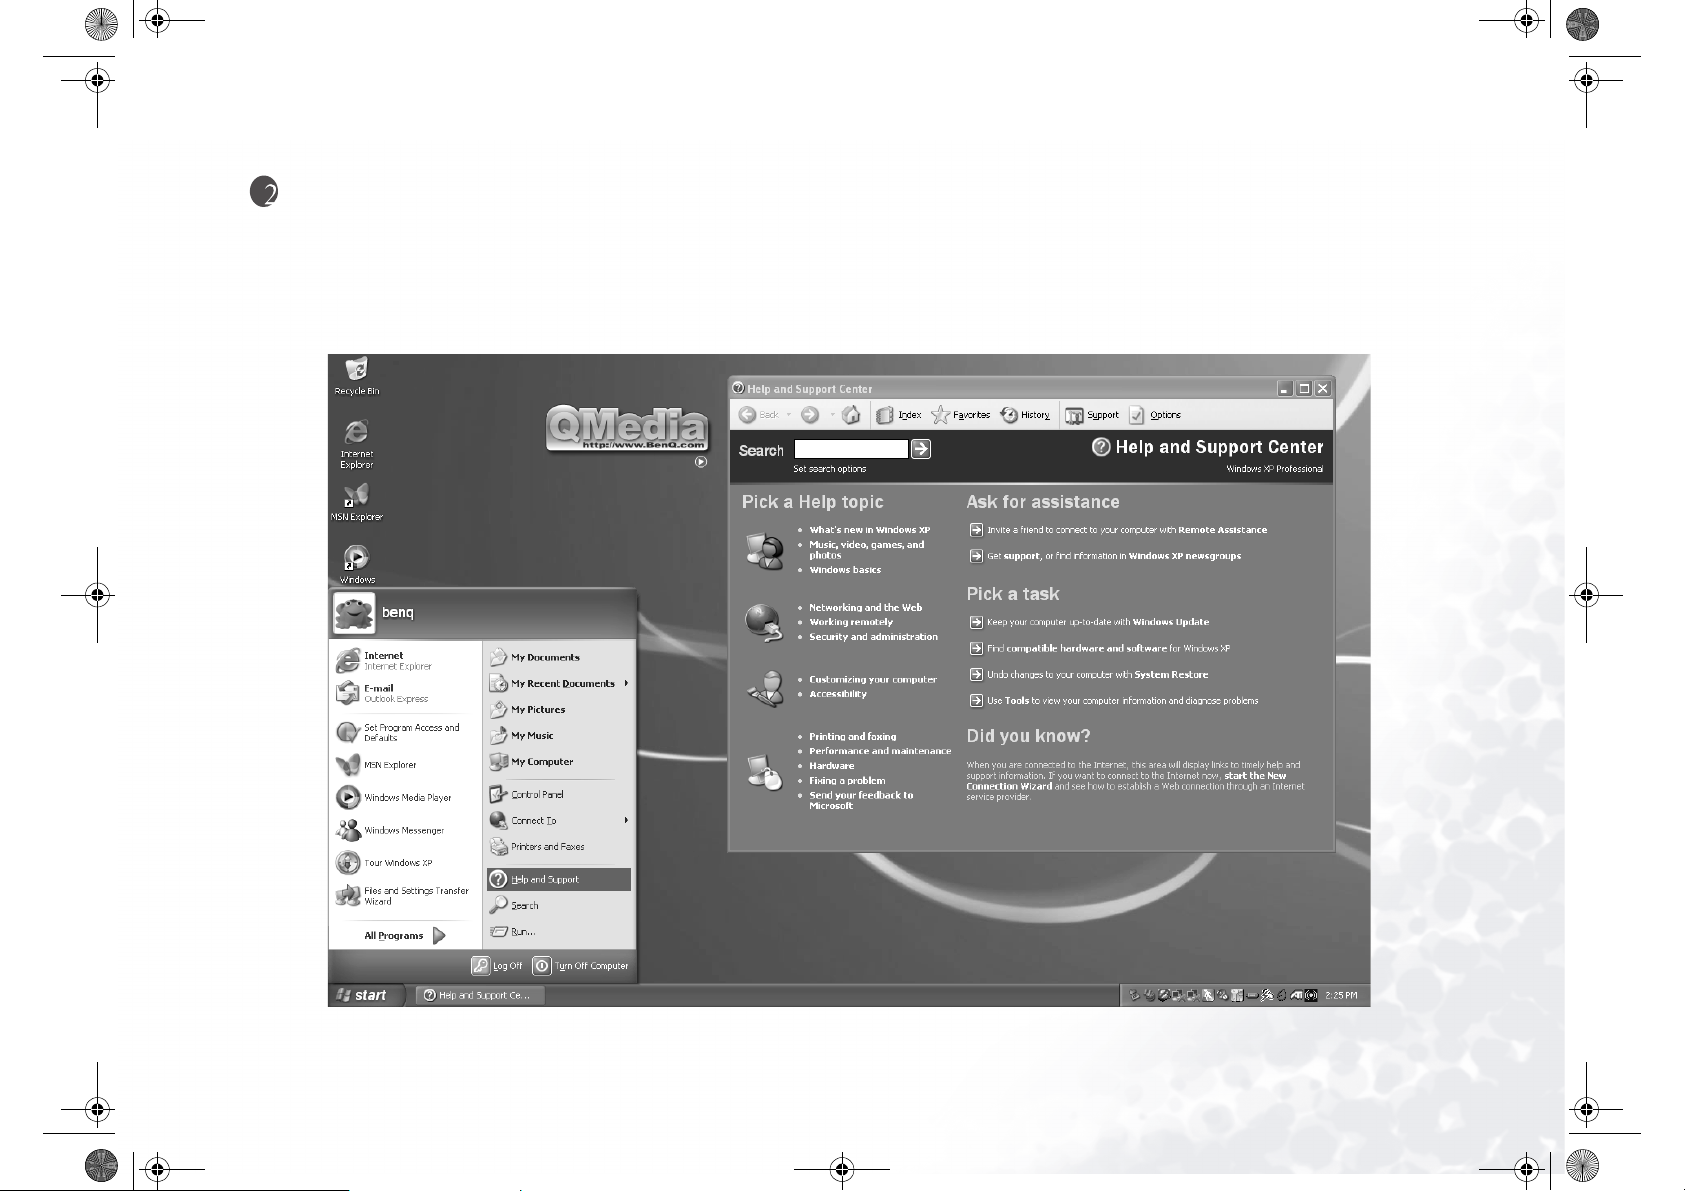
Getting Started with Windows XP
Your Joybook comes installed with Windows XP, Microsoft's latest operating system for consumer PCs. The first time you start up your Joybook, Windows XP will ask you a
few questions. Answer the questions to ensure that your full rights are protected. I
fication label on the packing carton to determine the correct keyboard type.
After you are done answering the questions, Joybook will restart and then you will enter Windows XP for the first time. Click S
that appears. The H
Help and Support Center will appear and you can find more information on how to use Windows XP here.
If you are asked to select the type of keyboard and you are not sure, please check the speci-
Start and select HHelp and Support in the menu
Getting Started with Windows XP 11
Page 16

KC9211F/cppl!!Qbhf!23!!Uvftebz-!Nbsdi!3-!3115!!22;51!BN
Using the Q-Media Bar
The QQ-Media Bar integrates a number of software applications to enhance the multimedia experience on your Joybook 8100. Click on the small
triangle button and a rotating button bar will appear.
From the Q-Media Bar, you can;
Click to start up
Click to open O
Click to open QQMusic. You can use QMusic to listen to MP3 or CD music, burn MP3 music onto a CD (needs optional CD burner), convert and save CD music into
Click to activate P
Click to open C
Click to open EZQ for chatting over the wireless network.
Click to open Q
Click to open QQSync for exchanging data between Joybook and your mobile devices.
Click to view the information about QMedia Bar.
Internet Explorer and surf the Internet.
Outlook Express for accessing e-mail.
MP3 format, or create your personal favorite music album.
PowerDirector with which you can create and edit your personal movie clips.
CD-Maker or NNero Express for burning your favorite music, photos and files onto CDs.
QMedia Center for an integrated audio and visual entertainment experience.
Using the Q-Media Bar12
Page 17

KC9211F/cppl!!Qbhf!24!!Uvftebz-!Nbsdi!3-!3115!!22;51!BN
Setting Up QMedia Bar
Right-click on the QMedia Bar and a menu will appear on it.
Yo u ca n :
• Let QMedia Bar appear on top of all open programs by selecting AAlways on top.
• Close QMedia Bar by selecting E
• Customizing the P1 and P2 hotkeys on your Joybook 8100 by selecting H
Setting.
• Adjust the size of QMedia Bar on the screen by selecting SSize and then select an
appropriate size.
Customizing the hotkeys
Using QMedia Bar, you can setup the P1 and P2 hotkeys on your Joybook 8100 by
yourself.
1. Right click on QMedia Bar and select H
a program you want to open when pressing the hotkey.
2. If the program you want is not on the menu, select .....
Exit.
Hotkey
Hotkey Setting,PP1 or PP2 hotkey and then
An O
Open dialogue box will appear.
3. Browse to select the executable (.exe) file of the desired program and click
Open.
Using the Q-Media Bar 13
Page 18

KC9211F/cppl!!Qbhf!25!!Uvftebz-!Nbsdi!3-!3115!!22;51!BN
Your Digital Entertainment Center - BenQ Joybook 8100
Send and receive e-mail. Browse the
We b.
Listen to music and create your
own custom music collections.
Convert music into the MP3 format
and take your favorite tunes wher-
ever you go.
Exchanging data between Joybook
and your mobile devices.
Create your own movies.
Listen to music, play music and
movies and view digital pictures.
Burn CDs quickly and reliably.
Chat wirelessly with other Joybook
users.
Your Digital Entertainment Center - BenQ Joybook 810014
Page 19

KC9211F/cppl!!Qbhf!26!!Uvftebz-!Nbsdi!3-!3115!!22;51!BN
QMedia Center
With QMedia Center and your wireless remote control, you can easily and comfortably enjoy the multi-media capabilities of your Joybook 8100.
To open QMedia Center, press the button on the remote control, or click
the button on the QMedia Bar.
Playing music/MP3 CD in QMedia Center
1. Turn on the power of your Joybook 8100.
2. Press the Q
less remote control to enter QMedia Center.
3. Press the up or down directional buttons on
the wireless remote control to select M
press the O
4. Insert a music CD into the disc drive.
5. A few seconds later, the tracks on the CD will
appear on the display. Press the U
button on the wireless!remote control to
scroll to a track you want to play, and then
press the
Additional playback operations
Shuffle
1. Press the S
2. Press the directional buttons on the wireless remote control to select S
press the O
Repeat all
1. Press the S
2. Press the directional buttons on the wireless remote control to select R
and press the O
Adjust volume
Press the V
Stop
Press the S
QMedia Center button on the wire-
Music and
OK button.
Up or DDown
OK button
Stop button on the wireless remote control.
OK button.
Stop button on the wireless remote control.
OK button.
Volume Up or VVolume Down button on the remote control.
Stop button on the wireless remote control.
Shuffle and
Repeat All
Playing music files in Joybook 8100
1. Turn on the power of your Joybook 8100.
2. Press the QQMedia Center button on the wire-
less remote control to enter QMedia Center.
3. Press the up or down directional buttons on
the wireless remote control to select M
press the O
4. The contents screen will appear. You can locate
the music files you want to play following the
method below:
• Use the directional buttons on the wireless
remote control to select a folder.
• Press the OOK button on the wireless remote
control to open the selected folder.
• To return to the previous screen, press the BBack
button.
• Press the directional buttons on the wireless
remote control to select a song you want to play
and press the O
If there are more than 9 songs in the selected directory (folder), press the down
directional button to go to the next page.
OK button.
OK button.
Music and
Additional playback operations
Shuffle
1. Press the S
2. Press the directional buttons on the wireless remote control to select S
press the O
Repeat all
1. Press the S
2. Press the directional buttons on the wireless remote control to select R
and press the O
Adjust volume
Press the V
Stop
Press the S
Stop button on the wireless remote control.
Shuffle and
OK button.
Stop button on the wireless remote control.
Repeat All
OK button.
Volume Up or VVolume Down button on the remote control.
Stop button on the wireless remote control.
Your Digital Entertainment Center - BenQ Joybook 8100 15
Page 20

KC9211F/cppl!!Qbhf!27!!Uvftebz-!Nbsdi!3-!3115!!22;51!BN
QMedia Center Music settings
The Music settings of QMedia Center allow you to customize the music playback
function of QMedia Center according to your preferences. Press the directional
buttons on the wireless remote control to select S
In the Settings menu, you can press a directional button on the wireless remote
control to select an option and then the O
return to the previous screen, press the B
Please refer to the table below for a description of the settings and options:
Option/Setting Description
Show visualization
and song information
Select visualization 1. Move to this option using the directional buttons on the
Restore Default Settings
You can choose to display or not display visualization
effects or song information when playing music. Select
this option using the directional buttons on the remote
control and then press the O
remote control and then press the O
the visualization effects list.
2. Move to a visualization effect on the right and press the
OK button to select it.
3. When you are done selecting, move to BBack using the
directional buttons and then press the O
Move to this option using the directional buttons on the
remote control and then press the O
settings to default value.
Settings and press the OOK button.
OK button to select or change settings. to
Back button.
OK button to select YYes or NNo.
OK button to open
OK button.
OK button to reset all
Playing DVD/VCD movies
1. Turn on the power of your Joybook 8100.
2. Press the Q
less remote control to enter QMedia Center.
3. Press the up or down directional buttons on
the wireless remote control to select M
and press the O
4. Insert a movie DVD/VCD into the disc drive.
5. A few seconds later, the DVD/VCD will play
automatically.
QMedia Center button on the wire-
Movies
OK button.
Movie desktop
When playing DVD/VCD movies, click the button located at the bottom part
of the screen and the movie will appear on the Windows desktop as a motion wallpaper.
To return to QMedia Center, press the QMedia Center button on the wireless
remote control.!
Operations during playback
When playing DVD/VCD movies, you can press the Stop button on the wireless
remote control to access the Stop Menu. In the Stop Menu, you can move to an
option using the directional buttons and select it using the O
Resume Movie
Use the directional button on the remote control to scroll to this item and press
OK, and QMedia Center will resume the movie.
Restart
Play the movie from the very beginning.
Title menu
Go to the title menu of the movie.
Eject
Eject the VCD/DVD.
Settings
Enter the S
Settings menu.
OK button.
Your Digital Entertainment Center - BenQ Joybook 810016
Page 21

KC9211F/cppl!!Qbhf!28!!Uvftebz-!Nbsdi!3-!3115!!22;51!BN
QMedia Center VCD/DVD playback settings
If SSettings is selected in the Stop Menu, you will enter the settings menu.
In the Settings menu, you can press a directional button on the wireless remote
control to select an option and then the OK button to select or change settings. to
return to the previous screen, press the B
Please refer to the table below for a description of the settings and options:
Option/Setting Description
Video Use hardware acceleration
Allows you to choose whether to use the hardware acceleration or not.
4:3 output type
If the picture aspect ratio of current movie is 4:3, you can
select the type of display method on the screen.
Color profile
This option allows you to select an appropriate color profile
according to the ambient light condition or other factors
while viewing the movie.
Language Subtitle
If the DVD disc supports, you can select a subtitle language
with this option.
Closed Caption
If the DVD disc supports, you can select a closed caption language with this option.
Audio
If the DVD disc supports, you can select an audio language
with this option.
Restore Default
Settings
Move to this option using the directional buttons on the
remote control and then press the O
tings to default value.
Back button.
OK button to reset all set-
Playing movie files
1. Turn on the power of your Joybook 8100.
2. Press the QQMedia Center button on the wire-
less remote control to enter QMedia Center.
3. Press the up or down directional buttons on
the wireless remote control to select M
and press the O
4. The contents screen will appear. You can locate
the movie files you want to play following the
method below:
• Use the directional buttons on the wireless
remote control to select a folder.
• Press the O
control to open the selected folder.
• To return to the previous screen, press the BBack
button.
• Press the directional buttons on the wireless
remote control to select a movie file you want
to play and press the O
OK button.
OK button on the wireless remote
OK button.
Movies
Your Digital Entertainment Center - BenQ Joybook 8100 17
Page 22

KC9211F/cppl!!Qbhf!29!!Uvftebz-!Nbsdi!3-!3115!!22;51!BN
Viewing digital pictures
1. Turn on the power of your Joybook 8100.
2. Press the Q
less remote control to enter QMedia Center.
3. Press the up or down directional button on the
wireless remote control to select P
press the O
4. The contents screen will appear. You can locate
the pictures you want to view following the
method below:
• Use the directional buttons on the wireless
remote control to select a folder.
• Press the O
control to open the selected folder.
• To return to the previous screen, press the BBack
button.
• Press the directional buttons on the wireless
remote control to select a picture you want to
play and press the O
QMedia Center button on the wire-
Pictures and
OK button.
OK button on the wireless remote
OK button
Options when viewing pictures
Activating slideshow
Select P
Play slideshow using the directional buttons on the wireless remote control
and then press the O
To stop playing slideshow, press the B
Sort pictures by name
Select
Sort by name using the directional buttons on the wireless remote control
and then press the O
Sort pictures by date
Select
Sort by date using the directional buttons on the wireless remote control
and then press the O
Rotate picture
1. Select R
Rotate pictures using the directional buttons on the wireless remote con-
trol and press the O
2. Select a picture you want to rotate using the directional buttons on the wireless
remote control and press the OOK button.
3. Select a rotating directional using the directional buttons on the wireless remote
control and press the OOK button.
OK button.
Back button.
OK button.
OK button.
OK button.
4. The selected picture will be rotated in the specified directional.
5. You can select N
control to continue rotating the next picture, or press the B
to the previous screen.
Next picture and press the OOK button on the wireless remote
Back button to return
Picture settings
When viewing pictures, you can use the directional buttons on the wireless remote
control to select S
In the Settings menu, you can press a directional button on the wireless remote
control to select an option and then the O
return to the previous screen, press the B
Please refer to the table below for a description of the settings and options.
Option/Setting Description
Slide duration You can setup the duration of each picture in a slideshow
Transition effects You can specify a transition effect between each picture in a
Play music during
slideshow
Settings and then press the OOK button to access picture settings.
OK button to select or change settings. to
Back button.
with this option.
Move the selection focus on the left or right arrow button
using the directional buttons on the wireless remote control
and then press the OOK button to increase or decrease dura-
tion.
slideshow with this option.
Move the selection focus on the left or right arrow button
using the directional buttons on the wireless remote control
and then press the O
You can choose to play background music when playing a
slideshow with this option.
Move the selection focus on the left or right arrow button
using the directional buttons on the wireless remote control
and then press the O
OK button to select a transition effect.
OK button to select YYes or NNo.
Your Digital Entertainment Center - BenQ Joybook 810018
Page 23

KC9211F/cppl!!Qbhf!2:!!Uvftebz-!Nbsdi!3-!3115!!22;51!BN
Background music You can choose the background music for slideshows with
this option.
1. Move the selection focus on the arrow button using the
directional buttons on the wireless remote control and
Restore Default
Settings
press the O
2. Select a music file following the method below:
• Use the directional buttons to select a folder.
• Press the O
• To return to the previous screen, press the B
• Press the directional buttons on the wireless remote con-
trol to select the music file you want and press the OOK but-
ton.
Move to this option using the directional buttons on the
remote control and then press the O
tings to default value.
OK button.
OK button to open the selected folder.
Back button.
OK button to reset all set-
Setting up QMedia Center
1. Turn on the power of your Joybook 8100.
2. Press the QQMedia Center button on the wire-
less remote control to enter QMedia Center.
3. Press the up or down directional buttons on
the wireless remote control to select S
and press the O
Press the directional buttons on the wireless
remote control to move the selection focus to an
option, and then press the O
or change settings.To return to the previous
screen, press the B
Please refer to the table below for a description of the settings and options.
Option/Setting Description
Screen ratio You can setup the screen aspect ratio according to the display
About QMedia
Center
Restore Default
Settings
OK button.
OK button to select it
Back button.
size. It is recommended that you select W
Move the selection focus on the left or right arrow button
and then press the OOK button to select a ratio.
Displays detailed information about QMedia Center.
Move the selection focus on this option and then press the
OK button.
Move to this option using the directional buttons on the
remote control and then press the O
tings to default value.
Settings
Widescreen.
OK button to reset all set-
Your Digital Entertainment Center - BenQ Joybook 8100 19
Page 24

KC9211F/cppl!!Qbhf!31!!Uvftebz-!Nbsdi!3-!3115!!22;51!BN
Sending and Receiving E-mail
You can use Outlook Express to send and receive e-mail.
Jn order to use e-mail, you must have an account with an ISP (Internet service provider) and perform needed software configuration. For detailed information on accounts, passwords, e-mail servers and other settings, please consult your system administrator or ISP.
1. Open Outlook Express by pressing the hotkey on your Joybook 8100 or clicking on the button on the QMedia Bar.
2. After the Outlook Express
application window
opens, you can start to
write, send and receive email.
For more information on how to use Outlook Express, please consult the on-line Help by clicking Help and then select Contents and Index.
Your Digital Entertainment Center - BenQ Joybook 810020
Page 25

KC9211F/cppl!!Qbhf!32!!Uvftebz-!Nbsdi!3-!3115!!22;51!BN
Getting Online
You can use Internet Explorer to browse web pages on the Internet and access various on-line information.
In order to get online, you must have an account with an ISP (Internet service provider) and perform needed software configuration. For detailed information on accounts, passwords and other settings, please consult your system administrator or ISP.
1. Open Internet Explorer by pressing the hotkey on your Joybook 8100 or clicking on the button on the QMedia Bar.
2. After the Internet
Explorer application window opens, enter the
address for the web page
you wish to view in the
Address field and then
click G
Go to.
For more information on how to use Internet Explorer, please consult the on-line Help by clicking Help and then select Contents and Index.
Your Digital Entertainment Center - BenQ Joybook 8100 21
Page 26

KC9211F/cppl!!Qbhf!33!!Uvftebz-!Nbsdi!3-!3115!!22;51!BN
Listening to Music and Creating Custom Music Collections
QMusic is the perfect tool for managing your favorite music collections. You can use it to play music CDs and MP3 files, burn MP3 songs onto CDs, convert audio CD tracks
to MP3 format for storage on your hard disk drive, or create custom music compilation. If you also have a BenQ Joybee MP3 digital audio player, you can also use QMusic to
update songs in the player quickly and easily.
Click the button on the QMedia Bar to open QMusic.
Display the status of the action
Display Area
currently being performed.
Action Buttons
Used to execute certain actions
in QMusic, such as burning a
CD, converting songs, stopping
the current action, adding songs
or playlists..., etc.
Media
Which contains:
Music Library
Lists your music file collections.
My Joybee
This is where you can store the
songs to be updated to the Joy-
bee Digital Audio Player.
Super DJ
Allows you to create playlists for
Super DJ.
My Play Lists
This is the place to store your
own music playlists.
MP3 Disc Playlists
This is the location where you
can arrange the directories for
your favorite MP3 music and
creation of CD.
Play Buttons
Used to control the playback actions or
adjust volume when playing music.
System!Buttons
Controls the QMusic window
or opens the on-line Help.
Search Window
Allows you to search for a song
in your music collection.
Feature!Buttons
Allows you to customize sound
effects, setup QMusic or change
play modes..., etc.
About QMusic
Click to view detail
information about QMusic.
Status Bar
Displays the details of your song list.
For more information on how to use QMusic, please consult the on-line Help by clicking the button.
Your Digital Entertainment Center - BenQ Joybook 810022
Page 27

KC9211F/cppl!!Qbhf!34!!Uvftebz-!Nbsdi!3-!3115!!22;51!BN
Making Your Own Movies
Your Joybook 8100 can help you edit video files to create a movie that you can share with family and friends. With a digital video camera or other source of digital video footage, you can take advantage of the PoweDirector to produce your very own cinematic masterpiece-or if you're less ambitious, just the coolest home video ever!
Click the button on the QMedia Bar to open PowerDirector.
Media Databank
Shows various types
of raw media files
that can be used in
the storyboard pane.
Preview Pane
Displays previews of
video footage, transi-
tions, and various
types of effects.
i-Power
Brings up the i-Power
online resources portal website.
Minimize
Minimizes the Power
Director application
window.
Close
Closes the Power
Director.
Mode Wheel
Used for switching
between various editing modes.
Trash Can
For deleting items
from the Media
Databank or Story-
board pane.
Storyboard Pane
Provides area for
manipulating all the
media segments,
transitions, special
effects and user set-
tings needed to pro-
duce the final movie.
For more information on how to use PoweDirector, please consult the on-line Help by clicking Help and selecting PowerDirector Pro Help.
Your Digital Entertainment Center - BenQ Joybook 8100 23
Volume
Controls audio volume.
Page 28

KC9211F/cppl!!Qbhf!35!!Uvftebz-!Nbsdi!3-!3115!!22;51!BN
Burning CDs
The Nero Express software that comes with your Joybook 8100 enables you to
burn different types of data to CD by simply following the easy step-by-step
instructions.
Click the button on the QMedia Bar to open Nero Express.
1. Insert a blank CD into the CD-burner.
2. Take burning an audio (music) CD that you can play on any audio CD players
as an example, move the cursor onto the icon , and then click the MMake
Audio CD item that appears underneath.
4. Browse to select the music files in the dialogue box that appears and then click
Add. Repeat this step if you want to burn more music files onto the CD.
5. When you are done selecting files, click FFinished.
3. In the window that follows, click A
Your Digital Entertainment Center - BenQ Joybook 810024
Add.
6. The total selected file size will be calculated and displayed by a blue bar at the
bottom part of the window. If the blue bar goes over the dotted red line, you
Page 29

KC9211F/cppl!!Qbhf!36!!Uvftebz-!Nbsdi!3-!3115!!22;51!BN
have to delete some files from the selected files list by right-clicking a file and
Delete. Click NNext.
select D
7. The following window will appear. Click B
Burn.
8. Nero Express will start burning files on to the CD.
9. When the burning process has been carried out successfully, the following dialogue box will appear. Click O
10. Click N
Next.
OK.
11. You can now choose to burn another CD with the same selection of files again,
burn a CD with different files, enter Cover Designer to design the cover for the
Your Digital Entertainment Center - BenQ Joybook 8100 25
Page 30

KC9211F/cppl!!Qbhf!37!!Uvftebz-!Nbsdi!3-!3115!!22;51!BN
CD you just burned or save the setting of this CD for future use. Or, you can
simply click E
For more information on how to use Nero Express, please consult the on-line Help
by clicking the icon on the Nero Express welcome window and then select
Help Topics.
Exit to exit Nero Express.
Your Digital Entertainment Center - BenQ Joybook 810026
Page 31

KC9211F/cppl!!Qbhf!38!!Uvftebz-!Nbsdi!3-!3115!!22;51!BN
Wireless Magic - Using the Built-In Wireless LAN Function
With the built-in wireless LAN card on your Joybook 8100, you can access Ethernet network wirelessly without the constraints of network cables.
At home or in the office, you need an access point, which serves as an air station to
make transmission possible. Outdoors in places such as in coffee shops or library,
you can inquire the service personnel about an account.
To connect to a wireless LAN network:
1. Make sure that you are located within the wireless network service area and you
have already obtained the user name and password for accessing such network
from the service provider.
2. Turn on your Joybook 8100 and press the Wireless Network Card
Switch to turn on the wireless network function.
3. Double-click on the icon on Windows system tray located at the lower
right corner of the Desktop.
4. Select a wireless network. Fill in the blank with your network key and click CCon-
nect.
5. After you are connected to the wireless network, the network status will appear
on the screen.
To access Internet, you may have to undergo another authorization process and
enter username and password. For details, please consult your ISP.
If you are not to use the WLAN Card in your Joybook 8100, dial-up connection using
the modem port, ADSL and broadband transmission using the LAN port would also
do. Please contact your local ISP to get more information.
When travelling by air, please be sure to turn off wireless networking to avoid any
possible risks to flight safety.
If your Joybook 8100 is equipped with the Ethernet network and the wireless network functions, the system will automatically optimize the working environment
itself when you connect to the Internet.
Your Digital Entertainment Center - BenQ Joybook 8100 27
Page 32

KC9211F/cppl!!Qbhf!39!!Uvftebz-!Nbsdi!3-!3115!!22;51!BN
Chatting over the Air - Using EZQ
If your Joybook 8100 is equipped with the wireless LAN function, EZQ allows you
to chat wirelessly through the peer-to-peer wireless LAN connection with another
user who also uses a Joybook 8100 that has wireless LAN function.
Click the button on the QMedia Bar to open EZQ.
1. The following dialogue box will appear. You can choose to sign in to the BenQ
Joybook Family as a Joybook Family member or simply enter your name, sex
and e-mail to login temporarily.
Chatting with a Buddy
To chat with someone, you can choose to perform one of the following:
• Click a name under the Buddy List and then click C
• Double-click on a name under the Buddy List.
• Right-click a name under the Buddy List and select S
menu that appears.
The following Chat Window will appear.
Menu Bar
Tool Bar
Conversation Box
Text
Chat message Box
Chat on the Tool Bar.
Send Message in the sub-
2. The following EZQ Window will appear. If there are other BenQ Joybook EZQ
users nearby, their names will appear in the chat screen under the Buddy List.
Menu Bar
Tool Bar
Public Chatroom
Buddy List
Status Bar
Your Digital Entertainment Center - BenQ Joybook 810028
Enter your chat message in the Chat Message Box and click S
will appear in the Conversation Box.
Send. Your message
You can also use the options on the Tool Bar to access certain actions when chatting.
Buttons on the Tool Bar
Option Description
Profile Click this button to open a dialogue box that contains the informa-
tion about the buddy you are chatting with.
Page 33

KC9211F/cppl!!Qbhf!3:!!Uvftebz-!Nbsdi!3-!3115!!22;51!BN
Alert Click this button to play a doorbell chime and draw your buddy’s
attention.
History Click this button to view the chatting history log in another new
window.
Deny Click this button to deny all chat messages from current buddy. If
this button is clicked, the smiley of current buddy will turn into .
Click this button again to cancel denying the buddy’s messages.
The Public Chatroom
In addition to chatting with a buddy privately, you can also enter the Public Chatroom where all EZQ users nearby can chat together.
To enter Public Chatroom, double-click C
The following Public Chatroom Window will appear. Now you can start chatting
in the Public Chatroom.
Chatroom in the EZQ Window.
You can right-click on the EZQ icon on Windows system tray located at the lower
right corner of the Desktop and select Configuration from the menu that appears to
configure the settings of EZQ.
Your Digital Entertainment Center - BenQ Joybook 8100 29
Page 34

KC9211F/cppl!!Qbhf!41!!Uvftebz-!Nbsdi!3-!3115!!22;51!BN
The Good Partner of Your Personal Mobile Devices - QSync
QSync is a software program that allows you to synchronize various data in your mobile devices (such as a GSM/GPRS mobile phone) with your Joybook 8100.
To open QSync, click the button on the QMedia Bar.
For more information on how to use QSync, please consult the on-line Help by clicking Help and then select Online Help....
Your Digital Entertainment Center - BenQ Joybook 810030
Page 35

KC9211F/cppl!!Qbhf!42!!Uvftebz-!Nbsdi!3-!3115!!22;51!BN
Attaching External Display Devices
Attaching a VGA Display Device
When giving a presentation, you can output the Joybook 8100's video signal to an external display device, such as a projector or monitor. Press the Fn + F3 hotkey combination to switch between Joybook 8100's own LCD panel and the attached display device, or use simultaneous display.
Monitor
Projector
Attaching External Display Devices 31
Page 36

KC9211F/cppl!!Qbhf!43!!Uvftebz-!Nbsdi!3-!3115!!22;51!BN
S-Video Out
The S-Video Out port allows you to output display signals to a television set or VCR for viewing or recording.
TV
VCR
Attaching External Display Devices32
Page 37

KC9211F/cppl!!Qbhf!44!!Uvftebz-!Nbsdi!3-!3115!!22;51!BN
Installing Additional Memory
If you wish to upgrade the system memory, you can replace the existing memory module with a higher-capacity one. However, please note that the product
warranty as provided by BenQ d
result of your own discretionary upgrade or memory replacement. Therefore,
it is recommended that you take your Joybook 8100 to the BenQ distributor
or customer service center for the upgrade or memory replacement.
It is recommended that you use only BenQ DDR333 memory modules for your Joybook.
does not cover any damage to the machine as a
1. Turn off Joybook 8100, and disconnect the AC adapter. Turn Joybook 8100 over.
Memory
cover
Battery
Installing Additional Memory 33
Page 38

KC9211F/cppl!!Qbhf!45!!Uvftebz-!Nbsdi!3-!3115!!22;51!BN
2. Take out the battery, and use a screwdriver to remove the screws that secure the
memory cover. Open the cover.
4. Gently push the free edge downwards until the module locks into place.
Installing Additional Memory34
3. Align the memory module with the slot, and then insert it.
5.!Replace the cover, and use a screwdriver to secure it with the screws. Insert the battery, and then connect the AC adapter. When you start Joybook 8100, it will automatically test and configure the new memory.
Page 39

KC9211F/cppl!!Qbhf!46!!Uvftebz-!Nbsdi!3-!3115!!22;51!BN
Recovering Your System
Before following any of the methods below to restore your system, you should try
to use Microsoft Windows XP System Restore tool to restore under Windows. If you
don't know where the System Restore tool is, you can just insert the Recovery CD
Disc 1 into CD-ROM drive under Windows, then Recovery CD will auto-launch the
Windows XP System Restore tool.
System recovery is a data destructive process. You should backup all data and
applications prior to restoring. Please make sure your system is connected to AC
Power before continuing.
Recovering From Your Hard Disk
Your Joybook provides you with a One-Button Quick Recovery method from its
hard drive.
To use One-Button Quick Recovery:
1. Restart your Joybook.
2. During the restart process, press the F10 key when you see "<-+>" symbols displayed on the upper-left part of the screen. The system will then enter the Quick
Recovery mode.
3. Follow the instructions on the screen.
Recovering Using the Recovery CDs
You should receive a Recovery CD pack containing CDs that you can use to
rebuild your system. These Recovery CDs will help you to restore the hard disk
with the original content that was installed when you purchased your Joybook.
Follow the steps below to rebuild your hard disk.
The Primary Partition (Drive C:) will be reformatted. The data files on Extended Partition (Drive D:) will not be erased.
To recover your system using the recovery CDs:
1. When Joybook starts up, press the E
Power-On Self-Test (POST) while the BenQ Joybook logo is being displayed.
2. Insert the Recovery CD Disc 1 into the CD-ROM drive.
CD-ROM/DVD from Boot Menu and press the EEnter key.
3. Select C
4. Then system will boot from CD-ROM and you will see the Quick Restore
screen.
5. When you finish the recovery process, remember to remove the Recovery CD.
Esc key to enter the Boot Menu during
Reinstalling Software or Driver
To install/reinstall the software or driver that was installed when you purchased
your Joybook, you could find the source files on the Recovery CD Disc 2.
After you complete recovering your Joybook 8100 from the hard disk or recovery
CDs, please follow the steps below to disable the vertical scroll bar on the touch
pad and re-activate the Infrared port/
To disable the vertical scroll bar:
1. Double-click the icon on Windows system tray located at the lower right cor-
ner of the Desktop.
2. The following window will appear on the screen. Click the Device Settings tab.
Recovering Your System 35
Page 40

KC9211F/cppl!!Qbhf!47!!Uvftebz-!Nbsdi!3-!3115!!22;51!BN
3. Click the Settings button.
4. A new window will appear. Click Virtual Scrolling on the left part of the new window.
5. Uncheck the Enable vertical scrolling and Enable horizontal scrolling checkboxes and then click Apply, OK.
To re-activate the Infrared port:
1. Click the Start button on Windows Taskbar and right-click on My Computer. In the
submenu that appears, select Properties.
2. Click the Hardware tab in the dialogue that appears.
Recovering Your System36
Page 41

KC9211F/cppl!!Qbhf!48!!Uvftebz-!Nbsdi!3-!3115!!22;51!BN
3. Click Device Manager.
4. Click the “+” sign beside Infrared Devices.
5. Right-click on IrDA Fast Infrared Port and select Properties in the submenu that
appears.
6. Click the Advanced tab.
Recovering Your System 37
Page 42

KC9211F/cppl!!Qbhf!49!!Uvftebz-!Nbsdi!3-!3115!!22;51!BN
7. Click to select Infrared Transceiver A in the Property box, and then select HP
HSDL-1100/2100 in the Value drop-down listbox. Click OK.
Recovering Your System38
Page 43

KC9211F/cppl!!Qbhf!4:!!Uvftebz-!Nbsdi!3-!3115!!22;51!BN
Recommendations and Troubleshooting
The following are descriptions of situations that you may encounter during use of
the Joybook 8100, along with basic troubleshooting steps. If you are not able to
resolve the issue, immediately contact a BenQ service center for assistance.
Joybook 8100 will not start up, even though the power button was pressed.
Check the power indicator.
• If it is not lit up, Joybook 8100 is not being supplied by power-either from an
external power source via the AC adapter or from the battery. Make sure that the
AC adapter is correctly inserted into the power jack of Joybook 8100 and a working electrical socket, and allow the battery to begin charging.
• If the power indicator is lit up in blue, the Joybook 8100 is being supplied normally with power, meaning that the problem lies elsewhere.
• If you have added any hardware (for example, memory), check if it has
been installed correctly.
• It is possible that certain operating system files are damaged or missing.
If so, you may need to first back up all your data and then use the restore
CD that came with the Joybook 8100 to return the its software to original state. Please note however that doing so will cause all of your personal data on the hard disk drive to be lost!
There is nothing visible on the screen.
Check the power indicator.
• If it is not lit up, no power is being supplied to Joybook 8100. Connect the AC
adapter and restart Joybook 8100.
• If it is lit up in orange, Joybook 8100 has entered sleep mode in order to conserve
power. Simply pressing the power button should return Joybook 8100 to normal
operating mode.
• If it is lit up in blue, Joybook 8100 is being supplied normally with power. There
are two possible causes for the problem.
• The screen's brightness may be set too low. Use the Fn + F5 hotkey combination to increase the brightness.
• The display mode may be set to use an external display. Use the Fn + F3
hotkey combination to switch the display mode to use Joybook 8100's
own LCD panel or to use simultaneous display.
There is no sound coming from the speakers.
Check the following:
• The speakers may have been muted. Look at the volume control (speaker icon)
on the Windows Taskbar to see if mute has been set. If so, turn off the mute.
• The speakers may have been turned off. Use the Fn + F7 hotkey combination to
turn them on.
• The volume may have been set too low. Use the Fn + F9 hotkey combination to
increase the volume.
• An earphone or external speakers may be connected to the audio-out jack, automatically turning off Joybook 8100's internal speakers.
CD or DVD discs don't seem to be detected by Joybook 8100.
Please verify the following:
• Joybook 8100 is turned on.
• There are no other discs inserted in the optical drive.
• The disk that you want to use is properly inserted in the optical drive.
• The CD or DVD discs are in good condition.
DVD movies will not play.
The region code of the DVD inserted must match that of the DVD playback software used. This region code can be set up to five times. If you have not reached
this limit, a prompt will appear that will allow you to change the region code of
the software to match that of the move. Otherwise, you can only play back DVDs
with the same region code as the last DVD played back successfully.
Joybook 8100 is unable to use the infrared port to communicate with other
devices.
Please confirm the following:
• Communication speeds for Joybook 8100 and the external device are identical.
• The infrared port is clean, and there are no objects blocking the path between
Joybook 8100 and the external device.
• The distance and angle between Joybook 8100 and device do not exceed the
effective range of the port.
• You are not attempting to establish the link under conditions of direct sunlight.
• There are no incompatibilities between the communications software that is
attempting to establish the infrared link and any other communications software on Joybook 8100. For further information, please consult the manual for
the particular software.
Recommendations and Troubleshooting 39
Page 44

C°C°C°C
KC9211F/cppl!!Qbhf!51!!Uvftebz-!Nbsdi!3-!3115!!22;51!BN
Information on Safety, Cleaning, and Battery Maintenance
Safety
When setting up or operating Joybook 8100, please pay special attention to the
following:
1. Keep this manual in a safe place for easy reference when needed.
2. Make sure to follow all instructions and warnings related to the system.
3. Place Joybook 8100 on stable, level surface, and ensure that the ventilation holes
are not obstructed.
4. Do not expose Joybook 8100 to rain or excess humidity, and keep it away from
liquids (such as beverages, faucets, and so on).
5. Do not expose Joybook 8100 to direct sunlight, and keep it away from sources
of heat (such as radiators, space heaters, stoves, and so on).
6. Do not expose Joybook 8100 to heavy impacts or strong vibrations. When closing Joybook 8100, do not use excessive force.
7. Do not place Joybook 8100 in environments where the temperature is below 20 or above 60 , or operate Joybook in environments where the tempera-
°
ture is below 0 or above 40 .
8. Do not place Joybook 8100 in the area of strong magnetic fields.
9. Use an appropriate electrical outlet, and make sure that no heavy objects are
placed on the AC adapter or power cord.
10. The AC adapter is a high-voltage component. Do not attempt to repair it on
your own. If it becomes damaged, please contact an authorized BenQ distributor or service center.
11. Make sure that the modem port is used only with a regular analog phone line.
Do not connect a digital phone line to the modem port, as this will cause damage to the modem.
When updating/upgrading system firmware (BIOS), do not connect or re-connect
the power adapter.
4. Follow the local laws governing the disposal of batteries. As far as possible, submit used batteries to be recycled.
5. Use of improper batteries, or attempting to disassemble a battery, may result in
explosions. Follow vendor recommendations in using batteries of the identical
or equivalent type as replacements for worn-out batteries.
Cleaning Your Joybook 8100
When cleaning Joybook 8100, follow these steps:
1. Turn off Joybook 8100, disconnect the AC adapter, and remove the battery.
2. Use a damp cloth to wipe the outer surface of Joybook 8100. Do not apply liquid or spray cleaners directly on the Joybook 8100.
3. Do not use cleaners containing alcohol or acetone. Instead, use cleaning fluids
specially formulated for LCD screens.
Battery Maintenance
1. Do not use AC adapters other than the one provided with Joybook 8100.
2. After an extended period of usage, the battery's ability to retain charge will
gradually deteriorate-this is entirely normal. To replace an old battery, turn off
Joybook 8100, and be sure to use a new battery from the same manufacturer.
3. Do not place the battery within reach of children, and keep well away from
sources of fire.
Information on Safety, Cleaning, and Battery Maintenance40
Page 45

KC9211F/cppl!!Qbhf!52!!Uvftebz-!Nbsdi!3-!3115!!22;51!BN
<Memo>
Information on Safety, Cleaning, and Battery Maintenance 41
Page 46

KC9211F/cppl!!Qbhf!53!!Uvftebz-!Nbsdi!3-!3115!!22;51!BN
<Memo>
Information on Safety, Cleaning, and Battery Maintenance42
Page 47

KC9211F/cppl!!Qbhf!54!!Uvftebz-!Nbsdi!3-!3115!!22;51!BN
<Memo>
Information on Safety, Cleaning, and Battery Maintenance 43
Page 48

KC9211F/cppl!!Qbhf!55!!Uvftebz-!Nbsdi!3-!3115!!22;51!BN
<Memo>
Information on Safety, Cleaning, and Battery Maintenance44
 Loading...