

Page 1

USB driver instalation
User Manual
Version 1.0, Code No. 20 751 029
Page 2

USB driver installation Table of contents
1. Installing USB driver on your PC (WINDOWS XP)............................................... 3
1.1. Standard USB communication setup .................................................................... 3
1.2. Installing PC software ........................................................................................... 7
1.3. Configuring an USB connection between BENNING IT 120 and PC .................... 7
2. Debugging communication (WINDOWS XP)........................................................ 9
3. Uninstalling USB Drivers (WINDOWS XP).......................................................... 16
4. Installing USB driver on your PC (WINDOWS 2000)..........................................17
4.1. Standard USB communication setup .................................................................. 17
4.2. Installing PC software ......................................................................................... 23
4.3. Configuring an USB connection between BENNING IT 120 and PC .................. 23
5. Debugging communication (WINDOWS 2000)................................................... 25
6. Uninstalling USB Drivers (WINDOWS 2000)....................................................... 32
2
Page 3
USB driver installation Installing USB driver on your PC (WIN. XP)
1. Installing USB driver on your PC (WIN. XP)
1.1. Standard USB communication setup
1. Turn on the BENNING IT 120, set communication mode to USB (consult
BENNING IT 120 User manual) and connect BENNING IT 120 and PC with USB
cable.
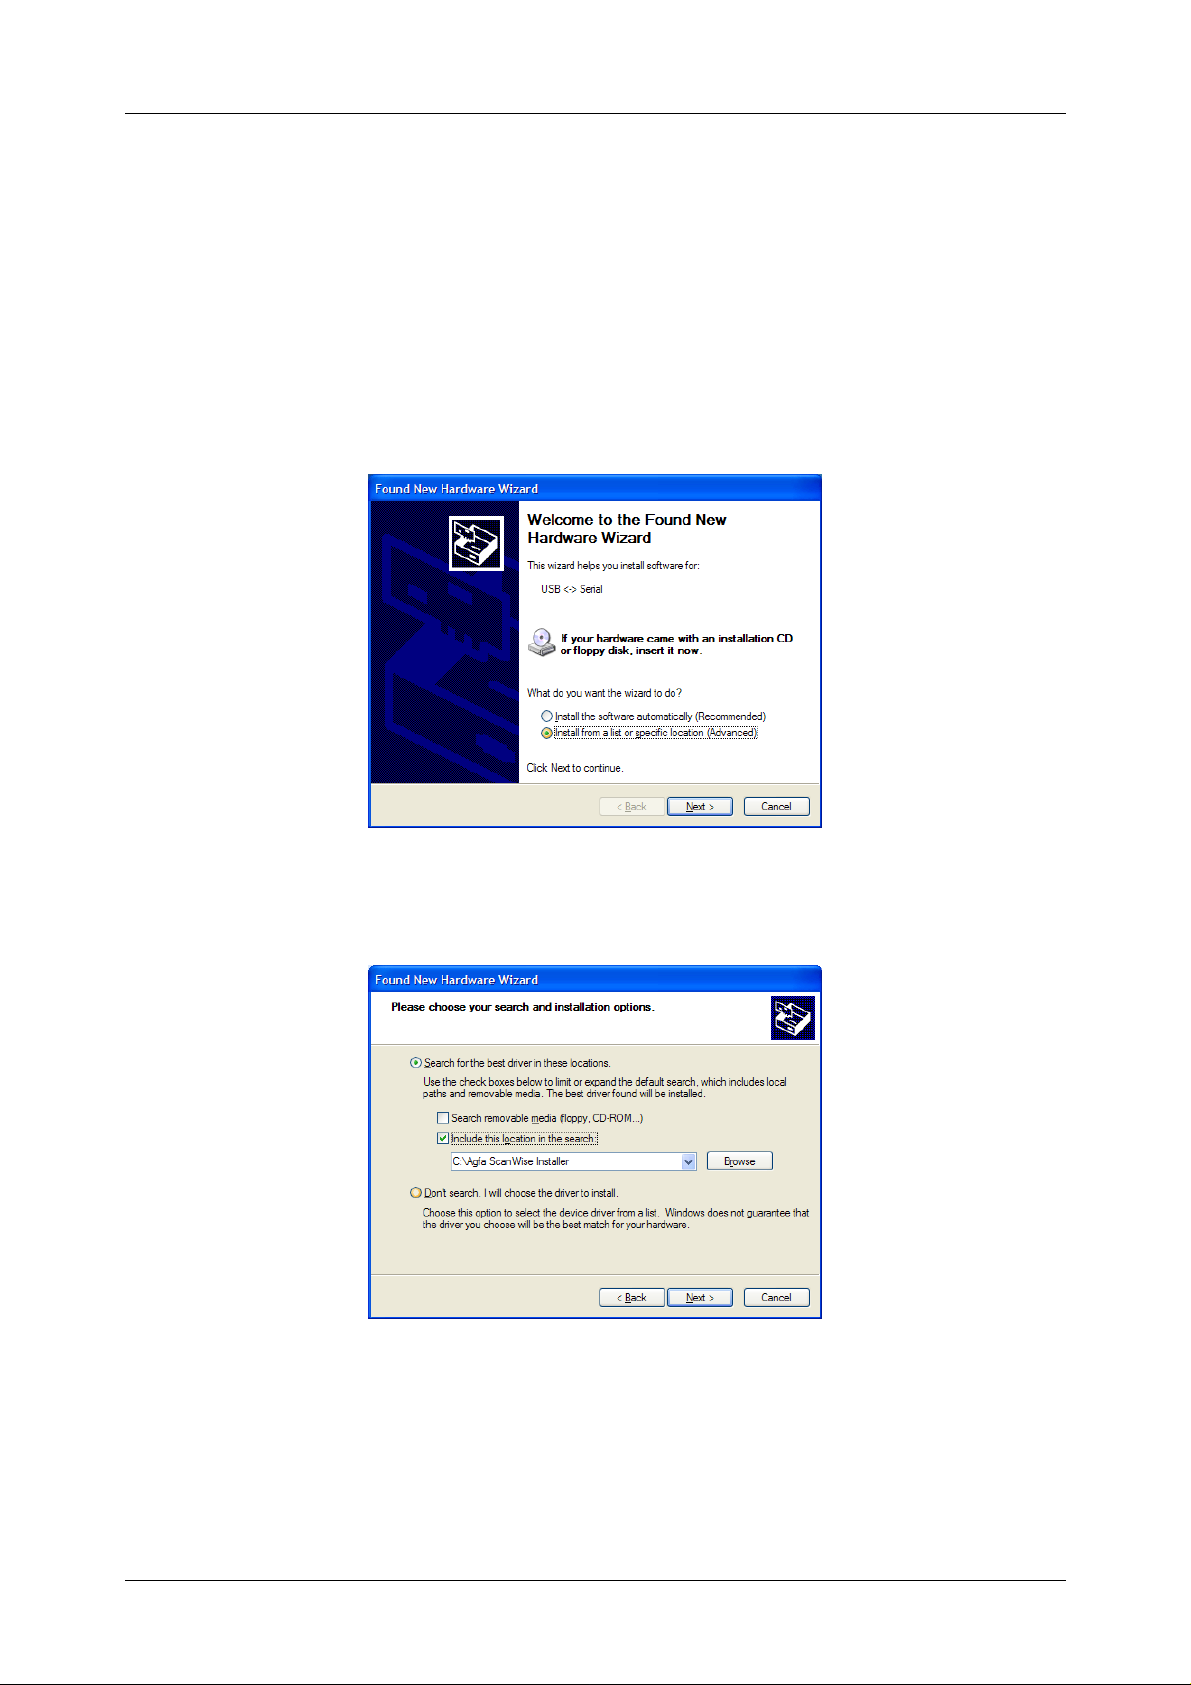
2. Next screen will show on your desktop.
3. Make sure that the Install from a list or specific location (Advanced) is
selected and click Next.
4. Make sure that the Search for the best driver in these locations is selected
and Include this location in the search is checked. Click Browse.
3
Page 4
USB driver installation Installing USB driver on your PC (WIN. XP)
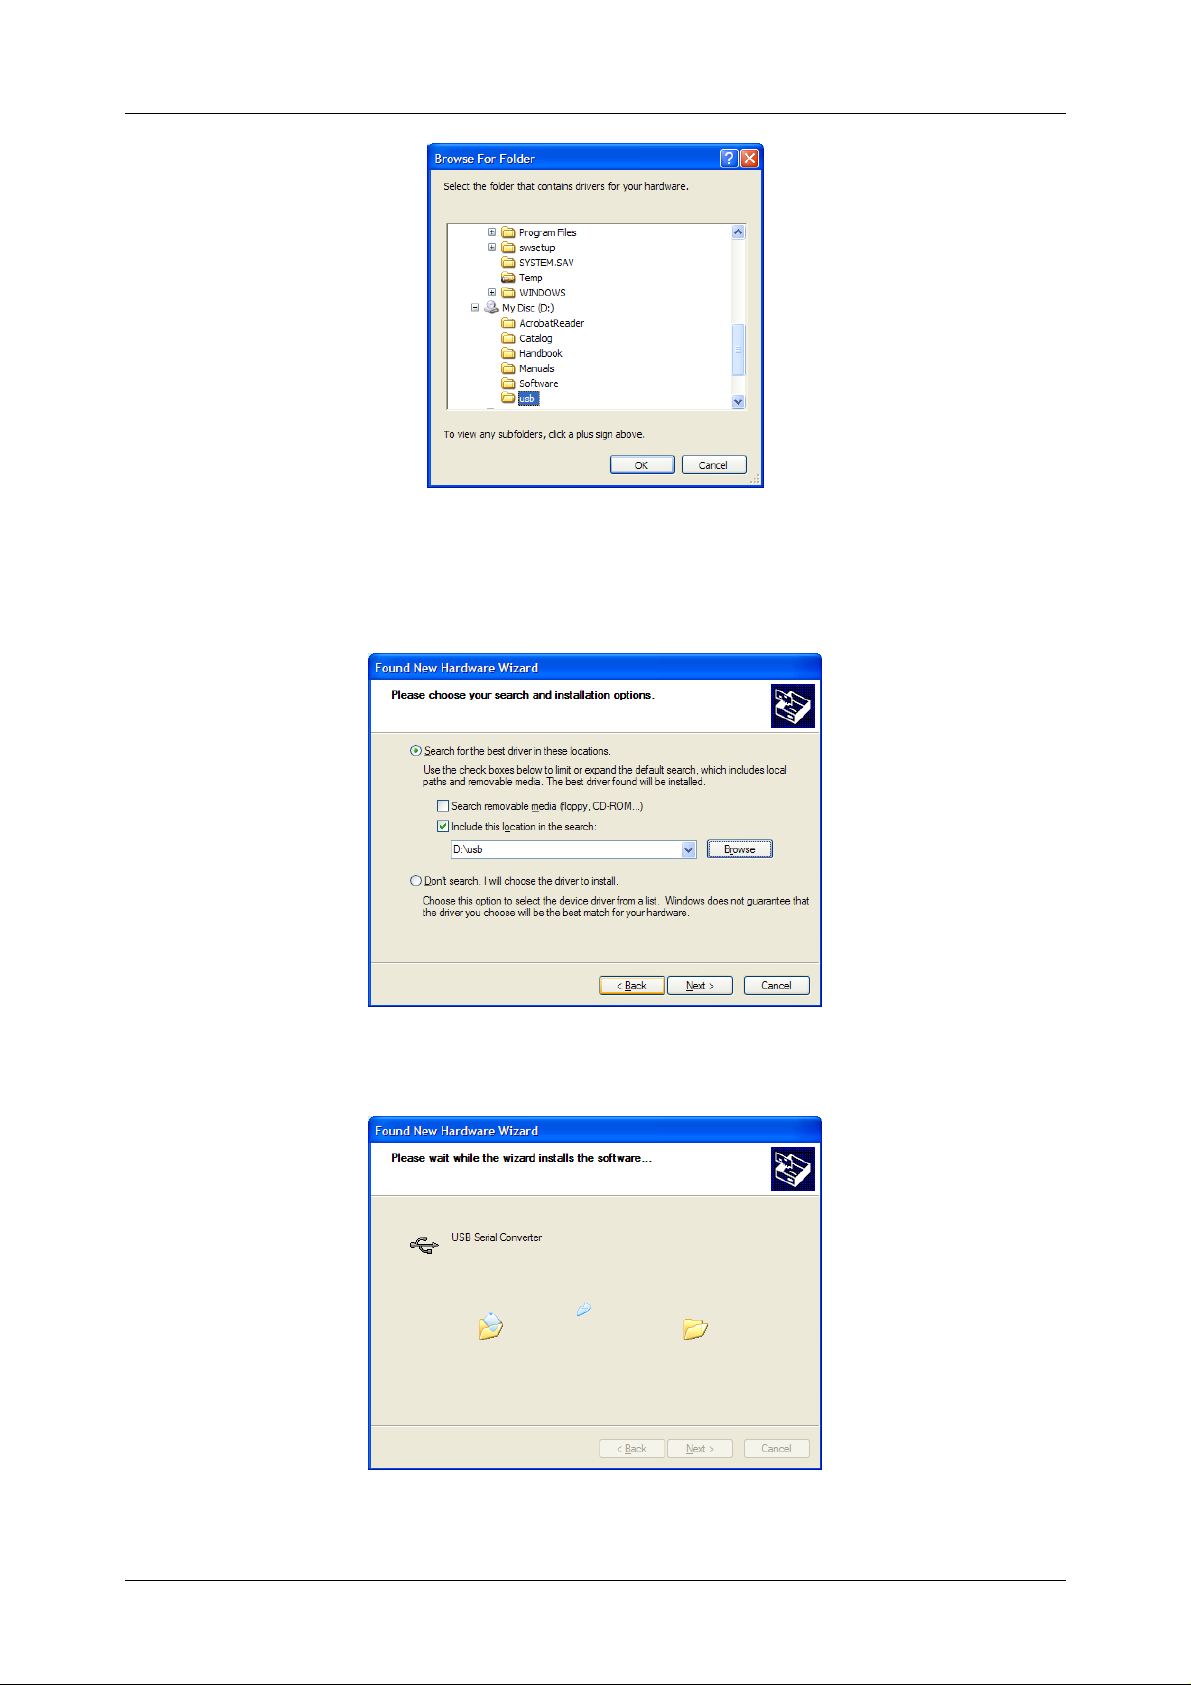
5. Select USB map on your CD (BENNING IT 120 software CD must be inserted in
your CD drive). Click OK.
6. When you find USB map on the CD click Next.
7. Hardware wizard found correct driver file.
4
Page 5

USB driver installation Installing USB driver on your PC (WIN. XP)
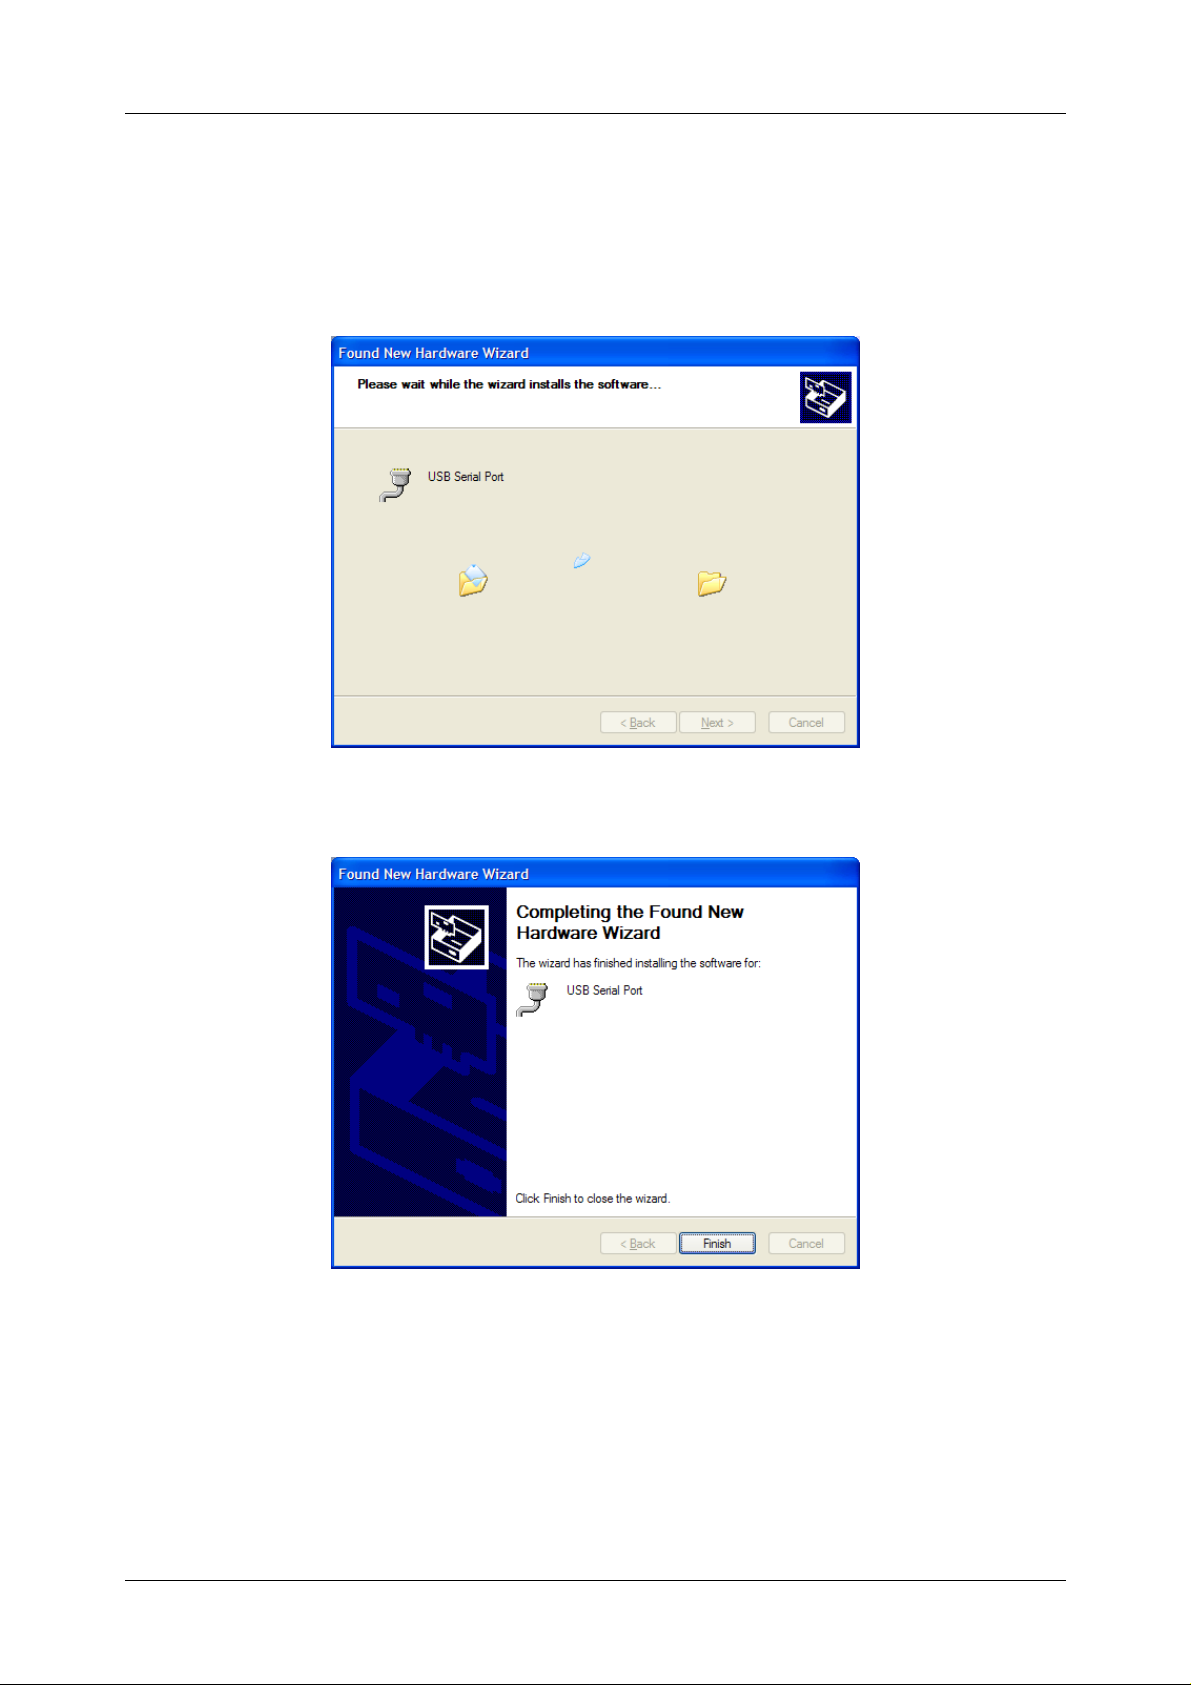
8. USB Serial Converter was installed successfully. Click Finish.
9. The next screen is shown on your desktop again.
10. Make sure that the Install from a list or specific location (Advanced) is
selected and click Next.
5
Page 6
USB driver installation Installing USB driver on your PC (WIN. XP)
11. Make sure that the Search for the best driver in these locations is selected
and Include this location in the search is checked. If the target map is not the
same as the first time complete the same procedure as in the first driver
installation. Click Browse and select USB map on your CD (BENNING IT 120
software CD must be inserted in your CD drive).
12. Hardware wizard found correct driver file.
13. USB Serial Port was installed successfully. Click Finish.
6
Page 7
USB driver installation Installing USB driver on your PC (WIN. XP)
1.2. Installing PC software
1. Run installation from BENNING IT 120 PC software CD. Follow the installation
steps.
1.3. Configuring an USB connection between BENNING IT 120 and PC
1. Turn on the BENNING IT 120, set communication mode to USB (consult
BENNING IT 120 User manual) and connect BENNING IT 120 and PC with USB
cable.
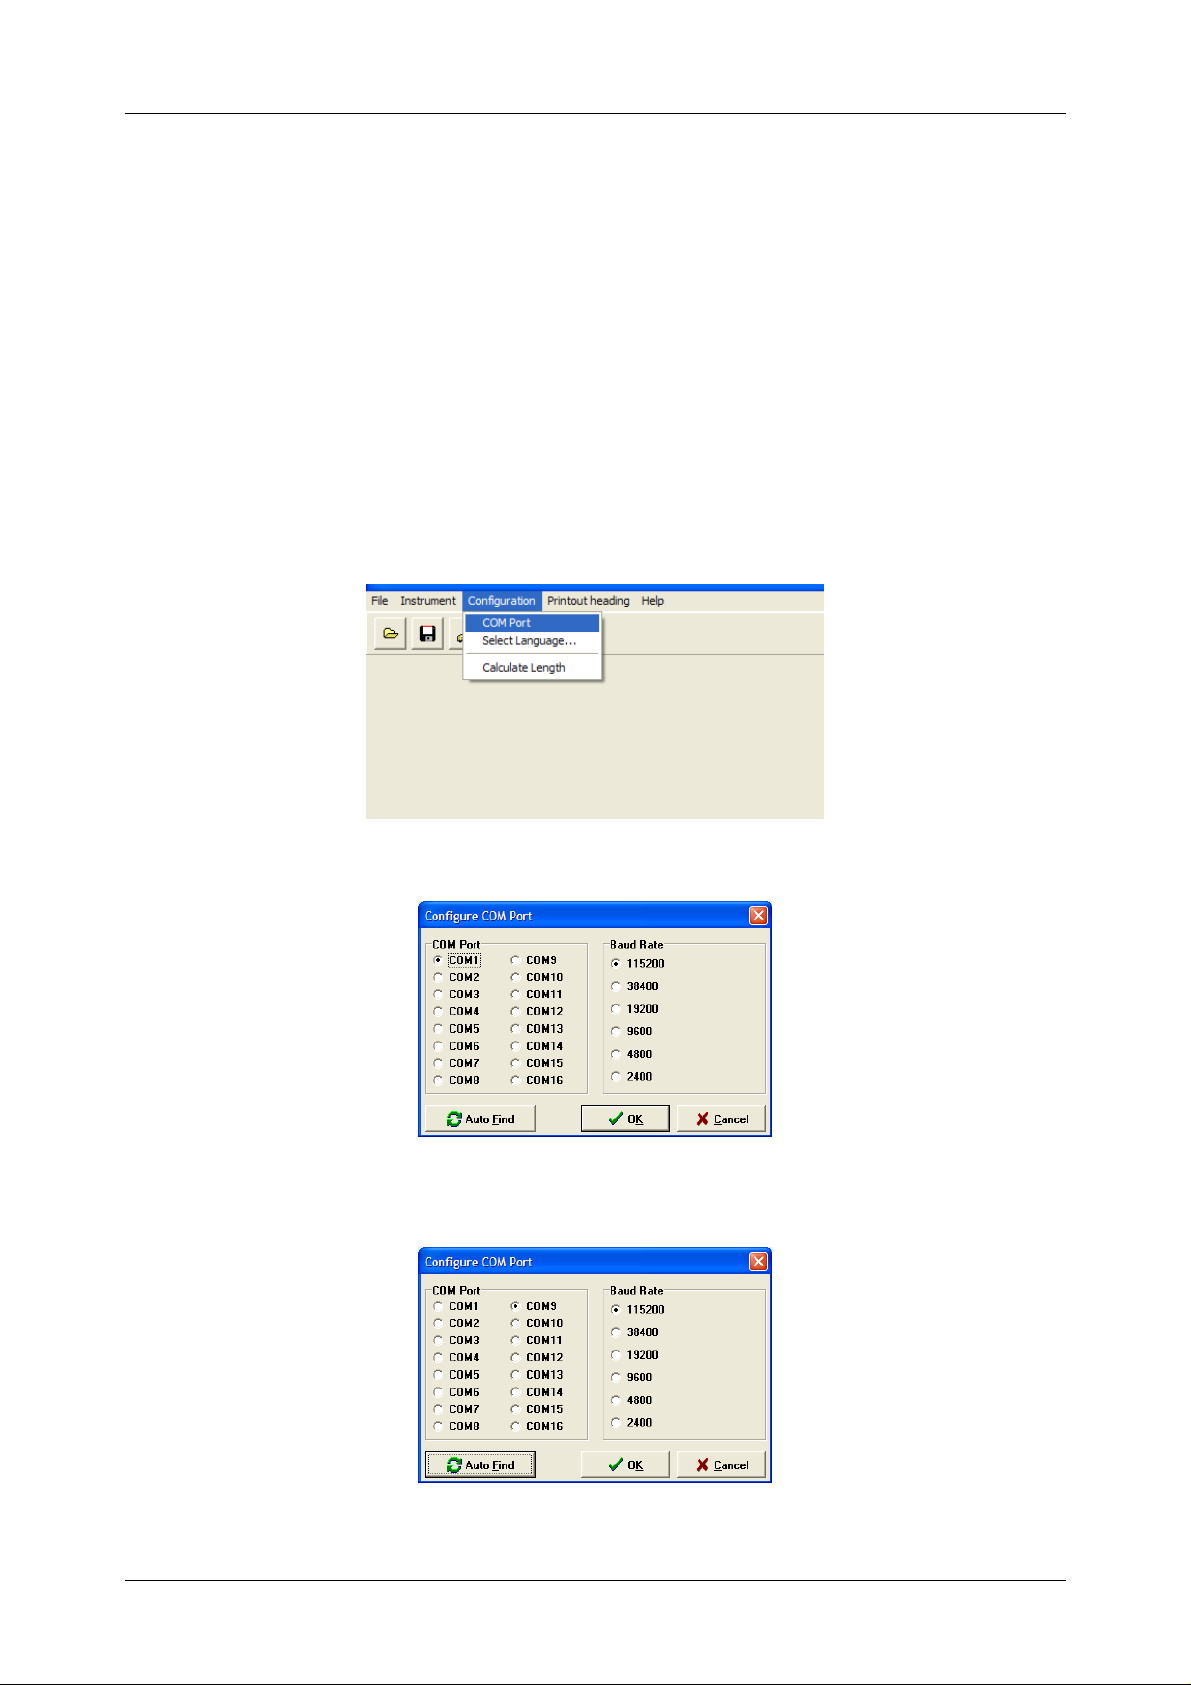
2. Run PC software for the BENNING IT 120.
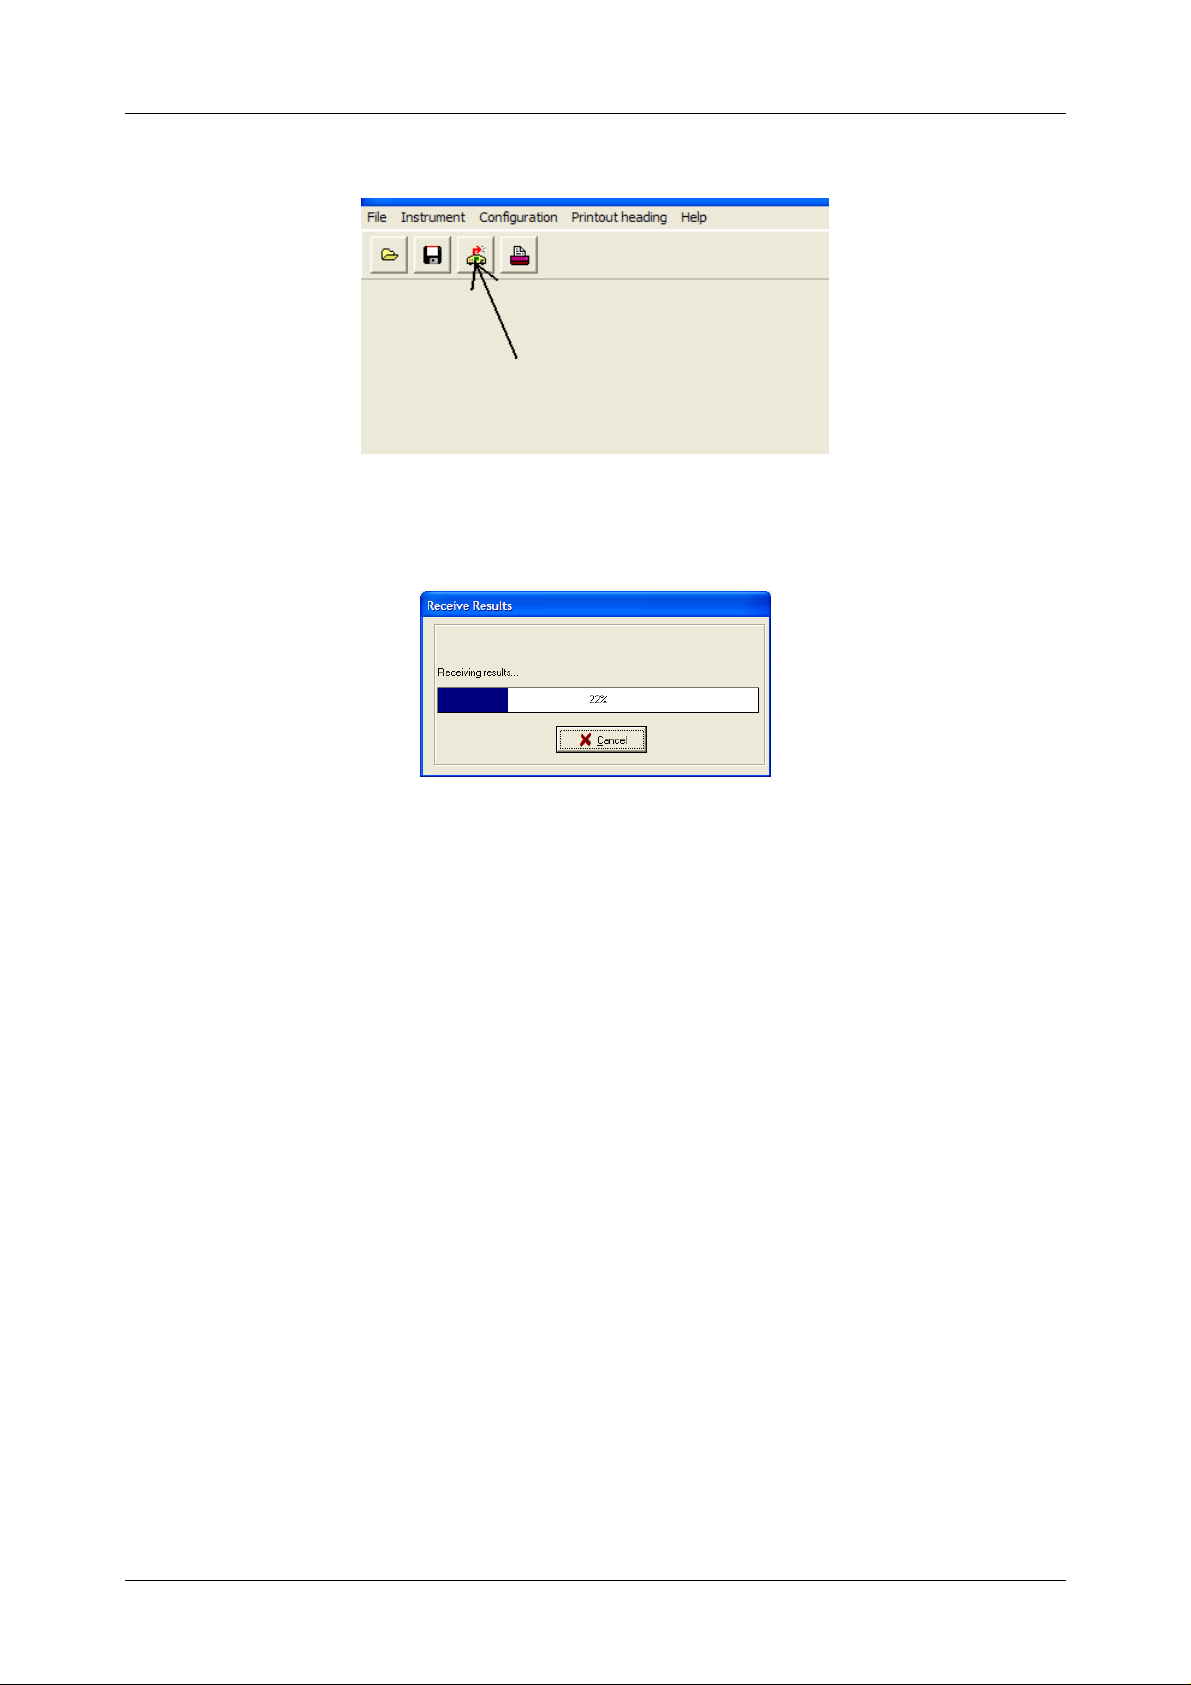
3. Select COM Port from Configuration pull-down menu.
4. Click Auto Find button and wait.
5. Click OK if search is successful. See chapter Debugging communication if
7
Page 8
USB driver installation Installing USB driver on your PC (WIN. XP)
search is not successful.
6. You can start communication with the BENNING IT 120 by clicking download
button in PC software now.
7. PC is receiving results from the BENNING IT 120.
8
Page 9
USB driver installation Debugging communication (WINDOWS XP)
2. Debugging communication (WINDOWS XP)
1. If communication still doesn’t work follow the next procedure.
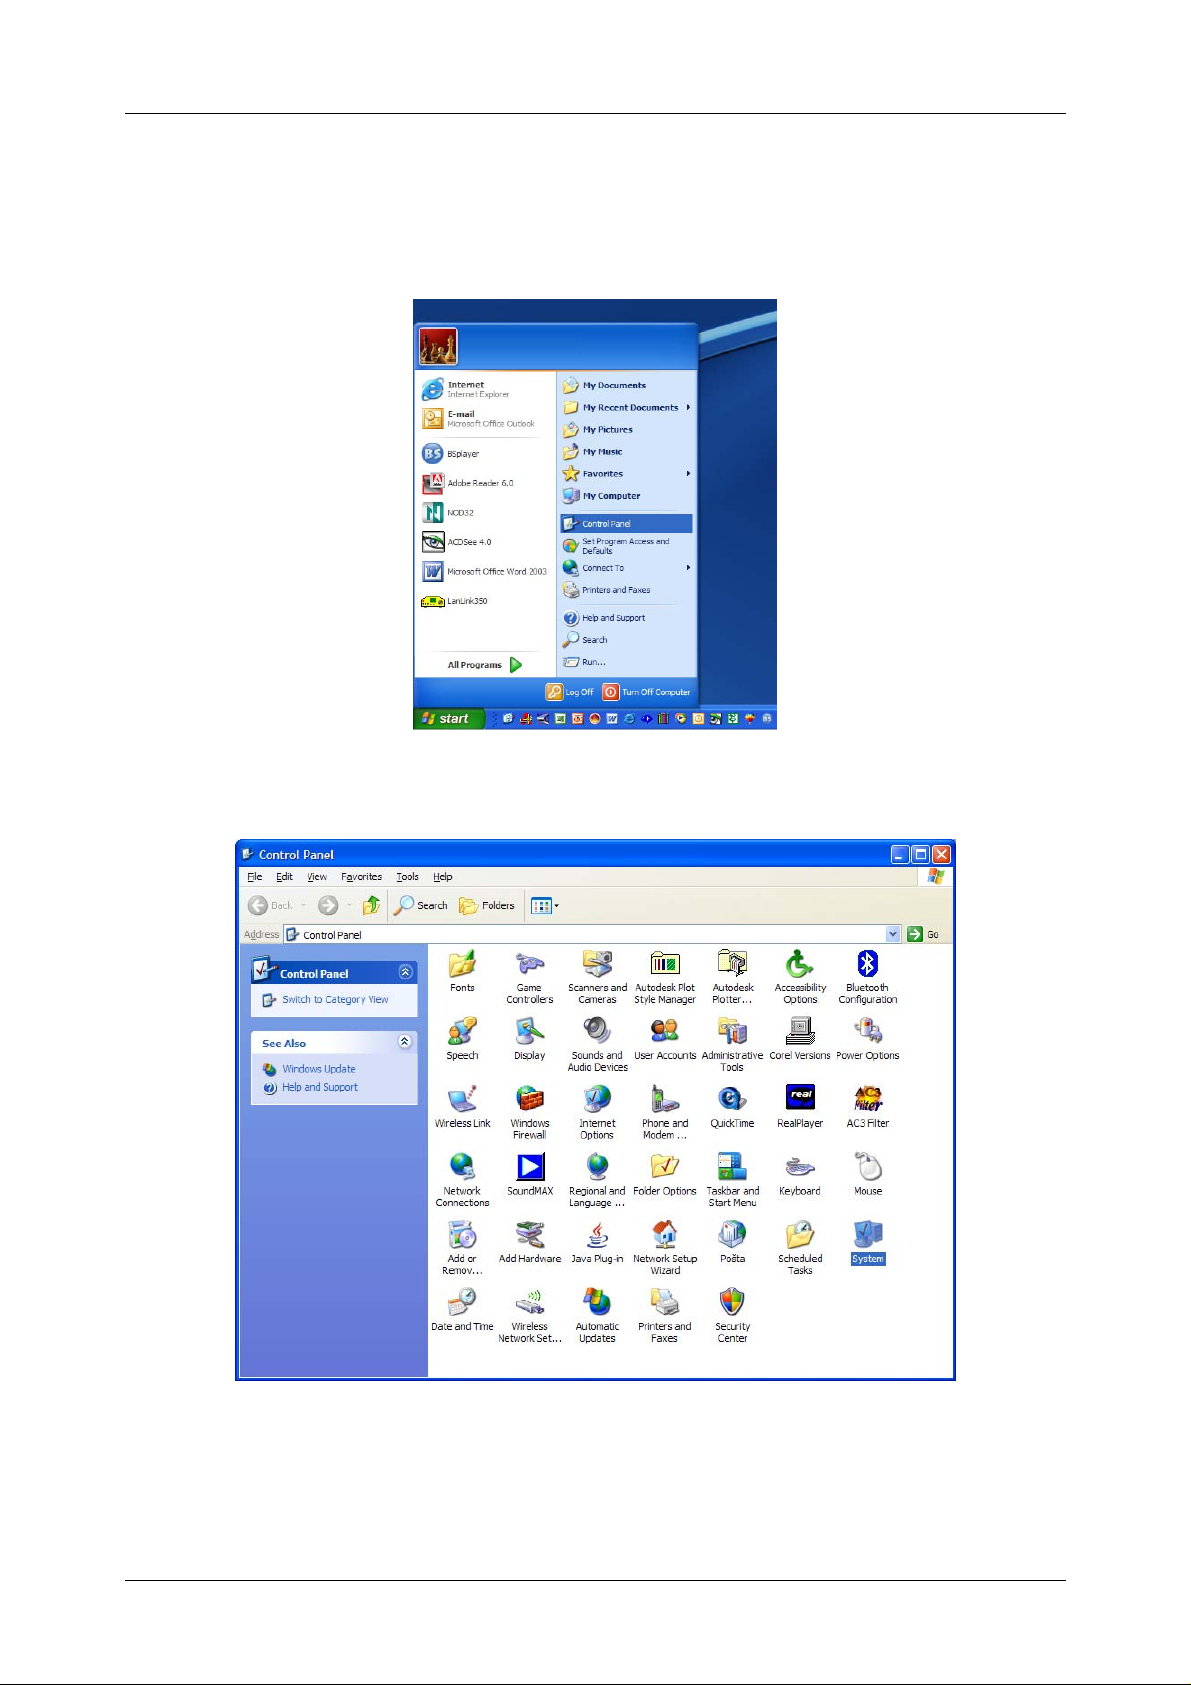
2. Check driver installation by opening Control Panel.
3. Double click System icon.
9
Page 10
USB driver installation Debugging communication (WINDOWS XP)
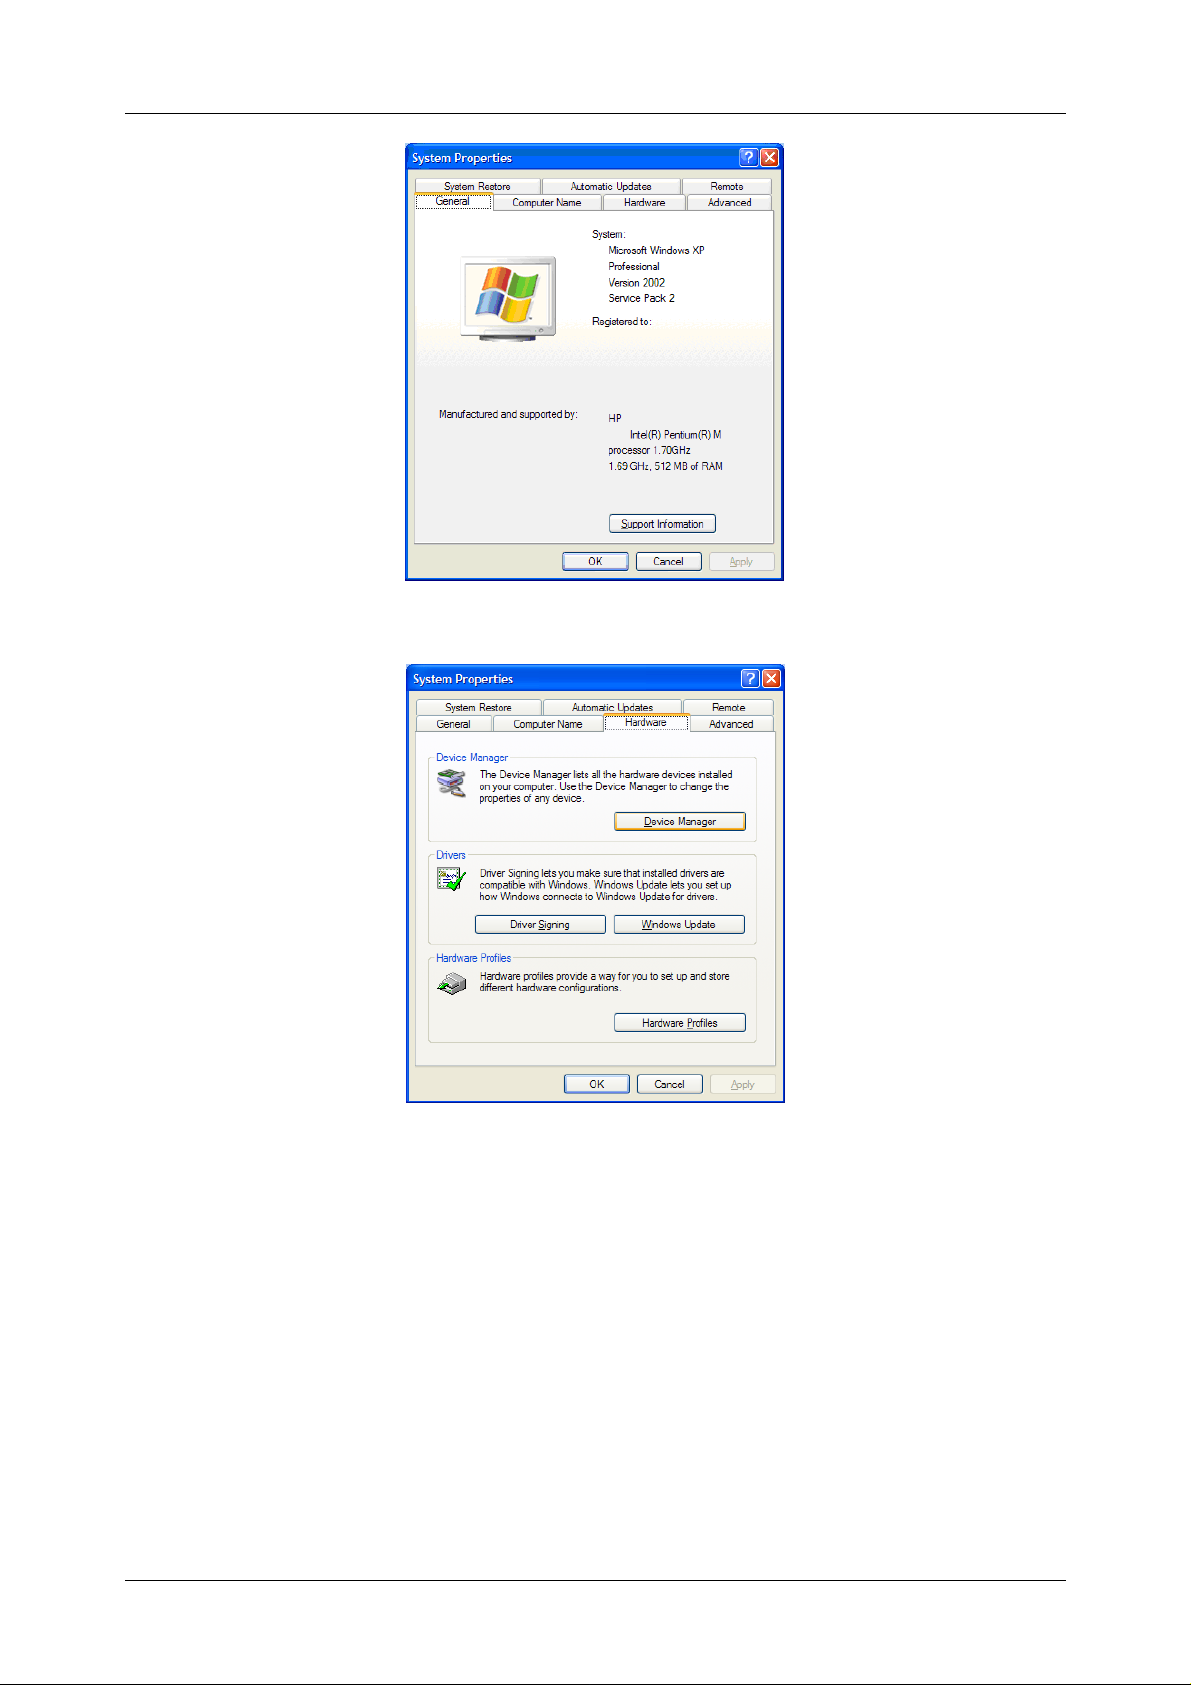
4. Select Hardware tab.
5. Open Device Manager.
10
Page 11

USB driver installation Debugging communication (WINDOWS XP)
6. BENNING IT 120 must be turned on, set to USB communication and connected
to a PC with USB cable.
Important: The Ports (COM & LPT) section must show installed USB Serial Port
(COMX). X must be number between 1 and 16 (COM1 and COM6 in some versions). If
it is, continue with chapter 13. You have to change COM port manually if number is
higher than 16 (COM1 and COM6 in some versions).
7. Right-click USB Serial Port and select Properties from the drop-down menu.
11
Page 12

USB driver installation Debugging communication (WINDOWS XP)
8. Open Port Setting tab.
9. Click Advanced button.
12
Page 13

USB driver installation Debugging communication (WINDOWS XP)
10. Chose unused port between COM1 and COM16 (COM1 and COM6 in some
versions).
11. Confirm selection with OK button.
13
Page 14

USB driver installation Debugging communication (WINDOWS XP)
12. Refresh Device Manager Window.
13. USB Serial Converter must also be installed in Universal Serial Bus
Controllers section.
Now set PC software COM port to the same number as set in Device Manager / Ports
(COM & LPT) / USB Serial Port driver.
14
Page 15

USB driver installation Debugging communication (WINDOWS XP)
Run PC software for the BENNING IT 120.
14. Select COM Port from Configuration pull-down menu.
15. Select correct COM Port (the same as USB Serial Port in device manager
window) and Baud Rate 115200. Click OK.
16. You can start communication with the BENNING IT 120 by clicking download
button in PC software now. BENNING IT 120 must be turned on, set to USB
communication mode and connected to a PC with USB cable.
17. PC is receiving results from the BENNING IT 120.
15
Page 16

USB driver installation Uninstalling USB Drivers (WINDOWS XP)
3. Uninstalling USB Drivers (WINDOWS XP)
To uninstall USB drivers for BENNING IT 120 follow the instructions below:
1. Ιf the BENNING IT 120 is attached to the PC with USB cable disconnect it.
2. Open the Add/Remove Programs utility located in Control Panel.
3. Select FTDI USB Serial Converter Drivers from the list of installed programs.
4. Click the Change/Remove button. This will run the FTDI uninstaller program.
5. Click Continue to run the uninstaller.
6. When the uninstaller has finished removing the device from the system click
Finish to complete the process. USB driver for the BENNING IT 120 is removed.
16
Page 17

USB driver installation Installing USB driver on your PC (WIN. 2000)
4. Installing USB driver on your PC (WIN. 2000)
4.1. Standard USB communication setup
1. Turn on the BENNING IT 120, set communication mode to USB (consult
BENNING IT 120 User manual) and connect BENNING IT 120 and PC with USB
cable.
2. Next two screens will show on your desktop.
3. Click Next.
17
Page 18

USB driver installation Installing USB driver on your PC (WIN. 2000)
4. Make sure that the Search for a suitable driver for my device (recommended)
is selected and click Next.
5. Make sure that the Specify a location is checked and click Next.
6. Click Browse and select USB map on your CD (BENNING IT 120 software CD
must be inserted in your CD drive).
18
Page 19

USB driver installation Installing USB driver on your PC (WIN. 2000)
7. When you find USB map on the CD click Open.
8. The driver source location is selected. Click OK.
9. Hardware wizard found correct driver file. Click Next.
19
Page 20

USB driver installation Installing USB driver on your PC (WIN. 2000)
10. USB Serial Converter was installed successfully. Click Finish.
11. The next two screens are shown on your desktop again.
12. Click Next.
20
Page 21

USB driver installation Installing USB driver on your PC (WIN. 2000)
13. Make sure that the Search for a suitable driver for my device (recommended)
is selected and click Next.
14. Make sure that the Specify a location is checked and click Next.
15. Click Browse and select USB map on your CD (BENNING IT 120 software CD
must be inserted in your CD drive). If the target map is not the same as the first
21
Page 22

USB driver installation Installing USB driver on your PC (WIN. 2000)
time complete the same procedure as in the first driver installation.
16. Hardware wizard found correct driver file. Click Next.
17. USB Serial Port was installed successfully. Click Finish.
22
Page 23

USB driver installation Installing USB driver on your PC (WIN. 2000)
4.2. Installing PC software
1. Run installation from BENNING IT 120 PC software CD. Follow the installation
steps.
4.3. Configuring an USB connection between BENNING IT 120 and PC
1. Turn on the BENNING IT 120, set communication mode to USB (consult
BENNING IT 120 User manual) and connect BENNING IT 120 and PC with USB
cable.
2. Run PC software for the BENNING IT 120.
3. Select COM Port from Configuration pull-down menu.
4. Click Auto Find button and wait.
5. Click OK if search is successful. See chapter Debugging communication if
search is not successful.
23
Page 24

USB driver installation Installing USB driver on your PC (WIN. 2000)
6. You can start communication with the BENNING IT 120 by clicking download
button in PC software now.
7. PC is receiving results from the BENNING IT 120.
24
Page 25

USB driver installation Debugging communication (WINDOWS 2000)
5. Debugging communication (WINDOWS 2000)
1. If communication still doesn’t work follow the next procedure.
2. Check driver installation by opening Control Panel.
25
Page 26

USB driver installation Debugging communication (WINDOWS 2000)
3. Double click System icon.
4. Select Hardware tab.
5. Open Device Manager.
26
Page 27

USB driver installation Debugging communication (WINDOWS 2000)
6. BENNING IT 120 must be turned on, set to USB communication and connected
to a PC with USB cable.
Important: The Ports (COM & LPT) section must show installed USB Serial Port
(COMX). X must be number between 1 and 16 (COM1 and COM6 in some versions). If
it is, continue with chapter 13. You have to change COM port manually if number is
higher than 16 (COM1 and COM6 in some versions).
7. Right-click USB Serial Port and select Properties from the drop-down menu.
27
Page 28

USB driver installation Debugging communication (WINDOWS 2000)
8. Open Port Setting tab.
9. Click Advanced button.
28
Page 29

USB driver installation Debugging communication (WINDOWS 2000)
10. Chose unused port between COM1 and COM16 (COM1 and COM6 in some
versions).
11. Confirm selection with OK button.
29
Page 30

USB driver installation Debugging communication (WINDOWS 2000)
12. Refresh Device Manager Window.
13. USB Serial Converter must also be installed in Universal Serial Bus
Controllers section.
Now set PC software COM port to the same number as set in Device Manager / Ports
(COM &LPT) / USB Serial Port driver.
14. Run PC software for BENNING IT 120.
30
Page 31

USB driver installation Debugging communication (WINDOWS 2000)
15. Select COM Port from Configuration pull-down menu.
16. Select correct COM Port (the same as USB Serial Port in device manager
window) and Baud Rate 115200. Click OK.
17. You can start communication with the BENNING IT 120 by clicking download
button in PC software now. BENNING IT 120 must be turned on, set to USB
communication mode and connected to a PC with USB cable.
18. PC is receiving results from the BENNING IT 120.
31
Page 32

USB driver installation Uninstalling USB Drivers (WINDOWS 2000)
6. Uninstalling USB Drivers (WINDOWS 2000)
To uninstall USB drivers for BENNING IT 120 follow the instructions below:
1. Ιf the BENNING IT 120 is attached to the PC with USB cable disconnect it.
2. Open the Add/Remove Programs utility located in Control Panel.
3. Select FTDI USB Serial Converter Drivers from the list of installed programs.
4. Click the Change/Remove button. This will run the FTDI uninstaller program.
5. Click Continue to run the uninstaller.
6. When the uninstaller has finished removing the device from the system click
Finish to complete the process. USB driver for the BENNING IT 120 is removed.
32
 Loading...