

Page 1

L8542771 ITA/ENG/FRA/ESP
09/2013 rev 5
BULLOCK 424
BULLOCK 424 115
UNIONE NAZIONALE COSTRUTTORI
AUTOMATISMI PER CANCELLI, PORTE
SERRANDE ED AFFINI
Page 2
EC Declaration of Conformity
Directive 2004/108/EC(EMC); 2006/95/EC (LVD)
Manufacturer:
Automatismi Benincà SpA.
Address:
Via Capitello, 45 - 36066 Sandrigo (VI) – Italy
It is hereby stated that the product
automatic system 24Vdc for sliding gates
BULLOCK 424.
is compliant with provisions set forth in the following EC Directives:
- DIRECTIVE 2004/108/EC OF THE EUROPEAN PARLIAMENT AND OF THE COUNCIL of 15 December 2004, on the harmonisa-
tion of the laws of Member States relating to electromagnetic compatibility and which cancels Directive 89/336/EEC, according to the following
harmonised regulations: EN 61000-6-2:2005, EN 61000-6-3:2007.
- DIRECTIVE 2006/95/EC OF THE EUROPEAN PARLIAMENT AND OF THE COUNCIL of 12 December 2006, on the harmonisation
of the laws of Member States relating to electrical equipment designed for use with certain voltage limits, according to the following harmonised
regulations: EN 60335-1:2002 + A1:2004 + A11:2004 + A12:2006 + A2:2006 + A13:2008; EN 60335-2-103:2003.
- DIRECTIVE 2006/42/EC OF THE EUROPEAN PARLIAMENT AND OF THE COUNCIL of 17 May 2006, on machinery, which amends
Directive 95/16/EC, and complies with the requisites for the !partly completed machinery (almost machinery)" set forth in the EN13241-1:2003
regulation.
# Moreover, Automatismi Benincà SpA declares that the pertaining technical documentation has been drawn up in compliance with Attach-
ment VII B of the 2006/42/ EC Directive and that the following requirements have been complied with: 1.1.1 - 1.1.2 - 1.1.3 - 1.1.5 - 1.2.1 - 1.2.3
- 1.2.6 - 1.3.1 - 1.3.2 - 1.3.3 - 1.3.4 - 1.3.7 - 1.3.9 - 1.5.1 - 1.5.2 - 1.5.4 - 1.5.5 - 1.5.6 - 1.5.7 - 1.5.8 - 1.5.10 - 1.5.11 - 1.5.13 - 1.6.1 - 1.6.2 - 1.6.4
- 1.7.2 - 1.7.4 - 1.7.4.1 - 1.7.4.2 - 1.7.4.3.
# The manufacturer undertakes that information on the !partly completed machinery" will be sent to domestic authorities. Transmission ways
are also included in the undertaking, and the Manufacturer$s intellectual property rights of the !almost machinery" are respected.
# It is highlighted that commissioning of the !partly completed machinery" shall not be provided until the ¿nal machinery, in which it should
be incorporated, is declared compliant, if applicable, with provisions set forth in the Directive 2006/42/EC on Machinery.
# Moreover, the product, as applicable, is compliant with the following regulations:
EN 12445:2002, EN 12453:2002, EN 12978:2003.
Benincà Luigi, Legal 2f¿cer.
Sandrigo, 22 November 2010.
WARNING
The product shall not be used for purposes or in ways
other than those for which the product is intended for and
as described in this manual. Incorrect uses can damage
the product and cause injuries and damages.
The company shall not be deemed responsible for the
non-compliance with a good manufacture technique of
gates as well as for any deformation, which might occur
during use.
Keep this manual for further use.
Qualified personnel, in compliance with regulations in force,
shall install the system.
Packaging must be kept out of reach of children, as it can
be hazardous. For disposal, packaging must be divided
the various types of waste (e.g. carton board, polystyrene)
in compliance with regulations in force.
The installer must supply all information on the automatic,
manual and emergency operation of the automatic system
and supply the end user with instructions for use.
An omnipolar switch/section switch with remote
contact opening equal to, or higher than 3mm
Make sure that before wiring an adequate differential
switch and an overcurrent protection is provided.
Pursuant to safety regulations in force, some types of in-
stallation require that the gate connection be earthed.
During installation, maintenance and repair, cut off power
supply before accessing to live parts.
Descriptions and figures in this manual are not binding.
While leaving the essential characteristics of the product
unchanged, the manufacturer reserves the right to modify
the same under the technical, design or commercial point
of view without necessarily update this manual.
must be provided on the power supply mains..
12
Page 3
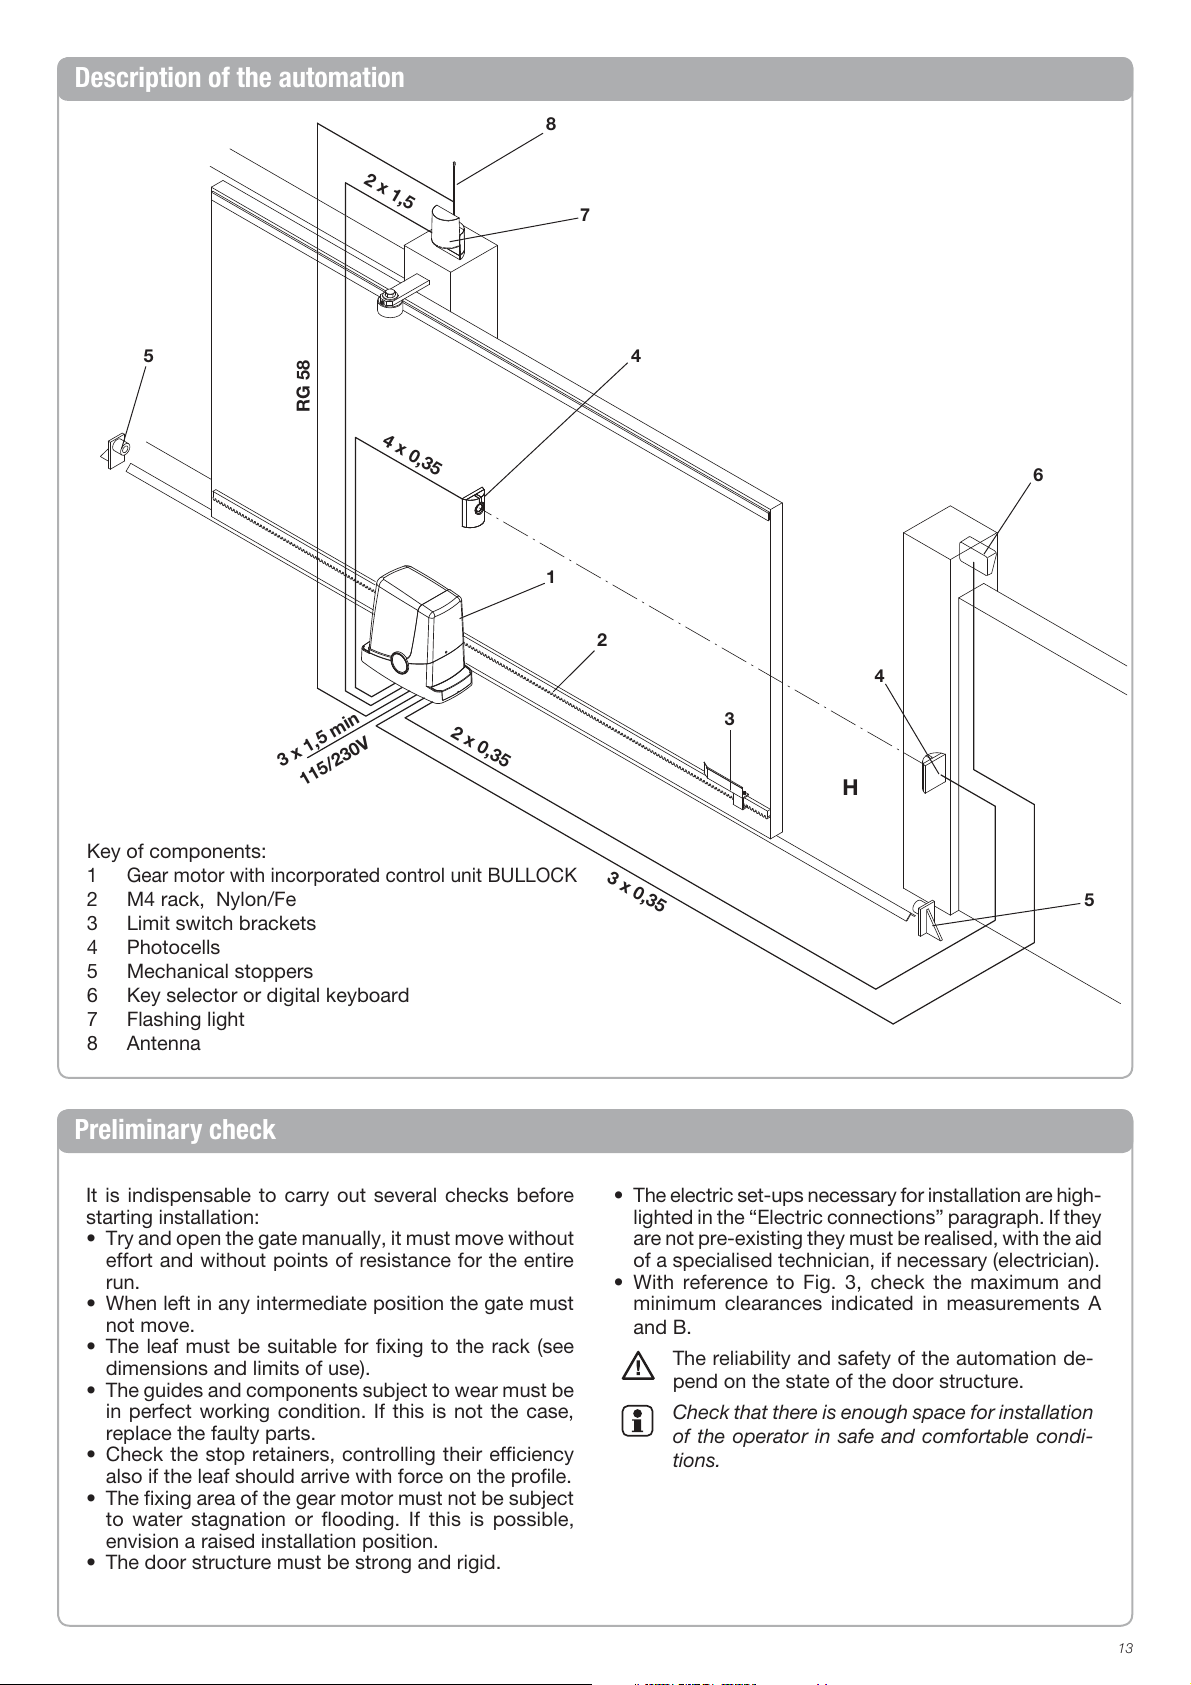
Description of the automation
2 x 1,5
8
7
5
RG 58
4 x 0,35
1
2 x 0,35
3 x 1,5 min
115/230V
Key of components:
1 Gear motor with incorporated control unit BULLOCK
2 M4 rack, Nylon/Fe
3 Limit switch brackets
4 Photocells
5 Mechanical stoppers
6 Key selector or digital keyboard
7 Flashing light
8 Antenna
4
6
2
4
3
H
3 x 0,35
5
Preliminary check
It is indispensable to carry out several checks before
starting installation:
• Try and open the gate manually, it must move without
effort and without points of resistance for the entire
run.
• When left in any intermediate position the gate must
not move.
• The leaf must be suitable for fixing to the rack (see
dimensions and limits of use).
• The guides and components subject to wear must be
in perfect working condition. If this is not the case,
replace the faulty parts.
• Check the stop retainers, controlling their efficiency
also if the leaf should arrive with force on the profile.
• The fixing area of the gear motor must not be subject
to water stagnation or flooding. If this is possible,
envision a raised installation position.
• The door structure must be strong and rigid.
• The electric set-ups necessary for installation are high-
lighted in the “Electric connections” paragraph. If they
are not pre-existing they must be realised, with the aid
of a specialised technician, if necessary (electrician).
• With reference to Fig. 3, check the maximum and
minimum clearances indicated in measurements A
and B.
The reliability and safety of the automation de-
pend on the state of the door structure.
Check that there is enough space for installation
of the operator in safe and comfortable condi-
tions.
13
Page 4
Technical Data, dimensions and limits of use
TECHNICAL DATA BULLOCK
Control unit power supply 230 Vac (Bullock 424)
115 Vac (Bullock 424 115)
50/60 Hz
Motor power supply 24Vdc
Absorbed power 80 W
Absorption 0,6 A
Torque 9 Nm
Operative intermittence 10 minutes ON
50 minutes OFF
Opening speed 10 m/1'
Protection rating IP44
Functioning temperature -20°C / +60°C
Driving gear for rack M4 Z14
Noise <70 dB
Weight 6,8 kg
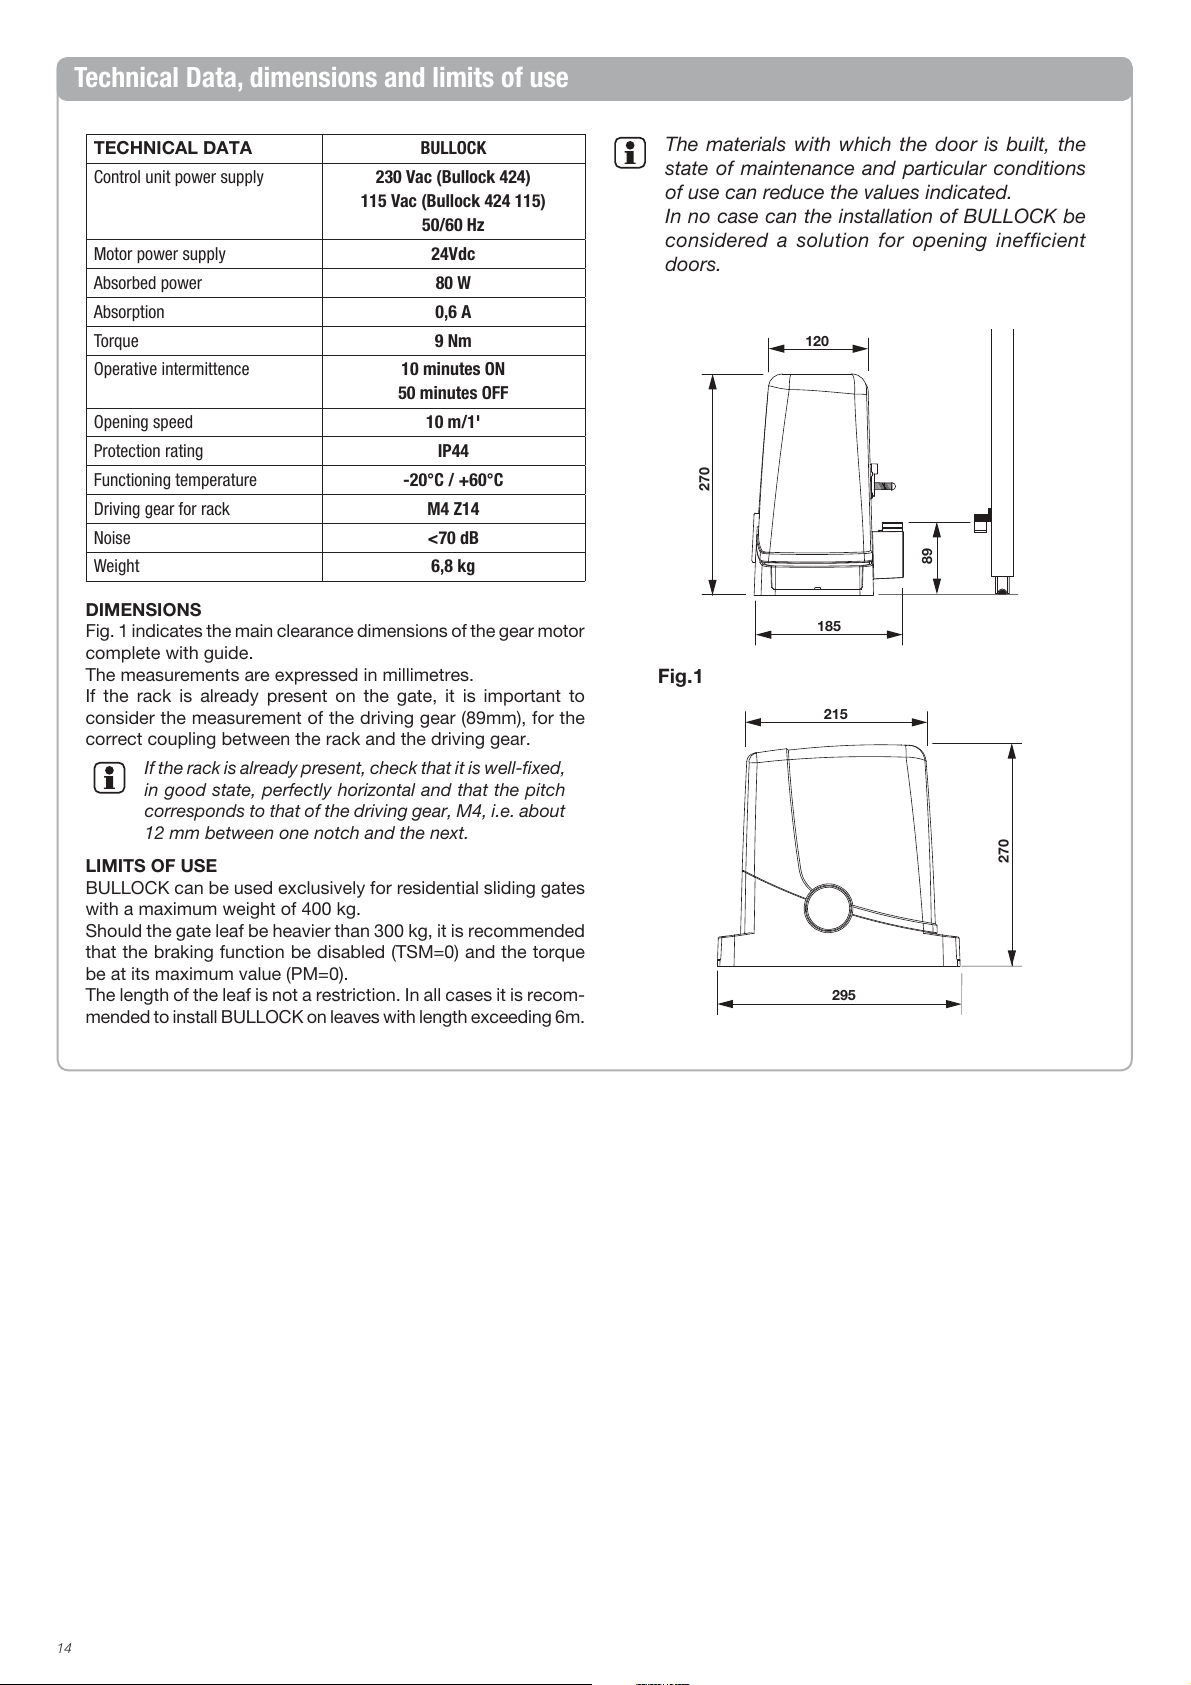
DIMENSIONS
Fig. 1 indicates the main clearance dimensions of the gear motor
complete with guide.
The measurements are expressed in millimetres.
If the rack is already present on the gate, it is important to
consider the measurement of the driving gear (89mm), for the
correct coupling between the rack and the driving gear.
If the rack is already present, check that it is well-fixed,
in good state, perfectly horizontal and that the pitch
corresponds to that of the driving gear, M4, i.e. about
12 mm between one notch and the next.
LIMITS OF USE
BULLOCK can be used exclusively for residential sliding gates
with a maximum weight of 400 kg.
Should the gate leaf be heavier than 300 kg, it is recommended
that the braking function be disabled (TSM=0) and the torque
be at its maximum value (PM=0).
The length of the leaf is not a restriction. In all cases it is recom-
mended to install BULLOCK on leaves with length exceeding 6m.
The materials with which the door is built, the
state of maintenance and particular conditions
of use can reduce the values indicated.
In no case can the installation of BULLOCK be
considered a solution for opening inefficient
doors.
120
270
89
185
Fig.1
215
270
295
14
Page 5

Laying the foundation plate - Measurements
The positioning of the plate must respect the distances indi-
cated in figures 2a/b/c/d (seen from above):
- Fig. 2a installation with motor on the left
- Fig. 2b installation with motor on the right
If the rack is already installed on the leaf:
- Fig. 2c installation with motor on the left
- Fig. 2d installation with motor on the right
90 mm
Fig.2a
0-50 mm
90 mm
Fig.2b
50-100 mm
It is also indispensable that the rack projects, with respect to
the centre of the plate, by at least the measurements indicated
in figure 3a (motor on left) and 3b (motor on right) to allow po-
sitioning of the end run brackets.
In some cases it is possible that the rack projects by a
few centimetres with respect to the plumb line of the
gate in order to allow complete closure.
Make note of the measurements indicated before proceeding
with the successive phases.
The foundation plate has two large holes for the pas-
sage of the raceways. They can both be used, thanks
to the space present on the bottom of the gear motor,
but it is easier to use the hole of the left if the pinion,
highlighted in the figures.
190 mm
Fig.3a
40 mm
50-100 mm
0-50 mm
40 mm
Fig.2c
Fig.2d
150 mm
190 mm
Fig.3b
150 mm
15
Page 6

Laying the foundation plate - Cement foundation
m
If there is no cement flooring (or similar material) a cement*
foundation must be prepared. Proceed as follows:
1 - Dig a suitable hole (minimum 40x30cm, at last 35cm deep),
considering the measurements indicated in the previous para-
graph.
2 - Prepare the pipes for the passage of the electric cables
(see “Electric connections”), leaving the pipes longer by about
30/40cm (figure 4-ref.T).
3 - Bend the 4 threaded bars:
a) if the rack is pre-installed at a measurement greater than that
indicated in Figure 1, or in the case of possible water stagnation,
the foundation plate may have to be raised. In this case, bend
the bars at a height of about 45 mm as indicated in Figure 5.
b) if the motor will be fixed to the ground, bend the bars at a
height of about 30 mm as indicated in Figure 6.
4 - Prepare the plate for the cast, fixing the threaded bars.
With reference to Figure 7 use 4 lower support nuts D and 4
nuts F with the relative washers R to block the plate in posi-
tion. The position of the bars must be similar to that indicated
in figure 7.
5 - Prepare the cement following the manufacturer’s indications.
In some cases it may be necessary to realise a metal cage to
make the foundation more stable.
6 - Sink the bars into the cement, paying attention to the level
of the plate and the parallelism with the leaf (figure 8).
7 - Wait for the cement cast to be reinforced.
8 - Remove the upper screws and washers, which will be suc-
cessively used to fix the gear motor.
9 - Figure 9 shows the plate when fixing is ultimated. If neces-
sary, it is now possible to raise the plate by a maximum of 20
mm, positioning 4 nuts and the relative washers under the plate,
as indicated in figure 10.
* If in doubt, contact qualified staff for realisation of the foun-
dation.
Fig. 7
F
R
D
Fig. 8
The plate must be tightly fixed to the ground, perfectly
levelled and parallel to the leaf.
Fig. 4
T
45 mm
30 m
Fig. 9
Fig. 10
Fig. 5 Fig. 6
16
25 mm
20 mm max.
Max 20 mm
Page 7

Laying the foundation plate - Fixing to the floor
If the floor is in cement (or similar material) it is possible to fix
the plate directly to the ground:
1 - Obtain suitable fixing systems, normally on the market, steel
pressure plugs (figure 11 -ref A) or anchorage with expansion
straps (figure 1 -ref B) to be inserted using a mallet.
2 - Respecting the measurements indicated previously, trace
the drilling points using the plate as a reference, make 4 holes
measuring 10 mm in diameter and fix the plate. Make sure
that the threaded bar projects by at least 25mm as indicated
in figure 10.
3 - In some cases (rack already installed, possible water stag-
nation, etc) it is possible to ix the plate in a raised position with
respect to the floor by a maximum of 20 mm, positioning 4
nuts and the relative washers under the plate as indicated in
figure 12. In this case, the pins must project from the ground
by at least 45mm.
Check that the floor is well-levelled and suitable for fixing
via plugs. Independently from the type of pre-selected
fixing, the plate must result well-fixed, perfectly levelled
and parallel to the leaf.
Fig. 11
B
A
Fig. 10
25 mm
Fixing the gear motor
To fix the motor reducer to the plate, with reference to fig. 13,
proceed as follows:
1 - Remove the two screw-cover sumps C.
2 - Place the gear motor on the plate, making sure that the
threaded bars enter the holes.
3 - Block the gear motor using the 4 washers R and the 4
bolts D.
4 - The slots F allow to regulate the distance of the motor with
respect to the leaf.
Fig. 12
Fig. 13
25 mm
20 mm max.
Max 20 mm
C
D
R
F
B
17
Page 8

Fixing the rack
The rack, appropriately fixed to the leaf, transforms the rotary
movement of the gear into the linear movement of the leaf.
Before fixing the rack, it is necessary to release the gear motor,
proceed as follows:
1) Turn the circular cover by 180°, in a way to view the trian-
gular pin.
2 - Insert the release key FRD.3 and turn it clockwise until a
certain resistance is felt (Fig.13).
About 15 complete rotations of the key are necessary
3 - The gear is now released and free to turn.
Now fix the rack:
1 - Take the leaf into the completely open position.
2 - Place the first tract of the rack on the gear.
Considering the measurements indicated in figures 3a and 3b,
mark the first drilling point. Block the rack temporarily, using a
clamp for example (Fig.15).
3 - Drill and block the first fin of the rack using the screw and
the washer as indicated in figure 16, checking that a space of
about 1 mm remains between the gear and rack (Fig.17).
4 - Make the leaf slide and take the driving gear near to the
second fixing fin, always checking the space of 1mm between
gear and rack (Fig.18).
5 - Proceed in the same way for the other fins, moving the
leaf every time in a way always to have the correct gear/rack
coupling.
6 - Now continue with the remaining tracts of the rack. Every
tract must be attached to the previous one as indicated in Figure
19, in a way to keep the rack pitch constant.
Fig. 16
Fig. 17
1 mm
Use several manual opening and closing manoeuvres
to check that the rack is correctly engaged, along its
entire length. If necessary, the holes present on the rack
allow height adjustment.
Fig. 13 Fig. 14
Fig. 15
Fig. 18
Fig. 19
18
Page 9

Fixing the end run brackets
Stopping the movement, in the opening phase and in the clos-
ing phase, takes place via the end run brackets FRD.1, which,
relevantly fixed onto the rack, make the end run spring, present
on the gear motor, intervene.
To position and fix the brackets FRD 1, proceed as follows:
1 -Take the leaf to the desired opening position. If a stop block
is present on the ground, the leaf must stop 2/3 cm before the
block (Figure 20).
2 - Place the right bracket FRD.1 on the rack and make it slide
until the end run spring, bending, effects switch-over of the inter-
nal switch, which can be perceived with a “click” (Figure 21).
3 - Fix the bracket temporarily via the two screws supplied
(Figure 22).
4 - Take the leaf into the completely closed position and then
open by about 2 cm (Figure 23).
5 - Place the left bracket FRD.1 on the rack and make it slide until
the end run spring, bending, effects switch-over of the internal
switch, which can be perceived with a “click” (Figure 24).
6 - Fix the bracket as indicated in previous point 3.
7 - If necessary, use a hacksaw to shorten the end part of the
last tract of the rack, so that it does not project with respect to
the plumb line of the leaf.
In the inspection phase, use several opening and closing
manoeuvres to check whether the end run intervenes
in the correct opening and closing points, before the
respective mechanical profiles.
If necessary, move the brackets FRD.1 to advance or
delay the stop points
8 - When the best stop points have been established, remove
the two screws, and use a drill (45 mm point), to make the holes
with depth of about 2 mm in correspondence with the signs left
by the screws and then fix bracket FRD.1 again (Figure 25).
A seat for the screws is created in this way, which guarantees
the stability of the bracket FRD.1 on the rack.
Fig. 22
Fig. 23
2/3 cm
Fig. 20
Fig. 21
¡CLIC!
CLICK!
2/3 cm
¡CLIC!
CLICK!
Fig. 25
Fig. 24
19
Page 10

User guide
KEEP THIS GUIDE AND MAKE IT AVAILABLE TO ALL USERS OF THE AUTOMATION.
SAFETY STANDARDS
Do not stand in the movement area of the door.
Do not allow children to play with the commands or
in proximity of the leaves.
In the case of functioning anomalies do not at-
tempt to repair the fault but contact a BENINCA'
specialised technician.
MANUAL MOVEMENT FROM INSIDE
In the case of functioning anomalies or power cuts, the automa-
tion can be released and the door moved manually, proceed
as follows:
1 - Turn the circular cover by 180°, in a way to view the trian-
gular pin.
MAINTENANCE
• Periodically check the efficiency of the manual emergency
release.
• The actuator does not require routine maintenance, however it
is necessary to periodically check the safety devices and the
other parts of the plant that could create dangers following
wear.
DISPOSAL
Whenever the product is put out of service, the legislative
provisions in force must be followed regarding differentiated
disposal and re-cycling of the various components (metals,
plastics, electric cables, etc.).
It is advised to contact a BENINCA' specialised technician or a
specialised company that is enabled for this purpose.
2 - Insert the release key FRD.3 and turn it clockwise until a
certain resistance is felt (Fig.20).
About 15 complete rotations of the key are necessary.
3 - The gear is now released and free to turn. Move the leaf
manually to open and close the gate.
4 - To restore automatic functioning, turn the key anti-clockwise
until it stops.
20
Page 11

Parti di ricambio - Spare parts - Lista de recambios
10
9
4
5
7
11
6
2
3
8
8
1
8
12
N. Code Note
1 9688164
2 9688165
3 9686414
4 9688166
5
9686622 Bullock 424
9688142 Bullock 424 115
6 9686623
7 9686624
8 9688169
9 9686626
10
9688170 Bullock 424
9688143 Bullock 424 115
11 9686488
12 9688174
39
Page 12

AUTOMATISMI BENINCÀ SpA - Via Capitello, 45 - 36066 Sandrigo (VI) - Tel. 0444 751030 r.a. - Fax 0444 759728
 Loading...