

Page 1
Washing Machine
User Manual
Mašina za pranje veša
Uputstvo za upotrebu
EN / SB
Document Number=
WTE 7511 X0A
2820526535_EN / 27-07-18.(11:16)
Page 2

This product was manufactured using the latest technology in environmentally friendly conditions.
Page 3

1
General safety nstructons
This section includes security instructions which may help prevent
the injuries and material damage risks. All kinds of warranties shall
be invalid if these instructions are not observed.
1.1 Lfe and property safety
u
Never place the product on a carpet-covered floor. Electrcal parts
wll get overheated snce ar cannot crculate from under the devce.
Ths wll cause problems wth your product.
u
Unplug the product f t s not n use.
u
Always have the nstallaton and reparng procedures carred out by
the Authorsed Servce Agent. The manufacturer shall not be held
lable for damages that may arse from procedures carred out by
unauthorsed persons.
u
The water supply and dranng hoses must be securely fastened and
reman undamaged. Otherwse, water leak may occur.
u
Whle there s stll water nsde the product, never open the loadng
door or remove the flter. Otherwse, rsk of floodng and njury from
hot water wll occur.
u
Do not force open the locked loadng door. Door can be opened a few
mnutes after the washng cycle ends. In case of forcng the loadng
door to open, the door and the lock mechansm may get damaged.
u
Use detergents, softeners and supplements sutable for automatc
washng machnes only.
u
Follow the nstructons on the label of textles and the detergent
package.
1.2 Chldren's safety
u
Ths product can be used by the chldren who are at the age of 8 and
over and the people whose physcal, sensory or mental sklls are not
fully developed or who do not have necessary requred experence
and knowledge as long as they are supervsed or traned about the
safe use of the product and ts rsks. Chldren should not play wth the
devce. Cleanng and mantenance works should not be performed
by chldren unless they are supervsed by someone. Chldren of less
than 3 years should be kept away unless contnuously supervsed.
u
Packagng materals may be dangerous for the chldren. Keep
packagng materals n a safe place away from reach of the chldren.
Washing Machine / User’s Manual
3 / EN
Page 4

u
Electrcal products are dangerous for the chldren. Keep the chldren
away from the product when t s n use. Do not allow them to play
wth the product. Use chld lock to prevent chldren from ntervenng
wth the product.
u
Do not forget to close the loadng door when leavng the room where
the product s located.
u
Store all detergents and addtves n a safe place away from the
reach of the chldren by closng the cover of the detergent contaner
or sealng the detergent package.
1.3 Electrcal safety
u
If the product has a falure, t should not be operated unless t s
repared by the Authorsed Servce Agent. Rsk of electrc shock!
u
Ths product s desgned to resume operatng n the event of
powerng on after a power nterrupton. If you wsh to cancel the
programme, see "Cancellng the programme" secton.
u
Plug the product nto a grounded outlet protected by a 16 A fuse. Do
not neglect to have the groundng nstallaton made by a qualfed
electrcan. Our company shall not be lable for any damages that
wll arse when the product s used wthout groundng n accordance
wth the local regulatons.
u
Do not wash the product by sprayng or pourng water onto t! Rsk of
electrc shock!
u
Never touch the power cable plug wth wet hands! Do not grab the
power cord to unplug the machne, always unplug t by holdng the
socket wth one hand, and pullng the plug wth the other hand.
u
Product should be unplugged durng nstallaton, mantenance,
cleanng and repar procedures.
u
If the power cable s damaged, t must be replaced by the
manufacturer, after sales servce or a smlarly qualfed person
(preferably an electrcan) or someone desgnated by the mporter n
order to avod possble rsks.
1.4 Hot surface safety
4 / EN
While washing the laundry at high
temperatures, the loading door glass
will get hot. Considering this fact, during
washing operation keep the children away
from the loading door of the product to
prevent them touching it.
Washing Machine / User’s Manual
Page 5
2
Important instructions for environment
2.1 Compliance with WEEE Directive
This product complies with EU WEEE Directive (2012/19/EU). This product bears a
classification symbol for waste electrical and electronic equipment (WEEE).
This product has been manufactured with high quality parts and materials which
can be reused and are suitable for recycling. Do not dispose of the waste product
with normal domestic and other wastes at the end of its service life. Take it to the
collection center for the recycling of electrical and electronic equipment. Please
consult your local authorities to learn about these collection centers.
Compliance with RoHS Directive:
The product you have purchased complies with EU RoHS Directive (2011/65/EU). It does not
contain harmful and prohibited materials specified in the Directive.
2.2 Package information
Packaging materials of the product are manufactured from recyclable materials in accordance
with our National Environment Regulations. Do not dispose of the packaging materials together
with the domestic or other wastes. Take them to the packaging material collection points
designated by the local authorities.
3
Intended use
• This product has been designed for domestic use. It is not for commercial
purposes or it should not be used out of its intended use.
• The product must only be used for washing and rinsing of laundry that are
marked accordingly.
• The manufacturer waives any responsibility arisen from incorrect usage or
transportation.
• The service life of your product is 10 years. During this period, original spare
parts will be available to operate the appliance properly.
Washing Machine / User’s Manual
5 / EN
Page 6
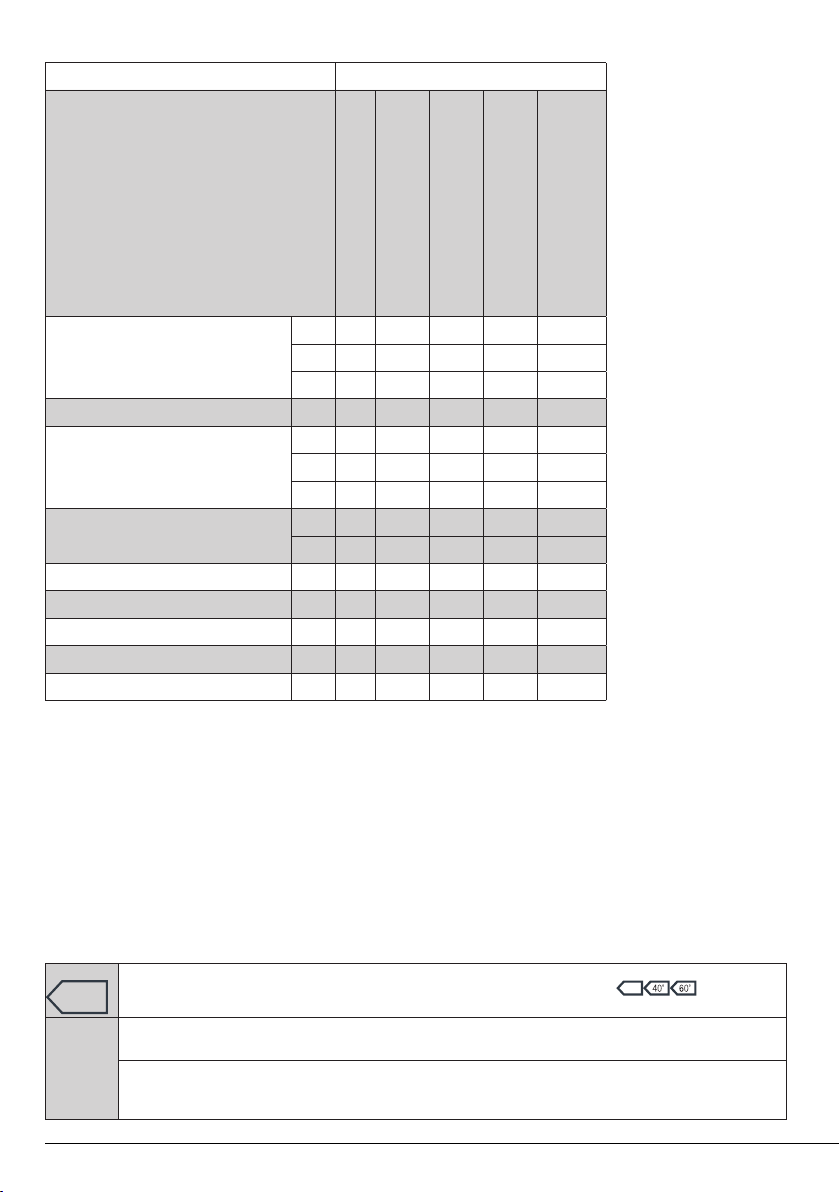
4
Technical specifications
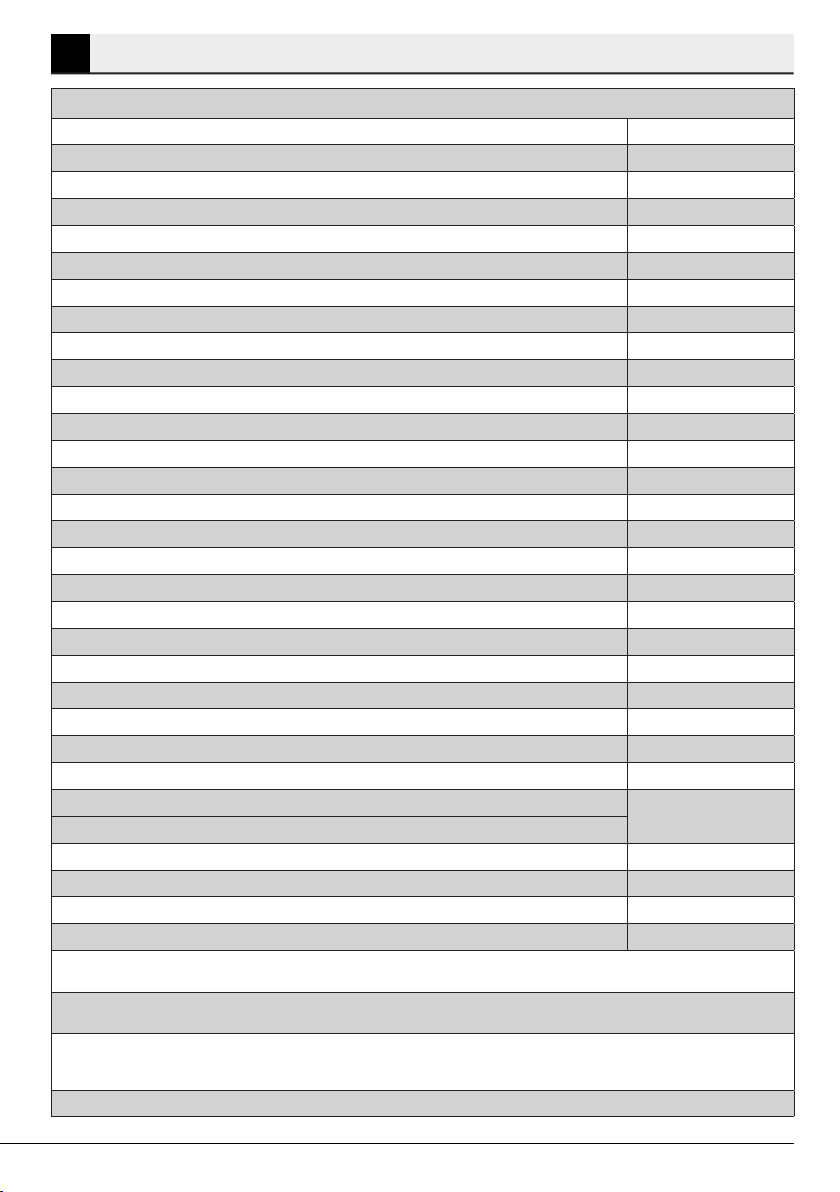
Complying Commission Delegated Regulation (EU) No 1061/2010
Supplier name or trademark Beko
Model name WTE 7511 X0A
Rated capacity (kg) 7
Energy efficiency class / Scale from A+++ (Highest Efficiency) to D (Lowest Efficiency) A+++
Annual Energy Consumption (kWh)
Energy consumption of the standard 60°C cotton programme at full load (kWh) 0,840
Energy consumption of the standard 60°C cotton programme at partial load (kWh) 0,720
Energy consumption of the standard 40°C cotton programme at partial load (kWh) 0,710
Power consumption in ‘off-mode’ (W) 0,250
Power consumption in ‘left-on mode’ (W) 0,750
Annual Water Consumption (l)
Spin-drying efficiency class / Scale from A (Highest Efficiency) to G (Lowest Efficiency) C
Maximum spin speed (rpm) 1000
Remaining moisture Content (%) 62
Standard cotton programme
Programme time of the standard 60°C cotton programme at full load (min) 220
Programme time of the standard 60°C cotton programme at partial load (min) 195
Programme time of the standard 40°C cotton programme at partial load (min) 178
Duration of the left-on mode (min) N/A
Airborne acoustical noise emissions washing/spinning (dB) 63/75
Built-in No
Height (cm) 84
Width (cm) 60
Depth (cm) 49
Net weight (±4 kg.) 61
Single Water inlet / Double Water inlet
• Available
Electrical input (V/Hz) 230 V / 50Hz
Total current (A) 10
Total power (W) 2200
Main model code 9217
(1)
Energy Consumption based on 220 standard washing cycles for cotton programmes at 60°C and 40°C at full and partial load, and the
consumption of the low-power modes. Actual energy consumption will depend on how the appliance is used.
(2)
Water consumption based on 220 standard washing cycles for cotton programmes at 60°C and 40°C at full and partial load. Actual water
consumption will depend on how the appliance is used.
(3)
“Standard 60°C cotton programme” and the “standard 40°C cotton programme” are the standard washing programmes to which the information
in the label and the fiche relates and these programmes are suitable to clean normally soiled cotton laundry and that they are the most efficient
programmes in terms of combined energy and water consumption.
Technical specifications may be changed without prior notice to improve the quality of the product.
(1)
(2)
(3)
Cotton Eco 60°C and 40°C
173
9899
• / -
6 / EN
Washing Machine / User’s Manual
Page 7
4.1 Installation
• Apply to the nearest authorised service agent for the installation of your product.
• Preparation of the location and electrical, tap water and waste water installations at the place of
installation is under customer's responsibility.
• Make sure that the water inlet and discharge hoses as well as the power cable are not folded,
pinched or crushed while pushing the product into its place after installation or cleaning
procedures.
• Make sure that the installation and electrical connections of the product are performed by
authorised service. Manufacturer shall not be held liable for damages that may arise from
procedures carried out by unauthorised persons.
• Prior to installation, visually check if the product has any defects on it. If so, do not have it installed.
Damaged products cause risks for your safety.
4.1.1 Approprate nstallaton locaton
• Place the product on a hard and level floor. Do not put it onto a carpet with high pile or other
similar surfaces.
• When the washing machine and dryer are placed on top of each other, their total weight –when
loaded– amounts to 180 kilograms. Place the product on a solid and flat floor that has sufficient
load carrying capacity!
• Do not place the product on the power cable.
• Do not install the product in the environments where the temperature falls below 0 ºC.
• Leaving a gap at the sides of the machine is suggested to reduce vibration and noise
• On a graduated floor, do not place the product next to the edge or on a platform.
• Do not place heat sources such as Hobs, Irons, Ovens, etc. on the washing machine and do not use
them on the product.
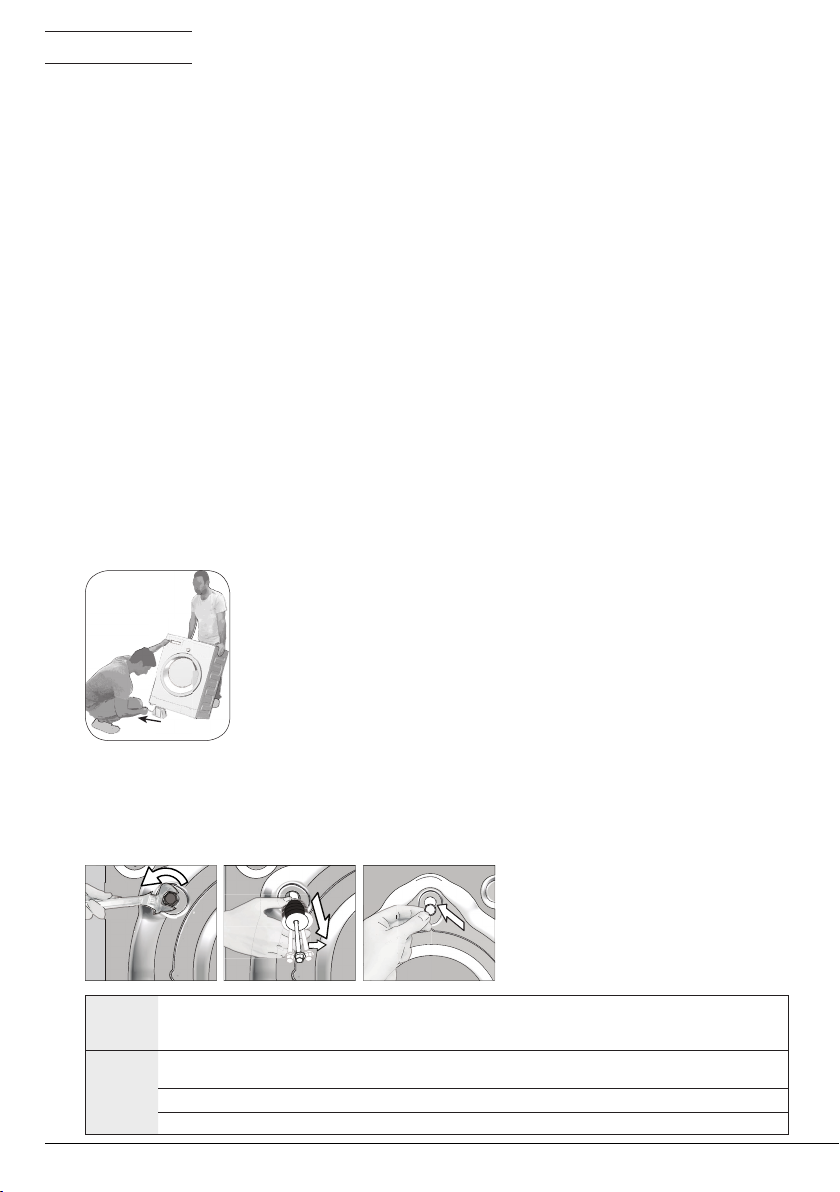
4.1.2 Removng packagng renforcement
Tilt the machine backwards to remove the packaging
reinforcement. Remove the packaging reinforcement by pulling the
ribbon. Do not make this operation alone by yourself.
4.1.3 Removng the transportaton locks
1 Loosen all bolts with an appropriate wrench until they turn freely.
2 Remove the transport safety bolts by turning them slightly.
3 Insert the plastic covers in the bag containing the user manual to the openings on the rear
panel.
CAUTION: Remove the transportation safety bolts before operating the washing machine! Otherwise, the
A
C
Washing Machine / User’s Manual
product will be damaged.
Keep the transportation safety bolts in a safe place to reuse when the washing machine needs to be moved again
in the future.
Install the transport safety bolts in reverse order of the disassembly procedure.
Never move the product without the transportation safety bolts properly fixed in place!
7 / EN
Page 8
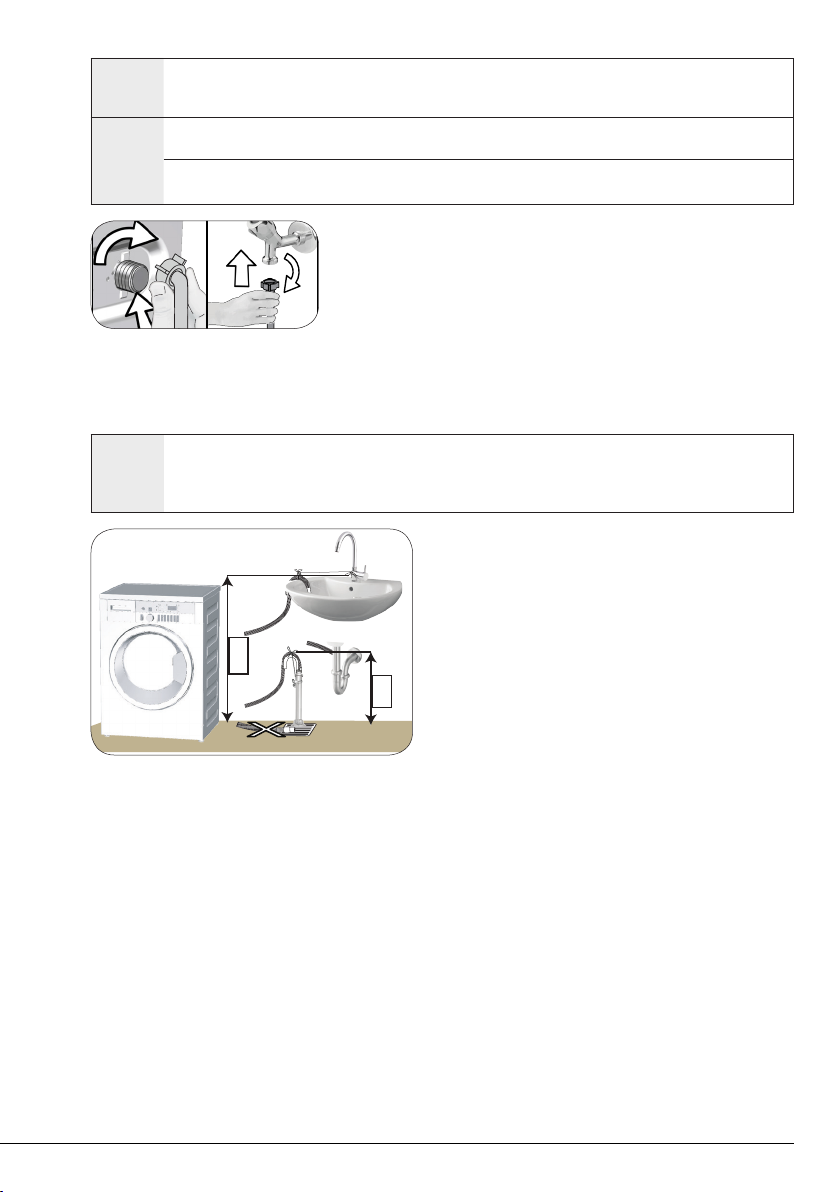
4.1.4 Connectng water supply
40 cm
100 cm
The water supply pressure required to run the product is between 1 to 10 bars (0.1 – 1 MPa). It is necessary to have
10 – 80 liters of water flowing from the fully open tap in one minute to have your machine run smoothly. Attach a
C
A
pressure reducing valve if water pressure is higher.
CAUTION: Models with a single water inlet should not be connected to the hot water tap. In such a case the
laundry will get damaged or the product will switch to protection mode and will not operate.
CAUTION: Do not use old or used water inlet hoses on the new product. It may cause stains on your laundry.
1 Tighten the nuts of the hose by hand. Never use a tool when
tightening the nuts.
2 When hose connection is completed, check whether there is
leak problems at the connection points by opening the taps
fully. If any leaks occur, turn off the tap and remove the nut.
Retighten the nut carefully after checking the seal. In order to
prevent the water leaks and resultant damages, keep the taps
closed when you do not use the product.
4.1.5 Connectng the dran hose to the dran
• Attach the end of the drain hose directly to waste water drain, lavatory or bathtub.
CAUTION: Your drain house will be flooded if the hose comes out of its housing during water discharge.
A
Moreover, there is risk of scalding due to high washing temperatures! In order to prevent such situations and
make sure that the machine performs water intake and discharge processes without any problem, fix the drain
hose securely.
• Connect the drain hose to a minimum height of 40
cm and a maximum height of 100 cm.
• In case the drain hose is elevated after laying it on
the floor level or close to the ground (less than 40 cm
above the ground), water discharge becomes more
difficult and the laundry may come out excessively
wet. Therefore, follow the heights described in the
figure.
• To prevent the waste water to go back into the machine again and to ensure easy drainage, do not
immerse the end of the hose into the waste water or do not insert it into the drain for more than
15 cm. If it is too long, cut it short.
• The end of the hose should not be bent, it should not be stepped on and the hose must not be
pinched between the drain and the machine.
• If the length of the hose is too short, use it by adding an original extension hose. Length of the
hose may not be longer than 3.2 m. To avoid water leak failures, the connection between the
extension hose and the drain hose of the product must be fitted well with an appropriate clamp as
not to come off and leak.
8 / EN
Washing Machine / User’s Manual
Page 9
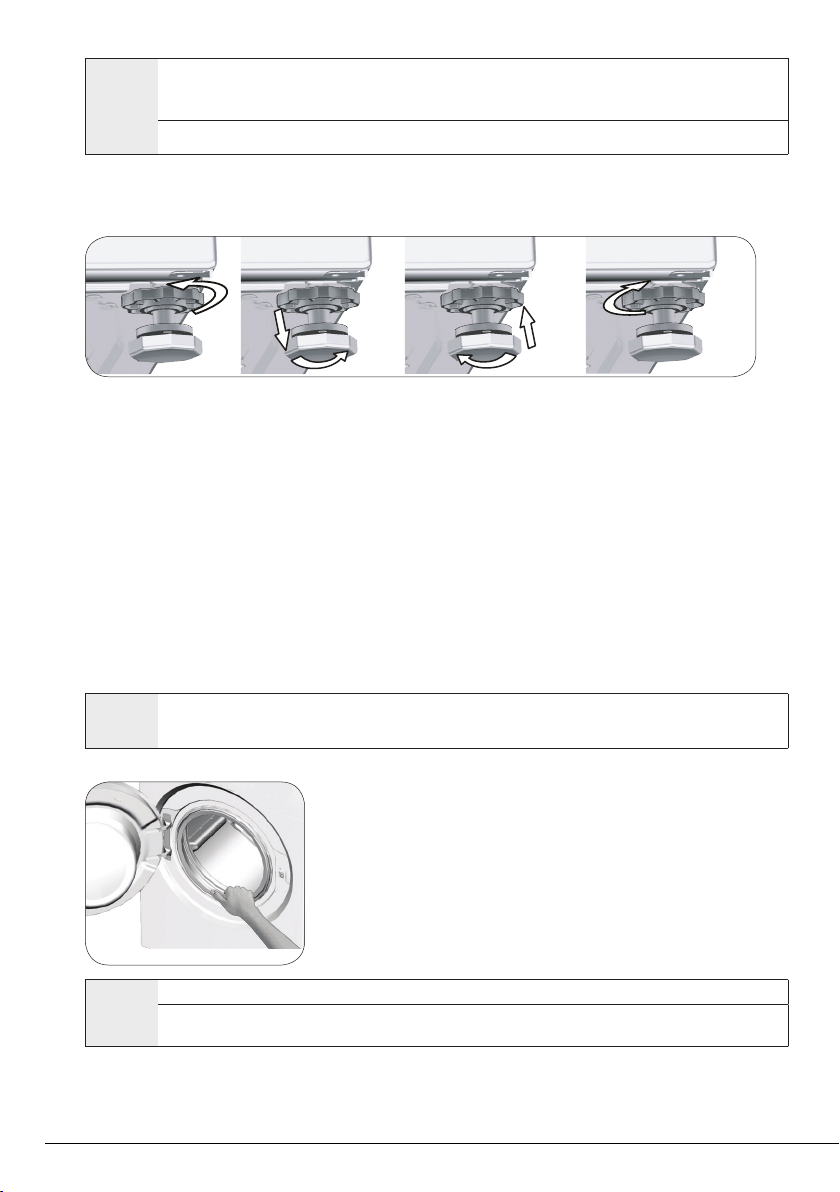
4.1.6 Adjustng the feet
CAUTION: In order to ensure that the product operates more silently and vibration-free, it must stand level
A
1 Loosen the lock nuts on the feet by hand.
2 Adjust the feet until the product stands in a stable and balanced way.
3. Tighten all lock nuts by hand again.
4.1.7 Electrcal connecton
Connect the product to a grounded outlet protected by a 16 A fuse. Our company shall not be liable
for any damages that will arise when the product is used without grounding in accordance with the
local regulations.
• Connection must comply with national regulations.
• The wiring for the electrical outlet circuit must be sufficient to meet the appliance requirements.
Use of a Groud Fault Circuit Interrupter (GFCI) is recommended.
• Power cable plug must be within easy reach after installation.
• If the current value of the fuse or breaker in the house is less than 16 Amps, have a qualified
electrician install a 16 Amp fuse.
• The voltage specified in the "Technical specifications" section must be equal to your mains
voltage.
• Do not make connections via extension cables or multi-plugs.
and balanced on its feet. Balance the machine by adjusting the feet. Otherwise, the product may move from its
place and cause crushing and vibration problems.
CAUTION: Do not use any tools to loosen the lock nuts. Otherwise, they will get damaged.
B
4.1.8 Intal use
C
Washing Machine / User’s Manual
CAUTION: Damaged power cables must be replaced by the Authorised Service Agents.
Use an anti-limescale suitable for the washing machines.
Some water might have remained in the product due to the quality control processes in the production. It is not
harmful for the product.
Before starting to use the product make sure that the preparations
are made which are in line with the “Important Safety and
Environment Instructions” and the instructions in the “Installation”
section.
To prepare the product for washing laundry, perform first operation
in Drum Cleaning programme. If this program is not available in your
machine, apply the method which is described in the section 4.4.2.
9 / EN
Page 10

4.2 Preparation
4.2.1 Sortng the laundry
* Sort laundry according to type of fabric, color, and degree of soiling and allowable water
temperature.
* Always obey the instructions given on the garment tags.
4.2.2 Preparng laundry for washng
• Laundry items with metal attachments such as, underwired bras, belt buckles or metal buttons
will damage the machine. Remove the metal pieces or wash the clothes by putting them in a
laundry bag or pillow case.
• Take out all substances in the pockets such as coins, pens and paper clips, and turn pockets inside
out and brush. Such objects may damage the product or cause noise problem.
• Put small size clothes such as infant's socks and nylon stockings in a laundry bag or pillow case.
• Place curtains in without compressing them. Remove curtain attachment items.
• Fasten zippers, sew loose buttons and mend rips and tears.
• Wash “machine washable” or “hand washable” labeled products only with an appropriate
programme.
• Do not wash colours and whites together. New, dark coloured cottons release a lot of dye. Wash
them separately.
• Tough stains must be treated properly before washing. If unsure, check with a dry cleaner.
• Only use the dyes / color changers and descaling agents which are appropriate to machine wash.
Always follow the instructions on the package.
• Wash trousers and delicate laundry turned inside out.
• Keep laundry items made of Angora wool in the freezer for a few hours before washing. This will
reduce pilling.
• Laundry that are subjected to materials such as flour, lime dust, milk powder, etc. intensely must
be shaken off before placing into the machine. Such dusts and powders on the laundry may build
up on the inner parts of the machine in time and can cause damage.
4.2.3 Thngs to be done for energy savng
Following information will help you use the product in an ecological and energy-efficient manner.
• Operate the product in the highest capacity allowed by the programme you have selected, but do
not overload; see, "Programme and consumption table". See, “Programme and consumption table"
• Always follow the instructions on the detergent packaging.
• Wash slightly soiled laundry at low temperatures.
• Use faster programmes for small quantities of lightly soiled laundry.
• Do not use prewash and high temperatures for laundry that is not heavily soiled or stained.
• If you plan to dry your laundry in a dryer, select the highest spin speed recommended during
washing process.
• Do not use more detergent than the recommended amount specified on its package.
4.2.4 Loadng the laundry
1. Open the laundry cover.
2. Put the laundry items into the machine in a loose manner.
3. Push and close the loading cover until you hear the locking sound. Ensure that no items are caught
in the door. The loading door is locked while a programme is running. The door can only be opened
a while after the programme comes to an end.
4.2.5 Correct load capacty
The maximum load capacity depends on the type of laundry, the degree of soiling and the washing
programme desired.
Machine automatically adjusts the water amount according to the weight of the laundry put inside it.
A
10 / EN
WARNING: Follow the information in the “Programme and consumption table”. When overloaded, machine's
washing performance will drop. Moreover, noise and vibration problems may occur.
Washing Machine / User’s Manual
Page 11
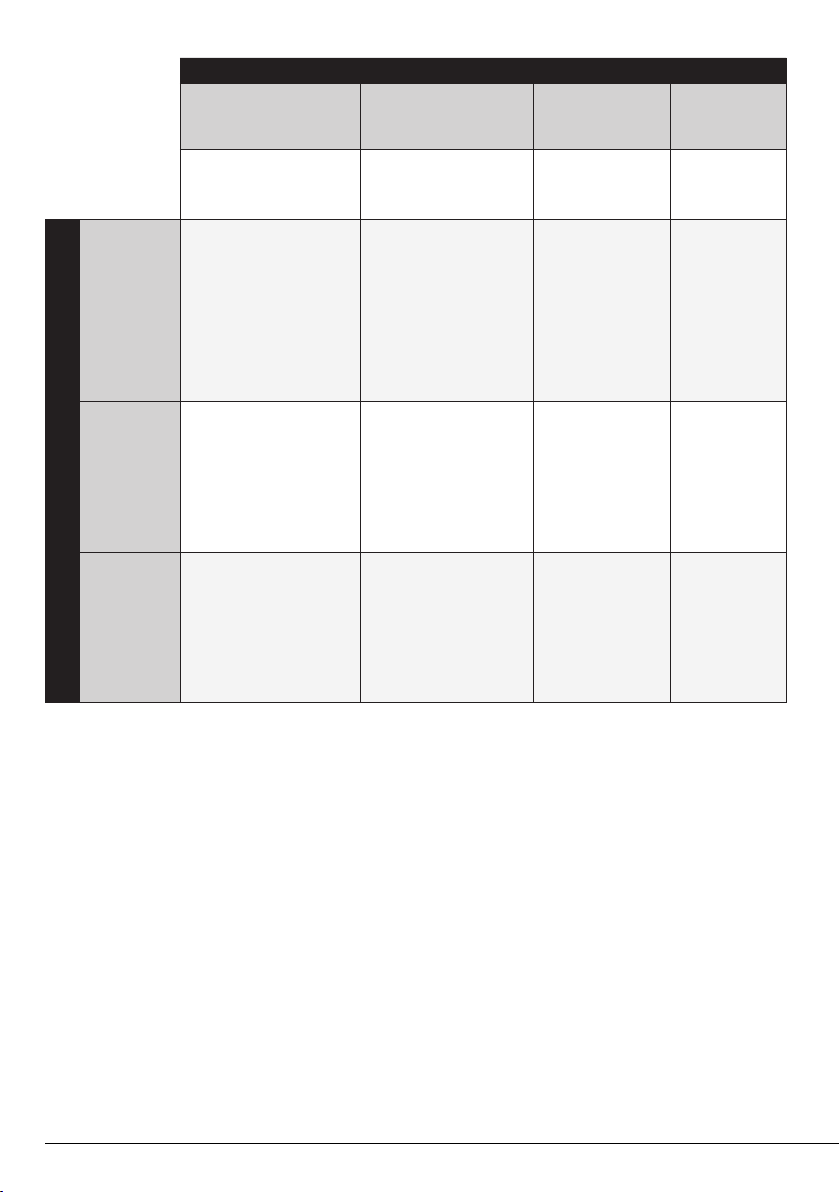
4.2.6 Usng detergent and softener
1
3
2
When using detergent, softener, starch, fabric dye, bleacher and decolorant, descaling agents; read the
manufacturer's instructions written on the package and follow the dosages specified. Use measuring cup if
C
Detergent, softener and other cleaning agents
• Add detergent and softener before starting the washing programme.
• While the washing cycle is in progress, do not leave the detergent dispenser open!
• When using a programme without prewash, do not put any detergent into the prewash
compartment (compartment nr. "1").
• In a programme with prewash, do not put liquid detergent into the prewash compartment
(compartment nr. "1").
• Do not select a programme with prewash if you are using a detergent bag or dispensing ball. Place
the detergent bag or the dispensing ball directly among the laundry in the machine.
If you are using liquid detergent, do not forget to place the liquid detergent container into the main
wash compartment (compartment number “2”).
Choosing the detergent type
Detergent type to be used depends on the fabric type and color.
• Use different detergents for coloured and white laundry.
• Wash your delicate clothes only with special detergents (liquid detergent, wool shampoo, etc.)
used solely for delicate clothes.
• When washing dark coloured clothes and quilts, it is recommended to use liquid detergent.
• Wash woolens with special detergent made specifically for woolens.
A
Adjusting detergent amount
The amount of washing detergent to be used depends on the amount of laundry, the degree of
soiling and water hardness.
• Do not use amounts exceeding the dosage quantities recommended on the detergent package
to avoid problems of excessive foam, poor rinsing, financial savings and finally, environmental
protection.
• Use lesser detergent for small amounts or lightly soiled clothes.
Using softeners
Pour the softener into the softener compartment of the detergent drawer.
• Do not exceed the (>max<) level sign on the softener compartment.
• If the softener has lost its fluidity, dilute it with water before putting it in the detergent drawer.
available.
The detergent drawer is composed of three
compartments:
– (1) for prewash
– (2) for main wash
– (3) for softener
– ( ) in addition, there is a siphon piece in the
softener compartment.
CAUTION: Use only detergents manufactured specifically for washing machines.
CAUTION: Do not use soap powder.
Washing Machine / User’s Manual
11 / EN
Page 12

Using liquid detergents
2
If the product contains a liquid detergent cup:
• Put the liquid detergent container into the
compartment no “2”.
• If the liquid detergent lost its fluidity, dilute
it with water before putting it into the
detergent container.
If the product does not contain a liquid detergent cup:
• Do not use liquid detergent for the prewash in a programme with prewash.
• Liquid detergent stains your clothes when used with Delayed Start function. If you are going to
use the Delayed Start function, do not use liquid detergent.
Using gel and tablet detergent
• If the gel detergent thickness is fluidal and your machine does not contain a special liquid
detergent cup, put the gel detergent into the main wash detergent compartment during first
water intake. If your machine contains a liquid detergent cup, fill the detergent into this cup before
starting the programme.
• If the gel detergent thickness is not fluidal or in the shape of capsule liquid tablet, put it directly
into the drum before washing.
• Put tablet detergents into the main wash compartment (compartment nr. "2") or directly into the
drum before washing.
Using starch
• Put the liquid soda, powder soda or the fabric dye into the softener compartment.
Do not use softener and starch together in a washing cycle.
Wipe the inside of the machine with a damp and clean cloth after using starch.
Using limescale remover
• When required, use limescale removers manufactured specifically for washing machines only.
Using bleaches
Add the bleach at the beginning of the washing cycle by selecting a prewash program. Do not put
detergent in the prewash compartment. As an alternative application, select a programme with
extra rinse and add the bleaching agent while the machine is taking water from the detergent
compartment during first rinsing step.
• Do not use bleaching agent and detergent by mixing them.
• Use just a little amount (approx. 50 ml) of bleaching agent and rinse the clothes very well as it
causes skin irritation. Do not pour the bleach onto the laundry and do not use it with the colored
items.
• When using oxygen-based decolorant, select a program which washes the laundry at a low
temperature.
• Oxygen-based decolorant can be used with the detergent; however, if it is not at the same
consistence, first put detergent in the compartment number “2” in the detergent dispenser and
wait for the machine to flush the detergent when taking in water. While the machine continues
taking in water, add decolorant in the same compartment.
12 / EN
Washing Machine / User’s Manual
Page 13
4.2.7 Tps for effcent washng
Light Colours and
Whites
(Recommended temperature
range based on soiling level:
40-90 oC)
It may be necessary to pre-
Heavily
Soiled
(difficult stains
such as grass,
coffee, fruits
and blood.)
Normally
Soiled
(For example,
stains caused
Soiling Level
by body on
collars and
cuffs)
Lightly
Soiled
(No visible
stains exist.)
treat the stains or perform
prewash. Powder and liquid
detergents recommended
for whites can be used at
dosages recommended for
heavily soiled clothes. It is
recommended to use powder
detergents to clean clay and
soil stains and the stains that
are sensitive to bleaches.
Powder and liquid detergents
recommended for whites
can be used at dosages
recommended for normally
soiled clothes.
Powder and liquid detergents
recommended for whites
can be used at dosages
recommended for lightly soiled
clothes.
Clothes
Colours
(Recommended temperature
range based on soiling level:
cold -40 oC)
Powder and liquid
detergents recommended
for colors can be used at
dosages recommended for
heavily soiled clothes. It is
recommended to use powder
detergents to clean clay and
soil stains and the stains that
are sensitive to bleaches. Use
detergents without bleach.
Powder and liquid detergents
recommended for colors
can be used at dosages
recommended for normally
soiled clothes. Detergents
which do not contain bleach
should be used.
Powder and liquid detergents
recommended for colors
can be used at dosages
recommended for lightly
soiled clothes. Detergents
which do not contain bleach
should be used.
Black/Dark
Colours
(Recommended
temperature range
based on soiling level:
cold -40 oC)
Liquid detergents
suitable for colors
and dark colors can
be used at dosages
recommended for
heavily soiled clothes.
Liquid detergents
suitable for colors
and dark colors can
be used at dosages
recommended for
normally soiled
clothes.
Liquid detergents
suitable for colors
and dark colors can
be used at dosages
recommended for
lightly soiled clothes.
Delicates/
Woolens/
Silks
(Recommended
temperature range
based on soiling
level: cold -30 oC)
Prefer liquid
detergents
produced for
delicate clothes.
Woolen and silk
clothes must
be washed with
special woolen
detergents.
Prefer liquid
detergents
produced for
delicate clothes.
Woolen and silk
clothes must
be washed with
special woolen
detergents.
Prefer liquid
detergents
produced for
delicate clothes.
Woolen and silk
clothes must
be washed with
special woolen
detergents.
Washing Machine / User’s Manual
13 / EN
Page 14
4.3 Operating the product
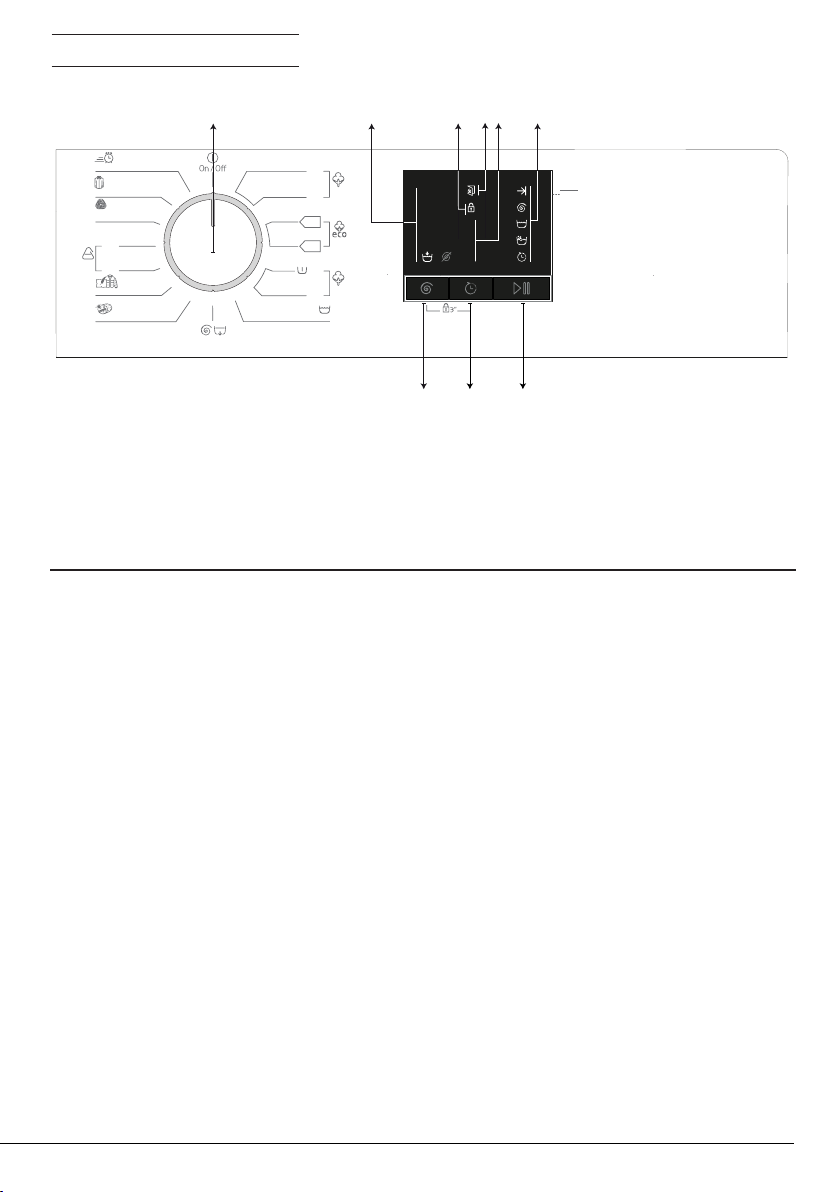
4.3.1 Control panel
1
2 3 4 6
5
Synthetics
Daily Xpress
Shirts 40°
Woollens 40°
Hand Wash 40°
40º
20º
Down Wear
Drum Clean
40º
Spin+Drain
40º
60º
20º
40º
60°
90º
Rinse
Cottons
Cottons Eco
Cottons
1 - Programme Selection knob (Uppermost
position On / Off)
2 - Spin Speed Indicator LEDs
3 - Child Lock Enabled LED
4 - Door Lock Enabled LED
1000
800
600
400
9
6
3
End
Cancel
Spin
Rinse
Wash
Time Delay
789
5 - Delayed Start Indicator LEDs
6 - Programme Follow-up LEDs
7 - Start / Pause Button
8 - Delayed Start Setting Button
9 - Spin Speed Adjustment button
WTE 7511 X0A
4.3.2 Preparng the machne
1.Make sure that the hoses are connected tightly.
2.Plug in your machine.
3.Turn the tap on completely.
4.Place the laundry in the machine.
5.Add detergent and fabric softener.
4.3.3 Programme selecton and tps for effcent washng
1.Select the programme suitable for the type, quantity and soiling degree of the laundry in
accordance with the "Programme and consumption table" and the temperature table below.
2.Select the desired programme with the Programme Selection knob.
14 / EN
Washing Machine / User’s Manual
Page 15
4.3.4 Programme and consumpton table
EN 2
Programme
Max. Load (kg)
Programme Duration (~min)
Water Consumption (l)
Energy Consumption (kWh)
90 7 205 98 2,45 1000
Cottons
Prewash-Cottons 60 7 225 106 1,96 1000
Cottons Eco
Synthetics
Daily Xpress 30 7 28 65 0,15 1000
Woollens / Hand Wash 40 1,5 65 53 0,47 1000
Down Wear 40 1,5 105 90 0,85 1000
Shirts 40 3 80 45 0,60 800
Drum Clean 90 - 160 70 2,20 600
40 7 205 96 1,10 1000
20 7 205 96 0,55 1000
60** 7 220 49 0,840 1000
60** 3,5 195 42,5 0,720 1000
40** 3,5 178 41,5 0,710 1000
40 3 130 69 0,80 1000
20 3 130 67 0,26 1000
Max. Speed***
** : Energy Label programme (EN 60456 Ed.3)
***: If maximum spin speed of the machine is lower then this value, you can only select up to the maximum spin speed.
- : See the programme description for maximum load.
** "Cotton Economic 40°C and Cotton Economic 60°C are standard programmes." These programmes are known as '40°C
cotton standard programme' and '60°C cotton standard programme' and indicated with the symbols on the
panel.
Water and power consumption may vary subject to the changes in water pressure, water hardness and temperature,
C
Washing Machine / User’s Manual
ambient temperature, type and amount of laundry, spin speed, and changes in electric voltage.
Depending on the amount of laundry you have loaded into your machine, there may be a difference of 1-1.5 hours
between the duration shown in the Programme and consumption table and the actual washing duration. Duration will
be automatically updated soon after the washing starts.
15 / EN
Page 16
Indcatve values for Synthetcs programmes (EN)
Remanng Mosture
Content (%) **
Load (kg)
Water
Consumpton
(l)
Energy
Consumpton
(kWh)
Programme
Duraton (mn)
Synthetcs 40
Synthetcs 20
** Remanng mosture content values may dffer accordng to the selected spn speed.
3 69 0,80 115/140
3 67 0.26 115/140
≤ 1000 rpm > 1000 rpm
45 40
45 40
Remanng Mosture
Content (%) **
4.3.5 Man programmes
Depending on the type of fabric, use the following main programmes.
• Cottons
Use this programme for your cotton laundry (sheets, bedlinen, towels, bathrobes, underwear etc.).
Your laundry will be washed with vigorous washing action for a longer washing cycle.
• Synthetics
Use to wash your synthetc clothes (shrts, blouses, synthetc/cotton blends, etc.). Your laundry
wll be washed wth a gentle acton for a shorter washng cycle when compared to the Cottons
programme. For curtans and tulle, t s recommended to use Synthetcs 20˚C or 40˚C programme.
• Woollens / Hand Wash
Use to wash your woolen/delicate laundry. Your laundry will be washed with a very gentle washing
action in order not to damage the clothes.
"Woolens programme of this machine is approved by The Woolmark Company
for washing machine-washable woolen products provided that the products
are washed in accordance with the instructions on the product tag and the
instructions published by the manufacturer of this machine. M1520"
In UK, Ireland, Hong Kong and India, the Woolmark trademark is a
Certification trademark.
4.3.6 Addtonal programmes
For special cases, additional programmes are available in the machine.
C
Additional programmes may differ according to the model of the machine.
• Cottons Eco
Use this programme to wash your laundry washable in cottons programme for a longer time, still
with a very good performance for saving purposes.
Cotton Eco programme consumes less energy compared to other cotton programmes.
C
• Prewash-Cottons
Use this programme only for heavily soiled cotton clothes. Add detergent into the prewash
compartment.
• Daily Xpress
Use this programme to wash your lightly soiled cotton clothes in a short time.
• Shirts
This programme is used to wash the shirts made from cotton, synthetic and synthetic blended
fabrics altogether. It reduces wrinkles. Pre-treatment algorithm is executed.
• Apply the pre-treatment chemical on your garments directly or add it together with detergent
when the machine starts to take water from the main washing compartment. Thus the machine will
wash them in a short period of time and expected lifespan of your shirts will extend.
16 / EN
Washing Machine / User’s Manual
Page 17

• Down Wear
Use this programme to wash your coats, vest, jackets etc. containing feathers with a "machinewashable" label on them. Thanks to special spinning profiles, it is ensured that the water reaches the
air gaps amongst the feathers.
• Drum Clean
Use regularly (once in every 1-2 months) to clean the drum and provide the required hygiene.
Operate the programme while the machine is completely empty. To obtain better results, put
powder lime-scale remover for washing machines into the detergent compartment no. “2”. When the
programme is over, leave the loading door ajar so that the inside of the machine gets dry.
This is not a washing programme. It is a maintenance programme.
C
4.3.7 Specal programmes
For specific applications, select any of the following programmes.
• Rinse
Use when you want to rinse or starch separately.
• Spin+Drain
You can use this function to remove the water on the garment of drain the water in the machine.
Before selecting this programme, select the desired spin speed and press Start / Pause button. First,
the machine will drain the water inside of it. Then, it will spin the laundry with the set spin speed and
drain the water coming out of them.
If you wish to drain only the water without spinning your laundry, select the Pump+Spin programme
and then select the No Spin function with the help of Spin Speed Adjustment button. Press Start /
Pause button.
Do not run the programme when there is something in the machine. If you try to do so, the machine detects that
there is load inside and aborts the programme.
C
Use a lower spin speed for delicate laundries.
4.3.8 Speed selecton
Whenever a new programme is selected, the recommended spin speed of the selected programme is
displayed on the spin speed indicator.
To decrease the spin speed, press the Spin Speed Adjustment button. Spin speed decreases
gradually. Then, depending on the model of the product, "Rinse Hold" and "No Spin" options appear
on the display. When "No Spin" is selected, the rinse level indicator lights will not turn on.
Rinse hold
If you are not going to unload your clothes immediately after the programme completes, you can
use rinse hold function to keep your laundry in the final rinsing water in order to prevent them from
getting wrinkled when there is no water in the machine. Press Start / Pause button after this process
if you want to drain the water without spinning your laundry. Programme will resume and complete
after draining the water.
If you want to spin the laundry held in water, adjust the Spin Speed and press Start / Pause button.
The programme will resume. Water is drained, laundry is spun and the programme is completed.
If the programme has not reached the spinning step, you can change the speed without switching the machine
C
to Pause mode.
Washing Machine / User’s Manual
17 / EN
Page 18

4.3.9 Delayed Start
With the Delayed Start function the startup of the programme may be delayed up to 3, 6 or 9 hours.
C
Do not use liquid detergents when you set Delayed Start! There is the risk of staining of the clothes.
1. Open the loading door, place the laundry and put detergent, etc.
2. Select a washing programme and spin speed.
3. Set the desired time by pressing the Delayed Start button. When the button is pressed once, 3
hours delayed start is selected. When the same button is pressed again, 6 hours delay is selected,
and when it is pressed for the third time, 9 hours delayed start is selected. If you press the Delayed
Start button once again, Delayed Start function will be canceled.
4. Press Start / Pause button. Previous delayed start time light turns off and next delayed start time
light turns on after every 3 hours.
5. At the end of the countdown, all delayed start lights will turn off and the selected programme will
start.
You can switch the machine to pause mode and add laundry during the delayed start period.
C
Changing the delayed start period
If you want to change the time during countdown, you will need to cancel the programme and set
the delay time again.
Canceling the Delayed Start function
If you want to cancel the delayed start countdown and start the programme immediately:
1. Turn the Programme Selection knob to any programme. Thus, Delayed Start function will be
canceled. The End/Cancel light flashes continuously.
2. Then, select the programme you want to run again.
3. Press Start / Pause button to start the programme.
4.3.10 Startng the programme
1. Press Start / Pause button to start the programme.
2. Programme follow-up light showing the startup of the programme will turn on.
4.3.11 Chld Lock
Use Child Lock function to prevent children from tampering with the machine. Thus you can avoid
any changes in a running programme.
If the Programme Selection knob is rotated when the child lock is active, "Child Lock Enabled LED" will flash 3
C
To activate the Child Lock:
Press and hold Speed and Delayed Start buttons for 3 seconds. While you are holding for 3 seconds,
the "Child Lock Enabled LED" will flash. You can release the buttons when the LEDs become
permanently on.
18 / EN
times. The Child Lock does not allow any change in the programmes or the selected speed.
Even if another programme is selected with the Programme Selection knob while the Child Lock is active,
previously selected programme will continue running.
When the Child Lock is active and the machine is running, you can switch the machine to Pause mode without
deactivating the Child Lock by turning the Programme Selection knob to On / Off position. When you turn the
Programme Selection knob afterwards, the programme will resume.
Washing Machine / User’s Manual
Page 19

To deactivate the Child Lock:
Press and hold Speed and Delayed Start buttons for 3 seconds while any programme is running.
While you are holding for 3 seconds, the "Child Lock Enabled LED" will flash. You can release the
buttons when the LED turns off completely.
In addition to the method above, to deactivate the Child Lock, switch the Programme Selection knob to On / Off
C
4.3.12 Progress of programme
4.3.13 Loadng door lock
4.3.14 Changng the selectons after programme has started
position when no programme is running, and select another programme.
Child Lock is not deactivated after power failures or when the machine is unplugged.
Progress of a running programme can be followed from the Programme Follow-up indicator. At
the beginning of every programme step, the relevant indicator light will turn on and light of the
completed step will turn off.
You can change the speed settings without stopping the programme flow while the programme is
running. To do this, the change you are going to make must be in a step after the running programme
step. If the change is not compatible, relevant lights will flash for 3 times.
If the machine does not proceed to the spinning step, the Rinse Hold function might be active or the automatic
C
There is a locking system on the loading door of the machine that prevents opening of the loading
door in cases when the water level is unsuitable.
Loading door light will start flashing when the machine is switched to Pause mode. The machine
checks the level of the water inside. If the level is suitable, the Loading Door light turns off and the
loading door can be opened within 1-2 minutes.
If the level is unsuitable, the Loading Door light remains on and the loading door cannot be opened.
If you are obliged to open the Loading Door while the Loading Door light is on, you must cancel the
current programme. See. "Cancelling the programme"
Switching the machine to pause mode
Press the Start / Pause button to switch the machine to pause mode while a programme is running.
The light of the step which the machine is in starts flashing in the Programme Follow-up indicator to
show that the machine has been switched to the pause mode.
Additionally, when the loading door is openable, the Loading Door light turns off completely.
Changing the speed settings
You can change the speed settings of the programme that is currently running. See "Speed
selection".
unbalanced load detection system might be activated due to the unbalanced distribution of the laundry in the
machine.
C
Washing Machine / User’s Manual
If no change is allowed, the relevant light will flash 3 times.
19 / EN
Page 20

Adding or taking out laundry
You can load/unload laundry when a programme is running if the water level is appropriate to open
the door. To do this:
1. Press Start / Pause button to switch the machine to pause mode. The programme follow-up light
of the relevant step during which the machine was switched into the pause mode will flash.
2. Wait until the Loading Door can be opened.
3. Open the Loading Door and add or take out the laundry.
4. Close the Loading Door.
5. Make changes in speed settings, if necessary.
6. Press Start / Pause button to start the machine.
4.3.15 Cancellng the programme
To cancel the programme, turn the Programme Selection knob to select another programme.
Previous programme will be cancelled. End / Cancel light will flash continuously to notify that the
programme has been canceled.
Your machine will end the programme when you turn the Programme Selection knob; however, it
does not drain the water inside. When you select and start a new programme, the newly selected
programme will start depending on the step the previous programme was canceled in. For example,
it may take in additional water or continue to wash with the water inside.
Some programmes may start by discharging the water inside the machine. Depending on the step where the
C
programme was canceled in, you may have to put detergent and softener again for the programme you have
selected anew.
4.3.16 End of programme
When the programme ends, "End" LED becomes on at the Programme Follow-up indicator.
1. Wait until the "Door Lock Enabled LED" goes off completely.
2. To switch off the machine, turn the Programme Selection Knob to On/Off position.
3. Take out your laundry and close the loading door. Your machine is ready for the next washing
cycle.
4.3.17 Your machne features "Pause Mode".
After you switch on your machine with the programme selection button (by switching the button
to a different position than the On/Off position), if no programme is started or no other procedure
is performed in the selection step or no action is taken within approx. 2 minutes after the selected
programme ends, your machine will switch to energy saving mode automatically. The brightness of
the indicator lights will decrease. Also, if your product has a display that shows programme time, this
display will be completely turned off. If you turn the Programme Selection knob or touch any button,
lights and display will switch back to previous condition. The selections which you make when exiting
from the energy efficiency may change. Please check the correctness of your selections before
starting the programme. If necessary, please make your settings again. This is not an error.
20 / EN
Washing Machine / User’s Manual
Page 21

4.4 Maintenance and cleaning
Service life of product extends and frequently experienced problems will be reduced if it is cleaned at
regular intervals.
4.4.1 Cleanng the detergent drawer
Clean the detergent drawer at regular intervals (every 4-5 washing cycles)
as shown below in order to prevent accumulation of powder detergent in
time.
Lift the rear part of the siphon to remove it as illustrated.
If more than normal amount of water and softener mixture starts to gather
in the softener compartment, the siphon must be cleaned.
1 Press the dotted point on the siphon in the softener compartment and pull towards you until
the compartment is removed from the machine.
2. Wash the detergent drawer and the siphon with plenty of lukewarm water in a washbasin.
In order to prevent the residues to contact your skin, clean it with an appropriate brush by
wearing a pair of gloves.
3 Insert the drawer back into its place after cleaning and make sure that it is seated well.
4.4.2 Cleanng the loadng door and the drum
For products with drum cleaning programme, please see Operating the product - Programmes.
Repeat Drum Cleaning process in every 2 months.
C
4.4.3 Cleanng the body and control panel
Wipe the body of the machine with soapy water or non-corrosive mild gel detergents as necessary,
and dry with a soft cloth.
Use only a soft and damp cloth to clean the control panel.
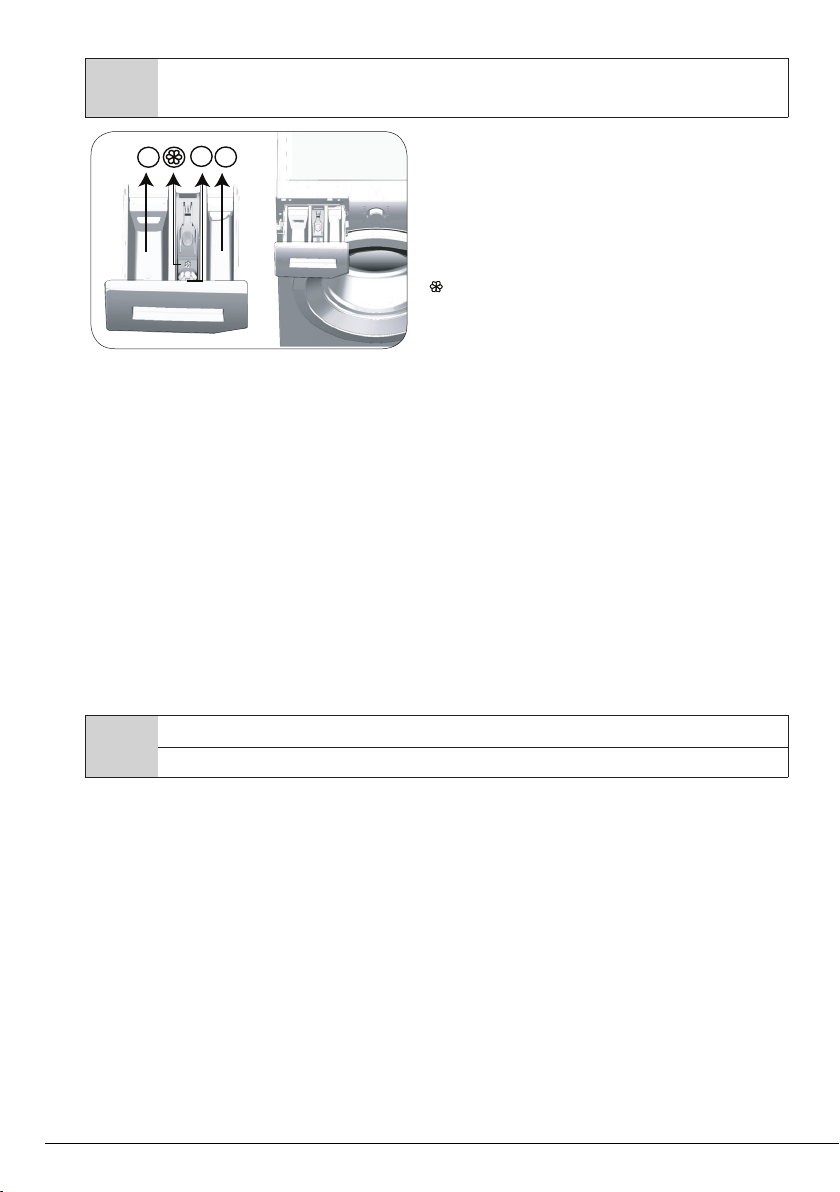
4.4.4 Cleanng the water ntake flters
There is a filter at the end of each water intake valve at the rear of the machine and also at the
end of each water intake hose where they are connected to the tap. These filters prevent foreign
substances and dirt in the water to enter the washing machine. Filters should be cleaned as they do
get dirty.
Use an detergent / anti-limescale suitable for the washing machines.
After every washing make sure that no foreign substance is left in the drum.
If the holes on the bellow shown in the figure is blocked, open the holes using
a toothpick.
Foreign metal substances will cause rust stains in the drum. Clean the stains
on the drum surface by using cleaning agents for stainless steel.
Never use steel wool or wire wool. These will damage the painted, chromated
and plastic surfaces.
1. Close the taps.
2. Remove the nuts of the water intake hoses to access
the filters on the water intake valves. Clean them
with an appropriate brush. If the filters are too dirty,
remove them from their places with a pliers and clean
in this way.
3. Take out the filters on the flat ends of the water
intake hoses together with the gaskets and clean
thoroughly under running water.
4. Replace the seals and filters carefully and tighten
their nuts by hand.
Washing Machine / User’s Manual
21 / EN
Page 22

4.4.5 Dranng remanng water and cleanng the pump flter
The filter system in your machine prevents solid items such as buttons, coins and fabric fibers
clogging the pump impeller during discharge of washing water. Thus, the water will be discharged
without any problem and the service life of the pump will extend.
If the machine fails to drain water, the pump filter is clogged. Filter must be cleaned whenever it is
clogged or in every 3 months. Water must be drained off first to clean the pump filter.
In addition, prior to transporting the machine (e.g., when moving to another house) and in case of
freezing of the water, water may have to be drained completely.
CAUTION: Foreign substances left in the pump filter may damage your machine or may cause noise problem.
A
In order to clean the drty flter and dscharge the water:
1 Unplug the machine to cut off the supply power.
A
2. Open the filter cover.
3 Follow the below procedures in order to drain water.
The product does not have an emergency water dran hose, n order to dran the water:
CAUTION: If the product is not being used, shut the tap shut, remove mains pipe and drain the water inside
the machine against any likely freezing.
CAUTION: After each use, turn off the water tap to which the mains hose is connected.
CAUTION: Temperature of the water inside the machine may rise up to 90 ºC. To avoid the burning risk, clean
the filter after the water inside the machine is cooled down.
a. In order to collect the water to flow out of the
filter, place a large vessel in front of the filter.
b. Turn and loosen the pump filter until water
starts to flow (counterclockwise). Fill the
flowing water into the container you have
placed in front of the filter. Always keep a piece
of cloth handy to absorb any spilled water.
c When the water inside the machine is finished,
take out the filter completely by turning it.
4. Clean any residues inside the filter as well as fibers, if any, around the pump impeller region.
5. Replace the filter.
6. If the filter cap is composed of two pieces, close the filter cap by pressing on the tab. If it is one
piece, seat the tabs in the lower part into their places first, and then press the upper part to close.
22 / EN
Washing Machine / User’s Manual
Page 23

5
Troubleshooting
Problem Reason Soluton
Program does not start after
closing the door.
Programme cannot be started or
selected.
Water in the machine.
The machine enters standby
mode after the programme
starts or it does not take in
water.
Machine does not drain water.
Machine vibrates or makes noise.
There is water leaking from the
bottom of the washing machine.
Machine stopped shortly after
the programme started.
Machine directly discharges the
water it takes in.
No water can be seen in the
machine during washing.
Loading door cannot be opened.
Start / Pause / Cancel button was not pressed. • *Press the Start / Pause / Cancel button.
It may be difficult to close the loading door in case
of excessive loading.
Washing machine has switched to self protection
mode due to a supply problem (line voltage, water
pressure, etc.).
Some water might have remained in the product
due to the quality control processes in the
production.
Tap is turned off. • Turn on the taps.
Water inlet hose is bent. • Flatten the hose.
Water inlet filter is clogged. • Clean the flter.
Loading door may be open. • Close the door.
The water connection may be wrong or water may
be cut off (When the water is cut off, washing or
rinsing LEDs flash).
Water drain hose might be clogged or twisted. • Clean or flatten the hose.
Pump filter is clogged. • Clean the pump flter.
Machine might be standing unbalanced. • Adjust the feet to level the machne.
A hard substance might have entered into the
pump filter.
Transportation safety bolts are not removed. • Remove the transportaton safety bolts.
Laundry quantity in the machine might be too
little.
Machine might be overloaded with laundry. • Take out some of the laundry from the
Machine might be leaning on a rigid item. • Make sure that the machne s not leanng
Water drain hose might be clogged or twisted. • Clean or flatten the hose.
Pump filter is clogged. • Clean the pump flter.
Machine might have stopped temporarily due to
low voltage.
Draining hose might not be at adequate height. • Connect the water dranng hose as
The water level is not visible from outside of the
washing machine.
Door lock is activated because of the water level
in the machine.
Machine is heating up the water or it is at the
spinning cycle.
Child lock is engaged. Door lock will be deactivated
a couple of minutes after the programme has
come to an end.
Loading door may be stuck because of the
pressure it is subjected to.
• Reduce the amount of laundry and make sure
that the loadng door s closed properly.
• To cancel the programme, turn the
Programme Selecton knob to select another
programme. Prevous programme wll be
canceled. (see. “Cancellaton of program”)
• Ths s not a falure; water s not harmful to
the machne.
• Check the water connecton. If the water s
cut off, press the Start/Pause key after the
water has been suppled agan to resume the
operaton from standby mode.
• Clean the pump flter.
• Add more laundry to the machne.
machne or dstrbute the load by hand to
balance t homogenously n the machne.
on anythng.
• It wll resume runnng when the voltage
restores to the normal level.
descrbed n the operaton manual.
• Ths s not a falure.
• Dran the water by runnng the Pump or Spn
programme.
• Wat untl the programme completes.
• Wat for a couple of mnutes for deactvaton
of the door lock.
• Grab the handle and push and pull the loadng
door to release and open t.
Washing Machine / User’s Manual
23 / EN
Page 24

Problem Reason Soluton
Washing takes longer time than
specified in the manual.(*)
Programme time does not
countdown. (On models with
display) (*)
Programme time does not
countdown. (*)
Machine does not switch to
spinning step. (*)
Washing performance is poor:
Laundry turns gray. (**)
Washing performance is poor:
Stains persist or the laundry is
not whitened. (**)
Water pressure is low. • Machne wats untl takng n adequate
Voltage might be low. • Washng tme s prolonged to avod poor
Input temperature of water might be low. • Requred tme to heat up the water extends
Number of rinses and/or amount of rinse water
might have increased.
Excessive foam might have occurred and
automatic foam absorption system might have
been activated due to too much detergent usage.
Timer may stop during water intake. • Tmer ndcator wll not countdown untl the
Timer may stop during heating step. • Tmer ndcator wll not countdown untl the
Timer may stop during spinning step. • Automatc unbalanced load detecton system
There might be unbalanced load in the machine. • Automatc unbalanced load detecton system
There might be unbalanced load in the machine. • Automatc unbalanced load detecton system
The machine will not spin if water is not drained
completely.
Excessive foam might have occurred and
automatic foam absorption system might have
been activated due to too much detergent usage.
Insufficient amount of detergent has been used
over a long period of time.
Washing was made at low temperatures for a
long time.
Insufficient amount of detergent is used with
hard water.
Too much detergent is used. • Use the recommended amount of detergent
Insufficient amount of detergent is used. • Use the recommended amount of detergent
Excessive laundry was loaded in. • Do not load the machne n excess. Load wth
Wrong programme and temperature were
selected.
Wrong type of detergent is used. • Use orgnal detergent approprate for the
Too much detergent is used. • Put the detergent n the correct
amount of water to prevent poor washng
qualty due to the decreased amount of
water. Therefore, the washng tme extends.
washng results when the supply voltage
s low.
n cold seasons. Also, washng tme can be
lengthened to avod poor washng results.
• Machne ncreases the amount of rnse water
when good rnsng s needed and adds an
extra rnsng step f necessary.
• Use recommended amount of detergent.
machne takes n adequate amount of water.
The machne wll wat untl there s suffcent
amount of water to avod poor washng
results due to lack of water. Tmer ndcator
wll resume countdown after ths.
machne reaches the selected temperature.
mght be actvated due to the unbalanced
dstrbuton of the laundry n the drum.
mght be actvated due to the unbalanced
dstrbuton of the laundry n the drum.
mght be actvated due to the unbalanced
dstrbuton of the laundry n the drum.
• Check the flter and the dranng hose.
• Use recommended amount of detergent.
• Use the recommended amount of detergent
approprate for water hardness and the
laundry.
• Select the proper temperature for the
laundry to be washed.
• Usng nsuffcent amount of detergent wth
hard water causes the sol to stck on the
cloth and ths turns the cloth nto gray n
tme. It s dffcult to elmnate grayng once
t happens. Use the recommended amount
of detergent approprate for water hardness
and the laundry.
approprate for water hardness and the
laundry.
approprate for water hardness and the
laundry.
amounts recommended n the "Programme
and consumpton table".
• Select the proper programme and
temperature for the laundry to be washed.
machne.
compartment. Do not mx the bleachng
agent and the detergent wth each other.
24 / EN
Washing Machine / User’s Manual
Page 25

Problem Reason Soluton
Washing performance is poor:
Oily stains appeared on the
laundry. (**)
Washing performance is poor:
Clothes smell unpleasantly. (**)
Colour of the clothes faded. (**)
It does not rinse well.
Laundry became stiff after
washing. (**)
Laundry does not smell like the
softener. (**)
Detergent residue in the
detergent drawer. (**)
Regular drum cleaning is not applied. • Clean the drum regularly. For ths, please
Odours and bacteria layers are formed on the
drum as a result of continuous washing at lower
temperatures and/or in short programmes.
Excessive laundry was loaded in. • Do not load the machne n excess.
Detergent in use is damp. • Keep detergents closed n an envronment
A higher temperature is selected. • Select the proper programme and
The amount, brand and storage conditions of the
detergent used are inappropriate.
Detergent is put in the wrong compartment. • If detergent s put n the prewash
Pump filter is clogged. • Check the flter.
Drain hose is folded. • Check the dran hose.
Insufficient amount of detergent is used. • Usng nsuffcent amount of detergent for
Detergent is put in the wrong compartment. • If detergent s put n the prewash
Detergent might be mixed with the softener. • Do not mx the softener wth detergent.
Detergent is put in the wrong compartment. • If detergent s put n the prewash
Detergent might be mixed with the softener. • Do not mx the softener wth detergent.
Detergent is put in wet drawer. • Dry the detergent drawer before puttng n
Detergent has gotten damp. • Keep detergents closed n an envronment
Water pressure is low. • Check the water pressure.
The detergent in the main wash compartment got
wet while taking in the prewash water. Holes of
the detergent compartment are blocked.
There is a problem with the detergent drawer
valves.
Detergent might be mixed with the softener. • Do not mx the softener wth detergent.
Regular drum cleaning is not applied. • Clean the drum regularly. For ths, please
see 4.4.2.
• Leave the detergent drawer as well as
the loadng door of the machne ajar after
each washng. Thus, a humd envronment
favorable for bactera cannot occur n the
machne.
free of humdty and do not expose them to
excessve temperatures.
temperature accordng to the type and
solng degree of the laundry.
• Use a detergent approprate for the washng
machne and your laundry. Keep detergents
closed n an envronment free of humdty
and do not expose them to excessve
temperatures.
compartment although prewash cycle s not
selected, machne can take ths detergent
durng rnsng or softener step. Put the
detergent n the correct compartment.
the water hardness can cause the laundry
to become stff n tme. Use approprate
amount of detergent accordng to the water
hardness.
compartment although prewash cycle s not
selected, machne can take ths detergent
durng rnsng or softener step. Put the
detergent n the correct compartment.
Wash and clean the dspenser wth hot water.
compartment although prewash cycle s not
selected, machne can take ths detergent
durng rnsng or softener step. Wash and
clean the dspenser wth hot water. Put the
detergent n the correct compartment.
Wash and clean the dspenser wth hot water.
detergent.
free of humdty and do not expose them to
excessve temperatures.
• Check the holes and clean f they are clogged.
• Call the Authorsed Servce Agent.
Wash and clean the dspenser wth hot water.
see 4.4.2.
Washing Machine / User’s Manual
25 / EN
Page 26

Problem Reason Soluton
Too much foam forms in the
machine. (**)
Foam is overflowing from the
detergent drawer.
Laundry remains wet at the end
of the programme. (*)
(*) Machine does not switch to spinning step when the laundry is not evenly distributed in the drum to prevent any damage to the
machine and to its surrounding environment. Laundry should be rearranged and re-spun.
(**) Regular drum cleaning is not applied. Clean the drum regularly. See 4.4.2
Improper detergents for the washing machine are
being used.
Excessive amount of detergent is used. • Use only suffcent amount of detergent.
Detergent was stored under improper conditions. • Store detergent n a closed and dry locaton.
Some meshed laundry such as tulle may foam too
much because of their texture.
Detergent is put in the wrong compartment. • Put the detergent n the correct
Softener is being taken early. • There may be problem n the valves or n the
Too much detergent is used. • Mx 1 tablespoonful softener and ½ l water
Excessive foam might have occurred and
automatic foam absorption system might have
been activated due to too much detergent usage.
• Use detergents approprate for the washng
machne.
Do not store n excessvely hot places.
• Use smaller amounts of detergent for ths
type of tem.
compartment.
detergent dspenser. Call the Authorsed
Servce Agent.
and pour nto the man wash compartment of
the detergent drawer.
• Put detergent nto the machne sutable
for the programmes and maxmum
loads ndcated n the “Programme and
consumpton table”. When you use addtonal
chemcals (stan removers, bleachs and etc),
reduce the amount of detergent.
• Use recommended amount of detergent.
A
CAUTION: If you cannot eliminate the problem although you follow the instructions in this section, consult your
dealer or the Authorised Service Agent. Never try to repair a nonfunctional product yourself.
26 / EN
Washing Machine / User’s Manual
Page 27

Mašina za pranje veša
Uputstvo za upotrebu
SB
Document Number=
WTE 7511 X0A
2820526535_SB / 27-07-18.(11:32)
Page 28

1 Opšta bezbednosna uputstva
Ovaj odeljak obuhvata bezbednosna uputstva koja vam mogu pomoći da
sprečite povrede i rizike od oštećenja materijala. Sve vrste garancija neće
važiti ako se ova uputstva ne poštuju.
1.1 Lična i bezbednost svojine
u
Nikad ne stavljajte proizvod na pod pokriven tepihom. Električni delovi će
se pregrejati pošto vazduh ne može da cirkuliše sa donje strane uređaja. To
može da prouzrokuje probleme sa vašim proizvodom.
u
Izvadite strujni utikač kada proizvod nije u upotrebi.
u
Sve radove na instalaciji i popravci uvek prepustite ovlašćenom serviseru.
Proizvođač neće biti odgovoran za oštećenja do kojih može da dođe kada
takve radove obavljaju neovlašćena lica.
u
Creva za dovod i ispuštanje vode uvek moraju da budu dobro učvršćena i
neoštećena. Inače može da dođe do isticanja vode.
u
Dok još uvek ima vode unutar proizvoda, nikada nemojte da otvarate vrata za
ubacivanje ili da vadite filter. U suprotnom će postojati opasnost od poplave i
povreda zbog vruće vode.
u
Nikada nemojte na silu da otvarate zaključana vrata za punjenje veša. Vrata
se mogu otvoriti nekoliko minuta nakon završetka ciklusa pranja. U slučaju
da se vrata za punjenje veša silom otvaraju može doći do oštećivanja vrata
i mehanizma zaključavanja.
u
Koristite samo deterdžente, omekšivače i dodatke koji se upotrebljavaju za
mašinsko pranje.
u
Pratite uputstva na etiketi odeće i pakovanju deterdženta.
1.2 Bezbednost dece
u
Ovaj proizvod mogu da koristite deca starosti 8 godina i više kao i osobe sa
nepotpuno razvijenim telesnim, senzornim i mentalnim sposobnostima, kao
i osobe koje nemaju dovoljno potrebnog iskustva i znanja sve dok su pod
nadzorom ili su prošli obuku u vezi sa bezbednom upotrebom proizvoda i
rizicima. Deca ne treba da se igraju sa ovim uređajem. Čišćenje i održavanje
nikad ne smeju obavljati deca, osim pod nečijim nadzorom. Deca mlađa
od 3 godine ne treba da se približavaju osim ako nisu pod neprekidnim
nadzorom.
Ovaj proizvod je proizveden koristeći najnoviju tehnologiju u ekološki čistim uslovima.
28 / SB
Mašina za pranje veša / Uputstvo za upotrebu
Page 29

u
Materijali pakovanja mogu biti opasni po decu. Ambalažne materijale čuvajte
na sigurnom mestu, van domašaja dece.
u
Električni proizvodi su opasni po decu. Držite decu dalje od proizvoda dok
se koristi. Ne dajte im da se igraju ovim proizvodom. Koristite funkciju
zaključavanja zbog dece da biste sprečili da deca manipulišu ovim
proizvodom.
u
Nemojte zaboraviti da zatvorite vrata za punjenje veša kada napuštate
prostoriju u kojoj se nalazi ovaj proizvod.
u
Držite sve deterdžente i aditive na sigurnom mestu, dalje od domašaja
dece i zatvarajte poklopac posude sa deterdžentom ili zapečatite pakovanje
deterdženta.
1.3 Električna bezbednost
u
U slučaju da je proizvod u kvaru, ne sme da se uključuje dok ga ne popravi
ovlašćeni serviser. Rizik od strujnog udara!
u
Ovaj proizvod je projektovan tako da nastavi da radi u slučaju ponovnog
uspostavljanja napajanja posle nestanka struje. Ako želite da otkažete
program, pogledajte deo „Otkazivanje programa“.
u
Priključite proizvod na uzemljenu utičnicu zaštićenu osiguračem od 16 A.
Neka Vam instalaciju uzemljenja uradi kvalifikovani električar. Naša firma
neće biti odgovorna za bilo kakva oštećenja do kojih može da dođe kad se
proizvod koristi bez uzemljenja u skladu sa lokalnim propisima.
u
Nemojte da perete proizvod prskanjem ili prosipanjem vode na njega! Rizik
od strujnog udara!
u
Nikada nemojte da dodirujete kablove za napajanje vlažnim rukama!
Nemojte da držite kabl za napajanje da biste ga izvukli iz utičnice, uvek ga
izvlačite iz utičnice držeći utičnicu jednom rukom i povlačeći utikač drugom
rukom.
u
Proizvod treba da se isključi iz struje za vreme instalacije, održavanja,
čišćenja i popravke.
u
Ukoliko se kabl za napajanje ošteti, mora da ga zameni proizvođač, serviser
ili slično kvalifikovano lica (po mogućstvu električar) ili osoba koju je odredio
uvoznik da bi se izbegli mogući rizici.
1.4 Bezbednost u vezi sa vrelim površinama
Staklo na vratima mašine je vruće kada se veš
pere na visokim temperaturama. S obzirom na
ovu činjenicu, tokom pranja decu držite podalje
od vrata za ubacivanje veša na proizvodu da
biste sprečili da ih dodirnu.
Mašina za pranje veša / Uputstvo za upotrebu
29 / SB
Page 30

2 Važna uputstva za zaštitu životne sredine
2.1 Usaglašenost sa WEEE direktivom
Ovaj proizvod je usaglašen sa WEEE direktivom Evropske Unije (2012/19/EU). Ovaj proizvod
nosi znak klasifikacije za električni i elektronski otpad (WEEE).
Ovaj proizvod je proizveden korišćenjem visokokvalitetnih delova i materijala koji se mogu
ponovo iskoristiti ili su pogodni za reciklažu. Nemojte odlagati proizvod u otpad sa običnim
kućnim otpadom i drugim otpadima na kraju veka trajanja. Odložite ga u centar za sakupljanje i
reciklažu električnog i elektronskog otpada. Konsultujte se sa svojim lokalnim vlastima da biste
saznali o ovim centrima za sakupljanje otpada.
Usaglašenost sa RoHS direktivom:
Proizvod koji ste kupili u saglasnosti je sa RoHS direktivom Evropske unije (2011/65/EU). On ne sadrži štetne i
zabranjene materijale navedene u direktivi.
2.2 Informacije o pakovanju
Ambalažni materijali ovog proizvoda su proizvedeni od materijala koji se recikliraju u skladu sa nacionalnim
propisima o zaštiti životne sredine. Ambalažne materijale ne odlažite zajedno sa kućnim ili drugim otpadima.
Odnesite ih na mesta za prikupljanje ambalažnog materijala određena od strane lokalne vlasti.
3 Namena
• Ovaj proizvod je dizajniran za upotrebu u domaćinstvu. Nije namenjen za komercijalnu upotrebu i ne treba
ga koristiti van svoje namene.
• Ovaj proizvod sme da se koristiti samo za pranje i ispiranje veša prema njihovim etiketama.
• Proizvođač ne prihvata odgovornost koja proističe iz nepravilne upotrebe ili prenosa.
• Radni vek vašeg uređaja je 10 godina. Tokom ovog perioda će biti dostupni originalni rezervni delovi koji će
omogućiti pravilan rad uređaja.
30 / SB
Mašina za pranje veša / Uputstvo za upotrebu
Page 31

4 Tehničke specifikacije
Ispunjavanje propisa Komisije (EU) br. 1061/2010
Naziv dobavljača ili zaštitni znak
Naziv modela
Nominalni kapacitet (kg)
Klasa energetske efikasnosti / skala od A+++ (najviša efikasnost) do D (najniža efikasnost)
Godišnja potrošnja energije (kWh)
(1)
Potrošnja energije na standardnom programu na 60 °C pri kompletnom punjenju (kWh)
Potrošnja energije na standardnom programu na 60 °C pri delimičnom punjenju (kWh)
Potrošnja energije na standardnom programu na 40 °C pri delimičnom punjenju (kWh)
Potrošnja energije u „isključenom režimu“ (W)
Potrošnja energije u „režimu ostavljanja“ (W)
Godišnja potrošnja vode (l)
(2)
Klasa efikasnosti sušenja centrifugom / skala od A (najviša efikasnost) do G (najniža efikasnost)
Maksimalna brzina obrtaja (opm)
Sadržaj preostale vlage (%)
Standardni program za pamuk
(3)
Pamuk eko 60 °C i 40° C
Vreme standardnog programa na 60 °C pri kompletnom punjenju (min)
Vreme standardnog programa na 60 °C pri delimičnom punjenju (min)
Vreme standardnog programa na 40 ℃ pri delimičnom punjenju (min)
Trajanje režima ostavljanja (min)
Nivo akustične buke koja se prenosi vazduhom prilikom pranja/obrtanja (dB)
Ugrađeno
Visina (cm)
Širina (cm)
Dubina (cm)
Neto težina (±4 kg)
Jednostruki dovod vode / Dvostruki dovod vode
• Dostupno
Napon napajanja (V/Hz)
Ukupna struja (A)
Ukupna snaga (W)
Šifra glavnog modela
(1)
Potrošnja energije je zasnovana na 220 ciklusa standardnog pranja u programima za pamuk na 60 °C i 40 °C pri kompletnom i delimičnom
punjenju, i potrošnji u režimima za uštedu energije. Stvarna potrošnja energije će zavisiti od načina upotrebe uređaja.
(2)
Potrošnja vode je zasnovana na 220 ciklusa standardnog pranja u programima za pamuk na 60 °C i 40 °C pri kompletnom ili delimičnom
punjenju. Stvarna potrošnja vode će zavisiti od načina upotrebe uređaja.
(3)
„Standardni program za pamuk na 60 °C“ i „standardni program za pamuk na 40 °C“ su standardni programi za pranje na koje se podaci na
etiketi i deklaraciji odnose i ovi programi su pogodni za pranje normalno zaprljanog pamučnog veša i to su najefikasniji programi kada je reč o
kombinovanoj potrošni energije i vode.
Tehničke specifikacije mogu da se promene bez upozorenja da bi se poboljšao kvalitet proizvoda.
Beko
WTE 7511 X0A
7
A+++
173
0,840
0,720
0,710
0,250
0,750
9899
C
1000
62
220
195
178
N/A
63/75
Non
84
60
49
61
• / -
230 V / 50Hz
10
2200
9217
Mašina za pranje veša / Uputstvo za upotrebu
31 / SB
Page 32

4.1 Instalacija
• Zatražite pomoć u vezi sa instalacijom proizvoda od najbližeg ovlašćenog servisa.
• Priprema lokacije i priključaka za struju, vodovod i kanalizaciju na mestu instalacije proizvoda su
odgovornost kupca.
• Pazite da se creva za dovod i odvod vode, kao i električni kabl, ne saviju, uklješte ili prignječe prilikom
postavljanja proizvoda na mesto posle instalacije i procedura čišćenja.
• Postarajte se da instalacija i električno priključivanje proizvoda bude obavljeno od strane ovlašćenog
servisa. Proizvođač neće biti odgovoran za oštećenja do kojih može da dođe kada takve radove obavljaju
neovlašćena lica.
• Pre instalacije vizuelno proverite da li na njemu postoje oštećenja. Ako postoje, nemojte ga instalirati.
Oštećeni proizvodi predstavljaju opasnost za vašu bezbednost.
4.1.1 Odgovarajuće mesto za instalaciju
• Postavite proizvod na čvrst i ravan pod. Nemojte da ga stavljate na debeo tepih ili druge slične površine.
• Kada se mašina za veš i sušenje postave jedna iznad druge, njihova ukupna težina - kada su napunjene
vešom - dostiže 180 kilograma. Proizvod postavite na čvrst i ravan pod koji ima dovoljnu nosivost!
• Ne stavljajte proizvod na strujni kabl.
• Nemojte da stavljate proizvod u okruženja gde temperatura pada ispod 0 ºC.
• Preporučuje se da se na stranama mašine ostavi zazor da bi se smanjile vibracije i buka
• Kod poda na više nivoa, nemojte da stavljate proizvod blizu ivice ili na platformu.
• Nemojte da postavljate izvore toplote, kao što su ploče za kuvanje, pegle, rerne itd. na mašinu za pranje i
nemojte da ih koristite na proizvodu.
4.1.2 Uklanjanje pojačanja pakovanja
Nagnite mašinu unazad da biste uklonili pojačanja pakovanja. Uklonite
pojačanje pakovanja povlačenjem trake. Nemojte sami da obavljate ovu
radnju.
4.1.3 Uklanjanje transportnih brava
1 Olabavite sve zavrtnjaje odgovarajućim ključem dok se slobodno ne okreću.
2 Sklonite sigurnosne zavrtnjaje za trasport tako što ćete ih polako okrenuti.
3 Ubacite plastične poklopce iz kese sa korisničkim uputstvom u otvore na zadnjoj strani.
PAŽNJA: Uklonite transportne bezbednosne vijke pre uključivanja mašine za pranje veša! U suprotnom se proizvod može
A
C
32 / SB
oštetiti.
Držite transportne bezbednosne vijke na sigurnom mestu da biste ih mogli ponovo koristiti kad se mašina bude jednom
ponovo prenosila.
Postavite transportne bezbednosne vijke u obrnutom redosledu u odnosu na proceduru rastavljanja.
Nikad ne pomerajte proizvod bez montiranih bezbednosnih vijaka!
Mašina za pranje veša / Uputstvo za upotrebu
Page 33

4.1.4 Povezivanje dovoda vode
Pritisak dovoda vode potreban da bi mašina radila mora da bude od 1 do 10 bara (0,1 – 1 MPa). Morate da imate 10 –
80 litara vode koja teče iz potpuno otvorene slavine u jednom minutu da bi mašina radila kako treba. Dodajte ventil za
C
A
smanjivanje pritiska ako je pritisak vode prejak.
PAŽNJA: Modeli sa jednostrukim dovodom vode ne smeju da se spajaju na slavinu sa toplom vodom. U tom slučaju će se
oštetiti veš ili će proizvod uključiti zaštitu i neće raditi.
PAŽNJA: Ne koristite stara ili korišćena creva za dovod vode na novom proizvodu. To može da prouzrokuje fleke na vašem
vešu.
1 Zategnite matice creva rukom. Nikad ne koristite alat za pritezanje
ovih navrtki.
2 Kada se priključivanje creva završi, proverite da li ima curenja na
mestima povezivanja tako što ćete slavine otvoriti u potpunosti. Ako
curi, zatvorite slavinu i uklonite navrtku. Proverite zaptivač i ponovo
pažljivo pritegnite navrtku. Da biste sprečili curenja vode i oštećenje,
slavine držite zatvorene kada ne koristite proizvod.
4.1.5 Povezivanje odvodnog creva sa odvodnim otvorom
• Prključite kraj creva direktno na kanalizacionu cev, odvod lavboa ili kade.
PAŽNJA: Vaša kuća može da bude poplavljena ako crevo izađe iz kućišta za vreme izbacivanja vode. Osim toga, postoji
A
opasnost od opekotina zbog visokih temperature pranja! Da biste sprečili takve situacije i postarali se da mašina obavlja
procese prihvatanja i odvoda vode bez problema, pričvrstite crevo za odvod čvrsto.
• Priključite crevo za odvod minimalne dužine 40 cm a
maksimalne dužine 100 cm.
• U slučaju da je crevo za odvod dignuto posle stajanja
100 cm
na podu ili blizu poda (manje od 40 cm iznad zemlje),
ispuštanje vode postaje teže i veš može da izađe mokar.
40 cm
Zato treba da se držite visina opisanih na slici.
• Da biste sprečili vraćanje prljave vode u mašinu i obezbedili jednostavno odvođenje, nemojte da potapate
kraj creva u prljavu vodu i nemojte da ga ubacujete u odvodni otvor više od 15 cm. Ako je previše dugačko,
skratite ga.
• Kraj creva ne sme da se savija i ne sme da se gazi, a crevo se ne sme ukleštiti između odvoda i mašine.
• Ako je dužina creva prekratka, produžite ga originalnim dodatnim crevom. Dužina creva ne sme da bude
veća od 3,2 m. Da biste izbegli probleme sa curenjem vode, veza između produžnog creva i odvodnog
creva na proizvodu mora da bude pričvršćena dobro odgovarajućom stegom tako da ne dođe do spadanja i
curenja.
Mašina za pranje veša / Uputstvo za upotrebu
33 / SB
Page 34

4.1.6 Podešavanje nožica
PAŽNJA: Da bi osigurali tiši rad proizvoda bez vibracija, on mora da stoji ravno i u ravnoteži na svojim nožicama.
A
1 Rukom otpustite blokirajuće navrtke na nožicama.
2 Podesite nožice dok proizvod bude mogao da stoji stabilno i balansirano.
3. Sve blokirajuće navrtke pritegnite ručno.
4.1.7 Povezivanje struje
Proizvod priključite na uzemljenu utičnicu koja je zaštićena osiguračem od 16 A. Naša firma neće biti
odgovorna za bilo kakva oštećenja do kojih može da dođe kad se proizvod koristi bez uzemljenja u skladu sa
lokalnim propisima.
• Povezivanje mora da bude obavljeno prema nacionalnim standardima.
• Ožičenje kola električne utičnice mora da bude dovoljno tako da zadovolji zahteve uređaja. Korišćenje
osigurača za slučaj neispravnog uzemljenja je preporučeno.
• Utikač kabla za napajanje mora da bude pristupačan nakon instalacije.
• Ako je trenutna vrednost osigurača u Vašoj kući manja od 16 ampera, neka vam električar ugradi osigurač
od 16 ampera.
• Napon naveden u "Tehničkim specifikacijama" mora da bude jednak naponu vaše električne mreže.
• Ne priključivati preko produžnih kablova ili razvodnika.
Uravnotežite mašinu podešavanjem nožica. U suprotnom se može desiti da se proizvod pomera sa svog mesta i izazove
probleme sa vibracijama i lomovima.
PAŽNJA: Ne koristite nikakve alate za popuštanje blokirajućih navrtki. U suprotnom se mogu oštetiti.
B
4.1.8 Prva upotreba
C
34 / SB
PAŽNJA: Oštećeni strujni kabl mora zameniti ovlašćeni električar.
Koristite sredstvo za uklanjanje kamenca koje je podesno za mašine za pranje veša.
U proizvodu je možda ostalo malo vode iz procesa kontrole kvaliteta u proizvodnji. To ne šteti proizvodu.
Pre početka korišćenja proizvoda, proverite da li su sve pripreme u skladu
sa odeljkom „Važna uputstva vezana za bezbednost i životnu sredinu“ i
uputstvima iz odeljka „Instalacija“.
Da biste pripremili proizvod za pranje veša, prvo uključite program
za čišćenje doboša. Ako ovaj program nije dostupan na vašoj mašini,
koristite metod koji je opisan u odeljku 4.4.2.
Mašina za pranje veša / Uputstvo za upotrebu
Page 35

4.2 Priprema
4.2.1. Sortiranje veša
* Sortirajte veš prema vrsti tkanine, boji, prema tome koliko je prljav i prema dozvoljenoj temperaturi vode.
* Uvek se držite uputstava koja su navedena na etiketama odeće.
4.2.2 Priprema veša za pranje
• Veš sa metalnim dodacima kao što su brushalteri, kopče kaiša i metalna dugmad mogu da oštete mašinu.
Uklonite metalne dodatke ili operite takav veš tako što ćete ga staviti u vreću za veš ili jastučnicu.
• Izvadite sve stvari iz džepova, kao što su novčići, olovke i spajalice, izvrnite džepove naopačke i iščetkajte ih.
Takvi objekti mogu da oštete proizvod ili da izazovu problem sa bukom.
• Odeću male veličine, kao što su dečije sokne i najlon čarape, stavite u vreću za veš ili jastučnicu.
• Zavese stavljajte tako da ih ne pritiskate. Uklonite dodatke sa zavesa.
• Zatvorite rajsferšluse, zašijte dugmad koja visi i ušijte pocepano.
• Perite proizvode označene sa “pere se u mašini” ili “pere se na ruke” samo na odgovarajućem programu.
• Ne perite beli i obojeni veš zajedno. Novi tamni pamučni veš može da ispusti puno boje. Perite ih posebno.
• Uporne fleke se moraju pravilno obraditi pre pranja. Ako niste sigurni, raspitajte se u radnji za hemijsko
čišćenje.
• Koristite samo sredstva za boje koja odgovaraju mašinskom pranju. Uvek se držite uputstava na pakovanju.
• Pantalone i osetljivo rublje perite izvrnuto naopačke.
• Komade odeće od angore držite u frižideru nekoliko sati pre pranja. To će smanjiti ćebanje.
• Veš koji je bio izložen materijama kao što su brašno, prašina, mleko u prahu itd. mora dobro da se istrese
pre stavljanja u mašinu. Takve prašine i praškovi na vešu mogu da se natalože u unutrašnjosti mašine
tokom vremena i izazovu oštećenje.
4.2.3 Za uštedu energije
Sledeće informacije će vam pomoći da ovaj proizvod koristite na ekološki i energetski efikasan način.
• Proizvod koristiti za najveći kapacitet koji dozvoljava izabrani program, ali ne preopterećujte mašinu;
pogledajte "Tabelu programa i korišćenja". Pogledajte "Tabelu programa i korišćenja"
• Uvek se držite uputstava sa pakovanja deterdženta.
• Malo prljav veš perite na niskim temperaturama.
• Koristite brže programe za male količine ili malo prljav veš.
• Ne koristite pretpranje i visoke temperature za veš koji nije mnogo prljav ili isflekan.
• Ako planirate da sušite veš u mašini za sušenje veša, izaberite najveću brzinu centrifuge koja je
preporučena za proces pranja.
• Nemojte da koristite više deterdženta nego što je preporučeno na njegovom pakovanju.
4.2.4 Stavljanje veša
1. Otvorite poklopac za veš.
2. Stavite delove odeće u mašinu bez nabijanja.
3. Gurnite i zatvorite poklopac dok ne začujete zvuk zaključavanja. Pazite da vrata ništa ne zahvate. Vrata za
punjenje su zaključana dok je program u toku. Vrata se mogu otvoriti samo posle završetka programa.
4.2.5 Odgovarajući kapacitet punjenja
Maksimalni kapacitet punjenja zavisi o vrsti veša, o tome koliko je prljav i koji program želite da koristite.
Mašina automatski podešava količinu vode na osnovu težine stavljenog veša.
UPOZORENJE: Držite se informacija iz „Tabele programa i potrošnje“. Ako je preopterećena, rezultati pranja mašine
A
Mašina za pranje veša / Uputstvo za upotrebu
biće slabiji. Štaviše, mogu se javiti problemi sa bukom i vibriranjem.
35 / SB
Page 36

4.2.6 Korišćenje deterdženta i omekšivača
2
Kada se koristi deterdžent, omekšivač, štirak, boja za tkaninu, izbeljivač ili sredstvo za uklanjanje boje , pažljivo pročitajte
C
Deterdžent, omekšivači i druga sredstva za pranje
• Dodajte deterdžent i omekšivač pre pokretanja programa pranja.
• Dok je ciklus pranja u toku, nemojte da ostavljate fioku za deterdžent otvorenu!
• Kada koristite program bez pretpranja, ne stavljajte deterdžent u odeljak za pretpranje (odeljak br. "1").
• Kod programa sa pretpranjem ne stavljajte tečni deterdžent u odeljak za pretpranje (odeljak br. "1").
• Ne birajte program sa pretpranjem ako koristite kesu s deterdžentom ili kuglu za raspršivanje. Stavite kesu s
deterdžentom ili kuglu za raspršivanje u mašinu, direktno među vešom.
Ako koristite tečni deterdžent, nemojte zaboraviti da posudu sa tečnim deterdžentom stavite u odeljak za
glavno pranje (odeljak broj „2“).
Izbor vrste deterdženta
Tip deterdženta koji treba koristiti zavisi od vrste i boje tkanine.
• Koristite različite deterdžente za beli veš i veš u boji.
• Osetljivu odeću perite specijalnim deterdžentima (tečni deterdžent, šampon za vunu itd.) koji se koriste
isključivo za osetljivu odeću.
• Kada perete odeću tamnije boje i kiltove, preporučuje se korišćenje tečnog deterdženta.
• Vunene stvari perite specijalnim deterdžentom koji je namenjen za vunu.
A
uputstvo proizvođača na pakovanju i držite se navedenih vrednosti za doziranje. Koristite čašicu za merenje ako postoji.
1
3
2
Fioka za deterdžent se sastoji od 3 odeljka:
– (1) za pretpranje
– (2) za glavno pranje
– (3) za omekšivač
– ( ) osim toga, postoji sifonski deo u odeljku za omekšivač.
PAŽNJA: Koristite samo deterdžente proizvedene specijalno za mašinsko pranje.
PAŽNJA: Nemojte da koristite sapun u obliku pudera.
Podešavanje količine deterdženta
Količina deterdženta koja će da se koristi zavisi od količine veša, od toga koliko je prljav i od tvrdoće vode.
• Nemojte da koristite količine koje prelaze doze preporučene na pakovanju da biste izbegli problem sa
previše pene, lošim ispiranjem, finansijskom uštedama i, na kraju, zaštitom okoline.
• Koristite manje deterdženta za male količine veša ili za malo prljav veš.
Korišćenje omekšivača
Sipajte omekšivač u odeljak za omekšivač fioke za deterdžent.
• Nemojte da pređete znak (>max<) na odeljku za omekšivač.
• Ako je omekšivač izgubio tečnost, razblažite ga vodom pre nego što ga stavite u fioku za deterdžent.
Korišćenje tečnih deterdženata
Ako proizvod sadrži šolju za tečni deterdžent:
• Stavite posudu za tečni deterdžent u odeljak br.
„2“.
• Ako je tečni deterdžent izgubio svoju tečnost,
razblažite ga vodom pre stavljanja u posudu za
deterdžent.
36 / SB
Mašina za pranje veša / Uputstvo za upotrebu
Page 37

Ako proizvod ne sadrži šolju za tečni deterdžent:
• Ne koristite tečni deterdžent za pretpranje u programima sa pretpranjem.
• Tečni deterdžent ostavlja fleke na vašoj odeći ako se koristi sa funkcijom odloženog početka. Ako hoćete da
koristite funkciju odloženog početka, ne koristite tečni deterdžent.
Korišćenje deterdženta u obliku gela i tabele
• Ako je gustina gel-deterdženta fluidna, a vaša mašina nema specijalnu šolju za teči deterdžent, gel stavite
u odeljak za glavno pranje prilikom prvog uzimanja vode. Ako vaša mašina sadrži šolju za tečni deterdžent,
sipajte ga u tu šolju pre nego što pokrenete program.
• Ako gustina gel-deterdženta nije fluidna ili je u deterdžent u obliku tablete sa kapsuliranom tečnošću, pre
pranja ga stavite direktno u doboš.
• Deterdžent u obliku tablete stavite u odeljak za glavno pranje (odeljak br. "2") ili direktno u doboš pre pranja.
Upotreba štirka
• Stavite tečnu sodu, sodu u puderu ili boju za tkaninu u odeljak za omekšivač.
Nemojte koristiti omekšivač i štirak zajedno u ciklusu pranja.
Posle korišćenja štirka, obrišite unutrašnjost mašine vlažnom i čistom krpom.
Korišćenje sredstva za uklanjanje kamenca
• Ako je potrebno, koristite sredstva za uklanjanje kamenca koja su proizvedena specijalno za mašine za
pranje veša.
Korišćenje izbeljivača
Dodajte izbeljivač na početku ciklusa pranja biranjem programa za pretpranje. Ne stavljajte deterdžent u
odeljak za pretpranje. Drugi način bi bio da izaberete program sa dodatnim ispiranjem i dodate sredstvo za
izbeljivanje dok mašina uzima vodu preko fioke za deterdžent tokom prve faze ispiranja.
• Ne mešajte sredstvo za izbeljivanje i deterdžent.
• Sredstvo za izbeljivanje koristite u maloj količini (oko 50 ml) i isperite dobro odeću jer može da iritira kožu.
Nemojte da sipate izbeljivač na veš i nemojte da ga koristite sa obojenim vešom.
• Prlikom korišćenja sredstava za uklanjanje boje zasnovanih na kiseoniku, izaberite program koji pere veš na
niskoj temperaturi.
• Sredstvo za skidanje boje zasnovano na kiseoniku se može koristiti sa deterdžentom; međutim, ako se
ne nalaz u istom obliku, prvo stavite deterdžent u odeljak broj „2“ u posudu za deterdžent i sačekajte da
mašina ispere deterdžent prilikom uzimanja vode. Dok mašina nastavlja da uzima vodu, dodajte sredstvo za
uklanjanje boje u isti odeljak.
Mašina za pranje veša / Uputstvo za upotrebu
37 / SB
Page 38

4.2.7 Saveti za efikasnije pranje
Pastelne boje i beli veš Boje
(Preporučeni opseg temperatura
zavisno od zaprljanosti: 40-90 oC)
Moguće je da bude potrebno da
Veoma
prljav
(teške mrlje, kao
što su mrlje od
trave, kafe, vođa
i krvi.)
Normalno
prljav
(Na primer,
Zaprljanost
za mrlje koje
su izazvane
znojenjem na
okovratnicima i
manžetnama)
Malo prljav
(Nema vidljivih
mrlja.)
se mrlje tretiraju ili da se obavi
pretpranje. Praškasti i tečni
deterdženti koji su preporučeni
za beli veš mogu se koristiti
u dozama preporučenim za
veoma prljav veš. Preporučuje
se korišćenje praškastih
deterdženata za čišćenje mrlja od
blata, kao i mrlja koje reaguju na
izbeljivače.
Praškasti i tečni deterdženti
koji su preporučeni za beli veš
mogu se koristiti u dozama
preporučenim za normalno
prljav veš.
Praškasti i tečni deterdženti
koji su preporučeni za beli veš
mogu se koristiti u dozama
preporučenim za malo prljav veš.
Odeća
(Preporučeni opseg temperatura
zavisno od zaprljanosti: hladno
-40 oC)
Praškasti i tečni deterdženti koji su
preporučeni za veš u boji mogu se
koristiti u dozama preporučenim za
veoma prljav veš. Preporučuje se
korišćenje praškastih deterdženata
za čišćenje mrlja od blata, kao i
mrlja koje reaguju na izbeljivače.
Koristite deterdžente bez
izbeljivača.
Praškasti i tečni deterdženti koji su
preporučeni za veš u boji mogu se
koristiti u dozama preporučenim
za normalno prljav veš. Treba
koristiti deterdžente koji ne sadrže
izbeljivač.
Praškasti i tečni deterdženti koji su
preporučeni za veš u boji mogu se
koristiti u dozama preporučenim
za malo prljav veš. Treba koristiti
deterdžente koji ne sadrže
izbeljivač.
Crni/veš tamne
boje
(Preporučeni opseg
temperatura zavisno
od zaprljanosti: hladno
-40 oC)
Praškasti i tečni
deterdženti koji su
preporučeni za veš u
boji i tamne boje mogu
se koristiti u dozama
preporučenim za veoma
prljav veš.
Praškasti i tečni
deterdženti koji su
preporučeni za veš u
boji i tamne boje mogu
se koristiti u dozama
preporučenim za
normalno prljav veš.
Praškasti i tečni
deterdženti koji su
preporučeni za veš u
boji i tamne boje mogu
se koristiti u dozama
preporučenim za malo
prljav veš.
Osetljivo/Vuna/
Svila
(Preporučeni opseg
temperatura zavisno
od zaprljanosti:
hladno -30 oC)
Za osetljivu odeću
je bolje koristiti
tečne deterdžente.
Vunena i svilena
odeća mora da se
pere specijalnim
deterdžentima za
vunu.
Za osetljivu odeću
je bolje koristiti
tečne deterdžente.
Vunena i svilena
odeća mora da se
pere specijalnim
deterdžentima za
vunu.
Za osetljivu odeću
je bolje koristiti
tečne deterdžente.
Vunena i svilena
odeća mora da se
pere specijalnim
deterdžentima za
vunu.
38 / SB
Mašina za pranje veša / Uputstvo za upotrebu
Page 39

4.3 Rukovanje proizvodom
4.3.1 Kontrolna tabla
1
2 3 4 6
5
Synthetics
Daily Xpress
Shirts 40°
Woollens 40°
Hand Wash 40°
40º
20º
Down Wear
Drum Clean
40º
Spin+Drain
20º
40º
40º
60º
60°
90º
Rinse
1 – Dugme za izbor programa (na vrhu je položaj
za Uključivanje/isključivanje)
2 – LED lampice indikatora brzine centrifuge
3 – LED lampica za aktiviranje funkcije
zaključavanja zbog dece
4 – LED lampica za aktiviranje funkcije
zaključavanja vrata
Cottons
Cottons Eco
Cottons
1000
800
600
400
9
6
3
End
Cancel
Spin
Rinse
Wash
Time Delay
789
5 – LED lampice indikatora za odlaganje početka
6 – LED lampice pratećeg indikatora programa
7 – Dugme Početak/pauza
8 – Dugme za podešavanje odlaganja početka
9 – Dugme za podešavanje brzine centrifuge
WTE 7511 X0A
4.3.2 Priprema mašine
1. Uverite se da li su creva čvrsto spojena.
2. Uključite mašinu u struju.
3. Otvorite slavinu do kraja.
4. Stavite veš u mašinu.
5. Dodajte deterdžent i omekšivač za veš.
4.3.3 Biranje programa i saveti za efikasno pranje
1. Izaberite odgovarajući program prema tipu i količini veša i prema tome koliko je prljav u skladu sa tabelom
„Tabela programa i potrošnje” i tabelom temperature ispod.
2. Izaberite traženi program putem dugmeta Izbor programa.
Mašina za pranje veša / Uputstvo za upotrebu
39 / SB
Page 40

4.3.4 Tabela programa i korišćenja
SB 2
Program (°C)
Maks. opterećenje (kg)
Trajanje programa (~min)
Potrošnja vode (l)
Potrošnja energije (kWh)
90 7 205 98 2,45 1000
Cottons
Prewash-Cottons (Pretpranje za pamuk) 60 7 225 106 1,96 1000
Cottons Eco
Synthetics
Daily Xpress 30 7 28 65 0,15 1000
Woollens / Hand Wash 40 1,5 65 53 0,47 1000
Down Wear 40 1,5 105 90 0,85 1000
Shirts 40 3 80 45 0,60 800
Drum Clean 90 - 160 70 2,20 600
40 7 205 96 1,10 1000
20 7 205 96 0,55 1000
60** 7 220 49 0,840 1000
60** 3,5 195 42,5 0,720 1000
40** 3,5 178 41,5 0,710 1000
40 3 130 69 0,80 1000
20 3 130 67 0,26 1000
Maks. brzina***
** : Program znaka za energiju (EN 60456 Ed.3)
***: Ako je maksimalna brzina centrifuge mašine manja od ove vrednosti, možete da birate samo do maksimalne brzine centrifuge.
- : Pogledajte opis programa za maksimalno opterećenje.
** „Pamuk Ekonomik 40 °C i Pamuk Ekonomik 60 °C su standardni programi.” Ovi programi su poznati kao „40 °C, standardni
program za pamuk” i „60 °C, standardni program za pamuk” i označeni su sa simbolima na ploči.
Potrošnja vode i struje može da bude različita, što zavisi od promena u pritisku vode, tvrdoće vode i temperature, temperature
C
40 / SB
okoline, vrste i količine veša, brzine centrifuge, kao i promena električnog napona.
U zavisnosti od količine veša koji ste stavili u mašinu, može doći do vremenskog odstupanja u trajanju od 1–1,5 časova između
trajanja pranja koje je prikazano u Tabeli programa i korišćenja i stvarnog trajanja pranja. Trajanje pranja će se automatski ažurirati
ubrzo nakon početka pranja.
Mašina za pranje veša / Uputstvo za upotrebu
Page 41

Nominalne vrednosti za programe za pranje sintetike
Preostala vlaga (%) ** Preostala vlaga (%) **
Punjenje (kg)
Potrošnja vode
(l)
Potrošnja struje
(kWh)
Trajanje
programa (min)
Sintetika 40
Sintetika 20
** Vrednosti za preostalu vlagu mogu se razlikovati u zavisnosti od izabrane brzine centrifuge.
3 69 0,80 115/140
3 67 0.26 115/140
≤ 1000 rpm > 1000 rpm
45 40
45 40
4.3.5 Glavni programi
Zavisno od vrste tkanine, koristite sledeće glavne programe.
• Cottons (Pamuk)
Koristite ovaj program za svoj pamučni veš (čaršafi, posteljina, peškiri, kućne haljine, donji veš itd.). Vaš veš će
biti pran žustrim pokretima tokom dužeg ciklusa pranja.
• Synthetics (Sintetika)
Koristite za pranje svoje sintetičke odeće (košulje, bluze, odeća od sintetike / mešano s pamukom itd.). Veš
će se prati uz laganije pokrete pranja i kraći ciklus pranja u poređenju sa programom „Pamuk”. Za zavese i til
preporučuje se primena programa Sintetika na 20 ˚C ili 40 ˚C.
• Woollens / Hand Wash (Vuna / Ručno pranje)
Koristite za pranje svoje vunene/osetljive odeće. Veš se pere veoma laganim pokretima pranja da se odeća ne
bi oštetila.
„Program vune za ovu mašinu je odobren od strane The Woolmark Company za
proizvode od vune koji se peru u mašini pod uslovom da se proizvodi peru u skladu
sa uputstvima na etiketi proizvoda i uputstvima objavljenim od strane proizvođača
ove mašine. M1520”
U Velikoj Britaniji, Irskoj, Hong Kongu i Indiji robna marka Woolmark je robna marka
sa sertifikatom.
4.3.6 Dodatni programi
Ova mašina ima dodatne programe za posebne slučajeve.
Dodatni programi mogu da budu različiti, što zavisi od modela mašine.
C
• Cottons Eco (Pamuk Eko)
Koristite ovaj program za pranje veša koji se inače pere programom za pamuk duže vreme, on još uvek ima
veoma dobre performanse uštede.
C
Program za pamuk Eko troši manje energije u odnosu na ostale programe za pamuk.
• Prewash-Cottons (Pretpranje za pamuk)
Koristite ovaj program za veoma prljav pamučni veš. Dodajte deterdžent u odeljak za pretpranje.
• Daily Xpress (Dnevno – ekspres)
Koristite ovaj program za pranje pamučne odeće koja nije mnogo prljava za kraće vreme.
• Shirts (Košulje)
Ovaj program se koristi za pranje majica od pamuka, sintetike i uopšte tkanina koje sadrže sintetiku. Smanjuje
gužvanje. Izvršava se algoritam pretpranja.
• Nanesite hemijsko sredstvo za pretpranje na svoj veš direktno ili ga dodajte uz deterdžent kada mašina
počne da uzima vodu iz odeljka za glavno pranje. Tako će mašina oprati veš za kratko vreme, a predviđeni vek
trajanja vaših košulja će se produžiti.
Mašina za pranje veša / Uputstvo za upotrebu
41 / SB
Page 42

• Down Wear (Program Down Wear (Perje))
Koristite ovaj program za pranje kaputa, prsluka, jakni itd. koji sadrže perje i koji nose oznaku „pere se u
mašini”. Zahvaljujući posebnim režimima rada centrifuge, zagarantovano je da voda u potpunosti dopre do
međuprostora između perja.
• Drum Clean (Čišćenje doboša)
Koristite redovno (jednom na svakih 1-2 meseca) da biste očistili doboš i obezbedili potrebnu higijenu.
Pokrenite program kada je mašina u potpunosti prazna. Da biste postigli bolje rezultate, stavite sredstvo za
uklanjanje kamenca iz mašina za pranje u odeljak II za deterdžent. „2”. Kada se ovaj program završi, ostavite
vrata za punjenje odškrinuta da bi se osušila unutrašnjost mašine.
Ovo nije program za pranje. Ovo je program za održavanje.
C
4.3.7 Posebni programi
Za posebne primene izaberite bilo koji od sledećih programa.
• Rinse (Ispiranje)
Koristite kada hoćete posebno ispiranje ili dodavanje štirka.
• Spin+Drain (Centrifuga + sušenje)
Možete da koristite ovu funkciju za uklanjanje vode sa veša ili za izbacivanje vode iz mašine.
Pre pokretanja ovog programa, izaberite traženu brzinu centrifuge i pritisnite dugme „Početak/pauza”. Prvo će
mašina ispumpati vodu iz nje. Zatim će centrifugirati veš sa podešenom brzinom centrifuge i ispumpati vodu
koja je izašla iz njega.
Ako hoćete samo da ispustite vodu bez centrifugiranja veša, izaberite program „Ispumpavanje+centrifuga”,
a zatim izaberite funkciju „Bez centrifuge” dugmetom za podešavanje brzine centrifuge. Pritisnite dugme
„Početak/pauza”.
Nemojte da pokrećete program ako u mašini ima veša. Ukoliko pokušate da učinite to, mašina detektuje da u mašini ima
veša i prekida program.
C
Za osetljiv veš koristite nižu brzinu centrifuge.
4.3.8 Izbor brzine
Kad god se izabere novi program, preporučena brzina centrifuge izabranog programa se prikazuje na
indikatoru brzine centrifuge.
Da biste smanjili brzinu centrifuge, pritisnite dugme za podešavanje brzine centrifuge. Brzina centrifuge se
postepeno smanjuje. Zatim se, zavisno od modela ovog proizvoda, na displeju prikazuju opcije „Zadržavanje
ispiranja” i „Bez centrifuge”. Kada se izabere opcija „Bez centrifuge”, lampice indikatora nivoa ispiranja neće
se uključiti.
Zadržavanje ispiranja
Ako nećete da izvadite svoju odeću odmah posle završetka programa, možete da koristite funkciju zadržavanje
ispiranja i zadržali veš u poslednjoj vodi za ispiranje da biste sprečili gužvanje odeće kada u mašini nema vode.
Pritisnite dugme „Početak/pauza” nakon ovog procesa ako želite da izbacite vodu bez centrifugiranja veša.
Program će se nastaviti i dovršiti posle izbacivanja vode.
Ako želite da centrifugirate veš koji je stajao u vodi, podesite brzinu centrifuge i pritisnite dugme „Početak/
pauza”.
Program će nastaviti rad. Voda se izbacuje, veš se centrifugira i program se završava.
Ako program nije stigao do faze centrifugiranja, brzinu možete da promenite bez prebacivanja mašine u režim pauze.
C
42 / SB
Mašina za pranje veša / Uputstvo za upotrebu
Page 43

4.3.9 Odloženi početak
Pomoću funkcije „Odloženi početak” može se odložiti početak programa za 3, 6 ili 9 sati.
C
Ne upotrebljavajte tečni deterdžent kad koristite funkciju odloženog početka! Postoji opasnost da će na odeći ostati fleke.
1. Otvorite vrata za ubacivanje veša, stavite veš i sipajte deterdžent itd.
2. Izaberite program pranja i brzinu centrifuge.
3. Podesite željeno vreme pritiskom na dugme za odloženi početak. Kada se ovo dugme pritisne jednom,
izabran je početak odložen za 3 sata. Ako se isto dugme ponovo pritisne, bira se odlaganje od 6 sati, a kada
se pritisne po treći put, izabrano je odlaganje početka za 9 sati. Ako dugme za odloženi početak pritisnete
još jednom, funkcija odloženog početka će biti otkazana.
4. Pritisnite dugme „Početak/pauza”. Lampica za prethodno odlaganje početka se gasi, a na svaka 3 sati se
pali lampica za sledeće vreme odlaganja početka.
5. Na kraju odbrojavanja će sve lampice za odloženi početak da se ugase i uključiće se izabrani program.
Možete da prebacite mašinu na režim pauze i da ubacite veš tokom vremena odlaganja početka.
C
Menjanje vremena odlaganja početka
Ako želite da promenite vreme tokom odbrojavanja, biće potrebno da otkažete program i da ponovo podesite
vreme odlaganja.
Otkazivanje funkcije odloženog početka
Ako hoćete da opozovete odbrojavanje vremena odloženog početka i odmah uključite program:
1. Okrenite dugme za izbor programa na bilo koji program. Time će funkcija odlaganje početka biti otkazana.
Lampica za „Kraj/otkazivanje” neprekidno trepće.
2. Zatim ponovo izaberite program koji želite da pokrenete.
3. Pritisnite dugme „Početak/pauza” da biste uključili program.
4.3.10 Pokretanje programa
1. Pritisnite dugme „Početak/pauza” da biste uključili program.
2. Upaliće se prateća lampica programa koja pokazuje početak programa.
4.3.11 Zaključavanje zbog dece
Koristite funkciju zaključavanja zbog dece da biste sprečili da se deca igraju mašinom. Na taj način možete
sprečiti bilo kakve izmene programa koji je u toku.
Ako se dugme za izbor programa okreće dok je aktivno zaključavanje zbog dece, „LED lampica za aktivirano zaključavanje
C
Za aktiviranje zaključavanja zbog dece:
Pritisnite i držite dugmad za podešavanje brzine i odloženi početak 3 sekunde. Dok držite dugmad 3 sekunde,
„LED lampica za aktiviranje zaključavanja zbog dece” će treperiti. Možete da otpustite dugmad kada LED
lampice postanu neprekidno uključene.
Za deaktiviranje zaključavanja zbog dece:
Pritisnite i držite dugmad za podešavanje brzine i odloženi početak 3 sekunde tokom trajanja bilo kog
programa. Dok držite dugmad 3 sekunde, „LED lampica za aktiviranje zaključavanja zbog dece” će treperiti.
Možete da otpustite dugmad kada se LED lampica u potpunosti isključi.
C
zbog dece” će zatreperiti 3 puta. Zaključavanje zbog dece ne dozvoljava nikakve promene programa ili izabrane brzine.
Čak i ako se putem dugmeta za izbor programa izabere neki drugi program dok je funkcija zaključavanja zbog dece aktivna,
prethodno izabrani program će nastaviti da radi.
Kada je zaključavanje zbog dece aktivno i mašina radi, mašinu možete prebaciti u režim pauze bez deaktiviranja funkcije
zaključavanja zbog dece tako što ćete okrenuti dugme za izbor programa u položaj Uklj./isk. Kad nakog toga ponovo
okrenete dugme za izbor programa, prekinuti program će nastaviti rad.
Osim gore navedenog načina, da biste deaktivirali zaključavanja zbog dece, prebacite dugme za izbor programa u položaj
Uklj./isk. dok je program u toku i izaberite drugi program.
Zaključavanje zbog dece se ne deaktivira zbog nestanka napajanja ili kada se mašina isključi iz struje.
Mašina za pranje veša / Uputstvo za upotrebu
43 / SB
Page 44

4.3.12 Progres programa
Progres programa koji je u toku može se pratiti putem indikatora redosleda programa. Na početku svakog
programskog koraka upaliće se odgovarajuća lampica indikatora a ugasiće se lampica završene faze.
Možete da menjate podešenja brzine bez zaustavljanja programskog toka dok je program u toku. Da biste to
uradili, promena koju želite da izvršite mora da bude u fazi iza programskog koraka koji je u toku. Ako promena
nije kompatibilna, odgovarajuća lampica će zatreptati 3 puta.
Ako mašini ne prelazi na korak centrifuge, moguće je da je aktivirana funkcija zadržavanja ispiranja ili je aktiviran automatski
C
4.3.13 Brava na vratima za punjenje veša
Na vratima za punjenje veša postoji sistem zaključavanja koji sprečava otvaranje vrata za punjenje veša u
slučaju kada je nivo vode neodgovarajući.
Lampica za vrata za punjenje veša će treptati kada mašina pređe u režim pauze. Mašina proverava nivo vode
unutar nje. Ako je nivo odgovarajući, lampica za vrata za punjenje veša će se isključiti, a vrata za punjenje veša
mogu da se otvore u roku od 1–2 minuta.
Ako je ovaj nivo neodgovarajući, lampica za vrata za punjenje veša ostaje uključena, a vrata za punjenje veša
se ne mogu otvoriti. Ako morate da otvorite vrata za punjenje veša dok je lampica za vrata za punjenje veša
uključena, morate da otkažete trenutni program. Pogledajte. „Otkazivanje programa”
4.3.14 Promena izbora kad je program već počeo
Prebacivanje mašine u režim pauze
Pritisnite dugme „Početak/pauza” da biste prebacili mašinu u režim pauze dok je neki program u toku.
Lampica za fazu u kojoj se mašina nalazi počinje da trepće u indikatoru redosleda programa kako bi pokazala
da je mašina prebačena u režim pauze.
Uz to, ako se vrata za punjenje mogu otvoriti, isključuje se lampica za vrata za punjenje.
Promena podešavanja brzine
Možete da menjate podešavanja brzine prograga koji je u toku. Pogledajte „Izbor brzine”.
sistem za detekciju neujednačenog opterećenja zbog neujednačene raspodele veša u mašini.
C
U slučaju da nije dozvoljena nikakva promena, odgovarajuća lampica će zatreperiti 3 puta.
Dodavanje ili vađenje veša
Možete da ubacujete/izbacujete veš dok je program u toku ako je nivo vode odgovarajući za otvaranje vrata.
Da biste to uradili:
1. Pritisnite dugme „Početak/pauza” da biste prebacili mašinu u režim pauze. Osim toga, treptaće
odgovarajuća lampica u indikatoru redosleda programa za programski korak tokom koga je mašina
prebačena u režim pauze.
2. Sačekajte dok vrata za punjenje veša ne budu mogla da se otvore.
3. Otvorite vrata za punjenje veša i dodajte ili izvadite veš.
4. Zatvorite vrata za punjenje veša.
5. Po potrebi izvršite izmene u podešavanju brzine.
6. Pritisnite dugme „Početak/pauza” da biste pokrenuli mašinu.
4.3.15 Otkazivanje programa
Da biste otkazali program, okrenite dugme za izbor programa i izaberite drugi program. Prethodni program će
biti otkazan. Lampica "kraj/otkazati" će neprekidno treptati da bi vas upozorila da je program otkazan.
Vaša mašina će prekinuti program kada okrenete dugme za izbor programa; međutim, ona neće izbaciti vodu
iz nje. Ako izaberete i pokrenete novi program, novoizabrani program će početi u zavisnosti od koraka u kome
je prethodni program otkazan. Na primer, može uzeti dodatnu vodu ili nastaviti da pere sa vodom unutar nje.
Neki programi se mogu pokrenuti izbacivanjem vode iz mašine. Zavisno od koraka u kome je program bio otkazan, možda
C
44 / SB
ćete morati ponovo da dodate deterdžent i omekšivač za novi program koji ste izabrali.
Mašina za pranje veša / Uputstvo za upotrebu
Page 45

4.3.16 Kraj programa
Kada se program završi, LED lampica za „Kraj” se uključuje na indikatoru za redosled programa.
1. Sačekajte dok se „LED lampica za aktiviranje funkcije zaključavanja vrata” u potpunosti ne isključi.
2. Da biste isključili mašinu, okrenite dugme za izbor programa na položaj za Uključ./isključ.
3. Izvadite veš i zatvorite vrata za punjenje. Vaša mašina je spremna za sledeći ciklus pranja.
4.3.17 Vaša mašina poseduje „Režim mirovanja”.
Nakon što uključite mašinu preko dugmeta za izbor programa (prebacivanjem dugmeta iz položaja za Uključ./
isključ. u neki drugi položaj), ako se nijedan program ne pokrene ili se druga procedura ne obavi u vezi sa
biranjem koraka ili se nijedna radnja ne preduzme približno 2 minuta nakon što se izabrani program završi,
mašina će se automatski prebaciti na režim uštede energije. Sjaj lampica indikatora će se smanjiti. Takođe,
ako vaš proizvod ima ekran koji pokazuje vreme programa, taj ekran će se potpuno isključiti. Ako okrenete
dugme za izbor programa ili pritisnete neko drugo dugme, lampice i ekran će se vratiti u prethodno stanje. Ono
što izaberete prilikom izlaska iz energetske efikasnosti može se promeniti. Proverite da li su izbori odgovarajući
pre pokretanja programa. Ako je to potrebno, ponovo izvršite podešavanja. Ovo nije greška.
Mašina za pranje veša / Uputstvo za upotrebu
45 / SB
Page 46

4.4 Održavanje i čišćenje
Radni vek proizvoda se produžava i česti problemi će se smanjiti ako se čisti redovno.
4.4.1 Čišćenje fioke za deterdžent
Redovno (svakih 4-5 ciklusa pranja) čistite fioku za deterdžent kao što je pokazano
u nastavku da biste sprečili taloženje praška tokom vremena.
Podignite zadnji deo sifona da biste ga izvadili, kao što je pokazano na slici.
Ako u odeljku za omekšivač počne da se nakuplja više mešavine vode i omekšivača
nego obično, sifon mora da se očisti.
1 Pritisnite tačku na sifonu u odeljku za omekšivač i vucite prema sebi dok ne izvadite odeljak iz mašine.
2. Operite fioku za deterdžent i sifon u lavabou sa puno mlake vode. Da biste sprečili da ostaci dođu u
kontakt sa vašim kožom, očistite ih odgovarajućom četkom noseći rukavice.
3 Posle čišćenja vratite fioku na mesto i uverite se da je dobro postavljena.
4.4.2 Čišćenje vrata za punjenje i doboša
Za proizvode sa programom čišćenja bubnja, pogledajte odeljak Rukovanje proizvodom - Programi.
Proces čišćenja doboša treba ponavljati na svaka 2 meseca.
C
Koristite sredstvo za uklanjanje kamenca koje je podesno za mašine za pranje veša.
Posle svakog pranja proverite da nikakve materije nisu zaostale u dobošu.
Ako su otvori na odeljku (kao na slici) blokirani, otvorite ih pomoću čačkalice.
Strani metal će dovesti do stvaranja mrlja od rđe u dobošu. Očistite mrlje na površini
bubnja koristeći sredstva za čišćenje za nerđajući čelik.
Nikada nemojte da koristite čeličnu bunu ili žičanu vunu. To će oštetiti obojenem,
hromirane i plastične površine.
4.4.3 Čišćenje kućišta i komandne table
Kućište mašine obrišite sapunicom ili nekorozivnim blagim gel deterdžentom, ako je potrebno, i osušite mekom
krpom.
Za čišćenje komandne table koristite samo meku i vlažnu krpu.
4.4.4 Čišćenja filtera za dovod vode
Na kraju svakog ventila za dovod vode na poleđini mašine i na kraju svakog creva za dovod vode, na mestu
gde se spaja na slavinu, nalazi se filter. Ti filteri sprečavaju ulazak stranih tela i prljavštine iz vode u mašinu za
pranje veša. Filteri treba da se čiste kad se uprljaju.
46 / SB
1. Zatvorite slavine.
2. Izvadite navrtke creva za dovod vode da biste pristupili
filterima na ventilima za dovod vode. Očistite ih prikladnom
četkom. Ako su filteri previše prljavi, izvadite ih pomoću
klješta i očistite ih.
3. Izvadite filtere na ravnim krajevima creva za dovod vode
zajedno sa zaptivačima i dobro ih očistite pod tekućom
vodom.
4. Ponovo postavite zaptivke i filtere pažljivo i zategnite ih
ručno.
Mašina za pranje veša / Uputstvo za upotrebu
Page 47

4.4.5 Ispuštanje preostale vode i čišćenje filtera pumpe
Sistem filtera u Vašoj mašini sprečava da predmeti kao što su dugmad, novčići i niti tkanina začepe propeler
pumpe za vreme izbacivanja vode od pranja. Zbog toga će voda biti izbačena bez ikakvih problema, a servisni
vek trajanja pumpe će biti duži.
Ako mašina ne uspe da izbaci vodu, filter pumpe može da bude začepljen. Filter se mora čistiti kad god je
začepljen ili na svaka 3 meseca. Da bi se očistio filter pumpe prvo se mora izbaciti voda.
Osim toga, pre transportovanja mašine (npr. preseljenje u drugu kuću) i u slučaju zamrzavanja vode, vodu ćete
možda morati u potpunosti da izbacite.
PAŽNJA: Strane materije koje su zaostale u filteru pumpe mogu da oštete vašu mašinu ili da izazovu problem sa bukom.
A
Da biste očistili prljavi filter i ispustili vodu:
1 Isključite mašinu da biste prekinuli dovod električne energije.
A
2. Otvorite poklopac za filter.
3 Pratite proceduru ispod da biste ispustili vodu.
Ako proizvod nema crevo za hitno ispuštanje vode, da biste ispustili vodu:
PAŽNJA: Ako se proizvod ne koristi, isključite slavinu, skinite glavnu cev i istočite vodu iz mašine zbog smrzavanja.
PAŽNJA: Nakon svake upotrebe, isključite slavinu za glavni dotok vode.
PAŽNJA: Temperatura vode u mašini može da se poveća do 90 ºC. Da biste izbegli rizik od opekotina, očistite filter nakon
što se voda u unutrašnjosti ohladi.
a. Da biste sakupili vodu koja ističe iz filtera, postavite
veći sud ispred filtera.
b. Okrenite i olabavite filter pumpe dok voda ne počne
da teče (u smeru suprotnom kretanju kazaljke na
satu). Usmerite vodu koja teče u kofu koju ste stavili
ispred filtera. Imajte uvek pri ruci krpu da biste
pokupili prolivenu vodu.
c Kada se voda iz mašine potpuno izbaci, okrećite filter
da biste ga skinuli.
4 Očistite sav talog u filteru, kao i vlakna oko propelera pumpe, ako ih ima.
5. Vratite filter.
6. Ako se poklopac filtera sastoji iz dva dela, zatvorite poklopac filtera pritiskom na polugicu. Ako je iz
jednog komada, polugice na nižem delu prvo postavite na njihova mesta, a zatim pritisnite gornji deo radi
zatvaranja.
Mašina za pranje veša / Uputstvo za upotrebu
47 / SB
Page 48

5 Rešavanje problema
Problem Razlog Rešenje
Program se ne pokreće nakon
zatvaranja vrata.
Program ne može da se uključi ili
izabere.
Voda u mašini. U proizvodu je možda ostalo malo vode iz procesa
Mašina ulazi u režim pripravnosti
nakon što se pokrene program ili
ne prima vodu.
Mašina ne izbacuje vodu. Crevo za izbacivanje vode je možda zapušeno ili
Mašina vibrira ili pravi buku. Mašina možda nije nivelisana. • Nivelišite mašinu podešavanjem nožica.
Postoji curenje vode na dnu mašine
za pranje veša.
Mašina je stala ubrzo nakon
početka programa.
Mašina direktno prazni vodu koju
prihvata.
Voda se ne može videti u mašini
tokom pranja.
Vrata za ubacivanje veša se ne
mogu otvoriti.
Pranje traje duže nego što je
naznačeno u uputstvu.(*)
Dugme za Pokretanje / Pauziranje / Otkazivanje nije
pritisnuto.
Zatvaranje vrata za punjenje veša može biti otežano u
slučaju prekomernog punjenja.
Mašina za pranje veša se možda prebacila u režim
samozaštite zbog problema sa snabdevanjem (kao što
su napon, pritisak vode itd.).
kontrole kvaliteta u proizvodnji.
Slavina je isključena. • Otvorite slavinu.
Crevo za ulaz vode je savijeno. • Ispravite crevo.
Filter za ulaz vode je zapušen. • Očistite filter.
Vrata za ubacivanje veša su možda otvorena. • Zatvorite vrata.
Priključak za vodu je možda neispravan ili je dotok
vode prekinut (kada je dotok vode prekinut, LED
lampice za pranje ili ispiranje počnu da trepere).
uvrnuto.
Filter pumpe je zapušen. • Očistite filter pumpe .
Čvrsta materija je možda ušla u filter pumpe. • Očistite filter pumpe .
Nisu skinuti bezbednosni transportni vijci. • Skinite bezbednosne transportne vijke.
Moguće je da je količina veša u mašini premala. • Dodajte više veša u mašinu.
Mašina je možda preopterećena vešom. • Izvadite malo veša iz mašine ili rukom popravite
Mašina se možda naslanja na kruti predmet. • Pobrinite se da se mašina ne naslanja ni na kakav
Crevo za izbacivanje vode je možda zapušeno ili
uvrnuto.
Filter pumpe je zapušen. • Očistite filter pumpe .
Mašina je možda privremeno zaustavljena zbog pada
napona.
Crevo za pražnjenje možda nije na adekvatnoj visini. • Priključite crevo za pražnjenje kao što je opisano u
Nivo vode nije vidljiv spolja. • Ovo nije greška.
Zaključavanje vrata je aktivirano zbog nivoa vode u
mašini.
Mašina greje vodu ili je u ciklusu centrifuge. • Sačekajte dok se program ne završi.
Aktivirano je zaključavanje zbog dece. Zaključana
vrata će se otključati nekoliko minuta nakon završetka
programa.
Vrata za punjenje se mogu zaglaviti zbog pritiska kome
su izložena.
Pritisak vode je nizak. • Mašina čeka dok ne preuzme odgovarajuću
Napon može biti nizak. • Vreme pranja se produžava da bi se izbegli loši
Temperatura dolazne vode je možda niska. • Vreme potrebno za grejanje vode se produžava u
Broj ispiranja i/ili količina vode za ispiranje je možda
povećana.
Moguće je da je došlo do stvaranja prevelike pene i
da je sistem za automatsku apsorpciju pene aktiviran
zbog prekomerne količine deterdženta.
• Pritisnite dugme za Pokretanje / Pauziranje /
Otkazivanje.
• Smanjite količinu veša i postarajte se da vrata za
punjenje budu pravilno zatvorena.
• Da biste otkazali program, okrenite dugme
za izbor programa i izaberite drugi program.
Prethodni program će biti otkazan. (Pogledajte
“Otkazivanje programa”)
• To nije kvar; voda nije štetna za mašinu.
• Proverite priključak za vodu. Ako je dotok vode
prekinut, pritisnite taster Početak/pauza nakon
što se voda ponovo doprema da bi se nastavio
postupak iz režima pripravnosti.
• Očistite ili ispravite crevo.
ravnotežu veša.
predmet.
• Očistite ili ispravite crevo.
• Ona će nastaviti s radom kada se napon bude
vratio na normalan nivo.
priručniku za rukovanje.
• Ispustite vodu pokretanjem programa Pumpa ili
Centrifuga.
• Sačekajte nekoliko minuta za deaktivaciju
zaključanih vrata.
• Uhvatite ručku i povucite i gurnite vrata za
punjenje da biste ih oslobodili i otvorili.
količinu vode kako bi sprečila loš kvalitet pranja
usled smanjene količine vode. Stoga, vreme pranja
se produžava.
rezultati pranja kada je napon nizak.
hladnim godišnjim dobima. Takođe, vreme pranja
se može produžiti kako bise izbegli loši rezultati
pranja.
• Mašina povećava količinu vode za ispiranje kada
je potrebno dobro ispiranje i dodaje dodatni korak
ispiranja ako je potrebno.
• Koristite preporučenu količinu deterdženta.
48 / SB
Mašina za pranje veša / Uputstvo za upotrebu
Page 49

Problem Razlog Rešenje
Trajanje programa se ne odbrojava.
(kod modela sa displejem) (*)
Trajanje programa se ne odbrojava.
(*)
Mašina ne prabacuje na korak
centrifugiranja. (*)
Učinak pranja je loš: Veš postaje
siv. (**)
Učinak pranja je loš: Mrlje
istrajavaju ili se veš ne beli. (**)
Učinak pranja je loš: Mrlje od ulja
ostaju na vešu. (**)
Tajmer je možda zaustavljen zbog uzimanja vode. • Tajmer neće odbrojavati dok mašina ne uzme
Tajmer se može zaustaviti tokom koraka zagrevanja. • Indikator tajmera neće odbrojavati dok mašina ne
Tajmer se može zaustaviti tokom koraka
centrifugiranja.
Možda ima nebalansiranog veša u mašini. • Moguće je da je došlo do aktiviranja sistema
Možda ima nebalansiranog veša u mašini. • Moguće je da je došlo do aktiviranja sistema
Mašina neće centrifugirati ako se voda ne isprazni u
potpunosti.
Moguće je da je došlo do stvaranja prevelike pene i
da je sistem za automatsku apsorpciju pene aktiviran
zbog prekomerne količine deterdženta.
Nedovoljna količina deterdženta se koristi tokom dužeg
vremenskog perioda.
Pranje je obavljeno na niskim temperaturama tokom
dužeg vremena.
Nedovoljna količina deterdženta se koristi sa tvrdom
vodom.
Koristi se previše deterdženta. • Koristite preporučenu količinu deterdženta koja
Koristi se nedovoljna količina deterdženta. • Koristite preporučenu količinu deterdženta koja
Ubačena je prekomerna količina veša. • Nemojte prekomerno da ubacujete veš. Ubacite
Izabrani su pogrešan program i temperatura. • Izaberite odgovarajuću temperaturu i program za
Pogrešan tip deterdženta se koristi. • Koristite originalni deterdžent koji odgovara
Koristi se previše deterdženta. • Stavite deterdžent u odgovarajući odeljak. Nemojte
Regularno pranje u bubnju se ne primenjuje. • Očistite bubanj redovno. Pogledajte odeljak 4.4.2.
dovoljnu količinu vode. Mašina će sačekati dok
u njoj ne bude dovoljna količine vode da bi se
izbegli slabi rezultati pranja zbog nedostatka
vode. Indikator tajmera će nakon toga nastaviti sa
odbrojavanjem.
dostigne izabranu temperaturu.
• Moguće je da je došlo do aktiviranja sistema
za automatsku detekciju neuravnoteženog
opterećenje zbog neujednačene raspodele veša
u bubnju.
za automatsku detekciju neuravnoteženog
opterećenje zbog neujednačene raspodele veša
u bubnju.
za automatsku detekciju neuravnoteženog
opterećenje zbog neujednačene raspodele veša
u bubnju.
• Proverite filter i crevo za pražnjenje.
• Koristite preporučenu količinu deterdženta.
• Koristite preporučenu količinu deterdženta koja
odgovara tvrdoći vode i vešu.
• Izaberite odgovarajuću temperaturu za pranje
veša.
• Korišćenje nedovoljne količine deterdženta sa
tvrdom vodom dovodi do lepljenja nečistoća na
odeću i vremenom odeća postaje siva. Teško je
eliminisati sivu boju kada se to dogodi. Koristite
preporučenu količinu deterdženta koja odgovara
tvrdoći vode i vešu.
odgovara tvrdoći vode i vešu.
odgovara tvrdoći vode i vešu.
količine veša preporučene u „Tabeli programa i
potrošnje“.
pranje veša.
mašini.
da mešate sredstvo za beljenje i deterdžent.
Učinak pranja je loš: Odeća ne
miriše prijatno. (**)
Boja odeće bledi. (**) Ubačena je prekomerna količina veša. • Nemojte prekomerno da ubacujete veš.
Mirisi i slojevi bakterija se formiraju na bubnju kao
rezultat neprekidnog pranja na nižim temperaturama i/
ili kraćim programima.
Deterdžent koji se koristi je vlažan. • Deterdžente držite zatvorenim u okruženju koje
Izabrana je viša temperatura. • Izaberite odgovarajući program i temperaturu u
• Ostavite fioku deterdženta kao i vrata za
ubacivanje veša otvorene nakon svakog pranja.
Tako neće doći do stvaranja vlažnog okruženja
koje odgovara baterijama.
nije vlažno i nemojte da ih izlažete prekomernim
temperaturama.
skladu sa tipom i stepenom zaprljanosti veša.
Mašina za pranje veša / Uputstvo za upotrebu
49 / SB
Page 50

Problem Razlog Rešenje
Ne ispira se dobro. Količina, brend i uslovi skladištenja deterdženta koji se
Veš postaje krut nakon pranja. (**) Koristi se nedovoljna količina deterdženta. • Korišćenjem nedovoljne količine deterdženta
Veš ne miriše kao omekšivač. (**) Deterdžent je stavljen u pogrešan odeljak. • Ako se deterdžent stavi u odeljak za pretpranje
Deterdžent zaostaje u fioci za
deterdžent. (**)
Previše pene se stvara u mašini.
(**)
Pena izlazi iz fioke za deterdžent. Koristi se previše deterdženta. • Izmešajte 1 kašiku omekšivača i ½ litra vode
koristi je neodgovarajući.
Deterdžent je stavljen u pogrešan odeljak. • Ako se deterdžent stavi u odeljak za pretpranje
Filter pumpe je zapušen. • Očistite filter.
Crevo za odvod je savijeno. • Proverite crevo za odvod.
Deterdžent je stavljen u pogrešan odeljak. • Ako se deterdžent stavi u odeljak za pretpranje
Deterdžent je možda pomešan sa omekšivačem. • Nemojte da mešate omekšivač sa deterdžentom.
Deterdžent je možda pomešan sa omekšivačem. • Nemojte da mešate omekšivač sa deterdžentom.
Deterdžent je stavljen u vlažnu fioku. • Osušite fioku za deterdžent pre stavljanja
Deterdžent je navlažen. • Deterdžente držite zatvorenim u okruženju koje
Pritisak vode je nizak. • Proverite pritisak vode.
Deterdžent u odeljku za glavno pranje je navlažen
tokom uzimanja vode za pretpranje. Otvori odeljka za
deterdžent su blokirani.
Postoji problem sa ventilima u fioci za deterdžent. • Pozovite ovlašćenog servisera.
Deterdžent je možda pomešan sa omekšivačem. • Nemojte da mešate omekšivač sa deterdžentom.
Regularno pranje u bubnju se ne primenjuje. • Očistite bubanj redovno. Pogledajte odeljak 4.4.2.
Neodgovarajući deterdžent za pranje mašine se koristi. • Koristite deterdžent koji odgovara mašini za
Prekomerna količina deterdženta se koristi. • Koristite samo dovoljnu količinu deterdženta.
Deterdžent se skladišti u neodgovarajućim uslovima. • Čuvajte deterdžent na zatvorenoj i suvoj lokaciji.
Neki mešoviti veš kao što je veš od tila može da pravi
prekomernu penu zbog svoje teksture.
Deterdžent je stavljen u pogrešan odeljak. • Stavite deterdžent u odgovarajući odeljak.
Omekšivač se preuzima rano. • Može postojati problem sa ventilima ili u odeljku
• Koristite deterdžent koji odgovara mašini za pranje
i vašem vešu. Deterdžente držite zatvorenim u
okruženju koje nije vlažno i nemojte da ih izlažete
prekomernim temperaturama.
iako ciklus pretpranja nije izabran, mašina može
da uzme ovaj deterdžent tokom koraka ispiranja
ili uzimanja omekšivača. Stavite deterdžent u
odgovarajući odeljak.
u poređenju sa tvrdoćom vode može dovesti
do stvrdnjavanja vode vremenom. Koristite
odgovarajuću količinu deterdženta na osnovu
tvrdoće vode.
iako ciklus pretpranja nije izabran, mašina može
da uzme ovaj deterdžent tokom koraka ispiranja
ili uzimanja omekšivača. Stavite deterdžent u
odgovarajući odeljak.
Operite i očistite posudu vrućom vodom.
iako ciklus pretpranja nije izabran, mašina može
da uzme ovaj deterdžent tokom koraka ispiranja
ili uzimanja omekšivača. Operite i očistite posudu
vrućom vodom. Stavite deterdžent u odgovarajući
odeljak.
Operite i očistite posudu vrućom vodom.
deterdženta.
nije vlažno i nemojte da ih izlažete prekomernim
temperaturama.
• Proverite otvore i očistite ako su zapušeni.
Operite i očistite posudu vrućom vodom.
pranje.
Nemojte da ga čuvate na prekomerno vrućim
mestima.
• Koristite manje količine deterdženta za ovaj tip
odeće.
za deterdžent. Pozovite ovlašćenog servisera.
i sipajte u odeljak za glavno pranje fioke za
deterdžent.
• U mašinu stavite deterdžent koji je pogodan za
programe i maksimalna opterećenja navedena
u “Tabeli programa i korišćenja”. Ako koristite
dodatne hemikalije (sredstva za uklanjanje fleka,
izbeljivače itd.) smanjite količinu deterdženta.
50 / SB
Mašina za pranje veša / Uputstvo za upotrebu
Page 51

Problem Razlog Rešenje
Veš ostaje mokar na kraju
programa. (*)
(*) Mašina se ne prebacuje na korak centrifuge ako veš nije raspodeljen ravnomerno u bubnju da bi se sprečilo oštećenje mašine i njene
okoline. Veš treba da se ponovo preraspodeli i da se ponovo uključi centrifuga.
(**) Regularno pranje u bubnju se ne primenjuje. Očistite bubanj redovno. Pogledajte 4.4.2
Moguće je da je došlo do stvaranja prevelike pene i
da je sistem za automatsku apsorpciju pene aktiviran
zbog prekomerne količine deterdženta.
• Koristite preporučenu količinu deterdženta.
PAŽNJA: Ako ne možete da eliminišete problem iako ste pratili uputstva iz ovog odeljka, obratite se svom dobavljaču ili
A
ovlašćenom serviseru. Nikad nemojte sami da pokušavate da popravite neispravan proizvod.
Mašina za pranje veša / Uputstvo za upotrebu
51 / SB
Page 52

www.beko.com
 Loading...