

Page 1
Washing Machine
User’s Manual
Mosógép
Használati útmutató
Skalbimo mašina
Vartotojo vadovas
Пральна машина
Ръководство за употреба
WMY 71243 LMB2
Document Number
2820523886_EN / 17-09-14.(9:02)
Page 2

This product was manufactured using the latest technology in environmentally friendly conditions.
Page 3

1 Important instructions for safety and environment
This section contains safety instructions that will help protect from risk of personal injury
or property damage. Failure to follow these instructions shall void any warranty.
1.1 General safety
• This product can be used by children at and above 8 years old and by persons whose
physical, sensory or mental capabilities were not fully developed or who lack experience and knowledge provided that they are supervised or trained on the safe usage
of the product and the risks it brings out. Children must not play with the product.
Cleaning and maintenance works should not be performed by children unless they
are supervised by someone. Children of less than 3 years should be kept away unless
continuously supervised.
• Never place the product on a carpet-covered floor. Otherwise, lack of airflow beneath
the machine will cause electrical parts to overheat. This will cause problems with your
product.
• If the product has a failure, it should not be operated unless it is repaired by the
Authorized Service Agent. There is the risk of electric shock!
• This product is designed to resume operating in the event of powering on after a
power interruption. If you wish to cancel the programme, see "Cancelling the programme" section.
• Connect the product to a grounded outlet protected by a 16 A fuse. Do not neglect to
have the grounding installation made by a qualified electrician. Our company shall not
be liable for any damages that will arise when the product is used without grounding
in accordance with the local regulations.
• The water supply and draining hoses must be securely fastened and remain undamaged. Otherwise, there is the risk of water leakage.
• Never open the loading door or remove the filter while there is still water in the drum.
Otherwise, risk of flooding and injury from hot water will occur.
• Do not force open the locked loading door. The loading door will be ready to open just
a few minutes after the washing cycle comes to an end. In case of forcing the loading
door to open, the door and the lock mechanism may get damaged.
• Unplug the product when not in use.
• Never wash the product by spreading or pouring water onto it! There is the risk of
electric shock!
• Never touch the plug with wet hands! Never unplug by pulling on the cable, always
pull out by grabbing the plug.
• Use detergents, softeners and supplements suitable for automatic washing machines
only.
• Follow the instructions on the textile tags and on the detergent package.
• The product must be unplugged during installation, maintenance, cleaning and repairing procedures.
• Always have the installation and repairing procedures carried out by the Authorized
Service Agent. Manufacturer shall not be held liable for damages that may arise from
procedures carried out by unauthorized persons.
3 / EN
Washing Machine / User’s Manual
Page 4

• If the power cable is damaged, it must be replaced by the manufacturer, after sales
service or a similarly qualified person (preferably an electrician) or someone designated by the importer in order to avoid possible risks.
• Place the product on a rigid, flat and level surface.
• Do not place it on a long-pile rug or similar surfaces.
• Do not place the product on a high platform or near the edge on a cascaded surface.
• Do not place the product on the power cable.
• Never use sponge or scrub materials. These will damage the painted, chrome plated
and plastic surfaces.
1.2 Intended use
• This product has been designed for domestic use. It is not suitable for commercial
use and it must not be used out of its intended use.
• The product must only be used for washing and rinsing of laundry that are marked
accordingly.
• The manufacturer waives any responsibility arisen from incorrect usage or transportation.
1.3 Children's safety
• Packaging materials are dangerous to children. Keep packaging materials in a safe
place away from reach of the children.
• Electrical products are dangerous for the children. Keep children away from the product when it is in use. Do not let them to tamper with the product. Use child lock to
prevent children from intervening with the product.
• Do not forget to close the loading door when leaving the room where the product is
located.
• Store all detergents and additives in a safe place away from the reach of the children
by closing the cover of the detergent container or sealing the detergent package.
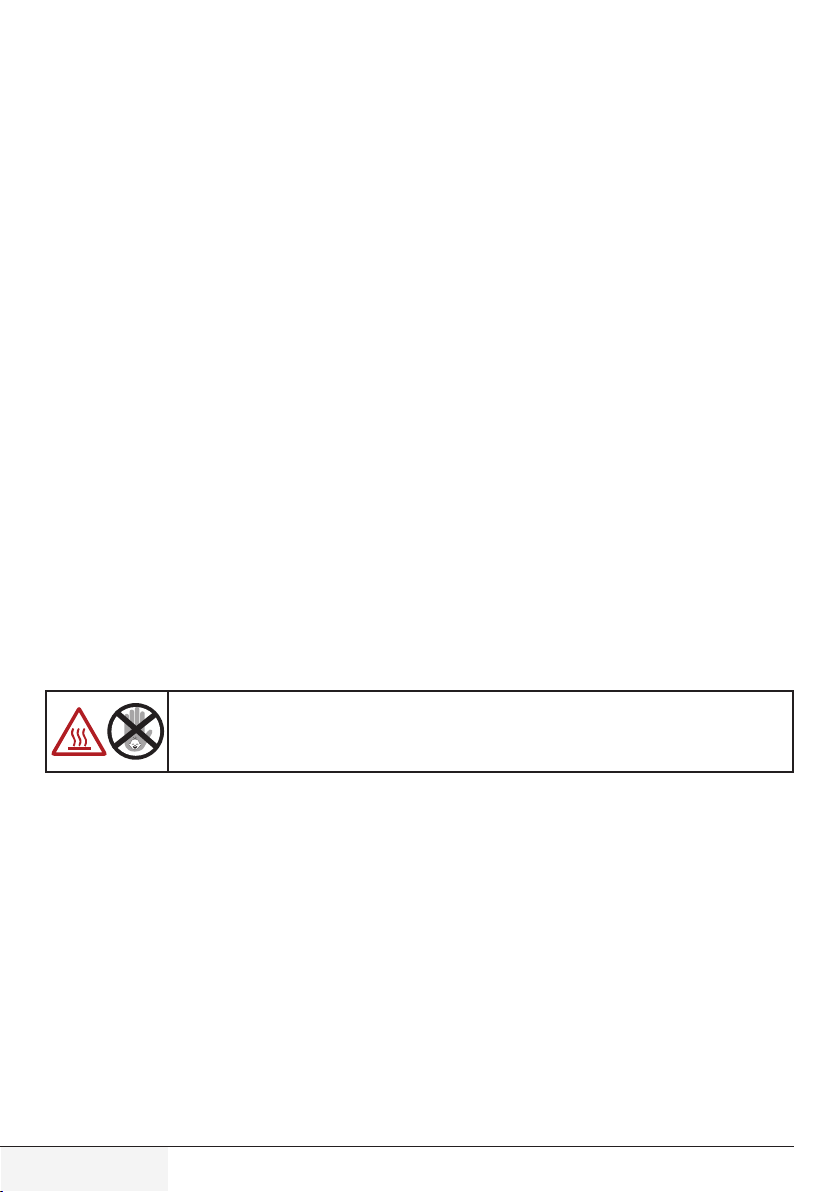
While washing the laundry at high temperatures, the loading door glass
becomes hot. Therefore, keep especially the children away from the
loading door of the machine while the washing operation is in progress.
1.4 Package information
• Packaging materials of the product are manufactured from recyclable materials in accordance with our National Environment Regulations. Do not dispose of the packaging
materials together with the domestic or other wastes. Take them to the packaging
material collection points designated by the local authorities.
1.5 Disposing of the waste product
• This product has been manufactured with high quality parts and materials which can
be reused and are suitable for recycling. Therefore, do not dispose the product with
normal domestic waste at the end of its service life. Take it to a collection point for the
recycling of electrical and electronic equipment. Please consult your local authorities
to learn the nearest collection point. Help protect the environment and natural resources by recycling used products. For children's safety, cut the power cable and break
the locking mechanism of the loading door so that it will be non-functional before disposing of the product.
4 / EN
Washing Machine / User’s Manual
Page 5
1.6 Compliance with WEEE Directive
This product complies with EU WEEE Directive (2012/19/EU). This product
bears a classification symbol for waste electrical and electronic equipment
(WEEE).
This product has been manufactured with high quality parts and materials
which can be reused and are suitable for recycling. Do not dispose of the
waste product with normal domestic and other wastes at the end of its service life. Take it to the collection center for the recycling of electrical and electronic equipment. Please consult your local authorities to learn about these
Compliance with RoHS Directive:
The product you have purchased complies with EU RoHS Directive (2011/65/EU). It
does not contain harmful and prohibited materials specified in the Directive.
2 Installation
Refer to the nearest Authorised Service Agent for installation
of the product. To make the product ready for use, review
the information in the user manual and make sure that the
electricity, tap water supply and water drainage systems are
appropriate before calling the Authorized Service Agent. If
they are not, call a qualified technician and plumber to have
any necessary arrangements carried out.
C
B
A
2.1 Appropriate installation location
• Place the machine on a rigid floor. Do not place it on a
long pile rug or similar surfaces.
• Total weight of the washing machine and the dryer -with
full load- when they are placed on top of each other
reaches to approx. 180 kilograms. Place the product
on a solid and flat floor that has sufficient load carrying
capacity!
• Do not place the product on the power cable.
• Do not install the product at places where temperature
may fall below 0ºC.
• Place the product at least 1 cm away from the edges of
other furniture.
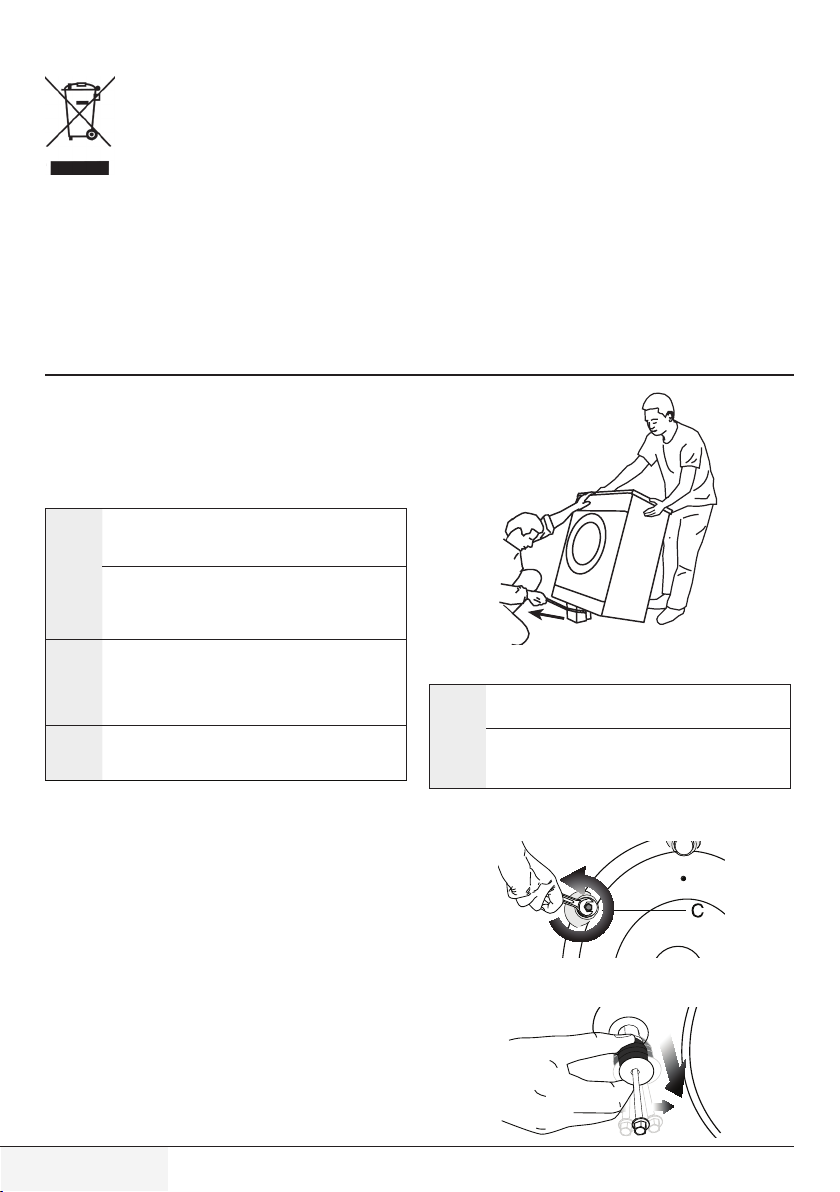
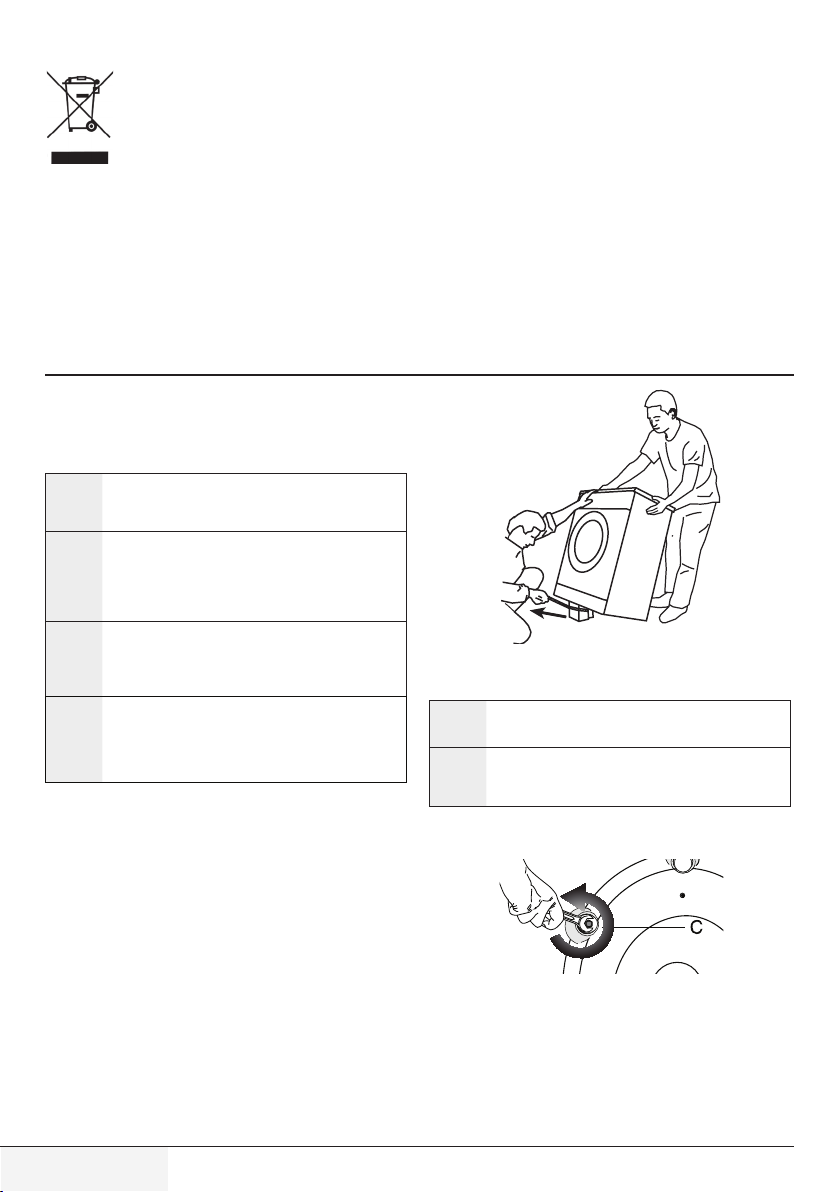
2.2 Removing packaging reinforcement
Tilt the machine backwards to remove the packaging
reinforcement. Remove the packaging reinforcement by
pulling the ribbon.
collection centers.
Preparation of the location and electrical, tap water and
waste water installations at the place of installation is
under customer's responsibility.
Make sure that the water inlet and discharge hoses
as well as the power cable are not folded, pinched or
crushed while pushing the product into its place after
installation or cleaning procedures.
WARNING: Installation and electrical connections
of the product must be carried out by the Authorized
Service Agent. Manufacturer shall not be held liable for
damages that may arise from procedures carried out by
unauthorized persons.
WARNING: Prior to installation, visually check if
the product has any defects on it. If so, do not have it
installed. Damaged products cause risks for your safety.
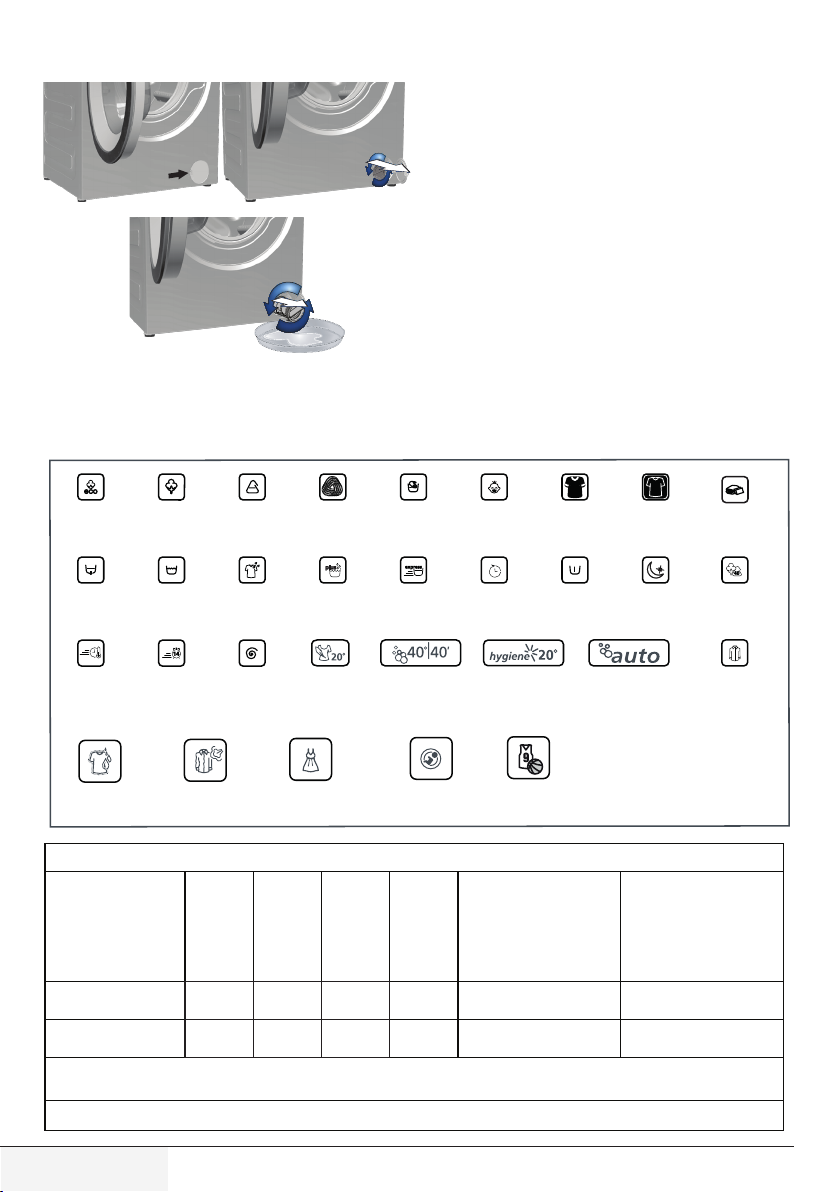
2.3 Removing the transportation locks
WARNING: Do not remove the transportation locks
before taking out the packaging reinforcement.
A
WARNING: Remove the transportation safety bolts
before operating the washing machine! Otherwise, the
product will be damaged.
1. Loosen all the bolts with a suitable spanner until they
rotate freely
2. Remove transportation safety bolts by turning them
gently.
(C).
5 / EN
Washing Machine / User’s Manual
Page 6
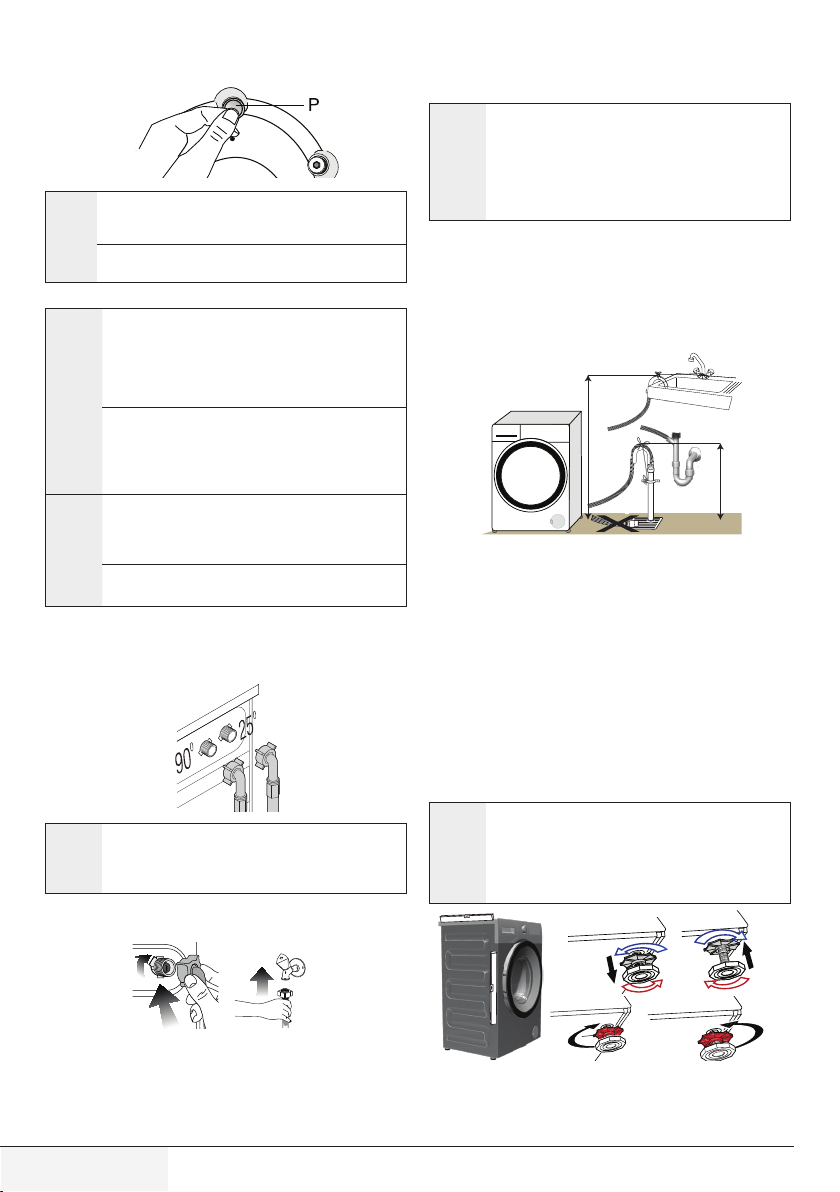
3. Attach the plastic covers supplied in the User Manual bag
into the holes on the rear panel.
Keep the transportation safety bolts in a safe place to
reuse when the washing machine needs to be moved
C
again in the future.
Never move the product without the transportation safety
bolts properly fixed in place!
(P)
2.4 Connecting water supply
The water supply pressure required to run the product is
between 1 to 10 bars (0.1 – 1 MPa). It is necessary to
C
have 10 – 80 liters of water flowing from the fully open
tap in one minute to have your machine run smoothly.
Attach a pressure reducing valve if water pressure is
higher.
If you are going to use the double water-inlet product
as a single
(cold) water-inlet unit, you must install the
supplied stopper to the hot water valve before operating
the product. (Applies for the products supplied with a
blind stopper group.)
WARNING: Models with a single water inlet should not
be connected to the hot water tap. In such a case the
A
laundry will get damaged or the product will switch to
protection mode and will not operate.
WARNING: Do not use old or used water inlet hoses
on the new product. It may cause stains on your laundry.
1. Connect the special hoses supplied with the product to
the water inlets on the product. Red hose (left) (max. 90
ºC) is for hot water inlet, blue hose (right) (max. 25 ºC) is
for cold water inlet.
WARNING: Ensure that the cold and hot water
connections are made correctly when installing the
A
product. Otherwise, your laundry will come out hot at the
end of the washing process and wear out.
2. Tighten all hose nuts by hand. Never use a tool when
tightening the nuts.
2.5 Connecting to the drain
• The end of the drain hose must be directly connected to
the wastewater drain or to the washbasin.
WARNING: Your house will be flooded if the hose
comes out of its housing during water discharge.
A
Moreover, there is risk of scalding due to high washing
temperatures! To prevent such situations and to ensure
smooth water intake and discharge of the machine, fix
the end of the discharge hose tightly so that it cannot
come out.
• The hose should be attached to a height of at least 40
cm, and 100 cm at most.
• In case the hose is elevated after laying it on the floor
level or close to the ground (less than 40 cm above the
ground), water discharge becomes more difficult and the
laundry may come out excessively wet. Therefore, follow
the heights described in the figure.
100cm
40cm
• To prevent flowing of dirty water back into the machine
and to allow for easy discharge, do not immerse the hose
end into the dirty water or do not drive it in the drain more
than 15 cm. If it is too long, cut it short.
• The end of the hose should not be bent, it should not be
stepped on and the hose must not be pinched between
the drain and the machine.
• If the length of the hose is too short, use it by adding
an original extension hose. Length of the hose may
not be longer than 3.2 m. To avoid water leak failures,
the connection between the extension hose and the
drain hose of the product must be fitted well with an
appropriate clamp as not to come off and leak.
2.6 Adjusting the feet
WARNING: In order to ensure that the product
operates more silently and vibration-free, it must stand
A
level and balanced on its feet. Balance the machine
by adjusting the feet. Otherwise, the product may
move from its place and cause crushing and vibration
problems.
3. Open the taps completely after making the hose
connection to check for water leaks at the connection
points. If any leaks occur, turn off the tap and remove the
nut. Retighten the nut carefully after checking the seal. To
prevent water leakages and damages caused by them,
keep the taps closed when the machine is not in use.
6 / EN
1. Loosen the lock nuts on the feet by hand.
2. Adjust the feet until the product stands level and
balanced.
3. Tighten all lock nuts again by hand.
Washing Machine / User’s Manual
Page 7
WARNING: Do not use any tools to loosen the lock
nuts. Otherwise, they will get damaged.
A
2.7 Electrical connection
Connect the product to a grounded outlet protected by a 16
A fuse. Our company shall not be liable for any damages
that will arise when the product is used without grounding in
accordance with the local regulations.
• Connection must comply with national regulations.
• Power cable plug must be within easy reach after
installation.
• If the current value of the fuse or breaker in the house is
less than 16 Amps, have a qualified electrician install a
16 Amp fuse.
• The voltage specified in the "Technical specifications"
section must be equal to your mains voltage.
• Do not make connections via extension cables or multiplugs.
WARNING: Damaged power cables must be
replaced by the Authorized Service Agents.
B
Transportation of the product
1. Unplug the product before transporting it.
2. Remove water drain and water supply connections.
3. Drain all water that has remained in the product.
4. Install transportation safety bolts in the reverse order of
removal procedure;
Never move the product without the transportation
safety bolts properly fixed in place!
C
WARNING: Packaging materials are dangerous to
children. Keep packaging materials in a safe place
A
away from reach of the children.
3 Preparation
3.1 Sorting the laundry
• Sort laundry according to type of fabric, colour, and
degree of soiling and allowable water temperature.
• Always obey the instructions given on the garment tags.
3.2 Preparing laundry for washing
• Laundry items with metal attachments such as,
underwired bras, belt buckles or metal buttons will
damage the machine. Remove the metal pieces or wash
the clothes by putting them in a laundry bag or pillow
case.
• Take out all substances in the pockets such as coins,
pens and paper clips, and turn pockets inside out and
brush. Such objects may damage the product or cause
noise problem.
• Put small size clothes such as infant's socks and nylon
stockings in a laundry bag or pillow case.
• Place curtains in without compressing them. Remove
curtain attachment items.
• Fasten zippers, sew loose buttons and mend rips and
tears.
• Wash “machine washable” or “hand washable” labeled
products only with an appropriate programme.
• Do not wash colours and whites together. New, dark
coloured cottons release a lot of dye. Wash them
separately.
• Tough stains must be treated properly before washing. If
unsure, check with a dry cleaner.
• Use only dyes/colour changers and limescale removers
suitable for machine wash. Always follow the instructions
on the package.
• Wash trousers and delicate laundry turned inside out.
• Keep laundry items made of Angora wool in the freezer
for a few hours before washing. This will reduce pilling.
• Laundry that are subjected to materials such as flour,
lime dust, milk powder, etc. intensely must be shaken off
before placing into the machine. Such dusts and powders
on the laundry may build up on the inner parts of the
machine in time and can cause damage.
3.3 Things to be done for energy saving
Following information will help you use the product in an
ecological and energy-efficient manner.
• Operate the product in the highest capacity allowed by
the programme you have selected, but do not overload;
see, "Programme and consumption table".
• Always follow the instructions on the detergent
packaging.
• Wash slightly soiled laundry at low temperatures.
• Use faster programmes for small quantities of lightly
soiled laundry.
• Do not use prewash and high temperatures for laundry
that is not heavily soiled or stained.
• If you plan to dry your laundry in a dryer, select the
highest spin speed recommended during washing
process.
• Do not use detergent in excess of the amount
recommended on the detergent package.
3.4 Initial use
Before starting to use the product, make sure that all
preparations are made in accordance with the instructions in
sections “Important safety instructions” and “Installation”.
To prepare the product for washing laundry, perform first
operation in Drum Cleaning programme. If your product
is not equipped with Drum Cleaning programme, perform
the Initial Use procedure in accordance with the methods
described under “5.2 Cleaning the loading door and the
drum” section of the user manual.
Use an anti-limescale suitable for the washing machines.
Some water might have remained in the product due to
C
the quality control processes in the production. It is not
harmful for the product.
3.5 Correct load capacity
The maximum load capacity depends on the type of laundry,
the degree of soiling and the washing programme desired.
The machine automatically adjusts the amount of water
according to the weight of the loaded laundry.
7 / EN
Washing Machine / User’s Manual
Page 8
warning: Follow the information in the “Programme
and consumption table”. When overloaded, machine's
A
washing performance will drop. Moreover, noise and
vibration problems may occur.
3.6 Loading the laundry
1. Open the loading door.
2. Place laundry items loosely into the machine.
3. Push the loading door to close until you hear a locking
sound. Ensure that no items are caught in the door.
The loading door is locked while a programme is running.
The door can only be opened a while after the programme
C
comes to an end.
warning: In case of misplacing the laundry, noise and
vibration problems may occur in the machine.
A
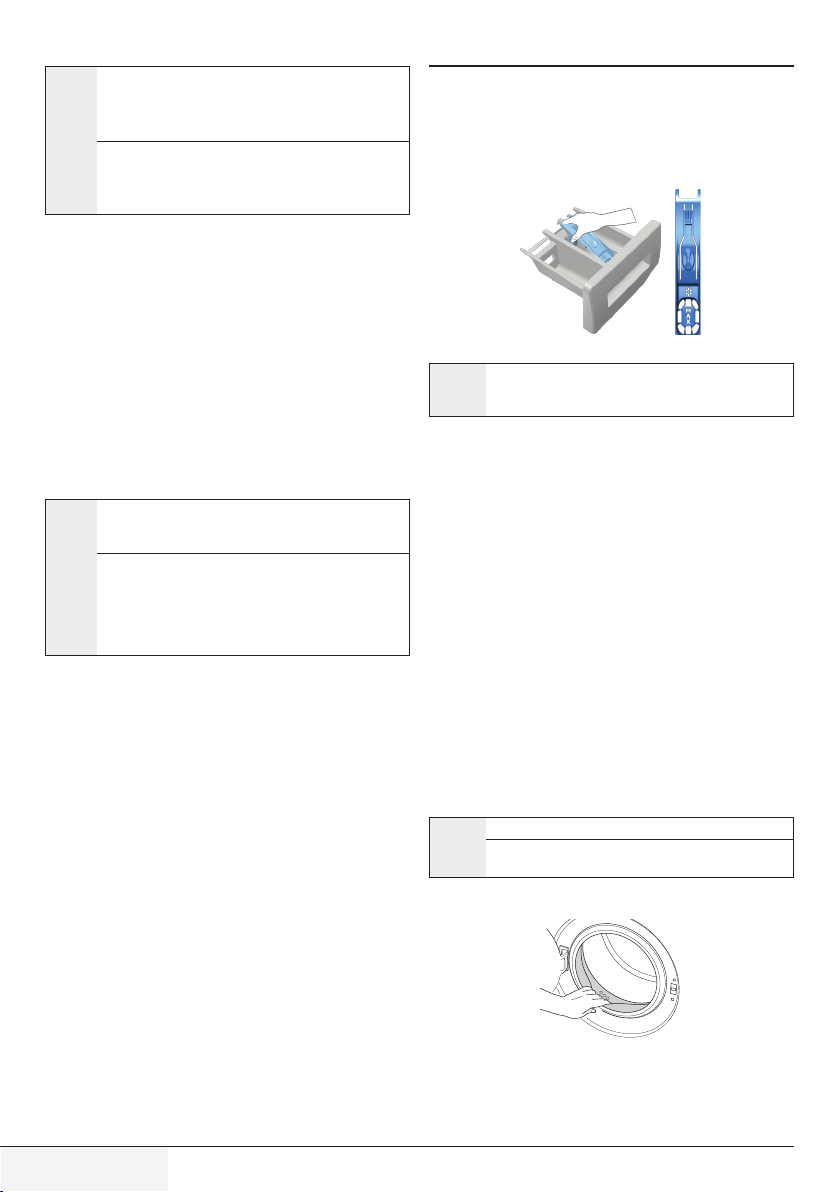
3.7 Using detergent and softener
When using detergent, softener, starch, fabric dye, bleach
or limescale remover read the manufacturer's instructions
C
on the package carefully and follow the suggested dosage
values. Use measuring cup if available.
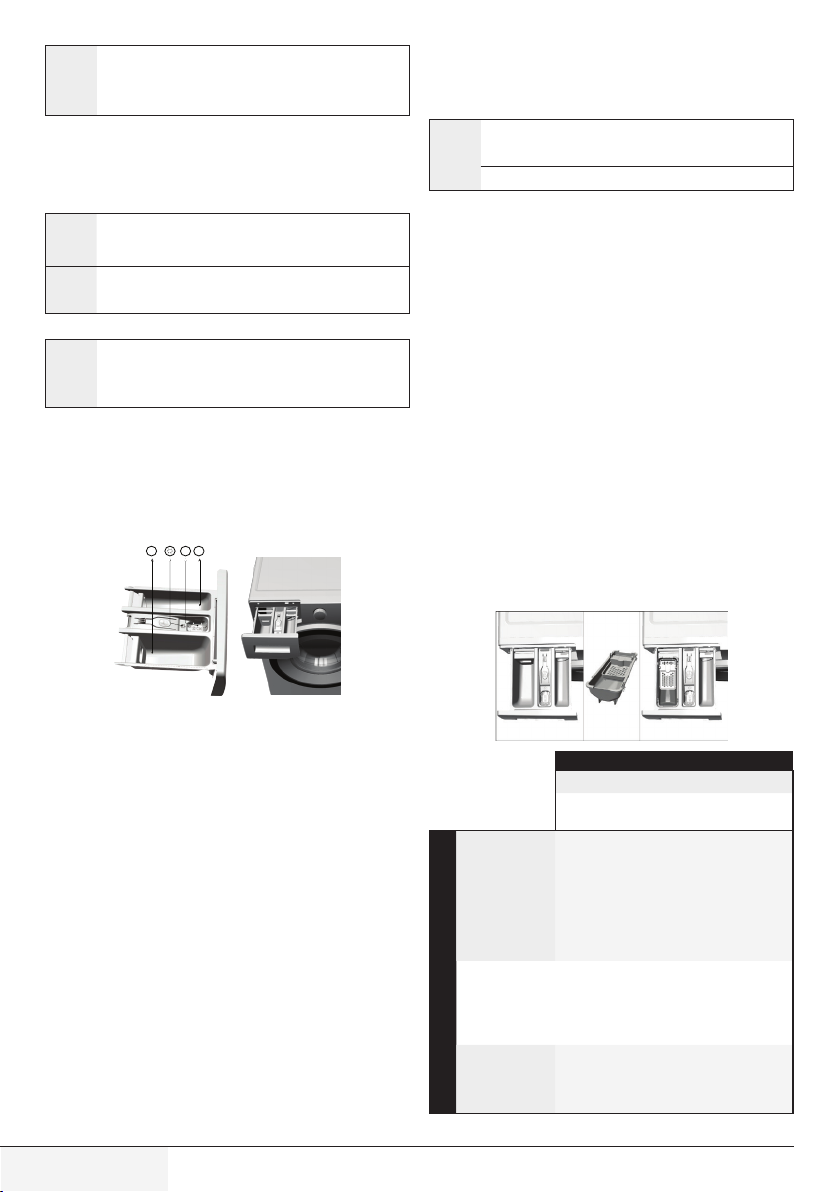
Detergent Drawer
The detergent drawer is composed of three compartments:
– (1) for prewash
– (2) for main wash
– (3) for softener
– (*) in addition, there is siphon piece in the softener
compartment.
1
2
3
• When washing dark coloured clothes and quilts, it is
recommended to use liquid detergent.
• Wash woolens with special detergent made specifically
for woolens.
warning: Use only detergents manufactured specifically
for washing machines.
A
warning: Do not use soap powder.
Adjusting detergent amount
The amount of washing detergent to be used depends
on the amount of laundry, the degree of soiling and water
hardness.
• Do not use amounts exceeding the dosage quantities
recommended on the detergent package to avoid
problems of excessive foam, poor rinsing, financial
savings and finally, environmental protection.
• Use lesser detergent for small amounts or lightly soiled
clothes.
Using softeners
Pour the softener into the softener compartment of the
detergent drawer.
• Do not exceed the (>max<) level marking in the softener
compartment.
• If the softener has lost its fluidity, dilute it with water
before putting it in the detergent drawer.
Using liquid detergents
If the product contains a liquid detergent cup:
• Make sure that you have placed the liquid detergent cup
in compartment nr. "2".
• If the liquid detergent has lost its fluidity, dilute it with
water before putting in the detergent cup.
Detergent, softener and other cleaning agents
• Add detergent and softener before starting the washing
programme.
• Never leave the detergent drawer open while the washing
programme is running!
• When using a programme without prewash, do not
put any detergent into the prewash compartment
(compartment nr. "1").
• In a programme with prewash, do not put liquid detergent
into the prewash compartment (compartment nr. "1").
• Do not select a programme with prewash if you are using
a detergent bag or dispensing ball. Place the detergent
bag or the dispensing ball directly among the laundry in
the machine.
• If you are using liquid detergent, do not forget to place
the liquid detergent cup into the main wash compartment
(compartment nr. "2").
Choosing the detergent type
The type of detergent to be used depends on the type and
colour of the fabric.
• Use different detergents for coloured and white laundry.
• Wash your delicate clothes only with special detergents
(liquid detergent, wool shampoo, etc.) used solely for
delicate clothes.
8 / EN
Heavily Soiled
(difficult stains
such as grass,
coffee, fruits and
blood.)
Normally Soiled
(For example,
stains caused by
Soiling Level
body on collars
and cuffs)
Lightly Soiled
(No visible stains
exist.)
Clothes
Light colours and whites
(Recommended temperature range based
on soiling level: 40-90 °C)
It may be necessary to pre-treat the stains
or perform prewash. Powder and liquid
detergents recommended for whites can be
used at dosages recommended for heavily
soiled clothes. It is recommended to use
powder detergents to clean clay and soil
stains and the stains that are sensitive to
bleaches.
Powder and liquid detergents recommended
for whites can be used at dosages
recommended for normally soiled clothes.
Powder and liquid detergents recommended
for whites can be used at dosages
recommended for lightly soiled clothes.
Washing Machine / User’s Manual
Page 9

Clothes
Colours
(Recommended temperature range based
on soiling level: cold -40 °C)
Powder and liquid detergents recommended
for colours can be used at dosages
Heavily Soiled
Normally Soiled
Soiling Level
Lightly Soiled
recommended for heavily soiled clothes. It is
recommended to use powder detergents to
clean clay and soil stains and the stains that
are sensitive to bleaches. Use detergents
without bleach.
Powder and liquid detergents recommended
for colours can be used at dosages
recommended for normally soiled clothes.
Use detergents without bleach.
Powder and liquid detergents recommended
for colours can be used at dosages
recommended for lightly soiled clothes. Use
detergents without bleach.
Dark colours
(Recommended temperature range based
on soiling level: cold -40 °C)
Heavily Soiled
Normally Soiled
Soiling Level
Lightly Soiled
Liquid detergents suitable for colours
and dark colours can be used at dosages
recommended for heavily soiled clothes.
Liquid detergents suitable for colours
and dark colours can be used at dosages
recommended for normally soiled clothes.
Liquid detergents suitable for colours
and dark colours can be used at dosages
recommended for lightly soiled clothes.
Delicates/Woollens/Silks
(Recommended temperature range based
on soiling level: cold -30 °C)
Prefer liquid detergents produced for
Heavily Soiled
Normally Soiled
Soiling Level
Lightly Soiled
delicate clothes. Woollen and silk clothes
must be washed with special woollen
detergents.
Prefer liquid detergents produced for
delicate clothes. Woollen and silk clothes
must be washed with special woollen
detergents.
Prefer liquid detergents produced for
delicate clothes. Woollen and silk clothes
must be washed with special woollen
detergents.
If the product does not contain a liquid detergent
cup:
• Do not use liquid detergent for the prewash in a
programme with prewash.
• Liquid detergent stains your clothes when used with
Delayed Start function. If you are going to use the Delayed
Start function, do not use liquid detergent.
Using gel and tablet detergent
Apply the following instructions when using tablet, gel and
similar detergents.
• If the gel detergent thickness is fluidal and your machine
does not contain a special liquid detergent cup, put the
gel detergent into the main wash detergent compartment
during first water intake. If your machine contains a liquid
detergent cup, fill the detergent into this cup before
starting the programme.
• If the gel detergent thickness is not fluidal or in the shape
of capsule liquid tablet, put it directly into the drum before
washing.
• Put tablet detergents into the main wash compartment
(compartment nr. "2") or directly into the drum before
washing.
Tablet detergents may leave residues in the detergent
compartment. If you encounter such a case, place the
C
tablet detergent between the laundry, close to the lower
part of the drum in future washings.
Use the tablet or gel detergent without selecting the
prewash function.
Using starch
• Add liquid starch, powder starch or the fabric dye into the
softener compartment.
• Do not use softener and starch together in a washing
cycle.
• Wipe the inside of the machine with a damp and clean
cloth after using starch.
Using bleaches
• Select a programme with prewash and add the bleaching
agent at the beginning of the prewash. Do not put
detergent in the prewash compartment. As an alternative
application, select a programme with extra rinse and add
the bleaching agent while the machine is taking water
from the detergent compartment during first rinsing step.
• Do not use bleaching agent and detergent by mixing
them.
• Use just a little amount (approx. 50 ml) of bleaching agent
and rinse the clothes very well as it causes skin irritation.
Do not pour the bleaching agent onto the clothes and do
not use it for coloured clothes.
• When using oxygen based bleaches, select a programme
that washes at a lower temperature.
• Oxygen based bleaches can be used together with
detergents; however, if its thickness is not the same
with the detergent, put the detergent first into the
compartment nr. "2" in the detergent drawer and wait
until the detergent flows while the machine is taking
in water. Add the bleaching agent from the same
compartment while the machine is still taking in water.
Using limescale remover
• When required, use limescale removers manufactured
specifically for washing machines only.
9 / EN
Washing Machine / User’s Manual
Page 10

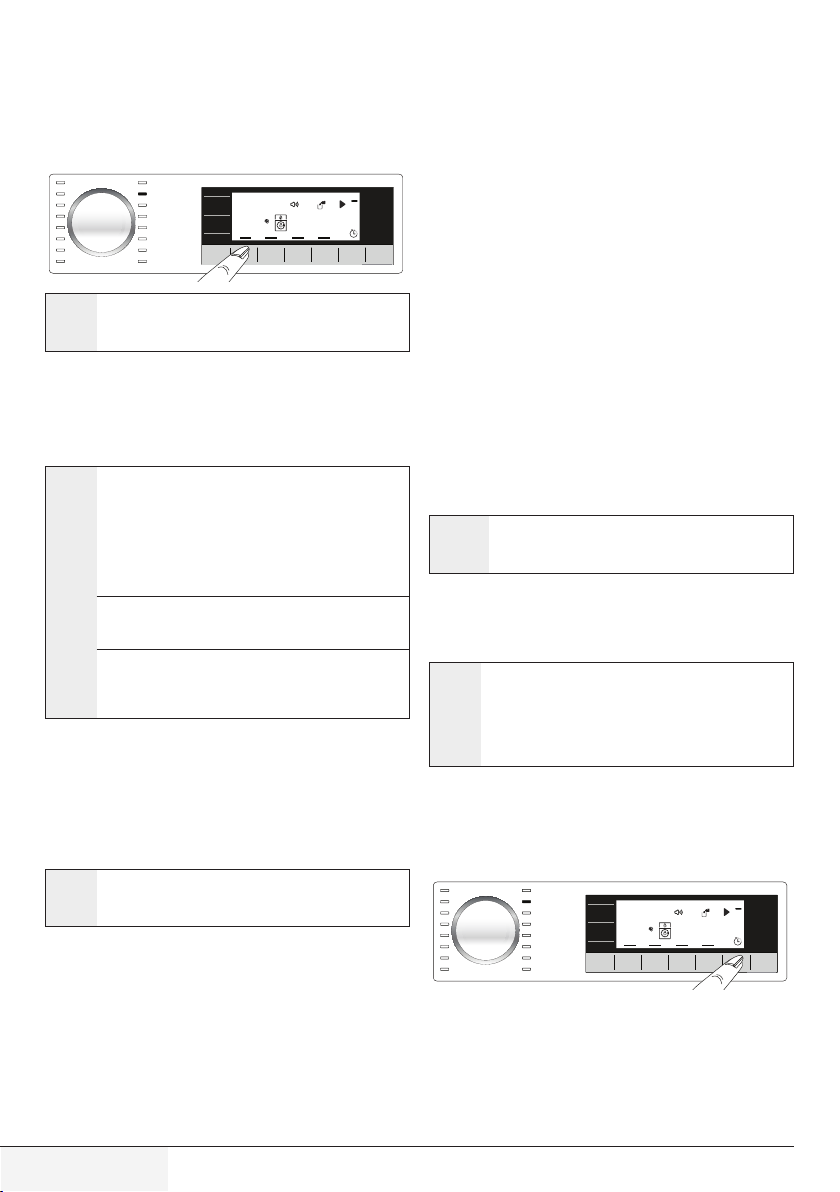
4 Operating the product
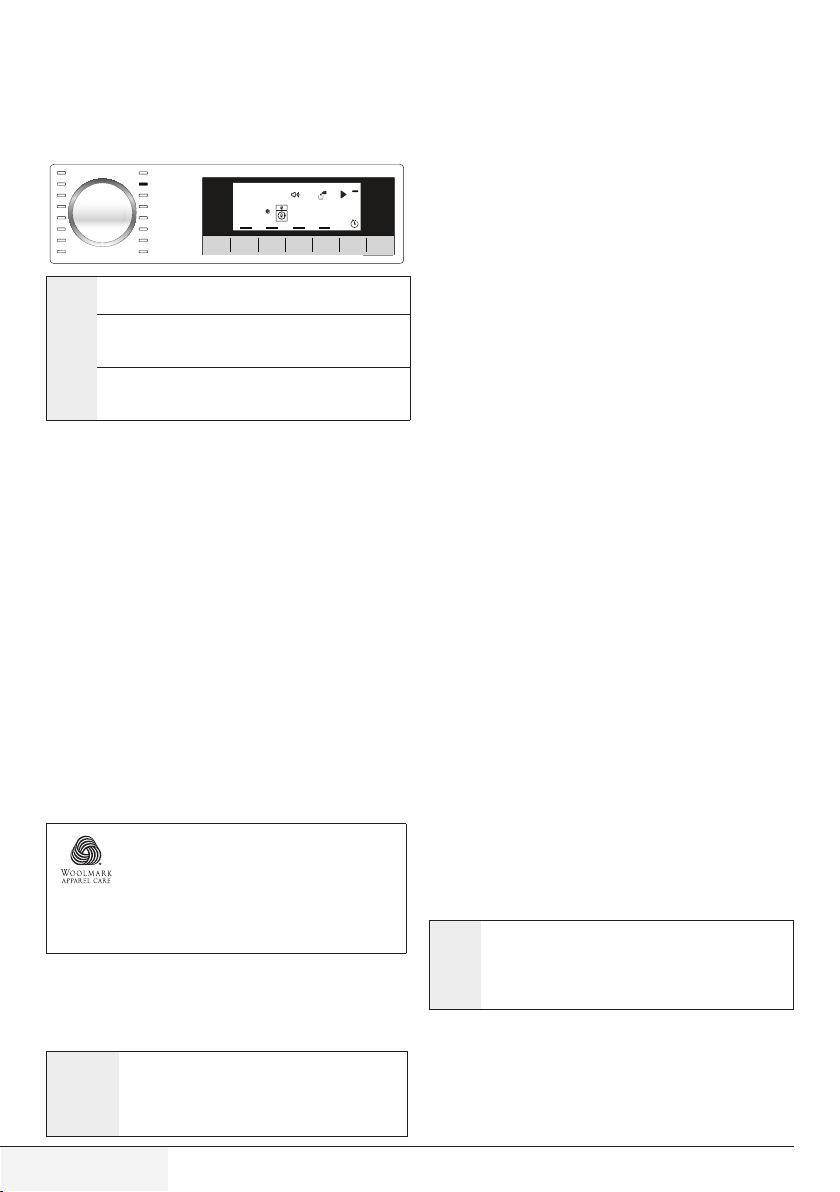
4.1 Control panel
1 2 3 4 5
6
7
8910
1. Programme selection knob
2 - Spin Speed Adjustment button
3 - Temperature adjustment button
4 - Display
5 - Programme follow-up indicator
4.2 Display symbols
a b c d e f g
0
88
1888
a - Temperature indicator
b - Electrical connection
c - Steam indicator
d - Audio Warning indicator
e - No Water indicator
f - Detergent indicator
g - Start / Pause indicator
6 - On / Off button
7 - Start / Pause button
8 - End Time Adjustment button
9 - Auxiliary Function buttons
10 - Programme Selection lights
C
h
88:88
ijklm
h - Program Follow-up indicator
i - End Time indicator
j - Duration Information Line
k - Auxiliary Function indicators
l - Lock indicator
m - Spin Speed indicator
The visuals used for machine description in this section are schematic and may not match exactly will the features
C
of your machine.
10 / EN
Washing Machine / User’s Manual
Page 11
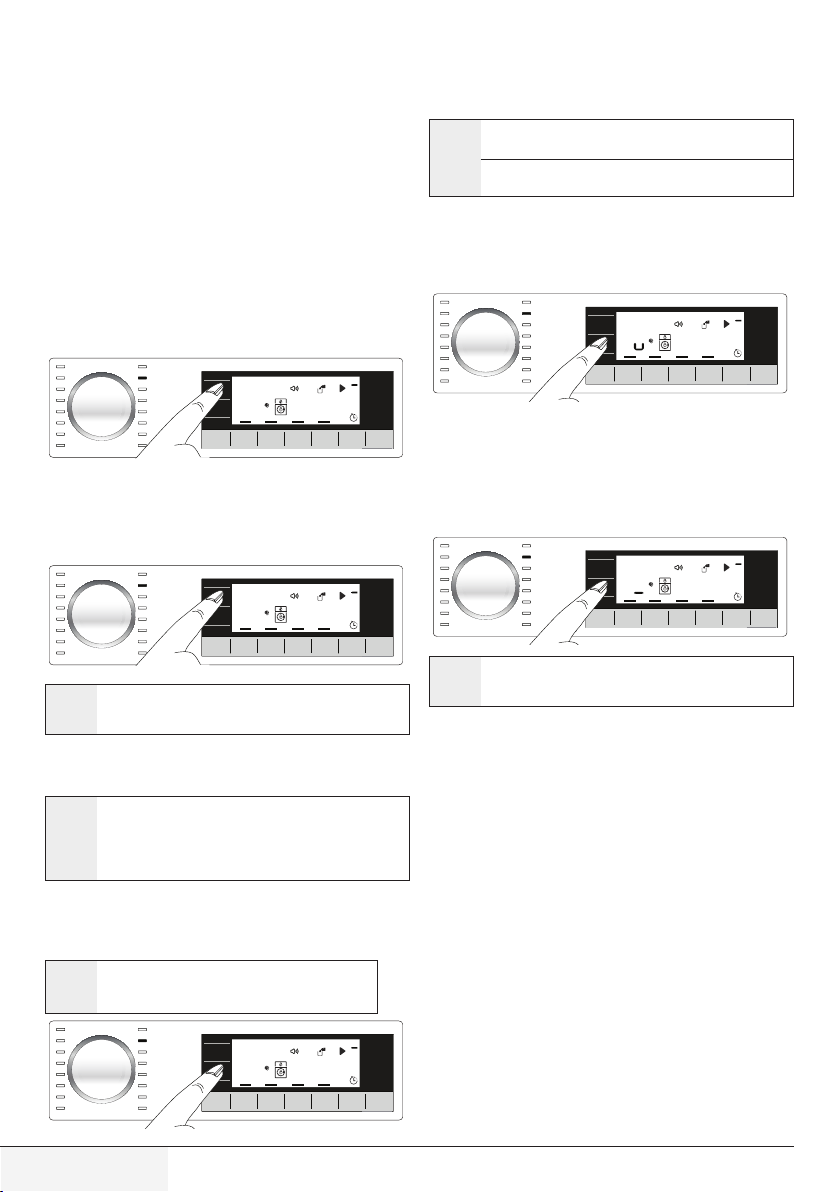
4.3 Programme selection
1 Determine the programme suitable for the type, quantity
and soiling level of the laundry in accordance with the
"Programme and consumption table".
2 Select the desired programme with the “Programme
Selection” knob.
0
C
88
1888
88:88
Programmes are limited with the highest spin speed
appropriate for that particular type of fabric.
C
When selecting the program you will use, always take
fabric type, color, soil degree and permitted water
temperature into consideration.
Always prefer the lowest temperature value which is fit
to your laundry type. Higher temperature means higher
power consumption.
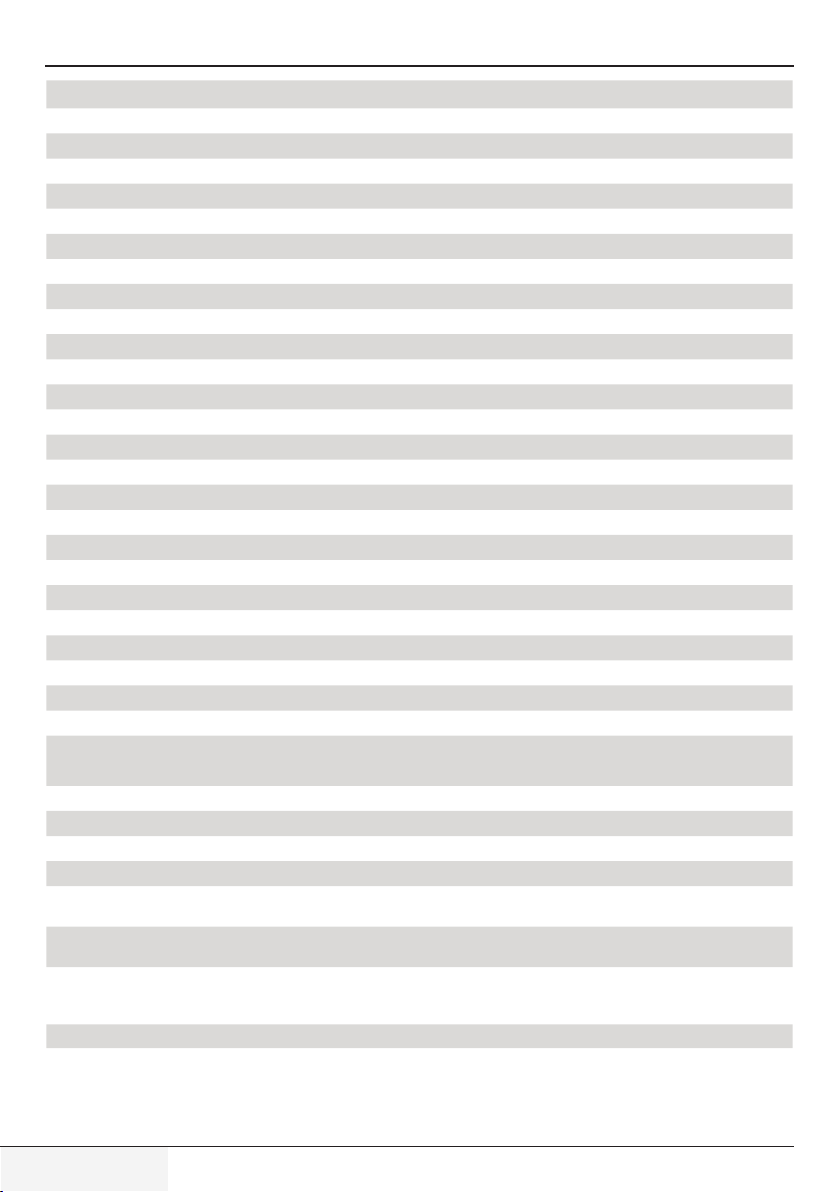
4.3.1 Programs
• Cottons
Use for your cotton laundry (such as bed sheets, duvet and
pillowcase sets, towels, bathrobes, underwear, etc.). Your
laundry will be washed with vigorous washing action for a
longer washing cycle.
• Synthetics
Use to wash your synthetic clothes (shirts, blouses,
synthetic/cotton blends, etc.). It washes with a gentle action
and has a shorter washing cycle compared to the Cottons
programme.
For curtains and tulle, use the Synthetic 40˚C programme
with prewash and anti-creasing functions selected. As their
meshed texture causes excessive foaming, wash the veils/
tulle by putting little amount of detergent into the main
wash compartment. Do not put detergent in the prewash
compartment.
• Woollens
Use to wash your woolen clothes. Select the appropriate
temperature complying with the tags of your clothes. Use
appropriate detergents for woolens.
“The wool wash cycle of this machine has been
approved by The Woolmark Company for the washing
of machine washable wool products provided that the
products are washed according to the instructions
on the garment label and those issued by the
manufacturer of this washing machine. M1428”
“In UK, Eire, Hong Kong and India the Woolmark trade
mark is a Certification trade mark.”
• Automatic Programme
Use to wash your frequently washable cotton, synthetic or
blended (cotton+synthetic) clothes. Programme detects the
type and quantity of the laundry to automatically adjust water
consumption and programme time.
CAUTION: Do not wash your woolen and delicate
A
clothes in this programme.
Select a suitable temperature if the temperature
shown on the temperature display is not compatible
with the warnings on the garment label.
The maximum washing temperature in Automatic
programme depending on the soiling level and laundry
type is 60ºC. Washing performance may not be at the
desired level for heavily soiled whites and stubborn stains
(collar, sock soil, perspiration stain, etc.). In this case, it is
recommended to select Cottons programme with prewash
and set the temperature to 50-60°C.
Many types of clothing are correctly detected and safely
washed in Automatic programme.
• Cotton Economic
Use to wash your normally soiled, durable cotton and
linen laundry. Although it washes longer than all other
programmes, it provides high energy and water savings.
Actual water temperature may be different from the stated
wash temperature. When you load the machine with less
laundry (e.g. ½ capacity or less), programme time may
automatically get shorter. In this case, energy and water
consumption will decrease more, providing a more economic
wash. This programme is available in the models with the
remaining time indicator.
• BabyProtect
Use to wash baby laundry, and the laundry that belongs
to allergic persons. Longer heating time and an additional
rinsing step provide a higher level of hygiene.
• Delicate 20°
Use to wash your delicate clothes. It washes with more
gentle washing action compared to the Synthetics
programme.
• Hand wash
Use to wash your woolen/delicate clothes that bear “not
machine-washable” tags and for which hand wash is
recommended. It washes laundry with a very gentle washing
action to not to damage clothes.
• Daily express
Use to wash your lightly soiled and unstained cotton laundry
in a short time.
• Super short express
Use to wash your lightly soiled and unstained cotton laundry
in a short time.
• Darkcare
Use this programme to wash your dark coloured laundry
or the laundry that you do not want it get faded. Washing
is performed with little mechanic action and at low
temperatures. It is recommended to use liquid detergent or
woolen shampoo for dark coloured laundry.
• Freshen Up
To soften the soiling, it pre-treats the laundry by giving
steam.
Load only half of the capacity stated for the selected
programme.
C
When this programme is selected, it is normal to hear
boiling noises since the steam generator boils water to
produce steam.
• 40° / 40’
Use this programme to wash your lightly soiled and unstained
cotton laundry in a short time.
11 / EN
Washing Machine / User’s Manual
Page 12
• Hygiene 20°
Use this programme for your laundry for which you require
washing at lower temperature with intensive and long
washing cycle. Use this programme for your laundry for
which you require hygienic washing at lower temperature.
• Rinse
Use when you want to rinse or starch separately.
• Spin + Drain
Use to drain the water in the machine.
4.4 Temperature selection
Whenever a new programme is selected, the recommended
temperature for the programme appears on the temperature
indicator. It is possible that the recommended temperature
value is not the maximum temperature that can be selected
for the current programme.
0
C
88
1888
88:88
Press the Temperature Adjustment button to change the
temperature. Temperature will decrease by increments of
10 °C.
Finally, “-” symbol indicating the cold wash option appears
on the display.
0
C
-
1888
88:88
Press the Spin Speed Adjustment button to change the
spin speed. Spin speed decreases gradually.
Then, depending on the model of the product, "Rinse Hold"
and "No Spin" options appear on the display.
Spin Speed Adjustment button only serves for
decreasing the spin speed.
C
Rinse Hold option is indicated with “ı_ı” symbol and No
Spin option is indicated with “_” symbol.
If you are not going to unload your laundry immediately
after the programme completes, you can use
Rinse Hold
function in order to prevent them from getting wrinkled when
there is no water in the machine.
This function holds the laundry in the final rinsing water.
0
C
88
88:88
If you want to spin your laundry after the Rinse Hold function:
- Adjust the Spin Speed.
- Press Start / Pause / Cancel button. The programme
resumes. Machine spins the laundry by discharging the
water.
If you want to discharge the water at the end of the
programme without spinning, use
No Spin function.
0
C
88
88:88
No change can be made in programmes where
temperature adjustment is not allowed.
C
You can also change the temperature after the washing
starts. This change can be made if the washing steps allow
it. Changes cannot be made if the steps do not allow it.
If you scroll to cold wash option and press Temperature
Adjustment button again, the recommended maximum
C
temperature for the selected programme appears on the
display. Press the Temperature Adjustment button again
to decrease the temperature.
4.5 Spin speed selection
Whenever a new programme is selected, the recommended
spin speed of the selected programme is displayed on the
Spin Speed indicator.
It is possible that the recommended spin speed
value is not the maximum spin speed that can be
C
selected for the current programme.
0
C
88
1888
88:88
12 / EN
No change can be made in programmes where spin
speed adjustment is not allowed.
C
You can change the spin speed after the washing starts if
the washing steps allow it. Changes cannot be made if the
steps do not allow it.
Washing Machine / User’s Manual
Page 13
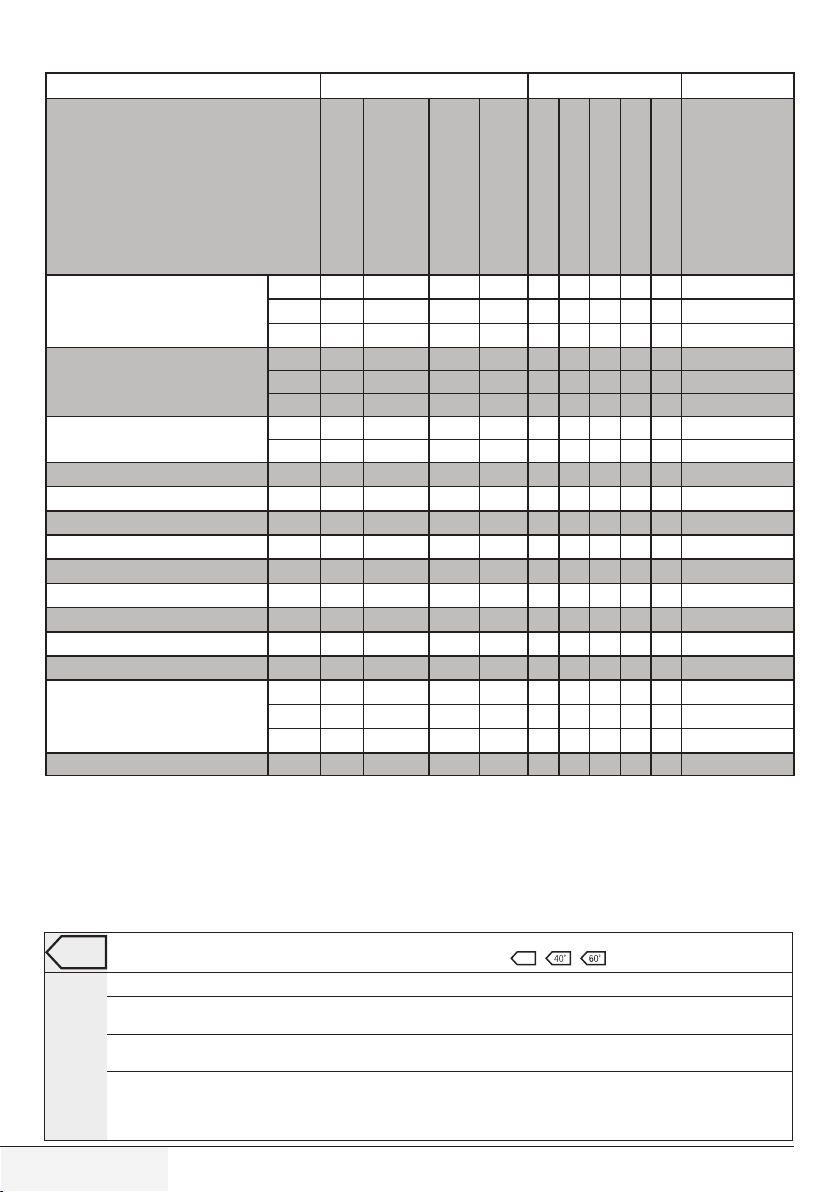
4.6 Programme and consumption table
EN
2
Auxiliary functions
Programme (°C)
Max. Load (kg)
Water Consumption (l)
Energy Consumption (kWh)
Max. Speed***
Prewash
Quick Wash
Rinse Hold
Pet hair removal
60** 7 44 0.88 1600 Cold-60
Cotton Economic
Cottons
Synthetics
Woollens 40 1.5 49 0.25 1000 • • • Cold-40
Hand wash 30 1 40 0.25 600 Cold-30
BabyProtect 60 7 85 1.90 1600 30 - 90
Darkcare 40 3 60 0.60 1000 • • • • Cold-40
Freshen Up - 2 35 0.15 1000 40° / 40’ 40 7 45 0.60 1400 • Cold-40
Delicate 20° 20 3.5 45 0.15 1000 • • • • 20
Hygiene 20° 20 2 95 0.40 1600 20
Super short express 30 2 35 0.15 1400 • • Cold-30
Daily express
Automatic Programme 40 7 **** **** 1600 • • • • • Cold-60
60** 3.5 37 0.70 1600 Cold-60
40** 3.5 37 0.69 1600 Cold-60
90 7 70 2.20 1600 • • • • • Cold-90
60 7 70 1.55 1600 • • • • • Cold-90
40 7 67 0.90 1600 • • • • • Cold-90
60 3 52 1.10 1200 • • • • • Cold-60
40 3 49 0.60 1200 • • • • • Cold-60
90 7 67 2.00 1400 • • Cold-90
60 7 67 1.10 1400 • • Cold-90
30 7 67 0.25 1400 • • Cold-90
Selectable
temperature range
°C
Night mode
• : Selectable.
* : Automatically selected, no canceling.
** : Energy Label programme (EN 60456 Ed.3)
*** : If maximum spin speed of the machine is lower then this value, you can only select up to the maximum spin speed.
**** : Program will detect the type and amount of the laundry which you put into the machine and adjust the water consumption,
energy consumption and program duration automatically.
- : See the programme description for maximum load.
** “Cotton eco 40°C and Cotton eco 60°C are standard programmes.” These programmes are known as ‘40°C cotton standard
programme’ and ‘60°C cotton standard programme’ and indicated with the symbols on the panel.
The auxiliary functions in the table may vary according to the model of your machine.
Water and power consumption may vary subject to the changes in water pressure, water hardness and temperature, ambient
C
temperature, type and amount of laundry, selection of auxiliary functions and spin speed, and changes in electric voltage.
You can see the washing time of the programme you have selected on the display of the machine. It is normal that small
differences may occur between the time shown on the display and the real washing time.
“Selection patterns for auxiliary functions can be changed by the manufacturer company. New selection patterns can be added
or removed.”
“The spin speed of your machine may vary according to the programme; this spin speed cannot exceed the max. spin speed of
your machine.”
13 / EN
Washing Machine / User’s Manual
Page 14
4.7 Auxiliary function selection
Select the desired auxiliary functions before starting the
programme. Whenever a programme is selected, frames of
the auxiliary function symbol that can be selected together
with it illuminates. And when you select an auxiliary function,
the interior area of the auxiliary function symbol also starts
to illuminate.
0
C
88
1888
88:88
Frame of the auxiliary function symbol that cannot
be selected with the current programme does not
C
illuminate.
Also the frames of the auxiliary function suitable for the
current programme after the washing has started remains
illuminated. You can select or cancel the auxiliary functions
whose frames are illuminated. If the wash cycle has reached
a point where you cannot select the auxiliary function, the
function's frame turns off.
Some functions cannot be selected together. If a second
auxiliary function conflicting with the first one is selected
C
before starting the machine, the function selected
first will be canceled and the second auxiliary function
selection will remain active. For example, if you want to
select Quick Wash after you have selected the Additional
Water, Additional Water will be canceled and Quick Wash
will remain active.
An auxiliary function that is not compatible with the
programme cannot be selected. (See, “Programme and
consumption table")
Some programmes have auxiliary functions that must
be operated simultaneously. Those functions cannot be
cancelled. The frame of the auxiliary function will not be
illuminated, only inner area will be illuminated.
• Prewash
A Prewash is only worthwhile for heavily soiled laundry. Not
using the Prewash will save energy, water, detergent and
time.
• Quick Wash
This function can be used in Cottons and Synthetics
programmes. It decreases the washing times and also the
number of rinsing steps for lightly soiled laundry.
When you select this function, load your machine with
half of the maximum laundry specified in the programme
C
table.
• Rinse Plus
This function enables the machine to make another rinsing
in addition to the one already made after the main wash.
Thus, the risk for sensitive skins (babies, allergic skins, etc.)
to be effected by the minimal detergent remnants on the
laundry can be reduced.
• Anti-Creasing
This function creases the clothes lesser when they are being
washed. Drum movement is reduced and spin speed is
limited to prevent creasing. In addition, washing is done with
a higher water level.
• Rinse Hold
If you are not going to unload your clothes immediately after
the programme completes, you can use rinse hold function
to keep your laundry in the final rinsing water in order to
prevent them from getting wrinkled when there is no water
in the machine. Press Start / Pause button after this process
if you want to drain the water without spinning your laundry.
Programme will resume and complete after draining the
water.
If you want to spin the laundry held in water, adjust the Spin
Speed and press Start / Pause button.
The programme resumes. Water is drained, laundry is spun
and the programme is completed.
• Night mode
Use to wash the cottons with lesser energy consumption and
silently. Spin steps are cancelled for a silent washing and the
cycle ends with the Rinse Hold step. After completion of the
programme, run Spin cycle to spin the laundry.
• Pet hair removal
This function helps to remove pet hair that remain on your
garments more effectively.
When you select this function, Prewash and Extra Rinse
steps are added to the normal programme. Thus, washing
is performed with more water (30%) and the pet hair is
removed more effectively.
warning: Never wash your pets in the washing
A
Time display
Remaining time for the completion of the programme while
it is running is displayed as “01:30” in hours and minutes
format.
C
machine.
Programme time may differ from the values in the
"Programme and consumption table" depending on
the water pressure, water hardness and temperature,
ambient temperature, amount and the type of laundry,
auxiliary functions selected and the changes at the
mains voltage.
4.8 End Time
With the End Time function, the startup of the programme
may be delayed up to 24 hours. After pressing
button, the programme's estimated ending time is
Time
displayed. If the
is illuminated.
In order for the End Time function is activated and the
programme is completed at the end of the specified time,
you must press
time.
End Time is adjusted, End Time indicator
0
C
88
1888
Start / Pause button after adjusting the
End
88:88
14 / EN
Washing Machine / User’s Manual
Page 15
88
1888
0
C
88:88
If you want to cancel End Time function, press On / Off
button to turn off and on the machine.
Do not use liquid detergents when you activate End
Time function! There is the risk of staining of the clothes.
C
1 Open the loading door, place the laundry and put
detergent, etc.
2 Select the washing programme, temperature, spin speed
and, if required, the auxiliary functions.
3 Set the end time of your choice by pressing the
button. End Time indicator illuminates.
Time
4 Press
Start / Pause button. Time countdown starts. “:”
End
sign in the middle of the end time on the display starts
flashing.
Additional laundry may be loaded during the End
Time countdown period. At the end of the countdown,
C
End Time indicator turns off, washing cycle starts and
the time of the selected programme appears on the
display.
When the End Time selection is completed, the
time appears on the screen consists of end time plus the
duration of the selected programme.
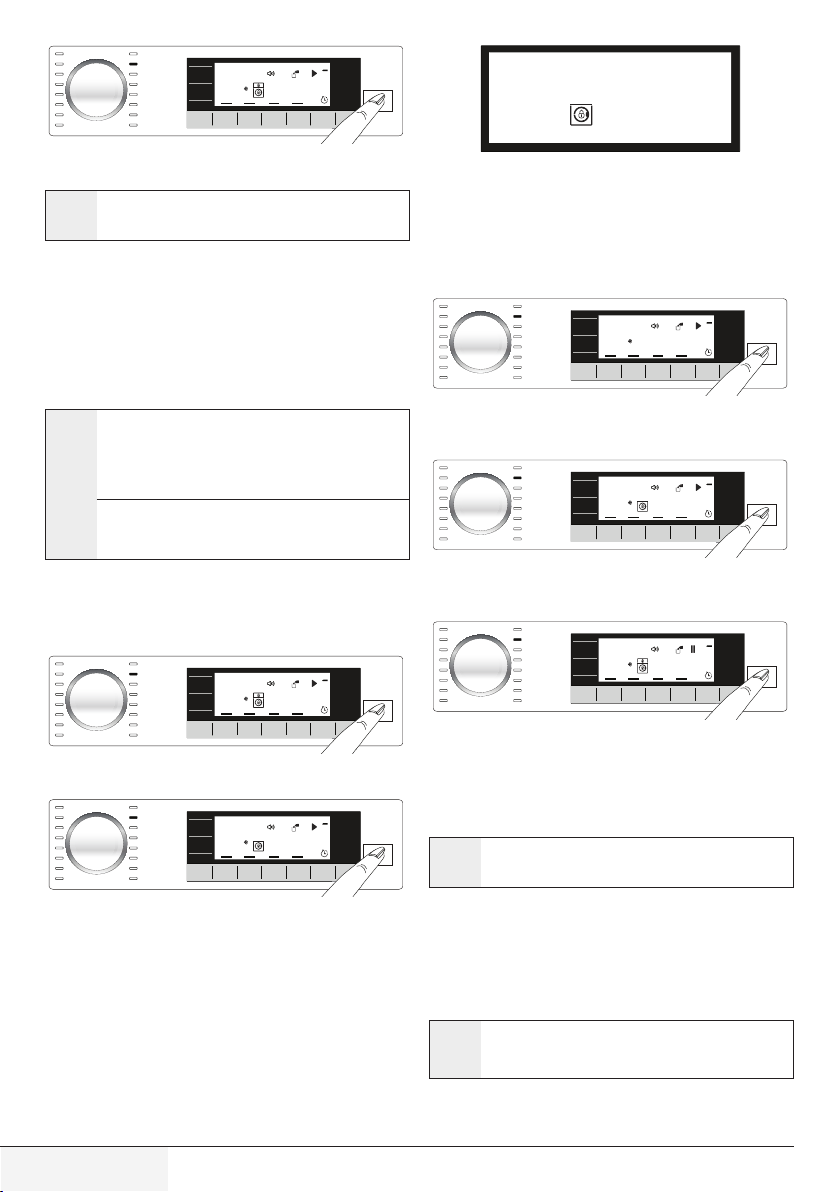
4.9 Starting the programme
1 Press Start / Pause button to start the programme.
2 The
Start / Pause button which was off before starts to
illuminate steadily now, indicating that the programme
has started.
0
C
88
1888
88:88
3 Loading door is locked. The door lock symbol appears on
the display after the loading door is locked.
0
C
88
1888
88:88
4 Programme follow-up indicator lights on the display will
show the current programme step.
4.10 Loading door lock
There is a locking system on the loading door of the
machine that prevents opening of the door in cases when
the water level is unsuitable.
"Door Locked" symbol appears on the display when the
loading door is locked.
4.11 Changing the selections after the
programme has started
Adding laundry after the programme has started:
If the water level in the machine is suitable when
you press Start / Pause
button, loading door symbol will
flash on the display until the loading door is opened and will
disappear when the loading door is opened.
0
C
88
1888
88:88
If the water level in the machine is not suitable when you
press Start / Pause button, the loading door symbol remain
lit on the display.
0
C
88
1888
88:88
Switching the machine to pause mode:
Press the Start / Pause
button to switch the machine to
pause mode. Pause symbol will flash on the display.
0
C
88
1888
88:88
Changing the programme selection after programme
has started:
The programme change is not allowed when the current
programme is running.
You can select the new programme after switching the
current programme to pause mode.
The selected program starts anew.
C
Changing the auxiliary function, speed and
temperature
Depending on the step the programme has reached, you
can cancel or activate the auxiliary functions. See, "Auxiliary
function selection".
You can also change the speed and temperature settings.
See, "Spin speed selection" and "Temperature selection".
The loading door will not open if the water temperature
in the machine is high or the water level is above the
C
door opening.
4.12 Child Lock
Use Child Lock function to prevent children from tampering
with the machine. Thus you can avoid any changes in a
15 / EN
Washing Machine / User’s Manual
Page 16
running programme.
You can switch on and off the machine with On / Off
button when the Child Lock is active. When you switch
C
on the machine again, programme will resume from
where it has stopped.
When the child lock is enabled, an audio warning will
be given if the buttons are pressed. Audio warning
will be canceled if the buttons are pressed 5 times
consecutively.
To activate the Child Lock:
Press and hold Auxiliary Function
seconds. After the countdown as “CL 3-2-1" on the display
is over, "Child Lock Enabled" appears on the display. Release
2nd Auxiliary Function button 1 when this warning is
displayed.
To deactivate the childproof lock:
Press and hold Auxiliary Function
seconds. After the countdown as
is over, "Child Lock Enabled" disappears from the display.
button 2 for 3
button 2 for 3
“CL 3-2-1” on the display
4.13 Canceling the programme
The programme is cancelled when the machine is turned off
and on again. Press and hold
After the countdown as "3-2-1" on the display is over, the
machine turns off.
If you press On / Off button when the Child Lock is
enabled, the programme will not be cancelled. You should
C
cancel the Child Lock first.
If you want to open the loading door after you have
cancelled the programme but it is not possible to open
the loading door since the water level in the machine
is above the loading door opening, then turn the
Programme Selection knob to Pump+Spin
programme and discharge the water in the machine.
On / Off button for 3 seconds.
4.14 End of programme
End symbol appears on the display when the programme is
completed.
If you do not press any button for 10 minutes, the machine
will switch to OFF mode. Display and all indicators are turned
off.
Completed programme steps will be displayed if you press
On / Off button.
4.15 Adjusting the VOLUME level
Low volume and high volume
Press and hold Auxiliary Function button 3 for 3 seconds to
adjust the volume level. After the countdown as "3-2-1" on
the display is over, the volume level symbol will appear and
the new volume level will be displayed.
5 Maintenance and cleaning
Service life of the product extends and frequently faced
problems decrease if cleaned at regular intervals.
5.1 Cleaning the detergent drawer
Clean the detergent drawer at regular intervals (every
4-5 washing cycles) as shown below in order to prevent
accumulation of powder detergent in time.
Lift the rear part of the siphon to remove it as illustrated.
If more than normal amount of water and softener
mixture starts to gather in the softener compartment,
C
clean the siphon.
2 Wash the detergent drawer and the siphon with plenty of
lukewarm water in a washbasin. Wear protective gloves
or use an appropriate brush to avoid touching of the
residues in the drawer with your skin when cleaning.
3 After cleaning, replace the siphon back to its seating and
push its front section downwards to make sure that the
locking tab engages.
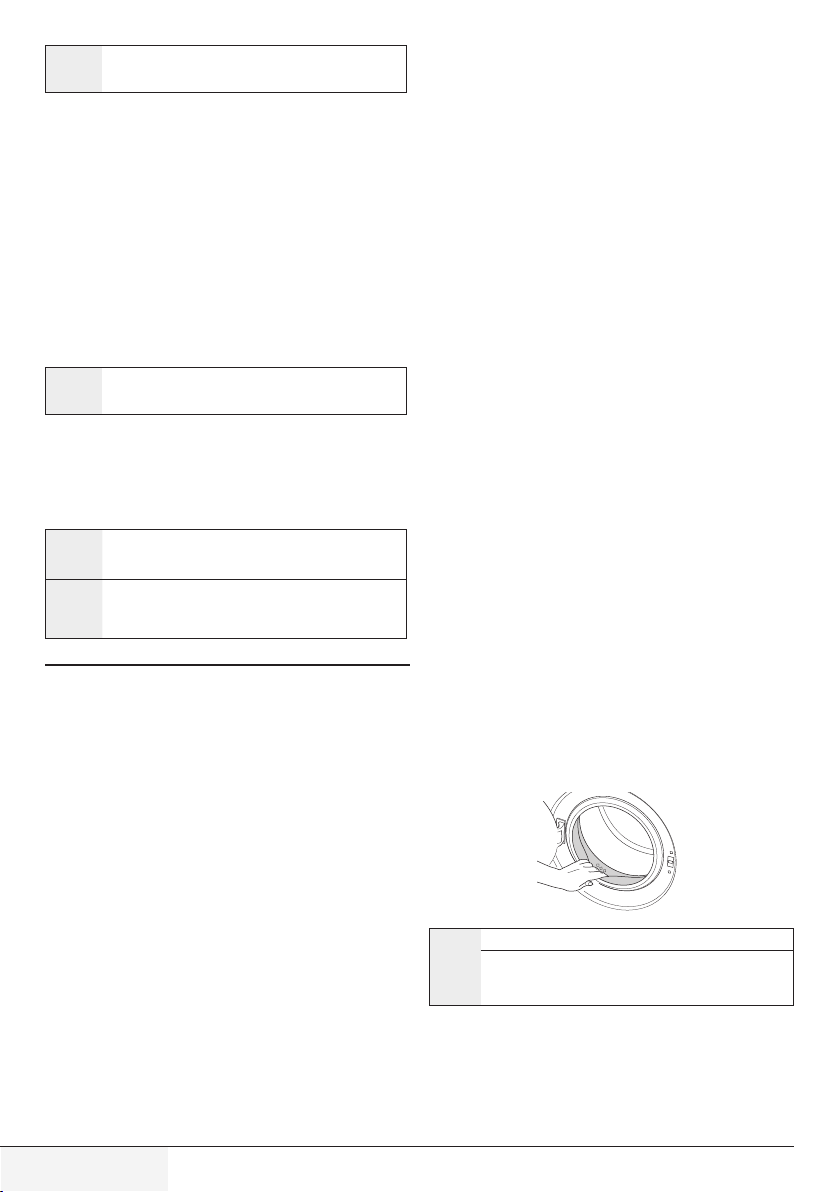
5.2 Cleaning the loading door and the drum
Residues of softener, detergent and dirt may accumulate in
your machine in time and may cause unpleasant odours and
washing complaints. To avoid this, use the
programme. If your machine is not featured with
programme, use Cottons-90 programme and
Cleaning
select
Additional Water or Extra Rinse auxiliary functions
as well. Run the programme without any laundry in the
machine. Before starting the programme, put max. 100
g of powder anti-limescale into the main wash detergent
compartment(compartment nr. 2). If the anti-limescale is in
tablet form, put only one tablet into compartment nr. 2. Dry
the inside of the bellow with a clean piece of cloth after the
programme has come to an end.
Repeat Drum Cleaning process in every 2 months.
Use an anti-limescale suitable for the washing
C
machines.
After every washing check that no foreign substance is left
in the drum.
Drum Cleaning
Drum
16 / EN
Washing Machine / User’s Manual
Page 17
If the holes on the bellow shown in the figure is blocked,
open the holes using a toothpick.
Foreign metal substances will cause rust stains in the
drum. Clean the stains on the drum surface by using
C
cleaning agents for stainless steel. Never use steel wool
or wire wool.
WARNING: Never use sponge or scrub materials.
These will damage the painted and plastic surfaces.
A
5.3 Cleaning the body and control panel
Wipe the body of the machine with soapy water or noncorrosive mild gel detergents as necessary, and dry with a
soft cloth.
Use only a soft and damp cloth to clean the control panel.
5.4 Cleaning the water intake filters
There is a filter at the end of each water intake valve at the
rear of the machine and also at the end of each water intake
hose where they are connected to the tap. These filters
prevent foreign substances and dirt in the water to enter the
washing machine. Filters should be cleaned as they do get
dirty.
1 Close the taps.
2 Remove the nuts of the water intake hoses to access
the filters on the water intake valves. Clean them with an
appropriate brush. If the filters are too dirty, take them out
by means of pliers and clean them.
3 Take out the filters on the flat ends of the water intake
hoses together with the gaskets and clean thoroughly
under running water.
4 Replace the gaskets and filters carefully in their places
and tighten the hose nuts by hand.
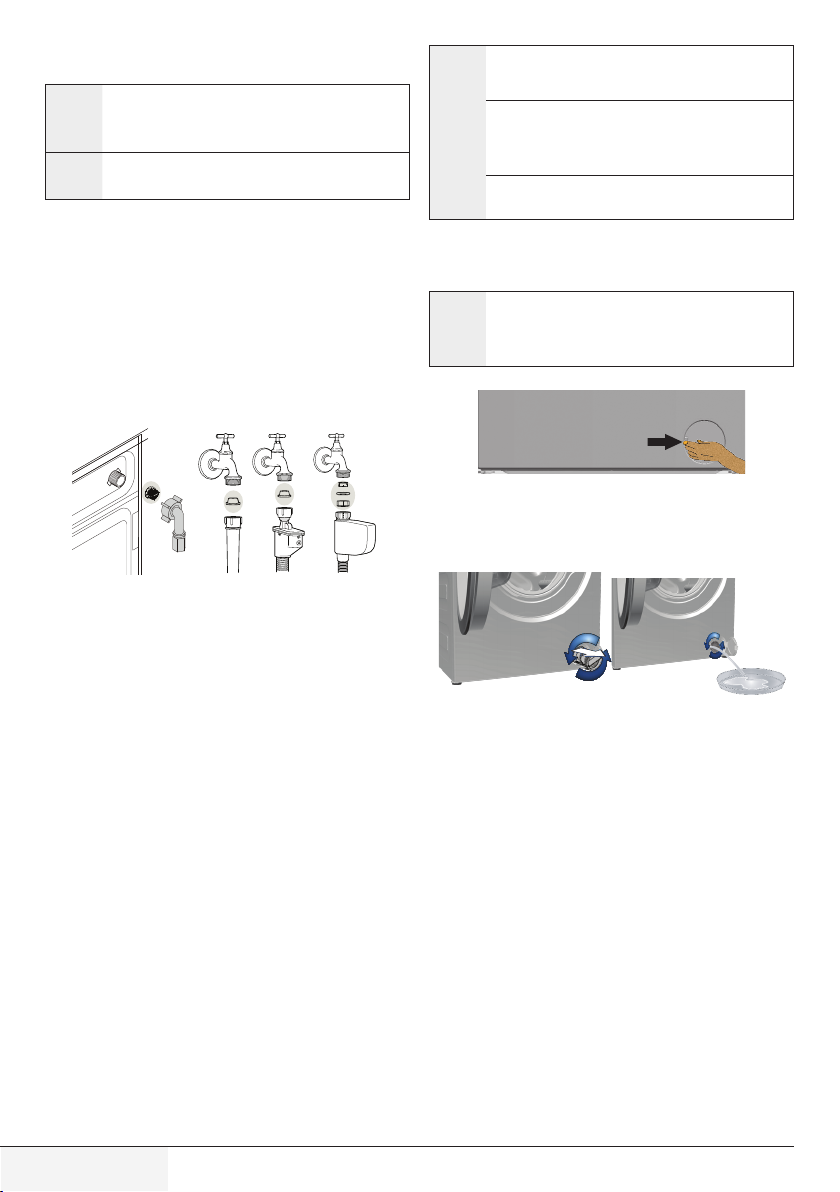
5.5 Draining remaining water and cleaning the
pump filter
The filter system in your machine prevents solid items
such as buttons, coins and fabric fibers clogging the pump
impeller during discharge of washing water. Thus, the water
will be discharged without any problem and the service life
of the pump will extend.
If the machine fails to drain water, the pump filter is clogged.
Filter must be cleaned whenever it is clogged or in every 3
months. Water must be drained off first to clean the pump
filter.
In addition, prior to transporting the machine (e.g., when
moving to another house) and in case of freezing of the
water, water may have to be drained completely.
WARNING: Foreign substances left in the pump
filter may damage your machine or may cause noise
A
problem.
WARNING: If the product is not in use, turn the tap
off, detach the supply hose and drain the water inside
the machine against any freezing possibility in the
region of installation.
WARNING: After each use close the supply hose tap
of the product.
In order to clean the dirty filter and discharge the
water:
1 Unplug the machine to cut off the supply power.
WARNING: Temperature of the water inside the
machine may rise up to 90 ºC. To avoid burning risk,
A
clean the filter after the water in the machine cools
down.
2 Open the filter cap.
3 Some of our products have emergency draining hose and
some does not have. Follow the steps below to discharge
the water.
Discharging the water when the product has an
emergency draining hose:
a Pull the emergency draining hose out from its seat
b Place a large container at the end of the hose. Drain the
water into the container by pulling out the plug at the end
of the hose. When the container is full, block the inlet
of the hose by replacing the plug. After the container is
emptied, repeat the above procedure to drain the water in
the machine completely.
c When draining of water is finished, close the end by the
plug again and fix the hose in its place.
d Turn the pump filter to take it out.
17 / EN
Washing Machine / User’s Manual
Page 18
Discharging the water when the product does not
have an emergency draining hose:
a Place a large container in front of the filter to catch water
from the filter.
b Loosen pump filter (anticlockwise) until water starts to
flow. Fill the flowing water into the container you have
placed in front of the filter. Always keep a piece of cloth
handy to absorb any spilled water.
c When the water inside the machine is finished, take out
the filter completely by turning it.
4 Clean any residues inside the filter as well as fibers, if
any, around the pump impeller region.
5 Install the filter.
6 If the filter cap is composed of two pieces, close the filter
cap by pressing on the tab. If it is one piece, seat the tabs
in the lower part into their places first, and then press the
upper part to close.
Eco
(Pump)
Daily
express
Cottons
RinseDrain
Super short
express
Synthetics
Freshen
up
Spin
Woollens
Extra rinse
(Rinse Plus)
Delicate 20° Hygiene 20°40° 40’
Silk+Hand washSteamFinishing Protection BabyProtect+
Hand
Wash
wash
BabyProtectCotton
Time delay
Sports
Dark wash
(Darkcare)
Pre-wash
Night modeQuick
Automatic Programme
Dark wash
(Darkcare)
Duvet
(Bedding)
Mixed 40
(Mix40)
Shirts
Indicative values for Synthetics programmes (EN)
Remaining Moisture
Content (%) **
Load (kg)
Water
Consumption
(l)
Energy
Consumption
(kWh)
Programme
Duration
Synthetics 60
Synthetics 40
* You can see the washing time of the programme you have selected on the display of the machine. It is normal that small
differences may occur between the time shown on the display and the real washing time.
** Remaining moisture content values may differ according to the selected spin speed.
3 52 1.10
3 49 0.60
01:45 45 40
01:31 45 40
≤ 1000 rpm > 1000 rpm
(min) *
Remaining Moisture
Content (%) **
18 / EN
Washing Machine / User’s Manual
Page 19
6 Technical specifications
Complying Commission Delegated Regulation (EU) No 1061/2010
Supplier name or trademark Beko
Model name WMY 71243 LMB2
Rated capacity (kg) 7
Energy efficiency class / Scale from A+++ (Highest Efficiency) to D (Lowest Efficiency) A+++
Annual Energy Consumption (kWh)
Energy consumption of the standard 60°C cotton programme at full load (kWh) 0.880
Energy consumption of the standard 60°C cotton programme at partial load (kWh) 0.695
Energy consumption of the standard 40°C cotton programme at partial load (kWh) 0.690
Power consumption in ‘off-mode’ (W) 0.440
Power consumption in ‘left-on mode’ (W) 0.640
Annual Water Consumption (l)
Spin-drying efficiency class / Scale from A (Highest Efficiency) to G (Lowest Efficiency) B
Maximum spin speed (rpm) 1200
Remaining moisture Content (%) 53
Standard cotton programme
Programme time of the standard 60°C cotton programme at full load (min) 209
Programme time of the standard 60°C cotton programme at partial load (min) 185
Programme time of the standard 40°C cotton programme at partial load (min) 185
Duration of the left-on mode (min) N/A
Airborne acoustical noise emissions washing/spinning (dB) 53/75
Built-in No
Height (cm) 84
Width (cm) 60
Depth (cm) 50
Net weight (±4 kg.) 64
Single Water inlet / Double Water inlet
• Available
Electrical input (V/Hz) 230 V / 50Hz
Total current (A) 10
Total power (W) 2200
Main model code 9710
(1)
Energy Consumption based on 220 standard washing cycles for cotton programmes at 60°C and 40°C at full and partial load, and the consumption of
the low-power modes. Actual energy consumption will depend on how the appliance is used.
(2)
Water consumption based on 220 standard washing cycles for cotton programmes at 60°C and 40°C at full and partial load. Actual water consumption
will depend on how the appliance is used.
(3)
“Standard 60°C cotton programme” and the “standard 40°C cotton programme” are the standard washing programmes to which the information in the
label and the fiche relates and these programmes are suitable to clean normally soiled cotton laundry and that they are the most efficient programmes in
terms of combined energy and water consumption.
Technical specifications may be changed without prior notice to improve the quality of the product.
(1)
(2)
(3)
Cotton Eco 60°C and 40°C
174
8800
• / -
19 / EN
Washing Machine / User’s Manual
Page 20

7 Troubleshooting
Programme cannot be started or selected.
• Washing machine has switched to self protection mode due to a supply problem (line voltage, water pressure, etc.). >>> To cancel the
programme, turn the Programme Selection knob to select another programme. Previous programme will be cancelled. (See “Canceling
the programme”)
Water in the machine.
• Some water might have remained in the product due to the quality control processes in the production. >>> This is not a failure; water is
not harmful to the machine.
Machine vibrates or makes noise.
• Machine might be standing unbalanced. >>> Adjust the feet to level the machine.
• A hard substance might have entered into the pump filter. >>> Clean the pump filter.
• Transportation safety bolts are not removed. >>> Remove the transportation safety bolts.
• Laundry quantity in the machine might be too little. >>> Add more laundry to the machine.
• Machine might be overloaded with laundry. >>> Take out some of the laundry from the machine or distribute the load by hand to
balance it homogenously in the machine.
• Machine might be leaning on a rigid item. >>> Make sure that the machine is not leaning on anything.
Machine stopped shortly after the programme started.
• Machine might have stopped temporarily due to low voltage. >>> It will resume running when the voltage restores to the normal level.
Programme time does not countdown. (On models with display)
• Timer may stop during water intake. >>> Timer indicator will not countdown until the machine takes in adequate amount of water. The
machine will wait until there is sufficient amount of water to avoid poor washing results due to lack of water. Timer indicator will resume
countdown after this.
• Timer may stop during heating step. >>> Timer indicator will not countdown until the machine reaches the selected temperature.
• Timer may stop during spinning step. >>> Automatic unbalanced load detection system might be activated due to the unbalanced
distribution of the laundry in the drum.
• Machine does not switch to spinning step when the laundry is not evenly distributed in the drum to prevent any damage to the machine and
to its surrounding environment. Laundry should be rearranged and re-spun.
Foam is overflowing from the detergent drawer.
• Too much detergent is used. >>> Mix 1 tablespoonful softener and ½ l water and pour into the main wash compartment of the
detergent drawer.
• Put detergent into the machine suitable for the programmes and maximum loads indicated in the “Programme and consumption table”.
When you use additional chemicals (stain removers, bleachs and etc), reduce the amount of detergent.
Laundry remains wet at the end of the programme
• Excessive foam might have occurred and automatic foam absorption system might have been activated due to too much detergent usage.
Use recommended amount of detergent.
>>>
• Machine does not switch to spinning step when the laundry is not evenly distributed in the drum to prevent any damage to the machine and
to its surrounding environment. Laundry should be rearranged and re-spun.
warning: If you cannot eliminate the problem although you follow the instructions in this section, consult your dealer or the
Authorized Service Agent. Never try to repair a nonfunctional product yourself.
A
20 / EN
Washing Machine / User’s Manual
Page 21
Mosógép
Használati útmutató
WMY 71243 LMB2
Dokumentum Száma
2820523886_HU / 17-09-14.(9:12)
Page 22

Ez a termék a legújabb technológiával, környezetbarát körülmények között készült.
Page 23

1 A biztonságra és a környezetre vonatkozó fontos utasítások
Ez a fejezet olyan biztonsági utasításokat tartalmaz, melyek segítenek elkerülni a
személyi sérüléseket és az anyagi károkat. Ezen utasítások figyelmen kívül hagyása
garanciavesztést von maga után.
1.1 Általános biztonsági utasítások
• A terméket csak abban az esetben használhatják 8 évesnél idősebb gyermekek és
olyan személyek, akiknél érzékszervi vagy mentális képességek nem teljes mértékben
fejlődtek ki vagy nem ismerik a terméket, ha felügyelet alatt vannak, mely megfelelő
képzésben részeülnek a termék biztonságos használatát illetően. A gyermekek nem
játszhatnak a termékkel. A tisztítási és karbantartási feladatokat a gyermekek csak
felügyelet mellett végezhetik el. 3 év alatti gyermekek kizárólag felnőtt felügyelete
mellett tartózkodhatnak a közelben.
• Soha ne helyezze a terméket szőnyegre. Ellenkező esetben a gép alja nem fog
megfelelően szellőzni, melynek hatására az elektromos részek túlmelegedhetnek.
Mindez problémákat okoz a termékben.
• Amennyiben a termék hibásan működik, ne használja addig, amíg egy Szakképzett
Szakember meg nem vizsgálta azt. Ezzel áramütésnek teszi ki magát!
• A terméket úgy tervezték, hogy az áramszünetet követően ne kapcsoljon vissza
automatikusan. Amennyiben meg szeretne szakítani egy programot, tekintse meg a
"Program megszakítása" című fejezetet.
• A terméket egy 16A-es biztosítékkal védett, földelt konnektorhoz csatlakoztassa. Ne
feledkezzen el a megfelelő földelésről sem. Cégünk nem vállal felelősséget a termék
(az országában érvényes jogszabályoknak megfelelő) földelés nélkül használatából
eredő károkért.
• A vízforrásokat és a leeresztő tömlőket biztosan kell rögzíteni. Ellenkező esetben
szivárgás jöhet létre.
• A betöltőajtót soha ne nyissa ki, illetve ne vegye ki a szűrőt, ha a dob belsejében még
víz van. Ellenkező esetben a víz kifolyhat és a forró víz megégetheti.
• A lezárt betöltőajtót soha ne próbálja meg erővel kinyitni. A betöltőajtó pár perccel a
mosási program végét követően kinyílik. A betöltőajtó erőszakkal történő kinyitásakor
az ajtó és a zárszerkezet megsérülhet.
• Ha nem használja, húzza ki a készülék dugaszát az aljzatból.
• Soha ne mossa úgy a terméket, hogy vizet önt a felületére vagy a belsejébe! Ezzel
áramütésnek teszi ki magát!
• Nedves kézzel soha ne érintse meg a csatlakozót! Az áramtalanítást soha ne a zsinór
húzásával végezze, mindig csak a csatlakozót húzza ki.
• Kizárólag az automata mosógépekhez használható mosószereket, öblítőszereket és
adalékanyagokat használjon.
• Minden esetben tartsa be a ruha címkéjén és a mosószer csomagolásán feltüntetett
utasításokat.
• A terméket üzembe helyezés, karbantartás, tisztítás vagy javítási munkálatok során
mindig húzza ki a konnektorból.
• Az üzembe helyezési és javítási munkálatokat minden esetben egy Képzett
Szakemberrel
végzett javítási munkák következtében létrejövő károkért.
végeztesse el. A gyártó nem vállal felelősséget a képzetlen személy által
23 / HU
Mosógép / Használati útmutató
Page 24
• Amennyiben a tápkábel megsérült, a kockázatok elkerülése érdekében azt a gyártóval,
egy szervizzel vagy egy hasonlóan képzett személlyel (lehetőleg villanyszerelővel) vagy a
forgalmazó által kijelölt személlyel cseréltesse ki.
• Helyezze a terméket egy szilárd, vízszintes és egyenletes felületre.
• Ne helyezze a gépet hosszú, bolyhos szőnyegre vagy más, hasonló felületre.
• Ne helyezze a terméket magasra vagy egy lépcsőzetes felület szélére.
• Soha ne helyezze a készüléket a tápkábelre.
• Soha ne használjon szivacsot vagy súrolószert. Ezek kárt tehetnek a festett, krómozott
és a műanyag felületekben.
1.2 Rendeltetési cél
• A terméket otthoni használatra tervezték. Nem használható ipari célokra és nem
használható a rendeltetésszerű használattól eltérő feladatokhoz.
• A gép csak a megfelelő jelzéssel ellátott dolgok mosására és öblítésére alkalmas.
• A gyártó nem vállal felelősséget a helytelen használatból vagy szállításból eredő
károkért.
1.3 Gyermekek biztonsága
• A csomagolóanyagok veszélyesek a gyermekek számára. Olyan helyen tárolja őket, ahol
a gyermekek nem érhetik el.
• Az elektromos termékek veszélyesek a gyermekek számára. Ha a gép működik, a
gyermekeket ne engedje a közelébe! Ne hagyja, hogy a gyermekek a géppel játszanak!
Annak érdekében, hogy a gyermekek ne tudjanak beavatkozni a gép működésébe,
használja a gyerekzárat.
• Amennyiben elhagyja a termet, ahol a gép található, soha ne felejtse el bezárni a
készülék ajtaját.
• A mosószereket és az egyéb anyagokat biztonságos helyen, a gyermekek számára nem
elérhető helyen, pl. egy zárható mosószeres szekrényben tárolja.
A ruhák magas hőmérsékleten történő mosása során a betöltőajtó
üvege felforrósodik. Ezért – amíg a mosás tart – főleg gyermekek ne
tartózkodjanak a betöltőajtó közelében.
1.4 Csomagolási információk
• A termék csomagolóanyagai a Nemzeti Környezetvédelmi Jogszabályoknak megfelelően újrahasznosítható anyagokból készülnek. Ne dobja ki a termék csomagolását
a háztartási hulladékkal együtt. A csomagolóanyagot vigye el a helyi hatóságok által
kijelölt csomagolóanyag gyűjtőpontra.
1.5 A leselejtezett termék kidobása
• A termék csúcsminőségű alkatrészekből és anyagokból készül, melyek ismét felhasználhatók és újrahasznosíthatók. Ebből következően az élettartam lejárta után ne dobja ki
a terméket a háztartási hulladékkal együtt. Vigye el egy gyűjtőpontra az elektromos és
elektronikus részek újrahasznosítása céljából. A legközelebbi gyűjtőponttal kapcsolatos
információkért vegye fel a kapcsolatot a helyi hatóságokkal. Segítsen megóvni a
környezetet és a termékszeti erőforrásokat a használt termékek újrahasznosításával. A
gyermekek biztonsága érdekében, a termék leselejtezése előtt vágja el a tápkábelt és
rongálja meg a mosógép ajtajának záró mechanizmusát.
24 / HU
Mosógép / Használati útmutató
Page 25
1.6 WEEE-irányelv betartása
A termék megfelel az uniós WEEE-irányelv (2012/19/EU) követelményeinek. A
terméken megtalálható az elektromos és elektronikus hulladékok besorolására
vonatkozó szimbólum (WEEE).
A terméket magas minőségű alkatrészekből és anyagokból állították elő, amel-
yek ismételten felhasználhatók és alkalmasak az újrahasznosításra. A hulladék
terméket annak élettartamának végén ne a szokásos háztartási vagy egyéb hulladékkal
együtt selejtezze le. Vigye el azt egy az elektromos és elektronikus berendezések újrahasznosítására szakosodott begyűjtőhelyre. A begyűjtőhelyek kapcsán kérjük, tájékozódjon a helyi hatóságoknál.
Az RoHS-irányelvnek való megfelelés:
Az Ön által megvásárolt termék megfelel az uniós RoHS-irányelv (2011/65/EU) követelményeinek. A termék nem tartalmaz az irányelvben meghatározott káros vagy tiltott
anyagokat.
2 Üzembe helyezés
A termék beszerelésével kapcsolatban forduljon a
legközelebbi szervizhez. Mielőtt kihívná a szervizt, olvassa
el a használati útmutatót és ellenőrizze, hogy az áramforrás,
a csapvíz és a vízleeresztő rendszer megfelelő-e. Ellenkező
esetben, a szükséges teendők elvégzéséhez hívjon szerelőt.
A beszerelés helyén található elektromos hálózat,
csapvíz és szennyvíz csatornák előkészítése minden
C
esetben a vásárló felelőssége.
FIGYELMEZTETÉS: A termék üzembe helyezését
és elektromos csatlakozásainak előkészítését kizárólag
B
az arra feljogosított szerviz szakemberével végeztesse
el. A gyártó nem vállal felelősséget a jogosulatlanul
végzett javítási munkák miatt bekövetkező károkért.
FIGYELMEZTETÉS:A beszerelést megelőzően
vegye szemügyre a gépet, hogy nincsenek-e rajta
A
sérülések. Amennyiben vannak, ne szerelje be a
készüléket. A sérült készülékek veszélyt jelentenek.
Biztosítsa, hogy az üzembe helyezéskor vagy a tisztítási
műveletek során végzett mozgatáskor a vízbevezető
C
és a leeresztő csövek, továbbá a tápkábel soha ne
hajoljanak meg és törjenek meg.
2.1 Megfelelő helyszín az üzembe helyezéshez
• A gépet szilárd talajon helyezze el. Ne helyezze a gépet
hosszú, bolyhos szőnyegre vagy más, hasonló felületre.
• A mosógép és a szárítógép összes tömege (teljes töltettel
és egymásra helyezve) körülbelül 180 kilogramm. A
terméket olyan szilárd és vízszintes talajra helyezze,
melynek elegendő a teherbírása.
• Soha ne helyezze a készüléket a tápkábelre.
• Soha ne helyezze a készüléket olyan helyre, ahol a
környezeti hőmérséklet 0ºC alá csökkenhet.
• A terméket úgy helyezze el, hogy a bútorok szélétől
legalább 1 cm távolságra legyen.
2.2 A csomagolás eltávolítása
A csomagolóanyag eltávolításához billentse hátra a
csomagot. A csomagolást a szalag meghúzásával tudja
leválasztani.
2.3 A szállításhoz használt rögzítések
eltávolítása
FIGYELMEZTETÉS: A csomagolás eltávolítása előtt
soha ne távolítsa el a szállításhoz használt rögzítéseket.
A
FIGYELMEZTETÉS: A gép használatba vétele
előtt távolítsa el a szállításhoz használt biztonsági
A
csavarokat. Ellenkező esetben a gép megsérülhet.
1. Egy megfelelő villáskulcs segítségével lazítsa meg a
csavarokat, amíg már kézzel is csavarhatóak
2. Óvatos csavarásokkal távolítsa el őket.
(C).
25 / HU
Mosógép / Használati útmutató
Page 26
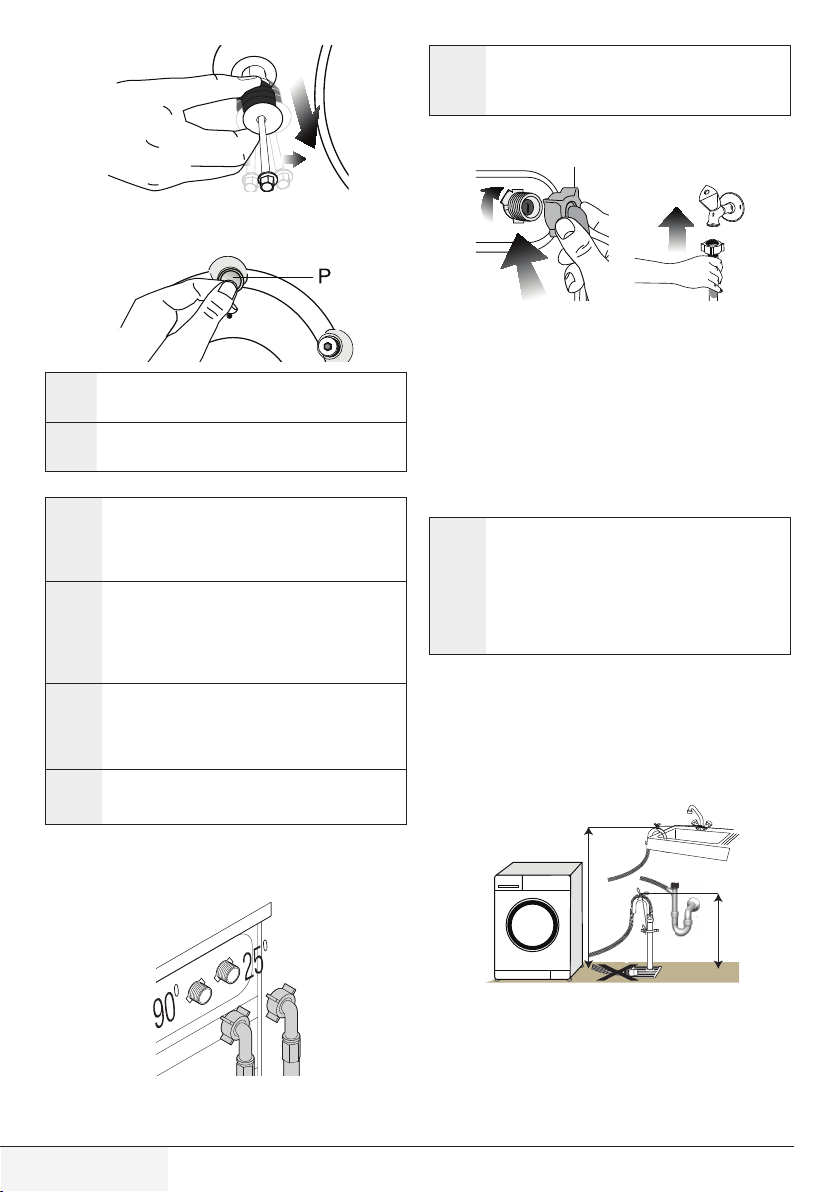
3. A műanyag fedőket (a használati útmutatóval együtt a
csomagban található) csatlakoztassa a panel hátulján lévő
lyukakhoz.
C
C
(P)
A biztonsági csavarokat tartsa biztonságos helyen arra az
esetre, ha újra át kellene helyeznie a gépet.
A biztonsági csavarok megfelelő rögzítése nélkül soha ne
mozgassa és szállítsa a terméket!
2.4 Csatlakoztassa a vízellátást
A gép üzemeltetéséhez a víznyomásnak 1 és 10 bar (0,1
– 1 MPa) közt kell lennie. A gép megfelelő működéséhez
C
10-80 liter víznek kell átfolynia percenként. Magasabb
víznyomás esetén iktasson be nyomáscsökkentő
szelepet.
Amennyiben dupla vízbemenetes (hideg és meleg)
terméket egyetlen vízbemenetesként
C
használni, akkor a termék használatát megelőzően
csatlakoztassa a csomagban található dugót a
melegvizes bemenethez. (Kizárólag dugóval ellátott
termékekre vonatkozik.)
FIGYELMEZTETÉS: Egyetlen vízbeömlővel
rendelkező modellek nem csatlakoztathatók a melegvizes
A
csaphoz. Ilyen esetben a ruhák károsodhatnak, de
az is előfordulhat, hogy a gép átkapcsol biztonsági
üzemmódba és nem indul el.
FIGYELMEZTETÉS: Az új termékhez ne használjon
régi vagy használt vízbeömlő tömlőket. Az ugyanis foltos
A
szennyeződést okozhat a mosott ruhán.
1. A csomagban található speciális tömlőket erősítse a
gépen található vízbeömlőkhöz. Piros tömlő (bal oldal)
(max. 90 ºC) a melegvízhez, kék tömlő (jobb oldal) (max.
25 ºC) a hidegvízhez.
(hideg) kíván
FIGYELMEZTETÉS: Üzembe helyezéskor győződjön
meg róla, hogy a hideg- és melegvizes csatlakoztatások
A
megfelelőek-e. Máskülönben a mosás végeztével a
ruhák forrók maradhatnak, illetve elkophatnak.
2. Húzza meg kézzel az anyákat. Az anyák megszorításához
soha ne használjon szerszámot.
3. A csatlakoztatás után nyissa ki teljesen a csapot és
ellenőrizze, észlel-e szivárgást a csatlakozási pontokon.
Amennyiben szivárgást talál, zárja el a csapot és távolítsa
el az anyát. A tömítő ellenőrzését követően gondosan
erősítse vissza az anyát. A szivárgások és a sérülések
elkerülése érdekében tartsa elzárva a csapot, amikor a
készülék nincs használatban.
2.5 Vízelvezető csatornához való
csatlakoztatás
• A tömlő végét közvetlenül a lefolyóhoz vagy a kádhoz kell
csatlakoztatni.
FIGYELMEZTETÉS: Ha a vízleeresztés közben a
tömlő kikerül az illesztés helyéről, a lakást elöntheti a
A
víz. Ezenfelül, a magas mosási hőmérsékletek miatt
a forrázás kockázata is fennáll! Az ilyen helyzetek
elkerülése érdekében, továbbá az egyetlenes vízfelvétel
és leeresztés biztosítása érdekében, a leeresztő tömlő
végét megfelelően szorítsa meg, hogy az ne tudjon
kicsúszni a helyéről.
• A tömlőt legalább 40, maximum 100 cm magasan kell
csatlakoztatni.
• Amennyiben a padlóra lefektetett vagy annak közelében
lévő (a padló felett kevesebb, mint 40 centi magasságban
található) tömlőt megemeli, akkor a vízelvezetés
nehézzé válik, a mosott ruhák pedig túlságosan vizesek
maradhatnak. Ennek következtében, tartsa be az ábrán
megadott magasságokat.
100cm
40cm
26 / HU
• Annak elkerülése érdekében, hogy a szennyes víz
visszafolyhasson a gépbe, továbbá a könnyebb leeresztés
érdekében, soha ne merítse bele a tömlő végét a
szennyes vízbe, illetve ne nyomja 15 cm-nél mélyebbre a
leeresztő csonkba. Ha a tömlő túl hosszú, vágja vissza.
• A tömlő vége nem tekeredhet meg, nem szabad ráállni és
azt a lefolyó és a gép között nem szabad meghajlítani.
Mosógép / Használati útmutató
Page 27

• Amennyiben a tömlő hossza túl rövid, csatlakoztasson
hozzá egy eredeti hosszabbító tömlőt. A tömlő nem
lehet hosszabb 3,2 méternél. A vízszivárgás elkerülése
érdekében a hosszabbító cső és a gép lefolyócsöve
közötti csatlakozást megfelelően meg kell szorítani, úgy,
hogy az ne jöjjön szét, és ne szivárogjon.
2.6 A lábak beállítása
FIGYELMEZTETÉS: A termék csendesebb
és rázkódásmentes működése érdekében annak
A
vízszintesen, a lábain megfelelően kiegyensúlyozva kell
állnia. A lábak beállításával egyensúlyozza ki a gépet.
Ellenkező esetben a gép elmozdulhat a helyéről, ami
törést és rezgési problémákat okozhat.
1. Kézzel lazítsa meg a gép talpán található csavarokat.
2. Állítsa be a lábakat úgy, hogy a termék vízszintesen és
stabilan álljon.
3. Húzza meg kézzel az anyákat.
FIGYELMEZTETÉS: Ne használjon semmilyen
szerszámot a csavarok meglazításához! Az ugyanis a
A
lábak sérülését okozhatja.
2.7 Elektromos csatlakoztatás
A terméket egy 16A-es biztosítékkal védett, földelt
konnektorhoz csatlakoztassa. Cégünk nem vállal felelősséget
a termék (az országában érvényes jogszabályoknak
megfelelő) földelés nélkül használatából eredő károkért.
• A csatlakozásnak meg kell felelnie az adott ország
nemzeti előírásainak.
• A tápkábel dugaszának könnyen elérhető helyen kell
lennie.
• Amennyiben a házban található biztosíték vagy
megszakító aktuális értéke kevesebb, mint 16 Amper, egy
képzett villanyszerelővel szereltessen be egy 16 Amperes
biztosítékot.
• A „Műszaki adatok" fejezetben meghatározott
feszültségnek meg kell egyeznie a hálózati feszültséggel.
• Hosszabbítók és többdugaszos aljazatok segítségével ne
csatlakoztassa a készüléket.
FIGYELMEZTETÉS: A sérült tápkábeleket a kijelölt
szerviz szakemberével cseréltesse ki.
B
A gép szállítása
1. Szállítás előtt húzza ki a készüléket a konnektorból.
2. Távolítsa el a leeresztő és a vízellátás csatlakozásait.
3. Engedjen le a termékben maradt összes vizet.
4. Az eltávolítási folyamat sorrendjével ellentétes sorrendben
helyezze vissza a szállításhoz használt biztonsági
csavarokat.
A biztonsági csavarok megfelelő rögzítése nélkül soha
ne mozgassa és szállítsa a terméket!
C
FIGYELMEZTETÉS: A csomagolóanyagok veszélyt
jelentenek a gyermekekre. Olyan helyen tárolja azokat,
A
hogy a gyermekek ne férhessenek hozzá.
3 Előkészítés
3.1 A mosnivaló szétválogatása
• A program kiválasztása előtt válogassa szét a ruhákat
anyag, szín, szennyezettségi fok és a megengedett
vízhőmérsékleti értékek szerint.
• Minden esetben tartsa be a ruhák címkéjén feltüntetett
utasításokat.
3.2 A ruhák előkészítése a mosáshoz
• A fémtartozékokkal ellátott ruhadarabok (például
merevítős melltartók, övcsatok vagy fémgombok)
károsíthatják a gépet. A mosás előtt távolítsa el a fém
részeket, illetve mosóhálóban vagy párnahuzatban mossa
a ruhákat.
• Mosás előtt vegyen ki minden tárgyat a ruhák zsebéből,
pl. pénzérme, toll, gémkapcsok, majd fordítsa és kefélje
ki a zsebeket. Az ilyen tárgyak kárt tehetnek a termékben,
illetve zajt okozhatnak mosás közben.
• A kisméretű ruhákat, pl. gyermekzoknikat és
nejlonharisnyát mosóhálóban vagy párnahuzatban mossa.
• A függönyöket összepréselés nélkül helyezze be a gépbe.
Távolítsa el a függöny csipeszeit.
• Húzza fel a zipzárakat, varrja fel a meglazult gombokat és
javítsa meg a szakadásokat.
• A „gépben mosható” vagy a „kézzel mosható” termékeket
kizárólag a megfelelő programmal mossa.
• Ne mossa együtt a színes és fehér ruhákat. Az új, sötét
ruhák sok festéket kiereszthetnek magukból. Ezért fontos,
hogy azokat külön mossa.
• A makacs foltokat mosás előtt kezelje a megfelelő
módon. Ha nem biztos a dolgában, kérjen tanácsot egy
száraztisztítótól.
• Kizárólag gépi mosáshoz használatos festékeket/
színezőket és vízkőmentesítőket használjon. Minden
esetben kövesse a csomagoláson található utasításokat.
• A nadrágokat és a kényes ruhákat kifordítva mossa.
• Az angóra gyapjúból készült ruhákat mosás előtt tegye
be pár órára a fagyasztóba. Ily módon megóvhatja ezt a
kényes ruhaneműt.
• Az olyan szennyest, melyen liszt, mészkőpor, tejpor stb.
található, a mosógépbe történő behelyezés előtt alaposan
rázza ki. Az ilyen porok idővel összegyűlhetnek a mosógép
belső alkatrészeiben, és kárt tehetnek a gépben.
3.3 Teendők az energiatakarékosság jegyében
A következő információk elősegítik a termék gazdaságos és
energiatakarékos használatát.
• A terméket minden esetben a program által megengedett
legnagyobb kapacitással használja, de soha ne helyezzen
be ennél több ruhát. Lásd: „Program és fogyasztási
táblázat".
• Mindig kövesse a mosószer csomagolásán feltüntetett
utasításokat.
• A kismértékben szennyezett ruhákat mindig alacsony
hőmérsékleten mossa.
27 / HU
Mosógép / Használati útmutató
Page 28

• Kismennyiségű, kismértékben szennyezett ruhákhoz
használjon gyorsabb programokat.
• A kismértékben szennyezett ruhákhoz ne használjon
előmosást és magas mosási hőmérsékletet.
• Ha használni szeretné a gép szárító funkcióját,
akkor válassza a mosási folyamat alatti leggyorsabb
centrifugálási sebességet.
• A mosószer csomagolásán javasolt mennyiségnél soha ne
használjon több mosószert.
3.4 Első használat
A termék használatának megkezdése előtt győződjön
meg róla, hogy a „Fontos biztonsági és környezetvédelmi
utasítások" és az „Üzembe helyezés" című fejezetekben leírt
útmutató szerint elvégezte-e az összes előkészítő műveletet.
Az első mosás megkezdése előtt futtassa le a dobtisztító
programot. Ha az Ön gépe esetében nincs ilyen program,
kövesse a 5.2 fejezetben ismertetett eljárást.
Kizárólag mosógépekhez használatos vízkőmentesítőt
használjon.
C
A gyártás során végzett minőségellenőrzési folyamatot
következtében víz maradhatott a gépben. Ez nincs káros
C
hatással a termékre.
3.5 Helyes ruhamennyiség
A maximálisan mosható ruhamennyiség a szennyes
jellegétől, a szennyezettség fokától és a használni kívánt
mosási programtól függ.
A gép automatikusan a belehelyezett ruha súlyának
megfelelő mennyiségű vizet tölt be.
FIGYELMEZTETÉS: Kövesse a „Program és
fogyasztási táblázatban” megadottakat. Túlterhelés
A
esetén a gép mosóteljesítménye nagymértékben
lecsökken. Ezenkívül az erős zaj és a rezgés okozhat
problémákat.
3.6 A szennyes betöltése
1 Nyissa ki a betöltőajtót.
2 A ruhaneműt lazán helyezze be a gépbe.
3 Nyomja be az ajtót, amíg egy kattanó hangot nem hall.
Győződjön meg róla, hogy semmi sem csípődött be az
ajtónál.
A betöltőajtó a program működése közben lezáródik. Az
ajtó csak a program befejeződésekor nyitható ki.
C
FIGYELMEZTETÉS: A szennyes rossz behelyezése
rezgést és erős zajt okozhat a gép belsejében.
A
3.7 A mosószer és az öblítőszer használata
Mosószer, öblítő, keményítő, ruhafesték, fehérítő vagy
vízkőmentesítő használata esetén alaposan olvassa el a
C
csomagoláson található gyártói utasításokat és kövesse a
javasolt mennyiségekre vonatkozó útmutatót. Használjon
mérőpoharat, ha van.
Mosószeradagoló fiók
A mosószeradagoló fiók három egységből áll:
– (1) előmosáshoz
– (2) főmosáshoz
– (3) öblítéshez
– (*) az öblítő adagolójában egy szifon is található.
Mosószer, öblítő és más tisztítószerek
• A program elindítása előtt adagoljon mosószert és öblítőt.
• A program futása alatt soha ne hagyja nyitva a
mosószeradagoló fiókot!
• Amennyiben előmosás nélküli programot használ, soha
ne öntsön mosószert az előmosó rekeszbe („1” számú
rekesz). "1").
• Előmosást alkalmazó program használatakor soha ne
öntsön folyékony mosószert az előmosó rekeszbe („1”
számú rekesz). "1").
• Mosószeres zacskó vagy mosólabda használata esetén
soha ne válasszon előmosást használó programot. A
mosószeres zacskót vagy a mosólabdát közvetlenül a
mosandó ruha közé helyezze.
• Folyékony mosószer használata esetén soha ne
feledje el betenni folyékony mosószer kupakot a fő
mosószeradagolóba („2” számú rekesz). "2").
A mosószer fajtájának megválasztása
Az alkalmazandó mosószer fajtája az anyag jellegétől és
színétől függ.
• Színes és fehér ruhaneműhöz más-más mosószert
használjon.
• A kényes ruhákat speciális, kizárólag finom ruhákhoz
megfelelő mosószerrel mossa (folyékony mosószer,
gyapjúsampon stb.).
• Sötét szenű ruhák és paplan mosásakor folyékony
mosószert célszerű használni.
• A gyapjúneműt speciális gyapjú mosószerrel mossa.
FIGYELMEZTETÉS: Kizárólag gépi mosáshoz
készült mosószert használjon.
A
FIGYELMEZTETÉS: Ne használjon szappanport.
A
Mosószeradagoló fiók beállítása
A használandó mosószer mennyisége attól függ, hogy
mennyi ruhát kell kimosni, mennyire piszkosak a ruhák,
illetve milyen a vízkeménység.
• Ne használjon a csomagoláson feltüntetett mennyiségnél
több mosószert, így elkerülheti a túlzott mértékű habzást,
a nem megfelelő öblítést, emellett még spórolhat is és
kíméli a környezetet.
• Kisebb mennyiségű és kevésbé szennyezett ruhákhoz
használjon kevesebb mosószert.
Öblítők használata
Töltse az öblítőt a mosószeradagoló fiók öblítő rekeszébe.
• Az öblítőt soha ne töltse a (>max<) szint fölé.
1
2
3
28 / HU
Mosógép / Használati útmutató
Page 29

• Ha az öblítő besűrűsödött, hígítsa fel vízzel, mielőtt a
mosószeradagoló fiókba töltené.
Folyékony mosószerek használata
Amennyiben a termék folyékonymosószer-tartó
kupakot is tartalmaz:
• Helyezze a folyékonymosószer-tartó kupakot ebbe a
rekeszbe: "2".
• Ha az öblítő besűrűsödött, hígítsa fel vízzel, mielőtt azt a
mosószeradagoló kupakba töltené.
Amennyiben a termék nem tartalmaz folyékony
mosószertartó kupakot:
• Ne használjon folyékony mosószert előmosáshoz olyan
programok esetén, melyek előmosást használnak.
• Amennyiben a Késleltetett indítás funkciót használja a
folyékony mosószer foltot hagyhat a ruhákon. Amennyiben
Késleltetett indítást kíván használni, soha ne használjon
folyékony mosószert.
Gél és tablettás mosószer használata
• Amennyiben a gél folyékony halmazállapotú és a
mosógép nem tartalmaz speciális folyékonymosószertartó kupakot, akkor a gélt az első vízbeszívás során
öntse be fő mosószertartó rekeszbe. Amennyiben a
mosógép folyékonymosószer-tartó kupakot is tartalmaz,
a mosószert ebbe a kupakba öntse a program elindítása
előtt.
• Amennyiben a gél nem folyékony halmazállapotú vagy
kapszula alakú folyékony tablettát használ, ezeket
közvetlenül a dobba kell behelyezni a mosás megkezdése
előtt.
• A tablettás mosószert a mosógép fő mosórészébe („2”
számú rekesz), vagy közvetlenül a dobba kell tenni.
Előfordulhat, hogy a mosószeres rekeszbe helyezett
tabletták egy része a rekeszben marad. Ha ilyet
C
tapasztal, a következő mosások alkalmával helyezze a
tablettát a szennyes közé, majd csukja be a dob alsó
részét.
Tablettát vagy gélt csak előmosás nélküli programok
esetén használjon.
C
Keményítő használata
• A folyékony keményítőt, a por alapú keményítőt vagy a
ruhafestéket az öblítő rekeszébe töltse.
• Egy mosási menetben ne használjon öblítőt és keményítőt
is.
• Keményítő használata után tisztítsa meg a mosógép
belsejét egy tiszta, nedves ronggyal.
Fehérítőszer használata
• Válasszon ki egy előmosást is tartalmazó programot,
majd az előmosás megkezdésekor adatoljon a gépbe
fehérítőszert. Ne tegyen mosószert az előmosás rekeszbe.
Alternatív megoldásként olyan programot válasszon ki,
ami extra öblítés funkciót tartalmaz. Az öblítés első lépése
(vízbeszívás a mosószertartóból) közben adja hozzá a
fehérítőszert.
• Soha ne keverje össze a mosószert és a fehérítőt.
• A bőrirritáció elkerülése érdekében csak kevés
fehérítőszert használjon (kb. 50 ml) és öblítse ki alaposan
a ruhákat. A fehérítőszert soha ne öntse közvetlenül a
ruhákra, és ne használja színes ruhákon.
• Oxigén alapú fehérítők esetén alacsony hőmérsékletű
programot válasszon.
• Az oxigén alapú fehérítőszerek mosószerekkel együtt is
alkalmazhatók; igaz, ha a viszkozitása nem egyezik meg
a mosószer viszkozitásával, abban az esetben előbb a
mosószert töltse be a „2" számú rekeszbe, és várja meg,
amíg a gép a vízbeszívás közben beviszi a mosószert.
A fehérítőt ugyanazon a rekeszen keresztül, ugyanazon
vízbeszívás során adja hozzá.
Vízkőmentesítő használata
• Ha szükséges, kizárólag mosógéphez használatos
vízkőmentesítőszert használjon.
29 / HU
Mosógép / Használati útmutató
Page 30

Erősen
szennyezett
(makacs foltok, pl.
fű, kávé, gyümölcs
és vér.)
Normál
szennyezettség
(Például, a test által
a gallérokon és az
Szennyezettségi szint
ingujjakon okozott
szennyeződések)
Enyhén
szennyezett
(Nincs látható
szennyeződés.)
Ruhák
Világos és fehér ruhák Színek Sötét színek
(A javasolt
hőmérséklettartományt
a szennyezettségi szint
határozza meg: 40-90 °C)
Előfordulhat, hogy előkezelést
kell végeznie a foltokon vagy
előmosást kell végeznie.
Fehér ruhákhoz mosóporok
és folyékony mosószerek
is használhatók, az erősen
szennyezett ruhákhoz javasolt
mennyiségben. A mosópor
használatát agyag vagy föld
okozta szennyeződésekhez,
illetve olyan foltok esetében
használja, amelyek érzékenyek
a fehérítőkre.
Fehér ruhákhoz mosóporok
és folyékony mosószerek
is használhatók, a normál
szinten szennyezett ruhákhoz
javasolt mennyiségben.
Fehér ruhákhoz mosóporok
és folyékony mosószerek
is használhatók, az enyhén
szennyezett ruhákhoz javasolt
mennyiségben.
(A javasolt
hőmérséklettartományt
a szennyezettségi szint
határozza meg: hideg
-40 °C)
Színes ruhákhoz mosóporok
és folyékony mosószerek
is használhatók, az erősen
szennyezett ruhákhoz
javasolt mennyiségben.
A mosópor használatát
agyag vagy föld okozta
szennyeződésekhez, illetve
olyan foltok esetében
használja, amelyek
érzékenyek a fehérítőkre.
A mosószereket fehérítő
nélkül használja.
Színes ruhákhoz mosóporok
és folyékony mosószerek
is használhatók, a normál
szinten szennyezett
ruhákhoz javasolt
mennyiségben. A
mosószereket fehérítő
nélkül használja.
Színes ruhákhoz mosóporok
és folyékony mosószerek
is használhatók, az enyhén
szennyezett ruhákhoz
javasolt mennyiségben.
A mosószereket fehérítő
nélkül használja.
(A javasolt
hőmérséklettartományt
a szennyezettségi szint
határozza meg: hideg
-40 °C)
Színes és sötét
ruhákhoz folyékony
mosószerek
használhatók, az
erősen szennyezett
ruhákhoz javasolt
mennyiségben.
Színes és sötét
ruhákhoz folyékony
mosószerek
használhatók, a normál
szinten szennyezett
ruhákhoz javasolt
mennyiségben.
Színes és sötét
ruhákhoz folyékony
mosószerek
használhatók, az
enyhén szennyezett
ruhákhoz javasolt
mennyiségben.
Kényes/Gyapjú/
Selyem ruhák
(A javasolt
hőmérséklettartományt
a szennyezettségi szint
határozza meg: hideg
-30 °C)
Lehetőleg a kényes
ruhákhoz gyártott
folyékony mosószert
használjon. A pamut és
selyem ruhákat az ilyen
anyagokhoz készült,
speciális mosószerekkel
mossa.
Lehetőleg a kényes
ruhákhoz gyártott
folyékony mosószert
használjon. A pamut és
selyem ruhákat az ilyen
anyagokhoz készült,
speciális mosószerekkel
mossa.
Lehetőleg a kényes
ruhákhoz gyártott
folyékony mosószert
használjon. A pamut és
selyem ruhákat az ilyen
anyagokhoz készült,
speciális mosószerekkel
mossa.
30 / HU
Mosógép / Használati útmutató
Page 31

4 A termék üzemeltetése
4.1 Kezelőpult
1 2 3 4 5
6
7
8910
1. Programválasztó gomb
2 - Centrifugázás sebességbeállító gomb
3 - Hőmérséklet beállító gomb
4 - Kijelző
5 - Programjelző
4.2 Kijelző szimbólumok
a b c d e f g
0
C
88
1888
a - Hőmérséklet-jelző
b - Elektromos csatlakozás
a - Gőzjelző
a - Hangfigyelmeztetés-jelző
a - Nincs víz kijelző
a - Mosószer-kijelző
g - Start / Szünet kijelző
6 - Be- / Kikapcsoló gomb
7 - Start/Szünet gomb
8 - Befejezési idő beállító gomb
9 - Segédfunkció gombok
10 - Programválasztó lámpák
h
88:88
ijklm
h - Programjelző
i - Befejezési idő kijelző
j - Időtartam információs vonal
k - Segédfunkció kijelzők
l - Zár kijelző
m - Centrifugálási sebesség kijelző
C
31 / HU
Az e fejezetben a gép ismertetéséhez használt szemléltetések sematikusak és esetleg nem egyeznek meg pontosan az Ön
gépének jellemzőivel.
Mosógép / Használati útmutató
Page 32

4.3 Programválasztás
1 Válasszon ki egy a mosandó ruha fajtájának,
mennyiségének és szennyezettségének megfelelő
programot a „Program és fogyasztási táblázat" szerint.
1 A „Programválasztó” gomb segítségével válassza ki a
kívánt programot.
0
C
88
1888
88:88
Az egyes programok maximális centrifugálási
C
sebessége az adott ruhatípusnak megfelelően
korlátozott.
Programválasztásnál mindig vegye figyelembe az
anyagtípust, a színt, a szennyezettségi fokot és a
megengedett vízhőmérsékletet.
Mindenkor a ruha típusának megfelelő,
legalacsonyabb hőmérsékletet részesítse előnyben.
A nagyobb hőmérsékletű mosás során nagyobb a
gép energiafogyasztása.
4.3.1 Programok
Az anyag típusától függően használja az alábbi
főprogramokat.
• Pamut
Pamut ruhaneműhöz ajánlott (pl. lepedő, paplan- és
párnahuzat, törülköző, köntös, fehérnemű stb.). A ruhák
erőteljes mosása egy hosszabb mosási ciklus alatt.
• Szintetikus
Szintetikus ruhanemű mosásához ajánlott (ingek, blúzok,
szintetikus/pamut keverék stb.). Kíméletesen mos, rövidebb
mosási ciklussal a Pamut programhoz képest.
Függönyök és csipke esetében ajánlatos a „Szintetikus 40
˚C" program használata, az előmosás és a gyűrődésgátló
funkciók kiválasztása mellett. Mivel ezek hálós textúrája
fokozza a habzást, a fátylak/csipkék mosásához kevés
mosószert használjon. Ne tegyen mosószert az előmosás
rekeszbe.
• Gyapjú
Gyapjú ruhanemű mosásához ajánlott. Válassza ki a ruhák
címkéjén feltűntetett hőmérsékletet. Gyapjúneműhöz
használjon megfelelő mosószert.
E mosógép gyapjú programját a gépben mosható
gyapjúneműk mosása vonatkozásában a „The
Woolmark Company” jóváhagyta, feltéve, hogy a
ruhák mosására a termékcímkén található, valamint
a mosógép gyártója által kiadott utasításoknak
megfelelően kerül sor. M1428
• Automatic Programme (Automatikus program)
Ezt a programot használja gyakran mosandó pamut,
szintetikus vagy kevertszálas (pamut+szintetikus) ruhák
esetén. A program érzékeli a mosandó ruha típusát és
mennyiségét és a vízfogyasztást, illetve a programidőt
automatikusan annak megfelelően állítja be.
FIGYELMEZTETÉS: Ne mossa ezzel a programmal
A
Az automata program a szennyezettség fokától és a
szennyes típusától függő maximális mosási hőmérséklete
60ºC. Erősen szennyezett fehér ruhák és makacs foltok
(gallér, zoknin található szennyeződés, izzadságfolt stb.)
esetén a mosási teljesítmény esetleg nem éri el a kívánt
szintet. Ilyenkor javasoljuk, válassza a Pamut programot
előmosással és a hőmérsékletet állítsa 50-60°C-ra.
Az automata program segítségével számos típusú ruhanemű
helyesen felismerhető és biztonságosan mosható.
• Pamut Eco
Ezt a programot használja a normál szennyezettségű,
tartós pamutból és vászonból készült ruhákhoz. Bár a
mosási idő hosszabb, mint az összes többi program
esetében, komoly energia- és víz-megtakarítást biztosít. A
tényleges vízhőmérséklet eltérhet a megállapított mosási
hőmérséklettől. Amennyiben a normálnál kevesebb ruhát rak
be a gépbe (a kapacitás felét vagy kevesebbet), a program
ideje automatikusan lerövidülhet. Ebben az esetben az áramés vízfogyasztás csökken és a mosás gazdaságosabbá válik.
Ez a program a hátralévő időt kijelző modelleknél található
meg.
• BabyProtect (Babaruha program)
Ezzel a programmal babaruhák, valamint allergiás személyek
ruhái moshatók. A hosszabb fűtési idő és az extra öblítési
lépés magasabb fokú higiéniát biztosít.
• Kényes ruhadarabok 20°
Kényes ruhanemű mosásához ajánlott. Ez a Szintetikus
programhoz képest kíméletesebben mos.
• Kézi mosás
Ezzel a programmal moshatóak a „gépben nem mosható”
címkével ellátott gyapjú- és finom ruhák. A ruhákat igen
kíméletesen mossa, hogy azok ne károsodjanak.
• Napi expressz
E programmal az enyhén szennyezett és foltmentes pamut
ruhák moshatók ki gyorsan.
• Szuper rövid expressz
E programmal az enyhén szennyezett és foltmentes pamut
ruhák moshatók ki gyorsan.
a gyapjúból készült, illetve a finom ruhákat.
Válasszon megfelelő hőmérsékletet, ha a hőmérsékletkijelzőn látható hőmérséklet nem felel meg a
ruhacímkén szereplő figyelmeztetésnek.
• Sötét mosás
Ezt a programot használja sötét színű ruhák kimosásához,
valamint olyan ruhák esetében, melyeknek kifakulását
szeretné megelőzni. A mosás során a gép minimális
mechanikai hatásnak teszi ki a ruhákat, alacsony
hőmérsékleten. Kifejezetten sötét ruhákhoz való folyékony
mosószer vagy gyapjúmosószer használatát javasoljuk.
• Felfrissítés
A szennyeződés fellazításához gőz segítségével előkezeli a
mosandó ruhát.
Csak a kiválasztott programhoz meghatározott
C
kapacitás felét töltse be.
E program kiválasztásakor normális, ha forrást
jelző hangok hallatszanak, mivel a gőzgenerátor a
gőzképződéshez vizet forral.
32 / HU
Mosógép / Használati útmutató
Page 33

• 40° / 40’
E programmal az enyhén szennyezett és foltmentes pamut
ruhák moshatók ki gyorsan.
88
1888
0
C
88:88
• Hygiene 20°
Használja ezt a programot a mosoda, amelyre szüksége van
a mosás alacsonyabb hőmérsékleten, intenzív és hosszú
mosási ciklust. Használja ezt a programot a mosoda, amelyre
szüksége higiénikus mosás alacsonyabb hőmérsékleten.
• Öblítés
Ezt a programot akkor használja, ha külön szeretne öblíteni
és keményíteni.
• Centrifugálás + Szivattyúzás
Ezt a programot használja a gépben lévő víz leeresztésére.
4.4 Hőmérséklet kiválasztása
Új program kiválasztásakor a hőmérséklet kijelzőn
megjelenik az adott programhoz ajánlott hőmérséklet.
Lehetséges, hogy az ajánlott hőmérsékleti érték nem a
maximális hőmérséklet, amely az aktuális programhoz
kiválasztható.
0
C
88
1888
88:88
A hőmérséklet megváltoztatásához nyomja meg a
Hőmérséklet beállítása gombot. A hőmérséklet
csökkentése 10 °C-os lépésekben történik.
Végül a hidegmosást jelző “-” szimbólum jelenik meg a
kijelzőn.
0
C
-
1888
88:88
Ha a hőmérséklet beállítása nem megengedett,
C
akkor nem lehet változtatni a programokon.
A hőmérséklet a mosás elindulását követően is változtatható.
E változtatás akkor tehető meg, ha a mosási lépések azt
lehetővé teszik. Ha a lépések nem engedik meg, akkor nem
lehet változtatni.
A hidegmosás opcióra lépve és még egyszer
C
megnyomva a hőmérséklet beállító gombot,
a kijelzőn a kiválasztott programhoz ajánlott
maximális hőmérséklet jelenik meg. A hőmérséklet
csökkentéséhez ezután nyomja meg ismét a
Hőmérsékletbeállító gombot.
4.5 Centrifugázási sebesség kiválasztása
Új program kiválasztásakor az adott programhoz
tartozó ajánlott centrifugázási sebesség megjelenik a
Centrifugálási sebességkijelzőn.
Lehetséges, hogy az ajánlott centrifugálási
C
sebességérték nem a maximális centrifugálási
sebesség, amely az aktuális programhoz
kiválasztható.
A centrifugálási sebesség megváltoztatásához nyomja meg
a
Centrifugálási sebesség beállítása gombot. Így a
sebesség fokozatosan csökken.
Ezután az adott modelltől függően a „Rinse Hold" (Öblítés
tartás) vagy a „No Spin" (Nincs centrifugázás) opció
megjelenik a kijelzőn.
A Centrifugálási sebességet beállító gomb
C
kizárólag a centrifugálási sebesség csökkentésére
szolgál.
Az Öblítés tartás opciót a “ı_ı” szimbólum jelzi, a
Nincs centrifugálás opciót pedig a “_” szimbólum.
Ha a program végeztével nem veszi ki azonnal a ruhákat,
akkor kiválasztható az
Öblítés tartása funkció, így a ruhák
nem gyűrődnek meg, amikor nincs víz a gépben.
E funkció segítségével a ruhák az utolsó öblítővízben
maradnak.
0
C
88
88:88
Ha az Öblítés tartás funkció után ki szeretné centrifugálni a
ruhákat:
- Állítsa be a Centrifugálási sebességet.
- Nyomja meg a Start / Szünet / Törlés gombot. A
program ekkor továbbmegy. A gép a víz leeresztésével
kicentrifugázza a ruhákat.
Ha a program végén centrifugálás nélkül kívánja leereszteni
a vizet, akkor használja a
Nincs centrifugázás funkciót.
0
C
88
88:88
Ha a centrifugálási sebesség beállítsa nem
C
Ha a mosási lépések lehetővé teszik, akkor a mosás
megkezdését követően a centrifugálási sebesség
változtatható. Ha a lépések nem engedik meg, akkor nem
lehet változtatni.
megengedett, akkor nem lehet változtatni a
programokon.
33 / HU
Mosógép / Használati útmutató
Page 34

4.6 Program- és fogyasztási táblázat
HU
Program (°C)
Pamut Eco
Pamut
Szintetikus
Gyapjú 40 1.5 49 0.25 1000 • • • Hideg-40
Kézi mosás 30 1 40 0.25 600 Hideg-30
BabyProtect 60 7 85 1.90 1600 30 - 90
Sötét mosás 40 3 60 0.60 1000 • • • • Hideg-40
Felfrissítés - 2 35 0.15 1000 40° / 40’ 40 7 45 0.60 1400 • Hideg-40
Kényes ruhadarabok 20° 20 3.5 45 0.15 1000 • • • • 20
Hygiene 20° 20 2 95 0.40 1600 20
Szuper rövid expressz 30 2 35 0.15 1400 • • Hideg-30
Napi expressz
Automatic Programme 40 7 **** **** 1600 • • • • • Hideg-60
15
Max betöltés (kg)
Vízfogyasztás (l)
Energiafogyasztás (kWh)
60** 7 44 0.88 1600 Hideg-60
60** 3.5 37 0.70 1600 Hideg-60
40** 3.5 37 0.69 1600 Hideg-60
90 7 70 2.20 1600 • • • • • Hideg-90
60 7 70 1.55 1600 • • • • • Hideg-90
40 7 67 0.90 1600 • • • • • Hideg-90
60 3 52 1.10 1200 • • • • • Hideg-60
40 3 49 0.60 1200 • • • • • Hideg-60
90 7 67 2.00 1400 • • Hideg-90
60 7 67 1.10 1400 • • Hideg-90
30 7 67 0.25 1400 • • Hideg-90
Kiegészítő funkció
Max. sebesség***
Előmosás
Gyors mosás
Öblítés tartás
Állatszőr eltávolítása
Éjszakai mód
Választható
hőmérséklet-
tartomány °C
• : Választható.
* : Automatikus kiválasztás, nincs megszakítás.
** : Energia címke program (EN 60456 Ed.3)
*** : Ha a gép maximális centrifugázási sebessége alacsonyabb, mint ez az érték, akkor csak a maximális centrifugázási sebességet
lehet kiválasztani.
**** : A program érzékeli a gépbe behelyezett ruha típusát és mennyiségét, és a víz-, illetve energiafogyasztást, valamint a program
időtartamát automatikusan annak megfelelően állítja be.
- : Tekintse meg a program leírását a maximális ruhamennyiséget illetően.
** „A Pamut eco 40°C és a Pamut eco 60°C standard programok.” Ezek a programok „40°C pamut standard program” és
„60°C pamut standard program” néven ismertek, és a kijelzőn mint szimbólumok szerepelnek.
A táblázatban szereplő segédfunkciók modellenként eltérőek lehetnek.
C
34 / HU
A vízfogyasztás és az energiafogyasztás a víznyomás, a vízkeménység és a hőmérséklet, a környezeti hőmérséklet, a szennyes
típusa és mennyisége, a kiválasztott kiegészítő funkciók és a tápfeszültség függvényében változhat.
A program mosási ideje megjelenik a gép kijelzőjén. Előfordulhat, hogy a tényleges mosási idő némiképp eltér a kijelzőn látható
értéktől.
„A segédfunkciók választhatóságát a gyártó módosíthatja. A gyártó hozzáadhat új válaszható funkciókat, vagy eltávolíthatja
azokat."
„A gép centrifugálási sebessége programonként eltérő lehet, azonban a sebesség nem haladhatja meg a gép maximális
centrifugálási sebességét."
Mosógép / Használati útmutató
Page 35

4.7 Segédfunkció kiválasztása
A program megkezdése előtt válassza ki a kívánt
segédfunkciót. Programválasztáskor a hozzá választható
segédfunkció szimbólumának mezője kigyullad. És amikor
segédfunkciót választ, a segédfunkció szimbólum belső
területe is világítani kezd.
0
C
88
1888
88:88
Az aktuális programhoz nem választható
C
A mosás elindulását követően az aktuális programnak
megfelelő segédfunkció mezője továbbra is világít. Azok
a segédfunkciók választhatók ki vagy törölhetők, amelyek
mezője világít. Amennyiben a mosási program már elérte azt
a pontot, ahol segédfunkció nem választható ki, a funkció
mező kialszik.
C
• Előmosás
Előmosás csak erősen szennyezett ruhanemű esetén
ajánlott. Előmosás nélkül energiát, vizet, mosószert és időt
spórolhat.
• Gyors mosás
Ezt a funkciót a pamut és a szintetikus programokhoz lehet
használni. Enyhén szennyezett ruhák esetében csökken a
mosási idő és az öblítések száma.
C
• Öblítés plusz
E funkció lehetővé teszi a gép számára, hogy a főmosást
követő öblítésen túl egy másik öblítést is elvégezzen. Ily
módon az érzékeny bőrűek (csecsemők, allergiás személyek
stb.) számára minimálisra csökkenthető a ruhákon maradó
mosószer mennyisége.
• Gyűrődésgátlás
E funkciónak köszönhetően a ruhák mosás közben kevésbé
gyűrődnek. A gyűrődés megelőzése érdekében a dob
mosáskor és centrifugázáskor egyaránt lassabban forog.
A mosásra továbbá magasabb vízállás-szint mellett kerül sor.
segédfunkció szimbólumának mezője nem világít.
Egyes funkciók nem használhatók egyszerre. Ha
második segédfunkcióként olyat választ ki a gép
elindítása előtt, mely összeférhetetlen az elsővel,
akkor az első segédfunkció törlődik, és csak a
második fog életbe lépni. Ha például először
kiválasztja az Extra víz funkciót, majd a Gyorsmosás
funkciót szeretné kiválasztani, akkor az Extra víz
funkció törlődik és a Gyorsmosás funkció marad
aktív.
Olyan segédfunkciót nem lehet kiválasztani, mely
összeférhetetlen a főprogrammal. (Lásd: „Programés fogyasztási táblázat")
Egyes programokhoz olyan segédfunkciók tartoznak,
amelyeket egyidejűleg kell működtetni. E funkciók
nem törölhetők. Az ilyen segédfunkció mezője nem,
csak a belső terület világít.
Amikor kiválasztja ezt a funkciót, a gépet a
programtáblázatban meghatározott maximális
mennyiségű szennyes felével töltse meg.
• Öblítés tartás
Ha a program végeztével nem veszi ki azonnal a ruhákat,
akkor kiválaszthatja az öblítés tartása funkciót, ezzel a
ruhák az utolsó öblítővízben maradnak és megelőzhető a
ruhák meggyűrődése, akkor, amikor nincs víz a gépben.
Amennyiben a folyamat után centrifugázás nélkül kívánja
leereszteni a vizet, nyomja meg a Start/Szünet gombot. A
program ezután folytatódik, és befejezi a víz leeresztését.
Ha a vízben tartott szennyest szeretné kicentrifugázni, akkor
állítsa be a centrifugázás sebességét, majd nyomja meg a
Start/Szünet gombot.
A program ekkor továbbmegy. A vizet a gép leereszti, a
ruhákat kicentrifugázza, és a program végig lefut.
• Éjszakai mód
E programmal a pamut ruhák kevesebb energiafelhasználás
mellett és csendesen moshatók. A csendes mosás
érdekében a centrifugázási lépések törölve vannak, a
program pedig az Öblítés tartása lépéssel ér véget. Ha a
program véget ért, a ruha centrifugázásához futtassa le a
Centrifugázás programot.
Időkijelzés
A program működése közben a befejezésig hátralévő idő
órában és percben kifejezve, “01:30” formában jelenik meg
a kijelzőn.
A program időtartama eltérhet a „Program és
C
fogyasztási táblázatban" feltüntetett értékektől,
függően a víznyomástól, a víz keménységétől és
hőmérsékletétől, a környezeti hőmérséklettől,
a mosandó ruha típusától és mennyiségétől,
a kiválasztott segédfunkcióktól és az esetleges
feszültségingadozásoktól.
4.8 Befejezési idő
A Befejezési idő funkció segítségével a program
elindítása akár 24 órával is eltolható. A
gomb megnyomását követően a kijelzőn megjelenik a
program befejeződésének becsült ideje. A
beállításakor a
A Befejezési idő funkció aktiválásához és ahhoz, hogy a
program a meghatározott idő leteltével véget érjen, az idő
beállítása után meg kell nyomni a
Ha törölni szeretné a Befejezési idő funkciót, nyomja meg a
Befejezési idő kijelzője világít.
88
1888
Be- / Kikapcsolás gombot a gép ki- és bekapcsolásához.
A Befejezési idő aktiválásakor ne
C
használjon folyékony mosószert! Fennáll a ruhák
elszíneződésének veszélye.
Befejezési idő
Befejezési idő
0
C
88
1888
88:88
Start / Szünet gombot.
0
C
88:88
35 / HU
Mosógép / Használati útmutató
Page 36

1 Nyissa ki a betöltőajtót, tegye be a ruhákat és adja hozzá
a mosószert stb.
2 Válassza ki a mosási programot, a hőmérsékletet,
a centrifugázási sebességet, és ha szükséges, a
segédfunkciókat.
3 A
Befejezési idő gomb megnyomásával válassza ki a
kívánt befejezési időt.
4 Nyomja meg a
A Befejezési idő kijelző világít.
Start / Szünet gombot. Az idő
visszaszámlálás elkezdődik. “:” A kijelző közepén látható
hátralévő idő elkezd villogni.
A Befejezési idő visszaszámlálás
C
időtartama alatt
a már gépben lévőkhöz. A visszaszámlálás végén
a Befejezési idő kijelző kialszik, elindul a mosási
program és a kiválasztott program időtartama
megjelenik a kijelzőn.
A Befejezési idő kiválasztásával a
képernyőn megjelenő időtartam a befejezési időből
plusz a kiválasztott program időtartamából tevődik
össze.
további ruhák adagolhatók
4.9 A program elindítása
1 A program elindításához nyomja meg a Start / Szünet
gombot.
2 A
Start / Szünet gomb, amelyik eddig nem világított,
most elkezd folyamatosan világítani, jelezve, hogy a
program elindult.
0
C
88
1888
88:88
3 A betöltőajtó lezáródik. A betöltőajtó lezárását követően az
ajtózár szimbólum megjelenik a kijelzőn.
0
C
88
1888
88:88
4 A Programjelző kigyullad a kijelzőn és mutatja az aktuális
programlépést.
4.10 Ajtózár
A betöltő ajtó egy olyan zárrendszerrel rendelkezik, amely
a nem megfelelő vízszint esetén megakadályozza az ajtó
kinyitását.
A betöltőajtó lezárásakor az „Ajtó zárva” szimbólum jelenik
meg a kijelzőn.
4.11 A kiválasztások módosítása a program
elindulását követően
Ruhák hozzáadása a program elindulását követően:
Ha a Start / Szünet gomb megnyomásakor a gépben lévő
vízszint megfelelő,
akkor a betöltőajtó szimbólum addig villog
a kijelzőn, amíg a betöltőajtó ki van nyitva, és eltűnik, amikor
a betöltőajtó nyitva van.
0
C
88
1888
88:88
Amennyiben a gépben lévő vízszint nem megfelelő, nyomja
meg a Start / Szünet gombot; a betöltőajtó szimbólum
továbbra is világít a kijelzőn.
0
C
88
1888
88:88
A gép szünet üzemmódba állítása:
Ha a gépet szünetelési
üzemmódba kívánja helyezni, akkor
nyomja meg a Start/Szünet gombot. A Szünet szimbólum
villog a kijelzőn.
0
C
88
1888
88:88
A programválasztás módosítása a program
elindulását követően:
Az aktuális program futása közben a program módosítása
nem lehetséges.
Miután az aktuális programot szünet üzemmódba kapcsolta,
kiválaszthatja az új programot.
C
A kiválasztott program újra elindul.
A segédfunkció, a sebesség és a hőmérséklet
módosítása
A már elért programlépéstől függően törölheti vagy
aktiválhatja a segédfunkciókat. Lásd: „Segédfunkció
kiválasztása”.
Megváltoztathatja a sebesség- és a hőmérsékletbeállításokat is. Lásd a „Centrifugázási sebesség
kiválasztása" és a „Hőmérséklet kiválasztása" című
fejezeteket.
A mosógép ajtaja nem nyílik ki, ha a víz forró, vagy
C
ha a vízszint eléri az ajtó nyílását.
4.12 Gyerekzár
Annak érdekében, hogy a gyermekek ne tudjanak babrálni
a géppel, használja a gyerekzárat. Ezzel elkerülhető, hogy a
gyermekek módosításokat végezzenek egy adott programon.
A mosógépet a Be- / Kikapcsoló gombbal
C
lehet be- és kikapcsolni, ha a gyerekzár aktív. A
mosógép ismételt bekapcsolásakor a program
onnan folytatódik, ahol az le lett állítva.
Ha a gyerekzár be van kapcsolva, akkor a gombok
megnyomásakor egy hangfigyelmeztetés hallható.
A hangfigyelmeztetés törlődik, ha a gombokat
egymás után 5-ször megnyomja.
36 / HU
Mosógép / Használati útmutató
Page 37

A gyerekzár aktiválása:
Nyomja meg és tartsa lenyomva 3 másodpercig a 2
Segédfunkció
3-2-1" visszaszámlálás, a „Gyerekzár bekapcsolva" jelenik
meg a kijelzőn. Engedje el a
amikor ez a figyelmeztetés megjelenik.
A gyerekzár kikapcsolása:
Nyomja meg és tartsa lenyomva 3 másodpercig a 2
Segédfunkció
3-2-1”
a kijelzőről.
gombot. Amint a kijelzőről eltűnik a „CL
2. Segédfunkció gombot 1
gombot. Amint a kijelzőn véget ér a „CL
visszaszámlálás, a „Gyerekzár bekapcsolva" eltűnik
4.13 Program törlése
A gép kikapcsolásakor és ismételt bekapcsolásakor a
program törlődik. Nyomja meg és tartsa lenyomva a
Kikapcsoló
eltűnik a „3-2-1" visszaszámlálás, a gép kikapcsol.
C
gombot 3 másodpercig. Amint a kijelzőről
Ha megnyomja a Be- / Kikapcsoló gombot
miközben a gyerekzár be van kapcsolva, a program
nem törlődik. Először a gyerekzárat kell törölni.
Ha a program törlése után ki szeretné nyitni
a mosógép ajtaját, de erre nincs mód, mert
a gépben lévő víz szintje eléri az ajtót, akkor
fordítsa a
Programválasztó gombot
Szivattyúzás+Centrifugálás programra és
eressze le a gépben található vizet.
Be- /
4.14 Program vége
Ha a program a végéhez ér, a képernyőn megjelenik a
Befejezés szimbólum.
Ha 10 percig nem nyomja meg egyik gombot sem, akkor
a gép KIKAPCSOLÁS üzemmódba kapcsol. A kijelző és az
összes jelzőlámpa kikapcsol.
Ha megnyomja a Be- / Kikapcsoló gombot, a már
befejeződött programlépések megjelennek a kijelzőn.
4.15 A MENNYISÉG szintjének beállítása
Kis és nagy mennyiség
A mennyiségi szint beállításához nyomja meg és 3
másodpercig tartsa lenyomva a 3-as Segédfunkció gombot.
Amint a kijelzőről eltűnik a „3-2-1" visszaszámlálás,
megjelenik a mennyiségi szint szimbólum és kijelzésre kerül
az új mennyiségi szint.
5 Karbantartás és tisztítás
A termék élettartama meghosszabbítható, a gyakran
előforduló problémák pedig elkerülhetők, ha a gépet
rendszeresen tisztítja.
5.1 A mosószertartó fiók tisztítása
Tisztítsa meg rendszeresen a mosószertartót (4-5
menetenként) annak érdekében, hogy ne rakódjon le benne
a mosópor.
Az eltávolításhoz emelje fel a szifon hátsó részét az ábrán
látható módon.
Amennyiben a víz és az öblítő keveréke a
C
2 Bő, langyos vízzel mossa ki a kádban a mosószertartó
fiókot majd a szívócsövet. Tisztítás közben viseljen
védőkesztyűt vagy használjon megfelelő kefét, hogy védje
a kezét a visszamaradt mosószer-maradványoktól.
3 A fenti tisztítási műveletek elvégzése után helyezze vissza
a szifont a helyére és tolja lefelé az elülső részét, hogy a
záró fül megfelelően rögzüljön.
5.2 A betöltőajtó és a dob tisztítása
A gépben idővel öblítőszer, mosószer és szennyeződés
gyűlhet össze, ami kellemetlen szagokat és elégtelen
mosási teljesítményt eredményezhet. Ennek elkerülésére
használja a
nem rendelkezik
a
Pamut-90 programot és válassza ki hozzá az Extra
vagy az Extra öblítés segédfunkciók valamelyikét.
víz
Futtassa le a programot, úgy, hogy ruha ne legyen a
gépben. A program megkezdése előtt helyezzen max. 100
g vízkőmentesítőt a fő mosószer-adagolóba (2. számú
rekesz 2). Amennyiben tablettás vízkőoldót használt, csak
egy tablettát helyezzen a következő számú rekeszbe: 2. A
program végeztével egy száraz ruha segítségével törölje
szárazra a rekeszt.
C
C
Minden mosás után ellenőrizze, hogy nem maradt-e idegen
anyag a dobban.
normálisnál nagyobb mértékben kezd összegyűlni
a lágyító tartórekeszében, akkor a szifont ki kell
tisztítani.
Dobtisztítás programot. Amennyiben a gép
Dobtisztítás programmal, úgy használja
Kéthavonta ismételje meg a Dobtisztítás
programot.
Kizárólag mosógépekhez használatos
vízkőmentesítőt használjon.
37 / HU
Mosógép / Használati útmutató
Page 38

Amennyiben a lenti képen látható lyukak eltömődnek, egy
fogpiszkáló segítségével tisztítsa ki őket.
Az idegen anyagok a dob rozsdásodását
C
A
okozhatják. A dob felületén lévő foltok
megtisztításához használjon rozsdamentes acélhoz
kifejlesztett tisztítószert. Soha ne használjon fém
dörzsit vagy kefét.
FIGYELMEZTETÉS: Soha ne használjon
szivacsot vagy súrolószert. Ezek kárt tehetnek a
festett és a műanyag felületekben.
5.3 A gép és a vezérlőpanel tisztítása
Szükség esetén szappanos vízzel vagy nem korrozív, gyenge
gél mosogatószerrel mossa le a gép külsejét, majd egy
száraz, puha ruhával törölgesse át.
A vezérlőpanel tisztításához kizárólag puha, száraz ruhát
használjon.
5.4 A vízbeeresztő szűrők tisztítása
Az egyes vízbeömlő szelepek végein (a gép hátulsó részén)
és az egyes bemeneti víztömlők végén (ahol azok a
csaphoz vannak kapcsolva) szűrők találhatók. Ezek a szűrők
megakadályozzák, hogy idegen anyagok és szennyeződés
kerülhessen a vízbe, majd azon keresztül a gépbe. A piszkos
szűrőket meg kell tisztítani.
szűrőjének kitisztításához a vizet előbb le kell szivattyúzni.
Ezenkívül a gép szállítása előtt (pl. költözéskor), valamint
fagypont alatti hőmérséklet esetén is teljesen le kell
ereszteni a vizet.
FIGYELMEZTETÉS: A szivattyú szűrőjén
A
A
A
A piszkos szűrő megtisztításához és a víz
leszivattyúzásához:
1 Húzza ki a gépet az áramtalanításhoz.
A
2 Nyissa ki a szűrősapkát.
3 Egyes gépek vészleeresztő tömlővel vannak ellátva, míg
mások nincsenek. A víz leeresztéséhez kövesse az alábbi
lépéseket.
Ha a gép el van látva vészleeresztő tömlővel:
fennakadt idegen anyagok kárt tehetnek a
gépben, vagy zajossá tehetik a gép működését.
FIGYELMEZTETÉS: Ha a gép használaton
kívül van, zárja el a csapot, szerelje le a vízbeömlő
tömlőt és eressze le a gépben lévő vizet,
elkerülendő a beszerelés helyén fennálló esetleges
fagyásveszélyt.
FIGYELMEZTETÉS: Minden használat után
zárja el a gép vízcsapját.
FIGYELMEZTETÉS: A gépben a víz
hőmérséklete akár a 90 ºC-ot is elérheti. Az égési
sérülések elkerülése érdekében a szűrőt csak
azután szabad megtisztítani, hogy a gépben lévő
víz lehűlt.
1 Zárja le a csapokat.
2 Távolítsa el a vízbeeresztő csövek anyáit, hogy
hozzáférhessen a vízbeeresztő szelepek szűrőihez.
Tisztítsa meg őket egy erre alkalmas kefével. Amennyiben
a szűrők nagyon piszkosak lennének, vegye ki azokat
harapófogóval, és így tisztítsa meg őket.
3 Vegye ki a bemeneti víztömlők lapos végén található
szűrőket a tömítésekkel együtt, majd folyóvízben alaposan
tisztítsa meg őket.
4 A tömítéseket és a szűrőket óvatosan illessze vissza a
helyére, majd kézzel húzza meg a tömlőanyákat.
5.5 Az esetlegesen visszamaradt víz
leszivattyúzása és a szivattyúszűrő tisztítása
A gép szűrőrendszere megakadályozza, hogy a mosóvíz
leeresztése közben gombok, pénzérmék, szövetfoszlányok
és más szilárd anyagok eltömítsék a szivattyú propellerét. Ily
módon a víz akadály nélkül távozhat és a szivattyú tovább
marad működőképes.
Amennyiben a gép nem szivattyúzná le a vizet, akkor a
szivattyú szűrője eltömítődhetett. A szűrőt háromhavonta,
vagy akkor kell megtisztítani, ha az eltömítődik. A szivattyú
38 / HU
a Húzza ki a helyéről a vészleeresztő tömlőt.
b Helyezze a tömlő végét egy nagy edénybe. Eressze le a
vizet az edénybe úgy, hogy kihúzza a tömlő végén lévő
dugót. Ha az edény megtelt, zárja el a tömlőt a dugó
visszahelyezésével. Az edény kiürítése után ismételje
meg a fenti műveletet annyiszor, hogy a gépből teljesen
kifogyjon a víz.
c Ha végzett a víz leeresztésével, ismét zárja el a tömlőt,
majd tegye azt vissza a helyére.
d Fordítsa el a szivattyúszűrőt annak kivételéhez.
Mosógép / Használati útmutató
Page 39

Ha a gép nincs ellátva vészleeresztő tömlővel: a Helyezzen egy nagyobb edényt a szűrő elé, amely képes
felfogni a szűrőből kiömlő vizet.
b Lazítson a szivattyú szűrőjén (az óramutató járásával
ellenkező irányban), amíg a víz el nem kezd kiömleni
belőle. Irányítsa a kiömlő vizet a szűrő elé helyezett
edénybe. Egy rongy segítségével felitathatja az
esetlegesen kiömlött vizet.
c Ha a gépből a víz teljesen kiürült, vegye ki a szűrőt annak
elforgatásával.
4 Tisztítsa meg a szűrőt a maradványoktól és az esetleges
szövetszálaktól.
5 Helyezze be a szűrőt.
6 Ha a szűrősapka két részből áll, akkor a szűrősapkát a fül
lenyomásával zárja le. Ha egy részből áll, akkor először
helyezze a füleket a helyükre alul, majd nyomja meg a
felső részüket.
Eco
(Szivattyúzás)
Napi
expressz
Bevonat
védelem
Pamut
ÖblítésLeeresztés
Szuper rövid
expressz
Gőz Selyem és
Szintetikus
anyagok
Felfrissítés
Centrifugálás Kímélő 20°
Gyapjú
(Öblítés
kézi mosás
plusz)
Kézi
mosás
GyorsmosásExtra öblítés
BabyProtect+
BabyProtectPamut
Késleltetés
Sötét ruhák
(Sötét-ápol
ás)
Előmosás
Higiénia 20° Automata
Sportruházat
(Sports)
Sötét ruhák
(Sötét-ápolás)
Éjszakai
üzemmód
program
Düftin
(Ágynemű)
Vegyes 40
Ingek
Indikatív értékek a szintetikus programokhoz
Maradék
nedvességtartalom (%) **
Töltősúly (kg)
Szintetikus 60
Szintetikus 40
* A program Ön által kiválasztott mosási ideje a gép kijelzőjén látható. Előfordulhat, hogy a tényleges mosási idő némiképp eltér a kijelzőn látható értéktől.
** A maradék nedvességtartalom-értékek a kiválasztott centrifugálási sebesség szerint eltérőek lehetnek.
3 52 1.10
3 49 0.60
Vízfogyasztás (l)
Energiafogyasztás
(kWh)
Program
időtartama (perc) *
01:45 45 40
01:31 45 40
≤ 1000 rpm > 1000 rpm
Maradék
nedvességtartalom (%) **
39 / HU
Mosógép / Használati útmutató
Page 40

6 Műszaki adatok
Megfelelés a Bizottság (EU) No 1061/2010 felhatalmazáson alapuló rendeletének
Beszállító neve vagy védjegye Beko
Modell neve WMY 71243 LMB2
Névleges kapacitás (kg) 7
Energiahatékonysági osztály / A+++-tól (legmagasabb hatékonysági fok) D-ig (legalacsonyabb
hatékonysági fok)
Éves energiafogyasztás (kWh)
(1)
Standard 60°C fokos pamutprogram energiafogyasztása teljes töltet esetén (kWh) 0.880
Standard 60°C fokos pamutprogram energiafogyasztása résztöltet esetén (kWh) 0.695
Standard 40℃ fokos pamutprogram energiafogyasztása résztöltet esetén (kWh) 0.690
Energiafogyasztás kikacsolt állapotban (W) 0.440
Energiafogyasztás bekapcsolva hagyott állapotban (W) 0.640
Éves vízfogyasztás (l)
(2)
Centrifuga energiahatékonysági osztály / A-tól (legmagasabb energiahatékonysági fok) G-ig
(legalacsonyabb energiahatékonysági fok)
Maximális centrifugálási sebesség (rpm) 1200
Fennmaradó nedvesség (%) 53
Standard pamutprogram
(3)
Standard 60°C fokos pamutprogram programideje teljes töltet esetén (min) 209
Standard 60°C fokos pamutprogram programideje résztöltet esetén (min) 185
Standard 40℃ fokos pamutprogram programideje résztöltet esetén (min) 185
Bekapcsolva hagyott állapot időtartama (min) N/A
Mosási/centrifugálási zajszint (dB) 53/75
Beépített Non
Magasság (cm) 84
Szélesség (cm) 60
Mélység (cm) 50
Nettó súly (±4 kg) 64
Egyszeres vízbemenet / dupla vízbemenet
• Elérhető
Elektromos bemenet (V/Hz) 230 V / 50Hz
Teljes áram (A) 10
Összteljesítmény (W) 2200
Fő modellkód 9710
(1)
220 standard mosási ciklus energiafogyasztása 60°C és 40°C fokos standard pamutprogram teljes és résztöltete esetén, valamint az alacsony
energiafogyasztású módok fogyasztása A tényleges energiafogyasztás a készülék felhasználásától függ.
(2)
220 standard mosási ciklus vízfogyasztása 60°C és 40°C fokos pamutprogram teljes vagy résztöltete esetén A tényleges vízfogyasztás a készülék
felhasználásától függ.
(3)
A címkén és a kézikönyvben található információ a “standard 60°C fokos pamutprogram” és a “standard 40°C fokos pamutprogram” standard
programokra vonatkozik és ezek a programok alkalmasak a normál szennyeződésű pamut ruhák tisztítására, továbbá az energia- és vízfogyasztást
együttesen figyelembe véve ezek a programok a leghatékonyabbak.
A változtatás jogát fenntartjuk!
A+++
174
8800
B
Pamut Eco 60°C és 40°C
• / -
40 / HU
Mosógép / Használati útmutató
Page 41

7 Hibaelhárítás
A program nem indítható vagy választható ki.
• Elképzelhető, hogy a gép önvédelmi módra kapcsolta magát valamely közmű probléma miatt (például feszültség,
víznyomás stb. következtében). >>>
másik programot. Az előző program ekkor törlődik. (Lásd: "Program megszakítása")
Víz van a gépben.
• A minőség-ellenőrzési folyamatot követően víz maradt a gépben. >>> Ez nem hiba; a víz nem tesz kárt a gépben.
A gép rázkódik vagy zajos.
• Lehet, hogy a gép nem áll stabilan. >>> Állítsa be a gép lábát úgy, hogy az vízszintesen álljon.
• Lehet, hogy egy kemény tárgy került a szivattyú szűrőjébe. >>> Tisztítsa meg a szivattyú szűrőjét.
• A szállításnál használatos biztonsági csavarok nincsenek eltávolítva. >>> Távolítsa el a szállításnál használt biztonsági
csavarokat.
• Lehet, hogy túl kevés ruha van a gépben. >>> Helyezzen több ruhát a gépbe.
• Lehet, hogy túl sok ruha van a gépben. >>> Vegyen ki a gépből pár ruhadarabot, vagy rendezze el a ruhákat egyenletesen.
• Lehet, hogy a gép nekinyomódik egy merev tárgynak. >>> Ügyeljen rá, hogy a gép ne nyomódjon neki semminek.
A gép röviddel a program kezdete után megállt.
• Lehet, hogy a gép az alacsony feszültség miatt állt meg ideiglenesen. >>> A feszültség normális szintre való visszaállását
követően a gép ismét működni fog.
A program időzítője nem számol vissza. (Kijelzővel ellátott modelleknél)
• Vízfelszíváskor az időzítő leállhat. >>> Az időzítő addig nem kezd el visszaszámolni, amíg a gép fel nem szívta a szükséges
mennyiségű vizet. A gép egészen addig vár, amíg elegendő mennyiségű víz kerül bele, hogy ezzel elkerülhető legyen a rossz mosási
eredmény. Az időzítő ezután folytatja csak a visszaszámlálást.
• Melegedéskor az időzítő leállhat. >>> Az időzítő addig nem számol vissza, amíg a gép el nem éri a kívánt hőmérsékletet.
• Centrifugázáskor az időzítő leállhat. >>> Ha a dobban egyenetlenül van elrendezve a szennyes, akkor bekapcsolhat az
automatikus egyenetlen szennyeselrendeződés érzékelő rendszer.
• Ha a ruhák nincsenek arányosan elosztva a gépben, a gép és annak környezete védelme érdekében a centrifugálás nem
indul el. Ilyenkor a szennyest át kell rendezni, majd el kell indítani a centrifugázást.
A program megszakításához forgassa el a Programválasztó gombot és válasszon ki egy
Habzik a mosószertartó.
• Túl sok mosószert tett a fiókba. >>> Tegyen 1 evőkanál öblítőt fél liter vízbe, és öntse ezt a mosószertartó fő mosórészébe.
• Tegye be a programnak és a ruha mennyiségének megfelelő mennyiségű mosóport (Lásd: “Program és fogyasztási
táblázat”). Kiegészítő vegyszerek (pl. folteltávolítók, fehérítők stb.) esetén kevesebb mosóport kell betenni.
A program lejárta után a ruha nedves marad
• Lehet, hogy túl sok mosóport tett a gépbe, ami fokozott mértékű habzáshoz vezetett, és így az automatikus habelnyelő
rendszer bekapcsolt. >>>
• Ha a ruhák nincsenek arányosan elosztva a gépben, a gép és annak környezete védelme érdekében a centrifugálás nem
indul el. Ilyenkor a szennyest át kell rendezni, majd el kell indítani a centrifugázást.
FİGYELMEZTETÉS:
hivatalos márkaszervizhez. Sose próbálja saját maga megjavítani a készüléket!
A
41 / HU
Ügyeljen a mosópor megfelelő mennyiségére.
Ha az itt közöltek segítségével sem tudja elhárítani a problémát, akkor forduljon a viszonteladóhoz vagy a
Mosógép / Használati útmutató
Page 42

Skalbimo mašina
Vartotojo vadovas
WMY 71243 LMB2
Dokumentu Nr
2820523886_LT / 17-09-14.(9:21)
Page 43

Šis gaminys pagamintas naudojant naujausią technologiją, aplinkai nekenksmingomis sąlygomis.
Page 44

1 Svarbūs nurodymai dėl saugos ir aplinkosaugos
Šiame skyriuje pateikta saugos informacija, kuri padės apsisaugoti nuo susižeidimo arba
materialinės žalos. Jeigu nesivadovausite šiais nurodymais, gali nebegalioti jokia garantija.
1.1 Bendri saugos reikalavimai
• Šį gaminį galima naudoti vaikams nuo 8 metų amžiaus ir asmenims, turintiems psichinių, jutiminių arba protinių negalių arba patirties bei žinių trūkumo, jeigu jie yra prižiūrimi
arba instruktuojami, kaip saugiai naudoti šį gaminį, ir supranta atitinkamus pavojus.
Neleiskite vaikams žaisti su šiuo gaminiu. Vaikams draudžiama valyti ir techniškai
prižiūrėti šį gaminį, nebent juos prižiūrėtų už jų saugą atsakingas suaugęs. Niekada neleiskite artyn jaunesnių nei 3 metų amžiaus vaikų, nebent jie būtų nuolat prižiūrimi.
• Niekad nestatykite gaminio ant kilimu išklotų grindų. Kitaip po mašina nepakankamai
cirkuliuoja oras, ir todėl elektrinės dalys gali perkaisti. Tai gali sukelti gaminio gedimą.
• Jeigu gaminys turi defektų, jo negalima naudoti, kol jo nepataisys įgaliotojo techniniio
aptarnavimo centro atstovas. Kyla elektros smūgio pavojus!
• Gaminys sukurtas taip, kad nutrūkus elektros tiekimui ir vėl jam atsiradus, jis toliau veiktų. Jeigu pageidaujate atšaukti programą, žr. skyrių „Programos atšaukimas“.
• Prijunkite šį gaminį prie įžeminto elektros lizdo, apsaugoto 16 A saugikliu. Būtinai pasirūpinkite, kad kvalifikuotas elektrikas įžemintų instaliaciją. Mūsų bendrovė nėra atsakinga už jokią žalą, kuri gali atsirasti naudojant gaminį, kuris nėra įžemintas atsižvelgiant
į vietos reglamentus.
• Vandens įleidimo ir išleidimo žarnos visuomet turi būti saugiai pritvirtintos ir nepažeistos.
Kitaip kyla vandens nuotėkio pavojus.
• Niekad neatidarykite mašinos durelių ar nebandykite ištraukti filtro, kol būgne dar yra
vandens. Kitaip kyla užliejimo ir nusiplikymo karštu vandeniu pavojai.
• Nebandykite jėga atidaryti užblokuotų durelių. Dureles galėsite atidaryti praėjus kelioms
minutėms nuo sklabimo ciklo pabaigos. Bandant jėga atidaryti užblokuotas dureles, gali
būti sugadintas durelių užrakto mechanizmas.
• Išjunkite gaminį, jei jo nenaudojate.
• Niekada neplaukite gaminio, purkšdami arba pildami ant jo vandenį! Kyla elektros smūgio pavojus!
• Niekada nelieskite kištukinio lizdo šlapiomis rankomis! Išjungdami niekuomet netraukite
už elektros laido, ištraukite laikydami už kištuko.
• Galima naudoti tik automatinėms skalbyklėms tinkamas skalbimo priemones, audinių
minkštiklius ir priedus.
• Vadovaukitės drabužių etiketėse ir ant skalbimo priemonės pakuotės pateiktais nurodymais.
• Atliekant montavimo, techninės priežiūros ir remonto darbus, šis gaminys privalo būti
atjungtas nuo maitinimo tinklo.
• Įrengimo ir remonto darbus visada privalo atlikti
tovas. Gamintojas nėra atsakingas už žalą, kilusią dėl darbų, kuriuos atliko neįgaliotieji
asmenys.
• Jei maitinimo kabelis pažeistas, jį turi pakeisti gamintojas, jo įgaliotas aptarnavimo darbuotojas arba kvalifikuotas asmuo (pageidautina elektrikas) arba importuotojo paskirtasis meistras – taip išvengsite pavojaus
įgaliotasis techninio aptarnavimo centro ats-
44 / LT
Skalbimo mašina / Vartotojo vadovas
Page 45

1.2 Naudojimas pagal paskirtį
• Šis gaminys skirtas tik naudojimui namuose. Jis netinkamas naudoti komerciniams tikslams ir jo negalima naudoti jokiems kitiems tikslams.
• Gaminį galima naudoti tik atitinkamai paženklintų tekstilės dirbinių skalbimui ir skalavimui.
• Gamintojas atsisako bet kokios atsakomybės už žalą dėl netinkamo naudojimo arba gabenimo.
1.3 Vaikų sauga
• Pakavimo medžiagos gali būti pavojingos vaikams. Pakavimo medžiagas laikykite vaikams nepasiekiamoje vietoje.
• Elektriniai prietaisai gali būti pavojingi vaikams. Mašinai veikiant, neleiskite artyn vaikų.
Neleiskite jiems žaisti su mašina. Naudokite apsaugos nuo vaikų funckciją, kad vaikai
nežaistų su šiuo gaminiu.
• Išėję iš patalpos, kurioje stovi prietaisas, nepamirškite uždaryti prietaiso durelių.
• Visas skalbimo priemones ir papildomas priemones laikykite saugioje, vaikams nepasiekiamoje vietoje; skalbimo priemonių dėžutes uždenkite dangteliais arba laikykite jas
sandarioje pakuotėje.
Skalbiant skalbinius aukštos temperatūros vandenyje, įkrovos durelių
stiklas įkaista. Todėl vykstant skalbimo procesui, neleiskite vaikų artyn
prie skalbyklės įkrovos durelių.
1.4 Informacija apie pakuotę
Šio gaminio pakavimo medžiagos pagamintos iš pakartotinai panaudojamų medžiagų, atsižvelgiant į mūsų nacionalinius aplinkosaugos reglamentus.
Neišmeskite pakavimo medžiagų kartu su kitomis buitinėmis atliekomis arba kitomis
šiukšlėmis. Išmeskite pakavimo medžiagas į tam skirtą vietos atliekų surinkimo punktą.
1.5 Seno gaminio išmetimas
Šis gaminys pagamintas iš aukštos kokybės medžiagų ir dalių, kurias galima perdirbti ir
pakartotinai panaudoti.
Todėl pasibaigus gaminio tarnavimo laikui, neišmeskite jo kartu su įprastomis buitinėmis
atliekomis. Atiduokite jį į surinkimo punktą, kad elektros ir elektronikos įranga būtų perdirbta. Artimiausio surinkimo punkto adresą sužinosite vietos savivaldybėje. Pakartotinis
medžiagų panaudojimas padės tausoti gamtos išteklius. Vaikų saugai užtikrinti, prieš išmesdami gaminį, nupjaukite maitinimo kabelį ir sugadinkite durelių užrakto mechanizmą,
kad jis neveiktų.
1.6 WEEE Direktyvą Atitikimas
Šis gaminys atitinka EU WEEE Direktyvą (2012/19/EU). Šis gaminys paženklin-
tas elektros ir elektroninės įrangos klasifikavimo (WEEE) ženklu.
Šis gaminys pagamintas iš aukštos kokybės medžiagų ir dalių, kurias galima perdirbti ir pakartotinai panaudoti. Pasibaigus gaminio tarnavimo laikui, neišmeskite
jo kartu su įprastomis buitinėmis atliekomis. Atiduokite jį į surinkimo punktą, kad
elektros ir elektronikos įranga būtų perdirbta. Surinkimo punktų adresus sužinosite vietos
savivaldybėje.
RoHS direktyvos atitiktis:
Jūsų įsigytas gaminys atitinka ES RoHS Direktyvą (2011/65/ES). Jame nėra šioje
Direktyvoje nurodytų kenksmingų ir draudžiamų medžiagų.
45 / LT
Skalbimo mašina / Vartotojo vadovas
Page 46

2 Montavimas
Dėl šio gaminio instaliacijos kreipkitės į artimiausią įgaliotąjį
techninio aptarnavimo centro atstovą. Norėdami paruošti
gaminį naudojimui, prieš iškviesdami įgaliotąjį techninės
priežiūros atstovą, įsitikinkite, ar įrengtos tinkamos
elektros, vandentiekio ir kanalizacijos sistemos. Jeigu šios
sąlygos nėra patenkintos, iškvieskite kvalifikuotą meistrą ir
santechniką, kad jis atliktų tinkamus instaliacijos darbus.
Vartotojas yra atsakingas už vietos, elektros,
vandentiekio ir dujų instaliacijos paruošimą šiam
C
gaminiui.
ĮSPĖJIMAS: Įrengimo ir elektros prijungimo darbus
privalo atlikti įgaliotasis techninio aptarnavimo centro
B
atstovas. Gamintojas nėra atsakingas už žalą, kilusią
dėl darbų, kuriuos atliko neįgaliotieji asmenys.
ĮSPĖJIMAS: Prieš pradedant instaliaciją, apžiūrėkite
šį gaminį, ar jis neturi kokių nors defektų. Jeigu turi,
A
neinstaliuokite jo. Sugadinti gaminiai kelia pajovų jūsų
saugai.
Labai svarbu, kad po įrengimo arba valymo statant
C
buitinį prietaisą į vietą, vandens įleidimo ir išleidimo
žarnos nebūtų perlenktos, suspaustos arba prakiurę.
2.1 Įrengimui tinkama vieta
• Statykite mašiną ant tvirtų grindų. Nestatykite jos ant
minkšto pūkuoto kilimo arba panašių paviršių.
• Bendras visiškai priklautos skalbyklės ir džiovyklės svoris,
kai jos pastatytos viena ant kitos, siekia 180 kilogramų.
Statykite gaminį ant tvirtų, stabilių grindų, kurios gali
atlaikyti šį krūvį!
• Nestatykite gaminio ant maitinimo laido.
• Neįrenkite prietaiso ten, kur temperatūra būna žemesnė
nei 0 °C.
• Tarp gaminio ir kitų baldų kraštų reikia palikti bent 1 cm
tarpus.
2.2 Pakavimo sutvirtinimo nuėmimas
Paverskite mašiną atgal, kad galėtumėte nuimti pakavimo
sutvirtinimus. Patraukite už juostos ir nuimkite pakavimo
sutvirtinimą.
2.3 Gabenimo kaiščių išėmimas
ĮSPĖJIMAS: Neišimkite gabenimo kaiščių, prieš tai
nenuėmę pakavimo sutvirtinimų.
A
ĮSPĖJIMAS: Išimkite gabenimo kaiščius prieš
pradėdami naudoti skalbimo mašiną! Kitaip galite ją
A
sugadinti.
1. Veržliarakčiu atsukite visus varžtus, kad jie laisvai suktųsi
(C).
2. Atsargiai sukdami ištraukite transportavimui skirtus
saugos varžtus.
3. Į galinėje plokštėje esančias skyles įtaisykite plastikinius
gaubtelius, esančius maišelyje su naudojimo instrukcija.
(P)
Transportavimui skirtus saugos varžtus laikykite saugioje
vietoje, kad galėtumėte juos vėl panaudoti, kai kitą kartą
C
prireiks gabenti skalbimo mašiną.
Niekada negabenkite gaminio, jeigu jame tinkamai
neįtaisyti transportavimui skirti saugos varžtai!
C
2.4 Vandens tiekimo prijungimas
Norint naudoti šį gaminį, būtinas 1–10 barų (0,1–1 MPa)
vandens slėgis. Norint, kad mašina tinkamai veiktų,
C
reikia, kad per minutę iš čiaupo išbėgtų 10–80 litrų
vandens. Jeigu vandens slėgis yra didesnis, pritvirtinkite
slėgio mažinimo vožtuvą.
Jeigu ketinate naudoti dvigubo vandens įleidimo gaminį
kaip viengubo
C
prieš pradėdami naudoti šį gaminį, ant karšto vandens
sklendės privalote sumontuoti pateiktą stabdiklį.
(Taikytina gaminiams, pateiktiems su sandarinimo
stabdiklio rinkiniu.)
ĮSPĖJIMAS: Modelius su viena vandens įleidimo anga
reikia prijungti prie šalto vandens čiaupo. Kitaip skalbiniai
A
bus sugadinti arba gaminys gali persijungti į apsauginį
režima ir neveikti.
ĮSPĖJIMAS: Nenaudokite susidėvėjusių/naudotų
vandens įleidimo žarnų su nauju gaminiu. Dėl to ant
A
skalbinių gali likti dėmių.
1. Prijunkite prie mašinos vandens įleidimo vožtuvų
specialias kartu su mašina pristatytas žarnas. Raudonai
pažymėta žarna (kairėje) (maks. 90 ºC) skirta šiltam
(šalto) vandens įleidimo angos gaminį,
46 / LT
Skalbimo mašina / Vartotojo vadovas
Page 47

vandeniui, o mėlynai pažymėta žarna (dešinėje) (maks. 25
ºC) – šaltam įleidžiamam vandeniui.
ĮSPĖJIMAS: Instaliuodami mašiną patikrinkite, ar
tinkamai atliktas šalto ir karšto vandens prijungimas.
A
Kitaip, pabaigus skalbimo procesą, skalbiniai bus karšti ir
gali būti susidėvėję.
2. Užsukite visas žarnų veržles ranka. Verždami veržles,
niekada nenaudokite veržliarakčio.
• Norint apsaugoti, kad purvinas vanduo ne tekėtų atgal į
mašiną, o būtų lengvai išleistas, nenardinkite žarnos galo
į purviną vandenį ir neįleiskite jo į nuotėkų vamzdį daugiau
nei 15 cm. Jeigu žarna per ilga, sutrumpinkite ją.
• Žarnos galo negalima sulenkti, ant jos negalima atsistoti,
negalima sulankstyti tarp išleidimo vamzdžio ir mašinos.
• Jeigu žarna per trumpa, pailginkite ją, pridėdami originalią
ilginimo žarną. Žarnos ilgis neturi viršyti 3,2 m. Norint
išvengti vandens nuotėkių, ilginimo žarna ir mašinos
išleidimo žarna turi būti tvirtai sujungtos, naudojant
tinkamą spaustuką, kad jos neatsijungtų ir nenukristų.
2.6 Kojelių reguliavimas
ĮSPĖJIMAS: Norint užtikrinti, kad mašina veiktų
tyliau ir nevibruotų, ji turi stovėti tiesiai, išlaikant
A
pusiausvyrą kojelių pagalba. Pastatykite mašiną tiesiai,
pareguliuodami kojeles. Kitaip gaminys gali pajudėti iš
vietos ir ką nors prispausti arba pradėti vibruoti.
3. Prijungę žarnas, iki galo atsukite vandens čiaupus,
kad patikrintumėte jungimo taškų sandarumą. Jeigu
pastebite nuotėkį, užsukite čiauspą ir atsukite veržlę.
Patikrinę tarpiklį, vėl atsargiai užsukite veržlę. Norint,
kad vanduo nepratekėtų ir nepridarytų žalos, kai mašina
nenaudojama, čiaupai turi būti užsukti.
2.5 Prijungimas prie kanalizacijos vamzdžio
• Vandens išleidimo žarną reikia tiesiogiai prijungti prie
kriauklės kanalizacijos vamzdžio arba pritaisyti ją prie
kriauklės krašto.
ĮSPĖJIMAS: Jeigu vandens išleidimo metu žarna
nukris nuo korpuso, jūsų namai bus užlieti vandeniu.
A
Skalbiant aukštoje temperatūroje, gali kilti pavojus
apsiplikinti karštu vandeniu! Norėdami išvengti
tokių situacijų ir užtikrinti sklandų vandens įleidimą
ir išleidimą iš mašinos, tvirtai pritvirtinkite išleidimo
žarnos galą, kad jis negalėtų nukristi.
• Žarną reikia pritaisyti mažiausiai 40 cm ir daugiausia 100
cm aukštyje.
• Jeigu žarna bus paguldyta ant grindų ir po to pakelta
arba jeigu ji bus arti žemės ( žemiau nei 40 cm aukštyje),
vandenį bus sunkiau išleisti ir skalbiniai gali likti šlapi.
Todėl vadovaukitės paveikslėlyje pateiktais aukščiais.
100cm
40cm
1. Ranka atsukite kojelių antveržles.
2. Reguliuokite kojeles tol, kol mašina stovės tiesiai ir tvirtai.
3. Vėl ranka užsukite visas antveržles.
ĮSPĖJIMAS: Fiksavimo veržles atsukite tik rankomis,
nenaudokite jokių įrankių. Kitaip galite jas sugadinti.
A
2.7 Elektros įvado prijungimas
Prijunkite šį gaminį prie įžeminto elektros lizdo, apsaugoto
16 A saugikliu. Mūsų bendrovė nėra atsakinga už jokią žalą,
kuri gali atsirasti naudojant gaminį, kuris nėra įžemintas
atsižvelgiant į vietos reglamentus.
• Pajungiant reikia vadovautis nacionaliniais reglamentais.
• Po sumontavimo maitinimo laido kištukas turi būti lengvai
pasiekiamas.
• Jeigu namuose naudojamas saugiklis yra 16 amperų,
kreipkitės į kvalifikuotą elektriką, kad jis instaliuotų16
amperų saugiklį.
• Įtampa, nurodyta skyriuje „Techniniai duomenys“, privalo
atitikti jūsų namų elektros tinklo įtampą.
• Draudžiama pajungti naudojant laidų ilgintuvus arba
daugiaviečius lizdus.
ĮSPĖJIMAS: Pažeistus maitinimo laidus privalo
pakeisti įgaliotieji techninio aptarnavimo centro
B
atstovai.
Gaminio gabenimas
1. Prieš gabendami, išjunkite prietaisą iš elektros tinklo.
2. Atjunkite vandens išleidimo žarną ir vandentiekio jungtis.
3. Visiškai išleiskite iš gaminio likusį vandenį.
4. Sumontuokite gabenimo saugos varžtus išėmimui
atvirkščia eilės tvarka.
Niekada negabenkite gaminio, jeigu jame tinkamai
neįtaisyti transportavimui skirti saugos varžtai!
C
47 / LT
Skalbimo mašina / Vartotojo vadovas
Page 48

ĮSPĖJIMAS: Pakavimo medžiagos gali būti
pavojingos vaikams. Pakavimo medžiagas laikykite
A
vaikams nepasiekiamoje vietoje.
3 Paruošimas
3.1 Skalbinių rūšiavimas
• Išrūšiuokite skalbinius pagal audinių rūšis, spalvą,
sutepimo laipsnį ir leistiną vandens temperatūrą, kurioje
juos galima skalbti.
• Visuomet vadovaukitės gaminio etiketėje pateiktais
nurodymais.
3.2 Skalbinių paruošimas skalbimui
• Skalbiniai su metalinėmis detalėmis, pavyzdžiui,
liemenėlės, diržų sagtys ir metalinės sagos gadina
mašiną. Ištraukite metalines dalis arba tokius skalbinius
sudėkite į skalbinių maišelį, pagalvės užvalkalą ar pan.
• Iškraustykite kišenes ir išimkite iš jų visus pašalinius
daiktus, pavyzdžiui, monetas, rašiklius ir popieriaus
sąvaržėles. Tokie daiktai gali sugadinti gaminį arba kelti
triukšmą.
• Mažus skalbinius, pavyzdžiui, kūdikių kojinaites, nailonines
kojines ir kt. sudėkite į skalbinių maišelį, pagalvės
užvalkalą ar pan.
• Užuolaidas į mašiną dėkite laisvai, nespausdami. Nuimkite
užuolaidų segtukus.
• Užsekite spaustukus, įsiūkite pamestas sagas, užadykite
skyles.
• Skalbiant gaminius, kurių etiketėse nurodyta „Skalbti
mašinoje“ arba „Skalbti rankomis“ reikia pasirinkti
atitinkamas programas.
• Spalvotus ir baltus gaminius skalbkite atskirai. Nauji
ryškūs medvilniniai gaminiai gali stipriai nudažyti kitus
skalbinius. Skalbkite juos atskirai.
• Prieš skalbimą reikia tinkamai pašalinti sunkiai
pašalinamas dėmes. Jeigu nesate tikri, kaip jas pašalinti,
pasiteiraukite cheminio valymo punkte.
• Naudokite tik skalbimo mašinai tinkamus dažus/spalvų
keitimo priemones ir kalkių nuosėdų šalinimo priemones.
Būtinai vadovaukitės ant pakuočių esančiais nurodymais.
• Kelnes ir skalbimui jautrius skalbinius išverskite į blogąją
pusę.
• Kelias valandas prieš skalbimą skalbinius, pagamintus iš
angoros vilnos, palaikykite šaldiklyje. Jie mažiau susivels.
• Skalbinius, labai suteptus tokiomis medžiagomis kaip
miltai, kalkės, pieno milteliai ir pan., prieš dedant į
skalbyklę reikia išpurtyti. Laikui bėgant, tokios ant
skalbinių likę dulkės ir milteliai gali susikaupti ant vidinių
mašinos dalių ir sukelti gedimą.
3.3 Kaip taupyti elektros energiją
Ši informacija padės jums ekologiškiau naudoti šį buitinį
prietaisą ir taupyti energiją.
• Naudokite gaminį esant didžiausiam pajėgumui, kurį
leidžia pasirinkta programa, bet be perkrovos. Žr. skyrių
„Programų ir sąnaudų lentelė“.
• Visuomet vadovaukitės ant skalbimo priemonės pakuotės
pateiktais nurodymais.
• Mažai suteptus skalbinius skalbkite nustatę žemą
temperatūrą.
• Mažam nesmarkiai suteptų skalbinių kiekiui skalbti
naudokite trumpesnes programas.
• Nenaudokite nuskalbimo programos ir aukštos
temperatūros skalbiniams, kurie nėra smarkiai sutepti
arba dėmėti, skalbti.
• Jeigu skalbinius planuojate džiovinti džiovyklėje, nustatant
skalbimo programą, rekomenduojama pasirinkti didesnį
gręžimo greitį.
• Naudokite tik ant skalbimo priemonės pakuotės nurodytą
skalbimo priemonės kiekį.
3.4 Prietaiso naudojimas
Prieš pradėdami naudoti gaminį, užtikrinkite, kad visi
parengiamieji darbai būtų atlikti pagal nurodymus, pateiktus
skyriuose „Svarbūs saugos nurodymai“ ir „Įrengimas“.
Norėdami paruošti gaminį skalbiniams skalbti, atlikite pirmą
veiksmą būgno valymo programoje. Jeigu mašinoje šios
programos nėra, naudokite metodą, aprašytą skyriuje 5.2.
Naudokite skalbyklėms tinkamas kalkių nuosėdų
šalinimo priemones.
C
Gamybos metu, dėl kokybės kontrolės procesų,
mašinoje gali būti likę vandens. Jis nekenkia gaminiui.
C
3.5 Nepridėkite per daug skalbinių
Maksimalus skalbinių kiekis priklauso nuo skalbinių rūšies, jų
sutepimo laipsnio ir pasirinktos skalbimo programos.
Vandens kiekis mašinoje automatiškai nustatomas pagal į ją
sudėtų skalbinių svorį.
ĮSPĖJIMAS: Vadovaukitės „Programų ir sąnaudų
lentelėje“ pateikta informacija. Jeigu mašina bus
A
pernelyg prikrauta, sumažės skalbimo kokybė. Be to,
gali kilti triukšmas ir vibracija.
3.6 Skalbinių sudėjimas
1 Atidarykite įkrovos dureles.
2 Laisvai sudėkite skalbinius į mašiną.
3 Spausdami uždarykite dureles, kol pasigirs
spragtelėjimas. Patikrinkite, ar durelėmis neprivėrėte
skalbinių.
Programai veikiant, durelės bus užblokuotos. Dureles
galima atidaryti praėjus šiek tiek laiko po to, kai
C
programa pasibaigia.
ĮSPĖJIMAS: Jeigu skalbiniai susimes į vietą krūvą,
gali kilti triukšmas ir vibracija.
A
3.7 Skalbimo miltelių ir audinių minkštiklio
naudojimas
Naudodami skalbimo milterius, audinių minkštiklius,
krakmolą, audinių dažus, baliklius arba kalkių nuosėdų
C
šalinimo priemones, atidžiai perskaitykite gamintojo
nurodymus, pateiktus ant pakuotės, ir naudokite
nurodytus kiekius. Jeigu turite, naudokite dozavimo indelį.
48 / LT
Skalbimo mašina / Vartotojo vadovas
Page 49

Skalbimo miltelių stalčius
Skalbimo priemonių stalčiukas padalintas į tris skyrius:
– (1) nuskalbimui
– (2) pagrindiniam skalbimui
– (3) audinių minkštikliui
– (*) be to, audinių minkštiklio skyriuje yra sifonas.
1
2
3
Skalbimo milteliai, audinių minkštiklis ir kitos
skalbimo priemonės
• Prieš paleisdami skalbimo programą, pripilkite skalbimo
miltelių ir audinių minkštiklio.
• Niekada neatidarykite skalbimo priemonių stalčiuko, kol
skalbimo programa veikia!
• Naudojant programą be nuskalbimo, į nuskalbimo skyrių
skalbimo miltelių pilti nereikia (į skyrių Nr. "1").
• Naudojant programą su nuskalbimu, į nuskalbimo skyrių
negalima pilti skystos skalbimo priemonės (į skyrių Nr.
"1").
• Nesirinkite programos su nuskalbimu, jeigu naudojate
skalbimo priemonės indelį arba paskirstymo rutuliuką.
Dėkite skalbimo priemonės indelį arba paskirstymo
rutuliuką tiesiai į mašiną, tarp skalbinių.
• Jeigu naudojate skystą skalbimo priemonę, nepamirškite
įdėti skystos skalbimo priemonės indelį į pagrindinį
skalbimo skyrių (skyrių Nr. "2").
Skalbimo priemonės rūšies pasirinkimas
Skalbimo priemonės rūšis priklauso nuo audinių spalvos ir
rūšies.
• Spalvotiems ir baltiems skalbiniams naudokite skirtingas
skalbimo priemones.
• Jautrius audinius skalbkite tik specialiomis skalbimo
priemonėmis (skystais skalbikliais, vilnai skirtu šampūnu ir
pan.), skirtomis tik jautriems skalbiniams skalbti.
• Skalbiant tamsius spalvotus drabužius ir antklodes,
rekomenduojama naudoti skystą skalbimo priemonę.
• Vilnonius audinius skalbkite specialiai vilnai skirtomis
skalbimo priemonėmis.
ĮSPĖJIMAS: Naudokite tik specialiai skalbyklėms
skirtus skalbiklius.
A
ĮSPĖJIMAS: Nenaudokite muilo miltelių.
A
Skalbiklio kiekio nustatymas
Reikiamas skalbimo miltelių kiekis priklauso nuo skalbinių
kiekio, jų sutepimo laipsnio ir vandens kietumo.
• Nenaudokite skalbimo miltelių daugiau nei kad nurodyta
ant pakuotės, nes kils problemų: susidarys per daug putų,
milteliai nebus tinkamai išskalauti, netaupydami miltelių
bereikalingai išlaidausite, ir pagaliau darysite žalą gamtai.
• Mažesniam skalbinių kiekiui arba nesmarkiai suteptiems
drabužiams naudokite mažiau skalbiklio.
Audinių minkštiklių naudojimas
Pripilkite audinių minkštiklio į audinių minkštikliui skirtą
stalčiuko skyrelį.
• Neviršykite ant skalbimo priemonių stalčiuko pažymėto
maksimalaus lygio (>max.<).
• Jeigu audinių minkštiklis sutirštėja, prieš pildami jį į
stalčiuko skyrių, atskieskite jį.
Skystų skalbiklių naudojimas
Jeigu gaminyje yra skysto skalbiklio indelis:
• Skystoms skalbimo priemonėms skirtą indelį dėkite į
skyrelį Nr. "2".
• Jeigu skystas skalbiklis sutirštėja, prieš pildami jį į
skalbiklio indelį, atskieskite jį.
Jeigu gaminyje nėra skysto skalbiklio indelio:
• Nenaudokite skysto skalbiklio nuskalbimui, naudodami
programą su nuskalbimu.
• Naudojant atidėto paleidimo funkciją, skystas skalbiklis
palieka ant skalbinių dėmių. Jeigu ketinate naudoti atidėto
paleidimo funkciją, nenaudokite skysto skalbiklio.
Skalbiklių gelio ir tablečių forma naudojimas
• Jeigu gelis yra skystas, o mašinoje nėra specialaus skysto
skalbiklio indelio, supilkite gelį į pagrindinį skalbiklio
skyrelį pirmą kartą prileidžiant į mašiną vandens. Jeigu
mašinoje yra skysto skalbiklio indelis, prieš paleisdami
programą, supilkite gelį į šį indelį.
• Jeigu gelis yra tirštas arba yra skysčio kapsulės formos,
prieš skalbdami, dėkite jį tiesiai į būgną.
• Prieš pradėdami skalbti, įdėkite skalbimo priemonės
tabletę į pagrindinio skalbimo skyrelį (skyrelį Nr. „2“) arba
tiesiai į būgną.
Skalbiklių tabletės gali nevisiškai ištirpti ir skalbiklio
skyrelyje gali likti jų likučių. Jeigu taip atsitiktų, kitą kartą
C
skalbdami, dėkite tabletę tarp skalbinių, arčiau būgno
dugno.
Naudokite skalbiklio tabletę arba gelį nepasirinkę
nuskalbimo funkcijos.
C
Krakmolo naudojimas
• Pripilkite skysto krakmolo, krakmolo miltelių arba audinių
dažų į audinių minkštiklio skyrių.
• Skalbimo ciklo metu niekada nenaudokite ir audinių
minkštiklio, ir krakmolo.
• Panaudoję krakmolą, išvalykite mašinos vidų švariu
drėgnu skudurėliu.
Baliklių naudojimas
• Pasirinkite programą su nuskalbimu ir pripilkite baliklio
nuskalbimo programos pradžioje. Nepilkite skalbimo
miltelių į nuskalbimo skyrių. Taip pat galite pasirinkti
programą su papildomu skalavimu ir pripilti baliklio
į skalbimo priemonės skyrių tuo metu, kai mašina
pripildoma vandens pirmo skalavimo etapo metu.
• Nenaudokite sumaišyto baliklio ir skalbiklio.
49 / LT
Skalbimo mašina / Vartotojo vadovas
Page 50

• Naudokite labai mažai baliklio (maždaug 50 ml) ir gerai
išskalaukite drabužius, nes jis dirgina odą. Nepilkite
baliklio tiesiai ant skalbinių ir nenaudokite jo skalbdami
spalvotus skalbinius.
• Naudodami baliklius su deguonimi, rinkitės skalbimo
žemesnėje temperatūroje programas.
• Baliklius su deguonimi galima naudoti kartu su
skalbikliais; visgi, jeigu baliklio tirštumas nėra toks pats
kaip skalbiklio, pirma įpilkite skalbiklio į skyrelį Nr. „2“
ir palaukite, kol skalbiklis nutekės į mašiną, pirmą kartą
įleidžiant vandens. Mašinai vis dar prisipildant vandens,
pilkite į tą patį skyrelį baliklio.
Kalkių nuosėdų šalinimo priemonės naudojimas
• Jeigu reikia, naudokite tik specialiai skalbyklėms skirtas
kalkių nuosėdų šalinimo priemones.
Neryškių spalvų ir balti
skalbiniai
(Rekomenduojama temperatūra
pagal sutepimo lygį: 40-90 °C)
(Rekomenduojama
temperatūra pagal sutepimo
lygį: šaltas -40 °C)
Drabužiai
Spalvos Tamsios spalvos
(Rekomenduojama
temperatūra pagal
sutepimo lygį: šaltas
-40 °C)
Jautrūs /
vilnoniai
/ šilkiniai
skalbiniai
(Rekomenduojama
temperatūra pagal
sutepimo lygį: šaltas
-30 °C)
Smarkiai sutepti
(sunkiai
pašalinamos
dėmės, pavyzdžiui,
žolės, kavos, vaisių
ir kraujo.)
Vidutiniškai
sutepti
(Pavyzdžiui,
Nešvarumo lygis
apykaklėms ir
rankogaliams
skalbti)
Nesmarkiai
sutepti
(Nėra matomų
dėmių.)
Gali prireikti papildomai
apdoroti dėmes prieš atliekant
papildomą nuskalbimą.
Skalbimo miltelius ir skysčius,
rekomenduojamus naudoti
baltiems skalbiniams, galima
naudoti smarkiai suteptiems
skalbiniams, vadovaujantis
rekomenduojamomis dozėmis.
Rekomenduojama naudoti
skalbimo miltelius molio ir
žemės dėmėms bei dėmėms,
kurios yra jautrios balikliams,
šalinti.
Skalbimo miltelius ir skysčius,
rekomenduojamus naudoti
baltiems skalbiniams, galima
naudoti vidutiniškai suteptiems
skalbiniams, vadovaujantis
rekomenduojamomis dozėmis.
Skalbimo miltelius ir skysčius,
rekomenduojamus naudoti
baltiems skalbiniams, galima
naudoti mažai suteptiems
skalbiniams, vadovaujantis
rekomenduojamomis dozėmis.
Skalbimo miltelius ir
skysčius, rekomenduojamus
naudoti spalvotiems
skalbiniams, galima naudoti
smarkiai suteptiems
skalbiniams, vadovaujantis
rekomenduojamomis
dozėmis. Rekomenduojama
naudoti skalbimo miltelius
molio ir žemės dėmėms bei
dėmėms, kurios yra jautrios
balikliams, šalinti. Naudokite
skalbiklius be baliklių.
Skalbimo miltelius ir
skysčius, rekomenduojamus
naudoti spalvotiems
skalbiniams, galima naudoti
vidutiniškai suteptiems
skalbiniams, vadovaujantis
rekomenduojamomis
dozėmis. Naudokite
skalbiklius be baliklių.
Skalbimo miltelius ir
skysčius, rekomenduojamus
naudoti spalvotiems
skalbiniams, galima
naudoti mažai suteptiems
skalbiniams, vadovaujantis
rekomenduojamomis
dozėmis. Naudokite
skalbiklius be baliklių.
Skystus skalbiklius,
tinkamus spalvotiems
ir tamsių spalvų
skalbiniams skalbti,
galima naudoti
smarkiai suteptiems
skalbiniams,
vadovaujantis
rekomenduojamomis
dozėmis.
Skystus skalbiklius,
tinkamus spalvotiems
ir tamsių spalvų
skalbiniams skalbti,
galima naudoti
vidutiniškai suteptiems
skalbiniams,
vadovaujantis
rekomenduojamomis
dozėmis.
Skystus skalbiklius,
tinkamus spalvotiems
ir tamsių spalvų
skalbiniams skalbti,
galima naudoti
mažai suteptiems
skalbiniams,
vadovaujantis
rekomenduojamomis
dozėmis.
Jautriems skalbiniams
patartina naudoti
specialiai jiems skirtus
skystus skalbiklius.
Vilnonius ir šilkinius
skalbinius privaloma
skalbti specialiai vilnai
skirtais skalbikliais.
Jautriems skalbiniams
patartina naudoti
specialiai jiems skirtus
skystus skalbiklius.
Vilnonius ir šilkinius
skalbinius privaloma
skalbti specialiai vilnai
skirtais skalbikliais.
Jautriems skalbiniams
patartina naudoti
specialiai jiems skirtus
skystus skalbiklius.
Vilnonius ir šilkinius
skalbinius privaloma
skalbti specialiai vilnai
skirtais skalbikliais.
50 / LT
Skalbimo mašina / Vartotojo vadovas
Page 51

4 Gaminio naudojimas
4.1 Valdymo skydelis
1 2 3 4 5
6
7
8910
1. Programos pasirinkimo rankenėlė
2 - Gręžimo greičio reguliavimo mygtukas
3 - Temperatūros reguliavimo mygtukas
4 - Ekranas
5 - Programos tęsimo indikatorius
4.2 Ekrano simboliai
a b c d e f g
0
C
88
1888
a - Temperatūros indikatorius
b - Elektros prijungimas
c - Garų indikatorius
d - Įspėjamojo garso signalo indikatorius
e - Indikatorius, rodantis, kad nėra vandens
f - Skalbimo priemonės indikatorius
g - Paleidimo/pristabdymo indikatorius
6 - Įjungimo / išjungimo mygtukas
7 - Paleidimo / pristabdymo mygtukas
8 - Pabaigos laiko nustatymo mygtukas
9 - Pagalbinių funkcijų mygtukai
10 - Programos pasirinkimo lemputės
h
88:88
ijklm
h - Programos eigos indikatorius
i - Programos pabaigos indikatorius
j - Trukmės informacijos eilutė
k - Papildomų funkcijų indikatoriai
l - Užrakto indikatorius
m - Gręžimo greičio indikatorius
C
51 / LT
Šiame skyriuje panaudotos mašinos aprašymo vaizdinės priemonės yra schemiškos – jos gali šiek tiek skirtis nuo Jūsų
turimos mašinos funkcijų.
Skalbimo mašina / Vartotojo vadovas
Page 52

4.3 Programos pasirinkimas
1 Pasirinkite tinkamą programą, atsižvelgdami į skalbinių
audinių rūšį, kiekį ir nešvarumo lygį iš programų ir
sąnaudų lentelės bei skalbimo temperatūros lentelės.
1 Sukdami programos pasirinkimo raneknėlę, pasirinkite
norimą programą.
0
C
88
1888
88:88
Programos skiriasi pagal didžiausią, tam tikrai
C
audinių rūšiai tinkamą gręžimo greitį.
Pasirinkdami programą, kurią naudosite, visada
atsižvelkite į audinio rūšį, spalvą, nešvarumo lygį ir
leistiną vandens temperatūrą.
Visada rinktinės žemiausią temperatūros vertę,
tinkamą skalbinių tipui. Aukštesnė temperatūra
reiškia didesnes galios sąnaudas.
4.3.1 Rodyti programas
Priklausomai nuo audinių rūšių, galima naudoti šias
pagrindines programas.
• Medvilniniai audiniai
Ji rekomenduojama medvilniniams skalbiniams (pvz.,
paklodėms, antklodėms ir pagalvių užvalkalams,
rankšluosčiams, chalatams, apatiniams rūbams ir pan.).
Skalbiniai bus skalbiami energingai ir ilgiau.
• Sintetiniai audiniai
Ji rekomenduojama sintetiniams drabužiams skalbti
(marškiniams, palaidinukėms, gaminiams iš sintetinių/
medvilninių audinių ir pan.). Lyginant su medvilniniams
skalbiniams skirta programa, ši programa skalbia atsargiai
ir trumpiau.
Užuolaidoms ir nėriniams rekomenduojama pasirinkti
programą „Sintetika 40 ˚C“ ir nuskalbimo bei apsaugos nuo
susiglamžymo funkcijas. Skalbdami nėrinius/užuolaidas,
į pagrindinį skalbimo priemonės skyrelį pilkite mažiau
skalbimo priemonės, nes šių audinių tinklinė struktūra
sukelia pernelyg didelį putojimą. Nepilkite skalbimo miltelių į
nuskalbimo skyrių.
• Vilnoniai audiniai
Ji rekomenduojama vilnoniams drabužiams skalbti.
Pasirinkite tinkamą temperatūrą, atsižvelgdami į drabužių
etiketes. Vilnoniams audiniams naudokite jiems skirtas
skalbimo priemones.
Šios skalbyklės vilnonių audinių skalbimo programa
yra patvirtinta bendrovės „The Woolmark Company“
kaip programa, tinkama skalbti vilnoniams
gaminiams, kuriuos leidžiama skalbti skalbyklėje,
su sąlyga, kad tie gaminiai bus skalbiami pagal
nurodymus, pateiktus gaminio etiketėje, ir šios
skalbyklės gamintojo pateiktus nurodymus.
• Automatic Programme (Automatinė programa)
Ji rekomenduojama dažnai skalbiamiems medvilniniams,
sintetiniams arba mišraus pluošto audinių
(medvilnė+sintetika) drabužiams skalbti. Programa aptinka
skalbinių rūšį bei kiekį ir automatiškai nustato vandens
sąnaudas ir programos veikimo trukmę.
DĖMESIO! Nenaudokite šios programos
A
Veikiant programai „Automatinė“, maksimali skalbimo
temperatūra pagal nešvarumo lygį ir skalbinių tipą yra 60
ºC. Jeigu skalbiami smarkiai sutepti balti arba įsisenėjusių
dėmių turintys skalbiniai (purvinos apykaklės, nešvarios
kojinės, prakaito dėmės ir pan.), skalbimo rezultatai gali
būti nepatenkinami. Tokiu atveju rekomenduojama naudoti
programą „Medvilniniai audiniai“ su pradiniu skalbimu ir
nustatyti 50–60 °C temperatūrą.
Daugelis drabužių tipų yra tinkamai nustatomi ir saugiai
skalbiami parinkus programą „Automatinė“.
• Ekonomiška medvilnės skalbimo programa
Ji rekomenduojama vidutiniškai sutemptiems,
neblunkantiems medvilniniams ir lininiams audiniams
skalbti. Nors jis skalbia ilgiau nei visos kitos programos, ji
labai taupo energiją ir vandenį. Faktinė vandens temperatūra
gali skirtis nuo nurodytosios skalbimo temperatūros. Kai į
skalbimo mašiną įdedate mažiau skalbinių (pvz., ½ talpos ar
mažiau), programos laikas gali automatiškai sutrumpėti. Šiuo
atveju sumažės energijos ir vandens sąnaudos – skalbiniai
bus skalbiami ekonomiškiau. Ši programa yra modeliuose su
likusio laiko indikatoriumi.
• BabyProtect (Kūdikių drabužėliai)
Ji rekomenduojama kūdikių rūbeliams ir alergiškų žmonių
drabužiams skalbti. Ilgesnis kaitinimo laikas ir papildomas
skalavimas užtikrina aukštesnį higienos lygį.
• Jautrûs audiniai 20°
Ji rekomenduojama jautrių audinių drabužiams skalbti. Ji
skalbia atsargiau lyginant su sintetinių audinių programa.
• Rankinis skalbimas
Ji rekomenduojama vilnoniams/jautrių audinių drabužiams,
kurių etiketėse nurodyta „Neskalbti mašinoje“, o
rekomenduojama skalbti rankomis, skalbti. Pasirinkus šią
programą, skalbiniai skalbiami labai atsargiai, negadinant
drabužių.
• Kasdienė skubioji
Ji rekomenduojama lengvai sutemptiems ir nedėmėtiems
medvilniniams audiniams greitai išskalbti.
• Itin trumpa skubioji programa
Ji rekomenduojama lengvai sutemptiems ir nedėmėtiems
medvilniniams audiniams greitai išskalbti.
• Atgaivinimas
Siekiant greičiau pašalinti nešvarumus, skalbiniai apdorojami
garais.
C
• 40° / 40’
Ji rekomenduojama mažam lengvai sutemptų medvilninių
skalbinių kiekiui greitai išskalbti.
vilnoniams ir jautriems skalbiniams skalbti.
Pasirinkite tinkamą temperatūrą, jeigu ekrane
rodoma temperatūra nėra tinkama pagal gaminio
priežiūros etiketę.
Dėkite tik pusę pasirinktai programai nurodyto
skalbinių kiekio.
Pasirinkus šią programą, paprastai girdimi virimo
garsai, nes garų generatorius virina vandenį, kad
susidarytų garai.
52 / LT
Skalbimo mašina / Vartotojo vadovas
Page 53

• Hygiene 20°
Šią programą naudokite skalbiniams, kuriuos reikia skalbti
žemoje temperatūroje, naudojant intensyvų ir ilgą skalbimo
ciklą. Šią programą naudokite skalbiniams, kuriuos reikia
higieniškai skalbti žemoje temperatūroje.
• Skalavimas
Ji rekomenduojama tuomet, kai norima ką nors išskalauti
arba iškrakmolinti.
• Gręžimas + Vandens išleidimas
Pasirinkite šią programą, kad iš skalbyklės būtų išleistas
vanduo.
4.4 Temperatūros pasirinkimas
Pasirinkus naują programą, temperatūros indikatorius
parodo tai programai rekomenduojamą temperatūrą.
Gali būti, kad rekomenduojama temperatūros vertė nėra
maksimali temperatūra, kurią galima pasirinkti esamai
programai.
0
C
88
1888
88:88
Norėdami pakeisti temperatūrą, spauskite temperatūros
reguliavimo
padalomis.
Galų gale ekrane rodomas simbolis „–“, reiškiantis skalbimo
šaltame vandenyje parinktį.
C
Temperatūrą galima pakeisti ir tada, kai skalbimas jau
pradėtas. Šį pakeitimą galima atlikti tik tam tikro skalbimo
etapo metu. Pakeitimų daryti negalima esant tam tikriems
skalbimo etapams.
C
mygtuką. Temperatūra bus mažinama 10 °C
0
C
-
1888
88:88
Programose, kuriose negalima keisti temperatūros
nuostatų, pakeitimų daryti negalima.
Jeigu nustatysite skalbimo šaltame vandenyje
parinktį, o paskui dar kartą paspausite temperatūros
reguliavimo mygtuką, ekrane bus rodoma pasirinktai
programai rekomenduojama temperatūra. Norėdami
sumažinti temperatūrą, dar kartą paspauskite
temperatūros reguliavimo mygtuką.
4.5 Gręžimo greičio pasirinkimas
Kai tik pasirenkama nauja programa, gręžimo greičio
indikatorius parodo rekomenduojamą pasirinktos programos
gręžimo greitį.
Gali būti, kad rekomenduojama greęžimo greičio
C
vertė nėra maksimalius gręžimo greitis, kurį galima
pasirinkti esamai programai.
0
C
88
1888
88:88
Spauskite gręžimo greičio reguliavimo mygtuką, kad
pakeistumėte gręžimo greitį. Gręžimo greitis palaipsniui
sumažėja.
Tuomet, priklausomai nuo gaminio modelio, ekrane bus
rodomos parinktys „Skalavimo sulaikymas“ ir „Be gręžimo“.
Gręžimo greičio nustatymo mygtukas
C
C
Jeigu programai pasibaigus skalbinių tuoj pat išimti
neplanuojate, galite naudoti
funkciją, kad skalbiniai išleidus vandenį iš skalbyklės
nesusiglamžytų.
Ši funkcija laiko skalbinius galutinio skalavimo vandenyje.
naudojamas tik gręžimo greičiui mažinti.
Skalavimo sulaikymo parinktį parodo simbolis „ı_ı“,
o gręžimo sulaikymo parinktį – simbolis „_“.
skalavimo sulaikymo
0
C
88
88:88
Jeigu pasirinkote skalavimo sulaikymo funkciją ir norite
išgręžti skalbinius:
- Nustatykite gręžimo greitį.
- Paspauskite paleidimo / pristabdymo / atšaukimo
mygtuką. Programa vėl paleidžiama. Mašina gręžia
skalbinius, išleisdama vandenį.
Galite pasirinkti funkciją
programai pasibaigus vanduo būtų išleistas, bet skalbiniai
nebūtų gręžiami.
Be gręžimo, jeigu norite, kad
0
C
88
88:88
Programose, kuriose negalima keisti gręžimo
C
Galite pakeisti gręžimo greitį skalbimui prasidėjus, esant tam
tikriems skalbimo etapams. Pakeitimų daryti negalima esant
tam tikriems skalbimo etapams.
greičio nuostatų, pakeitimų daryti negalima.
53 / LT
Skalbimo mašina / Vartotojo vadovas
Page 54

4.6 Programų ir sąnaudų lentelė
LT
16
Pagalbinė funkcija
Programa (°C)
Maksimalus skalbinių kiekis (kg)
Vandens sunaudojimas (l)
Elektros sunaudojimas (kWh)
Maks. greitis***
Nuskalbimas
Greitas skalbimas
Skalavimo sulaikymas
Naminių gyvūnų plaukų šalinimas
Ekonomiška medvilnės skalbimo
programa
Medvilniniai audiniai
Sintetiniai audiniai
Vilnoniai audiniai 40 1.5 49 0.25 1000 • • • Žema temperatūra-40
Rankinis skalbimas 30 1 40 0.25 600 Žema temperatūra-30
BabyProtect+ 60 7 85 1.90 1600 30 - 90
Tamsių skalbinių skalbimas 40 3 60 0.60 1000 • • • • Žema temperatūra-40
Atgaivinimas - 2 35 0.15 1000 40° / 40’ 40 7 45 0.60 1400 • Žema temperatūra-40
Jautrûs audiniai 20° 20 3.5 45 0.15 1000 • • • • 20
Hygiene 20° 20 2 95 0.40 1600 20
Itin trumpa skubioji programa 30 2 35 0.15 1400 • • Žema temperatūra-30
Kasdienė skubioji
Automatic Programme 40 7 **** **** 1600 • • • • • Žema temperatūra-60
60** 7 44 0.88 1600 Žema temperatūra-60
60** 3.5 37 0.70 1600 Žema temperatūra-60
40** 3.5 37 0.69 1600 Žema temperatūra-60
90 7 70 2.20 1600 • • • • • Žema temperatūra-90
60 7 70 1.55 1600 • • • • • Žema temperatūra-90
40 7 67 0.90 1600 • • • • • Žema temperatūra-90
60 3 52 1.10 1200 • • • • • Žema temperatūra-60
40 3 49 0.60 1200 • • • • • Žema temperatūra-60
90 7 67 2.00 1400 • • Žema temperatūra-90
60 7 67 1.10 1400 • • Žema temperatūra-90
30 7 67 0.25 1400 • • Žema temperatūra-90
Pasirinktina
temperatūra °C
Naktinis režimas
• : Galima pasirinkti.
* : Pasirenkama automatiškai, neatšaukiama.
** : Standartinių energijos sąnaudų programa (EN 60456 3 leid.)
*** : Jeigu jūsų mašinos maksimalus gręžimo greitis yra mažesnis už šią reikšmę, galima pasirinkti maksimalų leistiną gręžimo greitį.
**** : Programa aptinka į skalbyklę sudėtų skalbinių rūšį ir kiekį ir automatiškai nustato vandens bei energijos sąnaudas ir programos
veikimo trukmę.
- : Apie maksimalų skalbinių kiekį žr. programos aprašymą.
** „Programos „Medvilnės ekonominė 40 °C“ ir „Medvilnės ekonominė 60 °C“ yra standartinės programos.“ Šios programos
vadinamos „40 °C medvilnės standartine programa“ ir „60 °C medvilnės standartine programa; skydelyje jos pažymėtos
simboliais.
Lentelėje nurodytos pagalbinės funkcijos gali skirtis priklausomai nuo jūsų mašinos modelio.
C
54 / LT
Vandens ir energijos sąnaudos gali skirtis nuo pateiktųjų lentelėje, priklausomai nuo vandens slėgio, vandens kietumo ir
temperatūros, aplinkos temperatūros, skalbinių rūšies ir kiekio, pagalbinių funkcijų pasirinkimo ir tinklo įtampos svyravimų.
Pasirinktos programos skalbimo laikas rodomas mašinos ekrane. Normalu, kad faktinis skalbimo laikas gali šiek tiek skirtis nuo
ekrane rodomo laiko.
„Gamintojas gali pakeisti papildomų funkcijų pasirinkimo būdus. Gali būti pridėta naujų pasirinkimo būdų arba jie pašalinti.“
„Mašinos gręžimo greitis gali skirtis atsižvelgiant į programą; šis gręžimo greitis negali viršyti maks. mašinos gręžimo greičio.“
Skalbimo mašina / Vartotojo vadovas
Page 55

4.7 Pagalbinės funkcijos pasirinkimas
Reikiamas papildomas funkcijas pasirinkite prieš paleisdami
programą. Kiekvieną kartą pasirinkus programą, kartu
užsidega ir tų pagalbinių funkcijų simbolių rėmeliai, kuriuos
galima su ja pasirinkti. Pasirinkus papildomą funkciją,
užsidega vidinė pagalbinės funkcijos simbolio sritis.
0
C
88
1888
88:88
Tų pagalbinių funkcijų simbolių rėmeliai, kurių su
C
Be to esamai programai tinkamų pagalbinių funkcijų
rėmeliai šviečia ir pradėjus skalbimą. Galite pasirinkti arba
atšaukti tas pagalbines funkcijas, kurių rėmeliai šviečia.
Jeigu skalbimo ciklo metu pasiekiamas toks momentas,
kai pagalbinės funkcijos pasirinkti negalima, tos funkcijos
rėmeliai užgęsta.
C
• Nuskalbimas
Nuskalbti reikėtų tik stipriai suteptus skalbinius.
Nenuskalbdami taupote energiją, vandenį, skalbimo miltelius
ir laiką.
• Greitas skalbimas
Šią funkciją galima naudoti su medvilnės ir sintetikos
skalbimo programomis. Sumažinamas lengvai suteptų
skalbinių skalbimo laikas ir skalavimų skaičius.
C
• Papildomas skalavimas
Ši funkcija leidžia mašinai atlikti dar vieną papildomą
skalavimą po pagrindinio skalbimo skalavimo. Todėl
sumažėja rizika, kad jautrią odą (kūdikių, į alergiją linkusią
odą ir pan.) paveiks skalbiniuose likę skalbimo miltelių
likučiai.
• Glamžymąsi mažinanti programa
Ši funkcija skalbiant mažiau suglamžo drabužius. Būgno
judesiai sumažinami ir apribojamas gręžimo greitis, kad
skalbiniai nesusiglamžytų. Be to, skalbiama didesniame
vandens kiekyje.
esama programa pasirinkti negalima, nešviečia.
Kai kurių funkcijų kartu pasirinkti neįmanoma.
Jeigu prieš paleisdami mašiną pasirinksite antrą
papildomą funkciją, kuri yra nesuderinama su
anksčiau pasirinktąja, pirmoji pasirinkta funkcija bus
atšaukta ir liks įjungta tik antroji pasirinkta pagalbinė
funkcija. Pavyzdžiui, jeigu pirma pasirenkate greitąjį
skalbimą, o po to papildomą skalavimą, papildomas
skalavimas bus atšauktas ir liks įjungtas tik greitasis
skalbimas.
Pagalbinė funkcija, kuri yra nesuderinama su
programa, pasirinkti neįmanoma. (Žr. „Programų ir
sąnaudų lentelę“)
Kai kurios programos turi pagalbinių funkcijų, kurias
privaloma naudoti kartu su jomis. Tokių funkcijų
atšaukti neįmanoma. Tokių pagalbinių funkcijų
rėmeliai nešvies – švies tik vidinė jų sritis.
Kai tik pasirenkate šią pagalbinę funkciją, į mašiną
dėkite tik pusę maksimalaus programų lentelėje
nurodyto skalbinių kiekio.
• Skalavimo sulaikymas
Jeigu programai pasibaigus skalbinių tuoj pat išimti
neplanuojate, galite naudoti skalavimo užlaikymo funkciją,
kad skalbiniai būtų laikomi paskutiniam skalavimui skirtame
vandenyje ir, būdami sausi, nesusiglamžytų. Jeigu norite
išleisti vandenį negręžiant skalbinių, po šio proceso
paspauskite paleidimo/pristabdymo mygtuką. Programa
vėl paleidžiama ir išleidžiamas vanduo, bet skalbiniai
neišgręžiami.
Jeigu norite išgręžti vandenyje laikytus skalbinius, nustatyktie
gręžimo greitį ir paspauskite paleidimo/pristabdymo
mygtuką.
Programa vėl paleidžiama. Vanduo išleidžiamas, skalbiniai
išgręžiami ir programa baigiama.
• Naktinis režimas
Ji rekomenduojama medvilniniams skalbiniams skalbti tyliai
ir mažesnėmis energijos sąnaudoms. Gręžimo etapai yra
atšaukiami ir programa sustabdoma skalavimo etape, kad
skalbimas būtų atliekamas tyliai. Programai pasibaigus,
paleiskite gręžimo ciklą, kad skalbiniai būtų išgręžti.
Laiko ekranas
Veikiant programai, laikas, likęs iki programos pabaigos,
rodomas valandomis ir minutėmis, pvz., „01:30“.
Programos trukmė gali skirtis nuo nurodytosios
C
„programų ir sąnaudų lentelėje“, priklausomai nuo
vandens slėgio, kietumo ir temperatūros, aplinkos
temperatūros, skalbinių rūšies ir kiekio, pagalbinių
funkcijų pasirinkimo ir tinklo įtampos svyravimų.
4.8 Programos pabaiga
Programos pabaigos funkcija leidžia atidėti skalbimo
programos paleidimą iki 24 valandų. Paspaudus
Programos pabaigos mygtuką, ekrane rodomas
apskaičiuotas programos pabaigos laikas. Nustačius
Programos pabaigą, užsidega Programos pabaigos
indikatorius.
0
C
88
1888
88:88
Norėdami, kad pabaigos laiko funkcija būtų įjungta ir
programa nustatytam laikui pasibaigus būtų baigta, nustatę
laiką, privalote paspausti
mygtuką.
Jeigu Programos pabaigos funkciją norite atšaukti, paspaudę
įjungimo/išjungimo išjunkite ir vėl įjunkite mašiną.
Pasirinkę pabaigos laiko funkciją, nenaudokite
C
1 Atidarykite dureles, sudėkite skalbinius ir pripilkite
skalbimo miltelių bei kitų priemonių.
skystų skalbimo priemonių! Drabužiai gali tapti
dėmėti.
paleidimo / pristabdymo
0
C
88
1888
88:88
55 / LT
Skalbimo mašina / Vartotojo vadovas
Page 56

2 Nustatykite džiovinimo programą, temperatūrą, gręžimo
greitį ir, jeigu reikia, pasirinkite pagalbines funkcijas.
3 Nustatykite norimą pabaigos laiką, paspausdami
Programos pabaigos mygtuką. Programos pabaigos
indikatorius šviečia.
4 Paspauskite
paleidimo / pristabdymo mygtuką.
Pradedama atgalinė laiko atskaita. „:“ ženklas ekrane,
esantis pabaigos laiko viduryje, pradeda žybčioti.
Veikiant atgalinės pabaigos laiko atskaitos
C
funkcijai, į mašiną galima pridėti daugiau skalbinių.
Pasibaigus atgalinei laiko atskaitai, pabaigos
laiko indikatorius užgęsta, pradedamas skalbimo
procesas ir ekrane rodoma pasirinktos programos
trukmė.
Pasirinkus pabaigos laiką, ekrane rodomas
laikas, kurį sudaro pabaigos laikas ir pasirinktos
programos trukmė.
4.9 Programos paleidimas
1 Paspauskite paleidimo / pristabdymo mygtuką, kad
paleistumėte programą.
2 Pirmiau neveikęs
dabar pradeda šviesti be perstojo, rodydamas, kad
programa yra paleista.
paleidimo / pristabdymo mygtukas
0
C
88
1888
88:88
0
C
88
1888
88:88
Jeigu skalbyklėje vandens lygis yra netinkamas, paspaudus
paleidimo / pristabdymo mygtuką, įkrovos durelių simbolis
tebešvies ekrane.
0
C
88
1888
88:88
Mašinos perjungimas į pristabdymo režimą:
Jei norite mašiną perjungti į pristabdymo režimą,
paspauskite paleidimo / pristabdymo
mygtuką. Ekrane
žybčios pristabdymo simbolis.
0
C
88
1888
88:88
Programos keitimas po programos paleidimo:
Programai veikiant, jos pakeisti negalima.
Pristabdę esamą programą, galite pasirinkti kitą programą.
3 Įkrovos durelės yra užrakintos. Užrakinus įkrovos dureles,
ekrane rodomas durelių užrakto simbolis.
0
C
88
1888
88:88
4 Programos eigos indikatoriaus lemputės ekrane parodo
esamą programos etapą.
4.10 Durelių užraktas
Mašinos dureles užblokuoja užrakto sistema, kuri neleidžia
atidaryti durelių tais atvejais, kai vandens lygis nėra
tinkamas.
Užrakinus įkrovos dureles, ekrane rodomas užrakintų durelių
simbolis.
4.11 Pasirinkimų keitimas paleidus programą
Skalbinių pridėjimas, kai programa jau paleista:
Jeigu paspaudus paleidimo / pristabdymo
mašinoje vandens lygis yra tinkamas, ekrane žybčios įkrovos
durelių simbolis, kol durelės bus atidarytos; atidarius įkrovos
dureles, simbolis dings.
56 / LT
mygtuką
C
Pasirinkta programa paleidžiama nuo pradžios.
Pagalbinių funkcijų, gręžimo greičio ir temperatūros
nuostatų pakeitimas
Priklausomai nuo vykdomo programos etapo, .galite atšaukti
arba įjungti pagalbines funkcijas. Žr. „Pagalbinės funkcijos
pasirinkimas“.
Taip pat galite pakeisti greičio ir temperatūros nuostatas.
Žr. „Gręžimo greičio pasirinkimas“ ir „Temperatūros
pasirinkimas“.
Jeigu skalbyklės temperatūra bus aukšta arba
C
joje esančio vandens lygis bus virš durelių angos,
durelės neatsidarys.
4.12 Užraktas nuo vaikų
Naudokite apsaugos nuo vaikų funckciją, kad vaikai
nežaistų su mašina. Ji neleidžia vaikams pakeisti veikiančios
programos.
Veikiant užrakto nuo vaikų funkcijai, mašiną
C
galima įjungti ir išjungti
mygtuku. Vėl įjungus skalbyklę, programa tęsiama
nuo to taško, kuriame ji buvo pristabdyta.
Kai užrakto nuo vaikų funkcija yra įjungta,
spaudžiant mygtukus, girdimas įspėjamasis garso
signalas. Paspaudus šiuos mygtukus 5 kartus iš
eilės, įspėjamasis garso signalas bus atšauktas.
Jeigu norite įjungti apsaugos nuo vaikų funkciją:
Paspauskite ir 3 sekundes palaikykite nuspaudę
pagalbinės funkcijos mygtuką. Pasibaigus ekrane rodomai
atgalinei laiko atskaitai „CL 3-2-1“, ekrane rodoma
„Užraktas nuo vaikų įjungtas“. Jeigu rodomas šis įspėjimas,
atleiskite
2-os papildomos funkcijos mygtuką.
Skalbimo mašina / Vartotojo vadovas
įjungimo / išjungimo
2-os
Page 57

Jeigu norite išjungti apsaugos nuo vaikų užraktą:
Paspauskite ir 3 sekundes palaikykite nuspaudę
pagalbinės funkcijos mygtuką. Pasibaigus ekrane rodomai
atgalinei laiko atskaitai
„Užraktas nuo vaikų įjungtas“.
“CL 3-2-1”, ekrane rodoma
2-os
4.13 Programos atšaukimas
Programa atšaukiama, kai skalbyklė išjungiama ir vėl
įjungiama. Paspauskite ir 3 sekundes palaikykite nuspaudę
įjungimo / išjungimo mygtuką. Pasibaigus ekrane
rodomai atgalinei laiko atskaitai „3-2-1“, skalbyklė
išjungiama.
Jeigu veikiant užrakto nuo vaikų funkcijai paspausite
C
įjungimo / išjungimo mygtuką, programa
nebus atšaukta. Pirmiausiai reikia atšaukti užrakto
nuo vaikų funkciją.
Jeigu atšaukę programą norite atidaryti dureles,
bet jų atidaryti nepavyksta, nes skalbyklėje esančio
vandens lygis yra virš durelių angos, tuomet pasukite
programos pasirinkimo rankenėlę ties
vandens išleidimo+gręžimo programa, kad
vanduo būtų išleistas iš skalbyklės.
4.14 Programos pabaiga
Programai pasibaigus, ekrane rodomas pabaigos simbolis.
Jeigu per 10 minutes nepaspausite jokio mygtuko, mašina
persijungs į išjungimo režimą. Ekranas ir visi indikatoriai
išjungiami.
Jeigu paspausite įjungimo / išjungimo mygtuką, atlikti
programos etapai nebus rodomi.
4.15 GARSO lygio reguliavimas
Mažas ir didelis garso lygis
Norėdami pareguliuoti garso lygį, paspauskite ir 3 sekundes
palaikykite nuspaudę papildomos funkcijos mygtuką 3.
Pasibaigus ekrane rodomai atgalinei laiko atskaitai „3-21“, užsidegs garso lygio simbolis ir bus rodomas naujas
pasirinktas garso lygis.
5 Techninė priežiūra ir valymas
Reguliai valant, pailgėja gaminio naudojimo laikas ir
sumažėja trikčių atvejų.
5.1 Skalbimo priemonių stalčiuko valymas
Reguliariai (kas 4–5 skalbimo ciklus), valykite skalbimo
priemonės stalčiuką, kad jame nesikauptų skalbimo
priemonės likučiai.
Pakelkite galinę sifono dalį, kad jį išimtumėte kaip
parodyta.
Jeigu audinių minkštiklio skyriuje pradeda kauptis
C
didesnis nei įprasta minkštiklio ir vandens mišinio
kiekis, išvalykite sifoną.
užsidėkite apsaugines pirštines arba naudokite tinkamą
šepetėlį, kad neliestumėte nuosėdų rankomis.
3 Atlikę valymo darbus, įtaisykite sifoną atgal į vietą ir
paspauskite priekinę jo dalį žemyn, kad įsitikintumėte, jog
fiksavimo auselės tinkamai įtaisytos.
5.2 Durelių ir būgno valymas
Laikui bėgant mašinoje gali prisikaupti audinių minkštiklio,
skalbimo priemonių ir purvo likučių, dėl kurių gali kilti
nemalonių kvapų ir nusiskundimų dėl prasto skalbimo.
Norėdami to išvengti, naudokite
Jeigu mašinoje
programą
vandens kiekio
funkcijas. ŠiąPrieš paleisdami programą, pripilkite maks.
100 g kalkių nuosėdų šalinimo miltelių į pagrindinį
skalbimo priemonės skyrelį (skyrelį Nr. 2). Jeigu kalkių
nuosėdų šalinimo priemonė yra tablečių forma, dėkite vieną
tabletę į skyrių Nr. 2. Programai pasibaigus, nusausinkite
gofruotosios dalies vidų švariu skudurėliu.
C
Po kiekvieno skalbimo patikrinkite, ar būgne neliko pašalinių
daiktų.
Jeigu apačioje esančiame paveikslėlyje parodytos angos
būtų užkimštos, atkimškite angas dantų krapštuku.
C
A
būgno valymo programos nėra, naudokite
„Cottons-90“ ir taip pat pasirinkite papildomo
arba papildomo skalavimo pagalbines
Būgno valymo procesą kartokite kas 2 mėnesius.
Naudokite skalbyklėms tinkamas kalkių nuosėdų
šalinimo priemones.
Metaliniai daiktai subraižys būgną, dėl ko jis
pradės rūdyti. Rūdžių dėmes nuo būgno nuvalykite
nerūdijančio plieno valikliu. Nenaudokite plieno
vatos arba vielinių šepetėlių.
ĮSPĖJIMAS: Niekada nenaudokite kempinių
arba šveitimo medžiagų. Jos gali sugadinti
plastmasinius ir dažytus paviršius.
būgno valymo programą.
5.3 Korpuso ir valdymo skydelio valymas
Valykite mašinos korpusą muiluotu vandeniu arba
neėsdinančia, švelnia, geline valymo priemone ir
nušluostykite minkštu skudurėliu.
Valdymo skydelį valykite tik minkštu, drėgnu skudurėliu.
5.4 Vandens įleidimo filtrų valymas
Kiekviename mašinos užpakalinėje dalyje esančio vandens
įleidimo sklendės gale bei kiekviename vandens įleidimo
žarnos gale, prijungimo prie čiaupo vietoje, yra po filtrą.
Šie filtrai neleidžia į mašiną patekti vandenyje esantiems
svetimkūniams ir purvui. Filtrams užsiteršus, juos reikėtų
išvalyti.
2 Išplaukite skalbimo priemonių stalčiuką ir sifoną kriauklėje
dideliame drungno vandens kiekyje. Valydami stalčiuką,
57 / LT
Skalbimo mašina / Vartotojo vadovas
Page 58

Vandens išleidimas, kai gaminys turi avarinio
vandens išleidimo žarną:
1 Užsukite čiaupus.
2 Ištraukite kaiščius iš vandens įleidimo žarnų, kad
pasiektumėte vandens įleidimo vožtuvuose esančius
filtrus. Nuvalykite juos tinkamu šepetėliu. Jeigu filtrai labai
purvini, galite juos ištraukti pincetu ir išvalyti.
3 Ištraukite filtrus su tarpikliais iš tiesiųjų vandens įleidimo
žarnų dalių ir kruopščiai juos nuplaukite po tekančiu
vandeniu.
4 Atsargiai atgal įkiškite tarpiklius ir filtrus į vietą ir ranka
užveržkite žarnos veržles.
5.5 Likusio vandens išleidimas ir siurblio filtro
valymas
Išleidžiant skalbimo vandenį, šioje mašinoje įrengta filtrų
sistema neleidžia į jos sraigtą patekti kietiems daiktams,
pavyzdžiui, sagoms, monetoms ir audinių pluoštams. Todėl
vanduo išleidžiamas sklandžiai ir pailgėja siurblio naudojimo
laikas.
Jeigu iš mašinos neišleidžiamas vanduo, gali būti užsikišęs
siurblio filtras. Filtrą privaloma išvalyti kiekvieną kartą, kai tik
jis užsikemša, arba kas 3 mėnesius. Norint išvalyti siurblio
filtrą, pirma reikia išleisti vandenį.
Be to, prieš gabenant mašiną (pvz., persikraustant į kitą
namą) ir esant šaltam orui, vandenį reikia visiškai išleisti.
ĮSPĖJIMAS: Siurblio filtre likę pašaliniai daiktai
A
A
A
Norint išvalyti purviną filtrą ir išleisti vandenį:
1 Ištraukite mašinos kištuką iš maitinimo lizdo.
A
2 Atidarykite filtro galvutę.
gali jį sugadinti arba kelti triukšmą.
ĮSPĖJIMAS: Jeigu gaminio nenaudosite,
užsukite čiaupą, atjunkite tiekimo žarną ir išleiskite
iš mašinos vandenį, kad esant atitinkamoms oro
sąlygoms jis neužšaltų.
ĮSPĖJIMAS: Po kiekvieno panaudojimo užsukite
gaminio tiekimo žarnos čiaupą.
ĮSPĖJIMAS: Mašinoje vandens temperatūra
gali pakilti iki 90 ºC. Norint neapsideginti, filtrą
privaloma valyti tada, kai vanduo mašinoje atvėsta.
a Ištraukite avarinio vandens išleidimo žarną iš jos lizdo
b Po žarnos galu padėkite didelį indą. Ištraukite iš žarnos
galo kaištį ir išpilkite vandenį į indą. Kai indas bus lipnas,
užkimškite žarnos galą, vėl įkišdami kaištį. Išpylę vandenį
iš bakelio, vėl pakartokite pirmiau aprašytus veiksmus,
kad vanduo būtų visiškai išleistas iš mašinos.
c Išleidę visą vandenį, užkimškite jos galą kaiščiu ir
užfiksuokite žarną jos tvirtinimo vietoje.
d Pasukite ir ištraukite siurblio filtrą.
Vandens išleidimas, kai gaminys neturi avarinio
vandens išleidimo žarnos:
a Padėkite didelį indą priešais filtrą, kad į jį subėgtų filtre
esantis vanduo.
b Atsukite siurblio filtrą (sukite prieš laikrodžio rodyklę), kol
iš jo ims tekėti vanduo. Nukreipkite vandens srovę į indą,
kurį buvote padėjęs priešais filtrą. Šalia visuomet turėkite
šluostę, kad galėtumėte sugerti ja išsiliejusį vandenį.
c Išleidę iš mašinos visą vandenį, sukdami visiškai ištraukite
filtrą.
4 Išvalykite filtro viduje esančias nuosėdas ir, jeigu yra,
audinių pluoštus siurblio sraigto vietoje.
5 Įdėkite filtrą.
6 Jeigu filtro galvutė sudaryta iš dviejų dalių, uždarykite filtro
galvutę, paspauskite ąselę. Jeigu ji yra sudaryta iš vienos
dalies, pirmiausiai įtaisykite ąseles apačioje, tuomet
užspauskite viršutinę dalį.
3 Kai kuriuose modeliuose yra avarinio vandens išleidimo
žarna, o kai kuriuose – ne. Norėdami išleisti vandenį,
vadovaukitės toliau pateiktais nurodymais.
58 / LT
Skalbimo mašina / Vartotojo vadovas
Page 59

Ekonomiška
medvilnės
skalbimo
programa
Medvilnė
Sintetika
Vilna
Skalbimas
rankomis
Kūdikių
drabužėliai
Tamsūs skalbiniai
(tamsių spalvų
drabužių skalbimo
programa)
Tamsūs skalbiniai
(tamsių spalvų
drabužių skalbimo
programa)
Antklodė
Patalynė
Vandens
išleidimas
(Vandens
išleidimas)
Kasdienė
skubioji
Apdailos
detalių
apsauga
Skalavimas
Itin trumpa
skubioji
programa
Atšviežini
Gręžimas
Garinimas Šilkas +
mas
Papildomas
skalavimas
(Gausesnis
skalavimas)
Gležni 20º
skalbimas
rankomis
Greitasis
skalbimas
Kūdikių
drabužėliai+
Laiko
atidėjimas
Higieniškas
skalbimas 20º
Sports
Nuskalbi
mas
Naktinis
režimas
Automatinė
programa
Įvairūs audiniai
40
Marškiniai
Sintetinių skalbinių skalbimo programų parodomosios vertės (LT)
Likęs drėgmės kiekis (%)** Likęs drėgmės kiekis (%)**
Maksimalus
skalbinių kiekis
(kg)
Vandens sąnaudos
Sintetiniai audiniai
Sintetiniai audiniai
(l)
3 52 1.10
3 49 0.60
Elektros sąnaudos
(kWh)
01:45 45 40
01:31 45 40
Programos trukmė
(min)*
* Pasirinktos programos skalbimo laikas rodomas skalbyklės ekrane. Faktinis skalbimo laikas gali šiek tiek skirtis nuo ekrane rodomo laiko – tai
visiškai normalu.
** Likusio drėgmės kiekio vertės gali skirtis atsižvelgiant į pasirinkto gręžimo greičio vertę.
59 / LT
≤ 1000 rpm > 1000 rpm
Skalbimo mašina / Vartotojo vadovas
Page 60

6 Techninės savybės
Pagal Europos komisijos (ES) reglamentą Nr. 1061/2010
Tiekėjo pavadinimas arba prekės ženklas Beko
Modelio pavadinimas WMY 71243 LMB2
Nominali talpa (kg) 7
Energijos efektyvumo klasė / skalė nuo A+++ (didžiausias efektyvumas) iki D (mažiausias
efektyvumas)
Metinės energijos sąnaudos (kWh)
(1)
Energijos suvartojimas, naudojant standartinę 60°C programą medvilnei, esant pilnai apkrovai
(kWh)
Energijos sąnaudos naudojant standartinę 60°C programą medvilnei, esant dalinei apkrovai (kWh) 0.695
Energijos suvartojimas, naudojant standartinę 40°C programą medvilnei, esant dalinei apkrovai
(kWh)
Energijos suvartojimo režimas išjungtas (W) 0.440
Energijos suvartojimo režimas įjungtas (W) 0.640
Metinės vandens sąnaudos (l)
(2)
Gręžimo-džiovinimo efektyvumo klasė / skalė nuo A (didžiausias efektyvumas) iki G (mažiausias
efektyvumas)
Maksimalus sukimosi greitis (aps./ min.) 1200
Likęs drėgmės kiekis (%) 53
Standartinė programa medvilnei
(3)
Programos laikas standartinei 60°C programai medvilnei, esant pilnai apkrovai (min.) 209
Programos laikas standartinei 60°C programai medvilnei, esant dalinei apkrovai (min.) 185
Programos laikas standartinei 40°C programai medvilnei, esant dalinei apkrovai (min.) 185
Įjungto režimo trukmė (min.) N/A
Aplinkos akustinio triukšmo emisijos skalbiant / gręžiant (dB) 53/75
Įtaisytasis Non
Aukštis (cm) 84
Plotis (cm) 60
Gylis (cm) 50
Grynasis svoris (±4 kg) 64
Vienas vandens įvadas / dvigubas vandens įvadas
• Yra
Elektros įvestis (V/Hz) 230 V / 50Hz
Bendroji el. srovė (A) 10
Bendroji galia (W) 2200
Pagrindinio modelios kodas 9710
(1)
Energijos suvartojimas pagal 220 standartinius skalbimo ciklus programai medvilnei, esant 60°C ir 40°C temperatūrai, su pilna ir daline apkrova bei
mažesnio galingumo režimų suvartojimu. Faktinis energijos suvartojimas priklausys nuo to, kaip prietaisas naudojamas.
(2)
Vandens suvartojimas pagal 220 standartinius skalbimo ciklus programoms medvilnei, esant 60°C ir 40°C temperatūrai, su pilna ir daline apkrova.
Faktinis energijos suvartojimas priklausys nuo to, kaip prietaisas naudojamas.
(3)
„Standartinė 60°C programa medvilnei“ ir „Standartinė 40°C programa medvilnei“ yra standartinės skalbimo programos, kurioms skiriama informacija
ant etiketės ir informaciniame lapelyje. Šios programos tinka skalbiant vidutiniškai išpurvintus skalbinius, taip pat jos yra efektyviausios energijos ir vandens
suvartojimo atžvilgiu.
Siekiant pagerinti šio gaminio kokybę, techniniai duomenys gali būti keičiami be išankstinio įspėjimo.
A+++
174
0.880
0.690
8800
B
Medvilnė Eko 60°C ir 40°C
• / -
60 / LT
Skalbimo mašina / Vartotojo vadovas
Page 61

7 Trikčių šalinimas
Programa nepasileidžia arba jos negalima pasirinkti.
• Iškilus tiekimo problemai (pavyzdžiui, tinklo įtampa, vandens slėgis ir pan.), mašina gali būti persijungusi į savisaugos
režimą. >>>
programa bus atšaukta. (Žr. „Programos atšaukimas“)
Vanduo lieka mašinoje.
• Gamybos metu, dėl kokybės kontrolės procesų, mašinoje gali būti likę vandens. >>> Tai nėra gedimas; vanduo nekenkia
mašinai.
Mašina vibruoja arba kelia triukšmą.
• Mašina gali būti nelygiai pastatyta. >>> Pareguliuokite kojeles, kad mašina stovėtų lygiai.
• Į siurblio filtrą gali būti pakliuvęs kietas daiktas. >>> Išvalykite siurblio filtrą.
• Gali būti neišsukti apsauginiai gabenimo varžtai. >>> Išsukite apsauginius gabenimo varžtus.
• Mašinoje gali būti per mažai skalbinių. >>> Pridėkite į mašiną daugiau skalbinių.
• Mašinoje gali būti pridėta per daug skalbinių. >>> Sumažinkite skalbinių kiekį mašinoje arba išskirstykite skalbinius rankomis.
• Mašinoje gali būti atremta į kietą daiktą. >>> Įsitikinkite, kad mašina nebūtų į nieką atremta.
Paleidus programą, mašina netrukus išsijungė.
• Mašina gali laikinai išsijungti sumažėjus įtampai. >>> Ji veiks toliau, kai įtampos lygis vėl taps normalus.
Nepaleidžiama programos atgalinė laiko atskaita. (Modeliuose su įrengtu ekranu)
• Laikmatis gali būti sustojęs įleidžiant vandenį. >>> Laikmatis nepradeda atgalinės laiko atskaitos, kol į mašiną nepripilamas
tinkamas vandens kiekis. Mašina lauks, kol į ją bus pripiltas pakankamas vandens kiekis, kad dėl per mažo vandens kiekio
nepablogėtų skalbimo rezultatai. Po to laikmatis vėl ims skaičiuoti laiką atgal.
• Laikmatis gali būti sustojęs šildymo etapo metu. >>> Laikmatis nepradeda atgalinės laiko atskaitos, kol mašinoje nepasiekiama
pasirinkta temperatūra.
• Laikmatis gali būti sustojęs gręžimo etapo metu. >>> Dėl būgne netolygiai pasiskirsčiusių skalbinių gali būti įsijungusi
automatinė nesubalansuotų skalbinių aptikimo sistema.
• Skalbiniai mašinoje negręžiami tol, kol jie nėra tolygiai paskirstyti būgne, nes mašina gali sugesti arba apgadinti aplink ją
esančius daiktus. Skalbinius reikėtų iğskirstyti ir dar kartą iğgręşti.
Norėdami atšaukti programą, pasukite programų pasirinkimo rankenėlę, kad pasirinktumėte kitą programą. Ankstesnė
Iš skalbimo priemonės stalčiuko bėga putos.
• Pridėta per daug skalbimo priemonės. >>> Sumaišykite 1 valgomąjį šaukštą minkštiklio ir ½ l vandens bei įpilkite į pagrindinį
skalbimo priemonės stalčiaus plovimo skyrių.
• Įpilkite į skalbyklę skalbimo miltelių, atsižvelgdami į tinkamas programas ir maks. skalbinių kiekį, nurodytą „Programų ir
sąnaudų lentelėje“. Jeigu naudojate papildomas chemines priemones (dėmių vailiklius, baliklius ir pan.), skalbimo miltelių
pilkite mažiau.
Programos pabaigoje skalbiniai lieka šlapi
• Naudojant per daug skalbimo priemonės, gali susidaryti per daug putų, todėl gali įsijungti automatinė putų sugėrimo
sistema. >>>
• Skalbiniai mašinoje negręžiami tol, kol jie nėra tolygiai paskirstyti būgne, nes mašina gali sugesti arba apgadinti aplink ją
esančius daiktus. Skalbinius reikėtų iğskirstyti ir dar kartą iğgręşti.
A
61 / LT
Naudokite rekomenduojamą kiekį skalbimo priemonės.
ĮSPĖJIMAS:Jeigu negalite pašalinti problemos, nors ir vadovaujatės šiame skyriuje pateiktais nurodymais, kreipkitės į pardavėją
arba įgaliotojo techninio aptarnavimo centro atstovą. Niekada nebandykite patys taisyti neveikiančio gaminio.
Skalbimo mašina / Vartotojo vadovas
Page 62

Пральна машина
Ръководство за употреба
WMY 71243 LMB2
номер документа
2820523886_BG / 17-09-14.(9:30)
Page 63

Този продукт е произведен с помощта на последните технологии в екологично чиста среда.
Page 64

1 Важни указания за безопасност и опазване на
околната среда
Този раздел съдържа важни указания, които ще ви помогнат да
предотвратите риска от нараняване или щети върху имуществото
ви. Неспазването на тези указания правят невалидна гаранцията.
1.1 Обща безопасност
• Този продукт може да се ползва от деца над 8 години
включително, както и от лица с физически, сензорни или
умствени недъзи или необучени и неопитни хора, но само ако
те са наглеждани ли обучени от лице, което ги е инструктирало
относно безпасната употреба на уреда и свързаните рискове.
Децата не бива да си играят с уреда. Почистването и
поддръжката не бива да се извършват от деца, освен ако те не
са надзиравани от възрастен. Не допускайте деца под три години,
освен ако не ги наблюдавате непрекъснато.
• Не поставяйте уреда върху покрит с килим под. В противен
случай, блокираният приток на въздух отдолу ще доведе до
пренагряване на електрическите части на машината. Това може
да доведе до проблеми с уреда.
• Ако уредът е повреден, той не бива да се ползва преди да е
поправен от представител на оторизиран сервиз. Съществува
риск от електрически удар!
• Уредът е програмиран да продължи работа в случай на
прекъсване на електрозахранването. Ако желаете да откажете
програма, вижте раздел "Отказ на програма".
• Свържете уреда към заземен контакт, защитен с 16-амперов
бушон. Не мислете, че не е важно заземяването на инсталацията
Ви да е направено от квалифициран електротехник. Фирмата ни
не носи отговорност за щети по причина на ползване на уреда без
заземяване направено съгласно местните наредби.
• Водопроводът и отточните тръби трябва да са добре затегнати
и да не са повредени. В противен случай съществува риск от
протичане.
• Никога не отваряйте вратата на пералнята за да извадите
филтъра ако в резервоара има останала вода. В противен случай
съществува риск от изгаряне с горещата вода.
• Не насилвайте заключената врата за да я отворите. Вратата е
готова за отваряне само няколко минути след завършване на
перилния цикъл. Ако насилите вратата за да я отворите, може да
повредите вратата и залючващия механизъм.
• Изключете уреда от контакта когато не го ползвате.
• Никога не мийте уреда с изливане или пръскане на вода отгоре
му! Съществува риск от електрически удар!
64 / BG
Пральна машина / Посібник користувача
Page 65

• Никога не пипайте щепсела с мокри ръце! Никога не изваждайте
щепсела като дърпате за кабела, винаги хващайте за щепсела.
• Изполвайте прах за пране, омекотител и други препарати,
подходящи за автоматична перална машина.
• Следвайте указанията върху етикетите на дрехите и върху
опаковката на препарата.
• Уредът трябва да бъде изключен от контакта при монтаж,
подрръжка, почистване и ремонт.
• Монтаж и ремонт на уреда трябва да се извършва само от
представител на оторизирания сервиз. Производителят не носи
отговорност за щети, причинени от процедури, извършени от
неквалифицирани лица.
• Ако захранвашият кабел е повреден, той трябва да бъде
подменен от производителя, следпродажбения сервиз или лице с
подобна квалификация (за предпочитане електротеник) или друго
определено от внсителя лице, с цел да се избегнат всякакви
рискове.
• Поставете продукта върху твърда, плоска и равна повърхност.
• Не го поставяйте върху килим или подобна повърхност.
• Не поставяйте продукта върху висока платформа или на ръба на
каскадна повърхност.
• Не поставяйте уреда върху захранващия кабел.
• Никога не използвайте гъба или изстъргващи материали. Те ще
повредят боядисаните, хромирани и пластмасови повърхности.
1.2 Предназначение на уреда
• Този уред е предназначен за битова употреба. Уредът не е
предназначен за комерсиална употреба и не бива да се ползва за
други цели освен предназначението му.
• Уредът може да се ползва за пране и изплакване само на пране,
обозначено по съответния начин.
• Производителят не носи отговорност в случай на неправилна
употреба или транспортиране.
1.3 Безопасност на децата
• Опаковъчните материали са опасни за децата. Дръжте
опаковъчните материали на безопасно място, далеч от достъпа
на деца.
• Електическите уреди са опасни за децата. Дръжте децата далеч
от уреда когато той работи. Не им позволявайте да си играят с
уреда. Използвайте защитата от деца за да предпазите децата от
игра с уреда.
• Не забраяйте да затворите вратата на уреда когато напускате
помещението, в което е разположен.
• Съхранявайте всички препарати и добавки на безпасно мяст,
далеч от достъпа на деца, като покриете контейнера или
залепите пакета на препарата.
65 / BG
Пральна машина / Посібник користувача
Page 66

При пране на дрехите при висока температура
стъклото на вратата се нагорещява. Затова дръжте
децата далеч от вратата на машината по време на
работата й.
1.4 Информация за опаковъчните материали
• Опаковъчните материали на продукта са произведени от
рециклируеми материали в съответствие с наредбите за опазване
на националната околна среда. Не изхвърляйте опаковъчните
материали заедно с останалите битови отпадъци. Занесете ги
в специалните пунктове за събиране на опаковъчни материали,
определени от местните власти.
1.5 Изхвърляне на остарелия уред
• Продуктът е произведен от висококачествени части и материали,
които могат да бъдат използвани повторно и са подходящи за
рециклиране. Затова не го изхвърляйте заедно с нормалните
битови отпадъци в края на сервизния му живот. Занесете го в
събирателен пункт за рециклиране на електрическо и електронно
оборудване. За да научите къде се намира най-близкият такъв
пункт, се свържете с местните власти. Помогнете в опазването
на околната среда и природните ресурси като рециклирате
използваните продукти. С цел безопасността на децата, срежете
захранващия кабел и счупете заключващия механизъм на вратата
така, че да бъдат нефункционални преди изхвърлянето на
продукта.
1.6 Спазването на Директивата за WEEE
Продуктът отговаря на изискванията на директивата на ЕС
за ихвърляне на отпадъчни продукти (2012/19/EU). Този
продукт носи класификационен символ за отпадъчно
електрическо и електронно оборудване (WEEE).
Продуктът е произведен от висококачествени части и
материали, които могат да се използват повторно и са подходящи
за рециклиране. Не изхвърляйте уреда заедно с обикновените
битови и други отпадъци в края на оперативния му живот. Занесете
го в събирателния център за рециклиране на електронно и
електрическо оборудване. Обърнете се към местните власти за
повече подробности относно тези събирателни центрове.
Съвместимост с директивата за ограничаване на употребата на
определени опасни вещества
Закупеният от вас продукт отговаря на изискванията на
директивата за ограничаване на употребата на определени опасни
вещества на ЕС (2011/65/EU). Той не съдържа никой от вредните и
забранени материали, описани в Директивата.
66 / BG
Пральна машина / Посібник користувача
Page 67

2 Инсталация
За монтажа на уреда се обърнете към найблизкия оторизиран сервиз. За да подготвите
уреда за употреба, прегледайте информацията
в това ръководство за употреба и проверете
дали електрозахранването, водоподаването
и канализацията са наред преди да повикате
представител на оторизирания сервиз. Ако
не са, се обадете на квалифициран техник и
водопроводчик за да ги оправи.
Подготовката на мястото и електрическата,
водната и канализационната инсталация са
C
задължение на клиента.
Проверете дали входящия и изходящия
маркуч, както и захранващия кабел не са
прегънати, затиснати или премазани при
наместването на продукта на мястото му
след монтажа или почистването.
ПРЕДУПРЕЖДЕНИЕ: Монтажът и
свързването на електрозахранването
B
на уреда трябва да бъдат извършени от
представител на оторизирания сервиз.
Производителят не носи отговорност за
щети, причинени от процедури, извършени от
неквалифицирани лица.
ПРЕДУПРЕЖДЕНИЕ: Преди монтажа
огледайте уреда за видими дефекти. Ако има
A
такива, не го монтирайте. Повредените уреди
носят риск за безопасността ви.
2.1 Подходящо място за инсталиране
• Поставете машината върху твърд под. Не
поставяйте машината върху черга или подобна
повърхност.
• Общото тегло на пералната машина и сушилнята
-заредени на пълен капацитет- поставени една
върху друга достига до около 180 килограма.
Поставете уреда върху здрав, равен под,
способен да издържи на това натоварване!
• Не поставяйте уреда върху захранващия кабел.
• Не монтирайте уреда на място, където
температурата може да падне под 0ºC.
• Поставете уреда на поне 1 см разстояние от
ръба на други мебели.
2.2 Отстраняване на подсилващите
опаковъчни материали
Наклонете машината назад за да отстраните
подсилващите опаковъчни материали. Отстранете
подсилващите опаковъчни материали като
издърпате опаковъчната лента.
2.3 Сваляне на болтовете
за транспортиране
ПРЕДУПРЕЖДЕНИЕ: Не сваляйте
болтовете за транспортиране преди да
A
сте свалили подсилващите опаковъчни
материали.
ПРЕДУПРЕЖДЕНИЕ: Отстранете
обезопасяващите болтове за
транспортиране преди да използвате
пералнята! В противен случай ще повредите
уреда.
1. Разхлабете всички болтове с подходящ гаечен
ключ, докато започнат да се въртят свободно
(C).
2. Отстранете транспортните болтове като ги
развиете внимателно.
3. Наместете пластмасовите капачки, доставени в
пакета с ръководството за употреба, в дупките
от винтовете на задния панел.
Съхранявайте болтовете за обезопасено
транспортиране, за да може да ги ползвате
C
отново ако се налага пренасяне на пералнята
в бъдеще.
Никога не пренасяйте пералнята без да сте
завили правилно болтовете по местата им!
(P)
2.4 Свързване на водопровода
Водното налягане, необходимо за работата на
уреда, трябва да е между 1 и 10 бара (0.1 – 10
C
MPa). За да работи пералнята Ви нормално,
са необходими 10 – 80 литра вода изтичащи от
крана за една минута. Ако водното налягане
е твърде високо, монтирайте понижаваща
налягането клапа.
Ако ще ползвате уреда само в един вход за
вода
(студена вода) вместо два, трябва да
монтирате капачката на клапата за топлата
вода преди да пуснете уреда. (Важи за уреди,
оборудвани с капачка.)
67 / BG
Пральна машина / Посібник користувача
Page 68

ПРЕДУПРЕЖДЕНИЕ: Моделите с
единично водно захранване не се свързват с
A
кран с топла вода. В този случай прането ще
се повреди или уредът ще премине в режим
на безопасност и няма да работи.
ПРЕДУПРЕЖДЕНИЕ: Не използвайте
стари или употребявани маркучи с новия
уред. Те може да направят петна по дрехите.
1. Свържете специалните маркучи, доставени
заедно с уреда, към входящите отвори за
водно захранване, разположени върху уреда.
Червениятмаркуч (вляво) (макс. 90 ºC) е за
топлата вода, синият маркуч (вдясно) (макс. 25
ºC) е за студената вода.
ПРЕДУПРЕЖДЕНИЕ: Уверете се, че
отводите за топла и студена вода са свързани
A
правилно при монтажа. В противен случай в
края на перилния цикъл прането може да е
горещо и повредено.
2. Затегнете всички гайки на маркуча с ръка.
Никога не използвайте уред за затягането им.
3. Отворете крановете докрай след като свържете
маркучите и проверете за изтичане в точките
на свързване. Ако има изтичане на вода,
затворете крана и свалете гайката. Проверете
уплътнението и затегнете добре уплътнението.
Когато машината не е в употреба, дръжте
крановете затворени за да избегнете протичане
на вода.
2.5 Свързване към
отводнителната система
• Накрайникът на изходящия маркуч трябва да е
свързан директно с канала за мръсна вода или
мивката.
ПРЕДУПРЕЖДЕНИЕ: Може да наводните
дома си ако маркучът се изтръгне от
A
гнездото си по време на източване на водата.
Освен това съществува риск от изгаряне
поради високата теммпература на водата! За
да избегнете подобни рискове и да осигурите
безопасно наточване и източване на водата
в машината, затегнете накрайникът на
маркуча добре, така че да не може да се
изтръгне.
• Маркучът трябва да се инсталира на височина
най-малко 40 см и най-много 100 см.
• В случай, че маркучът е повдигнат след като
е поставен на нивото на земята (по-малко от
40см над земята), източването на водата се
затруднява и прането може да остане твърде
мокро. Затова спазвайте височините описани на
фигурата.
100cm
40cm
• За да се избегне вливането на мръсна вода
обратно в машината и да се осигури лесното й
източване, не пъхайте маркуча в мръсната вода
и не го вкарвайте в канала по-дълбоко от 15 см.
Ако е твърде дълъг, го срежете. Ако е прекалено
дълъг, отрежете.
• Краят на маркуча не бива да е извит,
внимавайте да не е настъпен или прегънат по
пътя между канала и машината.
• Ако маркучът е твърде къс, използвайте
оригинално удължение. Дължината на
маркуча не може да надвишава 3,2 м. За да
избегнете протичане на вода, свързването на
удължението и дренажния маркуч на уреда
трябва да бъде направено с подходяща скоба за
да не може да се откъсне и протече.
2.6 Регулиране на крачетата
ПРЕДУПРЕЖДЕНИЕ: За да работи
уредът безшумно, без да вибрира, трябва да
A
стои в равно и балансирано положение на
крачетата. Балансирайте машината с тяхна
помощ. В противен случай уредът може да
се размести и да започне да вибрира или да
нанесе щети.
1. Разхлабете контра гайките на крака с ръка.
2. Регулирайте крачетата така, че уредът да е
нивелиран и балансиран.
3. Затегнете всички контра гайки с ръка.
ПРЕДУПРЕЖДЕНИЕ: Не използвайте
никакви уреди за разхлабване на
A
контрагайките. В противен случай ще ги
повредите.
2.7 Свързване на електричеството
Свържете уреда към заземен контакт, защитен
с 16-амперов бушон. Фирмата ни не носи
отговорност за щети по причина на ползване
на уреда без заземяване направено съгласно
местните наредби.
• Свързването трябва да е направено в
съответствие с държавните стандарти.
68 / BG
Пральна машина / Посібник користувача
Page 69

• След монтажа захранващият кабел трябва да е
леснодостъпен.
• Ако стойността на бушона или прекъсвача
у дома ви е под 16 ампера, накарайте
квалифициран електротехник да монтира
16-амперов бушон.
• Напрежението, обозначено в "Техническите
спецификации" трябва да отговаря на вашето
захранване.
• Не свързвайте уреда чрез удължител или
разклонител.
ПРЕДУПРЕЖДЕНИЕ: Повреденият
захранващ кабел трябва да се подмени от
B
представител на оторизирания сервиз.
Транспортиране на уреда
1. Изключете уреда от контакта преди
транспортиране.
2. Свалете маркучите за източване и за входяща
вода.
3. Източете всичката вода, останала в уреда.
Вижте 6.5
4. Монтирайте обезопасителните болтове в
обратен ред на свалянето им; вижте 3.3.
Никога не пренасяйте пералнята без да сте
завили правилно болтовете по местата им!
C
ПРЕДУПРЕЖДЕНИЕ: Опаковъчните
материали са опасни за децата. Дръжте
A
опаковъчните материали на безопасно
място, далеч от достъпа на деца.
3 Подготовка
3.1 Сортиране на прането
• Сортирайте прането според вида на тъканите,
цвета, степента на замърсяване и допустимата
температура на пране.
• Винаги спазвайте указанията върху етикета на
дрехите.
3.2 Подготовка на дрехите за пране
• Металните части в прането, като банели на
сутиени или катарами на колани могат да
повредят пералнята Ви. Свалете металните
части или перете дрехите в торбичка за пране
или калъфка за възглавница.
• Изпразнете джобовете от монети, химикалки,
кламери и други подобни, изкарайте джобовете
навън и изчеткайте. Тези предмети могат да
повредят машината и да предизвикат шум при
прането.
• Поставяйте малки на размер дрешки като
бебешки чорапи или найлонови чорапи в
торбичка за пране или калъфка за възглавница.
• Поставете пердетата в машината без да ги
притискате. Свалете окачалките на пердетата.
• Закопчайте циповете, зашийте разхлабени
копчета и скъсани и разпорени места.
• Перете дрехи, означени с етикети “за
машинно пране” или “за ръчно пране”, само със
съответната за тях програма.
• Не перете цветно и бяло пране заедно. Нови,
тъмни дрехи могат да пуснат много боя. Перете
ги отделно.
• Упоритите петна трябва да се почистят
добре преди изпирането. Ако не сте сигурни,
проверете със сух препарат за петна.
• Използвайте само оцветители/избелващи
вещества, подходящи за машинно пране. Винаги
спазвайте указанията върху опаковката.
• Перете панталоните и деликатното пране
обърнати от опаката страна.
• Сложете дрехите от ангорска вълна във
фризера за няколко часа преди пране. Това ще
намали завалването на дрехите.
• Пране, силно напрашено с материали от рода на
брашно, вар, мляко на прах и др., трябва добре
да се изтупа преди поставяне в машината. В
противен случай, тези прахообразни вещества
се натрупват по вътрешните части на машината
и може да я повредят.
3.3 Какво да направите за
да спестите енергия
Слеващата информация ще ви помогне
да използвате уреда по екологичен и
енергийноефективен начин.
• Пускайте уреда на максималния капацитет,
позволен от програмата, която сте избрали, но
не го претоварвайте; виж "Таблица с програми и
консумация"
• Винаги спазвайте инструкциите на опаковката
на перилния препарат.
• Перете слабо замърсеното пране на ниска
температура.
• Използвайте бързи програми за малки
количества леко замърсено пране.
• Не използвайте предпране и висока
температура за пране, което не е силно
замърсено и по него няма петна.
• Ако планирате да сушите прането си в
сушилнята, при изпирането изберете
най-високата препоръчана скорост на
центрофугиране.
• Не използвайте повече препарат от
препоръчаното върху пакета му.
3.4 Първоначална употреба
Преди да започнете употребата на продукта, се
уверете, че всички подготвителни дейности са
направени в съответствие с указанията в раздели
"Важни указания за безопасност" и "Монтаж".
За да подготвите уреда за пускане на пране,
го пуснете в програма Почистване на барабана
първия път. Ако уредът ви е оборудван с
програма за почистване на барабана, извършете
процедурата при първоначално ползване съгласно
методите, описани в раздел "5.2 Почистване на
вратата и барабана" на настоящето ръководство
за употреба.
Използвайте препарат срещу котлен камък,
подходящ за перални машини.
C
В машината може дае останала малко вода
в следствие на процедурите по качествен
контрол в процеса на производство. Това не
вреди на уреда.
69 / BG
Пральна машина / Посібник користувача
Page 70

3.5 Спазване капацитета на прането
Максималният капацитет на зареждане зависи
от типа на прането, степентта на замърсяване и
желаната програмата за изпиране.
Машината автоматично регулира количеството
вода според теглото на зареденото пране.
предупреждение: Спазвайте информацията
в “Таблица с програми и консумация”. Ако е
A
претоварена, качеството на изпиране на
машината се понижава. Освен това може да
се получи шум или вибриране.
3.6 Зареждане на прането
1. Отворете вратата за зареждане.
2. Поставете прането отделно едно от друго в
машината.
3. Натиснете вратата за да я затворите докато
чуете звук от заключване. Внимавайте прането
да не бъде защипано от вратата.
Вратата е заключена през време на работа на
програмата. Вратата може да бъде отворена
C
известно време след като програмата свърши.
предупреждение: В случай на неравномерно
разпределение на прането, може да се появи
A
шум или вибрация в машината.
3.7 Употреба на перилен
препарат и омекотител
При използване на пепарат, омекотител,
колосан, фабрична боя, белина или препарат
C
срещу котлен камък, прочитайте внимателно
указанията върху опаковката им и следвайте
посочените препоръчителни дози. По
възможност използвайте измервателна чашка.
Чекмедже за препарат
Чекмеджето за перилен препарат се състои от три
отделения:
– (1) за предпране
– (2) за основно пране
– (3) за омекотител
– (*) в отделението за омекотите има
допълнителен сифон.
1
2
3
Перилни препарати, омекотители и други
почистващи препарати
• Сипете перилен препарат или омекотител преди
започването на програмата.
• Никога не оставяйте чекмеджето за перилен
препарат отворено по време на работа на
програмата!
• При ползване на програма без предпране,
не сипвайте никакъв перилен препарат в
отделението за предпране (отделение № "1").
• При ползване на програма с предпране,
не сипвайте течен перилен препарат в
отделението за предпране (отделение № "1").
• Не ползвайте програми с предпране ако
използвате торбичка за перилен препарат или
топка за пране. Поставете торбичката с перилен
препарат или топката за пране директно в
прането в машината.
• Ако използвате течен перилен препарат, не
забравяйте да поставите чашката с течен
препарат в отделението за основно пране
(отделение № "2").
Избиране на типа перилен препарат
Видът перилен препарат зависи от типа и цвета на
тъканите.
• Използвайте различни препарати за цветно и за
бяло пране.
• Перете деликатните дрехи само със специални
препарати (течен перилен препарат, шампоан
за вълна и др.) предназначени за деликатни
тъкани.
• При пране на тъмни дрехи или юргани се
препоръчва използването на течен перилен
препарат.
• Перете вълнените дрехи със специални
препарати, предназначени само за вълнени
тъкани.
предупреждение: Използвайте само
препарати, произведени специално за перални
A
машини.
предупреждение: Не използвайте сапун на
прах.
Регулиране количеството на препарата
Количеството на използвания перилен
препарат зависи от количеството и степента на
замърсяване на прането, както и твърдостта на
водата.
• Не надвишавайте количеството, означено на
пакета, за да избегнете прекомерно пенене и
недоизплакване. По този начин не само пестите
пари, но и спомагате за опазването на околната
среда.
• Използвайте по-малко количество препарат за
малко количество или леко замърсени дрехи.
Използване на омекотители
Сипете омекотителя в отделението за омекотител
на чекмеджето за препарати.
• Не надвишавайте нивото на маркировката
(>max<)в отделението за омекотител.
• Ако омекотителят се е сгъстил, го разредете
с вода преди да го сложите в чекмеджето за
препарати.
Използване на течни перилни препарати
Ако уредът е оборудван с чашка за течен
перилен препарат:
• Чашката за течен перилен препарат трябва да
бъде поставена в отделение № "2".
• Ако течният перилен препарат се е сгъстил, го
разредете с вода преди да го сложите в чашката
за перилен препарат.
70 / BG
Пральна машина / Посібник користувача
Page 71

Светли и бели на цвят
(Препоръчителен диапазон на
температурата в зависимост от
степента на замърсеност: 40-90 °C)
Може да се наложи да обработите
Силно
замърсени
(трудни за
изпиране
петна, напр.
от трева,
кафе, плодове
и кръв.)
Средно
замърсени
(Например
петна от
допира на
Ниво на замърсеност
тялото с яки и
ръкави)
Леко
замърсени
(Няма видими
петна.)
Силно
замърсени
Средно
замърсени
Ниво на замърсеност
Леко
замърсени
предварително петната или да
използвате предпране. Течните и
прахообразни перилни препарати
за бели дрехи може да се използват
в дозите, препоръчани за силно
замърсено пране. Препоръчително
е използването на прахообразни
перилни препарти за петна от
глина и пръст, както и петна,
чувствителни към белина.
Течните и прахообразни перилни
препарати за бели дрехи може да
се използват в дозите, препоръчани
за средно замърсено пране.
Течните и прахообразни перилни
препарати за бели дрехи може да
се използват в дозите, препоръчани
за леко замърсено пране.
(Препоръчителни температурни
диапазони за ниво замърсяване:
студено -40 °C)
Течните и прахообразни перилни
препарати за цветни дрехи може да
се използват в дозите, препоръчани
за силно замърсено пране.
Препоръчително е използването
на прахообразни перилни препарти
за петна от глина и пръст, както и
петна, чувствителни към белина.
Използвайте перилни препарати
без белина.
Течните и прахообразни перилни
препарати за цветни дрехи може да
се използват в дозите, препоръчани
за средно замърсено пране.
Използвайте перилни препарати
без белина.
Течните и прахообразни перилни
препарати за цветни дрехи може да
се използват в дозите, препоръчани
за леко замърсено пране.
Използвайте перилни препарати
без белина.
Дрехи
Цветни
Дрехи
Тъмни
(Препоръчителни температурни
диапазони за ниво замърсяване:
студено -40 °C)
Течните перилни препарати за
Силно
замърсени
Средно
замърсени
Леко
замърсени
Ниво на замърсеност
цветни и тъмни дрехи може да се
използват в дозите, препоръчани за
силно замърсено пране.
Течните перилни препарати за
цветни и тъмни дрехи може да се
използват в дозите, препоръчани за
средно замърсено пране.
Течните перилни препарати за
цветни и тъмни дрехи може да се
използват в дозите, препоръчани за
леко замърсено пране.
Деликатни/Вълнени/Коприна
(Препоръчителни температурни
диапазони за ниво на замърсяване:
студено -30 °C)
Предпочетете течни препарати
Силно
замърсени
Средно
замърсени
Леко
Ниво на замърсеност
замърсени
за деликатни дрехи. Вълнените
и копринени дрехи трябва да се
перат със специални препарати за
вълна.
Предпочетете течни препарати
за деликатни дрехи. Вълнените
и копринени дрехи трябва да се
перат със специални препарати за
вълна.
Предпочетете течни препарати
за деликатни дрехи. Вълнените
и копринени дрехи трябва да се
перат със специални препарати за
вълна.
Ако уредът не е оборудван с чашка за течен
перилен препарат:
• Не използвайте течен перилен препарат за
предпране в програма с предпране.
• Течният перилен препарат прави петна по
дрехите ви ако се използва с функция Забавяне
на старта. Ако желаете да използвате функция
Забавяне на старта, то не използвайте течен
перилен препарат.
Използване на гелообразен перилен
препарат и препарат на таблетки
При ползване на препарати на таблетки, гелове и
други подобни, следвайте следните указания.
• Ако гелообразният перилен препарат е с течна
консистенция и машината ви не е оборудвана
със специална чашка за течен перилен
препарат, сипете гелообразният препарат в
отделението за основно пране при първото
вливане на вода в машината. Ако машината
ви е оборудвана с чашка за течен перилен
препарат, сипете препарата в чашката преди да
стартирате програмата.
• Ако консистенцията на гелообразния перилен
препарат не е течна или е във формата на
капсулообразна течна таблетка, го поставете
директно в барабана преди прането.
71 / BG
Пральна машина / Посібник користувача
Page 72

• Перилният препарат на таблетки се поставя в
отделението за основно пране (отделение №
"2") или директно в барабана преди пране.
Препаратите на таблетки може да оставят
остатъци в отделението за перилен препарат.
C
В такъв случай при следващото пране пъхнете
таблетката в прането в долната част на
барабана.
При ползване на таблетки за пране
или гелообразни перилни препарати не
използвайте функция предпране.
Използване на колосан
• Добавете течен колосан, колосан на прах или
фабрична боя в отделението за омекотител.
• Не използвайте омекотител и препарат за
колосване едновременно в един перилен цикъл.
• Избършете вътрешността на машината с чист
влажен парцал след използване на препарат за
колосване.
Използване на белина
• Изберете програма с предпране и добавете
белината в началото на предпрането. Не
слагайте перилен препарат в отделението
за предпране. Алтернативен начин за
използване на белина е да изберете програма
с допълнително изплакване и да сипете
белината докато машината налива вода през
отделението за перилни препарати по време на
първата стъпка на изплакването.
• Не смесвайте белина и перилен препарат.
• Използвайте малко количество (около 50 мл)
белина и изплаквайте дрехите много добре тъй
като тя предизвика кожни раздразнения. Не
изливайте белината директно при дрехите и не
ползвайте белина с цветно пране.
• Когато използвате белина на кислородна
основа, изберете програма която пере на ниска
температура.
• Белините на кислородна основа могат да се
ползват заедно с перилни препарати; ако обаче
консистенцията на белината не е еднаква с тази
на перилния препарат, първо сипете перилния
препарат в отделение № "2" на чекмеджето
за препарати и изчакайте машината да поеме
препарата с входящата вода. Добавете белината
през същото отделение докато машината все
още налива вода.
Използване на препарат против котлен
камък
• При необходимост използвайте препарати
против котлен камък пригодени специално за
перални машини.
72 / BG
Пральна машина / Посібник користувача
Page 73

4 Експлотация на продукта
4.1 Контролен панел
1 2 3 4 5
6
7
8910
1. Програмен селектор
2 - Бутон за настройка на скоростта на
центофугиране
3 - Бутон за регулиране на температурата
4 - Дисплей
5 - Индикатор за прогрес на програма
4.2 Символи на дисплея
a b c d e f g
0
C
88
1888
a - Температурен индикатор
b - Електрическо свързване
с - Индикатор за пара
d - Индикатор за аудио предупреждение
е - Индикатор за вода
f - Индикатор за препарат
g - Индикатор Старт / Пауза
h - Индикатор за прогрес на програма
6 - Бутон Вкл / Изкл
7 - Бутон Старт/Пауза
8 - Бутон за настройка на краен час
9 - Бутони за допълнителни функции
10 - Лампи на програмен селектор
h
88:88
ijklm
i - Индикатор за време
j - Информационна линия за продължителност
k - Индикатор за спомагателни функции
l - Индикатор за заключване
m - Индикатор скорост на въртене
C
73 / BG
Визуализацията, използвана за описание на машината в тази секция е схематична и може да не
съвпада точно с функциите на вашата машина.
Пральна машина / Посібник користувача
Page 74

4.3 Избор на програма
1 Определете програмата, която съответства на
типа, количеството и нивото на замърсеност на
прането в съответствие с "Таблицата с програми
и консумация".
1 Изберете желаната програма чрез копчето за
избор на програма.
0
C
88
1888
88:88
Програмите са с ограничение до най-
C
високата скорост на центрофугиране
подходяща за съответния вид тъкани.
Когато избирате програма, която ще
използвате, винаги имайте предвид типа
тъкан, цвета, степента на замърсеност и
допустимата температура на водата.
Винаги предпочитайте по-ниска
температура, която да пасне на вашия тип
пране. По-високата температура означава
по-висока консумация на електроенергия.
4.3.1 Програми
В зависимост от вида тъкан, използвайте
следните основни програми.
• Памучни материи
Използвайте за памучно пране (като спални
чаршафи, калъфки за юргани и възглавници,
кърпи, хавлии, долно бельо и др.). Прането ще
бъде изпрано чрез активни перилни движения при
по-дълъг перилен цикъл.
• Синтетични тъкани
Използвайте за пране на синтетичните ви дрехи
(ризи, блузи, смес синтетични/памучни и т.н.).
Програмата пере с по-нежни движения и е с
по-къс перилен цикъл по сравнение с програма
Памучни.
За пердета и тюл използвайте програма
Синтетични 40ºC с избрани функции предпране и
предпазване от намачкване. Тъй като мрежестата
им структура предизвиква прекалено пенене,
при прането на драперии/тюл ползвайте малко
препарат в отделението за основно пране. Не
слагайте перилен препарат в отделението за
предпране.
• Вълнени материи
Използвайте за пране на вълнени дрехи.
Използвайте подходящата температура съобразно
етикета на дрехите ви. Използвайте подходящи
препарати за пране на вълнени тъкани.
Програмата за вълнени на тази перална
машина е одобрена от “The Woolmark
Company” за машинно-перими продукти
Woolmark, като за целта дрехите трябва да
се перат съгласно инструкциите на етикета
им и инструкциите на производителя на
пералнята. M1428
• Automatic Programme (Автоматична програма)
Използвайте тази програма за пране на често
използвани памучни, синтетични или смесени
(памучни+синтетични) дрехи. Програмата
разпознава типа и количеството пране и
автоматично регулира разхода на вода и
продължителността на програмата.
ВНИМАНИЕ: Не перете вълнени или
A
Максималната температура на пране на
автоматичната програма в зависимст от степента
на замърсеност и типа на прането, е 60ºC.
Изпирането може да не е на желаното ниво за
силно замърсени бели дрехи и упорити петна (яки,
захабени чорапи, петна от пот и др.). В този случай
се препоръчва да изберете програма "Памучни"
с предпране и да настроите температурата на 5060°C.
Много видове дрехи се разпознават правилно и
изпират надеждно с автоматичната програма.
• Памук Еко
Използвайте за пране на нормално замърсено,
издръжливо памучно и ленено пране. Въпреки
че пере по-дълго от всички останали програми,
тя пести мног електроенергия и вода.
Действителната температура на водата може
да се различава от посочената температура на
изпиране. Когато заредите машината с по-малко
пране (напр. º или по-малко от капацитета),
продължителността на програмата може
автоматично да се скъси. В такъв случай,
консумираната енергия и вода ще намалеят,
предвид по-икономичното пране. Тази програма
е налична на модели с индикатор за оставащо
време.
• BabyProtect (Защита за бебето)
Използвайте за пране на бебешки дрехи и
дрехи на алергични хора. По-дългият период
на загряване и допълнителната стъпка на
изплакаване осигуряват по-високо ниво на
хигиена.
• Деликатни материи 20°
Използвайте за пране на деликатни дрехи. Пере с
по-нежни движения в сравнение с програмата за
синтетично пране.
• Ръчно пране
Използвайте за пране на вълнени/деликатни
дрехи, обозначени с етикет “Да не се пере в
машина”, при които се препоръчва пране на ръка.
Програмата пере с много нежни движения с цел да
не повреди дрехите.
• Ежедневни екпрес
Използвайте за бързо изпиране на леко
замърсено памучно пране без петна.
• Супер бърз екпрес
Използвайте за бързо изпиране на леко
замърсено памучно пране без петна.
деликатни дрехи с тази програма.
Изберете подходяща температура, ако
температурата, показана на дисплея не
е съвместима с предупрежденията на
етикета на дрехата.
• Тъмно пране
Използвайте тази програма за изпиране на
тъмното ви пране, или за пране, което не
искате да избелее. Прането се извършва с леко
механично движение при ниска тепература.
Препоръчва се използването на течен перилнен
препарат или шампоан за вълна при пране на
тъмни дрехи.
74 / BG
Пральна машина / Посібник користувача
Page 75

• Освежаване
За да размекне мръсотията, обработва
предварително прането с изпускане на пара.
Заредете само половината капацитет,
C
• Ризи
• 40° / 40’
посочен за избраната програма.
Когато програмата е избрана, е нормално
да се чува шум от варене, тъй като
генераторът сварява водата за да се
получи пара.
Използвайте за бързо изпиране на леко
замърсено и неоцветено памучно пране.
Ако стигнете до опция студено пране и
C
натиснете отново бутона за регулиране
на температурата, на дисплея се
изписва препоръчителната максимална
температура за избраната програма.
Натиснете отново бутона за регулиране на
температурата за да я намалите.
4.5 Избор на скорост на въртене
При избора на нова програма, индикаторът за
скорост на въртене показва максималната
скорост на въртене за избраната програма.
Възможно е препоръчителната стойност
C
на въртене да не е максималната, която
може да бъде избрана за текущата
програма.
• Hygiene 20°
Използвайте тази програма за пране, за които
имате нужда от пране при ниска температура,
с интензивен и продължителен цикъл на пране.
Използвайте тази програма за пране, за които
имате нужда хигиенно измиване на по-ниска
температура.
• Изплакване
Използвайте, когато искате да изплакнете или
колосате отделно.
• Центрофугиране + Помпа
Използвайте за източване на водата от машината.
4.4 Избор на температура
Когато избирате нова програма, температурният
индикатор показва препоръчителната за нея
температура. Възможно е препоръчителната
стойност на температурата да не е максималната
температура, която може да бъде избрана за
текущата програма.
0
C
88
1888
88:88
Натиснете отново бутона за регулиране на
температурата за да я намалите. Температурата
ще се понижи на интервали от 10 °C.
Най-накрая на дисплея се появява символ “-”,
обозначаващ студено изпиране.
0
C
-
1888
88:88
0
C
88
1888
88:88
Натиснете отново бутона за регулиране на
скоростта на въртене за да я намалите.
Скоростта на центрофугиране постепенно
намалява.
След това, в зависимост от модела на уред, на
дисплея се изписва "Задържане на изплакването"
и "Без центрофугиране".
Бутонът за Регулиране скоростта на
C
Ако не искате да извадите дрехите веднага след
приключване на програмата, може да използвате
функция
предпазите дрехите от измачкване при липсата на
вода в машината.
Тази функция задържа прането в последната вода
от изплакването.
въртене служи само за понижаване на
скоростта на въртене.
Опция задържане на изплакането се
обозначава със символ “ı_ı”, а опция без
центрофугиране със символ “_”.
"Задържане на изплакването", за да
0
C
88
88:88
Ако желаете да центрофугирате прането след
функция "Задържане на изплакването":
Не може да бъде направена промяна
C
Можете да промените температурата и след
стартиране на изпирането. Тази промяна може
да бъде направена, ако стъпките за пране го
позволяват. Промените могат да бъдат направени,
ако стъпките позволяват това.
в програмите, където регулирането на
температурата не е допустимо.
75 / BG
Пральна машина / Посібник користувача
Page 76

- Регулиране Скоростта на въртене.
- Натиснете бутон Старт / Пауза / Отказ .
Програмата продължава. Машината завърта
прането като източва водата.
Ако желаете да източите водата в края на
програмата без да центрофугирате, използвайте
функция
Без центрофугиране.
0
C
88
88:88
Не може да бъде направена промяна
C
Вие можете да смените скоростта на въртене
след като започне прането, ако стъпките за пране
позволяват това. Промените могат да бъдат
направени, ако стъпките позволяват това.
в програмите, където регулирането на
скоростта на въртене не е допустимо.
76 / BG
Пральна машина / Посібник користувача
Page 77

4.6 Таблица с програми и консумация
BG
3
допълнителна функция
Програма (°C)
Максимално натоварване (кг)
Консумация на вода (л)
Консумация на енергия (кВч)
Макс.скорост***
Предпране
Бързо изпиране
Задържане на изплакването
60** 7 44 0.88 1600 Студена вода-60
Памук Еко
Памучни материи
Синтетични тъкани
Вълнени материи 40 1.5 49 0.25 1000 • • • Студена вода-40
Ръчно пране 30 1 40 0.25 600 Студена вода-30
BabyProtect+ 60 7 85 1.90 1600 30 - 90
Тъмно пране 40 3 60 0.60 1000 • • • • Студена вода-40
Освежаване - 2 35 0.15 1000 -
40° / 40’ 40 7 45 0.60 1400 • Студена вода-40
Деликатни материи 20° 20 3.5 45 0.15 1000 • • • • 20
Hygiene 20° 20 2 95 0.40 1600 20
Супер бърз екпрес 30 2 35 0.15 1400 • • Студена вода-30
Ежедневни екпрес
Automatic Programme 40 7 **** **** 1600 • • • • • Студена вода-60
60** 3.5 37 0.70 1600 Студена вода-60
40** 3.5 37 0.69 1600 Студена вода-60
90 7 70 2.20 1600 • • • • • Студена вода-90
60 7 70 1.55 1600 • • • • • Студена вода-90
40 7 67 0.90 1600 • • • • • Студена вода-90
60 3 52 1.10 1200 • • • • • Студена вода-60
40 3 49 0.60 1200 • • • • • Студена вода-60
90 7 67 2.00 1400 • • Студена вода-90
60 7 67 1.10 1400 • • Студена вода-90
30 7 67 0.25 1400 • • Студена вода-90
Избираема настройка
на температурата °C
Отстраняване на косми от
домашни любимци
Нощен режим
• : Избираемо.
* : Автоматично избирани, не могат да се отказват.
** : Програма за енергийно етикетиране (EN 60456 Ed.3)
*** : Ако максималната скорост на въртене на пералнята ви е по-ниска от тази стойност, може да
изберете само до максималната възможна скорост.
**** : Програмата ще регистрира типа и количеството пране, което сте поставили в машината и ще
регулира автоматично консумацията на вода, енергия и продължителността си.
- : Виж описанието на програмата за максималния капацитет на зареждане.
** “Памучни еко 40°C и Памучни 60°C са стандартни програми.” Тези програми са известни като
Стандартна програма за памук 40°C и Стандартна програма за памук 60°C и се указват на панела със
символи
.
Допълнителните функции в таблицата варират в зависимост от модела на пералнята.
C
77 / BG
Консумацията на енергия и вода и продължителността на програмата може да варират в зависимост
от налягането, твърдостта и температурата на водата, външната температура, вида и количеството на
прането, избора на допълнителни функции и промените в електрическото напрежение.
Може да проследите времето за изпиране на програмата която сте избрали, на дисплея на пералнята.
Нормално е да има малки разлики между времето, показвано на дисплея, и реалното време на
изпиране.
“Системата за избор за допълнителни функции може да бъде сменена от производителя. Нови
системи за избор могат да бъдат добавени или да бъдат отстранени такива.”
"Скоростта на центрофугиране на машината може да варира според програмата, като никога не
надвишава максималната скорост на центрофугиране на машината."
Пральна машина / Посібник користувача
Page 78

4.7 Избор на допълнителни функции
Изберете желаните допълнителни функции
преди стартиране на програмата. Когато се
избере програма, рамките на символите на
допълнителните функции, които могат да бъдат
избрани с нея се осветяват. Когато изберете
допълнителна функция, вътрешната част на
символа за допълнителна функця също светва.
0
C
88
1888
88:88
Рамката на допълнителна функция, която
C
Рамките на допълнителните функции, подходящи
за текущата програма остават осветени след
стартиране на изпирането. Можете да изберете
или да откажете допълнителните функции, чиито
рамки светят. Ако перилният цикъл е достигнал
до точка, в която не можете да промените дадена
допълнителна функция, рамката на тази функция
изгасва.
C
• Предпране
Предпрането е подходящо само за силно
замърсено пране. С пропускането на предпрането
се пести енергия, вода, препарат за прае и време.
• Бързо изпиране
Тази функция може да се използва при програмите
Памучни и Синтетични. Тя намалява времето на
изпиране, както и броя на стъпките на изплакване
на леко замърсеното пране.
C
не може да бъде избрана с текущата
програма, не свети.
Някои функции не могат да се избират
заедно. Ако е избрана втора допълнителна
функция в конфликт с първата функция,
избрана при стартирането на машината,
избраната първо функция бива отказана,
а втората избрана допълнителна
функция остава активна. Ако желаете
например да изберете Бързо пране след
като сте избрали Допълнителна вода,
Допълнителна вода ще бъде отменена, а
ще остане активна Бързо пране.
Допълнителните функции, които са
несъвместими с избраната програма, не
могат да бъдат избрани. (Виж "Таблица с
програми и консумация")
Някои програми са с допълнителни
функции, коит трябва да се пуснат
едновременно. Тези функции не могат
да бъдат отказвани. Рамката на
допълнителната функция не свети, а само
вътрешността на симсола й свети.
Когато изберете тази функция, пералнята
трябва да се зареди с половината от
максимума пране, посочен в таблицата с
програмите.
• Допълнително изплакване
Тази функция позволява на машината да направи
друго изплакване в допълнение към това, което
вече е направено след основното пране. По
този начин може да бъде намален рискът за
въздействие на чувствителна кожа (бебета,
алергична кожа и пр.) от минималните остатъци по
прането.
• Предпазване от намачкване
При тази функция дрехите семачкат по-малко при
изпирането. Движенията на барабана намаляват,
а скоростта на центрофугиране се ограничава за
да се избегне намачкване. Освен това, прането се
извършва с повече вода.
• Задържане на изплакването
Ако не искате да извадите дрехите веднага след
приключване на програмата, може да използвате
функция "Задържане на изплакването", за да
предпазите дрехите от измачкване при липсата
на вода в машината. Натиснете бутон Старт/Пауза
след завършване на този процес ако искате да
източите водата без центрофугиране. Програмата
продължава работа и спира след източването на
водата.
Ако желаете да центрофугирате задържаното
във водата пране, регулирайте скоростта на
центрофугиране и натиснете бутон Старт / Пауза.
Програмата продължава. Водата се източва,
прането се центрофугира, а програмата завършва.
• Нощен режим
Използвайте за пране на памучни тъкани с помалък разход на енергия и безшумно. Стъпки
центрофугиране са отказани за постигане на
напълно безшумно пране, а цикълът завършва
със стъпка задържане на изплакването. След
завършване на прорамата се пуска цикъл
центрофуга за да се центрофугира прането.
Дисплей на времето
Оставащото време до края на програмата по
време на работата й се изписва като “01:30” във
формат на часове и минути.
Продължителността на програмата
C
може да се различава от стойностите
в "Таблица с програми и консумация"
в зависимост от водното налягане,
твърдостта и температурата на водата,
околната температура, количеството и
вида пране, избраните допълнителни
функции и промените в захранващата
мощност.
4.8 Краен час
Чрез функция Краен час стартирането на
програмата може да бъде забавено до 24 часа.
След като натиснете бутон
на дисплея се изписва ориентировъчен краен
час. Ако
Краен час се регулира, то индикатора за
краен час светва.
End Time (Краен час),
0
C
88
1888
88:88
78 / BG
Пральна машина / Посібник користувача
Page 79

За да се активира функция "Краен час" и
прграмата да завърши в края на посоченото
време, трябва да натиснете бутон
след като го настроите.
0
88
1888
Старт / Пауза
C
88:88
Ако искате да отмените функцията за крайно
време, натиснете бутон
Вкл / Изкл , за да
включите или изключите машината.
Не използвайте не използвайте
C
течни перилни препарати, когато
активирате функция "Краен час"!
Има опасност да направите лекета по
дрехите.
1 Отворете вратата, поставете прането, сложете
перилния препарат и т.н.
2 Изберете програмата за пране, температурата,
скоростта на центрофугиране и ако е
необходимо допълнителни функции.
3 Изберете желание краен час с натискане на
Крайно време . Индикаторът за краен
бутон
час светва.
4 Натиснете бутон
Старт / Пауза . Обратното
броене започва. Знакът “:” в средата на крайния
час започва да премигва.
Може да бъде заредено
C
допълнително пране по време на
обратното броене за Краен час. В края на
обратното броене, символът за краен час
изчезва, перилният цикъл стартира, а на
дисплея се изписва продължителността
на избраната програма.
Когато приключи изборът Краен
C
час, часът изписван на дисплея показва
крайния час плюс продължителността на
избраната програма.
4.9 Стартиране на програма
1 Натиснете бутон Старт / Пауза, за да
стартирате програмата.
2 Бутонът
започва да свети постоянно, обозначавайки, че
програмата е стартирала.
Старт / Пауза, който е премигвал
0
C
88
1888
88:88
4 Индикаторните лампи за прогрес на програма
на дисплея ще покажат текущата програмна
стъпка.
4.10 Заключване на вратата
Вратата на машината е оборудвана със заключаща
система за да не може да бъде отворена в случай
на неподходящо ниво на водата.
При заключването на вратата на дисплея
се показва символ "Door Locked" (Вратата е
заключена).
4.11 Промяна на настройките след
стартиране на програмата
Добавяне на пране след стартиране на
програмата:
Ако нивото на водата в машината е
подходящо, когато натиснете бутона Старт
/ Пауза, символът за заключване на вратата ще
мига, докато вратата за зареждане е отворена.
0
C
88
1888
88:88
Ако нивото на водата в машината не е
подходящо, когато натиснете бутона Старт / Пауза,
символът за врата за зареждане остава светнал
на дисплея.
0
C
88
1888
88:88
Превключване на пералнята в режим пауза:
Натиснете бутона Старт/Пауза за да
превключите машината в режим пауза. Символът
за пауза ще мига на дисплея.
0
C
88
1888
88:88
3 Вратата за зареждане е заключена. При
заключването на вратата на дисплея се показва
символ за заключена врата.
0
C
88
1888
88:88
79 / BG
Промяна на избраната програма след
стартирането й:
Промяна на програмата не е разрешена през
време на работата й.
Можете да изберете нова програма след като
превключите текущата програма в режим на
пауза.
C
Избраната програма започва отначало
Пральна машина / Посібник користувача
Page 80

Промяна на допълнителните функции,
скоростта и температурата
В зависимост от стъпката, която е достигнала
програмата, може да откажете или активирате
допълнителните функции. Вижте "Избор на
допълнителни функции".
Освен това, можете да смените настройките за
скорост и температура. Вижте, "Избор на скорост
на въртене" и "Избор на температура".
Вратата не се отваря ако температурата
C
на водата в пералнята е висока или ако
нивото на водата надвишава нивото на
вратата .
4.12 Защита от деца
Използвайте защитата от деца за да предпазите
децата от игра с уреда. По този начин ще
избегнете внасянето на промени в текущата
програма.
Може да включите и изключите
C
За да активирате защитата от деца:
Натиснете и задръжте бутона 2
Допълнителна функция за 3 секунди. След
като обратното броене "CL 3-2-1" на дисплея
приключи, там се изписва "Child Lock Enabled"
(Активирана защита за деца). Освободете
бутон за Допълнителна функция 1 , когато
това предупреждение се покаже.
За да деактивирате защитата за деца:
Натиснете и задръжте бутона 2
Допълнителна функция за 3 секунди. След
като обратното броене
приключи от там изчезва надписа "Child Lock
Enabled" (Деактивирана защита за деца).
машината от бутон
активирана защита от деца. Когато
включите машината отново, програмата
продължава оттам, откъдето е спряла.
Когато е активирана блокировката за
деца ще се чуе звуково предупреждение,
ако бъдат натиснати бутони. Звуковото
предупреждение ще бъде отменено, ако
бутоните бъдат натиснати 5 пъти поред.
Вкл / Изкл при
2рия
“CL 3-2-1” на дисплея
4.13 Отмяна на програма
Програмата бива отказана когато машината
бъде изключена и включена отново. Натиснете
и задръжте бутон
След като обратното броене "3-2-1" на дисплея
приключи, машината се изключва.
C
Вкл / Изкл за 3 секунди.
Ако натиснете бутон Вкл / Изкл при
активирана защита за деца, програмата
няма да бъде отказана. Трябва първо да
откажете защитата за деца.
Ако желаете да отворите вратата след
като сте отказали програмата, но това не
е възможно тъй като нивото на водата в
машината надвишава нивото на вратата, то
завъртете
на
източете водата от машината.
селектора на програмите
Изпомпване+центрофугиране и
80 / BG
4.14 Край на програма
На дисплея се изписва символ за край и
програмата приключва.
Ако не натиснете никакъв бутон в рамките
на 10 минути, машината преминава в режим
ИЗКЛЮЧВАНЕ. Дисплеят и всички индикатори се
изключват.
Пълните програмни стъпки ще бъдат показани,
ако натиснете бутон Вкл / Изкл.
4.15 Регулиране нивото на
VOLUME (силата на звука)
Слаб звук и силен звук
Натиснете и задръжте бутона за Допълнителна
функция 3 за 3 секунди, за да регулирате силата
на звука. След приключване на обратното броене
"3-2-1" на дисплея ще се появи символ за сила на
звука, и ще бъде показана новата сила на звука.
5 Поддръжка и почистване
Оперативният живот на уреда се удължава, а
често срещаните проблеми намаляват ако уредът
се почиства редовно.
5.1 Почистване на чекмеджето
за препарати
Почиствайте чекмеджето редовно (на всеки 4-5
перилни цикъла) по начинът описан по-долу за
да избегнете наслагването на прах за пране с
времето.
Повдигнете задната част на сифона за да го
свалите както е показано.
Сифонът трябва да се почисти ако в
отделението за омекотител се събира
C
повече от нормалното количество вода и
омекотител.
2 Измивайте чекмеджето за препаратите и
сифона в леген с много хладка вода. Сложете
предпазни ръкавици или използвайте
подходяща четка за да избегнете допира с
наслагванията в чекмеджето при почистването.
3 След почистването, върнете сифона обратно
на мястото му и натиснете предната му част
надолу за да се заключи с резето.
5.2 Почистване на вратата и барабана
Утайките от омекотителя, перилния препарат
и мръсотията може с времето да се наслоят в
машината и да доведат до неприятни миризми
и оплаквания от изпирането. За да избегнете
това, използвайте програмата за
барабана. Ако машината ви не е оборудвана с
програма
програма
Допълнителна вода или Допълнително
изплакване. Пуснете програматаПреди да
стартирате програмата, сложете макс. 100 г
Почистване на барабана, използвайте
Памучни-90 и изберете функция
Пральна машина / Посібник користувача
почистване на
Page 81

препарат срещу котлен камък в отделението
за препарат за основното пране (отделение No.
2). Ако препаратът срещу котлен камък е във
формата на таблетки, сложете само една таблетка
в отделение No. 2. Подсушете вътрешността на
барабана с чист парцал след като програмата
приключи.
Повтаряйте процедурата по почистване на
барабана на всеки 2 месеца.
C
Използвайте препарат срещу котлен камък,
подходящ за перални машини.
ººСлед всяко изпиране проверявайте да няма
останали чужди вещества в барабана.
Ако отворите на барабана показани на фигурата
са запушени, ги отпушете с помощта на клечка за
зъби.
Металните чужди вещества ще доведат до
петна от ръжда по барабана. Почистете
C
петната по барабана с помощта на
почистващи вещества, подходящи за
използване върху неръждаема стомана.
Никога не използвайте стоманена или друга
тел за почистване.
ВНИМАНИЕ: Никога не използвайте гъба
или изстъргващи материали. Те ще повредят
A
боядисаните и пластмасови повърхности.
5.3 Почистване на корпуса
и контролния панел
Забършете корпуса на пералнята със сапунива
вода или неабразивен гелообразен препарат при
необходимост, след което подсушете с мек парцал.
Използвайте само мек и влажен парцал за да
почистите контролния панел.
5.4 Почване на филтрите
за входящата вода.
В края на всеки отвор за входяща вода отзад на
пералнята и в края на всеки входящ маркуч, който
се свързва с крана, има филтър. Тези филтри
пречат на чужди тела и замърсители във водата
да влизат в пералнята. Филтрите трябва да се
почистват тъй като те постоянно се замърсяват.
3 Извадете филтрите от правите накрайници
на маркучите за входяща вода, заедно с
уплътнителите, и ги почистете цялостно под
течаща вода.
4 Поставете внимателно уплътнителите и
филтрите обратно по местата им и затегнете
гайките на маркуча с ръка.
5.5. Източване на остатъчна вода и
почистване на филтъра на помпата
Филтриращата система на машината ви предпазва
твърдите предмети като копчета, монети и
конци да се заклещят в перката на помпата
при източването на водата от пералнята. По
този начин водата се източва безпроблемно, а
оперативният живот на помпата се удължава.
Ако пералнята ви не изпомпва водата, възможно
е филтърът на помпата да е задръстен. Филтърът
трябва да се почиства всеки път когато се
задръсти или на всеки 3 месеца. За да се почисти
филтърът на помпата, водата трябва да се източи.
Преди транспортиране на машината (напр. при
преместване в нов дом) и в случай на замръзване
на водата, може да се наложи да източите докрай
водата от уреда.
ВНИМАНИЕ: Остатъчни чужди вещества
във филтъра на помпата може да повредят
A
машината ви и да предизвикат шум.
ВНИМАНИЕ: Ако уредът не се използва,
завъртете крана, откачете входящия маркуч
и отцедете водата в машината за да не
се заледи евентуално в района, където е
монтирана.
ВНИМАНИЕ: След всяка употреба,
затваряйте крана на входящия маркуч.
За да почистите мръсния филтър и да
източите водата:
1 Извадете щепсела от контакта за да
прекъснете захранването с електричество.
ВНИМАНИЕ: Температурата на водата в
машината може да стигне до 90 ºC. За да
A
избегнете риска от изгаряне, почистете
филтъра чак след като пералнята се охлади.
2. Отворете капачката за зареждане.
3 Някои модели са оборудвани с маркуч за
източване при спешни случаи, а други не са.
Следвайте долните стъпки за да източите
водата.
1 Затворете крановете.
2 Свалете накрайниците на маркучите за
входящата вода за да стигнете до филтрите
в клапите за входящата вода. Почистете ги
с подходяща четка. Ако филтрите са много
мръсни, ги извадете с щипци и ги почистете.
81 / BG
Пральна машина / Посібник користувача
Page 82

Източване на водата когато уредът е оборудван
с маркуч за източване в спешни случаи:
a Издърпайте дренажния маркуч за спешни
случаи от гнездото му.
b Поставете голям съд в края на маркуча.
Източете водата в съда като издърпате
тапата в края на маркуча. Когато съдът се
напълни, запушете отново края на маркуча с
тапата. След като изхвърлите водата от съда,
повторете горната процедура за да източите
водата от машината докрай.
c Когато източването на водата приключи,
запушете отново маркуча с тапата и го
поставете обратно на мястото му.
d Завъртете филтъра на помпата за да го
извадите.
Източване на водата когато уредът не е
оборудван с маркуч за източване в спешни
случаи:
a Поставете голям съд пред филтъра за да може
водата в него да се източи в съда.
b Разхлабете филтъра на помпата (обратно
на часовниковата стрелка) докато водата
от него започне да изтича навън. Напълнете
изтичащата вода в съда, който сте поставили
пред филтъра. Винаги дръжте наблизо парцал
за да забършете евентуално разлятата вода.
c Когато водата в машината се източи докрай,
извадете филтъра докрай като го завъртите.
4 Почистете всякакви отлагания по вътрешността
на филтъра, както и влакната около перката на
помпата, ако има такива.
5 Монтирайте филтъра
6 Ако капачката на филтъра се състои от две
части, затворете капачката като натиснете
ухото й. Ако се състои от една част, първо
наместете ушенцата в долната й част на
местата им, а след това натиснете горната част
за да затворите.
82 / BG
Пральна машина / Посібник користувача
Page 83

Еко
памук
Памучни
материи
Синтетичн
и материи
Вълнени
материи
Ръчно
пране
Защита за
бебето
Тъмно пране
(Грижа за
тъмни дрехи)
Тъмно пране
(Грижа за
тъмни дрехи)
Олекотени
завивки
(Завивки)
(Помпа)
Ежедневн
о експрес
Защита на
покритието
ИзплакванеИзточване
Супер
кратко
експрес
Пара
Освежав
ане
Центрофуг
иране
Допълнително
изплакване
(Изплакване
Деликатни
Коприна+Р
ъчно пране
плюс)
20º
Бързо
пране
Грижа за
бебето+
Отлагане
Хигиена
Спортно
облекло
20º
Предпра
не
Нощен
режим
Автоматична
програма
Смесени 40
Ризи
Указателни стойности за синтетични програми
Съдържание на остатъчна
влажност (%) **
≤ 1000 rpm > 1000 rpm
Капацитет (кг)
Синтетични 60
Синтетични 40
* Може да проследите времето за изпиране на програмата която сте избрали, на дисплея на пералнята. Нормално е да има малки
разлики между времето, показвано на дисплея, и реалното време на изпиране.
** Стойностите на съдържанието на остатъчна влажност може да са различни в зависимост от избраната скорост на
центрофугиране.
3 52 1.10
3 49 0.60
Консумация на вода (l)
Разход на енергия (kWh)
Продължителност на
програмата (мин) *
01:45 45 40
01:31 45 40
Съдържание на остатъчна
влажност (%) **
83 / BG
Пральна машина / Посібник користувача
Page 84

6 Технически спецификации
В съответствие с делегираният регмаламент (ЕС) №:1061/2010
Име на доставчика или запазена марка Beko
Име на модела WMY 71243 LMB2
Капацитет мощност (кг) 7
Клас енергийна ефективност / Скала от A+++ (най-висока ефективност) до D (най-ниска
ефективност)
Годишен разход на енергия (kWh)
(1)
Разход на енергия на стандартната програма “Памучни 60°C” при пълно зареждане (kWh) 0.880
Разход на енергия на стандартната програма “Памучни 60℃” при частично зареждане (кВч) 0.695
Разход на енергия на стандартната програма “Памучни 40 °C” при пълно зареждане (кВч) 0.690
Разход на енергия в ‘изключен режим’ (W) 0.440
Разход на енергия във ‘включен режим’ (W) 0.640
Годишен разход на вода (l)
(2)
Клас ефективност на центрофуга / Скала от A+++ (най-висока ефективност) до D (найниска ефективност)
Максимална скорост на центрофугиране (оборота в минута) 1200
Съдържание на остатъчна влажност (%) 53
Стандартна програма памучни
(3)
Памучни Еко 60°C и 40°C
Разход на енергия на стандартната програма “Памучни 60 °C” при пълно зареждане (мин) 209
Разход на енергия на стандартната програма “Памучни 60 °C” при частично зареждане
(мин)
Разход на енергия на стандартната програма “Памучни 40 °C” при частично зареждане
(мин)
Продължителност на включен режим (мин) N/A
Емисия на въздушен акустичен шум при пране/центрофугиране (dB) 53/75
Вграден Non
Височина (см) 84
Широчина (см) 60
Дълбочина (см) 50
Нетно тегло (±4 кг) 64
Единичен вход за вода / Двоен вход за вода
• Налично
Електричество (V/Hz) 230 V / 50Hz
Общ ел.поток (A) 10
Обща мощност (W) 2200
Код на основния модел 9710
(1)
Разходът на енергия се базира на 220 стандратни перилни цикъла на програми за памучни тъкани при 60°C и 40°C при пълно и частично
зареждане, и консумация при режими на ниска мощност. Действителният разход на енергия зависи от това по какъв начин се използва
уреда.
(2)
Разходът на вода се базира на 220 стандартни перилни цикъла на програма памучни тъкани при 60°C и 40°C при пълно и частично
зареждане. Действителният разход на вода зависи от това по какъв начин се използва уреда.
(3)
Програма “Стандарт 60°C памучни” и “стандарт 40°C памучни” са стандартните перилни програми, свързани с информацията върху
етикета и фиша, подходящи за пране на нормално замърсено памучно пране и че те са най-ефективните програми, що се отнася до
комбиниран разход на енергия и вода.
Техническите спецификации може да бъдат променени без предварително предупреждение с цел подобряване качеството на продукта.
A+++
174
8800
B
185
185
• / -
84 / BG
Пральна машина / Посібник користувача
Page 85

7 Възможни решения на възникнали проблеми
Програмата не може да се стартира или да се избере.
• Пералнята е преминала в режим на самозащита поради възникнал външен проблем (в
електрическото напрежение, водното налягане и т.н.). >>> За да откажете програмата, завъртете
селектора на програмите за да изберете друга програма. Предишната програма бива отказана.
“Отказ на програма”)
Вода в пералнята.
• В машината може дае останала малко вода в следствие на процедурите по качествен контрол в
процеса на производство. >>>
Това не е опасно; водата не вреди на машината.
Машината вибрира или издава шум
• Машината може да не е нивелирана на пода. >>> Регулирайте крачетата за да нивелирате машината.
• Във филтъра на помпата може да навлязло някакво твърдо вещество. >>> Почистете филтъра на
помпата.
• Обезопасяващите болтове за транспортиране не са свалени. >>> Отстранете обезопасяващите болтове
за транспортиране.
• Количеството пране в машината може да е твърде малко. >>> Добавете още пране в машината.
• Машината може да е претоварена с пране. >>> Извадете част от прането от машината или разпределете
тежестта равномерно в барабана.
• Машината може да е опряна до твърда повърхност. >>> Проверет дали машината не опира твърда
повърхност.
Пералнята спира малко след започване на програмата.
• Пералнята може временно да е спряла по причина на ниско напрежение. >>> Пералнята ще продължи
работата си когато електрическото напрежение достигне отново нормалното си ниво.
Таймерът на програмата не извършва обратно броене. (При модели с дисплей)
• Таймерът може да спре по време на наточването на вода. >>> Индикаторът на таймера не извършва
обратно броене докато машината не поеме достатъчно количество вода. Пералнята изчаква да се напълни
с достатъчно количество вода за да се избегне недоизпиране в следствие липсата на вода. Индикаторът на
времето продължава обратното броене след това.
• Таймерът може да спре по време на стъпката на загряване. >>> Индикаторът на времето не извършва
обратно броене докато машината не достигне избраната температура.
• Таймерът може да спре по време на стъпка центрофугиране. >>> Автоматичната система за определяне
на небалансирано пране може да се е ективирала поради неравномерно разпределение на прането в
барабана.
• Машината не се превключва на ценрофугиране в случай, че прането не е равномерно разпределено
в барабана за да предпази пералнята и заобикалящите я предмети от повреда. То трябва да се
преразпредели и пусне отново.
(Виж
От чекмеджето за перилни препарати излиза пяна.
• Използван е твърде много перилен препарат. >>> Смесете 1 с.л. омекотител с ½ л вода и изсипете в
главното отделение на чекмеджето за перилен препарат.
• Сложете перилен препарат в машината в съответствие с програмите и максималния капацитет,
посочени в “Таблица с програми и консумация”. При добавяне на допълнителни химикали (препарати
за почистване на петна, белина и др.), намалете количеството перилен препарат.
Прането излиза мокро в края на програмата
• Възможно е да се е поучила твърде много пяна и автоматичната система за абсорбиране на пяна да
се е активирала поради използване на тврде голямо количество перилен препарат. >>>
препоръчителното количество перилен препарат.
• Машината не се превключва на ценрофугиране в случай, че прането не е равномерно разпределено
в барабана за да предпази пералнята и заобикалящите я предмети от повреда. То трябва да се
преразпредели и пусне отново.
ПРЕДУПРЕЖДЕНИЕ: Ако не може да разрешите проблема въпреки, че сте спазили указанията в този
раздел, се консултирайте с търговеца или представител на оторизиран сервиз. Никога не се опитвайте да
A
поправите неработещия уред сами.
85 / BG
Пральна машина / Посібник користувача
Използвайте
 Loading...