

Page 1

WMA 767 W
Automatic
washing machine
installation & operating
instructions and washing guidance
g
e
t
t
h
e
b
e
s
t
f
r
o
m
y
o
u
r
n
e
w
w
a
s
h
e
r
WMA 767 W
WMA 767 S
Page 2

Dear Customer,
We wish that your product which was manufactured in modern facilities and has
passed through strict quality control procedure will give you the best results.
Therefore, we advise you to read through this manual carefully before using your
product and keep it for future reference.
Page 3

3
Contents
Technical Specifications of your Washing Machine Page 2
1
Warnings Page 4
2
Preparation Page 5
3
Selecting a Program and Operating your Appliance Page 10
4
Maintenance and Cleaning Page 18
5
Installation Page 20
6
Page 4

4
1
Technical Specifications of your Washing Machine
Specifications of the machine may be changed without any prior notice
to improve the quality of the product.
Figures in this guide are schematic and may not be in exact conformity
with your product.
Values stated in the markings on the product or in the printed
documents that come with the product are attained in laboratory on
basis of the applicable standards. These values may change according
to the operating and environment conditions of the product.
Models WMA 767 W
WMA 767 S
Maximum dry laundry capacity (kg) 7
Height (cm.) 85
Width (cm.) 60
Depth (cm.) 59
Net weight (kg.) 75
Electricity input (V/Hz.) 220-240/50
Total current (A) 10
Total Power (W) 2200-2350
Wash-rinse speed (rpm) 52
Spin speed (rpm max.) 1000
Single water inlet
Page 5
5
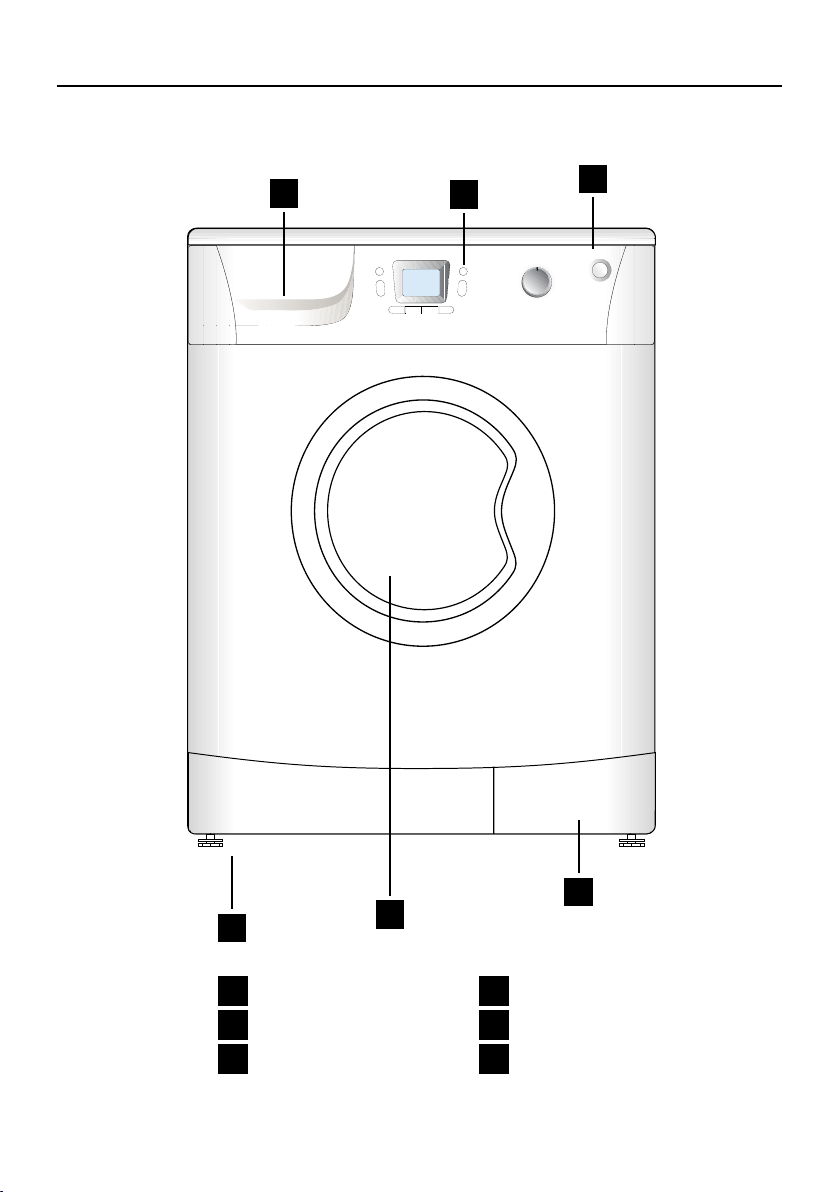
Your Washing Machine
1
2
3
4
5
6
1
Tabletop
4
Adjustable feet
2
The Detergent Drawer
5
Loading door
3
Control panel
6
Filter cap
Page 6

6
Please examine the following information,
otherwise there may be the risk of
personal injury or material damage and
any warranty and responsibility will
become void.
Intended use
• The appliance may only be used for
the washing and rinsing of textiles that
are marked accordingly.
• Only detergents, softeners and
additives suitable for use in washing
machines may be used.
• Observe the maintenance instructions
labeled on textiles products and the
information stated by companies
that produce the washing machine
detergents.
Safety instructions
• This appliance must be connected to
an earthed outlet protected by a fuse
of suitable capacity.
• The power and draining hose must
always be securely fastened and be in
perfect condition.
• Do not use a washbasin or bathtub to
which the draining hose is attached
while the machine is operating. There
may be a risk of being scalded due to
high washing temperatures!
• Never open the loading door or
unscrew the filter while there is still
water in the drum (for example, after
a power failure). Otherwise there may
be a risk of flooding and possible injury
due to hot sudsy water.
• Never force to open the locked loading
door! If the loading door does not
open even a few minutes after the
programme has ended, contact an
authorized service.
• Rinse garments pre-treated with
cleaning agents (petroleum ether, liquid
stain remover, etc.) thoroughly in clear
water before washing.
• Never wash down the appliance with
a water hose! There may be the risk
of electric shock! Always disconnect
from the mains by unplugging before
cleaning.
• Never touch the plug with wet hands.
Never pull from the cable to unplug,
always pull from the plug only.
• Do not operate the appliance if the
power cable or power plug is damaged
or the appliance shows any other
faults!
• There should be 5 cm of spacing (gap)
all around the washing machine.
• The repair or change of main plug
should be carried out by authorized
technicians or specialists.
• Main water pressure should be bet
• For malfunctions that cannot be
resolved by applying the information in
these operating instructions:
Turn off the machine, unplug it,
close the water tap and contact an
authorized service.
• Never attempt to repair the machine by
yourself. Otherwise you may be putting
your own life and the lives of others in
danger.
If there are children in your house...
• Keep children away from the machine.
Electrical appliances are not toys.
• Unplug the machine when it is not in
use.
• Close the front door when you leave
the area.
Warnings
2
Page 7
7
The First Use
If the machine cannot be operated,
apply to an authorized service. To
drain any water remaining from the test
operation, the first wash cycle must be
performed without using any garments.
1. Open the water tap fully. Check that
the hoses are connected tightly.
2. Check that the drum is completely
empty; Close the loading door.
3. Add a small amount of detergent to
t second compartment; close the
detergent drawer.
4. Press the On/Off button. Some
information will appear in the display
after a few seconds.
5. Select the cottons programme (see
“Programme selection”).
6. Adjust the temperature to the highest
level ( 90°) (see “temperature and spin
speed selection”).
7. Press Start/Pause/Cancel button (11).
A In case of abnormal sounds or water
leakage: Press the On/Off (15) button,
close the water tap and pull the mains
plug out of the socket. Check to make
sure that all transit bars have been
unscrewed and that the hoses have
been connected properly.
After the programme ends:
Loading door may be opened ater
the Door Locked Symbol (141)
disappears (see “Door Lock”).
1. Press the On/Off button (15).
2. Close the water tap.
3. Leave the loading door and detergent
drawer open to dry.
Preparing to wash
Sorting the laundry
Sort the laundry according to type of
fabric, colour, degree of soiling and
permissible water temperature.
Always follow the recommendations on
the garment label.
Preparation
3
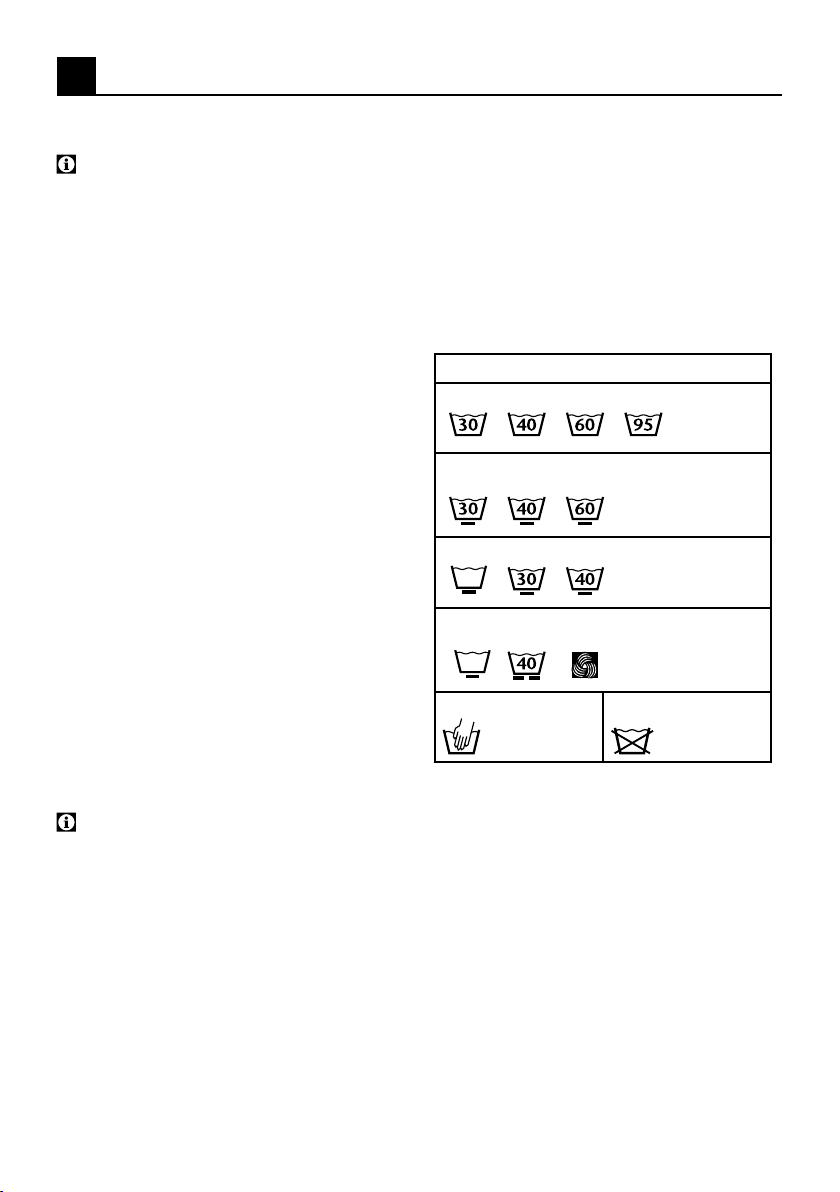
Garment type and warning signs
Whites/coloureds: cotton, linen
Easy maintenance: Synthetics (polyester, polyamide);
blended fabrics (with cotton blend)
Delicates: Delicate fabrics (rayon, silk, etc.); Curtains
Woolens: Only those carrying a wool mark or a
"Machine washable" label
Machine washable
Hand wash: Do not wash
cold
cold
Page 8
8
Preparing clothes for washing
Laundry items with metal parts (e.g.
bras, belt buckles, metal buttons) will
damage the machine.
Remove metal parts or place the
items in a clothing bag, pillow case, or
something similar.
• Empty pockets, remove all foreign
objects (e.g. coins, pens, paper clips).
If possible: Turn pockets out and
brush.
• Place small items (e.g. infants’ socks,
nylon socks) in a clothing bag, pillow
case, or something similar. This will
also save you from searching for your
missing socks.
• Place curtains with care. Remove
unstained curtain rails and pullers.
Place rails that cannot be removed in
a cloth bag, pillow case or something
similar.
• Close zippers, sew on loose buttons,
mend unstiched seams and tears.
• Only wash the “machine washable” or
“hand washable” labeled products –
and only with the suitable programme.
• Do not wash coloureds and whites
together. New, dark coloured cottons
may release a lot of dye.
• Wash new coloured laundry items
separately as they may release "dye".
• Tough stains must be treated in a
suitable way before washing. If you are
worried, check with a chemist or dry
cleaner.
• Use only dyes/colour changers and
calc solvent items suitable for machine
wash. Always follow the instructions on
the packaging.
• Wash pants and Delicates turned
inside out.
• Keep laundry items made of
Angorawool in the freezer for a few
hours before washing – this reduces
the number of fluff balls that form.
The correct load capacity
• The maximum load capacity depends
on the type of laundry, the degree of
soling and the washing programme
you wish to use.
A Please follow the information in the
"Programme selection table".
Washing results are adversely affected
by an overloaded drum.
Always try to utilize the max. loading
level.
Loading door
The loading door will lock when a
programme is running and the Door
Locked Symbol (14i) will light up, the
loading door may be opened when the
Door Locked Symbol (14i) turns off.
• Pull on the handle to open the loading
door.
• Place laundry items loosely in the
drum; add detergent if necessary
• Push the loading door until it clicks
into its place tightly. Take care that no
textiles are caught by the door.
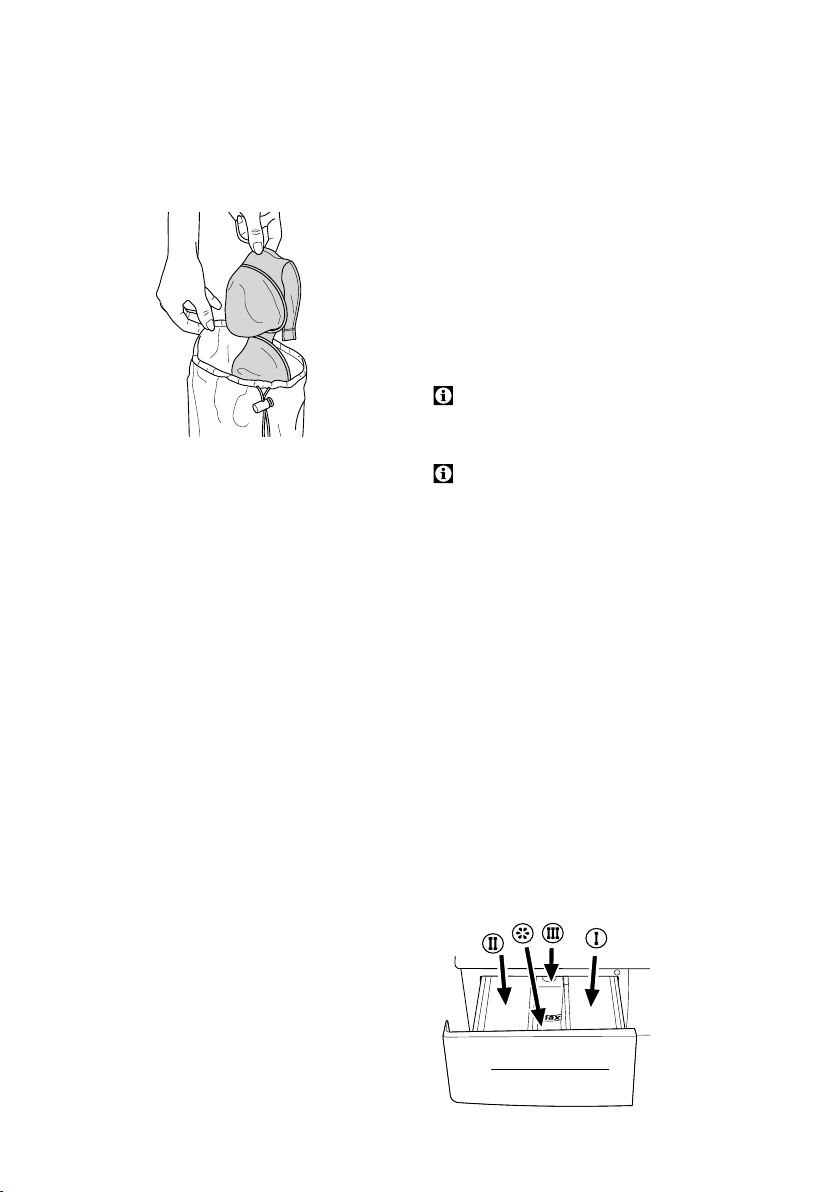
Detergents and softeners
The detergent drawer
The detergent drawer comprises three
compartments:
– left compartment (II) for main wash
– middle compartment for softener
– right compartment (I) for pre-wash
Page 9

9
• Always add detergent and fabric
softener before starting the washing
programme.
A Never open the detergent dispensing
drawer while the wash programme is
still running!
Dosage tools
In case of programme without pre-wash,
you can add washing detergent directly
to the drum with a detergent bag or a
dosage ball.
Liquid detergent
When using liquid or gel washing
detergents, please note the following:
When the liquid detergent time delay
feature is set, it may leave stains on your
laundry.
• Do not use liquid detergent if you want
to wash using the time delay feature.
• Do not use liquid detergent for the
main wash in a cycle with pre-wash.
• Use the detergent manufacturer’s
dosing cup and follow the instructions
on the package.
Choice of detergent
The type of detergent used depends on
the type of textile, colour, degree of soiling
and desired washing temperature.
• Use regular detergent for cottons (60 95 °C), otherwise use special detegent
for coloured and delicate wash.
• Wash woolens with a special detergent
used only for woolens.
• Use only detergents manufactured
specifically for washing machines.
Detergent quantity
The amount of washing detergent to be
used depends on the amount of laundry,
the degree of soiling and hardness of
water.
• You must always follow the
proportions recommended on the
package.
• Use less amount of detergent at a
suitable measure for small amounts of
laundry or for slightly soiled laundry.
A Use highly concentrated detergent
doses at their exact measures.
Too much detergent causes an excessive
amount of foaming, bad washing and
rinsing results.
Too little washing detergent causes
laundry to turn grey and calcification of the
machine.
Softener
Fabric softener is added into the middle
compartment of the detergent drawer.
• Use the proportions recommended on
the package!
• Fill only up to the (>max<) level
indicator.
• Dilute dense softener with water before
placing it in the detergent drawer.
If you use a dryer or hang your laundry
outside, you do not need to use a
softener.
Starch
• Add liquid starch and finishing agent
into the middle compartment.
• Mix powdered starch according to
the directions on the package and
like fabric softener, add to the middle
compartment.
• Never use fabric softener and starch
together in the same washing cycle.
• Wipe off the drum after using starch.
Page 10

10
Control Panel
7 - Spin Button
8 - Time Delaying Button (+)
9 - Time Delaying Button (-)
10 - Temperature Button
11 - Start/Pause/Cancel Button
12- Auxiliary Function Keys
a - Pre-wash
b - Quick Wash
c - Supplemental Rinsing
d - Anti-creasing
13 - Program Selection Knob
14 - Display (LCD)
15 - On / Off Button
7
14
10
8
9
12a 12b 12c 12d 11 13
15
Cottons
Intensive
Baby&Toddler
Clothing
A+A 40
Mini
Drain
Spin
Rinse
Woollens
Delicates
Synthetic
s
On / Off
Spin
Prewash
Quic
k
Wash
Extra
Rinse
Anti-
Crease
+
Time
Delay
Hand
Wash
Temperature
Start
Pause
Cancel
F1 F2 F3 F4
Page 11

11
Display (LCD) Symbols
14.a - Selected Spin Speed Indicator
14.b - Selected Temperature Indicator
14.c - Spin Symbol
14.d - Temperature Symbol
14.e - Remaining Time and Delaying
Time Indicator
14.f - Programme Indicator Symbols
(pre-wash/main wash/rinse/
softener/spin)
14.g - Economy Symbol
14.h - Time Delaying Symbol
14.i - Door Locked Symbol
14.j - Start Symbol
14.k - Standby Symbol
14.l - Auxiliary Function Symbols
Page 12

12
Selecting a Program and Operating your Appliance
3
Program Selection
Select the appropriate program from the
program table according to type, amount
and soiling degree of the laundry and
washing temperatures.
Bring the Programme Selection Knob
(13) to the program mode that you wish to
wash your laundry at.
The recommended temperature for the
selected programme is displayed.
Cottons : 60°
Baby : 90°
A+A 40 : 40°
Intensive : 60°
Synthetics : 40°
Delicates : 30°
Woolens : 40°
Hand Wash : 30°
Mini : 30°
Rinse, spin, pump : -
Maximum spin option for the selected
programme is displayed.
Spin
Prewash
Quick
Wash
Extra
Rinse
Anti-
Crease
+
Time
Delay
Temperature
Start
Pause
Cancel
F1 F2 F3 F4
Programme starts only when the Start/
Pause/Cancel button (11) is pressed.
Main programmes
Depending on the type of textile, the
following main programmes are available:
• Cottons
• Synthetics
• Delicates
• Woolens
• Hand Wash
For special cases extra programmes are
available:
• Baby
Increased hygiene is provided by a longer
heating period and an extra rinse cycle.
Useful for baby clothes and clothes worn
by people with illnesses.
• A+A 40
This programme uses the detergent
continuously at a temperature of 40 °C
and therefore saves energy. It is also
suitable for garments for which you cannot
use the Cottons 60 °C programme.
• Mini
Use this programme, to quickly wash a
small number of cotton/blended fabrics.
Suitable for clothes that are normally worn
for a short time such as sportswear.
Each of these main programmes comprise
a complete washing process, including
washing, rinsing and if required, spin
cycles.
A Sort the laundry according to type
of fabric, colour, degree of soiling and
permissible water temperature.
Always follow the recommendations on
the garment label.
Different temperatures may be selected in
most main programmes.
A Always select the lowest required
temperature.
Higher temperature means higher power
consumption.
Economy Symbol
Shows energy saving programs and
temperature selections.
As Intensive and Baby programs are
long programs with higher temperature
selections to ensure hygiene, Economy
symbol (14g) will not light.
Page 13

13
Special programmes
For specific applications you can select
any of the following special programmes:
• Rinse
Use this programme when you want to
soft rinse or starch separately.
• Spin
This program spins with maximum
possible rpm in the default setting.
A You should decrease the spin rpm for
delicate laundry.
• Pump
This program enables you to discharge
the water when you want to wash the
laundry inside the appliance that was
previously soaked into water.
Temperature Selection
Whenever a new program is selected, the
temperature anticipated for the program
displays on the Selected Temperature
Indicator (14b).
To change the temperature, press the
Temperature Button (10).
Temperature falls in slices of 10°. Cold
selection is shown with “-” symbol.
Spin
Prewash
Quick
Wash
Extra
Rinse
Anti-
Crease
+
Time
Delay
Temperature
Start
Pause
Cancel
F1 F2 F3 F4
After coming to the cold selection, the
maximum temperature of the selected
program is displayed when you press the
Temperature Button (10).
To decrease the temperature, press the
Temperature Button (10) again.
Spin Speed Selection
Whenever a new program is selected,
the maximum spin speed of the selected
program displays on the Selected Spin
Speed Indicator (14a).
To decrease the spin speed, press the
Spin Button (7). Spin decreases in levels.
Then, rinse hold and no spin selections
apeear respectively.
Rinse hold is shown with “ ” and spin is
shown with “ ” symbols.
Spin
Time Delaying
Prewash
Quick
Wash
Supplemental
Rinsing
Anti-
creasing
Temperature
Start/Pause
Cancel/3 sec.
+
F1 F2 F3 F4
Page 14

14
Functions
Auxiliary Function Selection
Keys
Depending on the program, you can
select the desired auxiliary function by
pressing the keys 12a, 12b, 12c,12d.
• Press the required buttons before
starting the program.
• Some combinations cannot be
selected together. Example: Prewash
(12a) and Quick Wash (12b).
• Selected Auxiliary Function Symbol
(14l) will light up.
Auxiliary Function Selection
Selected Auxiliary Function Symbol (14l)
will light up.
If the previously selected auxiliary function
or invalid auxiliary function is selected, the
first selected function will be cancelled
and the final auxiliary function selection will
remain active.
For example: If you want to select
prewash first and then quick wash,
prewash will be cancelled and quick wash
will remain active.
Auxiliary function that is not compatible
with the program cannot be selected. (see
Program Selection Table)
Prewash
A prewash can be activated with 12a
button.
A prewash is only worthwhile with
heavily soiled laundry. Without prewash
you save energy, water, washing
powder – and time.
Prewash without washing powder is
recommended for curtains.
Supplemental Rinsing
12c button is recommended for a beter
rinse.
Anti-creasing
If you press 12d button, boiler movement
will be lessened to prevent creasing and
spinning is limited. In addition, washing is
carried out in a higher water level.
• Use this button for delicate laundries
that easily crease.
A In this case, the maximum load
– for linens/coloureds: 3,0 kg
– for synthetics: 1,5 kg
– for delicates: 1,0 kg
Quick Wash
With button 12b, the wash time is
shortened.
• Use this function for smaller loads or
slightly soiled laundries.
Time Screen
The display shows the time remaining
for the programme to complete while a
program is running. Time is displayed in
hours and minutes as “ ” .
The length of a program depends
on the type of program and the
additional functions selected. Details in
the “Technical Data and Consumption
Figures” table are related to the programs
without auxiliary functions.
Time Delaying
With the Time Delay function you can
delay the program start. You can delay
Spin
Time Delaying
Prewash
Quick
Wash
Supplemental
Rinsing
Anti-
creasing
Temperature
Start/Pause
Cancel/3 sec.
12a 12b 12c 12d
+
F1 F2 F3 F4
Page 15

15
time up to 24:00 hours. Setting can be
made in intervals of 30 minutes.
A Do not use liquid detergent when you
set time delay! Risk of staining on the
clothes.
1. Open the lid, place the laundry and fill in
with detergent.
2. Set washing program, temperature,
spin speed and also auxiliary functions, if
required.
3. Pres Time Delaying adjustment
Buttons (+) and (-) (8-9) to make your
desired setting.
4. Press Start/Pause/Cancel Button
(11). Time delaying starts countdown.
Time Delaying Symbol (14h) lights up.
The “ “ in the middle of the displayed time
delay starts to flash.
More laundry may be added during the
time delay period. At the end of the
time delay countdown process, Time
Delaying Symbol (14h) fades and the
washing starts, program duration is
displayed.
Spin
Prewash
Quick
Wash
Extra
Rinse
Anti-
Crease
+
Time
Delay
Temperature
Start
Pause
Cancel
F1 F2 F3 F4
Changing the Delay Time
If you want to change the time during
the countdown:
1. Press Start/Pause/Cancel Button (11).
“ : in the middle of the screen stops
flashing. Pause symbol lights up.
2. Pres Time Delaying adjustment
Buttons “+” and “-“ (8-9) to make
your desired setting.
3. Press Start/Pause/Cancel Button
(11) the Time Delay Symbol (14h) will
light up.
4. Time delaying starts countdown. Time
Delaying Symbol (14h) flashes.
The " :" in the middle of the displaelay
starts to flash.
Canceling the Time Delay
If you want to cancel the time delay
countdown and start the program
immediately:
1. Press Start/Pause/Cancel Button
(11). The “ “ in the middle of the
displayed time delay stops flashing.
2. Pres Time Delaying adjustment
Button “-” (9) to decrease delayed
time. Program duration will be
displayed.
3. Press Start/Pause/Cancel Button
(11) to start the program.
Starting the Program
1. Program is started by pressing Start/
Pause/Cancel Button (11).
2. The Start Symbol (14j) that indicates
the startup of the program lights up.
3. The door is locked and the Door
Locked Symbol 814i) lights up.
4. Symbol of the relevant step (prewash,
main wash, rinse, softener and spin)
that the program has started from will
light up (14f).
Program Proceeding
Proceeding of a running program is shown
through a number of symbols on the
screen.
At the beginning of each program step,
the relevant symbol in the serie of symbols
will light up and thus, at the end of the
program, all symbols will remain lighted
up. The rightmost symbol lighting up on
the screen indicates the step being carried
out.
Prewash
When prewash auxiliary function is
selected, its symbol will light up at the
beginning of prewash.
Main wash
Symbol will light up to indicate that the
main wash has started.
Rinse
Symbol lights up at the beginning of
rinsing.
Page 16

16
Softener
Symbol lights up at the beginning of
softener step.
Spin
Symbol will light up at the beginning of
the final spinning – after the final rinse or
during Spin and Pump special programs.
If the machine is not spinning,
program may be at rinse hold mode
or automatic spin correction system is
activated due to excessive unbalance.
Chamnging the Position of the
Program Selection Key after
the Program Has Started:
The selected spin speed and program
temperature fades out. An empty frame
appears.
When the program selection button is
brought to the appropriate position, rpm
and temperature data reappear.
Spin
Prewash
Quick
Wash
Extra
Rinse
Anti-
Crease
+
Time
Delay
Temperature
Start
Pause
Cancel
F1 F2 F3 F4
Switching the Machine to
Standby Mode:
Machine is switched to standby mode by
pressing Start/Pause/Cancel Button
(11) for a short time. Standby Symbol
(14k) that indicates the machine is in
standby mode lights up and the Start
Symbol (14j) that shows the program has
started and is still continuing fades out.
Auxiliary functions can be cancelled or
selected in accordance with the step the
program is in.
Door can be opened if the water level is
suitable; the Door Locked Symbol (14i)
will flash until the door lock is released and
ths symbol fades out when the door lock
is opened.
Door Lock
Door Locked Symbol (14i) lights up
when the loading door is locked. It
continues flashing until the lock is ready to
open. Do not force the door at this stage.
When the door is ready to be opened, the
symbol will fade out.
Child-proof Lock
You can protect the appliance from
children’s prying by means of the childproof lock. If this is the case, no change is
made in the running program,
2. and 4. by pressing the auxiliary
functions, the machine is switched to
child-proof lock. “ “ (child-proof
lock activated) label is displayed on
the screen. The same label will appear
whenever any button is pressed during
child-proof lock mode.
Spin
Prewash
Quick
Wash
Extra
Rinse
Anti-
Crease
+
Time
Delay
Temperature
Start
Pause
Cancel
F1 F2 F3 F4
Deactivaing the Child-proof
Lock:
When the child-proof lock is activated, the
child-proof lock is deactivated by pressing
2nd and 4th auxiliary functions.
“ “ (Child-proof lock is
deactivated) label appears on the screen.
Spin
Prewash
Quick
Wash
Extra
Rinse
Anti-
Crease
+
Time
Delay
Temperature
Start
Pause
Cancel
F1 F2 F3 F4
End of Program
When the program is finished, the symbols
of the relevant steps will remain lighted
up and the auxiliary function, spin and
Page 17

17
temperature selections that were selected
at the startup of the program remain
selected.
“ “ label appears on the screen.
Ending the Program Through
Cancelling:
The program can be cancelled by pressing
the Start/Pause/Cancel Button (11) for a
long time. The Start Symbol (14j) will flash
during cancellation. After the cancellation,
the symbol of the relevant step during
which the program was cancelled will
remain lighted up and “ “ label will
appear on the screen.
Quick Instructions for Daily Use
Preparation
1. Open the water tap fully. Check that
the hoses are connected tightly.
2. Place the laundry in the machine.
3. Put in detergent and softener.
Starting
1. Press the On/Off Button (15).
2. Select the program and the
temperature.
3. If required:
- select any auxiliary function,
- adjust spin speed,
- set time delay,
4. Close the loading door.
5. Press Start/Pause/Cancel Button (11).
The display shows the time remaining
for the programme to complete.
6. Check if the Door Locked Symbol (14i)
lights up on the screen.
Canceling a Program
• Press and hold the Start/Pause/
Cancel Button (11) for about 3
seconds; the Start Symbol (14j) will
start flashing.
Machine can discharge all the water
that is still in the boiler or can take in
water 3 times maximum to cool down
the clothes to complete discharging
process.
Adding More Laundry
This is possible only under the following
conditions:
- during a time delay,
- at the beginning of the washing
(machine allows adding more laundry
during a future step only if the water
level or temperature is low).
1. Press Start/Pause/Cancel Button
(11).
2. Open the loading door and put in more
laundry.
3. Close the loading door.
4. Press Start/Pause/Cancel Button (11).
Program at Rinse Hold Mode
This process is shown with the Spin
Symbol (14c) and Standby Symbol
(14k) which are flashing.
If you wish to spin now:
1. Adjust spin speed.
2. Press Start/Pause/Cancel Button
(11).
The program continues and only
pumps out the water.
If you want to discharge the water
without spinning:
• Press Start/Pause/Cancel Button (11).
The program continues and only
pumps out the water.
Re-spinning the Laundry
The automatic spin correction system can
restrain spinning in cases where the boiler
is unbalanced.
If you want to re-spin the clothes:
1. Rearrange the previously placed
clothes in the boiler.
2. Adjust the spin program.
3. Adjust spin speed.
Spin
Prewash
Quick
Wash
Extra
Rinse
Anti-
Crease
+
Time
Delay
Temperature
Start
Pause
Cancel
F1 F2 F3 F4
Page 18

18
After the Program is Finished
Program Indicator Symbols (14f) on the
screen remain lighted up after the program
is finished.
1 When the Door Locked Symbol (14i)
turns off on the screen, " " )
label appears. Open the loading door
and take out the clothes.
2. Press the On/Off Button (15).
3. Close the water tap.
4. Eliminate any folding of the rubber seal
on the door and check for impurities.
5. Leave the loading door and detergent
drawer open to dry.
Consumption Table
Water and power
consumption and program
duration may differ from
the table above subject to
the changes in the water
pressure, water hardness
and temperature, ambient
temperature, type and
amount of laundry, selection
of auxiliary functions, and
changes in electric voltage.
A+A 40 program may be
selected instead of Cotton
60 program during winter
at places where the input
temperature of water is
dropped an/or at places with
low voltage.
* : Energy Label programme
(EN 60456)
Program Temperature
Program
time
(minutes)
Water
consumption
(lt)
Power
consumption
(kWh)
Cottons 90° 153 49 2.72
Cottons 60° 136 49 1.19
Cottons 40° 124 49 0.72
Baby 90° 139 70 2.80
A+A 40 40° 159 49 0.84
Intensive 60° 189 70 1.43
Synthetics 60° 128 59 1.00
Synthetics 40° 93 59 0.79
Synthetics Cool 74 59 0.50
Delicates 30° 75 65 0.30
Woolens 40° 67 59 0.44
Woolens Cool 42 59 0.30
Hand
Wash
30° 49 40 0.25
Mini 30° 30 55 0.22
Rinse - 18 - -
Spin - 12 - -
Pump - 2 - -
Page 19

19
Program Selection Table
Program
Temperatures Auxiliary functions Spin speed
Program Description Laundry type
Maximum
Load (kg)
90 80 70 60 50 40 30
Cool
Prewash
Quick wash
Anti-creasing
Supplemental
rinsing
1000
900
800
700
600
500
Rinse hold
No spin
Cottons 7
• • • • • • • • • • • • • • • • • • • •
Main wash / 3 rinses / 3
intermediate spins / Final Spin
Heavily soiled, heat resistant cotton, linen
Baby 7
• • • • • • • • • • • • • •
Main wash / 4 rinses / 4
intermediate spins / Final Spin
Heavily soiled, heat resistant cotton, linen
(baby clothes and underwear etc)
A+A 40 7
• • • • • • • • •
Main wash / 3 rinses / 3
intermediate spins / Final Spin
Heavily soiled or heat sensitive cotton
Intensive 7
• • • • • • • • • • • •
Main wash / 4 rinses / 4
intermediate spins / Final Spin
Heavily soiled and heat resistant cotton
Synthetics 3
• • • • • • • • • • • • • • •
Main wash / 3 rinses / 3
intermediate spins / Final Spin
Normal soiled, heat resistant cotton/
synthetic blend
Delicates 2
• • • • • • • • •
Main wash / 3 rinses / Final
Spin
Delicate, Sensitive sysnthetic and cotton
blend
Woolens 1.5
• • • • • • • •
Main wash / 3 rinses / 1
intermediate spin / Final Spin
Delicate mixtures with wool and machine
washable label
Hand
Wash
1
• • • • •
Main wash / 2 rinses / Final
Spin
Special program for silks, cashmeres and
clothes with not machine washable labels
Mini 2.5
• • • • • • • • •
Main wash / 2 rinses / Final
Spin
Special program for slightly soiled and
little amounts of laundry (tracking suits,
towels, etc., that were used only 1 time)
Rinse 7
• • • • • • • •
1 rinse / Cottons Final Spin
Profile
Rinse program
Spin 7
• • • • • • •
Cottons Final Spin Profile Spin program
Pump - Pump Pump program
•: Selectable
• : It is selected automaticaly and can not be cancelled
Page 20

20
Maintenance and cleaning
5
The detergent drawer
Clean when necessary:
1. Open the drawer as much as you can.
2. Push down the tab on the siphon and
take out the drawer completely.
3. Clean the drawer under flowing
lukewarm water. Remove the siphon;
clean the siphon and the drawer
under flowing lukewarm water and
drill the opening by means of a pin if
necessary.
Place the siphone in its housing.
4. Wipe any detergent residues in the
drawer. Clean any lime residues on the
water spray nozzles on the top part of
the drawer, if any.
The loading door and the
boiler
After each wash:
• Eliminate any folding on the bellow and
check for impurities.
• Check the drum against foreign
substances.
A Foreign metal substances can cause
rust stains. In such cases:
Clean the drum with a stainless steel
cleaning agent. Never use steel wool
or wire wool.
Body and control panel
When necessary:
• Clean the body with soap suds or mild
detergent; wipe dry with a soft cloth.
• Use only a soft, damp cloth to clean
the control panel.
A Never use a sponge or scrub material.
These will damage the painted and
plastic parts.
Cleaning the pump filter
• Clean the pump filter once a year!
• Clean foreign object trap, if foreign
objects (coins, buttons, baby socks,
etc.) are blocking the pump filter.
• When >Check filter< message
appears, clean the foreign object trap.
• Drain left-over water before cleaning
(see following title).
Page 21

21
Draining remaining water
Drain off the water completely in the
following cases...
• before cleaning the foreign substance
trap;
• before transporting the machine (e.g.
when shifting house);
• when there is a power failure
(“emergency draining”);
• when there is a danger of frost.
A At ambient temperatures below 0°C
the remaining water in the appliance
could freeze and damage it.
1. Turn off the appliance, unplug the
power cable and close the water filter.
A A wait until the hot suds cool off
sufficiently.
Otherwise, there is a danger of being
boiled.
2. Open the service door by pushing on
the button. Take out the drain pipe and
hold it over a bowl. Remove the gasket
from the drain hose and drain one
bucket of water at a time.
A There might be 20 lt of water left over
in the machine when the drum is full
(e.g. after a power cut off)!
3. Rotate (anriclockwise) the pump filter
a half tour to loosen it and wipe off the
left over water with a piece of cloth.
When there is not any water left, turn
the foreign substance trap until it is
completely freed and take it out.
4. Clean the pump filter and the mouth of
the pump. Check if the pump propeller
(pump mouth) rotates freely.
5. Place the door on the drain hose and
put it aside.
6. Replace the pump filter and squeeze it
tightly (clockwise).
7. Close the service door.
To clean limes
The machine does not have to be cleaned
off the limes if appropriate amount of
detergent was used.
• Use only lime removers manufactured
specifically for washing machines.
Always follow the instructions on the
packaging.
Page 22

22
Installation
6
Opening the transportion
locks.
A Before the washing machine is
operated, the transit safety screws
must be removed!
The machine will otherwise be damaged.
1. Loosen the bolt with a spanner until it
rotates freely.
2. Remove transportation safety screws
by turning them gently.
3. Place the lids (in the accessory bag) in
the spaces on the rear panel and use
an appropriate tool to attach them (like
the handle of a screwdriver). Small lid
will be used for the uppermost space.
Store the transportation safety screws
in a safe place.
• If the washing machine is to be
transported again, you will need them
(e.g. if you switch your house).
A Never move the appliance unless the
transportation safety bolts are fixed!
Page 23

23
Appropriate place foer installation
Install the appliance in environments
without risk of freezing in a stable and
even position.
A If there is risk of freezing, discharge all
the remaining water at the end of the
program.
A Floor must be capable enough to carry
the load on it.
For example, if the washing machine and
a drier is placed on top of each other, their
approximate weight together might reach
180 kg – when they are full.
Important:
• Do not stand appliance on the power
cable.
• Keep at least 1cm distance to walls of
other furniture.
• Place the machine on a sound surface;
do not locate it on a long nap rug or
surfaces alike.
Adjusting the feet
A Don’t use any tool to loosen the lock
nuts to avoid damaging them.
1. Loosen the lock nuts on the feet.
2. Adjust them until the machine stands
evenly and firmly.
3. Important: Squeeze all lock nuts again.
Connecting to the water
supply.
Important:
• Keep the permissible water pressure in
mind (see “Technical specifications”).
Attach a pressure reducing valve if
water pressure is higher.
• As the water pressure will be
insufficient, do not attach to a heater
(water heater).
• Use only the new hose supplied with
the machine, not an old existing one!
• Be sure that the hoses do not have
sharp bends.
A Do not use a tool to tighten it.
• The special hoses supplied with the
machine are connected to the water
intake valves on the machine. The red
hose or the hose with red sign is for the
hot water inlet and the blue hose or the
hose with blue sign is for the cool water
inlet.
• In order to prevent water leakage that
may occur at the connection points,
there are rubber sealings (4 sealings for
the models with double water inlet and
2 sealings for other models) attached
to the hoses or put in the packaging.
These sealings should be used at both
connection ends of the hoses. Sealings on
the machine side should sit on the hose
filter channel.
• Do not connect a product with single
water inlet to the hot water tap. Otherwise,
product may switch to protection.
1. If it is not attached already, screw
tightly the bent end of the network
hose on the rear panel of the machine
by hand.
2. Tightly attach the network hose to the
tap by hand.
3. Turn the water tap all the way on and
check all connections for leaks; Turn
the water tap off again. Correct the
positions of seals and screw couplings,
if necessary.
Page 24

24
Connecting to the water
drainage.
You may hang the drain hose at the
edge of a washbasin, sink or bathtub –
or attach it to a drain pipe permanently
(equipped with a siphon mechanism).
• Do not place the drain hose higher
than 100 cm above floor level for the
suds pump to be able to pump out.
Do not go below the minimal height of
40 cm, otherwise water will come out.
• Water should flow uninterruptedly.
Washbasins with a small drain are not
suitable.
• The end of the hose must not immerse
in the pumped-out water.
• Check with the customer service
for extension hoses. Do not use
homemade extensions with hose
clamps or alike!
• Use only the new hose supplied with
the machine, not an old existing one!
• Be sure that the hoses do not have
sharp bends.
Fastening the hose holder:
1. Pass the holder supplied during
delivery over the end of the hose.
2. Hold the drain hose with the holder
attached to it on top of the edge of
the washbasin or bathtub and fix it to
prevent slipping – e.g. fastening it by a
chain around the water tap.
Permanent connection to a
siphon cover.
A Qualified plumber should attach the
hose to prevent the hose from slipping
off. There is risk of overflow.
Electrical connection .
Connect the appliance to an earthed
outlet protected by a fuse of suitable
capacity.
Important:
• Connection should comply with
national regulations.
• Power cord plug must be within reach
after installation.
• The voltage and allowed fuse
protection is stated on the type label
plate.
• The stated voltage must match with
your mains voltage.
• Connection via extension cords or
multi-plugs is not allowed.
B A damaged power cable must be
replaced by a qualified electrician.
B The appliance must not be operated
unless it is repaired! There is the risk of
electric shock!
Page 25

Page 26

Page 27

Page 28

 Loading...