


Beko ASN541B, ASN541S, ASN541X, ASP341B, ASP341S User manual [EN]
...ASN541B |
ASP341S |
ASNL551X |
ASN541S |
ASP341X |
ASPM341PX |
ASN541X |
ASNL551B |
|
ASP341B |
ASGP342B |
|
EN |
|
|
Please read these instructions first before using your appliance
Thank you for choosing a Beko appliance.
Please take some time to read this user manual before using your appliance, to ensure you know how to safely operate the controls and functions.
Carefully follow all unpacking and installation instructions to ensure the appliance is correctly connected and fitted prior to use.
Please write your product model and serial number on the last page of this user manual, and store in a safe location close to the appliance for easy future reference.
This user manual may also be applicable for several other models. Differences between models will be listed.
If you have any questions or concerns, please call our contact centre or find help and information online at www.beko.co.uk
Symbols and their descriptions
This instruction manual contains the following symbols:
C A B
Important information or useful usage tips.
Warning against dangerous conditions for life and property.
Warning against electric voltage.
1. Safety and environment |
3 |
|
instructions |
||
2 |
Your refrigerator |
6 |
|
|
|
3 |
Installation |
7 |
3.1. Appropriate installation location 7 3.2. Installing the plastic wedges . . . .8 3.3. Electrical connection. . . . . . . . . . . . .8 3.4. Adjusting the feet. . . . . . . . . . . . . . . .8 3.5. Illumination lamp. . . . . . . . . . . . . . . . .9 3.6. Door open warning . . . . . . . . . . . . . .9 3.7. Water connection . . . . . . . . . . . . . . . .9
3.8. Connecting the water hose to the refrigerator. . . . . . . . . . . . . . . . . . . . . 10
3.9. Connecting of the water hose to the cold water mains line . . . . . . . . . . 10
3.10.Water filter. . . . . . . . . . . . . . . . . . . . . .11
3.11.Mounting the external filter onto the wall . . . . . . . . . . . . . . . . . . . . . . . . . . . . . .11
3.12 Activating water filter change warning . . . . . . . . . . . . . . . . . . . . . . . . 13
3.13.Before starting to use the water/ice dispenser. . . . . . . . . . . . . . . . . . . . . . . 14
3.14.Transportation of the product. 14
4 Preparation |
16 |
4.1. Things to be done for energy saving . . . . . . . . . . . . . . . . . . . . . . . . . . 16
4.2. Efficient operation . . . . . . . . . . . . . 16
4.3. Recommendations on the fridge compartment . . . . . . . . . . . . . . . . . . 16
4.4. Initial use . . . . . . . . . . . . . . . . . . . . . . . 16
5 Operating the product |
18 |
5.1. Indicator panel . . . . . . . . . . . . . . . . . 18 5.2. NeoFrost Cooling System . . . . . . 21 5.3. Freezing fresh food . . . . . . . . . . . . 21
5.4. Recommendations for preserving the frozen food . . . . . . . . . . . . . . . . . . . . . 22
5.5. Placing the food. . . . . . . . . . . . . . . . 22 5.6. Deep-freeze information . . . . . . 22 5.7. Chiller compartment . . . . . . . . . . . 23 5.8. Butter & cheese section . . . . . . 23 5.9. Egg section. . . . . . . . . . . . . . . . . . . . . 23 5.10.Crisper. . . . . . . . . . . . . . . . . . . . . . . . . . 23 5.11.Odour filter . . . . . . . . . . . . . . . . . . . . . 23 5.12.Using the dispenser . . . . . . . . . . . 24 5.13.Filling the water dispenser’s tank24 5.14.Filling the water dispenser’s tank25 5.15.Drip tray . . . . . . . . . . . . . . . . . . . . . . . . 25
5.16.Icematic and ice storage container . . . . . . . . . . . . . . . . . . . . . . . 27
5.17.Ice-maker . . . . . . . . . . . . . . . . . . . . . . 27 5.18.Humidity controlled crisper. . . . 28
6 Maintenance and cleaning30
6.1 Avoiding bad odours . . . . . . . . . . . 30 6.2 Protecting the plastic surfaces 30 6.3 Cleaning of Glass Water Tank . . 31
7. Troubleshooting 32
|
2 / 41 EN |
Refrigerator / User Manual |
1. Safety and environment instructions
This section provides the safety instructions necessary to prevent the risk of injury and material damage. Failure to observe these instructions will invalidate all types of product warranty.
Intended use
WARNING:
Keep ventilation openings, A in the appliance enclosure or in the built-instructure,
clear of obstruction.
WARNING:
Do not use mechanical devices or other means
A to accelerate the defrostingprocess, other than those recommended by the manufacturer.
WARNING:
A Do not damage the refrigerant circuit.
WARNING:
Do not use electrical appliances inside the food storage
A compartments of the appliance, unless they are of the type recommended by the manufacturer.
supervision or instruction concerning use of the appliance in a safe way and understand the hazards involved. Children shall not play with the appliance.
• In case of malfunction, unplug the device.
• After unplugging, wait at least 5 minutes before plugging in again.
• Unplug the product when not in use.
• Do not touch the plug with wet hands! Do not pull the cable to plug off, always hold the plug.
• Do not plug in the refrigerator if the socket is loose.
• Unplug the product during installation, maintenance, cleaning and repair.
• If the product will not be used for a while, unplug the product and remove any food inside.
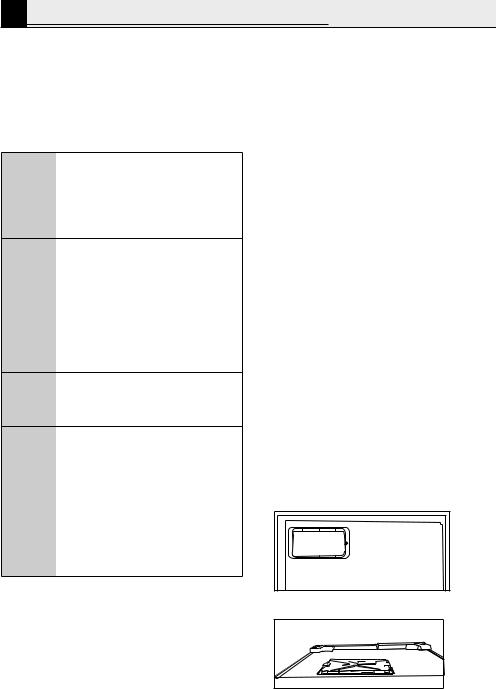
• Do not use the product when the compartment with circuit cards located on the upper back part of the product (electrical card box cover) (1) is open.
1
1.1.General safety
• This appliance can be used by children aged from 8 years and above and persons with reduced physical,sensory or mental capabilities or lack of experience and knowledge if they have been given
1 |
|
|
|
Refrigerator / User Manual |
3 / 41EN |
|
|
Important instructions for safety and environment |
||||||
• Do not use steam or steamed |
cause electrical danger. When |
||||||
|
cleaning materials for cleaning |
relocating the product, do not |
|||||
|
the refrigerator and melting the |
pull by holding the door handle. |
|||||
|
ice inside. Steam may contact |
The handle may come off. |
|||||
|
the electrified areas and cause |
• Take care to avoid trapping any |
|||||
|
short circuit or electric shock! |
part of your hands or body in |
|||||
• Do not wash the product by |
any of the moving parts inside |
||||||
|
spraying or pouring water on it! |
the product. |
|||||
|
Danger of electric shock! |
• Do not step or lean on the door, |
|||||
• In case of malfunction, do |
drawers and similar parts of the |
||||||
|
not use the product, as it may |
refrigerator. This will cause the |
|||||
|
cause electric shock. Contact |
product to fall down and cause |
|||||
|
the authorised service as soon |
damage to the parts. |
|||||
|
as possible. |
• Take care not to trap the power |
|||||
• Plug the product into an |
cable. |
||||||
|
earthed socket. Earthing |
|
|
|
|
|
|
|
|
|
|
|
|
||
|
must be done by a qualified |
|
|
|
|
|
|
|
electrician. |
|
|
|
|
|
|
• If the product has LED type |
|
|
|
|
|
||
|
lighting, contact the authorised |
|
|
|
|
|
|
|
service for replacing or in case |
|
|
|
|
|
|
|
of any problem. |
|
|
|
|
|
|
• Do not touch frozen food with |
|
|
|
|
|
||
|
|
|
|
|
|||
|
wet hands! It may adhere to |
1.1.1 HC warning |
|||||
|
your hands! |
||||||
|
If the product comprises a cooling |
||||||
• Do not place liquids in bottles |
|||||||
system using R600a gas, take |
|||||||
|
and cans into the freezer |
||||||
|
care to avoid damaging the |
||||||
|
compartment. They may burst. |
||||||
|
cooling system and its pipe while |
||||||
• Place liquids in upright position |
|||||||
using and moving the product. |
|||||||
|
after tightly closing the lid. |
||||||
|
This gas is flammable. If the |
||||||
• Do not spray flammable |
|||||||
cooling system is damaged, keep |
|||||||
|
substances near the product, as |
||||||
|
the product away from sources |
||||||
|
it may burn or explode. |
of fire and ventilate the room |
|||||
• Do not keep flammable |
|||||||
immediately. |
|||||||
|
materials and products with |
||||||
|
flammable gas (sprays, etc.) in |
C |
The label on the inner |
|
|||
|
the refrigerator. |
left side indicates the |
|
||||
• Do not place containers |
|
|
type of gas used in the |
|
|||
|
holding liquids on top of the |
|
|
product. |
|
||
|
product. Splashing water on |
1.1.2 For models with |
|||||
|
an electrified part may cause |
water dispenser |
|||||
|
electric shock and risk of fire. |
• Pressure for cold water inlet |
|||||
• Exposing the product to rain, |
shall be maximum 90 psi (6.2 |
|
snow, sunlight and wind will |
||
|
|
4 / 41 EN |
Refrigerator / User Manual |
Important instructions for safety and environment
bar). If your water pressure exceeds 80 psi (5.5 bar), use a pressure limiting valve in your mains system. If you do not know how to check your water pressure, ask for the help of a professional plumber.
• If there is a risk of water hammer effect in your installation. Consult a plumber.
• Do not install on the hot water inlet. Take precautions against of the risk of freezing of the hoses. Water temperature operating interval shall be 33°F (0.6°C) minimum and 100°F (38°C) maximum.
• Use drinking water only.
1.2.Intended use
• This product is designed for home use. It is not intended for commercial use.
• The product should be used to store food and beverages only.
• Do not keep sensitive products requiring controlled temperatures (vaccines, heat sensitive medication, medical supplies, etc.) in the refrigerator.
• The manufacturer assumes no responsibility for any damage due to misuse or mishandling.
1.3.Child safety
• Keep packaging materials out of children’s reach.
• Do not allow the children to play with the product.
•If the product’s door comprises a lock, break off the lock when eventually disposing of the product.
1.4. Compliance with WEEE Directive and Disposing of the Waste Product
This product complies with EU WEEE Directive (2012/19/EU). This
product bears a classification symbol for waste electrical and electronic equipment (WEEE).
This product has been manufactured with high quality parts and materials which can be reused and are suitable for recycling. Do not dispose of the waste product with normal domestic and other wastes at
the end of its service life. Take it to the collection center for the recycling of electrical and electronic equipment. Please consult your local authorities to learn about these collection centers.
1.5.Compliance with RoHS Directive
• This product complies with EU WEEE Directive (2011/65/EU). It does
not contain harmful and prohibited materials specified in the Directive.
1.6.Package information
• Packaging materials of the product are manufactured from recyclable materials in accordance with our National Environment Regulations. Do not dispose of the packaging materials together with the domestic or other wastes. Take them to the packaging
material collection points designated by the local authorities.
|
|
|
Refrigerator / User Manual |
5 / 41EN |
|

2 Your refrigerator
Congratulations on your choice a Beko quality Appliance which has been designed to give you service for many years.
1
*17
*16 |
*15 |
14 |
13
12
2 |
|
3 |
*4 |
|
|
5 |
*6 |
|
|
|
*7 |
9 |
|
|
*8 |
10 |
|
11 |
|
|
12 |
1- Freezer compartment
2- Fridge compartment
3- Fan
4- Butter-cheese compartments
5- Glass shelves
6- Fridge compartment door racks and egg compartment
7- Minibar accessory
8- Water dispenser tank
9- Odour filter
10-Chiller compartment
11-Crisper compartment
12-Adjustable feet
13Frozen food storage compartments
14Freezer compartment door racks
15-Ice makers
16-Ice storage compartment
17Ice maker decorative cover
*Optional: Figures in this user manual are schematic and may not match C the product exactly. If the relevant parts are not available in the product you
purchased, it applies to other models.
|
6 / 41 EN |
Refrigerator / User Manual |
3 Installation
Always have the repair procedures carried out by the Authorised Service Agent. Manufacturer shall not be held liable for damages that may arise from procedures carried out by unauthorised persons.
To make the product ready for use, make sure that the electricity installation
is appropriate before calling the Authorised Service Agent. If not, call a qualified electrician to have any necessary arrangements carried out.
C |
Preparation of the location and |
electrical installation at the |
|
place of installation is under |
|
|
customer's responsibility. |
B |
Product must not be plugged in |
during installation. Otherwise, |
|
there is the risk of death or |
|
|
serious injury! |
|
WARNING:Manufacturer shall |
B |
not be held liable for damages |
that may arise from procedures |
|
|
carried out by unauthorised |
|
persons. |
|
WARNING: Prior to |
A |
installation, visually check if |
the product has any defects on |
|
it. If so, do not have it installed. |
|
|
Damaged products cause risks |
|
for your safety. |
Make sure that the power cable is not pinched or crushed
C while pushing the product into its place after installation or cleaning procedures.
3.1.Appropriate installation location
WARNING: If the door of the room where the product will be
A placed is too small for the product to pass, then the product's doors can be removed and the product turned aside to pass it through.
•Chooseaplaceatwhereyouwould use the product comfortably.
•Installtheproductatleast30cmaway from heat sources such as hobs, ovens, heater cores and stoves. Product must not be subjected to direct sun light and kept in humid places after installation.
•Appropriateairventilationmustbe provided around your product in order to achieve an efficient operation. If the product is to be placed in a recess in the wall, pay attention to leave at least 5 cm distance with the ceiling and side walls.
•Donotplacetheproductonthe materials such as rugs or carpets.
•Placetheproductonanevenfloor surface to prevent jolts.
•Donotinstalltheproductinplaces where the temperature falls below -5°C.
If two coolers are to be installed C side by side, there should be at
least 4 cm distance between them.
|
|
|
Refrigerator / User Manual |
7 / 41EN |
|
Installation
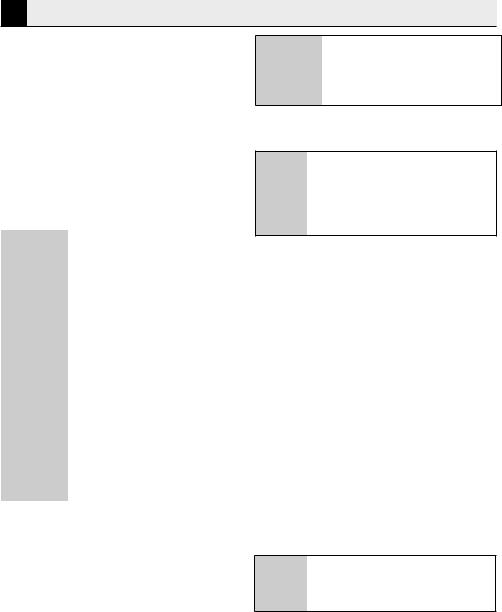
3.2.Installing the plastic wedges
Plastic wedges are used to create the distance for the air circulation between the product and the rear wall. Insert the 2 plastic wedges onto the rear ventilation cover as illustrated in the figure. To install the wedges, remove the screws on the product and use the
screws given in the same pouch with the wedges.
of the product. If the current value of the fuse or breaker in the house does not comply with the value in the rating plate, have a qualified electrician install a suitable fuse.
• Thespecifiedvoltagemustbeequalto
your mains voltage.
• Donotmakeconnectionsvia
extension cables or multi-plugs.
WARNING: Damaged power B cable must be replaced by the
Authorised Service Agents.
WARNING:If the product has a failure, it should not be operated
B unless it is repaired by the Authorised Service Agent! There is the risk of electric shock!
3.4.Adjusting the feet
If the product stands unbalanced after installation adjust the feet. Taking help from someone to slightly lift the refrigerator will facilitate this process.
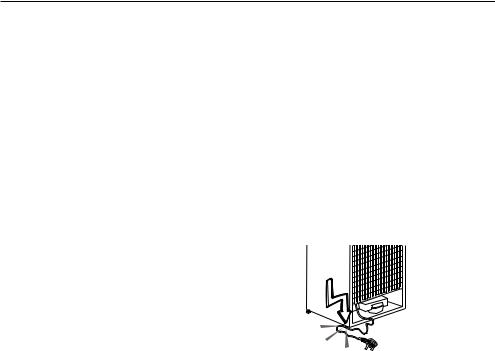
3.3.Electrical connection
Connect the product to a grounded outlet protected by a fuse complying with the values in the rating plate. Our company shall not be liable for any damages that will arise when the product is used without grounding in accordance with the local regulations.
•Electricalconnectionmustcomply with national regulations.
•Powercableplugmustbewithineasy reach after installation.
•Thevoltageandallowedfuseor breaker protection are specified in the Rating Plate which is affixed to interior
WARNING: First unplug the product. Product must not be B plugged in when adjusting the feet. There is the risk of electric
shock!
Turn the front feet to balance the product. The corner where the foot exists is lowered when you turn in the direction of arrow and raised when you turn it in the opposite direction.
|
8 / 41 EN |
Refrigerator / User Manual |

Installation
In order to adjust the doors vertically,
•Loosenthefixingnutatthebottom
•Screwadjustingnut(CW/CCW) according to the position of the door
•Tightenthefixingnutforthefinal position
In order to adjust the doors horizontally,
•Loosen the fixing bolt on the top
•Screw the adjusting bolt (CW/CCW) on the side according to the position of the door
•Tighten the fixing bolt on the top for the final position.
adjusting nut |
fixing nut |
fixing nut |
adjusting nut |
3.5.Illumination lamp |
Do not attempt to repair yourself but call the Authorised Service Agent if the LED illumination lamps do not go on or are out of order.
3.6.Door open warning
(This feature is optional)
An audio warning signal will be given when the door of your product is left open for 1 minute. This warning will be muted when the door is closed or any of the display buttons (if any) are pressed.
3.7.Water connection
ASP341 models only
(This feature is optional)
Water system installation of the refrigerator must be performed by a competent person.
Depending on the model of the refrigerator, you may not have to connect to water main.First you must connect the water hose to the refrigerator.
1 |
2 |
|
3 |
4 |
*5 |
Check that following parts have been delivered together with the product:
1.Union for connecting the water hose to the rear of the refrigerator
2.3 pieces of pipe clips (used to secure the water hose)
a |
a |
2 |
c |
Refrigerator / User Manual |
9 / 41EN |
Installation
3.5-meter long water hose (1/4 inch in diameter)
4.(4) Cold mains water valve with mesh filter (tap adapter)
5. (5) External water filter.
3.8. Connecting the water hose to the refrigerator
1.Slip the union (b) onto the water hose
(a).
2.Push the water hose downwards firmly to slip it onto the water inlet valve (c).
3.Tighten the union (c) by hand to secure
it onto the water inlet valve.
C |
Normally, you are not required |
to tighten the union with a tool. |
|
|
However, you can use a spanner or |
|
pliers to tighten the union if there |
|
is a leakage. |
3.9. Connecting of the water hose to the cold water mains line
ASP341 models only
(This feature is optional)
If you will use the refrigerator by connecting it to the cold water mains line, you must install a standard 1/2" valve connector to the cold water installation of your home. If this valve is not present or you are not sure, consult a qualified plumber.
1.Separate the union from the tap adaptor.
2.Install the tap adaptor to standard 1/2” valve connector.
3.After inserting the water hose to the union, install it to the tap adaptor and insert to the union to the tap adapter.
4.Tighten the union by hand.
|
10 / 41 EN |
Refrigerator / User Manual |
Installation
A |
WARNING: Secure the water |
hose to suitable points by means |
|
|
of the clips supplied to avoid |
|
any damage or displacement or |
|
accidental disconnection. |
A |
WARNING: After turning on the |
water valve, make sure that there |
|
|
is no leakage at both connection |
|
points of the water hose. If there |
|
is a leakage, turn off the valve |
|
immediately and tighten all joints |
|
again using a spanner or a pliers. |
A |
WARNING: Make sure that |
standard 1/2" valve connector is |
|
|
available and completely turned |
|
off on your cold water mains line. |
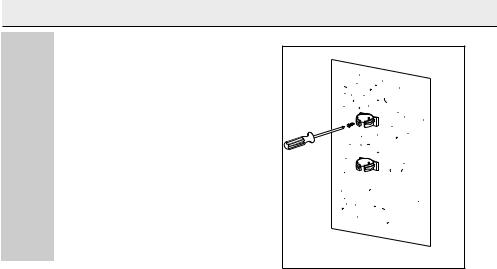
3.10. Water filter
(This feature is optional) |
|
WARNING: Water filter must |
Your refrigerator may be equipped with |
B |
be held upright as shown in the |
figure. It is critical to connect the |
||
an external or internal filter depending |
|
water inlet and outlet hoses on |
on its model. To fit the water filter, |
|
the filter correctly. |
follow the instructions below referring |
|
|
to the figures supplied: |
|
|
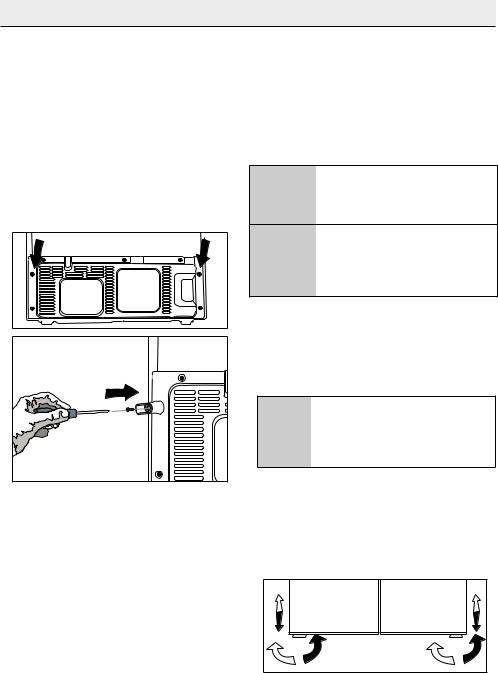
3.11. Mounting |
|
|
the external filter |
|
|
onto the wall |
|
|
ASP341 models only |
|
|
1.First, determine the location to mount the external filter.
2.Then, determine the distance between the filter and the tap and filter and the water inlet respectively. Prepare hoses at required lengths.
3.Mount the filter connection kit onto the wall by using a screwdriver and attach the filter.
|
|
|
Refrigerator / User Manual |
11 / 41EN |
|
Installation
C |
After connecting the filter, |
do not consume the first 10 |
|
|
glasses of water. |
B |
WARNING: Never mount |
the filter onto the refrigerator. |
|
|
Coolant pipes might be pierced! |
|
12 / 41 EN |
Refrigerator / User Manual |
 Loading...