

Page 1
WING Firmware Update 1.13
New Features
•
•
•
•
•
•
•
•
•
•
•
•
•
•
Description of new GUI Features
WING fw 1.13 > Library Functions
The recent fw update 1.13 features a complete overhaul of the internal and external memory structure,
and it can be seen as an important cornerstone for the upcoming Show Control 2.0 release for WING,
which is due for release in Q2/2023.
Note: Due to the structural changes with fw 1.13 there is also changes in the remote control API. Hence,
console firmware >1.13 will require the updated WING CoPilot 1.12 or the new WING-EDIT application
for PC/Mac/Linux.
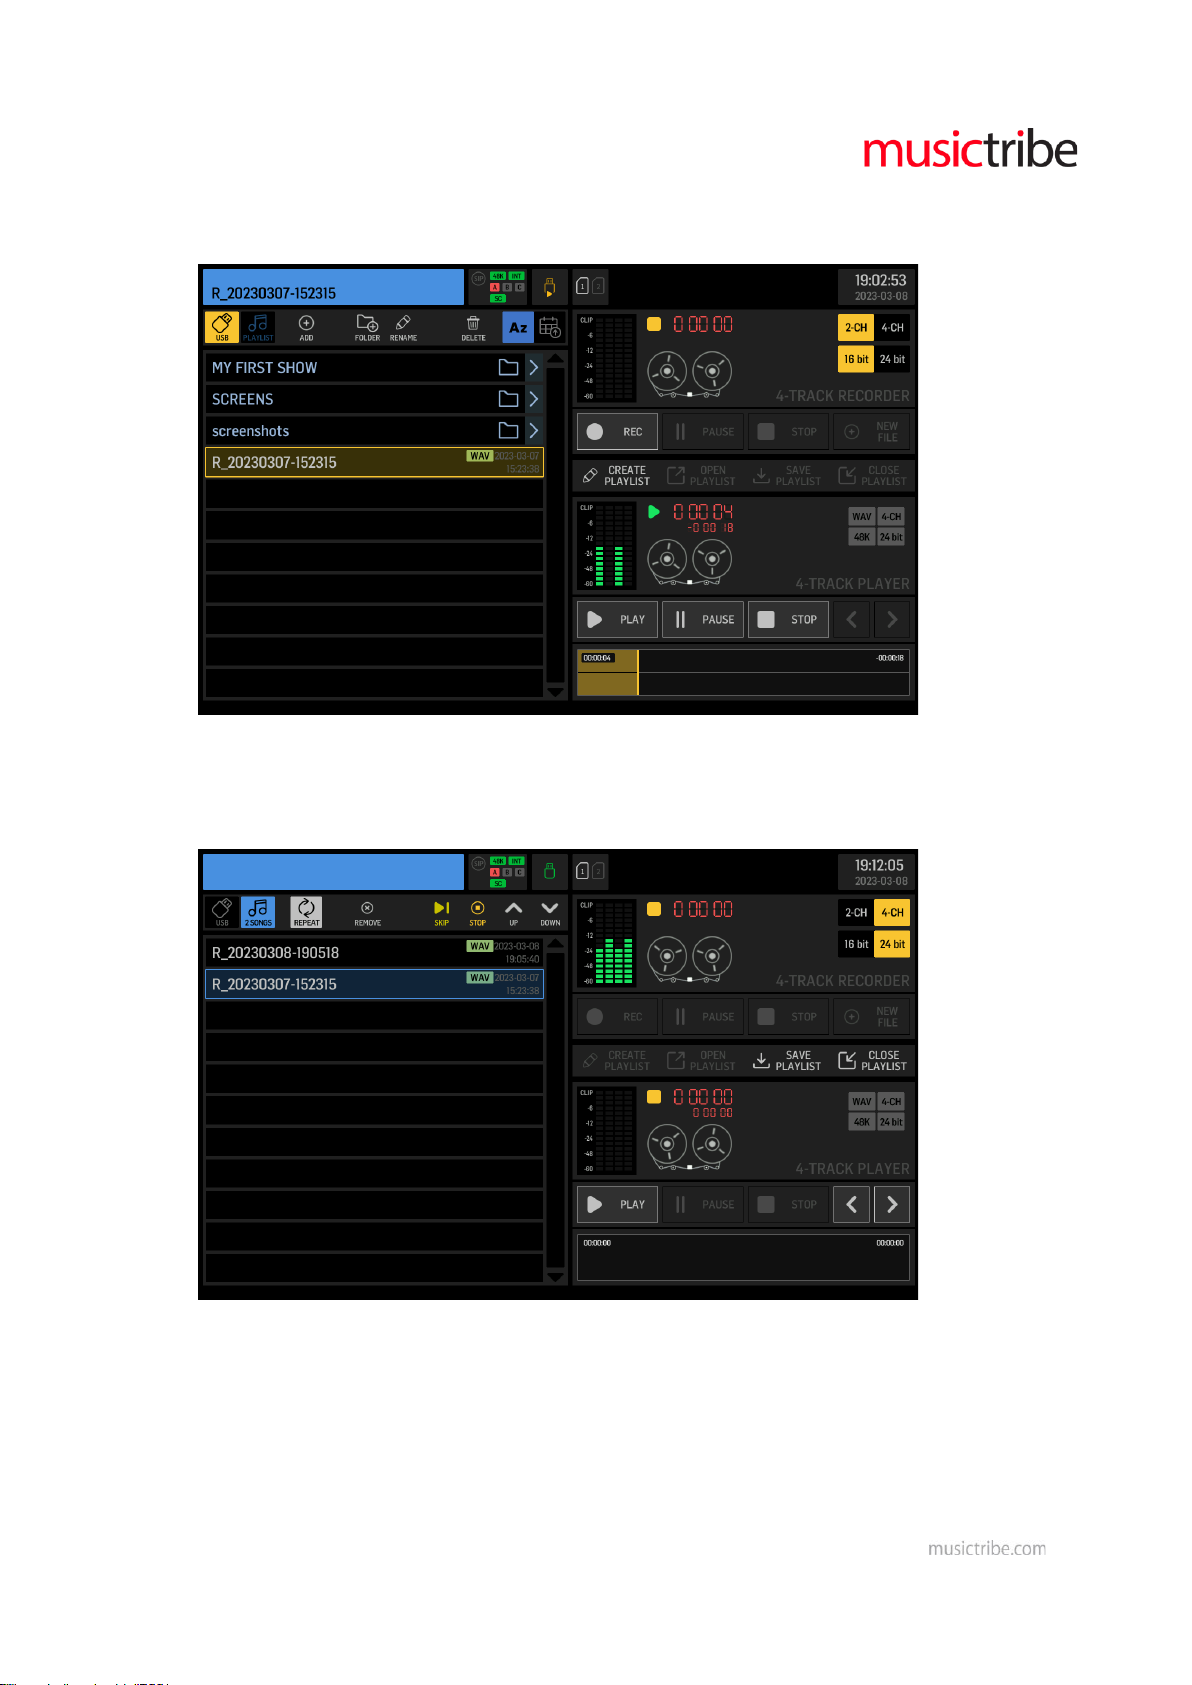
Firmware 1.13 already features Show files, wherein snapshot files (SNAP) and audio clips (CLIP) from
both internal memory or USB drive can be arranged and referenced in a show sequence.
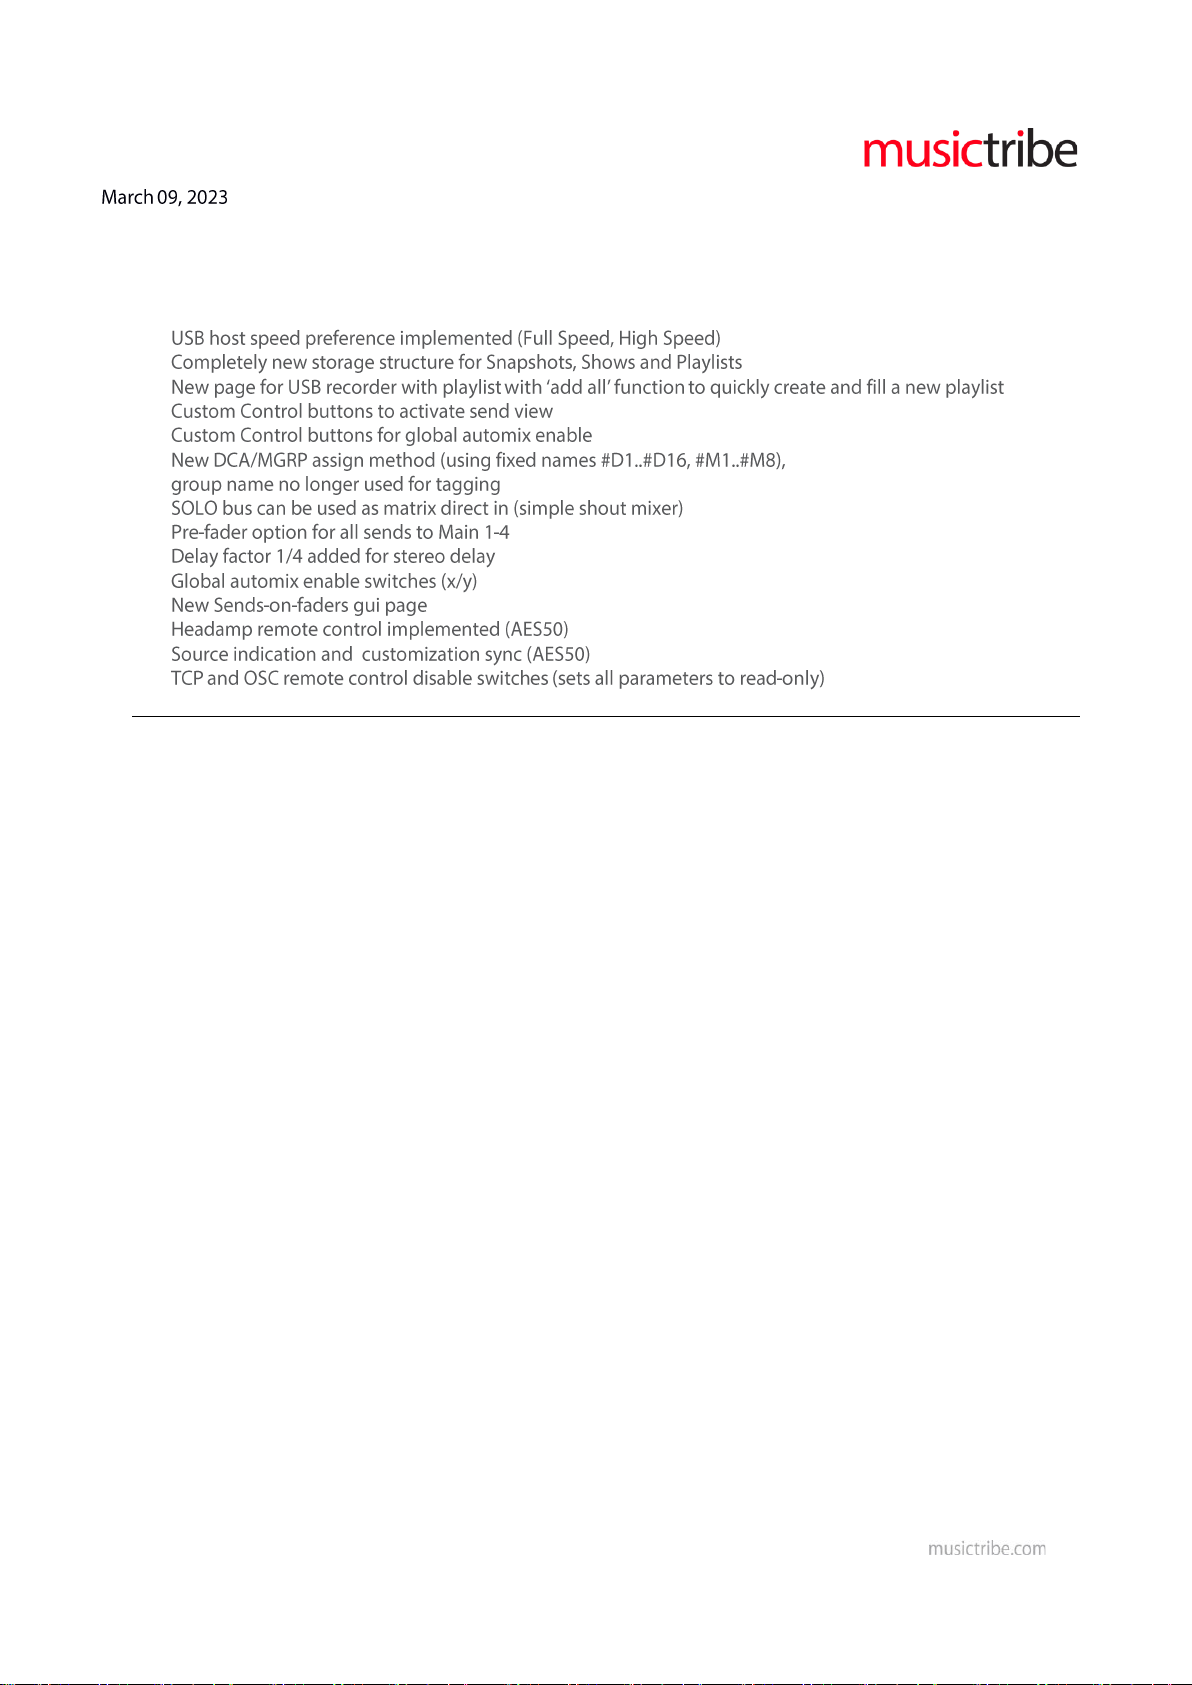
LIBRARY (left side of screen)
INT > Internal Memory of WING
Lists up the internal flash memory file tree, sorted ascending/descending either alphabetically (Az,
Za), or by date.
You can create, delete or rename folders, using the icon buttons Folder+, pencil and dustbin in the
top row. Individual files can be renamed or deleted the same way.
Page 2
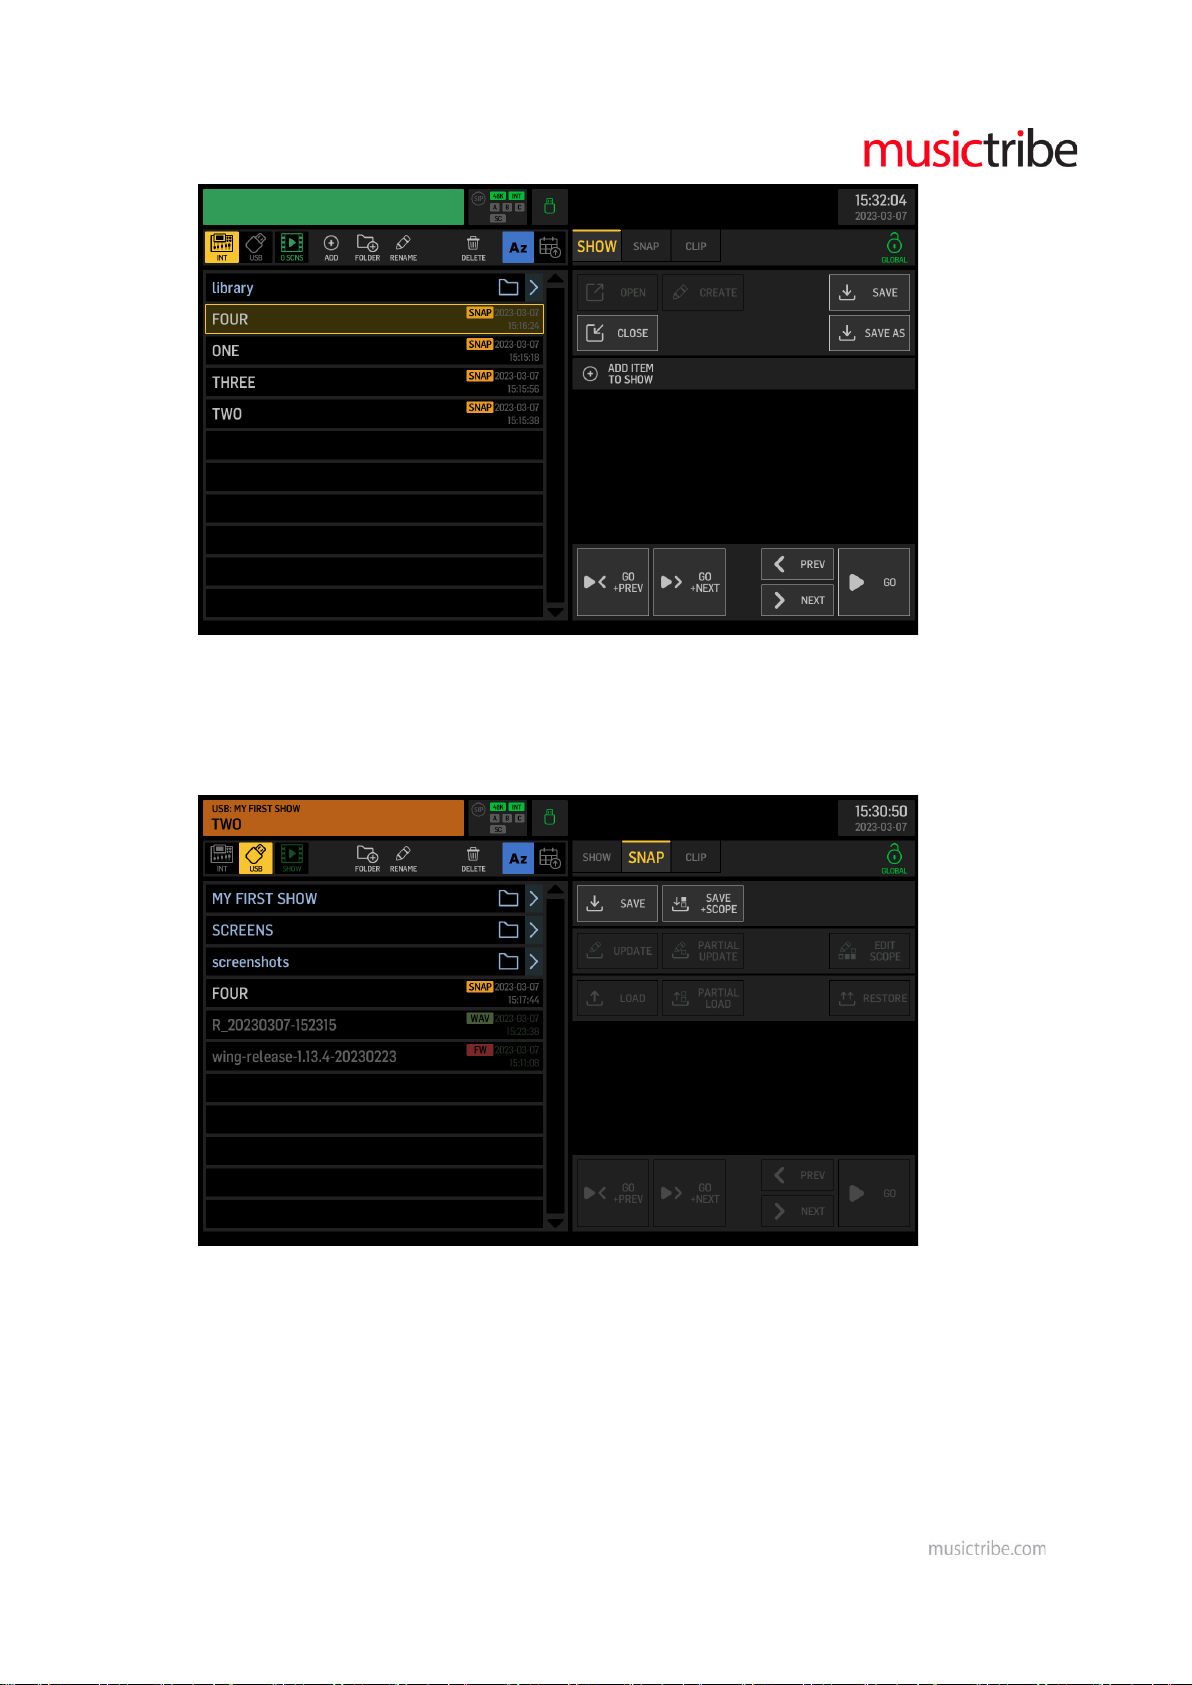
USB > External Memory on USB Drive
Lists up the USB flash memory file tree, sorted ascending/descending either alphabetically (Az,
Za), or by date.
You can create, delete or rename folders, using the icon buttons Folder+, pencil and dustbin in the
top row.
Individual files can be renamed or deleted the same way.
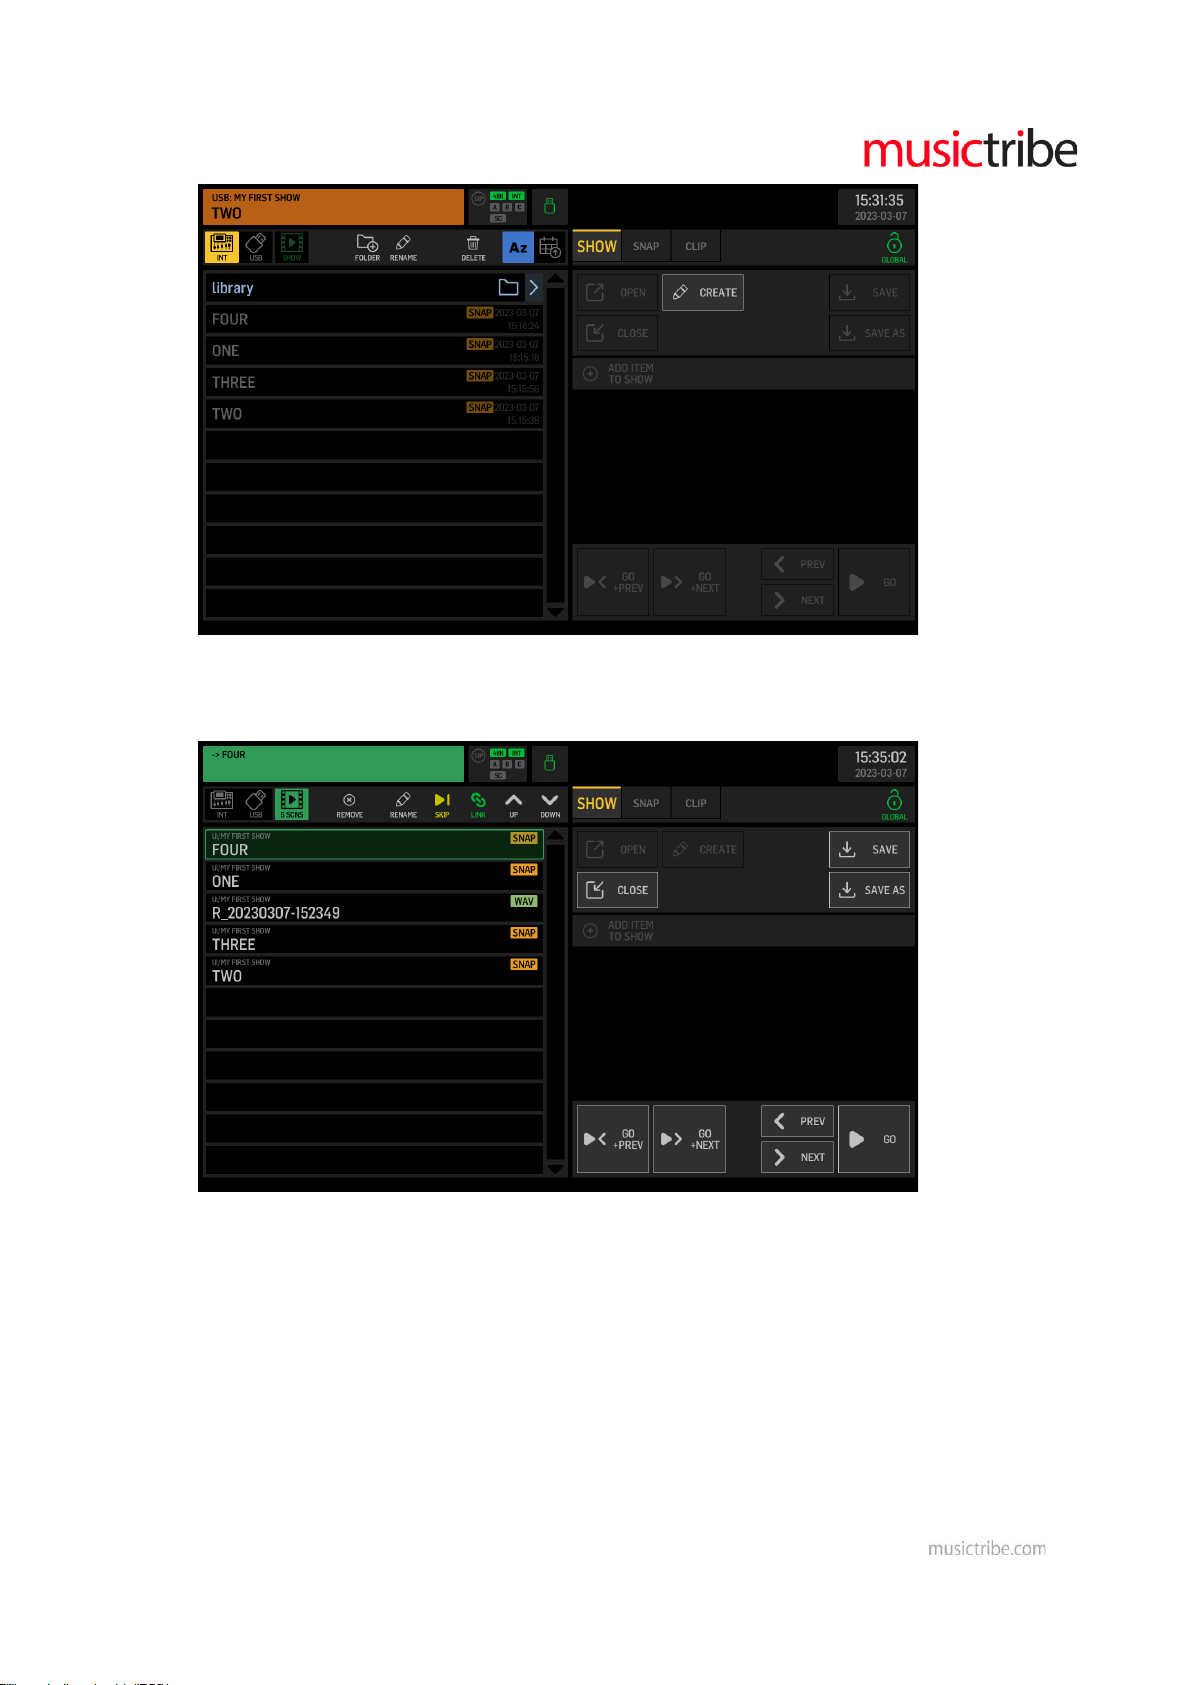
xx SCNS > Filmstrip icon indicating the number of scenes or cues in the current Show
Lists of all cues with references to audio files or snapshots in the sequence of the show
progression. Entries can be re-ordered by selecting an item and using the UP and DOWN arrow
icons for moving it in the sequence.
You can REMOVE or RENAME list items using the icon buttons in the top row.
The SKIP tag can be assigned to the selected list item, if you want the show progression to jump
over it without loading its content.
The LINK icon can be assigned to a selected list item, if you want to perform the subsequent tasks
in the same step of the show progression. E.g. you might wish to load a specific console state for a
Page 3
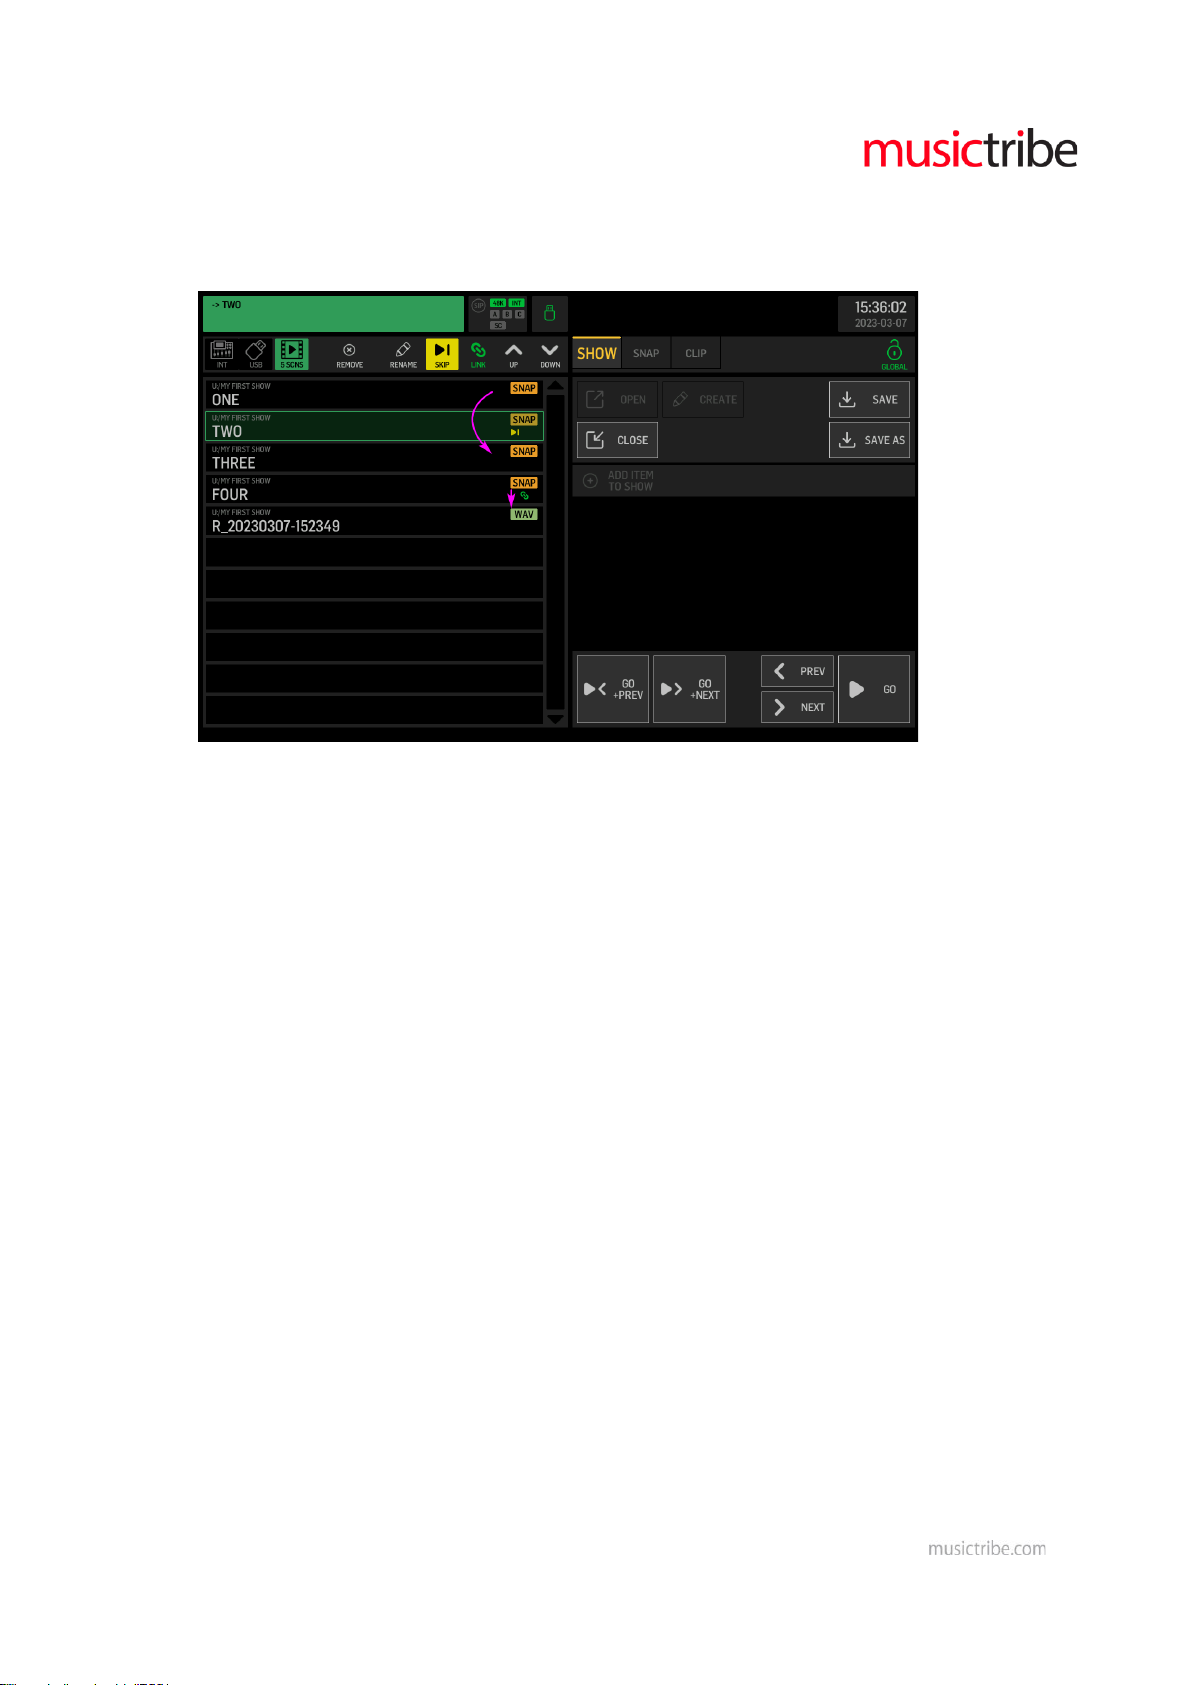
break and immediately play a sound effect that tells the audience about it. You may link as many
cues as you like and they will be recalled in one GO, in the sequence they are ordered.
In the example below the GO NEXT from snapshot ONE will go to THREE. The GO NEXT to FOUR
will automatically play the WAV file afterwards.
LIBRARY (right side of screen)
SNAP > Snapshot files
Still covering the complete console settings, as before. They can be stored or loaded with a
specific scope selection, allowing you to tailor the impact they have when loading. That means
even if you selected an incorrect scope while storing, you can still modify the scope to what you
are interested in while loading.
You can SAVE the current WING state into a new snapshot file any time, either with or without a
specific scope. Choose SAVE+SCOPE if you are specifically interested in a subset of the full
information, e.g. the Source information only… You may choose SAVE without a scope for storing
and recalling the complete mixer parameters. When saving while a showfile is open (left side of
the screen), the snapshot files will always be stored in the same folder where the open showfile is
located.
Note: SAVE operations will store the file into the last folder location that was opened.
Page 4
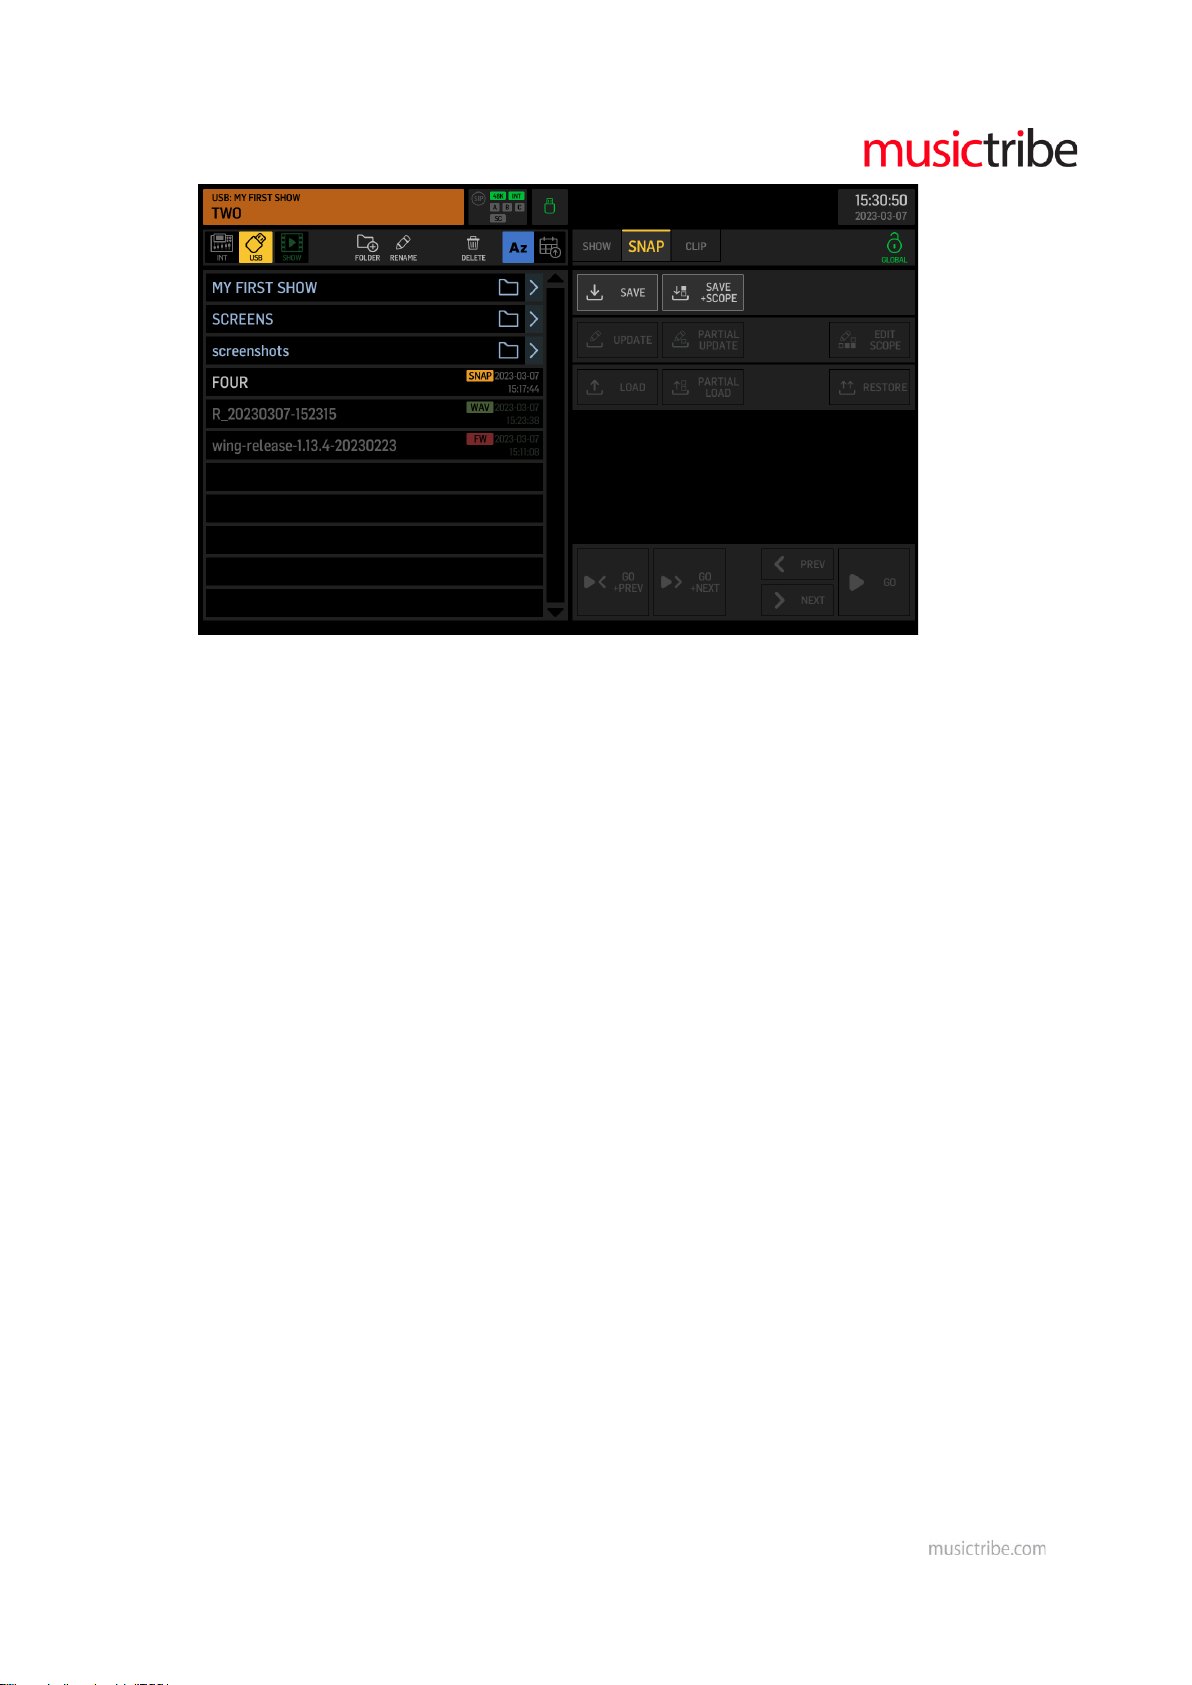
When any snapshot is selected on the left side of the screen, you get the additional options for
updating or loading that snapshot.
UPDATE allows to overwrite the selected file with the current mixer parameter state. It always
follows the scope settings (stored within the file). All other parameters in the file will remain
unchanged.
You may consider to EDIT SCOPE before UPDATE, if you want to define a specific set of
parameters to be loaded, later.
PARTIAL UPDATE allows to specify a set of parameters in the existing snapshot file, that will be
replaced (updated) with the current mixer parameter states. All other parameters will remain as
previously stored.
LOAD allows to recall the state of all mixer parameters according to the Scope that was selected
while saving.
- You may consider to EDIT SCOPE before LOAD, if you want to permanently adjust the set of
parameters to be loaded.
- Alternatively, you may choose PARTIAL LOAD, if you wish to make a temporary selection of
parameters to recall.
Page 5
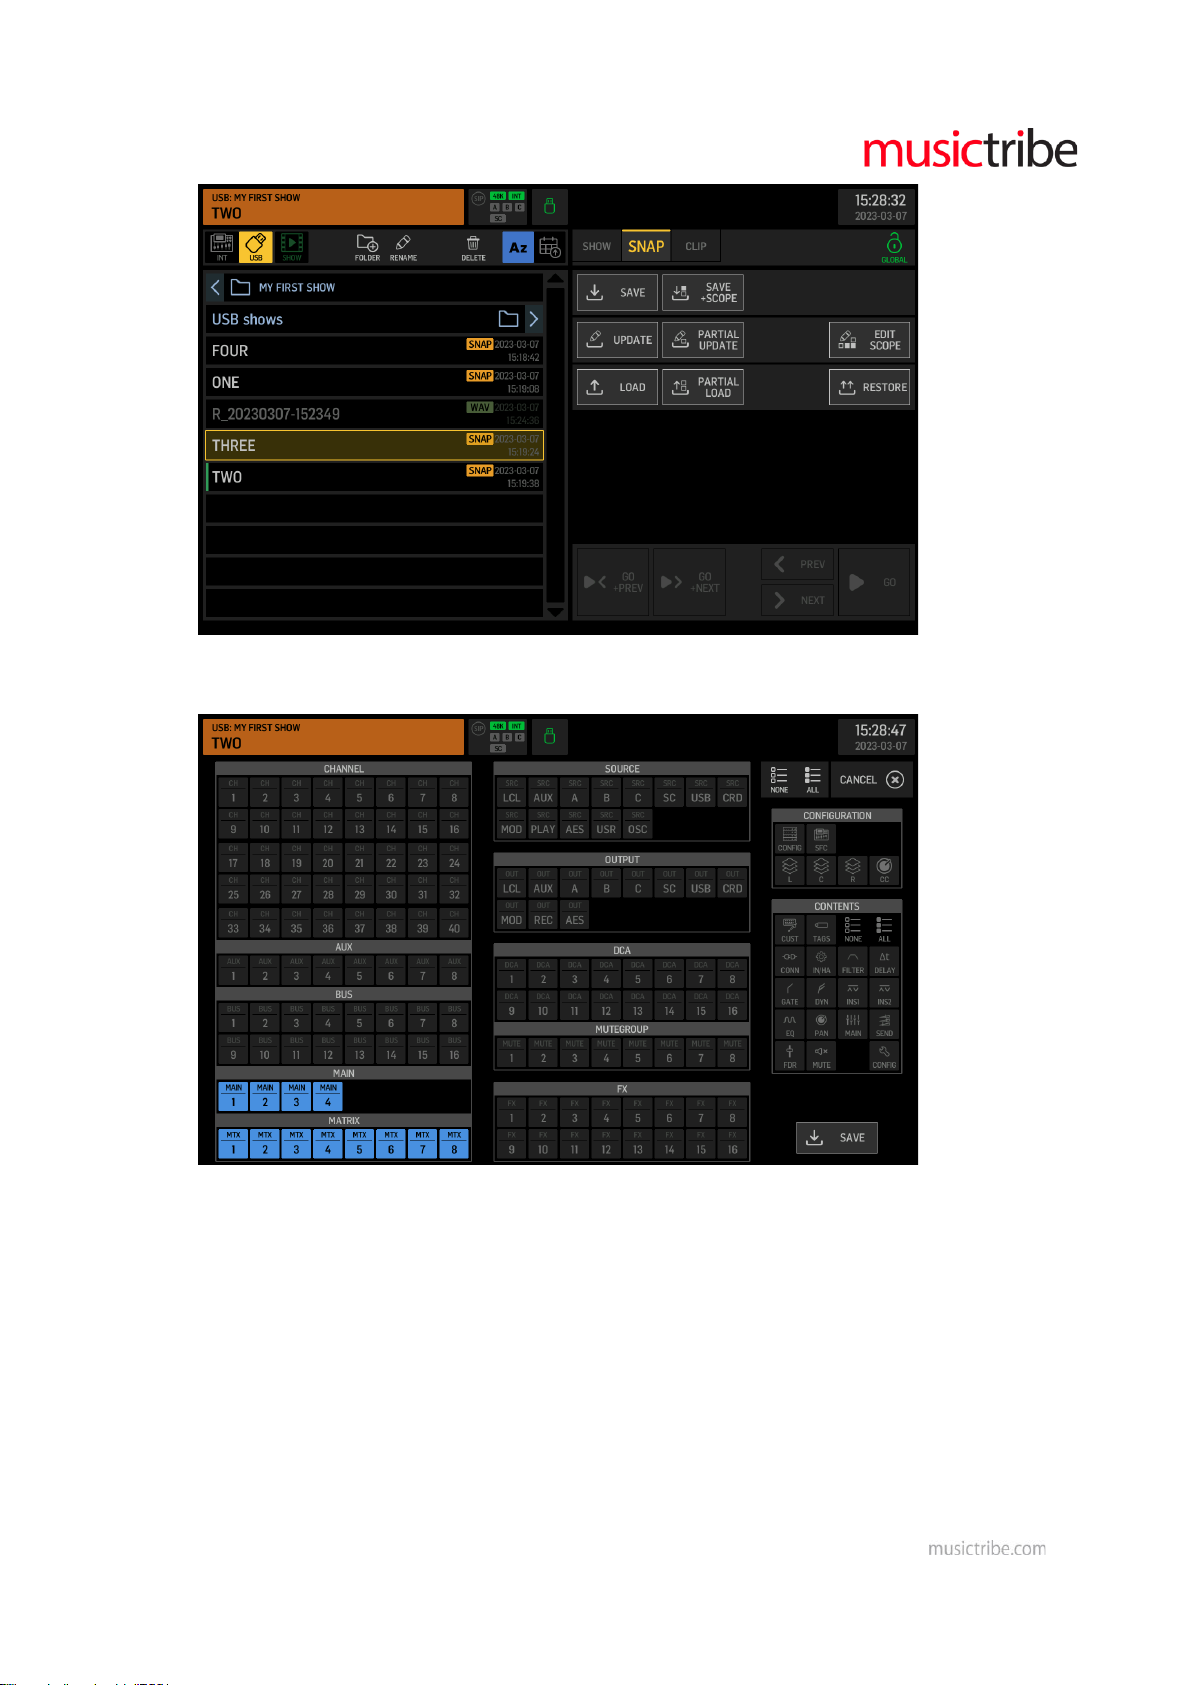
The RESTORE function ignores all Safes and Scopes and it is useful for recalling a complete mixer
state.
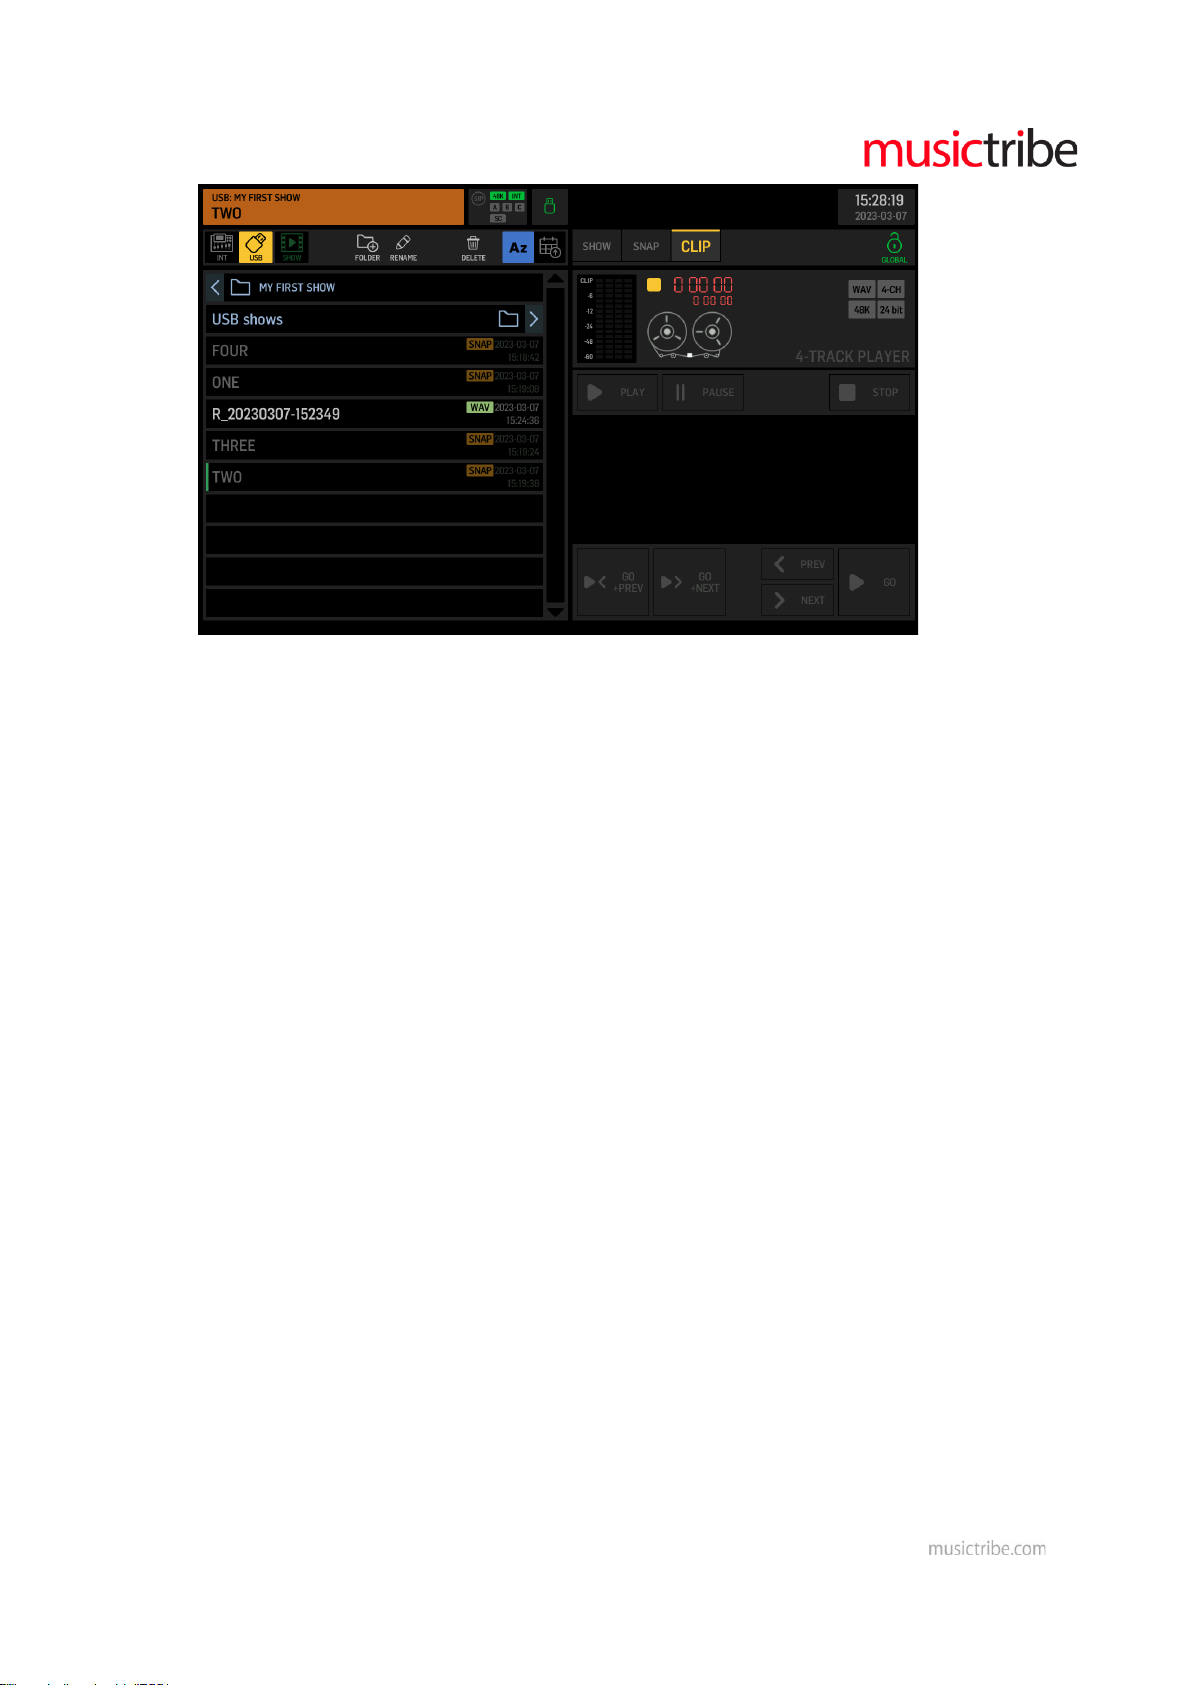
CLIP > Audio clips
Can be any stereo or 4-ch WAV files on internal memory or on USB drive. There are no limitations
on the length of clips for play back, within the FAT32 file size limit of 4GB.
Audio clips can also be recorded to a USB drive from any signal available in WING, by Routing it to
the Output Group "Recorder" and using the standard USB Recorder UI.
Note: Audio clips can only be played back when they match the active console sample rate
(44.1kHz or 48kHz).
Page 6
SHOW > List of cues and references to files
Note: A show file only includes file references and allows them to be put in any arbitrary order or
sequence that is required for the performance. It does not copy the content of the listed files. This
has two important consequences:
1. The show must be copied (or backed up) together with all the snapshot and audio clip files, in
order to keep it functional. An easy way to ensure that is keeping the show file with its
snapshots and audio clips in the same folder, and make sure the entire folder is backed up or
stored.
2. A snapshot or audio clip that was changed after it was referenced in a show file, will be recalled
with its new properties. This is useful when making adjustments that should be reflected in all
occurrences in one or several shows. You may need to ensure the Show will recall exactly the
settings as they were when saving them in the show, by keeping the associated files exclusively
in the same folder with the show file and not use the snapshot update function cautiously.
You can CREATE a SHOW, which opens a naming dialog and saves a new show file into the last
active folder. It is useful to create a folder first, where you'd like to store a show and its associated
files.
Page 7
Show files need to be OPEN prior to editing and operating them. Once opened, you can use the
GO, PREV and NEXT controls.
You may CLOSE the SHOW for deactivating all Go, Previous and Next functions, and returning to
normal library operation for loading presets, snapshots or clips. Make sure that you do not
accidentally remove or change files that are referenced in your show.
GO initiates to load the selected cue, while PREV and NEXT can be used to move the selection to
the previous or next entry in the cue list. GO+PREV and GO+NEXT will load the selected list item
and then move the selection to the previous or next item, which allows you to go through the
entire show progression with just pressing the same button repeatedly.
GLOBAL Lock Icon > Global Parameter Safes
Page 8
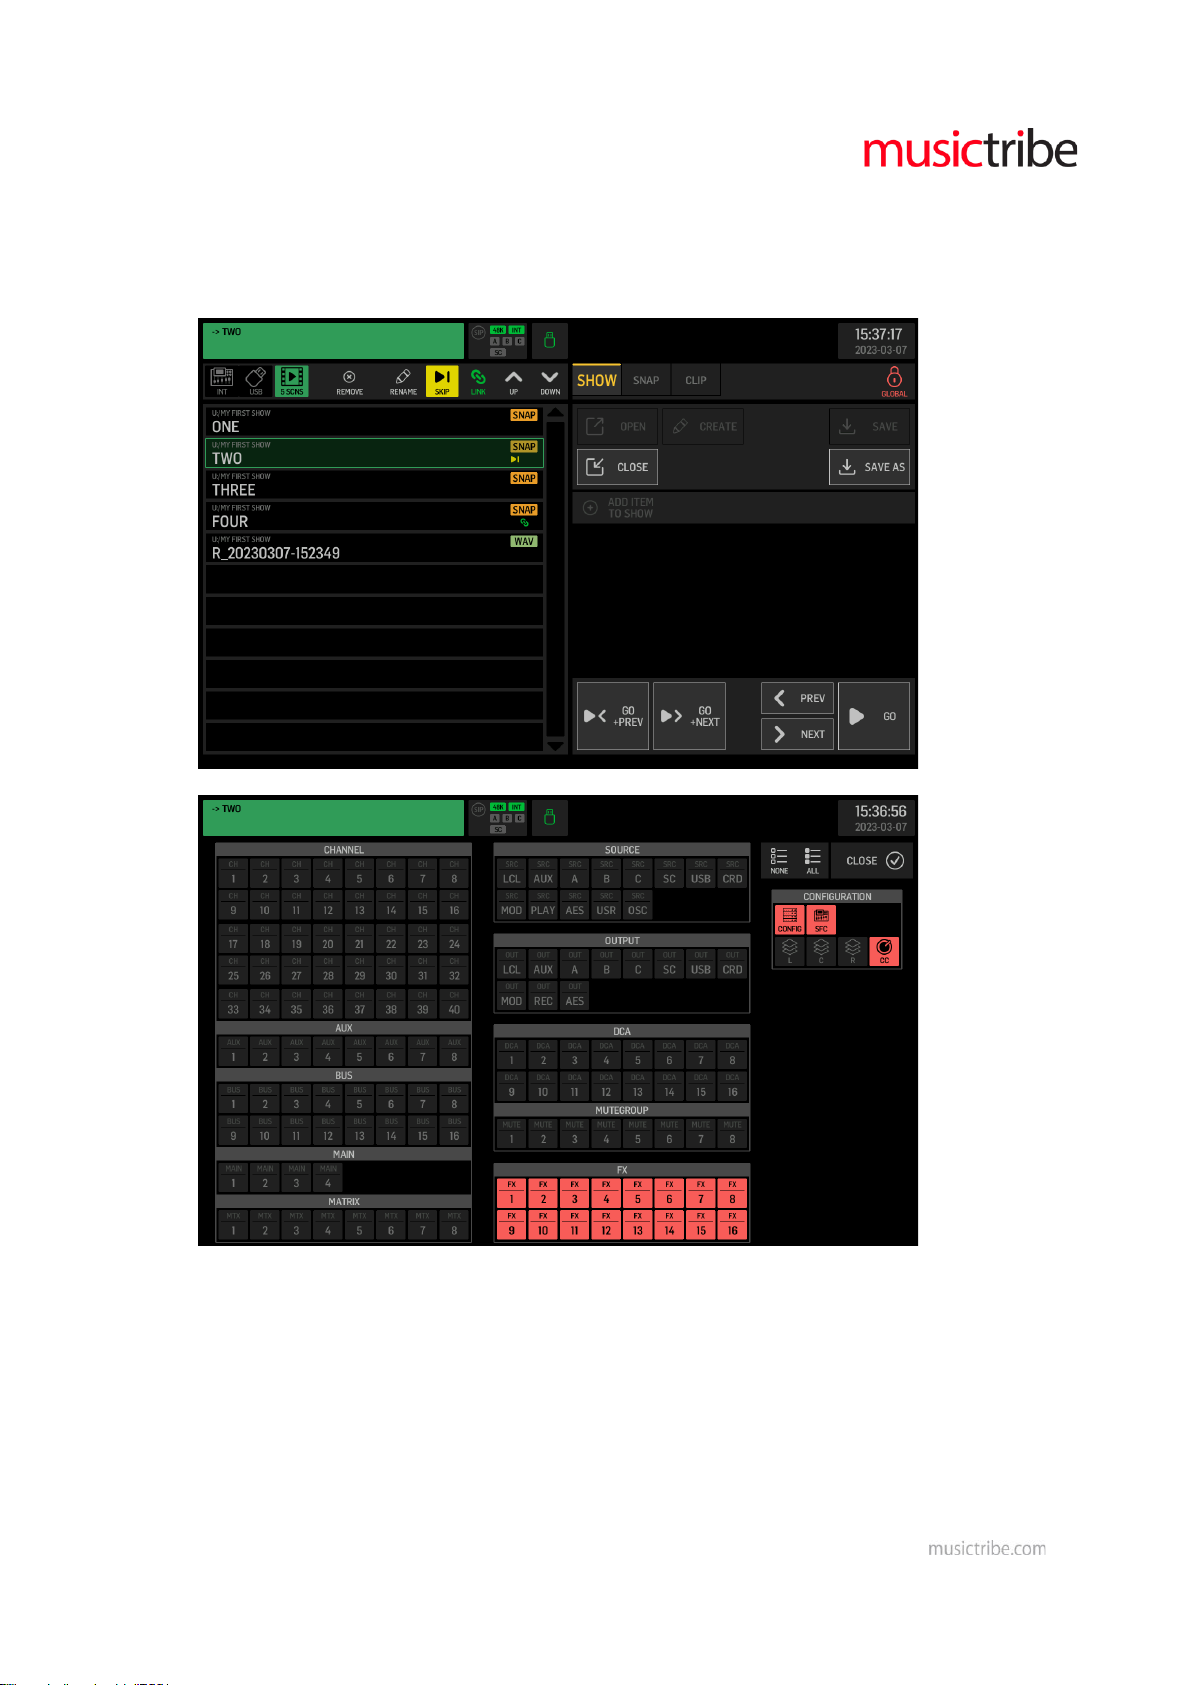
The lock icon opens a page for configuring all parameter areas that will be blocked (safe) for any
snapshot load operations. It indicates an open lock in green color, when no global safes are active,
and all parameters will be loaded considering the scope settings only. When the lock icon is closed
in red color, then there are safes active preventing to load the corresponding parameters, while
all other parameters will be loaded depending on the scope settings.
USB RECORDER (left side of screen)
USB > USB stick icon > External Memory on USB Drive
Lists up the USB flash memory file tree, sorted ascending/descending either alphabetically (Az,
Za), or by date.
You can create, delete or rename folders, using the icon buttons Folder+, pencil and dustbin in the
top row.
Individual files can be renamed or deleted the same way.
Page 9
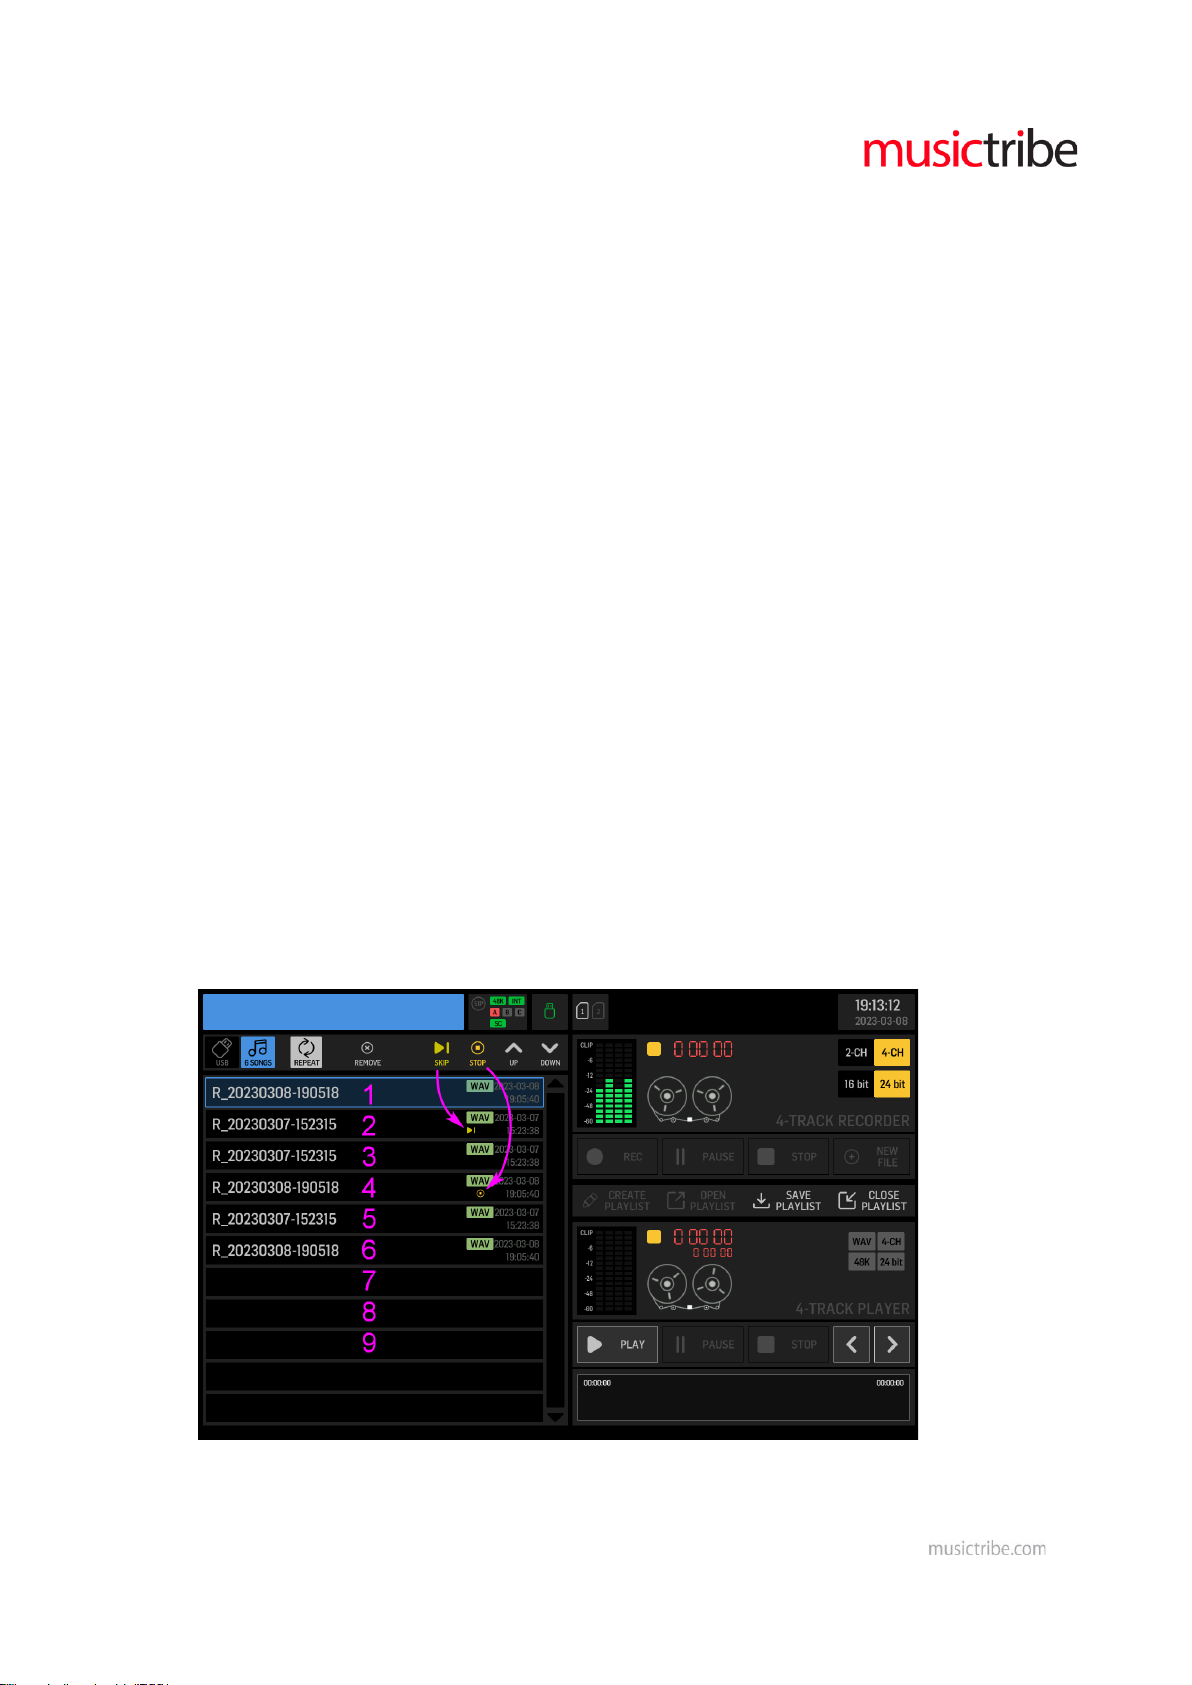
The ADD (+) icon allows to append the selected WAV file to the current playlist. You can select
and add files from several folders to the current playlist. The number of SONGS (audio file
references) in the current playlist is indicated below the note-icon next to the USB stick icon.
PLAYLIST > Note icon > List of WAV audio clips/files in a sequence
Lists up the file references of the current playlist.
You can switch on REPEAT for the entire playlist. You can REMOVE files from the playlist, or apply
SKIP and STOP tags to any of the files in the sequence. Use the arrow UP and DOWN buttons to
move the selected file in the playlist. The progression in your playlist is from top to bottom.
USB RECORDER (right side of screen)
Top section > USB 2-ch/4-ch RECORDER controls
4 input meters representing signals to be recorded, transport state and timecode, tape reel
animation
Recording preferences 2ch/4ch and 16-/24-Bits
Page 10
REC starts a new recording in the current directory, the format of which depends on the selected
preferences.
PAUSE will hold the recording temporarily keeping the file open, and it can resume recording by
touching REC again.
Touching NEW FILE (+) while recording will close the current file at that point in time, and
seamlessly continue recording in a new file. This is especially useful when recording a live
performance, where you'd want the complete set to be recorded, but structured song-by-song or
scene-by-scene.
STOP will end the current recording and close the file. This may take a couple of seconds to be
completed. Watch the access LED showing activity on the attached USB drive, and make sure you
do not remove the stick before closing is completed and the LED is off, to prevent any loss of
recorded data.
Bottom section > USB 2-ch/4-ch PLAYER controls
4 output meters representing the playback signals, transport state and timecode indicators, tape
reel animation.
Gray indicators for selected file’s properties WAV, 2ch/4ch, resolution 16-/24-Bits and sample
rate 44.1kHz/48kHz
You can CREATE, OPEN, SAVE or CLOSE a PLAYLIST. Saving will be done in the current folder on
the left.
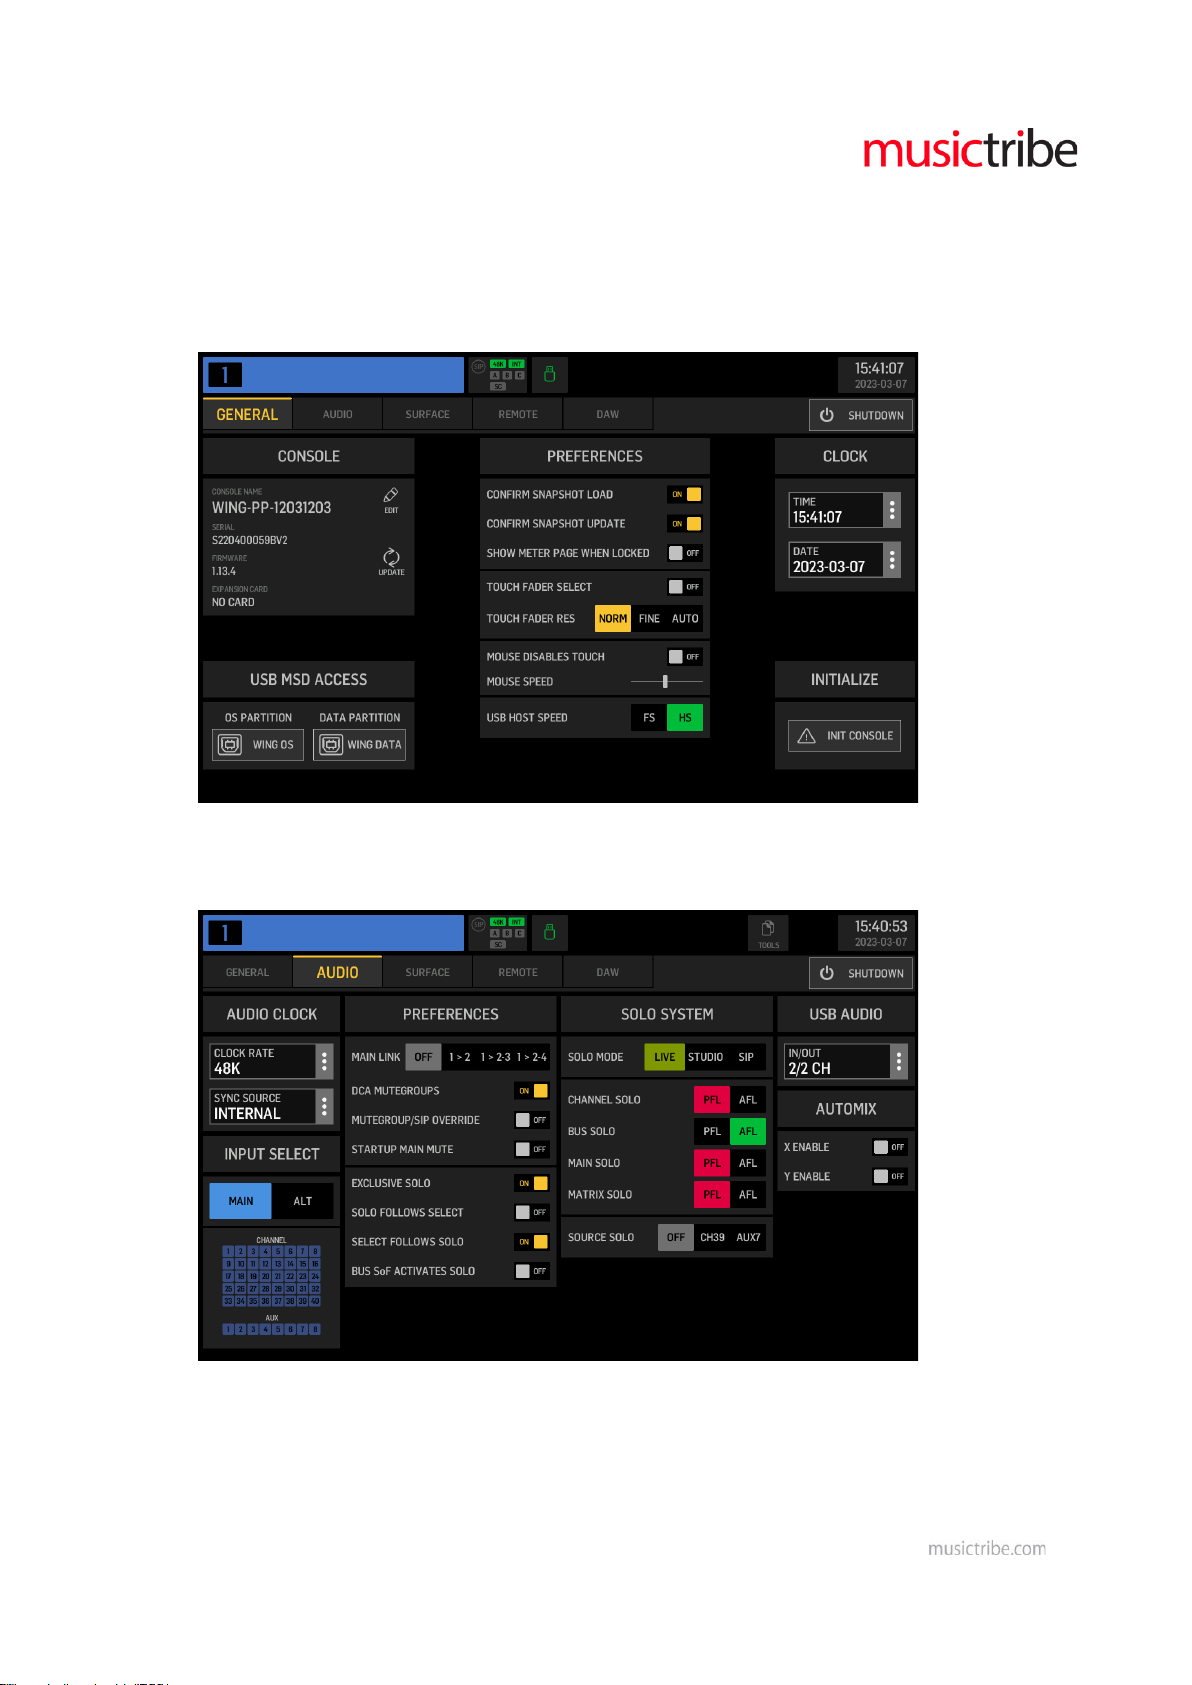
PLAY starts playing back the selected audio file on the left side. IF a playlist is open, then PLAY will
start playing through the list of audio files, from the selected entry downwards and considering
any SKIP and STOP attributes if applicable.
Flagging a file with SKIP will cause the sequence to play the next following item immediately,
while the STOP flag indicates that the sequence will stop playing automatically at the end of that
file.
In the example below, only the files 1, 3 and 4 will be played when pressing PLAY.
You may use the arrow buttons for jumping forward or backward in the sequence.
Page 11

PAUSE will hold the playback temporarily keeping the file open, and it can resume playing back
immediately by touching PLAY again.
STOP will end the current playback and close the file. This may take a couple of seconds to be
completed. Watch the access LED showing activity on the attached USB drive, and make sure you
do not remove the stick before closing is completed and the LED is off, to prevent any loss of
recorded data.
Page 12
SETUP > new preferences
GENERAL > USB HOST SPEED
You can now choose between Full-Speed and High-Speed USB interface. Usually High-speed is
preferred, and it is required for 4-ch recording/playback. However, should you have issues with
specific types of USB drives not working properly, then switching back to Full Speed mode may
solve the problem.
AUDIO > Automix Enable
You can now globally enable the Automix Groups X and Y. Switching them off will inhibit the
automix function from all assigned channels.
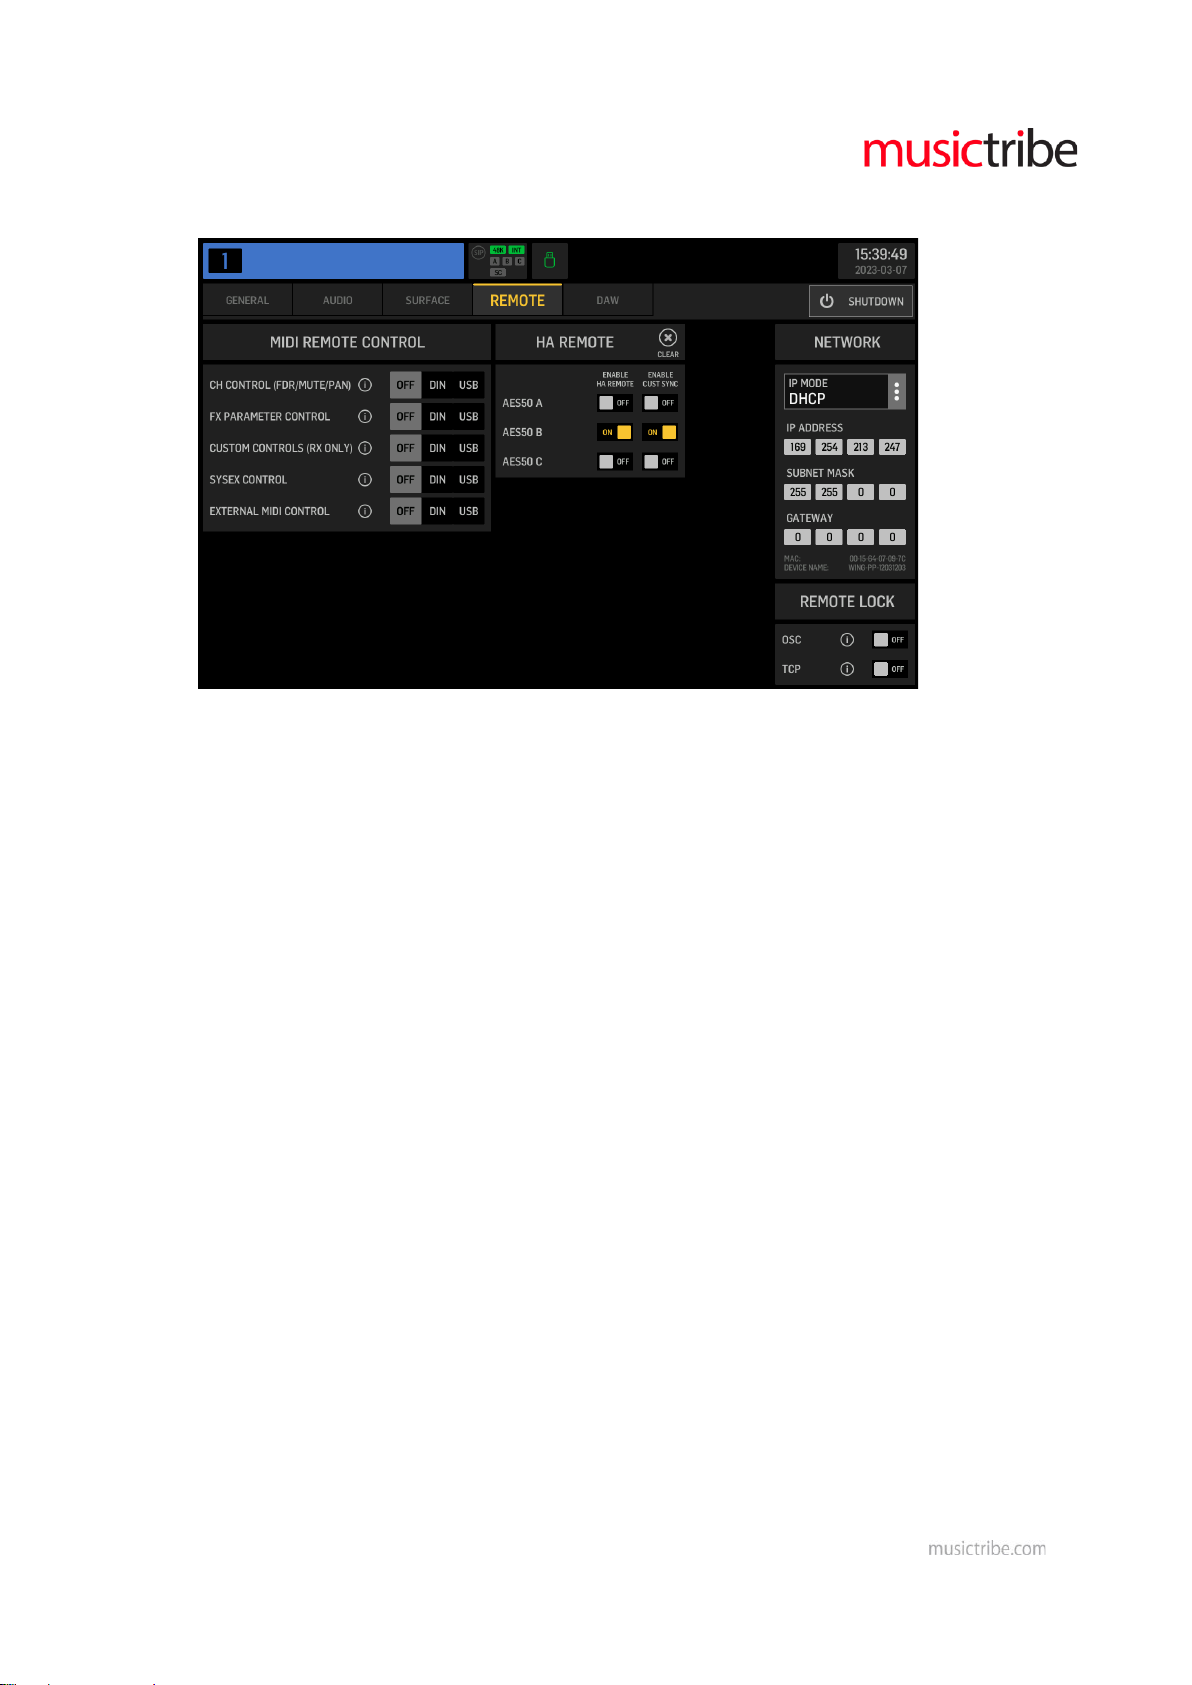
REMOTE > HA REMOTE
WING consoles connected to one of the AES50 ports can now enable remote control of their own
local analog preamps (HA, head amps) from another WING console. And they can also enable
synchronizing the source customization details, i.e. name/color/icon, with the remote console.
Page 13
Note that this currently working between WING consoles only, support for other mixers may
follow soon.
For HA REMOTE to work,
1. The console that offers its local preamps to the remote controlling console generally
needs to enable HA REMOTE for the AES50 port that is used for transmission. E.g. in the
image above a remote WING console that is connected to AES50 Port B would be allowed
to alter the local head amp parameters, like Gain or phantom power.
2. The local source needs to be routed to the AES50 port (ROUTING/OUTPUT) that is
connected to the remote controlling console.
3. Lastly, the Source/Settings on the local console needs to enable
o REMOTE for the specific AES50 Port, for giving access to that specific headamp
o RCV CUST, for receiving customization from the remote controlling console
Remote control of X32 Series headamps from WING
1. On the X32 open the Setup/Preamps page and enable the HA Remote feature for the
AES50 port that is connected to the WING console
2. Rout the blocks of local inputs of X32 to that AES50 port, using the ROUTING/ AES-A or
AES-B tab, depending on where the WING console is connected.
3. On the WING console go to the ROUTING/SOURCE page and select the respective AES50
port from the SOURCE GROUP dropdown
4. You can now see the signals coming from X32 and select one of the 48 sources for making
adjustments to its preamp, remotedly.
5. Note that X32 channel names and icons cannot be synced to the WING source
customization, yet.
Page 14
The following examples shall give an idea about the mechanics, how remote control of preamp
parameters gain and phantom power (HA) and synchronization of channel names, icons and
colors (Customization) is handled in WING.
NOTE: Other Source properties like Tags, Mute and Polarity are considered local for the
respective console, and they cannot be synchronized or remote controlled.
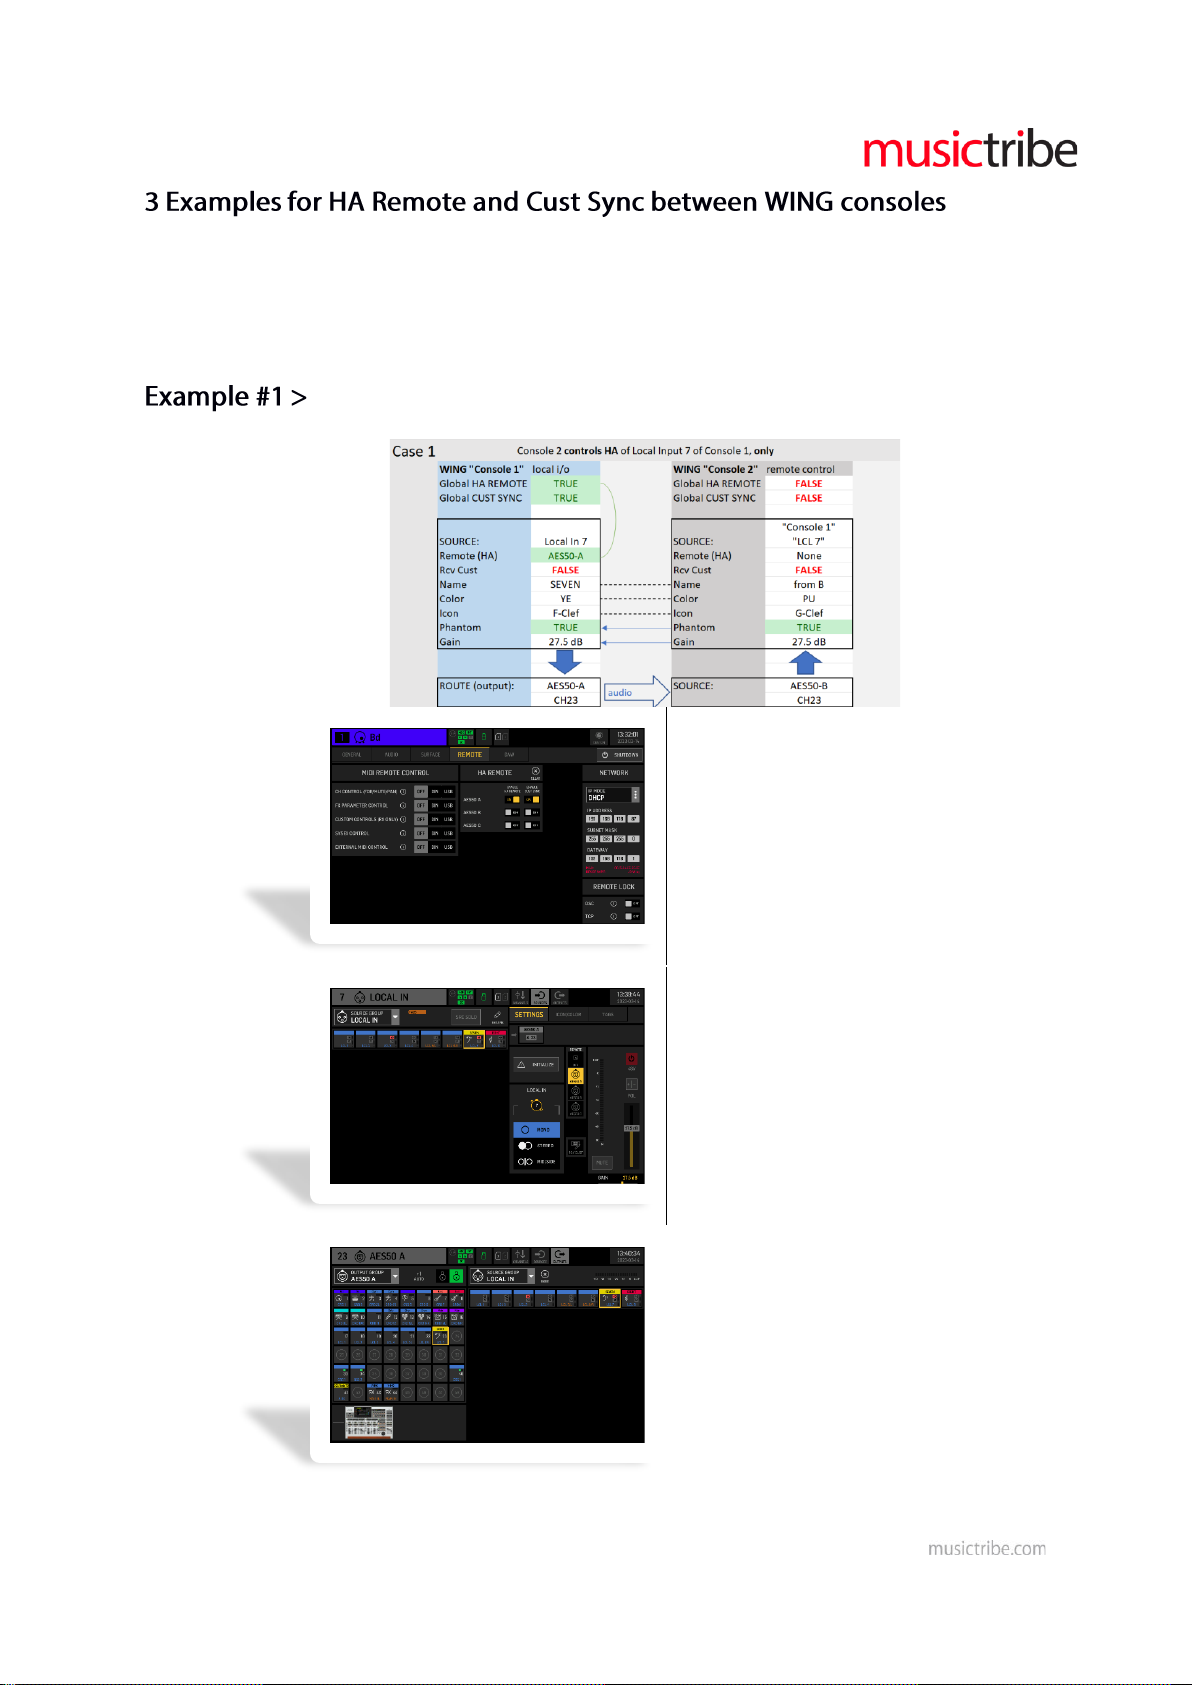
Preamp Gain and Phantom Power of “Console 1” shall be controlled from “Console 2”
…global enable for HA and Cust Sync
…source LCL 7 enables remote control
…source LCL 7 is routed to AES50-A ch 23
Page 15
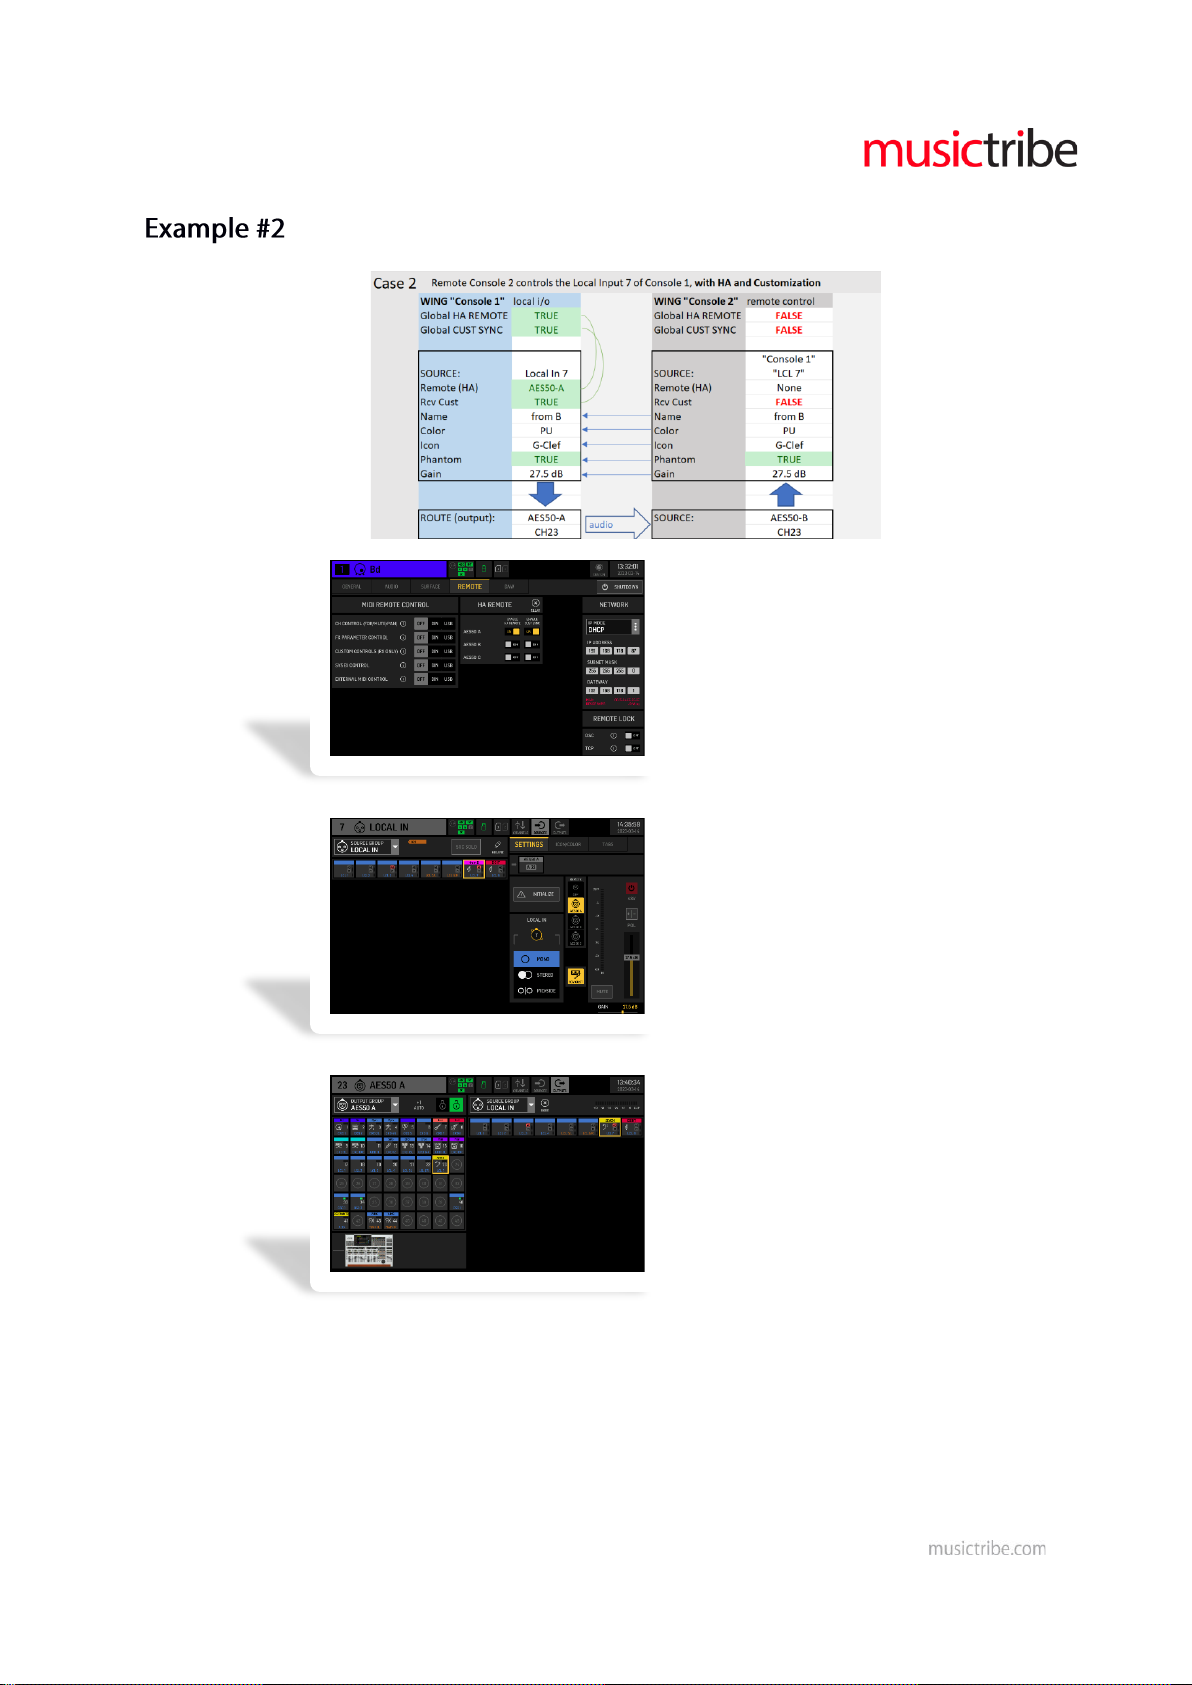
Preamp and Customization of “Console 1” shall be controlled from “Console 2”
…global enable for HA and Cust Sync
…source LCL 7 enables remote control
…source LCL 7 is routed to AES50-A ch 23
Page 16
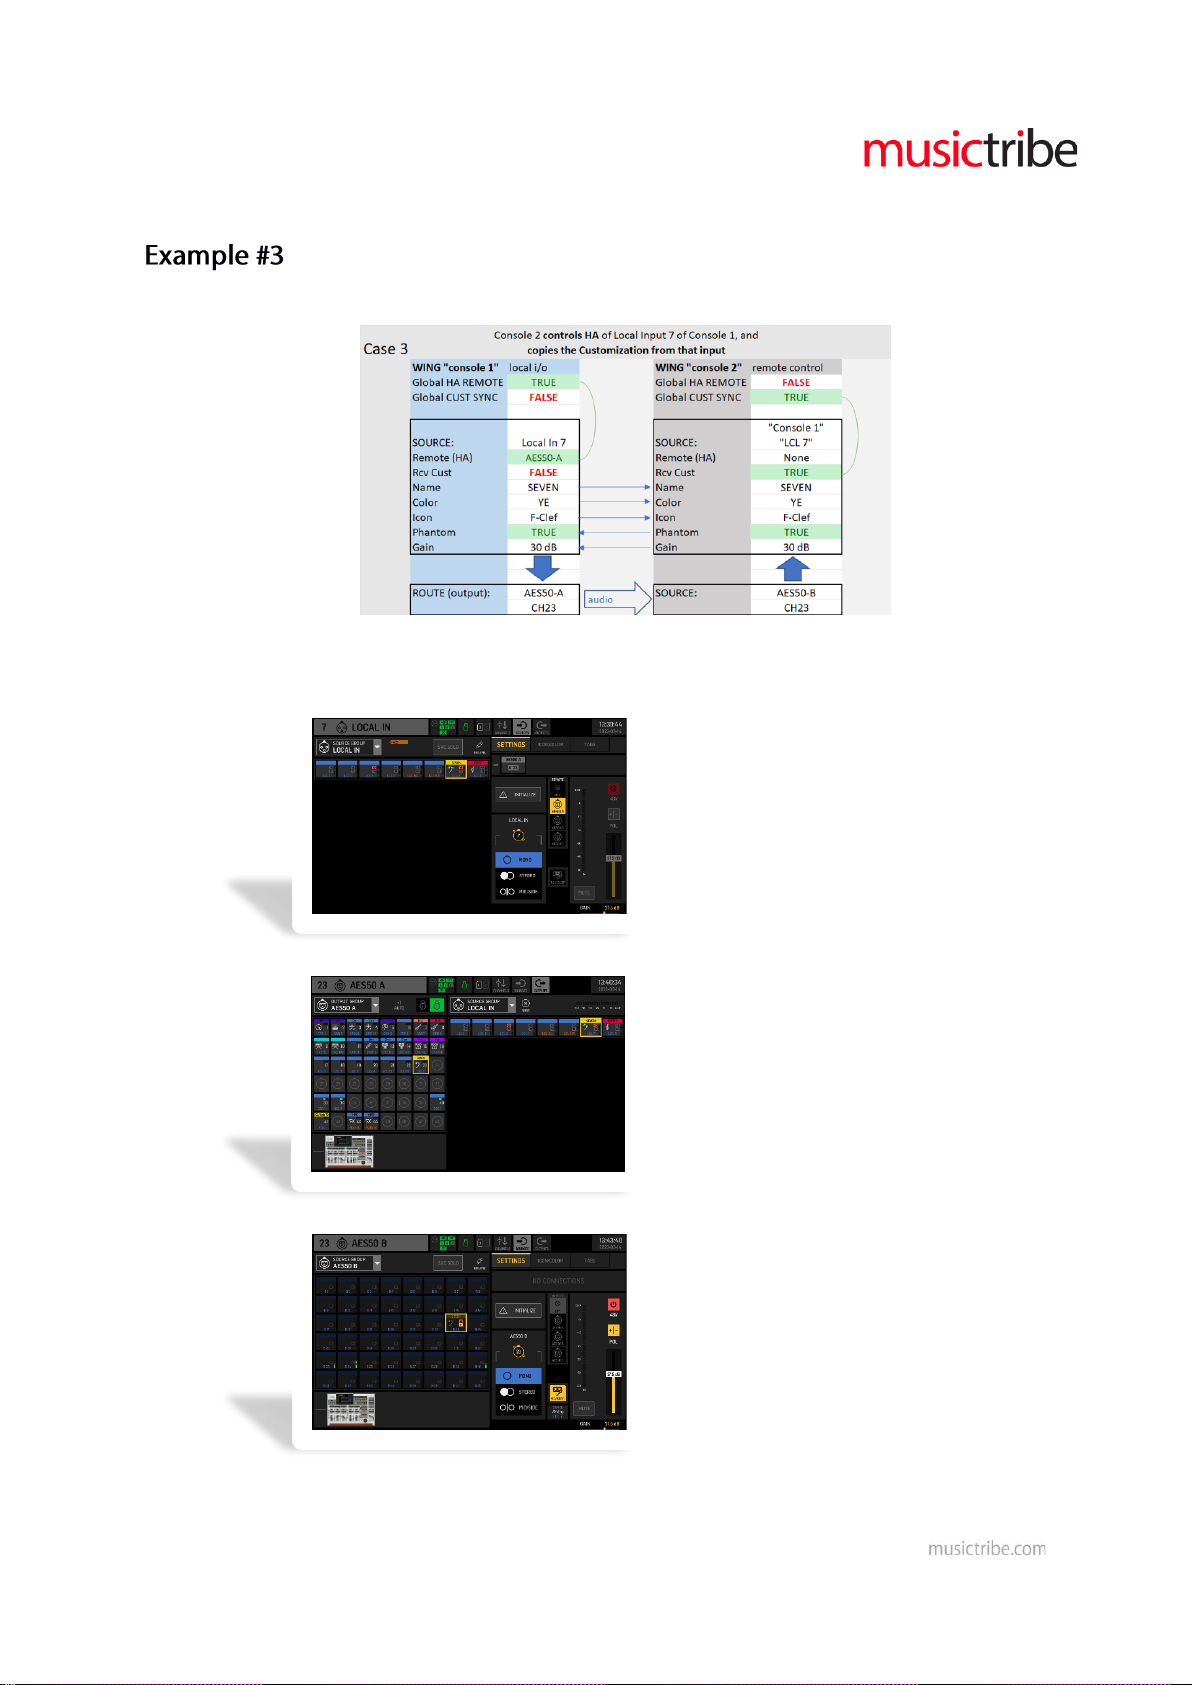
Preamp of “Console 1” shall be controlled from “Console 2”, and Customization of “Console
1” is copied to “Console 2”
Set global enable for HA Remote on “Console 1”, and
set global enable for Cust Sync on “Console2”
…Console 1/LCL 7 enables HA remote control
…source LCL 7 is routed to out AES50-A ch23
…Console 2/AES50-B23 enables to receive
the customization from Console 1 / LCL 7
 Loading...