


BALAY 3TS955A, 3TS940A, 3TS84160A, 3TS84120A, 3TS84100A User Manual
...en Operating instructions and installation
fr |
Notice d' utilisation et d' installation |
de Gebrauchs-und Aufstellanweisung
Electrónica con
selector de temperatura

Index
Page Points to remember Notes on safety and general warnings. . . . . . . . . . . . . 3
Notes on the removal and
disposal of packaging. . . . . . . . . . . . . . . . . 4. . .
Protecting the environment / Hints on saving . energy. . . . .
Installation instructions Removing the transport securing devices. . . . . . . . . . . 5. Installing the appliance. . . . . . . . . . . . . . . . 5. . .
Aligning the appliance. . . . . . . . . . . . . . . . . 6. . .
Connecting to the water supply. . . . . . . . . . . . . . . 7. Appliance outlet. . . . . . . . . . . . . . . . . . . 8. . .
Connecting to the power supply. . . . . . . . . . . . . . .8
Your |
new washing |
machine |
Getting to know your new appliance. . . . . . . . . . . . . .9 |
||||
|
|
|
|
|
Programme and temperature selectors. . . . . . . . . . . 10. . |
||
|
|
|
|
|
Washing machine status indicator lights. . . . . . . . . . . 10. . |
||
|
|
|
|
|
Function and «Start» selection button. . . . . . . . . . . . 10. |
||
|
|
|
|
|
|
||
Notes |
on |
detergent |
/ |
Detergents and softeners. . . . . . . . . . . . . . . . 11. . |
|||
Preparing |
the |
laundry |
Preparing the laundry. . . . . . . . . . . . . . . . |
12. . . . |
|||
|
|
|
|
|
|
|
|
First |
washing |
cycle |
|
First washing cycle. . . . . . . . . . . . . . . . . |
14. . . . |
||
|
|
|
|
|
|
|
|
Wash |
|
|
|
|
Washing / Opening the door / |
|
|
|
|
|
|
|
Loading the machine / Shutting the. .door. . . . . . . . . . |
||
|
|
|
|
|
Washing the laundry. . . . . . . . . . . . . . . . .16. . . |
||
|
|
|
|
|
Wash programme end / |
|
|
|
|
|
|
|
Taking the laundry out of the machine. . . . . . . . . . . . . 1 |
||
|
|
|
|
|
|||
Cleaning |
Maintenance Frost |
Cleaning/Maintenance/Frost protection . . . . . . . . . |
.18. . . |
||||
protection |
|
|
|
|
|
|
|
|
|
|
|
|
|||
Malfunctions |
|
|
Malfunctions with simple solutions. . . . . . . . . . . . . 21. . |
||||
|
|
|
|
|
After-Sales Service. . . . . . . . . . . . . . . . . |
22. . . . |
|
|
|
|
|
|
Technical data. . . . . . . . . . . . . . . . . . . |
23. . . . |
|
|
|
|
|
|
Consumption data. . . . . . . . . . . . . . . . . |
.23. . . |
|
2en

|
Notes |
|
on |
safety and |
general |
warnings |
|
|
|
|
|
|
|
|
|||||||
|
|
|
|
|
|
|
|||||||||||||||
This appliance complies with the industry safety! |
Take care |
when |
pumping out hot |
water. |
|||||||||||||||||
regulations. |
|
|
|
|
|
|
|
|
! |
A flashing light |
does not indicate a fau |
||||||||||
|
|
|
|
|
|
|
|
|
|
|
|||||||||||
Points |
to |
remember |
before |
putting |
the |
See |
the |
section: |
|
«Washing |
machine |
||||||||||
status |
indicator |
lights». |
|
|
|||||||||||||||||
appliance |
into |
operation: |
|
|
|
|
|
|
|
|
|
|
|
|
|
|
|
|
|||
! |
Read |
|
the |
enclosed |
instructions |
beforeMaintenance |
and |
care |
of |
the appliance: |
|||||||||||
|
putting |
the |
appliance |
into |
operation. |
They |
Do |
not |
climb |
onto |
the appliance. |
|
|
||||||||
|
contain |
important information |
and |
advice |
! |
|
|
||||||||||||||
|
for |
|
|
|
|
|
|
|
|
|
|
||||||||||
|
installation, |
|
|
|
|
|
|
|
! |
Do |
not |
use the |
door |
as a footrest or stan |
|||||||
|
use and safety of the appliance. |
|
|
|
|
|
|
|
|
|
|
||||||||||
! |
Keep |
|
the |
user |
documentation |
for |
the |
it. |
|
|
|
|
|
|
|
|
|
||||
|
appliance so that |
later |
owners can |
use |
it. |
|
|
|
|
|
|
|
|
|
|
||||||
|
|
|
|
|
|
|
|
|
|
|
Points to remember when moving the machine |
||||||||||
! |
Install |
|
the |
appliance |
as |
described |
in |
!theFit the |
transport |
securing devices. |
|
|
|||||||||
|
installation |
instructions. |
|
Remove |
the |
|
|
|
|
|
|
|
|
|
|
||||||
|
transport securing |
devices |
and keep |
them!. |
Empty any remaining water from inside th |
||||||||||||||||
! If the |
|
|
|
|
|
|
|
|
|
|
appliance. |
|
|
|
|
|
|
|
|||
appliance shows any sign of damage or |
|
|
|
|
|
|
|
|
|
||||||||||||
|
imperfection it must not be connected to! theTake care when moving the appliance Do n |
||||||||||||||||||||
|
power |
supply. |
If |
in |
doubt |
contact theuse |
the |
front components or controls on t |
|||||||||||||
|
After-sales |
Service |
or |
the |
Distributor |
that |
appliance |
as |
a |
lifting |
aid. |
|
|
||||||||
|
sold the appliance. |
|
|
|
|
|
|
|
|
|
|
|
|
|
|
|
|
|
|||
!A damaged power cable must be replaced with another special cable available from the Manufacturer's Customer Service.
Points to remember when washing clothes:
!The appliance must only be operated using
cold water from the water mains.
! The appliance may only be used for items that may be washed in a domestic washing machine.
!Never leave children unsupervised with the appliance.
!Keep pets away from the appliance.
en 3

Notes on the removal and disposal of packaging
Protecting |
the environment / Hints |
|
on saving |
energy |
|
|
|
|
Removal |
and |
disposal |
of |
packaging |
material m The |
most |
economical |
and |
environmentally |
|||||||||||||||||||||||
for |
a |
new |
|
appliance |
|
|
|
|
|
|
|
|
|
|
|
friendly |
way to |
use the machine is always |
||||||||||||||
! |
Remove |
|
|
and |
dispose |
|
of |
packaging |
|
in |
wash |
the |
maximum amount |
of |
laundry: |
|
||||||||||||||||
|
accordance |
with |
current |
legislation. |
|
|
|
|
Cottons/coloureds |
|
|
|
|
|
|
|
||||||||||||||||
|
|
|
|
|
(hard-wearing fabrics) |
|
|
|
4.50kg |
|
||||||||||||||||||||||
! Packaging material is not a toy. |
|
|
|
|
|
|
|
|
|
|||||||||||||||||||||||
|
|
|
|
|
Synthetics |
|
|
|
|
|
2.25 |
kg |
|
|||||||||||||||||||
Reprocessing |
|
and |
reusing |
|
materials |
saves |
raw |
and |
woollens |
|
kg |
|||||||||||||||||||||
materials |
and |
reduces |
|
waste. |
All |
packaging |
Delicates |
|
|
2.00 |
||||||||||||||||||||||
|
|
|
|
|
|
|
|
|
|
|
|
|
||||||||||||||||||||
material |
|
used is |
environmentally |
friendly |
and |
canm How |
to |
save |
energy |
|
|
|
|
|
|
|||||||||||||||||
be |
recycled |
|
|
or |
reused. |
The |
cardboard |
packaging The |
variable |
capacity |
automatic |
system |
||||||||||||||||||||
consists |
of |
|
|
80% to 100% recycled paper. Thereduces the amount of water and energ |
||||||||||||||||||||||||||||
transparent |
protective |
|
film |
|
is |
polyethylene |
(PE), |
consumed |
accordingly |
if |
the |
amount |
of |
|||||||||||||||||||
the |
fastening |
bands |
are |
polypropylene |
(PP) |
and laundry |
loaded |
into the machine is small. |
||||||||||||||||||||||||
the chlorofluorocarbon-free (CFC) |
mouldedm How |
to |
save |
water, energy and detergent: |
||||||||||||||||||||||||||||
pieces |
are |
polystyrene |
foam |
(PS). These |
materials Omit |
the |
prewash |
programme |
for |
lightly |
||||||||||||||||||||||
are |
made |
|
of |
pure |
hydrocarbons |
and |
can |
be |
|
soiled |
laundry. |
|
|
|
|
|
|
|||||||||||||||
recycled. |
|
|
|
|
|
|
|
|
|
|
|
|
|
|
|
|
|
|
normally |
|
|
|
|
|
|
|||||||
|
|
|
|
|
|
|
|
|
|
|
|
|
|
|
|
|
|
|
|
|
|
|
|
|
|
|
|
|
|
|||
Disposal |
of |
|
|
an |
old |
appliance |
|
|
|
|
|
m How to save energy and time: |
|
|
||||||||||||||||||
|
|
|
|
|
|
|
|
Select the short programme suitable for th |
||||||||||||||||||||||||
|
|
|
|
|
|
|
|
|
|
|
|
|
|
|
|
|
|
|
|
|
||||||||||||
! |
The |
|
old |
|
|
appliance must be made unusablefabric if items |
are |
lightly |
soiled. |
|
|
|||||||||||||||||||||
|
before it is disposed of: |
|
|
|
|
|
|
|
|
|
|
|
|
|
|
|
|
|
|
|
||||||||||||
|
Disconnect |
from |
the |
mains power supply.m How |
to |
save |
detergent: |
according |
to |
the |
||||||||||||||||||||||
|
|
|
|
|
|
|
|
|
|
|
|
|
|
|
|
|
|
|
|
|
Measure |
the |
detergent |
|||||||||
|
Cut off the connecting cable and remove it |
|
|
|
|
|
|
|
|
|
|
|
||||||||||||||||||||
|
together |
|
|
with |
the |
mains plug. Remove thewater |
hardness, |
degree |
of |
soiling |
and |
|||||||||||||||||||||
|
door |
locks |
and |
|
fastenings |
or |
make |
themamount |
of |
laundry, |
|
and |
follow |
the |
||||||||||||||||||
|
unusable |
|
so |
that |
children |
cannot |
|
shut |
instructions |
on |
the |
detergent |
package. |
|
||||||||||||||||||
|
themselves |
inside |
|
and |
suffocate. |
|
|
|
|
|
|
|
|
|
|
|
|
|
|
|
|
|
||||||||||
Worn-out appliances contain valuable materials |
|
|
|
|
|
|
|
|
|
|
|
|
||||||||||||||||||||
that can |
be |
|
recovered, |
if |
the |
appliance |
is |
taken |
to |
|
|
|
|
|
|
|
|
|
|
|
||||||||||||
an |
official |
recyclable |
|
waste |
recovery |
centre |
(a |
|
|
|
|
|
|
|
|
|
|
|
|
|||||||||||||
public |
tip |
|
or recycling centre, for example). |
|
|
|
|
|
|
|
|
|
|
|
|
|||||||||||||||||
Actively contribute to the protection of the |
|
|
|
|
|
|
|
|
|
|
|
|
||||||||||||||||||||
environment |
|
|
by |
ensuring |
that |
your old |
appliance |
|
|
|
|
|
|
|
|
|
|
|
|
|||||||||||||
is |
disposed |
|
of |
in |
|
a |
|
way |
that |
respects |
the |
|
|
|
|
|
|
|
|
|
|
|
||||||||||
environment.
4en
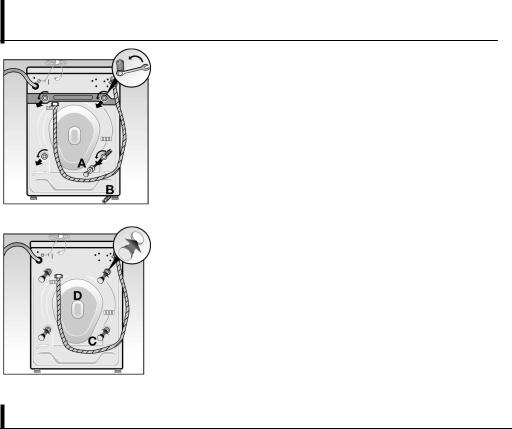
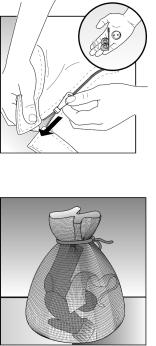
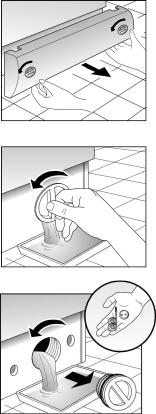
Removing the transport securing devices
!Remove all the transport securing devices from the back o
machine before starting the appliance for the first time.
!Use the spanner supplied only if a suitable ring spanner available.
! Caution. Risk of injury through slipping.
m Loosen and |
remove the 4 |
fastening«A»bolts,the |
tie |
bar |
and |
|||
the seal. |
|
|
|
|
|
|
|
|
m Next |
remove |
the four spacers«B» |
which will have fallen |
to th |
||||
floor. |
Gently |
tilt the appliance |
forward. |
|
|
|
||
m Fit the protective covers«C» which are in |
the |
bag |
||||||
accompanying |
the |
appliance |
documentation. |
|
|
|
||
! Keep |
the transport |
securing |
devices in case |
you |
need to |
|||
the appliance |
in future. |
|
|
|
|
|
||
The appliance should only be moved with the transport sec devices in place. To fit them, remove the back«D» panelfrom the appliance and carry out the operations given above in rev order.
Installing the appliance
!When installing the appliance and connecting the water electricity supplies, the following should all be to hand: s
instructions, warnings, general advice and information, an standards or requirements from water and electricity supplie
! Take care when lifting the applianceRisk . of injury.
! |
Do not lift the appliance by |
the controls |
or |
protru |
|||||
|
components. |
|
|
|
|
|
|
|
|
! |
If you |
are |
in any doubt, commission a qualified perso |
||||||
|
connect |
the |
appliance to |
the water |
and |
electricity |
supplies |
||
All |
appliances |
are rigorously |
tested |
at |
the |
factory |
under no |
||
working conditions. The appliance or the outlet hose may damp or contain residual water as a result of these tests.
en 5
Installing the unit |
The |
appliance must |
be placed on a firm flat surface to ensure |
||||||
|
is |
stable |
during |
spinning. |
|
||||
|
Soft |
floor |
coverings, such as carpets or foam-backed flooring |
||||||
|
not suitable |
surfaces for |
installation. |
||||||
|
! |
If |
you |
havewoodena |
joist floor, the appliance must be placed |
||||
|
|
on a |
water-resistant |
|
wooden board, 30 mm thick. |
||||
|
|
It |
must |
be |
screwed |
to the floor. The appliance should |
|||
|
|
installed in a corner of the room if possible. |
|||||||
|
|
Secure the appliance |
to the floor using fastening brackets fi |
||||||
|
|
to the machine's feet (especially if the machine is a comb |
|||||||
|
|
washer/dryer). |
|
|
|
|
|||
|
! |
If |
the |
machine |
is placed on a pedestal or raised base, th |
||||
|
|
must |
be |
fixed |
using |
brackets to prevent the machine f |
|||
|
|
shifting during the spin cycle. |
|||||||
|
The fastening brackets are available as a spare parts set from |
||||||||
|
specialist |
distributor. |
|
|
|
||||
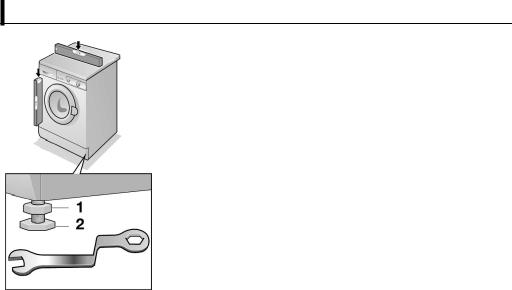
Aligning the appliance
!The appliance must sit firmly and horizontally on the four without rocking.
m Use a spirit level to ensure that all four sides of the applia level.
Correct any imbalance by adjusting the height of the feet.
m Loosen the locknuts.
m Adjust the height of the feet.
m Tighten the locknuts securely so that the height set is reta
6en
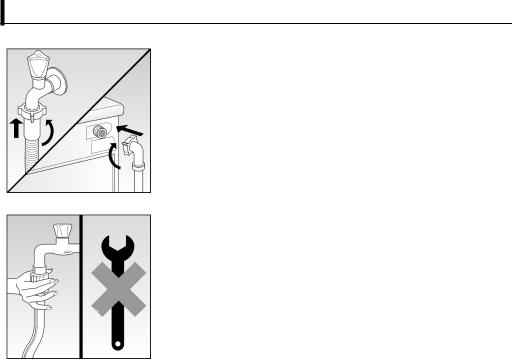
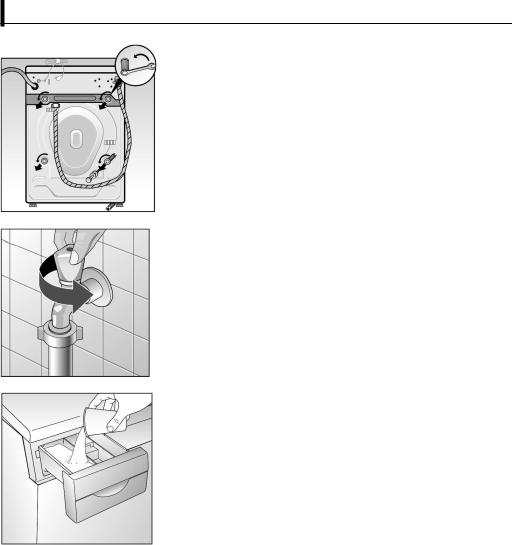
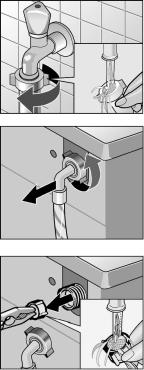
Connecting to the water supply
A |
pipe or standard domestic fresh-water hose is required fo |
||||
water |
supply, with a minimum pressure of 1 |
bar |
(water must |
||
a |
rate |
of approximately 8 litres per minute |
with |
the tap |
fully |
If |
the pressure is higher than 10 bar, a pressure |
reducing |
valv |
||
be |
inserted between the appliance and the |
water |
supply. |
|
|
!Never connect the appliance to the mixer tap of
unpressurized water heater. If in doubt have connections m by a qualified technician.
!Caution. Connections between the appliance and the wat
supply must |
be able to withstand the |
full |
water pressure. C |
|
the ring |
seal |
with the tap fully open. |
|
|
! Remove |
the |
filter located at the end |
of |
the solenoid valv |
when it needs cleaning. The other filter, located at the end pipe inside the plastic locknut which screws onto tap, shou cleaned in its tube (it cannot be removed).
!To avoid damage caused by leaks and flooding, the tap s always be closed after the appliance has completed a cycle especially during long absences.
!Hand-tighten the plastic hose connection locknuts.
en 7

Appliance outlet
! Take |
care |
when fitting and connecting the appliance to |
water outlet |
system that the hose is not bent or twisted. |
|
pull |
on the |
hose. |
!If the water is discharged via a sink, ensure that the outl cannot be dislodged. Check also that the water drains a quickly enough. Ensure that the sink plug is not preve drainage. Risk of flooding. .
Connecting to the power supply
! |
The |
appliance must only be connected to |
an |
A.C. mains |
|
|
via |
a correctly installed earthed socket. |
|
|
|
! |
The |
voltage given on |
the appliance nameplate |
must match |
|
|
of the power supply |
where the appliance |
is |
installed. |
|
! |
The |
power rating and the fuse or circuit |
breaker require |
||
|
given on the appliance nameplate. |
|
|
||
! Check that the socket and the plug on the machine compatible, that the cables have a sufficient diameter and it is earthed correctly.
!Never use multiple plugs, sockets or connectors or extens cables.
! If using a residual |
current-operated circuit breaker, it m |
display the7 symbol. Only this type of protective switch |
|
ensure compliance |
with current regulations. |
!Remove the appliance plug from the socket, holding onto
body of |
the plug. |
|
|
! In order |
to fulfil the safety regulations, the plug of the ap |
||
must be |
accessible for the |
user; if this cannot be guaran |
|
there must be incorporated in the fixed wiring a means f |
|||
connection from |
the supply |
having a contact separation o |
|
least 3 |
mm in |
all poles |
|
8en

Getting to know your new appliance
1.Protective plate (lid).
2.Detergent and softener drawer.
3.Control panel (printed keys, symbols or full text, depending model).
4.Rating plate.
5.Door.
6.Door opener.
7. |
Outlet |
pump (water outlet |
filter), behind the kick panel. |
8. |
Kick panel. |
|
|
9. |
Height |
adjustable feet for |
aligning the appliance. |
10.Water outlet pipe.
11.Water inlet hose.
(according |
to |
model) |
|
||
12. |
M |
|
«Start»- |
|
button |
13. |
|
/ |
/ |
/ |
- «Spin» button . |
14.L «Flot»- button
15.Temperature selector
16.Washing machine status indicator lights
17.Programme selector.
en 9

|
Programme |
|
and |
|
temperature |
|
|
Function |
|
and |
|
|
«Start» |
|
selection |
|||||||||||||||||||||||||||||
|
selectors |
|
|
|
|
|
|
|
|
|
|
|
|
|
|
|
button |
|
|
|
|
|
|
|
|
|
|
|
|
|
|
|
|
|
|
|||||||||
|
|
|
|
|
|
|
|
|
|
|
|
|
|
|
|
|
|
|
|
|
|
|
|
|
|
|||||||||||||||||||
The programme |
|
|
selector is used |
to |
select and3 - |
Start |
|
|
|
|
|
|
|
|
|
|
|
|
|
|
|
|
|
|||||||||||||||||||||
adjust |
programmes. Turn |
|
the |
selector |
clockwise |
|
|
|
appliance |
starts |
the |
programme |
selected |
|||||||||||||||||||||||||||||||
(to |
the |
right). |
|
Align |
the |
setting |
mark |
|
|
The |
|
|
||||||||||||||||||||||||||||||||
|
with |
the |
the |
button is pressed. lavado/pulsarThe « |
|
|||||||||||||||||||||||||||||||||||||||
programme |
required. |
|
|
|
|
|
|
|
|
|
|
when |
|
|||||||||||||||||||||||||||||||
|
|
|
|
|
|
|
|
|
3» |
|
indicator light comes on. Preselect the w |
|||||||||||||||||||||||||||||||||
See |
the |
programme |
table |
below. |
|
|
|
|
|
|||||||||||||||||||||||||||||||||||
|
|
|
|
|
programme. |
|
|
|
|
|
|
|
|
|
|
|
|
|
|
|
|
|
|
|||||||||||||||||||||
|
|
|
|
|
|
|
|
|
|
|
|
|
|
|
|
|
|
|
|
|
|
|
|
|
|
|
|
|
|
|
|
|
|
|
|
|
|
|||||||
The |
temperature selector |
is |
used |
to |
select |
|
the |
|
|
|
|
|
|
|
|
|
|
|
|
|
|
|
|
|
|
|
|
|
|
|||||||||||||||
wash |
temperature. |
The |
maximum |
|
|
|
|
Caution: To prevent damage to the appliance |
||||||||||||||||||||||||||||||||||||
programme |
|
|
not |
|
start |
|
the |
machine |
if |
the |
|
door |
is |
|||||||||||||||||||||||||||||||
temperature |
is |
set |
at |
60º |
C |
for |
|
|
|
|
|
do |
|
|
|
|
||||||||||||||||||||||||||||
delicates and |
40º |
|
shut, |
|
even |
if |
thelavado/pulsar« |
3» |
|
|||||||||||||||||||||||||||||||||||
C |
for |
woollens, |
even |
if |
a higher |
|
|
|
|
|
properly |
|
|
|||||||||||||||||||||||||||||||
temperature has |
|
|
|
|
|
|
|
|
and«Startthe |
3» button is |
|
|||||||||||||||||||||||||||||||||
been |
selected, |
|
so |
as |
to |
|
avoid |
damaging |
|
|
indicator |
light |
|
is |
|
on |
|
|||||||||||||||||||||||||||
|
|
delicate |
|
|
|
|
|
|
|
|
|
|
|
|
|
|
|
|
|
|
|
|
|
|
||||||||||||||||||||
items. |
|
|
|
|
|
|
|
|
|
|
|
|
|
|
|
|
|
depressed. |
|
|
|
|
|
|
|
|
|
|
|
|
|
|
|
|
|
|
||||||||
|
|
|
|
|
|
|
|
|
|
|
|
|
|
|
|
|
|
|
|
|
|
|
|
|
|
|
|
|
|
|
|
|
|
|
|
|
|
|
|
|
|
|||
Use |
cold |
wash |
or |
low |
temperature |
|
|
|
The |
|
|
door |
of |
|
the washing |
machine |
|
cannot |
||||||||||||||||||||||||||
programs |
if |
|
|
|
|
|
|
|
|
|
|
|
|
|
|
|
|
|
|
|
|
|
|
|||||||||||||||||||||
the |
type |
of |
laundry |
and |
degree |
of |
soiling |
|
|
opened during the washing cycle. The machin |
||||||||||||||||||||||||||||||||||
permits. |
|
|
|
|
|
|
|
|
|
|
|
|
|
|
|
|
|
|
|
|
|
|||||||||||||||||||||||
Washing |
at |
60º |
C |
consumes |
approximately |
|
must |
first be |
|
switched |
off |
before the |
|
door |
can |
|||||||||||||||||||||||||||||
half |
|
|
|
|
|
|
|
|
|
|
|
|
|
|
|
|
|
|
|
|
|
|
|
|||||||||||||||||||||
as |
much |
energy |
as |
washing |
at |
90º |
C. |
|
|
opened |
(programme |
selector on«Stop»). Check |
|
|||||||||||||||||||||||||||||||
If |
the |
washing |
|
|
is |
very |
|
soiled |
and |
needs |
|
that |
|
|
the centrifug« |
./fin» |
indicator |
light |
has |
gone |
||||||||||||||||||||||||
|
|
|
to |
|
be |
|
|
|
|
|
|
|
|
|
|
|
|
|
|
|
|
|
|
|
|
|||||||||||||||||||
washed at |
90º |
|
|
|
|
|
|
|
|
|
|
|
|
|
|
out. The |
door |
can |
be |
opened |
after |
2 |
minutes |
|||||||||||||||||||||
|
|
C, turn the rotary selector until it |
|
|
|
|
|
|
|
|
|
|
|
|
|
|
|
|
|
|
|
|
||||||||||||||||||||||
clicks into the 90 position. This will require some |
|
|
|
|
|
|
|
|
|
|
|
|
|
|
|
|
|
|
|
|
|
|||||||||||||||||||||||
extra effort. It is not a fault but is becauseL it- isFlot |
|
|
|
|
|
|
|
|
|
|
|
|
|
|
|
|
|
|
||||||||||||||||||||||||||
regarded |
as |
a |
|
safety |
measure. |
|
|
|
|
|
|
When |
this |
button |
is |
pressed, |
the |
|
functio |
|||||||||||||||||||||||||
|
|
|
|
|
|
|
|
|
|
|
|
|
|
|
|
|
|
|
|
|
||||||||||||||||||||||||
|
|
|
|
|
|
|
|
|
|
|
|
|
|
|
|
|
|
|
|
indicator |
light |
comes on and the laundry remai |
||||||||||||||||||||||
|
Washing machine |
|
status |
|
|
|
|
in the last rinsing water to avoid creasing. |
|
|||||||||||||||||||||||||||||||||||
|
|
|
|
|
|
|||||||||||||||||||||||||||||||||||||||
|
|
indicator |
|
|
|
|
|
|
|
|
|
|
|
|
|
|
|
|
|
|
|
|
|
|
|
|
||||||||||||||||||
|
lights |
|
|
|
|
|
|
|
|
|
|
|
|
|
|
|
|
|
|
|
/ |
|
/ |
|
/ |
|
- |
Spin |
|
|
|
|
|
|
|
|
|
|
||||||
|
|
|
|
|
|
|
|
|
|
|
|
|
|
|
|
|
|
|
|
The |
|
|
function |
indicator light comes on when th |
||||||||||||||||||||
The «lavado/pulsar 3» indicator |
|
|
|
|
|
|
|
|
||||||||||||||||||||||||||||||||||||
|
light |
flashes button |
is |
pressed. |
The |
spin |
cycle |
in |
the |
w |
||||||||||||||||||||||||||||||||||
when |
the |
required |
programme |
has |
been |
|
|
|
|
|
|
|
for |
|
hard-wearing |
white |
|
and |
||||||||||||||||||||||||||
selected. |
This |
|
indicator |
light |
remains |
|
|
|
programme |
|
|
|
||||||||||||||||||||||||||||||||
|
lit when |
the |
|
|
items |
is |
carried |
out |
|
at |
a |
lower spee |
||||||||||||||||||||||||||||||||
«Start |
»3button |
is |
pressed and |
the |
|
|
|
coloured |
|
|||||||||||||||||||||||||||||||||||
programme |
|
|
|
|
|
|
|
|
|
|
|
|
|
|
|
|
|
|
|
|
|
|
|
|||||||||||||||||||||
begins. |
|
|
|
|
|
|
|
|
|
|
|
|
|
|
|
|
In the delicates and woollens |
programme, |
th |
|||||||||||||||||||||||||
The «aclarado» |
|
|
indicator |
light |
comes |
on |
|
|
spin |
|
cycle is automatically carried out with t |
|||||||||||||||||||||||||||||||||
|
|
(set) |
|
|
|
|
|
|
|
|
|
|
|
|
|
|
|
|
|
|
|
|
|
|
|
|
||||||||||||||||||
during |
the rinse |
programme. |
|
|
|
|
|
|
|
least |
|
number of spins, regardless of whether th |
||||||||||||||||||||||||||||||||
|
|
|
|
|
|
|
button |
has |
been |
pressed |
|
|
|
|
|
|
|
|
|
|
||||||||||||||||||||||||
|
|
|
|
|
|
|
|
|
|
|
|
|
|
|
|
|
|
|
|
|
|
|
|
|
|
|
|
|
|
|||||||||||||||
While the washing machine is spinning and |
|
|
|
|
|
|
|
|
|
|
|
|
|
|
|
|
|
|
|
|
|
|
|
|||||||||||||||||||||
emptying out the water, «cthentrifug./fin» |
|
|
|
|
|
|
|
|
|
|
|
|
|
|
|
|
|
|
|
|
|
|
|
|
|
|
|
|||||||||||||||||
indicator |
light |
remains |
lit. |
The |
indicator light |
|
|
|
|
|
|
|
|
|
|
|
|
|
|
|
|
|
|
|
|
|
|
|||||||||||||||||
flashes when the programme is completed. To |
|
|
|
|
|
|
|
|
|
|
|
|
|
|
|
|
|
|
|
|
|
|
||||||||||||||||||||||
turn the machine off, set |
the |
programme |
selector |
|
|
|
|
|
|
|
|
|
|
|
|
|
|
|
|
|
|
|
|
|
|
|||||||||||||||||||
to |
|
«Stop» |
|
|
|
|
|
|
|
|
|
|
|
|
|
|
|
|
|
|
|
|
|
|
|
|
|
|
|
|
|
|
|
|
|
|
|
|
|
|
|
|
||
10 en
Detergents and softeners
You can use all powder and liquid detergents suitabl front-loading washing machines.
! Do |
not use hand washing detergents because they prod |
too |
much foam. |
!Do not use solvent-based detergents in automatic washi
machines. Risk of explosion.
!Do not use washing performance enhancers, stain removers
|
|
sprays |
near |
the |
machine as they |
could |
damage |
the mac |
||||||||||
|
! |
Store |
detergents |
and additives in |
a |
safe |
place |
out of |
the |
|||||||||
|
|
of children. |
|
|
|
|
|
|
|
|
|
|
|
|
||||
Detergent quantity |
Only |
the |
correct |
|
dosage |
of |
detergent |
ensures |
good |
was |
||||||||
|
results. |
Follow |
the instructions on the detergent packaging. |
|||||||||||||||
|
Use the dispenser provided with |
the |
packaging, |
such a |
||||||||||||||
|
detergent |
ball or sachet, for liquid detergent. |
|
|
|
|||||||||||||
|
|
Never |
exceed |
the maximum mark, «MAX», on the dispenser |
||||||||||||||
|
The |
quantity |
of |
detergent required depends |
on: |
|
|
|
||||||||||
|
- |
the water |
hardness. |
|
|
|
|
|
|
|
|
|
||||||
|
- |
the |
degree |
of |
soiling. |
|
|
|
|
|
|
|
|
|||||
|
- |
the |
amount |
of |
|
washing. |
|
|
|
|
|
|
|
|
||||
|
- |
the |
dosage |
recommended for the type of detergent. |
|
|||||||||||||
|
Insufficient detergent will not be noticed until the laundry has |
|||||||||||||||||
|
washed |
several |
times in the same way: |
|
|
|
|
|
||||||||||
|
- |
The |
laundry |
turns grey |
or |
is not |
clean. |
|
|
|
|
|||||||
|
- |
Greyish brown |
spots |
may form on the |
laundry. |
|
|
|||||||||||
|
- |
Lime |
scale may |
|
start |
to |
form on |
the |
appliance |
heating |
ele |
|||||||
An excessive amount of detergent may cause: - Unnecessary environmental pollution.
- Slower washing |
movement |
in the machine due to the form |
of foam leading |
to poor |
washing results. |
The detergent dosage given on the packaging is based on washing machine load.
The quantity of detergent should be reduced for smaller loa laundry that is lightly soiled.
en 11
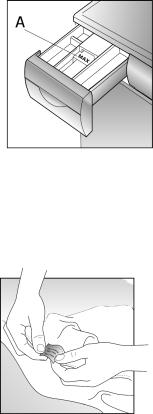
Hints |
Fabric |
softeners |
|
|
|
|
|
||
|
Put the |
fabric |
softener |
in the chamber 2marked.Do |
not |
exceed |
the |
||
|
«MAX» marking (maximum to the lower edge of theA) |
piec |
|||||||
|
because |
the |
softener |
will be |
flushed into |
the |
water |
with |
|
|
detergent |
at the start of the washing cycle and |
so have |
no |
|||||
|
the fabric softening cycle. Thicker fabric softeners should first |
||||||||
|
diluted with a little water. |
|
|
|
|
||||
|
Bleaching |
agents, stain |
removers |
|
|
|
|||
|
Powdered bleaching agents and stain removers can be added |
||||||||
|
First put the detergent in the drawer. Next add the pow |
||||||||
|
bleaching |
agent or stain remover |
toII thechamber. |
|
|
||||
Preparing the |
laundry |
|
|
|
|
|
|
|
|
|
|
|
|
|
|
|
|
|
|
|
|
||
Sorting the laundry |
m Sort |
the laundry |
according |
to |
the |
symbols on |
the |
labels. |
|||
|
! Items |
made |
of |
or containing, |
wool |
must have |
«Will |
not |
s |
||
|
or «Machine |
washable» on |
the |
label. Otherwise |
there |
is |
a |
||||
the wool shrinking.
Only items displaying the following symbols should be mach washed:
Hard-wearing white fabrics
d
Coloured fabrics (hard-wearing colour-fast fabrics)
cba
Delicate items and coloured fabrics
hgf
Very delicate items
lgkf
Hand washable or machine washable at 30ºC, wool, cold
6lgkf
Items showing the following symbols should not be washed i machine:
Do not wash at homeB
m Sort the laundry into colours. Wash white and coloured i separately, otherwise whites may take on colour.
12 en
Practical advice
Removing stains
!Any new coloured items should be washed separatelyRisk of. colour running.
m Sort the laundry |
according to the |
maximum |
permitted load |
|||||||||
the machine. Do not overload the machine. Overloading |
|
|||||||||||
machine leads to poor washing results. |
|
|
|
|
|
|||||||
Maximum |
washing loads permitted: |
|
|
|
|
|
|
|
||||
Soiled or very soiled hard-wearing |
white |
laundry/colourfas |
||||||||||
and hard-wearing laundry |
|
|
|
|
4.50 |
kg |
|
|||||
Synthetics |
|
|
|
|
|
|
|
|
2.25 kg |
|
||
Delicates |
and |
woollens |
|
|
|
|
|
2.00 |
kg |
|
||
m Remove all |
foreign material and metal objects from the |
it |
||||||||||
for example, |
safety |
pins, fasteners, |
clips, |
etc. |
|
|
||||||
m Brush |
sand |
out |
of |
pockets, cuffs |
and |
turnups. |
|
|
||||
m Close |
zips |
and |
fasten |
buttons |
on duvet |
covers |
and |
p |
||||
cases. |
|
|
|
|
|
|
|
|
|
|
|
|
m Remove curtain |
hooks |
or tie in |
a |
net |
or |
bag. |
|
|
||||
m Wash particularly delicate items, such as |
tights or lace curt |
|||||||||||
and small items, such as socks and handkerchieves, in a |
||||||||||||
pillow |
case |
or cushion |
cover. |
|
|
|
|
|
|
|
||
m Turn trousers and knitted items (for example knitwear, T-sh sweatshirts, etc.) inside out.
m Ensure that fasteners with inserts (hoops, etc.) can be wa in a machine.
!Place items with inserts in a pillowcase, for example, to p them from becoming detatched during washing and falli through the perforations in the drum, causing damage to machine.
If possible, stains should be treated or |
removed |
as |
soon a |
|
occur. |
|
|
|
|
Try first with soap and water. |
Do |
not rub |
the |
material. |
stains will only be removed after |
several |
washes. |
|
|
en 13
First washing cycle
Carry out the first washwit out any laundry in the machineto |
|
|||
remove residual water left from testing the machine |
at |
the |
fac |
|
m Check that the transport security devices have |
been remo |
|||
from at the back of the machine (refer |
to |
the |
re |
|
instructions |
for the machine). |
|
|
|
m Open the |
water tap. |
|
|
|
m |
Open |
the detergent |
drawer as far as .it will go |
m Pour |
approximately |
one litre of water into chamberII of the |
|
|
drawer |
|
|
m Put standard detergent in chamberII using the measuring cup. Never use detergent for delicate or woollen items becaus produces too much foam.
m Turn the programme selector to the right (clockwise) to t
«resistentes/algod. 90º C»programme. The«lavado/pulsar
3» indicator light flashes.
m Press the«Start 3» button. The programme starts and th «lavado/pulsar 3» indicator light stays on.
m When the programme has finished, «centrifugthe ./fin» indicator light starts flashing. Set the programme selecto «Stop» and the light goes out.
14 en
Washing / Opening the door / Loading the machine / Shutting th
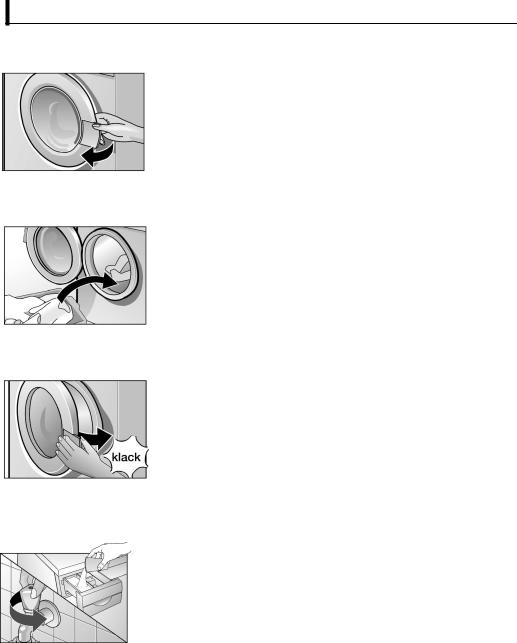
Opening the door m Pull the door catch towards you.
Put |
the |
laundry |
in |
the! |
Items |
which |
have been pre-treated with detergents containi |
||
washing |
machine |
|
|
solvents, |
for |
example stain removers, cleaning fluids, et |
|||
|
|
|
|
|
should be left to dry in the open air beforeRiskwashingof . |
||||
|
|
|
|
|
explosion. |
|
|
||
|
|
|
|
! |
Check |
that |
there are no foreign bodies or animals inside |
||
|
|
|
|
|
drum |
before |
putting the |
washing in. |
|
|
|
|
|
m Place |
the |
laundry loosely |
and unfolded in the drum. Mix |
||
|
|
|
|
|
and small |
items. |
|
||
Shutting the door
Adding the detergent turning the tap on
!Shut the door, taking care to ensure that no items are tr
between the door and the rubber seal.
m Shut |
the |
door pressing |
it against the door frame until the |
lock |
can |
be heard to |
engage. |
andm Put detergent in chamberII of the drawer.
Do not exceed the maximum mark (MAX).
-Chamber I: Prewash detergent.
-Chamber II: Main wash detergent, water softener, starch
bleach and stain remover.
-Chamber 2: Additives for the final rinse, for example fa softeners.
en 15

Washing the laundry
Selecting a wash programme
See the programme table below.
«resistentes/algod.»
Additional functions.
Flot L
The laundry remains in the water after the fin
Spin |
/ |
/ |
/ |
Reduces |
the |
spin |
speed. |
Starting a programme
Heavily soiled whites, 90 ºC |
|
m |
Turn the programme selector to the require |
||||||||||||||||||||
Intensive wash programme for hard-wearing |
wash |
|
programme. |
|
|
|
|
|
|
|
|
||||||||||||
cotton |
or |
linen |
items. |
|
m The |
|
«lavado/pulsar |
3» |
indicator |
light |
|
||||||||||||
|
|
|
|
|
|
|
|
|
|||||||||||||||
Stains / Intensive, 60 ºC |
|
|
flashes. |
|
|
|
|
|
|
|
|
|
|
|
|
||||||||
Energy-saving |
|
programme. |
The longestm Selecting |
the |
required spin |
speed. |
Ensures |
||||||||||||||||
washing |
cycle |
reduces energy consumption. |
careful washing by automatically limiting the |
||||||||||||||||||||
|
|
|
|
|
|
|
|
||||||||||||||||
«resistentes/algod.+prelava» |
|
|
maximum spin speed in «sinteticos»the , |
|
|
||||||||||||||||||
Whites and coloureds, hard-wearing fabrics |
«lana/delicado» |
wash programmes. |
|
|
|
||||||||||||||||||
|
|
|
|
|
|
|
|
|
|
|
|
|
|
|
|
||||||||
and colourfast, 60 ºC, with pre-wash. |
m Set |
to the required temperature using th |
|||||||||||||||||||||
For heavily |
soiled laundry. |
|
|
temperature |
selector. |
|
|
|
|
|
|
|
|||||||||||
Coloureds, |
30, |
40, 60 ºC |
|
m Press |
the |
additional |
function |
button(s) |
to |
||||||||||||||
|
|
activate them. |
|
The |
corresponding indicator |
||||||||||||||||||
Hard-wearing |
fabrics. |
|
|
|
|||||||||||||||||||
|
|
light |
comes |
on. |
|
|
|
|
|
|
|
|
|
||||||||||
«sinteticos» |
|
|
|
|
|
|
|
|
|
|
|
|
|
||||||||||
|
|
|
m Press |
the«Start 3» |
button |
|
|
|
|
|
|||||||||||||
Delicates, |
30, |
40, 60 synthetics)ºC ( |
|
|
|
|
|
||||||||||||||||
|
The |
|
«lavado/pulsar |
3» |
indicator |
light |
|
||||||||||||||||
For washing delicate cottons, synthetic or |
mixed comes |
on. |
The |
wash |
programme |
starts. |
|||||||||||||||||
fibre fabrics. |
|
|
|
|
The |
|
«lavado/pulsar |
3» |
indicator |
light |
|
||||||||||||
«lana/delicado» |
|
|
|
remains |
lit |
throughout the |
wash programm |
||||||||||||||||
Very |
delicate, |
30 ºC |
|
|
selected. |
|
|
|
|
|
|
|
|
|
|
|
|
||||||
|
|
|
|
|
|
|
|
S» |
|
|
|
|
|
|
|
|
|||||||
For washing very delicate cotton garments, |
The |
|
aclarado« |
indicator |
light |
comes |
on |
||||||||||||||||
synthetic or mixed fibre fabrics, curtains. |
These during |
the |
«Rinse» |
programme. |
|
|
|
|
|||||||||||||||
programmes have no spin cycle between |
Modifying |
a |
selected |
programme |
|
|
|
|
|||||||||||||||
rinsing cycles. |
|
|
|
|
|
|
|
||||||||||||||||
Woollens 30, |
ºC, cold |
|
If |
you |
|
have selected and started an incorre |
|||||||||||||||||
For machine washable woollens or |
wash |
programme |
it |
can |
be |
corrected |
in |
t |
|||||||||||||||
wool |
|
|
|
|
|
|
|
|
|
|
|
|
|
|
|
|
|||||||
mixtures. |
|
|
|
|
|
following |
way: |
|
|
|
|
|
|
|
|
|
|
|
|||||
Additional |
programmes |
|
m Turn |
the |
programme |
selector«Stop». |
|
|
|
||||||||||||||
|
m Set |
the |
programme |
selector to |
the |
positio |
|||||||||||||||||
Rinse |
-S |
|
|
|
|
||||||||||||||||||
|
|
|
|
|
for |
|
|
the |
required |
|
programme. |
|
The |
||||||||||
|
|
|
|
|
|
|
|
|
|
|
|
||||||||||||
Rinse cycle with low-energy spin. Can |
also be«lavado/pulsar 3» |
indicator |
light |
flashes. |
|
||||||||||||||||||
used |
for |
delicate items. |
|
m Press |
the«Inicio 3»button |
|
|
|
|
|
|
||||||||||||
Spin |
-B |
|
|
|
|
|
|
|
|
|
|
||||||||||||
|
|
|
|
|
The |
|
«lavado/pulsar |
3» |
indicator |
light |
|
||||||||||||
|
|
|
|
|
|
|
|
|
|
||||||||||||||
Extra spin cycle, washing or rinsing water iscomes |
on. |
|
The |
newly |
selected programm |
||||||||||||||||||
pumped |
out before spinning the |
laundry. |
|
starts. |
|
|
|
|
|
|
|
|
|
|
|
|
|
||||||
|
|
|
|
|
|
|
|
|
|
|
|
|
|
|
|
|
|
|
|
|
|||
Pumping |
(emptied) b- |
|
|
|
|
|
|
|
|
|
|
|
|
|
|
|
|
|
|
||||
Pumps out the rinse water«Flotif L» has been |
|
|
|
|
|
|
|
|
|
|
|
|
|
|
|
|
|||||||
selected. |
For |
careful washing of |
delicate |
items. |
|
|
|
|
|
|
|
|
|
|
|
|
|
|
|
|
|||
16 en

Interrupting a wash programme |
Wash programme end / Taking th |
|
If you should wish to stop a programme already |
||
|
laundry out of the machine |
|
in progress: |
|
|
|
|
|
mTurn the programme selector«Stop».
mTurn the programme selector to the
«Pumping b» or«Spin B» programme
position.
The «centrifug./fin» indicator light flashes.
mPress the«Start 3» button.
The «centrifug./fin» indicator light light comes on.
The «centrifug./fin» indicator light flashes.
m Turn the programme selector«Stop».
If necessary:
m Select an additional programme («Pumping b», «SpinB» or «RinseS»).
m Press the«Start 3» button.
m When the additional programme selected has finished, turn the programme selector t
«Stop».
Taking the laundry out of the machine
m Close |
the |
tap. |
|
|
||
m Open |
the |
door. |
|
|
||
If the door cannot be opened: |
||||||
Wait |
2 minutes (the |
machine's safety devic |
||||
is |
activated) |
or: |
|
|
||
If |
the«Flot L» |
option |
was selected, there will |
|||
still be water inside the appliance. Select |
||||||
additional |
programme«Rinse( |
b» or«Spin |
||||
B») |
to pump out the water. |
|||||
m Take the laundry out of the machine.
!Remove any foreign material or metal object
(clips, |
fasteners, |
money, etc.) |
which |
may |
have collected in the drum or |
rubber se |
|||
Risk of rusting. |
|
|
|
|
Leave the door open so that air |
can |
circul |
||
inside and |
dry the |
appliance. |
|
|
en 17
Cleaning/Maintenance/Frost protection
|
|
|
! |
Disconnect the appliance from the mains and shut off |
|||||
|
|
|
|
water |
supply before carrying out |
any |
maintenance |
wor |
|
Cleaning |
the |
outside |
! |
Do not use solvents. These products |
can |
damage |
the |
wa |
|
of the |
appliance |
|
machine's components, produce noxious fumes and ma |
||||||
|
|
|
|
cause |
an explosion. |
|
|
|
|
|
|
|
! |
Do not clean the appliance with a water jet. |
|
|
|||
|
|
|
Clean the body of the appliance and |
the |
controls |
with |
luke |
||
|
|
|
soapy water or a standard cleaning agent only. Do not use sc |
||||||
|
|
|
products. Dry it with a soft cloth. |
|
|
|
|
||
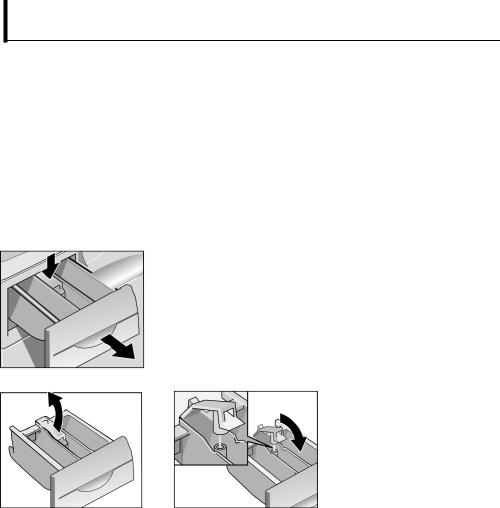
Cleaning |
the |
detergent |
1. |
Remove the drawer from the appliance. Disengage it |
|||||
drawer |
|
|
|
pressing down on the tab at the back of the drawer in th |
|||||
|
|
|
|
softener section. Hold the tab down |
and |
pull the |
drawer |
||
|
|
|
|
the appliance. |
|
|
|
|
|
|
|
|
2. |
Clean all the parts and components under running water. |
|||||
|
|
|
3. |
Replace the drawer. |
|
|
|
|
|
Descaling the appliance |
Descaling |
is |
not normally necessary if the correct dosage |
|
detergent |
has |
been used. |
!Descaling agents contain acids which may attack t
components |
and |
insides of the appliance or cau |
discolouration |
in the |
laundry. |
If you wish to descale the machine anyway, follow manufacturer's instructions closely.
18 en
Cleaning the drum
Water inlet hose
Cleaning the water pump
Rust stains |
should |
be cleaned using chlorine-free detergents |
|||||||
at |
the |
list |
of substances |
contained |
in the |
product |
on |
||
packaging.) |
Never |
use |
wire |
wool. |
|
|
|
||
It |
is recommended |
that the condition of the hose be checked |
|||||||
5 |
years |
to |
prevent |
the |
risk of damage |
caused |
by leaks |
or f |
|
Cleaning is necessary:
m If the pump is blocked by foreign material (for example bu
|
fasteners, |
clips, etc.) |
or |
if |
used |
water is not drained. |
||||||
m After washing |
fluffy |
items. |
|
|
|
|
|
|||||
All |
water |
must |
be removed from inside the appliance b |
|||||||||
cleaning the pump. As much |
as 20 litres / 4.4 gal of wa |
|||||||||||
remain if the pump is obstructed. |
|
|
|
|
||||||||
Procedure |
|
|
|
|
|
|
|
|
|
|
|
|
1. |
Remove the base board from the front of the washing ma |
|||||||||||
|
turning the plastic screw heads using a coin. |
|
||||||||||
! |
Risk of burningAllow. |
the used water to cool down |
|
|||||||||
2. |
Place |
a |
shallow |
container |
under the drainage pump co |
|||||||
|
(outlet |
filter). |
Loosen |
the |
cover |
without |
removing it |
comple |
||||
|
to allow the water to empty gradually. Close the drainage |
|||||||||||
|
cover when the |
container |
is full. Repeat the operation un |
|||||||||
|
the water has been emptied. Use a suitable container to re |
|||||||||||
|
any remaining water which may spill on the floor. |
|
||||||||||
3. |
Loosen the drainage pump cover completely. |
|
|
|||||||||
4. |
Remove any foreign material or fluff which may have colle |
|||||||||||
|
there. |
Wipe |
the |
inside |
of |
the |
pump. |
The |
blades |
must |
||
|
freely. |
|
|
|
|
|
|
|
|
|
|
|
5. |
Loosen |
and |
fit the drainage pump cover in place. Ensure |
|||||||||
|
it is correctly |
closed. |
|
|
|
|
|
|
||||
6. |
Fit the base board in place. |
|
|
|
|
|||||||
7. |
Pour 2 |
litres |
/ 3.5 pt of |
water |
into the |
detergent drawer |
||||||
|
the «Pumping |
»badditional |
programme. |
This |
will prevent th |
|||||||
detergent from being flushed out before being used in the wash.
en 19
Wiping the appliance's waterThe |
appliance's |
water |
inlet |
filters must be cleaned with the |
||||
inlet filters |
open and |
no water flowing |
into the |
appliance. |
||||
|
The |
filters |
are |
located |
in |
the |
hose |
connection joining the |
|
supply pipe to the domestic water supply, and in the solenoid |
|||||||
|
connection at the back |
of |
the |
machine. |
||||
Procedure
1. First let the water pressure out of the supply pipe:
m Close the tap.
m Turn the programme selector to any wash programme (exc
«Spin B» or«Pumping b» |
|
|
|
m Press the«Start 3» button. Allow |
the |
machine to |
operate for |
40 seconds. |
|
|
|
m Turn the selector «Stop». |
|
|
|
2. Loosen the supply pipe from |
the |
tap. Rinse |
the filter |
running water. |
|
|
|
3. Reconnect the pipe to the tap fitting.
4. Remove the water supply hose from its connection on the of the appliance.
5. Remove the filter using flat pliers; wipe it and replace it.
6. Tighten and fit the pipe on its coupling.
|
7. |
Open |
the |
tap |
and check |
that there |
are no water leaks. |
|
|
8. |
Close |
the |
tap. |
|
|
|
|
|
If the machine has been installed in an area where it is not p |
|||||||
|
against low temperatures, residual water |
must be removed fr |
||||||
|
the pump and the fresh-water hose after each wash cycle. |
|||||||
Frost protection |
Empty the water |
from |
the |
pump: |
|
|||
|
See the |
«Cleaning |
the |
pump» |
section. |
|
||
Empty the water from the water inlet hose:
1. |
Close |
the |
tap. |
2. |
Loosen the |
supply pipe from the tap. Place the end of th |
|
|
in a |
container. |
|
3.Select any wash programme for 40 seconds. Any wa remaining in the hose is drained.
4.Reconnect the pipe to the closed tap.
20 en
Malfunctions with simple solutions
!Repairs to electrical appliances must only be carried out by qualified specialists. Repairs carried out incorrectly can be dangerous.
Malfunction |
Possible |
cause |
/ |
Remedy |
||
|
|
|
|
|
|
|
The On/Off light does not |
come on-The appliance |
plug |
is |
not inserted in the socket or not |
||
|
inserted in |
the |
socket. |
|
|
|
|
-The fuse |
has |
blown. |
|
|
|
|
-Electrical |
power failure. |
|
|
||
Electrical power failure
The wash cycle does not start
In the event of a |
|
power failure or appliance malfunc |
||
emergency |
draining |
is |
possible (refer to the «Cleaning |
|
discharge |
pump» section, so that the laundry can be remo |
|||
from the machine). |
|
|
||
The «Start M» |
button |
is |
not depressed. |
|
The door |
is |
not properly closed. |
||
Machine |
does |
not |
fill with water This is |
not a malfunction. The water remains below the visibl |
|
|
|
in the |
machine. |
Washing |
result |
is |
unsatisfactory Abnormally high degree of soiling. |
|
|
|
|
Insufficient detergent. Measure the detergent according to t |
|
|
|
|
manufacturer's instructions. |
|
|
|
|
Select |
the most appropriate temperature and wash programm |
|
|
|
for the |
laundry. |
Foam comes out of the detergentToo much detergent was used. Switch the machine off for 5 drawer minutes. Prevent foam building up by putting a tablespoon o bric softener and half a litre (or one pint) of water into the d
drawer. Reduce the detergent dosage in the next wash.
Foam is visible after the final rinse
Unexpected motor noises
Pump noises
Some detergents |
produce a |
large quantity of foam although |
has no effect on |
the rinsing |
result. |
This is not a malfunction. During the heating stage, the moto duces noises characteristic of starting.
This is not a malfunction. These noises are characteristic o machine starting and the pump discharging.
The machine vibrates when was" The |
transport securing devices have not been removed. See |
|||||||
hing |
or spinning |
machine installation |
instructions. |
|
|
|
|
|
|
|
The |
adjustable feet |
on the machine were |
not |
fixed during |
ins |
|
|
|
tion |
of the appliance. Align the machine |
using |
a spirit |
level |
||
|
|
the |
feet as indicated in the installation instructions. |
|
|
|||
The |
appliance does not spin or |
The |
outlet pump is |
blocked. The outlet |
pipe |
is bent |
or |
blo |
drain |
the used water. |
|
|
|
|
|
|
|
en 21
 Loading...