


Table of contents
Safety |
information. |
. . . . . . . |
. . . |
. |
. . |
.5 . . . . . . . . |
|
|
|
|
|
|
|
|
|
Before |
installation. . |
. . . . . . . . |
. . |
. . |
. . |
.5 . . . . . . . . |
|
|
|
|
|
|
|
|
|
Information for your safety. . . . . . . . . . . . . . 6. . . . . . .
Items that may damage the appliance. . . . . . . . . . 8.
Your new oven. . . . . . . . . . . . . . . 10. . . . . . . . .
Control panel. . . . . . . . . . . . . . . . . .10. . . . . . . . .
Function selector . . . . . . . . . . . . . . . . 11. . . . . . . . .
Buttons and display. . . . . . . . . . . . . . . .12. . . . . . . .
Temperature knob . . . . . . . . . . . . . . . .12. . . . . . . . .
Cooking compartment. . . . . . . . . . . . . . 13. . . . . . . . .
Racks . . . . . . . . . . . . . . . . . . . . .13. . . . . . . . .
Before using your oven for the first. .time. . . . 15
Setting the time. . . . . . . . . . . . . . . . .15. . . . . . . . .
Heating the oven. . . . . . . . . . . . . . . . . 15. . . . . . . . .
Cleaning the accessories. . . . . . . . . . . . . .15. . . . . . . .
Setting the oven. . . . . . . . . . . . . . . .16. . . . . . . .
Type of heating and temperature. . . . . . . . . . . 16. . . .
Rapid heating. . . . . . . . . . . . . . . . . 17. . . . . . . . . .
Setting the time<setting options. . . . . . . . . .18. . . .
Timer . . . . . . . . . . . . . . . . . . . . .18. . . . . . . . .
Cooking time. . . . . . . . . . . . . . . . . .19. . . . . . . . .
End time . . . . . . . . . . . . . . . . . . . 21. . . . . . . . . .
Time . . . . . . . . . . . . . . . . . . . . . 23. . . . . . . . . .
Childproof |
lock. . . |
. . . . . . . |
. . . . . .23. . . . . . . . |
|
|
|
|
||
Modifying |
the basic settings. . . . . . . . . . . 24. . . . . . |
|||
|
|
|
|
|
Automatic |
switch<off. |
. . . . . . . |
. . . . . 25. . . . . . . . . |
|
3
Table of contents
Self<cleaning . . . . . . . . . . . . . . . . 25. . . . . . . . .
Important notes. . . . . . . . . . . . . . . . .26. . . . . . . . .
Before using the self-clean function. . . . . . . . . . 26. . .
Setting . . . . . . . . . . . . . . . . . . . . 27. . . . . . . . . .
After automatic selfJcleaning. . . . . . . . . . . . 28. . . . . . .
Care and cleaning. . . . . . . . . . . . . . .29. . . . . . . .
Cleaning products . . . . |
. . . . . . . . . . . .29. . . . . . . . . |
||||
|
|
||||
Light . . . . . . . . . . . . . . . . . . . . . 31. . . . . . . . . . |
|||||
|
|
||||
Unhooking and inserting the wire shelves. . . . . . . . 31 |
|||||
|
|
||||
Unhooking and hanging the oven door. . . . . . . . . 32. |
|||||
|
|
|
|
|
|
Removing |
and |
installing |
the |
door panels. . . . . . . |
. 34. |
|
|
||||
Troubleshooting . . . . . . . . . . . . . . .37. . . . . . . . . |
|||||
|
|
|
|
||
Malfunction table . . . . |
. . |
. . . . . . . . . . 37. . . . . . . . . |
|||
|
|
|
|
|
|
Changing |
the |
light bulb |
at |
the top of the. . .oven. . |
38 |
|
|
|
|
|
|
Protective glass panels. . . . . . . . . . . . . . 39. . . . . . . . .
Technical Assistance Service. . . . . . . . . . 39. . . . . .
Energy-saving and environmental |
|
|
|
protection tips. . . . . . . . . . |
. . . . . .40. . . . . . . . . |
||
|
|
|
|
Saving energy. . . . . . . . . . . . . |
. . . . 40. . . . . . . . . . |
||
|
|
|
|
Environmentally-friendly disposal of waste. |
. . . . . |
.40 |
|
|
|
|
|
Tables and tips. . . . . . . . . . |
. . . . . . |
41. . . . . . . . |
|
4

Safety information
Read the instructions in this |
manual carefully. Keep |
the operation and installation |
instructions. The |
corresponding manual must be passed on to any subsequent owner.
This instruction manual is for use with both stand-alone ovens and oven-hob combinations. Read the instruction manual supplied with the hobs oven-hob combinations to find out how their hob controls work.
Before installation
Transport damage Check the appliance after removing it from its packaging. Do not connect an appliance that has been damaged in transit.
Electrical connection Only an authorised technician may connect the appliance. The guarantee will be void if damage is caused by incorrect connection.
Before using the appliance for the first time, you
ensure that |
your domestic |
electrical system |
is earth |
and meets |
all the current |
safety regulations. |
An au |
rised technician should install and connect your apJ pliance.
Use of this appliance without an earth connection
incorrectly |
installed can cause serious injuries (i.e. a |
|
injury |
or |
death from electrocution), although this is |
very |
rare. |
|
The manufacturer accepts no responsibility for any malfunction or damage which is caused by unsuita electrical installations.
5

Information for your safety
Oven door
This appliance is intended for domestic use only. T appliance must only be used for food preparation.
Adults and children must not operate the appliance without supervision,
H |
if |
they |
are |
physically or mentally |
incapable of do |
|
so |
or |
|
|
|
H |
if |
they |
lack |
the knowledge and |
experience. |
Never let children play with the appliance.
The oven door must remain closed when the oven switched on. As a precaution, we recommend that you keep the oven door closed even when the ov switched off.
Hot cooking compartment There |
is a risk of burns. |
|
|
|
|
|
|||
Never touch the interior surfaces of the cooking |
|
||||||||
compartment or the heating elements. Open the |
|
||||||||
appliance door carefully. Hot steam may escape. |
|
||||||||
Small |
children must be kept at |
a safe distance |
fro |
||||||
the |
appliance. |
|
|
|
|
|
|
||
There is a risk of fire. |
|
|
|
|
|
||||
Never store combustible items in the cooking |
|
|
|||||||
compartment. |
|
|
|
|
|
|
|||
Never open the appliance door if there is smoke |
|||||||||
inside. |
Switch off the |
appliance. |
Pull |
out |
the |
mains |
|||
plug or switch off the appliance |
by |
the |
fuse |
in |
th |
||||
box. |
|
|
|
|
|
|
|
|
|
There is a risk of shortJcircuiting. |
|
|
|
|
|||||
Never |
trap |
connecting |
cables of |
electrical |
appliances |
||||
in the |
hot |
appliance |
door. The |
cable insulation |
cou |
||||
melt. |
|
|
|
|
|
|
|
|
|
There is a risk of scalding |
|
|
|
|
|
||||
Never |
pour water into the hot cooking compartmen |
||||||||
This |
will cause hot steam. |
|
|
|
|
|
|||
6
Hot accessories and ovenware
Incorrect repairs
There is a risk of burns.
Never prepare food containing large quantities of drinks with a high alcohol content. Alcoholic vapour can catch fire in the cooking compartment. Only u
small |
quantities |
of drinks |
with a high alcohol conte |
and |
open the |
appliance |
door carefully. |
There is a risk of burns.
Never remove ovenware and accessories from the cooking compartment without an oven cloth or ove gloves.
There is a risk of electric shock.
Incorrect repairs are dangerous. Repairs may only b
carried out by one of our experienced afterJsales |
|
engineers. |
|
If the appliance is defective, pull out the mains |
plu |
switch off the appliance by the fuse in the fuse |
b |
Call the afterJsales service. |
|
Self<cleaning |
There is a risk of fire. |
|
Loose food residue, grease and meat juices can |
|
catch fire during the selfJcleaning cycle. |
|
Remove course dirt from the cooking compartment |
|
before every selfJcleaning cycle. |
|
There is a risk of fire. |
|
Never hang flammable items, such as tea towels, |
|
the door handle. |
|
The appliance will become very hot on the outside |
|
during the selfJcleaning cycle. Keep children at a s |
|
distance. |
|
There is a risk of serious damage to health. |
|
Never let nonJstick baking trays and tins go throug |
|
the selfJcleaning cycle. High temperatures cause |
|
damage to the nonJstick coating and poisonous |
|
gases to be released. |
7

Items |
that |
may |
|
|
|
|
|
|
|
|
|
|
|
|
||||
damage |
|
the |
|
|
|
|
|
|
|
|
|
|
|
|
|
|||
appliance |
|
|
|
|
|
|
|
|
|
|
|
|
|
|
||||
Accessories, |
pans, |
film, |
Do not place any accessory on the oven |
floor. Do |
||||||||||||||
greaseproof |
paper |
or |
cover the |
oven |
floor |
with |
any type of |
film |
or |
pape |
||||||||
aluminium |
foil on |
the |
oven |
any |
cookware |
on |
the oven |
floor |
if |
the |
||||||||
floor |
|
|
|
|
|
|
not place |
|||||||||||
|
|
|
|
|
|
temperature is |
set at more |
than |
50ºC. |
|
|
|||||||
|
|
|
|
|
|
|
|
|
||||||||||
|
|
|
|
|
|
|
It will get too hot. Oven and cooking times will b |
|||||||||||
|
|
|
|
|
|
|
inaccurate |
and |
the enamel will be damaged. |
|
||||||||
Water |
|
in |
a |
hot |
oven |
Do not pour hot water into a hot oven. Steam wi |
||||||||||||
|
|
|
|
|
|
|
produced. The resulting changes in temperature ma |
|||||||||||
|
|
|
|
|
|
|
damage the enamel and/or accessories. |
|
|
|||||||||
Liquid |
|
foods |
|
|
Do not keep liquid foods |
for |
an |
extended |
period i |
|||||||||
|
|
|
|
|
|
|
the oven with the door closed. This would damage |
|||||||||||
|
|
|
|
|
|
|
enamel. |
|
|
|
|
|
|
|
|
|
|
|
Fruit |
juices |
|
|
|
Do not overfill |
the tray when baking pies |
containin |
|||||||||||
|
|
|
|
|
|
|
juicy fruits. Fruit juice spilling from the tray |
will cau |
||||||||||
|
|
|
|
|
|
|
stains that |
will |
be impossible |
to |
remove. |
|
|
|||||
|
|
|
|
|
|
|
Use the universal deep tray |
|
when possible. |
|
|
|||||||
Leaving |
the |
door |
open |
The oven |
must |
only |
be left |
|
to |
cool with the |
door |
|||||||
when |
the |
oven |
is |
cooling closed. Even if |
the |
oven |
door |
is |
left |
only |
slightly |
|||||||
down |
|
|
|
|
|
|
the fronts of nearby kitchen |
|
units |
may |
be |
damage |
||||||
|
|
|
|
|
|
|
|
|||||||||||
|
|
|
|
|
|
|
over time. |
|
|
|
|
|
|
|
|
|
|
|
Dirty |
oven |
|
seal |
|
|
A very dirty oven seal will prevent the oven door |
||||||||||||
|
|
|
|
|
|
|
remaining |
properly closed |
during |
operation. |
The |
fron |
||||||
|
|
|
|
|
|
|
of nearby kitchen units may be damaged. Keep th |
|||||||||||
|
|
|
|
|
|
|
oven door |
seal |
clean at |
all |
|
times. |
|
|
|
|||
The oven door as a support surface
Do not rest or sit on the oven door when it is o not place any cookware or accessory on the oven door.
8
Moving the appliance |
Do |
not |
use |
the door handle to move or secure t |
|
|
appliance; |
|
|
||
|
H |
the |
handle |
cannot take the weight of the applia |
|
|
|
and |
may |
break |
|
|
H the glass panel of the oven door might move, |
||||
|
|
causing |
a |
misalignment between the front panel |
|
|
|
and |
the |
glass panel. |
|
Heavy accessories |
Do not |
pull |
heavily loaded accessories out too far |
|||
|
without supporting the weight. Heavy accessories |
|||||
|
will tip |
when |
pulled out. This causes pressure to b |
|||
|
exerted on the shelf supports in the cooking |
|||||
|
compartment, which can damage the enamel. |
|||||
|
Relieve the strain on the accessories when they ar |
|||||
|
pulled out by raising them slightly with one hand. |
|||||
|
Caution: always use an oven cloth or oven gloves |
|||||
|
when |
handling |
hot accessories. |
|||
Grilling |
When |
grilling, |
do not place the universal deep tray |
|||
|
the flat |
oven |
tray higher than level 3. |
|||
|
The high heat distorts it and the enamel may be |
|||||
|
damaged |
when |
removing |
it. |
||
|
At level |
4 and |
5, only |
grill directly on the wire ra |
||
9

Your new oven
We will now describe your new oven. This chapter explains the functions of the control panel and its individual elements. Information is also provided abo the oven's accessories and internal components.
Control panel
Here |
is an |
overview |
of the control panel. The disp |
||
never shows |
all |
of the symbols at the same time. |
|||
Discrepancies |
|
in |
the |
data are possible, depending |
|
the |
appliance |
model. |
|
||
Function selector
Retractable rotary control knobs
Buttons and |
|
display |
Temperature |
|
|
|
selector |
On some ovens the rotary control knobs are retractable. To lock or unlock the rotary knob, pres when it is at the 0 position.
10

Function |
selector |
|
|
|
|
|
|
|||
|
|
|
|
Use |
the |
function selector to set |
the type of heatin |
|||
Setting |
|
|
|
Use |
|
|
|
|
|
|
|
|
|
|
|
|
|
|
|
|
|
Û Off |
position |
|
|
The |
oven |
is switched off. |
|
|
|
|
|
|
|
|
|
|
|
|
|
|
|
" Hot |
air* |
|
|
For |
cakes |
and |
pastries. |
|
|
|
|
|
|
|
The |
fan distributes the heat of |
the ring heating element in |
||||
|
|
|
|
rear |
wall |
evenly |
throughout the |
cooking |
compartment. |
|
% Top/bottom heating*
0 Wood-fire oven
# Hot air grilling
For |
cakes, |
bakes |
and |
lean |
joints |
of |
meat, |
e.g. |
beef |
or |
gam |
||||
one |
level. |
|
|
|
|
|
|
|
|
|
|
|
|
|
|
The |
heat |
is |
emitted evenly from the top and bottom. |
|
|||||||||||
|
|
|
|
|
|
|
|
|
|
|
|||||
For |
fresh, |
chilled |
and |
frozen |
pizza, |
puff pastry, |
pies |
or |
pasti |
||||||
and pastries, e.g. fairy cakes. |
|
|
|
|
|
|
|
|
|||||||
This |
heating |
setting operates the lower heat level and fan. |
|||||||||||||
The |
food |
is |
heated from the bottom upwards, with the most |
||||||||||||
intense heat |
reaching |
the |
underside |
of |
the |
food |
and |
a |
lowe |
||||||
heat |
level |
at |
the |
top. |
|
|
|
|
|
|
|
|
|
|
|
|
|
|
|
|
|
|
|
|
|
|
|||||
For |
roasting |
meat, |
poultry |
and whole |
fish. |
|
|
|
|
|
|||||
The |
grill element and the fan switch on and off alternately. |
||||||||||||||
fan |
circulates |
the |
hot |
air |
around |
the |
food. |
|
|
|
|
|
|||
( Grill, large area
* Grill, small area
$ Bottom heating
@ Defrost
V SelfHcleaning
For |
grilling |
steaks, |
sausages, |
toast |
and pieces |
of |
fish. |
||||
The |
entire area under the grill element becomes hot. |
||||||||||
|
|
|
|
||||||||
For |
grilling small quantities of steaks, sausages, |
toast and |
|||||||||
pieces of |
fish. |
|
|
|
|
|
|
|
|
|
|
The |
centre part of the grill element becomes hot. |
||||||||||
|
|
|
|
|
|
|
|
|
|||
For |
preserving, |
browning |
and |
final |
baking |
stage. |
|
|
|||
The |
heat is emitted from below. |
|
|
|
|
|
|||||
|
|
|
|
|
|
|
|
|
|||
For |
defrosting, |
e.g. |
meat, |
poultry, |
bread |
and |
cakes. |
||||
The |
fan circulates the warm air around the food. |
||||||||||
|
|
|
|||||||||
For |
automatic cleaning of the cooking compartment. |
||||||||||
The |
oven |
heats up |
until |
the |
dirt |
disintegrates. |
|
|
|||
* The type of heating with which the energy efficiency class was determined in accordance EN50304.
When you make settings, the oven light in the co compartment switches on.
11
Buttons |
and |
display |
|
|
|
|
|
|
|
|
|
|
|
|||||
|
|
|
|
|
|
|
You can use the buttons to set various additional |
|||||||||||
|
|
|
|
|
|
|
functions. |
You |
can read |
the |
values that |
you have |
||||||
|
|
|
|
|
|
|
set in |
the |
|
display. |
|
|
|
|
|
|||
Button |
|
|
|
|
|
Use |
|
|
|
|
|
|
|
|
|
|
|
|
|
|
|
|
|
|
|
|
|
|
|
||||||||
0 Time |
setting options |
|
|
Selects the timerV, |
cooking |
timex, |
end timey |
|
|
|
||||||||
|
|
|
|
|
|
|
or clock0. |
|
|
|
|
|
|
|
|
|
||
|
|
|
|
|
|
|
|
|
|
|
|
|
|
|
||||
A |
Minus |
|
|
|
|
|
Decreases |
set |
values. |
|
|
|
|
|
||||
@ |
Plus |
|
|
|
|
|
Increases |
set |
values. |
|
|
|
|
|
||||
|
|
|
|
|
|
|
|
|
|
|||||||||
i |
Rapid |
heating |
|
|
|
Heats up the oven particularly quickly. |
|
|
|
|||||||||
|
Childproof |
lock |
|
|
|
Locks and unlocks the control panel. |
|
|
|
|||||||||
|
|
|
|
|
|
|
|
|
|
|
|
|
|
|||||
|
|
|
|
|
|
|
The time |
setting |
option |
that |
is currently |
selected |
||||||
|
|
|
|
|
|
|
in the |
display |
is |
indicated by |
theNarrownext |
to the |
||||||
|
|
|
|
|
|
|
corresponding |
symbol. |
|
|
|
|
|
|||||
|
|
|
|
|
|
|
Exception: |
for |
the clock, 0thesymbol only lights up |
|||||||||
|
|
|
|
|
|
|
when |
you |
are |
making changes. |
|
|
|
|||||
Temperature |
knob |
|
|
|
|
|
|
|
|
|
|
|
|
|||||
|
|
|
|
|
|
|
The temperature control knob is used to select the |
|||||||||||
|
|
|
|
|
|
|
temperature and the grill power or cleaning level. |
|||||||||||
Setting |
|
|
|
|
|
Meaning |
|
|
|
|
|
|
|
|
|
|
||
|
|
|
|
|
|
|
|
|
|
|
|
|
|
|||||
Ú |
|
|
Zero setting |
|
|
The oven |
does |
not |
heat up. |
|
|
|
|
|||||
|
|
|
|
|
|
|
|
|
||||||||||
50H270 |
|
Temperature |
range |
The temperature inside the oven in ºC. |
|
|
|
|||||||||||
|
|
|
|
|
|
|
Exception: The maximum temperature for the defrost |
|||||||||||
|
|
|
|
|
|
|
function @ is |
60ºC. |
|
|
|
|
|
|
||||
|
|
|
|
|
|
|
|
|||||||||||
K== Grill power |
levels |
Power |
levels |
for |
the small surface area* grilland the large |
|||||||||||||
|
|
|
|
|
|
|
surface |
area |
grill( |
|
|
|
|
|
|
|||
|
|
|
|
|
|
|
K = level 1, low |
|
|
|
|
|
||||||
|
|
|
|
|
|
|
= = level 2, medium |
|
|
|
|
|
||||||
|
|
|
|
|
|
|
= = level 3, high |
|
|
|
|
|
||||||
|
|
|
Cleaning |
levels |
The cleaning levels for SelfHcleaningV. |
|
|
|
||||||||||
|
|
|
|
|
|
|
K = level 1, gentle |
|
|
|
|
|
||||||
|
|
|
|
|
|
|
= = level 2, medium |
|
|
|
|
|
||||||
|
|
|
|
|
|
|
= = |
level |
3, |
intensive |
|
|
|
|
|
|||
12
|
When the oven |
is heating up,~thesymbol |
lights up |
|||||
|
on the indicator panel. This light goes |
off when th |
||||||
|
oven reaches the required temperature. The symbol |
|||||||
|
does not light up for grill power and cleaning leve |
|||||||
Cooking |
|
|
|
|
|
|
|
|
compartment |
The |
oven includes a fan and light. |
|
|
|
|||
Oven light |
During operation, |
the oven light in the |
cooking |
|||||
|
compartment is on. When temperatures |
up to 60 ºC |
||||||
|
are selected, and when selfJcleaning is |
activated, th |
||||||
|
light switches off. This allows for optimum fine |
|||||||
|
adjustment. |
|
|
|
|
|
|
|
Cooling fan |
The |
cooling fan |
switches on and off as |
required. |
||||
|
hot |
air escapes |
above the door. |
Caution. |
Do not |
|||
|
the ventilation slots. Otherwise the |
oven |
will overhe |
|||||
|
So that the cooking compartment cools down more |
|||||||
|
quickly after operation, the cooling |
fan |
continues to |
|||||
|
run for a certain period afterwards. |
|
|
|
||||
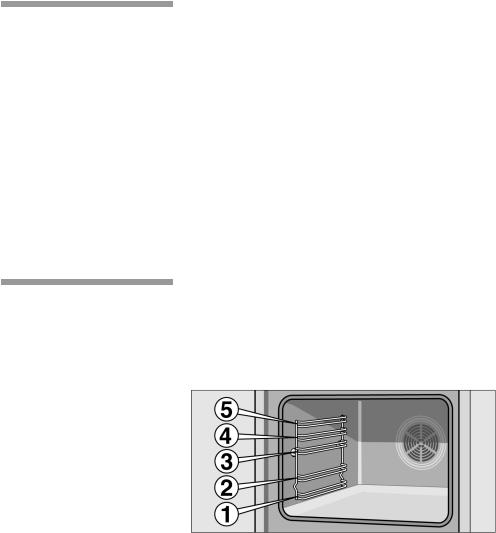
Racks |
|
|
|
|
|
|
|
|
|
Racks may be positioned in the oven at 5 differen |
|||||||
|
heights. |
|
|
|
|
|
|
|
|
Up to 2/3 of a |
rack may |
be pulled |
out |
without it |
|||
|
over. |
This makes |
it easy to |
remove |
food. |
|||
Racks may deform as they heat up. Once they ha cooled, the deformation disappears and their operation is unaffected.
13
Your oven is supplied with only some of the follow accessories.
Accessories may be purchased from the Technical Assistance Service or from specialist retailers. Please refer to the commercial catalogue for the available accessories.
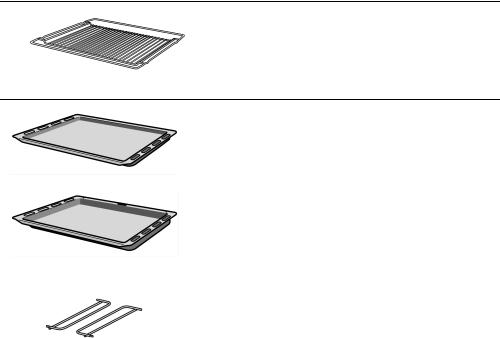
Shelf |
|
For pans, cookware, |
baking tins, roasts, items placed directly |
a shelf and frozen |
meals. |
Put the shelf in the oven so that it is curving ¾downwards.
Flat |
enamel oven tray |
|
|
||
For cakes |
and biscuits. |
|
|
||
Place |
the |
baking |
tray in |
the oven with its raised lip facing |
|
door. |
|
|
|
|
|
|
|
|
|
|
|
Universal |
deep |
enamel |
tray |
||
For runny cakes, pastries, frozen meals and large joints for
roasting. This can also be used as |
a |
tray |
to |
collect |
the |
fat |
||||||
roasting directly on the shelf. |
|
|
|
|
|
|
|
|
|
|||
Place |
the |
baking tray |
in the oven |
with |
its |
raised |
lip |
facing |
||||
door. |
|
|
|
|
|
|
|
|
|
|
|
|
|
|
|
|
|
|
|
|
|
|
|
|
|
Accessory |
support |
|
|
|
|
|
|
|
|
|
|
|
The universal deep tray or the flat |
oven |
tray |
can |
also be |
c |
|||||||
during the self-clean function. |
|
|
|
|
|
|
|
|
|
|||
Insert |
the |
accessory to |
the right and |
left. |
|
|
|
|
|
|
||
|
|
|
|
|
|
|
|
|
|
|
|
|
14
 Loading...