

Page 1
Page 2

Page 3

Contents
Introduction..............................................................................................................................2
Advanced Sewing Features........................................................................................................2
Additional Accessories ..............................................................................................................3
Advanced Functions..................................................................................................................4
Pivoting .................................................................................................................................... 4
Automatic Fabric Sensor System (Automatic Presser Foot Pressure)........................................... 5
Free-motion Quilting ................................................................................................................ 6
Using Free-motion Quilting Foot “C” ..................................................................................6
Using Free-motion Open Toe Quilting Foot “O” ................................................................. 7
Echo Quilting Using the Free-motion Echo Quilting Foot “E”.................................................... 9
Measurements on the Bobbin Cover ....................................................................................... 10
Blind stitch foot ...................................................................................................................... 11
Use ...................................................................................................................................11
Sewing ..............................................................................................................................11
Narrow hemmer foot .............................................................................................................. 12
Preparing to sew ...............................................................................................................12
Sewing ..............................................................................................................................12
Hints .................................................................................................................................13
Cording foot (3 cord guide)..................................................................................................... 13
Use ...................................................................................................................................13
Preparing to sew ...............................................................................................................13
Sewing ..............................................................................................................................14
Machine Maintenance............................................................................................................ 14
ENGLISH
1
Page 4

Introduction
Note
This manual provides additional information not described in the Operation Manual.
Be sure to read this information before using the machine.
Advanced Sewing Features
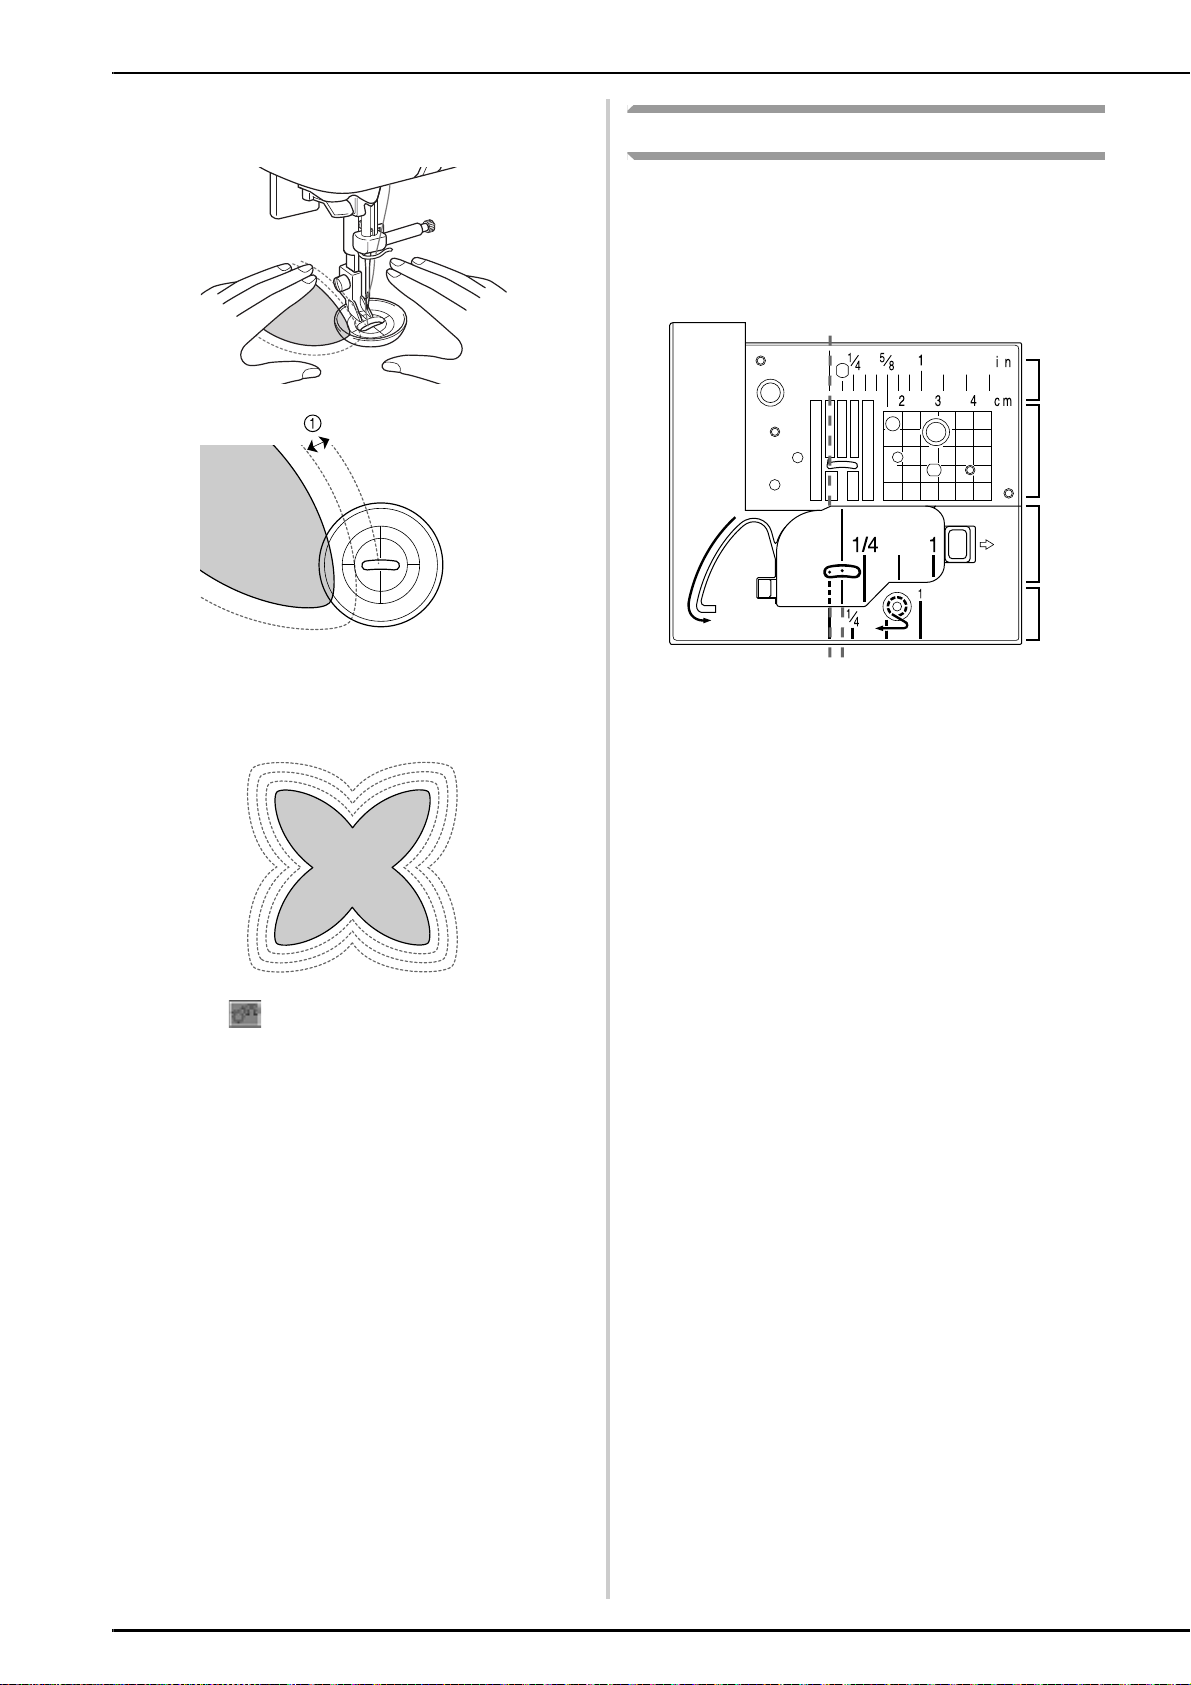
1. Pivoting
The function is useful when changing the sewing direction. The machine stops with the needle lowered (in the
fabric) and the presser foot is automatically raised to an appropriate height when the “Start/Stop” button is pressed.
From the settings screen, the presser foot can be adjusted to one of three heights (3.2 mm, 5.0 mm and 7.5 mm).
Refer to page 4.
2. Free Motion Foot Height
When using the quilting foot “C” or the echo quilting foot “E”, the height of the foot can be preset in the settings
screen. Height of the presser foot can be increased for easy fabric guiding when sewing puffy and thick fabrics or
decreased for better control of thin fabrics.
Refer to page 6, 9.
3. Automatic Fabric Sensor System
The thickness of the fabric is automatically detected and the presser foot pressure is automatically adjusted with an
internal sensor while sewing, so the fabric can be fed smoothly. This function is useful for sewing over thick seams,
or quilting with feed dogs raised. The Automatic Fabric Sensor System works continuously while sewing.
Refer to page 5.
Due to the addition of the functions described above, please be aware that the actual screens may differ slightly from those
shown in the Operation Manual.
ab
2
a Functions have been added to the second page of the settings screen.
b has been added to the screens that appear after or is pressed.
Page 5

THE THICKN
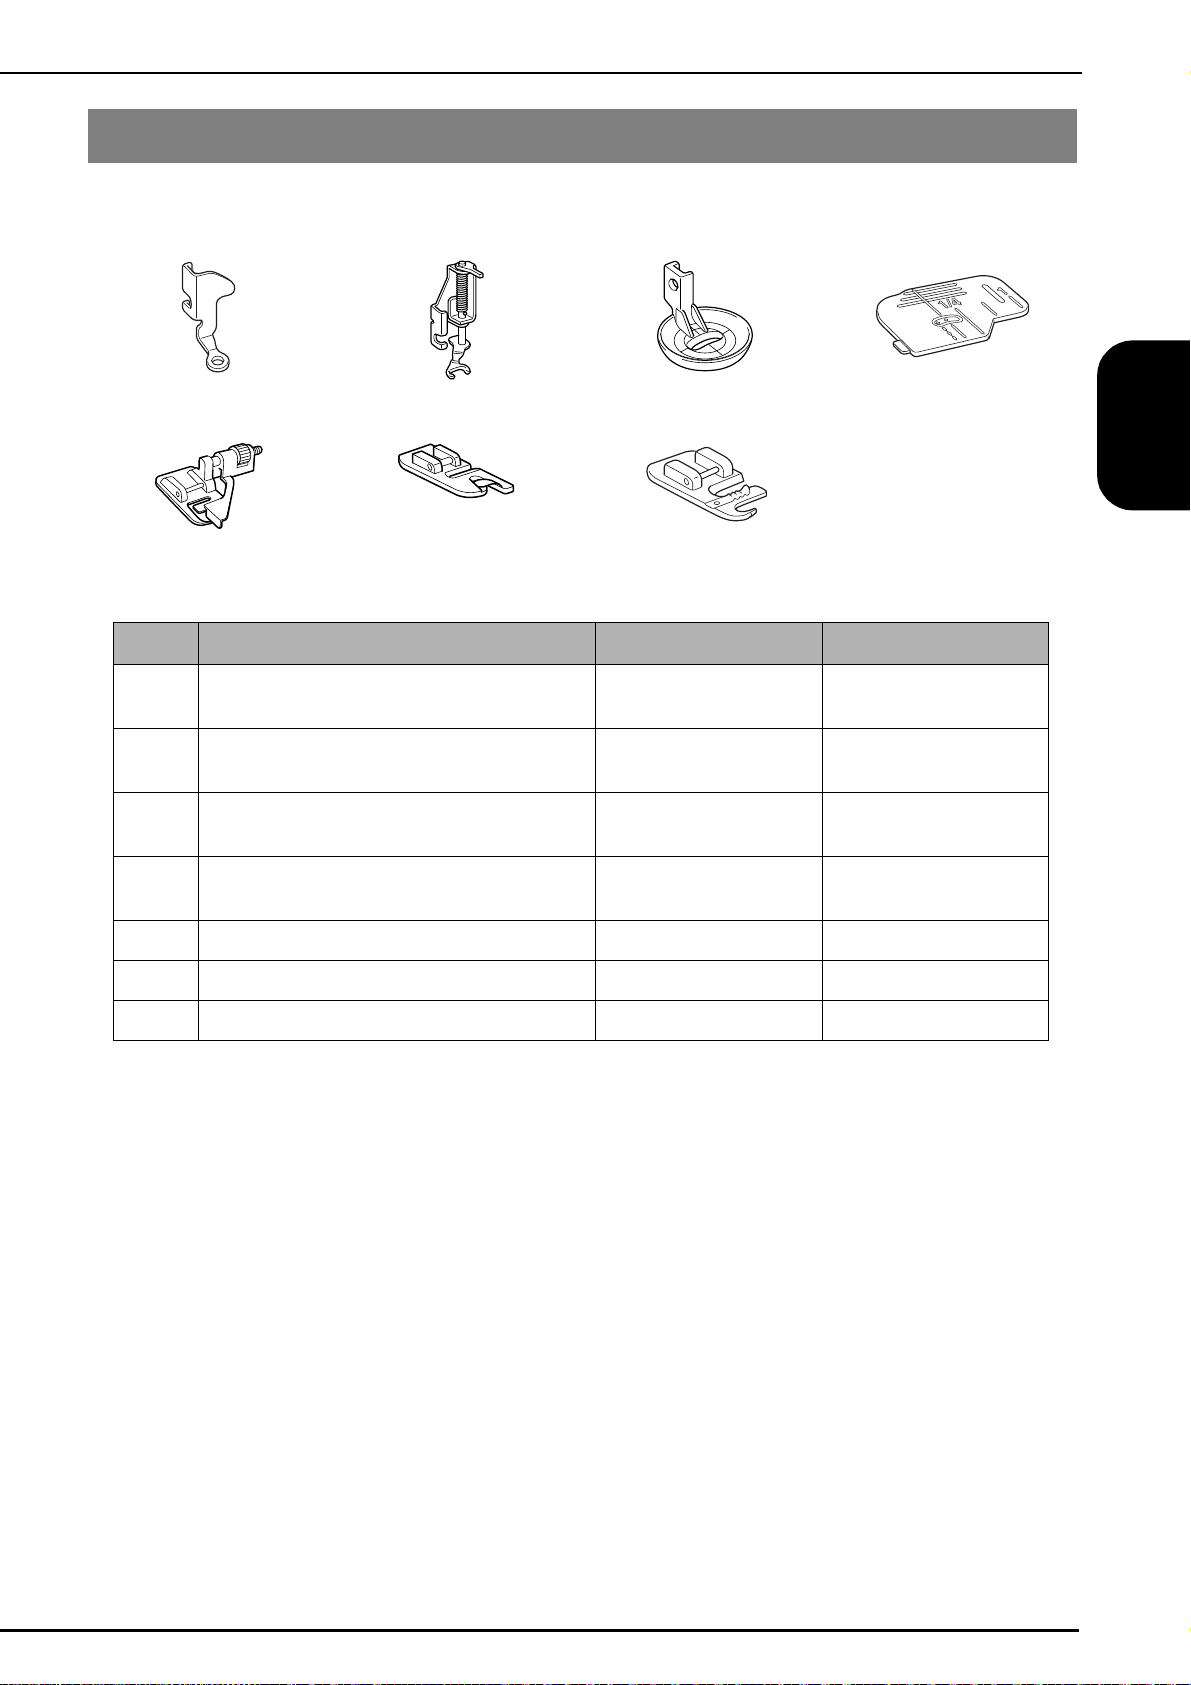
Additional Accessories
1. 2. 3. 4.
5. 6. 7.
No. Part Name Part Code Reference Page
1 Free-motion quilting foot “C” XE0765-101 page 6
ENGLISH
2 Free-motion open toe quilting foot “O” XE0767-001 page 7
3 Free-motion echo quilting foot “E” XE0766-001 page 9
4 Bobbin cover (with mark) (on machine) XE0715-001 page 10
5 Blind stitch foot (with guide) XA0059-001 page 11
6 Narrow hemmer foot XE0754-001 page 12
7 Cording foot (3 cord guide) XA6871-001 page 13
3
Page 6

Advanced Functions
CAUTION
Memo
Note
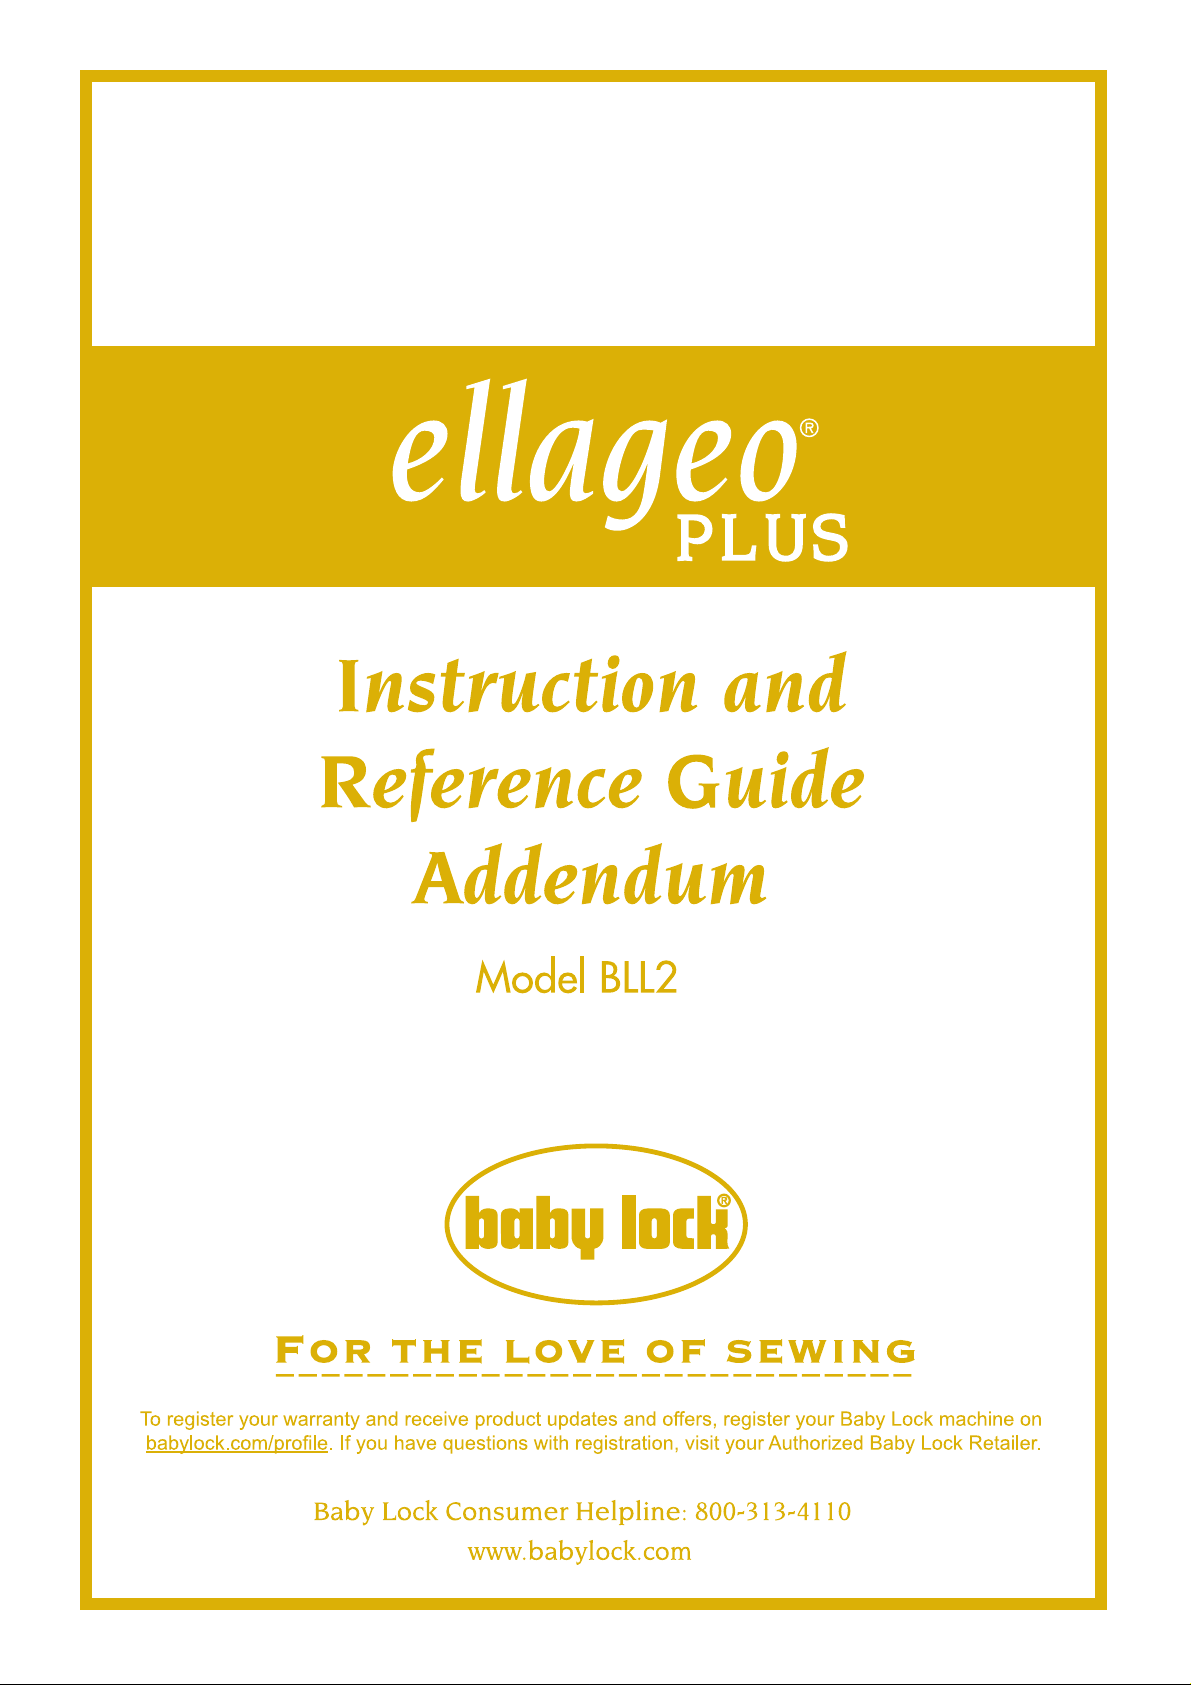
Pivoting
If the pivot setting is selected, the machine stops with
the needle lowered (in the fabric) and the presser foot is
automatically raised to an appropriate height when the
“Start/Stop” button is pressed. When the “Start/Stop”
button is pressed again, the presser foot is automatically
lowered and sewing continues. This function is useful
for stopping the machine to rotate the fabric.
• When the pivot setting is selected, the machine
starts when the “Start/Stop” button is pressed or
the foot controller is pressed down even if the
presser foot has been raised. Be sure to keep your
hands and other items away from the needle,
otherwise injuries may occur.
When the pivot setting is selected and sewing is stopped,
the height of the presser foot can be changed according to
the type of fabric being sewn. Press to display
“PIVOTING HEIGHT” on P. 2 of the settings screen. Press
or to select one of the three heights
(3.2 mm, 5.0 mm or 7.5 mm). T o raise the presser foot
further, increase the setting. (The default setting is 3.2 mm)
• The “NEED LE POSITION” (P. 1 of the settings
screen) must be set in the down position for the
pivot function to be used. W hen “NEEDLE
POSITION” is set in the raised position,
appears as light gray and cannot be used.
• When the setting is selected, the pivot function can
only be used with stitches where presser foot J or N
is indicated in the upper-left cor ner of the screen. If
any other stitch is selected, appears as light
gray and is not available.
• Since the pr esser foot is fully raised when the
automatic thread cutti ng key is pressed, press the
“Presser Foot Lifter” button to lower the presser foot,
and then press the “Start/St op” button to continue
sewing.
• If the pivot se tting is sel ected , an d be side
“PRESSER FOOT HEIGHT” in the settings screen
are not available and the setting cannot be changed.
• When the pivot setting is se lected the “PRESSER
FOOT HEIGHT” in the settings screen will
automatically be changed to 10.0 mm. When the
pivot setting is deselected the “PRESSER FOOT
HEIGHT” will return to the prior setting.
Select a stitch.
a
Press to select the pivot setting.
b
4
→ The key appears as .
Page 7

Place the fabric under the presser foot with
Memo
Note
c
the needle at the starting point of the
stitching, and then press the “Start/Stop”
button. The machine will begin sewing.
If you press the “Start/Stop” but t on t o pause sewing,
then press it again to cont in ue.
Press the “Start/Stop” button to stop the
d
machine at the point where the sewing
direction changes.
Automatic Fabric Sensor System (Automatic Presser Foot Pressure)
Your machine is not shipped w it h th is feat ur e tu rn ed
on. Please follow the instructions to activate this
feature.
The thickness of the fabric is automatically detected
and the presser foot pressure is automatically adjusted
with an internal sensor while sewing, so your fabric is
fed smoothly. The fabric sensor system works
continuously while sewing. This function is useful for
sewing over thick seams, or quilting.
ENGLISH
→ The machine stops with the needle in the fabric, and
the presser foot is automatically raised.
Rotate the fabric, and then press the “Start/
e
Stop” button.
→ The presser foot is automatically lowered, and
sewing continues.
Press .
a
→ The settings screen appears.
Set “AUTOMATIC FABRIC SENSOR SYSTEM”
b
to “ON”.
Press to return to the original screen.
c
5
Page 8

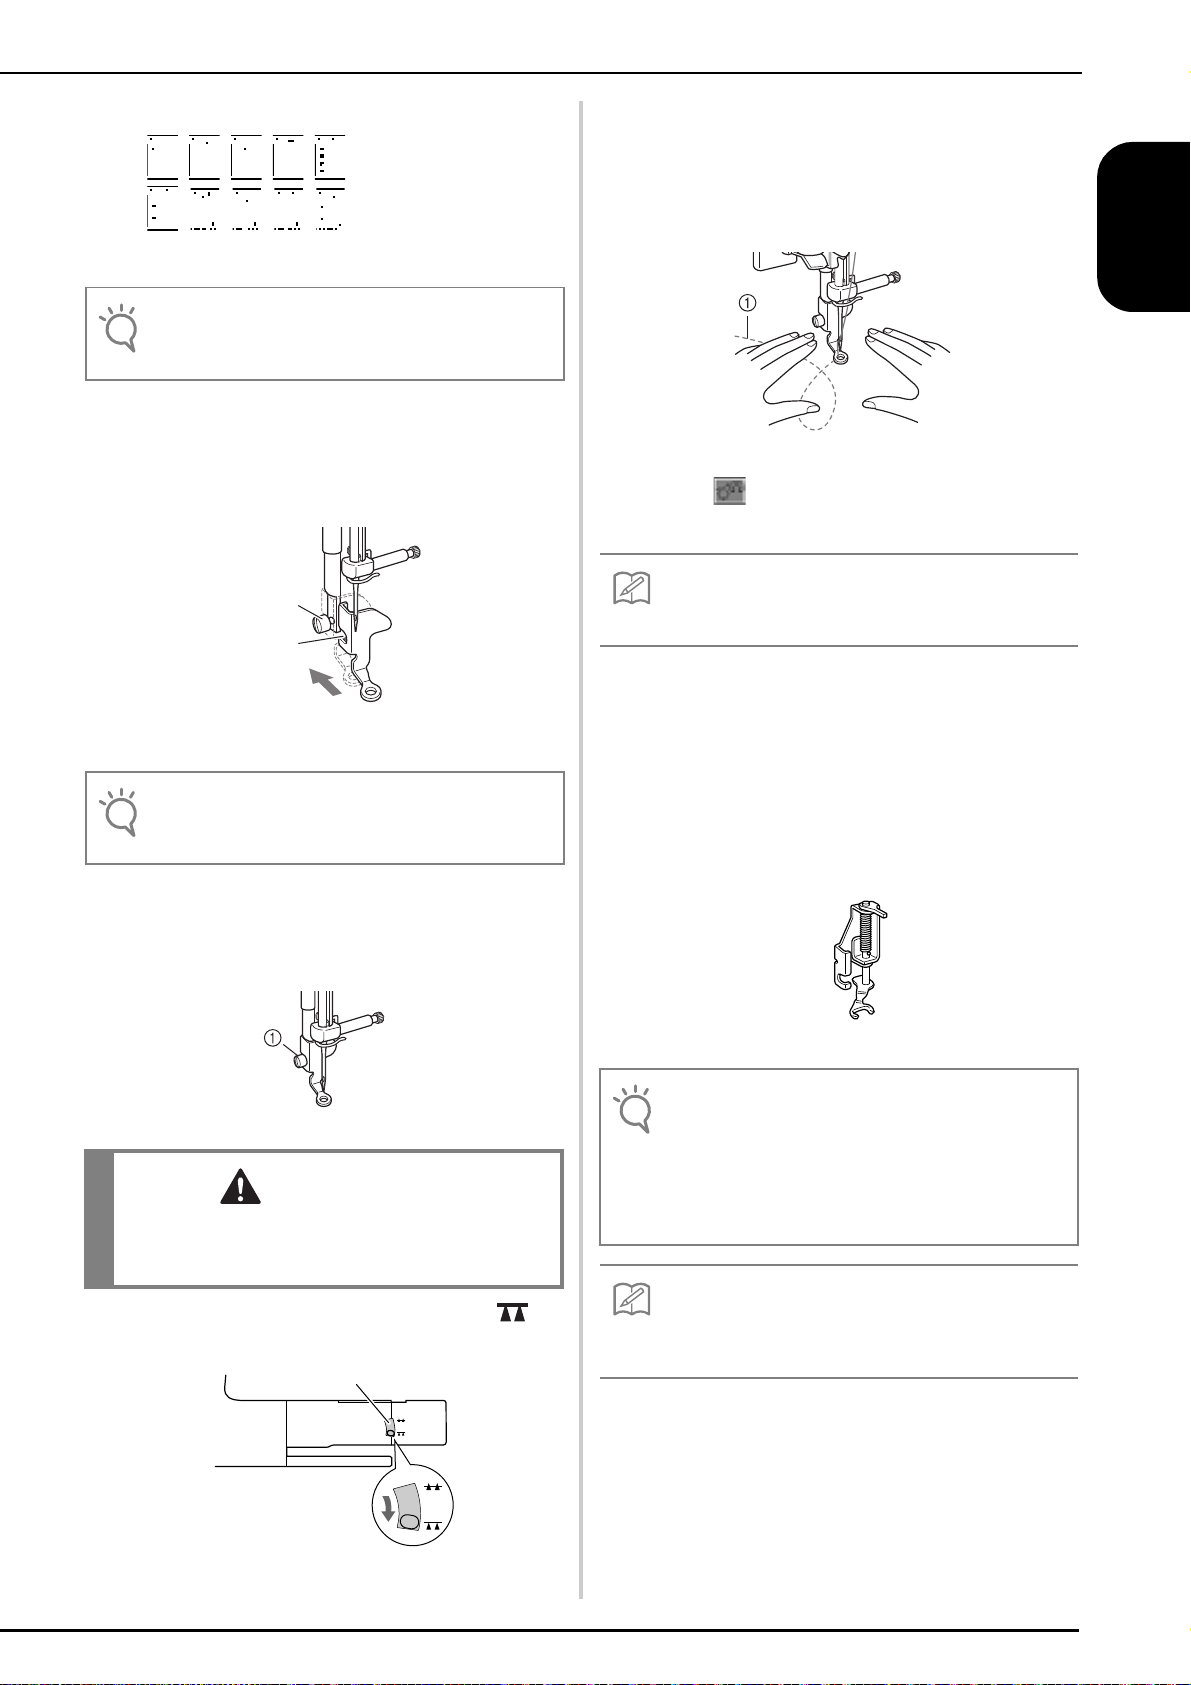
Free-motion Quilting
CAUTION
Memo
Memo
1
For free-motion quilting, use free-motion quilting foot
“C” or free-motion open toe quilting foot “O”
depending on the stitch that is selected, and set the
machine to free-motion sewing mode. In this mode, the
presser foot is raised to the necessary height for freemotion sewing.
We recommend attaching the foot controller and
sewing at a consistent speed. You can adjust the sewing
speed with the speed control slide on the machine.
Follow steps on page 56 through 57 of the
a
machine's Operation Manual to attach the
straight stitch needle plate.
a Single hole
Notice that this plate has a single hole.
■ Using Free-motion Quilting Foot “C”
The free-motion quilting foot “C” is used for free-
motion sewing using the straight stitch needle plate.
Free-motion quilting foot “C”
• With free-motion quilting, control the feeding speed
of the fabric to match the sewing speed. If the fabric
is moved faster than the sewing speed, the needle
may break or other damage may result.
• When using free-motion quilting foot “C”, be sure to
use the straight stitch needle plate and sew with the
needle in middle (center) needle position. If the
needle is moved to any position other than the
middle (center) needle position, the needle may
break, which may result in injuries.
Press to set the machine to free-motion
b
sewing mode.
• When starting to sew, the internal sensor detects the
thickness of the fabric, and the quilting foot is raised
to the height specified in the machine settings
screen. Press to display “FREE MOTION
FOOT HEIGHT” on P. 2 of the settings screen.
Press or to select the height that the
quilting foot is raised. Increase the setting by
pressing , for example, when sewin g very
stretchy fabric, so that it is easier to sew.
• In order to sew with a balanced tension, it may be
necessary to adjust the upp er thread tension. Test
with a sample piece of fabric that is similar to your
chosen fabric.
→ The key appears as , and the quilting foot is
raised to the necessary height for free-motion sewing.
6
Page 9
Select any of the following stitches.
Note
Note
CAUTION
a
Memo
Note
Memo
c
→ Free-motion quilting foot “C” is indicated in the
upper-left corner of the screen.
When selecting stitch 1- 01, 1- 02, 1- 05, 1-07 the
needle position will remai n i n th e center.
Remove the presser foot holder.
d
Attach free-motion quilting foot “C” at the
e
front with the presser foot holder screw
aligned with the notch in the quilting foot.
Use both hands to securely hold the fabric
h
taut, and then move the fabric at a consistent
pace in order to sew uniform stitches roughly
2.0-2.5 mm (approx. 1/16 - 3/32 inch) in
length.
a Stitch
Press to cancel the free-motion sewing
i
mode.
ENGLISH
a
b
a Presser foot holder screw
b Notch
Make sure that the quilting f oot is attached properly
and not slanted.
Hold the quilting foot in place with your right
f
hand, and tighten the presser foot holder
screw using the screwdriver with your left
hand.
a Presser foot holder screw
• Be sure to tighten the screw securely with the
screwdriver. Otherwise, the needle may touch the
quilting foot, causing it to bend or break.
Do not be discouraged wit h your initial results. The
technique requires practice.
■ Using Free-motion Open Toe Quilting Foot “O”
The free-motion open toe quilting foot “O” is used
for free-motion quilting with zigzag or decorative
stitches or for free-motion quilting of straight lines
on fabric with an uneven thickness. Any stitch can
be sewn with the free-motion open toe quilting foot
“O”.
Free-motion open toe quilting foot “O”
Free-motion open toe quilting foot “O” can also be
used with the straight stitc h needle plate with stitche s
listed in “Using Free-motion Quilting Foot “C”” c
only. We recommend usi ng free-motion open toe
quilting foot “O” with free-m ot i on sewing of fabrics of
uneven thicknesses .
g
Lower the feed dog position switch to to
lower the feed dogs.
a Feed dog position switch (as seen from the rear of the
machine)
In order to sew with a balanced tension, it may be
necessary to adjust the upper thread tension. Test with
a sample piece of quilting fa br ic .
7
Page 10

Press to set the machine to free-motion
Note
Note
CAUTION
Memo
a
sewing mode.
→ The key appears as , and the quilting foot is
raised to the necessary height for free-motion
sewing.
Remove the presser foot holder.
c
Attach free-motion open toe quilting foot “O”
d
by positioning the pin of the quilting foot
above the needle clamp screw and aligning
the lower-left of the quilting foot and the
presser bar.
1
3
2
a Pin
b Needle clamp screw
c Presser bar
Make sure that the quilting foot is attached properly
and is not slanted.
Hold the quilting foot in place with your right
e
hand, and tighten the presser foot holder
screw using the screwdriver with your left
hand.
Select a stitch.
b
→ Free-motion open toe quilting foot “O” is indicated
in the upper-left corner of the screen.
If using straight stitch needle plate with the free-motion
open toe quilting foot “O” then th e le t te r “C ” will be
indicated in the upper- left corner of screen.
a Presser foot holder screw
• Be sure to tighten the screw securely with the
screwdriver. Otherwise, the needle may touch the
quilting foot, causing it to bend or break.
Use both hands to securely hold the fabric taut,
f
and then move the fabric at a consistent pace in
order to sew uniform stitches roughly
2.0-2.5 mm (approx. 1/16 - 3/32 inch) in length.
a Stitch
Press to cancel the free-motion sewing
g
mode.
8
Do not be discourage d wi th you r ini tial re sults. The
technique r equires pra ctice.
Page 11

Echo Quilting Using the Free-motion
CAUTION
Memo
Echo Quilting Foot “E”
Sewing quilting lines at equal distances around a motif
is called echo quilting. The quilting lines, which appear
as ripples that echo away from the motif, are the
distinguishing characteristic of this quilting style. Use
the free-motion echo quilting foot “E” for echo quilting.
Using the measurement on the presser foot as a guide,
sew around the motif at a fixed interval.
We recommend attaching the foot controller and sewing at
a consistent speed. Remember that you can also gain
greater control by moving the horizontal speed dial to the
medium location and using the foot controller.
Free-motion echo quilting foot “E” measurement
Press to set the machine to free-motion
a
sewing mode.
ENGLISH
a 6.4 mm (approx. 1/4 inch)
b 9.5 mm (approx. 3/8 inch)
• With free-motion quilting, control the feeding
speed of the fabric to match the sewing speed. If the
fabric is moved faster than the sewing speed, the
needle may break or other damage may result.
• When starting to sew, the internal sensor detects the
thickness of the fabric, and the quilting foot is raised to the
height specified in the machine settings screen. Press
to display “FREE MOTION F OOT HEIGHT”
on P. 2 of the settings screen. Press or to
select the height that the quilting foot is raised. Increas e
the setting by pressing , for example, when sewing
very stretchy fabric, so that it is easier to sew.
→ The key appears as , and the quilting foot is
raised to the necessary height for free-motion
sewing.
Select .
b
Remove the presser foot.
c
Remove the presser foot holder and the
d
screw.
Position the free-motion echo quilting foot
e
“E” on the left side of the presser bar with the
holes in the quilting foot and presser bar
aligned.
Tighten the screw.
f
• In order to sew with a balanced t ension, it may be
necessary to adjust the upper thread tension. Test
with a sampl e piece of quil t i ng fabric.
9
Page 12

Using the measurement on the quilting foot as
b
ab
c
d
e
f
g
a guide, sew around the motif.
a 6.4 mm (approx. 1/4 inch)
Finished project
Measurements on the Bobbin Cover
The measurements on the bobbin cover are references
for patterns with a middle (center) needle position. The
measurements on the needle plate and the needle plate
cover are references for stitches with a left needle
position.
a For stitches with a middle (center) needle position
b For stitches with a left needle position
c Left needle position on the needle plate <inch>
d Left needle position on the needle plate <cm>
e Middle (center) needle position on the bobbin cover
<inch>
f Left needle position on the needle plate cover <inch>
Press to cancel the free-motion sewing
h
mode.
10
Page 13
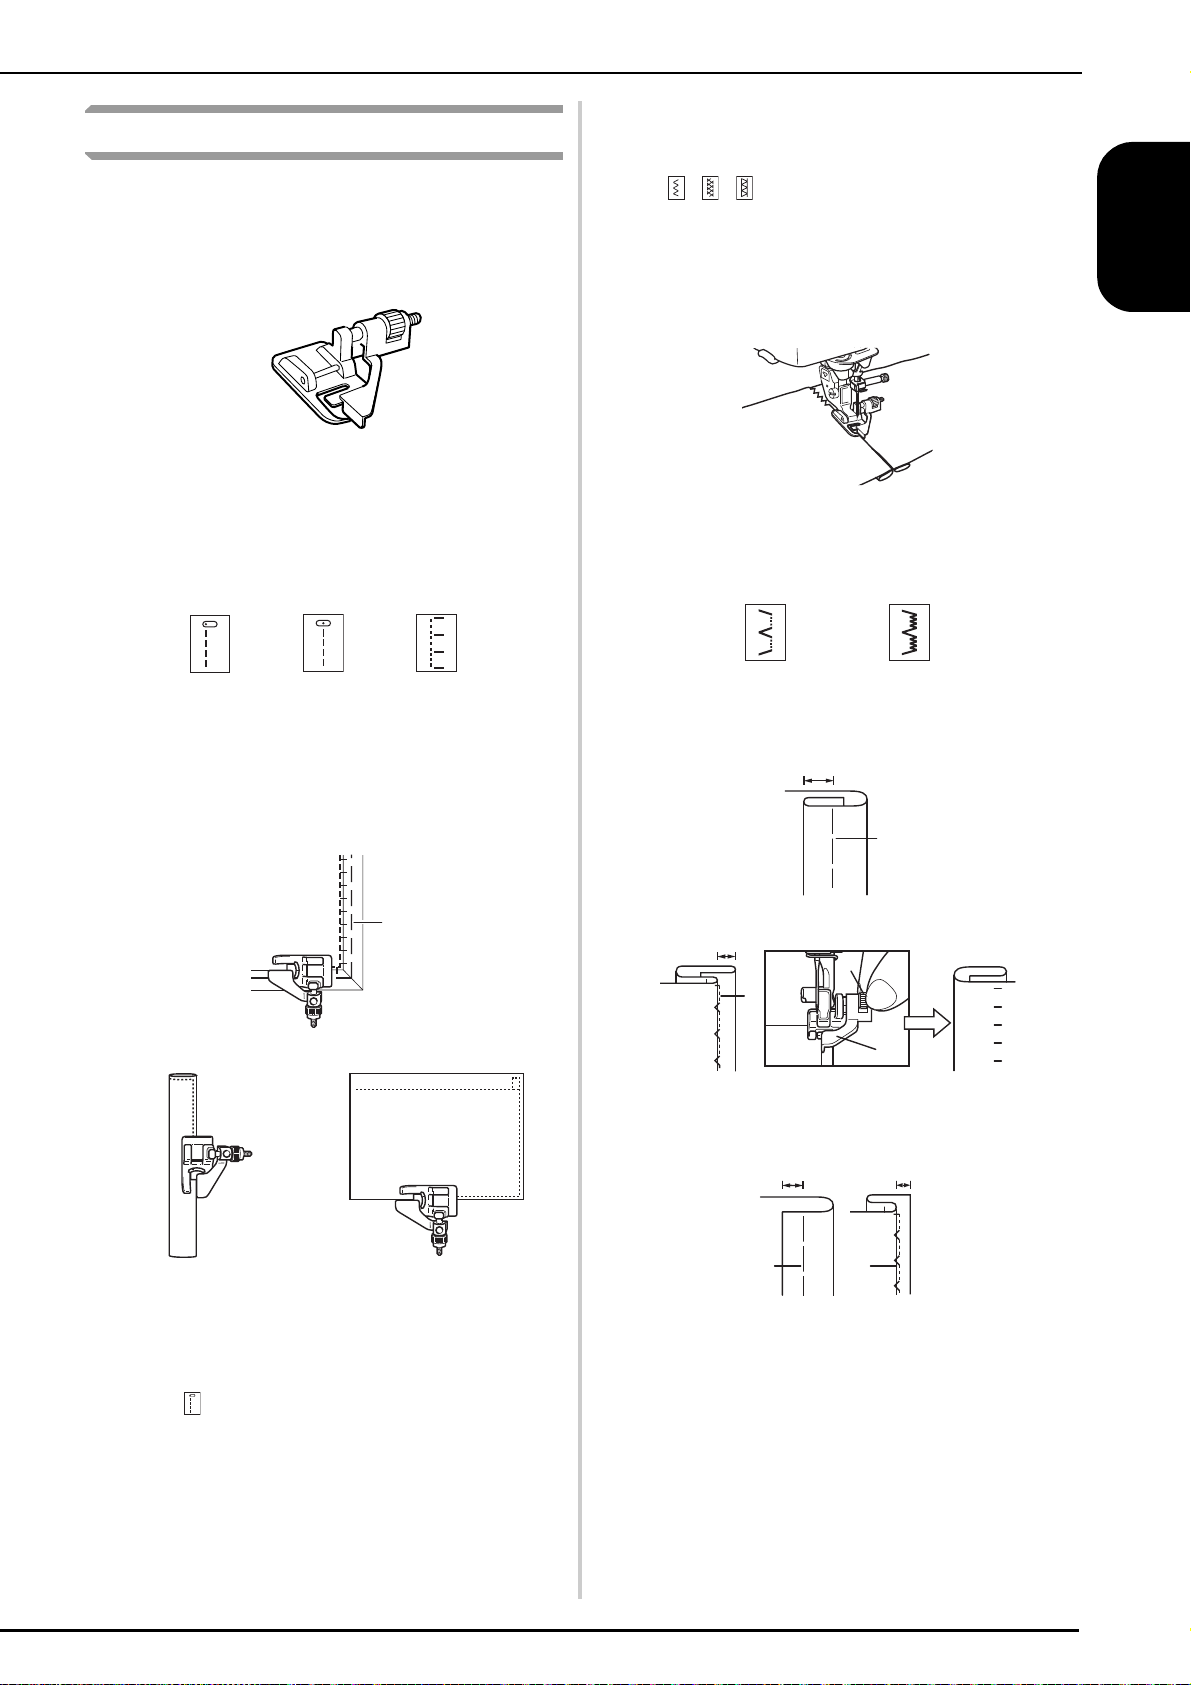
Blind stitch foot (with guide)
■ Use
This foot comes in handy not only for blindstitching,
but also for sewing fabric edges and seams.
Remove presser foot and attach snap-on blind stitch
foot.
Blind stitch foot (with guide)
■ Sewing
• When Edge Stitching
• When Joining
Select desired top stitch. Examples
a
(,, etc.)
Place cloth under foot so that foot guide is
b
lined up between both edges of fabric.
Lower foot and sew.
c
• When Blindstitching
ENGLISH
Position needle the distance you wish it to be from
the edge of the fabric and lower needle in that
position.
Turn foot guide screw and carefully adjust to guide
fabric.
1
When using regular weight fabrics
1cm
*2
*1
0.5cm
2
*2
1
3
4
When using heavyweight fabric
1cm 0.5cm
*2*2*1
1 2
*1
5
a Basting
• When Sewing Seams
Select “ ”. Align position of foot guide to needle
position and sew the desired width seam allowance.
a Basting
b Sewing position
c Turn screw to adjust guide to folded hem.
d Guide
e Turn to front side
*1 Front side
*2 Reverse side
11
Page 14

Narrow hemmer foot
Reverse sideFront side
This foot is designed to curl under a 3 mm double hem
while sewing a straight stitch.
■ Sewing
Position the fabric (reverse side facing up)
a
under the presser foot. Lower the needle
3 mm from the edges of the fabric, lower the
presser foot, then sew 2 or 3 stitches.
Narrow hemmer foot
■ Preparing to sew
Remove presser foot and attach snap-on
a
narrow hemmer foot.
Select the straight stitch (center needle
b
position).
3 mm
3 mm
Raise the needle and the presser foot, then
b
hold the ends of the upper thread and lower
thread to prevent them from being pulled out
of the fabric and pull the fabric out from the
front of the presser foot.
Holding both threads, pass them through the
c
curled part of the presser foot and pull them
toward the back of the presser foot. Wrap the
fabric around the curled part of the presser
foot in the same way. Position the edge of the
fabric just behind the needle and lower the
presser foot.
12
Connect the foot controller so that both
c
hands are free to guide the fabric.
Without allowing the fabric to stick out from
d
the right side of the presser foot, lightly pull
on the thread while slowly sewing.
Page 15

After sewing 2 to 3 cm of the fabric, release
e
the thread and guide the fabric from the front
of the presser foot with your left hand. Keep a
uniform amount of fabric wrapped around the
presser foot curl until the seam is completed.
■ Hints
• If too little fabric is wrapped around the curl
and a threefold seam is not being sewn:
Pull the fabric held in your right hand to the left in
order to increase the amount of fabric wrapped in
the presser foot curl. At the same time, carefully
guide the fabric to the right with your left hand.
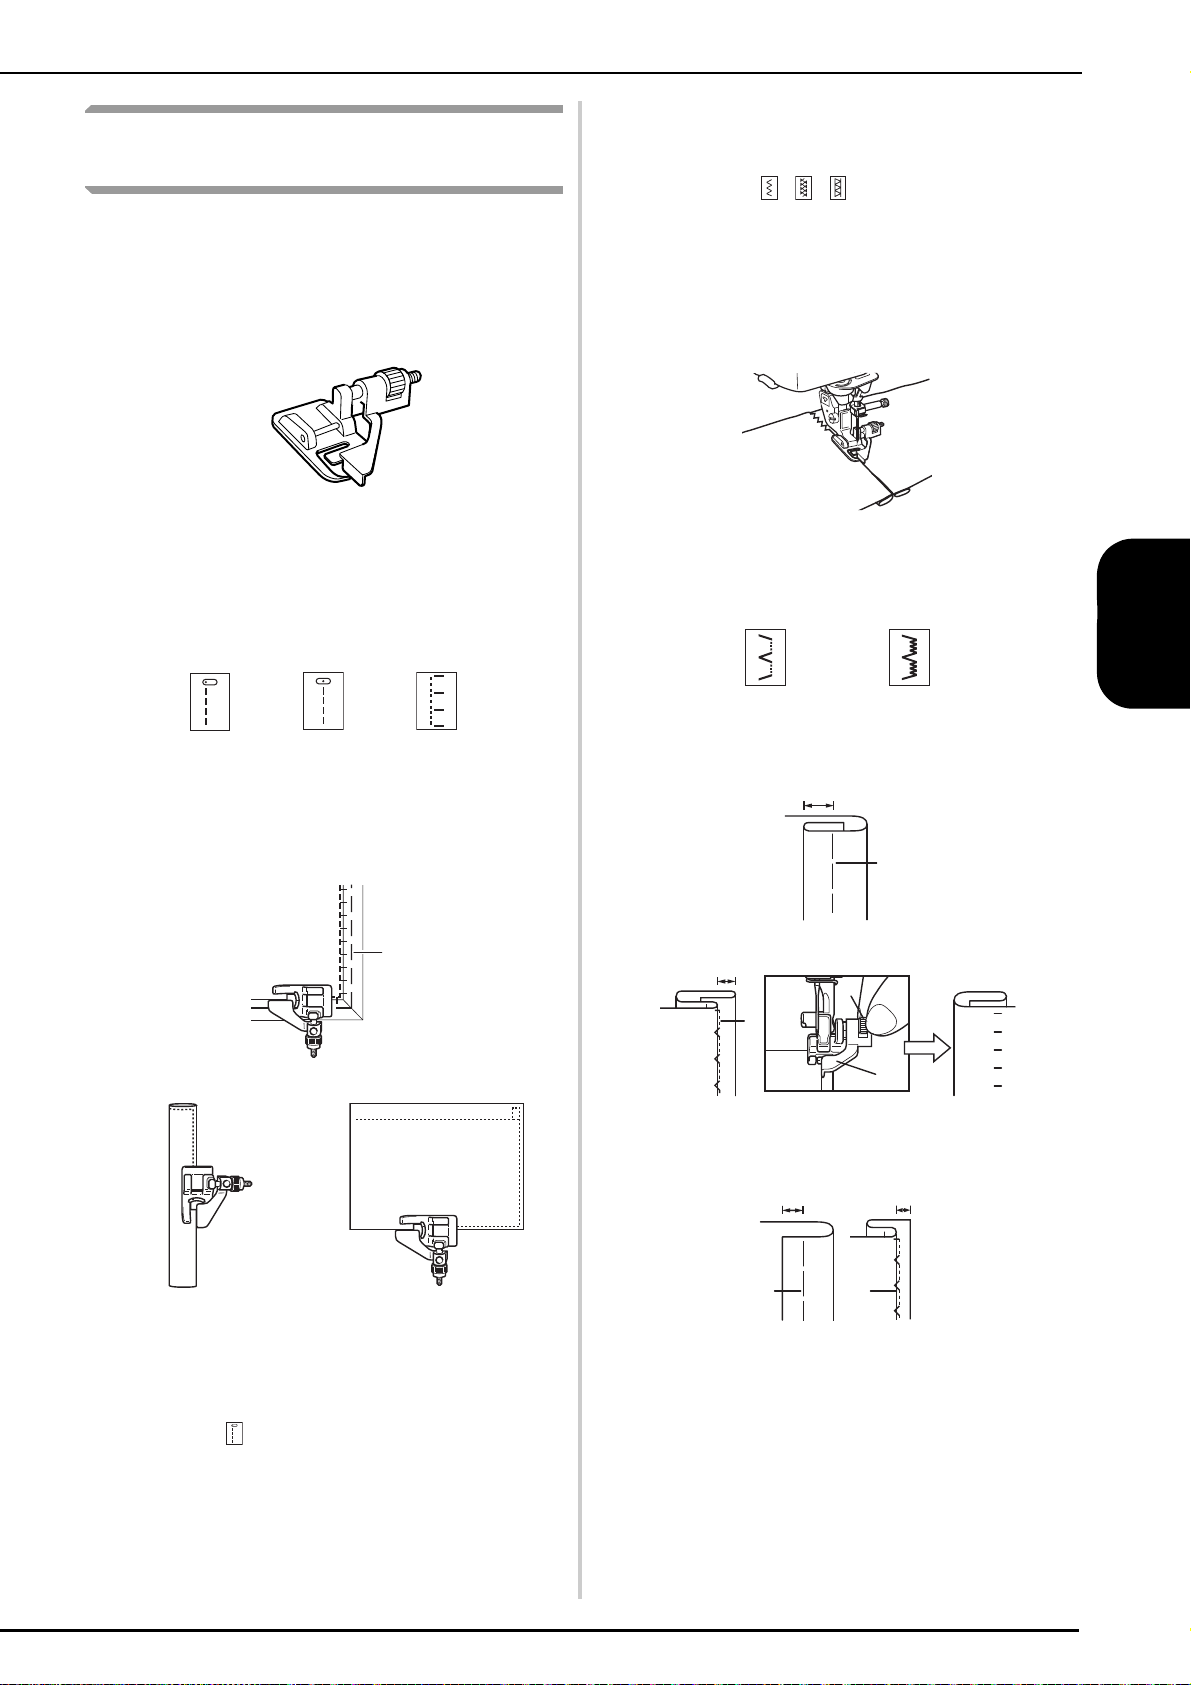
Cording foot (3 cord guide)
ENGLISH
■ Use
Embellish clothing and household linens with
decorative threads.
Cording foot (3 cord guide)
■ Preparing to sew
Remove presser foot and attach snap-on cording
foot.
• Suggested Stitches
• If too much fabric is wrapped around the curl
and a wide threefold seam is being sewn:
Pull the fabric held in your right hand to the right in
order to decrease the amount of fabric wrapped in
the presser foot curl. At the same time, carefully
guide the extra fabric to the left with your left hand.
Zigzag Stretch Zigzag Decorative Satin Stitch
• Zigzag stitch width
Triple Cording stretch
Select dotted zigzag stitch and sew
at a maximum stitch width of 5 mm.
Single Cording
The zigzag stitch may be positioned
in the center or right guide. Verify
position of stitch and determine the
appropriate guide to be followed. Set
stitch width slightly greater than
width of cording.
• Stitch Length
Select desired stitch length. Remember that the
results will vary based on the stitch length you have
selected.
13
Page 16

• Foot control
Using your foot controller will help you to have both
hands free for easier fabric handling.
■ Sewing
Machine Maintenance
Your machine has been updated to display the
following message when maintenance is suggested:
Feed cords, one by one, from
the right side of the cording
foot spring into their
respective guides.
Draw cording under foot and
extend the cord 4-5 mm
behind foot. When using 2 or
3 cords, be careful to make
sure that cords are not
trampled under the front of
foot.
Place cloth under foot.
Lower foot and sew.
Once this message appears, it is recommended to
take your machine to an Authorized BabyLock
retailer or Service Center for a regular maintenance
check. Although this message will disappear and the
machine will continue to function once the OK key
on the LCD screen is selected, the message will
display several more times until the appropriate
maintenance is performed.
Please take the time to arrange the maintenance
your machine requires once this message appears.
Such steps will help to ensure you receive
continued, uninterrupted hours of machine
operation for the future.
14
Page 17

Table des matières
Introduction............................................................................................................................16
Fonctions de couture avancées ...............................................................................................16
Accessoires supplémentaires...................................................................................................17
Fonctions avancées .................................................................................................................18
Pivotement ............................................................................................................................. 18
Système de capteur de tissu automatique (pression automatique du pied-de-biche) ................ 19
Quilting (courtepointe) en mouvement libre ........................................................................... 20
Utilisation du pied pour quilting en mouvement libre « C » .............................................. 20
Utilisation du pied pour quilting ouvert en mouvement libre « O » .................................. 21
Quilting (courtepointe) en écho - Utilisation du pied pour quilting en écho en mouvement
libre « E » ............................................................................................................................... 23
Dimensions du capot du compartiment à canette ................................................................... 24
Pied pour ourlets invisibles (avec guide) ................................................................................. 25
Utilisation .........................................................................................................................25
Couture ............................................................................................................................25
Semelle pour ourlet etroit ....................................................................................................... 26
Préparatifs .........................................................................................................................26
Couture ............................................................................................................................26
Conseils pratiques .............................................................................................................27
Pied pour cordonnet (3 cordonnets)........................................................................................ 27
Emploi ..............................................................................................................................27
Préparatifs .........................................................................................................................27
Couture ............................................................................................................................28
Maintenance de la machine.................................................................................................... 28
FRANÇAIS
15
Page 18

Introduction
Remarque
Ce manuel fournit des informations supplémentaires qui n’ont pas été décrites dans le manuel d’instructions. Lisez
ces informations avant d’utiliser la machine.
Fonctions de couture avancées
1. Pivotement
Cette fonction est utile lors du changement du sens de la couture. La machine s’arrête, l’aiguille abaissée (dans le
tissu), et le pied-de-biche se relève automatiquement à une hauteur appropriée lorsque la touche « Marche/arrêt »
est enfoncée. Le pied-de-biche peut être réglé sur l’une des trois hauteurs (3,2 mm, 5,0 mm et 7,5 mm) à partir de
l’écran de réglages.
Reportez-vous à la page 18.
2. Hauteur du pied pour la couture en mouvement libre
Lors de l’utilisation du pied de quilting « C » ou du pied d’écho quilting « E », vous pouvez prérégler la hauteur du
pied dans l’écran de réglage. Vous pouvez augmenter la hauteur du pied-de-biche pour guider plus facilement le
tissu lors de la couture de tissus épais ou de mousse, ou la réduire pour coudre plus aisément des tissus fins.
Reportez-vous à la page 20, 23.
3. Système de capteur de tissu automatique
L’épaisseur du tissu est automatiquement détectée et la pression du pied-de-biche est automatiquement réglée via
un capteur interne pendant la couture. Ainsi, le tissu peut être entraîné librement. Cette fonction est utile lors de la
couture sur des bords épais ou du quilting avec les griffes d’entraînement relevées. Le système de capteur de tissu
automatique fonctionne en continu pendant la couture.
Reportez-vous à la page 19.
En raison de l’ajout des fonctions décrites ci-de ssus, notez que les écran s ré el s peuvent différer légèrement de ceux
illustrés dans le manuel d’instructions.
ab
16
a Les fonctions ont été ajoutées sur la deuxième page de l’écran de réglages.
b a été ajouté aux écrans qui apparaissent lorsque vous appuyez sur ou .
Page 19
THE THICKN
Accessoires supplémentaires
1. 2. 3. 4.
5. 6. 7.
No. Nom de la pièce Code de la pièce Page de référence
FRANÇAIS
1
2
3
4
5 Pied pour ourlets invisibles (avec guide) XA0059-001 page 25
6 Semelle pour ourlet etroit XE0754-001 page 26
7 Pied pour cordonnet (3 cordonnets) XA6871-001 page 27
Pied pour quilting en mouvement libre
«C»
Pied pour quilting ouvert en mouvement
libre «O»
Pied pour quilting en écho en mouvement
libre «E»
Capot du compartiment à canette (avec
repère) (sur la machine)
XE0765-101 page 20
XE0767-001 page 21
XE0766-001 page 23
XE0715-001 page 24
17
Page 20

Fonctions avancées
ATTENTION
Mémo
Remarque
Pivotement
Si le réglage de pivotement est sélectionné, la machine
s’arrête, l’aiguille abaissée (dans le tissu), et le
pied-de-biche se relève automatiquement à une
hauteur appropriée lorsque la touche « Marche/arrêt »
est enfoncée. Si la touche « Marche/arrêt » est de
nouveau enfoncée, le pied-de-biche s’abaisse
automatiquement et la couture se poursuit. Cette
fonction est utile car elle évite d’arrêter la machine
pour faire pivoter le tissu.
• Lorsque le réglage de pivotement est sélectionné, la
machine démarre lorsque la touche « Marche/arrêt »
ou la pédale est enfoncée même si le pied-de-biche
a été relevé. Ne placez pas vos mains ni d’autres
éléments près de l’aiguille, sinon vous risquez de
vous blesser.
Lorsque le réglage de pivotement est sélectionné et que
la couture est arrêtée, la hauteur du pied-de-biche peut
être modifiée en fonction du type de tissu cousu. Appuyez
sur pour afficher « HAUTEUR DE
PIVOTEMENT » sur P. 2 de l’écran de réglages. Appuyez
sur ou pour sélectionner l’une des trois
hauteurs (3,2 mm, 5,0 mm ou 7,5 mm). Pour relever
davantage le pied-de-biche, augmentez le réglage
(Le réglage par défaut est 3,2 mm.).
• Le « POSITIONNEMENT AIGUILLE » (P. 1 de
l’écran de réglages) doit être réglé sur le
positionnement inférie ur pour pouvoir utiliser la
fonction de pivo tement. S i le « POSITIONNEMENT
AIGUILLE » est réglé sur la pos ition haute,
s’affiche en gris clair et il est im possible de l’utiliser.
• Lorsque le régl age est sélectionné, la fo nct ion de
pivotement ne peut être ut ili sé e qu’ avec des points
pour lesquels le pied-de-b ic he J ou N est in diqué
dans l’angle supérieu r gauche de l’éc ran. Si un
autre point est sélectionné, s’affiche en gris
clair et n’est pas disponible.
• Le pied-de-biche étant comp l èt em ent relevé lorsqu e
la touche du coupe-fil automatique est enfoncée,
appuyez sur la tou che « Rel eveur du p ied- de- bic he »
pour abaisser le pied-de-biche, puis appuyez sur la
touche « Marche/a r r êt » pour continuer à coudre.
• Si le réglage de pivotement est sélectionné, et
à côté de « HAUTEUR DU PIED-DE-BICHE »
à l’écran de réglages ne sont pas disponibles et il
est impossible de modif ie r le ré gl age.
• Lorsque le réglage de pivoteme nt est sélectionné,
« HAUTEUR DU PIED-DE-BICHE » à l’écran de
réglages passe automatiquement à 10 mm. Lorsque
le réglage de pivotement est désélectionné, le
réglage de « HAUTEUR DU PIED-DE-BICHE »
revient à la valeur précé dente.
Sélectionnez un point.
a
Appuyez sur pour sélectionner le réglage
b
de pivotement.
18
→ La touche est représentée par à l’écran.
Page 21

Placez le tissu sous le pied-de-biche, l’aiguille
Mémo
Remarque
c
au point de départ de la couture, puis
appuyez sur la touche « Marche/arrêt ». La
machine commence à coudre.
Si vous appuyez sur la touche « Marche/arrêt » pour
un arrêt momentané au cours de la couture, appuyez
de nouveau dessus pou r la re pr endre ; la machine
effectue des points inverses (ou de renfort).
Appuyez sur la touche « Marche/arrêt » pour
d
arrêter la machine à l’endroit où le sens de la
couture change.
Système de capteur de tissu automatique (pression automatique du pied-de-biche)
Votre machine n’est pas livrée avec cette fonction
activée.Suivez les instructions pour activer cette fonction.
FRANÇAIS
L’épaisseur du tissu est automatiquement détectée et la
pression du pied-de-biche est automatiquement réglée via
un capteur interne pendant la couture. Ainsi, le tissu peut
être entraîné librement. Le système de capteur de tissu
fonctionne en continu pendant la couture. Cette fonction est
utile lors de la couture sur des bords épais ou du quilting.
→ La machine s’arrête, l’aiguille dans le tissu, et le
pied-de-biche est automatiquement relevé.
Faites pivoter le tissu, puis appuyez sur la
e
touche « Marche/arrêt ».
→ Le pied-de-biche s’abaisse automatiquement et la
couture continue.
Appuyez sur .
a
→ L’écran de réglages apparaît.
Réglez le « SYSTÈME DE CAPTEUR DE TISSU
b
AUTOMATIQUE » sur « ON ».
Appuyez sur pour revenir à l’écran
c
initial.
19
Page 22

Quilting (courtepointe) en mouvement libre
ATTENTION
Mémo
Mémo
1
Pour le quilting en mouvement libre, utilisez un pied
pour quilting en mouvement libre « C » ou un pied pour
quilting ouvert en mouvement libre « O » en fonction
du point sélectionné et réglez la machine sur le mode
de couture en mouvement libre. Dans ce mode, le piedde-biche se relève à la hauteur nécessaire pour la
couture en mouvement libre.
Nous recommandons de fixer la pédale et de coudre à
vitesse constante. Vous pouvez régler la vitesse de
couture à l’aide du curseur de contrôle de vitesse
figurant sur la machine.
■ Utilisation du pied pour quilting en mouvement libre « C »
Le pied pour quilting en mouvement libre « C » est
utilisé pour la couture en mouvement libre avec la
plaque d’aiguille du point droit.
Respectez les étapes des pages 56 et 57 du
a
Manuel d’instructions pour fixer la plaque
d’aiguille du point droit.
a Trou unique
Notez que cette plaque co mporte un trou unique.
Appuyez sur pour régler la machine sur
b
le mode de couture en mouvement libre.
Pied pour quilting en mouvement libre « C »
• Le quilting en mouvement libre permet de contrôler la
vitesse d’entraînement du tissu et ainsi de correspondre
à la vitesse de couture. Si le tissu est déplacé plus
rapidement que la vitesse de couture, l’aiguille risqué
de se casser ou la machine de s’endommager.
• Lorsque vous utilisez le pied pour quilting en
mouvement libre « C », veillez à utiliser la plaque
d’aiguille du point droit et à coudre avec l’aiguille
positionnée au milieu. Si l’aiguille est déplacée dans
une position autre que celle du milieu, elle risque de se
casser et de vous blesser.
• Lorsque vous commencez à coudre, le capteur interne
détecte l’épaisseur du tissu et le pied pour quilting se relève à
la hauteur spécifiée sur l’écran de réglages de la machine.
Appuyez su r pour affich er « HA UTEUR DU PIE D
POUR LA COUTURE EN MOUVEMENT LIBRE » sur P. 2 de
l’écran de réglages. Appuyez sur ou pour
sélectionner la hauteur à laquelle le pied pour quilting est
relevé. Augmentez le réglage en appuyant sur , par
exemple, lorsque vous cousez sur du tissu très extensible,
afin de faciliter la couture.
→
La touche est représentée par à l’écran et le
pied pour quilting se relève à la hauteur nécessaire
pour la couture en mouvement libre.
20
• Pour coudre avec une tension équilibrée, il peut être
nécessaire de régler la tension du fil supérieur. Faites un test
avec un échantillon de tissu identique à celui de votre choix.
Page 23

Sélectionnez l’un des points suivants.
Remarque
Remarque
ATTENTION
a
Mémo
Remarque
Mémo
c
→ Le pied pour quilting en mouvement libre « C » est
indiqué dans l’angle supérieur gauche de l’écran.
Tendez le tissu à l’aide de vos deux mains et
h
déplacez-le à vitesse constante pour coudre
des points uniformes d’une longueur
d’environ 2 à 2,5 mm (env. 1/16 - 3/32 de
po).
Lorsque vous sélectionnez le point 1-01, 1-02, 1-05 ou
1-07, l’aiguille reste positi on née au centre.
Retirez le support du pied-de-biche.
d
Fixez le pied pour quilting en mouvement
e
libre « C » à l’avant, la vis du support du piedde-biche alignée sur l’encoche du pied pour
quilting.
a
b
a Vis du support du pied-de-biche
b Encoche
Veillez à ce que le pied pour quilti ng soit fixé
correctement et ne soit pas incliné.
De votre main droite, maintenez le pied pour
f
quilting en place et, de votre main gauche,
serrez la vis du support du pied-de-biche à
l’aide du tournevis.
a Point
Appuyez sur pour annuler le mode de
i
couture en mouvement libre.
Ne soyez pas découragé par vos premiers résultats.
La technique nécessit e de la pratique.
■ Utilisation du pied pour quilting ouvert en mouvement libre « O »
Le pied pour quilting ouvert en mouvement libre
« O » est utilisé pour le quilting en mouvement libre
avec des points zigzag ou décoratifs, ou pour le
quilting en mouvement libre de lignes droites sur un
tissu d’épaisseur inégale. Vous pouvez coudre
n’importe quel point à l’aide du pied pour quilting
ouvert en mouvement libre « O ».
FRANÇAIS
a Vis du support du pied-de-biche
• Veillez à serrer fermement les vis à l’aide du
Placez le sélecteur de réglage des griffes
g
d’entraînement sur pour les abaisser.
a Sélecteur de réglage des griffes d’entraînement
tournevis. L’aiguille risque en effet de heurter le
pied pour quilting et de se tordre ou de se casser.
(vu depuis l’arrière de la machine)
Pied pour quilting ouvert en mouvement libre « O »
Le pied pour quilting ouvert en mouvement libre « O »
peut également être utilisé avec la p laque d’aig uille du
point dro it po ur le point uniq uement répert orié à l’é tape
c de la section «Utilisation du pied pour quilting en
mouvement libre « C »» . Nous vous recommandons
d’utiliser le pied pour quilti ng ouvert en mouvement
libre « O » pour la couture en mouvement lib re de
tissus d’é paisseur inégale.
Pour coudr e avec une tension équilibr ée, il peut être
nécessaire de régler la tens io n du fil supérieur. Faites
un test avec un échantillon de tissu pour quilting.
21
Page 24

Appuyez sur pour régler la machine sur
Remarque
Remarque
ATTENTION
Mémo
a
le mode de couture en mouvement libre.
Retirez le support du pied-de-biche.
c
Fixez le pied pour quilting ouvert en
d
movement libre « O » en positionnant le
crochet du pied pour quilting au-dessus de la
vis du support de l’aiguille et en alignant la
partie inférieure gauche du pied pour quilting
sur la barre du pied-de-biche.
1
3
2
a Crochet
b Vis du support de l’aiguille
c Barre du pied-de-biche
Veillez à ce que le pied pour quilting soit fixé
correctement et ne soi t pa s i ncl i né.
→ La touche est représentée par à l’écran et le
pied pour quilting se relève à la hauteur nécessaire
pour la couture en mouvement libre.
De votre main droite, maintenez le pied pour
e
quilting en place et, de votre main gauche,
serrez la vis du support du pied-de-biche à
l’aide du tournevis.
a Vis du support du pied-de-biche
• Veillez à serrer fermement les vis à l’aide du
tournevis. L’aiguille risque en effet de heurter le
pied pour quilting et de se tordre ou de se casser.
Tendez le tissu à l’aide de vos deux mains et
f
déplacez-le à vitesse constante pour coudre des
points uniformes d’une longueur d’environ 2 à
2,5 mm (env. 1/16 - 3/32 de po).
b
22
Sélectionnez un point.
→ Le pied pour quilting ouvert en mouvement libre
« O » est indiqué dans l’angle supérieur gauche de
l’écran.
Si vous utilisez la plaque d’aig ui lle du poi nt droit avec
le pied pour quilting ouvert e n m ouvement libre « O »,
la lettre « C » est indiquée dans l’an gl e supérieur
gauche de l’écran.
a Point
Appuyez sur pour annuler le mode de
g
couture en mouvement libre.
Ne soyez pas découragé par vos premiers résultats.
La technique nécessite de la pratique.
Page 25

Quilting (courtepointe) en écho -
ATTENTION
Mémo
Utilisation du pied pour quilting en
écho en mouvement libre « E »
Le quilting en écho consiste à coudre des lignes de quilting à des
distances égales autour d’un motif. Les lignes de quilting,
représentant des ondulations faisant écho et s’éloignant du motif,
constituent les traits distinctifs de ce style quilting. Utilisez le pied
pour quilting en écho en mouvement libre « E » pour le quilting
en écho. Utilisez les dimensions du pied-de-biche comme guide
pour coudre autour du motif à un intervalle fixe.
Nous recommandons de fixer la pédale et de coudre à vitesse
constante. Souvenez-vous que vous pouvez mieux contrôler la
machine en déplaçant la molette de réglage de la vitesse
horizontale au milieu et en utilisant la pédale.
Pied pour quilting en écho en mouvement libre « E »
Appuyez sur pour régler la machine sur
a
le mode de couture en mouvement libre.
FRANÇAIS
a 6,4 mm (env. 1/4 de po)
b 9,5 mm (env. 3/8 de po)
• Le quilting en mouvement libre permet de contrôler la
vitesse d’entraînement du tissu et ainsi de correspondre à
la vitesse de couture. Si le tissu est déplacé plus
rapidement que la vitesse de couture, l’aiguille risque de
se casser ou la machine de s’endommager.
• Lorsque vous commencez à coudre, le capteur interne détecte
l’épaisseur du tissu et le pied pour quilting se relève à la hauteur
spécifiée sur l’écran de réglages de la machine. Appuyez sur
pour afficher « HAUTEUR DU PIED POUR LA
COUTURE EN MOUVEMENT LIBRE » sur P. 1 de l’écran de
réglages. Appuyez sur ou pour sélectionner la
hauteur à laquelle le pied pour quilting est relevé. Augmentez le
réglage en appuyant sur , par exemple, lorsque vous
cousez sur du tissu très extensible, afin de faciliter la couture.
→ La touche est représentée par à l’écran et le
pied pour quilting se relève à la hauteur nécessaire
pour la couture en mouvement libre.
Sélectionnez .
b
Retirez le pied-de-biche.
c
Retirez le support du pied-de-biche et la vis.
d
Positionnez le pied pour quilting en écho en
e
mouvement libre « E » à gauche de la barre du
pied-de-biche en alignant les trous du pied
pour quilting et la barre du pied-de-biche.
Serrez la vis.
f
• Pour coud re av ec un e tens ion éq uilibr ée, il p eut être néce ssa ire
de régler la tension du fil supérieur. Faites un test avec un
échantillon de tissu pour quilting.
23
Page 26

Utilisez les dimensions du pied pour quilting
b
ab
c
d
e
f
g
comme guide pour coudre autour du motif.
a 6,4 mm (env. 1/4 de po)
Dimensions du capot du compartiment à canette
Les dimensions du capot du compartiment à canette
servent de référence aux motifs avec aiguille au milieu.
Les dimensions de la plaque d’aiguille et du couvercle
de plaque d’aiguille servent de référence aux points
avec aiguille à gauche.
Projet terminé
Appuyez sur pour annuler le mode de
h
couture en mouvement libre.
a Pour les points avec aiguille au milieu
b Pour les points avec aiguille à gauche
c Aiguille à gauche sur la plaque d’aiguille <po>
d Aiguille à gauche sur la plaque d’aiguille <cm>
e Aiguille au milieu sur le capot du compartiment à
canette <po>
f Aiguille à gauche sur le couvercle de plaque d’aiguille
<po>
24
Page 27

Pied pour ourlets invisibles (avec guide)
■ Utilisation
Ce pied est pratique non seulement pour la couture
de points invisibles mais aussi pour la couture
d’ourlets et de bords de tissus.
Retirer le pied presseur et fixer le pied pour point
invisible encliquetable.
Pied pour ourlets invisibles (avec guide)
• Lors de l’assemblage
Sélectionnez la couture de renfort de votre
a
choix. Exemples ( , , etc.)
Poser le tissu sous le pied de sorte que le
b
guide de pied soit aligné entre les deux bords
du tissu.
Baisser le pied et coudre.
c
FRANÇAIS
■ Couture
• Couture de bord de tissu
Régler l’aiguille pour qu’elle soit à la distance
souhaitée du bord du tissu et la baisser à cette
position.
Tourner la vis du guide de pied et ajuster avec
précaution sur le guide de tissu.
1
• Point invisible
Couture de tissus ordinaires
*2
0.5cm
2
*2
Couture de tissus épois
1cm
*1
1
3
*1
5
4
a Faufilage
• Couture d’ourlets
Sélectionner “ ”. Alignez la position du guide du
pied sur la position de l’aiguille et cousez un rabat
de la largeur souhaitée.
1cm 0.5cm
*2*2*1
1 2
a Faufilage
b Position de couture
c Tourner la vis pour ajuster le guide sur l’ourlet rabattu.
d Guide
e Tourner vers l’avant
*1 Face avant
*2 Face arrière
25
Page 28

Semelle pour ourlet etroit
Face arrièreFace avant
Ce pied est destiné à replier un double ourlet de 3 mm
en cousant un point droit.
■ Couture
Placer le tissu (à l’envers) sous le pied.
a
Abaisser l’aiguille et la placer à 3 mm du bord
du tissu, abaisser le pied, puis coudre 2 à 3
points.
Semelle pour ourlet etroit
■ Préparatifs
Retirer le pied presseur et fixer le pied pour
a
ourlet étroit encliquetable.
Sélectionner le point droit (aiguille placée au
b
milieu).
3 mm
3 mm
Relever l’aiguille et le pied, puis retirer le tissu
b
vers l’avant du pied en tenant l’extrémité des
deux fils afin qu’ils ne se décousent pas.
Saisir les deux fils et les faire passer derrière
c
le pied en les accrochant dans le bec central
recourbé. Enrouler le tissue autour du crochet
droit. Placer le bord du tissu juste derrière
l’aiguille, puis abaisser le pied.
26
Branchez la pédale de manière à ce que vos
c
deux mains soient libres pour guider le tissu.
Coudre lentement en tirant légèrement sur le
d
fil. Veiller à ce que le tissu reste bien enroulé
dans le crochet central pendant la couture.
Page 29

Après avoir cousu 2 ou 3 cm, relâcher le fil et
e
guider le tissu à l’aide de la main gauche.
Continuer la couture en veillant à ce que le
tissu soit toujours enroulé de la même façon.
■ Conseils pratiques
• Si la couture “triple” ne se coud pas parce que
trop peu de tissu est enroulé autour du crochet
du pied :
Accroître la quantité de tissu enroulée autour du
crochet en repoussant légèrement le morceau de
tissu vers son centre à l’aide des mains gauche et
droite.
Pied pour cordonnet (3 cordonnets)
■ Emploi
Décoration de vêtements ou de linge de maison
avec fils spéciaux.
FRANÇAIS
Pied pour cordonnet (3 cordonnets)
■ Préparatifs
Retirer le pied-presseur et fixer le pied pour
cordonnet.
• Points suggérés
• Si la couture “triple” ne se coud pas parce que
trop de tissu est enroulé autour du crochet du
pied :
Réduire la quantité de tissu enroulée autour du
crochet en tirant légèrement le côté du tissu tenu
dans la main droite vers la droite et le côté gauche
vers la gauche.
Zigzag Zigzag pointillé Point satin décoratif
• Largeur de couture en zigzag
Zigzag pointillé pour triple
cordonnet
Sélectionner le point de zigzag
pointillé et coudre un point de 5 mm
au maximum.
Zigzag pour cordonnet unique
Le point zigzag peut être positionné
dans le guide central ou de droite.
Vérifier la position du point et le
guide qui doit être utilisé.Définissez
une largeur de point légèrement
supérieure à la largeur du cordonnet.
• Longueur de point
Sélectionner la longueur de point souhaitée. Se
souvenir que les résultants varient selon la longueur
de point sélectionnée.
27
Page 30

• Pédale
L’utilisation de la pédale libère les mains pour tenir
le tissu.
■ Couture
Enfiler les cordonnets, un à
un, du côté droit du ressort
du pied à semelle gauche,
chacun dans leur guide
respectif.
Faire passer le cordonnet
sous le pied et le tirer de 4 à
5 mm derrière le pied. Si 2 ou
trois cordonnets sont utilisés,
s’assurer qu’ils sont bien à
plat sous l’avant du pied.
Maintenance de la machine
Votre machine a été mise à jour pour afficher le
message suivant lorsqu’il est recommandé de procéder
à sa maintenance :
Dès que ce message s’affiche, nous vous
recommandons de faire vérifier votre machine par
un revendeur ou un service après-vente agréé. Bien
que ce message disparaisse et que la machine
continue de fonctionner une fois que vous avez
appuyé sur la touche « OK » de l’écran LCD/ACL, le
message s’affichera plusieurs fois tant que la
maintenance appropriée n’aura pas été effectuée.
Prenez le temps de prévoir la maintenance de votre
machine lorsque ce message s’affiche. Une
maintenance régulière vous garantira une utilisation
plus longue, continue et ininterrompue de votre
machine.
Placer le tissu sous le pied et
abaisser le pied pour coudre.
28
Page 31

Contenido
Introducción ...........................................................................................................................30
Funciones avanzadas de costura .............................................................................................30
Accesorios adicionales ............................................................................................................31
Funciones avanzadas...............................................................................................................32
Giro........................................................................................................................................ 32
Sensor automático de tela (Presión automática del pie prensatela).......................................... 33
Acolchado libre...................................................................................................................... 34
Uso del pie para acolchado libre “C” ............................................................................... 34
Uso del pie para acolchado libre de punta abierta “O” .....................................................35
Acolchado repetido utilizando el pie para acolchado repetido libre “E” ................................. 37
Medidas de la tapa de la bobina............................................................................................. 38
Prensatela de puntada invisible (con guía) .............................................................................. 39
Uso ...................................................................................................................................39
Cosido ..............................................................................................................................39
Prensatela de dobladillo estrecha............................................................................................ 40
Antes de empezar a coser ................................................................................................. 40
Instrucciones de cómo coser ............................................................................................. 40
Indicaciones .....................................................................................................................41
Prensatela de cordón (tres cordones)....................................................................................... 41
Uso ...................................................................................................................................41
Preparativos para coser ..................................................................................................... 41
Para coser ......................................................................................................................... 42
Mantenimiento de la máquina................................................................................................ 42
ESPAÑOL
29
Page 32

Introducción
Nota
En este manual se facilita información adicional no incluida en el Manual de instrucciones.
No olvide leer esta información antes de utilizar la máquina.
Funciones avanzadas de costura
1. Función de giro
Esta función resulta útil cuando se cambia la dirección de costura. La máquina se detiene con la aguja en posición
baja (dentro de la tela) y el pie prensatela se eleva automáticamente hasta una altura adecuada cuando se pulsa el
botón de “inicio/parar”. El pie prensatela se puede ajustar en una de tres alturas (3,2 mm, 5,0 mm o 7,5 mm) en la
pantalla de ajustes.
Consulte la página 32.
2. Altura del pie para costura libre
Cuando vaya a utilizar el pie para acolchado “C” o el pie para acolchado repetido “E”, la altura del pie se puede
especificar en la pantalla de ajustes. La altura del pie prensatela se puede aumentar para guiar la tela más
fácilmente, cuando vaya a coser telas gruesas y abultadas, o disminuir para un mejor control de telas finas.
Consulte la página 34, 37.
3. Sensor automático de tela
El grosor de la tela se detecta automáticamente y la presión del pie prensatela se ajusta de forma automática con un
sensor interno durante la costura, para que la tela avance fácilmente. Esta función resulta útil para coser encima de
costuras gruesas o para el acolchado con los dientes de arrastre subidos. El sensor automático de tela funciona
permanentemente durante la costura.
Consulte la página 33.
Debido a la incorporación de las funciones descritas anteriormente, teng a en cuent a que las pan tall as reale s pueden vari ar
ligeramente de las mostradas en el Manual de instrucciones.
ab
30
a Se han añadido funciones a la segunda página de la pantalla de ajustes.
b Se ha añadido a las pantallas que aparecen después de pulsar o .
Page 33

THE THICKN
Accesorios adicionales
1. 2. 3. 4.
5. 6. 7.
Nº Nombre de la pieza Código de la pieza Página de referencia
ESPAÑOL
1 Pie para acolchado libre “C” XE0765-101 página 34
2
3 Pie para acolchado repetido libre “E” XE0766-001 página 37
4
5 Prensatela de puntada invisible (con guía) XA0059-001 página 39
6 Prensatela de dobladillo estrecha XE0754-001 página 40
7 Prensatela de cordón (tres cordones) XA6871-001 página 41
Pie para acolchado libre de punta abierta
“O”
Tapa de bobina (con marca) (en la
máquina)
XE0767-001 página 35
XE0715-001 página 38
31
Page 34

Funciones avanzadas
PRECAUCIÓN
Recuerde
Nota
Giro
Si está seleccionada la función de giro, la máquina se
detiene con la aguja bajada (en la tela) y el pie
prensatela se eleva automáticamente hasta una altura
adecuada cuando está pulsado el botón de “inicio/
parar”. Cuando se ha vuelto a pulsar el botón de
“inicio/parar”, el pie prensatela se baja
automáticamente y sigue la costura. Esta función resulta
útil para parar la máquina y girar la tela.
• Cuando está seleccionada la función de giro, la
máquina se pone en funcionamiento si está pulsado
el botón de “inicio/parar” o se ha utilizado el pedal
aunque se haya subido el pie prensatela. Asegúrese
de mantener las manos y otros objetos alejados de
la aguja, de lo contrario podría hacerse daño.
Cuando la función de giro está seleccionada y la costura
está parada, la altura del pie prensatela se puede cambiar
según el tipo de tela que se está cosiendo. Pulse
para ver “ALTURA DE GIRO” en P. 2 de la
pantalla de ajustes. Pulse o para seleccionar
una de las tres alturas (3,2 mm, 5,0 mm o 7,5 mm).
Para subir aún más el pie prensatela, aumente el ajuste.
(El ajuste predeterminado es 3,2 mm).
• La “POSICIÓN DE LA AGUJA” (P. 1 de la pantalla
de ajustes) se debe ajustar en la posición baja para
que se pueda utilizar la función de giro. Cuando la
“POSICIÓN DE LA AGUJA” está ajustada en la
posición elevada, aparece en gris y no se
puede utilizar.
• Cuando está seleccionado el ajuste, la función de
giro sólo se puede utilizar con puntadas donde el
pie prensatela J o N aparece indicado en la esquina
superior izquierda de la pantalla. Si está
seleccionada alguna otra puntada, aparece en
gris y no está disponible.
• Puesto que el pie prensatela está completamente
elevado cuando se ha pulsado la tecla de corte de
hilo automático, pulse el botón del “elevador del pie
prensatela” para bajar el pie prensatela y, a
continuación, pulse el botón de “inicio/parar” para
seguir con la costura.
• Si está seleccionada la función de giro, no están
disponibles en la pantalla de ajustes ni
además de “ALTURA DEL PIE PRENSATELA” y el
ajuste no se puede cambiar.
• Si está seleccionada la función de giro, el ajuste de
“ALTURA DEL PIE PRENSATELA” cambiará
automáticamente a 10,0 mm en la pantalla de
ajustes. Cuando se cancela la selección de la
función de giro, “ALTURA DEL PIE PRENS AT EL A”
vuelve al ajuste anterior.
Seleccione una puntada.
a
Pulse para seleccionar la función de giro.
b
32
→ La tecla aparecerá como .
Page 35

Coloque la tela debajo del pie prensatela con
Recuerde
Nota
c
la aguja en el punto de inicio de la costura y,
a continuación, pulse el botón de “inicio/
parar”. La máquina empezará a coser.
Si pulsa el botón de “inicio/parar” para detener la
costura, vuelva a pulsarlo para continuar, las costuras
en reversa (o puntadas de refuerzo) no se coserán.
Pulse el botón de “inicio/parar” para detener
d
la máquina en el punto donde cambia la
dirección de la costura.
Sensor automático de tela (Presión automática del pie prensatela)
La máquina no se envía con esta función activada.
Siga las instrucciones para activar esta función.
El grosor de la tela se detecta automáticamente y la
presión del pie prensatela se ajusta de forma
automática con un sensor interno durante la costura,
para que así la tela avance fácilmente. El sensor
automático de tela funciona permanentemente durante
la costura. Esta función resulta útil para costuras gruesas
o para el acolchado.
ESPAÑOL
→ La máquina se detiene con la aguja en la tela y el
pie prensatela se sube automáticamente.
Gire la tela y, a continuación, pulse el botón
e
de “inicio/parar”.
→ El pie prensatela baja automáticamente y sigue la
costura.
Pulse .
a
→ Aparecerá la pantalla de ajustes.
Establezca “SENSOR AUTOMÁTICO DE
b
TELA” en “ON”.
Pulse para regresar a la pantalla
c
inicial.
33
Page 36

Acolchado libre
PRECAUCIÓN
Recuerde
Recuerde
1
Para el acolchado libre, utilice el pie para acolchado
libre “C” o el pie para acolchado libre de punta abierta
“O” dependiendo de la puntada seleccionada y
configure la máquina para el modo de costura libre. En
este modo el pie prensatela está subido hasta la altura
necesaria para la costura libre.
Se recomienda colocar el pedal y coser a una velocidad
uniforme. Puede ajustar la velocidad de costura con el
pasador del control de velocidad de la máquina.
Siga los pasos de las páginas 56 y 57 del
a
Manual de instrucciones de la máquina para
colocar la placa de la aguja de costura recta.
a Solo orificio
Tenga en cuenta que esta placa tiene un solo orificio.
■ Uso del pie para acolchado libre “C”
El pie para acolchado libre “C” sirve para la costura
libre con la placa de la aguja de costura recta.
Pie para acolchado libre “C”
• Con el acolchado libre controle la velocidad de
arrastre de la tela para que coincida con la velocidad
de la costura. Si la tela se mueve más rápido que la
costura, la aguja podría romperse o la máquina
podría averiarse.
• Cuando utiliza el pie para acolchado libre “C”,
asegúrese de utilizar la placa de la aguja de costura
recta y coser con la aguja en la posición de aguja en
el medio (centro). Si la aguja se mueve a otra
posición distinta de la aguja en el medio (centro), la
aguja podría romperse y causar lesiones.
• Cuando comience a coser, el sensor interno
detectará el grosor de la tela y el pie p ara acolchado
se elevará hasta la altura especifi cada en la pantalla
de ajustes de la máquina. Pulse para ver
“ALTURA DEL PIE LIBRE” en P. 2 de la pantalla de
ajustes. Pulse o para seleccionar la
altura a la que el pie para acolchado se ha elevado.
Aumente el ajuste al pulsar , por ejemplo,
cuando cose tela muy elástica para facilitar la
costura.
Pulse para configurar la máquina para el
b
modo de costura libre.
→ La tecla aparecerá como y el pie para
acolchado se ha elevado hasta la altura necesaria
para la costura libre.
34
• Para coser con una tensión equilibrada, puede que
sea necesario ajustar la tensión del hilo superior.
Pruebe con una pieza de tela de muestra que sea
similar a la tela elegida.
Page 37

Seleccione cualquiera de las siguientes puntadas
Nota
Nota
PRECAUCIÓN
a
Recuerde
Nota
Recuerde
c
→ El pie para acolchado libre “C” aparece indicado en
la esquina superior izquierda de la pantalla.
Al seleccionar la puntada 1-01, 1-02, 1-05, 1-07, la
posición de la aguja permanecerá en el centro.
Extraiga el soporte del pie prensatela.
d
Coloque el pie para acolchado libre “C” en la parte
e
delantera con el tornillo del soporte del pie prensatela
alineado con la muesca en el pie para acolchado.
.
Estire suavemente con las dos manos la tela
h
para tensarla y luego muévala a un mismo
ritmo para coser puntadas uniformes con una
longitud aproximada de 2,0 a 2,5 mm (aprox.
de 1/16 a 3/32 pulg.).
a Puntada
Pulse para cancelar el modo de costura
i
libre.
ESPAÑOL
a
b
a Tornillo del soporte del pie prensatela
b Muesca
Asegúrese de que el pie para acolchado está
colocado correctamente y no está inclinado.
Coloque en su sitio el pie para acolchado con
f
la mano derecha y, a continuación, apriete
con la mano izquierda el tornillo del soporte
del pie prensatela utilizando el destornillador.
a Tornillo del soporte del pie prensatela
• Asegúrese de haber apretado bien los tornillos con el
destornillador. De lo contrario, la aguja podría chocar
contra el pie para acolchado y romperse o doblarse.
No se desanime con los resultados iniciales. La
técnica requiere práctica.
■ Uso del pie para acolchado libre de punta abierta “O”
El pie para acolchado libre de punta abierta “O”
sirve para el acolchado libre con puntada decorative
o de zigzag o para el acolchado libre de líneas
rectas en tela con un grosor irregular. El pie para
acolchado libre de punta abierta “O” permite coser
cualquier puntada.
Pie para acolchado libre de punta abierta “O”
El pie para acolchado libre de punta abierta “O”
también puede utilizarse con la placa de la aguja de
costura recta únicamente con el tipo de puntada
indicado en el paso
acolchado libre “C”". Se recomienda la utilización del
pie para acolchado libre de punta abierta “O” con la
costura libre de telas con un grosor irregular.
c de "Uso del pie para
Baje el selector de posición de dientes de
g
arrastre a para bajar los dientes de arrastre.
a Selector de posición de dientes de arrastre (vista desde
la parte trasera de la máquina)
Para coser con una tensión equilibrada, puede que
sea necesario ajustar la tensión del hilo superior.
Pruebe con una pieza de tela de acolchado.
35
Page 38

Pulse para configurar la máquina para el
Nota
Nota
PRECAUCIÓN
Recuerde
1
2
3
a
modo de costura libre.
→ La tecla aparecerá como y el pie para
acolchado se ha elevado hasta la altura necesaria
para la costura libre.
Extraiga el soporte del pie prensatela.
c
Coloque el pie para acolchado libre de punta
d
abierta “O” situando la patilla del pie para
acolchado encima de la presilla de la aguja y
alineando el lado inferior izquierdo del pie y
la barra del pie prensatela.
a Patilla
b Tornillo de la presilla de la aguja
c Barra del pie prensatela
Asegúrese de que el pie para acolchado está
colocado correctamente y no está inclinado.
Coloque en su sitio el pie para acolchado con
e
la mano derecha y, a continuación, apriete
con la mano izquierda el tornillo del soporte
del pie prensatela utilizando el destornillador.
Seleccione una puntada.
b
→ El pie para acolchado libre de punta abierta “O”
aparece indicado en la esquina superior izquierda
de la pantalla.
Si se utiliza la placa de la aguja de costura recta con el
pie para acolchado libre de punta abierta “O”,
aparecerá indicada la letra “C” en la esquina superior
izquierda de la pantalla.
a Tornillo del soporte del pie prensatela
• Asegúrese de haber apretado bien los tornillos con el
destornillador. De lo contrario, la aguja podría chocar
contra el pie para acolchado y romperse o doblarse.
Estire suavemente con las dos manos la tela
f
para tensarla y luego muévala a un mismo
ritmo para coser puntadas uniformes con una
longitud aproximada de 2,0 a 2,5 mm (aprox.
de 1/16 a 3/32 pulg.).
a Puntada
Pulse para cancelar el modo de costura
g
libre.
No se desanime con los resultados iniciales. La
técnica requiere práctica.
36
Page 39

Acolchado repetido utilizando el pie
PRECAUCIÓN
Recuerde
para acolchado repetido libre “E”
Se llama acolchado repetido a la costura de líneas de
acolchado a una distancia fija de un contorno de un
motivo. Las líneas de acolchado que aparecen como
ondas del motivo son la característica distintiva de este
estilo de acolchado. Utilice el pie para acolchado
repetido libre “E” para el acolchado repetido. Con la
medida del pie prensatela como guía, cosa alrededor
del motivo en un intervalo fijo.
Se recomienda colocar el pedal y coser a una velocidad
uniforme. Recuerde que también puede obtener un
mayor control si coloca el control de velocidad
horizontal en la posición intermedia y utiliza el pedal.
Medida del pie para acolchado repetido libre “E”
Pulse para configurar la máquina para el
a
modo de costura libre.
ESPAÑOL
a 6,4 mm (aprox. 1/4 pulg.)
b 9,5 mm (aprox. 3/8 pulg.)
• Con el acolchado libre, controle la velocidad de arrastre
de la tela para que coincida con la velocidad de la
costura. Si la tela se mueve más rápido que la costura, la
aguja podría romperse o la máquina podría averiarse.
• Cuando comienza a coser, el sensor interno detecta
el grosor de la tela y el pie para acolchado se eleva
hasta la altura especificada en la pantalla de ajustes
de la máquina. Pulse para ver “ALTURA
DEL PIE LIBRE” en P. 1 de la pantalla de ajustes.
Pulse o para seleccionar la altura a la
que el pie para acolchado se ha elevado. Aumente
el ajuste al pulsar , por ejemplo, cuando cose
tela muy elástica para facilitar la costura.
→ La tecla aparecerá como y el pie para
acolchado se ha elevado hasta la altura necesaria
para la costura libre.
Seleccione .
b
Extraiga el pie prensatela.
c
Extraiga el soporte del pie prensatela y el
d
tornillo.
Coloque el pie para acolchado repetido libre
e
“E” en el lado izquierdo de la barra del pie
prensatela con los orificios en el pie para
acolchado y la barra del pie prensatela
alineados.
Apriete el tornillo.
f
• Para coser con una tensión equilibrada, puede que se a
necesario ajustar la tensión del hilo superior. Pruebe
con una pieza de tela de muestra de acolchado.
37
Page 40
Con la medida del pie para acolchado como
b
ab
c
d
e
f
g
guía, cosa alrededor del motivo.
a 6,4 mm (aprox. 1/4 pulg.)
Labor terminada
Medidas de la tapa de la bobina
Las medidas de la tapa de la bobina sirven de referencia
para los patrones con una posición de la aguja en el
medio (centro). Las medidas de la placa de la aguja y la
cubierta de la placa de la aguja sirven de referencia a
las puntadas con la posición de la aguja a la izquierda.
a Para puntadas con la posición de la aguja en el medio
(centro)
b Para puntadas con una posición de la aguja a la
izquierda
c Posición de la aguja a la izquierda en la placa de la
aguja <pulg.>
d Posición de la aguja a la izquierda en la placa de la
aguja <cm>
e Posición de la aguja en el medio (centro) en la tapa de
la bobina <pulg.>
f Posición de la aguja a la izquierda en la cubierta de la
placa de la aguja <pulg.>
Pulse para cancelar el modo de costura
h
libre.
38
Page 41
Prensatela de puntada invisible (con guía)
■ Uso
Este pie prensatelas es útil no sólo para puntadas
invisibles, sino también para coser bordes de tejidos
y costuras.
Quite el prensatela y coloque el prensatela de
puntada invisible acoplable.
Prensatela de puntada invisible (con guía)
■ Cosido
• Para puntadas de borde
• Para puntadas de unión
Seleccione la costura sobrepuesta deseada.
a
Ejemplos: ( , , etc.)
Coloque la tela debajo del pie prensatelas de
b
forma que la guía quede alineada entre ambos
bordes del tejido.
Baje el pie prensatelas y cosa.
c
• Para puntadas invisibles
ESPAÑOL
Coloque la aguja a la distancia que desee ponerla
del borde del tejido y baje la aguja en esa posición.
Gire el tornillo guía del pie prensatelas y ajústelo
cuidadosamente para guiar el del tejido.
1
Cuando se utilicen tejidos de peso normal
1cm
*2
*1
0.5cm
2
*2
1
3
5
4
Cuando se utilicen tejidos pesados
1cm 0.5cm
*2*2*1
1 2
*1
a Hilvanado
• Para coser costuras
Seleccione “ ”. Alinee la posición de la guía del
pie con la posición de la aguja y cosa el ancho
deseado del margen de costura.
a Hilvanado
b Posición de cosido
c Gire el tornillo para ajustar la guía en el dobladillo
plegado.
d Guía
e Pase al lado frontal.
*1 Lado frontal
*2 Reverso
39
Page 42

Prensatela de dobladillo estrecha
ReversoLado frontal
3 mm
3 mm
Este pie está diseñado para crear ondas bajo un
dobladillo doble de 3 mm mientras se cose una
puntada recta.
Prensatela de dobladillo estrecha
■ Antes de empezar a coser
■ Instrucciones de cómo coser
Ponga el tejido (con el reverso hacia arriba)
a
debajo del prensatelas. Baje la aguja a 3 mm
de los extremos del tejido, baje el prensatelas
y haga dos o tres puntadas.
Levante la aguja y el prensatelas, después
b
sujete los extremos de los hilos superior e
inferior para evitar que se salgan del tejido y
tire del tejido para sacarlo de la parte
delantera del prensatelas.
Quite el prensatela y coloque el prensatela de
a
dobladillo estrecho acoplable.
Seleccione la puntada recta (posición central
b
de la aguja).
Conecte el pedal para que ambas manos
c
queden libres para guiar el tejido.
Sujetando los dos hilos, páselos por la parte
c
en forma de bucle del prensatelas y sáquelos
hacia la parte posterior del prensatelas.
Enrolle el tejido en la parte en forma de bucle
del prensatelas del mismo modo. Ponga el
extremo del tejido inmediatamente detrás de
la aguja y baje el prensatelas.
Sin dejar que el tejido sobresalga del lado
d
derecho del prensatelas, tire levemente del
hilo mientras va cosiendo.
40
Page 43

Después de coser dos o tres cm de tejido,
e
suelte el hilo y guíe el tejido desde la parte
frontal del prensatelas con la mano izquierda.
Mantenga una cantidad constante de tejido
enrollada al bucle del prensatelas hasta que
acabe la costura.
■ Indicaciones
• Si no hay una cantidad suficiente de tejido
enrollada en el bucle y no se está cosiendo una
costura triple:
Tire del tejido que sujeta con la mano derecha hacia
la izquierda para que haya más tejido enrollado en
el bucle del prensatelas. Al mismo tiempo, guíe el
tejido con suavidad hacia la derecha con la mano
izquierda.
Prensatela de cordón (tres cordones)
■ Uso
Embellecimiento de prendas y ropa blanca con hilos
decorativos.
Prensatela de cordón (tres cordones)
■ Preparativos para coser
Quite el pie prensatelas y coloque el prensatela de
cordón encajable.
ESPAÑOL
• Puntadas sugeridas
• Si hay demasiado tejido enrollado en el bucle y
se está cosiendo una costura triple ancha:
Tire del tejido que sujeta con la mano derecha hacia
la derecha para que haya menos tejido enrollado en
el bucle del prensatelas. Al mismo tiempo, guíe el
tejido sobrante a la izquierda con la mano
izquierda.
Zigzag Zigzag elastico Puntada decorativa rasa
• Anchura de puntada zigzag
Cordón triple
Seleccione puntada zigzag a puntos
y cosa con una anchura de puntada
máxima de 5 mm.
Cordón sencillo
La puntada de zig-zag puede situarse
en la guía central o derecha.
Verifique la posición de la puntada y
determine la guía apropiada a seguir.
Ajuste el ancho de puntada
ligeramente mayor que el ancho del
cordón.
• Longitud de puntada
eleccione la longitud de puntada deseada. Recuerde
que los resultados variarán en función de la longitud
de puntada que haya seleccionado.
41
Page 44

• Pedal de control
El empleo del pedal de control le ayudará a
mantener libres ambas manos para que puede
manejar mejor las prendas.
■ Para coser
Mantenimiento de la máquina
Se ha actualizado la máquina para que se muestre el
siguiente mensaje cuando se recomiende realizar tareas
de mantenimiento:
Conduzca los cordones, uno
a uno, desde el lado derecho
del resorte del prensatela de
córdon hacia sus guías
respectivas.
Ponga los cordones debajo
del prensatela de cordón y
extiéndalos 4-5 mm por
detrás del mismo. Cuando
utilice 2 ó 3 cordones, tenga
cuidado para asegurarse de
que los cordones no sean
aplastados debajo de la parte
delantera del pie.
Coloque la tela debajo del
pie. Baje el pie y cosa.
Una vez aparezca este mensaje, se recomienda
llevar la máquina a un distribuidor au-torizado o
servicio de reparaciones para que la sometan a un
control de mantenimiento periódico. Aunque este
mensaje desaparecerá y podrá seguir utilizando la
máquina en cuanto seleccione la tecla “Aceptar” en
la pantalla LCD, el mensaje volverá a aparecer
varias veces más hasta que se efectúe el
mantenimiento adecuado.
Una vez aparezca este mensaje, asegúrese de
planificar una cita de mantenimiento. Esta
operación contribuirá a garantizar el
funcionamiento continuo e ininterrumpido de la
máquina en el futuro.
42
Page 45

Page 46

Page 47

Page 48

ENGLISH
FRENCH
SPANISH
882-U82
XE6352-001
Printed in Taiwan
 Loading...