

Page 1

AutoView
®
Installer/User Guide
3100/3200
Page 2
USA Notification
Warning: Changes or modifications to this unit not expressly approved by the party responsible for
compliance could void the user’s authority to operate the equipment.
Note: This equipment has been tested and found to comply with the limits for a Class A digital device,
pursuant to Part 15 of the FCC Rules. These limits are designed to provide reasonable protection against
harmful interference when the equipment is operated in a commercial environment. This equipment
generates, uses and can radiate radio frequency energy and, if not installed and used in accordance with the
instruction manual, may cause harmful interference to radio communications. Operation of this equipment in
a residential area is likely to cause harmful interference in which case the user will be required to correct the
interference at his own expense.
Canadian Notification
This Class A digital apparatus complies with Canadian ICES-003.
Cet appareil numérique de la classe A est conforme à la norme NMB-003 du Canada.
Japanese Notification
Korean Notification
Safety and EMC Approvals and Markings
UL, FCC, cUL, ICES-003, CE, GS, VCCI, MIC, C-Tick, GOST
Page 3

AutoView 3100/3200
Instal ler/ User Guide
®
Switch
Avocent, the Avocent logo, The Power of Being There, AutoView,
DSView, Dambrackas Video Compress i on and OSCAR are registere d
trademarks of Avocent Corporation or its affiliates. All ot he r ma rks are
the property of their respective owners.
© 2007 Avocent Corporation. All rights reserved. 590-640-
616D
Page 4
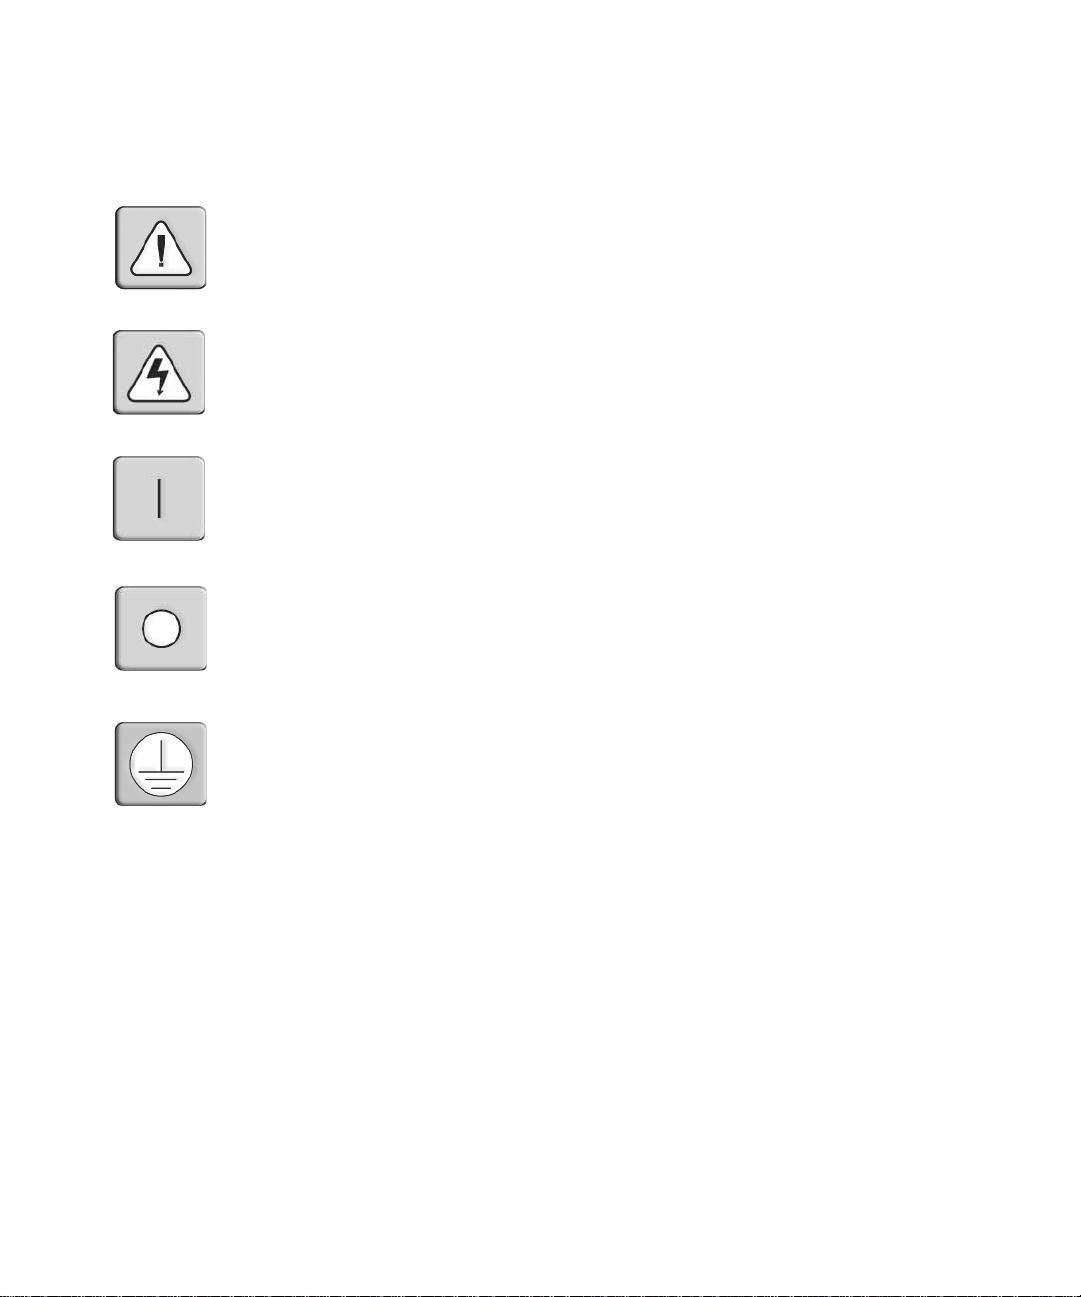
Instructions
This symbol is intended to alert the user to the presence of important operating and maintenance
(se
rvicing) instructions in the literature accompanying the appliance.
Dangerous Voltage
This symbol is intended to alert the user to the presence of uninsulated dangerous voltage within the
produ
ct’s enclosure that may be of sufficient magnitude to constitute a risk of electric shock to persons.
Power On
This symbol indicates the principal on/off switch is in the on position.
Power Of f
This symbol indicates the principal on/off switch is in the off position.
Protective Grounding Terminal
This symbol indicates a terminal which must be connected to earth ground prior to making any other
connections to the equipment.
Page 5

TABLE OF CONTENTS
Table of Contents
List of Figures ................................................................................................................ vii
List of Tables................................................................................................................... ix
Chapter 1: Product Overview........................... ............................................. ...... ....... ..... 1
Features and Benefits ........................................................................................................................1
Reduce cable bulk.......................................................................................................................1
Access the AutoView 3100/3200 switch via a standard TCP/IP network ..................................2
Chapter 2: Installation ...................................... ...... ....... ...... ...... ....... ...... ......................... 5
AutoView 3100/3200 Switch Connectivity ......................................................................................... 5
Installation Overview.........................................................................................................................5
Getting started.............................. ..... .............................................. ...........................................7
Setting up your network..............................................................................................................8
Rack Mounting an AutoView 3100/3200 Switch................................................................................8
Rack mounting safety considerations.........................................................................................8
Connecting the AutoView 3100/3200 Switch Hardware ...................................................................9
Configuring the AutoView 3100/3200 Switch..................................................................................10
Setting up the built-in web server.............................................................................................10
Connecting to the on-board web interface through a firewall.................................................11
Verifying the Connections................................................................................................................13
AutoView 3100/3200 switch .....................................................................................................13
IQ and serial IQ modules .........................................................................................................13
Adjusting Mouse Settings on Target Devices ..................................................................................13
iii
Chapter 3: Local Port Operation................................................................................... 15
Basic Operations..............................................................................................................................15
Viewing and selecting ports and servers..................................................................................15
Selecting a target device...........................................................................................................15
Soft switching............................................................................................................................16
Viewing the status of your AutoView 3100/3200 switching system..........................................16
Navigating the OSCAR interface......................................... ...... ...... .........................................17
Main Dialog Box Functions.............................................................................................................18
Managing a KVM session.........................................................................................................19
Page 6

iv AutoView 3100/3200 Switch Installer/User Guide
Setup Dialog Box Functions............................................................................................................19
Changing the display behavior.................................................................................................21
Controlling the status flag........................................................................................................22
Selecting target devices for broadcasting.................................................................................23
Selecting target devices for Scan mode....................................................................................24
Setting local port Screen Saver options....................................................................................26
Setting the keyboard country code............................................................................................27
Assigning device types..............................................................................................................28
Assigning target device names..................................................................................................30
Commands Dialog Box Functions...................................................................................................31
Enabling or disabling Broadcasting.........................................................................................32
Enabling or disabling Scan mode.............................................................................................33
Viewing and disconnecting user connections...........................................................................33
Displaying version information................................................................................................35
Resetting your PS/2 keyboard and mouse................................................................................36
Sending a ping request....................... ...... ...... ............................................. ..............................37
Chapter 4: Web Interface Operations........................................................................... 39
AutoView 3100/3200 Switch On-Board Web Interface ...................................................................39
Viewing and Selecting Ports and Servers........................................................................................40
The AutoView 3100/3200 Explorer Window ...................................................................................40
Using the side navigation bar...................................................................................................41
Using the top option bar ...........................................................................................................42
Launching a KVM Session ...............................................................................................................42
Managing the AutoView 3100/3200 Switch On-Board Web Interface............................................43
Upgrading IQ modules.............................................................................................................43
Managing local accounts..........................................................................................................44
Managing device properties.....................................................................................................45
Rebooting the appliance...........................................................................................................46
Managing local accounts..........................................................................................................46
Access levels .............................................................................................................................46
Preemption levels......................................................................................................................47
Managing Device Properties...........................................................................................................48
Viewing and changing appliance configuration information...................................................48
Page 7

Table of Contents v
Appliance and target device query modes................................................................................49
Setting up Active Directory for performing queries.................................................................51
Chapter 5: The Video Viewer......................................................................................... 53
The Video Viewer Window...............................................................................................................53
Launching a KVM Session ...............................................................................................................54
Session time-out....................................... ............................................. ....................................54
Video Viewer Window Features ......................................................................................................54
Changing the toolbar................................................................................................................56
Setting the window size.............................................................................................................56
Adjusting the view.....................................................................................................................56
Adjusting color depth................................................................................................................58
Additional video adjustment................................................................. ....................................58
Target video settings.................................................................................................................59
Contrast and brightness............................................................................................................60
Detection thresholds....................................................... ..... ............................................. .. ......60
Block Noise Threshold and Pixel Noise Threshold ..................................................................60
Automatic video adjustment......................................................................................................60
Refresh Image...........................................................................................................................61
Video Test Pattern ....................................................................................................................61
Adjusting mouse options...........................................................................................................61
Cursor type ...............................................................................................................................61
Mouse scaling...........................................................................................................................63
Vendor-specific video settings..................................................................................................63
Mouse alignment and synchronization.....................................................................................63
Using Keyboard Pass-through.........................................................................................................64
Using Macros...................................................................................................................................64
Saving the View................................................................................................................................65
Closing a Video Viewer Window Session ........................................................................................65
Chapter 6: Terminal Operations ................................................................................... 67
The Console Menu...........................................................................................................................67
Network Configuration....................................................................................................................67
Other Console Main Menu Options.................................................................................................69
Security Configuration .............................................................................................................69
Firmware Management ............................................................................................................69
Page 8

vi AutoView 3100/3200 Switch Installer/User Guide
Enable Debug Messages...........................................................................................................69
Restore Factory Defaults..........................................................................................................70
Reset Appliance ........................................................................................................................70
Exit............................................................................................................................................70
Appendices..................................................................................................................... 71
Appendix A: Flash Upgrades...........................................................................................................71
Appendix B: Using Serial IQ Modules ............................................................................................73
Appendix C: UTP Cabling...............................................................................................................77
Appendix D: Technical Specifications.............................................................................................79
Appendix E: Sun Advanced Key Emulation.....................................................................................81
Appendix F: Technical Support.......................................................................................................83
Page 9

LIST OF FIGURES
List of Figures
Figure 1.1: Example AutoView 3100/3200 Switch Configuration....................................................2
Figure 2.1: Basic AutoView 3100/3200 Switch Configuration .........................................................6
Figure 2.2: AutoView 3100/3200 Switch Mounting Diagram...........................................................9
Figure 2.3: Typical AutoView 3100/3200 Switch Firewall Configuration .....................................12
Figure 3.1: OSCAR Interface Main Dialog Box..............................................................................19
Figure 3.2: OSCAR Interface Setup Dialog Box.............................................................................20
Figure 3.3: OSCAR Interface Menu Dialog Box.............................................................................21
Figure 3.4: OSCAR Interface Flag Dialog Box ..............................................................................22
Figure 3.5: Position Flag................................................................................................................23
Figure 3.6: OSCAR Interface Broadcast Dialog Box......................................................................24
Figure 3.7: OSCAR Interface Scan Dialog Box ..............................................................................25
Figure 3.8: OSCAR Interface Screen Saver Dialog Box.................................................................26
Figure 3.9: OSCAR Interface Keyboard Dialog Box......................................................................28
Figure 3.10: OSCAR Interface Devices Dialog Box.......................................................................29
Figure 3.11: OSCAR Interface Device Modify Dialog Box.............................................................29
Figure 3.12: OSCAR Interface Names Dialog Box.........................................................................30
Figure 3.13: OSCAR Interface Name Modify Dialog Box..............................................................31
Figure 3.14: OSCAR Interface Commands Dialog Box..................................................................32
Figure 3.15: OSCAR Interface User Status Dialog Box .................................................................34
Figure 3.16: OSCAR Interface Disconnect Dialog Box..................................................................34
Figure 3.17: OSCAR Interface Version Dialog Box........................................................................35
Figure 3.18: AVRIQ Selection Dialog Box......................................................................................35
Figure 3.19: AVRIQ Version Dialog Box........................................................................................36
Figure 3.20: OSCAR Interface Ping Dialog Box ............................................................................37
Figure 4.1: Avocent AutoView 3100/3200 Explorer Window .........................................................41
Figure 4.2: Active Directory - KVM user........................................................................................50
Figure 4.3: Active Directory - KVM appliance admin....................................................................50
Figure 4.4: Active Directory - Define Groups.................................................................................51
Figure 5.1: Video Viewer Window (Normal Window Mode) ..........................................................55
Figure 5.2: Manual Video Adjust Dialog Box.................................................................................59
Figure 5.3: Video Viewer Window with Local and Remote Cursors Displayed .............................61
vii
Page 10

viii AutoView 3100/3200 Switch Installer/User Guide
Figure 6.1: Console Main Menu......................................................................................................68
Figure 6.2: Network Configuration Menu.......................................................................................68
Page 11

LIST OF TABLES
List of Tables
Table 1.1: Descriptions for Figure 1.1..............................................................................................2
Table 2.1: Descriptions for Figure 2.1..............................................................................................7
Table 2.2: TCP Ports and Functions for the AutoView 3100/3200 Switch.....................................11
Table 2.3: Descriptions for Figure 2.3............................................................................................12
Table 3.1: OSCAR Interface Status Symbols...................................................................................16
Table 3.2: OSCAR Interface Navigation Basics..............................................................................17
Table 3.3: Main Dialog Box Functions...........................................................................................19
Table 3.4: Setup Features to Configure the OSCAR Interface........................................................20
Table 3.5: OSCAR Interface Status Flags.......................................................................................22
Table 3.6: Commands to Manage Routine Tasks for Your Target Devices ....................................31
Table 4.1: On-Board Web Interface Supported Operating Systems and Browsers.........................39
Table 4.2: Descriptions for Figure 4.1............................................................................................41
ix
Table 4.3: Viewing Appliance Information......................................................................................45
Table 4.4: Allowed Operations by Access Level..............................................................................47
Table 4.5: Viewing Appliance Information......................................................................................48
Table 5.1: Descriptions for Figure 5.1............................................................................................55
Table 5.2: Descriptions for Figure 5.2............................................................................................59
Table 5.3: Descriptions for Figure 5.3............................................................................................62
Table B.1: Serial IQ Module Pinouts..............................................................................................76
Table C.1: UTP Wiring Standards ..................................................................................................77
Table D.1: AutoView 3100/3200 Switch Product Specifications ............................ ........................79
Table E.1: Sun Key Emulation .............................................................. ..... ...... ..............................81
Table E.2: PS/2-to-USB Keyboard Mappings.................................................................................82
Page 12

x AutoView 3100/3200 Switch Installer/User Guide
Page 13

CHAPTER
Product Overvi ew
1
Features and Benefits
Avocent AutoView® 3100/3200 switches combine analog and digital technology to provide
flexible control of data center servers, and to facilitate the OA&M (operations, activation and
maintenance) of remote branch offices where trained operators may be unavailable. The Auto View
3100/3200 switches provide our customers with a significant reduction of cable volume, secure
remote access and flexible server management from anywhere at anytime.
The AutoView 3100/3200 KVM switch family has several options depending on the model:
1
• a rack mountable keyboard , video and mo use (KVM) swit
digital (remote) conne ctivity
• video resolutions supported up to 1280 x 1024 for remote users
• enhanced video quality of up to 1600 x 1200 available to local users via the video port
• accessibility to target devices across 10/100 or 1000BaseT (some models) LAN port(s)
The IP-based AutoView 3100/3200 switches give you flexible target device management control
from anyw
here in the world.
Reduce cable bulk
With server densities continually increasing, cable bulk remains a major concern for network
administrators. The AutoView 3100/3200 switches significantly reduce KVM cable volume in the
rack by utilizing the innovative IQ module and single, industry-standard Unshielded Twisted Pair
(UTP) cabling or the Integrated Access Cable (IAC) cabling option. This allows a higher server
density while providing greater airflow and cooling capacity.
NOTE: All references to IQ modules in this document use the AVRIQ module as a default. The AutoView 3100/
3200 switches support Avocent AVRIQ, DSRIQ and DSAVIQ modules as well as Avocent Integrated Access
Cables (IAC modules).
The IQ module and IAC are powered directly from the target device and provides Keep Alive
functionality when the switch is not powered.
ch, configurable for analog (local) or
Page 14
2 AutoView 3100/3200 Switch Installer/User Guide
The serial IQ module is a DCE device that provides the primary interface between a serial device
and a AutoView 3100/3200 switch. It provides VT100 terminal emulation, break suppression and
port history in a compact, convenient module.
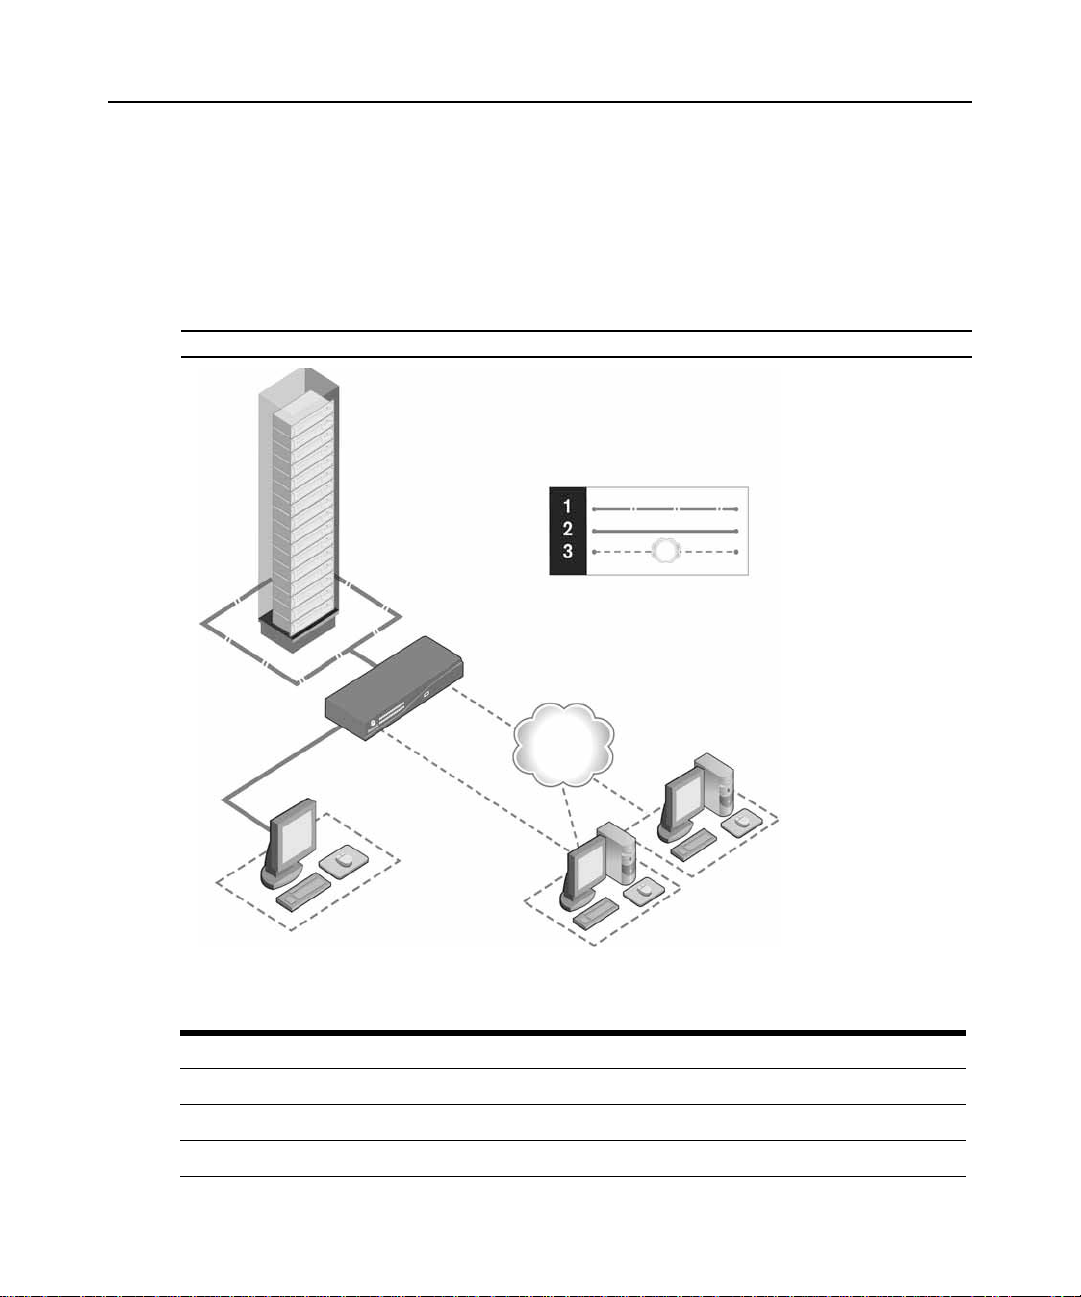
Access the AutoView 3100/3200 switch via a standard TCP/IP network
The Avocent AutoView 3100/3200 switches provide agentless remote control and access. No
special software or drivers are required on the attached, or client, computers.
NOTE: The client connects to the AutoView 3100/3200 switch using an Internet browser.
3
4
5
6
7
Figure 1.1: Example AutoView 3100/3200 Switch Configuration
Table 1.1: Descriptions for Figure 1.1
Number Description Number Description
1 CAT 5 Connection 5 Ethernet
2 KVM Connection to the Switch 6 Digital User (Computer with Internet browser)
3 Remote IP Connection 7 Analog User (OSCAR Graphical User Interface)
8
Page 15

Table 1.1: Descriptions for Figure 1.1 (Continued)
Chapter 1: Product Overview 3
Number
4 AutoView 3100/3200 Switch 8 Digital User (Computer with Internet browser)
Description Number Description
Page 16

4 AutoView 3100/3200 Switch Installer/User Guide
Page 17

CHAPTER
Installation
2
AutoView 3100/3200 Switch Connectivity
The AutoView 3100/3200 switching system transmits keyboard, video and mouse (KVM)
information between operators and target devices attached to the switch over a n etwork using either
an Ethernet or modem connection.
The AutoView 3100/3200 switch uses TCP/IP for communication over Ethernet. Although
aseT Ethernet may be used, Avocent recommends a dedicated, switched 100BaseT or
10B
1000BaseT network for switches that support it.
Install ation Overview
5
The general procedure for setting up and installing an AutoView 3100 /3200 switch is as follows:
• Unpack the switch and verify that all components are present and in good condition.
• Make all hardware connections between the power source, switch, target devices, the Ethernet
and the option
• Turn on the power and verify that all connections are working.
• Configure the AutoView 3100/3200 switch’s IP address using the console menu interface.
• Use the on-board web interface to configure the AutoView 3100/3200 switch.
• Make the appropriate mouse setting adjustments.
al modem connection.
Page 18
6 AutoView 3100/3200 Switch Installer/User Guide
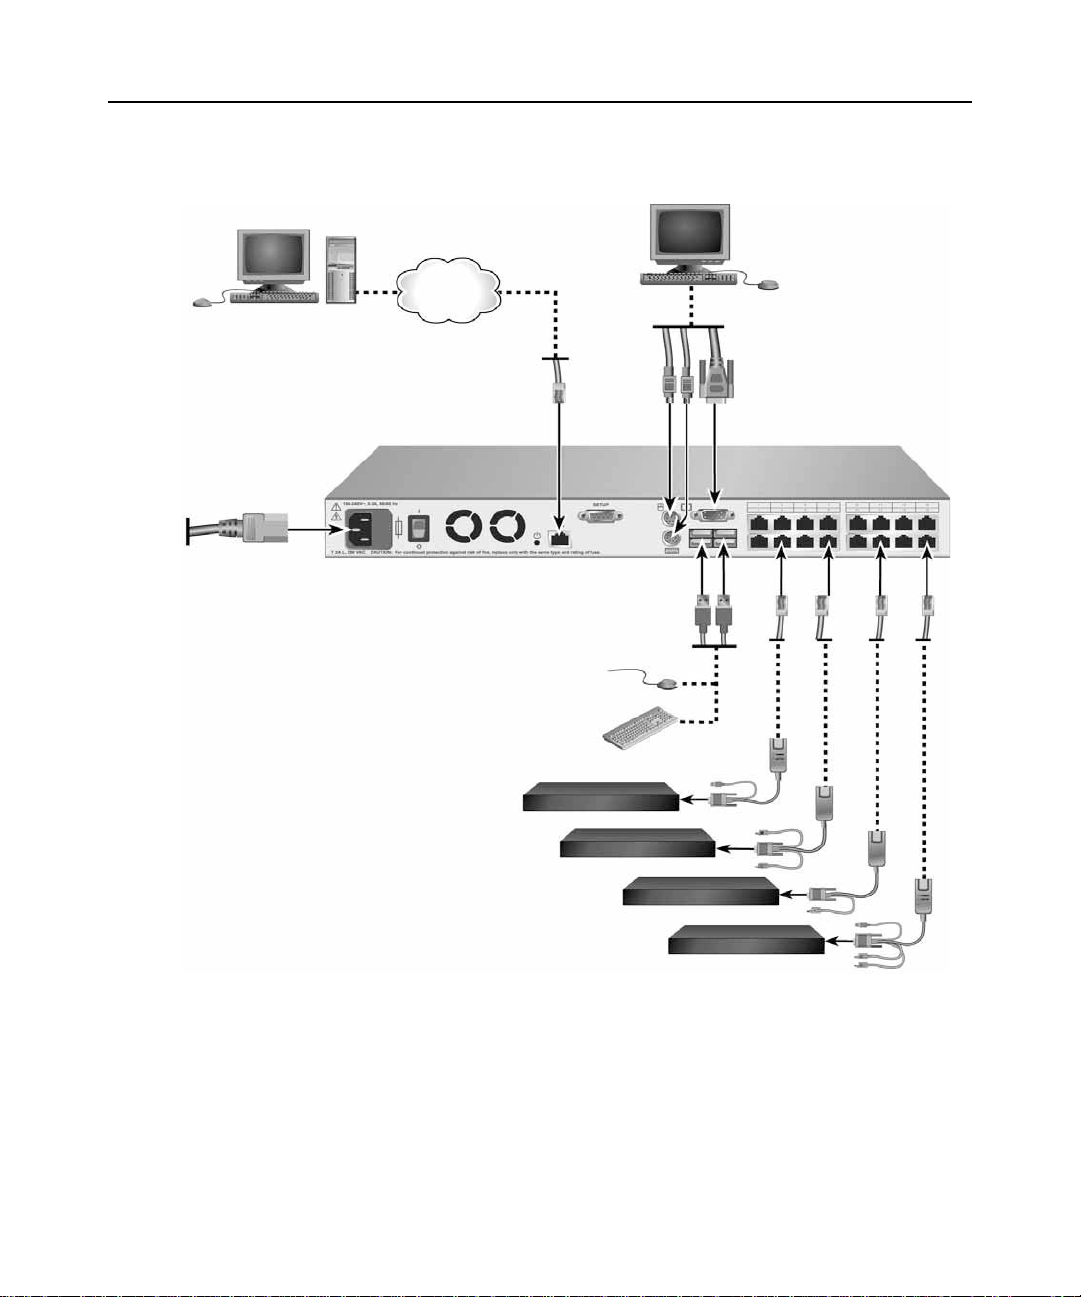
Figure 2.1 illustrates a basic configuration for the AutoView 3100/32 00 switch, using the
AutoView 3100/3200 model for the example. Descriptions follow in Table 2.1.
2
1
5
3
4
6
7
8
Figure 2.1: Basic AutoView 3100/3200 Switch Configuration
9
Page 19

Table 2.1: Descriptions for Figure 2.1
Number Description Number Description
1 Digital User 6 Ports 1-16
2 Network 7 Local USB Connections
3 Analog User 8 Servers 1-16
Chapter 2: Installation 7
4 AutoView 3100/3200
5 Power Cord
Getting started
Before installing your AutoView 3100/3200 switch, refer to the following lists to ensure you have
all items that shipped with the AutoView 3100/3200 switch, as well as other items necessary for
proper installation.
NOTE: While it is possible to use two AutoView 3100/3200 switches in a cascaded configuration, it can cause
function conflicts and limit the advanced features of the switch. As a result, Avocent does not recommend this
configuration.
Supplied with the AutoView 3100/3200 switch
• Local country power cord
• Rack mounting brackets (depending on switch model)
• Rack Mounting Bracket Quick Inst
• AutoView 3100/3200 Switch Quick Installation Guide
• Either of the following:
• Two ribbon cables with RJ-45 connectors at each end
One RJ-45 to DB-9 (male) adaptor fo
Sw
9 IQ Modules, IAC cables, PS/2, USB, Sun and serial
it
ch
adaptors are available
allation Guide (depending on switch model)
r the modem connection
One RJ-45 to DB-9 (female) adaptor for
the SETUP, CONSOLE or 10101 port
-or-
• One null modem cable
Additional items needed
• One IQ module per target server or serial IQ module per serial device
• One UTP patch cable per IQ module (4-pair UTP, up to 30 meters)
• UTP patch cable(s) for network connectivity (4-pair UTP, up to 30 meters)
Page 20

8 AutoView 3100/3200 Switch Installer/User Guide
Setting up your network
The AutoView 3100/3200 switching system uses IP addres ses to uniquely identify the switch and
the target devices. The AutoView 3100/3200 switch family supports both Dynamic Host
Configuration Protocol (DHCP) and static IP addressing. Avocent recommends that IP addresses
be reserved for each switch and that they remain static while the switches are connected to the
network.
Rack Mounting an AutoView 3100/3200 Switch
A rack mounting kit is supplied with each AutoView 3100/3200 switch. You may either place the
AutoView 3100/3200 switch on the rack shelf or mount the switch directly into an Electronic
Industries Alliance (EIA) standard rack.
Most AutoView 3100/3200 switches may be rack mou
3100/3200 switch family does not support a 0U configuration.
Rack mounting safety considerations
• Rack Loading - Overloading or uneven loading of racks may result in shelf or rack failure,
causing damage to equipment and possible personal injury. Stabilize racks in a permanent
location before loading begins. Mount components beginning at the bottom of the rack, then
work to the top. Do not exceed your rack load rating.
• Power Considerations - Connect on ly to the p ower source specified o n the un it. When multipl e
electrical co
not exceed circuit capabilities. Overloaded power sources and extension cords present fire and
shock hazards.
• Elevated Ambient Temperature: If installed i
temperature of the rack environment may be greater than room ambient. Use care not to exceed
the rated maximum ambient temperature of the switch.
• Reduced Air Flow: Install the equipment in the rack so
safe operation of the equipment is not compromised.
• Reliable Earthing: Maintain reliable earthing of rack mounted equipment. Pay particular
attention
example, use of power strips).
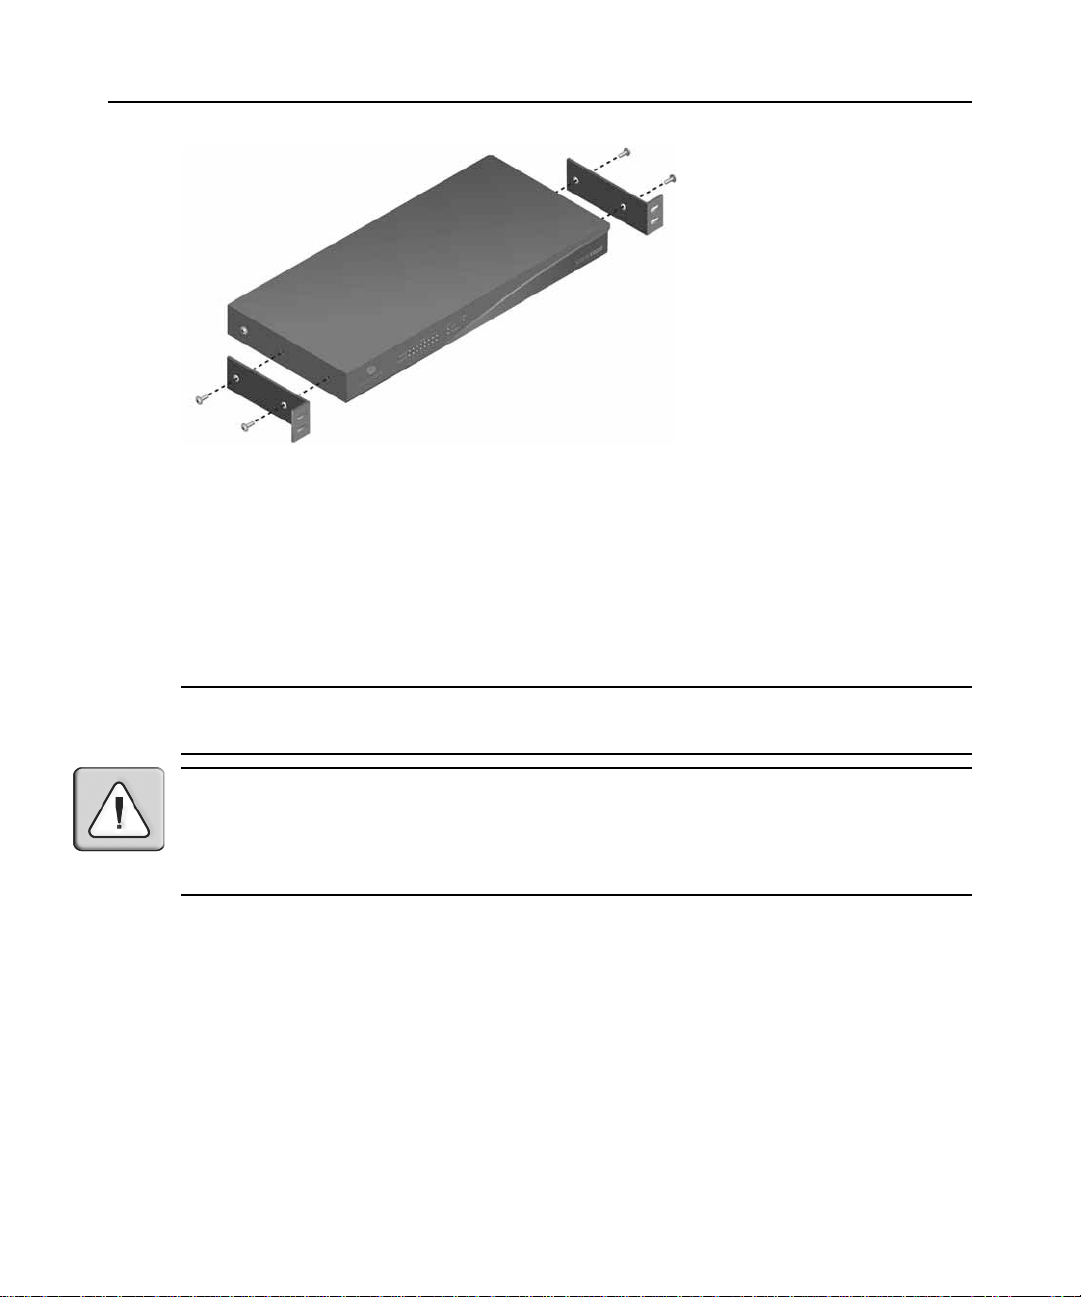
To install the rack mounting bracket:
1. Remove the two rack mounting screws from each side of the AutoView 3100/3200 switch.
2. Place the rack mounting brackets next to the swit
3. Insert the screws supplied with the rack mounting kit through the holes of the brackets and into
the A
mponents
to supply connections other than direct connections to the branch circuit (for
utoView 3100/3200 switch. Tighten the screws securely.
are installed in a rack, ensure that the total component power ratings do
nted in a 1U configuration. The AutoView
n a clos
ed rack assembly, the operating
that the amount of airflow required for
ch as illustrated in Figure 2.2.
Install the AutoView 3100/3200 switch into the rack using the method of the rack manufacturer.
Page 21
Chapter 2: Installation 9
Figure 2.2: AutoView 3100/3200 Switch Mounting Diagram
Connecting the AutoView 3100/3200 Switch Hardware
T o connect and turn on your AutoView 3100/3200 switch:
1. Turn off the target device(s) that will be part of your AutoView 3100/3200 switching system.
Locate the po
appropriate end into the power socket on the rear of the AutoView 3100/3200 switch. Plug the
other end into an appropriate AC wall outlet.
wer cord that came with the AutoView 3100/3200 switch and plug the
NOTE: To avoid potential video and/or ke y boa r d problems when using Avocent pr oducts: If the building
has 3-phase AC power, ensure that the computer and monitor are on the same phase. For best results, they
should be on the same circuit.
WARNING: To reduce the risk of electric shock or damage to your equipment:
- Do not disable the power cord grounding plug. The grounding plug is an important safety feature.
- Plug the power cord into a grounded (earthed) outlet that is easily accessible at all times.
- Disconnect the power from the switch by unplugging the
the appliance.
- The AC inlet is the main power disconnect.
power cor
d from either the electrical outlet or
2. Disconnect the power from the switch by unplugging the po wer cord fr om either the electr ical
outlet or the appliance.
3. Plug your VGA monitor and either PS/2 or USB keyboard and mouse cables into the
ropriately l abeled ports. You must install bo th a keyboard and mouse on the local ports or
app
the keyboard will not initialize properly.
4. Plug a compatible IQ module into the appropriate ports
on the back of the target server.
5. Choose an available numbered port on the rear of your AutoView 3100/3200 switch. Plug one
end o
f a UTP patch cable (4-pair, up t o 30 meters) into the selected por t and plug the other end
into the RJ-45 connector of the IQ module. Repeat this procedure for all servers that are to be
connected to the AutoView 3100/3200 switch.
Page 22

10 AutoView 3100/3200 Switch Installer/User Guide
NOTE: When connecting a Sun IQ module, you must use a multi-sync monitor in the local port to accommodate
Sun computers that support both VGA and sync-on-green or composite sync.
6. Plug a UTP patch cable from your Ethernet network into the LAN port on the back of your
AutoView 3100/3200 switch. Network users will access the AutoView 3100/3200 switch
through this port.
7. Turn on each target device and then turn on the AutoView 3100/3200 switch. After about one
minute, the
switch completes initialization and displays the OSCAR graphical user interface
Free tag on the local port monitor.
8. Point your web browser to the default IP address https://192.168.1.1 to access the dev ice.
9. Log in to the OBWI and, using the top menu bar, select Appliance-App
Network. Enter the appropriate addressing information for your network.
To connect a serial IQ module to a serial device:
liance Settings-
1. Attach the serial IQ module 9-pin serial connector
to the serial port of the device to be
connected to your AutoView 3100/3200 switch.
2. Attach one end of the UTP patch cable to the RJ-45 conn
ector on the IQ-SRL module. Co nnect
the other end of the UTP patch cable to the desired port on the back of your AutoView 3100/
3200 switch.
NOTE: The serial IQ module is a DCE device and only supports VT100 terminal emulation.
3. Connect the power supply to the power connector on your serial IQ module. The cable
expander can be used to turn on to four serial IQ modules from a single power supply.
4. Connect the serial IQ module power supply to a grounded AC wall outlet. Turn on your serial
device. See the Us
ing Serial IQ Modules on pag
e 73 for more information.
Configuring the AutoView 3100/3200 Switch
Once all mechanical connections have been made, you will need to configure the switch for use in
the overall switching system. See Chapter 6 for detailed instructions.
Setting up the built-in web server
You can access the AutoView 3100/3200 switch via an embedded web server that handles most
day-to-day switching tasks. Before using the web server to access the switch, first specify an IP
address through the SETUP , CONSOLE or 10 101 port o n the back panel of the swi tch. See Chapter
4 for detailed instructions on using the on-board web interface for switching.
Page 23

Chapter 2: Installation 11
Connecting to the on-board web interface through a firewall
For AutoView 3100/3200 switch installations that use the on-board web interface for access, four
ports must be opened in a firewall if outside access is desired.
Table 2.2: TCP Ports and Functions for the AutoView 3100/3200 Switch
TCP Port
Number Function
80 Used for the initial downloading of the Avocent Video Viewer (for downloading the Java applet)
443 Used by the web browser interface for managing the AutoView 3100/3200 switch and launching
M sessi
KV
2068 Transmission of KVM session data (mouse & keyboard) or t
x035 model AutoView 3100/3200 switches
ons
ran
smission of video on x030 and
8192 Transmission of KVM session data (video) except for x030 and x035 model AutoView 3100/
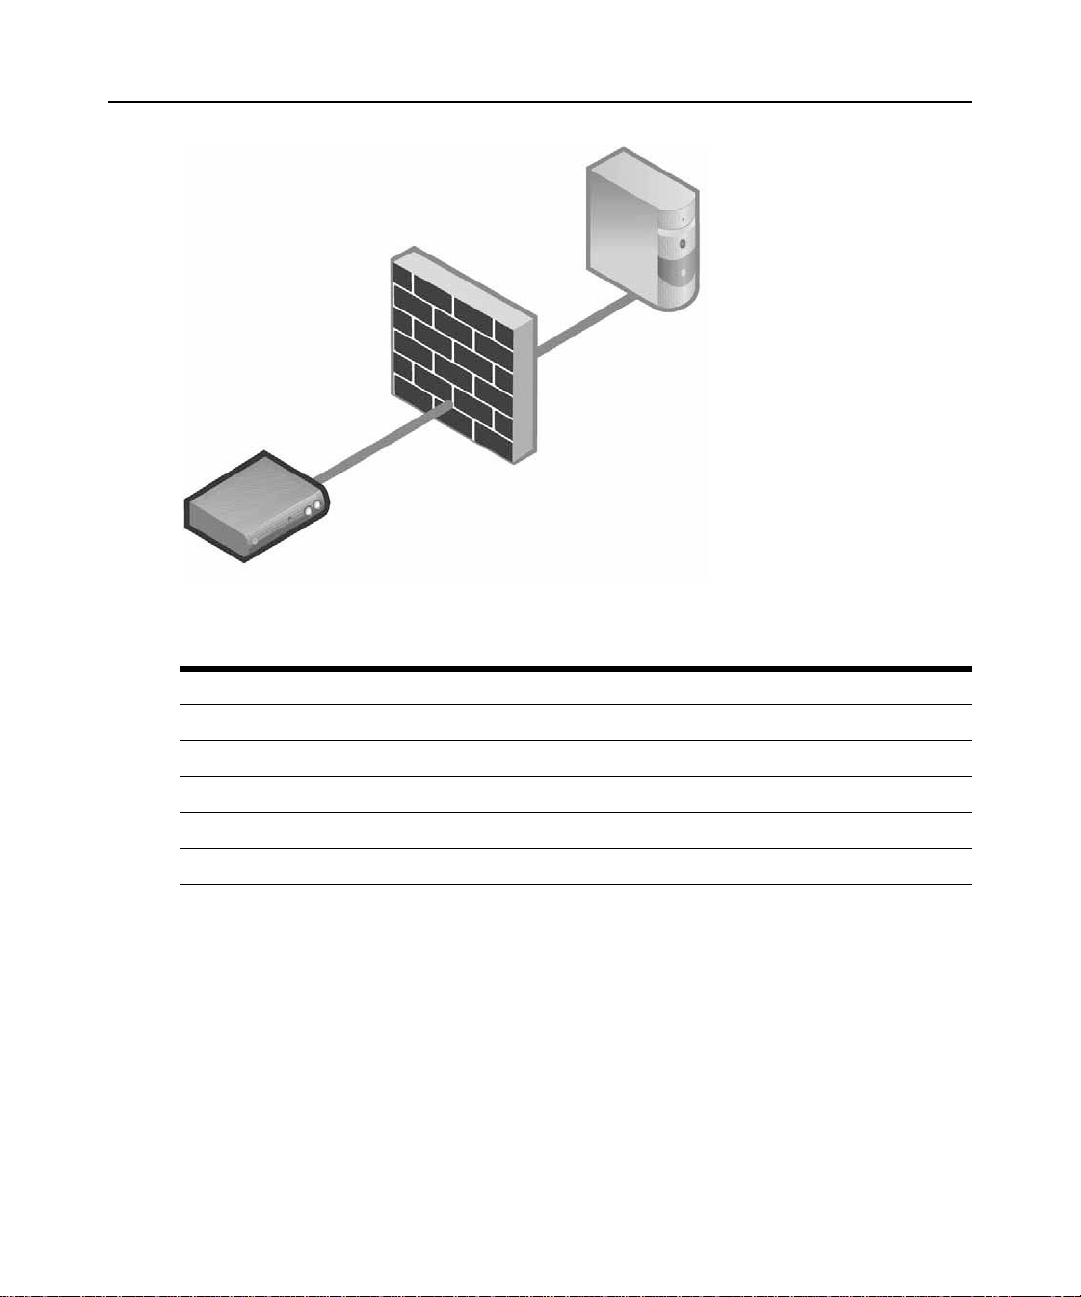
In a typical configuration, as shown in Figure 2.3, the user
3200 switches
’s computer is located outside of the
firewall, and the AutoView 3100/3200 switch resides inside the firewall.
Page 24
12 AutoView 3100/3200 Switch Installer/User Guide
5
4
2
1
Figure 2.3: Typical AutoView 3100/3200 Switch Firewall Configuration
Table 2.3: Descriptions for Figure 2.3
Number Description
1 AutoView 3100/3200 Switch
2 Firewall
3 User’s Computer
4 Firewall Forwards HTTP Requests and KVM Traffic to the AutoView 3100/3200 Switch
5 User Browses to Firewall’s External IP Address
3
To configure the firewall:
To access the AutoView 3100/3200 switch from outside a f
irewall, configure your firewall to
forward ports 80, 443, 2068 and 8192 from its external interface to the KVM switch through the
firewall’s internal interface. Consult the manual for your firewall for specific port forwarding
instructions.
T o connect to the AutoView 3100/3200 switch on-board web interface:
Open a web browser and enter the external IP address of the firewall. The AutoView 3100/3200
er will open and prompt you to login.
Explor
Page 25

Verifying the Connections
AutoView 3100/3200 switch
The front panel of the AutoView 3100/3200 switch features LEDS indicating the Ethernet
connection for LAN, as well as LEDS that indicate the target device status for each port.
Ethernet connection LEDS
Chapter 2: Installation 13
• The green LED, labeled Link, illum
inates when a valid connection to the network is
established at the maximum supported rate and blinks when there is activity on the port.
• The amber LED illuminates when you are communicating at a slower rate when using an
Ethernet co
nnection.
• If neither LED is illuminated, connection speed is at a rate of 10 Mbps.
T arget device status LEDS
• A green LED illuminates when the attached target d
evice has power.
• An amber LED illuminates when that port is selected.
• The LEDs blink during a firmware upgrade.
IQ and serial IQ modules
Typically, IQ modules feature two green LEDs: a POWER LED and a STATUS LED.
•The POWER LED ind
•The STATUS LED
icates that the attached module is powered.
indicates that a valid selection has been made to an AutoView 3100/3200
switch.
The serial IQ module prevents a serial break from the attached device if
However, a user can generate a serial break with the attached device by pressing
accessing the Terminal Applications menu.
Adjusting Mouse Settings on Target Devices
Before a computer connected to the AutoView 3100/3200 switch can be used for remote user
control, you must set the target mouse speed and turn off acceleration. For machines running
Microsoft
®
Windows® (Windows NT
®
, 2000, XP, Server 2003), use the default PS/2 mouse driver.
the module loses power.
Alt-B after
To ensure that the local mouse movement and remote cursor display remain in sync, mouse
acceleration must
be set to “none” for all user accounts accessing a remote system through a KVM
switch. Mouse acceleration must also be set to “none” on every remote system. Special cursors
should not be used and cursor visibility options, such as pointer trails,
Ctrl key cursor location
animations, cursor shadowing and cursor hiding, should also be turned off.
Page 26

14 AutoView 3100/3200 Switch Installer/User Guide
Page 27

CHAPTER
Local Port Oper ation
3
The AutoView 3100/3200 switch includes a local port on the back. This port enables you to
connect a keyboard, monitor and mouse to the switch for direct access. The AutoView 3100/3200
switches include the OSCAR
target devices.
Basic Operations
Viewing and selecting ports and servers
Use the Main dialog box to view, configure and control target devi ces in the Auto View 31 00/32 00
switching system. You may view the target devices by name, port or by the unique Electronic ID
(EID) embedded in each IQ module. You will see an OSCAR interface-generated port list by
default when you first launch the OSCAR interface.
graphical user interface for configuring your system and selecting
15
The Port column indicates the port to which
Selecting a target device
Use the Main dialog box to select a target device. When you select a target device, the AutoView
3100/3200 switch reconfigures the keyboard and mouse to the settings for the selected target
device.
T o select a target device:
Double-cl i ck the target device name, EID or port number.
-orIf the display order of your list is by port (the Po
Enter.
press
-orIf the display order of your list is by name or EID (the Name
first few letters of the name of the target device or the EID number to establish it as unique and
Enter.
press
a target device is connected.
button is depressed), type the port nu mber and
rt
or EID button is depressed), type the
Page 28

16 AutoView 3100/3200 Switch Installer/User Guide
NOTE: If OSCAR Authentication has been enabled, an “Authenticating” screen will appear after you select a
target device because the AutoView 3100/3200 switch is confirming your access to that target device. If you are
denied access to the target device, a message will appear saying that you can not view that particular target
device.
To select the previous target device:
Press
Print Screen and then Backspace. This key combination toggles you between the previous
and current connections.
To disconnect from a target device:
Press
Print Screen and then Alt+0 (zero). This leaves the user in a free state, with no target device
selected. The status flag on your desktop displays Free.
Soft switching
Soft switching is the ability to switch target devices using a hotkey sequence. You can soft switch
to a target device by pressing
number. If you have set a Scr een Del ay Ti me and y ou p ress the key sequ ences befo re that time h as
elapsed, the OSCAR interface will not display.
T o soft switch to a target device:
Press
Print Screen. If the disp lay order of th e Main dial og is by port (the Port button is depressed),
type the por t number and press
Print Screen and then typing the first few characters of its name or
Enter.
-orIf the display order of the Main dialo g is by n ame (the Name
letters of the name of the target device to establish it as unique and press
To switch back to the previous target device, press
Print Screen then Backspace.
button is depressed), type the first few
Enter.
Viewing the status of your AutoView 3100/3200 switching system
The status of target devices in your system is indicated in the far right columns of the Main dialog
box. The following table describes the status symbols.
Table 3.1: OSCAR Interface St atus Symbols
Symbol Description
(green circle) Server connected, powered up and the IQ module is online.
Connected target device is powered down or is
is offline.
Connected switch is online.
Connected switch is offline or not operating properly.
not operating properly, and the IQ module
Page 29

Table 3.1: OSCAR Interface Status Symbols (Continued)
mb
ol Description
Sy
(yellow circle) The designated IQ module is being upgraded. When this symbol displays, do not
cycle power to the AutoView 3100/3200 switch or connected target devices and do not
disconnect IQ modules. Doing so may render the module permanently inoperable and require
the IQ module to be returned to the factory for repair.
(green letter) IQ module is being accessed by the indicated user channel.
(black letter) IQ module is blocked by the indicated user channel. For instance, in Figure 3.1,
user B is viewing Forester, but is blocking access to Acton, Barrett and Edie, which are
onnected t
c
o the same IQ module.
Navigating the OSCAR interface
This table describes how to navigate the OSCAR interface using the keyboard and mouse.
Table 3.2: OSCAR Interface Navigation Basics
Keystroke Function
Chapter 3: Local Port Operation 17
Print Screen Opens the OSCAR interface. Press Prin
F1 Opens the Help screen for the current dialog box.
Escape Closes the current dialog box without saving changes and returns to the
Alt Opens dialog boxes, selects or checks opt
Alt+X Closes current dialog box and returns to previous one.
Alt+O Selects the OK
Enter Completes a switch operation in the Main dialog box and exits the
Single-click, Enter In a text box, single-clicking an entry and pressing En
Print Screen, Backspace Toggles back to previous selection.
Screen keystroke to the currently selected IQ module.
evious one. I
pr
OSCAR interface and displays a status flag if status flags are enabled. See the
Commands Dialog Box Functions o
message box, pressing Escape
current dialog box.
used with underlined or other designated letters.
OSCAR int
editing and enables the Left and Right Arrow keys to move the cursor. Press
Enter again to quit the Edit mode.
f the Main dialog box is displayed, pressing Escape closes the
closes the pop-up box and returns to the
but
ton, then returns to the previous dialog box.
erface.
t Screen twice to send the Print
31 for more information. In a
n page
ions
and executes actions when
ter sel
ects the text for
Page 30

18 AutoView 3100/3200 Switch Installer/User Guide
Table 3.2: OSCAR Interface Navigation Basics (Continued)
ro
ke Function
Keyst
Print Screen, Alt+0 (zero) Immediately disengages user from a target device; no target device is selected.
Print Screen, Pause Immediately turns on Screen Saver mode and prevents access to that specific
Up/Down Arrows Moves the cursor from line to line in lists.
Right/Left Arrows Moves the cursor between columns. When editing a text box, these keys move
Page Up/Page Down Pages up and down through Name and Port lists and Help pages.
Home/End Moves the cursor to the top or bottom of a list.
Backspace Erases characters in a text box.
Delete Deletes current selection in the Scan list or characters in a text box.
Shift-Del Deletes from the current selection to the end of the list when editing a Scan list.
Numbers Type from the keyboard or keypad.
Caps Lock Disabled. Use the Sh
Backspace Erases characters in a text box.
Status flag displays Free. (This only applies to the 0 (zero) on the keyboard and
not the numeric keypad.)
onsole, if
c
he cu
rsor within the column.
t
Main Dialog Box Functions
To access the OSCAR interface Main dialog box:
it is password protected.
ey to change case.
ift k
Press
Print Screen to launch the OSCAR interface. The Main dialog box will appear as shown in
Figure 3.1.
NOTE: If OSCAR Authentication has been enabled, you will be prompted to enter a username and password
before you can launch the OSCAR interface.
Page 31

Figure 3.1: OSCAR Interface Main Dialog Box
Table 3.3: Main Dialog Box Functions
Button Function
Clear Clear all offline IQ modules.
Disconnect Disconnect the KVM session.
Chapter 3: Local Port Operation 19
Setup Access the Setup dialog box and configure the OSCAR interface.
Commands Access the Commands dialog box.
Managing a KVM session
Click Log Out to disconnect the KVM and user sessions.
-orClick Clear to clear
all offline IQ modules.
-orClick Disconnect to
disconnect a KVM session.
Setup Dialog Box Functions
You can configure your AutoView 3100/3200 switching system from the Setup dialog box within
the OSCAR interface. Select the Names button when initially setting up your AutoView 3100/3200
switching system to identify target devices by unique names. Select the other setup features to
Page 32

20 AutoView 3100/3200 Switch Installer/User Guide
manage routine tasks for your target devices from the OSCAR interface menu. Table 3.4 outlines
the function accessed using each of the buttons in
the Setup dialog box as shown in Figure 3.2.
Table 3.4: Setup Features to Configure the OS
Feature Purpose
Menu Change the Main dialog box list sorting option by toggling
EID number and alphabetically by name. Change the Screen Delay Time before the
OSCAR interface displays after pressing Print Screen.
Flag Change display, timing, color or location of the status flag.
Broadcast Simultaneously send mouse movements and keyst
Scan Set up a custom Scan pattern for multiple target devices.
Screen Saver Set passwords to protect or restrict access or enable the screen saver.
Keyboard Set the keyboard country code t
Devices Identify the appropriate number of ports on
Names Identify target devices by unique names.
CAR Interface
o send t
o Sun servers.
between numerically by port or
es to multiple target devices.
rok
an attached cascade switch.
To access the OSCAR interface Setup dialog box:
1. Press
2. Click Setup
Print Screen to launch the OSCAR interface. The Main dialog box appears.
to open the Setup dialog box shown in Figure 3.2.
Figure 3.2: OSCAR Interface Setup Dialog Box
Page 33

Changing the display behavior
Use the Menu dialog box to change the display order of target devices, change how the OSCAR
interface is invoked or set a Screen Delay Time for the OSCAR interface. This setting alters how
target devices will display in several dialog boxes, including Main, Devices and Broadcast.
To access the OSCAR interface Menu dialog box:
Chapter 3: Local Port Operation 21
1. If the OSCAR interface is not open, press
2. Click Setup
Figure 3.3: OSCAR Interface Menu Dialog Box
- Menu in the Main dialog box to open the Menu dialog box shown in Figure 3.3.
Print Screen to open the Main dialog box.
To choose the display order of target devices:
1. Select Name
to display target devices alphabetically by name.
-orSelect EID to display target devices numerically by EID number.
-
-or
Select Port to
display target devices numerically by port number.
2. Click OK.
Depending on the display meth od s el ect ed, the co rres po ndin g bu tto n wi ll b e dep ress ed i n the Mai n
dial
og box.
To change how the OSCAR interface is invoked:
1. Select the checkbox next to one of the listed methods.
2. Click OK.
To set a Screen Delay Time for the OSCAR interface:
1. Type in the number of seconds (0-9) to delay the OSCAR Interface display after you press
Print Screen. Entering 0 will instantly launch the OSCAR interface with no delay.
2. Click OK.
Page 34

22 AutoView 3100/3200 Switch Installer/User Guide
Setting a Screen Delay Time enables you to complete a soft switch without the OSCAR interface
displaying. To perform a soft switch, see the Soft switching on page
Controlling the status flag
The status flag displays on your desktop and shows the name or EID number of the selected target
device or the status of the selected port. Use the Flag dialog box to configure the flag to display by
target device name or EID number, or to change the flag color, opacity, display time and location
on the desktop. Table 3.5 describes each status flag.
Table 3.5: OSCAR Interface St atus Flags
Flag Description
Flag type by name
Flag type by EID number
Flag indicating that the user has been disconnected from all systems
Flag indicating that Broadcast mode is enabled
16.
To access the OSCAR interface Flag dialog box:
1. If the OSCAR interface is not open, press
Print Screen to open the Main dialog box.
2. Click Setup - Fl ag to open the Flag dialog box shown in Fi
Figure 3.4: OSCAR Interface Flag Dialog Box
To determine how the status flag is displayed:
1. Select Name
or EID to determine what information will be displayed.
gure 3.4.
Page 35

Chapter 3: Local Port Operation 23
2. Select Displayed to activate the flag display. After a switch, the flag will remain on the screen
until the user switches to another devi ce. Selectin g Timed will cause the flag to display for five
seconds when a switch is made and then disappear.
3. Select a flag color under Display Color. The fo
llowing flag colors are available:
• Flag 1 - Gray flag with black text
• Fla
• Fla
• Flag
4.
In Display Mode, select Opaq
g 2 - White flag with red text
g 3 - White flag with blue text
4 - White flag with violet text
ue for a solid color flag.
-orSelect Transparent to see th
e desktop through the flag.
5. To position the status flag on the desktop:
a. Click
Figure 3.5: Position Flag
Set Position to gain access to the Position Flag screen shown in Figure 3.5.
b. Left-click on the title bar and drag to the desired location.
c. Right-click to return to the Flag dialog box.
NOTE: Changes made to the flag position are not saved until you click OK in the Flag dialog box.
6. Click OK to save settings.
-orClick X to exit without saving changes.
Selecting target devices for broadcasting
The local user can simultaneously control multiple target devices in a system to ensure that all
selected target devices receive identical input. You can choose to broadcast keystrokes and/or
mouse movements independently.
NOTE: You can broadcast to as many as eight target devices at a time (one target device per port).
To access the OSCAR interface Broadcast dialog box:
1. If the OSCAR interface is not open, press
2. Click Setup
- Broadcast to open the Broadcast dialog box shown in Figure 3.6.
Print Screen to open the Main dialog box.
Page 36

24 AutoView 3100/3200 Switch Installer/User Guide
Figure 3.6: OSCAR Interface Broadcast Dialog Box
NOTE: Broadcasting Keystrokes - The keyboard state must be identical for all target devices receiving a
broadcast to interpret keystrokes identically. Specifically, the Caps Lock and Num Lock modes must be the
same on all keyboards. While the switch attempts to send keystrokes to the selected target devices
simultaneously, some target devices may inhibit and thereby delay the transmission.
or
Broadcasting Mouse Movements - F
drivers, desktops (such as identically placed icons) and video resolutions. In addition, the mouse must be in
exactly the same place on all screens. Because these conditions are extremely difficult to achieve, broadcasting
mouse movements to multiple systems may have unpredictable results.
the mouse to work accurately, all systems must have identical mouse
T o select the target devices for broadcasting:
1. From the Broadcast dialog box, select the mouse and/or keyboard checkboxes for the target
devices
that are to receive the Broadcast commands.
-orPress the
select the keyboard checkbox and/or
Up or Down Arrow keys to move the cursor to the target device. Then press Alt+K to
Alt+M to select the mouse checkbox. Repeat for
additional target devices.
2. Click OK to s
ave the settings and return to the Setup dialog box. Click X or press Escape to
return to the Main dialog box.
For information on starting and stopping broadcasting, see Enabl
page 32.
Selecting target devices for Scan mode
In Scan mode, the AutoView 3100/3 200 switch automatically scans from port to port (target device
to target device). You can scan multiple target devices, specifying which devices to scan and the
number of seconds that each will display. The scanning order is determined by placement of the
target device in the list. The list is always shown in scanning order. You can, however, choose to
display the target device’s name or EID number by pressing the appropriate button.
ing or disabling Broadcasting on
Page 37

NOTE: Scanning is available only to local users.
T o add target devices to the Scan list:
Chapter 3: Local Port Operation 25
1. If the OSCAR interface is not open, press
2. Click Setup
Figure 3.7: OSCAR Interface Scan Dialog Box
- Scan to open the Scan dialog box shown in Figure 3.7.
Print Screen to open the Main dialog box.
3. Determine the order within the list to add the target device. If there are no tar g et devices in the
Scan list, your cursor will appear in a blank line at the top of the list.
-orT o add a tar get device to the end of the list, place your cursor in the last tar get device entry and
res
p
Down Arrow key.
s the
-orTo add a target device within an existing list, place you
want to insert a new target device and press
Insert.
4. Type the first few characters of a tar get device name or po
r cursor in the line below where you
rt number to scan. The first matching
target device will appear in the line.
-orPress the following keyboard commands in the Name, Port or Time column to move through
li
st of target devices available to scan.
the
a. Press
b. Press
c. Press
d. Press
5. In the Time column, type the number of seconds (from 3-2
Alt+Down Arrow to move the cursor down through the list of target devices.
Alt+Up Arrow to move the cursor up through the list of target devices.
Alt+Home to move the cursor to the first target device in the list.
Alt+End to move the cursor to the last target device in the list.
55) of desired time before the scan
moves to the next target device in the sequence.
Page 38

26 AutoView 3100/3200 Switch Installer/User Guide
6. Move the cursor to the next line or press Down Arrow and repeat steps 2-5 for each of the
remaining target devices to be included in the scan pattern.
7. Click OK to
save your settings.
To remove a target device from the Scan list:
1. In the Scan dialog box, click the target device to be removed.
2. Press
Delete.
-or-
Shift+Delete to remove the selected target device and all entries below it.
Press
3. Click OK to
save your settings.
For more on starting and stopping scanning, see Enabli
Setting local port Screen Saver options
You can use the Screen Saver dialog box to manage the screen saver inactivity time and test the
Screen Saver mode on the local port. If OSCAR Authentication has been enabled, after the
specified Inactivity Time elapses, the local port locks and remains locked until you press any key or
move the mouse. You will then need to log in and reselect a target device to continue.
To access the OSCAR interface Screen Saver dialog box:
1. If the OSCAR interface is not open, press
2. Click Setup - Sc
reen Saver to open the Screen Saver dialog box shown in Figure 3.8.
ng or disabling Scan mode on page 33.
Print Screen to open the Main dialog box.
Figure 3.8: OSCAR Interface Screen Saver Dialog Box
T o set the Screen Saver options:
1. Type the number of minutes for Inactivity Time (from 1-90) to delay activation of password
protection
2. For Mo de, select Energy if y
and the screen saver feature.
our monitor is ENERGY STAR
®
compliant; otherwise select Screen.
Page 39

CAUTION: Monitor damage can result from the use of Energy mode with monitors not compliant with
ENERGY STAR®.
3. (Optional) Click Test to activate the screen saver test, which lasts 10 seconds, then returns you
to the Security dialog box.
4. Click OK to
save your settings.
To exit Screen Saver mode and log in to the local port:
1. Press any key or move t he mouse.
2. If OSCAR Authentication has been enabled, you will see a login screen. Enter your username
and pass
word and then click OK.
3. The Main OSCAR interface dialog box will appear. You m
T o immediately activate the screen saver:
Press
Print Screen, then Pause.
This command sequence works only when the user is connected to a target device.
Setting the keyboard country code
NOTE: Using a keyboard code that supports a language different from that of your AutoView 3100/3200 switch
firmware will cause incorrect keyboard mapping.
Chapter 3: Local Port Operation 27
ay select an available target device.
Sun servers may use keyboard mappings for non-US keyboards. By defau lt, the AutoView 3100/
3200 switch sends the US keyboard country code to Sun and USB modules attached to target
devices, and the code is applied to the target devi ces when th ey are powered up or rebooted. Codes
are then stored in the IQ module.
Issues may arise when you use the US keyboard country code with a keyboard of another country.
Z key on a US keyboard is in the same location as the Y key on a German
For exampl
keyboard. Sun servers will interpret pressing the
e, the
Y key on a German keyboard as pressing t he Z key
when the US keyboard country code is used.
The Keyboard dialog box enables you to send a different keyboard country code than the default
US setting
. The specified country code is sent to all target devices attached to the AutoView 3100/
3200 switches when they are powered up or rebooted, and the new code is stored in the IQ module.
NOTE: If an IQ module is moved to a different target device, the keyboard country code will need to be reset.
See Sun Advanced Key Emulation on page 81 for information on emulating certain Sun keys using
a PS/2 keyboard and special considerations for J
NOTE: Only local users can view or change keyboard country code settings.
apanese and Korean Sun USB keyboards.
Page 40

28 AutoView 3100/3200 Switch Installer/User Guide
To set the keyboard country code for Sun servers:
1. If the OSCAR interface is not open, press
2. Click
Figure 3.9: OSCAR Interface Keyboard Dialog Box
Setup - Keyboard to open the Keyboard dialog box shown in Figure 3.9.
3. Select a country code and click OK to save your settings.
4. Reboot the Sun servers. After rebooting, each Sun server will request the country code setting
stored
in the IQ module.
NOTE: If you wish to reboot the target devices by power-cycling them, you must wait 90 seconds before
rebooting. A soft reboot may be performed without waiting 90 seconds.
Assigning device types
Print Screen to open the Main dialog box.
To access the OSCAR interface Devices dialog box:
1. If the OSCAR interface is not open, press
2. Click Setup - Devices t
NOTE: The Modify button is available only if a configurable switch is selected.
o open the Devices dialog box shown in Figure 3.10.
Print Screen to open the Main dialog box.
Page 41

Chapter 3: Local Port Operation 29
Figure 3.10: OSCAR Interface Devices Dialog Box
When the AutoView 3100/3200 switch discovers a cascaded switch, the numbering format chang es
from an AutoView 3100/3200 port only to [AutoView 3100/3200 port]-[switch port] to
accommodate each target device under that switch.
For example, if a switch is connected to
AutoView 3100/3200 port 6, each target device connected
to it would be numbered sequentially. The target device using AutoV iew 3100/ 320 0 port 6, switch
port 1, would be 06-01, the target device using AutoView 3100/3200 port 6, switch port 2, would
be 06-02, and so on.
To assign a device type:
1. In the Devices di alog box, select the desired port number.
2. Click Modify t
Figure 3.11: OSCAR Interface Device Modify Dialog Box
o open the Device Modify dialog box shown in Figure 3.11.
3. Choose the number of ports supported by your switch and click OK.
Page 42

30 AutoView 3100/3200 Switch Installer/User Guide
4. Repeat steps 1-3 for each port requiring a device type to be assigned.
5. Click OK in th
NOTE: Changes made in the Device Modify dialog box are not saved until you click OK in the dialog box.
e Devices dialog box to save settings.
Assigning target device names
Use the Names dialog box to identify target devices by name rather than by port number. The
Names list is always sorted by port order. You can toggle between displaying the name or the EID
number of each IQ module, so even if you move the target device to another port, the name and
configuration will be recognized by the switch.
NOTE: When it is initially connected, a target device will not appear in the Names list until it is powered up. Once
an initial connection has been made, it will appear in the Names list even when powered down.
To access the OSCAR interface Names dialog box:
1. If the OSCAR interface is not open, press
2. Click Setup
Figure 3.12: OSCAR Interface Names Dialog Box
NOTE: If new IQ modules are discovered by the AutoView 3100/3200 switch, the on-screen list will be
automatically updated. The mouse cursor will change into an hourglass during the update. No mouse or
keyboard input will be accepted until the list update is complete.
- Names to open the Names dialog box shown in Figure 3.12.
Print Screen. The Main dialog box appears.
To assign names to target devices:
1. In the Names dialog box, select a target device name or port number and click Mod
ify to open
the Name Mo dify dialog box shown in Figure 3.13.
Page 43

Chapter 3: Local Port Operation 31
Figure 3.13: OSCAR Interface Name Modify Dialog Box
2. Type a name in the New Name box. Names of target devices may contain all
printable characters.
3. Click OK to tr
ansfer the new name to the Names dialog box. Your selection is not saved until
you click OK in the Names dialog box.
4. Repeat steps 1-3 for each target device
5. Click OK in
the Names dialog box to save your changes.
in the system.
-orClick X or press
Escape to exit the dialog box without saving changes.
NOTE: If an IQ module has not been assigned a name, the EID is used as the default name.
T o list target devices alphabetically by name:
Press
Alt+N or click Name in the Main dialog box.
Commands Dialog Box Functions
From the OSCAR interface Commands dialog box, you can manage your AutoView 3100/3200
switching system and user connections, enable the Scan and Broadcast modes and update your
firmware.
Table 3.6: Commands to Manage Routine Tasks for Your Target Devices
Features Purpose
Broadcast
Enab
le
Scan Enable Begin scanning your target devices. Set up a t
Begin broadcasting to your target devices. Configure a target device list for broadcasting
under the Setup dialog box.
dialog box.
arget
device list for scanning in the Setup
Page 44

32 AutoView 3100/3200 Switch Installer/User Guide
Table 3.6: Commands to Manage Routine Tasks for Your Target Devices (Continued)
at
ures Purpose
Fe
User Status View and disconnect users.
Display Versions View version information for the AutoView 3100/3200 switch as well as view and upgrade
Reset PS/2 Re-establish operation of PS/2 keyboard and mouse.
Network Ping Ping a specific IP address.
mware for individual IQ modules.
fir
To access the OSCAR interface Commands dialog box:
1. If the OSCAR interface is not open, press
2. Click Comm
Figure 3.14: OSCAR Interface Commands Dialog Box
ands to open the Commands dialog box shown in Figure 3.14.
Print Screen to open the Main dialog box.
Enabling or disabling Broadcasting
To turn Broadcasting on:
1. If the OSCAR interface is not open, press
2. Click Comm
3. Select the Broadcas
4. From the user station, type the informatio n and pe r for m the m ouse movements you wish
to broadcast.
To turn Broadcasting off:
From the Commands dialog box, clear the Broadcas
ands to open the Commands dialog box.
t Enable checkbox to activate Broadcasting.
Print Screen to open the Main dialog box.
t Enable checkbox.
Page 45

Enabling or disabling Scan mode
To start the Scan mode:
Chapter 3: Local Port Operation 33
1. If the OSCAR interface is not open, press
2. Click Comm
3. Select Scan En
4. Click X to clos
NOTE: Scanning will begin as soon as the Scan Enable button is selected.
ands to open the Commands dialog box.
able in the Commands dialog box.
e the Commands dialog box.
Print Screen to open the Main dialog box.
To cancel Scan mode:
Select a target device if the OSCAR interface is open.
-orMove the mouse or press any key on the keyboard if the OSCAR interface is not open. Scanning
will s
p at the currently selected target device.
to
-orFrom the Commands dialog
box, deselect the Scan Enable checkbox.
Viewing and disconnecting user connections
You can view and disconnect users through the User Status dialog box. The username (U) will
always be displayed; however, you can display either the target device name or EID number to
which a user is connected. If there is no user currently connected to a channel, the user field will be
blank and the Server Name field will display Free.
To view current user connections:
1. If the OSCAR interface is not open, press
2. Click Comm
ands - User Status to open the User Status dialog box shown in Figure 3.15.
Print Screen to open the Main dialog box.
Page 46

34 AutoView 3100/3200 Switch Installer/User Guide
Figure 3.15: OSCAR Interface User Status Dialog Box
To disconnect a user:
1. If the OSCAR interface is not open, press
2. Click Comm
ands - User Status to open the User Status dialog box shown in Figure 3.15.
Print Screen to open the Main dialog box.
3. Click the letter corresponding to the user to disconnect. The Disconnect dialog box will appear
as show
Figure 3.16: OSCAR Interface Disconnect Dialog Box
n in Figure 3.16.
4. Click OK to disconnect the user and return to the User Status dialog box.
-orClick X or press
NOTE: If the User Status list has changed since last displayed, the mouse cursor will turn into an hourglass as
the list is automatically updated. No mouse or keyboard input will be accepted until the list update is complete.
Escape to exit the dialog box without disconnecting a user.
Page 47

Displaying version information
The OSCAR interface enables you to display the version number of the switch firmware and any
auxiliary devices connected to the switch. This information facilitat es system troubleshooting and
support. For optimum performance, keep your firmware current.
To display version information:
Chapter 3: Local Port Operation 35
1. If the OSCAR interface is not open, press
2. Click
Figure 3.17: OSCAR Interface Version Dialog Box
Command s - Display Versions to open the Version dialog box shown in Figure 3.17.
Print Screen to open the Main dialog box.
3. To view individual AVRIQ module version information, click AVRIQ to open the AVRIQ
Selection dialog box shown in Figure 3.1 8.
Figure 3.18: AVRIQ Selection Dialog Box
Page 48

36 AutoView 3100/3200 Switch Installer/User Guide
4. Select a AVRIQ module to view and click the Version button. The AVRIQ Version dialog box
shown in Figure 3.19 appears.
For more information on loading firmware, refer to Flas
Figure 3.19: AVRIQ Version Dialog Box
5. Click X to close the AVRIQ Version dialog box.
To enable or disable USB 2.0:
1. If the OSCAR interface is not open, press
2. Click
3. Click AVRIQ to
Command s - Display Versions to open the Version dialog box shown in Figure 3.17.
open the AVRIQ Selection dialog box shown in Figure 3.18.
Print Screen to open the Main dialog box.
4. Select a AVRIQ module to view and click the Vers
shown in Figure 3.19 appears.
h Upgrades on page 71.
ion button. The AVRIQ Version dialog box
Resetting your PS/2 keyboard and mouse
NOTE: This function is for Microsoft Windows-based computers only. Resetting the PS/2 on a target device
running any other operating system may require that you reboot that target device.
If your PS/2 keyboard or mouse locks up, you may be able to re-establish operation of these
peripherals by issuing a Reset command. The Reset command sends a hot-plug sequence to the
target device that causes the mouse and keyboard settings to be sent to the AutoView 3100/3200
switch. With communication re-established between the target device and the AutoView 3100/
3200 switch, functionality is restored to the user.
T o reset the PS/2 mouse and keyboard values:
1. If the OSCAR interface is not open, press
2. Click Commands - Reset PS/2. A
message box displays requesting that you confirm the reset.
Print Screen to open the Main dialog box.
Page 49

3. In the message box, click OK.
a. A message appears indicating that the mouse an
b. Click OK to
close the message box.
-orClick X or press
and keyboard.
Sending a ping request
To send a ping request:
Chapter 3: Local Port Operation 37
d keyboard have been reset.
Escape to exit without sending a Reset command to the PS/2 mouse
1. If the OSCAR interface is not open, press
2. Click Comm
3. Click Networ
Figure 3.20: OSCAR Interface Ping Dialog Box
ands to open the Commands dialog box.
k Ping to open the Ping dialog box shown in Figure 3.20.
Print Screen to open the Main dialog box.
4. Enter the IP address that yo u want to pin g i n the I P Address to ping field, then clic k Send Ping.
The result will be displayed in the Result box below the Send Pi ng button. The result will be
one o
f the following:
• Ping successful!
• No response received.
• Invalid IP address.
Page 50

38 AutoView 3100/3200 Switch Installer/User Guide
Page 51

CHAPTER
Web Interface Operations
4
AutoView 3100/3200 Switch On-Board Web Interface
In addition to the OSCAR on-screen interface, AutoView 3100/3200 switches equipped with the
on-board web interface feature provide a built in interface to handle all basic KVM switching
needs. The AutoView 3100/3200 switch on-board web interface provides secure “point-and-click”
web browser-based access to control any device attached to your AutoView 3100/3200 switch.
Table 4.1 shows which operating systems and browsers the AutoView 3100/3200 switch on-board
web interface supports.
Table 4.1: On-Board Web Interface Supported Operating Systems and Browsers
39
Browser
Microsoft
Internet Explorer
Operating System
Windows 2000 Workstation or Server with
rv
ice Pack 2
Se
Windows Server 2003 Standard, Enterprise
or Web E
Windows XP Home Edition or Professional Yes Yes Yes
Red Hat Enterprise Linux 3 and 4 No Yes Yes
Sun Solaris 9 and 10 No Yes Yes
Novell SUSE
Fedora Core 4 and 5 No Yes Yes
Mac OS X Tiger (10.4+) No No Yes
NOTE: Mac OS X requires Firefox 1.5 or later.
dition
®
Linux Enterprise 9 and 10 No Yes Yes
version 6.0 SP1
and later
Yes Yes Yes
Yes Yes Yes
®
Mozilla
on 1.7.3
versi
and later
Firefox
on 1.0
versi
and later
Page 52

40 AutoView 3100/3200 Switch Installer/User Guide
Avocent recommends that the browser be kept up-to-date with the latest version.
A Video Viewer window allows you to control the keyboard, monitor and mouse functions of
individu
use predefined global macros to perform actions within the Video Viewer window. For instructions
on how to use the Video Viewer, see Chapter 5. Once the switch has been i
as described in Chapter 2 and you have set th e IP address, y ou are ready to begin reg ular op eration.
al target devices connected to the AutoView 3100/3200 switch in real time. You may also
Viewing and Selecting Ports and Servers
Before you can begin a KVM session, you must first login to the AutoView 3100/3200 switch onboard web interface.
To log in to the AutoView 3100/3200 switch on-board web interface:
1. Laun ch a web browse r.
2. In the address field of the browser, enter the IP address
3100/3200 switch you wish to access. Use https://xxx.xx.xx.xx or https://hostname as the
format.
3. When the browser makes contact with the switch, enter your username and password, then
click Logi
NOTE: The default username is Admin with no password.
n. The AutoView 3100/3200 Explorer Window will appear.
ns
talled and configured
or host name assigned to the AutoView
The AutoView 3100/3200 Explorer Window
When a user has been logged in and authenticated, the Avocent AutoView 3100/3200 Explorer
window appears. From the AutoView 3100/3200 Explorer window, users may view, access and
manage their AutoView 3100/3200 switch. The window may also be used to specify system
settings and change profile settings.
Figure 4.1 shows the AutoView 3100/3200 Explorer window areas for the AutoView 3100/3200
switch, and descriptions follow in Table 4.2.
Page 53

1
2
3
Figure 4.1: Avocent AutoView 3100/3200 Explorer Window
Chapter 4: Web Interface Operations 41
Table 4.2: Descriptions for Figure 4.1
Number Description
1 Top option bar: Use the top option bar to bookmark an Aut
2 Side navigation bar: Use the side navigation bar to display the system information you wish to
3 Content area: Use the content area to display or
interface window, refresh the display of an AutoView 3100/3200 switch on-board web interface
window, print a web page, log out of a software session or access the Avocent Technical Support
help page. The name of the logged in user appears on the left side of the top option bar.
play or edit, which displays in the content area. The side navigation bar also contains icons in the
is
d
top left corner which, when clicked, expand or collapse all nodes.
on-board web interface system.
Using the side navigation bar
You can use the side navigation bar to display windows in which you can specify settings or
perform operations. Clicking on a link that does not contain an arrow will display its
corresponding window.
oView 3100/3200 switch on-board web
make change
s to the AutoView 3100/3200 switch
Page 54

42 AutoView 3100/3200 Switch Installer/User Guide
Using the top option bar
Bookmarking a window
The AutoView 3100/3200 Explorer window contains a bookmark icon and text in the top option
bar
. Bookmarking a window will add a link to the window in the Favorites drop-down menu. You
may select the link at any time to quickly access the bookmarked window.
If you bookmark a window and information related to the window changes, this new information
will appear
in the window when you next display the bookmarked window.
If you click BOOK
web interface session has timed out, the User Login window will open and you must log in again.
To bookmark a window:
1. In the top option bar, click BOOKMARK or t
will appear.
2. If you wish, type a name for the window. You may also click the Create in
specify a folder in which to place the window.
3. Click OK to clos
Printing a window
All AutoView 3100/3200 switch on-board web interface (OB
the top option bar.
To print an AutoView 3100/3200 switch on-board web interface window:
1. In the top option bar, click PRINT or
2. Specify the options you wish to us e for printi ng the AutoView 3100/3200 switch on -board web
interf
ace window.
3. Click Print to p
the Print dialog box.
Refreshing a window
The AutoView 3100/3200 Explor er window may b e refreshed at any ti me by clicking REFRESH or
the refresh icon in the top option bar.
MARK or the bookmark icon after the AutoView 3100/3200 switch on-board
he bookmark icon. The Add Favorite dialog box
button to create or
e the Add Favorite dialog box.
WI) windows contain a print icon in
the print icon. The Print dialog box will appear.
rint the AutoView 310 0/3200 s witch on-boar d web interface window and close
Logging out
A user may log out at any time by clicking the logout icon in the top option bar.
Launching a KVM Session
NOTE: When in IPv4 mode, Java 1.5 or later is required.
Page 55

Chapter 4: Web Interface Operations 43
T o launch a KVM session from the AutoView 3100/3200 Explorer:
1. From the AutoView 3100/3200 Explorer, select Tar
list of available devices will appear.
2. Clic k t he KVM s
Viewer will launch. For more information on the Video Viewer, see Chapter 5.
If the target device is currently in use, users attempting access will be given an opportunity to force
a connect
Users may also launch KVM sessions from the Unit Overview window.
To delete offline IQ modules:
1. If you wish to only list servers that are available and powered, click Ap
2. Clic k t he Delete Offline bu
To disconnect an active KVM session (administrator only):
1. Click Appliance - Appliance Settings - Sessions - Active to dis
2. Select the checkbox to the left of the sessi
ion to the device if their preemption level is equal to or higher than the current user’s.
Settings - P orts - IQ modul es to activate the Appliance IQ modules window.
sessions.
button.
ession link to the right of the target device that you wish to access. The Video
tton.
on you wish to disconnect and click the Disconnect
get Devices in the side navigation bar. A
pliance - App
play a list of active KVM
Managing the AutoView 3100/3200 Switch On-Board Web
Interface
The AutoView 3100/3200 switch on-board web interf ace pro vides s everal co nfig uration optio ns to
tailor the AutoView 3100/3200 switch to your specific application.
liance
Upgrading IQ modules
The IQ module Flash upgrade feature allows you to update IQ modules with the latest firmware
available. This update can be performed using the AutoView 3100/3200 switch on-board web
interface or the OSCAR interface.
After the Flash memory is reprogrammed with the upgrade, the AutoView 3100/3200 switch
forms a soft reset, which terminates all IQ module sessions. A target device experiencing an IQ
per
module firmware update may not display, or may display as disconnected. The target device will
appear normally when the Flash update is completed.
NOTE: Check www.avocent.com for firmware upgrade files.
NOTE: IQ modules are automatically updated when the AutoView 3100/3200 switch is updated.
If issues occur during the normal upgrade process, IQ modules may also be force upgraded
when needed.
Page 56

44 AutoView 3100/3200 Switch Installer/User Guide
To force upgrade the IQ module firmware using the AutoView 3100/3200 switch onboard web interface:
1. From the side navigati on bar, select Applia
2. Select the IQ modules that you wish to upgrade and click the Upgr
CAUTION: Disconnecting an AutoView 3100/3200 switch or IQ module or power cycling the user’s computer
during a firmware update may render it inoperable and require it to be returned to the factory for repair.
Managing local accounts
The AutoView switch web interface provides local and login security through Administratordefined user accounts. By selecting Local Accounts on the side menu bar, Administrators may add
and delete users, define user preemption and access levels and change passwords.
User access levels
Accounts have two access levels: user and administrator. Most switch management tasks can only
be perf
ormed by persons with administrator level access.
Preemption levels
The preemption level of users determine whether they may disconnect another user’s serial or
video
(KVM) session with a target device.
AutoView switch web interface administrators may sp
when an account is created. The preemption level may be changed later.
Preemption levels range from 1-4, with 4 being the highes
preemption level of 4 may preempt other level 4 users, as well as those with a level 1, 2 or 3 setting.
nce - Appliance Settings - Ports - IQ modules.
ade button.
ecify the preemption level for user accounts
t level. For example, a user with a
To change the default premption level (Administrator only):
1. Click Appliance - Appliance Se ttings - Ports - OSCAR.
2.
Use the drop-down menu to select the new level and click the Save butto
To add a new user account (Administrator only):
1. On the side menu bar, select Local A
2. Clic k t he Add bu
tton.
s. The current user list will be displayed.
ccount
3. Enter the name and password of the new user in the blanks provided.
4. Select the preemption and access leve
5. Clic k t he Save b
utton to complete the process.
ls for the new user.
To delete a user account (Administrator only):
1. On the side menu bar, select Local A
2. Click the box to the left of each account that you wish
s. The current user list will be displayed.
ccount
to delete, then click the
delete butt on.
n.
Page 57

Chapter 4: Web Interface Operations 45
To edit a user account (Administrator or active user only):
1. On the side menu bar, select local accounts. The current us
2. Click the name of the user you wish to edit. A user profile will appear.
3. Edit the user account as needed, then click Save.
Managing device properties
Viewing and changing appliance configuration information
The AutoView 3100/3200 switch can rep ort mo st device properties directly through the Aut o View
swi
tch web browser.
NOTE: Users can view all appliance information, but only Administrators can change settings.
Table 4.3: Viewing Appliance Information
To do t his : Select this:
Display the unit’s name or type Appliance - Overview
Display a list of available target devices, their
type and
Enter, change or display the unit’s network
address,
address, LAN speed, DHCP enable status or
ICMP ping reply status
Display the unit’s current firmware revision for
applicat
status
gateway address, subnet mask, MAC
ion, boot
and Video FPGA
er list will be displayed.
Target Devi ces
Appliance - Appliance Settings - Network
Appliance - Appliance Settings - Versions
Display a list of the attached AVRIQ modules and
their st
atus
Display a list of active KVM sessions and
their durat
Display a list of devices attached to the AutoView
3100/3200 s
Display a list of devices attached to the AutoView
3100/3200 s
View the unit’s part number, serial number and
EID number
Enter or display the unit’s Site, Department
and Location
Enable the inactivity timeout Appliance - Appliance Settings - Sessions - KVM settings
ion
witch
witch
Appliance - Appliance Settings - Ports - AVRIQ modules
Appliance - Appliance Settings - Sessions - Active
Appliance - Appliance Settings - Sessions - Active
Appliance - Connections
A
ppliance - Properties - Identity
Appliance - Properties - Location
Then, click the Enable Inact
ivity timeout box.
Page 58

46 AutoView 3100/3200 Switch Installer/User Guide
Table 4.3: Viewing Appliance Information (Continued)
To do t his : Select this:
Change the unit encryption level Appliance - Appliance Settings - Sessions - KVM settings
Rebooting the appliance
Periodically, such as after an upgrade, you may need to reboot the AutoView 3100/3200 switch.
To reboot the AutoView 3100/3200 switch remotely:
1. From the side navigati on bar, select Appliance - O
2. When the appliance overview window appears, click Too
Managing local accounts
The AutoView 3100/3200 switch on-board web in terface provides local and login security through
administrator-defined user accounts. By selecting Local Accounts on the side menu bar,
administrators may add and delete users, define user preemption and access levels and
change passwords.
Access levels
When a user account is added to the on-board web interface, the user may be assig ned to any of the
following access levels:
• Appliance administrators
• User administrators
•Users
Then select the level of encryption desired for keyboard/
ouse signals
m
and then video signals.
verview.
ls - Reboot A ppliance.
Page 59

Table 4.4: Allowed Operations by Access Level
Chapter 4: Web Interface Operations 47
Access Level
Operation
Configure on-board web interface system-level settings Yes No No
Configure access rights Yes Yes No
Add, change and delete user accounts Yes, for all
Change your own password Yes Yes Yes
Access target device Yes, all target
Appliance
Administrator
acces
devices
s l
evels
User
Administrator
Yes, for users and
user administrators
only
Yes, all target
ices
dev
To add a new user account (administrator only):
1. On the side menu bar, select Local Account
2. Clic k t he Add but
ton.
s. The current user list will be displayed.
3. Enter the name and password of the new user in the blanks provided.
4. Select the preemption and access leve
5. Clic k t he Save b
utton to complete the process.
ls for the new user.
To delete a user account (administrator only):
1. On the side menu bar, select Local Account
2. Click the box to the left of each account that you wish
s. The current user list will be displayed.
to delete, then click the Delete button.
Users
No
s, if allowed
Ye
To edit a user account (administrator or active user only):
1. On the side menu bar, select Local Account
2. Click the name of the user you wish to edit. A user profile will appear.
3. Edit the user account as needed, then click Save.
Preemption levels
The preemption level of users determines whether they may disconnect another user’s serial or
video (KVM) session with a target devi ce.
AutoView 3100/3200 switch on-board web interface administ
level for user accounts when an account is created. The preemption level may be changed later.
s. The current user list will be displayed.
rators may specify the preemption
Page 60

48 AutoView 3100/3200 Switch Installer/User Guide
Preemption levels range from 1-4, with 4 being the highest level. For example, a user with a
preemption level of 4 may preempt other level 4 users, as well as those with a level 1, 2 or 3 setting.
To change the default preemption level (administrator only):
1. Click Appliance - Appliance Se ttings - Ports - OSCAR.
2.
Use the drop-down menu to select the new level and click the Save butto
Managing Device Properties
Viewing and changing appliance configuration information
The AutoView 3100/3200 switch can rep ort mo st device properties directly through the Aut o View
3100/3200 switch web browser.
NOTE: Users can view all appliance information, but only administrators can change settings.
Table 4.5: Viewing Appliance Information
To do t his : Select this:
Display the unit’s name or type Appliance - Overview
n.
Display a list of available target devices, their type
and status
Enter, change or display the unit’s IP version,
network address,
MAC address, LAN speed, DHCP enable status,
ICMP ping reply status, SNMP enable status or
primary, secondary or tertiary DNS servers
Display the unit’s current firmware revision for
ion, boot
applicat
Display a list of the attached IQ module and
its st
atus
Display a list of active KVM sessions and
their durat
Display a list of active sessions Appliance - Appliance Settings - Sessions - Active
Display a list of devices attached to the AutoView
3100/3200 switc
VIew the unit’s part number, serial number and
EID number
Enter or display the unit’s Site, Department
and Location
gateway address, subnet mask,
and Video FPGA
ion
h
arget Devices
T
Appliance - Appliance Settings - Network
Appliance- Appliance Settings - Versions
Appliance - Appliance Settings - Ports - IQ modules
Appliance - Appliance Settings - Sessions - Active
Appliance - Connections
Appliance - Propert
Appliance - Properties - Location
ies - Identity
Page 61

Table 4.5: Viewing Appliance Information (Continued)
o this: Select this:
o d
T
Chapter 4: Web Interface Operations 49
Enable the Inactivity Timeout Appliance - Appliance Settings - Sessions - KVM settings
Change the unit encryption level Appliance - Appliance Settings - Sessions - KVM settings
Change the modem time-out settings Appliance - Appliance Settings - Ports - Modern
Then click the Enable Inact
Then select the level of encryption desired for keyboard/
mou
Appliance and target device query modes
One of three different modes can each be used for Query Mode (Appliance) and Query
Mode (Device):
• Basic – A user name and password query for the user is made to the directory service. If they
are verified, the u
devices for Query Mode (Appliance), or to any selected target device for Query
Mode (Device).
• User Attribute – A user name, password and Acces
user is made to the directory service. The Access Control Attribute is read from the user object
(the user account) in Active Directory.
If the value “KVM Appliance Admin” is found, the user is
access to the appliance and any attached target devices for Query Mode (Appliance) , or to any
selected target device for Query Mode (Device). If the value “KVM User Admin” is found, th e
user is given User administrator access to the appliance and attached target devices for Query
Mode (Appliance), or to any selected target device for Query Mode (Device).
ser is given administrator access to the appliance and any attached target
ivity Timeout box
se s
ignals and then video signals
s C
ontrol Attribute query for the appliance
given appliance administrator
The following are examples showing how the KVM Applian
ce Admin and KVM User Admin
attribute modes are defined in Active Directory for a user named John Smith, stored in the
ADUC. You can access the ADUC by selecting Start > Programs > Administrative Tools >
Active Directory Users and Computers.
Page 62

50 AutoView 3100/3200 Switch Installer/User Guide
Figure 4.2: Active Directory - KVM user
Figure 4.3: Active Directory - KVM appliance admin
• Group Attribute – A user n ame, pas s word an d gr oup query is made to the directory servi ce fo r
an appliance and attached target devices when using Query Mode (Appliance), or for a selected
Page 63

Chapter 4: Web Interface Operations 51
target device when using Query Mod e (Device). If a grou p is fo und conta ining the user and the
appliance name, the user is given access to the appliance or attached target devices, depending
on the group contents, when using Query Mode (Appliance). If a group is found con taining the
user and target device IDs, the user is given access to the selected target device connected to
the appliance when using Query Mode (Device).
Groups can be nested to a maximum of 16 levels in depth. U se nest ing t o create grou ps within
er groups. For example, you may have a top-level group named Computers that contains a
oth
member nam ed R&D, which is a group. The R&D group may contain a member named
Domestic, which is a group, and so on.
The following is an example of groups defined in Active Directory.
Figure 4.4: Active Directory - Define Groups
Setting up Active Directory for performing queries
Before you can use any of the querying modes for units, you must first make changes to Active
Directory so that the selected querying mode can assign the applicable authorization level for
the user.
To set up group queries:
1. Log into Windows with administrator privileges.
2. Open Active Directory software.
3. Create an organizational unit to be used as a group container.
Page 64

52 AutoView 3100/3200 Switch Installer/User Guide
4. Create an object in Active Directory with a name identical to the switching system name for
querying appliances (specified in the Appliance Overview screen of the OB WI), or iden tical to
the attached target devices for querying target devices. The name must match exactly,
including case.
5. The appliance names and target device names used for group queries are stored in the
pliance. Th
ap
e appliance name specified in the Appliance Overview screen of the OBWI and
target device names must identically match the object names in Active Directory. Each
appliance name and target device name may be comprised of any combination of upper-case
and lower-case letters (a-z, A-Z), digits (0-9) and hyphens (-). You cannot use spaces and
periods (.) or create a name that consists entirely of digits. These are Active
Directory constraints.
NOTE: The factory default name in earlier versions contains a space that must be removed by editing the
switching system name in the Appliance Overview screen of the OBWI.
6. Create one or more groups under the group container organizational unit.
7. Add the user names and target device and appliance ob
8. Specify the value of any attribute being used to implement the
example, if you are using info as the attribute in the Access Control Attribute field and using
the Notes property in the group object to implement the access control attribute, the value of
the Notes attribute in Active Directory may be set to one of the three available access levels
(KVM User, KVM User Admin or KVM Appliance Admin) for the group object. The
members of the group may then access the appliances and target devices at the specified
access level.
jects to the groups you created in step 5.
access control attribute. For
Page 65

CHAPTER
The Video Viewer
5
The Video Viewer Window
The Video Viewer is used to conduct a KVM session with the target devices attached to an
AutoView 3100/3200 switch using the on-board web interface. When you connect to a device using
the Video Viewer, the target device desktop appears in a separate window containin g both the local
and the target device cursor. The Video Viewer window supports either a 3- or 5-button mouse.
The AutoView 3100/3200 switch on-board web interface software uses a Java-based program to
play the Video Viewer window. The AutoView 3100/3200 switch on-board web interface
dis
automatically downloads and installs the Video Viewer the first time it is opened.
NOTE: When in IPv4 mode, Java 1.5 or later is required.
53
NOTE: The AutoView 3100/3200 switch on-board web interface does not install the Java Resource Engine
(JRE). The JRE is available as a free download from http://www.sun.com for PC users and from http://
www.apple.com for Mac users.
NOTE: The AutoView 3100/3200 switch on-board web interface uses system memory to store and display
images within Video Viewer windows. Each opened Video Viewer window requires additional system memory:
• An 8-bit color setting on the client PC requires 1.4 MB of memory per Video Viewer window.
• A 16-bit color setting requires 2.4 MB and a 32-bit
Opening more than four simultaneous Video Viewer windows may affect system performance and is not
mend
recom
receive an out-of-memory error and the requested Video Viewer window will not open.
If the device you are attempting to access is currently being viewed by another user, you will be
prompted to preempt the other users if your preemption level is equal to or greater than theirs. An
appliance administrator can also disconnect an active user via the Active Session page. For more
information, see To disconnect an active KVM session (administrator only): on
ed. If you attempt to open more Video Viewer windows than your system memory allows, you will
color sett
ing requires 6.8 MB.
page 43.
Page 66

54 AutoView 3100/3200 Switch Installer/User Guide
Launching a KVM Session
NOTE: When using a non-proxied connection, video performance over a slower network connection may be less
than optimal. Since certain color settings (such as Grayscale) use less network bandwidth than others (such as
Best Color), changing the color settings can increase video performance. For optimal video performance over a
slower network connection, Avocent recommends a color setting such as Grayscale/Best Compression or Low
Color/High Compression. See
page 58 for more information.
NOTE: If a user connects to a target device with a higher screen resolution than the local computer, the Video
Viewer window will display a portion of the target device screen, with scroll bars for viewing the remainder of the
screen. The user may view the entire screen by adjusting the resolution on the target device, the local computer
or both.
To launch a KVM session from the AutoView 3100/3200 Explorer window:
1. Click on a device listed on the Target Devices screen to open the unit overview window.
2. Clic k t he KVM S
Session time-out
A remote session can time-out when no activity occurs in a Session window for a specified time.
The session time-out value can be configured in the Appliance KVM Session Settings window. The
specified time-out value will be used the next time the switch on-board web interface is accessed.
1024 x 768 768 x 576 960 x 720 704 x 528 896 x 672 640 x 480 832 x 624 on
ession link to open the Video Viewer in a new window.
To enable, disable or configure the session time-out:
1. In the side menu, select Uni
t Views - Appliance - Appl i ance Set ti ngs - Ses sion s - K VM Settings.
2. Select the desired setting for the Enab
3. If necessary, select the time limit for the inactivity time-out.
Video Viewer Window Features
Figure 5.1 shows the Video Viewer window areas. Descriptions follow in Table 5.1.
le Activity Timeout box.
Page 67

Chapter 5: The Video Viewer 55
2
3
4
5
6
7
1
8
9
Figure 5.1: Video Viewer Window (Normal Win dow Mode)
Table 5.1: Descriptions for Figure 5.1
Number Description
1 Title Bar: Displays the name of the server being viewed. When
disappears and the server name appears between the menu and toolbar.
2 Thumbtack: Locks the display of the menu and toolbar so that it is visible at all times.
3 Menu and toolbar: Enables you to access many of the features in the Video Viewer window. The
4 Macro buttons: Commonly used keyboard sequences tha
5 Minimize button: Minimizes the display of
6 Maximize button: Changes t
enu and t
m
over the toolbar to display the menu and toolbar. Up to ten commands and/or macro group buttons
can be displayed on the toolbar. By default, the Single Cursor Mode, Refresh, Automatic Video
Adjust and Align Local Cursor buttons appear on the toolbar. For more information, see the
Changing the toolbar on
the local computer.
desktop to fill the entire screen. Expanding the window causes the following to occur:
• The title bar disappears.
• The server name appears between the menu and toolbar.
• The Maximize button changes to a Normal Window Mode button and appears on the toolbar.
• The Close button appears on the toolbar.
oolbar is in a show/hide state if the thumbtack has not been used. Place your cursor
page 56 and
he window to
lick
ing the button toggles the Video Viewer window to Normal Window mode.
C
the Using Macros on page 64.
the Video Viewer window into the task bar at the bottom of
Full Screen mode, which expands the accessed device
in Full Screen mode, the title bar
t can be sent to the target device.
Page 68

56 AutoView 3100/3200 Switch Installer/User Guide
Table 5.1: Descriptions for Figure 5.1 (Continued)
Number
7 Close button: Closes the Video Viewer window.
8 Ac
9 Frame: Resizes
Description
NOTE: The Close button may not be present for all operating systems.
cessed device desktop: Int
Changing the toolbar
You can choose the amount of elapsed time before the toolbar hides in the Video Viewer window
when it is in show/hide state (that is, not locked in place by the thumbtack).
To specify a toolbar hide time:
1. Select Tools - Session Options from
-orClick the Session Options but
The Session Options dialog box appears.
2. Clic k t he Toolb
ar tab.
3. Use the arrow keys to specify the number of elapsed
4. Click OK to
save your changes and close the dialog box.
Setting the window size
eracts with your device through this window.
the Video Viewer window by clicking and holding on the frame.
the Video Viewer window menu.
ton.
seconds prior to hiding the toolbar.
NOTE: The View - Scaling command is not available if the Video Viewer window is in Full Screen mode or to
non-primary users of a shared session.
When the AutoView 3100/3200 switch on-board web interface is used for the first time, any open
Video Viewer windows display at a resolution of 1024 x 768 until the user changes the value. Each
Video Viewer window can be set to a different resolution.
The AutoView 3100/3200 switch on-board web interface automatically adjus
window size changes during a session as long as autoscaling is enabled. If the target device
resolution changes any time during a session, the display adjusts automatically.
To change the Video Viewer window resolution:
1. Select the View
2. Clic k on the desired resolution.
Adjusting the view
Using menus or task buttons in the Video Viewer window, you can do the following:
ts the display if the
- Scaling command.
Page 69

Chapter 5: The Video Viewer 57
• Align the mouse cursors.
• Refresh the screen.
• Enable or disable Full Screen mode. When Full Screen mode is en
abled, the image adjusts to
fit the desktop up to a size of 1024 x 768. If the desktop has a higher resolution, the
following occurs:
• The full-screen image is centered in the desktop
, and the areas surrounding the Video
Viewer window are black.
• The menu and toolbar are locked so that they are vi
sible at all times.
• Enable automatic, full or manual scaling of the session image:
• With full scaling, the desktop window remains fixed and the device image scales to fit
the wi
ndow.
• With automatic scaling, the desktop window is sized to match the resolution of the server
viewed.
being
• With manual scaling, a drop-down menu of supported image scaling resolutions
is displayed.
• Change the color depth of the session image.
To align the mouse cursors:
Click the Align Lo
cal Cursor button in the Video Viewer window toolbar. The local cursor should
align with the cursor on the remote device.
NOTE: If cursors drift out of alignment, turn off mouse acceleration in the attached device.
To refresh the screen:
Click the Refresh Image button in the Video Viewer window.
-orSelect View - Refres
h from the Video Viewer window menu.
The digitized video image is completely regenerated.
To enable or disable Full Screen mode:
1. To enable Full Screen mode, click the Ma
mize button.
xi
-orSelect View - Full Screen from t
The desktop window disappears and only the accessed
he Video Viewer window menu.
device desktop is visible. The screen
resizes up to a maximum of 1024 x 768. If the desktop has a higher resolution, then a black
background surrounds the full screen image. The floating toolbar appears.
-or-
Page 70

58 AutoView 3100/3200 Switch Installer/User Guide
2. To disable Full Screen mode, click the Full Screen Mode button on the floating toolbar to
return to the desktop window.
To enable full or manual scaling:
To enable full scaling, select View - Sca
image scales automatically to the resolution of the server being viewed.
-or-
To enable manual scaling, select View - Sca
dimension to scale the window. Available manual scaling sizes are as follows:
1024 x 768 768 x 576
960 x 720 704 x 528
896 x 672 640 x 480
832 x 624
Adjusting color depth
The Dambrackas Video Compression
viewable colors in a remote session window. You can choose to display more colors for the best
fidelity or fewer colors to reduce the volume of data transferred on the network.
Video Viewer windows can be viewed using the Best Co
Compression (fastest updates), a combination of Best Color and Best Compression or in Grayscale.
You can specify the color depths of individual ports and channels by selecting the View - Co
command in a remote session window. These settings are saved individually per channel.
Additional video adjustment
Generally, the Video Viewer window automatic adjustment features o ptimize the video for the best
possible view. However, users can fine-tune the video with the hel p of Avocen t Technical Sup por t
by selecting the Tools - Manual Video Adjust command in the Video Viewer window menu or
clicking the Manual Video Adjust but ton. This display s the Manual Video Adjust dial og box. Vide o
adjustment is a per target setting.
ling from the Video Viewer window menu. The device
ling from the Video Viewer windo w menu . C hoose the
®
(DVC) algorithm enables users to adjust the number of
lor Available (slower updates), Best
lor
Users can also verify the level of packets per second req
uired to support a static screen by
observing the packet rate located in the lower left-hand corner of the dialog box.
To manually adjust the video quality of the window:
NOTE: The following video adjustments should be made only on the advice and with the help of Avocent
Technical Support.
1. Select Tools - Manual Video Adjust from the Video Viewer window menu.
-orClick the Manual Video Adjust bu
tton.
The Manual Video Adjust dialog box appears. Figure 5.2 shows the dialog box, and
descripti ons follow in Table 5.2.
Page 71

Chapter 5: The Video Viewer 59
2
1
3
5
4
7
6
8
9
10
11
12
13
14
Figure 5.2: Manual Vi de o Adjust Dialog Box
Table 5.2: Descriptions for Figure 5.2
Number Description Number Description
1 Image Capture Width 8 Pixel Noise Thre shold
2 Pixel Sampling/Fine Adjust 9 Automatic Video Adjustment
3 Image Capture Horizontal Position 10 Refresh Image
4 Image Capture Vertical Position 11 Adjustment bar
5 Contrast 12 Video Test Pattern
6 Brightness 13 Perf orm ance Monit or
7 Block Noise Threshold 14 Close button
2. Click the icon corresponding to the feature you wish to adjust.
3. Move the Contrast slider bar and then fine-tune the setting by clicking the Min (-) or
buttons to adjust the parameter for each icon pressed. The adjustments display immediately in
the Video Viewer window.
4. When finished, click Close
Target video settings
The Image Capture Width, Pixel Sampling/Fine Adjust, Image Capture Horizontal Position and
Image Capture Vertical Position adjustments affect how the target video is captured and digitized
and are seldom changed.
Max (+)
to exit the Manual Video Ad jus t dialog box .
Page 72

60 AutoView 3100/3200 Switch Installer/User Guide
The image capture parameters are automatically changed by the Automatic Adjustment function. A
special image is required on the target in order to make accurate adjustments independently.
Contrast and brightness
If the image in the Video Viewer window is too dark or too light, select Tools - Automatic Video
Adjust or click the Automatic Video Adjust button. This command is also available in the Video
Adjustments dialog box. In most cases, this corrects video issues.
When clicking Auto Adj
adjusting the contrast and brightness manually can help. Increase the brightness. Do not go more
than 10 increments before moving the contrast. Generally, the contrast should be moved very little.
ust several times does not set the contrast and brightness as desired,
Detection thresholds
In some cases, noise in the video transmission keeps the packets/sec count up , which is indicated b y
little dots changing in the area of the cursor when it is moved. Varying the threshold values may
result in “quieter” screens and can improve cursor tracking.
You can modify Noise Threshold and Priority Threshold values if you are using standard video
pression. You can also modify Block Noise Threshold and Pixel Noise Th reshold values. You
com
can restore default threshold values by clicking Auto Adjust Video.
Block Noise Threshold and Pixel Noise Threshold
The Block Noise Threshold and Pixel Noise Threshold values set the minimum color levels in
terms of changed video blocks and pixels per thousand that are allowed.
• The Block Noise Threshold sets the minimum color change that occurs in a single video block.
Increasi
these artifacts smaller.
• The Pixel Noise Threshold sets the minimum color change in
value reduces the number of low-contrast artifacts, but increases network bandwidth.
See Adjusting the view on page
ng the value reduces the network bandwidth. Decreasing the value makes the size of
56 for information about changing the color depth.
Automatic video adjustment
a single pixel. Decreasing the
In most cases, you do not need to alter the Video Settings from the default. The system
automatically adjusts and uses the optimal video parameters. The AutoView 3100/3200 switch onboard web interface performs best when the video parameters are set such that no (0) vide o packets
are transmitted for a static screen.
You can easily adjust your video parameters to ideal settings by clicking on the Auto Adj
button in the Manual Video Adjust dialog box.
NOTE: You can also select Tools - Automatic Video Adjust from the Video Viewer window menu or click the
Automatic Video Adjust toolbar icon to automatically adjust the video.
ust Video
Page 73

Refresh Image
Clicking the Refresh Image button in the Manual Video Adjust dialog box completely regenerates
the digitized video image.
NOTE: You can also select View - Refresh from the Video Viewer window menu to refresh the image.
Video Test Pattern
Clicking the Video Test Pattern button in the Manual Video Adjust dialog box toggles a display of
a video test pattern. Click the Video Test Pattern button again to toggle back to a normal
video image.
Adjusting mouse options
The Video Viewer window mouse options affect cursor type, Cursor mode, scaling, alignment and
resetting. Mouse settings are device-specific; that is, they may be set differently for each device.
NOTE: If the device does not support the ability to disconnect and reconnect the mouse (almost all newer PCs
do), then the mouse will become disabled and the device will have to be rebooted.
Cursor type
The Video Viewer window offers five appearance choices for the local mous e cursor. You can also
choose no cursor or the default cursor.
Chapter 5: The Video Viewer 61
In Single Cursor mode, the display of the local (second) curs
or in the Video Viewer window turns
off and only the target device mouse pointe r is vi sible. The only mouse movements that appear are
those of the target device remote cursor. Use Single Cursor mode when there is no need for a local
cursor. Figure 5.3 shows both the Remote Cursor and t he Local Cursor displayed in the Video
Viewer window.
1
2
Figure 5.3: Video Viewer Window with Local and Remote Cursors Displayed
Page 74

62 AutoView 3100/3200 Switch Installer/User Guide
Table 5.3: Descriptions for Figure 5.3
Number Description
1 Remote Cursor
2 Local Cursor
The Cursor mode status of the Video Viewer window displays in the title bar, including the
keystroke that will exit Single Cursor mode. You can define the keystroke that will exit Single
Cursor mode in the Session Options dialog box.
NOTE: When using a device that captures keystrokes before they reach the client, you should avoid using those
keys to restore the mouse pointer.
To enter Single Cursor mode:
Select Tools - Single Cursor Mode from
the Video Viewer window menu.
-orClick the Single Cursor Mode button.
The local cu
rsor does not appear and all movements
are relative to the target device.
T o select a key for exiting Single Cursor mode:
1. Select Tools - Session Options from
the Video Viewer window menu.
-orClick the Session Options but
ton.
The Session Options dialog box appears.
2. Clic k t he Mouse tab
.
3. Select a terminating keystroke from the drop-down menu in the Single Cursor mode area.
4. Click OK to s
When you enable Single Cursor mode, you can pres
ave settings.
s the specified key to return to Regular
Desktop mode.
To exit Single Cursor mode:
Press the key on the keyboard that is identified in the title bar.
To change the mouse cursor setting:
1. Select T
ools - Session Options from
the Video Viewer window menu.
-orClick the Session Options but
ton.
Page 75

The Session Options dialog box appears.
Chapter 5: The Video Viewer 63
2. Clic k t he Mouse tab
3. Select a mouse cursor type in the Local Cursor panel.
4. Click OK to s
Mouse scaling
Some earlier versions of Linux did not support adjustable mouse accelerations. For installations
that must support these earlier versions, you can choose among three preconfigured mouse scaling
options or set you r o wn custom scaling. The preconfig ured s etti n gs are D efau l t (1:1), High (2:1) or
Low (1:2):
• In a 1:1 scaling ratio, every mouse movement on the desktop window sends an equivalent
mouse mov
• In a 2:1 scaling ratio, the same mouse movement sends a 2X mouse movement.
• In a 1:2 scaling ratio, the value is 1/2X.
To set mouse scaling:
1. Select Tools - Session Options from
-orClick the Session Options but
The Session Options dialog box appears.
2. Clic k t he Mouse tab
3. To use one of the preconfigured settings, check the appropriate radio button.
-orTo set custom scaling:
a. Click the Custom
b. Type a scaling value in the X and Y fields. For
are multiplied by the respective X and Y scaling factors. Valid input range is 0.25-3.00.
.
ave settings.
ement to the server.
the Video Viewer window menu.
ton.
.
radio button to enable the X and Y fields.
every mouse input, the mouse movements
Vendor-specific video settings
Video settings vary significantly among manufacturers. Avocent maintain s an online database of
optimized video settings for various video cards, particularly Sun-specific ones. This information
can be obtained from Avocent’s online knowledge base or by calling Avocent technical support.
Mouse alignment and synchronization
Because the AutoView 3100/3200 switch on-board web interface cannot get constant feedback
from the mouse, there are times when the mouse on the AutoView 3100/320 0 switch may los e sync
with the mouse on the host system. If your mouse or keyboard no longer responds properly, you
can align the mouse to re-establish proper tracking.
Page 76

64 AutoView 3100/3200 Switch Installer/User Guide
Alignment causes the local cursor to align with the remote server’s cursor. Resetting causes a
simulation of a mouse and keyboard reconnect as if you had disconnected and reconnected them.
To realign the mouse:
Click the Align Lo
cal Cursor button in the Video Viewer window toolbar.
Using Keyboard Pass-through
Keystrokes that a user enters when using a Video Viewer window may be interpreted in two ways,
depending on the Screen mode of the Video Viewer window.
• If a Video Viewer window is in Full Screen mode, all keystrokes and keyboard combinations
Ctrl-Alt-Del are sent to the remote server being viewed.
except
• If a Video Viewer window is in Regular Desktop mode, Keyboard Pass-through mode can be
used
to control whether the remote server or local computer recognizes certain keystrokes or
keystroke combinations.
Keyboard pass-through must be specified using the Session Options dialog box. When enabled,
ard pass-through sends all keystrokes and keystroke combinations except
keybo
remote server being viewed when the Video Viewer window is active. When the local desktop is
active, keystrokes and keystroke combinations entered by the user affect the local computer.
NOTE: The Ctrl-Alt-Delete keyboard combination can be sent only to a remote server by using a macro.
NOTE: The Japanese keyboard ALT-Han/Zen keystroke combination is always sent to a remote server
regardless of the Screen mode or keyboard pass-through setting.
To specify keyboard pass-through:
1. Select Tools - Session Options from
-orClick the Session Options but
ton.
Ctrl-Alt-Del to the
the Video Viewer window menu.
The Session Options dialog box appears.
2. Clic k t he Genera
3. Select Pass-
4. Click OK to s
Using Macros
The AutoView 3100/3200 switch on-board web interface comes pre-configured with macros for
the Windows and the Sun platforms.
To send a macro:
Select Macros - <desired macro> from
l tab.
through all keystrokes in regular window mode.
ave setting.
the Video Viewer window menu.
Page 77

-or-
Chapter 5: The Video Viewer 65
Select the desired macro from the buttons available on the Video
Saving the View
You can save the display of a Video Viewer either to a file or to the clipboard for pasting into a
word processor or other program.
To capture the Video Viewer window to a file:
1. Select File - Cap
-orClick the Capture to File but
The Save As dialog box appears.
2. Enter a filename and choose a location to save the file.
3. Click Save to
To capture the Video Viewer window to your clipboard:
Select File - Capture to Clipboard from
-orClick the Capture to Clipboard bu
The image data is saved to the clipboard.
ture to File from the Video Viewer window menu.
ton.
save the display to a file.
the Video Viewer window menu.
tton.
Closing a Video Viewer Window Session
Viewer menu.
T o close a Video Viewer window session:
Select File - Exit from the Video Viewer window.
Page 78

66 AutoView 3100/3200 Switch Installer/User Guide
Page 79

CHAPTER
Terminal Operations
6
The Console Menu
Each AutoView 3100/3200 switch may be configured at the appliance level through the Console
menu interface accessed through the SETUP, CONSOLE or 10101 port. All terminal commands
are accessed through a terminal or PC running terminal emulation software.
To connect a terminal to the AutoView 3100/3200 switch:
67
1. Using a null modem cable, connect a terminal or a PC th
software (such as HyperTerminal
of the AutoView 3100/3200 switch.
The terminal settings are 9600 bits per second (bps), 8 bits, 1 stop bit, no parity and no
flow cont
2. Turn on each target device and then turn on the AutoView 3100/3200 switch. When the
AutoV
following message: “Press any key to continue.”
rol.
iew 3100/3200 switch completes initialization, the Console menu will disp lay the
Network Configuration
To configure network settings using the Console menu:
1. When you turn on your AutoView 3100/3200 switch, the switch initializes for approximately
one m
inute. After it completes initialization, press any key on the terminal or on the PC
running the terminal emulation software to access the Console men u interface sho wn in Figure
6.1.
NOTE: The terminal may be connected at any time, even when the switch is already powered.
at is running terminal emulation
®
) to the SETUP, CONSOLE or 10101 port on the back panel
Page 80

68 AutoView 3100/3200 Switch Installer/User Guide
Figure 6.1: Console Main Menu
2. Once the Console Main menu displays, type the number corresponding to Network
Configuration and press
Enter to access the menu shown in Figure 6.2.
Figure 6.2: Network Configuration Menu
Page 81

Chapter 6: Terminal Operations 69
3. Type 1 and press Enter to set your network speed. For best performance, set the AutoView
3100/3200 switch at the same speed as the Ethernet switch to which it is attached. After you
Enter, you will be returned to the Network Configuration menu.
press
4. Type
2 and press Enter to select IPv4 mode, and whether you are using a static or Dynamic
Host Configuration Protocol (DHCP) address.
A static IP configuration may be used to provide a user-
length, and default gateway for the AutoView 3100/3200 switch.
DHCP is a protocol that automates the configuration of TCP/IP-enabled computers. When
DHCP is s
automatically assigned to the AutoView 3100/3200 switch and may not be modified by an
AutoView 3100/3200 switch user.
If you are using the DHCP option, pl ease configure your DHCP server to provide an IP address
to t
5. Select the remaining options from the Network Configuration menu to finish the configuration
of your A
gateway an d ping response.
6. Type
elected, the IP address, netmask or prefix length, and default gateway settings are
he AutoView 3100/3200 switch and then skip to step 6.
utoView 3100/3200 switch with an IP address, netmask or prefix length, default
0 (zero) and press Enter to return to the Console Main menu.
Other Console Main Menu Options
Besides the Network Configuration option, the Console Main menu of the AutoView 3100/3200
switch features the following menu items: Security Configuration, Firmware Management, Enable
Debug Messages, Restore Factory Defaults, Reset Appliance and Exit. Each menu item is
discussed in this sec tion.
Security Configuration
The Security Configuration menu allows you to enable or disable the Console Password using
security for the console (access requires an Admin account).
defined IP address, netmask or prefix
Console Password
If this is enabled, access to the switch’s Console Main menu will require an appliance administrator
to lo
g in.
Firmware Management
This menu contains the Flash Download selection. For more information, see Flash Upgrades
section on pa ge 71.
Enable Debug Messages
This menu option turns on console status messages. Because this can significantly reduce
performance, you should only enable debug messages when instructed to do so by Avocent
Technical Support. When you are finished viewing the messages, press any key to exit this mode.
Page 82

70 AutoView 3100/3200 Switch Installer/User Guide
Restore Factory Defaults
This menu option will restore all switch options to the default settings.
Reset Appliance
This menu option allows you to execute a soft reset of the AutoView 3100/3200 switch.
Exit
This menu selection will return you to the ready prompt. If the Console menu interface password is
enabled, you must exit the Console Main menu so that the next user will be prompted with the
Username and Password login screen.
Page 83

APPENDICES
Appendices
Appendix A: Flash Upgrades
The AutoView 3100/3200 switch Flash upgrade feature allows you to update your appliance with
the latest firmware available. This update can be performed using a Trivial File Transfer Protocol
(TFTP) server or using the on-board web interface.
After the Flash memory is reprogrammed with the upgrade, the AutoView 3100/3200 switch
forms a soft reset, which terminates all IQ module sessions. A target device experiencing an IQ
per
module firmware update may not display, or may display as disconnected. The target device will
appear normally when the Flash update is completed.
NOTE: During an upgrade, the IQ module status indicator in the OSCAR interface Main dialog box is yellow.
CAUTION: Disconnecting an IQ module during a firmware update or cycling power to the target device will
render the module inoperable and require the IQ module to be returned to the factory for repair.
Using the Console menu interface
To upgrade the AutoView 3100/3200 switch firmware using the Console menu
interface:
71
NOTE: You may only update the AutoView 3100/3200 switch firmware using the Console menu interface when
using IPv4 mode.
NOTE: If you do not have a TFTP server, you can find several shareware and freeware programs on the Internet
that you can download and install.
1. Visit http://www.avocent.com/support and download the latest Flash firmware from Avocent.
2. Save the Flash upgrade file to the appropriate d
3. Use the null modem cable to connect a terminal or PC ru
irectory on the TFTP server.
nning terminal emulation software
(such as HyperTerminal) to the SETUP, CONSOLE or 10101 port on the back panel of the
AutoView 3100/3200 switch. The terminal should be set to 9600 bps, 8 bits, 1 stop bit, no
parity and no flow control.
4. If the AutoView 3100/3200 switch is not on, turn it on now. After approximately one minute,
res
s any key to access the Console Main menu.
p
5. Select the Firm
NOTE: The current version of your firmware will be displayed on the Firmware Management menu.
ware Management option from the Cons ole Main menu.
6. Type 1 and press Enter to access Flash Download.
7. Type the IP address of your TFTP server and press
Enter.
8. Enter the name of the file that you downloaded from the Avocent web site.
Page 84

72 AutoView 3100/3200 Switch Installer/User Guide
9. Confirm the TFTP download by typing a y or yes and pressing Enter.
10. The AutoView 3100/3200 switch will begin the Flash upgrade process. On-screen indicators
will disp
lay the upgrade progress. When the upload is complete, the AutoView 3100/3200
switch will reset and upgrade the internal subsystems.
11. Once the upgrade is complete, the login screen will appear.
Using the on-board web interface
This method utilizes an HTTP binary upload and does not require the use of a TFTP server. To
upgrade the firmware, you will download the upgrade file to the client computer from which you
will initiate the firmware upgrade.
To upgrade the AutoView 3100/3200 switc h firmwar e:
1. From the side navigati on bar, select Appliance - O
window appears.
2. Click Tool
3. Click Browse to
s - Upgrade Applianc e. The Upgrade Firmware File window appears.
specify the location of the firmware upgrade file.
4. Click Upgrade.
Recovering from a failed Flash upgrade
NOTE: If the green power LED on the front and back panel of the switch blinks continuously, the switch is in
recovery mode.
To recover from a failed Flash upgrade:
1. Visit http://www.avocent.com/support
2. Save the Flash upgrade file to the appropriate d
3. Set up the TFTP server with the server
4. Rename the downloaded file the appropriate name from
TFTP root directory of the TFTP server:
• AutoView 3100/3200
5. If the AutoView 3100/3200 switch is not on, turn it on now.
6. The recovery process should start automatically.
and download the latest Flash firmware from Avocent.
IP address 10.0.0.3.
verview. The Appliance Overview
irectory on the TFTP server.
the following list and place it into the
Page 85

Appendix B: Using Serial IQ Modules
The serial IQ module is a serial-to-VGA converter that allows VT100-capable devices to be viewed
from the AutoView 3100/3200 switch local port or, the on-board web interface. The actual serial
data is not accessed, but is merely displayed. All serial data coming from the target device is
displayed in a VT100 window, placed into a video buffer and sent to the AutoView 3100/3200
switch as though it came from a VGA target. Likewise, keystrokes entered on a keyboard are sent
to the attached device as though they were typed on a VT100 terminal.
Serial IQ module modes
The following modes can be accessed from the serial IQ module:
• On-Line: This mode enables you to send
• Configuration: This mo de enables you to specify AutoView 3100/3200 switc h communicat ion
parameters
specific actions and macros.
• History: This mode enables you to review serial data.
, the appearance of the Terminal Applications menu and key combinations for
Configuring the serial IQ module
NOTE: The serial IQ module is a DCE device and only supports VT100 terminal emulation.
Pressing Ctrl-F8 will activate the Configuration screen of the IQ module’s Terminal Applications
menu, which enables you to configure your serial IQ module.
and receive serial data.
Appendices 73
NOTE: When any T erminal Applications menu is active, pressing Enter saves changes and returns you to the
previous screen. Pressing Escape returns you to the previous screen without saving changes.
Within the Terminal Applications menu’s Configuration screen, you can modify the
following options:
• Baud Rate: This option allows you to specify the se
options are 300, 1200, 2400, 9600, 19,200, 34,800, 57,600 or 115,200 bps. The default value
is 9600.
• Parity: This option allows you to specify the serial port’s communications parity. Available
ns are EVEN, ODD or NONE. The default value is NONE.
optio
• Flow Control: This option allows you to specify the type o f serial flow control. Available
are NONE, XOn/XOff (software) and RTS/CTS (hardware). The default value is
options
NONE. If you select a bps rate of 115,200, the only available flow control is RTS/CTS
(hardware).
• AutoView 3100/3200/CD Mode: This option allows you to control how the AutoView 3100/
200 sw
3
Toggle mode, AutoView 3100/3200 and CD lines are turned off for one-half second and then
turned on each time a module is selected or deselected. The default value is Always on.
itch and CD lines operate. Available options are Always on and Toggle. When in
rial port communications speed. Available
Page 86

74 AutoView 3100/3200 Switch Installer/User Guide
• Enter Sends: This option enables you to specify the keys that are transmitted when Enter is
pressed. Available options are <CR> (Enter), which moves the cursor to the left side of the
screen, or <CR><LF> (Enter-Linefeed), which moves the cursor to the left side of the screen
and down one line.
• Received: This option enables you to specify h
character. Available options are <CR> (Enter) or <CR><LF> (Enter-Linefeed).
• Background: This option changes the screen’s background
displays in the option line as it is changed. Available colors are Black, Light Grey, Yellow,
Green, Teal, Cyan, Blue, Dark Blue, Purple, Pink, Orange, Red, Maroon and Brown. The
default color is Black. This value cannot be identical to the Normal Text or Bold Text value.
• Normal Text: This option changes the screen’s normal text col
displays in the option line as it is changed. Available colors are Grey, Light Grey, Yellow,
Green, Teal, Cyan, Blue, Dark Blue, Purple, Pink, Orange, Red, Maroon and Brown. The
default color is Grey. This value cannot be identical to the Bold Text or Background value.
• Bold Text: This option changes the screen’s bold
displays in the option line as it is changed. Available colors are White, Yellow, Green, Teal,
Cyan, Blue, Dark Blue, Purple, Pink, Orange, Red, Maroon, Brown and Light Grey. The
default color is White. This value cannot be identical to the Normal Text or Background value.
• Screen Size: This option allows you to specify the s
are widths of 80 columns or 132 columns. The length for both widths is 26 lines.
The following options for the Terminal Application menu’s Configuration screen enable you to
ne the function keys tha t will perfor m a selected action. To specify a new function key, press
defi
and hold the
Ctrl key, then press the function key that you want to associate with the action. For
example, if you want to change the Configuration (Config) Key Sequences option from <CTRLF8> to <CTRL-F7>, press and hold the
Ctrl key and then press F7.
• Config Key Sequences: This option allows you to define the key combination that makes the
Term
inal Application menu’s Configuration screen appear. The default key sequence is
Ctrl-F8.
• On-Line Key Sequence: This option allows you to define the key sequence that displays the
On-
Line mode. The default key sequence is
• Help Key Sequence: This option allows you to define the key combination that displays the
Help Syst
em screen. The default key sequence is
• History Key Sequence: This option allows you to define the key combination that enables
His
tory mode. The default key sequence is
• Clear History Key Sequence: This option allows you to define
the history buffer while in History mode. The default key sequence is
• Break Key Sequence: This option allows you to configure the key combination that generates a
break
condition. The default key sequence is
ow the m
text
Ctrl-F10.
Ctrl-F9.
Alt-B.
odule translates a received Enter
color. The currently-selected color
or. The currently-selected color
color. The currently-selected color
creen’s
text width size. Available values
Ctrl-F1.
the key combination that clears
Ctrl-F11.
Page 87

To configure a serial IQ module:
Appendices 75
1. Press
2. Select a parameter to change. You can naviga
Ctrl-F8. The Configuration Screen will appear.
te the Configuration Screen using the Up Arrow
and Down Arrow keys.
3. Modify the selected value using the
Left Arrow and Right Arrow keys.
4. Repeat steps 2 and 3 to modify additio nal values.
5. Press
Enter to save your changes and exit the Configuration Screen.
-or-
Escape to exit the Configuration Screen without saving the changes.
Press
Creating a serial IQ module macro
Pressing the
Page Down key when the Terminal Applications menu’s Configuration screen is
displayed will provide access to the Macro Configuration screen. The serial IQ module can be
configured with up to 10 macros. Each macro can be up to 128 characters in length.
To create a macro:
1. Select the serial IQ module you wish
to configure and press Ctrl-F8 to activate the Terminal
Applications menu’s Configuration screen.
2. When the Terminal Applications menu appears, press
Page Down to view the Macro
Configuration screen. The Macro Configuration screen shows the 10 available macros and the
associated key sequences, if any, for each.
3. Using the
Up Arrow and Down Arrow keys, scroll to an available macro number and highl ight
the listed keystroke sequence. Type the new macro keystroke sequence over the default. Any
combination of
keystroke sequence that will activate the new macro, press the
Ctrl or Alt and a single key may be used. When you have finis hed ente rin g the
Down Arrow key.
4. On the line below the macro keystroke sequence you just entered, type the keystroke sequen ce
tha
t you wish the macro to perform.
5. Repeat steps 3 and 4 to configure additional macros.
6. When finished, press
Enter to return to the previous screen.
Using History mode
History mode allows you to examine the contents of the history buffer, which contains the events
that have occurred.
The serial IQ module maintains a buffer containing 240 lines minimum, or 10 screens, of output.
When th
lines at the top of the buffer.
NOTE: The Config Key Sequence, On-Line Key Sequence and Clear History Key Sequence used in the
following procedure are the default values. These key combinations can be changed using the Terminal
Applications menu.
e history buffer is full, it will add new lines at the bottom of the buffer and delete the oldest
Page 88

76 AutoView 3100/3200 Switch Installer/User Guide
To use History mode:
1. Press
Ctrl-F9. The mode will display as History.
2. Press one of the following key combinations
•
Home: Move to the top of the buffer.
•
End: Move to the bottom of the buffer.
•
Page Up: Move up one buffer page.
•
Page Down: Move down one buffer page.
•
Up Arrow: Move up one buffer line.
•
Down Arrow: Move down one buffer line.
•
Ctrl-F8: Enters Configuration mode. The Configuration screen will appear.
•
Ctrl-F9: While in Configuration mode, returns to the previous screen with Histor y
mode enabled.
Ctrl-F10: While in Configuration mode, returns to the previous screen with On-Line
•
mode enabled.
Ctrl-F11: Clears the history buffer. If you choose this option, a warning screen will appear.
•
Enter to delete the history buffer or Escape to cancel the action. The previous
Press
screen will reappear.
3. When finished, press
Serial IQ module pinouts
Table B.1 lists the pinouts for the serial IQ module.
Table B.1: Serial IQ Module Pinouts
to perform the indicated action:
Ctrl-F10 to exit History mode and return to On-Line mode.
DB9-F
Pin
1 DCD - Data Carrier Detect Out of SRL DTR - Data Terminal Ready
2 RXD - Receive Data Out of SRL TXD - Transmit Data
3 TXD - Transmit Data In to SRL RXD - Receive Data
4 DTR - Data Terminal Ready In to SRL AutoView 3100/3200 - Data Set Ready
5 GN D - Signal Ground N/A GND - Signal Ground
6
7 RTS - Request to Send In to SRL CT S - Clear to Send
8 CTS - Clear to Send Out of SRL RTS - Request to Send
9 N/C - Not Connected N/A N/C - Not Connected
Host
Signal Name Description S ignal Flow SRL Signal Name Description
AutoView 3100/3200 - Data Set
Ready
Out of SRL DTR - Data Te rm inal Ready
Page 89

Appendix C: UTP Cabling
This appendix discusses various aspects of connection media. The performance of an AutoView
3100/3200 switching system depends on high quality connections. Poor quality or poorly installed
or maintained cabling can diminish AutoView 3100/3200 system performance. AutoView 3100/
3200 switching systems utilize UTP cabling.
NOTE: This appendix is for information purposes only. Please consult with your local code officials and/or
cabling consultants prior to any installation.
UTP copper cabling
The following are basic definitions for the three types of UTP cabling that the AutoView 3100/
3200 switch supports:
• CAT 5 UTP (4-pair) high performance cable consists of twisted pair conductors, used
arily for data transmission. The twisting of the pairs gives this cable some immunity from
prim
the infiltration of unwanted interference. CA T 5 cable is generally used for networks running at
10 or 100 Mbps.
• CAT 5E (enhanced) cable has the same characteristics as CAT 5, but is manufactured to
omewh
s
• CAT 6 cable is manufactured to tighter requirements tha
measured frequency ranges and significantly better performance requirements than CAT 5E
cable at the same frequencies.
at more stringent standards.
Appendices 77
n CAT 5E cable. CAT 6 has higher
Wiring standards
There are two supported wiring standards for 8-conductor (4-pair) RJ-45 terminated UTP cable:
EIA/TIA 568A and B. These standards apply to installations utilizing CAT 5, 5E and 6 cable
specifications. The AutoView 3100/3200 switching system supports either of these wiring
standards. Table C.1 describes the standards for each pin.
Table C.1: UTP Wiring Standards
Pin EIA/TIA 568A EIA/TIA 568B
1 white/green white/orange
2 green orange
3 white/orange white/green
4 blue blue
5 white/blue white/blue
6 orange green
7 white/brown white/brown
Page 90

78 AutoView 3100/3200 Switch Installer/User Guide
Table C.1: UTP Wiring Standards (Continued)
Pin
8 brown brown
EIA/TIA 568A EIA/TIA 568B
Cabling installation, maintenance and safety tips
The following is a list of important safety considerations that should be reviewed prior to installing
or maintaining your cables:
• Keep all UTP runs to a maximum of 100 feet each.
• Maintain the twists of the pairs all the way to the point of termination, or no more that one-half
ntwisted. Do not skin off more than one inch of jacket while terminating.
inch u
• If bending the cable is necessary, make it gradual with no bend sharper than a one inch radius.
owing the cable to be sharply bent or kinked can permanently damage the cable’s interior.
All
• Dress the cables neatly with cable ties, using low to moderate pressure. Do not over tighten
s.
the tie
• Cross-connect cables where necessary, using rated punch blocks, patch panels and
components
• Keep the UTP cable as far away as possible from potential s
cables, transformers and light fixtures. Do not tie the cables to electrical conduits or lay the
cables on electrical fixtures.
• Always test every installed segment with a cable tester. “Toning” alone is not an
accepta
• Always install jacks so as to prevent dust and other contaminants from settling on the contacts.
The cont
surface mount boxes.
• Always leave extra slack on the cables, neatly coil
location. Leave at least five feet at the work outlet side and 15 feet at the patch panel side.
• Choose either 568A or 56 8B wiri ng s tandard b efor e beginni ng. Wire all jacks an d pat ch panel s
for th
• Always obey all local and national fire and building co
that penetrate a firewall. Use plenum rated cable where it is required.
. Do not splice or bridge the cable at any point.
ble test.
acts of the jack should face up on the flush mounted plates, or left/right/down on
ed in the ceiling or nearest concealed
e same wiring scheme. Don’t mix 568A and 568B wiring in the same installation.
ources of EMI, such as electrical
des. Be sure to firestop all the cables
Page 91

Appendix D: Technical Specifications
Table D.1: AutoView 3100/3200 Switch Product Specifications
Server Ports
Number 16
Type PS/2, Sun, USB and Serial
Connectors 8-pin modular
Sync Types Separate horizontal and vertical
Plug and Play DDC2B
640 x 480 @ 60 Hz
800 x 600 @ 75 Hz
Video Resolution
Supported Cabling 4-pair UTP CAT 5 or CAT 6, 100 feet (30 meters) maximum length
Dimensions
960 x 700 @ 75 Hz
1024 x 768 @ 75 Hz
1280 x 1024 @ 75 Hz
Appendices 79
Form Factor 1-U rack mountable
Height x Width x Depth
Weight (without cables) 7.3 lbs (3.31 kg)
SETUP Port
Number 1
Type RS-232 serial
Connector DB9 male
Network Connection
Number 1
Type 10/100/1000 Ethernet
Connector 8-pin modular
Local Port
Number 1
1.72 x 17.00 x 10.98 in
(4.37 x 43.18 x 27.88 cm)
Page 92

80 AutoView 3100/3200 Switch Installer/User Guide
Table D.1: AutoView 3100/3200 Switch Product Specifications (Continued)
Type PS/2, USB and VGA
USB Device Port
Number 4
Type USB 1.1
Power Supply
Type Internal
Power
Heat Dissipation
AC-input Range 100 - 240 VAC
AC Frequency 50 - 60 Hz autosensing
AC-input Current Rating 0.5 A
AC-input Power (maximum) 40 W
AC-input Cable
Ambient Atmospheric Condition Ratings
Temperature
idity 10 - 95% noncondensing
Hum
Safety and EMC Standards
Approv
als and Markings
AutoView 3100: 11.0 W
AutoView 3200: 13.0 W
AutoView 3100: 37.5 BTU/hr
AutoView 3200: 44.4 BTU/hr
18 AWG three-wire cable, with a three-lead
supply end and a country-dependent plug on the power resource end
32 to 104 degrees Fahrenheit (0 to 40 degrees Celsius) operating;
-4 to 158 degrees Fahrenheit (-20 to 70 degrees Celsius) nonopera
UL, FCC, cUL, ICES-003, CE, GS, VCCI, MIC, C-Tick, GOST
Safety certifications and EMC certifications fo
one or more of the following designations: CMN (Certification Model Number),
MPN (Manufacturer’s Part Number) or Sales Level Model designation. The
designation that is referenced in the EMC and/or safety reports and certificates
are printed on the label applied to this product.
IE
C-320; receptacle on the power
ting
r this product are obtained under
Page 93

Appendix E: Sun Advanced Key Emulation
Certain keys on a standard Typ e 5 (US) Sun keybo ard can b e emulated b y key press sequences on a
PS/2 keyboard. To enable Sun Advanced Key Emulation mode and use these keys, press and hold
Ctrl+Shift+Alt and then press the Scroll Lock key. The S c roll Lock LED blinks. Use the indicated
keys in Table E.1 as you would use the advanced keys on a Sun keyboard.
Table E.1: Sun Key Emulation
Sun Key (US) PS/2 Key to Enable Sun Key Emulation
Compose
Application
Compose keypad
Power F11
Open F7
Help Num Lock
Props F3
Front F5
Stop F1
(1)
Appendices 81
Again F2
Undo F4
Cut F10
Copy F6
Paste F8
Find F9
Mute keypad /
Vol.+ keypad +
Vol.- keypad -
(2)
Command (left)
Command (left)
Command (right)
(1)Windows 95 104-key keyboard.
(2)The Command key is the Sun Meta (diamond) key.
(2)
Win (GUI) left
(2)
Win (GUI) right
F12
(1)
(1)
Page 94

82 AutoView 3100/3200 Switch Installer/User Guide
For example: For Stop + A, press and hold Ctrl+Shift+Alt and press Scroll Lock, then F1 + A.
These key combinations will work with the serial USB IQ module (if your Sun system comes with
a USB por
t) as well as the Sun VSN and WSN IQ modules. With the exception of
combinations are not recognized by Microsoft Windows. Using
F12 performs a Windows key
F12, these key
press.
When finished, press and hold
Ctrl+Shift+Alt and then press the Scroll Lock key to toggle Sun
Advanced Key Emulation mode off.
Special considerations for Japanese Sun USB and Korean Sun USB
keyboards (USB IQ modules only)
Japanese Sun USB and Korean Sun USB keyboards assign usage IDs for certain keys that differ
from standard USB usage IDs. If USB IQ modules are attached to your Sun servers, the Han/Zen
and Katakana/Hiragana keys on Japanese Sun USB keyboards and Hangul and Hanja keys on
Korean Sun USB keyboards must be accessed using alternate keystrokes.
Due to these keyboard-specific differences, keyb oard mapping in consistencies may be encou ntered
sw
when
using USB IQ modules. These keys function normally if your Sun servers are attached to the
AutoView 3100/3200 switch using a VSN or WSN IQ module.
Table E.2 lists the keyboard mapping that will take place when a USB IQ module is used in
this setting.
itching between target devices using Sun VSN and WSN IQ modules and target devices
Table E.2: PS/2-to-USB Keyboa r d Mappings
PS/2 Keyboard USB Usage ID Sun USB Keyboard
Right-Alt 0xE6 Al tGraph Hangul Katakana/Hiragana
Windows Application 0x65 Compose H anja Compose
Hangul 0x90 N/A N/A N/A
Hanja 0x91 N/A N/A N/A
Katakana/Hiragana 0x88 N/A N/A Han/Zen
Han/Zen 0x35 ` ~ ` ~ N/A
Korean Sun USB
eybo
ard
K
Japanese Sun USB
Keyboard
Page 95

Appendix F: T echnical Support
Our Technical Support staff is ready to assist you with any installation or operating issues you
encounter with your Avocent product. If an issue should develop, follow the step s below for the
fastest possible service.
To resolve an issue:
Appendices 83
1. Check the pertinent section of this manual to see if the is
procedures outlined.
2. Check our web site at www.avocent.com/support to
online service request.
3. Call the Avocent Technical Support
location nearest you.
search the knowledge base or use the
sue can be resolved by following the
Page 96

84 AutoView 3100/3200 Switch Installer/User Guide
Page 97

5
Page 98

5
Page 99

Commutateur AutoView
®
3100/3200
Guide d’installation et d’utilisation
Avocent, le logo Avocent, The Power of Being There, AutoView,
DSView, Dambrackas Video Compression et OSCAR sont des marques
déposées d’Avocent Corporation ou de ses filiales. Toutes les autres
marques sont la propriété exclusive de leurs détenteurs respectifs.
© 2007 Avocent Corporation. Tous droits réservés. 590-640-616
D
Page 100

Instructions
Ce symbole est destiné à attirer votre attention sur la présence
fonctionnement et à la maintenance (entretien) dans la documentation accompagnant le matériel.
Tension dangereuse
Ce symbole est destiné à vous avertir de la présence de « tensions danger
l’intérieur de l’appareil pouvant être suffisamment élevées pour constituer un
électrique pour les individus.
Sous tension
Ce symbole indique que la commande principale de marche
Hors tension
Ce symbole indique que la commande principale de marche/ar
Racco
rdement de protection à la terre
Ce symbole indique que l’équipement doit être relié à la terre avant d’être branché.
de consignes importantes liées au
euses » non isolées à
risque de choc
/arrêt est sur marche.
rêt est sur arrêt.
 Loading...