

Page 1

Monarch® 9450
Label Design Software
User’s Manual
TM
TC9450UM Rev. A 12/95 ©1994 Monarch Marking Systems, Inc. All rights reserved.
Page 2

Each product and program carries a respective written
warranty, the only warranty on which the customer can rely.
Monarch reserves the right to make changes in the product
and the programs and their availability at any time and without
notice. Although Monarch has made every effort to provide
complete and accurate information in this manual, Monarch
shall not be liable for any omissions or inaccuracies. Any
update will be incorporated in a later edition of this manual.
Trademarks
Monarch is a registered trademark of Monarch Marking Systems, Inc.
9450 is a trademark of Monarch Marking Systems, Inc.
Microsoft, Windows and MS-DOS are registered trademarks of Microsoft Corporation.
Page 3

Table of Contents
1. Introduction.......................................................................1-1
About This Manual.......................................................1-1
System Requi rements.................................................1-1
Key Terms....................................................................1- 2
Function Keys..............................................................1-3
2. Installing the Software .....................................................2-1
Before You Install.........................................................2-1
Installing on a Hard Disk..............................................2-2
Configuring the 9450 Software....................................2-5
Moving Within the Font Manager ....................2-8
Adding Fonts and Point Siz es .........................2-8
Deleting Fonts ................................................. 2- 9
Replacing Fonts and Point Sizes....................2-9
Saving Your Fonts and Exiting the
Font Manager................................................2-10
Checking the Printer Connection...............................2-11
3. Using the 9450 Label Design Software..........................3-1
Starting the 9450 Softwa re..........................................3-3
Menus..........................................................................3-4
Menu Modes....................................................3-4
Main Menu.......................................................3-5
Menu Selections..............................................3-5
4. Designing Formats ..........................................................4-1
Creating a Format........................................................4-2
Adding a New Field .....................................................4-4
Adding a Bar Code Field .................................4-6
Adding a Text Field..........................................4-6
Adding a Line Field..........................................4-7
Adding a Box Field..........................................4-7
Adding a Graphic Field ...................................4-8
i
Page 4

9450 User’s Manual
Adding a Copied Field...................................4-10
Viewing/Modifying a Text or Bar Code Fiel d ..............4-11
Moving a Field...........................................................4-1 2
Deleting a Field.........................................................4-1 3
Changing the Format Size .......................................4-14
Printing a Test Label..................................................4-14
Saving the Format.....................................................4-14
Renaming and Saving the Format............................4 -15
Modifying an Existing Format ...................................4-16
Deleting a Format .....................................................4-16
5. Printing ..............................................................................5-1
Printing a Test Label....................................................5-2
Printing a Batch of Labels...........................................5-3
Entering M ul tiple Lines of Tex t in the
Same Field......................................................5-4
Downloading a Format................................................5-4
Changing Label Data..................................................5-4
Scanning Bar codes....................................................5-5
Printing a Different Format..........................................5-5
Cancelling a Print Job.................................................5-6
6. Batch Functions...............................................................6- 1
Creating a Batch File...................................................6-2
Adding Data to a Batch File............................6-3
Changing Label Data......................................6-4
Choosing a Different Format...........................6-4
Deleting a Batch File...................................................6-5
Printing a Batch File....................................................6-6
Terminating a Batch Print............................................6-7
Viewing the Batch Data Stream..................................6-7
7. Online Commands ...........................................................7-1
Selecting the Stoc k Type.............................................7-2
Selecting the Print Mode.............................................7-2
Selecting the Print Contrast ........................................7-3
ii
Page 5

Table of Contents
Appendix A. Sample Label..................................................A-1
Sample Label - 9450 Printer........................................A- 1
Appendix B. Format Specification Data.............................B-1
Field Specification Data--Bar Codes...........................B- 2
Field Specification Data--Text Fields...........................B-4
Character Soft Fonts .......................................B-4
Appendix C. Messages .......................................................C-1
iii
Page 6

9450 User’s Manual
iv
Page 7

1. Introduction
About This Manual
Read this m anual if you
• oversee the generation of labels or tags
• design labels or tags
• decide what to print on labels or tags.
This manu al tells you how to design and print labels using this
software w i th a 9450 printer. For information on how to loa d
and use your pr inter, see your
9450 Operat or’s Handbook
System Requirements
To operate the 9450 Label Design Software, you need:
• IBM XT-compatible (or later) computer and a monitor
• 1 Megabyte hard disk space
.
• DOS Version 3.1 or later
• IBM RS-232C or compatible asynchronous
communications adapter
• Hercules monochrome or IBM color graphics board or
compatible
NOTE: Some Terminate and Stay Resident programs (TSR’s)
may cause problems with the 9450 software. You may
want to disable TSR’s when running 9450.
Monarch does not recommend running the 9450
software under the Windows shell.
1-1
Page 8

9450 User’s Manual
Key Terms
Y ou need to be familiar with several key terms when using the
9450 softw a re.
Decrement To decrease a field or part of a field by 1.
Default Value automatically assigned by the
system.
Field Designated area in a format (for
example, a bar code field).
File Specific set of data.
Format Label or tag design.
Hot Key Underlined letter on the name of a field
or command on the screen. To use the
hot key, press ALT + the underlined
key. This action moves the cursor to the
field or performs the command.
Increment To increase a field or part of a field by 1.
Menu Group of choices displayed at the top of
a screen.
Selection Option presented on a menu.
1-2
Page 9

1. Introduction
Function Keys
Several keys have special meaning in the 9450 Label Design
Software. Short descri ptions of their functions follow.
F1 Toggles between full menu display and
single-line menu mode. Use with any menu.
F10 Interrupts the data being sent to the printer.
Use this key to stop the printer so you can
change label stock, adjust the labels, etc.,
without creating a printer error.
F12 Makes all arrow keys move the cursor in .01
inch increments.
ESC Stops the current function. ESC works the
same as Q (for Quit) on most menus. If you
press ESC while the 9450 software is sending
data to the printer, printing is cancelled. Turn
the printer off and then on again to clear the
printer buffer.
ARROW
KEYS
ENTER Sends inform ation to the software. Various
Move either the cursor or a box representing a
field in the direction printed on the key. The
field or cursor m oves in 0.20 inch increments.
If you use the arrow keys located on the
numeric keypad with Num Lock toggled ON,
the movement will be in 0.01 inch increments.
prompts use this key to signal a particular
selection.
1-3
Page 10

9450 User’s Manual
PgUp/
PgDn
HOME/
END
When you are asked to enter a filename, the
9450 software presents a list of available files.
If all filenames do not fit on the screen, use
PgDn to see the next set of format names.
Use PgUp to see the previous set of format
names. You can use these keys to view up to
300 format names.
When you display a format, PgUp moves the
cursor up 1 inch. PgDn moves the cu rsor
down 1 inch.
HOME moves the cursor to the upper left
corner of a for m at. END moves the cursor to
the lower right corner of a format.
1-4
Page 11

2. Installing the Software
Install i ng the software is a three-s tep process:
1. Run the installation program.
2. Configure the software for use with your printer .
3. Print the test format, which is provided on the installation
disk. This format allows you to verify your printer’s
connection to the PC.
Before You Install
Before you install this software on your computer, make sure
your:
• computer is using DOS 3.1 or later.
• AUTOEXEC.BAT file includes DOS in the path
statement (e.g., Path = c:\DOS).
• label printer is installed and connected to your
computer’s serial port.
• printer’s communication port is set to the following
values:
• Baud Rate = 9600
• Stop Bits = 1
• Parity = None
• Word Length = 8
• Flow Control = DTR
2-1
Page 12

9450 User’s Manual
Installing on a Hard Disk
To install the so ftware on a hard disk:
1. Insert the installation disk into the appropriate floppy disk
drive and switch to that drive.
2. At the DOS prompt (A or B), type:
install
and press ENTER.
You will see:
Installing the 9450 Bar Code Printing
System Software
-------------------------------------
To install properly...
* the 9450 system program disk must be
in drive A: or B:
* DOS 3.1 or later must be installed
* the path to DOS must be established in
AUTOEXEC.BAT
2-2
If these conditions are not true, do
NOT continue!
Press ENTER to continue installation.
Press any other key to exit.
Page 13

2. Installing t he Sof tware
3. If these conditions have not been met, exit the installation
program by pressing ESC. Complete the conditions before
you continue. If you have met these conditions, press
ENTER to continue the installation.
You will see:
Default directory: C:\9450
Do you wish to change? (Y/N)
N
4. If you want your software to reside in the default
drive\di rectory (c:\9450) press ENTER.
If C:\9450 contains an older copy of the software, you
will see:
9450 already exists in C:\9450
Do you wish to overwrite previous
version? (Y\N) N.
a. Press ENTER if you do not want to install over the
previous version of the 9450 soft w are. The installation
program stops automatical ly and you return to the DOS
prompt.
b. If you want to inst al l over an older version of the
software , type Y and press ENTER.
c. If you want the 9450 software to reside in another
directory, type N and press ENTER.
You will see:
Enter the drive:
2-3
Page 14

9450 User’s Manual
5. Type the letter corresponding to the drive on which you
want the sof tw are to reside. (For example, type C.) Press
ENTER.
You will see:
Enter the directory name:
6. Enter the name of the directory where you want the 9450
softwar e to res i de (up to 3 directories deep). Use a
backslash ( \) for the first character. (For example, type
\labels.) Press ENTER. The installation program places
all the necessary files in this directory.
You will see:
Copying 9450 files into
drive:\directory
...please wait.
NOTE: Y our 9450 package includes both a 3 1/2 inch and
two 5 1/4 inch diskettes containing the 9450
software. If you are using the 5 1/4 inch
diskettes, the installation program prompts you to
insert the second disk. When thi s happens, you
will see:
Insert Disk 2...
7. Insert the second disk and press ENTER for installation to
continue.
When installation is complete, you will see:
!!!!!!!INSTALLATION COMPLETE!!!!!!!
2-4
Page 15

2. Installing t he Sof tware
After installing the 9450 software, run the configuration
program to select fonts and set communication parameters
for your printer.
Configuring the 9450 Software
To configure the 9450 software for use with your printer, follow
these steps:
1. Make sure you are in the specified 9450 directory.
2. At the DOS prompt, type:
config
and press ENTER.
You will see:
********************************
* PRINTER CONFIGURATION PROGRAM*
********************************
SELECT OPTION:
1) LABEL PRINTER connected to COM1
2) LABEL PRINTER connected to COM2
3) LABEL PRINTER connected to COM3
4) LABEL PRINTER connected to COM4
>>>
3. Enter the num ber that corresponds to the COM port to
which your printer is connected (1 for COM1, 2 for COM2,
etc).
2-5
Page 16

9450 User’s Manual
You will see:
SELECT OPTION:
1) LPT1 PORT IS OPEN
2) LPT2 PORT IS OPEN
3) LPT3 PORT IS OPEN
4) LPT4 PORT IS OPEN
>
open
4. Select an LPT port that is
on your system. Make
sure that no printer or other device is attached to it. (The
softwar e uses an LPT port during the printing process).
Press ENTER. You will see:
Enter letter of drive to be used for
labels:>
5. Enter the letter of the drive on which to save your labels.
No colon is needed (for example, type C).
You will see:
SELECT OPTION:
1) ENGLISH
2) METRIC
>>>
2-6
Page 17
2. Installing t he Sof tware
6. Enter 1 for inches. Enter 2 for millimeters. Press ENTER.
You will see:
SELECT OPTION:
1) Resend format only if modified
2) Resend format every time
>>>
7. Enter 1 to send only mo di fi ed formats before printing.
Enter 2 to send all formats before printing. Pr ess ENTER.
You will see:
Do you wish to change the current font
selections? (Y/N)>
2-7
Page 18

9450 User’s Manual
8. Enter Y to bring up the Font Manager screen and add new
fonts, delete fonts, or replace fonts. Enter N if you do not
want to change your fonts.
If you entered Y, you will see:
Moving Within the Font Manager
Y ou can use either the keyboard or the mouse to get around in
the Font Manager screens. To sel ect an item when using a
mouse, move the c ursor onto the object and th en press the left
mouse button.
If you are using a keyboard, use the TAB key to move from box
to box, or press the hot key that corresponds to the box you
want to move to. Use the Up Arr ow and Down Arrow keys to
move to the item you want to select, and then press the
Spaceba r to select the item.
Adding Fonts and Point Sizes
To add a new font and point size to the li st of selected fonts,
follow these steps:
1. Select the font you want to add from the Available Font s
list box.
2. From the Points list box, select the poin t size you want the
new font to be.
3. Select the library number for the new font in the Selected
Fonts bo x .
2-8
Page 19

2. Installing t he Sof tware
4. Select the Add button to add the font to your list of selected
fonts.
Repeat this pr ocess for each font and poin t siz e you want to
add.
Deleting Fonts
To delete a font from the list of available fonts, follow these
steps:
1. Select the font you want to delete from the Selected Fonts
list box.
2. Select the Delete button to delete the font.
Repeat this process for each font you want to delete.
Replacing Fonts and Point Sizes
To replace a selected font and point size with a new font and
point size, follow these steps:
1. Select the new font that you want to use from the Available
Fonts list box.
2. From the Points l ist box, select the point size you want the
new font to be.
3. Select the font that you want to replace from the Selected
Fonts list box.
4. Select the Add button to replace the font.
Repeat this pr ocess for each font and poin t siz e you want to
replace.
2-9
Page 20

9450 User’s Manual
Saving Your Fonts and Exiting the Font Manager
To save your font and point size changes, select the Save
Fonts button. The new fonts are saved.
To exit the Font Manager, follow these steps:
1. Select the Exit button. You will see:
2. Select Yes to sav e your changes, or No to exit witho ut
saving. Press ESC or click on Cancel to return to the Font
Manager program.
After the configuration is complete, you will see:
*************************************
* PRINTER CONFIGURATION IS COMPLETE *
*************************************
Y ou then return to the directory you selected in the installation
program.
NOTE: If you are using an IBM PS/2, you may ha ve to
modify your RUN9450.BA T file to include the
statement COPY PRIME COM1 or COPY PRIME
COM2 to initialize the communication port. See
the manual for your co m puter’s operating system
for more informat i on on setting communicat i on
ports.
2-10
Page 21

2. Installing t he Sof tware
Checking the Printer Connection
Before you start the software, us e the test format (provided on
the installation disk) to verify your printer’s connection to the PC.
1. Make sure your printer cable is connected to a
communication port on the PC. Refer to your
Handbook
2. Set the communi cation values for th e comm unication port
attached to the printer. At the DOS prompt, type
mode com
(where x in comx is the number of the communication port
to which your printer is attached.)
NOTE: Y our AUTOEXEC.BA T file must include DOS in
for instructions on connecting your printer.
x
:9600,n,8,1
the path statement (e.g., Path = c:\DOS) for the
mode command to work correctly.
Operator’s
3. From the installation disk, copy the test batch,
to the communication port to which your printer is
connected. At the DOS prompt, type
copy test.bch com
(where x in comx is the number of the communication port
to which your printer is attached.)
If the test label does not print, mak e sure the communication
parameters are correct on the printer and on the PC. (Refer to
9450 Operat or’s Handbook
your
parameters on the printer.)
x
to set comm uni cation
TEST.BCH
2-11
,
Page 22

9450 User’s Manual
2-12
Page 23
3. Using the 9450 Label Design
Software
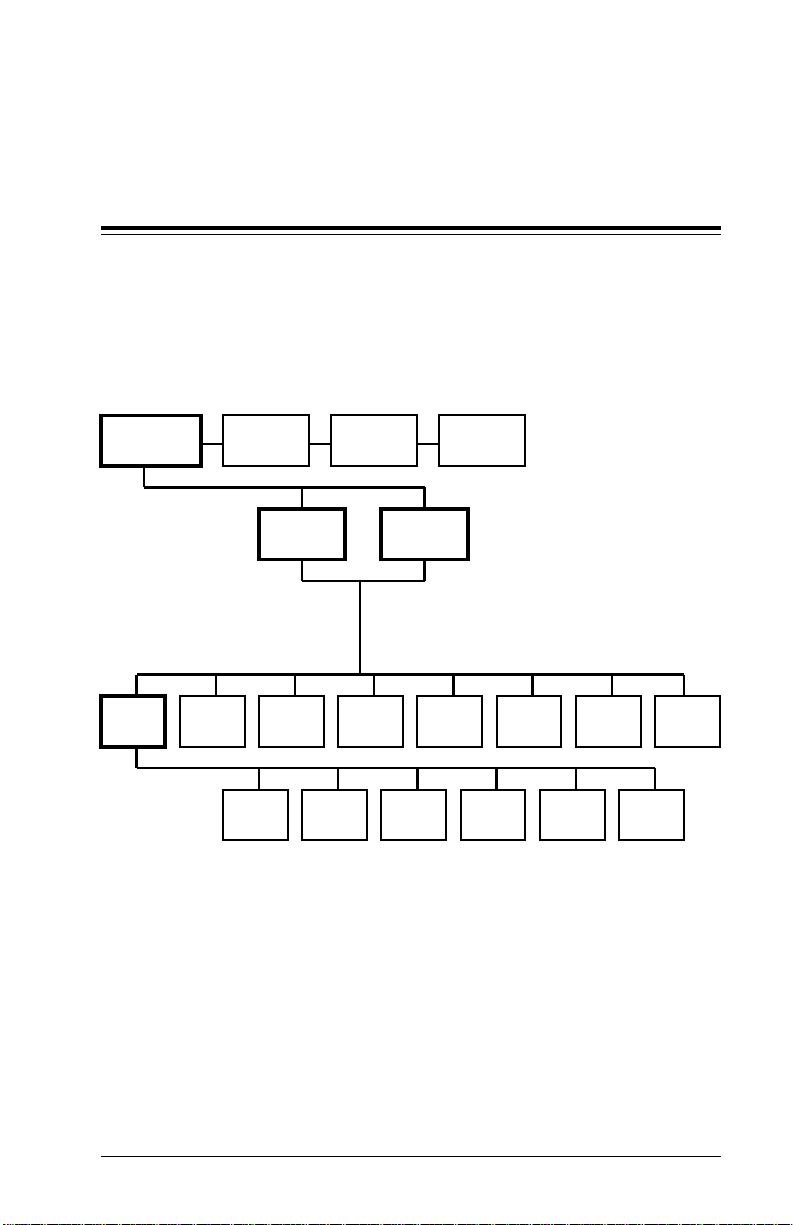
The 9450 program is menu-driven. The following charts show
how the 9450 software menus are organized.
Main Menu
Create, Modify
or Delete a
Format
Print
Labels
Edit Format Menu
Add New
Field
New Field
Menu
View or
Modify
Field
Add
Barcode
Field
Create
Format
Move
Field
Add Text
Field
Batch File
Functions
Delete
Field
Modify
Format
Add Line
Field
Online 9450
Commands
Change
Format
Size
Add Box
Field
Print Test
Label
Add
Graphic
Field
Save
Format
Copy
Field
Rename
and save
Format
3-1
Page 24

9450 User’s Manual
Print Labels Menu
Create, Modify
or Delete a
Format
Print
Labels
Print
Labels
Download
Format
Batch File
Functions
Batch File Functions Menu
Create, Modify
or Delete a
Format
Print
Labels
Create a
New Batch
File
Batch File
Functions
Change
Data
Delete a
Batch File
Online 9450
Commands
Test
Print
Online 9450
Commands
Print a
Batch File
Scan
Terminate
a Batch
Print
New
Format
9450 Online Commands Menu
Create, Modify
or Delete a
Format
Print
Labels
Form
Length
Batch File
Functions
3-2
Print
Mode
Online 9450
Commands
Contrast
Selection
Page 25

3. Using the 9450 Label Design Software
Starting the 9450 Software
To start the software:
1. Type:
run9450
and press ENTER.
NOTE: The RUN9450 command resets your computer’s
communication ports. These ports remain at the
values set by the 9450 software unt il the
computer is reset. To return your ports to their
origina l values, reboot your com puter or run a
DOS MODE command. See your computer’s
manual for mo re i nformation on operati ng system
functions.
The 9450 logo is displayed on the screen.
2. Press any key to acc es s th e Mai n Me nu.
3-3
Page 26

9450 User’s Manual
Menus
Each time a menu appears, you can sele ct fr om i t the option or
function you wish to perform. You can display menus in either
"Full Menu" or "Sin gl e Li ne Menu" mode.
Menu Modes
When you use Full Menu mode (the default), each menu
appears at the top of your display, with its options enclosed in
boxes with a selection letter above each box. Each box
contains a short description of the option. T o select an option,
press the le tter shown above the box.
When you use the Single Line Menu mode, each one-word
option appears at the top of your display, preceded by the letter
used to select the option. The advantage to the single-line
mode is that you can see the whole format as you design it.
Y ou can switch back and forth between these two menu display
options by pressing the F1 key at any menu.
3-4
Page 27

3. Using the 9450 Label Design Software
Main Menu
The Main Menu displays all the major functions of the software.
From this menu you can:
• design formats
• print labels
• perform batch file functions
• download online commands to the printer.
Menu Selections
Exit a function by pressing Q (Quit) . To end the current function
without finishing it, press ESC. When you press Q or the ESC
key, the previous menu is displayed. To quit the Main Menu
and exit the program, press X.
3-5
Page 28

9450 User’s Manual
3-6
Page 29

4. Designing Formats
Before you des i gn your formats with the so ftware, you may
want to sketch them out on paper.
You can pri nt the formats using th e 9450 software, or you can
send the formats to another application, such as Monarch data
collection software.
Refer to Appendix A, "Sample Label," for an example of a label
format.
When you are ready to create your formats, select C at the
Main Menu. Yo u will see:
From this menu you can:
• create a new format
• modify an existing format
• delete a format.
4-1
Page 30

9450 User’s Manual
Creating a Format
To create a new format:
1. Select C at the Create, M odify Format Menu.
You will see:
The formats that already exist on the drive you specified in
the configuration program are displayed. If there are more
format names than you can see at one time on the screen,
press PgUp and PgDn.
2. Enter the name (up to 8 characters) of the format you wish
to create. The format name may contain any eight letters
or numbers, but no special characters such as periods (.),
hyphens (-), or spaces. Press ENTER. Yo u will see the
Label Size screen:
A highlighted bar appears to the right or below each
prompt. For each item, directions for entering the item
appear in a box at the top of the display.
4-2
Page 31

4. Designing Format s
Some items hav e predefined or default values already
displayed. Some items already have values entered. If you
press ENTER or one of the arrow keys when a field already
contains a va l ue, the value stays the same.
3. When the highlighted bar moves to a particular item, enter
the value for that item. Press ENTER. The highlighted bar
moves to the next item.
NOTE: Y ou may also use the Down Arrow key to move
to the next item. Use the Up Arrow key to move
to a previous i tem i f you need to change the value
entered.
4. Enter a value at each prompt and press ENTER. Refer to
Appendix B, "Format Specification Data" for vali d values.
When you are finished entering data, you will see:
ALL DATA IS CORRECT. PRESS ENTER TO
BEGIN ADDING FIELDS. PRESS ’C’ TO MAKE
CHANGES. PRESS ESC TO NOT CREATE THE
FORMAT.
5. To make changes to any data item, press C. The
highlighted bar reappears at the first item. You can move
the bar to an item and change it. Press ESC when you are
finished making changes.
If you decide you do not want to add the new field or the
new format, press ESC again. The field is not added and
you return to the Edit Format Menu. Press ENTER to
begin adding fields.
4-3
Page 32

9450 User’s Manual
The Edit Format Menu appears.
From this menu, you can:
• add a new field
• view or modify a field
• move a field
• delete a field
• change a format size
• print a test label
• save a format
• rename and save a format.
Adding a New Field
To add a new field to a format:
1. Type A at the Edit Format Menu.
You will see:
4-4
Page 33

4. Designing Format s
From this menu, you can:
• add a bar code field
• add a text field
• add a line field
• add a box field
• add a graphic location
• copy a field.
2. Enter the letter (B, T, L, X, G, or C) that corresponds to the
type of fie l d you want to add.
You are prompted for the field specification data.
3. Enter a value at each prompt. Refer to Appendix B, "Field
Specification Data," for valid values. Press ENTER when
you finish defining your field.
You will see a graphic representation of the supply as well
as the field y ou defined.
4. Use the cursor, which appears as a plus sign (+), to place
the field where you want it. To position the field, use the
arrow keys on the right side of the keyboard or numeric
keypad, or the keys m arke d PgUp, PgDn, Home and End.
See Chapter 1, "Introduction," for information on how to
use these keys.
The coordinates of the cursor are shown at the top left side
of the format display. The horizontal or "H" coordinate
shows the distance in inches from the left edge of the
format. The vertical or "V" coordinate s how s the distance
in inches from the top edge of the format.
4-5
Page 34

9450 User’s Manual
Adding a Bar Code Field
To add a new bar code field to a format:
1. Select B from the New Field Menu. You are prompted for
bar code specification data.
2. Enter a value at each prompt. Refer to Appendix B, "Field
Specification Data," for valid values.
After entering all the items, press ENTER. The format is
displayed again, with a box representing the area for the
bar code.
3. Position the bar code field on the fo rm at. When it appears
in the desired position, press ENTER. You are returne d to
the Edit Format Menu.
Adding a Text Field
To add a new text field to a format:
1. Enter T at the New Field Menu. You are prompted for text
field speci fication data.
2. Enter an appro pri ate value at each prompt. Refer to
Appendix B, "Field Specificat i on Data," for valid values.
After you have entered all items correctly, press ENTER.
The format is displayed again, with a box representing the
area for the text field.
3. Position the text field on the format. When it appears in
the desired position, press ENTER. You are returned to
the Edit Format Menu.
4-6
Page 35

4. Designing Format s
Adding a Line Field
To add a line field:
1. Select L at the New Field Menu. You will see the format
display and the following message:
Enter the thickness of the line:
2. Enter the thickness of the line in inches and press [Enter].
You will see:
Use arrow keys to move to the BEGINNING
of the LINE. Press ENTER when done.
3. Use the arrow keys to move to the location on your format
where you want the line to start. Pre ss ENTER. You will
see:
Use arrow keys to move to the END of the
line. Press ENTER when done.
4. Press the Right Arrow or Left Arrow to draw a horizon tal
line. Press the Up Arrow or Down Arrow to draw a
vertical l i ne.
Press ENTER when the line is complete. You are returned
to the Edit Format Menu.
Adding a Box Field
Use this function to add a box to your format. To add a box:
1. Select X at the New Field Menu. You will see:
Enter the line thickness of the box:
4-7
Page 36

9450 User’s Manual
2. Enter the thickness that you want for the lines of the box.
Press Enter. You will see:
Use arrow keys to move to upper left
corner for the box. Press ENTER when
done.
3. Use the Down Arrow and Right Arrow keys to position
the cursor where you want the top left corner of the box.
Press ENTER. You will return to the Edit Format Menu.
Adding a Graphic Field
Use this function to position a graphic (such as a company
logo) that has b een dow nloaded to the pri nter.
Graphic fields require some extra steps. The graphic must
already exist a a bitmap and must be downloaded to the printer
using some other m eans (the 9450 softwar e won’t download
graphics) . For information on downloading or creating a
graphics file, see the
Monarch Technical Support.
9450 Programmer’s Manual
or call
The graphic fi eld of the format only s pecifies where to place the
graphic on the label. The graphic must already be downloaded
in printer memory for a format to print the label with the graphic.
To add a graphic fiel d:
1. Select G at the New Field Menu. You will see the format
display and the following message:
Enter the number of the GRAPHIC:
4-8
Page 37

4. Designing Format s
2. Using the chart below, type the number that c orresponds to
the ASCII character that was assigned to the download
graphic. This ASCII character is called the GID (Graphics
Identification) in other documentation. Press ENTER.
ASCIIEFGHI JKLMNOPQR
GID012345678910111213
ASCIISTUVWXYZ[ \ ] ^_ ‘
GID1415161718192021222324252627
NOTE: Your programmer can give you a li st of graphic file
names and what they contain.
You will see:
Use arrow keys to move to UPPER LEFT
CORNER for the GRAPHIC box. Press ENTER.
3. Use the arrow keys to move to the starting point for the
graphic location and press ENTER. You will see:
Use arrow keys to EXPAND BOX to correct
size. Press ENTER when done.
4. Adjust the size of the graphic print are (the box):
• to expand the box horizontally to the right, press the
right arrow
• to collapse the box horizontally to the left, press the Left
Arrow.
• to expand the box vertically, press the Down Arrow.
• to collapse the box vertically, press the Up Arrow.
Press ENTER when the box is the size you need.
The Edit Format Menu will reappear.
4-9
Page 38

9450 User’s Manual
Adding a Copied Field
This function enables you to copy an existing field and pl ace it
anywhere on th e form at.
To copy a field on your format:
1. Press C at the New Field Menu.
You will see:
Use arrow keys to move cursor to FIELD
TO BE COPIED. Press ENTER when done.
2. Use the arrow keys to select the fiel d you want to copy and
press ENTER.
A box representing the area required for the new field is
displayed and the following message appears:
Move box to LOCATION FOR THE NEW FIELD.
NOTE: Enter "H" to CENTER HORIZONTALLY
or "V" to CENTER VERTICALLY. Press
ENTER when done.
3. Move the box where you want the copied field and press
ENTER. The copied field is added to the format and the
Edit Format Menu rea ppears.
4-10
Page 39

4. Designing Format s
Viewing/Modifying a Text or Bar Code Field
This selec tion enables you to review the specifications for a text
or bar code field. Y ou may make changes or return to the Edit
Format Menu without making changes.
To view and/ or modify a text or bar code field:
1. Enter V at the Edit Format Menu.
You will see:
Use arrow keys to move cursor to BARCODE
OR TEXT FIELD TO BE VIEWED/MODIFIED.
Press ENTER when done.
2. Use the cursor to select the field you want to modify and
press ENTER.
The currently-defined specifications for the field are
display ed. In addition, the field’s horizontal and verti cal
coordinates appear above the other data. You will also
see the following message:
Press ENTER to CHANGE FIELD DATA. Press
ANOTHER KEY to return to Edit Format
Menu.
4-11
Page 40

9450 User’s Manual
3. If you do not want to change any data, press any key
(except ENTER). You will see the format display and the
Edit Format Menu.
• To change data, press ENTER. The highlighted bar
appears at the first data item.
• To change the value for an item, use the Up Arrow or
Down Arrow keys or the ENTER key to scroll to the
item you want to change and type in the new value.
• To exit, scroll past the last item or press ESC.
You will see:
All data is correct. Press ENTER to
include field...
4. Press ENTER to accept changes or ESC to not accept.
The format will be displayed again.
5. To leave the fi el d in its original po sition, press ENTER. If
you want to mov e the fi eld, use the arrow keys to position
the field where you want it. Press ENTER.
You will see the format with its new values and the Edit
Format Menu.
Moving a Field
To move a field to a new loc ation on the format:
1. Enter M at the Edit Format Menu.
You will see:
Use arrow keys to move cursor to FIELD
TO BE MOVED. Press ENTER when done.
4-12
Page 41

4. Designing Format s
2. Use the cursor to select the field you want to mov e. Press
ENTER.
A box appears on the display around the field to be moved.
This box represents the area the field requires on the
format. Use the arrow keys and PgUp, Pg Dn, Home and
End to move the box.
3. When you have moved the box where you wan t it, press
ENTER.
You will see the field in its new location, and then the Edit
Format Menu.
Deleting a Field
To delete a field from your format:
1. Enter D at the Edit Format Menu.
You will see:
Use arrow keys to move cursor to FIELD
TO BE DELETED. Press ENTER when done.
2. Select the fi el d you want to delete and pre ss ENTER.
You will see:
ARE YOU SURE? Press Y to DELETE FIELD
or N to NOT DELETE FIELD.
3. To delete the field, press Y. If you do not want to delete
the field, press N or ESC. If you delete the field, it is
removed from the display and the Edit Format Menu is
display ed agai n.
4-13
Page 42

9450 User’s Manual
Changing the Format Size
To view or modify the format size specifications:
1. Enter F at the Edit Format Menu.
You will see the format size specification data. The date,
time, the drive the formats and data are on, and the
number of fields used will appear at the bottom of your
screen.
2. To change the format size information, press ENTER. You
can enter new data.
NOTE: If you decreas e the label size, any fi el ds that
would appear off or partially off the format will not
print on the label.
Printing a Test Label
Save your form at before doing a test prin t. To print a test label
using the current format, enter P at the Edit Format Menu. A
test label is printed and the Edit F orm at Menu is displayed
again.
Saving the Format
This function saves all the information that defines the format
on your hard disk.
To save a format:
1. Enter S at the Edit Form at Menu.
You will see:
THE FORMAT
SAVED. PRESS A KEY TO CONTINUE.
4-14
drive: format name
HAS BEEN
Page 43

4. Designing Format s
2. Press any key to retu rn to the Ed it Form at M e nu.
Renaming and Saving the Format
The Rename function is similar to the save function. The only
difference is that you will be asked to enter a new name for the
format before i t i s saved. The Rename functi on enabl es you to
make several copies or several vers i ons of a format.
To make a copy, save a format und er a n ew n am e. To make a
new version, modify the format and then save it under a new
name. In either case, the Rename function will not affect the
original format.
To rename a format:
1. Enter R at the Edit Format Menu.
You will see:
ENTER NEW FORMAT NAME:
The formats that already exist on the drive you specified in
the configuration program are displayed. If there are more
format names than you can see at one time on the screen,
press PgUp and PgDn.
2. Enter the nam e ( up to 8 characters) of the format you wish
to create. Th e format name may contain any eight letters
or numbers, but no special characters such as periods (.),
hyphens (-), or spaces. Press ENTER.
You will see:
THE FORMAT
HAS BEEN SAVED. PRESS A KEY TO CONTINUE.
drive: format name
4-15
Page 44

9450 User’s Manual
3. Press any key to return to the Edit Format Menu.
Modifying an Existing Format
To modify an existing format:
1. Enter M at the Create, Modify, Menu.
You will see:
ENTER FORMAT NAME:
Use PgUp and PgDn to scroll through the format names.
2. Type in the format name and press ENTER.
The format you selected is displayed. You may now
continue by adding, modifying and deleting fields or using
any other function at the Edit Format Menu.
Deleting a Format
To delete a format:
1. Enter D at the Create, Modify Format Menu.
You will see:
ENTER NAME OF FORMAT TO BE ERASED:
2. Enter the name of the format you wish to delete. Press
ENTER. Use PgUp and PgDn to page through the format
names.
4-16
Page 45

4. Designing Format s
You will see:
ARE YOU SURE? PRESS "Y" TO ERASE X:XXXX
OR ANOTHER KEY NOT TO ERASE
3. Press Y to delete the format you have selected.
You will see:
THE FORMAT
drive: format name
HAS BEEN
ERASE D. PRESS ANY KEY TO CONTINUE.
4. Press any key to return to the Create, Modify Format Menu.
4-17
Page 46

9450 User’s Manual
4-18
Page 47

5. Printing
Y ou can use the Print Labels Menu or the Batch File Functions
Menu to print l abel s. For information on pri nting labels using
the batch functions, see Chapter 6, "Batch Functions."
To print labels using the Print Menu:
1. Enter P at the Main Menu. Y o u will see:
ENTER NAME OF FORMAT TO PRINT:
2. Enter the name of the format you want to print. Press the
PgDn and PgUp ke ys to scroll through the format names.
Press ENTER.
If you did not include any variable fields in your format, the
Print Label s Menu appears. If you inc l uded variable fie lds
in your format design, you are prompted for that
information.
3. Enter any variable data. Press ENTER.
The Print Labels Menu is displayed with a graphic
representation of the format.
5-1
Page 48

9450 User’s Manual
From this menu, you can
• print a test label
• print a batch of labels
• download a format
• change label data
• scan bar codes
• choose a new format.
Printing a Test Label
This function prints one label, enabling you to determine
whether the format appears to your satisfaction. The printer
must be cabled correctly to the computer, and turned on.
To print a test label for the current format, enter T at the Pri n t
Labels Menu. One label is printed and you are returned to the
Print Labels Menu.
5-2
Page 49

5. Printing
Printing a Batch of Labels
Use this function to print a set of labels that use the same
format. To pri nt a batch of labels:
1. Enter P at the Print Labels Menu.
You will see:
Please enter NUMBER OF LABELS you would
like to print:
2. Enter the num ber of labels you want to print ( up to 9999)
and press ENTER.
3. When the pri n ting is finished, you are returned to the Print
Labels Menu.
Entering Multiple Lines of Text in the Same Field
You can enter multiple lin es of text in one field:
• If the data source of the format is When Printed
-and-
• If the Number of Lines per field is defined as more than
one
For multiple lines, you type /n at each l i ne break to simulate a
carriage return. Follow these steps:
1. When prom pted to type the text for the field, type the text
until you get to the point where you want the line to break.
2. Type /n and then type the n ext line of text. Do not type any
spaces between the text and the /n. For example, if you
type The/nRascal, "The" will print on the first line and
"Rascal" will print on the second line.
The number of line breaks you can enter equals the value
defined in the format for "Number of Lines ."
5-3
Page 50

9450 User’s Manual
Downloading a Format
Y ou can send formats to the printer with the Download format
function. This function sends the fields and the format, but
does not send batches or fonts.
To download a format, enter D at the Pri nt Labels Menu. You
will see "
downloaded the format.
Format Now Being Created
." The software has
Changing Label Data
Use this function to change the variable data contained on a
format. For example, if your format contains a variable price
field, you may want to change the price defined for that format
from $25.00 to $19.95.
To change forma t data:
1. Enter C at the Print Menu.
A screen appears containing the fields that need to be
defined by the operator before printing. This screen shows
the prompts defined for each variable field when the format
was created. Below each prompt is an input area.
2. Enter the new value for any field you want to change.
Variable fields are grouped six per page. Use the PgU p
and PgDn keys to move between pages or to move
between variable fields. You may also use the ENTER key
to move to the next field.
• Press ENTER or the Down Arrow key from the last
variable field on a page to move to the next page.
• Press the Up Arrow key from the top variable field on a
page to move to the previous page.
5-4
Page 51

5. Printing
3. When you are finished entering data, press ESC to return
to the Print Labels Menu or press ENTER after you have
entered dat a in the last field. Each variable field and any
copied fields will be displayed again with the curre nt dat a.
Scanning Bar codes
To scan bar codes :
1. Enter S at the Prin t Menu.
You will see:
Set up scanner and begin scanning. Data
read will appear below. To RETURN to
PRINT MENU, PRESS ESC.
2. Set up your scanner and begin scanning. All data scanned
is displayed on the screen.
3. To return to the Print Menu, press ESC.
Printing a Different Format
You can select another format for pri nting by using the New
format function. This funct i on is equivalent to selec ti ng the
Print Labels option from the Main Menu.
To select another format to print:
1. Enter N at the Print Labels Menu.
You will see:
ENTER NAME OF FORMAT TO PRINT:
5-5
Page 52

9450 User’s Manual
2. Enter the name of the format you wish to print. Pres s the
PgDn and PgUp keys to scroll through the format names.
Press ENTER.
You will see:
Please enter NUMBER OF LABELS you would
like to print:
3. Enter the numb er of labels you want to print (up to 9999)
and press ENTER.
4. When the printing is finished, you are returned to the Print
Labels Menu.
Cancelling a Print Job
Y ou can cancel a print job in one of two ways:
• Cancel a print job while the computer is sending data,
but before any printing begins, by pressing ESC.
• Interrupt the transmission of data, by pressing F1O. To
resume sending data, press any key.
5-6
Page 53

6. Batch Functions
Batching i ncreases your productivity by sending several labels
using the same format to print at the same time. You can print
batche s us i ng the 9450 software , or you can send the batches
to another application, such as Monarch data collection
software.
To access the batching functions:
1. Enter B a t the Main Menu. You will see:
From this menu you can:
• create a batch file
• delete a batch file
• print a batch file
• terminate a batch print.
6-1
Page 54

9450 User’s Manual
Creating a Batch File
This function enables you to create a new file with any formats.
To create a new Batch File:
1. Enter C at the Batch File Functions Menu.
You will see:
Enter new Batch File name:
2. Enter the name of the new batch file (up to 8 let ters).
Press ENTER.
You will see:
Enter name of format to print:
3. Enter the name of the format to print. Press ENTER.
You will see:
From this menu you can:
• add data to a batch file
• change label data
• change formats.
6-2
Page 55

6. Batch Functions
Adding Data to a Batch File
You can add data to the current batch file by using this function.
To add data:
1. Press A at the Batch File Creation Menu.
You will be prompted for any variable data on the label.
2. Enter the required data. Press ENTER.
If there are no incremented or decremented fields, you will
see:
Please enter the NUMBER OF LABELS you
would like to print.
If there are incremented or decremented fields, you will see:
Enter BATCH SIZE (number....)
then you will see:
Enter NUMBER OF BATCHES (number)
3. If the label contains no incre m ented or decremente d fields,
enter the number of labels you want to print (up to 9999)
and press ENTER.
If your label contains incremented or decremented fields,
you can print several sets of labels before the field
increments or decrements. Enter the batch size and
number of batches and press ENTER.
For example, to print 10 sets of labels with an incremented
serial number starting at 30 and ending at 60, enter 30 for
Batch Si z e and 10 for Num b er of Ba tc h e s . Pre s s ENTER.
6-3
Page 56

9450 User’s Manual
4. The data is added to the batch file and the Batch File
Creation Menu is displayed again.
Changing Label Data
Use this function to change any variable data on the displayed
label.
To change var iable data on your format:
1. Press C at the Batch File Creation Menu. Y ou are
prompted for any variable data on the label and the
quantity of labels you want to print.
2. Enter the required data. Press ENTER.
The data is changed in the batch file and the Batch File
Creation Menu is displayed again.
Choosing a Different Format
Use this function to select a new format for the current batch
file. To change fo rm ats:
1. Press N at the Batch File Crea ti on Menu.
You will see:
Enter name to format to print:
2. Enter the name of the new format. Press ENTER. You are
prompted for any variable data.
3. Enter the required data and press ENTER.
The system displays the selected label as well as the
Batch File Creation Menu. Press ESC to return to the
Batch File Functions Menu.
6-4
Page 57

6. Batch Functions
Deleting a Batch File
Use this function to delete any batch on the disk.
To delete a batch file:
1. Enter D at the Batch File Functions Menu.
You will see:
Enter name of Batch File to be erased:
2. Enter the nam e ( up to 8 characters) of the fil e you want to
delete. Press ENTER.
You will see:
’ARE YOU SURE? PRESS ’Y’ TO ERASE BATCH
FILE d:nnnnnnnn OR ANOTHER KEY NOT TO
ERASE.’
d is the drive that contains the batch file and nnnnnnnn is
the name of the batch file.
3. Press any key if you do not want to erase the batch file.
Enter Y to remove the file.
You will see:
The batch file d:nnnnnnnn has been
erased. PRESS A KEY TO CONTINUE.
4. Press any key to return to the Batch File Functions Menu.
6-5
Page 58

9450 User’s Manual
Printing a Batch File
Use this function to print any batch file on the disk. To print a
batch file:
1. Enter P from the Bat ch File Functions Menu.
You will see:
Enter name of Batch File to print:
2. Enter the name of the file you want to print . Press ENTER.
You will see:
’THE BATCH FILE d:nnnnnnnn IS BEING
PRINTED. PRESS A KEY TO CONTINUE.’
d is the drive that contains the batch file and nnnnnnnn is
the name of the batch file.
3. Press any key to return to the Batch File Functions Menu.
6-6
Page 59

6. Batch Functions
Terminating a Batch Print
Use this function to cancel the batch currently being printed. To
terminate a batch print:
1. Enter T at the Batch File Functions Menu.
The printer prints the remainder of the format currently
printing, but does not print any remaining formats in that
batch.
You will see:
PRINTING OF BATCH FILE(S) CANCELED.
PRESS A KEY TO CONTINUE. NOTE: TURN
PRINTER OFF THEN ON TO CLEAR BUFFER.
PRESS A KEY TO CONTINUE.
2. Turn the printer off and then on again.
3. Press any key to display the Batch File Functions Menu.
Viewing the Batch Data Stream
You can di splay the complete onli ne data stream in DOS.
1. After creating a batch, exit to DOS .
2. Use the DOS TYPE command to display the file contents.
All batch files end with a .BCH file extension (for example
TEST .BCH). To view the contents of TEST.BCH, you type
the following at the command line:
TYPE TEST.BCH
6-7
Page 60

9450 User’s Manual
6-8
Page 61

7. Online Commands
The Online Commands menu allows you to select the supply
type and method of printing. Thi s menu also gives you the
ability to select a darker or lighter contrast in the appearance of
the print.
To select Online Commands:
1. Press O at the Main Menu. You will see:
From this menu, you can set these features:
• Stock type
• Print mode
• Print contrast
7-1
Page 62

9450 User’s Manual
Selecting the Stock Type
This function enables you to select the type of label stock to
use.
1. Enter S at the Onli n e Commands M e nu.
You will see:
2. Enter N to print on non-indexed label stock. Or, enter B to
print on black mark label stock. Press ENTER.
Selecting the Print Mode
This function enables you to select whether to print labels in
one continuous batch, or one at a time.
1. Enter P at the Onli n e Commands M e nu.
You will see:
2. Enter C to print labels in conti nuous mode. Or, enter O to
print labe l s in on dem and mode. Press ENTER.
Continuous printing means that the labels will print without
pausing. On Demand printing means that one label will
print each time you press the feed but ton on the printer.
7-2
Page 63

7. Online Commands
Selecting the Print Contrast
This function enables you to select the contrast percentage of
the print on the label.
1. Enter C at the Online Commands Menu.
You will see:
2. From this sc r een, you can darken or light en the contrast.
• To darken the contrast, press D. Then, enter the
percentage darker that you want the label to print. You
can enter a value up to 35% (do not enter the percent
symbol). Press ENTER.
• To lighten the contrast, press L. Then, enter the
percentage l i ghter that you want the l abel to print. You
can enter a value as low as 15% (do not enter the
percent symbol).
7-3
Page 64

9450 User’s Manual
7-4
Page 65

Appendix A. Sample Label
Sample Label - 9450 Printer
The following steps guide you through the process of creating a
sample format and printing a sample label.
In this sample, the label size is 1.89" x 2.0". The bar code is a
UPC-A.
1. Type C at the Main Menu. The Create, Modify Format
Menu will be displayed.
2. Type C to display th e list of formats.
3. Type SAMPLE and press ENTER to display the label
specifications list.
4. Type 1.89 (width) and press ENTER.
5. Type 2 (length) and press ENTER.
6. Type O (On Demand) and pr ess ENTER.
7. Type 1 for the format ID number and press ENTER.
8. Type 1 for the field number for the format.
9. Press ENTER to display the Edit Format Menu.
10. Type A to display the New Field Menu.
11. Type T to display the specification list for this field.
12. Type 2 (Font) and press ENTER.
13. Type 1 (Orientation) and press ENTER.
14. Type 1 (Height Magnification) and press ENTER.
A-1
Page 66

9450 User’s Manual
15. Type 1 (Width Magnification) and press ENTER.
16. Type N (Contrast) and press ENTER.
17. Type F (Source) and pr ess ENTER.
18. Type SAMPLE (Fixed Data) and press ENTER.
19. Press ENTER to display a picture of the label on the
screen.
20. Press the dow n arrow key one time (V= .20) to move the
box down.
21. Type H to center the box horizontally.
22. Press ENTER to display the Edit Format Menu.
23. Type A to display the New Field Menu.
24. Type B to display the specification list for this field.
25. Type .5 (Height) and press ENTER.
26. Type 1 (Orientation) and press ENTER.
27. Type A (Symb ol ogy) and press ENTER.
28. Type 2 (Density) and press ENTER.
29. Type 11 (Max. Field Length) and press ENTER.
30. Type ENTER BARCODE (Prompt Line) and press ENTER.
31. Press ENTER to display a picture of the label.
32. Press the down arrow key three times (V=.60) to move the
box down.
33. Type H to center the box.
34. Press ENTER to display the Edit Format Menu.
35. Type S to save the format and write it to the disk.
A-2
Page 67

Appendix A. Sample Label
36. Press any key to display the Edit Format Menu.
37. Type Q to display the Create, Modify F orm at Menu.
38. Type Q to return to the Main Menu.
39. Type P to display the list of formats.
40. Type SAMPLE and press ENTER to display the Print
Labels Menu.
41. Type T to print the sample l abel shown below.
A-3
Page 68

9450 User’s Manual
A-4
Page 69

Appendix B. Format Specification
Data
The following paragraphs provide information regarding the
valid values for each prompt you may see when creating a
format for the first time.
Maximum width
The width of the printable area may be up to 1.89 inches.
Maximum length
The maximum length of the label may be up to 4.94 inches.
Continuous/On Demand
Indicates either continuously or on demand printing.
Continuous printing means that the labels will print without
pausing. On Demand means that one label will print each
time you press the Feed button on the printer.
Format Number
The number associated with the format you want to use.
Range: 0 to 74.
Starting Field Number
The number of the field where you want the printer to start
printi ng on the label. Range: 0 to 74.
B-1
Page 70

9450 User’s Manual
Field Specification Data--Bar Codes
Each of the prompts you may see when defining a bar code
field is described in the following paragraphs.
Bar Code Height
The height in inches and tenths of inches of the bars
making up the bar c ode. Range: .3 inches to 5 inches.
Bar Code Orientation
The orientation of the bar code on the label. Choices are:
1 = horizontal
2 = vertical (90 degree rotation)
Symbology
The letter corresponding to one of the available bar codes.
A - UPCA F - UPCE+5 M - CODABAR
B - UPCA+2 G - EAN 13 N - Code 128a
C - UPCA+5 H - EAN8 O - Code 128b
D - UPCE K - Code39 P - Code 128c
E - UPCE+2 L - l 2 of 5 Q - MSI
A UPC-A bar code on this size format will also have less
white space around it. This may make it difficult to scan if
the label is applied to a dark surface.
B-2
Page 71

Appendix B. Format Specification Data
Density
Density defines the wide to narrow bar code element in dot
rows.
The chart below shows the available densities for each bar
code.
Bar Code Densities
UPCA
UPCA+2
UPCA+5
UPCE
UPCE+2
UPCE+5
EAN8
EAN13
Code 39
l 2 of 5
Codabar
Code 128a
Code 128b
Code 128c
MSI
1, 2
1, 2
1, 2
1, 2
1, 2
1, 2
1, 2
1, 2
3, 4, 5, 6, 7, 8
6, 7, 8, 9, 10, 11, 13, 15
4, 5, 6, 7, 9, 10
9, 12, 19
9, 12, 19
9, 12, 19
4, 6, 9
Maximum Field Length
Enter the maximum number of characters for the bar code
field.
Operator Prompt
Text to be used to prompt the operator to enter data. The
line is displayed above the data entry area for the field.
B-3
Page 72

9450 User’s Manual
Field Specification Data--Text Fields
Select a fon t and poi nt size from the dis pl ayed list.
NOTE: To view addi tional font sel ections, type N and
press ENTER. To view the previous font
select i ons, type P and press ENTER.
Character Soft Fonts
The following table shows the 9450 soft fonts with av ai l a ble
poin t sizes.
CG Triumvirate Bold
Point
Cell Height Nominal Width Nominal Height
Size
6.5 0.098"
2.51 mm
8 0.123"
3.153 mm
10 0.152"
3.897 mm
12 0.177"
4.538 mm
18* 0.256"
6.564 mm
22* 0.310"
7.948 mm
20 dots 0.039"
1 mm
25 dots 0.049"
1.256 mm
31 dots 0.059"
1.512 mm
36 dots 0.073"
1.871 mm
52 dots 0.231"
5.923 mm
63 dots 0.275"
7.051 mm
8 dots 0.054"
1.38 mm
10 dots 0.068"
1.743 mm
12 dots 0.083"
2.128 mm
15 dots 0.108"
2.769 mm
47 dots 0.256"
6.564 mm
56 dots 0.310"
7.948 mm
1 1 dot s
14 dots
17 dots
22 dots
52 dots
63 dots
* indicate s point size only supports numeric characters.
B-4
Page 73

Appendix B. Format Specification Data
CG Triumvirate Bold Condensed
Point
Cell Height Nominal Width Nominal Height
Size
6.5 0.103"
2.641 mm
80.123"
3.153 mm
10 0.147"
3.769 mm
12 0.172"
4.410 mm
18* 0.246"
6.307 mm
22* 0.295"
7.564 mm
21 dots 0.029"
0.743 mm
25 dots 0.039"
1 mm
30 dots 0.049"
1.256 mm
35 dots 0.054"
1.384 mm
50 dots 0.206"
5.282 mm
60 dots 0.246"
6.307 mm
6 dots 0.054"
8 dots 0.073"
10 dots 0.088"
1 1 dot s 0.108"
42 dots 0.246"
50 dots 0.295"
* indicates point size only supports numeric characters.
Field Orientation
1.384 mm
1 1 dot s
15 dots
1.871 mm
18 dots
2.256 mm
22 dots
2.769 mm
50 dots
6.307 mm
60 dots
7.564 mm
The field can be printed in two directions:
1 left to right (normal)
2 top to bottom
NOTE: Refer to the instruction box at the top of the
display for an ex am pl e of each orientatio n.
Height Magnification
The magnification for the character height. The possible
magnifications are 1, 2, 3, and 4.
Width Magnification
The magnification for the character width. The possible
magnifications are 1, 2, 3, and 4.
Field Contrast
You can print black characters on a white background
(NORMAL) or white characters on a black background
(REVE RSE). If you ch o ose Revers e, a border ar e a is also
printed around the text.
B-5
Page 74

9450 User’s Manual
Data Source
The data source for the field can be one of the following:
Fixed
The exact data you entered in the field. The
field is always printed with that value.
When
Printe d
The field data is vari abl e. When you print
the label, the program prompts you to fill in
the value of th e fi el d. You can change the
value for each set of labels printed.
NOTE: If the field is a "Whe n Printed" field,
it is displayed as a string of question marks
on the format display .
Characters Per Line
If you define the field as "When Printed," enter the number
of characters per line for the field.
Number of Lines
If you define the field as "When Printed," enter the number
of lines to appear in the field. If you enter a value of more
than one for this field, the operator who prints the labels
will be able to type multiple lines of text by using /n to
represent a carriage return. Refer to Chapter 5, "Printing,"
for more information.
Justify
If you define the field as "When Printed," specify whether
you want the characters to print flush left (L), right (R), or
centered (C) in the field.
Operator Prompt
If you define the field as "When Printed," enter text to be
used as a prompt for the operator.
B-6
Page 75

Appendix B. Format Specification Data
Incremen t Field
If you define the field as "Fixed," you can define these
options:
Incremen t
the field
Decrement
the fiel d
Constant
Fixed Data
If you define the field as "Fixed," enter the value of the
field. You can type multiple lines of text by using /n to
represent a carriage return. Refer to Chapter 5, "Printing,"
for more information.
A number added to the field value for each
batch of lab e l s requested when prin ti ng.
This option is typically used in applications
where a unique number such as a serial
number is requi red on each label. The
number increments by 1.
A number subtracted from the field value for
each batch of labels requested when
printing. The number decrements by 1.
The field will not be
incremented/decremented.
If the field value is not numeric, no
incrementing/decrementing will occur. If the
field contains letters and numbers, the
increment/decrement applies only to the
numeric port ion at the end of the field.
Example: For the field "45 ABC 23," only
"23" is incremented.
B-7
Page 76

9450 User’s Manual
B-8
Page 77

Appendix C. Messages
Following are status messages you could receive while using
the 9450 software. Each is accompanied by an explanation as
well as a possible solution.
NOTE: Some Terminate and Stay Resident programs (TSR’s)
may cause problems with the 9450 software. You may
want to disable TSR’s when running 9450.
Monarch does not recommend running the 9450
program under the Windows shell.
Message Description
Error on printer. This is the most common error
message you will encounter.
One of the following may have
caused this prob l em :
You ran 9450.EXE, not
RUN9450.BAT. Try running the
RUN9450.BAT file.
Y our cable is not attached to the
correct communications port.
Make sure it is connected to the
correct port.
The Flow Control on your printer
is not set to DTR. Set it to DTR.
Decimal value = 128 for DTR.
C-1
Page 78

9450 User’s Manual
Different DOS versions of
MODE.CO M , PRINT.COM, or
PRINT.EXE are loaded into the
9450 directory. If you have a
path statement to DOS in your
AUTO EX EC . BAT fi l e, you do not
need these files in the 9450
sub-directory. Be sure to delete
them.
Y our printer may be offline. Make
sure the printer is turned on and
online.
101 Error erasing label
file.
102 Error erasing report
file.
103 Error opening label
file.
The batch or format file you are
trying to delete cannot be found.
System error. Shut down your
system and start over. If you
receive this message again, call
Monarch Technical Support.
The batch or format file you are
trying to delete cannot be found.
System error. Shut down your
system and start over. If you
receive this message again, call
Monarch Technical Support.
The batch or format file you are
trying to open cannot be found.
System error. Shut down your
system and start over. If you
receive this message again, call
Monarch Technical Support.
C-2
Page 79

Message Description
Appendix C. Mess ages
104 Error reading label
file.
105 Error reading label
file.
106 Error reading label
file.
107 Error reading label
file.
The batch or format file you are
trying to read cannot be found.
System error. Shut dow n your
system and start over. If you
receive this message again, call
Monarch Technical Support.
The batch or format file you are
trying to read cannot be found.
System error. Shut dow n your
system and start over. If you
receive this message again, call
Monarch Technical Support.
The batch or format file you are
trying to read cannot be found.
System error. Shut dow n your
system and start over. If you
receive this message again, call
Monarch Technical Support.
The batch or format file you are
trying to read cannot be found.
108 Early end of file on
label file - label file
damaged.
System error. Shut dow n your
system and start over. If you
receive this message again, call
Monarch Technical Support.
There is something wrong with
the label fil e.
Restart the system. The format
may be lost. If so, recreate it.
C-3
Page 80

9450 User’s Manual
Message Description
109 Too many fields in
label file - label file
damaged.
There is something wrong with
the label file.
Restart the system. The format
may be lost. If so, recreate it.
1 10 Too many pictures on
label file.
There is something wrong with
the label file.
Restart the system. The format
may be lost. If so, recreate it.
111 Error reading label There is something wrong with
the label file.
Restart the system. The format
may be lost. If so, recreate it.
112 Error closing label file. There is something wrong with
the label file.
Restart the system. The format
may be lost. If so, recreate it.
113 Error creating or
opening label file.
There is something wrong with
the label file.
114 Error reading label
file.
C-4
Restart the system. The format
may be lost. If so, recreate it.
There is something wrong with
the label file.
Restart the system. The format
may be lost. If so, recreate it.
Page 81

Appendix C. Mess ages
Message Description
115 Error writing label file. There is something wrong with
the label fil e.
Restart the system. The format
may be lost. If so, recreate it.
116 Disk full while writing
label file.
There is not enough room on
your selecte d disk to m ak e
changes to the label file.
Exit to DOS and check to see
how much space is available on
your selected disk. If the disk
containi ng your label files is full,
you may want to dele te so me
files from the disk. If there
appears to be enough room on
the disk, reboot your computer.
117 Error saving label
file--changes lost.
There is something wrong with
the label fil e.
Try again. If this is the first time
you are c r ea ting this fo rm at, it will
be lost. If you hav e saved this
format before, only the changes
will be lost.
118 Error writing label file. There is something wrong with
the label fil e.
Restart the system. The format
may be lost. If so, recreate it.
C-5
Page 82

9450 User’s Manual
Message Description
1 19 Disk full while writing
label file.
There is not enough room on
your selecte d disk to ma ke
changes to the label file.
Exit to DOS and check to see
how much space i s available on
your selected disk. If the disk
containing your label files is full,
you may want to delete some
files from the disk. If there
appears to be enough room on
the disk, reboot your computer.
120 Error writing label file. Ther e i s something wrong with
the label file.
Restart the system. The format
may be lost. If so, recreate it.
121 Disk full while writing
label file.
There is not enough room on
your selecte d disk to ma ke
changes to the label file.
Exit to DOS and check to see
how much space i s available on
your selected disk. If the disk
containing your label files is full,
you may want to delete some
files from the disk. If there
appears to be enough room on
the disk, reboot your computer.
122 Error writing label file. Ther e i s something wrong with
the label file.
Restart the system. The format
may be lost. If so, recreate it.
C-6
Page 83

Message Description
Appendix C. Mess ages
123 Disk full while writing
label file.
124 Disk full while writing
label file.
There is not enough room on
your selecte d disk to m ak e
changes to the label file.
Exit to DOS and check to see
how much space is available on
your selected disk. If the disk
containi ng your label files is full,
you may want to dele te so me
files from the disk. If there
appears to be enough room on
the disk, reboot your computer.
130 Label size
parameters in error.
System error.
Shut down your system and start
over. If you rec ei ve this message
again, call Monarch Technical
Support.
C-7
Page 84

9450 User’s Manual
Message Description
189 Disk full while writing
label file.
201 Invalid field type
encountered.
202 Error locating field
info.
There is not enough room on
your selecte d disk to ma ke
changes to the label file.
Exit to DOS and check to see
how much space i s available on
your selected disk. If the disk
containing your label files is full,
you may want to delete some
files from the disk. If there
appears to be enough room on
the disk, reboot your computer.
System error.
Shut down your syst em and st art
over. If you receive this mes sage
again, call Monarch T echnical
Support.
System error.
Shut down your syst em and st art
over. If you receive this mes sage
again, call Monarch T echnical
Support.
203 Invalid field type
encountered.
C-8
System error.
Shut down your syst em and st art
over. If you receive this mes sage
again, call Monarch T echnical
Support.
Page 85

Message Description
Appendix C. Mess ages
204 Error locating copy
source info.
206 Invalid source of data
found.
601 Error locating field
info.
701 Error locating field
info.
System error.
Shut down your system and start
over. If you rec ei ve this message
again, call Monarch Technical
Support.
System error.
Shut down your system and start
over. If you rec ei ve this message
again, call Monarch Technical
Support.
System error.
Shut down your system and start
over. If you rec ei ve this message
again, call Monarch Technical
Support.
System error.
Shut down your system and start
over. If you rec ei ve this message
again, call Monarch Technical
Support.
702 Error locating field
info.
System error.
Shut down your system and start
over. If you rec ei ve this message
again, call Monarch Technical
Support.
C-9
Page 86

9450 User’s Manual
Message Description
801 Unable to add new
field.
System error.
Shut down your syst em and st art
over. If you receive this mes sage
again, call Monarch T echnical
Support.
919 Vertical position out
of range.
System error.
Shut down your syst em and st art
over. If you receive this mes sage
again, call Monarch T echnical
Support.
NOTE: Any error number not included in the above table
indicates an i nternal program fai l ure. Please report
any such error to Monarch Technical Support.
C-10
Page 87

Index
A
about this manual 1-1
adding a bar code field 4-6
adding a box 4-7
adding a text field 4-6
adding graphics 4-8
adding new fields 4-4
B
bar code field
adding 4-6
bar codes
scanning 5-6
batch files
printing 6-6
batch functions 6-1, 6-3, 6-5,
6-7
batches
adding data 6-3
changing data 6-4
deleting 6-5
printing 5-3
terminating a print job 6-7
viewing 6-1
baud rate 2-1
before you install 2-1
box
adding 4-7
C
cancelling a print job 6-7
cancelling print jobs 5-6
changing format data 5-4
changing formats 6-4
changing variable data 6-4
communication port settings
2-1
configuration program 2-5
creating formats 4-2
D
data
changing 5-5
deleting a field 4-13
deleting a format 4-16
deleting batch files 6-5
designing formats 4-1, 4-3,
4-5, 4-7, 4-9, 4-11, 4-13, 4-15,
4-17
E
erasing batch files 6-5
error messages C-1, C-3, C-5,
C-7, C-9
F
fields
adding 4-4
bar code 4-6
box 4-7
deleting 4-13
graphics 4-8
moving 4-12
text 4-6
flow control 2-1
formats
changing 6-4
creating 4-2
deleting 4-16
designing 4-1, 4-3, 4-5, 4-7,
4-9, 4-11, 4-13, 4-15, 4-17
modifying 4-14, 4-16
Index-1
Page 88

9450 User’s Manual
renaming 4-15
saving 4-14
viewing 4-14
function keys 1-3
functions 1-3
G
graphics
adding 4-8
I
installation 2-2
installing the software 2-1, 2-3,
2-5, 2-7, 2-9, 2-11
introduction 1-1
O
online commands 7-1, 7-3
operating requirements 1-1
overview 1-1
P
parity 2-1
port settings 2-1
print jobs
cancelling 5-6
printer settings 2-1
printing 5-1, 5-3, 5-5, 6-6
terminating 6-7
test label 4-14
K
key terms 1-2
keys 1-3
L
labels
changing data 6-4
printing 5-1, 6-6
sample A-1, A-3
M
main menu 3-5
menu modes 3-4
menu selections 3-5
menus 3-4
messages C-1, C-3, C-5, C-7,
C-9
modifying a format 4-16
modifying formats 4-14
moving fields 4-12
R
renaming formats 4-15
requirements 1-1, 2-1
S
sample label A-1, A-3
saving formats 4-14
scanning bar codes 5-5
selections 3-5
software installation 2-1, 2-3,
2-5, 2-7, 2-9, 2-11
starting the program 3-3
status messages C-1, C-3,
C-5, C-7, C-9
stop bits 2-1
system messages C-1, C-3,
C-5, C-7, C-9
system requirements 1-1
T
terminating a print job 6-7
terms 1-2
test format 2-11
Index-2
Page 89

test label
printing 4-14
test print 5-2
text fie l d s
adding 4-6
V
variable data
changing 5-4
viewing formats 4-14
W
word length 2-1
Index
Index-3
Page 90

9450 User’s Manual
Index-4
Page 91

Page 92

For supplies, service, or assistance call:
TOLL FREE:
1-800-543-6650 (In the U.S.A.)
1-800-263-4650 (In Canada)
Published by the Technical Communications Department.
Printed in the U.S.A.
 Loading...