

Page 1
Operator's
Handbook
28028 28028
0 0
FRESHMARX
9415™
Labeling System
®
TC9415OH Rev. AK 8/11
©2007 Avery Dennison Corp. All rights reserved.
Page 2

Page 3

Each product and program carries a respective written
warranty, the only warranty on which the customer can
rely. Avery Dennison reserves the right to make changes in
the product, the programs, and their availability at any time
and without notice. Although Avery Denn ison has made
every effort to provide complete and accurate information
in this manual, Avery Dennison shall not be liable for a ny
omissions or inaccuracies. Any update will be incorporated
in a later edition of this manual.
©2
007 Avery Dennison Corporation. All rights reserved. No
part of this publication may be reproduced, transmitted,
stored in a retrieval system, or translated into any
language in any form by any means, withou t the prior
written permission of Avery Dennison.
WARNING
This equipment has been tested and found to comply with the limits for a Class A
digital device, pursuant to Part 15 of the FCC Rules. These limits are designed to
provide reasonable protection against harmful interference when the equipment is
operated in a commercial environment. This equipment generates, uses, and can
radiate radio frequency energy and, if not installed and used in accordance with the
instruction manual, may cause harmful interference to radio communications.
Operation of this equipment in a residential area is likely to cause harmful
interference in which case the user will be required to correct the interference at his
own expense.
CANADIAN D.O.C. WARNING
This digital apparatus does not exceed the Class A limits for radio noise emissions
from digital apparatus set out in the Radio Interference Regulations of the Canadian
Department of Communications. Le présent appareil numérique n’émet pas de
bruits radioélectriques dépassant les limites applicables aux appareils numériques
de la classe A prescrites dans le Réglement sur le brouillage radioélectrique édicte
par le ministère des Communications du Canada.
Trademarks
FreshMarx® and 9415 are registered trademarks of Avery Dennison Corporation.
Avery Dennison
170 Monarch Lane
Miamisburg, OH 45342
Page 4

Page 5

TABLE OF CONTENTS
GETTING STARTED ............................................................1-1
Using This Manual.........................................................1-1
Audience ......................................................................1-1
Unpacking the Printer .................................................... 1-2
Installing the Printer ......................................................1-3
Connecting the Printer’s Power Supply ............................ 1-4
Loading Labels .............................................................1-5
PRINTING LABELS .............................................................2-1
About the Printer...........................................................2-2
Calibrating the Touch Screen ......................................... 2-3
Printing Freshness Labels.............................................. 2-4
Reprinting a Label......................................................... 2-6
Printing Use First Labels................................................2-8
Sleep Mode..................................................................2-8
CARE & MAINTENANCE...................................................... 3-1
Clearing Label Jams...................................................... 3-2
Cleaning the Platen Roller and Printhead......................... 3-3
Cleaning the Touch Screen Display................................. 3-5
Cleaning the Printer ......................................................3-5
TROUBLESHOOTING .......................................................... 4-1
Technical Support.........................................................4-3
Printing a Diagnostics Label........................................... 4-4
LABEL FORMATS.............................................................. A-1
Format 1 ..................................................................... A-1
Format 2 ..................................................................... A-2
Format 3 ..................................................................... A-3
Format 4 ..................................................................... A-4
Format 5 ..................................................................... A-5
Format 6 ..................................................................... A-6
Format 7 ..................................................................... A-7
Format 8 ..................................................................... A-9
SPECIFICATIONS .............................................................. B-1
Printer Specifications ................................................... B-1
Supply Specifications................................................... B-1
i
Page 6

ii Operator’s Handbook
Page 7

GETTING STARTED
Use the FreshMarx® 9415™ Labeling System
for product freshness and to la bel inventory. This
system is available as a single or dual printer.
Information in this document superc edes information
in previous versions. Check our Web site for the lat est
documentation and release i nformation.
1
Using This Manual
Following is a summary of the contents of this manual:
Chapter Contents
1 Getting Started
2 Printing Labels
Care &
3
Maintenance
4 Troubleshooting
A Label Formats Format sizes and content fields.
Unpacking and installing the
printer and loading supplies.
Selecting and printing freshness
labels.
Clearing supply jams and
cleaning the printer.
Common problems and their
solutions.
B Specifications Printer and supply
specifications.
Audience
The Operator's Handbook is for the person who pri nts
and applies labels.
Getting Started 1-1
Page 8

Unpacking the Printer
After you unpack the printer, you should have the
following:
9415 printer
power supply and cord
4 wall anchors
wall mount template
Keep all packaging material in case you need to move
or return the printer.
Caution: Do not touch the electrical conn ectors
while setting up the printer. Static
electricity can damage or destroy th e
electronic components.
1-2 Operator’s Handbook
Page 9
Installing the Printer
To install the printer on the wall:
1. Select a suitable location for the printer on a wall.
2. Tape the wall mount template to the wall in the
selected location.
Caution: The template must be level or the printer
will not install correctly.
3. Install the four wall anchors acco rding to the four
outside holes indicated on the template.
Mounting holes in back of printer
4. Remove
the template.
5. Lower the supply door on the printer so you can
see the mounting holes on t he back of the printer.
6. Attach the printer to the wall anchors using the
corresponding holes on the back of the printer.
7. Press down firmly on the printer to lock it in place.
8. Close the supply door.
Getting Started 1-3
Page 10
Connecting the Printer’s Power Supply
To connect the power supply to the printer:
1. Turn off the printer. Press the p ower switch on
the side of the printer to the off (O) position.
2. Place the power supply in a suit able location,
preferably on a table, near an electrical outlet.
3. Plug the three-hole end of the AC adapter cable
into the three-pronged outlet in the p rinter’s power
supply.
4. Plug the L-shaped end of the power supply cable
into the socket on the side of the printer.
Power socket
L-Shaped
Connector
5. Plug the three-pronged end of the AC adapter
cord into a grounded electrical out let.
Warning: The printer and power supply should
never be operated in a location where
either one can get wet. Personal injury
could result.
1-4 Operator’s Handbook
Page 11

Loading Labels
1. Dual printer: Printer 1 is located on the left a nd
Printer 2 is located on the right. Printer 1 is the
default printer for all categories and formats.
2. Single printer: Printer 1 (located on the left) is
the only available printer. There is no option to
assign a format to a printer.
3. The first time you load the printer after receiving it
you must remove and discard the thermal paper
from the printer slots.
4. Turn on the printer. Press the p ower switch on the
side of the printer to the on (I) position.
5. Press to remove the thermal paper from the
printer, if necessary.
6. Remove and discard the tape from a new roll of
labels.
7. Lower the supply door.
8. Slide a roll of labels onto the supply holder.
If necessary, adjust the supply holder guide so it
touches the roll.
9. Feed the labels, printing side up , into the supply
slots in the supply door.
Note: Make sure no label ad hesive is exposed when
loading labels. This causes jams .
Getting Started 1-5
Page 12
Make sure the supply clip is in the correct po sition
10.
to touch the edge of the supply. This clip guides
the labels through the supply slot so they do not
shift while printing.
Supply Holder
Guide
Printer 2
Supply clip
Supply slot
Dual printer shown
Printer 1
11. Close the supply door.
The printer calibrates the labels auto matically.
1-6 Operator’s Handbook
Page 13

PRINTING LABELS
This chapter describes how to
use the application
calibrate the touch screen
print freshness labels
print Use First labels.
Note: You may have a custom application tha t
differs slightly from the examples in this
manual. The screens and labels shown are
for reference only.
2
Printing Labels 2-1
Page 14
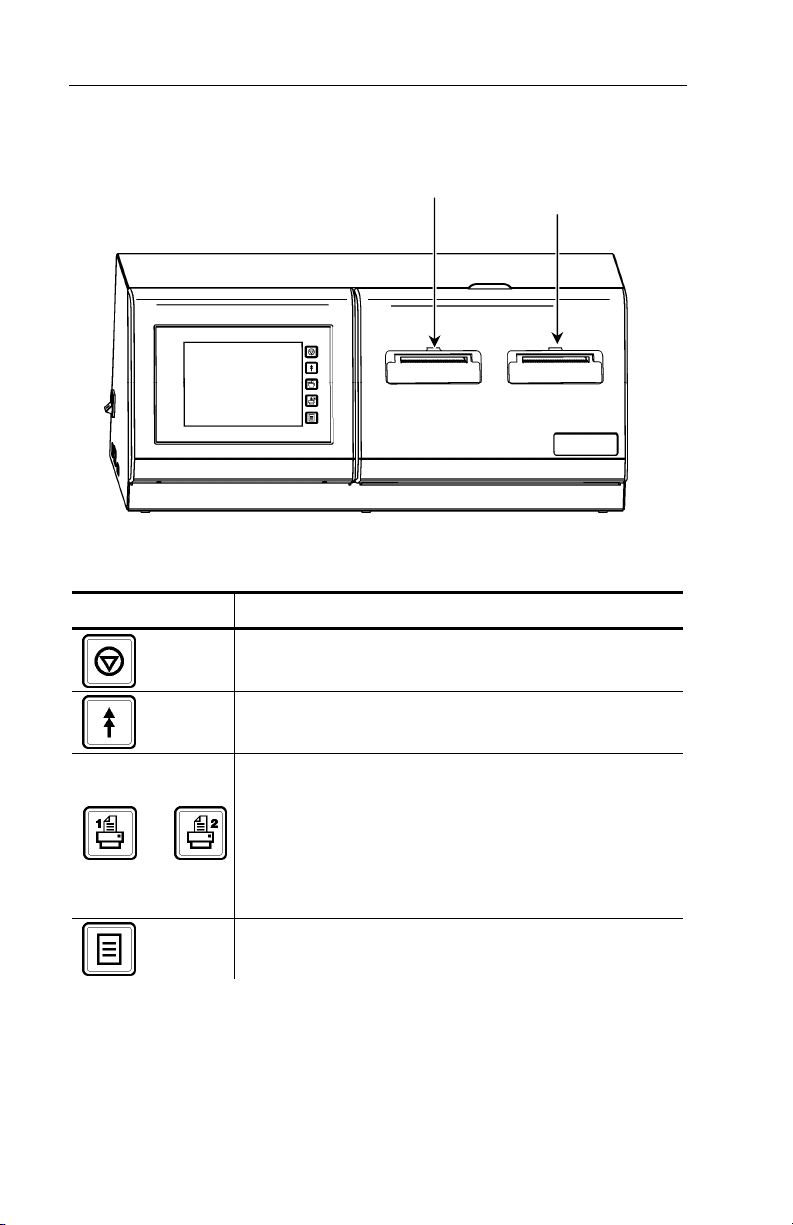
About the Printer
The printer has a touch screen , five control buttons,
and, depending on your model, one or two printers .
Printer 1
he five control buttons are located on the right side
T
Printer 2
(dual printer only)
of the touch screen.
Button Action
Stops/cancels the current print job.
Advances supply for the selected
printer.
Selects which printer feeds the
supply.
Printer 1 is located on the left side.
or
Printer 2 is located on the right side.
Note: In the single printer version,
these buttons do not funct ion.
Enters the printer configuration menu.
2-2 Operator’s Handbook
Page 15

Calibrating the Touch Screen
Calibrate the touch screen so th e buttons respond
correctly when pressed. Do this the first time you turn
the printer on after receiving it and whenever the
screen does not correctly respo nd to your touch.
1. Press the upper right-hand corner of the sc reen as
you turn on the printer.
The Touch Screen Calibration screen appears.
2. Follow the instructions to calibrate the touch
screen.
+
TOUCH SCREEN CALIBRATION
Please press center of cros s
The application runs automa tically when you
are finished.
Printing Labels 2-3
Page 16

Printing Freshness Labels
Use the application to labe l any product for freshness.
All products are listed under their corresponding
category. Select a new category by touching one of
the color-coded home keys on the right side of the
screen.
Note: All products in a category may not appear on
the screen. Use the tabs at the top of the
screen to view more products.
1. Turn on the printer.
2. Enter your Employee ID and press Enter. Your ID
must be 2-10 alphanumeric characters and
appears on the freshness labels. Then, you see
the product menu.
Note: Dependi ng on your application, the Employee
ID login may not appear. This option is
enabled by your Manager.
The product buttons are blank if a product
menu is not created or loaded. See your
Manager for more information .
3. Press any product button.
Tabs
Sample Product Buttons
2-4 Operator’s Handbook
Sample Home Keys
Page 17

4. The expiration date and time appear in th e upper-
right corner. If they are not co rrect, notify your
Manager. Refer to the System Administrator’s
Guide for more information.
5. Use
the numeric buttons to enter the quantity of
labels to print.
Press Back to backspace one character.
Press Cancel to return to the produc t screen
without printing labels.
6. Press Enter to print labels in the quantity you
entered.
OR
Press Enter without entering a quantity to print
only one label.
Labels print for the selected product. You return to
the product screen.
Note: If the printer is out of labels, a preview of the
label appears on the screen and no label
prints. Touch the screen to return to the
product screen.
Printing Labels 2-5
Page 18

Reprinting a Label
You may need to reprint a fre shness label if a label is
torn or missing from a product.
Note: Dependi ng on your application, you may have
this option, which is enabled by your
Manager.
1. Press the product button that needs to be
relabeled.
2. Press the Use By button in the upp er-right corner.
The Enter New Use By Value screen appears.
The Enter New Use By Value screen appears.
ght corner.
2-6 Operator’s Handbook
Page 19

Note: If thi s option is not enabled, the Use By
information does not appear as a button.
3. Enter the original Use By information:
Use the left and right ar row keys to set the
month, day, year, hour and minu te fields. The
day of the week is automatically set based on
the date.
Select the button for PM if necessary.
Note: Dependi ng on your application, your screen
may appear without the hour and minute
fields.
4. Press OK.
5. Use the numeric buttons to enter the quantity of
labels to print.
Press Back to backspace one character.
Press Cancel to return to the produc t screen
without printing labels.
6. Press Enter to print labels in the quantity you
entered.
OR
Press Enter without entering a qu antity to print
only one label.
Labels print for the selected product. You return to
the product screen.
Note: If the pri nter is out of labels, a preview of the
label appears on the screen and no label
prints. Touch the screen to return to the
product screen.
Printing Labels 2-7
Page 20

Printing Use First Labels
Apply a “Use First” label to any product on the shelf
that needs to be used first. A Use First label can print
on any label format. The current date and time is
printed on a Use First labe l.
1. Press Use First on the right side of the sc reen.
The Enter Print Quantity screen appears.
2. Enter the quantity of Use First labels you need to
print and press Enter.
OR Press Enter without entering a quantity to
print only one label.
Labels with the words "Use First" print.
The Use First button can be cu stomized to print words
other than “Use First”. Refer to the System
Administrator’s Guide for more information.
Note: If the printer is out of
labels, a preview of the
label appears on the
screen and no label prints.
Touch the screen to retu rn
to the product screen.
USE
FIRST
10/3/09 2:20 PM
S
ample Label
Sleep Mode
After 10 minutes of inacti vity, the touch screen
backlight dims to conserve power. After 30 mi nutes of
inactivity, the screen saver appe ars. After 50 minutes
of inactivity, the screen goes blank.
o wake up the printer, gently touch the screen.
T
2-8 Operator’s Handbook
Page 21

CARE &
MAINTENANCE
This chapter tells you how to
clear label jams
clean the platen roller and printhead
clean the printer.
3
Care & Maintenance 3-1
Page 22

Clearing Label Jams
To clear a jam:
1. Lower the supply door.
2. Remove any previously loaded labels.
3. Slide the roll of labels off th e supply holder.
4. Remove the jammed labels.
Caution: Do not use sharp or pointed objects t o
remove labels. It may damage the printer.
5. Reload the labels. See “Loading Labels
Chapter 1 for more information.
6. Close the supply door.
7. Press
to calibrate the labels.
” in
3-2 Operator’s Handbook
Page 23

Cleaning the Platen Roller and Printhead
Clean the platen roller and printhead after every five
rolls of labels or when you see voids in the print.
Voids Correct Print
1. Remove any loaded labels.
2. Use a plastic knife to snap of f the supply slot
cover.
Supply Cover
3. Use the plas tic knife to press the L-shaped bar and
the platen roller pops out.
Note:
Art is cut-away to show detail.
Care & Maintenance 3-3
Page 24

Clean the platen roller and printhead using a
4.
cotton swab moistened with isopropyl alcohol.
5. Allow time fo r the parts to dry.
6. Replace the platen roller.
7. Snap the cover into place.
8. Reload the labels . See “Loading Labels” in Chapter
1 for more information.
3-4 Operator’s Handbook
Page 25

Cleaning the Touch Screen Display
Use a non-ammonia glass cleaner an d a soft cloth to
clean the touch screen displ ay. If a stronger cleaner is
needed, use a mixture of 50% isopropyl alcoh ol and
water.
Caution: Do not use sharp objects or abrasive
cleaners on the touch scre en display;
it can damage the screen.
Cleaning the Printer
Slightly dampen a cloth with water an d wipe the
printer’s exterior surfaces cl ean. Use a dry, softbristled brush to clean paper dust out of the sup ply
door’s interior.
Caution: Do not use household cleaners to cl ean
the printer.
Care & Maintenance 3-5
Page 26

3-6 Operator’s Handbook
Page 27

TROUBLESHOOTING
This chapter lists some common problems and
their solutions.
Problem Action
Screen is off when
the printer is turned
on.
The printer does not
print.
Printing stops OR the
printer does not
advance from one
label to the next
correctly.
Check the power connections
from the power supply to the
printer and the wall outl et. See
“Connecting the Printer’s Power
Supply” in Chapter 1 for more
information.
Load the labels correctly and
make sure they are the
FreshMarx labels recommended
for this application. See
“Loading Labels
for more information.
Labels may be jammed. See
“Clearing Label Jams
Chapter 3 for more informa tion.
Calibrate the supply.
1. Load labels. See “Loading
Labels” in Chapter 1 for
more information.
2. Press
labels.
Clear a label jam. See
“Clearing Label Jams
Chapter 3 for more informa tion.
Place the supply clip in the
correct position to rest against
the edge of the labels. See
“Loading Labels
for more information.
” in Chapter 1
” in
to calibrate the
” in
” in Chapter 1
4
Troubleshooting 4-1
Page 28

Problem Acti
Label exits partially out
of the printer or skips a
label.
A label may be caught in the
printer. See “Clearing Label
Jams” in Chapter 3 for more
information.
Make sure the labels are
loaded correctly, the supply
clip is in the correct location ,
and that they are the
FreshMarx labels
recommended for this
application. See “Loading
Labels” in Chapter 1 for more
information.
Printing is faded or
poor quality.
Make sure the labels are
loaded correctly and that they
are the FreshMarx labels
recommended for this
application. See “Loading
Labels” in Chapter 1 for more
information.
Clean the printhead. See
“Cleaning the Printhead
Chapter 3 for more
information.
An asterisk (*) prints
after the time or date
on a freshness label.
The label was reprinted using
the original expiration time or
date. Depending on your
application, this option may not
be available. It must be
enabled by your Manager.
Printer performs no
action or an incorrect
action after pressing a
key.
Forgot Manager
Password
Calibrate the touch screen.
See “Calibrating the Touch
Screen” in Chapter 2 for more
information.
Enter password 1234.
The Configure screen appears.
Refer to the System
Administrator’s Guide for
information on resetting the
Manager Password.
on
” in
4-2 Operator’s Handbook
Page 29

Problem Acti
Paper Out error
appears.
Printhead Over
Temperature error
appears.
Motor Over
Temperature error
appears.
on
Load labels. See “Loading
Labels” in Chapter 1 for more
information.
Turn off the printer and allow it
to cool down before you
resume printing.
Turn off the printer and allow it
to cool down before you
resume printing.
Technical Support
If these solutions do not work, call Service at the
number listed on the back of this manual. Before
calling Service, print a diagnostics label.
Troubleshooting 4-3
Page 30

Printing a Diagnostics Label
The diagnostics label shows the printer’s software and
firmware versions and Ethernet information.
1. Press .
2. En
ter the Manager Password and press Ente r. The
default password is 1234. The Configure screen
appears.
Note: This screen ma y appear differently on the
single printer version.
3. Press Ser
vice.
4. Press Print Diag Label. A diagnostics label prints.
Sample Diag Label
5. Press Return until you see the product menu.
4-4 Operator’s Handbook
Page 31

LABEL FORMATS
This appendix shows a sample of each label
format.
Note: If an asterisk (*) prints after the d ate or time,
the label was reprinted using the original
expiration date or time. Depending on your
application, this option may not be available.
It must be enabled by your Manager.
A
A
Format 1
Prints 1.2” wide x 1.1” long labels.
Enter the following information for each field:
Field Description
Description 1
Description 2
Description 3
EMPL
Must Use By
Prints up to 17 characters.
Prints up to 17 characters.
Prints up to 17 characters.
Employee ID must be 2-10 characters.
Numbers only. Days 0-365, hours 0-23,
minutes 0-59.
Label Formats A-1
Page 32

Format 2
Prints 2.2” wide x 1.1” long labels.
Enter the following information for each field:
Field Description
Description 1
Description 2
EMPL
Must Use By
Prints up to 35 characters.
Prints up to 35 characters.
Employee ID must be 2-10 characters.
Numbers only. Days 0-365, hours 0-23,
minutes 0-59.
A-2 Operator’s Handbook
Page 33

Format 3
Prints 2.2” wide x 1.5” long labels.
Enter the following information for each field:
Field Description
Description 1
Description 2
EMPL
Expire
Date/Time
Prints up to 25 characters.
Prints up to 25 characters.
Employee ID must be 2-10 characters.
Numbers only. Days 0-365, hours 0-23,
minutes 0-59.
Label Formats A-3
Page 34

Format 4
Prints 2.2” wide x 2.0” long labels.
Note: A box prints around th e color-coded block that
corresponds to the day-of-week expiration
date. Check the box next to “display box with
lines” to print lines through the remaining
color-coded blocks.
Color-Coded
Block
Optional Lines
Enter the following information for each field:
Fi
eld Description
Description 1
Description 2
EMPL
Use By
Blue
Yellow
Red
Brown
Green
Gold
Black
Prints up to 15 characters.
Prints up to 15 characters
Employee ID must be 2-10 characters.
Numbers only. Days 0-365, hours 0-23,
minutes 0-59.
Use by Monday.
Use by Tuesday.
Use by Wednesday.
Use by Thursday.
Use by Friday.
Use by Saturday.
Use by Sunday.
Note: The employee ID number does not print if it
was not entered.
A-4 Operator’s Handbook
Page 35

Format 5
Prints 2.2” wide by 3.0” long labels.
Enter the following information for each field:
Field Description
Description
Shelf Life
EMPL
Use By
Prints up to 16 characters.
Prints up to 13 characters.
Employee ID must be 2-10 characters.
Numbers only. Days 0-365, hours 0-23,
minutes 0-59.
Label Formats A-5
Page 36

Format 6
Prints 2.2” wide x 4.0” long labels.
Enter the following information for each field:
Field Description
Store Name
Description 1
Description 2
Description 3
Ingredients
Use By
Net Weight
Price
Prints up to 17 characters.
Prints up to 23 characters.
Prints up to 23 characters.
Prints up to 23 characters.
Prints up to 875 characters.
Note: Does not print semicolons or
returns.
Prints in MM/DD/YY format.
Prints up to 8 characters.
Prints up to 7 characters: numbers 0-9,
period and dollar, cents, Euro, pound, and
yen signs only.
A-6 Operator’s Handbook
Page 37

Format 7
Prints 2.2” wide x 3.0” long labels.
ter the following information for each field:
En
Field Description
Serving Size
Servings Per
Container
Calories
Fat Calories
Total Fat
(g & %)
Saturated Fat
(g & %)
Trans Fat
Cholesterol
(mg & %)
Prints up to 25 characters.
Prints up to 10 characters.
Prints up to 6 characters: numbers 0-9
and period only.
Prints up to 6 characters: numbers 0-9
and period only.
Prints up to 6 characters: numbers 0-9
and period only.
Prints up to 6 characters: numbers 0-9
and period only.
Prints up to 6 characters: numbers 0-9
and period only.
Prints up to 6 characters: numbers 0-9
and period only.
Label Formats A-7
Page 38

eld Description
Fi
Sodium
(mg & %)
Total Carbs
(g & %)
Dietary Fiber
(g & %)
Sugars (g)
Prints up to 6 characters: numbers 0-9
and period only.
Prints up to 6 characters: numbers 0-9
and period only.
Prints up to 6 characters: numbers 0-9
and period only.
Prints up to 6 characters: numbers 0-9
and period only.
Protein (g)
Prints up to 6 characters: numbers 0-9
and period only.
Vitamin A (%)
Prints up to 6 characters: numbers 0-9
and period only.
Vitamin C (%)
Prints up to 6 characters: numbers 0-9
and period only.
Iron (%)
Prints up to 6 characters: numbers 0-9
and period only.
Calcium (%)
Prints up to 6 characters: numbers 0-9
and period only.
A-8 Operator’s Handbook
Page 39

Format 8
Prints 1.2” wide x 1.1” long labels.
ITEM DESCRIPTION 1
ITEM DESCRIPTION 2
ITEM DESCRIPTION 3
MM/DD/YY PREP HH:MM:PM
MUST USE BY:
MM/DD/YY HH:MM:PM
Day-of-week (English) Day-of-week (Spanish)
Note:
A box prints around the color-code d block that
corresponds to the day-of-week expiration
date. Check the box next to “display box with
lines” to print lines through the remaining
color-coded blocks.
Enter the following information for each field:
Field Description
Description 1
Description 2
Description 3
EMPL
Must Use By
Blue
Yellow
Red
Brown
Green
Gold
Black
Prints up to 17 characters.
Prints up to 17 characters.
Prints up to 17 characters.
Employee ID must be 2-10 characters.
Numbers only. Days 0-365, hours 0-23,
minutes 0-59.
Use by Monday.
Use by Tuesday.
Use by Wednesday.
Use by Thursday.
Use by Friday.
Use by Saturday.
Use by Sunday.
Label Formats A-9
Page 40

A-10 Operator’s Handbook
Page 41

SPECIFICATIONS
B
Printer Specifications
Height: 7.75” (197 mm)
Width: 17.75" (451 mm)
Depth: 7.0” (178 mm)
Weight w/ supply: 12.06 lbs (5.48 kg)
Shipping Weight: 14.5 lbs (6.58 kg)
Power: 100-240V AC, 47 to 63Hz input
supplies 24V DC, 90W to
printer
Operating Limits: Operating Thermal Direct
32 to 122 F (0 to 50 C)
Storage: -4 to 149 F
(-20 to 65 C)
Relative Humidity: 0% - 90% non-condensing
Printhead: 203 dpi (8.0 dots per mm)
Printing Method: Thermal Direct
Supply Specifications
Supply Type: Labels
Supply Widths: 1.2” (30 mm) minimum
2.2” (56 mm) maximum
Supply Lengths: 1.1” (28 mm) minimum
4.0” (102 mm) maximum
Max. Print Area: 2.0” (51 mm)
Specifications B-1
Page 42

B-2 Operator’s Handbook
Page 43

Page 44

Avery Dennison
170 Monarch Lane
Miamisburg, OH 45342
1-800-543-6650 (In the U.S.A.)
1-800-387-4740 (In Canada)
www.monarch.com
For FreshMarx sales:
1-877-774-6829 (In the U.S.A.)
www.freshmarx.com
28028 28028
0 0
 Loading...