

Avery 9406 User Manual
Monarch ® 9406™
Thermal Printer
System Administrator’ s
Guide
TC9406SA Rev. B 8/94 ©1994 Monarch Marking Systems, Inc. All ri ghts res erved.

Each product and program carries a respective written
warranty, the only warranty on which the customer can rely.
Monarch reserves the right to make changes in the product
and the programs and their availability at any time and without
notice. Although Monarch has made every effort to provide
complete and accurate i nformation in this manual, Monarch
shall not be liable for any omissions or inaccuracies. Any
update will be incorporated in a later edition of this manual.
F.C.C. WARNING
This equipment can interfere wi th radio communication if not installed
and used in accordance with the inst ruction man ual . It has been tested
and found to com pl y with the limit s f or a Class A comput in g device
pursuant to FCC Rules, Part 15, Subpar t B, w hi ch pr ovide reasonabl e
protection against such inter f er ence when operat ed i n a com m er ci al
environment . Operation in a r esi dential area is li kel y t o cause
interference which the user must correct at their own expens e.
CANADIAN D.O.C. WARNING
This digital apparatus does not exceed the Cla ss A lim its f or radio
noise emissi ons from digita l ap paratus set out in t he R adi o Interference
Regulations of the Canadian Department of Communications.
Le présent appa reil numérique n’ ém et pas de bruits radioélectriques
dépassant les limites applicables aux appareils numérique s de la
classe A prescrit es dans le Régle m ent sur le brouill age radioélectrique
édicte par le m i ni stère des Commu ni cat ions du Canada.
Monarch is a registered trademark and 9406 is a trademark of Monarch Marking
Systems, Inc.
IBM is a registered trademark of International Business Machines Corporation.
MS-DOS is a registered trademark of Microsoft Corporation.

Table of Contents
1. Introduction.......................................................................1-1
About this Manual........................................................1-1
Equipment Requirement s............................................1-2
Standard 9406 Features..............................................1-2
New 9406 Features.....................................................1-2
What is a Format?....................................................... 1 -3
Format Example..........................................................1-4
Format Size:....................................................1-4
How to Use this Manual .............................................. 1 -5
2. Designing a Format...........................................................2-1
Format Design Tools.................................................... 2 -1
Format Worksheet...........................................2 - 1
Supply Layout Grids........................................2-2
Steps to Designing a Format.......................................2-2
Determine Format Contents........................................2-3
Text Fields .......................................................2-3
Non-Printable Text Fields................................ 2-3
Bar Code Fields...............................................2-3
Overlays ......................................................................2-4
Constant Text Overlays ...................................2-4
Lines and Boxes..............................................2-4
Graphics..........................................................2-4
Field Options ...............................................................2-4
The Print Area..............................................................2-6
Draw Rough Sketches.................................................2-7
Filling in the Format Worksheet...................................2-8
Defining the Forma t Header........................................2-9
Defining Text Fields ................................................... 2- 13
Defining Constant Text Overlays...............................2-23
Defining Bar Code Fields ..........................................2-28
Defining Non-Printable Text Fields............................2-34
Table of Contents
i

9406 System Administrator’s Guide
Lines and Boxes........................................................2-36
Defining Lines................................................2-36
Defining Lines as Vectors..............................2-39
Defining Boxes..............................................2-39
3. Applying Field Options....................................................3-1
Defining Fixed Data (Option 1) ...................................3-3
Defining Fixed Characters for an
Entire Field......................................................3-3
Defining Fixed Characters for Part of
the Field...........................................................3-4
Copying Data Into a Field (Option 4) ..........................3-5
Merging Fields.................................................3-8
Sub-Fields.......................................................3-8
Adding Characters to Pad Fields (Option 30).............3-9
Formatting a Price Field (Option 42).........................3-10
Incrementing Fiel ds (Option 60).................................3-11
Entering data for incrementing fields ............ 3-12
Fixing th e First Number in the Incrementing
Sequence ......................................................3-12
4. Using Check Digits ..........................................................4-1
Defining a Check Digit Scheme..................................4-2
Check Digit Field Definition.............................4-3
Generating Check Digits .............................................4-3
Clearing a Check Digit Scheme..................................4-4
Sample Check Digit Calculation..................................4-4
Sum of Products..............................................4-5
Sum of Digits...................................................4-7
5. Recording Batch Information.........................................5-1
Preparing Batches for Downloading...........................5-1
6. Entering Data Streams ....................................................6-1
Creating Formats ........................................................6-2
Entering Text Fields.........................................6-4
Entering Non-Printable Text Fields ................. 6-5
ii

Table of Contents
Entering Bar C ode Fields................................6-6
Entering Constant Text Overlays.....................6-7
Entering Lines..................................................6-8
Entering Boxes................................................6- 9
Adding Field Options.....................................6-10
Finishing a Data Stream................................6-11
Creating Check Digits................................................6-14
Creating Batch Data..................................................6-15
7. Configuring the Printer.....................................................7-1
Connect ing the Printer.................................................7-1
Online Communication Parameters............................7-1
Communication Values - Definitions................7-2
Setting Communication Values...................................7-3
At the Printer....................................................7-3
At the Host .......................................................7-5
Cable Interface............................................................7-6
8. Printing...............................................................................8-1
Placing the Printer Online............................................8-1
Downloading................................................................8-2
Downloading from an MS-DOS PC.................8-2
Downloading from Other Hosts.......................8-2
Printing Batches ..........................................................8-3
Printer Storage Capacity .............................................8-3
9. Editing and Reviewing Formats......................................9-1
Modifying Formats.......................................................9-1
Deleting a Format from the Printer..............................9-1
10. Establishing Daily Procedures...................................10-1
Daily Start Up Checklist.............................................10- 1
Print Logs ..................................................................10-1
Creating MS-DOS Batch Files for Downloading.......10-2
Backing up Formats and Batches .............................10-2
iii

9406 System Administrator’s Guide
11. Online Information .........................................................11-1
Data Stream Structure...............................................11-1
Format Header...........................................................11-3
Example.........................................................11-4
Syntax Checklist.............................................11-4
Text Field Defin itio n....................................................11-5
Example.........................................................11-6
Syntax Checklist.............................................11-7
Bar Code Field D efinition...........................................11-8
Example.......................................................11-10
Syntax Checklist...........................................11-11
Non-Printable Text Field Definition........................... 11-12
Example.......................................................11-12
Syntax Checklist...........................................11-13
Constant Text Overlays............................................1 1-14
Example.......................................................11-15
Syntax Checklist...........................................11-16
Line Field Definition s................................................1 1-17
Example.......................................................11-18
Syntax Checklist...........................................11-18
Box Field Definitions................................................11-19
Example.......................................................11-20
Syntax Checklist...........................................11-20
Field Options............................................................11-21
Definitions.................................................................11-22
Example of a Field with Options ..................11-27
Syntax Checklist...........................................11-27
Format Syntax Checklist..............................11-28
Batch Packets..........................................................11-29
Batch Header Line .......................................11-29
Example.......................................................11-30
Syntax Checklist...........................................11-30
Batch Data Lines..........................................11-31
Example.......................................................11-31
iv

Table of Contents
Syntax Checklist..........................................11-32
Check Digits ............................................................11-33
Example.......................................................11-34
Syntax Checklist..........................................11-34
Transmitti ng Data....................................................1 1- 35
Example Format Data Stream.....................11-36
12. Quick Reference...........................................................12-1
Fonts..........................................................................12-1
Character Height.......................................................12-3
Character Width.........................................................12-4
Bar Codes..................................................................12-5
Line Thickness...........................................................12-6
13. Diagnostics...................................................................13-1
Checking the Software Version.................................13-1
Printing a Test Label..................................................13 -2
Printing a Test Pattern...................................13-3
Printi ng Test Label 1......................................13-4
Printi ng Test Label 2......................................13-5
Checking Supply Quality...........................................13-6
Calling for Service.....................................................13-7
Appendix A. Sample Format Data Streams....................... A -1
Appendix B. Extended Character Sets..............................B-1
Code 128 Function Codes...........................................B-1
Entering Special Characters in Data Streams.............B-1
Appendix C. Format Design Tools.....................................C-1
v

9406 System Administrator’s Guide
vi

1. Introduction
Be sure you understand the information in the
Handbook
Read this m anual if you
before you read this manual.
Operator’s
• oversee the generation of labels or tags.
• design labels or tags.
• decide what to print on labels or tags.
This manual helps you design and print custom labels or tags
on the Monarch
®
9406™ printer.
About this Manual
This manual explains how to
• design a label.
• convert your design to a format.
• build formats on a host.
• prepare the printer to receive information for printing.
Introduction
• send data to the printer from a host.
• set up printing procedures for printer operators.
• run printer diagnostics.
You need a host for many of the tasks in this manual. You need
not be a programmer, but you sho ul d have a thorough
knowledge of commands used by your host’ s operating system.
On MS-DOS systems, for example, you should be familiar with
the COPY and MODE c ommands.
1-1

9406 System Administrator’s Guide
Equipment Requirements
To create your own label or ta g designs, you need a
• 9406 printer
• host (any computing device with a serial port and can
communicate using DTR or XON/XOFF).
• text editor (ASCII) or word processor
• 9-pin RS-232 interface cable
Standard 9406 Features
Followi ng are the standard features for the 9406 printer
• 4-key keypad for printer control
• 4" x 8" print image
• label backing take-up reel
• ribbon provision
New 9406 Features
With the latest release of the softwar e , the 9406 printer
• no longer prints invalid labels when a format is
incorrect. The printer chec ks the format prior to
printing, and if the format is incorrect, the printer deletes
it from memory.
• creates Swedish characters that appear on the same
base line as English characters (instead of below the
base line).
See the
features.
1-2
Operator’s Handbook
for an explanation of more

1. Introduction
What is a Format?
A
format
defining where to place information on labels or tags. Labels
and tags are also called
The goal in designing a format is to map your label or tag.
Later, you will insert actual information, like a bar code, price, or
serial number. The format defines where to put this
information, and how to print it.
Each "slot" that will contain an item of information (bar code,
price, et c. ) is called a
is a set of dimensions, parameters, and instructions
supplies
field
.
.
Introduction
The actual information that fills this framework is called
data
.
batch
1-3

9406 System Administrator’s Guide
Format Example
An example of a format is shown below. See Appendix A,
"Sample Format Data Streams," for more format examples.
Format Size:
English: 2-3/4" x 1-1/2"
Metric: 67 mm x 38 mm
Dots: 528 x 288 dots
Field #1, text,
up to 5
charact ers
Constant text
Constant text
Constant text
Constant text
Field #2, text,
up to 10
charact ers
Field #3,
UPC-A Bar
Code
Field #4, text,
up to 8
charact ers
Field #5, price
field
Field #6, price
field
Constant text
1-4

How to Use this Manual
Complete these steps to print supplies.
1. Create a form at that fits your supply size.
You can use suppli es equal to or larger than the form at
size. Read Chapters 2 through 6 to desig n your own
formats.
2. Enter batch data to fill the format.
To record and download batch data from a host, read
Chapters 5 and 6.
3. Print supplies. Read Chapters 7 and 8.
1. Introduction
Introduction
1-5

9406 System Administrator’s Guide
1-6
2. Designing a Format
This chapter shows you how to design formats.
Format Design Tools
A Format Worksheet and three Suppl y Layout Grids are
supplied in Appendix C, "Format Design Tools." You will need
them to design formats.
Make copies of the worksheet and the grid. Save the originals
and work with the copies.
Make sure you have s om e paper for rough sketches.
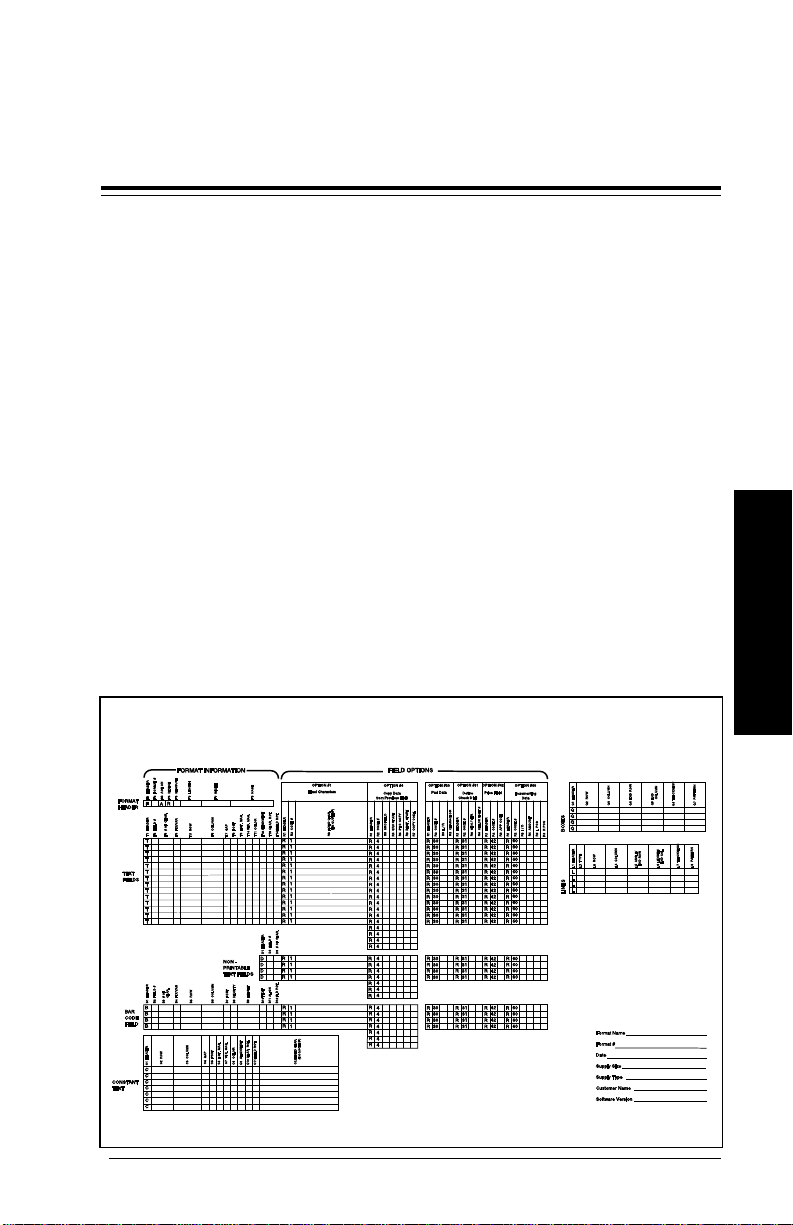
Format Worksheet
The Format Worksheet serves as a permanent record of your
format parameters. As you create formats, write parameter
values on the worksheet. Later, you will use the worksheet
when entering format data into a host.
Format Worksheet
Designing a Format
2-1
9406 System Administrator’s Guide
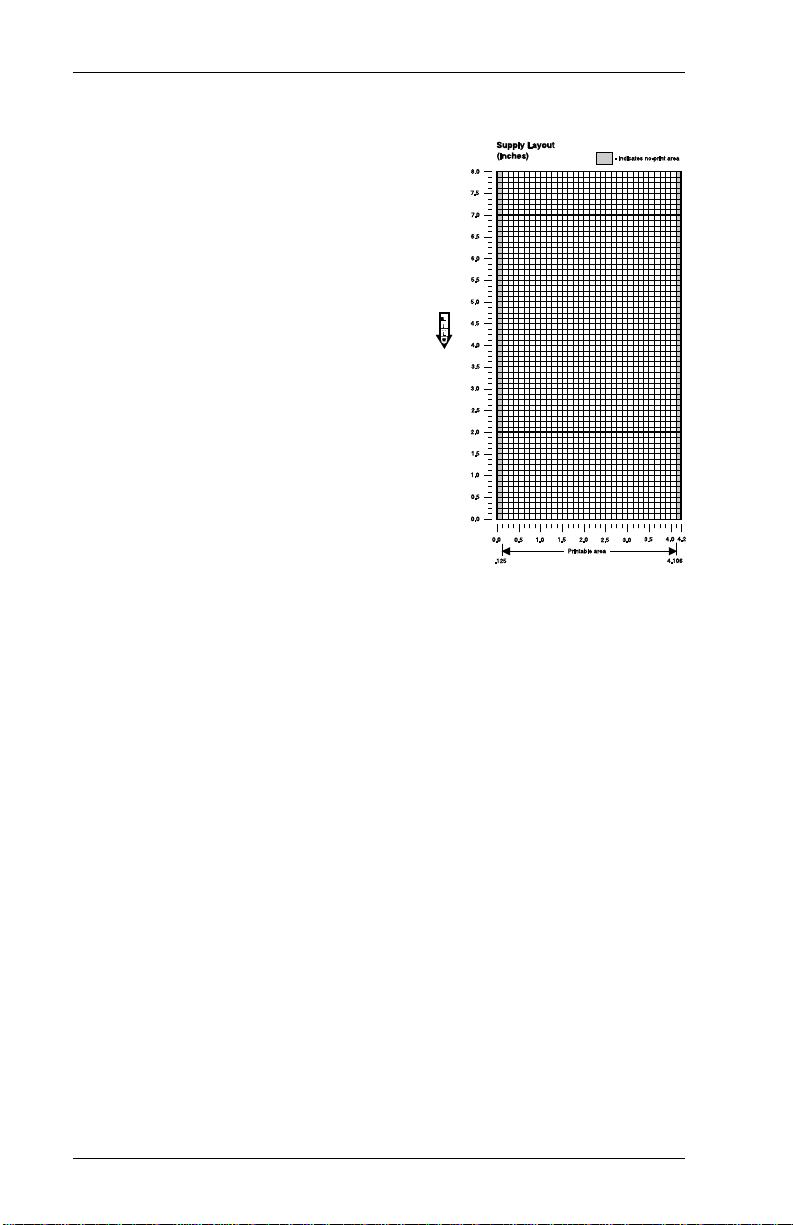
Supply Layout Grids
There are three Supply Layout
Grids:
• English
• Metric
• Dots.
Decide whether you want to
design formats using English,
Metric, or dot measurement.
Use the corr esponding Supply
Layout Gr id to determine
supply dimensions and
measure fi el d locations.
The English gri d, shown to the
right, is measured in inches.
The Metric grid is measured in millimeters. Use the Dot Layout
Grid if you prefer to design formats according to dot
measurement.
The printer uses dots to print images on a supply. The
printhead has 192 dots per inch.
Steps to Designing a Format
To design your own custom format:
1. Determine format contents
2. Define th e format header
3. Define text and bar code fields
4. Define lines and boxes, if any
5. Apply field options, if desired (Chapter 3, "Applying Field
Options").
2-2

2. Designing a Format
Determine Format Contents
Decide what you want to print on the supply. Information
should be in the form of text, bar codes, line s, boxes, or
graphics.
Each piece of information is called a
are the fiel d types and how each type might be us ed.
field
or an
overl a y
. Here
Text Fields
Text fields contain alphabetical, symbol, or numerical
chara c ters. He re ar e some uses:
• Company name or
department number
• Serial number
• Shipping address
You can define up to 30
field s i n a fo r m at . T h e
total can be any
combination of field
types.
• Price
Non-Printable Text Fields
Non-printable text fields do not print. Use them if you want the
data entered in the batch, but you do not want to print it as
entered. For exam pl e, enter city, state, and zip code in three
non-printable fields. Merge non-printable fields to print as one
field.
Bar Code Fields
Select from 8 bar co des: UPC-A, UPC-E, I 2 of 5, Code 39,
Codabar, EAN- 8, EAN-13, Code 128. Her e a r e some uses:
Designing a Format
• Item or serial number
• Merged information from multiple text fields
2-3

9406 System Administrator’s Guide
Overlays
Constant text, lines, boxes, and graphics are
overlays
.
Constant Text Overlays
A constant text overlay is a set of
fixed characters that prints on all
supplies using that format. The
characters in the overlay are fixed,
and the user canno t change them.
Overlays do not count
in field numbering from
1 to 30. Fiel d Op ti o n s
do not apply to overlays.
Lines and Boxes
Use lines or boxes to
• create borders.
• mark out the regular price on a sale tag.
• box an item to highlight it.
Graphics
You can print graphics, such as logos or symbols. See yo ur
Graphics M anual
.
Field Options
Y ou can apply options to text, non-printable text, and bar code
fields. For example, you can format a field as a price. Chapter
3, "Applying FIeld Options," describes field options in detail.
Here are some examples:
Fixed Characters
Fixed chara cters print automatically on every supply. You can
specify fixed characters for any text or bar code field.
2-4

2. Designing a Format
Price Fields
You can design a pric e fi el d so the printer generates the
monetary sy m bol s. You need to enter only num bers in the
batch.
Sub-fields
Y ou can copy part of a field to a new location. The new location
is called a sub-field. For example, you can extract part of the
data in a bar code, such as a price, and display it in text form in
a sub-field.
Merged fields
Merged fields are a combination of informat ion from other
fields. You can merge any combination of text, non-printable
text, or bar code fields.
Incremen ting/Decrementing fields
Y ou can specify numeric fields to increase or decrease in value
as you print. Th is option applies only to num eri c data. For
example, you could print a batch of labels with serial numbers
that incr ease with each label.
Designing a Format
Check digits
You can have the pr i nter generate check digits for text or bar
code fields. See Chapter 4, "Using Check Digits."
2-5
9406 System Administrator’s Guide
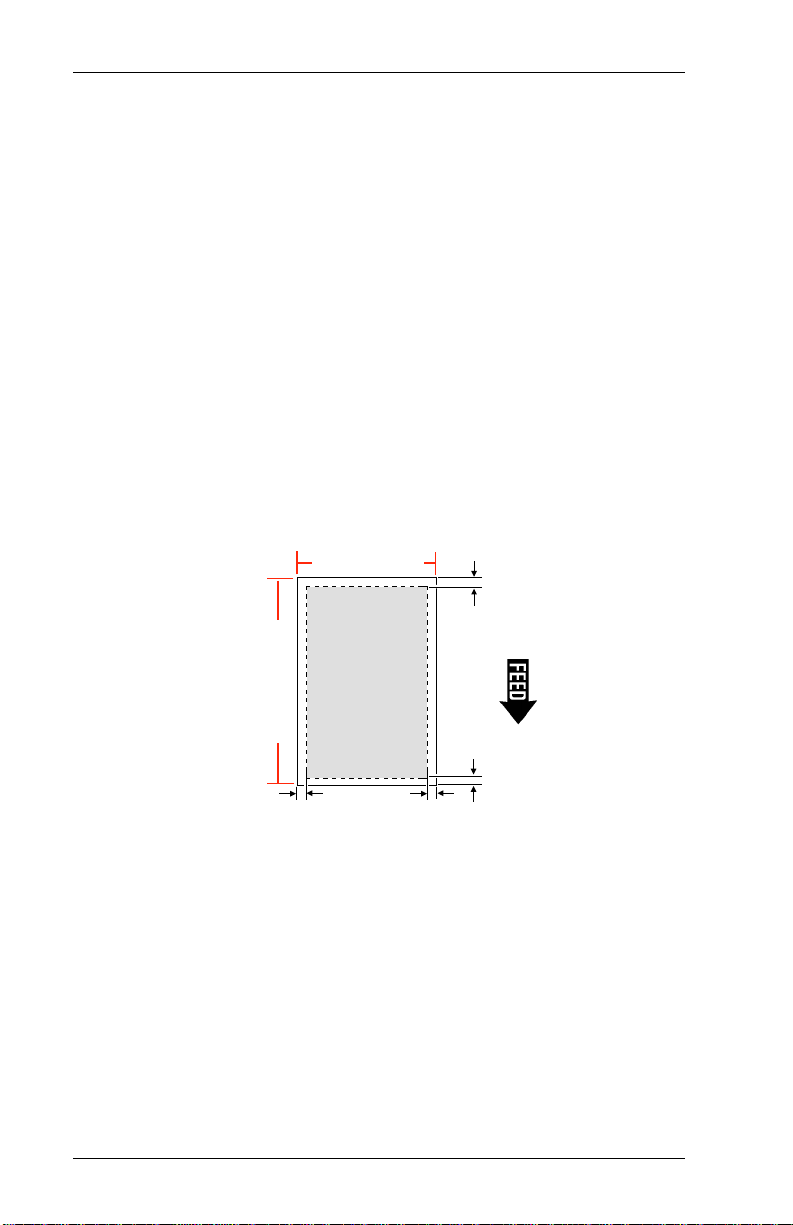
The Print Area
If you use supplies larger than four inches wide, your printer
may not print an area that covers the entire supply.
The print area is in the center of the supply. The bottom is the
edge that exits the printer first.
The actual print area begi ns approximately 0.161 inches from
the bottom, 0.125 inches from the left edge, and .031 inches
from the top of the supply. These are the no-pri nt zones. If you
are using die cut labels, you must also include the inter-label
gap as a no-print zone. For supplies wider than the printhead,
there is another no-print zone along the right edge 3.98 inches
across from the left edge no-print zone. The no-print zones are
the same for both indexed and non-indexed supplies. See the
diagram below.
4.2" (107 mm)
3.98" x 8.0"
(101 mm x 203 mm)
Print Area
8.32" (211mm)
.125"
(3.2 mm)
.094"
(2.4 mm)
.031"
(.8 mm)
.161"
(4.1mm)
If you want to shift printing to a different part of the supply, see
"Setting Suppl y Options" in your
Operator’s Handbook
.
2-6

Draw Rough Sketches
When you deci de what information
you want to print and how it will
appear on the supply, draw the
information where you want it to
appear. Note any areas that are
pre-pri nted on the supply.
NOTE: Be careful to avoid having
fields ov erl ap. If two bar
codes occupy th e same
space on the image,
unpredictable (and perhaps
un-scannable) bar codes
may result.
These sketches
show a depart m ent
number, date, bar
code, and price.
2. Designing a Format
Designing a Format
Draw several
sketches to
determine which
layout works best for
you.
2-7

9406 System Administrator’s Guide
Filling in the Format Worksheet
1. Once yo u d ecide on a l a yo ut, sep arate your fo r m at
contents int o groups: text, non-printable text, bar codes,
text overlays, lines, and boxes.
2. Make a copy of the F ormat Worksheet. Copy to two
sheets, if necessary.
3. Define th e Format Header first. See "Defini ng the Format
Header."
4. Refer to your rough sketch for the types of fi elds to include
in the fo r m at. Find th e s t ep s to de fine ea ch field on t he
pages listed below.
NOTE: If using non- printable text fields, defi ne all
non-printable text fields before defining the field
that will print the information.
T y pe Examples See
Text Fields
Constant Text
Bar Code Fields
Non-Printable
Text Fields
Lines
Boxes
2-8
Order Number "Defining Text
Price Fields"
Company name
Text to print on all "Defining
suppl i e s Const ant Text
Overlays"
UPC, EAN, etc. "Defining Bar
Code Fields"
"Hold" data for later use "Defin i ng
(such as a merged field) Non-Pri ntable
Text Fields"
Borders and highlights "Defining Lines"
Strike through original price
on sale tag
Borders and highlights "Defining Boxes"

2. Designing a Format
Defining the Format Header
The Format Header is the foundation for the format. On it, you
identify the format and define important supply information.
Use your copies of the Format Worksheet and Suppl y Layout
Grid to complete these steps.
1. Find "Format Header" on the Format Worksheet. Assign a
number between 1 and 30 to the format you are about to
create. Select an unassigned number for a new for m at. If
you select a number assigned to a previous format, the
previous format will be overwritten. Write the format
number in box F2.
Designing a Format
2. Decid e what you want to do with the format a fter you have
printed yo ur tags or labels. You have two choices.
A Add the format to printer memory until you cancel it.
C Clear the format out of pri nter memory immediately.
Write your choi c e in bo x F3.
2-9

9406 System Administrator’s Guide
3. You must send this format to the print er before you can
use it to print batches. Decide how the printer will store the
format. You have two choices.
R Store form at until printer is turned off.
T Store format only until the printer uses another format.
Write your choice in box F4.
4. What syst em ar e you using to meas ure supplies and
fields? You have three choices.
E English. Measure in 1/100 inches.
M Metric. Measure in 1/10 millimeters.
G Graphic. Measure in dots. 192 dots = 1 inch.
Write your choice in box F5.
All fields in the format must follow the system you select
here.
5. Tear off one label or tag from your s upply roll. Position it in
the lower left corner of the grid.
If you are using non-indexed supplies (supplies with no
black mark or aperture), determine the leng th you want to
use for each format.
If you are using indexed supplies (that have black marks or
apertures), use the black mark or aperture as your
reference for the format length.
Make sure the bottom left corner of the supply aligns with
the lower lef t corner of the layout grid (the b ottom is the
edge that exits the printer first).
NOTE: See "The Print Area," in this chapter, for a
description of the no-print zones.
2-10
2. Designing a Format
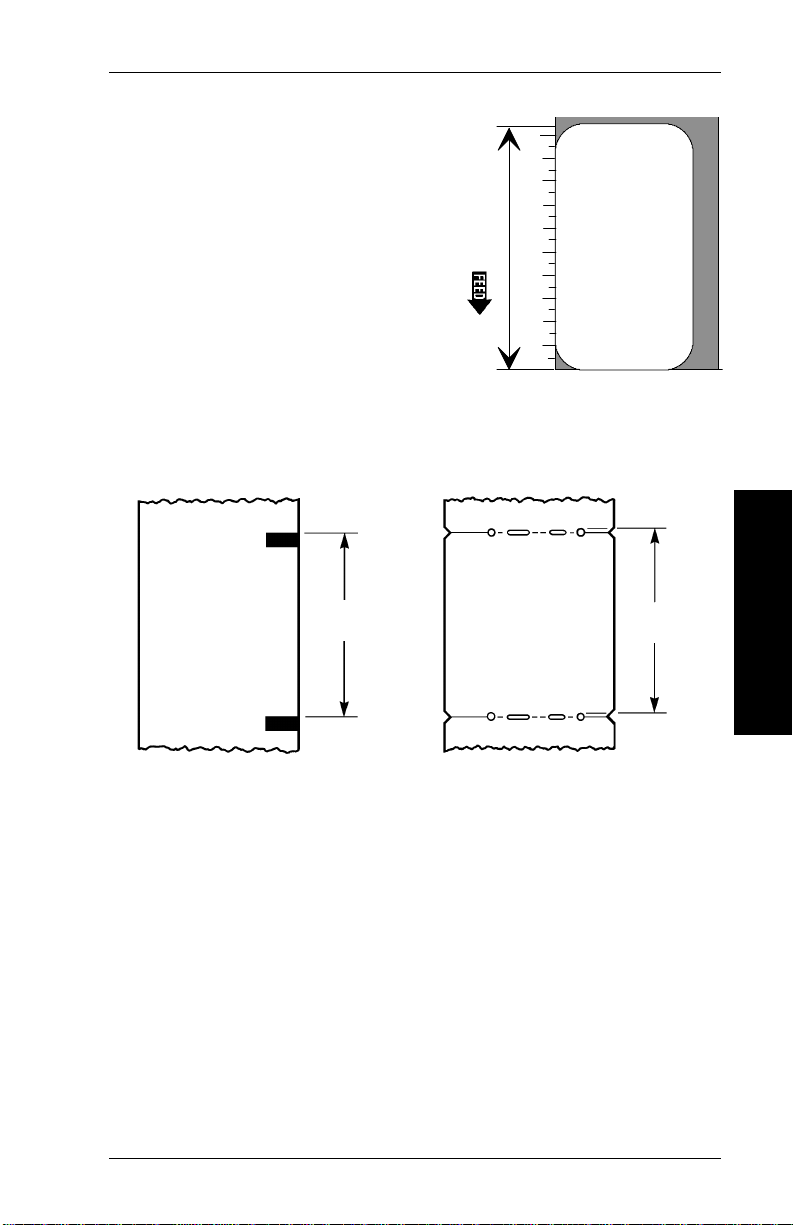
6. Measure the
length
of the
supply from bottom to top,
using the ruler marks on the
left side of the grid.
Then, subtract either .192
inches, 37 dots, or 4.8 mm
(depending on the units you
use) from your measurement
to account for the no-print
zones. If you are us i ng di e
cut labels, also subtract the
inter-label gap. The resulting
number is the m aximum image height.
When measuring indexed supplies, measure from top to
top as shown below.
Supply
Length
Designing a Format
Supply
Length
When measuring labels, use the black sens or m arks or die
cuts on the label backing.
7. Write the maximum image height in box F6 on the Format
Worksheet. Remember to use your selected units.
System Units Example
English 1/100 in 1 in = 100 units
Metric 1/10 mm 1 mm = 10 units
Graphic Dots 100 dots = 100 units
Ranges for supply length
English 150-800
Metric 380-2032
Dots 288-1536
2-11
9406 System Administrator’s Guide
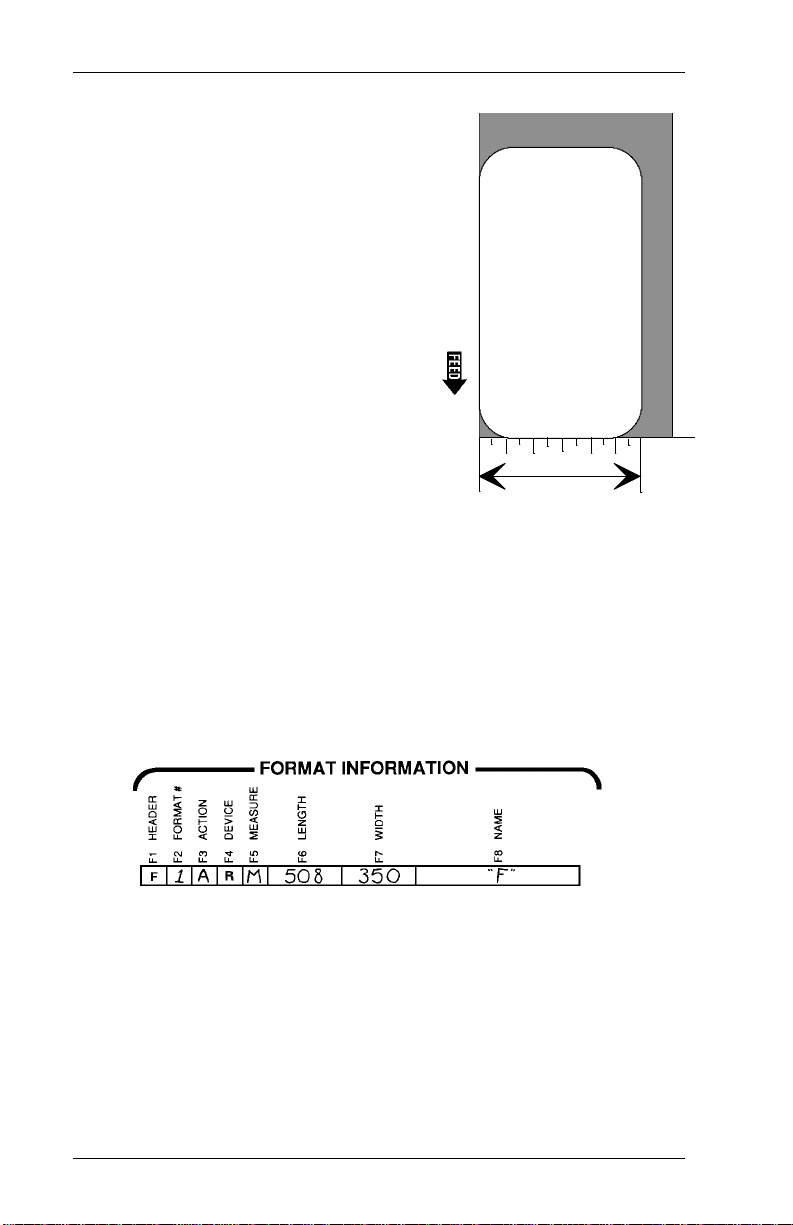
8. Measure the width of the supply
from left to ri ght, using the ruler
marks at the bottom of the grid.
Write the width in box F7 .
Ranges for supply width:
English 220-420
Metric 559-1064
Dots 423-807
9. Trace an outline of the supply
on the grid.
10. Assign a name (up to 8 characters)
to the format. Write the name in
box F8. Put quotation marks
around the name, like this:
"LABEL 1"
If you want th e pr i n ter to assign a name to the forma t,
place quotation marks, with no characters or spaces
between them, in box F8. The printer will assign a name in
the form of "AUTOnnnn."
11. Make sure you have filled in boxes F1 through F8 on the
Format Worksheet.
Now you are ready to define the contents of your format.
Continue with "Defining Text Fields," "Defining Constant Text
Overlays ," "Defining Bar Code Fields," or "D efi ning
Non-Printable Text Fields."
2-12

2. Designing a Format
Defining Text Fields
Create a separate definition for each text field. If text falls on
two lines, each line of text requires a separate definition.
1. If you have not
already done so,
define the format as
shown in this chapter.
2. Select a text field
from your lay out to
begin field definition.
3. Find "Text Fields" on
the Format Worksheet.
Write a number from 1
to 30 in box T2 to
identify the field.
Assign numbe rs in
sequence from 1 to 30.
Do not use any field
number more than
once in a format.
Designing a Format
2-13

9406 System Administrator’s Guide
4. In box T3, write the maximum number of characters, from
1 to 30, that will appear in the field. Include spaces, $, /, or
other symbol s that may appear in price or fixed character
fields.
A date field, for example, may have a maximum of 8
characters (mm/dd/yy).
5. Write V or F in box T4 to indicate if the field is fixed or
variable.
F Fixe d l e ng th. The fi e l d al w a ys h as the n u m be r of
characters defined in box T3.
V Variable length. The number of characters in the field
varies from 0 to whatever yo u d efi ned in box T3.
6. Refer to the samples on the next page to selec t a font style
for the field. Note that the bold font does not accept
lowercase letters.
2-14

Bold Font
2. Designing a Format
Standard Font
Reduced Font
NOTE: Special characters are avail able for standard and
reduced fonts. See Appendix B, "Extended Character
Sets."
Designing a Format
2-15

9406 System Administrator’s Guide
7. Determine the height of the field.
a. Find your selected font and the desired height from the
table below.
b. Draw two lines on the layout grid to show the bottom
and the top of the text field.
Font Magnification
1x 2x 3x 4x 5x 6x 7x
Standard
1/100 in. 11.4 22.8 34.2 45.6 57.0 68.4 79.8
1/10 mm 29.1 58.2 87.3 116.4 145.5 174.6 203.7
Dots 22 44 66 88 110 132 154
Reduced
1/100 in. 7.3 14.6 21.9 29.2 36.5 43.8 51.1
1/10 mm 18.5 37.0 55.5 74.0 92.5 110.0 129.5
Dots 14 28 42 56 70 84 98
Bold
1/100 in. 17.7 35.4 53.1 70.8 88.5 106.2 124
1/10 mm 44.9 89.8 134.7 179.6 224.5 269.4 314
Dots 34 68 102 136 170 204 238
2-16
 Loading...