

Page 1

Operating Instructions
28028
0
Monarch 928™
®
Stacker
TC0928OI Rev. AJ 10/12
1
0
789
456
23
e
ckl
a
ing T
h
s
Fi
0
0
.
01
89
7
56
4
23
e
l
k
c
Ta
ng
shi
i
F
1
0
789
56
4
23
e
l
ck
ng Ta
hi
s
Fi
1
0
789
456
23
e
l
ck
a
ng T
i
h
s
Fi
0
0
.
0
4
$
0
0
.
0
4
$
0
.0
0
4
$
0
4
$
©2004 Avery Dennison Corp. All rights reserved.
Page 2

Each product and program carries a respective written warranty, the only warranty on
which the customer can rely. Avery Dennison Corp. reserves the right to make changes
in the product, the programs, and their availability at any time and without notice.
Although Avery Dennison Corp. has made every effort to provide complete and accurate
information in this manual, Avery Dennison Corp. shall not be liable for any omissions or
inaccuracies. Any update will be incorporated in a later edition of this manual.
©2004 Avery Dennison Corp. All rights reserved. No part of this publication may be
reproduced, transmitted, stored in a retrieval system, or translated into any language in
any form by any means, without the prior written permission of Avery Dennison Corp.
WARNING
This equipment has been tested and found to comply with the limits for a Class A digital device,
pursuant to Part 15 of the FCC Rules. These limits are designed to provide reasonable
protection against harmful interference when the equipment is operated in a commercial
environment. This equipment generates, uses, and can radiate radio frequency energy and, if not
installed and used in accordance with the instruction manual, may cause harmful interference to
radio communications. Operation of this equipment in a residential area is likely to cause harmful
interference in which case the user will be required to correct the interference at his own
expense.
CANADIAN D.O.C. WARNING
This digital apparatus does not exceed the Class A limits for radio noise emissions from digital
apparatus set out in the Radio Interference Regulations of the Canadian Department of
Communications.
Le présent appareil numérique n’émet pas de bruits radioélectriques dépassant les limites
applicables aux appareils numériques de la classe A prescrites dans le Réglement sur le
brouillage radioélectrique édicte par le ministère des Communications du Canada.
Trademarks
Monarch®, 926, 928, 938, and 9855® are registered trademarks of Avery Dennison Corporation.
Avery Dennison
170 Monarch Lane
Miamisburg, OH 45342
Page 3

TABLE OF CONTENTS
GETTING STARTED.....................................................................................1-1
Unpacking the Stacker.............................................................................1-2
Installing the Stacker...............................................................................1-2
Connecting the Power Cable.................................................................... 1-4
Checking the Alignment...........................................................................1-4
Using Four-inch Wide Tags......................................................................1-5
OPERATION AND ADJUSTMENTS ................................................................2-1
Making Tag Adjustments ..........................................................................2-2
Setting the Belt Movement.......................................................................2-7
Adjusting the Belt Movement ....................................................................2-8
Loading Supplies ....................................................................................2-9
Emptying the Stacker ..............................................................................2-9
Stacker Running..................................................................................2-9
Stacker Full ...................................................................................... 2-10
Clearing a Tag Jam ............................................................................... 2-11
TROUBLESHOOTING...................................................................................3-1
SPECIFICATIONS ........................................................................................ A-1
Stacker..................................................................................................A-1
Supplies................................................................................................. A-2
Minimum Stacked Tag Dimensions.........................................................A-2
Using RFID Supplies............................................................................... A-2
TOC- i
Page 4

Page 5

GETTING STARTED
1
The Monarch® 928stacker works with a Monarch®9855® printer
equipped with a Monarch® 926knife.
e Monarch® 928™ RFID stacker works wi th a Monarch® 9855®RFMP
Th
printer equipped with a Monarch® 926knife stacking RFID supplies.
Note: The non-RFID stacker cannot stack RFID supplies.
The RFID stacker cannot stack non-RFI D supplies.
Since the RFID stacker can only be use d with RFID supplies, it includes this
label:
See “Using RFID Supplies
We recommend using a Monarch® 939 keyboard whenever a stacker is
installed.
Before reading this manual, revi ew the printer and knife informati on in the
Operator’s Handbook.
This chapter describes how to
unpack the stacker
install the stacker
connect the power cord
check the stacker’s alignment.
” in Appendix A for more information.
Getting Started 1-1
Page 6
Unpacking the Stacker
After you unpack the stacker, you should have a 928 stacker, stacker
mounting plate, and power cord.
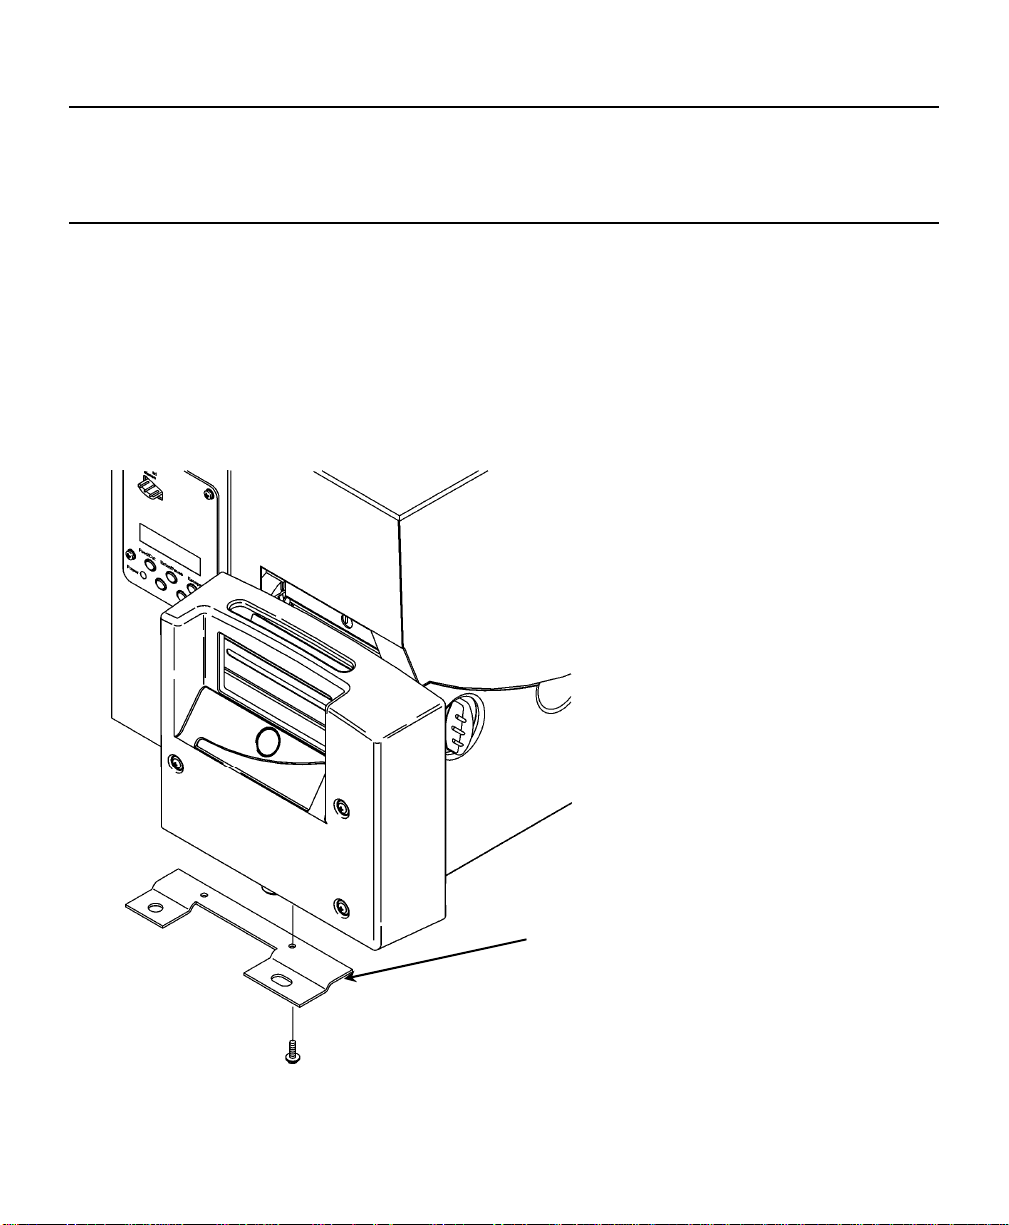
Installing the Stacker
In addition to the 928 stacker, your printer could also have the 938
verifier. Always install the knife before the stacker or verifier. Then install
the verifier (if necessary) and then the stack er. The printer and all
accessories must be install ed on a level surface.
To install the stacker:
1. Turn off the printer.
2. Attach the stacker mounting plate to the knife.
1-2 Operating Instructions
Stacker mounting plate
Page 7
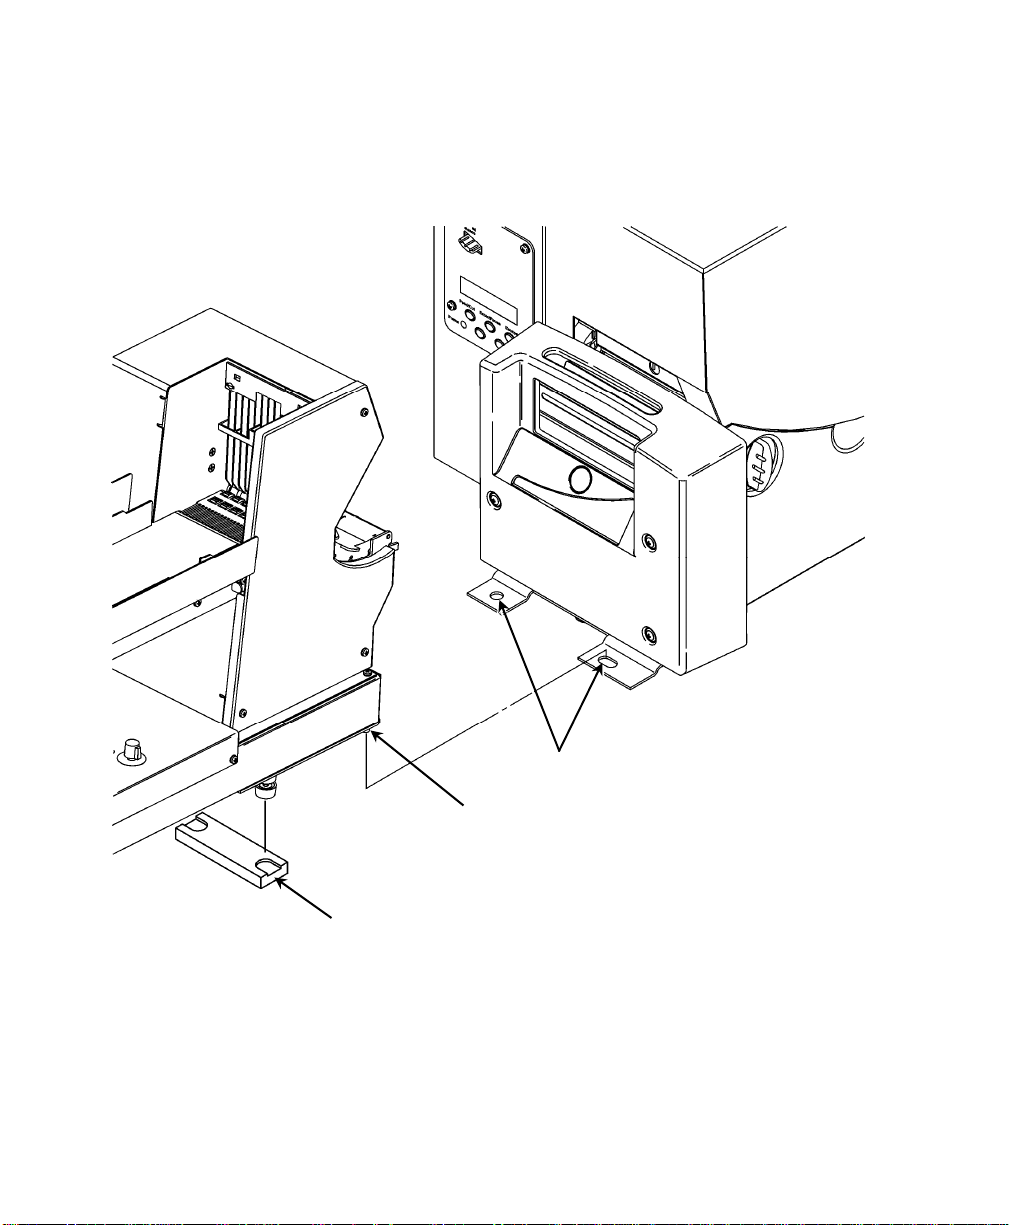
3. Align the stacker with the front of the knife.
4. Gently lift the stacker and center the guide tabs in the knife open ing.
5. Set the stacker locating pins (on bottom of stacker) firmly in the mounting
plate holes.
Mounting plate holes
Stacker locating pin
Note: Height adjust bracket is on ly needed when
installing the stacker with a 938™ verifier.
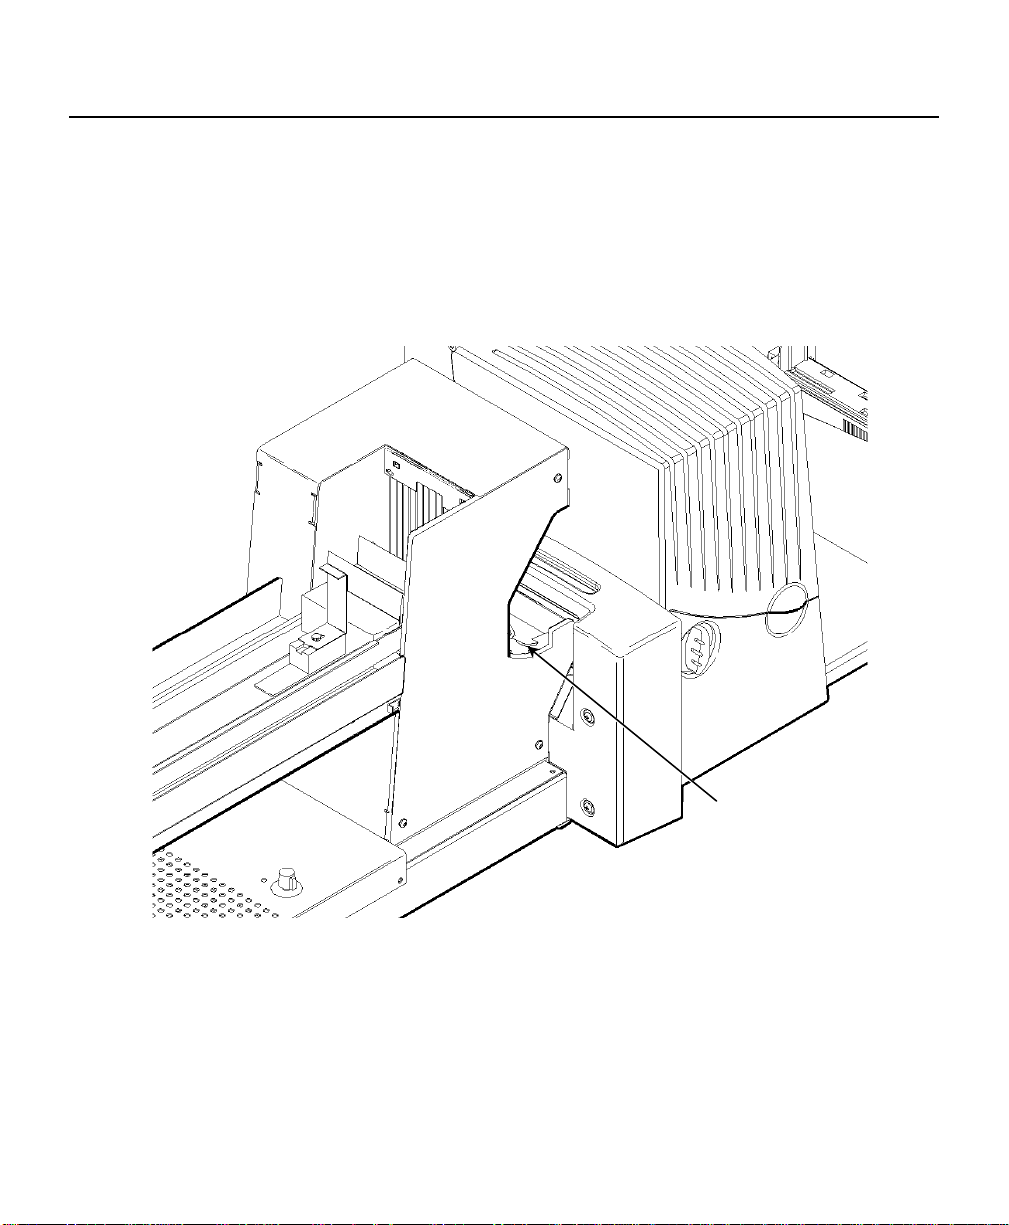
Note
: To avoid damage to the motor, the stacker rollers and the front of
the knife must not be in direct contact. If they are, lower the
stacker’s feet by turning them . Turn the nut to lock the feet in place.
Getting Started 1-3
Page 8

Connecting the Power Cable
To connect the power cable:
1. Turn off the printer. Make sure the stacker’s power switch is tu rned off.
2. Make sure the stacker is properly aligned with the knife. See “Installing
the Stacker” for more information.
3. Plug the power cable into the socket.
4. Plug the other end of the cable into a grounded electrical outlet. Once the
power cord is attached to an outlet, the stacker is on. There is no power
ON/OFF switch.
5. Turn on the printer. Press (I) to turn on and (O) to turn off the stacker and
printer.
Checking the Alignment
The stacker must be flat on a level surface. To check the alignment of the
stacker:
1. Turn on the printer.
2. Print a batch of tags and check for nicked corners. Refer to your printer’s
Operator’s Handbook for instructions.
Note: Nicked corners may occur on four-i nch wide tags.
3. To adjust the stacker’s alignment, push the stacker slightly forward or
backward along the mounting plate.
4. Print another batch of tags and realign i f necessary.
5. Make sure the stacker’s feet are flat on a level surface. You can rais e or
lower the feet by turning them. Turn the nut to lock the feet in place.
You are now ready to print tags and make adjustments to the stacker. See
Chapter 2, “Operation and Adjustments
”, for more information.
1-4 Operating Instructions
Page 9
Using Four-inch Wide Tags
For four-inch wide tags, nicked corners may occur. You can minimize nicked
corners by aligning the knife and stacker properly with the printer.
1. Feed a batch of tags through the knife, cutting th e supply. Check the tags
in the stacker for nicked corners.
2. Open the supply transport by turning the transport lock handle up halfway
and pulling it completely out.
Transport Lock
Handle
Getting Started 1-5
Page 10

3. Use the tab to lift the transpo rt and see where the tags are insid e the
stacker. If the tags are too close to either wall of the stacke r, adjust the
knife alignment.
Tags too close to
wall of stacker
Lift
Here
4. Loosen the three thumbscrews connecting the knife to the printer.
5. Push
the knife toward the printer until the knife does not pivot or rotate.
6. Slide the knife to the left o r right to center the tags inside the stacker.
7. Tighte
n the three thumbscrews.
8. Feed another batch of tags thro ugh the knife and repeat steps 1-8 if
necessary.
The supply is centered inside the printer but it may drift wh en it enters the
knife and the stacker. Sliding the knife to the lef t or right corrects the
alignment.
1-6 Operating Instructions
Page 11

OPERATION AND ADJUSTMENTS
This chapter describes how to
make tag adjustments
adjust the belt movement
clear a tag jam
print label strips.
2
Operation and Adjustments 2-1
Page 12

Making Tag Adjustments
You must adjust the stacker for the wi dth of your tags at the initial stack er
setup and whenever you change t ag widths.
1. Feed a batch of tags through the knife, cutting th e supply. Check the tags
in the stacker for proper stacking or nicked corners.
Grooves
Guide Rail
Hold Here
2-2 Operating Instructions
Page 13

2. Pull the guide rails (using the end by the bar) out of the grooves at the
bottom of the tray.
Note: Use two hands to move the gui de rails and hold the rails on the en ds
by the bar.
Guide Rail
3. Move
the guide rails to the sides of the tray.
Operation and Adjustments 2-3
Page 14

4. Unlock the tag weight handle by turning the knob countercloc kwise.
ard
Handle
Knob
Tag Weight
Slide
backw
ard
forw
Tag Stop
5. Push th
e handle all the way backward for tags 1.6 inch or shorter;
forward for tags 1.6 inch or higher.
6. Tighten the knob.
7. Place the tag weight against the tag stop.
8. Print a test batch of 50 tags or 25 RFID tags. Refer to your printer’s
Operator’s Handbook for instructions.
9. Move the tag weight out of the way.
10. Adjust the guide rails to match the width of your tags by moving the
guides against the tags.
Note: Use two hands to move the guide rails and hold the rails on the ends
by the bar.
2-4 Operating Instructions
Page 15

11. Slide the guide rails into the grooves closest to the tags, except for four-
inch wide tags. Make sure the guide rails are all the way forward.
For four-inch wide tags, the guide rails should be fully extended and not in
the grooves.
Guide Rail
Fully
Extended
Operation and Adjustments 2-5
Page 16

12. Adjust the tag stop to the tag length by moving it up or down.
Note: Adjust the tag stop to the length of the regular tags, not the batch
separators.
Tag Stop
Batch Separator
Tag Stop
Regular
Tags
13. Pla
ce the tag weight against the tags. If you are print ing chadless tags,
move the weight to the solid s ide of the tags.
14. Set the belt movement. See “Setting the Belt Movement
2-6 Operating Instructions
.”
Page 17

Setting the Belt Movement
You need to set the belt movement
when you first get the stacker.
when you switch to supplies t hat have a different thickness.
To set the belt movement:
1. Print a test batch of 50 tags or 25 RFID tags. Refer to your printer’s
Operator’s Handbook for instructions.
2. Move the tag weight away and remove the tags.
3. Stack the tags in your hand.
4. Hold the stack against the gauge on the tag weight. If you are usi ng pre-
punched supplies, do not hold the pre-punched end of the sta ck against
the gauge.
The bar closest to the top of the stack is the number for the belt
adjustment.
Tag Samples
5. Turn
the belt adjustment knob to the number from the stack
measurement.
6. The stacker is now ready.
Note: If the tags are stacked too loosely or too tightly, see “Adjusting the
Belt Movement”.
Operation and Adjustments 2-7
Page 18

Adjusting the Belt Movement
You need to adjust the belt mo vement if the tags are stacked too loosely or
too tightly. When you see a s tacking problem:
1. Press Pause to pause printing.
2. Empty the tray.
3. If the tags are too loose, turn the belt adjustment knob to the next lower
setting.
Belt Adjustment
Knob
4. I
the tags are too tight or fan out, turn the belt adjustment kn ob to the
f
next higher setting.
5. Print a test batch of 50 tags or 25 RFID tags. Refer to your printer’s
Operator’s Handbook for instructions.
2-8 Operating Instructions
Page 19

Loading Supplies
If you run out of supplies while printing, the printer shows 756 on the
display.
1. Press Feed to feed the last tag into the stacker.
2. Load a new roll of supplies. Refer to the printer’s Ope rator’s Handbook
for instructions.
Note: If you are switching to a different supply, you need to res et the belt
movement. See “Setting the Belt Movement
3. Press Clear to clear the error.
4. Press Feed (once or several times, depending on the tag’s length) to feed
a tag through the knife and into the stacker.
5. Print a batch of tags.
.”
Emptying the Stacker
You can empty the stacker while it is running, or wait until it is full.
Stacker Running
For continuous operation, empty the stacker tray before it is full.
When the tray is about half full:
1. Pick up some of the tags in front of the tag weight.
Note: If you have batch separators, keep all the tags in eac h batch
together.
2. Move the tag weight lightly against the stack. Do not push or compress
the stack.
3. Continue to remove tags as th e tray reaches half full.
Operation and Adjustments 2-9
Page 20

Stacker Full
When the stacker is full, a sensor at the end of the tray stops the printer.
Sensor
The pr
inter shows 761 on the display.
1. Empty the stacker tray.
2. Press Clear to clear the error.
3. Print a batch of tags.
2-10 Operating Instructions
Page 21

Clearing a Tag Jam
If a tag jams inside the stacker, the printer automatically stops. The printer
shows 761 on the display.
1. Check to see if the guide rail s and tag stop are set for the width and
length of the tag.
2. Turn the transport lock handle up halfway and pull it completely out.
Transport Lock
Handle
Operation and Adjustments 2-11
Page 22

3. Use the tab to lift the transpo rt. Check for tags.
Lift Here
4. Remove the tags.
5. Lower
6. Repla
the transport.
ce the transport lock handle. Make s ure it is completely in the hole
at the back of the stacker. Turn the handle down.
7. Press Clear to
2-12 Operating Instructions
clear the error, and print a batch of tags.
Page 23

TROUBLESHOOTING
This section helps you correct some problems that may occur.
Problem Action
Stacker Full Empty the tray. Press Clear to clear the
error and resume printing.
The stacker may not be plugged into an
outlet. Verify the power connection.
Stacker Jam Clear the jam. Press Clear to clear the
error and resume printing.
If the jam is not inside t he stacker, check
inside the knife or printer.
Stacker does not work. Make sure the stacker is plugged into an
outlet and is fully connected to the
printer.
Tags are stacked loosely. Empty the tray. Turn the adjustment knob
to a lower setting.
Adjust the guide rails and tag stop to the
width and length of the tags.
3
Tags are stacked too tightly. Empty the tray. Turn the adjustment knob
to a higher setting.
Troubleshooting 3-1
Page 24

Problem Action
Tags are not stacking neatly. Adjust the guide rails and ta g stop to the
width and length of the tags.
Tags rub against the side guid e
rails.
The guide rails are too close to the tag.
Adjust the guide rails.
Make sure the printer is aligned e venly
with the stacker.
The guide rails will not stay in
place.
Make sure the guide rails are in the
grooves at the bottom of the tray.
If you cannot fix a problem, call Service.
3-2 Operating Instructions
Page 25

SPECIFICATIONS
This section lists the produc t’s specifications.
A
Stacker
Height:
Width:
Length:
Tag Bed:
Weight:
Shipping
Weight:
Power:
Operating
Limits:
Storage Limits:
Humidity:
14.4 inches (366 mm)
7.9 inches (201 mm)
29.6 inches long (752 mm)
23.5 inches long (597 mm)
18 lbs. (8.2 kg)
30 lb. (13.6 kg)
115 Vac, 60Hz, 100 Vac, 50/60 Hz, 230 Vac,
50Hz
For Thermal Transfer (ribbon) 40to 95° F
(4° to 35° C)
For Thermal Direct 40° to 104° F (4° to 40° C)
15° to 120° F(-9° to 49° C)
Operating and Storage 5% to 90%
non-condensing
Stacking
Capacity:
2,000 tags .010 inches (.25 mm) thick
Specifications A-1
Page 26

Supplies
Thickness:
Widths:
Lengths:
.007 inches (.18 mm) minimu m
.010 inches (.25 mm) maximum
1.2 inch (30 mm) minimum
4.0 inches (102 mm) maximum
1.2 inches (30 mm) minimum
3.66 inches (93 mm) maximum
Minimum Stacked Tag Dimensions
If a tag is
printed width
wise:
If a tag is
printed length
wise:
1.63 inches by 1.2 inches
(41 mm by 30 mm)
1.2 inches by 1.57 inches
(30 mm by 40 mm)
Using RFID Supplies
These specifications appl y when stacking RFID tag supplies.
Length:
Width:
Thickness with
inlay:
Thickness
without inlay:
Stacking
Capacity:
A-2 Operating Instructions
1.5 inches (38.1 mm)
3.25 inches (82.5 mm)
0.020 to 0.024 inches (0.51t o 0.61mm)
0.010 to 0.014 inches (0.25 to 0.35mm)
500 tags (unattended)
1000 tags (attended; may require manually stack
adjustment)
Page 27

Page 28

Avery Dennison
170 Monarch Lane
Miamisburg, OH 45342
1-800-543-6650 (In the U.S.A.)
1-800-387-4740 (In Canada)
www.monarch.com
28028
0
 Loading...