

Page 1
Attention to
Detail!
We understand the unique needs of our
customers and customize services to help
them to efciently and economically run
their business.
Other Audio/Visual services and
products include:
» SOUND MASKING
Reduce background noise and increase
privacy with small emitters that t in any
layout.
» DIGITAL SIGNAGE
A greener way to communicate and
entertain your customers or to deliver
event information to your employees.
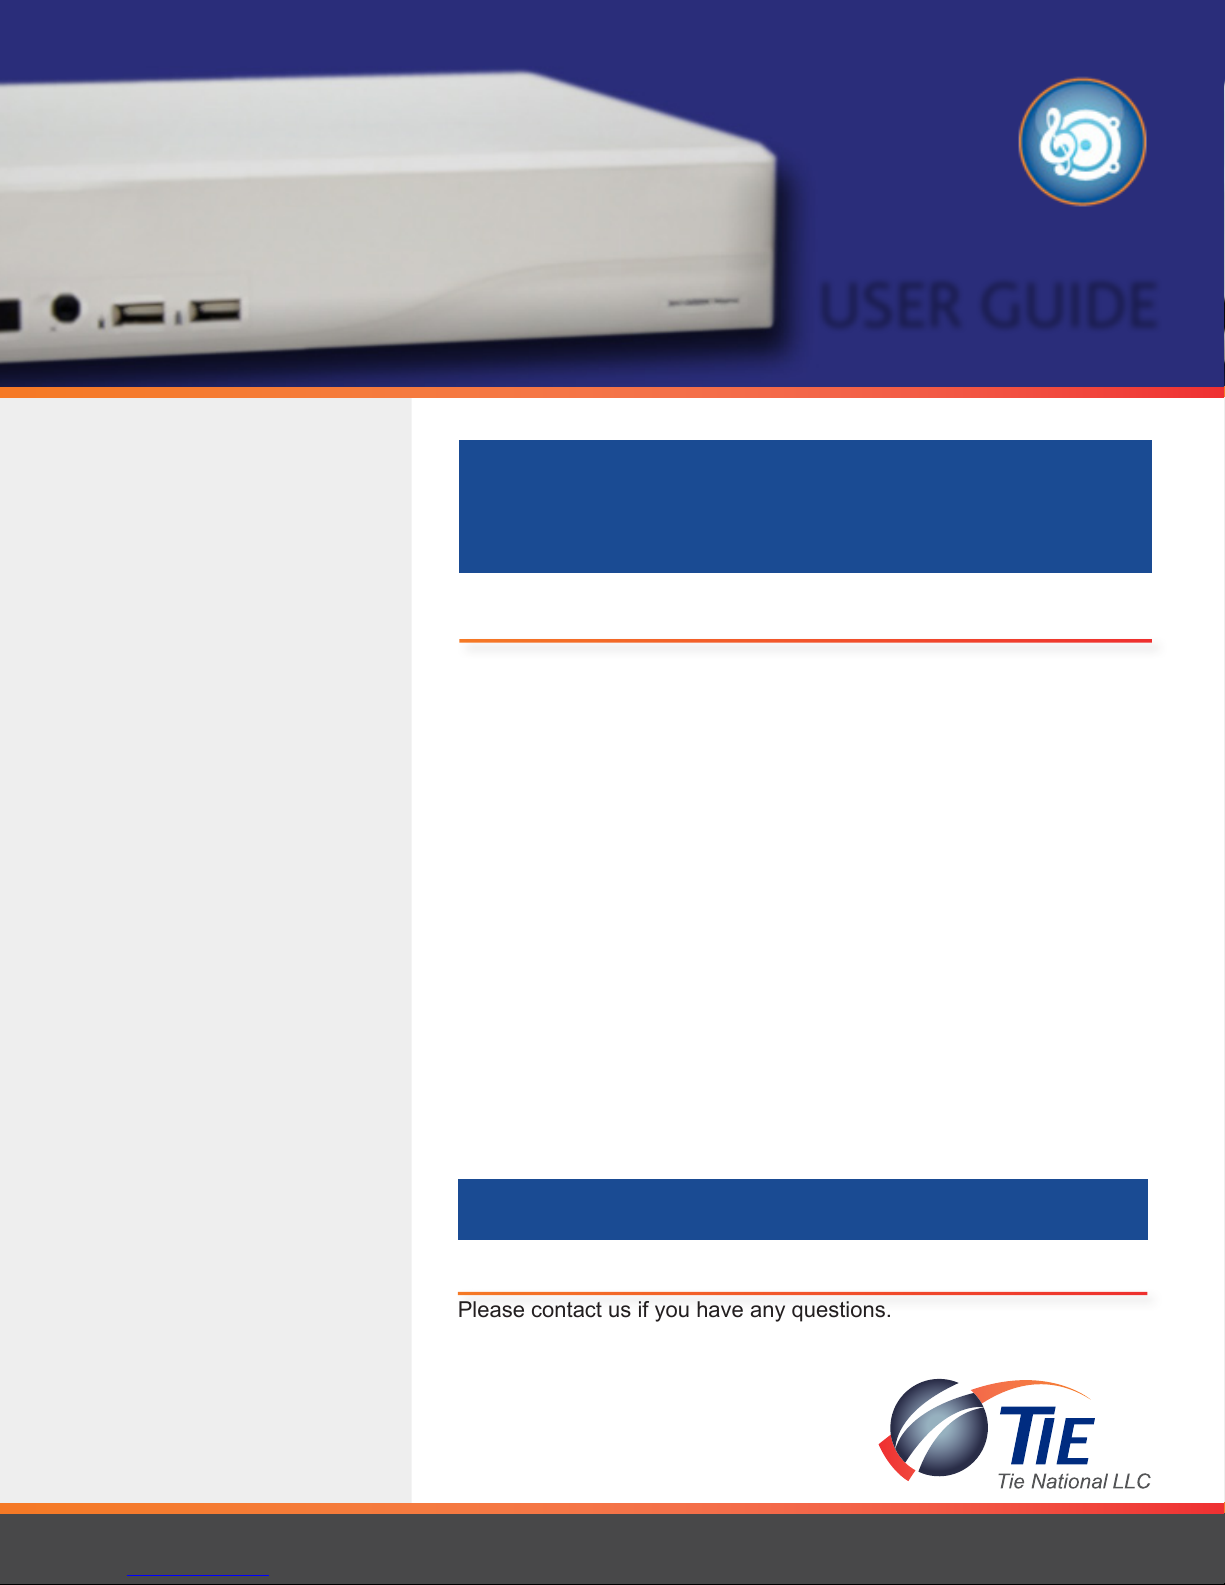
USER GUIDE
AVer Hybrid Linux DVRs
(featuring AVer’s EH1004 and EH1008 series DVRs)
Table of Contents
(in order of appearance)
Contact Us
Page 1
Overview of the EH1004 and
EH1008 DVR Unit
Page 2 DVR Unit
Remote Console Installation
Page 2 Desktop Shortcut
Page 2 Monitor Resolution
Preview Mode
Page 3 Preview Mode Layout
Page 4 Setup
Page 4 Network (Login)
Page 5 Alarm
Playback Mode
Page 5 Playback Mode Selection
Your Nationwide Technology
Partner.
Remote Playback
Page 6 Download and Playback
Page 7
Page 8 Segment and Export
Page 8 RealTime Playback
Page 9 RealTime Playback Layout
Page 10 Event Log Viewer
Page 10 Event Search
AVer i-Viewer Mobile Access
Page 10 Mobile Installation
Page 11 Mobile Login
Page 11 Live View
Page 12 Playback Mode
Remote User Setup
Page 12 User Setup Login
Page 12 Add/Delete Users
Page 12 Password Reset
Download and Playback
Layout
» TIE’S SOUND SUITE
A packaged solution featuring Music on
Hold and Background Music, is easily
customized and programmed through TIE’s
online portal.
Call us today and let us design a
solution for your Audio/Visual
needs.
AVer User Guide v.2.1 Tie National, LLC www.TieNational.com
Contact us at 630.301.7444 or Visit us on the web at www.TieNational.com
Contact Us
Your Nationwide Technology Partner.
Please contact us if you have any questions.
Tie National, LLC
630.301.7444
www.TieNational.com
1
Page 2
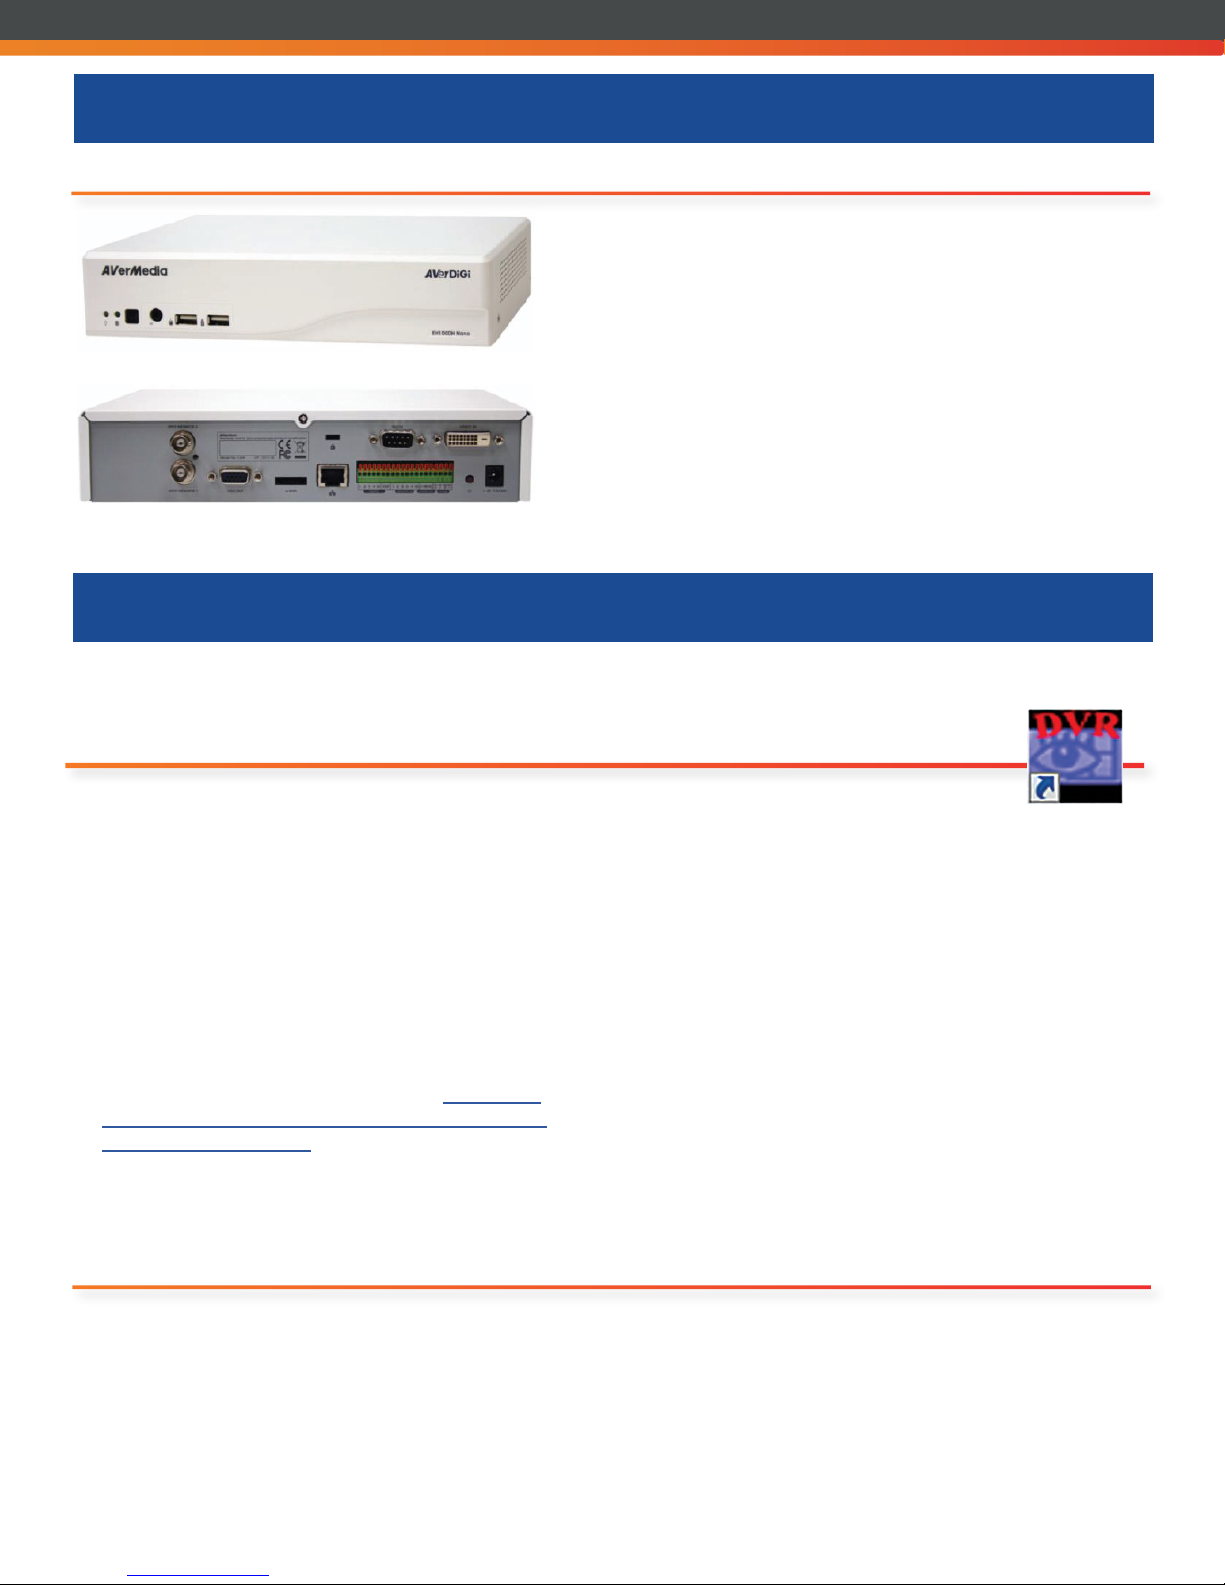
Overview of the EH1004 and EH1008 DVR Unit
DVR Unit
• Your DVR unit has been programmed and installed to
match the needs of your location.
• Please do not make changes to the physical connections
of your unit without the guidance of a TIE engineer.
Please visit our website at http://www.tienational.com/resources.html for additional training options.
Remote Console Installation
While access is also available from your browser, to avoid making changes that may inadvertantly affect the programming
of your surveillance unit, TIE recommends using the Remote Console.
Desktop Shortcut
Please note that the Remote Console is only supported by
Windows OS and is not currently available with MAC OS.
• Your installation technician has installed a shortcut to
the Remote Console on the desktop of one of your
computers at your location. Double click on the icon to
open.
Adding Web Tools (Remote Console):
• Remote Console can be added to additional computers
by selecting Download next to Software item Web
Tools (Remote Console) located here: http://www.
averusa.com/campus-security/support/downloads.
asp?product=EH1008H.
• Open the le to automatically save as Web Tools under
a Temporary folder on your computer.
Monitor Resolution
Compatible Monitor (Screen) Resolutions:
• 1024 x 768
• 1280 x 1024
• 1920 x 1200
• 1440 x 900
• 1680 x 1050
• Open the new Web Tools folder and
double click on Setup.
• Click on Run from the Open File pop-up to activate the
installation.
• Follow the InstallShield Wizard prompts to install
Remote Console. (Make sure to ONLY check off
Remote Console as a component to install.)
• After installation has completed, restart the computer.
• Remote Console should appear on the desktop upon
start-up.
• Using a screen resolution that is not indicated here
may eliminate access to some functions of the Remote
Console.
• Change and/or conrm your screen resolution by rightclicking on your computer’s desktop background and
selecting Screen Resolutions from the options listed.
AVer User Guide v.2.1 www.TieNational.com
Tie National, LLC
2
Page 3

Preview Mode Layout
Preview Mode
Initial login will require rst making a selection from the Remote Server under Setup (6), clicking on
OK, and then signing into the unit via Network (5). Until then, no images will appear.
See the sections on Setup and Network for more details.
1. Exit - Closes the Remote Console.
2. Single and Split Screen Mode Selection - Offers
different viewing options for multiple camera locations.
3. Record - Offers recording of the current camera view.
4. Emap - Not supported.
5. Network - Allows access to the DVR server remotely
using an internet connection.
6. Setup - Remote Console settings.
7. PTZ - Not supported.
8. Preview - Live camera view.
9. Playback - Viewing of recorded video les.
10. Status Bar - Displays IP address and transmitting
bytes.
11. Camera ID - Shows the number of available cameras
for viewing.
• When in single screen mode, select the camera
you wish to view from this list.
12. Snapshot - Capture and save current view in either
.jpg or .bmp format.
13. Event Log - Displays Event, Operation, System and
Network Logs.
14. Auto Scan - Turns on/off automatic cycling between
cameras in the Single and Split Screen Modes.
15. Full Screen - Uses the entire area of the screen for
video display.
• To exit full screen press ESC on the keyboard or
right-click using your mouse.
16. Alarm - Alert and display warning information.
17. DirectDraw - Enhances video quality for certain VGA
cards.
18. Audio Button - Enable/Disable sound. Only one
camera’s audio can be heard at a time.
• When in Split Screen Mode, click on the same icon
in the upper right hand corner of the camera view
to listen to that specic camera’s audio.
AVer User Guide v.2.1 Tie National, LLC www.TieNational.com
3
Page 4
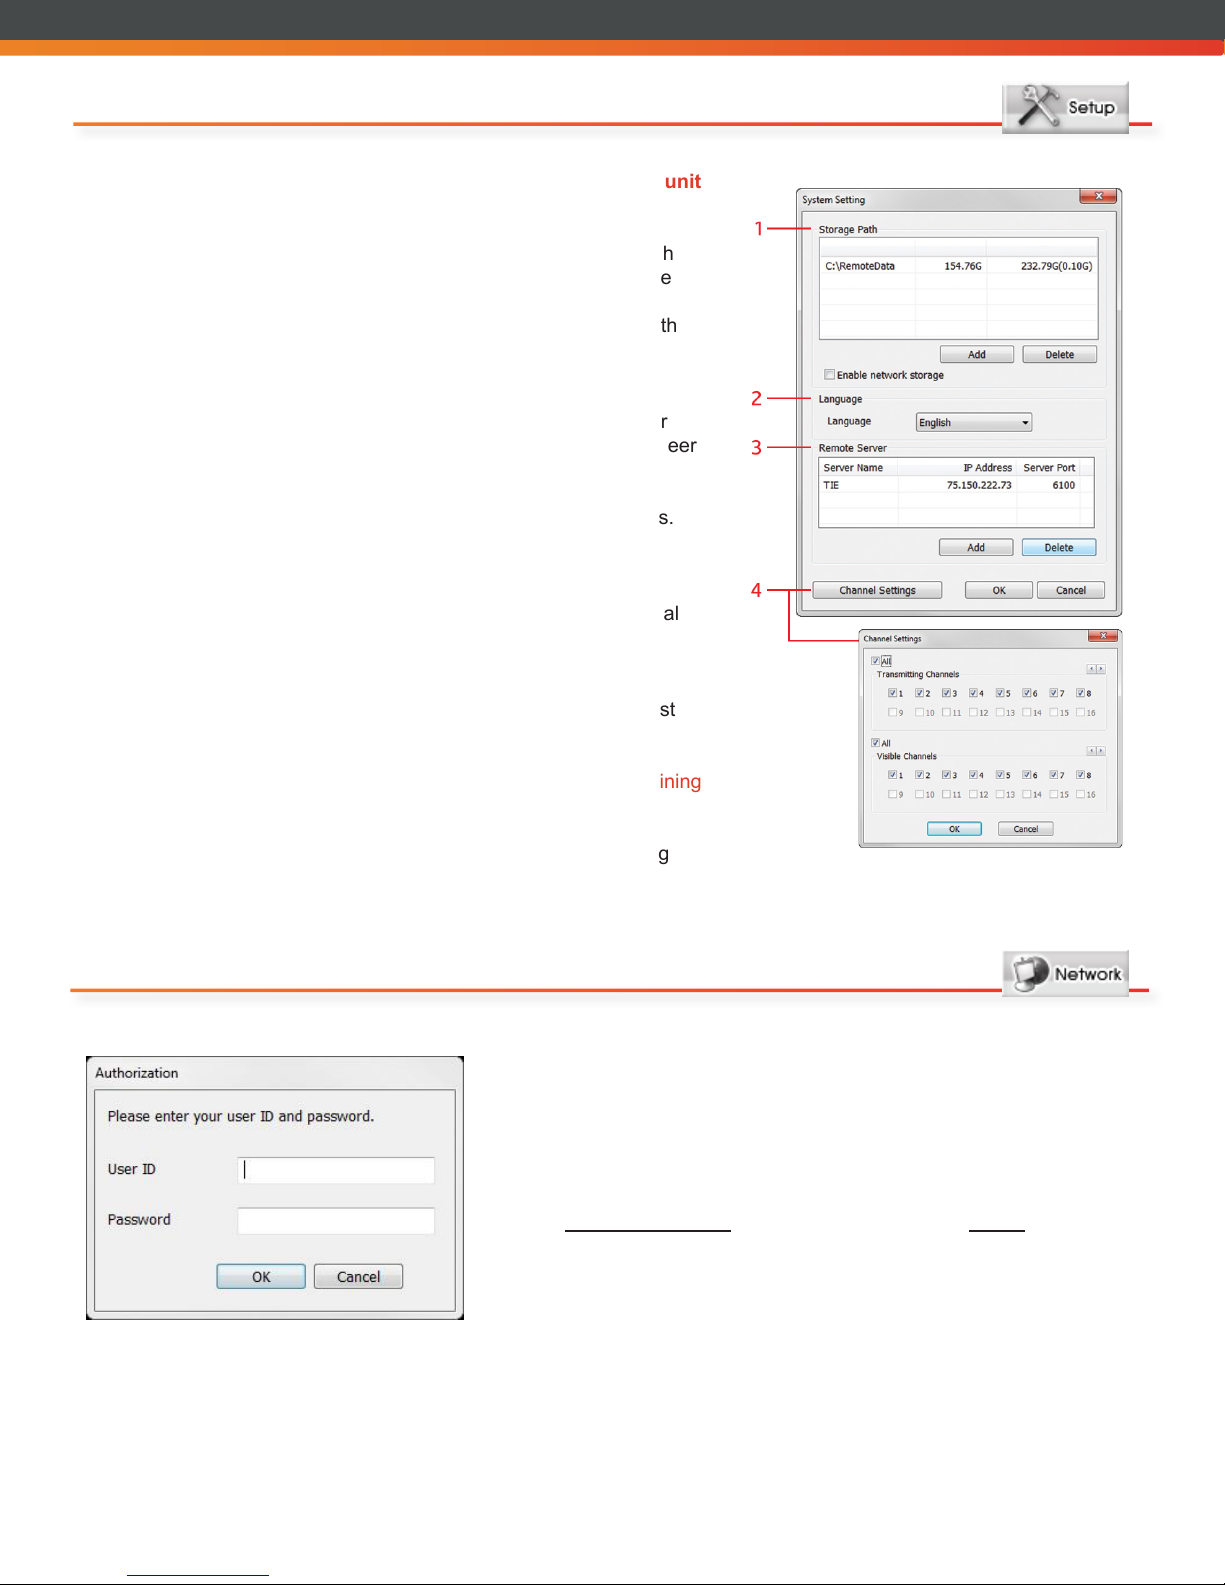
Setup
Initial login will require rst making a selection from the Remote
Server under Setup, clicking on OK, and then signing into the unit
via Network.
1. Storage Path - Sets where data is saved. If there is not enough
free space to record the data the system will automatically save
over the oldest data. If you have more than one storage path
entered, the system will automatically save data to the next path
shown. By default data is stored in C:\RemoteData.
Enable network storage sends recorded video to an internet
storage drive/folder that has been mapped as a Network Driver
within the DVR server. This will be programmed by a TIE Engineer
if required.
2. Language - Adjusts the language used for tool tips and dialogs.
Default is set to English.
3. Remote Server - Available DVR servers for viewing. If viewing
from within the location, the IP Address shown will be an internal
address. If viewing remotely, an external IP must be added.
• Click Add/Delete to update the available list view with
additional IP addresses.
• To view a selected site, highlight the IP to view from the list
and click OK.
Contact TIE’s Help Desk at 630.301.7444 for assistance in determining
your IP address and port number.
4. Channel Settings - Identies the cameras that are transmitting
signals to the server and which cameras can be viewed from the
Remote Console. Default for both is set to all.
Network (Login)
Initial login will require rst making a selection from the Remote
Server under Setup, clicking on OK, and then signing into the unit via
Network.
• The following User ID and Passwords have been setup by default on
your system. After entering, click OK and you will be connected to Live
view.
ADMINISTRATOR
(playback and recording
authorization)
ID: owner
Password: 1234
USER
(view only access)
ID: user
Password: 1234
Please note that TIE encourages that you change your passwords (see Password Reset) and keep them stored in a
secure location. TIE does not have access to your passwords.
AVer User Guide v.2.1 www.TieNational.com
Tie National, LLC
4
Page 5
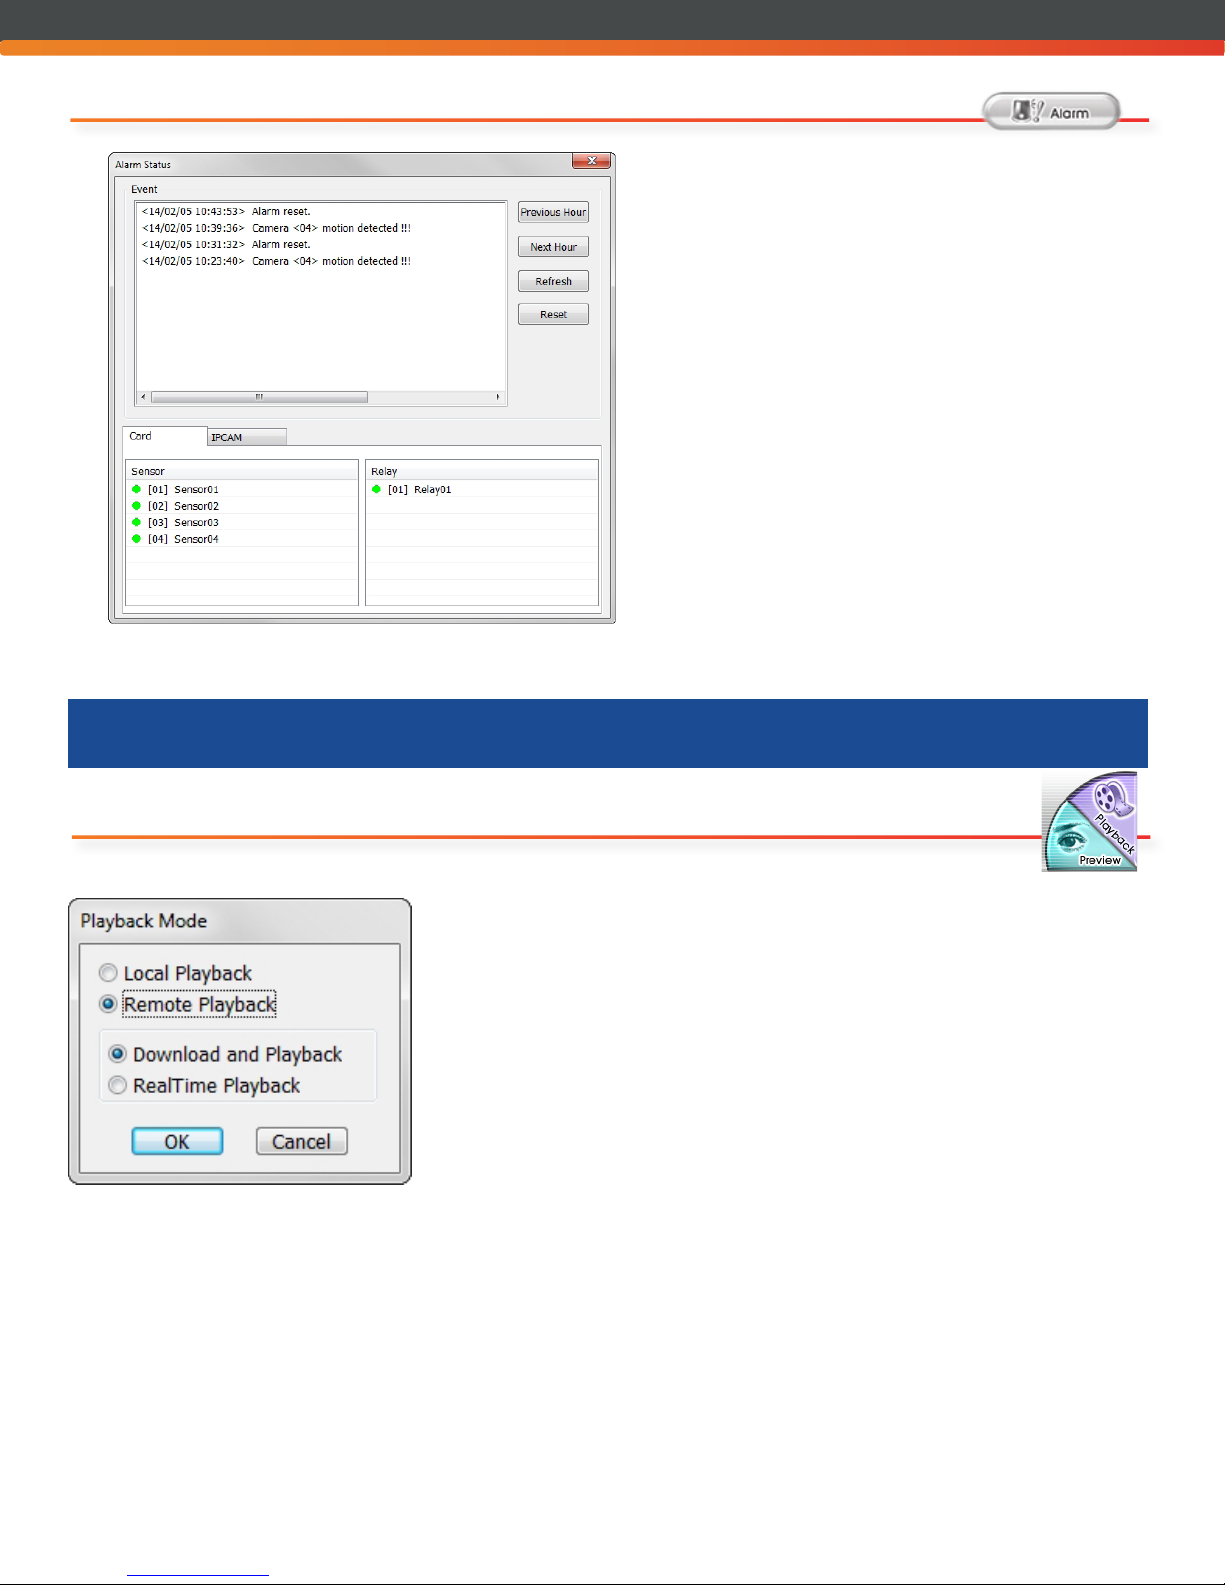
Alarm
• The Alarm button will blink if an event has
occurred since the last login.
• Click on the Alarm button to view an Alarm Status
pop-up with a detailed event history and an option
to reset.
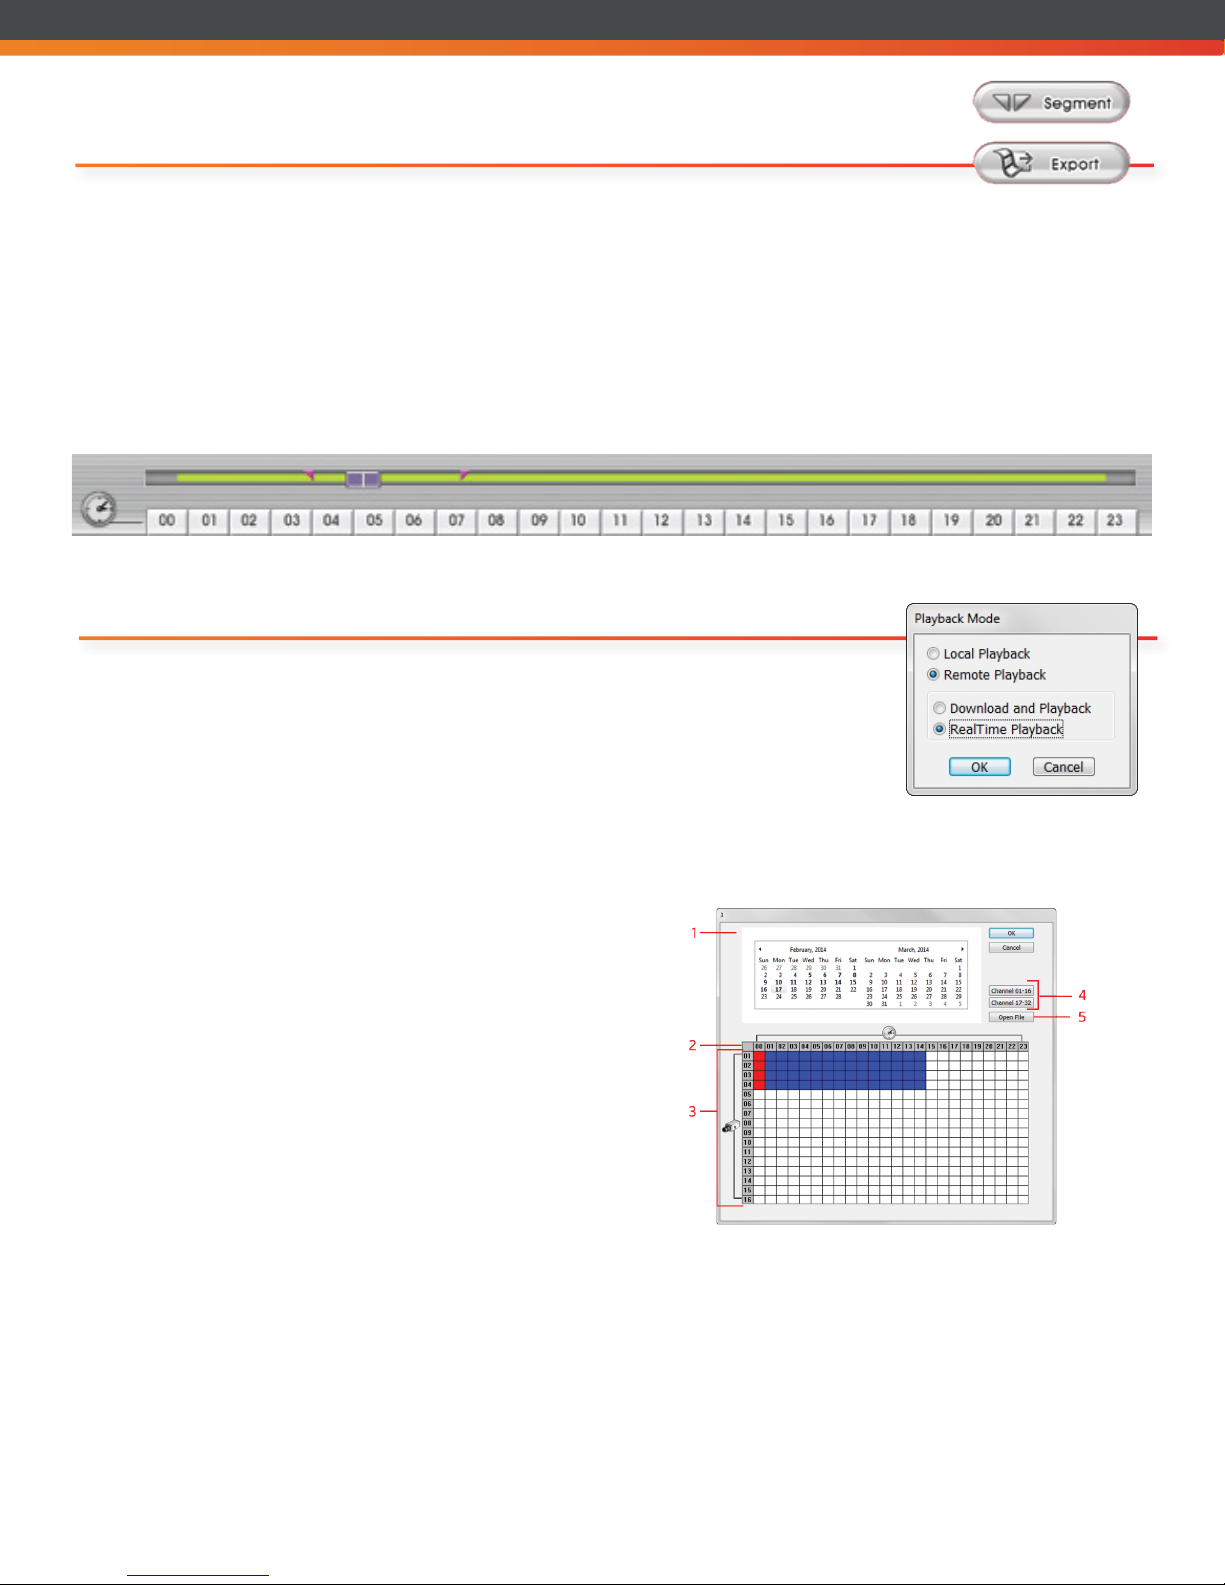
Playback Mode Selection
• Begin by selecting the Playback option from the lower right hand portion of
• Make your selection from the options provided:
Local Playback is not explored using
this User Guide. Contact our Help
Desk at 630.301.7444 if assistance is
needed.
Playback Mode
the Remote Console.
• Local Playback - Opens a
le that is recorded in the
Remote Console. Must be
viewing directly from a monitor
connected to the AVer unit to
view.
• Remote Playback - Opens a le
that has been recorded in the DVR
server.
• Download and Playback -
Provides thumbnails of the
footage within a selected
timeframe of the recorded
footage at 3 to 4 minute
intervals from a specic
camera.
This view allows for
segmenting and exporting of
recorded footage.
• RealTime Playback - View
footage from the selected time
for all cameras. Also allows
viewing of previously saved
video les.
AVer User Guide v.2.1 Tie National, LLC www.TieNational.com
5
Page 6

Remote Playback
Download and Playback
• After selecting Remote Playback along with Download and Playback from the Select
Playback Mode options, click OK.
• Use the Remote Playback Date/Time Selection tool to narrow down the recorded
footage to view.
1. Calendar - Dates that hold recorded footage are in
bold.
• Click on the date within the calendar for the footage
to view to highlight your selection using the left and
right arrows to scroll between months as needed.
2. 24 Hour Clock- Midnight is represented by 00 and
ends with the eleven o’clock hour which is represented
by the number 23. Recorded footage will be
represented by a blue square. White blocks do not hold
data.
AVer User Guide v.2.1 www.TieNational.com
3. Camera Selection - Cameras are numbered vertically
on the grid to match the sequence shown in Preview
Mode.
• After selecting the date, choose the camera/time
to view by clicking the cell that intersects. The
selected camera/time will then change to red. Click
OK to proceed.
4. Thumbnail Selection A screen will appear that
divides the footage for that selected hour into 16 video
thumbnails, each ranging from 3 to 4 minutes in length.
• Click once on the thumbnail selected to view, then
double click on the same frame to open it.
Tie National, LLC
6
Page 7

Download and Playback Layout
1. Exit - Closes the Download and Playback View.
2. Progress Bar - Shows the progress of the le being
played.
• Move the slider to jump around within the le.
4. Playback Control Buttons - From left to right: Begin,
Previous, Slower, Rewind, Play/Pause, Faster, Next,
and End.
6. Status Bar - Displays the recorded date, time, and
play speed.
8. Languages - Select the language of function tips.
11. Export -
• Snapshot to capture and save the current screen
image as a .jpg or .bmp format.
• Print the current screen image of the video still
frame.
• Output Video Clip to save a segmented le in
.mpg, .avi, or .dvr format.
12. Segment - Click to section off a portion of the video le
to save.
13. Full Screen - Use the entire monitor to view the video.
• To return press ESC on the keyboard or right click
with the mouse.
16. Visual Search - Search from a specic camera by
date, hour, minute, ten seconds and one second.
20. Volume Control - Slide to the left to decrease the
volume or to the right to increase the volume.
21. Audio Button - Enable/Disable sound.
22. De-Interlace - Used to enhance video quality.
• Set the de-interlace mode to #1 before exporting
a snapshot of motionless picture and #2 when
viewing video that captures a lot of movement.
23. Watermark - Not supported.
DISABLED BUTTONS FOR THIS VIEW:
3. Hour Buttons
5. Archive
7. Camera
9. Advanced
10. iPOS Search
14. Event Log
15. Bookmark
17. Find Next
18. Event Search
19. Intelligent Search
AVer User Guide v.2.1 Tie National, LLC www.TieNational.com
7
Page 8
Segment and Export
• To segment a video clip to export and save, click on
Sement from within Download and Playback once at
the beginning of where you want to start the shortened
video le, and a second time for where the video clip
should end.
• A pink triangle will mark these start and stop points on
the Progress Bar. Only the portion of the video between
these two markers will be included within the segment.
• Click Export and select Output Video Clip. Select where
you would like to save the le, and then select the
format of which to save the le.
• If saving to view later within the Remote Console, save
as a .dvr le. If intending to view from another source
or share with local authorities, select either .avi or .mpg
and click Save.
RealTime Playback
• After selecting Remote Playback along with RealTime Playback from the Select
Playback Mode options, click OK.
• Use the Remote Playback Date/Time Selection tool to narrow down the recorded
footage to view.
Segmenting and Exporting is NOT available in this mode.
1. Calendar - Dates that hold recorded footage are in
bold.
2. 24 Hour Clock- Midnight is represented by 00
and ends with the eleven o’clock hour which is
represented by the number 23. Recorded footage will
be represented by a blue square. White blocks do not
hold data.
3. Camera Selection - Cameras are numbered vertically
on the grid to match the sequence shown in Preview
Mode.
4. Channel Selections - If wanting to only view specic
camera footage in RealTime Playback, these buttons
allow for targeted viewing by selecting the cameras to
view. Default for both is set to all.
• Click on the date within the calendar for the
footage to view to highlight your selection using
the left and right arrows to scroll between months
as needed.
• After selecting the date, choose the time, all
cameras within that timeframe that contain data
will then change to red.
• Click OK to proceed.
5. Open File - Allows the user to nd previously
extracted footage and play from the Remote Console
viewer. This may be helpful if the saved le format
cannot be viewed in another media player.
AVer User Guide v.2.1 www.TieNational.com
Tie National, LLC
8
Page 9

RealTime Playback Layout
1. Exit - Closes the RealTime
Playback.
2. Single and Split Screen Mode
Selection - Offers different
viewing options for multiple
camera locations.
• To zoom in on an area on the
screen, right click and drag a
square on the area you want
to enlarge.
3. Progress Bar - Shows the
progress of the le being played.
• Move the slider to jump
around within the le.
4. Hour Buttons - Hours are
represented as a 24-hour clock.
The blue bar indicates recorded
footage is available for that time
period. The red bar shows the
le that is currently being played.
• Select and click from the hour
buttons to jump to different
times.
5. Playback Control Buttons -
From left to right: Beginning,
Previous, Slower, Rewind, Play/
Pause, Faster, Next, and End.
6. Preview - Returns to live camera
view in Preview Mode.
7. Playback - Allows to change
between Local, Download and
Playback or RealTime Playback
Modes.
8. Archive - Used for selecting a
different date within the RealTime
Playback mode.
9. Status Bar - Displays the
recorded date, time and play
speed.
10. Camera ID - Shows the number
of available cameras for viewing.
• When in single screen mode,
select the camera you wish to
view from this list.
14. Export - Snapshot to capture and
save the current screen image as
a .jpg or .bmp format.
16. Full Screen - Use the entire
monitor to view the video.
• To return press ESC on the
keyboard or right click with the
mouse.
17. Event Log - Recorded activities
that have taken place on the
system.
20. Find Next - Works with Event
Search to jump to the next
recorded event.
21. Event Search - Select to view
recorded activities that have taken
place on the system.
23. Volume Control - Slide to the left
and right to adjust the volume.
24. Audio Button - Enable/Disable
sound. Only one camera’s audio
can be heard at a time.
• When in Split Screen Mode,
click on the same icon in the
upper right hand corner of the
camera view to listen to that
specic camera’s audio.
25. De-Interlace - Used to enhance
video quality. Set the
de-interlace mode to #1 before
exporting motionless picture and
#2 for a lot of movement.
DISABLED BUTTONS FOR THIS VIEW:
11. Languages
12. Advanced
13. iPOS Search
15. Segment
18. Bookmark
19. Visual Search
22. Intelligent Search
26. Watermark
AVer User Guide v.2.1 Tie National, LLC www.TieNational.com
9
Page 10

Event Log Viewer
1. Date - Select the date to view and click Save.
2. Filter - To further lter the records, select from Event,
Operation, System or Network events.
3. Records - Records that meet the date and lter criteria
will appear in this window.
4. Finding Text - Use specic word or term to search the
records for then click Find.
Event Search
• Begin by clicking on the video screen where you want to
search, then click on Event Search.
1. Search Condition Setting - Check the type of condition
to search, either Sensor, Motion, VideoLoss, POS or by
using a nding text.
• Click ok. The video search will stop at the frame that
matches the condition.
• To keep searching click on the Find Next button.
2. Event List - To isolate the events, no matter the
condition, by a specic timeframe, enter in the date, time
and searching interval.
• After making the intended selections,
click OK.
• Select the item to view from the Event list that
appears.
AVer i-Viewer Mobile Access
Mobile Installation
• While connected to the internet, select the appropriate App Store.
(Available on iPhone, iPad, and Android devices.)
• Select Search and enter keyword “AVer” to search.
• From the results, select AVer i-Viewer.
• The AVer i-Viewer icon will appear on your application list. Click this to run the application.
AVer User Guide v.2.1 www.TieNational.com
Tie National, LLC
10
Page 11
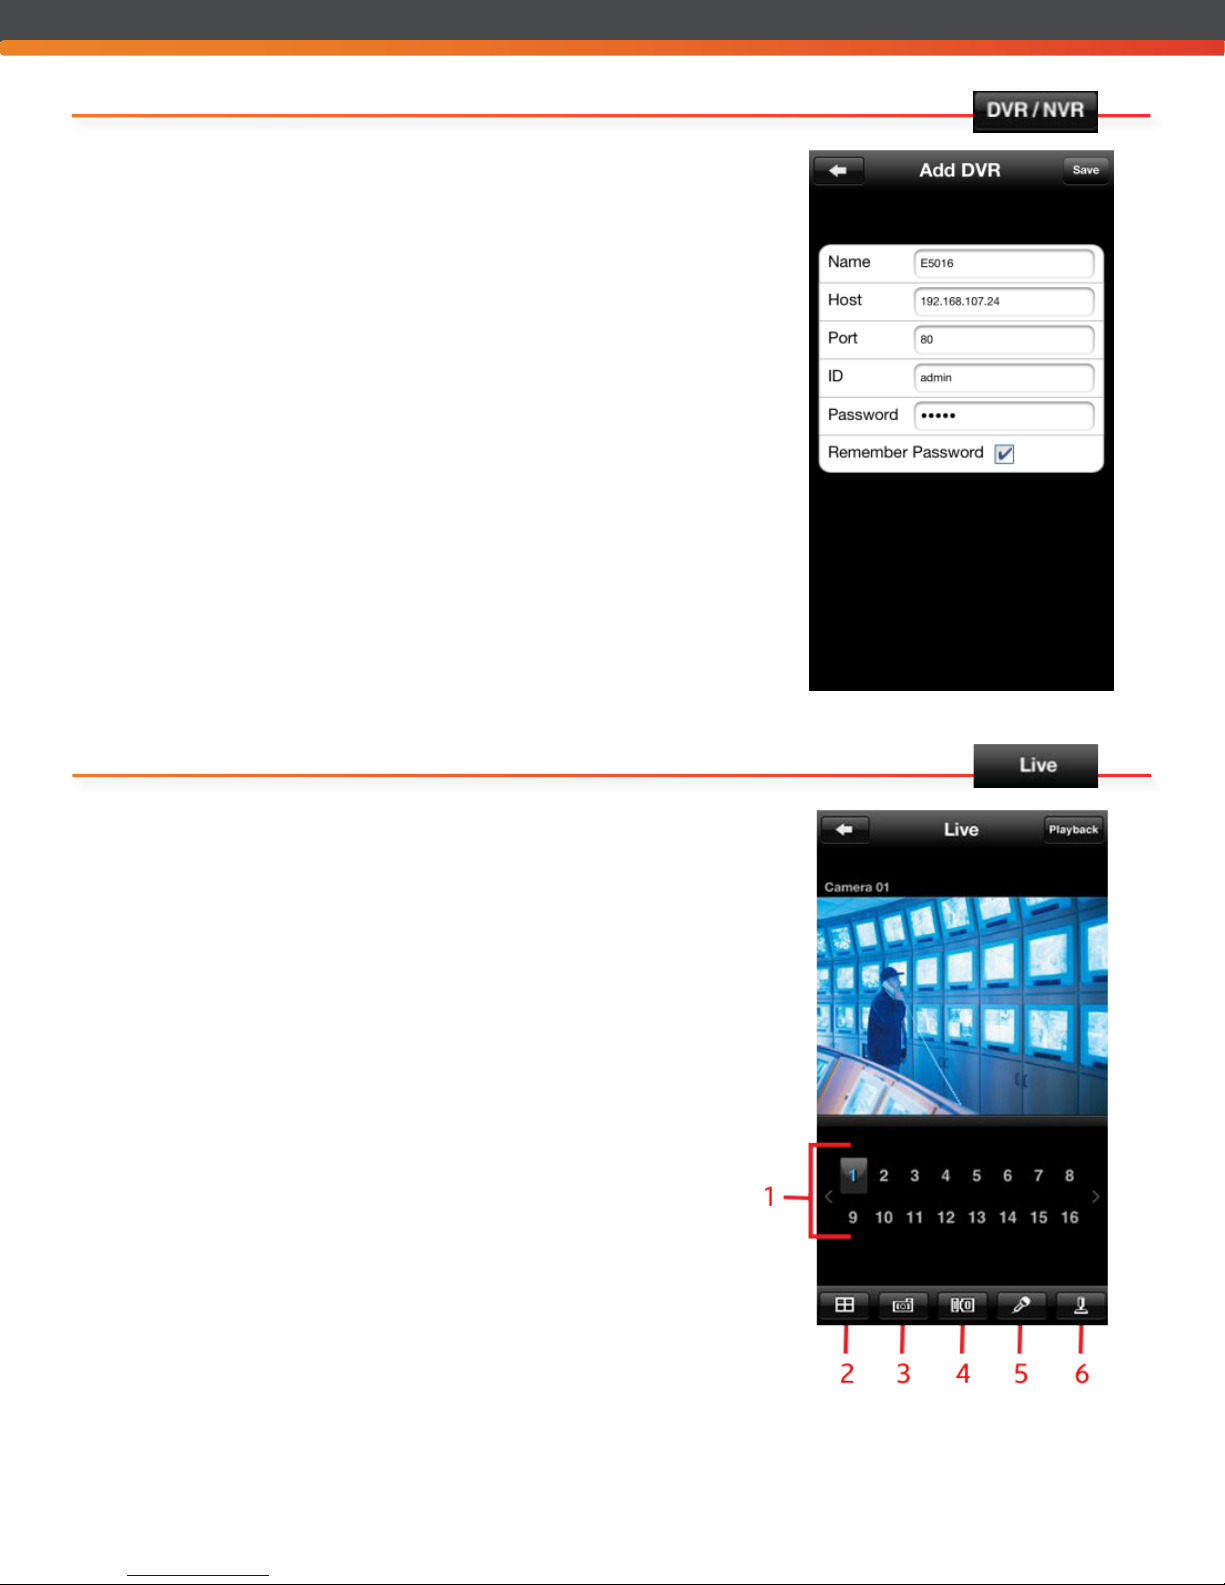
Mobile Login
• While connected to the internet, select the AVer i-Viewer icon from your
mobile device.
• Select DVR/NVR from the home screen.
• From the DVR List, select the + button.
• Populate the elds on the Add DVR screen.
Name - Create a nickname for the location being added.
Host - External IP address of the DVR/NVR server.
Port - The connection port of DVR/NVR.
ID - Network login User Name.
Password - Network login Password. Click Save.
• The DVR List will now be updated with the new entry. Click to open.
Live View
1. Cameras - Select the camera to view.
2. Single and Split Screen Mode Selection - Offers different viewing
options for multiple camera locations.
3. Snapshot - Captures a snapshot of the current screen image to
save on your mobile device.
4. Sensor/Relay - Not supported.
5. 2-Way Audio - Not supported.
6. PTZ Camera - Not supported.
To return to the DVR List, select the left arrow at the top of the screen.
To enter Playback Mode, click on Playback from the top of the screen.
AVer User Guide v.2.1 Tie National, LLC www.TieNational.com
11
Page 12

Playback Mode
1. Date, Time, and Camera - Select the date, time, and camera to playback
footage.
2. Playback Control Buttons - From left to Right: Beginning, Play/Pause,
End. For use after selecting the Date, Time, and Camera to view.
3. Snapshot - Captures a snapshot of the current screen image to save on
your mobile device.
• Please note that video footage cannot be saved to your mobile
device. To export and save video footage rather than only a
snapshot still image, please use the Remote Console from a desktop
connection.
• To return to Live View, click on Live from the top of the screen.
Remote User Setup
User Setup Login
• Using Internet Explorer (must be from this browser), enter http://[insert IP address]:6100.
• Install associated drivers and make sure to use compatability mode as needed.
• Sign in using the Administrator user name and password. (Only the Administrator level authority can access User
Setting.
• Click on Remote Setup and sign in again as necessary.
Add/Delete Users Password Reset
• In the User Setting box, select either Add to insert a
new user, or Delete to remove a selected user, or Edit
to modify a user. Click OK.
• When Adding a new user, select whether or not they
should have Administrator or User Authorization Level
rights.
• When Adding a new user with User Authorization Level
rights, check the access they should have for Control
Rights, WebViewer Access, Visible Cameras, and Time
Span.
• When Adding a new user, enter the User Name, a
description, new password (and conrm password).
Click OK.
Please note that TIE encourages that you change your
passwords and keep them stored in a secure location. TIE
does not have access to your passwords.
• In the User Setting box, select Edit to modify a user.
Click OK.
• Type over the password shown with the new password,
and type the new password again in the Conrm
Password eld. Click OK.
AVer User Guide v.2.1 www.TieNational.com
Tie National, LLC
12
 Loading...