

Page 1
TM
Data Box
DB25 Parallel cable (2m)
DB9 Male to DB9 Male (Gender changer)
DB9 Female to DB9 Female (Gender changer)
Quick User Guide
Name
Description
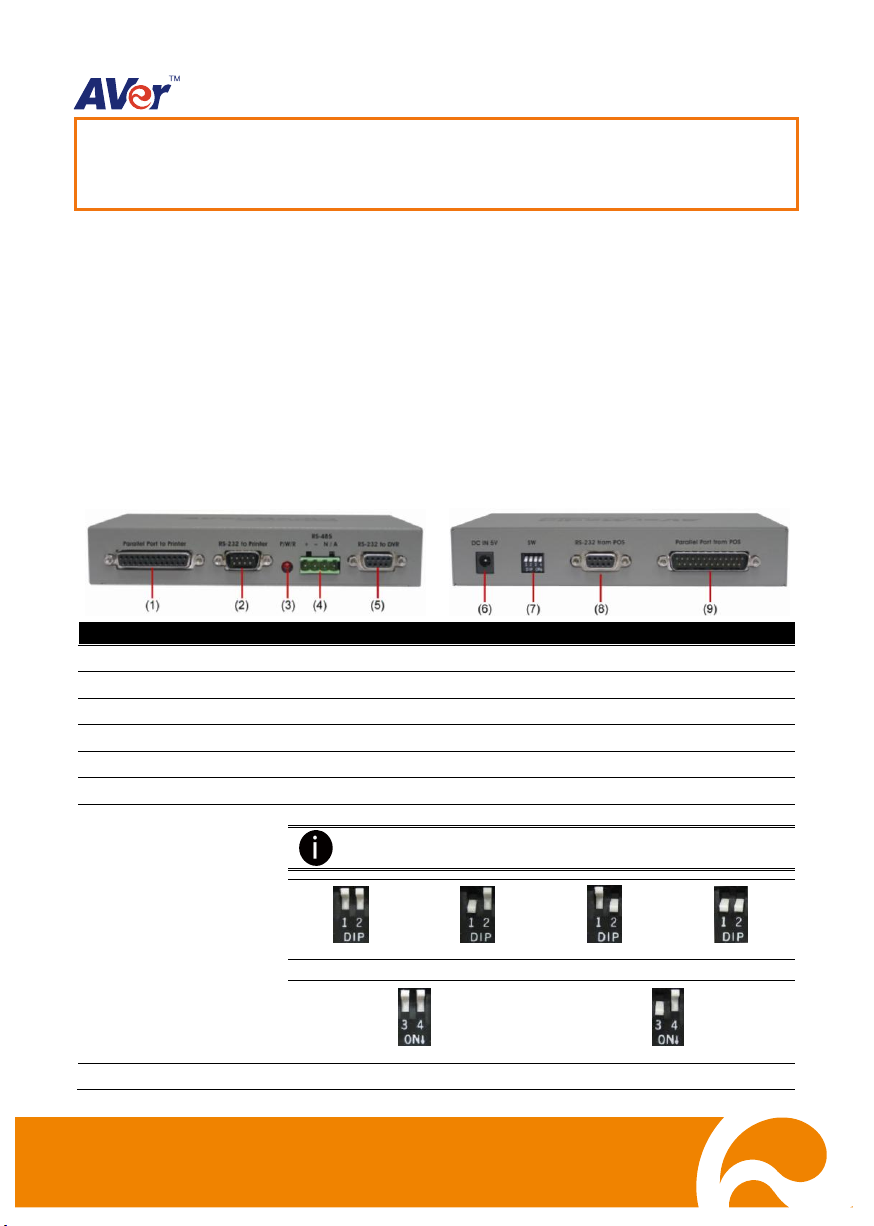
(1) Parallel Port to Printer
Connect to parallel POS printer port.
(2) RS-232 to Printer
Connect to serial POS printer port.
(3) P/W/R
Light when the power is connected
(4) RS-485
Connect to the RS-485 to RS-232 converter.
(5) RS-232 to DVR
Connect to the COM port of the AVerTM DVR.
(6) DC IN 5V
Connect the power adapter into this port.
(7) SW
Use the dip switch no.1 & 2 to set the baud-rate setting.
If you use parallel connection, it is not necessary to set the
baud-rate.
9600bps
19200bps
57600bps
115200bps
Use the dip switch no. 3 to set the type of connection.
Serial Connection
Parallel Connection
(8) RS-232 from POS
Connect to the serial port of the POS system.
Data Box
Quick User Guide
I. Introduction
With the AVerTM Data Box, user can integrate the POS equipment with the AVerTM NV/SA/EH/IWH
series DVR. It transmits the transaction data on both POS printer and surveillance system. Therefore,
the transaction data can be overplayed on the surveillance video, then you can monitor, record, and
keep track of the items that were sold.
II. Package Contents
III. Data Box Parts
1
Page 2
Name
Description
(9) Parallel Port from POS
Connect to the parallel port of the POS system.
IV. Making the Connection
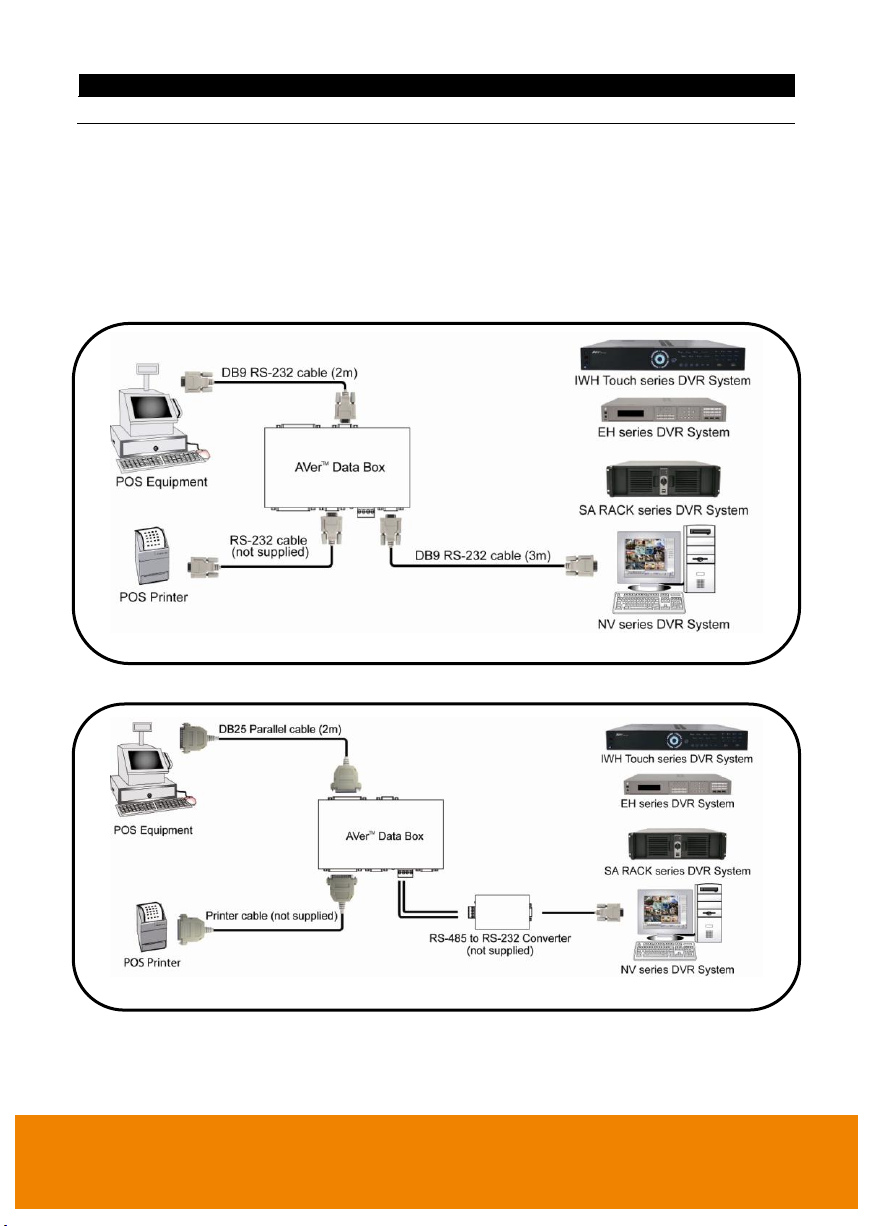
AVerTM Data Box supports serial and parallel ports to connect your POS system. If the distance
between POS and AVerTM DVR is more than 10 meter, we suggest connecting the surveillance system
through RS-485.
Please follow the below illustrated to make a connection.
Serial Connection
Make sure dip switch no.3 is OFF.
Connecting Via RS-232
Connecting Via RS-485
2
Page 3
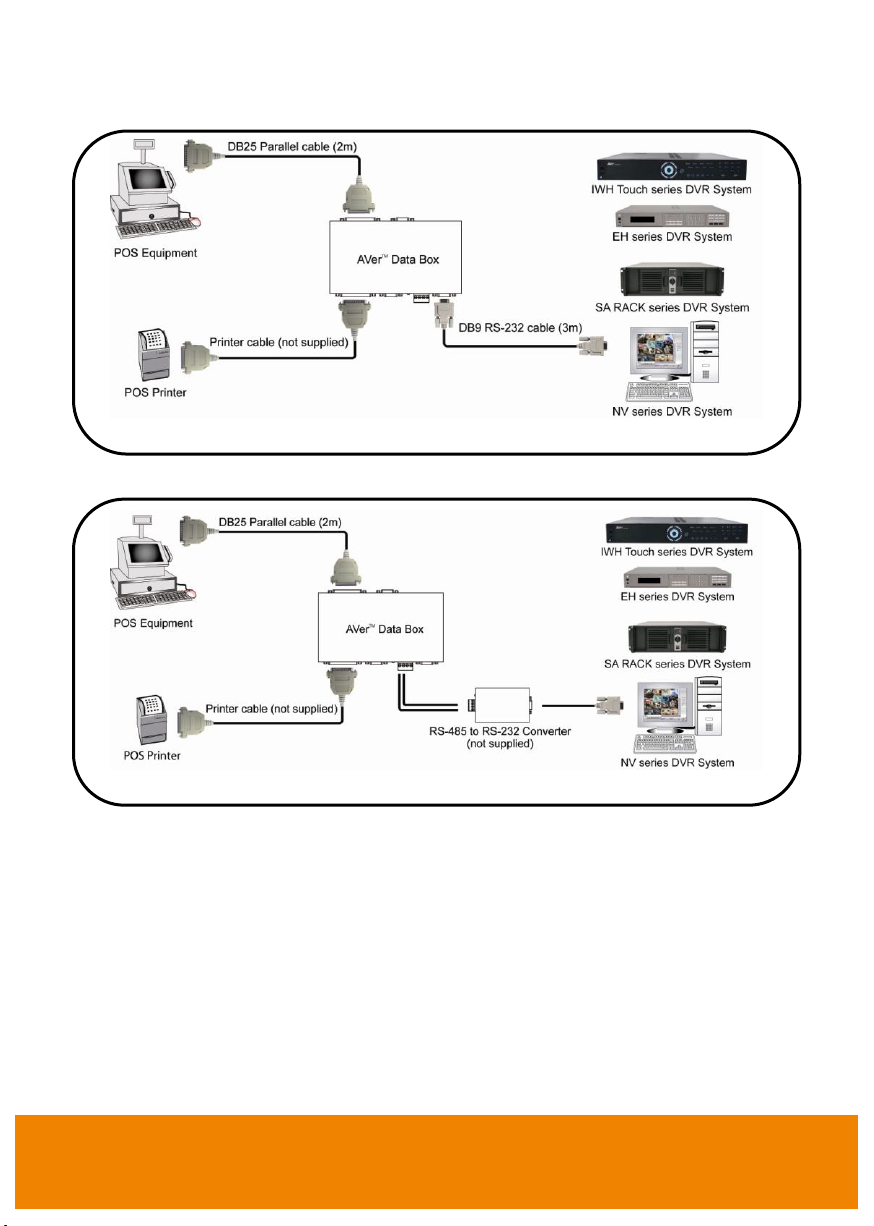
Parallel Connection
Make sure dip switch no.3 is ON.
Connecting Via RS-232
Connecting Via RS-485
3
Page 4

Multiple AVer DVR POS Capture Box Connection
You may connect more than one AVerTM Data Box to the AVerTM DVR. Your DVR must connect
AVerTM USB2RS232/485 Box; each USB2RS232/485 Box can connect up 4 AVerTM Data Box. For
multiple connections, user may connect up to 16 AVerTM Data Boxes.
4
Page 5

Setting DVR POS Configuration
To set the NV/SA DVR POS setting:
1. Run the NV/SA DVR program.
2. In the Preview/Advanced screen mode, click .
3. When the NV/SA DVR configuration setup selection appears, click System.
4. In the System Setting dialog box, POS section, click Setting.
5. In the POS Console Setting dialog box, click Add to set a new POS setting, Modify to change
the POS setting, and Delete to remove the selected POS setting. Click Exit to close POS
Console Setting.
5
Page 6

6. In the POS Mapping dialog box, click OK to accept the settings and Cancel to exit without saving
(1)
(2)
(3)
(6)
(7)
(8)
(4)
(5)
P/N: 300AC0DB-DNK
Sept. 2011
the new setting.
(1) POS Name: Enter a name to identify the POS.
(2) Protocol: To select the protocol, click Setting button.
(3) Skip first: Set the number of lines you want to be removed
(4) Start Testing: Click to test POS setting. You will see a test result on the right side of POS
(5) Setup…: Set the COM Properties. If you are not sure, please contact your POS service
(6) Port Setting: Select the Local or Remote port to where it is connected.
Local - select the COM port number which is connected.
Remote – Use the UDP protocol for remote connection if POS system can broadcast
(7) Map to Channel: Select to which camera number to display the transaction text.
(8) Text Filter: Enter the word you want to be removed.
Mapping window.
provider.
to Internet. Enter the IP address of the remote station.
6
Page 7

To set the EH series DVR POS setting:
1. Run the EH DVR program.
2. In the Preview screen mode, click .
3. When the EH DVR configuration setup selection appears, click System.
4. In the System Setting dialog box, POS section, click Setting.
5. In the POS Console Setting dialog box, click Add to set a new POS setting, Modify to change
the POS setting, and Delete to remove the selected POS setting. Click OK to save and close
POS Console Setting.
7
Page 8

7. In the POS Mapping dialog box, click OK to accept the settings and Cancel to exit without saving
Input
RS-232 port from POS
Parallel port from POS
Output
RS-232 port to printer
Parallel port to printer
RS-232 port to DVR
RS-485(9600bps~19200bps)
Baud-rate setting
9600, 19200, 57600, 115200 bps
DC IN
DC 5V, 2A
Dimensions
172(W) × 30(H) × 108(D) mm
© 2011 AVer Information Inc. All rights reserved.
the new setting. Click or right-click screen to call out the virtual keyboard to enter the value.
For uppercase, click Caps button. To exit, click Esc.
(1) Name: Enter a name to identify the POS.
(2) Protocol: To select the protocol, click Setting button (see Setup POS Protocol)
(3) Skip first: Set the number of lines you want to be removed
(4) Front Color: Select the POS text color.
(5) Port Setting: Select the Local or Remote port to where it is connected.
Local - select the COM port number which is connected.
Baud Rate – Select the baud rate of the connection port.
(6) Map to Channel: Select to which camera number to display the transaction text.
(7) Text Filter: Enter the word you want to be removed.
Specification
8
 Loading...