

Page 1
AVer CP series
CP654I/CP754I/CP864I
User Manual
Page 2
Federal Communications Commission
NOTE- This equipment has been tested and found to comply with the limits for a Class A digital
device, pursuant to part 15 of the FCC Rules. These limits are designed to pro-vide reasonable
protection against harmful interference when the equipment is operate din a commercial
environment. This equipment generates, uses, and can radiate radiofrequency energy and, if not
installed and used in accordance with the instruction manual, may cause harmful interference to
radio communications. Operation of this equipment in a residential area is likely to cause harmful
interference in which case the user will be required to correct the interference at his own expense.
FCC Caution: Any changes or modifications not expressly approved by the party responsible for
compliance could void the user's authority to operate this equipment.
This device complies with part 15 of the FCC Rules.
Operation is subject to the following two conditions:
(1) This device may not cause harmful interference, and
(2) This device must accept any interference received, including interference that may cause
undesired operation.
This product is herewith confirmed to comply with the requirements set out in the
Council Directives on the Approximation of the laws of the Member States relating to
Electromagnetic Compatibility Directive 2014/30/EU.
Warning - This is a Class A product. In a domestic environment this product may cause radio
interference in which case the user may be required to take adequate measures to correct this
interference.
DISCLAIMER
No warranty or representation, either expressed or implied, is made with respect to the
contents of this documentation, its quality, performance, merchantability, or fitness for a
particular purpose. Information presented in this documentation has been carefully checked
for reliability; however, no responsibility is assumed for inaccuracies. The information
contained in this documentation is subject to change without notice.
In no event will AVer Information Inc. be liable for direct, indirect, special, incidental, or
consequential damages arising out of the use or inability to use this product or
documentation, even if advised of the possibility of such damages.
TRADEMARKS
“AVer” is a trademark owned by AVer Information Inc. Other trademarks used herein for
description purpose only belong to each of their companies.
警告使用者:這是甲類的資訊產品,在居住的環境中使用時,可能會造成射頻干擾,在這種
情況下,使用者會被要求採取某些適當的對策。
COPYRIGHT
© 2017 AVer Information Inc. All rights reserved.
All rights of this object belong to AVer Information Inc. Reproduced or transmitted in any
form or by any means without the prior written permission of AVer Information Inc. is
prohibited. All information or specifications are subject to change without prior notice.
Page 3

The mark of Crossed-out wheeled bin indicates that this product must not be
disposed of with your other household waste. Instead, you need to dispose of
the waste equipment by handing it over to a designated collection point for the
recycling of waste electrical and electronic equipment. For more information
about where to drop off your waste equipment for recycling, please contact
your household waste disposal service or the shop where you purchased the
product.
Page 4

CONTENTS
Introduction ........................................................................................................................ 1
Hardware Introduction ....................................................................................................... 2
Package Contents........................................................................................................... 2
Optional Accessories ...................................................................................................... 2
Front Side ....................................................................................................................... 3
Back Side ........................................................................................................................ 5
Remote Controller ........................................................................................................... 6
RReemmoottee ccoonnttrrooll RReecceeiivveerr rraanngge
e
................................................................................. 7
Wall Mounting Installation ............................................................................................... 8
VVeennttiillaattiioon
n
................................ ................................ ..................................................... 13
Installation......................................................................................................................... 14
Connect to PC .............................................................................................................. 14
Connecting USB Peripherals ........................................................................................ 15
HDMI Connections ........................................................................................................ 15
Install OPS .................................................................................................................... 16
Using AVer CP System ..................................................................................................... 17
Power on ....................................................................................................................... 17
Power Off ...................................................................................................................... 17
Main Screen .................................................................................................................. 18
Toolbar .......................................................................................................................... 20
SSeettttiinnggs
s
......................................................................................................................... 22
AAnnnnoottaattiioonn TTooool
l
............................................................................................................. 25
Whiteboard ................................................................................................................... 26
TTuuttoorriiaal
l
.................................................................................................................... 26
Page 5

NNoottee
Format ............................................................................................................ 27
IImmppoorrtt PPDDF
F
.............................................................................................................. 28
CChhaannggee NNaammee ooff tthhee NNootte
e
....................................................................................... 29
UUssiinngg WWhhiitteebbooaarrd
d
.................................................................................................... 30
Gallery .......................................................................................................................... 47
Snapshot ....................................................................................................................... 54
Using Browser .............................................................................................................. 55
Connect to DocCam...................................................................................................... 56
Connect to WiFi ............................................................................................................ 57
Adjust Date and Time.................................................................................................... 58
OSD Menu Operation ................................................................................................... 59
Specification ..................................................................................................................... 61
Multimedia Supported Formats ..................................................................................... 64
RS-233 Command Table ............................................................................................... 64
Troubleshooting ............................................................................................................... 66
Page 6

Safety Instruction
As a valuable offering better audio and visual experience, this product has considered the
personal safety factors in design and been tested strictly before delivery. However, improper
installation and use may cause electric shock or fire. To ensure its safe use, maintain its
service life and bring its best performance into full play, please read and understand the
operating instructions and nameplates and observe the following safety precautions
carefully before using the product, and keep this Manual properly for future reference.
For your safety, please read the following instruction before you use the product. Serious
injury or property loss may be caused by improper operations. Do not try to repair the
product by your own.
WARNING
Disconnect the product from power supply immediately if major
failures occur.
The major failures include the following:
Smoke, peculiar smell or abnormal sound is discharged from the
product.
No image or sound is displayed, or the image error occurs.
Where the mains plug or an appliance coupler is used as the
disconnect device the disconnect device shall remain readily
operable.
In the preceding scenarios, do not continue to use the product,
disconnect power supply immediately and contact professional staff for
troubleshooting.
The socket-outlet shall be installed near the equipment and shall be
easily accessible.
Do not drop liquid, metal or combustible into the product.
If any liquid or metal is dropped into the product, power off the
product and disconnect power supply, then contact professional staff
for solutions.
Pay attention to the children when they are close to the product.
Do not damage the power cable.
Do not damage, change, wind, bend, heat or drag the power cable
forcibly.
Page 7
WARNING
Do not put weights (such as the product itself) on the power cable.
Do not drag the cable forcibly when you pull out the power plug. If the
power cable is damaged, please contact the local distributor to repair
or replace it.
The power cable in the accessory box is for this product only. Don't
use it on other devices.
Put the product on a stable surface.
An unstable surface includes and does not limit to an inclined plane, a
shaky stand, desk or platform, which might cause the turnover and
damage.
Use the battery correctly.
Galvanic corrosion, electric leakage and even fire may be caused by
improper battery usage.
It is recommended to use the designated type of battery and install
the battery by correct electrodes (positive and negative electrodes).
Do not install and use new battery together with the used one.
Take out the battery if the remote control is not used for a long period.
Do not expose the battery under overheated environments such as
sunlight and firing.
Dump the used battery based on local regulations.
Do not open the cover or change the product by your own.
High voltage components are installed in the product. When you open
the cover, high voltage, electric shock or other dangerous situations may
occur. If inspection, adjustment or maintenance is required, contact the
local distributor for help.
Use the specified power supply.
Do not use any types of power cables other than the one provided
with the product to prevent the product from being damaged.
Use a three-wire socket and ensure that it is properly grounded.
Pull out the power plug from the socket if the product is not used for a
long period.
Page 8
WARNING
Before you move the product, disconnect all external connections
and separate all toppling preventing devices.
Move the product carefully to prevent it from being hit or squeezed,
especially the screen, which may cause injury if broken.
Clean the dust and metal on the power plug regularly.
When you are cleaning, fire or electric shock may be caused if the
product is powered on.
Keep in mind to pull out the power plug before cleaning it by using a
dried cloth.
Do not put items on the top of the product.
Do not put items, such as a container for liquid (a vase, flowerpot,
cosmetics or liquid medicine), on the top of the product.
If any water or liquid is spilled on the product, short circuit may occur
and cause fire or electric shock.
Do not tread on the product or hang any items on the product.
Do not install the product in an improper place.
Do not install the product in humid places, such as the bathroom, the
shower room, the place near windows or outdoor environments
where experience rain, snow or other harsh weather. The product
installation is also required to avoid a place around by hot spring
vapor. The preceding environments may cause faults or electric
shock under extreme conditions.
Do not put exposed fire source, such as an ignited candle, on the
product.
Pull out the power plug during thunderstorms.
Do not touch the product when lighting to avoid electric shock.
Install or place components which power supply voltage is high
enough to cause personal injury in places out of the reach of children.
Do not cover or block up any vents on the product.
The overheated components may cause fire, damage the product
and shorten the service life.
Page 9
WARNING
Do not put the venting surface of the product facedown.
Do not install the product on a carpet or bed clothes.
Do not use a cloth such as table cloth to cover the product.
Do not touch the power cable with wet hands to avoid electric shock.
Altitude during operation (m): less than 5000m
CAUTION
Do not install the product in high temperature environments.
Do not install the product near heat source, such as the radiator, the
heat reservoir, the stove or other heating devices.
Do not expose the product under sunlight, which may cause high
temperature and subsequent faults in the product.
For transport:
Pack the product for mobility or maintenance by using the cartons
and cushioning material provided with the product.
Vertically move the product during transport. The screen or other
components are easily broken if the product is moved by an
improper way.
Keep away from the product when you use a radio.
The product design to prevent radio interference complies with the
international EMI standard. However, the interference still exists and
causes noise in the radio.
If noise occurs in the radio, try the following solutions.
Adjust the direction of the radio antenna to avoid the interference
from the product.
Keep the radio away from the product.
Page 10

CAUTION
Advice for watching:
Use the product in an environment with comfortable light. It is
harmful to your eyes to watch in a too bright or too dark environment.
Relax your eyes after a period of time for watching.
When you are watching, the distance which is 3 to 7 times of the
display height should be kept, and it is the best distance to protect
eyes and prevent eyestrain.
Adjust the volume to an appropriate level, especially at night.
Use amplifier equipment as the audio input source with caution. If
you must use amplifier equipment, the input power should not
exceed the maximum of speaker power. Otherwise, problems occur,
such as the speaker is overpowered and damaged.
Notice
The technical specifications provided in this Manual and on the carton are subject to
change without further notice. If there is any difference between this Manual and any
actual operation, such actual operation shall prevail.
Page 11

1
Introduction
Thank you for choosing our interactive display. As our latest independently developed and
produced human-machine interactive product, the interactive display is a multi-functional
display for interactive teaching, digital demonstration, multi-media presentation, touch
operations and handwriting. They are well designed and produced to meet the needs of
education and corporate applications, and provide a user-friendly experience, digital
intelligent control as an ideal equipment for schools and companies. You can use your
fingers or opaque objects to write, edit and delete any things on the screen.
The product features are as follows:
Run on Android 5.0.1 operating system with unique UI design, offering you more
convenient operations and better visual experience.
Support convenient operation through a mouse and keyboard with USB port, just like a
computer.
Built-in large-capacity memory and large-capacity buffer, running 4K movies.
High-quality LCD screen featured by flicker free, low radiation, high brightness, high
contrast, large view angle and short response time, greatly reducing the ghosting of fast
moving images and eye fatigue.
De-interlaced image processing and industry-leading motion compensation technology,
improving the jagged and blurred edges of moving images thoroughly.
Dynamic contrast technology, significantly improving image definition and contrast.
Multiple USB ports, supporting HD streaming media function.
Ultrathin body and ultra-narrow edges.
Page 12
2
Hardware Introduction
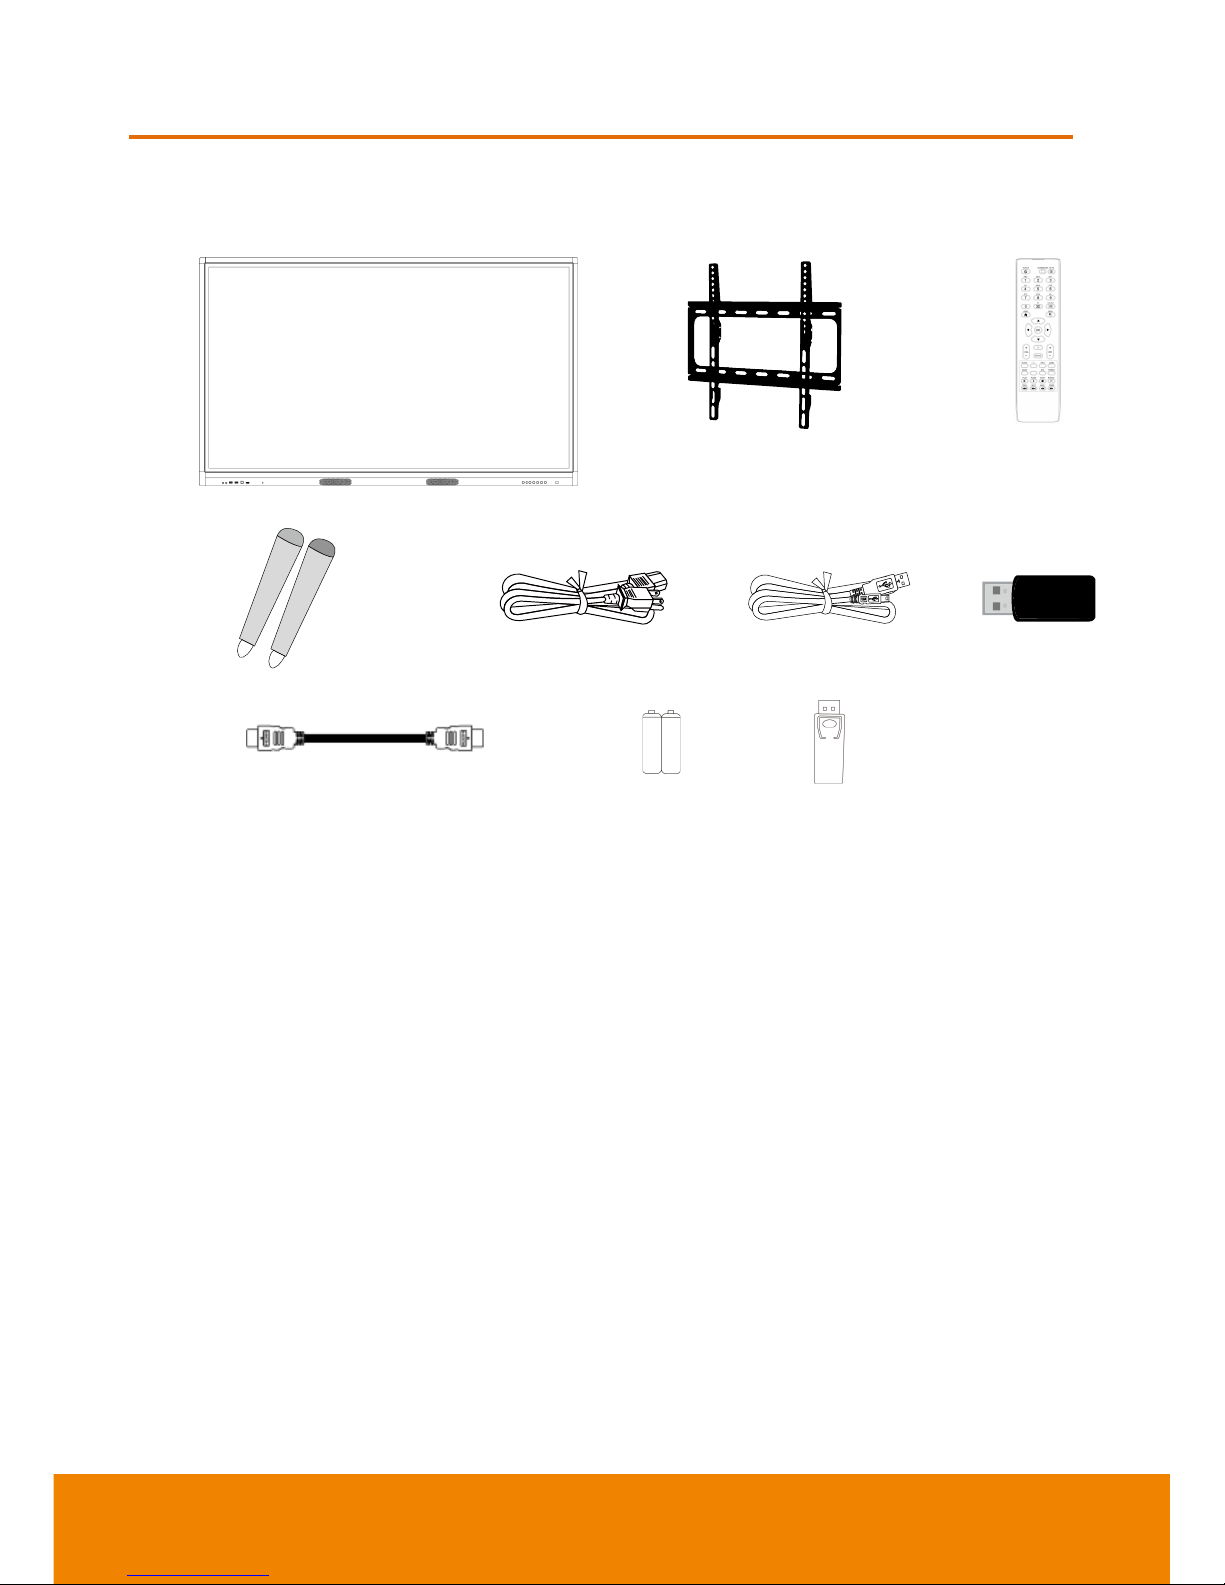
Package Contents
1 2 3
4 5 6 7
8 9 10
1. AVer CP series (65”, 75”, 86”)
2. Wall mount
3. Remote Controller
4. Stylus pen x 2
5. Power cable
6. USB cable
7. WiFi dongle (For US only)
8. HDMI cable
9. AAA battery x 2
10. DP to HDMI port converter
Optional Accessories
Floor Stand
OPS
Page 13

3
Front Side
Item
Description
1
Power on/off
2
Press to show the OSD(On Screen Display) menu (Non Android
screen)
3
VOL +/VOL - button; select or adjust menu options
4
Select or adjust menu options
5
Gesture control on/off (Long press > 2s to activate/inactivate)
6
Indicator and remote receiver
7
AC power On/Off switch
Page 14
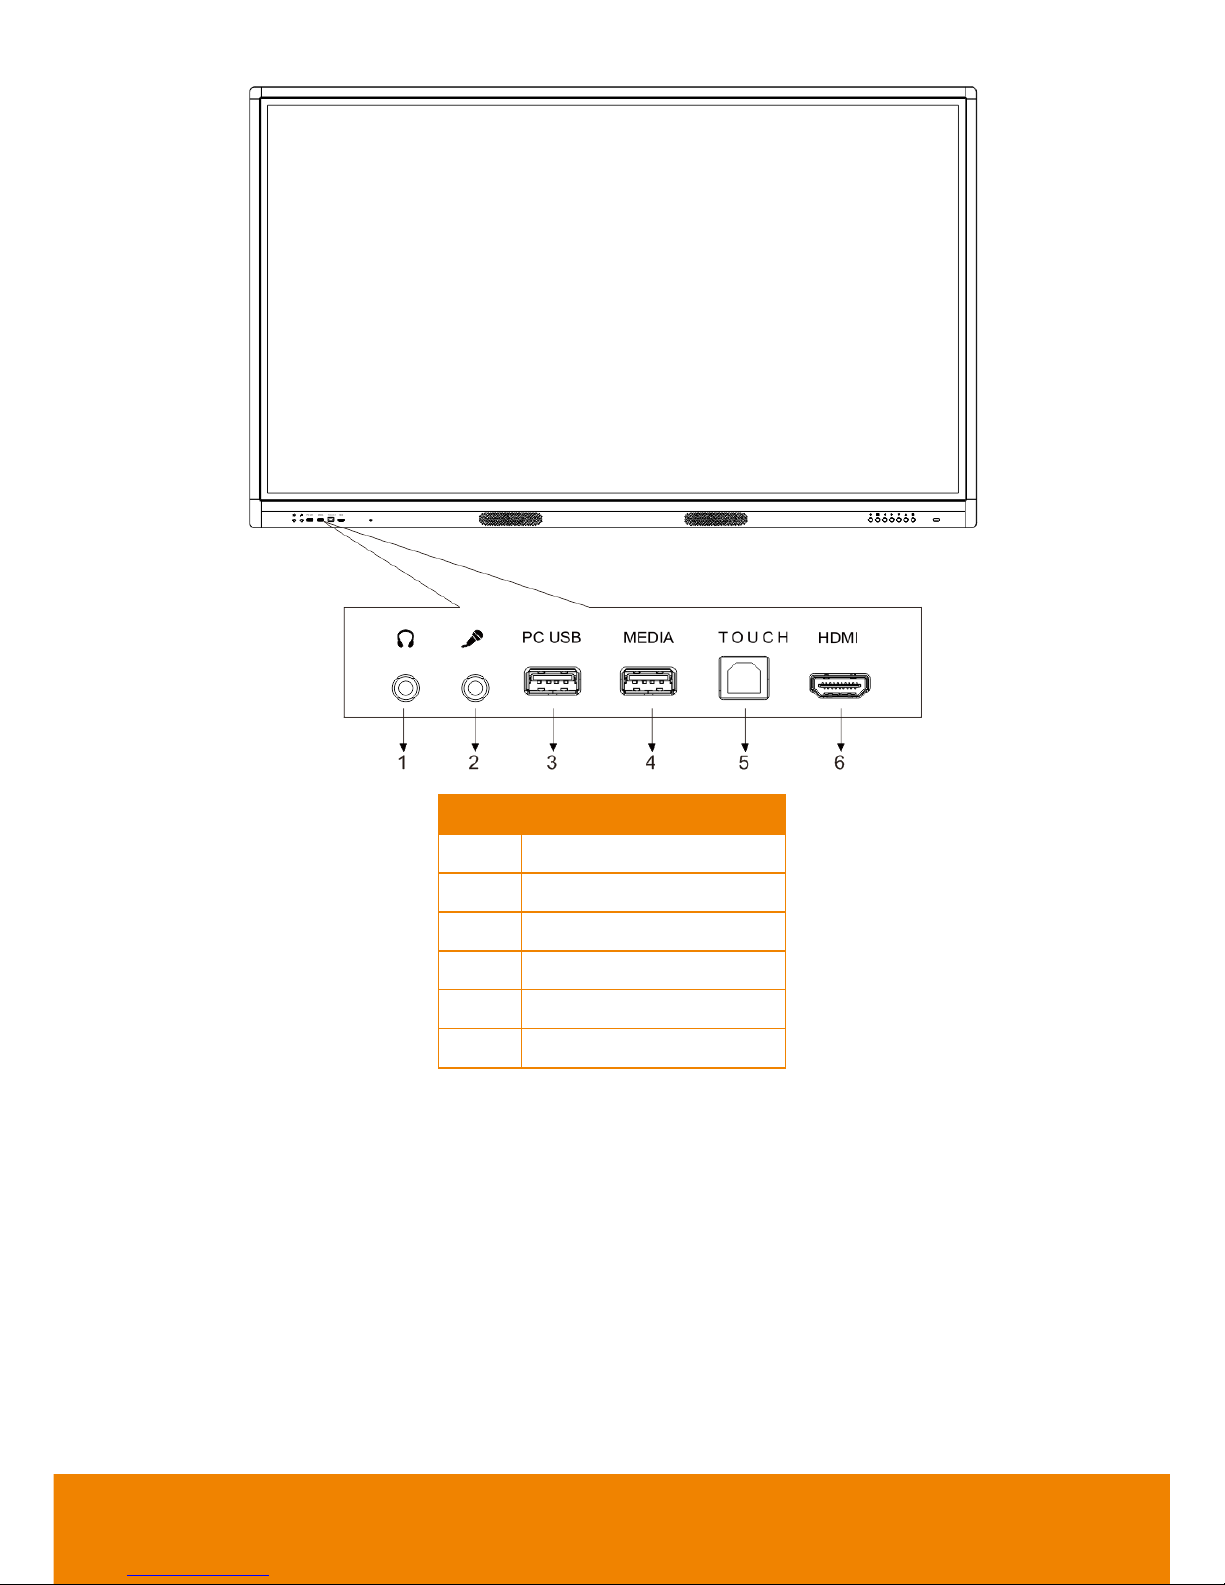
4
Item
Description
1
Headset port
2
MIC IN port
3
OPS-USB port
4
Android-USB port
5
TOUCH-USB port
6
HDMI IN port
Page 15
5
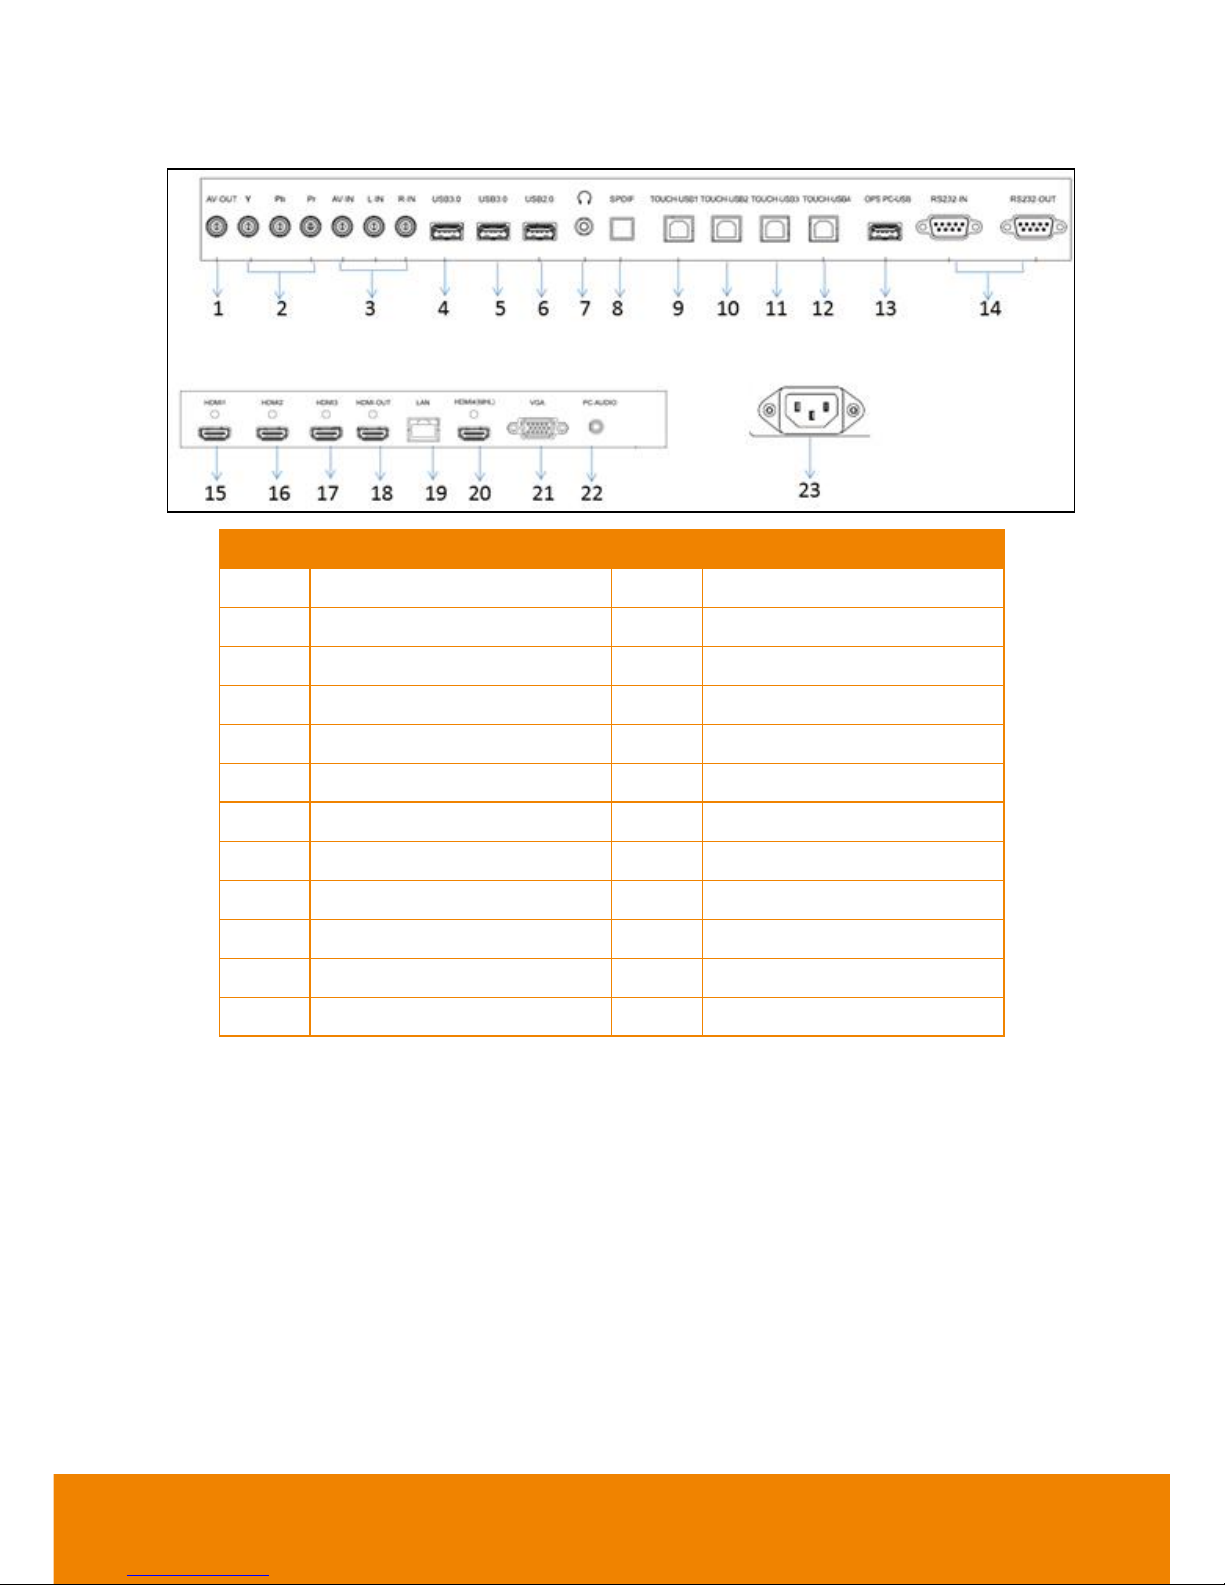
Back Side
Item
Description
Item
Description
1
AV-OUT port
13
OPS-USB port
2
YPbPr IN ports
14*
RS232 IN/OUT port
3
AV-IN port
15
HDMI1 IN port
4
Android-USB port 3.0
16
HDMI2 IN port
5
Android -USB port 3.0
17
HDMI3 IN port
6
Android -USB port 2.0
18
HDMI 1/2/3 OUT port
7
Headset port
19
LAN port
8
SPDIF OUT port
20
HDMI4-IN port
9
TOUCH-USB1 port
21
VGA-IN port
10
TOUCH-USB2 port
22
VGA-AUDIO IN port
11
TOUCH-USB3 port
23
POWER port
12
TOUCH-USB4 port
*The RS232 In/Out ports are in different position on CP654I unit.
Page 16
6
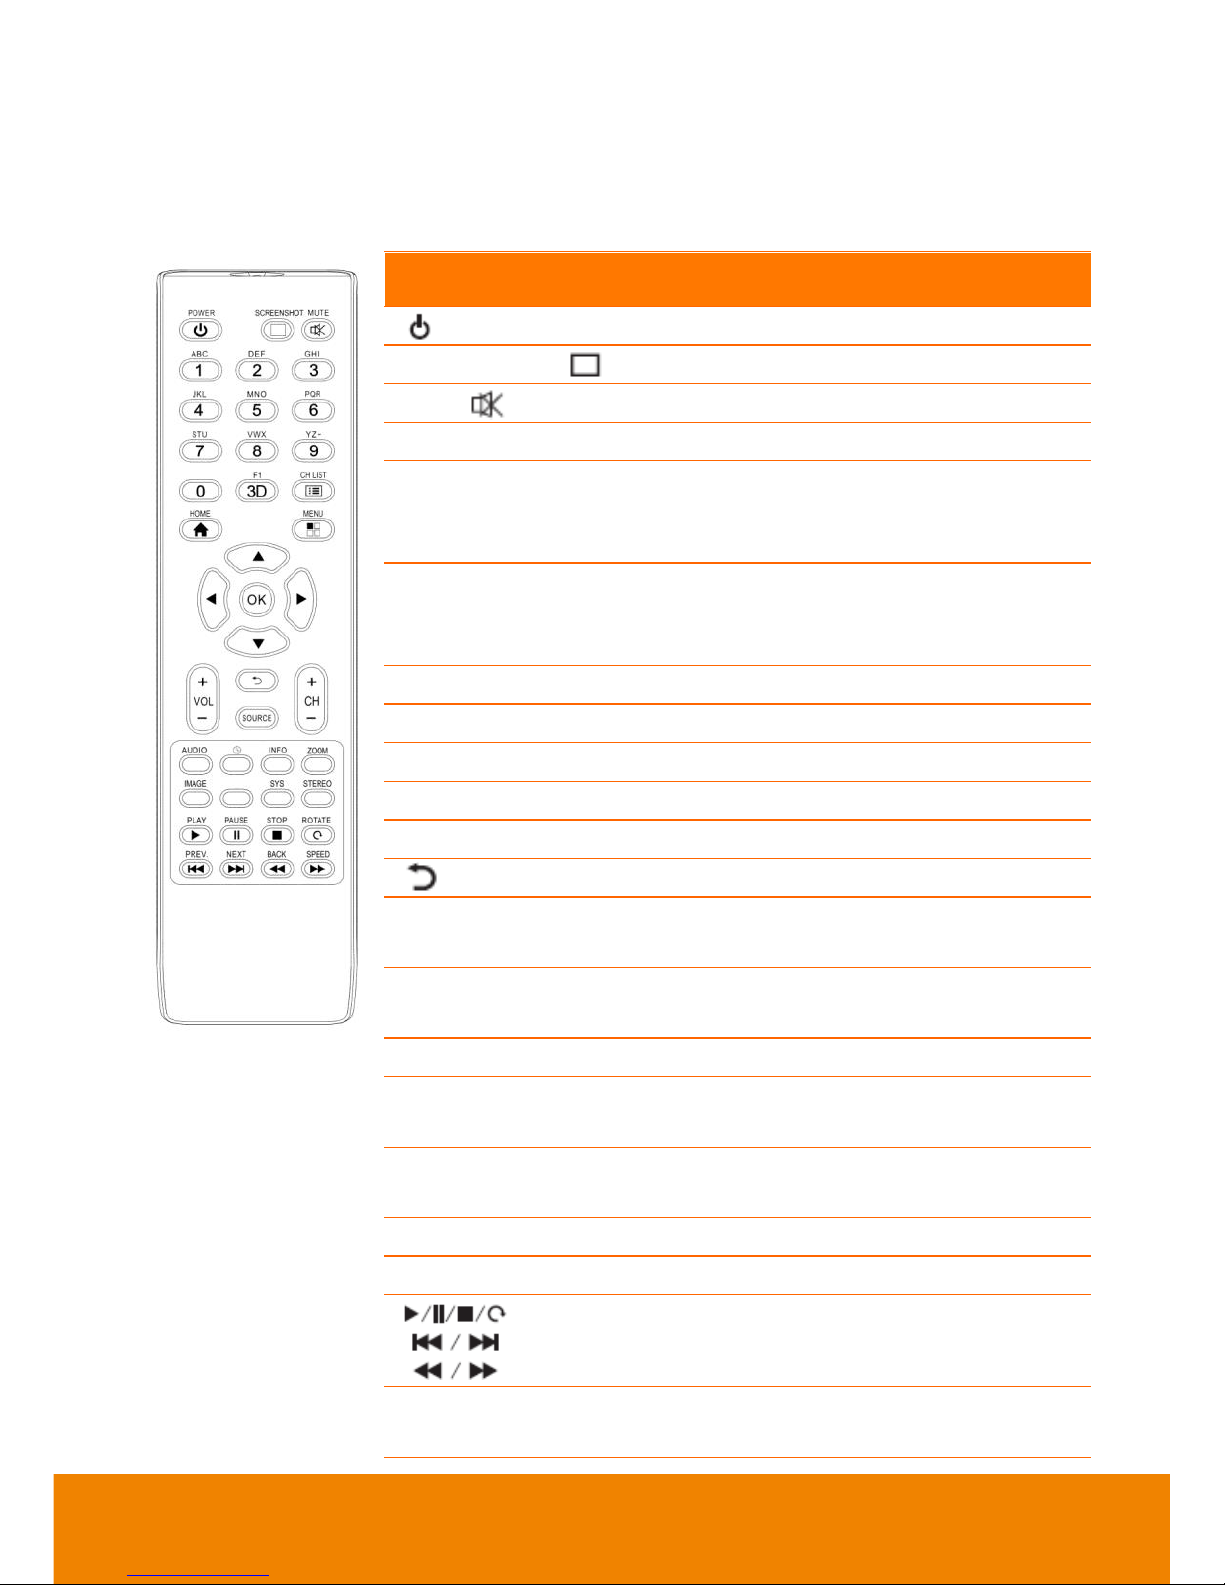
Remote Controller
Install Batteries before using remote controller.
Aim the remote control at the remote receiver when using the remote control. Any object
placed between the remote control and the remote receiver may disturb normal operation.
Name
Descriptions
Power on/off
SCREENSHOT
Take screenshot.
MUTE
Enable or disable sound.
NUMERIC KEYS
Input any number.
F1(FREEZE)
Enable or disable freeze function in the
system (Only works in non-Android
mode)
CH LIST
Allow backspace when input
characters/view TV channel list (No used
currently)
HOME
Jump back to Android Home
MENU
Display the on screen menu.
▲/▼//
Select or adjust menu options.
OK
Confirm the operation.
VOL +/-
Adjust volume.
Return to the previous setting interface.
SOURCE
Display the source selection menu (Valid
only in TV mode).
CH +/-
Turn channel up/down. (No used
currently)
AUDIO
Select the sound mode.
SLEEP
Set the sleep time and auto standby when
the specified time is reached.
ZOOM
Switch the channel display ratio on the
screen.
IMAGE
Select the picture mode of the product.
SYS
Only for switching TV system.
For operation of multimedia functions in
the intelligent platform.
INFO
Display the content information of the
input source.
Page 17
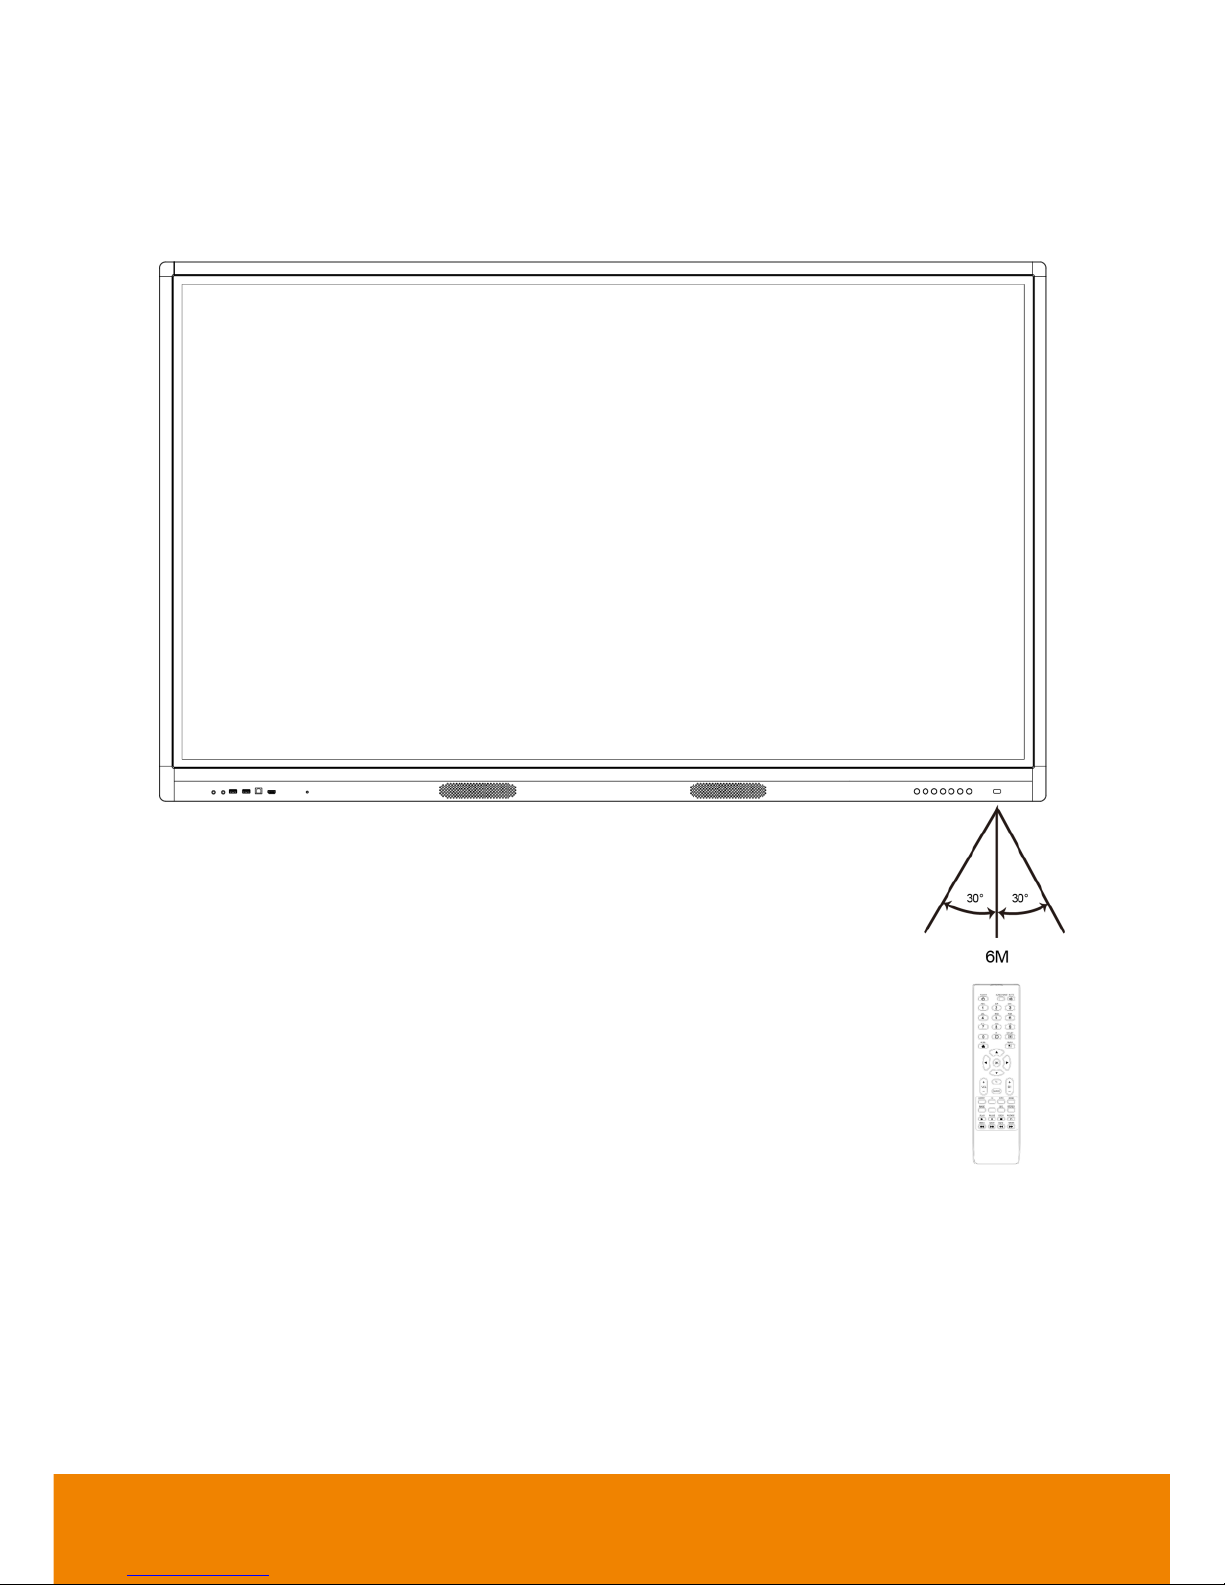
7
RReemmoottee ccoonnttrrooll RReecceeiivveerr rraanngge
e
The effective area of the remote controller is the vertical distance within 6 meters in front of
the product and the area within an angle of 30 degrees from the vertical point to the left and
the right.
[Note] To avoid probable faults, please read the following instructions and use the remote
controller properly.
Do not drop or beat the remote controller.
Do not spill water or other liquid on the remote controller.
Do not put the remote controller on wet items.
Do not expose the remote controller under sunlight or put it near overheated source.
Page 18

8
Wall Mounting Installation
Safety tips for installation
1. At least 2 professional installers should on site when installing the wall mounting bracket
and the IFP. To prevent injury and damage to the wall and device, user should not
perform the installation without professional guidance.
2. The installation position should be on the wall that can bear the weight of the IFP and
bracket, and measures should be taken to calculate the effects of other external forces.
3. To avoid accidental damage to the device and human safety, please install the bracket in
a place which avoids the contact of children.
4. When the installed screws become loose, please turn off the device and unplug the
power cord for further check.
5. The bracket should be installed on a vertical flat surface.
6. For the best working performance, these places should be avoided: strong electric field,
strong magnetic field and potential leakage of inflammable gas.
7. For the best panel viewing, the bracket should be installed in the place where the direct
intense light and reversed light situations should be avoided.
8. In case of fire, please avoid the places as described below: heavy soot, windy and dusty
place, intense humidity and intense heat.
9. During installation, please make sure connection between the screws and bracket are
secured firmly.
10. This instruction should be strictly followed. The manufacturer isn’t responsible for any
damages and lost caused by inappropriate installation and operation.
List of Wall-mounting bracket
1. Wall-mounting bracket (installed onto the wall), you just need to do this step.
2. 4 pieces of M8 (M6) screws (already attached to the IFP) 12 pieces of M4X6MM B-head
screws.)
Installation tools needed
Churn (impact) drill, pencil, screwdriver, hammer, wrench, grinder (polisher).
Page 19
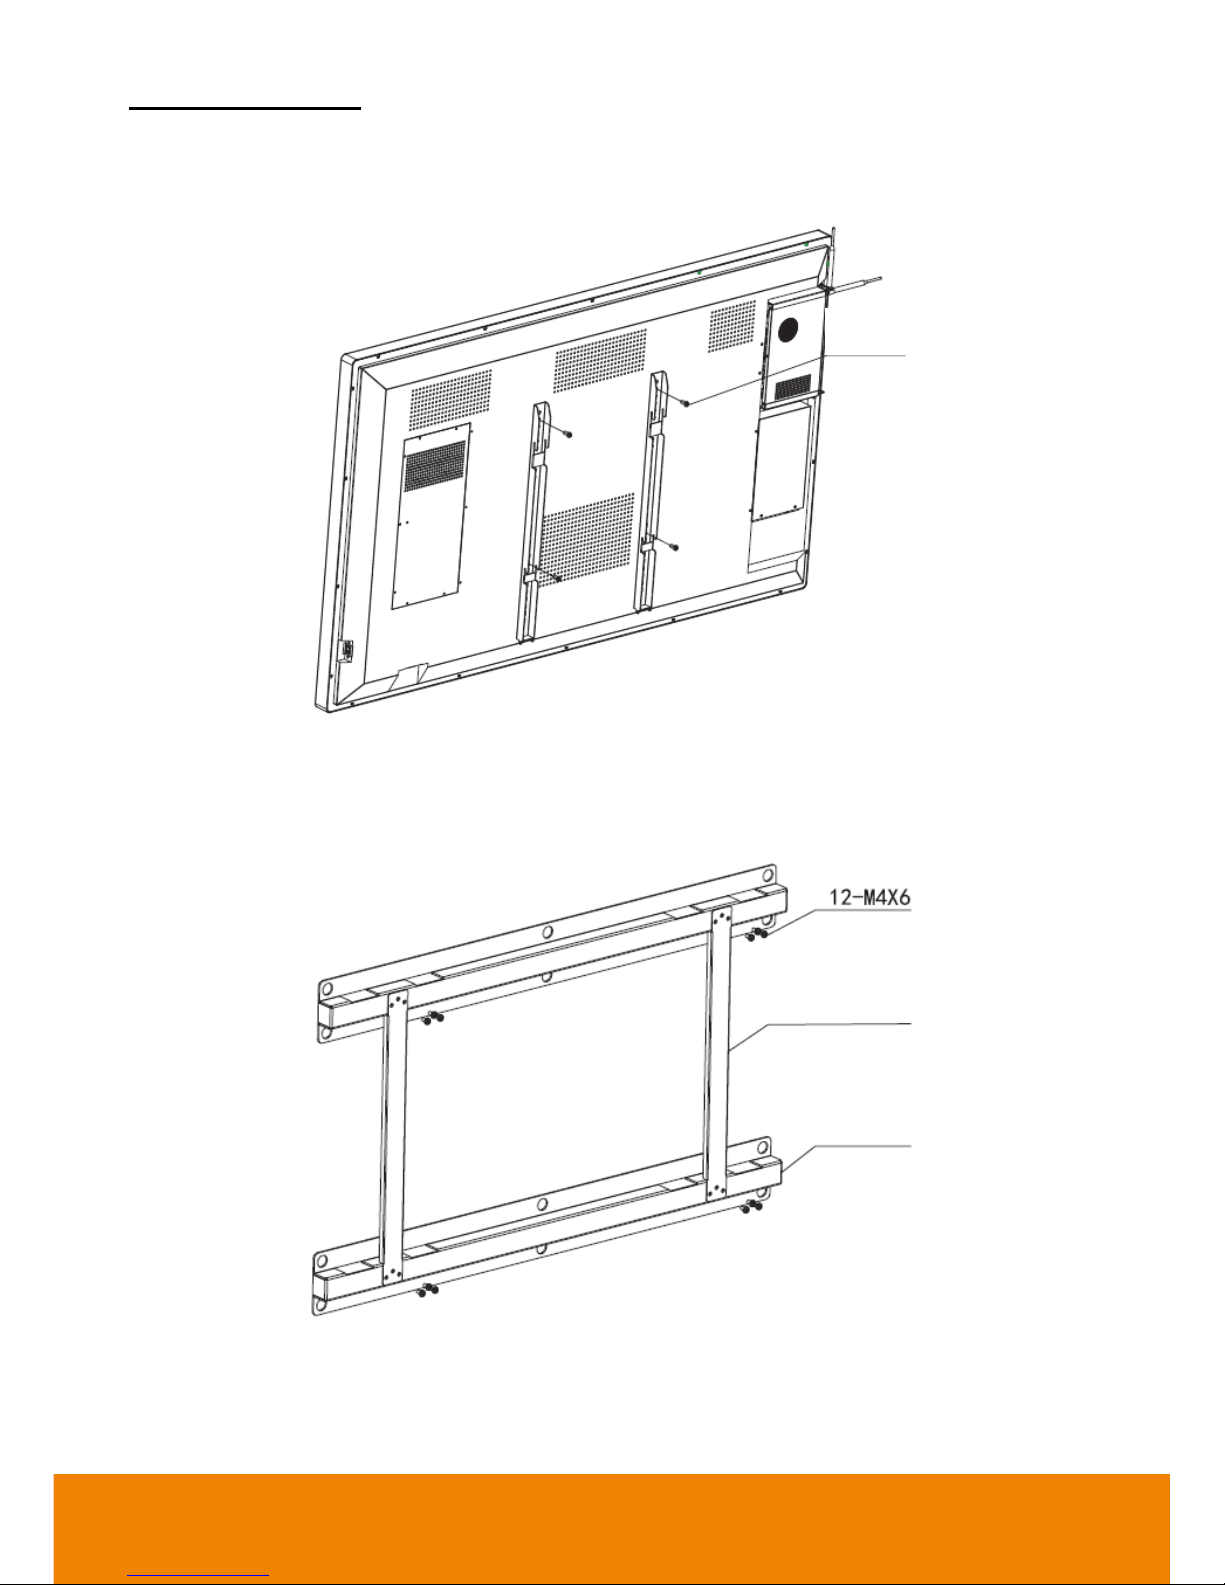
9
Installation methods
1. As shown below: Lock the hanging bracket to the corresponding VESA holes of IFP, with
4 pieces of M8 (M6) screws.
2. As shown below: Lock the connection bracket and wall-mounting bracket together with
12 pieces of M4X6 B-head screws.
Connection bracket
Wall mounting bracket
4-M8(M6) screws
Page 20
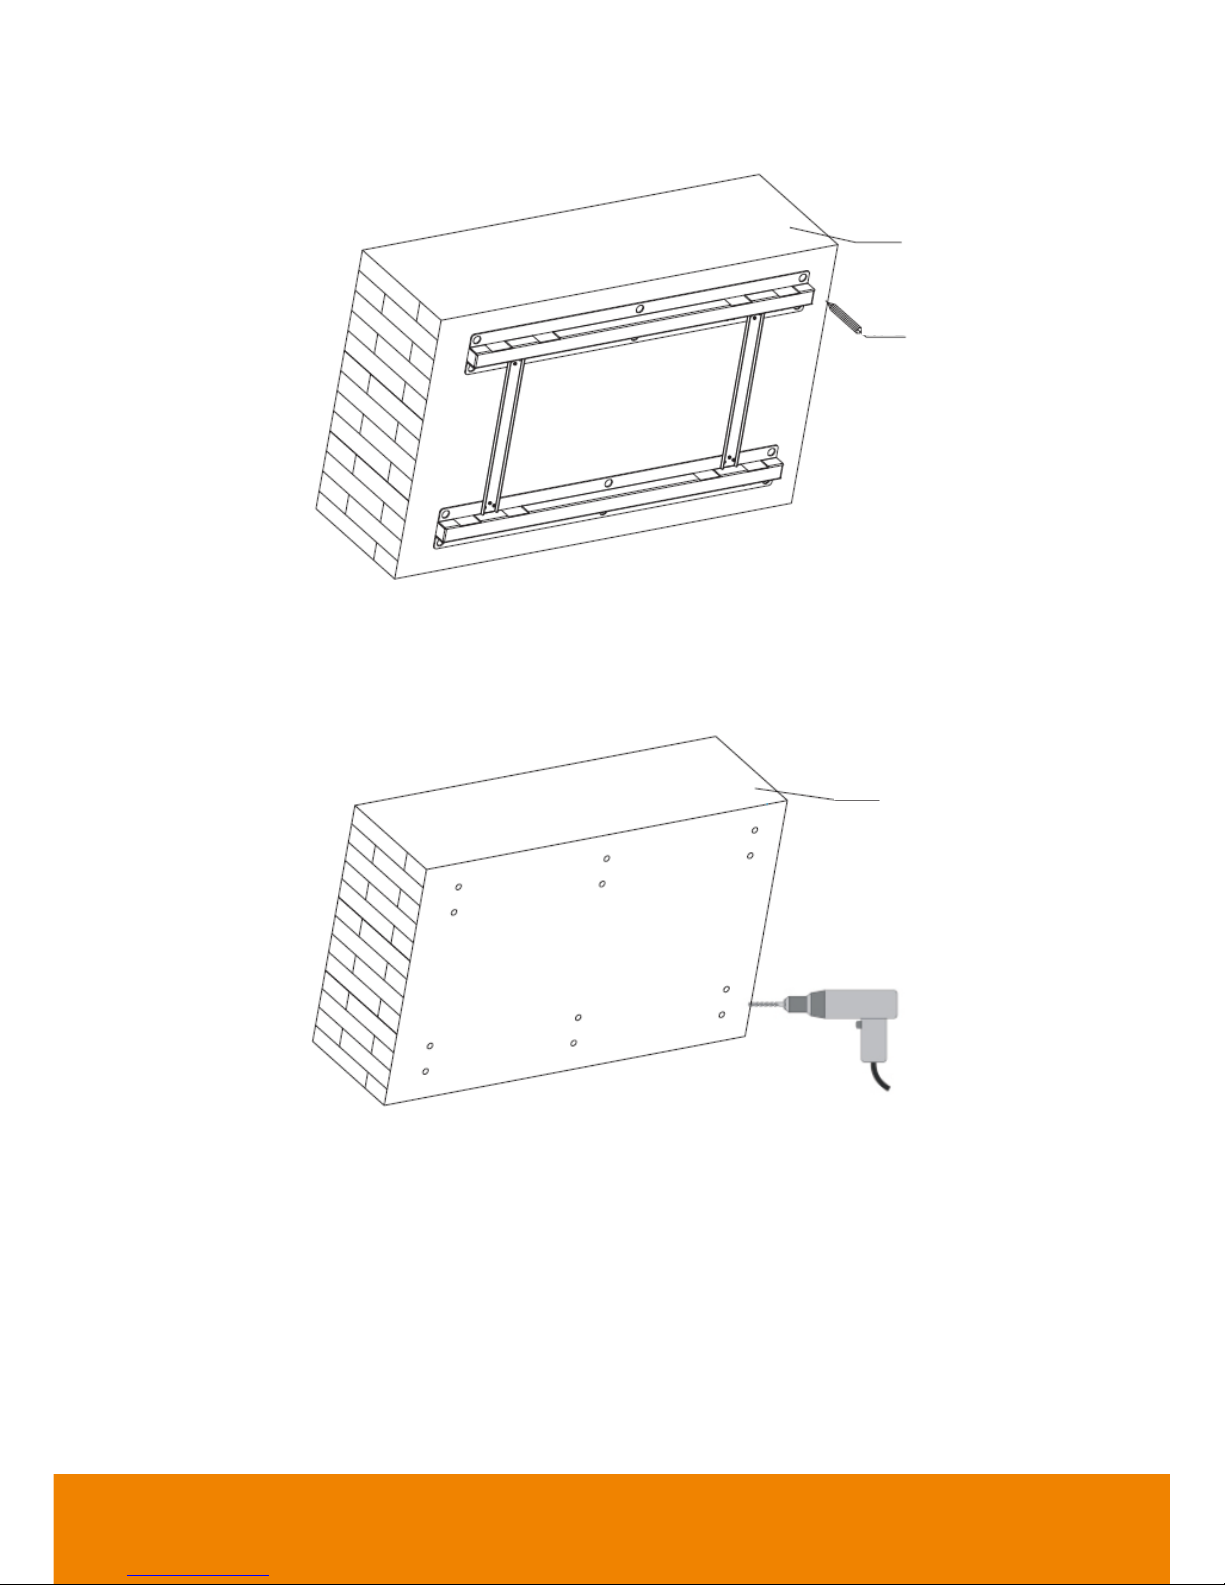
10
3. Pictured below: put the combined wall mounting bracket on the suitable wall, use the
pencil to mark the right hole for expansion screws (12 holes):
4. Picture shown as below: Use churn (impact) drill to drill 12 holes on the wall according to
the position marked by pencil in Step 3. The diameter and depth should be chosen
according to the spec. and the type of the expansion screws used in the wall.
Wall
Wall
Impact drill
Pencil
Page 21
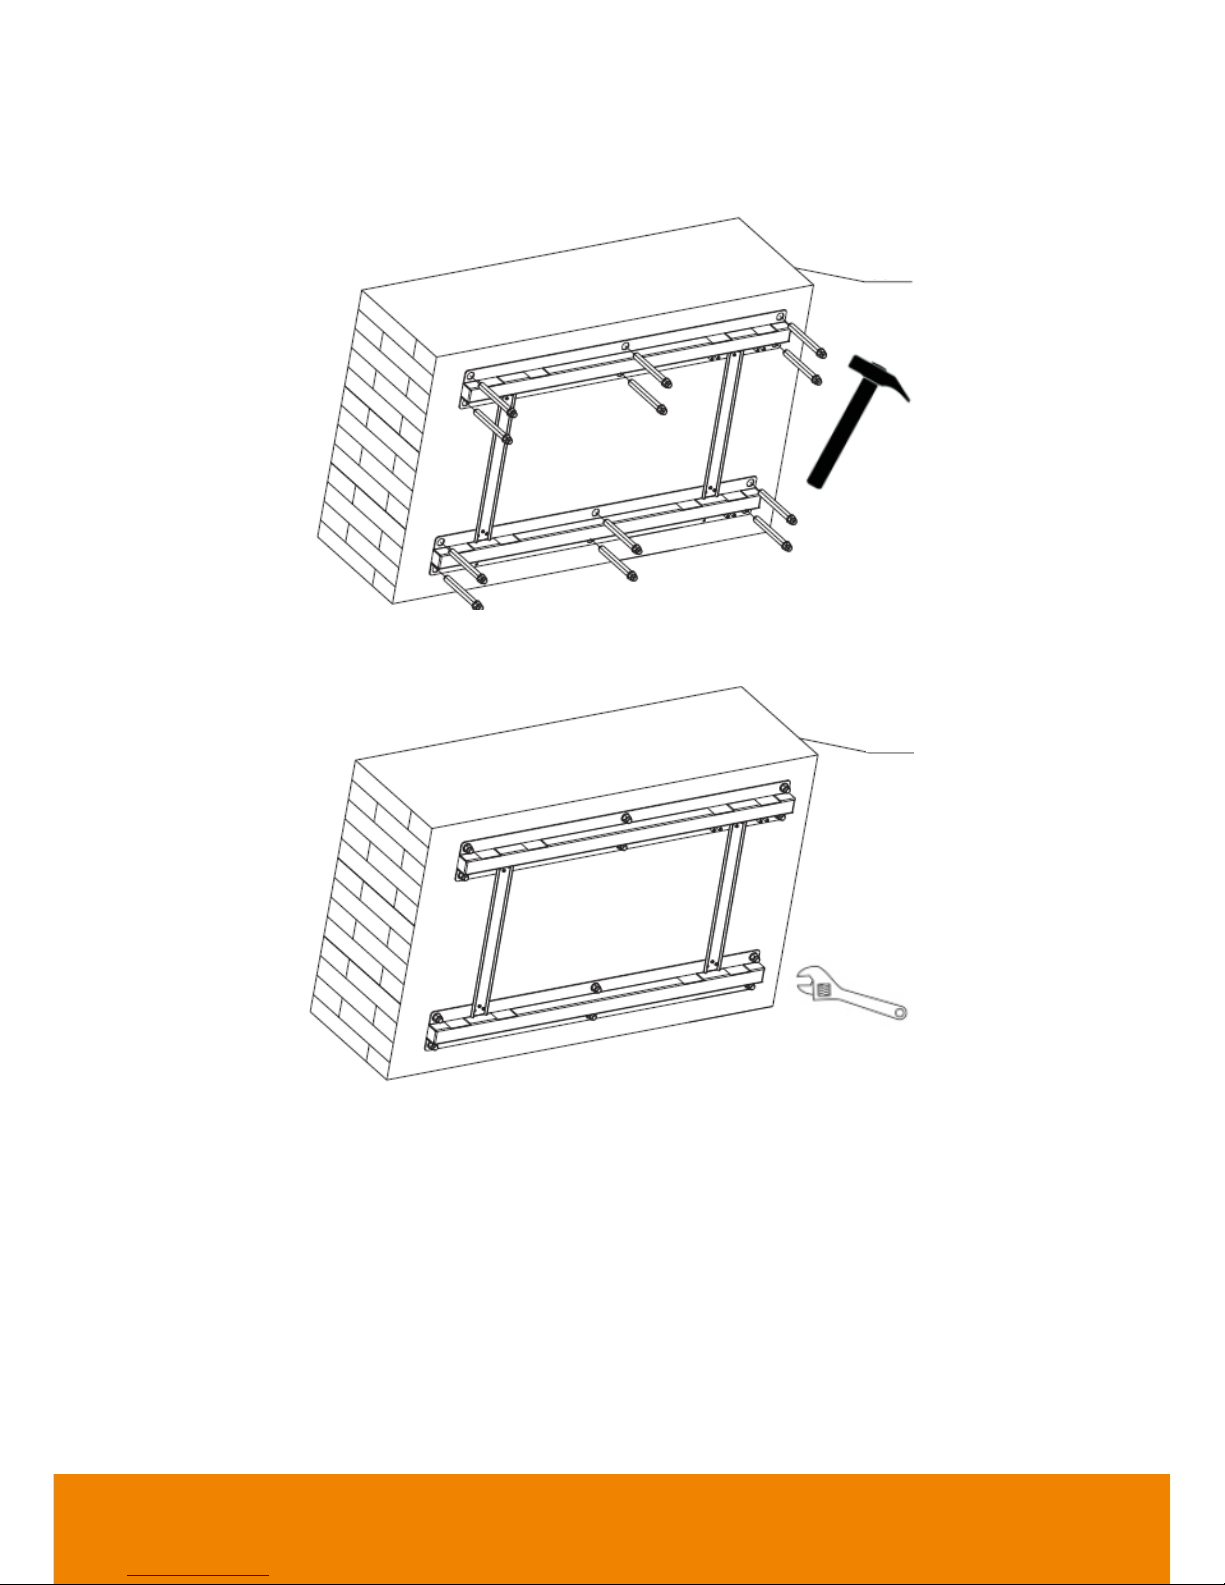
11
5. Use a hammer to drive the 12 pieces of expansion screws into the wall. The client
should choose the right specification of the expansion screws (you just need to prepare
these screws in the whole process) according to the wall type.
6. Use the wrench to tighten the nuts of the expansion screws.
Wall
Wall
Page 22
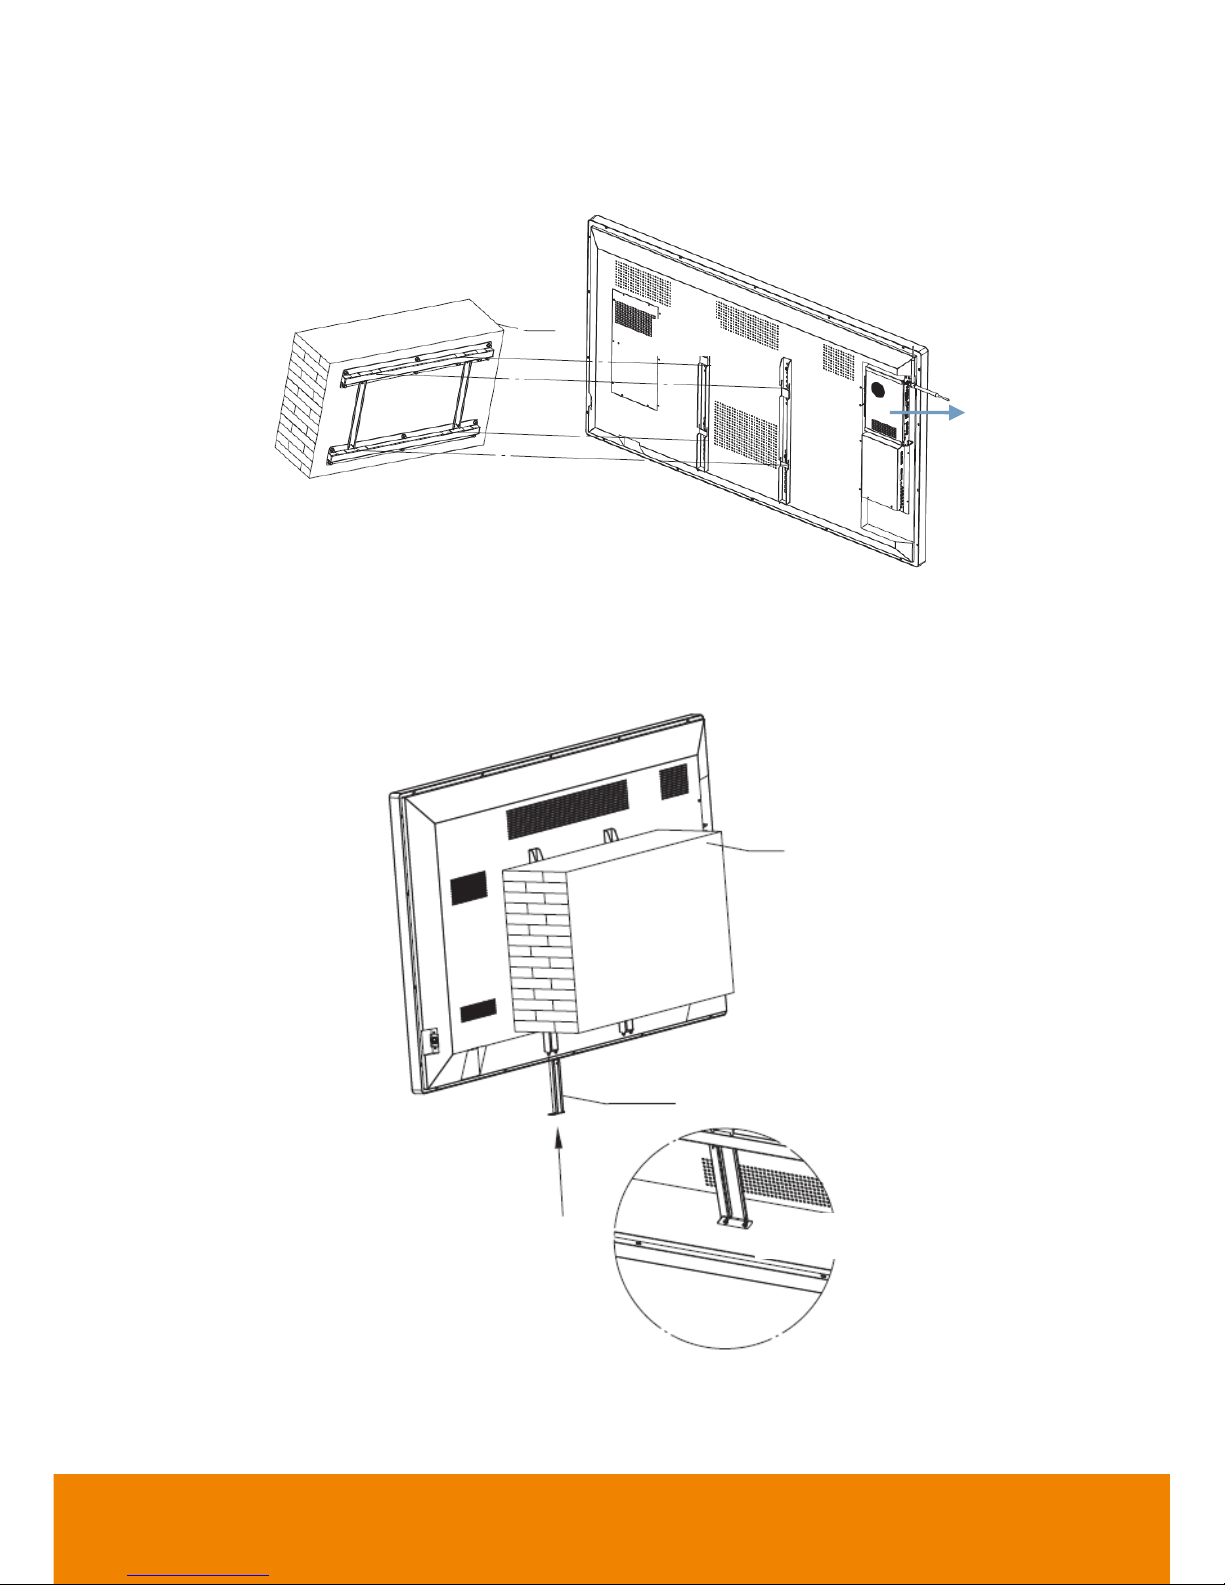
12
7. Verify the specification (length * width, mm) of the hanging bracket on the IFP, then put
the IFP onto the corresponding hole on the wall mounting bracket. (400*400, mm or
600*600, mm, 2 types optional, you need to verify!)
8. As pictured below, push the anti-theft bracket (in the accessory bag) into the
corresponding hole which is at the bottom of the IFP. Use the screws to lock the
anti-theft bracket in place.
Anti-theft bracket in the right position
Wall
Wall
Anti-theft bracket
OPS PC
Page 23
13
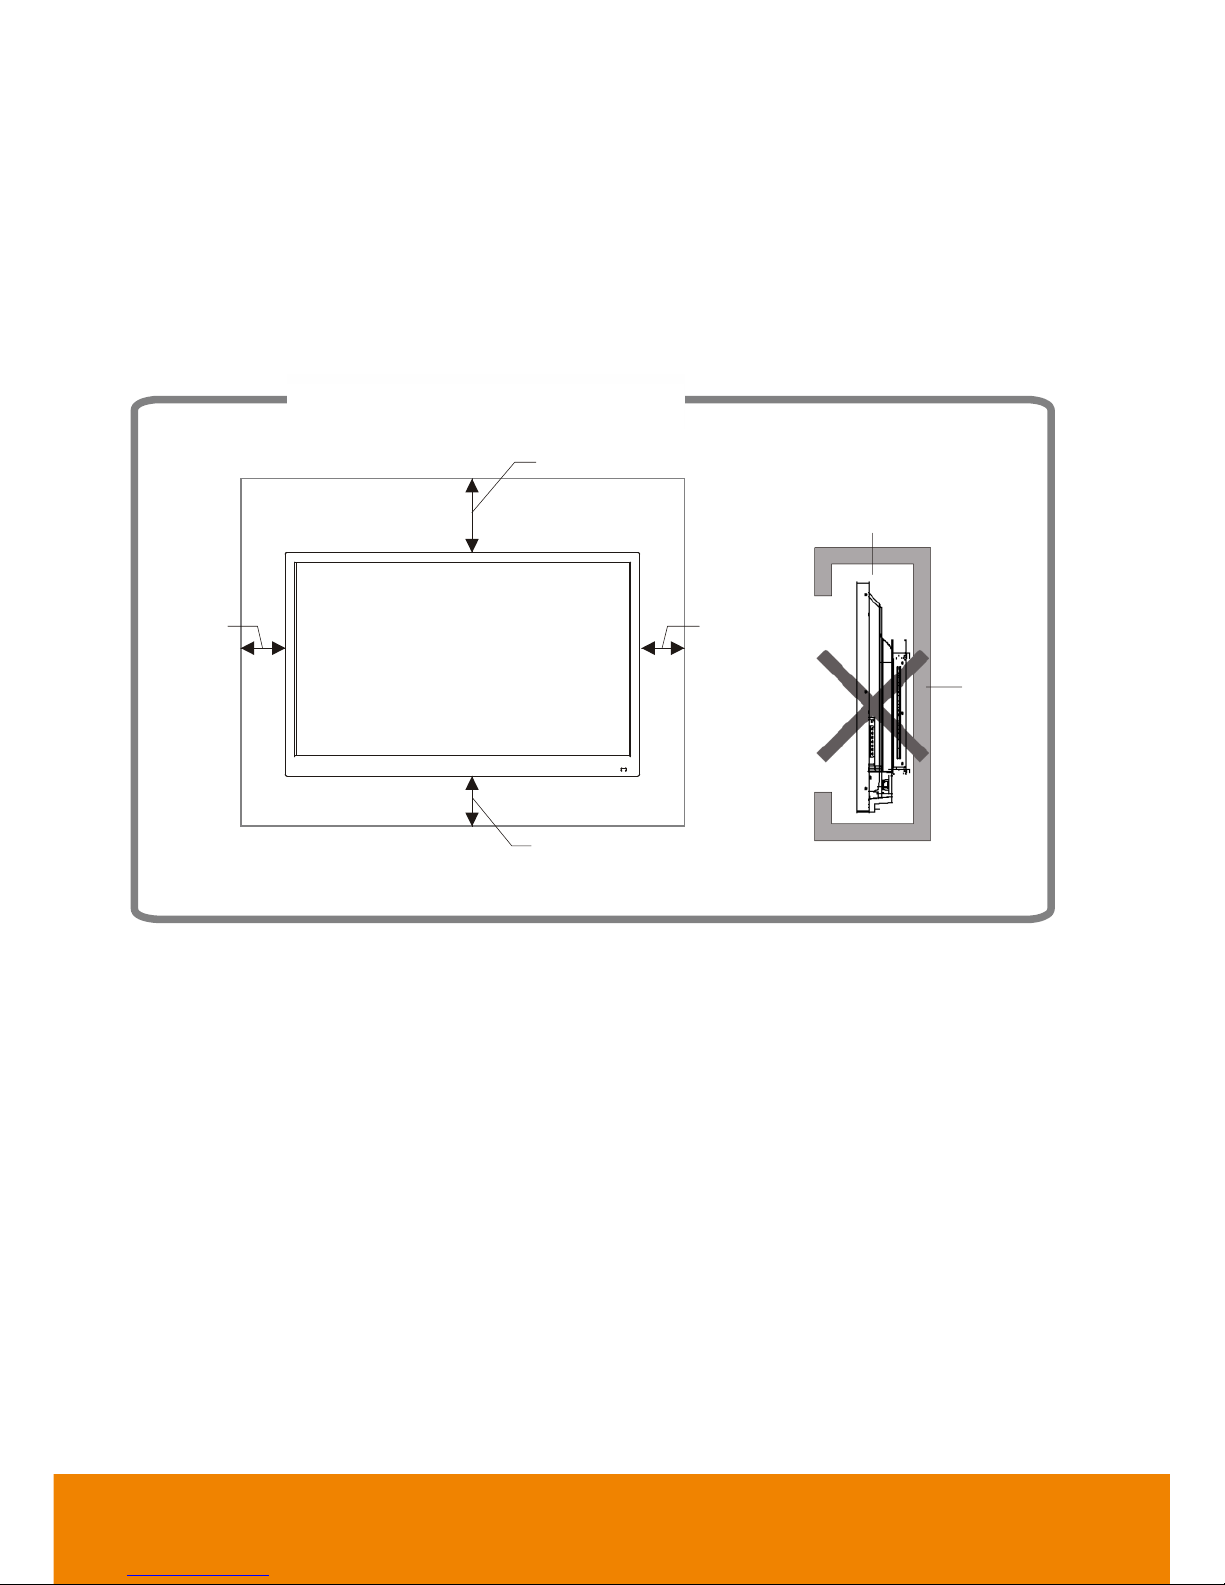
VVeennttiillaattiioonn
Keep clearances around the product according to the minimum dimensions shown in the
picture.
Never cover the ventilation holes or insert any object into the housing.
Do not place the product in a confined space such as bookcase or imbedded closet unless
appropriate ventilation conditions are provided. There should be adequate clearances
around the product to ensure good ventilation.
Mounted on the wall
Impede air circulation
30cm
10cm
10cm
10cm
Wall
Page 24
14
Installation
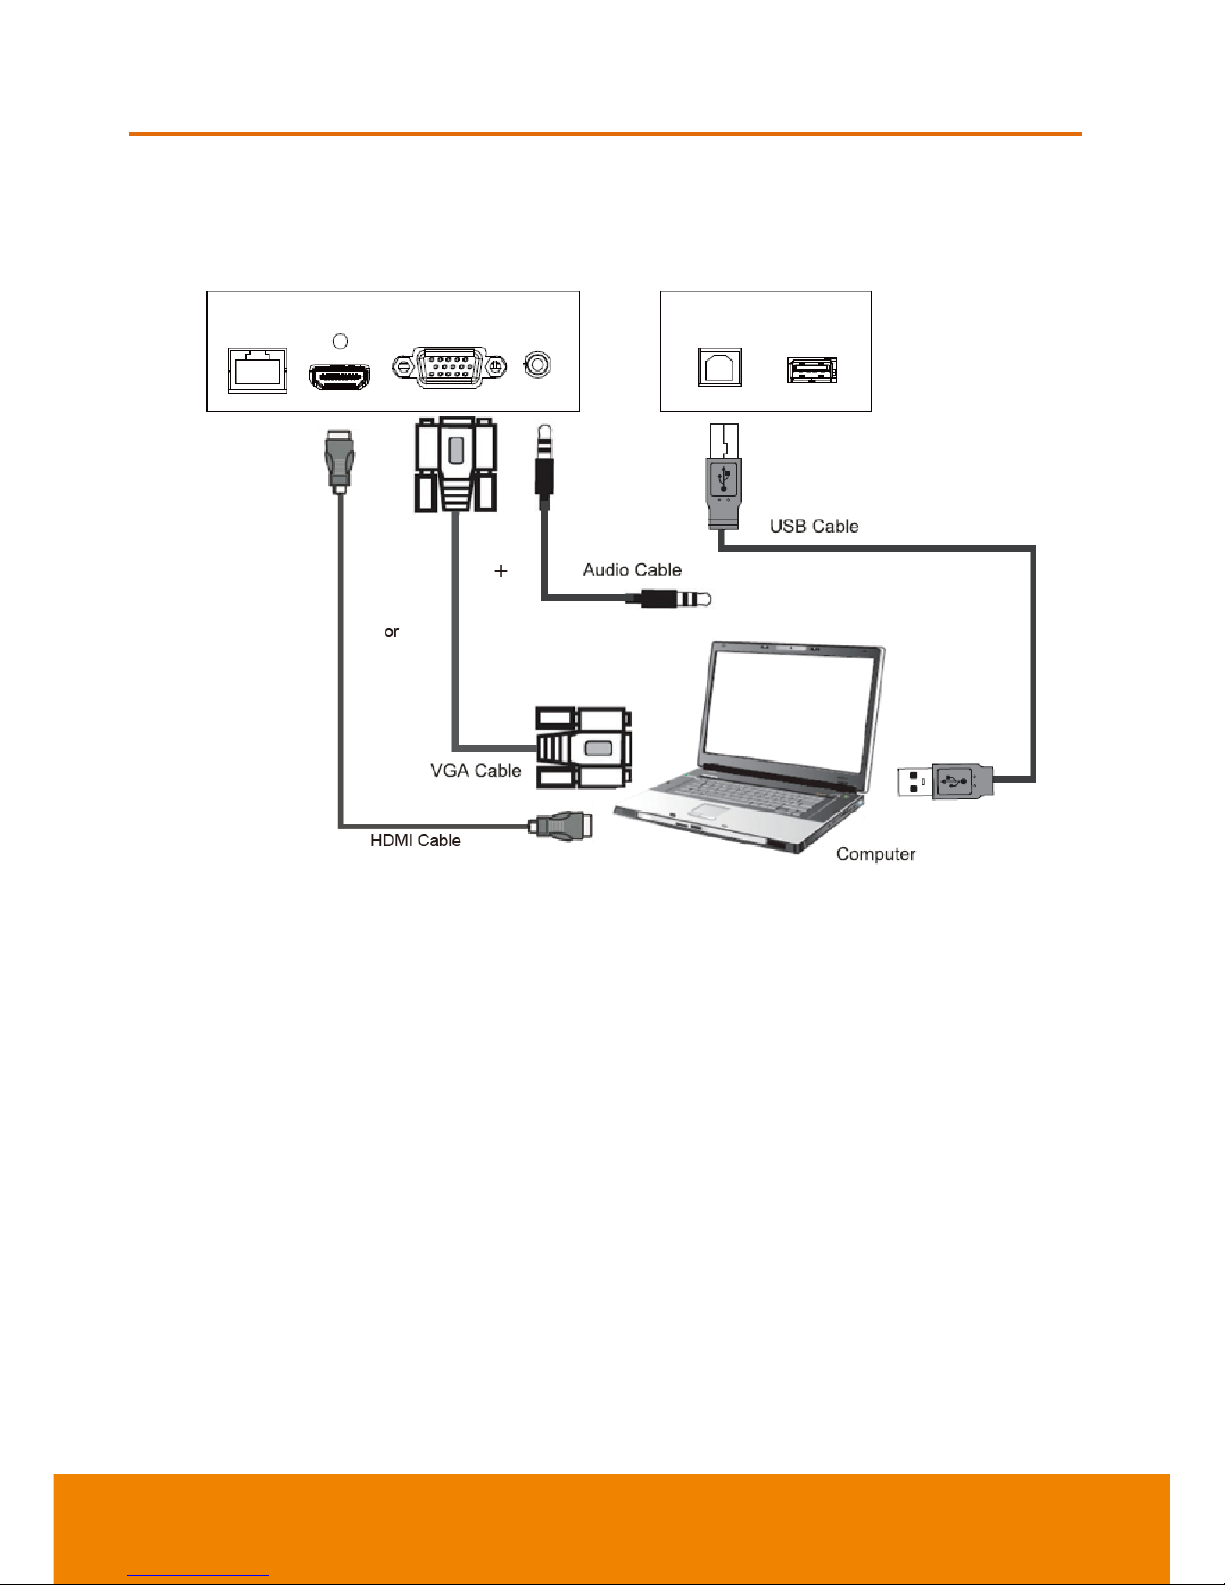
Connect to PC
[Note] Disconnect the power plug before installing or removing the product.
[Remark] Either connects the HDMI cable (or VGA + Audio cable) from the external computer.
Touch-USB4 PC-USB
LAN HDMI(CEC)
VGA VGA-AUDIO
Page 25

15
Connecting USB Peripherals
1. WiFi Adapter (& other supported USB devices): Plug into USB IN port.
2. Networking and modem cables: Plug the router cable into the LAN port.
HDMI Connections
Page 26

16
Install OPS
Slide the OPS into the OPS slot.
[Note] The fan side of OPS is face outside.
Power on/off OPS
The OPS will not turn on when IFP system
power on.
When IFP system switches to OPS source,
the OPS will automatically power on.
When IFP power off, the OPS will be
powered off.
Page 27

17
Using AVer CP System
Power on
Connect the power plug to the power outlet on the wall. Then, press the power button on of
AVer CP unit. Also, user can press power button on the remote controller to power up, too.
After power on, the main screen is displayed.
Power Off
While in power on status, press power button on the AVer CP unit or on the remote
controller and the power off message is displayed on screen; press power button again to
turn off the AVer CP system.
Page 28

18
Main Screen
After power on, the main screen will display as below shown.
(1)
(3) (4) (5) (6) (7) (8)
(2)(2)
Name
Descriptions
(1) Timer and Date
Display the current time and date.
(2) Tool bar
Select to extend the tool bar. For more detail, see Toolbar
section.
(3) Browser
Call out browser to explore the Internet if Internet connection is
available.
(4) Whiteboard
Call out the whiteboard interface to use whiteboard functions.
(5) All apps
To enter the application program page. All application programs
in the system are displayed.
(6) File Manager
Select to call out the file manager screen.
Page 29

19
Name
Descriptions
(7) App Switch
View recent running programs, switch to one of running
program, and close the running programs.
(8) Input Switch
Select the input source which devices are connected with the
AVer CP system through HDMI, VGA, and USB interface.
Touch the blue frame and hold, then, swipe to the source that
user wants to select.
Page 30

20
Toolbar
The toolbar is located at both of the screen, touch
or on the both side of
screen to call out the tool bar. Touch aging to hide the tool bar.
Name
Descriptions
Select the input source which devices are connected with the AVer CP
system through HDMI, VGA, and USB interface.
Back to previous screen.
Return to main screen.
Call out setting function list. Setting function includes volume +/-, snapshot,
file manager, system setting, and freeze. For more detail please see
Settings section.
Page 31

21
Name
Descriptions
Call out the annotation tool. The annotation tool can be used in any input
source screen. For more detail please see Annotation Tool section.
Page 32

22
SSeettttiinnggss
Settings function includes volume +/-, snapshot, file manager, system setting, and freeze.
Volume ( )
Adjust system volume.
Select > to call out volume adjust bar. Touch and hold the blue dot and move to
adjust the volume.
Snapshot ( )
Capture the current screen shot.
Select > to take a screen shot. User can view the screen shot in Gallery.
File manager ( )
Open the ES file explorer screen.
Select > to open ES file explorer screen. User can manage the files on IFP
system.
Page 33

23
System Setting( )
Setup IFP system’s parameters – Network, System Sounds, Apps, Storage & reset, About,
Date & Time, Language, Keyboard, Accessibility Add accessory, and Security &
Restrictions.
Select > to open IFP system settings screen.
- Network: Turn on/off the WiFi function and make a WiFi connection.
- System Sounds: Turn on/off the IFP system sound.
- Apps: Manage the apps on the IFP system.
- Storage & reset: View the storage capacity on the IFP system and reset the IFP system
back to factory default.
- About: View the version and related information of the IFP system.
- Date & Time: Setup the date and time of the IFP system.
- Language: Select the language of the IFP system.
- Keyboard: Setup keyboard format.
- Accessibility: Setup parameters of caption, speak passwords, and text to speech.
- Add accessory: Bluetooth device setup.
- Security & Restrictions: Setup Apps installation authority on the IFP system and security
of restriction profile.
Page 34

24
Freeze( )
To temporary freeze the current screen. While freezing, no functions can be operated.
[Note] Freeze function doesn’t’ support on Android system.
Select > to freeze the screen. The left upper corner of screen will display
“Freeze On”.
Page 35

25
AAnnnnoottaattiioonn TTooool
l
The annotation tool can be used in any input source screen.
Select to call out annotation tool.
(Eraser): Clear the annotation on the screen.
(Red) & (Blue): Red and blue color pen. User can draw and write on the screen.
(Save): Save the screen to local ( , IFP) or U-Disk ( , external USB pen
drive).
(Exit): Close the annotation tool.
Page 36

26
Whiteboard
Select on main screen to call out Whiteboard application.
TTuuttoorriiaal
l
For the first time use, the tutorial will guide the user how to use whiteboard; select to
go next step, select to back previous step. Select the tutorial will close, select
can continue the tutorial.
If user wants to view the tutorial again after tutorial, select the “VIEW TUTORIAL” at main
page of whiteboard. Select “DISMISS” will close the tutorial selection.
Page 37

27
NNoottee FFoorrmmaat
t
The note page has different format and user can choose the proper format to use.
1. Select and select “Note”. Also, user can select “Default note”. The default note will
be a blank page.
2. The note formats are category in Standard, Grid, Math&Engineering, Music, Sports, and
Planners&Lists. Choose the proper note format to use.
Page 38

28
IImmppoorrtt PPDDF
F
User can import the PDF file from external USB pen drive or local (IFP system) into
whiteboard.
1. Select and select “Import PDF”.
2. Locate the PDF file.
3. The imported PDF file is displayed on whiteboard screen.
Page 39

29
CChhaannggee NNaammee ooff tthhee NNootte
e
User can rename the note.
1. Select the note name is located at left upper corner.
2. Enter the new name of the note and select OK to confirm.
Page 40

30
UUssiinngg WWhhiitteebbooaarrd
d
The Whiteboard function tools are described in following.
/ : Undo and redo the actions.
: Pen function includes pen, eraser, mark, shape, and text function.
: Color selection. User can select the color of pen, text, shape, and background of
note.
(Add image): Take a picture from camera that is connected with IFP or select an
image to display on whiteboard.
: Note page switch and add new note page.
: Call out sub menu list – view only, export, print, page settings, and help.
Page 41

31
Pen ( )
The function includes pen, eraser, mark, shape and text functions.
Pen
- Type: Pen has three types – pencil ( ), highlight pen (
)
, and pen (
)
.
- Multitouch: Allows user to use more than 1 finger on screen.
- Pressure: To make writing more smooth.
- Thickness: Adjust the thickness of pen. Move the dot to adjust the thickness.
Page 42

32
- Color Depth: Highlight pen can adjust color depth.
- Color: The color of all pens can be changed. Select the type of pen and go to Color
selection (
)
and select the color.
Page 43

33
Select( )
Allows user to select the object on the screen to edit. After selecting, the screen will switch
to edit mode. In edit mode, user can modify the selected object.
Select and use finger to select the object on the screen and the screen will switch to
edit mode. In edit mode, select can switch to whiteboard screen.
Page 44

34
In edit mode, user can perform the following actions.
- : Change the color of selected object.
- : Change thickness of strokes and shapes.
- : Cut the selected object. The cut object can be passed on the note page.
Select
t
o paste
Page 45

35
- : Make a copy of selected object. Select
can past the copy object on the note
page.
-
:
Past the cut or copy of the selected object.
-
:
Duplicate the selected object. The duplicate object will paste on note screen
immediately.
- : Delete the selected object.
Eraser(
)
To clear the handwriting or drawing on screen as required.
- : Clear large area.
- : Clear part by part.
Page 46

36
Shape(
)
Draw the shape object on the note page. Shape objects are included line, square, and
round. Move the dot to adjust thickness of the shape object.
Text( )
Type the text on the note page.
Move the dot to adjust the font of the text.
Page 47

37
Select the and enter the text and select OK.
Page 48

38
Color ( )
Change the color of pens, Shape, and text.
Select the pen, shape, or text function first, then, select to select the color.
If the color user wants don’t list in color pattern, select to define the color on your own.
Page 49

39
Add image(
)
To take a picture from connected camera or select an image from local or external USB pen
drive.
Take picture
Take pictures from connected camera. Please make sure the camera is well connected and
power on.
1. Select and select “Take picture”.
2. Select to take picture.
Page 50

40
3. Select to accept the picture. To re-take, select . To discard the taken picture,
select . Select can adjust the flash, display grid, and time if camera support
those function.
4. After accepting the picture, the screen will switch to edit mode. Touch the picture can
move picture around. Select
can back to whiteboard screen.
Page 51

41
- : To crop the image. In Crop mode, user can do following action:
Select all
Detect face
Rotate left
Cancel
Rotate right
Save
Select or can go back to edit mode.
- : Cut the picture. The cute image can be passed. Select
t
o paste
- : Make a copy of picture. Select
can past the picture.
-
:
Past the cut or copy of the picture.
-
:
Duplicate the picture. The duplicate picture will paste on the screen immediately.
-
: Delete the selected part.
5. In edit mode, select can switch to whiteboard screen.
Page 52

42
Choose image
Take pictures from connected camera. Please make sure the camera is well connected and
power on.
1. Select and select “Choose image”.
2. Select the image from local or external USB pen drive. Select to locate the image
from other drive.
Page 53

43
3. The image can be edited.
- : To crop the image. In Crop mode, user can do following action:
Select all
Detect face
Rotate left
Cancel
Rotate right
Save
Select or can go back to edit mode.
- : Cut the picture. The cute image can be passed. Select
t
o paste.
- : Make a copy of picture. Select
can past the picture.
-
:
Past the cut or copy of the picture.
-
:
Duplicate the picture. The duplicate picture will paste on the screen immediately.
-
: Delete the selected part.
4. In edit mode, select can switch to whiteboard screen.
Page 54

44
Sub-menu( )
View Only: Change to view only mode. No action can be operated. Select can
back to normal mode.
Page 55

45
Export: Export the note page or all note pages to PDF, PNG, JPE file and share to
specify path.
Select “SHARE” and select the type to share.
Page 56

46
Print: To print out the note page.
Page Setting
Change background (note format), note page size, and color of note page.
Paste: In edit mode, user does the cut, copy, or duplicate and select “Paste” from
sub-menu list can be pasted the object on note page.
Help: View the tutorial and FAQ.
Page 57

47
Gallery
In gallery, user can take pictures by connected camera, view screenshots, pictures, and
share screenshots/pictures to whiteboard.
Open gallery
Select “All Apps” from main screen, then, select “Gallery”.
Page 58

48
View screenshots and pictures
In gallery screen, user can see images are divided into screenshots and camera folder.
Screenshot folder is the screenshots taken by press snapshot button on remote or by
selecting from tool bar to capture the screen shot.
Camera folder is the pictures are taken by connected camera.
To view the images, select the folder and select the image to view.
Page 59

49
Select to open “Sort by” dialog to select sorting order.
Page 60

50
Select to display image’s file name.
Select to call out sub-menu list. In sub-men, user can hide the image, exclude image,
temporarily show hidden image, increase/reduce column count and setup more detail of
image.
Page 61

51
The functions of image view screen are:
:
Rotate the image to right, left, or 180
°
.
: Delete the image.
Page 62

52
: Share the image to whiteboard, through Bluetooth, email, LAN to share, save the
image to ES explorer file.
The following example is sharing the image to AVer Whiteboard.
1. Select and select “AVer Whiteboard”.
2. The image will display on whiteboard screen.
Page 63

53
: Use other app to edit the image.
: Call out sub-men. User can copy and move the image to other folder on the IFP, save
the image as wallpaper, open the image by other app, hide the image, rename the image
file name, view the detail information of image, display the image on the map.
Page 64

54
Snapshot
Press the “Screenshot” button on the remote controller or select the of setting on the
tool bar to capture the screen view.
To view the snapshot images, select “All apps” on the main screen > “Gallery”. In Gallery
app, user can select the screenshot images to view and edit. For more detail on using
gallery refer to Gallery section.
Also, user can view snapshot images in ES file explorer (select from tool bar to open
or select “All Apps” > “ES file explorer”). In ES file explorer, the screenshot images are
saved at folder called “Picture”
If the external USB pen drive has installed on AVer CP system, then, the screenshot is
saved to external USB pen drive; a folder called “Picture” will be created.
ES file explorer
Page 65

55
Using Browser
User can opeate the browser same as on PC, beside use the finger instead of the mouse.
Select the “Browser( )” to launch the browser app.
Page 66

56
Connect to DocCam
The AVer CP system can connect to DocCam device through the Sphere2 to use the class
interactive function in Sphere2.
1. Select All apps > Sphere2.
2. Please make sure the DocCam and the AVer CP system are at same local network. The
Sphere2 will auto search the available DocCam on your local network and list on screen.
3. Select the DocCam device that wants to connect.
4. Enter the “Password” of DocCam and select OK to confirm.
5. And, select “Start” to connect.
6. How to use Sphere2 application; please refer to user manual of Sphere2.
Page 67

57
Connect to WiFi
1. Install the WiFi dongle to the IFP system.
2. Select the > and select “Network”.
3. Next, select WiFi and turn on WiFi. The AVer CP system will search the available WiFi
connection on your local network. Then, select the available WiFi connection to connect.
Page 68

58
Adjust Date and Time
Select
> on the tool bar to call out settings page. In settings page, select the
“automatic date & time” to adjust date and time to local time area.
[Note] The internet connection is required for auto date and time adjustment.
Page 69

59
OSD Menu Operation
Select any external input, press Menu ( ) button on the front panel of AVer CP system
unit to call out OSD menu. Swipe on the screen between each setting or press or
button on the front panel to switch. Touch the item on the screen to change the settings.
Picture Mode
Select the picture mode and adjust the parameters.
Picture mode has Standard, User, PC, Soft, and Lightness modes. Each mode can be
adjusted the some value for user want. The gray-out item means it’s not available for
adjusting.
The item values can
be adjusted.
Page 70

60
Sound Mode
Sound mode has Standard, Music, Movie, Sports, and User modes. Each mode can be
adjusted the some value for user want. The gray-out item means it’s not available for
adjusting.
Setting
In Setting, user can setup Menu Time(how long the OSD menu display on screen), MHL
Auto Switch, Auto Brightness, HDMI EDID Version, and Restore to Default.
The item values can
be adjusted.
Page 71

61
Specification
Specification
CP654I
Physical resolution
3840 x 2160 (pixels)
Response time
8ms
Brightness
450cd/m²
Contrast
1200:1
Viewing angle
178°/178°
Chroma
1.07B
Control mode
Key control/infrared remote
control/RS232 control
Input voltage
AC 100-240V
Power consumption
180W(Not include OPS)
Dimension (without packing)
1510.5mm x 926.5mm x 106.1mm
(depth)
Net weight/gross weight
52.95kg/66.45kg
Wall mounting holes
400mm(H) x 400mm(W)
Installation method
Through the wall mounting holes (screw
size: M6)
Working conditions:
0°C~40°C; RH: 20%~80%;
atmospheric pressure: 86kPa~104kPa.
Storage conditions:
-10°C~60°C; RH: 10%~60%;
atmospheric pressure: 86kPa~104kPa.
AV video input
1+0.3Vp-p, RCA terminal
AV audio input
500mV RMS
HDMI video input
480i, 480P, 576i, 576P, 720P, 1080i,
1080P, 4K
Intelligent operating system
Android 5.0.1
Page 72

62
Specification
CP754I
Physical resolution
3840 x 2160(pixels)
Response time
8ms
Brightness
450cd/m²
Contrast
1200:1
Viewing angle
178°/ 178°
Chroma
1.07B
Control mode
Key control/infrared remote
control/RS232 control
Input voltage
AC100-240V
Power consumption
320W(Not include OPS)
Dimension (without packing)
1736.8mm x 1055.3mm x 109.5mm
(depth)
Net weight/gross weight
61.95kg/79.1kg
Wall mounting holes
400mm(H) x 600mm(W)
Installation method
Through the wall mounting holes (screw
size: M8)
Working conditions:
0°C~40°C; RH: 20%~80%;
atmospheric pressure: 86kPa~104kPa.
Storage conditions:
-10°C~60°C; RH: 10%~60%;
atmospheric pressure: 86kPa~104kPa.
AV video input
1+0.3Vp-p, RCA terminal
AV audio input
500mV RMS
HDMI video input
480i, 480P, 576i, 576P, 720P, 1080i,
1080P, 4K
Intelligent operating system
Android 5.0.1
Page 73

63
Specification
CP864I
Physical resolution
3840 x 2160(pixels)
Pixel pitch
0.4935mm x 0.4935mm
Response time
8ms
Brightness
350cd/m²
Contrast
1200:1
Viewing angle
178° / 178°
Chroma
1.07B
Control mode
Key control/infrared remote
control/RS232 control
Input voltage
AC100-240V
Power consumption
500W(Not include OPS)
Dimension (without packing)
1990mm x 1201mm x 114.5mm (depth)
Net weight/gross weight
89.2kg/116.6kg
Wall mounting holes
400mm(H) x 700mm(W)
Installation method
Through the wall mounting holes (screw
size: M8)
Housing material
Aluminum profile, plastic
Working conditions:
0°C~40°C; RH: 20%~80%;
atmospheric pressure: 86kPa~104kPa.
Storage conditions
-10°C~60°C; RH: 10%~60%;
atmospheric pressure: 86kPa~104kPa.
AV video input
1+0.3Vp-p, RCA terminal
AV audio input
500mV RMS
HDMI video input
480i, 480P, 576i, 576P, 720P, 1080i,
1080P, 4K
Intelligent operating system
Android 5.0.1
[Note]
The capacity of internal memory is subject to actual configuration;
The cache capacity is subject to actual configuration
If you discover any unclear presentation, mistake or omission in this manual, please
contact us immediately.
Page 74

64
Multimedia Supported Formats
Type
Format
File Extension
Image
JPEG、BMP、PNG
.jpg\.bmp\.png
Video
MPEG1、MPEG2、MPEG4、H264、
RM、RMVB、MOV、MJPEG、VC1、
DivXFLV
.avi\.mpg\.dat\.vob\.div\.mov\.mkv\.r
m\.rmvb\.mp4\.mjpeg\.ts\.trp\.wmv\.
asf\.flv
Audio
MP3、M4A(AAC)
.mp3\.m4a
RS-233 Command Table
Baud Rate : 38400 bps
Data bits: 8 bits
Parity: None
Stop bits: 1 bits
Press “menu” button on remote controller + “8” + “2” + “0” to enter factory menu.
Function
Command
Power off
69
76
20
Power on
69
53
43
Enter
69
07
8F
MUTE
69
37
5F
VOL+
69
82
14
VOL-
69
85
11
SOURCE
69
19
7D
MENU
69
80
16
LEFT
69
63
33
RIGHT
69
66
30
DOWN
69
43
53
UP
69
46
50
LAN
69
34
62
AV1
89
55
0D
14
YCbCr
89
55
04
1D
VGA
89
65
03
0E
HDMI1
89
65
05
0C
Page 75

65
Function
Command
HDMI2
89
65
07
0A
FREEZE
89
55
06
1B
HDMI3
89
65
09
08
HDMI4
89
65
0B
06
OPS
89
65
0D
04
HDMI
89
65
0E
03
Page 76

66
Troubleshooting
Symptom
Possible Cause
Solution
The screen does not
display anything; there is no
sound, and the
indicator does not come on
Looseness of power plug,
power connection failure
Check if the power cord is
properly connected
Pictures are colorless
Color saturation is set too
low
Enter “Picture” settings to
increase the color
saturation
The product has no
accompanying sound
1. Volume is set too low
2. Sound is muted
1. Adjust the volume to a
proper level
2. Press the “MUTE” key on
the remote control to
unmute the product
The PC does not display
anything, and gives a
prompt indicating no signal
input; the red indicator
blinks
Looseness or come-off of
the signal connection cable
Check if the signal
connection cable is
loosened
or comes off; if so,
reconnect it
Pictures shown on the
PC are offset, do not cover
the entire screen, go
beyond the screen, or are
blurred
1. Improper adjustment
2. Wrong display mode
1. Use the auto adjustment
function
2. Enter “PC Screen
Adjustment” to adjust the
horizontal or vertical
Short remote control
distance, malfunction of
remote control
1. The remote receiver of
the product is blocked by
some object
2. Battery level of the
remote control is low
1. Move the object to avoid
blocking the remote
receiver
2. Replace the battery
The white noise problem
has occurred on screen
when MAC computer
connect with HDMI in 3840
x 2160 30Hz setting
Might be the compatibility
issue
Please change to HDMI 4
connection for normal
output
Page 77

67
Symptom
Possible Cause
Solution
A link cannot be accessed
via the browser
1. Wrong network
parameter configuration
2. Improper network
connection
3. Network service is not
activated
1. Ask the network
administrator for
available network IP
addresses and other
parameters
2. Check if the network
connection cable is
properly connected
3. Consult the network
service provider
Video gets seriously stuck
when played
online
1. Network bandwidth is
low
2. Several movies are
buffered or other content
is downloaded
1. Upgrade your network
bandwidth to a higher
one
2. Try replacement with
other VOD addresses to
The product gets stuck,
crashes or cannot be
operated
1. Too many programs are
running
2. Normal operation of the
product is disturbed by
external environment
(e.g., lightning, static
electricity)
Disconnect the product
from power supply; wait for
1-2min and reconnect
power supply; then restart
the product
MAC /Win extend desktop
touch control won’t work.
AVer CP series don’t
support touch control on
extend desktop.
In 1366*768 resolution,
Windows touch offset and
cannot do the screen
correction.
1366*768 resolution
doesn’t fit on AVer CP
series screen display,
please change to the
suitable resolution.
 Loading...