

Page 1
Quick Reference for Avaya
J189 SIP IP Phone in Avaya
Aura
®
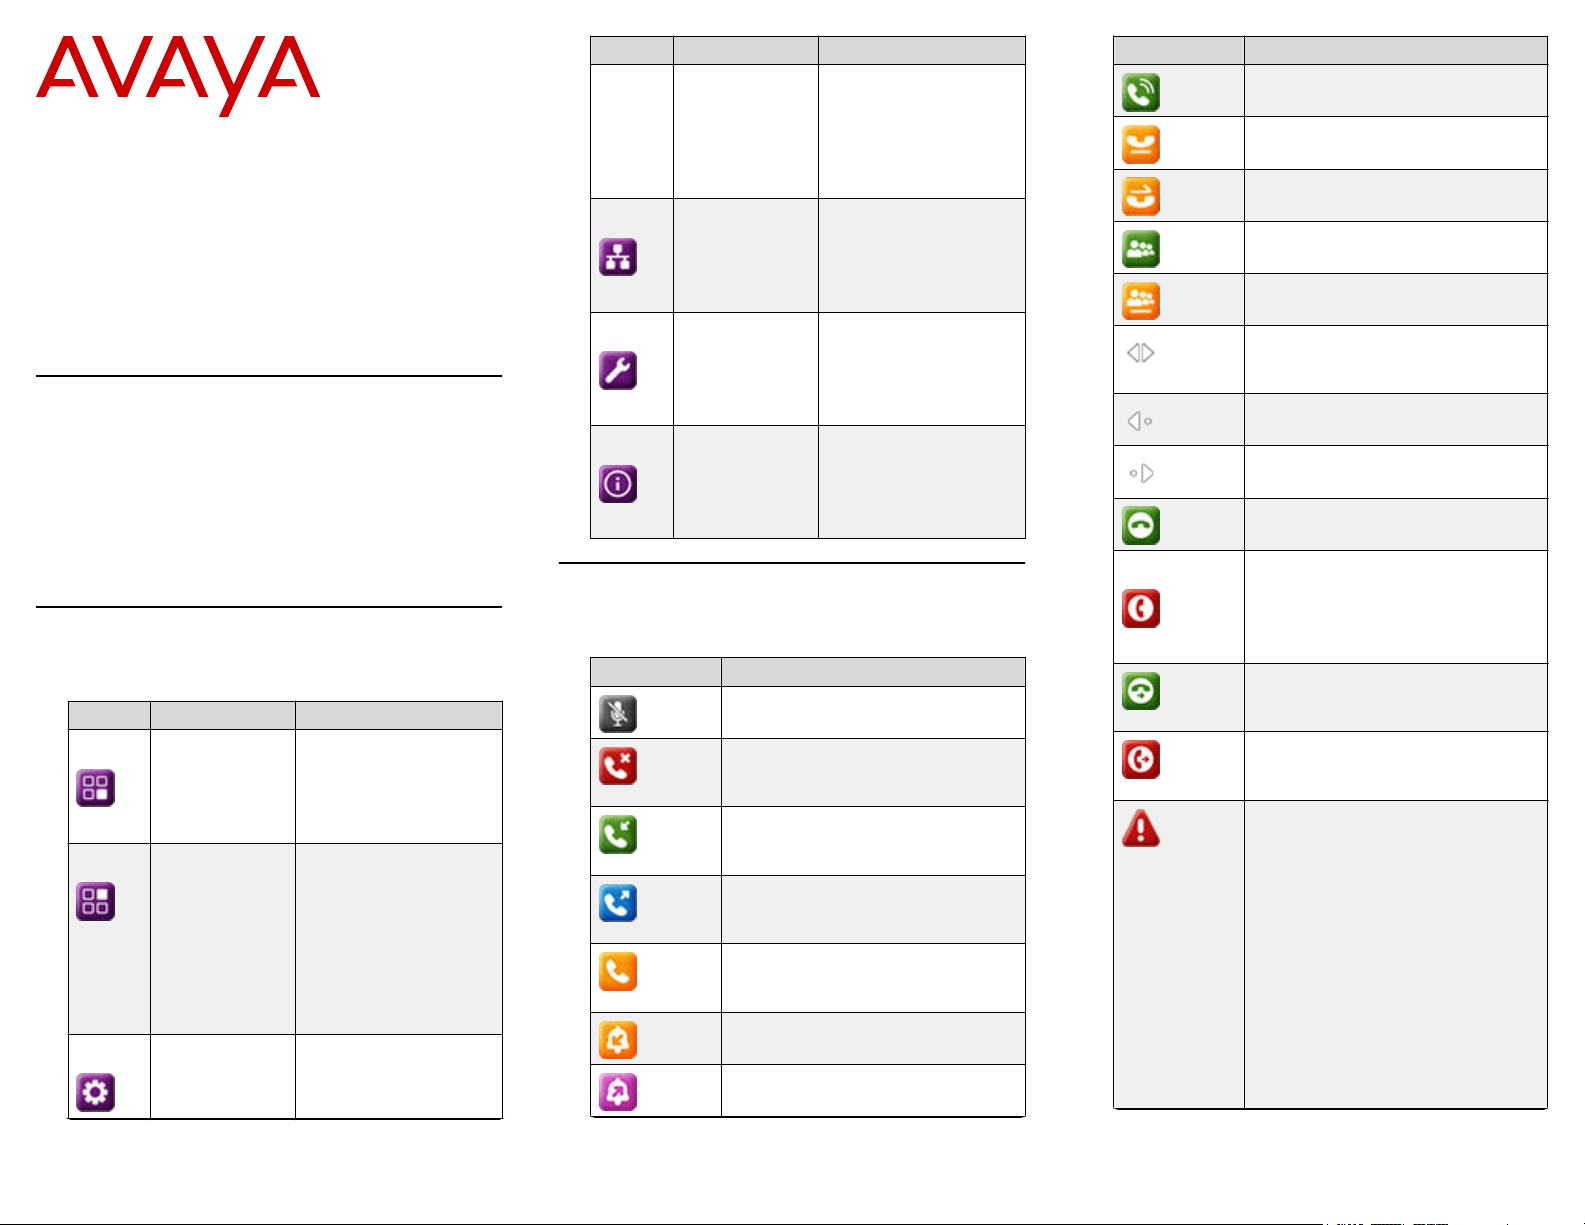
Icons Name Description
settings, assign speed
Network
information
dial entries, etc.
Used to view the
connected USB
devices such as USB
stick and keyboard.
To check network
settings.
Icon Description
Call is active.
Call is on hold.
Call is on hold during a conference
or transfer call setup.
Conference is active.
Release 4.0.9
Issue 1
©
2020-2021, Avaya Inc.
All Rights Reserved.
April 2021
Secondary display
The secondary display of the phone provides additional
call appearances and feature or application display.
It has six lines of four-page display that provides 24
additional lines for incoming calls, outgoing calls, autodialing, and calling features. It displays the dedicated view
for keys 25 — 48. You can switch between the pages
using the left and right keys.
Main menu
The following table lists the Main menu icons used in
Avaya J189 IP Phone:
Icons
Settings To change your phone
Name Description
Features To access administrator
activated features.
Applications • To access phone
applications such as
Contacts, Recents,
and Activate screen
saver.
• To sign off the phone,
to protect your
settings, or to let
another user log in.
settings, customize
button labels, adjust
brightness, audio
Table continues…
Administration To access
administration settings.
About To view the phone
model, software
version, default device
type, and the default
server type.
General phone icons
The following table lists the icons used in the Avaya
J189 IP Phone:
Icon
Description
Microphone is muted.
Missed call on your phone. You can
see this icon in the Recents
application.
Incoming call; indicates you have
answered this call. You can see this
icon in the Recents application.
Outgoing call; indicates you have
made this call. You can see this
icon in the Recents application.
Bridged call; indicates this line is
being used for a call on another
phone.
Incoming call is alerting.
Outgoing call; indicates you have
made this call.
Table continues…
Conference is on hold.
Use the Right or Left navigation
arrow to see more pages /
screens / options.
Scroll left for other options.
Scroll right for other options.
Team icon indicating this team
member is available.
Team icon indicating this team
member is busy on a call and
unavailable.
Team icon indicating this team
member is not on a call, but is
forwarding incoming calls.
Team icon indicating this team
member is busy on a call and is
forwarding incoming calls.
Indicates that the phone is not
connected to the SIP proxy server
and is operating in Failover mode.
Some features might not be
available or work incorrectly.
If the appearance line displays this
icon, it indicates that the phone has
encountered a failure and has
preserved the media session until
the user hangs up.
This icon can also indicate that the
phone is connected to the call
server but the features are not
available.
Table continues…
1
Page 2
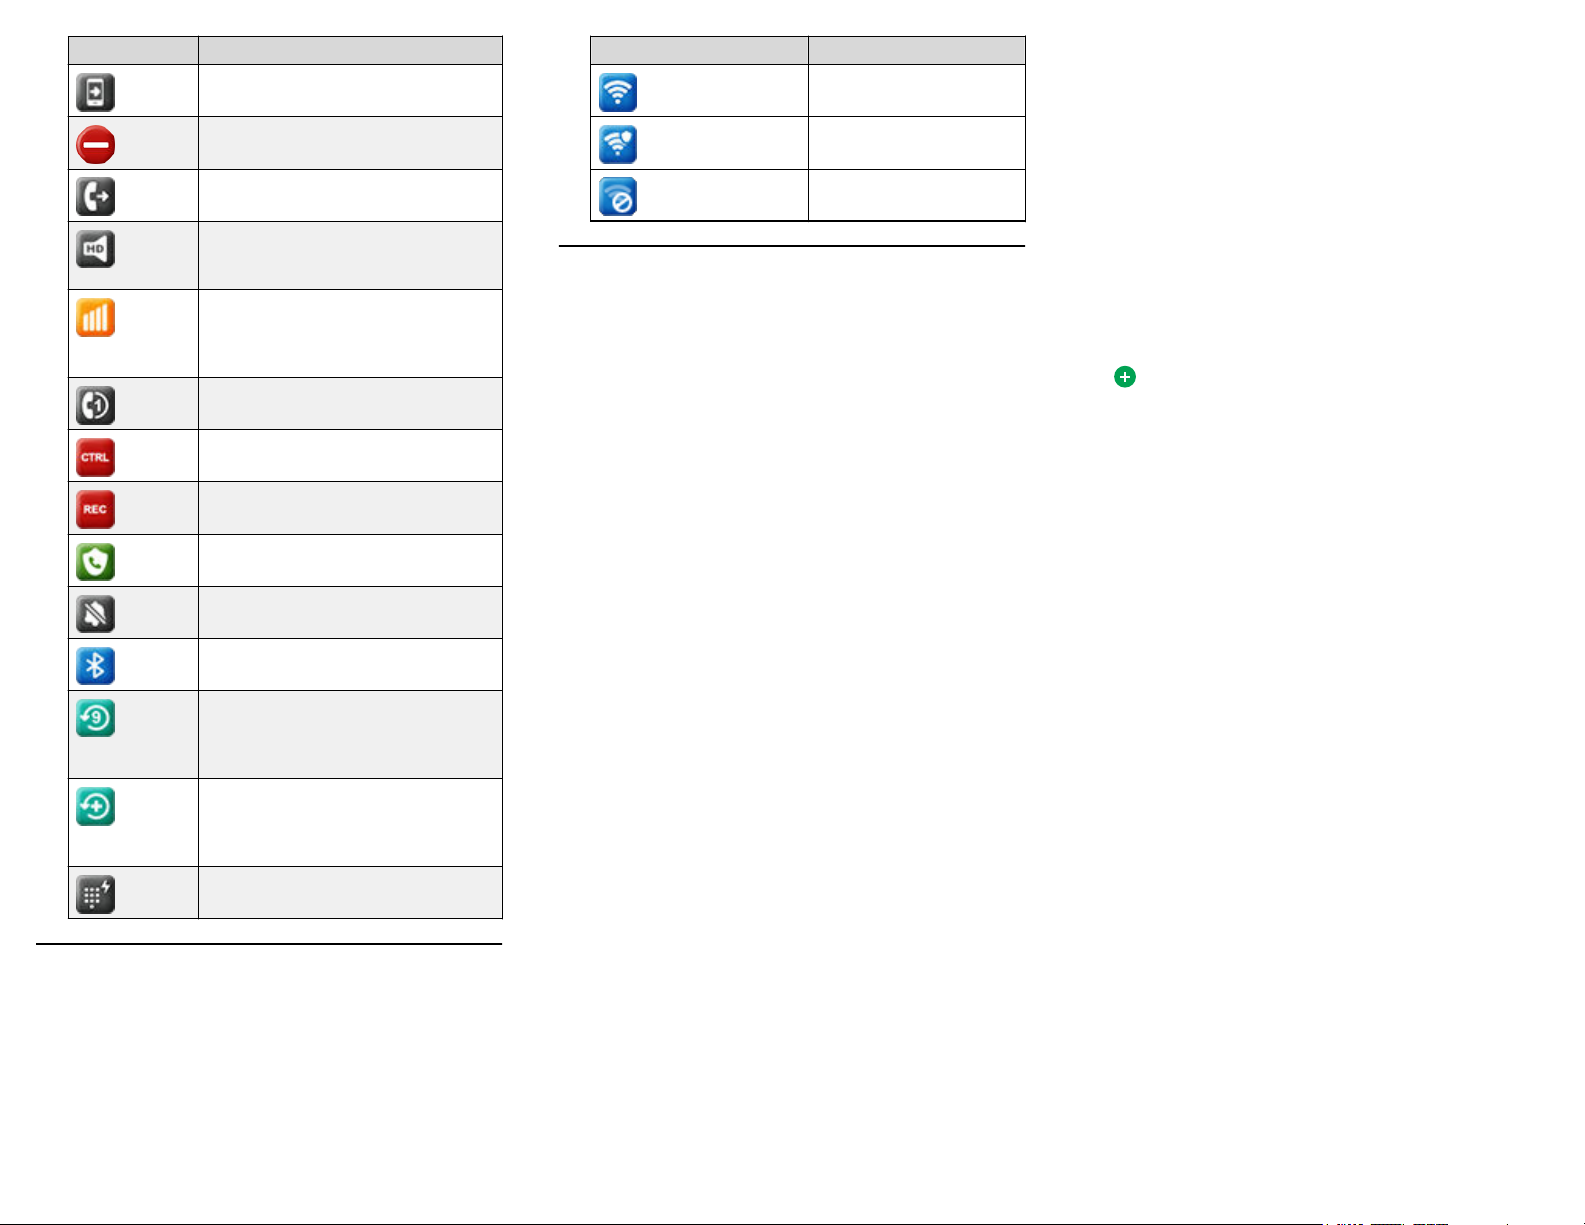
Icon Description
The EC500 feature is on.
The Do not disturb feature is on.
The Call forward feature is on.
Indicates that the call is using a
wideband codec for excellent voice
quality.
Indicates a low network
performance or presence of local
network issues that might result in
lower call quality.
The Limit Number of Concurrent
Calls (LNCC) feature is on.
Indicates that the SLA Mon™ agent
has taken control of the phone.
Indicates that the call is being
recorded for SLA Mon™.
Indicates that the audio of this call
is secure.
Indicates that the audio alert for
incoming calls is off.
Indicates the Bluetooth feature is
on.
Indicates that you have missed a
call. The number in the icon
indicates the number of missed
calls.
Indicates that you have missed a
call. The + in the icon indicates that
the number of missed calls is more
than 9.
Autodialing feature
Wi-Fi icons
The following table lists the Wi-Fi icons used in the
Avaya J189 IP Phone:
Icon
Description
Non-secure Wi-Fi
network is detected.
Secure Wi-Fi network is
detected.
Wi-Fi network is out of
range or offline.
Operations
Entering the provisioning details
Enter the provisioning server address if the phone
prompts, for example, when you connect to the network
for the first time.
Obtain the provisioning server address from the system
administrator.
1. When you boot the phone for the first time, the Auto
Provisioning screen displays Do you want to
activate Auto Provisioning now?, press one
of the following:
• Yes: To connect to the Device Enrollment Services
server to obtain the provisioning server address and
ignore the provisioning server address from the
DHCP.
• No: To obtain the provisioning server address from
the DHCP server.
In case of a time out, and the DHCP does not provide
the provisioning server address, the phone selects
Yes.
If the connection to Device Enrollment Services is
successful, and the phone receives the provisioning
server address, the phone continues to boot and not
prompt you for the provisioning server address.
If the connection to Device Enrollment Services is
successful, and the phone does not receive the
provisioning server address from Device Enrollment
Services, the phone prompts you for a Numeric
Enrollment code. Contact your administrator for a
numeric enrollment code. When you enter the valid
numeric enrollment code, the phone continues to boot
and not prompt you for the provisioning server
address.
If you do not have a numeric enrollment code, press
Cancel. The phone continues to boot using the
DHCP.
The phone displays the Starting message. If the
phone does not receive the provisioning server
address from the Device Enrollment Services or the
DHCP server, the phone displays the Enter
provisioning details screen.
2. On Enter provisioning details screen, press one of the
following:
• Config: To enter the provisioning server address.
• Never: To never prompt for the provisioning server
address.
• Cancel: To cancel the prompt and display the Login
screen.
3. After you have pressed Config, enter the provisioning
server address in the Address field.
The address is an alphanumeric URL like http://
myfileserver.com/j100/.
Tip:
To enter the dot symbol (.) in the field, press the
alphanumeric soft key to toggle to the ABC mode.
To enter the forward slash symbol (/) in the field,
press the / soft key.
4. (Optional) Enter the Group number.
Obtain the Group number from your system
administrator. The value ranges from 0 to 999. 0 is the
default value. If you do not enter any value in this
field, the phone uses the default value.
5. Press Save.
The phone continues to boot and connect to the
provisioning server address for provisioning
configuration.
Making a call by using speed dial
Ensure you have speed dial numbers assigned to your
contacts.
Press and hold the dial pad key assigned to the
number you want to call.
Making an emergency call
Ensure that the Emerg soft key is assigned by your
administrator.
Do one of the following:
• On the Phone screen, press the Emerg soft key,
and again press Emerg when the phone prompts
you for confirmation.
• Dial the emergency number by using the dial pad.
Declining a call
You can decline an incoming call when you do not want to
answer a call. The incoming call is declined depending on
the Call decline policy set by your administrator. Contact
2
Page 3

your administrator to enable this feature for your extension
and also to know about the Call decline policy.
Ensure that the administrator activates the feature.
Contact your administrator for details.
On the incoming call screen, press Decline soft key.
The call is declined. Depending on your Call decline
policy, the caller receives one of the following alert:
• An audio message alert
• A busy tone alert
Answering a call when on another call
You can receive a call on a secondary call appearance
only if the call appearance is free.
Press one of the following:
• The Answer soft key
• OK Button
The phone puts the first call on hold and moves to the
second call.
Adding a person to an active call
You can add participants to an active call to set up a
conference call.
Start a call.
1. During a call, on the Phone screen, press More >
Conference.
The phone puts the existing call on hold.
2. To make a call to a participant, do one of the following:
• Dial the phone extension by using the dial pad.
• Call the person from the Contacts list or the
Recents list.
3. When the third participant answers the call, press the
Join soft key.
4. To add another person, press Add and repeat Steps 2
and 3.
Viewing the Recents details
In the Recents screen, depending upon the call type, you
can view the following details of each call:
• Incoming call icon
• Outgoing call icon
• Missed call icon
• Name
• Extension number
• Time
• Date
• Duration
Note:
Duration is not available for a missed call.
1. Press Recents.
2. (Optional) To navigate through Main menu, scroll to
the following:
a. Applications, and press Select.
b. Recents, and press Select.
3. Select the call that you want to view.
4. Press Details.
The phone displays the details of the selected call.
Contacts
Adding a contact from the Recents list
Use this procedure to add a number to your Contacts list
from your call history.
1. Press Recents.
2. Scroll to the required number, and press +Contact.
3. In the First name and Last name fields, type the
relevant information.
The phone assigns the extension number to Last
name. You can remove the extension number from
this field and add other information.
4. Press Save.
Combining contacts
Use this procedure to merge the phone number of the
current contact with the existing local contact.
Ensure the Contacts list is not empty.
1. Press Contacts.
2. (Optional) To navigate through Main menu, do the
following:
a. Scroll to Applications and press Select.
b. Scroll to Contacts and press Select.
3. Scroll to the contact that you want to combine, and
press Details > More > Combine.
The select mode displays the Contacts list without the
current content.
4. To combine the current contact, scroll to the existing
contact, and press Select.
The current contact will be deleted from the Contacts
list and merged with the local contact.
Creating a local Сontacts group
1. Press Contacts.
(Optional) To navigate through Main menu, do the
2.
following:
a. Scroll to Applications and press Select.
b. Scroll to Contacts and press Select.
3. Press Groups.
4. Press NewGroup.
5. In the Enter group name field, type your group name.
6. Press Save.
Advanced features
Call forwarding to your cell phone using EC500
Use this procedure to forward calls from your Avaya
deskphone to your personal phone.
• Ensure that the administrator activates the feature.
Contact your administrator for details.
• Ensure that the system administrator sets your
personal phone number as your destination number.
1. Press Main menu, and scroll to Features.
2. Press Select.
3. Scroll to EC500, and press Select.
Long-term acoustic exposure protection
Avaya J100 Series IP Phones have the long-term acoustic
exposure protection to prevent the users from getting
acoustic shocks. This feature reduces the loud volume of
the conversations on the phone call to permissible
acoustic limits. The user can set the permissible acoustic
limit to dynamic or predefined static values. If a dynamic
setting is selected, the feature activates itself and
gradually reduces the loud volume of the phone
conversations to prevent from reaching the damaging
decibel levels.
Long-term acoustic exposure protection feature satisfies
OSHA, ETSI and employee health safety requirements.
Important:
Only L100 Series Headsets with RJ9 connector
support long-term acoustic exposure protection when
the headset profile is set to Profile1.
Configuring Long term acoustic protection
Long-term acoustic protection feature reduces the loud
volume of the conversations on the phone call to
permissible acoustic limits, you can configure the longterm acoustic exposure protection for your headset.
3
Page 4

Ensure you set the headset profile to Profile1, and use
L100 Series Headsets.
1. Press the Main menu.
2. Scroll to Settings and press Select.
3. Scroll to Audio settings and press Select.
4. Scroll to Long term acoustic protection, and press
Select.
5. Choose one of the following and press Select:
• Default : Sets the acoustic protection values to one
of the following options that your administrator sets:
- Dynamic
- 8 hours
- 4 hours
- Off
Administrator configured value will be chosen as
the default value.
• Off: Sets the acoustic protection off.
• Dynamic: Sets the acoustic feature to Dynamic,
which activates itself and gradually reduces the
loud volume of the phone conversations to prevent
from reaching the damaging decibel levels.
• 4 hours: Sets the acoustic protection for 4 hours.
• 8 hours: Sets the acoustic protection to 8 hours.
6. Press Save.
Making a priority call
Use the Priority Calling feature to provide a special type of
internal call alerting for the users. The called party hears a
distinctive ringing when the calling party uses Priority
Calling.
The call rings even at an extension with Do not disturb
enabled.
1. Press the Main menu.
2. Scroll to Features, and press Select.
3. Scroll down to Priority Call, press OK, or press the
corresponding line button.
4. Enter the extension you want to call.
5. Press Enter or OK to initiate a priority call.
Retrieving a voice message
Use this procedure to listen to your voicemail messages.
Few voicemail configuration has the web interface to
access it, please contact your administrator for more
information.
• Ensure that the system administrator configures the
voicemail for your extension.
• Obtain the user ID and password of your voicemail
from your system administrator.
1. To log in to your voicemail, press the Message button.
2. Follow the voice prompts to playback your voice
messages.
Making a precedence call by using the Main menu
1. Press the Main menu.
2. Scroll to Applications and press Select.
3. Select Call Priority.
4. On the Precedence Selection screen, select the
precedence level.
5. Dial the extension from one of the following:
• Contacts
• Recents
• The dial pad
Joining a call on a bridged line
On the phone, do one of the following:
• Press the line button with the active call.
• Select an active bridge line number, and press
Bridge.
Note:
Do not use Headset, Handset or Speaker
softkeys to join the call on a bridged line. Pressing
Headset, Handset or Speaker opens the Dial
screen. To cancel dialing and to press the required
line button for joining a call, press the End Call
key.
Using a Guest Login
Use this procedure to log in as a guest on another phone
to access your applications and call history for a limited
time.
Note:
You need to re-login if the phone reboots.
Ensure that the administrator activates the feature.
Contact your administrator for details.
1. Press the Main menu.
2. Scroll to Applications and press Select.
3. Scroll to Guest login and press Select.
4. Enter your extension and password.
5. Press one of the following to set the duration in hours:
• Right arrow key: To increase the value.
Left arrow key: To decrease the value.
•
6. Press Enter.
Call Transfer
With the Call Transfer feature, you can transfer your call to
another destination number.
The types of Call Transfer are:
• Consultative transfer: Transferring a call by
connecting a call with the transfer recipient.
• Blind transfer: Transferring a call without connecting
a call with the transfer recipient.
Making a consultative transfer
Transfer a call by connecting a call with the transfer
recipient.
1. While on an active call, press Transfer soft key.
The phone displays the Enter transfer destination
screen.
The first call is placed on hold.
2. Do one of the following and then press the Call soft
key :
• Dial the number to transfer the call.
• Search for the number in Contacts or Recents.
3. To initiate a consultative transfer, press Talk.
The call transfer recipient’s phone starts ringing.
4. Do one of the following:
• Press Complete after the recipient answers the
call.
The call transfer is complete. This is also called
attended transfer.
• Press Complete after the recipient’s number starts
ringing.
The call transfer is complete. This is also called
unattended transfer.
Making a blind transfer
Use this procedure to transfer an active call without
connecting a call with the transfer recipient.
1. While on an active call, press Transfer.
The phone displays the Enter Transfer Destination
screen.
4
Page 5

2. Do one of the following and then press the Call soft
key:
• Dial the number to which you want to transfer the
call.
• Search for the number in the Contacts or Recents
list.
3. To initiate a blind transfer, press Now.
The call transfer is complete.
Customization
Customizing phone keys
Use this procedure to add, relabel, move, or delete
contacts, features, or applications from the Phone screen.
1. Press the Main menu.
2. Scroll to Settings and press Select.
3. Scroll to Phone and press Select.
4. Scroll to Phone keys customization, and press
Select.
5. Press Customize key.
6. Use Navigation keys to select the line key.
7. (Optional) On the phone screen, if the selected line is
empty, press Add, and do the following:
• To add a contact, press Contact.
• To add a feature, press Feature.
• To add an application, press App.
You can use the Navigation keys to scroll to the
required functionality, and press Select.
8. To move the selected line key, do the following:
a. Press Move.
b. Use the Navigation keys to move the selected
line.
c. (Optional) If the new location is empty, press
Select.
d. (Optional) If the new location is already assigned
a key, press Swap.
9. To set a new label, do the following:
a. Press Relabel.
b. Type the name of the label.
c. If your native language uses extended Latin or
non-Latin symbols, press More > Symbol the
soft key to open the Symbols menu and select
the necessary symbols there. Press Insert >
More > Save.
10. To delete a key, press Delete, and then confirm the
deletion.
Enabling the Away timer
1. Press the Main menu.
2. Scroll to Settings and press Select.
3. Scroll to Applications and press Select.
4. Scroll down to Presence integration, and press
Select.
5. Scroll down to Away timer.
6. Press Toggle to turn on the timer.
7. Use the Down Arrow key to go to Away timer value.
8. Enter the time in seconds.
You can enter any value from 0 to 999.
9. Press Save.
Changing the background image
1. Press the Main menu.
2. Scroll to Settings and press Select.
3. Scroll to Display and press Select.
4. Scroll to Background, and press Select.
5. Scroll to Primary display, and press Select.
6. Scroll down to the new image.
7. (Optional) To preview the image, press Preview and
then press Back.
8. Press Select.
9. Press Save.
Setting a personalized ringtone
Use this procedure to set a ringtone for different uses.
1. Press the Main menu.
2. Scroll to Settings and press Select.
3. Scroll to Audio settings and press Select.
4. Scroll to Personalize ringing, and press Select.
5. Scroll to one of the following options:
• Primary
• Team Key
• Bridged CA
• Call Pickup
6. Press Select.
7. Scroll to the ringtone, and press Select.
8. (Optional) To play the ringtone, press Play.
9. Press Save.
Setting the network mode
You can set the network mode to Ethernet or Wi-Fi. You
do not need to perform this procedure if your phone is
configured to connect to Ethernet or a specific Wi-Fi
network.
Ensure that the system administrator gave you access to
perform this task.
1. Press the Main menu.
2. Scroll to Settings and press Select.
3. Scroll to Network and press Select.
4. Scroll to Network mode.
The Network mode setting shows the following
options:
• Ethernet: To connect to an Ethernet network.
• Wi-Fi: To connect phone to a Wi-Fi network.
5. Press one of the following:
• Toggle
• Right Arrow key
• Left Arrow key
6. When Network mode displays Wi-Fi, the following
lines are shown on the Phone screen:
• SSID: The name of the Wi-Fi network that the
phone is either currently connected to, or will
attempt to connect to if you start the connection
process.
• Wi-Fi network: Scroll to this line and press Select
to view the list of Wi-Fi networks.
7. After selecting the network mode, press Save.
8. When you switch Network mode from Ethernet to
Wi-Fi, see Connecting to a Wi-Fi network section in
the user guide of your phone model.
9. When you switch Network mode from Wi-Fi to
Ethernet, press Save.
10. When the phone prompts for permission to restart,
press OK.
Press Cancel to go back to previous step.
Connecting to a Wi-Fi network
Use this procedure if your phone is not configured to
connect to a specific Wi-Fi network
• Ensure that the system administrator gave you
access to perform this task.
• Select Wi-Fi as your network mode.
• When you set the network mode, note the SSID, as
this is the name of the Wi-Fi network that the phone
will attempt to connect to.
5
Page 6

• Depending on the type of security in the Wi-Fi
network, obtain the required credentials. Contact
your system administrator for more details.
1. Press the Main menu.
2. Scroll to Settings and press Select.
3. Scroll to Network and press Select.
4. To access the list of available Wi-Fi networks, scroll to
Wi-Fi network, and press Select.
5. Scroll to the required Wi-Fi network, and press
Connect to start the connection process.
6. Press OK to restart the phone.
7. If the security is WEP or WPA/WPA2 PSK, in
Password, enter the password for the Wi-Fi network.
8. If the security is 802.1x EAP, enter the following:
• Identity: Either your personal user ID or the shared
user ID provided by your system administrator.
• Anonymous Identity: Leave blank or use the
shared Anonymous Identity provided by your
system administrator.
• Password: Either your personal password or the
shared password provided by your system
administrator.
If the credentials are authenticated successfully, the
phone automatically restarts to complete the connection.
Viewing USB menu
Use this procedure to view the USB menu for information
on connected USB devices.
Connect the USB device to the phone and ensure that
USB support is enabled.
1. Press the Main menu.
2. Scroll to Settings and press Select.
3. Scroll to USB and press Select.
You can view the list of USB devices connected to the
phone, such as a USB flash drive and keyboard.
For more information
Go to www.avaya.com/support for latest support
information, including the user guide, administrator guide,
installation and maintenance guide, interactive document,
and software downloads.
6
 Loading...