

Page 1
TEMPORIZADOR /
TIMER DA CUCINA
TEMPORIZADOR
Instrucciones de utilización y de seguridad
TIMER DA CUCINA
Indicazioni per l’uso e per la sicurezza
KITCHEN TIMER
Operation and Safety Notes
KURZZEITMESSER
Bedienungs- und Sicherheitshinweise
IAN 94702
Page 2

ES Instrucciones de utilización y de seguridad Página 6
IT / MT Indicazioni per l’uso e per la sicurezza Pagina 21
GB / MT Operation and Safety Notes Page 34
DE / AT / CH Bedienungs- und Sicherheitshinweise Seite 47
Page 3
A
1
2
10
3
9
4
8
5
67
3
Page 4
B
121111
13
14
4
Page 5
C
15
16
17
D
18
19
20
5
Page 6

Uso adecuado ..............................................................Página 7
Descripción de las partes ........................................Página 7
Características técnicas ............................................Página 8
Contenido de la caja .................................................Página 8
Instrucciones generales de seguridad ...............Página 9
Instrucciones de seguridad para
el uso de las pilas .......................................................Página 10
Antes de la puesta en funcionamiento
Colocación del aparato ...............................................Página 11
Operación
Modos de operación ....................................................Página 12
Modo Reloj (CLOCK) ...................................................Página 12
Modo Temporizador (TIMER) ......................................Página 13
Función de memoria
Función de memoria para cada temporizador ...........Página 15
Función de memoria para todos los temporizadores ...Página 16
Cambiar las pilas ........................................................Página 16
Solución de problemas ............................................Página 17
Limpieza y mantenimiento .....................................Página 18
Desechar el producto ................................................Página 18
Garantía .........................................................................Página 19
6 ES
Page 7
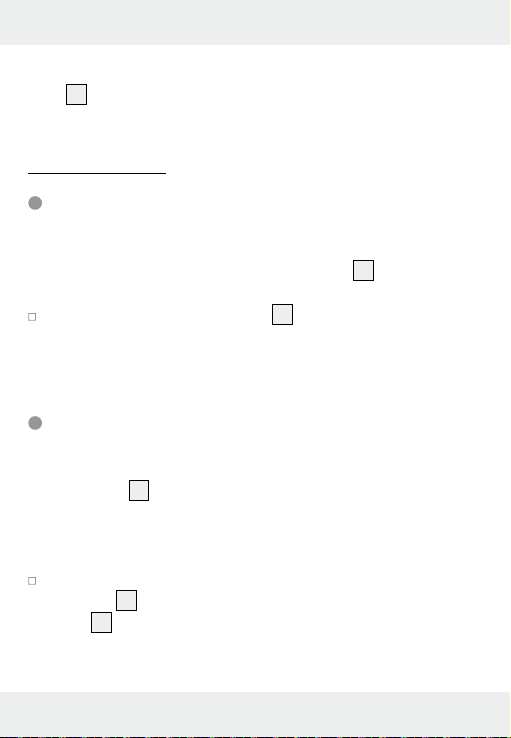
Temporizador
Q
Uso adecuado
Este temporizador digital es capaz de programar alarmas para
distintos intervalos de tiempo simultáneos. Además, también permite
visualizar la hora y cronometrar el tiempo. Este dispositivo sólo es
apto para su funcionamiento en sitios cubiertos a temperaturas
ambientes normales.
Q
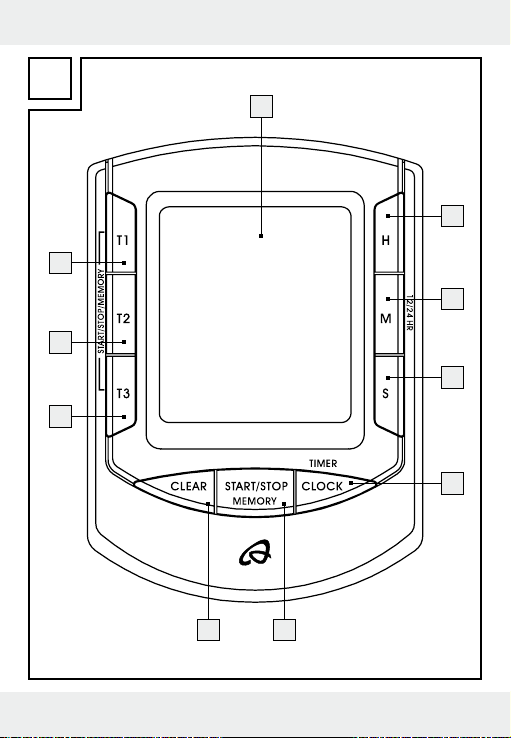
Descripción de las partes
1
Pantalla
2
Botón HR
3
Botón MIN
4
Botón Sec
5
Botón CLOCK (TIMER)
6
Botón START / STOP (MEMORY)
7
Botón CLEAR
8
Botón T3
9
Botón T2
10
Botón T1
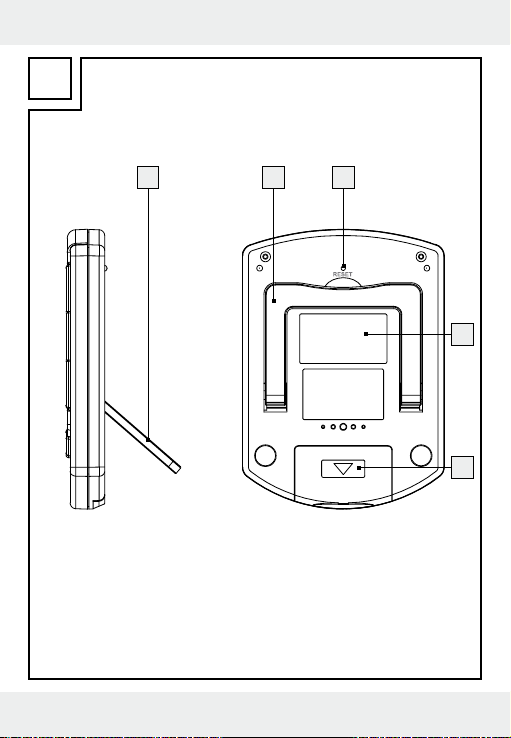
11
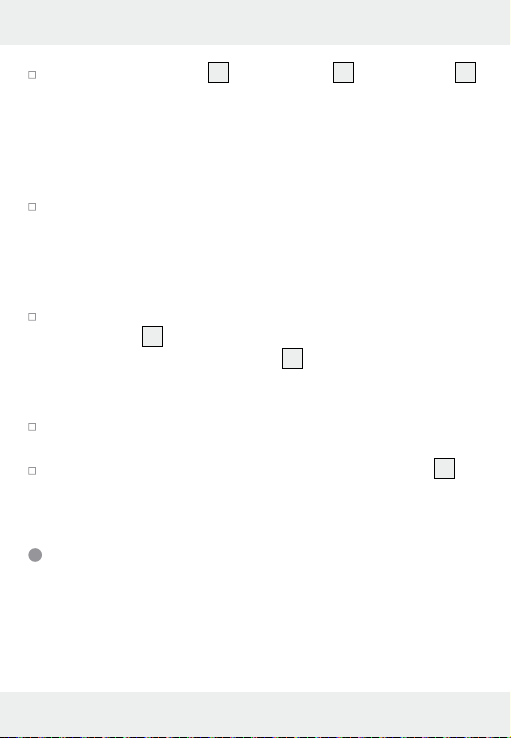
Soporte
12
Orificio RESET
13
Imán
14
Tapa del compartimento para las pilas
7 ES
Page 8
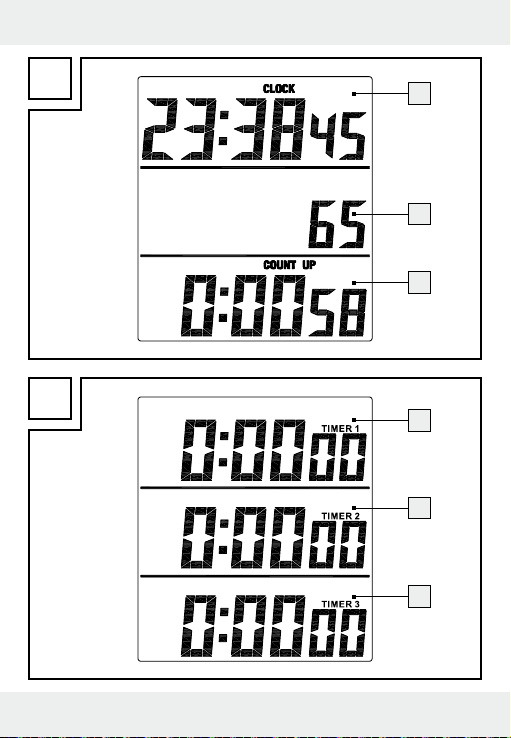
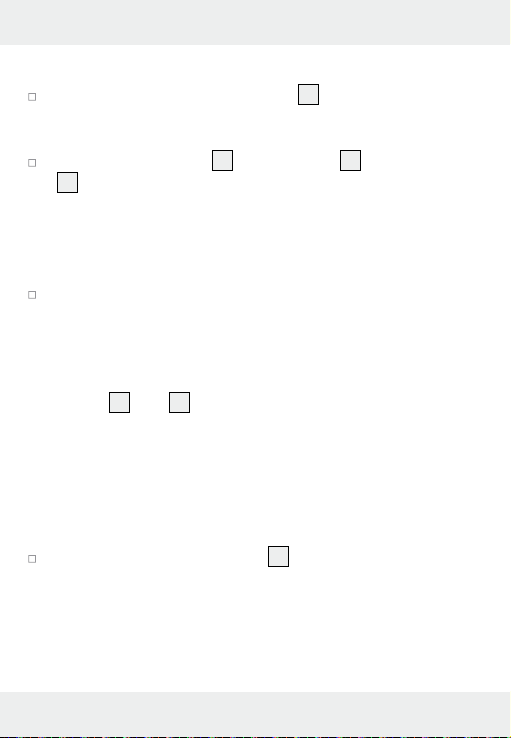
15
Reloj
16
Centésimas de segundo
17
Cronómetro
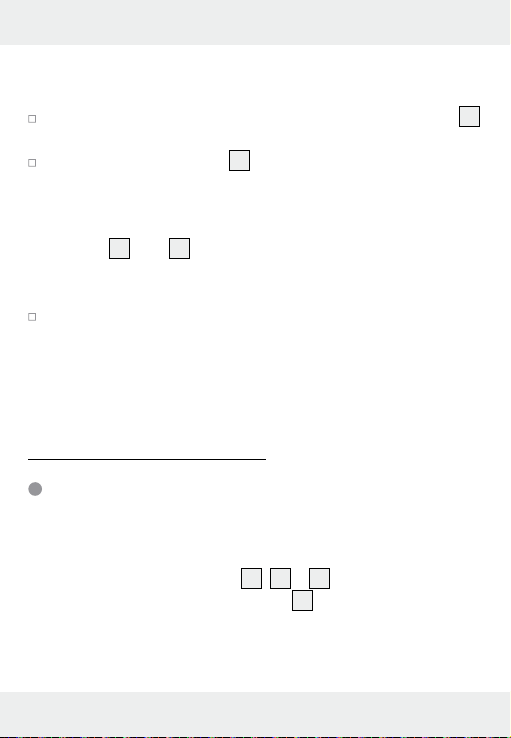
18
Temporizador 1
19
Temporizador 2
20
Temporizador 3
Q
Características técnicas
Consumo: 3 V
Fuente de alimentación: 2 x 1,5 V, pila de botón, modelo LR44
Cuenta hacia atrás: 1s – 99 h: 59 min: 59 s
Cuenta hacia delante: 99 h: 59 min: 59 s
Q
Contenido de la caja
1 temporizador digital
2 pilas, modelo LR44 (ya instaladas)
1 manual de instrucciones
8 ES
Page 9
Instrucciones generales
de seguridad
Familiarícese con todas las instrucciones de uso y seguridad antes
de utilizar este producto. Si entrega este producto a terceros, no
olvide adjuntar igualmente toda la documentación.
Compruebe que el producto se encuentra en perfectas condi-
ciones antes de ponerlo en funcionamiento. ¡Si el producto
está averiado, no lo utilice en ningún caso!
No exponga este producto a ambientes húmedos o podría
resultar dañado.
Este producto puede ser utilizado por niños mayores de 8 años,
así como por personas con capacidades físicas, sensoriales o
mentales reducidas o que cuenten con poca experiencia y/o
falta de conocimientos, siempre y cuando se les haya enseñado cómo utilizar el aparato de forma segura y hayan comprendido los peligros que pueden resultar de un mal uso del
mismo. No permita que los niños jueguen con este aparato.
La limpieza y mantenimiento no deben llevarse a cabo por
niños sin vigilancia.
9 ES
Page 10

Q
Instrucciones de seguridad
para el uso de las pilas
¡PELIGRO DE MUERTE! ¡No deje las
pilas al alcance de los niños! ¡En caso de ingesta, acuda
inmediatamente a un médico!
¡PELIGRO DE EXPLOSIÓN! ¡Nunca recargue
pilas no recargables, no las ponga en cortocircuito
y/o las abra!
¡Nunca arroje las pilas al fuego o al agua!
¡No aplique cargas mecánicas sobre las pilas!
Riesgo por pérdida del líquido de las pilas
Si las pilas se sulfatan ¡retírelas inmediatamente del aparato
para evitar daños!
¡Evite el contacto con la piel, ojos y mucosas! En caso de que
el ácido de las pilas entre en contacto con el cuerpo ¡lave
inmediatamente la zona afectada con agua clara y acuda
inmediatamente a un médico!
Utilice únicamente pilas del mismo tipo. No mezcle pilas usa-
das con pilas nuevas.
Evite condiciones y temperaturas extremas que puedan influir
en el funcionamiento de las pilas, por ejemplo, acercarlas a
un radiador.
Retire las pilas del aparato si no piensa utilizarlo durante un
período de tiempo prolongado.
10 ES
Page 11
Peligro de daños en el aparato
Utilice exclusivamente el tipo de pila indicado.
Tenga en cuenta la polaridad correcta al colocar las pilas.
Esta se indica en el compartimento para las pilas.
Si fuera necesario, limpie los contactos de las pilas y del apa-
rato antes de colocarlas.
Retire enseguida las pilas gastadas del aparato.
Q
Antes de la puesta en funcionamiento
Antes de poner en funcionamiento el aparato, retire la lámina
de plástico de la pantalla
Bajo la tapa del compartimento para las pilas
una cinta de aislamiento.
Abra la tapa del compartimento para las pilas empujando ha-
cia afuera en la dirección que indica la flecha. Retire la cinta
de aislamiento de la pila.
Cierre de nuevo el compartimento para las pilas.
Ya puede empezar a utilizar su temporizador digital.
Colocación del aparato
Puede colocar el aparato en posición horizontal sobre superficies
planas desplegando el soporte
1
.
14
11
hacia abajo (ver figura B).
sobresale
11 ES
Page 12
También puede fijar el aparato a superficies magnéticas con el
13
imán
.
Q
Operación
Modos de operación
El temporizador digital dispone de dos modos de operación que
se muestran en la parte superior de la pantalla
1
.
Pulse el botón CLOCK (TIMER) 5 para cambiar del modo
de operación Reloj (CLOCK) al modo de operación Temporizador (TIMER) y viceversa.
Modo Reloj (CLOCK)
En el modo Reloj (CLOCK) la hora se muestra en la parte superior
de la pantalla
cronometrado (ver figura C).
Fijar la hora
En modo Reloj (CLOCK), mantega presionado el botón CLOCK
(TIMER)
talla
1
. Las dos celdas inferiores muestran el tiempo
5
durante 3 segundos. La celda superior de la pan-
1
se iluminará.
12 ES
Page 13
Presione el botón SEC 4, el botón MIN 3 o el botón HR 2
para ir estableciendo los segundos (SEC), los minutos (MIN)
y las horas (HR) respectivamente.
RECOMENDACIÓN: Mantenga el botón presionado
durante unos segundos, para que los números transcurran de
forma más rápida.
Presione brevemente el botón CLOCK (TIMER) para confirmar
la hora establecida. La pantalla no se iluminará al mostrar la
hora.
Activar el cronómetro
En modo Reloj (CLOCK), presione el botón START / STOP
(MEMORY)
en la parte inferior de la pantalla
6
. El cronómetro empezará a contar y mostrará
1
los segundos, los minutos
y las horas transcurridas. En la celda central de la pantalla se
mostrarán las centésimas de segundo.
Presione el botón START / STOP (MEMORY) para parar el
cronómetro y presionelo de nuevo para continuar.
Para reiniciar la cuenta desde 0, pulse el botón CLEAR 7
tras haber parado previamente el cronómetro.
Modo Temporizador (TIMER)
En el modo Temporizador (TIMER) se muestran 3 celdas. En cada
una de las tres celdas se establece un temporizador (ver figura D).
13 ES
Page 14
Fijar el tiempo deseado
Mantenga presionado el botón T1 10 durante 3 segundos.
La celda junto al botón se iluminará, indicando así que ya se
puede establecer el tiempo deseado.
Presione el botón SEC 4, el botón MIN 3 o el botón HR
2
para ir estableciendo los segundos (SEC), los minutos
(MIN) y las horas (HR) respectivamente.
RECOMENDACIÓN: Mantenga el botón presionado
durante unos segundos, para que los números transcurran de
forma más rápida.
Presione brevemente el botón T1 para confirmar el tiempo
establecido. La pantalla del temporizador 1 dejará de iluminarse y mostrará el tiempo establecido.
Siga el mismo procedimiento con los temporizadores junto a los
botones T2
9
y T3 8.
Activar los temporizadores configurados
El temporizador se encuentra en modo Temporizador (TIMER) y el
temporizador seleccionado muestra el tiempo que usted ha establecido.
Presione de nuevo el botón T1 10 para activar el temporiza-
dor situado en el extremo superior. El contador comenzará la
cuenta atrá hasta 0. Cuando el tiempo programado haya
transcurrido, sonará una alarma durante un minuto. La pantalla
del temporizador se iluminará y en la esquina superior
14 ES
Page 15
izquierda sobre el temporizador correspondiente aparecerá
iluminado el mensaje „TIME‘S UP“ („el tiempo ha expirado“).
Presione el botón T1 o el botón START / STOP (MEMORY) 6
para que el temporizador deje de contar y la alarma cese.
Presione el botón CLEAR 7 para reiniciar el contador
desde 0.
Siga el mismo procedimiento con los temporizadores junto a los
botones T2
9
y T3 8.
Interrumpir un temporizador
Presione en cualquier momento el botón junto al temporizador
correspondiente (botones T1, T2 y T3) para parar la secuencia
temporal del contador correspondiente y también para reactivarlo.
Q
Función de memoria
Función de memoria para
cada temporizador
Cada temporizador memoriza el último tiempo establecido. Pulsando los botones T1, T2 o T3
dor (TIMER) se muestra en la pantalla
más recientemente.
10, 9
o 8 en modo Temporiza-
1
el tiempo seleccionado
15 ES
Page 16
Presione los botones T1, T2 o T3 de nuevo para activar los
respectivos temporizadores.
Presione los botones T1, T2 o T3 para parar la alarma.
Función de memoria para todos los
temporizadores
Presione el botón START / STOP (MEMORY) 6 para selec-
cionar el último tiempo establecido en cada uno de los tres
temporizadores.
Presione el botón START / STOP (MEMORY) para activar
simultáneamente en los 3 temporizadores los últimos tiempos
establecidos. La alarma puede ahora pararse presionando
respectivamente los botones T1, T2 y T3, o bien presionando
el botón START / STOP (MEMORY).
Una vez hayan transcurrido todos los tiempos establecidos,
presione el botón CLEAR
cuenta atrás de los 3 temporizadores uno por uno.
Q
Cambiar las pilas
Recomendación: Si la pantalla 1 pierde legibilidad por una
disminución del contraste, se debe a que las pilas no tienen batería y deben reemplazarse.
7
para ir reiniciando desde 0 la
16 ES
Page 17
Abra la tapa del compartimento para las pilas 14 en la parte
posterior del aparato, empujando hacia afuera en la dirección
que indica la flecha.
Saque las pilas usadas. Para ello utilice un objeto delgado y
con punta.
Recomendación: Tenga en cuenta la polaridad correcta al
insertar las pilas. Esta se indica en el compartimento para las
pilas.
Cierre de nuevo el compartimento para las pilas de modo
que oiga un sonido al cerrarlo.
Q
Solución de problemas
El aparato contiene componentes electrónicos sensibles. Por ello.
podría sufrir interferencias por otros equipos de transmisión por
radio que se encuentren en las proximidades. Si se muestran indicaciones de error en la pantalla
1
, retire los aparatos de este tipo
que se encuentren en las inmediaciones del aparato.
Las descargas electroestáticas pueden provocar perturbaciones
en el funcionamiento. En tal caso, utilice un objeto delgado y con
punta para introducirlo en el orificio RESET
12
y presione entonces
levemente. El aparato activará brevemente todas sus funciones y
se reiniciará.
17 ES
Page 18
Q
Limpieza y mantenimiento
Limpie el aparato sólo por fuera con un paño suave y seco.
Q
Desechar el producto
El embalaje está compuesto por materiales no contaminantes que pueden ser desechados en los puntos de
reciclaje locales.
Para obtener información sobre qué hacer con el producto al
finalizar su vida útil, acuda a la administración de su comunidad
o ciudad.
No elimine el producto al final de su vida útil junto con
los desechos domésticos. Deseche el producto adecuadamente. Proteja así el medio ambiente. Infórmese en la
oficina competente de su administración sobre los puestos de recogida y sus horarios de atención al público.
Las pilas defectuosas o usadas deben reciclarse según lo indicado
en la directiva 2006/66/CE. Para ello entregue las pilas o el
aparato en los puntos de recogida indicados.
Las pilas no deben eliminarse junto con los residuos
domésticos. Estas pueden contener metales pesados
Pb Hg
tóxicos que deben tratarse conforme a la normativa
18 ES
Page 19

aplicable a los residuos especiales. Los símbolos químicos de los
metales pesados son: Cd = cadmio, Hg = mercurio, Pb = plomo.
Las pilas usadas deben reciclarse en un punto de recogida local.
Garantía
El aparato ha sido fabricado cuidadosamente siguiendo exigentes
normas de calidad y ha sido probado antes de su entrega. En caso
de defecto del producto, usted tiene derechos legales frente al
vendedor del mismo. Nuestra garantía (abajo indicada) no supone
una restricción de dichos derechos legales.
Este aparato tiene una garantía de 3 años a partir de la fecha de
compra. El plazo de garantía comienza a partir de la fecha de
compra. Por favor, conserve adecuadamente el justificante de
compra original. Este documento se requerirá como prueba de
que se realizó la compra.
Si en el plazo de tres años a partir de la fecha de compra se produce un fallo de material o fabricación en este producto, repararemos el producto o lo sustituiremos gratuitamente por un producto
nuevo (según nuestra elección). La garantía quedará anulada si el
producto resulta dañado o es utilizado o mantenido de forma inadecuada.
La garantía cubre defectos de materiales o de fabricación. Esta
garantía no cubre aquellos componentes del producto sometidos
19 ES
Page 20

a un desgaste normal y que, por ello, puedan considerarse piezas
de desgaste (por ej. las pilas). Tampoco cubre daños de componentes frágiles como, por ejemplo, los interruptores, baterías y
piezas de cristal.
EMC
20 ES
Page 21

Utilizzo conforme alla destinazione d‘uso ......Pagina 22
Descrizione dei componenti ...................................Pagina 22
Dati tecnici .....................................................................Pagina 23
Dotazione ......................................................................Pagina 23
Avvertenze generali di sicurezza ........................Pagina 23
Indicazioni di sicurezza relative alle batterie ....Pagina 24
Prima dell’avvio .........................................................Pagina 25
Posizionare l‘apparecchio ............................................Pagina 26
Funzionamento
Tipologie di funzionamento ..........................................Pagina 26
Modalità orologio (CLOCK) ........................................Pagina 27
Modalità Timer ..............................................................Pagina 28
Funzione memory
Funzione memory per il singolo timer ..........................Pagina 29
Funzione memory per tutti i timer .................................Pagina 30
Sostituzione delle batterie ......................................Pagina 30
Risoluzione dei problemi ........................................Pagina 31
Pulizia e cura ................................................................Pagina 31
Smaltimento .................................................................Pagina 31
Garanzia ........................................................................Pagina 32
21 IT/MT
Page 22

Timer da cucina
Q
Utilizzo conforme alla destinazione d‘uso
Il contaminuti digitale serve a indicare acusticamente la scadenza
contemporanea di differenti intervalli di tempo. Inoltre, è dotato di
orologio, esattamente come accade nei cronometri. L’apparecchio
è adatto unicamente per un utilizzo in ambienti chiusi e in presenza
di una normale temperatura ambiente.
Q
Descrizione dei componenti
1
Display
2
Tasto HR
3
Tasto MIN
4
Tasto Sec
5
Tasto CLOCK (TIMER)
6
Tasto START / STOP (MEMORY)
7
Tasto CLEAR
8
Tasto T3
9
Tasto T2
10
Tasto T1
11
Sostegno
12
RESET
13
Magnete
14
Coperchio vano portabatterie
22 IT/MT
Page 23

15
Ora
16
Centesimi di secondi
17
Cronometro
18
Timer 1
19
Timer 2
20
Timer 3
Q
Dati tecnici
Tensione di esercizio: 3 V
Tipo di batterie: 2 x 1,5 V, pilette, Tipo LR44
Area conteggio alla rovescia: 1s – 99 h: 59 min: 59 s
Area conteggio dello
scorrere del tempo: 99 h: 59 min: 59 s
Q
Dotazione
1 Contaminuti digitale
2 Batterie, Tipo LR44 (già inserite in fabbrica)
1 Manuale di istruzioni
Avvertenze generali di sicurezza
Prima dell‘uso leggere attentamente tutte le istruzioni e le avvertenze di sicurezza allegate al prodotto! In caso di cessione del
23 IT/MT
Page 24

prodotto a terzi, consegnare anche l‘intera documentazione del
prodotto!
Prima dell‘uso, controllare che il prodotto non sia danneggiato.
Non mettere in funzione il prodotto se è danneggiato!
Non esporre l‘apparecchio all‘umidità! Esso ne potrebbe
venire danneggiato.
Quest‘apparecchio può essere utilizzato da bambini di età
superiore agli 8 anni, da persone con capacità fisiche, sensoriali o mentali ridotte o da persone inesperte solo se supervisionate o preventivamente istruite sull’utilizzo in sicurezza del
prodotto e solo se informate dei pericoli legati al prodotto stesso.
Non lasciare che i bambini giochino con l‘apparecchio. La
pulizia e la manutenzione non devono essere eseguite da
bambini senza supervisione.
Q
Indicazioni di sicurezza
relative alle batterie
PERICOLO DI MORTE! Le batterie vanno
tenute fuori dalla portata dei bambini. In caso di ingerimento
consultare subito un medico!
PERICOLO DI ESPLOSIONE! Non ricaricare
mai batterie non ricaricabili, non cortocircuitarle
e / o aprirle!
Non gettare mai le batterie nel fuoco o in acqua.
Non esercitare alcuna pressione meccanica sulle batterie!
24 IT/MT
Page 25

Pericolo di perdite delle batterie
Nel caso di perdite delle batterie, rimuoverle subito dall‘ap-
parecchio per evitare danni!
Evitare il contatto con pelle, occhi e mucose! In caso di con-
tatto con gli acidi delle batterie risciacquare le aree affette con
acqua corrente e chiedere immediatamente l’intervento di un
medico!
Utilizzare solamente batterie dello stesso tipo! Non mischiare
le batterie nuove con quelle vecchie!
Evitare condizioni e temperature estreme che potrebbero
avere influenza sulle batterie, per es. su caloriferi.
Rimuovere le batterie dall’apparecchio qualora non venissero
utilizzate per lungo tempo!
Pericolo di danno all‘apparecchio
Utilizzare esclusivamente il tipo di batterie indicato!
Prestare attenzione alla polarità corretta quando vengono
inserite le batterie! Questa viene indicata nel vano batterie!
Se necessario, pulire i contatti della batteria e dell’apparecchio
prima di inserire le batterie!
Rimuovere immediatamente dall‘apparecchio le batterie esauste!
Q
Prima dell’avvio
Prima di mettere in funzione l‘apparecchio rimuovere la pelli-
cola di protezione dal relativo display
1
.
25 IT/MT
Page 26

Sotto il coperchio del vano batterie 14, dal vano batterie,
vengono fuori delle strisce isolanti.
Aprire il coperchio del vano portabatterie, facendolo scorrere
verso l‘esterno. Rimuovere le strisce isolanti.
Richiudere il coperchio del vano batterie.
Il vostro contaminuti digitale è ora pronto per l‘uso.
Posizionare l‘apparecchio
Potete posizionare l‘apparecchio orizzontalmente, rialzare le
superfici piane, ribaltare il sostegno
11
verso il basso (vedi fig. B).
Alternativamente potete assicurarlo a superfici adatte con dei
magneti
Q
13
.
Funzionamento
Tipologie di funzionamento
Il contaminuti digitale possiede due differenti tipologie di funzionamento, che vengono mostrate nel display
Premete il tasto CLOCK (TIMER) 5, per decidere tra la tipo-
logia di funzionamento orologio (CLOCK) e timer (TIMER).
1
.
26 IT/MT
Page 27

Modalità orologio (CLOCK)
Con la modalità orologio nel display 1, nel campo superiore,
viene mostrato l‘orario. Entrambi i campi inferiori mostrano il tempo
del cronometro (fig.C).
Impostare l‘orario
Tenere premuto in modus orologio il tasto CLOCK (TIMER) 5
per circa 3 secondi. Il campo più in alto nel display
mina.
Premere il tasto SEC 4, il tasto MIN 3 o il tasto HR 2 per
modificare i valori visualizzati per secondi (SEC), minuti (MIN)
o ore (HR) gradualmente.
CONSIGLIO: Tenere premuto il tasto per impostare tutto più
rapidamente.
Premere brevemente il tasto CLOCK (TIMER), al fine di confer-
mare il tempo impostato. Il tempo verrà visualizzato senza
lampeggiare.
Attivare il cronometro
In modalità orologio, premere il tasto START / STOP (MEMORY)
6
. Il cronometro parte nella parte inferiore del display 1 e
mostra i secondi, i minuti e le ore. I centesimi di secondo vengono contati nella sezione centrale del display.
Premere il tasto START / STOP (MEMORY) per fermare il
cronometro o per riattivare il conteggio.
Dopo aver fermato il cronometro, è possibile ripristinarlo a 0
premendo il tasto CLEAR
7
.
1
si illu-
27 IT/MT
Page 28

Modalità Timer
Nella modalità Timer, appaiono 3 campi di tempo. C‘è un timer in
ciascuno dei tre campi (Fig. D).
Impostare il tempo desiderato
Tenere premuto il tasto T1 10 per circa 3 secondi. Il campo
accanto al tasto lampeggia, segnalando così che può essere
impostato un tempo.
Premere il tasto SEC 4, il tasto MIN 3 o il tasto HR 2 per
modificare i valori visualizzati per secondi (SEC), minuti
(MIN) o ore (HR) gradualmente.
CONSIGLIO: Tenere premuto il tasto per impostare tutto più
rapidamente.
Premere il tasto T1 per confermare l‘impostazione. Il display
del timer 1 smette di lampeggiare e mostra l‘ora impostata.
Impostare il timer accanto al T2
9
e al T3 8 allo stesso modo.
Attivare il timer impostato
Il timer è in modalità timer e il timer selezionato mostra il tempo
selezionato.
Per attivare il timer premere il tasto T1 10. Il contatore ora
inizia il conto alla rovescia fino a 0. Trascorso il tempo impostato, un segnale acustico suonerà per la durata di un minuto.
Sul display del timer, in alto a sinistra, lampeggia il messaggio
28 IT/MT
Page 29

TIME‘S UP („Il tempo è scaduto“), e il timer comincia a contare in avanti.
Premere il tasto T1 o il tasto START / STOP (MEMORY) 6 per
interrompere l‘operazione di conteggio del timer e il segnale
acustico.
Per azzerare il contatore premere il tasto CLEAR 7.
Impostare il timer accanto al T2
9
e al T3 8 allo stesso modo.
Interrompendo la sequenza di un timer
Premere il tasto accanto al timer appropriato (T1, T2 o T3)
per arrestare la sequenza temporale del contatore corrispondente in qualsiasi momento e per riattivarlo.
Q
Funzione memory
Funzione memory per il singolo timer
Ogni timer salva il tempo impostato più recentemente. Premendo il
tasto T1, T2 o T3
impostato più recentemente per il timer specifico sul display
Premere il tasto T1, T2 o T3 per attivare il timer corrispon-
dente.
Premere il tasto T1 , T2 o T3 per fermare il segnale acustico.
10, 9
o 8 si apre, in modalità timer, il tempo
1
.
29 IT/MT
Page 30

Funzione memory per tutti i timer
Premere il tasto START / STOP (MEMORY) 6 per aprire i
tempi impostati per tutti e tre i timer.
Premere nuovamente il tasto START / STOP (MEMORY) per
avviare tutti i 3 tempi contemporaneamente. Il segnale acustico può ora essere interrotto utilizzando il tasto T corrispondente (T1, T2, T3) o il tasto START / STOP (MEMORY).
Dopo che tutti e 3 i tempi sono trascorsi, premere il tasto CLEAR
7
per azzerare i conti alla rovescia da 1 a 3 e portarli a 0,
uno dopo l‘altro.
Q
Sostituzione delle batterie
Nota: se la leggibilità del display 1 diminuisce a causa del
contrasto, le batterie sono scariche e vanno sostituite.
Aprire il coperchio del vano batterie 14 sul lato posteriore del
dispositivo spingendolo verso l‘esterno nella direzione della
freccia.
Rimuovere le batterie vecchie. Utilizzare un oggetto sottile e
appuntito come leva per rimuovere le batterie dal vano batterie.
Nota: inserendo le batteria, fare attenzione a rispettare la
polarità corretta! Questa viene indicata sul vano portabatterie.
Richiudere il coperchio del vano batterie, fino al click.
30 IT/MT
Page 31

Q
Risoluzione dei problemi
L’apparecchio contiene componenti elettronici sensibili. E‘ quindi
possibile che apparecchi di trasmissione radio eventualmente posti nelle immediate vicinanze lo disturbino. Qualora sul display
1
si visualizzassero errori, rimuovere tali apparecchi dalle immediate
vicinanze.
Le scariche elettrostatiche possono provocare disturbi di funzionamento. In tali casi, inserire un oggetto sottile e appuntito (ad esempio il filo di una graffetta) nel foro RESET
12
e spingere delicatamente.
Il dispositivo attiverà quindi brevemente tutti i display e si azzererà.
Q
Pulizia e cura
Pulire l’apparecchiatura solo sulla sua superficie esterna ser-
vendosi di una pezza morbida e asciutta.
Q
Smaltimento
L’imballaggio consiste di materiali ecologici che potete
smaltire portandoli nei luoghi pubblici che si occupano
di riciclaggio.
E‘ possibile informarsi sulle possibilità di smaltimento del prodotto
utilizzato presso l‘amministrazione comunale e cittadina.
31 IT/MT
Page 32

Per la salvaguardia della tutela ambientale, quando il
prodotto non funziona più non smaltirlo nei rifiuti domestici bensì nei luoghi adatti di raccolta. Informarsi presso
l’amministrazione competente sui centri di raccolta e i
relativi orari di apertura.
Le batterie difettose o esauste devono essere riciclate secondo la
direttiva 2006 / 66 / CE. Smaltire le batterie o l’apparecchio nei
centri di raccolta previsti.
Le batterie non devono essere smaltite nei rifiuti domestici. Esse possono contenere metalli pesanti nocivi e sono
Pb Hg
soggette a smaltimento come rifiuti tossici. I simboli chimici
dei metalli pesanti sono i seguenti: Cd = cadmio, Hg = mercurio,
Pb = piombo. Consegnare quindi le batterie usate presso un
punto di raccolta comunale.
Garanzia
L‘apparecchio è stato prodotto secondo severe direttive di qualità
e controllato con premura prima della consegna. In caso di difetti
del prodotto, l‘acquirente può far valere i propri diritti legali nei
confronti del venditore. Questi diritti legali non vengono limitati in
alcun modo dalla garanzia di seguito riportata.
Se entro tre anni dalla data di acquisto di questo prodotto si rileva un difetto di materiale o di fabbricazione, il prodotto verrà
32 IT/MT
Page 33

riparato o sostituito gratuitamente, a nostra discrezione. Il termine
di garanzia ha inizio a partire dalla data di acquisto. Conservare
lo scontrino di acquisto originale in buone condizioni. Questo documento servirà a documentare l‘avvenuto acquisto.
l‘apparecchio da Lei acquistato dà diritto ad una garanzia di 3 anni
a partire dalla data di acquisto. La presente garanzia decade nel
caso di danneggiamento del prodotto, di utilizzo o di manutenzione
inadeguati.
La prestazione di garanzia vale sia per difetti di materiale che per
difetti di fabbricazione. La presente garanzia non si estende a parti
del prodotto soggette a normale usura e che possono essere identificate, pertanto, come parti soggette a usura (p. es., le batterie),
né a danni su parti staccabili, come interruttore, batterie o simili,
realizzate in vetro.
EMC
33 IT/MT
Page 34

Proper use ........................................................................ Page 35
Description of parts and features ........................... Page 35
Technical data ................................................................. Page 36
Included items ................................................................. Page 36
General safety instructions ....................................... Page 36
Safety instructions for batteries .............................. Page 37
Before initial use ............................................................ Page 38
Setting up the device ....................................................... Page 39
Operation
Modes of the device ........................................................ Page 39
Clock mode ...................................................................... Page 40
Timer mode ....................................................................... Page 41
Memory function
Memory function of individual timers .............................. Page 42
Memory function for all timers ........................................ Page 43
Changing the batteries ................................................ Page 43
Troubleshooting ............................................................. Page 44
Cleaning and care ......................................................... Page 44
Disposal ............................................................................. Page 44
Warranty .......................................................................... Page 45
34 GB/MT
Page 35

Kitchen Timer
Q
Proper use
The digital timer is suitable for the acoustic display of simultaneous
running of various time periods. In addition, it has a time display
as well as a stopwatch. The device is suitable for indoor use at
normal room temperature.
Q
Description of parts and features
1
Display
2
HR key
3
MIN key
4
Sec key
5
CLOCK (TIMER) key
6
START / STOP (MEMORY) key
7
CLEAR key
8
T3 key
9
T2 key
10
T1 key
11
Stand
12
RESET hole
13
Magnet
14
Battery compartment cover
15
Time
35 GB/MT
Page 36

16
Hundredths of a second
17
Stopwatch
18
Timer 1
19
Timer 2
20
Timer 3
Q
Technical data
Operating voltage: 3 V
Battery type: 2 x 1.5 V, button cells, type LR44
Countdown area: 1 s – 99 h: 59 min: 59 s
Count up area: 99 h: 59 min: 59 s
Q
Included items
1 digital timer
2 batteries, type LR44 (already installed)
1 set of operating instructions
General safety instructions
Before using the product, please familiarise yourself with all of the
safety information and instructions for use! When passing this
product on to others, please also include all the documents!
36 GB/MT
Page 37

Check the product for damage before use! Never use a dam-
aged product!
Do not expose the product to moisture! This may damage it.
This appliance may be used by children age 8 years and up,
as well as by persons with reduced physical, sensory or mental
capacities, or lacking experience and/or knowledge, so long
as they are supervised or instructed in the safe use of the appliance and understand the associated risks. Children should
not be allowed to play with the appliance. Cleaning and user
maintenance should not be performed by children without
supervision.
Q
Safety instructions for batteries
DANGER TO LIFE! Batteries are not intended
for children. If accidentally swallowed seek immediate medical
attention!
EXPLOSION HAZARD! Never recharge non-
rechargeable batteries, short-circuit and / or open
batteries!
Never throw batteries into fire or water!
Do not exert mechanical loads to batteries!
Risk of battery leakage
In the event of a battery leak, immediately remove it from the
device to prevent damage!
37 GB/MT
Page 38

Avoid contact with the skin, eyes and mucous membranes! In
the event of contact with battery acid, thoroughly flush the
affected area with plenty of clean water and seek immediate
medical attention!
Only use the same type of batteries! Do not mix used and new
batteries!
Avoid extreme conditions and temperatures which may impact
batteries, e.g. on radiators!
Remove the batteries from the device if they have not been
used for a long period!
Risk of equipment damage
Only use the specified battery type!
When inserting the battery ensure the correct polarity! This is
shown in the battery compartment!
If necessary, clean the battery and device contacts before
inserting the battery!
Promptly remove drained batteries from the product!
Q
Before initial use
Before initial use, remove the protective film from the device
1
display
An insulating strip protrudes from beneath the battery com-
partment lid
.
14
.
38 GB/MT
Page 39

Open the battery compartment cover by pushing it outwards
in the direction of the arrow. Remove the insulation strip.
Close the battery compartment cover again.
Your digital timer is now ready for operation.
Setting up the device
You can set up the device on horizontal, flat surfaces, by folding
the stand
the magnet
Q
11
downwards (see Fig. B). Alternatively, you can use
13
to fasten the device to magnetic surfaces.
Operation
Modes of the device
The digital time has two modes, which are displayed at the top of
the display
Press the CLOCK (TIMER) key 5 to switch back and forth
1
.
between the Clock and Timer modes.
39 GB/MT
Page 40

Clock mode
In Clock mode, the time is shown in the top field of the display 1.
The bottom two fields show the stopwatch time (Fig. C).
Setting the time
In Clock mode, press and hold down the CLOCK (TIMER) key
5
for 3 seconds. The top field of the display 1 flashes.
Press the SEC key 4, the MIN key 3 or the HR key 2 to
change the displayed values for seconds (SEC), minutes
(MIN) or hours (HR) in steps.
TIP: Press and hold the key to make the numbers change
more quickly.
Press the CLOCK (TIMER) key briefly, in order to confirm the
set time. The time does not flash.
Activating the stopwatch
In Clock mode, press the START / STOP (MEMORY) key 6.
The stopwatch begins in the bottom section of the display
and shows the expired seconds, minutes and hours. The hundredths of a second are counted in the middle section of the
display.
Press the START / STOP (MEMORY) key to halt the stopwatch
or to reactivate counting.
When you have halted the stopwatch, you can reset it to 0 by
pressing the CLEAR key
7
.
1
40 GB/MT
Page 41

Timer mode
In Timer mode, 3 time fields appear. A timer is provided in each of
the three fields (Fig. D).
Setting the desired time
Press and hold the T1 key 10 for 3 seconds. The field next to
the key flashes, thus signalling that a time can be set.
Press the SEC key 4, the MIN key 3 or the HR key 2 to
change the displayed values for seconds (SEC), minutes
(MIN) or hours (HR) in steps.
TIP: Press and hold the key to make the numbers change
more quickly.
Press the T1 key briefly to confirm your setting. The display of
Timer 1 stops flashing and shows the set time.
Set the timers next to the T2
9
and/or T3 keys 8 in the same
way.
Activating set timers
The timer is in Timer mode and the selected timer displays the
selected time.
Press the T1 key 10 again to activate the topmost timer. The
counter now begins counting down to 0. When the set time
has elapsed, a signal tone will sound for the period of one
minute. The timer display flashes, the message „TIME‘S UP“
41 GB/MT
Page 42

flashes in the top left-hand corner above the timer and the
timer begins counting up.
Press the T1 key or the START / STOP (MEMORY) key 6 to
stop the timer‘s counting operation and the acoustic signal.
Press the CLEAR key 7 to reset the counter to 0.
Set the timers next to the T2
9
and / or T3 keys 8 in the same
way.
Interrupting the sequence of a timer
Press the key next to the appropriate timer (T1, T2 or T3 key)
to stop the time sequence of the appropriate counter at any
time, and also to reactivate it.
Q
Memory function
Memory function of individual timers
Each timer saves the most recently selected time. Pressing the T1,
T2 or T3 key
selected time for the appropriate timer in the display
Press the appropriate T1, T2 or T3 key again to activate the
timer belonging to this key.
Press the appropriate T1, T2 or T3 key to stop the acoustic
signal.
42 GB/MT
10, 9
or 8 in Timer mode opens the most recently
1
.
Page 43

Memory function for all timers
Press the START / STOP (MEMORY) key 6 to open the most
recently selected times for all three timers.
Press the START / STOP (MEMORY) key again to start all
3 times simultaneously. The acoustic signal can now be interrupted using the appropriate T key (T1, T2, T3) or the
START / STOP (MEMORY) key.
After all 3 times have elapsed, press the CLEAR key 7 to
reset the countdowns 1 to 3 to 0, one after another.
Q
Changing the batteries
Note: If the legibility of the 1 decreases due to diminishing
contrast, then the inserted batteries are discharged and must be
replaced.
Open the battery compartment cover 14 on the rear side of
the device by pushing it outwards in the direction of the arrow.
Remove the old batteries. Use a thin, pointed object to lever
the batteries out of the battery compartment.
Note: Make sure you insert the batteries the right way round
(polarity). This is shown above the battery compartment.
Close the battery compartment cover again, so that it engages
audibly.
43 GB/MT
Page 44

Q
Troubleshooting
The device contains delicate electronic components. For this reason
it is possible that it can be disrupted by radio transmitting equipment
in the immediate vicinity. If the display
1
indicates a problem,
move such objects away from it.
Electrostatic discharges can lead to malfunctions. In such cases,
insert a thin, pointed object (e.g. the wire of a paperclip) into the
RESET hole
12
and push it in gently. The device will briefly activate
all the displays and will reset itself.
Q
Cleaning and care
The device should only be cleaned on the outside with a soft
dry cloth.
Q
Disposal
The packaging is made of environmentally friendly
materials, which may be disposed of through your local
recycling facilities.
Contact your municipal authorities for details on how to dispose of
your worn-out product.
44 GB/MT
Page 45

In the interest of the environment, do not throw out your
product with your household refuse. Take it to a suitable
centre where it can be disposed of properly. Information
on collection points and their opening hours can be obtained from your local authority.
Defective or used batteries must be recycled in accordance with
Directive 2006 / 66 / EC. Return batteries and / or the device via
the recycling facilities provided.
Never dispose of batteries in your household waste. They
may contain toxic heavy metals and are subject to haz-
Pb Hg
ardous waste regulations. The chemical symbols of the
heavy metals are: Cd = cadmium, Hg = mercury, Pb = lead. Therefore dispose of used batteries through your municipal collection site.
Warranty
The device has been manufactured to strict quality guidelines and
meticulously examined before delivery. In the event of product defects you have legal rights against the retailer of this product. Your
legal rights are not limited in any way by our warranty detailed
below.
The warranty for this device is 3 years from the date of purchase.
Should this device show any fault in materials or manufacture within
45 GB/MT
Page 46

three years from the date of purchase, we will repair or replace it at our choice - free of charge to you.
The warranty period begins on the date of purchase. Please keep
the original sales receipt in a safe location. This document is required as your proof of purchase. This warranty becomes void if
the device has been damaged or improperly used or maintained.
The warranty applies to faults in material or manufacture. This
warranty does not cover product parts subject to normal wear,
thus possibly considered consumables (e.g. batteries) or for damage to fragile parts, e.g. switches, rechargeable batteries or glass
parts.
EMC
46 GB/MT
Page 47

Bestimmungsgemäße Verwendung ...................... Seite 48
Teilebeschreibung ......................................................... Seite 48
Technische Daten ........................................................... Seite 49
Lieferumfang ................................................................... Seite 49
Allgemeine Sicherheitshinweise ............................. Seite 49
Sicherheitshinweise zu Batterien ............................ Seite 50
Vor der Inbetriebnahme ............................................ Seite 51
Gerät aufstellen ................................................................ Seite 52
Bedienung
Betriebsarten des Geräts ................................................. Seite 52
Modus Uhrzeit (CLOCK) ................................................. Seite 53
Modus Timer..................................................................... Seite 54
Memory-Funktion
Memory-Funktion einzelner Timer ................................... Seite 56
Memory-Funktion für alle Timer ....................................... Seite 56
Batterien wechseln ....................................................... Seite 57
Fehlerbehebung ............................................................. Seite 57
Reinigung und Pflege .................................................. Seite 58
Entsorgung ....................................................................... Seite 58
Garantie ............................................................................ Seite 59
47 DE/AT/CH
Page 48

Kurzzeitmesser
Q
Bestimmungsgemäße Verwendung
Der digitale Kurzzeitmesser ist dazu geeignet, den gleichzeitigen
Ablauf von verschiedenen Zeitintervallen akustisch anzuzeigen.
Darüber hinaus verfügt er über eine Uhrzeitanzeige sowie eine
Stoppuhr. Das Gerät ist nur für den Betrieb in geschlossenen Räumen
bei normaler Zimmertemperatur geeignet.
Q
Teilebeschreibung
1
Display
2
HR-Taste
3
MIN-Taste
4
Sec-Taste
5
CLOCK (TIMER)-Taste
6
START / STOP (MEMORY)-Taste
7
CLEAR-Taste
8
T3-Taste
9
T2-Taste
10
T1-Taste
11
Aufsteller
12
RESET-Loch
13
Magnet
14
Batteriefachdeckel
48 DE/AT/CH
Page 49

15
Uhrzeit
16
Hundertstelsekunden
17
Stoppuhr
18
Timer 1
19
Timer 2
20
Timer 3
Q
Technische Daten
Betriebsspannung: 3 V
Batterietyp: 2 x 1,5 V, Knopfzellen, Typ LR44
Abwärtszählbereich: 1s – 99 h: 59min: 59s
Aufwärtszählbereich: 99h: 59min: 59s
Q
Lieferumfang
1 digitaler Kurzzeitmesser
2 Batterien, Typ LR44 (bereits eingelegt)
1 Bedienungsanleitung
Allgemeine Sicherheitshinweise
Machen Sie sich vor der ersten Benutzung des Produkts mit allen
Bedien- und Sicherheitshinweisen vertraut! Händigen Sie alle Unterlagen bei Weitergabe des Produkts an Dritte ebenfalls mit aus!
49 DE/AT/CH
Page 50

Kontrollieren Sie das Produkt vor der Inbetriebnahme auf Be-
schädigungen! Nehmen Sie ein beschädigtes Produkt nicht in
Betrieb!
Setzen Sie das Gerät keiner Feuchtigkeit aus! Es kann hierdurch
beschädigt werden.
Dieses Gerät kann von Kindern ab 8 Jahren und darüber sowie
von Personen mit verringerten physischen, sensorischen oder
mentalen Fähigkeiten oder Mangel an Erfahrung und Wissen
benutzt werden, wenn sie beaufsichtigt oder bezüglich des
sicheren Gebrauchs des Gerätes unterwiesen wurden und die
daraus resultierenden Gefahren verstehen. Kinder dürfen nicht
mit dem Gerät spielen. Reinigung und Benutzerwartung dürfen
nicht von Kindern ohne Beaufsichtigung durchgeführt werden.
Q
Sicherheitshinweise zu Batterien
LEBENSGEFAHR! Batterien gehören nicht
in Kinderhände. Suchen Sie im Falle eines Verschluckens
sofort einen Arzt auf!
EXPLOSIONSGEFAHR! Laden Sie nicht auflad-
bare Batterien niemals wieder auf, schließen Sie
sie nicht kurz und / oder öffnen Sie sie nicht!
Werfen Sie Batterien niemals in Feuer oder Wasser!
Setzen Sie Batterien keiner mechanischen Belastung aus!
50 DE/AT/CH
Page 51

Gefahr des Auslaufens der Batterien
Im Falle eines Auslaufens der Batterien entfernen Sie diese
sofort aus dem Gerät, um Beschädigungen zu vermeiden!
Vermeiden Sie den Kontakt mit Haut, Augen und Schleimhäuten!
Spülen Sie bei Kontakt mit Batteriesäure die betroffenen Stellen
sofort mit klarem Wasser und suchen Sie umgehend einen
Arzt auf!
Verwenden Sie nur Batterien des gleichen Typs! Alte Batterien
nicht mit neuen mischen!
Vermeiden Sie extreme Bedingungen und Temperaturen, die
auf Batterien einwirken können z. B. auf Heizkörpern!
Entfernen Sie die Batterien, wenn sie längere Zeit nicht ver-
wendet worden sind, aus dem Gerät!
Gefahr der Gerätebeschädigung
Ausschließlich den angegebenen Batterietyp verwenden!
Achten Sie beim Einlegen auf die richtige Polarität! Diese wird
im Batteriefach angezeigt!
Reinigen Sie Batterie- und Gerätekontakt vor dem Einlegen
falls erforderlich!
Entfernen Sie verbrauchte Batterien umgehend aus dem Gerät!
Q
Vor der Inbetriebnahme
Entfernen Sie vor der Inbetriebnahme die Schutzfolie vom
Display
1
des Geräts.
51 DE/AT/CH
Page 52

Unter dem Batteriefachdeckel 14 ragt ein Isolierstreifen aus
dem Batteriefach.
Öffnen Sie den Batteriefachdeckel, indem Sie ihn in Pfeilrichtung
nach außen schieben. Entnehmen Sie den Isolierstreifen.
Schließen Sie den Batteriefachdeckel wieder.
Ihr digitaler Kurzzeitmesser ist nun betriebsbereit.
Gerät aufstellen
Sie können das Gerät auf waagerechten, ebenen Oberflächen
aufstellen, indem Sie den Aufsteller
Abb. B). Alternativ können Sie das Gerät mit dem Magneten
11
nach unten klappen (siehe
13
an magnetisierbaren Oberflächen befestigen.
Q
Bedienung
Betriebsarten des Geräts
Der digitale Kurzzeitmesser verfügt über zwei Betriebsarten, welche
oben im Display
Drücken Sie die CLOCK (TIMER)-Taste 5, um zwischen den
Betriebsarten Uhrzeit (CLOCK) und Timer (Anzeige TIMER)
hin- und herzuschalten.
1
angezeigt werden.
52 DE/AT/CH
Page 53

Modus Uhrzeit (CLOCK)
Im Uhrzeit-Modus wird im oberen Feld des Displays 1 die Uhrzeit angezeigt. Die beiden unteren Felder zeigen die Zeit der
Stoppuhr an (Abb. C).
Uhrzeit einstellen
Halten Sie im Uhrzeit-Modus die CLOCK (TIMER)-Taste 5
3 Sekunden lang gedrückt. Das oberste Feld des Displays
blinkt.
Drücken Sie die SEC-Taste 4, die MIN-Taste 3 bzw. die
HR-Taste
Minute (MIN) bzw. Stunde (HR) schrittweise zu verändern.
TIPP: Halten Sie die entsprechende Taste gedrückt, um zur
schnelleren Einstellung einen automatischen Vorlauf der Zahlen
zu erzeugen.
Drücken Sie kurz die CLOCK (TIMER)-Taste, um die eingestellte
Uhrzeit zu bestätigen. Die Uhrzeit wird ohne Blinken angezeigt.
Stoppuhr aktivieren
Drücken Sie im Uhrzeit-Modus die START / STOP (MEMORY)-
Taste
und zeigt die abgelaufenen Sekunden, Minuten und Stunden
an. Im mittleren Feld des Displays werden die Hundertstelsekunden gezählt.
Drücken Sie die START / STOP (MEMORY)-Taste, um die Stopp-
uhr anzuhalten bzw. das Weiterzählen wieder zu aktivieren.
2
, um die angezeigten Werte für Sekunde (SEC),
6
. Im unteren Teil des Displays 1 startet die Stoppuhr
1
53 DE/AT/CH
Page 54

Nachdem Sie die Stoppuhr angehalten haben, können Sie
die Stoppuhr durch Drücken der CLEAR-Taste
7
wieder auf
0 stellen.
Modus Timer
Im Modus Timer erscheinen 3 Zeitfelder. In allen drei Feldern wird
ein Timer bereitgestellt (Abb. D).
Gewünschte Zeit einstellen
Halten Sie die T1-Taste 10 3 Sekunden lang gedrückt. Das
Feld neben der Taste blinkt und signalisiert auf diese Art, dass
eine Zeit eingestellt werden kann.
Drücken Sie die SEC-Taste 4, die MIN-Taste 3 bzw. die
HR-Taste
Minute (MIN) bzw. Stunde (HR) schrittweise zu verändern.
TIPP: Halten Sie die entsprechende Taste gedrückt, um zur
schnelleren Einstellung einen automatischen Vorlauf der Zahlen
zu erzeugen.
Drücken Sie kurz die T1-Taste, um Ihre Einstellung zu bestätigen.
Das Display des Timers 1 hört auf zu blinken und zeigt die
eingestellte Zeit an.
2
, um die angezeigten Werte für Sekunde (SEC),
Stellen Sie die Timer neben der T2-Taste
auf die gleiche Art ein.
54 DE/AT/CH
9
bzw. der T3-Taste 8
Page 55

Eingestellten Timer aktivieren
Der Kurzzeitmesser befindet sich im Modus Timer und der gewählte
Timer zeigt die gewählte Zeit an.
Drücken Sie erneut die T1-Taste 10, um den obersten Timer zu
aktivieren. Der Zähler zählt nun abwärts bis auf 0. Nach
Ablauf der eingestellten Zeit ertönt für die Dauer von einer
Minute ein Signalton. Das Display des Timers blinkt, oben
links über dem Timer blinkt die Anzeige TIME’S UP („die Zeit
ist abgelaufen“) und der Timer zählt aufwärts.
Drücken Sie die T1-Taste oder die START / STOP (MEMORY)-
6
Taste
, um den Zählvorgang des Timers und das Tonsignal
zu stoppen.
Drücken Sie die CLEAR-Taste 7, um den Zähler wieder auf
0 zu setzen.
Stellen Sie die Timer neben der T2-Taste
9
bzw. der T3-Taste 8
auf die gleiche Art ein.
Ablauf eines Timers unterbrechen
Drücken Sie die Taste neben dem jeweiligen Timer (T1-, T2-
bzw. T3-Taste), um den Zeitablauf des jeweiligen Zählers
jederzeit anzuhalten und auch wieder zu aktivieren.
55 DE/AT/CH
Page 56

Q
Memory-Funktion
Memory-Funktion einzelner Timer
Jeder Timer speichert die zuletzt gewählte Zeit. Durch Drücken der
T1-, T2- bzw. T3-Taste
für den jeweiligen Timer zuletzt gewählte Zeit im Display
gerufen.
Drücken Sie die jeweilige T1-, T2- bzw. T3-Taste erneut, um
den dieser Taste zugehörigen Timer zu aktivieren.
Drücken Sie die jeweilige T1-, T2- bzw. T3-Taste, um das
Tonsignal zu stoppen.
10, 9
, bzw. 8 wird im Modus Timer die
1
auf-
Memory-Funktion für alle Timer
Drücken Sie die START / STOP (MEMORY)-Taste 6, um für
alle drei Timer die zuletzt gewählten Zeiten aufzurufen.
Drücken Sie die START / STOP (MEMORY)-Taste erneut, um
alle 3 Zeiten gleichzeitig zu starten. Das Tonsignal kann nun
wahlweise über die jeweilige T-Taste (T1, T2, T3) oder die
START / STOP (MEMORY)-Taste unterbrochen werden.
Drücken Sie nach Ablauf aller 3 Zeiten die CLEAR-Taste 7,
um nacheinander die Ablaufzähler 1 bis 3 auf 0 zu setzen.
56 DE/AT/CH
Page 57

Q
Batterien wechseln
Hinweis: Wenn die Lesbarkeit des Displays 1 aufgrund des
schwächer werdenden Kontrastes nachlässt, sind die eingelegten
Batterien aufgebraucht und müssen getauscht werden.
Öffnen Sie den Batteriefachdeckel 14 auf der Rückseite des
Geräts, indem Sie ihn in Pfeilrichtung nach außen schieben.
Entnehmen Sie die alten Batterien. Verwenden Sie einen dünnen
spitzen Gegenstand, um die Batterien aus dem Batteriefach
zu hebeln.
Hinweis: Achten Sie beim Einsetzen der neuen Batterien auf
die richtige Polarität. Diese wird über dem Batteriefach
angezeigt.
Schließen Sie den Batteriefachdeckel wieder, sodass er hörbar
einrastet.
Q
Fehlerbehebung
Das Gerät enthält empfindliche elektronische Bauteile. Daher ist es
möglich, dass es durch Funkübertragungsgeräte in unmittelbarer
Nähe gestört wird. Treten Fehlanzeigen im Display
1
auf, entfernen
Sie solche Geräte aus der Umgebung des Gerätes.
Elektrostatische Entladungen können zu Funktionsstörungen führen.
Führen Sie in solchen Fällen einen dünnen, spitzen Gegenstand
(z. B. den Draht einer Büroklammer) in das RESET-Loch
12
ein und
57 DE/AT/CH
Page 58

drücken Sie leicht dagegen. Das Gerät aktiviert dann kurzzeitig
alle Anzeigen des Displays und stellt sich neu ein.
Q
Reinigung und Pflege
Reinigen Sie das Gerät nur äußerlich mit einem weichen
trockenen Tuch.
Q
Entsorgung
Die Verpackung besteht aus umweltfreundlichen
Materialien, die Sie über die örtlichen Recyclingstellen
entsorgen können.
Möglichkeiten zur Entsorgung des ausgedienten Produkts erfahren
Sie bei Ihrer Gemeinde- oder Stadtverwaltung.
Werfen Sie Ihr Produkt, wenn es ausgedient hat, im
Interesse des Umweltschutzes nicht in den Hausmüll,
sondern führen Sie es einer fachgerechten Entsorgung zu.
Über Sammelstellen und deren Öffnungszeiten können
Sie sich bei Ihrer zuständigen Verwaltung informieren.
Defekte oder verbrauchte Batterien müssen gemäß Richt linie
2006 / 66 / EC recycelt werden. Geben Sie Batterien und / oder
das Gerät über die angebotenen Sammeleinrichtungen zurück.
58 DE/AT/CH
Page 59

Batterien dürfen nicht über den Hausmüll entsorgt werden.
Sie können giftige Schwermetalle enthalten und unter-
Pb Hg
liegen der Sondermüllbehandlung. Die chemischen
Symbole der Schwermetalle sind wie folgt: Cd = Cadmium, Hg =
Quecksilber, Pb = Blei. Geben Sie deshalb verbrauchte Batterien
bei einer kommunalen Sammelstelle ab.
Garantie
Das Produkt wurde nach strengen Qualitätsrichtlinien sorgfältig
produziert und vor Anlieferung gewissenhaft geprüft. Im Falle von
Mängeln dieses Produkts stehen Ihnen gegen den Verkäufer des
Produkts gesetzliche Rechte zu. Diese gesetzlichen Rechte werden
durch unsere im Folgenden dargestellte Garantie nicht eingeschränkt.
Sie erhalten auf dieses Gerät 3 Jahre Garantie ab Kaufdatum. Die
Garantiefrist beginnt mit dem Kaufdatum. Bitte bewahren Sie den
Original Kassenbon gut auf. Diese Unterlage wird als Nachweis
für den Kauf benötigt.
Tritt innerhalb von drei Jahren ab dem Kaufdatum dieses Produkts
ein Material- oder Fabrikationsfehler auf, wird das Produkt von uns
– nach unserer Wahl – für Sie kostenlos repariert oder ersetzt.
Diese Garantie verfällt, wenn das Produkt beschädigt, nicht sachgemäß benutzt oder gewartet wurde.
59 DE/AT/CH
Page 60

Die Garantieleistung gilt für Material- oder Fabrikationsfehler. Diese
Garantie erstreckt sich nicht auf Produktteile, die normaler Abnutzung ausgesetzt sind (z. B. Batterien) und daher als Verschleißteile
angesehen werden können oder für Beschädigungen an zerbrechlichen Teilen, z. B. Schalter, Akkus oder die aus Glas gefertigt sind.
EMC
60 DE/AT/CH
Page 61

OWIM GmbH & Co. KG
Stiftsbergstraße 1
D-74167 Neckarsulm
Model-No.: Z31793
Version: 11 / 2013
Estado de las informaciones · Versione delle
informazioni · Last Information Update
Stand der Informationen: 11 / 2013
Ident.-No.: Z31793112013-ES / IT
IAN 94702
 Loading...