

ASUS WL-100W User Manual

Wireless Local Area Network Card
®
ACT
LINK
®
WL-100W
(For SuperSpeed N Wireless Network)
User Manual
E2655/ June 2006

Copyright Information
No part of this manual, including the products and software described in it,
may be reproduced, transmitted, transcribed, stored in a retrieval system,
or translated into any language in any form or by any means, except
documentation kept by the purchaser for backup purposes, without the
express written permission of ASUSTeK COMPUTER INC. (“ASUS”).
ASUS PROVIDES THIS MANUAL “A S I S ” WI T H O UT WA R RA N T Y
OF ANY KIND, EITHER EXPRESS O R IMPL IED, INCLUDING B UT
NOT LIMITED TO THE IMPLIED WARRANTIES OR CONDITIONS OF
MERCHANTABILITY OR FITNESS FOR A PARTICULAR PURPOSE. IN
NO EVENT SHALL ASUS, ITS DIRECTORS, OFFICERS, EMPLOYEES
OR AGENTS BE LIABLE FOR ANY INDIRECT, SPECIAL, INCIDENTAL,
OR CON S EQ UE NT IA L D A MA GE S (INCL U D ING DAM A GE S FO R
LOSS OF PROFITS, LOSS OF BUSINESS, LOSS OF USE OR DATA,
INTERRUPTION OF BUSINESS AND THE LIKE), EVEN IF ASUS HAS
BEEN ADVISED OF THE POSSIBILITY OF SUCH DAMAGES ARISING
FROM ANY DEFECT OR ERROR IN THIS MANUAL OR PRODUCT.
Product warranty or service will not be extended if: (1) the product is repaired,
modied or altered, unless such repair, modication of alteration is authorized
in writing by ASUS; or (2) the serial number of the product is defaced or
missing.
Products and corporate names appearing in this manual may or may not be
registered trademarks or copyrights of their respective companies, and are
used only for identication or explanation and to the owners’ benet, without
intent to infringe.
SPECIFICATIONS AND INFORMATION CONTAINED IN THIS MANUAL
ARE FURNISHED FOR INFORMATIONAL USE ONLY, AND ARE SUBJECT
TO CHANGE AT ANY TIME WITHOUT NOTICE, AND SHOULD NOT
BE CONSTRUED AS A COMMITMENT BY ASUS. ASUS ASSUMES NO
RESPONSIBILITY OR LIABILITY FOR ANY ERRORS OR INACCURACIES
THAT MAY APPEAR IN THIS MANUAL, INCLUDING THE PRODUCTS AND
SOFTWARE DESCRIBED IN IT.
Copyright © 2005 ASUSTeK COMPUTER INC. All Rights Reserved.
2 ASUS WLAN Card

Contact Information
ASUSTeK COMPUTER INC.
Company address: 15 Li-Te Road, Beitou, Taipei 11259
General (tel): +886-2-2894-3447
Web site address: www.asus.com.tw
General (fax): +886-2-2894-7798
General email: info@asus.com.tw
Technical support
General support (tel): +886-2-2894-3447
Online support: http://support.asus.com
ASUS COMPUTER INTERNATIONAL (America)
Company address: 44370 Nobel Drive, Fremont, CA 94538, USA
General (fax): +1-510-608-4555
Web site address: usa.asus.com
Technical support
General support (tel): +1-502-995-0883
Online support: http://support.asus.com
Notebook (tel): +1-510-739-3777 x5110
Support (fax): +1-502-933-8713
ASUS COMPUTER GmbH (Germany & Austria)
Company address: Harkort Str. 25, D-40880 Ratingen, Germany
General (tel): +49-2102-95990
Web site address: www.asus.com.de
General (fax): +49-2102-959911
Online contact: www.asus.com.de/sales
Technical support
Component support: +49-2102-95990
Online support: http://support.asus.com
Notebook support: +49-2102-959910
Support (fax): +49-2102-959911
ASUS WLAN Card 3

Table of Contents
1. Introduction ..............................................................................5
Package contents ..................................................................................5
Features .................................................................................................5
2. Installation ................................................................................6
System Requirements ...........................................................................6
Installation Procedures ..........................................................................6
Installing the WLAN utilities and driver .....................................................6
Reading the WLAN Status Indicators .......................................................7
One Touch Wizard ....................................................................................8
Conguring with the WLAN utility (Infrastructure) ....................................9
Conguring with the WLAN utility (Ad Hoc) ............................................10
3. Software Reference ................................................................11
ASUS WLAN Control Center ...............................................................11
Wireless Settings Utility .......................................................................13
Status - Status ........................................................................................13
Status - Connection ................................................................................15
Status - IP Cong ...................................................................................16
Status - Ping ...........................................................................................16
Cong - Basic .........................................................................................17
Cong - Advanced ..................................................................................18
Cong - Encryption .................................................................................19
Cong - Authentication ...........................................................................22
Survey - Site Survey ...............................................................................22
About - Version Info ................................................................................23
Link State ...............................................................................................24
Exit Wireless Settings .............................................................................24
Windows® XP Wireless Options ...........................................................25
4. Troubleshooting .....................................................................27
5. Glossary ..................................................................................29
6. Appendix .................................................................................37
4 ASUS WLAN Card

Chapter 1 - Introduction
Package contents
Check the following items in your ASUS Cardbus Wireless LAN Adapter
package. Contact your retailer if any item is damaged or missing.
1 x ASUS Wireless LAN Adapter (WL-100W)
1 x Support CD
1 x Quick Start Guide
Features
Standard PCMCIA slot Type II, 802.11n Draft, OFDM, DSSS.
Supports Infrastructure and Ad-hoc networks.
Compatible with IEEE 802.11b and 802.11g devices.
Chapter 1
Introduction
ASUS WLAN Card 5
Installation
Chapter 2
Chapter 2 - Installation
2. Installation
System Requirements
To begin using the WLAN Card, you must meet the following minimum
requirements:
• Windows XP/2000
• Standard PCMCIA slot Type II or Type III for notebook computer
• 128MB system memory or larger
• 750MHz processor or higher
Important: Install the WLAN card utilities before inserting the WLAN Card
into your computer.
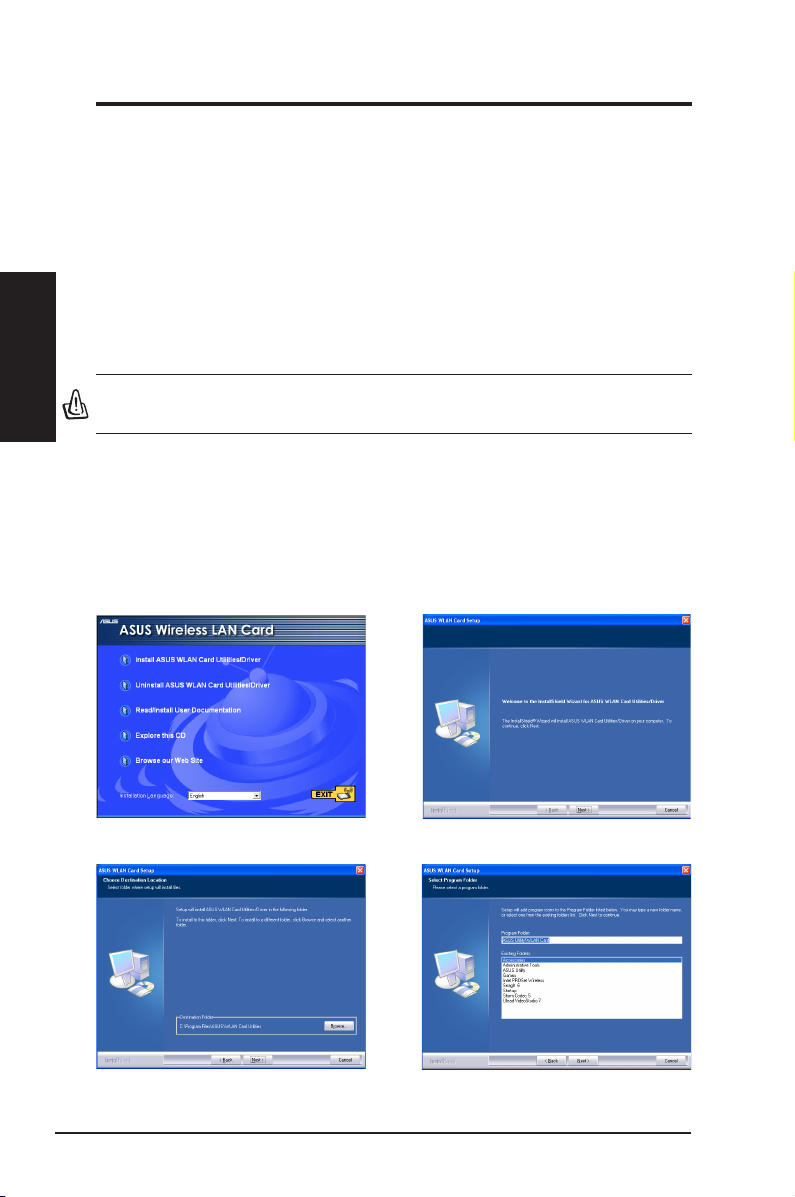
Installing the WLAN utilities and driver
Follow these instructions to install the WLAN card utilities and driver. Insert the
support CD into your optical drive. If autorun is enabled in your computer, the
CD automatically displays the utility menu. Clickmatically displays the utility menu. Click
Utilities/Driver
. If autorun is disabled, double-click SETUP.EXE in the root
directory of the CD.
Install ASUS WLAN Card
WLAN Card Utilities/Driver.
3. Click
Folder or click Browse to select another folder.
6 ASUS WLAN Card
to use the default Destination
Next
Install
2. Click
4. Click
on the Welcome screen.1. Select your language and click
Next
to creat short cut.
Next
Chapter 2 - Installation
ACT
LINK
®
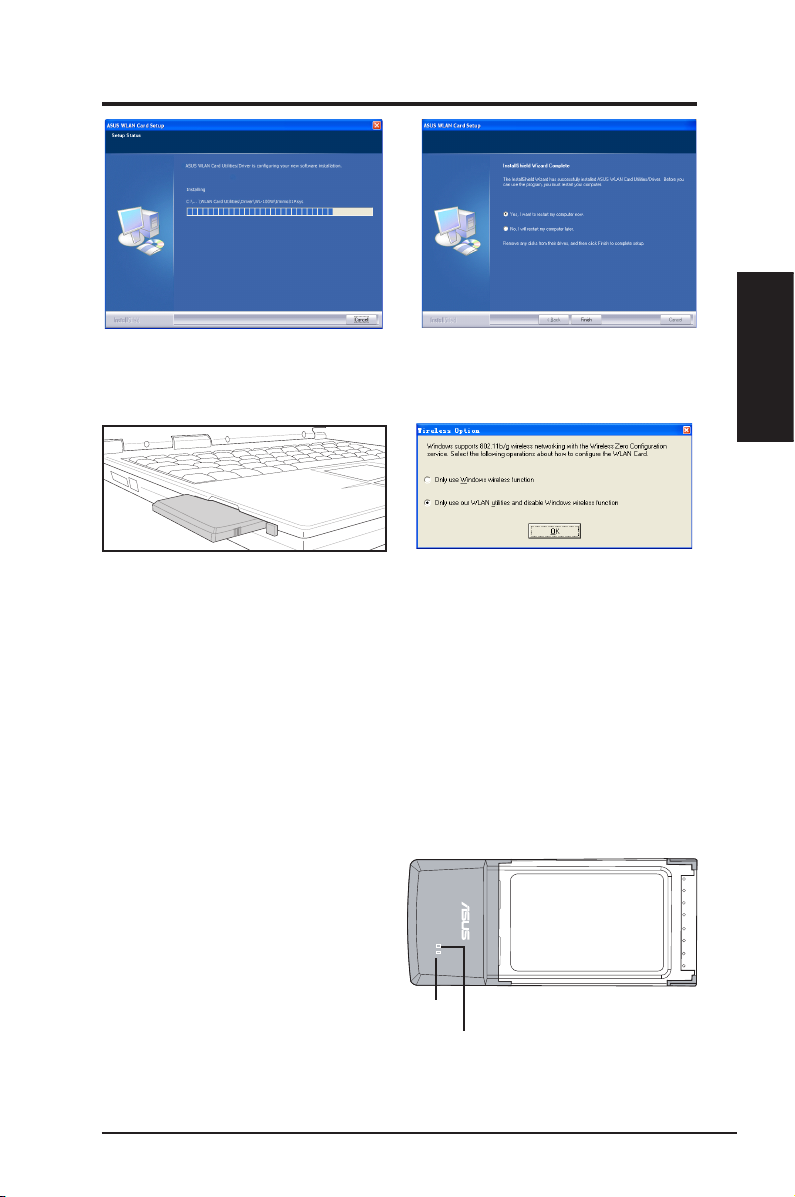
5. The installation process takes several
seconds.
7. Carefully insert the WLAN card into your
computer ’s PCMCIA slot. Windows will
automatically detect and configure the
WLAN Card using the utilities and drivers
installed in the previous steps.
6. When Setup is complete, click
exit the installation wizard and restart the
computer.
8. Windows XP users: When the program
is laun c h ed fo r th e fir s t ti m e (d u ring
Windows re s t a rt ) , yo u are asked to
choose one utility to congure the WLAN
Card. Select "Only use our WLAN utilities
and disable Windows wireless function".
Finish
Reading the WLAN status indicators
The device comes with two LEDs that indicate the status of the WLAN Card.
ACT LED
Blinking:
OFF:
LINK LED
ON:
OFF:
Transmitting data; the blinking speed indicates the link speed.
Radio off or Card is disabled.
Connected to wireless device.
No wireless connection.
to
Chapter 2
Installation
ACT
LINK
ASUS WLAN Card 7
Installation
Chapter 2
Chapter 2 - Installation
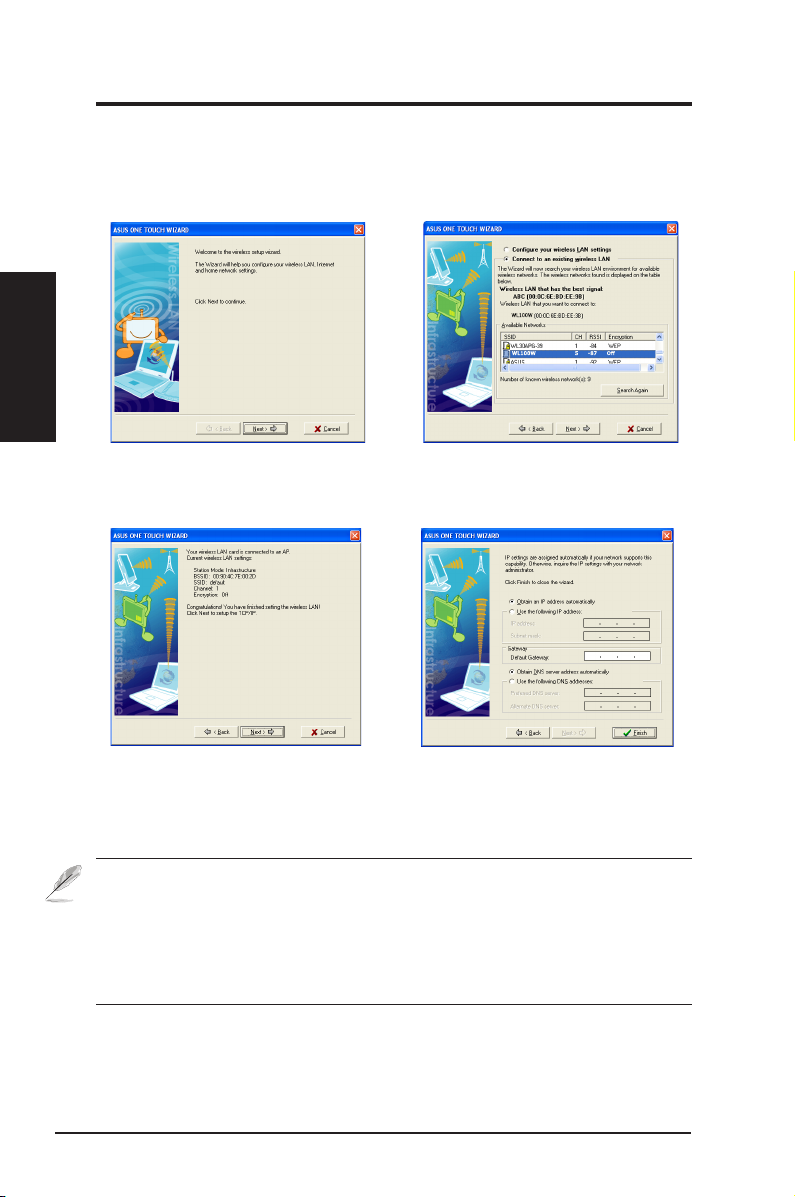
One Touch Wizard
Use One Touch Wizard to setup your wireless connection with an existing
wireless LAN.
1. Launch O ne Touch Wizard f ro m Start
me n u a n d click
wireless network.
3. Connection is complete. Click
setup the IP address for the WLAN card.
to s e t up yo u r
Ne x t
Next
to
2. Select an AP from the
eld, then click
4. C h o ose to obt a i n an IP a d dress o r to
assign static address manually for your
WLAN card. When IP setting is complete,
click
to exit the One Touch Wizard.
Finish
Available Networks
.
Next
Note: If the access point you want to connect has set up encryption
policies, you must congure the same encryption on your WLAN Card.
Select "Configure your wireless LAN settings" radio button in step 2
and make the settings accordingly. When the encryption settings are
complete, you can launch the One Touch Wizard once again from the Start
menu to set up the connection with your AP.
8 ASUS WLAN Card
Chapter 2 - Installation
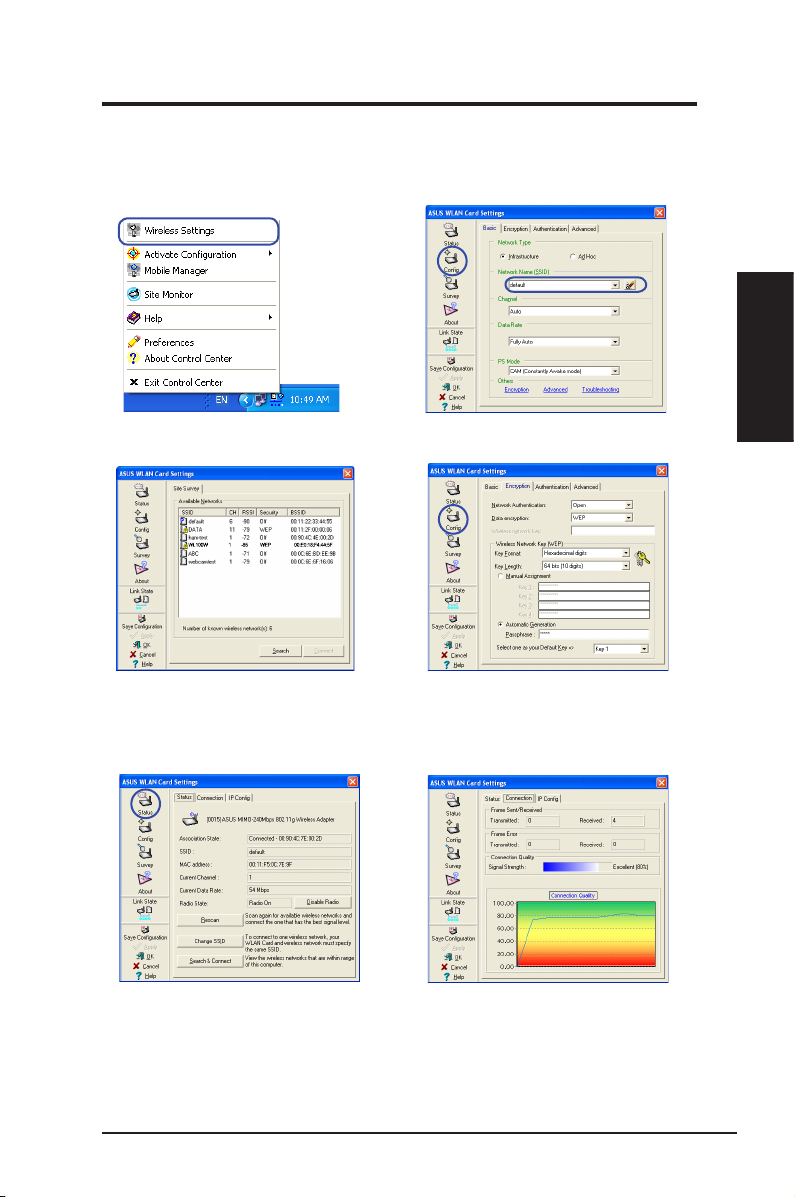
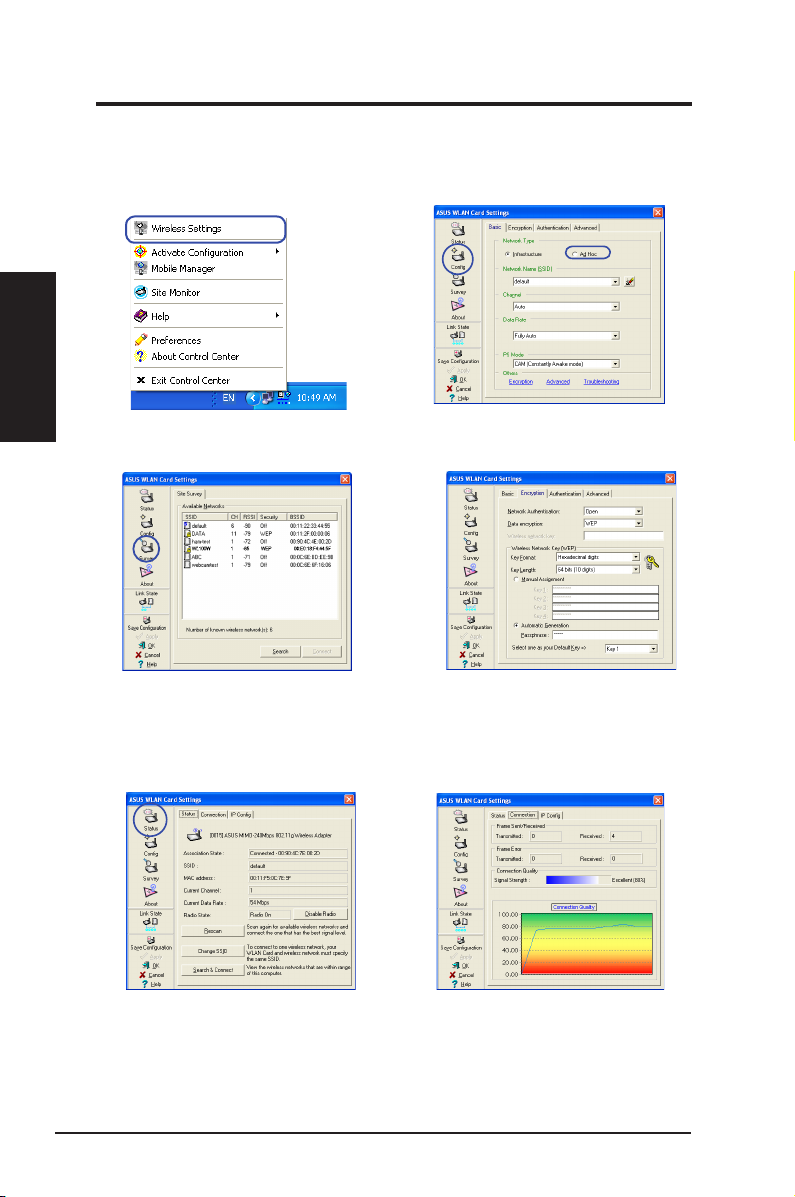
Conguring with the WLAN utility (Infrastructure)
Use ASUS WLAN utility to get connected with an existing wireless network.
1. Right-click the wireless connection icon
and select
Wireless Settings.
2. Check the
(network name) to that of your wireless AP.
page to set the
Config
SSID
Chapter 2
Installation
3. Use
Site Survey
SSID of your access point(s).
5. C hec k the
as s o ci ati o n st a t e. If con n e cti o n is
established, the box shows “Connected xx:xx:xx:xx:xx:xx”.
if you don’t know the
pag e to se e th e
St a t us
ASUS WLAN Card 9
4. Enc rypti on setti ngs must matc h tho se
at the acces s poi nt. Ask your netw ork
administrator about settings if necessary.
Click
6. C heck the
signal strength. Click
to activate the settings.
Apply
Conn ection
OK
tab to s ee the
to exit the utility.
Installation
Chapter 2
Chapter 2 - Installation
Conguring with the WLAN utility (Ad Hoc)
The WLAN card supports Ad Hoc mode which allows communication between
wireless stations without an AP.
1. Right-click the wireless connection icon
and select
3. Click the
Hoc nodes. Select the node you want to
communicate with and press
Wireless Settings.
button to scan for Ad
Survey
Connect
.
2. Click the
Card to
4. If the encryption settings of your WLAN
Card are different from those of the other
Ad Hoc nodes, you are prompted to make
the encryption of the two nodes identical.
Click
Apply
button and set the WLAN
Cong
connection mode.
Ad Hoc
to activate the settings.
5. Check the
state. If connection is established, the box
shows “Connected - xx:xx:xx:xx:xx:xx”.
page to see the association
Status
6. Check the
signal strength. Click
10 ASUS WLAN Card
Connection
OK
tab to see the
to exit the utility.
Chapter 3 - Software Reference
3. Software Reference
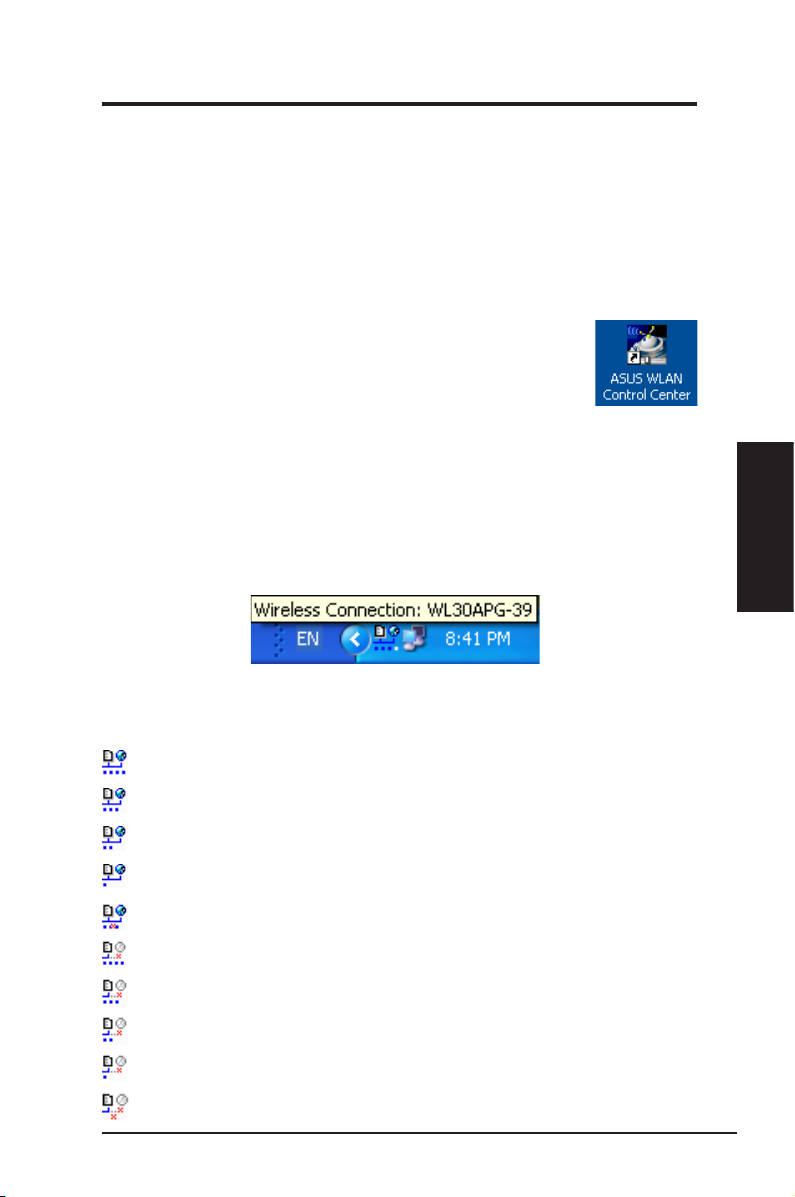
ASUS WLAN Control Center
ASUS WLAN Control Center is an application which makes it easier to launch
WLAN applications and activate network location settings. The WLAN Control
Center starts automatically when system boots. When WLAN Control Center is
running, you can see a Control Center icon on the Windows taskbar.
Starting the Control Center
• Select
• Double-click the
ASUS WLAN Control Center
menu, or
ASUS WLAN Control Center
Using the Control Center
The Control Center taskbar icon displays the following information:
• Link quality of the WLAN Card (Excellent, Good, Fair, Poor, Not Linked)
• Whether the WLAN Card is connected to a network (Blue: Connected,
Gray: Not Connected)
in Windows Start
icon on the desktop.
Chapter 3
Software Reference
Taskbar Icon and Status
Wireless Status Icons (on the taskbar)
Excellent
Good
Fair
Poor
Not linked
Excellent
Good
Fair
Poor
Not linked
link quality and
link quality and
link quality and
link quality and
but
connected to Internet
link quality but
link quality but
link quality but
link quality but
and
not connected to Internet
not connected to Internet
connected to Internet
connected to Internet
connected to Internet
connected to Internet
(Infrastructure)
not connected to Internet
not connected to Internet
not connected to Internet
ASUS WLAN Card 11
(Infrastructure)
(Infrastructure)
(Infrastructure)
(Infrastructure)
(Infrastructure)
(Infrastructure)
(Infrastructure)
(Infrastructure)
(Infrastructure)

Chapter 3 - Software Reference
Taskbar icon - Right-click menu
Right-click the taskbar icon to show the following menu items:
•
Wireless Settings
•
Activate Conguration
•
Mobile Manager
•
Site Monitor
•
Preferences
create a Control Center shortcut on the desktop and decide whether to
start Control Center when system boots.
•
About Control Center
Software Reference
•
– Closes the Control Center program.
Exit
– Launches Wireless Settings application.
– Allows you to choose a preset prole.
– Launches Mobile Manager application.
– Launches the Site Monitor application.
– Customizes the Control Center program. You can
-Shows the version of Control Center.
Chapter 3
Taskbar icon - Left-click menu
Le f t - click the taskbar ic o n to sh o w the
following menu items:
• Wi r e l e s s Radio On
wireless radio ON.
•
Wireless Radio Off
wireless radio OFF.
•
Se a rch & C o nn e ct
properties of available access points.
•
Wireless Option
Zero Conguration (WZC) service or ASUS utilities to congure your
WLAN card.
– Turns th e
– Turn s the
– Vi ew t h e
(Windows® XP only) – Choose Windows® Wireless
Taskbar Left-Click Menu
Taskbar Icon - Launch Wireless Settings
Double-click the taskbar icon to launch the Wireless Settings utility. to launch the Wireless Settings utility.
12 ASUS WLAN Card
 Loading...