

ASUS WL-100g Deluxe User Manual
Wireless Local Area Network Card
®
WL-100g Deluxe
(For 802.11g & 802.11b Wireless Networks)
LNK
AIR
User’s Manual
E1806 / Sep 2004

Copyright Information
No part of this manual, including the products and software described in it,
may be reproduced, transmitted, transcribed, stored in a retrieval system, or
translated into any language in any form or by any means, except documentation
kept by the purchaser for backup purposes, without the express written
permission of ASUSTeK COMPUTER INC. (“ASUS”).
ASUS PROVIDES THIS MANUAL “AS IS” WITHOUT WARRANTY OF
ANY KIND, EITHER EXPRESS OR IMPLIED, INCLUDING BUT NOT
LIMITED TO THE IMPLIED WARRANTIES OR CONDITIONS OF
MERCHANT ABILITY OR FITNESS FOR A P AR TICULAR PURPOSE. IN
NO EVENT SHALL ASUS, ITS DIRECTORS, OFFICERS, EMPLOYEES
OR AGENTS BE LIABLE FOR ANY INDIRECT , SPECIAL, INCIDENT AL,
OR CONSEQUENTIAL DAMAGES (INCLUDING DAMAGES FOR LOSS
OF PROFITS, LOSS OF BUSINESS, LOSS OF USE OR DATA,
INTERRUPTION OF BUSINESS AND THE LIKE), EVEN IF ASUS HAS
BEEN ADVISED OF THE POSSIBILITY OF SUCH DAMAGES ARISING
FROM ANY DEFECT OR ERROR IN THIS MANUAL OR PRODUCT.
Product warranty or service will not be extended if: (1) the product is repaired,
modified or altered, unless such repair, modification of alteration is authorized
in writing by ASUS; or (2) the serial number of the product is defaced or
missing.
Products and corporate names appearing in this manual may or may not be
registered trademarks or copyrights of their respective companies, and are used
only for identification or explanation and to the owners’ benefit, without intent
to infringe.
SPECIFICA TIONS AND INFORMA TION CONT AINED IN THIS MANUAL
ARE FURNISHED FOR INFORMATIONAL USE ONLY, AND ARE
SUBJECT TO CHANGE A T ANY TIME WITHOUT NOTICE, AND SHOULD
NOT BE CONSTRUED AS A COMMITMENT BY ASUS. ASUS ASSUMES
NO RESPONSIBILITY OR LIABILITY FOR ANY ERRORS OR
INACCURACIES THAT MAY APPEAR IN THIS MANUAL, INCLUDING
THE PRODUCTS AND SOFTWARE DESCRIBED IN IT.
Copyright © 2004 ASUSTeK COMPUTER INC. All Rights Reserved.
2 ASUS WLAN Card

Copyright Information
ASUSTeK COMPUTER INC. (Asia-Pacific)
Company Address: 15 Li-Te Road, Peitou, Taipei 112
General Telephone: +886-2-2894-3447
General Fax: +886-2-2894-7798
Web Site Address: www.asus.com.tw
General Email: info@asus.com.tw
Technical Support
MB/Others (Tel): +886-2-2890-7121
Notebook (Tel): +886-2-2894-3447
Desktop/Server (Tel): +886-2-2890-7123
Networking (Tel): +886-2-2890-7902
Support Fax: +886-2-2890-7698
ASUS COMPUTER INTERNATIONAL (America)
Company Address: 44370 Nobel Drive, Fremont, CA 94538, USA
General Fax: +1-510-608-4555
Web Site Address: usa.asus.com
General Email: tsd@asus.com
Technical Support
General Support: +1-502-995-0883
Notebook (Tel): +1-510-739-3777 x5110
Support Email: notebooktsd@asus.com
Support Fax: +1-502-933-8713
ASUS COMPUTER GmbH (Germany & Austria)
Company Address: Harkort Str. 25, D-40880 Ratingen, Germany
General Telephone: +49-2102-95990
General Fax: +49-2102-959911
Web Site Address: www.asuscom.de
Online Contact: www.asuscom.de/sales
Technical Support
Component Support: +49-2102-95990
Notebook Support: +49-2102-959910
Online Support: www.asuscom.de/support
Support Fax: +49-2102-959911
ASUS WLAN Card 3

Table of Contents
1. Introduction ............................................................................. 7
Overview .............................................................................................. 7
2. Installation ............................................................................... 8
System Requirements .......................................................................... 8
Installation Procedures......................................................................... 9
Installing the WLAN utilities and driver ........................................... 9
Orientating the Antenna ................................................................ 10
Reading the WLAN Status Indicators ........................................... 11
One Touch Wizard (new wireless LAN) ........................................ 12
One Touch Wizard (existing LAN)................................................. 13
Configuring the WLAN utility......................................................... 14
Soft AP (Windows XP Only) ............................................................... 15
3. Software Reference .............................................................. 19
Chapter Overview............................................................................... 19
Windows XP Wireless Options ..................................................... 19
WLAN Control Center......................................................................... 20
Wireless Settings Utility...................................................................... 23
Status - Status Tab ....................................................................... 23
Status - Connection ...................................................................... 26
Status - IP Config.......................................................................... 27
Config - Basic ............................................................................... 28
Config - Encryption ....................................................................... 30
Status - Advanced......................................................................... 33
Survey - Site Survey ..................................................................... 34
Ping............................................................................................... 35
About - Version Info Tab ............................................................... 36
Link State...................................................................................... 37
Exit Wireless Settings ................................................................... 37
Ad Hoc................................................................................................ 38
Windows XP Wireless Properties ....................................................... 40
4 ASUS WLAN Card

Table of Contents
4. Troubleshooting.................................................................... 42
5. Glossary................................................................................. 44
6. Safety Information................................................................. 52
Federal Communications Commission............................................... 52
FCC Radio Frequency Interference Requirements ...................... 53
FCC RF Exposure Guidelines (Access Points) ............................ 53
FCC RF Exposure Guidelines (Wireless Cards)........................... 54
Canadian Department of Communications ........................................ 54
Operation Channel for Different Domains .......................................... 54
France Restricted Frequency Band.................................................... 55
ASUS WLAN Card 5

6 ASUS WLAN Card

1. Introduction
Chapter 1 - Introduction
Overview
Thank you for purchasing the ASUS WLAN Card. The ASUS WLAN Card is
a PCMCIA compliant “wireless” network interface card (NIC) for any computer
equipped with a PC Card slot (available mainly in Notebook PCs).
The ASUS WLAN Card is designed to be fully compliant with both the
IEEE802.11b wireless local area network (W ireless LAN) standards. As a result
of the completion of the standard, the interoperability of W ireless LAN products
among multiple manufacturers will be guaranteed. The ASUS WLAN Card
product provides high-speed, standards-based W ireless LAN solutions.
The ASUS WLAN Card configuration utility is a user-friendly application that
helps you quickly setup multiple roaming nodes using the ASUS WLAN Card.
You can even export the configuration settings to a file and import them to
other computers for fast multiple installations using ASUS Mobile Manager.
Wireless LANs are complementary extensions to existing wired LANs, of fering
complete mobility while maintaining continuous network connectivity to both
corporate and home Intranets. They add a new level of convenience for LAN
users. PC users stay connected to the network anywhere throughout a building
without being bound by a LAN wires. This is accomplished through the use of
ASUS WLAN Access Points or ASUS WLAN Home Gateways. ASUS WLAN
Home Gateways with built-in Internet gateway capability , allows your family
to share a broadband Modem and one ISP account simultaneously from dif ferent
rooms without wires! ASUS WLAN products can keep you connected
anywhere, any time.
Chapter 1
Introduction
ASUS WLAN Card 7

2. Installation
System Requirements
To begin using the WLAN Card, you must have the following minimum
requirements:
Quick Start
Chapter 2
• Windows XP/2000/ME/98SE
• Standard PCMCIA Slot Type II
• 32MB system memory or larger
• 300MHz processor or higher
Installation Procedures
Chapter 2 - Installation
Important: Install the WLAN card utilities before inserting the WLAN
Card into your computer.
Follow these two easy steps before using the WLAN card.
1. Install the WLAN card utilities and driver from the support CD.
2. Insert the WLAN card into your computer.
8 ASUS WLAN Card
Chapter 2 - Installation
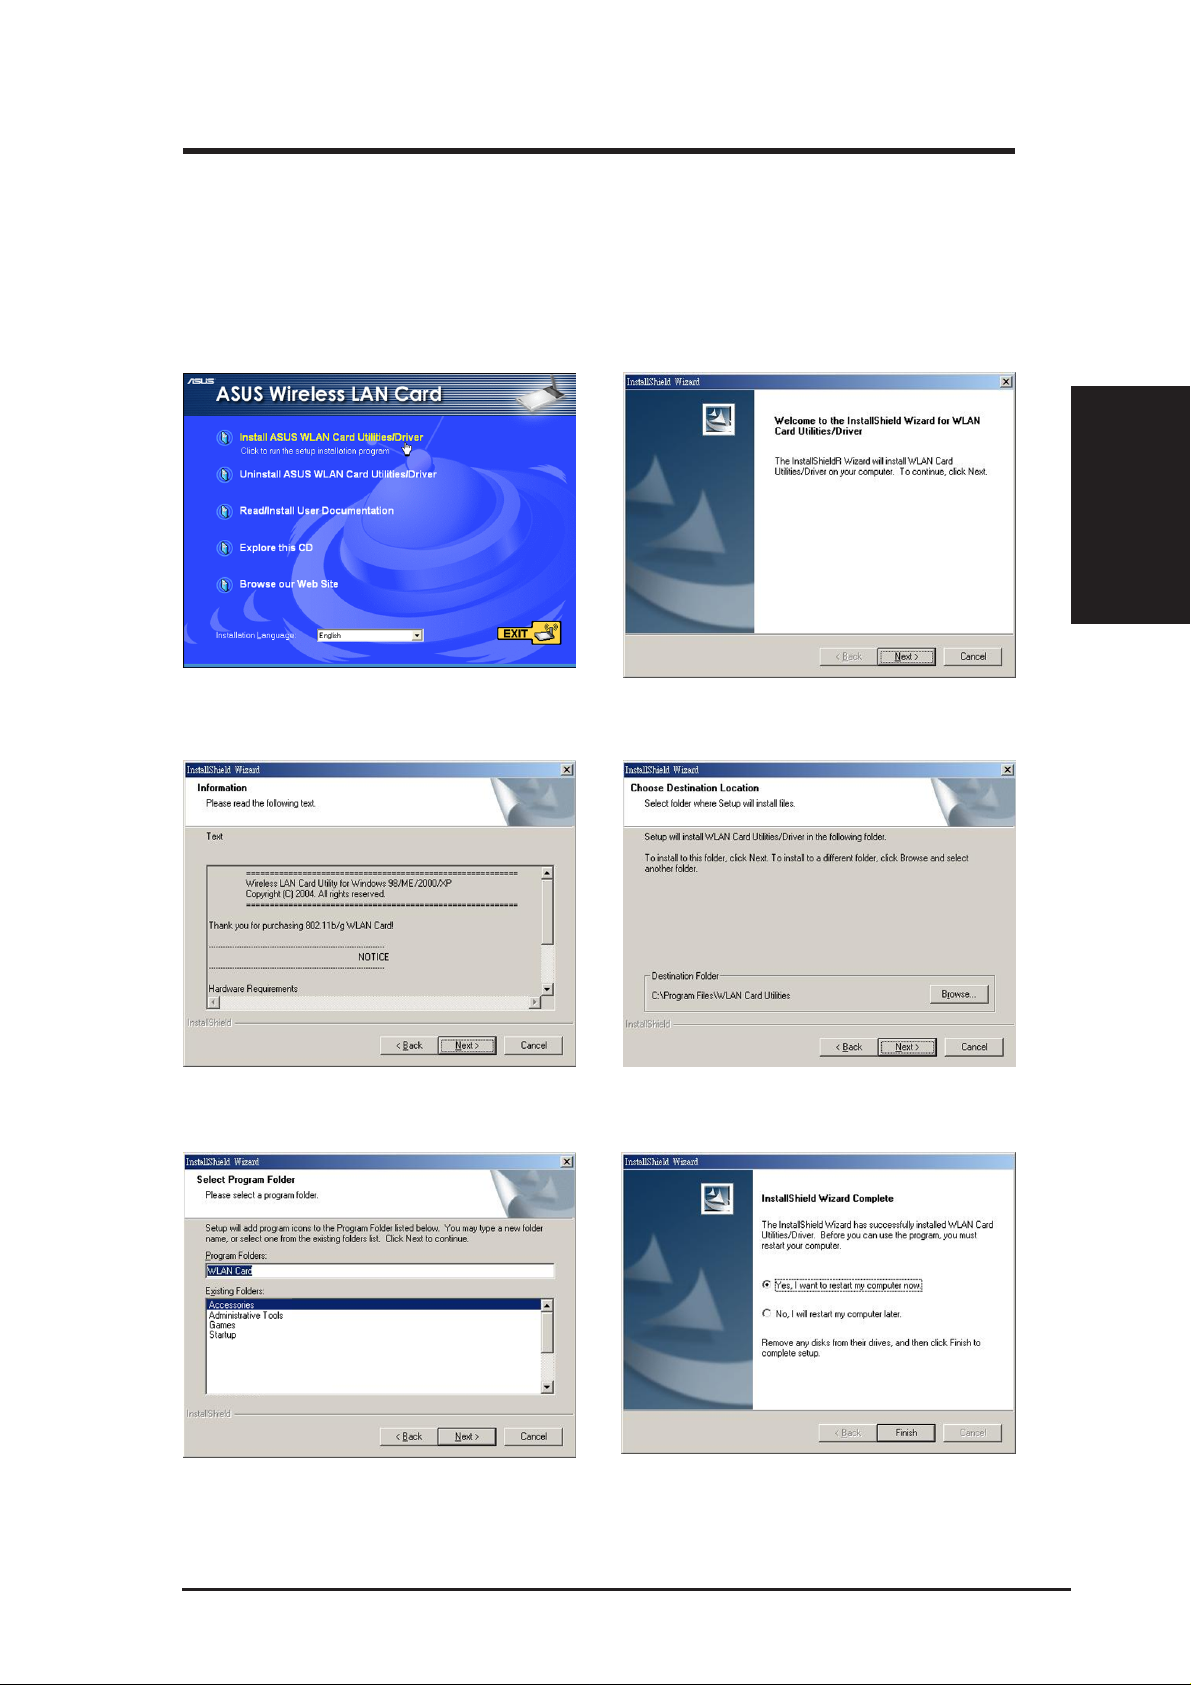
Installing the WLAN utilities and driver
Follow these instructions to install the WLAN card utilities and driver. Insert
the support CD and an autorun menu will appear. If your autorun is disabled,
double click SETUP.EXE in the root directory of the support CD.
Chapter 2
Quick Start
1. Select your language and click Install
WLAN Card Utilities/Driver.
3. Click Next after reading the Information. 4. Click Next to use the default Destination
2. Click Next on the Welcome screen.
Folder or click Browse to select another folder.
5. Click Next to place icons in the default program folder or type another folder name.
ASUS WLAN Card 9
6. When Setup is complete, click Finish to exit
the installation wizard and restart Windows.
Chapter 2 - Installation
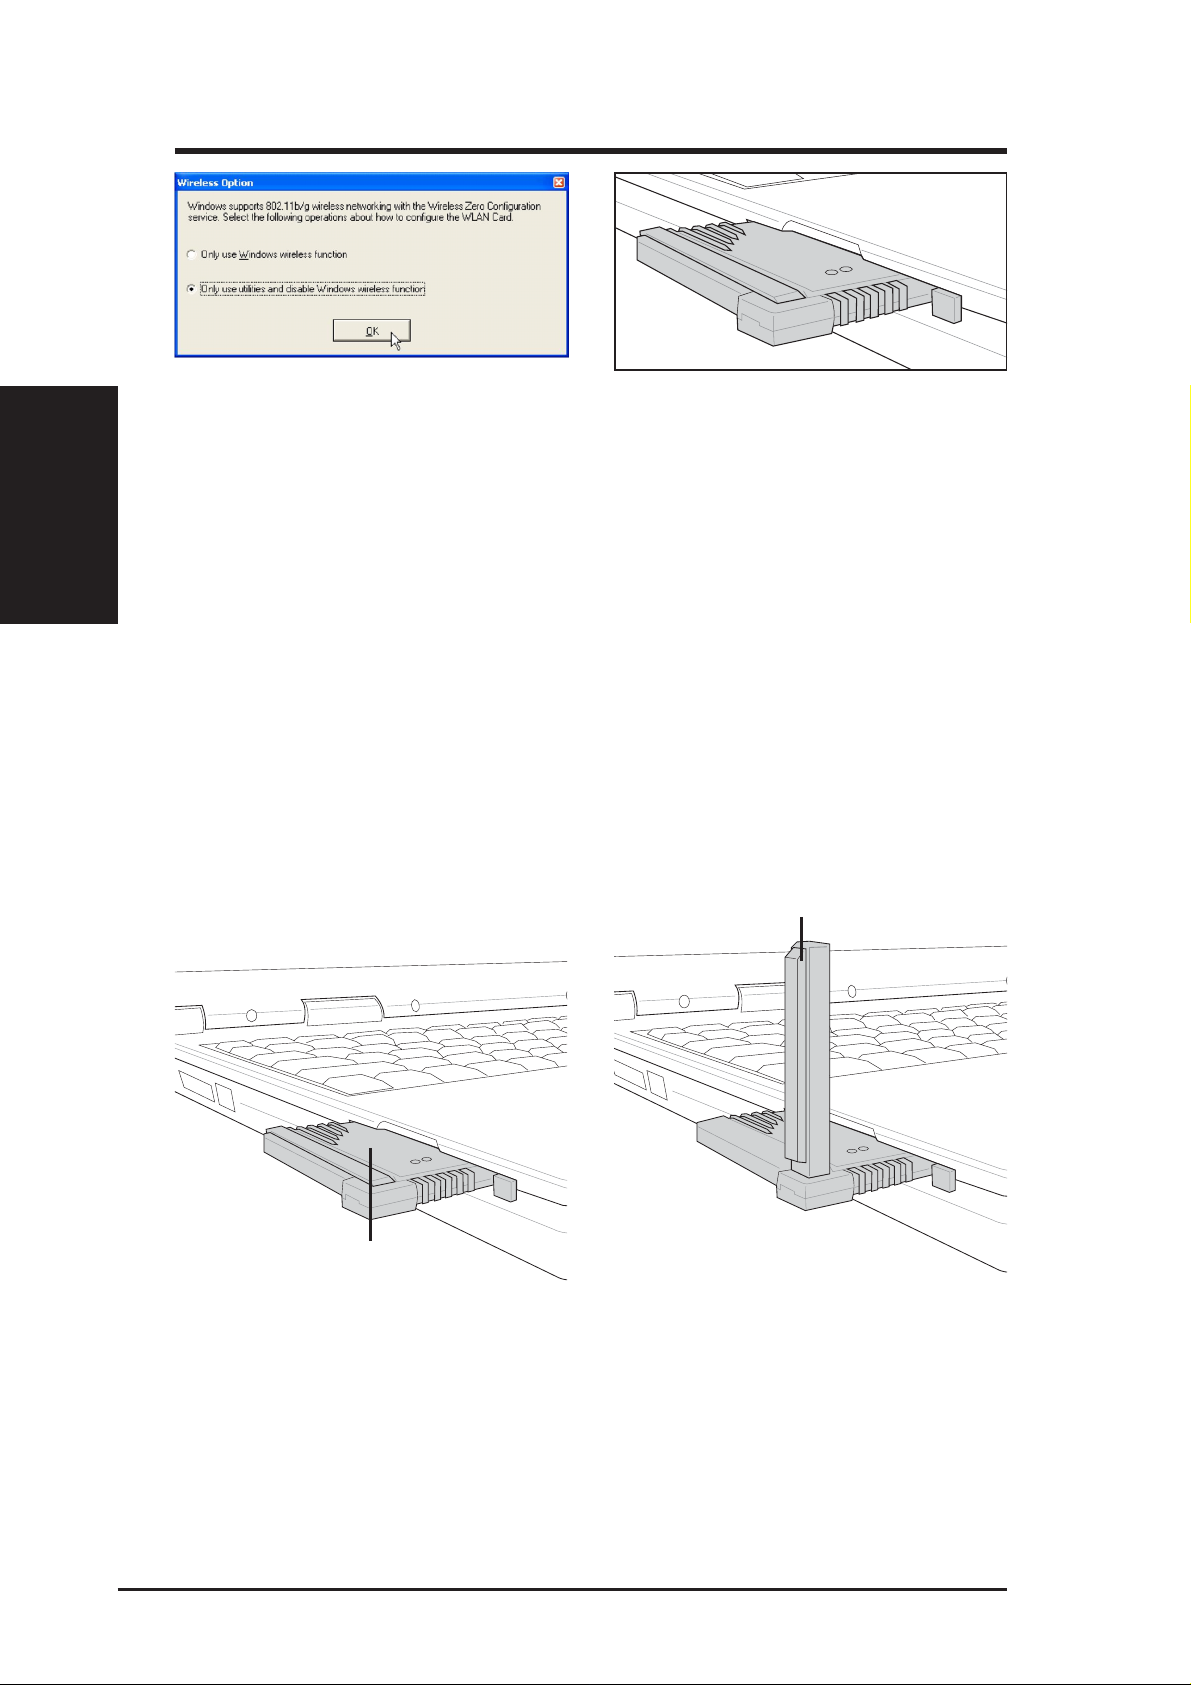
7. Windows XP users: When the program is
Quick Start
Chapter 2
Orientating the Antenna
The ASUS WLAN Card has two integrated antennas, one external
omnidirectional antenna and the other is a built-in diversity antenna. It is
recommended that you adjust the external antenna straight up for maximum
range and higher link quality. Lower the external antenna when transporting
your Notebook PC.
launched for the first time (during Windows
restart), you will be asked which function to
use. Select to use utilities for more functions.
8. Carefully insert the WLAN card into your
computer’s PC card slot. Windows will automatically find and configure the WLAN
card using the drivers installed in the previous steps.
External omnidirectional antenna
Internal diversity antenna
Inserted with antenna down
10 ASUS WLAN Card
Inserted with antenna up
Chapter 2 - Installation
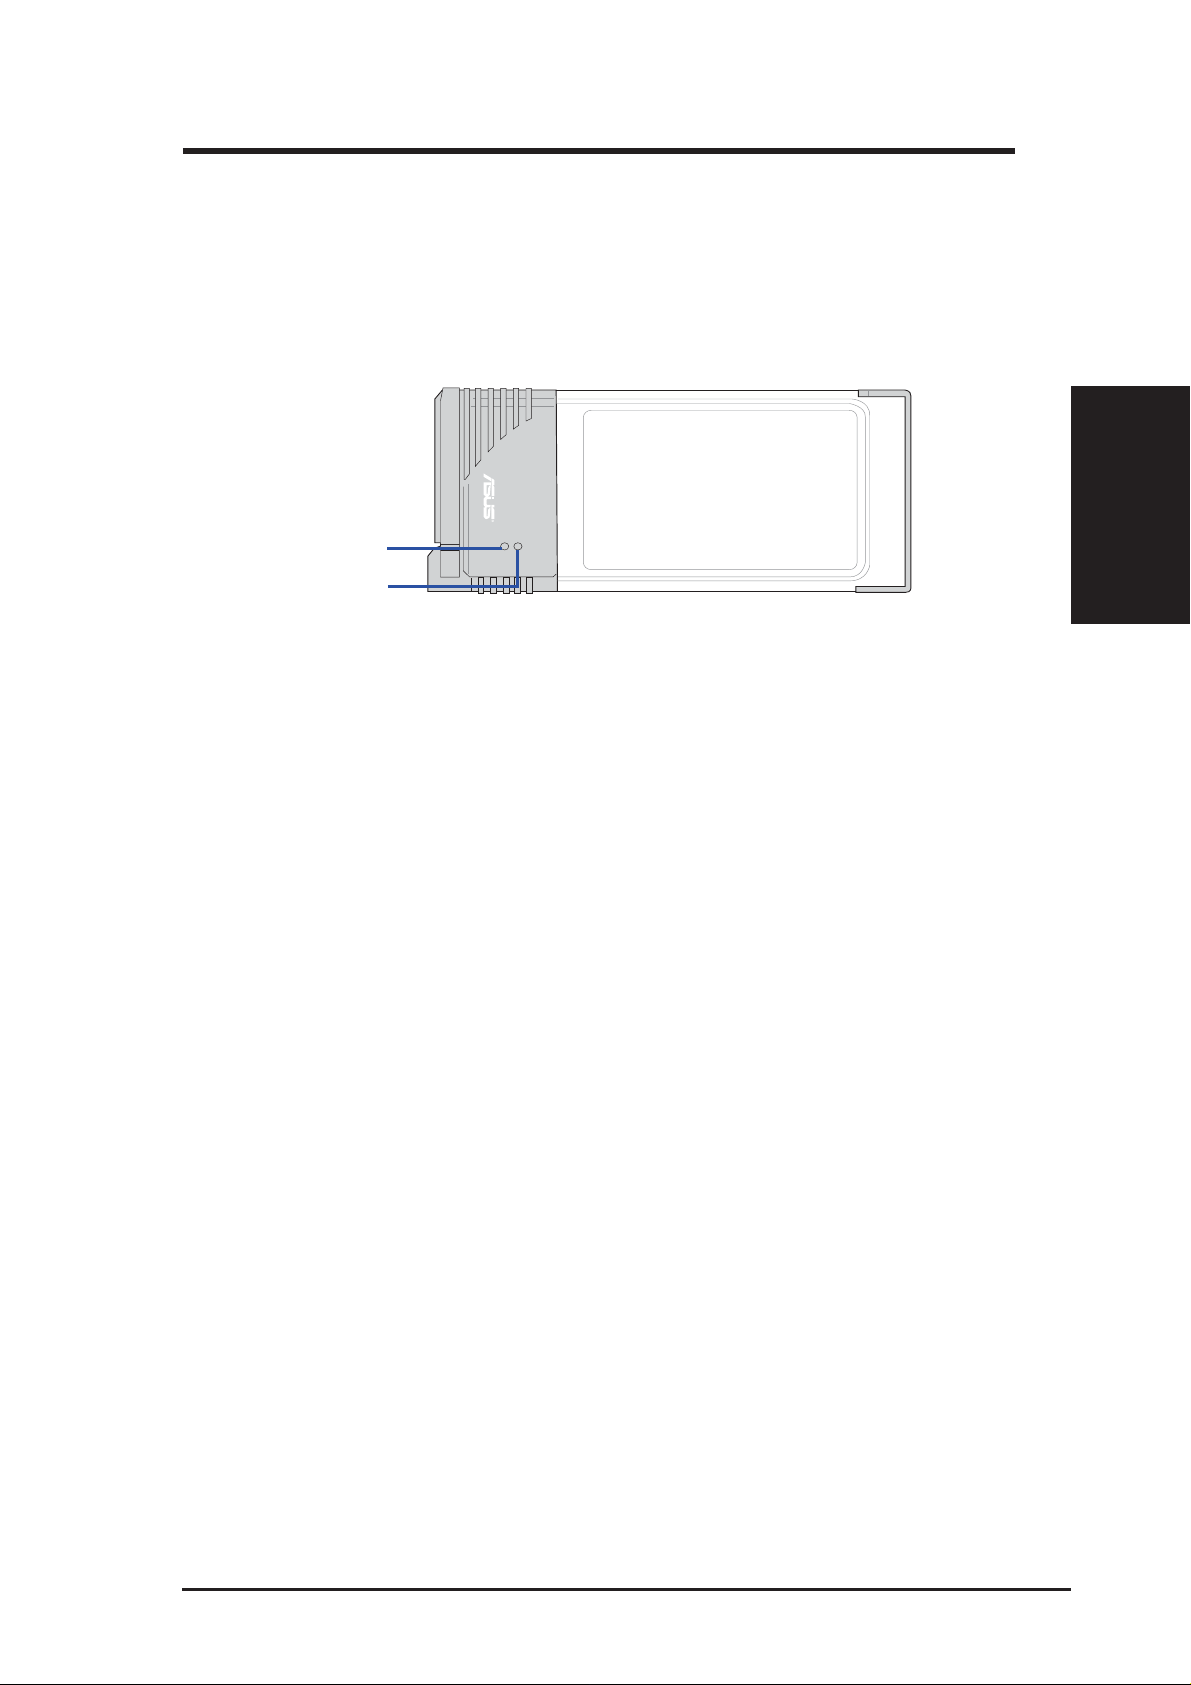
Reading the WLAN Status Indicators
The part of the WLAN Card that protrudes out of the PCMCIA socket consists
of two LEDs that indicate the status of the WLAN Card .
LNK
AIR
Air LED
Power LED
Air LED
OFF: No wireless activity.
Blink: Transmitting or receiving wireless data.
Power LED
OFF: No power or error.
ON: Power ON.
Chapter 2
Quick Start
ASUS WLAN Card 11
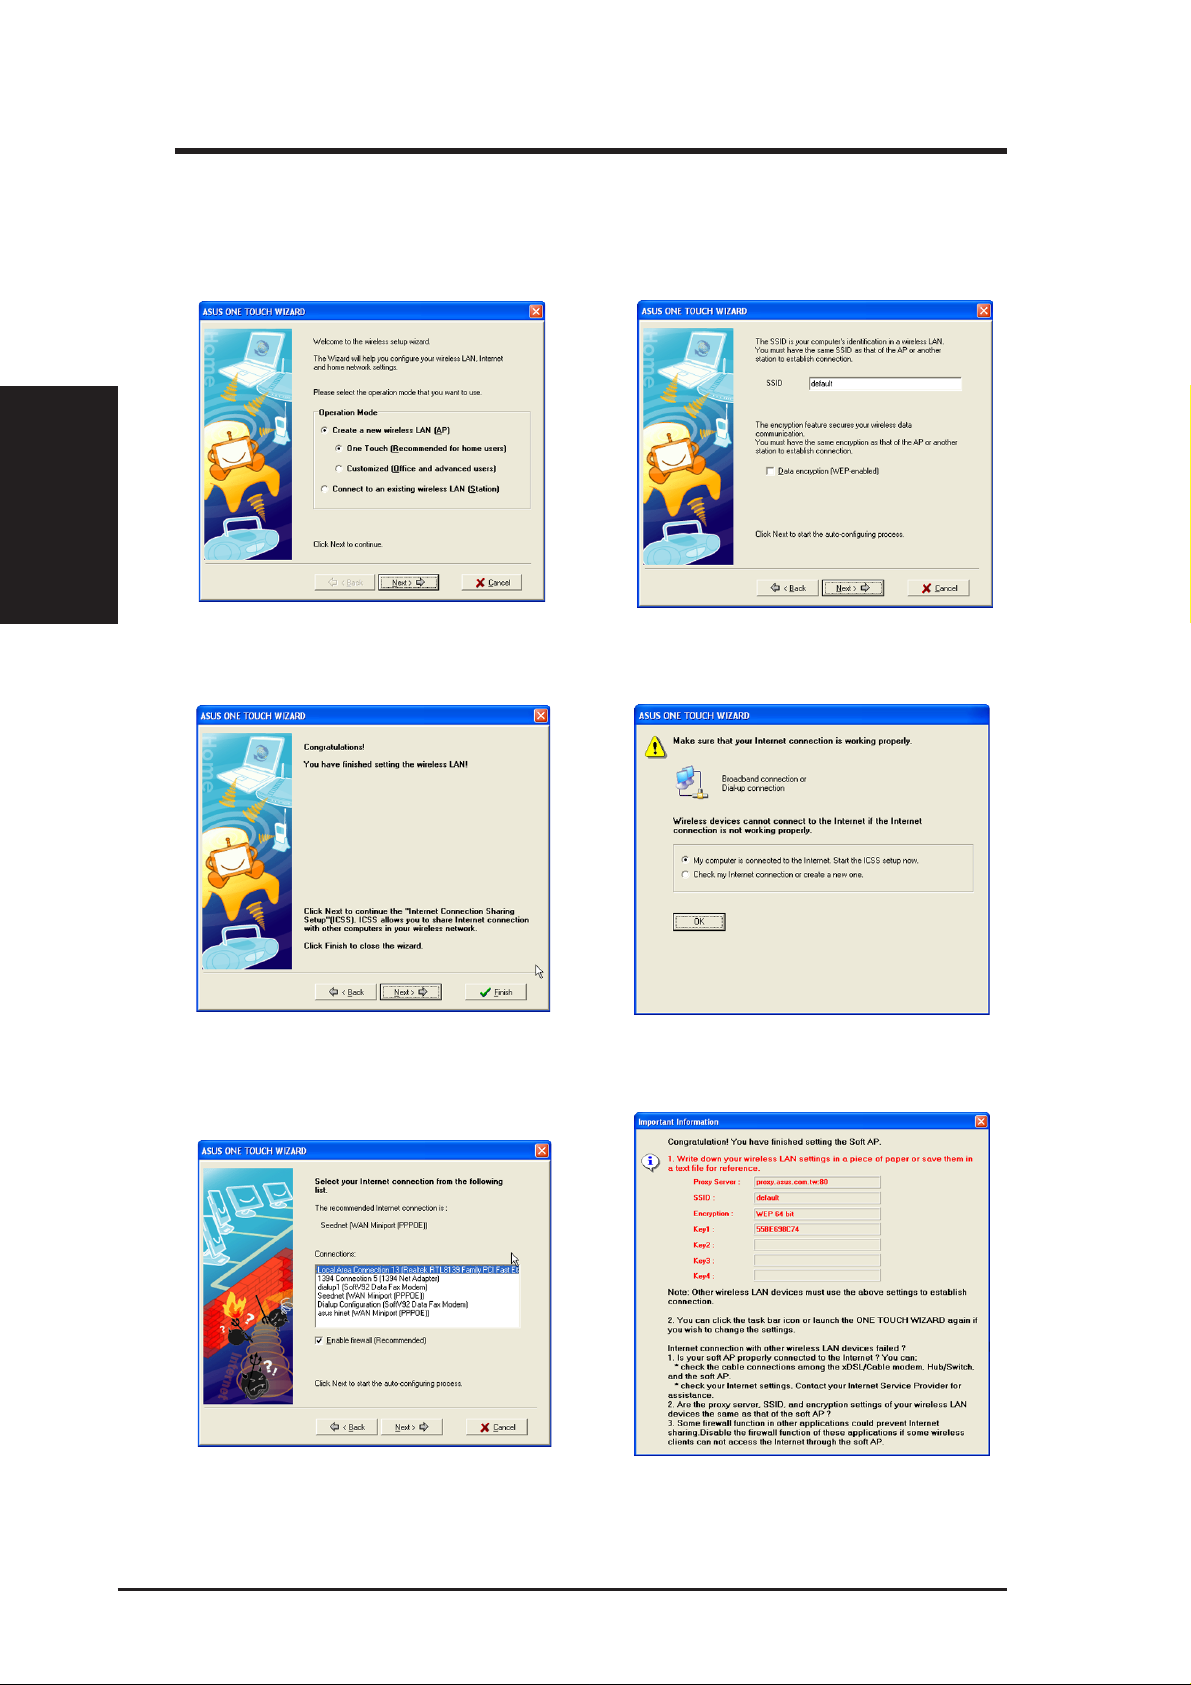
One Touch Wizard (new wireless LAN)
Use the One Touch Wizard to setup your wireless connection.
Quick Start
Chapter 2
Chapter 2 - Installation
1. Select Create a new... and click Next to
use the simplest configuration or select another option first.
3. Setup is complete. Click Finish to exit the
wizard or click Next to continue with more
advanced features.
2. Enter the SSID name of the access point that
you wish to connect to. Select Data encryp-
tion if secured connections are enabled.
4. Click OK to start ICSS setup.
5. Select your Internet connection from the list.
6. Setup is complete. Y ou can review your settings here.
12 ASUS WLAN Card
Chapter 2 - Installation
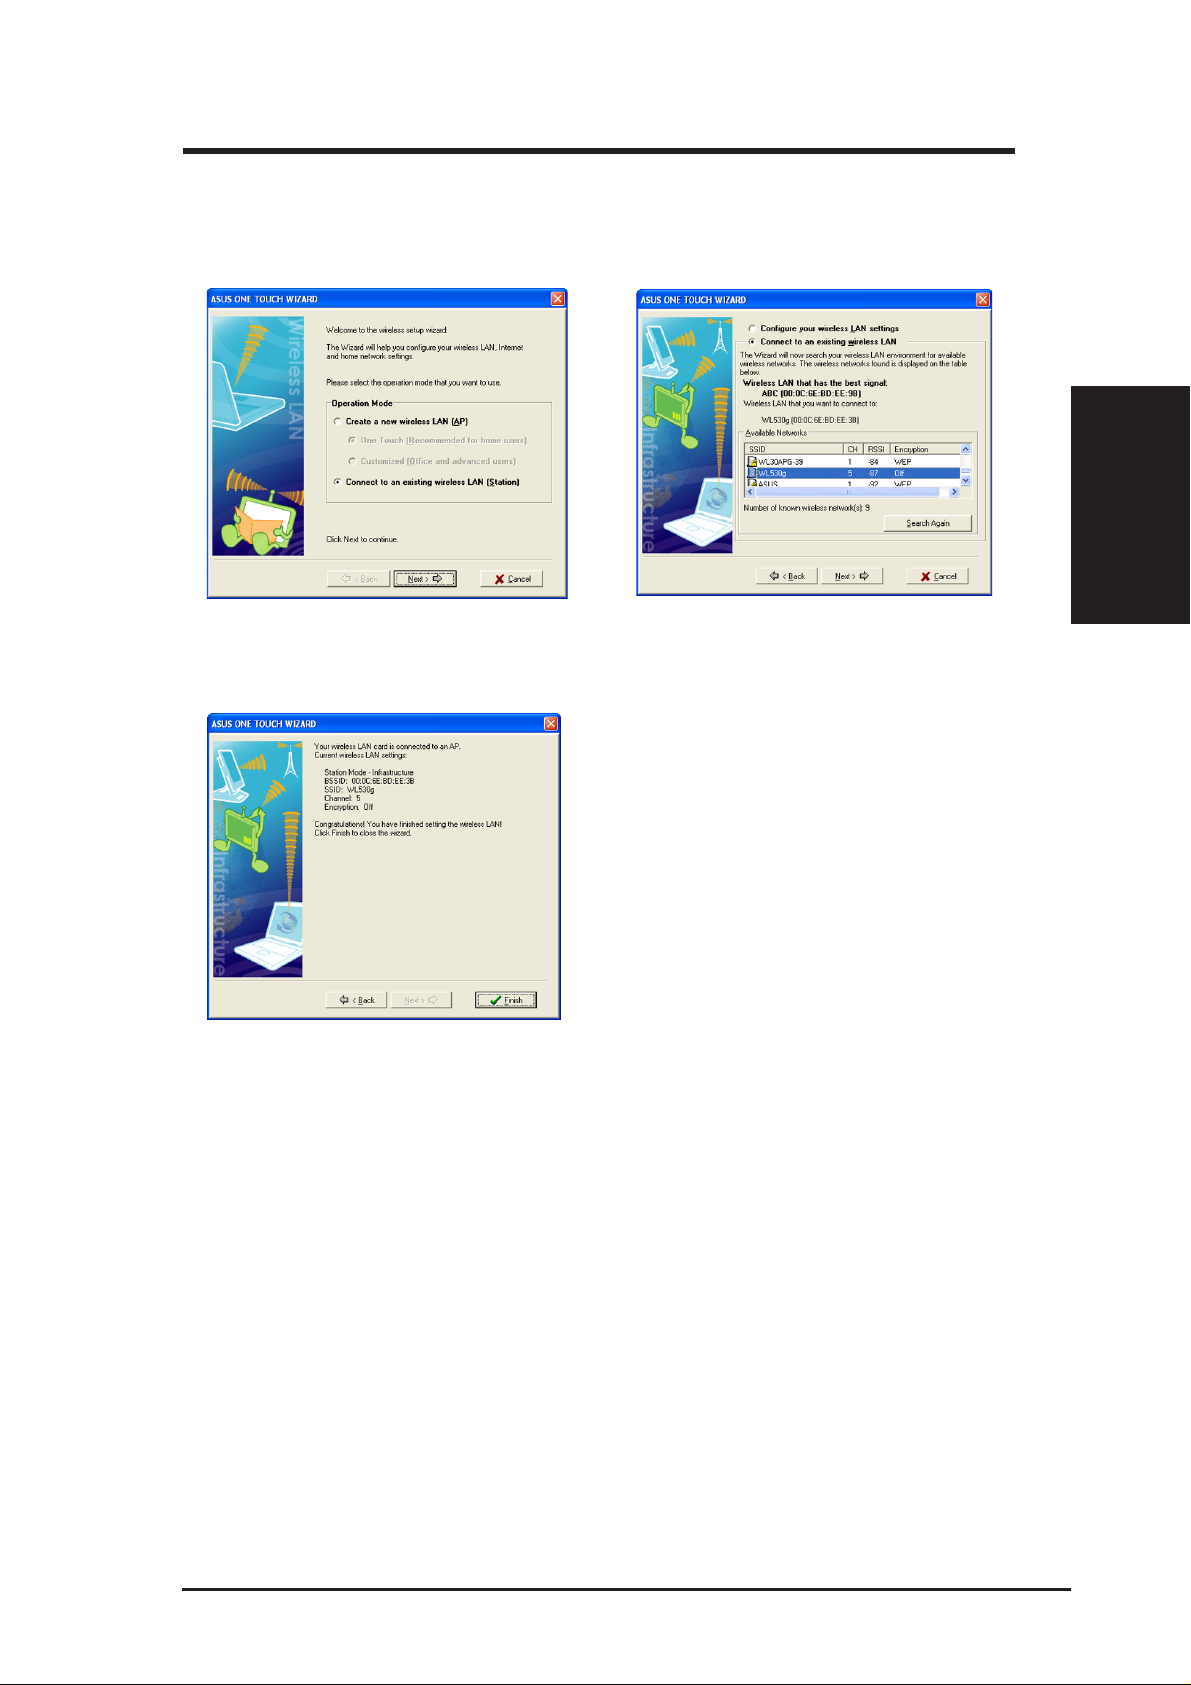
One Touch Wizard (existing LAN)
Use the One Touch Wizard to setup your wireless connection.
Chapter 2
Quick Start
1. Select Connect to... and click Next to use
the simplest configuration or select another
option first.
3. Setup is complete. Click Finish to exit the
wizard.
2. Select an AP from the available networks.
ASUS WLAN Card 13
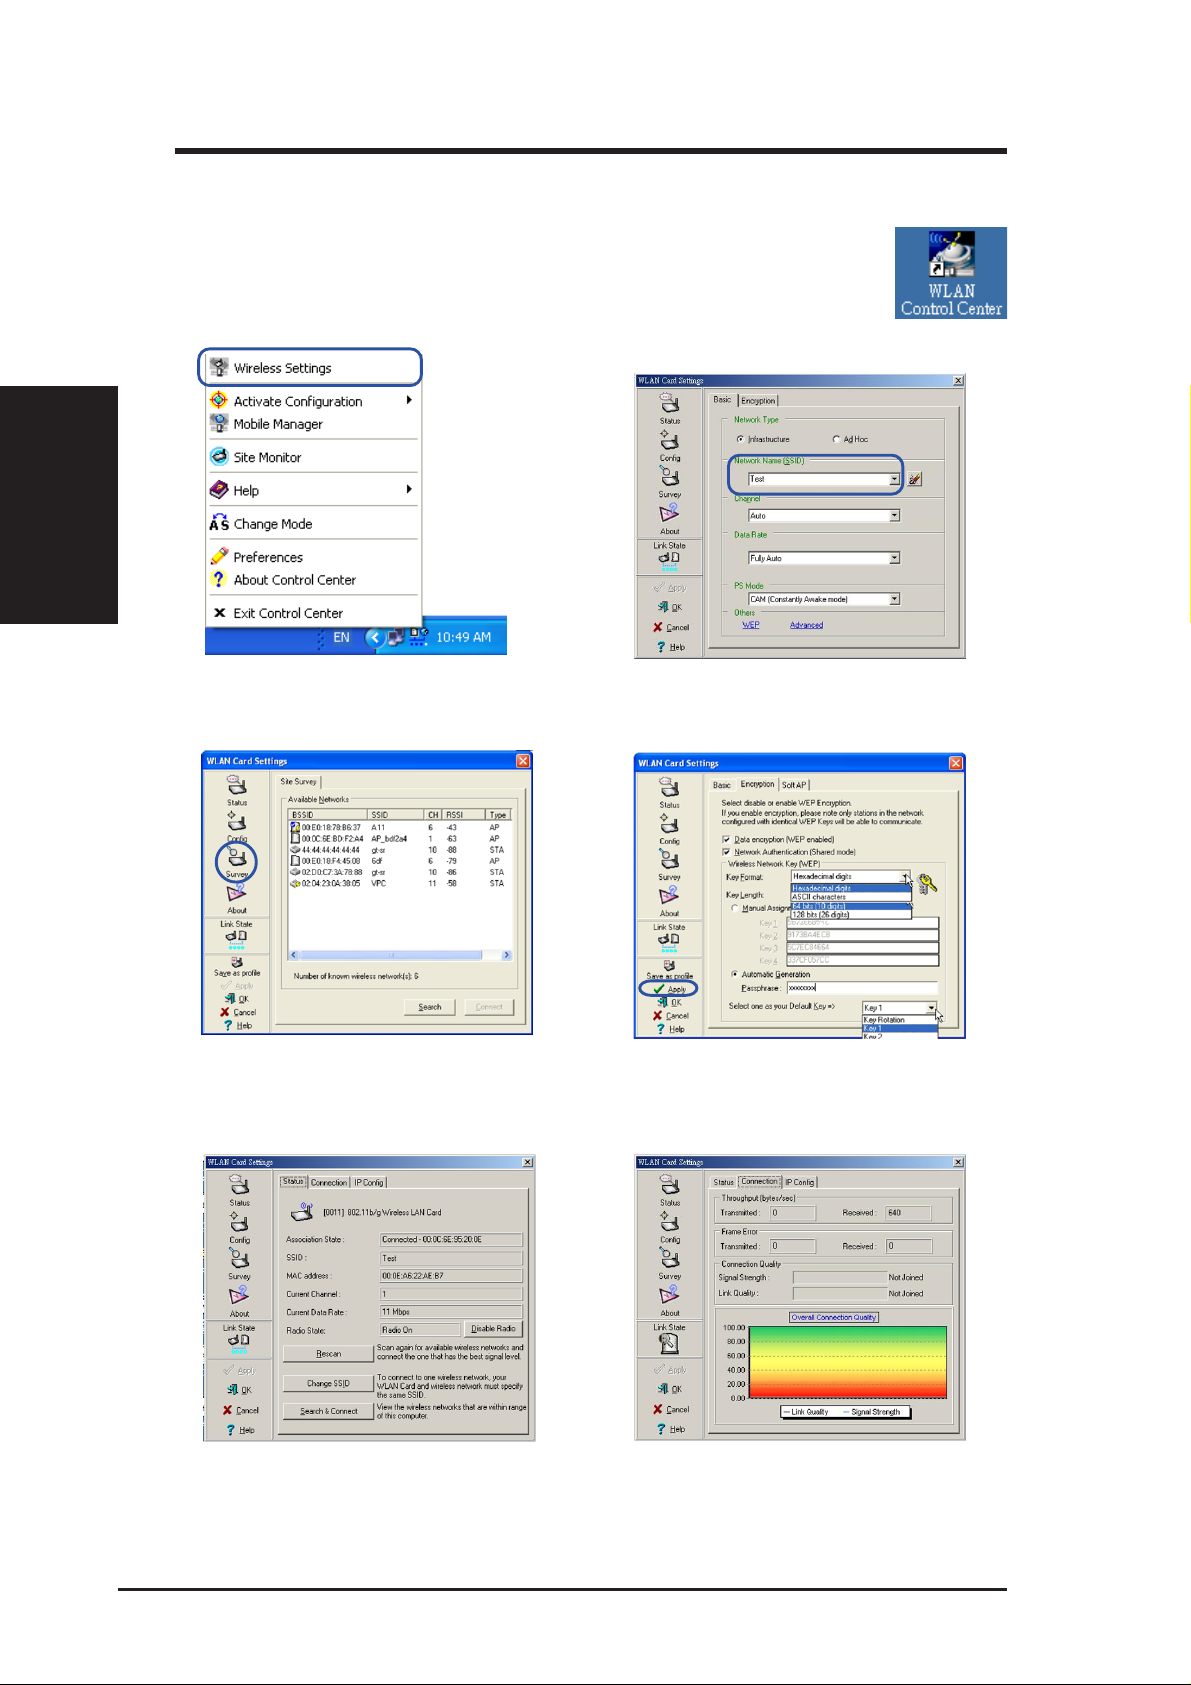
Configuring the WLAN utility
After installing the WLAN Card Utilities, you will need to make
some settings before being able to use your wireless connection.
Double-click the WLAN Control Center icon to start the utility.
Quick Start
Chapter 2
Chapter 2 - Installation
1. Right-click the WLAN icon and select “Wireless Settings”
3. Use “Site Survey” if you don’t know the
name of your access point(s).
2. Set the Network Name (SSID) to the same
name as the SSID set in your wireless access point.
4. Encryption settings must also match those
set in the access point. Ask your network
administrator about settings if necessary.
Click Apply to save your settings
5. Check the “Status” page to see the “Association State”. It should show “Connected xx:xx:xx:xx:xx:xx”.
6. You can also see the connection quality on
the “Connection” page. Click OK to exit the
utility.
14 ASUS WLAN Card
Chapter 2 - Installation
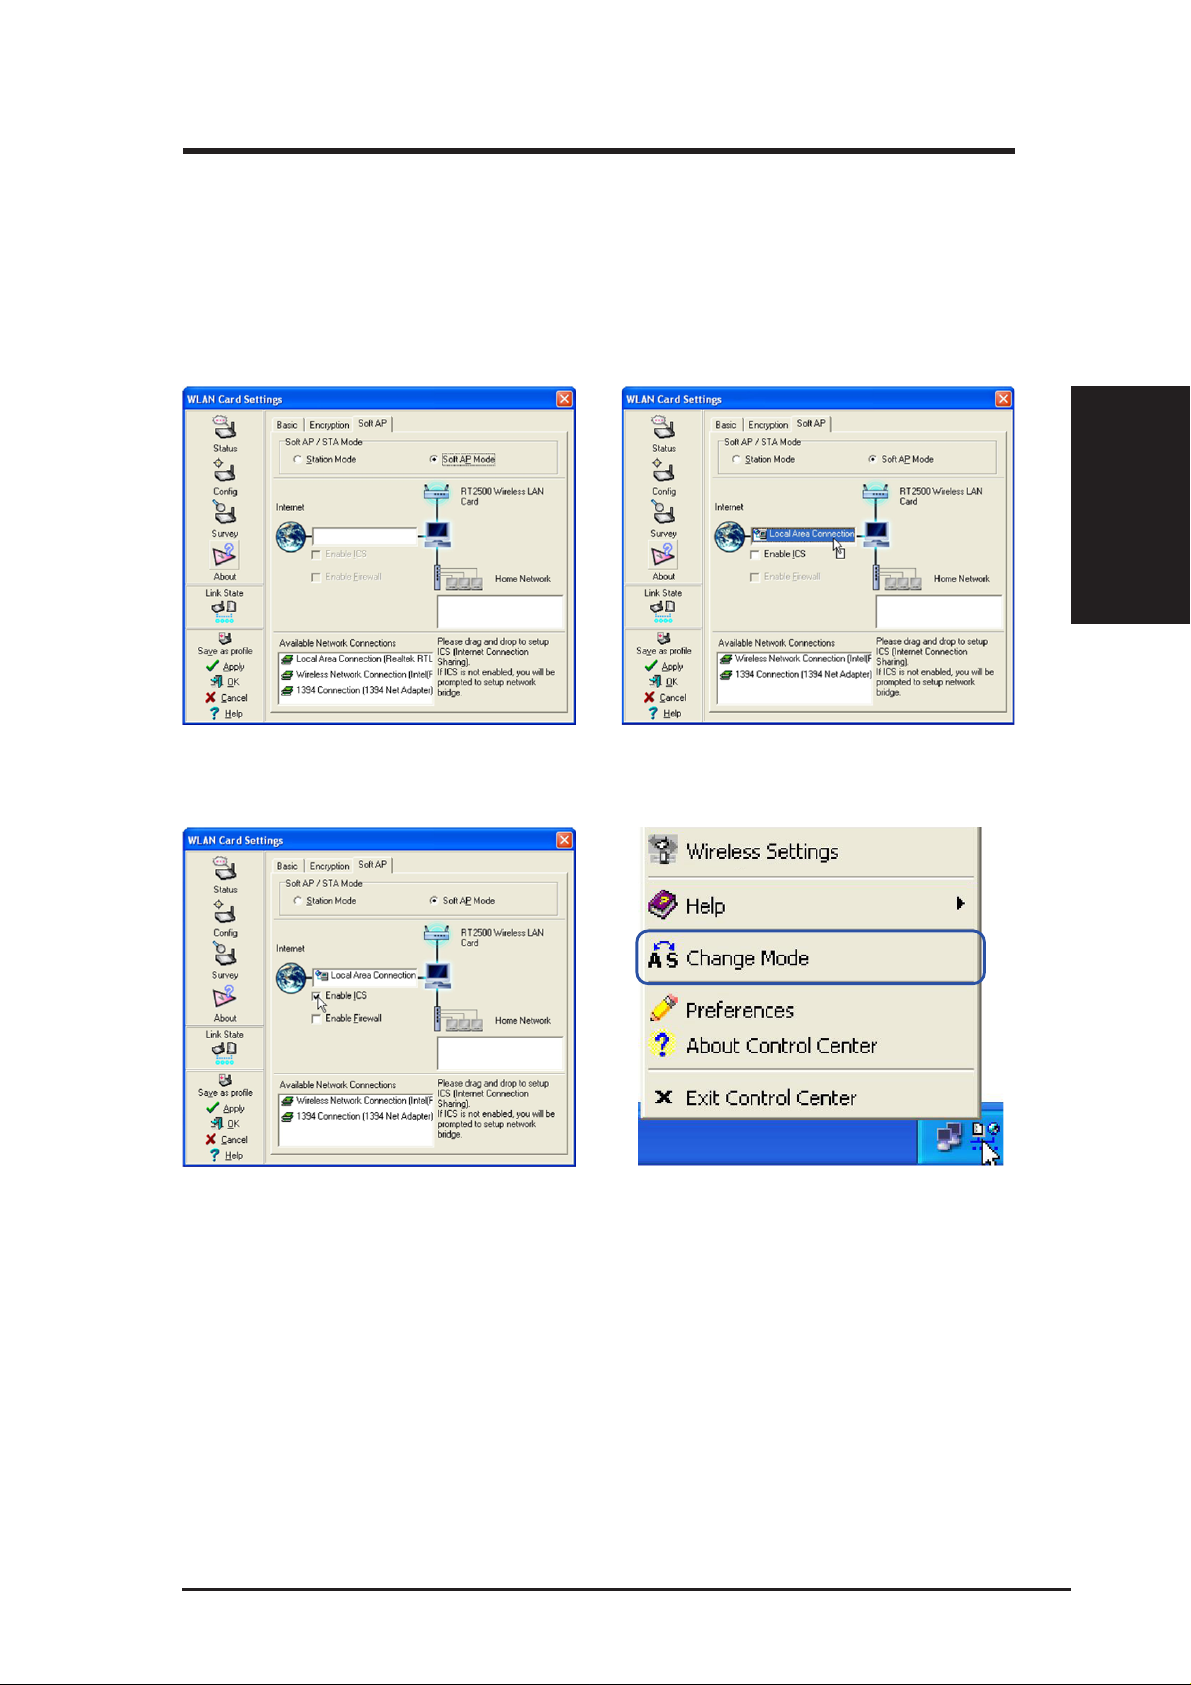
Soft AP (Windows XP Only)
Soft AP mode allows the WLAN card to act as a virtual access point. The
computer needs to be connected to a wired network using an Ethernet connection
in order to provide network access to WLAN clients.
Chapter 2
Quick Start
1. Select Soft AP Mode
3. Enable ICS* and Firewall if desired. Refer
to Windows help for information on “Internet Connection Sharing”.
2. Drag and drop a wired network connection
next to the globe icon.
4. You can easily switch between Soft AP and
Station mode by right clicking the taskbar
icon and selecting “A-S Change Mode”.
*ICS is used to share this computer’s Internet connection with the rest of the computers on your
network. When this computer is connected to the Internet, communication to and from the Internet to all the computers on your network are sent through this computer, called the host computer. Other computers can send and receive email and access the Web as if it were connected
directly to the Internet.
ASUS WLAN Card 15
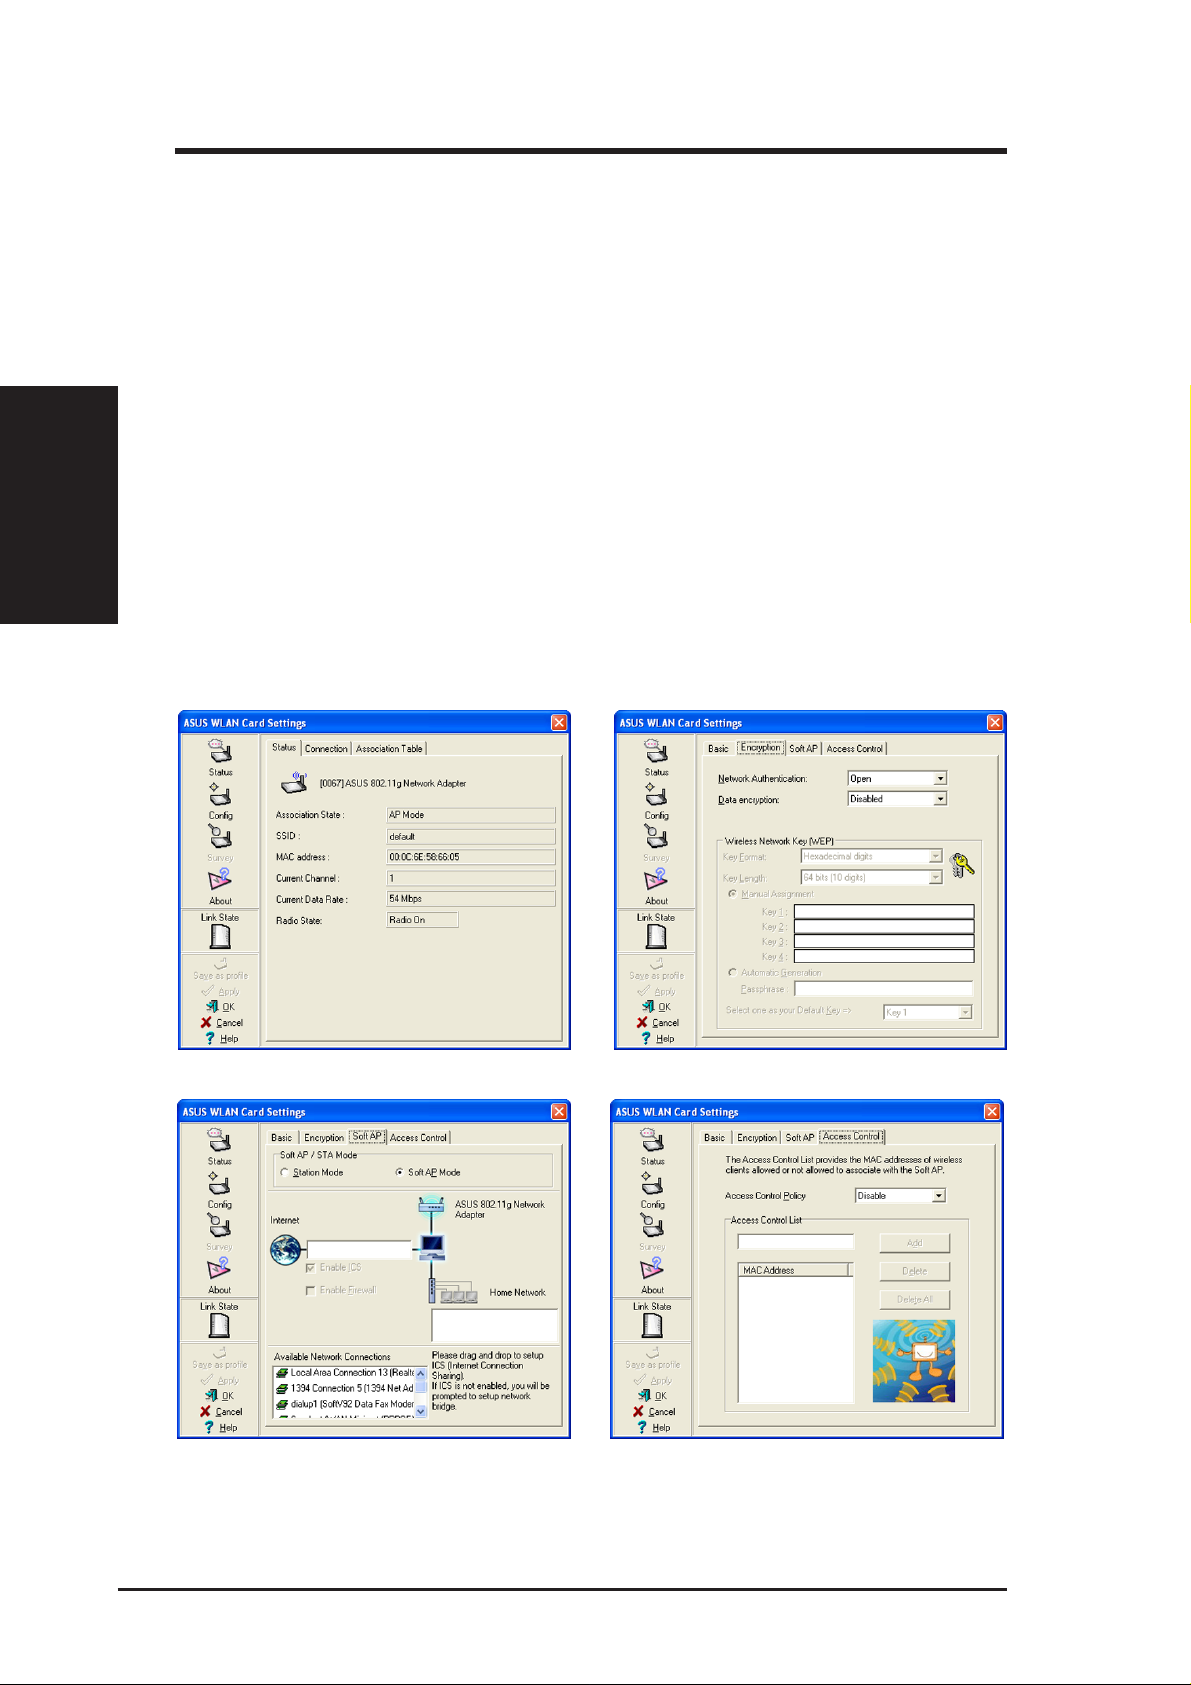
Soft AP (Windows XP Only) Cont.
Soft AP mode allows for Access Control configuration.
Access Control
The AP provides facilities to limit the wireless clients that associate with it and
the data packets that can forward through it. Filters provide network security
Quick Start
Chapter 2
or improve performance by eliminating broadcast/multicast packets from the
radio network.
The Access Control List (ACL) contains MAC addresses for wireless clients
allowed to associate with the AP. This provides security by preventing
unauthorized access. The AP also uses a disallowed address list of destinations.
This feature prevents the AP from communicating with specified destinations.
This can include network devices that do not require communication with the
AP or its wireless clients.
Chapter 2 - Installation
Status Page Encryption Page
Clicking Apply after configuring Soft AP will
show the “Access Control” tab.
16 ASUS WLAN Card
Enter a MAC Address on the Access Control
page and select “Accept” or “Reject” or “Disable” from the pull-down menu.
Chapter 2 - Installation
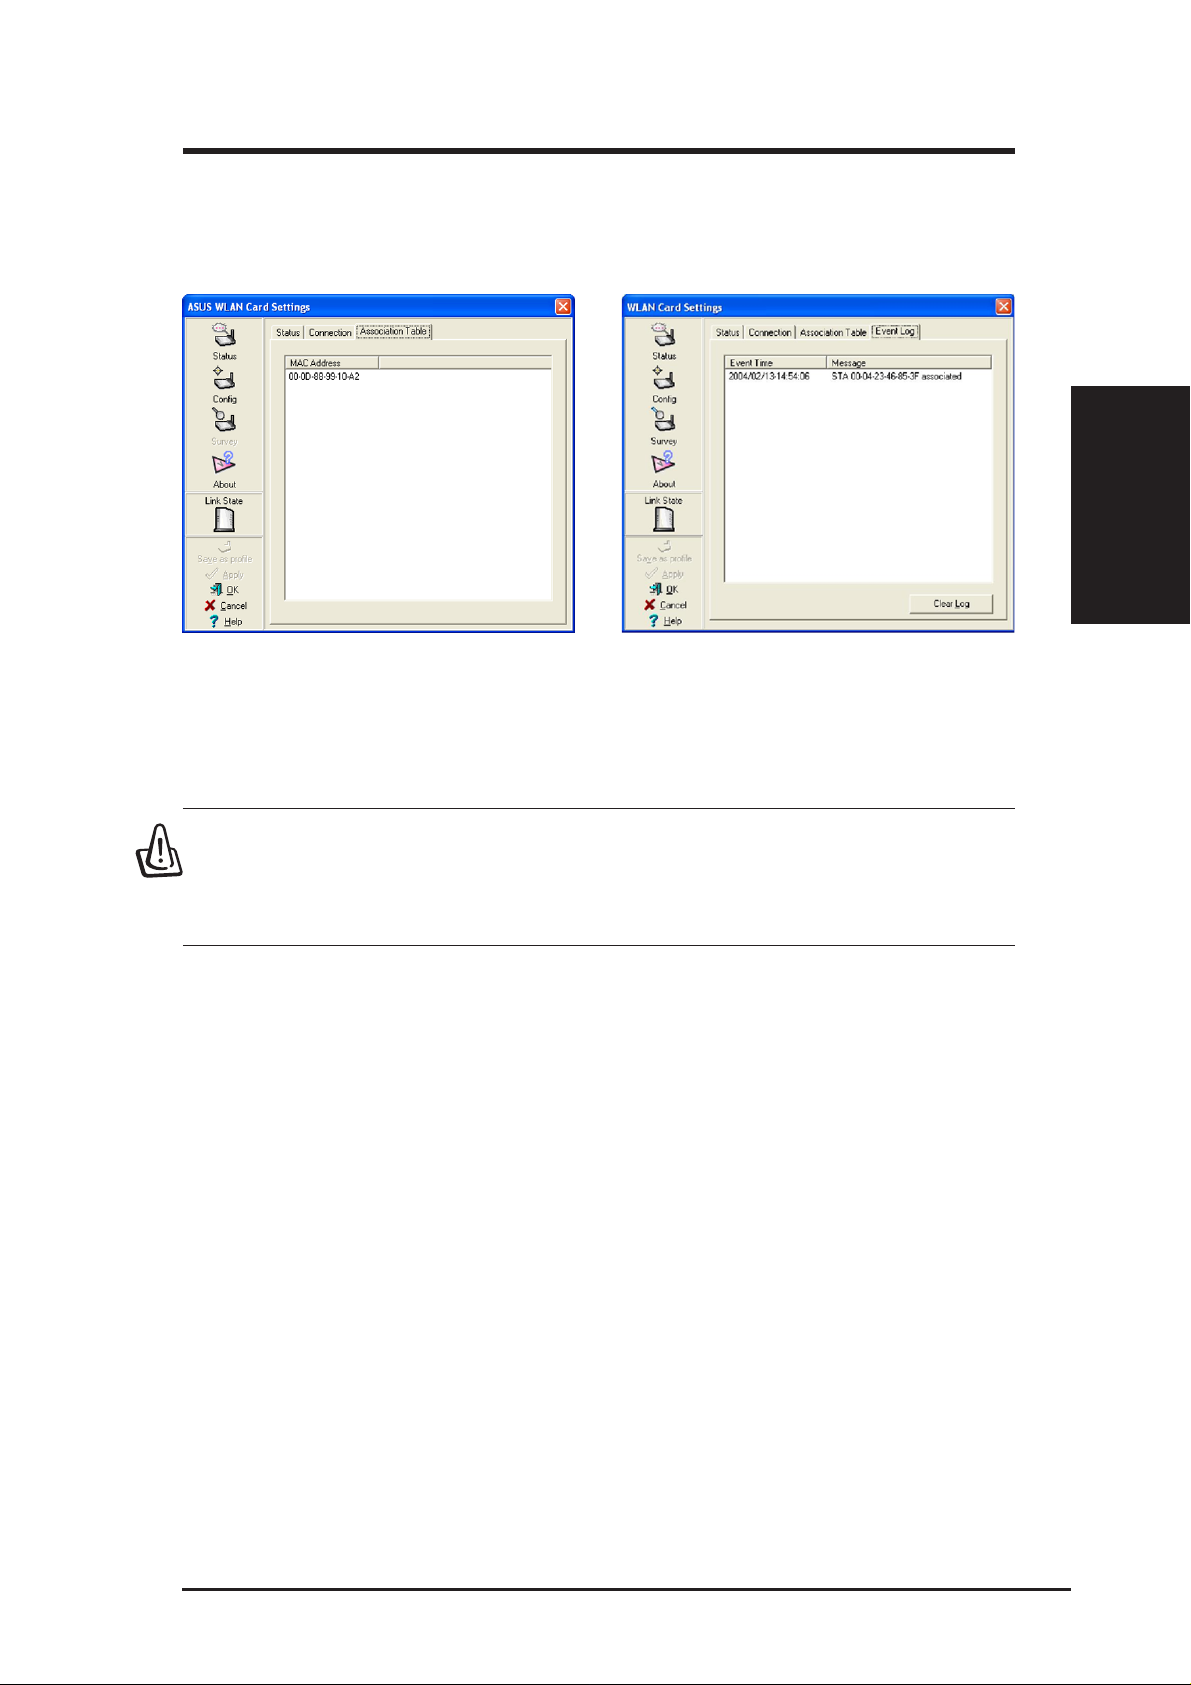
Soft AP (Windows XP Only) Cont.
Chapter 2
Quick Start
Soft AP Mode will also provide two extra tabs
on the Status pages - Association Table and
Event Log. The Association T able shows clients
that are currently connected to the Soft AP.
IMPORTANT: If the end points of a chain are connected to each
other a loop is created. Normally it is advised to avoid loops involving bridges as it can lead to performance breakdowns, and broadcast and multicast storms.
The Event Log tracks messages associated
with the Soft AP.
ASUS WLAN Card 17

Quick Start
Chapter 2
Chapter 2 - Installation
18 ASUS WLAN Card
 Loading...