

Page 1

Ghidul utilizatorului
Seria RT-N12
Router wireless N de super viteză
Page 2

RO7901
Prima Ediţie (V1)
Decembrie 2012
Copyright © 2012 ASUSTeK COMPUTER INC. Toate drepturile rezervate.
Nicio parte a acestui manual, inclusiv produsele şi software-ul descris în el,
poate reprodusă, transmisă, transcrisă, stocată într-un sistem de căutare
sau tradus în altă limbă, sub orice formă sau prin orice mijloace, cu excepţia
documentaţiei păstrate de cumpărător pentru backup, fără permisiunea
expresă scrisă a ASUSTeK COMPUTER INC. (“ASUS”).
Garanţia produsului sau service-ul vor extinse dacă: (1) produsul este reparat,
modicat sau schimbat, în aşa fel încât repararea, modicarea sau schimbarea
să e autorizată de ASUS, sau (2) numărul de serie al produsului este deteriorat
sau lipseşte.
ASUS OFERĂ ACEST MANUAL ”CA ATARE”, FĂRĂ NICIO GARANŢIE, FIE EA
EXPRESĂ SAU IMPLICITĂ, INCLUZÂND, ÎNSĂ NELIMITÂNDU-SE LA GARANŢIILE
IMPLICITE SAU CONDIŢIILE DE VALDABILITATE SAU POTRIVIRE ÎNTR-UN SCOP
ANUME. ÎN NICIO EVENTUALITATE ASUS, DIRECTORII, FUNCŢIONARII SAU
AGENŢII SĂI SUNT RĂSUNZĂTORI PENTRU ORICE PAGUBE INDIRECTE, SPECIALE,
ACCIDENTALE (INCLUSIV PIERDERE PROFITURI, PIERDEREA AFACERII, PIERDEREA
FOLOSINŢEI SAU A DATELOR, ÎNTRERUPEREA AFACERII ETC.), CHIAR DACĂ ASUS
A FOST ÎN PREALABIL SFĂTUIT DE POSIBILITATEA UNOR ASEMENEA DAUNE
PROVENITE DIN ORICE EROARE SAU DEFECT DIN ACEST MANUAL AU PRODUS.
SPECIFICAŢIILE ŞI INFORMAŢIILE PREZENTATE ÎN ACEST MANUAL SUNT FURNIZARE
EXCLUSIV CU TITLU INFORMATIV, ŞI POT FI MODIFICATE ORICÂND, FĂRĂ
PREAVIZ, ACEASTA NEINTRÂND ÎN OBLIGAŢIILE ASUS. ASUS NU ÎŞI ASUMĂ NICIO
RESPONSABILITATE SAU OBLIGAŢIE PENTRU ORICE ERORI SAU INEXACTITĂŢI CE POT
APĂREA ÎN ACEST MANUAL, INCLUSIV PRODUSELE ŞI SOFTWARE-UL DESCRISE ÎN EL.
Numele produselor şi companiilor din acest manual pot sau nu pot mărci
înregistrate sau drepturi de autor ale companiilor respective, şi sunt folosite
doar pentru identicare sau explicaţii şi în beneciul proprietarilor lor, fără
intenţie de a încălca legea.
2
Page 3

Sumar
1 Prezentare succintă 5
Conţinutul pachetului ................................................................................5
Caracteristici hardware .............................................................................. 6
2 Congurarea reţelei wireless 11
Poziţionarea ruterului ..............................................................................11
De ce aveţi nevoie .....................................................................................12
Instalarea routerului .................................................................................12
Conexiune cu r .................................................................................13
Conexiune wireless ............................................................................15
Înainte de a începe ............................................................................17
A. Dezactivaţi serverul proxy, dacă este activat..................17
B. Conguraţi setările TCP/IP pentru obţinerea
automată a unei adrese IP......................................... .............19
C. Dezactivaţi conexiunea pe linie comutată, dacă
este activată ................................................................... .............21
3 Congurarea prin GUI web 22
Conectarea la interfaţa Web GUI ..........................................................22
Congurarea conexiunii la Internet ....................................................23
Congurarea rapidă a conexiunii la Internet (QIS) cu
detectare automată ...........................................................................24
Congurarea setărilor de securitate pentru reţeaua wireless ...29
Reglarea puterii Tx (numai pentru modelul RT-N12 HP) .............31
Administrarea clienţilor din reţea ........................................................32
Utilizarea funcţiei Trac Manager (Manager trac) ......................34
Gestionarea lăţimii de bandă pentru funcţia QoS
(Calitatea serviciului) .........................................................................34
Monitorizarea tracului ...................................................................36
3
Page 4

Sumar
Congurarea setărilor Complexe .........................................................37
Congurarea serverului DHCP .......................................................37
Actualizarea softului integrat .........................................................39
Refacerea/Salvarea/Încărcarea setărilor .....................................40
4 Folosirea utilitarelor 41
Detectarea Dispozitivului .......................................................................41
Refacerea softului integrat .....................................................................42
5 Remedierea defecţiunilor 44
Remedierea defecţiunilor .......................................................................44
Serviciul ASUS DDNS ................................................................................48
Întrebări frecvente (FAQ) .................................................................48
Anexă 50
Anunţuri ........................................................................................................50
Informaţii privind liniile telefonice de asistenţă globale .............64
ASUS Contact information .....................................................................66
4
Page 5

1 Prezentare succintă
Conţinutul pachetului
Router fără cablu RT-N12
Cablu RJ45
Adaptor de alimentare
Ghid rapid de pornire
Certicat de garanţie
• Routerele wireless din seria RT-N12 includ modelele RT-N12
D1 şi RT-N12 HP. Acest manual prezintă caracteristicile
ambelor modele.
• Dacă oricare dintre articole este deteriorat sau lipseşte,
contactaţi ASUS pentru informaţii şi asistenţă tehnică.
Consultaţi lista de linii telefonice de asistenţă ASUS de pe
partea din spate a acestui manual de utilizare.
• Păstraţi ambalajul original în caz că veţi avea nevoie de servicii
ulterioare în garanţie, cum ar reparare sau înlocuire.
5
Page 6
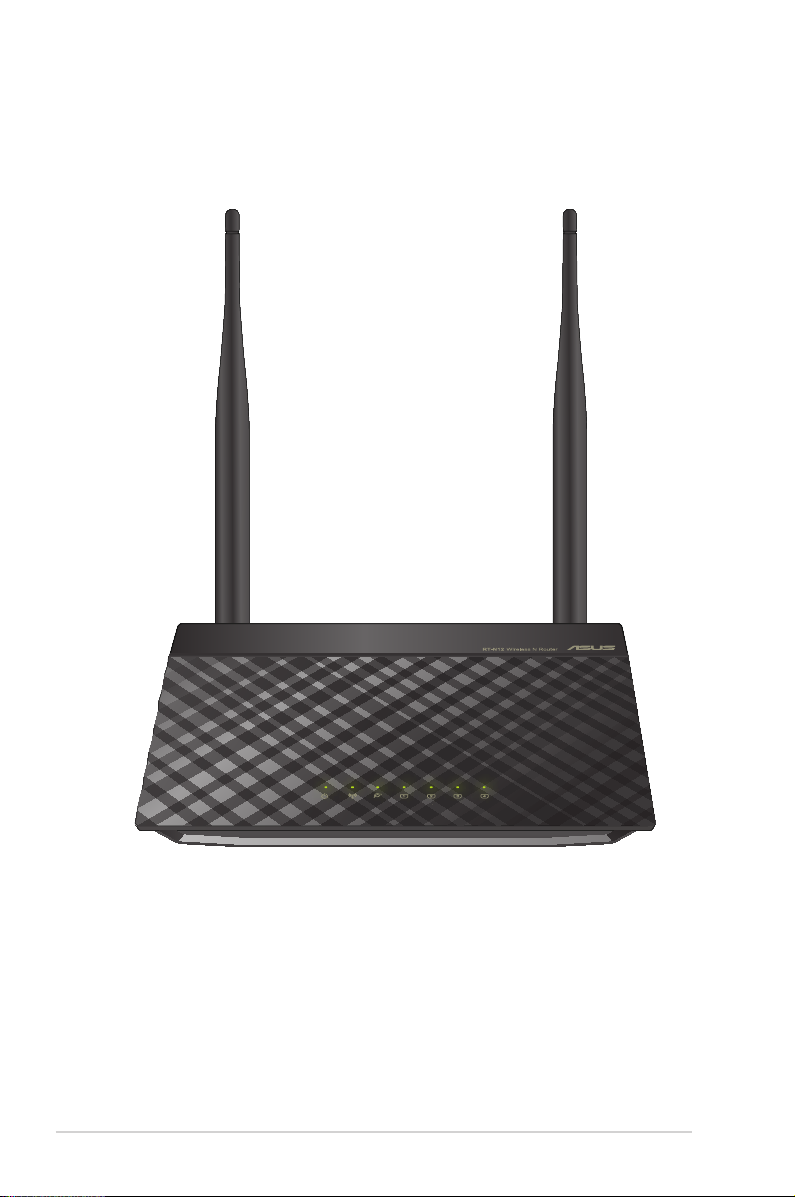
Caracteristici hardware
Partea frontală
6
Page 7
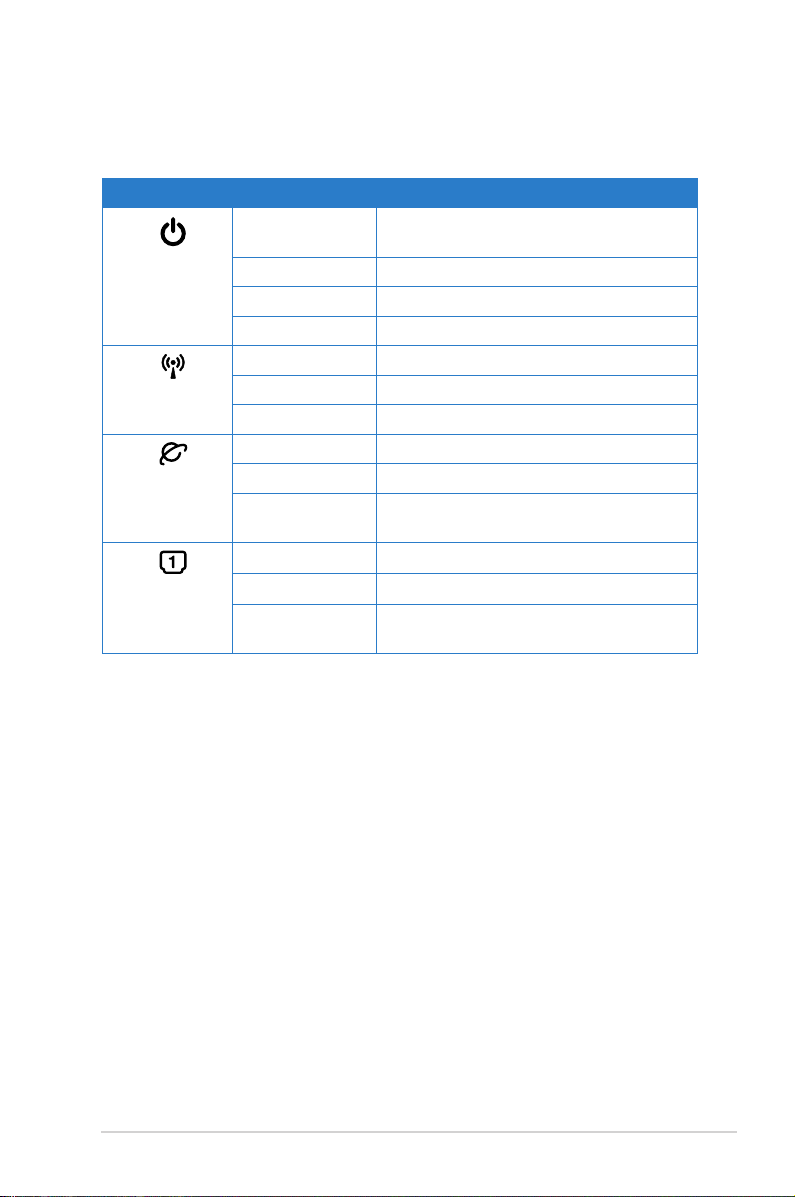
Indicatori de stare
LED Stare Indicare
Oprită Lipsă alimentare sau semnalul fără r este
dezactivat
Alimentare
Wireless
WAN
Reţea �onalãeţea �onalã
Largã
LAN 1-4
Reţea Localăeţea Locală
Pornită Sistem pregătit
Pâlpâire lentă Mod eliberare
Pâlpâire rapidă Se procesează WPS
Oprită Fără alimentare
Pornită Sistemul wireless pregătit
Pâlpâire Transmitere sau primire de date (wireless)
Oprită Fără alimentare sau fără conexiune zică
Pornită Are conexiune zică la o reţea Ethernet
Pâlpâire Transmitere sau primire de date (prin cablu
Ethernet)
Oprită Fără alimentare sau fără conexiune zică
Pornită Are conexiune zică cu o reţea Ethernet
Pâlpâire Transmitting or receiving data (through
Ethernet cable)
7
Page 8

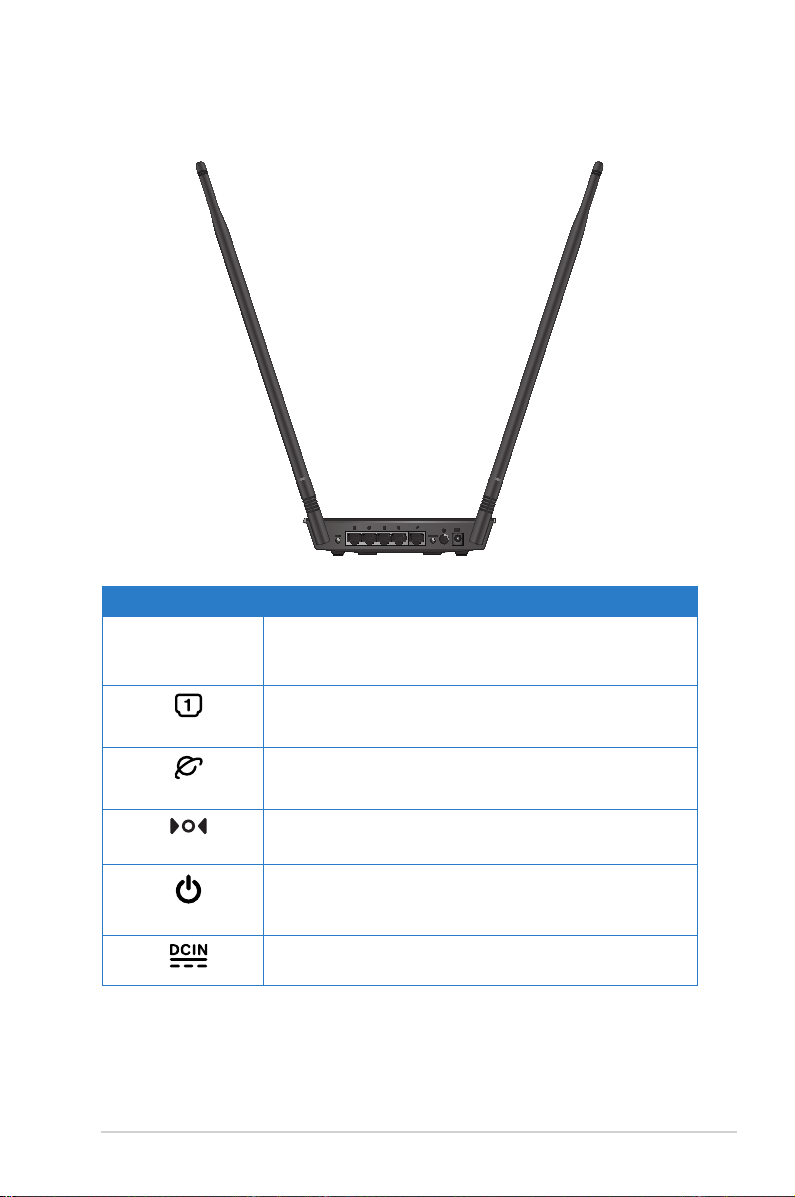
Panou spate (RT-N12 D1)
Articol Descriere
Apãsaţi acest buton pentru mai mult de cinci secunde
Restabilire
pentru a restabili sistemul la setãrile iniţiale de fabricã.
Apăsaţi acest buton pentru a porni/opri routerul wireless.
Alimentarelimentare
Introduceţi adaptorul AC în acest port pentru a vă conecta
routerul la curent.
Conectaţi cablul RJ-45 Ethernet la aceste porturi pentru a
LAN1-LAN4
WAN
WPS Apăsaţi acest buton pentru mai mult de patru secunde
stabili conexiunea LAN.
Conectaţi cablul RJ-45 Ethernet la aceste porturi pentru a
stabili conexiunea WAN.
pentru a stabili o conexiune securizată cu un dispozitiv
wireless compatibil WPS.
8
Page 9
Panou spate (RT-N12 HP)
Articol Descriere
WPS Apăsaţi acest buton pentru mai mult de patru secunde
pentru a stabili o conexiune securizată cu un dispozitiv
wireless compatibil WPS.
Conectaţi cablul RJ-45 Ethernet la aceste porturi pentru a
LAN1-LAN4
WAN
Restabilire
stabili conexiunea LAN.
Conectaţi cablul RJ-45 Ethernet la aceste porturi pentru a
stabili conexiunea WAN.
Apãsaţi acest buton pentru mai mult de cinci secunde
pentru a restabili sistemul la setãrile iniţiale de fabricã.
Apăsaţi acest buton pentru a porni/opri routerul wireless.
Alimentarelimentare
Introduceţi adaptorul AC în acest port pentru a vă conecta
routerul la curent.
9
Page 10

Panoul din spate
1
2
Artico Descrier
1
2
Suporturi de montare
Utilizaţi suporturile de montare pentru a monta router-ul pe
suprafeţe din beton sau din lemn, utilizând două şuruburi cu cap
rotund.
Oricii pentru aerisire
Aceste oricii asigură ventilarea router-ului dvs.
10
Nu se recomandă montarea pe perete, deoarece reduce perfor
manța conexiunii wireless.
Page 11

2 Congurarea reţelei wireless
Poziţionarea ruterului
Pentru transmisia optimă a semnalului fără r între ruterul fără r
şi dispozitivele de reţea conectate la acesta, asiguraţi-vă că:
• Aşezaţi ruterul fără r într-o zonă centrală pentru o acoperire
fără r maximă pentru dispozitivele de reţea.
• Feriţi dispozitivul de obstacole de metal şi de lumina directă a
soarelui.
• Feriţi dispozitivul de dispozitive Wi-Fi numai de 802.11g sau 20
MHz, echipamente periferice de 2,4 GHz, dispozitive Bluetooth,
telefoane fără r, transformatoare, motoare de mare putere,
lumini uorescente, cuptoare cu microunde, frigidere şi alte
echipamente industriale pentru a preveni interferenţele sau
pierderea semnalului.
• Pentru o acoperire optimă din faţă în spate, aşezaţi ruterul fără
r în poziţie verticală.
• Pentru o acoperire optimă de sus până jos, aşezaţi ruterul fără
r în poziţie înclinată.
• Actualizaţi întotdeauna la cel mai recent rmware. Vizitaţi siteul Web ASUS la adresa http://www.asus.com pentru a obţine
cele mai recente actualizări de rmware.
11
Page 12

De ce aveţi nevoie
Pentru a vă congura reţeaua, aveţi nevoie de unul sau de două
computere care să întrunească următoarele cerinţe de sistem:
• Port Ethernet RJ-45 (LAN) (10Base-T/100Base-TX)
• Capabilitate wireless IEEE 802.11b/g/n
• Un serviciu TCP/IP instalat
• Browser de Web, ca de exemplu Internet Explorer, Firefox, Safari
sau Google Chrome
• În cazul în care computerul dvs. nu dispune de capabilităţi
încorporate de wireless, puteţi instala un adaptor WLAN IEEE
802.11b/g/n în computerul dvs. pentru a vă conecta la reţea.
• Cablurile Ethernet RJ-45 care vor utilizate pentru conectarea
dispozitivelor de reţea nu trebuie să depăşească 100 de metri.
Instalarea routerului
• Utilizaţi conexiunea cu r pentru setarea ruterului wireless
pentru a evita eventualele probleme de congurare datorate
unei conexiuni wireless nesigure.
12
• Înainte de a congura ruterul fără r ASUS, efectuaţi
următoarele acţiuni:
• Dacă înlocuiţi un ruter existent, deconectaţi-l de la reţea.
• Deconectaţi cablurile/rele de la instalaţia de modem
existentă. Dacă modemul dispune de o baterie de rezervă,
scoateţi-o şi pe aceasta.
• Reporniţi computerul (recomandat).
Page 13

RT-N12 D1
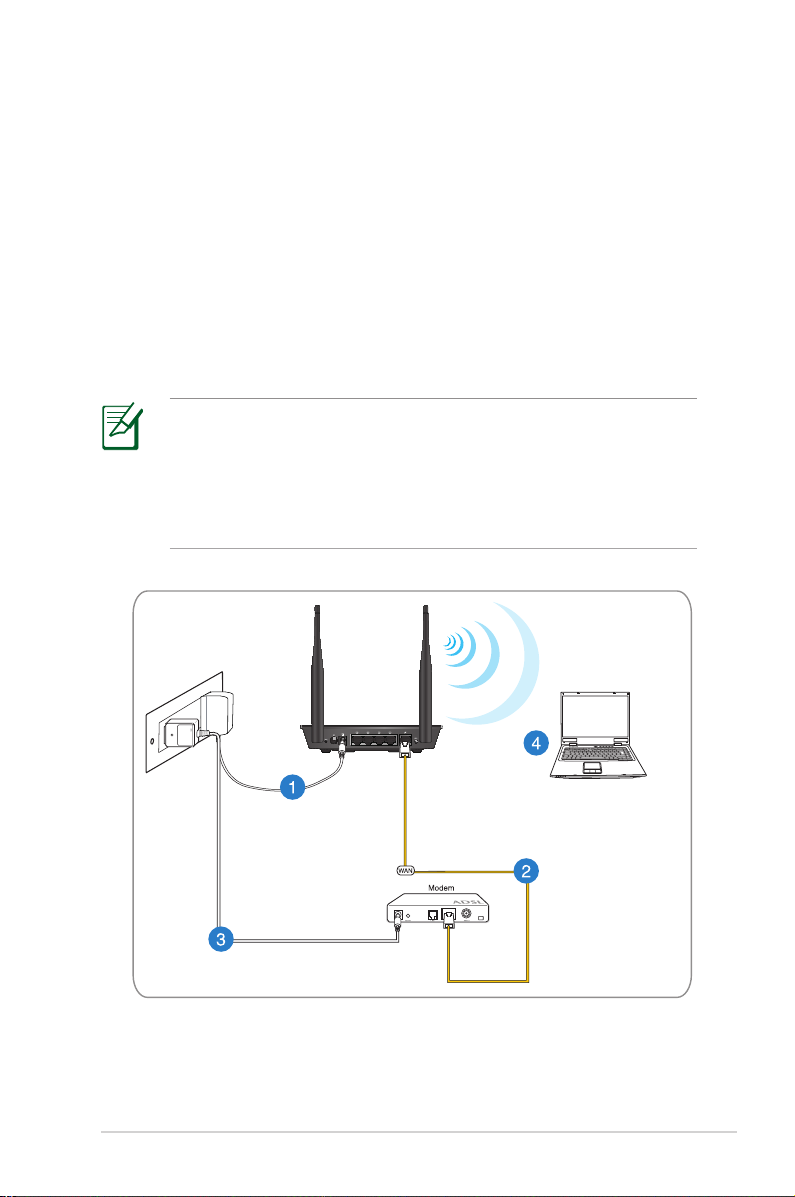
Conexiune cu r
Routerul dvs. wireless acceptă cabluri directe sau inversate
atunci când doriţi să conguraţi o reţea prin cablu.
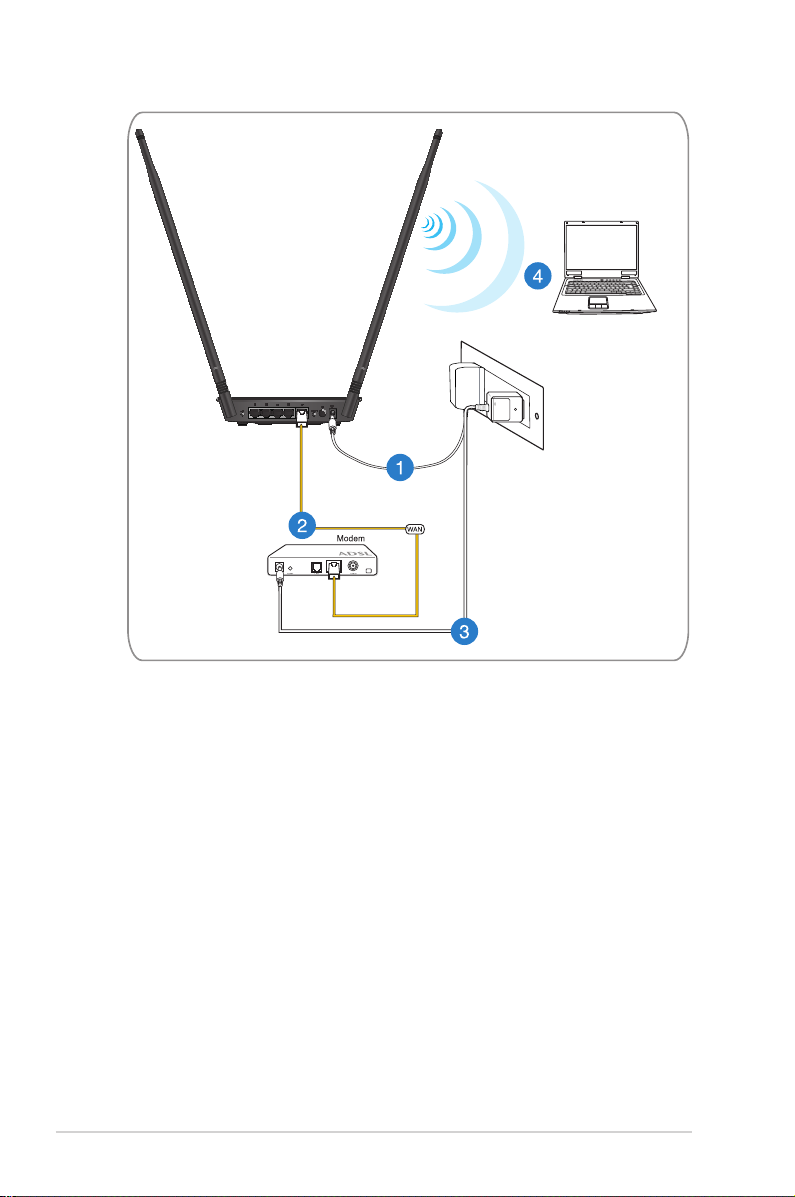
Pentru a congura o reţea utilizând conexiuni prin cablu:
1. Inseraţi adaptorul de c.a. al ruterului fără r în portul de intrare
c.c. şi conectaţi-l la o priză.
2. Utilizând cablul de reţea inclus, conectaţi computerul la portul
LAN al ruterului fără r.
13
Page 14

Asiguraţi-vă că LED-ul LAN iluminează intermitent.
RT-N12 HP
3 Utilizând un alt cablu de reţea, conectaţi modemul la portul
WAN al ruterului fără r.
4. Inseraţi adaptorul de c.a. al modemului în portul de intrare c.c.
şi conectaţi-l la o priză.
14
Page 15
RT-N12 D1
Conexiune wireless
Pentru a congura o reţea wireless:
1. Inseraţi adaptorul de c.a. al ruterului fără r în portul de intrare
c.c. şi conectaţi-l la o priză.
2 Utilizând cablul de reţea inclus, conectaţi modemul la portul
WAN al ruterului fără r.
3. Insert your modem’s AC adapter to the DC-In port and plug it
to a power outlet.
4. Instalaţi un adaptor WLAN IEEE 802.11b/g/n pe computer.
• Pentru detalii referitoare la o reţea wireless, consultaţi
manualul de utilizare al adaptorului WLAN.
• Pentru a congura setările de securitate pentru reţeaua dvs.,
consultaţi capitolul Congurarea setărilor de securitate
pentru reţeaua wireless din acest manual de utilizare.
15
Page 16
16
RT-N12 HP
Page 17

Înainte de a începe
Înainte de a congura routerul wireless, aplicaţi etapele descrise
în această secţiune pentru ecare computer din reţea, pentru a
evita problemele de conectare la reţeaua wireless.
A. Dezactivaţi serverul proxy, dacă este activat.
Windows® 7
1. Faceţi clic pe Start >
Internet Explorer.
2. Faceţi clic pe Tools
(Instrumente) >
Internet options
(Opţiuni Internet) > la
Connections (Conexiuni)
> LAN settings (Setări
LAN).
17
Page 18
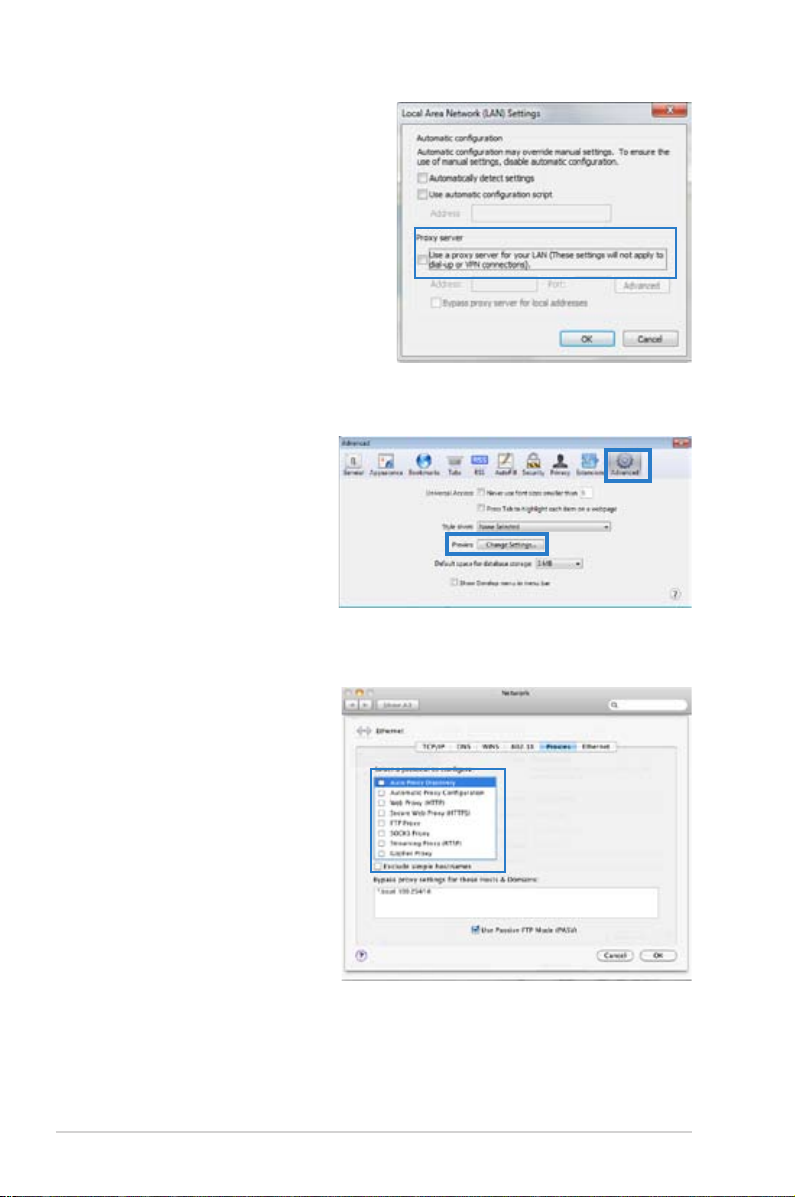
3. Din ecranul Local Area
Network (LAN) Settings
(Setări pentru reţeaua locală
(LAN)), debifaţi opţiunea
Use a proxy server for your
LAN (Utilizare server proxy
pentru reţeaua locală).
4. Faceţi clic pe OK şi apoi pe
Apply (Aplicare).
MAC OS
1.În browserul Safari,
faceţi clic pe Safari
> Preferences
(Preferinţe) >
Advanced (Complex).
În elementul Proxies
(Proxy-uri), faceţi clic
pe Change Settings...
(Modicare setări... )
2. În ecranul Network
(Reţea), deselectaţi FTP
Proxy (Server proxy
FTP) şi Web Proxy
(HTTP) (Server proxy
Web (HTTP)).
3. Faceţi clic pe OK şi apoi
pe Apply (Aplicare).
18
Page 19
B. Conguraţi setările TCP/IP pentru obţinerea
automată a unei adrese IP.
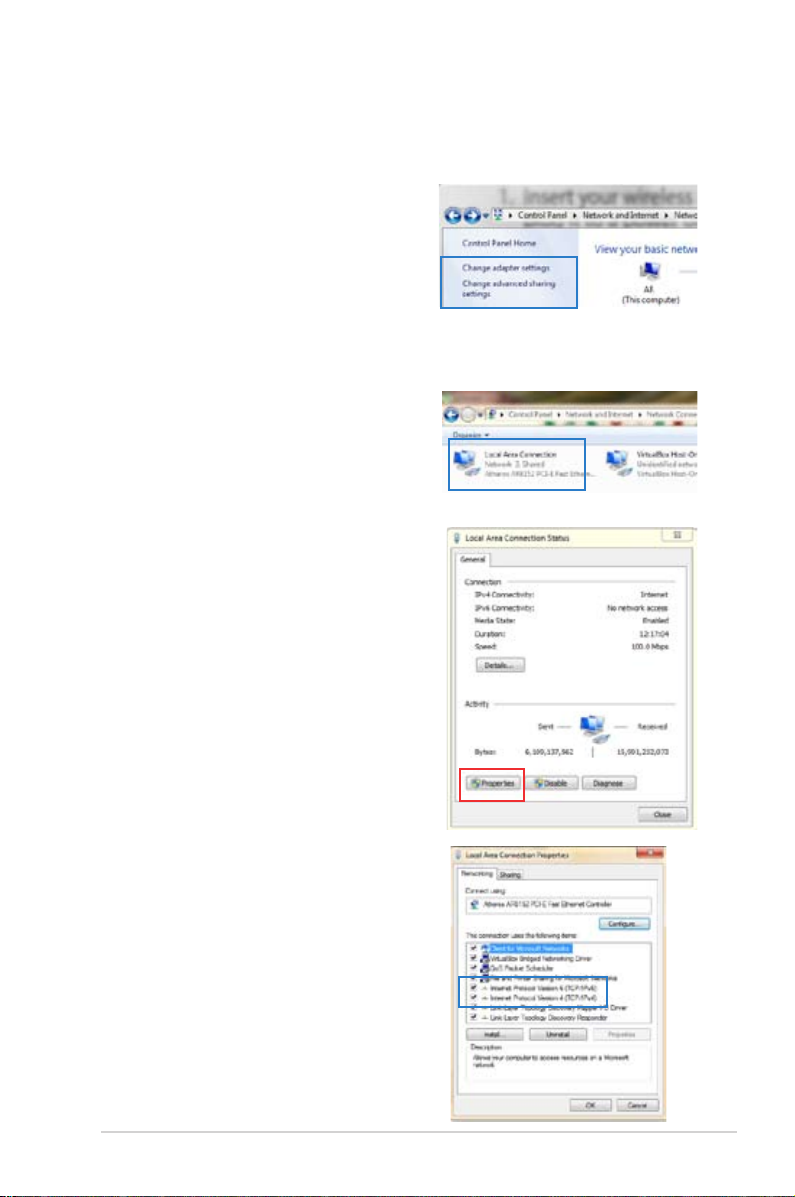
Windows® 7
1. Faceţi clic pe Start > Control
Panel (Panou de control) >
Network and Internet (Reţea
şi Internet) > Network and
Sharing Center (Centru de
reţea şi partajare) > Change
adapter settings (Modicarea
setărilor adaptorului.).
2. În fereastra Network
Connections (Conexiuni de
reţea), faceţi clic pe Local
Area Connection (Conexiune
de reţea locală).
3. În fereastra Local Area
Connection Network
Status (Stare conexiune de
reţea locală) faceţi clic pe
Properties (Proprietăţi).
4. Selectaţi Internet Protocol
Version 4 (Versiune protocol
internet 4) (TCP/IPv4) sau
Internet Protocol Version 6
(Versiune protocol internet 6)
(TCP/IPv6), apoi faceţi clic pe
Properties (Proprietăţi).
19
Page 20
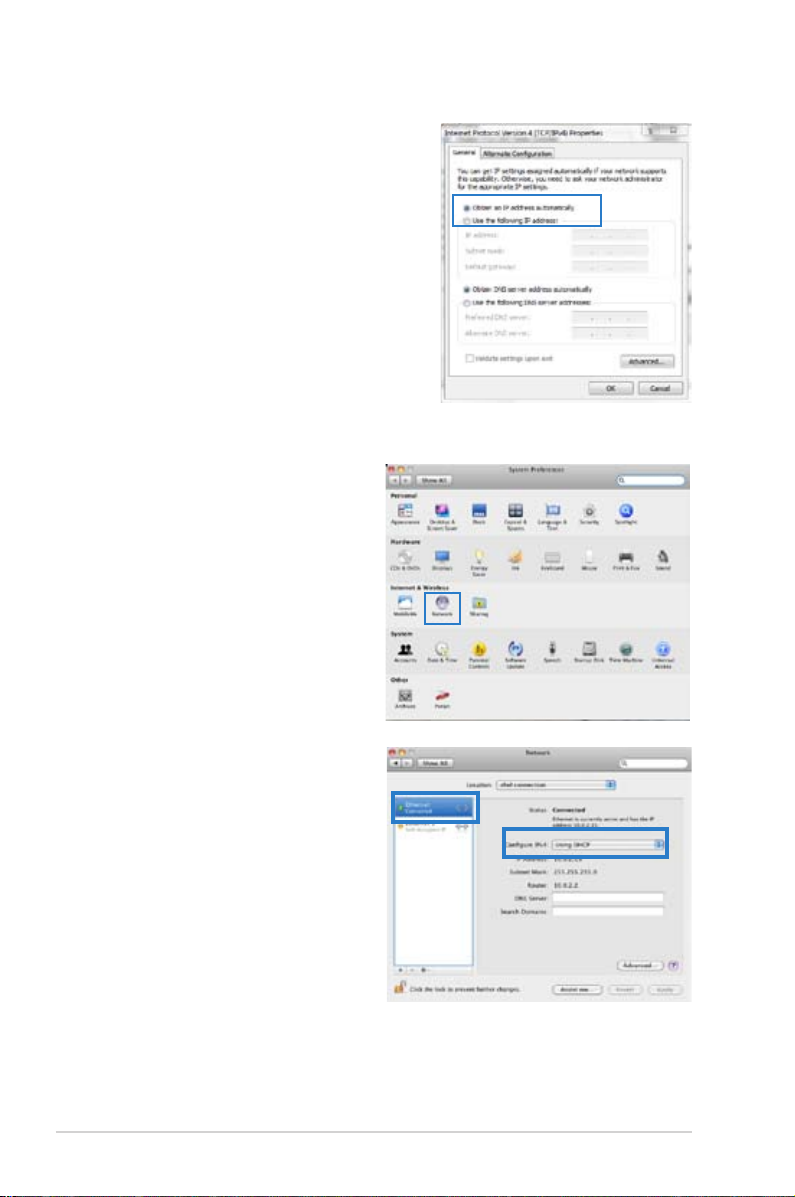
6. Bifaţi opţiunea Obtain an IP
address automatically (Se
obţine automat o adresă IP).
7. Faceţi clic pe OK.
MAC OS
1. Faceţi clic pe Apple Menu
(Meniu Apple)> System
Preferences (Preferinţe
sistem) > Network
(Reţea)
2. Faceţi clic pe Ethernet
în panoul din partea
stângă.
3. În secţiunea Congure
IPv4 (Congurare IPv4),
selectaţi Using DHCP
(Utilizare DHCP).
4. Faceţi clic pe Apply
(Aplicare).
20
Page 21
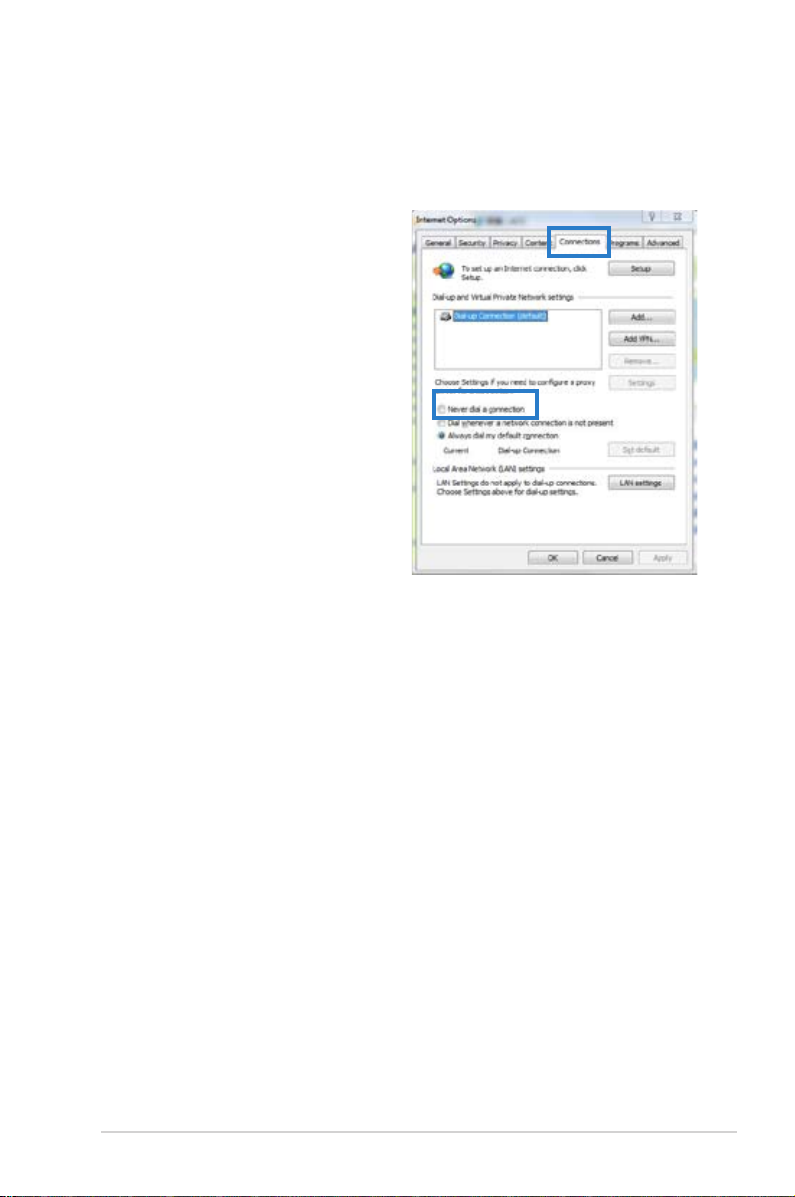
C. Dezactivaţi conexiunea pe linie comutată, dacă este
activată
Windows® 7
1. Faceţi clic pe Start >
Internet Explorer.
2. Faceţi clic pe Tools
(Instrumente) >
Internet options
(Opţiuni Internet) > la
Connections (Conexiuni).
3. Bifaţi Never dial a
connection (Nu se
apelează niciodată o
conexiune).
4. Faceţi clic pe OK şi apoi pe
Apply (Aplicare).
21
Page 22

3 Congurarea prin GUI web
Conectarea la interfaţa Web GUI
Routerul dvs. wireless ASUS utilizează o interfaţă de utilizare
bazată pe web, care vă permite să conguraţi routerul utilizând
orice browser web, precum Internet Explorer, Mozilla Firefox,
Apple Safari, sau Google Chrome.
Pentru a vă conecta la interfaţa Web GUI:
1. Lansaţi browserul web şi introduceţi manual adresa IP implicită
a routerului wireless: 192.168.1.1
2. Pe pagina de acces, tastaţi numele iniţial al utilizatorului
(admin) şi parola (admin).
22
Page 23

3. Interfaţa gracă a routerului wireless oferă acces la diferite
setări de congurare.
Congurarea conexiunii la Internet
Când setaţi conexiunea la Internet pentru prima dată, apăsaţi
pe butonul Reset (Reiniţializare) de pe ruterul fără r pentru a-l
reiniţializa la setările implicite din fabrică.
23
Page 24

Congurarea rapidă a conexiunii la Internet (QIS) cu
detectare automată
Funcţia Quick Internet Setup (QIS – Congurare rapidă Internet) vă
ghidează pentru setarea rapidă a conexiunii la Internet.
Pentru a utiliza QIS cu detectare automată:
1. Lansaţi un browser de Web, ca de exemplu Internet Explorer,
Moxilla, Firefox, Apple Safari sau Google Chrome.
2. Utilitarul Quick Internet Setup (Congurare rapidă internet) va
lansat în mod automat. Faceţi clic pe Next (Următorul).
24
Dacă funcţia QIS nu a reuşit să se lanseze automat, lansaţi
manual interfaţa gracă Web a ruterului fără r pentru a
accesa pagina QIS. Pentru a realiza acest lucru urmaţi aceşti
paşi:
1. În browserul Web, introduceţi adresa http://192.168.1.1
2. Pe pagina de login, introduceţi numele de utilizator implicit
admin şi parola admin.
3. Faceţi clic pe Quick Internet Setup (Congurare rapidă
internet) în panoul de navigare.
Page 25

3. Introduceţi o nouă parolă de administrator pentru a preveni
accesul neautorizat la router. Faceţi clic pe Next (Următorul).
4. Selectaţi Wireless router mode (Mod router wireless), Repeater
mode (Mod repetator) sau Access Point (AP) (Mod punct de
acces PA). Faceţi clic pe Next (Următorul).
Pentru a congura o reţea wireless cu acces la internet, utilizaţi
Wireless router mode (Modul router wireless).
25
Page 26

5. Routerul wireless va încerca să identice tipul de conexiune.
Dacă este necesar, selectaţi tipul conexiunii şi introduceţi orice
informaţii care sunt solicitate, precum numele de utilizator şi
parola alocate de către furnizorul dvs. de servicii internet.
Puteţi să obţineţi informaţiile necesare despre tipul conexiunii
dvs. la internet şi orice alte informaţii de conectare suplimentare
de la furnizorul dvs. de servicii internet.
• Detectarea automată a tipului de conexiune are loc când
congura routerul wireless pentru prima dată sau când
routerul dvs. wireless este resetat la valorile implicite.
26
• Dacă QIS nu a putut detecta tipul conexiunii la internet, faceţi
clic pe Skip to manual setting (Trecere la setarea manuală)
şi conguraţi manual setările conexiunii.
Page 27

8. În ecranul Wireless Setting (Setare wireless), introduceţi
un nou nume pentru reţea (SSID) şi alocaţi o cheie de
securitate pentru conexiunea dvs. wireless. Faceţi clic pe Apply
(Aplicare).
9. Va aşat un sumar al setărilor dvs. de reţea. Faceţi clic pe Next
(Următorul) pentru continuare.
27
Page 28

10. Citiţi asistentul de instruire pentru conexiunea la reţea
fără r. Când aţi terminat, faceţi clic pe Finish (Terminare).
28
Page 29

Congurarea setărilor de securitate pentru
reţeaua wireless
Pentru a vă proteja reţeaua wireless împotriva accesului
neautorizat, este necesar să conguraţi setările de securitate.
Pentru a congura setările de securitate pentru reţeaua
wireless:
1. Tastaţi 192.168.1.1 în browserul de Web.
2. În ecranul de conectare tastaţi numele de utilizator (admin)
şi parola (admin) implicite, apoi faceţi clic pe OK. Se lansează
interfaţa Web GUI a ruterului wireless.
3. În ecranul Network Map (Hartă reţea), zona System Status
(Stare sistem) aşează metoda de autenticare SSID (Service
Set Identier (identicator set servicii)) şi setările cheii de
securitate pentru reţeaua dvs. wireless.
29
Page 30

4. În câmpul Wireless name (SSID) (Nume reţea wireless (SSID))
tastaţi un nume unic pentru reţeaua dvs. wireless.
5. Din lista verticală Authentication Method (Metodă de
autenticare), selectaţi metoda de criptare pentru reţeaua dvs.
wireless.
Standardul IEEE 802.11n interzice utilizarea unei rate mari de
transfer cu WEP sau WPA-TKP ca şi cifru unicast. În cazul în care
utilizaţi aceste metode de criptare, rata de date va scădea la o
conexiune IEEE 802.11g de 54 Mbps.
6. Tastaţi cheia de acces de securitate.
7. Faceţi clic pe Apply (Aplicare).
30
Page 31

Reglarea puterii Tx (numai pentru modelul RTN12 HP)
Ajustarea puterii Tx face referire la puterea (în mW) necesară
pentru alimenta semnalul radio emis de către routerul wireless.
Routerul RT-N12 HP acceptă o putere maximă de transmitere de
200 mW.
Pentru a ajusta puterea TX:
1. Faceţi clic pe Wireless în panoul de navigare.
2. Faceţi clic pe la Professional (Profesional).
3. În zona Tx Power adjustment (Ajustare putere Tx)
introduceţi o valoare între 0 şi 200 mW.
Mărirea valorii pentru puterea Tx poate afecta stabilitatea reţelei
wireless şi durata de viaţă a routerului wireless.
31
Page 32

Administrarea clienţilor din reţea
Congurarea unei reţele pentru oaspeţi oferă o conectivitate
wireless la internet pentru vizitatori, restricţionând în acelaşi timp
accesul la reţeaua dvs. privată.
Pentru a administra clienţii din reţea:
1. Faceţi clic pe Guest Network (Reţea oaspeţi) în panoul de
navigare.
2. Faceţi clic pe Enable (Activare).
3. Pentru a congura mai multe opţiuni, faceţi clic pe oricare din
elementele enumerate.
32
Page 33

4. Alocaţi un nume pentru reţeaua dvs. wireless temporară în
câmpul Network Name (SSID) (Nume reţea (SSID)).
5. Selectaţi o metodă de autenticare.
6. Selectaţi o metodă de criptare WEP.
7. Specicaţi timpul de acces sau faceţi clic pe opţiunea
Limitless (Fără limită).
8. Selectaţi Disable (Dezactivare) sau Enable (Activare) pentru
elementul Acces Intranet (Accesare intranet).
9. Faceţi clic pe Apply (Aplicare).
33
Page 34

Utilizarea funcţiei Trac Manager (Manager
trac)
Gestionarea lăţimii de bandă pentru funcţia QoS (Calitatea serviciului)
Funcţia QoS (Quality of Service – Calitatea serviciului) vă
permite să setaţi prioritatea de lăţime de bandă şi să gestionaţi
tracul în reţea.
Pentru a congura QoS:
1. Faceţi clic pe Trac Manager (Manager trac) din panoul de
navigare şi apoi faceţi clic p la QoS.
2. Faceţi clic pe ON (Pornit) pentru a activa QoS.
3. Faceţi clic pe Save (Salvare).
34
Informaţiile cu privire la lăţimea de bandă de care dispuneţi pot
obţinute de la furnizorul dvs. de servicii internet.
Page 35

4. Dacă doriţi să acordaţi prioritate anumitor aplicaţii şi servicii în
reţea, faceţi clic pe User-dened Priority (Prioritate denită
de utilizator) în colţul din dreapta sus.
5. Ajustaţi valorile după cum este necesar. Faceţi clic pe Apply
(Aplicare).
35
Page 36

Monitorizarea tracului
Faceţi clic pe la Trac Monitor (Monitor trac) pentru a
vizualiza informaţii în timp real sau istorice referitoare lăţimea de
bandă a conexiunilor internet prin cablu şi wireless.
36
Page 37

Congurarea setărilor Complexe
Congurarea serverului DHCP
Routerul dvs. wireless utilizează protocolul DHCP pentru a aloca
adrese IP automat în reţeaua dvs. Puteţi specica intervalul de
adrese IP şi durata de alocare a acestor adrese pentru clienţii din
reţeaua dvs.
Pentru a congura serverul DHCP:
1. Faceţi clic pe LAN în panoul de navigare.
2. Faceţi clic pe la DHCP Server (Server DHCP).
3. În câmpul Enable the DHCP Server? (Activaţi serverul
DHCP?) bifaţi Yes (Da).
4. În câmpul IP Pool Starting Address (Plajă adresă IP de
pornire), tastaţi adresa IP de pornire.
5. În câmpul IP Pool Ending Address (Plajă adresă IP de sfârşit),
tastaţi adresa IP de sfârşit.
37
Page 38

6. În câmpul Lease Time (Perioadă de închiriere) tastaţi data
la care expiră adresele IP şi ruterul wireless va aloca automat
adrese IP noi pentru clienţii reţelei.
• ASUS recomandă utilizarea unui format de adresă de tipul
192.168.1.xxx (unde xxx poate un număr cuprins între 2 şi
254) atunci când specicaţi un interval de adrese IP.
• Plaja de adrese IP de pornire nu trebuie să e mai mare decât
plaja de adrese IP de sfârşit.
38
Page 39

Actualizarea softului integrat
Descărcaţi ultimul soft integrat de pe pagina web a ASUS la:
http://support.asus.com
Pentru actualizarea softului integrat:
1. Faceţi clic pe Administration (Administrare) în panoul de
navigare.
2. Faceţi clic pe la Firmware Upgrade (Actualizare Soft
Integrat).
3. În campul New Firmware File (Fişier Nou Soft Integrat), faceţi
click pe Browse (Răsfoiţi) pentru a localiza noul soft integrat
pe computerul dvs.
4. Faceţi click pe Upload (Încărcare).
Dacă procesul de actualizare eşuează, routerul va intra automat
în modul de urgenţă sau de defecţiune şi indicatorul LED
de curent de pe partea frontală pâlpâie lent. Pentru a reface
sistemul, folosiţi utilitara Firmware Restoration (Restaurare Soft
Integrat).
39
Page 40

Refacerea/Salvarea/Încărcarea setărilor
Pentru a reface/salva/încărca setările:
1. Faceţi clic pe Administration (Administrare) în panoul de
navigare.
2. Faceţi clic pe la Restore/Save/Upload Setting (Restaurare/
Salvare/Încărcare setare).
3. Selectaţi sarcina pe care doriţi s-o îndepliniţi:Selectaţi sarcina pe care doriţi s-o îndepliniţi:
• Pentru a reface setările iniţiale din fabrică, faceţi click pe
Restore (Refacere) apoi click OK în mesajul de conrmare.
• Pentru a salva setările prezente ale sistemului, click Save
(Salvează) şi click pe Save (Salvează) în fereastra şierului
de încărcare, pentru a salva şierul sistemului pe ruta
preferată.
• Pentru a reface setarea sistemului anterior, click Browse
(Răsfoieşte) pentru a localiza şierul sistemului pe care
doriţi să.l refaceţi apoi faceţi click pe Upload (Încărcare).
40
Page 41

4 Folosirea utilitarelor
Utilitare pentru routerul wireless ASUS pot descărcate la
adresa http://support.asus.com
După descărcarea şi instalarea şierului de congurare pentru
utilitarele wireless ASUS, utilitarele Device Discovery (Descoperire
dispozitive) şi Firmware Restoration (Restaurare rmware) pot
adăugate în rândul aplicaţiilor dvs.
Detectarea Dispozitivului
Detectarea Dispozitivului este o utilitară ASUS WLAN ce
detectează dispozitivul Router ASUS şi permite să conguraţi
dispozitivul.
41
Page 42

Pentru a lansa utilitara Detectează Dispozitivul
• De pe desktopul computerului dvs click Start > All programs
(Toate Programele) > ASUS Utility (Utilitară ASUS) >
Router fără cablu RT-N12 > Device Discovery (Detectare
Dispozitiv).
Atunci când setaţi ruterul la modul Access Point (Punct
de acces), trebuie să utilizaţi utilitarul Device Discovery
(Descoperire dispozitiv) pentru a obţine adresa IP a ruterului.
Refacerea softului integrat
Utilitarul Firmware Restoration (Restaurare rmware) poate
utilizat pentru un router wireless ASUS după eşuarea unei
actualizări rmware. Acest utilitar încarcă un şier rmware în
routerul wireless. Procesul durează aproximativ trei până la patru
minute.
Lansaţi modul de salvare înainte de a utiliza utilitarul Firmware
Restoration (Restabilire rmware).
Pentru a lansa modul de salvare şi a utiliza utilitarul Firmware
Restoration (Restabilire rmware):
1. Deconectaţi ruterul fără r de la sursa de alimentare.
42
Page 43

2. Ţineţi apăsat butonul Reset (Reiniţializare) de pe panoul din
spate şi simultan conectaţi din nou ruterul fără r la sursa
de alimentare. Eliberaţi butonul Reset (Reiniţializare) atunci
când LED-ul de alimentare de pe panoul frontal iluminează
intermitent lent, ceea ce indică faptul că ruterul fără r este în
modul de salvare.
3. Utilizaţi următoarele informaţii pentru a vă congura setările
TCP/IP:
Adresă IP: 192.168.1.x
Mască subreţea: 255.255.255.0
4. De pe desktopul computerului, faceţi clic pe Start > All
Programs (Toate programele) > ASUS Utility RT-N12
Wireless Router (Ruter fără r RT-N12 utilitar ASUS) >
Firmware Restoration (Restabilire rmware).
5. Faceţi clic pe Browse (Răsfoire) pentru a naviga la şierul
rmware, după care faceţi clic pe Upload (Încărcare).
Acesta nu este un utilitar de upgrade de rmware şi nu poate
utilizat pe un ruter fără r ASUS în funcţiune. Upgradeurile normale de rmware trebuie efectuate prin intermediul
interfeţei Web. Consultaţi secţiunea Upgrading the rmware
(Actualizarea rmware) pentru a obţine mai multe detalii.
43
Page 44

5 Remedierea defecţiunilor
În cazul în care întâmpinaţi probleme care nu sunt menţionate
în acest capitol, contactaţi Asistenţă tehnică ASUS.
Remedierea defecţiunilor
Nu pot accesa un browser web pentru congurarea routerului.
• Ştergeţi modulele cookie şi şierele din browserul Web.Pentru a
face acest lucru în Internet Explorer 8:
1. lansaţi un browser web apoi click Toos (Unelte) > Internet
Options... (Opţiuni Internet).
2. În la General, faceţi clic pe Delete (Ştergere) în secţiunea
Browsing History (Istoric navigare).
3. Bifaţi Temporary Internet Files (Fişiere Internet
temporare) şi Cookies (Module cookie). Faceţi clic pe
Delete (Ştergere).
Comenzile pentru ştergerea modulelor cookie şi a şierelor
diferă în funcţie de browserul Web.
• Dezactivaţi setările de server proxy, revocaţi conexiunea pe
linie comutată şi setaţi setările TCP/IP pentru a obţine automat
adrese IP. Pentru mai multe detalii, consultaţi secţiunea Înainte
de a începe din acest manual de utilizare.
Clientul nu poate stabili o legătura wireless cu routerul.
În afara razei:
• Puneţi routerul mai aproape de clientul wireless.
• Încercaţi să schimbaţi setările canalului.
44
Page 45

Autenticare:
• Folosiţi conexiune cu cablu pentru a vă conecta la router.
• Vericaţi setările de securitate wireless.
• Apăsaţi butonul Resetare mai mult de cinci secunde de pe
panoul din spate.
Nu poate găsi routerul:
• Apăsaţi butonul Resetare de pe panoul din spate pentru
mai mult de cinci secunde.
• Vericaţi setarea adaptorului wireless precum SSID şi
setarea de criptare.
Nu poate accesa la internet prin adaptorul LAN wireless
• Mutaţi routerul mai aproape de clientul wireless.
• Vericaţi dacă adaptorul wireless este conectat
corespunzător la router.
• Vericaţi dacă canalul wireless în uz este conform cu
canalele disponibile în zona/ţara dvs.
• Vericaţi setările de criptare.
• Vericaţi dacă conexiunea ADSL sau a cablului este corectă.
• Reîncercaţi folosind un alt cablu Ethernet.
Internetul nu este accesibil
• Vericaţi statustul indicatorilor pe modemul ADSL şi router.
• Vericaţi dacă LED-ul WAN de pe router este APRINS. Dacă
nu, schimbaţi cablul şi încercaţi din nou.
45
Page 46

Când “Link-ul” Modemului ADSL este PORNIT (nu pâlpâie)
înseamnă că accesul la internet e posibil.
• Reporniţi calculatorul
• Vericaţi dacă LED-ul WAN de pe router este APRINS.
• Vericaţi setările de criptare wireless.
• Vericaţi dacă computerul poate obţine adresă IP (prin
reţeaua cu cablu sau cea wireless).
• Asiguraţi-vă că browserul web este congurat pebntru a
folosi LAN local, şi că nu este congurat să folosească un
proxy server.
Dacă lumina “link-ului” ADSL clipeşte încontinuu sau e stinsă
permanent, accesul la internet nu este posibil – routerul nu
poate stabili legătura la reţeaua ADSL.
• Asiguraţi-vă că toate cablurile sunt corect conectate.
• Deconectaţi cablul de curent de la modemul de cablu sau
ADSL, aşteptaţi câteva minute şi reconectaţi.
• Dacă lumina de la ADSL continuă să clipească sau să e
stinsă, contactaţi furnizorul dvs de servicii ADSL.
Numele reţelei sau codul de criptare e uitat
• Încercaţi conectarea prin cablu şi conguraţi criptarea
wireless din nou.
• Apăsaţi butonul Resetare mai mult de cinci secunde de pe
panoul din spate al router-lui fără r.
46
Page 47

Cum să readuc sistemul la setările sale iniţiale
• Apăsaţi butonul Resetare din spatele routerului pentru mai
mult de cinci secunde.
• Referiţi-vă la secţiunea Refacerea softului integrat în
capitolul 5 acestui manual al utilizatorului.
Următoarele sunt setări iniţiale de fabrică:
Nume utilizator: admin
Parolă: admin
Validează DHCP: Da (când cablul
WAN este conectat)
Adresă IP: 192.168.1.1
Nume domeniu: (Gol)
Subnet Mask: 255.255.255.0
DNS Server 1: 192.168.1.1
DNS Server 2: (Gol)
SSID: ASUS
47
Page 48

Serviciul ASUS DDNS
Routerele din seria RT-N12 acceptă serviciul DDNS de la ASUS.
Dacă v-aţi înregistrat pentru un serviciu DDNS de la ASUS şi
trebuie să schimbaţi dispozitivele la un centrul de service,
informaţi centrul de service că doriţi să păstraţi numele de
domeniu iniţial şi serviciul DDNS. Pentru mai multe informaţii,
vizitaţi centrul de service local.
• Dacă nu există nicio activitate în domeniu – cum ar
recongurarea router-ului sau accesarea numelui de domeniu
înregistrat - timp de 90 de zile, sistemul şterge automat
informaţiile înregistrate.
• Dacă întâmpinaţi probleme sau dicultăţi de utilizare a
dispozitivului, contactaţi centrul de service.
Întrebări frecvente (FAQ)
1. Informaţiile înregistrate se vor pierde sau vor înregistrate
de alte persoane?
Dacă nu aţi actualizat informaţiile înregistrate timp de 90
de zile, sistemul şterge automat informaţiile înregistrate şi
este posibil ca numele domeniului să e înregistrat de alte
persoane.
2. Nu m-am abonat la ASUS DDNS pentru router-ul pe care lam cumpărat acum şase luni. Pot să mai înregistrez routerul?
Da, vă mai puteţi înregistra la serviciul ASUS DDNS pentru
router-ul dvs. Serviciul DDNS este încorporat în router-ul dvs.,
astfel încât vă puteţi înregistra la serviciul ASUS DDNS oricând.
Înainte de înregistrare, dacă hostname-ul (numele “gazdei”, ales
de dvs) a fost înregistrat sau nu. Dacă nu, sistemul va înregistra
numele dorit.”
48
Page 49

3. Am înregistrat un nume de domeniu înainte şi a funcţionat
până când prietenii mei mi-au spus că nu mai pot accesa
numele de domeniu.
Vericaţi următoarele:
1. Dacă Internetul funcţionează corect;
2. Dacă serverul DNS funcţionează corect;
3. Data ultimei actualizări a numelui de domeniu.
Dacă problemele de accesare a numelui de domeniu persistă,
contactaţi centrul de service.
4. Pot înregistra două nume de domenii pentru a accesa
separat serverele http şi ftp?
R. Nu, nu puteţi face acest lucru. Puteţi înregista un singur nume
de domeniu pentru un router. Utilizaţi maparea de porturi
pentru implementarea aplicaţiilor de securitate în reţea.
5. De ce există adrese IP WAN diferite în MS DOS şi în
pagina de congurare a router-ului după ce repornesc
computerul?
Acest lucru este normal. Intervalul de timp dintre serverul DNS
al furnizorului de servicii de Internet şi serviciul ASUS DDNS
generează adrese IP WAN diferite în MS DOS şi în pagina de
congurare a router-ului. Este posibil ca furnizorii de servicii
de Internet diferiţi să aibă intervale de timp diferite pentru
actualizarea adreselor IP.
6. Serviciul ASUS DDNS este gratuit sau este doar o versiune
de încercare?
Serviciul ASUS DDNS este un serviciu gratuit şi încorporat în
unele routere ASUS. Vericaţi dacă router-ul dvs. ASUS acceptă
serviciul ASUS DDNS.
49
Page 50

Anexă
Anunţuri
ASUS Recycling/Takeback Services
ASUS recycling and takeback programs come from our
commitment to the highest standards for protecting our
environment. We believe in providing solutions for you to be able
to responsibly recycle our products, batteries, other components,
as well as the packaging materials. Please go to http://csr.asus.
com/english/Takeback.htm for the detailed recycling information
in dierent regions.
REACH
Complying with the REACH (Registration, Evaluation,
Authorisation, and Restriction of Chemicals) regulatory
framework, we published the chemical substances in our products
at ASUS REACH website at
http://csr.asus.com/english/index.aspx
Federal Communications Commission Statement
This device complies with Part 15 of the FCC Rules. Operation is
subject to the following two conditions:
• This device may not cause harmful interference.
• This device must accept any interference received, including
interference that may cause undesired operation.
This equipment has been tested and found to comply with the
limits for a class B digital device, pursuant to part 15 of the FCC
Rules. These limits are designed to provide reasonable protection
against harmful interference in a residential installation.
50
Page 51

This equipment generates, uses and can radiate radio frequency
energy and, if not installed and used in accordance with
the instructions, may cause harmful interference to radio
communications. However, there is no guarantee that interference
will not occur in a particular installation. If this equipment does
cause harmful interference to radio or television reception, which
can be determined by turning the equipment o and on, the user
is encouraged to try to correct the interference by one or more of
the following measures:
• Reorient or relocate the receiving antenna.
• Increase the separation between the equipment and receiver.
• Connect the equipment into an outlet on a circuit dierent
from that to which the receiver is connected.
• Consult the dealer or an experienced radio/TV technician for
help.
Any changes or modications not expressly approved by the
party responsible for compliance could void the user’s authority
to operate the equipment.
Prohibition of Co-location
This device and its antenna(s) must not be co-located or operating
in conjunction with any other antenna or transmitter
51
Page 52

Safety Information
To maintain compliance with FCC’s RF exposure guidelines, this
equipment should be installed and operated with minimum
distance 20cm between the radiator and your body. Use on the
supplied antenna.
Declaration of Conformity for R&TTE directive 1999/5/EC
Essential requirements – Article 3
Protection requirements for health and safety – Article 3.1a
Testing for electric safety according to EN 60950-1 has been
conducted. These are considered relevant and sucient.
Protection requirements for electromagnetic compatibility
– Article 3.1b
Testing for electromagnetic compatibility according to EN
301 489-1 and EN 301 489-17 has been conducted. These are
considered relevant and sucient.
Eective use of the radio spectrum – Article 3.2
Testing for radio test suites according to EN 300 328- 2 has been
conducted. These are considered relevant and sucient.
CE Mark Warning
This is a Class B product, in a domestic environment, this product
may cause radio interference, in which case the user may be
required to take adequate measures.
Canada, Industry Canada (IC) Notices
This Class B digital apparatus complies with Canadian ICES-003
and RSS-210.
52
Page 53

Operation is subject to the following two conditions: (1) this
device may not cause interference, and (2) this device must accept
any interference, including interference that may cause undesired
operation of the device.
Radio Frequency (RF) Exposure Information
The radiated output power of the Wireless Device is below the
Industry Canada (IC) radio frequency exposure limits. The Wireless
Device should be used in such a manner such that the potential
for human contact during normal operation is minimized.
This device has been evaluated for and shown compliant with
the IC Specic Absorption Rate (“SAR”) limits when installed in
specic host products operated in portable exposure conditions
(antennas are less than 20 centimeters of a person’s body).
This device has been certied for use in Canada. Status of the
listing in the Industry Canada’s REL (Radio Equipment List) can be
found at the following web address: http://www.ic.gc.ca/app/sitt/
reltel/srch/nwRdSrch.do?lang=eng
Additional Canadian information on RF exposure also can be
found at the following web: http://www.ic.gc.ca/eic/site/smt-gst.
nsf/eng/sf08792.html
Canada, avis d’Industry Canada (IC)
Cet appareil numérique de classe B est conforme aux normes
canadiennes ICES-003 et RSS-210.
Son fonctionnement est soumis aux deux conditions suivantes:
(1) cet appareil ne doit pas causer d’interférence et (2) cet appareil
doit accepter toute interférence, notamment les interférences qui
peuvent a ecter son fonctionnement.
53
Page 54

NCC 警語
經型式認證合格之低功率射頻電機,非經許可,公司、商號或
使用者均不得擅自變更頻率、加大功率或變更原設計之特性及
功能。低功率射頻電機之使用不得影響飛航安全及干擾合法通
信;經發現有干擾現象時,應立即停用,並改善至無干擾時方
得繼續使用。前項合法通信,指依電信法規定作業之無線電通
信。低功率射頻電機須忍受合法通信或工業、科學及醫療用電
波輻射性電機設備之干擾。
Authorised distributors in Turkey
BOGA�ICI BIL GISAYAR SAN. VE TIC. A.S.
Tel: +90 212 3311000
Addrress: AYAZAGA MAH. KEMERBURGAZ CAD. NO.10
AYAZAGA/ISTANBUL
CI�GI Elektronik San. Tic. Ltd. Sti.
Tel: +90 212 3567070
Address: CEMAL SURURI CD. HALIM MERIC IS MERKEZI
No: 15/C D:5-6 34394 MECIDIYEKOY/ISTANBUL
54
Page 55

GNU General Public License
Licensing information
This product includes copyrighted third-party software licensed
under the terms of the GNU General Public License. Please see The
GNU General Public License for the exact terms and conditions
of this license. We include a copy of the GPL with every CD
shipped with our product. All future rmware updates will also be
accompanied with their respective source code. Please visit our
web site for updated information. Note that we do not oer direct
support for the distribution.
GNU GENERAL PUBLIC LICENSE
Version 2, June 1991
Copyright (C) 1989, 1991 Free Software Foundation, Inc.
59 Temple Place, Suite 330, Boston, MA 02111-1307 USA
Everyone is permitted to copy and distribute verbatim copies of
this license document, but changing it is not allowed.
Preamble
The licenses for most software are designed to take away your
freedom to share and change it. By contrast, the GNU General
Public License is intended to guarantee your freedom to share
and change free software--to make sure the software is free for all
its users. This General Public License applies to most of the Free
Software Foundation’s software and to any other program whose
authors commit to using it. (Some other Free Software Foundation
software is covered by the GNU Library General Public License
instead.) You can apply it to your programs, too.
When we speak of free software, we are referring to freedom, not
price. Our General Public Licenses are designed to make sure that
you have the freedom to distribute copies of free software (and
charge for this service if you wish), that you receive source code or
can get it if you want it, that you can change the software or use
pieces of it in new free programs; and that you know you can do
these things.
55
Page 56

To protect your rights, we need to make restrictions that forbid
anyone to deny you these rights or to ask you to surrender the
rights. These restrictions translate to certain responsibilities for
you if you distribute copies of the software, or if you modify it.
For example, if you distribute copies of such a program, whether
gratis or for a fee, you must give the recipients all the rights
that you have. You must make sure that they, too, receive or can
get the source code. And you must show them these terms so
they know their rights.We protect your rights with two steps:
(1) copyright the software, and (2) oer you this license which
gives you legal permission to copy, distribute and/or modify the
software.
Also, for each author’s protection and ours, we want to make
certain that everyone understands that there is no warranty for
this free software. If the software is modied by someone else and
passed on, we want its recipients to know that what they have is
not the original, so that any problems introduced by others will
not reect on the original authors’ reputations.
Finally, any free program is threatened constantly by software
patents. We wish to avoid the danger that redistributors of a free
program will individually obtain patent licenses, in eect making
the program proprietary. To prevent this, we have made it clear
that any patent must be licensed for everyone’s free use or not
licensed at all.
The precise terms and conditions for copying, distribution and
modication follow.
Terms & conditions for copying, distribution, & modication
0. This License applies to any program or other work which
contains a notice placed by the copyright holder saying it may
be distributed under the terms of this General Public License.
The “Program”, below, refers to any such program or work, and
a “work based on the Program” means either the Program or
any derivative work under copyright law: that is to say, a work
56
Page 57

containing the Program or a portion of it, either verbatim or
with modications and/or translated into another language.
(Hereinafter, translation is included without limitation in the
term “modication”.) Each licensee is addressed as “you”.
Activities other than copying, distribution and modication are
not covered by this License; they are outside its scope. The act
of running the Program is not restricted, and the output from
the Program is covered only if its contents constitute a work
based on the Program (independent of having been made by
running the Program). Whether that is true depends on what
the Program does.
1. You may copy and distribute verbatim copies of the Program’s
source code as you receive it, in any medium, provided that
you conspicuously and appropriately publish on each copy
an appropriate copyright notice and disclaimer of warranty;
keep intact all the notices that refer to this License and to the
absence of any warranty; and give any other recipients of the
Program a copy of this License along with the Program.
You may charge a fee for the physical act of transferring a
copy, and you may at your option oer warranty protection in
exchange for a fee.
2. You may modify your copy or copies of the Program or any
portion of it, thus forming a work based on the Program, and
copy and distribute such modications or work under the
terms of Section 1 above, provided that you also meet all of
these conditions:
a) You must cause the modied les to carry prominent
notices stating that you changed the les and the date of any
change.
b) You must cause any work that you distribute or publish, that
in whole or in part contains or is derived from the Program or
any part thereof, to be licensed as a whole at no charge to all
third parties under the terms of this License.
57
Page 58

c) If the modied program normally reads commands
interactively when run, you must cause it, when started
running for such interactive use in the most ordinary way, to
print or display an announcement including an appropriate
copyright notice and a notice that there is no warranty (or
else, saying that you provide a warranty) and that users may
redistribute the program under these conditions, and telling
the user how to view a copy of this License. (Exception: if the
Program itself is interactive but does not normally print such
an announcement, your work based on the Program is not
required to print an announcement.)
These requirements apply to the modied work as a whole.
If identiable sections of that work are not derived from the
Program, and can be reasonably considered independent and
separate works in themselves, then this License, and its terms,
do not apply to those sections when you distribute them as
separate works. But when you distribute the same sections
as part of a whole which is a work based on the Program, the
distribution of the whole must be on the terms of this License,
whose permissions for other licensees extend to the entire
whole, and thus to each and every part regardless of who
wrote it.
Thus, it is not the intent of this section to claim rights or contest
your rights to work written entirely by you; rather, the intent is
to exercise the right to control the distribution of derivative or
collective works based on the Program.
In addition, mere aggregation of another work not based on
the Program with the Program (or with a work based on the
Program) on a volume of a storage or distribution medium
does not bring the other work under the scope of this License.
3. You may copy and distribute the Program (or a work based on
it, under Section 2) in object code or executable form under the
terms of Sections 1 and 2 above provided that you also do one
of the following:
58
Page 59

a) Accompany it with the complete corresponding machine-
readable source code, which must be distributed under the
terms of Sections 1 and 2 above on a medium customarily used
for software interchange; or,
b) Accompany it with a written oer, valid for at least three
years, to give any third party, for a charge no more than your
cost of physically performing source distribution, a complete
machine-readable copy of the corresponding source code, to
be distributed under the terms of Sections 1 and 2 above on a
medium customarily used for software interchange; or,
c) Accompany it with the information you received as to the oer
to distribute corresponding source code. (This alternative is
allowed only for noncommercial distribution and only if you
received the program in object code or executable form with
such an oer, in accord with Subsection b above.)
The source code for a work means the preferred form of
the work for making modications to it. For an executable
work, complete source code means all the source code for all
modules it contains, plus any associated interface denition
les, plus the scripts used to control compilation and
installation of the executable. However, as a special exception,
the source code distributed need not include anything that
is normally distributed (in either source or binary form) with
the major components (compiler, kernel, and so on) of the
operating system on which the executable runs, unless that
component itself accompanies the executable.
If distribution of executable or object code is made by
oering access to copy from a designated place, then oering
equivalent access to copy the source code from the same place
counts as distribution of the source code, even though third
parties are not compelled to copy the source along with the
object code.
59
Page 60

4. You may not copy, modify, sublicense, or distribute the
Program except as expressly provided under this License. Any
attempt otherwise to copy, modify, sublicense or distribute
the Program is void, and will automatically terminate your
rights under this License. However, parties who have received
copies, or rights, from you under this License will not have
their licenses terminated so long as such parties remain in full
compliance.
5. You are not required to accept this License, since you have
not signed it. However, nothing else grants you permission to
modify or distribute the Program or its derivative works. These
actions are prohibited by law if you do not accept this License.
Therefore, by modifying or distributing the Program (or any
work based on the Program), you indicate your acceptance
of this License to do so, and all its terms and conditions for
copying, distributing or modifying the Program or works based
on it.
6. Each time you redistribute the Program (or any work based
on the Program), the recipient automatically receives a license
from the original licensor to copy, distribute or modify the
Program subject to these terms and conditions. You may not
impose any further restrictions on the recipients’ exercise of
the rights granted herein. You are not responsible for enforcing
compliance by third parties to this License.
7. If, as a consequence of a court judgment or allegation of patent
infringement or for any other reason (not limited to patent
issues), conditions are imposed on you (whether by court order,
agreement or otherwise) that contradict the conditions of this
License, they do not excuse you from the conditions of this
License. If you cannot distribute so as to satisfy simultaneously
your obligations under this License and any other pertinent
obligations, then as a consequence you may not distribute
the Program at all. For example, if a patent license would not
permit royalty-free redistribution of the Program by all those
who receive copies directly or indirectly through you, then the
only way you could satisfy both it and this License would be to
refrain entirely from distribution of the Program.
60
Page 61

If any portion of this section is held invalid or unenforceable
under any particular circumstance, the balance of the section
is intended to apply and the section as a whole is intended to
apply in other circumstances.
It is not the purpose of this section to induce you to infringe
any patents or other property right claims or to contest
validity of any such claims; this section has the sole purpose
of protecting the integrity of the free software distribution
system, which is implemented by public license practices.
Many people have made generous contributions to the wide
range of software distributed through that system in reliance
on consistent application of that system; it is up to the author/
donor to decide if he or she is willing to distribute software
through any other system and a licensee cannot impose that
choice.
This section is intended to make thoroughly clear what is
believed to be a consequence of the rest of this License.
8. If the distribution and/or use of the Program is restricted in
certain countries either by patents or by copyrighted interfaces,
the original copyright holder who places the Program under
this License may add an explicit geographical distribution
limitation excluding those countries, so that distribution is
permitted only in or among countries not thus excluded. In
such case, this License incorporates the limitation as if written
in the body of this License.
9. The Free Software Foundation may publish revised and/or new
versions of the General Public License from time to time. Such
new versions will be similar in spirit to the present version, but
may dier in detail to address new problems or concerns.
61
Page 62

Each version is given a distinguishing version number. If the
Program species a version number of this License which
applies to it and “any later version”, you have the option of
following the terms and conditions either of that version or of
any later version published by the Free Software Foundation. If
the Program does not specify a version number of this License,
you may choose any version ever published by the Free
Software Foundation.
10. If you wish to incorporate parts of the Program into other free
programs whose distribution conditions are dierent, write to
the author to ask for permission.
For software which is copyrighted by the Free Software
Foundation, write to the Free Software Foundation; we
sometimes make exceptions for this. Our decision will be
guided by the two goals of preserving the free status of all
derivatives of our free software and of promoting the sharing
and reuse of software generally.
NO WARRANTY
11. BECAUSE THE PROGRAM IS LICENSED FREE OF CHARGE,
THERE IS NO WARRANTY FOR THE PROGRAM, TO THE EXTENT
PERMITTED BY APPLICABLE LAW. EXCEPT WHEN OTHERWISE
STATED IN WRITING THE COPYRIGHT HOLDERS AND/OR OTHER
PARTIES PROVIDE THE PROGRAM “AS IS” WITHOUT WARRANTY
OF ANY KIND, EITHER EXPRESSED OR IMPLIED, INCLUDING,
BUT NOT LIMITED TO, THE IMPLIED WARRANTIES OF
MERCHANTABILITY AND FITNESS FOR A PARTICULAR PURPOSE.
THE ENTIRE RISK AS TO THE QUALITY AND PERFORMANCE OF
THE PROGRAM IS WITH YOU. SHOULD THE PROGRAM PROVE
DEFECTIVE, YOU ASSUME THE COST OF ALL NECESSARY
SERVICING, REPAIR OR CORRECTION.
62
Page 63

12 IN NO EVENT UNLESS REQUIRED BY APPLICABLE LAW OR
AGREED TO IN WRITING WILL ANY COPYRIGHT HOLDER, OR
ANY OTHER PARTY WHO MAY MODIFY AND/OR REDISTRIBUTE
THE PROGRAM AS PERMITTED ABOVE, BE LIABLE TO YOU FOR
DAMAGES, INCLUDING ANY GENERAL, SPECIAL, INCIDENTAL
OR CONSEQUENTIAL DAMAGES ARISING OUT OF THE USE
OR INABILITY TO USE THE PROGRAM (INCLUDING BUT NOT
LIMITED TO LOSS OF DATA OR DATA BEING RENDERED
INACCURATE OR LOSSES SUSTAINED BY YOU OR THIRD PARTIES
OR A FAILURE OF THE PROGRAM TO OPERATE WITH ANY OTHER
PROGRAMS), EVEN IF SUCH HOLDER OR OTHER PARTY HAS
BEEN ADVISED OF THE POSSIBILITY OF SUCH DAMAGES.
END OF TERMS AND CONDITIONS
63
Page 64

Informaţii privind liniile telefonice de asistenţă globale
Area Hotline Number
Australia 1300-2787-88 English 8:00-20:00 Mon. to Fri.
Austria 0043-820240513 German 9:00-18:00 Mon. to Fri.
Belgium 0032-78150231 Dutch /French 9:00-17:00 Mon. to Fri.
China 400-620-6655
Denmark 0045-3832-2943 Denish/English 9:00-17:00 Mon. to Fri.
Finland 00358-9693-7969
France 0033-170949400 France 9:00-17:45 Mon. to Fri.
Greece 00800-44-14-20-44 Greek
Hong Kong 3582-4770
Ireland 0035-31890719918 English 9:00-17:00 Mon. to Fri.
Italy 199-400089 Italian
Japan 0800-123-2787 Japanese
+603 2148 0827 (Check
Malaysia
Netherlands
/ Luxembourg
New Zealand
Norway 0047-2316-2682
Philippine
Poland
Portugal 707-500-310 Portuguese 9:00-17:00 Mon. to Fri.
Repair Detail Status
Only)
+603-6279-5077
0031-591-570290 Dutch / English 9:00-17:00 Mon. to Fri.
0800-278-788 /
0800-278-778
+632-636 8504;
180014410573
00225-718-033
00225-718-040
Support
Languages
Simplied
Chinese
Finnish/English/
Swedish
Cantonese/
Chinese/
English
Bahasa Melayu/
English
English 8:00-20:00 Mon. to Fri.
Norwegian
/English
English 9:00-18:00 Mon. to Fri.
Polish
Working
Hour
9:00-18:00
10:00-18:00 Mon. to Fri.
9:00-13:00;
14:00-18:00
10:00-20:00
10:00-17:00 Sat.
09:00-13:00
14:00-18:00
9:00-18:00 Mon. to Fri.
9:00-17:00 Sat. to Sun.
10:00-19:00 Mon. to Fri.
9:00-17:00 Mon. to Fri.
9:00-17:00
8:30-17:30
Working
Day
Mon. to
Sun.
Mon. to Fri.
Mon. to Fri.
Mon. to Fri.
Mon. to Fri.
64
Page 65

Area Hotline Number
Russia
Singapore
Slovak 00421-232-162-621 Czech 8:00-17:00 Mon. to Fri.
Spain 902-88-96-88 Spanish 9:00-18:00 Mon. to Fri.
Sweden 0046-8587-6940
Switzerland
Taiwan
Thailand
Turkey +90-216-524-3000 Turkish 09:00-18:00 Mon. to Fri
United Kingdom
USA/Canada
+8-800-100-ASUS; +7495-231-1999
+65-6720-3835
(Check Repair Detail
Status Only)
-66221701
0041-848111010 German 9:00-18:00 Mon. to Fri.
0041-848111014 French Mon. to Fri.
0041-848111012 Italian Mon. to Fri.
0800-093-456;
02-81439000
+662-679-8367 -70; 001
800 852 5201
0044-870-1208340;
0035-31890719918
1-812-282-2787 English
Support
Languages
Russian/
English
English
Swedish/
English
Traditional
Chinese
Thai/English 9:00-18:00 Mon. to Fri.
English 9:00-17:00 Mon. to Fri.
Working
Hour
9:00-18:00 Mon. to Fri.
11:00-19:00 Mon. to Fri.
9:00-17:00 Mon. to Fri.
9:00-12:00;
13:30-18:00
8:30-12:00am
EST
(5:30am9:00pm PST)
9:00am6:00pm EST
(6:00am3:00pm PST)
Working
Day
Mon. to Fri.
Mon. to Fri.
Sat. to Sun.
Pentru mai multe informaţii, vizitaţi site-ul de asistenţă ASUS la
adresahttp://support.asus.com
65
Page 66

ASUS Contact information
ASUSTeK COMPUTER INC. (Asia Pacic)
Address 15 Li-Te Road, Peitou, Taipei, Taiwan 11259
Website www.asus.com.tw
Technical Support
Telephone +886228943447
Support Fax +886228907698
Online support support.asus.com
ASUS COMPUTER INTERNATIONAL (America)
Address 800 Corporate Way, Fremont, CA 94539, USA
Telephone +15107393777
Fax +15106084555
Website usa.asus.com
Online support support.asus.com
ASUS COMPUTER GmbH (Germany and Austria)
Address Harkort Str. 21-23, D-40880 Ratingen, Germany
Telephone +491805010923*
Fax +492102959911
Website www.asus.de
Online contact www.asus.de/sales
66
Technical Support
Telephone (Component, Networking) +491805010923*
Telephone (System/Notebook/Eee/LCD) +491805010920*
Fax +492102959911
Online support support.asus.com
* EUR 0.14/minute from a German xed landline; EUR 0.42/minute from a mobile phone.
Page 67

Producător:
ASUSTeK Computer Inc.
Telefon: +886-2-2894-3447
Adresă: 4F, No. 150, LI-TE RD., PEITOU,
Reprezentant
autorizat în Europa:
ASUS Computer GmbH
Adresă: HARKORT STR. 21-23, 40880
EEE Yönetmeliğine Uygundur.
TAIPEI 112, TAIWAN
RATINGEN, GERMANY
67
Page 68

68
 Loading...