

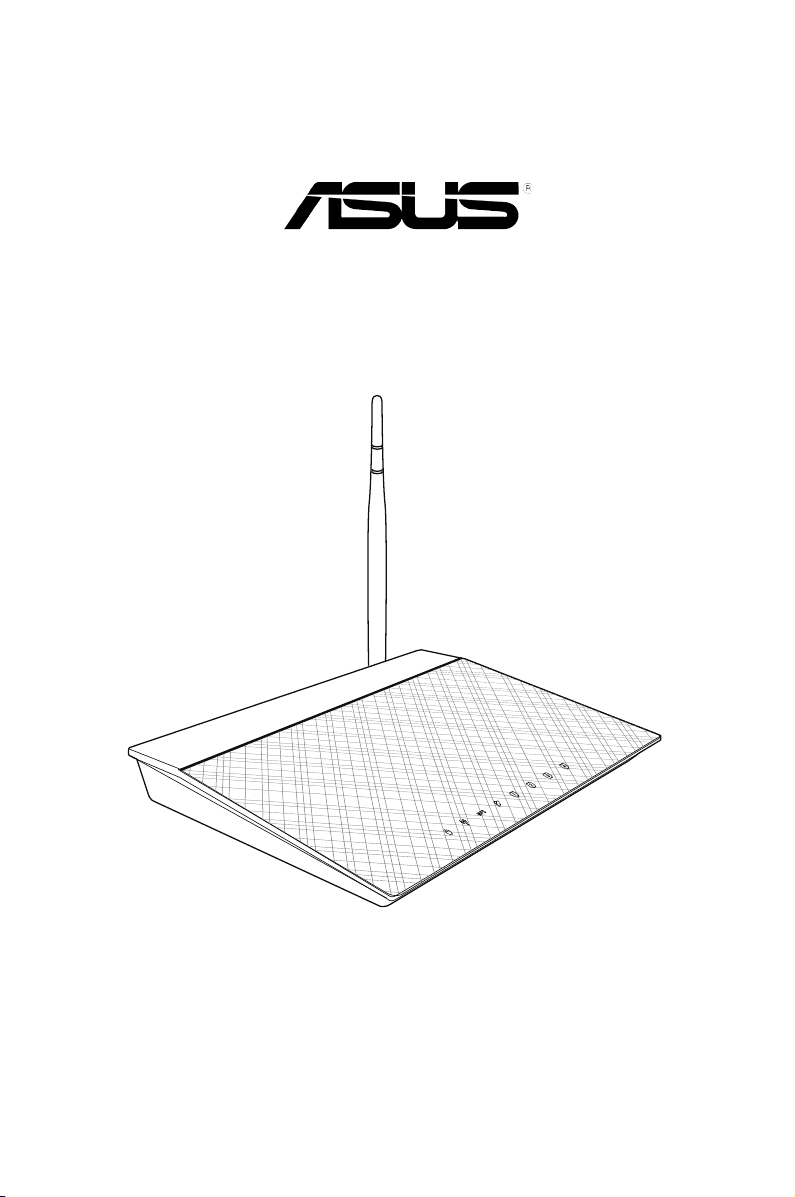
RT-N10 LX
Router Sem Fios 11n
Manual do utilizador

PG6736
Edição Primeiro
Julho 2011
Copyright © 2011 ASUSTeK COMPUTER INC. Reservados todos os direitos.
Nenhuma parte deste manual, incluindo os produtos e software aqui descritos, pode ser
reproduzida, transmitida, transcrita, armazenada num sistema de recuperação, ou traduzida para
outro idioma por qualquer forma ou por quaisquer meios, excepto a documentação mantida pelo
comprador como cópia de segurança, sem o consentimento expresso e por escrito da ASUSTeK
COMPUTER INC.(“ASUS”).
A garantia do produto ou a manutenção não será alargada se: (1) o produto for reparado,
modicado ou alterado, a não ser que tal reparação, modicação ou alteração seja autorizada por
escrito pela ASUS; ou (2) caso o número de série do produto tenha sido apagado ou esteja em falta.
A ASUS FORNECE ESTE MANUAL “TAL COMO ESTÁ” SEM QUALQUER TIPO DE GARANTIA QUER
EXPRESSA QUER IMPLÍCITA, INCLUINDO MAS NÃO LIMITADA ÀS GARANTIAS IMPLÍCITAS OU
CONDIÇÕES DE PRÁTICAS COMERCIAIS OU ADEQUABILIDADE PARA UM DETERMINADO FIM. EM
CIRCUNSTÂNCIA ALGUMA PODE A ASUS, SEUS DIRECTORES, OFICIAIS, EMPREGADOS OU AGENTES
SER RESPONSABILIZADA POR QUAISQUER DANOS INDIRECTOS, ESPECIAIS, ACIDENTAIS OU
CONSEQUENTES.(INCLUINDO DANOS PELA PERDA DE LUCROS, PERDA DE NEGÓCIO, PERDA DE
UTILIZAÇÃO OU DE DADOS, INTERRUPÇÃO DA ACTIVIDADE, ETC.) MESMO QUE A ASUS TENHA SIDO
ALERTADA PARA A POSSIBILIDADE DE OCORRÊNCIA DE TAIS DANOS, RESULTANTES DE QUALQUER
DEFEITO OU ERRO NESTE MANUAL OU NO PRODUTO.
AS ESPECIFICAÇÕES E INFORMAÇÕES CONTIDAS NESTE MANUAL SÃO FORNECIDAS APENAS
PARA FINS INFORMATIVOS E ESTÃO SUJEITAS A ALTERAÇÃO EM QUALQUER ALTURA SEM AVISO
PRÉVIO, NÃO CONSTITUINDO QUALQUER OBRIGAÇÃO POR PARTE DA ASUS. A ASUS NÃO ASSUME
QUALQUER RESPONSABILIDADE POR QUAISQUER ERROS OU IMPRECISÕES QUE POSSAM APARECER
NESTE MANUAL, INCLUINDO OS PRODUTOS E SOFTWARE NELE DESCRITOS.
Os nomes dos produtos e das empresas mencionados neste manual podem ou não ser marcas
registadas ou estarem protegidos por direitos de autor que pertencem às respectivas empresas.
Estes nomes são aqui utilizados apenas para ns de identicação ou explicação, para benefício dos
proprietários e sem qualquer intenção de violação dos direitos de autor.
Oferta para disponibilizar o código fonte de determinado software
Este produto contém software protegido por direitos de autor que está licenciado sob os termos da
Licença Pública Geral (“GPL”), da Versão Limitada da Licença Pública Geral (“LGPL”) e/ou outras Licenças
de Software Livre de Código Aberto. Esse software incluído neste produto é distribuído sem qualquer
garantia na medida do permitido pela legislação aplicável. Este produto inclui cópias dessas licenças.
Quando a licença aplicável confere ao utilizador o direito ao código fonte desse software e/ou a dados
adicionais, esses dados deverão ser fornecidos com este produto.
O utilizador poderá também transferi-lo gratuitamente a partir de http://support.asus.com/download.
O código fonte é distribuído SEM QUALQUER GARANTIA e licenciado sob os termos da mesma licença do
respectivo código binário/objecto.
A ASUSTeK pretende fornecer atempadamente o código fonte complete tal como exigido pelas várias
Licenças de Software Livre de Código Aberto. Se, no entanto, tiver diculdade em obter a totalidade do
respectivo código fonte, agradecemos que nos envie uma noticação para o endereço de e-mail, gpl@
asus.com, indicando o produto e descrevendo o problema (NÃO envie anexos grandes, como arquivos de
código fonte, etc. para este endereço de e-mail).
2

Índice
Acerca deste guia ........................................................................................... 4
Como este guia está organizado ............................................................................... 4
Convenções usadas neste guia .................................................................................. 5
Capítulo 1: Conheça o seu router sem os
Conteúdo da embalagem .............................................................................. 7
Requisitos do sistema .................................................................................... 7
Antes de prosseguir ....................................................................................... 7
Características do hardware ..........................................................................8
Painel frontal .....................................................................................................................8
Painel traseiro ................................................................................................................... 9
Painel inferior ..................................................................................................................10
Opções de montagem .................................................................................. 11
Capítulo 2: Começar a utilizar
Instalação do router sem os ......................................................................13
Utilizar a Conguração Rápida de Internet (QIS) ......................................13
Utilizar a função QIS com detecção automática ................................................13
Utilizar a função QIS sem detecção automática .................................................15
Capítulo 3: Conguração dos clientes de rede
Aceder ao router sem os ............................................................................ 17
Congurar um endereço IP para um cliente cablado ou sem os ..............17
Capítulo 4: Conguração com a interface gráca para a web
Conguração com a interface gráca para a web .....................................21
Utilização da opção Network Map (Mapa de rede) ...................................22
Criar múltiplos pers SSID ..........................................................................................23
Gerir a largura de banda com a função EzQoS...........................................24
Congurar o modo de funcionamento .......................................................25
Congurar o router sem os no modo Router....................................................25
Congurar o router sem os no modo Repetidor .............................................26
Congurar o router sem os no modo AP............................................................27
Actualização do rmware ............................................................................ 28
Restaurar/guardar/transferir as denições ...............................................29
3

Índice
Capítulo 5: Instalação dos utilitários
Instalação dos utilitários .............................................................................31
O Device Discovery ......................................................................................33
Restauro do rmware ..................................................................................34
Utilizar o WPS Wizard (Assistente WPS) .................................................................35
Congurar a sua impressora de rede ..........................................................41
Capítulo 6: Resolução de problemas
Resolução de problemas .............................................................................45
O serviço DDNS da ASUS .............................................................................48
Perguntas frequentes (FAQs) .....................................................................................48
Apêndices
Avisos ............................................................................................................51
Informação de Contactos ASUS ..................................................................59
Acerca deste guia
Este guia do utilizador contém a informação de que necessita para instalar e congurar
o seu router sem os da ASUS.
Como este guia está organizado
Este guia está dividido da seguinte forma:
• Capítulo 1 : Conheça o seu router sem os
Este capítulo inclui informação sobre o conteúdo da embalagem, os requisitos do
sistema, as características do hardware e os LEDs indicadores do router sem os da
ASUS.
• Capítulo 2 : Instalação do hardware
Este capítulo fornece instruções acerca da conguração dos modos Router, e Ponto
de acesso do Router Sem Fios ASUS.
• Capítulo 3 : Conguração dos clientes de rede
Este capítulo inclui informação sobre a conguração de clientes na sua rede para
utilização do seu router sem os da ASUS.
• Capítulo 4 : Congurar as denições avançadas
Este capítulo fornece instruções para a conguração das denições avançadas do
Router Sem Fios da ASUS.
• Capítulo 5 : Instalação dos utilitários
Este capítulo fornece informação sobre os utilitários fornecidos no CD de suporte.
4
• Capítulo 6 : Resolução de problemas
Este capítulo inclui um guia para resolução de problemas comuns que possam surgir
durante a utilização do router sem os da ASUS.
• Apêndices
Este capítulo inclui os avisos obrigatórios e as normas de segurança.
Convenções usadas neste guia
AVISO: Informação que se destina a evitar que sofra lesões ao tentar concluir
uma tarefa.
CUIDADO: Informação que se destina a evitar que danique os componentes
ao tentar concluir uma tarefa.
IMPORTANTE: Instruções que deve seguir para concluir uma tarefa.
NOTA: Dicas e informações adicionais para o ajudar a concluir uma tarefa.
5

6

Conheça o seu router
1
sem os
Conteúdo da embalagem
Verique se os itens seguintes constam da embalagem do seu router sem os da ASUS.
Router sem os RT-N10 LX x1
Transformador x1
CD de suporte (contendo o manual e os utilitários) x1
Cabo RJ45 x1
Guia de consulta rápida x1
Nota: Caso qualquer um dos itens esteja danicado ou em falta, contacte imediatamente a loja onde
adquiriu o produto.
Requisitos do sistema
Antes de instalar o router sem os da ASUS, certique-se de que o sistema/a rede
satisfaz os seguintes requisitos:
• Porta Ethernet RJ-45 (10Base-T/100Base-TX)
• Pelo menos um dispositivo IEEE 802.11b/g/n com capacidade para ligação sem os
• Protocolo TCP/IP e browser para a Internet instalado
Antes de prosseguir
Tenha em atenção as directrizes seguintes antes de instalar o router sem os da ASUS:
• O comprimento do cabo Ethernet que liga o dispositivo à rede (hub, modem ADSL/
por cabo, router, wall patch) não deve ter mais de 100 metros.
• Coloque o dispositivo sobre uma superfície plana, estável e o mais afastada possível
do chão.
• Mantenha o dispositivo longe de quaisquer obstáculos metálicos e da luz solar
directa.
• Mantenha o dispositivo afastado de transformadores, motores potentes, luzes
uorescentes, microondas, frigorícos e outros equipamentos industriais de forma a
evitar a perda de sinal.
• Instale o dispositivo numa zona central de maneira a proporcionar uma boa
cobertura da rede para todos os dispositivos móveis sem os.
Capítulo 1 : Conheça o seu router sem os RT-N10 LX
7
• Instale o dispositivo a uma distância de pelo menos 20 cm de qualquer pessoa
para garantir o funcionamento do mesmo de acordo com as orientações de
radiofrequência relativamente à exposição humana adoptadas pela FCC (Federal
Communications Commission).
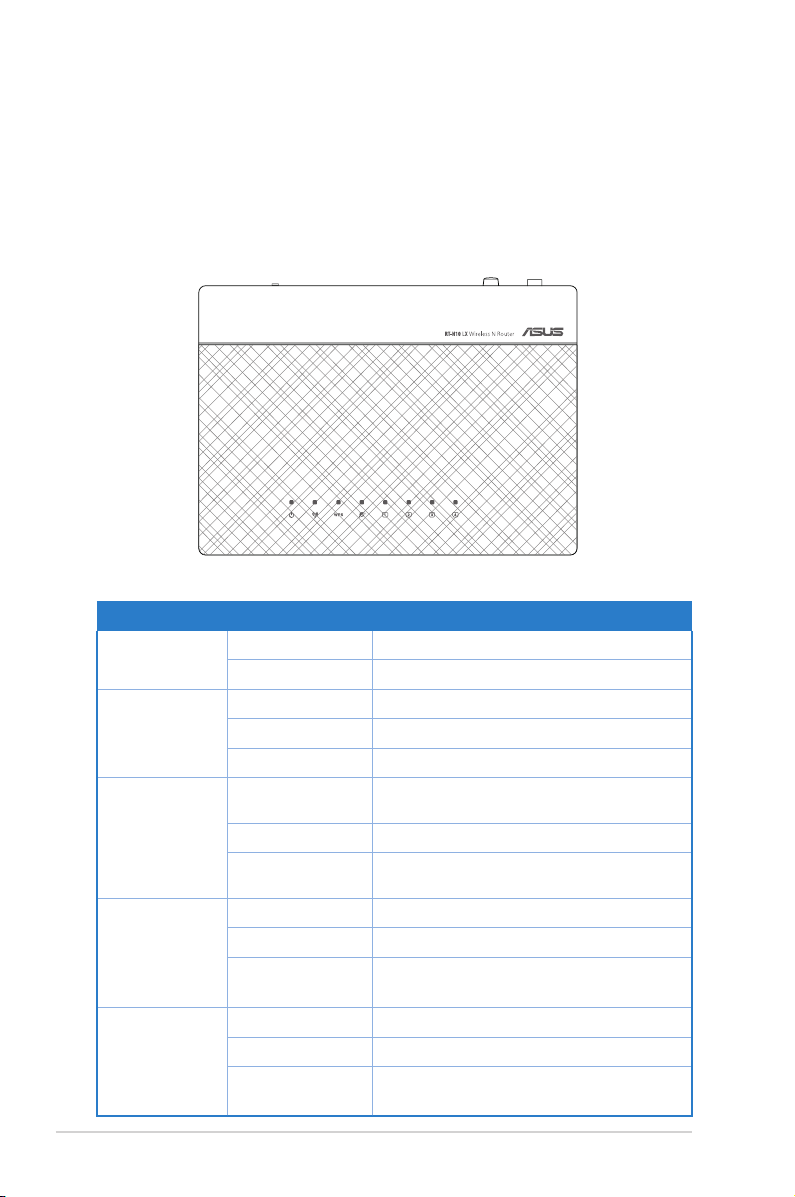
Características do hardware
Painel frontal
LEDs indicadores de estado
LED Estado Signicado
Energia
WLAN
WPS
WAN (Wide
Area Network
- Rede de
Longa
Distância)
LAN 1-4 (Local
Area Network
- Rede Local))
Desligado Não há alimentação
Ligado Sistema pronto
Desligado Não há alimentação
Ligado Sistema sem os pronto
A Piscar A transmitir ou a receber dados (sem os)
A piscar
constantemente
A piscar uma vez Reposição das predenições do sistema
A piscar
lentamente
Desligado Sem alimentação ou qualquer ligação física
Ligado Com ligação física a uma rede Ethernet
A Piscar A transmitir ou a receber dados (através de
Desligado Sem alimentação ou qualquer ligação física
Ligado Com ligação física a uma rede Ethernet
A Piscar A transmitir ou a receber dados (através de
WPS em processamento
Modo de recuperação
cabo Ethernet)
cabo Ethernet)
RT-N10 LX Capítulo 1 : Conheça o seu router sem os
8
Painel traseiro
Reset
Power
WAN
LAN4
LAN3 LAN2
LAN1 WPS
1
2 3 4 5
Item Descrição
1
Botão de reposição
Pressione este botão durante mais de cinco segundos para repor as
predenições do sistema.
2
Botão de energia
Prima este botão para ligar/desligar o router.
3
Porta de alimentação (Entrada DC)
Ligue o transformador AC a esta porta para ligar o router a uma fonte
de alimentação.
4
Porta WAN
Ligue um cabo Ethernet RJ-45 a esta porta para estabelecer a ligação
WAN.
5
Portas LAN 1 a 4
Ligue os cabos Ethernet RJ-45 a estas portas para estabelecer a ligação
LAN.
6
Botão WPS
Pressione este botão para estabelecer a ligação sem os.
6
Capítulo 1 : Conheça o seu router sem os RT-N10 LX
9
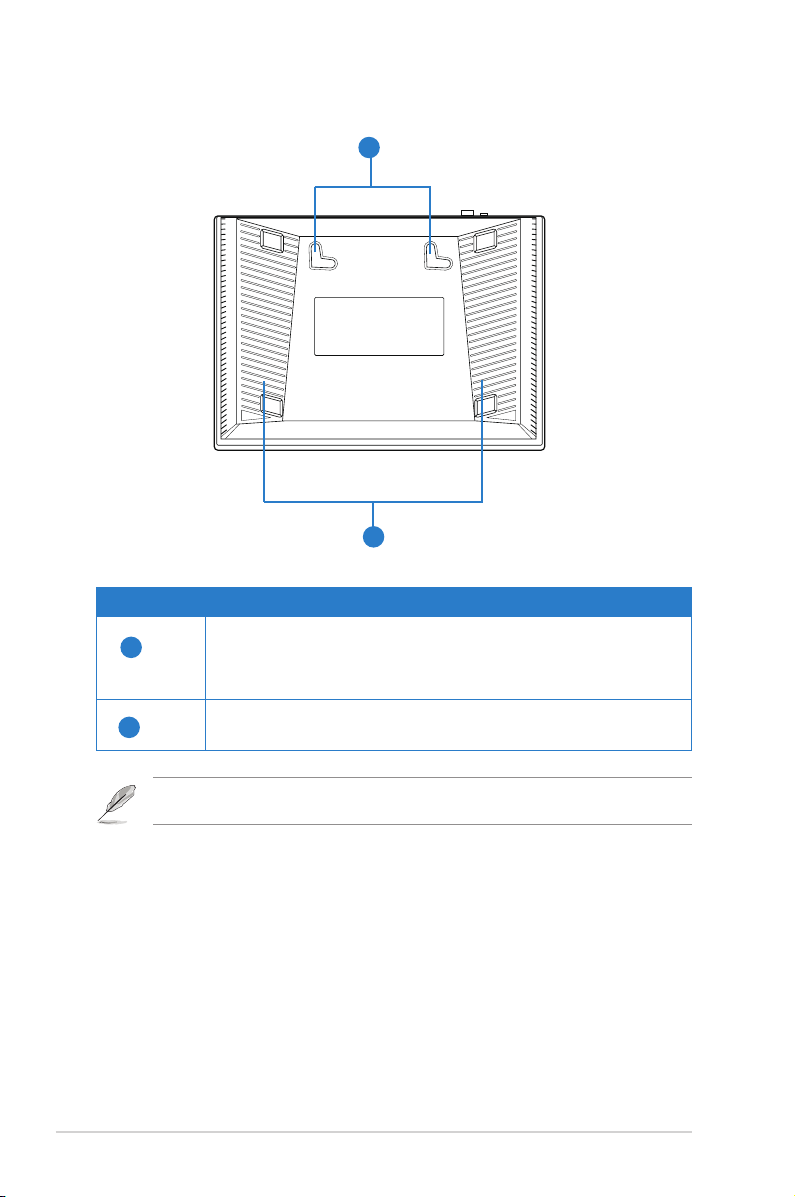
Painel inferior
1
2
Item Descrição
1
2
Ganchos de montagem
Use os ganchos de montagem para montar o router em superfície
de cimento ou de madeira usando dois parafusos de cabeça
redonda
Condutas de ventilação
Estas condutas permitem a ventilação do router.
Nota: Para mais informações sobre a montagem do router na parede ou no tecto consulte a secção
Opções de montagem na página seguinte deste manual do utilizador.
RT-N10 LX Capítulo 1 : Conheça o seu router sem os
10
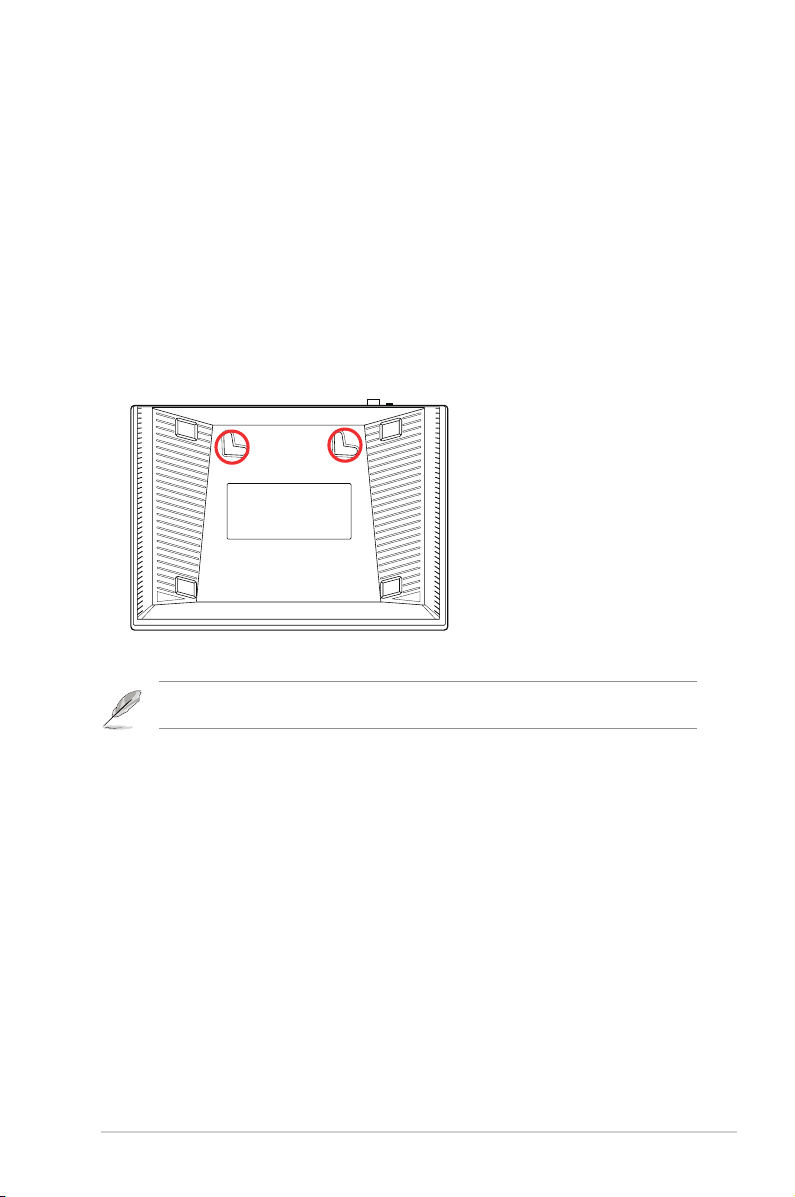
Opções de montagem
Fora da caixa, o Router Sem Fios RT-N10 ASUS é concebido para estar numa superfície
plana e elevada, como um arquivo de cheiros ou uma estante de livros. A unidade
também pode ser convertida para montagem numa parede ou tecto.
Para montar o RT-N10 ASUS:
1. Procure dois ganchos de montagem na parte inferior.
2. Marque dois orifícios superiores numa parede ou numa superfície plana e elevada.
3. Aperte dois parafusos até que apenas esteja visível 1/4".
4. Prenda os ganchos do RT-N10 ASUS aos parafusos.
Nota: Reajuste os parafusos se não conseguir prender o Router Sem Fios ASUS aos parafusos ou se
estiver muito solto.
Capítulo 1 : Conheça o seu router sem os RT-N10 LX
11

RT-N10 LX Capítulo 1 : Conheça o seu router sem os
12
Começar a utilizar
2
Instalação do router sem os
O Router sem os ASUS inclui uma interface gráca baseada na Web (Interface Web) que
lhe permite congurar o router sem os através do navegador Web do seu computador.
Nota: Para mais detalhes sobre a conguração do seu router sem os através da Interface Web,
consulte o Capítulo 4: Conguração através da Interface Web.
Utilizar a Conguração Rápida de Internet (QIS)
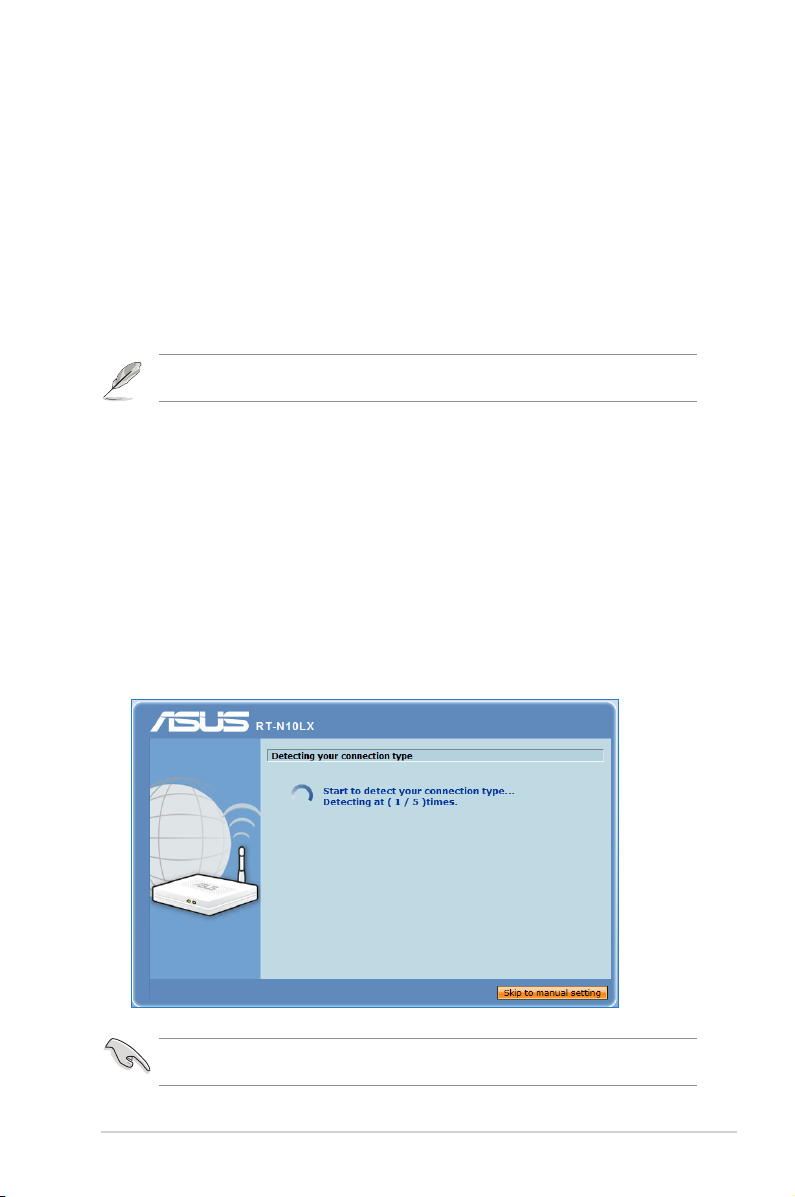
Utilizar a função QIS com detecção automática
A função de Conguração Rápida de Internet (QIS) ajuda a congurar rapidamente a sua
ligação à Internet.
Para utilizar a função QIS com detecção automática:
1. Inicie um navegador Web. O router sem os detecta automaticamente se o tipo de
ligação do seu ISP é de Dynamic IP (IP Dinâmico), PPPoE, PPTP, L2TP, e Static IP
(IP Estático). Introduza as informações necessárias para o tipo de ligação do seu ISP.
IMPORTANTE!: Contacte o seu ISP, para obter as informações necessárias relativas ao seu tipo de
ligação à Internet.
Capítulo 2 : Começar a utilizar RT-N10 LX
13
NOTA:
• Se a função QIS não detectar o seu tipo de ligação à Internet, clique em Skip to manual setting
(Avançar para a conguração manual) e congure manualmente as denições da sua ligação.
• Se a função QIS não for executada automaticamente, introduza o endereço http://192.168.1.1
no seu navegador Web e execute manualmente a função QIS. Para mais detalhes, consulte a
secção seguinte Utilizar a função QIS sem detecção automática.
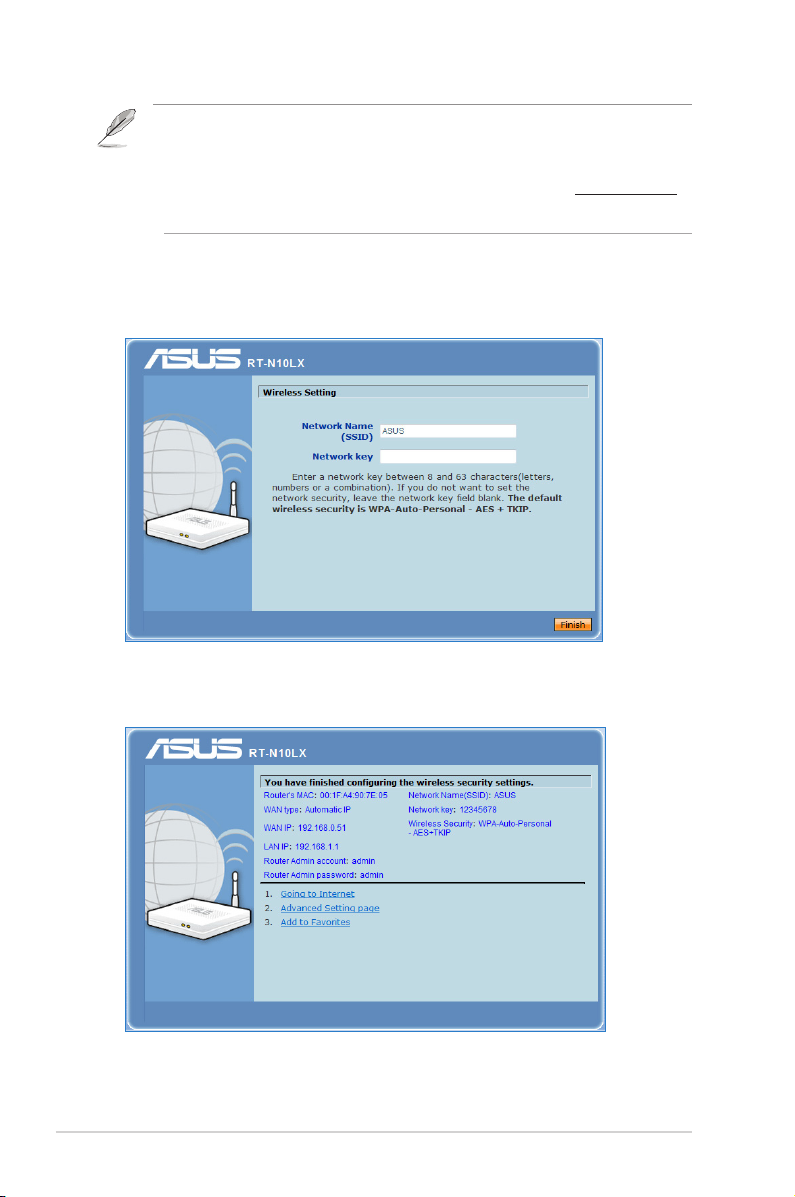
2. Atribua o network name (nome de rede) e a network key (chave de rede) para
proteger a rede sem os. Clique em Finish (Concluir) quando terminar.
3. A conguração da ligação à Internet está concluída.
RT-N10 LX Capítulo 2 : Começar a utilizar
14

Seleccione a seguinte tarefa preferida a partir das seguintes opções:
1. Aceder à Internet: Clique para começar a navegar na Internet ou realizar
actividades relacionadas com a Internet, como conversas ou leitura/escrita de
mensagens de e-mail.
2. Página de denições avançadas: Clique para aceder à página de Denições
Avançadas para congurar mais denições avançadas da rede sem os.
3. Adicionar aos favoritos: Clique para adicionar a interface Web do router aos
seus Favoritos.
NOTA: Se escolher as opções 2 e 3, precisará de iniciar sessão na GUI Web. Para obter mais detalhes,
consulte a secção Adicionar aos favoritos neste manual do utilizador.
Utilizar a função QIS sem detecção automática
Para utilizar a função QIS sem detecção automática:
1. No navegador Web, introduza o endereço http://192.168.1.1
2. Clique em QIS no menu de navegação. O router suporta cinco tipos de serviços ISP:
Automatic IP, PPPoE, Static IP, PPTP, and L2TP.
3. Clique em Next (Seguinte) e introduza as informações necessárias para o tipo de
ligação do seu ISP.
IMPORTANTE: Contacte o seu ISP, para obter as informações necessárias relativas ao seu tipo de
ligação à Internet.
Capítulo 2 : Começar a utilizar RT-N10 LX
15

RT-N10 LX Capítulo 2 : Começar a utilizar
16

Conguração dos
3
clientes de rede
Aceder ao router sem os
Congurar um endereço IP para um cliente cablado ou
sem os
Para aceder ao Router Sem Fios RT-N13U, é necessário ter as congurações TCP/IP correctas
nos seus clientes cablados ou sem os. Dena os endereços IP dos clientes a partir da mesma
sub-rede do RT-N13U,.
Por predenição, o router sem os da ASUS integra funções de servidor DHCP o qual atribui
automaticamente endereços IP aos clientes da rede.
No entanto, em alguns casos o utilizador pode querer atribuir endereços IP xos a
determinados clientes ou computadores da rede em vez de os obter automaticamente a
partir do router sem os.
Siga as instruções que correspondem ao sistema operativo instalado no seu cliente ou
computador.
Nota: Se quiser atribuir manualmente um endereço IP ao cliente, recomendamos-lhe que use as
seguintes denições:
• Endereço IP: 192.168.1.xxx (os xxx podem representar qualquer número entre 2 e 254. Certique-se
de que o endereço IP não está a ser utilizado por outro dispositivo)
• Máscara de sub rede: 255.255.255.0 (igual à do router sem os da ASUS)
• Gateway: 192.168.1.1 (este é o endereço IP do router sem os da ASUS)
• DNS: 192.168.1.1 (router sem os da ASUS), ou atribua um servidor DNS conhecido na sua rede
Capítulo 3 : Conguração dos clientes de rede RT-N10 LX
17

Windows® 2000
1. Clique em Start (Iniciar) > Control
Panel (Painel de controlo) >
Network and Dial-up Connection
(Ligações de acesso telefónico e de
rede). Prima a tecla direita do rato
sobre a opção Local Area Connection
(Rede local) e depois clique em
Properties (Propriedades).
2. Seleccione a opção Internet Protocol
(TCP/IP) (Protocolo Internet
(TCP/IP)) e clique em Properties
(Propriedades).
3. Seleccione a opção Obtain an IP
address automatically (Obter um
endereço IP automaticamente)
se quiser que as denições IP
sejam atribuídas automaticamente.
Caso contrário, seleccione Use
the following IP address: (Usar o
seguinte endereço IP:) e introduza a
informação relevante nos campos IP
address (Endereço IP), Subnet mask
(Máscara de sub rede) e Default
gateway (Gateway predenido).
4. Seleccione a opção Obtain an IP
address automatically (Obter um
endereço IP automaticamente)
se quiser que as denições do
servidor DNS sejam atribuídas
automaticamente. Caso contrário,
seleccione Use the following DNS
server address: (Usar o seguinte
endereço de servidor DNS:) e
introduza a informação relevante no
campo Preferred and Alternate DNS
server (Servidor DNS preferencial e
alternativo).
5. Clique OK quando terminar.
RT-N10 LX Capítulo 3 : Conguração dos clientes de rede
18

Windows® XP
1. Clique em Start (Iniciar) > Control
Panel (Painel de controlo) >
Network Connection (Ligações de
rede). Prima a tecla direita do rato
sobre a opção Local Area Connection
(Rede local) e depois seleccione
Properties (Propriedades).
2. Seleccione a opção Internet Protocol
(TCP/IP) (Protocolo Internet
(TCP/IP)) e clique em Properties
(Propriedades).
3. Seleccione a opção Obtain an IP
address automatically (Obter um
endereço IP automaticamente)
se quiser que as denições IP
sejam atribuídas automaticamente.
Caso contrário, seleccione Use
the following IP address: (Usar o
seguinte endereço IP:) e introduza a
informação relevante nos campos IP
address (Endereço IP), Subnet mask
(Máscara de sub rede) e Default
gateway (Gateway predenido).
4. Seleccione a opção Obtain DNS
server address automatically
(Obter endereço do servidor
DNS automaticamente) se quiser
que as denições do servidor DNS
sejam atribuídas automaticamente.
Caso contrário, seleccione Use the
following DNS server address: (Usar
o seguinte endereço de servidor
DNS:) e introduza a informação
relevante no campo Preferred and
Alternate DNS server (Servidor DNS
preferencial e alternativo).
5. Clique OK quando terminar.
Capítulo 3 : Conguração dos clientes de rede RT-N10 LX
19

Windows® Vista/7
1. Vá a Start (Iniciar) > Control Panel
(Painel de controlo) > Network
and Internet (Rede e Internet)
> Network and Sharing Center
(Centro de Rede e Partilha). Clique
em View status (Ver estado) >
Properties (Propriedades) >
Continue (Continuar).
2. Seleccione Internet Protocol
Version 4 (Internet Protocol
Versão 4) (TCP/IPv4),
depois clique em Properties
(Propriedades).
3. Seleccione a opção Obtain an IP
address automatically (Obter um
endereço IP automaticamente)
se quiser que as denições IP
sejam atribuídas automaticamente.
Caso contrário, seleccione Use
the following IP address: (Usar
o seguinte endereço IP:) e
introduza o IP address (Endereço
IP) e Subnet mask (Máscara de subrede).
4. Seleccione a opção Obtain DNS
server address automatically
(Obter endereço do servidor DNS automaticamente) se quiser que as denições
do servidor DNS sejam atribuídas automaticamente. Caso contrário, seleccione Use
the following DNS server address: (Usar o seguinte endereço de servidor DNS:)
e introduza a informação relevante no campo Preferred and Alternate DNS server
(Servidor DNS preferencial e alternativo).
5. Clique OK quando terminar.
RT-N10 LX Capítulo 3 : Conguração dos clientes de rede
20

Congurar as
4
denições avançadas
Gerir a largura de banda com a função EzQoS
QoS permite-lhe denir a prioridade em termos da largura de banda e gerir o tráfego napermite-lhe denir a prioridade em termos da largura de banda e gerir o tráfego na
rede..
Para congurar a prioridade da largura de banda:
1. No menu de navegação da esquerda, clique em Advanced Setting (Conguração
avançada) > WAN > separador QoS..
2. Marque a opção Yes (Sim) no campo Enable QoS (Activar QoS).
3. Para gerir o tráfego de rede, seleccione IP ou MAC no campo Address Type (Tipo de
endereço).
4. Clique Apply (Aplicar) para guardar as denições.
Capítulo 4 : Conguração com a interface gráca para a web RT-N10 LX
21

Congurar o modo de funcionamento
A página Operation Mode (Modo de funcionamento) permite colocar o router sem os
num dos três modos de funcionamento: IP Sharing mode (Modo de Partilha de IP) ou
Access Point mode (Modo de Ponto de Acesso).
Congurar o router sem os para o modo de Partilha de
IP
No modo de Partilha de IP , o router sem os liga-se à Internet através de PPPoE, IP
automático, PPTP, L2TP, ou IP estático, oferecendo-lhe um sinal de rádio sem os. Os
serviços de NAT, rewall e partilha de IP para clientes da Rede local são activados.
Para congurar o router sem os para o modo de Partilha de IP:
1. No menu de navegação, clique em Advanced Setting (Conguração avançada)
> Administration (Administração) > separador Operation Mode (Modo de
funcionamento).
2. Marque a opção IP Sharing mode (Default) (Modo de Partilha de IP
(Predenição)) e clique em Save (Guardar).
3. Clique em QIS no menu de navegação. Seleccione o seu tipo de ligação a partir dos
seguintes tipos de serviços de ISP: Automatic IP (IP automático), PPPoE, Static IP
(IP estático), PPTP e L2TP.
RT-N10 LX Capítulo 4 : Congurar as denições avançadas
22

3. Clique em Next (Seguinte) e introduza as informações necessárias para o tipo de
ligação do seu ISP.
Importante: Contacte o seu ISP, para obter as informações necessárias relativas ao seu tipo de ligação
à Internet.
Congurar o router sem os no modo Access Point
No modo Access Point, o router sem os recebe o endereço IP da WAN a partir de um
router ligado à porta WAN e oferece-lhe um sinal de rádio sem os. Os serviços de NAT,
rewall e partilha de IP são desactivados
Para congurar o router sem os para o modo de Partilha de IP:
1. No menu de navegação, clique em Advanced Setting (Conguração avançada)
> Administration (Administração) > separador Operation Mode (Modo de
funcionamento).
2. Marque a opção Access Point (Ponto de Acesso) e clique em Save (Guardar)
3. Introduza o nome de rede (SSID) e a chave de rede. Clique em Finish (Concluir)
quando terminar.
Capítulo 4 : Conguração com a interface gráca para a web RT-N10 LX
23

Reset
Power
WAN
LAN4
LAN3 LAN2
LAN1 WPS
Congurar a Conguração Wi-Fi Protegida (WPS)
A função WPS (Conguração Wi-Fi Protegida) permite-lhe congurar facilmente uma
rede sem os segura e protegida.
Notas:
• Certique-se de está a usar uma placa LAN sem os com a função WPS (Wireless Protected Setup).
• Sistemas operativos Windows® e placas LAN sem os que suportam a função WPS:
Sistemas
Placa sem os suportada
operativos
suportados
Vista 32/64 Placa LAN sem os da Intel®
Controlador ASUS 167gv2 v3.0.6.0 ou superior
Controlador ASUS 160N/130N v2.0.0.0 ou superior
XP SP2 Placa LAN sem os da Intel®
Controlador ASUS 167gv2 v1.2.2.0 ou superior
Controlador ASUS 160N/130N v1.0.4.0 ou superior
XP SP1 e 2000 Placa LAN da ASUS com o utilitário da ASUS para a
WLAN
Controlador ASUS 167gv2 v1.2.2.0 ou superior
Controlador ASUS 160N/130N v1.0.4.0 ou superior
Para congurar a função WPS:
1. Prima o botão WPS no router.
RT-N10 LX Capítulo 4 : Congurar as denições avançadas
24

2. Prima o botão WPS na placa LAN sem os e clique em Start PBC (Iniciar PBC).
Poderá também introduzir o código PIN da placa LAN sem os e depois clicar em
Start PIN (Iniciar PIN).
Nota: Consulte a documentação fornecida com a placa LAN sem os para saber o código PIN da placa
LAN sem os.
Capítulo 4 : Conguração com a interface gráca para a web RT-N10 LX
25

Actualização do rmware
Nota: Transra o mais recente rmware a partir do web site da ASUS em http://www.asus.com
Para actualizar o rmware.
1. Clique em Advanced Setting (Denições avançadas) no menu de navegação
visível no lado esquerdo do ecrã.
2. No menu Administration (Administração) clique em Firmware Upgrade
(Actualização do rmware).
3. No campo New Firmware File (Novo cheiro de rmware), clique em Browse
(Procurar) para denir onde quer guardar o novo rmware no computador.
4. Clique em Upload (Transferir). A operação de transferência demora cerca de três
minutos.
Nota: Se o processo de actualização falhar, utilize o utilitário Firmware Restoration (Restauro do
rmware) para restaurar o sistema. Para mais informações sobre este utilitário, consulte a secção
Firmware Restoration no Capítulo 5 deste manual do utilizador
RT-N10 LX Capítulo 4 : Congurar as denições avançadas
26

Restaurar/guardar/transferir as denições
Para restaurar/guardar/transferir as denições:
1. Clique em Advanced Setting (Denições avançadas) no menu de navegação
visível no lado esquerdo do ecrã.
2. No menu Administration (Administração) clique em Restore (Restaurar) /Save
(Guardar)/Upload Setting (Transferir denições).
3. Seleccione as tarefas que pretende executar:
• Para restaurar as predenições de fábrica, clique em Restore (Restaurar) e
depois em OK na mensagem de conrmação.
• Para guardar as denições do sistema actuais, clique em Save (Guardar) e
depois novamente em Save (Guardar) na janela de transferência do cheiro
para guardar o cheiro do sistema no caminho pretendido.
• Para restaurar as denições do sistema anteriores, clique em Browse (Procurar)
para procurar o cheiro de sistema que quer restaurar e depois clique em
Upload (Transferir).
Capítulo 4 : Conguração com a interface gráca para a web RT-N10 LX
27

RT-N10 LX Capítulo 4 : Congurar as denições avançadas
28

Instalação dos
utilitários
5
Instalação dos utilitários
O CD de suporte inclui os utilitários necessários para conguração do router sem os
da ASUS. Para instalar os utilitários da WLAN da ASUS no sistema operativo Microsoft®
Windows, introduza o CD de suporte na unidade de CD-ROM. Se a função de execução
automática estiver desactivada, execute o cheiro setup.exe que encontra no directório
raiz do CD.
Para instalar os utilitários:
1. Clique em Install...Utilities
(Instalar…utilitários).
2. Clique em Next (Seguinte).
Capítulo 5 : Instalação dos utilitários RT-N10 LX
29

3. Clique em Next (Seguinte) para
aceitar a pasta de destino predenida
ou em Browse (Procurar) para
especicar um caminho diferente.
4. Clique em Next (Seguinte) para
aceitar a pasta de programa
predenida ou especique um nome
diferente.
5. Clique em Finish (Concluir) quando
terminar.
RT-N10 LX Capítulo 5 : Instalação dos utilitários
30

O Device Discovery
O Device Discovery é um utilitário para a WLAN da ASUS que detecta o router sem os
da ASUS e permite congurar o dispositivo.
Para abrir o Device Discovery:
No ambiente de trabalho do computador, clique em Start (Iniciar) > All Programs
(Todos os programas) > ASUS Utility (Utilitário da ASUS) > Router sem os RT-N10
LX > Device Discovery (Device Discovery).
• Clique em Congure (Congurar) para aceder à Interface Web e congurar
o router sem os.
• Clique em Search (Procurar) para procurar por routers sem os ASUS
dentro do alcance.
• Clique em Exit (Sair) para sair da aplicação.
Capítulo 5 : Instalação dos utilitários RT-N10 LX
31

Restauro do rmware
O Firmware Restoration (Restauro do rmware) é utilizado num Router Sem Fios ASUS
que falhou durante o processo de actualização do rmware. Este utilitário envia o
rmware que o utilizador especicar. O processo demora cerca de três a quatro minutos.
Importante: Inicie o modo de recuperação antes de utilizar o utilitário Firmware Restoration
(Restauro do rmware).
Para iniciar o modo de recuperação e utilizar o utilitário Firmware Restoration
(Restauro do rmware):
1. Desligue o router sem os da corrente eléctrica.
2. Mantenha premido o botão Restore (Restauro) no painel traseiro ao mesmo tempo
que volta a ligar o router sem os à corrente eléctrica. Liberte o botão Reset (Repor)
quando o LED Power (Energia) no painel frontal começar a piscar lentamente, o que
indica que o router sem os se encontra no modo de recuperação.
3. A partir do ambiente de trabalho do seu computador, clique em Start (Iniciar) > All
Programs (Todos os programas) > ASUS Utility (Utilitário ASUS) > RT-N10 LX
Wireless Router (Router sem os RT-N10 LX) > Firmware Restoration (Restauro
do rmware).
4. Especique um cheiro de rmware, depois clique em Upload (Enviar).
Nota: Este não é um utilitário para actualização de rmware e não pode ser utilizado num Router ASUS
que esteja a funcionar correctamente. As normais actualizações de rmware devem ser efectuadas
através da interface Web. Consulte o Capítulo 4: Conguração através da Interface Web para mais
detalhes.
RT-N10 LX Capítulo 5 : Instalação dos utilitários
32

Resolução de
problemas
6
Resolução de problemas
Este guia para resolução de problemas fornece soluções para alguns problemas comuns
com os quais se pode deparar durante a instalação ou utilização do router sem os da
ASUS. Estes problemas são de fácil resolução e podem ser resolvidos pelo utilizador.
Contacte a assistência técnica da ASUS caso se depare com um qualquer problema não
mencionado neste capítulo.
Problema Acção
O cliente não consegue
estabelecer uma ligação sem
os com o router.
Fora de alcance:
• Coloque o router mais próximo do cliente sem
os.
• Experimente alterar as denições do canal.
Autenticação:
• Utilize uma ligação com os para ligar ao router.
• Verique as denições de segurança da ligação
sem os.
• Prima o botão Restore existente no painel frontal
durante mais de cinco segundos.
Não é possível localizar o router:
• Pr ima o bo tão Restore existent e no painel
traseiro durante mais de cinco segundos.
• Verique as denições na placa sem os
como, por exemplo, as denições SSID e de
encriptação.
Capítulo 6 : Resolução de problemas RT-N10 LX
33

Problema Acção
Não é possível aceder à
Internet através da LAN sem
os
Não é possível aceder à
Internet
Quando o LED "Link" do
modem ADSL estiver aceso
(sem estar a piscar) é sinal de
que é possível ligar à Internet.
Se o LED "LINK" do modem
ADSL estiver intermitente ou
desligado, é sinal de que não
é possível aceder à Internet
– o router não consegue
estabelecer ligação através da
rede ADSL.
Caso se esqueça do nome
de rede ou das chaves de
encriptação
• Coloque o router mais próximo do cliente sem
os.
• Verique se a placa sem os está ligada ao router
sem os correcto.
• Ver ifique se o canal da função sem fios em
utilização está em conformidade com os canais
disponíveis no seu país/na sua área.
• Verique as denições de encriptação.
• Verique se a ligação por ADSL ou por cabo está
correcta.
• Volte a tentar utilizando um outro cabo
Ethernet.
• Verique os LEDs de estado no modem ADSL e
no router sem os
• Verique se o LED “WAN” no router sem os está
LIGADO. Se o LED não estiver ligado, mude o
cabo e tente novamente.
• Reinicie o computador.
• Consulte o guia de consulta rápida do router
sem os e volte a congurar as denições.
• Verique se o LED “WAN” no router sem os está
LIGADO.
• Verique as denições de encriptação da função
sem os.
• Verifique se o computador consegue ou não
obter o endereço IP (tanto através da rede com
os como da rede sem os).
• Certique-se de que o seu browser da web está
congurado para utilizar a LAN local e não para
utilizar um servidor proxy.
• Ce r tif iqu e -se de que tod os os cabo s e stã o
devidamente ligados.
• Desligue o cabo de alimentação do modem
ADSL ou do modem por cabo. Aguarde alguns
minutos e volte a ligar o cabo.
• Se o LED do modem ADSL continuar a piscar
ou permanecer desligado, contacte o seu
fornecedor de serviços.
• Experimente utilizar uma ligação com os para
depois congurar a encriptação sem os.
• Prima o botão Restore existente no painel
traseiro do router sem os durante mais de
cinco segundos.
RT-N10 LX Capítulo 6 : Resolução de problemas
34

Problema Acção
Como restaurar o sistema para
as predenições de fábrica
Não consigo utilizar o
endereço 192.168.1.1 para
aceder à página principal.
• Prima o botão Restore existente no painel
traseiro do router sem os durante mais de
cinco segundos.
• Consulte a secção O Firmware Restoration no
Capítulo 5 deste manual do utilizador.
AS opções seguintes são as predefinições de
fábrica.
Nome de utilizador: admin
Senha: admin
Activar DHCP: Sim (se o cabo WAN estiver ligado)
Endereço IP: 192.168.1.1
Nome de domínio: (Vazio)
Máscara de sub rede: 255. 255. 255.0
Servidor de DNS 1: 192 .168.1.1
Servidor de DNS 2: (Vazio)
SSID: ASUS
Verique o modo de funcionamento do router.
No modo Router, o endereço IP predefinido é
192.168.1.1.
No modo Repet idor / AP, utili ze o util itár io
Descoberta de dispositivos para saber o endereço
IP do router.
Capítulo 6 : Resolução de problemas RT-N10 LX
35

RT-N10 LX Capítulo 6 : Resolução de problemas
36

Apêndices
Avisos
ASUS Recycling/Takeback Services
ASUS recycling and takeback programs come from our commitment to the highest
standards for protecting our environment. We believe in providing solutions for you
to be able to responsibly recycle our products, batteries, other components, as well as
the packaging materials. Please go to http://csr.asus.com/english/Takeback.htm for the
detailed recycling information in dierent regions.
REACH
Complying with the REACH (Registration, Evaluation, Authorisation, and Restriction
of Chemicals) regulatory framework, we published the chemical substances in our
products at ASUS REACH website at
http://csr.asus.com/english/REACH.htm
Federal Communications Commission Statement
This device complies with Part 15 of the FCC Rules. Operation is subject to the following
two conditions:
• This device may not cause harmful interference.
• This device must accept any interference received, including interference that may
cause undesired operation.
This equipment has been tested and found to comply with the limits for a class B digital
device, pursuant to part 15 of the FCC Rules. These limits are designed to provide
reasonable protection against harmful interference in a residential installation.
This equipment generates, uses and can radiate radio frequency energy and, if not
installed and used in accordance with the instructions, may cause harmful interference
to radio communications. However, there is no guarantee that interference will not
occur in a particular installation. If this equipment does cause harmful interference to
radio or television reception, which can be determined by turning the equipment o
and on, the user is encouraged to try to correct the interference by one or more of the
following measures:
• Reorient or relocate the receiving antenna.
• Increase the separation between the equipment and receiver.
• Connect the equipment into an outlet on a circuit dierent from that to which the
receiver is connected.
• Consult the dealer or an experienced radio/TV technician for help.
Warning: Any changes or modications not expressly approved by the party responsible for compliance
could void the user’s authority to operate the equipment.
Apêndices RT-N10LX
37

Prohibition of Co-location
This device and its antenna(s) must not be co-located or operating in conjunction with
any other antenna or transmitter.
Safety Information
To maintain compliance with FCC’s RF exposure guidelines, this equipment should be
installed and operated with minimum distance 20cm between the radiator and your
body. Use on the supplied antenna.
Declaration of Conformity for R&TTE directive 1999/5/EC
Essential requirements – Article 3
Protection requirements for health and safety – Article 3.1a
Testing for electric safety according to EN 60950-1 has been conducted. These are
considered relevant and sucient.
Protection requirements for electromagnetic compatibility – Article 3.1b
Testing for electromagnetic compatibility according to EN 301 489-1 and EN 301 489-17
has been conducted. These are considered relevant and sucient.
Eective use of the radio spectrum – Article 3.2
Testing for radio test suites according to EN 300 328- 2 has been conducted. These are
considered relevant and sucient.
CE Mark Warning
This is a Class B product, in a domestic environment, this product may cause radio
interference, in which case the user may be required to take adequate measures.
Operation Channels: Ch1~11 for N. America, Ch1~14 Japan, Ch1~13 Europe (ETSI)
IC Warning
The Class B digital apparatus meets all requirements of the Canadian InterferenceCausing Equipment Regulation.
Cet appareil numerique de la class B respecte toutes les exigences du Reglement
sur le materiel brouilleur du Canada.
GNU General Public License
Licensing information
This product includes copyrighted third-party software licensed under the terms of the
GNU General Public License. Please see The GNU General Public License for the exact
terms and conditions of this license. We include a copy of the GPL with every CD shipped
with our product. All future rmware updates will also be accompanied with their
respective source code. Please visit our web site for updated information. Note that we
RT-N10 LX Apêndices
38

do not oer direct support for the distribution.
GNU GENERAL PUBLIC LICENSE
Version 2, June 1991
Copyright (C) 1989, 1991 Free Software Foundation, Inc.
59 Temple Place, Suite 330, Boston, MA 02111-1307 USA
Everyone is permitted to copy and distribute verbatim copies of this license document,
but changing it is not allowed.
Preamble
The licenses for most software are designed to take away your freedom to share and
change it. By contrast, the GNU General Public License is intended to guarantee your
freedom to share and change free software--to make sure the software is free for all
its users. This General Public License applies to most of the Free Software Foundation’s
software and to any other program whose authors commit to using it. (Some other Free
Software Foundation software is covered by the GNU Library General Public License
instead.) You can apply it to your programs, too.
When we speak of free software, we are referring to freedom, not price. Our General
Public Licenses are designed to make sure that you have the freedom to distribute
copies of free software (and charge for this service if you wish), that you receive source
code or can get it if you want it, that you can change the software or use pieces of it in
new free programs; and that you know you can do these things.
To protect your rights, we need to make restrictions that forbid anyone to deny you
these rights or to ask you to surrender the rights. These restrictions translate to certain
responsibilities for you if you distribute copies of the software, or if you modify it.
For example, if you distribute copies of such a program, whether gratis or for a fee, you
must give the recipients all the rights that you have. You must make sure that they, too,
receive or can get the source code. And you must show them these terms so they know
their rights.
We protect your rights with two steps: (1) copyright the software, and (2) oer you this
license which gives you legal permission to copy, distribute and/or modify the software.
Also, for each author’s protection and ours, we want to make certain that everyone
understands that there is no warranty for this free software. If the software is modied
by someone else and passed on, we want its recipients to know that what they have
is not the original, so that any problems introduced by others will not reect on the
original authors’ reputations.
Apêndices RT-N10LX
39

Finally, any free program is threatened constantly by software patents. We wish to avoid
the danger that redistributors of a free program will individually obtain patent licenses,
in eect making the program proprietary. To prevent this, we have made it clear that any
patent must be licensed for everyone’s free use or not licensed at all.
The precise terms and conditions for copying, distribution and modication follow.
Terms & conditions for copying, distribution, & modication
0. This License applies to any program or other work which contains a notice placed
by the copyright holder saying it may be distributed under the terms of this General
Public License. The “Program”, below, refers to any such program or work, and a
“work based on the Program” means either the Program or any derivative work
under copyright law: that is to say, a work containing the Program or a portion of
it, either verbatim or with modications and/or translated into another language.
(Hereinafter, translation is included without limitation in the term “modication”.)
Each licensee is addressed as “you”.
Activities other than copying, distribution and modication are not covered by this
License; they are outside its scope. The act of running the Program is not restricted,
and the output from the Program is covered only if its contents constitute a work
based on the Program (independent of having been made by running the Program).
Whether that is true depends on what the Program does.
1. You may copy and distribute verbatim copies of the Program’s source code as you
receive it, in any medium, provided that you conspicuously and appropriately
publish on each copy an appropriate copyright notice and disclaimer of warranty;
keep intact all the notices that refer to this License and to the absence of any
warranty; and give any other recipients of the Program a copy of this License along
with the Program.
You may charge a fee for the physical act of transferring a copy, and you may at your
option oer warranty protection in exchange for a fee.
2. You may modify your copy or copies of the Program or any portion of it, thus
forming a work based on the Program, and copy and distribute such modications
or work under the terms of Section 1 above, provided that you also meet all of these
conditions:
a) You must cause the modied les to carry prominent notices stating that
you changed the les and the date of any change.
b) You must cause any work that you distribute or publish, that in whole or in
part contains or is derived from the Program or any part thereof, to be licensed as a
whole at no charge to all third parties under the terms of this License.
c) If the modied program normally reads commands interactively when run, you
must cause it, when started running for such interactive use in the most ordinary
way, to print or display an announcement including an appropriate copyright notice
and a notice that there is no warranty (or else, saying that you provide a warranty)
and that users may redistribute the program under these conditions, and telling the
user how to view a copy of this License. (Exception: if the Program itself is interactive
RT-N10 LX Apêndices
40

but does not normally print such an announcement, your work based on the
Program is not required to print an announcement.)
These requirements apply to the modied work as a whole. If identiable sections
of that work are not derived from the Program, and can be reasonably considered
independent and separate works in themselves, then this License, and its terms, do
not apply to those sections when you distribute them as separate works. But when
you distribute the same sections as part of a whole which is a work based on the
Program, the distribution of the whole must be on the terms of this License, whose
permissions for other licensees extend to the entire whole, and thus to each and
every part regardless of who wrote it.
Thus, it is not the intent of this section to claim rights or contest your rights to
work written entirely by you; rather, the intent is to exercise the right to control the
distribution of derivative or collective works based on the Program.
In addition, mere aggregation of another work not based on the Program with
the Program (or with a work based on the Program) on a volume of a storage or
distribution medium does not bring the other work under the scope of this License.
3. You may copy and distribute the Program (or a work based on it, under Section 2) in
object code or executable form under the terms of Sections 1 and 2 above provided
that you also do one of the following:
a) Accompany it with the complete corresponding machine-readable source code,
which must be distributed under the terms of Sections 1 and 2 above on a medium
customarily used for software interchange; or,
b) Accompany it with a written oer, valid for at least three years, to give any
third party, for a charge no more than your cost of physically performing source
distribution, a complete machine-readable copy of the corresponding source
code, to be distributed under the terms of Sections 1 and 2 above on a medium
customarily used for software interchange; or,
c) Accompany it with the information you received as to the oer to distribute
corresponding source code. (This alternative is allowed only for noncommercial
distribution and only if you received the program in object code or executable form
with such an oer, in accord with Subsection b above.)
The source code for a work means the preferred form of the work for making
modications to it. For an executable work, complete source code means all the
source code for all modules it contains, plus any associated interface denition
les, plus the scripts used to control compilation and installation of the executable.
However, as a special exception, the source code distributed need not include
anything that is normally distributed (in either source or binary form) with the major
components (compiler, kernel, and so on) of the operating system on which the
executable runs, unless that component itself accompanies the executable.
If distribution of executable or object code is made by oering access to copy from a
designated place, then oering equivalent access to copy the source code from the
same place counts as distribution of the source code, even
Apêndices RT-N10LX
41

though third parties are not compelled to copy the source along with the object code.
4. You may not copy, modify, sublicense, or distribute the Program except as expressly
provided under this License. Any attempt otherwise to copy, modify, sublicense or
distribute the Program is void, and will automatically terminate your rights under
this License. However, parties who have received copies, or rights, from you under
this License will not have their licenses terminated so long as such parties remain in
full compliance.
5. You are not required to accept this License, since you have not signed it. However,
nothing else grants you permission to modify or distribute the Program or its
derivative works. These actions are prohibited by law if you do not accept this
License. Therefore, by modifying or distributing the Program (or any work based on
the Program), you indicate your acceptance of this License to do so, and all its terms
and conditions for copying, distributing or modifying the Program or works based
on it.
6. Each time you redistribute the Program (or any work based on the Program),
the recipient automatically receives a license from the original licensor to copy,
distribute or modify the Program subject to these terms and conditions. You may
not impose any further restrictions on the recipients’ exercise of the rights granted
herein. You are not responsible for enforcing compliance by third parties to this
License.
7. If, as a consequence of a court judgment or allegation of patent infringement or
for any other reason (not limited to patent issues), conditions are imposed on you
(whether by court order, agreement or otherwise) that contradict the conditions
of this License, they do not excuse you from the conditions of this License. If you
cannot distribute so as to satisfy simultaneously your obligations under this License
and any other pertinent obligations, then as a consequence you may not distribute
the Program at all. For example, if a patent license would not permit royalty-free
redistribution of the Program by all those who receive copies directly or indirectly
through you, then the only way you could satisfy both it and this License would be
to refrain entirely from distribution of the Program.
If any portion of this section is held invalid or unenforceable under any particular
circumstance, the balance of the section is intended to apply and the section as a
whole is intended to apply in other circumstances.
It is not the purpose of this section to induce you to infringe any patents or other
property right claims or to contest validity of any such claims; this section has the
sole purpose of protecting the integrity of the free software distribution system,
which is implemented by public license practices. Many people have made generous
contributions to the wide range of software distributed through that system in
reliance on consistent application of that system; it is up to the author/donor to
decide if he or she is willing to distribute software through any other system and a
licensee cannot impose that choice.
This section is intended to make thoroughly clear what is believed to be a
consequence of the rest of this License.
RT-N10 LX Apêndices
42

8. If the distribution and/or use of the Program is restricted in certain countries either
by patents or by copyrighted interfaces, the original copyright holder who places
the Program under this License may add an explicit geographical distribution
limitation excluding those countries, so that distribution is permitted only in or
among countries not thus excluded. In such case, this License incorporates the
limitation as if written in the body of this License.
9. The Free Software Foundation may publish revised and/or new versions of the
General Public License from time to time. Such new versions will be similar in spirit
to the present version, but may dier in detail to address new problems or concerns.
Each version is given a distinguishing version number. If the Program species a
version number of this License which applies to it and “any later version”, you have
the option of following the terms and conditions either of that version or of any later
version published by the Free Software Foundation. If the Program does not specify
a version number of this License, you may choose any version ever published by the
Free Software Foundation.
10. If you wish to incorporate parts of the Program into other free programs whose
distribution conditions are dierent, write to the author to ask for permission. For
software which is copyrighted by the Free Software Foundation, write to the Free
Software Foundation; we sometimes make exceptions for this. Our decision will be
guided by the two goals of preserving the free status of all derivatives of our free
software and of promoting the sharing and reuse of software generally.
NO WARRANTY
11 BECAUSE THE PROGRAM IS LICENSED FREE OF CHARGE, THERE IS NO WARRANTY
FOR THE PROGRAM, TO THE EXTENT PERMITTED BY APPLICABLE LAW. EXCEPT
WHEN OTHERWISE STATED IN WRITING THE COPYRIGHT HOLDERS AND/OR OTHER
PARTIES PROVIDE THE PROGRAM “AS IS” WITHOUT WARRANTY OF ANY KIND,
EITHER EXPRESSED OR IMPLIED, INCLUDING, BUT NOT LIMITED TO, THE IMPLIED
WARRANTIES OF MERCHANTABILITY AND FITNESS FOR A PARTICULAR PURPOSE.
THE ENTIRE RISK AS TO THE QUALITY AND PERFORMANCE OF THE PROGRAM IS WITH
YOU. SHOULD THE PROGRAM PROVE DEFECTIVE, YOU ASSUME THE COST OF ALL
NECESSARY SERVICING, REPAIR OR CORRECTION.
12 IN NO EVENT UNLESS REQUIRED BY APPLICABLE LAW OR AGREED TO IN WRITING
WILL ANY COPYRIGHT HOLDER, OR ANY OTHER PARTY WHO MAY MODIFY AND/
OR REDISTRIBUTE THE PROGRAM AS PERMITTED ABOVE, BE LIABLE TO YOU FOR
DAMAGES, INCLUDING ANY GENERAL, SPECIAL, INCIDENTAL OR CONSEQUENTIAL
DAMAGES
Apêndices RT-N10LX
43

ARISING OUT OF THE USE OR INABILITY TO USE THE PROGRAM (INCLUDING BUT NOT
LIMITED TO LOSS OF DATA OR DATA BEING RENDERED INACCURATE OR LOSSES
SUSTAINED BY YOU OR THIRD PARTIES OR A FAILURE OF THE PROGRAM TO OPERATE
WITH ANY OTHER PROGRAMS), EVEN IF SUCH HOLDER OR OTHER PARTY HAS BEEN
ADVISED OF THE POSSIBILITY OF SUCH DAMAGES.
END OF TERMS AND CONDITIONS
DGT Warning
Safety Warning
SAFE TEMP: This wireless router should be only used in environments with ambient
temperatures between 5ºC(41ºF) and 40ºC(104ºF).
DO NOT expose to or use near liquids, rain, or moisture. DO NOT use the modem during
electrical storms.
RT-N10 LX Apêndices
44

Informação de Contactos ASUS
ASUSTeK COMPUTER INC. (Ásia-Pacíco)
Morada da empresa: 15 Li-Te Road, Peitou, Taipei, Taiwan 11259
Endereço do site Web: www.asus.com.
Assistência técnica
Geral (tel.): +886228943447
Geral (fax): +886228907698
Assistência online: support.asus.com*
ASUS COMPUTER INTERNATIONAL (América)
Morada da empresa: 800 Corporate Way, Fremont, CA 94539, USA
Geral (tel.): +15029550883
Geral (fax): +15029338713
Endereço do site Web: usa.asus.com
Assistência online: support.asus.com*
ASUS COMPUTER GmbH (Alemanha & Áustria)
Morada da empresa: Harkort Str. 21-23, D40880 Ratingen, Germany
Geral (fax): +492102959911
Endereço do site Web: www.asus.de
Contacto online: www.asus.de/sales
Assistência técnica
Telefone para Componentes: +49-1805-010923
Telefone para Sistemas
/Portáteis/Eee/LCD: +49-1805-010920
Geral (fax): +492102959911
Assistência online: support.asus.com*
* Neste site está disponível um formulário para perguntas de natureza técnica. Preencha este
formulário se necessitar de contactar a assistência técnica.
Apêndices RT-N10LX
45

Manufacturer:
Authorised representative
in Europe:
Authorised distributors
in Turkey:
EEE Yönetmeliğine Uygundur.
ASUSTeK Computer Inc.
Tel: +886-2-2894-3447
Address: No. 150, LI-DE RD., PEITOU, TAIPEI 112,
TAIWAN
ASUS Computer GmbH
Address: HARKORT STR. 21-23, 40880 RATINGEN,
GERMANY
BOGAZICI BIL GISAYAR SAN. VE TIC. A.S.
Tel: +90 212 3311000
Address: AYAZAGA MAH. KEMERBURGAZ CAD.
NO.10 AYAZAGA/ISTANBUL
CIZGI Elektronik San. Tic. Ltd. Sti.
Tel: 0090 2123567070
Address: CEMAL SURURI CD. HALIM MERIC
IS MERKEZI No:15/C D: 5-6 34394
MECIDIYEKOY/ISTANBUL
RT-N10 LX Apêndices
46
 Loading...