

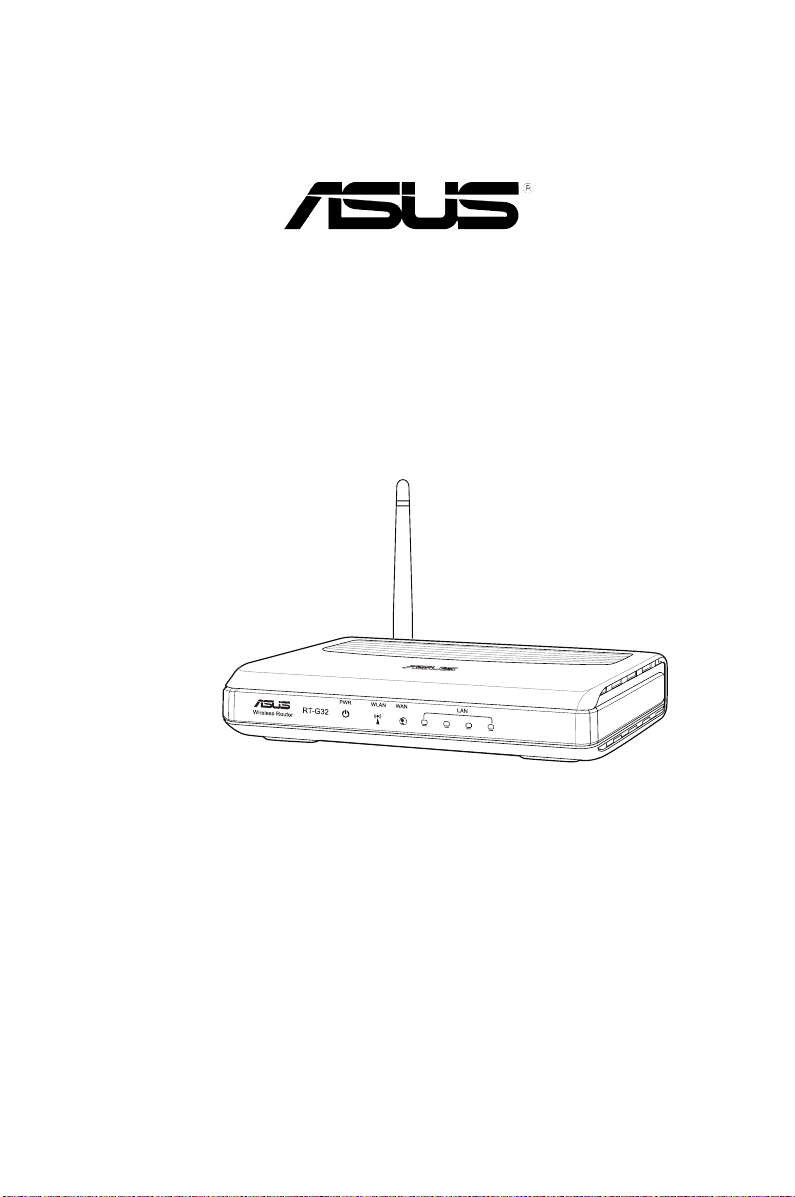
RT-G32
ไวร์เลส เราเตอร์
คู่มือผู้ใช้

TH4264
การแก้ไขครั้งแรก
พฤศจิกายน 2008
ลิขสิทธิ์ © 2008 ASUSTeK Computer Inc. ลิขสิทธิ์ถูกต้อง
ห้ามทำซ้ำ ส่งต่อ คัดลอก เก็บในระบบที่สามารถเรียกกลับมาได้ หรือแปลส่วนหนึ่งส่วนใดของ
คู่มือฉบับนี้เป็นภาษาอื่น ซึ่งรวมถึงผลิตภัณฑ์และซอฟต์แวร์ที่บรรจุอยู่ภายใน ยกเว้นเอกสารที่
ผู้ซื้อเป็นผู้เก็บไว้เพื่อจุดประสงค์ในการสำรองเท่านั้น โดยไม่ได้รับความยินยอมเป็นลายลักษณ์
อักษรอย่างชัดแจ้งจาก ASUSTeK Computer Inc. (“ASUS”)
การรับประกันผลิตภัณฑ์หรือบริการ จะไม่ขยายออกไปถ้า: (1) ผลิตภัณฑ์ได้รับการซ่อมแซม,
ดัดแปลง หรือเปลี่ยนแปลง ถ้าการซ่อมแซม, การดัดแปลง หรือการเปลี่ยนแปลงนั้นไม่ได้รับ
อนุญาตเป็นลายลักษณ์อักษรจาก ASUS; หรือ (2) หมายเลขผลิตภัณฑ์ของผลิตภัณฑ์ถูกขีด
ฆ่า หรือหายไป
ASUS ให้คู่มือฉบับนี้ “ในลักษณะที่เป็น” โดยไม่มีการรับประกันใดๆ ไม่ว่าจะโดยชัดแจ้งหรือ
เป็นนัย ซึ่งรวมถึงแต่ไม่จำกัดอยู่เพียงการรับประกัน หรือเงื่อนไขของความสามารถเชิงพาณิชย์
หรือความเข้ากันได้สำหรับวัตถุประสงค์เฉพาะ ไม่ว่าจะในกรณีใดๆ ก็ตาม ASUS กรรมการ
เจ้า
หน้าที่ พนักงาน หรือตัวแทนของบริษัท ไม่ต้องรับผิดชอบต่อความเสียหายที่เกิดขึ้นโดยอ้อม
โดยกรณีพิเศษ โดยไม่ได้ตั้งใจ หรือโดยเป็นผลกระทบตามมา (รวมถึงความเสียหายจากการ
สูญเสียกำไร การขาดทุนของธุรกิจ การสูญเสียการใช้งานหรือข้อมูล การหยุดชะงักของธุรกิจ
และอื่นๆ ในลักษณะเดียวกันนี้) แม้ว่า ASUS จะได้รับทราบถึงความเป็นไปได้ของความเสีย
หายดังกล่าว อันเกิดจากข้อบกพร่องหรือข้อผิดพลาดในคู่มือหรือผลิตภัณฑ์นี้
ข้อกำหนดและข้อมูลต่างๆ ที่ระบุในคู่มือฉบับนี้ เป็นเพียงข้อมูลเพื่อการใช้งานเท่านั้น และอาจ
เปลี่ยนแปลงได้ตามเวลาที่ผ่านไปโดยไม่ต้องแจ้งให้ทราบ จึงไม่ควรถือเป็นภาระผูกพันของ
ASUS ASUS ไม่ขอรับผิดชอบหรือรับผิดต่อข้อผิดพลาด หรือความไม่ถูกต้องใดๆ ที่อาจเกิดขึ้น
ในคู่มือฉบับนี้ รวมทั้งผลิตภัณฑ์และซอฟต์แวร์ที่ระบุในคู่มือด้วย
ผลิตภัณฑ์และชื่อบริษัทที่ปรากฏในคู่มือนี้อาจเป็น หรือไม่เป็นเครื่องหมายการค้าจดทะเบียน
หรือลิขสิทธิ์ของบริษัทที่เป็นเจ้าของ และมีการใช้เฉพาะสำหรับการอ้างอิง หรืออธิบายเพื่อ
ประโยชน์ของเจ้าของเท่านั้น โดยไม่มีวัตถุประสงค์ในการละเมิดใดๆ
2

สารบัญ
เกี่ยวกับคู่มือนี้ ........................................................................................ 4
คู่มือนี้มีการจัดการอย่างไร ................................................ 4
ข้อกำหนดที่ใช้ในคู่มือนี้ .................................................... 5
ทำความรู้จักไวร์เลส เราเตอร์ของคุณ 6
สิ่งต่างๆ ในกล่องบรรจุ .......................................................................... 6
ความต้องการของระบบ ........................................................................ 6
ก่อนที่จะดำเนินการ ............................................................................... 6
คุณสมบัติของฮาร์ดแวร์ ........................................................................ 7
แผงด้านหน้า ...................................................................7
แผงด้านหลัง ................................................................... 8
แผงด้านหลัง ................................................................... 9
ตัวเลือกในการยึด ................................................................................10
การตั้งค่าฮาร์ดแวร์ 11
การตั้งค่าไวร์เลส เราเตอร์ .................................................................11
การตั้งค่าการเชื่อมต่อแบบมีสาย ....................................... 11
การตั้งค่าการเชื่อมต่อแบบไร้สาย ...................................... 12
การตั้งค่าคอนฟิกไวร์เลส เราเตอร์ ...................................................12
การใช้เว็บ GUI .............................................................. 12
การตั้งค่าคอนฟิกเน็ตเวิร์กไคลเอ็นต์ 14
การเข้าถึงไวร์เลส เราเตอร์ ................................................................14
การตั้งค่า IP แอดเดรสสำหรับไคลเอ็นต์แบบมีสาย และไร้สาย .14
การตั้งค่าคอนฟิกผ่านเว็บ GUI 21
การตั้งค่าคอนฟิกผ่านเว็บ GUI ..........................................................21
การคอนฟิกการตั้งค่า ..........................................................................22
การอัปเกรดเฟิร์มแวร์ .....................................................22
การกู้คืน/การจัดเก็บ/การอัปโหลดการตั้งค่า ....................... 23
การติดตั้งยูทิลิต้ 24
3

สารบัญ
การติดตั้งยูทิลิตี้ ...................................................................................24
การค้นหาอุปกรณ์ ................................................................................26
การกู้คืนเฟิร์มแวร์ ................................................................................26
EZSetup ...............................................................................................29
การตั้งค่าปุ่มด่วนของ WPS ............................................. 32
การแก้ไขปัญหา 33
การแก้ไขปัญหา ...................................................................................33
ภาคผนวก 36
Notices ................................................................................................36
GNU General Public License ......................................................38
ข้อมูลการติดต่อกับ ASUS ..................................................................44
เกี่ยวกับคู่มือนี้
คู่มือนี้ประกอบด้วยข้อมูลที่คุณจำเป็นในการติดตั้งและตั้งค่าคอนฟิก ASUS ไวร์เลส
เราเตอร์
คู่มือนี้มีการจัดการอย่างไร
คู่มือนี้ประกอบด้วยส่วนต่อไปนี้:
• บทที่ 1: ทำความรู้จักไวร์เลส เราเตอร์ของคุณ
บทนี้จะให้ข้อมูลเกี่ยวกับรายการที่อยู่ในกล่องบรรจุ, ความต้องการของระบบ,
คุณสมบัติของฮาร์ดแวร์ และไฟแสดงสถานะ LED ของ ASUS ไวร์เลส
เราเตอร์
• บทที่ 2: การตั้งค่าฮาร์ดแวร์
บทนี้จะให้ขั้นตอนในการติดตั้ง, การเข้าถึง และการตั้งค่าคอนฟิก ASUS ไวร์เลส
เราเตอร์
• บทที่ 3: การตั้งค่าคอนฟิกเน็ตเวิร์กไคลเอ็นต์
บทนี้จะให้ขั้นตอนในการตั้งค่าไคลเอ็นต์ในเครือข่ายของคุณเพื่อทำงานกับ
ASUS ไวร์เลส เราเตอร์
4
• บทที่ 4: การตั้งค่าคอนฟิกผ่านเว็บ GUI
บทนี้ให้ขั้นตอนเกี่ยวกับการตั้งค่าคอนฟิก ASUS ไวร์เลส เราเตอร์โดยใช้ระบบ
ติดต่อผู้ใช้แบบกราฟฟิกบนเว็บ (เว็บ GUI)
• บทที่ 5: การติดตั้งยูทิลิตี้
บทนี้ให้ข้อมูลเกี่ยวกับยูทิลิตี้ที่มีให้บนแผ่น CD สนับสนุน
• บทที่ 6: การแก้ไขปัญหา
บทนี้จะให้คำแนะนำในการแก้ไขปัญหาสำหรับปัญหาทั่วไปที่คุณอาจพบเมื่อใช้
ASUS ไวร์เลส เราเตอร์
• ภาคผนวก
บทนี้ให้ข้อมูลเกี่ยวกับประกาศของระเบียบข้อบังคับและความปลอดภัยต่างๆ
ข้อกำหนดที่ใช้ในคู่มือนี้
คำเตือน: ข้อมูลเพื่อป้องกันไม่ให้เกิดการบาดเจ็บ เมื่อพยายามปฏิบัติงาน
ให้สำเร็จ
ข้อควรระวัง: ข้อมูลเพื่อป้องกันความเสียหายต่อชิ้นส่วนต่างๆ เมื่อพยายาม
ปฏิบัติงานให้สำเร็จ
สำคัญ: ข้อมูลที่คุณต้องปฏิบัติตามเพื่อทำงานให้สำเร็จ
หมายเหตุ: เทคนิคและข้อมูลเพิ่มเติมเพื่อช่วยเหลือในการทำงานให้ส
ำเร็จ
5
ทำความรู้จักไวร์เลส
1
เราเตอร์ของคุณ
สิ่งต่างๆ ในกล่องบรรจุ
ตรวจสอบสิ่งต่อไปนี้ในกล่องบรรจุ ASUS ไวร์เลส เราเตอร์ของคุณ
RT-G32 ไวร์เลส เราเตอร์
อะแดปเตอร์เพาเวอร์
แผ่น CD สนับสนุน (คู่มือ, ยูทิลิตี้)
สายเคเบิล RJ45
คู่มือเริ่มต้นอย่างเร็ว
หมายเหตุ: ถ้ามีรายการใดๆ เสียหายหรือหายไป ให้ติดต่อร้านค้าปลีกที่คุณซื้อมา
ความต้องการของระบบ
ก่อนที่จะติดตั้ง ASUS ไวร์เลส เราเตอร์ ตรวจดูให้แน่ใจว่าระบบ/เครือข่ายของคุณมี
คุณสมบัติตรงตามความต้องการต่อไปนี้:
• พอร์ตอีเธอร์เน็ต RJ-45 (10Base-T/100Base-TX)
• อุปกรณ์ IEEE 802.11b/g ที่มีความสามารถไร้สายอย่างน้อยหนึ่งอย่าง
• TCP/IP และอินเตอร์เน็ตเบราเซอร์ที่ติดตั้งไว้แล้ว
• สนับสนุน Internet Explorer 6.0 ขึ้นไป
ก่อนที่จะดำเนินการ
สังเกตคำแนะนำต่อไปนี้ก่อนที่จะติดตั้ง ASUS ไวร์เลส เราเตอร์:
• ความยาวของสายเคเบิลอีเธอร์เน็ตที่เชื่อมต่ออุปกรณ์เข้ากับเครือข่าย (ฮับ,
โมเด็ม ADSL/เคเบิล, เราเตอร์, แผงที่ผนัง) ต้องไม่เกิน 100 เมตร
• โปรดวางอุปกรณ์บนพื้นผิวที่เรียบ และมั่นคง โดยอยู่ไกลจากพื้นมากที่สุดเท่าที่
จะเป็นไปได้
• วางอุปกรณ์ให้ห่างจากวัตถุขวางกั้นที่เป็นโลหะ และไม่ให้ถูกแสงแดดโดยตรง
• วางอุปกรณ์ให้ห่างจากหม้อแปลง, มอเตอร์ที่มีพลังงานสูง, หลอดฟลูออเรสเซนต์, เตาไมโครเวฟ, ตู้เย็น และอุปกรณ์อุตสาหกรรมอื่นๆ เพื่อป้องกันการสูญ
เสียสัญญาณ
RT-G32 บทที่ 1: ทำความรู้จักไวร์เลส เราเตอร์ของคุณ
6
• ติดตั้งอุปกรณ์ในบริเวณศูนย์กลางพื้นที่ เพื่อให้ส่งสัญญาณครอบคลุมพื้นที่
สำหรับอุปกรณ์มือถือไร้สายทั้งหมด
• ติดตั้งอุปกรณ์ห่างจากบุคคลอย่างน้อย 20 ซม. เพื่อประกันว่าผลิตภัณฑ์จะทำ
งานสอดคล้องตามคำแนะนำสำหรับการสัมผัสถูก RF ของมนุษย์ที่ประกาศใช้
โดยคณะกรรมการการสื่อสารแห่งชาติ
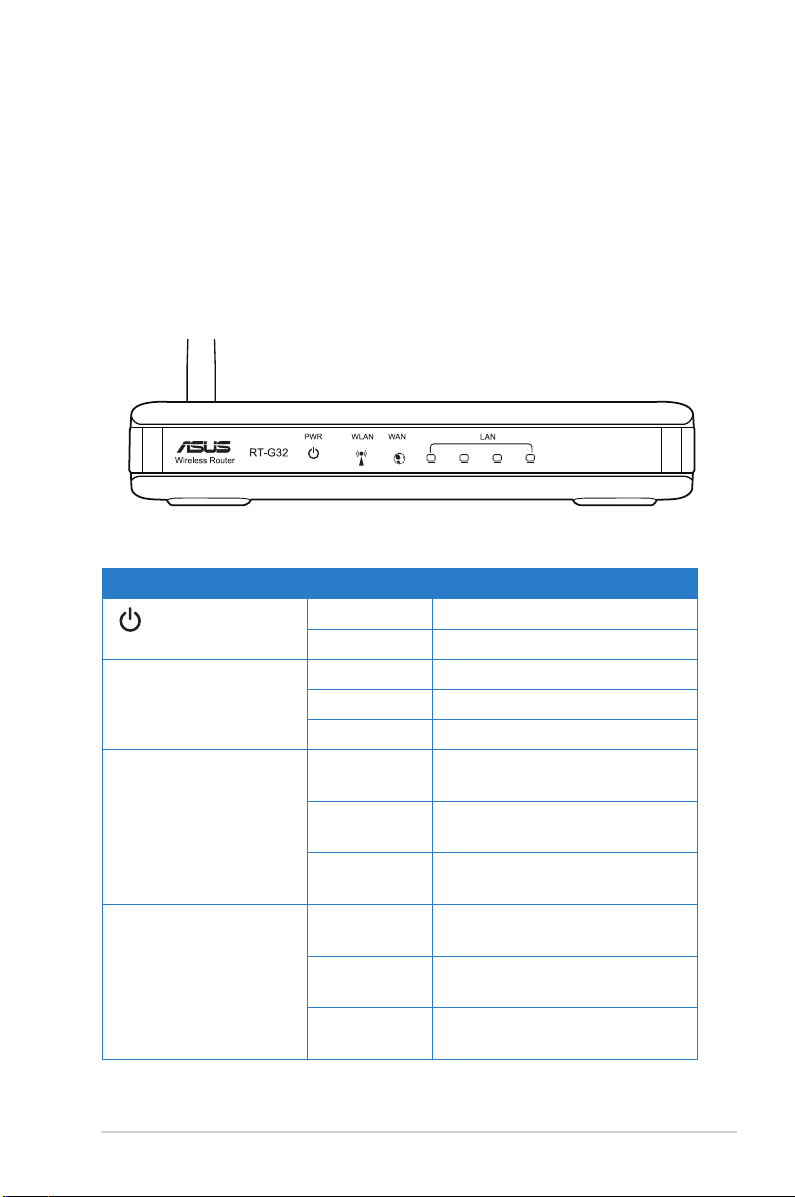
คุณสมบัติของฮาร์ดแวร์
แผงด้านหน้า
ตัวแสดงสถานะ
LED สถานะ ความหมาย
(เพาเวอร์)
WLAN (ไวร์เลส LAN) ดับ ไม่มีพลังงานเข้า
LAN 1-4
(เครือข่ายในพื้นที่)
WAN
(เครือข่ายบริเวณกว้าง)
ดับ ไม่มีพลังงานเข้า
ติด ระบบพร้อม
ติด ระบบไร้สายพร้อม
กะพริบ กำลังส่งหรือรับข้อมูล (ไร้สาย)
ดับ ไม่มีพลังงานเข้า หรือไม่มีการ
เชื่อมต่อทางกายภาพ
ติด มีการเชื่อมต่อทางกายภาพไปยัง
เครือข่ายอีเธอร์เน็ต
กะพริบ กำลังส่งหรือรับข้อมูล (ผ่านสาย
เคเบิลอีเธอร์เน็ต)
ดับ ไม่มีพลังงานเข้า หรือไม่มีการ
เชื่อมต่อทางกายภาพ
ติด มีการเชื่อมต่อทางกายภาพไปยัง
เครือข่ายอีเธอร์เน็ต
กะพริบ กำลังส่งหรือรับข้อมูล (ผ่านสาย
เคเบิลอีเธอร์เน็ต)
บทที่ 1: ทำความรู้จักไวร์เลส เราเตอร์ของคุณ RT-G32
7
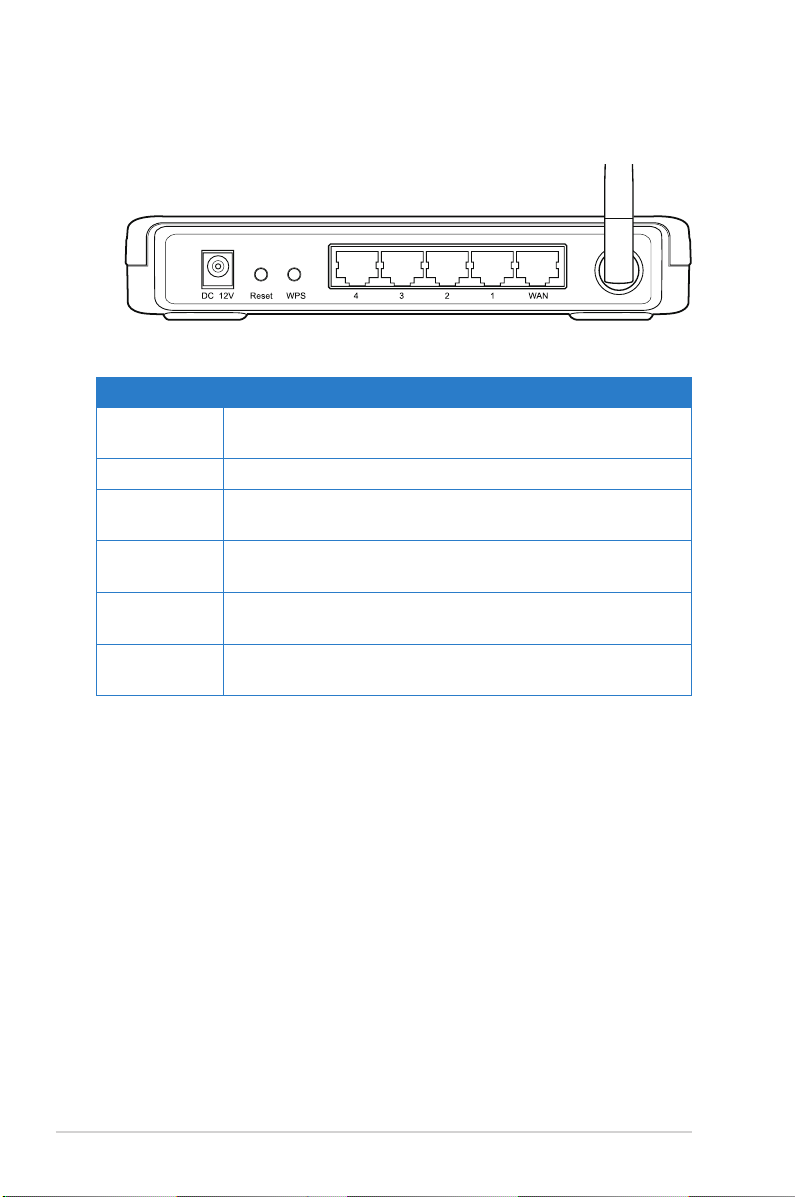
แผงด้านหลัง
ข้อความ คำอธิบาย
เสาอากาศ ปรับเสาอากาศแบบแมนนวล เพื่อให้ได้การรับสัญญาณที่ดี
ขึ้น
WPS กดปุ่มนี้เพื่อเปิดการตั้งค่า Wi-Fi ที่มีการป้องกัน (WPS)
รีเซ็ต กดเป็นเวลา 3 วินาที เพื่อกู้คืนกลับเป็นการตั้งค่าเริ่มต้นจาก
โรงงาน
WAN เชื่อมต่อสายเคเบิลอีเธอร์เน็ต RJ-45 เข้ากับพอร์ตนี้ เพื่อสร้าง
การเชื่อมต่อ WAN
LAN1-LAN4 เชื่อมต่อสายเคเบิลอีเธอร์เน็ต RJ-45 เข้ากับพอร์ตเหล่านี้ เพื่อ
สร้างการเชื่อมต่อ LAN
DC 12V เสียบอะแดปเตอร์ DC เข้ากับพอร์ตนี้ เพื่อเชื่อมต่อเราเตอร์ของ
คุณเข้ากับแหล่งพลังงาน
RT-G32 บทที่ 1: ทำความรู้จักไวร์เลส เราเตอร์ของคุณ
8
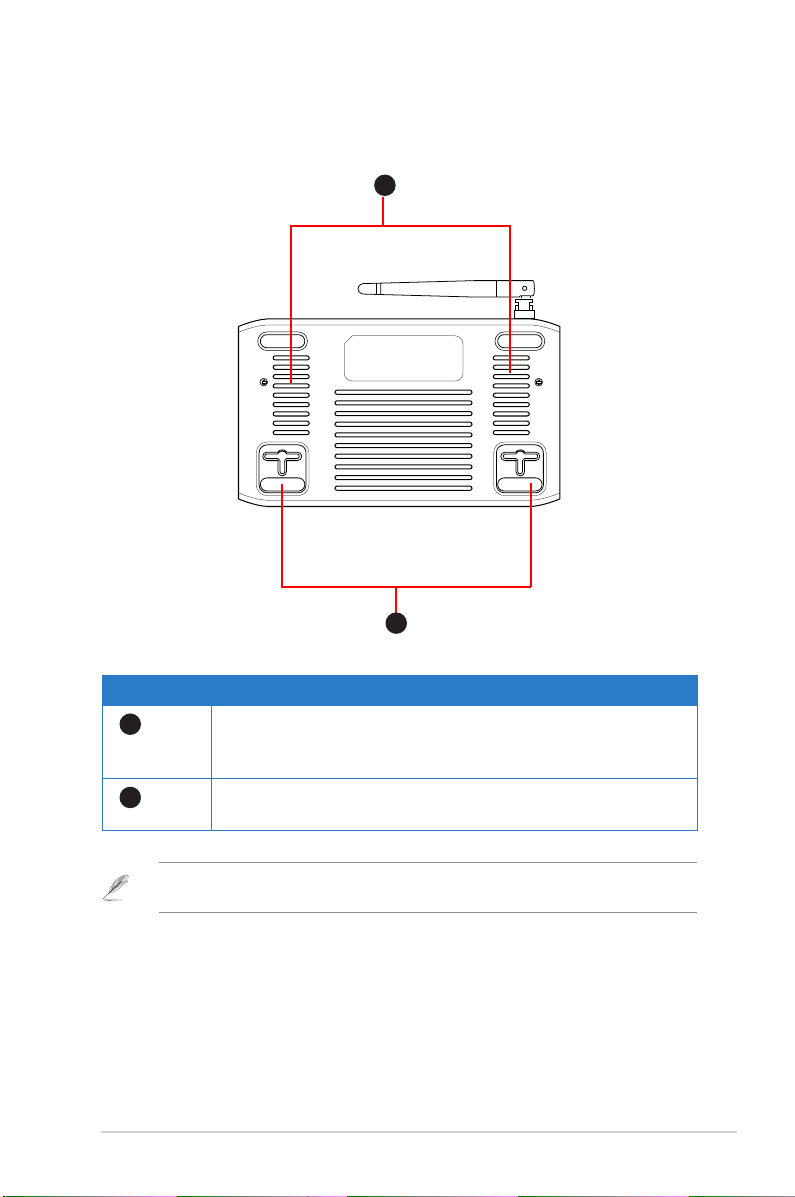
แผงด้านหลัง
2
1
รายการ คำอธิบาย
1
2
ขอเกี่ยวสำหรับยึด
ใช้ขอเกี่ยวสำหรับยึดเพื่อยึดเราเตอร์ของคุณบนผนังคอนกรีตห
รือพื้นผิวไม้ โดยใช้สกรูหัวกลม 2 ตัว
ช่องระบายอากาศ
ช่องเหล่านี้มีไว้เพื่อระบายอากาศในเราเตอร์ของคุณ
หมายเหตุ: สำหรับรายละเอียดในการยึดเราเตอร์ของคุณบนผนังหรือเพดาน ให้ดูส่วน
ตัวเลือกในการยึด ในหน้าถัดไปของของคู่มือผู้ใช้นี้
บทที่ 1: ทำความรู้จักไวร์เลส เราเตอร์ของคุณ RT-G32
9
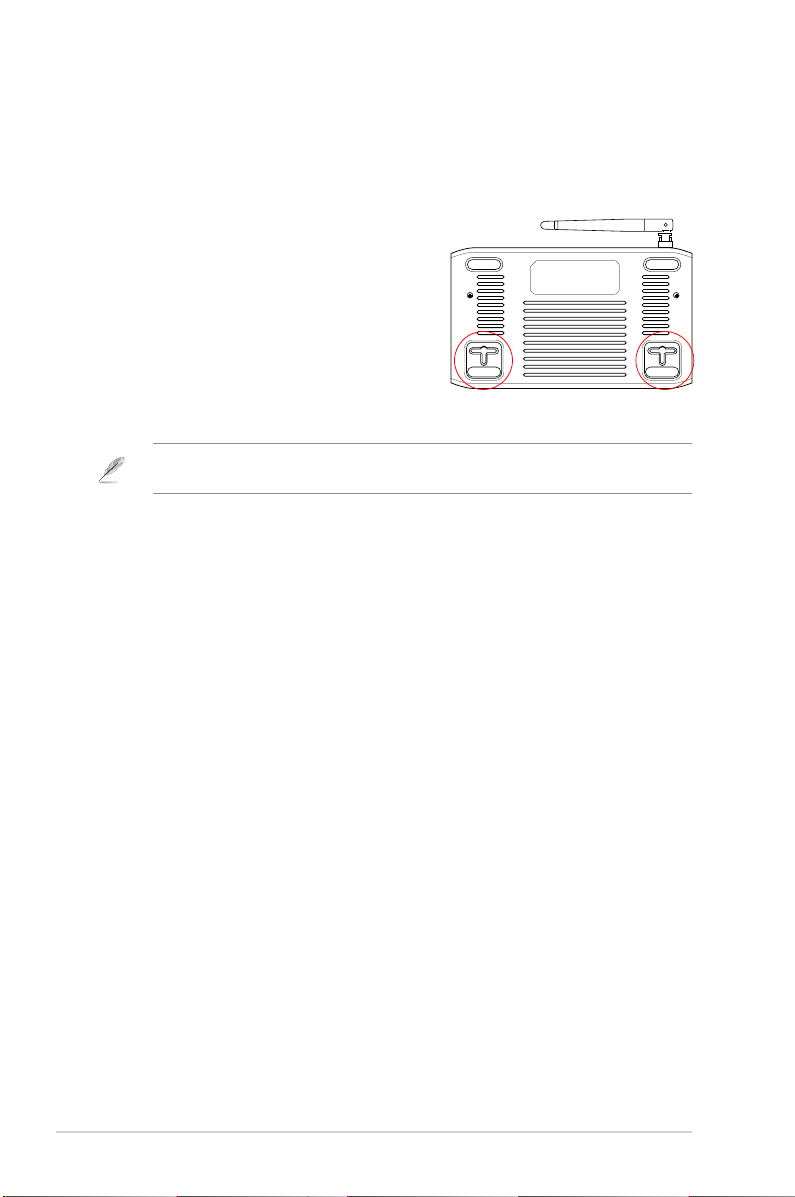
ตัวเลือกในการยึด
ASUS ไวร์เลส เราเตอร์ ได้รับการออกแบบให้วางบนพื้นผิวที่เรียบ เช่นบนตู้ หรือชั้น
หนังสือ นอกจากนี้ คุณยังสามารถแปลงเครื่องสำหรับแขวนที่ผนังหรือเพดานได้ด้วย
ในการยึด ASUS ไวร์เลส เราเตอร์:
1. มองข้างใต้เครื่อง สำหรับที่เกี่ยวสำหรับยึด
สองอัน
2. ทำเครื่องหมายรูด้านบน 2 รูบนพื้นผิวที่เรียบ
3. ไขสกรูสองตัว จนกระทั่งมีเหลือยื่นออกมาจาก
ผนัง 1/4''
4. แขวนที่เกี่ยวของ ASUS ไวร์เลส เราเตอร์ลง
บนสกรู
หมายเหตุ: ปรับสกรูใหม่ ถ้าคุณไม่สามารถแขวน ASUS ไวร์เลส เราเตอร์บนสกรูได้ หรือถ้ายึด
ไว้หลวมเกินไป
RT-G32 บทที่ 1: ทำความรู้จักไวร์เลส เราเตอร์ของคุณ
10
WAN
การตั้งค่าฮาร์ดแวร์
2
การตั้งค่าไวร์เลส เราเตอร์
ASUS ไวร์เลส เราเตอร์ มีการตั้งค่าคอนฟิเกอเรชั่นที่เหมาะกับสถานการณ์การทำ
งานแบบต่างๆ คุณอาจจำเป็นต้องเปลี่ยนแปลงการตั้งค่าเริ่มต้นของเราเตอร์เพื่อให้
ตรงกับความต้องการในสภาพแวดล้อมการทำงานแบบไร้สายของคุณ เราเตอร์ยังมี
EZSetup ซึ่งเป็นยูทิลิตี้ที่ช่วยให้คุณตั้งค่าเครือข่ายไร้สายที่มีระบบป้องกันได้อย่างง
่ายดาย
หมายเหตุ:
• สำหรับรายละเอียดเพิ่มเติมเกี่ยวกับ EZSetup, ให้ดูส่วน EZSetup ในบทที่ 5 ของคู่มือ
ผู้ใช้นี้
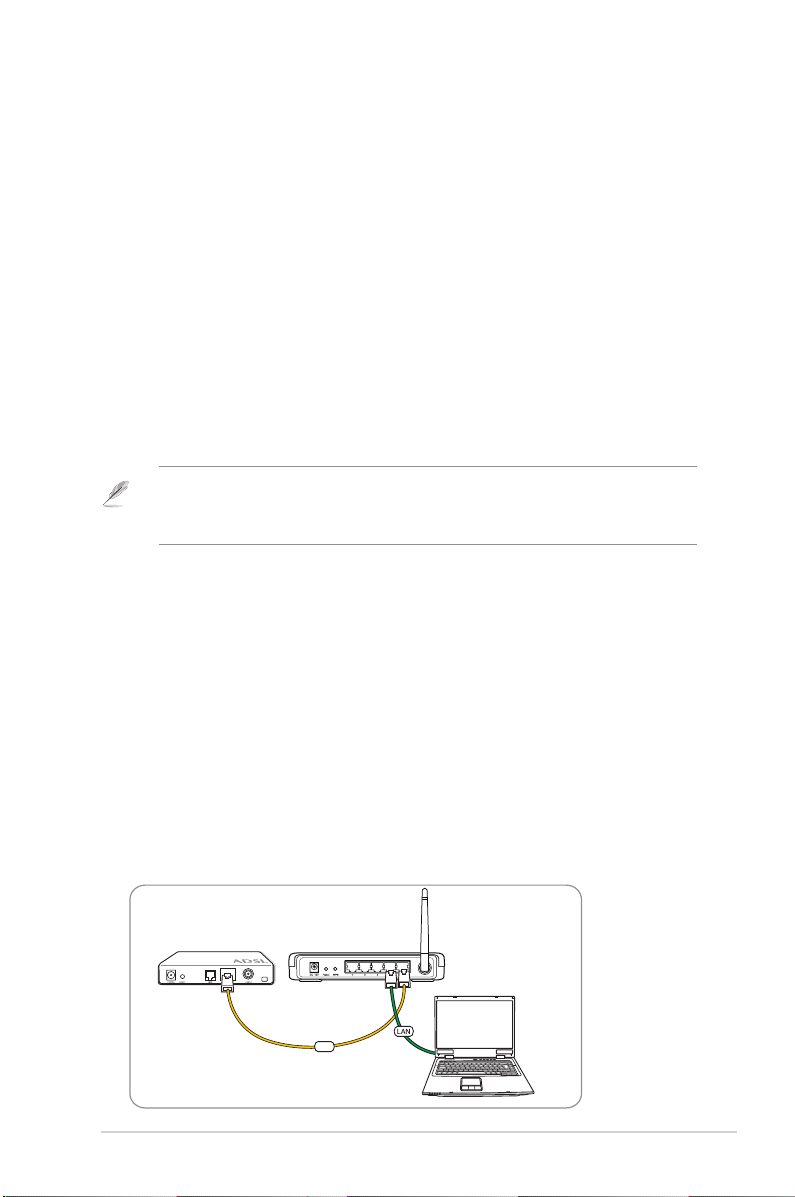
การตั้งค่าการเชื่อมต่อแบบมีสาย
ASUS ไวร์เลส เราเตอร์ ให้สายเคเบิลอีเธอร์เน็ตมาในกล่องบรรจุ ไวร์เลส เราเตอร์
มีฟังก์ชั่นครอสโอเวอร์อัตโนมัติในตัว ดังนั้น คุณจึงสามารถใช้ทั้งสายตรง หรือสาย
ครอสโอเวอร์สำหรับการเชื่อมต่อแบบมีสายได้
ในการตั้งค่าการเชื่อมต่อแบบมีสาย:
1. เปิดเราเตอร์และโมเด็มของคุณ
2. เชื่อมต่อพอร์ต WAN ของเราเตอร์กับโมเด็มด้วยการใช้สายเคเบิลอีเธอร์เน็ต
3. เชื่อมต่อพอร์ต LAN ของเราเตอร์เข้ากับพอร์ต LAN ของพีซีด้วยการใช้สายเ
คเบิล
อีเธอร์เน็ตอีกเส้นหนึ่ง
โมเด็ม
บทที่ 2: การตั้งค่าฮาร์ดแวร์ RT-G32
ASUS ไวร์เลส เราเตอร์
11
การตั้งค่าการเชื่อมต่อแบบไร้สาย
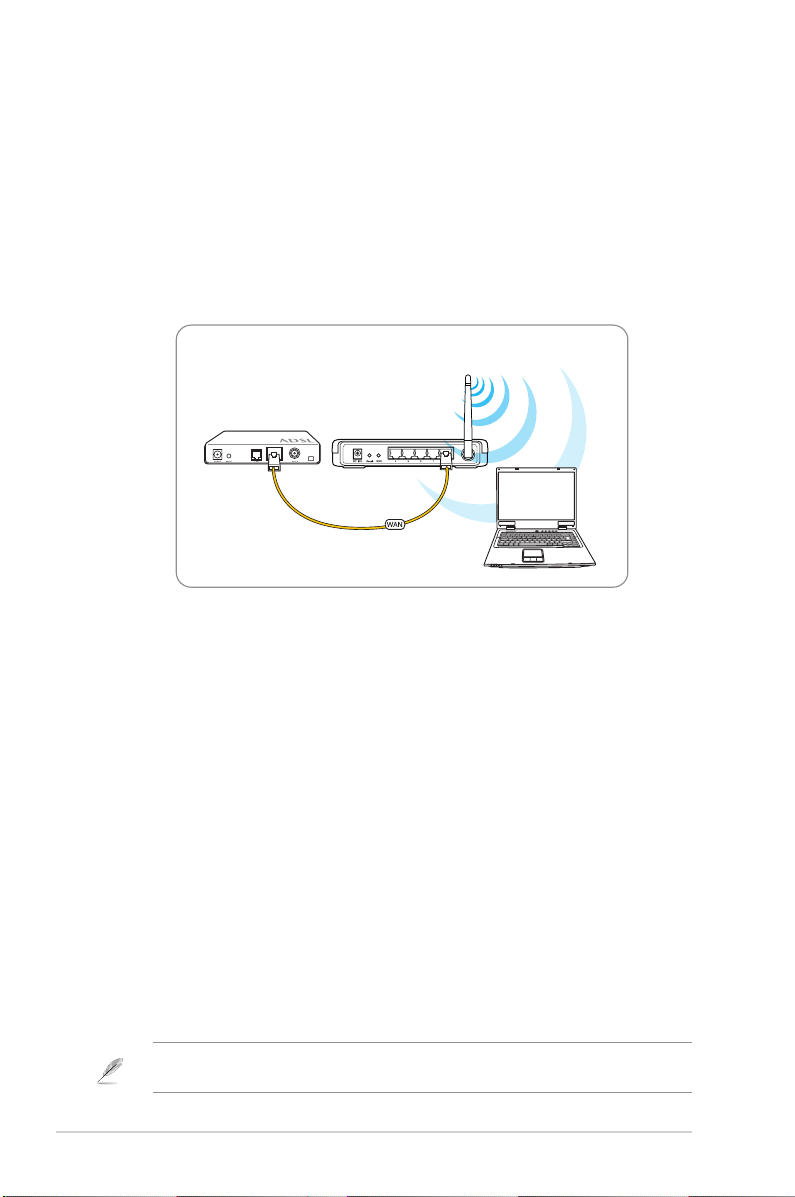
ในการตั้งค่าการเชื่อมต่อแบบไร้สาย:
1. เปิดเราเตอร์และโมเด็มของคุณ
2. เชื่อมต่อโมเด็มเข้ากับพอร์ต WAN ของเราเตอร์ด้วยการใช้สายเคเบิลอีเธอร์เน็ต
3. เชื่อมต่อ การ์ด WLAN ที่มีคุณสมบัติ IEEE 802.11b/g ให้อ่านคู่มือผู้ใช้อะแดปเตอร์ไร้สายของคุณ สำหรับขั้นตอนการเชื่อมต่อแบบไร้สาย ตามค่ามาตรฐาน
แล้ว SSID ของ ASUS ไวร์เลส เราเตอร์คือ “default” (ตัวพิมพ์เล็ก), ปิดการ
ทำงานการเข้ารหัส และเปิดการรับรองตัวบุคคลของระบบไว้
โมเด็ม
ASUS ไวร์เลส เราเตอร์
การตั้งค่าคอนฟิกไวร์เลส เราเตอร์
ASUS ไวร์เลส เราเตอร์ มีระบบติดต่อผู้ใช้แบบกราฟฟิกบนเว็บ (เว็บ GUI) ซึ่ง
อนุญาตให้คุณตั้งค่าคอนฟิกไวร์เลส เราเตอร์โดยใช้เว็บเบราเซอร์บนคอมพิวเตอร์
ของคุณ
การใช้เว็บ GUI
ถ้าพีซีของคุณเชื่อมต่อไปยังเราเตอร์โดยใช้สายเคเบิล ให้เปิดเว็บเบราเซอร์ และ
หน้าเข้าระบบของเว็บ GUI ของเราเตอร์ จะเปิดขึ้นโดยอัตโนมัติ
ถ้าพีซีของคุณเชื่อมต่อไปยังเราเตอร์แบบไร้สาย คุณต้องเลือกเครือข่ายก่อน
ในการเลือกเครือข่าย:
1. คลิก Start (เริ่ม) > Control Panel (แผงควบคุม) > Network Connections
(การเชื่อมต่อเครือข่าย) > Wireless Network Connection (การเชื่อมต่อเครือ
ข่ายไร้สาย)
2. เลือกเครือข่ายจากหน้าต่าง Choose a wireless network
(เลือกเครือข่ายไร้สาย)
รอให้ระบบเชื่อมต่อ
หมายเหตุ: ตามค่าเริ่มต้น SSID ของไวร์เลส เราเตอร์คือ default เชื่อมต่อไปยัง SSID
เริ่มต้นนี้
RT-G32 บทที่ 2: การตั้งค่าฮาร์ดแวร์
12

3. หลังจากการสร้างการเชื่อมต่อไร้สาย ให้เปิดเว็บเบราเซอร์
หมายเหตุ:
• คุณอาจต้องป้อน IP แอดเดรสเริ่มต้นของเราเตอร์ (192.168.1.1) เข้าไปด้วยตัวเองเพื่อ
เปิดระบบติดต่อบนเว็บของเราเตอร์
• สำหรับรายละเอียดเพิ่มเติมเกี่ยวกับการตั้งค่าคอนฟิกไวร์เลส เราเตอร์ของคุณโดยใช้เว็บ
GUI, ให้ดู บทที่ 4: การตั้งค่าคอนฟิกผ่านเว็บ GUI
บทที่ 2: การตั้งค่าฮาร์ดแวร์ RT-G32
13

การตั้งค่าคอนฟิกเน็ตเ
3
วิร์กไคลเอ็นต์
การเข้าถึงไวร์เลส เราเตอร์
การตั้งค่า IP แอดเดรสสำหรับไคลเอ็นต์แบบมีสาย และ
ไร้สาย
ในการเข้าถึง ASUS ไวร์เลส เราเตอร์ คุณต้องมีการตั้งค่า TCP/IP ที่ถูกต้องบน
ไคลเอ็นต์ทั้งแบบมีสาย หรือไร้สายของคุณ ตรวจดูให้แน่ใจว่า IP แอดเดรสของ
ไคลเอ็นต์อยู่ภายในซับเน็ตเดียวกันกับ ASUS ไวร์เลส เราเตอร์
ตามค่าเริ่มต้น ASUS ไวร์เลส เราเตอร์จะมีฟังก์ชั่น DHCP เซิร์ฟเวอร์ ซึ่งจะกำหนด
IP แอดเดรสให้กับไคลเอ็นต์ในระบบเครือข่ายของคุณโดยอัตโนมัติ
แต่ในบางสถานการณ์ คุณอาจต้องการกำหนดสแตติก IP แอดเดรสบนไคลเอ็นต์
หรือคอมพิวเตอร์บางเครื่องในระบบเครือข่ายของคุณแบบแมนนวลแทนที่จะรับ IP
แอดเดรสจากไวร์เลส เราเตอร์ของคุณโดยอัตโนมัติ
ปฏิบัติตามขั้นตอนด้านล่างตามระบบปฏิบัติการที่ติดตั้งบนไคลเอ็นต์หรือคอมพิวเตอร์ของคุณ
หมายเหตุ: ถ้าคุณต้องการกำหนด IP แอดเดรสให้กับไคลเอ็นต์ของคุณแบบแมนนวล เราแนะนำ
ให้คุณใช้การตั้งค่าต่อไปนี้:
• IP แอดเดรส: 192.168.1.xxx (xxx สามารถเป็นตัวเลขใดก็ได้ระหว่าง 2 ถึง 254 ตรวจ
ดูให้แน่ใจว่า IP แอดเดรสไม่ได้ถูกใช้โดยอุปกรณ์อื่น)
• ซับเน็ต มาสก์: 255.255.255.0 (เหมือนกับ ASUS ไวร์เลส เราเตอร์)
• เกตเวย์: 192.168.1.1 (IP แอดเดรสของ ASUS ไวร์เลส เราเตอร์)
• DNS: 192.168.1.1 (ASUS ไวร์เลส เราเตอร์) หรือกำหนดเป็น DNS เซิร์ฟเวอร์ที่รู้จักใน
เครือข่ายของคุณ
RT-G32 บทที่ 3: การตั้งค่าคอนฟิกไคลเอ็นต์
14

Windows® 9x/ME
1. คลิก Start (เริ่ม) > Control
Panel (แผงควบคุม) > Network
(เครือข่าย) เพื่อแสดงหน้าต่าง
Network setup (การตั้งค่า
เครือข่าย)
2. เลือก TCP/IP (TCP/IP) จากนั้น
คลิก Properties (คุณสมบัติ)
3. ถ้าคุณต้องการให้คอมพิวเตอร์
รับ IP แอดเดรสโดยอัตโนมัติ,
คลิก Obtain an IP address
automatically (รับ IP แอดเดรส
โดยอัตโนมัติ) จากนั้นคลิก OK
(ตกลง) ไม่เช่นนั้น คลิก Specify
an IP address (ระบุ IP
แอดเดรส),
จากนั้นพิมพ์ลงในช่อง IP address
(IP แอดเดรส) และ Subnet Mask
(ซับเน็ต มาสก์)
บทที่ 3: การตั้งค่าคอนฟิกไคลเอ็นต์ RT-G32
15

4. เลือกแท็บ Gateway (เกตเวย์),
และป้อนค่าใน New gateway
(เกตเวย์ใหม่) จากนั้นคลิก Add
(เพิ่ม)
5. เลือกแท็บ DNS configuration
(การ
กำหนดค่า DNS) และคลิก Enable
DNS (เปิดทำงาน DNS) ป้อนค่าใน
Host (โฮสต์), Domain (โดเมน)
และ DNS Server Search Order
(ลำดับการค้นหา DNS
เซิร์ฟเวอร์),
จากนั้นคลิก Add (เพิ่ม)
6. คลิก OK (ตกลง)
RT-G32 บทที่ 3: การตั้งค่าคอนฟิกไคลเอ็นต์
16

Windows® NT4.0
1. ไปที่ Control Panel (แผงควบคุม)
> Network (เครือข่าย) เพื่อแสดง
หน้าต่าง Network setup (การตั้ง
ค่าเครือข่าย) จากนั้นเลือกแท็บ
Protocols (โปรโตคอล)
2. เลือก TCP/IP Protocol
(โปรโตคอล
TCP/IP) จากรายการ Network
Protocols (โปรโตคอลเครือข่าย)
จากนั้นคลิก Properties
(คุณสมบัติ)
3. จากแท็บ IP Address (IP
แอดเดรส) ของหน้าต่าง TCP/IP
Properties (คุณสมบัติ TCP/IP)
ของ Microsoft, คุณสามารถ:
• เลือกชนิดของอะแดปเตอร์เครือ
ข่ายที่ติดตั้งในระบบของคุณ
• ตั้งค่าเราเตอร์ให้กำหนด IP
แอดเดรสโดยอัตโนมัติ
• ตั้งค่า IP แอดเดรส, ซับเน็ต
มาสก์ และเกตเวย์เริ่มต้นแบบ
แมนนวล
บทที่ 3: การตั้งค่าคอนฟิกไคลเอ็นต์ RT-G32
17

4. เลือกแท็บ DNS (DNS) จากนั้น
คลิก Add (เพิ่ม) ภายใต้ DNS
Service Search Order (ลำดับ
การค้นหาบริการ DNS) และป้อน
DNS เข้าไป
Windows® 2000
1. คลิก Start (เริ่ม) > Control
Panel
(แผงควบคุม) > Network and
Dial-up Connection
(เครือข่ายและ
การเชื่อมต่อแบบโทรเข้า) คลิกขวา
ที่ Local Area Connection (การ
เชื่อมต่อเครือข่ายท้องถิ่น) จากนั้น
คลิก Properties (คุณสมบัติ)
RT-G32 บทที่ 3: การตั้งค่าคอนฟิกไคลเอ็นต์
18

2. เลือก Internet Protocol (อินเตอร์
เน็ตโปรโตคอล)(TCP/IP), จากนั้น
คลิก Properties (คุณสมบัติ)
3. เลือก Obtain an IP address
automatically (รับ IP
แอดเดรสโดย
อัตโนมัติ) ถ้าคุณต้องการให้การตั้งค่า
IP ถูกกำหนดโดยอัตโนมัติ ไม่เช่น
นั้น เลือก Use the following IP
address (ใช้ IP แอดเดรสต่อไปนี้):
และป้อนค่าในช่อง IP address (IP
แอดเดรส), Subnet mask (ซับเน็ต
มาสก์) และ Default gateway (เกต
เวย์เริ่มต้น)
4. เลือก Obtain an IP address
automatically (รับ IP
แอดเดรสโดย
อัตโนมัติ) ถ้าคุณต้องการให้การตั้ง
ค่า DNS เซิร์ฟเวอร์ถูกกำหนดโดย
อัตโนมัติ ไม่เช่นนั้น เลือก Use the
following DNS server address
(ใช้ DNS เซิร์ฟเวอร์แอดเดรสต่อไป
นี้): และป้อนค่าในช่อง Preferred
(ที่เลือกใช้) และ Alternate DNS
server (DNS เซิร์ฟเวอร์อื่น)
5. คลิก OK (ตกลง) เมื่อทำเสร็จ
Windows® XP
1. คลิก Start (เริ่ม) > Control
Panel (แผงควบคุม) > Network
Connection
(การเชื่อมต่อเครือข่าย)
คลิกขวาที่ Local Area
Connection
(การเชื่อมต่อเครือข่ายท้องถิ่น)
จากนั้นเลือก
Properties (คุณสมบัติ)
บทที่ 3: การตั้งค่าคอนฟิกไคลเอ็นต์ RT-G32
19

2. เลือก Internet Protocol (อินเตอร์
เน็ตโปรโตคอล)(TCP/IP), จากนั้น
คลิก Properties (คุณสมบัติ)
3. เลือก Obtain an IP address
automatically (รับ IP
แอดเดรสโดย
อัตโนมัติ) ถ้าคุณต้องการให้การตั้ง
ค่า IP ถูกกำหนดโดยอัตโนมัติ ไม่
เช่นนั้น เลือก Use the following
IP address (ใช้ IP แอดเดรสต่อไป
นี้): และป้อนค่าในช่อง IP address
(IP แอดเดรส), Subnet mask (ซับ
เน็ต มาสก์) และ Default
gateway
(เกตเวย์เริ่มต้น)
4. เลือก Obtain DNS server
address
automatically (รับ DNS
เซิร์ฟเวอร์
แอดเดรสโดยอัตโนมัติ) ถ้าคุณต้อง
การให้การตั้งค่า DNS
เซิร์ฟเวอร์ถูก
กำหนดโดยอัตโนมัติ ไม่เช่นนั้น
เลือก Use the following DNS
server addresses (ใช้ DNS
เซิร์ฟ
เวอร์แอดเดรสต่อไปนี้): และป้อนค่า
ในช่อง Preferred and Alternate
DNS server (DNS เซิร์ฟเวอร์ที่
เลือกใช้และค่าอื่น)
5. คลิก OK (ตกลง) เมื่อทำเสร็จ
RT-G32 บทที่ 3: การตั้งค่าคอนฟิกไคลเอ็นต์
20

การตั้งค่าคอนฟิกผ่านเว็บ
4
GUI
การตั้งค่าคอนฟิกผ่านเว็บ GUI
ระบบติดต่อผู้ใช้แบบกราฟฟิกบนเว็บของเราเตอร์ (เว็บ GUI) อนุญาตให้คุณตั้งค่า
คอนฟิกคุณสมบัติต่างๆ: Setting (การตั้งค่า)
ในการตั้งค่าคอนฟิกผ่านเว็บ GUI:
1. หลังจากการตั้งค่าการเชื่อมต่อแบบมีสายหรือไร้สาย ให้เปิดเว็บเบราเซอร์ หน้า
เข้าระบบ จะเปิดขึ้นโดยอัตโนมัติ
หมายเหตุ: คุณอาจต้องป้อน IP แอดเดรสเริ่มต้นของเราเตอร์ (192.168.1.1) เข้าไปด้วยตัวเอง
เพื่อเปิดระบบติดต่อบนเว็บของเราเตอร์
2. บนหน้าเข้าระบบ ให้ป้อนชื่อผู้ใช้เริ่มต้น (admin) และรหัสผ่าน (admin)
เข้าไป
3. จากหน้าหลัก, คลิกเมนูหรือลิงค์สำหรับเลือก เพื่อตั้งค่าคอนฟิกคุณสมบัติต่างๆ
ของ ASUS ไวร์เลส เราเตอร์
บทที่ 4: การตั้งค่าคอนฟิกผ่านเว็บ GUI RT-G32
21

การคอนฟิกการตั้งค่า
หน้านี้อนุญาตให้คุณคอนฟิกการตั้งค่าสำหรับเราเตอร์และเครือข่ายของคุณ
หน้านี้ใช้
สำหรับกำหนดการตั้งค่าสำหรับ: Wireless (ไร้สาย), LAN, WAN, Firewall
(ไฟร์วอลล์),
Administration (การบริหารระบบ) และ System Log (บันทึกระบบ)
ในการเปิดหน้า การตั้งค่า:
• คลิก Setting (การตั้งค่า) จากเมนูสำหรับเลือกที่ด้านซ้ายของหน้าจอของคุณ
การอัปเกรดเฟิร์มแวร์
หมายเหตุ: ดาวน์โหลดเฟิร์มแวร์ล่าสุดจากเว็บไซต์ ASUS ที่ http://www.asus.com
ในการอัปเกรดเฟิร์มแวร์:
1. คลิก Setting (การตั้งค่า) จากเมนูสำหรับเลือกที่ด้านซ้ายของหน้าจอของคุณ
2. ภายใต้เมนู Administration (การบริหารระบบ), คลิก Firmware Upgrade
(เฟิร์มแวร์อัปเกรด)
3. ในช่อง New Firmware File (ไฟล์เฟิร์มแวร์ใหม่), คลิก Browse
(เรียกดู) เพื่อ
ค้นหาเฟิร์มแวร์ใหม่บนคอมพิวเตอร์ของคุณ
4. คลิก Upload (อัปโหลด) กระบวนการอัปโหลดใช้เวลาประมาณ 3 นาที
หมายเหตุ: ถ้ากระบวนการอัปเกรดล้มเหลว ไวร์เลส เราเตอร์จะเข้าสู่โหมดฉุกเฉินหรือโหมด
ล้มเหลวโดยอัตโนมัติ และไฟแสดงสถานะ LED เพาเวอร์ที่แผงด้านหน้าจะกะพริบช้าๆ ในการ
เรียกคืน หรือกู้คืนระบบ ให้ใช้ยูทิลิตี้ Firmware Restoration (การกู้คืนเฟิร์มแวร์)
สำหรับรายละเอีย
ดเพิ่มเติมเกี่ยวกับยูทิลิตี้นี้, ให้ดูส่วน การกู้คืนเฟิร์มแวร์ ในบทที่ 5 ของคู่มือผู้ใช้นี้
RT-G32 บทที่ 4: การตั้งค่าคอนฟิกผ่านเว็บ GUI
22

การกู้คืน/การจัดเก็บ/การอัปโหลดการตั้งค่า
ในการกู้คืน/จัดเก็บ/อัปโหลดการตั้งค่า:
1. คลิก Setting (การตั้งค่า) จากเมนูสำหรับเลือกที่ด้านซ้ายของหน้าจอของคุณ
2. ภายใต้เมนู Administration (การบริหารระบบ), คลิก Restore/Save/
Upload Setting
(กู้คืน/จัดเก็บ/อัปโหลดการตั้งค่า)
3. เลือกงานที่คุณต้องการทำ:
• ในการกู้คืนการตั้งค่ากลับเป็นค่าเริ่มต้นจากโรงงาน, คลิก Restore
(กู้คืน),
และคลิก OK (ตกลง) ในข้อความการยืนยัน
• ในการจัดเก็บการตั้งค่าระบบปัจจุบัน, คลิก Save (จัดเก็บ), และคลิก Save
(จัดเก็บ) ในหน้าต่างดาวน์โหลดไฟล์ เพื่อจัดเก็บไฟล์ระบบลงในพาธที่คุณ
ต้องการ
• ในการกู้คืนการตั้งค่าระบบก่อนหน้า, คลิก Browse (เรียกดู)
เพื่อค้นหาไฟล์ระบบ
ที่คุณต้องการกู้คืน, จากนั้นคลิก Upload (อัปโหลด)
บทที่ 4: การตั้งค่าคอนฟิกผ่านเว็บ GUI RT-G32
23

การติดตั้งยูทิลิต้
5
การติดตั้งยูทิลิตี้
แผ่น CD สนับสนุน ประกอบด้วยยูทิลิตี้สำหรับการตั้งค่าคอนฟิก ASUS ไวร์เลส
เราเตอร์ ในการติดตั้งยูทิลิตี้ ASUS WLAN ใน Microsoft® Windows, ให้ใส่
แผ่น CD สนับสนุนลงใน CD ไดรฟ์ ถ้าคุณสมบัติการรันอัตโนมัติปิดทำงาน, ให้
รัน setup.exe จากไดเรกทอรีรากของแผ่น CD สนับสนุน
ในการติดตั้งยูทิลิตี้:
1. คลิก Install ASUS Wireless
Router Utilities (ติดตั้งยูทิลิตี้
ASUS ไวร์เลส เราเตอร์)
2. คลิก Next (ถัดไป)
RT-G32 บทที่ 5: การติดตั้งยูทิลิตี้
24

3. คลิก Next (ถัดไป) เพื่อยอมรับ
โฟลเดอร์ปลายทางเริ่มต้น หรือ
คลิกBrowse (เรียกดู) เพื่อระบุ
พาธอื่น
4. คลิก Next (ถัดไป)
5. คลิก Install (ติดตั้ง) เพื่อติดตั้ง
ยูทิลิตี้
6. คลิก Finish (เสร็จ) เมื่อตั้งค่าเสร็จ
บทที่ 5: การติดตั้งยูทิลิตี้ RT-G32
25

การค้นหาอุปกรณ์
Device Discovery (การค้นหาอุปกรณ์) เป็นยูทิลิตี้ ASUS WLAN ซึ่งทำหน้าที่ตรวจ
หาอุปกรณ์ ASUS ไวร์เลส เราเตอร์ และอนุญาตให้คุณตั้งค่าคอนฟิกอุปกรณ์
ในการเปิดยูทิลิตี้ การค้นหาอุปกรณ์:
• จากเดสก์ทอปของคอมพิวเตอร์ของคุณ, คลิก Start (เริ่ม) > All Programs
(โปรแกรมทั้งหมด) > ASUS Utility (ยูทิลิตี้ ASUS) > RT-G32
Wireless
Router (RT-G32 ไวร์เลส เราเตอร์) > Device Discovery (การค้นหา
อุปกรณ์)
การกู้คืนเฟิร์มแวร์
Firmware Restoration (การกู้คืนเฟิร์มแวร์) เป็นยูทิลิตี้ที่ค้นหา ASUS ไวร์เลส
เราเตอร์ที่ทำงานล้มเหลวระหว่างกระบวนการอัปเกรดเฟิร์ม
แวร์ จากนั้นกู้คืนเฟิร์มแวร์ที่คุณระบุ กระบวนการจะใช้เวลาประมาณ 3 ถึง 4 นาที
อย่า ใช้ยูทิลิตี้นี้ ถ้าคุณไม่พบสถานการณ์ที่ผิดปกติ เช่น เฟิร์มแวร์เสีย, ล้มเหลวขณะอัปเกรด
หรือระบบล่ม
1. ดาวน์โหลดเฟิร์มแวร์และยูทิลิตี้เวอร์ชั่นล่าสุดจากเว็บไซต์ของเราที่ (http://
support.asus.com/download/download.aspx?SLanguage=en-us)
2. ขยายขนาดไฟล์ยูทิลิตี้ จากนั้นรัน Setup.exe คลิก Next (ถัดไป) เพื่อทำการ
ติดตั้งให้เสร็จ
RT-G32 บทที่ 5: การติดตั้งยูทิลิตี้
26

ตั้งค่า IP แอดเดรสแบบแมนนวล
คลิก Start (เริ่ม) > Control Panel (แผงควบคุม) > Network Connection (การ
เชื่อมต่อเครือข่าย) คลิกขวาที่ Local Area Connection (การเชื่อมต่อเครือข่ายท้อง
ถิ่น) จากนั้นเลือก Properties (คุณสมบัติ)
ตั้งค่า IP แอดเดรสแบบแมนนวล (192.168.1.254)
• เราแนะนำให้คุณใช้การเชื่อมต่อแบบมีสาย และตั้งค่า IP แอดเดรสแบบแมนนวล เพื่อให้ได้
สภาพแวดล้อมสำหรับการรับส่งที่ดีที่สุด
• ตรวจดูให้แน่ใจว่าไฟร์วอลล์บนพีซีนั้นปิดทำงาน
3. ปิดไวร์เลส เราเตอร์, กดปุ่มรีเซ็ตค้างไว้ จากนั้นเปิดอุปกรณ์อีกครั้ง อุปกรณ์
ไวร์เลสจะเข้าสู่โหมดช่วยเหลือ หลังจากที่ LED WLAN กะพริบ
อย่า ปิดเครื่อง หรือรีเซ็ตอุปกรณ์ในขณะที่กำลังอัปเดตเฟิร์มแวร์! การทำเช่นนั้นอาจทำให้การ
บูตระบบล้มเหลว!
บทที่ 5: การติดตั้งยูทิลิตี้ RT-G32
27

4. จากเดสก์ทอป Windows®, คลิก > Start (เริ่ม) > All programs (โปรแกรม
ทั้งหมด) > ASUS Utility (ยูทิลิตี้ ASUS) > RT-G32 Wireless Router
(RTG32 ไวร์เลส เราเตอร์) > Firmware Restoration (การกู้คืนเฟิร์มแวร์)
5. คลิก Browse (เรียกดู) เพื่อเลือกไฟล์เฟิร์มแวร์ จากนั้นคลิก Upload
(อัปโหลด)
6. หลังจากที่การอัปโหลดเฟิร์มแวร์สำเร็จ อุปกรณ์จะบูตใหม่โดยอัตโนมัติ
RT-G32 บทที่ 5: การติดตั้งยูทิลิตี้
28

EZSetup
EZSetup เป็นยูทิลิตี้ที่ช่วยให้คุณตั้งค่าไวร์เลส เราเตอร์ของคุณได้อย่างง่ายดาย
ก่อนที่คุณจะติดตั้ง EZSetup, ให้แน่ใจว่า RT-G32 เชื่อมต่อไปยังโมเด็มหรือพีซีด้วยสายเคเบิล
RJ45.
ในการใช้ EZSetup:
1. ปฏิบัติตามขั้นตอนเพื่อเชื่อมต่ออุปกรณ์ฮาร์ดแวร์ เมื่อทำเสร็จ, คลิก Next
(ถัดไป)
2. พิมพ์ชื่อผู้ใช้และรหัสผ่าน เพื่อตั้งค่าคอนฟิกไวร์เลส เราเตอร์บนเว็บ เมื่อทำเสร็จ,
คลิก Next (ถัดไป)
บทที่ 5: การติดตั้งยูทิลิตี้ RT-G32
29

3. หลังจากการตั้งค่าเน็ตเวิร์ก SSID และแชนเนลเชื่อมต่อเรียบร้อยแล้ว, คลิก Next
(ถัดไป) เพื่อทำต่อไป
(กำลังเชื่อมต่อ)
ถ้าการเชื่อมต่อล้มเหลว, ตรวจดูให้แน่ใจว่าฮาร์ดแวร์เชื่อมต่ออย่างเหมาะสม
และคลิก Re-search (ค้นหาใหม่) เพื่อค้นหาอีกครั้ง
(การเชื่อมต่อล้มเหลว)
RT-G32 บทที่ 5: การติดตั้งยูทิลิตี้
30

4. คลิก Next (ถัดไป) เพื่อตั้งค่าคอนฟิกการตั้งค่าการเชื่อมต่อ ISP พื้นฐาน คลิก
Finish (เสร็จ) เพื่อทำการตั้งค่าเครือข่ายภายในให้เสร็จ
5. เลือกชนิดการเชื่อมต่อของคุณจากชนิดของบริการ ISP เหล่านี้: Automatic IP
(IP อัตโนมัติ), PPPoE, PPTP, L2TP และ Static IP (สแตติก IP) พิมพ์ข้อมูล
ที่จำเป็นสำหรับชนิดการเชื่อมต่อ ISP ของคุณเข้าไป เมื่อทำเสร็จ, คลิก Next
(ถัดไป)
บทที่ 5: การติดตั้งยูทิลิตี้ RT-G32
31

6. เมื่อทำเสร็จ, คลิก Finish (เสร็จ)
การตั้งค่าปุ่มด่วนของ WPS
เมื่อคุณเชื่อมต่อไวร์เลส เราเตอร์ (เช่น ASUS USB-N11 และ PCI-G31 อะแดปเตอร์) กับฟังก์ชั่น WPS บนพีซี, โปรดทำตามขั้นตอนด้านล่าง เพื่อเปิดใช้งานการ
ตั้งค่าด่วน WPS
1. เพื่อที่จะใช้ WPS, ตรวจดูให้แน่ใจว่า
ทั้ง RT-G32 ไวร์เลส เราเตอร์ และ
ฟังก์ชั่น WPS ของซอฟต์แวร์ไร้สาย
ของคอมพิวเตอร์เปิดใช้งานอยู่
2. กดปุ่ม WPS ที่แผงด้านหลังของ
RT-G32 ไวร์เลส เราเตอร์
3. RT-G32 WLAN LED สามารถสว่าง
ขึ้น และกะพริบช้าๆ หลังจากที่การ
เชื่อมต่อ WPS ถูกสร้างขึ้น
RT-G32 บทที่ 5: การติดตั้งยูทิลิตี้
32

การแก้ไขปัญหา
6
การแก้ไขปัญหา
คำแนะนำในการแก้ไขปัญหา ให้วิธีแก้ไขสำหรับปัญหาทั่วไป ซึ่งคุณอาจพบใน
ขณะที่กำลังติดตั้งหรือใช้ ASUS ไวร์เลส เราเตอร์ ปัญหาเหล่านี้ มีวิธีการแก้ไข
ง่ายๆ ซึ่งคุณสามารถดำเนินการได้ด้วยตัวเอง ติดต่อฝ่ายสนับสนุนด้านเทคนิคของ
ASUS ถ้าคุณมีปัญหาที่ไม่ได้กล่าวไว้ในบทนี้
ปัญหา การดำเนินการ
ไม่สามารถเข้าถึงเว็บ
เบราเซอร์เพื่อตั้งค่าคอนฟิก
เราเตอร์ได้
ไคลเอ็นต์ไม่สามารถสร้าง
การเชื่อมต่อไร้สายกับ
เราเตอร์ได้
1. เปิดเว็บเบราเซอร์, จากนั้นคลิก Tools
(เครื่องมือ) > Internet Options...
(ตัวเลือกอินเตอร์เน็ต...)
2. ภายใต้ Temporary Internet files
(ไฟล์อินเตอร์เน็ตชั่วคราว), คลิก Delete
Cookies... (ลบคุกกี้...) และ Delete
Files... (ลบไฟล์...)
อยู่นอกพื้นที่ทำงาน:
• ย้ายเราเตอร์ให้เข้าใกล้ไวร์เลส ไคลเอ็นต์
มากขึ้น
• ลองเปลี่ยนการตั้งค่าแชนเนล
การยืนยันตัวบุคคล:
• ใช้การเชื่อมต่อแบบมีสายเพื่อเชื่อมต่อไปยัง
เราเตอร์
• ตรวจสอบการตั้งค่าระบบป้องกันแบบไร้สา
ย
• กดปุ่ม รีเซ็ต ที่แผงด้านหลังเป็นเวลานาน
กว่า 5 วินาที
ไม่สามารถพบเราเตอร์:
• กดปุ่ม รีเซ็ต ที่แผงด้านหลังเป็นเวลานาน
กว่า 5 วินาที
• ตรวจสอบการตั้งค่าในไวร์เลส อะแดปเตอร์
เช่น SSID และการตั้งค่าการเข้ารหัส
บทที่ 6: การแก้ไขปัญหา RT-G32
33

ปัญหา การดำเนินการ
ไม่สามารถเข้าถึงอินเตอ
ร์เน็ต
ผ่านไวร์เลส LAN อะแดป
เตอร์
ไม่สามารถเข้าถึงอินเตอร์
เน็ตได้
เมื่อไฟ "Link" ของโมเด็ม
ADSL ติด (ไม่กะพริบ),
หมายความว่าสามารถเข้า
ถึงอินเตอร์เน็ตได้
ถ้าไฟ "LINK" ADSL กะพริบ
อย่างต่อเนื่อง หรือดับ, จะไม่
สามารถเข้าถึงอินเตอร์เน็ต
ได้ - เราเตอร์ไม่สามารถ
สร้างการเชื่อมต่อกับเน็ตเวิร์ก
ADSL ได้
• ย้ายเราเตอร์ให้เข้าใกล้ไวร์เลส ไคลเอ็นต์
มากขึ้น
• ตรวจสอบว่าไวร์เลสอะแดปเตอร์เชื่อมต่อกับ
ไวร์เลส เราเตอร์ที่ถูกต้องหรือไม่
• ตรวจสอบว่าไวร์เลส แชนเนลที่ใช้สอดคล้อง
กับแชนเนลที่ใช้ได้ในประเทศ/พื้นที่ของคุณ
หรือไม่
• ตรวจสอบการตั้งค่าการเข้ารหัส
• ตรวจสอบว่าการเชื่อมต่อ ADSL หรือสาย
เคเบิลถูกต้องหรือไม่
• ลองใช้สายเคเบิลอีเธอร์เน็ตเส้นอื่น
• ตรวจสอบไฟแสดงสถานะบนโมเด็ม ADSL
และไวร์เลส เราเตอร์
• ตรวจสอบว่า LED WAN บนไวร์เลส เราเตอร์
ติดอยู่หรือไม่ ถ้า LED ไม่ติด, ให้เปลี่ยนสาย
เคเบิล และลองใหม่อีกครั้ง
• เริ่มคอมพิวเตอร์ของคุณใหม่
• ให้ดูคู่มือการเริ่มต้นฉบับย่อของไวร์เลส
เราเตอร์ และคอนฟิกการตั้งค่าใหม่
• ตรวจสอบว่า LED WAN บนไวร์เลส เราเตอร์
ติดอยู่หรือไม่
• ตรวจสอบการตั้งค่าการเข้ารหัสไร้สาย
• ตรวจสอบว่าคอมพิวเตอร์สามารถรับ IP
แอดเดรสได้หรือไม่ (ผ่านทั้งเครือข่ายแบบ
มีสาย และเครือข่ายแบบไร้สาย)
• ตรวจดูให้แน่ใจว่าเว็บเบราเซอร์ของคุณถูก
คอนฟิกให้ใช้โลคอล LAN, และไม่ได้ถูก
คอนฟิกให้ใช้พร็อกซี่เซิร์ฟเวอร์
• ตรวจดูให้แน่ใจว่าสายเคเบิลทั้งหมดเชื่อม
ต่ออย่างถูกต้อง
• ตัดการเชื่อมต่อสายไฟจาก ADSL หรือ
เคเบิลโมเด็ม, รอสองสามนาที จากนั้นเชื่อม
ต่อสายใหม่
• ถ้าไฟ ADSL ยังคงกะพริบต่อเนื่อง หรือดับ,
ให้ติดต่อผู้ให้บริการ ADSL ของคุณ
RT-G32 บทที่ 6: การแก้ไขปัญหา
34

ปัญหา การดำเนินการ
ลืมชื่อเครือข่าย หรือคีย์การ
เข้ารหัส
วิธีการกู้คืนระบบกลับเป็นการ
ตั้งค่าเริ่มต้น
• ลองตั้งค่าการเชื่อมต่อแบบมีสาย และตั้งค่า
คอนฟิกการเข้ารหัสแบบไร้สายอีกครั้ง
• กดปุ่ม กู้คืน ที่แผงด้านหลังของไวร์เลส
เราเตอร์เป็นเวลานานกว่า 5 วินาที
• กดปุ่ม กู้คืน ที่แผงด้านหลังของไวร์เลส
เราเตอร์เป็นเวลานานกว่า 5 วินาที
• ดูส่วน การกู้คืนกลับเป็นการตั้งค่าเริ่มต้น ใน
บทที่ 4 ของคู่มือผู้ใช้นี้
ค่าต่อไปนี้คือการตั้งค่าเริ่มต้นจากโรงงาน:
ชื่อผู้ใช้: admin
รหัสผ่าน: admin
เปิดทำงาน DHCP: ใช่ (ถ้าเสียบสายเคเบิล
WAN)
IP แอดเดรส: 192.168.1.1
ชื่อโดเมน: (ว่าง)
ซับเน็ต มาสก์: 255.255.255.0
DNS เซิร์ฟเวอร์ 1: 192.168.1.1
DNS เซิร์ฟเวอร์ 2: (ว่าง)
SSID: default
บทที่ 6: การแก้ไขปัญหา RT-G32
35

ภาคผนวก
Notices
Federal Communications Commission
Statement
This device complies with Part 15 of the FCC Rules. Operation is
subject to the following two conditions:
• This device may not cause harmful interference.
• This device must accept any interference received, including
interference that may cause undesired operation.
This equipment has been tested and found to comply with the
limits for a class B digital device, pursuant to part 15 of the FCC
Rules. These limits are designed to provide reasonable protection
against harmful interference in a residential installation.
This equipment generates, uses and can radiate radio frequency
energy and, if not installed and used in accordance with
the instructions, may cause harmful interference to radio
communications. However, there is no guarantee that interference
will not occur in a particular installation. If this equipment does
cause harmful interference to radio or television reception, which
can be determined by turning the equipment off and on, the user is
encouraged to try to correct the interference by one or more of the
following measures:
• Reorient or relocate the receiving antenna.
• Increase the separation between the equipment and receiver.
• Connect the equipment into an outlet on a circuit different from
that to which the receiver is connected.
• Consult the dealer or an experienced radio/TV technician for
help.
Caution: Any changes or modifications not expressly approved by the party
responsible for compliance could void the user’s authority to operate the
equipment.
Prohibition of Co-location
This device and its antenna(s) must not be co-located or operating
in conjunction with any other antenna or transmitter
RT-G32 ภาคผนวก
36

Safety Information
To maintain compliance with FCC’s RF exposure guidelines,
this equipment should be installed and operated with minimum
distance 20cm between the radiator and your body. Use on the
supplied antenna.
Declaration of Conformity for R&TTE
directive 1999/5/EC
Essential requirements – Article 3
Protection requirements for health and safety – Article 3.1a
Testing for electric safety according to EN 60950-1 has been
conducted. These are considered relevant and sufficient.
Protection requirements for electromagnetic compatibility – Article
3.1b
Testing for electromagnetic compatibility according to EN 301 489-
1 and EN 301 489-17 has been conducted. These are considered
relevant and sufficient.
Effective use of the radio spectrum – Article 3.2
Testing for radio test suites according to EN 300 328- 2 has been
conducted. These are considered relevant and sufficient.
CE Mark Warning
This is a Class B product, in a domestic environment, this product
may cause radio interference, in which case the user may be
required to take adequate measures.
ภาคผนวก RT-G32
37

GNU General Public License
Licensing information
This product includes copyrighted third-party software licensed
under the terms of the GNU General Public License. Please see The
GNU General Public License for the exact terms and conditions
of this license. We include a copy of the GPL with every CD
shipped with our product. All future firmware updates will also be
accompanied with their respective source code. Please visit our
web site for updated information. Note that we do not offer direct
support for the distribution.
GNU GENERAL PUBLIC LICENSE
Version 2, June 1991
Copyright (C) 1989, 1991 Free Software Foundation, Inc.
59 Temple Place, Suite 330, Boston, MA 02111-1307 USA
Everyone is permitted to copy and distribute verbatim copies of this
license document, but changing it is not allowed.
Preamble
The licenses for most software are designed to take away your
freedom to share and change it. By contrast, the GNU General
Public License is intended to guarantee your freedom to share and
change free software--to make sure the software is free for all
its users. This General Public License applies to most of the Free
Software Foundation’s software and to any other program whose
authors commit to using it. (Some other Free Software Foundation
software is covered by the GNU Library General Public License
instead.) You can apply it to your programs, too.
When we speak of free software, we are referring to freedom, not
price. Our General Public Licenses are designed to make sure that you
have the freedom to distribute copies of free software (and charge
for this service if you wish), that you receive source code or can get it
if you want it, that you can change the software or use pieces of it in
new free programs; and that you know you can do these things.
To protect your rights, we need to make restrictions that forbid
anyone to deny you these rights or to ask you to surrender the
rights. These restrictions translate to certain responsibilities for you
if you distribute copies of the software, or if you modify it.
For example, if you distribute copies of such a program, whether
gratis or for a fee, you must give the recipients all the rights that you
have. You must make sure that they, too, receive or can get the source
code. And you must show them these terms so they know their rights.
RT-G32 ภาคผนวก
38

We protect your rights with two steps: (1) copyright the software,
and (2) offer you this license which gives you legal permission to
copy, distribute and/or modify the software.
Also, for each author’s protection and ours, we want to make certain
that everyone understands that there is no warranty for this free
software. If the software is modified by someone else and passed on,
we want its recipients to know that what they have is not the original,
so that any problems introduced by others will not reflect on the
original authors’ reputations.
Finally, any free program is threatened constantly by software
patents. We wish to avoid the danger that redistributors of a free
program will individually obtain patent licenses, in effect making the
program proprietary. To prevent this, we have made it clear that any
patent must be licensed for everyone’s free use or not licensed at all.
The precise terms and conditions for copying, distribution and
modification follow.
Terms & conditions for copying, distribution, &
modification
0. This License applies to any program or other work which
contains a notice placed by the copyright holder saying it may
be distributed under the terms of this General Public License.
The “Program”, below, refers to any such program or work, and
a “work based on the Program” means either the Program or
any derivative work under copyright law: that is to say, a work
containing the Program or a portion of it, either verbatim or
with modifications and/or translated into another language.
(Hereinafter, translation is included without limitation in the term
“modification”.) Each licensee is addressed as “you”.
Activities other than copying, distribution and modification are
not covered by this License; they are outside its scope. The act
of running the Program is not restricted, and the output from the
Program is covered only if its contents constitute a work based on
the Program (independent of having been made by running the
Program). Whether that is true depends on what the Program does.
1. You may copy and distribute verbatim copies of the Program’s
source code as you receive it, in any medium, provided that
you conspicuously and appropriately publish on each copy an
appropriate copyright notice and disclaimer of warranty; keep
intact all the notices that refer to this License and to the absence
of any warranty; and give any other recipients of the Program a
copy of this License along with the Program.
You may charge a fee for the physical act of transferring a
copy, and you may at your option offer warranty protection in
exchange for a fee.
2. You may modify your copy or copies of the Program or any portion
ภาคผนวก RT-G32
39

of it, thus forming a work based on the Program, and copy and
distribute such modifications or work under the terms of Section 1
above, provided that you also meet all of these conditions:
a) You must cause the modified files to carry prominent notices
stating that you changed the files and the date of any change.
b) You must cause any work that you distribute or publish,
that in whole or in part contains or is derived from the Program
or any part thereof, to be licensed as a whole at no charge to all
third parties under the terms of this License.
c) If the modified program normally reads commands
interactively when run, you must cause it, when started running for
such interactive use in the most ordinary way, to print or display
an announcement including an appropriate copyright notice and a
notice that there is no warranty (or else, saying that you provide a
warranty) and that users may redistribute the program under these
conditions, and telling the user how to view a copy of this License.
(Exception: if the Program itself is interactive but does not normally
print such an announcement, your work based on the Program is
not required to print an announcement.)
These requirements apply to the modified work as a whole.
If identifiable sections of that work are not derived from the
Program, and can be reasonably considered independent and
separate works in themselves, then this License, and its terms, do
not apply to those sections when you distribute them as separate
works. But when you distribute the same sections as part of a
whole which is a work based on the Program, the distribution
of the whole must be on the terms of this License, whose
permissions for other licensees extend to the entire whole, and
thus to each and every part regardless of who wrote it.
Thus, it is not the intent of this section to claim rights or contest
your rights to work written entirely by you; rather, the intent is
to exercise the right to control the distribution of derivative or
collective works based on the Program.
In addition, mere aggregation of another work not based on the
Program with the Program (or with a work based on the Program)
on a volume of a storage or distribution medium does not bring
the other work under the scope of this License.
3. You may copy and distribute the Program (or a work based on
it, under Section 2) in object code or executable form under the
terms of Sections 1 and 2 above provided that you also do one of
the following:
a) Accompany it with the complete corresponding machinereadable source code, which must be distributed under the terms
of Sections 1 and 2 above on a medium customarily used for
software interchange; or,
b) Accompany it with a written offer, valid for at least three
years, to give any third party, for a charge no more than your
RT-G32 ภาคผนวก
40

cost of physically performing source distribution, a complete
machine-readable copy of the corresponding source code, to
be distributed under the terms of Sections 1 and 2 above on a
medium customarily used for software interchange; or,
c) Accompany it with the information you received as to the
offer to distribute corresponding source code. (This alternative
is allowed only for noncommercial distribution and only if you
received the program in object code or executable form with
such an offer, in accord with Subsection b above.)
The source code for a work means the preferred form of the work
for making modifications to it. For an executable work, complete
source code means all the source code for all modules it contains,
plus any associated interface definition files, plus the scripts
used to control compilation and installation of the executable.
However, as a special exception, the source code distributed need
not include anything that is normally distributed (in either source
or binary form) with the major components (compiler, kernel,
and so on) of the operating system on which the executable runs,
unless that component itself accompanies the executable.
If distribution of executable or object code is made by offering
access to copy from a designated place, then offering equivalent
access to copy the source code from the same place counts as
distribution of the source code, even though third parties are not
compelled to copy the source along with the object code.
4. You may not copy, modify, sublicense, or distribute the Program
except as expressly provided under this License. Any attempt
otherwise to copy, modify, sublicense or distribute the Program
is void, and will automatically terminate your rights under
this License. However, parties who have received copies, or
rights, from you under this License will not have their licenses
terminated so long as such parties remain in full compliance.
5. You are not required to accept this License, since you have
not signed it. However, nothing else grants you permission to
modify or distribute the Program or its derivative works. These
actions are prohibited by law if you do not accept this License.
Therefore, by modifying or distributing the Program (or any work
based on the Program), you indicate your acceptance of this
License to do so, and all its terms and conditions for copying,
distributing or modifying the Program or works based on it.
6. Each time you redistribute the Program (or any work based on
the Program), the recipient automatically receives a license from
the original licensor to copy, distribute or modify the Program
subject to these terms and conditions. You may not impose
any further restrictions on the recipients’ exercise of the rights
granted herein. You are not responsible for enforcing compliance
by third parties to this License.
7. If, as a consequence of a court judgment or allegation of patent
ภาคผนวก RT-G32
41

infringement or for any other reason (not limited to patent issues),
conditions are imposed on you (whether by court order, agreement
or otherwise) that contradict the conditions of this License, they do
not excuse you from the conditions of this License. If you cannot
distribute so as to satisfy simultaneously your obligations under this
License and any other pertinent obligations, then as a consequence
you may not distribute the Program at all. For example, if a patent
license would not permit royalty-free redistribution of the Program
by all those who receive copies directly or indirectly through you,
then the only way you could satisfy both it and this License would be
to refrain entirely from distribution of the Program.
If any portion of this section is held invalid or unenforceable
under any particular circumstance, the balance of the section is
intended to apply and the section as a whole is intended to apply
in other circumstances.
It is not the purpose of this section to induce you to infringe any
patents or other property right claims or to contest validity of
any such claims; this section has the sole purpose of protecting
the integrity of the free software distribution system, which is
implemented by public license practices. Many people have made
generous contributions to the wide range of software distributed
through that system in reliance on consistent application of
that system; it is up to the author/donor to decide if he or she
is willing to distribute software through any other system and a
licensee cannot impose that choice.
This section is intended to make thoroughly clear what is
believed to be a consequence of the rest of this License.
8. If the distribution and/or use of the Program is restricted in
certain countries either by patents or by copyrighted interfaces,
the original copyright holder who places the Program under this
License may add an explicit geographical distribution limitation
excluding those countries, so that distribution is permitted only
in or among countries not thus excluded. In such case, this
License incorporates the limitation as if written in the body of
this License.
9. The Free Software Foundation may publish revised and/or new
versions of the General Public License from time to time. Such
new versions will be similar in spirit to the present version, but
may differ in detail to address new problems or concerns.
Each version is given a distinguishing version number. If the
Program specifies a version number of this License which applies
to it and “any later version”, you have the option of following the
terms and conditions either of that version or of any later version
published by the Free Software Foundation. If the Program does
not specify a version number of this License, you may choose
any version ever published by the Free Software Foundation.
10. If you wish to incorporate parts of the Program into other
free programs whose distribution conditions are dierent,
RT-G32 ภาคผนวก
42

write to the author to ask for permission. For software which
is copyrighted by the Free Software Foundation, write to the
Free Software Foundation; we sometimes make exceptions for
this. Our decision will be guided by the two goals of preserving
the free status of all derivatives of our free software and of
promoting the sharing and reuse of software generally.
NO WARRANTY
11 BECAUSE THE PROGRAM IS LICENSED FREE OF CHARGE, THERE IS
NO WARRANTY FOR THE PROGRAM, TO THE EXTENT PERMITTED
BY APPLICABLE LAW. EXCEPT WHEN OTHERWISE STATED IN
WRITING THE COPYRIGHT HOLDERS AND/OR OTHER PARTIES
PROVIDE THE PROGRAM “AS IS” WITHOUT WARRANTY OF ANY
KIND, EITHER EXPRESSED OR IMPLIED, INCLUDING, BUT NOT
LIMITED TO, THE IMPLIED WARRANTIES OF MERCHANTABILITY
AND FITNESS FOR A PARTICULAR PURPOSE. THE ENTIRE RISK
AS TO THE QUALITY AND PERFORMANCE OF THE PROGRAM
IS WITH YOU. SHOULD THE PROGRAM PROVE DEFECTIVE, YOU
ASSUME THE COST OF ALL NECESSARY SERVICING, REPAIR OR
CORRECTION.
12 IN NO EVENT UNLESS REQUIRED BY APPLICABLE LAW OR
AGREED TO IN WRITING WILL ANY COPYRIGHT HOLDER, OR
ANY OTHER PARTY WHO MAY MODIFY AND/OR REDISTRIBUTE
THE PROGRAM AS PERMITTED ABOVE, BE LIABLE TO YOU FOR
DAMAGES, INCLUDING ANY GENERAL, SPECIAL, INCIDENTAL
OR CONSEQUENTIAL DAMAGES ARISING OUT OF THE USE OR
INABILITY TO USE THE PROGRAM (INCLUDING BUT NOT LIMITED
TO LOSS OF DATA OR DATA BEING RENDERED INACCURATE OR
LOSSES SUSTAINED BY YOU OR THIRD PARTIES OR A FAILURE OF
THE PROGRAM TO OPERATE WITH ANY OTHER PROGRAMS), EVEN
IF SUCH HOLDER OR OTHER PARTY HAS BEEN ADVISED OF THE
POSSIBILITY OF SUCH DAMAGES.
END OF TERMS AND CONDITIONS
ภาคผนวก RT-G32
43

ข้อมูลการติดต่อกับ ASUS
ASUSTeK COMPUTER INC. (เอเชีย แปซิฟิก)
ที่อยู่ 15 Li-Te Road, Peitou, Taipei, Taiwan 11259
เว็บไซต์ www.asus.com.tw
ฝ่ายสนับสนุนด้านเทคนิค
โทรศัพท์ +886228943447
Sแฟกซ์สนับสนุน +886228907698
ซอฟต์แวร์ดาวน์โหลด support.asus.com*
ASUS COMPUTER INTERNATIONAL (อเมริกา)
ที่อยู่ 800 Corporate Way, Fremont, CA 94539, USA
โทรศัพท์ +15029550883
แฟกซ์ +15029338713
เว็บไซต์ usa.asus.com
ซอฟต์แวร์ดาวน์โหลด support.asus.com*
ASUS COMPUTER GmbH (เยอรมันนีและออสเตรีย)
ที่อยู่ Harkort Str. 25, D40880 Ratingen, Germany
โทรศัพท์ +49210295990
แฟกซ์ +492102959911
การติดต่อออนไลน์ www.asus.com.de/sales
ฝ่ายสนับสนุนด้านเทคนิค
โทรศัพท์ +49210295990
แฟกซ์ +492102959911
ฝ่ายสนับสนุนออนไลน์ www.asus.com.de/support
เว็บไซต์ www.asus.com.de/news
* สิ่งที่มีบนไซต์นี้ เป็นแบบฟอร์มสอบถามด้านเทคนิคแบบออนไลน์ ซึ่งคุณสามา
รถกรอกข้อมูลเพื่อติดต่อฝ่ายสนับสนุนด้านเทคนิค
RT-G32 ภาคผนวก
44
 Loading...