How it Works
Log In / Sign Up
Buy Points
How it Works
FAQ
Contact Us
Questions and Suggestions
Users
Asus
Loading...
R
ROG Maximus XI Formula
ROG Maximus XI Gene
2
ROG Maximus XI Hero
4
ROG Maximus XI Hero - Call of Duty - Black Ops 4 Edition
ROG MAXIMUS XI HERO (WI-FI)
2
ROG MAXIMUS XII APEX
2
ROG Maximus XII extreme
2
ROG Maximus XII Formula
2
ROG Maximus XII Hero
2
ROG Phone
3
Rog Phone 3
ROG PHONE E14163
ROG Phone II
2
ROG Phone ZS600 KL
ROG Phone ZS661KS
ROG Pugio
2
ROG Pugio II
ROG Radeon RX 570
ROG Rampage II Gene
ROG RAMPAGE V EDITION 10
4
ROG RAMPAGE VI APEX
5
ROG RAMPAGE VI EXTREME
7
ROG RAMPAGE VI Extreme Encore
7
ROG RAMPAGE VI EXTREME OMEGA
3
ROG Rapture GT-AC2900
3
ROG Rapture GT-AC5300
2
ROG Rapture GT-AX11000
4
ROG Ryuo 240
ROG Sagaris GK1100
ROG Scabbard
ROG Sica
2
ROG Spartha
ROG Spatha
2
ROG STRIX
ROG Strix Arion
ROG Strix B350-I Gaming
ROG Strix B360-F Gaming
2
ROG Strix B360-G Gaming
ROG Strix B360-H Gaming
ROG Strix B360-I Gaming
2
ROG Strix B365-F Gaming
ROG Strix B365-G Gaming
2
ROG Strix B450-E Gaming
2
ROG STRIX B450-F GAMING
3
ROG Strix B450-F Gaming II
ROG Strix B450-I Gaming
ROG Strix B460-F Gaming
2
ROG Strix B460-G Gaming
2
ROG Strix B460-H Gaming
2
ROG STRIX B460-I GAMING
2
ROG Strix B550-A Gaming
ROG STRIX B550-E
ROG Strix B550-E Gaming
2
ROG STRIX B550-F
ROG Strix B550-F Gaming
3
ROG STRIX B550-F GAMING WI-FI
ROG Strix B550-I Gaming
2
ROG Strix B550-XE Gaming WIFI
2
ROG Strix Carry
ROG Strix Edge
2
ROG Strix Evolve
2
ROG Strix Flare PINK
ROG STRIX Fusion
ROG Strix Fusion 300
3
ROG Strix Fusion 500
2
ROG Strix Fusion 700
2
ROG Strix Fusion Wireless
2
ROG Strix G
ROG Strix G15DH-NL028T
ROG Strix G15 G512LV-HN033T
ROG Strix G15 G512LW-HN055T
2
ROG Strix G17
ROG Strix G17 G712LWS-EV003
3
ROG Strix G35DX-NL013T
ROG Strix GA15 G15DH-DE008T
ROG Strix GA35 G35DX-DE005T
2
ROG Strix GL503GE-EN296T
ROG STRIX GL531GT-AL299T
ROG STRIX GL702VM
ROG Strix Go USB-C
ROG Strix H370-F Gaming
2
ROG Strix H370-I Gaming
2
ROG Strix H470-I Gaming
2
ROG STRIX HELIOS
ROG Strix Hero II
ROG Strix Hero II GL504GM-BN328
ROG Strix Hero II GL504GM-BN328T
ROG Strix Hero II GL504GM-BN337
ROG Strix Hero II GL504GV-ES117
ROG Strix LC 120
2
ROG Strix LC 360
ROG Strix LC 360 RGB
ROG Strix Radeon RX 5500 XT
ROG STRIX RTX 2070 8G GAMING
ROG STRIX RTX 2080 8G GAMING
ROG STRIX RTX 2080TI 11G GAMING
ROG Strix Scar 17 G732LXS-HG014T
2
ROG Strix SCAR Edition GL503GE-EN272
ROG Strix SCAR Edition GL503GE-EN272T
ROG Strix SCAR Edition GL703GE-EE197T
Loading...
Loading...
Nothing found
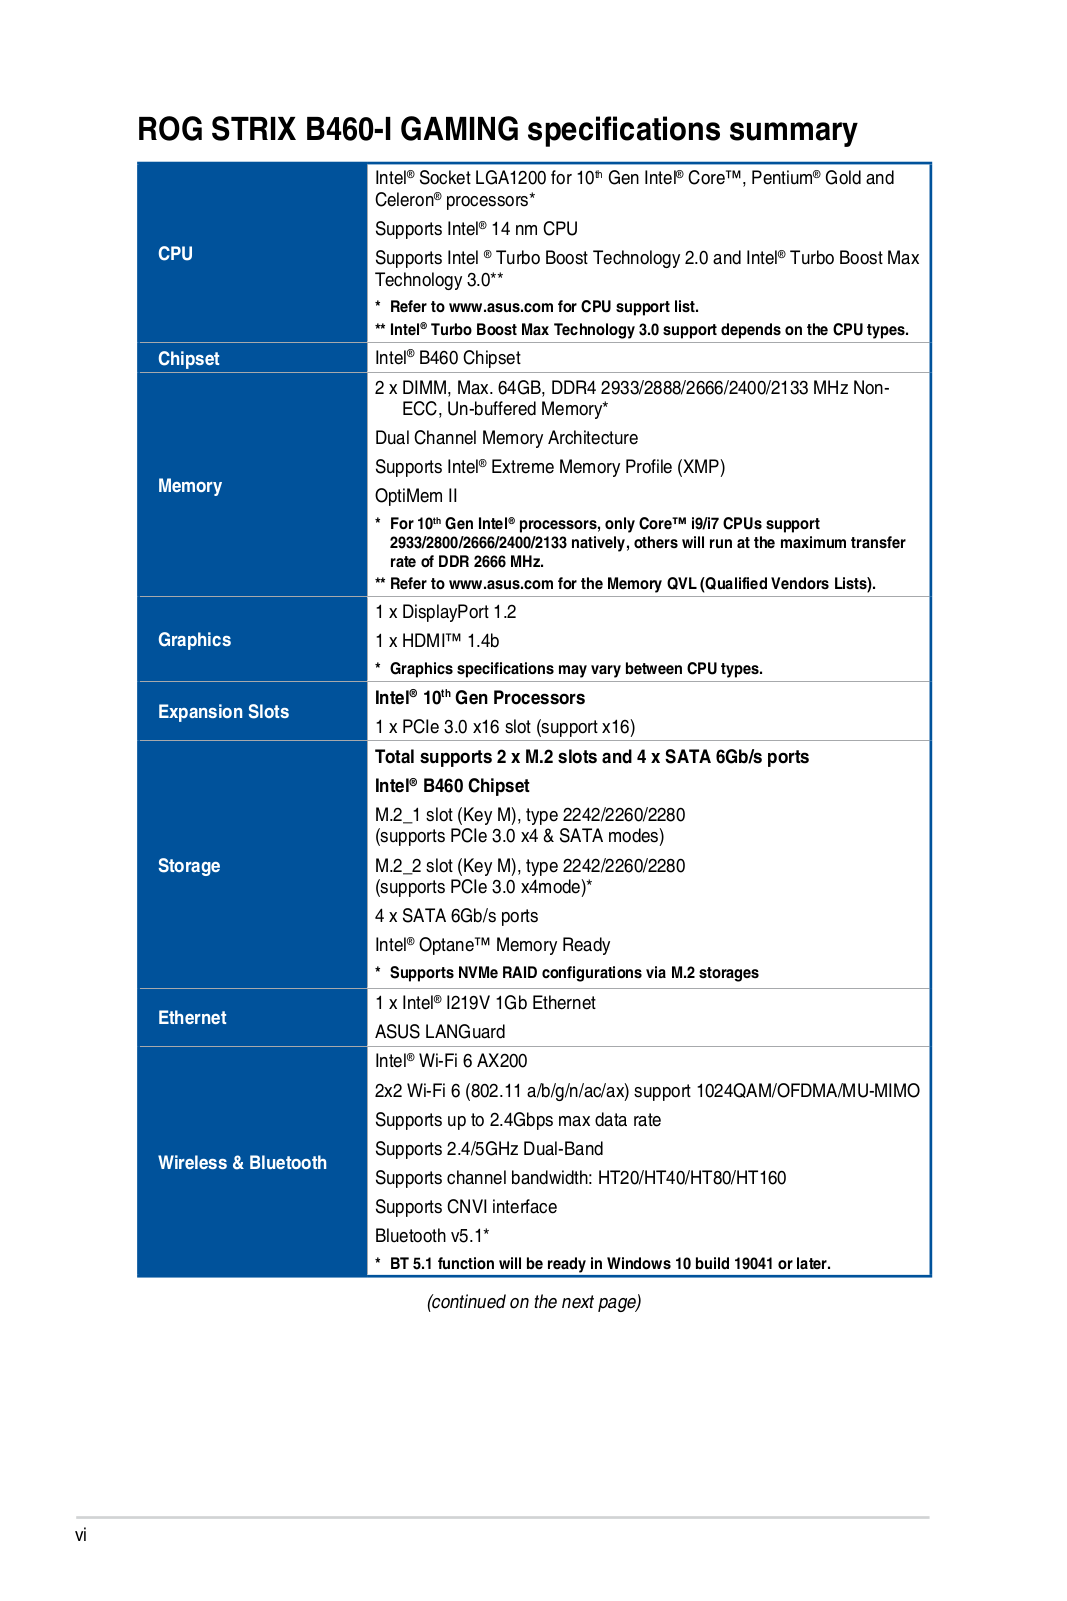
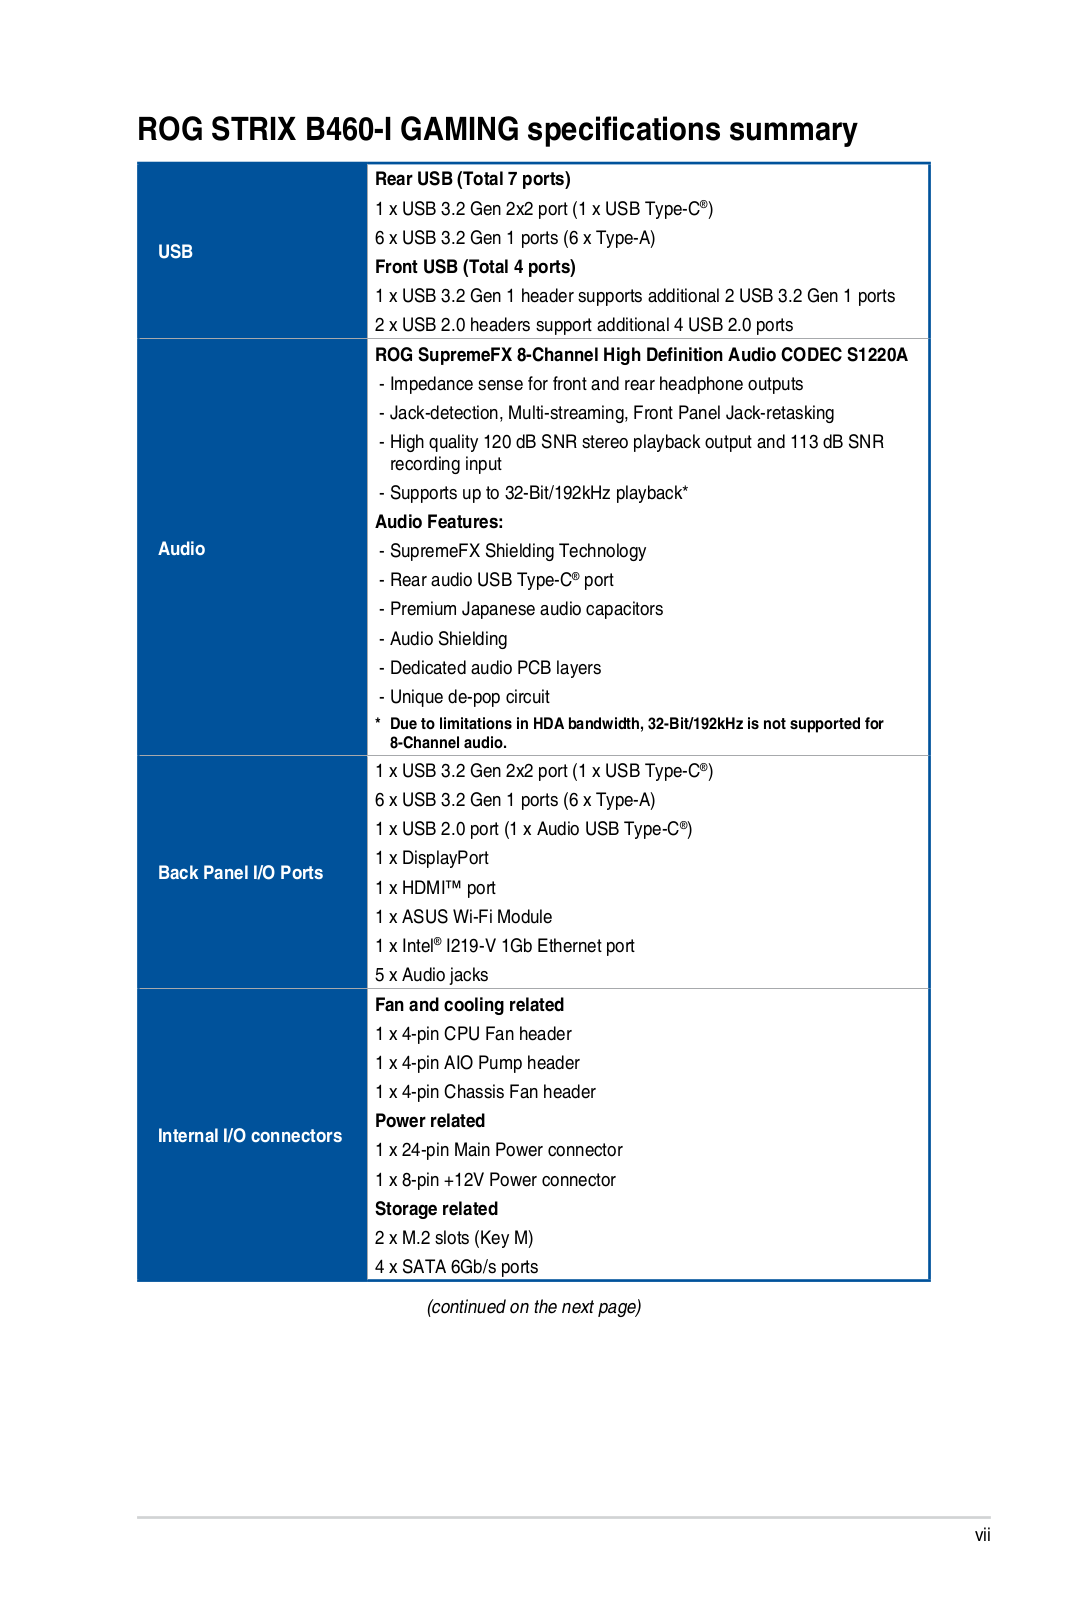
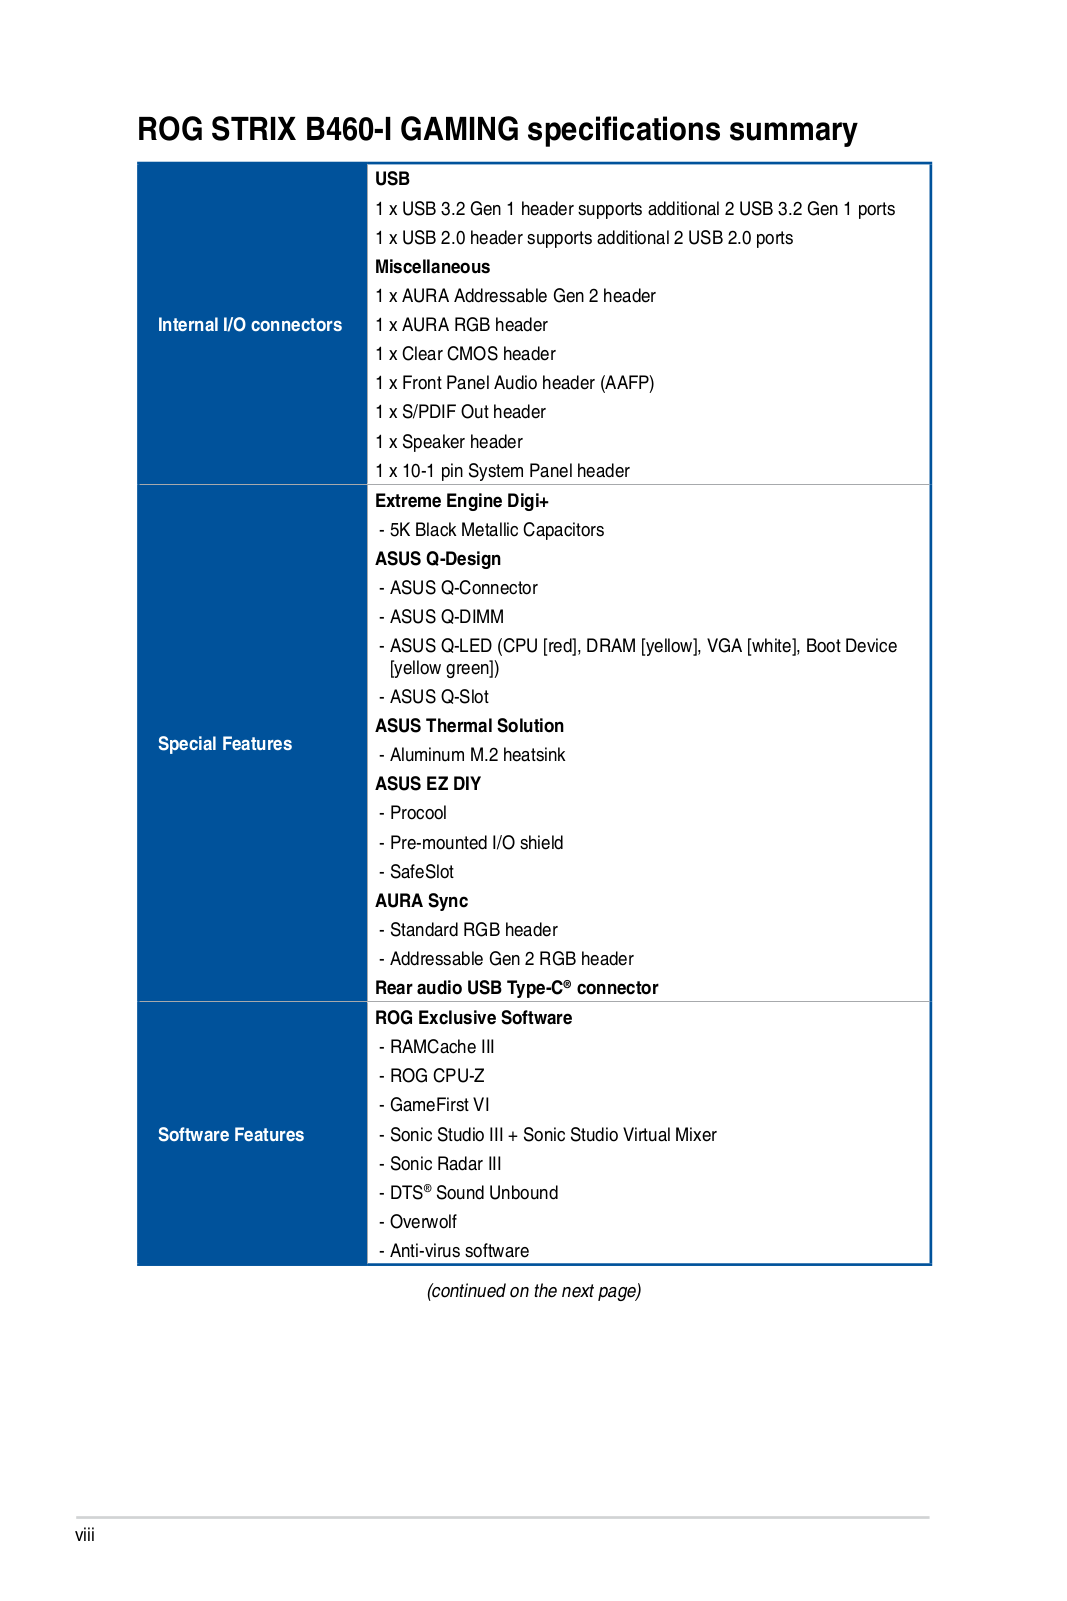
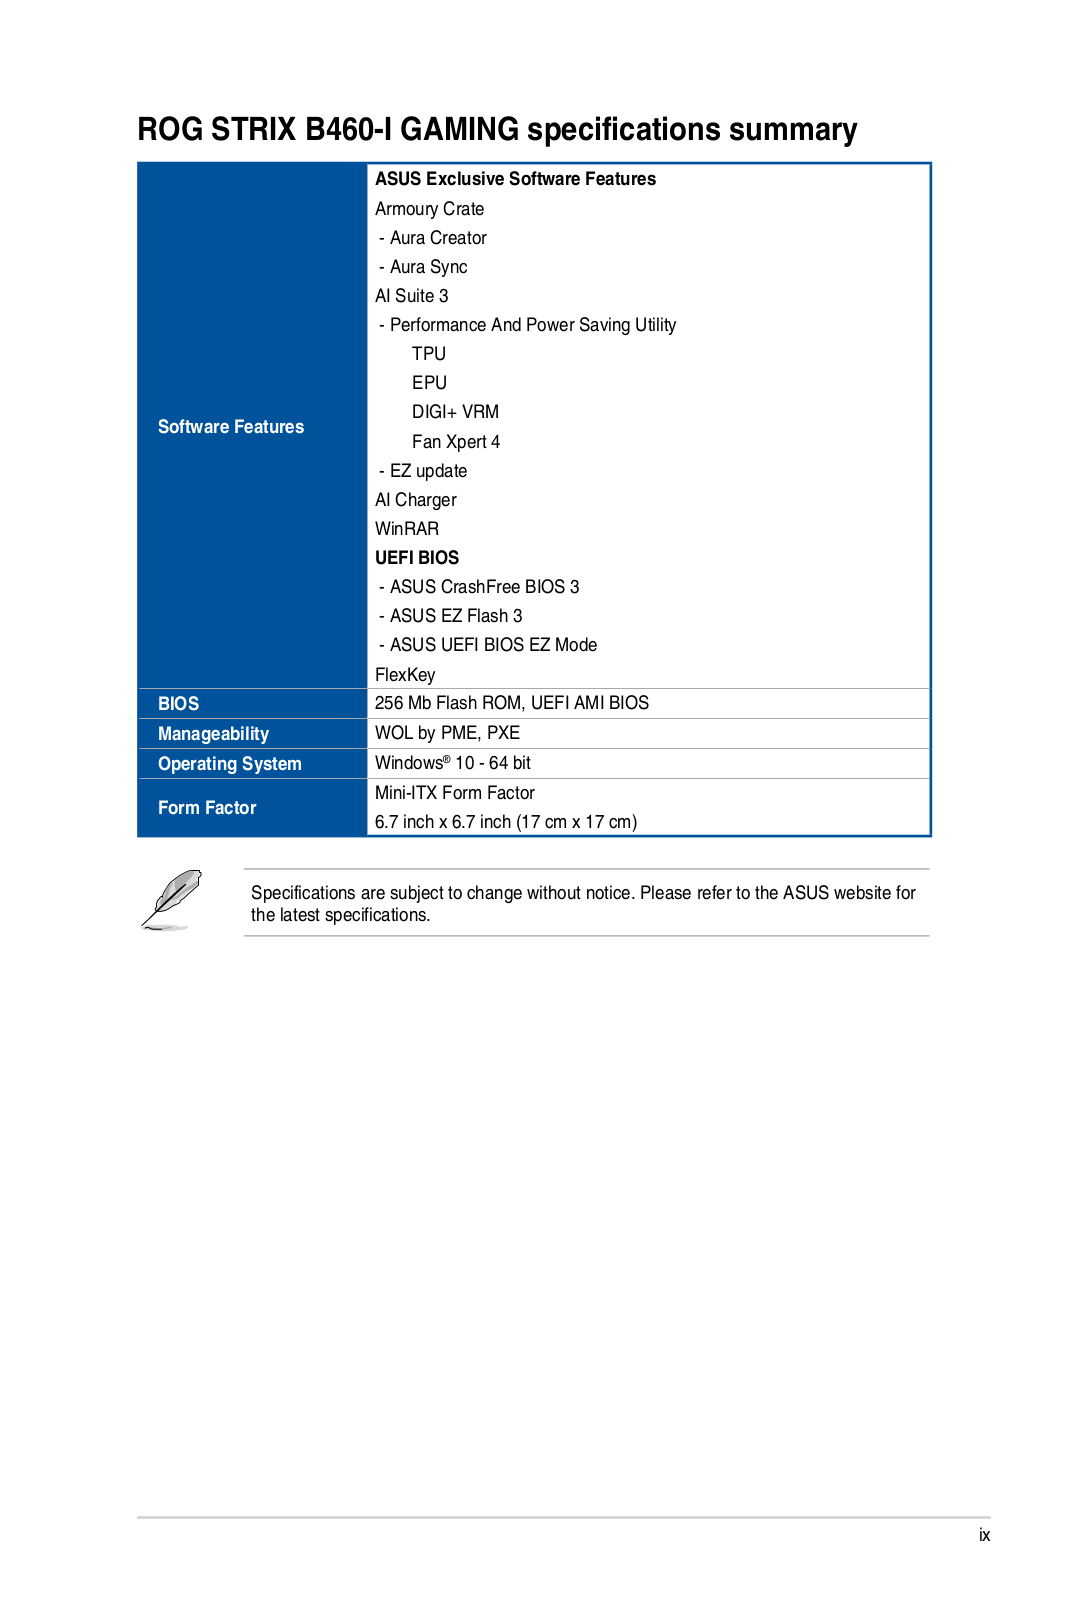
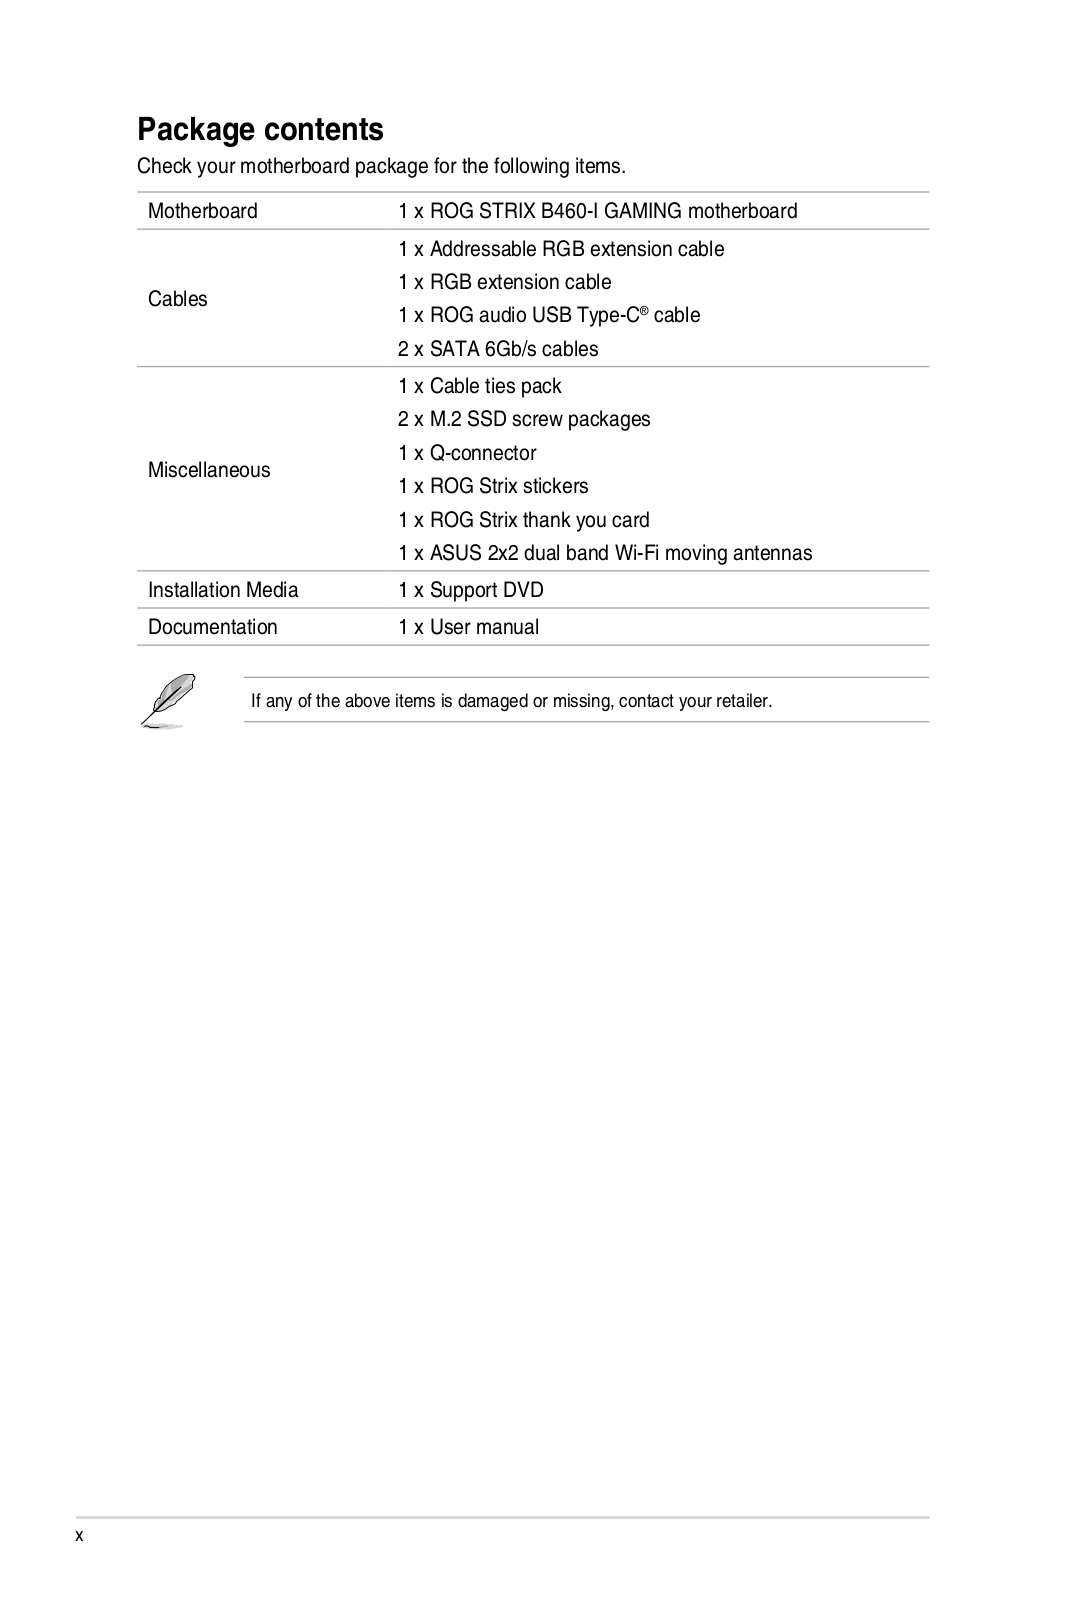
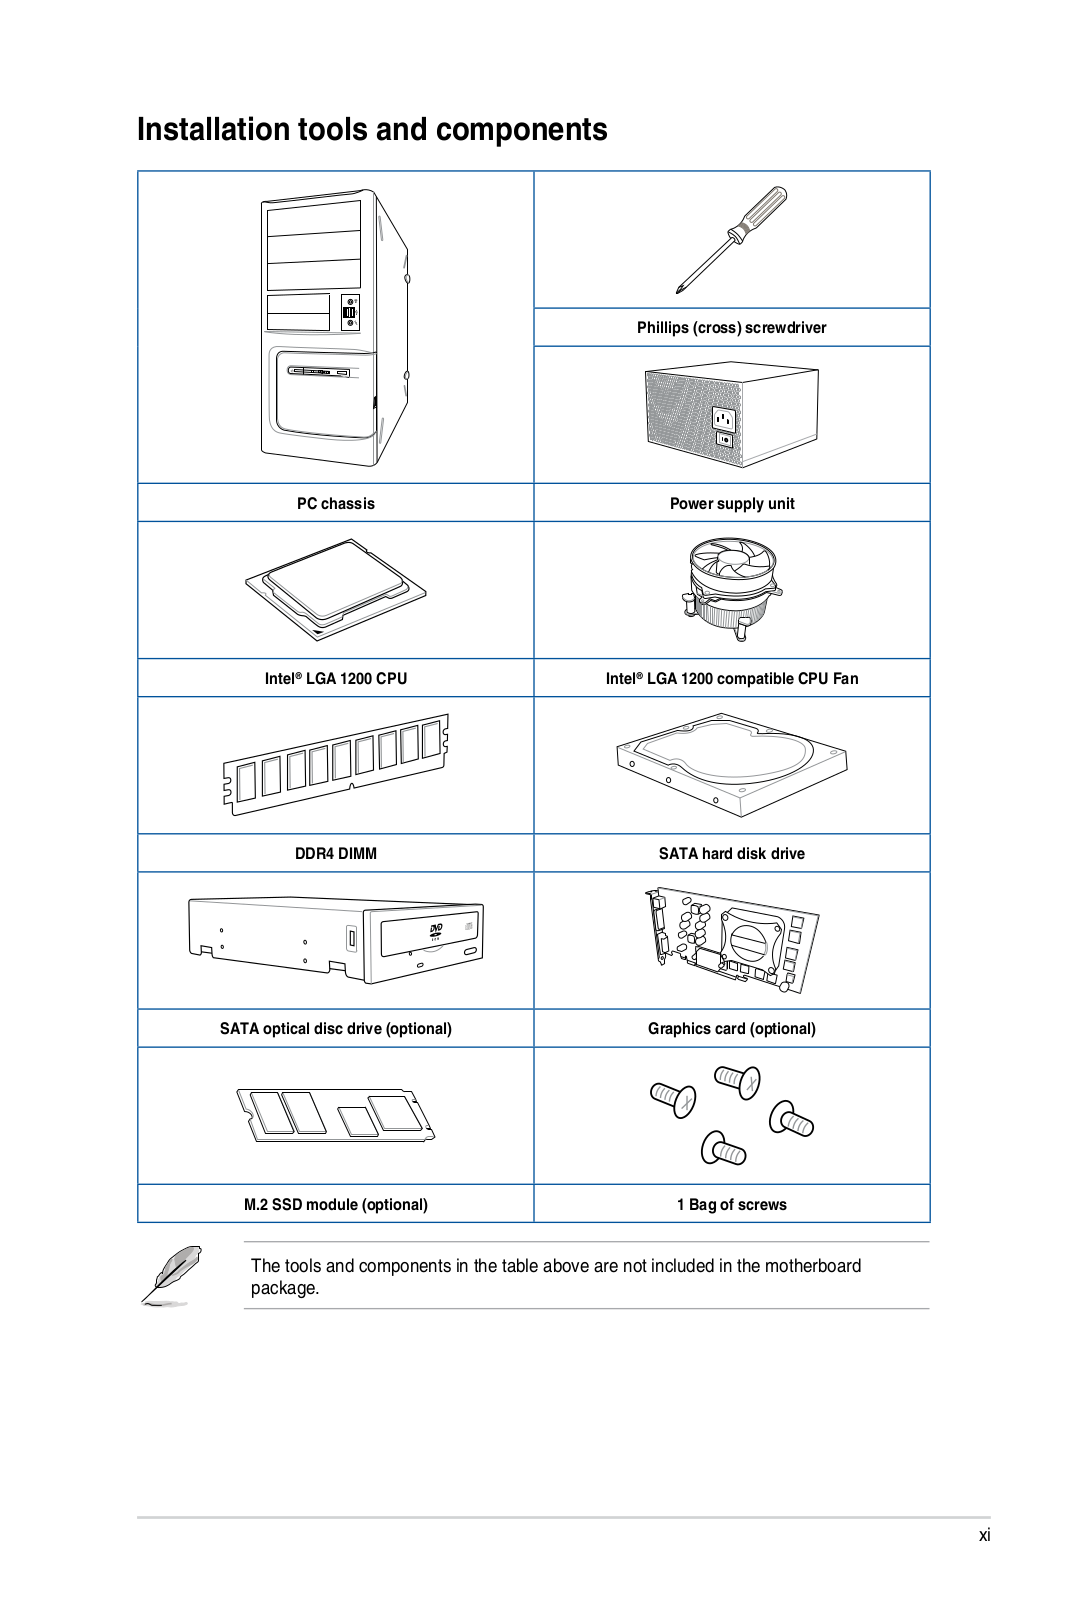
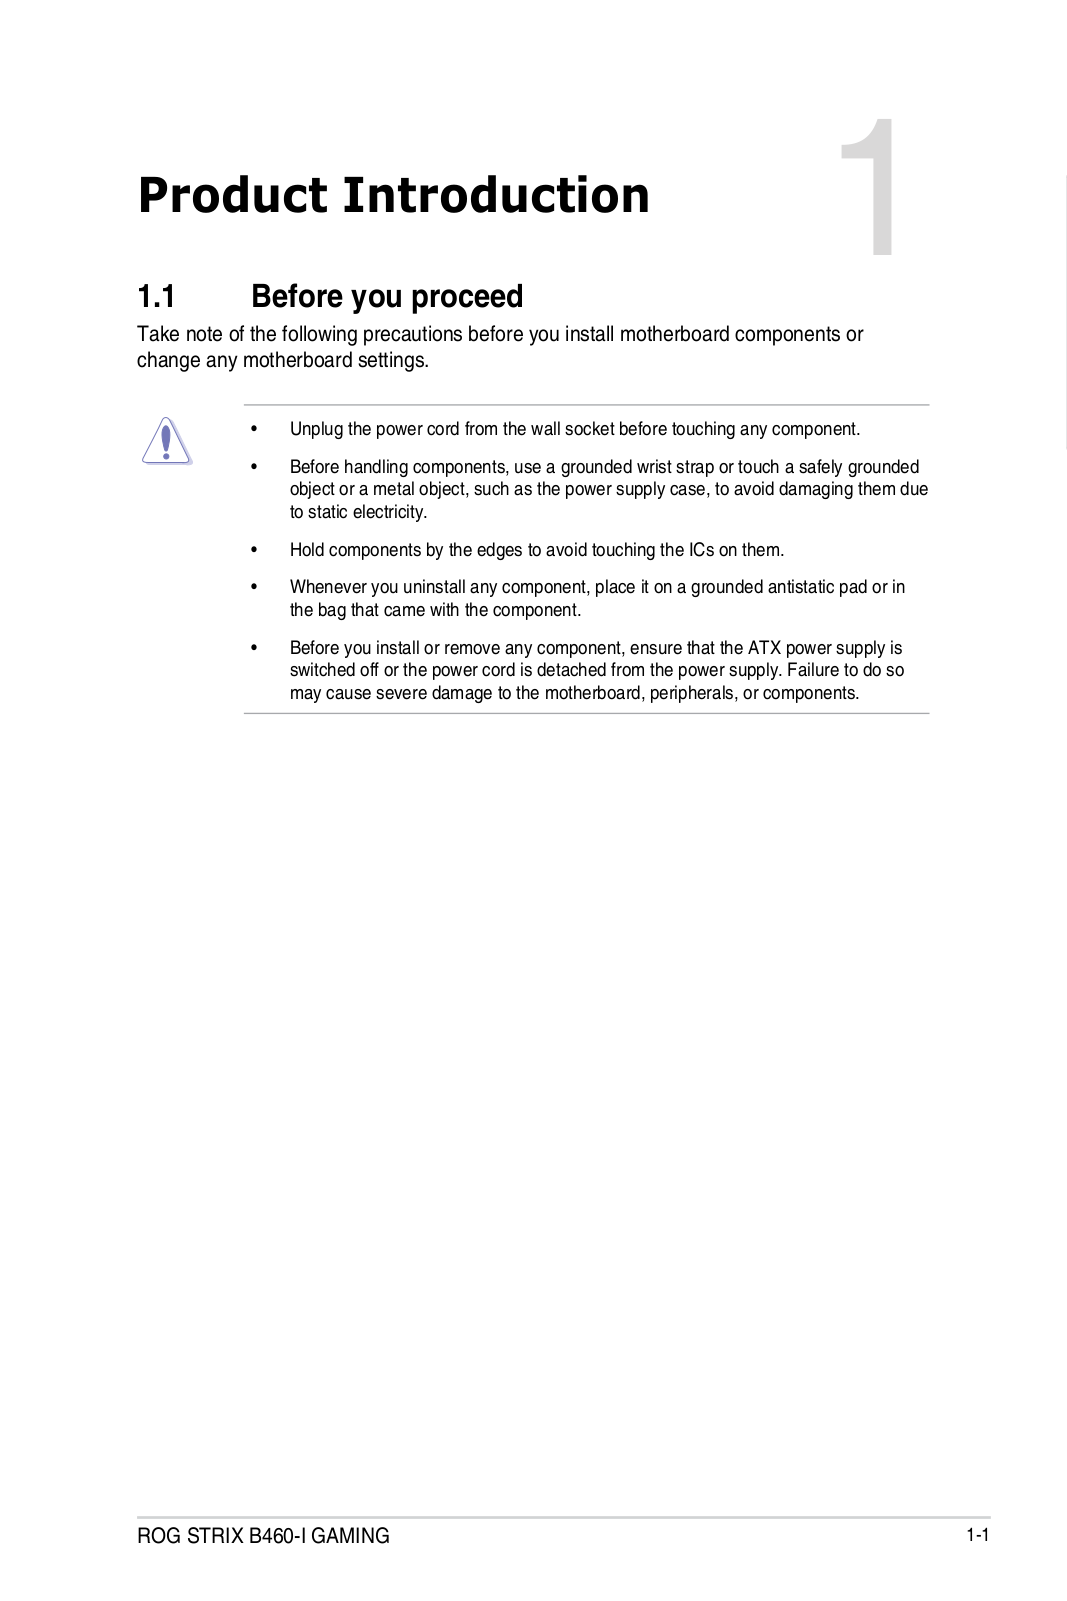
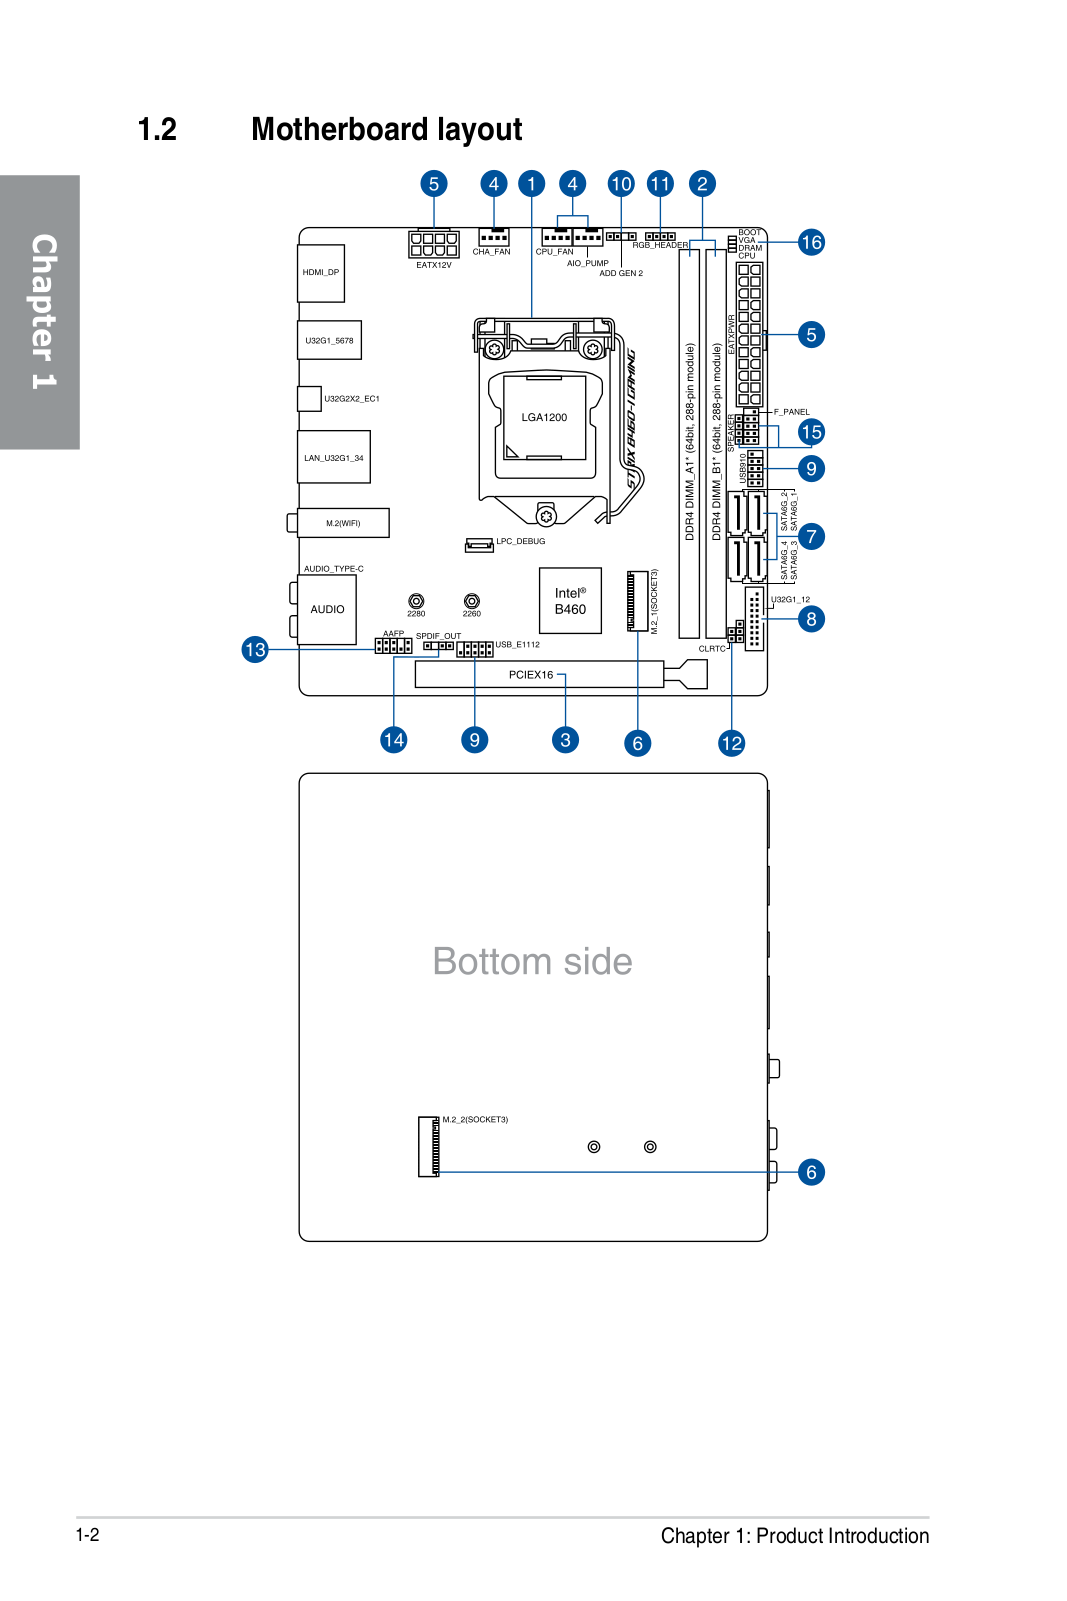
ROG STRIX B460-I GAMING
User manual
62 pgs
4.43 Mb
0
operation manual [de]
62 pgs
3.95 Mb
0
Table of contents
Loading...
Asus ROG STRIX B460-I GAMING User manual
...
Asus User manual
Download
Specifications and Main Features
Frequently Asked Questions
User Manual
Download
Loading...
+
43
hidden pages
Unhide
You need points to download manuals.
1 point = 1 manual.
You can buy points or you can get point for every manual you upload.
Buy points
Upload your manuals
 Loading...