Asus DSL-AC3100 User’s Manual

User Guide
DSL-AC3100
Dual-band Wi-Fi ADSL/VDSL
Modem Router

E14010
Revised Edition v2
February 2018
Copyright © 2018 ASUSTeK Computer Inc. All Rights Reserved.
No part of this manual, including the products and software described in it, may be reproduced, transmitted, transcribed, stored in a retrieval
system, or translated into any language in any form or by any means, except documentation kept by the purchaser for backup purposes, without the express written permission of ASUSTeK Computer Inc. (“ASUS”).
Product warranty or service will not be extended if: (1) the product is repaired, modified or altered, unless such repair, modification of alteration is authorized in writing by ASUS; or (2) the serial number of the product is defaced or missing.
ASUS PROVIDES THIS MANUAL“AS IS”WITHOUT WARRANTY OF ANY KIND, EITHER EXPRESS OR IMPLIED, INCLUDING BUT NOT LIMITED TO THE IMPLIED WARRANTIES OR CONDITIONS OF MERCHANTABILITY OR FITNESS FOR A PARTICULAR PURPOSE. IN NO EVENT SHALL ASUS, ITS DIRECTORS, OFFICERS, EMPLOYEES OR AGENTS BE LIABLE FOR ANY INDIRECT, SPECIAL, INCIDENTAL, OR CONSEQUENTIAL DAMAGES (INCLUDING DAMAGES FOR LOSS OF PROFITS, LOSS OF BUSINESS, LOSS OF USE OR DATA, INTERRUPTION OF BUSINESS
AND THE LIKE), EVEN IF ASUS HAS BEEN ADVISED OF THE POSSIBILITY OF SUCH DAMAGES ARISING FROM ANY DEFECT OR ERROR IN THIS MANUAL OR PRODUCT.
SPECIFICATIONS AND INFORMATION CONTAINED IN THIS MANUAL ARE FURNISHED FOR INFORMATIONAL USE ONLY, AND ARE SUBJECT TO CHANGE AT ANY TIME WITHOUT NOTICE, AND SHOULD NOT BE CONSTRUED AS A COMMITMENT BY ASUS. ASUS ASSUMES NO RESPONSIBILITY OR LIABILITY FOR ANY ERRORS OR INACCURACIES THAT MAY APPEAR IN THIS MANUAL, INCLUDING THE PRODUCTS AND SOFTWARE DESCRIBED IN IT.
Products and corporate names appearing in this manual may or may not be registered trademarks or copyrights of their respective companies, and are used only for identification or explanation and to the owners’ benefit, without intent to infringe.
2

Table of contents |
|
1 Getting to know your wireless router |
5 |
Package contents......................................................................................... |
5 |
Hardware features........................................................................................ |
6 |
2 Creating your network |
9 |
Positioning your router.............................................................................. |
9 |
What you need............................................................................................ |
10 |
Connecting your devices......................................................................... |
11 |
Before you proceed................................................................................... |
14 |
3 Network configuration using the web GUI |
21 |
Logging in to the web GUI...................................................................... |
21 |
Setting up the wireless security settings........................................... |
23 |
Managing your network clients............................................................ |
25 |
Monitoring your USB device.................................................................. |
26 |
Creating your Guest Network................................................................ |
28 |
Using the Traffic Manager....................................................................... |
29 |
Managing QoS (Quality of Service) Bandwidth....................... |
29 |
Monitoring Traffic .............................................................................. |
30 |
Using USB application.............................................................................. |
31 |
Using AiDisk for File Sharing........................................................... |
31 |
Using the Servers Center......................................................................... |
34 |
Using the Network Place (Samba) Share service..................... |
34 |
Using the FTP Share service............................................................ |
36 |
Using the Miscellaneous setting................................................... |
38 |
Configuring Advanced settings............................................................ |
39 |
Setting up the DHCP Server............................................................ |
39 |
Upgrading the firmware................................................................... |
40 |
Restoring/Saving/Uploading settings......................................... |
41 |
3

4 |
Firmware Upgrade |
42 |
5 |
Troubleshooting |
43 |
|
Troubleshooting......................................................................................... |
43 |
|
Restoring the firmware via the Rescue mode.................................. |
46 |
|
ASUS DDNS Service................................................................................... |
48 |
Appendices |
50 |
|
|
Notices........................................................................................................... |
50 |
|
Networks Global Hotline Information................................................ |
64 |
|
ASUS Contact information...................................................................... |
67 |
4

1Getting to know your wireless router
Package contents
 ADSL/VDSL WiFi modem router
 Network cable
 AC adapter
 Phone cable
 Quick Start Guide
 Warranty card
 Support CD (User Manual)
 Splitter (varies with regions)
• If any of the items is damaged or missing,contact ASUS for technical inquiries and support. Refer to the ASUS Support Hotline list at the back of this user manual.
•Keep the original packaging material in case you would need future warranty services such as repair or replacement.
5
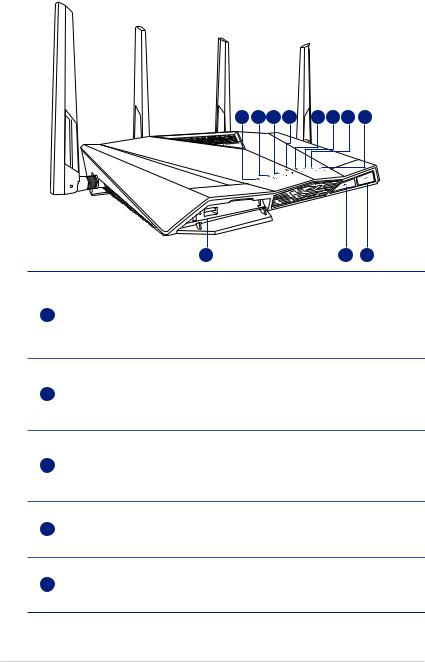
Hardware features
1 |
2 |
3 |
4 |
5 |
6 |
7 |
8 |
9 |
10 |
11 |
Power LED
Off: No power.
1On: Device is ready.
Flashing slowly: Rescue mode Flashing quickly: WPS in progress.
5GHz LED
2Off: No 5GHz signal.
On: Wireless system is ready.
Flashing: Transmitting or receiving data via wireless connection.
2.4GHz LED
3Off: No 2.4GHz signal.
On: Wireless system is ready.
Flashing: Transmitting or receiving data via wireless connection.
INTERNET LED
4Red: No power or no Internet connection.
On: Connection to a Wide Area Network (WAN).
DSL LED
5Off: No DSL connection. On: Connection to DSL.
6

E-WAN LED
6Off: No Ethernet connection. ON: Connection to Ethernet.
LAN LED
7Off: No power or no physical connection.
On: Has physical connection to a local area network (LAN).
USB LED
8Off: No power or no physical connection with a USB device. On: Has physical connection with a USB device.
USB 3.0 port
9Insert a USB 3.0/2.0 device such as USB hard disk or USB flash drive into the port.
Insert your iPad’s USB cable into the port to charge your iPad.
10LED Button
This button turns on/off the LED indicators.
11Wi-Fi Button
This button enables or disables Wi-Fi.
Power adapter specifications:
DC Power adapter |
DC output 19V with max. 1.75A current |
|
||
|
|
|
|
|
Operating |
0~40oC |
Storage Temperature |
|
0~70oC |
Temperature |
|
|
|
|
Operating Humidity |
50~90% |
Storage Humidity |
|
20~90% |
Use only the power adapter that came with your package. Using other adapters may damage the device.
7

12 |
|
|
|
17 18 19 |
13 |
14 |
15 |
16 |
12Reset button
This button resets or restores the system to its factory default settings.
13WPS button
This button launches the WPS Wizard.
14DSL port
Connect to a splitter or to a telephone outlet via an RJ-11 cable.
15LAN 1 ~ 4 ports
Connect network cables into these ports to establish LAN connection.
16WAN port
Connect a network cable into this port to establish WAN connection.
USB 2.0 port
17Insert a USB 2.0 devices such as USB hard disks or USB flash drives into this port.
Power (DC-IN) port
18Insert the bundled AC adapter into this port and connect your router to a power source.
19Power button
This button powers on or powers off the router.
8
2 Creating your network
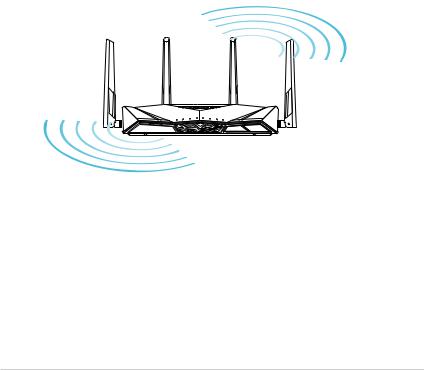
Positioning your router
To get the best wireless network performance from your wireless router, follow the recommendations below:
•Place the wireless router at the center of your network for maximum wireless coverage.
•Keep the device away from metal obstructions and away from direct sunlight.
•Keep the device away from 802.11g or 20MHz onlyWi-Fi devices, 2.4GHz computer peripherals, Bluetooth devices, cordless phones, transformers, heavy-duty motors, fluorescent lights, microwave ovens, refrigerators, and other industrial equipment to prevent signal interference or loss.
90
LED |
WiFi |
9

What you need
To set up your network, you need one or two computers that meet the following system requirements:
•Ethernet RJ-45 (LAN) port (10Base-T/100Base-TX/1000Base-T)
•IEEE 802.11a/b/g/n/ac wireless capability
•An installedTCP/IP service
•Web browser such as Microsoft Internet Explorer,Mozilla
Firefox, Apple Safari, or Google Chrome
• If your computer does not have built-in wireless capabilities, install an IEEE 802.11a/b/g/n/ac WLAN adapter to your computer to connect to the network.
•With its dual band technology,your ADSL/VDSL router supports 2.4GHz and 5GHz wireless signals simultaneously. This allows you to browse the Internet or access e-mail messages using the 2.4GHz band while streaming highdefinition audio/video files such as movies or music using the 5GHz band.
•If you are using only one computer with a single band IEEE
802.11a/b/g/n/ac WLAN adapter, you will only be able to use the 2.4GHz band.
•If you are using only one computer with a dual band IEEE
802.11a/b/g/n/ac WLAN adapter, you will be able to use the 2.4GHz or 5GHz band.
•If you are using two computers with both IEEE 802.11a/b/g/ n/ac WLAN adapters, you will be able to use both 2.4GHz and 5GHz bands simultaneously.
•The Ethernet RJ-45 cables used to connect the network devices should not exceed 100 meters.
10

Connecting your devices
•Use a wired connection when setting up your wireless router to avoid possible wireless setup issues.
•Before setting up your ASUS wireless router,do the following:
•If you are replacing an existing router,disconnect it from your network.
•Disconnect the cables/wires from your existing modem.If your modem has a backup battery, remove it as well.
•Reboot your computer (recommended).
11

Wired connection
Wall Power Outlet
Power
LAN
Wall telephone  outlet
Computer
To set up your ADSL/VDSL router using a wired connection:
1.Insert the splitter’s line connector to the phone outlet and connect your phone into the phone port.
2.Using the bundled phone cable, connect your DSL-AC3100’s DSL port to the splitter’s DSL port.
3.Using the bundled network cable, connect your computer to the ADSL/VDSL modem router’s LAN port.
12
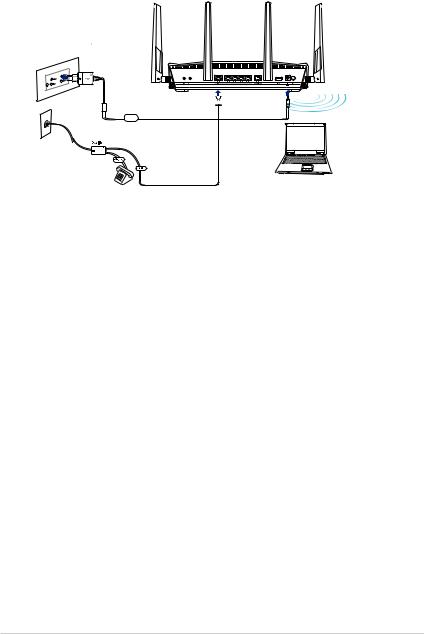
Wireless connection
Wall Power Outlet
Power
Wall telephone  outlet
Computer
To set up your ADSL/VDSL router using a wireless connection:
1.Insert your wireless modem router’s AC adapter into the DC-IN port and plug it to a power outlet.
2.Using the bundled phone cable, connect your DSL-AC3100’s DSL port to the splitter’s DSL port.
3.Install an IEEE 802.11 a/b/g/n/ac WLAN adapter to your computer to connect to the wireless network.
13

Before you proceed
Before configuring your wireless router, apply the steps described in this section to each computer on the network to avoid problems connecting to the wireless network.
A.Disable any configured proxy servers.
Windows® 7 / 8*
The screenshots provided are for Windows® 7 only.The steps and options may be different for Windows® 8 and Windows® 8.1.
1.Click Start > Internet Explorer.
2.Click Tools > Internet options > Connections tab > LAN settings.
14

3.From the Local Area
Network (LAN) Settings window, uncheck Use a proxy server for your LAN.
4.Click OK then Apply.
MAC OSX
1.From your Apple Safari browser, click
Safari > Preferences > Advanced. On the
Proxies item, click
Change Settings...
2.From the Network screen, uncheck FTP Proxy and Web Proxy (HTTP).
3.Click OK then Apply.
15

B.Configure TCP/IP settings to automatically obtain an IP address.
Windows® 7 / 8
The screenshots provided are for Windows® 7 only.The steps and options may be different for Windows® 8 and Windows® 8.1.
1.Click Start > Control Panel
>Network and Internet
>Network and Sharing Center > Change adapter settings.
2.On the Network Connections window, click on Local Area
Connection.
3.On the Local Area Connection
Network Status window, click
Properties.
16

4.Select Internet Protocol Version 4 (TCP/IPv4) or Internet Protocol Version
6 (TCP/IPv6), then click
Properties.
6.Tick Obtain an IP address automatically.
7.Click OK.
17
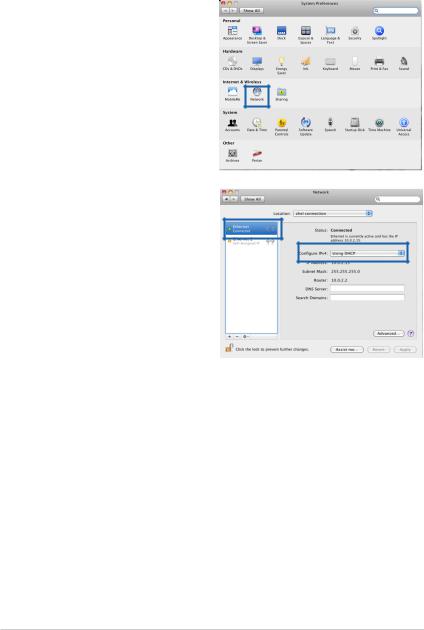
MAC OSX
1.Click Apple Menu >System Preferences >
Network
2.Click Ethernet on the left panel.
3.On the Configure IPv4, item select Using DHCP.
4.Click Apply.
18

Setting up your ADSL/VDSL router
1.Ensure that the DSL LED on the DSL-AC3100 front panel is on and not flashing.
19
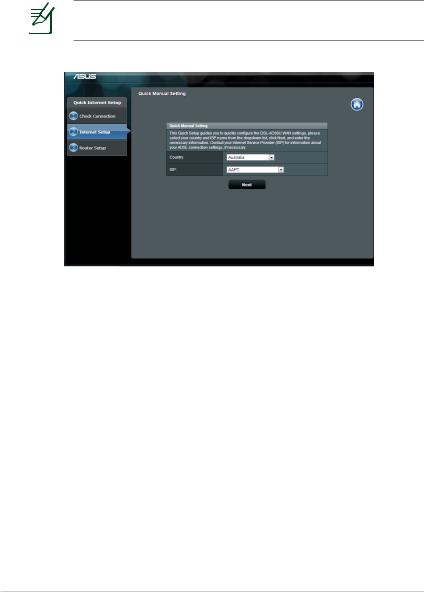
2.Launch your web browser.The QIS web page appears automatically and starts detecting your connection type, VPI/VCI value and encapsulation mode.
If the QIS web page does not appear after you launched your web browser, disable the proxy settings on your web browser.
20

3Network configuration using the web GUI
Logging in to the web GUI
Your ASUS Wireless Router uses a web-based user interface that allows you to configure the router using any web browser such as Internet Explorer, Mozilla Firefox, Apple Safari, or Google Chrome.
To log in to the web GUI:
1.Launch your web browser and manually key in the
wireless router’s default IP address: http://router.asus.com
2.On the login page, key in the default user name (admin) and password (admin).
21
 Loading...