

Page 1
USER MANUAL
Page 2

Special Thanks
DIRECTION
Frédéric BRUN Philippe CAVENEL Nicolas DUBOIS
ENGINEERING
Sébastien COLIN Lionel FERRAGUT Nadine LANTHEAUME Luc WALRAWENS
DESIGN
Baptiste LE GOFF Axel HARTMANN
TESTING
Arnaud BARBIER
BETA TESTING
Bernd WALDSTÄDT
Charles Capsis IV
Gustavo BRAVETTI
MANUAL
Leo DER STEPANIANS
(author)
© ARTURIA SA – 2019 – All rights reserved.
26 avenue Jean Kuntzmann
38330 Montbonnot-Saint-Martin
FRANCE
www.arturia.com
Information contained in this manual is subject to change without notice and does not
represent a commitment on the part of Arturia. The software described in this manual is
provided under the terms of a license agreement or non-disclosure agreement. The software
license agreement specifies the terms and conditions for its lawful use. No part of this
manual may be reproduced or transmitted in any form or by any purpose other than
purchaser’s personal use, without the express written permission of ARTURIA S.A.
All other products, logos or company names quoted in this manual are trademarks or
registered trademarks of their respective owners.
Product version: 1.0.0
Revision date: 17 July 2019
Marco CORREIA
Ben EGGEHORN
Chuck ZWICKY
Minoru KOIKE
Vincent LE HEN
Jeff STONELEY
Jeff CECIL
Tony FLYING SQUIRREL
Charlotte METAIS
Jose RENDON
Clement BASTIAT
Holger STEINBRINK
Jack VAN
Page 3

Thank you for purchasing the Arturia MicroLab!
This manual covers the features and operation of Arturia’s MicroLab, a portable and
powerful MIDI controller designed to work with any DAW software or plug-in you own.
♪: While MicroLab is part of a package which includes our Analog Lab Lite software, this manual
will focus primarily on the MicroLab controller hardware. Please refer to the Analog Lab user manual in
order to learn about the features of the software.
In this package you will find:
• One MicroLab keyboard controller, with a serial number and unlock code on the
bottom. You will need this information in order to register your MicroLab.
• One USB cable
• The Quick Start Guide for the MicroLab. The serial number for your unit has been
placed on this sheet also.
• A card describing Analog Lab Lite and how to upgrade to the full version of
Analog Lab. Also included on this card and with your purchase is a copy of Grand
Piano Model D by UVI, a beautifully realistic sampled grand piano.
• A card describing how to register for and download your copy of Bitwig Studio
8-Track.
Be sure to register your MicroLab as soon as possible! There is a sticker on the bottom panel
that contains the serial number of your unit and an unlock code. These are required during
the online registration process. This information is also included on the Quick Start Guide.
Registering your MicroLab provides the following benefits:
• A product license key for your installation of Bitwig Studio 8-Track
• The ability to download Analog Lab Lite and Grand Piano Model D by UVI
• Access to the MicroLab user manual and the latest version of the MIDI Control
Center software
• Special offers restricted to MicroLab owners
• The installation file for Bitwig Studio 8-Track is available here: www.bitwig.com/
8-track.html
Page 4

Special Message Section
Specifications Subject to Change:
The information contained in this manual is believed to be correct at the time of release.
However, Arturia reserves the right to change or modify any of the specifications without
notice or obligation to update the hardware that has been purchased.
IMPORTANT:
The product and its software, when used in combination with an amplifier, headphones or
speakers, may be able to produce sound levels that could cause permanent hearing loss.
DO NOT operate for long periods of time at a high level or at a level that is uncomfortable. If
you encounter any hearing loss or ringing in the ears, consult an audiologist.
NOTICE:
Service charges incurred due to a lack of knowledge relating to how a function or feature
works (when the product is operating as designed) are not covered by the manufacturer’s
warranty, and are therefore the owner's responsibility. Please study this manual carefully
and consult your dealer before requesting service.
Precautions include, but are not limited to, the following:
1. Read and understand all the instructions.
2. Always follow the instructions on the instrument.
3. Before cleaning the instrument, always remove the USB cable. When cleaning,
use a soft and dry cloth. Do not use gasoline, alcohol, acetone, turpentine or any
other organic solutions; do not use a liquid cleaner, spray or cloth that is too wet.
4. Do not use the instrument near water or moisture, such as a bathtub, sink,
swimming pool or similar place.
5. Do not place the instrument in an unstable position where it might accidentally
fall over.
6. Do not place heavy objects on the instrument. Do not block openings or vents
of the instrument; these locations are used for air circulation to prevent the
instrument from overheating. Do not place the instrument near a heat vent at any
location with poor air circulation.
7. Do not open or insert anything into the instrument that may cause a fire or
electrical shock.
8. Do not spill any kind of liquid onto the instrument.
9. Always take the instrument to a qualified service center. You will invalidate your
warranty if you open and remove the cover, and improper assembly may cause
electrical shock or other malfunctions.
10. Do not use the instrument with thunder and lightning present; otherwise it may
cause long distance electrical shock.
11. Do not expose the instrument to hot sunlight.
12. Do not use the instrument when there is a gas leak nearby.
13. Arturia is not responsible for any damage or data loss caused by improper
operation of the instrument.
Page 5

Table Of Contents
1. Introduction...................................................................................................................................................................... 2
2. Overview........................................................................................................................................................................... 3
2.1. Making the connections .................................................................................................................................................... 3
2.1.1. Top Panel............................................................................................................................................................................................................................. 4
2.1.2. Pitch and Modulation Touch Strips in detail............................................................................................................................................... 5
2.1.3. Shift Functions................................................................................................................................................................................................................ 6
2.2. Side panel.................................................................................................................................................................................. 8
3. Using MicroLab with Analog Lab Lite............................................................................................................ 9
3.1. Audio and MIDI setup ........................................................................................................................................................ 9
3.2. Playing Sounds................................................................................................................................................................... 10
3.3. Selecting Presets ............................................................................................................................................................... 10
4. MIDI Control Center .................................................................................................................................................. 11
4.1. The Basics ................................................................................................................................................................................. 11
4.1.1. System requirements ................................................................................................................................................................................................. 11
4.1.2. Installation and location.......................................................................................................................................................................................... 11
4.1.3. Connection........................................................................................................................................................................................................................ 11
4.1.4. Where to find the MCC manual........................................................................................................................................................................ 12
4.2. MicroLab and MCC ............................................................................................................................................................ 12
4.2.1. How to use MCC.......................................................................................................................................................................................................... 12
4.2.2. MicroLab's Available Controls........................................................................................................................................................................... 14
5. Software License Agreement............................................................................................................................. 17
6. Declaration of Conformity ................................................................................................................................. 20
Page 6

1. INTRODUCTION
MicroLab is Arturia’s most compact and portable USB MIDI keyboard controller to date. It
has a 25-key, velocity-sensitive keyboard, integrated USB cable and features for perfect
integration with Arturia's Analog Lab Lite as well as software synthesizers from other
companies. The attention to detail poured into MicroLab makes it perfect for the on-the-go
musician that needs an ultra-light, ultra-portable keyboard.
Beyond being a great MIDI controller, MicroLab comes with our Analog Lab Lite software
that includes an impressive array of classic synth and keyboard sounds. The integration of
these two products results in a powerful hybrid synthesizer with excellent functionality and
great sound. There’s an affordable and simple way to upgrade Analog Lab Lite to the full
version of Analog Lab, which provides access to many more thousands of the sounds you
will hear in Analog Lab Lite! To upgrade, go to www.arturia.com/analoglab-update.
MicroLab also features our innovative pitch and modulation touch strips: low-profile
controllers that offer a different take on the traditional "wheel" design while maintaining their
expressiveness. The modulation strip can be assigned to control any CC of your choice and
the pitch strip offers a choice of ‘last position hold’ or ‘return to zero’ modes of operation.
The included MIDI Control Center software lets you configure various controls of MicroLab
in a simple and easy way directly from your computer. This lets you adapt MicroLab to suit
your musical needs.
Made for the musician on the go or the performer with limited space, the MicroLab gives
you a great depth of features in a portable package that is ultra-light and looks great. We
hope it will enable you to capture your musical ideas no matter where you happen to be.
2 Arturia - User Manual MicroLab - Introduction
Page 7
2. OVERVIEW
2.1. Making the connections
Setting up MicroLab for use with Analog Lab Lite is fast and simple:
1. First install Analog Lab Lite on your computer and be sure to register and
authorize it (see Chapter 2 of the Analog Lab user manual).
2. Connect the MicroLab keyboard to the computer. MicroLab is powered by its USB
connection, so all you have to do is connect a USB cable from your computer to
the MicroLab keyboard.
3. MicroLab is a class-compliant USB device, so its driver will be automatically
installed when you connect MicroLab to your computer.
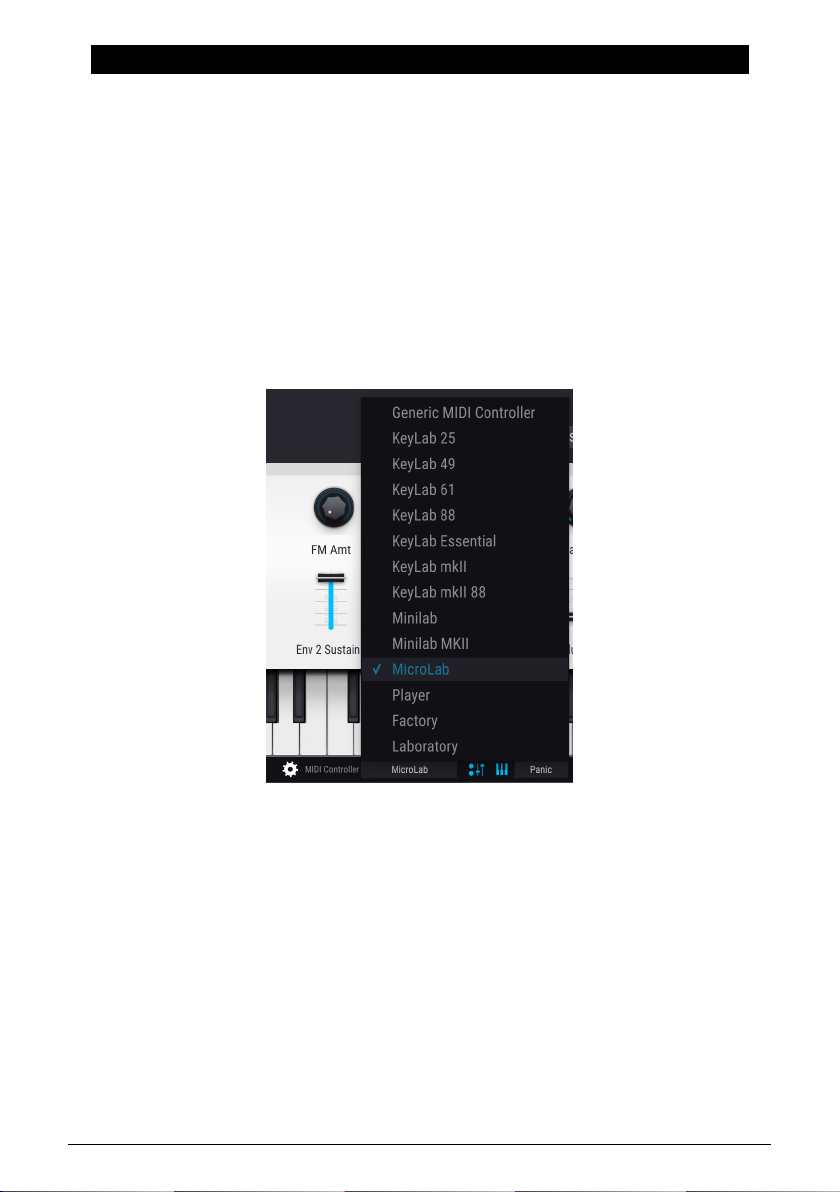
4. Launch Analog Lab Lite! MicroLab is automatically detected as MIDI controller. If
it is not, select it from the MIDI Controller menu at lower-right side of Analog Lab
Lite.
You're all set! Play some tunes and enjoy the amazing presets!
Arturia - User Manual MicroLab - Overview 3
Page 8
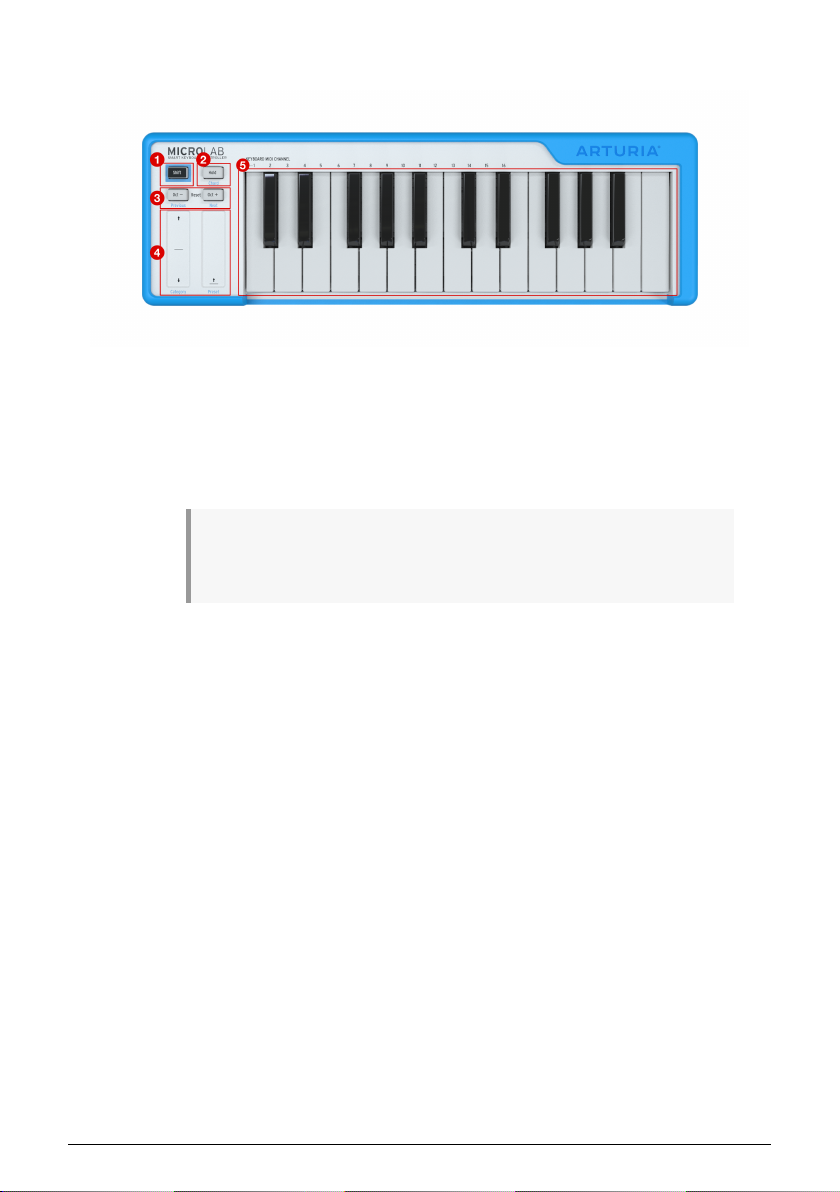
2.1.1. Top Panel
1. Shift button: This button lets you access the secondary functions of MicroLab.
The secondary functions are listed in blue text under the buttons and strips and
in black above the first 16 keys of the keyboard. These functions are described in
the
"Shift Functions"
2. Hold: Pressing this button engages the "sustain" function for notes being played
on the keyboard. This is like pressing the sustain pedal on a piano.
♪: The Hold button can be configured to work as an on/off switch ("toggle") or a
momentary switch ("gate") through the Arturia MIDI Control Center software. This is
covered in detail in chapter 4.
3. Octave - / + buttons: These buttons shift the keyboard range +/- 4 octaves. The
farther from center the keyboard has been transposed, the faster the + or button will blink. Pressing both buttons simultaneously re-centers the keyboard
back to its default octave range.
4. Pitch and Mod Touch Strips: These touch-sensitive strips generate pitch bend and
modulation MIDI messages that are sent to your music software. Use them to
add expressivity to your playing.
5. Keyboard: MicroLab features a 25-key velocity-sensitive, slim-key keyboard. This
keyboard generates standard MIDI messages that can be used to play any of
your favorite virtual instruments.
section later in this chapter.
4 Arturia - User Manual MicroLab - Overview
Page 9

2.1.2. Pitch and Modulation Touch Strips in detail
The touch-sensitive pitch and modulation strips are low-profile controllers that offer a
different take on the traditional "wheel" design while maintaining their expressiveness. If
you touch the Pitch bend strip at its center and move your finger forward or backward it
will raise or lower the pitch of the played sound. Similarly, moving your finger along the
Modulation strip alters the modulation amount of the played sound, from no modulation
(bottom) to maximum modulation (top).
Arturia's MIDI Control Center software can be used to configure the Pitch strip to either
“Return to Zero” upon release (like a typical spring-loaded pitch wheel) or to hold its released
position. The Mod strip can be configured to control any MIDI CC of your choice. To give you
maximum flexibility and control over your instruments, the MIDI Control Center software
even lets you set separate output MIDI channels for the Pitch and Mod strips that can be
independent from the keyboard's MIDI output channel. Please refer to Chapter 4 of this
guide to learn more about MIDI Control Center.
♪: The amount of pitch bend and type of modulation you hear when using these controls depends
entirely on your selected preset and how it is programmed. In some cases, you may find that a preset
may not make use of these parameters and in that case, manipulating the touch strip controls of
MicroLab will have no effect on your sound.
Arturia - User Manual MicroLab - Overview 5
Page 10

2.1.3. Shift Functions
MicroLab has a limited number of controls due to its small size, but the Shift button allows
the buttons, strips and keys to serve useful secondary functions. These functions are as
follows:
2.1.3.1. Selecting the Keyboard MIDI Channel:
Hold Shift and press a key on the keyboard to select the output MIDI Channel for the
MicroLab keyboard. The channel number (1-16) is labeled directly above the first 16 keys of
the keyboard.
!: This shift command sets the output channel of the MicroLab keyboard only. The Pitch and
Mod touch strips can be configured to either "follow" the keyboard's MIDI output channel (i.e., if you
change the keyboard output MIDI channel, one or both strips will change with it) or to have their
own specifically defined channels for the Pitch and Mod strips that do not change if you change the
keyboard's output MIDI channel. This can be done by using Arturia's MIDI Control Center software.
Please refer to Chapter 4 of this guide to learn more about MIDI Control Center.
2.1.3.2. Chord Mode
Chord mode allows you to program a chord and trigger it by playing only one note on
MicroLab. This can be a fun and creative way to compose and perform music.
• When MicroLab is first powered on, the chord memory slot is empty.
• To program a chord, hold the Shift and Hold buttons while playing a chord
or entering notes of the chord individually (from 2 to 10 notes). All notes you
enter while holding the Shift and Hold buttons will be recorded as part of your
programmed chord and the Hold button will blink rapidly to indicate that you are
in chord programming mode.
• If you release one or both buttons (Shift or Hold), the Hold button will blink slowly
to indicate that chord mode is active. You can now play a single note and it
will trigger your programmed chord. Playing up and down the keyboard will
transpose your programmed chord up and down, with the lowest note of the
programmed chord being the reference note for the transposition.
♪: Programmed chords must contain at least two notes as it is not possible to create a "chord" with
fewer notes. MicroLab's chord programming mode must see at least two notes otherwise nothing will
be recorded.
• To exit Chord mode, press and release Shift and Hold buttons again. The Hold
button will stop blinking and the keyboard will return to normal operation.
6 Arturia - User Manual MicroLab - Overview
Page 11

• Note that your programmed chord is "remembered" by MicroLab as long as the
keyboard remains powered. This means that if you have programmed a chord
and exited Chord mode, you can re-enter Chord mode and immediately start
playing the chord without having to re-program it again. To do this, simply press
and release Shift and Hold buttons (without playing any notes). The Hold button
will begin to blink and you can immediately play your pre-programmed chord.
♪: Programmed chords do not take into account the velocity with which you play each note. Instead,
the velocity of the entire chord will be based on the velocity of the note that you play when triggering a
chord.
2.1.3.3. Selecting Presets (in Analog Lab / Analog Lab Lite)
If you are using MicroLab with Analog Lab Lite, you can easily step forward or backward
through the preset list by holding Shift and pressing the Oct - (previous) or Oct + (next)
buttons. This is a handy feature when you are on stage or otherwise not near your
computer.
!: The MIDI Controller setting (at the lower right of Analog Lab Lite) must be set to MicroLab for this
feature to work correctly.
2.1.3.4. Selecting Filters and Presets with touch strips (in Analog Lab /
Analog Lab Lite)
If you are using MicroLab with Analog Lab Lite, you can easily select filters and scroll
through preset filter lists without having to use your computer's mouse or trackpad.
• Hold Shift and drag the Pitch strip up or down to navigate through the various
preset filters.
• To activate or deactivate a selected filter, hold Shift and tap the Pitch strip
(without dragging).
• Hold Shift and drag the Mod Strip to scroll through the filtered list of presets.
• To load a selected preset, hold Shift and tap the Mod strip (without dragging)
!: The MIDI Controller setting (at the lower right of Analog Lab Lite) must be set to MicroLab for this
feature to work correctly.
Arturia - User Manual MicroLab - Overview 7
Page 12

2.2. Side panel
The side panel of the MicroLab contains a recessed USB Type B connector that lets you
connect MicroLab to your computer. The USB connector is located on the side instead of the
back so that the MicroLab can be placed directly in front of a laptop without having to leave
extra (wasted) space for a USB connector to exit from the rear of the keyboard. This feature
is very useful in small studios or portable setups where space is extremely limited.
MicroLab ships with a removeable USB cable that includes a 90-degree connector and is
long enough to neatly wrap around the keyboard exactly one time. The channel around its
perimeter with its integrated rubber clips and magnetic holder secure the USB cable in place
when the unit is being transported. No more lost or forgotten USB cable!
8 Arturia - User Manual MicroLab - Overview
Page 13

3. USING MICROLAB WITH ANALOG LAB LITE
This chapter will focus on to use MicroLab to Analog Lab Lite software. Note that you will
find only basic coverage of Analog Lab Lite features here. For more details about Analog
Lab Lite, please refer to the Analog Lab user manual.
3.1. Audio and MIDI setup
The first thing to do after launching Analog Lab Lite is to make sure the software is set to
output audio correctly and that it will receive MIDI from the MicroLab keyboard.
Open the Preferences window by pressing [Command] + [,] or by selecting it from the Analog
Lab Lite drop-down menu.
This will open the Audio & MIDI Settings window, which is where the preferred audio output
device will be selected. Now click the Play button: If you hear a short sine wave, then your
audio is set up correctly. If not, make sure the correct audio driver is selected and that your
headphones or speakers are properly connected and turned on.
If MicroLab (or any MIDI controller) is connected to your computer, the Audio MIDI Settings
window will reveal a section labeled “MIDI Devices”. In this section, check the box labeled
“Arturia MicroLab” so that you can use it to play Analog Lab Lite.
That's it! You should now be able to use MicroLab to play Analog Lab Lite.
Arturia - User Manual MicroLab - Using MicroLab with Analog Lab Lite 9
Page 14

3.2. Playing Sounds
To play sounds in Analog Lab Lite, simply play the MicroLab keyboard! Use the Pitch and
Mod strips to modulate your sounds and the Octave + / - buttons to shift the MicroLab's
keyboard range up or down. The Hold button sustains notes (like a sustain pedal on a piano)
and the Chord function lets you program and trigger complex chords using a single key.
These buttons and functions are all detailed in the
Top Panel
section in Chapter 2.
3.3. Selecting Presets
You can always select presets in Analog Lab Lite using your computer's mouse or trackpad.
However, thanks to MicroLab's handy shift functions you can do this even faster without
having to touch your computer at all! This is very handy if, for example, you are on stage
and don't have the computer within arm's reach. Please refer to the
in Chapter 2 learn how to do this.
Shift Functions
section
10 Arturia - User Manual MicroLab - Using MicroLab with Analog Lab Lite
Page 15

4. MIDI CONTROL CENTER
4.1. The Basics
Arturia's MIDI Control Center (MCC) is a powerful application that lets you dive into your
Arturia hardware and configure the various controls (keys, pads, knobs, buttons, sliders,
etc.) so that they best serve your musical needs.
Note that this chapter only covers the MCC features that pertain to MicroLab. As a result,
much of MCC will
portable product with a minimalist feature set that does not use many of MCC's powerful
features (like preset management capabilities, for example). If you would like to see detailed
explanations of
find the manual
!: MCC works with most of Arturia’s devices, so if you already have an earlier version of it installed
on your computer, be sure to download the latest version to ensure it includes support for MicroLab.
4.1.1. System requirements
not
be described in this guide. This is because MicroLab is an ultra-
all
MCC features, please refer to the MCC User Manual (see the
section later in this chapter).
Where to
Win 7+ (64bit) 10.10+
• 2 GB RAM
• CPU 2 GHz
4.1.2. Installation and location
After downloading the MIDI Control Center installer, double-click the installer and follow the
on-screen instructions.
The installer will place the MIDI Control Center application with the other Arturia applications
on your system. In Windows, you should be able to find it in the Start menu. In macOS you’ll
find it inside the Applications/Arturia folder.
4.1.3. Connection
Connect MicroLab to your computer using its USB cable and launch the MIDI Control Center.
You should see MicroLab listed under connected devices:
Arturia - User Manual MicroLab - MIDI Control Center 11
Page 16

4.1.4. Where to find the MCC manual
MIDI Control Center has a great user manual in its Help menu, as shown below:
The MCC User Manual describes every section of the software and defines important terms
you may need to know while using the MIDI Control Center. We recommend you take a look
if you would like to find out more about MCC.
4.2. MicroLab and MCC
Editing MicroLab parameters in MCC is simple. A visual representation of MicroLab is shown
on the right and various editable parameters are shown in the area below the image. Device
Memories and Local Templates are displayed in the left column, but these features are not
really necessary when using MicroLab due to MicroLab's minimalist feature set. As a result
they are not covered in this guide.
4.2.1. How to use MCC
• Select the MicroLab feature that you would like to edit. As you move the mouse
over the MicroLab keyboard on your screen, a red box will appear over any
feature that can be edited (as shown below).
12 Arturia - User Manual MicroLab - MIDI Control Center
Page 17

• Click any red box to select it. The currently selected control will be highlighted in
red (see below)
• Any editable parameters for your selected control will appear at the bottom
section of the screen.
• These parameters can be adjusted to suit your specific musical needs. You can
open drop-down menus to select from the available options or click-drag a knob
to set its numerical value. You can also double-click the value displayed below a
knob to enter it numerically if you wish.
Arturia - User Manual MicroLab - MIDI Control Center 13
Page 18

4.2.2. MicroLab's Available Controls
You can modify the following items on MicroLab:
• Keyboard
• Hold Button
• Pitch Slider
• Mod Slider
4.2.2.1. Keyboard
• Channel lets you select an output MIDI channel for the MicroLab keyboard (from
1-16). This can be useful in situations, for example, where you have configured
your virtual instruments to receive MIDI data only on specific channels. By
switching between channels, you can play different instruments.
♪: It is possible to change the MIDI Channel setting directly from MicroLab (without using MCC) by
using shift commands. See the
do this.
Shift Functions
section in Chapter 2 of this user manual to learn how to
• Key Velocity Curve lets you adjust the "sensitivity" or "feel" of the MicroLab keys
by adjusting the velocity response curve of the keyboard. Some performers
prefer "heavier" action whereas others enjoy a "lighter" action from their
keyboards and MicroLab's four options (
Full
) can help adapt the keyboard to suit a player's preference. We recommend
experimenting with these settings to see what works best for you.
14 Arturia - User Manual MicroLab - MIDI Control Center
Linear,Logarithmic,Exponential
and
Page 19

4.2.2.2. Hold Button
• MicroLab's Hold button can be configured to work as an on/off switch ("toggle")
or a momentary switch ("gate") through the Option drop-down menu.
means that you must press the Hold button once to engage sustain mode and
press it again to switch it off.
are pressing it and that it is immediately switched off the instant you release the
button. You can select what method works best for you.
Gate
means that sustain mode is active when you
Toggle
4.2.2.3. Pitch Strip
• The Mode drop-down menu lets you switch MicroLab's Pitch strip on or off. The
default
Pitch Bend
Set this to
• Option menu lets you set how the Pitch strip behaves upon release. A traditional
pitch bend wheel (found on many synthesizers and MIDI Controllers) is normally
spring-loaded so it will snap back to its center position when released. The
default
touch strip, the pitch control returns to the middle position in your software. If
you would prefer the Pitch strip to maintain its position when you remove your
finger from the pitch strip, set this to
• Channel lets you select an output MIDI channel for the Pitch strip. Note that by
selecting
does not have to be same as the MicroLab keyboard's output MIDI channel (for
example, keyboard can be on channel 1 but Pitch strip on channel 3). It is also
possible to have the Pitch strip "follow" whatever MIDI channel the keyboard is
using by selecting
Off
Standard
1-16
setting means the strip will operate as a pitch bend controller.
you would like to deactivate the strip.
option on MicroLab does exactly this—when you release the
Hold
.
, you set the Pitch strip's output MIDI channel explicitly and this
Keyboard
from the drop-down menu.
Arturia - User Manual MicroLab - MIDI Control Center 15
Page 20

4.2.2.4. Mod Strip
• The Mode drop-down menu lets you switch MicroLab's Mod strip on or off. The
default
Control
Set this to
• Channel lets you select an output MIDI channel for the Mod strip. Note that by
selecting
does not have to be same as the MicroLab keyboard's output MIDI channel (for
example, keyboard can be on channel 1 but Mod strip on channel 5). It is also
possible to have the Mod strip "follow" whatever MIDI channel the keyboard is
using by selecting
• CC Number lets you select the MIDI CC number that the Mod strip will control,
with a short description of what it typically controls according to the MIDI
specification.
♪: Note that not all software instrument designers adhere to the MIDI specification for CC and may
choose to use CC numbers in non-standard ways. Refer to your virtual instrument's user guide to see
what parameters you can control with the modulation strip.
setting means the strip will operate as a modulation controller.
Off
you would like to deactivate the strip.
1-16
, you set the Mod strip's output MIDI channel explicitly and this
Keyboard
from the drop-down menu.
• The Min Value and Max Value settings let you set minimum and maximum
bounds on the modulation strip. The default0(minimum) and
settings give you access over the entire modulation range when using Mod strip.
Reducing this range, for example setting the minimum to50and the maximum
to
100
, will mean that the Mod strip will range from 50 to 100 as your finger
moves from bottom to top.
!: If you would like the mod strip to work in reverse (moving your finger down toward you
the output value) you can reverse the Min and Max values (i.e., set Min to 127 and Max to 0)
16 Arturia - User Manual MicroLab - MIDI Control Center
127
(maximum)
increases
Page 21

5. SOFTWARE LICENSE AGREEMENT
In consideration of payment of the Licensee fee, which is a portion of the price you paid,
Arturia, as Licensor, grants to you (hereinafter termed “Licensee”) a nonexclusive right to
use this copy of the SOFTWARE.
All intellectual property rights in the software belong to Arturia SA (hereinafter: “Arturia”).
Arturia permits you only to copy, download, install and use the software in accordance with
the terms and conditions of this Agreement.
The product contains product activation for protection against unlawful copying. The OEM
software can be used only following registration.
Internet access is required for the activation process. The terms and conditions for use of the
software by you, the end-user, appear below. By installing the software on your computer
you agree to these terms and conditions. Please read the following text carefully in its
entirety. If you do not approve these terms and conditions, you must not install this software.
In this event give the product back to where you have purchased it (including all written
material, the complete undamaged packing as well as the enclosed hardware) immediately
but at the latest within 30 days in return for a refund of the purchase price.
1. Software Ownership
Arturia shall retain full and complete title to the SOFTWARE recorded on the enclosed disks
and all subsequent copies of the SOFTWARE, regardless of the media or form on or in which
the original disks or copies may exist. The License is not a sale of the original SOFTWARE.
2. Grant of License
Arturia grants you a non-exclusive license for the use of the software according to the terms
and conditions of this Agreement. You may not lease, loan or sub-license the software.
The use of the software within a network is illegal where there is the possibility of a
contemporaneous multiple use of the program.
You are entitled to prepare a backup copy of the software which will not be used for
purposes other than storage purposes.
You shall have no further right or interest to use the software other than the limited rights as
specified in this Agreement. Arturia reserves all rights not expressly granted.
3. Activation of the Software
Arturia may use a compulsory activation of the software and a compulsory registration of
the OEM software for license control to protect the software against unlawful copying. If you
do not accept the terms and conditions of this Agreement, the software will not work.
In such a case the product including the software may only be returned within 30 days
following acquisition of the product. Upon return a claim according to § 11 shall not apply.
4. Support, Upgrades and Updates after Product Registration
You can only receive support, upgrades and updates following the personal product
registration. Support is provided only for the current version and for the previous version
during one year after publication of the new version. Arturia can modify and partly or
completely adjust the nature of the support (hotline, forum on the website etc.), upgrades
and updates at any time.
The product registration is possible during the activation process or at any time later through
the Internet. In such a process you are asked to agree to the storage and use of your
personal data (name, address, contact, email-address, and license data) for the purposes
specified above. Arturia may also forward these data to engaged third parties, in particular
distributors, for support purposes and for the verification of the upgrade or u pdate right.
Arturia - User Manual MicroLab - Software License Agreement 17
Page 22

5. No Unbundling
The software usually contains a variety of different files which in its configuration ensure
the complete functionality of the software. The software may be used as one product only. It
is not required that you use or install all components of the software. You must not arrange
components of the software in a new way and develop a modified version of the software
or a new product as a result. The configuration of the software may not be modified for the
purpose of distribution, assignment or resale.
6. Assignment of Rights
You may assign all your rights to use the software to another person subject to the
conditions that (a) you assign to this other person (i) this Agreement and (ii) the software or
hardware provided with the software, packed or preinstalled thereon, including all copies,
upgrades, updates, backup copies and previous versions, which granted a right to an
update or upgrade on this software, (b) you do not retain upgrades, updates, backup copies
und previous versions of this software and (c) the recipient accepts the terms and conditions
of this Agreement as well as other regulations pursuant to which you acquired a valid
software license.
A return of the product due to a failure to accept the terms and conditions of this Agreement,
e.g. the product activation, shall not be possible following the assignment of rights.
7. Upgrades and Updates
You must have a valid license for the previous or more inferior version of the software in
order to be allowed to use an upgrade or update for the software. Upon transferring this
previous or more inferior version of the software to third parties the right to use the upgrade
or update of the software shall expire.
The acquisition of an u pgrade or update does not in itself confer any right to use the
software.
The right of support for the previous or inferior version of the software expires upon the
installation of an upgrade or update.
8. Limited Warranty
Arturia warrants that the disks on which the software is furnished is free from defects in
materials and workmanship under normal use for a period of thirty (30) days from the date
of purchase. Your receipt shall be evidence of the date of purchase. Any implied warranties
on the software are limited to thirty (30) days from the date of purchase. Some states do not
allow limitations on duration of an implied warranty, so the above limitation may not apply
to you. All programs and accompanying materials are provided “as is” without warranty of
any kind. The complete risk as to the quality and performance of the programs is with you.
Should the program prove defective, you assume the entire cost of all necessary servicing,
repair or correction.
9. Remedies
Arturia's entire liability and your exclusive remedy shall be at Arturia's option either (a)
return of the purchase price or (b) replacement of the disk that does not meet the Limited
Warranty and which is returned to Arturia with a copy of your receipt. This limited Warranty
is void if failure of the software has resulted from accident, abuse, modification, or
misapplication. Any replacement software will be warranted for the remainder of the
original warranty period or thirty (30) days, whichever is longer.
10. No other Warranties
The above warranties are in lieu of all other warranties, expressed or implied, including but
not limited to, the implied warranties of merchantability and fitness for a particular purpose.
No oral or written information or advice given by Arturia, its dealers, distributors, agents
or employees shall create a warranty or in any way increase the scope of this limited
warranty.
18 Arturia - User Manual MicroLab - Software License Agreement
Page 23

11. No Liability for Consequential Damages
Neither Arturia nor anyone else involved in the creation, production, or delivery of this
product shall be liable for any direct, indirect, consequential, or incidental damages arising
out of the use of, or inability to use this product (including without limitation, damages for
loss of business profits, business interruption, loss of business information and the like)
even if Arturia was previously advised of the possibility of such damages. Some states do
not allow limitations on the length of an implied warranty or the exclusion or limitation of
incidental or consequential damages, so the above limitation or exclusions may not apply to
you. This warranty gives you specific legal rights, and you may also have other rights which
vary from state to state.
Arturia - User Manual MicroLab - Software License Agreement 19
Page 24

6. DECLARATION OF CONFORMITY
USA
Important notice: DO NOT MODIFY THE UNIT!
This product, when installed as indicate in the instructions contained in this manual, meets
FCC requirement. Modifications not expressly approved by Arturia may avoid your authority,
granted by the FCC, to use the product.
IMPORTANT:
high quality shielded cables. Cable (s) supplied with this product MUST be used. Follow all
installation instructions. Failure to follow instructions could void your FFC authorization to
use this product in the USA.
NOTE:
Digital device, pursuant to Part 15 of the FCC rules. These limits are designed to provide
a reasonable protection against harmful interference in a residential environment. This
equipment generate, use and radiate radio frequency energy and, if not installed and used
according to the instructions found in the users manual, may cause interferences harmful
to the operation to other electronic devices. Compliance with FCC regulations does not
guarantee that interferences will not occur in all the installations. If this product is found to
be the source of interferences, witch can be determined by turning the unit “OFF” and “ON”,
please try to eliminate the problem by using one of the following measures:
The above statements apply ONLY to those products distributed in the USA.
CANADA
NOTICE:
Interference-Causing Equipment Regulation.
AVIS
le matériel brouilleur du Canada.
EUROPE
When connecting this product to accessories and/or another product, use only
This product has been tested and found to comply with the limit for a Class B
• Relocate either this product or the device that is affected by the interference.
• Use power outlets that are on different branch (circuit breaker or fuse) circuits or
install AC line filter(s).
• In the case of radio or TV interferences, relocate/ reorient the antenna. If the
antenna lead-in is 300 ohm ribbon lead, change the lead-in to coaxial cable.
• If these corrective measures do not bring any satisfied results, please the local
retailer authorized to distribute this type of product. If you cannot locate the
appropriate retailer, please contact Arturia.
This class B digital apparatus meets all the requirements of the Canadian
: Cet appareil numérique de la classe B respecte toutes les exigences du Règlement sur
This product complies with the requirements of European Directive 89/336/EEC
This product may not work correctly by the influence of electro-static discharge; if it
happens, simply restart the product.
20 Arturia - User Manual MicroLab - Declaration of Conformity
 Loading...