

Page 1
USER MANUAL
Page 2

Special Thanks
DIRECTION
Frederic Brun Adrien Courdavault
ENGINEERING
Bruno Pillet
Thierry Chatelain
Robert Bocquier
Vivien Henry
Nadine Lantheaume
Pierre-Lin Laneyrie
Yves Usson
Nicolas Dubois
MANUAL
Nick Batzdorf Glen Darcey Sebastien Rochard Morgan Perrier
DESIGN
Glen Darcey
Bruno Pillet
© ARTURIA SA – 2016 – All rights reserved. 11 Chemin de la Dhuy 38240 Meylan
FRANCE http://www.arturia.com
Information contained in this manual is subject to change without notice and
does not represent a commitment on the part of Arturia. The software described
in this manual is provided under the terms of a license agreement or nondisclosure agreement. The software license agreement specifies the terms and
conditions for its lawful use. No part of this manual may be reproduced or
transmitted in any form or by any purpose other than purchaser’s personal use,
without the express written permission of ARTURIA S.A.
All other products, logos or company names quoted in this manual are
trademarks or registered trademarks of their respective owners.
Revision date: 27 December 2016
Sebastien Rochard
Daniel Vester
DesignBox
Frederic Brun
Page 3

Thank you for purchasing the Arturia
MatrixBrute!
This manual covers the features and operation of Arturia’s MatrixBrute.
In this package you will find:
• One Matrixbrute analog synthesizer, with a serial number on the
bottom. You will need this information in order to register your
MatrixBrute online.
• One IEC AC power cord.
Be sure to register your MatrixBrute as soon as possible! There is a sticker on
the bottom panel that contains the serial number of your unit. This is required
during the online registration process. You may want to record these elsewhere
or take a photo of the sticker in case it becomes damaged.
Registering your MatrixBrute provides the following benefits:
• It enables you to download the MatrixBrute user manual and the latest
version of the MIDI Control Center software
• It allows you to receive special offers restricted to MatrixBrute owners.
Page 4

Special Message Section
Specifications Subject to Change:
The information contained in this manual is believed to be correct at the time
of printing. However, Arturia reserves the right to change or modify any of the
specifications without notice or obligation to update the hardware that has been
purchased.
IMPORTANT:
The product and its software, when used in combination with an amplifier,
headphones or speakers, may be able to produce sound levels that could cause
permanent hearing loss. DO NOT operate for long periods of time at a high level
or at a level that is uncomfortable.
If you encounter any hearing loss or ringing in the ears, you should consult an
audiologist.
NOTICE:
Service charges incurred due to a lack of knowledge relating to how a function
or feature works (when the product is operating as designed) are not covered
by the manufacturer’s warranty, and are therefore the owner's responsibility.
Please study this manual carefully and consult your dealer before requesting
service.
Precautions include, but are not limited to, the following:
1. Read and understand all the instructions.
2. Always follow the instructions on the instrument.
3. Before cleaning the instrument, always remove the USB cable. When
cleaning, use a soft and dry cloth. Do not use gasoline, alcohol,
acetone, turpentine or any other organic solutions; do not use a liquid
cleaner, spray or cloth that's too wet.
4. Do not use the instrument near water or moisture, such as a bathtub,
sink, swimming pool or similar place.
5. Do not place the instrument in an unstable position where it might
accidentally fall over.
6. Do not place heavy objects on the instrument. Do not block openings or
vents of the instrument; these locations are used for air circulation to
prevent the instrument from overheating. Do not place the instrument
near a heat vent at any location with poor air circulation.
Page 5

7. Do not open or insert anything into the instrument that may cause a
fire or electrical shock.
8. Do not spill any kind of liquid onto the instrument.
9. Always take the instrument to a qualified service center. You will
invalidate your warranty if you open and remove the cover, and
improper assembly may cause electrical shock or other malfunctions.
10. Do not use the instrument with thunder and lightning present;
otherwise it may cause long distance electrical shock.
11. Do not expose the instrument to hot sunlight.
12. Do not use the instrument when there is a gas leak nearby.
13. Arturia is not responsible for any damage or data loss caused by
improper operation of the instrument.
Page 6

Introduction
Congratulations on your purchase of the Arturia MatrixBrute!
The MatrixBrute is designed to be a supremely powerful, modern analog classic
synthesizer.
The roots of this product stem from the greatest synthesizers of all time, all
enhanced with Arturia’s own modern touch and character. The now famous
‘Brute’ style oscillators, paired with the classic sounds of both the Steiner Parker
filter and Dr. Bob Moog ladder filter, and our own analog effects section, give you
a wealth of tools and amazing sonic character to build your own sounds up.
The center point of the MatrixBrute is the impressive Matrix Modulation, that
the name is derived from. This matrix allows you to take control and route
modulation sources in a near endless amount of ways. Couple this with the
preformance features of the sequencer, arpeggiator, assignable macro knobs
and the vast CV connectivity and you have a product the will be the center piece
in your studio or stage set up.
We are proud and thrilled to bring you this iconic synthesizer. It is the fusion
of the programable analog synthesizer wants and dreams of our entire
development team.
Be sure to visit the www.arturia.com website and check for the latest firmware,
download the MIDI Control Center and check out the tutorials and FAQs. Get
ready to explore synthesis in a whole new way.
Musically yours, The Arturia team
Page 7

Table Of Content
1. Connections ........................................................................................................................................... 3
2. Getting Started with MatrixBrute ............................................................................................ 5
3. Guided Tour........................................................................................................................................... 9
3.1. Subtractive synthesis overview ..................................................................................................... 9
3.2. Initializing a Preset ............................................................................................................................. 10
3.3. Hands On................................................................................................................................................... 10
3.3.1. VCO 1............................................................................................................................................................................................... 11
3.3.2. VCF 1.............................................................................................................................................................................................. 12
3.3.3. ENV 2 ............................................................................................................................................................................................ 13
3.3.4. LFO/Aftertouch/Matrix ...................................................................................................................................................... 14
3.3.5. Analog Effects Section ....................................................................................................................................................... 17
4. Operation.............................................................................................................................................. 18
4.1. Master Controls........................................................................................................................................ 18
4.2. Utility Commands ................................................................................................................................. 18
4.3. VCOs .............................................................................................................................................................. 19
4.3.1. VCOs 1 and 2 .......................................................................................................................................................................... 20
4.3.2. Sub oscillator......................................................................................................................................................................... 20
4.3.3. Mixable waveforms .......................................................................................................................................................... 20
4.3.4. VCO 3 - LFO 3 ......................................................................................................................................................................... 21
4.3.5. Noise Generator .................................................................................................................................................................... 21
4.4. Audio Mod................................................................................................................................................. 22
4.5. VCO Sync.................................................................................................................................................. 23
4.6. Voice Mode............................................................................................................................................... 23
4.6.1. Monophonic.............................................................................................................................................................................. 23
4.6.2. Paraphonic............................................................................................................................................................................... 23
4.6.3. Duo Split mode...................................................................................................................................................................... 23
4.7. Wheels........................................................................................................................................................ 24
4.8. Keyboard Performance Controls.............................................................................................. 25
4.8.1. Glide............................................................................................................................................................................................... 25
4.8.2. Play Control............................................................................................................................................................................. 26
4.9. Macro Knobs........................................................................................................................................... 26
4.10. Mixer........................................................................................................................................................... 28
4.11. LFOs 1 and 2........................................................................................................................................... 29
4.12. Filters......................................................................................................................................................... 30
4.13. Envelopes ................................................................................................................................................ 33
4.14. Analog Effects ...................................................................................................................................... 35
5. The Matrix ........................................................................................................................................... 37
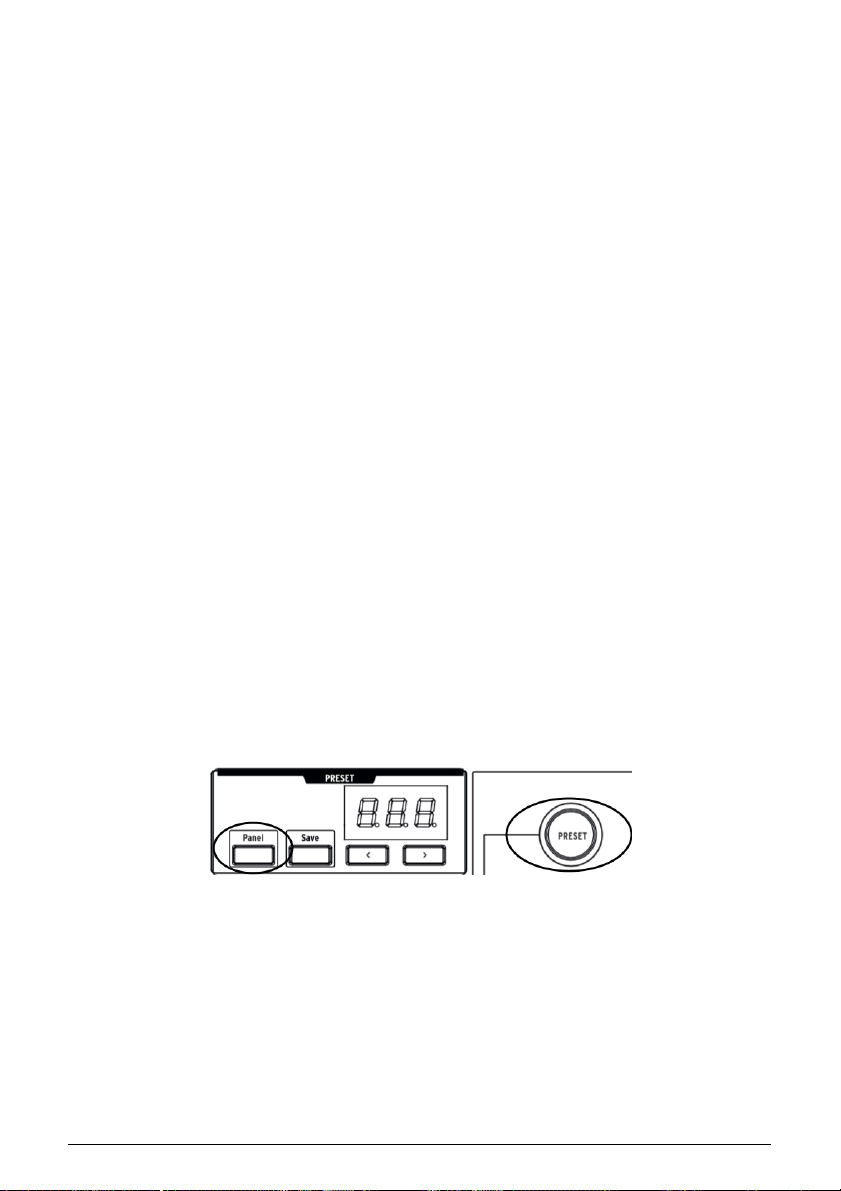
5.1. PRESET mode........................................................................................................................................... 37
5.1.1. Panel .............................................................................................................................................................................................. 38
5.1.2. Recalling internal presets................................................................................................................................................ 38
5.1.3. Saving a preset ...................................................................................................................................................................... 38
5.2. MOD mode................................................................................................................................................ 38
5.2.1. Create a modulation path............................................................................................................................................... 39
5.2.2. Setting the modulation amount ................................................................................................................................. 39
5.2.3. User assignable destinations ..................................................................................................................................... 40
5.3. SEQUENCER Mode ................................................................................................................................ 41
5.3.1. Arpeggiator mode................................................................................................................................................................ 47
5.3.2. Matrix Arpeggiator Mode................................................................................................................................................ 48
6. MIDI ....................................................................................................................................................... 50
6.1. MIDI Continuous Controller Assignments........................................................................... 50
6.2. MIDI Control Center settings ......................................................................................................... 51
7. Software License Agreement................................................................................................. 55
8. FCC Information............................................................................................................................. 58
Page 8

Page 9

1. CONNECTIONS
Panel Release latch - Push, then use the hinged prop inside the case to set the
control panel at the most convenient angle. You can also leave the panel flat.
1. Master Out - 1/4" unbalanced +4dBu stereo line-level outputs, intended to go to
an amp and speakers, or to an audio interface or mixer. For mono use the left
channel only.
2. Insert Send/Return - +4dBu 1/4" TRS jack for sending the output of the synth
(mono) to an external processor and back in. This goes before the Master Out
in the signal path. It requires an insert cable, wired: Tip = Send, Ring = Return,
Sleeve = Ground.
3. CV Ins/Outs - 3.5mm control voltage outputs and inputs for being controlled/
controlling by modular synthesizers. 12 parameters are available (VCA, LFO 1
Amount, Ladder Filter Cutoff, Steiner Filter Cutoff, VCO 2 Metal, Pulse Width,
Ultra, Pitch; VCO 1 Metal, Pulse Width, Ultra, Pitch). The CV inputs are tolerant to
+/-15V
4. Input - External input. Run external instruments through the MatrixBrute's
synthesis engine.
5. Input Type (Inst/Line) - For external instrument, use Instrument level for Hi-Z
sources like an electric guitar or bass; use Line level for sources such as another
electronic instrument, mixer output. This is an unbalanced input. Line = 68kΩ.
Instrument = 1.1MegΩ
6. Gain - Level control for external instrument input, used in conjunction with the
Gate (#7). Line Gain = 0 -> 20dB. Instrument Gain = 0 -> 40dB
7. Audio Gate (Off/On) - A gate extractor that allows you to use external audio
signals, like a guitar, to trigger the envelope generators. The Gain control (#6)
adjusts the level of the instrument relative to this threshold.
8. Gate In/Out - Receives/sends a voltage trigger, usually to/from another analog
synthesizer. Use it to trigger the MatrixBrute from another source, such as an
analog drum machine.
9. Sync In/Out - Interfaces MatrixBrute with pre-MIDI instruments that were
capable of synchronization, such as early Korg and Roland drum machines. The
following types of clock signals work: 1 step (Clock - this is the default); 1 step
(Gate); 24 pulses per quarter note; 48 pulses per quarter note.
Arturia - MatrixBrute Manual - Connections 3
Page 10

10. Expression 1, 2; Sustain - Pedal inputs. Expression 1 and 2 are for
continuously variable expression pedals (sometimes called volume pedals),
Sustain is for a momentary on/off pedal (i.e. a sustain pedal). Some
manufacturers reverse the polarity of their pedals; download the MIDI Control
Center software from www.arturia.com to correct the polarity of any of them.
These pedals are converted to MIDI, so they appear in the MIDI Out datastream.
Expression pedal wiring is Tip = pot center tap; Ring = 3.3V; Sleeve = Gnd
11. Memory Protection On/Off - When off, prevents the MatrixBrute's patch Preset
and sequencer Pattern memories from being overwritten.
12. MIDI In/Out/Thru - Standard 5-pin DIN jacks. Connect to MIDI interfaces and
other equipment.
13. USB - USB B jack for connecting MatrixBrute to a Mac or PC (which normally
have USB A connections; the cable is often called a "printer cable.") This lets you
use Arturia's MIDI Control Center software (available from www.arturia.com),
and it also sends/receives MIDI - no additional MIDI interface is required.
14. Power switch - Turn the instrument on and off.
15. AC jack 100-240Vac, 50-60Hz, 45W
4 Arturia - MatrixBrute Manual - Connections
Page 11

2. GETTING STARTED WITH MATRIXBRUTE
With the MatrixBrute on a solid playing surface, push the Panel Release latch and
use the hinged prop inside to set the control panel at the most convenient angle
(or just leave it flat if that works better). Take care when lifting on the Matrixbrute
panel as it could cause the support to fall.
In order to hear the instrument, connect cables from the Master Out to your amp
and speakers. Use the left output for mono, i.e. if you're only using one cable.
(You can also just use headphones - the jack is on the left side of the front edge,
by the wheels.)
Register and update first: MatrixBrute is designed so it can work stand-alone, but
it also brings some very useful features to a computer environment.
Please use a USB-B to USB-A cable to connect it to a Mac or PC when you first
get it.
Arturia - MatrixBrute Manual - Getting Started with MatrixBrute 5
Page 12
Then go to www.arturia.com and download the MIDI Control Center software for
Mac and PC. Arturia is constantly improving our instruments, so we ask that you
update to the latest firmware (which you do through this program).
MIDI Control Center is a librarian for presets and sequences, and it's used to
configure the instrument's MIDI settings.
MIDI: In addition to the keyboard, almost all the knobs and sliders send and
respond to MIDI, so you can record and edit them in a DAW. This also makes the
instrument useful as a hands-on controller for other instruments. MIDI can go in
and out the USB port, the 5-pin DIN ports, both, or neither.
For details about which MIDI Continuous Controllers each fader and knob
sends/receives, please see the section on MIDI [p.50].
Auto-Tuning MatrixBrute
Summary: Kbd Track + Panel
auto-tunes the instrument. You'll need to do that
once in a while, more often before it warms up.
6 Arturia - MatrixBrute Manual - Getting Started with MatrixBrute
Page 13

Part of the beauty of analog synths like the MatrixBrute is that the voltage
running through their circuitry drifts a small amount, giving them a slightly
random character. It also takes a while for the voltage to stabilize when you first
turn the synth on; the warmer the temperature, the shorter the time it takes, but
you'll still need to auto-tune the instrument from time to time.
Hold down Kbd Track and Panel to initiate the auto-tuning process.
Understanding Digitally-Controlled Analog
Summary:
The knobs and sliders don't necessarily reflect the underlying
settings. There are some different behavior settings in the MIDI Control Center
software, but in the default mode you must sweep the knob past its actual
setting to "hook" it.
Unlike early analog synths, MatrixBrute has the advantage of digital control
over its analog circuitry. It's the best of both worlds: the warmth and hands-on
control of real analog, with the ability to save and recall patches and settings
- to say nothing of the Matrix (electronic patchbay), MIDI, and other modern
conveniences.
Because of that, the instrument's knobs and sliders aren't actually controlling
voltages directly, they are knobs that instruct the digital circuitry how to control
the analog voltages. So the positions you see on the panel don't necessarily
reflect where they're really set, for example after you load a Preset sound.
The MIDI Control Center software has three modes. In Hook mode you must
sweep the knob until it catches its actual position before it has any effect. Jump
mode means the voltage jumps to the knob position as soon as you move it; and
Scaled mode scales the range of the knob based on the stored value and the
physical distance to either extreme.
The Panel button mentioned above will bypass the current preset and give you
a sound that is based on the actual positions of the knobs and sliders.
Load a Preset, Play, and Adjust the Output Level
Arturia - MatrixBrute Manual - Getting Started with MatrixBrute 7
Page 14
Press PRESET, and the button will turn purple.
Push a button to load a Patch so you can play the instrument. Adjust the output
and/or headphone levels, and fine-tune the pitch.
(
Be sure the Panel button mentioned above isn't lit, or you won't be listening to
the Preset
.)
MatrixBrute stores 16 banks of 16 Presets (total 256). The banks are rows A - P
on the left, Presets within each bank are in columns 1-16. To select, say, patch B3,
go two rows down and three columns across; B 03 will appear in the numeric
display.
(The Matrix is also used for the 64-step pattern sequencer/arpeggiator, and when
you push MOD it becomes the electronic patchbay.)
8 Arturia - MatrixBrute Manual - Getting Started with MatrixBrute
Page 15
3. GUIDED TOUR
The following walkthrough will give you a solid foundation for the MatrixBrute.
After this you'll have a good understanding of what you're doing when you
create and shape sounds.
3.1. Subtractive synthesis overview
MatrixBrute is an analog subtractive synthesizer. Subtractive synthesis starts
by generating basic waveforms, and then you remove what you don't want to
sculpt the timbre you're after. MatrixBrute can also use external sounds as basic
waveforms, and then process them through its engines.
The basic signal flow is simple:
Arturia - MatrixBrute Manual - Guided Tour 9
Page 16
• VCO (voltage-controlled oscillators) [p.19] generate various kinds of
waveforms. These are on a black background on the MatrixBrute
panel;
• VCF (voltage-controlled filters) [p.30] shape the harmonic content, but
they can also self-oscillate to become sound sources. For that reason,
they're also on a black background;
• An extensive list of modifiers, identified by a charcoal-colored
background, move the other parameters around over time in various
ways. In some cases, modulators can control other modulators.
One of the main features in the MatrixBrute is... its Matrix (hence the name).
This is an electronic modulation-routing patchbay, so everything that could be
a source can be routed to any and all possible destination parameters. Some
modulation sources you move physically, such as the modulation wheel; others
can either run freely or lock to the internal sequencer's clock. Or they can lock to
MIDI.
Triggers from the 4-octave keyboard and the sequencer/arpeggiator - as well as
incoming MIDI notes - could also be considered modifiers when they're doing
more than just playing notes.
The final module in the MatrixBrute's audio path is an analog effects section, and
the output levels and master tuning are separate from the synthesis engine.
Throughout an analog synthesizer, frequencies are controlled by voltage.
MatrixBrute uses 1V per octave, so for example from C3 to C4 is a 1V increase,
and from C3 to F#3 is a 0.5V increase.
3.2. Initializing a Preset
Start with an initialized sound: Panel + Preset.
3.3. Hands On
MatrixBrute has more than one of every type of module, but it's only necessary
to go through one of each for this bird's-eye view. So we'll just use one VCO, one
VCF, one LFO, one envelope.
10 Arturia - MatrixBrute Manual - Guided Tour
Page 17
3.3.1. VCO 1
Play the keyboard, and you'll hear a buzzy sound. If you don't, push Preset to
toggle to the initialized sound.
Turn VCO 1 up all the way, everything else all the way down in the mixer. These
are all the waveforms available for processing, and we're only working with VCO
1.
Keep pressing VCO 1's Filter button until it's only routed to the red one, the Steiner
filter. Oscillators must be routed to a filter to be audible.
Arturia - MatrixBrute Manual - Guided Tour 11
Page 18
Now that you're hearing VCO 1 on its own, move the Coarse knob to hear what it
sounds like at different pitches.
There are four different waveforms in this VCO - a Sub oscillator that sounds
an octave below the other three. Each wave generator has a level knob on the
bottom row and an enhancer for it on the top.
Turn all four down, then bring each one in one at a time so you can hear the
different waveforms. Try the enhancers to hear their effects on the waveforms.
For now, leave everything at 12 o'clock. It doesn't matter that this isn't a great
sound.
3.3.2. VCF 1
Now to shape the sound's timbre with VCF 1.
Sweep the Master Cutoff knob while playing. (VCF 1's Cutoff knob has the same
effect when you're only listening to one filter; the Master controls both together.)
With the initialized setting, the filter is set to lowpass, meaning it removes
high frequencies. Cutoff selects the
corner frequency
, which is where it starts
operating. This has a radical effect on the timbre of the sound.
Notice that there's no sound when you turn the way down (because you're
blocking all the frequencies from passing). You'd think the VCO, the sound
waveform generator, would be what turn the sound on and off - and it does - but
sounds can also be controlled by opening up a filter.
12 Arturia - MatrixBrute Manual - Guided Tour
Page 19
Bring up the Brute Factor knob, and experiment it, and with Drive. It's not
necessary to point out that you're adding some real testosterone to the sound.
The Resonance control adds more brightness. You can leave VCF 1 set where it
sounds good.
The sound in its present state is just on/off, which is what you want for, say,
organ sounds. We'll adjust that next.
3.3.3. ENV 2
Envelopes shape voltage levels over time while you're triggering a note on the
keyboard. While it can be routed to additional places in the MOD Matrix (see
below), ENV 2 is always hardwired to control the MatrixBrute's VCAs. VCA stands
for voltage-controlled amplifiers, which means all the sound sources that appear
in the Mixer, i.e. the VCOs and/or any external signals plugged into the back of
the instrument.
• Start by raising ENV 2's Attack slider all the way up and down to "catch"
the fader's actual position. Play the keyboard while gradually raising
it. This has the effect of fading in the note. A quarter of the way seems
like a reasonable setting.
• The middle two stages of the envelope, Decay and Sustain, are set to
one-size-fits-all settings in the initialized patch we started from. Attack
is how long it takes the voltage to fade in to its initial level. From there,
Decay sets how long it takes to glide to its Sustain level.
• Now for the Release stage of this 4-stage envelope (Attack/Decay/
Sustain/Release, or ADSR). This sets how fast the note fades out when
you release the key. Again, a quarter of the way up might be a
reasonable setting.
Arturia - MatrixBrute Manual - Guided Tour 13
Page 20
• Notice how every note plays at the same volume, no matter how
hard you play the keyboard? The Velo/VCA fader lets you dial in
how responsive the envelope is to keyboard
velocity
, which is what
electronic keyboards use to determine how hard you intended to play.
When the slider is all the way down, every note plays at full volume; all the way
up, and you have to slam the keyboard to get it to speak up. See whether you
like three quarters of the way up.
The MatrixBrute has two other Envelopes. ENV 1 is hardwired to the two filters'
Cutoffs. It works the same way, so you can experiment with its effect.
3.3.4. LFO/Aftertouch/Matrix
Next, how to route modulation sources in the Matrix, including the LFOs.
Low Frequency Oscillators (LFOs) are periodic waveforms just like VCOs, only
they're very low - which by definition means they're very slow. Rather than being
used as sound sources, LFOs 1 & 2 are used as modifiers to add movement
to other parameters. (However, VCO3 is intended to be used as both a sound
source and a modifier.)
Press the MOD button. The Matrix becomes an electronic patchbay.
We're going to route LFO 1 to VCO1's pitch. Depending on the settings, this can
create anything from a vibrato effect, to subtle movement, to some really crazy
stuff.
Like all modifiers (other than the hardwired envelopes), LFO 1 has to be routed
before it does anything. Modulation sources are on the rows on the left of the
Matrix, destinations are columns across the top.
14 Arturia - MatrixBrute Manual - Guided Tour
Page 21

LFO 1 is five rows down, VCO 1 Pitch is the first column, so simply push the button
where the two intersect. The button lights purple, indicating it's the one that's
selected; if you click on another button to select additional modulation routings,
it'll turn blue to show it's been assigned.
LFO 1 still won't modulate the pitch until you dial in a MOD Amount. Try + or -13,
a fairly radical pitch modulation, so you can hear the effect.
Arturia - MatrixBrute Manual - Guided Tour 15
Page 22

You'll also need to set LFO 1's Phase and Rate knobs where they're audible, so try
12 o'clock as a starting point (as usual, after sweeping them to catch their actual
voltage positions).
The pitch should oscillate up and down when you play.
Increase the MOD Amount to + or - 64, and it'll sound sci-fi. This is a good setting
to experiment with the Wave buttons to understand what they do.
MatrixBrute's LFOs have a choice of seven LFO waveforms, and you may be
surprised to see that they sound just like they look. Some of the same waveforms
are available in the VCOs, where they go by much faster, so this is a good way
to get a handle on how they sound.
Now the MOD Amount back to about 13, a vibrato effect.
The MatrixBrute's keys are pressure-sensitive. This is called Aftertouch, a
controller source when you push down the keys after the note has sounded.
We're going to use Aftertouch to increase LFO 1's rate a lot to bring in some reedy
growl.
Aftertouch is next to the letter J, but LFO 1's rate isn't one of the 12 hardwired
modulation destinations. Columns 13 - 16 are user-assignable to pretty much any
parameter on the instrument.
16 Arturia - MatrixBrute Manual - Guided Tour
Page 23

• Hold down button 13, then wiggle LFO 1 Rate a little. The LCD display
will darken and lighten, and LFO 1 Rate will appear in its display to
indicate that it's assigned.
• Now touch the button at the intersection of Aftertouch (J) and 13. Set its
MOD Amount to + 99.
Play a fairly low note, then press the key more to bring in aftertouch, and you'll
hear LFO 1 adding some soft growl.
3.3.5. Analog Effects Section
The operation instructions cover the MatrixBrute's Analog Effects [p.35] in detail,
but just to "finish" the sound and bring this module to your attention, turn the
Wet/Dry knob up a little to add some space. Use the Mode button to try other
effects.
Arturia - MatrixBrute Manual - Guided Tour 17
Page 24

4. OPERATION
4.1. Master Controls
These controls are always active, and they're not sent out or received over MIDI.
• Master Volume - The synthesizer itself will not distort with the level all
the way up; the control is only to avoid overloading the next step in the
chain (mixer, audio interface, amp...).
• Phones - The headphone level is independent of the Master Volume.
• Fine Tune - Global tuning ± 1 semitone from the knob's center detent.
4.2. Utility Commands
Pressing Panel plus another button invokes the following "hidden" commands.
• Panel + Kbd Track - Auto-tunes the instrument. Because voltages drift
over time - which is part of the character of analog synths - it's
necessary to tune the instrument occasionally, more frequently while
it's first warming up.
18 Arturia - MatrixBrute Manual - Operation
Page 25

• Panel + PRESET - Resets the current preset to an initialized voice
(without saving it and overwriting the preset). This is a good starting
point for working with MatrixBrute.
• Panel + MOD - Clears the Matrix (which is the electronic patchbay) of
all modulation routings.
• Panel + SEQ - Resets the current pattern.
• Panel + [Macro knobs, Master Cutoff, MOD Amount] - Resets the 360˚
knob's value to 0.
4.3. VCOs
Unless you bring in external instruments for processing, the raw soundwaves for
the MatrixBrute are generated by its three Voltage-Controlled Oscillators (VCOs).
A fourth oscillator produces random noise waveforms.
Arturia - MatrixBrute Manual - Operation 19
Page 26

VCOs 1 and 2 are exponential, like the ones on the most famous original
synthesizers. That gives them a musical, slightly unpredictable character,
because the pitch drifts a little over time. You may have to auto-tune the
instrument every once in a while (hold down Panel and Keyboard Track).
VCO 3 is a multi-function oscillator. It can be used as a sound source and as an
extra modulator, and its pitch is more stable due to its being linear.
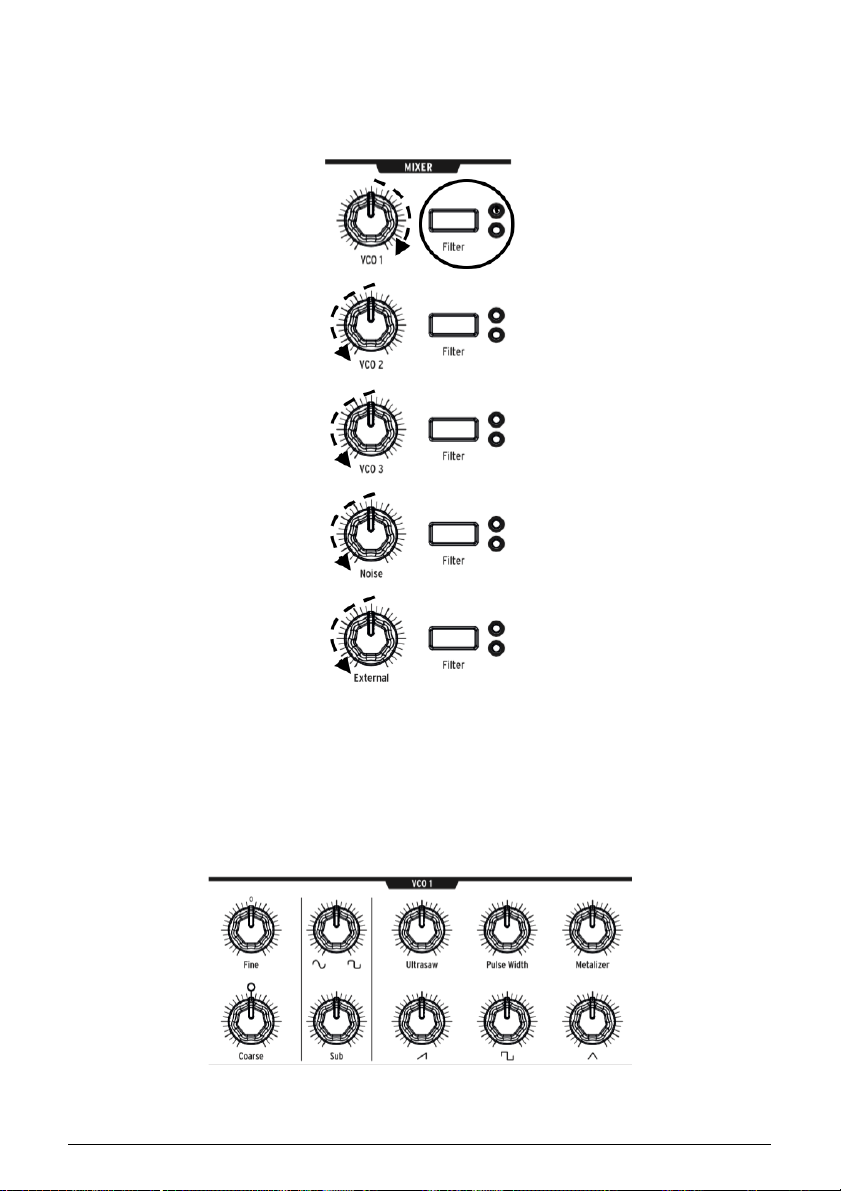
4.3.1. VCOs 1 and 2
The only difference between these two VCOs is that VCO 1 can be routed into
VCO 2 to modulate it (this is called
frequency modulation
, or FM). Both VCOs
operate the same way.
The controls are laid out so the top knob refines the more fundamental setting of
the knob below it.
Coarse
adjusts the pitch ± 2 octaves in semitone steps. The light comes on when
it is centered, when you're up or down one octave, and when you reach two
octaves.
Fine
adjusts the pitch continuously up to ± 1 semitone.
4.3.2. Sub oscillator
The sub oscillator is combined with the mixable waveforms (discussed next), an
octave below them.
Sub
adjusts the level.
The
waveform selection
knob above it sweeps the sub wavefom between a pure
sinewave to the left and a clipped one, which sounds buzzier, to the right.
4.3.3. Mixable waveforms
20 Arturia - MatrixBrute Manual - Operation
Page 27

There are three primary waveforms in VCOs 1 and 2 - sawtooth, square, and
triangle. Subjectively, sawtooth sounds the richest, square sounds more hollow,
and triangle sounds like a flute.
Each waveform knob has a signal enhancer above it. These make the waveform
more complex by combining slightly random, slightly time-shifted versions of it.
•
Ultrasaw
shifted copies of it, resulting in a brighter, edgier sound.
•
Pulse Width
square pulses - the width - so it's sometimes a rectangle rather than a
square, making the sound more complex.
•
Metalizer
of wave folder that adds harmonics to the original trianalge wave.
4.3.4. VCO 3 - LFO 3
VCO 3 is a multifunction oscillator, designed to be used as a sound source or as
a modulation source. The Noise oscillator is next to it, and it can also be used as
a modulation source.
enhances the sawtooth wave by combining two slightly time-
varies the lengths of the flat tops and bottoms of the
adds a hard edge to the triangle wave. The Metalizer is a type
•
Coarse
on when it's centered, when you're up or down one octave, and when
you reach two octaves.
•
Wave
right) between a reverse sawtooth, square, triangle, and sine wave.
Each sounds successively less buzzy, until you get to the pure sine
wave.
•
LFO Div
being used as a modulator. This determines the LFO speed.
•
Kbd Track
with successively higher notes. This simulates what happens with, for
example, woodwind and brass instruments.
4.3.5. Noise Generator
Arturia - MatrixBrute Manual - Operation 21
adjusts the pitch ± 2 octaves in semitone steps. The light comes
selects the waveform. Repeated button pushes go (from left to
divides the frequency by up to four (16, 32, 64, 128) when it's
, an on/off toggle, raises the output level of the oscillator
Page 28

The definition of noise is a random waveform, so it's unpitched. The MatrixBrute
offers four noise types, and the difference is in their frequency spectrum.
As a practical description, blue noise has the most energy in the high frequencies
and least in the low ones, then white sounds a little lower, followed by pink, and
finally red sounds the lowest. Noise can be an important component of a sound,
adding some grit, or it can be used to modulate another wave.
Noise Type selects the four types successively, and each one has an
appropriately colored light.
4.4. Audio Mod
In addition to making sounds, the VCOs can modulate other VCOs and the
two VCFs (Voltage-Controlled Filters). These will create more character and add
harmonics to the sound of the modulation destination.
When the VCOs modulate other VCOs, it's called Frequency Modulation - FM.
• VCO 1 > VCO 2 adjusts how much VCO 1 modulates VCO 2.
• VCO 1 < VCO 3 > VCO 2 lets VCO 3 modulate VCO 1 or 2. It modulates
neither when the knob hits its center detent.
• VCF 1 < VCO 3 > VCF 2 lets VCO 3 modulate VCF 1 or 2. It modulates
neither filter when the knob is in its center detent.
• VCO 1 < Noise > VCF 1 lets the Noise oscillator modulate VCO 1 or VCF 1.
Again, it does neither when the knob is centered in the detent.
For the bi-polar knobs to be used in the modulation matrix, you will need to turn
the knob in the direction that you want it to modulate when assigning it. There is
a small dead zone on either side of the center detent that will allow you to have
no modulation but still allow the knob position to be sensed.
22 Arturia - MatrixBrute Manual - Operation
Page 29

4.5. VCO Sync
VCO 2 > VCO 1 causes VCO 1 to follow VCO 2's pitch when it's engaged. Turning
VCO 1’s Coarse knob will allow you to hear the classic harmonic sync sweep
sound.
4.6. Voice Mode
There are 3 VOICE modes that are available on the MatrixBrute. These modes
allow you to play the synth in ways beyond the standard monophonic way.
4.6.1. Monophonic
Monophonic is the standard voice mode. In this mode, all the oscillators will play
when you press a key ( or send MIDI or CV information ). The voice path is laid
out as you see it in the graphics below.
4.6.2. Paraphonic
Paraphonic mode allows you to play multiple notes at one time. It splits the three
oscillators, one per note played, so that you can play up to 3 notes at once.
Paraphonic differs from polyphonic in that all 3 of the oscillators share the same
filters and VCA settings.
4.6.3. Duo Split mode
Duo split mode allows you to split the keyboard and have 2 completely different
sounds played on each half. To accomplish this, we split the voice up as shown
in the diagram below.
4.6.3.1. Upper part
Signals routed through VCF 1 (the Steiner filter), are controlled by ENV 1 and ENV
2.
Arturia - MatrixBrute Manual - Operation 23
Page 30

4.6.3.2. Lower Part
• Signals routed to VCF 2 (the Ladder filter); are controlled by ENV 3
which then controls both the Ladder filter and a hidden VCA.
• The Sequencer and Arpeggiator are routed to the lower part, so you
can hold a key to play a pattern or arpeggio on the lower part of the
keyboard while playing notes on the top part.
4.6.3.3. Setting the split point
Set the split point by pressing MODE button while playing a key. (This is the
MODE button in the VOICE panel area, not one of the filter mode buttons.)
4.6.3.4. Setting the octave of the lower section
Set the octave of the lower part by pressing MODE button and use the Octave <-
-> buttons to transpose it.
4.7. Wheels
• Wheels As on most keyboards, the MatrixBrute's pitch wheel springs back to the center position (no pitch shift), while the mod wheel is continuous.
24 Arturia - MatrixBrute Manual - Operation
Page 31

• Bend Range sets how far the pitch wheel bends up or down, up to a
maximum of ± 1 octave. The center position is up or down a fifth.
• Mod Wheel - successive pushes assign the mod wheel to the Matrix
(where it can be routed to multiple parameters); or to the master filter
Cutoff frequency; to LFO 1 Vibrato rate; or to LFO 1 amount.
4.8. Keyboard Performance Controls
• Pitch and Modulation wheels - Please refer to the previous section
(WHEELS) to set the pitch bend range and Modulation wheel
assignment.
• Octave <- -> - Transposes the entire 49-key keyboard ± 1 or 2 octaves to
extend its range past four octaves. This affects the instrument locally
as well as over MIDI.
4.8.1. Glide
• Glide On/Off - The Glide effect sweeps the pitch from one note to the
next. The ON/OFF button enables and disables the glide function.
• Glide - This knob sets the glide time from barely perceptible all the way to over two seconds when it's all the way up.
Arturia - MatrixBrute Manual - Operation 25
Page 32

4.8.2. Play Control
•
Legato
the envelopes on every key on. The following settings apply to each
note sounding in the current voice mode. In Monophonic they apply to
the single sound, and in Paraphonic and Duo-Split they apply to the
one being played. See the Voice Mode section [p.23].
•
On -
released. Holding a note while playing the next one, before releasing
the first, creates a slur effect. This works for successive notes as well,
and its effect is dependent on the envelope settings (because a sound's
overall length is relative to the first note you play). If you play staccato,
the envelope will trigger on each note played as normal.
•
Off
•
Glide
a note is held, will not trigger then envelopes. If the GLIDE is active,
then playing legato will both prevent the envelope from triggering as
well as gliding from one pitch to the next.
Note Priority - Determines what happens when you play more voices than are
available (one in Monophonic voice mode and two in the other voice modes).
•
Low -
are cut off;
– Legato allows for playing notes with or without retriggering
This will only retrigger the envelope after all notes have been
– Every note played will trigger the envelopes.
- This mode is similar to Legato mode in the playing a notes while
The lowest note you're holding keeps sustaining and other notes
•
High -
notes are cut off;
•
Last -
Key Hold – Simulates the effect of holding a note forever. It plays the last note
you triggered, no matter how much time has passed, and holds it. It does not
affect the envelopes so sounds with no sustain will not actually sound beyond
the decay time. This is also used to hold an arpeggiation on.
The highest note you're holding keeps sustaining and other
Held notes are cut off by the new ones you play.
4.9. Macro Knobs
26 Arturia - MatrixBrute Manual - Operation
Page 33

M1, M2, M3, and M4 knobs are modulation sources that appear the MOD Matrix
( see Mode Matrix Section [p.38] ) on rows M, N, O, and P. They're designed to be
convenient performance controls.
Each MACRO knob can modulate multiple MatrixBrute parameters, and they all
send MIDI Continuous Controllers (CC#11, 2, 3, 4 in order).
Arturia - MatrixBrute Manual - Operation 27
Page 34

4.9.0.1. Resetting Macro’s to 0
Press Panel + [M1 - M4] to reset the MACRO knob to 0.
4.10. Mixer
The levels of the MatrixBrute's five potential sound sources - the VCOs, Noise
generator, and External input - are set here. Sources must be sent to either or
both filters to be heard.
(If you've assigned a source to one of the filters and still hear nothing, the cutoff
frequency may be outside its range.)
28 Arturia - MatrixBrute Manual - Operation
Page 35

All five inputs to the mixer have the same features:
• Level [VCO 1, VCO 2, VCO 3, Noise, External]
• Filter routing - Press the button repeatedly to assign the sound source
to VCF 1, VCF 2, both, or neither. If the filters are in series, the VCOs
can only be assigned to VCF 1 (or turned off).
In Duo split mode, the routing here will assign the sound source to either the
upper (Steiner) or lower (Ladder) section of the keyboard.
4.11. LFOs 1 and 2
The two LFOs (low frequency oscillators) are modulators that can be routed
to add movement to pretty much any parameter on the MatrixBrute. LFO
waveforms are near or below the bottom threshold of our hearing, ranging from
about one cycle every 18 seconds up to 100Hz. They're useful for creating all
kinds of sounds, from vibrato to filter sweeps to pitch changes; their effects
range from subtle to wild.
Seven waveforms are available, from left to right: sine, triangle, square, reverse
sawtooth, sawtooth, S&H, and low frequency random.
The pictures of these waveforms show exactly how they behave, for example
the square wave turns on and off abruptly and the triangle ramps up and back
down. You can hear this very clearly at slow rates.
• Wave Selection - < and > scroll left and right through the waveforms.
LFO 1 and 2 are the same except for one similar parameter (Phase vs. Delay),
and you patch them into the signal path at the Matrix. See Matrix Section [p.37].
• Phase [LFO 1 only] adjusts where in the LFO's wave cycle it starts
relative to the note trigger, either early or late. The knob has center
detent position to starts the LFO at the beginning.
Arturia - MatrixBrute Manual - Operation 29
Page 36

• Delay [LFO 2 only] delays when LFO starts and also fades it in
gradually.
• Rate sets the frequency of the LFO. The light to the left of this knob
flashes with it (until the setting gets too high and the light remains
solid).
• Seq-Sync locks the LFO's tempo to the Sequencer See Sequencer
Section [p.41], which in turn can be synced to various sources.
• Retrig cycles through the three choices for how the LFOs respond to
note triggers/retriggers:
◦
Off
- The LFO keeps oscillating continuously on its own,
independently of whether notes are triggered; This mode
simulates a traditional analog LFO.
◦
Single
- The LFO goes through its wave one time only after
a note is triggered. This is useful for creating an interesting
note attack, among other applications.
◦
Multi
- The LFO starts its cycle over every time you trigger a
note.
4.12. Filters
Steiner Filter (VCF 1) and Ladder Filter (VCF 2)
30 Arturia - MatrixBrute Manual - Operation
Page 37

Filters remove frequencies from the sound sources coming from the Mixer
see Mixer Section [p.28], and they are a primary component in the subtractive
synthesis technique used by the MatrixBrute and all analog synths. Modulating
them varies the timbre of the sound over time. With very high Resonance levels
they can self-oscillate, becoming another sound source.
MatrixBrute features two multimode Voltage-Controlled Filters (VCFs):
• The Steiner Filter (VCF 1) was designed by Nyle Steiner in the '70s.
It has a unique character that becomes apparent immediately at
relatively pronounced settings.
• The other filter is a classic Ladder Filter (VCF 2), a famous standardbearing design known for its rich, thick sound; unlike the original, this
one is gain-compensated to avoid the dip in volume that you find at
higher resonance level. This one also is a multimode filter and has both
12dB per octave and 24dB per octave options. These filters play a big
role in the MatrixBrute's character.
Both filters have the same basic parameters, but the Steiner Filter has a couple
of additional ones.
Arturia - MatrixBrute Manual - Operation 31
Page 38

The central parameter in a filter is the corner frequency or frequencies where it
starts cutting. This is called Cutoff in synths. Maxibrute has two places to adjust
this:
• Cutoff sets the corner frequency/frequencies individually for each
filter. These are then fed to a combined control:
• Master Cutoff is a prominent knob that sweeps both filters' cutoffs
together.
The word "multimode" means the filter can adopt different curves, which also
change the sound completely.
Mode selects these curves:
•
LP (Lowpass)
does just that - allow low frequencies to pass while high
frequencies are attenuated.
•
BP (Bandpass)
allows a band of frequencies to pass while blocking
everything else. Another way to look at it is that the treble and bass are
turned down, leaving a midrange band.
•
HP (Highpass)
allows high frequencies to pass while low frequencies
are blocked.
•
Notch (Steiner/Parker filter only)
removes a narrow band of
frequencies.
The slope of the filter's roll-off changes the sharpness of the sound.
• Slope selects either the 12dB or 24dB per octave setting. Usually 12dB
sounds brighter.
• Drive adjusts how hard the signal hits the filter. The higher you set it,
the more pleasant distortion you get.
• Brute Factor™ is Arturia secret sauce. It ranges from warming up the
low end to creating a monstrous growl when turned up. The exact
effect depends on how it's interacting with other settings.
• Resonance emphasizes the frequencies at the point of the cutoff,
because they're fed back into the circuit. Higher resonance levels can
cause the filters to self-oscillate. NOTE: The Steiner filter does not track
the keyboard well over a wide range by nature. For better pitch to
octave tracking, using the Ladder filter.
• Env 1 Amt sets how much Envelope 1 (the one dedicated to the VCFs)
modulates the Cutoff frequency. This control allows for both positive
and negative modulation amounts.
32 Arturia - MatrixBrute Manual - Operation
Page 39

• Routing chooses between the two filters running in parallel or having
VCF 1 feed VCF 2. This unique control allows you to alter the voice path
and create a wealth of new sounds.
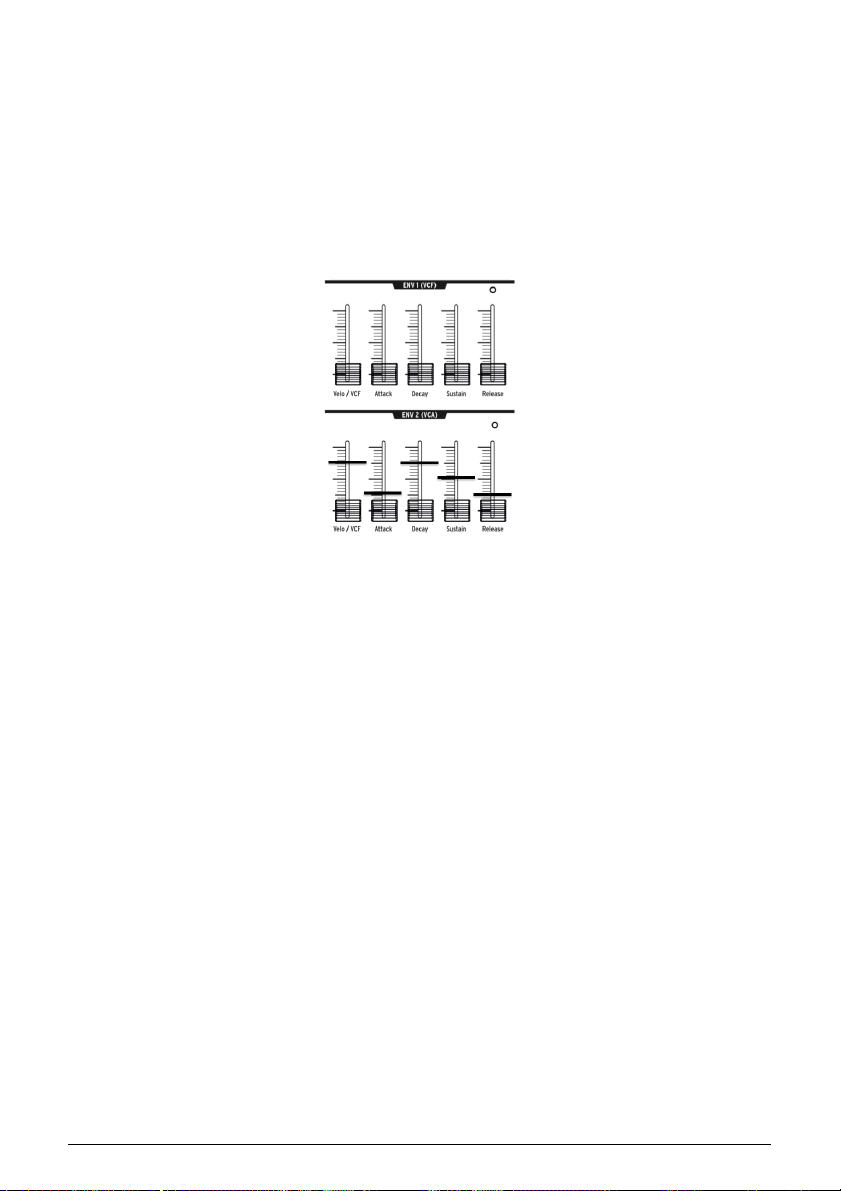
4.13. Envelopes
Envelopes are adjustable modulators that shape the voltage over time.
MatrixBrute has two 4-stage, ADSR (Attack Decay Sustain Release) envelopes,
plus a third one (ENV 3) which adds a Delay phase before the ADSR (this is
all explained below). Each envelope has a "gate" LED that show when a gate is
receive and will fade out to show when the release stage is still active.
You can add assignments to the envelopes in the Matrix, but by default:
• ENV 1 (VCF) is routed to the VCF's Master Cutoff frequency, so you can
shape the overall filter sweep;
• ENV 2 (VCA) (voltage-controlled amplifier) controls the overall volume
level of the sound;
• ENV 3 is freely assignable in the Matrix.
Arturia - MatrixBrute Manual - Operation 33
Page 40

In all three envelopes:
• Attack sets the time, from 2ms to more than 10 seconds, the voltage
takes to reach its initial level;
• Decay adjusts the time, again from 2ms to more than 10 seconds, it
takes the voltage to go from its initial level to the Sustain level;
• Sustain is the level the signal settles at after it decays. This level is
usually lower than the initial level (hence "decay"), however it can also
be the same - in which case the Decay setting has no effect. It can also
be all the way down, for example if you're programming percussive
sounds, in which case the Release setting has no effect.
• Release is the time it takes the voltage to fade all the way down after
you release the key that's triggering the sound.
• Velo/VCF and Velo/VCA (ENV 1 and ENV 1 only): You can tune ENV
1's and ENV 2's response to key velocity, i.e. the "louder" you play,
the higher the signal voltage. (Unlike pianos, electronic keyboards
measure how fast a key travels - its velocity - to determine how loudly
you intended to play.)
• Velo/VCF (ENV 1 only) This slider offsets the ADSR levels so velocity has
no effect when it's all the way down; the higher you raise it, the more
velocity is required to reach the maximum filter Cutoff level.
• Velo/VCA (ENV 2 only) When this slider's all the way down, the VCOs
sound at their maximum level, no matter how hard or softly you play;
raise the slider to increase the keyboard velocity response.
• ENV 3 is slightly different in two ways. First, it doesn't do anything
until it's assigned in the Matrix. Second, it runs through its stages
independently of keyboard velocity (although you can modulate its
stages in the Matrix).
34 Arturia - MatrixBrute Manual - Operation
Page 41

◦
Delay (ENV 3 only)
the key trigger; all the way down is no delay. The delay time
is from 2mSec to over 10 Seconds.
allows you to start ENV3 envelope after
4.14. Analog Effects
MatrixBrute features Analog Effects with 5 different modes on the output.
The Analog Effects are all based on classic Bucket Brigade Devices (BBD’s).
The technical differences between them are a function of the delay times and
how or whether they're modulated. Note that all the knobs can be modulation
destinations in the Matrix.
Mode cycles through the five effects, which are tuned with the five knobs at the
top of the Analog Effects section:
•
Stereo Delay
first left then right. When the Delay Time knob (see below) is at 12
o'clock, the first one is about 100ms and the second about 200ms. The
maximum time is about half a second.
•
Mono Delay
right sides).
•
Chorus
rich, thickening sound.
•
Flange
Typically, flangers have an "airplane" sound, and unlike choruses the
effect often moves in and out.
•
Reverberator
recirculating the delays with varying delay times.
The five effect-modifying parameters:
Arturia - MatrixBrute Manual - Operation 35
has two taps (meaning repetitions of the original sound),
is a single tap in the center (i.e. it's equal in both left and
is an LFO modulated delay, in the vicinity of 5 to 50ms. It's a
is a shorter modulated delay, somewhere around .5 to 10ms.
is a unique analog space effect, produced by
Page 42

• Delay Time has different ranges in different Modes. Longer delay times
are achieved with clockwise turns.
• Regeneration is a level control for the amount of the signal that gets
fed back into the processor. Things can get wild - in both good and bad
ways - if you turn it up.
• Tone/Rate This control doubles as a tone or lowpass filter control for
the delays, and as a rate control in the Chorus and Flanger modes.
• Width/Depth specifies the amount of stereo field in the stereo delay/
reverberator, and the modulation depth of the LFO in the chorus and
flanger.
36 Arturia - MatrixBrute Manual - Operation
Page 43

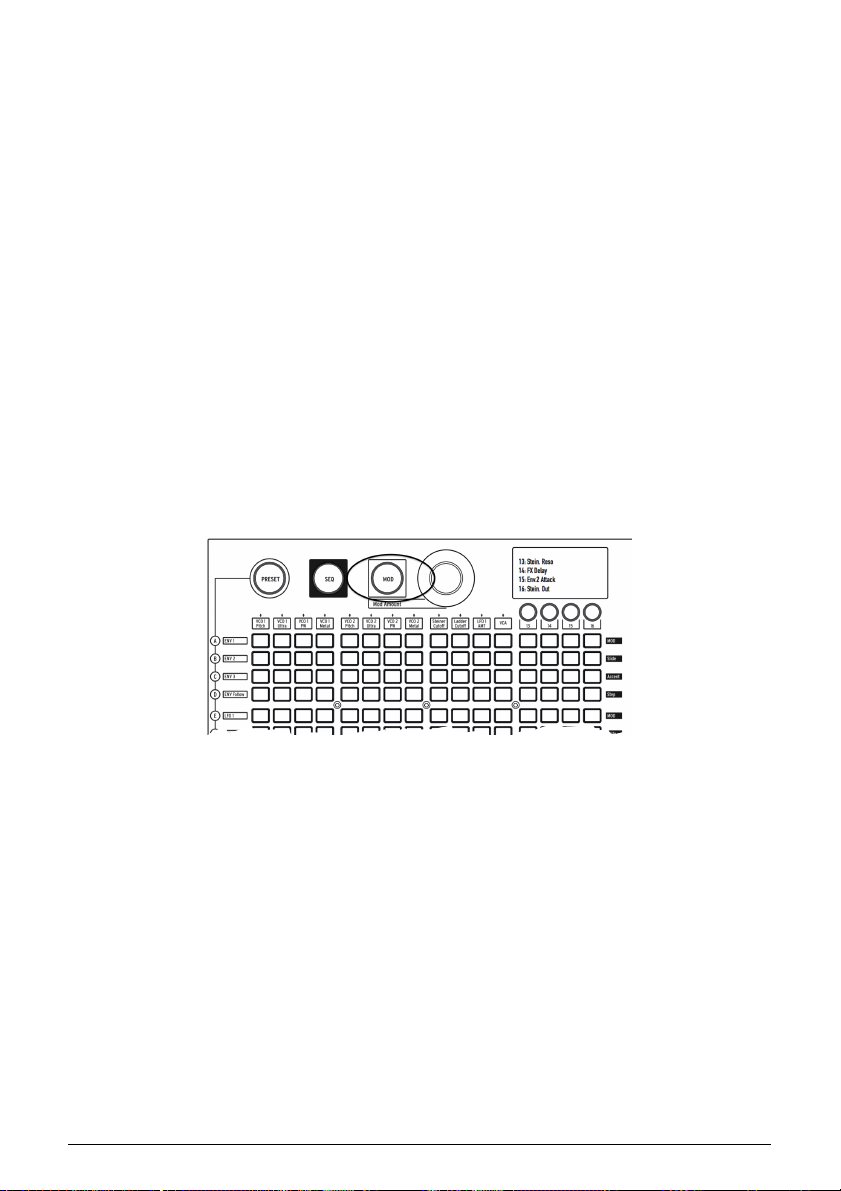
5. THE MATRIX
The Matrix is a 16 x 16 (256-button) grid that has three modes.
PRESET (pink), SEQ (red), and MOD (blue) are big buttons to select the active
Matrix mode:
• PRESET, in which the Matrix is used to save and recall patches in 16
banks (rows A - P) of 16 patches each (columns 1-16). The patches can
also include sequences.
• SEQ, a 64-step sequencer that also functions as an arpeggiator.
• MOD, an electronic patching matrix (hence the name "MatrixBrute") that
routes 16 modulation sources (rows A-P) to 16 destinations (columns 1
- 16).
5.1. PRESET mode
Arturia - MatrixBrute Manual - The Matrix 37
Page 44

5.1.1. Panel
Panel toggles between the physical and loaded preset positions.
When in this mode, the positions of the knobs determine the sound. This is the
mode to use if you are looking to get 1:1 feedback of parameters and the sound
you are editing.
IMPORTANT: to hear a preset you've loaded, the Panel button must be off!
5.1.2. Recalling internal presets
To recall one of the 256 internal presets:
In PRESET mode, simply select its button. The banks are rows A - P on the left,
and presets within each bank are columns 1-16. To select, say, patch B3, go two
rows down and three columns across; B 03 will appear in the numeric display.
Alternatively, use the < and > buttons underneath the numeric display to scroll up
and down through the presets.
5.1.3. Saving a preset
To save the Panel or edited Preset in an internal location:
Press Save + [desired bank/channel location, using the Matrix buttons or < and >
buttons].
5.2. MOD mode
38 Arturia - MatrixBrute Manual - The Matrix
Page 45

The MODulation Matrix is an electronic patchbay that routes all the MatrixBrute's
modulation sources to any or all possible destinations. Think of this as a grid
of patch cords, each with an attenuator that allows for positive or negative
modulation. Every parameter that it would make sense to modulate - pretty
much anything with a knob or fader - can be a destination.
The 16 modulation sources are in rows A - P, and destinations are in columns 1 -
16. Destinations 1 - 12 are hardwired, and 13 - 16 are freely assignable.
5.2.1. Create a modulation path
To assign a modulation source to a destination parameter:
1. In MOD mode, select a modulator and a destination by pressing any
button in the grid.
• The current selection lights up pink.
• You can select from 0 to all 16 destinations for each modulation source,
and each destination parameter can be modulated by 0 to 16 sources.
• Modulation "patch points" light up blue when they're not the current
selection.
1. Set a positive or negative modulation amount (± 99 steps) for the
current selection with the Mod Amount knob. This is an offset from the
input voltage.
Negative values decrease a destination's MOD Amount as the input voltage goes
up, positive values increase it. For example, you might want Aftertouch to lower
VCO 1's pitch a small amount while increasing VCO 1's Metal a lot.
5.2.2. Setting the modulation amount
When MOD Amount is centered, only the red LED at 12 o'clock is lit. White LEDs
in either direction indicate the knob's position when it's off-center; each dot gets
progressively brighter when you've moving toward it.
Also, the exact modulation amount is shown in the numeric display in the Preset
area.
Arturia - MatrixBrute Manual - The Matrix 39
Page 46

5.2.3. User assignable destinations
To assign a parameter to destinations 13 - 16:
Hold [13, 14, 15, or 16] button while moving the desired knob or slider on the front
panel. The parameter will appear in the LCD display as shown above.
You can also assign a modulation amount in the matrix itself as a modulation
destination by pressing and holding the [13, 14, 15, or 16] button and pressing a
button in the modulation grid.
For instance:
If you wanted to have the mod wheel adjust the amount of modulation between
the LFO2 and the Metalizer of VCO1, you would first route the LFO2 to the
Metalizer of VCO1 by pressing the F4 button. Then you would select F4 as a
modulation destination by pressing the [13 for example] button and the F4 button.
Now you would choose MOD Wheel to F4 by pressing the H13 button and using
the encoder to turn up this value.
List of MOD sources:
40 Arturia - MatrixBrute Manual - The Matrix
Page 47

MOD
#
source
A ENV 1
B ENV 2
C ENV 3
Notes
ENV
D
Follow
E LFO 1
F LFO 2
G LFO 3
Mod
H
Wheel
I Kbd/ Seq Note triggers from the keyboard or SEQuencer
J Aftertouch
K Velocity
L Seq Mod Mod from the SEQuencer
M M1 Macro knob M1
N M2 Macro knob M2
O Exp 1/M3
Generates a control voltage based on the level of the
external input.
The keys are pressure-sensitive when you keep pushing
after the note is triggered.
Electronic keyboards measure how fast a key travels to
determine how loudly you intended to play.
Expression pedal plugged into the rear panel, and
Macro knob M3.
P Exp 2/M4
Note that both the Expression pedal and the M 3 or 4 are summed before being
routed to the matrix
Expression pedal plugged into the rear panel, and
Macro knob M4.
5.3. SEQUENCER Mode
Arturia - MatrixBrute Manual - The Matrix 41
Page 48

MatrixBrute's 64-step sequencer has two modes: Sequencer and Arpeggiator.
In Sequencer mode, you can record/program and play Patterns in real time
or in "step" time, meaning one note at a time. Patterns can be Linked to a
corresponding preset so that they are stored with Presets, or stored and recalled
on their own. Play or step through patterns forward, backward, forward then
backward, in random order, and at different note values (e.g. if each step is an
1/8th note, switch it to 1/4 notes to halve the playback speed, etc.).
When the sequencer is being used as a modulation source and routed in the
Matrix, each step can send (or not send) modulation. Dial in the tempo, tap it, or
sync it to incoming MIDI clock. Slide one step into the next one. Steps respond to
key velocity, and you can enter accents manually.
In Arpeggiator mode the notes you hold down are stepped through in a variety
of orders, and repeated in higher octaves.
Press Sequencer) to enter Sequencer mode.
42 Arturia - MatrixBrute Manual - The Matrix
Page 49

Loading and saving sequencer Patterns:
•
Patterns
- You can load and play different sequences, or pattern, by
holding the PATTERNS buttons and choosing from any of the 256
sequences. The banks are rows A - P on the left, and presets within
each bank are in columns 1-16. To load, say, Pattern B3, go two rows
down and three columns across; the B3 red light shows you which
sequence is loaded.
•
Link
- you can link a sequence to your preset sound. When saving your
preset, enable the LINK button to store them together.
•
Save
- Just hold this button and select the bank/preset where you want
to save the Pattern.
Turn on
Matrix Preset Section [p.37]
•
SEQ Length
To set the sequence length, i.e. the number of steps up to
64 maximum, hold SEQ Length and touch any of the four buttons in
the last step to be played. They'll light up, and after that the sequence
will cycle back to the beginning when it gets there (assuming you
don't stop it first, and that it's playing forward rather than backward or
random).
Link
to save a Pattern with a Preset.
See
5.3.0.1. Step parameters:
The sequencer's 64 steps are in four 4-button rows of 16.
• Step indicates a trigger on that step (when it's lit red). See the Record
button below for instructions on how to program patterns, but you can
push the button to turn a programmed/recorded note off. To tie several
Arturia - MatrixBrute Manual - The Matrix 43
Page 50

steps together, hold the first step button and press the last step one. All
step buttons but the first are dimmed (darker).
• Accent lights automatically when you enter or record a note at higher
velocities, or you can turn it on to create an accent. This is used in
conjunction with the VELOCITY sliders on the ENV 1 (VCF) and ENV 2
(VCA).
• Slide activate the GLIDE enable button and will allow you to slide from
one note to another.
• MOD toggles modulation on and off for the step. It has to be routed to
a parameter in the modulation Matrix to have an effect, and it can do
all kinds of interesting things.
5.3.0.2. Sequencer transport and Pattern recording/programming
•
< and >
locate the transport backward or forward one step (when
it's stopped) and trigger the note on the step. (They have a different
function in Arpeggiator mode. See below.)
•
Record
- (Lights up red.) This works independently of whether the
transport is moving. When it's moving, your playing is recorded in real
time. If it's pushed when the transport is stopped, press any of the 64
step buttons and whatever note you play will be recorded on that step
(at the velocity you play). The button turns pink to indicate the current
step. You can record over any note(s) in a sequence, and you can turn
off individual notes simply by pushing their buttons.
•
Play from beginning
- (Lights up white.) This works under any
condition - transport moving or stopped, Record active, etc.
44 Arturia - MatrixBrute Manual - The Matrix
Page 51

•
Play/stop/continue
condition.
• "Auto-play" feature: When the Sequencer button is lit, the pattern will
start to play, and continue as long you hold a note on the keyboard.
Play from beginning lights up, and the pattern continues until you
release the note. Play the note again, and the pattern starts over from
the beginning.
NOTE:
The pattern auto-plays its programmed pitches if you play middle C,
- (Lights up green.) This also works under any
but it transposes if you play another note (and if you play subsequent notes,
it transposes again without stopping, provided you connect the notes closely
enough). For that reason, it's a good idea to program/record patterns with C as
the base note.
• Tempo, rate, and playback controls
NOTE:
These apply to both Sequencer and Arpeggiator modes.
MIDI Sync ignores the internal tempo and locks the Sequencer and Arpeggiator
to incoming MIDI clock. Use this if you're using the MatrixBrute with a MIDI
sequencer or other MIDI equipment. External Sync may come from three
sources: MIDI In, MIDI over USB and Sync port. You can choose the source you
wish to use with the MIDI Control Center.
Arturia - MatrixBrute Manual - The Matrix 45
Page 52

•
Gate
sets the on/off length of each step, on a scale from 1 to 99. At 99,
each note trigger is held until the following step.
•
Swing
delays every odd-numbered step to create a shuffle rather than
a straight pattern. 50% is no swing, 75% is maximum swing. With 8th
notes, for example, 50% swing gives you even 8th notes, and the more
swing you add, the closer you get to a dotted 8th followed by a 16th
note.
•
Rate
dials in the sequencer tempo, from 30 to 259.9. The tempo
is shown in the display. When sync’d to MIDI, the rate knob will
increment in exact divisions of time based on the incoming clock.
•
Tap
this button to tap in the tempo. The sequencer engine updates with
every tap, so you can keep tapping if you need to follow a drifting
tempo, and result is shown in the display. Taps are relative to the
current note value (see the following topic), so if you're set to quarter
notes, each tap is a quarter note. If you're set to 1/8th note triplets, each
tap is one of those, and do on.
Note value buttons
46 Arturia - MatrixBrute Manual - The Matrix
Page 53

These playback settings determine what note value each step is, relative to
the playback tempo. If you're using the MatrixBrute on its own, this will simply
change the playback speed in a predictable way. But if you're locking the tempo
to MIDI clock, it will change the musical value of each step in the sequencer or
arpeggiator.
From left to right, the three buttons with musical notes represent "straight" notes,
triplets, and dotted notes. The "fraction" buttons below them determine what
value the musical notes are.
Examples:
• 1/4 + ♩ means each step is a quarter note;
• 1/8 + ♩ makes each step an eighth note;
• 1/8 + ♩♩♩ will make each step an 1/8th note triplet;
• 1/16 + ♩. ...that's going to make each step a dotted 1/16th.
5.3.1. Arpeggiator mode
Arpeggiator enters this mode, in which the notes you hold are automatically
stepped through one at a time. You can hold down as many keys as your hands
or even forearms will cover; each note you hold lights up a red step in the Matrix.
The yellow lettering underneath buttons applies to the arpeggiator.
• Up steps through the notes from lowest to highest and repeats;
• Dwn steps through them from highest to lowest and repeats;
• Up/Down does just that: play from lowest to highest and back down;
Arturia - MatrixBrute Manual - The Matrix 47
Page 54

• Rand plays the held notes in random order.
• Octave > Each push of this button causes the arpeggiator to repeat
the up/down or random sequence an additional octave higher, up to
three octaves, and < subtracts an octave with each push. The setting is
shown in the display.
5.3.2. Matrix Arpeggiator Mode
Press both Sequencer and Arpeggiator.
This mode lets you hold up to four notes and play them in any order, in the
octave you set for each note, up to 16 steps. You can also vary the rhythm of the
arpeggio up to 16 steps.
You can hold down any four notes (or fewer), in the example above, Ab-C-EG are being arpeggiated in the pattern shown, use the blue buttons to shift the
specific note of your arpeggio up or down within the three octaves. The red line
shows the steps, i.e. the rhythm pattern.
In addition, you can use chromatic approach notes:
• Lower approach note: If you hold the < transport control while pressing
a button in the octave section, the note sent is one half step below, and
the button turns red instead of blue
48 Arturia - MatrixBrute Manual - The Matrix
Page 55

• Upper approach note: If you hold the > transport control while pressing
a button in the octave section, the note sent is one half step above, and
the button turns purple instead of blue
Arturia - MatrixBrute Manual - The Matrix 49
Page 56

6. MIDI
In addition to the keyboard, almost all MatrixBrute's knobs, sliders, and wheels
send and respond to MIDI, so you can record and edit their movements in a
DAW running on a computer. That makes the instrument useful as a hands-on
controller for external instruments, not just a master keyboard.
MIDI can go in and out the USB port, the 5-pin DIN ports, both, or neither. All the
MIDI settings are in Arturia's MIDI Control Center Mac/PC program, which you
download from www.arturia.com. (See below.)
The sequencer and arpeggiator can lock to MIDI clock. They send MIDI notes, so
you can record and edit the notes they send in a DAW. Since the LFOs can lock
to MIDI and then be patched anywhere, effectively everything on the instrument
can be in tempo.
6.1. MIDI Continuous Controller Assignments
In the graphic above, the numbers superimposed over knobs are all MIDI
Continuous Controllers (CC), so for example the Modulation wheel sends/
receives MIDI CC#1, and Macro knob 1 to its right sends/receives CC#11
(Expression).
While the Pitch wheel is unmarked, it is active; pitch isn't a CC in the MIDI
protocol - it's a separate command in the protocol. If you connect expression
pedals 1 or 2 to the rear panel, they have du plicate CC assignments to Macro
knobs 3's and 4's (to the left of the keyboard). The Sustain pedal input in the rear
is CC#64, which is standard.
50 Arturia - MatrixBrute Manual - MIDI
Page 57

6.2. MIDI Control Center settings
The MIDI settings are all using the MIDI Control Center's Device tab. Again,
download the software from www.arturia.com.
•
Input MIDI Channels
one 16-channel MIDI port.
•
Output MIDI Channel
send on.
•
MIDI clock source
built-in MIDI interface, which you connect to a Mac or PC; MIDI is the
5-pin DIN MIDI in. Use the Sync port to interface with pre-MIDI devices,
such as old Korg and Roland drum machines. The following types are
supported: the default is 1 pulse per step, 2 pulse per quarter note (Korg
Volca), 24 pulses per quarter note (Roland DIN), and 48 pulses per
quarter note DIN.
- All, 1-16, none. MaxiBrute sends and receives on
- 1-16. Choose between the 16 MIDI channels to
- USB, MIDI, Sync. The USB port is the MaxiBrute's
•
MIDI param send and receive
off. The keyboard still sends notes when it's off. You might not want
the knobs and sliders to trigger or respond to MIDI from another
instrument while you're playing.
•
MIDI out select
has the advantage of connecting directly to a Mac or PC without a
MIDI interface, but you can run MIDI cables over longer distances.
Also note that if you save a DAW project that used the USB connection,
then load it again later, the DAW may get upset if the MatrixBrute isn't
connected and turned on; it'll be looking for a MIDI interface it doesn't
see.
•
Local control
get sent out over MIDI, but they're disconnected from the MatrixBrute.
This is convenient if you're working with a DAW; you'll hear the
keyboard and controls on the MatrixBrute when its track is selected
and MIDI is being sent back to trigger it, but you won't hear it when
Arturia - MatrixBrute Manual - MIDI 51
- The choices are Off, USB, MIDI, or MIDI + USB. USB
- Local off means all the panel controls and the keyboard
- Turns MIDI from the panel on and
Page 58

DAW tracks assigned to other instruments are selected. You can then
play other instruments from the MatrixBrute without it playing along.
Also, the MatrixBrute can be playing back MIDI you've recorded while
you play other instruments from its keyboard and controls.
•
Program Change Receive
Presets. That can be convenient, or you can turn it off to prevent
Presets from changing when you don't want them to.
•
Pedal 1, Pedal 2, Footswitch polarity
Inverted. Some manufacturer's pedals are reversed, so higher is lower
and off is on. This corrects for that.
•
Pot mode
encoders, they don't necessarily reflect their underlying settings, there
are three choices for how they behave when sending MIDI.
•
Jump
as you move it, regardless of its underlying setting. If the underlying
setting is 12, the knob happens to be at 3, and you move it to 4, it will
jump to 4. (These are not actual numbers.)
•
Hook
(hook) it before sending anything. This is the default mode.
•
Scaled
the knob is. So if the actual value is 12 and you move the knob from
3 to 4, the actual value will go to 13. Scaled allows you to increment
or decrement the knob value. The drawback is if the knob is at a high
or low extreme, you obviously cannot move it further. In this case you
need to turn the knob and the value will have to go either negative or
positive first.
- Because the knobs are 270 pots and not 360 degree
means a knob sends the value of its physical position as soon
waits until you move a knob past its current setting to "catch"
increases or decreases the actual setting regardless of where
- MIDI Program Change commands switch
- The choices are Normal and
•
Velocity curve
playing style and preference.
•
Linear
(the default) has an even response across the dynamic range;
52 Arturia - MatrixBrute Manual - MIDI
- This lets you adjust the keyboard response to your
Page 59

•
Log
requires the least amount of force to play louder notes, but it's
harder to control the dynamics at lower levels;
•
Exponential
is less jumpy at lower dynamic levels, but it takes more
force to reach high dynamic levels.
•
Sequencer/Arp Sends Notes
- (On/Off) The sequencer/arpeggiator can
send MIDI notes to trigger other instruments or to be recorded in a
DAW.
AC Input Specifications
Voltage 100V - 240V AC
Power 45W
Frequency 50-60 Hz
Pedal Connections
Expression Tip = Pot center tap ; Ring = 3.3V ; Sleeve = Gnd
Sustain Normal open
Pedal Connections
Expression Tip = Pot center tap ; Ring = 3.3V ; Sleeve = Gnd
Sustain Normal open
Control Voltages I/O
Arturia - MatrixBrute Manual - MIDI 53
Page 60

VCO1 Pitch 0 - 10V
VCO1 Ultra Saw +/- 5V
VCO1 Pulse Width +/- 5V
VCO1 Metalizer +/- 5V
VCO2 Pitch 0 - 10V
VCO2 Ultra Saw +/- 5V
VCO2 Pulse Width +/- 5V
VCO2 Metalizer +/- 5V
Steiner Cutoff 0 - 10V
Ladder Cutoff 0 - 10V
LFO 1 amount 0 - 10V
VCA 0 - 10V
Gate I/O (TS)
Gate (TS) 0 – 5V
Sync (TRS)
Gate 0 – 5V
Audio I/O
Label Jack Level Note
Master
Out L/R
Audio In Mono TS
Insert
54 Arturia - MatrixBrute Manual - MIDI
Mono TS +4dBu
Line = 0-20dB Inst
= 0-40dB
TRS = Tip=Send; Ring =
Return; Sleeve = Gnd
+4dBu
68kΩ
1.1MΩ
Page 61

7. SOFTWARE LICENSE AGREEMENT
In consideration of payment of the Licensee fee, which is a portion of the price
you paid, Arturia, as Licensor, grants to you (hereinafter termed “Licensee”) a
nonexclusive right to use this copy of the SOFTWARE.
All intellectual property rights in the software belong to Arturia SA (hereinafter:
“Arturia”). Arturia permits you only to copy, download, install and use the
software in accordance with the terms and conditions of this Agreement.
The product contains product activation for protection against unlawful copying.
The OEM software can be used only following registration.
Internet access is required for the activation process. The terms and conditions
for use of the software by you, the end-user, appear below. By installing the
software on your computer you agree to these terms and conditions. Please
read the following text carefully in its entirety. If you do not approve these terms
and conditions, you must not install this software. In this event give the product
back to where you have purchased it (including all written material, the complete
undamaged packing as well as the enclosed hardware) immediately but at the
latest within 30 days in return for a refund of the purchase price.
1. Software Ownership Arturia shall retain full and complete title to the
SOFTWARE recorded on the enclosed disks and all subsequent copies of the
SOFTWARE, regardless of the media or form on or in which the original disks or
copies may exist. The License is not a sale of the original SOFTWARE.
2. Grant of License Arturia grants you a non-exclusive license for the use of the
software according to the terms and conditions of this Agreement. You may not
lease, loan or sub-license the software. The use of the software within a network
is illegal where there is the possibility of a contemporaneous multiple use of the
program.
You are entitled to prepare a backup copy of the software which will not be used
for purposes other than storage purposes.
You shall have no further right or interest to use the software other than the
limited rights as specified in this Agreement. Arturia reserves all rights not
expressly granted.
3. Activation of the Software Arturia may use a compulsory activation of the
software and a compulsory registration of the OEM software for license control
to protect the software against unlawful copying. If you do not accept the terms
and conditions of this Agreement, the software will not work.
In such a case the product including the software may only be returned within
30 days following acquisition of the product. Upon return a claim according to §
11 shall not apply.
Arturia - MatrixBrute Manual - Software License Agreement 55
Page 62

4. Support, Upgrades and Updates after Product Registration You can only
receive support, upgrades and updates following the personal product
registration. Support is provided only for the current version and for the previous
version during one year after publication of the new version. Arturia can modify
and partly or completely adjust the nature of the su pport (hotline, forum on the
website etc.), upgrades and updates at any time.
The product registration is possible during the activation process or at any
time later through the Internet. In such a process you are asked to agree to
the storage and use of your personal data (name, address, contact, emailaddress, and license data) for the purposes specified above. Arturia may also
forward these data to engaged third parties, in particular distributors, for support
purposes and for the verification of the upgrade or update right.
5. No Unbundling The software usually contains a variety of different files
which in its configuration ensure the complete functionality of the software. The
software may be used as one product only. It is not required that you use or
install all components of the software. You must not arrange components of the
software in a new way and develop a modified version of the software or a new
product as a result. The configuration of the software may not be modified for
the purpose of distribution, assignment or resale.
6. Assignment of Rights You may assign all your rights to use the software to
another person subject to the conditions that (a) you assign to this other person
(i) this Agreement and (ii) the software or hardware provided with the software,
packed or preinstalled thereon, including all copies, upgrades, updates, backup
copies and previous versions, which granted a right to an update or upgrade
on this software, (b) you do not retain upgrades, updates, backup copies und
previous versions of this software and (c) the recipient accepts the terms and
conditions of this Agreement as well as other regulations pursuant to which you
acquired a valid software license.
A return of the product due to a failure to accept the terms and conditions of
this Agreement, e.g. the product activation, shall not be possible following the
assignment of rights.
7. Upgrades and Updates You must have a valid license for the previous or more
inferior version of the software in order to be allowed to use an upgrade or
update for the software. Upon transferring this previous or more inferior version
of the software to third parties the right to use the upgrade or update of the
software shall expire.
The acquisition of an upgrade or update does not in itself confer any right to use
the software.
The right of support for the previous or inferior version of the software expires
upon the installation of an upgrade or update.
56 Arturia - MatrixBrute Manual - Software License Agreement
Page 63

8. Limited Warranty Arturia warrants that the disks on which the software is
furnished is free from defects in materials and workmanship under normal use
for a period of thirty (30) days from the date of purchase. Your receipt shall
be evidence of the date of purchase. Any implied warranties on the software
are limited to thirty (30) days from the date of purchase. Some states do not
allow limitations on duration of an implied warranty, so the above limitation
may not apply to you. All programs and accompanying materials are provided
“as is” without warranty of any kind. The complete risk as to the quality and
performance of the programs is with you. Should the program prove defective,
you assume the entire cost of all necessary servicing, repair or correction.
9. Remedies Arturia's entire liability and your exclusive remedy shall be at
Arturia's option either (a) return of the purchase price or (b) replacement of
the disk that does not meet the Limited Warranty and which is returned to
Arturia with a copy of your receipt. This limited Warranty is void if failure of
the software has resulted from accident, abuse, modification, or misapplication.
Any replacement software will be warranted for the remainder of the original
warranty period or thirty (30) days, whichever is longer.
10. No other Warranties The above warranties are in lieu of all other warranties,
expressed or implied, including but not limited to, the implied warranties of
merchantability and fitness for a particular purpose. No oral or written
information or advice given by Arturia, its dealers, distributors, agents or
employees shall create a warranty or in any way increase the scope of this
limited warranty.
11. No Liability for Consequential Damages Neither Arturia nor anyone else
involved in the creation, production, or delivery of this product shall be liable for
any direct, indirect, consequential, or incidental damages arising out of the use
of, or inability to use this product (including without limitation, damages for loss
of business profits, business interruption, loss of business information and the
like) even if Arturia was previously advised of the possibility of such damages.
Some states do not allow limitations on the length of an implied warranty or
the exclusion or limitation of incidental or consequential damages, so the above
limitation or exclusions may not apply to you. This warranty gives you specific
legal rights, and you may also have other rights which vary from state to state.
Arturia - MatrixBrute Manual - Software License Agreement 57
Page 64

8. FCC INFORMATION
USA
Important notice: DO NOT MODIFY THE UNIT!
This product, when installed as indicate in the instructions contained in this
manual, meets FCC requirement. Modifications not expressly approved by
Arturia may avoid your authority, granted by the FCC, to use the product.
IMPORTANT: When connecting this product to accessories and/or another
product, use only high quality shielded cables. Cable (s) supplied with this
product MUST be used. Follow all installation instructions. Failure to follow
instructions could void your FFC authorization to use this product in the USA.
NOTE:
This product has been tested and found to comply with the limit for
a Class B Digital device, pursuant to Part 15 of the FCC rules. These limits
are designed to provide a reasonable protection against harmful interference
in a residential environment. This equipment generate, use and radiate radio
frequency energy and, if not installed and used according to the instructions
found in the users manual, may cause interferences harmful to the operation to
other electronic devices. Compliance with FCC regulations does not guarantee
that interferences will not occur in all the installations. If this product is found
to be the source of interferences, witch can be determined by turning the unit
“OFF” and “ON”, please try to eliminate the problem by using one of the following
measures:
• Relocate either this product or the device that is affected by the
interference.
• Use power outlets that are on different branch (circuit breaker or fuse)
circuits or install AC line filter(s).
• In the case of radio or TV interferences, relocate/ reorient the antenna.
If the antenna lead-in is 300 ohm ribbon lead, change the lead-in to
coaxial cable.
• If these corrective measures do not bring any satisfied results, please
the local retailer authorized to distribute this type of product. If you
cannot locate the appropriate retailer, please contact Arturia.
The above statements apply ONLY to those products distributed in the USA.
CANADA
NOTICE:
Canadian Interference-Causing Equipment Regulation.
AVIS
Règlement sur le matériel brouilleur du Canada.
58 Arturia - MatrixBrute Manual - FCC Information
This class B digital apparatus meets all the requirements of the
: Cet appareil numérique de la classe B respecte toutes les exigences du
Page 65

EUROPE
This product complies with the requirements of European Directive 89/336/EEC
This product may not work correctly by the influence of electro-static discharge;
if it happens, simply restart the product.
Arturia - MatrixBrute Manual - FCC Information 59
 Loading...