

Arturia DrumBrute USER’S MANUAL
USER’S MANUAL
USER’S MANUAL

2 ARTURIA – DrumBrute – USER’S MANUAL
ENGINEERING :
Mickey Delp of Delptronics
Yannick Bellance
Olivier Delhomme
Valentin Lepetit
Nicolas Dubois
Adrien Courdavault
MANUAL :
Randy Lee
DESIGN :
Glen Darcey
Morgan Perrier
DesignBox
© ARTURIA SA – 2016 – All rights reserved.
11 Chemin de la Dhuy
38240 Meylan
FRANCE
http://www.arturia.com
Information contained in this manual is subject to change without notice and does not represent a commitment
on the part of Arturia. The software described in this manual is provided under the terms of a license
agreement or non-disclosure agreement. The software license agreement specifies the terms and conditions for
its lawful use. No part of this manual may be reproduced or transmitted in any form or by any purpose other
than purchaser’s personal use, without the express written permission of ARTURIA S.A.
All other products, logos or company names quoted in this manual are trademarks or registered trademarks of
their respective owners.
15th of October 2016 edition

ARTURIA – DrumBrute – USER’S MANUAL 3
Tha
Tha
nk you for purchasing the Arturia DrumBrute
nk you for purchasing the Arturia DrumBrute!!
This manual covers the features and operation of Arturia’s DrumBrute, a full-featured
analog drum synthesizer, pattern sequencer and live performance device.
In this package you will find:
§ One DrumBrute analog drum synthesizer, with a serial number and an unlock
code on the bottom. You will need this information in order to register your
DrumBrute online.
§ One DC power supply. Use only the included supply or else the unit could be
damaged.
§ The Quick Start Guide
Be sure to register your DrumBrute as soon as possible! There is a sticker on
the bottom panel that contains the serial number of your unit and an unlock code.
These are required during the online registration process. You may want to record
these elsewhere or take a photo of the sticker in case it becomes damaged.
Registering your DrumBrute provides the following benefits:
• It enables you to download the DrumBrute user manual and the latest version
of the MIDI Control Center software
• It allows you to receive special offers restricted to DrumBrute owners.

4 ARTURIA – DrumBrute – USER’S MANUAL
Special Message
Special Message
Section
Section
SPECIFICATIONS SUBJECT TO CHANGE:
The information contained in this manual is believed to be correct at the time of printing.
However, Arturia reserves the right to change or modify any of the specifications without
notice or obligation to update the hardware that has been purchased.
IMPORTANT:
The product and its software, when used in combination with an amplifier, headphones
or speakers, may be able to produce sound levels that could cause permanent hearing
loss. DO NOT operate for long periods of time at a high level or at a level that is
uncomfortable.
If you encounter any hearing loss or ringing in the ears, you should consult an
audiologist.
NOTICE:
Service charges incurred due to a lack of knowledge relating to how a function or feature
works (when the product is operating as designed) are not covered by the
manufacturer’s warranty, and are therefore the owner's responsibility. Please study this
manual carefully and consult your dealer before requesting service.
PRECAUTIONS INCLUDE, BUT ARE NOT LIMITED TO, THE FOLLOWING:
1. Read and understand all the instructions.
2. Always follow the instructions on the instrument.
3. Before cleaning the instrument, always remove the USB cable. When cleaning,
use a soft and dry cloth. Do not use gasoline, alcohol, acetone, turpentine or any
other organic solutions; do not use a liquid cleaner, spray or cloth that's too wet.
4. Do not use the instrument near water or moisture, such as a bathtub, sink,
swimming pool or similar place.
5. Do not place the instrument in an unstable position where it might accidentally
fall over.
6. Do not place heavy objects on the instrument. Do not block openings or vents of
the instrument; these locations are used for air circulation to prevent the
instrument from overheating. Do not place the instrument near a heat vent at
any location with poor air circulation.
7. Do not open or insert anything into the instrument that may cause a fire or
electrical shock.
8. Do not spill any kind of liquid onto the instrument.
9. Always take the instrument to a qualified service center. You will invalidate your
warranty if you open and remove the cover, and improper assembly may cause
electrical shock or other malfunctions.
10. Do not use the instrument with thunder and lightning present; otherwise it may
cause long distance electrical shock.
11. Do not expose the instrument to hot sunlight.
12. Do not use the instrument when there is a gas leak nearby.
13. Arturia is not responsible for any damage or data loss caused by improper
operation of the instrument.

ARTURIA – DrumBrute – USER’S MANUAL 5
Table of Contents
Table of Contents
1! INTRODUCTION ......................................................................................................................................... 9!
2! DRUMBRUTE OVERVIEW ...................................................................................................................... 10!
2.1! MAKING THE CONNECTIONS ................................................................................................................... 10!
2.1.1! …with a computer .......................................................................................................................... 10!
2.1.2! …with external devices .................................................................................................................. 11!
2.1.2.1! MIDI devices .............................................................................................. 11!
2.1.2.2! Clock sources/destinations ........................................................................... 11!
2.2! TRANSPORT + PATTERNS ....................................................................................................................... 12!
2.2.1! Tempo/Value display ...................................................................................................................... 12!
2.2.2! Rate/Fine/Tap Tempo ..................................................................................................................... 12!
2.2.3! Transport buttons ........................................................................................................................... 12!
2.2.4! Synchronization .............................................................................................................................. 13!
2.2.5! DrumBrute modes .......................................................................................................................... 13!
2.2.6! Step buttons .................................................................................................................................... 13!
2.2.7! Copy/Erase ..................................................................................................................................... 14!
2.2.8! Pattern length/Last step ................................................................................................................. 14!
2.2.9! Save button ..................................................................................................................................... 14!
2.3! FILTER + PATTERN EFFECTS ................................................................................................................... 15!
2.3.1! Output filter .................................................................................................................................... 15!
2.3.2! Master volume ................................................................................................................................ 16!
2.3.3! Pattern effects ................................................................................................................................ 16!
2.3.4! Roller/Looper/Step Repeat ............................................................................................................. 16!
2.3.4.1! Roller ........................................................................................................ 17!
2.3.4.2! Looper ....................................................................................................... 17!
2.3.4.3! Step Repeat ............................................................................................... 17!
2.3.5! Global BPM ................................................................................................................................... 17!
2.3.6! Polyrhythm ..................................................................................................................................... 17!
2.4! INSTRUMENTS + PADS ............................................................................................................................ 18!
2.4.1! Instrument controls ........................................................................................................................ 18!
2.4.2! Instrument select buttons ............................................................................................................... 18!
2.4.3! Pads................................................................................................................................................ 18!
2.5! METRONOME, MUTE/SOLO + SHIFT ....................................................................................................... 19!
2.5.1! Metronome ..................................................................................................................................... 19!
2.5.2! Mute/Solo buttons .......................................................................................................................... 19!
2.5.3! Shift button ..................................................................................................................................... 19!
2.6! REAR PANEL, PART 1 ............................................................................................................................... 20!
2.6.1! Power ............................................................................................................................................. 20!
2.6.2! USB ................................................................................................................................................ 20!
2.6.3! MIDI input/output .......................................................................................................................... 20!
2.6.4! Clock input/output .......................................................................................................................... 20!
2.7! REAR PANEL, PART 2 ............................................................................................................................... 21!
2.7.1! Individual Outs ............................................................................................................................... 21!
2.7.2! Metronome Output ......................................................................................................................... 21!
2.7.3! Mix Output ..................................................................................................................................... 21!
2.7.4! Headphone Level Control .............................................................................................................. 21!
2.7.5! Headphones .................................................................................................................................... 22!
3! BASIC OPERATIONS ................................................................................................................................ 23!
3.1! WORKING WITH PATTERNS ..................................................................................................................... 23!
3.1.1! Select a bank .................................................................................................................................. 23!
3.1.2! Select a pattern .............................................................................................................................. 23!
3.1.3! Set the tempo .................................................................................................................................. 23!
3.1.4! Enable the metronome ................................................................................................................... 24!
3.1.5! Record a pattern ............................................................................................................................ 24!
3.1.6! Save what you’ve done! ................................................................................................................. 24!
3.2! CREATIVE PLAYBACK OPTIONS .............................................................................................................. 25!
3.2.1! Output Filter .................................................................................................................................. 25!

6 ARTURIA – DrumBrute – USER’S MANUAL
3.2.2! Swing .............................................................................................................................................. 25!
3.2.3! Randomness ................................................................................................................................... 25!
3.2.4! Looper ............................................................................................................................................ 25!
3.2.4.1! Loop length ................................................................................................ 26!
3.2.4.2! Loop start point .......................................................................................... 26!
3.2.5! Pause or Restart ............................................................................................................................. 26!
3.3! ALL NOTES OFF ...................................................................................................................................... 26!
4! SONG MODE ............................................................................................................................................... 27!
4.1! WHAT’S A SONG? ................................................................................................................................... 27!
4.2! SELECTING A SONG ................................................................................................................................. 27!
4.3! CREATING A SONG .................................................................................................................................. 28!
4.4! SAVING A SONG ...................................................................................................................................... 28!
4.5! ERASING A SONG .................................................................................................................................... 28!
4.6! LIVE PERFORMANCE FEATURES .............................................................................................................. 29!
4.6.1! Song-level features ......................................................................................................................... 29!
4.6.1.1! Output Filter ............................................................................................... 29!
4.6.1.2! The Looper Strip ......................................................................................... 29!
4.6.1.3! Pause or Restart ......................................................................................... 29!
4.6.2! Pattern-level features ..................................................................................................................... 29!
4.6.2.1! Tempo ....................................................................................................... 29!
4.6.2.2! Swing/Randomness ..................................................................................... 29!
5! PATTERN MODE ....................................................................................................................................... 31!
5.1! PATTERN CREATION ............................................................................................................................... 31!
5.1.1! Set the tempo .................................................................................................................................. 31!
5.1.1.1! Fine-tuning the Tempo ................................................................................. 31!
5.1.1.2! Tap tempo ................................................................................................. 31!
5.1.2! Time Division ................................................................................................................................. 31!
5.1.3! Recording a Pattern ....................................................................................................................... 31!
5.1.3.1! The Metronome .......................................................................................... 32!
5.1.3.2! Quantize Record ......................................................................................... 32!
5.1.3.3! Non-quantize mode ..................................................................................... 32!
5.1.4! Mute/Solo features ......................................................................................................................... 32!
5.1.4.1! Create a Group ........................................................................................... 32!
5.1.4.2! Clear the Group .......................................................................................... 33!
5.1.5! Using the Roller ............................................................................................................................. 33!
5.1.5.1! How it works .............................................................................................. 33!
5.1.5.2! Sync settings .............................................................................................. 33!
5.1.6! Spot Erase ...................................................................................................................................... 33!
5.1.7! Swing .............................................................................................................................................. 33!
5.1.7.1! Current Track button ................................................................................... 34!
5.1.8! Randomness ................................................................................................................................... 34!
5.1.8.1! Current Track button ................................................................................... 35!
5.2! PATTERN EDITING .................................................................................................................................. 35!
5.2.1! Step Mode ....................................................................................................................................... 35!
5.2.2! Accent Mode ................................................................................................................................... 36!
5.2.3! Red state, Blue state ....................................................................................................................... 36!
5.2.4! Selecting a Drum… ........................................................................................................................ 36!
5.2.4.1! …while paused ............................................................................................ 36!
5.2.4.2! …while recording ......................................................................................... 36!
5.2.5! Step Repeat ..................................................................................................................................... 36!
5.2.6! Shift timing ..................................................................................................................................... 38!
5.2.7! Copy a Drum Track ....................................................................................................................... 38!
5.2.7.1! Within a pattern .......................................................................................... 38!
5.2.7.2! Between patterns ........................................................................................ 39!
5.2.7.3! Between banks ........................................................................................... 39!
5.2.8! Erasing a Drum Track ................................................................................................................... 40!
5.2.9! Pattern Length ............................................................................................................................... 40!
5.2.9.1! Pattern Follow mode .................................................................................... 40!
5.2.9.2! Lengths > 16 steps ..................................................................................... 40!

ARTURIA – DrumBrute – USER’S MANUAL 7
5.2.9.3! Editing steps 17-32 ..................................................................................... 41!
5.3! SAVE THE PATTERN! ............................................................................................................................... 41!
5.4! COPY A PATTERN .................................................................................................................................... 42!
6! COPY/ERASE FUNCTIONS ..................................................................................................................... 43!
6.1! COPY BANK TO BANK ............................................................................................................................. 43!
6.2! COPY PATTERN TO PATTERN .................................................................................................................. 43!
6.2.1! Within a Bank ................................................................................................................................. 43!
6.2.2! Between Banks ............................................................................................................................... 43!
6.3! COPY DRUM TO DRUM ........................................................................................................................... 44!
6.4! ERASING A BANK .................................................................................................................................... 44!
6.5! ERASING A PATTERN .............................................................................................................................. 44!
6.6! ERASING A DRUM TRACK ....................................................................................................................... 45!
7! ADVANCED FEATURES .......................................................................................................................... 46!
7.1! EXTEND A PATTERN ................................................................................................................................ 46!
7.1.1! Adding blank steps ......................................................................................................................... 46!
7.1.2! Copy and append ........................................................................................................................... 46!
7.2! SHORTEN A PATTERN .............................................................................................................................. 47!
7.3! POLYRHYTHM MODE ............................................................................................................................... 47!
7.3.1! What is Polyrhythm mode? ............................................................................................................ 47!
7.3.2! What it does .................................................................................................................................... 47!
7.3.3! Make a polyrhythm ........................................................................................................................ 48!
7.4! SHIFT BUTTON CHART ............................................................................................................................. 49!
8! SYNCHRONIZATION ............................................................................................................................... 50!
8.1! AS MASTER ............................................................................................................................................ 50!
8.2! AS SLAVE ............................................................................................................................................... 50!
8.2.1! Clock In/Out rates .......................................................................................................................... 50!
8.2.2! Clock connectors ............................................................................................................................ 51!
9! MIDI CONTROL CENTER BASICS ....................................................................................................... 52!
9.1! SYSTEM REQUIREMENTS ......................................................................................................................... 52!
9.2! INSTALLATION AND LOCATION ............................................................................................................... 52!
9.3! CONNECTION .......................................................................................................................................... 52!
9.4! BACK UP YOUR SEQUENCES .................................................................................................................... 53!
9.5! WHERE TO FIND THE MANUAL ................................................................................................................ 53!
10! USING MIDI CONTROL CENTER ..................................................................................................... 54!
10.1! THE SYNC OPTION .................................................................................................................................. 54!
10.1.1! Sync operations .............................................................................................................................. 54!
10.1.2! Non-sync operations ...................................................................................................................... 54!
10.2! DEVICE TEMPLATES ............................................................................................................................... 55!
10.2.1! The Working Memory .................................................................................................................... 55!
10.2.1.1! Live editing ............................................................................................. 55!
10.2.1.2! Drag and drop ......................................................................................... 56!
10.3! PROJECT BROWSER ................................................................................................................................. 56!
10.3.1! Building a library ........................................................................................................................... 56!
10.3.2! Revise a Template .......................................................................................................................... 57!
10.3.2.1! While synced ........................................................................................... 57!
10.3.2.2! Not synced .............................................................................................. 57!
10.3.3! Send one pattern to DrumBrute ..................................................................................................... 58!
10.3.3.1! When synced ........................................................................................... 58!
10.3.3.2! When not synced ..................................................................................... 58!
10.4! STORE TO/RECALL FROM ....................................................................................................................... 59!
10.4.1! The ‘Store To’ button ..................................................................................................................... 59!
10.4.2! Recall edited patterns from the DrumBrute ................................................................................... 60!
10.4.3! Save, Delete, Import/Export, etc. ................................................................................................... 60!
10.5! IMPORT/EXPORT DEVICE SETTINGS ........................................................................................................ 60!
10.5.1! Export Device Settings ................................................................................................................... 60!

8 ARTURIA – DrumBrute – USER’S MANUAL
10.5.2! Import Device Settings ................................................................................................................... 61!
10.6! EDITING BASICS ...................................................................................................................................... 61!
10.6.1! Data entry ...................................................................................................................................... 61!
10.6.2! Selecting the tabs ........................................................................................................................... 61!
10.6.3! Bank tabs ........................................................................................................................................ 62!
10.6.4! Device Settings tab ......................................................................................................................... 62!
10.7! PATTERN WINDOW .................................................................................................................................. 62!
10.7.1! Navigation ...................................................................................................................................... 62!
10.7.1.1! Scroll ..................................................................................................... 62!
10.7.1.2! Zoom ..................................................................................................... 63!
10.7.2! Pattern-level parameters ............................................................................................................... 63!
10.7.3! Pattern length ................................................................................................................................. 63!
10.7.4! Pattern events ................................................................................................................................. 64!
10.7.4.1! Enter/delete events .................................................................................. 64!
10.7.4.2! Move events ............................................................................................ 64!
10.7.4.3! Copy/paste events ................................................................................... 64!
10.7.4.4! Event velocity .......................................................................................... 65!
10.7.4.5! Shift Timing ............................................................................................ 65!
10.7.4.6! Step Repeat ............................................................................................ 66!
10.7.5! Track-level settings ........................................................................................................................ 66!
10.7.5.1! Swing ..................................................................................................... 67!
10.7.5.2! Randomness ........................................................................................... 67!
10.8! POLYRHYTHM ......................................................................................................................................... 67!
10.9! DEVICE SETTINGS ................................................................................................................................... 68!
10.9.1! MIDI Channel ................................................................................................................................ 68!
10.9.2! Global settings ............................................................................................................................... 68!
10.9.2.1! Clock In/Out Settings ............................................................................... 68!
10.9.2.2! Auto-Sync ............................................................................................... 68!
10.9.2.3! Tap Tempo .............................................................................................. 68!
10.9.2.4! Global BPM .............................................................................................. 68!
10.9.2.5! Wait to Load Pattern ................................................................................. 68!
10.9.2.6! Accent Velocity Threshold .......................................................................... 68!
10.9.2.7! Pads send MIDI notes ............................................................................... 69!
10.9.2.8! Metronome ............................................................................................. 69!
10.9.2.9! Step Repeat Randomizer ........................................................................... 69!
10.9.2.10! Step Repeat Probability ............................................................................. 69!
10.9.2.11! Vegas mode ............................................................................................ 69!
10.9.2.12! Pause mode ............................................................................................ 69!
10.9.2.13! Next bank ............................................................................................... 69!
10.9.3! Transport settings .......................................................................................................................... 69!
10.9.4! Drum Map ...................................................................................................................................... 70!
11! ARTURIA DRUMBRUTE – LEGAL INFORMATION ..................................................................... 71!
11.1! SOFTWARE LICENSE AGREEMENT ............................................................................................... 71!
11.2! FCC INFORMATION (USA) ................................................................................................................ 73!
11.3! CANADA .............................................................................................................................................. 74!
11.4! EUROPE ................................................................................................................................................ 74!

ARTURIA – DrumBrute – USER’S MANUAL 9
1 INTRODUCTION
Congratulations on your purchase of the Arturia DrumBrute!
This is truly a product that has been born a legend. DrumBrute is an analog drum
synthesizer, which means it follows in the time-honored tradition of the classic drum
machines of the 1970s and ‘80s by generating a truly organic, analog sound and then
providing nearly infinite analog control over each of the tone-shaping parameters.
And though its roots are squarely planted in the rich, analog past, DrumBrute reaches
for the future by incorporating the most advanced technological developments of the
modern era. And so it is able to integrate and synchronize with any computer system,
MIDI rig or vintage setup.
But most importantly, we have taken great care to make sure DrumBrute will enhance
your creative experience. And we’re proud of what we’ve accomplished.
Who are we kidding? We’re thrilled! DrumBrute is a ton of fun to use. You’re going to
have a blast with it.
Be sure to visit the www.arturia.com website and check for the latest firmware,
download the MIDI Control Center and check out the tutorials and FAQs. We are sure
you’ll be making killer grooves before you know it.
Musically yours,
The Arturia team
10 ARTURIA – DrumBrute – USER’S MANUAL
2 DRUMBRUTE OVERVIEW
2.1 Making the connections
DrumBrute provides many ways to connect with other types of equipment, from vintage
to modern. Below are examples of potential setups:
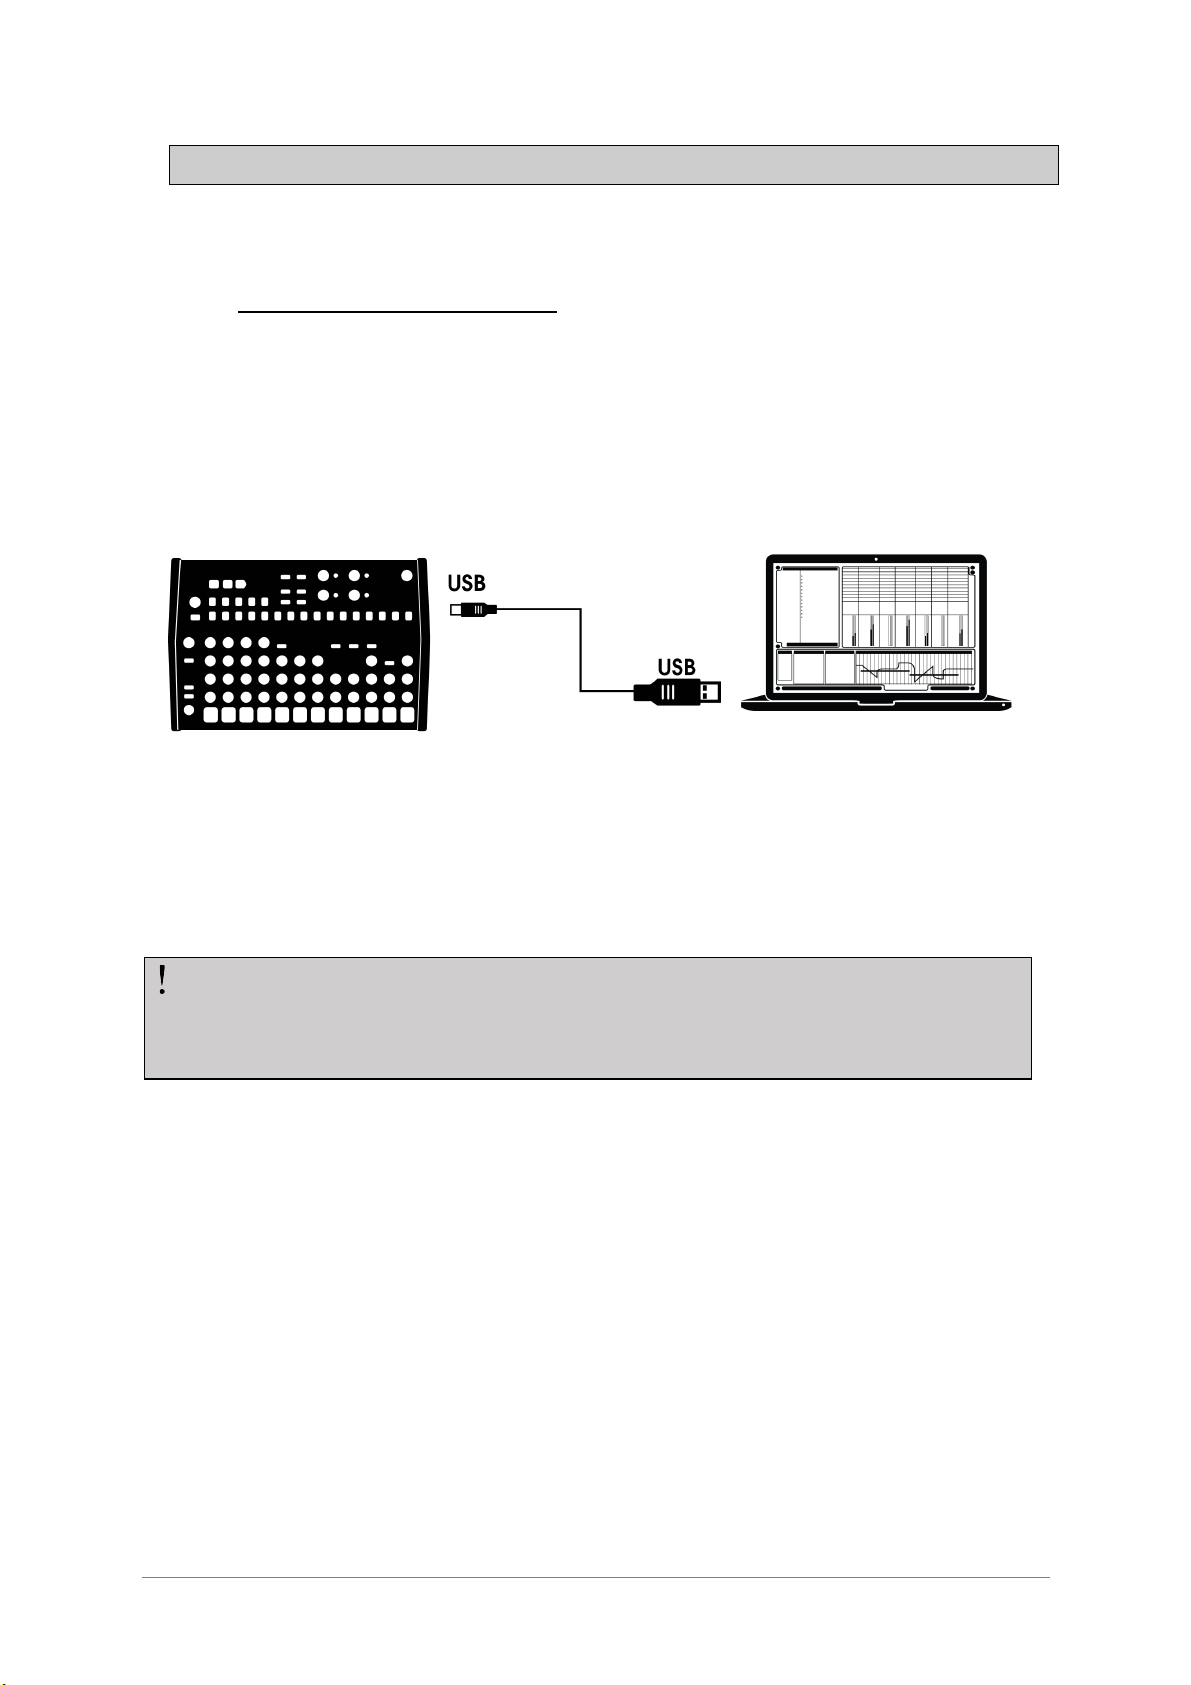
2.1.1 …with a computer
DrumBrute is more than a classic drum machine: it’s also a USB class-compliant device.
So at its most basic level it can be connected to any computer with a USB port, and its
pads can used as input devices for various applications. The included MIDI Control
Center software allows you to specify which MIDI notes and commands will be
transmitted by the pads and transport buttons, respectively.
DrumBrute does not draw its power from the USB port on your computer. To
supply power to the DrumBrute, simply connect the included DC power adapter to
the DrumBrute and to an external power source, then set the power switch on the
back of the DrumBrute to the On position.
ARTURIA – DrumBrute – USER’S MANUAL 11
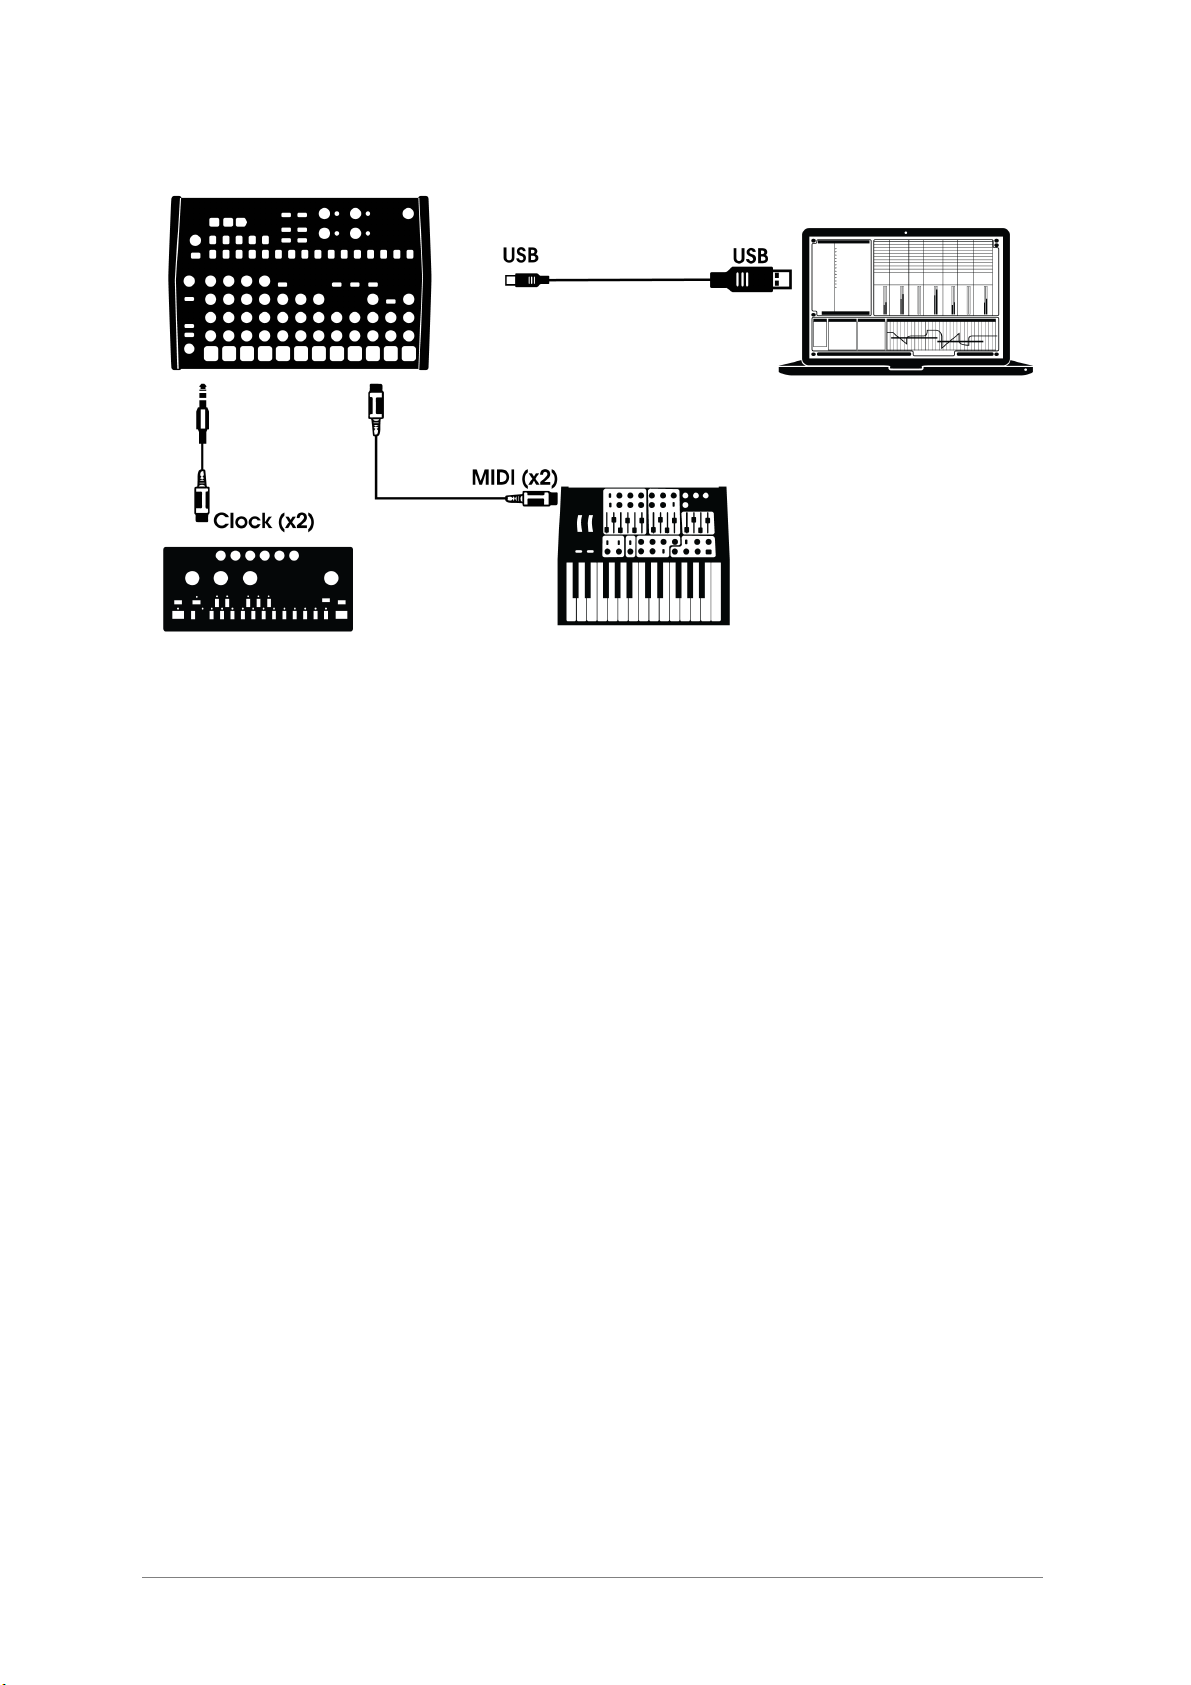
2.1.2 …with external devices
As you can see, the DrumBrute can be the backbone of some amazing systems.
2.1.2.1 MIDI devices
There are lots of great devices that only have MIDI ports (no clock sync, no USB).
DrumBrute will fit right in with these systems: it will sync with MIDI sequencers,
arpeggiators, and other drum machines, and its own drum sounds may be played from a
MIDI keyboard. And of course it can send and receive MIDI data using the USB port of
your computer.
2.1.2.2 Clock sources/destinations
The Clock input and output can synchronize with older clock types such as 24 pulses per
quarter note (ppqn), 48 ppqn, 2 ppqn (Korg), or even a single pulse per step.
See section 8.2.2 for information about what cables to use with other sync connections
and formats.

12 ARTURIA – DrumBrute – USER’S MANUAL
2.2 Transport + Patterns
1. Tempo/Value display (see 2.2.1)
2. Rate/Fine/Tap Tempo (see 2.2.2)
3. Transport buttons (see 2.2.3)
4. Synchronization (see 2.2.4)
5. DrumBrute modes (see 2.2.5)
6. Step buttons/Step values (see 2.2.6)
7. Copy/Erase (see 2.2.7)
8. Pattern length/Last step (see 2.2.8)
9. Save button (see 2.2.9)
2.2.1 Tempo/Value display
Most of the time the display will show the tempo value in beats per minute (BPM), but it
will also change temporarily to show the values of the Pattern Effects while they are
being edited.
2.2.2 Rate/Fine/Tap Tempo
The tempo can be set using the Rate/Fine encoder or by tapping the Tap Tempo button.
To fine-tune the tempo, press Shift and turn the encoder. The display will change to
show the decimal values of the tempo (.00-.99) as soon as the Shift button is pressed.
2.2.3 Transport buttons
ARTURIA – DrumBrute – USER’S MANUAL 13
The Transport buttons control the DrumBrute sequencer as well as external MIDI devices
using standard MIDI messages or MIDI Machine Control (MMC). Use the MIDI Control
Center software to make any necessary changes.
The Record button is used to create songs and patterns, and the Stop button will cancel
recording or playback.
The Play button doubles as a Pause/Continue button, which allows you to pause a
sequence in mid-stream, tweak the sound of an instrument, and then press Play again to
resume recording or playback. You can choose to have the Play button work in
Pause/Restart mode as well. Use the MIDI Control Center to choose the PAUSE option.
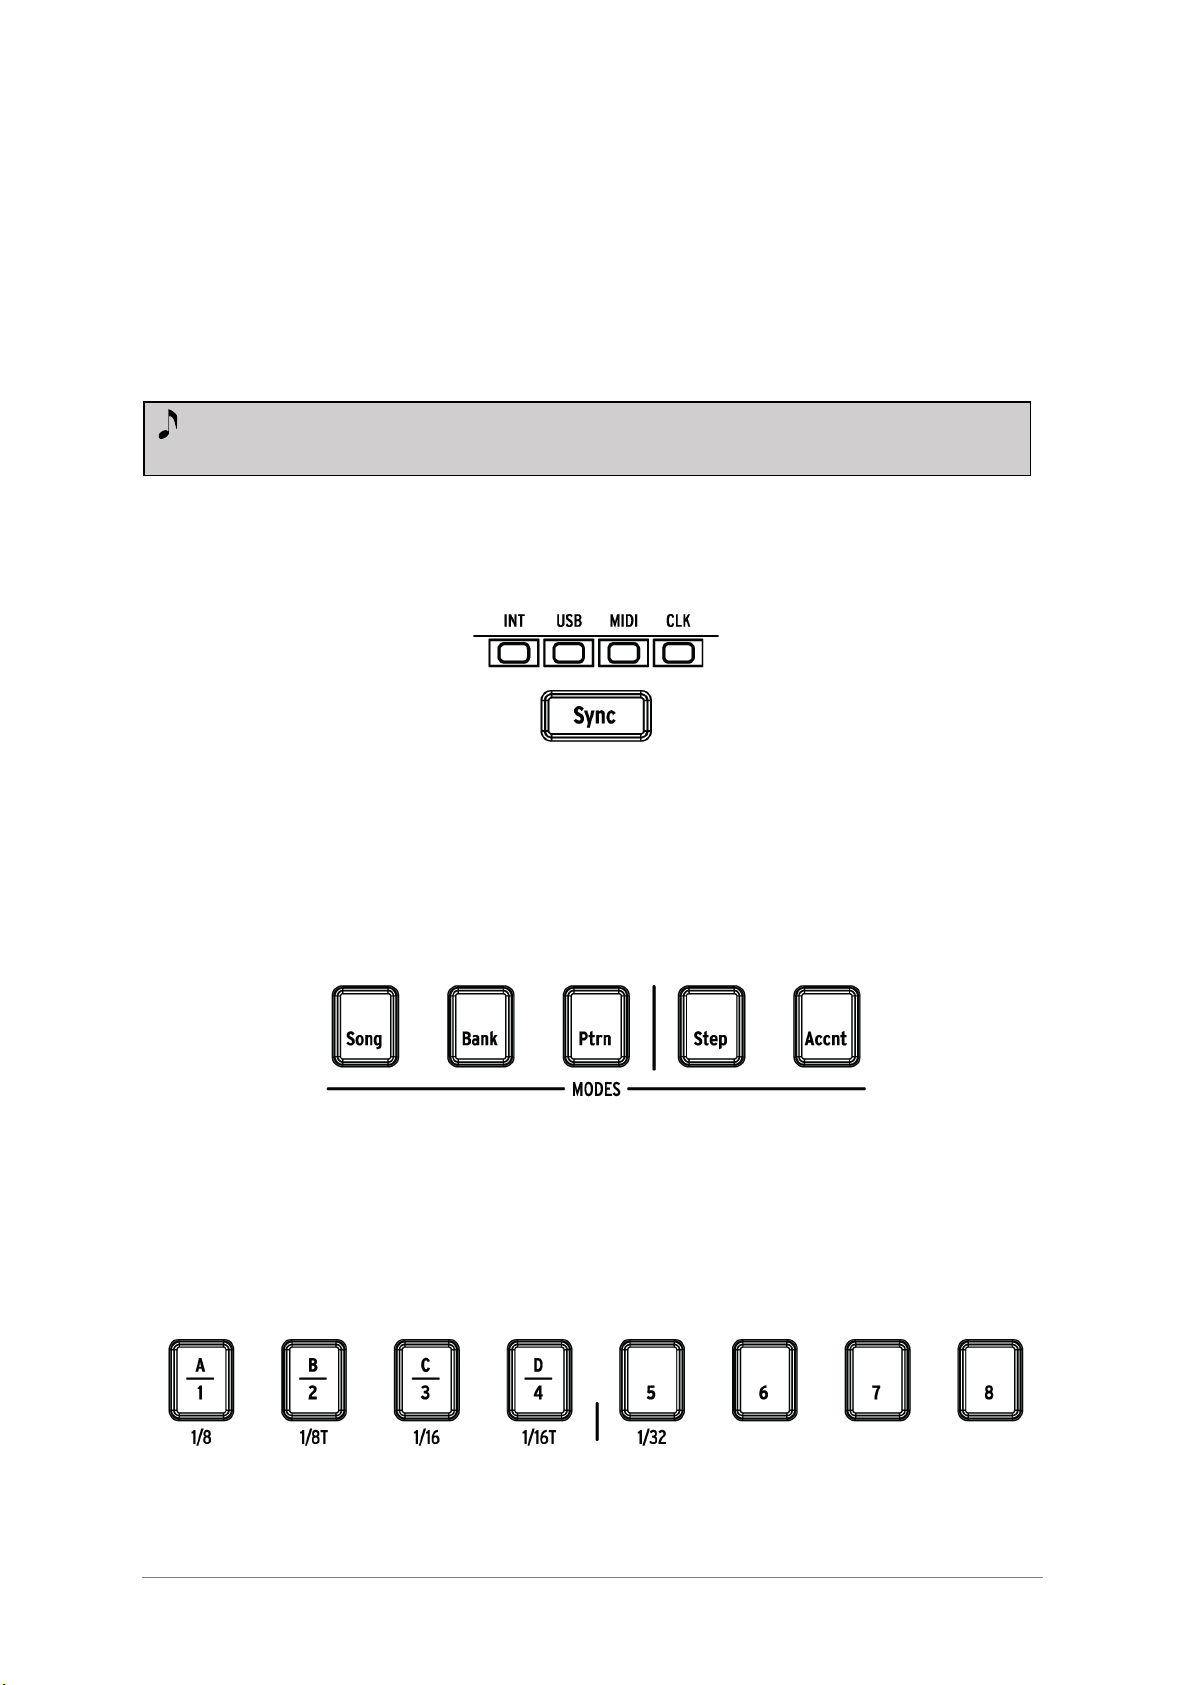
2.2.4 Synchronization
There are four Sync options which are accessed by pressing the Sync button repeatedly.
These determine whether DrumBrute will be the master or the slave in a multi-device
setup.
For descriptions of the sync features see chapter 8.
2.2.5 DrumBrute modes
These five buttons determine the operational mode of the DrumBrute: Song, Bank, or
Pattern mode. The Step and Accent buttons are used to edit a Pattern.
Everything you need to know about creating a pattern is in chapter 5. To learn how to
build a song, see chapter 4.
2.2.6 Step buttons
Record mode allows both quantized and unquantized recording. See section 5.1.3
for more information.
14 ARTURIA – DrumBrute – USER’S MANUAL
One main use for the sixteen Step buttons is to select patterns in Pattern mode. But they
serve many other purposes as well. For example, in Step mode they are used to
enable/disable events in a pattern.
In this manual you will learn how to use the Step buttons to select a song (see 4.2),
select a bank or pattern (see 3.1), to edit a pattern (see 5.2), to set the pattern length
(see 5.2.9), and much more.
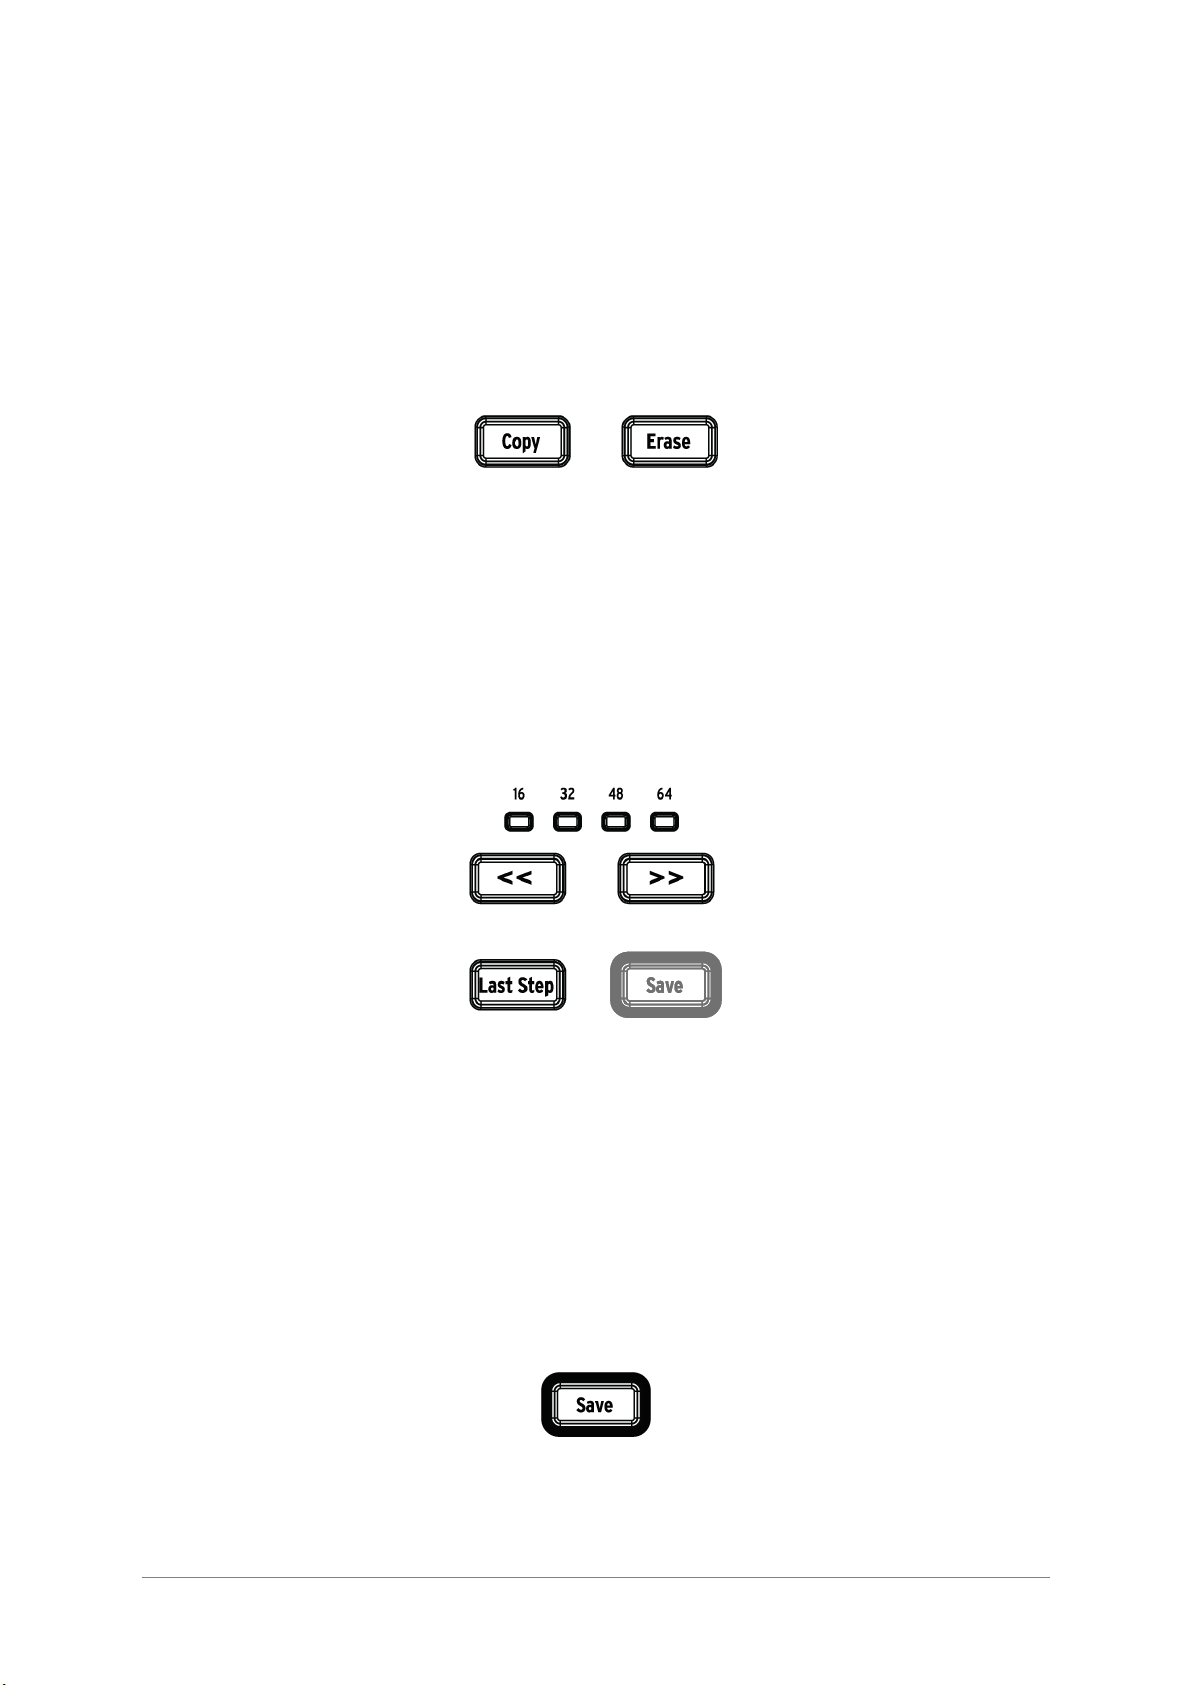
2.2.7 Copy/Erase
These two buttons are used in every mode to copy or erase large amounts of pattern
data at the same time. For example, you can copy a pattern to a new location or erase it
completely.
You can also copy sequence data from one instrument to another within the same
pattern, or erase all of the data for one instrument within a pattern.
The Copy/Erase functions are covered in greater detail in chapter 6.
2.2.8 Pattern length/Last step
DrumBrute patterns can be up to 64 steps long, consisting of up to four 16-step
subdivisions that play one after the other. Those are called the Step Groups.
The four LEDs above the double arrow buttons (<< >>) are used to indicate the pattern
length and which Step Group is currently playing.
The Last Step button is used with the Step buttons and the << >> buttons to change
the length of the current pattern.
For a complete description of these features, see section 5.2.9.
2.2.9 Save button
The Save button is used in conjunction with the Song, Bank and Pattern Mode buttons to
preserve the patterns you have created. When your patterns have been saved to the
ARTURIA – DrumBrute – USER’S MANUAL 15
internal memory then they will be loaded back into the memory when the DrumBrute is
powered up.
There are two levels of the Save function: Pattern and Bank. Details about these
operations are found in section 3.1.6.
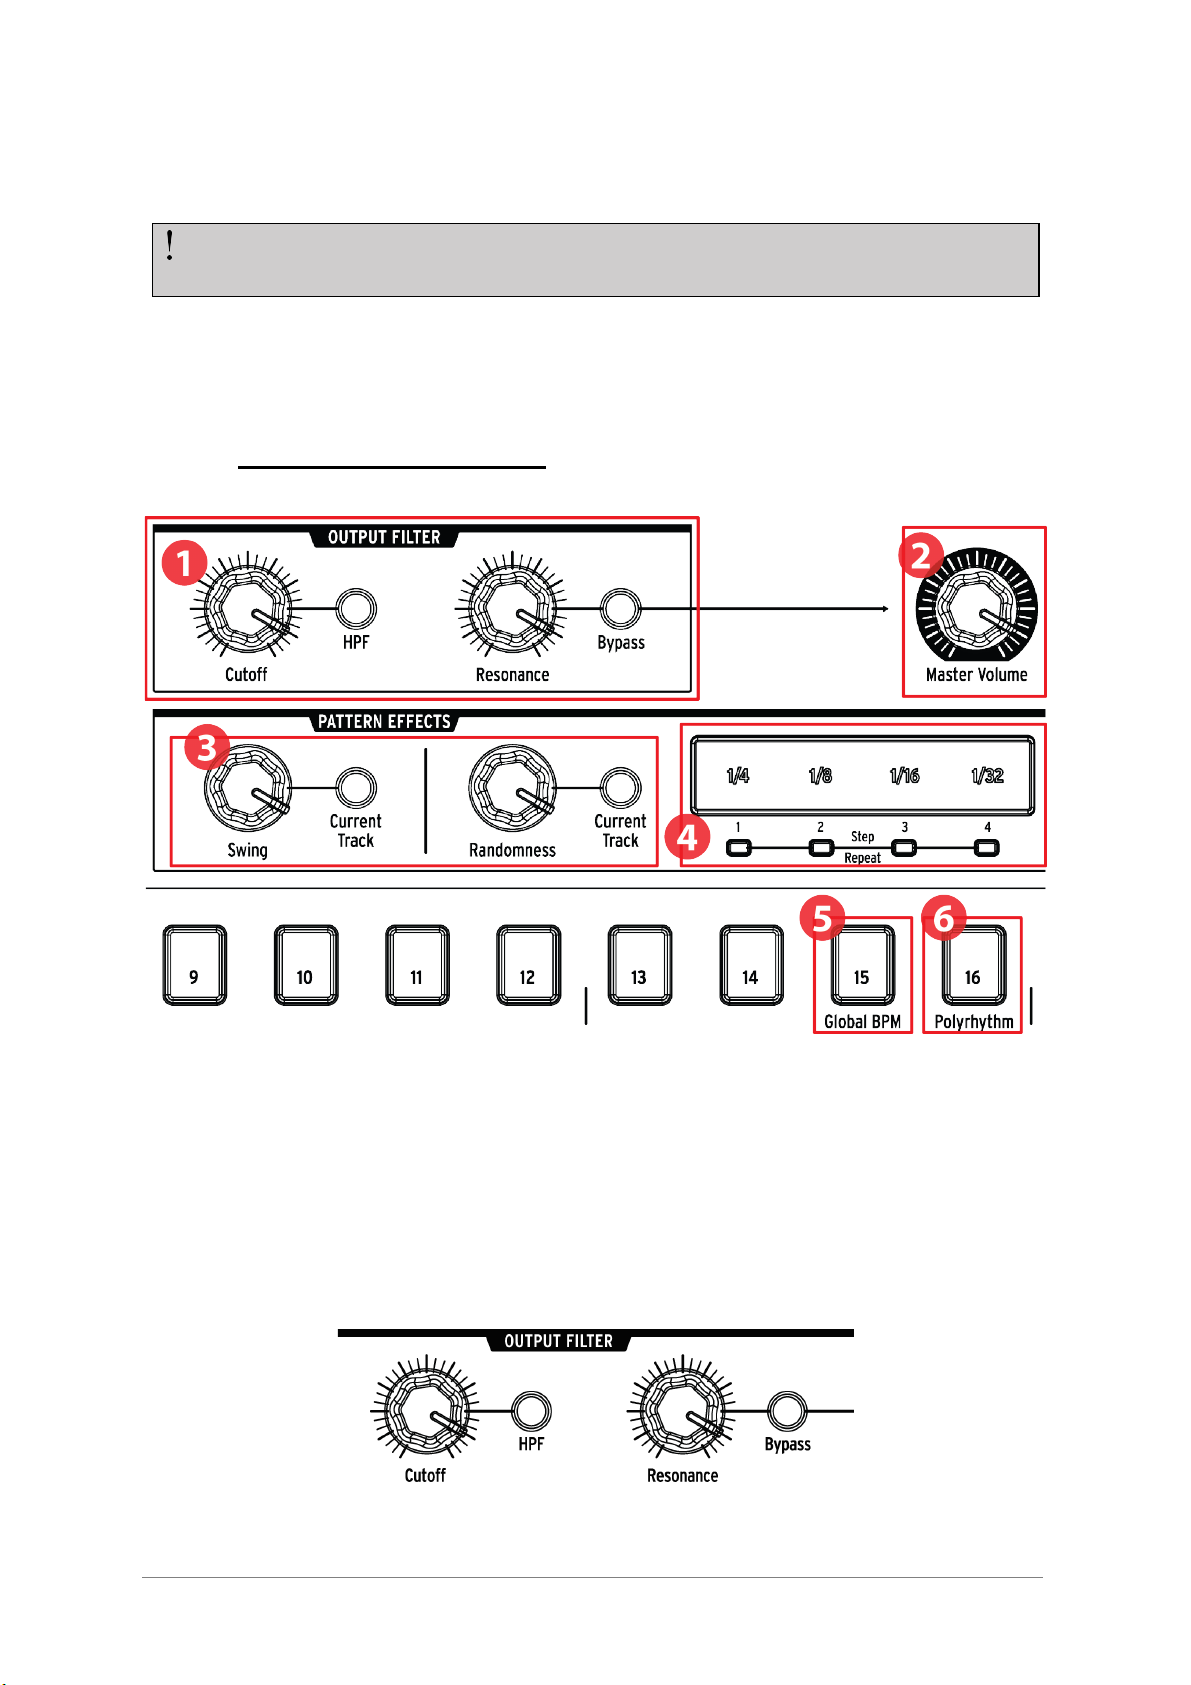
2.3 Filter + Pattern effects
1. Output filter (see 2.3.1)
2. Master volume (see 2.3.2)
3. Pattern effects (see 2.3.3)
4. Roller/looper/Step Repeat (see 2.3.4)
5. Shift+15: Global BPM (see 2.3.5)
6. Shift+16: Polyrhythm (see 2.3.6)
2.3.1 Output filter
Your new pattern data will be lost during a power-cycle unless you have used the
Save button to store it to the DrumBrute internal memory.
16 ARTURIA – DrumBrute – USER’S MANUAL
These knobs and buttons add a fun and expressive way to control the overall sound of
the DrumBrute during performance. Select the filter type with the HPF button (off = LPF,
or Low Pass Filter), sweep the filter frequency with the Cutoff knob, and use the
Resonance knob to control the filter emphasis.
To hear the unfiltered signal, press the Bypass button.
To learn more about the Output Filter options, see section 3.2.1.
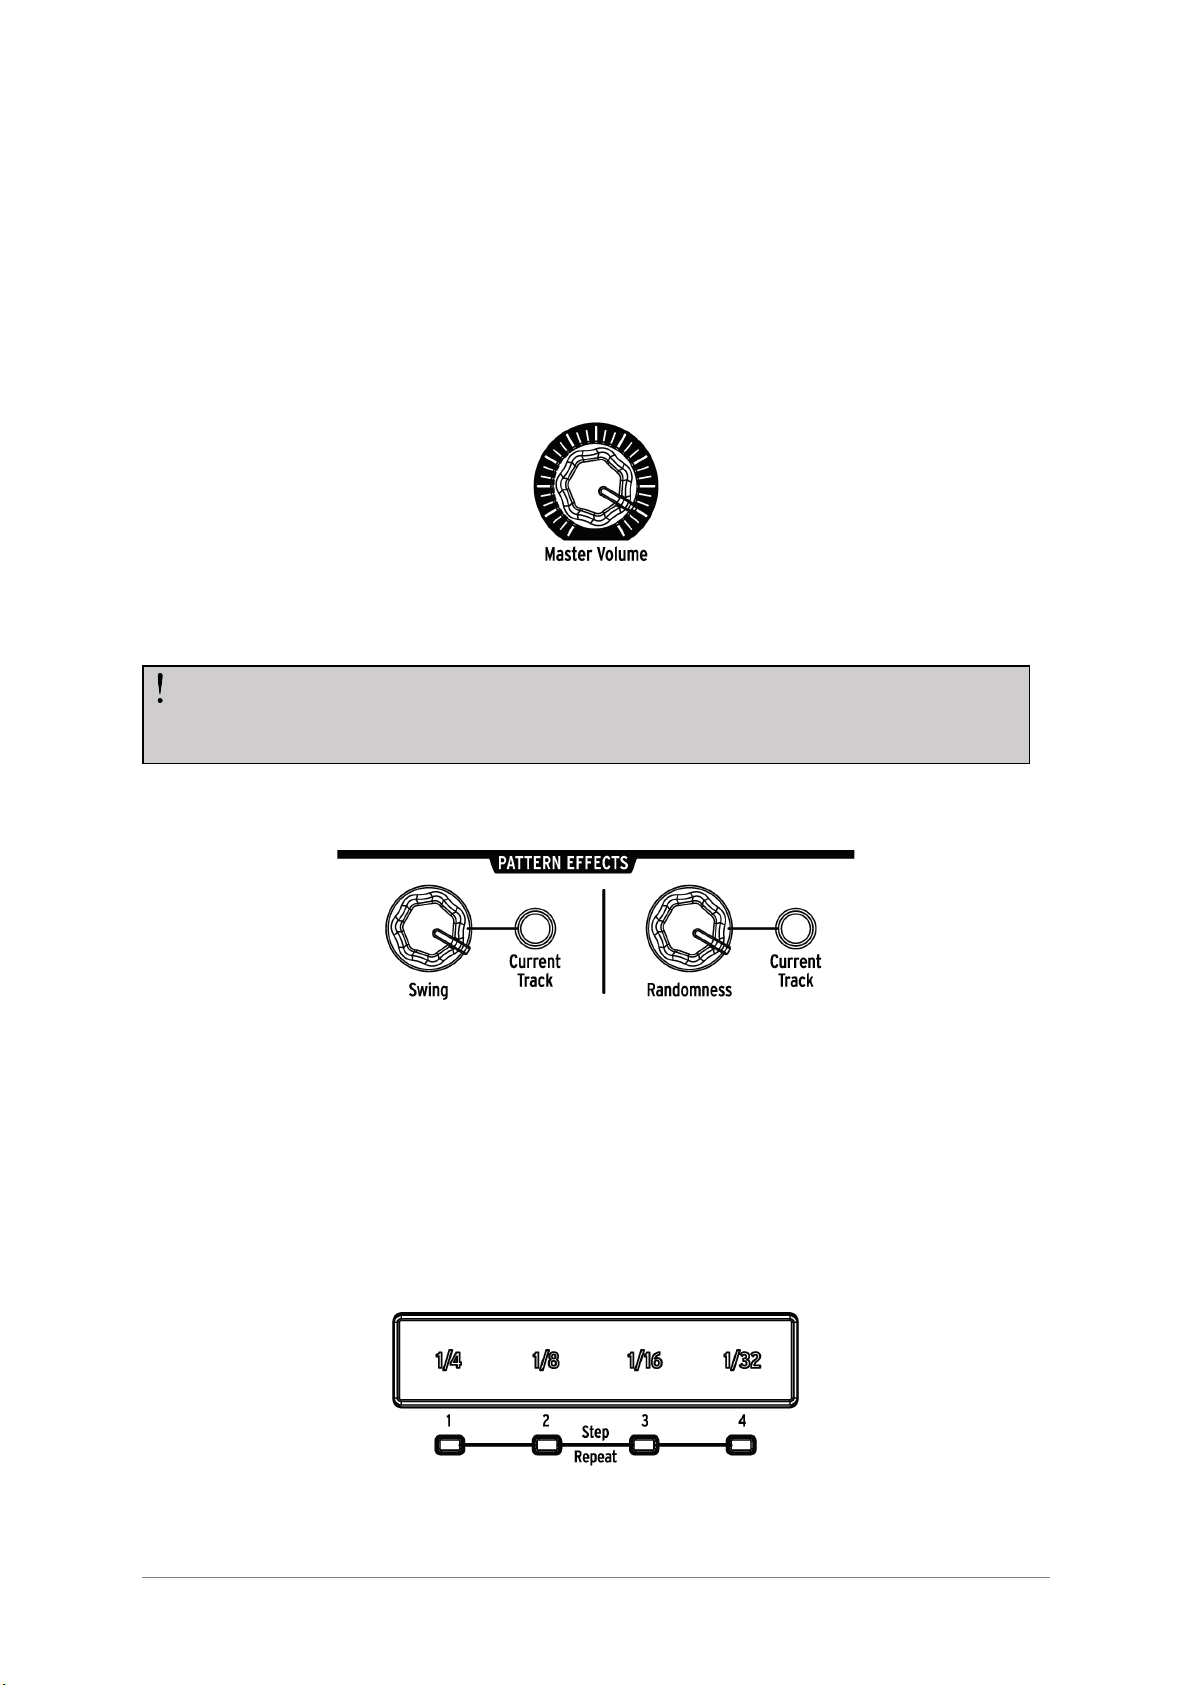
2.3.2 Master volume
This knob controls the master output level of the DrumBrute. It does not affect the
headphone level; that is controlled by a recessed knob on the rear panel.
2.3.3 Pattern effects
Swing introduces a “shuffle” feel to the patterns. It can affect the entire pattern (all
instruments at once) or only the current instrument track, leaving the others untouched.
Randomness introduces an increasing amount of unpredictability to the patterns. As with
the Swing setting, this control can affect the entire pattern or only the current
instrument track, leaving the others untouched.
For more details on these features, see sections 5.1.7 and 5.1.8.
2.3.4 Roller/Looper/Step Repeat
The Master Volume knob will not affect the level of an instrument when a cable is
plugged into the rear panel output of that instrument. In this case, use the Level
knob above that instrument’s drum pad. See section 2.7 for more information.
ARTURIA – DrumBrute – USER’S MANUAL 17
2.3.4.1 Roller
When DrumBrute is recording a pattern the Roller strip can be used to generate drum
rolls. Place your finger somewhere within the strip while recording, press a pad, and
DrumBrute will repeat (“roll”) that instrument into the pattern. The rate of the repeat is
determined by where you press your finger (1/4, 1/8, etc.).
2.3.4.2 Looper
When a pattern is playing back (i.e., not being recorded) this strip can be used to loop
sections of the current pattern. The size of the loop is determined by the time division
selected within the Looper strip area. The start and end points of the loop are based on
the playback location of the pattern at the time the Looper strip is pressed.
2.3.4.3 Step Repeat
The touch strip is also used in Step Mode to enter Step Repeat data. This feature allows
you to enter rapid, repeating notes without having to alter the timing value for the
pattern. Details about this feature are found in section 5.2.5.
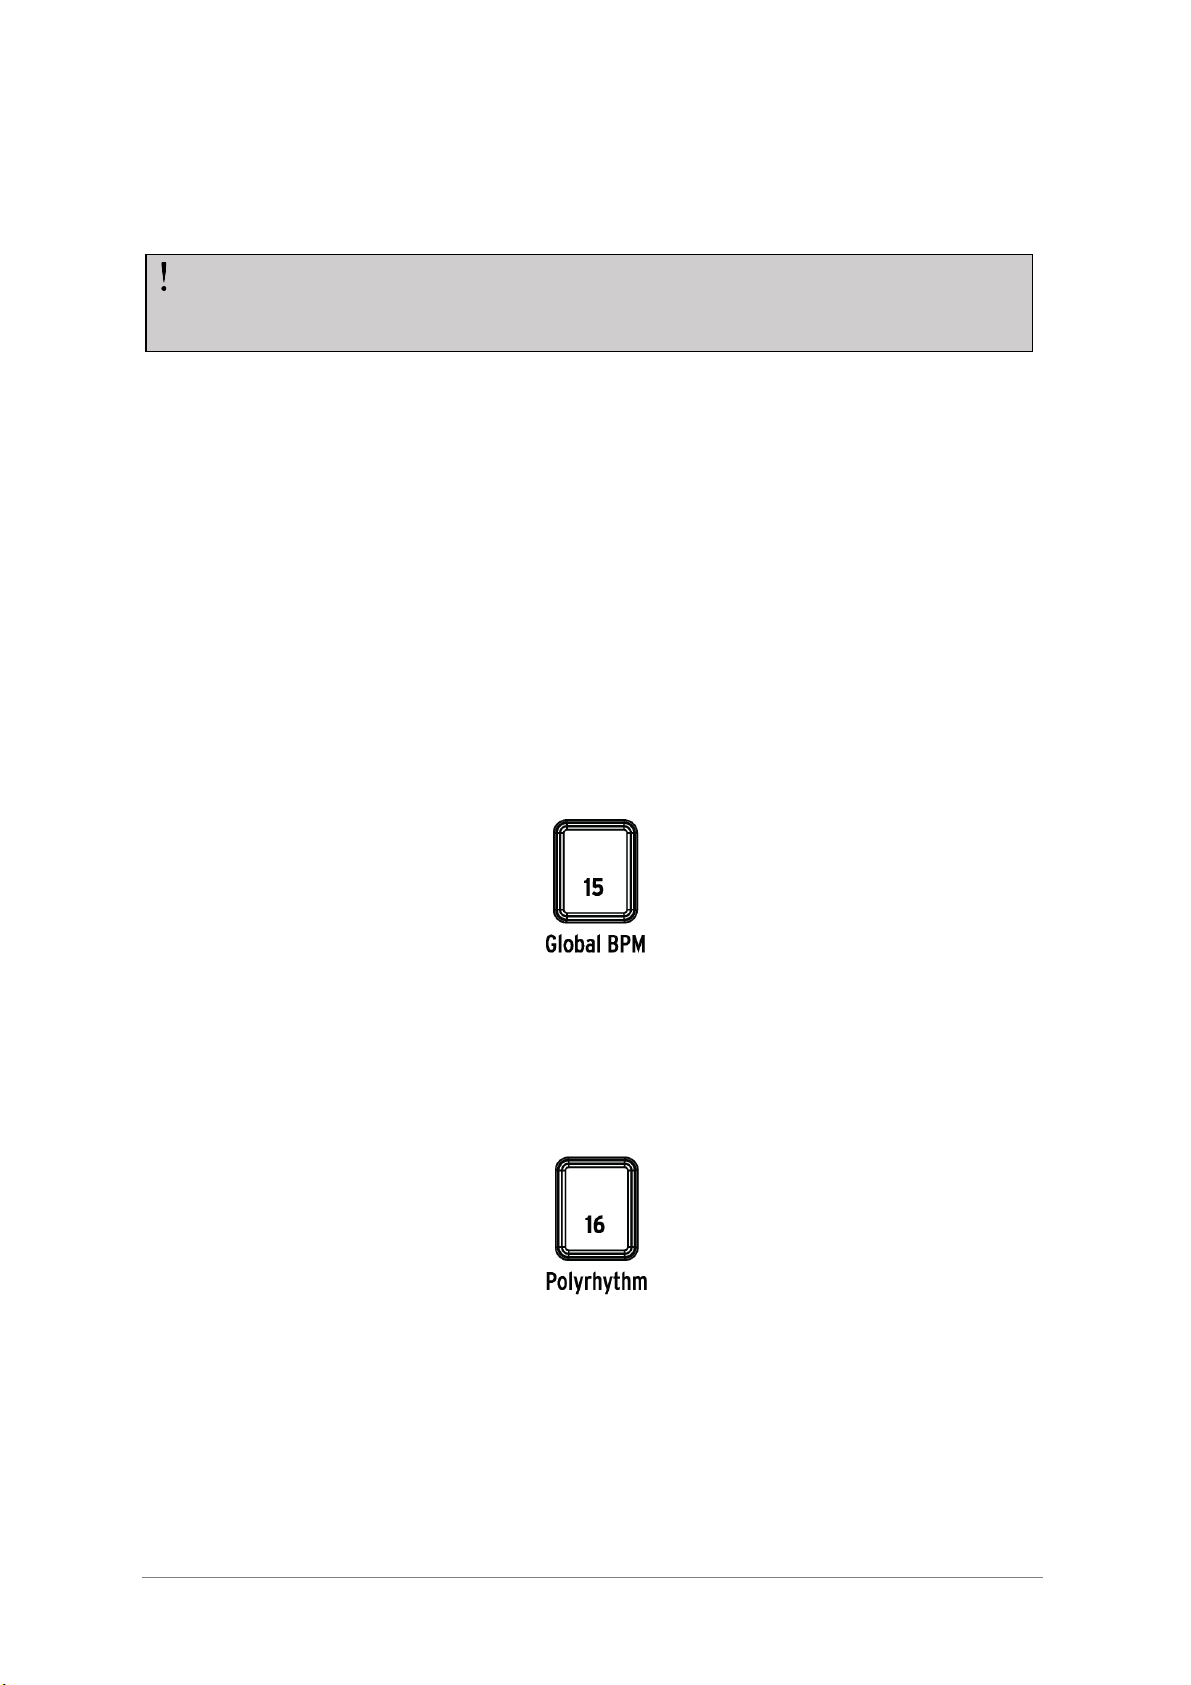
2.3.5 Global BPM
It is possible for all patterns to have their own tempo, or you can use this parameter to
force them all to play back at the same tempo. To toggle this feature, hold the Shift
button and press step button 15.
2.3.6 Polyrhythm
Individual instrument tracks within a pattern can loop independently when the
Polyrhythm feature is enabled. This setting is stored separately for each pattern. To
enable this feature, hold the Shift button and press step button 16.
To learn more about the Polyrhythm feature, see section 7.3.
The smallest drum roll the pattern can record is set by the timing division you have
selected for the pattern. In other words, if the timing division of the pattern is 1/16,
DrumBrute will not record 1/32 rolls played on the Roller strip.
18 ARTURIA – DrumBrute – USER’S MANUAL
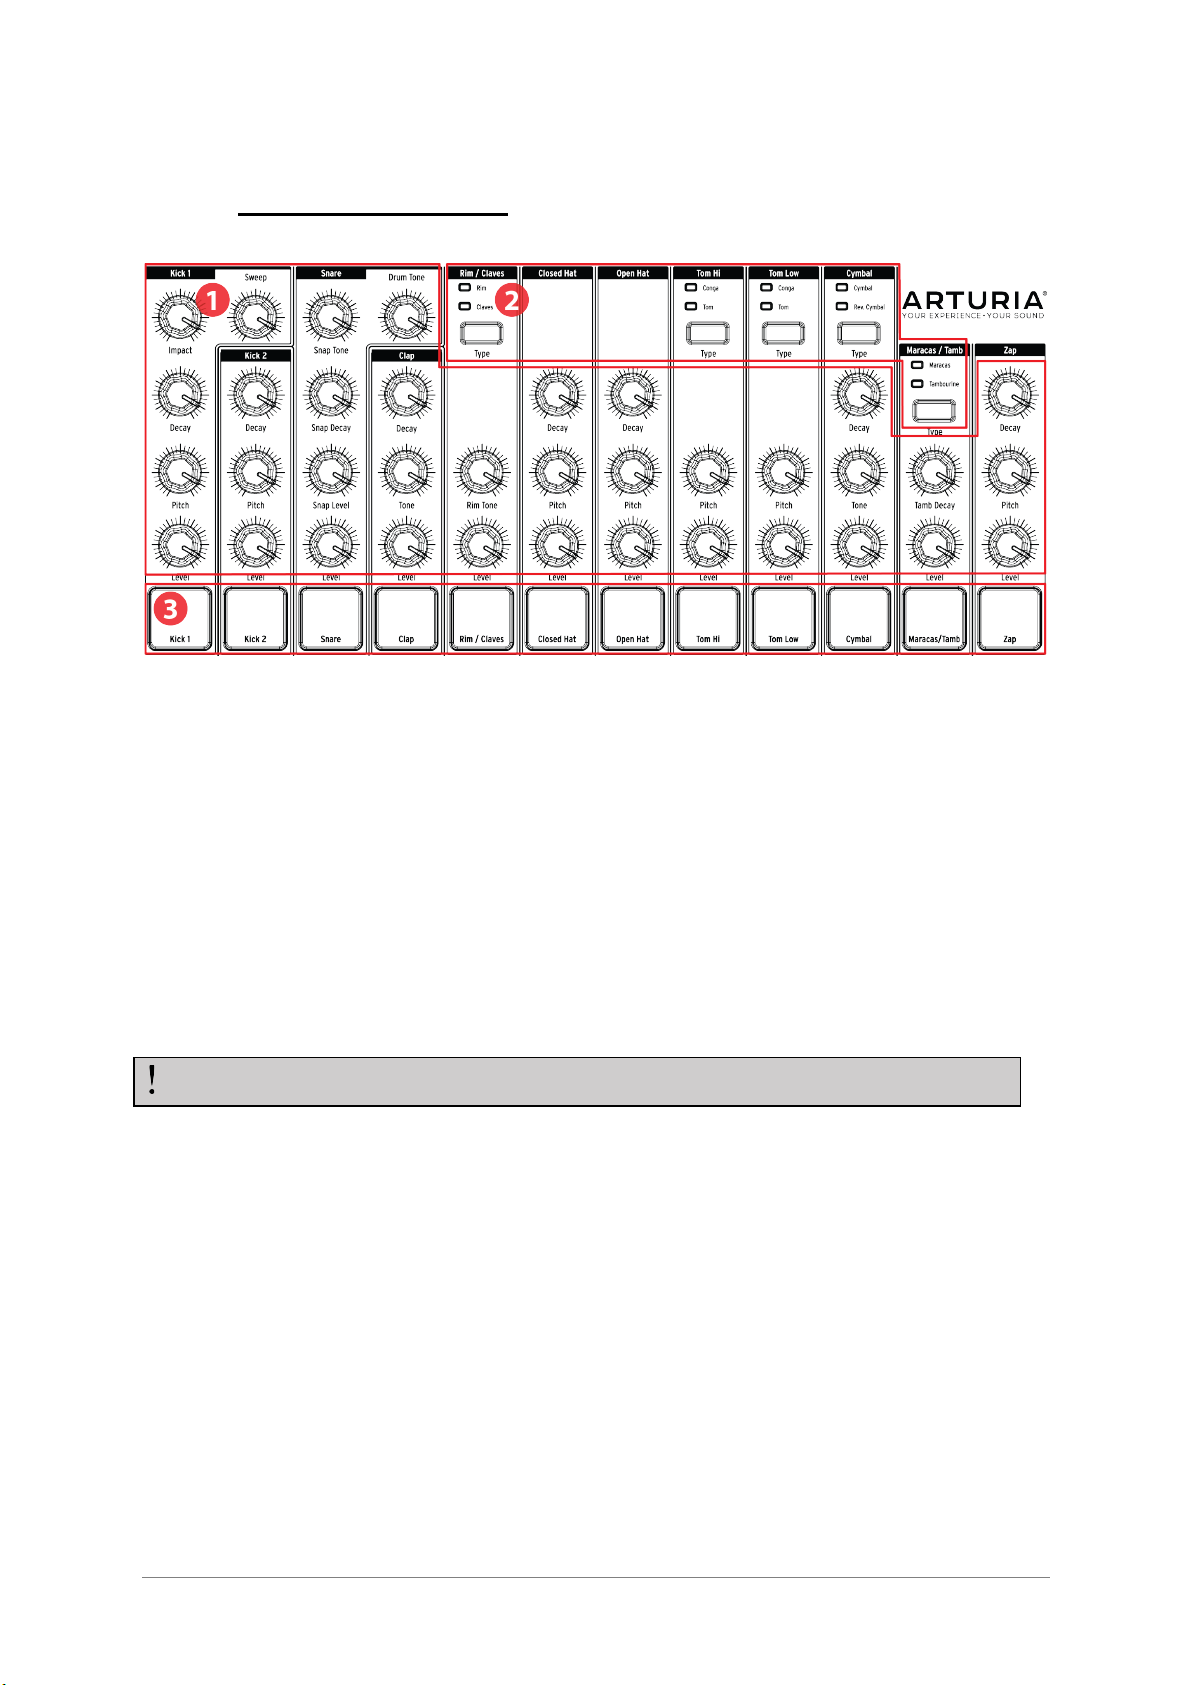
2.4 Instruments + Pads
1. Instrument controls (see 2.4.1)
2. Instrument select buttons (see 2.4.2)
3. Pads (see 2.4.3)
2.4.1 Instrument controls
Each instrument has its own set of sound-sculpting parameters. The lines between the
instruments indicate which knobs belong to which instrument. Each instrument and its
knobs are called an instrument channel.
Some instrument channels are shared by two instruments. For example, the Maracas
and the Tambourine instruments are both found within the Maracas/Tamb channel. This
is known as a shared channel.
2.4.2 Instrument select buttons
These buttons toggle between the instruments in a shared channel. Each instrument in a
shared channel can be recorded independently into a pattern.
However, as a general rule the instruments share the instrument controls. For example,
if you change the tuning on the Tom Hi instrument the tuning will also change for the Hi
Conga.
2.4.3 Pads
The 12 velocity-sensitive pads are used to input note data into a pattern. But they will
always trigger their instruments whether DrumBrute is running or not.
The movements of the instrument controls are not recorded as part of a pattern.
ARTURIA – DrumBrute – USER’S MANUAL 19
Remember that some pads provide access to more than one instrument, each of which
has its own track in the pattern sequencer. Counting all of the shared channels, there
are actually 16 separate instruments available from the 12 pads.
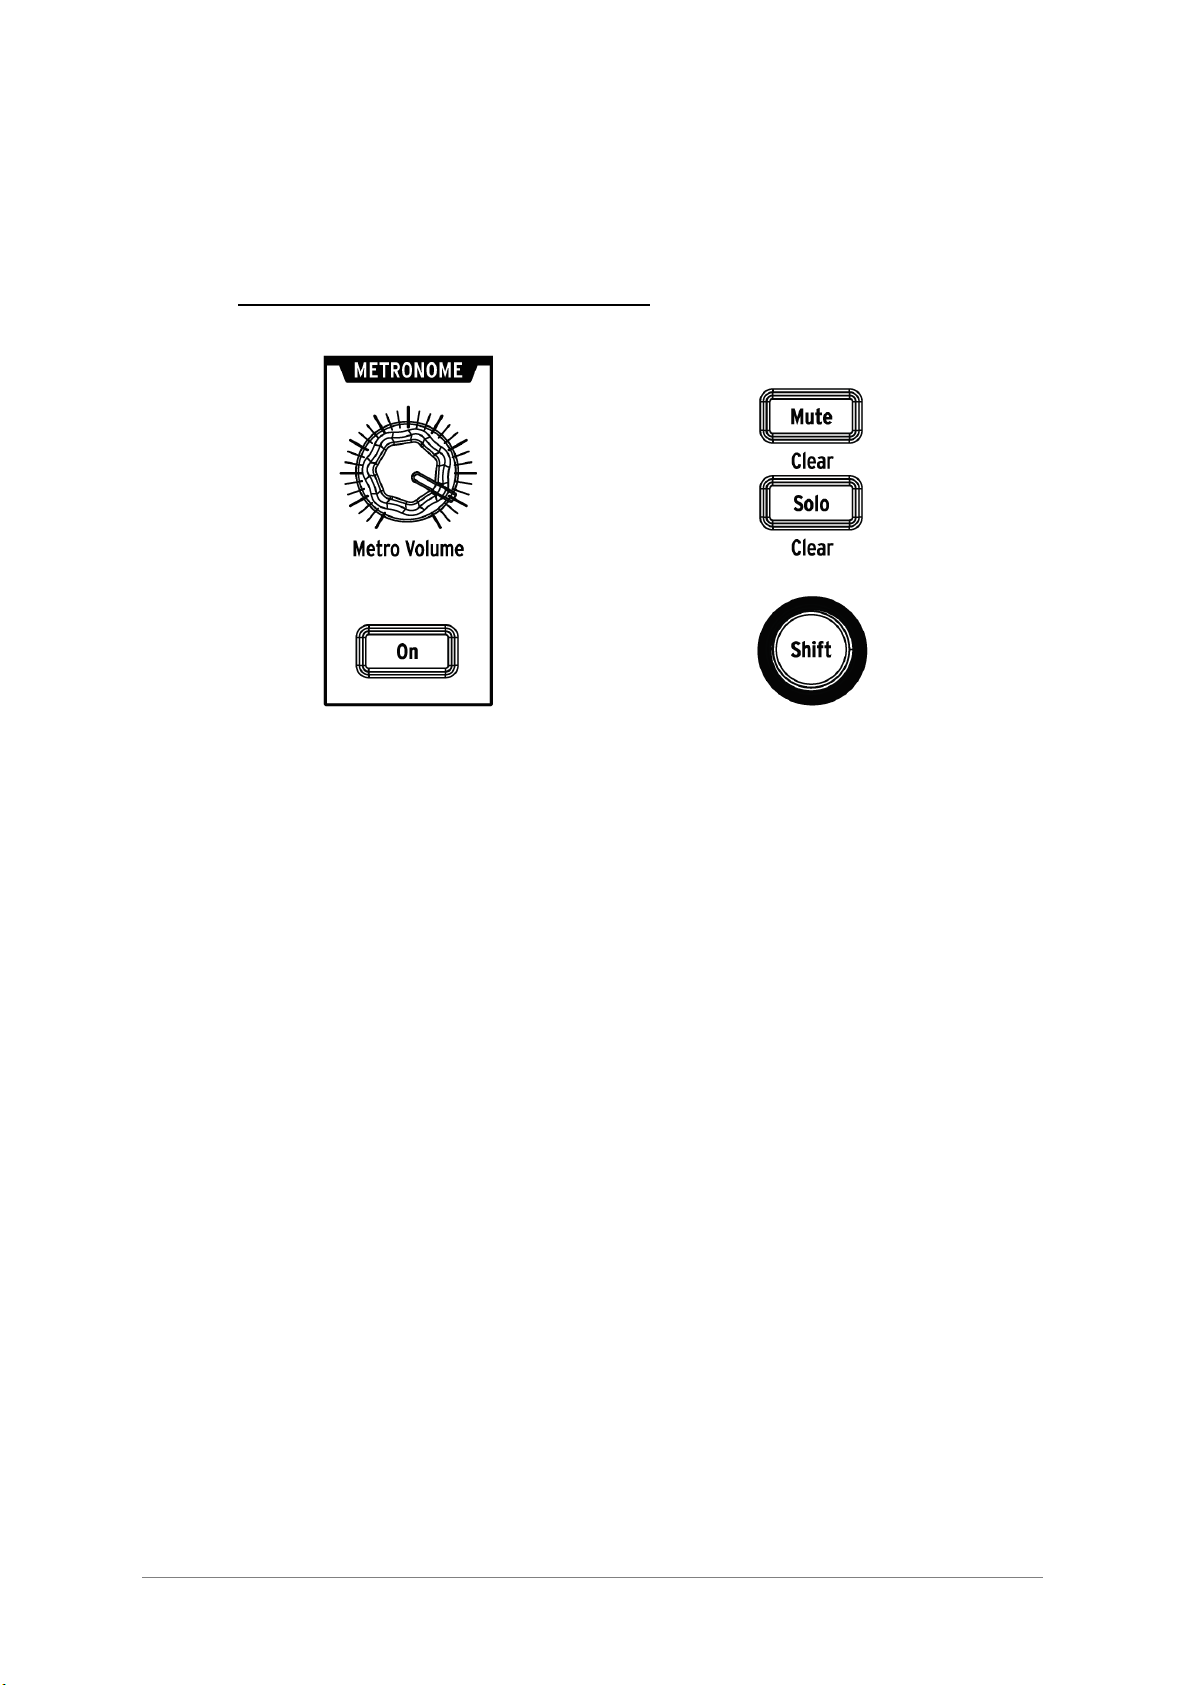
2.5 Metronome, Mute/Solo + Shift
Metronome controls Mute/Solo/Shift buttons
2.5.1 Metronome
To enable the metronome, press the On button. This will provide a timing reference
while DrumBrute is running. Various timing values are available for the click. See section
3.1.4 for information about this.
The click level is controlled by the Metro Volume knob. The metronome also has a
dedicated output jack on the rear panel.
For a description of the output options for the Metronome see section 2.7.
2.5.2 Mute/Solo buttons
These buttons allow you to silence one or more instruments or isolate specific
instruments while recording a pattern or playing it back.
For more information about using the Mute and Solo buttons, see section 5.1.4.
2.5.3 Shift button
The Shift button is used in conjunction with other controls to perform secondary
functions such as Fine Tempo adjustment or clearing the Mute group.
Each specific use of the Shift button will be described in the appropriate section of this
manual. For a complete list of Shift functions see section 7.4.
20 ARTURIA – DrumBrute – USER’S MANUAL
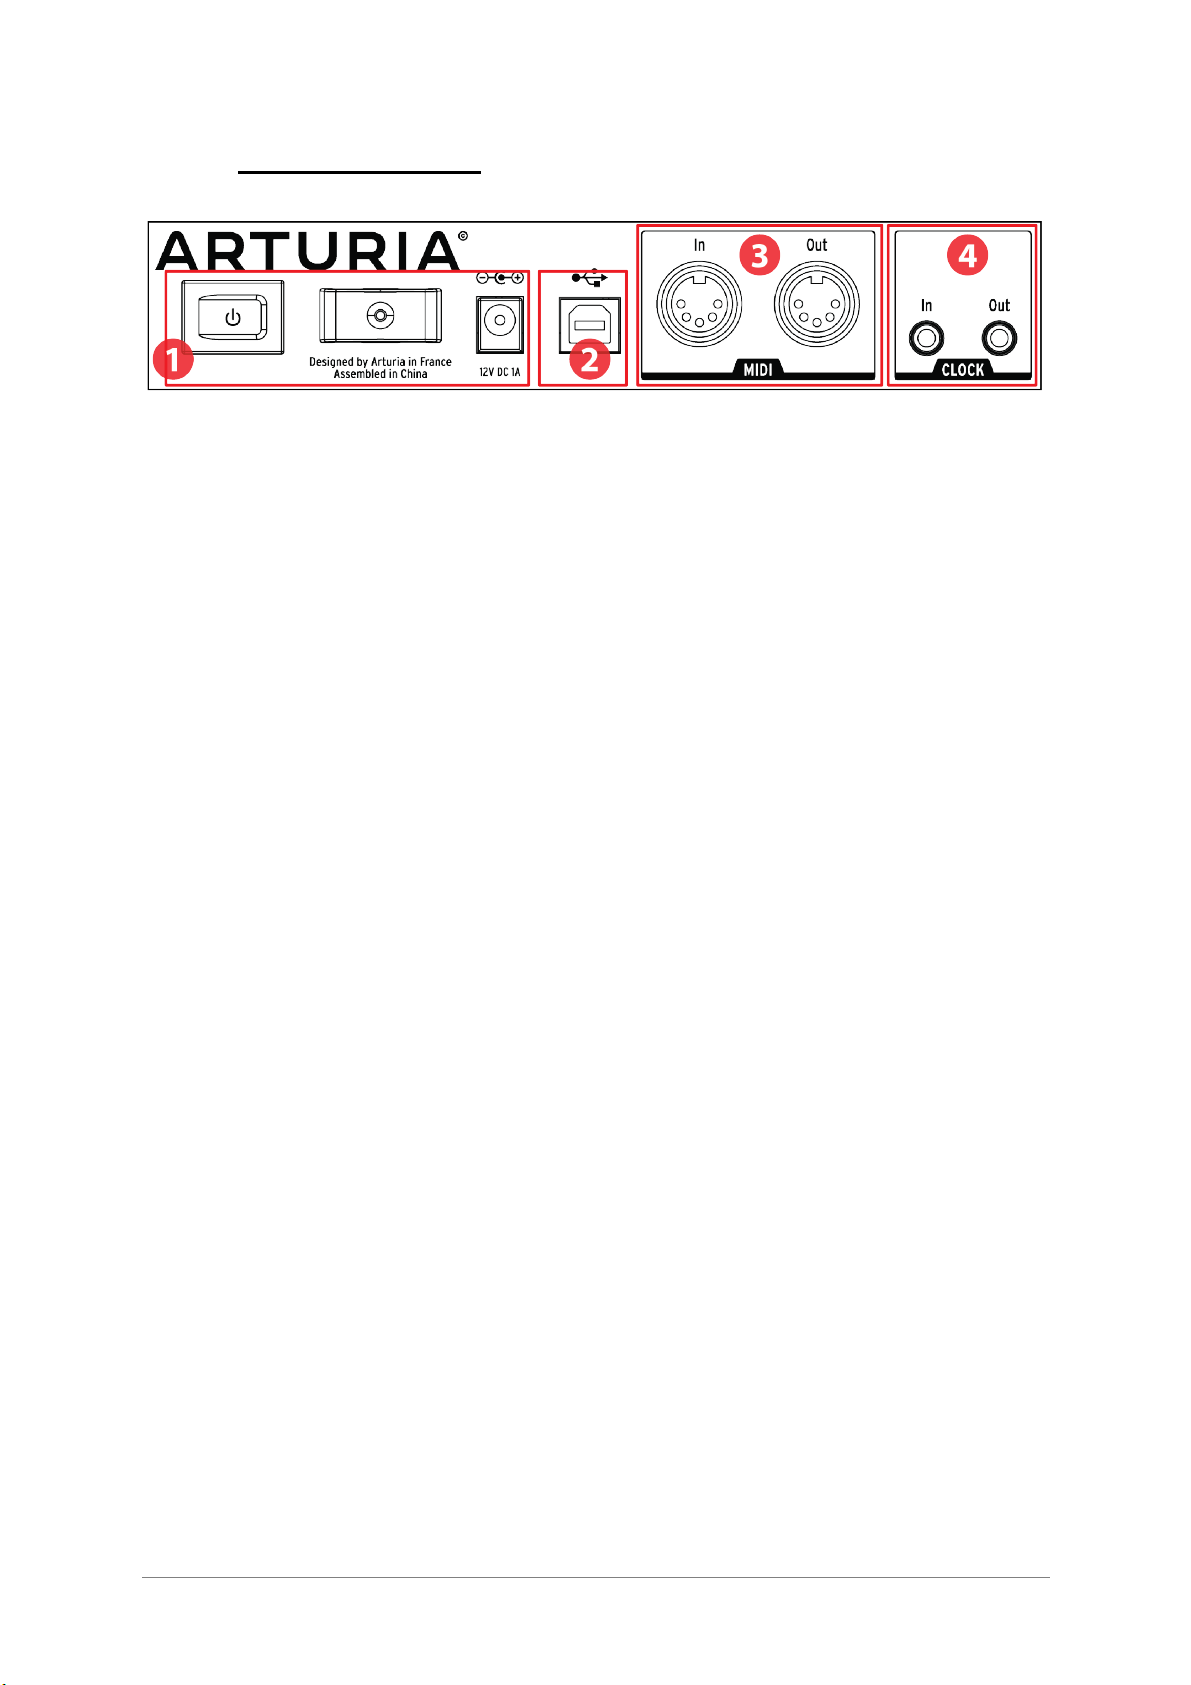
2.6 Rear panel, part 1
1. Power (see 2.6.1)
2. USB (see 2.6.2)
3. MIDI input/output (see 2.6.3)
4. Clock input/output (see 2.6.4)
2.6.1 Power
From left to right in this section are the power switch, the power cable strain relief, and
the 12V DC power connector. Use only the included power supply to avoid damage to the
DrumBrute.
2.6.2 USB
This jack provides the data connections to a computer. In addition to working with your
DAW, the USB connection enables you to use the MIDI Control Center software to
configure extra parameters and to update the DrumBrute software.
2.6.3 MIDI input/output
Use standard MIDI cables to send and receive MIDI note and clocking data between
DrumBrute and MIDI-compatible devices.
2.6.4 Clock input/output
The Clock input allows DrumBrute to interface with pre-MIDI devices that used these
connectors for synchronization, such as early drum machines by Korg and Roland. Other
vintage devices may use different types of connectors which should be readily available.
ARTURIA – DrumBrute – USER’S MANUAL 21
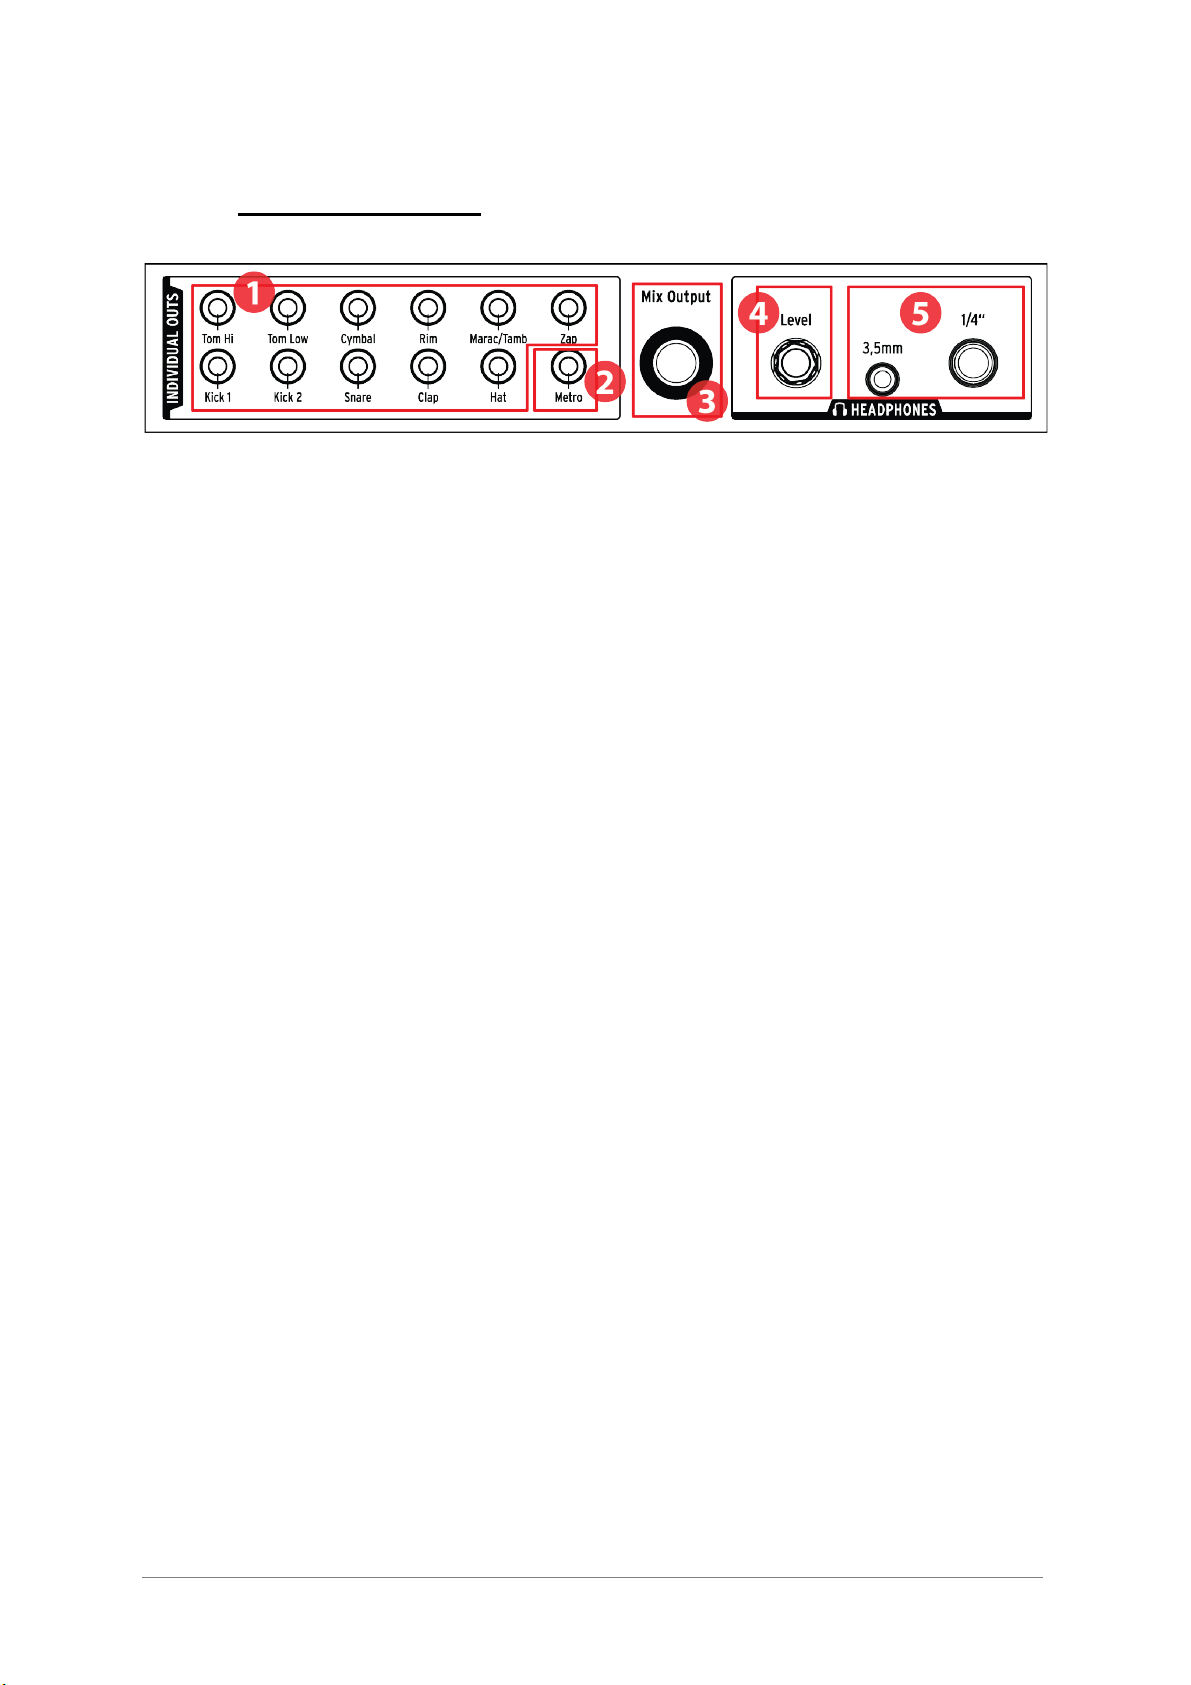
2.7 Rear panel, part 2
1. Individual Outs (see 2.7.1)
2. Metronome Output (see 2.7.2)
3. Mix Output (see 2.7.3)
4. Headphone Level Control (see 2.7.4)
5. Headphone Outputs (see 2.7.5)
2.7.1 Individual Outs
Each DrumBrute instrument channel has a dedicated 3.5mm output jack on the rear
panel. Both instruments of a shared channel will share that channel’s output.
When a cable is connected to one of the individual outputs, that instrument channel will
be removed from the Mix Output. This is true for the Metronome output as well.
The output level of each instrument channel is set by the corresponding Level knob on
the front panel.
2.7.2 Metronome Output
The metronome has its own individual output because the metronome’s output circuitry
behaves in a slightly different manner than the other instruments. See section 2.7.5 for
details.
2.7.3 Mix Output
This output jack carries the output signal for every instrument channel. When a cable is
connected to one of the individual outputs, that instrument channel will be removed from
the Mix Output. This is true for the Metronome output as well.
The Mix Output level is controlled by the Master Volume knob on the front panel.
2.7.4 Headphone Level Control
This knob is recessed into the rear panel to avoid an accidental change in level. Push the
knob inward to release it for adjustment, and push it back in to protect it from further
changes.

22 ARTURIA – DrumBrute – USER’S MANUAL
2.7.5 Headphones
The headphone outputs carry the same signal as the Mix Output and operate the same
way, with one exception: When one of the headphone jacks is connected, the
metronome will be removed from the Mix Output but will remain in the headphones until
its individual output is used.
The behavior of all other connection options is the same for the headphones and the Mix
Output, including the metronome: When a cable is plugged into one of the individual
outputs, that instrument channel’s signal will be removed from both the headphones and
the Mix Output.

ARTURIA – DrumBrute – USER’S MANUAL 23
3 BASIC OPERATIONS
3.1 Working with Patterns
DrumBrute holds 64 patterns, arranged in four banks of 16 patterns each.
3.1.1 Select a bank
In addition to the numbers 1-4, the first four Step buttons are silkscreened with the
letters A, B, C, and D. Each one represents a bank of 16 patterns.
To switch between banks, press the Bank button and then select one of the first four
Step buttons. After this, press the Ptrn button and select one of the 16 patterns within
that bank using the Step buttons.
There is a setting in the MIDI Control Center software that allows you to switch between
banks without the additional step of selecting a pattern. See section 10.9.2.13 to learn
more about this feature.
3.1.2 Select a pattern
To select a pattern within the current bank simply press one of the Step buttons 1-16. If
you are still in Bank mode you will need to press the Ptrn button first and then select the
pattern.
DrumBrute will respond in one of two ways if it is running when the selection is made: it
will either change immediately to the new pattern or wait until the end of the current
pattern. Use the “Wait to Load Pattern” setting in the MIDI Control Center software to
specify which behavior you prefer. This is described in section 10.9.2.5.
3.1.3 Set the tempo
When Sync is set to Internal, the tempo range of DrumBrute is 30-300 beats per minute
(bpm).
There are three ways to set the tempo for your pattern:
• Turn the Rate/Fine encoder.
• Use the Tap Tempo button.
• For fine tempo adjustment, hold Shift and then turn the Rate/Fine encoder.
Each pattern can have its own tempo, but you can make DrumBrute use the same tempo
for all patterns and songs. To do this, hold the Shift button and press Step button 15
(Global BPM). When Step button 15 is lit blue, Global BPM is active.
The MIDI Control Center allows you to specify all features related to tempo and the
metronome. See section 10.9.2 for details.
 Loading...