

Page 1
USER’S MANUAL
ARTURIA – BRASS 2 – USER’S MANUAL
1
Page 2

PROGRAMMING:
Arturia
Cristian Kreindler (Lead)
Robert Bocquier
Vincent Travaglini
Fabrice Bourgeois
Jean-Michel Blanchet
Nicolas Bronnec
Xavier Oudin
Fabrice Paumier
Cédric Rossi
Ircam
Nicholas Ellis (Lead)
Joel Bensoam
Thomas Helie
André Almeida
Matthew Burtner
René Caussé
Xavier Rodet
Norbert Schnell
Patrice Tisserand
Christophe Vergez
MANUAL:
Cristian Kreindler (Version 2)
Richard Phan (Version 2)
Antoine Back (Version 2)
André Almeida (French version)
Jean-Michel Blanchet (French version)
Christophe Vergez (French version)
Houston Haynes (Version anglaise)
Scott Stafiej (English version)
Mitsuru Sakaue (Japanese version)
Yuji Sano (Japanese version)
Katsunori Ujiie (Japanese version)
Tomoya Fukuchi (Japanese version)
GRAPHICS:
Sabine Simmermacher (Typografics)
Yannick Bonnefoy (Beautifulscreen)
Nicolas Pianfetti
© ARTURIA SA – 1999-2010 – All rights reserved.
4, Chemin de Malacher
38240 Meylan
FRANCE
http://www.arturia.com
Information contained in this manual is subject to change without notice and does not represent a commitment
on the part of Arturia. The software described in this manual is provided under the terms of a license
agreement or non-disclosure agreement. The software license agreement specifies the terms and conditions for
its lawful use. No part of this manual may be produced or transmitted in any form or by any purpose other than
purchaser’s personal use, without the express written permission of ARTURIA S.A.
Other products, logos or company names quoted in this manual are trademarks or registered trademarks of
their respective owners.
2
ARTURIA – BRASS 2 – USER’S MANUAL
Page 3

TThhaannkk yyoouu ffoorr ppuurrcchhaassiinngg AARRTTUURRIIAA BBRRAASSSS 22!!
In this package you will find:
• a CD-ROM containing the BRASS 2 installer for MAC OSX and Windows
7/Vista/XP/2000
• a paper manual for BRASS 2
• the Authorization Card below
Keep this card in a safe place!
We recommend that you register your product. By registering, you identify yourself as
the legitimate owner and will be sure to receive the latest news and updates for your
product. After registration, you will receive a user ID and password in order to access a
protected area on our site. It also puts you on our user notification list, so that you can
be the first to know when there are updates or new product offers.
ARTURIA – BRASS 2 – USER’S MANUAL
3
Page 4

BBRRAASSSS:: ggoo bbeeyyoonndd ssaammpplliinngg
There is nothing original in noticing that the center of musical creation has switched to
the computer platform during the last decades. The evolution of composition modes
associated with software sequencers and hard disk recordings, along with virtual
instruments and effects, have undeniably had an impact on the nature of musical
creation. The musical genres particularly suited for computer creation, those using loops
or electronic sounds and processing, have seen a large and significant growth.
In this context, the contemporary musician that searches to integrate a brass section into
a musical piece has a choice: either hire a performer that can play his piece in a studio,
or find an electronic means that simulates a brass piece at low cost. This being said, the
two choices are not exclusive; a composer might wish to program a brass part
individually as a preview before recording a real performer for the final version of the
song.
In any case, a composer that constructs the basics of his work on a computer and wishes
to program individual instrument parts, such as a solo trumpet or a section of
saxophones, is always looking for new ways to express himself.
The first possibility offered to him is the use of a sampler. With such a tool, musicians
can easily perform the recorded sound of each instrument on their keyboard.
Unfortunately, this simplicity often has a price: a certain lack of expression, flexibility and
instrument control. Once the performance is captured within the individual sample, it’s
difficult to modify the performance into something resembling a live player. The search to
find the right sample can also be long and tiresome, which often does not match the
productivity criteria set by the music industry today.
For a composer the second method consists of introducing a complete loop/cycle in the
composition; that is to say a small, previously recorded musical phrase that guarantees
an expression and interpretation closer to reality. Unfortunately, the downside of the loop
is that we cannot modify the content, articulations, tone, or the mood, which strongly
limits the musical usefulness of the recorded phrase.
Beyond sampling and loop playback, there is yet another solution – physical modeling.
Particularly through research done at Stanford University (USA) and IRCAM (France), the
concept came forth to emulate acoustic musical instruments with mathematics – and
created a new path of musical exploration. The third method is, by far, the most
promising since it allows the composer to recreate the performance of an acoustic
instrument with all its finesse, while working within an interface that is familiar. Thus, in
the case of physical models, keyboard control permits a level of expression that samplers
don’t offer. In this way, the composer once again becomes the interpreter, escaping the
trap of limiting technology, and is allowed to once again focus on the creation of
expressive music.
Of course, let’s not pretend physical models are the Holy Grail of music, offering the
exact same quality and expressivity as a live performance. The musician maintains a
strong advantage since the player defines what the results must be with the instrument
as they are performing. However, the path established by IRCAM opens a new generation
of physical models, based on the technology called “Non linear multiple feedback loop”,
4
ARTURIA – BRASS 2 – USER’S MANUAL
Page 5

giving a promising new choice. It permits us to access a solution that goes beyond the
samplers and loop libraries, and in many ways surpasses previous physical modeling
approaches. Arturia has created BRASS as the first incarnation of this next generation of
physically modeled musical instruments.
The goal of BRASS is to offer new possibilities, placing the composer in the perspective of
the musician. The software is built around two major components: LIVE mode that allows
a musician to create full, expressive performances in real time, and RIFF mode that
offers a multitude of pre-written, yet easily modifiable loops that leave audio loop
libraries behind.
While it offers much more than sample playback and flat looping systems, the core
modes of BRASS don’t ask you to radically modify your manner of working. As an
extension, with the usage of adapted controllers such as a breath controller and with
practice and understanding of the behavior of the underlying models, you can realize the
full measure of possibilities that BRASS offers. A physical model is in a way a living
instrument, much like their acoustic counterparts – it will become more responsive with
practice. But don’t worry; this will always be infinitely faster than the mastery of the real
instrument.
We hope that you find a lot of pleasure in playing and composing with BRASS software. It
is based on years of research and development, and we wanted to present a device
easily understood that's ready for you to use right now. Enjoy your new musical
instrument, and let us know what you think. We're always looking and listening for new
ways to connect musicians with cutting-edge technologies, and your input is important to
us.
Don’t hesitate to give us your feedback by emailing us at info@arturia.com – or by
selecting an option from the Contact page on our website at: http://www.arturia.com
Musically yours,
The Arturia and IRCAM development team
ARTURIA – BRASS 2 – USER’S MANUAL
5
Page 6

TTaabbllee ooff CCoonntteennttss
1 INTRODUCTION: ARRANGING FOR BRASS 2 ................................................................................... 9
1.1 POP/R
1.2 R
1.3 D
1.4 J
1.5 C
1.6 F
OCK
................................................................................................................................................ 9
EGGAE
................................................................................................................................................. 10
ANCE/FUNK
AZZ
....................................................................................................................................................... 10
LASSICAL
ANFARE/MILITARY
......................................................................................................................................... 10
............................................................................................................................................. 11
.............................................................................................................................. 11
2 INSTALLATION........................................................................................................................................ 13
2.1 WINDOWS
2.2 MAC OS X
3 AUTHORIZATION.................................................................................................................................... 17
4 QUICK START........................................................................................................................................... 23
4.1 LIVE
4.1.1 Management of documents............................................................................................................ 24
4.1.1.1 Kit Zone..................................................................................................................................................... 24
4.1.1.2 Harmonization Zone.................................................................................................................................. 24
4.1.1.3 Instrument type and preset zone ................................................................................................................ 24
4.1.1.4 Instrument Configuration Page.................................................................................................................. 25
4.1.1.5 Spatialization Page .................................................................................................................................... 25
4.1.1.6 MIDI PRESET page.................................................................................................................................. 26
4.1.2 Automation.................................................................................................................................... 28
4.1.3 To Save.......................................................................................................................................... 29
4.2 RIFF
4.2.1 Editing a short riff......................................................................................................................... 32
4.3 U
5 USER INTERFACES ................................................................................................................................. 37
5.1 L
5.2 R
SING
IVE MODE
5.1.1 Center Section - Controlling Parameters in real time .................................................................. 38
5.1.1.1 Presentation of the Parameters................................................................................................................... 38
5.1.1.2 Live display of parameters......................................................................................................................... 39
5.1.1.3 Direct settings with the mouse................................................................................................................... 39
5.1.1.4 Real time control ....................................................................................................................................... 39
5.1.1.5 Control in real time - Pitch Bend and Aftertouch ...................................................................................... 40
5.1.1.6 Automation of Live parameters................................................................................................................. 40
5.1.1.7 Drawing tools ............................................................................................................................................ 42
5.1.2 Left Section – Instrument Presets.................................................................................................. 43
5.1.2.1 Choose your kit.......................................................................................................................................... 43
5.1.2.2 Choose your harmonization....................................................................................................................... 43
5.1.2.3 Choose the type of an instrument .............................................................................................................. 45
5.1.2.4 Preset selection.......................................................................................................................................... 45
5.1.2.5 Preset management.................................................................................................................................... 46
5.1.3 Right Section – Instrument configuration...................................................................................... 46
5.1.3.1 Instrument parameters ............................................................................................................................... 46
5.1.3.2 Configuration............................................................................................................................................. 46
5.1.3.3 Spatialization............................................................................................................................................. 49
5.1.3.4 MIDI PRESET page.................................................................................................................................. 50
5.1.4 Virtual keyboard............................................................................................................................ 52
IFF MODE PRESENTATION
5.2.1 Riff selection, preset management................................................................................................. 53
5.2.1.1 Management of riff presets........................................................................................................................ 53
5.2.1.2 Import and Export Riffs............................................................................................................................. 54
5.2.2 Riff properties and visualization ................................................................................................... 54
5.2.2.1 Instrument choice zone.............................................................................................................................. 54
5.2.2.2 Riff properties............................................................................................................................................ 55
5.2.2.3 Properties of each riff instrument .............................................................................................................. 55
5.2.2.4 Spatialization............................................................................................................................................. 55
5.2.3 Control of the riff mode via MIDI ................................................................................................. 56
INSTALLATION
INSTALLATION
MODE
........................................................................................................................................... 23
MODE
............................................................................................................................................ 30
BRASS 2
VIA
............................................................................................................................................ 37
(2000, XP, V
.................................................................................................................... 15
MIDI.................................................................................................................... 35
.................................................................................................................... 52
ISTA,
7) ................................................................................. 13
6
ARTURIA – BRASS 2 – USER’S MANUAL
Page 7

5.2.3.1 MIDI synchronization................................................................................................................................ 56
5.2.3.2 Keyboard and control MIDI configuration................................................................................................ 56
5.2.4 Editing riffs ................................................................................................................................... 57
5.2.4.1 Piano roll visualization.............................................................................................................................. 58
5.2.4.2 Zoom ......................................................................................................................................................... 58
5.2.4.3 Editing Notes............................................................................................................................................. 59
5.2.4.4 Editing the real time controls..................................................................................................................... 60
6 USING BRASS IN MIDI............................................................................................................................ 61
6.1 LIVE M
6.1.1 Using a MIDI keyboard................................................................................................................. 61
6.1.1.1 The MIDI adjustment configuration panel................................................................................................. 62
6.1.2 Using a Breath Controller............................................................................................................. 64
6.1.3 Using an EWI or EWI USB ........................................................................................................... 65
6.1.4 Assigning the external MIDI controllers....................................................................................... 65
6.2 R
6.2.1 Playing riffs on a MIDI keyboard ................................................................................................. 65
6.2.2 Riff control through a MIDI sequencer......................................................................................... 66
6.2.2.1 Riff synchronization with external sequencers.......................................................................................... 66
6.2.2.2 Importing/Exporting riffs .......................................................................................................................... 67
7 MODES OF OPERATION ........................................................................................................................ 69
7.1 S
7.1.1 Launching the Stand-alone application......................................................................................... 69
7.1.2 Preference Configuration.............................................................................................................. 69
7.1.3 Saving the configuration ............................................................................................................... 70
7.2 VST....................................................................................................................................................... 71
7.2.1 Installation .................................................................................................................................... 71
7.2.1.1 Under Windows......................................................................................................................................... 71
7.2.1.2 Under Mac OSX........................................................................................................................................ 71
7.2.2 Instrument use in the VST mode.................................................................................................... 71
7.2.2.1 Connection to a MIDI track....................................................................................................................... 71
7.2.2.2 Saving of presets........................................................................................................................................ 72
7.2.2.3 Automation................................................................................................................................................ 72
7.3 A
7.3.1 Installation .................................................................................................................................... 72
7.3.2 Use in Logic Audio........................................................................................................................ 73
7.3.3 Use in Digital Performer............................................................................................................... 75
7.4 P
7.4.1 Installation .................................................................................................................................... 77
7.4.2 Utilization of the plug-in ............................................................................................................... 77
7.4.2.1 Opening of the plug-in............................................................................................................................... 77
7.4.2.2 Connection to a MIDI channel................................................................................................................... 78
7.4.2.3 Saving the presets...................................................................................................................................... 78
7.4.2.4 Automation under Pro Tools ..................................................................................................................... 78
ODE
........................................................................................................................................... 61
IFF MODE
TAND-ALONE
UDIO UNIT (MAX
RO TOOLS
............................................................................................................................................ 65
....................................................................................................................................... 69
............................................................................................................................................ 77
OSX
ONLY
)............................................................................................................. 72
8 RESEARCH ................................................................................................................................................ 79
8.1 T
8.2 T
8.3 T
RUMPET AND TROMBONE
8.1.1 Trumpet......................................................................................................................................... 79
8.1.1.1 How does it work?..................................................................................................................................... 79
8.1.1.2 A little musical physics… a little instrumental practice…......................................................................... 79
8.1.1.3 Brassy sounding… Brass!.......................................................................................................................... 80
8.1.2 Trombone ...................................................................................................................................... 80
ECHNOLOGY USED WITH THE TRUMPET AND TROMBONE
8.2.1.1 The acoustic signature of the instrument ................................................................................................... 80
8.2.1.2 The virtual trumpeter/trombonist............................................................................................................... 81
8.2.1.3 The Physical Model................................................................................................................................... 81
8.2.1.4 Why is BRASS 2 incomparably easier to use?.......................................................................................... 82
HE SAXOPHONE
8.3.1 Musicians Technique..................................................................................................................... 82
8.3.1.1 How does it work?..................................................................................................................................... 82
8.3.1.2 Pitch of the note......................................................................................................................................... 82
8.3.1.3 Role of the Reed........................................................................................................................................ 84
8.3.1.4 A bit of musical physics… a bit of instrumental practice…...................................................................... 84
8.3.2 Pressure ........................................................................................................................................ 85
.................................................................................................................................... 82
.................................................................................................................... 79
.................................................................... 80
ARTURIA – BRASS 2 – USER’S MANUAL
7
Page 8

8.3.2.1 Timbre....................................................................................................................................................... 85
8.3.2.2 Damping.................................................................................................................................................... 86
8.3.2.3 Noise.......................................................................................................................................................... 86
8.3.2.4 Instrument Control..................................................................................................................................... 86
8.3.2.5 Envelopes .................................................................................................................................................. 86
8.3.2.6 Attacks....................................................................................................................................................... 86
8
ARTURIA – BRASS 2 – USER’S MANUAL
Page 9

1 INTRODUCTION: ARRANGING FOR BRASS 2
Brass instruments are used in a great many music styles – sometimes discretely and
sometimes taking center-stage. To know which moment is best to insert a brass section,
musically and creatively speaking, is often the work of a brass arrangement specialist.
But what do you do if you are not a “brass arrangement specialist”?
First of all, listen to and emulate other songs of your chosen genre. Basing your
arrangement on the approach of a known work is a well-worn tradition in many musical
styles. Also, be creative. Don’t think that brass is limited merely to the styles of music
where we are accustomed to hearing them. Used appropriately, brass can give a hot,
lively touch to your piece regardless of whether your style of music fits neatly into a predefined category or not.
Next, determine what role you want to give to your brass section. You can use it as
accompaniment, marking transitions or strong moments in the piece (where it serves as
a response to a melodic line with singing, for example). A brass section can be used to
create melodic phrases for introductions, as the principal themes of a piece, or even to
be played along side with other instruments. Lighter arrangements (arrangements less
present in the mix) can also serve as the counter melody or harmonic reinforcement. A
single instrument can be used occasionally to punctuate a melody and, more than that,
as an instrumental solo in a transition or bridge.
Finally, consider the arrangement itself. Don’t try to overload it or do too much. A
simple, expressive horn line can be highly effective. Appreciate the work of harmony and
chords that form the notes between the different instruments, don’t settle by simply
playing all the instruments in unison. With all the parameters that BRASS 2 offers, work
on expression in your arrangements: profit from real time playing parameters such as
the attack, pressure, tone, vibrato, etc. A true instrumentalist naturally adjusts his
playing approach; that is what brings music to life.
Along those lines, think about the idiosyncrasies of an instrumentalist or of several
players together. For example, if all notes are precisely fixed using quantization, the
brass sections will sound a bit too “clean” because even the best of musicians play with a
certain shift in sound between them; this is what makes a brass section living and allows
us to perceive the subtle differences between the attack of each instrument. This
observation is true for all styles of music, to varying degrees, according to extensive
research regarding precision in performance and tempo variations. Below we have, for
the some general styles of music, some very general suggestions on using BRASS 2 to
create quality arrangements.
1.1 Pop/Rock
In general, the horn line is used to accentuate certain strong passages of the piece
(crescendo, transitions, etc.) Look for passages in you piece that can be accentuated, the
places that “miss something”, to give them the dimension of power and change that
you’re looking for. Brief and efficient riffs will be the easiest to insert into your song.
Sometimes a single, well-placed chord is enough. Until very confident with this genre,
avoid mixing the horn line with singing portions; instead, alternate them to fill empty
ARTURIA – BRASS 2 – USER’S MANUAL
9
Page 10

spaces. You might do this with the melody for example. If you do put the different
portions together at the same time, it can be specifically for a passage that requires a
particular impact. Also, consider that many rock and pop songs use keyboards, organs,
and synth pads to fill in chords during certain passages. A horn line can work with these
instruments, or can replace them. Just be careful that “human” phrasing is used, as a
synth pad can be held much longer than a note from a brass instrument, and careful
attention to phrasing is required if a synth effect is to be avoided. There are countless
examples of bands that use horn lines effectively. Of course, the band Chicago stands out
as a Classic Rock group that used the horn line as their center-piece, and of course Bruce
Springsteen's work with the E-Street Band. But there are also many, many current rock
groups and artists that use brass effectively in their work: Morphine, Cake, No Doubt,
Mighty Mighty Bosstones, Sublime, and Beck are all fine examples, with many others that
you will hear on the radio or see on television nearly every day.
1.2 Reggae
Brass sounds in this genre are well established – even fundamental, and we can usually
distinguish the different instruments in the arrangement. The phrasing has the role of
accompaniment to the melody, but is also found very often in refrains guiding the
melodic line. Horns can also serve as a rhythmic complement from a harmonic base.
Reggae is a style that permits a large amount of creativity and liberty for the usage of
BRASS 2. It is, therefore, natural that you can begin to integrate the riffs and different
parts of brass very early in the creation of a piece. Begin by determining what different
roles it is going to play throughout the arrangement, and then by selecting or creating
the riffs and phrases so that each instrument is discernable in the mix. However, in the
relatively open arrangements of Reggae music, horn lines do not need to have a very
high sound volume to be correctly mixed and heard. Of course, the most important part
of the reggae horn line is how it interacts with the “riddim”. Just about any reggae song
with a horn line will provide a general sense of the genre, but some obvious discography
choices would be anything from either of the Marley brothers or Burning Spear.
1.3 Dance/Funk
Brass instruments are very important in this style. It brings the bright, festive, energetic,
and rhythmic touch that these styles demand. The spread of dynamics are important and
play an integral part of an effective arrangement. Therefore, the level of expression in
your instruments, particularly the attack, will require a great deal of focus. Elaborate
harmonic portions with two trumpets, one saxophone and trombone, for example.
Sometimes, two trumpets are enough to create parts at octaves, fifths or even thirds…
Experiment several ways to harmonize. It takes a bit of time, but in general the results
should contain harmonic richness that will get the audience moving. Sometimes effects
such as a “fall”, “swell”, or “up” techniques are sufficient to launch the piece into a
creative intro. Some well-placed short “hits” also enrich the piece in a simple, yet
efficient way. Again, there are many good examples for these genres, but as a start,
consider the amazing horn lines from James Brown or Tower of Power, and for classic
dance tracks there's no better example than Earth, Wind and Fire.
1.4 Jazz
No other style of music explored the different playing palettes as much as jazz. For this
reason, it is a bit difficult to describe a certain way to use any horn in jazz because it is
so varied and uses a bit of everything. We can describe, however, several very general
configurations. Large sections, called “Big Band” sections, are found in many
configurations. Arrangements of this type of formation are fairly complex, more so on the
10
ARTURIA – BRASS 2 – USER’S MANUAL
Page 11

level of rhythm than melody. There are many examples of this – Benny Goodman and
Glenn Miller, even today the Brian Setzer orchestra makes good use of horns in a big
band setting.
In smaller sections there are fewer instruments, of course, and often a wider harmonic
selection is explored. With the smaller sections, we can use BRASS 2 with harmonized
trumpet, saxophone, and trombone to create a tight ensemble. Consider any of the Blue
Note recordings of smaller jazz ensembles for ideas on this approach. McCoy Tyner's “A
Search for Peace” and Herbie Hancock's “On Green Dolphin Street” are prime examples.
In solo, jazz has always given a large place to brass players. There are a number of
legendary soloists who have changed history with their instruments. To reproduce all the
finesse and nuance of these musicians seems daunting, but nonetheless, you can
reproduce a quite a number of solo playing modes with BRASS 2. To elaborate your brass
performance in a jazz style, begin by deciding on the focus of a single instrument. A
complex portion with several instruments would probably be a bit too long and really
difficult to arrange, given that you have to take the parameters of expression for each
instrument into consideration to obtain a good sound; this is, after all, what happens in
reality with the true musicians in brass sections who play each of their instruments with
unique expression. The sound palette in Jazz is vast. Phrasing is often played with a
subtle combination of legato and detached notes, while alternating styles or punctuating
the notes that follow. Expression is also carried by the variations in the pressure sent to
the instrument, so much so that the note can sometimes be inaudible for one fraction of
a second or might finish in a rapid decrescendo. Consider the trumpet work of Miles
Davis or Wynton Marsalis, the sax performances of Stan Getz or Wayne Shorter, or the
trombone solos of JJ Johnson or Bill Watrous. There is a vast array of virtuosos to draw
from.
1.5 Classical
Using Brass in this style is centered mostly around the trumpet and trombone, with
seldom an entry for the saxophone. The sound can be very different in function of the
usage: either in sections or solos. For example, using trumpets in a section can give a
majestic aspect to the piece; the sound will be straightforward and have easily
discernable attacks. In this style of arrangement, take care not to synchronize the
different trumpets too precisely in order to give the ensemble a realistic effect; even in
classical arrangements there needs to be a space between the notes played. For the part
of trumpet soloists, use a more subdued sound with well-controlled attacks. Play while
alternating between detached and linked notes to give lightness to the playing style. For
a sequence of fast notes, put the accents on the “key notes”, or on the notes a bit higher
than the others, such that the musician has to “search for it”. Any of the classical solo
works from Wynton Marsalis will present a clear image of this approach.
1.6 Fanfare/Military
These styles of music use brass in a powerful and commanding way. Expression in the
playing technique is not the principal element: the ensemble needs to be coherent with a
good level of synchronization. The sounds are very strong and the attacks are direct.
Most of the notes should be attacked without legato in order to give the phrasing a
powerful and detached aspect. The harmonies are simple in general; there are unisons or
often fifth intervals based from the beginning in order to hear several instruments
playing simultaneously. To create an interesting ensemble effect, think about the effect
of multiplication of BRASS 2 instruments; this quickly gives an impression of playing a
ARTURIA – BRASS 2 – USER’S MANUAL
11
Page 12

section to the ensemble. Make the principal attacks vary, with pressure and tone usually
raised even on the notes which have a weak attack. Aaron Copland's “Fanfare for the
Common Man” has a fair combination of separated and slurred phrasing that illustrates
both extremes for this sub-genre. Also, Respighi's “Pines of Rome” has very strong
trumpet and trombone parts in the section “Appian Way”. Many modern film scores also
use brass in this manner. One should not be required to venture too far to find an
example worth study and emulation.
This is only “the tip of the iceberg”. The most important thing is to listen, learn, and most
of all – create.
12
ARTURIA – BRASS 2 – USER’S MANUAL
Page 13
2 INSTALLATION
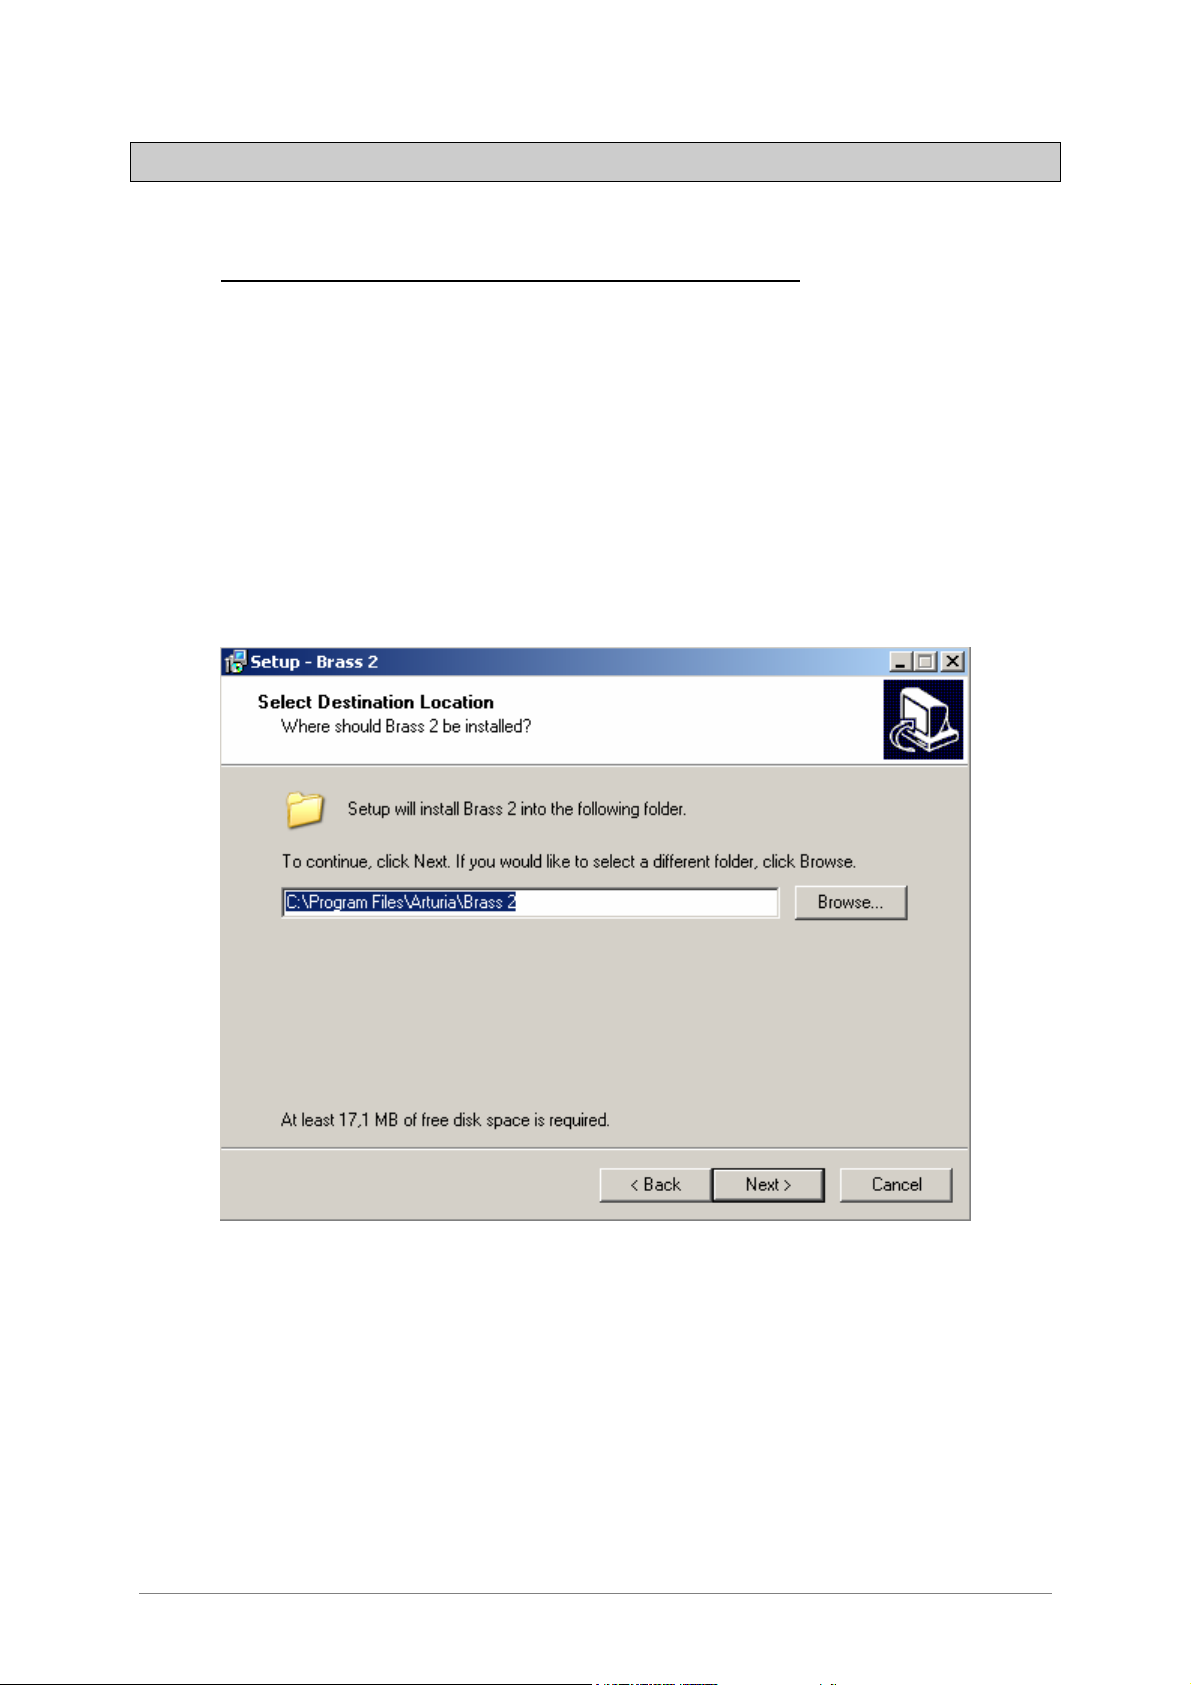
2.1 WINDOWS installation (2000, XP, Vista, 7)
Insert the CD-ROM into the drive. Explore the contents of the CD-ROM, double click on
the icon named Brass 2 Setup.exe.
At the first step of the installation, choose the destination folder for the BRASS 2
installation. By default, it will be installed in this location:
C:\Program Files\Arturia\Brass 2
You can change the destination with the Browse button.
Choose the installation folder
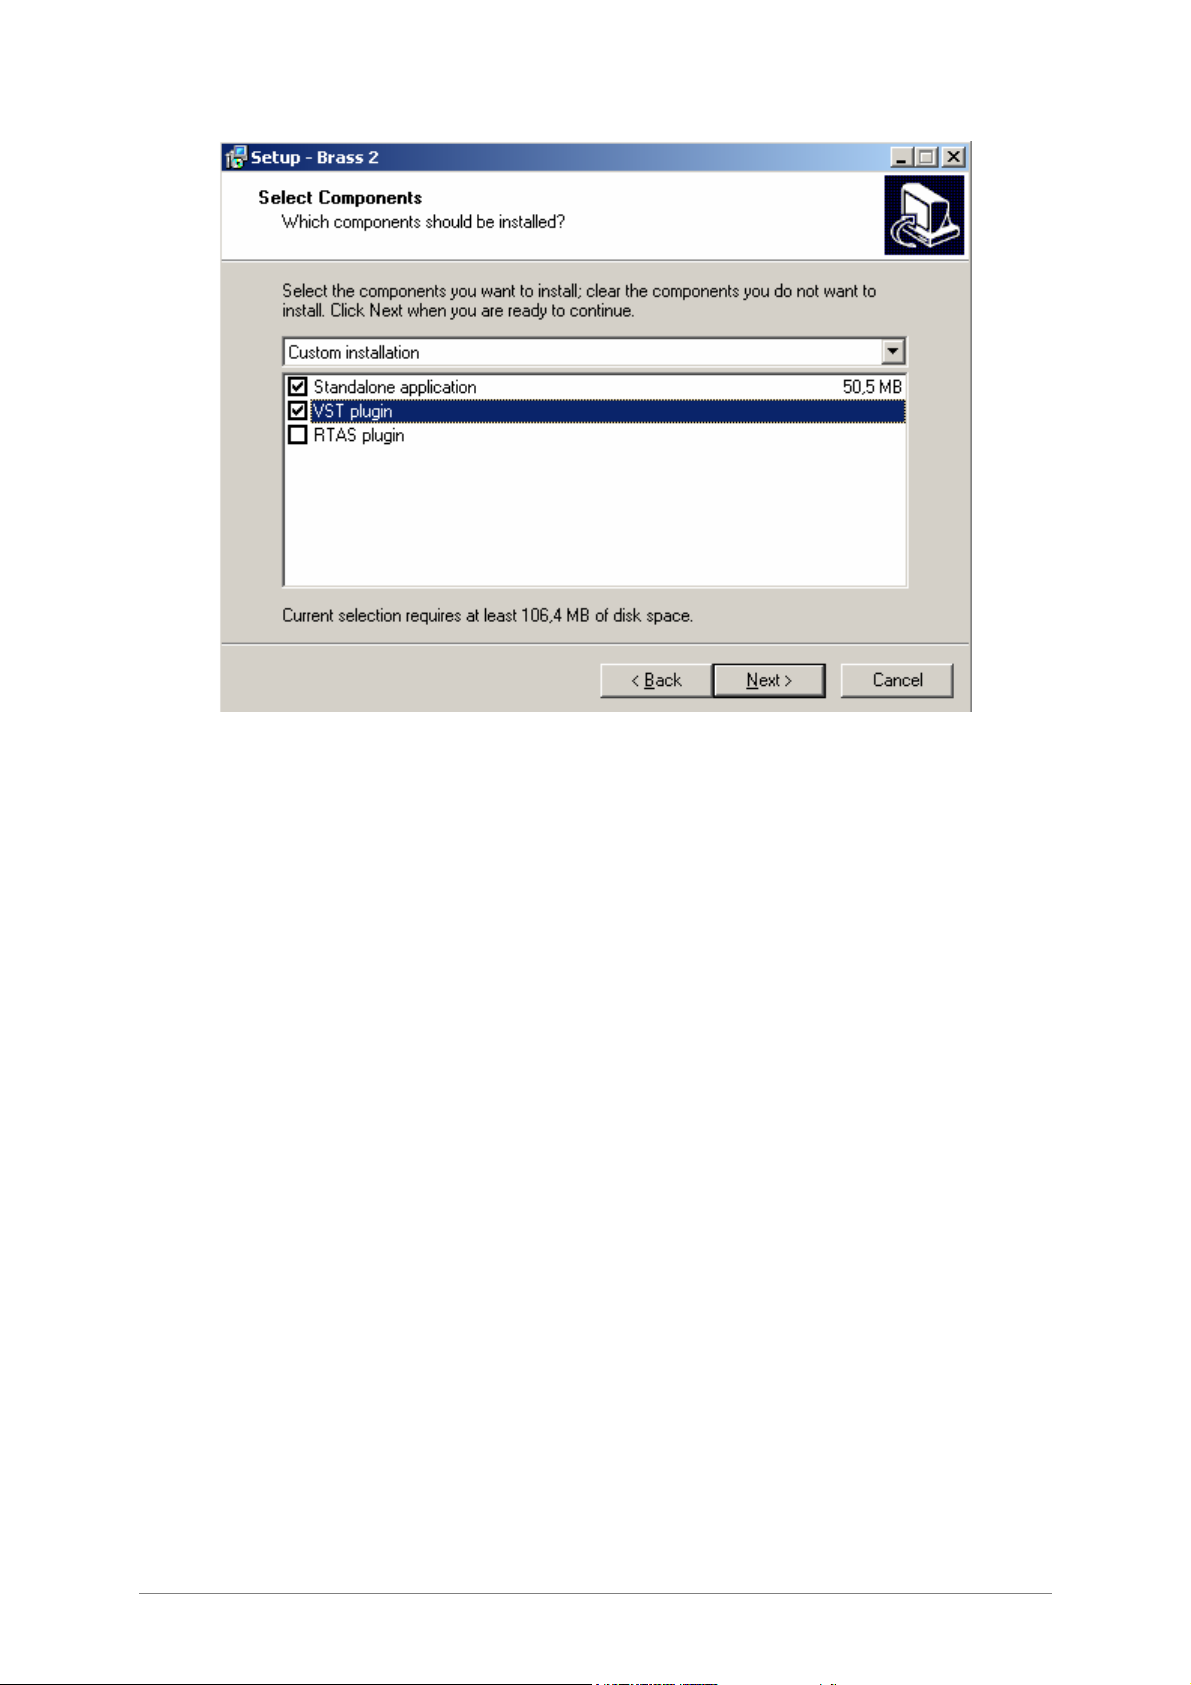
BRASS 2 will be installed as a standalone application. The following stage will let you
choose to install BRASS 2 as a plug-in. To do this, choose the protocol(s) that you wish
to use (VST or RTAS). For more information on these protocols, go to Chapter 7.
ARTURIA – BRASS 2 – USER’S MANUAL
13
Page 14
Choice of protocols
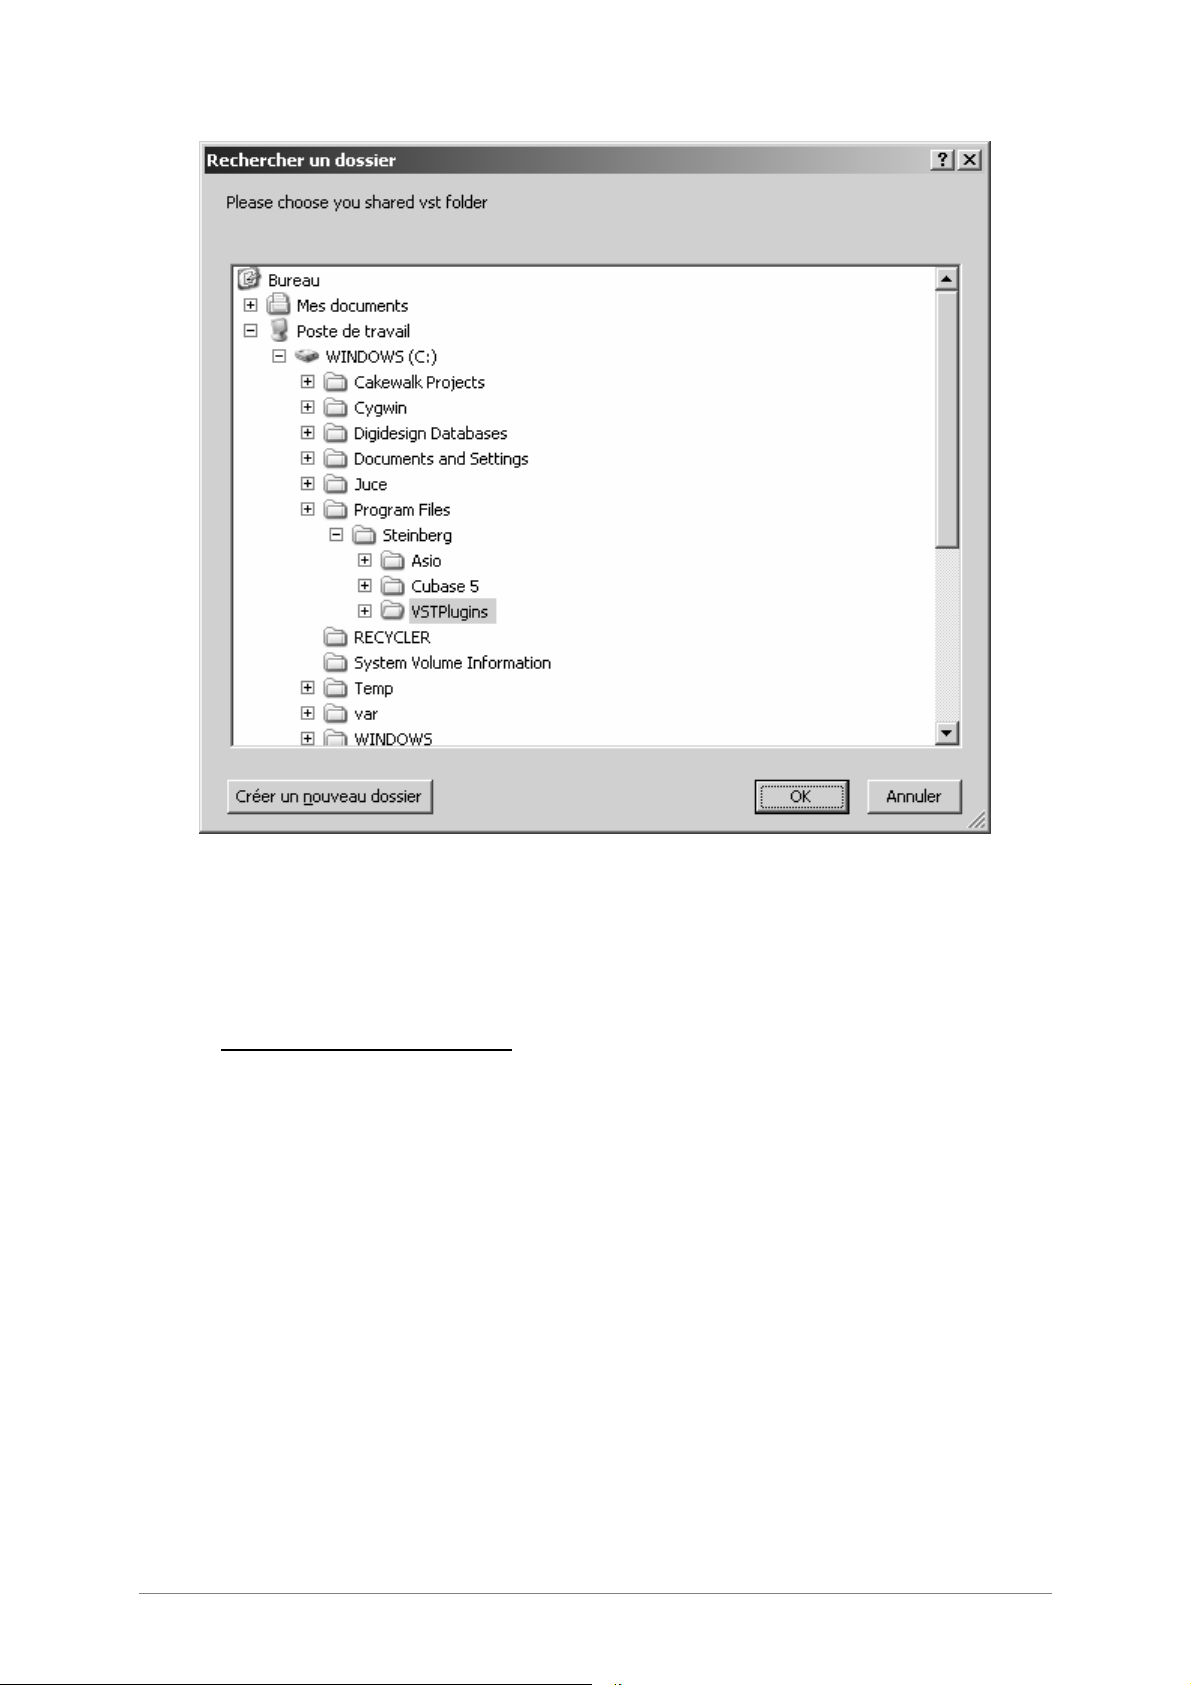
For the VST protocol, you must choose an installation folder in order for the host
application to use BRASS 2 as a plug-in. If you do not know how to make this choice, go
to Chapter 7.
14
ARTURIA – BRASS 2 – USER’S MANUAL
Page 15
Choice of VST plug-in installation folder
The installation program now has enough information to complete the installation. When
the installation process is completed, please proceed to the authorization step (Chapter
3).
2.2 MAC OS X installation
Insert the CD-ROM into the drive. Explore the content of the CD-ROM, then double click
on the icon named “Brass 2 Setup Mac”.
Follow these steps:
1. read and accept the End User License Agreement,
2. select a destination.
When prompted, enter the administrator name and password of your computer in the
authentication window.
ARTURIA – BRASS 2 – USER’S MANUAL
15
Page 16
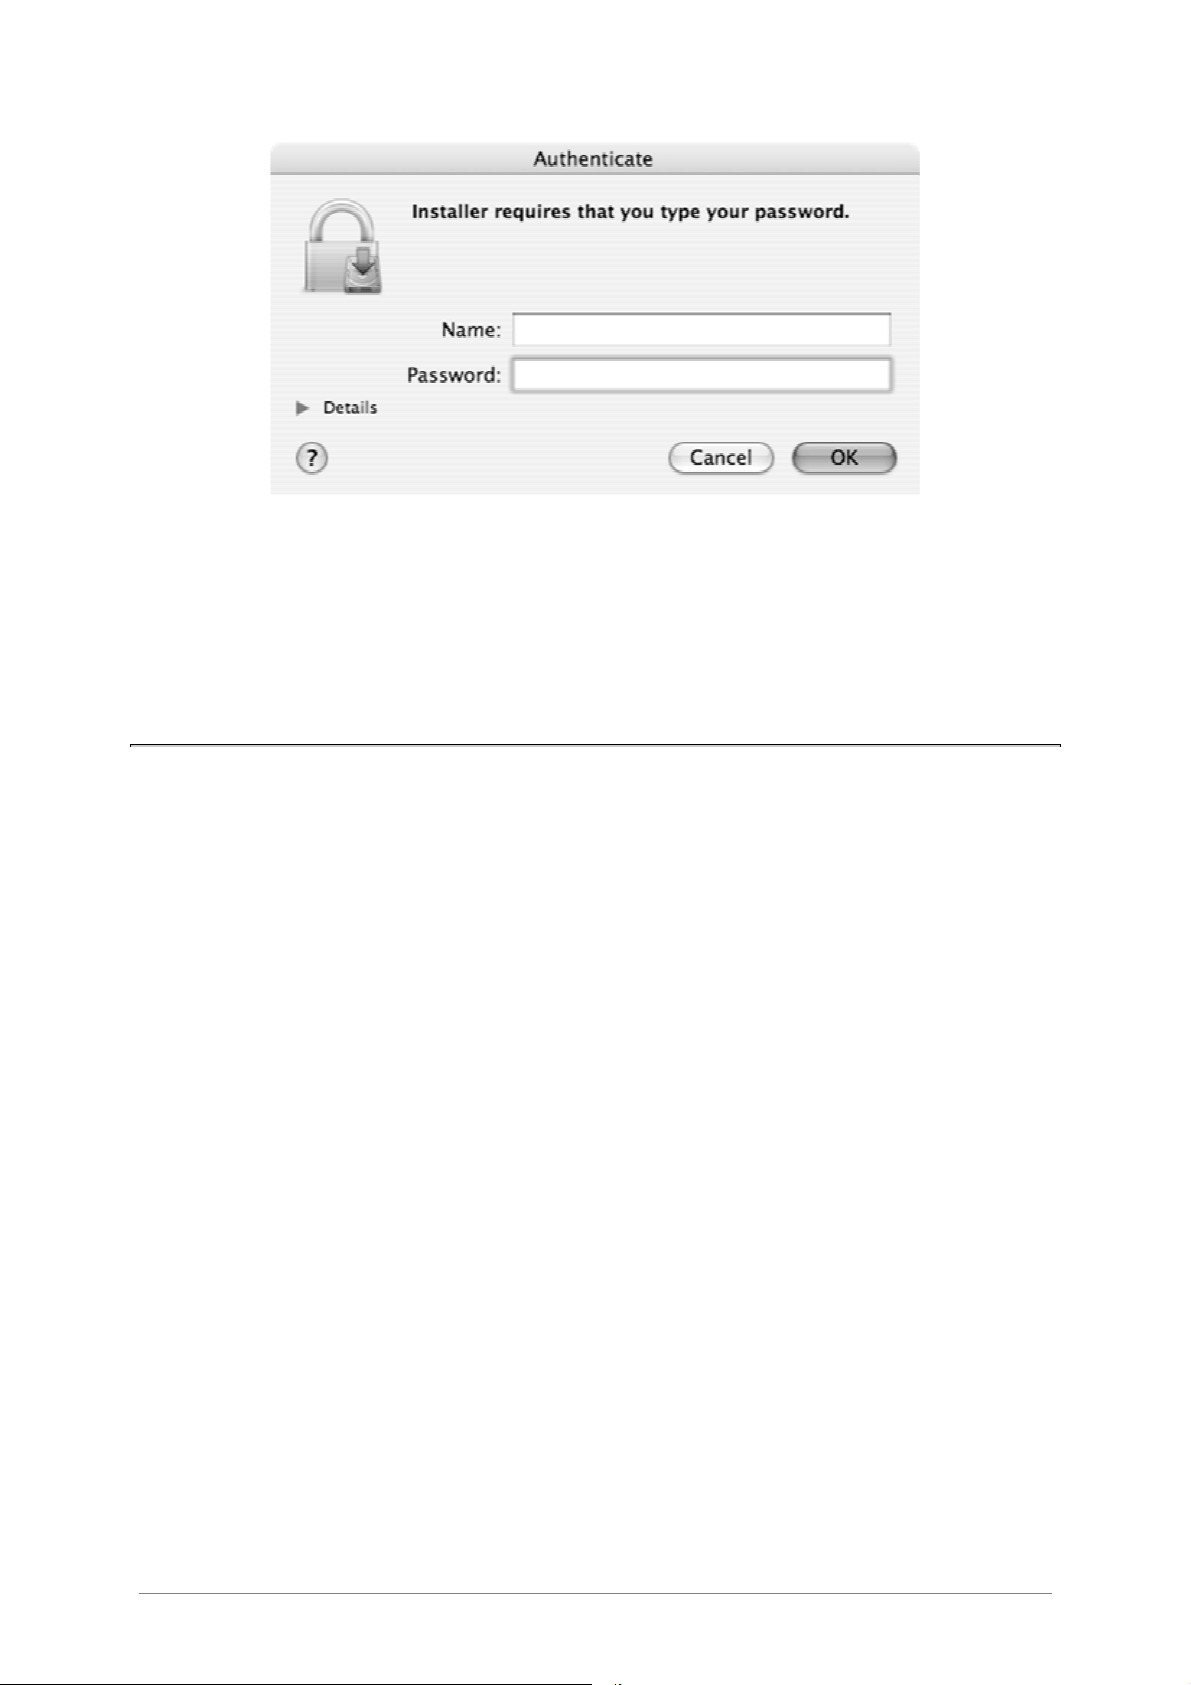
Authentication window
BRASS 2 will next be installed as a standalone application, but also as VST, AU and RTAS
plug-ins.
The installation program now has enough information to complete the installation. When
the installation process is completed, please proceed to the authorization step (Chapter
3).
16
ARTURIA – BRASS 2 – USER’S MANUAL
Page 17
3 AUTHORIZATION
Now that your BRASS 2 has been installed, you have to authorize the synthesizer.
This doesn’t apply to owners of the previous 1.x versions, who may use the software immediately by using
their USB-eLicenser hardware dongle.
Contrary to 1.x versions that used the USB-eLicenser protection scheme, BRASS 2 uses
the “Soft-eLicenser” virtual dongle solution by default. Avoiding the use of a USB port,
this system allows using the synthesizer on one machine which must be connected to the
Internet during the authorization process.
To transfer your license on another computer, or simply use BRASS 2 on several computers (one instance
at a time), you will need:
_ to use one USB-eLicenser hardware dongle (sold separately, also used by many other software editors);
_ in the eLicenser Control Center, to drag-and-drop your license from Soft-eLicenser to USB-eLicenser.
This transfer, requiring a valid Internet connection, can be done both ways:
_ from Soft-eLicenser to USB-eLicenser;
_ from USB-eLicenser to Soft-eLicenser.
Please check the eLicenser documentation installed on your computer for any further technical detail.
The first step is to register your software in order to obtain the activation code that will
enable you to actually use the software.
You should have handy the license serial number of BRASS 2 and the unlock code (these
are an integral part of the software and are printed on a small plastic card)
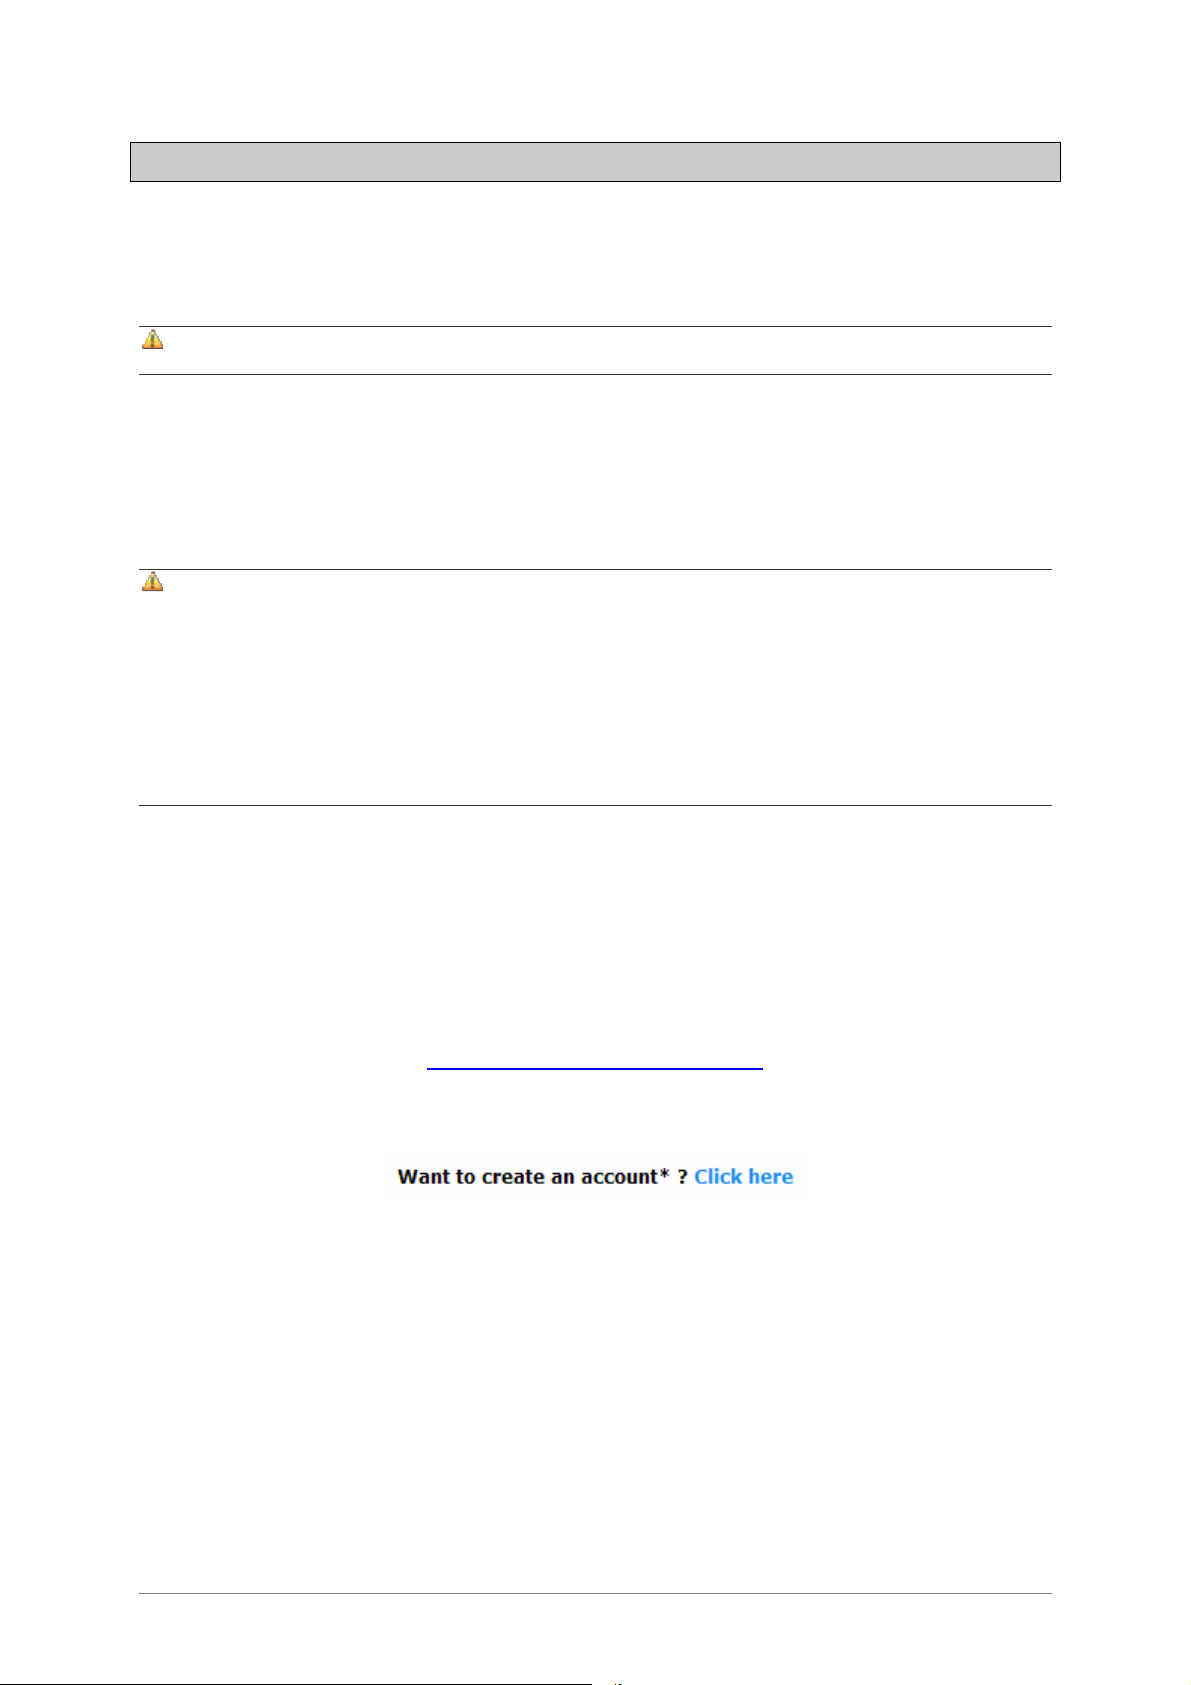
Connect your computer to the Internet, and go to this web page:
http://www.arturia.com/login
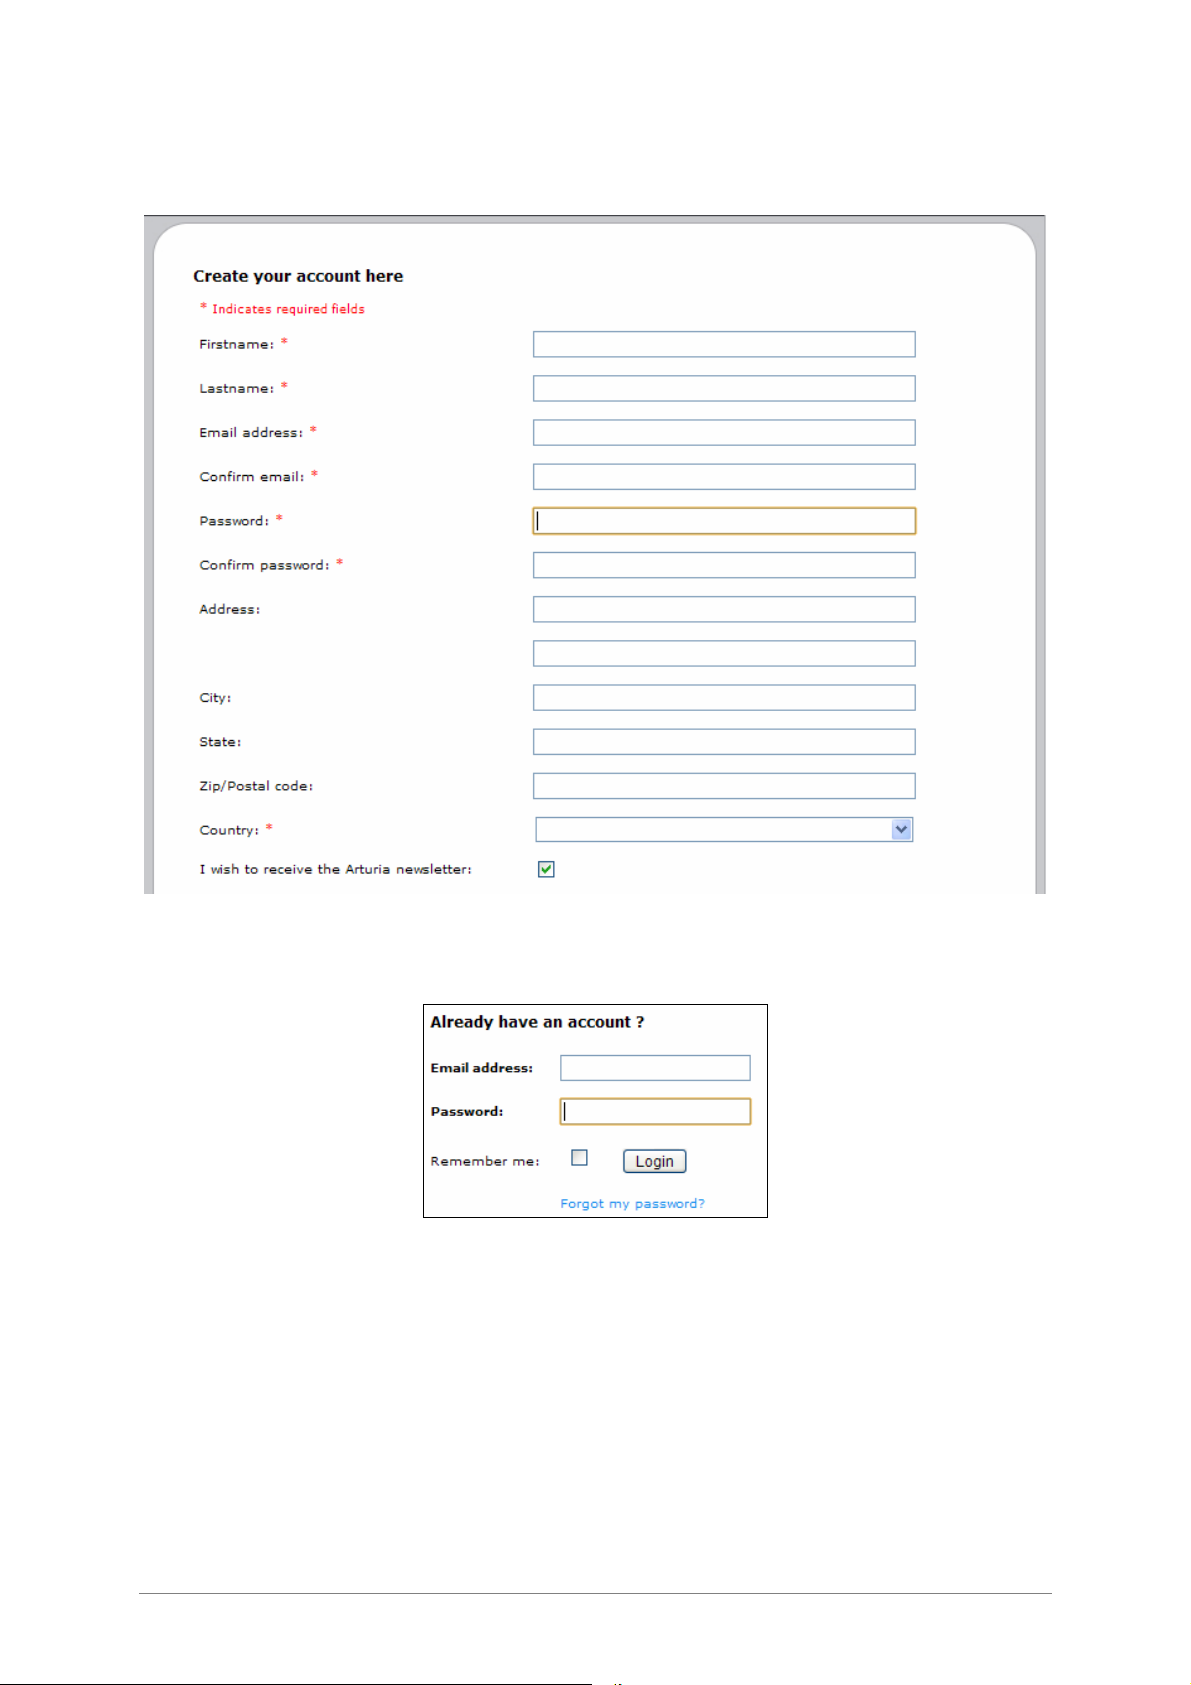
If you don’t have an Arturia account yet, please create one now:
ARTURIA – BRASS 2 – USER’S MANUAL
17
Page 18
This will send you to this form:
If you already have an account settled, simply log in:
Once you are logged into your account, you can register your BRASS 2 and request your
activation code.
Go to the “My Registered Products” section of your account and click on the “Add”
button:
18
ARTURIA – BRASS 2 – USER’S MANUAL
Page 19
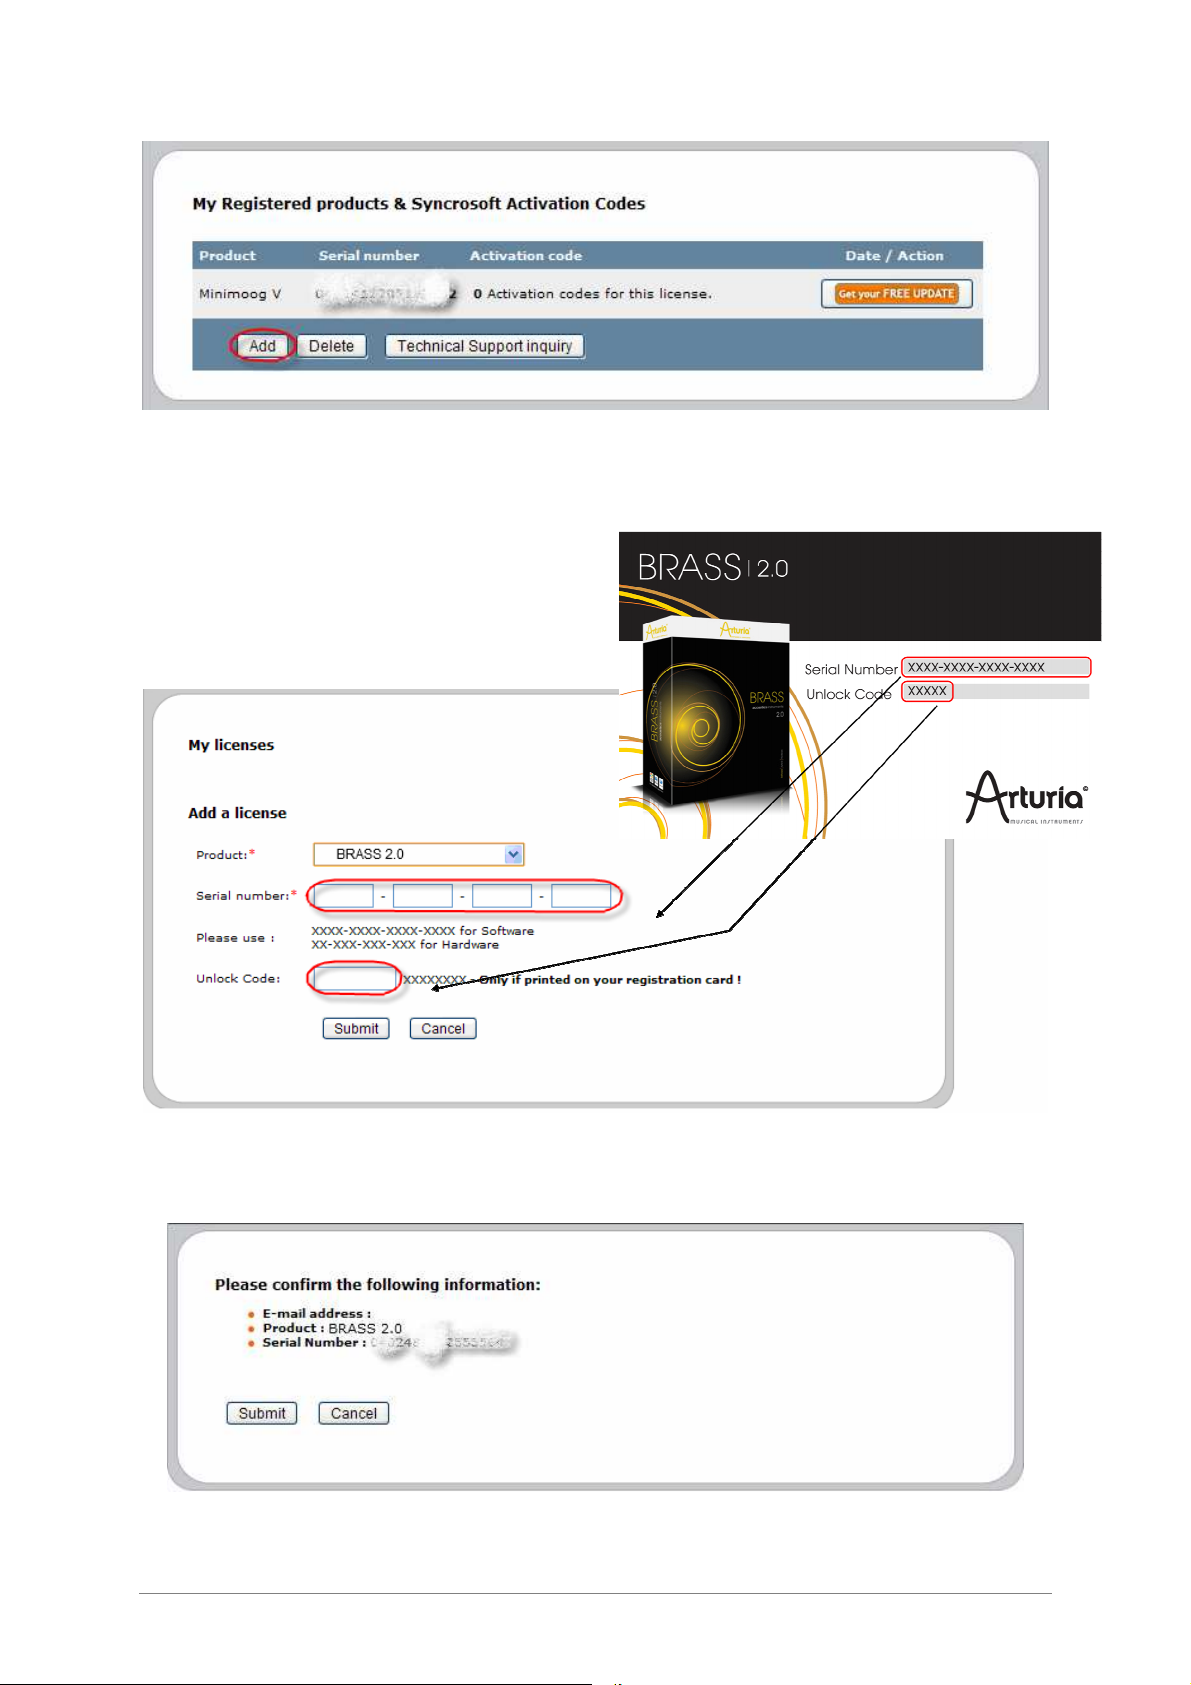
In the form that appears, select “BRASS 2” in the drop down menu, and key in your
synthesizer serial number and unlock code (as written on the registration card):
You will then see the confirmation screen:
ARTURIA – BRASS 2 – USER’S MANUAL
19
Page 20
And finally there is a screen from which you can copy the eLicenser activation code.
The very same information is sent to you by email as a backup.
Now that you have retrieved the activation code, launch the eLicenser Control Center.
This application has been automatically installed on your computer along with BRASS 2,
it can be found here:
• Windows: Start > Programs > eLicenser > eLicenser Control Center
• Mac OS X: Finder > Applications > eLicenser Control Center
The screenshots below have been taken on a Mac OS X operating system; however the process is strictly
identical under a Windows XP/Vista/7 environment. The same functions apply, only the graphical user interface
slightly differs.
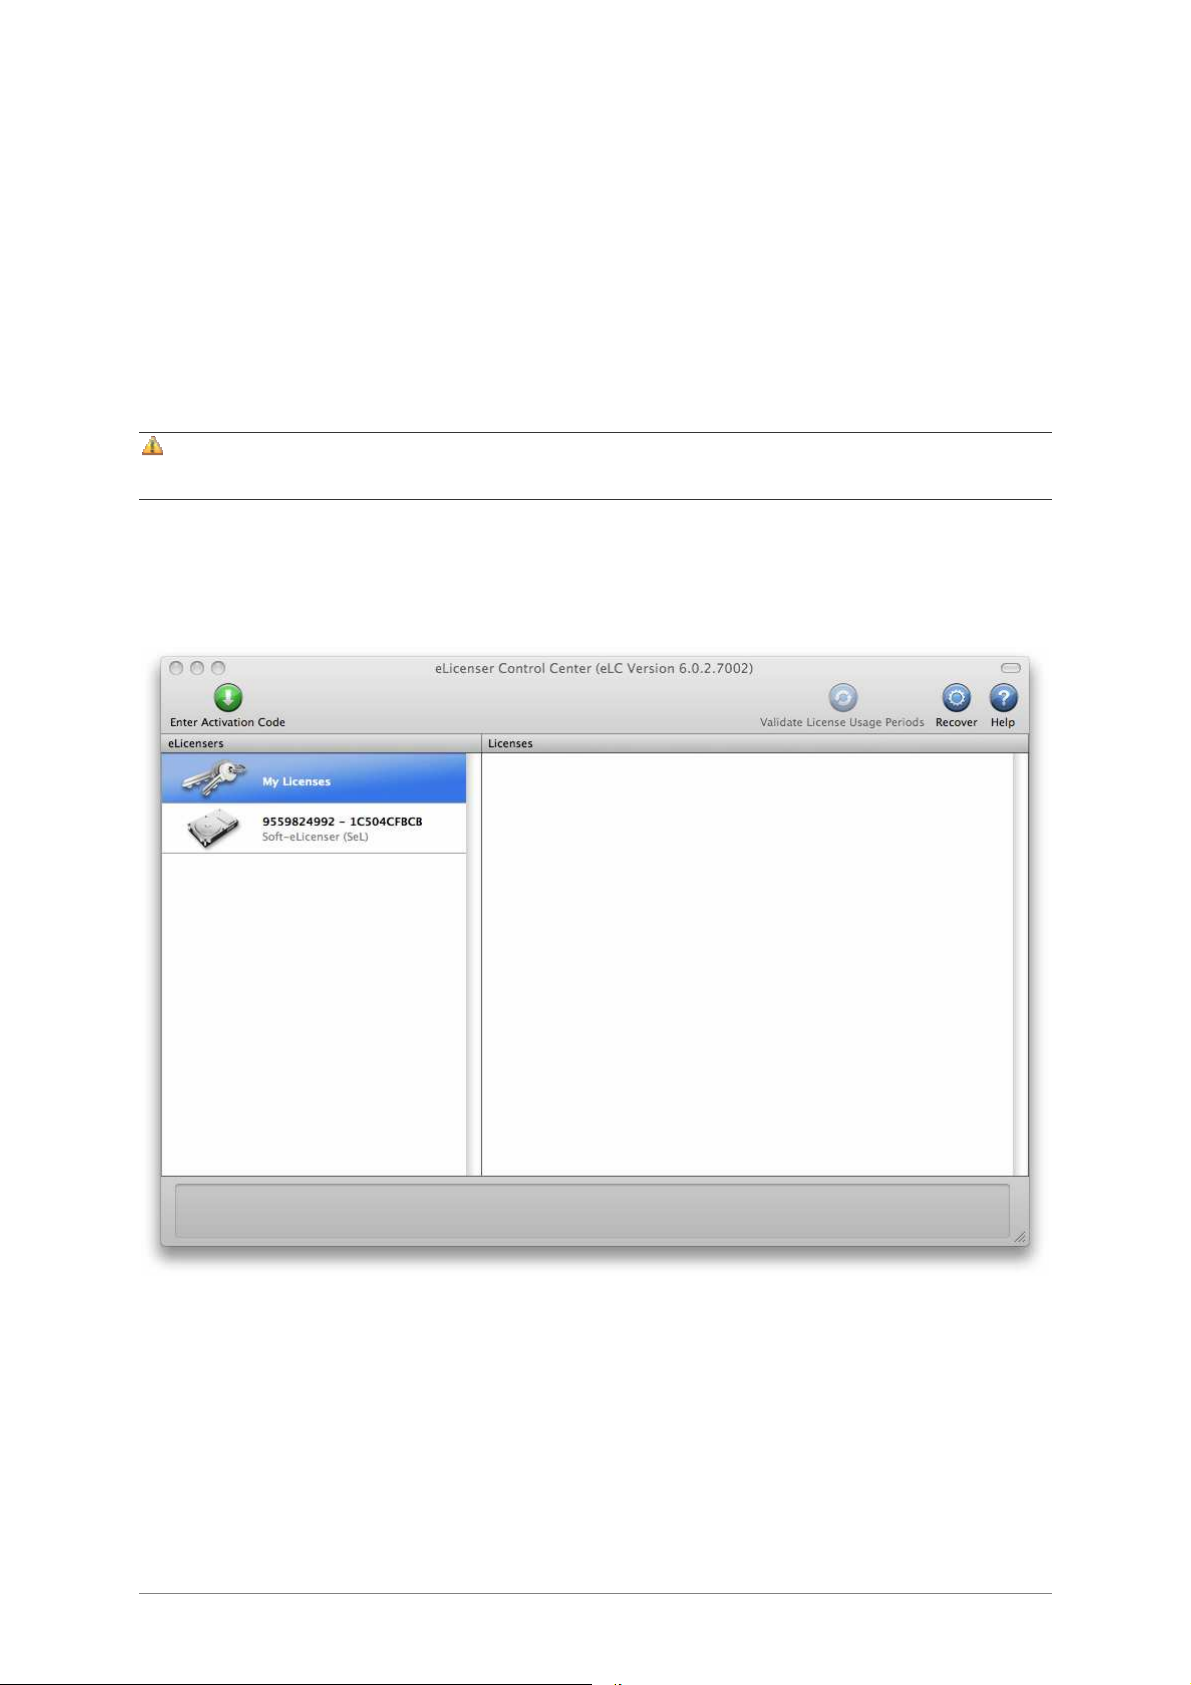
In the eLicenser Control Center main window you should see a “SeL” virtual dongle
installed onto your computer.
The eLicenser Control Center main window, showing an empty Soft-eLicenser.
In the eLicenser Control Center menu, click on the “Enter Activation Code” button, and
enter the code when prompted. Simply paste in the 32-digit code you’ve just copied from
your account on the ARTURIA website:
20
ARTURIA – BRASS 2 – USER’S MANUAL
Page 21
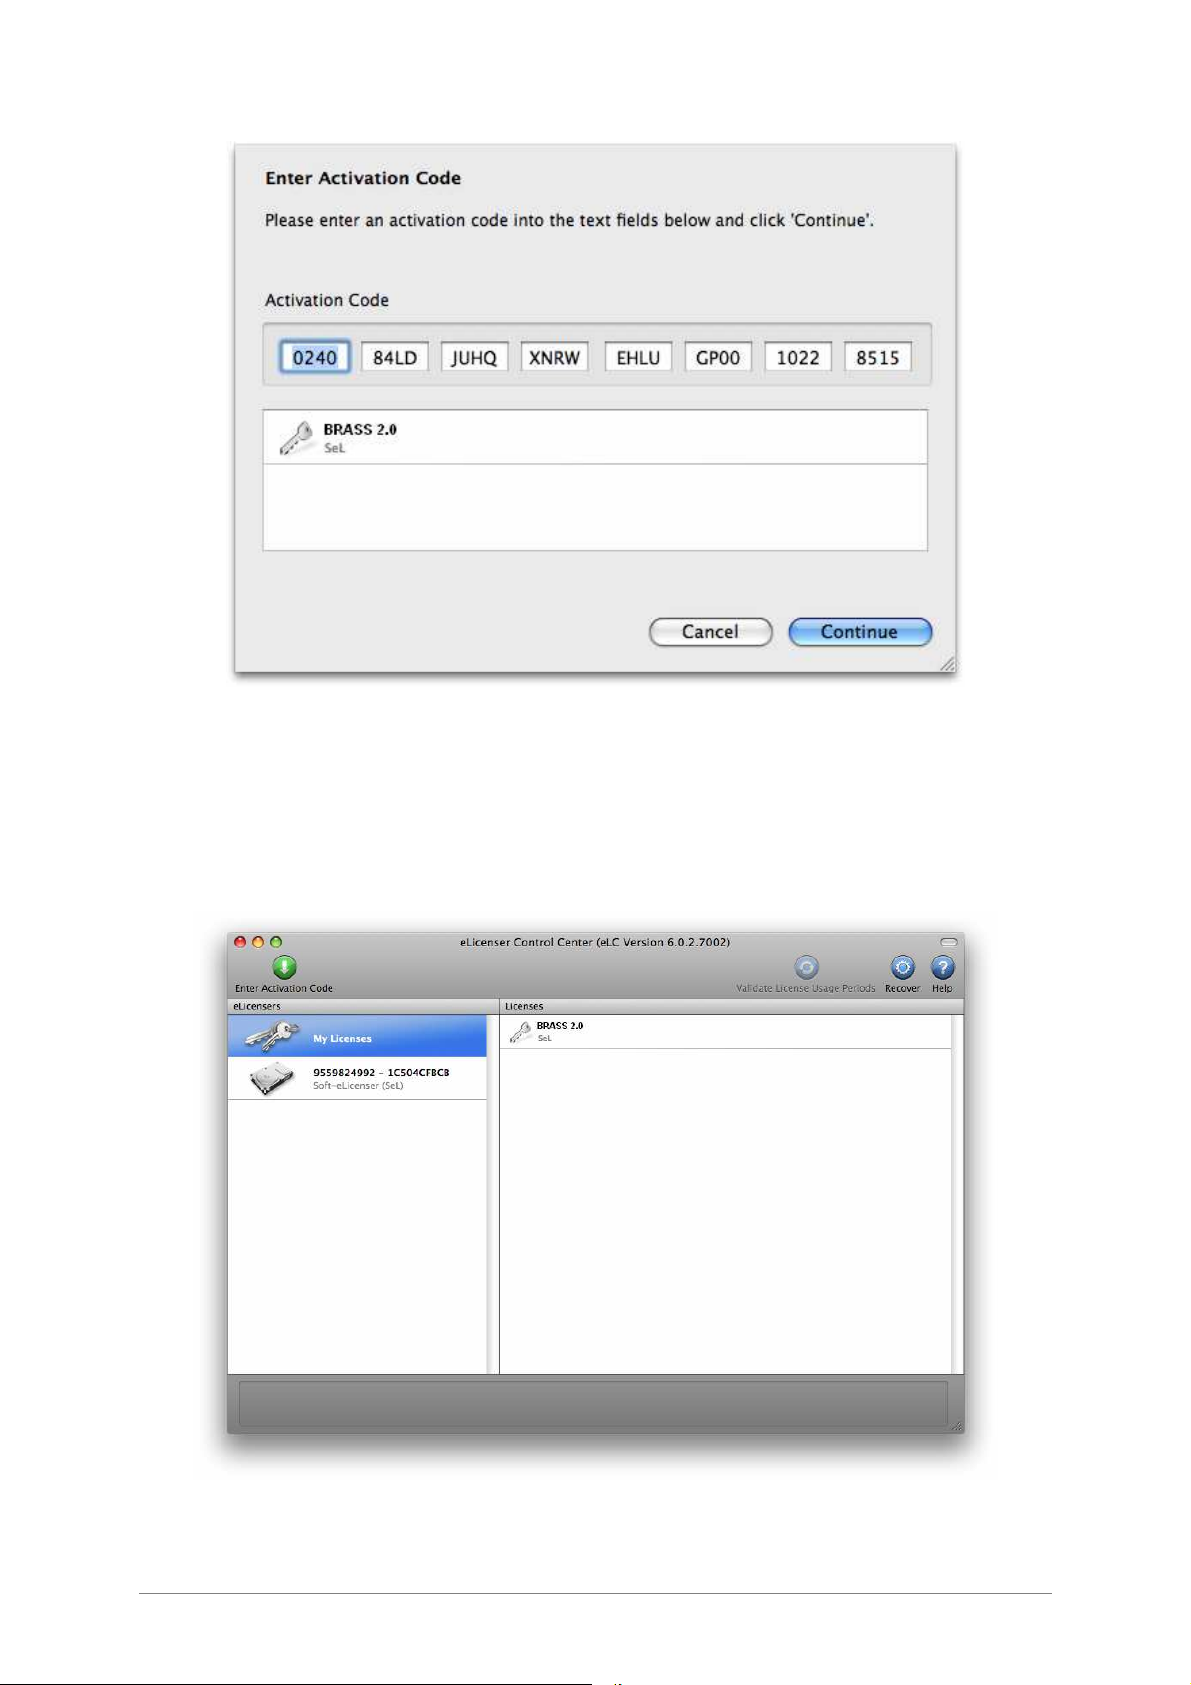
Enter the activation code
The eLicenser Control Center is now ready to download the software license that will
allow you to use BRASS 2. Click on Start, the progress bar should increase until
download completion. A popup window will confirm completion, then just click “Close”.
Now the main eLicenser Control Center window should show your BRASS 2 license
installed and activated.
License is installed and activated
ARTURIA – BRASS 2 – USER’S MANUAL
21
Page 22

It’s now time to launch BRASS 2.
22
ARTURIA – BRASS 2 – USER’S MANUAL
Page 23

4 QUICK START
This chapter will introduce you to the general principals of the functions in BRASS 2. You
will find a precise and detailed description of each function in later chapters.
BRASS 2 is a virtual instrument that offers the possibility of programming and playing
different brass instruments quite easily. It offers 3 types of instruments: the trumpet,
tenor saxophone, and trombone either in solo or ensemble modes.
The BRASS 2 software is divided in two parts: Live and Riff modes.
4.1 LIVE mode
Live Interface
As the name indicates, the “LIVE” mode is designed to play in real time on a MIDI
keyboard or with the help of a breath controller. In version 2 you can play up to four
brass instruments simultaneously, using different harmonization modes. It is also in this
interface that you can change the tonal characteristics of each instrument and create
new presets. By “preset” we mean either instrumental settings that permit you to obtain
a particular sound and performance response, or up to four such presets along with the
harmonization settings to use with these instruments (this forms a kit “preset”), or the
harmonization settings, grouped in a harmonization “preset”.
The Live mode window is composed of three distinct parts:
• on the left side reside the kit, harmonization and instrument presets as well as the
harmonization editor and file manager;
• on the center is the real time synthesizer;
• on the right, is the general configuration that concerns all of the following: the
instrument selected, the spacialization, and MIDI settings.
ARTURIA – BRASS 2 – USER’S MANUAL
23
Page 24
4.1.1 Management of documents
4.1.1.1 Kit Zone
In the “Kit” tab there is a drop down list containing all the kits (sections of one up to four
instruments with harmonization options). For now, simply choose a solo kit.
4.1.1.2 Harmonization Zone
You can load a second instrument on the second instrument slot, for example a
saxophone. In order to play these two instruments together, harmonization
options are provided. You can either load a harmonization preset, or set the
different options for each instrument slot in the Harmonization Page accessed by
clicking the EDIT button right of the harmonization preset list.
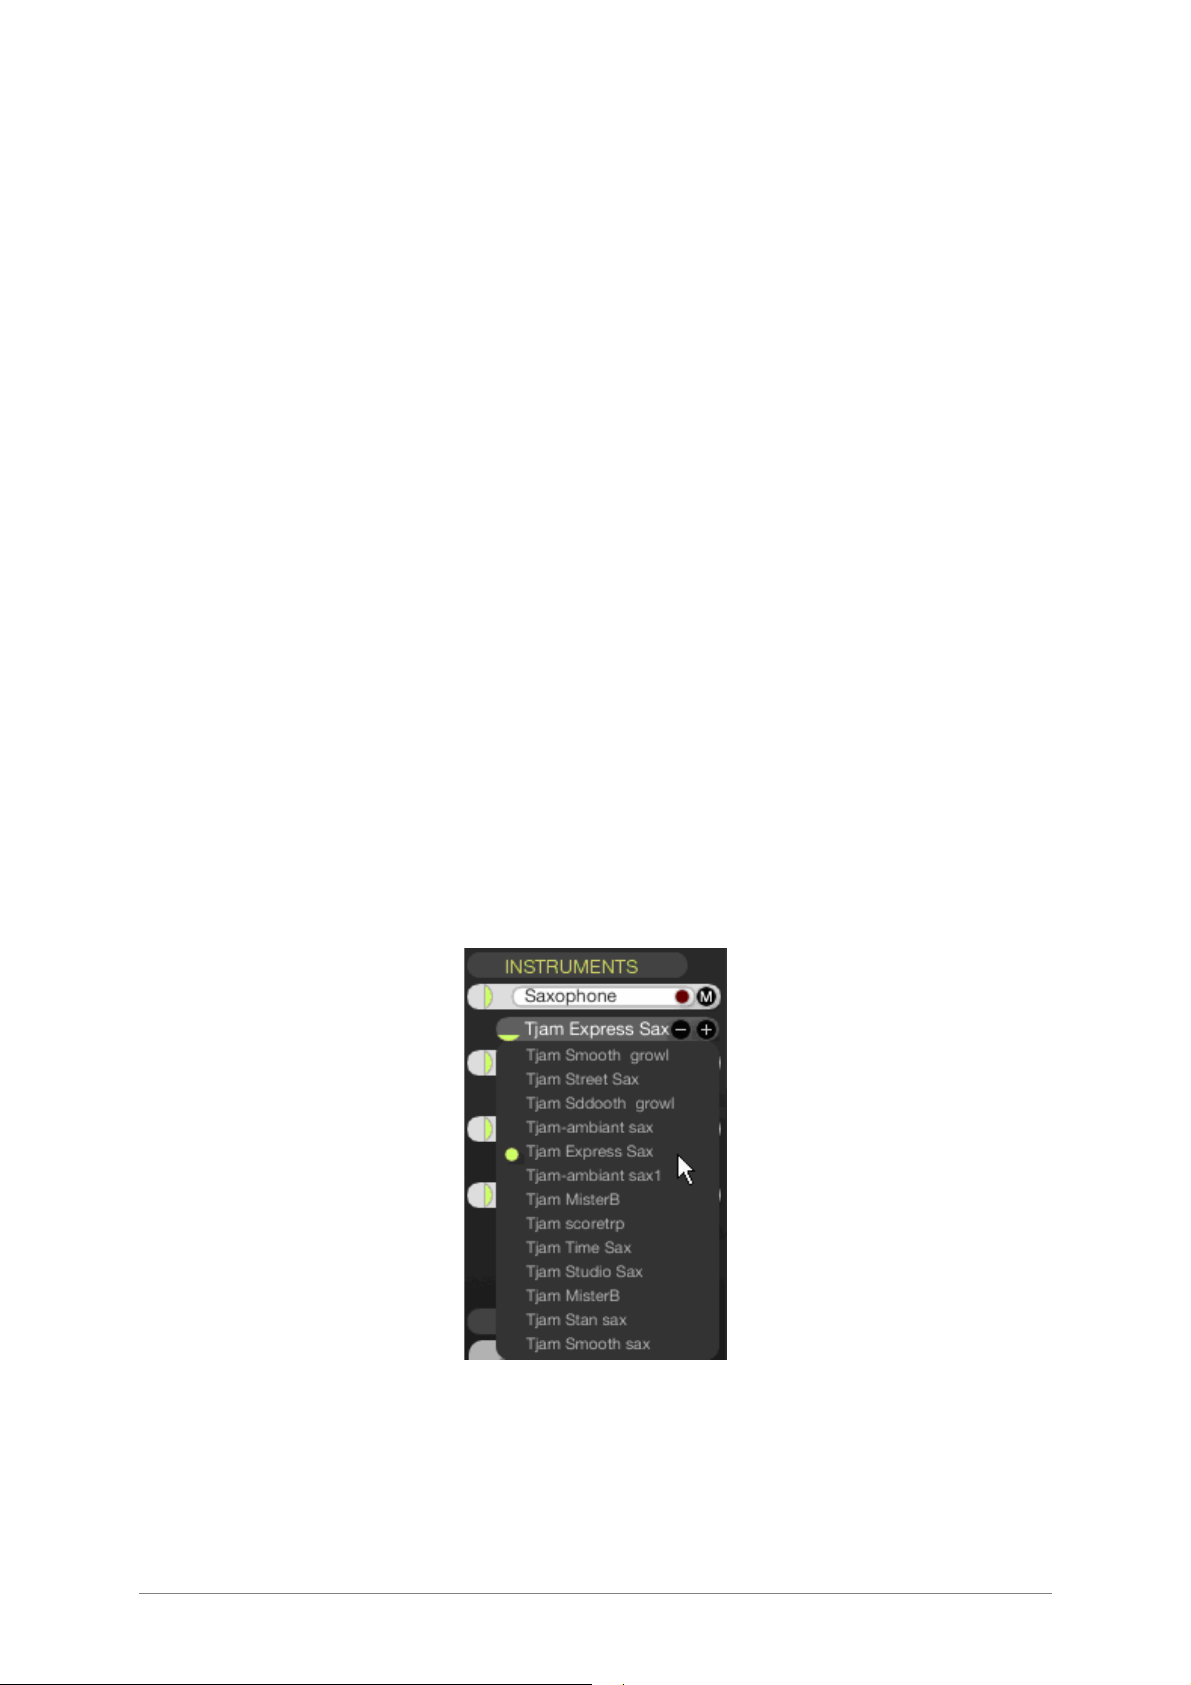
4.1.1.3 Instrument type and preset zone
In the INSTRUMENTS tab, four identical zones set the type and preset of each of the four
instruments.
With the light grey drop-down lists you can choose one of the 3 instruments proposed in
BRASS 2: for the first example we’ll choose the trumpet on the first slot.
With the dark grey ones, one of the presets can be loaded for the instrument in the
respective slot.
Select one among the 30 presets created for this instrument. This preset recalls:
• all settings of the synthesis parameters (seen in the center section of the screen),
• the configuration of the instrument and the spatialization (seen to the right of the
screen)
• the MIDI control settings for playing the instrument using a keyboard, a keyboard
and a Breath Controller or an Akai EWI.
Choose a preset
Start by playing a few notes on your MIDI keyboard (or on the keyboard situated
in the middle of the screen). Change the pressure and tone parameters, and listen
to the changes while you play.
24
ARTURIA – BRASS 2 – USER’S MANUAL
Page 25
Change the pressure parameters
The BRASS 2 faders are unique. The colored bar graph indicates the value of the fader. The two arrows
situated to the right and the left represent the boundaries between which the fader will be modulated if we
assign it to a MIDI control.
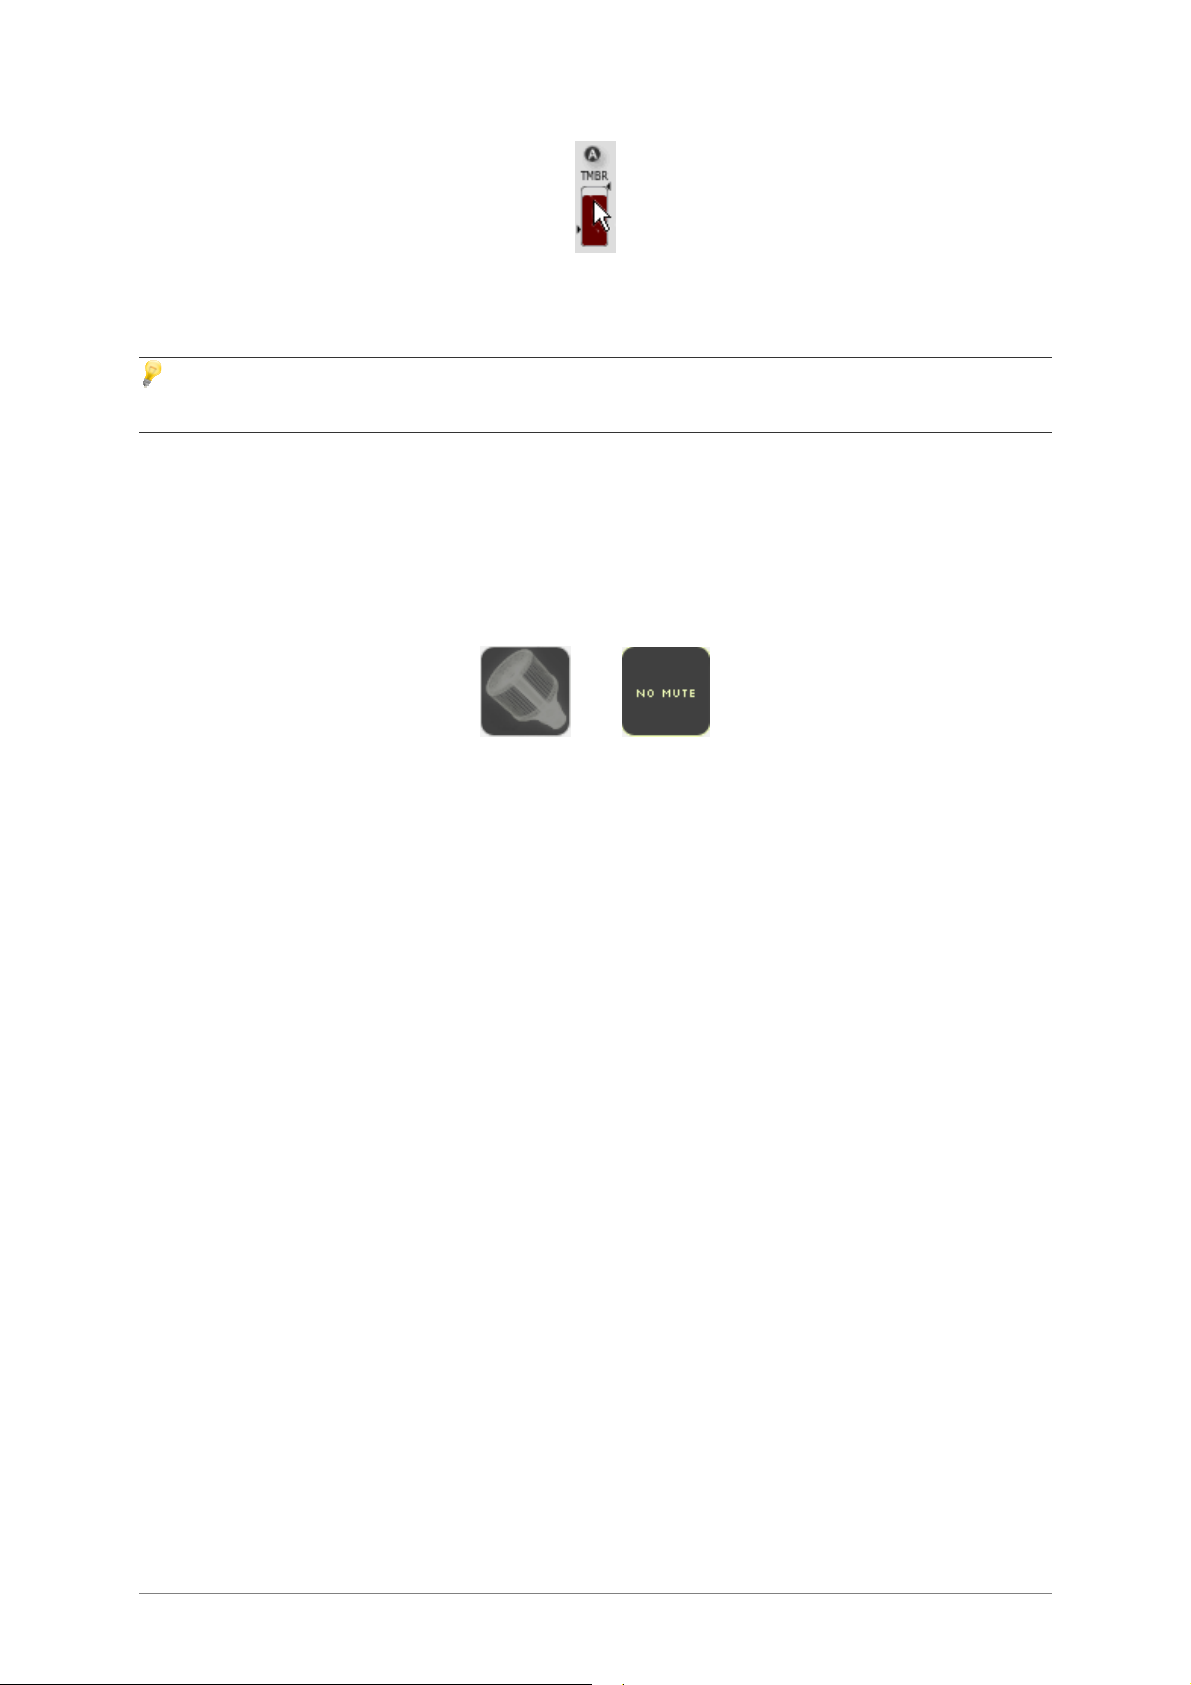
4.1.1.4 Instrument Configuration Page
Change the global playing characteristics of the trumpet by adding and removing
a mute to this example. Click on the “Configuration” tab then apply the mute to
the instrument by clicking on the adequate icon. To take away the mute, click on
the “no mute” icon.
« Mute » and « no mute » icons
4.1.1.5 Spatialization Page
Try to change the position of the trumpet in the stereo space. Click on the
“Spacialization” button, and then click on the trumpet icon to instantly position it
in the middle of virtual room. Move the instrument by sliding it across the room.
ARTURIA – BRASS 2 – USER’S MANUAL
25
Page 26

Spatialization
4.1.1.6 MIDI PRESET page
To finish, click on the MIDI PRESET tab in order to connect the playing parameters
to the external MIDI controllers.
26
ARTURIA – BRASS 2 – USER’S MANUAL
Page 27
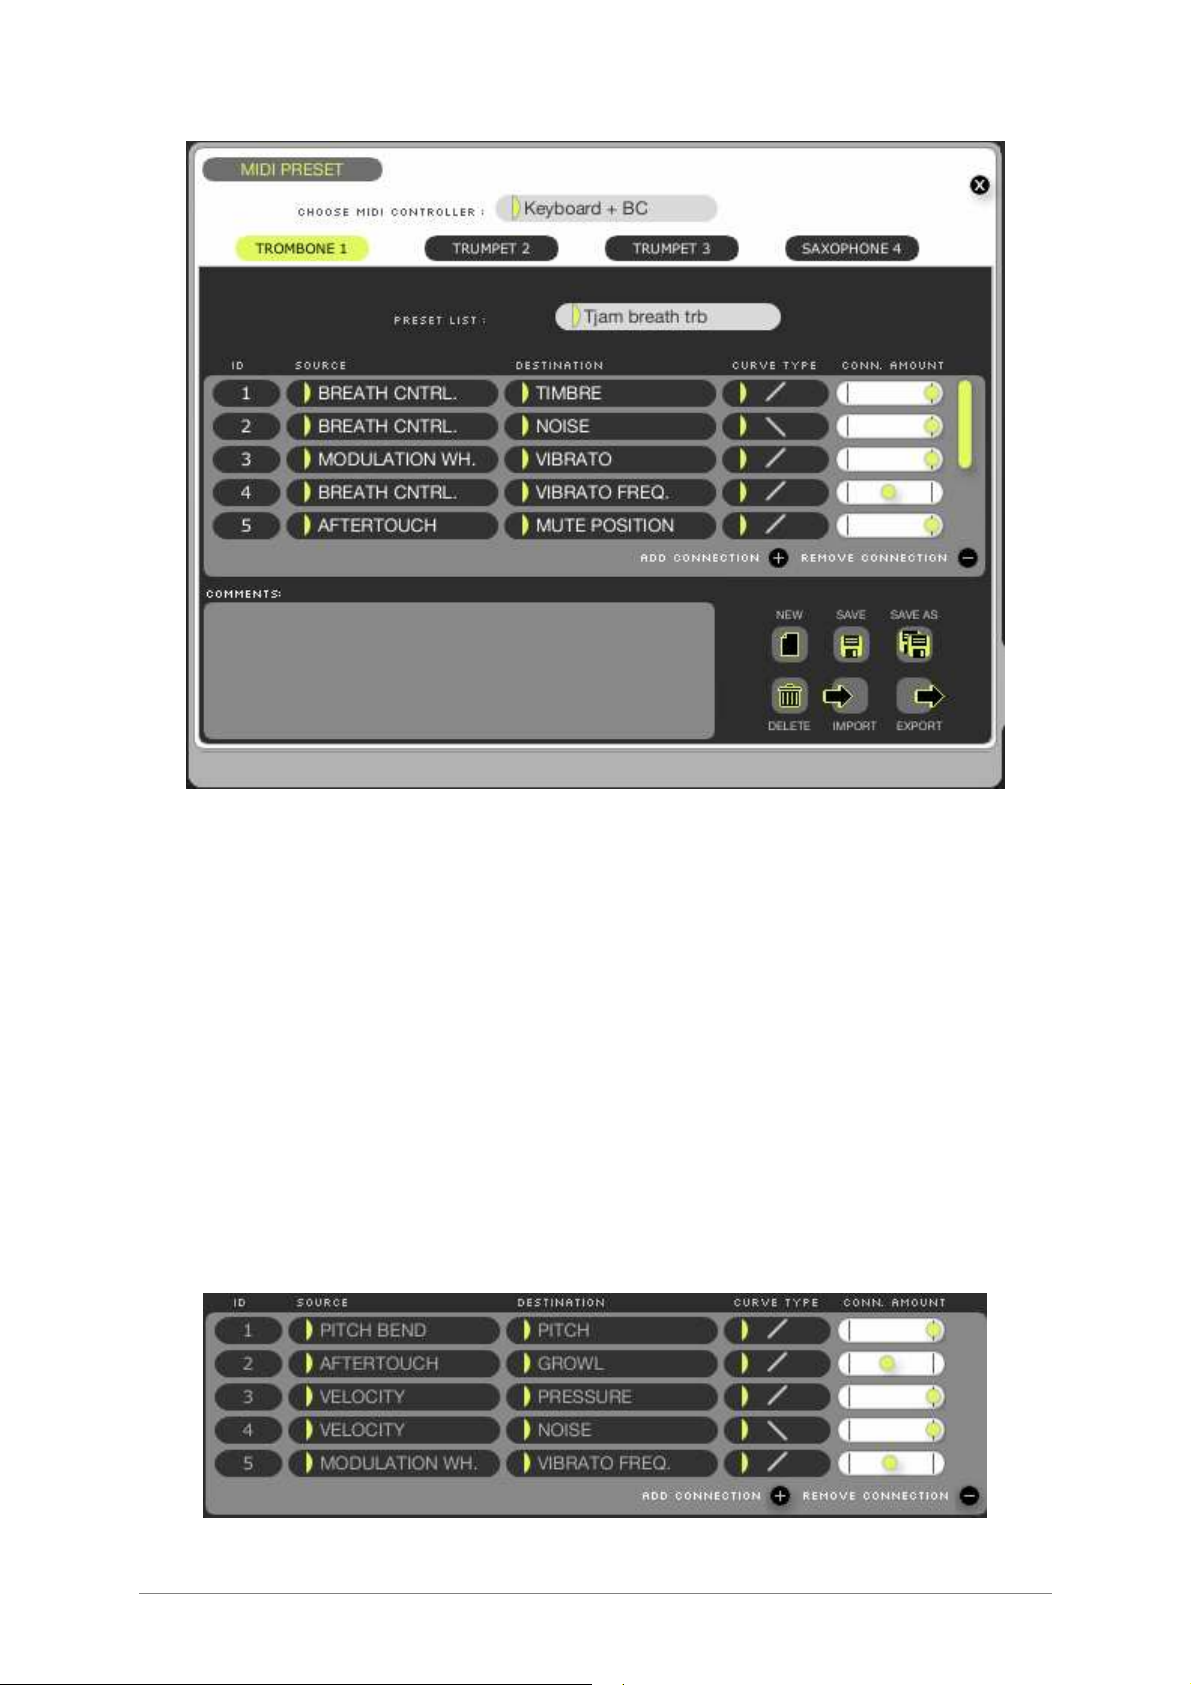
MIDI PRESET page
By default the page focuses on the selected slot’s midi configuration; in this case
the second saxophone
You can add connections between MIDI control sources and instrument
parameters by clicking on the “+” button.
For a connection you can choose:
• The MIDI modulation source (velocity, pitch bend, MIDI CCs...),
• The instrument’s parameter to be controlled using the MIDI control set above,
• The mapping curve for the controller’s values onto the parameter and,
• The previously set control’s gain.
Thus, the way the instruments respond to your playing can be tweaked very precisely !
Connect, for example, the velocity to the attack, then the modulation wheel to
instrument pressure and vibrato.
Connect “modulation wheel” to the “pressure”entry
ARTURIA – BRASS 2 – USER’S MANUAL
27
Page 28
It’s possible to connect several parameters from one modulation source. In order to do this, add connections
and choose the modulation parameter as source in all of them and the parameters you want to control as
destinations.
In order to delete the connection, select the connection then press the button “-”
(“Remove Connection”).
You can also change the border (extreme values) between which the control
parameter of MIDI will maneuver. Close the MIDI PRESET page then click on the
arrow surrounding one of the 8 synthesis sliders of the main page.
Change the response rate of each modulation
4.1.2 Automation
As an option, it is possible to program the evolution of a parameter through time, each
time you press a key. Thus, you can program the beginning of a progressive vibrato, or a
light point of white noise in the sound attack. To assign a modulation curve to one of the
8 available parameters:
Click on the “A” button situated above a synthesis fader in order to open the
design interface of the curve. Open, for example, the interface corresponding to
“noise”.
Click on the “A” button
You can choose the tool type that helps you design the curve that you wish to
apply to the parameter. Take the “pencil” tool to design a curve by hand.
28
ARTURIA – BRASS 2 – USER’S MANUAL
Page 29

A hand-drawn automation curve
Listening to the results, we notice that the sound evolves in time, as desired.
4.1.3 To Save
When you have made some settings that you are happy with, you might want to save
these changes as a preset to be recalled later.
In BRASS 2 you have the choice of saving:
• all of the settings of the brass section you built (Save > Kit);
• the instrument you edited separately for use in other kits (Save > Instrument);
• the harmonization settings you’re applying to your kit (Save > Harmonization).
Click on the button SAVE AS. A popup menu will appear, containing choices for
the types of preset you want to save: Kit, Instrument and Harmonization.
If you choose to save the entire kit the following dialog window will appear:
ARTURIA – BRASS 2 – USER’S MANUAL
29
Page 30

“Save As” window
In this Window, aside from saving the entire kit, you can also choose to save separate
copies of any of the four instrument presets used in the kit and/or a separate copy of the
harmonization settings.
Choose a new kit name by double clicking on the name
If you only want to save an instrument or the harmonization, choose the
respective option from the popup menu and enter the name you want your preset
to have.
When only one instrument is loaded (Solo Mode), only the instrument preset can be saved, initialized,
deleted, etc.
4.2 RIFF mode
30
Click on the “Save As” button
ARTURIA – BRASS 2 – USER’S MANUAL
Page 31

Riff Interface
The “Riff” mode provides a simple interface that allows selection or creation of short
keyboard-triggered performance arrangements. It is possible to use up to 4 instruments
simultaneously in each riff. A large riff palette is shown and provides examples of
arrangements in different musical styles.
To load all performance parameters for a particular riff, simply click on a preset in
the list. To play the riff on repeat, click the button “Play” or the [Space] key. To
stop the riff reader, click on “Play” or [Space] again.
Click on the “Play” button to stop the riff reader
You can also place a riff on one note of the keyboard on the screen to map that
particular riff to on note on your MIDI keyboard. Choose a riff in the list then
move it by dragging and dropping it on one of the virtual keyboard keys situated
at the bottom of the Riff window (left part of the keyboard). An orange triangle
indicates the position of the riff on the keyboard. To stop the reader, click on the
“Stop” button.
ARTURIA – BRASS 2 – USER’S MANUAL
31
Page 32

Place a riff on a MIDI note
To transpose the riff, click on one of the keys in the orange zone (right part of the
keyboard). You can also activate this transposition on your MIDI keyboard by
playing a key corresponding to this orange zone.
To transpose a riff, click on one of the keys in the orange zone
To delete a riff placed on a key, right-click on the corresponding key and choose
the “Remove” option.
4.2.1 Editing a short riff
32
ARTURIA – BRASS 2 – USER’S MANUAL
Page 33

Editing your Riffs
The “Edit” button opens the editing interface for the current riff. It consists of two distinct
parts:
• the note editor, where you can write or modify Riff notes,
• the sound control interface, where you can design the modulations that
correspond to individual instruments (breathe, pressure, vibrato, pitch, etc...).
This is how to work on an existing riff and how to save it:
Choose a riff in the list:
Choose a list among Presets
On the piano roll grid, change the pitch of one (or several) of the notes.
Click on one of the notes situated on the editing space then move it horizontally
ARTURIA – BRASS 2 – USER’S MANUAL
33
Page 34

to change its place in time, or vertically to transpose it higher or lower.
Add an effect to the sound:
Click on the EDIT button to open the tool box and the editing interface of the
expression curves.
Click the “Edit” button
Choose the “Pressure” parameter among the proposed options by clicking on the
arrow situated to the left of the selection field.
Choose the “Pressure” parameter
Click the “Activate” option to activate the action of the parameter.
Choose the pencil tool in the tool box then draw a curve by hand.
Design a curve
You can also choose the type of tool that will help you design the curve you wish to apply
to the parameter:
Click on one of the 5 last options of the utility bar to apply it to your curve. Take,
for example, the “curve” tool.
34
ARTURIA – BRASS 2 – USER’S MANUAL
Page 35

Click the “curve” tool
Design a climbing line starting at the beginning of the editing space to bring up
the pressure progressively.
Save your Riff preset by clicking on the “Save As” button. This will create a copy
of the current preset. Choose a new name by double clicking on one of the 3
fields.
It’s possible to import a previously programmed riff and format it to a MIDI file. In the
same way a new riff composed in BRASS 2 can be exported in the same format.
4.3 Using BRASS 2 via MIDI
As we have previously seen, it is possible to play an instrument directly on a MIDI
keyboard (or through a sequence coming from a MIDI sequencer).
Additionally, BRASS 2 can be controlled with the help of a MIDI breath controller or an
Akai EWI (uniquely in “Play” mode).
To do this, return to Live mode then choose the “Keyboard + BC” option in the
MIDI PRESET page.
Choose the “Keyboard Breathe controller” option
Choose the parameter(s) that you wish to assign to the breath controller by
connecting to the last of the 9 types of modulation.
Make a connection from a “breath controller” to the desired parameter (“Pressure”
and “Noise” for example).
ARTURIA – BRASS 2 – USER’S MANUAL
35
Page 36

Breath controller assigned to pressure and noise
As you may have noticed, the control of BRASS 2 in Live mode is very simple, but using
MIDI control in the Riff mode is very easy as well. You can set the parameters that will
trigger your riffs by simply playing a MIDI note (either on a MIDI keyboard or a host
sequencer):
Go back into Riff mode, then choose the MIDI channel by clicking in the field
“MIDI Channel” from the MIDI SETUP page.
When you want to synchronize the riff with the tempo of the MIDI host sequencer,
click on the option “Host Tempo” to activate such synchronization.
Choose the “Host Tempo” option
When you want to change the “internal” tempo of BRASS 2, click on the “Fixed
Tempo” button, then choose the tempo by clicking in the tempo field.
36
ARTURIA – BRASS 2 – USER’S MANUAL
Page 37

5 USER INTERFACES
This section describes the functions of each of the two principal playing modes:
• Live mode permits playing and editing of an instrument in real time.
• Riff mode permits playing and editing of riffs in real time
These two modes correspond to the Live and Riff screens of the software.
5.1 Live Mode
Live mode of BRASS 2 allows real time control of the trumpet, saxophone and trombone,
to configure instruments and use presets.
Live screen of BRASS 2
Interface can be divided in four parts:
• In the center zone, the kit instruments parameters are visualized. Each
parameter value is displayed in a dynamic controller gauge, each instrument
gauge being a different color in order to quickly mark the changes in the sound.
• The left zone contains kit, harmonization and instrument preset control, which
allows loading, saving, creation, deletion, importing and exporting of the presets.
ARTURIA – BRASS 2 – USER’S MANUAL
37
Page 38

The instrument preset area also indicates the instrument color codes used in the
interface.
• The right zone displays configuration elements of the current preset, along with
the instrument settings including spatialization and MIDI control.
• At the bottom, a virtual keyboard with the modulation and pitch wheel control
which allows to play or test the sound of the instrument with the mouse. The
keyboard is scrollable.
5.1.1 Center Section - Controlling Parameters in real time
In the center of the user interface there is a visualization of the kit’s instruments, and the
real time parameters that are associated with each instrument.
5.1.1.1 Presentation of the Parameters
ATT
(Attack)
PRS
(Pressure)
PTCH
(Pitch)
TMBR
(Timbre)
NOIS
(Noise)
VIBR
(Vibrato)
V.FRQ
(Vibrato
Frequency)
Real time parameters of an instrument
Set the attack force: higher settings provide a faster and stronger attack;
and lower parameter values create a slower and softer attack. We can set
different types of attacks in the instrument configuration window* in order
to adapt the model of different playing styles.
* see “5.1.3 Right Section - Instrument configuration,” Types of attacks.
Set the pressure of the air to be entering the instrument. Allow variation of
tone and volume of the instrument at the same time, in the same way a
musician would blow stronger into the instrument.
Vary the notes around the notes played. By default, the “pitch” parameter
is set to value “0” in the middle of its range.
Set the tone of the instrument in order to obtain a variation in the timbre of
the sound.
The noise parameter adds some breath noise air into the sound.
This allows adding vibrato while playing, from null to full amplitude. The
maximal amplitude allows interesting effects.
This parameter adjusts the vibrato frequency applied.
38
ARTURIA – BRASS 2 – USER’S MANUAL
Page 39

MUTE The mute is accessible uniquely for the trumpet and the trombone. In the
case where a muted wahwah effect is chosen*, this parameter allows us to
set the intensity of the effect, otherwise said the position of the hand for a
muted wahwah or the position of the mute plunger. When no mute is
activated, or one static mute is chosen, the real time controller is disabled.
* muted wahwah or muted plunger, see “5.1.3 Right Section – Instrument Configuration”,
Mutes.
GRWL
(Growl)
The growl effect is only accessible for the saxophone model. This effect
simulates “growling” into the mouthpiece in order to modulate the
saxophone’s sound with the player’s voice. This effect can be very
expressive even at small amounts.
5.1.1.2 Live display of parameters
The parameters viewed in the central band are representative of the sound and the
control of the instrument.
There are several ways to vary the parameters:
• Control with the mouse on the parameter bar.
• With your sequencer host plug-in automation, clicking on the “A” button and
beginning to draw will activate the control and open the editing window.
• Using assignable MIDI controllers in the configuration section of the instrument
(see “5.1.3 Right Section – Instrument Configuration”, MIDI PRESET).
5.1.1.3 Direct settings with the mouse
At any time, a parameter can be set with the mouse by clicking on the dynamic controller
zone.
Tweak a parameter with the mouse
5.1.1.4 Real time control
When a parameter is assigned to a MIDI control (see “5.1.3 Right Section – Instrument
configuration” MIDI PRESET), the maximum range of the parameter can be set with two
arrows displayed on each side of the dynamic controller zone. This option is particularly
useful, and permits great flexibility in the real time parameter control.
For example, if the modulation wheel is assigned to vibrato amplitude (via the MIDI
PRESET panel), and if you want the maximum amplitude of the modulation wheel to
match a measured value of the vibrato amplitude, you must set the parameters as
indicated below:
ARTURIA – BRASS 2 – USER’S MANUAL
39
Page 40

Modification of the range limit of a parameter
If the 2 arrows limiting the amplitude of the MIDI controls are located at the top and
bottom of the dynamic controller zone, then the amplitude will be at its maximum when
the control is MIDI assigned (see “5.1.3 Right Section - Instrument configuration”, MIDI
PRESET).
Nevertheless, the automation applied to a parameter (see following part, “Automation of
the Live parameters”) can push this parameter to “overflow” the range limits defined by
the arrows.
5.1.1.5 Control in real time - Pitch Bend and Aftertouch
When the pitch bend or the aftertouch control a real time parameter (see “5.1.3 Right
Section - Instrument configuration”, MIDI Settings), the behavior is different from that of
other controllers.
• Pitch bend
The pitch bend wheel returns to its central position when it is released. A
controller assigned to pitch bend also returns to its original position. For example,
if you assign the keyboard pitch bend with the Live interface pitch, the real time
controller will always return to his steady position, normally pitch=0, no matter
what the positions of the MIDI control amplitude arrows are.
• Aftertouch
The aftertouch is released after pushing on the key of a MIDI keyboard. It
changes the sound in function of the force applied to the key once the key is
pushed. Due to this, the modulation obtained with the aftertouch starts with the
initial value of the real time control, and changes this value in function of the MIDI
setting parameters.
For example, if we assign the Velocity and aftertouch controllers to the pressure
parameters, the initial value of the pressure is defined by the velocity of the playing.
Pushing on the key with more or less strength edits the pressure parameters accordingly.
5.1.1.6 Automation of Live parameters
All the parameters of Live play can be automated (except for the Attack). By clicking on
the button above the parameter name, you open an automation window corresponding
to that parameter.
The automation allows you to vary the parameter value for each note, making it possible
to play more realistically while making interpretation and control simpler.
The automation begins with the parameter’s current value, set with the mouse or using a
MIDI controller. The automation value added to the parameter is seen via a change to a
clearer color zone of the real time controller. Thus, you can visualize the controller’s
original value and the automation effect on the current value at the same time.
40
ARTURIA – BRASS 2 – USER’S MANUAL
Page 41

Automation of a parameter value
In the automation window, you will find the following buttons and settings:
Parameter Switch the parameter whose automation you want to edit.
On Activate or deactivate the automation on the corresponding parameter.
Loop Activate or deactivate the loop mode on the automation. When the loop is
deactivated, the automation is read only once.
Sync Synchronize the speed of the player of the automation window to the
tempo of the sequencer.
Delay Delay the automation to be read. This option makes it possible to launch
the automation playback a certain time after pressing the key.
Speed Automation of the player time. When synchronized to the sequencer, the
player time is displayed as a fraction of time.
Amp Sets the automation amplitude.
Edition screen of parameter automation
ARTURIA – BRASS 2 – USER’S MANUAL
41
Page 42

The horizontal time and vertical amplitude scales are updated when you modify the
“Delay”, “Speed” and “Amp” controllers. A vertical bar makes it possible to follow the
course along the curve when you are in the playing phase in order to be able to set these
various parameters in a more intuitive way.
The posted units are:
• Time in seconds on the horizontal scale. The modification of the “delay” parameter
shifts the displayed units, and the modification of the “speed” parameter modifies
the time scale.
• The relative amplitude of the parameter variation. This amplitude is posted in
percents, relative with the maximum range of the parameter. Thus, you can vary
the automated parameter on its entire value range with the amplitude set to the
maximum. The automation values exceeding the allowed maximum value for the
parameter won’t be taken into account, and then the parameter will be limited to
this maximum value.
5.1.1.7 Drawing tools
To select a drawing tool, you can use the bottom left button of the draw zone, or
right-click (Windows), click and press the Ctrl key (Mac) on the drawing zone to
display a menu with the different tools.
Pencil
Freely draw a curve with the shape that you want.
Eraser
Delete the values you put on the editor.
Line
Trace a straight line.
Curve
Trace curves with different shapes, by varying its amplitude, direction
and curve. You can use the curve tool in the following way:
Noise
Sine
Click on the origin point of the desired curve. While keeping
the mouse button pressed, move the cursor towards the
second desired curve.
By releasing the mouse button, you can now modify the line
curve between the two points previously defined. A new click
will validate the curve you have established.
You can also redraw a curve starting from the second point of
the preceding curve, by clicking and immediately releasing the
mouse button. Then by moving the cursor, a curve
automatically appears which you can set the curve in the same
way.
The noise tool allows you to add noise to the modulation. This signal
is added to the already present curve. The added noise amplitude is
proportional to the distance of the mouse cursor from the principal
curve axis. To add noise, click on the curve. For less noise, bring the
horizontal axis closer to the curve; to add more noise, move away
from the horizontal axis.
Allows you to draw a centered sinusoid on the horizontal axis. Click on
the drawing zone where you’d like to begin the sinusoid, move the
mouse cursor while holding the mouse button, and slide with the
42
ARTURIA – BRASS 2 – USER’S MANUAL
Page 43

desired sinusoid end height. The distance of the mouse cursor from
the horizontal axis when you release determines the sinusoid
amplitude.
Square
Allows you to draw square wave. Works in the same manner as the
sinusoid form.
5.1.2 Left Section – Instrument Presets
5.1.2.1 Choose your kit
In this list you will find all the kit presets available. Loading one of these presets implies
loading up to four instrument presets and the harmonization options to be used to play
these instruments.
Load a kit
5.1.2.2 Choose your harmonization
The harmonization zone contains a list for loading harmonization presets to use with the
currently loaded instrument presets as well as a button opening the Harmonization Page
in which the split and harmonizing settings are found.
ARTURIA – BRASS 2 – USER’S MANUAL
43
Page 44

The Harmonization page
The Harmonization page is accessed by clicking on the “EDIT” button found at the right
of the Harmonization Zone.
In this page you can:
• Change the split point using the yellow indicator above the keyboard,
• For each of the four “slots”, choose the harmonization settings:
o the MIDI channel to which it will respond;
o the split zone in which it will play;
o the harmonization mode used:
Melody: this mode makes the instrument play exactly what is
played on the keyboard;
Chroma Transpose: using this mode will transpose the instrument
chromaticaly using the interval chosen in the “Value” drop-down
list;
Scale Transpose: this transposition is done according to the scale
calculated from the chords input on the “Chord Port” (a MIDI
channel set using the “Chord Port” drop_down list at the bottom of
the page). Chords played on the Chord port are recognized and
shown at the left of the key range indicator, as well as the
corresponding scale mode.
Multi: this mode is a polyphonic mode: You can play up to four
notes simultaneously and choose which of these notes will play a
certain instrument: the highest note, the second highest, etc.
44
ARTURIA – BRASS 2 – USER’S MANUAL
Page 45

o The harmonization mode’s specific parameters: except for the “Melody”
mode, each mode has a parameter:
For the Chroma Transpose the parameter chooses the number of
semitones to transpose
For the Scale Transpose mode the interval (calculated in the scale
detected from the Chord Port) to transpose is to be chosen;
For the Multi mode the order (counting from the top) of the note is
set. For example if “2nd note” is selected for the first instrument,
the instrument in this slot will play the second note from the top
when two or more notes are played on the keyboard.
In this mode if only one note is played on the keyboard, all instruments will play
this note!
o An octave transposition is provided to allow you to choose by how many
octaves you want the instrument to be transposed.
• The Comments text box contains explanations about how the preset is organized
and how to use it, for instance: “ 1st instrument solo on high zone(of the split
keyboard) and the rest of the instruments harmonized in a Maj chord in the lower
zone (of the split keyboard).”
• The general harmonization settings:
o The MIDI Chord Port sets the MIDI channel through which the harmony
chords are to be entered, you can also choose to harmonize using the
Lower part of the current midi channel.
o Force notes into scale turns on an automatic correction system which , if
you play a note that is not found in the current scale (calculated from the
“Chord Port”), it will change the note you played into the nearest note from
the current scale(this feature is intended for beginners)
5.1.2.3 Choose the type of an instrument
Three instruments are available in BRASS 2: trumpet, saxophone, and trombone. In the
INSTRUMENTS section you can choose an instrument type for each of the four “slots” in
the kit. According to the slot number and the instrument type a color will be assigned to
each “slot”. This is the instrument’s color code which is used all throughout the interface
to make the distinction between instruments of the same type but in different slots
easier.
Choose an instrument
5.1.2.4 Preset selection
Each instrument has an ensemble of presets associated with it, allowing us to quickly find
a sound adapted to the style or playing type desired. For each instrument, different
presets covering all playing styles are displayed.
ARTURIA – BRASS 2 – USER’S MANUAL
45
Page 46

Select a preset
5.1.2.5 Preset management
In the lower left part of the screen is the file management section:
New Inserts a new preset called “Untitled” in the current bank of presets.
Save Saves the selected preset
Save As Saves the selected preset under another name
Delete Deletes the selected preset (note that you cannot delete factory presets).
WARNING: This operation has no confirmation screen and can’t be cancelled.
Import Imports the selected preset from a pre-selected
file.
Export Exports the selected preset in a pre-selected file.
Extensions:
.brk for kits
.brs for instruments
.brh for harmonization.
Presets operations buttons
5.1.3 Right Section – Instrument configuration
5.1.3.1 Instrument parameters
The right section of the Live screen is dedicated to the settings for the selected
instrument. This part shows the instrument configuration (a trumpet, a saxophone or a
trombone) including the number of instruments playing at the same time (1, 2, 3 or 4 at
the same time with the chorus mode).
5.1.3.2 Configuration
The configuration button opens the following window:
46
ARTURIA – BRASS 2 – USER’S MANUAL
Page 47

Configuration Screen
Type This allows changing the instrument sound according to its style. You will be
able, depending on your needs, to obtain a more subdued, brighter, or
clearer sound, etc.
Many different selections are available for each instrument, each reproducing
different characteristics specific to these instruments.
Number This allows multiplying up to four times the number of identical instruments
playing at the same time. In doing this we can give an instrument the sound
of an ensemble, each element of the ensemble varying in a natural way and
being placed distinctively in its own way
ARTURIA – BRASS 2 – USER’S MANUAL
47
Page 48

Attack An instrumentalist can make several different attacks according to the
pressure he gives to the beginning of the note, or the way he lets the air
pass, etc.
It would be too complex to want to control and maintain all the types of
attacks at the same time; this is why BRASS 2 offers 4 different types of
attacks in order to adapt to all the playing modes.
The attack typess are different for each instrument:
Trumpet & Trombone
Attack 1: direct, without breath, moderately brassy, appropriate in most
situations. The transitions between notes are rather short.
Attack 2: direct, very brass-like and marked attack. Is appropriate for
pop sounds or brass band sounds which need to be crisp. The transitions
between the notes are very short.
Attack 3: with a lot of breath, adapted to a more jazz or ballad type of
playing. The transitions between notes are short, and long enough for
values with a weak attack.
Attack 4: rather short, direct, without breath. Interesting for playing
traditional/orchestral trumpet parts. The transitions between the notes
are from short to fairly long.
Saxophone
Attack 1: direct, without breath, adapted to a broad range of playing.
Attack 2: direct and accentuated, for clear and precise sounds.
Attack 3: staggered, for a more jazzy sound.
Attack 4: without breath, quite soft.
Humanization This attribute is useful to make the sound of the instrument livelier; even a
very good instrumentalist never plays the notes the same way a computer
does. The breath pressure, the tension of ones mouthpiece and many other
aspects are always fluctuating. It is what gives the sound its living aspect.
The humanization attribute allows us to reproduce the tendency of an
instrumentalist to fluctuate in the way he plays:
Computer: no fluctuations will be sent to the sound.
Human: the variations of the sound will be those normally produced by
an instrumentalist.
Beginner: makes it possible to strongly exaggerate those fluctuations,
as a beginning instrumentalist might play.
The humanization varies the following aspects in a very human-like manner:
The pressure
The noise
The vibrato frequency and amplitude
Moreover, the more dominant the humanization is, the more the automation
variation is limited, i.e. the automation parameters become smoother. For
example, an instrumentalist can’t instantaneously make the pressure or the
position of the mute change.
The bottom part of the control display depends on the selected instrument.
48
ARTURIA – BRASS 2 – USER’S MANUAL
Page 49

For the trumpet and the trombone, it makes it possible to choose among several types
of mutes:
Dry mutes Choked and clear sound, used in classical or jazz playing.
Bowl mutes Sound more open, adapted to jazzy New Orleans playing.
Harmon Also called the “Miles mute”, because frequently used by Miles Davis.
This mute rules for jazz, acid jazz, etc.
Plunger Removable mute, which is held by the
instrumentalist and completely covers the bell or
can be released to have no effect on the sound.
Wahwah Fixed mute, on which the removable section can
be more or less filled up by the instrumentalist’s
hand when he plays
These two mutes can
be modulated in real
time with the
parameter “Mute” of
the Live interface,
when one of them is
selected.
For the saxophone, you will be able to choose among these two types of mouthpieces:
Classic Gives a clearer sonority, rather neutral
Jazz Gives a more jazzy, noisy sound.
For the saxophone model in version 2, there are some special parameters that can be
set. These parameters are found in the zone that opens by clicking on the Expert button
at the bottom right of the configuration page, when a saxophone instrument is selected.
The special parameters available are:
Release Changes the saxophone release time within natural limits.
Low/High
Expressivity
These two parameters change the saxophone behavior at low or high
velocity notes. The more one of these parameters is increased, the
more range will be available either for low velocity notes (the smooth
register) or for high velocity notes (the loud and noisy register).
Pitch Bend Toggles between a natural modeled pitch bend (using the instrument’s
reed) which sounds realistic but is not very precise, and an artificial
pitch bend (attained by “moving” the current playing hole on the sax)
which is precise but sounds more synthetic than the natural one.
Squeals This switch allows for squeals (wrong notes) to be generated at very
high velocity values in order to imitate a real saxophone behavior when
blown into too strongly.
5.1.3.3 Spatialization
The spatialization allows placing the different instrument instances in a virtual room.
Move the instrument in the room by clicking on its representative icon.
ARTURIA – BRASS 2 – USER’S MANUAL
49
Page 50

Virtual instrument placement in the virtual room
Amount Sets the effect intensity. This means the amount of reverberation added
to the sound.
Color Regulates the sound tonality of the room: duller or brighter
Dry/Wet Allows to set the proportioning of the effect, from spatial sounds to a
dense, ambient sound.
Volumes Sets the instruments’ volumes separately.
5.1.3.4 MIDI PRESET page
This window allows setting of MIDI controls for the selected instrument. Use this screen
to assign MIDI controllers such as the velocity, the modulation or the aftertouch with
instrument attributes such as the attack, pressure or noise.
With this, it’s possible to control the instrument in real time, in a way both flexible and
easy to configure, through any MIDI interface.
50
ARTURIA – BRASS 2 – USER’S MANUAL
Page 51

MIDI PRESET page
The main controller options to choose from are:
Keyboard Standard MIDI keyboard
Keyboard + BC MIDI keyboard with a Breath Control module : in this mode notes do
not sound even if keys are pressed on the keyboard until BC values
are received.
EWI Same functioning as keyboard with BC module, but with specific
settings.
For each controller mode, a different set of presets is provided, in order to cover different
playing possibilities and styles.
Different presets are used for each instrument type. You can choose the instrument for
which to load or edit a preset by clicking on one of the tabs:
Three MIDI control presets are saved for each instrument preset.
These presets consist of a series of connections between MIDI controllers (velocity, Pitch
ARTURIA – BRASS 2 – USER’S MANUAL
51
Page 52

Bend, After Touch, CCs...) and the instrument parameters you want to control with these
controllers(for example the pitch bend wheel controls the pitch parameter of the
instrument).
Each connection between a MIDI controller and a real time parameter can be configured
according to a response curve. Click on the connection you want to configure, and it will
highlight.
The connection can be set in different ways: with curves which increase rapidly from the
very beginning, with curves that slowly increase, upwards, downwards or anywhere in
between. The control parameter can also be reversed.
Take into consideration the different types of controllers and their action on the
parameters to which they are linked, notably the pitch bend and the aftertouch.
5.1.4 Virtual keyboard
The keyboard allows testing the sound directly in BRASS 2, with the help of the mouse.
When you push on the key, the velocity controller is a function of the position of the
mouse on the key. The farther toward the bottom that the key is clicked, the higher the
velocity is raised.
On the left of the keyboard, the two modulation wheels allow you to test the reaction of
both the pitch bend and the modulation. It also permits us to view their position when
controlled by a MIDI keyboard.
When using an external MIDI controller, you can view MIDI message input when the
MIDI Input indicator (to the top right of the keyboard) flickers. The notes played are also
indicated in color on the virtual keyboard of BRASS 2.
Above the keyboard there is a key range zone, which indicates the playing range of each
of the kit instruments after considering the split and harmonization parameters. The
playing ranges are represented by horizontal lines between the instrument’s playing
notes in the keyboard below. The lines are colored according to the color code indicated
in the Instrument preset management zone in the left section.
While playing BRASS 2, for each note that sounds in an instrument, a yellow circle will
appear above the concerned sounding note on the corresponding instrument’s colored
line.
5.2 Riff mode Presentation
The screen in Riff mode makes it possible to select, listen, play the keyboard, edit,
import and export phrases of brass sections.
52
ARTURIA – BRASS 2 – USER’S MANUAL
Page 53

Riff mode
The screen breaks up into 4 zones:
• At the center, the selection and editing section of the riffs which allow choosing a
riff, editing the notes and the real time parameters for each instrument.
• On the left side, the configuration of the selected riff with the choice of
instruments, length and riff tonality and the buttons used for riff managements
(saving, etc...)
• On the right side is the configuration part of the instrument and the selected riff,
with the spacing and MIDI control parameters.
• At the bottom is the keyboard which can be used to trigger riffs, according to the
mode chosen by the user in the MIDI configuration menu.
5.2.1 Riff selection, preset management
BRASS 2 contains an ensemble of riffs with several different styles and configurations.
The lower central part of the Riff screen, called “riff explorer” allows us to classify and
select the riffs, and contains 4 columns:
Style Musical style of the riff.
Riff Displays the riff names, which matches the previous criteria.
You can also move an existing riff by directly click-and-dropping it into another
instrument or style bank. To do this, click on the riff you want to move, and move the
mouse to the desired destination bank while holding the mouse button down.
5.2.1.1 Management of riff presets
The file menu allows use of the riff presets in different ways:
ARTURIA – BRASS 2 – USER’S MANUAL
53
Page 54

New Creates an empty riff at the place of the current Instrument/style
selection.
Save Saves the selected preset
Save As Saves the preset under a new name
Del Deletes the current selection.
This operation can not be cancelled!
Import Imports a riff in MIDI format
(see below)
Export Exports a riff in MIDI format
(see below)
5.2.1.2 Import and Export Riffs
It is possible to import and to export riffs in MIDI format thanks to “Import” and “Export”
buttons.
A riff can be imported from a MIDI file, but first the file needs to be constructed so that
the programmed tracks and controllers coincide with the riff instruments and its
parameters.
• The tracks 1 through 4 of the MIDI file correspond to instruments 1 through 4,
respectively.
• The different controllers are automatically associated to the following parameters
of each instrument:
Parameter
name
MIDI controller
default association
Associated controller number
(from 0 to 127)
Attack Velocity of the Note
Pressure Breath Controller 2
Pitch Pitch Bend
Tone After Touch
Noise General Purpose 1 16
Vibrato Modulation Wheel 1
Vibrato Freq General Purpose 2 17
Mute Position General Purpose 3 18
5.2.2 Riff properties and visualization
5.2.2.1 Instrument choice zone
You can choose up to 4 instruments per riff simultaneously, or load a kit preset.
For each instrumental line (which will correspond to an instrument), there are several
possible options:
• Choice of an instrument type : trumpet, saxophone or trombone. In order to
choose or to change the type of instrument, use the scroll down menu while
clicking on the arrow. Choose the option “none” if you want to remove the
54
ARTURIA – BRASS 2 – USER’S MANUAL
Page 55

instrument. Choosing the option “none” doesn’t remove the programmed notes
for this instrument.
• Choice of the sound preset, connected to the selected instrument. This menu will
allow you to choose among the presets of available instruments in the Live
screen.
• The Mute button allows to mute the instrument.
Choice of instruments and presets,
5.2.2.2 Riff properties
Programming Time parameters
Length Riff length in number of beats.
Tempo Speed at which the riff will be played in desynchronized mode
see “5.2.3 Control of the riff mode via MIDI”
Tune Riff tonality. A click on the arrow makes it possible to either transpose
the current riff to another tonality, or to change the basic riff tonality
without transposing it (right-click on Windows, [Ctrl]+click on Mac).
and the Mute button
5.2.2.3 Properties of each riff instrument
The properties for each instrument in the riff mode are the same as in the Live mode
(see “5.1.3 Right Section – Instrument Configuration”). These properties are loaded
during the selection of an instrument preset, but can be modified and saved with the riff.
If a preset modification comes in the Live section, you have to reselect the preset in the
riff section so that the modifications of the instrument preset will be taken into account in
the riff.
5.2.2.4 Spatialization
The spatialization of the riff mode allows us to easily manage the 4 riff instruments at the
same time. This is done the same as in the Live mode (see “5.1.3 Right Section -
ARTURIA – BRASS 2 – USER’S MANUAL
55
Page 56

Configuration of the instrument”), except that one can lay out the four instruments in the
space.
5.2.3 Control of the riff mode via MIDI
The MIDI SETUP panel makes it possible to configure the use of a MIDI keyboard and the
synchronization mode in riff mode.
MIDI screen settings in riff mode
5.2.3.1 MIDI synchronization
The tempo of the riffs can be configured by clicking one of the “Tempo Sync” options:
Riff tempo Riffs are played in their original tempo.
Host tempo Riffs are played in the tempo of the host sequencer.
5.2.3.2 Keyboard and control MIDI configuration
The keyboard is divided into two zones: the Riff zone and the Chord zone. These two
zones can be reversed with the “Mode” option of the MIDI SETUP configuration window.
The limit between the two zones can be moved by clicking on the keyboard of the MIDI
SETUP window.
56
ARTURIA – BRASS 2 – USER’S MANUAL
Page 57

Adjustment of separation between the riffs and chords with the mouse
The “Trigg On” option allows starting the riff while pressing a key in the riff zone or in the
chord zone. This option allows, for instance, not starting a riff before having fixed the
chords, and transposing the riff in progress without restarting it (“Trigg on Riff”). On the
contrary, it is possible to start a single riff in several following tonalities quite simply
(“Trig on Chord”).
The “Hold Riff” and “Hold Chord” options make it possible to release the pressed key
while continuing to play the beginning riff thanks to a combination of keys in the two
zones, Riff and Chord.
5.2.4 Editing riffs
When a riff is selected, you can listen to and edit it in the piano roll window, above the
riffs explorer.
Edit mode of the Riff screen
You find some buttons located in the middle of the Riff screen:
Play
Loop
Press on the button to start or stop the playing.
Press on the button to play a riff as a loop.
ARTURIA – BRASS 2 – USER’S MANUAL
57
Page 58

Edit
This button, located in the middle of the Riffs screen, brings up a
panel showing the edition tools and real time parameters for
each instrument.
Master
Sets the general sound volume.
Vol
5.2.4.1 Piano roll visualization
The piano roll represents the notes played by each instrument.
The temporal scale is horizontally represented above the piano roll. This bar reveals
measure divisions and the time signatures. The time division display can be modified by
clicking on the “Quantize” button and by selecting the
desired temporal division.
To display only one division per measure, select the
“1/1 Notes” option. To view ‘n’ division per time,
select the “1/n Note” option. The options “1/n Note T”
displays time divisions in triplets.
Selection of the display grid
5.2.4.2 Zoom
To visualize the different riff sections a bit more precisely, the piano roll can be “zoomed”
vertically and horizontally. The two bars located in the bottom right of the piano roll allow
the user to select the zoom factor of the two vertical and horizontal scales. The scroll
bars on the bottom right of the piano roll allow us to scroll the view.
58
ARTURIA – BRASS 2 – USER’S MANUAL
Page 59

Horizontal and vertical zoom bars
5.2.4.3 Editing Notes
Three tools are available for editing notes:
Pencil
Enables you to draw notes onto the pianoroll for the selected instrument, as
well as to change the notes length.
Accessible by a click on the corresponding button in editing mode, and by
the “Draw/Resize” menu when you right click (Windows) or [Ctrl]+click
(Mac) on the piano roll zone.
Select
Allows to select one or more notes and to move them on the pianoroll.
Accessible by a click on the corresponding button in editing mode, and by
the “Select/Move” menu while the right clicking (Windows) or [Ctrl]+click
(Mac) on the piano roll zone.
Eraser
Erases notes from the selected instrument on the pianoroll.
Accessible by a click on the corresponding button in editing mode, and by
the “Delete” menu while right clicking (Windows) or [Ctrl]+click (Mac) on
the piano roll.
Just a reminder: once the notes have been inserted, they can be quantized. The
quantization menu is accessible by clicking the button.
The applied quantization depends on the selected resolution value: 1/4 Note, 1/8 Note T,
etc.
Access to the quantization options
ARTURIA – BRASS 2 – USER’S MANUAL
59
Page 60

To quantize the beginning of the notes, click the option “Quantize start time”.
To quantize the note length, click the option “Quantize duration”.
The quantization will be applied when you select the option “Apply quantize” of
the menu.
To reset note placement, select the option “No quantization”.
5.2.4.4 Editing the real time controls
The real time controls available in the live section (Attack, Pressure, Pitch, Tone, Noise,
Vibrato, Vibrato Frequency, and Mute) can be separately edited and saved for each
instrument in the riff.
To open the editing panel of the real time controls, select the button in the
middle of the Riff interface. This same button, once the panel is open, changes into a
button and allows you to come back to the riff explorer display.
The editing panel makes it possible to select one of the parameters, to activate its control
in the riff (“Activate” button) and to draw the controls with different tools. Those tools
are the same as those used for automation in live mode (See “5.1.1 Middle Part –
Controlling Parameters in real time” Automation of the live parameter).
Editing the real time parameter for an instrument in a riff
When a real time control is deactivated in the Riff interface, the parameter varies
according to the original sound preset, in the same way as the Live interface. This means
that the starting value and the original automation in the instrument preset are taken
into account. When the option “Activate” is selected, values drawn in the Riff interface of
the parameter replace the original instrument preset values.
60
ARTURIA – BRASS 2 – USER’S MANUAL
Page 61

6 USING BRASS IN MIDI
6.1 LIVE Mode
In the Live mode, using a MIDI controller is indispensable if you wish to truly play your
instrument or kit. A MIDI controller is a physical interface, a control keyboard or a pedal
for example, that permits control of your software by a MIDI protocol device.
One of the major interests of the physical model synthesis that are proposed in BRASS 2
is the fact that they offer a control instrument close to that which we find on the original
instrument.
Working on the keyboard will be more practical and useful for the studio musician that
searches to compose in a well-known environment. Controlling the pressure by a breathcontroller will give a degree of additional realism. Controlling through pedals, joysticks,
etc. also permits enjoyable ease in your search for realism and expressivity.
Using a MIDI wind controller like the Akai EWI allows the most intuitive control over the
physical models by going back to the original playing modes of these instruments, and
sending by MIDI messages the performance parameters of your playing.
6.1.1 Using a MIDI keyboard
A MIDI keyboard literally permits you to play an instrument proposed in BRASS 2 in the
same manner an instrumentalist would.
Example of a MIDI control keyboard
In using the possibilities of control offered by the keyboard (velocity or after touch for
example) you’re going to be able to get closer to the level of expression of a master
instrumentalist on the trumpet, saxophone, or the trombone.
• The velocity is the force with which the keys of the keyboard are pushed. The
MIDI keyboards of a certain level can transmit this information to BRASS 2 which
will transform itself and send back the sound associated with the pressure.
ARTURIA – BRASS 2 – USER’S MANUAL
61
Page 62

• The aftertouch is a function that certain MIDI keyboards offer. It is the measure of
pressure value on the keys over a period of time. In effect, you can decide to
push strongly on the keys, then release, and then push with a different amount of
force, etc. The keyboards that save the variations permit a control very close to
BRASS 2.
Other controls are proposed for the MIDI keyboards, for example by the means of a
pitch-bend wheel or modulation wheel.
• The pitch-bend wheel which (all things being normal) should come back to the
center, is by default assigned to the pitch of the note played.
• The modulation wheel, that doesn’t come back to the center, can be used for
controlling all kinds of parameters.
In the section MIDI PRESET of BRASS 2 you can decide to allot the diverse controls
offered by the keyboard to the playing parameters of the software. The ideal is having a
maximum of controllers assigned to a few free modulations in real time.
MIDI-Settings Panel
6.1.1.1 The MIDI adjustment configuration panel
Before making your adjustments, begin by selecting the type of controller you wish to
use (if you haven’t already done this in the First Run dialog that opened when you first
executed Brass 2). Three choices are possible:
Keyboard Standard MIDI keyboard
Keyboard + BC MIDI keyboard with a breath controller module
62
ARTURIA – BRASS 2 – USER’S MANUAL
Page 63

EWI the famous dedicated controller from Akai
Once the controller is selected, you can load a control preset for each type of instrument.
The control preset is a set of “connections” from a MIDI control source(velocity, BC,
aftertouch, CCs, etc.) to one of the instruments’ parameters(attack, pressure, pitch,
etc.). These “connections” define the way in which you control a trumpet, a sax or a
trombone preset using your MIDI controller.
The connections given in the presets can all be modified at your convenience. For
instance:
Connect the Velocity to the Attack and from then on it will be the force with which
you push the key that decides the attack of the note.
If you link the Aftertouch to the Pressure, you can control the pressure sent to the
instrument simply by pushing the key.
Same way, connect the Modulation Wheel to the Noise, with a negative curve
value. You will obtain an high breath level when playing softly on the keyboard,
and inversely, the breath will disappear when you play louder.
For more precision in the control of your editing, it is possible to set the maximum and minimum limits of the
editing in order to determine the range of action of the parameter. To do this, close the window “MIDI Settings”
and return to the principal screen. Click on one of the 2 small black arrows situated around the parameters to
define the extremes of you editing. A horizontal white line marks the editing threshold you just defined.
The nature of the response curve chosen for each connection can have an affect on the
final results.
In the following example, make sure that you have connected the velocity of the
keyboard to the pressure parameter of the model saxophone. A curve of this nature
means that one weak push permits us to immediately attain one dominant pressure
value. In an inverse sense, the curve implies that one must push strongly on the key
to attain the true pressure needed.
Adjusting the curves depends upon your keyboard and on the results that you wait for in
the playing phase.
Possible Response curves for the MIDI control parameters
Taking another example, connect the modulation wheel on the breath “Noise” with a
backwards curve value
. Doing so, you obtain an important breath level when you play
softly on your keyboard, and inversely the breath disappears when you play strongly.
ARTURIA – BRASS 2 – USER’S MANUAL
63
Page 64

Each connection can have a variable influence depending on its Connection Amount
value.
Do not forget that, as seen in chapter 5.1.1, it is possible to adjust the inferior and
superior limits of the modulation in order to have a better control. This of course is
accomplished through the adjustment of the two small black arrows that surround the
adjustments of the playing parameters in real time (pitch, pressure, timbre, etc.).
The Comments text box is used to give explanations or suggestions for using the
respective MIDI control preset, such as: “Expert preset, aftertouch growls and
modulation changes timbre, no vibrato control (use pitch bend for manual vibrato)”.
6.1.2 Using a Breath Controller
The MIDI breath controller is an ideal tool for augmenting the realism of playing BRASS
2. If you use such a controller, choose option “Keyboard + BC” in the menu
CONTROLLER
in the MIDI PRESET screen.
CHOOSE YOUR
Breath controller and MIDI keyboard combination
Thanks to the breath controller, you can control the intensity of pressure with more
precision or, for example, make vibrato effects; thus, you will have mastered the
intensity and speed.
When in Breath Ccontrol or EWI modes, no sound is produced when notes are played if there is no breath
controller value, i.e. if you do not blow into the controller.
In order to use the breath controller, connect the source of the same name to the
64
ARTURIA – BRASS 2 – USER’S MANUAL
Page 65

modulation destination(s) desired on the MIDI Settings screen. Of course, it is the attack
and the pressure that one must, before all else, link to the breath-controller. It is by the
means of the keyboard that you will normally decide the pitch of the note.
You might also want to link breath values to the noise parameter for even more realistic effect!
As in the other sources of modulation, you can adjust the action curve positively or
negatively.
6.1.3 Using an EWI or EWI USB
The Akai EWI and EWI-USB are excellent MIDI controllers to use with BRASS 2. The
“EWI” mode is pretty much like the “Keyboard + BC” mode, but with specific settings.
You also have a button for editing the EWI-USB.
The Akai EWI dedicated controller
6.1.4 Assigning the external MIDI controllers
They permit the assignment of one or several modulations to some non-described
elements from the beginning in the list of dispensable MIDI controllers (a potentiometer
or a MIDI keyboard fader, a MIDI joystick, a MIDI pedal, etc.).
You can play and control BRASS 2 from an external MIDI sequencer, such as Cubase or
Logic Pro for example.
This option permits you to program the melodic lines in Live mode and construct an
arrangement of brass in real time. You can also program control automations in order to
make the sequence more realistic. Automation is the act of programming and saving the
evolution of one parameter in time.
For example, let’s make automation on the pressure (“swell” in the language of wind
instruments). For this, we assign the pressure to one MIDI track of your sequencer, and
then draw the curve of the swell corresponding to the note played.
We’ll reference you to chapter 7 for more training on the usage of BRASS 2 instanciated
in a sequencer.
6.2 Riff Mode
6.2.1 Playing riffs on a MIDI keyboard
In Riff Mode you can select, modify, or program brass riffs. Thanks to the MIDI protocol,
it is possible to launch riffs from your keyboard. To do this, slide the riffs of your choice
onto the notes of the virtual keyboard. Next, play them by pushing on the corresponding
notes on your MIDI keyboard.
In the initial configuration, launch the riff on the left portion of your keyboard
ARTURIA – BRASS 2 – USER’S MANUAL
65
Page 66

(from C1 to C3) and choose their transposition mode by clicking on the right
portion of the keyboard (beginning at D3).
Distribute the riff on the left portion of the keyboard
To delete one or several Riffs, right-click on it in order to choose the “Remove”
option.
Right-click on a riff to delete it
6.2.2 Riff control through a MIDI sequencer
Two main features must be presented here: the synchronization of riffs with an external
sequencer, and the possibility of importing or exporting riffs via MIDI (notably for
programming riffs in a sequencer).
6.2.2.1 Riff synchronization with external sequencers
One of the useful attributes of this mode is the ability to play the riffs with an external
MIDI sequencer (by opening BRASS 2 in VST mode for example). You can launch the riffs
by playing notes in a sequence created and synchronized on the host sequencer.
In this case, choose the option “Sync to Host Tempo”, in the MIDI SETUP window so that
the riff is synchronized in tempo with the MIDI sequencer.
66
ARTURIA – BRASS 2 – USER’S MANUAL
Page 67

Synchronization modes
In order to save a maximum charge on your CPU, we highly suggest using Riff mode as much as you can
when you wish to play a brass section with a MIDI sequencer rather than opening several sessions of BRASS 2
in Live mode.
6.2.2.2 Importing/Exporting riffs
You can also compose riffs in MIDI directly by opening several sessions of BRASS 2 in
your sequencer, as long as the number of VST plug-ins matches the number of
instruments in your riff. Choose “Play” mode to hear the sound of each instrument and
assign the necessary connections to the sound controls. You can create the sequence of
notes then, make the control automations that correspond to the instrument playing.
Make sure to create as many tracks as there will be instruments and reserve
channels 1, 2, 3, and 4 to assign to 4 instruments.
Open as many VST sessions of BRASS 2 as there are instruments in your riff
Save the results of this riff as a “MIDI file” so you can import it in Riff mode.
You will find the same configuration as in the arrangement of your host sequencer
(choice and number of instruments, notes and automations assigned to the correct
parameters).
You can also export a riff included in BRASS 2 as a “MIDI file” to inject it into a host
sequencer; this allows you to re-work certain portions easier or to re-play certain
portions directly.
Only the controllers listed in the MIDI PRESET page or in the principal page of “Play mode” will be taken into
consideration by automation in a MIDI sequencer.
ARTURIA – BRASS 2 – USER’S MANUAL
67
Page 68

The free controllers for automation in VST mode
68
ARTURIA – BRASS 2 – USER’S MANUAL
Page 69

7 MODES OF OPERATION
7.1 Stand-alone
The standalone application allows the use of BRASS 2 outside of any host application.
You can open one or several instruments, and play directly with the help of a master
MIDI keyboard or external sequencer on a separate computer.
7.1.1 Launching the Stand-alone application
To launch the standalone application on Windows, go into the menu
Start > Programs > Arturia > BRASS 2
and choose BRASS 2.
On Mac OS X, open the folder:
/Applications/Arturia BRASS 2/
and double click on the application icon BRASS 2.
You can also double-click on a previously saved document in order to open the
corresponding configuration of the BRASS 2 application. This will be described in Section
6.1.6 of this document.
7.1.2 Preference Configuration
In order to access the preferences window, click on the menu Settings. A pop-up
window allows you to configure the global preferences of the BRASS 2 application.
These are automatically saved.
If you have an EWI-USB and you want to configure it using BRASS interface (the
MIDI PRESET page, the “EWI setup” button), you don’t need to select the EWI as
the MIDI output port as it is detected and selected automatically.
ARTURIA – BRASS 2 – USER’S MANUAL
69
Page 70

Preferences window
audio device Select the driver corresponding to the sound menu that you
wish to use.
sample rate Choose the sampling frequency among those proposed by
your sound menu. Note that a large sampling frequency will
demand increasing processor performance on your computer.
audio buffer size Here, you can configure the optimal audio latency as it
relates to performance of your sound card. Be careful with
this setting, as a latency setting lower than your system can
support can cause unwanted artifacts in the sound.
configuration panel This button opens your audio card's configuration panel, if it
is available. (Windows only with ASIO protocol)
active output channels Allows you to select the main audio outputs for BRASS 2
active midi inputs List of MIDI controllers detected by the system; select one to
control BRASS 2.
7.1.3 Saving the configuration
The configuration is saved automatically, as well as the last loaded kit and riff,
when BRASS 2 is closed. These settings are then loaded at next startup.
70
ARTURIA – BRASS 2 – USER’S MANUAL
Page 71

7.2 VST
7.2.1 Installation
7.2.1.1 Under Windows
During installation, select the box “VST” among the proposed format choices of plug-ins.
The installer will automatically detect the VST folder of the instruments used by Cubase.
In the case of another compatible VST sequencer, such as Logic Audio, you will have to
select another folder that shall be scanned.
7.2.1.2 Under Mac OSX
The VST plug-in is automatically installed in the folder of the system corresponding to the
VST instruments: /Library/Audio/Plug-Ins/VST/
The VST plug-in will be usable by all your VST host applications.
7.2.2 Instrument use in the VST mode
The opening of VST BRASS 2 plug-ins is the same as opening all other VST plug-ins.
Please consult the instruction manual of your host sequencer for more specific
information. Under Cubase, open the menu VST Instruments, and choose BRASS 2 in the
rack.
BRASS 2 opening in Cubase
7.2.2.1 Connection to a MIDI track
So that BRASS 2 can play information coming from a MIDI track, you have to choose a
MIDI track and select BRASS 2 as MIDI output of this track. See the picture below for
more detail on how this is accomplished.
ARTURIA – BRASS 2 – USER’S MANUAL
71
Page 72

Connection of a MIDI track to BRASS 2
The events played on a MIDI keyboard are recorded by your host sequencer, and now
you can use the MIDI editing possibilities of the sequencer to control any parameter with
BRASS 2.
7.2.2.2 Saving of presets
When the session/project is saved, BRASS 2 is saved in its last mode of operation, with
all modifications intact. For instance, if you were working on a “P1” preset in which you
have modified parameters (without saving them as a separate voice in the plug-in itself),
at the next opening of the piece, BRASS 2 will load the “P1” preset and the modifications.
The drop-down menu which the VST sequencer allows you to save a new voice is of
course usable with BRASS 2. However, it is highly advised to use the BRASS 2 internal
menu: the presets saved in this way are usable in any other mode (standalone or other
sequencer), they can be exported and exchanged more easily, and they will remain
compatible with the future BRASS versions.
7.2.2.3 Automation
Automation works the same with BRASS 2 as with any VST plug-in (for more details
about automation, refer to the VST sequencer documentation).
7.3 Audio Unit (Max OSX only)
7.3.1 Installation
The Audio Unit plug-in is automatically installed in the folder reserved for this purpose,
in: /Library/Audio/Plug-Ins/Components/
72
ARTURIA – BRASS 2 – USER’S MANUAL
Page 73

7.3.2 Use in Logic Audio
Select an instrument track.
On the part of the mixer corresponding to the selected track, click on the button
“I/O” to obtain the list of plug-ins, then select Stereo > AU Instruments > Arturia
BRASS 2.
Opening BRASS 2 in Logic
Since version 7, there has been an Audio Unit plug-in manager in Logic. To launch it,
click on the menu Preferences > Audio Units Manager.
ARTURIA – BRASS 2 – USER’S MANUAL
73
Page 74

Launching Logic’s Audio Unit Manager
This Manager allows us to see the list of the available plug-ins, to test their compatibility
with Logic, and to activate or de-activate them.
If it happens that one of the Arturia plug-ins poses a problem in Logic, start by checking
that this plug-in has passed the compatibility test, and that it is actually selected for use.
74
ARTURIA – BRASS 2 – USER’S MANUAL
Page 75

The Audio Unit Manager
7.3.3 Use in Digital Performer
To add an instrument, choose the menu Project > Add Track > Instrument Track
> BRASS 2.
ARTURIA – BRASS 2 – USER’S MANUAL
75
Page 76

Opening BRASS 2 in the Digital Performer
Once you have added this instrument, it’s possible to assign a MIDI track to it. In the
connection menu of the MIDI track, select the instrument and the MIDI channel that you
want to use.
76
ARTURIA – BRASS 2 – USER’S MANUAL
Page 77

Connection from a MIDI track to BRASS 2
7.4 Pro Tools
7.4.1 Installation
• On Mac OSX, the plug-in is directly installed in the folder reserved for the Pro
Tools plug-ins, in : /Library/Application Support/Digidesign/Plug-Ins/
• On Windows, at the time of the installation procedure, select the RTAS plug-in
among the proposed choices of plug-ins. Then, when the system asks, indicate
the folder in which the other RTAS plug-ins are located. Usually, the path is :
C:\Program Files\Common Files\Digidesign\DAE\Plug-Ins\
7.4.2 Utilization of the plug-in
7.4.2.1 Opening of the plug-in
ARTURIA – BRASS 2 – USER’S MANUAL
77
Page 78

Access to the BRASS 2 plug-in is like all other plug-ins, via an audio track insert:
Opening BRASS 2 in Pro Tools
BRASS 2 must be loaded on an audio stereo track. We can now make BRASS 2 sound by
playing with the mouse on the virtual keyboard.
7.4.2.2 Connection to a MIDI channel
So that BRASS 2 can play the information coming from a MIDI track, you have to
connect it to a MIDI channel via the appropriate menu.
We can thus also control BRASS 2 from a control keyboard (see the Pro Tools menu for
more information on plug-in connection).
7.4.2.3 Saving the presets
When the session is saved, the status of BRASS 2 is saved as it is, even if its
programming does not correspond to the preset. For example, if you are working on a
preset “P1” in which you have modified the parameters (without saving them in the plugin itself), the next time you open the session, BRASS 2 will charge the “P1” preset plus
the modifications.
The “Librarian Menu” of Pro Tools is able to be used with BRASS 2 like with all other
plug-ins. Nevertheless it is highly recommended to use the internal BRASS 2 menu: with
the presets saved like this, they are usable no matter which mode (standalone or other
sequencer), and they can be exported, exchanged more easily, and will stay compatible
with the future versions of BRASS.
7.4.2.4 Automation under Pro Tools
The automation function with BRASS 2 like with all RTAS/HTDM plug-ins (make reference
to the Pro Tools documentation for more details on the plug-in automations).
78
ARTURIA – BRASS 2 – USER’S MANUAL
Page 79

8 RESEARCH
8.1 Trumpet and Trombone
8.1.1 Trumpet
8.1.1.1 How does it work?
The trumpet is a wind instrument in the brass family, composed of a mouthpiece and a
curved brass tube/cylinder that uses three valves to change the length of the tube, and
therefore the selection of notes that the player can choose. In the condition where sound
is formed to create a note with a well defined frequency, operation of the trumpet can be
described as the synchronization of several oscillations or waves at the same frequency:
the oscillation and vibration of the lips of the trumpeter (which open and close, for
example 440 times a second for the A of tuning fork), the waves of pressure in the
interior of the mouth and lungs flowing into the instrument, and then from the
instrument outward to create a musical sound (to be heard by the ears of listeners). This
common frequency allows the ear to distinguish notes played from each other (each note
corresponding to a particular frequency).
8.1.1.2 A little musical physics… a little instrumental practice…
When a trumpeter wants to play a note, he presses his lips together, increases the air
pressure in his mouth and lungs, and contracts his diaphragm (the muscle allowing
inhaling and exhaling). If the pressure is strong enough, the lips open temporarily and a
puff of air escapes into the mouthpiece. The acoustic disturbance generated by this small
release of air at the opening of the lips spreads out along the instrument and is refracted
through the internal sections of the instrument. Thus, one reflected wave brings back the
energy necessary to the lips in order to develop and eventually sustain the oscillation.
When the resonance frequency from the lips (the frequency at which the lips would
vibrate if the instrument wasn’t there) is close to the frequency of instrument resonance
(the frequency at which the internal pressure oscillates if the lips were not there), the
exchange of energy is constructive and allows a note to develop.
As with other brass instruments, the production of trumpet sound depends on the
cooperation between the lips of the musician and the instrument. The frequency of
oscillation (thus the sound!) is at the same time controlled by the instrument resonance
and the frequency of the lips. Thus, two possibilities are presented for the trumpeter to
choose a note:
• The trumpeter can increase or diminish the frequency of sound by modifying his
embouchure (the embouchure is what we call the ensemble of lip and face
muscles used in playing an instrument). In practice, he stiffens his lips to increase
the resonance frequency. It is like this that the trumpeter can produce different
notes with the same fingering. It is the bugle principle which, even without a
valved instrument, allows one to play all the notes in a harmonic series. Try to
modify the “pitch” parameters in BRASS 2 and you will obtain the exact same
results.
• The changing of a note can equally be achieved by increasing/diminishing the
resonance frequency of the instrument. One needs only to modify the position of
the three pistons. By pushing the pistons one increases the length of the pipe that
the trumpet is made of and in effect lowers the resonance frequency. Pushing the
n°1 piston lowers the frequency one half step, n°2 one full step, and n ° 3 one
and a half steps. The effect is increased when you press several pistons
ARTURIA – BRASS 2 – USER’S MANUAL
79
Page 80

simultaneously: thus the resonance frequency of a trumpet with all pistons held
down is three steps lower (0.5+1.0+1.5) than a trumpet with all the pistons
released.
By playing notes in these two ways, it is possible for the trumpeter to play all the notes
of the chromatic scale. It is the same when you play a note in BRASS 2; it is good that
one or the other of these options is put into place by the model.
8.1.1.3 Brassy sounding… Brass!
One of the essential characteristics in the performance of brass instruments is their
ability to transform and enrich the harmonic content produced when the volume level
augments. We’re talking about a metallic, bright, or even brassy sound. This
transformation of sound is principally due to the progressive distortion of acoustic waves
as they spread into the body of an instrument. The phenomenon is similar to the
formation of ocean waves, nearly winding in high tides, and that progressively crash into
one another while approaching the shore until surging and breaking onto the beach. The
equivalent of crashing for acoustic waves is the formation of shock waves in the interior
of the instrument. It is this spectacular distortion of pressure waves that is identified by
the ear and associated with a brass sound. To experience this with BRASS 2, breathe
stronger and stronger by increasing the “pressure” parameter and listen: the sound is
not only louder, it is also richer and colorful, in effect…brassy!
8.1.2 Trombone
The functioning of the trombone is very similar to that of the trumpet. The main
difference is that while a trumpeter is limited to a finite number of ways to elongate his
instrument (only 8 possible positions) the trombonist has a nearly-infinite range of
possibilities by setting the position of the slide at will.
One of the playing techniques unique to the trombone is due precisely to the possibilities
offered by means of the slide; the trombone can play a glissando like no other. Imagine
for example that the musician wishes to perform an ascending glissando: starting with a
precise note, progressively shorten the length of the instrument (and thus increase the
resonance frequency) by pulling the slide inward. But this is not enough! As we have said
for the trumpet, the sound frequency is influenced by the resonance frequency of the
instrument and lips. Thus, the trombonist must increase the resonance frequency of his
lips at the same time that he is moving the slide. This technique is very delicate and
takes a lot of work to master with the real instrument, but luckily, the technique is put at
the disposition of all BRASS 2 users in an easily accessible way.
8.2 Technology used with the Trumpet and Trombone
The trumpet and trombone models were developed by the researchers at IRCAM who
based all experiments on experience with real instruments. Through a few examples we
will see how the models used in BRASS 2 benefit from the most recent research in
musical acoustics.
8.2.1.1 The acoustic signature of the instrument
In order to define instrumental behavior, measures of acoustic impedance and impulse
response in an anechoic chamber were performed. This method acts as a precise
measure of the echo produced by a trumpet in response to an acoustic impulse: It is in
some way as though we shot a rifle in a room in the form of a trumpet or trombone and
saved the echo or reverberation returned by the room. The impulse response on an
instrument is made up of its acoustic signature and is an integral part of the physical
model used in BRASS 2.
80
ARTURIA – BRASS 2 – USER’S MANUAL
Page 81

8.2.1.2 The virtual trumpeter/trombonist
To define and shape the essential role held by a musician, an artificial mouth was
constructed: the experimental device was fed in compressed air and possessed latex lips
that really played the trumpet. It is, in any case, much easier to measure the pressure at
the interior of an artificial mouth than to convince a real musician to pierce his cheek!
One other advantage of the artificial mouth is to allow those conducting the experiments
to modify one parameter of the cheek at a time and study the consequences of the sound
produced at his leisure (an artificial mouth doesn’t need to breathe). It is ideal for
dissecting the physical mechanism playing a part of the production of sound and allows
us to propose some convincing physical models in BRASS 2.
Comparison Chart
8.2.1.3 The Physical Model
The physical model is the ensemble of equations that explain in mathematical language
the different phenomenon in physics, and are well-understood thanks to the studies of
ARTURIA – BRASS 2 – USER’S MANUAL
81
Page 82

the previously mentioned researchers. In fact, the sound produced by BRASS 2 is the
solution of equations calculated more than 44,000 times a second! Indeed, with a
physical model the sound is always in evolution; we told you in the introduction that you
would be impressed by the liveliness of our manual. Since the physics of the most up to
date studies are included in these equations, the model (and thus the sound) reacts in
the same way as the real instrument.
In this way the physical models included in BRASS 2 permit us to simulate innumerable
possibilities of playing on the instrument, naturally reproducing the sound effects made
by changing the valves and slide position, changing the tension in the lips of a trumpeter,
increasing the breath and thus the level of sound (effecting the brass sound)… The sound
of turbulence from the release of air in the instrument is equally modeled on an analytical
base of real sounds.
8.2.1.4 Why is BRASS 2 incomparably easier to use?
The possibilities offered by the model are comparable to those of the real instrument, but
the practice of the virtual instrument doesn’t require the long and difficult training
demanded by the real instrument. Due to this, with BRASS 2 you do not need to know
how to use breath control or tighten your lips to make a note. Why? We have, in a way,
taught the model how to produce notes or desired effects while playing naturally from a
keyboard. This setting of the model parameters has also benefited from recent research
since an optimization procedure was specially developed. The algorithm starts as a
beginner might: it tests thousands of different values, at first randomly, but at its rate of
progression, it allows chance to intervene less and less in its training. By the end, the
algorithm has determined the optimal values for the model parameters to produce the
varied notes and effects. You have nothing more to do than to be inspired.
8.3 The saxophone
8.3.1 Musicians Technique
8.3.1.1 How does it work?
As is true with other wind instruments, while playing a note on the saxophone two
elements of the instrument oscillate in synchronization: the air stream (contained in the
resonator) and the reed vibrating on the mouthpiece. These two components are not
necessarily at the exact same oscillation frequency and can also be different from the
note played; this means that if we played only the reed (by removing the mouthpiece
from the rest of the instrument) we obtain an extremely sharp sound (a false note),
generally above any other note that the saxophone can produce. We can produce a
sound specific to the resonator as well by tapping on the head stock from which we have
removed the mouthpiece. The sound created by tapping on this the instrument will be
rather short, and its pitch will depend upon both the position of each key (open or
closed) and slight variations in the manner of fingering the notes. The playing frequency
of the saxophone is, therefore, strongly influenced by the configuration of the resonator
(size, fingering), but the reed and the pinch of the lips on the reed also play a large role
on the pitch of the note produced.
8.3.1.2 Pitch of the note
As a general rule, the saxophonist selects the note by modifying the resonator
configuration.
From the physics point of view, the simplest configuration of the resonator is with all the
keys closed. In this case, an acoustic wave (periodic oscillations of air pressure and
speed whose amplitude vary throughout the instrument) develops on the interior of the
82
ARTURIA – BRASS 2 – USER’S MANUAL
Page 83

instrument and spreads through the length of the instrument. The frequency of this
oscillation (and thus the pitch of the note produced) is proportional to the length of the
acoustic wave in the instrument.
We see right away that one simple way to produce a change in pitch will be to modify the
length of the resonator. However, being that this procedure will be practical neither for
the instrument maker nor for the instrumentalist, we use holes perforated on the wall of
the resonator to produce these changes in length. Roughly speaking, by opening a hole
on the saxophone we shorten the air stream vibration length up to the point of the hole.
ARTURIA – BRASS 2 – USER’S MANUAL
83
Page 84

Different positions of the Resonator
In the world of virtual saxophones, the instrument makers are less limited to these
questions of practical order, and it is much easier and more flexible to reduce the length
of the resonator than to introduce 10 to 15 holes on the virtual resonator.
8.3.1.3 Role of the Reed
We have seen that the reed also plays its role on the pitch when an instrument produces
a note. Normally, it cannot change the frequency of the note produced more than a
fraction of the tone in relation to the notes selected with fingerings. These small
variations in the frequency are used to produce, for example, vibrato.
Moreover, the reed offers the saxophonist much more flexibility than the resonator
because there is much more liberty to change pressure on the reed, breath, etc. This
control translates physically into a number of parameters that influence more or less the
timbre (color) of the results. One problem with these parameters is that they can
influence the frequency of the final note at the same time. In BRASS 2, we free ourselves
of this problem by precisely determining the variation of frequency produced by each
parameter so that one “A” always remains an “A” independently of the reed parameters.
8.3.1.4 A bit of musical physics… a bit of instrumental practice…
To play the saxophone, the saxophonist pushes his bottom lips firmly against the reed
and his top teeth against the mouthpiece. The pressure must be equal in force: neither
too strong (because the reed would then be closed off and will have a sound too dismal
and weak) nor too weak (because the reed will begin to vibrate on its own oscillation
frequency resulting in a false note). The position of the lips on the reed is also important
because if the mouthpiece is pushed too far into the mouth the pinch of the lips will not
have enough control over the reed, but if it is not pushed in enough, the vibration on the
84
ARTURIA – BRASS 2 – USER’S MANUAL
Page 85

length of the reed is reduced too much.
Once he has found the right amount of pressure, the saxophonist breathes in the
instrument by increasing the pressure in his lungs and mouth. Once again this pressure
must be strong enough to inject the proper amount of energy into the instrument
allowing it to create and maintain the oscillations, but not so strong that it risks holding
the reed against the mouthpiece, closing off the entry of air.
Playing parameters Pinch on the Mouthpiece
8.3.2 Pressure
It goes without saying that the most important attribute of the process is the air pressure
imposed by the musician when he breathes into the mouthpiece. This factor largely
affects the note’s sound volume because it is the pressure provided by the
instrumentalist that injects energy into the saxophone. If the pressure is too weak there
will not be enough energy to maintain the oscillation in the instrument (we say that it is
below the threshold of oscillations). However, if it becomes too strong the pressure
forces the reed to a nearly closed position against the mouthpiece; after a certain
amount of pressure, the reed will stay stuck against the mouthpiece impeding the flow of
air into the instrument (we say it is above the plating threshold). To simplify a bit, if the
musician doesn’t breathe enough or breathes too much, he will not obtain a sound!
Luckily, there remains a large range of possible pressure. More than the sound volume,
the timbre varies a lot between two limits: a more muffled sound for weaker pressures
and brighter sound for a stronger amount of pressure. Enriching the timbre while
increasing the pressure corresponds to the shocks between the reed and the mouthpiece
leading to a progressive distortion of the sound wave.
8.3.2.1 Timbre
Next, we will talk about the pinch of the lips on the reed; this causes the position of the
reed equilibrium to vary in its range of vibration. We can say at first approximation that
this parameter makes a scale of reed oscillations, making the pressure thresholds
described above vary. This means that we could obtain a more intense sound while
keeping a similar timbre by simply increasing the pressure and the pinch of the reed at
the same time. By keeping the pressure constant and modifying the pressure of the lips,
we move between the timbres described above without modifying the intensity too
ARTURIA – BRASS 2 – USER’S MANUAL
85
Page 86

drastically.
8.3.2.2 Damping
refers to the “quality” of reed oscillation and to its ability to vibrate more or less freely.
In practical terms, a musician can play a little bit with these attributes by modifying the
stiffness of the lip that pushes on the reed or by moving the lip’s position on the reed.
The effect of these attributes sets the range of reed oscillation in relation to the air
stream. If the damping is too weak, the reed oscillation at its own frequency (the
mouthpiece frequency without the resonator) becomes too dominant and we can only
hear the false note produced by the reed. By progressively increasing the damping we
change the sound: initially, it will be brighter because the reed enriches the principal
vibration by its oscillations; then, it will be more and more velvety and weak. The two
pressure thresholds approach each other at the same time until the reed will no longer
be able to maintain the oscillation of the instrument.
The “Timbre” parameter in BRASS 2 is a mix of these two physical attributes allowing a
strong margin of sound color variation while maintaining the conditions necessary for
oscillation.
8.3.2.3 Noise
When the instrumentalist breathes strong enough into the instrument, the release of air
becomes more and more turbulent and formulates the sound of breath, affected by the
acoustic response of the resonator. When the pressure of the air is not strong enough to
generate the reed oscillation (below the oscillation threshold), we only hear the sound of
breath; if we were to increase this air pressure step by step, it would begin to approach
the oscillation threshold and the “breath” noise would slowly but surely gain the sound
characteristics of the instrument. Above the threshold, the noise is added to the sound of
the note giving it the real timbre of the saxophone. The proportion of noise in the final
sound is thus adjusted to this parameter. Attention; if the sound of breath is too strong,
the principal note can be disturbed or even stopped.
8.3.2.4 Instrument Control
The parameter setting on the principal BRASS 2 window does not signify that the physical
parameters apply to the instrument (neither when it is applied in a way that is constant
with all the notes nor while playing one note). It would not be realistic because the
instrumentalist does not maintain constant pressure or pinch throughout a musical
phrase; it would not be desirable either because the instrument often needs variations of
parameters to change states: saying that you can either change from one note to
another or silence a note.
8.3.2.5 Envelopes
In regard to the evolution of the physical parameters, there are three possible types of
transitions:
• Attack: when the instrument is silent and the musician plays a new note.
• Relaxation: when one is being played an the musician wants to stop it.
• Transition: between the notes (legato).
8.3.2.6 Attacks
Starting a musical phrase (or passing from silence to a note) can be done in several
ways: fast, slowly, in between, and with varying amounts of energy. The choice of type
of attack is up to the musician, but it must obey certain conditions so that the start of the
note is done correctly. For example, with certain low notes it is often necessary to apply
86
ARTURIA – BRASS 2 – USER’S MANUAL
Page 87

strong pressure for a short interval so that the oscillation can begin, then reduce the
pressure to arrive at the desired intensity. In other cases, the initial impact of pressure
may sometimes be strong enough to start the note, but it will start the note slowly. In
this situation, one must increase the pressure to an amount more than the volume of the
note simply to facilitate the speed of the attack; otherwise the note would begin much
slower than desired.
For an actual saxophone, it is the musician who automatically generates these variations.
This “gesture” can be reproduced with a breath controller for example, but when we play
on the keyboard, the synthesizer must reproduce these gestures automatically for each
note. In our case, an Attack/Decrease envelope is not only applied to pressures like the
pinch and the breath sound. The attack parameter in the BRASS 2 window sets the
attack time and rate simultaneously, and the decrease time to simulate the attacks is
more or less flexible.
Attack Figure
ARTURIA – BRASS 2 – USER’S MANUAL
87
Page 88

AARRTTUURRIIAA BBRRAASSSS 22 -- LLIICCEENNSSEE AAGGRREEEEMMEENNTT
In consideration of payment of the Licensee fee, which is a portion of the price you paid,
Arturia, as Licensor, grants to you (hereinafter termed “Licensee”) a nonexclusive right
to use this copy of the BRASS 2 program (hereinafter the “SOFTWARE”).
All intellectual property rights in the software belong to Arturia SA (hereinafter:
“Arturia”). Arturia permits you only to copy, download, install and use the software in
accordance with the terms and conditions of this Agreement.
The product contains product activation for protection against unlawful copying. This
system is known as eLicenser and permits a permanent use of the software only after the
activation process has been totally completed. The software can be used only together
with the eLicenser dongle (dongle) and/or the Soft-eLicenser; the OEM software can be
used only following registration.
Internet access is required for the activation process. The terms and conditions for use of
the software by you, the end user appear below. By installing the software on your
computer you agree to these terms and conditions. Please read the following text
carefully in its entirety. If you do not approve these terms and conditions, you must not
install this software. In this event give the product back to where you have purchased it
(including all written material, the complete undamaged packing as well as the enclosed
hardware) immediately but at the latest within 30 days in return for a refund of the
purchase price.
1. Software Ownership
Arturia shall retain full and complete title to the SOFTWARE recorded on the enclosed
disks and all subsequent copies of the SOFTWARE, regardless of the media or form on or
in which the original disks or copies may exist. The License is not a sale of the original
SOFTWARE.
2. Grant of License
• Arturia grants you a non-exclusive license for the use of the software according to
the terms and conditions of this Agreement. You may not lease, loan or sublicense the
software.
• If the software is protected by the eLicenser dongle alone, you may install a
license for the software on one or at most 3 computers which are in your possession. The
software may be used only on one of the computers at the same time by using the
Arturia key.
• If the software is protected by the Soft eLicenser (alone or together with the
Arturia key) or has been sold to the first end user together with other software and/or
hardware (hereinafter: “OEM software”), you may install and use a license for the
software only on one computer which is in your possession. Purchasing a eLicenser
dongle makes it easily possible to use the software on three computers if needs occur.
• The use of the software within a network is illegal where there is the possibility of
a contemporaneous multiple use of the program.
• You are entitled to prepare a backup copy of the software which will not be used
for purposes other than storage purposes.
• You shall have no further right or interest to use the software other than the
limited rights as specified in this Agreement. Arturia reserves all rights not expressly
granted.
88
ARTURIA – BRASS 2 – USER’S MANUAL
Page 89

3. Activation of the Software
• Arturia may use a compulsory activation of the software and a compulsory
registration of the OEM software for license control to protect the software against
unlawful copying. If you do not accept the terms and conditions of this Agreement, the
software will not work.
• In such a case the product including the software may only be returned within 30
days following acquisition of the product. Upon return a claim according to § 11 shall not
apply.
4. Support, Upgrades and Updates after Product Registration
• You can only receive support, upgrades and updates following the personal
product registration. Support is provided only for the current version and for the previous
version during one year after publication of the new version. Arturia can modify and
partly or completely adjust the nature of the support (hotline, forum on the website etc.),
upgrades and updates at any time.
• The product registration is possible during the activation process or at any time
later through the Internet. In such a process you are asked to agree to the storage and
use of your personal data (name, address, contact, email-address, and license data) for
the purposes specified above. Arturia may also forward these data to engaged third
parties, in particular distributors, for support purposes and for the verification of the
upgrade or update right.
5. License module (eLicenser Key and/or Soft eLicenser)
• Arturia uses a hardware device connected through the USB connection of a
computer, the “eLicenser dongle” and/or a protection scheme, the “Soft eLicenser” for
license control (hardware and/or virtual dongle). The eLicenser dongle and/or Soft
eLicenser permanently saves the license information and regulates access to the
software. If a eLicenser dongle is required for the use of the software, then the eLicenser
dongle must be connected physically to the computer through the USB interface.
• For the activation of the software, updates or upgrades of the software the
computer which is connected to the Arturia key and/or using the Soft eLicenser or using
the OEM software must be connected to the server of SIA eLicenser through the Internet.
If the product was delivered with the eLicenser dongle, the license information was
already transferred to the eLicenser dongle. If the product was delivered with a product
card (without the eLicenser dongle), the activation codes of the enclosed product card
must be entered manually by the user upon installation and the license information must
be exchanged with the server of SIA eLicenser.
• In the event of OEM software, the activation codes will be send to an emailaddress submitted by you during a registration and must be entered manually by the
user upon installation and the license information must be exchanged with the server of
SIA eLicenser.
• The reinstallation of the software - on the same or another computer - is
permitted only in case the already installed software cannot be used any more (e.g.
following deinstallation). If the software does not use an eLicenser dongle, the new
activation codes may be obtained from the user’s online account for support created
during the personal product registration. Further, the activation codes must be entered
manually by the user upon installation and the license information must be exchanged
with the server of SIA Steinberg. Arturia may require for the provision of further
activation codes e.g. your proof of purchase (invoice, receipt) and a signed assurance by
fax or letter stating your name, address and that the already installed software cannot be
ARTURIA – BRASS 2 – USER’S MANUAL
89
Page 90

used any more.
• You can also use another computer other than the one on which the software is to
be installed for the activation and transfer of license data to the eLicenser dongle, if the
software is using an eLicenser dongle. However, in such a case a corresponding access
software (eLicenser Control Center, “eLC”) must be installed on the computer connected
to the Internet, which is subject to a separate licensing agreement.
6. Defect and loss of the eLicenser dongle
• In the case of a defect or damage to the eLicenser dongle Arturia or a third party
engaged by Arturia will check the eLicenser dongle. In the case of a legitimate claim the
eLicenser dongle and the licenses included shall be replaced in return for a handling fee.
The licenses will only be replaced provided that they are licenses issued by Arturia.
Further claims against Arturia are excluded.
• Arturia assumes no liability or obligation if the eLicenser dongle is mislaid as a
result of loss, theft or otherwise. Arturia reserves the right to block the licenses saved on
the eLicenser dongle upon being notified by the registered user of the loss. The licenses
saved on the eLicenser dongle cannot be replaced.
7. No Unbundling
• The software usually contains a variety of different files which in its configuration
ensure the complete functionality of the software. The software may be used as one
product only. It is not required that you use or install all components of the software. You
must not arrange components of the software in a new way and develop a modified
version of the software or a new product as a result. The configuration of the software
may not be modified for the purpose of distribution, assignment or resale.
• You may also not sell the eLicenser dongle separately as a license; the usage
rights always remain with the software, in particular with the original software data
carrier (e.g. CD).
8. Assignment of Rights
• You may assign all your rights to use the software to another person subject to
the conditions that (a) you assign to this other person (i) this Agreement and (ii) the
software or hardware provided with the software, packed or preinstalled thereon,
including all copies, upgrades, updates, backup copies and previous versions, which
granted a right to an update or upgrade on this software, (b) you do not retain upgrades,
updates, backup copies und previous versions of this software and (c) the recipient
accepts the terms and conditions of this Agreement as well as other regulations pursuant
to which you acquired a valid software license.
• A return of the product due to a failure to accept the terms and conditions of this
Agreement, e.g. the product activation, shall not be possible following the assignment of
rights.
9. Upgrades and Updates
• You must have a valid license for the previous or more inferior version of the
software in order to be allowed to use an upgrade or update for the software. Upon
transferring this previous or more inferior version of the software to third parties the
right to use the upgrade or update of the software shall expire.
• The acquisition of an upgrade or update does not in itself confer any right to use
the software.
90
ARTURIA – BRASS 2 – USER’S MANUAL
Page 91

• The right of support for the previous or inferior version of the software expires
upon the installation of an upgrade or update.
10. Limited Warranty
Arturia warrants that the disks on which the software is furnished to be free from defects
in materials and workmanship under normal use for a period of thirty (30) days from the
date of purchase. Your receipt shall be evidence of the date of purchase. Any implied
warranties on the software are limited to thirty (30) days from the date of purchase.
Some states do not allow limitations on duration of an implied warranty, so the above
limitation may not apply to you. All programs and accompanying materials are provided
“as is” without warranty of any kind. The complete risk as to the quality and performance
of the programs is with you. Should the program prove defective, you assume the entire
cost of all necessary servicing, repair or correction.
11. Remedies
Arturia's entire liability and your exclusive remedy shall be at Arturia's option either (a)
return of the purchase price or (b) replacement of the disk that does not meet the
Limited Warranty and which is returned to Arturia with a copy of your receipt. This
limited Warranty is void if failure of the software has resulted from accident, abuse,
modification, or misapplication. Any replacement software will be warranted for the
remainder of the original warranty period or thirty (30) days, whichever is longer.
12. No other Warranties
The above warranties are in lieu of all other warranties, expressed or implied, including
but not limited to, the implied warranties of merchantability and fitness for a particular
purpose. No oral or written information or advice given by Arturia, its dealers,
distributors, agents or employees shall create a warranty or in any way increase the
scope of this limited warranty.
13. No Liability for Consequential Damages
Neither Arturia nor anyone else involved in the creation, production, or delivery of this
product shall be liable for any direct, indirect, consequential, or incidental damages
arising out of the use of, or inability to use this product (including without limitation,
damages for loss of business profits, business interruption, loss of business information
and the like) even if Arturia was previously advised of the possibility of such damages.
Some states do not allow limitations on the length of an implied warranty or the
exclusion or limitation of incidental or consequential damages, so the above limitation or
exclusions may not apply to you. This warranty gives you specific legal rights, and you
may also have other rights which vary from state to state.
ARTURIA – BRASS 2 – USER’S MANUAL
91
 Loading...