


RATINGS LIMITS
Set rating limits for Movies, TV and Other (unrated) shows. From
the left menu, select Rating Limits then select either Movies, TV
or Other.
Movies
Select the button next to the overall ratings limit you wish
to impose. Brief descriptions of the ratings appear for your
guidance.
TV Programs
Highlight and select the TV ratings limit you desire. In addition
to allowing or blocking shows by TV rating (i.e. TV-MA), you
can also set ratings limits for particular types of content such
as Fantasy Violence (FV), Dialogue (D), Language (L), Sexual
Content (S) and Violence (V). A description of each content type
displays when highlighted.
Other Shows
Highlight and select the box to toggle the setting between Allow
No Rating and Block No Rating. If you choose Block No Rating,
programming that has no rating, such as news and sports, will
not display.
PARENTAL CONTROLS
CHAPTER 6 - SETTINGS & HELP
9191
PARENTAL CONTROLS
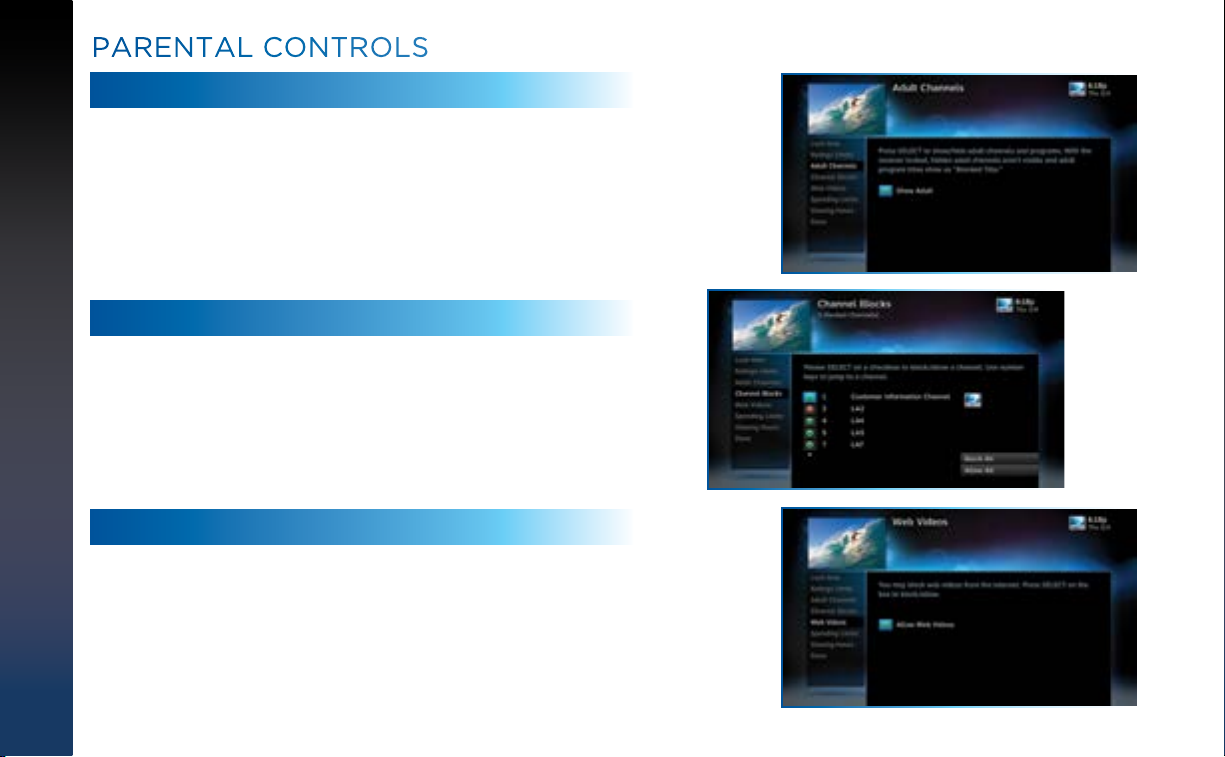
ADULT CHANNELS
Hide adult channels in the Program Guide, Manage Recordings
screens, and when channel surfing. Select Adult Channels, then
highlight and select the box to toggle between Hide Adult and
Show Adult. This action also hides the Adults Only icon in the
Search & Browse screen.
CHANNEL BLOCKS
Prevent children from viewing pre-selected channels with the
Channel Blocks feature. Scroll down the channel list and select
those you wish to block. You can also key in channel numbers or
use Block All or Allow All to save time.
WEB VIDEOS
Prevent children from viewing videos from the Internet. Select
Web Videos, then highlight and select the box to toggle between
Block Web Videos and Allow Web Videos.
DIRECTV HD DVR RECEIVER USER GUIDE
92

SPENDING LIMITS
Limit the amount that can be spent on each Pay Per View
purchase. Select Spending Limits. Then enter your preferred
spending dollar limit using the numbers on your Remote.
VIEWING HOURS
Specify days and times when TV watching is allowed in your
household. Select Viewing Hours, then select the start times and
durations for viewing. You can set hours based on “school nights”
— Monday-Thursday – and/or weekend nights—Friday-Saturday,
and Sunday.
PARENTAL CONTROLS
CHAPTER 6 - SETTINGS & HELP
9393
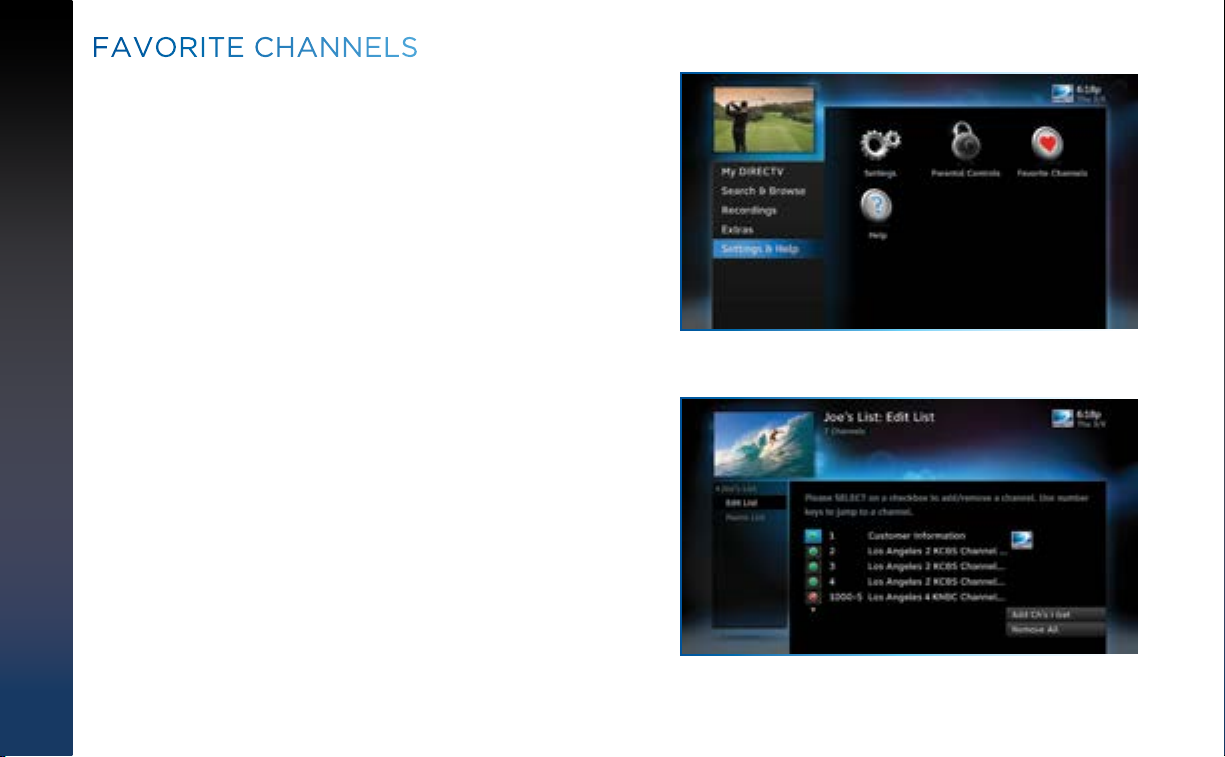
FAVORITE CHANNELS
Create lists of your favorite channels. Use your list to see only
those specific channels listed in the Guide as well as when you’re
channel surfing in live TV. You can create up to two custom lists
on your Receiver. You can also choose Channels I Get to see only
the channels that are in your DIRECTV programming package.
Press MENU on your remote, select Settings and Help then
Favorite Channels. If you haven’t created a Favorites list, the
Setup Custom 1 and Setup Custom 2 options will be displayed.
Select the one you want and follow the onscreen instructions to
create and name your list.
Selecting a Favorites list makes it active and hides the display of
all other channels in the Guide. From the Guide, press the DASH
key on your Remote, select Favorites and then select the list you
want to make active. The name of the currently selected Favorites
list is displayed in the bottom left of the Guide screen so you
always know which list you are using. To restore the display of all
channels, press the DASH key while in the Guide, select Change
favorites list, then select All Channels.
DIRECTV HD DVR RECEIVER USER GUIDE
94

HELP provides information about your Receiver and its
functionality, features, and more, as well as step-by-step
instructions and frequently asked questions (FAQs). Press MENU,
select Settings & Help, then select Help.
Select a category folder to view its contents, then select a topic
from the list for detailed information.
You can also view self-help videos on Channel 1 and find
answers to all your questions on DIRECTV’s Online Answer
Center at www.support.directv.com.
HELP
CHAPTER 6 - SETTINGS & HELP
9595

DIRECTV HD DVR RECEIVER USER GUIDE
96

CHAPTER 7 - GENIE™ HD DVR
Genie™ HD DVR ............................................................................ 98
Genie HD DVR - Key Features ................................................. 98
Genie Mini - Key Features ....................................................... 99
Share Programs Between Rooms ......................................... 100
Genie as a Media Server ........................................................ 101
Connecting Clients ................................................................. 102
DIRECTV GENIE Mini Back Panel Example ................................103
CHAPTER 7 - GENIE™ HD DVR
97
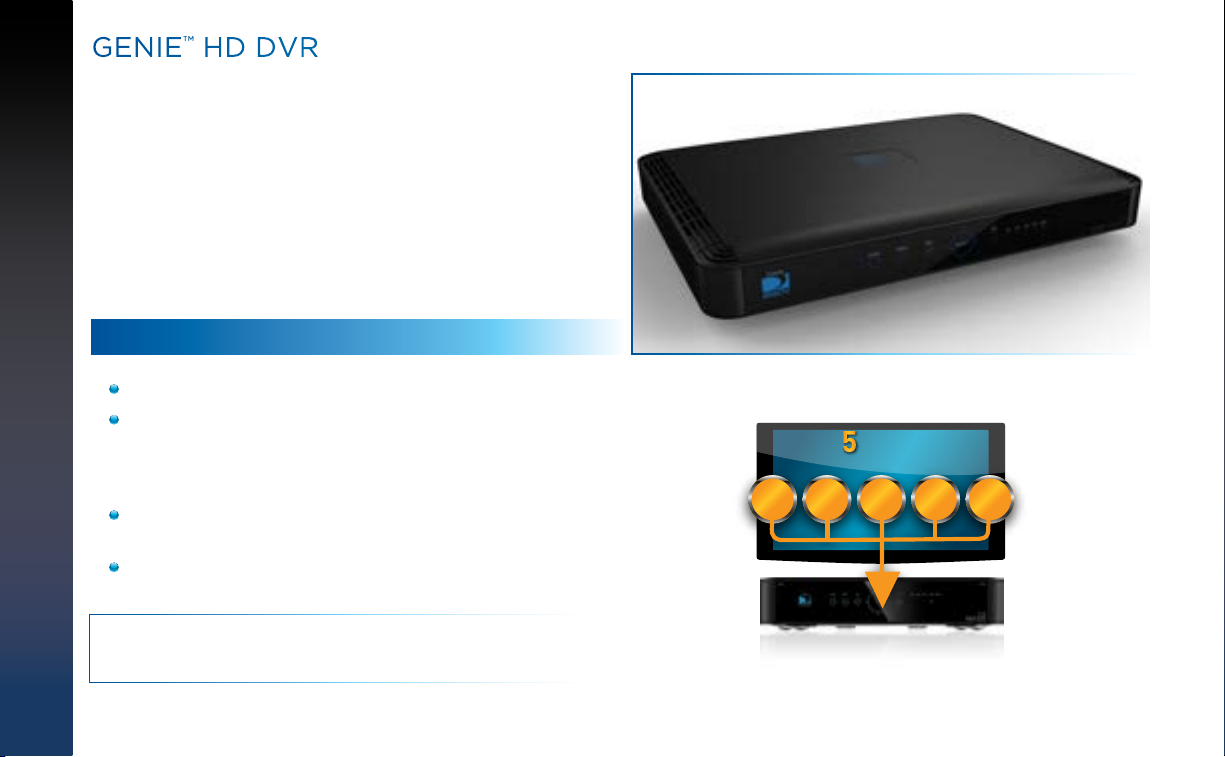
GENIE™ HD DVR
R
R
R
R
R
Record dierent shows
at once with one DVR.
Genie HD DVR
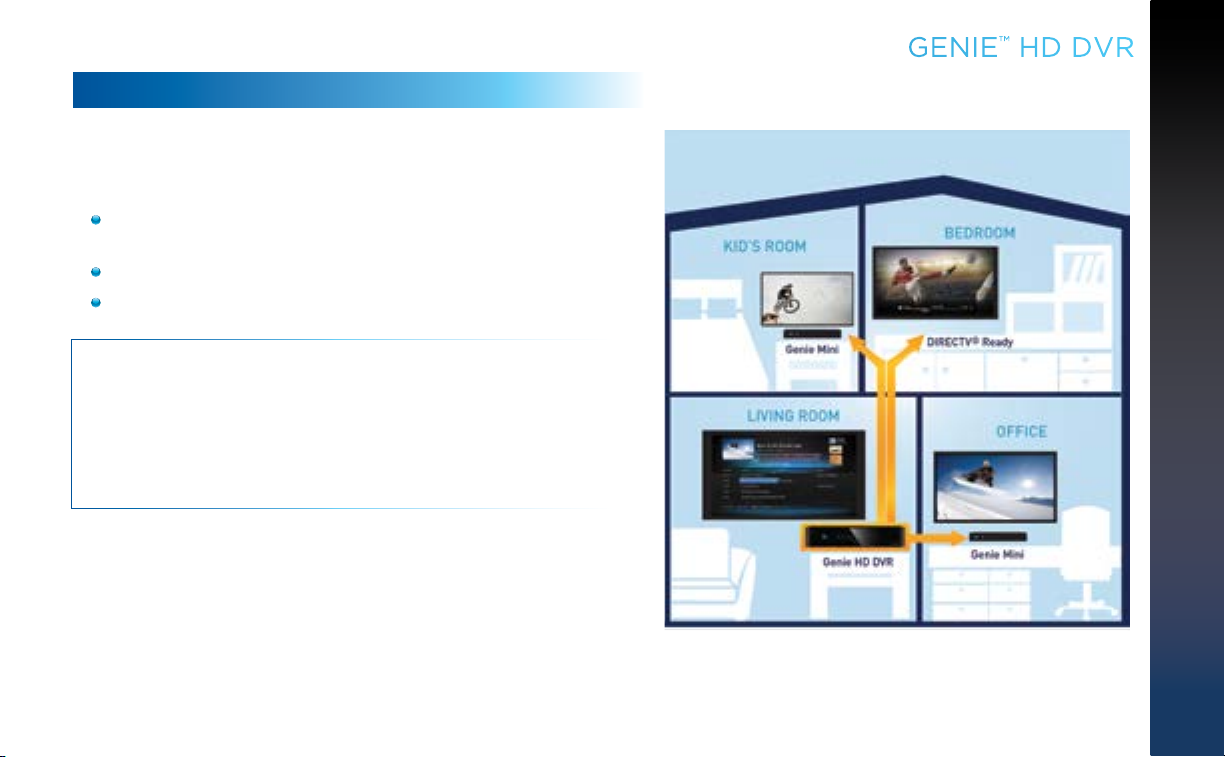
The DIRECTV Genie HD DVR is the most advanced DVR
experience available and provides HD DVR service in every
room without the need for additional receivers. A single Genie
(models HR34, HR44, HR54, and above), together with Genie
Minis (C51, C61, C61K, C61W, C41, C41W, C51,C61, C61K, and
earlier models) or DIRECTV Ready TVs, can serve your entire
home, allowing for more personalized viewing.
This chapter provides information on the many features and
benefits of DIRECTV Genie HD DVR and its companion Genie
Minis.
GENIE HD DVR - KEY FEATURES
Record up to five programs simultaneously.
Store up to 200 hours of HD programming and 800 hours
of SD total on the 1TB (terabyte) hard drive. (Actual
recording capacity varies based on type of programming
being recorded.)
Watch two shows at the same time with Picture In
Picture.*
View live or recorded programming in up to four different
rooms simultaneously (Genie Minis required).
NOTE: *Picture in Picture is only available on the TV connected
directly to the Genie HD DVR.
DIRECTV HD DVR RECEIVER USER GUIDE
98
Genie HD DVR
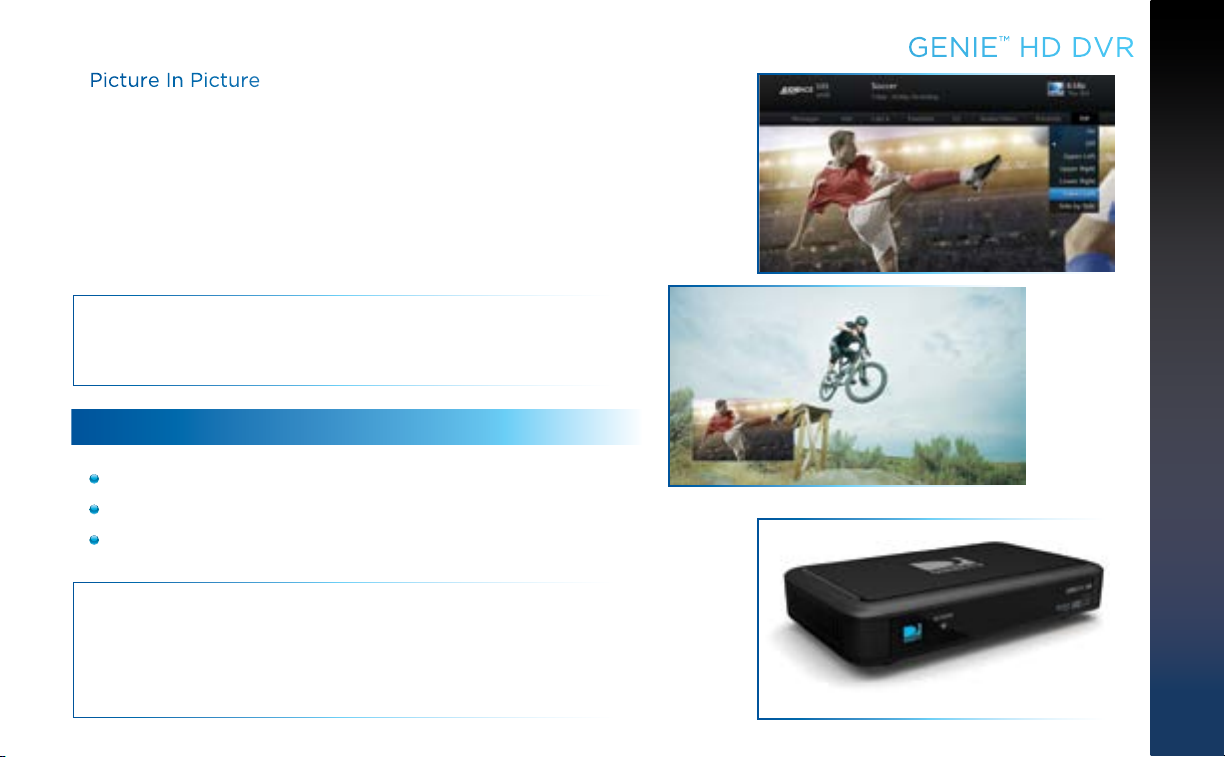
Picture In Picture
Genie lets you watch two programs on the same TV, live or recorded,
at the same time. While watching one program, press the INFO
button on your remote. Select PIP. The program you’re currently
watching moves into a smaller window on your screen. The larger
video is the active program and can be controlled by your remote. To
switch between programs, press the DOWN ARROW.
To change the position of the smaller window, press INFO on your
remote. Select PIP and choose a position from the options provided.
NOTE: Picture in Picture is only available on the TV that is
connected directly to the Genie HD DVR (models HR34, HR44 and
above).
GENIE MINI - KEY FEATURES
Watch and manage recorded programming from any room.*
Pause and rewind live or recorded T V from any room.**
Access On Demand content, TV Apps and other HD DVR
features from any room.
NOTE: *Including 4K On Demand programs when you have an HR44
or later receiver, a compatible 4K TV, and a 4K Genie Mini.
**Including 4K Live TV when you have an HR54 or later receiver,
a compatible 4K TV, and a 4K Genie Mini. See directv.com/4k for
details.
GENIE™ HD DVR
CHAPTER 7 - GENIE™ HD DVR
Genie Mini Client
99

GENIE™ HD DVR
SHARE PROGRAMS BETWEEN ROOMS
The Genie HD DVR can be configured two ways to share content
across your home:
1. As part of a Whole-Home DVR network - Genie enhances
your current Whole-Home setup. When connected to
other HD Receivers as the hub of your Whole-Home DVR
experience, Genie allows you to stream recordings to four
active rooms simultaneously (up to three Whole-Home
Clients).*
2. In a Client-Server setup - with Genie Minis, DIRECTV® Ready
TVs or other RVU-capable devices in your home. RVU is a
technology that allows you to connect certain TVs, devices,
and DIRECTV Clients to your Genie HD DVR, without adding
a full-featured DIRECTV Receiver. Please see next page for
details.
NOTE: *The Genie Receiver will work with any other DIRECTV
HD DVRs, HD Receivers and Clients that are compatible with
Genie and Whole-Home service, so you can play, pause, rewind
and delete recorded content that’s on your Genie HD DVR from
any room in the house. However, you will not be able to record
content to the Genie from another HD DVR.
DIRECTV HD DVR RECEIVER USER GUIDE
100
GENIE AS A MEDIA SERVER
You can use your Genie HD DVR as a media server. Any DIRECTV
Genie Mini, or DIRECTV® Ready TV or RVU-enabled device lets
you watch TV via your Whole-Home DVR Network.
Start watching a show in one room, press EXIT on your
remote, then resume watching in another.
Pause or rewind live programming in any connected room.
Schedule, watch or prioritize recordings from any room.
GENIE™ HD DVR
NOTE: Your Genie HD Receiver includes five (5) tuners. A tuner
is used whenever you watch or record a program. For example,
if two rooms are watching live TV, three tuners are available for
recording. Watching a recorded program does not require
a tuner.
Limit of three remote viewings per Genie HD DVR at a time.
See your DIRECTV Ready TV’s User Guide for more information
on connecting to the Genie HD DVR. You will need to activate the
DIRECTV Ready TV by calling DIRECTV at 1.800.531.5000.
CHAPTER 7 - GENIE™ HD DVR
101

DIRECTV HD DVR RECEIVER USER GUIDE
102
GENIE™ HD DVR
CONNECTING CLIENTS
You may register up to eight Clients per Genie HD DVR; these may be Genie
Minis (C41, C31, C41W and above), or DIRECTV® Ready TVs.
Before connecting and activating Clients, your Genie HD DVR must be set
up, activated, and functioning.
To begin, connect, plug in and turn on the Client. Once it detects the Genie
HD DVR, it will prompt you to enter a PIN. On your DIRECTV HD DVR, press
MENU, then select Settings & Help, then Settings. Select Whole-Home
from the left menu, then select Manage Clients. Note the PIN shown on the
Manage Clients screen, and do not exit the screen!
On the Client, enter the PIN you received from the Genie HD DVR using the
remote. Select Done on the confirmation screen. The Create a Location
screen displays. You may add a new location, or replace a location. Select
the appropriate option and follow the onscreen instructions.
Once the location has been set up, you have a choice of copying settings
from another location or accepting the DIRECTV defaults.
The following settings are copied from a server or Client to another Client:
Parental Control Settings
Favorite Channels
Display Settings
Clock
Language
Sound Effects
NOTE: The settings from any Client can also be copied to the Genie HD DVR.
NOTE: For more information on setting up, adding and moving Genie Minis
and other DIRECTV
Answer Center at http://support.directv.com/ or call 1.800.531.5000.
®
Ready Clients, do a search on the DIRECTV online
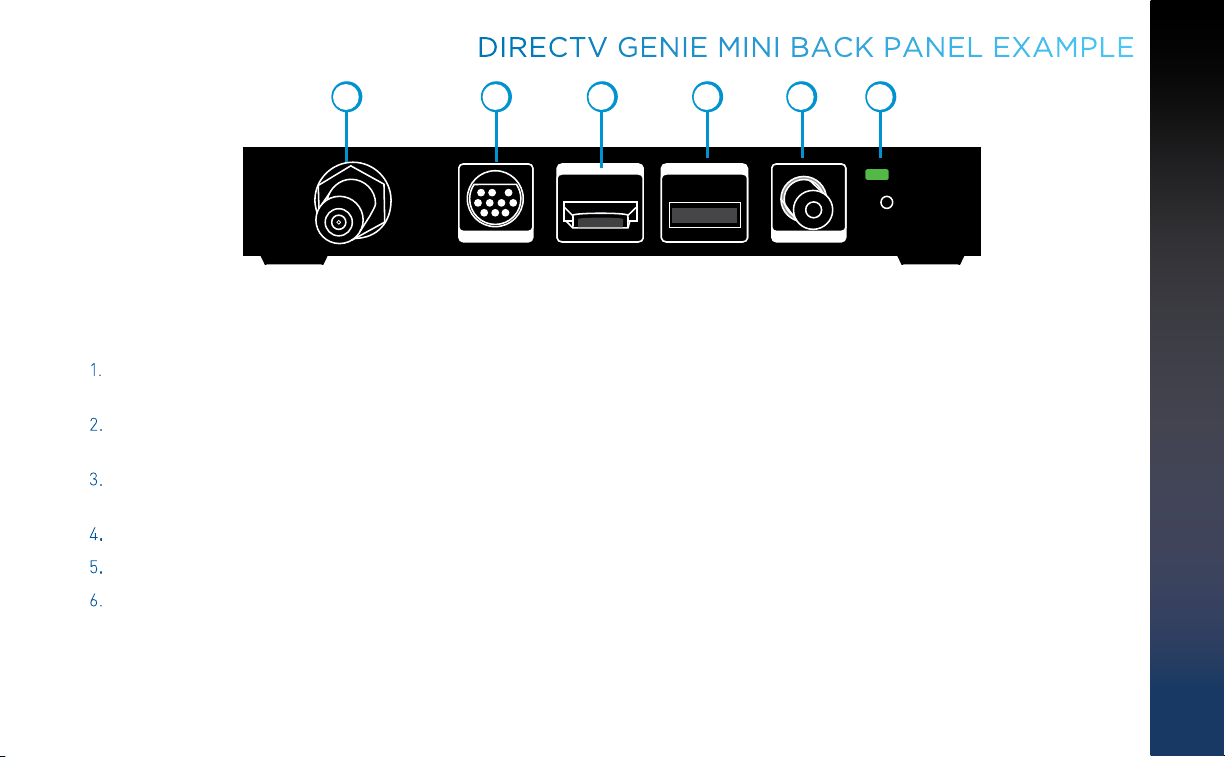
DIRECTV GENIE MINI BACK PANEL EXAMPLE
1
NETWORK
SWim ONLY
2 3 5 64
A/V OUT
USBHDMI
POWER INDIGITAL AUDIO
DIRECTV Genie™ Mini (C41, C31, C41W and above)
Your equipment may not look exactly like the model illustrated. This image has enlarged features for the purpose of clarity.
1. NETWORK SWM ONLY (models C41 and C31 only) – Connect a cable from a Single Wire Multi-Switch (SWM) to this port. This
is your SAT-IN connection.
2. A/ V OUT – A combined 10-pin output that supports both audio and video. Your Genie Mini client comes with an A/V Out cable
for Component Video and RCA audio. An A/V Out cable for Composite Video and RCA audio can be purchased separately.
3. HDMI – Use this combination digital video and audio connector for the best picture quality. This is the recommended
connector for HD TV.
4. USB – USB 2.0 Port (For future use.)
5. DIGITAL AUDIO OUT COAXIAL – Use this digital audio connection for sound.
6. POWER – Your Receiver must be plugged in at all times to function properly.
WARNING: Use only the power supply (power cord) that came with your DIRECTV Receiver or Client. Failure to use the authorized
power supply may cause electric shock, fire, bodily injury and/or property damage. If the power supply becomes damaged or needs
to be replaced, please contact DIRECTV Customer Service to obtain an authorized replacement.
CHAPTER 7 - GENIE™ HD DVR
103

DIRECTV HD DVR RECEIVER USER GUIDE
104
CHAPTER 8 - TROUBLESHOOTING & FAQS
Troubleshooting Tips ................................................................ 106
Reset Your Receiver .............................................................. 106
Reauthorize Your Receiver ................................................... 106
System Software Updates .................................................... 107
Onscreen Messages ............................................................. 107
Run the System Test ............................................................. 108
Frequently Asked Questions .....................................................109
CHAPTER 8 - TROUBLESHOOTING & FAQS
105

TROUBLESHOOTING TIPS
RESET YOUR RECEIVER
A simple reset of the DIRECTV® HD DVR can solve many issues.
If you experience frozen audio or video, or a blank screen, or
the Receiver won’t respond to remote or front panel button
commands, try resetting your Receiver as follows:
Press the red RESET button behind the access card panel
door on the front of the your Receiver, then wait a few
minutes for Program Guide information to be acquired.
If you reset a Genie Mini and the problem persists, try
resetting the Receiver.
If the problems persist, try unplugging the power cord of the
Receiver for 15 seconds, then plug it in again.
REAUTHORIZE YOUR RECEIVER
If your Receiver displayed the message “722 - Service Expired,”
try reauthorizing your Receiver. On a computer, go to
directv.com/reauthorize, log in to your account, and follow the
onscreen instructions. You will need to be logged into your
account on directv.com to complete this process.
Running the System Test (at the end of this section) can also
help you diagnose and solve many common problems.
SELECT
ACTIVE INFO RES
Reset Button
(Your equipment may not look exactly like the model illustrated.)
480i 480p 720p 1080i
RESET
DIRECTV HD DVR RECEIVER USER GUIDE
106
NOTE: Resetting your Receiver twice in a row will clear all
Guide data. It could take 48+ hours to reacquire all of it.

SYSTEM SOFTWARE UPDATES
DIRECTV sends system automatic software updates to your
Receiver to improve performance and upgrade features and
functions. The Receiver will give you the option to download
software “now” or “later.” Software downloads take just a few
minutes and should be allowed to proceed when possible. When
a download is in progress, your system will temporarily become
unavailable. After the download, the Receiver may reset itself,
after which, you can resume using your DIRECTV system.
ONSCREEN MESSAGES
On occassion, you may see an onscreen message similar to that
pictured at right. The top line of text provides a brief description of
the message purpose, while the second line provides instructions.
Most onscreen messages contain an error code in parentheses.
Go to directv.com/troubleshooting and select the corresponding
onscreen error message for solutions.
The sample message at the right displays when you try to view
to view a channel that is not in your programming package. In
this case, you must, call Customer Service at 1.800.531.5000 and
mention the error code number when prompted.
TROUBLESHOOTING TIPS
CHAPTER 8 - TROUBLESHOOTING & FAQS
107

TROUBLESHOOTING TIPS
RUN THE SYSTEM TEST
The System Test runs a basic diagnostics check on your DVR.
First make sure that:
1. All connections — jacks, cables, etc. — are in place correctly. See Appendix 2, “Connections for TV and Equipment” for
more information.
2. Remote control has working batteries.
®
3. The access card is inserted in the DIRECTV
Then follow these steps:
1. Turn on your TV and the DVR (if you have the Universal Remote, slide the MODE switch to DIRECTV position).
2. Press MENU, then select Settings & Help.
3. Select Settings then Info & Test.
4. Select Run System Test.
5. If your system does not pass the System Test, check any of these potential trouble areas: cabling, satellite dish position,
phone connection and access card.
6. If you continue to have problems, call DIRECTV Customer Service at 1.800.531.5000.
NOTE: Occasional fluctuations in the phone line or satellite signal can give temporary false readings, therefore we recommend
running a system test several times before concluding there is a problem.
Receiver.
DIRECTV HD DVR RECEIVER USER GUIDE
108

FREQUENTLY ASKED QUESTIONS
Q: What to do about temporary loss of satellite signal, “frozen” picture, or picture breaking into blocks /
pixels?
The image on your screen is frozen, blocky, or you see a message that says, “Searching for Satellite Signal (x 771)”.
Possible Causes:
Severe weather (rain, snow, hail etc.) may cause this issue.
There may be an obstruction to your dish (debris, snow, ice, etc.) or a building or tree that blocks your line of sight to the satellite.
There may be a problem with the cables running from your satellite dish to your DIRECTV® Receiver.
If the picture is frozen, blocky, or pixelated, there may be a problem with the transmission from the source.
Solution:
Weather issues are usually temporary. Wait for the weather to clear and
your signal should return to normal.
If there are no weather problems in your area, reset your DIRECTV DVR
using the red RESET button behind the door on the front of the Receiver or
by unplugging the Receiver for 15 seconds and then plugging it back in.
Check all the connections on the back of your Receiver, starting with the
SAT-IN connection, and make sure they’re secure.
If the problem originates from the program source (for example, you see
the problem on one channel, but not on any others), wait for the channel to
resolve the issue.
If there are obstructions blocking the dish’s path to the satellite, you should
contact a professional to remove them, or a DIRECTV installer at 1.800.531.5000 to relocate your dish.
If your signal strength is lower than 70 (60 or lower on HD Receivers) in good weather, contact a professional installer to
realign your dish, or call DIRECT V at 1.800.531.5000.
Check Satellite (SAT-IN) Connections
Coaxial Satellite Cable
CHAPTER 8 - TROUBLESHOOTING & FAQS
109
DIRECTV HD DVR RECEIVER USER GUIDE
110
FREQUENTLY ASKED QUESTIONS
Q: Why is my screen blue, black, gray or snowy?
Your TV displays a blue, black, gray or snowy screen.
Possible Causes:
Your TV and/or your Receiver are not powered on.
The DIRECTV® Receiver and most TVs and VCRs let you toggle between different video sources. Your TV may be on a different
input source than what you are trying to view.
Your TV may not support the selected HD resolution from your Receiver.
Solution:
Check that the DIRECT V® Receiver and TV are both powered on.
If you don’t see the DIRECTV picture, verify your current TV input by turning the T V on and off. Most T Vs display the input in the
upper right- or left-hand corner. If the input is set to something other than your DIRECTV Receiver, toggle through the inputs
with the input button on the DIRECT V Remote (if programmed) or TV Remote a your picture displays. (If the DIRECTV Remote is
not working for the T V, it may need to be programmed.)
If the TV Remote is not available:
1. Find the Input or Source button on your TV and press it. It may be on the front panel, sides, bottom, or top edges of your T V.
2. Slowly set the TV to each input option, one at a time. Sometimes it takes a second or two for the input to switch, so don’t
proceed too quickly.
3. Set the TV to whichever input displays a picture.
If you see a snowy screen and are using a coax connection to connect to the TV, make sure your TV is on channel 3 or 4.
Press the TV/VCR button on the VCR Remote or on the VCR’s front panel.
If problems persist, turn off all equipment connected to your TV, wait a few minutes, then turn the DIRECT V® Receiver back on.
Check your connections and cables.
FREQUENTLY ASKED QUESTIONS
ACTIVE INFO RES
480i 480p 720p 1080i
RESET
Check the HD output resolutions and deselect those not supported by your TV. For 1080p programs, some TVs do not
support the 24 frame-per-second rate DIRECTV provides. Press the RES button on your Receiver’s front panel to change the
resolution to one your TV supports.
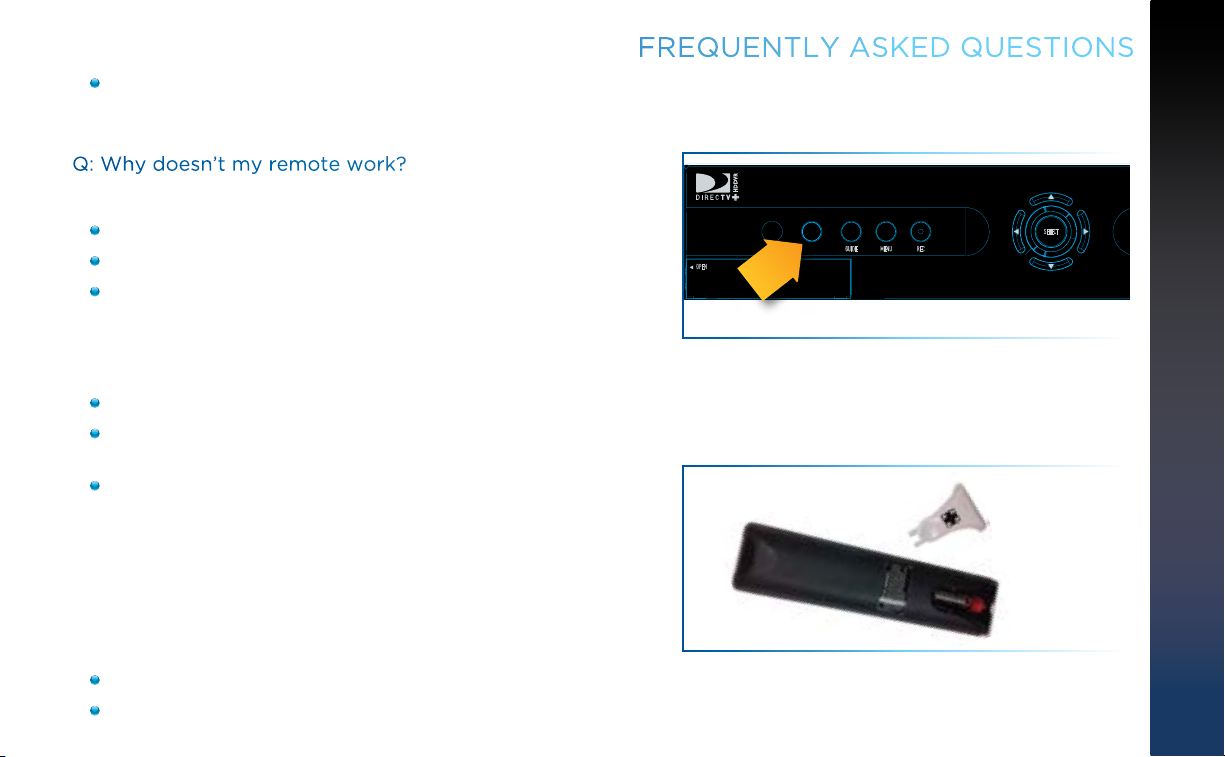
Q: Why doesn’t my remote work?
Possible Causes:
Weak batteries are the most common problem.
Trying to operate equipment other than your DIRECTV Receiver.
OPEN
POWER
GUIDE MENU REC
Remote sensor on the Receiver could be blocked.
Solution:
Remote Sensor
For the DIRECTV Universal Remote Control (RC65 and earlier models):
Check that nothing is between the Remote Control and the remote sensor.
Make sure the Remote is in DIRECTV mode. Slide the MODE switch on the Remote to the DIRECTV position so the Remote will
control the DIRECTV® Receiver.
If you are trying to operate a device other than the DIRECTV DVR
that you have programmed the Remote to control, make sure you
first slide the MODE switch to the mode that is programmed for that
device (AV1 or AV2). The indicator light for the component you’re
trying to control should light up when you press a valid key for that
component. If it doesn’t, make sure the MODE switch is in the correct
position.
For All Remote Controls:
Check the batteries in the Remote. They may be weak, dead or installed incorrectly. Try replacing batteries.
If you’re entering a channel number that is less than four digits long, the Receiver might wait two seconds before tuning to
Remote Battery Compartment
SELECT
CHAPTER 8 - TROUBLESHOOTING & FAQS
111
DIRECTV HD DVR RECEIVER USER GUIDE
112
FREQUENTLY ASKED QUESTIONS
the channel. Press ENTER after entering a channel number to tune immediately.
Make sure the device you are trying to control has been programmed to your DIRECTV Remote Control. See Chapter 6,
“Settings & Help: Settings: Remote Control” for instructions on how to program your remote to control other devices.
If the indicator lights on the remote control start flashing, the batteries in the remote control are running low and should be
replaced soon. You may also see an onscreen message that the batteries are low. Note that when you replace the batteries,
you should not have to reprogram your remote to control other devices unless the batteries have been completely dead for a
month or more.
Q: Why won’t my DIRECTV® Receiver or Client turn on?
Your Receiver or Client won’t turn on with either the Remote or from the front panel.
Possible Causes:
Remote batteries have an insufficient charge.
Receiver / Client or power strip is not plugged in to a power source, or power cord is not plugged in to the Receiver.
Wall outlet is not providing p o w er.
Solution:
If your Receiver or Client won’t turn on, the problem may be with the device itself, or with the remote control. Please try the
following:
To Check the Receiver or Client (C31, C41, C41W and above):
Verify the detachable power cord is plugged into the back of the DIRECTV® Receiver or Client and the wall outlet.
Check the outlet or power strip to make sure it is “live” by plugging in something else.
Try plugging Receiver or Client into a different wall outlet.
Make sure the outlet is not controlled by a wall switch.
Unplug Receiver or Client for five minutes, and then plug it in again.
FREQUENTLY ASKED QUESTIONS
If your Receiver or Client is plugged into a power strip, check the power strip and reset by pressing its reset button. Make
sure the Receiver or Client is plugged into a power strip outlet that has continuous power. Some power strips have energy
saving ports that only operate when a device is plugged in and powered on.
To Check the Remote:
Press the power button on the front panel. If your device turns on, the issue is with the Remote.
For the Universal Remote, make sure the MODE switch is in the left-most position (DIRECTV Mode), and press PWR (power
key) or press POWER button on the front panel of the Receiver. On the Genie Remote, this step is not necessary. See the
next bullet for more info.
Make sure remote batteries have sufficient charge. For the Universal Remote, the green light should be solid green when
you press its PWR button. If the light blinks several times slowly, replace the batteries. If there is no light, make sure
batteries are inserted with the positive and negative ends in the proper positions. Otherwise, replace batteries. For the
Genie Remote, a low battery indicator is displayed on your Receiver when the batteries need to be replaced.
Make sure nothing is blocking the IR sensor on the Receiver. Remote must be pointed at Receiver, unless it is capable of RF
(as is the case with the Genie Remote) and has been set up as RF.
I see a message on my TV screen that says, “Please Call Customer Service x721.” What’s going on?
Possible Causes
The channel you’re trying to watch may not be included in your programming package.
Your DIRECTV® Receiver may not have the programming information for this channel.
Solutions
If the channel is part of your programming package, try resetting your Receiver by turning it off and unplugging it. Wait 15
seconds, then plug it back in and turn it on.
If the channel is not part of your programming package, you can change your package online or call 1.800.531.5000.
Finally, try reauthorizing your Receiver. On a computer, go to directv.com/reauthorize and follow the onscreen instructions. You
will need to be logged into your account on directv.com to complete this process.
CHAPTER 8 - TROUBLESHOOTING & FAQS
113

DIRECTV HD DVR RECEIVER USER GUIDE
114
FREQUENTLY ASKED QUESTIONS
Q: Why does my Progress Bar freeze while acquiring Guide data / data from satellite?
While the Acquiring Guide Data or Acquiring Data From Satellite message is on the screen, progress freezes during download.
Possible Causes:
This may be normal. After five minutes, the screensaver will display.
Press any key on the remote to see the progress bar again.
This may happen if your satellite dish isn’t adjusted properly.
Solution:
If satellite data acquisition still does not move forward, press the RESET
button behind the access panel door on the front of the DIRECT V®
Receiver and wait for Program Guide information to be acquired.
Q: Why are my video and audio out of sync?
The audio track does not match the lip movements on the screen.
Possible Causes:
Problem with how the program was produced or how it was sent to DIRECTV for broadcast.
Your surround sound system may be out of sync, or may be set up incorrectly.
Solution:
Change the channel on your DIRECTV® Receiver. This may re-sync the audio.
Rewind the program for about 5 seconds, then fast forward to live programming.
Try replacing or switching the cables between your surround sound system and your DIRECT V Receiver. Refer to your
surround sound system’s manual for assistance.
SELECT
ACTIVE INFO RES
Reset Button
480i 480p 720p 1080i
RESET

FREQUENTLY ASKED QUESTIONS
If the issue continues, reset your DIRECTV Receiver. Press the RESET button behind the access panel door on the front of the
DIRECTV Receiver. You can also press MENU, press SELECT Settings & Help, then Settings. Select the Reset item from the
left menu and follow the onscreen instructions.
Q: Why is there no audio with picture?
You can see a picture from your DIRECTV® Receiver, but there is no sound.
Possible Causes:
A setting (such as mute or volume) may have changed on the Receiver or your TV.
The cables between your TV and the Receiver may not be connected properly, or there may be a problem with an external
stereo or surround sound system.
Verify that your surround sound system is working, if applicable.
Your TV may not support the selected HD resolution from your Receiver.
Solution:
Verify that the MUTE button is not activated on your Remote.
Raise or lower the volume. Did volume meter display on TV?
Test sound on your TV by changing the input to another source, such as a DVD player, game box, or antenna.
If connected to stereo or surround sound system, verify components are on and set to the correct mode, and that audio
cables are secure and connected correctly.
If the issue continues, reset your DIRECTV® Receiver. Press the RESET button behind the access panel door on the front of
the DIRECTV® Receiver. You can also press MENU, select Settings & Help, then Settings. Select the Reset item from the left
menu and follow the onscreen instructions.
Check the HD output resolutions and deselect those not supported by your TV. For 1080p programs, some TVs do not support
the 24 frame-per-second rate DIRECT V provides. Also, many TVs do not support 480i. You may have to press the RES button
on your Receiver’s front panel to set the resolution to one your TV supports.
CHAPTER 8 - TROUBLESHOOTING & FAQS
115
FREQUENTLY ASKED QUESTIONS
Q: What to do about partial programming loss; channels missing from Guide; channel is in the Guide but I
can’t tune to it?
Your Program Guide is missing channels, or you are unable to use the Guide to tune to a channel.
Possible Causes:
The channels might be excluded from the Favorites list currently in use.
Your satellite dish may be incorrectly configured.
Your Receiver information may need to be refreshed.
Solution:
To change your Favorites List, press GUIDE on the Remote, then press the DASH [—] button and select Change Favorites List,
then All Channels.
Enter the channel number using the number pad on the remote control.
Check the dish type set in your Receiver’s preferences: Press MENU, select Settings & Help, Settings, Info & Test, then More
System Info. Check the Satellite Dish Type shown on the System Setup screen to see if it is correct. If not, select Satellite
from the left menu, then select Repeat Satellite Setup. Follow the steps. From the Satellite Dish Type screen, make sure the
proper dish type is selected.
To refresh your Receiver information, go to directv.com/reauthorize. You will need to be logged into your account on
directv.com to begin this process.
DIRECTV HD DVR RECEIVER USER GUIDE
116
FREQUENTLY ASKED QUESTIONS
Q: Why does my DIRECTV® Receiver turn off while playing?
Your Receiver turns off unexpectedly.
Possible Causes:
Excessive heat may have caused the Receiver to go into a standby state.
Electronic protection circuit may have been activated due to a power surge.
You may have blown a circuit breaker or be experiencing a power outage.
Parental viewing limits may have been activated on your DIRECTV® Receiver.
Solution:
Ensure that your Receiver has plenty of ventilation and that nothing is on top of the Receiver.
Wait 30 seconds for internal circuits to reset, then turn Receiver back on.
Consider using a line conditioner or surge protector.
Consult an electrician if the problem is frequent or severe, especially if other household appliances or electronics are affected.
If parental limits are active, turn your DIRECTV® Receiver on again and enter your parental lock code when prompted.
Q: Why does my DIRECTV DVR turn on or change channels unexpectedly?
Your Receiver changes to a different channel without a Remote command.
Possible Causes:
A scheduled recording may be about to begin, so the Receiver is changing channels to record the show as requested.
Your TV’s timer may have been activated.
CHAPTER 8 - TROUBLESHOOTING & FAQS
117
 Loading...