

Page 1

Руководство по
экспл уатации
CIS
Русский, 1
LBF 517
EN
English,15
ПОСУДОМОЕЧНАЯ МАШИНА
Содержание
Монтаж, 2-3-4
Расположение и нивелировка
Водопроводное и электрическое подсоединение
Предупреждения по первому использованию машины
Технические данные
Описание изделия, 5
Общий вид
Панель управления
Загрузка корзин, 6
Нижняя корзина
Корзинка для столовых приборов
Верхняя корзина
Включение и эксплуатация, 7
Запуск посудомоечной машины
Загрузка моющего вещества
Дополнительные функции мойки
Программы, 8
Таблица программ
Ополаскиватель и регенерирующая соль, 9
Заливка ополаскивателя
Загрузка регенерирующей соли
Техническое обслуживание и уход, 10
Отключение воды и электрического тока
Чистка посудомоечной машины
Средства против неприятных запахов
Чистка оросителей
Чистка фильтров
Длительный простой машины
Предупреждения и рекомендации, 11
Общие требования к безопасности
Утилизация
Экономия электроэнергии и охрана окружающей среды
Неисправности и методы их устранения, 12
Сервис Технического Обслуживания, 13
1
Page 2
Монтаж
CIS
Важно сохранить данное руководство для его
последующих консультации. В случае продажи, передачи
или переезда проверьте, чтобы данное техническое
руководство сопровождало изделие.
Внимательно прочитайте инструкции: в них
содержатся важные сведения об установке изделия, его
эксплуатации и безопасности.
В случае переезда перевозите машину в
вертикальном положении. В случае крайней
необходимости машина может быть положена задней
стороной вниз.
Данная машина предусмотрена для бытового или
другого аналогичного использования, а именно:
- в помещениях, предназначенных для приготовления пищи
для персонала магазинов, офисов и прочих учреждений;
- в агротуристических усадьбах;
- для использования проживающими в гостинице, мотеле и
прочих местах проживания;
- в гостиницах типа «номер плюс завтрак».
Расположение и нивелировка
1. Снимите упаковку с изделия и проверьте, чтобы на нем
не было повреждений, нанесенных при транспортировке.
При обнаружении повреждений не подсоединяйте машину,
а обратиться к продавцу.
2. Установите посудомоечную машину в нишу кухонного
гарнитура, так чтобы сбоков или сзади она прилегала к
стене или к кухонным элементам. Изделие также может
быть встроено под сплошной столешницей кухонного
гарнитура
3. Установите посудомоечную машину на ровный и
твердый пол. Выровняйте машину, отвинчивая или
завинчивай передние опорные ножки до идеально
горизонтального положения машины. Точная нивелировка
гарантирует стабильность и помогает избежать вибраций,
шумов и смещений машины.
* (см. схему Монтажа).
Не используйте б/у трубы.
Тру бы подачи воды и слива и кабель электропитания
должны располагаться слева или справа от для
оптимальной установки машины.
Подсоединение шланга подачи воды.
• Подсоединение к водопроводу холодной воды: прочно
привинтите трубу подачи воды к крану с резьбовым
отверстием 3/4 газ. Перед закруткой дайте стечь воде
до тех пор, пока она не станет прозрачной во избежание
засорения машины нечистотами.
• Подсоединение к водопроводу горячей воды: если в
вашем доме централизованная система отопления,
посудомоечная машина может быть запитана горячей
водой из водопровода, если температура воды не
превышает 60°C.
Привинтите трубу к крану, как описано выше для трубы
холодной воды.
Если длина водопроводного шланга будет
недостаточной, следует обратиться в
специализированный магазин или к уполномоченному
сантехнику (см. Техническое обслуживание).
Давление воды должно быть в пределах значений,
указанных в таблице Технические данные (см. сбоку).
Проверьте, чтобы водопроводный шланг не был
заломлен или сжат.
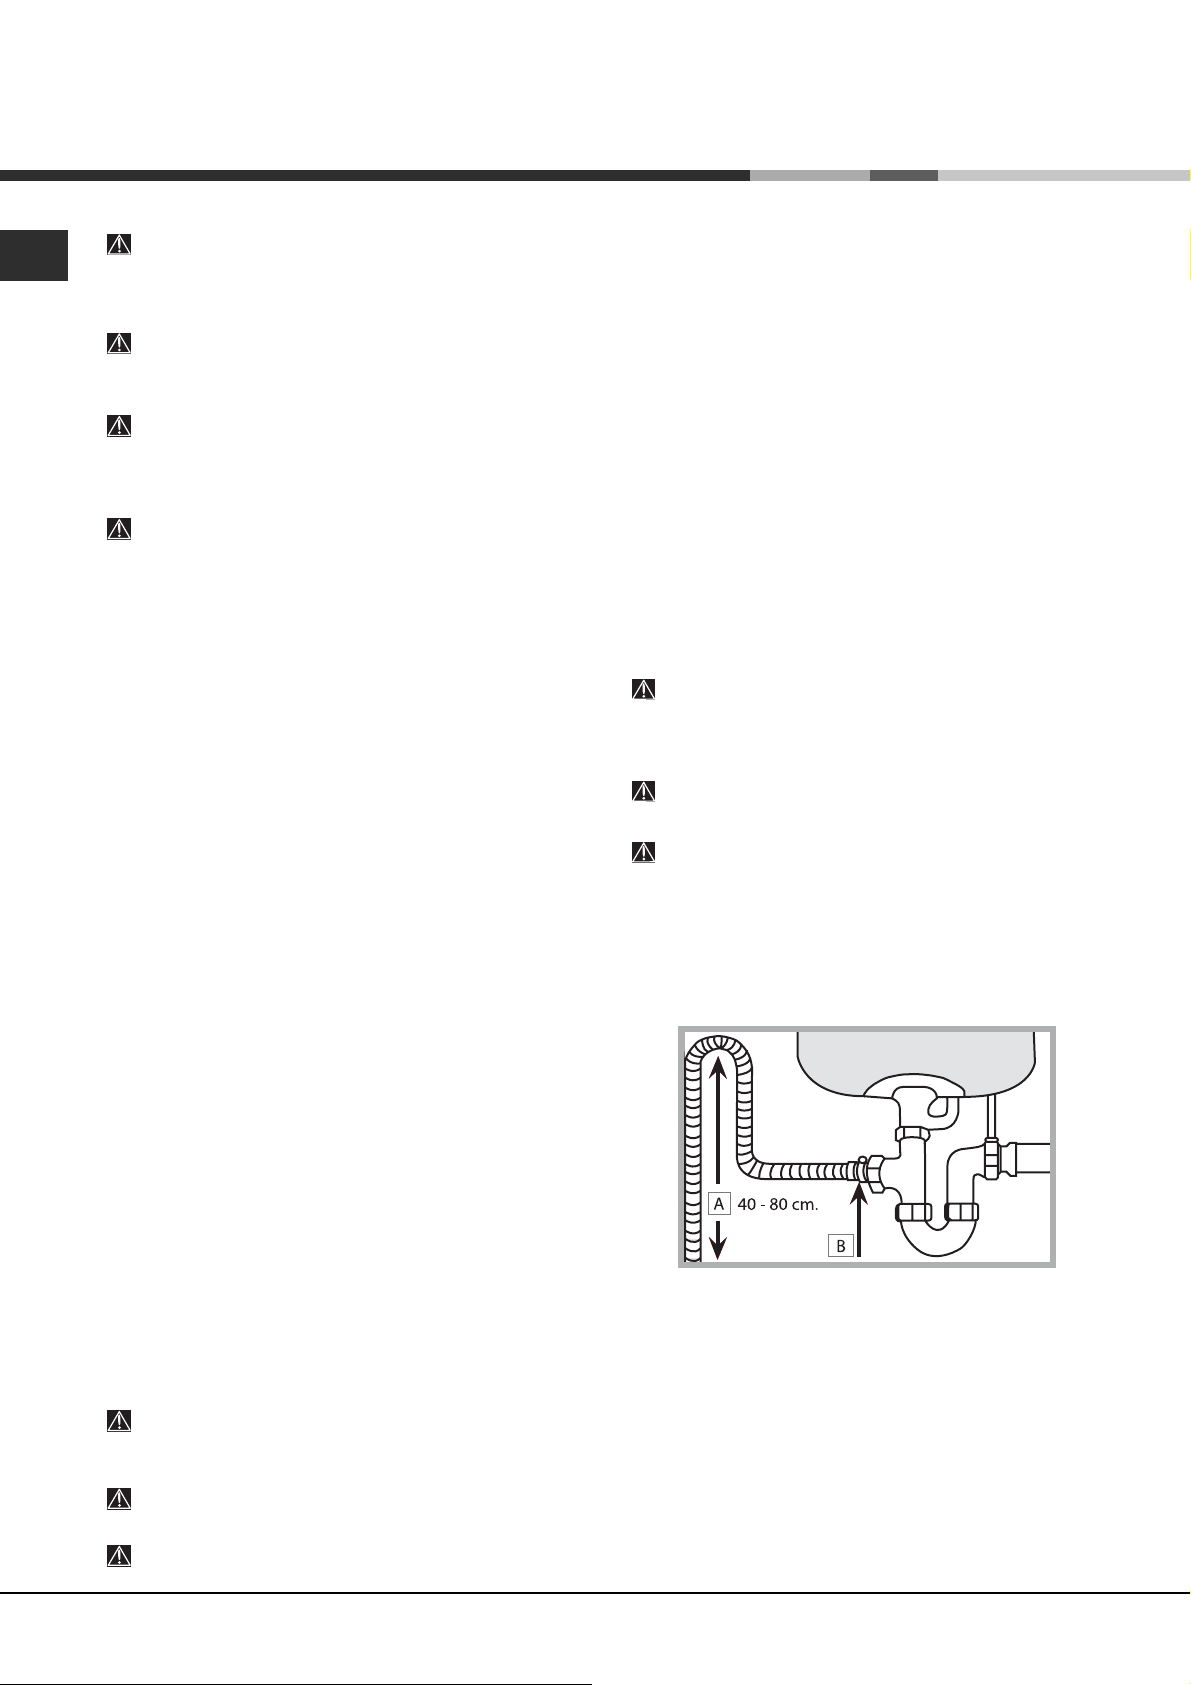
Подсоединение сливного шланга
подсоедините сливной шланг, не сгибая его, к сливному
трубопроводу с минимальным диаметром 4 см.
*. Отрегулируйте высоту задней опоры, повернув
4
шестигранную красную втулку , расположенную спереди, в
центральной нижней части посудомоечной машины,
шестигранным разводным ключом с раскрытием 8 мм по
часовой стрелке для увеличения высоты и против
часовой стрелки для ее уменьшения. (см. лист с
инструкциями по встроенному монтажу, прилагающийся к
документации на машину).
Водопроводное и электрическое
подсоединение
Электрическое и водопроводное подсоединения
машины должны выполняться только квалифицированным
техником.
Посудомоечная машина не должна давить на трубы
или на провод электропитания.
Изделие должно быть подсоединено к водопроводу
при помощи новых труб.
2
Сливной шланг должен быть расположен на высоте от 40
до 80 см от пола или от платформы посудомоечной
машины (А).
Перед подсоединением сливного шланга к сифону мойки
снимите пластиковую пробку (В).
* Имеется только в некоторых моделях
Page 3

Защита против затопления
Во избежание затопления посудомоечная машина:
- оснащена системой, перекрывающей подачу воды в
случае аномалии или внутренних утечек.
Некоторые модели оснащены дополнительным защитным
устройством New Acqua Stop
затопления даже в случае разрыва водопроводного
шланга.
*, предохраняющим от
ВНИМАНИЕ: ОПАСНОЕ
НАПРЯЖЕНИЕ!
Категорически запрещается обрезать шланг подачи воды,
так как вдоль него проходят элементы под напряжением.
Электрическое подсоединение
Перед подсоединением вилки машины к электрической
розетке необходимо проверить следующее:
• сетевая розетка должна быть соединена с заземлением
и соответствовать нормативам;
• сетевая розетка должна быть рассчитана на
максимальную потребляемую мощность изделия,
указанную на паспортной табличке (см. раздел
«Описание посудомоечной машины»);
• напряжение сети электропитания должно
соответствовать данным на паспортной табличке,
расположенной с внутренней стороны дверцы машины;
• сетевая розетка должна быть совместима со
штепсельной вилкой изделия. В противном случае
поручите замену вилки уполномоченному технику (см.
Техническое обслуживание); не используйте
удлинители и тройники.
Пленка защиты от конденсата*
После установки посудомоечной машины в нишу
кухонного элемента откройте ее дверцу и наклейте
прозрачную самоклеящуюся полоску снизу деревянной
кухонной рабочей поверхности для ее защиты от
возможного конденсата.
Предупреждения по первому использованию
машины
После установки машины, непосредственно перед первым
циклом мойки заполните бачок соли водой и засыпьте в
него примерно 1 кг соли (см. раздел Ополаскиватель и
регенерирующая соль): если вода будет вытекать из
бачка, это нормальное явление. Выберите степень
жесткости воды (см. раздел Ополаскиватель и
регенерирующая соль).
- После загрузки соли индикатор ОТСУТСТВИЕ СОЛИ
гаснет.
Если бачок не будет заполнен солью, смягчитель воды
и нагревательный элемент могут повредиться.
*
CIS
Изделие должно быть установлено таким образом,
чтобы провод электропитания и электророзетка были
легко доступны.
Кабель электропитания изделия не должен быть
согнут или сжат.
Регулярно проверяйте состояние кабеля
электропитания и в случае необходимости поручите его
замену только уполномоченным техникам (см.
Техническое обслуживание).
Производитель не несет ответственности за
последствия несоблюдения перечисленных выше
требований.
* Имеется только в некоторых моделях
3
Page 4
CIS
Изделие:
Торговая марка:
Торговый знак изготовителя:
Модель: LBF 517
Изготовитель:
Страна-изготовитель:
Загрузка
Размеры
Номинальное значение напряжения
электропитания или диапазон напряжения
Условное обозначение рода электрического тока
или номинальная частота переменного тока
Посудомоечная машина
Indesit Company
Польша - POLAND
12 столовых наборов
ширина 60 см
высота 85 см
глубина 60 см
220-230 V ~
50 Hz
Давление воды
Предохранитель
Класс мойки
Класс сушки
Класс энергопотребления
Потребление электроэнергии
Потребление воды за стандартный цикл мойки
Класс зашиты от поражения электрическим током
IPX0
В случае необходимости получения информации по
сертификатам соответствия или получения копий
сертификатов соответствия на данную технику, Вы
можете отправить запрос по электронному адресу
cert.rus@indesit.com.
Дату производства данной техники можно получить из
серийного номера, расположенного под штрих-кодом (S/N
XXXXXXXXX * XXXXXXXXXXX), следующим образом:
0,05-1MPa (0,5-10 bar) 7,25-145 psi
См. табличку технических данных на оборудовании
A
A
A
1,05 кВт/час
12л
Класс защиты I
Оборудование соответствует следующим директивам
Европейского Экономического Сообщества:
-2006/95/EC («Низкое напряжение»)
- 2004/108/ЕС («Электромагнитная совмести-мость»)
- 2005/32/EC («Comm. Reg. 1275/2008») (Ecodesign)
- 97/17/EC (Этикетирование)
- 2002/96/ЕС («Утилизация электрического и электронного)
- 1-ая цифра в S/N соответствует последней
цифре года,
- 2-ая и 3-я цифры в S/N - порядковому номеру
месяца года,
- 4-ая и 5-ая цифры в S/N - числу определенного
месяца и года.
Производитель:
Импортер:
С вопросами (в России) обращаться по адресу:
4
Indesit Company S.p.A.
Виале А. Мерлони 47, 60044, Фабриано (АН), Италия
ООО “Индезит РУС”
до 01.01.2011: Россия, 129223, Москва, Проспект
Мира, ВВЦ, пав. 46
с 01.01.2011: Россия, 127018, Москва, ул. Двинцев,
дом 12, корп. 1
Page 5
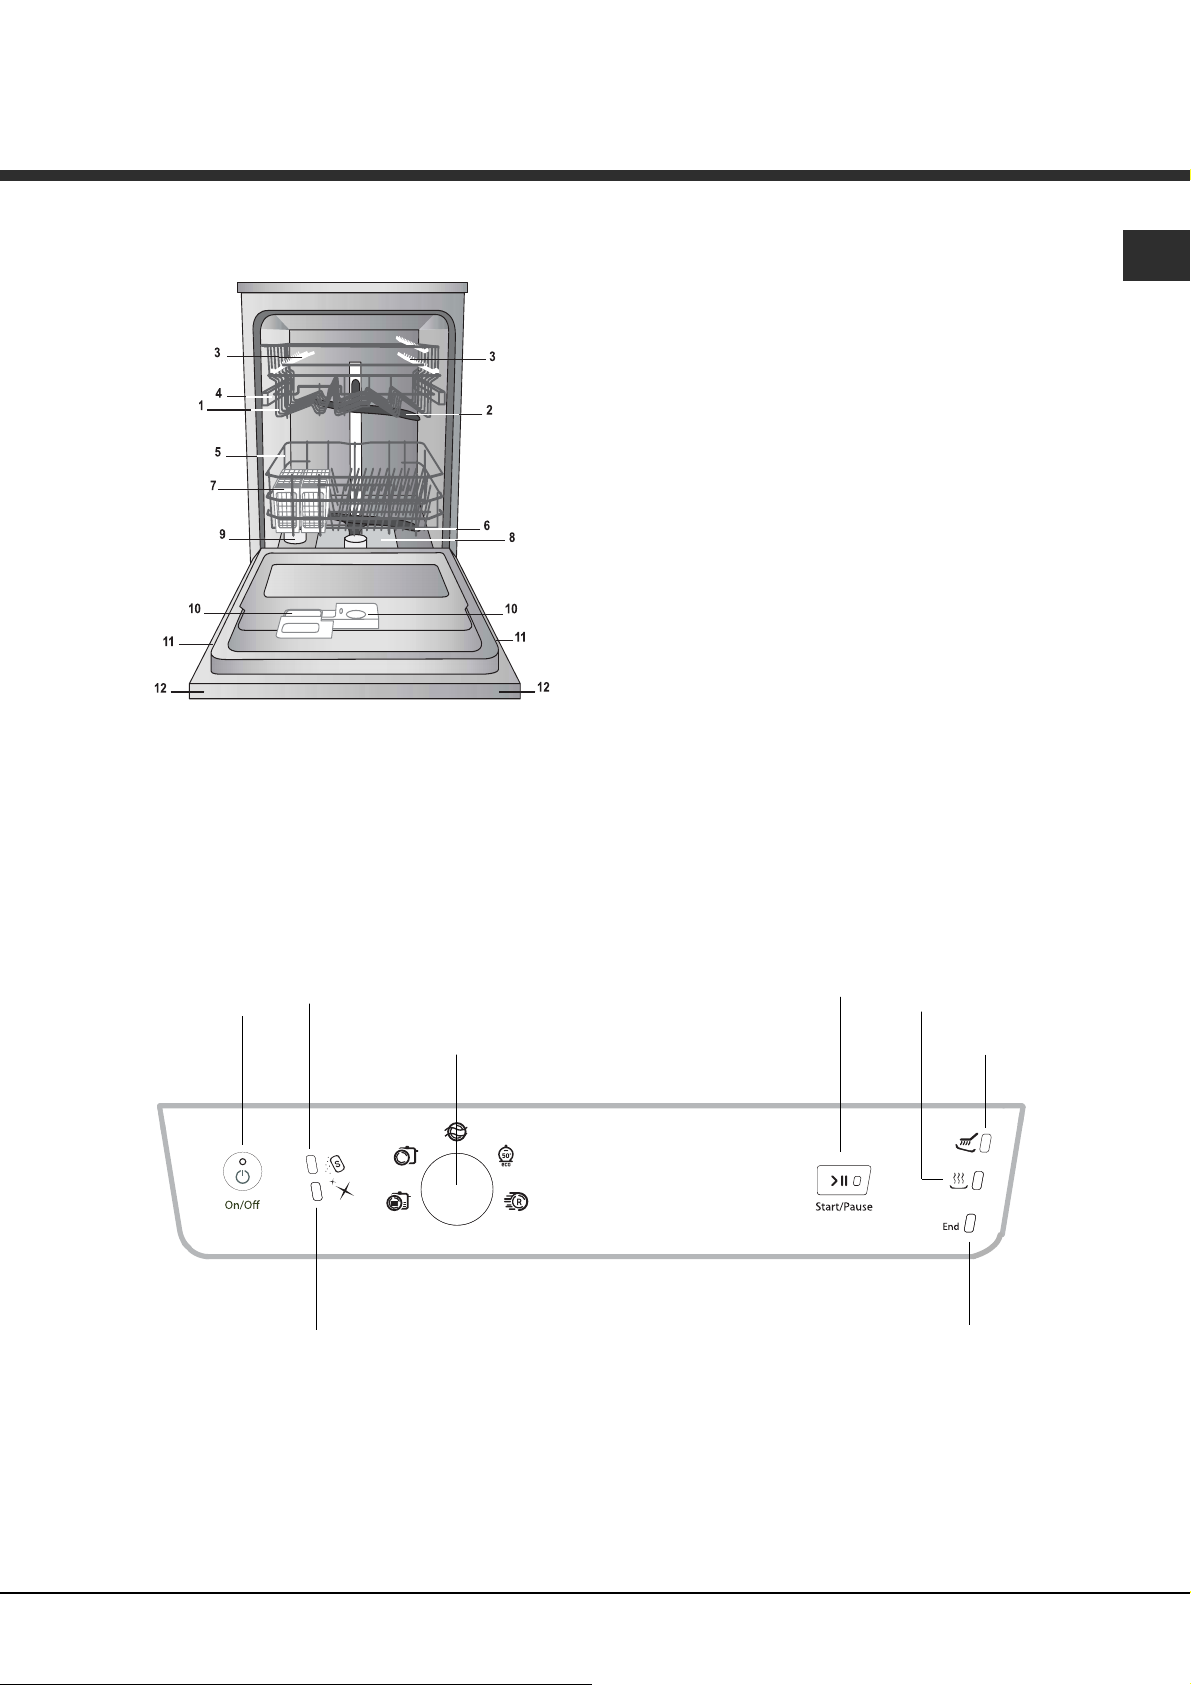
Описание изделия
Общий вид
1. Верхняя корзина
2. Верхний ороситель
3. Откидные полки
4. Регулятор высоты корзины
5. Нижняя корзина
6. Нижний ороситель
7. Корзинка для столовых приборов
8. Фильтр мойки
9. Бачок соли
10. Дозаторы моечного средства и дозатор
ополаскивателя
11. Паспортная табличка
12. Панель управления
***
CIS
Панель управления
Индикатор*
Кнопка
ВКЛ.-ВЫКЛ./
Reset
Индикатор
Отсутствие
соли*
Индикатор
Отсутствие
ополаскивателя*
Переключатель
выбора программ
Индикатор-
Кнопка Пуск/
Пауза
Индикатор
Сушка
Индикатор
Мойка
Индикатор
Конец
программа
***Только в полностью встраиваемых моделях.
* Имеется только в некоторых моделях
Количество и тип программ и дополнительных функций варьирует в зависимости от модели посудомоечной машины.
5
Page 6
Загру зка корзин
CIS
Перед загрузкой корзин удалите с посуды остатки пищи,
вылейте оставшееся содержимое из стаканов и чашек.
Загрузив посуду, проверьте, чтобы лопасти
оросителей могли свободно вращаться.
Нижняя корзина и контейнер для
столовых приборов
Нижняя корзина предназначена для кастрюль, крышек, тарелок,
салатниц, столовых приборов и т.п.Большие тарел к и и крышки
рекомендуется размещать с боков корзины.
Некоторые модели посудомоечных машин оснащены наклонными
секциями
положении для размещения тарелок или в горизонтальном для
размещения кастрюль, салатниц и сковород.
Тип контейнера для столовых приборов может варьировать,
быть разборным или неразборным в зависимости от модели
посудомоечной машины. Неразборный контейнер должен
устанавливаться только в передней части нижней корзины.
приборов.
помещены в контейнер для столовых приборов острыми
концам вниз или горизонтально уложены на откидных
полках верхней корзины.
мытья в посудомоечной машине.
*, которые можно использовать также в вертикальном
Оба типа
контейнера имеют
верхние решетки
для оптимального
размещения
столовых
Ножи и острые столовые приборы должны быть
Рекомендуем пользоваться посудой, пригодной для
* Имеется только в некоторых моделях. Варьирует
количество и положение.
Верхняя корзина
В эту корзину помещается хрупкая и легкая посуда:
стаканы, чашки, блюдца, мелкие салатницы.
Откидные полки с варьируемым
положением
Откидные полки могут
быть установлены на
двух разных уровнях
для оптимизации
размещения посуды в
корзине. Бокалы можно
стабильно поместить на
откидные полки,
вставив ножку бокала в
специальные прорези.
Регуляция положения верхней корзины
Для облегчения размещения посуды можно
отрегулировать высоту верхней корзины, установив ее
выше или ниже.
Рекомендуется регулировать высоту верхней
корзины БЕЗ ПОСУДЫ.
НИКОГДА не поднимайте и не опускайте корзину,
взявшись за нее только с одной стороны.
Откройте крепления направляющих
корзины справа и слева и выньте
корзину. Установите ее вверху или
внизу, пропустив ее по
направляющим вплоть до входа
передних роликов и закройте
крепления (см. схему).
Если корзина оснащена ручками Dual
* (см. схему), выдвиньте
Space
верхнюю корзину до упора, возьмитесь
за ручки по бокам корзины и
переместите ее вверх или вниз, после
чего задвиньте корзину назад.
Посуда, непригодная для мойки в посудомоечной
машине
• Деревянная посуда, посуда с деревянными, костяными
ручками или склеенная посуда.
• Алюминиевая, медная, латунная, оловянная посуда или
из сплава олова.
• Пластмассовая нетермоустойчивая посуда.
• Старинный фарфор или посуда с ручной росписью.
• Старинная серебряная посуда. Современную серебряную
посуду можно мыть в машине по деликатной программе,
проверив, чтобы эта посуда не касалась посуды из других
металлов.
6
Page 7
Вклю чение и
эксплуатация
Запуск посудомоечной машины
1. Откройте водопроводный кран.
2. Нажмите кнопку ВКЛ.-ВЫКЛ.: все индикаторы на панели
управления загорятсяна несколько секунд.
3. Откройте дверцу и поместите в дозатор моющее
вещество (см. ниже).
4. Загрузите посуду в корзины (см. Загрузка корзин) и
закройте дверцу.
5. Выберите программу, поворачивая рукоятку ВЫБОР
ПРОГРАММЫ по часовой стрелке: отметка на рукоятке
должна совпасть с номером или символом нужной
программы. Индикатор кнопки ПУСК/ПАУЗА замигает.
6. Выберите дополнительные функции мойки
7. Запустите программу, нажав кнопку ПУСК. Индикатор
из мигающего режима переключится в постоянно
включенный. Включение индикатора, соответствующего
мойке, сообщает о начале программы.
8. По завершении программы загорится индикатор КОНЕЦ
(в постоянно включенном режиме). Выключите машину
при помощи кнопки ВКЛ.-ВЫКЛ., закройте водопроводный
кран и отсоедините штепсельную вилку машины от
сетевой розетки.
9. Подождите несколько минут перед тем, как вынуть
посуду из машины во избежание ожегов. Выгрузку посуды
из машины начинайте с нижней корзины.
- В целях энергосбережения в некоторых
случаях ПРОСТОЯ машина отключается
автоматически.
Изменение текущей программы
Если Вы неправильно выбрали программу, ее можно
изменить, если с момента ее запуска прошло несколько
минут: при необходимости изменить программу мойки
после запуска цикла выключите машину, нажав на
несколько секунд кнопку ВКЛ./ВЫКЛ./Отмена, и вновь
включите ее той же кнопкой, вновь выберите нужную
программу и дополнительные функции.
* (см. сбоку).
Загрузка моющего вещества
Хороший результат мойки зависит также от
правильной дозировки моющего средства, излишек
которого не улучшает эффективность мойки, а только
загрязняет окружающую среду.
Используйте только специальные моющие
средства для посудомоечных машин.
НЕ ИСПОЛЬЗУЙТЕ моющие средства для ручного
мытья посуды.
Излишек моющего средства может оставить
следы от пены по завершении цикла.
Оптимальные результаты мойки и сушки
достигаются только в случае использования моющего
средства в порошке, жидкого ополаскивателя и
регенерирующей соли.
дозатор А: Моющее средство
дозатор В: Моющее средство для предварительной мойки
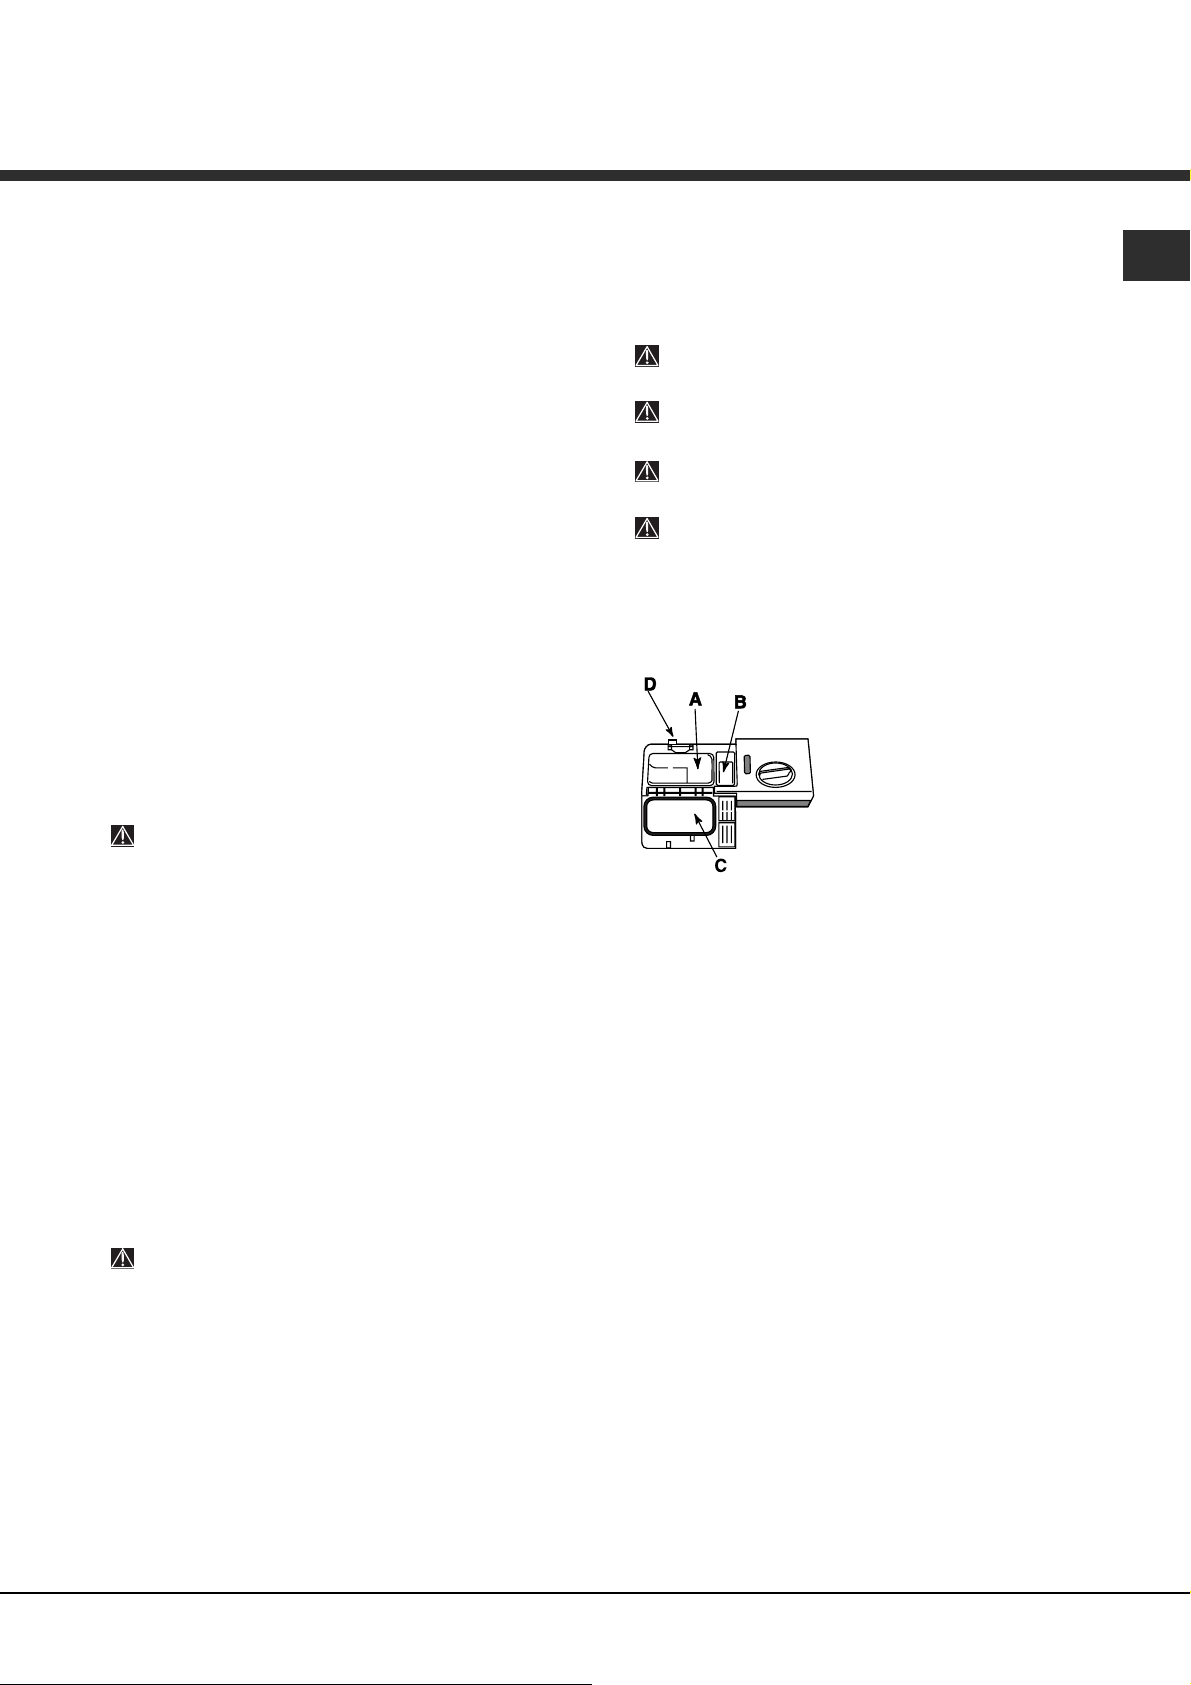
1. Откройте крышку С, нажав на
кнопку D.
2. Поместите в дозатор моющее
средство согласно
рекомендациям, приведенным в
Таблице программ:
• в порошке: дозаторы А и В.
• в таблетках: если по программе
требуется 1 штука, положите
таблетку в дозатор А и закройте
крышку. Если по программе предусмотрено 2 таблетки,
положите вторую на дно машины..
3. Удалите остатки моющего средства с краев дозатора и
закройте крышку с щелчком.
CIS
Порядок догрузки посуды
Нажмите кнопку Пуск/Пауза (кнопка мигает). Откройте
дверцу, стараясь не обжечься паром, и доложите посуду в
машину. Нажмите кнопку Пуск/Пауза (кнопка горит, не
мигая): цикл мойки продолжится.
Нажмите кнопку Пуск/Пауза для прерывания цикла.
Прервется как текущая программа, так и заданный
Отложенный запуск.
На данном этапе нельзя изменить программу.
Случайное прерывание мойки
Если в процессе мойки Вы откроете дверцу машины или
внезапно отключится электропитание, программа мойки
прервется. Когда дверца машины закроется или вернется
электроэнергия, программа возобновится с того момента,
в который она была прервана.
* Имеется только в некоторых моделях
7
Page 8
CIS
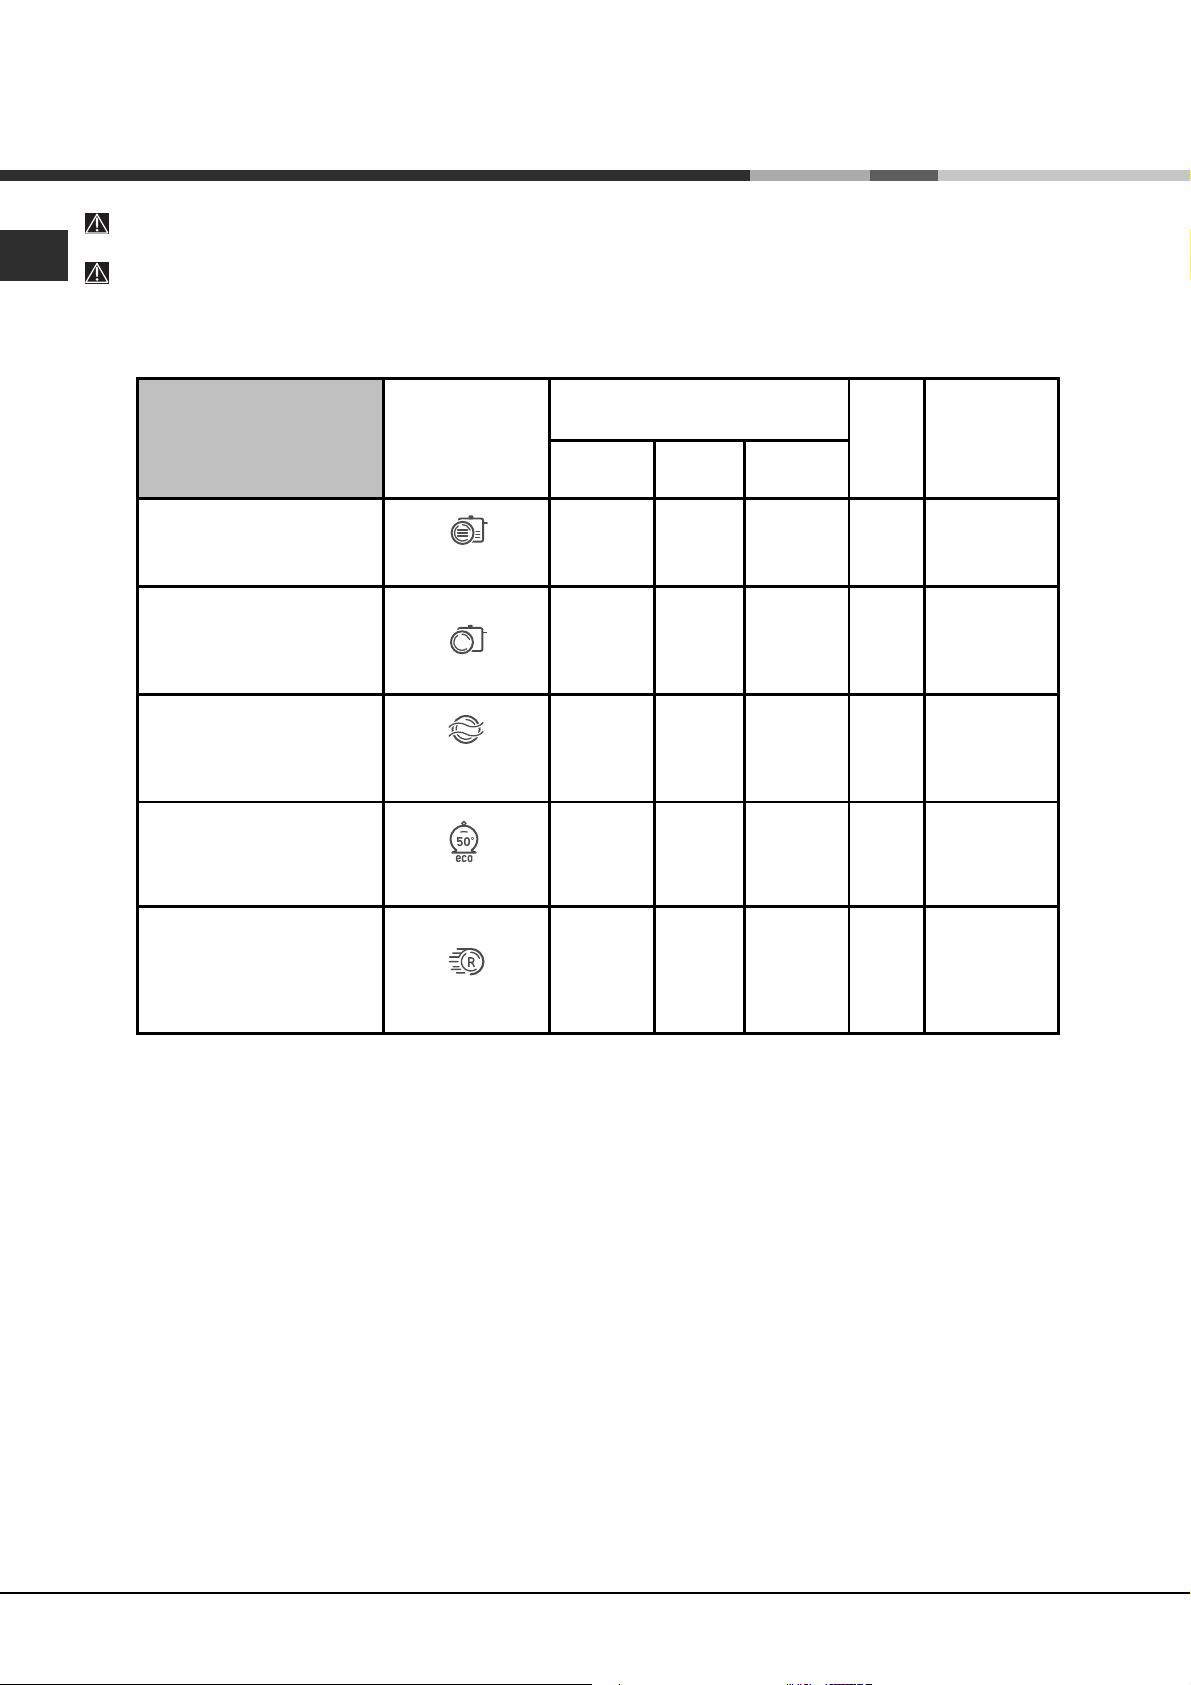
Программы
Описание ДОПОЛНИТЕЛЬНЫХ ФУНКЦИЙ смотрите в таблице Дополнительных функций на странице разделов Запуск и
эксплуатация.
Количество и тип программ и дополнительных функций варьирует в зависимости от модели посудомоечной
машины.
Продолжите
льность
цикла
(погрешность
±10%)
Часов Минут
2:25’
1:50’
0:08’
2:55’
Рекомендации по выбору
программы
Очень загрязненная посуда
и кастрюли (не использовать
для деликатной посуды).
Нормально загрязненная
посуда и кастрюли.
Стандартный ежедневный
цикл.
Предварительная мойка в
ожидании полной загрузки
машины.
Экологическая мойка с низки
мрасходом электроэнергии
для посуды и кастрюль.
Программа
Интенсивная
Нормальная
Предварительное
ополаскивание
Eco
*
Моющее средство
(А) = ячейка А
(В) = ячейка В
Порошок Жидкое Таблетки
30 гр (А) 30 мл (А) 1 (А)
25 гр (А)
5 гр (В)
Нет
25 гр (А)
5 гр (В)
25 мл (А)
5 мл (В)
Нет
25 мл (А)
5 мл (В)
1 (А)
Нет
1 (А)
Сушка
Да
Да
Нет
Да
Экономичный короткий цикл
для мойки малозагрязненно
й посуды сразу после еды.
(2 тарелки + 2 стакана + 4
столовых прибора + 1
маленькая сковородка)
Короткий
цикл мойки
25 гр (А) 25 мл (А) 1 (А)
Нет
0:35’
Примечание:
Для облегчения дозировки моющего средства следует знать, что:
1 столовая ложка = 15 грамм порошка = примерно 15 мл жидкости
1 чайная ложка = 5 грамм порошка = примерно 5 мл жидкости
Оптимальный результат мойки и сушки при выборе программ «Короткая/Speed» достигается при соблюдении
указанного количества загружаемой посуды.
* Программа Eco, отвечающая требованиям норматива EN-50242, имеет большую продолжительность по сравнению с
другими программами, тем не менее эта программа расходует меньше электроэнергии и меньше загрязняет
окружающую среду.
Примечание для Испытательных Лабораторий: за более подробной информацией касательно условий
сравнительного испытания EN пошлите запрос на адрес: ASSISTENZA_EN_LVS@indesitcompany.com
8
Page 9
Ополаскив атель и
регенерирующая соль
Используйте только специальные средства для
посудомоечных машин.
Не используйте поваренную или промышленную соль
и моющие средства для ручного мытья посуды.
Следуйте инструкциям, приведенным на упаковке
моющего средства.
Если вы используете многофункциональное моющее
средство, ополаскиватель добавлять не нужно,
рекомендуется добавить соль, в особенности, если
водопроводная вода жесткая или очень жесткая.
Следуйте инструкциям, приведенным на упаковке
моющего средства.
Если вы не добавляете ни соли, ни
ополаскивателя, Индикаторы ОТСУТСТВИЕ СОЛИ* и
ОТСУТСТВИЕ ОПОЛАСКИВАТЕЛЯ* остаются
включенными.
Заливка ополаскивателя
Ополаскиватель облегчает сушку посуды, так как вода
лучше стекает с ее поверхности , и на посуде таким
образом не остается разводов или пятен.
Необходимо долить ополаскиватель в дозатор:
• когда на панели управления загорается индикатор
ОТСУТСТВИЕ ОПОЛАСКИВАТЕЛЯ*;
1. Откройте дозатор, повернув
крышку (G) против часовой
стрелки.
2. Залейте ополаскиватель,
избегая перелива. Если вы
F
случайно пролили
ополаскиватель мимо дозатора,
G
удалите излишек губкой.
3. Завинтите крышку.
НИКОГДА не заливайте ополаскиватель
непосредственно в моечную камеру машины.
Отрегулируйте дозу ополаскивателя
Если вас не удовлетворяет качество сушки, можно
отрегулировать дозу ополаскивателя. При помощи
отвертки поверните регулятор (F) на одну из 6 отметок
(фабричная настройка – 4):
• если на посуде остаются белые разводы, поверните
регулятор на меньшее значение (1-3).
• если на посуде остаются капли воды или пятна
извести, поверните регулятор на более высокое
значение (4-5).
Выбор степени жесткости воды
Все посудомоечные машины укомплектованы
смягчителем воды, который благодаря специальной
регенерирующей соли для посудомоечных машин удаляет
известь из воды, использующейся для мытья посуды.
Данная посудомоечная машина может быть
отрегулирована таким образом, чтобы сократить
загрязнение окружающей среды и оптимизировать
качество мытья посуды в зависимости от жесткости
воды. Вы можете узнать градус жесткости воды в вашем
районе, обратившись в организацию водоснабжения.
- Выключите машину при помощи кнопки ВКЛ./ВЫКЛ. и
откройте дверцу.
- Поверните рукоятку ВЫБОРА ПРОГРАММ сначала на 5-
ую программу, а затем на 1-ую программу и потом вновь
на5-ую.
- Нажмите кнопку ВКЛ./ВЫКЛ., индикаторы фаз цикла
мигают. На данном этапе можно выбрать степень жесткости
воды. Каждой программе соответствует своя степень
жесткости:
Например: 1-ая программа, степень жесткости 1
2-ая программа, степень жесткости 2 и т.д. вплоть до
максимальной 5-ой
(Смягчитель воды настраивается на заводе на 3-ью
степень).
Для отмены этой функции подождите несколько секунд
или нажмите кнопку дополнительных функций
отключите машину кнопкой ВКЛ./ВЫКЛ.
Если вы пользуетесь многофункциональными таблетками,
бачок с регенерирующей солью должен быть в любом
случае заполнен.
Таблица жесткости воды
уровень °dH
От 0°f да 10°f рекомендуется не использовать соль.
*
**
(°dH = жесткость в немецких градусах - °fH = жесткость во
французских градусах - ммол/л = милимоль/литр)
1 0 - 6 0 - 10 0 - 1
2 6 - 11 11 - 20 1,1 - 2
3 12 - 17 21 - 30 2,1 - 3
4 17 - 34 31 - 60 3,1 - 6
5*
при установке 5, продолжительность цикла может увеличиться.
1 цикл в день.
* степени.
°fH mmol/l
34 - 50 61 - 90 6,1 - 9
* или
Средняя автономность
бачок для соли
месяцы
7 месяцев
5 месяцев
3 месяца
2 месяца
2/3 недели
Загрузка регенерирующей соли
Для хорошего результата мойки необходимо проверять,
чтобы бачок соли никогда не был пуст. Регенерирующая
соль удаляет из воды известь, которая в противном
случае остается на посуде.
Бачок соли расположен в нижней части посудомоечной
машины (см. Описание) и заполняется:
• когда зеленый поплавок* не виден через крышку бачка;
• когда на панели управления загорается индикатор
ОТСУТСТВИЕ СОЛИ*;
1. Выньте нижнюю корзину и поверните
крышку емкости против часовой стрелки.
2. Только при использовании в первый раз:
наполните емкость водой до краев.
3. Вставьте воронку* (см. рисунок) и засыпьте в емк ость
соль до краев (примерно 1 кг); выход воды из емкости
является нормальным.
4. Снимите воронку* и удалите остатки соли на входном
отверстии; сполосните крышку струей воды прежде чем
закрутить ее, располагая ее головкой вниз и позволяя
воде стекать по четырем звездообразным прорезям в
нижней части крышки.
Рекомендуем выполнять эту операцию каждый раз
при загрузке соли.
Хорошо закройте крышку, для того чтобы во время мойки
в емкость не попадало моющее средство (может быть
непоправимо повреждено устройство смягчения воды).
При необходимости загрузите соль перед циклом
мойки для удаления соляного раствора, вылившегося
через край бачка.
**
CIS
* Имеется только в некоторых моделях
9
Page 10

Те хническ ое
обслуживание и уход
CIS
Отключение воды и электрического тока
• Перекрывайте водопроводный кран после каждой мойки
во избежание опасности утечек.
• Выньте штепсельную вилку машины из электророзетки
перед началом чистки и технического обслуживания.
Чистка посудомоечной машины
• Для чистки наружных поверхностей и панели
управления машины используйте мягкую тряпку,
смоченную водой. Не используйте растворители или
абразивные чистящие средства.
• Возможные пятна внутри камеры мойки можно удалить
при помощи тряпки, смоченной в водой с небольшим
количеством уксуса.
Средства против неприятных запахов
• Всегда оставляйте дверцу машины полу-прикрытой во
избежание застоя влажности.
• Регулярно прочищайте периметральные уплотнения
дверцы и дозаторов моющего средства при помощи
влажной губки. Таким образом удаляются остатки пищи
– основной причины образвания неприятных запахов.
Чистка оросителей
Остатки пищи могут прилипнуть к лопастям оросителей и
засорить отверстия, из которых выходит вода: время от
времени следует проверять оросители и прочищать их
неметаллической щеткой.
Оба оросителя являются съемными.
Для съема верхнего оросителя
необходимо отвинтить против
часовой стртелки
пластмассовую гайку. Верхний
ороситель устанавливается
отверстиями вверх.
Периодически очищайте водный фильтр, расположенный на
выходе крана.
- Перекройте водопроводный кран.
- Открутите края трубы загрузки воды, снимите фильтр и
аккуратно промойте его под струей воды.
- Снова вставьте фильтр и закрепите трубу.
Чистка фильтров
Фильтрующий узел состоит из трех фильтров, которе служат
для очистки воды для мойки от остатков пищи и возвращают
воду в циркуляцию: для хороших результатов мойки необходимо
прочищать фильтры.
Регулярно прочищайте фильтры.
Запрещается пользоваться посудомоечной машиной без
фильтров или с незакрепленным фильтром.
• После нескольких циклов мойки проверьте фильтрующий узел и
при необходимости тщательно промойте его под струей воды
при помощи неметаллической щетки, следуя приведенным ниже
инструкциям:
1. поверните против часовой стрелки цилиндрический фильтр С
и выньте его (схема 1).
2. Выньте стакан фильтр В, слегка нажав на боковые выступы
(Схема 2);
3. Выньте плоский фильтр из нержавеющей стали А ( схема 3).
4. Проверка отстойника и удаление возможных остатков пищи.
НИКОГДА НЕ СНИМАЙТЕ крышку насоса (деталь черного цвета)
(рис. 4).
1
2
Для съема нижнего оросителя
нажмите на шпонки с боков и
потяните его вверх .
Очистка водного фильтра
Если водопровод новый или если он долгое время не
использовался, перед подсоединением дайте воде стечь
до тех пор, пока она не станет прозрачной. Несоблюдение
этого условия может привести к засорению фильтра и к
повреждению посудомоечной машины.
*
* Имеется только в некоторых моделях
10
43
После чистки фильтров точно установите фильтрующий узел на
свое место, что является важным для исправной работы
посудомоечной машины.
Длительный простой машины
• Отсоедините машину от сети электропитания и перекройте
водопроводный кран.
• Оставьте дверцу машины полу-прикрытой.
• После длительного простоя машины произведите один
холостой цикл мойки.
Page 11

Предупреждения и рек омендации
Изделие спроектировано и изготовлено в
соответствии с международными нормативами по
безопасности. Необходимо внимательно прочитать
настоящие предупреждения, составленные в целях вашей
безопасности.
Общие требования к безопасности
• Данный электроприбор не может быть использован
лицами (включая детей) с ограниченными физическими,
сенсорными или умственными способностями,
неопытными или незнакомыми с инструкциями
обращения с электроприбором, в отсутствие контроля
лиц, ответственных за их безопасность.
• Взрослые должны следить, чтобы дети не играли с
электроприбором.
• Данное изделие предназначается для
непрофессионального использования в домашних
условиях.
• Изделие предназначено для мытья посуды в домашних
условиях, может быть использовано только взрослыми
людьми в соответствии с инструкциями,
приведенными в данном техническом руководстве.
• Запрещается устанавливать изделие на улице, даже
под навесом, так как воздействие на него дождя и
грозы является чрезвычайно опасным.
• Не прикасайтесь к посудомоечной машине с босыми
ногами.
• Не тяните за кабель электропитания для отсоединения
вилки изделия из сетевой розетки, возьмитесь за вилку
рукой.
• Необходимо перекрыть водопроводный кран и вынуть
штепсельную вилку из розетки перед началом чистки и
технического обслуживания машины.
• В случае неисправности категорически запрещается
открывать внутренние механизмы изделия с целью их
самостоятельного ремонта.
• Никогда не прикасайтесь к сопротивлению.
• Не опирайтесь или не садитесь на открытую дверцу
машины: она может опрокинуться.
• Не держите дверцу открытой, так как об нее можно
случайно споткнуться.
• Храните моющие средства и ополаскиватель вдали от
детей.
• Не разрешать детям играть с упаковочными
материалами.
Экономия электроэнергии и
охрана окружающей среды
Экономия воды и электроэнергии
• Используйте посудомоечную машину с полной
загрузкой. В ожидание полного заполнения машины во
избежание образования неприятных запахов включите
цикл Ополаскивание (см. Программы).
• Выбирайте программу мойки, подходящую для данного
типа посуды и степени загрязнения в соответствии с
Таблицей программ:
- для нормально загрязненной посуды используйте
программу Есо, обеспечивающую низкий расход
электроэнергии и воды.
- если машина загружена неполностью, включите
дополнительную функцию Половина загрузки * (см.
Запуск и эксплуатация).
• Если ваш контракт с поставщиком электроэнергии
предусматривает разные часовые тарифы для
экономии электроэнергии, пользуйтесь машиной во
время с льготным тарифом. Дополнительная функция
Запуск с задержкой* (см. Запуск и эксплуатация)
может помочь спланировать мойку посуды в более
рациональном режиме.
Моющие средства, не содержащие фосфатов,
хлора и содержащие ферменты
• Настоятельно рекомендуем использовать моющие
средства, не содержащие фосфатов и хлора, что
помогает сохранить окружающую среду.
• Ферменты оказывают особо эффективное воздействие
при температуре около 50°C, поэтому при
использовании моющих веществ с ферментами можно
выбрать программы мойки с низкими температурами,
получая те же результаты, что и при мойке при 65°C.
• Аккуратно дозируйте моющее средство в соответствии
с указаниями производителя, с степенью жесткости
воды, со степенью загрязнения и с количеством
посуды во избежание нерационального расхода. Хотя
моющие средства и являются биоразлагаемыми, они
содержат вещества, отрицательно влияющие на
природу.
CIS
Утилизация
• Уничтожение упаковочных материалов: соблюдайте
местные нормативы по утилизации упаковочных
материалов.
• Согласно Европейской Директиве 2002/96/СЕ
касательно утилизации электронных и электрических
электроприборов электроприборы не должны
выбрасываться вместе с обычным городским
мусором. Выведенные из строя приборы должны
собираться отдельно для оптимизации их утилизации и
рекуперации составляющих их материалов, а также
для безопасности окружающей среды и здоровья.
Символ зачеркнутая мусорная корзинка, имеющийся на
всех приборах, служит напоминанием об их отдельной
утилизации.
За более подробной информацией о правильной
утилизации бытовых электроприборов пользователи
могут обратиться в специальную государственную
организацию или в магазин.
* Имеется только в некоторых моделях.
11
Page 12

CIS
Неисправности и
методы их устранения
В случае обнаружения аномалий в работе изделия проверьте следующие пунк ты перед тем, как обратиться в Сервис
технического обслуживания.
Неисправности: Возможные причины / Методы устранения:
Посудомоечная машина не запуска
ется или не реагирует на команды
Дверца не закрывается
• Выключите машину при помощи кнопки ВКЛ./ВЫКЛ., вновь включите ее
примерно через одну минуту и вновь задайте программу.
• Проверьте, хорошо ли штепсельная вилка вставлена в сетевую розетку.
• Дверца машины плохо закрыта.
• Защелкнулся замок; энергично толкните дверцу вплоть до щелчка.
Посудомоечная машина не сливае
т воду.
Шумная работа посудомоечной ма
шины.
На посуде и стаканах остается бел
оватый или известковый налет.
На посуде и стаканах остаются гол
убоватые разводы или налеты.
Посуда плохо высушена.
Посуда плохо вымыта.
Посудомоечная машина не залива
ет воду - Сигнализация закрытого
крана.
(раздаются короткие звуковые сигнал
ы)
(часто мигают индикаторы Сушка
и Конец цикла.)
Сигнализация сливного шланга во
ды / Засорен фильтр подачи воды.
(часто мигают индикаторы Мойка,
Сушка и Конец цикла.)
• Программа еще не завершилась.
• Сливной шланг согнут (см. Монтаж).
• Засорился слив в мойке.
• Фильтр засорен остатками пищи.
• Посуда бьется друг о друга или о лопасти оросителей.
• Чрезмерное пенообразование: неправильная дозировка или непригодное
моющее средство для посудомоечной машины. (см. Включение и
эксплуатация).
• Отсутствует регенерирующая соль или регуляция ее расхода не
соответствует степени жесткости воды (см. Ополаскиватель и соль).
• Крышка бачка соли плохо закрыта.
• Закончился ополаскиватель или его дозировка недостаточна.
• Чрезмерная дозировка ополаскивателя.
• Была выбрана программа мойки без сушки.
• Закончился ополаскиватель или настроена недостаточная дозировка
(см. Ополаскиватель и соль).
• Неправильно настроена дозировка ополаскивателя.
• Посуда с тефлоновым покрытием или из пластика.
• Корзины перегружены (см. Загрузка корзин).
• Посуда плохо расположена в корзинах.
• Посуда мешает вращению лопастей оросителей.
• Выбрана неэффективная программа мойки (см. Программы).
• Чрезмерное пенообразование: неправильная дозировка или непригодное
моющее средство для посудомоечной машины. (см. Включение и
эксплуатация).
• Крышка ополаскивателя плохо закрыта.
• Фильтр засорен (см. Техническое обслуживание и уход).
• Отсутствует регенерирующая соль (см. Ополаскиватель и соль).
• В водопроводе нет воды.
• Водопроводный шланг согнут (см. Монтаж).
• Откройте водопроводный кран, и машина запустится через несколько
минут.
• Машина заблокировалась, так как после звуковой сигнализации не было
произведено никаких действий. Выключите машину при помощи кнопки
ВКЛ./ВЫКЛ., откройте водопроводный кран и через 20 секунд вновь
включите машину при помощи той же кнопки. Перепрограммируйте
машину и вновь запустите цикл.
• Выключите машину при помощи кнопки ВКЛ./ВЫКЛ. Закройте водопрово
дный кран во избежание затопления, отсоедините штепсельную вилку ма
шины от сетевой розетки.Проверьте, не засорен ли фильтр
подачи воды нечистотами. (смотрите раздел «Техническое обслуживание
и уход»)
* Имеется только в некоторых моделях.
12
Page 13

Сервисное
обслуживание
Мы заботимся о своих покупателях и стараемся сделать сервисное обслуживание наиболее
качественным. Мы постоянно совершенствуем наши продукты, чтобы сделать Ваше общение с
техникой простым и приятным.
Уход за техникой
Продлите срок эксплуатации и снизьте вероятность поломки техники.
Воспользуйтесь профессиональными средствами для ухода за техникой от Indesit Professional для наиболее
простого, эффективного и легкого ухода за Вашей бытовой техникой.
Продукты Indesit Professional производятся в Италии с соблюдением высоких европейских стандартов в
области качества, экологии и безопасности использования и созданы с учетом многолетнего опыта
производителя техники. Узнайте подробнее на сайте www.hotpoint-ariston.ru в разделе «Сервис» и
спрашивайте в магазинах Вашего города.
Авторизованные сервисные центры
Чтобы быть ближе к нашим потребителям, мы создали широкую сервисную сеть, особенностью которой
является высокая подготовка, профессионализм и честность сервисных мастеров. На сегодняшний день
она насчитывает около 350 сервисных центров на территории России и СНГ.
Их контакты Вы можете найти в сервисном сертификате и на сайте www.hotpoint-ariston.ru в разделе
«Сервис».
CIS
Если вам надо обратиться в сервисный центр:
Внимание! При ремонте требуйте использования оригинальных запасных частей.
Перед тем как обратиться в Сервис Технического обслуживания:
• Проверьте, можно ли устранить неисправность самостоятельно (см. Неисправности и методы их устранения).
• Вновь запустите программу для проверки исправности машины.
• В противном случае обратитесь в уполномоченный Сервис Технического обслуживания.
Никогда не обращайтесь к неуполномоченным техникам.
При обращении в Сервия Технического обслуживания сообщите:
• характер неисправности
• модель изделия (Мод.)
• серийный номер (“S/N”)
Эти данные вы найдете на паспортной табличке, расположенной на изделии
(см. Описание изделия ).
Другую полезную информацию и новости Вы можете найти на сайте www.hotpoint-ariston.ru в разделе
«Сервис».
13
Page 14

CIS
14
Page 15

Operating instructions
DISHWASHER
EN
English,15
LBF 517
Contents
Installation, 16-17
Positioning and levelling
Connecting the water and electricity supplies
Advice regarding the first wash cycle
Technical data
Description of the appliance, 18
Overall view
Control panel
Loading the racks, 19
Lower rack
Cutlery basket
Upper rack
Start-up and use, 20
Starting the dishwasher
Measuring out the detergent
Wash options
Wash cycles, 21
Table of wash cycles
Rinse aid and refined salt, 22
Measuring out the rinse aid
Measuring out the refined salt
Care and maintenance, 23
Shutting off the water and electricity supplies
Cleaning the dishwasher
Preventing unpleasant odours
Cleaning the sprayer arms
Cleaning the water inlet filter
Cleaning the filters
Leaving the machine unused for extended periods
Precautions and advice , 24
General safety
Disposal
Saving energy and respecting the environment
Troubleshooting, 25
Assistance, 26
Before contacting Assistance
Page 16

Installation
EN
Keep this instruction manual in a safe place for
future reference. If the appliance is sold, given away or
moved, please ensure the manual is kept with the
machine, so that the new owner may benefit from the
advice contained within it.
Please read this instruction manual carefully: it
contains important information regarding the safe
installation, use and maintenance of the appliance.
If the appliance must be moved at any time, keep it in
an upright position; if absolutely necessary, it may be
tilted onto its back.
This appliance is intended to be used in household and
similar applications such as:
- staff kitchen areas in shops, offices and other working
environments;
- farm houses;
- by clients in hotels, motels and other residential type
environments;
- bed and breakfast type environments.
Positioning and levelling
1. Remove the appliance from all packaging and check
that it has not been damaged during transportation.
If it has been damaged, contact the retailer and do not
proceed any further with the installation process.
2. Check the dishwasher by placing it so that its sides or
back panel are in contact with the adjacent cabinets or
even with the wall. This appliance can also be recessed
under a single worktop
sheet).
* (see the Assembly instruction
Connecting the water inlet hose
To a suitable cold water connection point: before
attaching the hose, run the water until it is perfectly
clear so that any impurities that may be present in the
water do not clog the appliance; after performing this
operation, screw the inlet hose tightly onto a tap with
a ¾ gas threaded connection.
To a suitable hot water connection point: your
dishwasher may be supplied with hot water from the
mains supply (if you have a central heating system
with radiators) provided that it does not exceed a
temperature of 60°C.
Screw the hose to the tap as described for connection
to a cold water supply.
If the inlet hose is not long enough, contact a
specialist store or an authorised technician (see
Assistance).
The water pressure must be within the values
indicated in the Technical data table (see adjacent
information).
The hose should not be bent or compressed.
Connecting the water outlet hose
Connect the outlet hose (without bending it) to a drain
duct with a minimum diameter of 4 cm.
3. Position the dishwasher on a level and sturdy floor. If
the floor is uneven, the front feet of the appliance may be
adjusted until it reaches a horizontal position. If the
appliance is levelled correctly, it will be more stable and
much less likely to move or cause vibrations and noise
while it is operating.
4. Adjust the height of the rear foot from the front of the
appliance
a hexagonal spanner (red color) with an opening of 8 mm in a
clockwise direction to increase the height or in an
anticlockwise direction to decrease the height.
* on the central lower part of the dishwasher, turning
Connecting the water and electricity
supplies
Connection to the water and electricity supplies
should only be performed by a qualified technician.
The dishwasher should not stand on top of the water
hoses or the electricity supply cable.
The appliance must be connected to the water
supply network using new hoses.
Do not use old hoses.
The water inlet and outlet hoses and the electricity
supply cable may be positioned towards the right or the
left in order to achieve the best possible installation.
The outlet hose must be at a height ranging from 40 to
80 cm from the floor / surface where the dishwasher
rests (A).
Before connecting the water outlet hose to the sink
drain, remove the plastic plug (B).
* Only available in selected models.
16
Page 17

Anti-flooding protection
To ensure floods do not occur, the dishwasher:
- is provided with a special system which blocks the
water supply in the event of anomalies or leaks from
inside the appliance.
Anti-condensation strip*
After installing the dishwasher, open the door and stick
the adhesive transparent strip under the wooden shelf in
order to protect it from any condensation which may
form.
EN
Some models are also equipped with the supplementary
safety device New Acqua Stop
flooding protection even in the event of a supply hose
rupture.
*, which guarantees anti-
WARNING: HAZARDOUS VOLTAGE!
Under no circumstance should the water inlet hose be
cut as it contains live electrical parts.
Electrical connection
Before inserting the plug into the electrical socket, make
sure that:
The socket is earthed and complies with current
regulations.
The socket can withstand the maximum load of the
appliance, which is indicated on the data plate
located on the inside of the door (see chapter entitled
Description of the appliance).
The power supply voltage falls within the values
indicated on the data plate on the inside of the door.
The socket is compatible with the plug of the
appliance. If this is not the case, ask an authorised
technician to replace the plug (see Assistance); do
not use extension cables or multiple sockets.
Once the appliance has been installed, the power
supply cable and the electrical socket should be easily
accessible.
The cable should not be bent or compressed.
If the power supply cable is damaged, it must be replaced by the manufacturer or its Technical Assistance
Service in order to prevent all potential hazards. (See Assistance)
The Company shall not be held responsible for any
incidents that occur if these regulations are not
observed.
Advice regarding the first wash cycle
After the appliance has been installed, immediately
before running the first wash cycle, completely fill the
salt dispenser with water and add only then
approximately 1 kg of salt (see chapter entitled Rinse aid
and refined salt). The water may overflow: this is normal
and is not a cause for concern. Select the water
hardness value (see chapter entitled Rinse aid and
refined salt). - After the salt has been poured into the
machine, the LOW SALT indicator light
If the salt container is not filled, the water softener
and the heating element may be damaged as a result.
Technical data
Dimensions
Capacity 12 standard place-settings
Water supply
pressure
Power supply voltage See appliance data plate
Total absorbed power See appliance data plate
Fuse See appliance data plate
width 60 cm
height 85 cm
depth 60 cm
0,05 ÷ 1MPa (0.5 ÷ 10 bar)
7,25 – 145 psi
This dishwasher conforms to the
following European Community
Directives:
-2006/95/EC (Low Voltage)
-2004/108/EC (Electromagnetic
Compatibility)
-2005/32/EC (Comm. Reg.
1275/2008) (Ecodesign)
-97/17/EC (Labelling)
-2002/96/EC (Waste Electrical
and Electronic Equipment)
(WEEE)
* switches off.
* Only available in selected models.
17
Page 18

Description of the
appliance
EN
Overall view
1. Upper rack
2. Upper sprayer arm
3. Tip-up compartments
4. Rack height adjuster
5. Lower rack
6. Lower sprayer arm
7. Cutlery basket
8. Washing filter
9. Salt dispenser
10. Detergent and rinse aid dispensers
11. Data plate
12. Control Panel
***
Control panel
ON/OFF
indicator light*
ON/OFF/RESET
button
Low Salt
indicator light*
Low Rinse aid
indicator light*
Select wash
cycle knob
Washing
indicator light
Start/Pause button
and indicator light
Drying
indicator light
End cycle
indicator light
***Only in completely built-in models.
* Only available in selected models.
The number and type of wash cycles and options may vary depending on the dishwasher model.
18
Page 19

Loading the racks
Before loading the racks, remove all food residue from
crockery and empty liquids from glasses and cups.
After loading the appliance, make sure that the sprayer
arms can rotate freely.
Lower rack and cutlery basket
The lower rack can hold pans, lids, plates, salad bowls, cutlery, etc.
Large plates and lids should ideally be placed at the sides of the rack.
Several dishwasher models are fitted with tip-up sections
which can be used in a vertical position when arranging plates
or in a horizontal position when arranging saucepans, salad
bowls and frying pans.
The type of cutlery basket may vary (modular or non-modular)
according to the dishwasher model. The non-modular basket must
onlybe positioned at the front of the lower rack.
*,
Upper rack
Load this rack with delicate and lightweight crockery: glasses,
cups, saucers and shallow salad bowls.
Adjustable position tip-up compartments
The tip-up compartments
can be positioned at
different heights, to
optimise the arrangement
of crockery throughout
the rack. Wine glasses
can be placed safely in
the tip-up compartments,
by inserting the stem of
each glass into the
corresponding slots.
Adjusting the height of the upper rack
In order to make it easier to arrange the crockery, the upper
rack may be moved to a higher or lower level.
The height of the upper rack should ideally be adjusted
WHEN THE RACK IS EMPTY.
NEVER raise or lower the rack on one side only.
Open the left and right guide rail stops
and pull out the rack; position it higher
or lower as required, slide it along the
guide rails until the front wheels are in
place and close the stops (see figure).
EN
Both are fitted with
grilles over the top,
for improved
cutlery arrangement.
Knives and other utensils with sharp edges must be
placed in the cutlery basket with the points facing
downwards, or they must be positioned horizontally in the tipup compartments on the upper rack.
*Only available in selected models. The number and position
may vary.
If the rack is fitted with Dual Space
handles
upper rack until it reaches its stop
point, grip the handles at the sides of
the rack and move it upwards or
downwards, then slowly let it fall back
into place.
* (see figure), pull out the
Items that should not be washed in the
dishwasher
Wooden items, objects with wooden or horn handles or
glued-on parts.
Items made from aluminium, copper, brass, pewter or tin.
Items made from plastic material which is not heat-resistant.
Antique or hand-painted porcelain.
Antique silver. Silver that is not antique may, however, be
washed in the dishwasher using a delicate wash cycle,
provided that it does not come into contact with other
metals.
We recommend the use of crockery which is dishwasher
safe.
19
Page 20

Start-up and use
EN
Starting the dishwasher
1. Turn the water tap on.
2. Press the ON/OFF button: all the indicator lights on
the control panel will light up for a few seconds.
3. Open the door and pour in a suitable amount of
detergent (see below).
4. Load the racks (see Loading the racks) and shut the
door.
5. Select the wash cycle by turning the WASH CYCLE
SELECT knob in a clockwise direction: align the notch
on the knob with the number or symbol representing
the desired wash cycle. The START/PAUSE indicator
light will flash.
6. Select the wash options
information).
7. Start the cycle by pressing the START button; the
indicator light will light up and remain lit in a fixed
manner. The indicator light corresponding to the
wash phase will switch on, signalling that the wash
cycle has begun.
8. At the end of the wash cycle the END indicator light
will switch on (fixed light). Switch off the appliance by
pressing the ON/OFF button, shut off the water valve
and unplug the appliance from the electricity socket.
9. Wait for a few minutes before removing the
crockery, in order to avoid burns. Unload the racks,
beginning with the lower level.
- The machine will switch off automatically
during certain periods of inactivity, in order to
minimise electricity consumption.
Modifying a wash cycle in progress
If a mistake was made during the wash cycle selection
process it is possible to change the cycle, provided that
it has only just begun: once the wash cycle has started,
switch off the machine by pressing and holding the ON/
OFF/Reset button. Switch it back on using the same
button and select the desired wash cycle and options.
* (see adjacent
Measuring out the detergent
A good wash result also depends on the correct
amount of detergent being used; exceeding the
stated amount does not result in a more effective
wash and increases environmental pollution.
Only use detergent which has been
specifically designed for dishwashers.
DO NOT USE washing up liquid.
Using excessive detergent may result in foam
residue remaining in the machine after the cycle
has ended.
The use of tablets is only recommended for
models which offer the MULTI-FUNCTIONAL
TABLETS option.
To achieve the best results from each washing
and drying cycle, powder detergent, rinse aid
liquid and salt should be used.
Compartment A: Washing detergent
Compartment B: Pre-wash detergent
D
A
B
C
when the cycle requires 1 tablet, place it in compartment
A and close the cover; when it requires 2, place the
second tablet at the bottom of the appliance.
3. Remove detergent residues from the edges of the
compartment and close the cover until it clicks.
1. Open cover C by pressing
button D.
2. Pour in the detergent after
consulting the Table of wash
cycles:
For powder detergent use
compartments A and B.
For detergent in tablet form:
Adding extra crockery
Press the Start/Pause button (the corresponding
indicator light will flash). Open the door, taking care to
avoid the escaping steam, and place the crockery inside
the appliance. Press the Start/Pause button (fixed light):
the cycle starts from the point at which it was interrupted.
If the Start/Pause button is pressed so as to pause the
machine, the wash cycle or the Delayed Start function
(if selected) is interrupted.
At this stage it is not possible to change the wash cycle.
Accidental interruptions
If the door is opened during the wash cycle, or if there is
a power cut, the cycle stops. It starts again from the point
at which it was interrupted once the door has been shut
or once the electricity supply is restored.
20
* Only available in selected models.
Page 21

Wash cycles
If the crockery is only lightly soiled or if it has been rinsed with water before being placed in the
dishwasher, reduce the amount of detergent used accordingly.
The number and type of wash cycles and options may vary depending on the dishwasher model.
Wash cycle
duration
(tolerance
±10%)
Hrs. Min.
2:25’
1:50’
0:08’
2:55’
0:35’
Wash cycle selection
instructions
Heavily soiled dishes and pans
(not to be used for delicate
items).
Normally soiled pans and dishes.
Standard daily wash cycle.
Pre-wash for dishes while
awaiting completion of the load
with the dishes from the next
meal.
Environmentally-friendly wash
cycle with low energy
consumption levels, suitable for
pans and dishes.
Economic and fast wash to be
used for lightly soiled dishes.
(Run cycle immediately after use)
(2 plates + 2 glasses + 4 pieces
of cutlery + 1 saucepan + 1 small
frying pan).
Wash
cycle
Intensive
Normal
Soak
Eco
*
Rapide
wash
Detergent
(A) = compartment A
(B) = compartment B
Powder Liquid Tablets
30 g (A)
25 g (A)
5 g (B)
No
25 g (A)
5 g (B)
25 g (A)
30 ml (A)
25 ml (A)
5 ml (B)
No
25 ml (A)
5 ml (B)
25 ml (A)
1 (A)
1 (A)
No
1 (A)
1 (A)
Wash
cycles
which
include
drying
Yes
Yes
No
Yes
No
EN
Notes:
To make it easier to measure out the detergent, it is worth remembering that:
1 tablespoon = 15 gr. of powder = approximately 15 ml of liquid - 1 teaspoon = 5 gr. of powder =
approximately 5 ml of liquid
Optimum performance levels when using the "Rapide wash" cycles can be achieved by observing the maximum
amounts of crockery specified.
* The Eco wash cycle adheres to the regulation EN-50242. Although it has a longer duration than other wash
cycles it uses less energy and is les harmful to the environment.
Note for Test Laboratories: for information relating to comparative EN testing conditions, please send an email
to the following address: ASSISTENZA_EN_LVS@indesitcompany.com
21
Page 22

Rinse aid and refined salt
EN
Only use products which have been
specifically designed for dishwashers.
Do not use table salt or industrial salt, or
washing up liquid.
Follow the instructions given on the packaging.
If using a multi-functional product it is not necessary to
add rinse aid; however, we recommend that you add salt,
especially if you live in an area where the water is hard or
very hard. Follow the instructions given on the packaging.
If you do not add salt or rinse aid, the LOW
* and LOW RINSE AID* indicator lights
SALT
remain lit.
Measuring out the rinse aid
Rinse aid makes it easier for the crockery to dry, as water
runs off surfaces more readily and therefore does not leave
streaks or marks.
The rinse aid dispenser should be filled:
When the LOW RINSE AID
panel is illuminated;
NEVER pour the rinse aid directly into the appliance tub.
Adjusting the amount of rinse aid
If you are not completely satisfied with the drying results,
you may adjust the quantity of rinse aid used. Use a
screwdriver to turn the dosage adjuster (F) to one of the 6
pre-set positions (the default position is set to 4):
If there are streaks on the crockery, set the adjustment
device to a lower number (1-3).
If drops of water remain on the crockery or if there are
limescale marks present after the cycle has finished, set
the adjuster to a higher number (4-6).
Setting the water hardness
Every dishwasher is equipped with a water softener which, by
using refined salt designed especially for this type of
appliance, supplies water without limescale which is then used
to wash the crockery.
This dishwasher offers a setting which helps to reduce
pollution and optimises washing performance in accordance
with the water hardness level in your area. This information can
be obtained from the organisation which supplies your
household with water.
- Switch the machine off using the ON/OFF button and open
the door.
- Set the SELECT WASH CYCLE knob first to wash cycle 5,
then to wash cycle 1, then to wash cycle 5 again.
- Press the ON/OFF button; the wash cycle phase indicator
lights will flash. It is now possible to select the water hardness
level. There is a water hardness level for every wash cycle:
* indicator light on the control
1. Open the dispenser by turning
the lid (G) in an anticlockwise
direction.
2. Pour in the rinse aid, making
sure it does not overflow from the
F
dispenser. If this happens, clean
the spill immediately with a dry
G
cloth.
3. Screw the lid back on.
E.g.: wash cycle 1, water hardness level 1
wash cycle 2, water hardness level 2, etc. etc., (up to a maximum of 5
(The default water softener setting is level 3).
- To exit the function, wait a few seconds or press one of the
option buttons
button.
Even if using multi-functional tablets, the salt dispenser should
still be filled.
(°dH = hardness measured in German degrees - °f =
hardness measured in French degrees - mmol/l = millimoles
per litre)
* levels).
*, or switch off the machine using the ON/OFF
Water Hardness Table
Level °dH
1 0 - 6 0 - 10 0 - 1
2 6 - 11 11 - 20 1,1 - 2
3 12 - 17 21 - 30 2,1 - 3
4 17 - 34 31 - 60 3,1 - 6
5*
For values between 0°f and 10°f, we do not recommend the
use of salt.
this setting may cause a slight increase in the duration of
*
the cycles.
for 1 wash cycle per day.
**
°fH mmol/l
34 - 50 61 - 90 6,1 - 9
Average salt container
capacity duration
7 months
3 months
2 months
2/3 weeks
months
5 months
**
Measuring out the refined salt
In order to achieve the best possible results using a wash
cycle, make sure that the dispenser is never empty.
Refined salt removes limescale from the water, thus
avoiding the formation of deposits on crockery.
The salt dispenser is located in the lower part of the
dishwasher (see Description) and should be filled:
When the green float
the cap of the salt dispenser.
When the LOW SALT
illuminated;
the salt container right up to its edge (this should hold
approximately 1 kg); it is not unusual for a little water to leak
out.
4. Remove the funnel* and wipe any salt residue away from the
opening; rinse the cap under running water and then screw it
on, the head facing downwards so as to let the water flow out
of the four cracks which are arranged in a star shape on the
lower part of the cap. (Salt cap with green float
It is advisable to perform this procedure every time you
add salt to the container.
Make sure the cap is screwed on tightly, so that no detergent
can get into the container during the wash cycle (this could
damage the water softener beyond repair).
When necessary, measure out the salt before a wash
cycle so that any saline solution which has leaked out of the
salt dispenser is removed.
* cannot be seen by simply looking at
* indicator light on the control panel is
1. Remove the lower rack and unscrew the
container cap (anticlockwise).
2. The first time you do this: fill the water
tank right up to its edge.
3. Position the funnel
* (see figure) and fill
*)
22
* Only available in selected models.
Page 23

Care and maintenance
Shutting off the water and electricity
supplies
Turn off the water tap after every wash cycle to avoid
leaks.
Always unplug the appliance when cleaning it and
when performing maintenance work.
Cleaning the dishwasher
The external surfaces of the machine and the control
panel may be cleaned using a non-abrasive cloth
which has been dampened with water. Do not use
solvents or abrasive products.
Any marks on the inside of the appliance may be
removed using a cloth dampened with water and a
little vinegar.
Preventing unpleasant odours
Always keep the door of the appliance ajar in order to
avoid moisture from forming and being trapped inside
the machine.
Clean the seals around the door and detergent
dispensers regularly using a damp sponge. This will
avoid food becoming trapped in the seals, which is
the main cause behind the formation of unpleasant
odours.
Clean the water inlet filter at the tap outlet regularly.
- Turn off the water tap.
- Unscrew the end of the water inlet hose, remove the filter
and clean it carefully under running water.
- Replace the filter and screw the water hose back into
position.
Cleaning the filters
The filter assembly consists of three filters which remove food
residues from the washing water and then recirculate the
water. They should be cleaned if you wish to achieve the best
results in every wash.
Clean the filters regularly.
The dishwasher should not be used without filters, or if the
filter is loose.
After several washes, check the filter assembly and if
necessary clean it thoroughly under running water, using a
non-metallic brush and following the instructions below:
1. Turn the cylindrical filter C in an anti-clockwise direction
and pull it out (fig. 1).
2. Remove the cup filter B by exerting a slight pressure on the
side flaps (fig. 2).
3. Slide out the stainless steel plate filter A (fig. 3).
4. Inspect the trap and remove any food residue. NEVER
REMOVE the wash cycle pump (black detail) (fig. 4).
EN
Cleaning the sprayer arms
Food residue may become encrusted onto the sprayer
arms and block the holes used to spray the water. It is
therefore recommended that the arms are checked from
time to time and cleaned with a small non-metallic
brush.
The two sprayer arms may both be removed.
To remove the upper sprayer
arm, rotate the locking ring in
an anti-clockwise direction.
The upper sprayer arm should
be replaced with the holes
facing upwards.
The lower sprayer arm can be
removed by pressing on the
side tabs and pulling it
upwards.
Cleaning the water inlet filter*
If the water hoses are new or have not been used for an
extended period of time, let the water run to make sure it
is clear and free of impurities before performing the
necessary connections. If this precaution is not taken,
the water inlet could become blocked and damage the
dishwasher.
1 2
3
After cleaning the filters, replace the filter assembly and fix it
in position correctly; this is essential for maintaining the
efficient operation of the dishwasher.
4
Leaving the machine unused for extended
periods
Disconnect the appliance from the electricity supply and
shut off the water tap.
Leave the door of the appliance ajar.
When you return, run a wash cycle when the dishwasher is
empty.
* Only available in selected models.
23
Page 24

Precautions and advice
EN
This appliance was designed and manufactured in
compliance with current international safety standards. The
following information has been provided for safety reasons
and should therefore be read carefully.
General safety
This appliance is not intended for use by persons
(including children) with reduced physical, sensory or
mental capabilities, or lack of experience and knowledge,
unless they have been given supervision or instruction
concerning use of the appliance by a person responsible
for their safety.
Children should be supervised to ensure that they do not
play with the appliance.
The appliance was designed for domestic use inside the
home and is not intended for commercial or industrial use.
The appliance must be used by adults only, to wash
domestic crockery in accordance with the instructions in
this manual.
The appliance must not be installed outdoors, even in
covered areas. It is extremely dangerous to leave the
machine exposed to rain and storms.
Do not touch the appliance when barefoot.
When unplugging the appliance always pull the plug from
the mains socket, do not pull on the cable.
The water supply tap must be shut off and the plug should
be removed from the electrical socket before cleaning the
appliance or carrying out any maintenance work.
If the appliance breaks down, do not under any
circumstances touch the internal parts in an attempt to
perform the repair work yourself.
Never touch the heating element.
Do not lean or sit on the open door of the appliance: this
may cause the appliance to overturn.
The door should not be left open as it may create a
dangerous obstacle.
Keep detergent and rinse aid out of reach of children.
The packaging material should not be used as a toy.
Saving energy and respecting the
environment
Saving water and energy
Only begin a wash cycle when the dishwasher is full. While
waiting for the dishwasher to be filled, prevent unpleasant
odours using the Soak cycle (see Wash cycles).
Select a wash cycle which is suited to the type of crockery
and to the soil level of the crockery using the Table of wash
cycles:
- For dishes with a normal soil level, use the Eco wash
cycle, which guarantees low energy and water
consumption levels.
- If the load is smaller than usual activate the Half load
option
* (see Start-up and use).
If your electricity supply contract gives details of electricity
saving time bands, run wash cycles during the periods
when a lower tariff is applied. The Delayed start
(see Start-up and use) helps you organise the wash cycles
accordingly.
Phosphate-free and chlorine-free detergents
containing enzymes
We strongly recommend that you use detergents that do
not contain phosphates or chlorine, as these products are
harmful to the environment.
Enzymes provide a particularly effective action at
temperatures around 50°C, and as a result detergents
containing enzymes can be used in conjunction with lowtemperature wash cycles in order to achieve the same
results as a normal 65°C wash cycle.
To avoid wasting detergent, use the product in appropriate
quantities based on the manufacturers recommendations,
the hardness of the water and the soil level and quantity of
crockery to be washed. Even if they are biodegradable,
detergents contain substances which may alter the balance
of nature.
* button
Disposal
Disposal of packaging materials: observe local legislation
so that the packaging may be reused.
The European Directive 2002/96/EC relating to Waste
Electrical and Electronic Equipment (WEEE) states that
household appliances should not be disposed of using the
normal solid urban waste cycle. Exhausted appliances
should be collected separately in order to optimise the cost
of re-using and recycling the materials inside the machine,
while preventing potential damage to the atmosphere and
to public health. The crossed-out dustbin is marked on all
products to remind the owner of their obligations regarding
separated waste collection.
For further information relating to the correct disposal of
household appliances, owners may contact the relevant
public authority or the local appliance dealer.
24
* Only available in selected models.
Page 25

Troubleshooting
Whenever the appliance fails to work, check for a solution from the following list before calling for
Assistance.
Problem:
The dishwasher does not start or
cannot be controlled
The door won’t close • The lock was released. Strongly push the door until a “clacking” noise is heard.
No water drains out from the
dishwasher.
The dishwasher makes excessive
noise.
The dishes and glasses are
covered in a white film or
limescale deposits.
The dishes and glasses are
streaked or have a bluish tinge.
Possible causes / Solutions:
• Switch off the appliance by pressing the ON/OFF button, switch it back on after
approximately one minute and reset the program.
• The appliance has not been plugged in properly.
• The dishwasher door has not been shut properly.
• The dishwasher cycle has not yet finished.
• The water inlet hose is bent (see Installation).
• The drain duct is blocked.
• The filter is clogged up with food residues.
• The dishes are rattling against each other or against the sprayer arms.
• An excessive amount of foam has been produced: the detergent has not been
measured out correctly or it is not suitable for use in dishwashers (see Start-up
and use).
• The level of the refined salt is low or the dosage setting is not suited to the
hardness of the water (see Rinse aid and salt).
• The lid on the salt dispenser is not closed properly.
• The rinse aid has been used up or the dosage is too low.
• The rinse aid dosage is too high.
EN
The crockery has not been dried
properly.
The dishes are not clean. • The racks are overloaded (see Loading the racks).
The dishwasher does not take any
water in - Tap shut-off alarm
(several short beeps are emitted
(the Drying and End indicator lights
flash).
Water inlet hose alarm / Water inlet
filter blocked
(the Washing, Drying and End
indicator lights flashes).
• A wash cycle without a drying program has been selected.
• The rinse aid has been used up or the dosage is too low (see Rinse aid and
salt).
• The rinse aid dispenser setting is not suitable.
• The crockery is made from non-stick material or plastic.
• The crockery has not been arranged well.
• The sprayer arms cannot move freely.
• The wash cycle is too gentle (see Wash cycles).
• An excessive amount of foam has been produced: the detergent has not been
measured out correctly or it is not suitable for use in dishwashers (see Start-up
and use).
• The lid on the rinse aid compartment has not been shut correctly.
• The filter is dirty or blocked (see Care and maintenance).
• The refined salt level is low (see Rinse aid and salt).
• There is no water in the mains supply.
• The water inlet hose is bent (see Installation).
• Turn on the tap and the appliance will start after a few minutes.
)
*
• The appliance lock has been activated because no action was taken when the
beeps
sounded. Switch off the appliance using the ON/OFF button, turn on the
*
tap and switch the appliance back on after 20 seconds by pressing the same
button. Re-program the appliance and restart the wash cycle.
• Switch off the appliance by pressing the ON/OFF button. Shut off the water tap
to eliminate the risk of flooding and remove the plug from the electrical socket.
Make sure the water inlet filter has not become blocked by impurities (see “Care
and maintenance” chapter).
* Only available in selected models.
25
Page 26

Assistance
EN
We care about our consumers and we always try to provide the highest level of service. We keep
improving our products to make your contact with the appliance simple and pleasant.
Accessories
Extend the life of your appliance and decrease the possibility of its breakdown.
Try out the Indesit Professional accessories range for an easy and effective care about your domestic
appliances.
Indesit Professional accessories are made in Italy in accordance with European standards of quality, ecology
and safety, and in compliance with long-term experience of the producer.
Learn more on the website www.hotpoint-ariston.ru or in the shops in your town.
Authorized service centers
To be closer to our consumers we have created a wide service network with well-trained and honest service
professionals. Today it consists of about 350 service centers in Russia and CIS.
The contacts are available in your service certificate and on the website www.hotpoint-ariston.ru
If you need to call to the service center:
Att! Always ask for original spare parts for your repair.
Before contacting Assistance:
Check whether the problem can be resolved using the Troubleshooting guide (see Troubleshooting).
Restart the programme to check whether the problem has ceased to exist.
If the problem persists, contact the Authorised Technical Assistance Service.
Never use the services of unauthorised technicians.
Please have the following information to hand:
The type of malfunction.
The appliance model (Mod.).
The serial number (S/N).
This information can be found on the appliance data plate (see Description of the appliance).
Service news and other useful information you may find on www.hotpoint-ariston.ru
26
Page 27

EN
27
Page 28

EN
195081952.03
09/2011 - Xerox Fabriano
28
 Loading...