

Page 1

User guide
WASHING MACHINE
NA
NA
English,1
AW 149
SP
Español, #
F
Français, 49
Contents
NA
Description, 2
Important Safety Instructions, 3-4
Your safety and that of your family
Warnings about installation
Technical details
Unpacking, Installation, 5-6-7-8-9
Unpacking and levelling
Remove the shipping bolts
Water and Electric connections
Final Checklist
Washing Machine Description
and Option Modifiers, 10-11
Control panel
Washing Options
Variable spin
Variable temperature
Programs, 12
Program table
Detergent Dispenser and Tips, 13
Detergent dispenser
Before washing
Starting a Wash Program
and Washcare Tips, 14-15-16-17-18
Laundry preparation
Typical wash loads and laundry preparation
Washcare tips and understanding fabric care labels (symbols)
Woolmark Cashmere Platinum
Operating the washing machine
Stain removal chart
Care and Maintenance, 19
Switching off the water or electricity supply
Cleaning the machine
Cleaning the door bowl
Checking the water inlet hose
Drum maintenance
Cleaning the detergent dispenser drawer
Troubleshooting, 20-21
Service, 22
Before calling for Assistance
Warranties, 23
Ariston Statement of Warranties
www.aristonappliances.us
1
Page 2

NA
Description
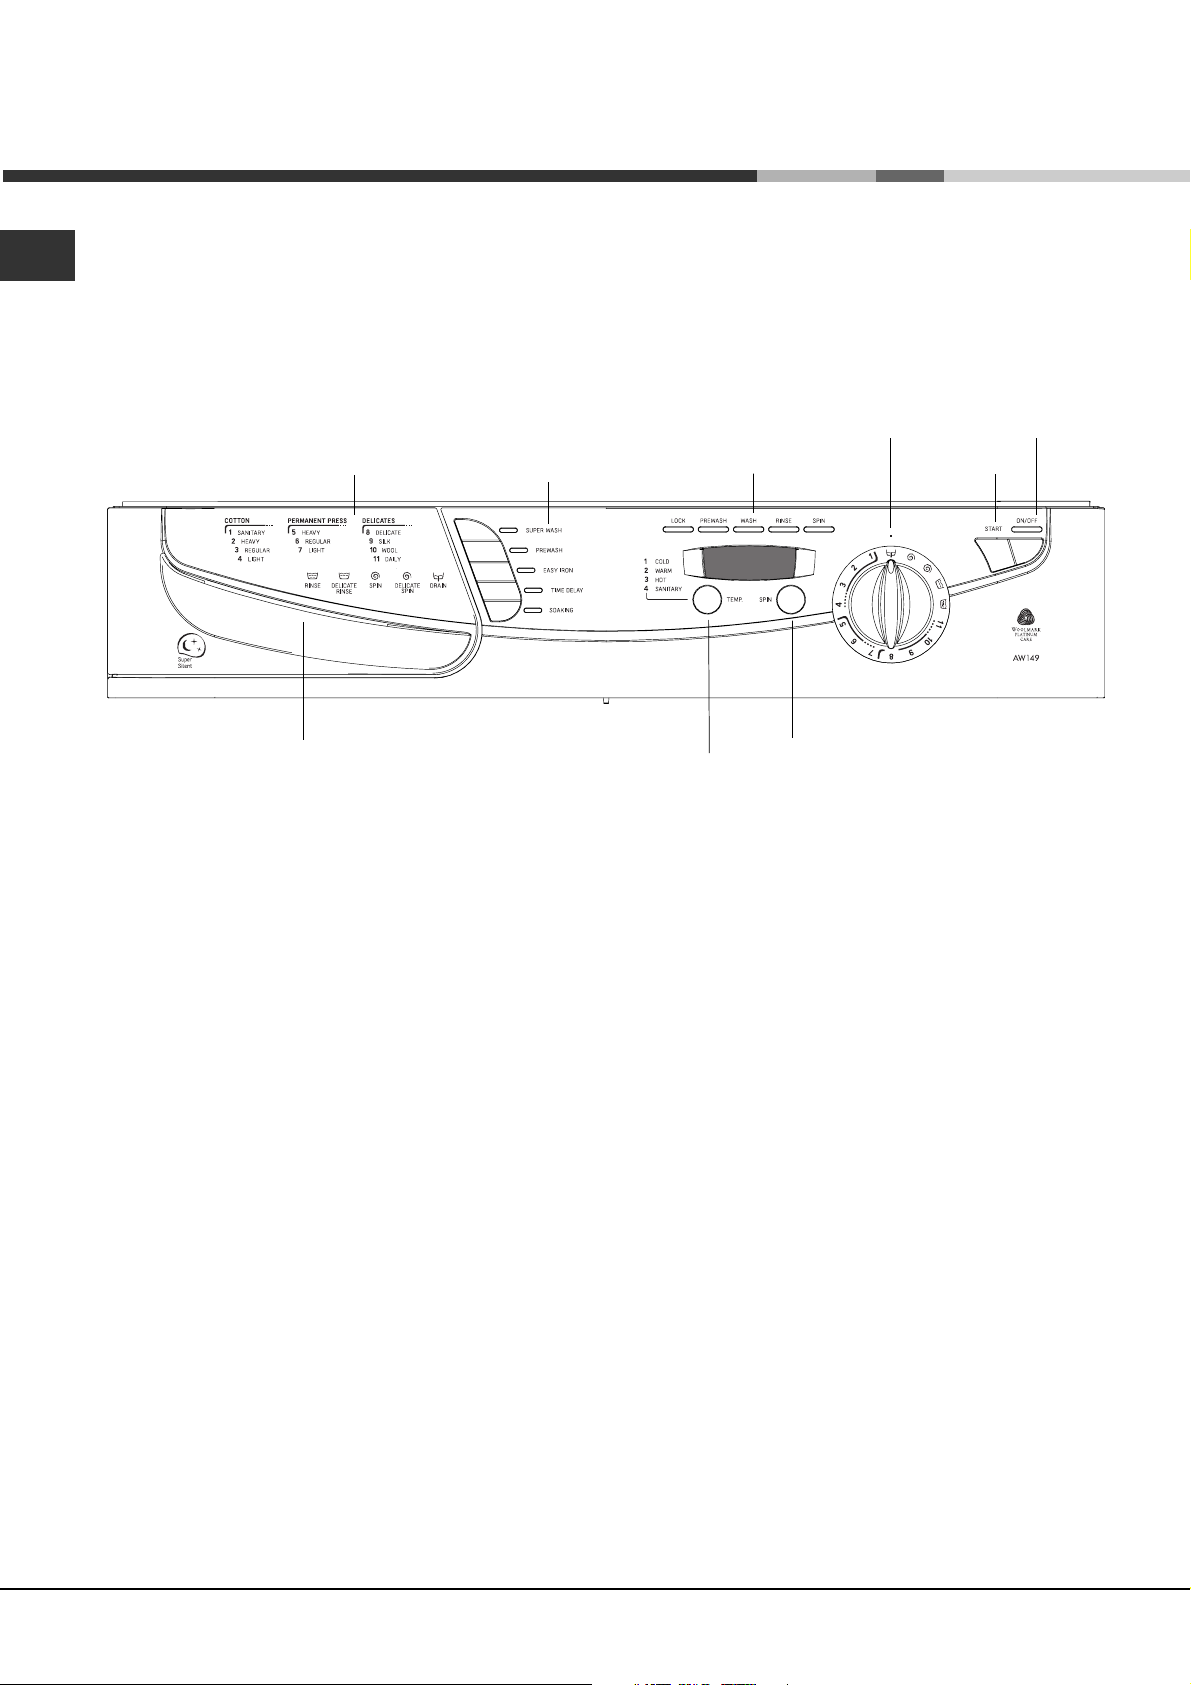
Control panel
(
Varies by Model)
Dispenser drawer
Front adjustable feet
Interlocking door
and release lever
Hooked end support
Plumbing indicator line
Please record the Model number and
Serial number of your machine located
behind the door for future reference.
Hot and Cold water
inlet points
Drainage hose
Power cord
Two shipping bolts under
the plastic covers !
BOTH must be removed BEFORE
you use your machine (see page 6)
! The machine was designed and built in
compliance with the appliance international
safety regulations.
The following information is provided for your
safety and should consequently be read
carefully.
2
Back feet
www.aristonappliances.us
Page 3
Important Safety Instructions
INTRODUCTION
Congratulations on your new Ariston washing machine. This is a highly sophisticated engineered product that
will give you many years of satisfaction. Please spend a few moments reading the Owner Manual. This will
show you ways to best utilize your valuable purchase
Save these instructions
Your washing machine has been built in compliance with the strictest international
safety regulations, to protect you and all your family
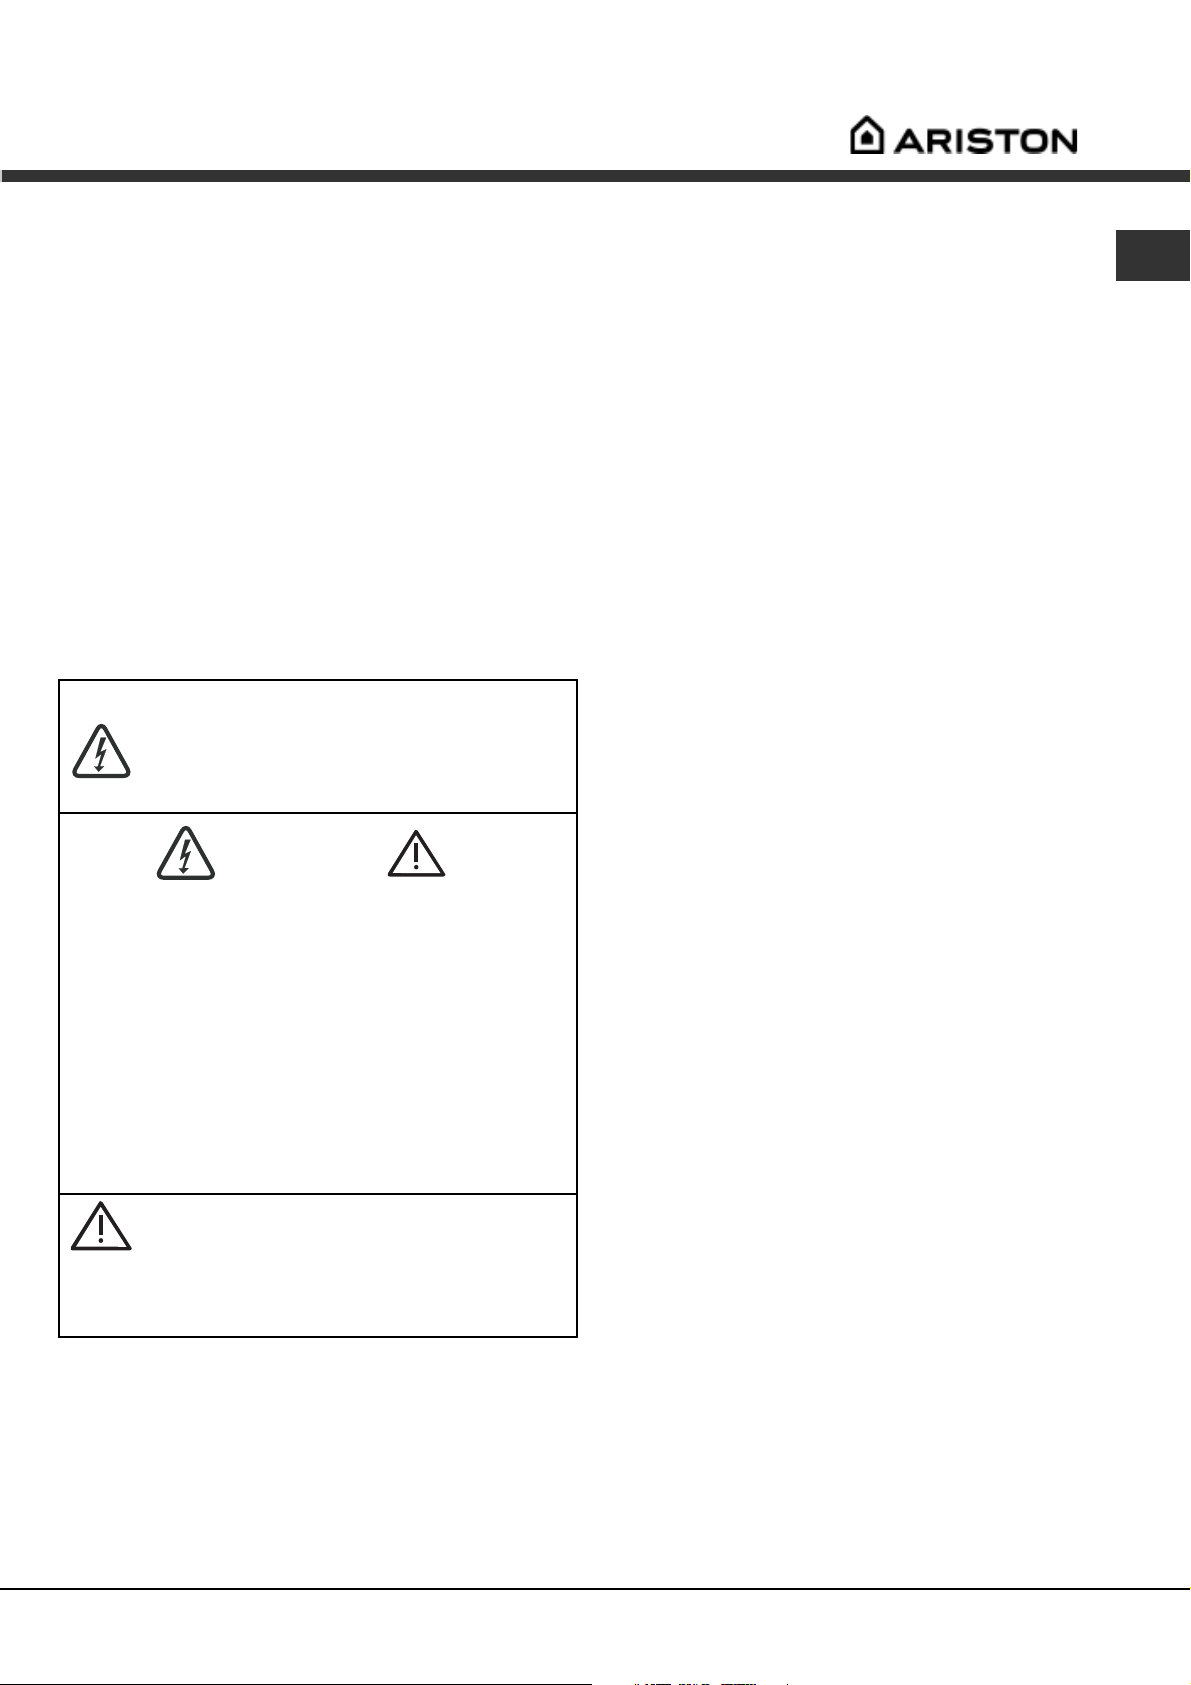
WARNING
To reduce the risk of fire, electrical shock, or injury to persons when using
your appliance, follow basic precautions, including the following:
NA
1. Read all instructions before using the appliance.
2. Install and level the clothes washer on a floor that
can support the weight.
3. This appliance must be properly grounded. Never
plug the appliance cord into a receptable which is not
grounded adequately and in accordance with local and
national codes. See installation instructions for grounding
this appliance.
4. To avoid the possibility of fire or explosion:
- Do not wash articles that have been previously cleaned
in, washed in, soaked in, or spotted with gasoline, dry
cleaning solvents, other flammable, or exlosive
substances as they give off vapors that could ignite or
explode.
- Do not add gasoline, dry cleaning solvents, or other
flammable or explosive substances to the wash water.
These substances give off vapors that could ignite or
explode.
- Under certain conditions hydrogen gas may be
produced in a hot water system that has not been used
for 2 weeks or more. HYDROGEN GAS IS EXPLOSIVE.
If the hot water system has not been used for such a
period, before using a washing machine, turn on all hot
water faucets and let the water flow from each for
several minutes. This will release any accumulated
hydrogen gas. As the gas is flammable do not smoke
or use an open flame during this time.
- To reduce the risk of fire, clothes, cleaning rags, mop
heads and the like which have traces of any flammable
substances, such as vegetable oil, petroleum based
oils or distillates, waxes, fats, etc. must not be placed in
the washing machine. These items may contain some
flammable substances after laundering, which may
smoke or catch fire by itself.
5. Always be sure to unplug the washing machine
from the electrical supply before attempting any service.
6. Do not insert/pull out the mains plug with wet hands.
7. Do not pull out the mains plug by tugging the cable.
To reduce the risk of fire or electrical shock, DO NOT use
an extension cord or an adapter to connect the washing
machine to the electrical power supply.
8. Caution when draining hot water.
9. The washing machine must only be used for its intended
purpose.
10. Make sure that all water connections to the washing
machine have shut-off valve(s) and that they are readily
accessible. Close the washing machine shut-off valve(s) at
the end of each wash day.
Check the fill hose connections on a regular basis to assure
that they are tight and not leaking.
11. Do not allow children to play on or in the appliance.
Close supervision of children is necessary when the
appliance is used near children.
12. Before the appliance is removed from service or
discarded, remove the door.
13. Do not reach into the appliance if the tub or drum is
moving.
14. Do not install or store this appliance where it will be
exposed to the weather.
15. Do not tamper with controls.
16. Do not repair or replace any part of the appliance or
attempt any servicing unless specifically recommended in
the user-maintenance instructions or in published user-repair
instructions that you understand and have the skills to carry
out.
17. Do not use fabric softeners or products to reduce static
unless recommended by the manufacturers of the fabric
softener product.
18. Do not machine wash fiberglass materials. Small
particles can stick to fabrics washed in following loads and
cause skin irritation.
19. Inlet hoses are subject to damage and deterioraton
over time. Check the hoses periodically for bulges, kinks,
cuts, wear or leaks and replace them every five years.
www.aristonappliances.us
3
Page 4
NA
Technical details
Model AW 149
Dimensions
Capacity
Electric
connections
Water
connections
Spin speed
U
®
L
C
US LISTED
23.4" (59.5 cm) wide
33.4" (85 cm ) high
23.6" (60 cm ) deep
from 2 to 15 L bs (7 kg)
voltage 1 20 Volts 60 Hz
maximum pressure 100 psi (689.6 kPa)
minimu m pres sure 20 psi (137.9 kPa)
drum capacity 54 litres
up to 1400 rpm
Th is app liance w as tested by UL
and conform s with bo th Canadian
and U.S. UL s afety requ iremen ts
and displays their Mark
Indesit Com pany offer their
cus tomers products w ith the
ENER GY STAR Label
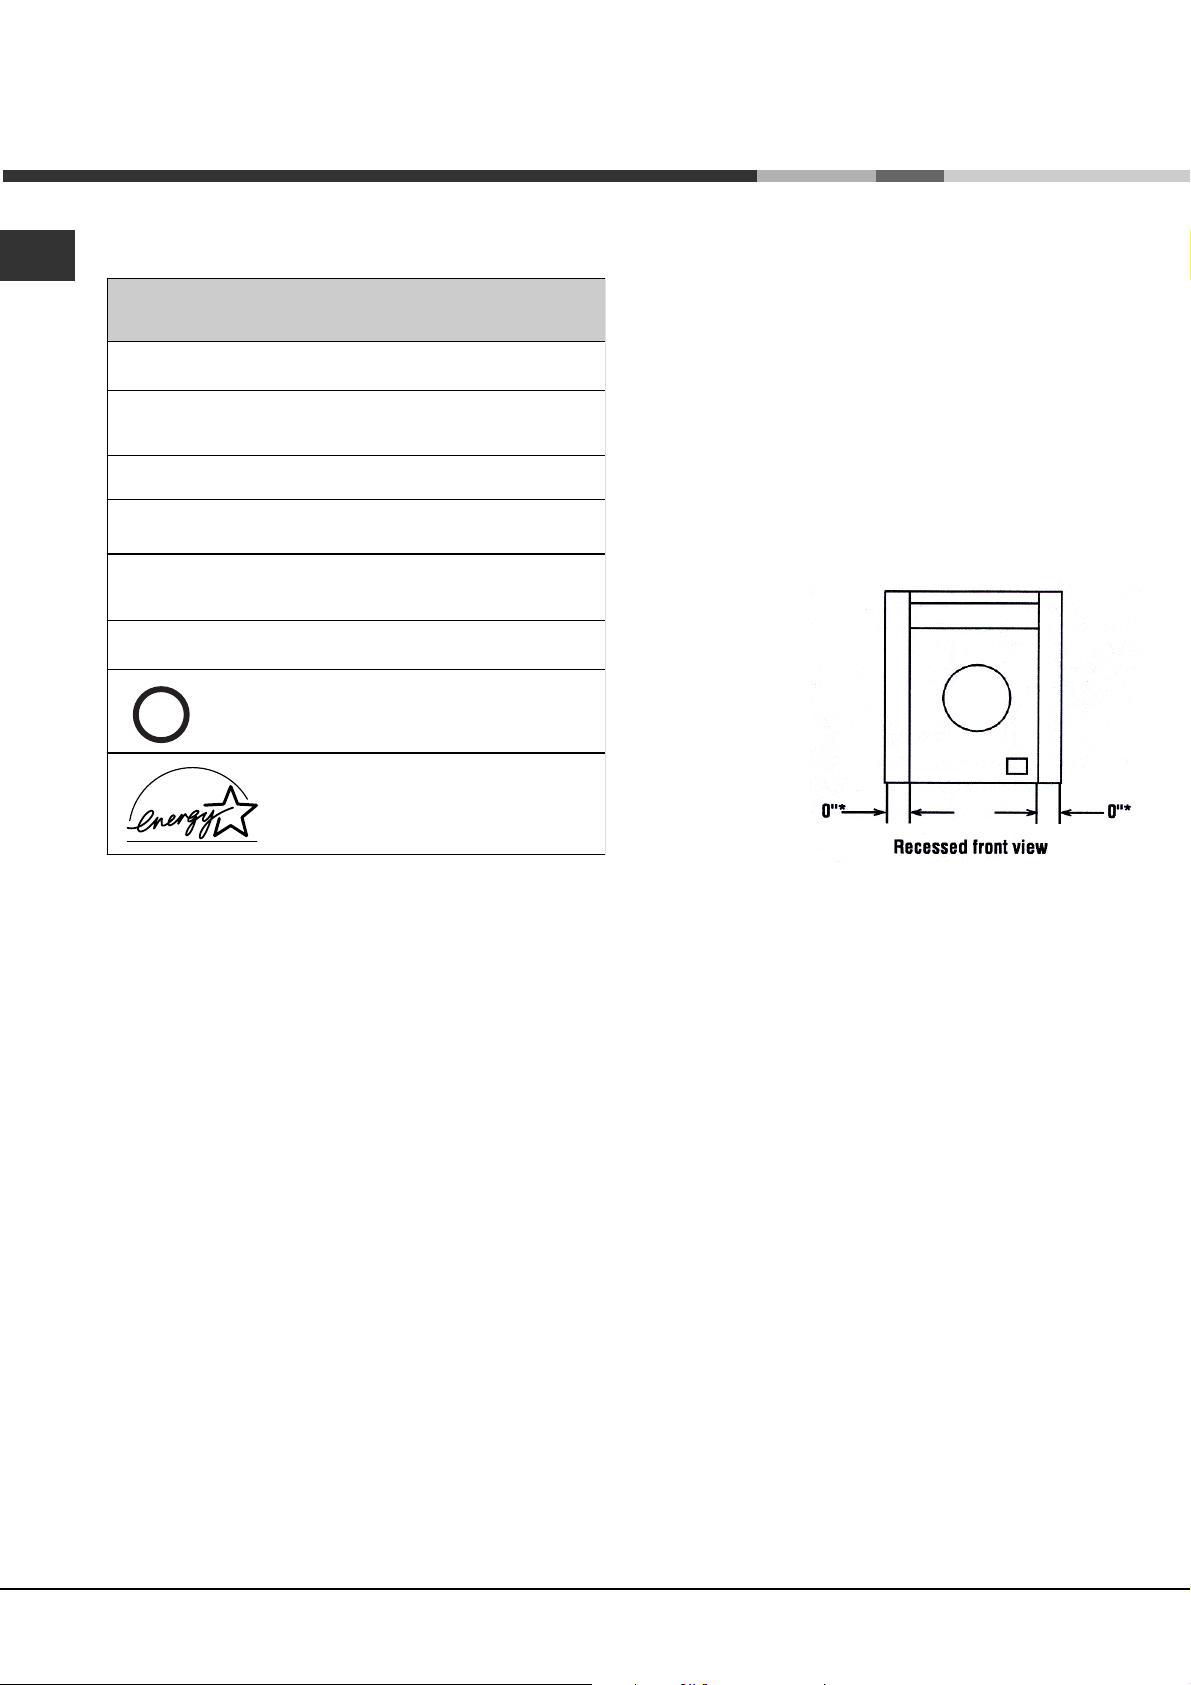
RECESSED, CLOSET AND ALCOVE
INSTALLATION (Instructions)
The machine may be installed in a recessed area,
closet or alcove.
The installation spacing is in inches and is the minimum
acceptable.
Additional spacing should be considered for easy
installation, servicing and in compliance with local codes
or ordinances.
Other installation must use the minimum dimensions
indicated .
Minimum
installation
spacing
* Additional clearances
for wall, door and floor
moldings maybe required.
As a result of technological progress, the manufacturer reserves the right to make any improvements to its
appliances without giving prior notice to its clientele.
4
www.aristonappliances.us
Page 5
Unpacking
! Keep this instruction book on hand in order to refer to it when necessary. Take it you when you move, and
should you sell this appliance or pass it on to an other party, make sure that this booklet is supplied along with
the appliance so that the new owner may be informed about warnings and suggestions on how the works.
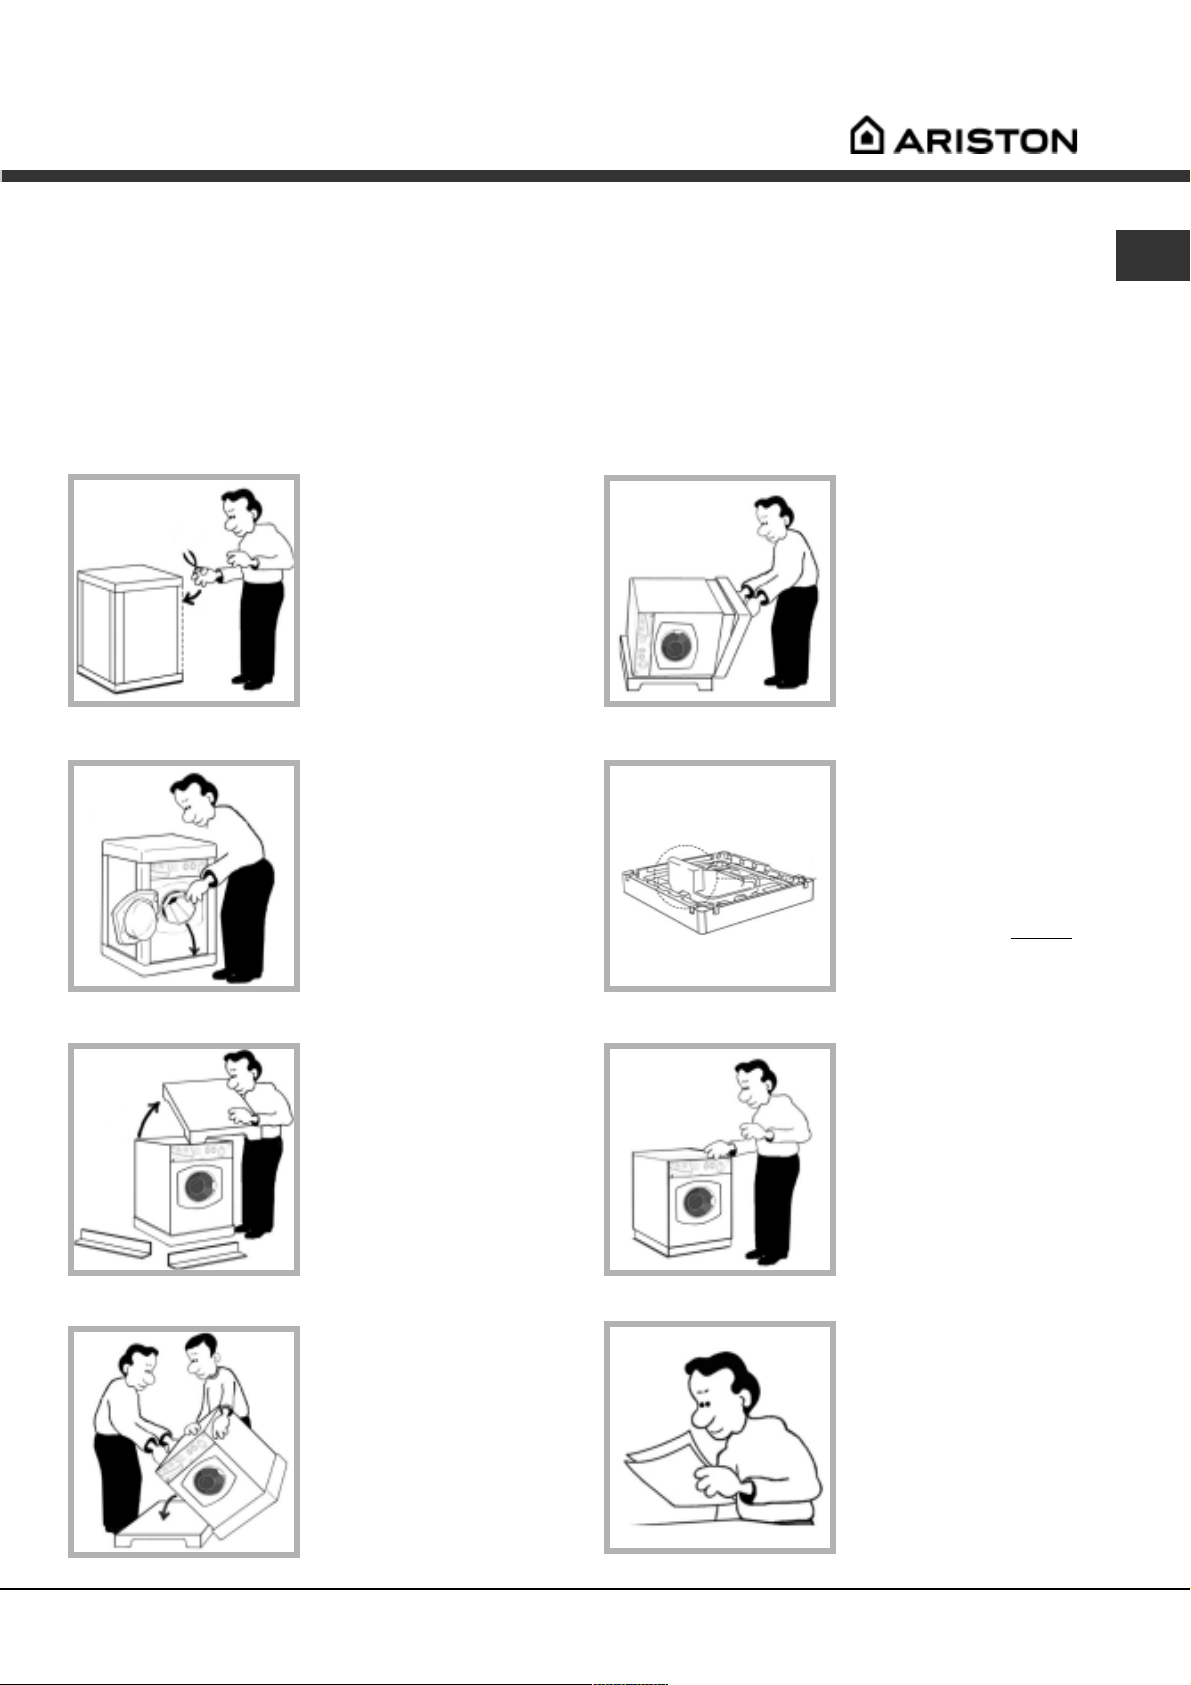
Unpacking
NA
1. Using scissors, cut
carefully along one
corner post to remove
the film.
2. Open the door, check
inside the drum and
remove the
accessories bags.
! Retain all packaging
material until
installation is
complete.
5. Remove the polystyrene
base.
! IMPORTANT check
when unpacking
your machine:
! This is the part of the
polystyrene base and should
have stayed intact when
you removed the base.
If it has broken off and is still
in the machine
it while the machine is still
laying on its side on the top
cap.
remove
www.aristonappliances.us
3. Lift of the polystyrene
top cap and remove the
four corner posts.
4. Carefully lay the left side
of the machine down
onto the top cap.
! We reccomend that
a second person help
to raise and lower
the machine.
7. Stand the machine
upright.
Protect the environment
Please dispose of the
packaging material carefully
and considerately.
! Continue to read the rest
of these instructions
carefully; the following
pages contain important
information on installation
and troubleshooting.
5
Page 6
NA
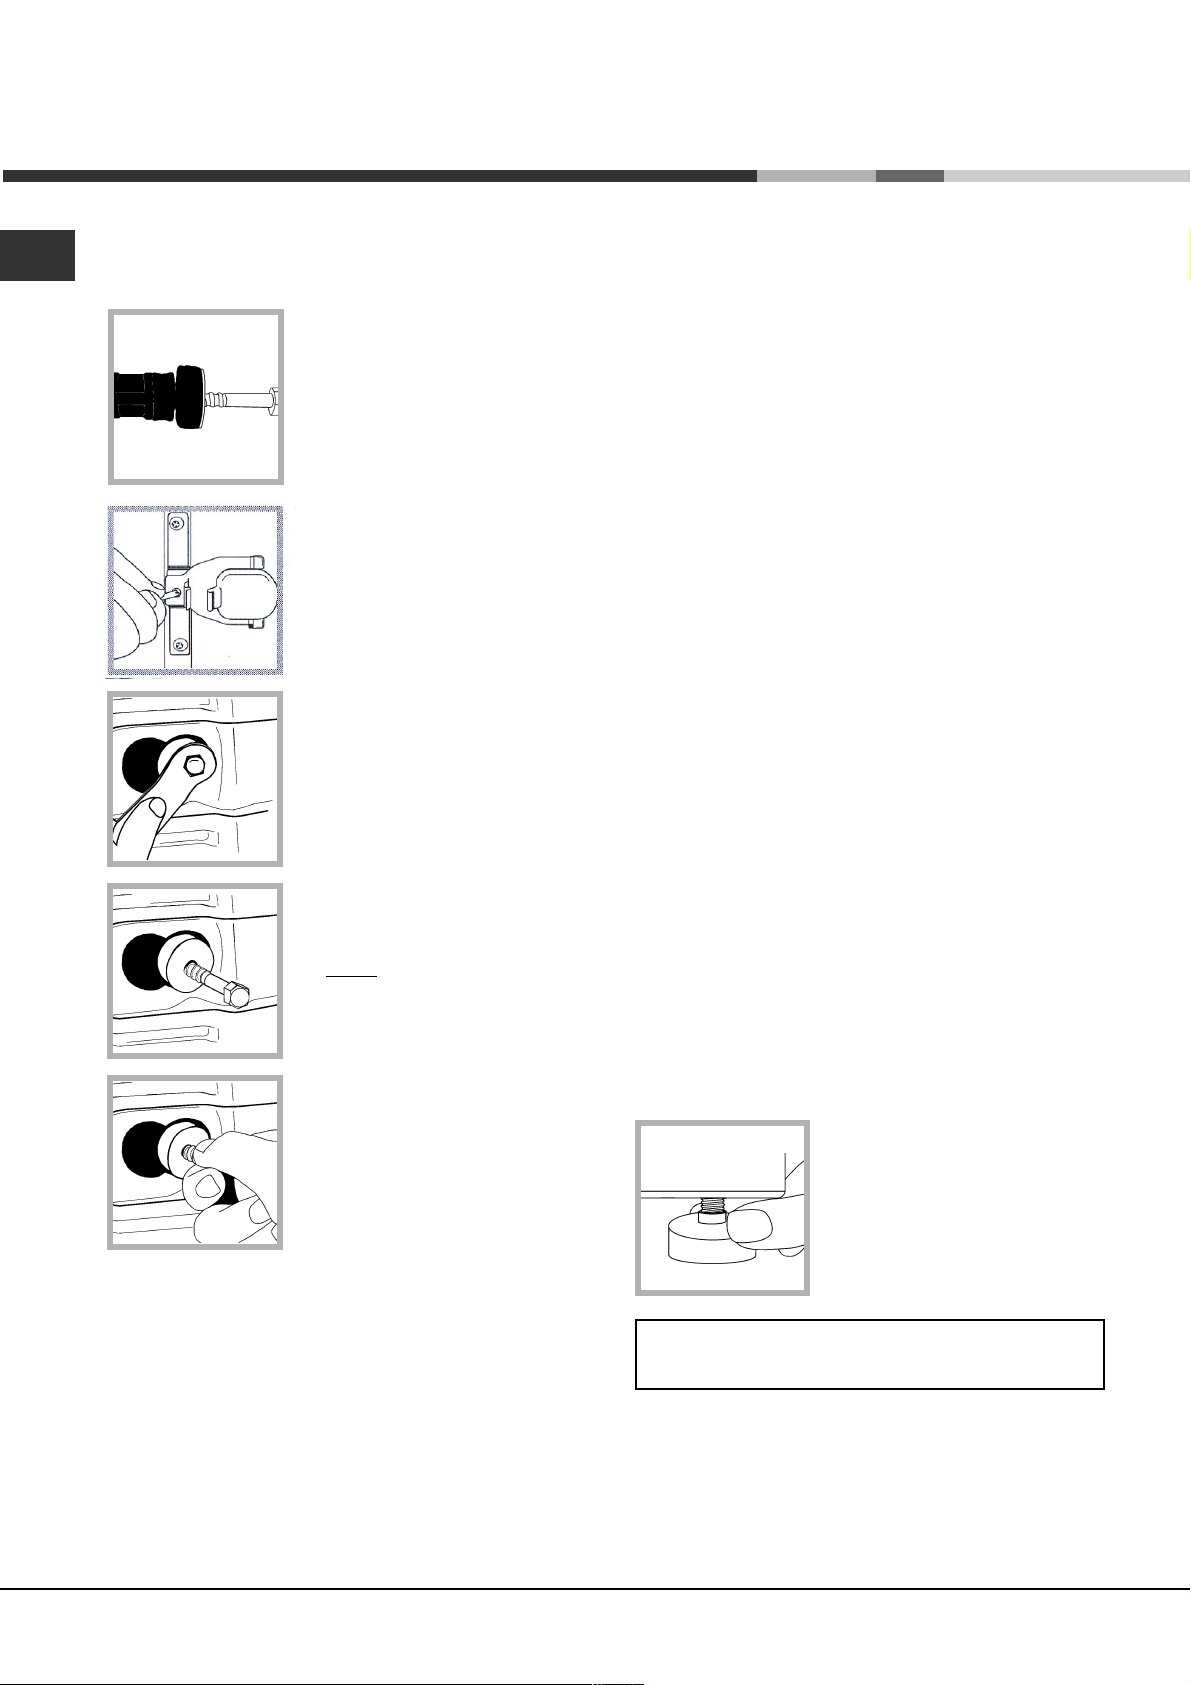
Remove the Shipping Bolts
IMPORTANT: Read these instructions to remove the 2
shipping bolts (see Description
for location). Situated on one
either side of the rear panel,
BOTH shipping bolts MUST be
removed before use.
! Failure to do so may cause
damage to your machine.
It is important the transit bolt and
spacer (see pic) come out intact.
1. Use a crosshead screwdriver
to remove the yellow plastic
covers.
Location
Where you install your machine will affect its performance:
! For your safety and to comply with electrical
regulations, seek professional advice if you want to install
your machine in a bath or shower room.
Make sure that the electrical socket and water taps are
easily accessible. You should switch off the machine's
electrical and water supplies when you are not using
it for extended periods.
Make sure that you allow enough space for the
machine. Select a space at least 23.6 (60 cm) wide,
23.6 (60 cm) deep and 33.4 (85 cm) high. Also
leave enough space to open the door fully, so that you
can load and unload it easily.
Where possible, the machine should be positioned on
a solid floor to minimise vibration.
Take care when you move the machine not to rip any
floor coverings. The weight of the machine may cause
indentations in some floor coverings.
2. Unscrew the bolt using a 13
mm wrench.
3.
STOP when 3 threads can be
seen.
4. Hold, slide sideways and pull to
remove.
5. For safety, replace both yellow plastic covers over the
holes left by removing the two bolts.
Did you know?
Levelling
Your machine will be noisy if the two front feet are not
adjusted so that the machine stands firm and level.
! The machine should be levelled from side to side and
from front to back.
1. Move your machine into its final location.
- Take care not to trap or kink the hoses.
2. Turn one or both front feet counter-clockwise by hand
until the feet cannot be turned any more.
When adjusting the feet, use a spirit level to check the
machine stands level, from side to side and from front to
back.
The spring on each foot will stop
them coming loose.
! If it is placed on a fitted or loose
carpet, adjust the feet in such a
way as to allow enough room for
ventilation beneath the machine.
! Packaging materials are
not children's toys.
the shipping bolts are fitted to ensure that your machine is undamaged during delivery.
...both of the shipping bolts must be removed before using the machine, not doing so will lead to
excessive vibration, movement of the machine and could eventually lead to internal damage.
...the majority of problems with noisy machines are due to the shipping bolts not being removed,
closely followed by the feet not being adjusted correctly to level the machine.
...you will be charged for a service engineers visit if a problem with your machine is caused by
incorrect installation or misuse.
6
www.aristonappliances.us
Page 7
Installation
Water Connection
Caution
1. The washing machine must only be operated
with cold and hot (max. 140°F//60°C) tap water.
Do not connect the appliance to the mixer tap of an
unpressured hot-water boiler.
2. To prevent water damage, the hot and cold water
valves should be accessible when the washer is in
place and should always be turned off when the
washer is not in use.
! Remember: please use the new hoses supplied,
fitted to the machine. Old hoses may cause leaks due
to worn out washers or may be split due to water
pressure.
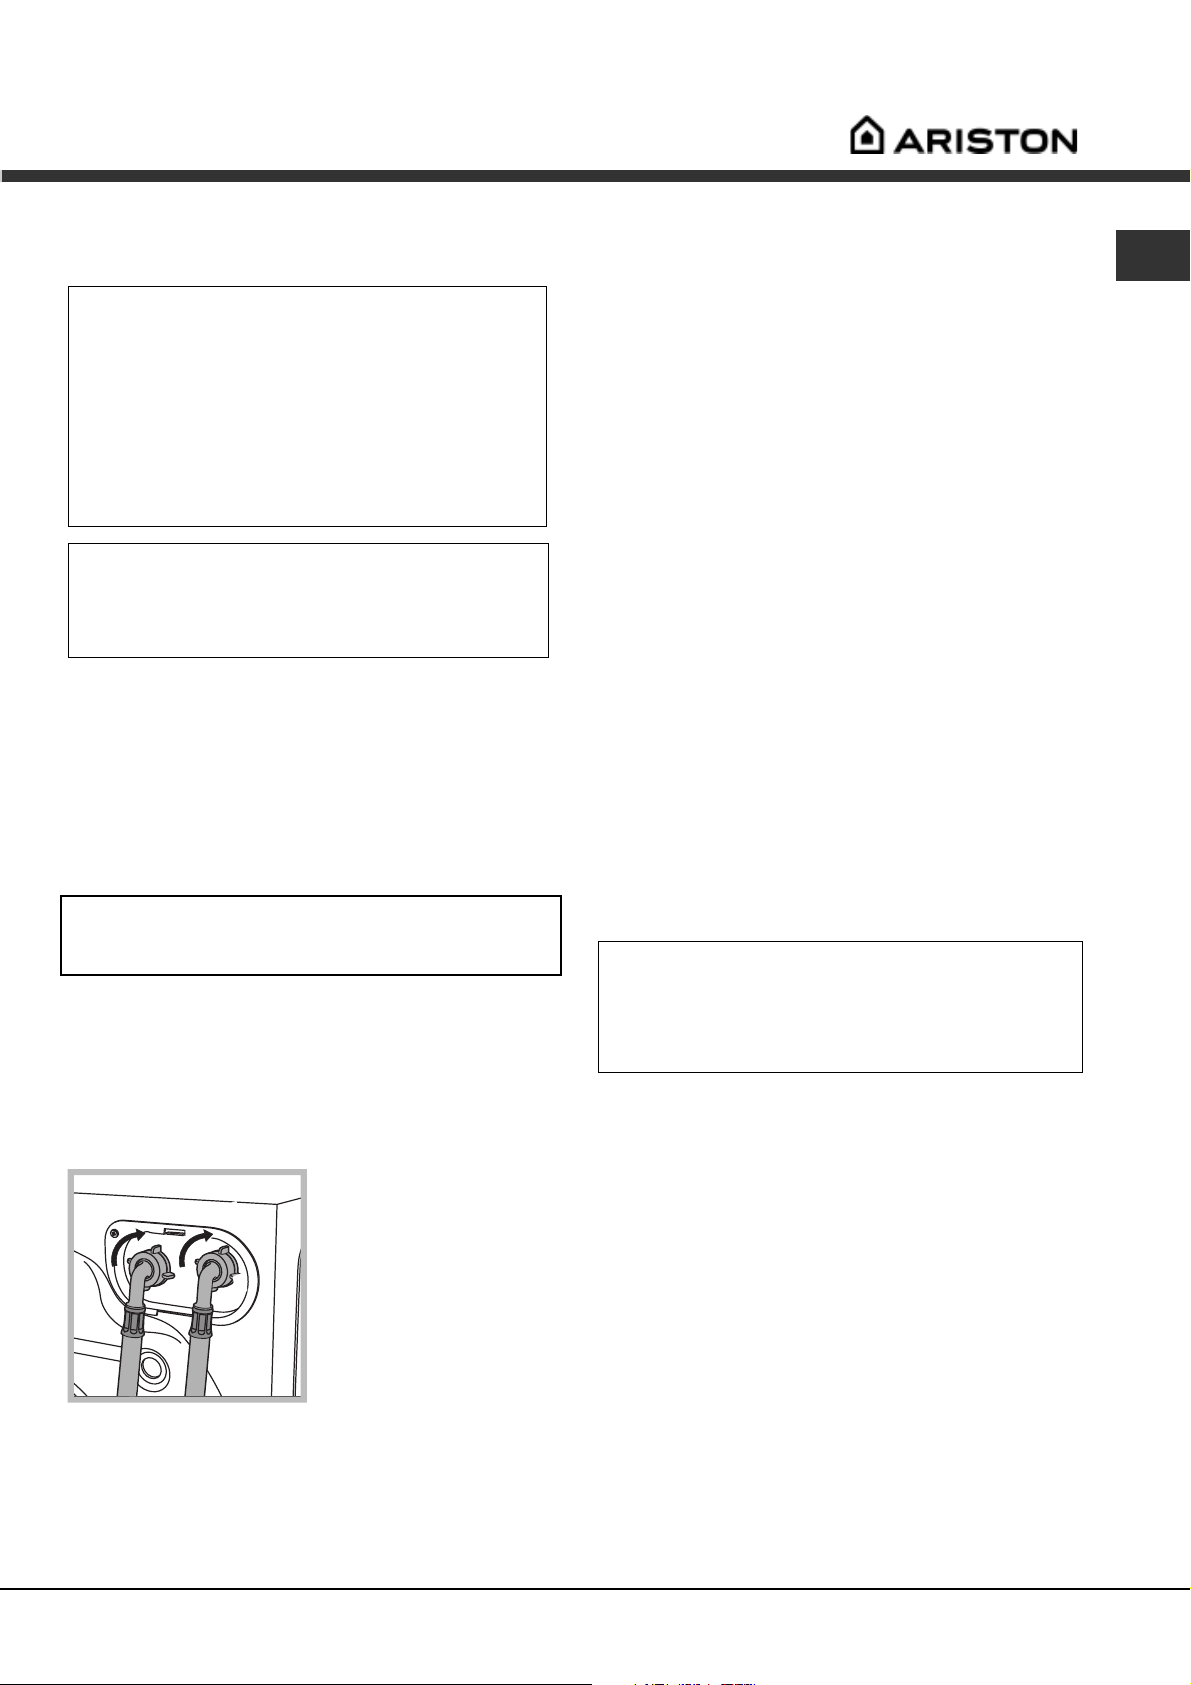
Connecting the water inlet hoses
Included in the accessories supplied with the machine
are 2 inlet hoses and 4 rubber washers. The straight end
of these hoses should be connected to the supply.
The 90° angled end of these hoses should be connected
to the inlet valves on the back of the machine to make a
water tight seal on each connection (see below figure).
The couplings should be tightened by hand, a tool should
only be used if a leak occurs. Do not use excessive
force.
Repair or replacement of a part should be made only by
a qualified service technician to prevent personal injury or
damage to the machine. Inlet valves are color coded:
Red = Hot / White = Cold
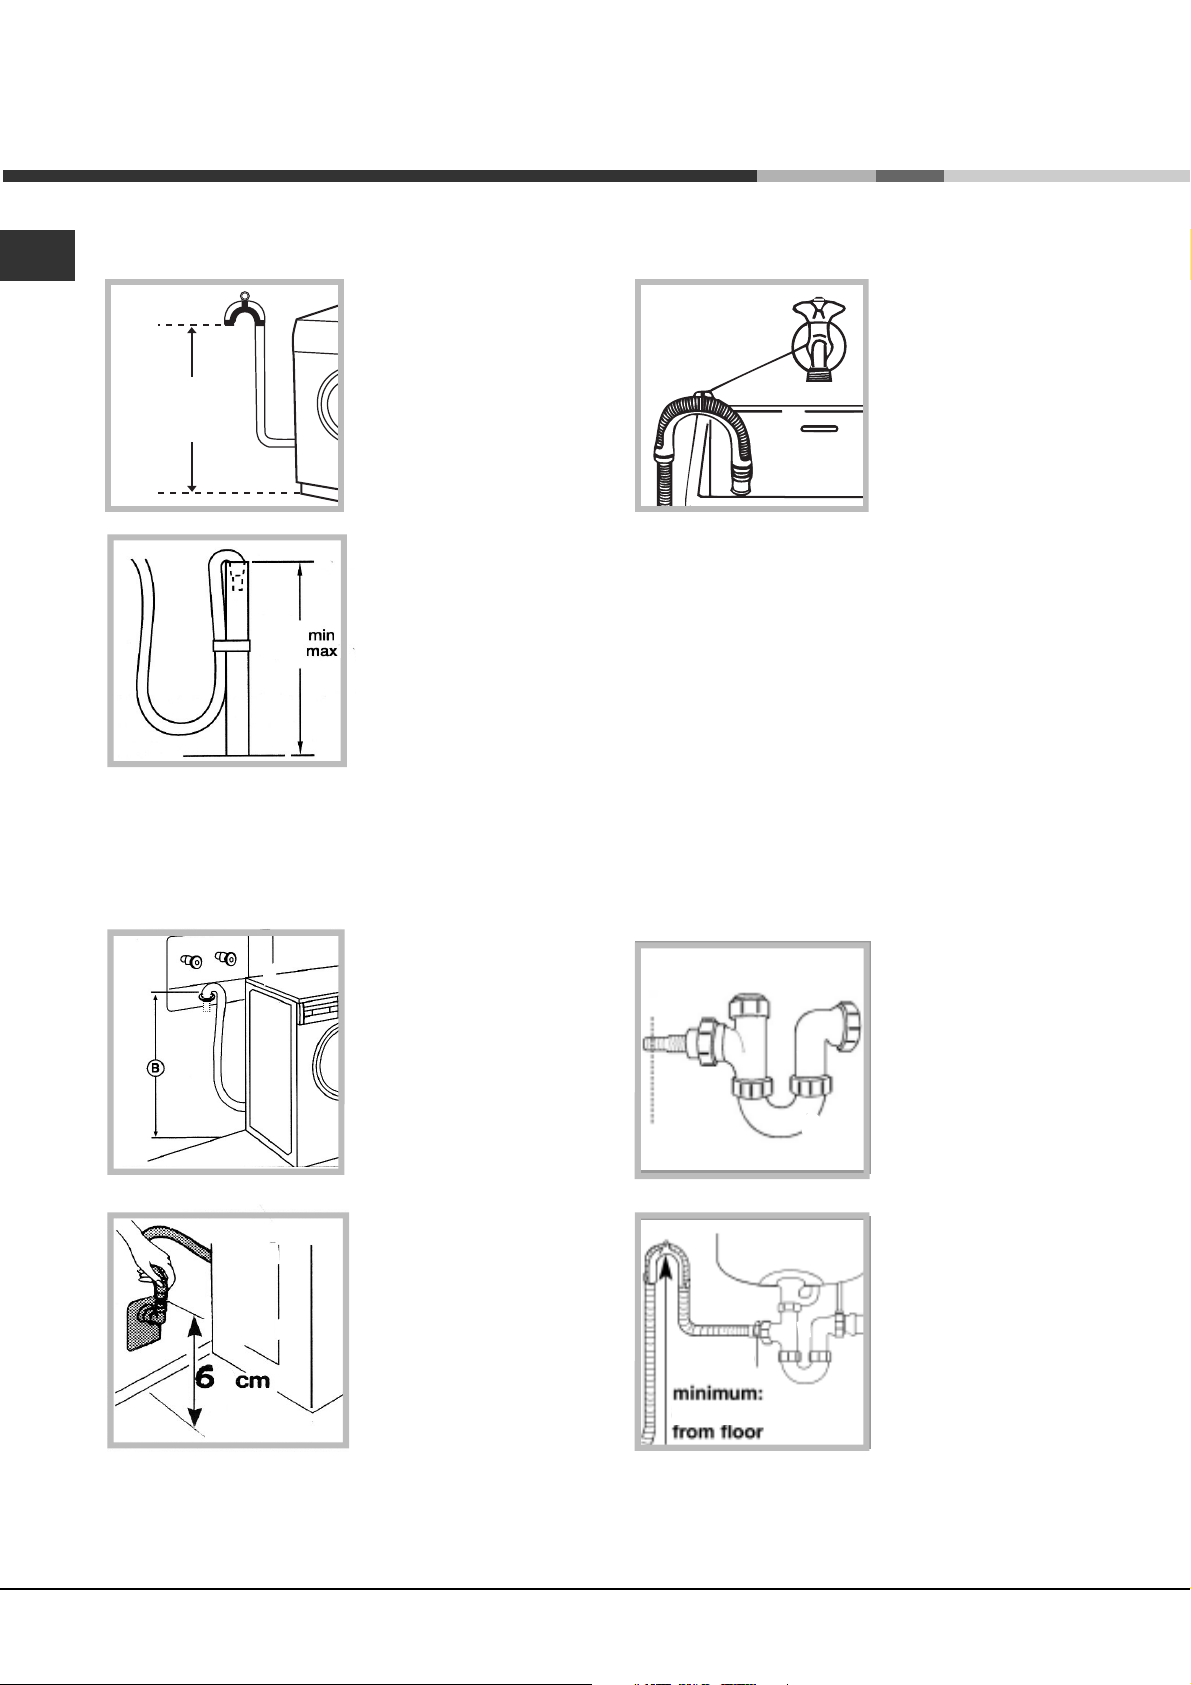
Drainage Connection
Standpipe Diameter/Capacity. Needs a 1 1/4 minimum
diameter standpipe with a minimum carry-away capacity of
7 gallons per minute.
Top of Standpipe. Must be between 25 - 34 inches (6286 cm) high measured from the bottom of the machine.
Outlet End of Drain Hose (provided with the unit).
Must be at least 20 above the bottom of the washer. An
air break must be available at the standpipe to avoid
siphoning. No more than 6 of the drain hose should be
inserted into the drain pipe to prevent siphoning.
! Although you may need to move the hooked end support
along the grey drainage hose,, DO NOT remove it.
! Whichever draining method you use, make sure that the
hooked end support is fixed level to, or above the
Plumbing Indicator Line.
You should carefully position the drain hose to avoid
kinks and ensure proper drainage of the water.
The outlet end of the drain hose must be at least 25 (62
cm) above the base machine. At this point it s possible
for the water to be discharged into a sink or drain pipe, but
an air break must be available at this 24 height to prevent
the machine from syphoning (see figures page 8).
No more than 6 of the drain hose should be inserted
in the drain pipe.
Important.
Make sure that the drain hose is not kinked and the
water flow has not been restricted.
The machine must rest solid on a sturdy floor for
optimum performance and minimum vibration.
NA
Connection.
1. Screw the cold water
H
C
onto the hot water supply until tight.
4. Turn on the hot water supply and check for leaks,
tighten if necessary.
fill hose (C blue connector)
onto the cold water supply
until tight.
2. Turn on the cold water
supply and check for
leaks, tighten if necessary.
3. Screw the hot water fill
hose (H red connector)
www.aristonappliances.us
Hints and tips
! Make sure there are no kinks or bends in the
hose.
! The water pressure at the supply tap must be
within the values indicated in the Technical
details table (see table on page 4).
Always use a new inlet hose.
Check the water inlet hose at least once a year,
replace if cracked as worn hoses could split under
water pressure.
Do not overtighten. The couplings should be
tightened by hand; a tool should only be used if a
leak occurs. Do not use excessive force.
7
Page 8
Installation
NA
Floor Standpipe Drain
(A)
25"-34"
62 - 86
inches
cm
25”
34”
Top of standpipe must
be at least 25 inches (62
cm) high and no higher
than 34 inches (86 cm)
from the bottom of the
washer (A).
Sink Drainpipe Method
Entry into the sink drain
system must be above the
trap (see fig. aside ).
When routing the drain
hose through cabinets or
walls use aprotective
material such as
electrical duct tape to
cover sharp edges that
could damage the drain
hose. Use a suitable
clamp to secure the drain
hose to the Y branch or
the disposer. With a sink drainpipe system (see figures
aside and below), you may connect directly:
1) to a disposer by following the manufacturers
attachement method.
2) directly to a Y branch tail piece (Available at
most hardware stores).
3) through the floor to a separate trap. The trap
must be vented to prevent siphoning. To provide
proper venting , install an Air Gap Kit (available at
most hardware stores).
4) To the faucet using a Faucet Adapter Kit (available
separately). It will supply water from your faucet and
discharge water directly into your sink drain.
Wall Standpipe Drain
#^
Top of standpipe must
be at least 25 inches
(62 cm) min.; 34 inches
(86 cm) max from end of
drain hose to bottom of
washer (B) (See figures
aside and below).
Under Sink Method
Hose
clamp
620 mm
1. Cut the blocked end of
the under sink drainage
unit.
2. Fix the hooked end
supporta minimum of
620 mm from the floor.
3. Use a hose clip clamp
to securely attach the
grey drainage hose
end to the under sink
drainage unit using a
hose. clamp
8
www.aristonappliances.us
Page 9
Electrical connection
Machine Voltage/Amperage - 120V, 60 Hz, 11 Amp.
Connection - 3-prong plug with 6 cord is provided
with the machine.
Circuit/Protector - 3-wire single phase, 120V, 60 Hz, AC,
on a separate 15 Amp circuit.
Final installation checklist
Instructions and Installalion Kit have been
removed from the tub.
Shipping straps have been removed.
NA
GROUNDING INSTRUCTIONS
This appliance must be grounded. In the event of malfunction,
or beakdown, grounding will reduce the risk of electric shock
by providing a path for electric current. This appliance is
equipped with a cord having an equipment grounding
conductor and grounding plug. Plug into an appropriate outlet
that is properly installed and grounded in accordance with all
local codes and ordances. DO NOT modify the plug provided
with the applliance. If it will not fit the outlet, have a proper
outlet installed by a qualified electrician.
WARNING: Improper connection of the equipment-grounding
conductor can result in a risk of electric shock.
Check with a qualified electrician or serviceman if
you are in doubt as to whether the appliance is
properly grounded.
Attention !
For your own protection and to prevent accidents, injury
and fire, please read the following carefully before
installing the washer.
Installation and grounding must be done in accordan ce with local codes and by a qualified installer.
Instalation instructions provided in this booklet are for
the installers reference.
Washer is plugged into electrical outlet and is
properly grounded.
Water hoses are connected to the faucets with
inlet screens and washers
Water is turned on and checked for leaks at
faucet and water valve connections.
Drain hose is properly located into drain
facility and is not collapsed or damaged.
Washer has been leveled.
Test for proper operation by running the
washer through a complete cycle at max
temperature.
Shipping bolts removed.
Washer MUST be installed on a strong, level floor and
in a protected dry and well-ventilated area close to a
power supply and drain outlet of sufficient capacity.
DO NOT install on carpet.
Important :
Installation on carpet floors will cause the machine to
vibrate and may result in excessive machine vibration
during the spin cycles and loss of performance.
The washer should be plugged into a properly grounded
(3) prong electrical outlet capable of 120 Volt, 60 Hz, and
11 Amp. It shouldnt be controlled by a wall switch or pull
cord which could be turned off accidentally. For your safety,
the third or round grounding prong must never be
removed. DO NOT USE AN EXTENSION CORD.
DO NOT install or store this appliance where it will be
exposed to weather or in an area where gasoline or other
flammables are stored.
www.aristonappliances.us
9
Page 10
NA
Washing machine description
Control panel AW 149 (NA)
Warning: To reduce the risk of fire, electric shock, or injury, read the
IMPORTANT SAFETY INSTRUCTIONS, before operating this appliance.
Program listing
Detergent dispenser
OPTION
Buttons
Control panel features
Program listing: To consult a straightforward chart of
the different programs available.
Display to program the washing machine and follow the
wash cycle progress (see opposite page).
Option buttons: To select the options available (see
Program Table and Option Modifiers).
Variable Temperature button: Use this option to
reduce the wash temperature below the maximum for the
program you have chosen.
PROGRAM
selector dial
STATUS INDICATOR
Lights
Display
VARIABLE
TEMPERATURE
Button
On/Off button: To turn the washing machine on and off.
Start/Cancel button: To start the program or to cancel
it, if incorrect settings were selected.
Program selector dial: to select the wash programs.
The knob stays still during the cycle.
Status Indicator lights: Shows if the door is locked
(when lit, the door cannot be opened) and the stage of
the program that the machine has reached (wash, rinse
or spin).
VARIABLE
SPIN SPEED
Button
START/
CANCEL
Button
ON-OFF
Button
Variable Spin Speed button: To reduce the spin speed
or exclude the spin cycle completely
*.
*
When you select a program and your you wish to change the spin speed, the machine will accept it only if the speed is
compatible with the program.
10
www.aristonappliances.us
Page 11

Program and Option Modifiers
Option modifiers
Superwash:
Use this option to select a more intensive wash and time program for the cotton (Sanitary, Heavy cotton, Regular cotton,
Heavy synthetics) and synthetics-permanent press (Heavy synthetics, Regular Synthetics).
Pre-wash Button:
For heavily soiled loads, push this button to adf an extra wash to any wash program
(except the 4-7-10-11 programs).
Easy Iron Button (Rinse Hold):
This option reduces the amount of creasing on fabrics, making them easier to iron.
Selecting this option the washing machine will reduce wash action and spin speed (max 600 rpm) for programs
5-6-7 and the machine will stop on the last rinse.
For the Silk program the Easy iron (stop with water) option is automatically carried out also if the button Easy iron is not
pressed: the washer will pause the cycle in the final rinse with laundry soaked.
The machine will stay in this state until either the Start/Cancel button is pressed or the Easy iron is pressed again to finish the
cycle .
Time Delay up to 24 hours:
Use this option to delay the program start by up to 24 hours. The display will show the delay chosen. Each press of the
button increases the Time delay in increments of 1 hour. If you press the button again after 24 shows in the display the
machine will reset the Time Delay and show OFF in the display, pressing the button after this start the Time Delay selection
from 1 hour. Once the countdown reaches zero the program will start.
NA
Soaking:
This option allows you to leave your washing to soak for one hour during the wash cycle.
During this time your washing machine tumbles every 2 minutes for 6 seconds (excepts 7, 8, 9, 10, 11 programs).
Variable Spin Speed:
Use this option to reduce the spin speed below the maximum for the program you have chosen.
Each press of the button will reduce the spin speed. The new spin speed will be shown in the display.
If you press again after OFF has been displayed, the machine will revert to the original higher spin speed.
N.B.: The washing machine will automatically prevent you from selecting a spin speed higher than the
maximum speed for each program.
Variable Temperature:
Use this option to reduce the wash temperature below the maximum for the program you have chosen.
The allowed selections are: 1: Cold (cold wash/cold rinse)
2: Warm (warm wash/cold rinse)
3: Hot (hot wash/cold rinse)
4: Sanitary
The cycle Sanitary is the one in which the heater element works.
Warning: If you select an option unsuitable to the chosen program the corresponding LED will blink for
some seconds and then will go out.
If the the option selected is suitable to the chosen
program the button LED will stay on.
In the event of an anomaly, an error code will appear, such as F-01, which should be communicated
to the Service Centre (see page 22)
www.aristonappliances.us
11
Page 12
Program and Options Modifiers
g
g
g
g
g
y
y
(*)
g
y
y
(*)
y
(*)
AW 149 (NA)
NA
Type of fabric and
degree of soil
Program Dial Max Load
Lbs
Pre-wash
(Option)
Detergent
for wash
Fabric
softener
Options
Length of the
cycle (min.)
witho ut
Optio ns
Description of wash
cycle
TIME DELAY
From 1 to 24 hour delay Start is delayed by 1 to 24 hours
COTTON
HEAVY DUTY
White Colourfast items
y deep-cleaning cotton
(safel
items)
Exceptionally soiled whites
(sheets, tablecloths, etc.)
Regular
(Heavily soiled whites and fast
colors)
Light - Slightly soiled whites
and delicate colors
(shirts, jumpers, etc.)
1
2
3
4
Sanitary
Heavy
Regular
Light
15
15
15
15
KKK
KKK
KKK
KK
Soakin
Pre-Wash
Super Wash
Soakin
Pre-Wash
Super Wash
Soakin
Pre-Wash
Super Wash
Soakin
170
92
82
59
Wash cycle
and final spin cycles
Wash cycle
and final spin cycles
Wash cycle,
and final spin cycles
Wash cycle,
and final spin cycles
, three rinse cycles, intermediate
, three rinse cycles, intermediate
three rinse cycles, intermediate
three rinse cycles, intermediate
PERMANENT
PRESS
Heavily soiled fast color
synthetics
(baby linen, etc.)
Delicate color synthetics
(all types of slightly soiled garments)
Delicate color synthetics
(all types of slightly soiled garments
Heavy
5
Regular
6
Light
7
)
7.5
7.5
7.5
KKK
KKK
KK
Soakin
Pre-wash
Iron
Eas
Super Wash
Soakin
Pre-wash
Iron
Eas
Super Wash
Easy Iron
75
69
63
Wash cycle,
cycle
Eas
Wash cycle,
cycle
Eas
Wash cycle ,
delicate spin cycle
Eas
three rinse cycles, delicate spin
Iron
three rinse cycles, delicate spin
Iron
three
rinse cycles and
Iron
DELICATES
Delicates
, particularly delicate
Silk
garments and fabrics
silk, viscose, etc.)
(curtains,
Wool
Daily - Mixed
(Very short refresh for lightly soiled
mixed fabrics)
8
9
10
11
Light
Silk
Wool
Daily
6.5
6.5
3.5
7.5
KKK
KKK
Pre-wash
Pre-wash
KK
KK
64
39
52
30
, three rinse cycles, delicate spn
Delicates
Wash cycle,
Draining
Wash cycle,
spin cycle (600 rpm)
Wash cycle,
spin cycle (800 rpm)
three rinse cycles,
(*)
four rinse cycles and delicate
two rinse cycles and delicate
SPECIAL
PROGRAMS
Rinse cycles
Delicate Rinse cycles
Spin cycle Draining and heavy duty spin cycle
Delicate Spin cycle Draining and delicate spin cycle
Drain Draining
K
K
Rinse cycles and spin cycle
Rinse cycles , ant-icrease or draining
Sanitary Special Program 1:
The Sanitary cycle is recommended for safely deep-cleaning stained cotton colorfast items. The high temperature (167°F75°C) eliminates harmful bacteria.
Important:
To cancel the wash program you have just press start button for at leat 5 seconds.
(*) For finishing the program press the button start.
12
www.aristonappliances.us
Page 13
Detergents tips and laundry
Detergent dispenser
! Do not put any items into the drawer, other than
detergents designed to be released from the drawer, as
they may cause damage or blockage.
1
2
3
4
5
1 Drawer release catch.
2 Pre-wash detergent compartment:
Maximum 200 ml powder or
100 ml liquid
3 Main wash detergent compartment:
Maximum 400 ml powder or
200 ml liquid
4 Grate
Detergent tips
Dispense a correct amount of detergent so to get
better washings
Warning
AVOID RISK OF POISONING KEEPING
DETERGENTS AND ADDITIVES OUT OF
THE REACH OF CHILDREN !
We suggest you to measure out the quantity of
detergent (powder or liquid) according to:
The water hardness. This piece of information you
will get it from your local water authority.
The quantity of laundry.
The degree of soiling (see Programs on page 12).
The specifications of the detergent manufacturer.
NA
5 Fabric conditioner compartment:
Maximum 120 ml
Dispensing powder detergent
To achieve the best wash results the manufacturer's
recommended amount of detergent should be measured
and added to the main detergent compartment.
Adding fabric conditioner
Pour the recommended amount of fabric conditioner into
the compartrrent. Do not exceed the maximum fill line.
Pre-wash
When selecting prewash, add detergent to both the prewash and the main wash compartments.
Fabric softener
All fabrics, particularly towels, benefit from the use of fabric
conditioners in the final rinse. Items of laundry feel softer, are
more easily ironed and the clinging affect of synthetics is
considerably reduced.
Pour the softener into Additives compartment of the
detergent dispenser to the level indicated on the syphon. Under
no circumstances overfill, as the softener will immediately
syphon into the machine and in so doing, impair the wash
results.
Measuring the correct amount of detergent ensures
optimum washing results and conributes to
get a better environment.
We recommend HE (high Efficiency) detergents
because they are particularly designed to deliver
optimum performance from your front-loading washer.
Not using HE detergent could cause problems such as
oversudsing (mess on your floor) and/or a decrease in
wash performances.
Too little detergent:
The laundry is not cleaned properly and will eventually
become gray and stiff. Grayish brown spots (fat
globules) may appear on the laundry. The heater may
calcify.
Too much detergent:
Not environmentally friendly, excessive suds reduce
wash agitation producing poor washing, poor rinsing
results or may prevent proper spinning.
Adjust the amount for heavily or lightly soiled loads.
Use more if water is extremely hard, use less in soft
water. If garments have been pretreated, you will not
need as much (or any) detergent at all.
www.aristonappliances.us
13
Page 14

Starting a wash Program
NA
Laundry preparation
Sorting
Clothes should be sorted from separate items which
could damage other garments. Sort items into loads
according to similar colors, fabrics, garment
construction and degrees of soil.
Color
Separate clothes into three groups: Whites and
pastels, medium and bright colors, Dark colors. Items
which bleed color should be washed alone.
Type of fabrics
Delicate items should be separated from sturdier
items. Fabrics that shed lint should be separated from
the ones which shed none or attract lint.
Garments constructions
Garments that may fray easily or that have unusual
trim require gentle care. These garments may be
washed in the loader using the knit cycle. If garments
are fragile and delicare, hand washing may be
desirable.
Degree of soil
Heavily sopiled items should be separated from the
rest of the wash to prevent transfer of soil in the wash
water.
Fasten all hooks, zippers and buttons.
Turn knit garments wrong side
out to reduce the tendency of knits to pill. Fabric
pills are balls of fibers on the surface of the
garments and cause damage by wear or friction.
Remove loose dirt and sand.
Brush dirt from trouser cuffs; shake or vacuum rugs
to remove loose surface soil.
If buckle is washable,
place a scrap of material securely around the
ornament before washing and drying to prevent
scratching and damage to the machine. Remove
non-washable trims, buckles, buttons and belts.
Tie strings
belts and apron sashes into bows to avoid tangling
during washing.
Before loading the washer,
make sure the drum is empty.
Inspection
While sorting clothes into wash-loads, also inspect
each garments to see if it requires special care
(see table fabric care on page 15).
Pretreating
Remove stains, while they are fresh and easy to get
out. Try cold water first to remove unknown stains. Hot
water sets stains containing protein such as blood,
egg, meat and milk. To remove difficult stains, refer to
the removal Chart on page 17.
Preatreat heavily soiled areas,
cuffs, and centers of pillowcases.
Mend rips and tears, before washing, so further
damage is not done to garments.
Empty pockets.
Objects left in pockets such as crayon, pens or
markers, or tobacco crumbs may stain an entire wash
load. Paper issues will shred leaving bits on each item
in the washer. Remove coins and other foreign object
to prevent damage to the machine.
such as collars,
Prewash
Prewash excessively soiled clothes, such as work or
childrens clothes.
They often get very soiled. Prewashing with detergent
will help loosen the soil
14
www.aristonappliances.us
Page 15
Washcare tips and Starting
Useful tips
Never use your washing machine to wash... torn, fraying or
non-hemmed linen. If it is absolutely neccessary, place it in
a bag for protection. Do not wash colored linen with whites.
Watch the weights!
For best results, do not exceed the weight limits stated
below (figures show weight of dry garments):
- Resistant fabrics (heavy - regular-light cotton):
15 lbs (7 kg) maximum
- Synthetic fabrics (heavy-regular-light):
7.5 lbs (3.4 kg) maximum
- Delicate fabrics
6.5 lbs (3 kg) maximum
Denim Alert.
Some overalls have straps with hooks that can damage the
drum of your washing machine or other garments during the
wash. To minimize the risk, place hooks in the pocket and
fasten with safety pins.
- Pure new wool
3.5 lbs (1,8 kg) maximum
- Bathrobe 6.5 lbs (3 kg) maximum
How much does it weigh?
1 sheet 11/4 lb (400-550 gr.)
1 pillow case 4 oz. (120 gr.)
1 tablecloth 1 lb (450 gr.)
1 bathrobe 2-3 lbs (900-1,300 gr.)
1 towel 5oz/1 lb (150-500 gr.)
Colored T-shirts, printed ones and shirts last longer if
turned inside out before washing.
Printed T-shirts and sweatshirts should always be ironed
inside out.
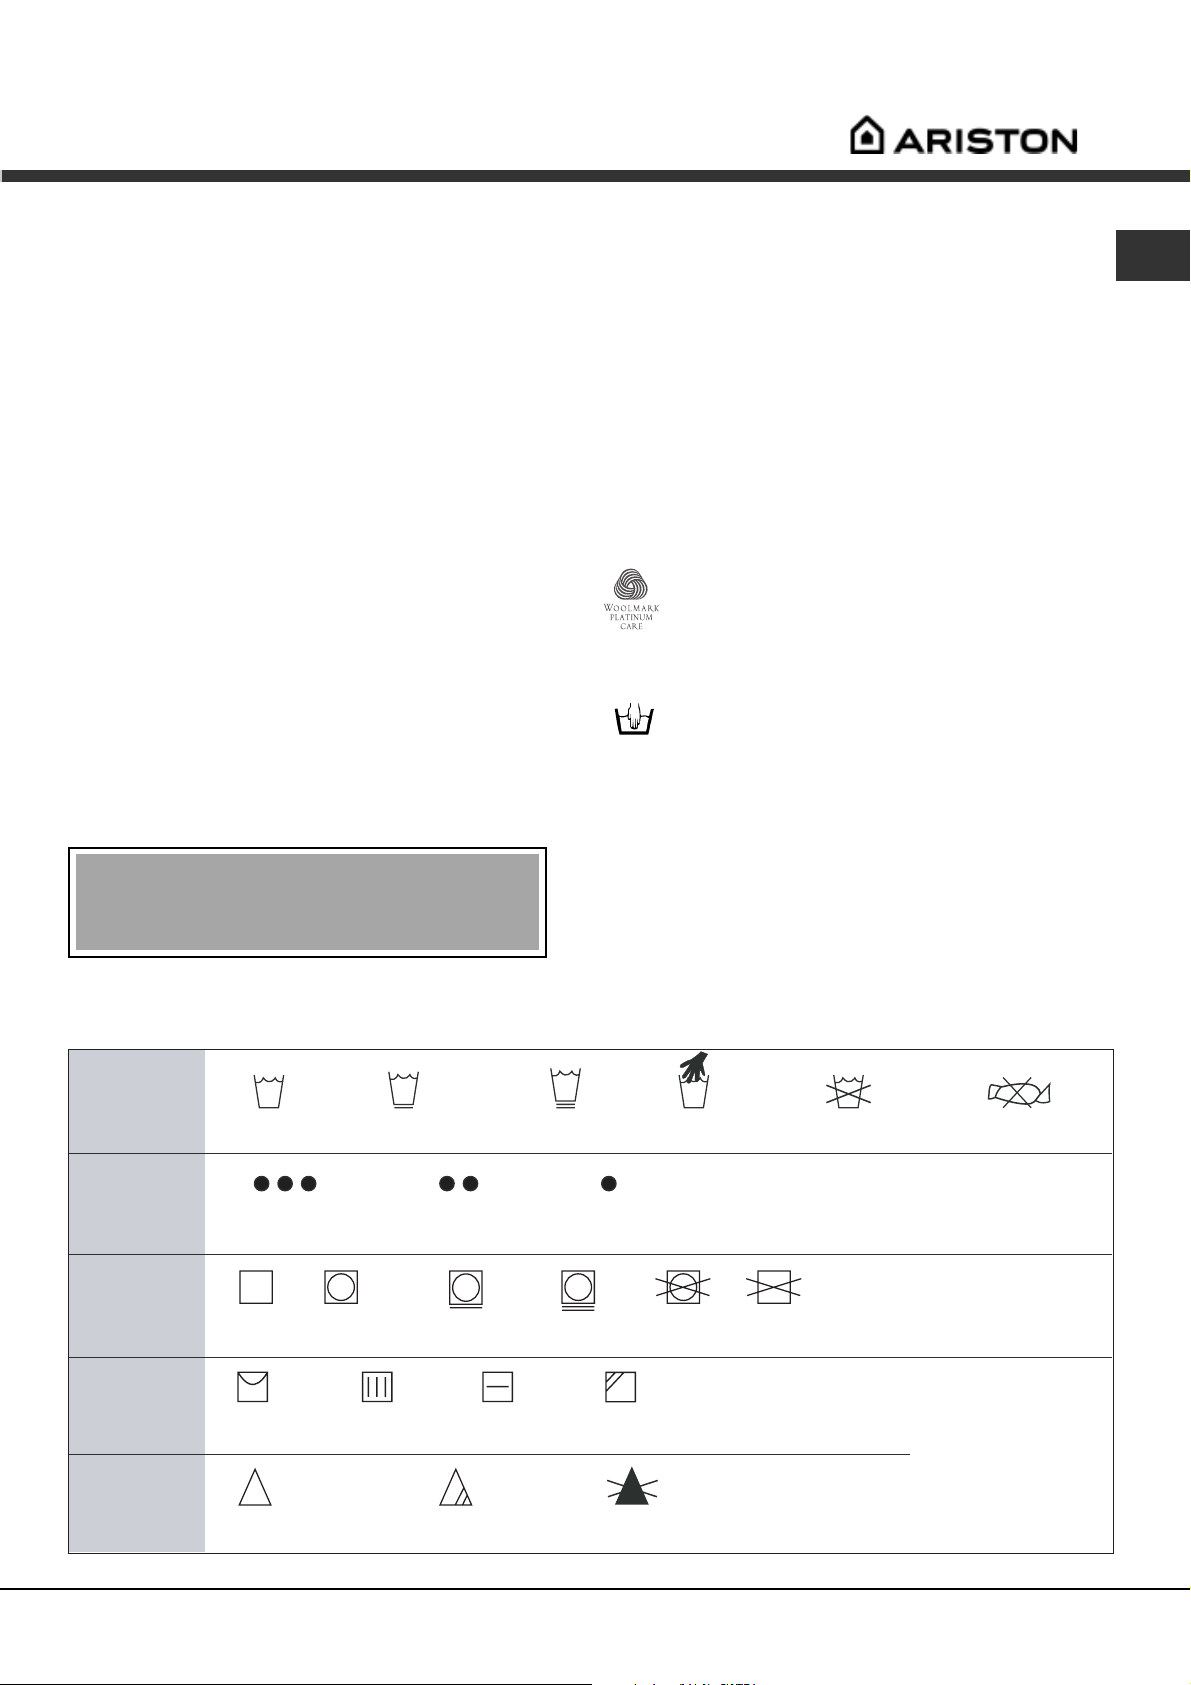
Wool cycle
Cashmere Platinum
As gentle as a hand wash.
Ariston is the only washing machine to have
obtained the prestigious Woolmark Platinum Care
mark of recognition (M.0303) from The Woolmark
Company, which certifies the machine washing of
all woollen garments, even those whose label states "hand
wash only" .
The "Wool" program therefore offers you complete
peace of mind when washing all woollen
garments, with great performance guaranteed every time.
For best results, we recommend you use very little detergent,
taking care not to wash more than 3.5 lbs (1,8 Kg) of
laundry.
NA
For more delicate garments:
protect underwear, tights and stockings and
delicate items by placing them in a linen bag
It is recommended that you should unplug the machine from
the socket and turn off the water supply. Leave the door ajar
to allow air circulation to the draw and the door gasket area.
This will prevent unpleasant odours.
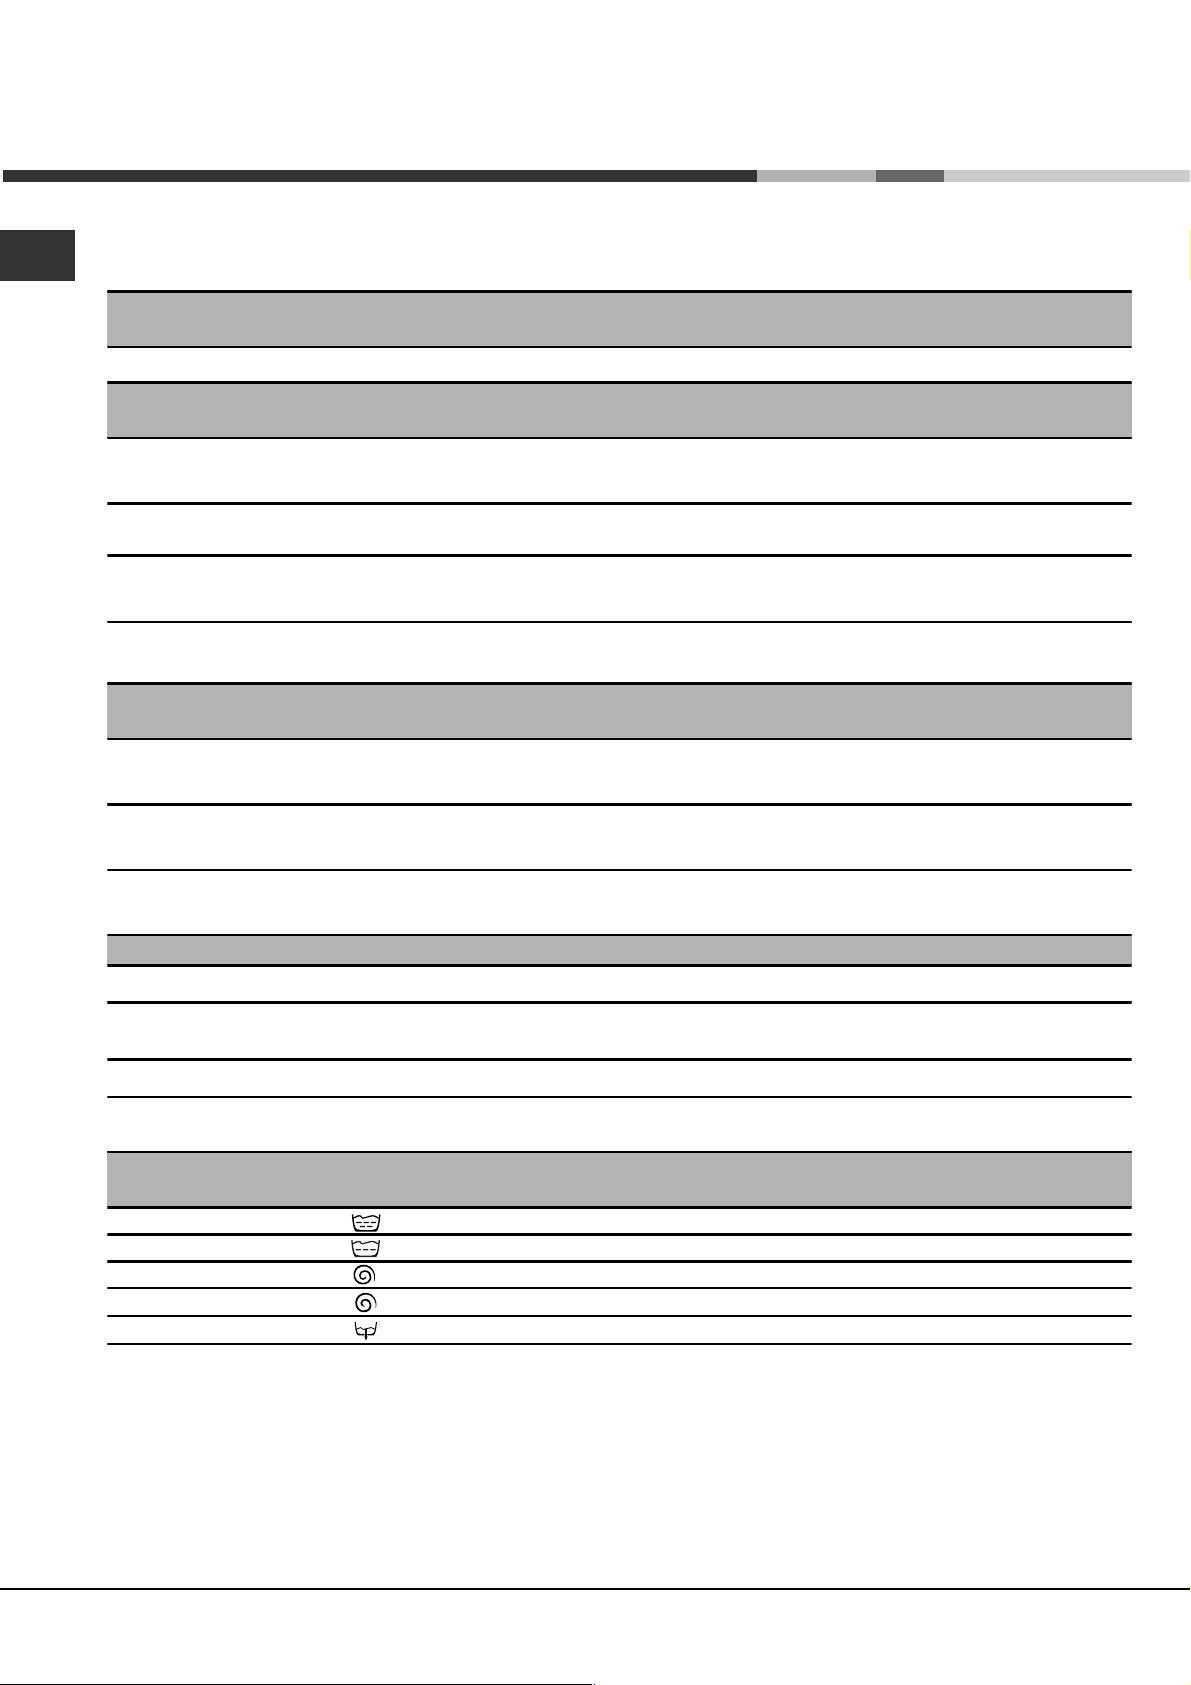
Understanding Fabric Care Labels
The symbols on labels of your garments will help you in choicing suitable wash program, the right temperature, wash cycles
and ironing methods. Dont forget to give a glance to these useful indications !
Machine Wash
Vacations: unplug the appliance.
Cycle
Water Temp.
Tumble
Dry
Special
Instructions
Normal/
Cotton Heavy Duty
Hot
(50oC/120oF)
Dry Do not
Cotton Heavy Duty
Line dry/
hang to dry
Permanent Press/
wrinkle resistant
Warm
(40oC/105oF)
Normal/
Drip dry Dry flat In the shade
Permt Press/
wrinkle resistant
Delicate/
Gentle
(30oC/85oF)
Delicate/
Gentle
Cold/Cool
tumble dry
Do not washHand wash Do not wring
Do not dry
Bleach
Symbols
Any bleach
(when needed)
www.aristonappliances.us
Only non-chlorine bleach
(when needed)
Do not bleach
15
Page 16

Operating the washing machine
NA
On-Off / Selecting a program
1. Switch the machine on by pressing the On/Off button.
2. Load your laundry into the machine and shut the door.
3. Add the detergent and any fabric softener.
4. Turn the program selector knob to the required
program.
5. Select any options you require (see Option Modifiers).
6. Press the Start/Cancel button to start the program.
To stop or change a program:
1. Press the Start/Cancel button for 5 seconds.
2. Select Pump out on the program selector knob.
A typical wash load
Two wexampes of maximum load for different types of
fabric:
COTTON 2 Bath Towels
1 Hand Towel
6 Shirts
6 Blouses
1 Set of Pyjamas
4 Items of Underwear
2 Sheets
= 15 Lbs (7 Kg)
SYNTHETICS 2 Childrens Dresses
5 Shirts
5 Blouses
1 Set of Pyjamas
4 Items of Underwear
= 7.5 Lbs (3.5 Kg)
3. When the machine has finished emptying, turn the
program selector knob to the new program required.
You may need to add detergent .
4. Press the start button to start the program.
Automatic feature
Before washing, you can do a great deal to ensure better
results. Divide your garments according to fabric and
color. Read the labels, follow their guidelines
Unbalance load detection
The washing machine has an inbuilt feature to prevent it from spinning to fast with an unbalanced load.
When an unbalanced load is detected, the washing machine will attempt to redistribute the load in order to balance it
evenly to achieve full spin speed.
If this is not possible and an unbalanced load remains the spin speed will be reduced, depending on the amount of
unbalanced detected. This is to prevent the machine from damaging itself or its surroundings and to prevent excessive
noise from the washing machine.
If the spin result is unsatisfactory following a reduced spin speed attempt to rectify the unbalanced load, then on
completion of the program the load can be redistributed evenly in the drum by hand. Select a spin cycle.
Note: Do not attempt to spin heavy or absorbent single items as the machine cannot distribute these evenly.
If you need to wash a single item you will need to add some other items as ballast to allow the machine to
distribute the load evenly throughout the drum.
16
www.aristonappliances.us
Page 17

Stain Removal Chart
NA
Blood
Rinse or soak fresh stain in cold water. Work detergent
into any remaining stain. Rinse. If stain persists, put a few
drops of ammonia on stain and repeat detergent
treatment. Rinse. If necessary bleach.
Candle Wax
Scrape off excess. Place stain between clean white
blotters or several layers of facial tissues. Press with warm
iron. Sponge with detergent. If dye spot remains, bleach.
Ketchup
Scrape of excess. Soak in cold water 30 minutes.
Pretreat with a detergent paste. Launder.
Chewing Gum
Rub with ice to harden. Scrape off excess with dull blade.
Sponge with cleaning fluid.
Chocolate or Cocoa
Soak 15 minutes in cold water. Rub detergent paste into
stain, then rinse thoroughly. Launder in hottest water safe
for fabric. If colored stain remains, sponge with hydrogen
peroxide, rinse and launder.
Coffee or Tea (Black)
Soak fresh stains immediately in cold water. Then use
bleach treatment with hottest water safe for fabric. Or if
safe for the fabric pour boiling water through spot from a
height of 1 to 3 feet. Launder.
Coffee or Tea (With Cream)
Rinse or soak in cold water. Work detergent into stain.
Rinse. Dry. If grease stain remains, sponge with cleaning
fluid. Repeat, if necessary. If stain remains, bleach.
Cosmetics: eye shadow, lipstick, liquid make-up,
mascara, powder, pancake make-up or rouge
Apply undiluted liquid detergent to stain, or dampen stain
and rub in soap or detergent paste until thick suds are
formed. Work in until stain is gone, rinse well. Repeat if
necessary. If color remains, bleach if safe for fabrics.
Cream, Ice Cream or Milk
Sponge stain with cool water or soak stain in cool water
for 30 minutes or longer. If stain remains, work a
detergent into spot then rinse. Bleach if necessary.
Deodorants and Antiperspirants
Wash or sponge stain thoroughly with warm water and
detergent; rinse. If stain remains, bleach with hot sudsy
water. Launder. You may be able to restore fabric color
by sponging with ammonia. Rinse thoroughly.
Egg or Meat Juice
Rinse in cold water. If stain remains, sprinkle with meat
tenderizer, let stand 15-20 minutes. If stain still remains,
sponge with cleaning fluid or diluted bleach. Launder in
hot water. The use of hot water first may set stain.
Dye
Rinse or soak in cold water. Work detergent into stain.
Rinse. If necessary, bleach. Stain is not always possible
to remove. A commercial color remover may also be
used.
Fabric Softener Stain
Rub with bar soap until stain has lightened. Rinse
thoroughly. Launder. Rubbing alcohol is sometimes
effective if the color of the garment can take it.
Launder. If desired, dry cleaning can be used.
Felt tip pen
Spray spot with cleaners suitable to this purpose.
Sponge stain thoroughly. Rinse with cold water. Reapply
cleaner if necessary .
Fruit, Wine
Soak fresh stains immediately with cool water. Then use
bleach treatment with hottest water safe for fabrics,
pour boiling water through spot from a height of 1 to 3
feet. Launder.
Grass
Work detergent into stain. Sponge with denatured
alcohol. Bleach, if necessary.
www.aristonappliances.us
17
Page 18

NA
Grease or Oil
Scrape away excess. Rub detergent paste or a general
purpose liquid household cleaner into stain, rinse with
hot water. If stain remains, sponge thoroughly with a
grease solvent. Dry. Repeat if necessary. To remove
yellow stain, use a chlorine or oxygen bleach.
Ink
Some ball-point inks are set by water. First test a scrap
of cloth. Sponge stain repeatedly with acetone, or
rubbing alcohol. Hair spray is effective. Launder. Bleach
if necessary. Use amyl acetate on triacetate, arnel,
dynel and verel. Use acetone on other fabrics.
NOTE: Some inks cannot be removed.
Mildew
Brush off surface growth to keep mold spores from
spreading. Dip article into solution of 1/2 cup bleach per
1 gallon of cool sudsy water for 5 to 10 minutes. Rinse
well. Launder.
Perfume
Rinse in cold water. Rub undiluted liquid detergent or
a detergent paste into stain. Rinse. If stain remains,
bleach.
Perspiration
Wash or sponge stain thoroughly with warm water
and detergent paste. If perspiration has changed the
color of the fabric, restore it by treating with ammonia
or vinegar. Apply ammonia to fresh stains; rinse with
water. Apply vinegar to old stains; rinse with water.
Rust and Iron
Apply commercial rust remover, according to
manufacturers directions. Rinse. Or, if safe for fabric,
boil stained article in solution of 4 teaspoons of cream
of tartar to 1 pint water.
Scotch
Rinse or soak in cold water. Work detergent into
stain. Rinse. Bleach, if necessary. Stain may be
impossible to re move.
Mud
Let stain dry; then brush well. Rinse repeatedly in cool
water until mud comes out. Launder. (Hot soaps suds
set a red or yellow clay stain).
Mustard
Soak in hot detergent water for several hours. If stain
remains, bleach.
Nail Polish
Treat while fresh, scraping or wiping off as much as
possible, before it dries. Place stain face down on white
paper towels. Sponge back of stain acetone (nail polish
remover) or sponge with denatured alcohol and a few
drops of household ammonia. Sponge stain frequently.
Launder with water at temperature suitable for fabric.
Do not use acetone on acetate, arnel, dynel or rayon.
Paint
Sponge or soak in turpentine or solvent recommended
as a thinner on label. Launder.
Urine
Soak in cool water. If stain is dry, work a detergent
paste into the spot then rinse. If necessary, bleach.
Shoe
Polish Scrape off as much as possible. Pretreat with a
detergent paste; rinse. If stain persists, sponge with
rubbing alcohol (1 part to 2 parts water) or turpentine.
Remove turpentine by sponging again with warm
detergent solution or with alcohol. Bleach if
necessary.
Soft Drinks
Sponge with cold water, some stains are invisible
when they have dried, but turn brown when heated
and may be impossible to remove.
Tar and Asphalt
Act quickly before stain is dry. Sponge with grease
solvent or turpentine. Launder.
.
18
www.aristonappliances.us
Page 19
Care and Maintenance
Switching off the water and
electricity supplies
Turn off the water tap after every wash. This limits
wear and tear on the machines water supply and
prevents leaks.
Disconnect the
appliance from the
electricity supply before
cleaning it and before
performing any
maintenance work on it.
To avoid risk of
explosion
Never use flammable
solvents to clean the
appliance
Cleaning the machine
The exterior of the appliance and all rubber parts may be
cleaned using a cloth soaked in warm soapy water. Do not
use solvents or abrasive products.
Cleaning the door bowl
Clean the internal surface of the door bowl regularly with a
soft cloth. A build up of soap powder and water hardness
residue may result in water leaking from the door.
Always leave the appliance dor ajar to prevent unpleasant
odors from forming
Cleaning
Cleaning the exterior
Use a damp cloth or silicon polish to clean the exterior
surfaces of the appliance.
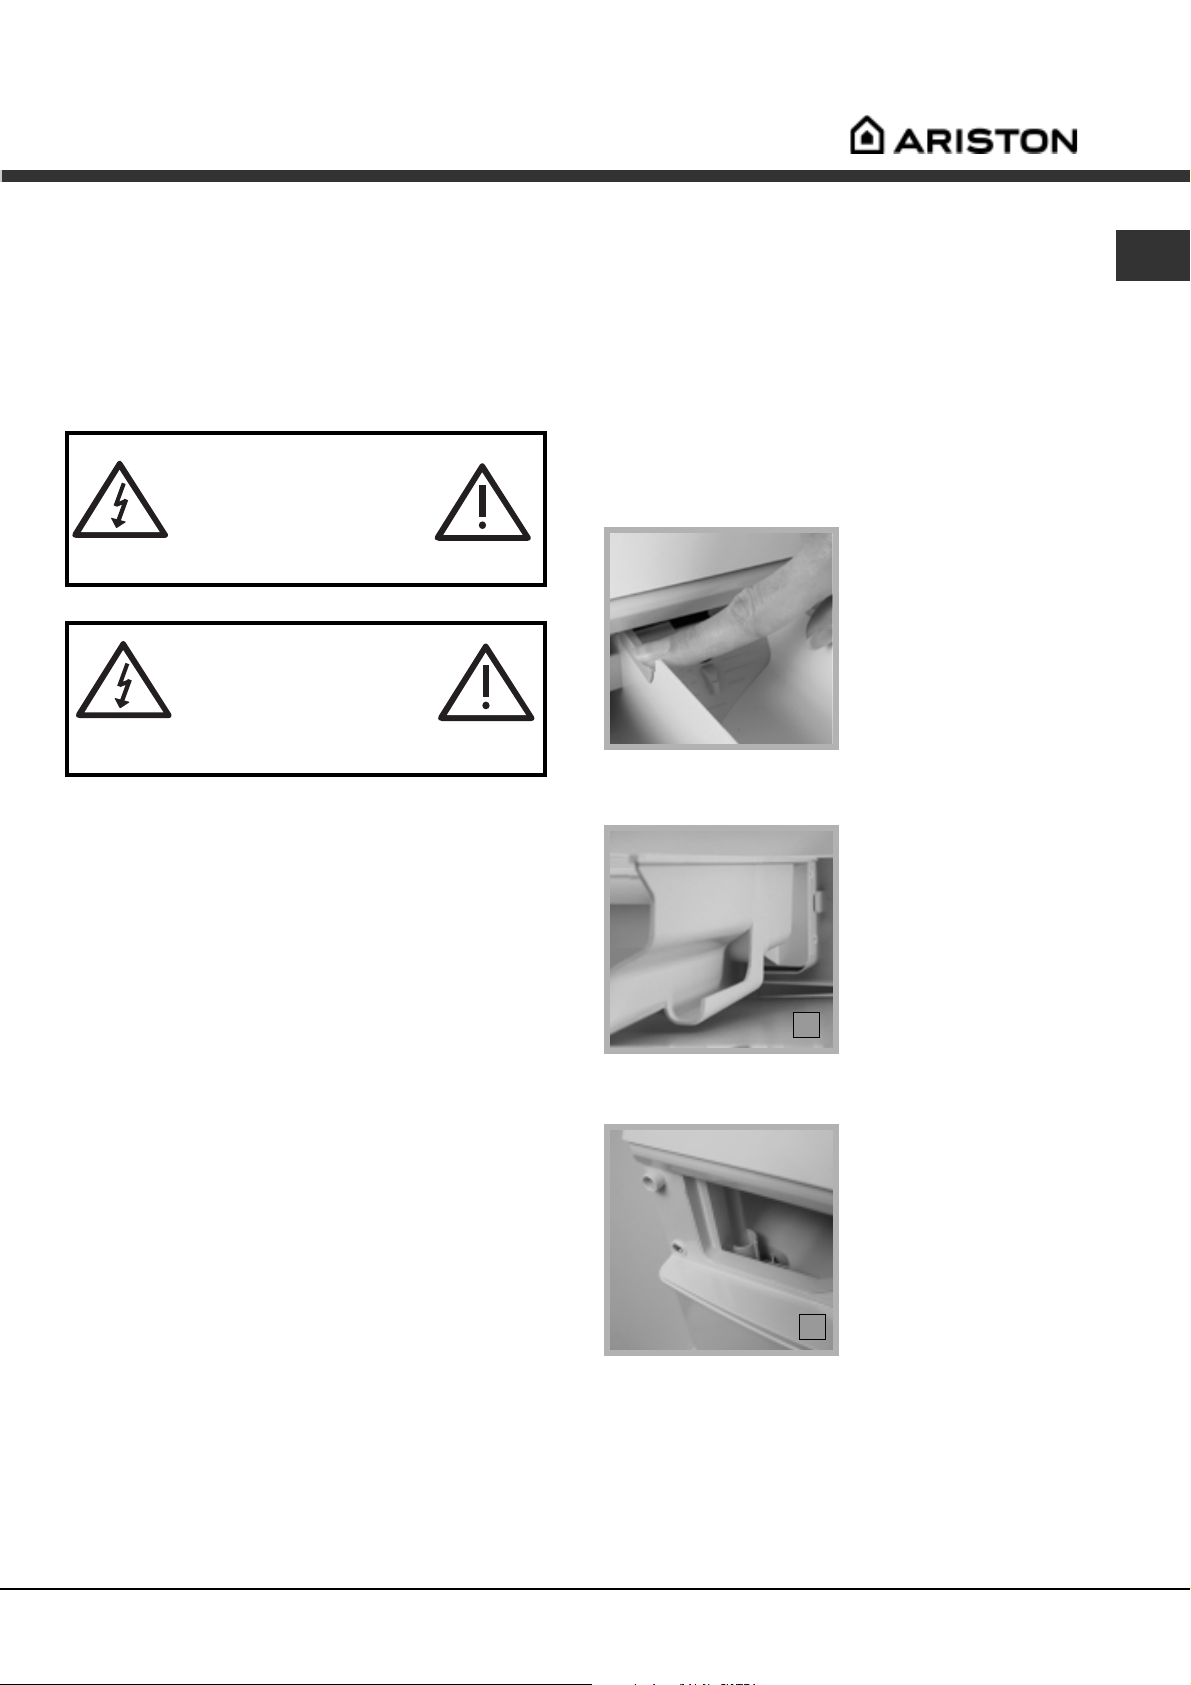
Cleaning the dispenser drawer and compartments
It is advisable to clean the dispenser drawer regularly. Do
not try to clean any part of the dispenser drawer while the
machine is running.
1. Pull out the drawer until
it reaches its stop.
2. Press the drawer
release button to remove
the dispenser drawer
(see picture).
3. Clean and dry the
dispenser drawer,
syphons, grate and fabric
conditioner exit channel
(A), ensuring any build up
of detergent and fabric
conditioner fully removed.
Failure to do so may lead
to the machine leaking
A
from the dispenser drawer.
Also regularly clean the
outlet pipe area (B).
NA
Checking the water inlet hose
Check the water fill hose once a year. If you see any
cracks, replace it immediately: during the wash cycles,
high water pressure cold cause a cracked hose to split
open.
! Never use hoses hat have already been used.
Drum maintenance
Always leave the porthole door ajar to prevent
unpleasant odours from forming.
www.aristonappliances.us
4. Relocate the disponser
drawer and push it firmly
back into place.
! Do not clean any part of
the machine with abrasive
cleaners, scouring agents,
acids, any bleach or metal
polish as they may cause
B
damage.
19
Page 20

Troubleshooting
NA
From time to time your machine may not operate as it should. Before calling for Assistance (see Service-Assistance),
make sure that the problem cannot be resolved easily using the following list.
Malfunction:
The washing machine will not switch on.
The wash cycle does not begin.
The washing machines fails to fill with
water.
The machine continuously fills and
drains water.
Possible causes / Solutions:
The plug has not been inserted into the electrical socket, or it has
not been inserted far enough to make contact.
There is no power in the house.
The porthole door has not been shut properly.
The START/RESET button has not been pressed.
The water tap has not been turned on.
The water inlet hose is not connected to the tap.
The hose is kinked.
The water tap has not been turned on.
There is no water in the house.
The water pressure is insufficient.
The START/RESET button has not been pressed.
The end of the outlet hose has not been fitted at a height between
25 - 34 inches (62 and 86 cm) from the floor (see Installation).
The free end of the hose is underwater (see Installation).
If If the dwelling is on one of the upper floors of a building, there
may be problems relating to water drainage, causing the washing
machine to load and drain water continuously. Special anti-
draining valves are available in shops and help to avoid this
inconvenience.
The water drainage system is not fitted with a breather pipe.
The machine does not drain or spin.
The washing machine vibrates too much
during the spin cycle.
The washing machine leaks.
The machine is locked and the display
flashes, indicating an error code (e.g. F-01,
F- ...) .
The programme does not include a draining phase: some
programs require manual draining (see Programmes and
options).
The Easy Iron option is enabled: to complete the program, press
the START/RESET button (see Programs and options).
The outlet hose is bent (see Installation).
The drainage duct is clogged.
The drum was not unlocked properly when the appliance was
installed. Remove shipping bolts (see Installation).
The washing machine is not level (see Installation).
The washing machine is trapped between cabinets and a wall
(see Installation).
The load is not balanced properly (see Operating the washing
machine).
The water inlet hose is not screwed on to the tap correctly (see
Installation).
The detergent dispenser drawer is blocked (for instructions on
how to clean it, see Care and maintenance).
The outlet hose has not been secured properly (see
Installation).
Switch off the machine and unplug the appliance; wait for
approximately 1 minute then switch it on again.
If the problem persists, contact Assistance.
20
www.aristonappliances.us
Page 21

There is too much foam.
The detergent is not designed for machine washing (the packaging
should state that the product is for washing by machine, for washing
by hand or machine or similar).
Too much detergent was used.
NA
The washing machine door remains
locked
Wait for the LED to switch itself off before you open the appliance door.
! If the problem persists after the above checks have been carried out,
shut off the water tap, switch off the machine and contact Assistance
www.aristonappliances.us
21
Page 22

Service
NA
Before calling for Assistance:
Check whether you can solve the problem on your own (see page 20);
Restart the programme to check whether the problem has been solved;
If this is not the case, contact an authorised Technical Service Centre on the telephone number provided on the
guarantee certificate.
! If the machine has been installed or used incorrectly, you may be charged for the maintenance callout service.
! Always request the assistance of authorised servicemen.
Notify the operator of:
the type of problem;
the appliance model (Mod.);
the serial number (S/N);
This information can be found on the data plate situated on the rear of the door of the washing machine.
CUSTOMER CARE,
SERVICE & PARTS : phone (888) 426-0825
22
www.aristonappliances.us
Page 23

Warranties
STATEMENT OF WARRANTIES
ARISTON Clothes Washers
The warranties provided by (Ariston) in this statement of warranties apply only to Ariston clothes washer sold to the
first using purchaser by Ariston or its authorized distributors, dealers, retailers or service centers in the United
States or Canada. The warranties provided herein are not transferable.
Length of Warranty
1st Year Full Limited Warranty from the date of installation*
Ariston will repair or replace, free of charge, any component part that proves defective in conditions of normal home
use. Shipping and labor costs included. Waranty repair service must be performed by an authorized Ariston service
center.
2nd Year Limited Warranty from the date of installation*
Ariston will provide replacement parts, free of charge, for any component part that proves defective under
conditions of normal home use, labor charges excluded.
3rd - 5th Year Limited Warranty on Electronics from the date of installation*
Ariston will repair or replace free of charge, any microprocessor or circuit board that proves defective under
conditions of normal home use 3rd year through 5th year from the date of original installation, labor charges
excluded.
NA
3rd - 5th Year Limited Warranty on Motor from the date of installation*
Ariston will repair or replace free of charge, any motor or component part of the motor that proves defective under
conditions of normal home use, 3rdyear through 5th year, from the date of original installation, labor charges
excluded.
Lifetime Limited Warranty against Stainless Steel Rust Through from the date of installation*
Ariston wll replace your clothes washer, free of charge, with the same model or a current model that is equivalent or
better in functionality if the washer drum should rust though under conditions of normal home use, labor, shipping,
and installation charges excluded.
10 day warranty after purchase on cosmetic damages detected
Ariston will replace any cosmetic parts, free of charge - including labor, which are detected damaged with in 10
days after purchase. Any damages deemed caused by improper handing, shipping, or installation will not be
covered under this clause.
* Date of installation shall refer to the earlier of the date the clothes washer is installed or ten business days after
delivery date.
Exlusions:
This warranty does not cover repair or service calls to correct the installation, to provide instructions on the use of
your product, to replace house fuses or correct plumbing or the electric wiring in your home. In addition any repair
to the products that’s use was in a manner other than what is normal for home use is void of any warranty claim.
The warranties exclude any defects or damage arising from accident, alteration, misuse, abuse, improper
installation, unathorized service work, or external forces beyond Ariston control, such as fire, flood, and other acts
of God, or installation not in accordance with local electric or plumbing codes. Labor, shipping, and installation
charges incurred in the repair or replacement of any product after a period of one year from the date of installation
shall not be covered by this warranty. Any and all replaced or repaired parts shall assume the identity of the original
for the purposes of the applicable warranty period. To the extent permitted by law, this warranty is in lieu of all
other express and implied warranties, including the implied warranties of merchantability and fitness for a particular
purpose. Ariston does not assume any responsibility for incidental or consequential damages.
To obtain warranty services call 1-888-426-0825, or write to:
Ultra 8 International, 2505 Anthem Village Drive, Suite E - PO BOX 562, Henderson Nevada 89052
Be sure to provide: model number, serial number, purchase date, and the sellers name and address.
www.aristonappliances.us
23
Page 24

NA
Ultra 8 International, 3027 East Sunset Road, Suite 101, LAS VEGAS Nevada 89120
24
www.aristonappliances.us
Page 25

Guía para el uso
LAVADORA
SP
Español
AW 149
Índice
Descripción, 26
Normas de seguridad importantes, 27-28
La seguridad para Ud. y para sus niños
Advertencias para la instalación
Características técnicas
Quitar los dispositivos de fijación para el transporte
Embalaje, Instalación, 29-30-31-32-33
Desembalaje y nivelación
Quite los dispositivos de fijación para el transporte
Conexiones hidráulicas y eléctricas
Lista de control de instalación final
Descripción de la lavadora y opciones, 34-35
Panel de mandos
Opciones de lavado
Temperatura variable
Centrifugado variable
Programas, 36
Tabla de programas
Consejos para detergentes y lavado, 37
Dosificador de detergentes
Antes de lavar
SP
Puesta en marcha del programa de lavado y
consejos para un lavado óptimo, 38-39-40-41-42
Poner en marcha la lavadora
Cargas típicas de lavado y preparación de la ropa
Consejos para obtener un lavado óptimo y comprensión
de las etiquetas de las prenda
Woolmark Cachemire Platinum
Ponga en funcionamiento la lavadoras
Guía para la eliminación de las manchas
Cuidados y mantenimiento, 43
Cierre del agua o interrupción de la alimentación eléctrica
Limpieza de la máquina
Limpieza del vidrio de la puerta
Control del tubo de carga de agua
Mantenimiento del cesto
Limpieza del contenedor dosificador de detergentes
Problemas y Soluciones, 44-45
Asistencia, 46
Antes de llamar al Servicio de Asistencia Técnica
Garantías, 47
Declaración de las garantías Ariston
25 www.aristonappliances.us
Page 26

SP
Descripción
Contenedor
dosificador
Panel de mandos
(Varía en base al modelo)
Bloqueo de la puerta y
palanca de desbloqueo
Coloque en el presente manual
el número del modelo y el número
de serie indicados en la parte
delantera de la máquina detrás
de la abertura de carga, para
posibles referencias futuras.
Patas regulables
delanteras
línea de referencia
nivelación horizontal
Dos dispositivos de fijación
para el transporte debajo los
cierres en plàstica.
! AMBOS DEBEN ser eliminados
antes de utilizar la máquina (ver la
página 5)
Soporte terminal de
gancho
Tubo de
descarga
Puntos de entrada
de agua caliente
y fría
Cable de
alimentación
! Esta máquina ha sido proyectada
y fabricada respetando las normas
internacionales vigentes en
materia de seguridad.
La siguiente información se
refiere a la seguridad del usuario
y, por lo tanto, debe ser leída
atentamente.
26
Patas posteriores
www.aristonappliances.us
Page 27

Instrucciones importantes
sobre seguridad
INTRODUCCIÓN
Felicitaciones por su nueva lavadora Ariston. Además de ser apreciada por su diseño, varias veces premiado,
este sofisticado producto, fruto de una tecnología innovadora, le garantizará años de servicio satisfactorio.
Dedique algunos minutos a la lectura de este manual. En él encontrará consejos útiles para el mejor uso de
esta valiosa adquisición.
Conserve este manual con cuidado
La lavadora ha sido fabricada según las normas internacionales sobre seguridad más severas, para
cuidarlo a Ud. y a toda su familia.
ATENCIÓN
Para disminuir el riesgo de incendio, de descarga eléctrica o de lesiones personales durante el uso
del electrodoméstico, se deben respetar estrictamente las precauciones fundamentales, tales como
las siguientes:
1. Antes de utilizar el aparato, lea atentamente todas las
instrucciones.
2. Instale y nivele la lavadora sobre un piso que pueda
soportar su peso.
3. El aparato debe estar correctamente conectado a
tierra. No enchufe el aparato en una toma que no
tenga una correcta conexión a tierra y no esté en
conformidad con los códigos nacionales y locales.
Para la conexión a tierra del aparato, consulte las
instrucciones correspondientes a la instalación.
4. Para evitar posibles incendios o explosiones:
- No lave prendas que hayan sido precedentemente
limpiadas, mojadas, empapadas o manchadas con
bencina, solventes para limpieza en seco u otras
sustancias inflamables o explosivas ya que producen
vapores que pueden arder o explotar.
- No agregue bencina, solventes para limpieza en
seco u otras sustancias inflamables o explosivas al
agua de lavado. Estas sustancias emiten vapores
que pueden arder o explotar.
- Es posible que en una instalación doméstica de
agua caliente que ha permanecido inutilizada
durante dos o más semanas, se produzca gas
hidrógeno. EL GAS HIDRÓGENO ES EXPLOSIVO. Por
lo tanto, si la instalación doméstica de agua caliente
no se utiliza durante una o varias semanas, antes de
utilizar nuevamente la lavadora, abra todos los grifos
de agua caliente y deje correr el agua durante
algunos minutos. Esta operación permitirá eliminar
toda acumulación de hidrógeno. Debido a que se
trata de un gas inflamable, no fume ni utilice llamas
durante dicha operación.
- Para disminuir el riesgo de incendios, no introduzca
en la lavadora prendas, trapos para la limpieza,
cepillos para pisos y objetos similares que contengan
restos de sustancias inflamables, como aceites
vegetales, aceites a base de petróleo o destilados,
ceras, grasas, etc. Después del lavado, estos objetos
podrían contener sustancias inflamables que pueden
producir humo o incendiarse.
5. Antes de realizar cualquier operación, controle
siempre que se haya desenchufado la lavadora.
6. No enchufe / desenchufe la lavadora con las manos
mojadas.
7. No desenchufe el aparato tirando del cable.
8. Tenga cuidado cuando se descarga agua caliente.
Para disminuir el riesgo de incendio o de sacudidas
eléctricas, NO utilice prolongaciones o adaptadores
para conectar la lavadora a la alimentación
eléctrica.
9. La lavadora se debe utilizar sólo para las funciones
para las que fue proyectada.
10. Controle que todas las conexiones hidráulicas a la
lavadora tengan una o varias válvulas de cierre y
que las mismas sean fácilmente accesibles. Cierre
las válvulas de retención de la lavadora al final de
cada jornada de lavado.
Controle regularmente las conexiones de los tubos
de llenado para verificar que estén bien apretadas y
sin pérdidas.
11. No permita a los niños utilizar el aparato para sus
juegos. Cuando el aparato se utiliza cerca de niños,
se deben vigilar con atención.
12. Cuando se decida no utilizar más el aparato o
destinarlo al desguace, extraiga primero la puerta.
13. No introduzca las manos dentro del aparato
mientras la cuba o el cesto esté en movimiento.
14.No instale o conserve el aparato en un ambiente
expuesto directamente a las condiciones
atmosféricas.
15. No adultere los mandos.
16. Evite cualquier intento de reparación o sustitución
de las piezas del aparato, salvo que esté
expresamente especificado en las instrucciones de
mantenimiento y reparación destinadas al usuario,
el cual deberá estar seguro de haberlas entendido
perfectamente y considerarse capaz de ponerlas en
práctica.
17. No utilice suavizantes o productos de otro tipo para
reducir la carga electrostática de los tejidos, salvo
explícita recomendación del fabricante del
suavizante.
18. No lave en la máquina materiales con fibras de
vidrio. Las partículas pueden adherirse a los tejidos
lavados en las sucesivas cargas y provocar
irritaciones cutáneas.
19. Los tubos de carga se pueden dañar y deteriorar
con el paso del tiempo. Verifique periódicamente
que los tubos no presenten hinchamientos,
estrangulamientos, cortes, signos de desgaste o
pérdidas y sustitúyalos cada cinco años.
SP
27 www.aristonappliances.us
Page 28

SP
Caracteristicas técnicas
INSTALACIÓN EN HUECO EN LA PARED,
DESVÁN O NICHO (Instrucciones)
Model AW 149
23.4" (59.5 cm) ancho
Dimensiones
Capacitad
Conexiones
eléctricas
Conexiones
hidràulicas
Velocidad de
centri fugado
U
®
L
US LISTED
C
33.4" (85 cm) altura
23.6" (60 cm) profundidad
de 2 a 15 Lbs (7 kg)
tension 120 Voltios 60 Hz
presiòn màxima 100 psi (689.6 kPa)
presiòm minima 20 psi (137.9 kPa)
capacitad del cesto54 litros
Hasta 1400 r.pm.
Esta marca certifica que el aparado fue
probado en los laboratorios UL y
resultò conforme con las normas de
seguridad UL canadienses y
estadounidenses
Ariston ofrece a sus clientes productos
con la marca ENERGY STAR
El aparato se puede instalar en un hueco en la
pared, en un desván o en un nicho.
Las distancias de instalación están expresadas en
centímetros y se refieren a los valores mínimos permitidos.
No obstante, se aconseja dejar siempre un espacio mayor
para facilitar las operaciones de instalación,
mantenimiento y colocación según conformidad con los
códigos y con las normas locales.
Otras instalaciones se deben realizar respetando las
dimensiones mínimas indicadas.
* Podría ser necesario
dejar otro espacio
libre debido a la
presencia de
elementos que
sobresalen de las
paredes, puertas o
pisos.
Distancias
mínimas de
instalación
Debido al continuo proceso de mejoramiento de los propios productos, el fabricante se reserva el derecho de
aportar cualquier modificación a las máquinas sin obligación de aviso previo a los clientes.
28
www.aristonappliances.us
Page 29

Desembalaje
! Tenga siempre el manual al alcance de la mano para poder consultarlo cuando sea necesario. En el caso
de traslados y si se vendiera o se diera a otras personas, verifique que el manual se suministre con el
aparato para que el nuevo propietario pueda conocer las advertencias y las sugerencias que contiene sobre
su funcionamiento.
Desembalaje
SP
1. Corte cuidadosamente
con una tijera a lo largo de
uno de los bordes para
quitar la película.
2. Abra la puerta,
controle el interior del
cesto y extraiga las cajas
de accesorios.
Conserve todos los
materiales del embalaje
hasta que la instalación
haya terminado.
5. Quite la base de
poliestireno.
! Avertencia !
Bolsas de plàstico,
polistirol expandido,
clavos y otros elementos
del embalaje non son
juguetes para los ninos ya
que constituyen fuen- tes
potencial de peligro
6. ! Al desembalar la
máquina es
IMPORTANTE controlar:
Esta es la parte de la
base de poliestireno que
debe permanecer intacta
después que se extraiga la
base.
- Si se ha desprendido una
pieza que todavía está en
la máquina
mientras la máquina esté
apoyada lateralmente
sobre la tapa superior.
quítela
3. Levante la tapa
superior de poliestireno y
quite los cuatros ángulos.
4. Coloque con cuidado
la parte izquierda de la
máquina sobre la tapa
superior.
Se recomienda pedir
ayuda a una segunda
persona para levantar y
bajar la máquina.
7. Coloque la máquina en
posición erecta.
Para proteger el ambiente, arroje el material de
embalaje de modo
adecuado y con cuidado.
! Continúe leyendo
atentamente el resto de las
instrucciones; las páginas
que siguen contienen
información importante
sobre la instalación y las
soluciones a los posibles
problemas.
29 www.aristonappliances.us
Page 30

SP
Quite los dispositivos de fijación para el
transporte
IMPORTANTE : siga estas instrucciones para quitar los
DOS dispositivos de fijación utilizados para el transporte
(para la correcta colocación, ver
Descripción). Los pernos para el
transporte están ubicados a
ambos lados del panel posterior,
AMBOS DEBEN ser quitados
antes del uso.
En caso contrario, la máquina
podría sufrir graves daños.
Es fundamental que el perno y el
distanciador utilizados para el
transporte (ver la fig.) estén
perfectamente íntegros en el
momento en que se quitan.
1. Desenrosque el perno con una
llave de 13 mm.
2.
DETENGA la operación
cuando se observan 3 roscas.
Posición
El lugar en el que se instala la máquina influirá sobre sus
prestaciones:
Para garantizar su seguridad y el respeto de las normas
sobre aparatos eléctricos, si desea instalar la máquina en
un baño, consulte a un electricista.
Controle que la toma de corriente y los grifos de agua
sean fácilmente accesibles. Si la máquina no se
utilizará durante largo tiempo, la alimentación eléctrica
e hídrica deberán cerrarse.
Controle que a la máquina se le deje el espacio
suficiente. Elija un espacio mínimo de 60 cm. de
ancho, 60 cm. de profundidad y 85 cm. de altura. Deje
también el espacio suficiente para abrir la puerta
completamente para que se pueda cargar y descargar
fácilmente.
Si es posible, la máquina debería colocarse sobre un
piso sólido para disminuir al mínimo las vibraciones.
Al desplazar la máquina, tenga cuidado con no dañar el
revestimiento del piso. El peso de la máquina podría
producir incisiones en dicho revestimiento.
Nivelación
Regule las dos patas delanteras para que la máquina
quede estable y nivelada. Si no es así, el funcionamiento
puede resultar ruidoso.
Regule la pendiente lateral y la inclinación hacia
adelante y hacia atrás.
3. Para quitar el dispositivo,
sujete el perno, hágalo deslizar
de costado y luego tire.
4. Por razones de seguridad,
introduzca uno de los tapones de
plástico (suministrados con la
máquina ) en el orificio.
Repita los pasos de 1 a 4 para
quitar el segundo perno usado
para el transporte.
Los materiales del embalaje no
son juguetes para los niños.
1. Desplace la máquina hasta su posición definitiva.
- Tenga cuidado con no encastrar o enroscar los
flexibles.
2. Gire manualmente una sola o
ambas patas delanteras en
sentido antihorario hasta el tope.
Durante la regulación de las
patas, utilice un nivel de burbuja
para controlar la nivelación de la
máquina, tanto lateralmente
como hacia delante y hacia
atrás.
- El resorte que se encuentra en cada pata impide que se
aflojen.
! Si la máquina se coloca sobre una alfombra o moqueta,
regule las patas dejando el espacio suficiente para una
buena aireación debajo de la lavadora.
¿Lo sabía?
... los dispositivos de fijación para el transporte sirven para garantizar que su máquina no sea
dañada durante la entrega.
... ambos dispositivos de fijación para el transporte se deben quitar antes de utilizar la máquina: no
hacerlo produciría una excesiva vibración, el movimiento de la máquina y posibles daños internos.
... gran parte de los problemas relacionados con el ruido de las máquinas son producidos por que no
se han quitado los dispositivos de fijación utilizados para el transporte, a lo cual se agrega la
incorrecta regulación de las patas para nivelar la máquina.
si el problema de su máquina es causado por una incorrecta instalación o por un mal uso, Ud.
deberá hacerse cargo de la intervención del técnico
30
www.aristonappliances.us
Page 31

Instalación
Conexión hidráulica
ATENCIÓN:
1. La lavadora debe funcionar sólo con grifos de agua
fría o caliente (máx. 60°C). No conecte el aparato al
mezclador de una caldera para el agua caliente no
presurizada.
2. Para evitar daños producidos por el agua, las válvulas
de agua fría y caliente deben ser accesibles cuando la
lavadora está en funcionamiento y deben permanecer
siempre cerradas cuando no se usa.
! Para recordar: utilice los tubos flexibles nuevos
suministrados con la máquina. Los tubos viejos pueden
producir pérdidas por el desgaste de las arandelas de
goma o se pueden quebrantar por la presión ejercida por
el agua.
Conexión de los tubos de carga del agua
Entre los accesorios suministrados con el aparato, se
incluyen dos tubos de carga. El extremo recto de estos
tubos debe estar conectado a la alimentación hídrica
(ver la figura de abajo).
El extremo en forma de ángulo recto de estos tubos debe
estar conectado a las válvulas de entrada colocadas en
la parte posterior del aparato para permitir el cierre
perfecto en cada uno de los puntos de unión.
Las operaciones de apretamiento se deben efectuar
manualmente; utilice una herramienta únicamente cuando
haya pérdidas de agua. No realice una fuerza excesiva
(ver la figura).
Cualquier reparación o sustitución de una pieza deberá
ser realizada únicamente por un técnico especializado
para evitar lesiones personales o daños al aparato. Las
válvulas para la entrada del agua están codificadas por
colores: Rojo = Caliente / Blanco = Fría
Conexión.
1. Enrosque el tubo de
H
C
llenado de agua caliente (conector rojo H ) a la alimentación de agua caliente hasta que quede bien apretado.
4. Abra la alimentación de agua caliente y controle que
no existan pérdidas. Si es necesario, apriete todavía más.
llenado de agua fría
(conector azul C ) a la
alimentación de agua fría
hasta que quede bien
apretado.
2. Abra la alimentación de
agua fría y controle que
no existan pérdidas. Si es
necesario, apriete todavía
más.
3. Enrosque el tubo de
Conexión a la descarga
Diámetro/Caudal de desagüe fijo. Necesita un desagüe
fijo con un diámetro mínimo de 1 1/4 (3,2 cm.) y un
caudal mínimo de 7 gallons (26 litros) por minuto.
Salida del desagüe fijo. Debe encontrarse a una altura
comprendida entre 25-34 (62 y 86 cm.) de la máquina.
Extremo de salida del tubo de desagüe (se suministra
con la unidad).
Debe encontrarse a una altura mínima de 20 (50 cm.) de
la base de la lavadora. Para evitar fenómenos de
sifonaje, es necesario que la descarga fija posea una
válvula especial. Para evitar fenómenos de sifonaje, el
tubo de descarga no se debe introducir más de 6 (15 cm )
en el tubo del desagüe fijo.
! Aún cuando fuera necesario desplazar el soporte
terminal de gancho a lo largo del tubo de desagüe gris,
NO lo quite.
! Independientemente del método de desagüe utilizado,
verifique que el soporte terminal de gancho esté fijado al
mismo nivel o por encima de la Línea de referencia
nivelación horizontal.
Coloque correctamente el tubo de descarga para evitar
roturas y garantizar una descarga adecuada del agua.
El extremo de salida del tubo de descarga debe
encontrarse, como mínimo, a una altura de 25 (62 cm)
de la base del aparato. En este punto, la descarga de
agua se puede realizar en el lavamanos o en el desagüe
fijo, pero es necesario que la máquina posea una válvula
especial ubicada a una altura mínima de 24 (60 cm)
para evitar fenómenos de sifonaje (ver figura al lado).
El tubo de descarga no debe introducirse en el desagüe
fijo más de 15 cm.
Importante:
Verifique que el tubo de desagüe no esté plegado y
que el paso de agua no esté obstruido por
estrangulaciones.
Para obtener prestaciones óptimas y disminuir al
mínimo las vibraciones, el aparato debe permanecer
estable sobre un piso resistente.
Consejos y sugerencias
! Controle que el tubo no esté sometido a pliegues ni
compresiones.
! La presión del agua en el grifo de alimentación debe
estar comprendida entre los valores indicados en la tabla
de características técnicas (ver la tabla en la página 28).
Utilice siempre un tubo de carga nuevo.
! Controle el tubo de carga de agua al menos una vez al
año y sustitúyalo cuando detecte grietas o rajaduras
porque los tubos desgastados pueden partirse debido a
la presión del agua.
No enrosque demasiado a fondo. Las operaciones de
apretamiento se deben realizar manualmente; utilice una
herramienta sólo en el caso de pérdidas de agua. No
ejerza una fuerza excesiva.
SP
31 www.aristonappliances.us
Page 32

Instalación
SP
Conexión al desagüe fijo en el piso
La salida del desagüe
(A)
25"-34"
62 - 86
inches
cm
fijo se debe encontrar a
una altura comprendida
entre 25 ( 62 cm.) y
34 (86 cm) de la base
del aparato (A).
25”
34”
Método del tubo de desagüe en el fregadero
El punto de ingreso en el
sistema de desagüe en el
fregadero debe
encontrarse por encima del
sifón (ver la figura al
costado). Si el tubo de
descarga se coloca cerca
de muebles o paredes, se
recomienda revestir con un
material protector (por
ejemplo, cinta aisladora o
cinta para tubos) las
eventuales aristas vivas
que podrían dañarlo. Utilice una abrazadera de manguera
adecuada para fijar el tubo de descarga a la unión en Y
o al triturador de basuras del fregadero. Con el sistema de
conexión del tubo de desagüe al fregadero, se puede
conectar el tubo directamente a:
1) un triturador de basura, siguiendo las instrucciones
suministradas por el fabricante del dispositivo;
2) directamente a una unión en Y (disponible en las
ferreterías);
3) un sifón separado a través del piso. Para evitar
fenómenos de sifonaje, el sifón debe poseer un
dispositivo de ventilación. Para garantizar una
adecuada aireación, instale un tubo de ventilación
especial, disponible en las ferreterías;
4) al grifo mediante un kit adaptador para grifos
(disponible individualmente). De este modo, el agua
tomada del grifo se descargará directamente en la
descarga del fregadero.
Conexión al desagüe fijo en la pared
La salida del desagüe
fijo debe encontrarse a
25 (62 cm.) como
mínimo y 34 (86 cm.)
como máximo del
extremo del tubo de
desagüe en la base de la
lavadora (B) (Ver la
figura al costado y de
abajo).
#^
Método debajo del fregadero
Hose
clamp
620 mm
1. Desenganche el
extremo bloqueado de la
unidad de descarga
debajo del fregadero.
2. Fije el soporte terminal
de gancho a una
distancia mínima de 620
mm. del piso.
3. Utilice un soporte de
grapa para tubos (por ej.
abrazadera de
manguera) para fijar el
extremo del tubo de
desagüe gris a la unidad
de descarga debajo del
fregadero.
32
www.aristonappliances.us
Page 33

Conexión eléctrica
Tensión/Amperaje del aparato - 120 V, 60 Hz, 1300
W, 11 Amp.
Conexión - enchufe tripolar con cable de alimentación
de 6 (1,8 m) de largo suministrado con el aparato.
Dispositivo de protección del circuito - monofásico de 3
hilos, 120 V, 60 Hz, AC corriente alterna en circuito
separado de 15 Amp.
INSTRUCCIONES DE CONEXIÓN A TIERRA
El aparato debe estar conectado a tierra. En caso de mal
funcionamiento o avería, la instalación a tierra reduce el
peligro de sacudidas eléctricas ofreciendo un camino a
la corriente eléctrica. El aparato está dotado de un cable
que incluye un conductor y un enchufe para la conexión
a tierra. El enchufe se debe conectar a un tomacorriente
adecuado, instalado correctamente y conectado a tierra
en conformidad con los códigos y con las normas
locales. NO adultere el enchufe suministrado con el
aparato. En el caso de incompatibilidad entre el
tomacorriente y el enchufe, haga instalar un
tomacorriente adecuado por un técnico especializado.
SP
La lavadora debe estar conectada a una toma
eléctrica tripolar (3) correctamente puesta a tierra de
120 Volt, 60 Hz, 11 Amp. No debe estar accionada por
un interruptor de pared o de cuerda que pueden ser
apagados accidentalmente. Para su seguridad, por
ningún motivo quite la toma tripolar o de sección
redonda de conexión a tierra. EVITE EL USO DE
PROLONGACIONES.
NO instale o conserve el aparato en un ambiente
expuesto a los agentes atmosféricos o en un local
destinado a depósito de gasolina u otras sustancias
inflamables.
Lista de control de instalación final
ADVERTENCIA: Una incorrecta conexión a tierra del
cable del aparato comporta un riesgo de
sacudida eléctrica. En caso de dudas, llame a
un técnico especializado o al servicio de
asistencia técnica para que efectúe un control
de la conexión a tierra del aparato.
¡Atención !
Para su propia seguridad y a los fines de evitar
incidentes, lesiones o incendios, lea atentamente
las siguientes instrucciones antes de instalar la
lavadora.
Las operaciones de instalación y puesta a tierra
deben ser realizadas por un instalador
especializado y respetando las normas locales. Las
instrucciones de instalación contenidas en el
presente manual están reservadas para el
instalador.
La lavadora se DEBE instalar sobre un piso
perfectamente plano e íntegro, en un ambiente
seco y bien aireado, en proximidad de un
tomacorriente y de un desagüe fijo con una
capacidad adecuada. NO la instale sobre
alfombras.
El kit para la instalación y las instrucciones han sido
extraídas de la cuba.
Las correas para el transporte han sido extraídas.
La lavadora está conectada a una toma eléctrica y
correctamente a tierra.
Los tubos de agua están conectados a los grifos con
filtros y arandelas de goma.
El agua se abre y se controla que no existan pérdidas
en el grifo y en las válvulas.
El tubo de descarga está colocado correctamente en
la instalación de desagüe y no está plegado ni
dañado.
Se ha realizado la nivelación de la lavadora.
Pruebe el correcto funcionamiento realizando un ciclo
completo de lavado a la máxima temperatura
Importante: Si se instala sobre alfombras, la máquina
se somete a excesivas vibraciones,
especialmente durante la fase de centrifuga ción, con el consiguiente deterioro de las
prestaciones.
33 www.aristonappliances.us
Page 34

Descripción de la lavadora
SP
Panel de mandos AW 149 (NA)
Atencion: Para su propia seguridad y a los fines de evitar incidentes, lesiones o incendios, lea atentamente
LAS INSTRUCCIONES IMPORTANTES SOBRE SEGURITA prima del uso de la lavadora (ver pagina 27).
Lista de
programas
Dosificador de detergentes
Botones
OPCIÓN
Pilotos de
SEÑALACIÓN
Display
Mando REGULACIÓN
DE TEMPERATURA
Mando VELOCIDAD
DE CENTRIFUGADO
Botón
START/
CANCEL
Mando de selección
de PROGRAMAS
Botón
ENCENDIDO/
APAGADO
Características del panel de mandos
Lista de programas: Tabla práctica para la consulta de
los distintos programas disponibles.
Display:
visualiza el avance del ciclo de lavado y/o de la
programación (ver página 35).
Botones OPCIÓN: Para seleccionar las opciones
disponibles (ver Tabla de programas y Opciones).
Mando de regulación de la temperatura: Para modificar
la temperatura según el programa seleccionado .
Mando de Velocidad de Centrifugado: Para disminuir la
velocidad de centrifugado o excluir completamente la
centrifugación
*.
Botón Encendido/Apagado . Para encender y apagar la
lavadora.
Botón Start/Cancel : Para poner en marcha el
programa o anularlo cuando se hayan realizado
selecciones incorrectas.
Mando de selección de programas: Para seleccionar
los programas de lavado. El mando no se mueve
durante todo el ciclo.
Pilotos de señalación: Indican el bloqueo de la puerta
(con el piloto encendido, la puerta no se puede abrir) y
la fase del programa alcanzada por la máquina (lavado,
aclarado o centrifugado).
*
Cuando se selecciona un programa y se desea modificar la velocidad de centrifugado, la máquina acepta la
modificación sólo si es compatible con el programa.
34
www.aristonappliances.us
Page 35

Programas y Opciones
Opciones
Superlavado:
Utilice esta opción para seleccionar un programa con una duración y un tipo de lavado más intenso, adecuado para
algodón (para uso sanitario, algodón pesado y algodón normal) y para sintéticos sin planchar (sintéticos pesados y
sintéticos normales).
Botón Prelavado:
Cuando se cargan prendas muy sucias, presione este botón para agregar un lavado adicional a cada programa (excepto
para los programas 4-7-10-11).
Botón plancha fácil (Parada con agua):
Reduce las arrugas en los tejidos, facilitando el planchado.
Eligiendo esta opción, la lavadora reduce la acción lavadora y la velocidad de centrifugado (máximo 600 rpm) para los
programas 5-6-7 y la lavadora se interrumpe en su ultimo aclarado.
En el programa Seda, la opción plancha fácil (parada con agua) se realiza automáticamente aún si el botón Plancha fácil
no ha sido presionado: la lavadora efectuará una pausa en el aclarado final del ciclo dejando la ropa en remojo.
El piloto Plancha fácil centellea para indicar que el ciclo está efectuando una pausa.
La máquina permanecerá en este estado hasta que se presione el botón Start/Cancel o se presione de nuevo el botón
Plancha Fácil para hacer que el ciclo finalice.
Retraso de hasta 24 horas:
Utilice esta opción para postergar el comienzo del programa hasta 24 horas. En el display se visualiza el retraso
seleccionado. Cada vez que se presiona el botón, el Retraso aumenta 1 hora. Si se pulsa el botón después que en el
display ha aparecido '24', la máquina vuelve a cero el delay timer y visualiza 'OFF'; posteriormente, pulsando nuevamente
el botón, se reanuda la cuenta desde una hora. Cuando la cuenta al revés llega a cero, el programa se pone en marcha.
SP
Remojo:
Esta opción permite dejar la ropa en remojo una hora du
rante el ciclo de lavado. Durante este período, la lavadora se mueve 6 segundos cada 2 minutos (excepto los programas
7, 8, 9, 10, 11).
Velocidad de Centrifugado variable:
Utilice esta opción para disminuir la velocidad de centrifugado, llevándola hasta un valor menor que el máximo previsto
para el programa elegido.
Cada vez que se presione el botón, disminuirá la velocidad de centrifugado. La nueva velocidad de centrifugado se
visualizará en el display.
Si se presiona nuevamente después que en el display aparece "OFF", la máquina volverá a la velocidad de centrifugado
inicial más alta.
Nota: La lavadora impide automáticamente seleccionar una velocidad de centrifugado superior al valor máximo previsto
para cada programa.
Botón de Regulación de la Temperatura:
Utilice este mando llevándola hasta un valor menor que el máximo previsto para el programa elegido.
Las selecciones consentidas son: 1) Cold (FRÍA) (Lavado frio/Aclarado frio)
2) Warm (TIBIA) (Lavado tibio/Aclarado frio)
3) Hot (CALIENTE ) (Lavado caliente/Aclarado frio)
4) Sanitary. En el cyclo Sanitary la resistencia è en marcha.
Atención: Si se selecciona una opción no adecuada para el programa elegido, el LED correspondiente centelleará
durante algunos segundos antes de apagarse.
Si se selecciona una opción no adecuada para el programa elegido, el LED correspondiente centelleará
durante algunos segundos antes de apagarse.
En caso de anomalía, aparece un código de error, por ejemplo: F-01, que se debe transmitir a la Asistencia
Técnica (véase las páginas 44-45-46).
35 www.aristonappliances.us
Page 36

p
p
j
p
j
p
j
p
j
(*)
p
j
(*)
(*)
Programas y Opciones
AW 149
SP
Tipos de tejidos y de
suciedad
Nº de Programa
Carga
máxima
(livras)
Prelavado
(Opción)
Detergente
lavado
Suavizante
O
ciones
Duración
del ciclo
(min.) sin
opciones
Descripción del ciclo
de lavado
REGULE EL
DELAY TIMER
De 1 a 24 horas de retraso Salida sea retraso
de una hora y así hasta 24h
ALGODÓN ENÉRGICO
Prendas blancas que no
destiñen
(prendas de algodó n para lavar
cuidadosamente por motivos
higiénicos)
Blancos particularmente
sucios
(sábanas, manteles, etc.
Normal
(Blancos y colores resistentes
muy su cios)
Ligero - Blancos y colores
delicados poco sucios
(camisas, camisetas, etc.)
)
1
2
3
4
Uso
sanitario
Pesada
Normal
Ligero
15
15
15
15
KKK
KKK
KKK
Prelavado
Su
Remo
Prelavado
Su
Remo
Prelavado
Su
Remo
KK
er lav ado
o
er lav ado
o
er lav ado
o
170 Lavado,
92 Lavado,
82 Lavado,
59 Lavado,
tres aclarad os,
centrifuga do intermedio y final
centrifuga do intermedio y final
centrifuga do intermedio y fina
centrifuga do intermedio y final
tres aclarad os,
tres aclarad os,
tres aclarad os,
SIN PLANCHAR
Sintéticos con colores
resistentes muy sucios
(ropa para reci én nacidos, etc.)
Sintéticos con colores
delicados
poco sucia)
Sintéticos con colores
delicados
poco sucia)
(ropa de todo tip o
(ropa de todo tip o
5
6
7
Pesada
Normal
Ligero
7. 5
7. 5
7. 5
KKK
KKK
KK
Prelavado
Plancha fácil
Su
Remo
Prelavado
Plancha fácil
Su
Remo
Plancha fácil
er lav ado
o
er lav ado
o
75 Lavado,
69 Lavado,
63 Lavado,
tres aclarad os y
centrifuga ción delicada
Plancha fácil
tres aclarad os y
centrifuga ción delicada
Plancha fácil
tres aclarad os y
centrifuga ción delicada
Plancha fácil
DELICADOS
Delicados
Seda, prendas y tejidos
especialmente delicados
(cortinas, seda, viscosa,
etc.)
Lana
Mixto - Daily
(Muy ligiero lavado por
ropa y tejidos mixtos
ligeramente sucios)
8
9
10
11
Ligero
Seda
Lana
Daily
6. 5
6. 5
3. 5
7. 5
KKK
KKK
Prelavado
Prelavado
KK
KK
64 Delicates,
centrifuga delicata
39 Lavado,
Descarga
52 Lavado,
centrifuga do delicado (600 rpm)
30 Lavado,
centrifuga do delicado (800 rpm)
tre risciacqui,
tres aclarad os
(*)
dos aclarados y
dos aclarados y
PROGRAMAS
PARTICULARES
Aclarados
Aclarados delicado
Centrifugación Centrifugación
Centrifugación delicada Centrifugación delicada
Descarga Descarga
K
K
Aclarados y centr ifugación
Aclarados, pl ancha fàcil o
Descarga
l
Programa especial Uso sanitario 1:
El ciclo Uso sanitario es recomendado para prendas de algodón con colores resistentes, con manchas que se deben
eliminar cuidadosamente por motivos higiénicos. La temperatura elevada 167°F (75°C) elimina gérmenes peligrosos.
Importante:
para anular el programa de lavado apenas seleccionado, presione durante 5 segundos, como mínimo, el botón
de puesta en marcha.
(*) Para completar el programa, presione el botón de puesta en marcha.
36
www.aristonappliances.us
Page 37

Consejos sobre
detergentes y ropa
Dosificador de detergentes
Vierta en el contenedor exclusivamente los detergentes
específicos que luego serán tomados de dicho
contenedor; otros productos podrían causar daños u
obstrucciones.
1
2
3
4
5
1 Sujetador de desbloqueo del
contenedor.
2 Compartimento de detergente
para prelavado:
Máximo: 200 ml en polvo o 100 ml
líquido
3 Compartimento de detergente
para el lavado principal:
Máximo: 400 ml en polvo o 200 ml
líquido
Consejos sobre los detergentes
Dosifique la cantidad correcta de detergente para
obtener lavados mejores
Atención
PARA EVITAR EL RIESGO DE ENVENE-
NAMIENTOS, MANTENGA LOS
DETERGENTES Y ADITIVOS FUERA DEL
ALCANCE DE LOS NIÑOS
Es aconsejable medir la cantidad de detergente (en
polvo o líquido) de acuerdo a:
La dureza del agua. La administración municipal
encargada del agua puede suministrar este tipo de
información.
La cantidad de ropa.
El grado de suciedad (ver Programas en la página 36).
Las especificaciones suministradas por el fabricante
del detergente.
SP
4 Rejilla
5 Compartimento de suavizante:
Máximo: 120 ml
Dosificación de detergente en polvo
Para obtener resultados óptimos de lavado, mida la
cantidad de detergente indicada por los fabricantes y
viértala en el compartimento principal de detergente.
Prelavado
Cuando se selecciona el prelavado, vierta el detergente
tanto en el compartimento de prelavado como en el de
lavado principal.
Suavizante
Todos los tejidos y en especial las toallas, se benefician
con el uso de suavizantes en el último aclarado. Las
prendas se vuelven más suaves y fáciles de planchar,
mientras que los tejidos sintéticos pierden gran parte de
su efecto adherente.
Vierta el suavizante en el compartimento Aditivos del
dosificador de detergente hasta el nivel indicado en el
sifón. Evite el llenado excesivo del compartimiento ya
que el suavizante se puede volcar dentro de la máquina
perjudicando la calidad del lavado.
Medir correctamente la cantidad de detergente asegura
óptimos lavados y contribuye a cuidar el medio ambiente.
Se recomienda el uso de detergentes de alta eficiencia
(HE) porque son estudiados especialmente para brindar
óptimas prestaciones en las lavadoras de carga frontal.
No utilizar este tipo de detergentes puede causar
problemas como el exceso de espuma (que se vierte en el
piso) y/o lavados de menor calidad.
Cantidad de detergente insuficiente:
La ropa no se lava bien y con el tiempo se vuelve gris y
rígida. Pueden aparecer en la ropa manchas grisáceas
(glóbulos de grasa). El calentador puede calcificar.
Cantidad excesiva de detergente:
Es perjudicial para el medio ambiente, el agua con
excesivo jabón reduce el sacudimiento del lavado,
disminuyendo la eficacia de dicho lavado y del aclarado o
impidiendo un adecuado centrifugado.
Regule la cantidad de producto en función del grado de
suciedad de la ropa.
Si el agua es particularmente dura, utilice una cantidad
mayor.
Si las prendas fueron tratadas previamente, reduzca la
cantidad de detergente o directamente no lo utilice.
37 www.aristonappliances.us
Page 38

Puesta en marcha
del programa de lavado
SP
Preparación del lavado
Selección de las prendas
Evite introducir, en la misma carga, prendas que podrían
perjudicar el resultado del lavado. Si es posible,
seleccione las prendas en cargas con uniformidad de
colores, tejido, estructura y grado de suciedad.
Color
Separe las prendas en tres grupos: Blanco y colores
claros, colores normales o fuertes, colores oscuros. Las
prendas que destiñen deben lavarse solas.
Tipo de tejidos
Los tejidos delicados deben ir separados de aquellos
más resistentes. Separe además las prendas que tienden
a producir pelusas de aquellas que no las producen o
que las atraen.
Estructura de las prendas
Las prendas que se deshilachan con facilidad o que
presentan decoraciones particulares necesitan de un
cuidado escrupuloso. Estas prendas pueden ser lavadas
en el aparato seleccionando el ciclo para tejidos de
punto. Para las prendas frágiles o delicadas se aconseja
lavar a mano.
Grado de suciedad
Las prendas muy sucias deben separarse del resto de la
carga para evitar que la suciedad contamine el agua del
lavado.
incluidas en el lavado. Saque las monedas u otros
objetos extraños a fin de evitar daños al aparato.
Cierre todos los ganchos, los cierres relámpagos y
los botones.
Dé vuelta las prendas de punto para reducir la tendencia
al pillingde dichos tejidos. El pilling es la formación de
pelotitas de fibra en la superficie de las prendas
causadas por el uso y el roce.
Elimine las acumulaciones de suciedad y de arena
Saque con un cepillo la suciedad de los ruedos de los
pantalones, sacuda o limpie con aspiradoras las
alfombras para quitar la suciedad depositada en la
superficie.
- En el caso de hebillas lavables, envuélvalas fuertemente
con un paño antes del lavado y del secado para evitar
rayaduras o daños al aparato. Saque las hebillas,
accesorios, botones o cinturones no lavables.
- Ate los cordones y cinturones y anude los lazos de los
delantales para evitar que se entrelacen durante el lavado.
- Antes de cargar la lavadora, controle que el cesto
esté vacío.
Inspección
Al seleccionar las prendas para la carga, verifique que
ninguna de ellas necesite un cuidado particular.
(ver la tabla para el cuidado de los tejidos en la página
39).
Pretratamiento
Elimine las manchas cuando todavía están frescas y
son fáciles de quitar. Para las manchas de las cuales no
se sabe la naturaleza, intente primero quitarlas con agua
fría. El agua caliente fija las manchas que contienen
proteínas como la sangre, carne, huevo o leche. Para
eliminar las manchas difíciles, consulte la Guía para la
eliminación de manchas de la página 41.
Trate previamente las partes muy sucias como
cuellos, puños de camisas y partes centrales de las
fundas.
Remiende las prendas rasgadas antes del lavado,
para evitar que se dañen más aún.
Vacíe los bolsillos
Los objetos que se dejan en los bolsillos como lápiz
pastel, lapiceras o restos de cigarrillos pueden manchar
toda la carga de la lavadora. Los pañuelos de papel se
deshacen dejando residuos en todas las prendas
Prelavado
Utilice la función de prelavado para prendas
particularmente sucias como la ropa de trabajo o las
prendas de los niños,
que, a menudo, están muy sucias. En estos casos, el
prelavado con detergente ayuda a disolver aún la
suciedad más persistente.
38
www.aristonappliances.us
Page 39

Consejos para un lavado óptimo
y para la puesta en marcha
Consejos Útiles
No lave nunca en lavadora... ropa sin dobladillos,
deshilachada o rasgada. Si no puede evitar lavarla,
colóquela en una bolsa para su protección. No lave
prendas de color junto con prendas blancas.
Cuidado con el peso
Para obtener un lavado óptimo, no supere los límites de
peso indicados abajo (los valores se refieren al peso de
ropa seca):
- Tejidos resistentes (algodón pesadonormal
¿Cuánto pesan?
1 sábana 1 1/4 lb (400-550 gr.)
1 funda 4 oz. (120 gr.)
1 mantel 1 lb (450 gr.)
1 albornoz 2-3 lbs (900-1.300 gr.)
1 toalla 5 oz/1 lb (150-500 gr.)
Las camisetas de color, las estampadas y las camisas
duran más si se lavan del revés.
Las camisetas y los chandales estampados deben
plancharse siempre del revés.
Ciclo Lana
ligero): 15 lbs (7 kg) máximo
- Tejidos sintéticos (pesadosnormalesligeros):
7,5 lbs (3,4 kg) máximo
- Tejidos delicados
6,5 lbs (3 kg) máximo
Alarma algodón denim.
Algunos monos de trabajo tipo salopette tienen tirantes
con ganchos que pueden dañar al cesto o a las otras
prendas durante el lavado. Para reducir al mínimo el
riesgo, coloque los ganchos en el bolsillo de la pechera
y fíjelos con alfileres de seguridad.
- Pura lana virgen: 1,8 kg máximo
- Albornoces: 3 kg máximo
Cachemire Platinum
Delicado como el lavado a mano.
Ariston es la única lavadora que ha obtenido el
prestigioso reconocimiento Woolmark Platinum
Care (M.0303) otorgado por The Woolmark
Company, que certifica el lavado en máquina de
todas las prendas de lana, aún aquellas que contienen la
etiqueta sólo lavado a mano.
Por lo tanto, con el programa Lana, se puede
lavar en máquina todas las prendas de lana con
absoluta tranquilidad y con la garantía de obtener
los mejores resultados.
Para obtener los mejores resultados, le aconsejamos utiizar
una pequeña cantidad de detergente cuidando no superar
Para las prendas más delicadas:
coloque la ropa interior, medias de mujer prendas
delicadas en un saco de tela para protegerlas
los 3.5 Lbs (1,8 Kg) de carga.
Períodos en los que no se utiliza: desenchufe el aparato.
Es aconsejable desenchufar la máquina y cerrar el grifo de
agua. Además, deje la puerta semiabierta para permitir
que el aire circule en la zona del cesto y de la junta. Si así
lo hace no se formarán olores desagradables.
Comprender las etiquetas de las prendas
Las etiquetas que encontramos en todas las prendas contienen instrucciones para el lavado y el secado expresadas en pequeños
símbolos. Consulte esta tabla para la correcta interpretación de estos símbolos; la ayudarán a lavar con más eficacia, a tratar mejor sus
prendas y a hacer rendir más su lavasecadora.
SP
Ciclo de
lavado
Temperatura
del agua
Secado en
secadora
Instrucciones
especiales
Símbolos
blanqueador
Normal/
Algodón Heavy Duty
Caliente
(50oC/120oF)
Se puede
secar en
máquina
Colgar
para secar
Cualquier blanqueador
(si es necesario)
Algodón Heavy Duty
Sin planchar/
antiarrugas
Tibia
(40oC/105oF)
Normal/
Colgar sin
retorcer
Sólo blanqueador sin cloro
Sin planchar/
antiarrugas
para secar
(si es necesario)
Te nd e r
Delicado/
Dolce
(30oC/85oF)
Delicado
Gentle
Fría
No se puede
secar en secadora
Secar a la
sombra
No blanquear
mano
No lave a umidoLavado a
No se
puede secar
en máquina
No torcer
39 www.aristonappliances.us
Page 40

Ponga en funcionamiento la lavadora
SP
Encendido/Apagado Seleccionar un
programa / On-Off
1. Presione el botón Encendido/Apagado (On/Off) para
encender la máquina.
2. Cargue la ropa y cierre la puerta.
3. Vierta el detergente y eventualmente el suavizante.
4. Gire el mando de selección hasta el programa que
debe comenzar.
5. Seleccione otras opciones deseadas (ver Opciones).
6. Presione el botón Start/Cancel para poner en marcha
el programa.
Para detener o cambiar el programa:
1. Presione el botón Start/Cancel durante 3 segundos.
2. Seleccione Pump out (Vaciado) con el mando de
selección de programas.
Carga típica de lavado
Dos ejemplos de carga máxima para diferentes tipos de
tejidos:
ALGODÓN 2 Cortinas para baño
1 Toalla
6 Camisas
6 Blusas
1 Pijama
4 Prendas interiores
2 Sabanas
= 15 Lbs (7 Kg)
SINTÉTICOS 2 Prendas de niño
5 Camisas
5 Blusas
1 Pijama
4 Prendas interiores
= 7.5 Lbs (3.5 Kg)
3. Cuando la máquina finaliza la descarga, gire el mando
de selección hasta el nuevo programa. Podría ser
necesario un agregado de detergente.
4. Presione Start para poner en marcha el programa.
Función automática
Antes del lavado se puede hacer mucho para obtener los
mejores resultados. Subdivida las prendas según el tipo
de tejido y los colores. Consulte las etiquetas y respete
las indicaciones.
Individualización de la carga desequilibrada
La lavadora posee una función incorporada que le permite disminuir la velocidad de centrifugado cuando se encuentra
con una carga desequilibrada.
Cuando se individualiza una carga desequilibrada, la lavadora trata de distribuirla de modo uniforme para balancearla
y alcanzar la velocidad de centrifugado total.
En caso contrario, cuando la carga permanece desequilibrada, la velocidad de centrifugado disminuye de acuerdo a la
magnitud de la carga desequilibrada individualizada. Esta característica permite evitar daños a la máquina y al ambiente que la rodea y disminuir el ruido excesivo.
Si el centrifugado no es satisfactorio debido a la baja velocidad causada por la presencia de una carga desequilibrada,
al completarse el programa, es posible redistribuir la carga a mano en el interior del cesto. Luego seleccione un ciclo
de centrifugado.
Nota: No intente centrifugar prendas pesadas solas o que absorban mucha agua porque la máquina no es capaz de
distribuirlas de modo uniforme.
Si es necesario lavar una prenda sola, deberá agregar otras que funcionen como contrapeso para que la máquina
pueda distribuir la carga uniformemente en cada punto del cesto.
40
www.aristonappliances.us
Page 41

Consejos para eliminar las manchas
SP
Sangre.
Aclare o introducza en aqua frìa las manchas de sangre fresca.
Restriegue con detergente las manchas persistentes. Aclare, si
la mancha no desaparece vierta unas gotas de amonìaco
sobre la mancha y repita el tratamiento con el detergente.
Aclare, si es necesario utilice lejìa.
Cera de vela.
Rasgue la cera. Coloque la mancha entre hojas de papel
secante blancas limpias o entre varias capas de toallitas de
papel y presione con la palancha caliente. Limpie con una
esponja con fluido de limpieza. Se persiste una mancha de
color, utilice la lejìa.
Ketchup.
Rasgue el ketchup. Introducza la prenda en agua frìa durante
30 minutos. Haga un pretratamiento con detergente en crema.
Lave.
Chicle.
Frote con hielo para que el chicle se endurezca. Rasgue el
chicle con una cuchilla. Limpie con una esponja empapada con
fluido de limpieza.
Chocolate o cacao.
Introducza la prenda manchada 15 minutos en agua frìa. Frote
conn detergente la mancha y aclare abundantemente. Lave en
agua caliente, si el tejido de la prenda lo permite. Si persisten
las manchas de color limpie con una esponja empapada en
peroxido de hidrògeno, acalare y lave.
Café o te (negro).
Introducza la prenda manchada inmediatamente en agua
frìa.Utilice la lejìa para tratarla con agua caliente, si el tejido de
la prenda lo permite. O si el tejido lo permite vierta agua
hirviendo desde una altura de 1 a 3 pies sore la mancha. Lave.
Café o te (con crema).
Introducza y aclare la prenda manchada en agua fria. Frote
con detergente la mancha y aclare. Seque. Si la mancha
persiste, frote con una esponja con un producto quitamanchas.
repita si es necesario. Utilice lejìa, si la mancha no desparece.
Cosméticos.
Aplique detergente liquido sin diluir sobre la mancha o
humedezca las manchas y frote con jabon o detergente hasta
obtener espuma.
Frote hasta que la espuma desaparezca, aclare
profundamentamene. Repita si es necesario. Si el color resiste,
utilice la lejìa si el tejido lo permite.
Crema, helado, o leche.
Frote con una esponja con agua frìa o introducza la prenda
manchada en agua frìa durante 30 minutos o màs tiempo. Si
la mancha persiste, frote con un detergente la mancha y
aclare a continuacion. Si el necesario, utilice la lejìa.
Desodorantes y productos para la
traspiraciòn.
Lave o frote con una esponja la mancha profundamente con
agua y detergente , aclare. S la mancha persiste , utilice lejìa
con agua caliente enjabonada. Lave. Tal vez consiga obtener
de nuevo el color del tejido frotando con amonìaco. Aclare
abundantemente.
Colorante.
Aclare e introducza la prenda en agua frìa. Frote con
detergente la mancha. Aclare. Si es necesario utilice la lejìa.
Si no es posible eliminar la mancha, utilice un quitamanchas
comercializado.
Huevo o grasa alimentaria.
Aclare la mancha en aqua frìa. Si persiste, rocìe con un
ablandador deje pasar un tiempo de 15-20 minutos. Si la
mancha no desparece tampoco, frote con una esponja con un
fluido liquido o lejìa diluida. Lave en agua caliente. El uso del
agua caliente puede afirmar la mancha.
Mancha de suavizante de tejidos.
Frote repetidamente con un trozo de jabòn. Frotar con alcohol
algunas veces es eficaz, si los colores de la prenda lo
permiten.
Lave. Si lo desea puede usar la limpieza en seco.
Rotulador.
Pulverice las manchas con limpiadores a decuados paa esta
finalidad. Frote con una esponja la mancha profundamente.
Aclare con agua frìa. Aplique de nuevo el producto limpiador
si es necesario.
Fruta, vino.
Introducza la prenda manchada inmediatamente en agua frìa.
Utilice un tratamiento a base de lejìa con agua tan caliente
como lo permita el tejido. Si el tejido lo consiente, vierta agua
hirviendo sobre la mancha a una altura de 1 a 3 pies. Lave .
Hierba.
Frote la mancha con el detergente. Limpie con una esponja
con alcohol desnaturalizado. Utilice lejìa, si es necesario.
41 www.aristonappliances.us
Page 42

SP
Aceite y grasa.
Rasgue la mancha. rote con dtergente o un limpiador
doméstico para esta finalidad, aclare con agua templada. Si la
mancha persiste, limpie profundamente con una esponja con
un disolvente de grasa. Deje secar. Repita la operaciòn si es
necesario. Para quitar manchas amarillas, utilice cloro o lejìa
con oxigeno.
Tinta de boligrafo.
Algunas manchas de tinta se afirmen con el agua . Haga la
prueba en primer lugar en una parte del tejido. Limpie con la
esponja repetidamente la mancha con un esmalte para unas.,
amil acetato o alcohol. La laca para el peso es eficiente. Lave.
Utilice lejìa si es necesario. Utilice amil acetato, arnel, dynel y
verel. Utilice acetona en otros tejidos.
NOTA:
algunas manchas de tinta no se pueden eliminar.
Pintura.
Limpie con esponja o introduzca en trementina o disolvente
indicado en la etiqueta como disolvente. Lave.
Parfume.
Aclare en agua frìa. Frote con un detergente lìquindo sin diluir
o con un detergente en crema la mancha. Aclare. Si la
mancha persiste utilice la lejìa.
Transpiraciòn.
lave o limpie con esponja la mancha profundamente con agua
templada y detergente en crema. Si la transpiraciòn ha
cambiado el color del tejido, devuélvaselo utilizando
amoniaco o vnagre. Aplique el amoniaco en als manchas
frescas; aclare con agua. Aplique vi en manchas no frescas,
aclare con agua.
Moho.
Cepille la superficie de crecimiento sin extenderlo. Introduzca
el articulo en una soluciòn de vaso de lejìa para un galòn de
agua con jabonn durante 5-10 minutos. Aclare bien y lave.
Barro.
Deje que la mancha se seque; después cepille bien. Aclare
abundantemente en agua frìa hasta que el barro desaparezca.
Lave. (Espuma de jabòn caliente afirma la mancha de arcilla
rojo o amarilla).
Mostaza.
Introduzca la prenda en agua con detergente durante varias
horas. Si la mancha persiste, utilice lejìa.
Esmalte de uñas.
Trate la prenda mientras que la mancha està seca rasqando
todo lo posible antes de que se seque. Coloque la mancha
hacia abajo sobre toallitas de papel. Frote con una esponja el
revés de la mancha con un disolvente para quitar el esmalte
de uñas o con alcohol desnaturalizado y vierta unas gotas de
amonìaco domestico. Frote la mancha repetidamente con la
esponja. Lave con agua a una temperatura adecuada para el
tejido. No use acetona en acetato arnel, dynel o rayon.
Oxidaciòn y hierro.
Aplique un limpiador para la oxidaciòn comericlizado
respetando
las indicaciones del fabricante. Aclare, o si el tejido lo permite
ponga el articulo en una soluciòn con 4 cucharadas de crema
de tàartaro en una pinta de agua.
Crema de zapados.
Quite todo lo que sea posible. Pretrate con agua y detergente
en crema; aclare. Si la mancha persiste, lave con esponja con
alcohol
diluido (1 parte de alcohol para 2 partes de agua) o
trementina.
Quite la trementina lavando con esponja con una soluciòn de
detergente caliente o con alcohol. Si es necesario, utilice la
lejia.
Refrescos.
Lave con una esponja con agua fria. Algunas manchas son
invisibles cuando se secan, pero se oscuren cuando son
calentadas y a veces es imposible eliminarlas. Actùe antes de
que la mancha se seque. Limpie con una esponja con
disolvente o trementina. Lave
42
www.aristonappliances.us
Page 43

Cuidados y
mantenimiento
Cierre del agua e interrupción de la
alimentación eléctrica
Cierre el grifo de agua al finalizar cada lavado. Esta
precaución sirve para limitar el desgaste de la
instalación hídrica del aparato y para prevenir
pérdidas.
Desenchufe el aparato
antes de realizar
operaciones de limpieza
o de mantenimiento.
Para evitar el riesgo de
explosiones
No use nunca solventes
inflamables para limpiar el
aparato
Limpieza de la máquina
La parte externa del aparato y todas las partes de goma
se pueden limpiar con un paño mojado en agua tibia con
jabón. No use solventes ni productos abrasivos.
Limpieza del vidrio de la puerta
Limpie regularmente la superficie interna del vidrio de la
puerta con un paño suave. La acumulación de polvo de
jabón o de residuos calcáreos del agua puede provocar
pérdidas de agua por la puerta.
Para evitar la formación de malos olores, deje siempre la
puerta semicerrada.
Control del tubo de carga del agua
Controle el tubo de llenado de agua una vez al año. Si
presenta grietas o rajaduras debe ser sustituido de
inmediato ya que durante los ciclos de lavado debe
soportar la elevada presión del agua que podría provocar
roturas repentinas.
Limpieza
Limpieza de las partes externas
Utilice un paño húmedo o un esmalte silicónico para
limpiar las superficies externas del aparato.
Limpieza del contenedor dosificador y de los
correspondientes compartimentos
Se aconseja lavar periódicamente el contenedor
dosificador. Evite siempre limpiar las partes del
contenedor dosificador mientras la máquina está en
funcionamiento.
! No utilice productos abrasivos, agentes
desengrasantes, ácidos, lejía, ni esmaltes para metal
para la limpieza de cualquier componente de la máquina
porque podrían dañarla.
1. Extraiga el contenedor
hasta el tope.
2. Pulse el botón de
desbloqueo del
contenedor dosificador
para extraerlo (ver la
figura).
3. Limpie y seque el
contenedor dosificador,
los sifones, la rejilla y el
canal de salida del
suavizante (A), verifican-
do que se haya quitado
completamente cualquier
acumulación de detergente o de suavizante. En
A
caso contrario, se podrían
producir pérdidas en el
contenedor dosificador.
Además, limpie
regularmente la zona del
tubo de descarga (B).
SP
! No utilice nunca tubos ya usados.
Mantenimiento del cesto
Deje siempre semicerrada la puerta para evitar que se
formen malos olores.
4. Vuelva a introducir el
contenedor dosificador en
su lugar empujándolo
B
hasta el fondo.
43 www.aristonappliances.us
Page 44

Problemas y soluciones
SP
De vez en cuando, la máquina no funciona como debería. Antes de llamar al Servicio de Asistencia Técnica (ver
Asistencia), verifique si la anomalía puede ser resuelta por Ud. mismo, consultando la siguiente lista:
Mal funcionamiento:
La lavadora no se enciende.
El ciclo de lavado no comienza.
La lavadora no carga agua.
La máquina carga y descarga agua
continuamente.
Causas probables / Soluciones:
El enchufe no ha sido colocado en la toma o no ha sido
introducido hasta el fondo para que se establezca contacto.
Hay un corte de electricidad en la casa.
La puerta no ha sido cerrada correctamente.
No se ha presionado el botón START/RESET.
El grifo de agua no ha sido abierto.
El tubo de carga de agua no está conectado al grifo.
El tubo está plegado.
El grifo de agua no ha sido abierto.
No hay agua en la casa.
El agua no llega con suficiente presión.
No se ha presionado el botón START/RESET.
El extremo del tubo de descarga no ha sido colocado a una
altura comprendida entre los 65 cm. y 100 cm. del piso (ver
Instalación).
El extremo libre del tubo está sumergido en agua (ver
Instalación).
Si la vivienda se encuentra en uno de los últimos pisos de un
edificio, es posible que se verifiquen fenómenos de sifonaje, en
ese caso la lavadora carga y descarga agua de modo continuo.
Para eliminar este inconveniente se encuentran disponibles en
el comercio válvulas especiales que permiten evitar el sifonaje.
El sistema de desagüe no posee respiradero.
La máquina no descarga o no centrifuga.
La lavadora vibra demasiado durante la
centrifugación.
La lavadora pierde agua.
Los iconos correspondientes a la Fase
en curso centellean velozmente junto
con el piloto ENCENDIDO/APAGADO.
El programa no comprende una fase de descarga: algunos
programas requieren una descarga manual (ver Programas y
opciones).
La opción Plancha fácil está habilitada: para completar el
programa, presione el botón START/RESET (ver Programas y
Opciones).
El tubo de descarga está plegado (ver Instalación).
La tubería de descarga está obstruida.
El cesto no ha sido correctamente desbloqueado cuando se
instaló el aparato (ver Quite los dispositivos de fijación para el
transporte pag. 30).
La lavadora no está instalada en un lugar perfectamente plano
(ver Instalación).
Existe muy poco espacio entre la lavadora, los muebles y la
pared (ver Instalación).
La carga no está correctamente equilibrada (ver Ponga el
funcionamento de la lavadora i.
El tubo de carga de agua no está enroscado correctamente al
grifo (ver Instalación).
El contenedor dosificador de detergente está obstruido (las
instrucciones sobre cómo limpiarlo se encuentran en,
Cuidados y mantenimineto).
El tubo de descarga no está bien fijado (ver Instalación).
Apague la máquina y desenchúfela; espere aproximadamente 1
minuto y luego enciéndala de nuevo.
Si el problema persiste, llame al Servicio de Asistencia Técnica.
44
www.aristonappliances.us
Page 45

La lavadora produce demasiada
espuma.
SP
El detergente no se puede utilizar para lavar a máquina (en el envase
debe estar escrito que el producto es para lavar a máquina, para
lavar a mano o a máquina o mensajes similares).
Se ha utilizado demasiado detergente.
La puerta de la lavadora está
bloqueada
Espera que el LED se apaga ante de poder abrir la puerta.
Si el problema persiste aún después de haber realizado los
controles indicados, cierre el grifo de agua, apague la máquina y
llame al Servicio de Asistencia Técnica.
45 www.aristonappliances.us
Page 46

SP
Asistencia
Antes de llamar al Servicio de Asistencia Técnica:
Verifique si la anomalía la puede resolver Ud. solo (ver la pág 44);
Vuelva a poner en marcha el programa para controlar si el inconveniente fue resuelto;
Si la anomalía no ha sido resuelta, llame al Servicio de Asistencia Técnica Autorizado, al número que se
encuentra en el certificado de garantía.
! Si la máquina ha sido instalada o usada inadecuadamente, el costo de la llamada quedará a cargo del usuario.
Solicite siempre la asistencia de personal autorizado.
A la central, comunique:
el tipo de anomalía;
el modelo del aparato (Mod.);
el número de serie (S/N ).
Esta información se encuentra en la placa que está fijada en la parte posterior de la lavadora.
ASISTENCIA A CLIENTES,
y REPUESTOS: teléfono (888) 426-0825
46
www.aristonappliances.us
Page 47

GARANTÍAS
Lavadora ARISTON
Las garantías entregadas por (Ariston) en la presente declaración son válidas únicamente para las máquinas
lavadoras Ariston vendidas al primer usuario que ha adquirido el producto a Ariston o a sus distribuidores,
revendedores o centros de asistencia autorizados en los Estados Unidos o en Canadá. Las garantías previstas por
el presente documento no son transferibles.
Duración de la garantía
Primer y segundo año : Garantía limitada completa a partir de la fecha de instalación*
Ariston reparará o sustituirá de forma gratuita cualquier pieza que se demuestre sea defectuosa bajo condiciones
de uso doméstico normales, incluyéndose además los gastos de envío y mano de obra. La reparación bajo
garantía deberá ser realizada por un centro de asistencia Ariston autorizado.
Tercer-Quinto año: Garantía limitada a componentes electrónicos a partir de la fecha de instalación*
Ariston reparará o sustituirá de forma gratuita los microprocesadores o tarjetas de circuitos que se demuestren
defectuosos bajo condiciones de uso doméstico normales a partir de los 3 a 5 años de la fecha de instalación
original, excluidos los gastos de mano de obra.
Tercer-Quinto año: Garantía limitada al motor a partir de la fecha de instalación*
Ariston reparará o sustituirá de forma gratuita el motor o cualquier componente del motor que se demuestren
defectuosos bajo condiciones de uso doméstico normales a partir de los 3 a 5 años de la fecha de instalación
original, excluidos los gastos de mano de obra.
Toda la vida útil del producto: Garantía limitada a la formación de herrumbre con perforación en acero
inoxidable a partir de la fecha de instalación*
Ariston sustituirá gratuitamente la máquina con el mismo modelo o con un modelo actual que sea equivalente o
mejor desde el punto de vista funcional, en el caso que el cesto de lavado, bajo condiciones de uso doméstico
normales, presente herrumbre con perforación, quedan excluidos los gastos de mano de obra, envío e instalación.
SP
Dentro de los 10 días de la fecha de compra: Garantía por daños a las partes estéticas
Ariston cambiará de forma gratuita cada parte estética (incluida la llamada de asistencia) que aparezca dañada
dentro de los 10 días de la fecha de compra. La presente cláusula, sin embargo, no incluye los daños causados por
operaciones de transporte, desplazamiento o instalación realizadas de manera inadecuada.
* La fecha de instalación se refiere a la fecha en la cual se ha instalado la máquina lavadora o a diez días
laborales
después de la fecha de entrega, según cuál de las dos situaciones se produzca primero.
Exclusiones:
La presente garantía no cubre las llamadas de asistencia o reparaciones realizadas para efectuar rectificaciones en
la instalación, para recibir instrucciones sobre el uso del producto, para sustituir fusibles domésticos o corregir el
cableado o la instalación hidráulica doméstica. Además, cualquier reparación que sea necesaria realizar al producto
como consecuencia de un uso doméstico normal diferente, no está cubierta por la garantía. Las garantías
excluyen los defectos o daños derivados de accidentes, alteraciones, usos impropios o incorrectos, instalaciones
erróneas, intervenciones de asistencia no autorizadas o fuerzas externas ajenas al control de Ariston tales como:
incendios, inundaciones u otras causas de fuerza mayor como instalaciones no conformes con los códigos
eléctricos o hidráulicos en vigor a nivel local. Los gastos de mano de obra, envío e instalación realizados para la
reparación o sustitución de un producto al finalizar el período de un año desde la fecha de instalación no serán
cubiertos por la presente garantía. Todos los componentes sustituidos o reparados reemplazarán a los originales en
relación con el período de garantía aplicable. Dentro de los límites permitidos por la ley, la presente garantía toma
el lugar de cualquier otra garantía explícita e implícita, comprendidas las garantías implícitas de comerciabilidad e
idoneidad para un objetivo específico. Ariston no asume ninguna responsabilidad por daños indirectos o
consecuentes.
Para acceder a los servicios de garantía llamar al 1-888-426-0825 o escribir a:
Ultra 8 International, 2505 Anthem Village Drive, Suite E - PO BOX 562, Henderson Nevada 89052
indicando siempre número del modelo, número de serie, fecha de compra, nombre y dirección del revendedor.
47 www.aristonappliances.us
Page 48

SP
Ultra 8 International, 3027 East Sunset Road, Suite 101, LAS VEGAS Nevada 89120
48
www.aristonappliances.us
Page 49

Guide de lutilisateur
MACHINE À LAVER
F
Français
AW 149
Table des matières
Description, 50
Importantes instructions de sécurité, 51-52
Votre sécurité et celle de vos enfants
Avertissements sur linstallation
Renseignements techniques
Retirer les supports d éxpedition
Déballage, Installation, 53-54-55-56-57
Déballage et mise à niveau
Retirez les upports d expédition
Liste de contrôle finale de linstallation
Raccordements deau et raccordements électriques
Description de la machine à laver et modificateurs
doptions, 58-59
Panneau de commande
Options de lavage
Température variable
Essorage variable
Programmes, 60
Tableau des programmes
Conseils sur les détergents et lavage, 61
Distributeur de détergent
Avant le lavage
F
Commencer un programme de lavage et conseils de
lavage, 62-63-64-65-66
Fonctionnement de la machine à laver
Brassées typiques de lavage et préparation du linge
Conseils sur le lavage et comprendre les étiquettes
dentretien des tissus
Woolmark Cachemire Platinum
Commencer un programme de lavage
Tableau pour enlever les taches
Soins et entretien, 67
Fermer lalimentation en eau et en électricité
Nettoyer la machine
Nettoyer le hublot de la porte
Vérifier le tuyau darrivée deau
Entretien du tambour
Nettoyer le tiroir du distributeur de détergent
Dépannage, 68-69
Service, 70
Avant dappeler le service technique
Garanties, 71
Énoncés des garanties Ariston
www.aristonappliances.us
49
Page 50

Description
F
Tiroir du
distributeur
Panneau de commande
( Varie selon les modèles)
Porte verrouillable et
levier douverture
Veuillez noter le numéro du
modèle et le numéro de série de
la machine, voir derrière de la
porte de votre lave-linge, pour
référence future.
Pieds avant réglables
Ligne indicatrice
du niveau daplomb
(a niveau)
Deux supports
dexpédition
! Retirez les DEUX supports sous
les petits couvercles en plastique
AVANT dutiliser votre machine
(référez-vous à la page 54)
Points dentrée deau
froide et chaude
Cordon
dalimentation
Tuyau de drainage
Support de lextrémité
coudée
La machine a été conçue et fabriquée
conformément aux règlements de sécurité
internationaux des appareils.
Les informations suivantes sont fournies
pour votre sécurité. Lisez-les attentivement.
50
Pieds arrière
www.aristonappliances.us
Page 51

Importantes instructions
de sécurité
INTRODUCTION
Félicitations pour votre nouvelle machine à laver Ariston. En plus de son concept primé, ce produit de pointe
très sophistiqué vous rendra satisfait pendant de nombreuses années. Veuillez lire ce manuel du propriétaire.
Il vous indiquera comment utiliser au mieux votre machine à laver.
Conservez ces instructions
Votre machine à laver a été fabriquée conformément aux règlements de sécurité internationaux les plus
stricts pour vous protéger ainsi que votre famille.
AVERTISSEMENT
Pour réduire tout risque dincendie, de choc électrique ou de blessure lors de lutilisation de votre
machine à laver, suivez les précautions de base, y compris les suivantes:
1. Lisez toutes les instructions avant dutiliser la
machine à laver.
2. Installez et nivelez la machine à laver sur un sol qui
peut supporter son poids.
3. Cet appareil doit être correctement mis à la terre. Ne
branchez jamais le cordon de lappareil dans une
prise qui nest pas correctement mise à la terre et qui
nest pas conforme aux codes locaux et nationaux.
Consultez les instructions dinstallation pour mettre à
la terre cet appareil.
4. Pour éviter tout risque dincendie ou dexplosion:
- Ne lavez pas des articles qui ont été nettoyés ou lavés
avec de lessence ou imbibés dessence, de solvants de
nettoyage à sec ou dautres substances inflammables
ou explosives; ces substances peuvent émettre des
vapeurs susceptibles de senflammer ou dexploser.
- Najoutez pas dessence, de solvants de nettoyage à
sec ou dautres substances inflammables ou
explosivesà leau de lavage. Ces substances
peuvent émettre des vapeurs susceptibles de
senflammer ou dexploser.
- Dans certaines conditions, lorsque le système deau
na pas été utilisé pendant plus de deux semaines, il
peut y avoir production dhydrogène. LHYDROGÈNE
EST UN GAZ EXPLOSIF. Si le système deau chaude
na pas été utilisé pendant une telle période, avant
dutiliser la machine, ouvrez tous les robinets deau
chaude et laissez leau couler pendant plusieurs
minutes. Cela éliminera laccumulation dhydrogène.
Comme ce gaz est inflammable, ne fumez pas et
nutilisez pas de flamme nue durant cette manoeuvre.
- Pour réduire tout risque dincendie, les vêtements,
chiffons, têtes de balai à frange et autres articles
similaires qui portent des traces de substances
inflammables comme lhuile végétale, les huiles
dérivées de pétrole ou de distillat, les cires, les
graisses, etc., ne doivent pas être mis dans la machine
à laver. Ces articles peuvent contenir des substances
inflammables après le lavage, qui peuvent émettre de
la fumée ou prendre feu delles-mêmes.
5. Débranchez toujours la machine à laver de
lalimentation électrique avant de la réparer.
6. Ninsérez pas/ne tirez pas la prise de secteur avec
les mains mouillées.
7. Ne retirez pas la prise de secteur en tirant sur le câble.
8. Attention lors de la vidange de leau chaude.
Pour réduire le risque dincendie ou de choc électrique,
Nutilisez PAS de rallonge ni dadaptateur pour brancher
la machine à laver sur lalimentation électrique.
9. Cette machine à laver doit être strictement réservée à
lusage pour lequel elle a été conçue.
10. Assurez-vous que tous les raccordements deau à la
machine à laver sont équipés de robinet(s) darrêt et
quils sont accessibles. Fermez le(s) robinet(s) darrêt de
la machine à laver à la fin de chaque journée de lessive.
Vérifiez régulièrement les raccords du boyau de
remplissage pour vous assurer quils sont serrés et
quils ne coulent pas.
11. Ne permettez pas aux enfants de jouer sur ou dans
lappareil. Surveillez attentivement les enfants
lorsque lappareil est utilisé à proximité des enfants.
12. Avant de mettre lappareil hors service ou au rebut,
retirez la porte.
13. Ne mettez pas la main dans lappareil si la cuve ou le
tambour est en mouvement.
14. Ninstallez ni ne remisez cet appareil dans un endroit
où il serait exposé aux intempéries.
15.Ne modifiez pas les commandes de lappareil.
16. Ne réparez ni ne remplacez une pièce quelconque
de lappareil et nentreprenez pas de réparation à
moins que ce ne soit spécifiquement recommandé
dans les instructions dentretien de lutilisateur ou
dans les instructions de réparations de lutilisateur.
Vous devez bien comprendre ces instructions et être
compétent pour les exécuter.
17. Nutilisez pas de produits assouplissants ni de produits
pour réduire lélectricité statique à moins que ce ne soit
recommandé par les fabricants du produit assouplissant.
18. Ne lavez pas à la machine les matières en fibre de
verre. Des petites particules peuvent saccrocher aux
tissus lavés par la suite et causer une irritation cutanée.
19. Les tuyaux dalimentation ont tendance à sabîmer et
à se détériorer avec le temps. Vérifiez les tuyaux
périodiquement pour voir sil y a des bosses, des
noeuds, des coupures, une usure ou des fuites et
remplacez-les tous les cinq ans.
F
www.aristonappliances.us
51
Page 52

F
Renseignements techniques
INSTALLATION ENCASTRÉE, DANS UN
PLACARD ET UNE ALCÔVE (Instructions)
Modèle
Dimensions
Capacité
Raccordements
électriques
Raccordements
d’eau
Vitesse
d’essorage
U
®
L
C
US LISTED
AW 149
23,4"" (59,5 cm) de largeur
33,4"" (85 cm) de hauteur
23,6"" (60 cm) de profondeur
de 2 à 15 lb (7 kg)
voltage 115 volts 60 Hz
pression maximale 100 psi (689,6 kPa)
pression minimale 20 psi (137,9 kPa)
capacité du tambour 54 litres
Jusqu’à 1400 tours/minute
Cet appareil a été testé par le Laboratoire
des assureurs du Canada et il est
conforme aux exigences de sécurité du
laboratoire des assureurs canadien et
américain et il affiche leur marque.
La compagnie Indesit offre à ses clients
des produits portant l’étiquette ENERGY
STAR
La machine peut être installée en encastré, dans
un placard ou dans une alcôve.
Lespace de désangement est exprimé en pouces et c
est le dégagement minimal requis.
Un dégagement supplémentaire permettra de simplifier les
opérations dinstallation et dentretien en conformité avec
les codes et règlements locaux.
Pour tout autre type dinstallation, respectez les
dimensions minimales indiquées.
* Un dégagement
supplémentaire peut
être requis pour les
moulures de mur,
de porte et de
plancher.
Espace de
dégagement
minimal
En raison des progrès technologiques, le fabricant se réserve le droit daméliorer ses appareils sans donner de
préavis à sa clientèle.
52
www.aristonappliances.us
Page 53

Déballage
! Gardez ce manuel dinstructions sous la main pour le consulter au besoin. Si vous déménagez ou si lappareil
est vendu ou transféré à un autre propriétaire, veillez toujours à ce que ce manuel dutilisation accompagne
lappareil pour que le nouveau propriétaire puisse prendre connaissance de son fonctionnement et des dangers
qui y sont reliés.
Déballage
1. À laide de ciseaux,
coupez soigneusement le
long dun montant dangle
pour retirer le film.
5. Enlevez la base en
polystyrène.
F
2. Ouvrez la porte,
vérifiez le tambour et
retirez les sacs
daccessoires.
Gardez tout le matériel
demballage jusquà la fin
de linstallation.
3. Soulevez le dessus en
polystyrène et retirez les
quatre montants dangle.
4. Inclinez la machine sur
le côté gauche jusquà ce
quelle repose sur le
dessus en polystyrène.
Faites appel à une
deuxième personne pur
vous aider à soulever et
incliner la machine.
Vérification
IMPORTANTE lors du
déballage de la
machine:
Cest la partie de la base
en polystyrène et elle
devrait être toujours
intacte après avoir retiré la
base.
- Si elle sest cassée et
quelle est toujours dans la
machine
lorsque la machine est
toujours posée sur le côté
sur le dessus en
polystyrène.
7. Redressez la machine.
! Protégez
lenvironnement:
veuillez mettre au rebut le
matériel demballage avec
soin.
Lisez soigneusement
le reste de ces
instructions; les pages
suivantes contiennent des
informations importantes
sur linstallation et le
dépannage.
retirez-la
www.aristonappliances.us
53
Page 54

Retirez les dispositifs de fixation pour le
F
trasnsport
IMPORTANT: suivez ces instructions pour retirer les DEUX
fixations pour le transport
(référez-vous à la Description pour
lemplacement). Situés de chaque
côté du panneau arrière, les DEUX
boulons de transport DOIVENT
être retirés avant lemploi.
Si vous ne les retirez pas, votre
machine risque dêtre
endommagée.
Il est important que le boulon et
lentretoise dexpédition (référezvous à lillustration) sortent
intacts.
1. Dévissez le boulon en
utilisant une clé de 13 mm.
Emplacement
Lemplacement de votre machine aura un effet sur sa
performance:
Pour votre sécurité et être conforme aux règlements
électriques, faites appel à un professionnel si vous désirez
installer votre machine dans une salle de bains ou une
salle de douches.
Assurez-vous que la douille et les robinets deau sont
facilement accessibles. Vous devez fermer
lalimentation électrique et lalimentation en eau de la
machine quand vous ne lutilisez pas pendant de
longues périodes.
Assurez-vous dallouer suffisamment despace pour la
machine. Choisissez un emplacement dau moins 60 cm
de largeur, 60 cm de profondeur et 85 cm de hauteur.
Laissez suffisamment despace pour pouvoir ouvrir la
porte en grand et remplir et vider la machine facilement.
Si possible, installez la machine sur un plancher plein
afin de minimiser les vibrations.
Faites attention quand vous déplacez la machine à ne pas
déchirer le revêtement du sol. Le poids de la machine peut
marquer certains revêtements de sol.
2.
ARRÊTEZ quand vous voyez 3
filets.
3. Faites glisser sur le côté et
tirez pour enlever.
4. Par mesure de sécurité,
insérez un des bouchons en
plastique (fournis avec votre
machine) dans le trou.
Répétez les étapes 1 à 4 pour
retirer le deuxième boulon
dexpédition.
Les matériaux demballage ne sont pas des jouets
pour les enfants.
Le saviez-vous?
Mise à niveau
Votre machine fera du bruit si les deux pieds avant ne sont
pas réglés de façon à ce que la machine soit stable et
mise à niveau.
La machine doit être mise à niveau dun côté à lautre et
de lavant vers larrière.
1. Mettez votre machine à son emplacement définitif
- Faites attention à ne pas coincer ni entortiller les tuyaux.
2. Tournez à la main, et au maximum, un ou les deux pieds
avant.
Quand vous réglez les pieds,
utilisez un niveau à bulles pour
vérifier que la machine est mise à
niveau dun côté à lautre et de
lavant vers larrière.
- Le ressort situé sur chaque pied
empêchera les pieds de se
desserrer.
Si vous installez la machine sur
une moquette ou un tapis, réglez
les pieds de façon à laisser suffisamment despace pour la
ventilation sous la machine.
les supports dexpédition assurent que votre machine nest pas endommagée pendant la livraison.
...les deux supports dexpédition doivent être retirés avant dutiliser la machine, ne pas les retirer risque de
causer une vibration excessive, un déplacement de la machine et cela pourrait provoquer un dommage interne.
...la majorité des problèmes des machines bruyantes est due aux supports dexpédition qui ne sont pas
retirés et aux pieds qui ne sont pas correctement réglés pour niveler la machine.
...vous serez facturé pour la visite dun technicien dentretien si le problème de votre machine est dû à
une installation incorrecte ou à un mauvais usage.
54
www.aristonappliances.us
Page 55

Installation
Raccordement deau
Avertissement
1. La machine à laver doit fonctionner seulement avec de
leau froide et chaude du robinet (max. 140° F//60° C). Ne
branchez pas lappareil sur un robinet mitigeur dune
chaudière à eau chaude sans pression.
2. Pour empêcher tout dégât deau, les robinets de prise
deau froide et chaude doivent être accessibles quand la
machine à laver est installée et ils doivent toujours être
fermés quand la machine à laver nest pas utilisée.
Rappel: veuillez utiliser les tuyaux neufs fournis, adaptés
à la machine. Les vieux tuyaux peuvent provoquer des
fuites en raison des rondelles usées ou être fendus par la
pression de leau.
Brancher les tuyaux dalimentation deau
Deux tuyaux dalimentation sont inclus dans les
accessoires fournis avec la machine. Raccordez
lextrémité rectiligne de ces tuyaux au réseau
dalimentation (référez-vous à la figure ci-dessous).
Raccordez lextrémité coudée à 90° de ces tuyaux aux
valves dadmission à larrière de la machine à laide des
rondelles pour créer un joint détanchéité à chaque
raccordement.
Les raccords doivent être serrés à la main, utilisez un outil
en cas de fuite seulement. Ne serrez pas trop (figure cidessous).
La réparation ou le remplacement dune pièce doit être
uniquement effectué par un technicien de service qualifié
pour empêcher toute blessure ou tout dommage à la
machine. Les valves dadmission sont codées par
couleur: Rouge = Chaud / Blanc = Froid
Raccordement.
Raccordement de la vidange
Diamètre/capacité de la canalisation dèvacuation.
La canalisation dévacuation doit avoir au moins 1
pouce de diamètre et une une capacité minimale
dacheminement de 7 gallons (26 litres) par minute.
Haut de la canalisation dévacuation. Lembouche de la
canalisation doit se trouver à une hauteur comprise entre
25 - 34 pouces (62-86 cm) par rapport à la machine.
Sortie du tuyau de vidange (fournie avec lappareil).
Elle doit être placée à au moins 20 pouces de haut par
rapport de la base de la machine à laver. Une coupure
anti-retour doit être disponible sur la colonne
dalimentation pour éviter le siphonage. Ninsérez pas
plus de 6 du tuyau de vidange dans le tuyau
dévacuation pour empêcher le siphonnement.
Même sil vous faut retirer le support dextrémité coudée
le long du tuyau de drainage gris, NE le retirez PAS.
Quelle que soit la méthode de vidange utilisée, assurez-
vous que le support dextrémité coudée est posé au
niveau de, ou au-dessus de, la « ligne dindication de
plomberie ».
Vous devez positionner soigneusement le tuyau de
vidange pour éviter tout entortillement et assurer une
vidange correcte de leau.
La sortie du tuyau de drainage doit être à au moins 25 (62
cm) au-dessus du bas de la machine. Maintenant, leau
peut se vider dans un évier ou un conduit dévacuation,
mais une coupure anti-retour doit être disponible à une
hauteur de 24 pour empêcher la machine de siphonner
(référez-vous à la figure sur le côté).
Ninsérez pas plus de 6 du tuyau de vidange dans le
tuyau dévacuation.
Important.
Assurez-vous que le tuyau de vidange nest pas
entortillé et que le débit deau nest pas gêné.
La machine doit être installée sur un plancher plein et
solide pour une performance optimale et des vibrations
minimales.
1/4
F
1. Vissez le boyau de
H
C
sur lalimentation en eau chaude jusquà ce quil soit
serré.
4. Ouvrez lalimentation en eau chaude et vérifiez sil y a
des fuites, serrez au besoin.
remplissage deau froide
(raccord bleu C) sur
lalimentation en eau
froide jusquà ce quil soit
serré.
2. Ouvrez lalimentation en
eau froide et vérifiez sil y
a des fuites, serrez au
besoin.
3. Vissez le boyau de
remplissage deau
chaude (raccord rouge H)
www.aristonappliances.us
Conseils
Assurez-vous que le tuyau nest pas entortillé ni plié.
La pression de leau du robinet dalimentation doit être
dans les valeurs indiquées dans le tableau des
renseignements techniques (référez-vous au tableau à la
page 52).
Utilisez toujours un tuyau dalimentation neuf.
Vérifiez au moins une fois par an le tuyau
dalimentation deau, remplacez-le sil est fendu car les
tuyaux usés peuvent se fendre sous la pression de
leau.
Ne serrez pas trop. Les raccords doivent être serrés à
la main; utilisez un outil en cas de fuite seulement. Ne
serrez pas trop.
55
Page 56

Installation
F
Vidange - Canalisation dévacuation au sol
Vidange - Evacuation dans lévier
L embouchure de la
(A)
25"-34"
62 - 86
inches
cm
canalisation doit se
trouver à une hauteur
comprise entre 25
pouces (62 cm) et 34
pouces (86 cm) mesurée
à partir du bas de la
machine à laver (A).
25”
34”
Vidange - Canalisation devacuation murale
Lentrée dans le système
de vidange à lévier doit
être au-dessus du siphon
(référez-vous à la fig. sur
le côté). Quand vous faites
passer le tuyau de
vidange dans des
placards ou des murs,
utilisez un matériel
protecteur comme un
ruban adhésif électrique
pour recouvrir les bords
tranchants qui pourraient endommager le tuyau de
vidange. Utilisez un collier de serrage adéquat pour fixer
le tuyau de vidange au branchement en Y ou au
broyeur de déchets. Avec un système de vidange à
lévier, vous pouvez raccorder directement:
1) à un broyeur de déchets en suivant la méthode
dassemblage des fabricants.
2) directement à une pièce de raccordement en Y
(disponible dans la plupart des quincailleries).
3) à travers le plancher au moyen dun siphon séparé.
Le siphon doit être ventilé pour empêcher le
siphonnement . Pour fournir une ventilation appropriée,
installez une coupure anti-retour (disponible dans la
plupart des quincailleries).
4) au robinet en utilisant un adaptateur de robinet
(disponible séparément). Il fournira leau à partir du
robinet et videra leau directement dans le tuyau
découlement lévier.
#^
L embouchure de la
canalisation doit se
trouver à une hauteur
comprise entre 25
pouces (62 cm) et 34
pouces (86 cm)
mesurée entre
lextrémité du tuyau de
vidange au bas de la
machine à laver (B)
(référez-vous à la fig. sur
le côté et sous).
Vidange - Evacuation sous lévier
1. Coupez lextrémité
colmatée de lunité de
drainage sous lévier.
2. Posez le support
dextrémité coudée à au
moins 620 mm du sol.
3. Utilisez un collier de
serrage (par exemple, une
Hose
clamp
620 mm
fixation Jubilee) pour bien
attacher lextrémité du
tuyau de drainage gris à
lunité de drainage sous
lévier en utilisant un
tuyau.
56
www.aristonappliances.us
Page 57

Raccordement électrique
Voltage/Ampérage de la machine: 120 V, 60 Hz,
11 ampères.
Branchement: une prise à 3 broches munie dun
cordon de 6 est fournie avec la machine.
Circuit/protecteur: monophasé à 3 fils, 120 V, 60 Hz, CA,
sur un circuit séparé de 15 ampères.
INSTRUCTIONS DE LA MISE À LA TERRE
Cet appareil doit être mis à la terre. En cas dun mauvais
fonctionnement ou dune panne, la mise à la terre réduira le
risque de choc électrique en offrant une voie de moindre
résistance au courant électrique. Cet appareil est équipé dun
fil électrique muni dun conducteur déquipement de mise à la
terre et dune prise de mise à la terre. Cette prise doit être
branchée sur une prise de courant appropriée qui est
correctement installée et mise à la terre conformément aux
codes et règlements locaux. NE modifiez PAS la prise fournie
avec lappareil. Si elle nest pas adaptée à la prise de courant,
demandez à un électricien qualifié den installer une adéquate.
AVERTISSEMENT: Le branchement incorrect du
conducteur déquipement de mise à la terre peut
résulter en un choc électrique. Consultez un
électricien qualifié ou un réparateur si vous avez le
moindre doute sur la mise à la terre de lappareil.
Liste de contrôle finale de linstallation
Les instructions et la trousse dinstallation ont été
retirées de la cuve.
Les sispositifs de fixation pour le trasnsport ont été
retirées.
La machine à laver est branchée sur une prise de
courant et elle est correctement mise à la terre.
Les tuyaux deau sont raccordés aux robinets avec les
grilles dentrée dair et les rondelles.
Leau est ouverte et les raccordements des robinets de
prise deau et des robinets sont examinés pour voir sil
y a des fuites.
Le tuyau de vidange est correctement installé dans le
dispositif de vidange et il nest pas plié ni endommagé.
La machine à laver a été mise à niveau.
F
Attention !
Pour votre propre protection et empêcher tout
accident, toute blessure et tout incendie, veuillez
lire attentivement les points suivants avant
dinstaller la machine à laver.
Linstallation et la mise à la terre doivent être faites
par un installateur qualifié, conformément aux codes
locaux. Les instructions dinstallation fournies dans
ce livret sont pour les références de linstallateur.
La machine à laver DOIT être installée sur un sol
nivelé et solide, dans un endroit protégé, sec et bien
aéré, à proximité dune alimentation électrique et
dune sortie deau chaude de capacité suffisante. NE
linstallez PAS sur une moquette.
Important: Si vous installez la machine sur
une moquette, elle risque de vibrer. Ceci
pourrait entraîner une vibration excessive
de la machine pendant les cycles dessorage et une
baisse de la performance.
La machine à laver doit être branchée dans une prise
de courant à 3 fiches correctement mise à la terre,
acceptant 120 volts, 60 Hz. Elle ne doit pas être
contrôlée par un interrupteur mural ou un interrupteur
à cordon qui pourrait être éteint par accident. Pour
votre sécurité, la troisième broche de masse ou la
brosse de masse ronde ne doit jamais être retirée.
NUTILISEZ PAS DE RALLONGE.
Ninstallez NI NE remisez cet appareil dans un endroit
où il serait exposer aux intempéries ou dans un endroit
où vous entreposez de lessence ou dautres produits
inflammables.
Faites un essai pour voir si la machine à laver
fonctionne bien en lui faisant faire un cycle complet à
la température maximale.
www.aristonappliances.us
57
Page 58

Description de la machine à laver
Panneau de commande AW 129
F
Liste des
programmes
Distributeur
de détergent
Boutons
DOPTION
DESSORAGE VARIABLE
Fonctions du panneau de commande
Voyants
DINDICATION
de MARCHE
Bouton
de VITESSE
Bouton
de MISE EN MARCHE/
DANNULATION
Display
Cadran de réglage
des PROGRAMMES
Bouton de
TEMPÉRATURE VARIABLE
Bouton
MARCHE/
ARRÊT
Liste des programmes: Pour consulter un tableau
simple des différents programmes disponibles.
Ecran:
il affiche le stade d'avancement du cycle de lavage et/ou
de la programmation (voir page 59).
Boutons doption: Pour sélectionner les options
disponibles ( référez-vous au tableau des programmes et
aux modificateurs doptions).
Bouton de température variable: Pour modifier la
température selon les programmes choisis.
Bouton de vitesse dessorage variable: Pour diminuer
la vitesse dessorage ou exclure complètement le cycle
dessorage
*.
Bouton marche/arrêt: Pour allumer et éteindre la
machine à laver.
Bouton de mise en marche/dannulation: Pour
commencer le programme ou lannuler, si les mauvais
réglages ont été sélectionnés.
Cadran de réglage des programmes: Pour
sélectionner les programmes de lavage. Le bouton ne
bouge pas pendant le cycle.
Voyants dindication de marche: Indique si la porte est
verrouillée (quand il est allumé, la porte ne peut pas être
ouverte) et le stade du programme de la machine
(lavage, rinçage ou essorage).
*
Si vous sélectionnez un programme et si vous souhaitez changer la vitesse d'essorage, la machine acceptera la variation
uniquement si celle-ci est compatible avec le programme.
58
www.aristonappliances.us
Page 59

Programme
et modificateurs doptions
Modificateurs doptions
Superlavage:
Utilisez cette option pour sélectionner un programme de lavage plus intensif pour le coton (sanitaire, coton lourd, coton
régulier) et synthétiques-anti-froissement (synthétiques lourds, synthétiques réguliers).
Bouton de prévalage:
Pour du linge extrêmement sale, appuyez sur ce bouton pour ajouter un lavage supplémentaire à nimporte quel
programme de lavage (à lexception des programmes 4-7-10-11).
Bouton de repassage facile (Rinçage dattente):
Grâce à cette option, les tissus sont moins froissés et il est plus facile de les repasser.
En sélectionnant cette option, la machine à laver réduira laction de lavage et la vitesse dessorage (maximum de 600
tours/minutes) pour les programmes 5-6-7et la laveuse sarretera sur le dernier rinçage.
Pour le programme Soie, loption de repassage facile (arrêt avec leau) est automatiquement appliquée si le bouton de
repassage facile nest pas pressé: la machine à laver arrêtera le cycle au rinçage final avec le linge trempé.
Le voyant de repassage facile clignotera pour indiquer que le cycle marque un temps darrêt.
La machine reste dans cet état jusqu'à ce que vous appuyiez sur le bouton Start/Cancel ou que vous appuyiez à nouveau
sur le bouton Repassage facile pour achever le cycle.
Retardement jusqu'à 24 heures :
Utilisez cette option pour postposer le démarrage du programme de maximum 24 heures. Le retard sélectionné s'affiche à
l'écran. Chaque fois que vous appuyez sur le bouton, le délai augmente d'une heure. Si vous appuyez sur le bouton après
que "24" s'est affiché sur l'écran, la machine remet la minuterie à zéro et "OFF" s'affiche. Ensuite, en appuyant sur le bouton,
le décompte recommence. Lorsque le compte à rebours atteint zéro, le programme démarre.
F
Trempage:
Cette option vous permet de faire tremper votre linge pendant une heure pendant le cycle de lavage. La machine à laver
remue le linge toutes les 2 minutes pendant 6 secondes (à lexception des programmes 7, 8, 9, 10, 11).
Bouton de vitesse dessorage variable:
Utilisez cette option pour diminuer la vitesse dessorage en dessous du maximum pour le programme que vous avez
choisi.
Utilisez cette option pour réduire la vitesse d'essorage en deçà du seuil prévu pour le programme choisi.
Chaque pression sur le bouton permet de réduire la vitesse d'essorage. La nouvelle vitesse d'essorage s'affiche à l'écran.
Si vous appuyez à nouveau après que "off" s'est affiché, la machine reviendra à la vitesse d'essorage la plus rapide
N.B.: La machine à laver vous empêchera automatiquement de sélectionner une vitesse supérieure à la vitesse maximale
de chaque programme.
Bouton de température variable:
Utilisez ce bouton pour réduire la température de leau de lavage au dessus du maximum du programme que vous avez
choisi.
Les séléctions permis sont: 1) Cold FROID (Lavage foid/rinçage froid)
2) Warm TIÈDE (Lavage tiède/rinçage froid)
3) Hot CHAUD (Lavage chaud/rinçage foid)
4) Sanitary. En cet cycle la résistance est en marche
AVERTISSEMENT: Si vous sélectionnez une option qui n'est pas adaptée au programme choisi, le voyant clignotera
pendant quelques secondes avant de s'éteindre.
Si vous choisissez une option qui ne convient pas au programme sélectionné, un voyant DEL
clignotera pendant quelques secondes avant de séteindre.
Si loption choisie convient au programme sélectionné, le voyant DEL restera allumé.
En cas d'anomalie, un code erreur est affiché, exemple: F-01, voir pages 68-69, Anomalies et remèdes.
www.aristonappliances.us
59
Page 60

p
g
g
p
p
p
g
p
p
(*)
g
p
p
(*)
g
p
(
)
Programme et modificateurs doptions
AW 149
Types de textiles et
F
degré de salissure
N° du programme
Charge
maximale
Prélavage
(Option)
Lessive
lavage
Assouplissant
O
tions
Durée du
cycle
(minutes)
sans options
Description du cycle de
lavage
DEPART
DIFFERE
De 1 à 24 heures de retard Le depart sera différé d'une heure et
ainsi de suite jusqu'à 24 h
COTON
ENERGIQUE
Couleurs ne déteignant pas
(articles en coton à laver
soigneusement pour des raisons
d'hygiène)
Blancs particulièrement sales
(draps, napp es, etc.)
Normal
(Blancs et c ouleurs résistantes très
sales)
Léger - Blancs et couleurs
délicates peu sales
(chemises, pulls, etc.)
1
2
3
4
Usage
sanitaire
Lourds
Normal
Léger
15
15
15
15
KK K
KK K
KK K
KK
Prélavage
Rinça
e Plus
Super lavage
Prélavage
Rinça
e Plus
Super lavage
Prélavage
Re
assage facile
Rinçage Plus
Su
er lavage
Rinçage Plus
Lavage,
intermédiaire et essorage final
170
Lavage,
92
intermédiaire et essorage final
Lavage,
82
Lavage,
59
trois rinçages, essorage
trois rinçages, essorage
trois rinçages, et essorage final
trois rinçages, et essorage final
SANS
REPASSAGE
K
Prélavage
Re
assage facile
Rinça
e Plus
Su
er lavage
Prélavage
Repassage facile
Rinça
e Plus
Su
er lavage
Repassage facile
Rinça
e Plus
Extra Rinse
Lavage,
assage facile
Re
75
Lavage,
Re
69
63
42
14
assage facile
Lavage,
assage facile
Re
Rinse cycles , delicate spin cycle
Vidange et essorage délicat
trois rinçages et essorage délicat
trois rinçages et essorage délicat
trois rinçages et essorage délicat
Synthétiques couleurs
résistantes très sales
(linge de b ébé, etc.)
Synthétiques couleurs
délicates
(linge en t out genre légèrement sale)
Synthétiques couleurs délicates
(linge en tout genr e légèrement sale)
Rinçages
Essorage
5
6
7
Lourd
Normal
Léger
7.5
7.5
7.5
KK K
KK K
KK
DELICATS
Délicats
Soie, vêtements et tissus
particulièrement délicats
(rideaux, soie, viscose, etc.)
Laine
Quotidien - Mixte
(pour rafraîchir rapid ement des articles
peu sales dans des textiles divers)
8
9
10
11
Léger
Soie
Laine
Quotidien
6.5
6.5
3.5
7.5
KK K
KK K
Prélavage
Prélavage
KK
KK
Lavage,
64
Lavage,
39
52
30
, trois rinçages
Repassage facile, vidange
Lavage,
deux rinçages et es sorage délicat
(600 tours minute)
Lavage,
deux rinçages et es sorage délicat
(800 tours minute)
trois rinçages, essorage délicat
PROGRAMMES
SPECIAUX
Rinçages Rinçages et essorage
Rinçages dèlicats Rinçages délicats, Anti-froissement ou
Essorages Essorage
Essorage délicats Essorage Délicat
Vidange Vidange
Vidange
*
( * )
Programme spécial sanitaire 1:
Le cycle Sanitaire est recommandé pour les articles grand teint en coton très sales. La température élevée (158° F-75° C)
élimine toutes les bactéries dangereuses.
Important:
Pour annuler le programme de lavage, il vous suffit dappuyer sur le bouton de mise en marche pendant au
moins 5 secondes.
(*) Pour finir le programme, appuyez sur le bouton de mise en marche.
60
www.aristonappliances.us
Page 61

Conseils sur les
détergents et lavage
Distributeur de détergent
Ne mettez aucun article dans le tiroir, à part les
détergents appropriés pour ne causer ni dommage ni
blocage.
1
4
3
4
5
1 Bouton douverture du tiroir.
2 Compartiment du détergent du
prélavage:
Maximum: 200 ml de détergent en
poudre ou 100 ml de
détergent liquide
3 Compartiment du détergent du
lavage principal:
Maximum: 400 ml de détergent en
poudre ou 200 ml de
détergent liquide
4 Grille
5 Compartiment du produit
assouplissant:
Maximum: 120 ml
F
Conseils sur les détergents
Versez la quantité adéquate de détergent pour un
excellent lavage
Avertissement
POUR ÉVITER TOUT RISQUE
DEMPOISONNEMENT, GARDEZ LES
DÉTERGENTS ET ADDITIFS HORS DE
LA PORTÉE DES ENFANTS
Nous vous suggérons de mesurer la quantité de
détergent (en poudre ou liquide) selon:
La dureté de leau. Vous obtiendrez cette information
auprès de votre fournisseur deau local.
La quantité de linge.
Le degré de saleté (référez-vous aux programmes à la
page 60).
Les précisions du fabricant de détergent.
Mesurer la quantité correcte de détergent assure des
résultats de lavage optimaux et contribue à un meilleur
environnement.
Distribuer le détergent en poudre
Pour obtenir les meilleurs résultats de lavage, la quantité
de détergent recommandée par le fabricant doit être
mesurée et ajoutée dans le compartiment du détergent
principal.
Ajouter le produit assouplissant
Versez la quantité recommandée de produit
assouplissant. Ne dépassez pas la ligne de remplissage
maximale.
Prélavage
Quand vous sélectionnez le prélavage, ajoutez le
détergent dans les compartiments du prélavage et du
lavage principal.
Produit assouplissant
Il est recommandé dutiliser un produit assouplissant pour
tous les tissus, notamment les serviettes, lors du cycle de
rinçage final. Le linge sera plus doux et plus facile à
repasser et leffet dadhérence des tissus synthétiques
est considérablement réduit.
Versez lassouplissant dans le compartiment «Additifs»
du distributeur de détergent en respectant le niveau
indiqué sur le siphon. Ne dépassez en aucun cas le
niveau indiqué, car lassouplissant débordera
immédiatement dans la machine et, par conséquent,
altérera les résultats du lavage.
Nous recommandons les détergents à haute efficacité car
ils sont conçus pour que votre machine à laver à
chargement frontal fournisse une performance optimale.
Ne pas utiliser un détergent à haute efficacité pourrait
causer des problèmes comme un excès de mousse
(dégâts sur le plancher) et/ou une baisse des
performances.
Trop peu de détergent:
Le linge est mal lavé et devient gris et raide. Des taches
grisâtres (globules de graisse) peuvent apparaître sur le
linge. Lélément chauffant peut se calcifier.
Trop de détergent:
Nest pas écologique et lexcès de mousse diminue
lagitation de la lessive entraînant ainsi un mauvais rinçage
ou un mauvais essorage.
Ajustez la quantité selon des brassées très sales ou
légèrement sales.
Utilisez plus de détergent si leau est très dure et
utilisez-en moins si leau est douce. Si les vêtements
ont été prétraités, vous aurez besoin de moins de
détergent (voire daucun détergent).
www.aristonappliances.us
61
Page 62

Commencer un programme de lavage
F
Préparation du linge
Tri
Vous devez trier les vêtements en séparant les articles qui
risquent dabîmer les autres vêtements. Triez les articles
selon les couleurs similaires, les tissus, la texture des
vêtements et le degré de saleté.
Couleur
Séparez les vêtements en trois groupes: blancs et
pastels, couleurs intermédiaires et vives, couleurs
sombres. Les articles qui déteignent doivent être lavés à
part.
Types de tissu
Lavez séparément les articles délicats et les articles plus
solides. Séparez aussi les tissus qui lâchent de la charpie
et les tissus qui attirent la charpie.
Textures des vêtements
Les vêtements qui seffilochent facilement ou qui ont des
garnitures inhabituelles ont besoin dun lavage délicat.
Ces vêtements peuvent être lavés sur le cycle Lainage. Si
les vêtements sont fragiles et délicats, le lavage à la main
est recommandé.
Degré de saleté
Séparez les articles très sales pour éviter le transfert de la
saleté dans leau de lavage.
autre corps étranger pour éviter dendommager la
machine.
Attachez les lacets, fermez les fermetures à
glissière et boutonnez les boutons.
Mettez les tissus en tricot à lenvers pour réduire la
formation des petites boules pelucheuses. Les petites
boules pelucheuses sont des boules en fibre qui se
trouvent sur la surface du tissu et qui causent un
dommage par lusure ou le frottement.
Enlevez la poussière et le sable.
Brossez les revers de pantalon pour enlever la saleté,
secouez les tapis ou passez laspirateur sur ces derniers
pour enlever la saleté et la poussière.
Si une boucle est lavable,entourez-la dun chiffon avant
de la laver et de la sécher pour éviter dégratigner et
dendommager la machine. Enlevez les ornements,
boucles, boutons et ceintures non lavables.
Attachez les cordons, courroies et ceintures de tablier
en faisant des nuds afin déviter tout enchevêtrement
durant le lavage.
Avant de charger la machine , assurez-vous que le
tambour est vide.
Examen
Lorsque vous triez les vêtements, vérifiez chaque
vêtement pour voir sil a besoin dun entretien spécial
(référez-vous au tableau de lentretien des tissus àla
page 63).
Prétraiter
Retirez les taches quand elles sont fraîches et faciles à
enlever. Retirez les taches inconnues avec de leau
froide. Leau chaude fixe les taches qui contiennent des
protéines comme le sang, luf, la viande et le lait. Pour
retirer les taches difficiles, référez-vous au tableau à la
page 65.
Prétraitez les endroits très sales tels que les cols,
les poignets et le centre des taies doreiller.
Raccommodez les décousures et les déchirures
avant le lavage afin déviter dendommager davantage
les vêtements.
Videz les poches.
Les objets oubliés dans les poches tels que les crayons,
stylos ou marqueurs ou les miettes de tabac pourraient
tacher une brassée entière de lavage. Quant aux
mouchoirs en papier, ils se déchiquèteront laissant des
petits morceaux sur chaque article se trouvant dans la
machine à laver. Enlevez les pièces de monnaie et tout
Prélavage
Prélavez les vêtements excessivement sales tels que les
vêtements de travail ou denfants.
Ils sont souvent très sales. Le prélavage avec un
détergent aidera à désincruster la saleté.
62
www.aristonappliances.us
Page 63

Conseils pour le lavage
et démarrage
Conseils utiles
Nutilisez jamais votre machine à laver pour laver... du
linge déchiré, effilé ou non ourlé. Sil est absolument
nécessaire de le faire, placez le vêtement dans un sac
pour le protéger. Ne lavez pas les vêtements de couleur
avec les vêtements blancs.
Combien pèsent-ils?
1 drap 1
1/4 lb (400-550 g)
1 taie doreiller 4 oz. (120 g)
1 nappe 1 lb (450 g)
1 sortie-de-bain 2-3 lb (900-1 300 g)
1 serviette 5
oz/1 l (150-500 g)
Les T-shirts colorés et imprimés ainsi que les chemises
durent plus longtemps sils sont mis à lenvers avant le
Surveillez le poids
Pour de meilleurs résultats, ne dépassez pas la limite de
poids indiquée ci-dessous (les chiffres indiquent le poids
lavage.
Les T-shirts et les chandails en molleton imprimés doivent
toujours être repassés à lenvers.
des vêtements secs) :
Cycle Lainage
- Tissus résistants (coton léger - normale - lourd):
15 lb (7 kg) maximum
- Tissus synthétiques (léger - normale - lourd):
7,5 lb (3,4 kg) maximum
- Tissus délicats
6,5 lb (3 kg) maximum
Cachemire Platinum
Délicat comme le lavage à la main.
Ariston a introduit un nouveau standard de performances supérieures, reconnu par The Woolmark
Company qui lui a attribué le prestigieux label
Woolmark Platinum Care. Si le logo Woolmark
Attention au denim.
Certaines salopettes ont des bretelles à crochets pouvant
endommager le tambour de votre machine à laver ou
dautres vêtements durant le lavage. Afin de minimiser le
risque, placez ces crochets dans la poche et fermez
avec des épingles de sûreté.
- Pure laine vierge : 3,5 lb (1,8 kg) maximum
- Sortie-de-bain: 6,5 (3 kg) maximum
Chouchoutez votre linge : placez vos pièces
de lingerie, vos bas et vos vêtements délicats
dans un sachet en toile pour les protéger
Platinum Care est appliqué sur votre lave-linge, vous pouvez
laver avec d'excellents résultats vos vêtements en laine portant
l'étiquette "laver à la main" (M.0303):
Sélectionnez le programme 10 pour tous les vêtements portant l'étiquette "Laver à la main" et utilisez
un produit lessiviel spécial.
Pour de meilleurs résultats, nous recommandons lutilisation
dune petite quantité de détergent et de prendre soin de ne
pas laver au-delà de 3,5 lb (1,8 kg) de linge.
Vacances : débranchez lappareil.
Il est recommandé de débrancher la machine de la prise et
de fermer lalimentation en eau. Laissez la porte entrouverte
pour permettre une circulation dair à la zone du tiroir et du
joint de porte. Ceci empêchera les odeurs désagréables.
SACHEZ LIRE LES ETIQUETTES
Les étiquettes que vous trouvez sur tous les vêtements contiennent des messages concernants le lavage et le
séchage sous forme de petits mais très importants symboles.Consultez ce tableau pour interpréter correctement ces
symboles; vous apprendrez à mieux laver et traiter votre linge et à augmenter les performances de votre lave-linge.
F
Cycle de
lavage
Température
eau
Séchage en
sèche-linge
Consignes
spéciales
Symboles
eau de
Javel
Normal/
Coton Intensif
Chaude
(50oC/120oF)
Séchage
autorisé en
sèche-linge
Suspendre
pour sécher
Eau de Javel
autorisée (au
besoin)
Normal/Coton
sécher sans essorer
www.aristonappliances.us
Pli Permanent/
anti-froissement
(40oC/105oF)
Intensif
Suspendre pour
Seulement eau de Javel
sans chlore (au besoin)
Tiède
Pli Permanent/
anti-froissement
Sécher à
plat
Délicat/
Doux
(30oC/85oF)
Délicat/
Doux
Froide
Sécher à
l'ombre
Traitement
interdit
la main
Séchage par
culbutage
interdit
Séchage
interdit en
sèche-linge
Ne pas laverLavage à
Ne tordez pas
63
Page 64

Fonctionnement
de la machine à laver
F
Marche-arrêt / Sélection dun
programme
1. Mettez la machine en marche en appuyant sur le
bouton marche/arrêt
2. Déposez le linge sale dans la machine et fermez la
porte.
3. Ajoutez le détergent et tout produit assouplissant.
4. Tournez le bouton de sélection de programme au
programme requis.
5. Sélectionnez une des options requises (référez-vous à
Modificateurs doptions).
6. Appuyez sur le bouton de mise en marche/
dannulation pour démarrer le programme.
Pour arrêter ou changer le programme :
1. Appuyez sur le bouton de mise en marche/
dannulation pendant 3 secondes.
2. Sélectionnez la fonction « Évacuer »
bouton de sélection de programme.
3. Une fois que la machine a fini le processus
dévacuation, tournez le bouton de sélection de
programme au nouveau programme désiré. Vous
pourriez avoir besoin dajouter du détergent.
située sur le
Une brassée typique de lavage
Deux exemples de brassées maximales pour différents
types de tissus :
COTON 2 serviettes de bain
1 serviette à mains
6 chemises
6 blouses
1 pyjama
4 dessous
2 draps
= 15 Lbs (7 kg )
SYNTHÉTIQUE 2 vêtements denfant
5 chemises
5 blouses
1 pyjama
4 dessous
= 7.5 Lbs (3,5 kg)
Avant dentreprendre le lavage, voici quelques conseils à
suivre pour obtenir les meilleurs résultats. Séparez vos
vêtements en fonction du tissu et des couleurs. Lisez les
étiquettes et suivez leurs directives
4. Appuyez sur le bouton de mise en marche pour
démarrer le programme.
Fonctions automatiques
Détection de déséquilibre de charge
La machine à laver est équipée dune fonction intégrée qui lempêche dessorer trop vite si la charge nest pas équilibrée.
Lorsquun déséquilibre de charge est détecté, la machine à laver va essayer de redistribuer le linge pour léquilibrer et
atteindre sa pleine vitesse dessorage.
Si cela est impossible et que le déséquilibre de charge demeure, la vitesse dessorage sera réduite selon limportance du
déséquilibre détecté. Ceci empêche la machine de sabîmer ou dendommager son environnement et de faire un bruit
assourdissant.
Si le résultat de lessorage est insatisfaisant à la suite dune vitesse dessorage réduite destinée à rectifier le déséquilibre
de charge, le linge peut alors être bien réparti manuellement dans le tambour une fois que le programme est terminé.
Ensuite, sélectionnez le cycle dessorage.
Remarque : Nessayez pas dessorer des articles lourds ou absorbants seuls car la machine ne pourra pas bien les
répartir.
Si vous avez besoin de laver un seul article, vous devez ajouter dautres articles comme poids supplémentaire afin
de permettre à la machine de bien répartir la charge dans le tambour.
64
www.aristonappliances.us
Page 65

Comment enlever certaines taches spéciales
F
Sang
Traitez les taches encore fraîches avec de l'eau froide. Versez de
la lessive sur les taches restantes. Rincez. Si les taches
persistent, versez quelques gouttes d'ammoniaque et traitez à
nouveau avec un produit lessiviel. Rincez. Au besoin, utilisez de
l'eau de javel.
Cire
Raclez l'épaisseur de cire. Placez le tissu taché entre deux
feuilles de papier buvard ou entre plusieurs couches de mouchoirs en papier. Repassez au fer tiède. Frottez avec une éponge
et un détergent liquide. Si la tache ne part pas, passez à l'eau de
javel.
Ketchup
Raclez les couches plus épaisses. Mettez tremper à l'eau froide
pendant 30 minutes. Pré-traitez avec du détergent en pâte. Lavez
à la machine.
Chewing gum.
Frottez avec un glaçon pour faire durcir le chewing gum. Raclez
les couches plus épaisses avec une lame non tranchante.
Frottez avec une éponge et un détergent liquide.
Chocolat ou cacao
Mettez tremper à l'eau froide pendant 15 minutes. Frottez la tache
avec un détergent en pâte puis rincez abondamment. Lavez à la
température la plus élevée appropriée au type de tissu. Si la
tache ne part pas, frottez avec une éponge et de l'eau oxygénée,
rincez et lavez à la machine.
Café ou thé (noir)
En cas de taches fraîches, mettez tremper tout de suite en eau
froide; puis traitez avec de l'eau de Javel à la température la plus
élevée supportée par le type de textile. Si le tissu ne risque rien,
versez de l'eau bouillante sur la tache en la versant de 1" à 3"
(30 - 90 cm) de haut. Lavez à la machine.
Café ou thé (au lait)
Rincez ou mettez tremper à l'eau froide. Versez un produit
lessiviel sur la tache, rincez et laissez sécher. S'il reste des
traces de graisse, frottez avec une éponge et un détergent
liquide. Au besoin, renouvelez l'opération. Si la tache ne part pas,
passez à l'eau de Javel.
Crème, glace ou lait
Frottez la tache avec une éponge et de l'eau froide, ou bien
mettez tremper en eau froide pendant 30 minutes au moins. Si la
tache ne part pas, versez un détergent sur la tache puis rincez.
Au besoin, traitez à l'eau de Javel.
Déodorants et anti-transpirants
Lavez ou frottez soigneusement la tache avec une éponge et de
l'eau tiède savonneuse, rincez. Si la tache ne part pas, blanchissez avec de l'eau chaude savonneuse. Lavez à la machine. Pour
raviver les couleurs, utilisez de l'ammoniaque. Rincez
abondamment.
Taches de couleur
Rincez ou mettez tremper à l'eau froide. Versez du détergent sur
la tache. Rincez. Au besoin, blanchissez. Certaines taches sont
impossibles à enlever. Vous pouvez aussi utiliser un détachant
courant disponible dans le commerce.
Œuf ou jus de viande
Rincez à l'eau froide. Si la tache ne part pas, appliquez un
produit pour assouplir le tissu et laissez agir pendant 15-20
minutes. Si la tache ne part pas, frottez avec une éponge et du
détergent liquide ou de l'eau de Javel diluée. Lavez à la machine
en eau chaude. Si vous traitez tout de suite la tache à l'eau
chaude, elle risque de se fixer encore plus.
Assouplissant
Frottez au savon de Marseille jusqu'à ce que la tache
s'assouplisse. Rincez abondamment et lavez à la machine. Dans
certains cas, si la couleur le permet, un frottement à l'alcool peut
s'avérer efficace. Lavez à la machine. Si vous le désirez, vous
pouvez faire nettoyer à sec.
Feutre
Aspergez la tache avec un détergent spécial. Frottez
soigneusement la tache avec une éponge. Rincez à l'eau froide.
Au besoin, appliquez encore du détergent.
Fruits, vin
Mettez immédiatement tremper en eau froide quand la tache est
encore fraîche. Traitez à l'eau de Javel à la température la plus
élevée supportée par le type de tissu ; versez de l'eau bouillante
sur la tache en la faisant tomber de 1" à 3" (30 - 90 cm) de haut.
Lavez à la machine.
Produits de beauté : fard à paupières, rouge à
lèvres, fond de teint liquide, mascara, poudre,
fond de teint compact ou fard à joues
Versez du détergent liquide concentré sur la tache ou bien
mouillez la tache et frottez avec du savon ou du détergent en
pâte jusqu'à obtenir une mousse dense. Frottez jusqu'à ce que la
tache disparaisse complètement, puis rincez abondamment. Au
besoin, renouvelez l'opération. Si la tache ne part pas, lavez
avec un produit blanchissant qui n'endommage pas le tissu.
www.aristonappliances.us
Herbe
Appliquez un détergent sur la tache. Frottez avec une éponge et
de l'alcool dénaturé. Au besoin, traitez à l'eau de Javel.
Graisse ou huile
Raclez les couches plus épaisses. Frottez la tache avec un
détergent en pâte ou un produit lessiviel courant; rincez à l'eau
chaude. Si la tache ne part pas, frottez soigneusement avec une
éponge et un détachant. Séchez. Au besoin, renouvelez
l'opération. Pour enlever les taches jaunâtres, utilisez un produit
blanchissant au chlore ou à l'oxygène.
65
Page 66

F
Encre et stylo à bille
Le lavage risque de fixer encore plus certains types d'encre.
Nous conseillons de traiter préalablement une petite portion de
tissu. Frottez plusieurs fois la tache avec une éponge et de
l'acétone, du solvant (acétate d'amyle) ou de l'alcool. Essayez
avec de la laque, ça peut marcher. Lavez à la machine. Au
besoin, traitez à l'eau de Javel. Utilisez de l'acétate d'amyle sur
des synthétiques en triacétate, Arnel, Dynel et Verel. Sur d'autres
textiles, utilisez de l'acétone.
REMARQUE : Certaines taches d'encre sont impossibles à
enlever.
Moisissures
Brossez la surface pour la débarrasser de la moisissure et
empêcher que les spores se répandent. Plongez dans une
solution composée d'un 1/2 verre d'eau de Javel diluée dans 4
litres d'eau froide savonneuse pendant 5-10 minutes. Rincez
avec soin. Lavez à la machine.
Boue
Laissez sécher la tache; puis brossez. Rincez plusieurs fois à
l'eau froide jusqu'à ce que la boue disparaisse. Lavez à la
machine. (L'eau savonneuse pourrait créer des taches
rougeâtres ou jaunâtres).
Moutarde
Mettez tremper en eau chaude avec un produit lessiviel pendant
quelques heures. Si la tache ne part pas, passez à l'eau de
Javel.
Vernis à ongles
Traitez la tache quand elle est encore fraîche, raclez-la et frottezla le plus possible avant qu'elle ne sèche. Posez le tissu du côté
de la tache contre une feuille de papier buvard. Frottez sur
l'envers de la tache avec une éponge et de l'acétone (solvant à
vernis à ongles), ou bien frottez avec de l'alcool dénaturé
additionné de quelques gouttes d'ammoniaque. Passez plusieurs
fois sur la tache. Lavez à la machine à la température supportée
par le type de tissu.
N'utilisez pas d'acétone sur les synthétiques en acétate, Arnel,
Dynel ou Rayonne.
Parfum
Rincez à l'eau froide. Frottez la tache avec un détergent liquide concentré ou un détergent en pâte. Rincez. Si la tache ne part pas, traitez
à l'eau de Javel.
Brûlures
Rincez ou mettez tremper à l'eau froide. Appliquez un détergent
sur la tache et rincez. Au besoin, traitez à l'eau de Javel. Les
taches sont parfois impossibles à enlever.
Urine
Mettez tremper dans de l'eau froide. Si la tache est sèche,
appliquez du détergent en pâte sur la tache puis rincez. Au
besoin, traitez à l'eau de Javel.
Cirage
Raclez le plus possible. Prétraitez avec un détergent en pâte puis
rincez. Si la tache ne part pas, frottez avec une éponge et de
l'alcool (1 part contre 2 parts d'eau) ou de l'essence de
térébenthine. Eliminez l'essence de térébenthine en frottant à
nouveau avec une solution d'eau tiède et de détergent ou avec de
l'alcool. Au besoin, traitez à l'eau de Javel.
Boissons
Frottez avec une éponge et de l'eau froide; certaines taches sont
invisibles quand elles sèchent, mais, une fois réchauffées, elles
foncent et sont parfois impossibles à enlever.
Goudron
Agissez immédiatement avant que la tache ne sèche. Frottez
avec une éponge et un détachant ou de l'essence de
térébenthine. Lavez à la machine.
Peinture
Frottez ou mettez tremper dans de l'essence de térébenthine ou
dans un solvant indiqué comme dilutif pour peinture. Lavez à la
machine.
Transpiration
Lavez ou frottez énergiquement la tache avec une éponge et de
l'eau tiède additionnée de détergent en pâte. Si la transpiration a
modifié la couleur du tissu, traitez-le avec de l'ammoniaque ou du
vinaigre pour le raviver. Versez de l'ammoniaque sur les taches
encore fraîches ; rincez. Sur les taches de vieille date, versez
par contre du vinaigre et rincez.
Rouille et fer
Appliquez un solvant spécial rouille disponible dans le commerce
en vous conformant aux instructions du fabricant. Rincez. S'il y a
pas de risques pour le tissu, faites bouillir le vêtement taché dans
une solution contenant 4 cuillères à café de crème de tartre
dissoute dans un demi-litre d'eau.
66
www.aristonappliances.us
Page 67

Soins et entretien
Fermer lalimentation en eau et en
électricité
Fermez le robinet deau après chaque lavage. Ceci
limite lusure et la rupture de lalimentation en eau de
la machine et empêche les fuites.
Débranchez la machine
de la prise électrique
avant de la nettoyer et
deffectuer tout travail
dentretien.
Pour éviter les risques
dexplosion
Nutilisez jamais des solvants
inflammables pour nettoyer
lappareil.
F
Nettoyage
Nettoyer lextérieur
Utilisez un linge humide ou un produit à polir à base de
silicone pour nettoyer la surface extérieure de la machine.
Nettoyer le tiroir et les compartiments du
distributeur
Il est recommandé de nettoyer le tiroir du distributeur
régulièrement. Nessayez pas de nettoyer toute partie du
tiroir du distributeur alors que la machine est en marche.
1. Tirez le tiroir jusquà
larret.
2. Appuyez sur le bouton
douverture du tiroir pour
retirer le tiroir du
distributeur (référez-vous
à lillustration).
Nettoyer la machine
Lextérieur de la machine et toutes les pièces en
caoutchouc peuvent être nettoyés à laide dun chiffon
trempé dans de leau tiède savonneuse. Nutilisez pas
des solvants ou des produits abrasifs.
Nettoyer le hublot de la porte
Nettoyez régulièrement la surface interne du hublot de la
porte avec un chiffon doux. Une accumulation de savon
en poudre et de résidus de dureté de leau pourraient
provoquer une fuite deau à travers la porte.
Laissez toujours la porte de la machine entrouverte pour
éviter la formation dodeurs désagréables.
Vérifier le tuyau dalimentation en eau
Vérifiez le boyau de remplissage deau une fois par an. Si
vous détectez une fissure quelconque, remplacez-le
immédiatement: durant les cycles de lavage, le boyau
fissuré pourrait se fendre à cause de la haute pression de
leau.
Nutilisez jamais un boyau qui a déjà été utilisé.
Entretien du tambour
Laissez toujours la porte à hublot entrouverte pour
éviter davoir des odeurs désagréables.
3. Nettoyez et séchez le
tiroir du distributeur, les
siphons, la grille et le
tuyau dévacuation de
lassouplissant textile (A),
en vous assurant
denlever entièrement
toute accumulation de
détergent et de produit
assouplissant. À défaut de
A
le faire, cela pourrait
provoquer une fuite de la
machine à partir du tiroir
du distributeur. Nettoyez
régulièrement la zone du
tuyau de sortie (B).
4. Replacez le tiroir du
distributeur en le poussant
fermement jusquà ce quil
B
soit bien en place.
Ne nettoyez aucune partie de la machine avec des
détergents abrasifs, des agents de désensimage, des
acides, des agents blanchissants ou des produits
dentretien pour les métaux, car ils pourraient causer des
dommages.
www.aristonappliances.us
67
Page 68

Dépannage
Parfois, votre machine risque de ne pas fonctionner pas comme il faut. Avant dappeler le service technique (référez-
F
vous au Service technique), assurez-vous que le problème ne peut pas être facilement résolu en vous référant à la liste
suivante:
Mauvais fonctionnement :
La machine ne se met pas en marche.
Le cycle de lavage ne démarre pas.
La machine à laver narrive pas à se
remplir deau.
La machine se remplit et se vide de son
eau continuellement.
Causes possibles / Solutions:
La fiche na pas été insérée dans la prise ou na pas été
suffisamment insérée pour établir un contact.
Il ny a pas de courant électrique dans la maison.
La porte à hublot na pas été fermée correctement.
Le bouton de MARCHE/RÉINITIALISATION na pas été pressé.
Le robinet deau na pas été ouvert.
Le tuyau dalimentation en eau nest pas branché au robinet.
Le tuyau est entortillé.
Le robinet deau na pas été ouvert.
Il ny a pas deau à la maison.
La pression deau est insuffisante.
Le bouton de MARCHE/RÉINITIALISATION na pas été pressé.
Lextrémité du tuyau de sortie na pas été ajusté à une hauteur
se situant entre 65 et 100 cm du plancher (référez-vous à
Installation).
Lextrémité libre du tuyau est immergée (référez-vous à
Installation).
Si le logement est situé à létage supérieur dun immeuble, il
pourrait y avoir un problème découlement des eaux, entraînant
ainsi la machine à se remplir et à se vider de son eau
continuellement. Des robinets anti-drainage sont disponibles
dans les magasins et vous permettent déviter ces
inconvénients.
Le système de drainage nest pas équipé dun tuyau du
reniflard.
La machine névacue pas leau ou
nessore pas.
La machine à laver vibre trop durant le
cycle dessorage.
La machine à laver fuit.
Le programme ninclut pas une phase de drainage: certains
programmes nécessitent un drainage manuel (référez-vous à
Programmes et options).
Loption de Repassage facile est activée: pour terminer le
programme, appuyez sur le bouton MARCHE/ARRÊT (référezvous à Programmes et options).
Le tuyau de sortie est plié (référez-vous à Installation).
Le conduit de drainage est engorgé.
Le tambour nétait pas bien déverrouillé lors de linstallation de
la machine (référez-vous à Installation - Retirez les dispositifs
de fixation pour le transport).
La machine à laver nest pas à niveau (référez-vous à
Installation).
La machine à laver est coincée entre les placards et le mur
(référez-vous à Installation).
La charge nest pas bien équilibrée ( référez-vous a Détection
de déséquilibre de charge.
Le tuyau dalimentation en eau nest pas correctement vissé au
robinet (référez-vous à Installation).
Le tiroir du distributeur de détergent est bloqué (pour savoir
comment le nettoyer, référez-vous à Soins et entretien).
Le tuyau de sortie na pas été fixé correctement ( référez-vous à
Installation).
68
www.aristonappliances.us
Page 69

Les icônes correspondant à la
«Phase en cours» clignotent
rapidement en même temps que le
voyant marche/arrêt.
F
Arrêtez la machine et débranchez-la; attendez environ 1 minute puis
remettez-la en marche.
Si le problème persiste, contactez le service technique.
Il y a trop de mousse.
La porte de la machine à laver
reste verrouillée.
Le détergent nest pas conçu pour les machines à laver (lemballage
doit indiquer que le produit est «pour le lavage par machine», «pour
le lavage à la main ou par machine» ou quelque chose de similaire).
Une grande quantité de détergent a été utilisée.
Suivez la procédure de déverrouillage du manuel. (référez-vous à
Précautions et conseils).
Si le problème persiste après avoir procédé à toutes les vérifications
indiquées ci-dessus, fermez le robinet deau, arrêtez la machine et
contactez le service technique.
Attendez jusqu à le DEL s éteindra avant douvir la porte.
Si le problème persiste après avoir procédé à toutes les vérifications
indiquées ci-dessus, fermez le robinet deau, éteignez la machine et
contactez le service technique.
www.aristonappliances.us
69
Page 70

Service
F
Avant dappeler le service technique :
Vérifiez si vous ne pouvez pas résoudre le problème par vous-même. (référez-vous à la page 68);
Redémarrez le programme pour vérifier si le problème a été résolu;
Si ce nest pas le cas, contactez le centre de service technique autorisé au numéro de téléphone indiqué sur le
certificat de garantie.
Si la machine a été mal installée ou mal utilisée, vous pourriez être facturé pour la visite du service dentretien.
Demandez toujours le service dun technicien autorisé.
Avisez le technicien du :
type de problème;
modèle de la machine (Mod.);
numéro de série de la machine (S/N);
Cette information se trouve sur la plaque signalétique située à larrière de la machine à laver.
ASSISTANCE À LA CLIENTÈLE,
SERVICE ET PIÈCES :
téléphone (888) 426-0825
70
www.aristonappliances.us
Page 71

Garanties
GARANTIES
Lave-linge ARISTON
Les garanties fournies par (Ariston) dans cette déclaration ne sont applicables qu'aux lave-linge Ariston vendus au
premier utilisateur qui aura acheté l'appareil chez Ariston ou chez l'un de ses distributeurs, revendeurs ou centres
d'assistance agréés aux Etats-Unis ou au Canada. Les garanties prévues par ce document ne sont pas
transférables.
Durée de la garantie
Première année Garantie totale limitée à compter de la date d'installation*
Ariston s'engage à réparer ou à remplacer gratuitement tout composant qui s'avèrera défectueux, sous réserve de
conditions normales d'utilisation domestique, frais d'expédition et de main d'œuvre inclus. La réparation sous
garantie devra être effectuée par un centre d'assistance Ariston agréé.
Deuxième année Garantie limitée à compter de la date d'installation*
Ariston s'engage à fournir gratuitement les pièces détachées pour tout composant qui s'avèrera défectueux sous
réserve de conditions normales d'utilisation domestique, frais de main d'œuvre exclus.
Troisième-Cinquième année Garantie limitée aux composants Electroniques à compter de la date
d'installation*
Ariston s'engage à réparer ou à remplacer gratuitement tout microprocesseur ou carte des circuits qui s'avèrera
défectueux sous réserve de conditions normales d'utilisation domestique dans les 3-5 ans suivant la date
d'installation originale, frais de main d'oeuvre exclus.
Troisième-Cinquième année Garantie limitée au moteur à compter de la date d'installation*
Ariston s'engage à réparer ou à remplacer gratuitement le moteur ou tout composant du moteur qui s'avèrera
défectueux sous réserve de conditions normales d'utilisation domestique dans les 3-5 ans suivant la date
d'installation originale, frais de main d'oeuvre exclus.
F
Garantie à vie limitée du produit contre la corrosion de l'acier inoxydable due à la rouille à compter de la
date d'installation*
Ariston s'engage à fournir gratuitement un lave-linge de remplacement du même modèle ou d'un modèle actuel qui
soit équivalent ou meilleur d'un point de vue fonctionnel, au cas où le tambour de lavage serait attaqué par de la
rouille sous réserve de conditions normales d'utilisation ; frais de main d'oeuvre, d'expédition et d'installation
exclus.
10 jours à compter de la date d'achat Garantie détériorations esthétiques
Ariston s'engage à remplacer gratuitement toute partie esthétique (appel au service assistance inclus) qui
s'avèrera abîmée, dans les 10 jours suivant la date d'achat. Cette clause n'inclut toutefois pas les dommages dus
aux opérations de transport, manutention ou installation effectuées de façon inappropriée.
* La date d'installation se réfère à la date d'installation du lave-linge séchant ou à dix jours ouvrables suivant la
date de livraison, la date à retenir est celle qui correspond à la circonstance qui s'est produite en premier.
Exclusions :
La présente garantie ne couvre pas les appels d'assistance ou de réparation effectués pour rectifier l'installation,
demander des instructions sur l'utilisation de l'appareil, remplacer les fusibles de l'appartement ou corriger le
câblage électrique ou l'installation hydraulique domestique. De plus, toute réparation de l'appareil qui s'avèrera
nécessaire suite à une utilisation autre qu'une utilisation domestique normale n'est pas couverte par la garantie.
Les garanties ne couvrent aucun défaut ou dommage causé par un accident, une mauvaise utilisation, un usage
abusif ou acte de négligence, une intervention d'assistance non autorisée ou des forces extérieures hors contrôle
d'Ariston, tels qu'incendies, inondations et autres causes de force majeure, ou les installations non conformes aux
réglementations électriques ou hydrauliques applicables au niveau local. Les frais de main d'oeuvre, d'expédition
et d'installation supportés pour la réparation ou le remplacement d'un appareil un an après la date d'installation ne
seront pas couverts par la présente garantie. Tous les composants remplacés ou réparés seront assimilés aux
pièces d'origine pour ce qui est de la période de garantie applicable. Dans les limites permises par la loi, la
présente garantie remplace toute autre garantie expresse ou implicite, y compris les garanties implicites de
commerciabilité et d'aptitude à un emploi spécifique. Ariston ne pourra en aucun cas être tenu pour responsable
des dommages accessoires ou indirects.
Pour accéder aux services de garantie, appeler les 1-888-426-0825 ou écrivez à :
Ultra 8 International, 2505 Anthem Village Drive, Suite E - PO BOX 562, Henderson Nevada 89052,
En précisant toujours le numéro du modèle, le numéro de série, la date d'achat, le nom et l'adresse du revendeur.
www.aristonappliances.us
71
Page 72

195 055 110.00
11/2005 - Xerox Business Services
F
Ultra 8 International, 3027 East Sunset Road, Suite 101, LAS VEGAS Nevada 89120
72
www.aristonappliances.us
 Loading...