

Page 1

1
About This Guide
This guide tells you how to configure your Workgroup Server, use software
programs, use its built-in CD-ROM drive and optional tape-backup unit,
and troubleshoot hardware and software problems. For information about
your server’s hardware, see the setup guide that came with your server.
About your Workgroup Server and Power Macintosh software
Your Workgroup Server is powered by the PowerPC™ microprocessor (or
“chip”). This microprocessor was designed by Apple Computer, Inc.,
Motorola, Inc., and IBM Corporation. The PowerPC microprocessor uses
Reduced Instruction Set Computer (RISC) technology to deliver very high
performance at the lowest possible cost. The PowerPC RISC microprocessor
represents the state of the art in microprocessor design.
Your Workgroup Server will run almost all of your existing Macintosh
software, but for best performance and greatest speed, look for software
programs designed especially for Power Macintosh computers.
Who should read this guide
This guide is intended for the person who administers the server on a dayto-day basis. You should be familiar with basic Macintosh terms, concepts,
and techniques. If you’re new to the Macintosh environment, see Appendix
A, “Getting Help,” after you turn on your server system. You also need to
know some details of your existing network to choose the appropriate
procedures for connecting the server to your network.
Page 2

2
What this guide contains
Here’s a brief summary of what you’ll find in this guide:
m Chapter 1, “Configuring Your Server,” describes how to set the system
time and date, how to choose a printer, how to configure your monitor,
and how to configure the Energy Saver control panel so that your server
restarts automatically after a power failure.
m Chapter 2, “Configuring Your Network Connection,” explains when you
need to configure your network connection and how to do it. This
chapter also describes Open Transport and the features of the AppleTalk
and TCP/IP control panels.
m Chapter 3, “Using Application Software,” discusses running Power
Macintosh software and server application programs.
m Chapter 4, “Managing Hard Disks,” describes routine maintenance
procedures associated with hard disk drives. This chapter also explains
how to reinstall system software.
m Chapter 5, “Using the CD-ROM Drive,” explains how to use the built-in
CD-ROM drive.
m Chapter 6, “Using a DAT Drive and Tape Cassettes,” explains the use of
the optional DAT drive and describes the types of tape cassettes that are
appropriate for use with the drive.
m Chapter 7, “Troubleshooting,” helps you solve problems with the server.
m Appendix A, “Getting Help,” describes how to use the various kinds of
on-screen help available in the Guide menu.
m Appendix B, “Special Keys on Your Keyboard,” describes the use of key
combinations as shortcuts for menu commands and alternatives to using
the mouse.
m Appendix C, “Obtaining Updated Apple Software,” explains how to
obtain software updates from a variety of online services.
Page 3

3
How to use this guide
If you are new to Macintosh: Refer to Appendix A, “Getting Help,” to learn
how to use the features of Mac OS and application programs.
Configure your server’s system software. See Chapter 1, “Configuring Your
Server,” for information about how to configure your server’s system
software for optimal performance.
If necessary, configure your server’s network connection. Your server
automatically uses the built-in Ethernet port for AppleTalk connections. See
Chapter 2, “Configuring Your Network Connection,” for information about
how to configure your server to use a different port for AppleTalk or how
to configure your server’s TCP/IP network connections.
Learn about application software. See Chapter 3, “Using Application
Software,” for information about Power Macintosh programs and the
shared libraries that they use and for information about running older
Macintosh programs. See Appendix C for information about obtaining
updates for Apple software products.
Learn about hard disk management. See Chapter 4, “Managing Hard Disks,”
for information about initializing hard disks and installing system software.
Familiarize yourself with the server’s built-in CD-ROM drive and optional DAT
drive. See Chapter 5, “Using the CD-ROM Drive,” and Chapter 6, “Using a
DAT Drive and Tape Cassettes.”
Review troubleshooting techniques. See Chapter 7, “Troubleshooting,” for
steps you can take to prevent the occurrence of problems and for solutions
when problems occur.
Page 4
4
For on-screen help and information
There are several valuable sources of help and information that you can
view directly on your server’s monitor screen, as described in this section.
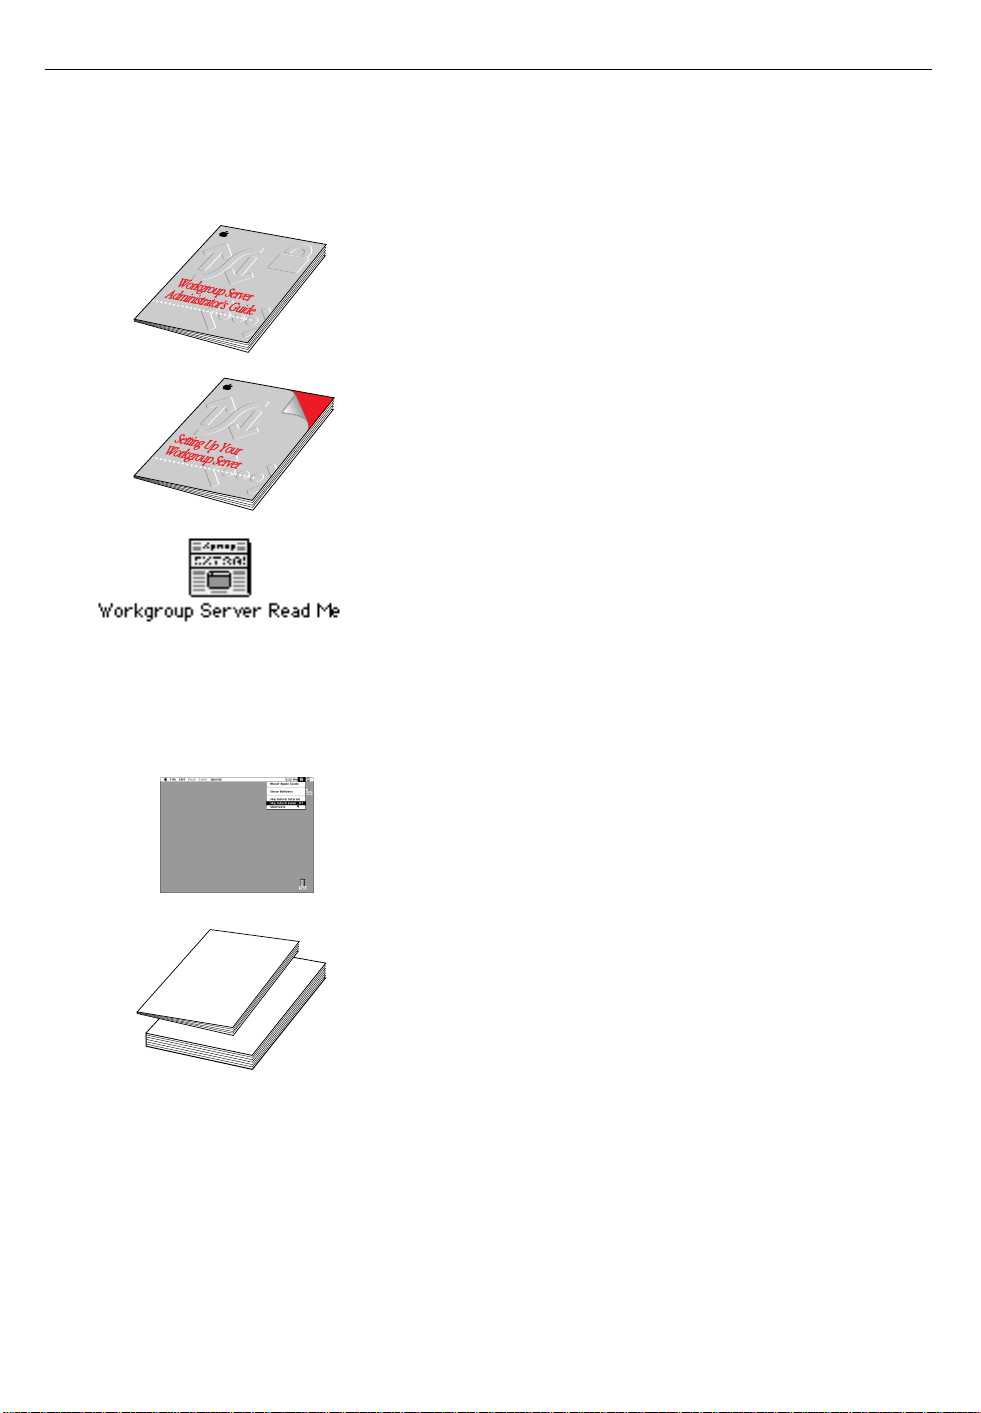
Workgroup Server Read Me
It’s important that you read the Workgroup Server Read Me file, which
contains late-breaking information about your server. This file is located on
the server’s hard disk and on the Workgroup Server Software CD-ROM disc.
You may want to print this file for future reference.
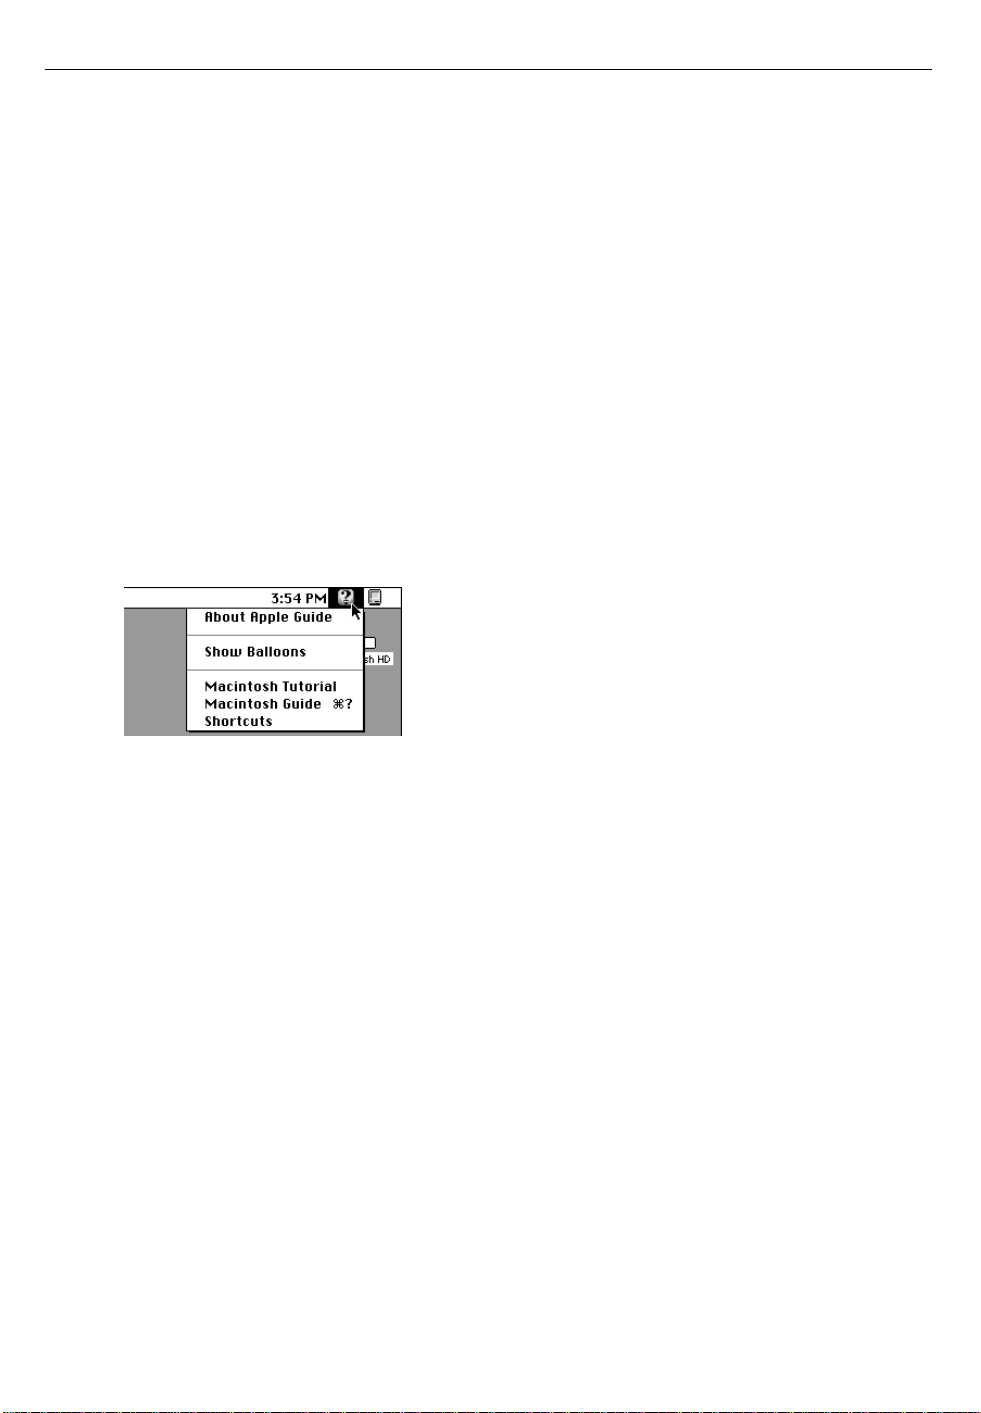
The Guide menu
Starting with Mac OS version 7.5, you have instant access to new kinds of
help when using your system and application programs. You can see your
options in the Guide (h) menu in the upper-right corner of the screen.
You’ll find the instructions available in Macintosh Guide particularly useful
when you have questions or encounter problems with your system
software. For more details on the types of on-screen help available, refer to
Appendix A, “Getting Help,” and explore your options in the Guide menu.
Workgroup Server Electronic Library
For your convenience, electronic versions of your server’s documentation
are provided on your server’s hard disk and on the Workgroup Server
Software CD-ROM disc. You’ll find these documents in a folder called the
WS Electronic Library. You’ll find on-screen help available in the
document.
Page 5

5
The WS Electronic Library folder contains electronic versions of the
following documents:
m this book, the Administrator’s Guide, in an Adobe™ Acrobat file that has
been specially formatted for easy on-screen readability
m other user’s guides for software that may have come with your server
Other reference material
In addition to this guide, you may need to consult the following sources of
information.
m For information about your server’s hardware setup and capabilities, see
the setup guide that came with your server.
m For late-breaking information about your server and system software, see
the Workgroup Server Read Me file, located on the server’s hard disk
and on the Workgroup Server Software CD-ROM disc.
m For information about server application programs included with your
Workgroup Server, such as Apple RAID Software and Retrospect
Remote, refer to the documentation for those programs included in the
server accessory kit.
m A number of network services, such as AppleShare, AppleSearch, and
Apple Remote Access, may be included with your server or can be
installed on your server. Refer to the documentation included with those
services for installation and operation information.
m If you purchased an Apple Internet Server, see the setup booklet included
in the Apple Internet Server Solution for the World Wide Web package.
m If you need a better understanding of how to configure your network, the
following books from Apple Computer, published by Addison Wesley,
are available at computer bookstores:
Understanding Computer Networks gives an overview of networking basics.
Planning and Managing AppleTalk Networks provides in-depth information
on setting up, maintaining, and troubleshooting AppleTalk networks.
Page 6
6
Where to find answers
When you have questions about using your server, there are several places
you can look for answers.
In this book
Use this book to help you set up your server and learn
about it, or to find solutions to problems with your
equipment.
In the setup guide
Use this book to help you set up and expand your
server system, and to connect it to a network. Also
use this book to check your server’s technical
specifications.
In the Read Me files
Your Workgroup Server’s startup disk and the
Workgroup Server Software CD-ROM disc contain
several SimpleText documents that are known as
Read Me files. Read Me files contain important
information about your server and its software that
may not be included in the setup guide or the
administrator’s guide.
In the Guide menu
The Guide menu (marked with the h icon) is your
main source of information about the Mac OS. To
learn how to get different kinds of help from the
Guide menu, see Appendix A in this book.
In other manuals
For answers to questions about other equipment
or about application programs you have purchased,
see the manuals that came with the equipment or
programs.
Page 7
7
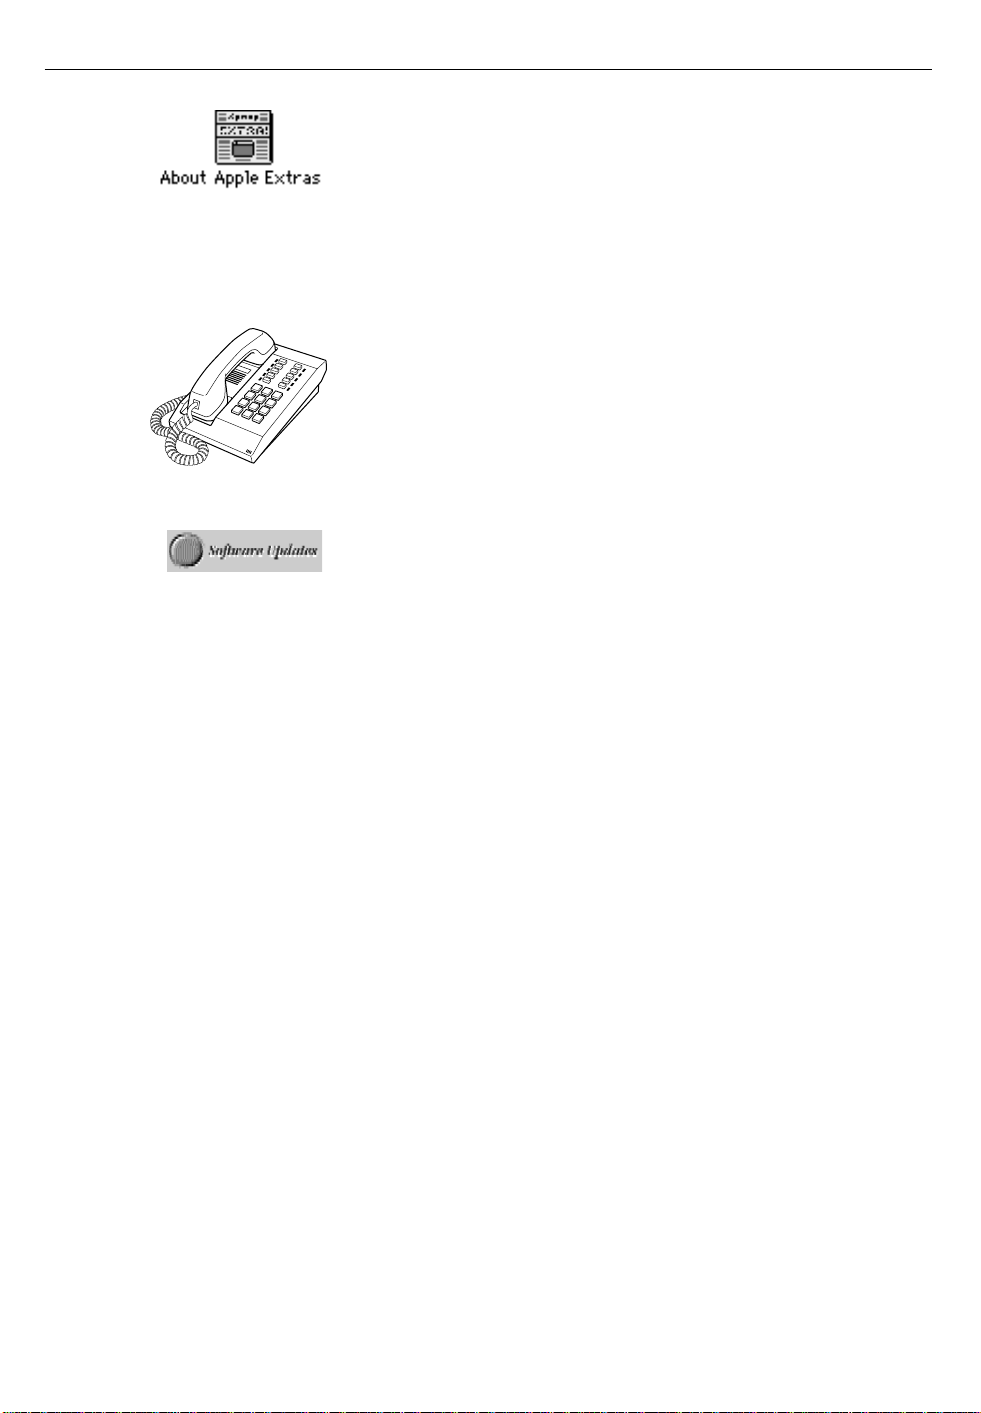
In the About Apple Extras file
The Apple Extras folder on your startup disk contains
a SimpleText document called About Apple Extras
with important information about some of the
application programs included with your server. Read
Me files can also be found inside application folders.
From Apple’s customer support hotline
If you can’t find an answer in any of the materials
provided, call the customer support hotline. (See the
information about technical support in the Apple
Resource Guide that came with your server.)
On Apple’s online support pages
Apple provides a number of online resources that can
give you helpful information. See Appendix C for a
listing of these resources.
Page 8

8
Page 9

9
1 Configuring Your Server
This chapter tells you how to configure your server’s software so you can
take advantage of your server’s hardware and software features. Most of
the configuration tasks are optional, but some of them allow the server to
deliver the highest performance. The tasks are:
m configuring the system time and date (required)
m installing device drivers (required only if you have installed an expansion card
or attached to your server a non-Apple hard disk drive or a SCSI device other
than a hard disk drive)
m choosing a printer (optional)
m configuring your monitor (optional)
m choosing sound devices (optional)
m configuring the Energy Saver control panel (optional)
Note: This chapter assumes that a keyboard, monitor, and mouse are
connected to your server and that your server is turned on. If you need to
connect these devices or if you don’t know how to turn the server on, see
the setup guide that came with your server.
Page 10
10
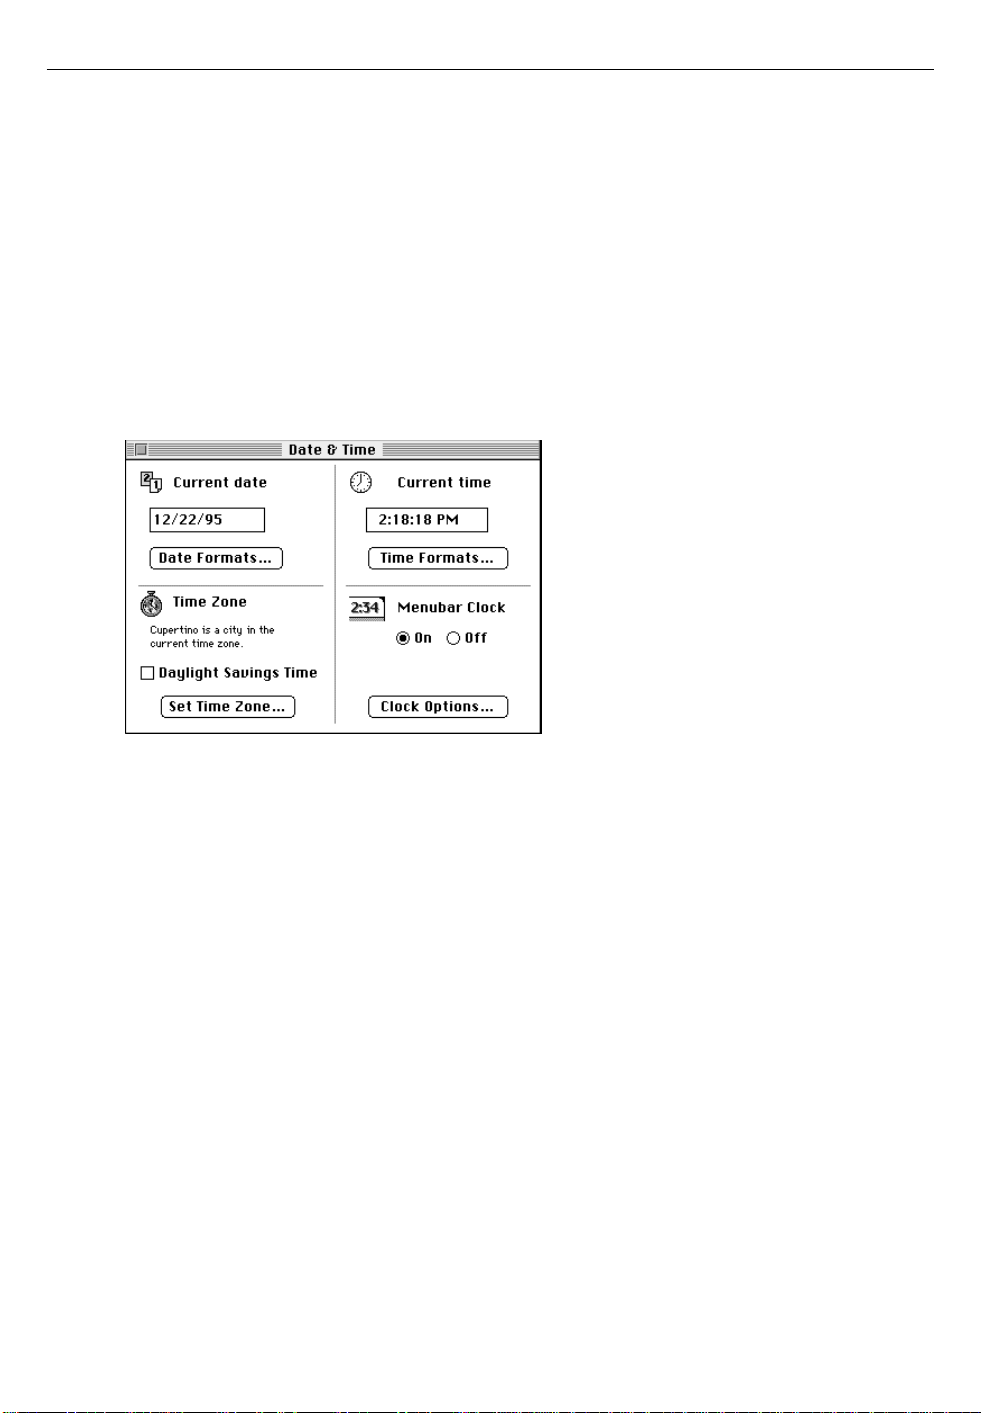
Configuring the system time and date
It’s important that you set the current time and date for your server so that
the system can correctly log system events and record file activity. You set
the time and date in the Date & Time control panel.
To set the system date and time:
1 Open the Date & Time control panel.
The Date & Time control panel is in the Control Panels submenu in the
Apple (K) menu.
2 To set the current date, click each number in the “Current date” box and
type the number you want to set for the month, day, or year. Or, click the
arrows that appear until the number you want to set is displayed.
Changes take effect immediately.
3 To display the date in a different format, click the Date Formats button.
A dialog box appears that allows you to select from a variety of date
formats. The new format takes effect when you click OK.
4 To set the time zone, click the Set Time Zone button.
A dialog box appears that allows you to select a city and country that
represents your time zone. The time zone you select takes effect
immediately.
5 If daylight savings time is in effect in your time zone, click the Daylight
Savings Time box so that an “X” appears.
Page 11

11
6 To set the current time, click each number in the “Current time” box and
type the number you want to set for the hour, month, or second. Or,
click the arrows that appear until the number you want to set is
displayed.
Changes take effect immediately.
7 To display the time in a different format, click the Time Formats button.
A dialog box appears that allows you to select from a variety of time
formats including a 12-hour or a 24-hour clock. The new format takes effect
when you click OK.
8 To display the time in the menu bar, make sure that the On button in the
Menubar Clock section of the Date & Time window is selected. Or, click
the Off button to turn off this feature.
Your changes take effect the next time you restart the server.
9 To cus tomiz e t he way tha t time i s disp l ayed in the menu ba r, click the
Clo c k O p tions button.
A dialog box appears that allows you to customize the way the time is
displayed in the menu bar. You can also configure the server to sound a
chime at regular intervals.
10 Close the Date & Time control panel.
Installing device drivers
Your Workgroup Server comes with three expansion slots in which you can
install Peripheral Component Interconnect (PCI) cards. PCI cards allow you
to expand the capability of your Workgroup Server, for example, by
generating additional SCSI buses or by providing additional network
interfaces. You can also attach additional SCSI devices to your Workgroup
Server’s internal/external SCSI bus. With the exception of Apple hard disks,
you need to install a device driver for any PCI cards or SCSI devices that you
add to your Workgroup Server.
A device driver is software that lets the server communicate with a card or
a SCSI device. The device driver is usually on a floppy disk that comes with
the card or device. To install a device driver, see the documentation that
came with the card or device.
Page 12
12
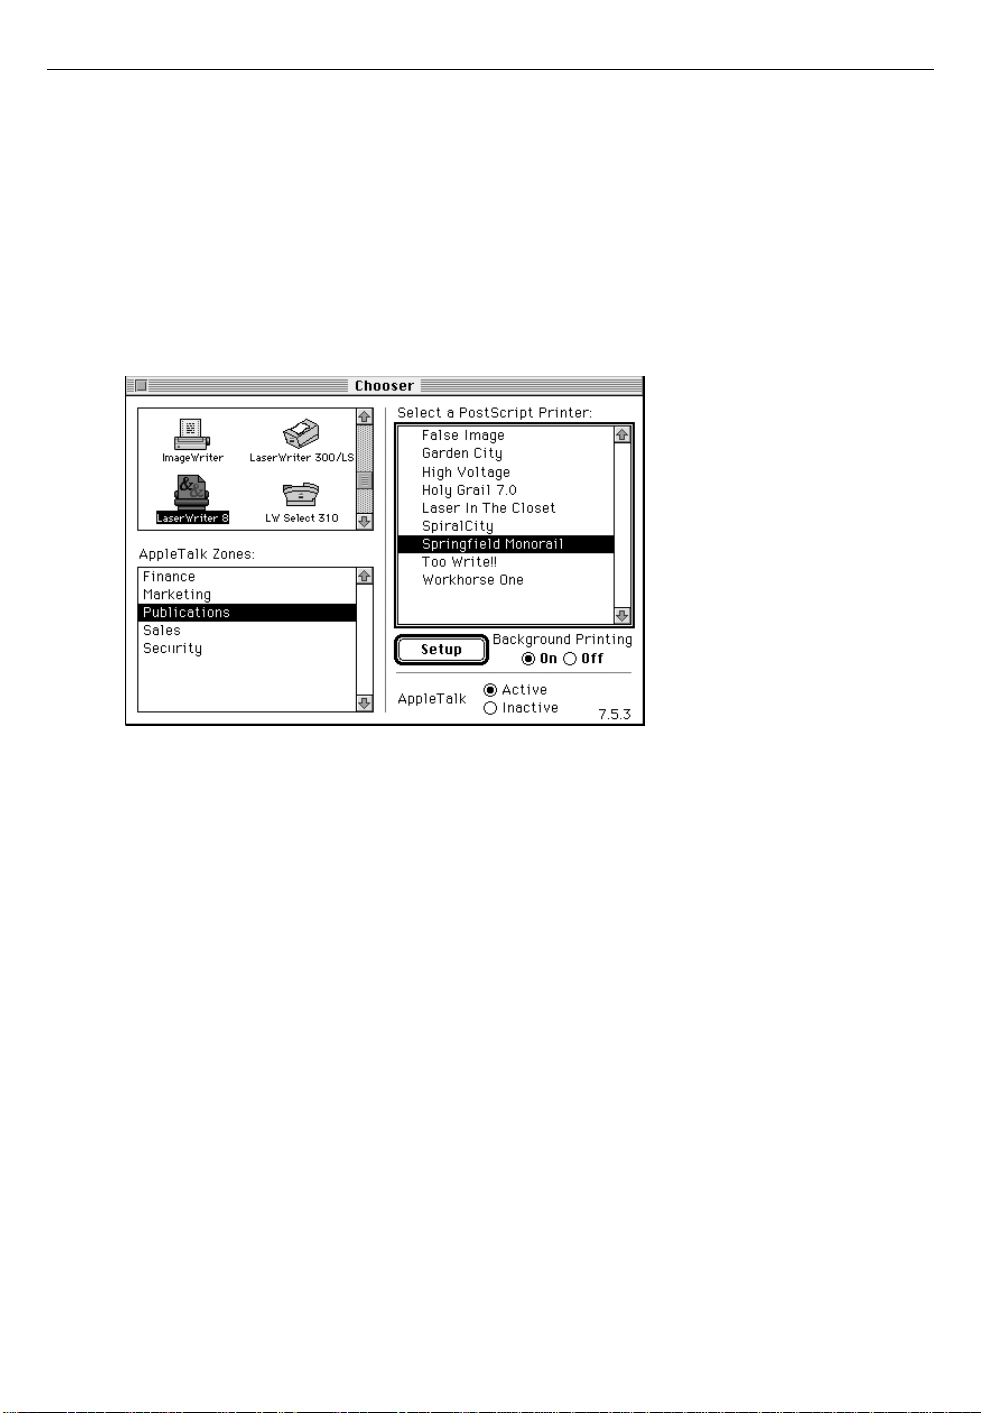
Choosing a printer
You use the Chooser to indicate the port (printer port or modem port) you
used to connect your printer, or to select a printer on the network.
To choose a printer:
1 Open the Chooser.
The Chooser is in the Apple (K) menu.
2 In the upper- left corner of the Chooser window, click the icon for the
type of printer you want to use.
3 If zones appear in the AppleTalk Zones list, click the zone in which the
printer resides.
4 In the list on the right side of the Chooser window, click the name of the
printer you want to use.
5 Close the Chooser.
Your changes take effect immediately.
Page 13
13
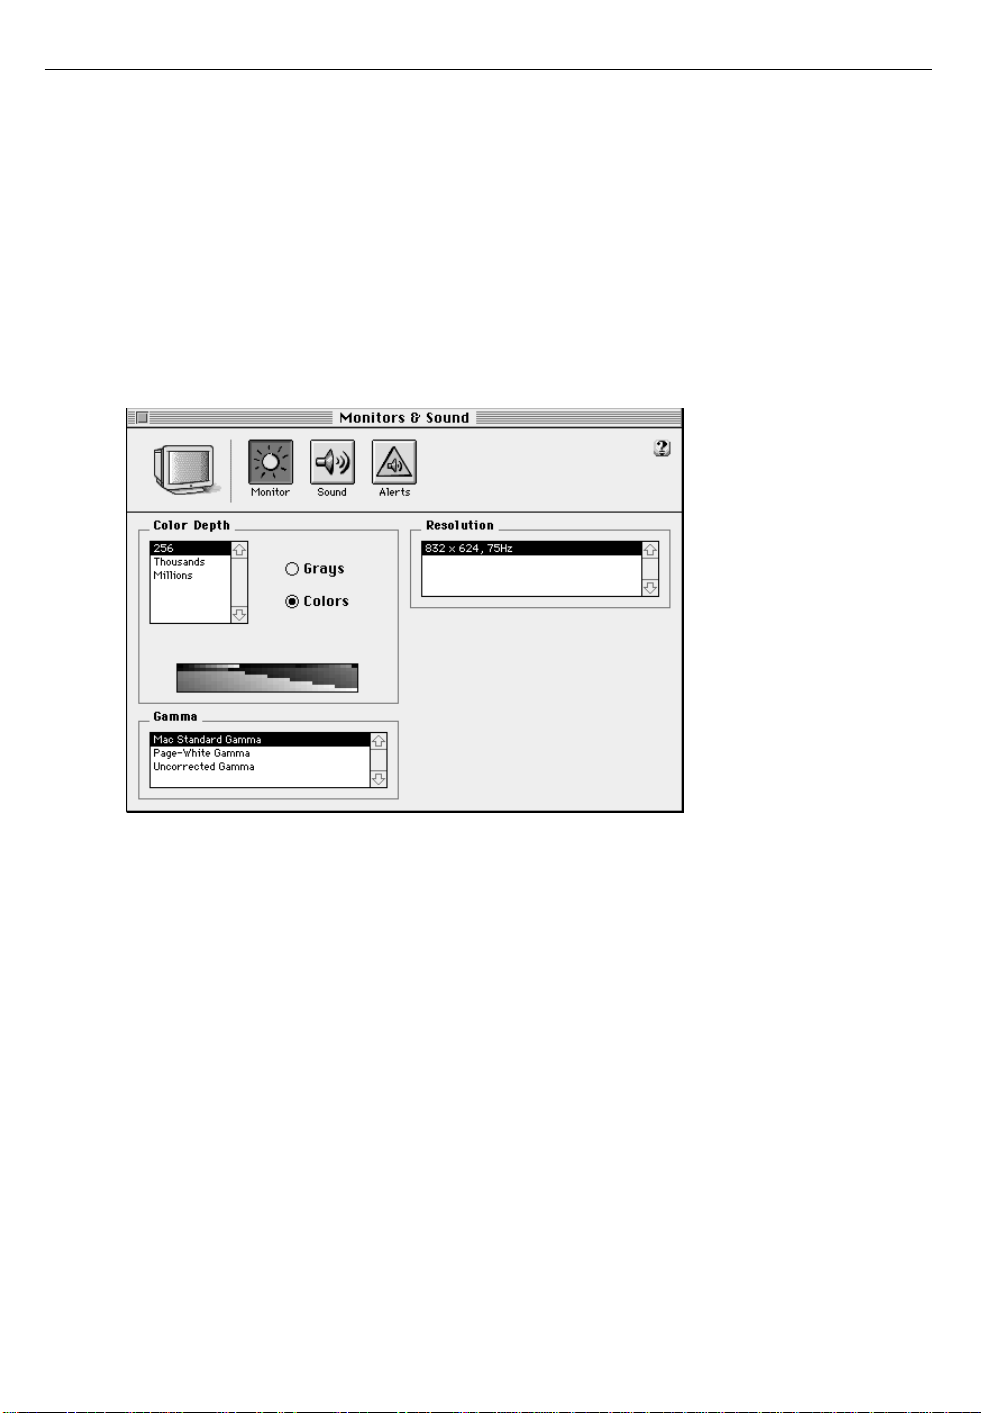
Configuring your monitor
This section tells you how use the Monitors & Sound control panel to
configure your server’s monitor.
Follow these steps to configure your server’s monitor:
1 Open the Monitors & Sound control panel.
The Monitors & Sound control panel is in the Control Panels submenu in the
Apple (K) menu.
2 If you have a color monitor, click 256 in the Color Depth list.
Your server performs best when the smallest number of colors is selected.
3 Click an item in the Gamma list to adjust the intensity and luminance of
your monitor’s screen.
4 Close the Monitors & Sound control panel.
Page 14

14
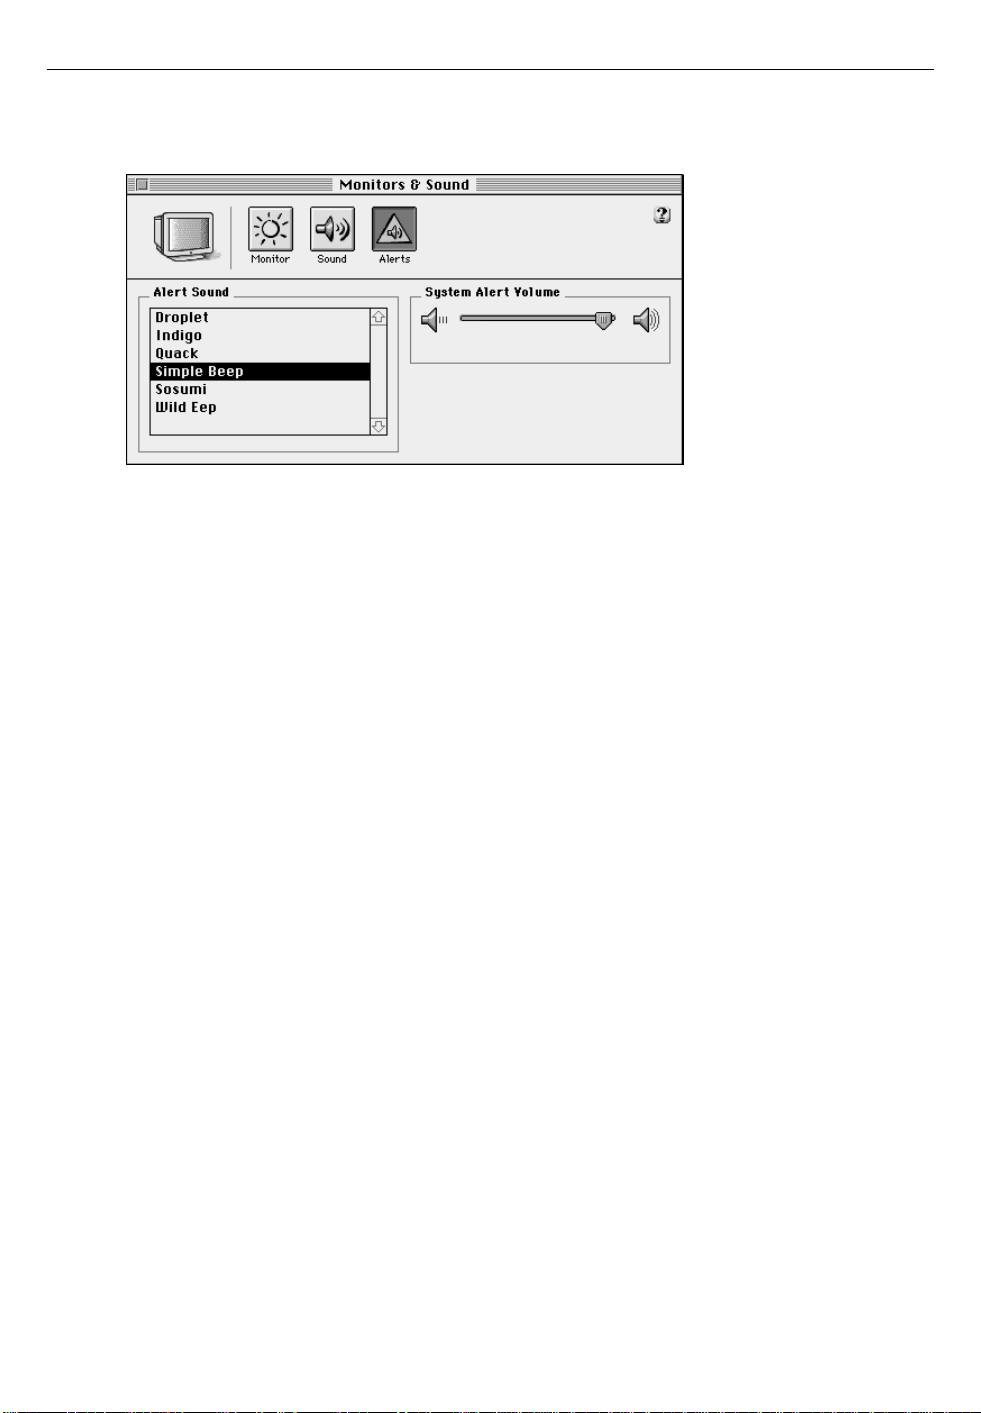
Choosing sound devices and alert sounds
This section tells you how to use the Monitors & Sound control panel to
choose your server’s sound input and output devices and to configure the
system alert sound and its volume.
Follow these steps to choose the sound input and output devices for your
server and to configure the system alert sound:
1 If you want to use an external device for sound input, connect it to the
sound input port, as described in the setup guide that came with your
server.
2 Open the Monitors & Sound control panel.
The Monitors & Sound control panel is in the Control Panels submenu in the
Apple (K) menu.
3 At the top of the Monitors & Sound control panel, click the Sound
button.
The following dialog box appears:
Page 15

15
4 Use the sliders to adjust sound output level, sound output balance,
computer speaker volume, and computer speaker balance.
5 To change the selected sou n d input device , click an item in the Sound
Input pop-up menu.
To use a microphone connected to the sound input port for spoken
commands, select the External Microphone.
The server records sounds in the same way as other Macintosh models: in 16bit mono sound, at a sample rate of 44.100 kilohertz (kHz). This makes the
sounds you record compatible with all Macintosh computers. For instructions on recording a sound, see the “Sound” topic of Macintosh Guide,
available in the Guide (h) menu.
6 If y ou want to use an exter nal dev ice for sound ou tput, connect it to the
sound out p ut port, as described in t he setup g uide tha t came with your
serve r.
About the sample rate: Most of the time, you will not need to change the
sample rate. You should change the sample rate only if the sound you wish
to play was recorded at a sample rate different from the current setting.
(The available rates are 11.025 kHz, 22.050 kHz, and 44.100 kHz.) For
instance, if you play a QuickTime movie containing sound recorded at
44.100 kHz, set the sample rate in the Sound Output Quality pop-up menu
to 44.100 kHz to hear the full quality of the sound. Increasing the sample
rate slows performance.
m Do not set the sample rate higher than the sample rate of the sound you
are playing because this slows your server’s performance without
improving sound quality.
m Do not change the sample rate for sound coming from a device
connected to the sound input port.
If you use a program that provides sound recording in mono format, you
can use its mono setting.
Page 16
16
7 To configure the sound that occurs when an alert box appears on the
screen, click the Alerts button.
8 Click an item in the Alert Sound list to select a sound.
9 Use the slider to adjust the volume of alert sounds.
10 Close the Monitors & Sound control panel.
Your changes take effect immediately.
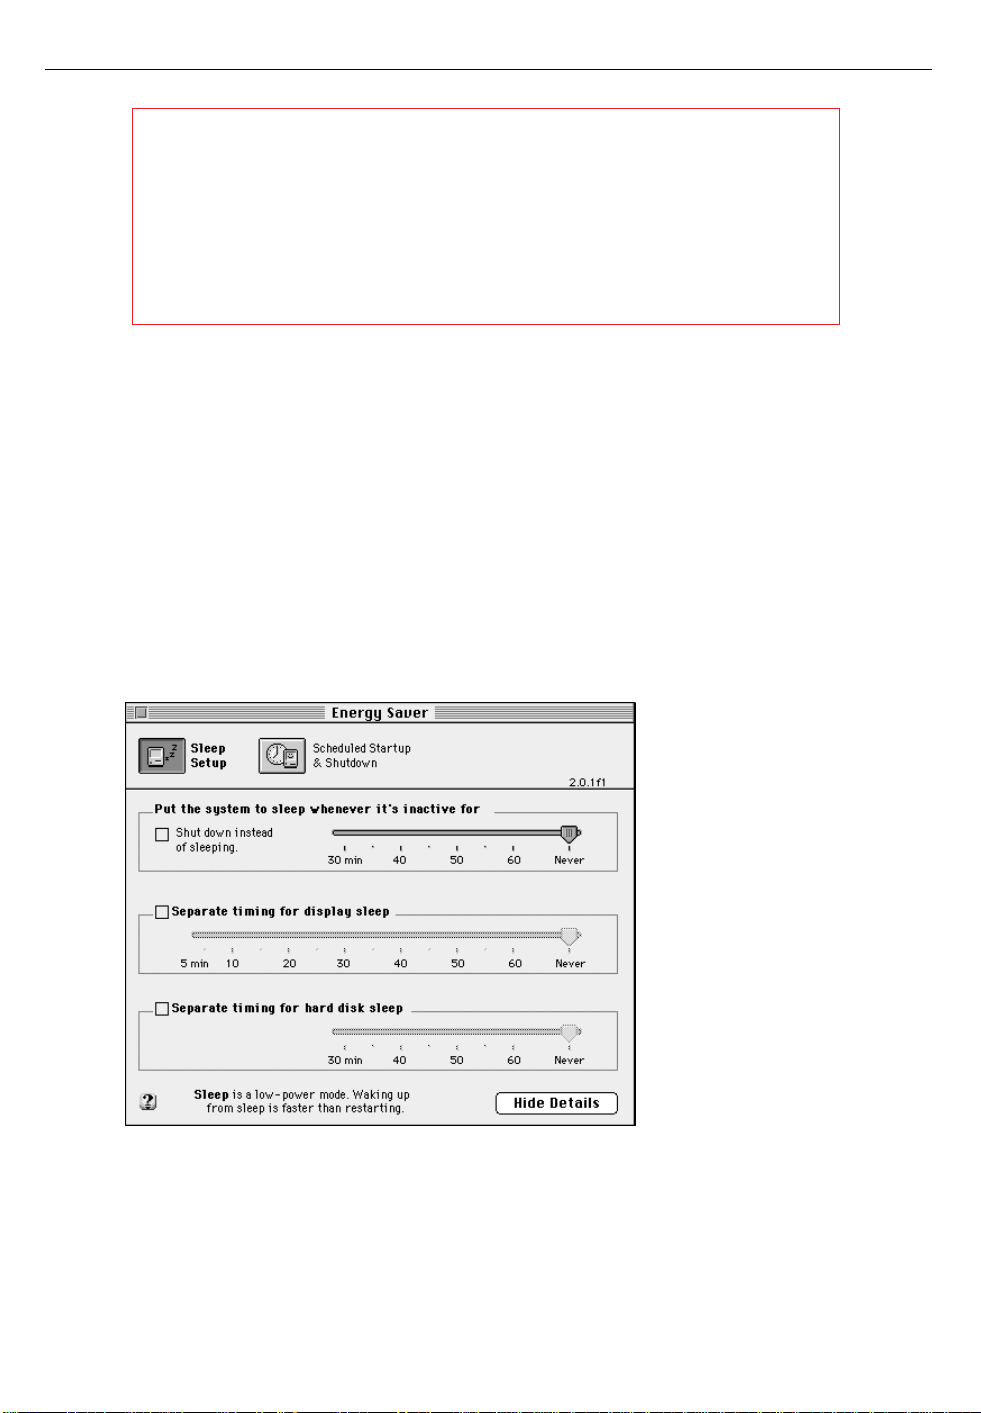
Configuring the Energy Saver control panel
Your Workgroup Server comes with the Energy Saver control panel, which
provides a variety of energy-saving features. Because most servers run continuously, energy-saving features are turned off when you first start up
your Workgroup Server. You may want to use the Energy Saver control
panel to configure the server to
m restart automatically after a power failure
m dim the monitor when it has not been used for several minutes
Page 17
17
WARNING It is possible to configure the Energy Saver control
panel so that the server shuts down when it’s inactive for a
short period of time or so that it enters a reduced power mode
(called
sleep mode
) when it’s inactive. Both behaviors are
undesirable for servers. To avoid accidentally configuring these
behaviors, follow the instructions in this section carefully.
To configure the Energy Saver control panel to dim the monitor or to cause
the server to restart automatically after a power failure:
1 Open the Energy Saver control panel.
The Energy Saver control panel is in the Control Panels submenu in the
Apple (K) menu.
An abbreviated form of the control panel appears.
2 In the Energy Saver control panel, click the Show Details button.
The full Energy Saver control panel appears.
Page 18
18
3 To dim the monitor when the keyboard is inactive for a period of time,
click the “Separate timing for display sleep” box so that an “X” appears.
If you configure the Energy Saver control panel to dim the monitor, you
don’t need to use a screen saver. Complicated screen savers require a considerable amount of processing power, thereby reducing server
performance.
4 Adjust the slider for the “Separate timing for display sleep” control to
the desired number of minutes.
5 If you want to configure the server so that it restarts automatically after
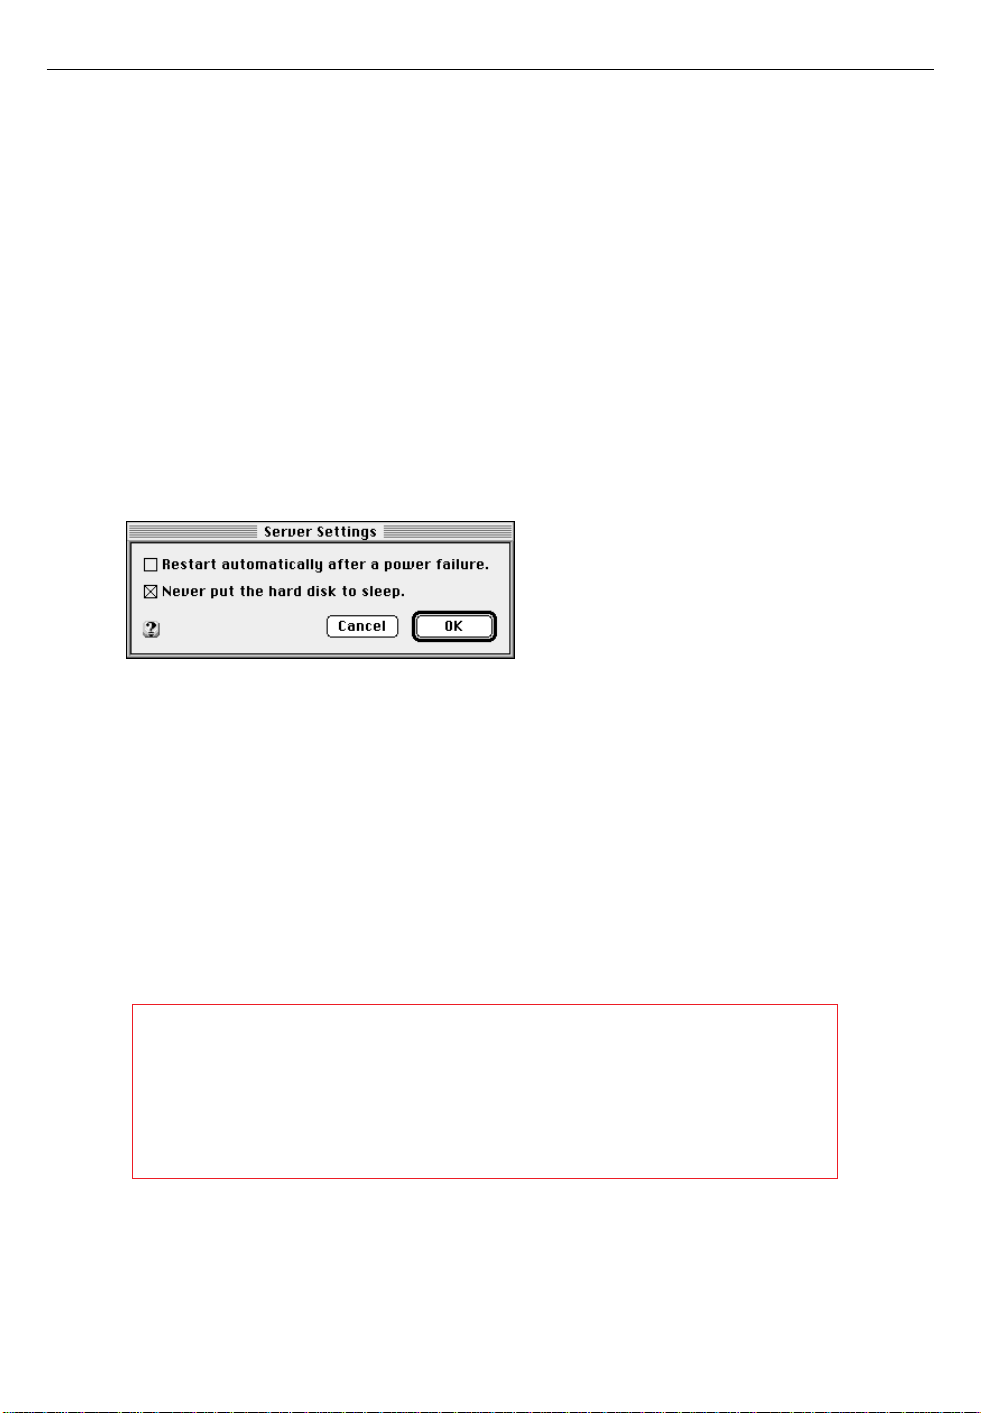
a power failure, choose Server Settings from the Preferences menu.
The following dialog box appears:
6 Click the box labeled “Restart automatically afte r a p ower failure” so that
an “X” appears .
7 Make sure that an “X” appears in the “Never put the hard disk to sleep”
box.
If the hard disk is put into sleep mode, the server cannot perform optimally.
8Click OK.
9 Make certain that the slider for the box labeled “Put the system to sleep
whenever it’s inactive for” is set to “Never.”
WARNING The slider for the box labeled “Put the system to
sleep wh eneve r it’ s inactive for” should alw ays be “Never.” If this
control is set to any other value, the server will shut down or
sleep when it is inactiv e f or the specified per i od of time a nd will
not be avai lable for use by clients .
10 Close the Energy Saver control panel.
Your changes take effect immediately.
Page 19

19
2 Configuring Your Network Connection
Your Workgroup Server is preconfigured to connect to an AppleTalk
network through its built-in Ethernet interface. In addition, your server
automatically senses the type of connector (10BASE-T or AAUI) that
connects to the network. Because of the way your server is preconfigured,
most network administrators do not need to perform any additional
network configuration tasks.
You need to read this chapter if you want to
m configure your server to use LocalTalk over one of the server’s serial
ports
m configure AppleTalk to use a network interface other than the built-in
Ethernet network interface
m configure your server to use the Transmission Control Protocol/Internet
Protocol (TCP/IP)
Otherwise, you can proceed to Chapter 3.
Page 20

20
About Open Transport
Your Workgroup Server comes with Open Transport preinstalled. Open
Transport is new networking and communications software for the Mac OS
that supports industry standards. Open Transport allows your server to run
AppleTalk applications over more than one network segment at the same
time.
Open Transport includes separate control panels for AppleTalk and
TCP/IP. You use the AppleTalk control panel to configure your connection
to an AppleTalk network. You use the TCP/IP control panel to configure
your connection to a TCP/IP network, an industry-standard protocol that
allows computers of different types to communicate with each other. The
AppleTalk control panel and the TCP/IP control panel replace the Network
control panel and the MacTCP control panel, respectively, which were part
of previous versions of Mac OS.
Both the AppleTalk control panel and the TCP/IP control panel have modes
that limit the information that is displayed. The modes are “Basic,”
“Advanced,” and “Administration.” The procedures in this chapter require
you to use Administration mode so that you can see all of the information
that can be configured in each control panel.
About the default port
Before Open Transport became available, AppleTalk applications could
only work with one network interface at a time. With Open Transport, new
AppleTalk applications that have been written for Open Transport can
work simultaneously with more than one network interface (a technique
known as multihoming). (The version of Open Transport that comes with
your server supports multihoming for AppleTalk, but not for TCP/IP.)
Your Workgroup Server comes with several network interfaces: the built-in
Ethernet interface, the modem port, and the printer port. You can also
install additional network interface cards.
Page 21

21
All TCP/IP applications and those AppleTalk applications that are not able
to use multihoming use the network interface that is configured as the
default port. When you first start up the Workgroup Server, the built-in
Ethernet interface is the default port.
The AppleTalk control panel sets the default port for AppleTalk applications, and the TCP/IP control panel sets the default port for TCP/IP applications. (Note that the default port for AppleTalk and TCP/IP can be
different.) In both control panels, the “Connect via” pop-up menu sets the
default port.
Whenever you want a non-multihoming networking application to work
with a network interface other than the current default port, you need to
make that network interface the default port. Both the AppleTalk and the
TCP/IP control panels allow you to save and restore configurations
(including the setting of the default port), which makes it easy to change
and restore specific settings. For information about saving and restoring
configurations, see “Working With Network Configurations” later in this
chapter.
Configuring your AppleTalk network connection
When you first start up the server, its AppleTalk network connection is
through the built-in Ethernet interface. If you want to change the default
port for AppleTalk, use the AppleTalk control panel.
If your server connects to a network segment for which only one AppleTalk
zone has been assigned, the AppleTalk control panel automatically selects
that zone for you. (An AppleTalk zone is a logical grouping of nodes on a
network segment.) If more than one AppleTalk zone is available on the
network segment to which your server is connected, you can use the
AppleTalk control panel to assign your server to an AppleTalk zone.
To use the AppleTalk control panel:
1 Open the AppleTalk control panel.
The AppleTalk control panel is in the Control Panels submenu in the Apple
(K) menu.
The AppleTalk control panel opens.
Page 22
22
2 Choo se User Mode from the Ed it menu an d clic k t he Admini stration
button. Then click OK.
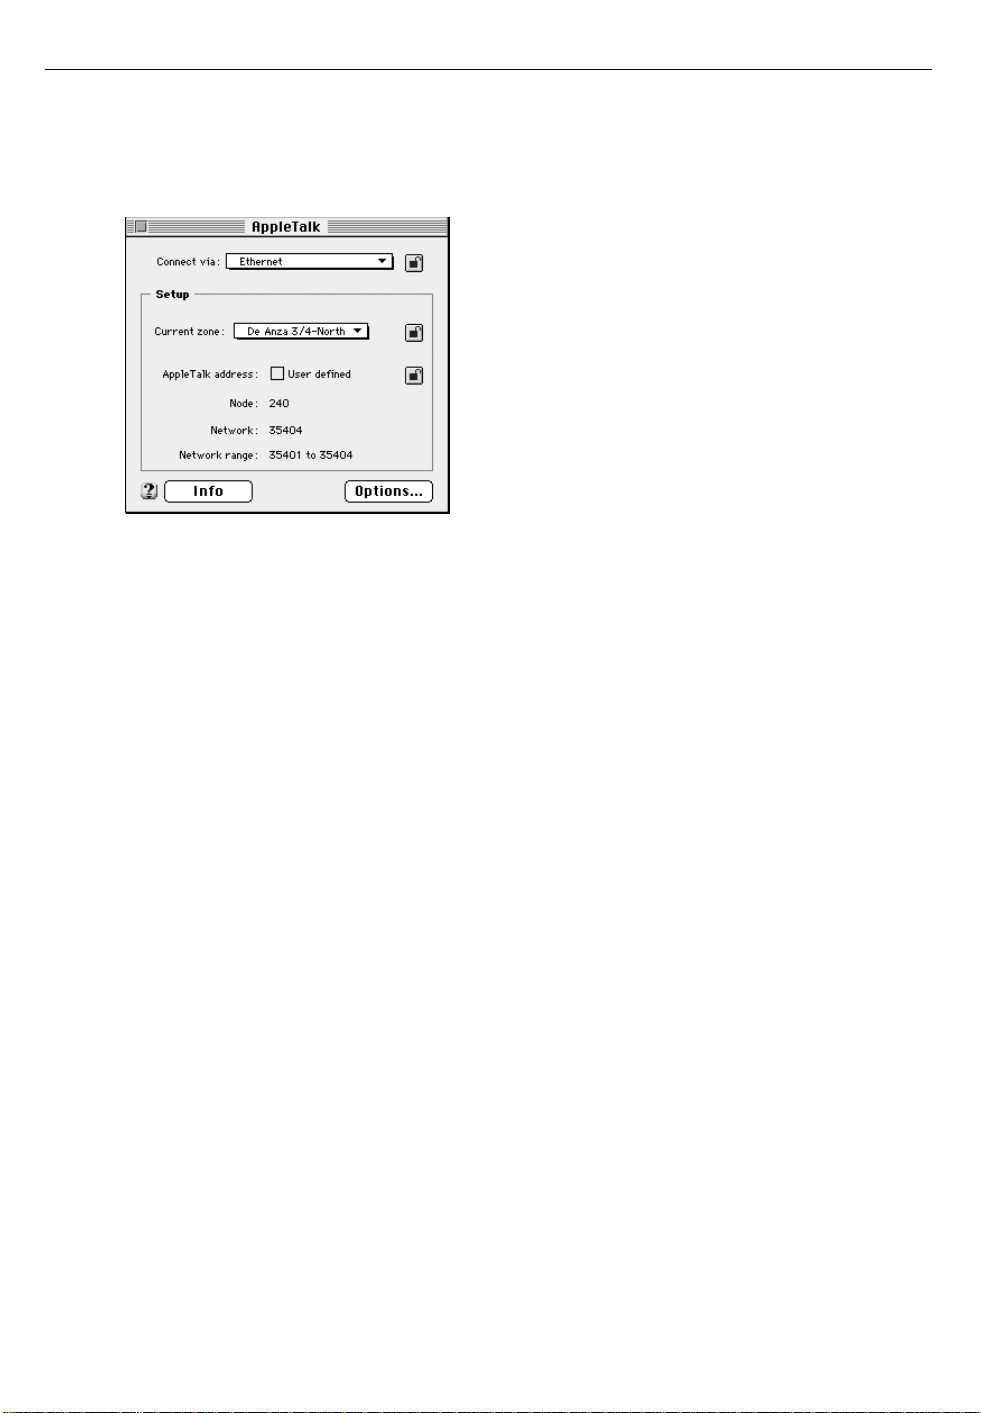
In Administration mode, the AppleTalk control panel looks like this:
In Administration mode, you can do the following:
m Lock certain settings by clicking the lock icon so that only a user with
access to Administration mode can change them.
m Click the Options button to turn AppleTalk on and off. (For information,
see “Turning Networking On and Off” later in this chapter.)
m Set a password for Administration mode. (For information, see “Setting a
Password” later in this chapter.)
For information about the other user modes, see “User Modes” later in this
chapter.
Page 23
23
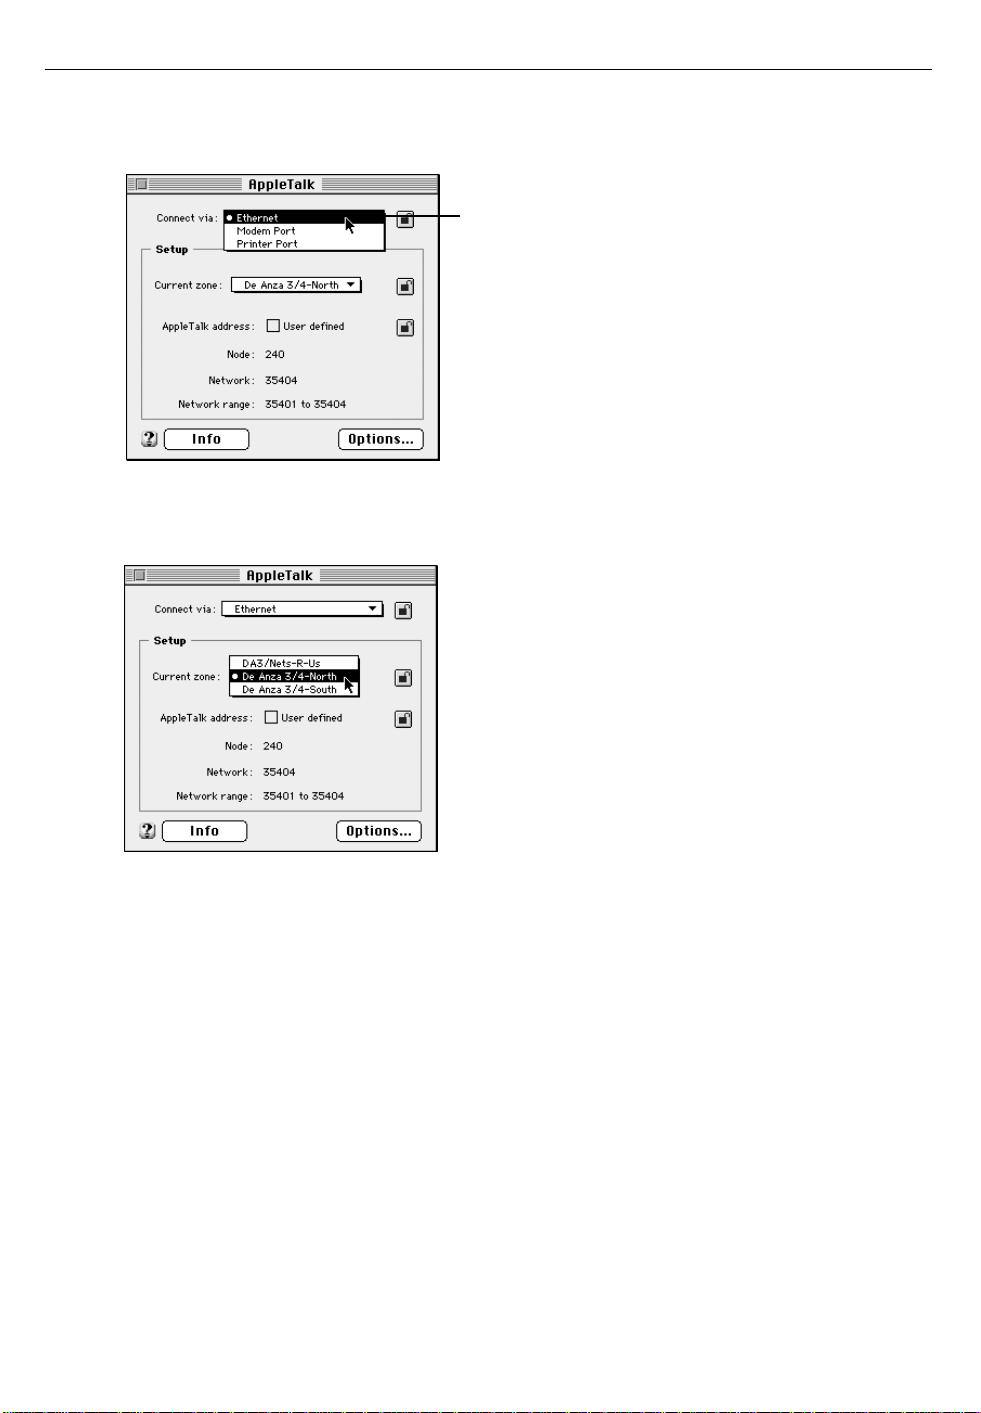
3 To change the default port, choose a new port from the “Connect via”
pop-up menu.
You can connect to an
AppleTalk network through
the printer port, the modem
port, the built-in Ethernet
interface, or any additional
network interface cards
installed in your server.
4 To choose the zone you want, choose a new zone from the “Current
zone” pop-up menu (if available).
5 Close the AppleTalk control panel.
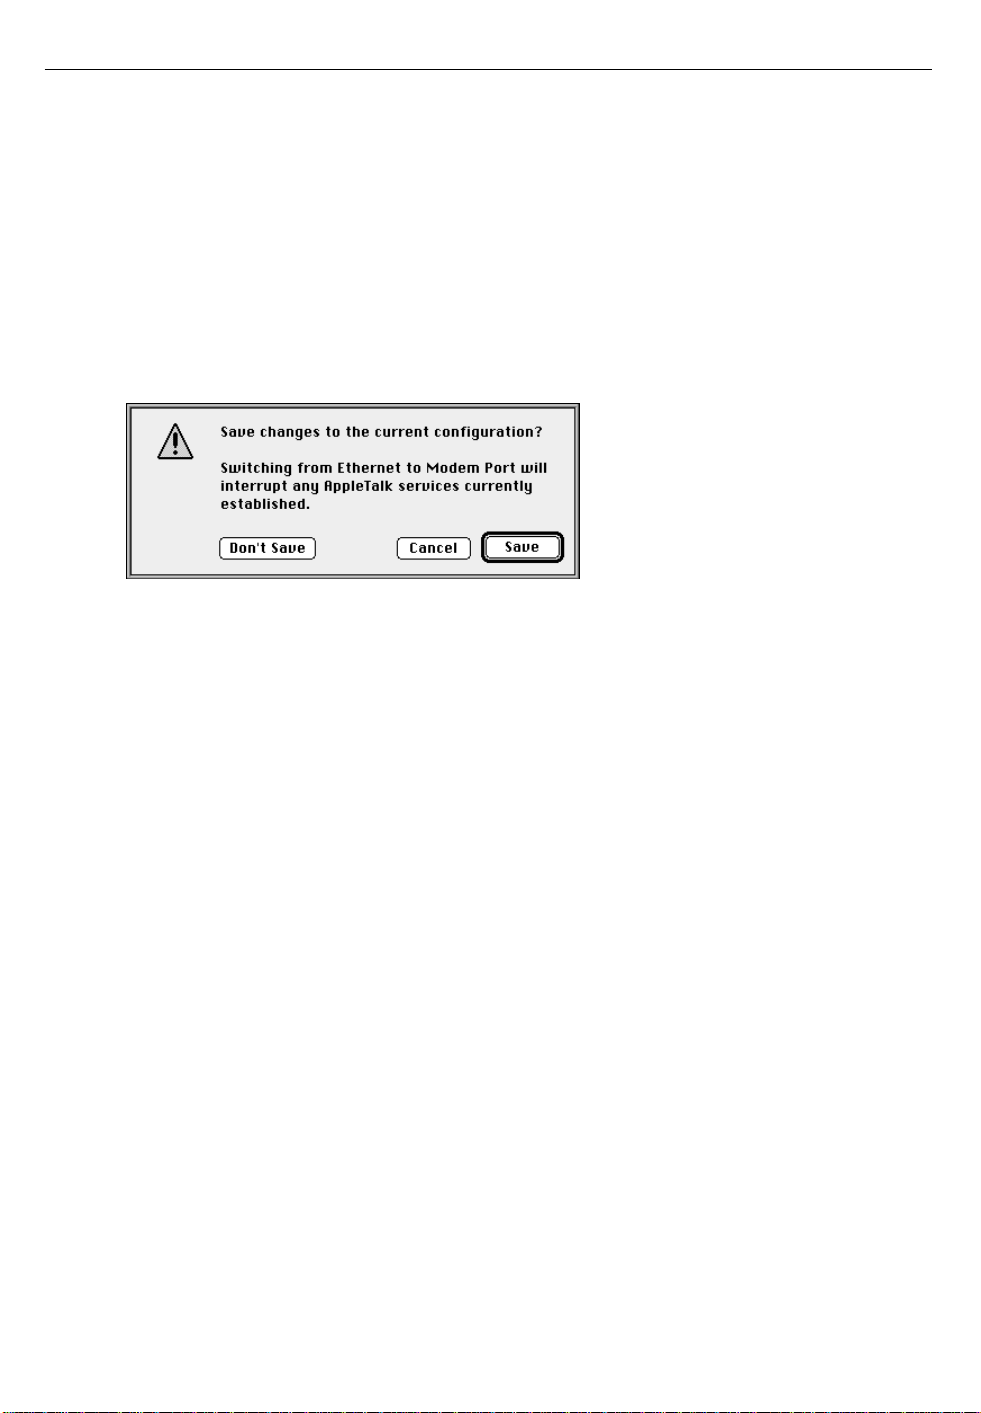
6 If you have made configuration changes, an alert box asks if you want to
save changes. Click the Save button.
If you have changed the default port, the alert box also tells you that the
change will interrupt any AppleTalk services that are established.
Your changes are saved as the default configuration and take effect
immediately.
Page 24

24
Configuring your TCP/IP network connection
You use the TCP/IP control panel to specify the default port for TCP/IP as
well as other information that TCP/IP requires. In particular, your server
must have an Internet Protocol (IP) address. It may also need a subnet mask
number, depending on the way TCP/IP is implemented on your network.
IMPORTANT If you have an Apple Internet Server, refer to the Getting Started
booklet that came in your Apple Internet Server Solution package for
details about configuring your TCP/IP connection.
You can enter this information manually, or you can use a server on your
network to provide this information automatically. The types of servers that
can configure TCP/IP automatically are BootP (for Boot Protocol), RARP
(for Reverse Address Resolution Protocol), DHCP (for Dynamic Host
Configuration Protocol), and MacIP (for Macintosh Internet Protocol) servers.
Note: MacIP is both a type of server and a protocol for sending Internettype packets of information over an AppleTalk network.
RARP and MacIP servers can provide an IP address only for your server.
DHCP and BootP servers can provide an IP address for your server as well
as the IP address of name servers that are present in your network.
To use the TCP/IP control panel:
1 Open the TCP/IP control panel.
The TCP/IP control panel is in the Control Panels submenu in the
Apple (K) menu.
The TCP/IP control panel appears.
2 Choo se User Mode from the Ed it menu , and click the Administ ratio n
button. Then click OK.
In Administration mode, the TCP/IP control panel looks like this:
Page 25
25
If your network has a BootP, DHCP, RARP, or MacIP server, continue to the
next section, “Configuring via a Server.” If you are configuring the TCP/IP
control panel manually, see “Configuring TCP/IP Manually” later in this
chapter.
Configuring via a server
The procedure for using a server varies depending on whether the server
that you are going to use is a BootP, DHCP, RARP, or MacIP server. If you
are going to use a BootP, DHCP, or RARP server, see “Configuring via a
BootP, DHCP, or RARP Server” later in this chapter.
Configuring via a MacIP server
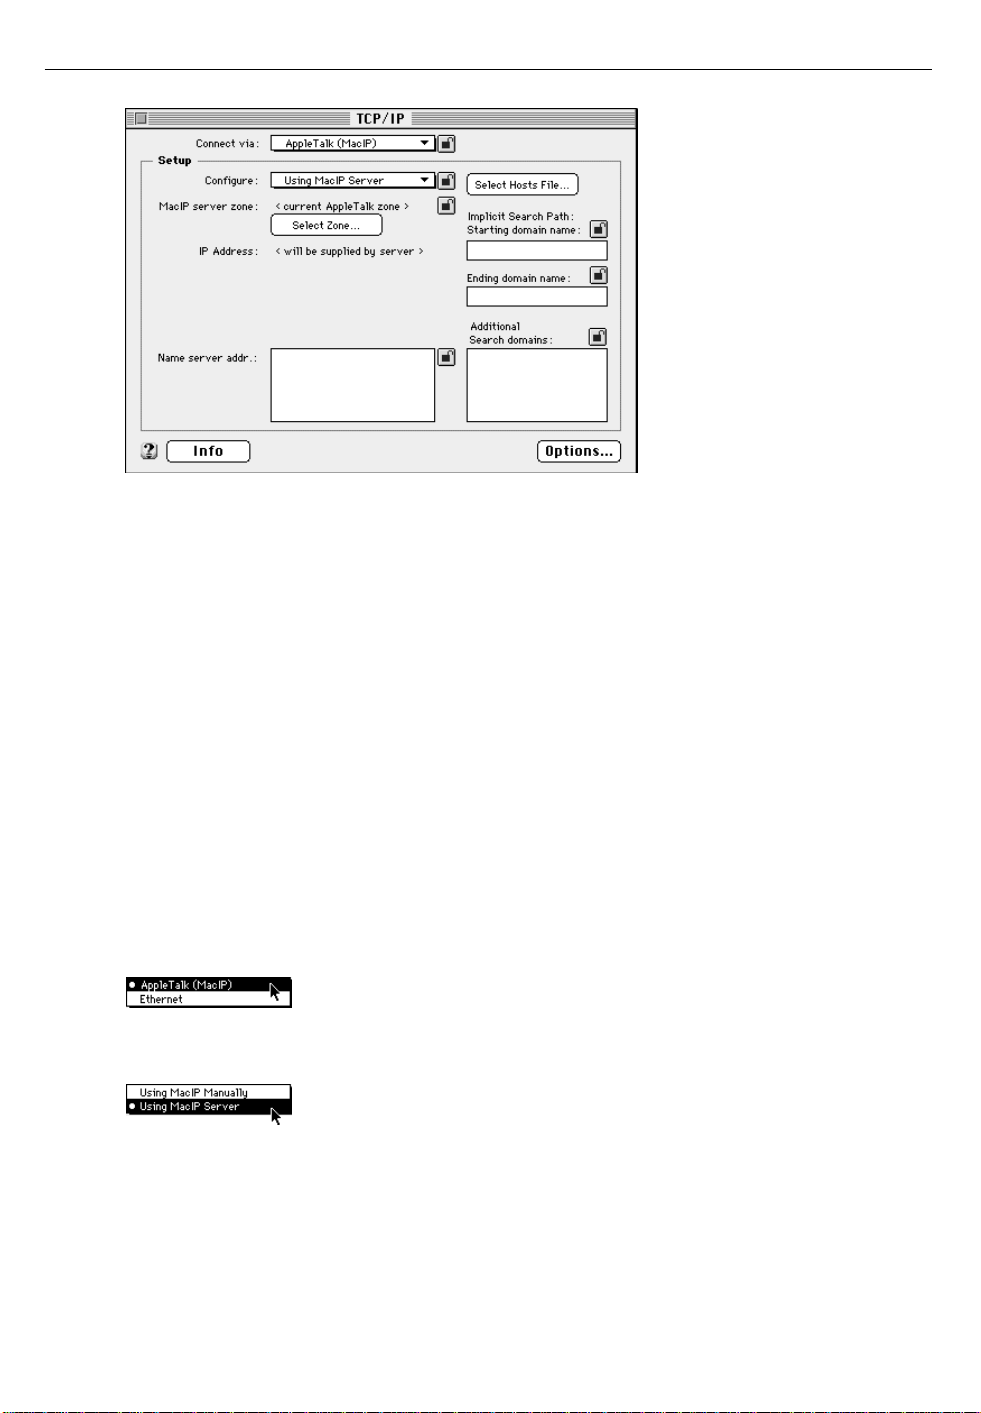
To configure TCP/IP using a MacIP server:
1 Choose AppleTalk (MacIP) from the “Connect via” pop-up menu.
2 Choose “Using MacIP Server” from the Configure pop-up menu.
Page 26
26
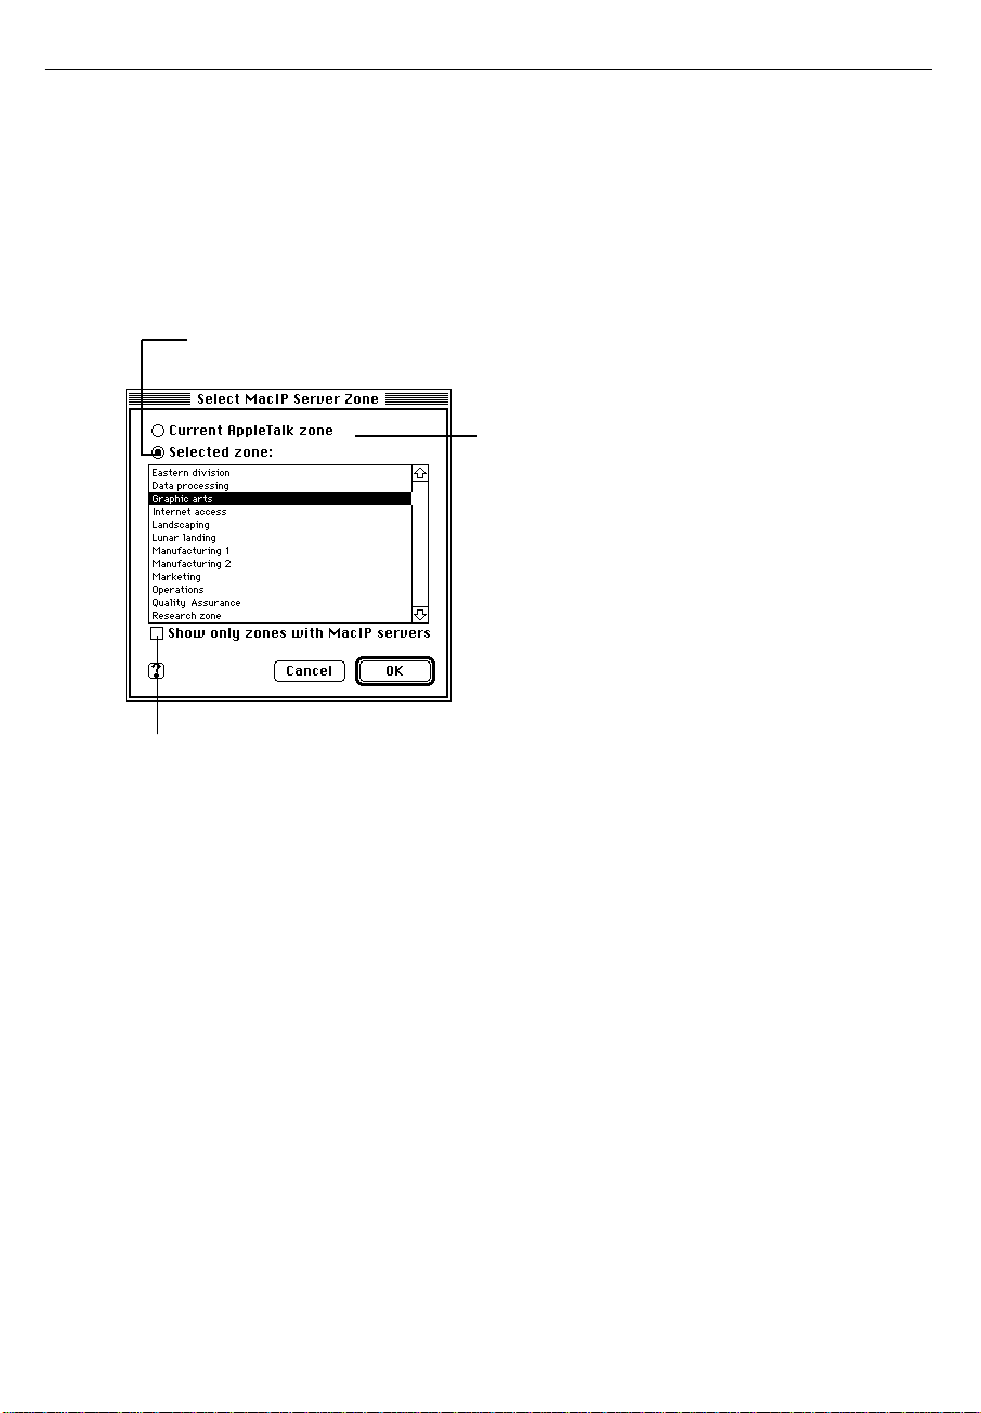
3 If you want to specify a MacIP server in a particular zone, click Select
Zone to choose the zone of the MacIP server you want to use.
Otherwise, go to step 6.
4 In the dialog box that appears, choose the zone in which your MacIP
server is located.
Click here if the MacIP server is in the
same zone as your Workgroup Server.
Click here to choose
a different zone.
Click here to display only those zones that have
MacIP servers. It may take a few moments for this
box to become available because TCP/IP searches
for MacIP servers in all zones first.
5 Click OK to close the dialog box.
6 Close the TCP/IP control panel.
Your TCP/IP configuration information is obtained from the MacIP server
the next time you open a networking connection (for example, by opening a
networking application, such as Netscape, Eudora, or NCSA Telnet).
If, after configuring your TCP/IP control panel, you see an error message
such as “Unable to locate host” or “Could not create a socket,” your
software is unable to reach the network. This indicates a problem in the
TCP/IP configuration. For troubleshooting information, see Chapter 7.
Page 27

27
Configuring via a BootP, DHCP, or RARP server
To configure TCP/IP using a BootP, DHCP, or RARP server:
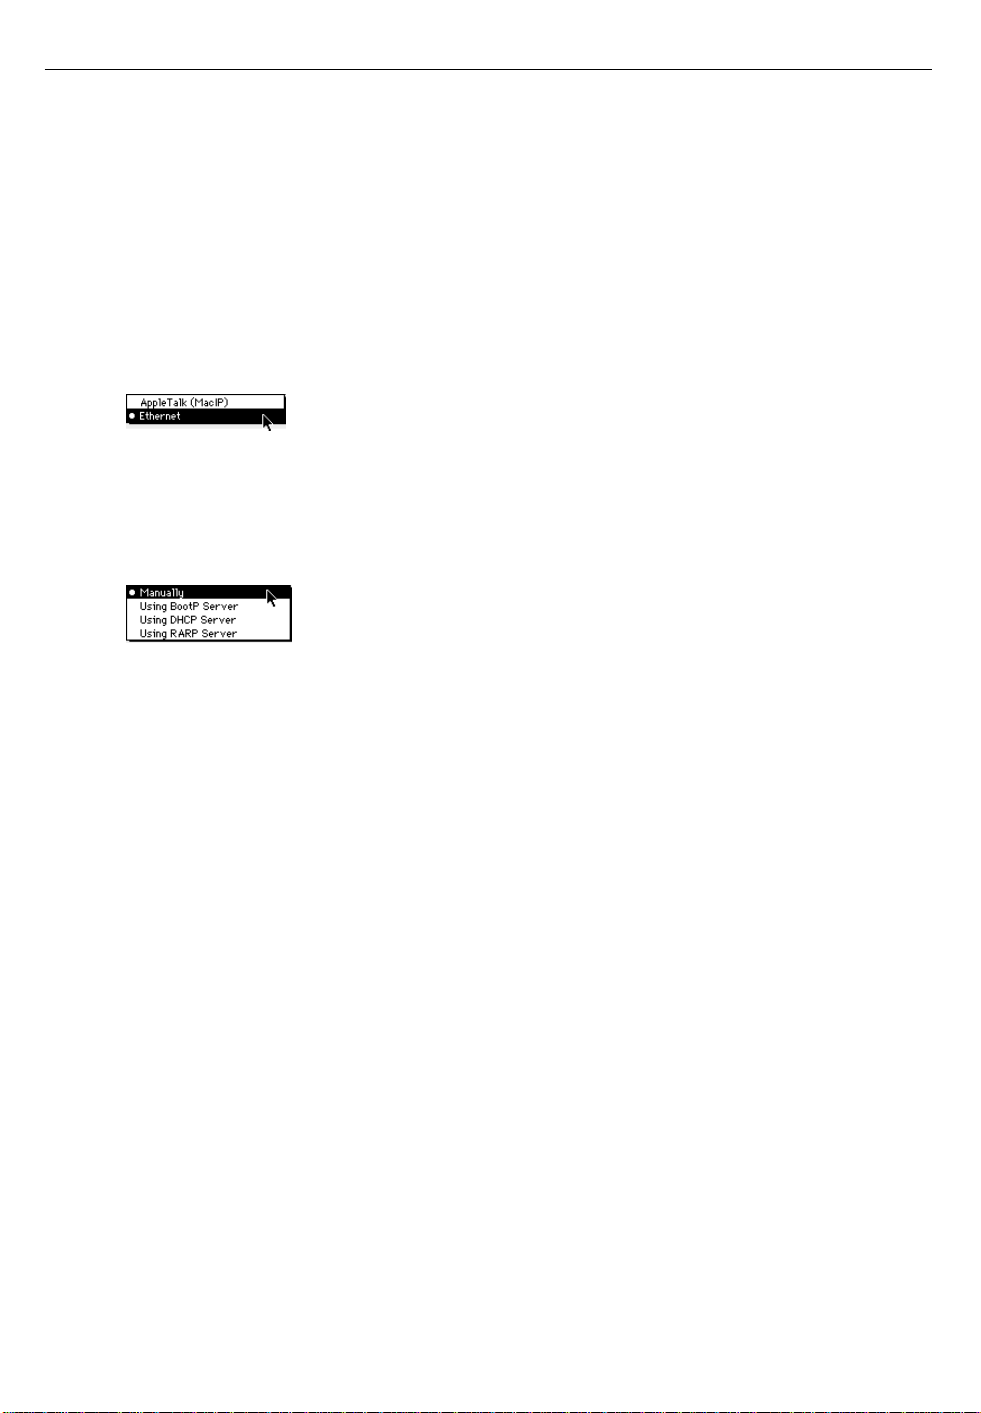
1 Choose Ethernet from the “Connect via” pop-up menu.
2 From the Configure pop-up menu, select the server type that is
appropriate for your network.
In this example, a BootP server is selected.
The next time you make a TCP/IP connection, an IP address will be
assigned to the server. If you open the TCP/IP control panel, your assigned
IP address will appear in the “IP Address” box.
If you close the TCP/IP connection and don’t make another connection for
a period of time, the BootP or DHCP server may take back the IP address
and assign it to another host. The next time you make a TCP/IP connection,
the BootP or DHCP server will assign a different IP address.
BootP and DHCP servers can provide your IP address and the addresses of
name servers that may be available on your network. RARP servers can
provide your IP address only. You may have additional TCP/IP configuration information to enter (such as a subnet mask, the IP address of a router,
or domain name information). Go to step 5 in the next section,
“Configuring TCP/IP Manually.”
Page 28
28
Configuring TCP/IP manually
You must configure TCP/IP manually if your server connects to a network
in which a BootP, DHCP, RARP, or MacIP server is not present, or if the
server does not provide all the configuration information that you need to
configure your Workgroup Server.
To configure TCP/IP manually:
1 Choose Ethernet from the “Connect via” pop-up menu.
2 If your network uses the IEEE 802.3 variant of the Ethernet standard,
click the Use 802.3 box to the right of the “Connect via” pop-up menu.
3 Choose Manually from the Configure pop-up menu.
4 Type your server’s IP address in the “IP Address” box.
An IP address is a set of four numbers from 0 to 255, separated by dots (for
example, 140.140.54.2). It identifies your server on the network.
IMPORTANT Make sure you enter the correct IP address. Each IP address
must be unique. Entering an incorrect address or the IP address that
another computer uses can cause problems with your server and with the
network.
5 If you have a subnet mask number, type it in the “Subnet mask” box.
Some organizations use a subnet mask number to increase the number of IP
addresses that are available for their network. If your network uses a
subnet mask, you must enter it for your server to work correctly on the
network. Like an IP address, a subnet mask is a set of numbers from 0 to
255, separated by dots (for example, 255.255.255.252).
Page 29

29
6 If you have the IP address for a router, type it in the “Router address”
box.
A router is a device that directs information along the most efficient or
appropriate network path. It connects two or more network cables, thereby
allowing computers and other network devices on each cable to
communicate with each other. The router maintains a table that contains
the address of each device on each network. When a packet of information
reaches the router, the router checks the destination address on the packet
and sends it to the cable on which the destination device resides.
If you have a dial-up connection to the Internet using SLIP (Serial Line
Internet Protocol) or PPP (Point-to-Point Protocol) software, you do not
need to enter a router address.
7 If you have the IP address of a name server, type it in the “Name server
addr” box.
A name server is a computer that associates a computer’s name (called a
host name) with an IP address. By associating names with IP addresses,
users don’t have to remember IP addresses when they need to identify a
particular computer. For example, an E-mail message can be addressed to
“john@planetX” (if “planetX” is the host name of John’s computer) instead
of “john@140.140.54.2” (if 140.140.54.2 is the IP address of John’s computer).
Before the mail application sends the message, it asks the name server to
find the IP address of “planetX.”
You can enter more than one name server address in the “Name server
addr” box. (The first address that you enter becomes your default name
server.) Press Return after each address. You can specify as many name
servers as you want as long as you do not type more than 255 characters.
8 If you have created a hosts file and want to use it, click the Select Hosts
File button. (The Select Hosts File button appears only when the control
panel is in Advanced or Administration mode.) Otherwise, go to step 9.
A dialog box appears that allows you to locate a hosts file that already
exists. When you locate the hosts file that you want to use, select its name
and click the Open button. A dialog box appears that asks you if you want
to replace the current hosts file with the contents of the selected hosts file.
Click the OK button.
Page 30

30
The hosts file contains a list of host names and associated IP addresses. The
hosts file provides a subset of the functionality of a name server. Because
maintaining the hosts file can become difficult in a network that has many
hosts, you should use a name server if one is available. If you use a name
server and a hosts file, the hosts file is checked before the name server.
For information about the format of the hosts file, see “Hosts File Format”
later in this chapter.
9 If you want to take advantage of implicit domain searching, enter your
domain name information.
TCP/IP applications can automatically search for computers you identify
by host name (for example, when you send mail to “john@planetX.com”).
To configure information that makes the search possible, type your local
domain name in the “Starting domain name” box and type your administrative domain in the “Ending domain name” box.
The local domain is the name of your own local network domain. For
example, if your server is named “server.mktng.east.xyzcorp.com,” your
local domain name is “mktng.east.xyzcorp.com.” The administrative
domain is the name of the larger domain that contains your local domain. It
must match the end of the local domain. For example, if your local domain
is “mktng.east.xyzcorp.com,” your administrative domain is
“xyzcorp.com.”
The names you type in the two boxes define a range of domain names.
When you use a host name, TCP/IP tries to resolve the name by appending
each possible suffix in the range. For example, if your local domain is
“mktng.east.xyzcorp.com” and your administrative domain is
“xyzcorp.com,” and you specify that you want to search for a computer
named “eng,” TCP/IP will search for computers that have these names:
eng.mktng.east.xyzcorp.com
eng.east.xyzcorp.com
eng.mktng.xyzcorp.com
eng.xyzcorp.com
Page 31

31
10 Enter in the “Additional Search domains” box the names of any other
domains that you want to search.
You can enter more than one domain name. Press Return after each domain
name. You can specify as many domain names as you want as long as you
do not type more than 255 characters.
The domain names that you enter are used exactly as you type them and
are not put together in different combinations. For example, if you specify
“apple.com,” “university.edu,” and “nowhere.org” in the “Additional
Search domains” box, and you specify that you want to search for a
computer named “eng,” TCP/IP will search for these computers:
eng.apple.com
eng.university.edu
eng.nowhere.org
11 Close the TCP/IP control panel.
12 If you have made configuration changes, an alert box asks if you want to
save changes. Click the Save button.
If you have changed the default port, the alert box also tells you that the
change will interrupt any TCP/IP services that are established.
Your changes are saved as the default configuration and take effect
immediately.
If, after configuring the TCP/IP control panel, you see an error message
such as “Unable to locate host” or “Could not create a socket,” your
software is unable to reach the network. This indicates a problem in the
TCP/IP configuration. For troubleshooting information, see Chapter 7.
Page 32

32
Turning networking on and off
Both the AppleTalk control panel and the TCP/IP control panel allow you
to turn off AppleTalk and TCP/IP, respectively.
To turn off AppleTalk or TCP/IP:
1 Open the appropriate control panel.
To turn off TCP/IP, open the TCP/IP control panel. To turn off AppleTalk,
open the AppleTalk control panel.
2 Choose User Mode from the control panel’s File menu and click the
Advanced or the Administration button. Then click OK.
3 In the control panel, click the Options button.
The TCP/IP Options dialog box appears. (The AppleTalk Options dialog
box appears if you opened the AppleTalk control panel in step 1.)
Note: The TCP/IP Options dialog box allows you to configure TCP/IP so
that it loads only when it is needed. For Workgroup Servers that frequently
connect to TCP/IP networks, the “Load only when needed” option should
not be selected (an “X” should not appear in the box). That is, TCP/IP
should be configured so that it is always loaded.
4 To make the protocol inactive, click the Inactive button and then click
OK.
AppleTalk or TCP/IP (depending on the control panel that you opened)
becomes inactive immediately. To turn AppleTalk or TCP/IP on again, click
the Active button.
Page 33

33
User modes
The AppleTalk and TCP/IP control panels support three different modes:
Basic, Advanced, and Administration. This section shows you what each
control panel looks like in each mode and describes the differences between
the modes.
AppleTalk control panel user modes
In Basic mode, the AppleTalk control panel looks like this:
In Basic mode, you can use the AppleTalk control panel to do the following:
m Use the “Connect via” pop-up menu to change the interface that is set as
the default port (if it is not locked).
m Use the “Current zone” pop-up menu to change the server’s AppleTalk
zone (if it is not locked).
In Advanced mode, the AppleTalk control panel looks like this:
Page 34

34
In Advanced mode, you can use the AppleTalk control panel to do
everything that can be done in Basic mode, plus the following:
Lock
m Display the server’s node and network numbers and the network range.
AppleTalk dynamically assigns the node number when it starts up.
m Click the Options button to display a dialog box that can be used to turn
AppleTalk off or on again.
m Click the Info button to display details about the server’s AppleTalk
settings.
m Click the “User defined” box so that an “X” appears, allowing you to
change the node and network numbers. You should not do this unless
you are sure the new address information is correct.
In Administration mode, the AppleTalk control panel looks like this:
In Administration mode, you can do everything that you can do in
Advanced mode, plus you can lock settings so they can’t be changed. To
lock a setting, click the lock button. To unlock it, click again.
Page 35

35
TCP/IP control panel user modes
In Basic mode, the TCP/IP control panel looks like this:
In Basic mode, the TCP/IP control panel allows you to do the following (if
the settings are not locked):
m Use the “Connect via” pop-up menu to change the default port for
TCP/IP.
m Use the Configure pop-up menu to select a configuration method.
m Enter the server’s IP address (if you are configuring manually).
m Enter the server’s subnet mask number.
m Enter the IP address of one or more name servers.
m Enter the names of domains that are to be searched in order to locate a
remote host.
m Enable the IEEE 802.3 variant of Ethernet (this option is available only
when Ethernet is selected in the “Connect via” pop-up menu).
Page 36

36
In Advanced mode, the TCP/IP control panel looks like this:
In Advanced mode, you can do everything that can be done in Basic mode,
plus the following (if the settings are not locked):
m Select a Hosts file (if you are configuring manually or if you are using a
BootP, DHCP, or RARP server). For information about the content and
format of this file, see “Hosts File Format” later in this chapter.
m Enter your local and administrative domain in the “Starting domain
name” and “Ending domain name” boxes, respectively (if you are
configuring manually or if you are using a BootP, DHCP, or RARP
server).
m Click the Options button to display a dialog box that can be used to turn
TCP/IP off or on again.
m Click the Info button to display details about the server’s TCP/IP
settings.
In Administration mode, the TCP/IP control panel looks like this:
Page 37

37
In Administration mode, you can do everything that can be done in
Advanced mode, plus lock (by clicking the lock icon) every setting except
the current Hosts file.
Setting a password
You can set a password that limits access to Administration mode for both
the AppleTalk control panel and the TCP/IP control panel.
To set a password:
1 With the AppleTalk or TCP/IP control panel open, choose User Mode
from the Edit menu.
2 In the box that appears, click the Administration button and then click
the Set Password button.
Page 38

38
3 Type the password you want to use in the Password box.
When you type the password, you see dots (•) instead of the letters you
type.
4 Type the password again in the Verify Password box, then click OK.
The password is set. The next time any one tries to enter Administration
mode for this control panel, he or she must enter the password that you set.
Getting information about your configuration
For information about the addresses and software versions currently in
effect for Open Transport, follow these steps:
1 Open the control panel for which you want to see configuration
information.
For information about your AppleTalk configuration, open the AppleTalk
control panel. For information about your TCP/IP configuration, open the
TCP/IP control panel.
2 Choose Get Info from the File menu.
If the control panel is in Advanced or Administration mode, you can also
click the Info button.
The Info window opens. You can see information in this window, but you
cannot change it.
The AppleTalk Info window looks like this:
Page 39

39
The top half of the Info window displays the following:
m The AppleTalk network number (in this case, 35404) and the node
number (in this case, 240).
m The Media Access Control (MAC) address of the default port (in this
case, 08 00 07 BF B5 17).
m The AppleTalk network and node number of the AppleTalk router that is
present on the cable connected to the current default port.
The bottom half of the AppleTalk Info window displays the version
numbers for Open Transport, AppleTalk, and the AppleTalk driver.
The TCP/IP Info window looks like this:
The top half of the Info window displays the following:
m The IP address (in this case, 192.22.23.28).
m The Media Access Control (MAC) address of the default port (in this
case, 08 00 07 BF B5 17).
m The IP address of the TCP/IP router that is present on the cable
connected to the current default port (in this case, 192.22.23.52).
The bottom half of the TCP/IP Info window displays the version numbers
for Open Transport and TCP/IP.
Page 40

40
Working with network configurations
The AppleTalk and TCP/IP control panels allow you to save configura-
tions. An “AppleTalk configuration” is the collection of settings that you
make in the AppleTalk control panel, and a “TCP/IP configuration” is a
collection of settings that you make in the TCP/IP control panel. You can
save settings for each control panel so that it is easy to transport a setting to
another computer or so that you can easily switch between settings.
Creating a new configuration
To create a new AppleTalk or TCP/IP configuration:
1 Open the control panel for which you want to create a new
configuration.
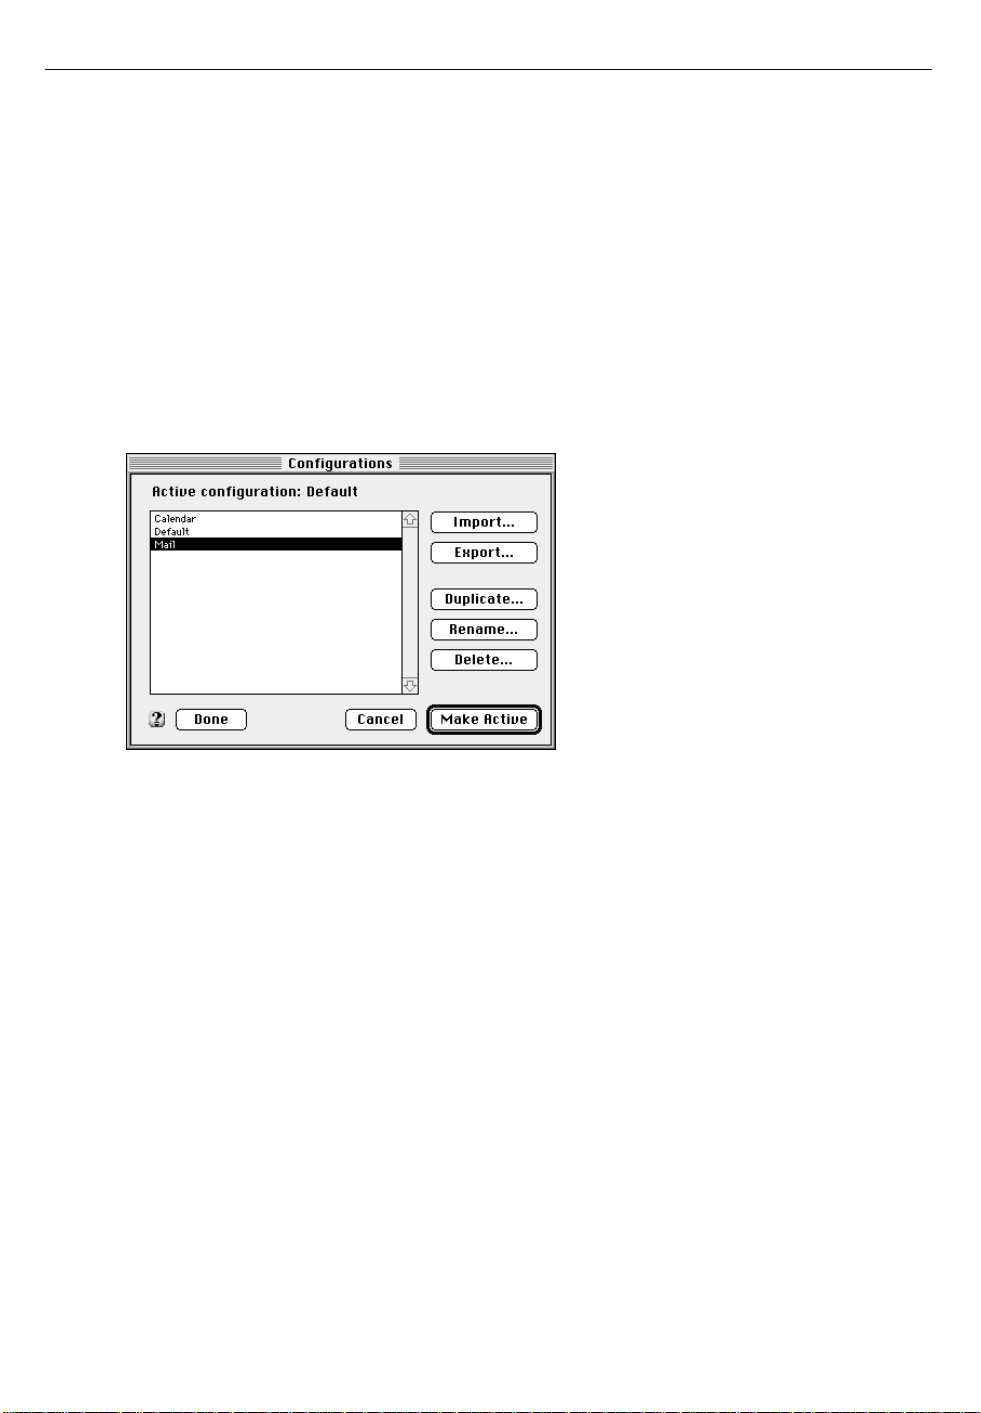
2 Choose Configurations from the File menu.
The Configurations window appears.
3 With the default configuration highlighted, click Duplicate.
4 In the window that appears, type a name for the new configuration.
Page 41
41
5 Click OK.
The name of the new configuration appears in the configuration list.
6 With the name of the new configuration highlighted, click Make Active.
The settings in the new configuration appear in the control panel.
7 Make any changes that you want for the new configuration.
8 Close the control panel.
An alert box appears:
Once saved, the new configuration will become the current configuration. If
the changes you made will disrupt a network service, such as AppleTalk in
this example, the alert box warns you that services will be disrupted.
9 Click the Save button.
Your changes take effect immediately. The saved configuration becomes the
new current configuration.
Page 42

42
Using a different configuration
To use a different configuration:
1 Open the control panel for which you want to use a different
configuration.
2 Choose Configurations from the File menu.
The Configurations window appears.
3 Click the name of the file that contains the configuration you want to
use.
4 Click Make Active.
The control panel becomes active, and the settings from the selected config-
uration file appear in it.
5 Close the control panel.
If the new configuration changes the default port, an alert notifies you that
networking services that are already established will be interrupted. Click
OK.
The settings of the configuration selected in step 3 take effect immediately.
Page 43
43
Exporting a configuration
You may want use a configuration (possibly with some small modification)
on another computer. You do this by exporting the configuration to a file
and copying the file to the other computer.
To export a configuration to a file:
1 Open the control panel for which you want to export a configuration.
2 Choose Configurations from the File menu.
The Configurations window appears.
3 Click the name of the configuration that you want to export.
4 Click Export.
5 In the dialog box that appears, type a name for the file in which the
configuration is to be saved, and locate the disk or folder in which you
want the file to reside.
6 Click Save.
The configuration is saved in the specified file and folder. To use the config-
uration on another computer, copy the file to that computer and import it,
as described in the next section.
Page 44

44
Importing a configuration
To import a configuration from another computer:
1 Copy the configuration file to the computer on which you want to use it.
2 On that computer, open the control panel for which you want to import a
configuration.
3 Choose Configurations from the File menu.
The Configurations window appears.
4 Click Import.
5 In the dialog box that appears, locate the file that contains the
configuration you want to import.
6 Click Open.
The name of the new configuration appears in the list of configurations:
7 If you want to make the new configuration active (that is, appear in the
control panel), click its name to select it, and click the Make Active
button.
Depending on the type of control panel (AppleTalk or TCP/IP), you may
want to change some settings. For example, if it is a TCP/IP control panel,
you should change the IP address.
Page 45

45
WARNING If you do not change the IP address, you may
cause the same IP address to be used by two different
computers on the network, which causes network errors.
8 Close the control panel.
9 If you have made configuration changes, an alert box asks if you want to
save changes. Click the Save button.
If the imported configuration changes the default port, an alert notifies you
that networking services already established will be interrupted. Click OK.
The imported configuration becomes the current configuration. Your
changes take effect immediately.
Hosts file format
A hosts file is a list of IP addresses and the names (host names and domain
names) that are associated with them. The hosts file can be stored anywhere
on your server’s hard drive, but it is usually stored in the Preferences folder
in your active System Folder. To make a particular hosts file active, locate it
through the Select Hosts file button in the TCP/IP control panel.
The information in the hosts file consists of a series of records whose fields
must be in the following format:
name data ; comment
The name field can be an alias or a fully qualified domain name (that is, it
contains at least one dot). For example, “apple.com” is a fully qualified
domain name; “apple” is not.
The data field in a hosts file record includes the following subfields, each
separated by one or more space characters.
Page 46

46
The ttl (time to live) subfield specifies the number of seconds for which the
record is valid. This subfield is optional. If it is not present, or if it is “-1”,
the record is always valid.
The class subfield is optional. The only value that is currently supported is
“IN” (Internet domain).
The type subfield is required and describes the type of identifier that
follows. Use “A” to indicate that an IP address follows. Use “CNAME” to
indicate that the identifier that follows is a canonical (“real”) name. Use
“NS” to indicate that the identifier that follows is a name server.
The identifier subfield is required and can be an IP addr ess or a canonical
name.
Examples of valid hosts file records are:
apple.com A 130.43.2.2
; address of host apple.com
foobar CNAME barfoo.apple.com
; canonical name for the host whose local alias is “foobar”
xyzcorp.com 86400 NS biglist.xyzcorp.com
; name server for xyz corp (valid for one week)
The MacTCP application also allows you to use a hosts file. The format
requirements for the MacTCP hosts file are slightly different from the
format requirements for an Open Transport hosts file.
If you want to use a MacTCP hosts file from another computer, make sure
that all of the listed domain names are fully qualified. MacTCP allows the
hosts file to contain domain names that are not fully qualified. When used
with Open Transport, a domain name that is not fully qualified will cause
an error unless it is an alias.
Page 47

47
To use a domain name that is not fully qualified in the TCP/IP hosts file,
you can use two records. The first record associates a local alias with a fully
qualified domain name, and the second record resolves the domain name to
an IP address. For example, you might have the following entry in a
MacTCP hosts file:
bigcomputer A 128.1.1.1
To accomplish the same effect of associating “bigcomputer” with the
address 128.1.1.1, an Open Transport hosts file needs these two records:
bigcomputer CNAME largedomain.xyzcorp.com
largedomain.xyzcorp.com A 128.1.1.1
The first record associates the alias “bigcomputer” with the fully qualified
domain name “largedomain.xyzcorp.com.” The second record resolves that
domain name to the IP address 128.1.1.1.
Page 48

48
Page 49

49
3 Using Application Software
This chapter provides important information you need to know about
using your Workgroup Server with application programs. For instance,
although your server is compatible with most programs intended for use
with Macintosh computers, certain programs are designed especially for
Power Macintosh computers. These kinds of programs take best advantage
of your server’s speed. In addition, the order in which certain programs
start up affects a server’s performance. Be sure to read the information in
this chapter before setting up your server’s application programs.
Page 50

?
?
?
?
?
?
?
?
?
?
?
?
?
?
?
?
?
?
?
?
?
?
?
?
?
?
?
?
?
?
?
?
50
Using Power Macintosh programs
Programs designed for the PowerPC–based Workgroup Server provide
improved performance for your server. However, to get the full benefit of
this software, you need to know about two important items—virtual
memory and shared libraries.
Virtual memory
Virtual memory is a feature of Macintosh computers that lets you use space
on a hard disk as additional memory. This feature helps you run large
programs when the computer does not contain enough dynamic random-
access memory (DRAM). However, virtual memory may adversely affect
the performance of some server application programs, such as AppleShare.
Refer to the documentation that came with your application to see if the
application works well with virtual memory turned on.
Shared libraries
Power Macintosh programs use special files called shared libraries. These
files help Power Macintosh programs to run more efficiently, and can be
used by more than one Power Macintosh program simultaneously. Any
necessary shared libraries are installed automatically in the System Folder
when you install Power Macintosh programs.
W2@@@@@@@@@@@@@@@@@@@@@@@@@6X?g
7< ?B1?g
@?e?@@6K? @?g
@?e?@@@@@@@@@@6X?he@?g
@?e?@@@g?I/Khe@?g
@?e?@@@hV46Xh@?g
@?e?@@@heI/X?g@?g
@?e?@@@he?V/Xg@?g
@W-X?@@@L?eW2@@6KeN1g@?g
@(R1e?B)Xe7@@@@@6K?@g@W-Xf
(Y?@e?J@)X?3@fI4@@L?f@(R1f
?@eW.MI/XV'L?fI4)Kf(Y?@f
?@?W.YeV/XN1?gI46Xf?@f
?@?7H?e?V/T5?hS,f?@f
?@?@?@fV+Y?g?W&Hf?@f
?@?@e?@hfW&@?f?@f
?@?@f?@h?W&@@Lf?@f
?@?3=?f?@fW-T&@@>,f?@f
?@?V46K?f?@?W&R'@@>(Yf?@f
?@e?I46K?f?&@?V'>(Y?f?@f
?@f?I'6K?e?N@L?V'Uf)X?@f
)X?@gN@@6K?e@)X?V/X?e@)T5f
@)T5g?@?I46K?@S,??V/Ke@V+Yf
@V+Yg?3L??I4@@0Y?eN@@?@?g
@?h?V/Xhe?@@?@?g
@?heV/K?h?@@?@?g
@?he?V46X?g?@@?@?g
@?hf?I/Kg?@@?@?g
@? V4@@@@@@@@@?@?g
@? I4@?@?g
3= ?:5?g
V4@@@@@@@@@@@@@@@@@@@@@@@@@0Y?g
Shared libraries are
Shared libraries are
represented by icons
represented by icons
like this.
like this
Page 51

51
If a Power Macintosh program requires a shared library and there is not
enough memory available for the shared library, you’ll see a message that
the program could not be opened because there is not enough system
memory available for the shared library. If this happens, quit programs not
in use or install more memory in your server. (For more information, see the
information on expanding memory in the setup guide that came with your
server.)
If a required shared library is missing, you’ll see a message that the
program could not be opened because the shared library could not be
found. If this happens, follow the directions that came with your program
to reinstall the program. If the shared library is still missing, contact the
software program’s manufacturer for assistance.
Using older Macintosh programs
If you experience problems using an older Macintosh program, it may be
incompatible with your Workgroup Server. You may be able to use your
older program if you change the Modern Memory Manager setting in your
Memory control panel.
WARNING If your Workgrou p Server is runni ng App l eShare, do not
change the Modern Memory Manager setting. For AppleShare to
work properly, Modern Memory Manager must be turned on. If
you want to run other applications that do not work when Modern
Memory Manager is turned on, check with the application’s
vendor to see if an update is available.
Follow these steps to change the Modern Memory Manager setting:
1 Choose Control Panels from the Apple (K) menu and open the Memory
control panel.
Page 52

52
2 Turn off Modern Memory Manager.
When you are finished using the program, open the Memory control panel
again and turn Modern Memory Manager back on.
Click here to turn off
Click here to turn
Modem Memory Manager
off Modern Memory
Manager.
For best performance, contact the program’s manufacturer for an upgrade.
Using server application programs
Specific server application programs or services, such as AppleShare,
AppleSearch, Apple Remote Access, or Apple RAID Software, may have
been included with your server. Review the documentation that came with
the software before you install these services; you may be required to
perform special procedures that can affect your server system before you
use a particular service.
IMPORTANT See the Workgroup Server Read Me for information about the
versions of application programs from Apple that are compatible with your
Workgroup Server.
Page 53

53
Using desktop application programs
You can also use your Workgroup Server as a desktop personal computer to
run some personal application programs. Running such programs,
however, may degrade the performance of your server application
programs or network services.
Order of installing and starting programs
Though your server may have come with server application programs or
network services, you may want to install additional software. Note that
the order in which server application programs are installed and started is
important. Be sure to review the documentation, especially product Read
Me files, for all the server application programs you plan to use before
installing and running them. Also, refer to the Workgroup Server Read Me
file on your server system’s hard disk for the most up-to-date news about
installing server application programs.
Setting up your server to restart programs automatically
You can set the Workgroup Server to start server application programs
(including network services) automatically whenever you start up the
server or whenever the server automatically restarts after a temporary
power outage.
To set up your server to restart server application programs automatically:
1 Create an alias for each program that you want the server to start
automatically .
You create an alias by selecting the icon of the program on the desktop and
choosing Make Alias from the File menu.
Page 54

54
2 Drag the aliases to the Startup Items folder, located in the System
Folder on your startup disk.
Macintosh computers and servers automatically open documents and
programs (or their aliases) located in the Startup Items folder whenever the
server starts up.
Note: The server opens documents and programs located in the Startup
Items folder in alphabetical or numerical order. Because the order in which
server application programs are started may be important (as described in
the program documentation), you may want to rename the aliases so that
the programs start in the desired order. For example, you can insert a
number at the beginning of each filename. The following figure shows a
sample setup.
Add numbers to the
Add numbers to the
program aliases to set
program aliases to set
the order of startup.
the order of startup.
Setting up your server to run programs at shutdown
The Shutdown Items folder in the System Folder allows you to specify
scripts or programs that automatically run during the shutdown process.
This folder works much like the Startup Items folder. To specify an item to
run during shutdown, put the item or its alias in the Shutdown Items
folder.
Page 55

55
Note: The server opens scripts and programs located in the Shutdown
Items folder in alphabetical or numerical order. Because the order in which
server application programs are run may be important, you may want to
rename the aliases so that the programs are run in the desired order.
The next time you choose Shut Down or Restart from the Special menu, the
scripts and programs are run. If you choose Shut Down from the Apple
menu, the items in the Shutdown Items folder are not run.
Additional capabilities for your server system
You have the option to install two programs included with your server that
provide additional capabilities for your system software:
m PowerTalk, which provides built-in mail and collaboration services
m QuickDraw GX, which gives your computer more powerful printing
capabilities
Because these programs are not designed specifically for use on server
systems, they may reduce your server’s performance. Keep this possibility
in mind when deciding if you want to add these capabilities to your
Workgroup Server.
IMPORTANT If you use the AppleShare Print Server with your server and
you want to use QuickDraw GX also, be sure to see the AppleShare Read
Me file.
You’ll find Installers for these optional programs in the System Software
Installers folder on the Workgroup Server Software CD-ROM disc.
IMPORTANT AppleScript, which allows you to automate many actions you
perform repeatedly on your server, is already installed in your system. To
review the available automated tasks, look in the Apple (K) menu. To learn
how to create new scripts for your server, see the “Using AppleScript”
documents in the AppleScript folder in the Apple Extras folder on your
hard disk.
Page 56

56
Working with several programs at a time
You can open as many application programs and desk accessories as your
server’s memory allows.
Finding out which programs are open
All open programs are listed in the Application menu at the right end of the
menu bar. The name of the active program (the one you’re using right now)
has a checkmark next to it, and its icon appears in the menu bar.
Switching programs
You can switch to another open program or desk accessory by choosing its
name from the Application menu.
If a program’s icon is dimmed in the menu, that means its windows are
hidden. Choosing the program from the Application menu displays its
windows.
You can also switch to another program by clicking in a window that
belongs to an open program or by double-clicking a program icon (or the
icon of a document that was created with the program).
Hiding and showing windows on the desktop
You can hide all windows except those of the active program by choosing
Hide Others from the Application menu.
The other programs remain open even though their windows are hidden.
When you switch to another program, its windows become visible again.
If you want to see all the open windows, choose Show All from the
Application menu.
The Finder icon
Commands to hide or display open windows
Open programs
A checkmark indicates
the active program.
Page 57

57
4 Managing Hard DIsks
This chapter tells you how to perform common disk maintenance tasks,
such as mounting volumes, initializing hard disks, and installing system
software. When working with your Workgroup Server’s startup disk, you
often need to start up from a different disk, such as the Workgroup Server
Software CD-ROM disc. This chapter tells you how.
Page 58

58
Backing up your files
Making backup copies of important server files is good protection against
possible damage to the originals. If a backup program was included with
your server, be sure to use it (or another backup program if you prefer) to
set up and schedule a regular, automatic backup of your files. You can also
back up your files manually, by making copies on another hard disk or
even on floppy disks, but such methods are less convenient.
Using Apple RAID Software
Your Workgroup Server comes with Apple RAID Software, which you can
use to increase the performance of your hard disk drives. To use Apple
RAID Software with a disk, you must install the Apple RAID driver on it.
For information about managing hard drives that have been prepared for
Apple RAID, see the Apple RAID Software Administrator’s Guide.
IMPORTANT Drive Setup, the disk utility from Apple Computer, cannot be
used on drives on which the Apple RAID driver has been installed. When a
drive is used with Apple RAID, you use Apple RAID Software to manage
the drive.
Mounting volumes
Each time you start up your Workgroup Server, it automatically searches
the SCSI buses for volumes and mounts any that it finds. Any SCSI devices
that are not turned on when you start up your Workgroup Server are not
found, so their volumes are not mounted.
If you later turn on a SCSI device, you can use Drive Setup to mount any
volume it contains.
Page 59

59
To use Drive Setup to mount volumes:
1 Open the Drive Setup icon.
The Drive Setup program resides in the Utilities folder in the Apple Extras
folder on your startup disk.
When Drive Setup starts up, it automatically scans the SCSI bus for devices
that contain volumes.
2 In the list of drives, click the umounted volume that you want to mount.
3 Choose Mount Volumes from the Functions menu.
The selected volume is mounted, and its icon appears on the desktop.
4 Choose Quit from the File menu.
Starting up from a CD-ROM disc
To test, repair, or initialize your startup hard disk, or to install system
software on your startup hard disk, you need to start up your server from
another disk, such as the Workgroup Server Software CD-ROM disc that came
with the server.
To start up the server using the Workgroup Server Software CD-ROM disc,
follow these steps:
1 Turn your server on.
2 When you see the desktop on your screen, press the Open/Close
button on your CD-ROM drive, and insert the CD-ROM disc containing
system software into the drive.
3 Hold down the “c” key on your keyboard and restart your server.
To ensure that the CD-ROM disc remains in the CD-ROM drive, continue to
hold down the “c” key until you see the “Welcome to Macintosh” message.
Page 60

60
Initializing a hard disk
Before you can use a new disk, the disk must be prepared so that the server
knows where to store information on the disk. This preparation is called
initializing (or formatting) the disk.
WARNING Initializing a disk erases any information that may be on
it. Before you initialize a damaged disk, try to repair it as
described in “Repairing a Damaged Disk” later in this chapter.
When do you need to initialize a hard disk?
The hard disk inside your server was initialized at the factory, so you
probably won’t need to initialize it. You need to initialize a hard disk only if
one of the following is true:
m The disk is new and uninitialized. Your internal hard disk and most external
hard disks are initialized at the factory and do not have to be initialized
again. If you are adding a new non-Apple hard disk to your server, check
your owner’s manual to see if it needs to be initialized.
m You’ve experienced repeated errors using this disk. If problems persist after
you initialize the disk, the disk is in need of servicing.
m You want your disk to be partitioned in a different way.
If a hard disk hasn’t been initialized, the disk’s icon does not appear on the
desktop when you start up the server using another disk.
How to initialize a hard disk
You initialize an Apple SCSI hard disk by using the Drive Setup program,
which is available on your server’s hard disk and on the Workgroup Server
Software CD-ROM disc that came with your server. (To initialize a hard disk
from another manufacturer, use the utility software that came with the hard
disk.)
Page 61

61
1 If the disk that you need to initialize is your startup disk, start up your
server from the
Workgroup Server Software
CD-ROM disc.
For details, see “Starting Up From a CD-ROM Disc” earlier in this chapter.
2 Open the Drive Setup icon.
The Drive Setup program resides in the Utilities folder in the Apple Extras
folder on your startup disk and on the Workgroup Server Software CD-ROM
disc.
3 In the list of drives, click the disk you want to initialize.
4 Click Initialize to initialize the hard disk.
5 Click Quit when you see a message reporting that initialization was
successful.
If a message reports that initialization failed, try again. If initialization fails
a second time, take the disk to your Apple-authorized service provider for
repair.
Page 62

62
Installing system software
System software is the set of programs and other files that your server uses
to start itself up, keep track of your files, and run the application programs
you use. System software is kept in the folder called the System Folder.
When you turn on your server, it looks for a startup disk, which is a disk
that contains the system software. The startup disk is usually an internal
hard disk, although another hard disk or a floppy disk can also be a
startup disk.
If you’re installing system software on a hard disk for the first time, make
sure that your hard disk has been initialized, a process that prepares the
disk to store information. If you see the hard disk’s icon on the desktop
when you start up the server, the disk has been initialized. If no disk icon
appears when you start up, see “Initializing a Hard Disk” earlier in this
chapter for instructions.
When should you reinstall system software?
If you have a problem with your system software, you may see this icon in
the middle of the screen:
If this icon appears, follow the instructions in “Solving Hard Disk
Problems” in Chapter 7 to test your startup hard disk and repair any
damage.
If repairing the disk doesn’t help, reinitialize it as described in “Initializing
a Hard Disk” earlier in this chapter. Then follow the steps in this section to
do what is commonly called a “normal” installation of system software.
Doing a normal installation of system software
To do a normal installation, follow these steps:
1 If the disk on which you want to install system software is your startup
disk, start up your server from the
CD-ROM disc.
Workgroup Server Software
For details, see “Starting Up From a CD-ROM Disc” earlier in this chapter.
Page 63

63
2 Find and open the Disk First Aid icon.
The Disk First Aid program resides in the Utilities folder in the Apple
Extras folder on your startup disk and on the Workgroup Server Software CD-
ROM disc.
After Disk First Aid starts, follow the instructions on the screen. Disk First
Aid checks your hard disk for any problems.
3 When D isk First Aid h as finis hed checkin g your h ard di sk, choose Quit
from the File menu.
4 Open the Drive Setup program.
The Drive Setup program resides in the Utilities folder.
You use the Drive Setup program to update your hard disk.
5 In the list of drives, click your startup disk.
6 Pull down the Functions menu and choose Update Driver.
7 When the update process is finished, quit Drive Setup.
8 Shut down your server.
9 If the disk on which you are installing system software is your startup
disk, start up your server from the
Workgroup Server Software
CD-ROM disc.
For details, see “Starting Up From a CD-ROM Disc” earlier in this chapter.
The Installer’s Welcome screen may appear or you may have to double-
click the System Software Installer icon to open the Installer program.
10 Click OK.
The Easy Install dialog box appears.
Page 64

64
Click to indicate
a different disk.
This is the disk on which system
software will be installed.
11 Make sure that the hard disk named in the box is the one on which you
want to install system software.
If it isn’t, click Switch Disk until the correct disk name appears.
12 Click Install.
13 Follow the instructions that appear on the screen.
If you’re installing system software from floppy disks, you see messages
asking you to insert different disks.
14 When you see a message reporting that the installation was successful,
click Restart (or “Quit,” if you’re installing from the CD-ROM disc).
Don’t forget to eject the CD-ROM disc containing system software. If a
message reports that installation was not successful, try installing again.
(Follow the instructions on the screen.)
If, after reinstalling system software by doing a normal installation, you
still experience problems with your server, follow the steps in the next
section for doing a “clean” installation of system software.
IMPORTANT Certain system extensions or application programs that were
originally on your hard disk may not be installed with the Installer
program. If you notice that a certain extension or program was not
installed, you need to install it separately. You can find these additional
extensions and programs on the Workgroup Server Software CD-ROM disc.
(Application programs from other vendors can be reinstalled from backup
copies you made.)
Page 65

65
Doing a clean installation of system software
The steps in this section outline a “clean” installation of system software. A
clean installation allows you to discover which item in your System Folder
is causing a problem. A clean installation creates a brand new System
Folder and saves everything in your original System Folder in a different
location. You can then follow the instructions in “Replacing Special
Software,” later in this chapter, to reinstall system extensions, control
panels, and other special software one at a time from the old System Folder
to the new System Folder. This procedure allows you to determine which
item in the old System Folder was the source of the problem.
Do a clean installation if you can’t determine what is damaged in your
System Folder (especially if you think any special software, such as control
panels, system extensions, or custom utilities, may be causing the problems
you’re experiencing). You should also do a clean installation if you’re still
having problems with your server after you’ve reinstalled system software
by doing a normal installation.
To do a clean installation, follow these steps:
1 If the disk on which you are installing system software is your startup
disk, start up your server from the
Workgroup Server Software
CD-ROM
disc.
For details, see “Starting Up From a CD-ROM Disc” earlier in this chapter.
2 Find and open the Disk First Aid icon.
The Disk First Aid program resides in the Utilities folder in the Apple
Extras folder on your startup disk and on the Workgroup Server Software CD-
ROM disc.
After Disk First Aid starts, follow the instructions on the screen. Disk First
Aid checks your hard disk for any problems.
3 When D isk First Aid h as finis hed checkin g your h ard di sk, choose Quit
from the File menu.
Page 66

66
4 Open the Drive Setup program.
You use the Drive Setup program to update your hard disk.
5 In the list of drives, click your startup disk.
6 Pull down the Functions menu and choose Update Driver.
7 When the update process is finished, quit Drive Setup.
8 Shut down your server.
9 If you are installing system software on your startup disk, start up your
server from the
Workgroup Server Software
CD-ROM disc.
The Installer’s Welcome screen may appear or you may have to doubleclick the System Software Installer icon to open the Installer program.
10 Click OK.
The Easy Install dialog box appears.
Disk on which
system software
will be installed.
If you need to install
on a different disk,
click this button.
For a clean
installation,
DO NOT click
the Install button.
Page 67
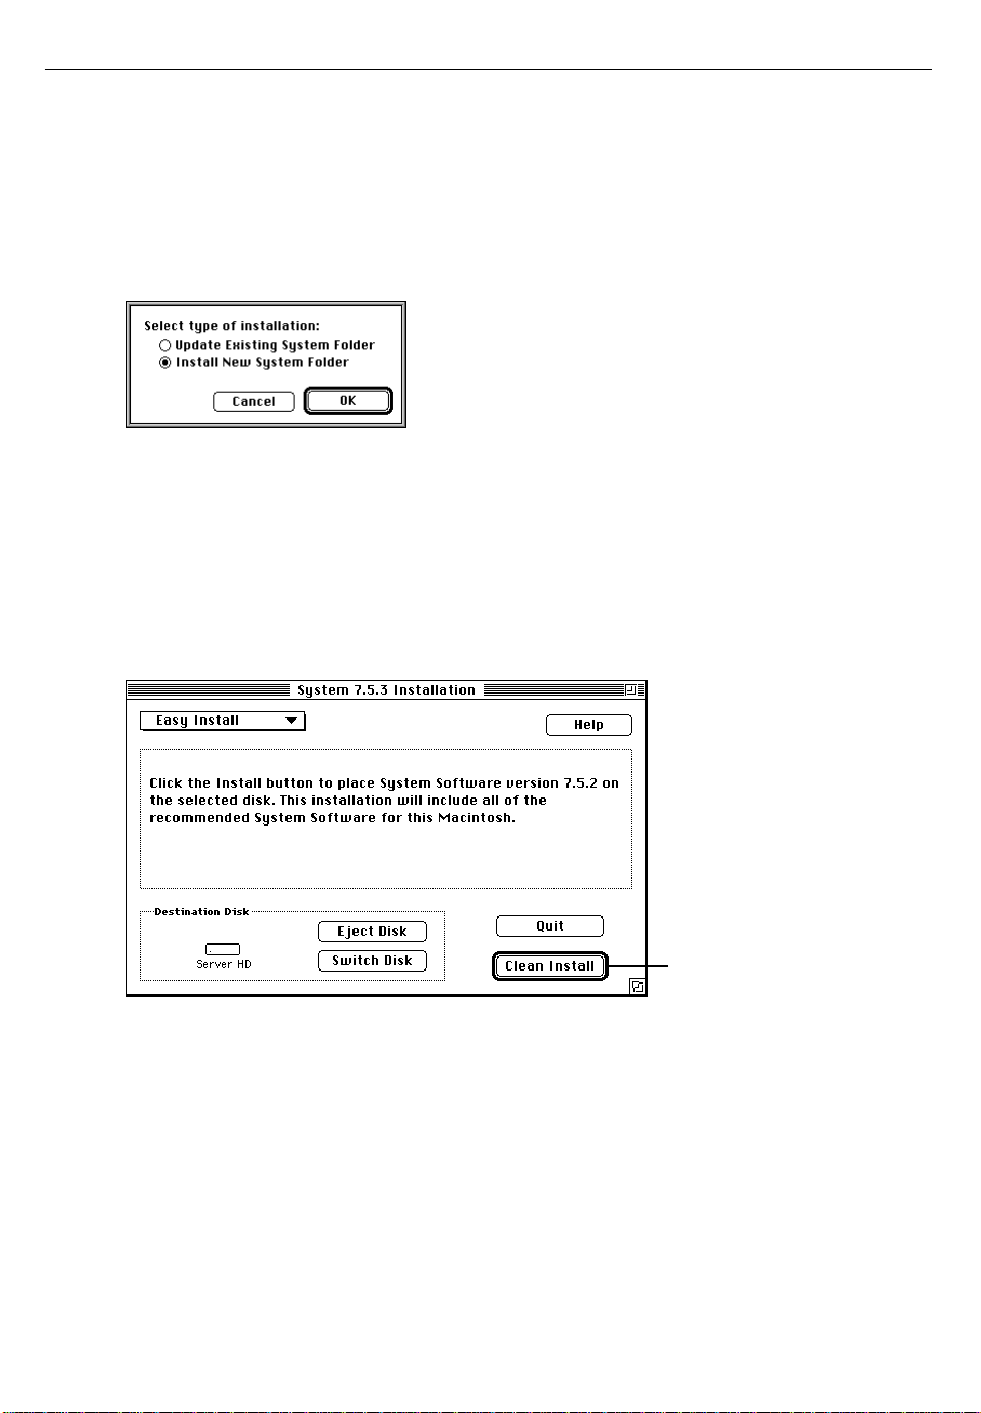
67
11 Make sure that the hard disk named in the Destination Disk box is the
one on which you want to install system software.
If it isn’t, click Switch Disk until the correct disk name appears.
12 Hold down Shift–x–K to start the clean installation.
The following dialog box appears.
13 Make sure that the Install New System Folder button is selected and
click OK.
The Easy Install dialog box appears. The Install button has changed to
Clean Install, and the contents of your old System Folder have been moved
to a new folder named Previous System Folder.
14 Click Clean Install.
Click here to install the
software you need.
Page 68

68
15 Follow the instructions that appear on the screen.
It takes a few minutes to complete the installation.
16 When you see a message reporting that the installation was successful,
you may need to click Restart.
You need to click Restart only if you installed software onto the startup disk.
If a message reports that installation was not successful, try repeating the
clean installation procedure.
IMPORTANT Certain system extensions or application programs that were
originally on your hard disk may not be installed with the Installer
program. If you notice that a certain extension or program was not
installed, you may need to install it separately. You can find these
additional extensions and programs on the Workgroup Server Software CD-
ROM disc. (Application programs from other vendors can be reinstalled
from backup copies you made.)
Replacing special software
Special software consists of items such as control panels, system extensions,
custom utilities, fonts, or Apple menu items that you may have had in your
old System Folder. To make sure that special software does not create any
conflicts with other programs on your server, follow this procedure to
replace these items in your new System Folder:
1 Copy any special software items from the Previous System Folder back
to your System Folder one item at a time, restarting the server after
copying each item.
IMPORTANT Be very careful not to replace (copy over) any of the files in the
System Folder with files from the Previous System Folder.
2 Check after each restart to make sure your server is not having any
software problems.
If any of your special software items cause software problems, contact the
software manufacturer for assistance or an upgrade.
Page 69

69
Doing a custom installation of system software
The Easy Install procedure described in the previous sections is usually
appropriate, because it automatically installs all the items you need.
However, if you’d like to select a combination of system software files for
your specific needs, you can customize your system software installation.
You use custom installation to install or update one or more specific files,
or to save space on your hard disk by installing only the files you want.
To install customized system software, follow these steps:
1 If you are installing system software on your startup disk, start up your
server from the
Workgroup Server Software
CD-ROM disc.
For details, see “Starting Up From a CD-ROM Disc” earlier in this chapter.
The Installer’s Welcome screen may appear or you may have to double-
click the System Software Installer icon to open the Installer program.
2Click OK.
The Easy Install dialog box appears.
3 Choose Custom Install from the pop-up menu.
The Custom Install dialog box appears, listing all available system
software components.
Page 70

70
4 Scroll through the list of components, clicking the checkbox next to
each component you want to install.
You can see and select individual items within each component by clicking
the arrow to the left of the component, then clicking the item you want to
install. To get additional information about each component listed, click the
box with the letter i in it to the right of the component.
5Click Install.
6 Follow the instructions that appear on the screen.
7 When you see a message reporting that the installation was successful,
click Quit.
If a message reports that installation was not successful, try installing
again. (Follow the instructions on the screen.)
8 Restart your server.
The system software is installed and your server is ready to use. Don’t
forget to eject the CD-ROM disc containing system software when you are
finished.
Page 71

71
5 Using the CD-ROM Drive
Read this chapter for information on using your server’s internal CD-ROM
(Compact Disc Read-Only Memory) drive. (CD-ROM drives are also
sometimes called CD-ROM players.) For information on the proper
handling of CD-ROM discs, refer to Appendix A in the setup guide that
came with your server.
Page 72

72
Your internal CD-ROM drive works with CD-ROM discs, standard audio
compact discs (CDs), and single-session or multisession Photo CDs. Your
CD-ROM drive provides access to large amounts of information. However,
you cannot save information on CD-ROM discs. ROM stands for read-only
memory, meaning that the player cannot “write” information onto CD-ROM
discs.
A wide selection of CD-ROM discs is available for entertainment,
education, and business. A typical disc can hold over 650 megabytes (MB) of
information— the equivalent of 270,000 pages of text, up to 8 hours of
speech or music (depending on the sound quality), hundreds of highresolution images, or any combination of text, sound, and graphics.
Inserting a CD-ROM disc
Follow these instructions to insert a CD-ROM disc into your CD-ROM
drive. Then follow the instructions provided with your disc, as well as the
instructions in this manual.
1 Turn on your server, if it’s not already on.
2 Press the Open/Close button to open the tray of the CD-ROM drive.
Open/Close button
The tray opens.
Page 73

73
3 Place a CD-ROM disc in the tray, with the disc label facing up.
Make sure the disc is lying flat and centered in the tray. If you are using a
small (8 cm) disc, make sure it is centered within the inside ring on the tray.
4 Push the tray in, or press the Open/Close button, to close the tray.
In a few moments, an icon for the CD-ROM disc appears on your screen.
Ejecting a CD-ROM disc
Follow these instructions to open the tray and eject a CD-ROM disc from
your computer.
IMPORTANT You may not be able to eject a disc if it is being shared.
Page 74

74
1 Open the tray.
There are several ways to open the tray of your CD-ROM drive.
If a CD-ROM disc icon appears on your screen:
m Select the disc icon on your screen and drag the icon to the Trash.
m Click the disc icon, then choose the Put Away command in the File menu.
m While the AppleCD Audio Player window is active, choose Eject CD
from the File menu, or simultaneously press the x and E keys. (AppleCD
Audio Player is a program that allows you to control your CD-ROM
drive and is available in the Apple [K] menu.)
If no CD-ROM disc icon appears on your screen:
m Press the Open/Close button for your CD-ROM drive.
2 Take the CD-ROM disc out of the tray.
Store your disc in a safe place, away from heat, dust, and moisture.
3 Push the tray in, or press the Open/Close button, to close the tray.
To avoid possible damage to the tray or the CD-ROM drive, keep the tray
closed when you are not using it.
Playing audio CDs
With your CD-ROM drive and your computer’s built-in speaker, you can
play audio compact discs (CDs) or audio tracks on CD-ROM discs. You can
also attach headphones or speakers to the computer to listen to audio CDs
and audio tracks. For information on connecting sound equipment to your
server, see Chapter 3 in the setup guide that came with your server.
You may need to set control panel options in order to play audio CD-ROM
discs. See “Choosing Sound Devices and Alert Sounds” in Chapter 1.
To start, stop, and otherwise control audio discs, use the AppleCD Audio
Player program, available in the Apple (K) menu. Your audio CD software
will only play tracks that contain audio information. You can listen to an
audio CD or audio tracks in the background while you do other work on
your server. For more information about playing audio CDs, see the “CDROM Discs” topic of Macintosh Guide, available in the Guide (h) menu.
Page 75

75
Working with Photo CDs
You can use your CD-ROM drive to open Photo CD images stored on
Photo CDs. A Photo CD image is a digitized version of a standard
photograph that you can open and view on your screen.
You can do many things with the images on your Photo CDs:
m Open and view the images individually on your screen.
m View the images on your screen in a series, as you would view a slide
presentation.
m Copy and save the images, print them, paste them into word-processing
documents or other documents that accept graphics, and edit them with
a graphics application program.
Photo CD images are an excellent source of graphics for desktop
publishing, multimedia presentations, business documents, and profession-
al-quality graphic design. For more information on working with Photo CD
images, see the “CD-ROM Discs” topic of Macintosh Guide, available in the
Guide (h) menu.
Page 76

Page 77

77
6 Using a DAT Drive and Tape Cassettes
You need to read this chapter only if your server includes an internal tapebackup unit. This chapter describes the types of tape cassettes that work
with the internal tape-backup unit, tells you how to insert and remove tape
cassettes, explains the DAT drive status lights, and tells you how to clean
the tape-drive heads.
The internal DDS-2 DAT drive and accompanying software can perform
full or partial backup and restore procedures for all of the data on your
hard disks. In addition, the drive automatically performs error correction
and data compression of the files that you back up and restore. The errorcorrection feature helps ensure a high level of data integrity. The datacompression feature allows more data to fit on a cassette than do conventional backup mechanisms.
Use Retrospect Remote (or some other backup utility) to back up and
restore data. For more information, see the utility’s documentation.
Page 78

78
Compatible tapes
Your internal DAT (digital audio tape) drive is compatible with MRSquality DDS (digital data storage) tape cassettes. MRS (Media Recognition
System) cassettes are the highest-quality digital data tape available. Your
internal tape drive requires this level of quality to perform backup
operations successfully. See your Apple-authorized service provider for
more MRS-quality DDS tape cassettes or their compatible substitutes.
Compatible cassettes are typically stamped “Digital Data Storage” and
longer-length cassettes (120 meters) need the “DDS2” designation. If you
use cassettes not approved by your Apple-authorized service provider, you
void the warranty on your tape drive.
IMPORTANT Some vendors of computer products may refer to DDS
cassettes as digital audio tape (DAT) cassettes. However, DAT (audio)
cassettes have a different mechanical specification from DDS cassettes. For
backing up your server files, be sure to use only those DAT cassettes
designed for MRS.
Tapes supplied with the server
Two cassettes are supplied with your Workgroup Server. The first is a blank
DDS cassette for backup and restore operations. (The blank tape included
with your system has a maximum storage capacity of 10–14 gigabytes of
compressed data.) The second is a cleaning cassette; its operation is
discussed later in this chapter.
Starting up the tape drive
The tape drive receives power and performs a self-test when you start up
your server. During the test, both status lights next to the tape drive
opening are solid green; then the light on the left flashes green and the light
on the right turns off. If no tape is loaded in the tape drive, both status
lights turn off. If a tape is loaded in the tape drive, the light on the left
becomes solid green.
Page 79

79
There are two conditions that indicate the self-test has failed. If the light on
the right flashes amber, you may need to clean the tape-drive head, as
described in the section “Cleaning the Tape-Drive Heads” later in this
chapter. Or, if a tape is loaded in the tape drive, a flashing amber light may
indicate that the tape is worn and needs to be replaced. If the light on the
right becomes solid amber, the tape drive did not successfully complete its
self-test and should not be used; consult an Apple-authorized service
provider.
The status lights are discussed in greater detail later in this chapter.
Inserting tape cassettes
To use a cassette:
m Insert it into the tape slot in the front panel of the server, as shown in
this figure:
As you insert the cassette, the drive pulls it into place and performs a
loading sequence, which includes threading and rewinding the tape and
checking for error conditions. The loading procedure takes about 30
seconds.
Page 80

80
Status lights
Located next to the tape drive opening are two lights that inform you of the
status of tape operations. The light on the left is the tape light, and the light
on the right is the clean light. A solid green tape light indicates normal
operation and a solid amber clean light indicates a warning condition. A
flashing green tape light indicates activity between the tape drive and the
SCSI bus. A flashing amber clean light indicates the tape in the drive is
worn or the tape-drive head needs to be cleaned.
The following table lists all the possible meanings of the status lights.
Tape light Clean light
(left side) (right side) Meaning
Normal operation
Flash green* Off Cassette loading or unloading, or
Fast flash green
Green Off Cassette loading/drive online
self-test in progress
†
Off Cassette loaded/read or write activity
Error states
Any Flash amber* Media wear (caution), or clean required
Any Amber Error condition
*Flash means the light flashes 1/2 second on, 1/2 second off.
†
Fast flash means the light flashes 1/4 second on, 1/4 second off.
Page 81

81
The caution signal
If your tape drive detects problems, it displays a caution signal: the clean
light flashes amber. You can clear the caution signal by ejecting the cassette.
The caution signal may be caused by dirty tape-drive heads. If this signal
appears, clean the heads and insert the tape again. (Head-cleaning instructions are given in “Cleaning the Tape-Drive Heads,” later in this chapter.)
The caution signal may also indicate a worn-out tape. If the tape is old or
worn, you should copy its data to a new tape and discard it. If you’re trying
to restore data from a worn tape and the caution signal appears, clean the
tape-drive heads, then try the restore operation again.
Removing tape cassettes
You can remove a tape cassette at any time by pressing the eject button
located under the tape slot on the right side. You should not press the eject
button while the tape is in use.
Check the Retrospect Remote (or other backup utility’s) documentation to
learn about additional methods for ejecting cassettes while using the
backup software.
Forcing the ejection of a tape cassette
If you need to force the ejection of a tape cassette:
m Hold the eject button down for at least 5 seconds (perform this
step
after
the server has started up).
The drive waits 35 seconds for the normal eject procedure to occur, and, if it
does not occur, unthreads the tape and ejects the cartridge.
WARNING If you force an eject while the drive is busy, you
may lose data or cause the tape to be invalidly formatted.
Page 82

82
Locking a cassette
You can lock a DDS cassette by sliding the tab on the back of the cassette so
that the hole is visible. Once a tape cassette is locked, data can be read from
the cassette but not written to it.
Avoiding high humidity
Whenever your tape drive detects water condensation, both status lights
glow solid amber. This warning signal cancels any commands in progress.
Furthermore, any commands that access the tape are rejected. The tape
drive then unthreads the tape to prevent tape and tape-head damage.
To minimize the chance of condensation, adhere to the environmental
require-ments described in the safety, health, and maintenance information
in the setup guide that came with your server and follow these general
cassette guidelines:
m Use tape cassettes at temperatures between 5˚ C (40˚F) and 40˚ C (104˚ F).
m If you expose the tape cassettes to temperatures outside the operating
limits, you can stabilize them by leaving them in the proper operating
temperature for a minimum of two hours.
Follow these guidelines to avoid temperature problems:
m Avoid exposing cassettes to severe temperature conditions. For example,
don’t store a cassette in a car in bright sunlight.
m Avoid transferring data to or from a tape cassette when the temperature
is changing by more than 10˚ F per hour (roughly 5˚C per hour).
Page 83

83
Cleaning the tape-drive heads
The most common reason for the display of a caution signal on the front
panel is that the tape-drive heads are dirty. Although your tape drive has a
built-in roller for cleaning the heads during normal operation, you still
need to perform a separate cleaning step as part of preventive maintenance.
Your system comes with a cleaning cassette that you should use to clean the
tape-drive heads after every 25 hours of running time.
The Apple cleaning cassette P/N 654-0002 is approved for use with the
Workgroup Server DDS-2 DAT drive. This cleaning tape is the “dry” type.
Don’t use the “wet,” alcohol-style cleaning tapes. Note that, in general,
cleaning tapes that work with DDS-2 drives also work with DDS drives,
but DDS cleaning tapes should not be used with DDS-2 drives.
When you insert the cleaning cassette into the drive, the drive automatically
loads it and cleans the heads. When the cleaning process is completed, the
drive automatically ejects the cassette. Keep a record of how many times
you use the cleaning cassette. After 25 uses, replace it.
The interval at which you clean the tape drive depends on how often you
use it. In general, if you back up daily, you should clean the drive weekly. If
you back up weekly, you should clean the tape drive once a month.
For more information about using the cleaning cassette, refer to the instructions that came with it. For additional cleaning cassettes, see your Appleauthorized service provider.
Page 84

84
Page 85

85
7Troubleshooting
If you have trouble with your server, review the solutions to typical
problems listed in this chapter.
If you have a question or encounter a problem while your system is still
running, you can also check the “Troubleshooting” topic of Macintosh
Guide, available in the Guide (h) menu. For more information on the kinds
of on-screen help available, see Appendix A, “Getting Help,” in this guide.
Page 86

86
When you run into trouble
When you see an error message, you don’t have to take action immediately.
The message stays on the screen until you click the OK button or turn off the
server.
To help diagnose and correct the problem, gather as much information
about the situation as you can before starting over.
m Make a note of exactly what you were doing when the problem occurred.
Write down the message on the screen and its ID number (if any). Also
list the programs you were using and the names of any items you know
have been added to the System Folder since the system software was
installed. This information will help a service person diagnose the
problem. (It is helpful to keep a printed copy of the items in your System
Folder. See instructions for printing a list of files in a window in the
“Printing” topic of Macintosh Guide, available in the Guide h menu.)
m Check the screen for any clues. Is a menu selected? What programs and
document icons are open? Note anything else that seems relevant.
m If you were typing text and were not able to save it before the problem
occurred, you can write down the parts of the text still visible on the
screen so that some of your work will be easy to replace.
m Ask other Macintosh users about the problem you’re having; they may
have a solution for it.
m Find out what actions users were performing on the server (such as
copying large files, launching programs on the server, or installing
programs over
the network).
If you need repair service, consult the service and support information that
came with your server for instructions on how to contact an Appleauthorized service provider or Apple for assistance.
Page 87

87
WARNING If you have a problem with your server and nothing
presented in this chapter solves it, consult the service and support
information that came with your server for instructions on how to
contact an Apple-authorized service provider or Apple for assistance.
If you attempt to repair the server yourself, any damage you may
cause to the server will not be covered by the limited warranty on
your server. Contact an Apple-authorized dealer or service provider
for additional information about this or any other warranty question.
Start over
Often you can eliminate a problem simply by clearing the server’s memory
and starting over.
If you can, save any open documents before restarting the server. If your
system is “frozen” and does not respond to any input, or if you have a
“bomb” message on the screen, saving may not be possible.
You can try pressing x-Option-Esc to quit the program in use when the
problem occurred; if this works, you can then save the documents open in
other programs before restarting. (Be sure to restart the server immediately
after you save your documents—quitting a program using x-Option-Esc
may leave corrupted data in the server’s memory. This corrupted data is
erased when you restart the server.)
Page 88

88
To restart your server, try the following steps:
1 If you can, choose Restart from the Special menu or from the dialog box
that’s on screen.
2 If you can’t choose Restart, press x-Control-Power key.
This key combination restarts the server. (Use this key combination only
when you can’t choose Restart from the Special menu.)
3 Turn off your server with the power button on the front panel of the
server, wait at least 10 seconds, and then turn it on again.
If the server does not turn off, try pressing and holding down the power
button for 3 to 4 seconds.
4 If the power button doesn’t turn off the server, unplug your server.
5 If you suspect that the problem is with a peripheral device, such as a
printer or external hard disk, turn it off for 10 seconds or more, then turn
it on again and restart the server.
Rebuild your desktop
A process known as “rebuilding the desktop” helps your server keep track
of data on your startup disks. (Although the hard disk in your server is
usually the startup disk, you can start up from any other disk that has
system software installed.)
Rebuilding your desktop can solve a number of problems. For example,
when application documents are no longer represented by applicationspecific icons (and are instead represented by generic icons on the desktop),
rebuilding the desktop fixes the problem. Afterward, appropriate icons
should appear for all documents.
Some extensions may interfere with rebuilding your desktop. To prevent
problems, you’ll need to turn off all extensions except Macintosh Easy
Open before you rebuild your desktop. When you finish rebuilding the
desktop, turn the extensions you normally use back on.
Page 89

89
To rebuild the desktop of a startup disk, follow these steps:
1 Save your set of currently selected extensions.
a. Open the Extensions Manager control panel by choosing Extensions
Manager from the Control Panels submenu of the Apple (K) menu.
b. From the Sets pop-up menu, choose Save Set.
c. In the Save Set dialog box, type a name for your currently selected
extensions (for example, “My Extensions”) and click OK. The name of
your set is added to the Sets pop-up menu.
2 Choose All Off from the Sets pop-up menu to turn off all extensions.
3 Turn on Macintosh Easy Open by clicking it in the list (under Control
Panels) so that a checkmark appears beside it.
4 Restart your server while holding down the Command (x) and Option
keys.
Hold down the
x and Option keys until you see the dialog box that asks if
you’re sure you want to rebuild your desktop file. When the dialog box
appears, you can release the keys.
5Click OK.
The desktop is rebuilt.
IMPORTANT Do not stop the desktop-rebuilding process. Doing so could
corrupt your system files.
6 Turn your original set of extensions back on.
a. Open the Extensions Manager control panel by choosing Extensions
Manager from the Control Panels submenu of the Apple (K) menu.
b. From the Sets pop-up menu, choose the name you gave your set of
extensions in step 1.
7 Restart your server to activate the extensions.
Page 90

90
Solving typical problems
This section contains descriptions of problems your server may experience.
Some problems may be caused by your CD-ROM drive, so if you don’t find
your problem here, be sure to check the section “Solving CD-ROM
Problems” later in this chapter.
IMPORTANT Be sure to review the information in the Workgroup Server
Read Me file located on your server’s hard disk and on the Workgroup
Server Software CD-ROM disc. This file contains late-breaking information
and tips.
The following table lists problems and the page number for each problem.
Problem Page
Your server’s performance decreases 91
You cannot turn on the server 91
The server is turned on but the screen is dark 92
A disk icon with a blinking question mark appears 92
A disk icon with an X appears 93
A “sad” Macintosh icon appears 93
You hear a prolonged beep as the server starts up 93
Your server won’t start up after you install CD-ROM drive software 94
Your server won’t restart, and a CD-ROM disc is in the CD-ROM drive 94
Your server changes to LocalTalk at startup 94
Your server starts up from the wrong hard disk 94
Your server’s clock keeps time inaccurately 95
Icons do not appear correctly on your screen 95
Your server can’t read a floppy disk 96
You can’t eject a floppy disk 96
You can’t start an application program 97
A dialog box with a “bomb” appears 98
The pointer doesn’t move when you move the mouse 98
Typing on the keyboard produces nothing on the screen 99
An application program can’t be found 100
You experience problems using a document from a DOS computer 101
Page 91

91
Problem Page
Your application program can’t be opened because a file can’t be found 101
You experience problems using an older Macintosh program 101
CD-ROM problems 102
Printer connectivity problems 110
AppleTalk problems 111
TCP/IP problems 112
Hard disk problems 113
Your server’s performance decreases.
If you notice a decrease in your server’s speed and general performance
after adding special software (a control panel, a system extension, or a
custom utility), it may be because your special software does not work well
with Power Macintosh computers.
To see if this is the problem, use the Extensions Manager control panel to
turn off individual programs and extensions, one at a time, and then restart
the server. (For information on using the Extensions Manager control panel,
see the “Customizing Your Computer” topic of Macintosh Guide, available
in the Guide h menu.) If your server performs better when a special
program or extension is removed, contact the software’s manufacturer for
information or an upgrade.
If you still do not notice an improvement after removing all special
programs, try doing a “clean” installation of system software, as described
in “Doing a Clean Installation of System Software” in Chapter 4.
You cannot turn on the server.
See the section about turning on your server in the setup guide that came
with your server.
Page 92

92
The server is turned on but the screen is dark.
The server or the monitor is not getting power, a program has darkened the
screen, or the monitor controls are not adjusted properly.
m If you use a screen-saver program or the Energy Saver control panel to
dim the screen, press a key or move the mouse.
m Check the monitor’s brightness and contrast controls and turn them up
if necessary.
m Check that the monitor is turned on.
m Check that the power cord and monitor cable are plugged in and firmly
connected to the server and that the electrical outlet has power. The
power light on the server’s front panel should be on.
m If you have more than one monitor, and only one is dark, check that it is
set up correctly in the Monitors & Sound control panel.
m If none of these steps solves the problem, you may need to reset your
server’s parameter RAM (PRAM). Reset PRAM by turning off the server
and disconnecting all external SCSI devices. Next, restart the server while
holding down the key combination x-Option-p-r. Wait for the second
startup chime, then release the keys. (Note that the Caps Lock key must
be in the up position. This procedure won’t work with the uppercase “P”
and “R” keys.)
A disk icon with a blinking question mark appeared when you started
your server.
The blinking question mark indicates that your server cannot find system
software. You may need to repair a damaged disk, or reinstall system
software.
m Your server may be having a problem recognizing a SCSI device. Turn off
external SCSI devices and restart.
If the server starts up after you turn off your SCSI devices, read the
section on SCSI devices in the setup guide that came with your server for
information on connecting SCSI devices and assigning SCSI ID numbers.
Page 93

93
m The system software is not installed on the startup hard disk, the system
software is damaged, or the hard disk is not working properly. Start up
your server with the Workgroup Server Software CD-ROM disc (see
“Starting Up From a CD-ROM Disc” in Chapter 4). Then refer to “Solving
Hard Disk Problems” at the end of this chapter.
If repairing the disk doesn’t help, follow the instructions in “Installing
System Software” in Chapter 4.
A disk icon with an X appeared and the floppy disk was ejected.
Your server ejected a floppy disk that is not a startup disk.
m Wait a few seconds. The server should start up from its internal hard
disk. Make sure you insert floppy disks only after the server has begun
starting up.
A “sad Macintosh” icon appeared and the server won’t start up.
Your server cannot start up because of a problem with the system software
or the server hardware.
m Eject any floppy disks (or CD-ROM discs) by turning off the server and
then holding down the mouse button while you turn the server on again.
Try starting up with a different startup disk (such as the Workgroup Server
Software CD-ROM disc). If the “sad Macintosh” icon appears again,
consult the service and support information that came with your server for
instructions on how to contact an Apple-authorized service provider or
Apple for assistance.
You hear a prolonged beep during the startup process.
Sometimes during heavy network traffic, a server may not start up correctly.
Disconnect the Ethernet cable before you try to start up again, and reconnect it
after the server starts up. Open the AppleTalk control panel to make sure that
Ethernet is still selected.
Page 94

94
You installed a CD-ROM drive after you bought your server and your
server won’t restart after you’ve copied software for your CD-ROM drive
to the System Folder.
m If you attempt to install software for your CD-ROM drive without using
the Installer, you may not be able to restart your server. Restart the server
while holding down the Shift key (to turn off system extensions) and
then remove any CD-ROM software files you copied by dragging them to
the Trash. Reinstall the software according to the instructions that came
with the drive.
If this procedure doesn’t solve the problem, restart your server using the
Workgroup Server Software CD-ROM disc that came with your server.
(For instructions on starting your server using a CD-ROM disc, see
“Starting Up From a CD-ROM Disc” in Chapter 4.)
Your server won’t restart, and a CD-ROM disc is in the CD-ROM drive.
m Your server may be trying to start up from the CD-ROM disc. Press the
Open/Close button of your CD-ROM drive to open the tray and remove
the CD-ROM disc. Close the tray, then restart your server.
Yo u see an error messa g e at startu p telling you tha t the sy stem will use
the Lo calTal k p ort.
There may be a problem with the cable that connects your server to the
network—it may be loose or damaged. Verify the connection, as described
in the setup guide that came with your server, and restart your server.
The server starts up from the wrong hard disk, or the hard disk icon
does not appear on the desktop.
m The startup disk may be slow to start up.
During startup, your server’s operating system finds and mounts
attached SCSI devices that are up and running within 20 seconds. Some
very large hard disk drives (such as 2-gigabyte drives) may take longer
than 20 seconds to come up to speed and therefore may not be
recognized by the operating system when the server is first turned on.
Use the Drive Setup program to make the disk available. Drive Setup is
located in the Utilities folder in the Apple Extras folder. For instructions,
see the section “Mounting Volumes” in Chapter 4.
Page 95

95
If you still have a problem, try the following:
m If the hard disk is external, make sure it is turned on and its cable is
connected firmly and properly terminated; then restart the server.
m Check the ID numbers of all SCSI equipment connected to your server.
See the information on SCSI devices in the setup guide that came with
your server.
m If the hard disk is your startup disk, start up your server with the
Workgroup Server Software CD-ROM disc (see “Starting Up From a CDROM Disc” in Chapter 4). Then see “Solving Hard Disk Problems” (later
in this chapter). If repairing the disk doesn’t help, follow the instructions
in “Installing System Software” in Chapter 4.
IMPORTANT If the hard disk in question has been initialized for use with
Apple RAID volumes, you won’t see an icon for it on the desktop until you
create at least one RAID volume on that disk.
The server’s clock keeps time inaccurately.
m Your server has a clock that runs continuously. When the server is turned
off, a battery keeps the clock running. If your clock begins to keep time
inaccurately, have your Apple-authorized service provider replace the
battery. Consult the service and support information that came with your
server for instructions on how to contact an Apple-authorized service
provider or Apple for assistance.
Icons do not appear correctly on your screen.
You need to “rebuild the desktop”—a process that helps your server keep
track of files and folders on your hard disks. For instructions, see “Rebuild
Your Desktop” earlier in this chapter.
Page 96

96
Your server can’t read a floppy disk.
If you see a message that a floppy disk is unreadable, try one of the
following:
m Insert the disk again—sometimes that’s all it takes.
m If the disk has never been used, you may simply need to initialize it. See
the instructions for preparing a disk listed in the “Disks” topic of
Macintosh Guide, available in the Guide (h) menu.
m Insert the disk in another computer’s disk drive. If that computer can use
the disk, make a copy of the data and put the copy on a different floppy
disk.
m You may need to repair the disk because it is damaged. For information
on testing and repairing disks, see “How to Repair a Hard Disk or
Floppy Disk” later in this chapter.
If you are trying to use a DOS disk:
m The disk may have been formatted incorrectly on a DOS computer. On
DOS computers it’s possible to format a standard double-sided disk in a
high-density (1440K) format, and vice versa. Disks formatted this way
cannot be read by a Macintosh computer.
When formatting disks on a DOS computer, always format standard
double-sided disks in the 720K format. Always format high-density disks
in the 1440K format.
If a disk has been formatted incorrectly, use a DOS computer to copy its
contents onto another disk that has been properly formatted.
You can’t eject a floppy disk.
If you can’t eject a floppy disk in the usual way, try the following in order:
m Hold down the x and Shift keys and press the number 1 key on your
keyboard to eject a disk in the internal disk drive.
m Turn off the server. If the disk isn’t ejected, then hold down the button on
your mouse or other pointing device while you turn the server on again.
m Locate the small hole near the disk drive’s opening, and carefully insert
the end of a large straightened paper clip into it. Push gently until the
disk is ejected. Do not use excessive force.
Page 97

97
If none of these solutions works, take the server or disk drive to your
Apple-authorized service provider to have the disk removed.
You can’t start your program or it quits unexpectedly. When you try to
open a program, you see a message that not enough memory is
avai lable.
The program needs more memory or the server ran out of memory.
m Quit the programs that you have open and then open the program you
want to use, or restart your server.
m Use the program’s Info window to give it more memory. For more
information see the instructions for making more memory available in the
“Application Programs” topic of Macintosh Guide, available in the Guide
(h) menu.
m The program is a non–Power Macintosh application program running in
emulation mode that requires a separate floating-point unit (FPU). It
cannot use the built-in FPU on your server’s microprocessor.
Check the documentation that came with the program or contact the
program’s manufacturer to find out if the program requires the FPU
found in a non–Power Macintosh chip. If it does, you may need to
upgrade to a Power Macintosh version of the program, or install software
that emulates a non–Power Macintosh FPU. (See your dealer for this
software.)
m Sometimes incompatible system extensions or control panels can cause
software problems. Restart while holding down the Shift key to turn off
all system extensions temporarily.
If your program works normally after you do this, use the Extensions
Manager control panel to turn off individual extensions and control
panels. For detailed instructions, see the “Customizing Your Computer”
topic of Macintosh Guide, available in the Guide (h) menu.
If your program performs better when a particular extension or control
panel is turned off, contact the software’s manufacturer for information
or an upgrade.
Page 98

98
A dialog box with a “bomb” icon appears.
Your system has a software problem.
m Write down what you were doing when the dialog box appeared, and
write down the number on the message, if there is one.
m Restart your server (see “Start Over” earlier in this chapter). Most
software problems are temporary and restarting usually corrects the
problem.
m If the problem recurs, check the startup disk and program you are using
when the message appears. Make sure that all programs, desk
accessories, and system extensions you’re using are compatible with the
system software. Reinstalling the system software may correct the
problem.
m If the bomb only occurs in one application program, try reinstalling the
program from the original disks. If reinstalling doesn’t solve the problem,
contact the manufacturer of the program.
m Sometimes incompatible system extensions or control panels can cause
system software problems. To see if this is the problem, use the
Extensions Manager control panel to turn off individual extensions and
then restart the server. For information on using this control panel to
manage system extensions, see the “Customizing Your Computer” topic
of Macintosh Guide, available in the Guide (h) menu. If turning off these
programs doesn’t correct the problem, you may need to reinstall system
software.
The pointer doesn’t move when you move the mouse.
The mouse is not connected properly, its signals are not reaching the server,
or there is a software error.
m Turn off the server by using the power button on the front panel of the
server check that the mouse cable is connected properly, then restart the
server.
m Clean the mouse. (For information about cleaning the mouse, see the
setup guide that came with your server).
m If you have another mouse or pointing device, try connecting and using
it. (Turn off the server first.) If it works, there is probably something
wrong with your mouse.
m Restart the server with a different startup disk (such as the Workgroup
Server Software CD-ROM disc). If the mouse works, reinstall system
software on your startup disk.
Page 99

99
m If the problem recurs, it may be due to an incompatible program. Make
sure that all programs, desk accessories, and system extensions you’re
using are compatible with the system software.
If none of these procedures solves the problem, consult the service and
support information that came with your server for instructions on how to
contact an Apple-authorized service provider or Apple for assistance.
Typing on the keyboard produces nothing on the screen.
The insertion point hasn’t been set, no text is selected, an application
program is not active, the keyboard is not connected properly, the
keyboard’s signals are not reaching the server, or there is a software error.
m Make sure the program you want to use is the active program.
m Place the pointer in the active window and click to set an insertion point
or drag to select text (if applicable).
m Easy Access may be turned on. (When Easy Access is turned on, the
server beeps every time you press a key.) Open Easy Access from the
control panels listed under the Apple (K) menu and turn it off.
m Turn off the server by using the power button on the front panel of the
server, then check that the keyboard cable is connected properly at both
ends.
m Turn off the server, then connect the keyboard cable to the other ADB
port (marked with the V icon) on the keyboard. (You may have to unplug
the mouse to do this.) If your keyboard cable is connected to your
monitor, connect it to another ADB port on the monitor or directly to the
server’s ADB port (on the back of the server). If typing still doesn’t work,
the problem is most likely in the keyboard itself.
m If you have access to another keyboard, try using it instead. (Turn off the
server before connecting it.)
m Restart the server with a different startup disk (such as the Workgroup
Server Software CD-ROM disc). If this solves the problem, reinstall system
software on your startup disk.
If none of these procedures solves the problem, consult the service and
support information that came with your server for instructions on how to
contact an Apple-authorized service provider or Apple for assistance.
Page 100

100
You see a message that an application program can’t be found.
The following dialog box appears if you try to open a document created
using software that is not on your hard disk.
Normally, you see this message if you try to open a document that came
from another computer with software that is different from yours.
m Some documents can be opened by more than one application program.
Try starting a program that you think might be able to open the
document, then choose the Open command from the program’s File
menu to try to open the document. (Or drag the document to the
program’s icon. If the program can open the document, the program’s
icon highlights.)
m Purchase and install the correct software to use the document, or find out
if the original owner of the document can convert it to a form that one of
your programs can use.
m Don’t try to open the files in your System Folder. Most of the System
Folder files are used by your server for internal purposes, and are not
intended to be opened.
m Rebuild your desktop. (Refer to “Rebuild Your Desktop” earlier in this
chapter.)
m The application program itself may be damaged. Try reinstalling it.
m If the document is from a DOS computer, use the PC Exchange control
panel. See the information on setting up your Macintosh to use DOS files
in the “DOS, Windows, Apple II Files” topic of Macintosh Guide,
available in the Guide (h) menu.
m See the Workgroup Server Read Me file for additional information about
Macintosh PC Exchange and DOS-formatted media.
 Loading...