

Page 1

Apple Wireless
Keyboard
Page 2

1
Setting Up Your Apple Wireless Keyboard
Congratulations on selecting the Apple Wireless Keyboard as
your input device.
Using the Wireless Keyboard
The information in this booklet supplements the setup instructions in the user’s guide
that came with your Mac. Follow the steps on the next several pages to:
Â
Install batteries in your keyboard.
Â
Set up your Mac.
Â
Use Setup Assistant to set up your keyboard with your Mac.
Â
Use Software Update to install the latest software.
Don’t turn on your keyboard until you start up your Mac in Step 3.
Important:
small children.
2
English
Keep the battery compartment cover and the batteries out of the reach of
Page 3
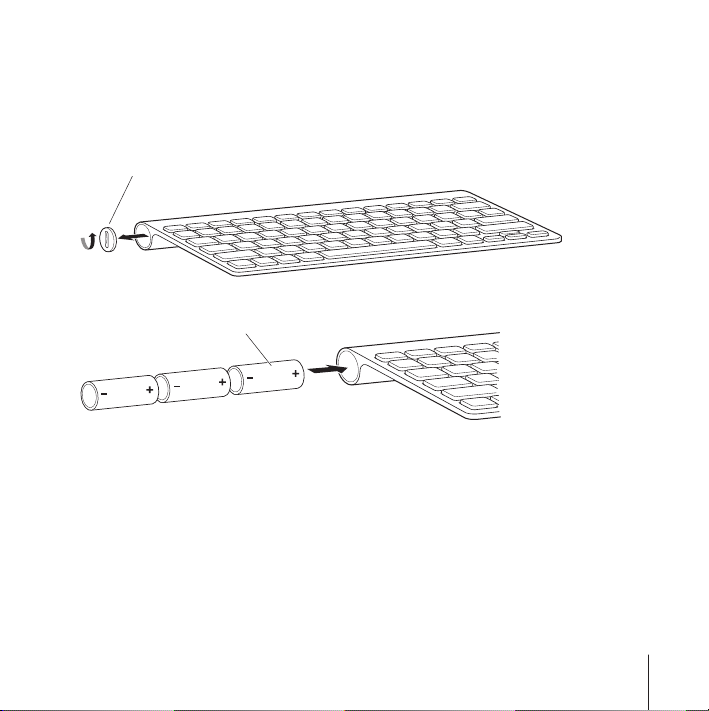
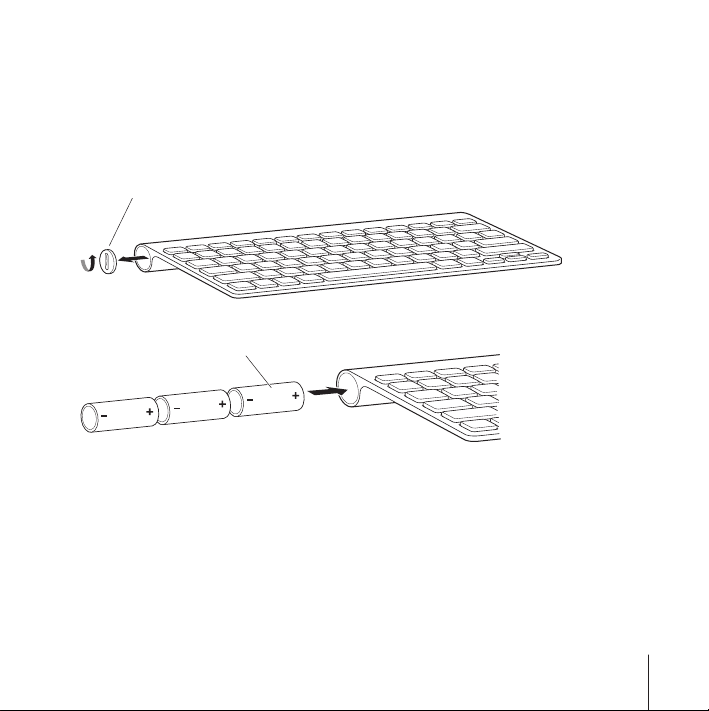
Step 1: Install the Batteries
Follow the instructions below to install batteries in your Apple Wireless Keyboard.
To install batteries in the keyboard:
1
Use a coin to remove the battery compartment cover.
Battery compartment cover
2
Slide the batteries into the battery compartment as shown below.
Insert batteries
3
Replace the battery compartment cover and leave the keyboard turned off until you
start up your Mac in Step 3.
Note:
When the Power On light is off, the keyboard is off.
Step 2: Set Up Your Mac
Follow the instructions in the user’s guide that came with your Mac to set it up.
Because you have a wireless keyboard, skip the instructions to connect a USB keyboard.
Wait to start up your Mac until instructed to do so in Step 3.
English
3
Page 4
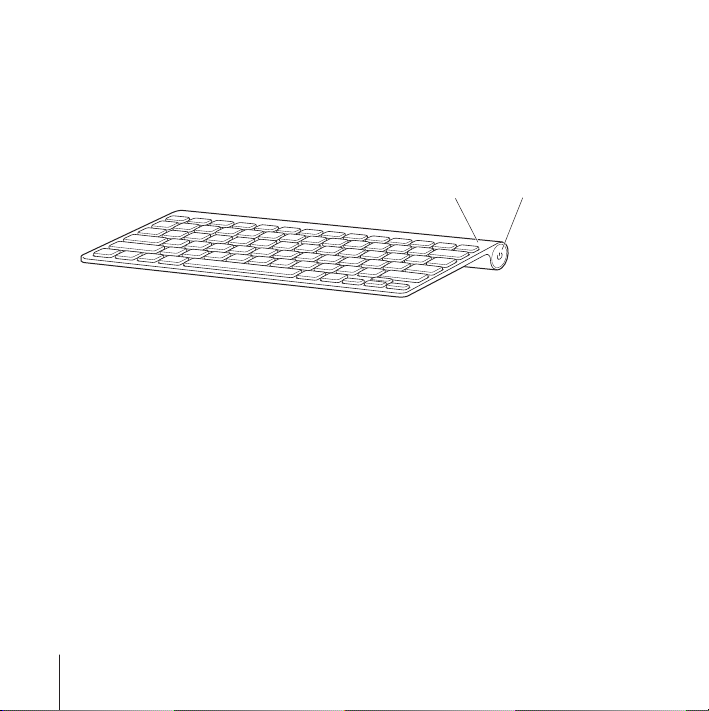
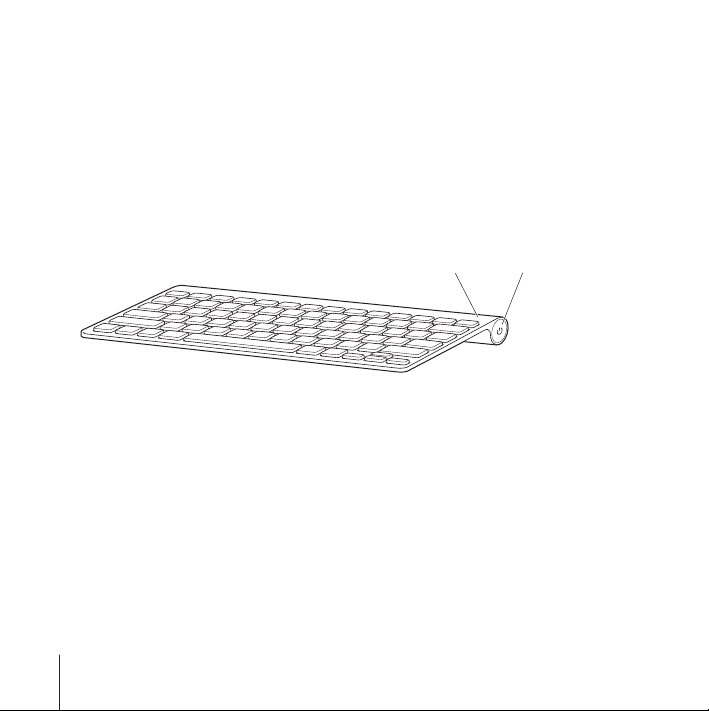
Step 3: Pair Your Keyboard
Before you can use your keyboard, you have to pair it with your Mac. Pairing allows
your keyboard to communicate wirelessly with your Mac. You only have to pair once.
The first time you start up your Mac, Setup Assistant guides you in setting up your
Apple Wireless Keyboard and pairing it with your Mac.
Power On light
1
Push and release the On/off (®
2
Turn on your Mac.
3
When your Mac starts up, follow the onscreen instructions in Setup Assistant.
) switch to turn on the Apple Wireless Keyboard.
On/off switch
Step 4: Install Software
To use your keyboard and take advantage of the full range of features, you need to
update your Mac to Mac OS X v10.4.10 or later and install the keyboard software
update.
To update to the latest version of Mac OS X and install the keyboard software update,
choose Apple (
) > Software Update from the menu bar and follow the onscreen
instructions.
4
English
Page 5
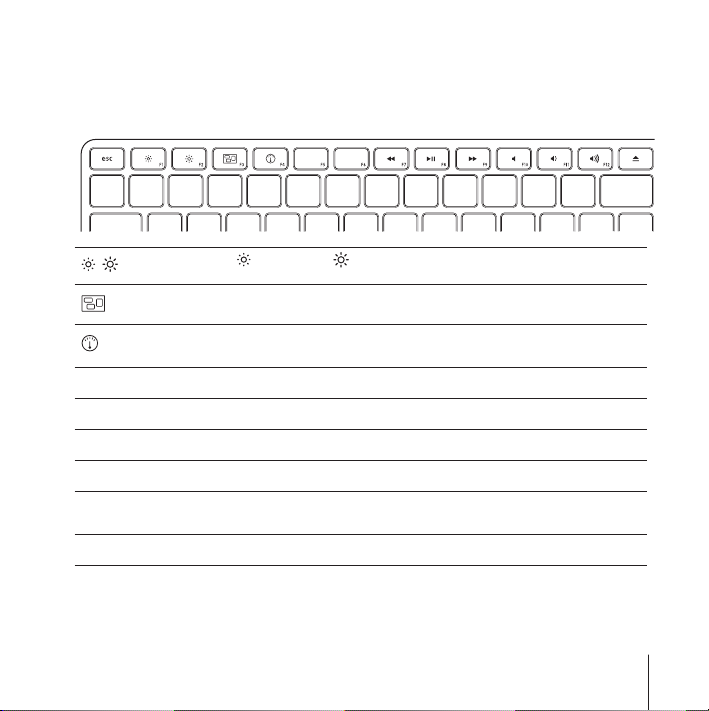
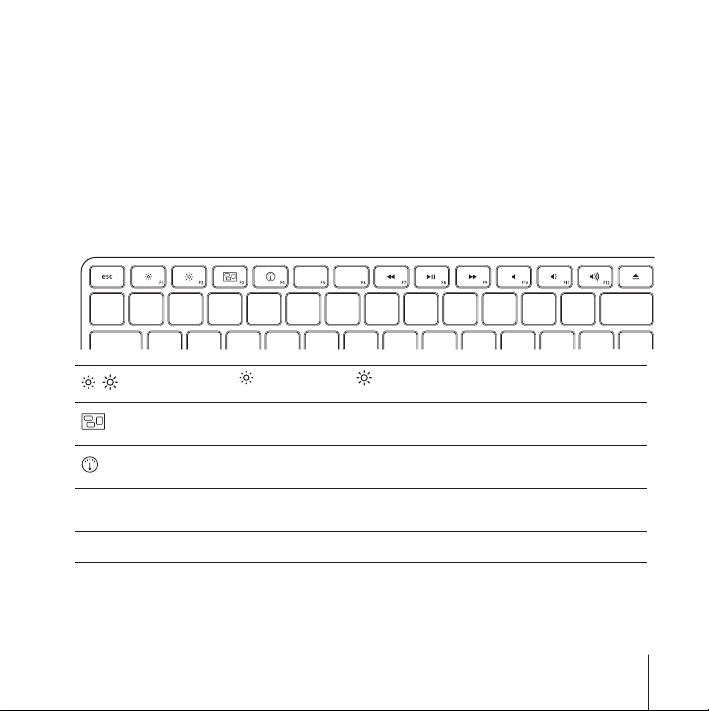
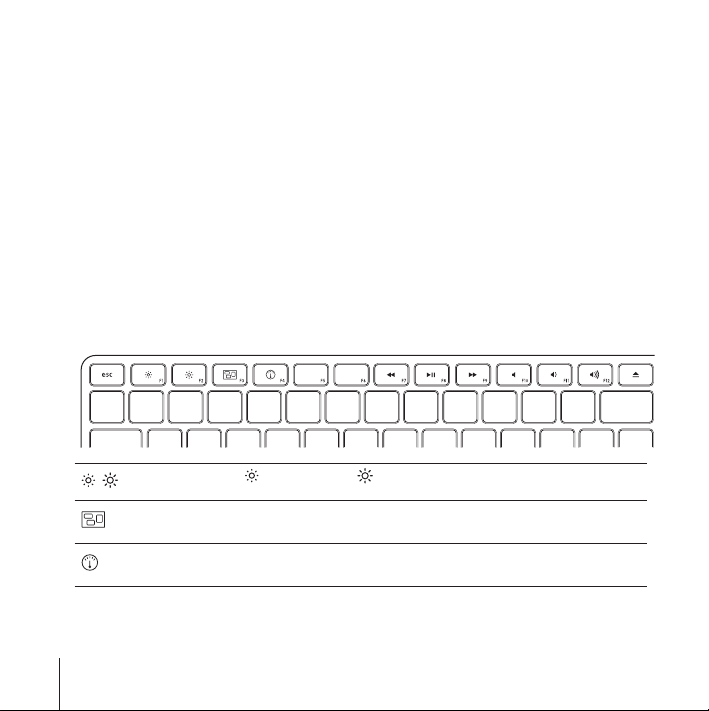
Using Your Keyboard
Use the keys at the top of your keyboard to adjust the brightness of your display, open
Exposé, view Dashboard widgets, control volume, and more.
Decrease ( ) or increase ( ) the brightness of your display.
Use Exposé All Windows to see all of the open windows on your desktop at once.
Open Dashboard to access your widgets and get information about the weather,
stocks, and more.
]
’
‘
—
–-
C
Rewind or go to the previous song, movie, or slideshow.
Play or pause songs, movies, or slideshows.
Fast-forward or go to the next song, movie, or slideshow.
Mute the sound coming from the speakers or headphone port on your computer.
Decrease (–
headphone port on your computer.
Press and hold the Media Eject key to eject a disc.
) or increase (-
) the volume of sound coming from the speakers or
English
5
Page 6

Customizing Your Keyboard
You can customize your keyboard using the Keyboard pane of Keyboard & Mouse
preferences.
To customize your keyboard:
1
Choose Apple (
2
Click Keyboard & Mouse.
3
Click Keyboard or Keyboard Shortcuts.
Click Keyboard Shortcuts to assign shortcuts to menu commands in a Mac OS X
application or in the Finder.
More information about your keyboard is available in Mac Help. Open Mac Help and
search for “keyboard.”
) > System Preferences.
Renaming Your Keyboard
Your Mac automatically gives your wireless keyboard a unique name the first time you
pair it. You can rename your keyboard using Keyboard & Mouse preferences. Choose
Apple (
and enter a name in the Name field.
) > System Preferences and click Keyboard & Mouse. Click the Bluetooth® tab
Cleaning Your Keyboard
Follow these guidelines when cleaning the outside of your keyboard:
Â
Remove the batteries from the keyboard.
Â
Use a damp, soft, lint-free cloth to clean the exterior of the keyboard. Avoid getting
moisture in any openings.
Â
Don’t use aerosol sprays, solvents, or abrasives.
6
English
Page 7
About Your Batteries
Your Apple Wireless Keyboard comes with three alkaline batteries. You can use alkaline,
lithium, or rechargeable AA batteries in your keyboard.
WARNING:
mix old batteries with new batteries or mix battery types (for example, don’t mix
alkaline and lithium batteries). Don’t open or puncture the batteries, install them
backwards, or expose them to fire, high temperatures, or water. Keep batteries out of
the reach of children.
You can use Keyboard & Mouse preferences to check the battery level. Choose
Apple (
Note:
you don’t plan to use your keyboard for an extended period, remove the batteries.
Dispose of batteries according to your local environmental laws and guidelines.
When you replace the batteries, replace them all at the same time. Don’t
) > System Preferences. Click Keyboard & Mouse and click Bluetooth.
To conserve battery power, turn your keyboard off when you aren’t using it. If
Ergonomics
For information about ergonomics, health, and safety, visit the Apple ergonomics
website at www.apple.com/about/ergonomics.
Support
For support and troubleshooting information, user discussion boards, and the latest
Apple software downloads, go to www.apple.com/support.
English
7
Page 8

2
Configuration de votre clavier Apple Wireless Keyboard
Félicitations pour l’acquisition du clavier Apple Wireless
Keyboard.
Utilisation du clavier sans fil
Ce fascicule vient compléter les instructions d’installation se trouvant dans le guide
de l’utilisateur fourni avec votre Mac. Suivez les instructions des pages suivantes pour :
Â
Installer les piles dans le clavier.
Â
Configurer votre Mac.
Â
Utiliser Assistant réglages pour configurer votre clavier via votre Mac.
Â
Utiliser Mise à jour de logiciels pour installer les derniers logiciels.
N’activez pas votre clavier avant de démarrer votre Mac au cours de l’étape 3.
8
Important :
des enfants.
Français
maintenez le couvercle prévu pour les piles et celles-ci hors de portée
Page 9
Étape 1: Installation des piles
Veuillez suivre les instructions ci-dessous pour installer les piles dans votre clavier
Apple Wireless Keyboard.
Pour installer les piles dans le clavier :
1
Utilisez une pièce pour retirer le couvercle des piles.
Couvercles des piles
2
Placez les piles dans le compartiment comme illustré ci-dessous.
Insérez les piles
3
Replacez le couvercle des piles et laissez le clavier éteint jusqu’au démarrage de votre
Mac lors de l’étape 3.
Remarque :
lorsque la lumière « Allumé » est éteinte, le clavier est éteint.
Étape 2: Configurer votre Mac
Configurer votre Mac en suivant les instructions du guide de l’utilisateur qui
l’accompagne. Étant donné que vous possédez un clavier sans fil, les instructions
concernant la connexion d’un clavier USB ne vous concernent pas.
Français
9
Page 10
Ne démarrez votre Mac que lorsque cela vous est indiqué dans l’étape 3.
Étape 3: Jumeler votre clavier
Avant de pouvoir utiliser votre clavier, vous devez le jumeler avec votre Mac. Le
jumelage permet à votre clavier de communiquer sans fil avec votre Mac. Cette
opération ne doit être effectuée qu’une seule fois.
Lors du premier démarrage de votre Mac, l’Assistant réglages vous guide durant la
configuration de votre clavier Apple Wireless Keyboard ainsi que lors du jumelage
avec votre Mac.
Lumière d’alimentation active
1
Appuyez sur le bouton Activé/désactivé (®
) pour allumer le clavier Apple Wireless
Keyboard.
2
Allumez votre Mac.
3
Suivez ensuite les instructions à l’écran de l’Assistant réglages.
Étape 4: Installer le logiciel
Pour utiliser votre clavier et profiter pleinement de toutes ses fonctionnalités, vous
devez mettre à jour votre Mac à Mac OS X 10.4.10 ou ultérieur et installer la mise à
jour du logiciel clavier.
10
Français
Bouton
Activé/désactivé
Page 11
Pour mettre à jour à la dernière version de Mac OS X et installer la mise à jour du
logiciel clavier, sélectionnez le menu pomme (
) > Mise à jour de logiciels dans
la barre des menus et suivre les instructions à l’écran.
Utilisation de votre clavier
Utilisez les touches en haut de votre clavier pour régler la luminosité de votre écran,
ouvrez Exposé, affichez les widgets du Dashboard, contrôlez le volume et bien plus
encore.
Diminuez ( ) ou augmentez ( ) la luminosité de votre écran.
Utilisez l’option Exposé Toutes les fenêtres pour voir toutes les fenêtres ouvertes
sur votre bureau en même temps.
Ouvrez le Dashboard pour accéder à tous les widgets et obtenir des informations
concernant le temps, la bourse et bien plus encore.
]
’
Revenez en arrière ou allez au morceau, à la séquence ou au diaporama
précédent.
Lisez ou mettez des morceaux, des séquences ou des diaporamas en pause.
Français
11
Page 12

‘
—
–-
C
Avancez ou allez au morceau, à la séquence ou au diaporama suivant.
Coupez le son provenant des haut-parleurs ou du port de sortie casque de votre
ordinateur.
Diminuez (–
ou du port de sortie casque de votre ordinateur.
Maintenez enfoncé la touche d’éjection de disque pour éjecter un disque.
) ou augmentez (-
) le volume du son provenant des haut-parleurs
Personnalisation de votre clavier
Vous pouvez personnaliser votre clavier en utilisant la sous-fenêtre Clavier dans
les préférences Clavier et souris.
Pour personnaliser votre clavier :
1
Choisissez Apple (
2
Cliquez sur Clavier et souris.
3
Cliquez sur Clavier ou Raccourcis clavier.
) > Préférences Système.
Cliquez sur Raccourcis clavier pour attribuer des raccourcis à des commandes dans
une application Mac OS X ou dans le Finder.
Des informations complémentaires sur votre clavier sont disponibles dans l’Aide Mac.
Ouvrez l’Aide Mac et recherchez « clavier ».
Changement de nom de votre clavier
La première fois que le clavier sans fil est jumelé, votre Mac leur attribue automatiquement
un nom unique. Vous pouvez changer ce nom dans les préférences Clavier et souris.
Sélectionnez le menu Pomme (
Cliquez ensuite sur Bluetooth et saisissez un nouveau nom dans le champ correspondant.
12
Français
) > Préférences Système et cliquez sur Clavier et souris.
Page 13
Nettoyage de votre clavier
Suivez les indications pour le nettoyage externe de votre clavier :
Â
Retirez les piles du clavier.
Â
Utilisez un tissu doux légèrement humide pour nettoyer l’extérieur de votre clavier.
Empêchez l’humidité de s’introduire dans les interstices.
Â
N’utilisez pas de vaporisateurs, de produits solvants ou abrasifs.
À propos des piles
Le clavier Apple Wireless Keyboard est fourni avec trois piles alcalines AA. Vous pouvez
également utiliser des piles AA alcalines, au lithium ou rechargeables.
AVERTISSEMENT :
temps. Ne mélangez pas les nouvelles piles avec les anciennes et ne mélangez pas
les types de piles (par exemple des piles alcalines et des piles au lithium). N’ouvrez
pas les piles, ne les percez pas, ne les installez pas à l’envers et ne les exposez pas au
feu, à des températures élevées ou à l’eau. Conservez-les hors de portée des enfants.
Pour vérifier le niveau de charge des piles, consultez les préférences Clavier et souris.
Choisissez le menu Pomme (
puis sur Bluetooth.
Remarque :
n’en faites pas usage. Si vous ne prévoyez pas utiliser votre clavier durant une période
prolongée, retirez les piles.
Respectez les lois et les instructions régionales en matière de pile.
lorsque vous changez les piles, remplacez-les toutes en même
) > Préférences Système. Cliquez sur Clavier et souris,
pour économiser l’énergie des piles, éteignez votre clavier lorsque vous
Français
13
Page 14

Ergonomie
Pour obtenir des informations sur l’ergonomie, la santé et la sécurité, rendez-vous sur
le site web d’Apple concernant l’ergonomie : www.apple.com/fr/about/ergonomics.
Assistance
Pour toute information concernant l’assistance et le dépannage, les forums de
discussion et les derniers téléchargements des logiciels d’Apple, rendez-vous
sur www.apple.com/fr/support.
14
Français
Page 15

3
Konfigurieren Ihres
Apple Wireless Keyboard
Mit dem Kauf des Apple Wireless Keyboard haben Sie eine
gute Wahl getroffen.
Verwenden der drahtlosen Tastatur
Die Informationen in dieser Broschüre ergänzen die Installationsanleitungen im Handbuch, das Sie mit Ihrem Mac erhalten haben. Anweisungen zu den folgenden Schritten
finden Sie auf den nächsten Seiten:
Â
Einsetzen der Batterien in Ihrer Tastatur
 Konfigurieren Ihres Mac
 Verwenden des Systemassistenten zur Konfiguration Ihrer Tastatur mit Ihrem Mac
 Verwenden der Softwareaktualisierung zur Installation der neusten Software
Schalten Sie Ihre Tastatur erst ein, wenn Sie Ihren Mac wie in Schritt 3 beschrieben
gestartet haben.
Wichtig: Achten Sie darauf, dass Kinder keinen Zugang zur Abdeckung des Batterie-
fachs und zu den Batterien haben.
Deutsch
15
Page 16

Schritt 1: Einsetzen der Batterien
Befolgen Sie die hier beschriebenen Anweisungen, um die Batterien in Ihrem Apple
Wireless Keyboard einzusetzen.
Gehen Sie wie folgt vor, um die Batterien in die Tastatur einzusetzen:
1 Verwenden Sie eine Münze, um die Abdeckung des Batteriefachs zu entfernen.
Abdeckung des Batteriefachs
2 Setzen Sie die Batterien wie unten gezeigt in das Batteriefach ein.
Batterien einsetzen
3 Schließen Sie die Abdeckung des Batteriefachs. Schalten Sie die Tastatur jedoch erst
ein, wenn Sie Ihren Mac wie in Schritt 3 beschrieben gestartet haben.
Hinweis: Wenn die Betriebsanzeige nicht leuchtet, ist die Tastatur ausgeschaltet.
16 Deutsch
Page 17

Schritt 2: Konfigurieren Ihres Mac
Befolgen Sie zum Konfigurieren Ihres Mac die Anleitungen im Benutzerhandbuch,
das Sie mit dem Computer erhalten haben. Da Sie eine drahtlose Tastatur besitzen,
können Sie die Hinweise zur Installation einer USB-Tastatur ignorieren.
Starten Sie Ihren Mac erst, wenn Sie in Schritt 3 dazu aufgefordert werden.
Schritt 3: Herstellen der Verbindung zwischen Tastatur und Computer
Damit Sie Ihre Tastatur verwenden können, müssen Sie eine Verbindung zwischen
Tastatur und Computer herstellen. Durch das Herstellen dieser Verbindung kann die
Tastatur drahtlos mit Ihrem Mac kommunizieren. Sie müssen die Tastatur nur einmal
auf diese Weise mit dem Computer verbinden.
Wenn Sie Ihren Mac zum ersten Mal starten, wird der Systemassistent geöffnet und
führt Sie durch die Schritte, die für die Konfiguration des Apple Wireless Keyboard
und dem Herstellen der Verbindung mit Ihrem Mac erforderlich sind.
Betriebsanzeige
Ein-/Ausschalter
1 Schieben Sie den Ein-/Ausschalter (®) nach oben, um das Apple Wireless Keyboard
einzuschalten.
2 Schalten Sie Ihren Mac ein.
3 Befolgen Sie nach dem Start Ihres Mac die auf dem Bildschirm angezeigten
Anleitungen.
Deutsch 17
Page 18
Schritt 4: Installieren der Software
Damit Sie die Tastatur verwenden und das gesamte Funktionsspektrum nutzen
können, müssen Sie Ihren Mac auf Mac OS X 10.4.10 (oder neuer) aktualisieren und
die Aktualisierung der Software für die Tastatur installieren.
Zum Aktualisieren auf die neuste Mac OS X-Version und Installieren der aktuellen Tastatursoftware wählen Sie „Apple“ () > „Softwareaktualisierung“ aus der Menüleiste.
Befolgen Sie dann die angezeigten Anweisungen.
Verwenden der Tastatur
Verwenden Sie die Tasten oben auf der Tastatur, um die Helligkeit des Bildschirms
einzustellen, um Exposé zu öffnen, Dashboard Widgets anzuzeigen, die Lautstärke
zu steuern und vieles mehr.
Verringern ( ) oder erhöhen ( ) Sie die Helligkeit des Bildschirms.
Verwenden Sie die Exposé Option „Alle Fenster“, damit alle geöffneten Fenster
gleichzeitig auf dem Schreibtisch angezeigt werden.
Öffnen Sie Dashboard, um auf Ihre Widgets zuzugreifen und Informationen wie
Wetterbericht, Aktienkurse und mehr abzurufen.
18 Deutsch
Page 19

]
’
‘
—
–-
C
Wählen Sie den vorherigen Song oder Film oder die zuletzt angezeigte Diashow
bzw. Präsentation.
Starten oder stoppen Sie die Wiedergabe von Songs, Filmen oder Diashows und
Präsentationen.
Wählen Sie den nächsten Song oder Film oder die nächste Diashow bzw.
Präsentation.
Schalten Sie den Ton der Lautsprecher oder des Kopfhöreranschlusses des
Computers stumm.
Senken (–) oder erhöhen (-) Sie die Lautstärke des Tons der Lautsprecher
oder des Kopfhöreranschlusses des Computers.
Drücken und halten Sie die Medienauswurftaste, um eine CD oder DVD
auszuwerfen.
Anpassen der Tastatur
Mithilfe der Systemeinstellung „Tastatur & Maus“ können Sie Ihre Tastatur wunschgemäß anpassen.
Gehen Sie wie folgt vor, um die Tastatur anzupassen:
1 Wählen Sie „Apple“ (K) > „Systemeinstellungen“.
2 Klicken Sie auf „Tastatur & Maus“.
3 Klicken Sie auf „Tastatur“ oder „Tastatur-Kurzbefehle“.
Klicken Sie auf „Tastatur-Kurzbefehle“, um Menübefehlen in einem Mac OS X-Programm
oder im Finder bestimmte Tastenkombinationen zuzuweisen.
Weitere Informationen zu Ihrer Tastatur finden Sie in der Mac Hilfe. Öffnen Sie die
Mac Hilfe und suchen Sie nach dem Stichwort „Tastatur“.
Deutsch 19
Page 20

Umbenennen Ihrer Tastatur
Ihr Mac weist Ihrer drahtlosen Tastatur automatisch einen eindeutigen Namen zu,
wenn Sie erstmals die Verbindung zum Computer herstellen. Mithilfe der Systemeinstellung „Tastatur & Maus“ können Sie der Tastatur einen anderen Namen zuweisen.
Wählen Sie „Apple“ (K) > „Systemeinstellungen“ und klicken Sie auf „Tastatur & Maus“.
Klicken Sie auf den Titel „Bluetooth®“ und geben Sie einen Namen im Namensfeld ein.
Reinigen Ihrer Tastatur
Beachten Sie zum Reinigen des Tastaturgehäuses stets folgende Richtlinien:
 Nehmen Sie die Batterien aus der Tastatur heraus.
 Verwenden Sie zum Reinigen des Gehäuses ein leicht angefeuchtetes, flusenfreies
Tuch. Achten Sie darauf, dass durch die Öffnungen keine Feuchtigkeit in die Tastatur
gelangt.
 Verwenden Sie keine Sprays, lösungsmittelhaltige Reiniger oder Scheuermittel.
20 Deutsch
Page 21

Verwendete Batterien
Ihr Apple Wireless Keyboard wird mit drei Alkalibatterien geliefert. Sie können Alkali-,
Lithium- oder wiederaufladbare AA-Batterien in der Tastatur verwenden.
ACHTUNG: Ersetzen Sie stets den kompletten Batteriesatz, wenn die Batterien aus-
getauscht werden müssen. Verwenden Sie niemals alte und neue Batterien oder
unterschiedliche Batterietypen (also etwa Alkali- und Lithiumbatterien) gemeinsam.
Batterien dürfen nicht geöffnet oder anderweitig beschädigt werden. Vertauschen
Sie beim Einsetzen die Plus- und Minuspole nicht. Werfen Sie die Batterien nicht ins
offene Feuer und setzen Sie sie weder hohen Temperaturen noch Feuchtigkeit aus.
Bewahren Sie die Batterien außerhalb der Reichweite von Kindern auf.
Überprüfen Sie den Batterieladezustand mithilfe der Systemeinstellung „Tastatur &
Maus“. Wählen Sie „Apple“ () > „Systemeinstellungen“. Klicken Sie auf „Tastatur &
Maus“ und dann auf „Bluetooth“.
Hinweis: Zum Einsparen von Batteriestrom sollten Sie Ihre Tastatur ausschalten, wenn
Sie sie nicht verwenden. Wenn Sie Tastatur längere Zeit nicht verwenden wollen, empfiehlt es sich, die Batterien herauszunehmen.
Entsorgen Sie verbrauchte Batterien entsprechend den geltenden umweltrechtlichen
Bestimmungen.
Deutsch 21
Page 22

Ergonomie am Arbeitsplatz
Informationen zur Ergonomie am Arbeitsplatz und zur Sicherheit finden Sie
auf der folgenden Apple-Website: www.apple.com/de/about/ergonomics.
Support
Informationen zu Support und Fehlerbeseitigung, Diskussionsforen und die
neuste Apple-Software zum Laden finden Sie auf der folgenden Website:
www.apple.com/de/support.
22 Deutsch
Page 23

4 Het Apple Wireless Keyboard installeren
Wij stellen het op prijs dat u het Apple Wireless Keyboard als
invoerapparaat hebt gekozen.
Het Wireless Keyboard gebruiken
De informatie in deze handleiding is een aanvulling op de installatie-instructies in de
gebruikershandleiding bij de Mac. Op de volgende pagina's vindt u de stappen voor
onderstaande handelingen:
 Batterijen in het toetsenbord plaatsen
 De Mac configureren
 Met behulp van de configuratie-assistent het toetsenbord met uw Mac koppelen
 Met behulp van Software-update de meest recente software installeren
Zet het toetsenbord pas aan wanneer u de Mac opstart in stap 3.
Belangrijk: houd het klepje van de batterijhouder en de batterijen buiten bereik van
kleine kinderen.
Nederlands 23
Page 24

Stap 1: de batterijen plaatsen
Volg de onderstaande instructies om de batterijen in het Apple Wireless Keyboard te
plaatsen.
De batterijen in het toetsenbord plaatsen
1 Verwijder het klepje van de batterijhouder met behulp van een muntstuk.
Afdekklepje batterijhouder
2 Plaats de batterijen in de batterijhouder, zoals hieronder wordt weergegeven.
Batterijen plaatsen
3 Plaats het klepje van de batterijhouder terug. Schakel het toetsenbord pas in wanneer
u de Mac opstart in stap 3.
Opmerking: als het indicatielampje niet brandt, is het toetsenbord uitgeschakeld.
Stap 2: de Mac configureren
Om de Mac te configureren, volgt u de instructies in de gebruikershandleiding die u bij
uw computer hebt ontvangen. Omdat u een draadloos toetsenbord hebt, kunt u de
instructies voor het aansluiten van een USB-toetsenbord overslaan.
24 Nederlands
Page 25

Zet de Mac pas aan wanneer u in stap 3 wordt verzocht dit te doen.
Stap 3: het toetsenbord koppelen met de computer
U kunt het toetsenbord pas gebruiken nadat u het hebt gekoppeld met uw Mac.
Hierdoor kan het toetsenbord draadloos met de Mac communiceren. U hoeft deze
procedure slechts één keer uit te voeren.
De eerste keer dat u de Mac aanzet, leidt de configuratie-assistent u door de stappen
die u moet volgen om het Apple Wireless Keyboard te configureren en met uw Mac te
koppelen.
Aan/uit-lampje
Aan/uit-schakelaar
1 Druk eenmaal op de aan/uit-knop (®) om het Apple Wireless Keyboard aan te zetten.
2 Zet de Mac aan.
3 Nadat u de Mac hebt aangezet, volgt u de aanwijzingen van de configuratie-assistent.
Stap 4: software installeren
Om het toetsenbord en alle functies te kunnen gebruiken, moet u de Mac bijwerken
naar Mac OS X versie 10.4.10 of hoger en de update van de toetsenbordsoftware
installeren.
Nederlands 25
Page 26

Om Mac OS X bij te werken naar de nieuwste versie en de update van de
toetsenbordsoftware te installeren, kiest u 'Apple' () > 'Software-update' uit de
menubalk en volgt u de instructies op het scherm.
Werken met het toetsenbord
Met de toetsen aan de bovenkant van het toetsenbord kunt u onder andere de
helderheid van het beeldscherm aanpassen, Exposé openen, Dashboard-widgets
weergeven of het volume wijzigen.
Hiermee verlaagt ( ) of verhoogt ( ) u de helderheid van het beeldscherm.
Hiermee geeft u alle geopende vensters tegelijkertijd op het bureaublad weer.
Hiermee opent u Dashboard, zodat u via uw widgets onder andere de
weersinformatie en aandelenkoersen kunt bekijken.
]
’
26 Nederlands
Hiermee spoelt u terug of gaat u naar het vorige nummer, de vorige film of de
vorige diavoorstelling.
Hiermee speelt u nummers, films of diavoorstellingen af, of onderbreekt u het
afspelen.
Page 27

‘
—
–-
C
Hiermee spoelt u vooruit of gaat u naar het volgende nummer, de volgende film
of de volgende diavoorstelling.
Hiermee schakelt u het geluid van de luidsprekers of koptelefoonpoort op de
computer uit.
Hiermee verlaagt (–) of verhoogt (-) u het volume van de luidsprekers of
koptelefoonpoort op de computer.
Als u deze toets ingedrukt houdt, kunt u een schijf verwijderen.
De werking van uw toetsenbord aanpassen
U kunt de werking van uw toetsenbord aanpassen in het paneel 'Toetsenbord' van het
paneel 'Toetsenbord en muis' in Systeemvoorkeuren.
De werking van uw toetsenbord aanpassen
1 Kies 'Apple' () > 'Systeemvoorkeuren'.
2 Klik op 'Toetsenbord en muis'.
3 Klik op 'Toetsenbord' of 'Toetscombinaties'.
In het paneel 'Toetscombinaties' wijst u toetscombinaties toe aan menucommando's in
een Mac OS X-programma of in de Finder.
Raadpleeg Mac Help voor meer informatie over uw toetsenbord. Open Mac Help en
zoek op “toetsenbord”.
Nederlands 27
Page 28

De naam van het toetsenbord wijzigen
De Mac geeft het draadloze toetsenbord automatisch een unieke naam wanneer u dit
voor het eerst koppelt. U kunt de naam van het toetsenbord wijzigen in het paneel
'Toetsenbord en muis' in Systeemvoorkeuren. Hiervoor kiest u 'Apple' () >
'Systeemvoorkeuren' en klikt u vervolgens op 'Toetsenbord en muis'. Klik op 'Bluetooth'
en geef een naam op in het veld in het gedeelte 'Bluetooth-toetsenbord'.
Uw toetsenbord reinigen
Volg de onderstaande richtlijnen wanneer u de buitenzijde van het toetsenbord reinigt:
 Verwijder de batterijen uit het toetsenbord.
 Reinig de buitenkant van het toetsenbord met een vochtige, zachte, pluisvrije doek.
Zorg dat er geen vocht in de behuizing terechtkomt.
 Gebruik geen spuitbussen, oplosmiddelen of schuurmiddelen.
Informatie over de batterijen
Bij het Apple Wireless Keyboard worden drie alkalinebatterijen geleverd. Voor het
toetsenbord kunt u alkaline-, lithium- of oplaadbare AA-batterijen gebruiken.
WAARSCHUWING: Vervang altijd alle batterijen tegelijk. Gebruik geen oude en
nieuwe batterijen door elkaar en gebruik alleen batterijen van hetzelfde type
(bijvoorbeeld alleen alkalinebatterijen of alleen lithiumbatterijen). U mag de
batterijen nooit openmaken, doorboren, omgekeerd plaatsen of blootstellen aan
vuur, hoge temperaturen of water. Houd batterijen buiten het bereik van kinderen.
28 Nederlands
Page 29

U kunt het ladingsniveau van de batterijen controleren in het paneel 'Toetsenbord en
muis' in Systeemvoorkeuren. Kies 'Apple' () > 'Systeemvoorkeuren'. Klik op
'Toetsenbord en muis' en klik vervolgens op 'Bluetooth'.
Opmerking: Om het stroomverbruik van de batterij te beperken, kunt u het
toetsenbord het best uitschakelen wanneer u het niet gebruikt. Als u het toetsenbord
langere tijd niet gaat gebruiken, verwijdert u de batterijen.
U moet zich volgens de in uw woonplaats geldende richtlijnen of regelgeving van
batterijen ontdoen.
Ergonomie
Voor meer informatie over ergonomie, gezondheid en veiligheid raadpleegt u de
website www.apple.com/nl/about/ergonomics.
Ondersteuning
Voor meer informatie over ondersteuning, discussieforums voor gebruikers en de
meest recente Apple softwaredownloads raadpleegt u de ondersteuningswebsite van
Apple op www.apple.com/nl/support.
Nederlands 29
Page 30

5 Configurare la tastiera
Apple Wireless Keyboard
Congratulazioni per avere scelto Apple Wireless Keyboard
come dispositivo di ingresso.
Utilizzare la tastiera wireless
Le informazioni incluse in questo documento forniscono un supplemento alle istruzioni
incluse nel manuale utente fornito con il tuo Mac. Segui i passi descritti nelle pagine
seguenti per:
 Installare le batterie nella tastiera.
 Configurare il tuo Mac.
 Utilizzare Impostazione Assistita per configurare la tastiera per il tuo Mac.
 Utilizzare Aggiornamento Software per installare il software più recente.
Non accendere la tastiera finché non avrai avviato il tuo Mac (passo 3).
Importante: tieni il coperchio dell'alloggiamento batterie e le batterie fuori dalla
portata dei bambini piccoli.
30 Italiano
Page 31

Passo 1: Installare le batterie
Segui le istruzioni seguenti per installare le batterie in Apple Wireless Keyboard.
Per installare le batterie nella tastiera:
1 Utilizza una moneta per rimuovere il coperchio dell'alloggiamento batterie.
Coperchio dell'alloggiamento batterie
2 Fai scivolare le batterie nell’alloggiamento come illustrato di seguito.
Inserisci le batterie
3 Sostituisci il coperchio dell'alloggiamento batterie e non accendere la tastiera finché
non avrai avviato il tuo Mac (passo 3).
Nota: quando la spia di alimentazione è spenta, la tastiera è spenta.
Passo 2: Configurare il tuo Mac
Per configurare il tuo Mac, segui le istruzioni incluse nel manuale utente in dotazione.
Visto che disponi di una tastiera wireless, non leggere le istruzioni relative al
collegamento di una tastiera USB.
Italiano 31
Page 32

Non avviare il tuo Mac finché non ti verrà richiesto al passo 3.
Passo 3: Abbina la tastiera
Prima di poter utilizzare la tastiera devi abbinarla al tuo Mac: questo consente alla
tastiera di comunicare in modalità wireless con il tuo Mac. È sufficiente abbinarli
una volta sola.
La prima volta che avvii il tuo Mac, Impostazione Assistita ti guida nella configurazione
della tastiera Apple Wireless Keyboard e ti aiuta ad abbinarla con il tuo Mac.
Spia di alimentazione
Interruttore I/O
1 Per accendere la tastiera Apple Wireless Keyboard, premi e rilascia il tasto I/O (®).
2 Accendi il tuo Mac.
3 Dopo avere avviato il tuo Mac, segui le istruzioni su schermo di Impostazione Assistita.
Passo 4: Installa il software
Per utilizzare la tastiera sfruttandone appieno le funzionalità, devi aggiornare il tuo Mac
a Mac OS X 10.4.10 o versione successiva e installare l'aggiornamento del software per
la tastiera.
Per aggiornare all'ultima versione di Mac OS X e installare l'aggiornamento del software
per la tastiera, dalla barra dei menu scegli Apple () > Aggiornamento Software,
quindi segui le istruzioni su schermo.
32 Italiano
Page 33

Utilizzo della tastiera
Usa i tasti nella parte superiore della tastiera per regolare la luminosità del monitor,
aprire Exposé, visualizzare i widget di Dashboard , controllare il volume e altro ancora.
Diminuire ( ) o aumentare ( ) la luminosità del monitor.
Usare Exposé - Tutte le finestre e visualizzare tutte le finestre aperte sulla
scrivania contemporaneamente.
Aprire Dashboard per accedere ai widget e ottenere informazioni
meteorologiche, sulle quotazioni di borsa e altro ancora.
]
’
‘
—
–-
C
Riavvolgere o andare alla presentazione, al brano o al filmato precedente.
Riprodurre o mettere in pausa presentazioni, brani o filmati.
Avanzare velocemente o passare alla presentazione, al brano o al filmato
successivo.
Eliminare l'audio del suono proveniente dagli altoparlanti o dalla porta per
le cuffie sul computer.
Diminuire (–) o aumentare (-) il volume del suono proveniente dagli altoparlanti
o dalla porta delle cuffie sul computer.
Per espellere un disco, premi e mantieni premuto il tasto Espelli.
Italiano 33
Page 34

Personalizzare la tastiera
Puoi personalizzare la tastiera utilizzando il pannello Tastiera delle preferenze Tastiera
e mouse.
Per personalizzare la tastiera:
1 Scegli Apple () > Preferenze di sistema.
2 Fai clic su Tastiera e mouse.
3 Fai clic su Tastiera o su Abbreviazioni da tastiera.
Fai clic su Abbreviazioni da tastiera per assegnare abbreviazioni di tastiera ai comandi
dei menu in un'applicazione Mac OS X o nel Finder.
Puoi reperire ulteriori informazioni sulla tastiera in Aiuto Mac. Apri Aiuto Mac e cerca
“tastiera”.
Rinominare la tastiera
Il tuo Mac assegna automaticamente alla tastiera un nome esclusivo la prima volta che
vengono abbinati. Puoi rinominarli utilizzando le preferenze Tastiera e Mouse. Scegli
Apple () > Preferenze di Sistema e fai clic su Tastiera e Mouse. Fai clic sulla linguetta
Bluetooth® e inserisci un nome nel campo Nome.
Pulire la tastiera
Per pulire l'esterno della tastiera, segui queste linee guida:
 Rimuovi le batterie dalla tastiera.
 Per pulire l'esterno della tastiera, utilizza un panno morbido, umido, non sfilacciato,
prestando attenzione a non fare entrare liquido nelle fessure.
 Non utilizzare spray, solventi o prodotti abrasivi.
34 Italiano
Page 35

Informazioni sulle batterie
La tastiera Apple Wireless Keyboard è fornita con tre batterie alcaline. Puoi alimentarla
con batterie alcaline, al litio o ricaricabili AA.
ATTENZIONE: quando sostituisci le batterie, cambiale tutte in una volta sola. Non
mischiare le batterie vecchie con quelle nuove e non mischiare batterie di diverso tipo
(ad esempio, non utilizzare insieme batterie alcaline e al litio). Non aprirle o forarle,
installarle al contrario, o esporle a fuoco, alte temperature o acqua. Tienile lontane
dalla portata dei bambini.
Per verificare il livello di carica della batteria, puoi utilizzare le preferenze Tastiera e
Mouse. Scegli Apple () > Preferenze di Sistema. Fai clic su Tastiera e Mouse, quindi
su Bluetooth.
Nota: per risparmiare l'energia delle batterie, spegni la tastiera quando non la utilizzi.
Se pensi di non utilizzare la tastiera per un periodo lungo, rimuovi le batterie.
Per lo smaltimento delle batterie, attieniti alle linee guida e alla normativa ambientale
locale.
Ergonomia
Per informazioni su ergonomia, salute e sicurezza, visita il sito web di Apple
www.apple.com/it/about/ergonomics.
Supporto
Per informazioni di supporto e risoluzione dei problemi, forum e download degli ultimi
software Apple, consulta il sito www.apple.com/it/support.
Italiano 35
Page 36

6 Configuración del teclado inalámbrico
Apple Wireless Keyboard
Enhorabuena por haber elegido el teclado inalámbrico
Apple Wireless Keyboard como dispositivo de entrada.
Utilización del teclado inalámbrico
La información que encontrará en esta guía complementa las instrucciones de
configuración incluidas en el manual suministrado con su ordenador. Siga los
pasos que se detallan en las siguientes páginas para:
 colocar las pilas en el teclado;
 configurar su Mac;
 usar el Asistente de Configuración para configurar el teclado con su Mac;
 usar Actualización de Software para instalar el software más reciente.
No encienda el teclado hasta que vaya a arrancar el ordenador en el paso 3.
Importante: Mantenga la tapa del compartimento de las pilas y las pilas fuera
del alcance de los niños.
36 Español
Page 37

Paso 1: Colocación de las pilas
Siga las instrucciones que figuran a continuación para insertar las pilas en el teclado
inalámbrico Apple Wireless Keyboard.
Para colocar las pilas en el teclado:
1 Con la ayuda de una moneda, extraiga la tapa del compartimento de las pilas.
Tapa del compartimento de las pilas
2 Introduzca las pilas en el compartimento tal como se muestra en la imagen.
Introduzca las pilas
3 Coloque la tapa en el compartimento de las pilas y deje el teclado apagado hasta
que vaya a arrancar el ordenador en el paso 3.
Nota: Cuando el indicador luminoso de encendido está apagado, el teclado está
apagado.
Español 37
Page 38

Paso 2: Configuración de su Mac
Para configurar su ordenador, siga las instrucciones que figuran en el manual de
usuario que venía con su Mac. Puesto que dispone de un teclado inalámbrico, no es
necesario que lea las instrucciones correspondientes a la conexión de un teclado USB.
No arranque el Mac hasta que se le solicite hacerlo en el paso 3.
Paso 3: Configuración del enlace con el teclado
Antes de poder utilizar el teclado, debe enlazarlo con su Mac. El proceso de enlace
permite que el teclado se comunique de forma inalámbrica con el ordenador. Esta
operación solo deberá llevarse a cabo una vez.
La primera vez que arranca el ordenador, el Asistente de Configuración le guía a través
de los pasos necesarios para configurar el teclado inalámbrico Apple Wireless Keyboard
y enlazarlo con su Mac.
Indicador luminoso de encendido
Botón de encendido/
apagado
1 Para encender el teclado inalámbrico Apple Wireless Keyboard, pulse el botón
de encendido/apagado (®).
2 Encienda el ordenador.
3 Cuando el sistema haya arrancado, siga las instrucciones del Asistente de
Configuración que van apareciendo en pantalla.
38 Español
Page 39

Paso 4: Instalación del software
Para utilizar su teclado y sacar el máximo partido a todas sus prestaciones, deberá
actualizar su sistema a la versión 10.4.10 o posterior del Mac OS X e instalar la
actualización de software del teclado.
Para actualizar su sistema a la última versión disponible de Mac OS X e instalar
la actualización de software del teclado, seleccione Apple () > “Actualización de
Software” en la barra de menús y siga las instrucciones que aparecen en pantalla.
Español 39
Page 40

Uso del teclado
Use las teclas de la hilera superior del teclado para ajustar el brillo de la pantalla, para
abrir Exposé, para ver los widgets del Dashboard, para controlar el volumen del
ordenador y para muchas otras cosas.
Reducir ( ) o aumentar ( ) el brillo de la pantalla.
Usar la tecla “Exposé: todas las ventanas” para ver todas las ventanas abiertas
a la vez en el escritorio.
Abrir el Dashboard para acceder a los widgets y obtener información sobre
cotizaciones en bolsa, consultar la previsión meteorológica y mucho más.
]
’
‘
—
–-
C
40 Español
Retroceder en la reproducción actual o ir a la canción, película o pase de
diapositivas anterior.
Iniciar o poner en pausa la reproducción de canciones, películas o pases
de diapositivas.
Avanzar en la reproducción actual o ir a la canción, película o pase de
diapositivas siguiente.
Desactivar el sonido de los altavoces o del puerto de auriculares del ordenador.
Reducir (–) o aumentar (-) el volumen del sonido de los auriculares o del puerto
de auriculares del ordenador.
Mantener pulsada la tecla de expulsión de discos para expulsar un disco.
Page 41

Personalización del teclado
Puede personalizar su teclado utilizando el panel Teclado del panel de preferencias
Teclado y Ratón.
Para personalizar el teclado:
1 Seleccione Apple () > Preferencias del Sistema.
2 Haga clic en “Teclado y Ratón”.
3 Haga clic en “Teclado” o en “Funciones rápidas de teclado”.
Haga clic en “Funciones rápidas de teclado” para asignar combinaciones de teclas a
los comandos de menú de una aplicación de Mac OS X o del Finder.
En la Ayuda Mac encontrará más información acerca del teclado. Abra la Ayuda Mac
y busque “teclado”.
Cómo cambiar el nombre al teclado
El Mac asigna automáticamente un nombre único al teclado inalámbrico la primera
vez que se establece el enlace con él. No obstante, si lo desea, puede modificar este
nombre en el panel de preferencias Teclado y Ratón. Para ello, seleccione Apple () >
“Preferencias del Sistema” y haga clic en “Teclado y Ratón”. Haga clic en la pestaña
Bluetooth® e introduzca un nuevo nombre en el campo Nombre.
Limpieza del teclado
Siga estas instrucciones para limpiar la parte exterior de su teclado:
 Extraiga las pilas del teclado.
 Utilice un paño suave y húmedo para limpiar el exterior del teclado. Evite que
entre agua o humedad por las aberturas.
Español 41
Page 42

 No utilice aerosoles, disolventes ni limpiadores abrasivos.
Acerca de las pilas
El teclado Apple Wireless Keyboard viene con tres pilas alcalinas. Puede usar tanto pilas
alcalinas como pilas de litio o pilas AA recargables.
ADVERTENCIA: Cuando sea necesario cambiar las pilas, sustituya siempre todas y no
mezcle pilas nuevas con viejas ni tipos de pilas distintos (por ejemplo, no mezcle pilas
alcalinas con pilas de litio). No intente abrir ni perforar las pilas, no las coloque al
revés y evite que entren en contacto con el fuego, con altas temperaturas o con el
agua. Mantenga las pilas fuera del alcance de los niños.
Puede comprobar el nivel de carga de las pilas a través del panel de preferencias
Teclado y Ratón. Para ello, seleccione Apple () > Preferencias del Sistema. Haga
clic en “Teclado y Ratón” y, a continuación, haga clic en Bluetooth.
Nota: Para prolongar la duración de las pilas, apague el teclado cuando no lo utilice.
Si tiene pensado no utilizarlo durante un tiempo prolongado, es aconsejable extraer
las pilas.
Deshágase de las pilas siguiendo la normativa ambiental aplicable en su municipio.
42 Español
Page 43

Ergonomía
Para obtener más información sobre ergonomía, salud y seguridad, visite la página web
de Apple sobre ergonomía: www.apple.com/es/about/ergonomics.
Soporte
Para obtener información sobre soporte y resolución de problemas, acceder a foros
de discusión de usuarios y descubrir las últimas novedades en descargas de software
de Apple, visite www.apple.com/es/support.
Español 43
Page 44

Regulatory Compliance Information
Compliance Statement
This device complies with part 15 of the FCC rules.
Operation is subject to the following two conditions: (1)
This device may not cause harmful interference, and (2)
this device must accept any interference received,
including interference that may cause undesired
operation. See instructions if interference to radio or
television reception is suspected.
L‘utilisation de ce dispositif est autorisée seulement aux
conditions suivantes : (1) il ne doit pas produire de
brouillage et (2) l’utilisateur du dispositif doit étre prêt à
accepter tout brouillage radioélectrique reçu, même si
ce brouillage est susceptible de compromettre le
fonctionnement du dispositif.
Radio and Television Interference
The equipment described in this manual generates,
uses, and can radiate radio-frequency energy. If it is not
installed and used properly—that is, in strict accordance
with Apple’s instructions—it may cause interference
with radio and television reception.
This equipment has been tested and found to comply
with the limits for a Class B digital device in accordance
with the specifications in Part 15 of FCC rules. These
specifications are designed to provide reasonable
protection against such interference in a residential
installation. However, there is no guarantee that
interference will not occur in a particular installation.
You can determine whether your computer system is
causing interference by turning it off. If the interference
stops, it was probably caused by the computer or one of
the peripheral devices.
44
If your computer system does cause interference to
radio or television reception, try to correct the
interference by using one or more of the following
measures:
 Turn the television or radio antenna until the
interference stops.
 Move the computer to one side or the other of the
television or radio.
 Move the computer farther away from the television or
radio.
 Plug the computer into an outlet that is on a different
circuit from the television or radio. (That is, make
certain the computer and the television or radio are on
circuits controlled by different circuit breakers or
fuses.)
If necessary, consult an Apple Authorized Service
Provider or Apple. See the service and support
information that came with your Apple product. Or,
consult an experienced radio or television technician for
additional suggestions.
Important: Changes or modifications to this product
not authorized by Apple Inc. could void the FCC
compliance and negate your authority to operate the
product. This product was tested for FCC compliance
under conditions that included the use of Apple
peripheral devices and Apple shielded cables and
connectors between system components. It is important
that you use Apple peripheral devices and shielded
cables and connectors between system components to
Page 45

reduce the possibility of causing interference to radios,
television sets, and other electronic devices. You can
obtain Apple peripheral devices and the proper shielded
cables and connectors through an Apple-authorized
dealer. For non-Apple peripheral devices, contact the
manufacturer or dealer for assistance.
Responsible party (contact for FCC matters only):
Apple Inc., Product Compliance
1 Infinite Loop M/S 26-A
Cupertino, CA 95014-2084
Industry Canada Statements
Complies with the Canadian ICES-003 Class B
specifications. Cet appareil numérique de la classe B est
conforme à la norme NMB-003 du Canada. This device
complies with RSS 210 of Industry Canada.
This Class B device meets all requirements of the
Canadian interference-causing equipment regulations.
Cet appareil numérique de la Class B respecte toutes les
exigences du Règlement sur le matériel brouilleur du
Canada.
European Compliance Statement
This product complies with the requirements of
European Directives 72/23/EEC, 89/336/EEC, and
1999/5/EC.
Bluetooth Europe–EU Declaration of
Conformity
This wireless device complies with the specifications EN
300 328, EN 301-489, EN 50371, and EN 60950 following
the provisions of the R&TTE Directive.
Caution: Modification of this device may result in
hazardous radiation exposure. For your safety, have this
equipment serviced only by an Apple Authorized
Service Provider.
VCCI Class B Statement
Korea Statements
Singapore Wireless Certification
Taiwan Wireless Statement
Taiwan Class B Statement
45
Page 46

Apple and the Environment
Apple Inc. recognizes its responsibility to minimize the
environmental impacts of its operations and products.
More information is available on the web at:
www.apple.com/environment
46
Disposal and Recycling Information
When this product reaches its end of life, please dispose
of it according to your local environmental laws and
guidelines.
For information about Apple’s recycling programs, visit:
www.apple.com/environment/recycling
Battery Disposal Information
Dispose of batteries according to your local
environmental laws and guidelines.
Deutschland: Das Gerät enthält Batterien. Diese
gehören nicht in den Hausmüll. Sie können verbrauchte
Batterien beim Handel oder bei den Kommunen
unentgeltlich abgeben. Um Kurzschlüsse zu vermeiden,
kleben Sie die Pole der Batterien vorsorglich mit einem
Klebestreifen ab.
Nederlands: Gebruikte batterijen kunnen worden
ingeleverd bij de chemokar of in een speciale
batterijcontainer voor klein chemisch afval (kca) worden
gedeponeerd.
Taiwan:
Page 47

European Union—Disposal Information
The symbol above means that according to local laws
and regulations your product should be disposed of
separately from household waste. When this product
reaches its end of life, take it to a collection point
designated by local authorities. Some collection points
accept products for free. The separate collection and
recycling of your product at the time of disposal will
help conserve natural resources and ensure that it is
recycled in a manner that protects human health and
the environment.
© 2007 Apple Inc. All rights reserved. Apple, the Apple
logo, Exposé, Mac, and Mac OS are trademarks of Apple
Inc., registered in the U.S. and other countries. Apple
Store is a service mark of Apple Inc., registered in the
U.S. and other countries.
The Bluetooth® word mark and logos are registered
trademarks owned by Bluetooth SIG, Inc. and any use of
such marks by Apple is under license.
47
Page 48

www.apple.com
Printed in XXXX
*1E034-4319-A*
 Loading...