

Page 1

GETTING STARTED
WITH WEBOBJECTS
Page 2

Apple, NeXT, and the publishers have tried to make the information contained in this manual as accurate and reliable
as possible, but assume no responsibility for errors or omissions. They disclaim any warranty of any kind, whether
express or implied, as to any matter whatsoever relating to this manual, including without limitation the
merchantability or fitness for any particular purpose. In no event shall they be liable for any indirect, special,
incidental, or consequential damages arising out of purchase or use of this manual or the information contained
herein. NeXT or Apple will from time to time revise the software described in this manual and reserves the right to
make such changes without obligation to notify the purchaser.
Copyright 1997 by Apple Computer, Inc., 1 Infinite Loop, Cupertino, CA 95014.
All rights reserved.
[7010.01]
No part of this publication may be reproduced, stored in a retrieval system, or transmitted, in any form or by any
means, electronic, mechanical, photocopying, recording, or otherwise, without the prior written permission of the
publisher or copyright owner. Printed in the United States of America. Published simultaneously in Canada.
NeXT, the NeXT logo, OPENSTEP, Enterprise Objects, Enterprise Objects Framework, Objective-C, WEBSCRIPT, and
WEBOBJECTS are trademarks of NeXT Software, Inc. Apple is a trademark of Apple Computer, Inc., registered in the
United States and other countries. PostScript is a registered trademark of Adobe Systems, Incorporated. Windows NT
is a trademark of Microsoft Corporation. UNIX is a registered trademark in the United States and other countries,
licensed exclusively through X/Open Company Limited. ORACLE is a registered trademark of Oracle Corporation, Inc.
SYBASE is a registered trademark of Sybase, Inc. All other trademarks mentioned belong to their respective owners.
Restricted Rights Legend: Use, duplication, or disclosure by the Government is subject to restrictions as set forth in
subparagraph (c)(1)(ii) of the Rights in Technical Data and Computer Software clause at DFARS 252.227-7013 [or, if
applicable, similar clauses at FAR 52.227-19 or NASA FAR Supp. 52.227-86].
This manual describes WebObjects 3.5.
Writing: Ron Karr and Kelly Toshach
Editing: Laurel Rezeau and Jeanne Woodward
With help from: Andy Belk, Craig Federighi, John Graziano, Ben Haller, Kenny Leung, Charles Lloyd, Jean Ostrem,
Becky Willrich, Greg Wilson
Graphic Design: Karin Stroud
Production: Gerri Gray
Page 3

Contents
Page 4

Page 5

Table of Contents
Contents iii
Preface 7
About WebObjects 9
About This Book 9
Where to Go From Here 10
Creating a Simple WebObjects Application 11
Creating a WebObjects Application Project 14
Choosing the Programming Language 16
Examining Your Project 17
Launching WebObjects Builder 18
Creating the Page’s Content 20
Entering Static Text 21
Using the Inspector 22
Creating Form-Based Dynamic HTML Elements 23
Resizing the Form Elements 25
Binding Elements 27
Creating Variables 27
Binding the Input Elements 29
Implementing an Action Method 30
Creating the Application’s Output 32
Building and Running Your Application 35
Enhancing Your Application 37
Duplicating Your Project 39
Creating a Custom Guest Class 41
Binding the Class’s Instance Variables to the Form Elements 42
Creating a Table to Display the Output 43
Adding Dynamic Elements to Table Cells 45
Binding the Dynamic Elements in the Table 45
Creating the Guest Object 46
Keeping Track of Multiple Guests 47
Creating a Guest List 48
Adding Guests to the Guest List 50
Adding a Second Component 51
Using a Repetition 53
Adding the Finishing Touches 56
Clearing the Guest List 56
Adding a Dynamic Hyperlink 57
Creating a WebObjects
Database Application 59
The Movies Application 62
Enterprise Objects and Relationships 63
Designing the Main Page 65
Starting the WebObjects Application Wizard 65
Specifying a Model File 66
Choosing an Adaptor 67
Choosing What to Include in Your Model 68
Choosing the Tables to Include 71
Specifying Primary Keys 71
Specifying Referential Integrity Rules 72
Choosing an Entity 74
Choosing a Layout 75
Choosing Attributes to Display 76
Choosing an Attribute to Display as a Hyperlink 77
Choosing Attributes to Query On 77
Running Movies 78
Examining Your Project 79
Examining the Variables 80
Examining the Bindings 81
Refining Main.wo 85
Specifying a Sort Order 86
Specifying Default Values for New Enterprise Objects 87
Setting a Date Format 88
Setting a Number Format 89
Optional Exercise 90
v
Page 6

Adding the MovieDetails Page 92
Creating the MovieDetails Component 93
Storing the Selected Movie 93
Navigating from Main to MovieDetails 94
Designing MovieDetails’ User Interface 95
Adding Date and Number Formats 96
Navigating from MovieDetails to Main 96
Running Movies 97
Refining Your Model 97
Opening Your Model 97
Removing Primary and Foreign Keys as Class Properties 98
Adding Relationships to Your Model 99
Using the Advanced Relationship Inspector 102
Where Do Primary Keys Come From? 103
Setting Up a Master-Detail Configuration 104
Creating a Detail Display Group 105
Adding a Repetition 108
Configuring a Repetition 109
Running Movies 110
Updating Objects in the Detail Display Group 111
Managing a DisplayGroup’s Selection 112
Adding a Form 113
Adding a Talent Display Group 113
Configuring the Browser 114
Adding Insert, Save, and Delete Buttons 116
Adding Behavior to Your Enterprise Objects 117
Specifying Custom Enterprise Object Classes 117
Generating Custom Enterprise Object Classes 118
Adding Custom Behavior to Talent 119
Providing Default Values in MovieRole 119
Running Movies 120
vi
Page 7

Preface
Page 8

Page 9

About WebObjects
About This Book
WebObjects is an object-oriented environment for developing and
deploying World Wide Web applications. A WebObjects application runs on
a server machine and receives requests from a user’s web browser on a client
machine. It dynamically generates HTML pages in response to the user’s
requests. WebObjects provides a suite of tools for rapid application
development, as well as prebuilt application components and a web
application server.
WebObjects is flexible enough to suit the needs of any web programmer.
You can write code using one of three programming languages: Java,
Objective-C, or WebScript. You can write simple WebObjects applications
in a matter of minutes. For more complex projects, WebObjects makes it
easy by performing common web application tasks automatically and by
allowing you to reuse objects you’ve written for other applications.
This book contains three tutorials that help you learn what WebObjects is
and how to use it:
• Chapter 1, “Creating a Simple WebObjects Application” (page 11),
teaches you the basic concepts and steps involved in creating a
WebObjects project, using the applications Project Builder and
WebObjects Builder. You’ll create a simple application that takes input
from a user and displays it.
• Chapter 2, “Enhancing Your Application” (page 37), extends the
capabilities of your application and shows you additional techniques
you use when working with WebObjects.
• Chapter 3, “Creating a WebObjects Database Application” (page 59),
teaches you how to create a more complex application, one that
accesses a database.
WebObjects can run on several platforms. Screen shots in this book are for
Windows NT systems; if you are running on a different platform, the look
of your windows may vary slightly.
9
Page 10

Preface
Where to Go From Here
After you have worked through the tutorials in this book, you should have a
good working knowledge of WebObjects. For more in-depth information about
how WebObjects works, read the
Other valuable information about WebObject is available online. You can access
all online information through the WebObjects Home Page. It is located in your
server’s document root, and you can access it at this URL:
In particular, the WebObjects HomePage gives you access to some books that
are available only online:
WebObjects Developer’s Guide
http://localhost/WebObjects/Documentation/WOHomePage.html
.
WebObjects Tools and Techniques
•
is a more comprehensive guide to using
Project Builder and WebObjects Builder to develop WebObjects
applications.
Serving WebObjects
•
describes how to administer and deploy WebObjects
applications after you’ve written them.
• The
Dynamic Elements Reference
documents the dynamic elements provided
with WebObjects and provides examples of how to use them.
• The
Client-Side Components Reference
describes what client-side components
are available for use in your program and the Java classes used to create
them.
• The
WebObjects Class Reference
provides a complete reference to the classes
in the WebObjects framework. Reference material is provided for both the
Java and Objective-C languages.
Additionally, for more information on Enterprise Objects Framework, read the
Enterprise Objects Framework Developer’s Guide
. This book provides in-depth
information about how Enterprise Objects Framework works and about
techniques for developing database applications with it.
10
Page 11

Chapter 1
Creating a Simple WebObjects Application
Page 12

Page 13
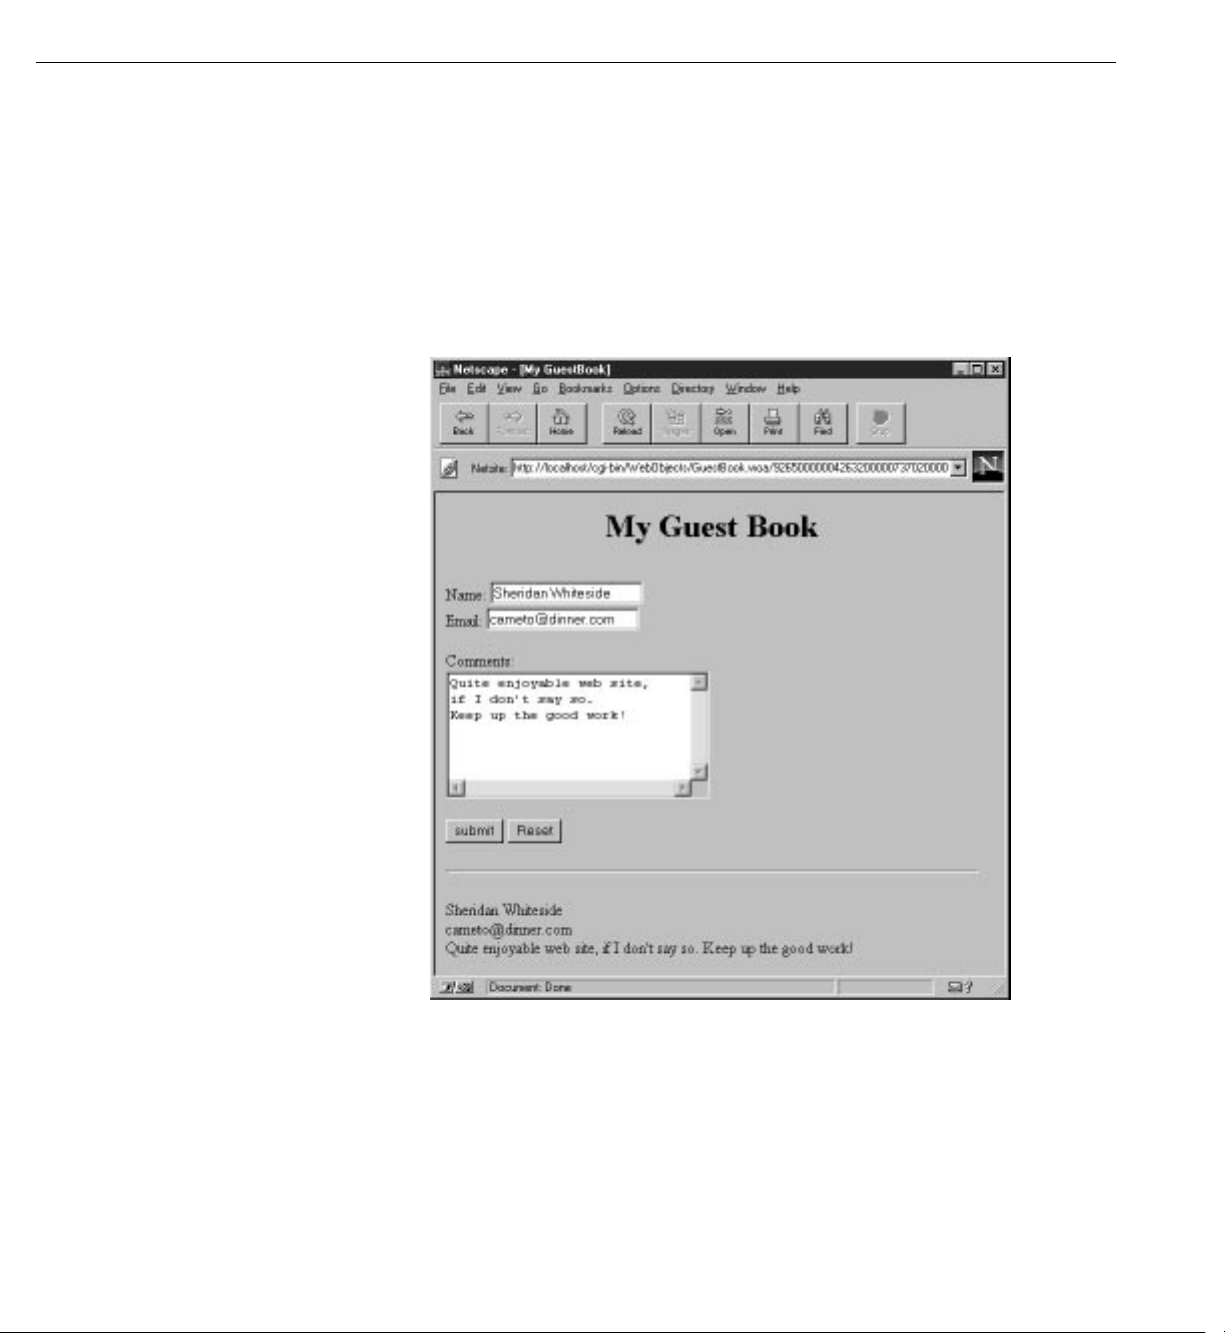
This chapter introduces you to the basic concepts and procedures of
developing WebObjects applications. You’ll develop, in stages, a simple
application for the World Wide Web. The application you’ll write is called
GuestBook.
When you’ve finished the steps in this chapter, your application will have
a single web page containing a form that allows users to enter their names,
e-mail addresses, and comments. When the form is submitted, the
application redraws the page with the user’s information at the bottom.
In Chapter 2, “Enhancing Your Application” (page 37), you will add
features to the application, including a second page, a table that displays
information from multiple users, and hyperlinks.
This application illustrates the basic techniques you use to create a
WebObjects application. You’ll use two primary tools, Project Builder
and WebObjects Builder.
13
Page 14
Chapter 1
Creating a Simple WebObjects Application
Project Builder is an integrated software-development application. It contains
a project browser, a code editor, build and debugging support, and many other
features needed to develop an application. In this tutorial, you’ll learn to use
Project Builder to:
• Create a new WebObjects application project.
• Write scripts or compiled code to provide behavior in your application.
• Build and launch your application.
WebObjects Builder is an application that provides graphical tools for creating
dynamic web pages. You’ll learn to use WebObjects Builder to:
• Create static content for your pages.
• Add dynamic elements to your pages.
• Bind the dynamic elements to variables and methods in your code.
Creating a WebObjects Application Project
A WebObjects application project contains all the files needed to build and
maintain your application. You use Project Builder to create a new project.
1. Launch Project Builder.
On Windows NT, you can launch Project Builder from the WebObjects
program group in the Start menu. On other platforms, you can launch the
application by navigating to the directory
launching
ProjectBuilder.app
.
NeXT_ROOT
is an environment variable defined
NeXT_ROOT
/NextDeveloper/Apps/
when you installed WebObjects. On Windows NT systems, it is
.
default. On Mach systems, it is the root directory
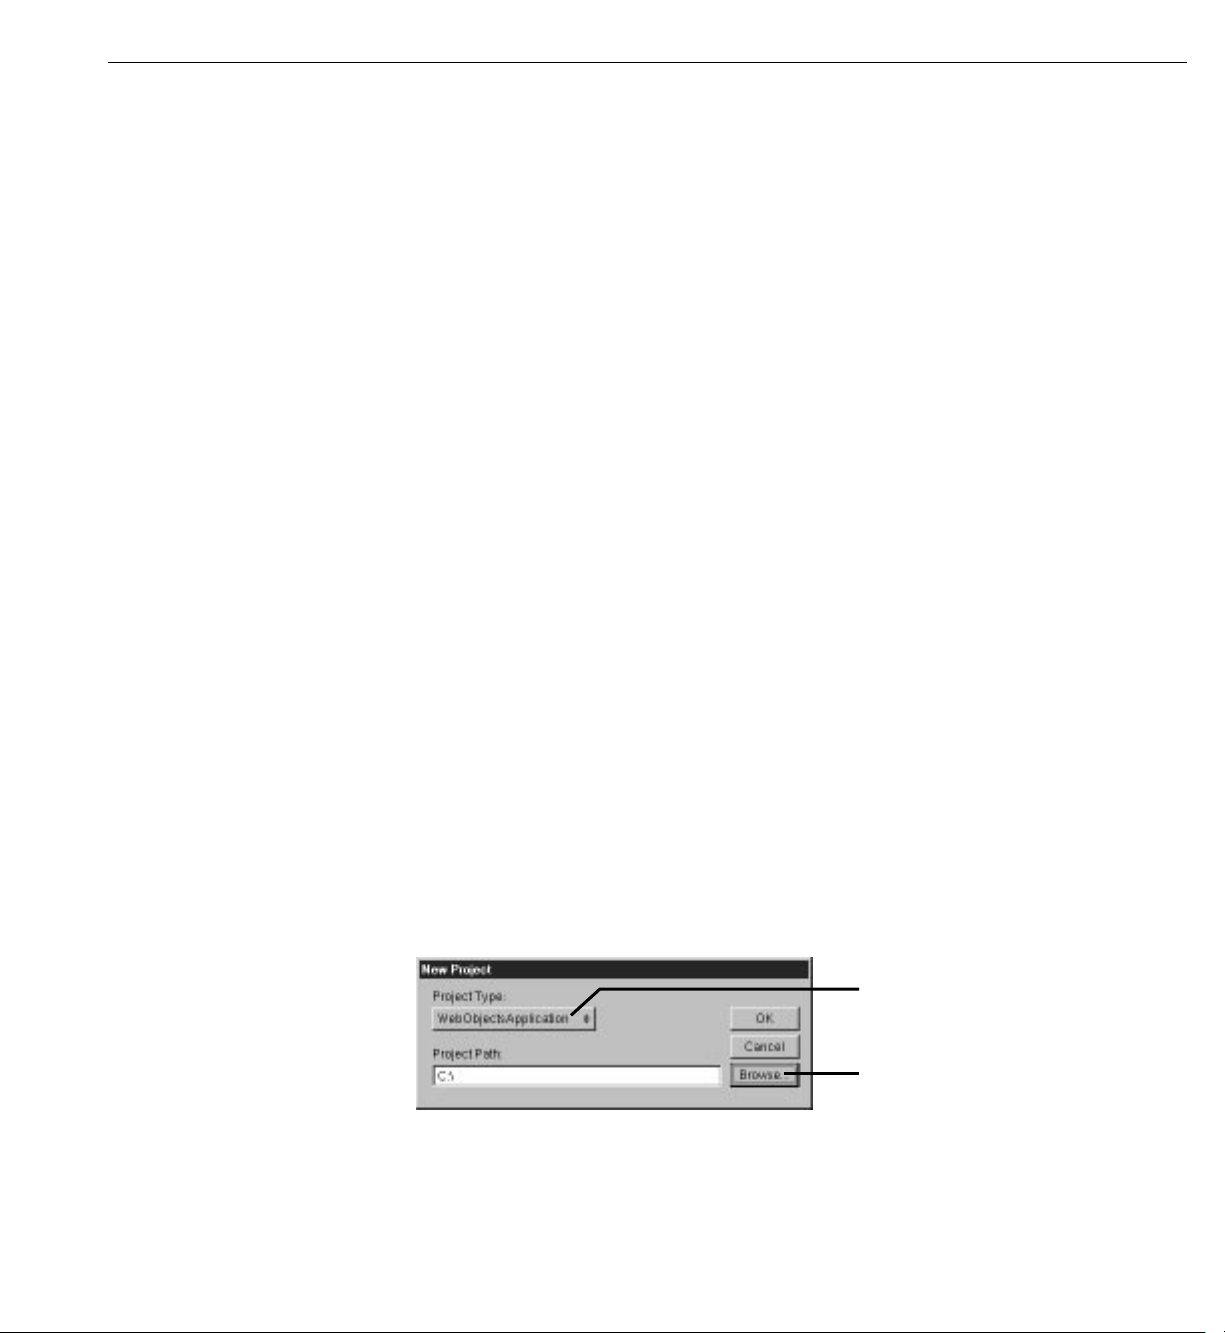
2. Choose Project
m
New.
/
Set project type here.
Click to choose directory in which to
create your project.
C:\NeXT
and
by
3. In the New Project panel, select WebObjectsApplication from the Project
Type pop-up list.
14
Page 15
Creating a WebObjects Application Project
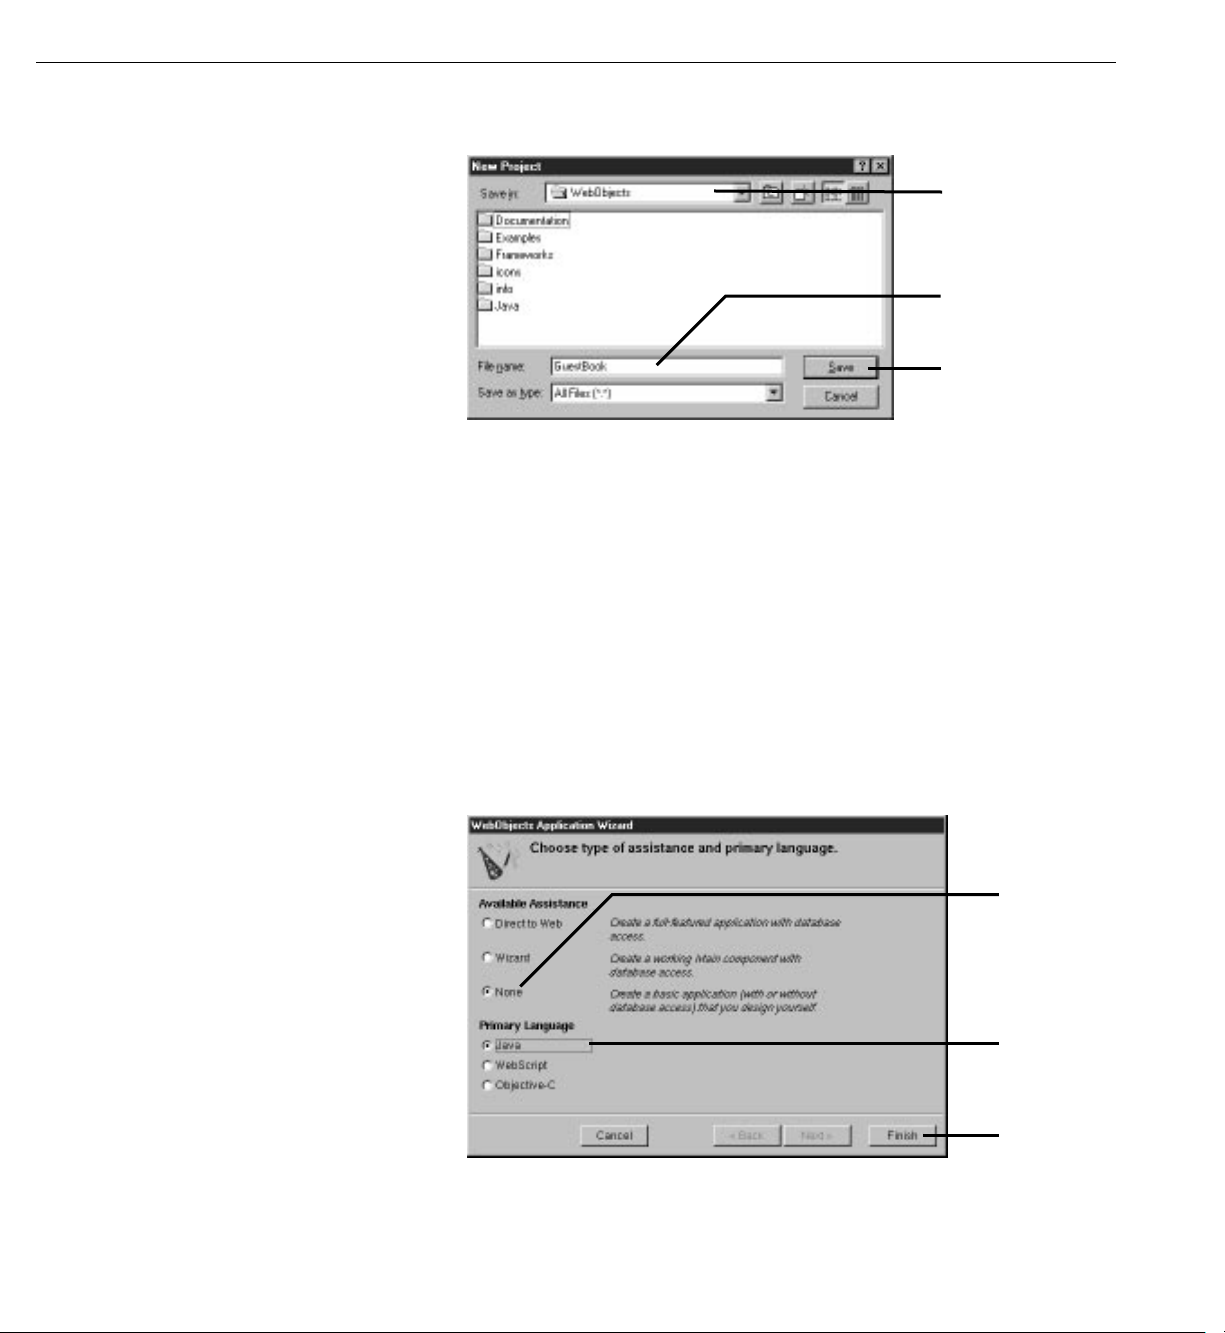
4. Click Browse.
Choose WebObjects under the
server’s document root.
Type project name here.
Click when finished.
5. In the Save panel, navigate to the
DocumentRoot
is your HTTP server’s document root, which you
DocumentRoot
/WebObjects
specified when you installed WebObjects.
6. Type the name of the project you want to create (
7. Click Save.
The New Project panel shows the path you specified.
8. Click OK.
The WebObjects Application Wizard starts.
directory.
GuestBook
).
Choose level of
assistance.
Choose programming
language.
Click to proceed.
15
Page 16

Chapter 1
Creating a Simple WebObjects Application
9. For Available Assistance, choose None.
If you are developing an application that accesses a database, you may wish
to use one of the levels of assistance that WebObjects provides. For more
information on these options, see Chapter 3, “Creating a WebObjects
Database Application” (page 59).
Choosing the Programming Language
WebObjects supports three languages:
• Java
• Objective-C
• WebScript
Java and Objective-C are
compiled
languages. They require you to build your
application before running it. WebScript, which is based on Objective-C, is a
scripted
language. It allows you to make changes to your application while it is
running.
When you create a new project, Project Builder provides you with a
component
called Main. In WebObjects terminology, a component represents a page in your
application (or possibly part of a page).
In the Wizard, you specify the language you’ll use to program your Main
component, as well as the
application
and
session
code files (which will be
described later).
1. For the primary language, select Java.
Later, you’ll create an additional component for your application and write
its code in WebScript.
2. Click Finish.
Project Builder creates a new application directory called
GuestBook
. This
directory contains the files you work with in both Project Builder and
WebObjects Builder.
16
Page 17
Examining Your Project
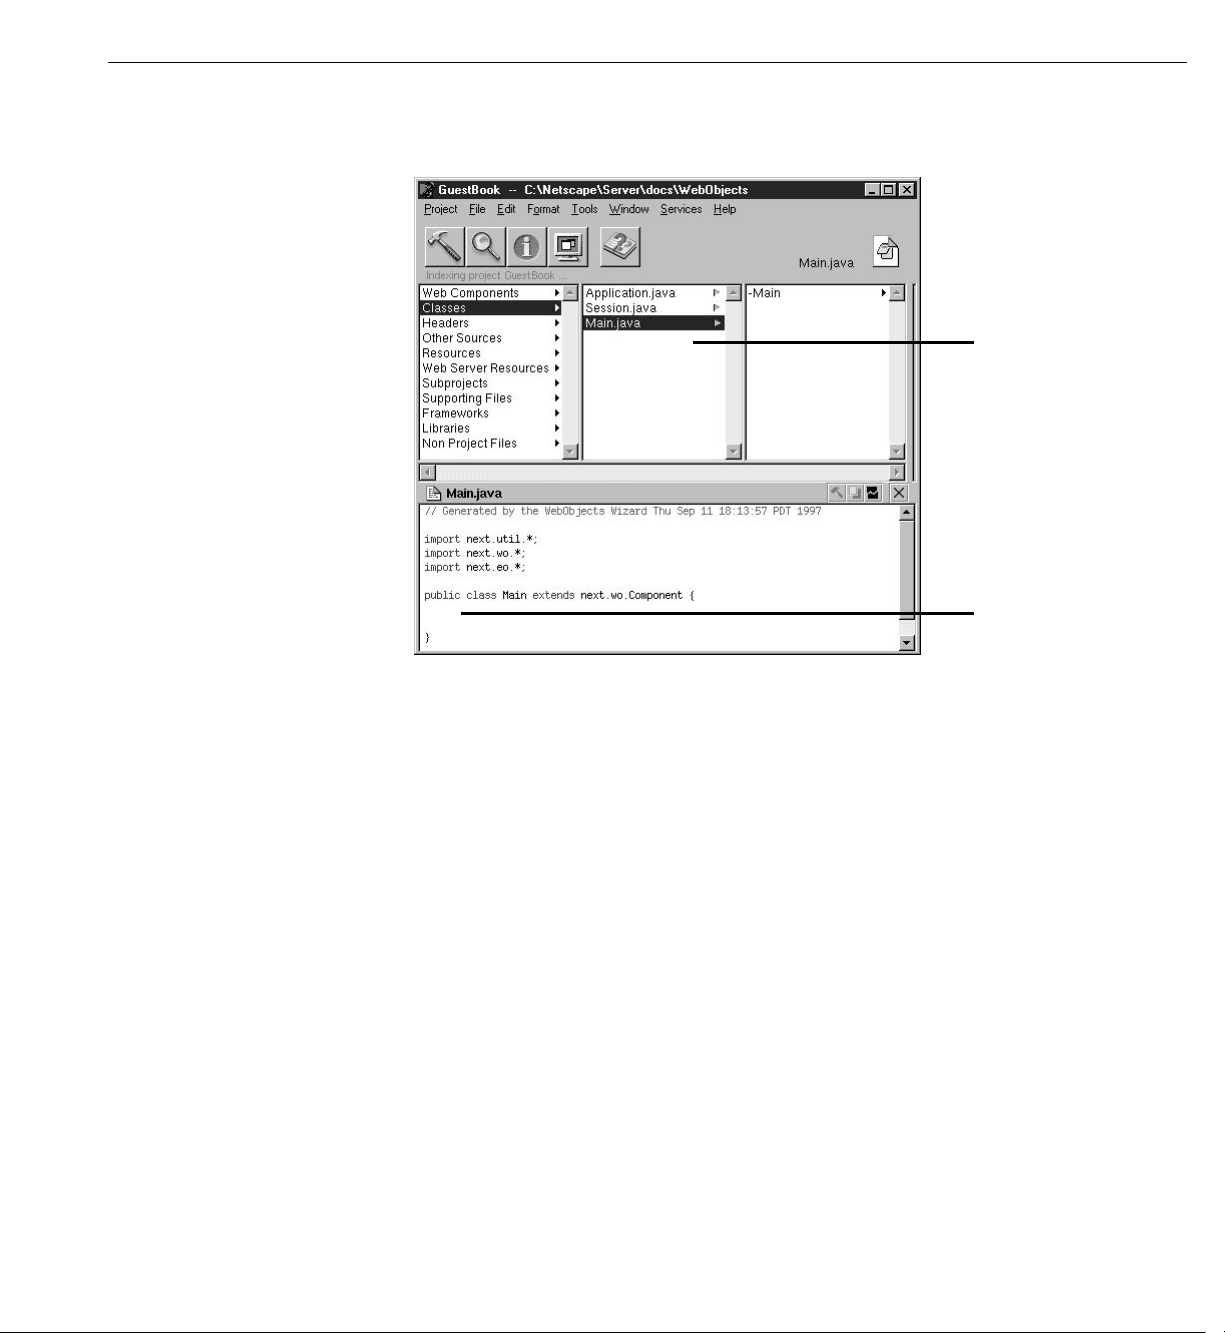
Examining Your Project
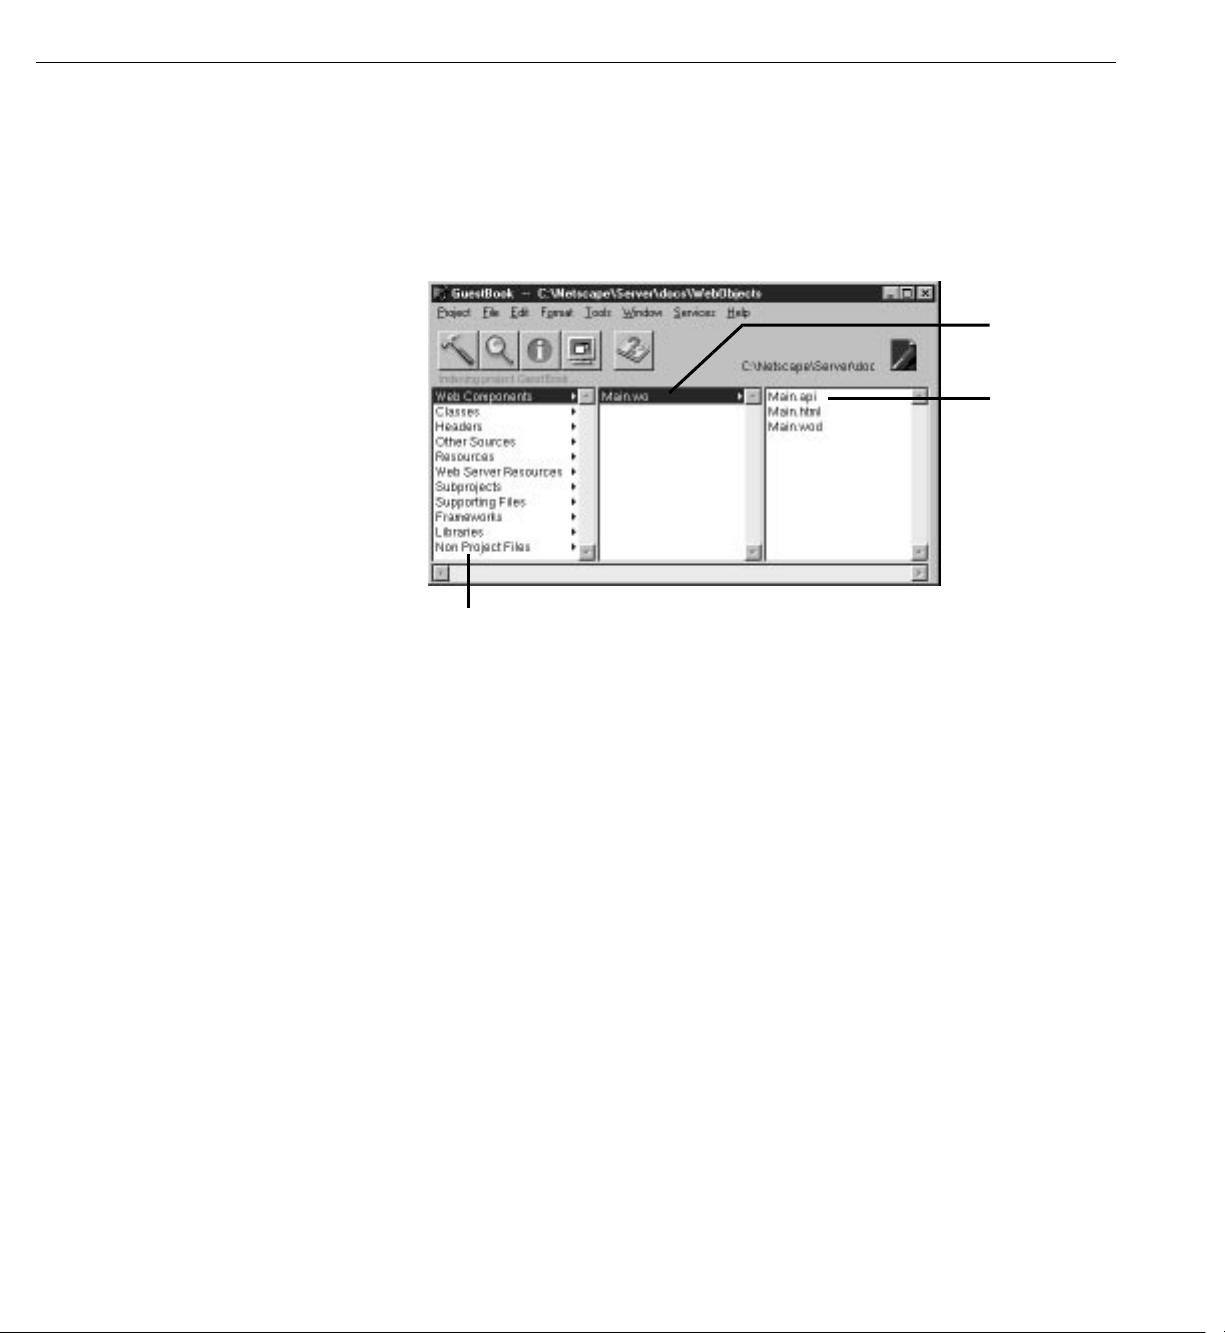
Project Builder displays a browser showing the contents of your project.
The first column lists several categories of files that your project may
contain. This section describes some of the most important files you’ll use.
Categories (“suitcases”)
of project resources.
Your project’s components.
Files in the selected
component.
1. Select Web Components.
The next column displays a list with one element,
directory containing the first
component
in your application. Every
Main.wo
, which is a
application starts with a component called Main.
Main.wo
2. Select
.
The files you see displayed in the next column are some of the files
you work with when developing your component:
•
•
is used for components that are going to be reused by other
Main.api
components; you won’t use it in this tutorial. See
Techniques
Main.html
for more information on creating reusable components.
is the HTML template for your page. It can include tags for
WebObjects Tools and
dynamic WebObjects elements as well as regular HTML. Typically, you do
not edit this file directly; you create your page’s elements graphically using
WebObjects Builder.
is the declarations file that specifies bindings between the dynamic
Main.wod
•
elements and variables or methods in your scripts. Normally, you don’t edit
this file directly; you use WebObjects Builder to generate the bindings for
you.
17
Page 18
Chapter 1
Creating a Simple WebObjects Application
3. Select Classes in the first column of the browser.
Your application’s
Java classes.
The Main component’s
code goes here.
You’ll see three files listed in the second column:
•
Main.java
component. You do this by writing code in Java (since you specified Java as the
language when you created the project). You use Project Builder to edit this
file.
Application.java
•
Chapter 2, you’ll add code to
session variables.
Launching WebObjects Builder
Now that you’ve created your project, you’ll edit the Main component with
WebObjects Builder.
1. Select Web Components in the first column of the browser.
is a file that allows you to specify behavior associated with the
Session.java
and
are other Java files that you may want to work with. In
Application.java
and learn about application and
18
Page 19
Launching WebObjects Builder
2. Double-click
in the second column.
Main.wo
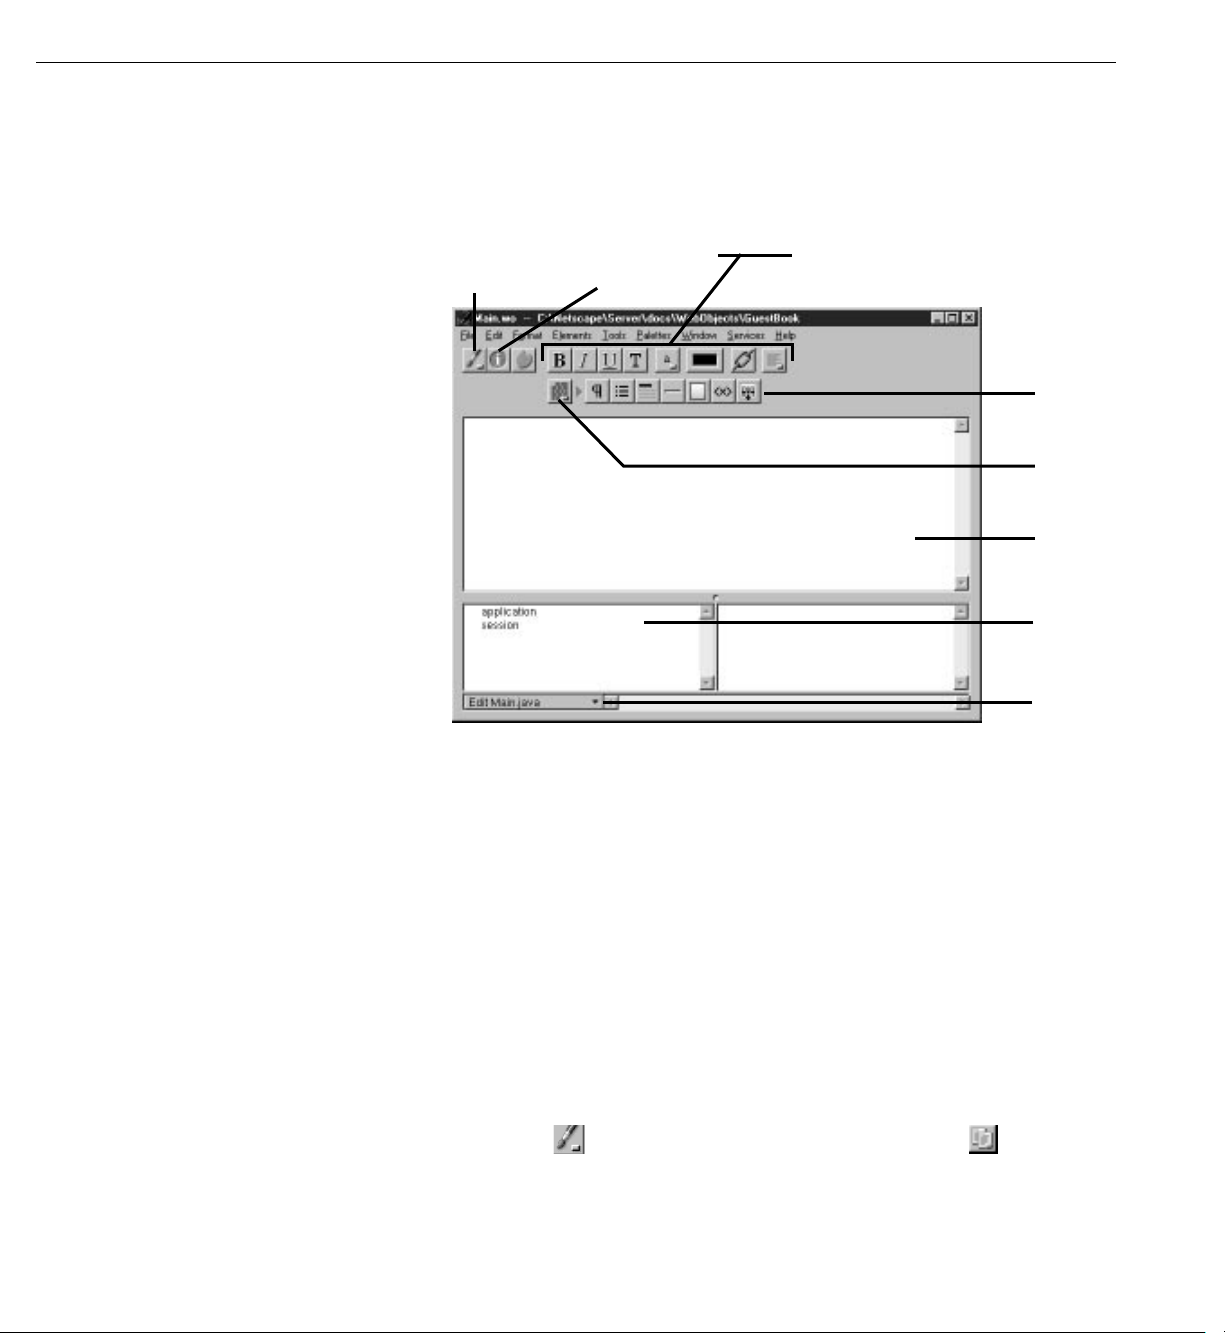
The application WebObjects Builder launches and displays a window
entitled
Pop-up list switches
editing modes
. This represents your application’s Main component.
Main.wo
Click to inspect
selected element.
These buttons change properties
of selected elements.
Click one of these
buttons to create a
specific element.
Elements pop-up list
switches buttons
displayed to its right.
This window displays
your component’s
elements graphically.
Object browser shows
variables and methods
in your application’s
code.
Pull-down menu lets
you add variables,
methods, and actions
to your source code.
You create your component graphically in the upper pane of the
component window. The browser at the bottom of the window (known
as the
object browser)
is used to display variables and methods your
component uses. Note that there are two variables already defined,
application
and
. You’ll create others later.
session
The toolbar at the top of the window contains several buttons that
allow you to create the content of your component. WebObjects
Builder also has menu commands corresponding to these buttons.
Depending on the width of the window, the toolbar may appear in
Note:
two rows or one.
3. From the pop-up list at the left of the toolbar, choose .
19
Page 20
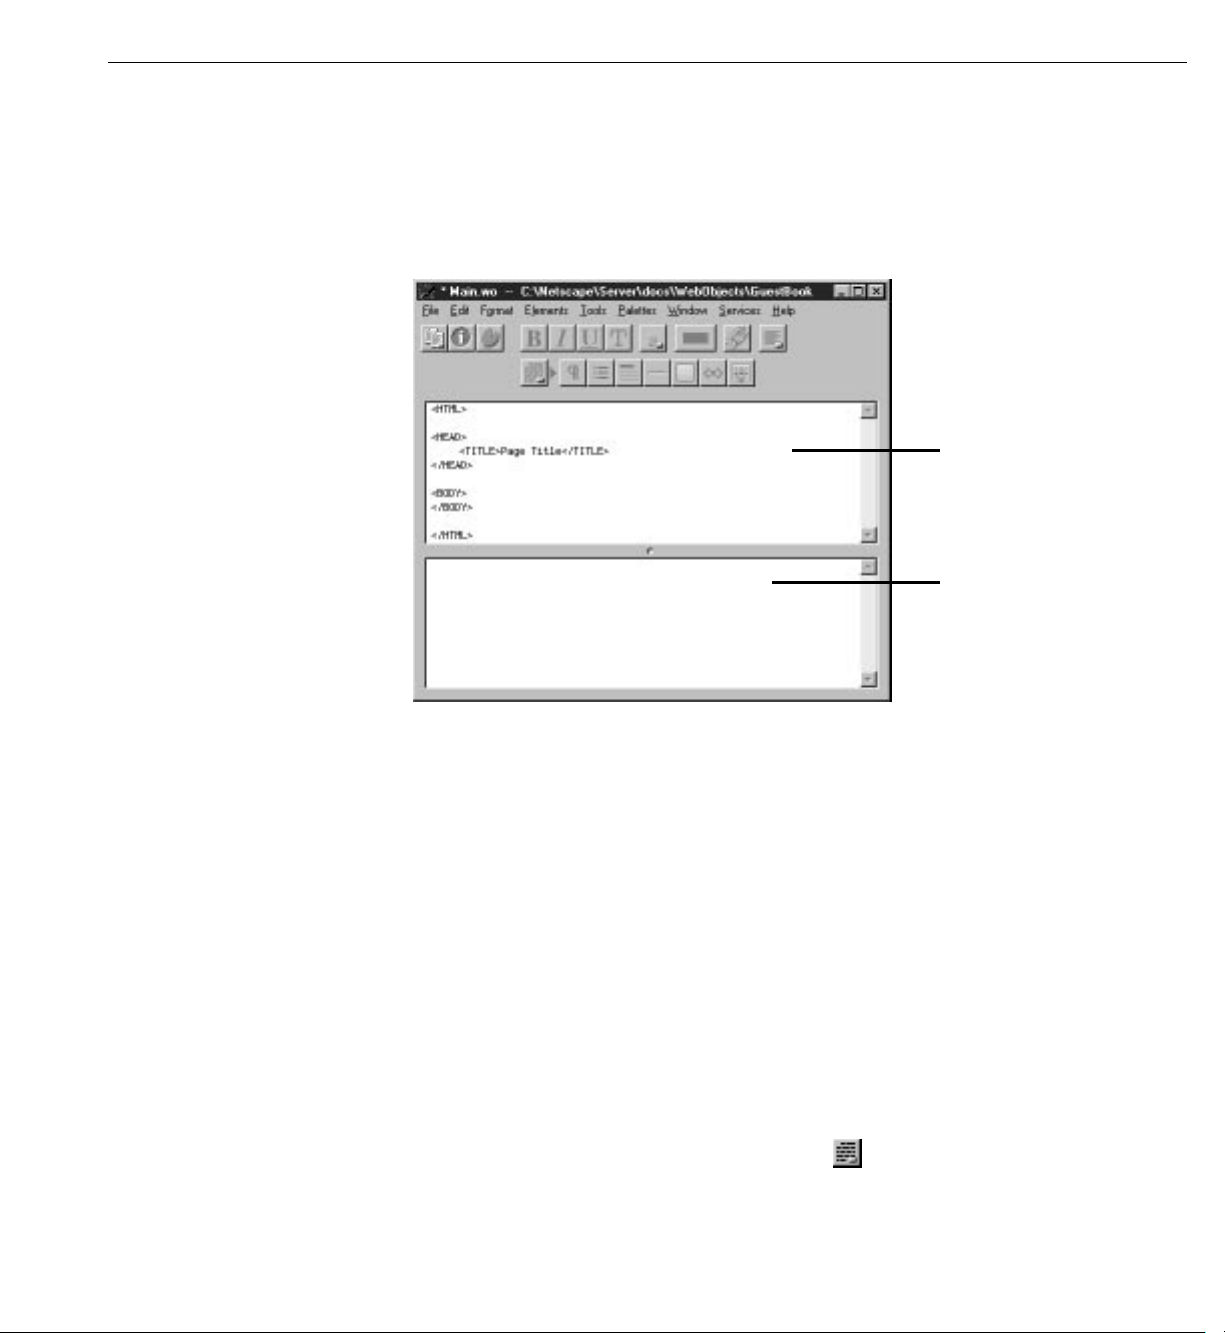
Chapter 1
Creating a Simple WebObjects Application
This pop-up list allows you to switch between graphical editing mode and
source editing mode. When you choose source editing mode, the text of
your HTML template (
Main.html
) appears. It is a skeleton at this point, since
the page is empty. As you add elements graphically, their corresponding
HTML tags appear in this file.
The HTML source for your
component.
Information about bindings
is displayed here.
The bottom pane shows your declarations (
bind variables to your dynamic elements, this file stores the information.
Normally, you never edit this file directly.
4. Switch back to graphical editing mode. For the rest of the tutorial, you’ll
work in this mode.
Creating the Page’s Content
A web page consists of
elements found in all web pages, WebObjects allows you to create
elements
To create elements, you use the buttons on the bottom row of the toolbar (or at
the right of the toolbar if your window is large). The button is a pop-up list
that lets you switch the group of buttons that are displayed to its right. There are
four groups of buttons:
20
, whose look and behavior are determined at run time.
elements
) file. Later, when you
Main.wod
. In addition to the standard static HTML
dynamic
Page 21
Creating the Page’s Content
Structures .
•
Use these buttons to create paragraphs, lists, images, and
other static HTML elements. This setting is the default.
•
Tables .
Use these buttons to create and manipulate HTML table
elements.
Dynamic form elements .
•
Use these buttons to create form elements in
which users enter information. WebObjects gives your application
access to the data entered by users by allowing you to associate, or
bind
these elements to variables in your application.
Other WebObjects .
•
Use these buttons to create other dynamic elements,
which you can bind to variables and methods in your program to control
how they are displayed. Some of these (such as hyperlinks) have direct
HTML equivalents. Others are
abstract dynamic elements
, such as
repetitions and conditionals, which determine how many times an
element is displayed or whether it is displayed at all.
Entering Static Text
The simplest way to add text to a page is to type it directly into the
component’s window. To demonstrate this, add a title for the GuestBook’s
page.
1. Type
My Guest Book
and press Enter.
,
The text is displayed at the insertion point, in this case at the
beginning of the page.
2. Select the text you just typed.
3. Click the button in the toolbar. This converts the text to a heading
element and displays it in bold.
4. From the pop-up list in the toolbar, choose center justification.
The toolbar also has buttons that allow you to apply text styles such as
bold, underline, and italics.
HTML provides several levels of headings. Typically, a document’s main
<H1>
title should be displayed as an
heading. To change the level, you use
the Inspector window. You’ll use this window frequently throughout these
tutorials.
21
Page 22
Chapter 1
Creating a Simple WebObjects Application
Using the Inspector
You use the Inspector window to set properties of the elements in your
component. The Inspector’s title and contents reflect the element you’ve
selected in the component window.
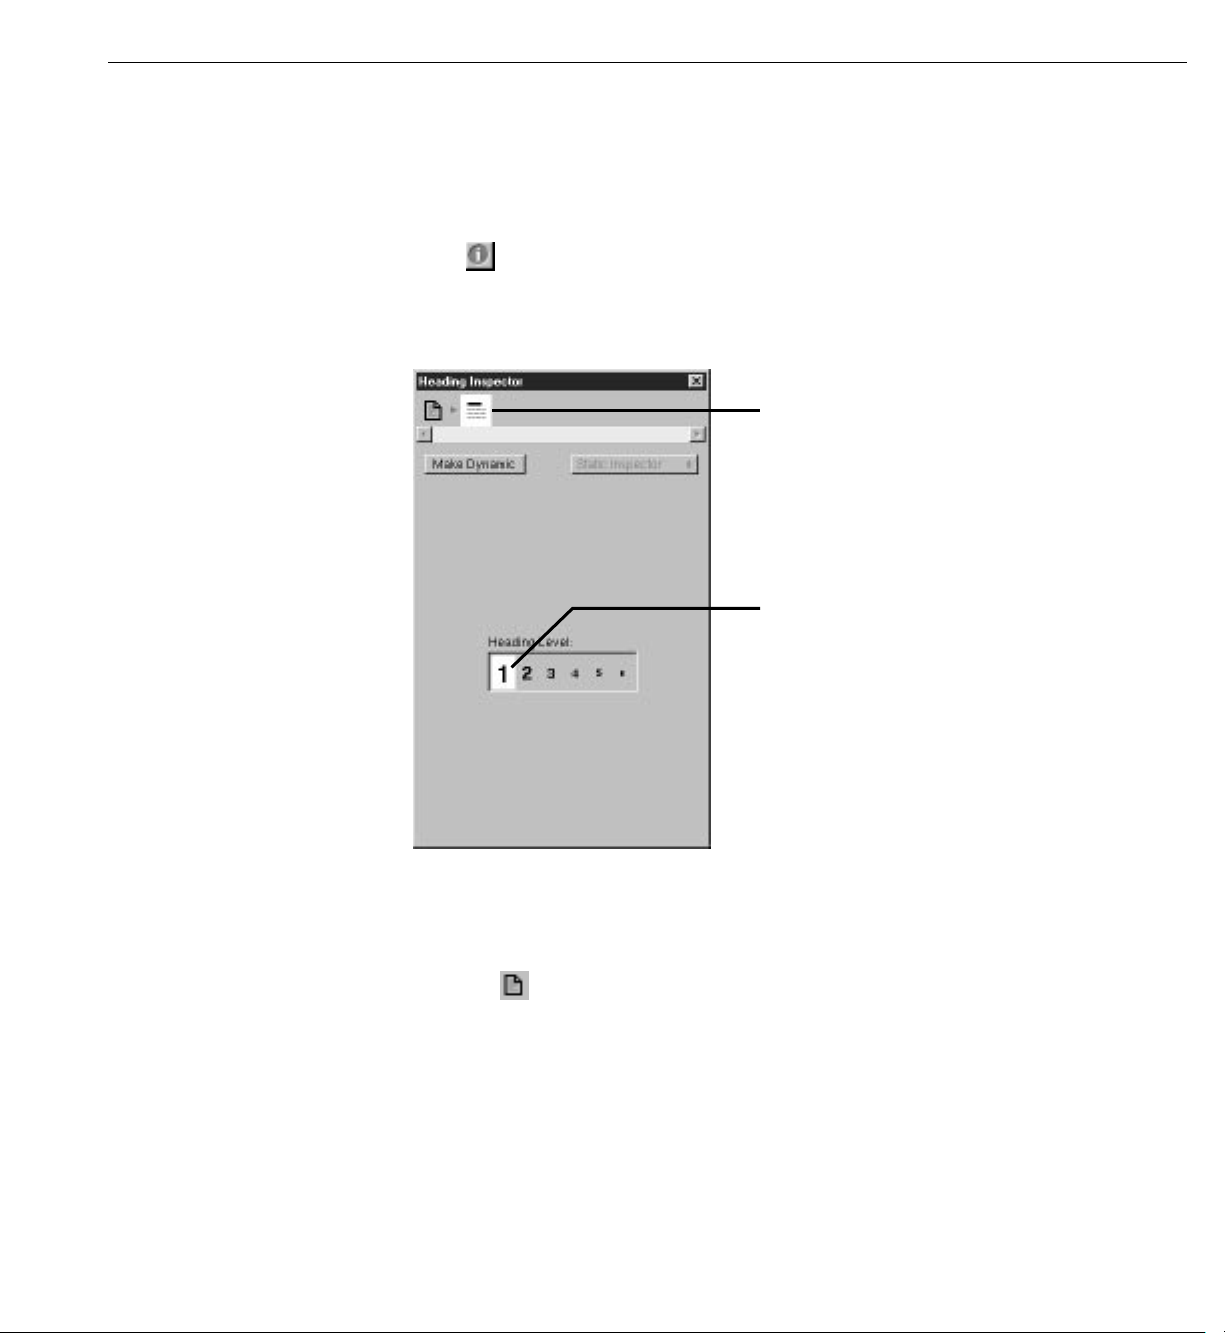
1. Click .
A window titled Heading Inspector appears. It allows you to set the level of
the heading.
The element path. Click to inspect
different elements in the hierarchy.
Click here to set the heading level.
2. Click “1”.
The text is now part of an
<H1> tag, and it is displayed in a larger font.
3. Click the icon at the top of the window.
The top of the window shows the element path to the selected element. Any
element can be contained in a hierarchy of several levels of elements and
can in turn contain other elements. Here, the element path shows that the
heading element is contained in the page element, which is the top level of
the hierarchy. By clicking the icons in the element path, you can easily
choose different elements in the hierarchy.
22
Page 23
Creating the Page’s Content
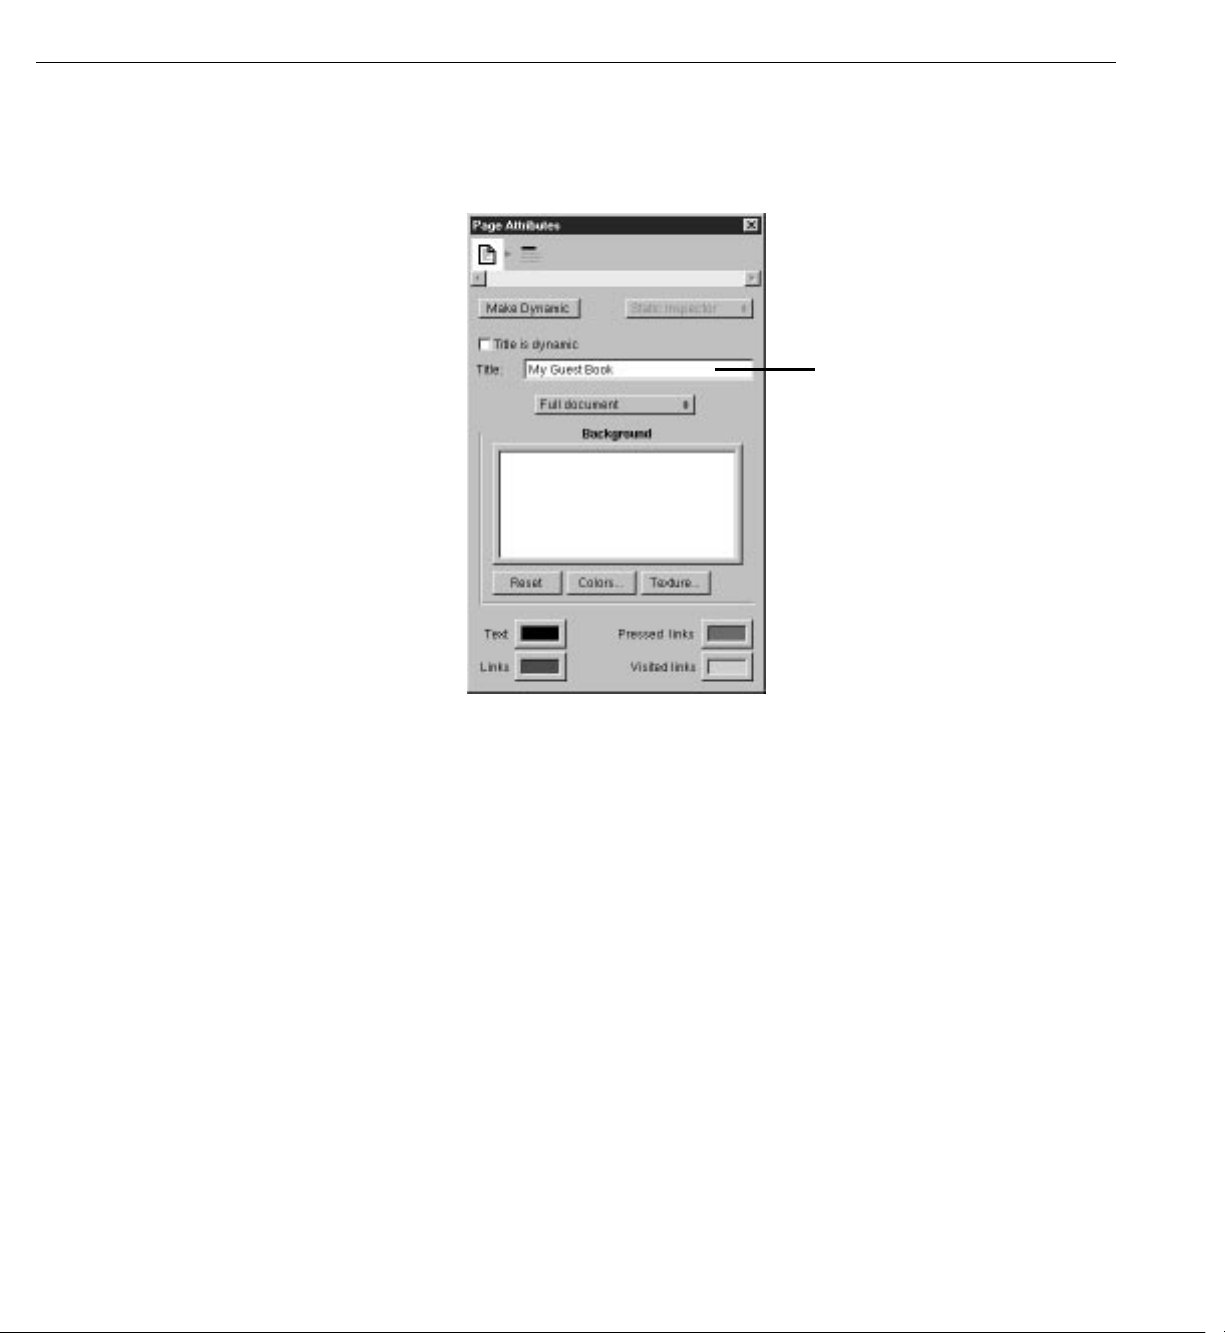
Each element has its own Inspector that allows you to set properties
appropriate for the element. The Page Attributes Inspector allows you
to set properties such as the page’s title and its text color.
Enter page’s title here.
4. Enter a title (such as My Guest Book, or something else of your
choosing) in the Title text field. This is the title of the window that
appears in your web browser when you run the application.
5. Close the Inspector window.
6. Choose File
Note: Version 3.5 of WebObjects Builder doesn’t allow you to undo
m Save to save the Main component.
actions you take when editing your component. Therefore, it is a good
idea to save frequently. That way, if you make a mistake, you can
revert to your previously saved version.
Creating Form-Based Dynamic HTML Elements
In this section, you’ll create a form with several elements to capture input
from a guest. These elements look and act like HTML form elements but
are actually dynamic WebObjects elements, which enable your code to
receive and manipulate the data entered by the user.
23
Page 24
Chapter 1 Creating a Simple WebObjects Application
1. To display the dynamic form elements buttons in the toolbar, choose
from the Elements pop-up list.
2. Place the cursor on the line after the “My Guest Book” text and press Enter.
3. Click .
WebObjects Builder adds a form element to your component. The triangle
at the upper-left corner indicates that it is a dynamic form, as opposed to a
static form.The gray border indicates the extent of the form. You can
increase its size by adding additional elements inside it.
4. Type the text “
Name: ” and press Enter.
This text replaces the word “Form” that was displayed by default.
5. Type “
6. Type “
E-mail: ” and press Enter twice
Comments: ” followed by Enter.
You have just entered three lines (and a blank line) of static text inside the
form. Now you’ll enter some dynamic elements to receive input from the
user: two text fields and a multi-line text area.
7. Place the cursor to the right of the text “Name: ”.
8. Click to create a dynamic text field element (WOTextField).
9. Repeat steps 7 and 8 for “E-mail: ”.
10. Use the button to create a multi-line text area below the “Comments: ”
line.
11. Press Enter twice to create two blank lines.
12. Click to create a Submit button, which is used to send the data in the
form to the server.
13. Click to create a Reset button, which is used to clear the data in the
form.
24
Page 25
Creating the Page’s Content
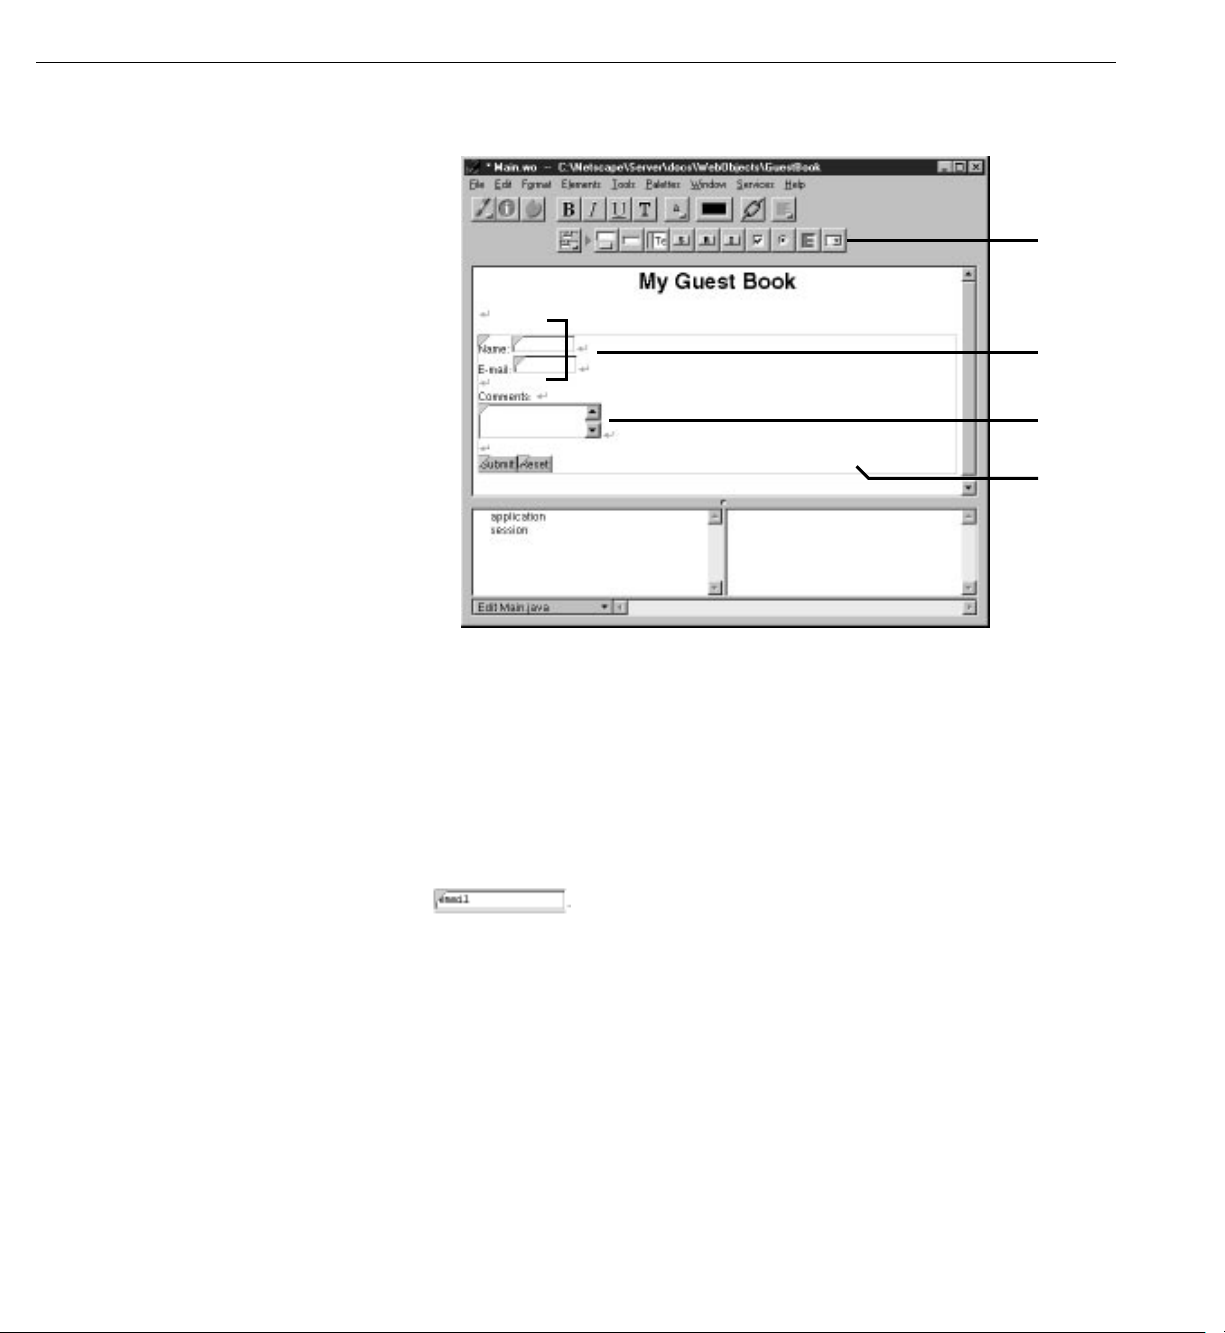
The window should now look like this:
Dynamic form
elements buttons.
Dynamic text field
elements.
Dynamic text area
element.
Rectangle indicates
extent of form.
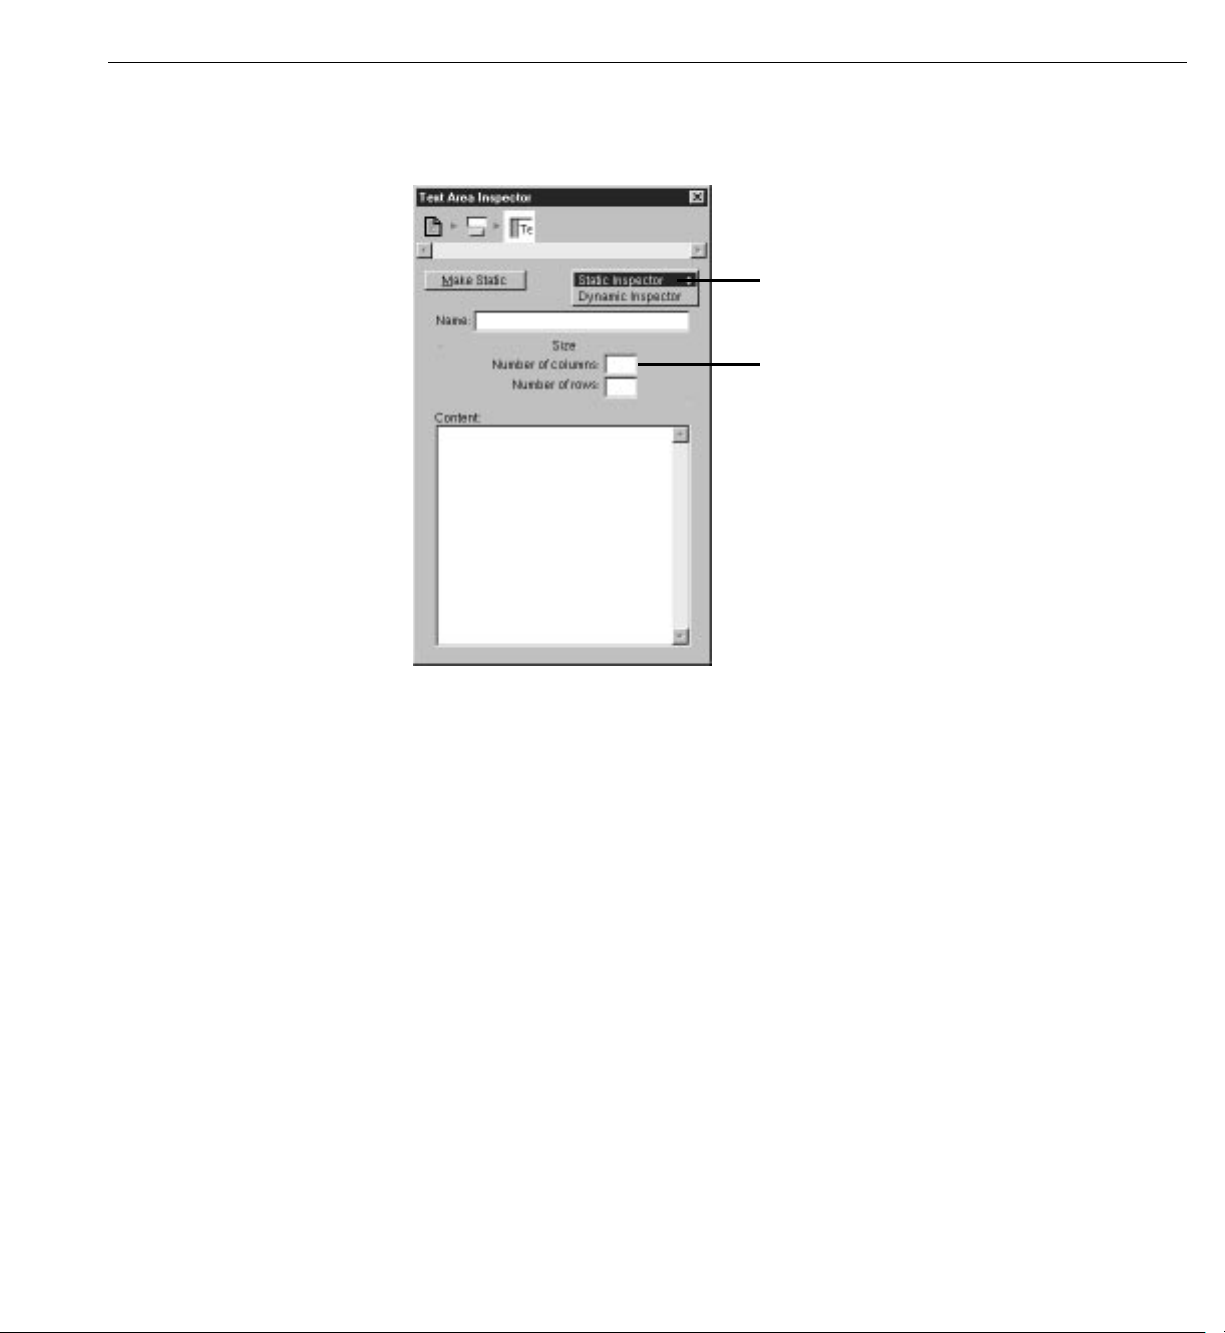
Resizing the Form Elements
The text fields and text area are a bit small, so you’ll resize them using the
Inspector window.
To inspect an element, you must first select it. Some elements (such as text
fields and text areas) can be selected simply by clicking them; they appear
with a gray line underneath.
You select text elements as you would in most text-editing applications (by
dragging, or by double-clicking words, or by triple-clicking lines); they
appear with gray shading.
25
Page 26
Chapter 1 Creating a Simple WebObjects Application
1. Inspect the Name text field (that is, select the text field and open the
Inspector window).
Choose Static Inspector from
this pop-up list.
Enter rows and columns here.
2. Change the setting of the pop-up list at the upper right of the window from
Dynamic Inspector to Static Inspector.
All WebObjects elements have a dynamic inspector, that is, one that allows
you to set bindings (you’ll work with bindings in the next section). In
addition, many WebObjects elements (those with direct counterparts in
static HTML) also have a static inspector. This inspector allows you to set
the standard HTML attributes for that type of element.
In this window, you can set various attributes of the static counterpart of a
WOTextField, which is an HTML
3. In the Size field, type
20 and press Enter to set the width of the text field
<INPUT TYPE=TEXT> element.
to 20 characters.
Note: Be sure to press Enter after typing the values; otherwise, they won’t
“stick.”
4. Repeat steps 1 through 3 for the E-mail field.
26
Page 27

Binding Elements
Binding Elements
5. Inspect the multi-line text area.
In Text Area Inspector, you can set various attributes corresponding to
those of a
6. Increase the size of the element by specifying the number of columns
and number of rows to, say, 30 and 6.
7. Save the Main component.
When a user enters information in GuestBook’s form elements, your
application needs a way of accessing that information. This is done by
binding the form elements to variables in your application. When the user
submits the form, WebObjects puts the data into the variables you’ve
specified.
Then, your application typically processes the data and returns a new page
(or the same page) displaying information that makes sense based on the
user’s input. The information displayed is usually represented by other
dynamic elements that are bound to variables and methods in your code.
<TEXTAREA> element.
This process of receiving a request (triggered by actions such as submitting
a form or clicking a hyperlink) and responding by returning a page is known
as the request-response loop. This loop is at the heart of WebObjects
programming.
In this tutorial, you’ll have WebObjects return the same page, with the
information you received from the user displayed, in a slightly different
format, at the bottom. In the second chapter, you’ll add an additional page
to your application.
Creating Variables
In this section, you’ll declare individual variables in your code file (Main.java)
to hold the name, e-mail address, and comments entered by a single guest.
Later on, you’ll structure this information differently in order to work with
data from multiple users.
27
Page 28
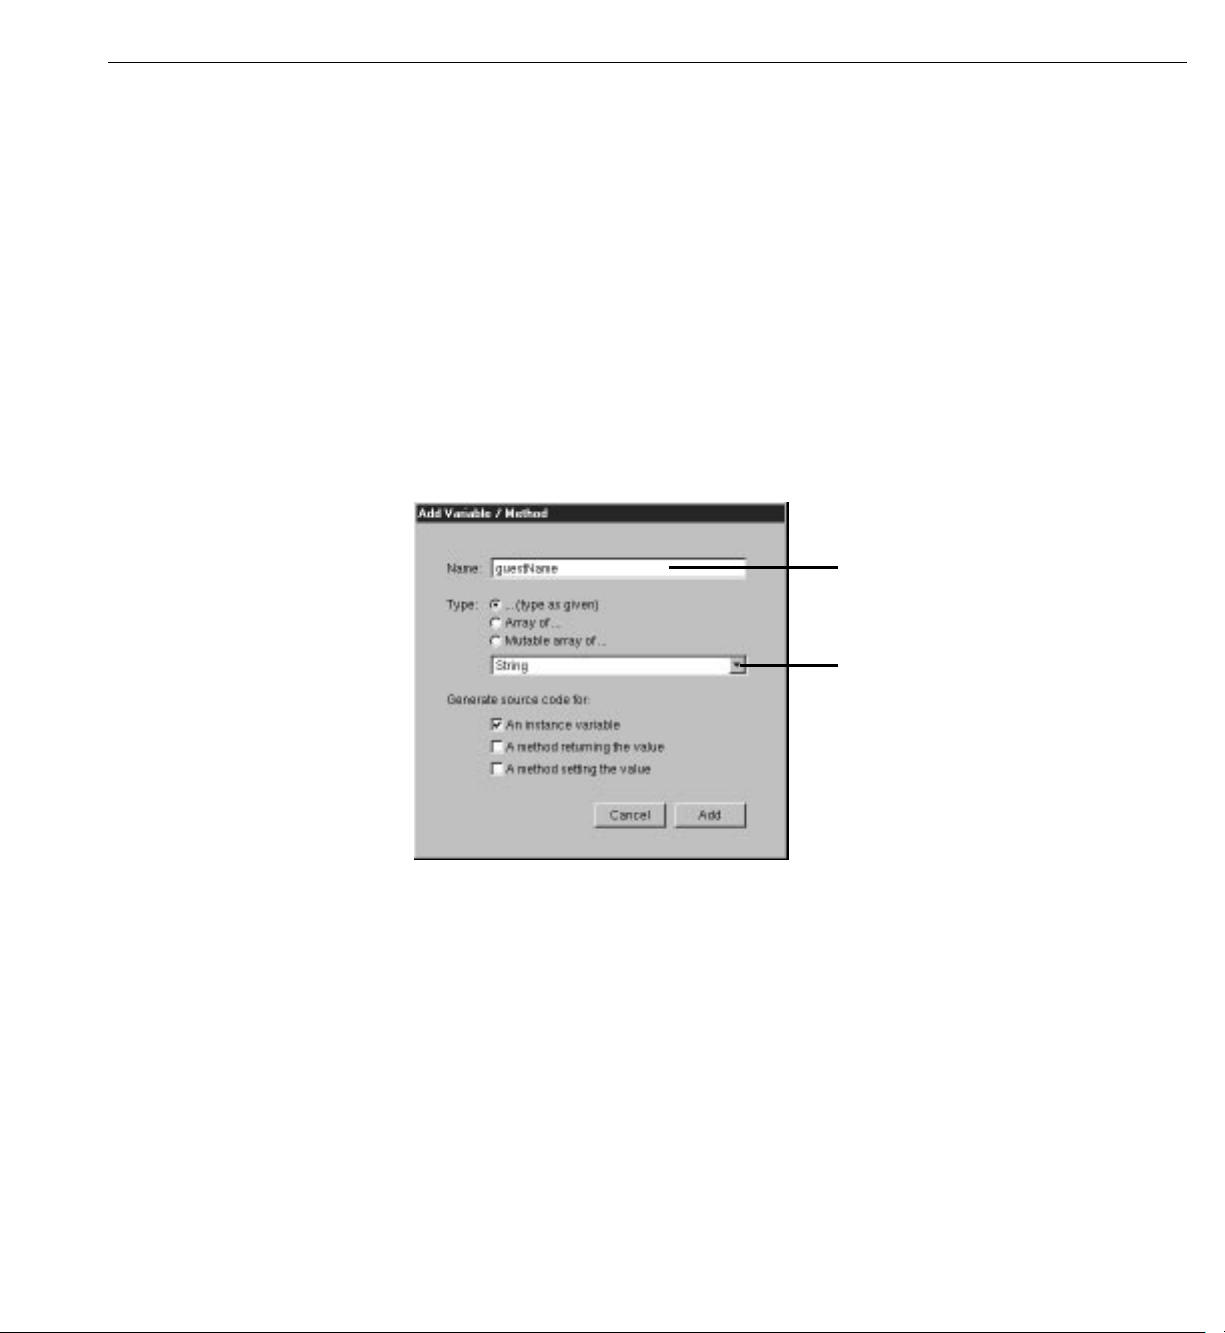
Chapter 1 Creating a Simple WebObjects Application
WebObjects Builder allows you to declare variables without having to edit your
source file directly. At the bottom of the window there is a pull-down menu
called Edit Main.java. It has three items:
Add Variable/Method allows you to add a key to your source file. A key can be either
•
an instance variable or a method that returns a value.
Add Action allows you to add the template for an action method, which is a
•
method that takes no parameters and returns a component (the next page
to be displayed).
View Source File opens the source file in a Project Builder window.
•
1. Choose Add Variable/Method from the pull-down menu.
The Add Variable/Method panel opens.
Type variable name here.
Choose variable’s type from
this pop-up menu.
2. Type
guestName in the Name field.
3. To specify the variable’s type, select String from the pop-up menu (or you
can type
String directly in the box.
4. Click Add.
You have just created a variable called
the first column of the object browser. A declaration for
appears in
5. Create the variables
Main.java, which you’ll edit later.
email and comments in the same way (they are also of
guestName of type String. It appears in
guestName also
type String.)
28
Page 29

Binding Elements
Binding the Input Elements
Each dynamic element contains several attributes. These attributes
determine what happens when the element is displayed or when a form
element is submitted. When you bind an element, you actually bind one or
more of its attributes.
For example, a WOText element (which represents a multi-line text area)
is defined as having two attributes:
value specifies the string the user enters in the text area.
•
name specifies a unique identifier for the text area.
•
In this tutorial, the only attribute you are concerned with is
value, which
represents the string entered by the user in the comments field. You’ll bind
this to the
comments variable. You don’t need to bind the name attribute in this
application. In a later example, you’ll bind more than one attribute of an
element.
1. In the object browser, click the
comments variable and drag the cursor into
the Comments text area. Then release the mouse button.
Binding
appears
here when
complete.
Click variable name and drag to
element to begin binding.
Click here
to complete
binding
29
Page 30
Chapter 1 Creating a Simple WebObjects Application
The Inspector window comes to the front, displaying the bindings for the
text area. The
value attribute is automatically selected (since that is the one
that is most commonly used in bindings). If you wanted to choose a
different attribute to bind (you don’t at this time), you would simply select
the binding of your choice.
2. Click Connect Variable.
comments appears in the Binding column next to the value attribute of the text
area, indicating that the binding has been made. Also, the text
appears in the text field to show that it has been bound.
Note: you can also bind a variable by typing its name directly in the Binding
column for the desired attribute.
comments
3. In the same way, bind the
guestName and email variables to the two text fields.
4. Save the Main component.
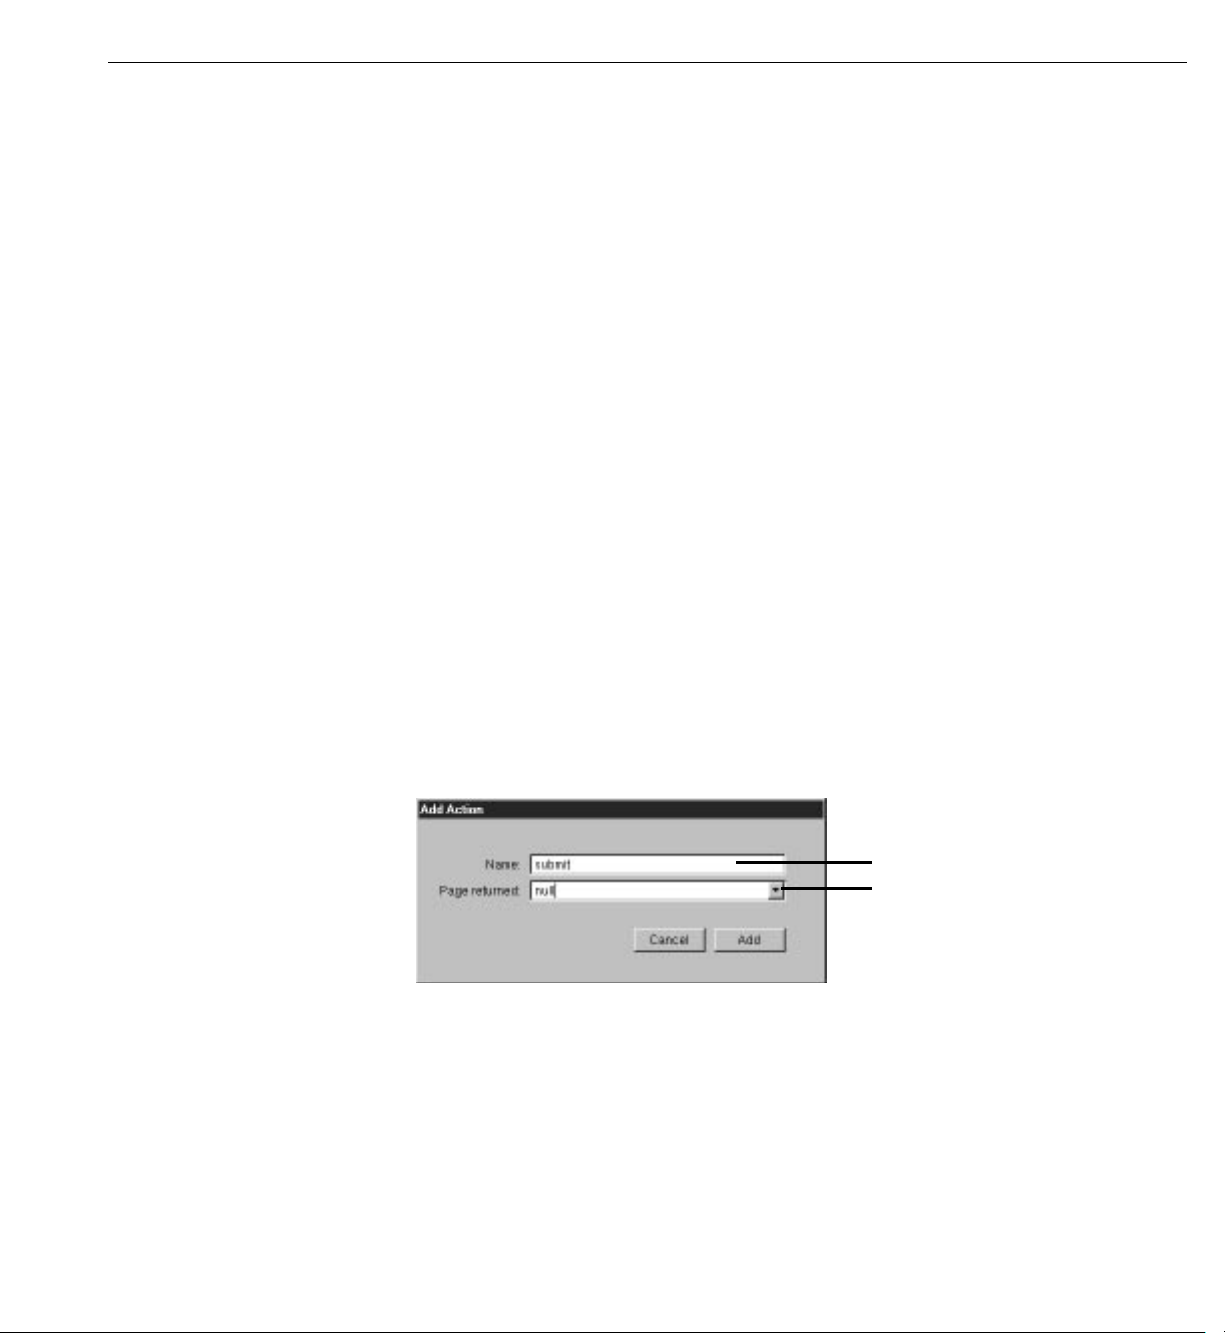
Implementing an Action Method
When the user clicks the Submit button, your application will respond by
redisplaying the page with the submitted information shown at the bottom. To
make this happen, you implement an action method and bind that method to the
action attribute of the WOSubmitButton.
1. From the Edit Main.java menu at the bottom of the object browser, choose
Add Action.
Enter action name here.
Select response page name from
pop-up menu (use null to return
same page).
2. Enter
submit as the name of your action method.
30
Page 31

Binding Elements
3. From the “Page returned” pop-up menu, select null.
The value returned by an action method represents the next page
(component) to be displayed. When you return
null (or nil if using
WebScript), the current page is redrawn. In a later task, you’ll see how
to return a new component.
4. Click Add.
submit action appears below a horizontal line in the first column
The
of the object browser.
5. Click
submit in the object browser and drag the cursor to the submit
button.
The Inspector opens with the button’s
action attribute selected.
6. Click Connect Variable.
You just bound the
submit method you created to the action attribute of
the WOSubmitButton. You don’t need to write any additional code, so
your application is now ready to run. However, you may want to look at
your source file.
7. From the pull-down menu at the bottom of the window, choose View
Source File.
Project Builder becomes active and displays the code for your
component (in
Main.java). You’ll notice that this file contains declarations
for the variables you created earlier, as well as a declaration for the
submit action method.
31
Page 32

Chapter 1 Creating a Simple WebObjects Application
Variable definitions.
submit action method.
Creating the Application’s Output
So far, you have a way for the guest to enter information and a way for the
application to store that information. Now, the application needs to do
something with the information.
For now, you’ll have the application simply display the same information the
user entered, in a slightly different format. This allows you to verify that you
have correctly received the data. To do this, you’ll add dynamic string elements
(WOStrings) to the main page and bind them. In the next chapter, you’ll use
more complex forms of output.
1. In WebObjects Builder, place the cursor at the end of the document,
making sure that it is outside the gray rectangle that represents the form,
and press Enter.
32
Page 33
Creating the Application’s Output
2. Choose from the Elements pop-up list to display the Structures
buttons.
3. Click to create a horizontal line (an
<HR> element).
4. Press Enter to add a blank line.
5. Select
from the Elements pop-up list to display the Other
WebObjects buttons.
6. Add a WOString element by clicking .
A WOString is a dynamic element whose value is determined at
run time. It is shown as a small rectangle surrounded by two icons.
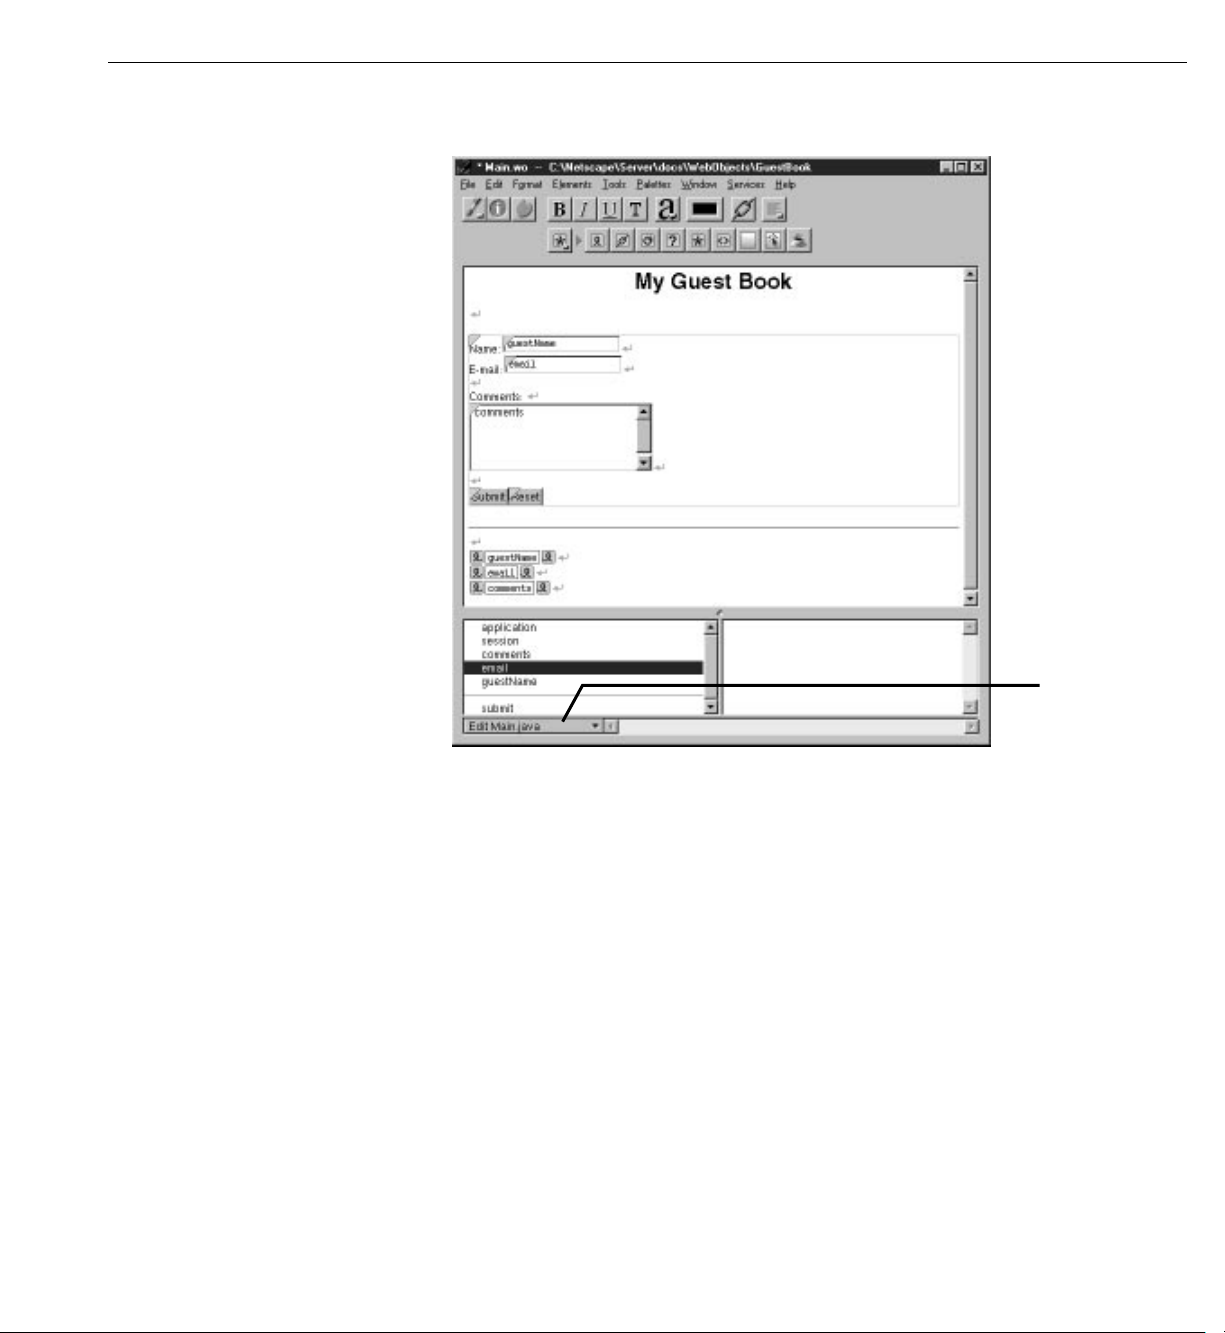
7. In the object browser, click the
guestName variable and drag the cursor to
the center rectangle of the WOString.
Notice that the name
guestName appears inside the WOString, and
the Inspector window doesn’t come to the front. The message
“Connected guestName to value” appears in the upper-right corner
of the window.
WebObjects provides this shortcut for binding to the
value attribute of
WOStrings, because it is the attribute you most often want to bind.
value attribute signifies the string that will be displayed when the
The
page is drawn. If you want to bind a different attribute, you dragconnect to the left or right icon, and the Inspector appears as usual.
8. Click to the right of the WOString and press Enter.
9. Create two more WOStrings and bind them to
email and comments,
respectively.
Note that it isn’t necessary to resize the WOStrings as you did with
the text fields. They expand at run time to display the value of the
variables to which they are bound.
33
Page 34
Chapter 1 Creating a Simple WebObjects Application
10. Save your component. It should now look like this:
Choose
View Source File
from this menu.
In summary, when the user clicks the Submit button, a new request-response
cycle begins. WebObjects stores the data entered in the dynamic form elements
in the variables they are bound to (
email contains the value in the E-mail field, and comments contains the value in the
Comments field). It then triggers the action method bound to the
guestName contains the value in the Name field,
action attribute
of the WOSubmitButton. The action method returns a page (which, in this
example, is the same page). When the page is redrawn, the dynamic strings at
the bottom show the values entered by the user.
Now you are ready to test your application.
34
Page 35
Building and Running Your Application
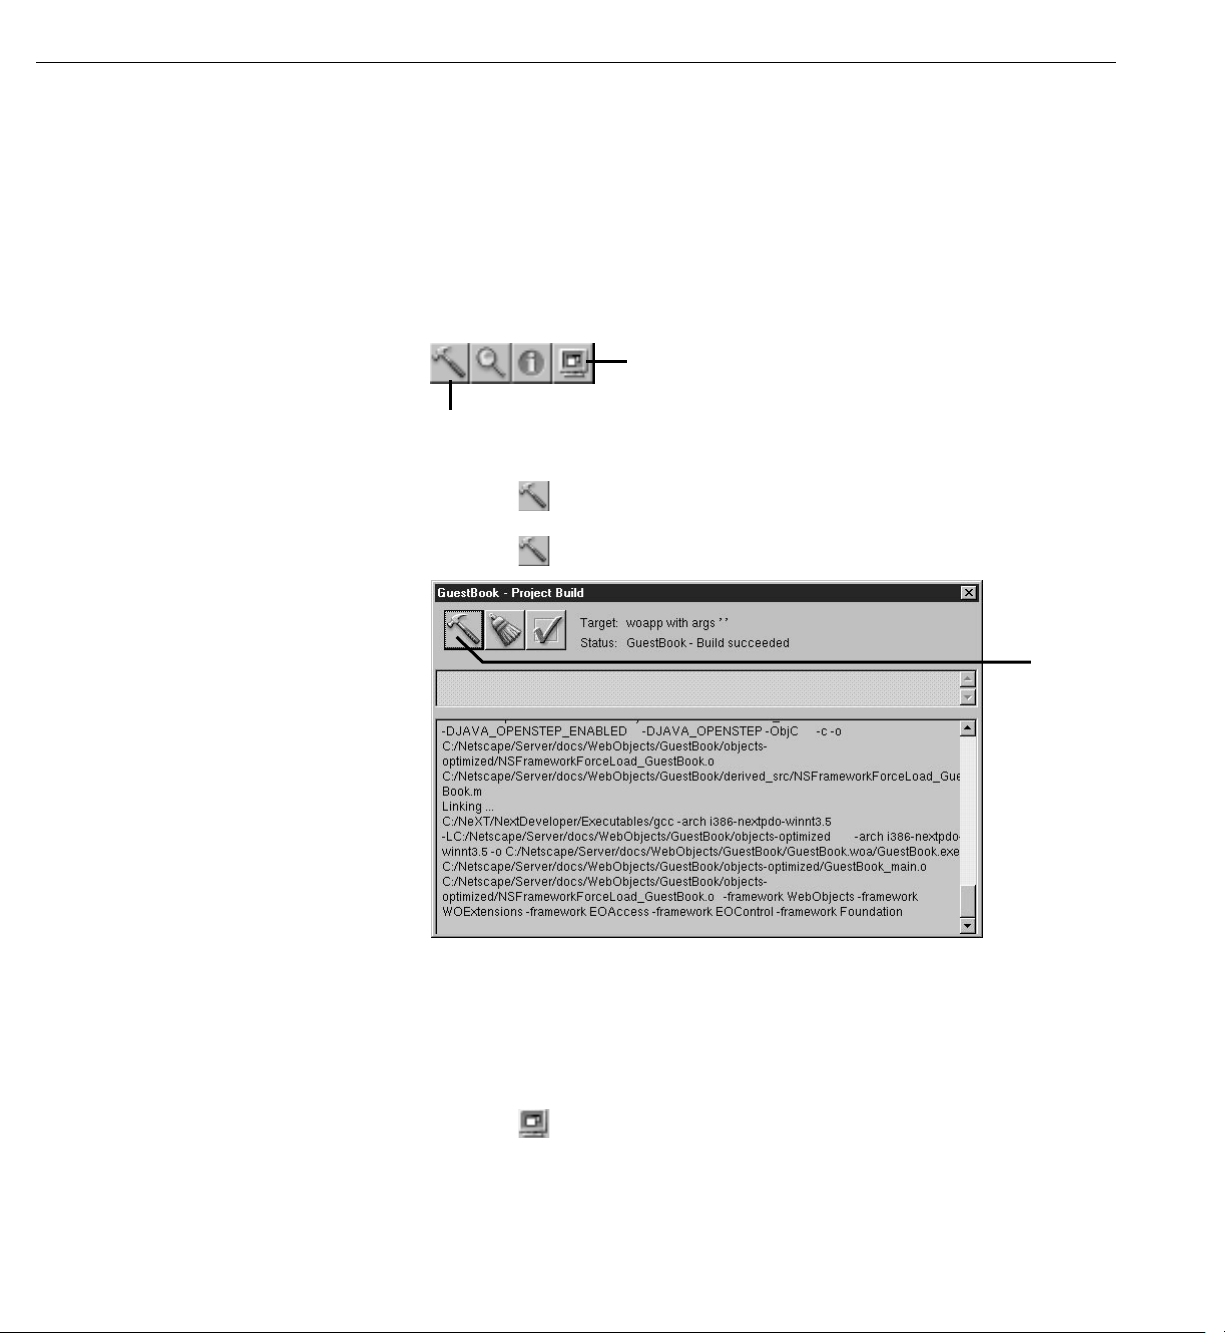
Building and Running Your Application
1. Make Project Builder active. A quick way to do this from WebObjects
Builder is to choose View Source File from the pull-down menu at the
bottom of the window.
To build and launch your application, you use buttons in Project
Builder’s toolbar.
Click here to open the Launch panel.
Click here to open the Project Build panel.
2. Click in the toolbar to open the Project Build panel.
3. Click in the Project Build panel.
The Project Build panel displays the commands that are being
executed to build your project. If all goes well, it displays the status
message “Build succeeded.”
4. Close the panel.
5. Click in the toolbar to open the Launch panel.
Click here to build
your application.
35
Page 36

Chapter 1 Creating a Simple WebObjects Application
6. Click in the Launch panel to launch your application.
The Launch Panel displays a series of messages. If all goes well, you
should see messages such as the following, which mean that your
application is running successfully.
Your web browser (such as Netscape Navigator or Internet Explorer)
should launch automatically and load the correct URL for your application.
If it doesn’t, do the next step; otherwise, proceed to step 8.
7. Launch your web browser and load a URL with the following form:
http://web_server_host/cgi-bin_directory/adaptor/application_directory
Your application directory is
under the
WebObjects subdirectory of your server’s document root when you
first created the project. The default adaptor name is
GuestBook, which was created by Project Builder
WebObjects (see Serving
WebObjects for more information about WebObjects adaptors). So if, for
example, your web server is named
cgi-bin, you would use this URL:
http://gandhi/cgi-bin/WebObjects/GuestBook
gandhi and its cgi-bin directory is named
8. Test your application by entering information and submitting the form.
If all goes well, your page should look like the one shown at the beginning
of this chapter (page 11).
36
Page 37

Chapter 2
Enhancing Your Application
Page 38

Page 39

Duplicating Your Project
In the previous tutorial, you learned how to create a web component that
has input and output elements and how to bind these elements to variables
and methods in your code.
Now you’ll add some additional features to your project that move it a bit
more in the direction of being a real-world web application. The application
will:
• Use a custom Java class to represent the data for a guest, rather than
using three separate variables.
• Maintain a guest list, which keeps track of all guest data (whether
entered by you or multiple users of your application), rather than just
the current guest.
• Have a second component, so that the guest list is displayed in a new
page rather than the same page. You’ll use WebScript rather than Java
to implement this component’s behavior.
• Make use of additional interface elements (such as HTML tables).
Duplicating Your Project
Before proceeding, you’ll create a new project by copying the old one and
renaming it. This way, you can make changes and still retain your previous
version.
1. In WebObjects Builder, close the component window.
2. In Project Builder, close GuestBook’s project window.
3. In your machine’s file system, navigate to the directory where your
If there are any unsaved files, you are prompted to save them.
project is located (the WebObjects directory under your server’s
document root).
39
Page 40

Chapter 2 Enhancing Your Application
4. Duplicate the GuestBook folder.
On Windows NT, you can do this by selecting the folder, choosing
m Copy, then Edit m Paste.
Edit
5. Open the new folder (Copy of GuestBook) and double-click the project file
PB.project.
Project Builder opens a new browser window for this project.
(Alternatively, you could have opened the project from within Project
Builder by choosing Project
and selecting
m Open, then navigating to the project folder
PB.project.)
6. Click from the toolbar to bring up the Project Build panel.
7. Click in the Project Build panel.
This command deletes all the files that were generated when you built the
project previously.
8. Click to open the Project Inspector.
9. Choose Project Attributes from the pop-up list at the top of the window.
10. In the Name field, enter
GuestBookPlus and press Enter.
11. Respond Yes to the prompt that asks if you want to rename the folder.
You now have a new project called GuestBookPlus.
40
Page 41

Creating a Custom Guest Class
Creating a Custom Guest Class
In the first chapter, you created individual variables to store a guest’s name,
e-mail address, and comments. When keeping track of multiple guests, it’s
more useful to encapsulate all the data for a guest as a single entity. You’ll
do this by creating a Java class that contains the data for a single guest.
1. In Project Builder’s browser, select Classes in the first column.
2. Choose File
3. Type
Guest.java as the name of the file.
m New in Project.
Type name of class here.
4. Click OK.
The newly created file contains a skeleton for a class called Guest.
5. Enter the following code to complete the definition of the Guest class.
Add your class’s
instance variables.
Add constructor for
Guest class.
A class stores information in its instance variables (also referred to as
data members). Here you’re declaring three instance variables for Guest:
name, email, and comments. Note that these declarations are the same as
those that appeared in the code for
Main.java when you added the three
variables using WebObjects Builder. In WebObjects, a component is
41
Page 42

Chapter 2 Enhancing Your Application
also a class, specifically a subclass of the class next.wo.Component (called
WOComponent in WebScript or Objective-C).
Java classes require a constructor to initialize an instance (or object) of a
particular class whenever one is created. A constructor has the same name
as the class and returns no value.
Whenever your application creates a new Guest class, its instance variables
are initialized with empty strings, which is the default value if the user
enters no data. (If you prefer, you can use different strings for these initial
values.)
6. Save
Guest.java.
Saving the file lets WebObjects Builder know about your newly created
Guest class.
Binding the Class’s Instance Variables to the Form Elements
In the first chapter, you bound the input elements to variables in Main’s code.
Now you’ll modify the bindings to use the class you just created.
1. Select Web Components in the first column of the browser.
2. Double-click
component in WebObjects Builder.
3. Using the Add Variable/Method panel, add a variable called
your component and specify its type as Guest. (Note that you can now
choose Guest from the Type pop-up menu.)
An entry for
symbol to the right of its name. This means that there is additional data to
be displayed in the second column.
4. Select
currentGuest in the object browser.
Main in the second column of the browser to open the
currentGuest to
currentGuest appears in the object browser. Notice the “>”
The second column displays the three fields of
currentGuest, as determined
by the definition of its class, Guest.
5. Click
guestName in the second column of the object browser next to currentGuest
and drag the cursor to the Name text field.
This time, when the Inspector opens, there is already a binding for the
attribute (
42
guestName), because you bound it in the first tutorial.
value
Page 43

Creating a Custom Guest Class
6. Double-click the row containing the value binding.
This removes the binding for
currentGuest.guestName to the value attribute.
7. Bind the other two input elements to
currentGuest.comments.
guestName you made previously and binds
currentGuest.email and
Creating a Table to Display the Output
In the first chapter, you created three WOString elements to display the
information the guest entered. In this task, you’ll create a different type of
element, an HTML table, to display the information. In later tasks, you’ll
display data for multiple users in the table.
1. Delete the WOStrings below the horizontal line in the Main
component, because you’ll be replacing them with a table.
2. Choose from the Elements pop-up list to display table elements.
3. Click the button.
A table with two rows and two columns appears.
Click here to
add a column.
Click here to add a row.
Double-click to enter
content-editing mode.
4. Click the icon at the upper right of the table.
A third column appears, and the columns are equally spaced.
5. Select the upper-left cell of the table by clicking it.
There are two modes for table editing: content-editing mode, which lets
you change the text in a cell and add other elements to it; and structure-
editing mode, which lets you perform operations on a cell such as
splitting it in two. The cell you just selected is now in structure-editing
mode.
43
Page 44

Chapter 2 Enhancing Your Application
6. Double-click the upper-left cell.
You can now edit the contents of the cell. If you want to resume structure
editing, click
in the toolbar, which allows you to toggle between
modes. (Alternatively, you can hold down the Control key and click in a
different cell to enter structure-editing mode.)
7. Change the text in the cell to
Name.
8. Open the Inspector.
The Inspector presents a number of modifiable settings that apply to the
table cell you’ve selected. Note also that the top row of the Inspector
window shows the element path, which includes the cell, the row it is
contained in, and the table itself. Selecting any of those allows you to set
specific properties of the elements.
Click here to inspect table row.
Click here to inspect table.
Check this box to make the
cell a header.
Enter table width here.
9. Click the Header Cell checkbox.
The text in the cell becomes bold and centered. (However, you don’t see
the changes until you begin editing another cell.)
10. In the Width box, enter 150 in the field marked “pixels” and press Enter.
The width of the column is set to 150 pixels.
44
Page 45

Creating a Custom Guest Class
11. Click in the component window, then press Tab.
Pressing Tab when editing a table causes the contents of the next cell
to the right to be selected (or the first cell of the next row if in the
rightmost column). Pressing Shift-Tab moves in the opposite direction
through the table.
12. Repeat steps 7 through 11 for the second and third cells of the top row.
Label the middle column
the third column
Comments and leave its width unset. (The comments
E-mail and set its width to 150 pixels. Label
field takes up the remainder of the width of the table.)
Note: It isn’t necessary to adjust the height of the columns, since they
expand at run time to accommodate the size of the text being
displayed.
Adding Dynamic Elements to Table Cells
Tables and cells are static HTML elements, so you can’t bind them to
variables or methods. To display dynamic information in cells, you add
dynamic elements, such as WOStrings, to the cells.
1. Select the contents of the first cell in the second row of the table by
clicking in the cell, then double-clicking the text.
2. Choose from the Elements pop-up list.
3. Click to add a WOString to the cell.
4. Press the Tab key.
The contents of the next cell to the right are selected.
5. Repeat steps 3 and 4 for the other two cells in the second row.
Binding the Dynamic Elements in the Table
1. Select currentGuest.guestName in the object browser and drag the cursor to
the center of the WOString in the first column to bind its
2. Similarly, bind
currentGuest.email and currentGuest.comments to the second and
third WOStrings.
value attribute.
45
Page 46

Chapter 2 Enhancing Your Application
The table should now look like this:
3. Save the Main component.
Creating the Guest Object
Earlier in this chapter, you created a Java class of type Guest and wrote a
constructor for it. You also added a variable of that class,
component. However, adding a variable in this way doesn’t actually create a new
Guest object; you need to create one explicitly at some point in your code.
You’ll create the Guest object in the constructor method for your component.
This method is called when the component is first created; that is, the first time
the user accesses the component.
Note: In WebScript or Objective-C, you use a method called init for this purpose.
1. Choose View Source File from the pull-down menu at the bottom of the
window.
currentGuest, to the Main
Project Builder becomes active and displays the code for
Main.java. Notice
the following declaration that was added to your code when you added the
currentGuest variable:
protected Guest currentGuest;
2. Delete the declarations of guestName, email and comments, since you aren’t using
them anymore.
3. Add the constructor method inside the Main class definition:
Main() {
super();
currentGuest = new Guest();
}
The first statement calls the constructor of Main’s superclass (which is
next.wo.Component). The second statement allocates a new empty Guest
object and calls Guest’s constructor to initialize its instance variables.
46
Page 47

Keeping Track of Multiple Guests
4. Save Main.java.
5. Build and run your application.
The application should work similarly to the first chapter, except that
the guest’s data is displayed in a table at the bottom of the page instead
of as plain text.
At this point, your application still handles information from a single guest
only; in the next section, you’ll keep track of multiple guests.
Keeping Track of Multiple Guests
You’ve been using the variable currentGuest in the Main component to hold
the information entered by the user. You’ll need another variable (an array)
to store the list of all the guests who have registered.
47
Page 48

Chapter 2 Enhancing Your Application
Before doing this, it is important to understand the scope and life span of
variables in WebObjects:
• Component variables, such as
currentGuest, exist for the lifetime of the
component. These variables are defined in the component (in this case,
Main.java) and are accessible only by its methods. Each user that uses a
component gets a separate instance of the variable.
• Session variables exist for the lifetime of one user’s session and are accessible
by all code in the session. They are defined in
Session.java. An instance of each
session variable is created for each user.
• Application variables live as long as the application does and are accessible by
all code in the application. They are defined in
Application.java. A single
instance of an application variable is shared by all users of the application.
Creating a Guest List
To store the information from all guests that have accessed the application,
you’ll create an application variable called
application.
1. In Project Builder, select Classes in the first column of the Browser. Then
Application.java from the second column.
select
The application’s code appears in the window. The following figure shows
the code generated by the Wizard, along with code you will add.
allGuests, which exists for the life of the
48
Page 49
Keeping Track of Multiple Guests
You add this line.
You add this line.
You add these
two methods.
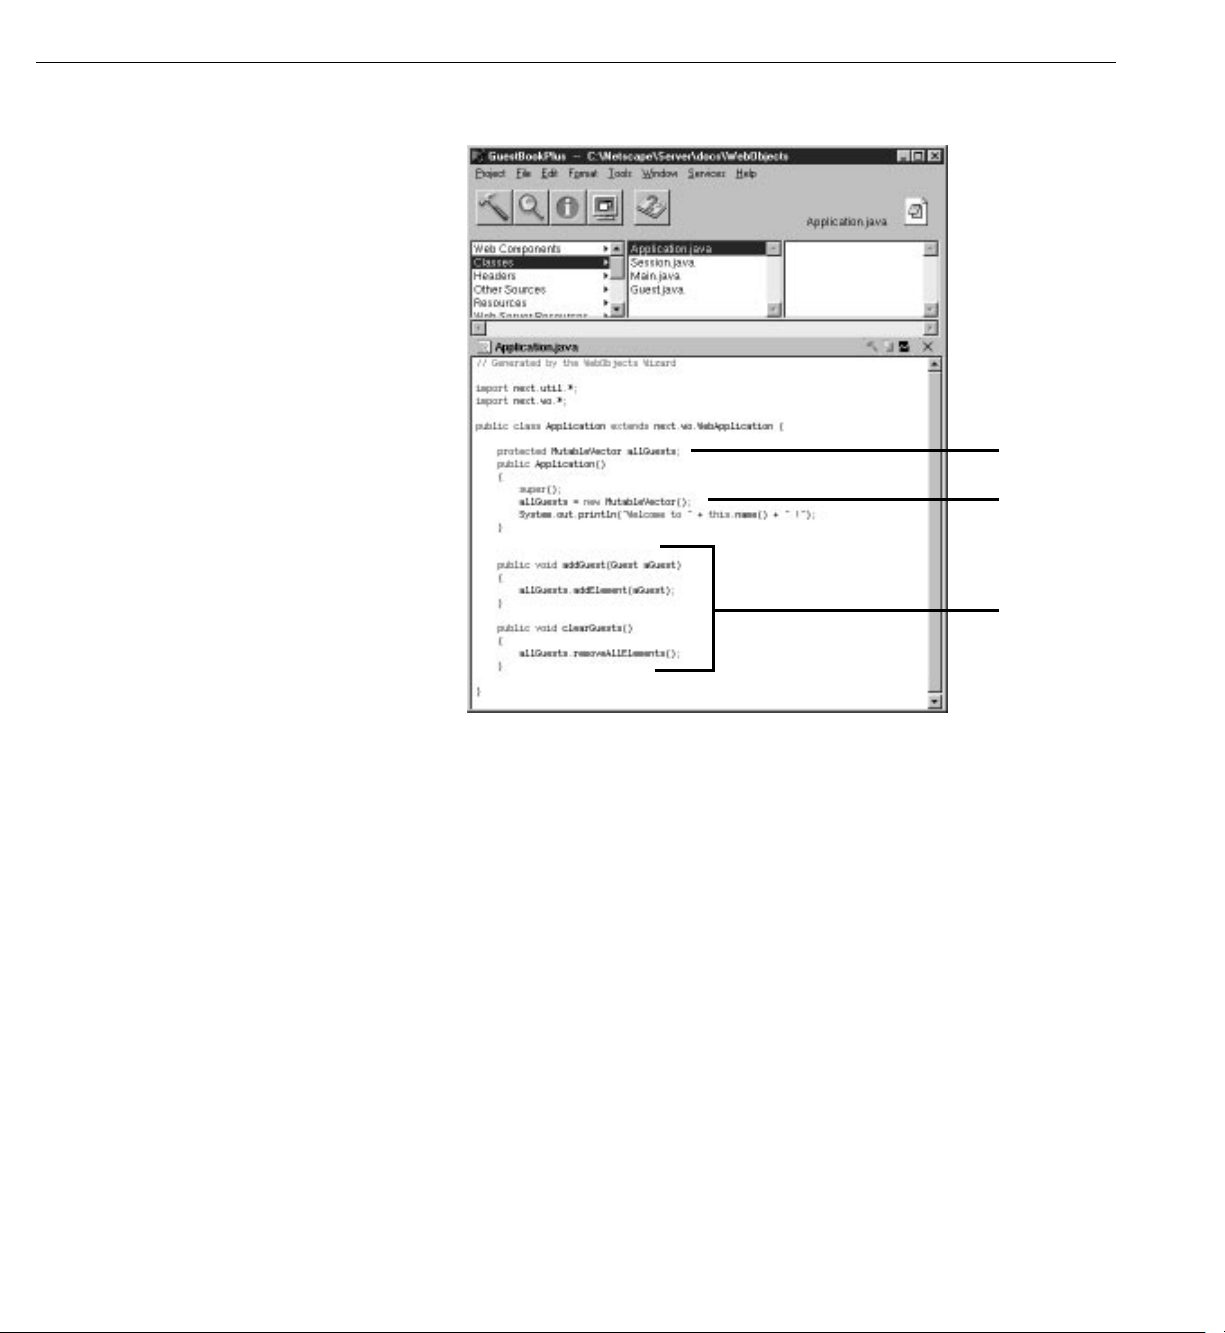
Note that there is one method already defined: Application, which is
the constructor for the application object. The first line calls the
constructor for Application’s superclass (which is the class
WebApplication). The second line prints a message, which you see
in the Launch panel when you launch your application.
2. After the call to
allGuests = new MutableVector();
super, enter this code:
This statement initializes allGuests to be a new object of class
MutableVector. This class is the Java equivalent of the Objective-C
class NSMutableArray, which provides an interface that allows you to
add, change and delete objects from an array.
49
Page 50

Chapter 2 Enhancing Your Application
3. At the top of the Application class definition, enter this declaration:
protected MutableVector allGuests;
This declares allGuests to be of type MutableVector. Declaring it
protected means that it is accessible only from this class or one of its
subclasses. It is standard object-oriented practice for a class to prevent
other classes from directly manipulating its instance variables. Instead,
you provide accessor methods that other objects use to read or modify the
instance variables.
4. Add the accessor methods
The
addGuest method adds an object of class Guest to the end of the allGuests
array, using the MutableVector method
equivalent is
The
clearGuests method removes all the objects from the array using the
addObject).
MutableVector method
removeAllObjects).
5. Save
Application.java.
addGuest and clearGuests, as shown in the figure.
addElement (its Objective-C
removeAllElements (its Objective-C equivalent is
Adding Guests to the Guest List
Now, when the user submits the form, you’ll add the information to the allGuests
array rather than displaying it directly.
1. Switch to the code for
2. In the
submit method, add the following code before the return statement:
((Application)application()).addGuest(currentGuest);
currentGuest = new Guest();
This code calls the application’s addGuest method, which adds an object (in
this case,
currentGuest) to the end of the array. Then it creates a new Guest
object to hold the next guest’s data.
Main.java.
Note: The addGuest method is defined in the class Application, which is a
subclass of WebApplication. The component’s
application method (called in
the above statement) returns an object of type WebApplication, so you
must cast it to Application in order to access its
addGuest method.
Your next step is to create a new component to display the list of guests that
allGuests stores.
50
Page 51

Adding a Second Component
Adding a Second Component
In this section, you’ll create a new component. Instead of Java, you’ll
implement its code using WebScript.
1. In Project Builder’s browser, click Web Components in the first column.
2. Choose File
m New in Project.
Note that the Web Components suitcase is selected.
3. Type
GuestList as the name of the new component. Then click OK.
The WebObjects Component Wizard appears.
4. Choose None for Available Assistance and WebScript for Component
Language.
5. Click Finish.
6. In the second column of the browser, click
GuestList.wo.
Note that there is an additional file you didn’t have with your Java
component.
Main.java in the Main component. For WebScript components, the script
GuestList.wos is your script file, the WebScript equivalent of
files are stored under the component, rather than in the Classes
bucket. You’ll add code to your script file in a later step.
7. Double-click
GuestList.wo to bring up the component window in
WebObjects Builder.
8. Create a heading for this page, as you did for the Main component. Call
it “Guest List” (or something else of your choosing). Then press Enter
twice.
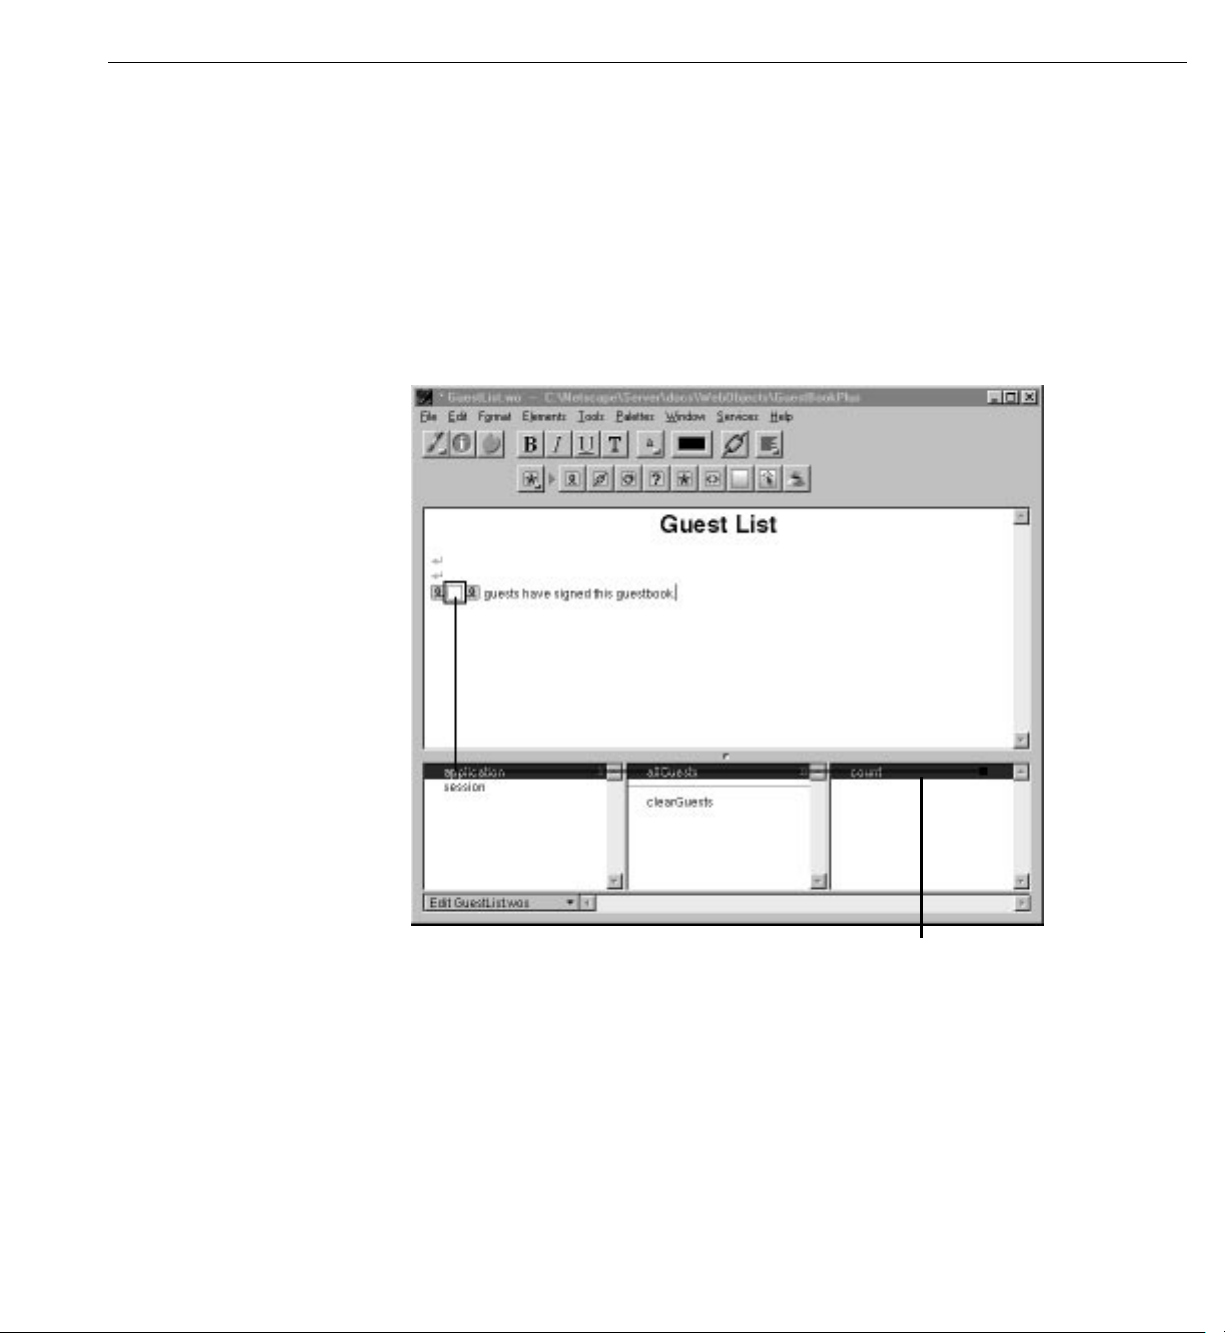
9. Add a WOString below the heading. Then type the text “
have signed this guestbook.”
guests
You’re going to bind this WOString so that it reflects the number of
guests who have submitted this form.
51
Page 52
Chapter 2 Enhancing Your Application
10. In the object browser, click application.
There is an entry in the second column for the
allGuests application variable
you created. This entry appears in the Main component as well, since
application variables are accessible from anywhere in the code.
If you click
allGuests, you’ll see in the third column an entry for count. This is
a standard method that returns the number of objects in the array.
11. Click
count and drag to the center rectangle to bind it to the WOString’s
value attribute.
allGuests. count represents the number
of objects in the array. Drag to bind it to the
WOString.
12. Save the GuestList component.
You need to do one more thing so that the GuestList page now displays
when the user submits the form.
13. Go back to Project Builder and view the source code for
Main.java. Replace the
return statement in the submit method with the following code:
return application().pageWithName("GuestList");
52
Page 53

Using a Repetition
pageWithName is a standard WebObjects method (defined in the
WebApplication class) that allows you to specify a new page to display.
At this point, the code for
14. Save
Main.java.
Main.java looks like this:
15. Build and run your application.
Each time you submit the form, the number of guests displayed in the
WOString should increase.
To return to the Main page, you’ll have to use your browser’s backtrack
button. Later in the tutorial, you’ll add a hyperlink to return to the
Main page.
Using a Repetition
You have demonstrated the use of a second component. Now you’ll create
a table to display the entire list of guests in the GuestList component. To
do so, you’ll use a dynamic element called a repetition (WORepetition).
Repetitions are one of the most important elements in WebObjects, since
it is quite common for applications to display repeated data (often from
databases) when the amount of data to be displayed isn’t known until
run time. Typically, a repetition is used to generate items in a list or a
browser, multiple rows in a table, or multiple tables.
A repetition can contain any other elements, either static HTML or
dynamic WebObjects elements. In the GuestList component, you’ll create
a repetition that contains a table row.
53
Page 54
Chapter 2 Enhancing Your Application
You’ll bind the allGuests array to the WORepetition’s list attribute. This tells
WebObjects to generate the elements in the repetition once for each item in the
array. Each time WebObjects iterates through the array, it sets the repetition’s
item attribute to the current array object. You bind item to the variable currentGuest
and use
currentGuest’s fields to bind the elements inside the repetition (such as
WOStrings). At run time, the table will consist of one row (displaying name,
e-mail address, and comments) for each guest.
1. In WebObjects Builder, make the Main component window active.
2. Select the table at the bottom of the page by clicking outside it and dragging
across it.
3. Choose Edit
m Copy.
4. Make the GuestList component active.
5. Place the cursor at the bottom of the page and choose Edit
m Paste.
You have just copied the table from Main into GuestList. It has all the
same properties, including the bindings. The WOStrings in the table are
still bound to instance variables of
currentGuest. Since currentGuest is a
component variable defined in Main, it isn’t accessible from GuestList.
Therefore, you need to declare it here.
6. From the pull-down menu at the bottom of the window, choose Add
Variable/Method. Enter
Guest as its type.
currentGuest as the name of the variable and
7. Choose from the Elements pop-up list to display the Tables buttons.
8. Click somewhere in the table, then click in the toolbar to enter
structure-editing mode. (Alternatively, Control-click on the table.)
9. Click one of the triangles in the second row to select the entire row.
10. Choose to display Other WebObjects in the toolbar and click
When you wrap a repetition around a table row in this way, the
WORepetition symbol
doesn’t appear in the table. Instead, a blue
border appears around the row. For additional examples of using
repetitions, see Chapter 3, “Creating a WebObjects Database Application”
(page 59).
54
Page 55

Using a Repetition
11. In the object browser, select application in the first column.
12. In the second column, click
allGuests and drag the cursor to anywhere
inside the row (but not inside one of the WOStrings).
The Inspector window opens showing the repetition’s bindings. The
list attribute is selected by default.
Select table row , then click here
to create repetition around row.
Element path shows that WORepetition is
contained by table and contains a table row.
Blue border and background
means row is in a repetition.
13. Click Connect Variable to bind
14. Bind
currentGuest to the repetition’s item attribute.
To do this, you can select the row for
Binding column and type
currentGuest.
Drag variable to table row
to bind to repetition.
application.allGuests to the list attribute.
item, then double-click in the
Click here to bind
allGuests to the
repetition’s
list attribute.
55
Page 56

Chapter 2 Enhancing Your Application
By using the name currentGuest for the item attribute, you are taking advantage
of the fact that the strings in your table are already bound to the fields of
currentGuest.
You now have finished implementing the repetition. When the table is
generated, it will have one row for each item in the
15. Save the GuestList component.
16. Delete the table from Main, since you no longer need it.
17. Build and launch your application.
18. Test your application by entering data for multiple guests and verifying that
each guest appears in the table.
Adding the Finishing Touches
There are a few additional things you’ll do to make your application a bit more
user friendly:
allGuests array.
• Add a button that, when clicked, clears the guest list.
• Add a hyperlink to the GuestList page that allows users to return to the
Main page.
Clearing the Guest List
While developing your application, you may find it useful to be able to remove
all guests from the list. (Typically, you wouldn’t allow users to remove all guests
from the list.)
1. In WebObjects Builder, make the GuestList component window active.
2. Choose Add Action from the pull-down menu at the bottom of the window.
In the panel, enter
page returned to
3. Choose View Source File from the pull-down menu.
Project Builder displays the code for
skeleton of the
as the declaration for
clearGuestList as the name of the action and set the
nil.
GuestList.wos. You’ll notice that there is a
clearGuestList action method, using WebScript syntax, as well
currentGuest that you created previously.
56
Page 57
Adding the Finishing Touches
4. Enter the following code before the return statement in clearGuestList:
[[self application] clearGuests];
This code calls the application’s clearGuests method, which removes all
the Guest objects from the array.
5. Save
GuestList.wos.
6. Go back to WebObjects Builder.
7. Place the cursor below the table and press Enter.
8. Choose from the Elements pop-up list and click .
This creates a submit button that the user will click to clear the guest
list.
9. Using the Inspector, bind the submit button’s
(including the quotes)
"Clear Guest List".
value attribute to
This changes the title of the button. Note that the quotes are
necessary to indicate that you’re binding a string, not a variable.
10. Bind the
When the user clicks the button, the
action attribute to clearGuestList.
clearGuestList action method is
called, which causes the guest list to be cleared and the page to be
redrawn.
Adding a Dynamic Hyperlink
Now you’ll create a hyperlink that returns the user to the Main page.
1. Place the cursor below the submit button (outside the rectangle of its
containing form).
2. Choose from the Elements pop-up list and click .
3. Double-click the text “Hyperlink” and type
Page.
Return to Sign-in
4. Inspect the hyperlink.
57
Page 58

Chapter 2 Enhancing Your Application
5. Select the pageName attribute, then double-click in the Binding column and
type (including the quotes)
Note: You must specifically type the quotation marks in “Main”, because you
are specifying a string representing the name of the page to be returned. If
you left off the quotes, you would be specifying a variable or method called
Main.
6. Save the GuestList component.
7. Test your application.
Note: In this case, you don’t have to rebuild and relaunch your application in
order to test it. Building is only required when you have made changes to
Java or Objective-C code. If you modify a component or WebScript code
only, the changes take effect even if the application is already running.
The GuestList page should now look like this:
"Main".
58
Page 59

Chapter 3
Creating a WebObjects
Database Application
Page 60

Page 61

One of the most powerful features of WebObjects is its ability to provide
access to databases. To do so, it uses a framework called the Enterprise
Objects Framework. This chapter introduces you to the Enterprise Objects
Framework by showing you how to create a simple database application.
The steps you take in creating this application demonstrate the principles
you’ll use in every other application you develop with the WebObjects and
Enterprise Objects Framework.
The application you’ll create in this tutorial is called Movies. It makes use
of a sample database, the Movies database, that contains information about
movies. Before you do this tutorial, you need to set up the Movies database
as described in the Post-Installation Instructions. In addition, if you aren’t
familiar with Project Builder and WebObjects Builder, read the first
tutorials in this book, “Creating a Simple WebObjects Application”
(page 11) and “Enhancing Your Application” (page 37), which introduce
basic concepts and procedures you should know before you go on.
In this tutorial, you will:
• Use the WebObjects Application Wizard to create a fully functional
Main component that reads and writes from the Movies database.
• Create and configure display groups for interacting with a database in
terms of objects.
• Create bindings between display groups and a user interface.
• Write code to manipulate display groups’ selected objects.
• Set up display groups in a master-detail configuration.
• Use EOModeler to maintain a model file.
• Create custom enterprise object classes.
Along the way, you’ll learn basic Enterprise Objects Framework concepts
you can use to design your own database applications.
61
Page 62

Chapter 3 Creating a WebObjects Database Application
The Movies Application
The Movies application has two pages, each of which allows you to access
information from the database in different ways:
• MovieSearch (the main page) lets you search for movies that match userspecified criteria. For example, you can search for all comedies starting with
the letter “T” that have an R rating. Once you find the movie you’re looking
for, you can make changes to its data or delete it. You can also use this page
to insert new movies into the database.
• MovieDetails displays the actors who star in a selected movie and the roles
those actors play. You can add new roles, change the name of a role, and
assign a different actor to a role.
62
Page 63

The Movies Application
1
0
2
8
F
e
d
e
r
i
g
h
i
C
r
a
i
g
1
1
3
2
F
e
l
d
m
a
n
C
o
r
e
y
T
A
L
E
N
T
_
I
D
L
A
S
T
_
N
A
M
E
F
I
R
S
T
_
N
A
M
E
T
A
L
E
N
T
Enterprise Objects and the Movies Database
Enterprise Objects Framework manages the interaction between the
database and objects in the Movies application. Its primary responsibility is
to fetch data from relational databases into enterprise objects. An enterprise
object, like any other object, couples data with methods for operating on
that data. In addition, an enterprise object has properties that map to stored
data. Enterprise object classes typically correspond to database tables. An
enterprise object instance corresponds to a single row or record in a database
table.
The Movies application centers around three kinds of enterprise objects:
Movies, MovieRoles, and Talents. A movie has many roles, and talents (or
actors) play those roles.
The Movie, MovieRole, and Talent enterprise objects in the Movies
application correspond to tables in a relational database. For example,
the Talent enterprise object corresponds to the TALENT table in the
database, which has LAST_NAME and FIRST_NAME columns. The
Talent enterprise object class in turn has
variables. In an application, Talent objects are instantiated using the data
from a corresponding database row, as shown in the following figure:
lastName and firstName instance
Talent
lastName "Federighi"
firstName "Craig"
Enterprise Objects and Relationships
Relational databases model not just individual entities, but entities’
relationships to one another. For example, a movie has zero, one, or more
roles. This is modeled in the database by both the MOVIE table and
63
Page 64

Chapter 3 Creating a WebObjects Database Application
1
0
2
8
R
i
p
l
e
y
5
0
1
5
0
1
A
l
i
e
n
1
1
3
2
A
s
h
5
0
1
7
0
3
T
o
y
S
t
o
r
y
T
A
L
E
N
T
_
I
D
M
O
V
I
E
_
R
O
L
E
M
O
V
I
E
_
I
D
M
O
V
I
E
_
I
D
T
I
T
L
E
M
O
V
I
E
_
R
O
L
E
M
O
V
I
E
MOVIE_ROLE table having a MOVIE_ID column. In the MOVIE table,
MOVIE_ID is a primary key, while in MOVIE_ROLE it’s a foreign key.
A primary key is a column or combination of columns whose values are
guaranteed to uniquely identify each row in that table. For example, each row
in the MOVIE table has a different value in the MOVIE_ID column, which
uniquely identifies that row. Two movies could have the same name but still be
distinguished from each other by their MOVIE_IDs.
A foreign key matches the value of a primary key in another table. The purpose
of a foreign key is to identify a relationship from a source table to a destination
table. In the following diagram, notice that the value in the MOVIE_ID column
for both MOVIE_ROLE rows is 501. This matches the value in the
MOVIE_ID column of the “Alien” MOVIE row. In other words, “Ripley”
and “Ash” are both roles in the movie “Alien.”
Suppose you fetch a Movie object. Enterprise Objects Framework takes the
value for the movie’s MOVIE_ID attribute and looks up movie roles with the
corresponding MOVIE_ID foreign key. The framework then assembles a
network of enterprise objects that connects a Movie object with its MovieRole
objects. As shown below, a Movie object has a vector of its MovieRoles, and the
MovieRoles each have a Movie.
64
Page 65
Designing the Main Page
Movie
Designing the Main Page
Every WebObjects application has at least one component—usually named
Main—that represents the first page the application displays. In Movies,
the Main component represents the MovieSearch page.
movieRoles
MutableVector
movie
MovieRole
movie
MovieRole
To design the Main component, you’ll use the WebObjects Application
Wizard. The wizard performs all the setup that’s necessary to fetch database
records and display them in a web page. Specifying different wizard options
yields different pages: The MovieSearch page is an example of one of the
many different layouts you can generate with the wizard.
Starting the WebObjects Application Wizard
1. In Project Builder, choose Project m New.
2. In the New Project panel, select WebObjects Application from the
Project Type pop-up list.
3. Click Browse.
4. In the Open panel, navigate to a directory under
DocumentRoot
/WebObjects, where you want to create your new project.
65
Page 66

Chapter 3 Creating a WebObjects Database Application
5. Type Movies in the “File name” field.
6. Click Save.
7. In the New Project panel, click OK.
This starts the WebObjects Application Wizard.
8. Choose Wizard under Available Assistance.
With this option, the wizard guides you through the creation of a Main
component for your application. When you finish, you can immediately
build and run your application without performing any additional steps
and without adding any code.
9. Choose Java as the primary language.
10. Click Next.
Specifying a Model File
A model associates database columns with instance variables of objects. It also
specifies relationships between objects in terms of database join criteria. You
typically create model files using the EOModeler application, but the wizard
can create a first cut at a model as a starting point. Later on, you’ll use
EOModeler to modify the model created by the wizard.
Select this option.
1. Choose “Create new model.”
2. Click Next.
66
Page 67
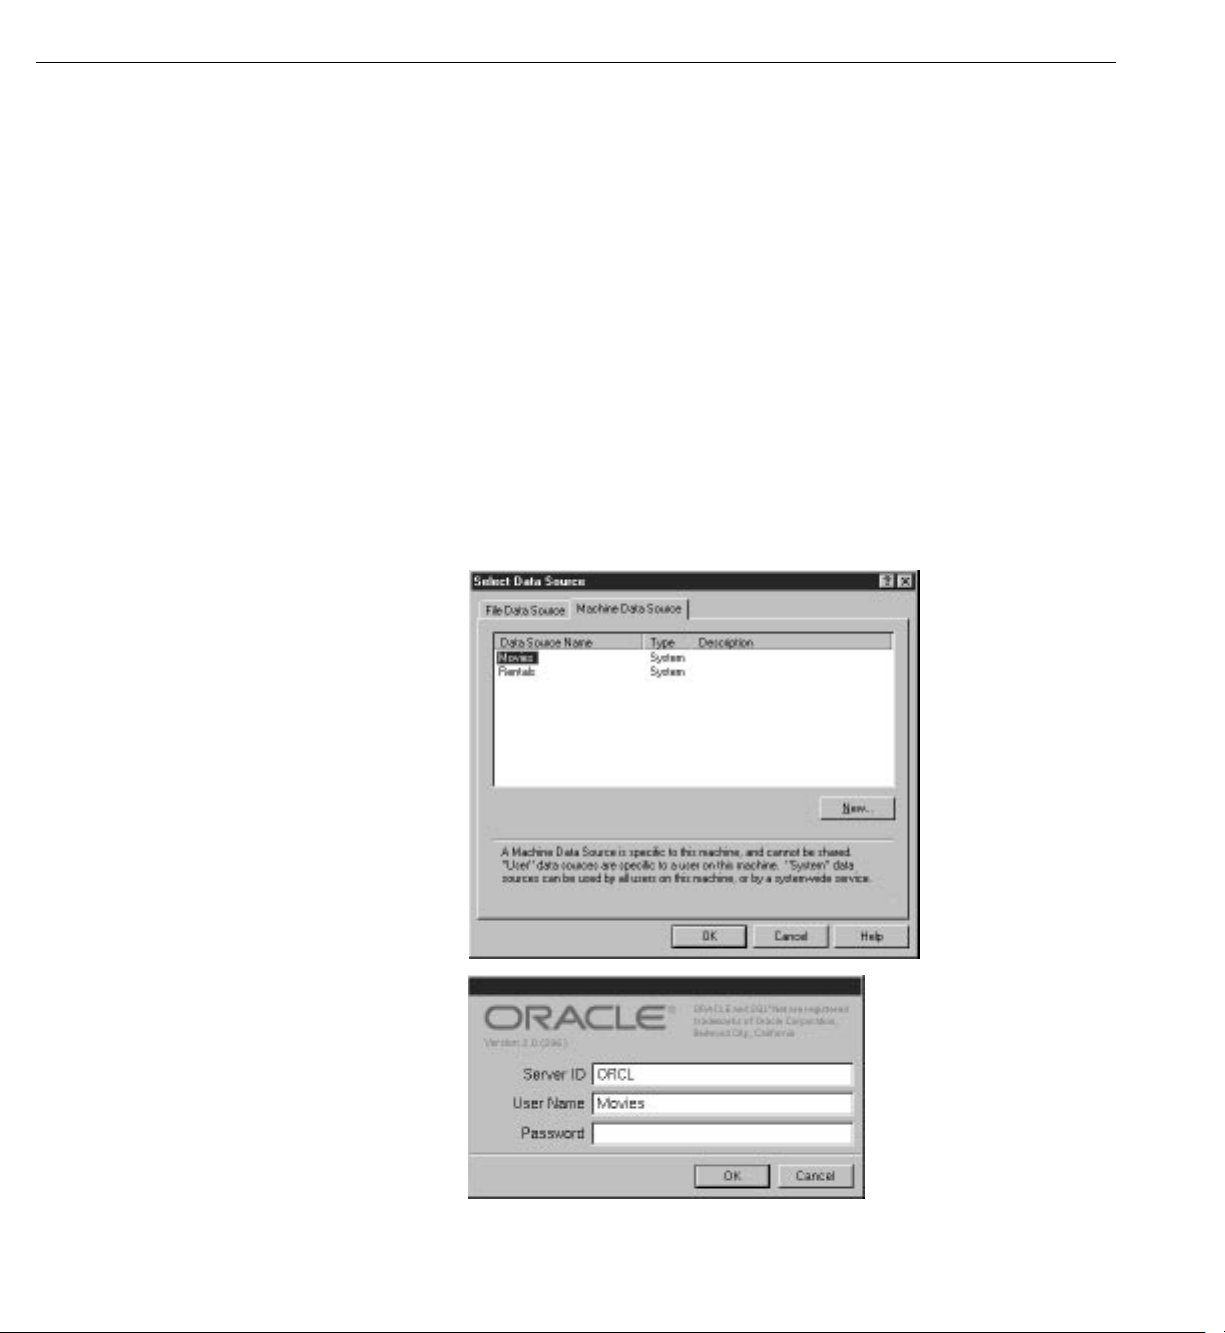
Designing the Main Page
Choosing an Adaptor
An adaptor is a mechanism that connects your application to a particular
database server. For each type of server you use, you need a separate
adaptor. WebObjects provides adaptors for Informix, Oracle, and Sybase
servers. If you’re working on a Windows platform, WebObjects also
provides an ODBC adaptor for use with ODBC-compliant database
sources.
1. In the wizard panel, choose the adaptor for your database.
2. Click Next.
A login panel for the selected adaptor opens. Different databases
require different login information, so each database’s login panel
looks different. Shown below are the login panels for the ODBC and
Oracle adaptors, for use with ODBC-compliant database servers (such
as Microsoft Access) and Oracle database servers, respectively.
67
Page 68
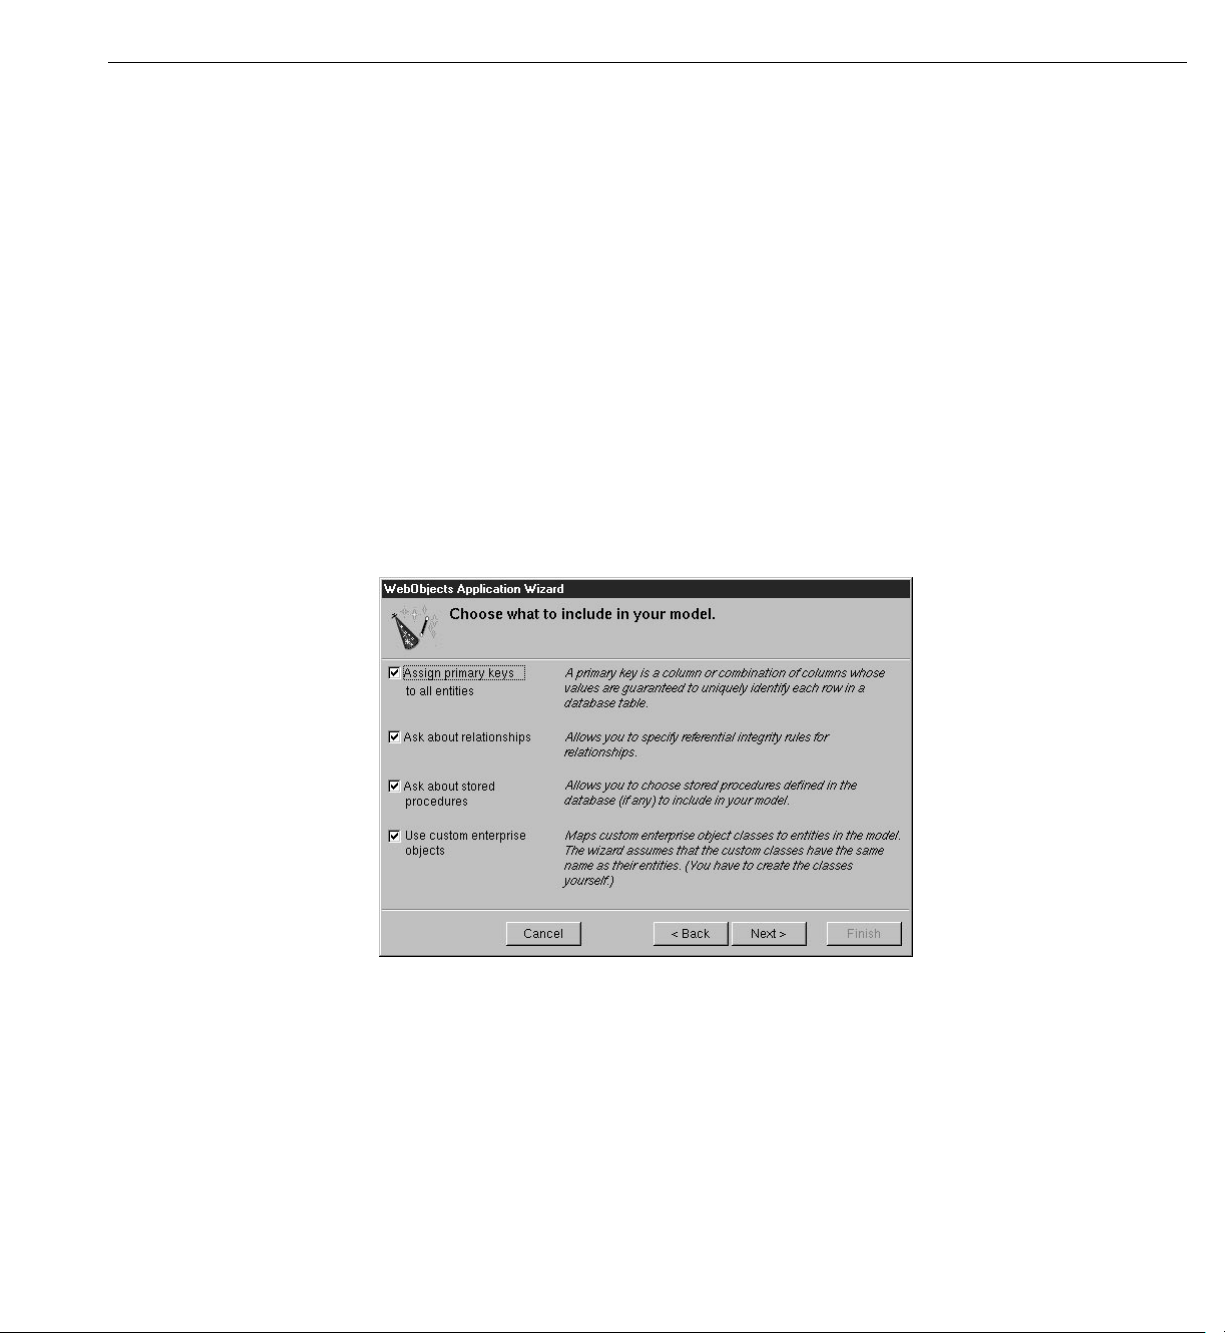
Chapter 3 Creating a WebObjects Database Application
3. Complete the login panel.
Specify the connection information you provided when you created and
populated the Movies database. Post-Installation Instructions provides more
information.
4. Click OK.
When you use the wizard to create a model file, the wizard uses the adaptor you
specify to connect to your database. With the information you specified in
the adaptor’s login panel, the adaptor logs in, reads the database’s schema
information, and creates a model. The wizard uses your answers to the questions
in the next several pages to configure that model.
Choosing What to Include in Your Model
In this next wizard page, you can specify the degree to which the wizard
configures your model.
The basic model the wizard creates contains entities, attributes, and relationships.
An entity is the part of the database-to-object mapping that associates a database
table with an enterprise object class. For example, the Movie entity maps rows
from the MOVIE table to Movie objects. Similarly, an attribute associates a
database column with an instance variable. For example, the
Movie entity maps the TITLE column of the MOVIE table to the
title attribute in the
title instance
variable of Movie objects.
68
Page 69
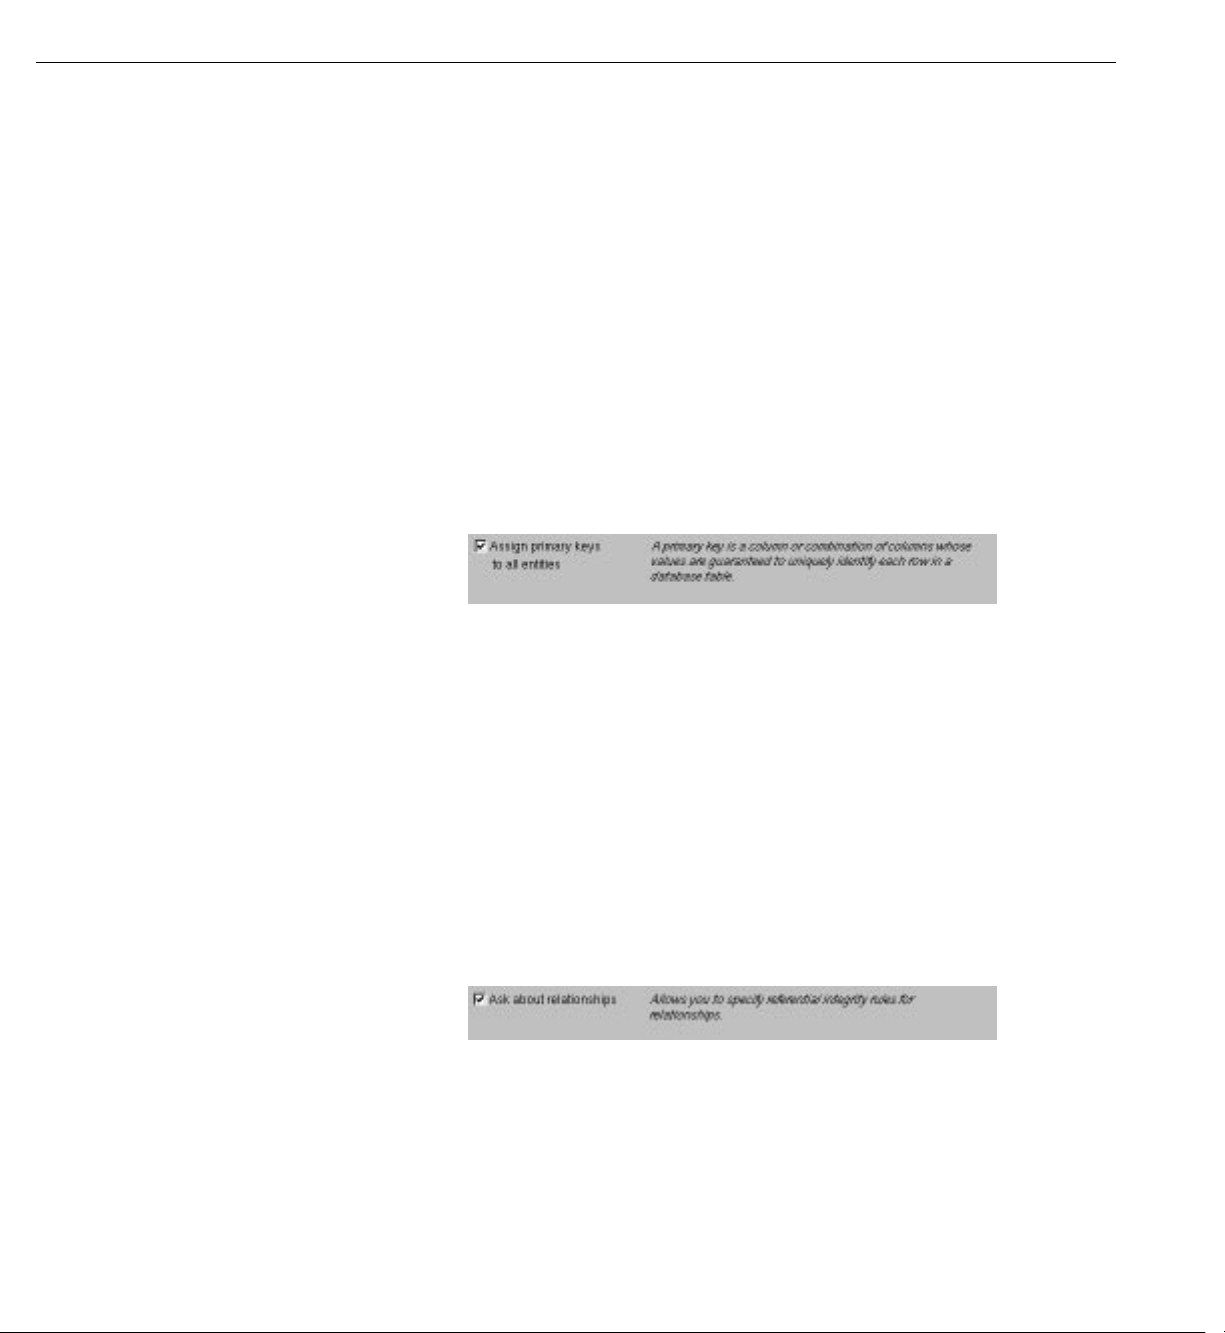
Designing the Main Page
A relationship is a link between two entities that’s based on attributes of the
entities. For example, the Movie entity has a relationship to the MovieRole
entity based on the entities’
movieId attributes (although the attributes in this
example have the same name in both entities, they don’t have to). This
relationship makes it possible to find all of a Movie’s MovieRoles.
How complete the basic model is depends on how completely the schema
information is inside your database server. For example, the wizard includes
relationships in your model only if the server’s schema information specifies
foreign key definitions.
Using the options in this page, you can supplement the basic model with
additional information. (Note that the wizard doesn’t modify the
underlying database.)
1. Check the “Assign primary keys to all entities” box.
Enterprise Objects Framework uses primary keys to uniquely identify
enterprise objects and to map them to the appropriate database row.
Therefore, you must assign a primary key to each entity you use in
your application. The wizard automatically assigns primary keys to the
model if it finds primary key information in the database’s schema
information.
Checking this box causes the wizard to prompt you to choose primary
keys that aren’t defined in the database’s schema information. If your
database doesn’t define them, the wizard later prompts you to choose
primary keys.
2. Check the “Ask about relationships” box.
If there are foreign key definitions in the database’s schema
information, the wizard includes the corresponding relationships in the
basic model. However, a definition in the schema information doesn’t
provide enough information for the wizard to set all of a relationship’s
options. Checking this box causes the wizard to prompt you to provide
the additional information it needs to complete the relationship
configurations.
69
Page 70

Chapter 3 Creating a WebObjects Database Application
3. Uncheck the “Ask about stored procedures” box.
Checking this box causes the wizard to read stored procedures from the
database’s schema information, display them, and allow you to choose
which to include in your model. Because the Movies application doesn’t
require the use of any stored procedures, don’t check this box.
4. Uncheck the “Use custom enterprise objects” box.
An entity maps a table to enterprise objects by storing the name of a
database table (MOVIE, for example) and the name of the corresponding
enterprise object class (a Java class, Movie, for example). When deciding
what class to map a table to, you have two choices: GenericRecord or a
custom class. GenericRecord is a class whose instances store key-value
pairs that correspond to an entity’s properties and the data associated with
each property.
If you don’t check the “Use custom enterprise objects” box, the wizard
maps all your database tables to GenericRecord. If you do check this box,
the wizard maps all your database tables to custom classes. The wizard
assumes that each entity is to be represented by a custom class with the
same name. For example, a table named MOVIE has an entity named
Movie, whose corresponding custom class is also named Movie.
Use a custom enterprise object class only when you need to add business
logic; otherwise use GenericRecord. The Movies application uses
GenericRecord for the Movie entity and custom classes for the Talent and
MovieRole entities. Later on, you’ll use EOModeler to specify the custom
classes.
5. Click Next.
70
Page 71
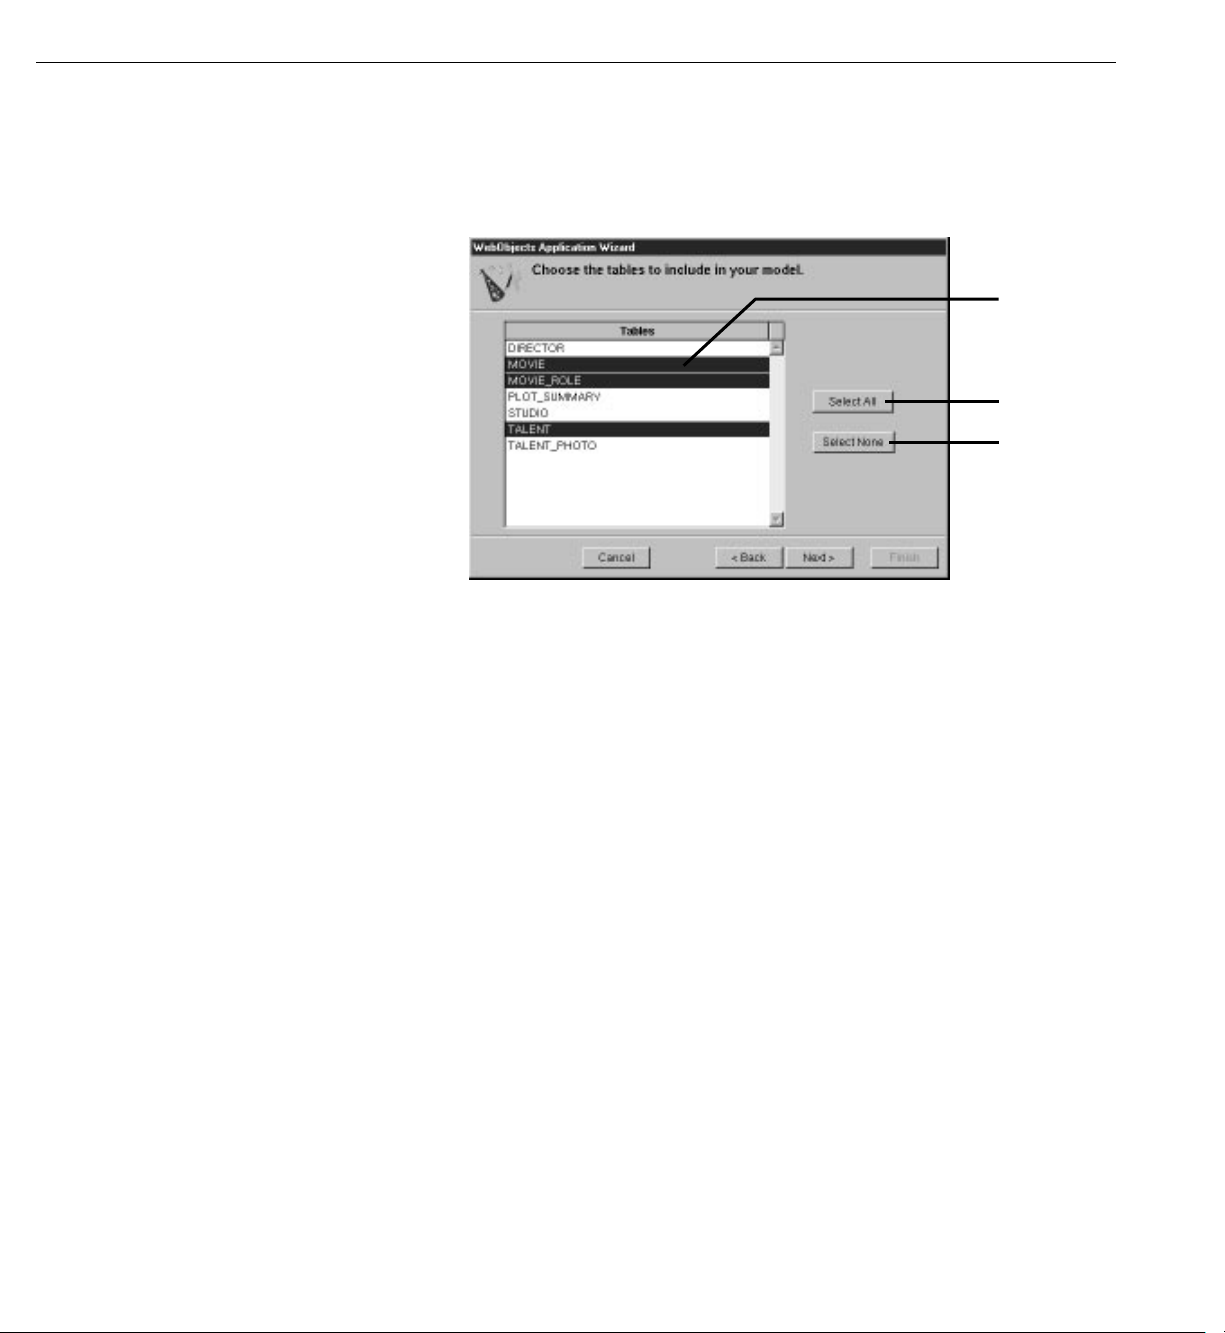
Designing the Main Page
Choosing the Tables to Include
1. In the wizard panel, select MOVIE, MOVIE_ROLE, and TALENT in
the Tables browser.
Shift-click to select
more than one table.
Click to select all the tables.
Click to deselect all
the tables.
The wizard creates entities only for the tables you select. Since
the Movies application doesn’t interact with any of the other
tables (DIRECTOR, PLOT_SUMMARY, STUDIO, and
TALENT_PHOTO), you don’t need to include them in the model.
2. Click Next.
Specifying Primary Keys
If you are using a database that stores primary key information in its
database server’s schema information, the wizard skips this step. The
wizard has already successfully read primary key information from the
schema information and assigned primary keys to your model.
However, if primary key information isn’t specified in your database server’s
schema information (as with Microsoft Access), the wizard now asks you to
specify a primary key for each entity.
71
Page 72
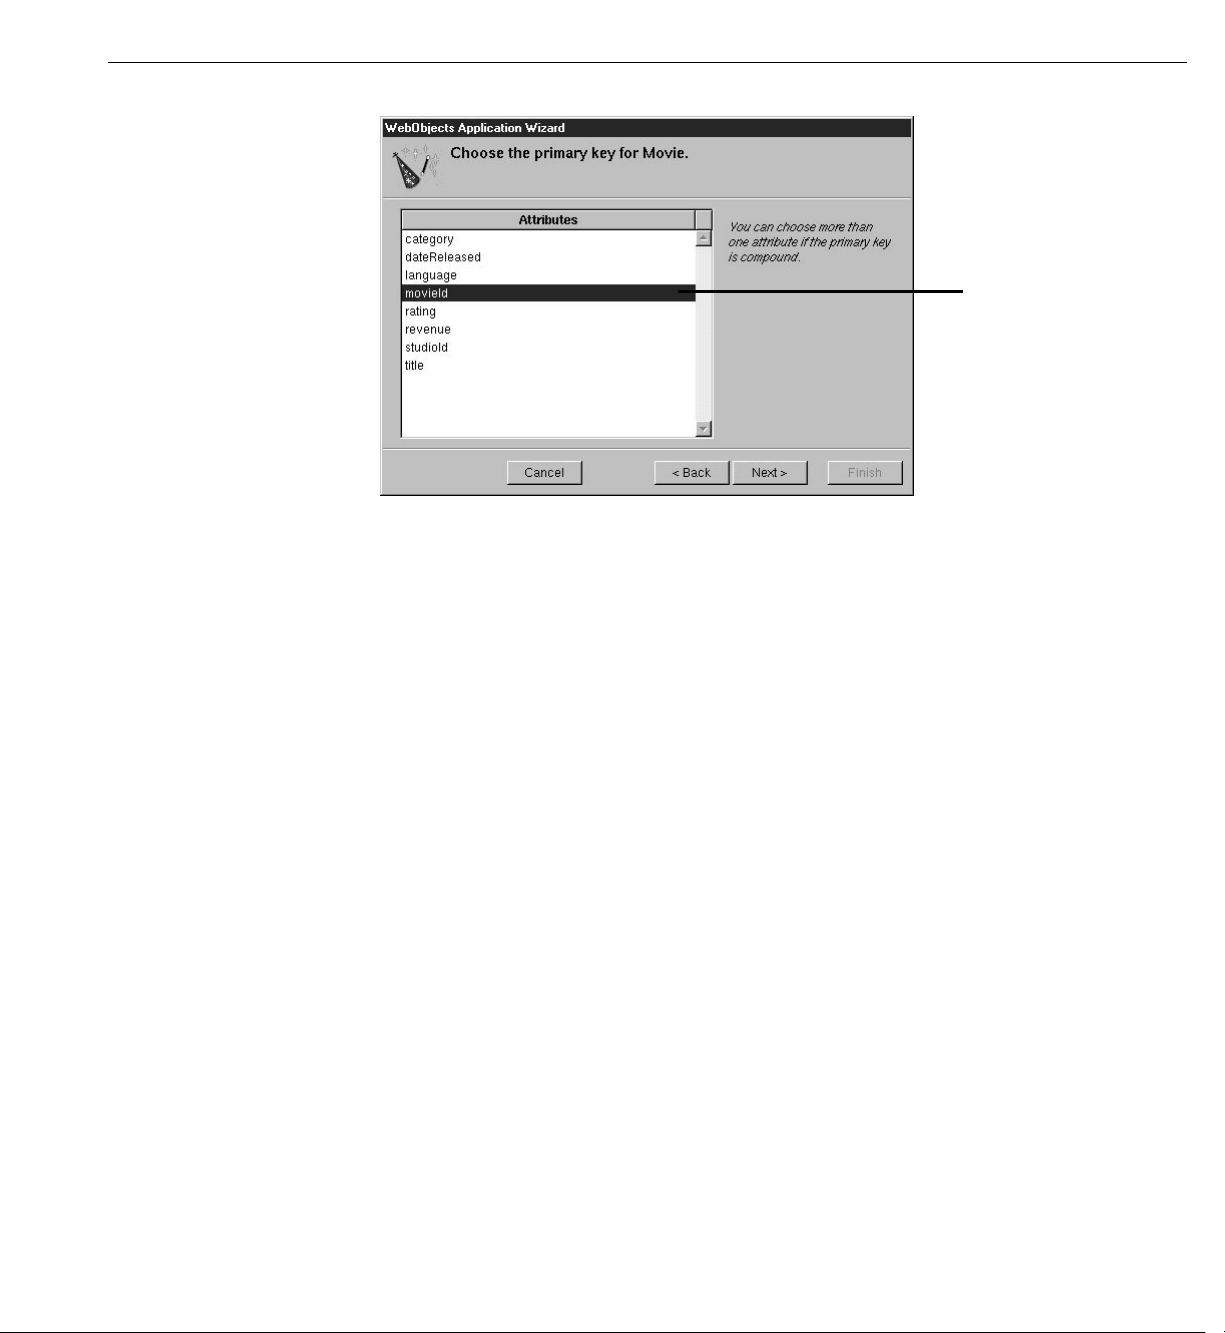
Chapter 3 Creating a WebObjects Database Application
1. Select movieId as the primary key for the Movie entity.
2. Click Next.
Shift-click to select more
than one attribute.
3. Select both
movieId and talentId as the primary key for the MovieRole entity.
MovieRole’s primary key is compound; that is, it’s composed of more than
one attribute. Use a compound primary key when any single attribute isn’t
sufficient to uniquely identify a row. For MovieRole, the combination of
movieId and talentId attributes is guaranteed to uniquely identify a row.
the
4. Click Next.
5. Select
talentId as the primary key for the Talent entity.
6. Click Next.
Specifying Referential Integrity Rules
If you’re using a database that stores foreign key definitions in its database
server’s schema information, the wizard reads them and creates corresponding
relationships in your model. For example, Movie has a to-many relationship to
MovieRole (that is, a Movie has a vector of MovieRoles), and Talent has a
to-many relationship to MovieRole. The wizard now asks you to provide
additional information about the relationships so it can further configure them.
72
Page 73
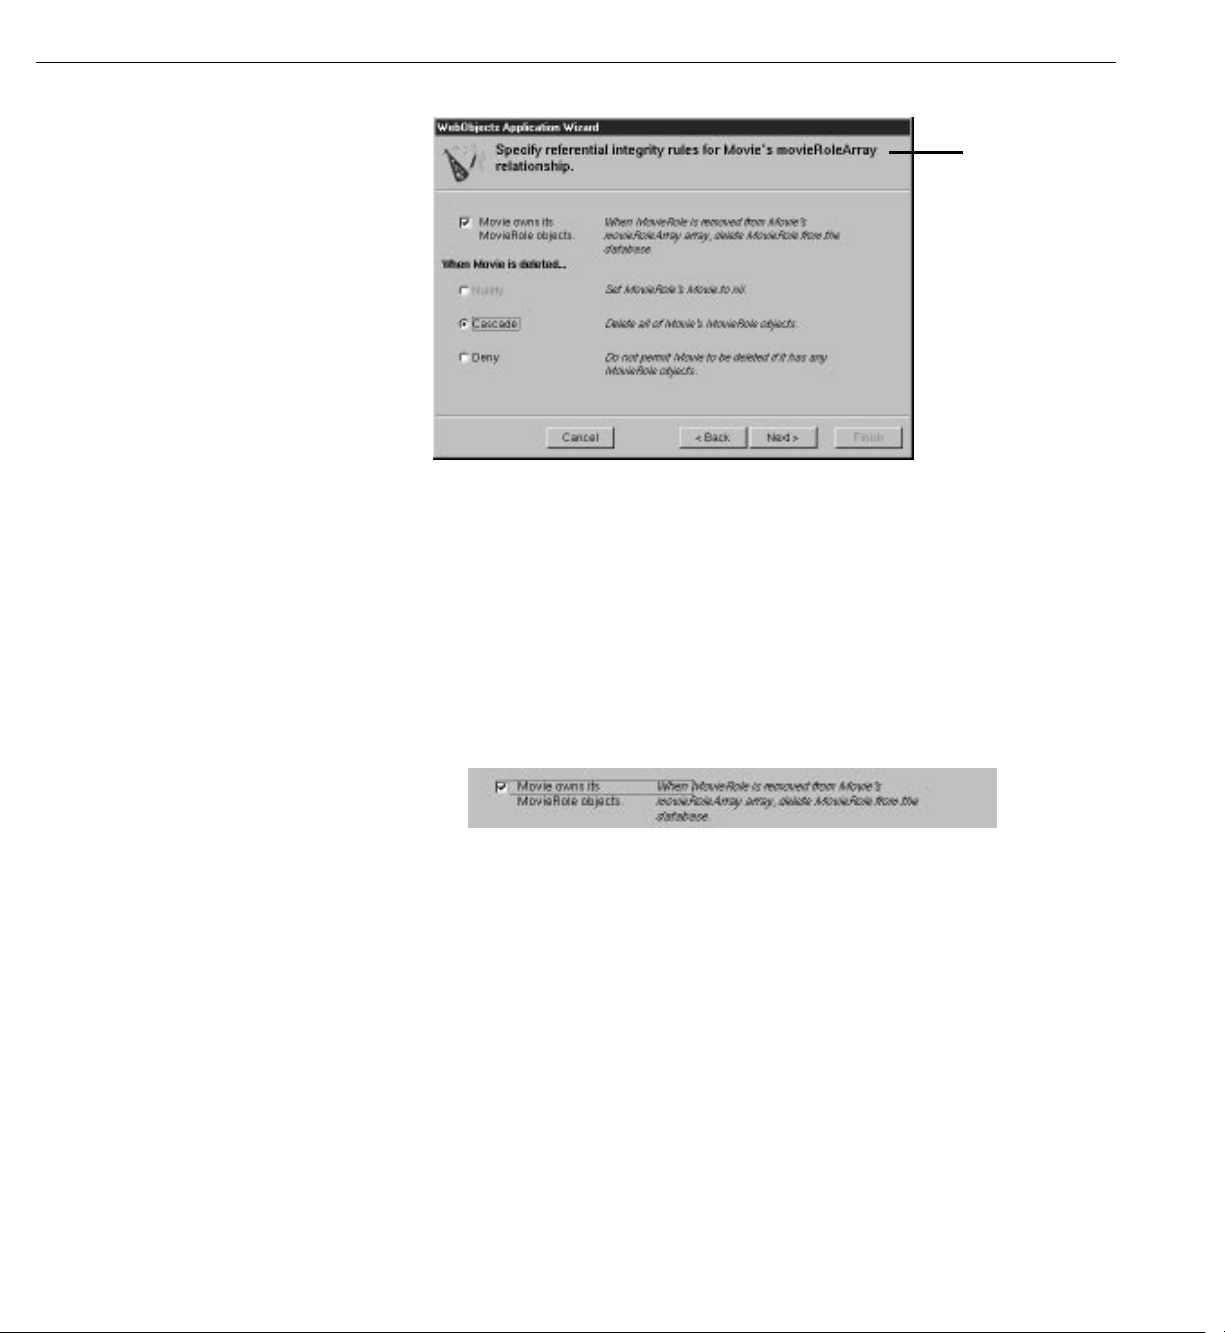
Designing the Main Page
In this example, the relationship
name is
movieRoleArray, but
the name is dependent on the
adaptor you’re using.
If foreign key definitions aren’t specified in your database server’s schema
information (as with Microsoft Access), the wizard hasn’t created any
relationships at all, and it skips this step. You’ll add relationships to your
model using EOModeler later in this tutorial.
In the first relationship configuration page, the wizard asks you about
Movie’s relationship to MovieRole. The name of the relationship is
dependent on the adaptor you’re using.
1. Check the “Movie owns its MovieRole objects” box.
This option specifies that a MovieRole can’t exist without its Movie.
Consequently, when a MovieRole is removed from its Movie’s vector
of MovieRoles, the MovieRole is deleted—deleted in memory and
deleted in the database.
73
Page 74

Chapter 3 Creating a WebObjects Database Application
2. Choose Cascade.
This option specifies what to do when the source object (the Movie) is
deleted. The cascade delete rule specifies that when a source object
is deleted, the source’s destination objects should also be deleted—again,
deleted in memory and correspondingly in the database.
3. Click Next.
Now the wizard asks you about Talent’s relationship to MovieRole.
4. Check the “Talent owns its MovieRole objects” box.
5. Choose Deny.
The deny delete rule specifies that if the relationship source (a Talent) has
any destination objects (MovieRoles), then the source object can’t be
deleted.
6. Click Next.
You’re done with the model configuration part of the wizard. The rest of the
wizard pages are to help you configure your application’s user interface.
Choosing an Entity
In this page, the wizard asks you to choose the entity around which the
Main component will be centered. Your Main component centers around
the Movie entity.
1. Select the Movie entity.
2. Click Next.
74
Page 75

Designing the Main Page
Choosing a Layout
The wizard provides several page layout options for formatting objects
fetched from the database.
1. Choose Selected Record.
2. Choose Matching Records.
A preview of the page is an
approximation of what the
finished page will look like
given your choices. (The
number of fields and items
isn’t necessarily the exact
number that will be in the
finished page.)
The wizard generates a title
based on your chosen
entity.
Specifies that the page will
have a way to select a
record from a list and a
way to edit that selected
record.
Specifies that the page will
have a way to specify
search criteria.
Based on your specifications, the wizard shows you a preview of the
page it will generate. To see how the wizard’s preview corresponds
with the actual page the wizard will create, the finished page is shown
below.
75
Page 76

Chapter 3 Creating a WebObjects Database Application
This is the query part, where users
type search criteria. Clicking Match
fetches movies that meet the criteria
and displays their titles in the
repetition part in the middle of
the page.
This is the
repetition part. Clicking
a movie title selects the movie and
displays it in the editing part at
the bottom of the page.
This is the
editing part, which
displays information about the
selected movie. You can use this part
to edit or delete the selected movie,
to create a new movie, and to save
your work.
There are three parts to this page: the query part (at the top of the page),
which contains fields into which users provide search criteria; the repetition
part (in the middle of the page), which contains a list of matching records
fetched from the database; and the editing part (at the bottom of the page),
which allows you to make changes to the selected record.
3. In the wizard panel, click Next.
Choosing Attributes to Display
The next step is to choose which of the Movie entity’s attributes to display in
the editing part at the bottom of the page.
1. Move attributes from the Don’t Include list to the Include list.
76
Page 77

Designing the Main Page
The order in which you add the attributes determines the order in
which they appear on the page, so add them in the following order:
category, rating, dateReleased, and revenue.
Double-click an attribute to
move it to the Include list.
OR
Select an attribute...
...and click here to move it.
title,
Don’t add any of the remaining attributes (
language, movieId, and studioId).
They don’t have meaning to users, and should not be displayed in
the page.
2. Click Next.
Choosing an Attribute to Display as a Hyperlink
You now need to specify the attribute used in the repetition part of the page
to identify each record. This attribute will be displayed as a hyperlink.
Clicking the hyperlink displays the corresponding record in the detail
part of the page.
1. Add the
title attribute to the Include browser.
2. Click Next.
Choosing Attributes to Query On
Specify the attributes to display in the query part of the page. The wizard
creates search criteria fields for each of the attributes you choose.
1. Add the
2. Click Finish.
title, category, and rating attributes to the Include browser.
77
Page 78

Chapter 3 Creating a WebObjects Database Application
When the wizard finishes, your new project is displayed in Project Builder. The
wizard has produced all the files and resources for a fully functional, one-page
application. All you need to do before running your Movies application is
build it.
Running Movies
Build and run the application.
Type matching criteria. A database string
matches if it begins with the string in the text
field. For example, strings match “The” if they
start with the string “The”.
Click here to fetch and return matching
movies.
Click a movie to select it and display its
information below.
Use these text fields to edit the information
about a movie.
Click here to create a new, empty movie.
Click here to delete the selected movie.
Click here to save your work in the database
(add the new movies you inserted, remove the
movies you deleted, and save changes you
made to existing movies).
Experiment with the application by entering different search criteria. Insert,
update, and delete movies. Try entering dates with different formats, such as:
• 6/7/97
• June 7, 1997
• today
78
Page 79

Examining Your Project
Examining Your Project
Whenever you create a new project, Project Builder populates the project
with ready-made files and directories. What it includes depends on the
choices you make in the wizard, so this project has a set of files different
from those of the GuestBook project.
Like GuestBook, the Movies project contains a Main component (
and classes (
Application.java, Session.java, and Main.java). It also includes some files
Main.wo)
that the GuestBook doesn’t have: a model file and images used by the Main
component.
In Project Builder, navigate to the Movie project’s Resources category. This
is where the model, named
Movies.eomodeld, is located. Later in this tutorial
you’ll use EOModeler to open the model and enhance it.
Navigate to the Web Server Resources category. This is where your
project’s images are located:
DBWizardDelete.gif, for the “Insert/New,” “Save to database,” and “Delete”
DBWizardInsert.gif, DBWizardUpdate.gif, and
buttons, respectively.
The biggest difference between the GuestBook and Movies projects are
their Main components. Whereas the Main component you created for the
GuestBook project was empty, the Main component for the Movies project
contains a fully functional user interface. Also, the
Main.java class already
contains code that supplies the component with behavior. In the next
sections, you’ll examine Movies’
Main.wo component and its Main.java class.
79
Page 80

Chapter 3 Creating a WebObjects Database Application
Examining the Variables
1. Double-click Main.wo in Project Builder’s WebObjects Components category
to open the Main component in WebObjects Builder.
There are four variables in the object browser: the
variables that are available in all components and two others,
movieDisplayGroup.
The
movie variable is an enterprise object that represents a row fetched from
the MOVIE table.
movieDisplayGroup is a display group—an object that interacts
application and session
movie and
with a database, indirectly through classes in the Enterprise Objects
Framework. Display groups are used to fetch, insert, update, and delete
enterprise objects that are associated with a single entity.
movieDisplayGroup’s
entity is Movie, which you specified in the wizard’s “Choose an entity”
page.
2. In Project Builder, look at the class file
The
movie declaration (shown below) declares movie to be an
Main.java to see how movie is declared.
EnterpriseObject—a Java interface that describes the general behavior that
all enterprise objects must have.
/** @TypeInfo Movie */ protected EnterpriseObject movie;
At run time, movie is a GenericRecord object. Recall that GenericRecord
is used to represent enterprise objects unless you specify a custom class.
Since you didn’t check the “Use custom enterprise objects” box in the
wizard’s “Choose what to include in your model” page, your application
defaults to using GenericRecord for all its entities.
The comment (
Builder to identify
WebObjects Builder to display
so on). You can see
/** @TypeInfo Movie */) is used by WebObjects
movie’s entity (Movie). Knowing the entity allows
movie’s attributes (category, dateReleased, and
movie’s attributes if you select the movie variable in the
WebObjects Builder’s object browser.
3. In Project Builder, examine
The declaration (shown below) declares
movieDisplayGroup’s declaration in Main.java.
movieDisplayGroup to be a
DisplayGroup.
protected DisplayGroup movieDisplayGroup;
80
Page 81

Examining Your Project
Also note the comment explaining how movieDisplayGroup is initialized.
Main.java class doesn’t have any code to create and initialize the
The
display group. Instead, it’s instantiated from an archive file,
that’s stored in the
Main.wo component. You shouldn’t edit woo files by
hand; they’re maintained by WebObjects Builder. The
Main.woo,
woo file
archiving mechanism is described in more detail later in “Specifying a
Sort Order” (page 86).
Examining the Bindings
Now examine the bindings of your Main component in WebObjects
Builder.
Everything within this gray
box is in a form.
The gray “shadow” on
this text field indicates that
it’s selected.
This is a repetition.
Everything within this gray
box is in the repetition.
This gray box identifies
another form.
This is a table with five rows
and two columns.
This text field is in a
table cell.
This is a WOImageButton.
Remember that you can use WebObjects Builder’s Inspector to see the
bindings for an element’s attributes. Simply select the element to inspect,
and click the button to open the Inspector.
81
Page 82
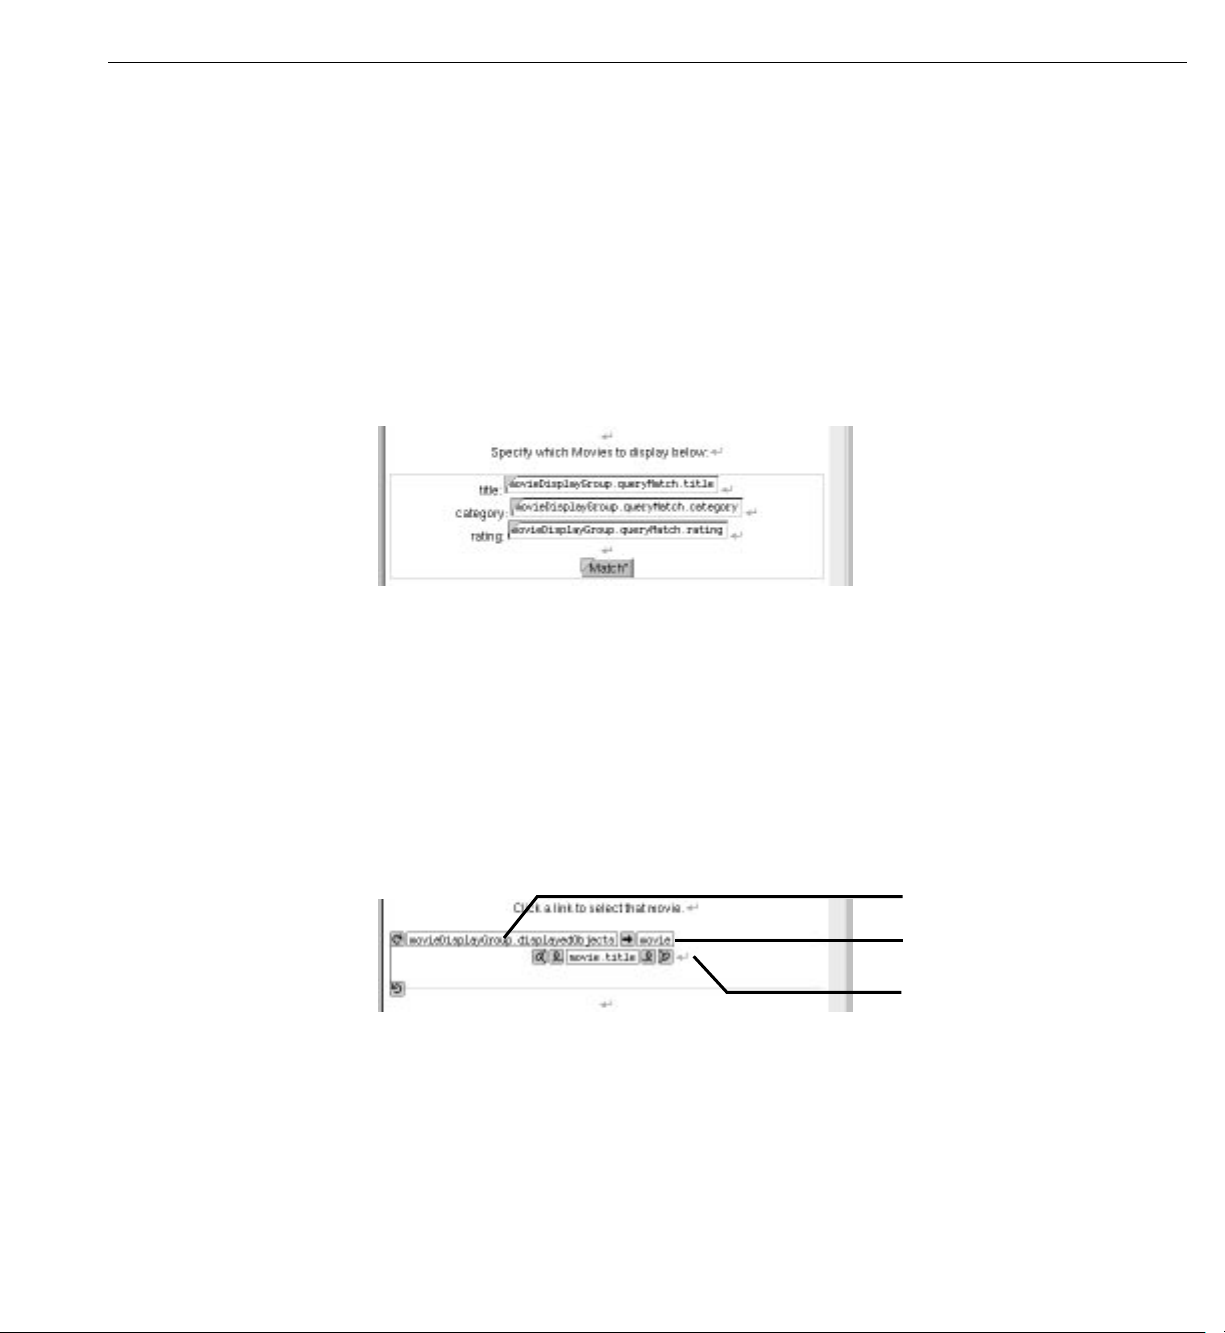
Chapter 3 Creating a WebObjects Database Application
Bindings in the Query Part
In the query part of the component, movieDisplayGroup.queryMatch.title is bound to the
Title text field. There are similar bindings to the Category and Rating text
fields. The
movieDisplayGroup next fetches movies. The Match button is bound to
movieDisplayGroup.qualifyDataSource, which actually performs the fetch.
For example, to display only R-rated comedies, a user types “Comedy” in the
Category text field, types “R” in the Rating text field, and clicks the Match
button.
values are set to Comedy and whose
queryMatch bindings allow users to specify search criteria to use when
movieDisplayGroup then refetches, selecting only movies whose category
rating values are set to R.
Bindings in the Repetition Part
In the repetition part of the component where matching movies are listed,
movieDisplayGroup.displayedObjects is bound to a repetition. More specifically,
displayedObjects is bound to the repetition’s list attribute, providing a vector
of movies for the repetition to iterate over.
movie variable is bound to the repetition’s item attribute to hold each movie
The
in turn, and
bindings produce a list of movie titles.
The repetition’s string element is enclosed in a hyperlink. By clicking a movie
title, the user selects the corresponding movie.
movie.title is bound to the string element inside the repetition. These
Displays the binding for the
repetition’s
Displays the binding for the
repetition’s
Displays the binding for the
string’s
list attribute.
item attribute.
value attribute.
82
Page 83
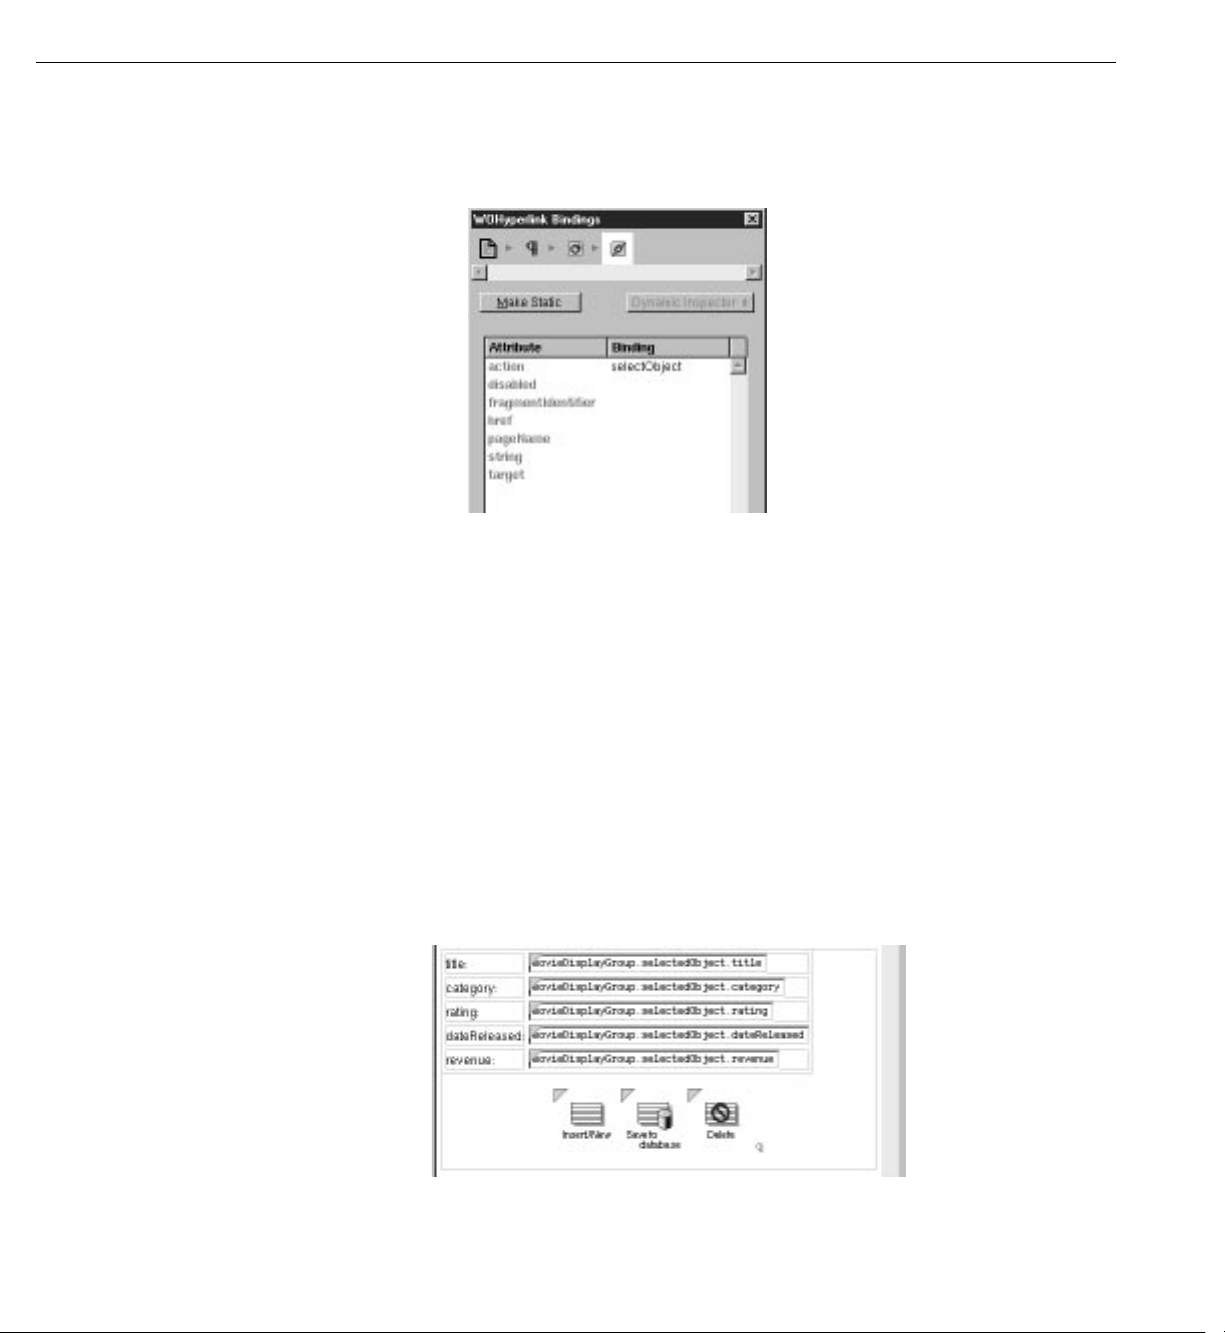
Examining Your Project
1. Inspect the hyperlink.
Its
action attribute is bound to the action method selectObject.
2. Look in the
The method (shown below) simply sets
Main.java class to see how selectObject is implemented.
movieDisplayGroup’s selected
object to the movie the user clicked.
public void selectObject() {
movieDisplayGroup.selectObject(movie);
}
Bindings in the Editing Part
The text fields in the editing part are all bound to attributes of the
movieDisplayGroup’s selectedObject—the movie on which the user clicked.
Typing new values into these fields updates the Movie enterprise object.
To actually save the updated values to the database, the user must click the
“Save to database” button.
83
Page 84

Chapter 3 Creating a WebObjects Database Application
1. Inspect the middle image button.
Its
action attribute is bound to the action method saveChanges.
2. Look in the
Main.java class to see how saveChanges is implemented.
The method (shown below with comments omitted) simply saves any
changes that have been made to
public void saveChanges() throws Exception {
try {
this.session().defaultEditingContext().saveChanges();
}
catch (Exception exception) {
System.err.println("Cannot save changes ");
throw exception;
}
}
this.session() returns a Session object that represents a connection to the
movieDisplayGroup’s objects to the database.
application by a single user. A Session object provides access to an
EditingContext object. The expression
this.session().defaultEditingContext().saveChanges();
sends a saveChanges message to the Session’s defaultEditingContext. This default
EditingContext object manages graphs of objects fetched from the
database, and all changes to the database are saved through it. For more
information, see the EditingContext class specification in the Enterprise
Objects Framework Reference.
An EditingContext’s
saveChanges method uses other Enterprise Objects
Framework objects to analyze its network of enterprise objects (Movie
objects referenced by the application) for changes and then to perform a set
of corresponding operations in the database. If an error occurs during this
process,
saveChanges throws an exception. Main.java’s saveChanges method simply
raises the exception, having the effect of returning a diagnostic page. You
could return an error page that explains the reason for the save failure
instead, but the application in this tutorial uses the default behavior.
3. Inspect the first and third image buttons to see what their
action attributes are
bound to.
They are bound to
respectively. The DisplayGroup
movieDisplayGroup.insert and movieDisplayGroup.delete,
insert method creates a new enterprise
object, then inserts it into the display group’s list of objects just past the
current selection. The DisplayGroup
84
delete method deletes the display
Page 85
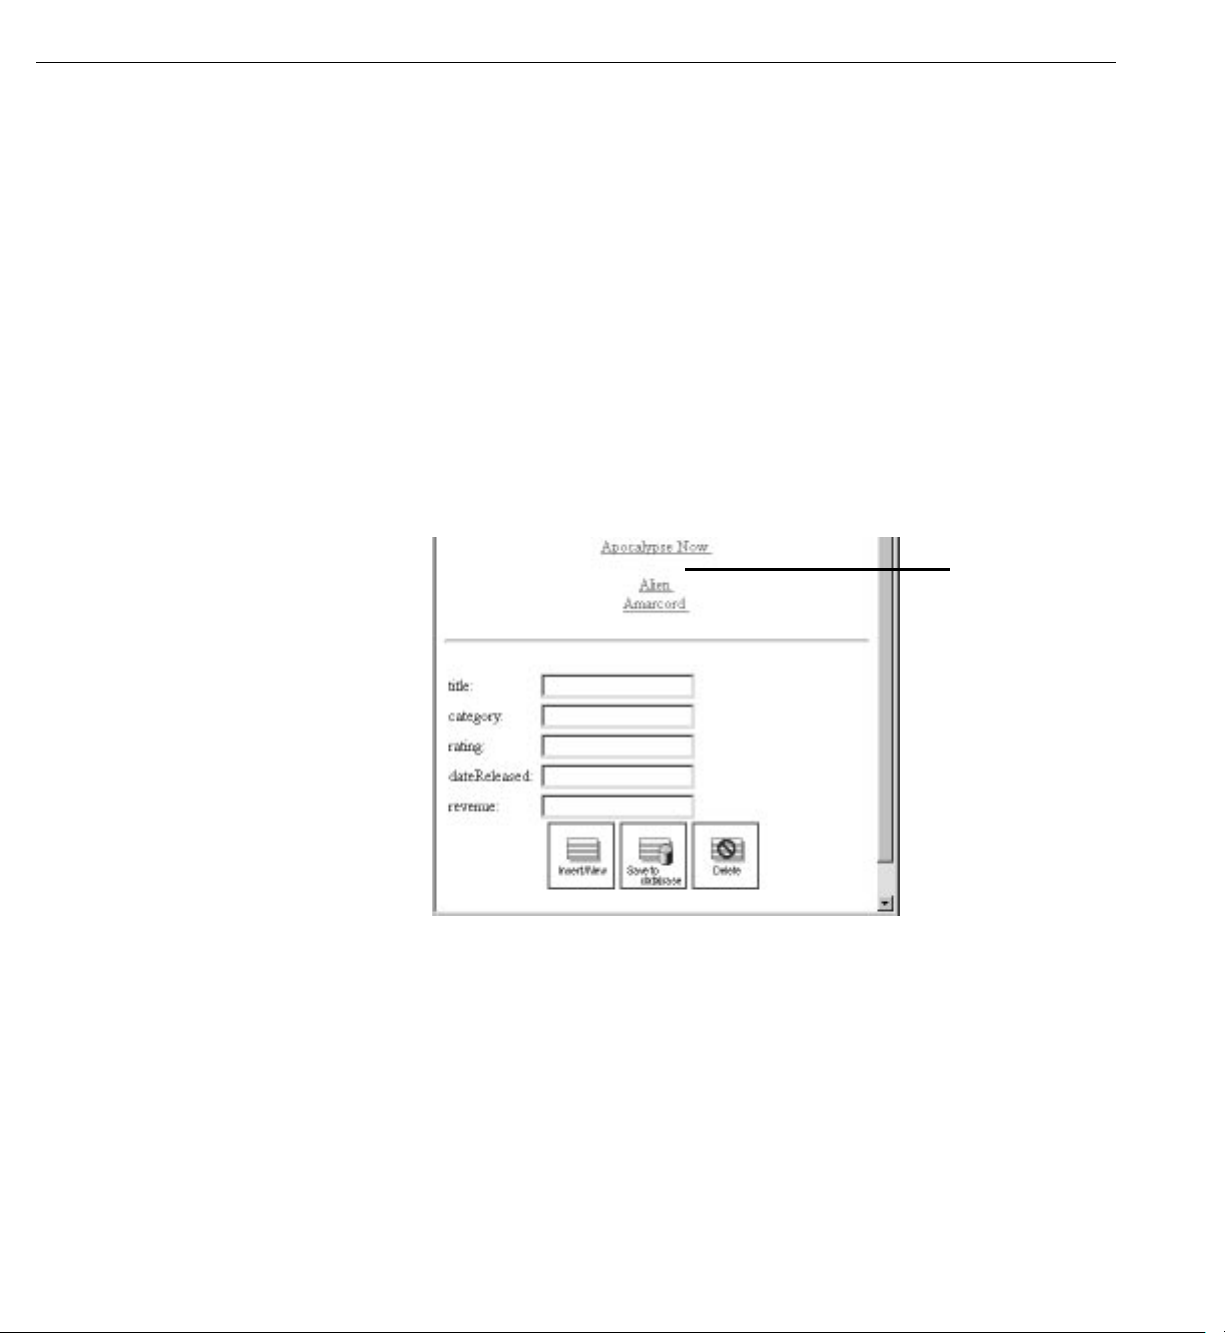
Refining Main.wo
Refining Main.wo
group’s selected object. These changes happen only in memory—not
in the database. To actually insert a new row in the database (or delete
a row), the user must click the “Save to database” button, invoking
saveChanges on the session’s EditingContext. The editing context
analyzes the enterprise objects in memory; determines if any objects
have been added, updated, or deleted; and then executes database
operations to sync the database with the application.
You may have noticed that your application doesn’t list fetched movies in
any particular order. Also, when you insert a new movie, it appears in the list
of movies as a blank line.
A newly inserted movie doesn’t have
a title set, so it appears in the list
of movies as a blank line.
In this section you’ll tidy up the user interface to fix these things and a few
others. Specifically, you’ll:
• Configure
movieDisplayGroup to sort the movies it displays.
• Assign default values to new Movie objects.
• Change the way that dates and numbers are displayed.
You can also put the query part of the page in a table and capitalize
Main.wo’s text field labels—for example, use “Title” instead of “title”
and “Date Released” instead of “dateReleased.”
85
Page 86
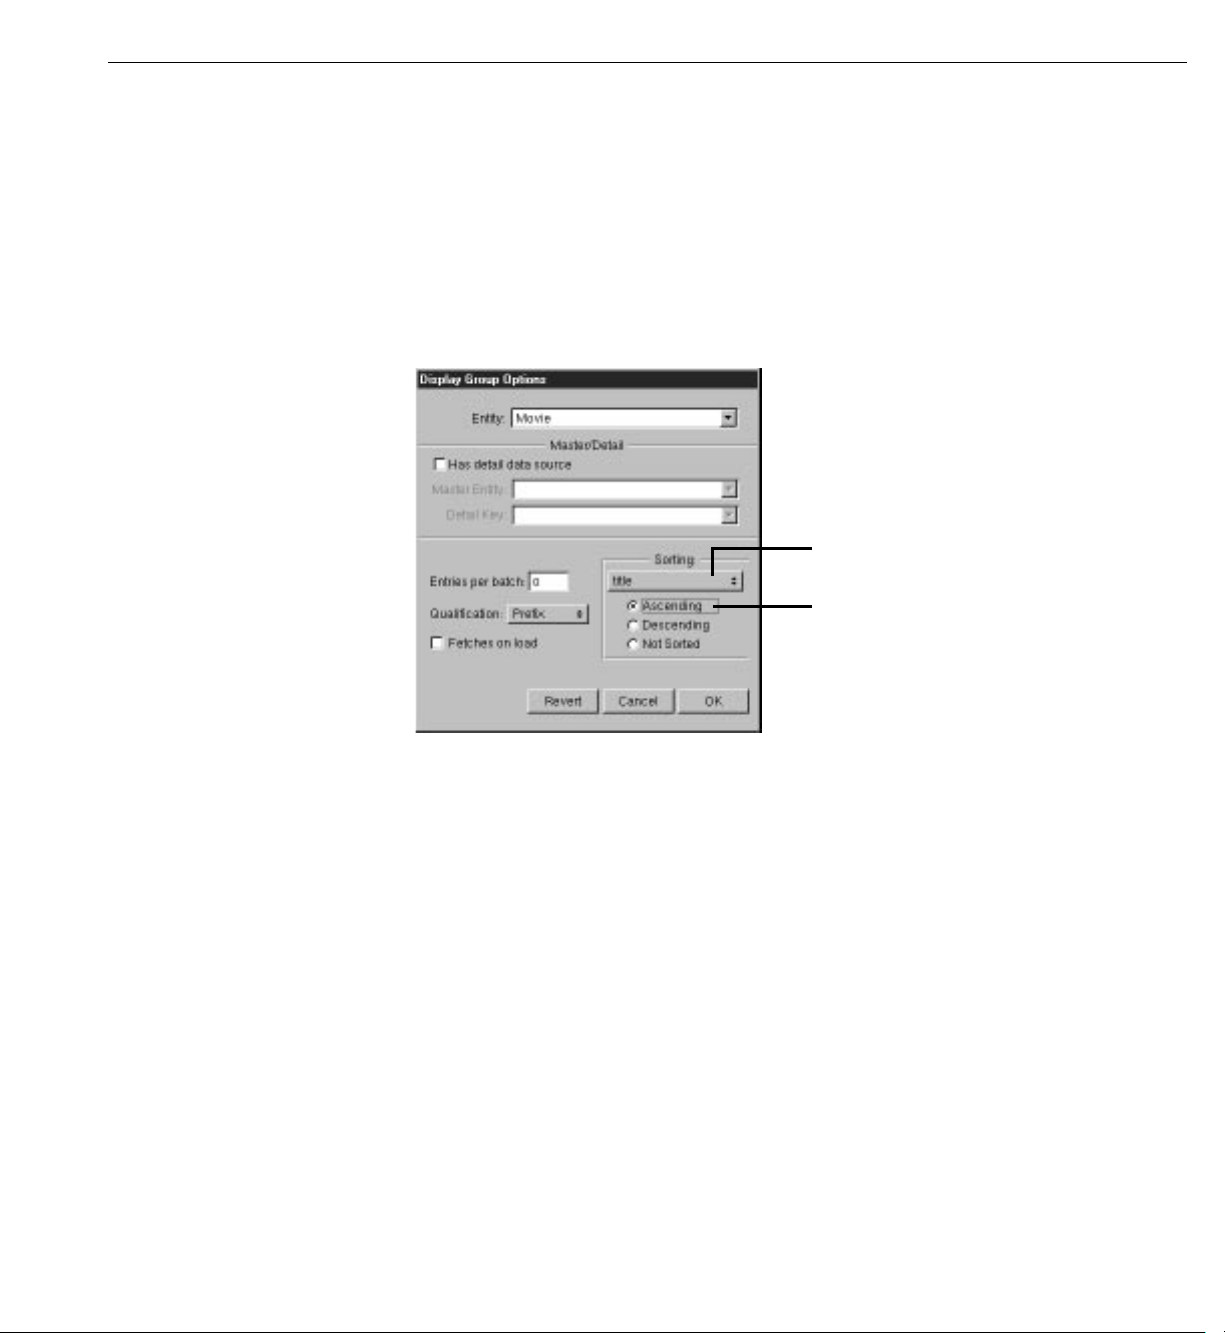
Chapter 3 Creating a WebObjects Database Application
Choose an attribute to sort on.
Select this option to sort from ‘A’ to ‘Z’.
Specifying a Sort Order
You can change your application to sort movies alphabetically without writing
any code. Display groups manage sorting behavior, and WebObjects Builder
provides a Display Group Options panel for configuring this and other
characteristics of display groups.
1. Double-click the
movieDisplayGroup variable in the object browser.
The Display Group Options panel opens for configuring
2. Select the
title attribute in the Sorting pop-up list.
3. Select Ascending.
movieDisplayGroup.
4. Click OK.
WebObjects Builder stores your settings in an archive that specifies how to
create and configure
Main component in a file named
movieDisplayGroup at run time. The archive is stored inside your
Main.woo. You can’t see the file from Project
Builder because you’re not meant to edit it directly, but WebObjects Builder’s
object browser shows you which of your component’s variables are initialized
from the archive (or
86
woo file) so you don’t have to view its contents directly.
Page 87

Refining Main.wo
An image in this column means that the variable can be initialized
from the component’s archive.
A means that initialization parameters are already set. The variable
is created and initialized from the archive as a part of the component’s
initialization.
A means that no initialization parameters have been set, and so
the variable isn’t automatically created. Double-click the variable to
configure it and add it to the archive.
Specifying Default Values for New Enterprise Objects
When new enterprise objects are created in your application, it’s common
to assign default values to some of their properties. For example, in your
Movies application it makes sense to assign a default value for the
attribute so a new movie won’t be displayed in the list of movies as a blank
line.
You could write an action method for the Insert/New button instead of
binding it directly to the display group
insert action method. In the custom
action, you would create a new Movie object, assign default values to it, and
then insert the new object into the display group. However, there are two
additional ways to specify default values for new enterprise objects, without
making explicit assignments:
title
• Assign default values in the enterprise object class.
• Specify default values using a display group.
For a particular situation, one of the approaches is usually better than the
other. If the default values are intrinsic to the enterprise object, assign them
in the enterprise object class. For example, consider a Member class with a
memberSince property. It’s likely that you would automatically assign the
current date to
memberSince instead of forcing a user to supply a value. You’ll
see how to use this technique in “Adding Behavior to Your Enterprise
Objects” (page 117).
On the other hand, if the default values are specific to an application or to a
particular user interface, explicitly initialize the object in code or specify the
default values using a display group. In the Movies application, the need for
default values is motivated by Main’s user interface: you need to provide a
default value so users can tell when a newly inserted record is selected. In
another situation, you might not want a new movie to have a default title;
you might instead want a new movie’s title to be blank.
87
Page 88

Chapter 3 Creating a WebObjects Database Application
The Movies application specifies default values for newly created Movie
objects using the display group,
movieDisplayGroup.
1. Open
Main.java in Project Builder.
2. Add the following constructor:
public Main() {
super();
MutableHashtable defaultValues = new MutableHashtable();
defaultValues.put("title", "New Movie Title");
movieDisplayGroup.setInsertedObjectDefaultValues(defaultValues);
}
This method assigns the value “New Movie Title” as the default value for
a new movie’s
title attribute. When movieDisplayGroup inserts a new movie (as it
does when a user clicks the Insert button), it creates a new movie and
assigns this default value to that movie.
Setting a Date Format
To change the way that dates are displayed, you assign a date format to the
element that displays the dates.
1. Inspect the
component window.
Notice that the text field has a
“%m/%d/%y”. This binding tells the text field that it’s displaying dates
and describes how to format them. The %m conversion specifier stands for
month as a decimal number, %d stands for day of the month, and %y
stands for year without century.
dateReleased text field, which is near the bottom of the Main
dateformat attribute that is bound to the string
2. Change the
dateformat value to the string (including the quotes) "%d %b %Y".
This date format displays dates such as 3 Sep 1997. The %b conversion
specifier stands for abbreviated month name, and %Y stands for year with
century. You can create your own date formats with any of the conversion
specifiers defined for dates. For more information, see the CalendarDate
class specification in the Foundation Framework Reference.
88
Page 89

Refining Main.wo
Setting a Number Format
In addition to a dateformat attribute, text field elements also have a numberformat
attribute.
1. Inspect the
The
“###.##”. This binding tells the text field that it’s displaying a number
and describes how to format it.
2. Change the text field’s
the quotes):
Using this number format, the Movies application formats the number
1750000 as $ 1,750,000. For more information on creating number
formats, see the NumberFormatter class specification in the
Foundation Framework Reference.
revenue text field.
revenue text field’s numberformat attribute is bound to the string
numberformat binding value to the string (including
"$ #,##0.00".
89
Page 90

Chapter 3 Creating a WebObjects Database Application
Optional Exercise
You can tidy up the user interface even further by putting the query part of the
page in a table to match the editing part of the page. Also, you should consider
capitalizing
To put the query part of the page in a table, follow these steps:
1. Put the cursor inside the form element before the “title” text field.
2. In the Tables toolbar, click the button to add a table.
A table with two rows and two columns appears. Initially the table spans
the entire width of the page. You’ll resize it later.
When the table is first added, it’s in structure-editing mode. You can tell it’s
in structure-editing mode because it has buttons for adding rows and
columns and because it has and icons around each of the table’s
rows.
3. Inspect the new table.
Main.wo’s text field labels.
Click to add a table at
the insertion point.
Click to toggle the table
between structure-editing
and content-editing modes.
Click to add a new row
of cells to the table.
Click to inspect the
table itself.
Type 0 to make the
table borderless.
Select to make the
table resize to fit its
contents.
90
Page 91
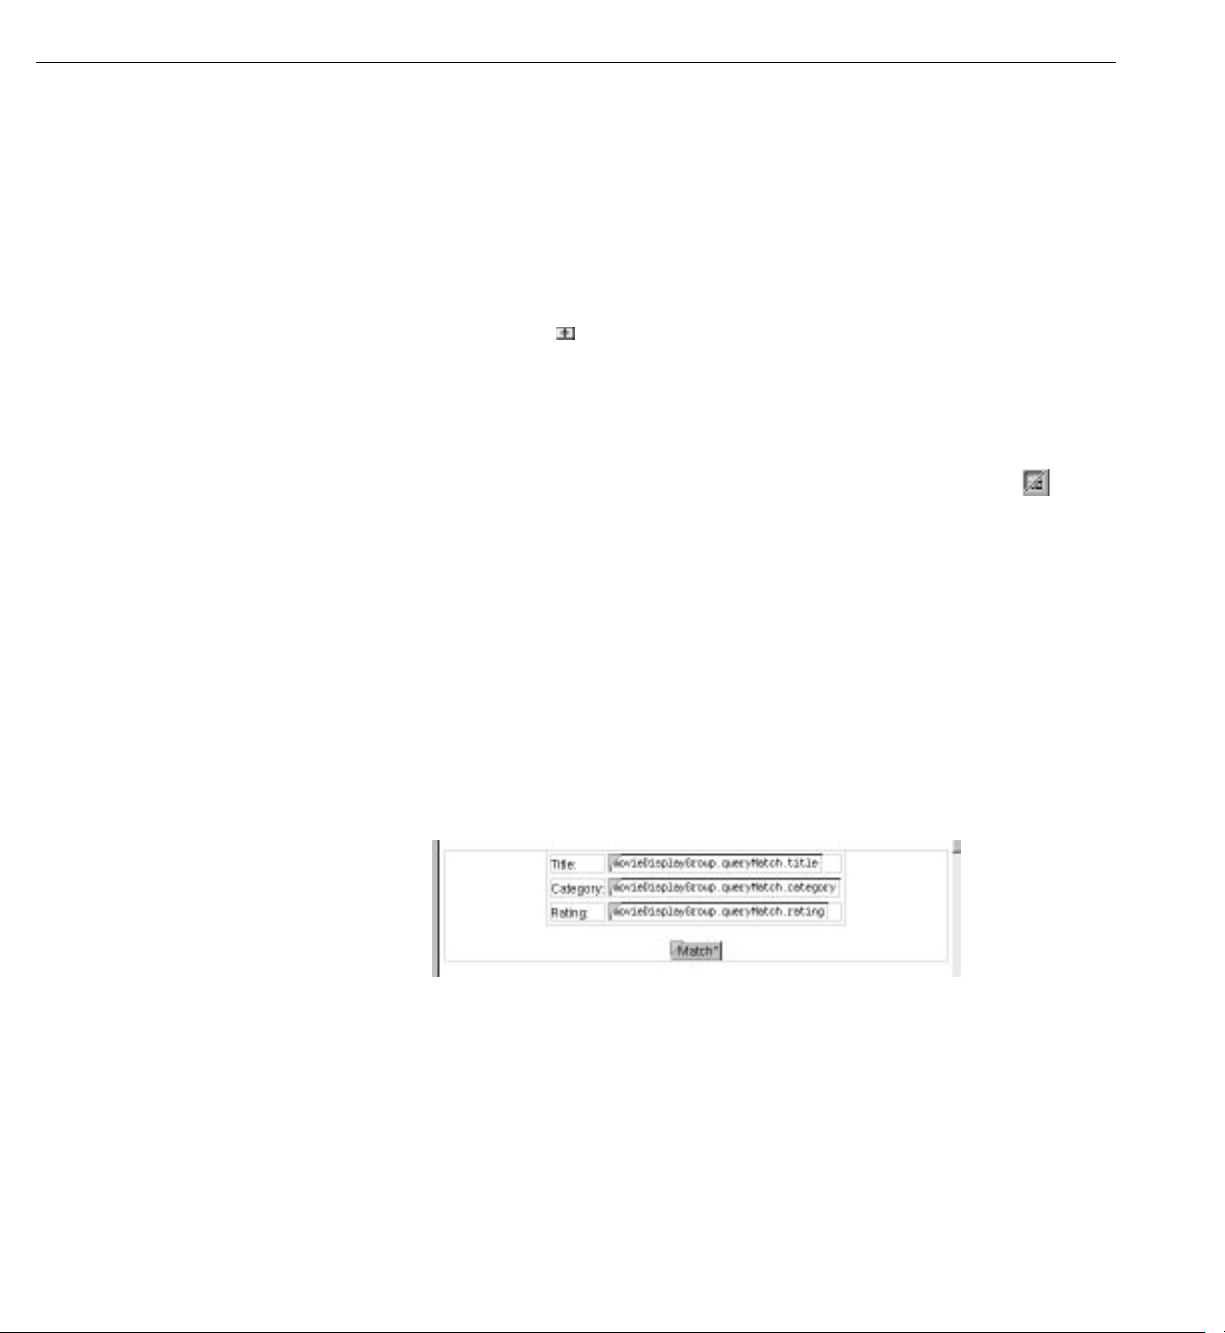
Refining Main.wo
4. In the Table Inspector, choose Unspecified for the table width.
The table resizes to just fit its contents. When you change the cell
contents later, the table will resize again to accommodate the new
values.
5. Also in the Table Inspector, set the border to 0 to remove the
appearance of a border.
6. Click the button in the lower left of the table to add a new row to
the table.
7. Type the labels
Title:, Category:, and Rating: in the cells in the
first column.
Recall that to put the table into content-editing mode, click the
button or double-click in one of the table’s cells.
The table doesn’t resize to accommodate new cell content until you’re
done typing; that is, until you move the cursor out of the edited cell.
8. Cut and paste the query text fields into their corresponding table cells.
Just click on a text field to select it. When a text field is selected, it
displays with a gray “shadow.”
9. Delete the old query field labels.
When you’re done, the query part should look like this:
Now edit the text labels in the editing part of the page and put any other
finishing touches on the page that you want. The finished component
might look something like this:
91
Page 92

Chapter 3 Creating a WebObjects Database Application
Adding the MovieDetails Page
The MovieDetails page shows you the detailed information about a movie
you select in the Main page. For this to work, the Main page has to tell the
MovieDetails page which movie the user selected. The MovieDetails page
keeps track of the selected movie in its own instance variable. In this section,
you’ll:
• Create a new component whose interface you’ll create yourself.
• Assign Main’s selected movie to a variable in the MovieDetails page.
• Create a way to navigate from Main to MovieDetails and back.
In the sections following this one, you’ll extend the MovieDetails page to
display movie roles and the starring actors.
92
Page 93

Adding the MovieDetails Page
Creating the MovieDetails Component
1. In Project Builder, choose File m New in Project.
2. In the New File panel, click the Web Components suitcase.
3. Type
MovieDetails in the Name field.
4. Click OK.
5. In the wizard panel, choose None from the available assistance.
6. Choose Java as the component language.
7. Click Finish.
8. Open the new component in WebObjects Builder.
Storing the Selected Movie
Now, in the MovieDetails component, create a variable that holds the
application’s selected movie. Later on, you’ll add code to the
that assigns Main’s selected movie to this variable.
1. Choose Add Variable/Method from the pull-down menu.
Type the variable name here.
Select this.
Main.java class
2. Name the variable
selectedMovie.
3. Set the variable’s type to Movie.
Choose Movie.
Check each of these boxes.
Click here when you’re done.
93
Page 94

Chapter 3 Creating a WebObjects Database Application
Movie isn’t actually a class; it’s an entity. It’s listed in the combo box as a
type along with entries for all the entities in your model. When you choose
an entity as the type for your variable, WebObjects Builder recognizes that
the variable is an enterprise object. Using information in the model,
WebObjects Builder can determine the entity’s corresponding enterprise
object class and the properties of that class.
4. Check the “An instance variable” box.
5. Check the “A method returning the value” box.
6. Check the “A method setting the value” box.
7. Click Add.
Navigating from Main to MovieDetails
To get to the MovieDetails page from the Main page, users use a hyperlink.
Clicking the hyperlink should set MovieDetail’s
open the MovieDetails page.
1. Add a hyperlink at the bottom of the Main component.
selectedMovie variable and then
2. Replace the text “Hyperlink” with “Movie Details.”
3. Choose Add Action from the pull-down menu.
4. In the Add Action panel, type
5. Type
MovieDetails in the “Page returned” field.
showDetails in the Name field.
6. Click Add.
7. Bind the
showDetails action to the hyperlink’s action attribute.
Add the hyperlink below
the horizontal rule.
94
Page 95

Adding the MovieDetails Page
8. In Project Builder, modify the showDetails action to look like the
following:
public Component showDetails()
{
MovieDetails nextPage =
(MovieDetails)application().pageWithName("MovieDetails");
EnterpriseObject selection =
(EnterpriseObject)movieDisplayGroup.selectedObject();
nextPage.setSelectedMovie(selection);
return nextPage;
}
This method creates the MovieDetails page and then invokes its
setSelectedMovie method with the movie that’s selected in the Main page.
The display group method
selectedObject returns its selected object,
which, in the Main component, is set when a user clicks a movie title
hyperlink.
Designing MovieDetails’ User Interface
Now lay out the user interface for MovieDetails. When you’re done, your
component should look like the following:
1. Create a top-level heading with the text
Movie Details.
Recall that to create a top-level heading, you type the text of the
heading, select the text, click the button to add a heading element
around the text, and then use the Inspector to set the heading’s level,
as you did in “Using the Inspector” (page 22).
2. Below the heading, add a string element.
3. With the string element selected, add a heading.
95
Page 96

Chapter 3 Creating a WebObjects Database Application
This adds a new level 3 heading element around the string. The
MovieDetails page will show the title of the selected movie in this
heading.
4. Add labels and string elements to display the selected movie’s category,
rating, date released, and revenue.
5. Bold the labels.
6. Bind
selectedMovie.title to the value attribute of the first string element (the one
in the heading).
7. Similarly, create bindings for the Category, Rating, Date Released, and
Revenue strings.
8. At the bottom of the page, add a horizontal rule.
Adding Date and Number Formats
String elements have dateformat and numberformat attributes just like text field
elements. Create bindings for the Date Released and Revenue strings so that
dateReleased and revenue values are displayed the way they are in the Main page.
1. Add the date format
2. Add the number format
"%d %b %Y" to the Date Released string.
"$ #,##0.00" to the Revenue string.
Navigating from MovieDetails to Main
Now add a hyperlink to the MovieDetails page so users can navigate back to the
Main page from MovieDetails.
1. Add a hyperlink to the bottom of the page.
2. Label it
3. Bind the hyperlink’s
"Main".
Recall that the
MovieSearch.
Add the hyperlink here.
pageName attribute to the text (including the quotes)
pageName attribute is a mechanism for navigating to another
page without writing code. By setting the attribute to “Main”, you’re
96
Page 97
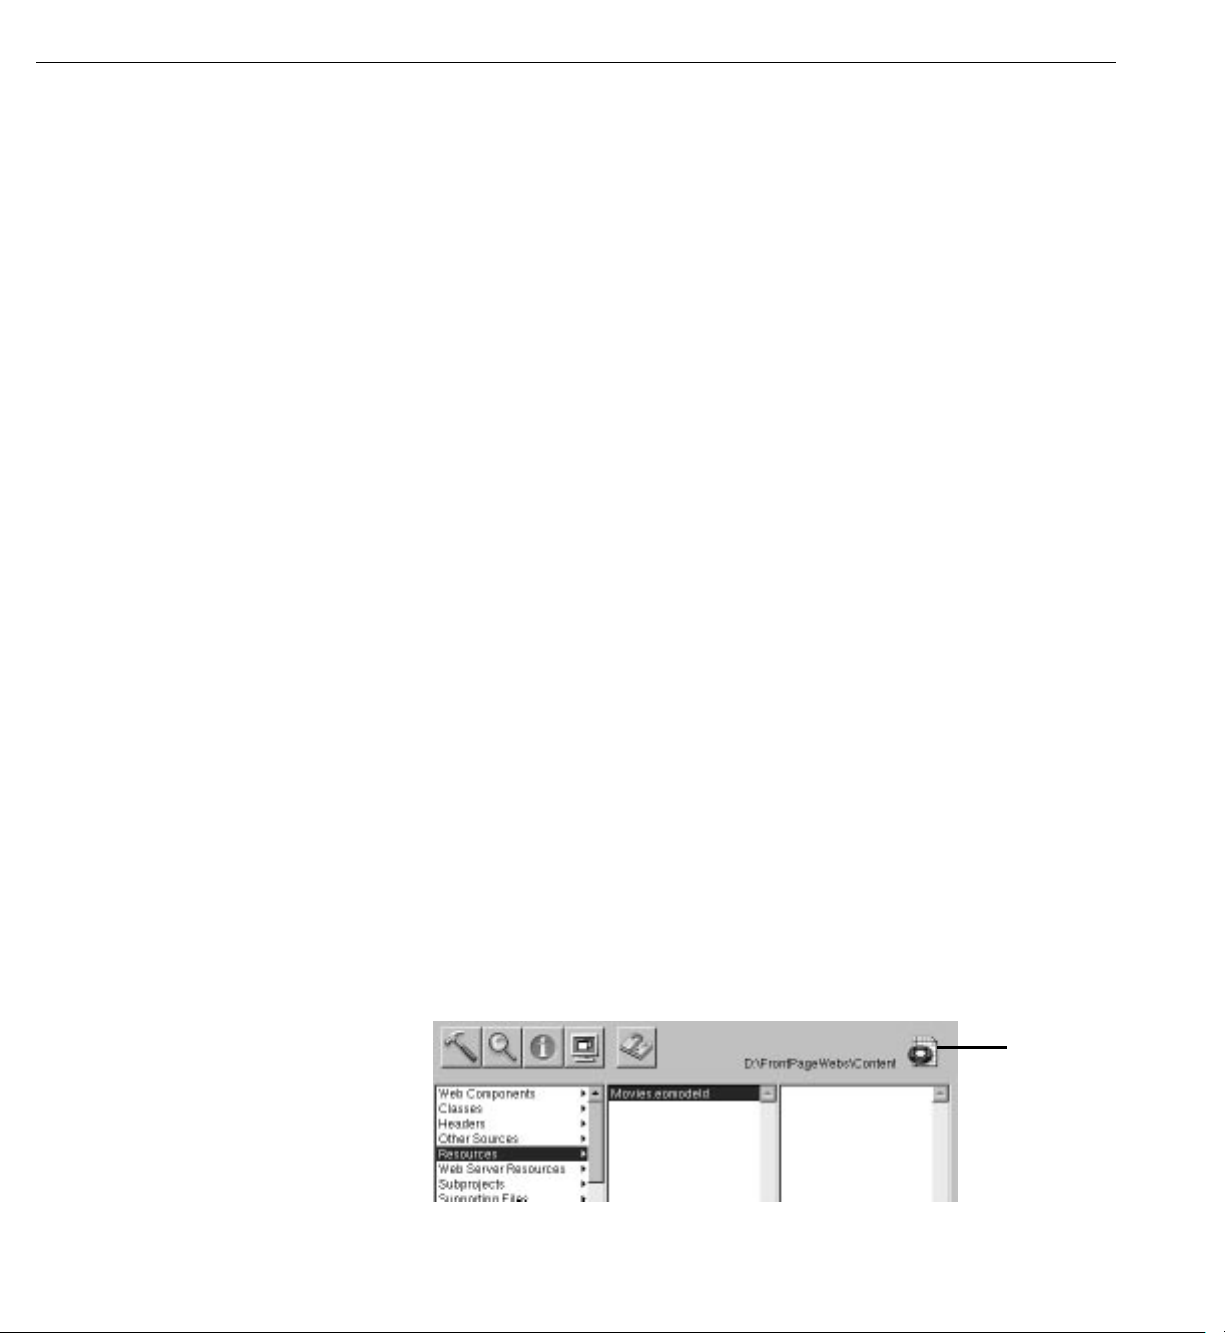
Refining Your Model
Refining Your Model
telling the application to open the MovieSearch page when the
hyperlink is clicked.
Running Movies
Be sure that all your project’s files are saved (including the components in
WebObjects Builder), and build and run your application. In the Main page,
select a movie and click the Movie Details link. The MovieDetails page
should display all the movie’s information.
The model created for you by the wizard is just a starting point. For most
applications, you need to do some additional work to your model to make it
useful in your application. To refine your model so that it can be used in the
Movies application, you’ll ultimately need to do all of the following:
• Remove primary and foreign keys as class properties.
• Add relationships to your model if the wizard didn’t have enough
information to add them for you.
• Configure your model’s relationships in the Advanced Relationship
Inspector.
• Generate source files for the Talent class.
These steps are described in more detail throughout the rest of this tutorial.
Opening Your Model
1. In Project Builder, click the Resources category.
2. Select
3. Double-click the model icon.
Movies.eomodeld.
Double-click to
open the model.
97
Page 98
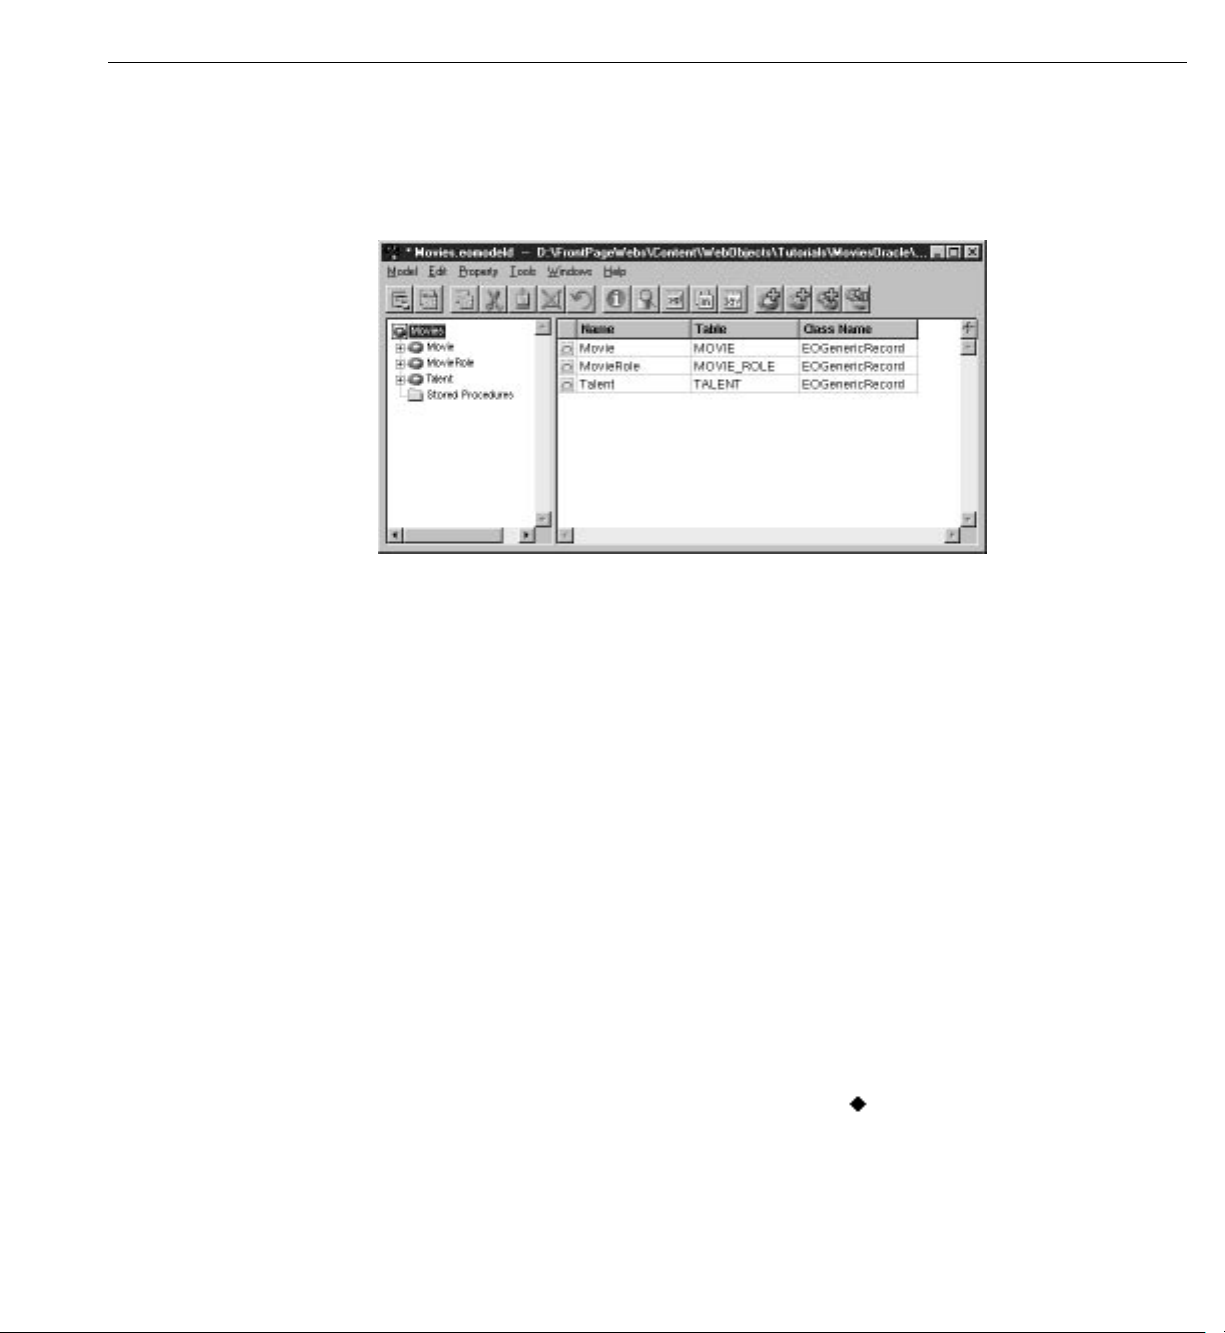
Chapter 3 Creating a WebObjects Database Application
Project Builder opens your model file in EOModeler, launching EOModeler
first if it isn’t already running. EOModeler displays your model in the Model
Editor. It lists the entities for the tables you specified in the wizard—Movie,
MovieRole, and Talent.
Removing Primary and Foreign Keys as Class Properties
By default, EOModeler makes all of an entity’s attributes class properties. When
an attribute is a class property, it means that the property is a part of your
enterprise object, usually as an instance variable.
You should mark as class properties only those attributes whose values are
meaningful in the objects that are created when you fetch from the database.
Attributes that are essentially database artifacts, such as primary and foreign
keys, shouldn’t be marked as class properties unless the key has meaning to the
user and must be displayed in the user interface.
Eliminating primary and foreign keys as class properties has no adverse effect
on how Enterprise Objects Framework manages enterprise objects in your
application.
1. In the left frame (or tree view), click the Movie entity.
The right frame switches from a view of the entities in the model to a view
of Movie’s attributes.
2. Click in the Class Property column to remove the symbol for the
movieId attribute.
3. Now repeat the previous step to remove
98
studioId as a class property.
Page 99
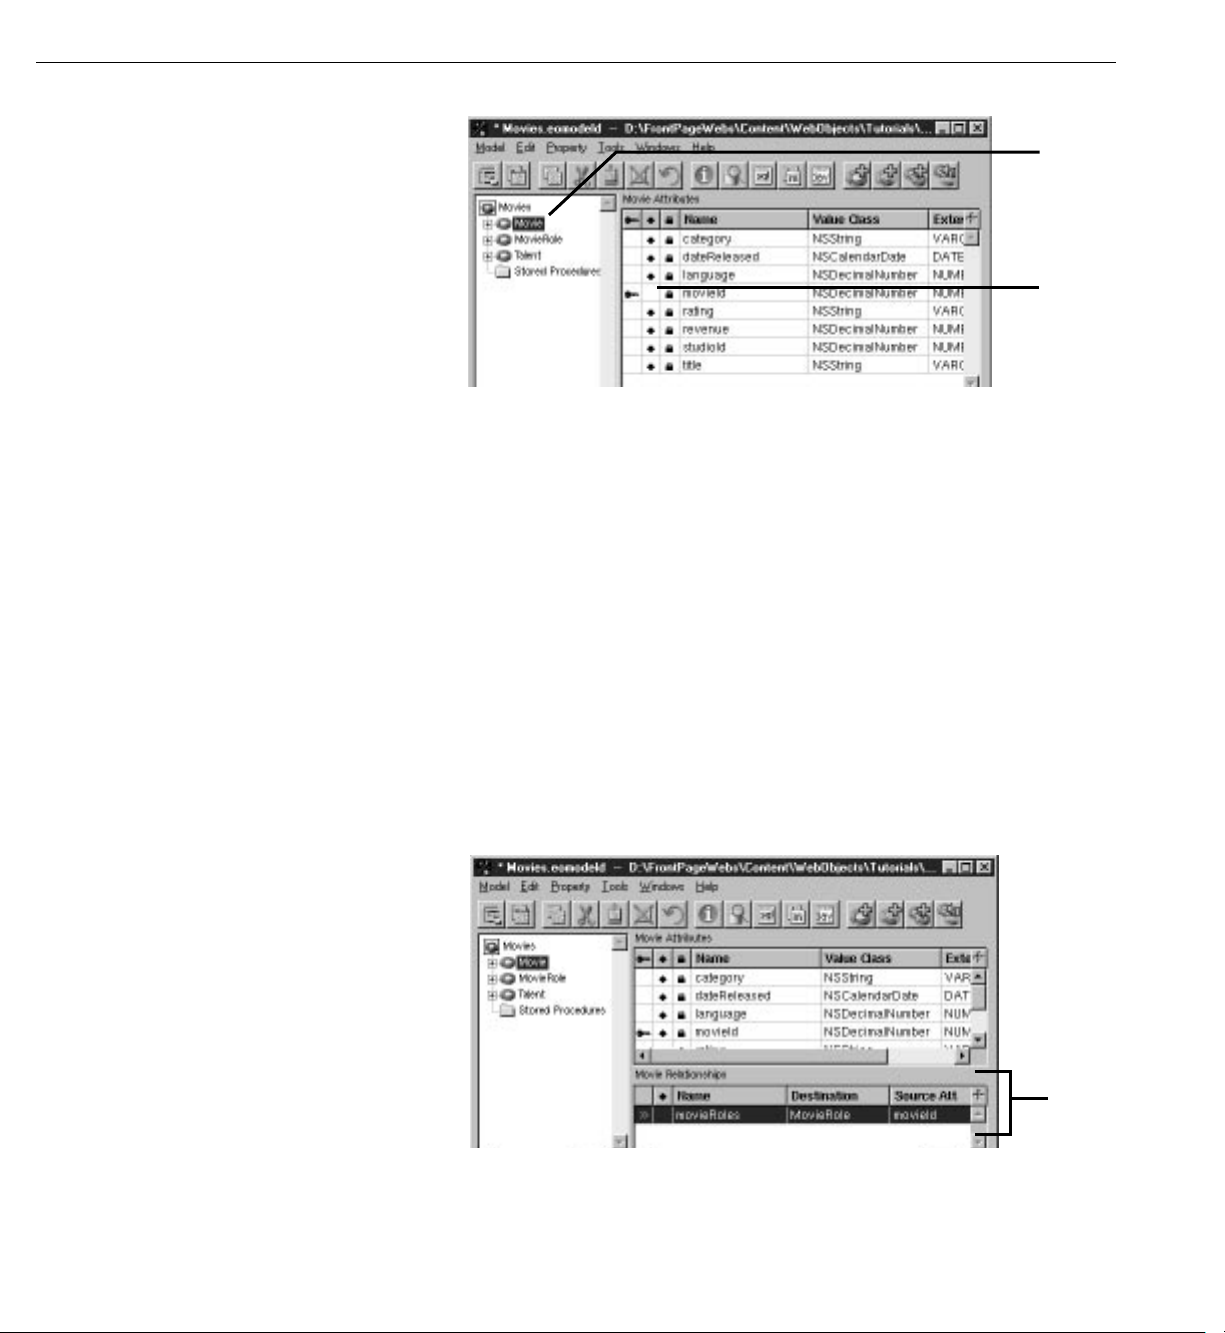
Refining Your Model
Click an entity
in this frame to
select the
entity.
Click in an
attribute’s Class
Property column
to remove it as a
class property.
4. In the MovieRole entity, remove movieId and talentId as class properties.
5. In the Talent entity, remove
talentId as a class property.
Adding Relationships to Your Model
The Movies application uses two pairs of inverse relationships. The first
pair defines the relationship between the Movie and MovieRole entities,
while the second pair defines the relationship between the MovieRole and
Talent entities. An Enterprise Objects Framework relationship is directed;
that is, a relationship has a source and a destination. Generally models
define a relationship for each direction.
1. Select the Movie entity.
The right frame of the Model Editor shows the Movie’s relationships
as well as its attributes.
The selected entity’s
relationships are
displayed here.
Your model’s Movie entity might have a different name than the
movieRoles relationship shown above. That’s because the wizard created
99
Page 100

Chapter 3 Creating a WebObjects Database Application
Don’t change the relationship’s name, because EOModeler
updates the name for you automatically when you connect
the Destination and Join properties.
First select whether the relationship is to-one or to-many.
Then select a destination entity.
Select a source attribute...
...and a matching destination attribute.
When you’re done, click here.
your relationship, and the relationship’s name is dependent on the adaptor
the wizard used. Adaptors don’t all have the same naming convention for
to-many relationships. For example, the Oracle adaptor names Movie’s
relationship
movieRoleArray instead of movieRoles.
If your Movie entity doesn’t have a
movieRoles relationship, it means that the
database server’s schema information for your database didn’t have enough
information for the wizard to create them. You need to create them by hand
now. The next several steps explain how.
2. Choose Property
m Add Relationship.
A new relationship named “Relationship” is added in the table view at the
bottom of the Model Editor. The new relationship is already selected.
3. With the relationship selected in the right frame of the Model Editor, click
the button (in the toolbar) to inspect the relationship.
100
4. In the Inspector, select the To Many option.
5. Select MovieRole as the destination entity.
6. Select
7. Select
movieId in the Source Attributes list.
movieId in the Destination Attributes list.
 Loading...