

Page 1
WaveBurner
User Manual
Page 2

Apple Inc.
© 2007 Apple Inc. All rights reserved.
Under the copyright laws, this manual may not be
copied, in whole or in part, without the written consent
of Apple. Your rights to the software are governed by
the accompanying software licence agreement.
The Apple logo is a trademark of Apple Inc., registered
in the U.S. and other countries. Use of the “keyboard”
Apple logo (Option-Shift-K) for commercial purposes
without the prior written consent of Apple may
constitute trademark infringement and unfair
competition in violation of federal and state laws.
Every effort has been made to ensure that the
information in this manual is accurate. Apple Inc. is not
responsible for printing or clerical errors.
Note: Because Apple frequently releases new versions
and updates to its system software, applications, and
Internet sites, images shown in this book may be slightly
different from what you see on your screen.
Apple Inc.
1 Infinite Loop
Cupertino, CA 95014-2084
408-996-1010
www.apple.com
Apple, Logic, Mac, Macintosh, and Mac OS are
trademarks of Apple Inc., registered in the U.S. and other
countries.
Finder and SuperDrive are trademarks of Apple Inc.
Other company and product names mentioned herein
are trademarks of their respective companies. Mention
of third-party products is for informational purposes
only and constitutes neither an endorsement nor a
recommendation. Apple assumes no responsibility with
regard to the performance or use of these products.
Page 3

9
13
13
15
16
17
18
21
22
23
23
26
26
27
27
29
32
32
32
1
Contents
Preface 7 An Introduction to WaveBurner
8 Creating a CD With WaveBurner
Quick Start
Chapter 1 11 The WaveBurner Interface
12 The Toolbar
Overview
Wave View Area
Region List
Track List
Plug-in Windows
Region Info Window
Track Info Window
Index Point Info Window
Level Meter
Customizing the Toolbar
Chapter 2 25 Getting Started With WaveBurner
25 Elements of a Project
Creating, Opening, and Saving Projects
Adding Audio Files to a Project
Name Handling in WaveBurner
Auditioning Projects and Controlling Playback
Navigating in the Wave View Area
Chapter 3 31 Working With Regions
31 Selecting Regions
Copying Regions
Reordering Regions
Moving Regions
33
Trimming Regions
33
Splicing Regions
34
Adjusting Levels
34
Checking a Region for Clipping
3
Page 4

4
35
36
38
38
38
40
42
44
46
50
51
Normalizing Regions
Adding and Adjusting Fades
Bouncing Regions
Renaming Regions
Deleting Regions
Chapter 4 39 Working With Tracks
39 The Track List
The CD Track Info Window
Bouncing Tracks
Chapter 5 43 Working With Markers
43 Types of Markers
Inserting and Deleting Markers
Moving Markers
Chapter 6 49 Working With Effects
49 Effects Plug-ins Included With WaveBurner
Using Audio Units Effects Plug-ins
Adding and Deleting Plug-ins
Bypassing Plug-ins
Adjusting Plug-in Parameters
Changing the Plug-in Order
Using the Level Meter
52
52
53
53
55
55
57
57
Chapter 7 55 Burning a Project to a CD
55 Getting Ready to Burn a CD
Supported CD Burners
Setting Disc Options
Previewing Transitions
Burning the CD
Chapter 8 59 Setting WaveBurner Preferences
59
General Preferences
60
Audio Driver Preferences
60
Preview Preferences
61
Burn Preferences
61
Bounce Preferences
62
SDII Preferences
62
Info Preferences
Contents
Page 5

Appendix 63 WaveBurner Keyboard Shortcuts
63 File Commands
Editing Commands
Disc Operations
Region Commands
View Commands
Transport Operations
Wave View Area Commands
Window Commands
Help Commands
63
63
64
64
64
65
65
65
Contents
5
Page 6

Page 7

An Introduction to WaveBurner
WaveBurner is an application that lets you assemble, master,
and burn audio CDs using a SuperDrive or CD burner
supported by Mac OS X.
Audio CDs created with WaveBurner can be played back on any audio CD player, and
can be used as pre-masters—for mass production.
WaveBurner supports all Red Book options for CD audio data storage. You can add up
to the maximum 99 tracks and 99 subindexes per track allowable by the Red Book
standard, include ISRC codes for each track, set copy prevention and pre-emphasis flags
for each track, and add UPC/EAN codes for the CD. WaveBurner also supports the CD
TEXT standard, allowing you to add text information that can be read by any CD TEXTcompatible player.
Preface
You create a CD by adding audio files to a WaveBurner project. The audio files appear
as regions in the project window, where you can edit and arrange them graphically or
numerically. You can add effects to both individual regions and the overall project—
using the included effects, or Audio Unit plug-ins installed on your computer. You can
edit pauses between tracks and add fade-ins, fade-outs, and crossfades. When your
project is complete, you can burn the project to a CD.
7
Page 8

Creating a CD With WaveBurner
WaveBurner makes it easy to create professional-quality audio CDs, in a straightforward,
no-fuss way. The following outlines the workflow of a typical WaveBurner project.
Step 1: Add audio files
You start by creating a new project and adding audio files. When you add an audio file,
it is imported as a region, which you can arrange and edit in the Wave View area and
the Region list. A track is created for each new region. You can edit the track in the
Wave View area and the Track list.
Step 2: Edit regions and tracks
You can edit regions and tracks in a variety of ways—either graphically in the Wave
View area, or numerically in the Region and Track lists. You can copy, reorder, trim, split,
adjust gain, and normalize regions. It’s also possible to combine several regions into
one track, or create several tracks with one region. As you work, you can play all, or any
part, of the project to hear the results of your edits immediately.
Step 3: Adjust crossfades
When you add a region, WaveBurner creates a track and adds track markers—to define
the pause between tracks. You can create crossfades between overlapping regions, and
adjust the crossfades in the Wave View area. You can also insert index markers to create
index points within a track.
Step 4: Add effects
You can add effects to individual regions and to the overall project mix, to enhance and
shape the sound. A set of professional-quality mastering effects is bundled with
WaveBurner, including equalization (EQ), compression, limiting, and noise reduction, as
well as analysis tools that will help you to optimize the overall mix. You can adjust
effect parameters and save and recall settings, including chains of effects and their
settings. You can also use Audio Unit effect plug-ins from Apple or third-party
manufacturers.
Step 5: Burn the project to a CD
You burn your project with supported CD burning hardware that is connected to (or
installed in) your Macintosh. Prior to burning the project to a CD, you can make use of
the Burn Test mode to determine the maximum speed that your system can reliably
write data to a blank CD-R.
8 Preface An Introduction to WaveBurner
Page 9

2
3
4
5
6
Quick Start
You can quickly burn a CD, using existing audio files and default settings for pauses
and crossfades.
To quickly burn a CD:
1 Open WaveBurner.
Choose File > New to create a new project.
Drag the desired audio files into the Region list or Wave View area—in the order that
you want them to appear on the CD.
Click the Burn button.
The Burn dialog appears at the top of the window. The name of the CD burner is
shown in the Burn dialog. If there is no blank disc in the CD burner tray, the Burn dialog
prompts you to insert one.
Insert a blank CD-R disc, if you have not already done so.
Click the Burn button in the Burn dialog.
WaveBurner will immediately begin burning (writing) your project to the blank CD. The
Burn dialog shows the progress of the burn process. When the write is complete, the
CD is ejected from the CD burner and is ready to play.
Preface An Introduction to WaveBurner
9
Page 10

Page 11
Customizable Toolbar
Overview
1
The WaveBurner Interface
1
You create your projects in the main WaveBurner window.
You can add and organize the regions in your project, graphically edit regions, pauses,
and crossfades, play the project to preview your changes, and add effects plug-ins in
the WaveBurner window.
Wave View area
Region list
Time, Track, and
Index field
Track list Region and Mix Plug-In lists
The WaveBurner interface features the following main areas:
 Customizable Toolbar with Counter (if visible): You can customize the Toolbar by
adding a Counter and buttons for the commands you use most often. See
“Customizing the Toolbar” on page 23 for further information.
 Overview: Displays a timeline of the entire project, including all regions.
 Wave View area: Displays the regions in time order. You can graphically edit regions,
track markers, pauses, and crossfades in the Wave View area.
 Time, Track, and Index field: Displays the current track number, index number and the
position of the position line.
11
Page 12
Â
Region list:
the Region list.
 Track list: Lists tracks in the order that they will appear on the CD, and displays
information for each track.
 Region and Mix Plug-In lists: You add effects plug-ins and adjust plug-in parameters in
the Region and Mix Plug-In lists.
Note: You can freely adjust the relative sizes of each section of the WaveBurner
interface by click-dragging on the parallel lines found on the borders of the various
panels. Vertical borders may be dragged horizontally, and horizontal borders may be
dragged vertically.
Lists the regions in chronological order. You add and organize regions in
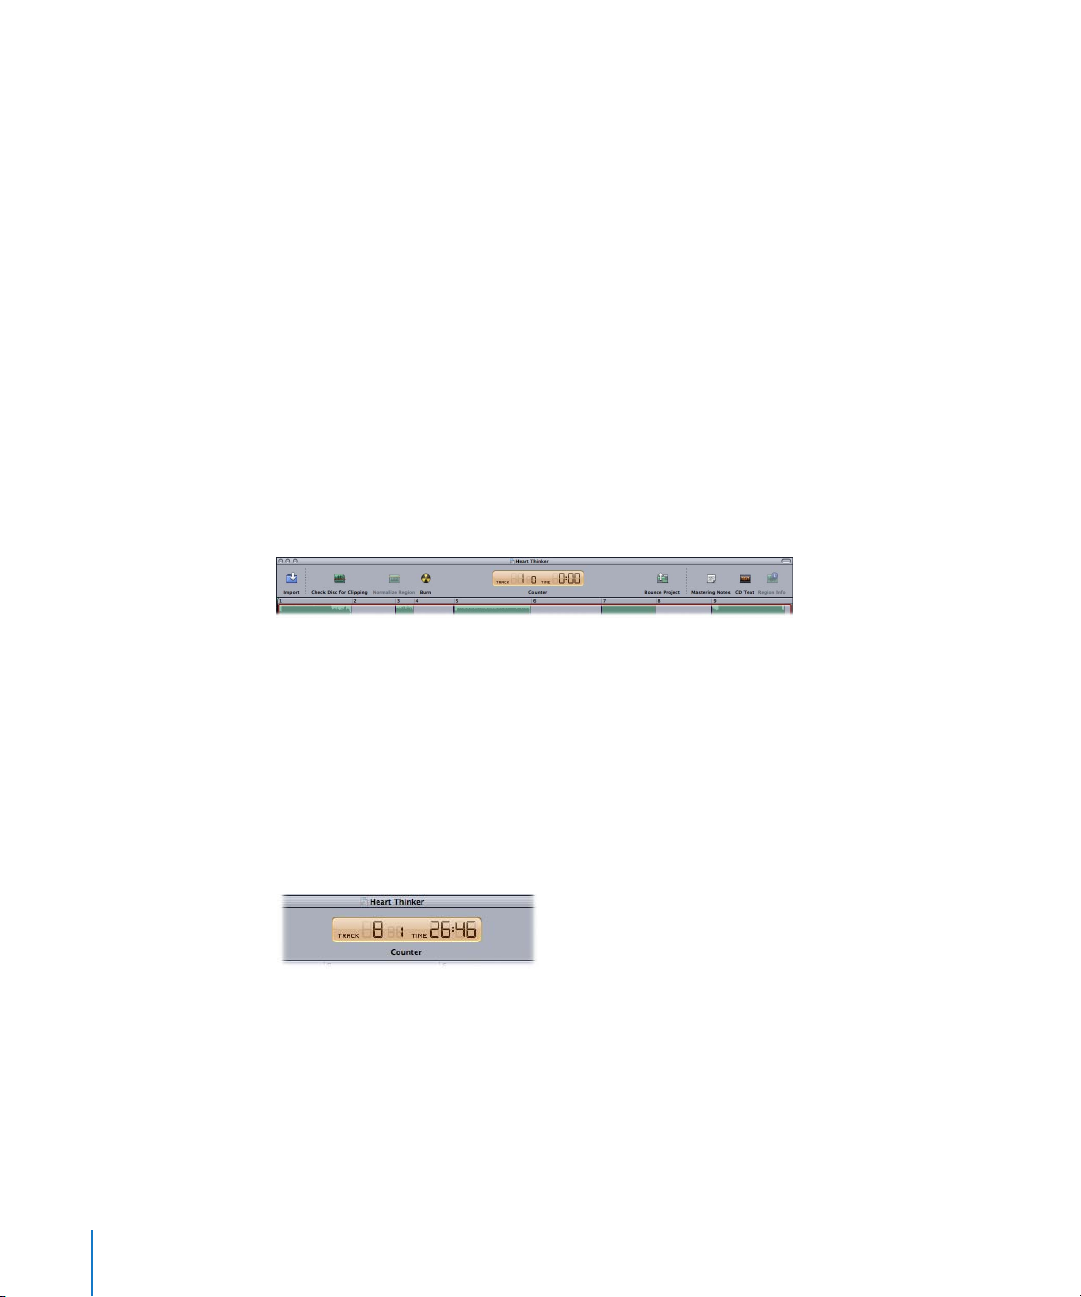
The Toolbar
WaveBurner’s Toolbar is customizable (see “Customizing the Toolbar” on page 23). It
contains a number of default tools that may include; the Import, Check Disc for
Clipping, Normalize Region, Burn, Bounce Project, Mastering Notes, CD Text, and
Region Info buttons, amongst others. It may also contain the Counter.
Counter
The Track field of the Counter displays the number of the track, with the smaller index
marker shown to the right. The current location of the position line is shown in minutes
and seconds in the Time field. The counter updates in real time as you play the project.
The Counter is designed to emulate the display of a CD player. A more accurate display
is available in the time ruler.
Note: The information shown in the Counter is also displayed in the Time, Track, and
Index fields below the Wave View, allowing you to remove the Counter, if desired.
12 Chapter 1 The WaveBurner Interface
Page 13
Overview
The Overview displays the entire duration of the project. A red rectangle in the
Overview indicates the part of the project currently visible in the Wave View area. You
can navigate to a different part of the project while simultaneously zooming in or out
on the Wave View, by dragging horizontally (move) and vertically (zoom) in the rectangle.
Wave View Area
The Wave View area is the main workspace for your projects. You view and graphically
edit regions and markers in the Wave View area. Regions are arranged, alternately,
between the top and bottom rows in the Wave View area. The two rows are
functionally identical—the reason for two of them is to simplify the editing of
overlapping regions.
Horizontal Zoom control
Time ruler
Time ruler
Vertical Waveform
Zoom control
Each region is displayed as a green rectangle, containing a waveform. Each region also
features a volume level line, which you can adjust. Track start markers are displayed as
purple flags, index markers as brown flags.
Position line
Marker bar
Marker bar
Transport controlsMarker buttons Time, Track, and Index fieldsEdit mode buttons
The Wave View area includes the following features:
 Marker bars: You add and arrange markers in the marker bars, located at the top and
bottom of the Wave View area.
 Time rulers: These show time units, enabling you to precisely place regions and
transitions at specific locations. Clicking the arrow button to the right of the Zoom
control opens a menu that allows you to change the ruler time format. You can also
access this menu by Control or right-clicking the time rulers. If you enable the CD
Track Time option in the menu, the time rulers will display the track time (rather than
the disc time).
Chapter 1 The WaveBurner Interface
13
Page 14

 Position line: This shows the current point in time (audible if the project is playing), or
the playback start position (if stopped).
 Transport buttons: You control the playback, stop, and forward/rewind functions, and
the location of the position line with the transport buttons.
 Edit mode buttons: Click one of the buttons to choose either of the edit pointer
modes, to perform different region editing tasks in the Wave View area. Press
Command to change between the two edit pointer modes.
 Marker buttons: Click one of the buttons to select either marker type, before adding
them to the marker bar. Press Command to alternate between the two edit pointer
modes.
 Time, Track, and Index fields: These fields show the current location of the position
line, the current track, and the current index point (if the project contains index
markers). This information is identical to that shown in the Counter, allowing you to
remove the Counter, if desired. Clicking the clock icon (beside the time field) opens a
menu that allows you to switch the time display between the following formats:
Track Time Elapsed, Track Time Remaining, Disc Time Elapsed, Disc Time Remaining.
 Vertical Waveform Zoom control: Click to set the zoom level of the vertical waveform
display.
 Horizontal Zoom control: Click the control or drag the slider to zoom in or out.
 Scroll bar: Drag to change the visible area of the project. Click-dragging the Zoom
Scroll buttons at either end of the scroll bar zooms the display in or out to fit the
window.
14 Chapter 1 The WaveBurner Interface
Page 15
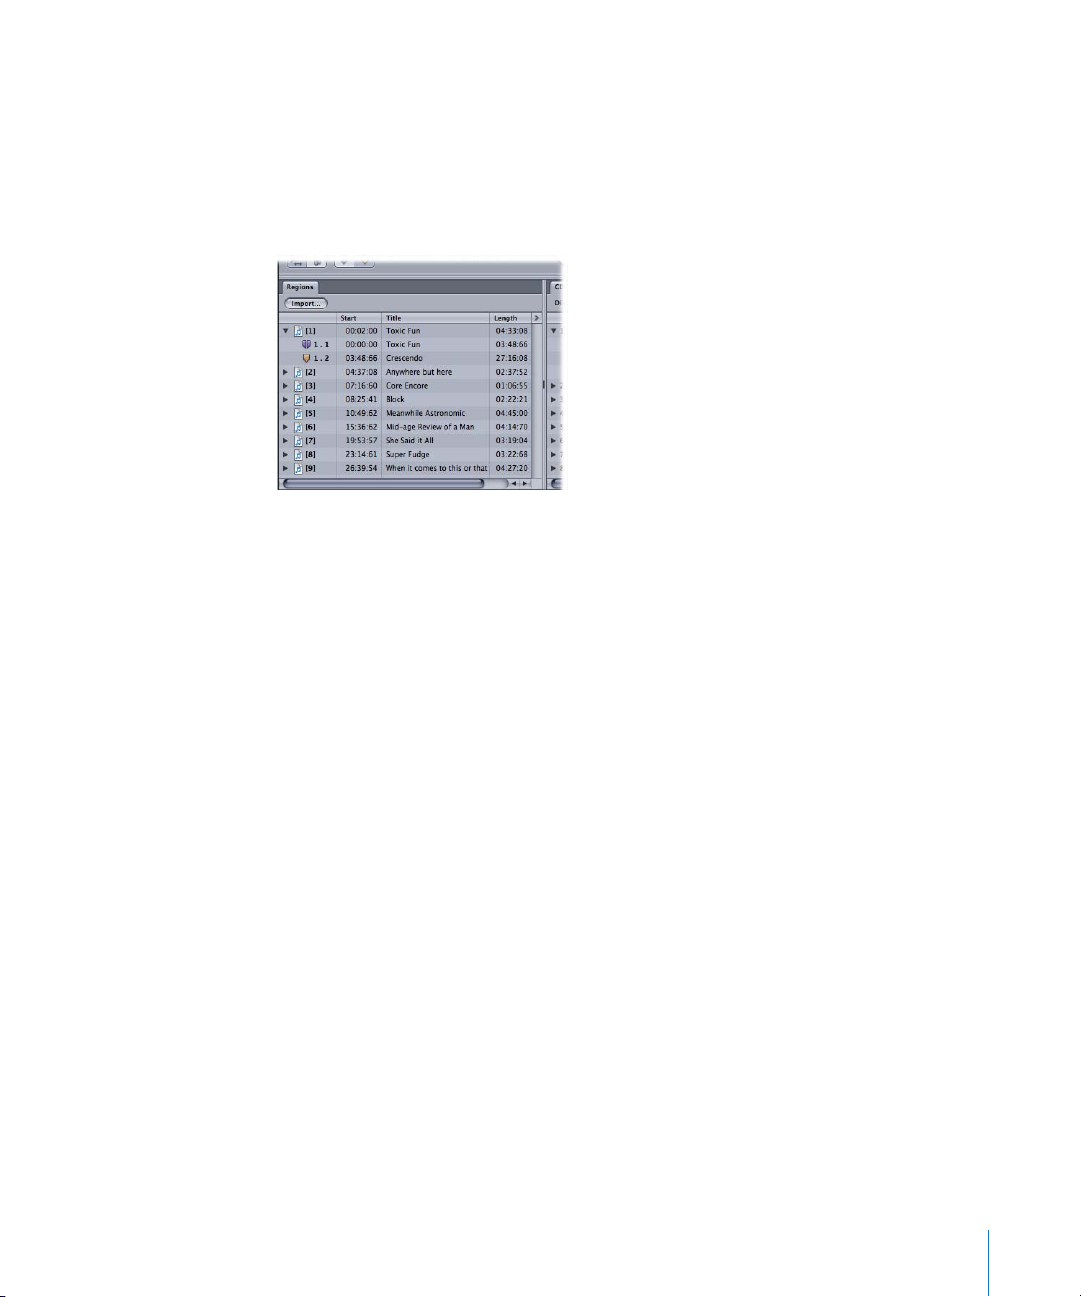
Region List
You add and organize your project’s regions in the Region list. Regions are listed
chronologically (in time order) from top to bottom. When you select a region in the
Region list, the region is also selected in the Wave View area. Click-holding the audio
file icon in the first column allows you to reorder regions by dragging them up or
down. Option-dragging region names copies them.
The Region list displays the following information about each region and its marker
points:
 Number
 Start time
 Title
 Length
 Comment
The arrow menu in the upper right corner of the Region list allows you to change the
time format. You can also determine if the time display of markers will be shown in
absolute (elapsed time since CD start), or relative values (elapsed time since track start).
You may freely swap column positions by click-dragging on the column name field,
and moving it left or right. Column widths may be resized by click-dragging on the
vertical lines that separate the column name fields. Click-dragging on the vertical line
between the Region and Track list enables you to set the width of the Region list,
thereby hiding or showing columns.
Chapter 1 The WaveBurner Interface 15
Page 16
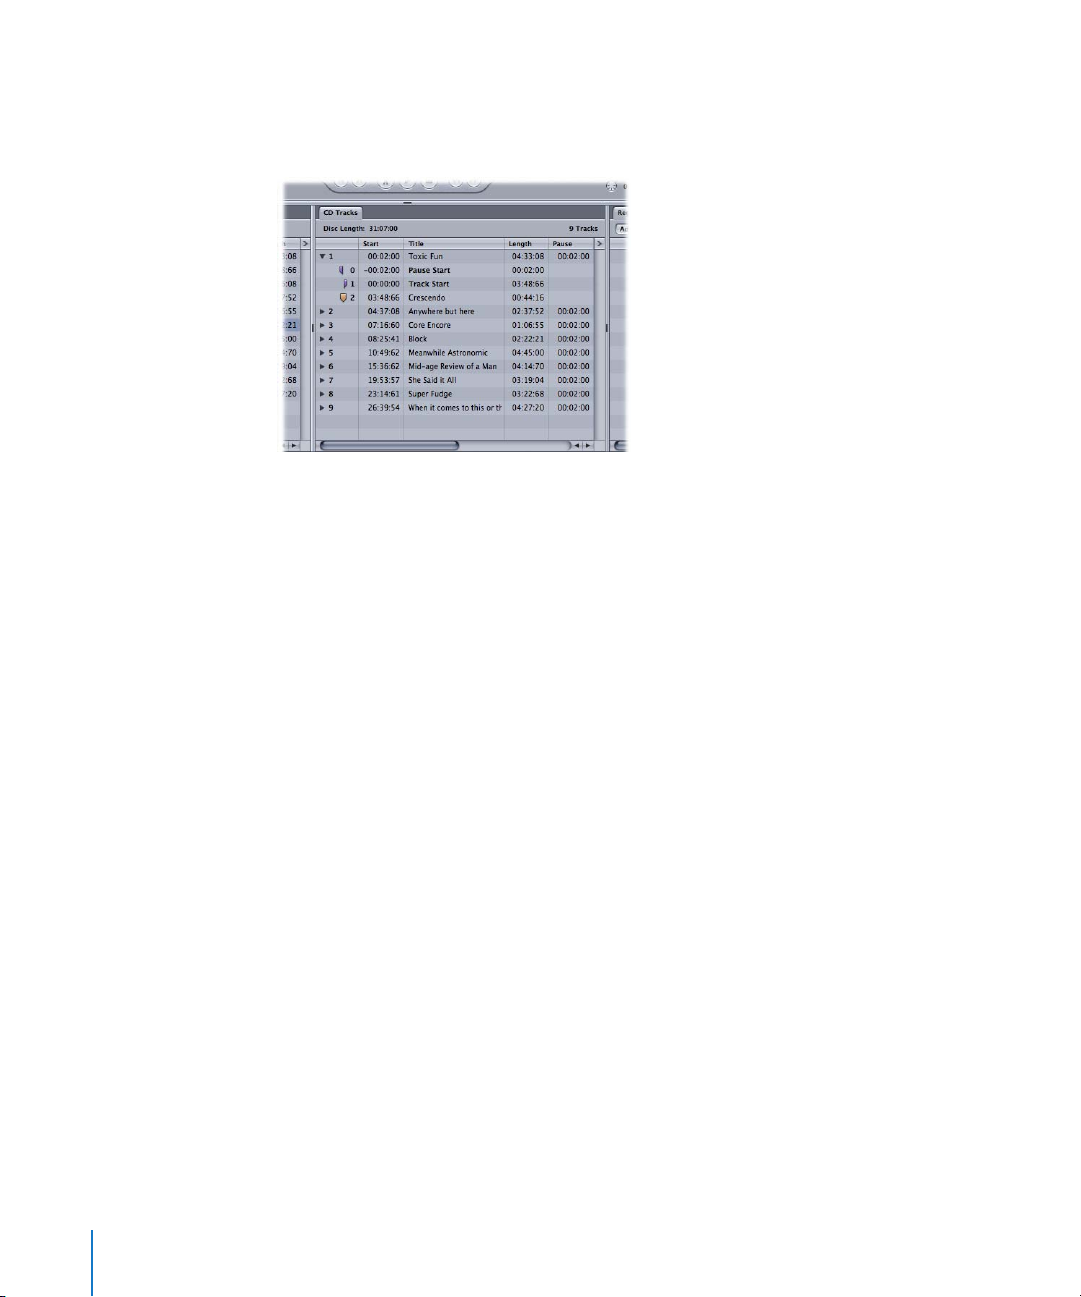
Track List
The Track list displays the track order as it will appear on the CD, and shows
information about each track.
The Track list includes the following information for each track and its marker points:
 Number
 Start time
 Title
 Length
 Copy Protection state (SCMS)
 Pre-emphasis state (PE)
 ISRC code
 Pause start time
 Comments
The arrow menu in the upper right corner of the Track list allows you to change the
time format. You can also determine if the time display of markers will be shown in
absolute (elapsed time since CD start), or relative values (elapsed time since track start).
You may freely swap column positions by click-dragging on the column name field,
and moving it left or right. Column widths may be resized by click-dragging on the
vertical lines that separate the column name fields. Click-dragging on the vertical line
between the Region and Track list enables you to set the width of the Track list, thereby
hiding or showing columns.
16 Chapter 1 The WaveBurner Interface
Page 17
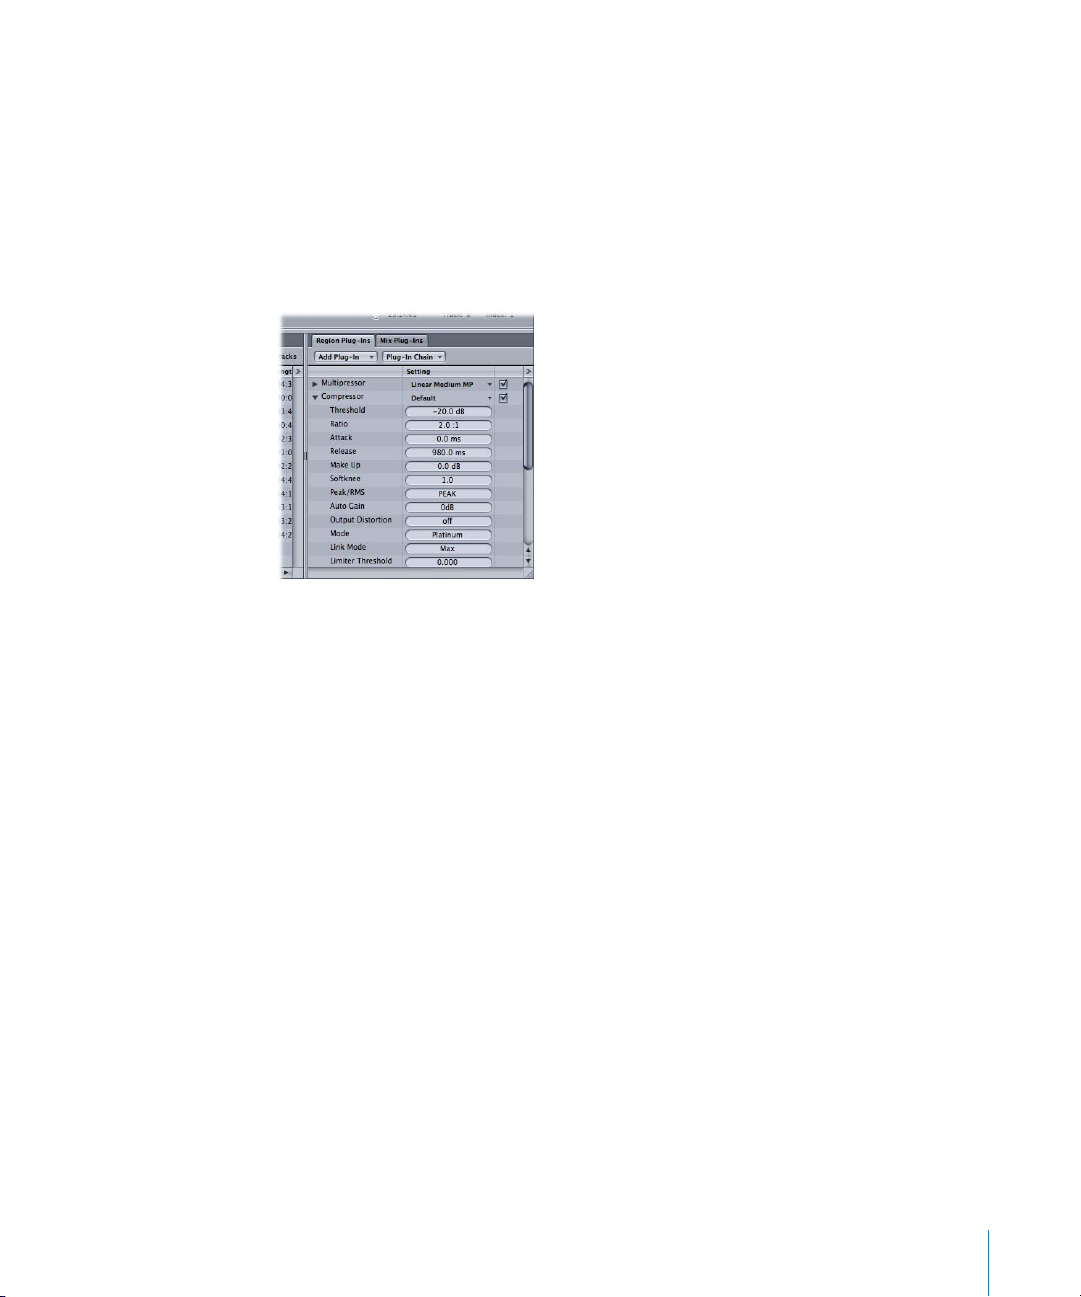
Region and Mix Plug-In Lists
You add and organize plug-ins in the two Plug-In lists. The Region Plug-In list shows
the plug-ins for the currently selected region.
Note: If none, or more than one, region is selected, the Region Plug-In list does not
display any plug-ins.
The Mix Plug-In list shows plug-ins used on the overall project. Click on the
corresponding tab to select either list.
The Add Plug-In menu enables you to load a plug-in. Click on the menu, and browse to
the desired plug-in name. Click the name, and the plug-in will be added to the list,
below any existing plug-ins, if applicable. The Plug-In Chain menu allows you to load
and set up plug-in chains.
Plug-in Windows
Each effect plug-in has its own window, offering controls that enable you to adjust
plug-in parameters. The controls can include sliders, buttons, and value fields, each
labeled to indicate the parameter being controlled. For details on the effect plug-ins
included with WaveBurner, please refer to the Logic Studio Instruments and Effects
manual.
To open a plug-in’s window:
m Double-click on the plug-in name in the Region or Mix Plug-In list.
Chapter 1 The WaveBurner Interface 17
Page 18
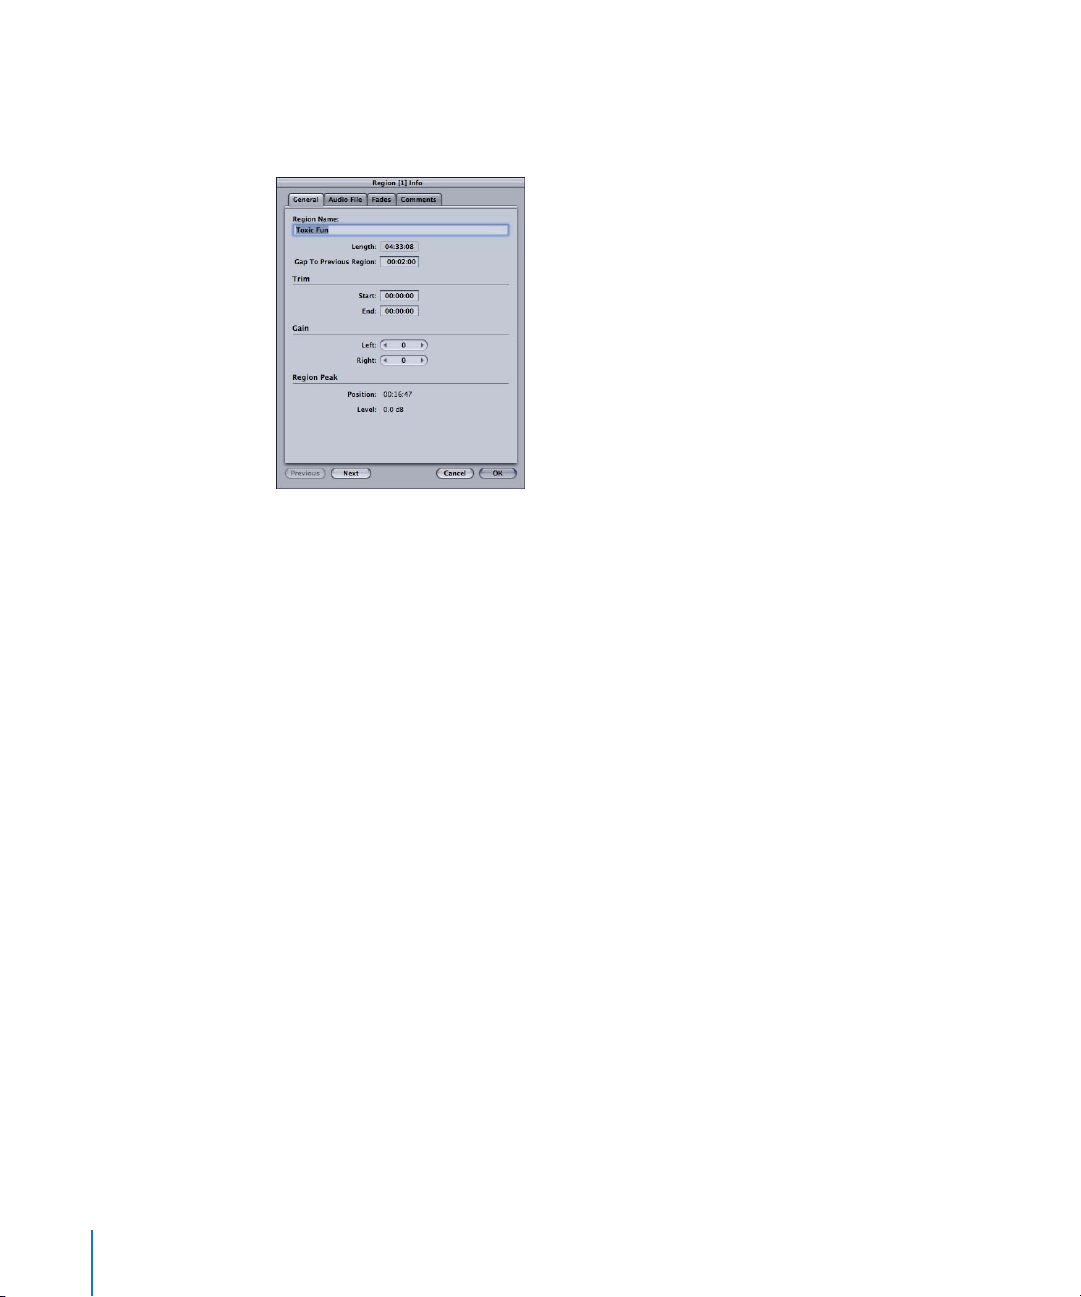
Region Info Window
The Region Info window allows you to view and edit information about the currently
selected region and its source audio file.
To show the Region Info window, do one of the following:
 Select a region, then choose Region > Region Info (or press Command-R).
 Double-click on the desired region.
The Previous and Next buttons allow you to step between the preceding and ensuing
regions in the Region list. This can accelerate the editing of a particular parameter in
several regions.
The Cancel and OK buttons cancel or execute any changes made in the Region Info
window.
Note: The Cancel button only works for the currently selected region: If you edited a
Region, then used the Next or Previous button to step to another region, followed by a
click on Cancel, only the changes made to the currently displayed region are canceled.
General Tab
The General tab of the Region Info window displays the following information:
 Region name: Double-click, and type in a new name to edit.
 Length
 Gap To Previous Region: The length of the gap between the start of the selected
region and the end of the previous region. Negative values refer to overlapping
regions—in other words, a given region starts before the previous region has ended.
 Trim Start and Trim End: These two values show the points at which the region
begins (after the start of the audio file) and ends (before the end of the audio file). As
long as the region spans the complete audio file, Trim Start and Trim End will have
values of 0.
18 Chapter 1 The WaveBurner Interface
Page 19
 Gain Left and Gain Right: These fields show the gain settings for the left and right
audio channels. Adjust by click-holding on the arrows on either side of the numerical
value, or double-click directly on the value and type in a new one.
 Region Peak Position and Level: Indicate the position (relative to the start of the
region, not the audio file) and level of the highest audio peak in the region. Any
volume changes made in WaveBurner (using the region’s volume envelope, for
example) are not taken into account.
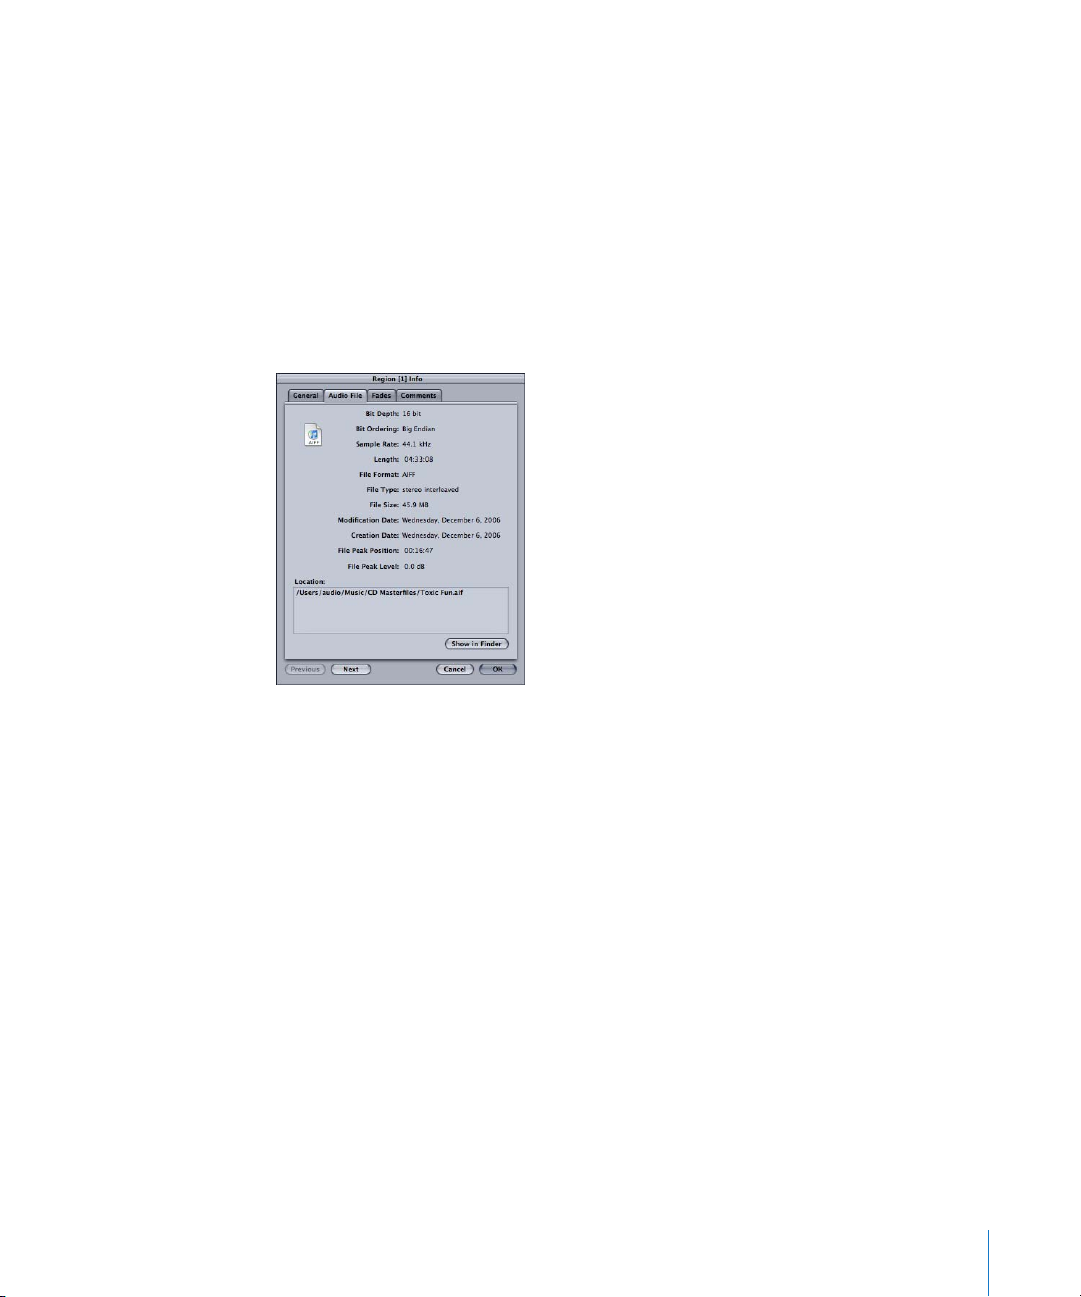
Audio File Tab
The Audio File tab of the Region Info window displays the following information about
the region’s source audio file.
 Audio file format, including bit depth and ordering, sample rate, and file type
 File length and size
 Creation and modification dates
 Peak position and level
 Location of the audio file on disk. Use the Show in Finder button to display the file in
the Finder.
Chapter 1 The WaveBurner Interface 19
Page 20
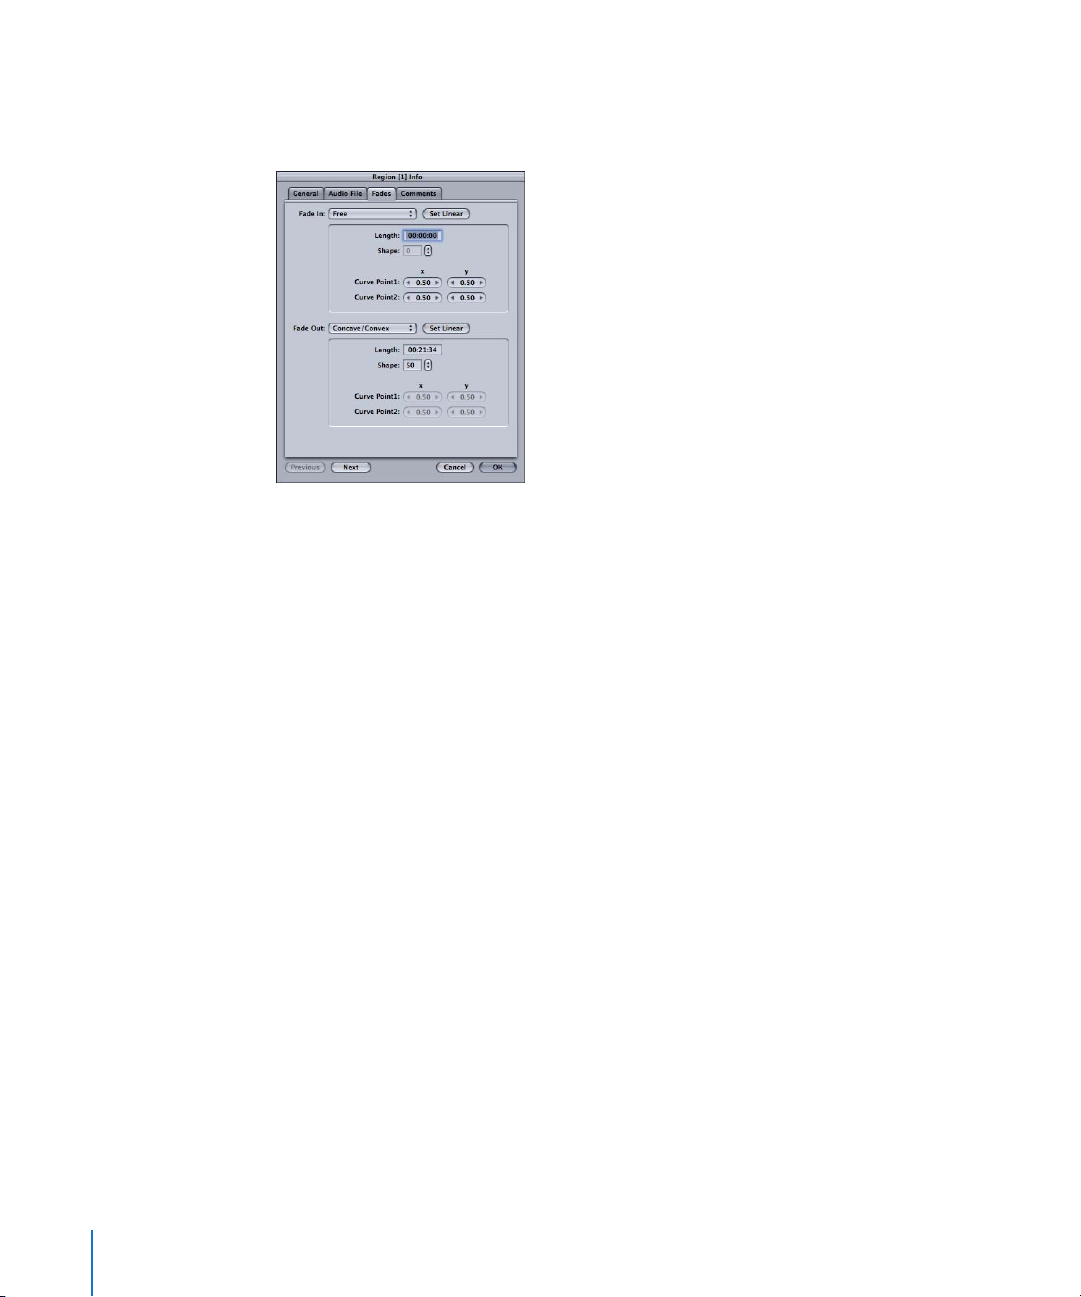
Fades Tab
The Fades tab of the Region Info window allows you to view and edit the following
information about the fades for the Fade In (top) and Fade Out (bottom) of your region.
 Fade-In and Fade Out menu: Click to choose a fade type. Choices include No Fade,
Free, S-Curve, and Concave/Convex fade curves. Click the Set Linear button to reset
the fade curves to linear (straight line).
 Fade Length: Click to input the desired fade length.
 Shape: If a fade curve type other than Free is selected, the Shape parameter allows
you to edit the points of the fade curve. Small shape values result in a shallower
curve—a value of zero equals a straight line.
 Curve points x/y coordinates: Indicate the positions of the fade curve envelope
points—as seen in the Wave View area. If the curve type is set to Free, you can edit
the curve point coordinates manually in the value fields.
Comments Tab
The Comments tab of the Region Info window enables you to add notes and
information about a region.
20 Chapter 1 The WaveBurner Interface
Page 21

Track Info Window
The Track Info window allows you to view and edit information about the selected
track (in the Track list).
To show the Track Info window, do one of the following:
m Select the track in the Track list, then choose Disc > CD Track Info (or press
Command-T).
m Click the track start marker for the track, then choose Disc > Track Info (or press
Command-T).
m Double-click the track start marker for the track.
The Previous and Next buttons allow you to step between the preceding and ensuing
tracks in the Track list. This can accelerate the editing of a particular parameter in
several tracks.
The Cancel and OK buttons cancel or execute any changes made in the Track Info
window.
General Tab
You can view or edit the following information in the General tab of the Track Info
window:
 Track Number
 Title
 Pause Length: The pause before the track starts.
 Start Time: Start time of the track as it would appear on the CD.
 Track Length
 ISRC Code
 SCMS (Serial Copy Management System)
 Pre-Emphasis
Chapter 1 The WaveBurner Interface 21
Page 22

CD Text Tab
The CD TEXT tab of the Track Info window allows you to view or edit the following
information:
 Track number
 Title
 Performer
 Songwriter
 Composer
 Arranger
 Message
Note: CD TEXT can only be written to your disk if your CD burner supports CD TEXT
and the Write CD TEXT Data option is checked in WaveBurner > Preferences > Burn.
Only CD TEXT compatible CD players will display CD Text.
Comments Tab
The Comments tab of the Track Info window enables you to add notes and information
about a track for mastering purposes. These comments will not appear on the CD.
Index Point Info Window
The Index Point Info window allows you to view or edit information about the currently
selected index point.
To show the Index Point Info window:
m Select the desired index marker, then choose Disk > Index Point Info (or press
Command-I).
m Double-click on the desired index marker.
The Previous and Next buttons allow you to step between the preceding and ensuing
Index Points.
The Cancel and OK buttons cancel or execute any changes made in the Index Point Info
window.
22 Chapter 1 The WaveBurner Interface
Page 23

The General tab of the Index Point Info window displays the following information:
 Index Point Name
 Track Number
 Index Point Number
 Position (of the index point) Relative To Track
 Position (of the index point) Relative To Disc
The Comments tab allows you to enter notes for the selected index point.
Level Meter
The Level Meter window displays the volume level of the left and right channels of
your project—in real time, as the project plays.
To show the Level Meter window:
m Choose Window > Open Level Meter (or press Command-L).
Customizing the Toolbar
You can customize the WaveBurner Toolbar by adding buttons for the commands you
use most often.
To customize the WaveBurner Toolbar:
1 Control-click (or right-click if you have a two-button mouse) the Toolbar, then choose
Customize Toolbar from the shortcut menu.
2 Drag the buttons you want to add from the Customize Toolbar dialog to any empty
area in the Toolbar. If you drag a button to a location between two existing buttons,
they will move to make space for the new button.
3 Click Done when finished.
Note: You may also choose to drag the entire “default set” from the bottom of the
Customize Toolbar dialog, if you don’t like your customizations.
To remove a Toolbar item:
m Control-click (or right-click if you have a two-button mouse) on the desired icon, then
choose Remove Item from the menu.
The shortcut menu and Customize Toolbar dialog’s Show menu also allow you to view
Toolbar items as Icon & Text, Icon Only, or Text Only.
Chapter 1 The WaveBurner Interface 23
Page 24

Page 25

2 Getting Started With WaveBurner
2
You assemble CDs in a WaveBurner project. A project
contains audio regions and CD tracks, that are created when
you add audio files.
All region and track edits, effect plug-ins, track and index markers are contained in the
project. A project can also include CD TEXT, disc and mastering information.
Projects do not include the original audio files—only references to file locations on
your computer hard disks. This keeps the size of the project file relatively small. The
original audio files are not changed when performing edits in WaveBurner.
Note: If you bounce your project, WaveBurner calculates the complete project off-line,
and renders it to one continuous audio file. The bounce file is actually a Mac OS X
package containing one continuous audio file, the document data, and mastering
information.
Elements of a Project
The main elements of a WaveBurner project include audio files, regions, and tracks.
 Audio files: Audio files are the source material for regions in your projects.
 Regions: When you add an audio file to a project, a region is created. The region can
include the entire source audio file or any continuous section of the audio file. When
you edit a region in the Wave View area or the Region list, the edits only affect the
region, not the source audio file.
 Tracks: Tracks are the individual selections on a CD, which a listener chooses with the
track number or forward and back buttons on a CD player. Tracks can include
multiple regions, and one region can span multiple tracks.
25
Page 26

Creating, Opening, and Saving Projects
The first step in making a CD in WaveBurner is the creation of a new project.
To create a new project:
m Choose File > New (or press Command-N).
A new blank, untitled project document appears. You can name the project when you
first save it.
∏ Tip: Dragging audio files onto the WaveBurner icon in the Finder or Dock creates a new
project. The audio files are automatically added to the new project.
To open an existing project:
1 Choose File > Open (or press Command-O).
2 Locate and select the project in the Open dialog, and click Open.
Note: You can open old WB 2 (Mac OS 9) documents in WaveBurner 1.5. When opening
such a document, the document format will be converted to the WaveBurner version
1.5 format. When saving this document for the first time, a file selector dialog will be
opened, so that the old document will not be overwritten automatically. Once saved in
version WB 1.5 format, a document can no longer be opened with versions prior to
version 1.1.
To save a project:
m Choose File > Save (or press Command-S).
Note: You can set preferences for various aspects of WaveBurner in the Preferences
window. Some preferences apply to the current project, and others apply when you
create a new project. You may want to set some preferences before you begin working
on your projects. Please see “Setting WaveBurner Preferences” on page 59 for details.
Adding Audio Files to a Project
WaveBurner supports the following audio file formats:
 AIFF
 WAV
 SDII
 AAC
 MP3
Audio files can be mono, split stereo, or interleaved stereo, and can be in any
combination of the following sample rates and bit depths:
 All sample rates from 11 kHz to 192 kHz
 8, 16, and 24 bit depths
26 Chapter 2 Getting Started With WaveBurner
Page 27

To add one or more audio files to a project, do one of the following:
m Drag the audio files from the Finder into the Region list or Wave View area.
m Drag the audio files onto the WaveBurner icon in the Finder or Dock. The files are
inserted at the end of the project.
m Choose File > Import Audio File (or press Command-F), select the audio files you want
to use, then click Add.
m Click the Import button in the upper left corner of the Region list, and choose the
audio file from the file selector.
Name Handling in WaveBurner
There are four name types in WaveBurner: the file name, region name, track name, and
CD Text track title name. You might expect a connection between the track title shown
in the Track list and the CD TEXT track title panel in the CD Track Info window. These are
separate entities, as you may want to use an alternate entry for CD TEXT, shown on
appropriate CD players. As an example, you may wish to differentiate between a
concert (live) version of a particular track, and the studio version.
Auditioning Projects and Controlling Playback
While working on a project, you’ll want to hear the regions, tracks, pauses, and
crossfades. You can control project playback with the Transport buttons, or by moving
the position line.
Using the Transport Buttons
You can control project playback and set the location of the position line with the
Transport buttons, located at the bottom center of the Wave View area.
The Transport buttons include, from left to right:
 Go to previous track start marker: Moves the position line to the previous track start
marker. If the project is currently playing, playback continues from this point. Hold
Option while clicking this button to move the position line to the previous index
marker.
 Go to next track start marker: Sets the position line to the next track start marker. If
the project is currently playing, playback continues from this point. Hold Option
while clicking this button to move the position line to the next index marker.
 Catch: Turns Catch mode on or off. When Catch mode is turned on, the visible part of
the Wave View area scrolls, ensuring that the position line always remains visible.
Chapter 2 Getting Started With WaveBurner 27
Page 28

 Play/Pause: Starts playback from the current position line location.
 Stop: Stops playback.
 Back: Scrubs (shuttles while audio is heard) towards the start of the project. Click-
hold on the button to operate.
 Forward: Scrubs (shuttles while audio is heard) towards the end of the project. Click-
hold on the button to operate.
To start playback, do one of the following:
m Click the Play button in the Transport (or press the Space bar).
m Double-click either time ruler to start playback from that point.
To stop playback, do one of the following:
m Click the Stop button (or press Space bar) in the Transport. A second click on the Stop
button (or pressing the Space bar) moves the position line to the beginning of the
project.
m Double-click either time ruler to stop playback and move the position line to the
clicked location.
Moving the Position Line
You can move the position line directly to any location.
To move the position line, do one of the following:
m Click once at the point you want to move the position line to—on either time ruler.
m Click-drag the position line to the desired point.
Selecting a region, track, or marker in the Track or Region lists sets the playback
position to the beginning of the region, track, or marker.
Looping Playback
You can loop (or cycle) a section of your project, so that it plays back repeatedly. This
can be useful when editing a part of the project, and you want to hear the results of
your edits in real time. You can loop playback by defining a cycle area in either time
ruler.
To define a cycle area:
m In either time ruler, drag from the desired loop start position to the point where you
want looping to end.
Click-dragging the cycle area handles allows you to resize an existing cycle area.
To remove the cycle area:
m Click anywhere outside the current cycle area in the time ruler. Note that this will move
the position line to the clicked point.
28 Chapter 2 Getting Started With WaveBurner
Page 29

Navigating in the Wave View Area
Navigation in the Wave View area is performed with the zoom controls and scroll bar.
You can also move to different parts of the Wave View area by using the rectangle in
the Overview.
You can zoom in to make precise edits, or zoom out to see more of your project.
The zoom control slider uses a graduated scale. Moving the slider left, or clicking the
left side of the scale, zooms in for a closer view of a section of the Wave View area.
Moving the slider right, or clicking the right side of the scale, zooms out for a wider
view. You can also zoom in or out with menu commands, by click-dragging on the
Zoom Scroll buttons, or by vertically dragging inside the Overview rectangle.
To zoom in, do one of the following:
m Drag the Zoom slider left.
m Click the left part of the Zoom control.
m Choose View > Zoom In (or press the Down Arrow key).
m Click-drag downwards on the red rectangle in the Overview.
m Minimize the scroll bar by click-dragging the Zoom Scroll buttons at either end of the
scroll bar. Shift-click-dragging a Zoom Scroll button allows you to zoom in on one side
(of a waveform).
m Move the mouse wheel down.
You can also choose View > Maximum Zoom In (or press Option–Down Arrow) to set
the display to the highest possible zoom level.
To zoom out, do one of the following:
m Drag the Zoom slider right.
m Click the right part of the Zoom control.
m Choose View > Zoom Out (or press the Up Arrow key).
m Click-drag upwards on the red rectangle in the Overview.
m Maximize the scroll bar by click-dragging the Zoom Scroll buttons at either end of the
scroll bar. Shift-click-dragging a Zoom Scroll button allows you to zoom out on one
side (of a waveform).
m Move the mouse wheel up.
You can also choose View > Maximum Zoom Out (or press Option–Up Arrow) to show
as much of your project as possible in the Wave View area.
Note: Activating WaveBurner > Preferences > General > Zoom To Position Line ensures
that the position line remains centered in the Wave View area when zooming.
Chapter 2 Getting Started With WaveBurner 29
Page 30

You can navigate to different parts of your project by dragging the horizontal scroll bar
or red rectangle in the Overview—to the left or right. You can also use a number of
transport keyboard shortcuts. See “Transport Operations” on page 64.
30 Chapter 2 Getting Started With WaveBurner
Page 31

3 Working With Regions
3
Regions are the building blocks of your WaveBurner projects.
Regions can include the entire source audio file or any
continuous section of an audio file.
The edits you make to a region do not change the source audio file, so you can always
revert to the original, if necessary.
When you add an audio file to a project, a region is created. The new region appears in
the Wave View area and in the Region list. Regions are displayed chronologically in the
Wave View area—from left to right. Regions are alternately displayed in the upper or
lower half of the Wave View area, making it easier to view any overlapping areas
between two regions. Regions are displayed in chronological order—from top to
bottom—in the Region list.
Once a region is added to your project, it is automatically assigned a track start marker,
which contains the track number displayed by the CD player during playback. This track
start marker is mirrored by a newly created track that uses the new region, and appears
in the Track list.
You can edit regions in a variety of ways. You can copy, reorder, trim, and split regions,
adjust volume levels, normalize, add fade-ins, fade-outs, and crossfades.
Selecting Regions
You must first select a region before editing it.
To select a region:
m Click the region name in the Region list or the waveform in the Wave View area.
Note: You can select more than one region by either Command or Shift-clicking
(consecutive regions) on the desired regions. You can also use rubber-band selection
for consecutive regions.
Selected regions appear darker in the Wave View area.
31
Page 32

Copying Regions
You can copy a region in the Region list.
To copy a region:
m Option-drag the region’s icon up or down in the first column of the Region list.
As you Option-drag, a dark, horizontal line will indicate the target location for the
region copy.
Reordering Regions
Regions are displayed in their order of appearance in the project—from top to bottom
in the Region list, and left to right in the Wave View area. You can reorder regions in the
Region list.
To reorder region positions:
m Drag the region’s icon (left column of the Region list) up or down.
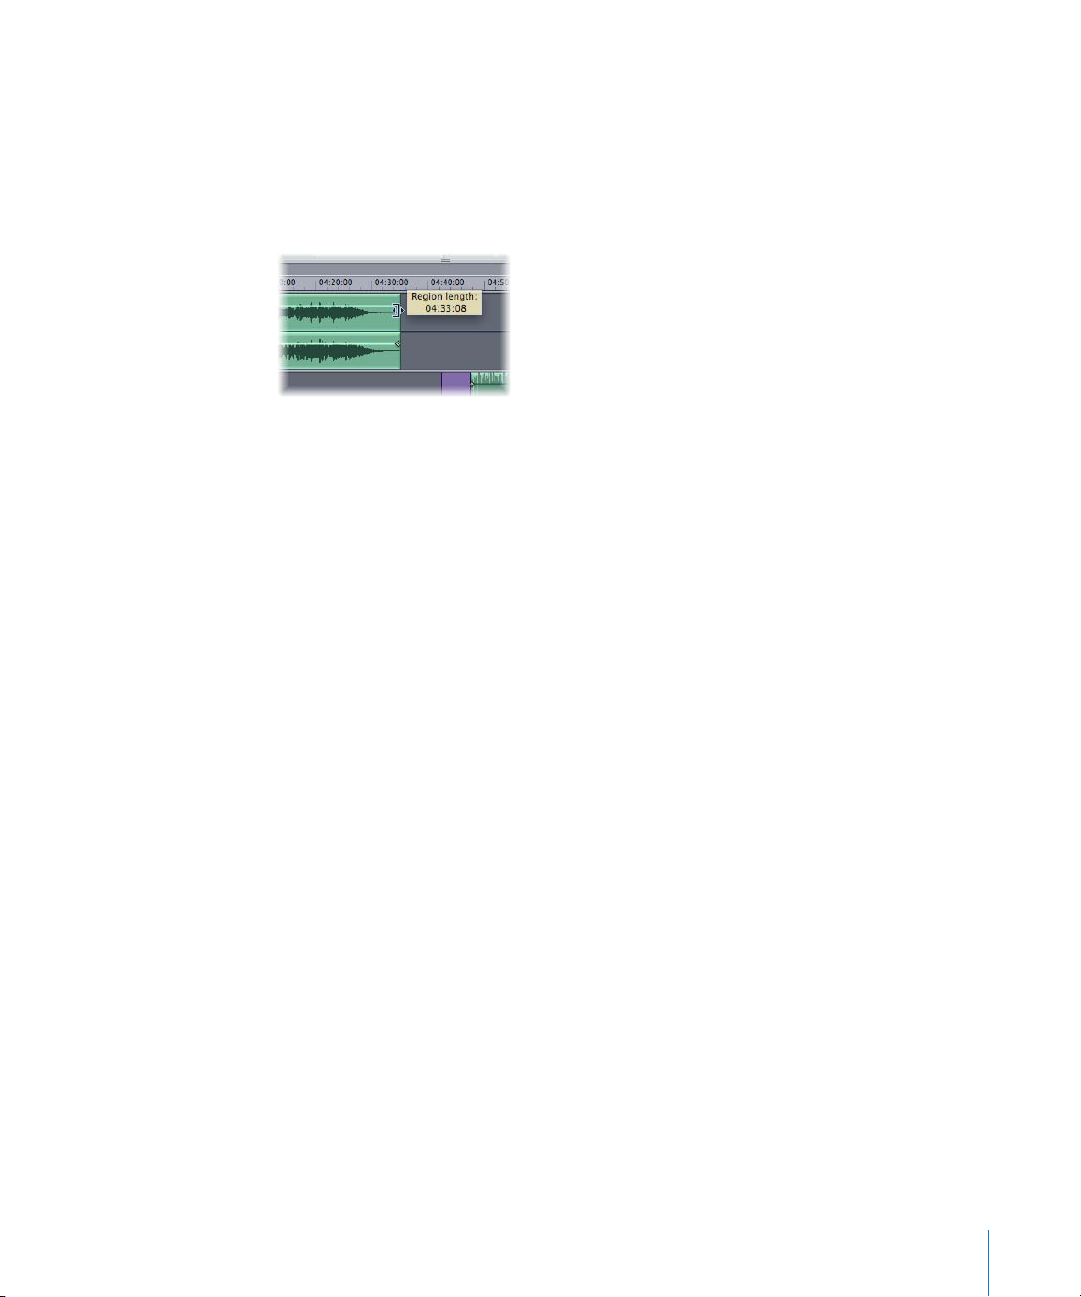
Moving Regions
You can move a region to a new time position, along with its markers, by dragging the
region in the Wave View area.
To move a region to a new time position:
m Drag the region to the left or right in the Wave View area.
As you drag, all subsequent regions are also moved. If you want to move the selected
region in isolation, press and hold Option before selecting and dragging it. All
subsequent region positions remain intact. The gaps at the beginning and end of the
region being moved are changed accordingly.
When you drag a region to the right, the pause length (the duration between the track
start marker and its pause start point) increases. When you drag a region to the left so
that it overlaps the previous region, the pause length is set to zero, and fades are
automatically added to the moved region (fade in) and the previous region (fade out),
crossfading the overlapped area.
You can adjust the crossfades. For information about adjusting crossfades, see “Adding
and Adjusting Fades” on page 36.
Note: The track start marker behavior outlined above only works when you have not
manually edited the track start marker (See “Automatic Positioning of Track Start
Markers” on page 47.)
32 Chapter 3 Working With Regions
Page 33
Trimming Regions
You can trim (shorten) a region by adjusting either (or both) the start and end points.
To trim the start or end point:
1 Move the pointer over the left or right edge of the region.
The pointer changes to the Resize pointer.
2 Drag the edge of the region. You can drag the start point to the right, or drag the end
point to the left.
Note: As you drag, the region is trimmed, and all subsequent regions are moved—in
order to retain their relative positions. Pressing Option while dragging allows you to
trim a region without moving adjacent regions.
Important: Please note that the audio material’s absolute position is shifted when you
trim the start point of a region. Changing the end point of a region doesn’t affect its
absolute position. Only the absolute position of the end point is changed.
Splicing Regions
You can splice a region into two regions. This is useful if you want to remove a portion
of a region, or move part of the region to another location within the project.
To splice a region:
1 Click the Splice (scissors) button.
∏ Tip: You can also press Control to temporarily switch the editing mode.
2 Click on the desired region splice position in the Wave View area.
The region is split in two, and the portion of the region that follows the splice point
appears in the opposite half (upper or lower) of the Wave View area. By default, a track
marker is created at the beginning of the new region. You can press Option when
cutting a region to prevent the insertion of the track marker.
Chapter 3 Working With Regions 33
Page 34
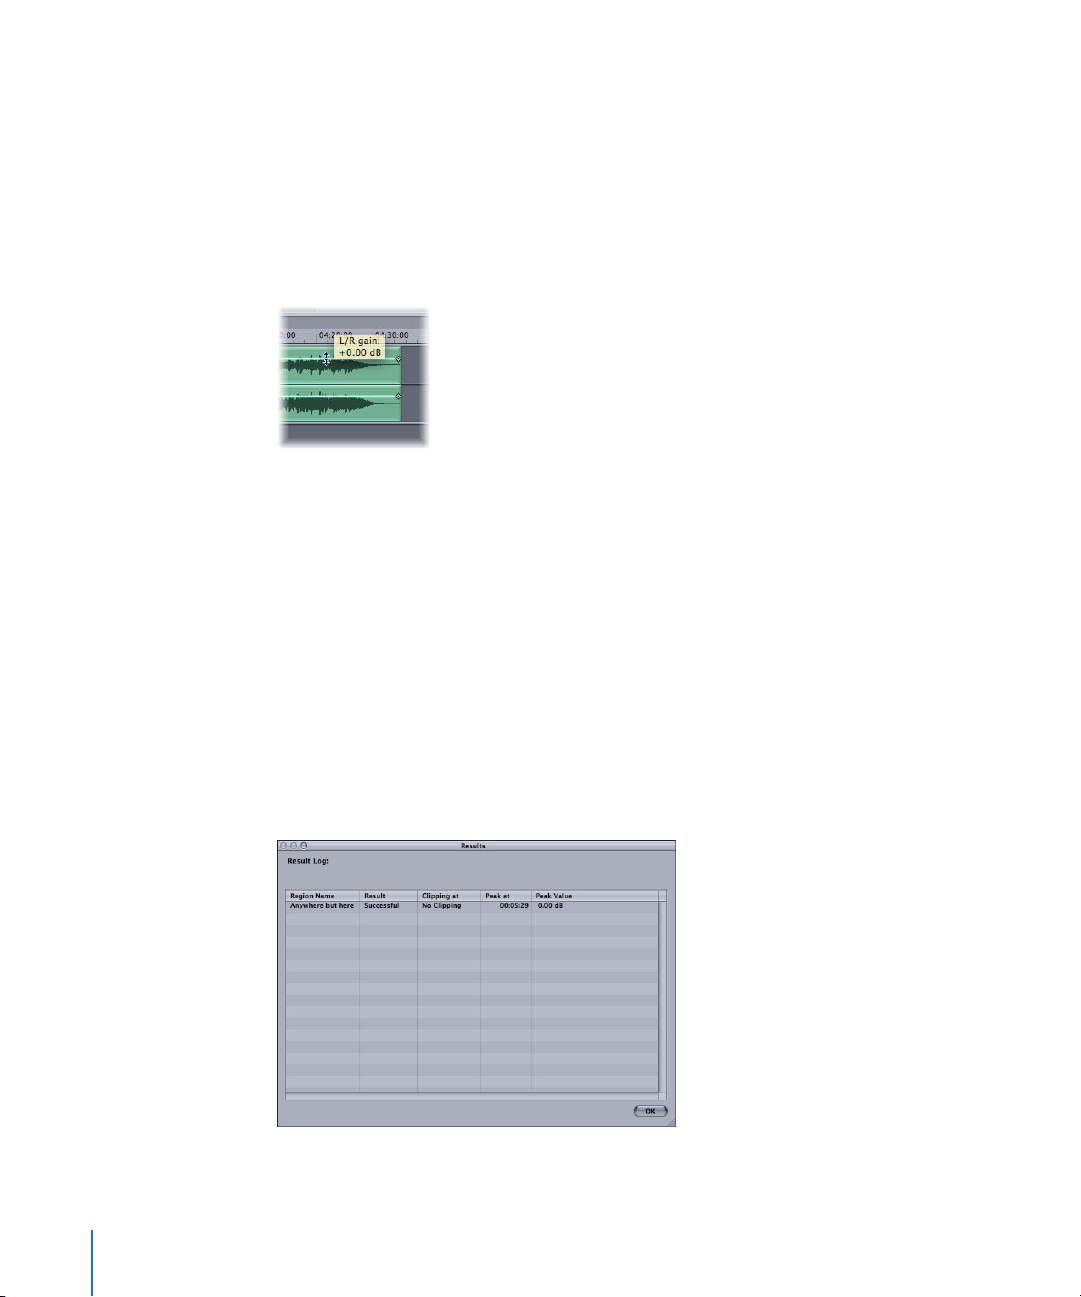
Adjusting Levels
A horizontal line—known as the region’s level envelope—is overlaid on top of each
region in the Wave View area. The line shows the volume level for the region. You can
adjust the region’s volume level by moving it up or down.
To adjust the level of a region:
1 Move the pointer over the horizontal level envelope that you want to adjust.
The pointer changes to a vertical line, with arrows pointing up and down.
2 Drag the envelope up or down to a new value.
Note: Pressing Option while dragging allows you to manipulate the level
independently for each stereo side.
Checking a Region for Clipping
You can check regions for clipping.
To check regions for clipping:
1 Select the regions in either the Wave View area or the Region list.
2 Choose Region > Check Region for Clipping.
After completing the process, a detailed log displays the results of the clipping analysis.
34 Chapter 3 Working With Regions
Page 35

Normalizing Regions
Typically, you want the volume level of your audio regions to be as high as possible,
without causing clipping. Changing the level of a region to the maximum possible
value—without causing clipping—is known as normalizing.
When a region is normalized, it is boosted so that the signal peak reaches (but doesn’t
exceed) the set digital level (maximum: 0 dB, but see below). All other portions of the
region are boosted by the same amount, so that the original dynamic range of the
recording is maintained. This ensures that the region will play at maximum level,
without clipping.
∏ Tip: You should not choose 0 dB in the Normalize dialog, as this may result in clipping
should you wish to increase the gain of the overall signal afterwards, say with an EQ. A
further issue is that many CD players clip signals that reach 0 dB. As a good rule of
thumb, you should leave at least 3 to 6 dB of “headroom,” to allow for further audio
processing tasks, such as mixing, and effects processing.
To normalize regions:
1 Select the regions in the Region list or Wave View area.
2 Choose Region > Normalize Region.
3 In the Normalize window, set a target level lower than the maximum peak level (0 dB) if
desired.
4 If several regions are selected, choose to either:
 Maintain the relative volumes of the regions by deactivating the Normalize Each
Region Individually checkbox.
 To normalize each individually (by activating the Each track Individually option).
Although the latter option results in higher volume levels, it also may cause a change in
the relative volumes between regions.
Chapter 3 Working With Regions 35
Page 36

Adding and Adjusting Fades
Fade-ins and fade-outs are commonly used at the beginning and end of songs in music
production. Commercially recorded albums make frequent use of these types of edits
to create a sense of continuity when moving from one track to the next.
To add a fade-in:
1 Move the pointer over the fade-in handle located on the volume envelope—at the left
edge of the region.
The pointer changes to a left-right arrow.
2 Drag the envelope point to the right to set the length of the fade-in.
As you drag, the envelope changes to show the length of the fade.
To add a fade-out:
1 Move the pointer over the fade-out handle located on the volume envelope—at the
right edge of the region.
The pointer changes to a left-right arrow.
2 Drag the envelope point to the left to set the length of the fade-out.
As you drag, the envelope changes to show the length of the fade.
When you drag a region (in the Wave View area) to a position that overlaps an adjacent
region, the overlapping portions of the regions are automatically crossfaded—a fadeout is added to the earlier region, and a fade-in is added to the later region.
Note: This automatic fade functionality only applies if you haven’t already created a
fade manually.
36 Chapter 3 Working With Regions
Page 37

To reactivate the automatic setting of a manually edited fade:
1 Move the Fade length handle to the position that coincides with the beginning (or
end) of the other overlapping region.
2 When the cursor changes to a chain icon, release the Fade length handle.
The automatic fade function will be restored.
If you move the region to a position where it doesn’t overlap another region, and then
move the corresponding Fade length handle to the zero position, the automatic fade
function is reactivated.
Note: Press and hold Option to prevent reactivation of the automatic fade setting at
the chain position.
You can adjust fade-ins and fade-outs by dragging the fade handles of the region
envelope. By default, the fade curve is linear, which means that the level increases
evenly (linearly) for the duration of the fade. You can adjust the fade curve to increase
the level more quickly or slowly as the fade progresses.
Note: You can also edit your fades numerically in the Fade tab of the Region Info
window. For further information, see the Region Info window section on page 18.
Chapter 3 Working With Regions 37
Page 38

Bouncing Regions
When you bounce a region in WaveBurner, the region’s audio, inclusive of any edits
you’ve made (such as changes, fades, and trims) and the effects of all region plug-ins
are rendered into a new audio file.
Note:
Region plug-ins are included when you bounce a region, but Mix plug-ins are not
Bouncing a region saves processing power. The computer simply reads the bounced
audio file, and does not need to process the edits or plug-ins in real time.
To bounce a region:
1 Select the region in the Region list or Wave View.
2 Choose Region > Bounce Region.
3 In the Bounce dialog, browse to the target save location for the bounced file and set
the desired File options: You can choose the file format (AIFF, SDII, WAV), bit depth,
stereo type (interleaved stereo, split stereo, left channel, right channel), and dithering
mode, if applied.
4 Click Save.
Dependent on the WaveBurner > Preferences > Bounce options, the original region
may automatically be replaced with the bounced audio file.
Note: You can also bounce the entire project by choosing File > Bounce Project. This
calculates the complete project off-line, and renders it to a single audio file. The bounce
file is actually a Mac OS X package containing one continuous audio file, the document
data, and mastering info.
.
Renaming Regions
When a region is created, it is assigned the name of the source audio file by default.
You can rename regions in the Region list.
To rename a region:
m Double-click the region name in the Region list, and type in a new name.
Deleting Regions
You can remove a region from the project if you decide you no longer want to include it
To delete a region:
m Select the region, then choose Edit > Delete (or press Delete/Backspace).
38 Chapter 3 Working With Regions
.
Page 39

4 Working With Tracks
4
Tracks are the individual selections on a CD, which a listener
chooses with the track number or forward and back buttons
on a CD player.
By default, a track is created for each region in a project. It’s also possible to combine
several regions into one track, or to create several tracks with one region. Tracks are
defined by a track start marker and a corresponding pause start point—automatically
inserted when you add a region. You can move this marker from its default position,
and insert additional markers. For information about inserting and moving markers, see
“Working With Markers” on page 43.
The Track List
Tracks are displayed chronologically in the Track list, from top to bottom. If you reorder
regions in the Region list, the Track list is updated to reflect the new order.
The Track list displays information about each track, including the track name, track
length, start time, and track pause. You can edit the track information in the Track list.
You can add comments, add ISRC codes, and set pre-emphasis flags for the track.
Adding Comments
Comments allow you to save notes and information about a track for mastering
purposes. These comments are WaveBurner-specific, and will not appear on the CD.
To add track comments:
m Click the track’s Comments field, and type in the desired text.
39
Page 40

Adding ISRC Codes
The International Standard Recording Code, or ISRC, serves as a unique registration
code for phonograph and audio-visual recordings. The ISRC standard was established in
1986 by the ISO (International Standards Organization) in ISO document No. 3901. The
IFPI (International Federation of the Phonographic Industry) was designated as the
international registration agency in 1989. The IFPI recommends that members include
the ISRC in the subcode as a “fingerprint” for all digital recordings. In 1992, all member
companies received their “first owner” codes.
The ISRC is permanently stored in the subcode of a recording. When the recording is
altered or edited, a new ISRC has to be used. An ISRC can only be allocated once. The
first owner can integrate ISRCs into an existing coding system, as long as doing so
requires no more than five digits (designation code). A complete ISRC contains 12
characters, such as that shown below:
DE-K22-05-256-12
 Country code (compliant with ISO 3166, in this case, Germany)
 First owner code (record company, in this case, Polydor)
 Year of recording code (2 digits)
 Designation code (5 digits)
The ISRC is used by radio stations to archive recordings. Royalty collection societies
such as GEMA or MCPS/PRS also use the code to automatically generate transmission
logs, thus simplifying licensing accounting. For commercial recordings, the ISRC should
only consist of the code provided by the record label. If the record label company has
not been issued a first owner code, you should contact the IFPI.
To add an ISRC code:
m Click the track’s ISRC field, then type the ISRC code in the field.
Note: You can only input numbers. The ISRC field does not allow spaces or hyphens.
The CD Track Info Window
The CD Track Info window is the best place to view and edit track information,
including copy protection and pre-emphasis flags.
To show the Track Info window, do one of the following:
m Select the track in the Track list, then choose Disc > CD Track Info (or press
Command-T).
m Click the track start marker for the track, then choose Disc > Track Info (or press
Command-T).
m Double-click the track start marker for the track.
40 Chapter 4 Working With Tracks
Page 41

Setting the Copy Prohibit Bit
You can set a Copy Prohibit Bit for a track. When a track’s Copy Prohibit Bit is set, the
track cannot be digitally copied more than once—by recording devices that support
the Serial Copy Management System (SCMS). These devices automatically write a Copy
Prohibit Bit to prevent further generation of digital copies (of the track).
Consumer-level DAT recorders (and a handful of professional-level units) are usually
equipped with SCMS. Given the number of recording devices that do not include this
type of copy protection, setting the Copy Prohibit Bit does not guarantee that the track
cannot be copied multiple times. WaveBurner provides the option to set the Copy
Prohibit Bit in order to comply with the Red Book standard.
To set the Copy Prohibit Bit, do one of the following:
m In the Track List, choose Free, Protected Original, or Protected Copy from the SCMS
pop-up menu.
m In the General tab of the CD Track Info window, choose Free, Protected Original, or
Protected Copy from the SCMS pop-up menu.
Setting Track Pre-Emphasis
The use of pre-emphasis dates from the early days of digital sound reproduction, when
14-bit A/D converters (without oversampling) were frequently used. The high
frequencies of digital recordings were boosted or “emphasized” during conversion
(similar to the RIAA EQ process for vinyl records), then were attenuated (de-emphasis)
after D/A conversion. This tended to mask the inaccuracies of the conversion process.
With today’s advanced digital recording technology, it is recommended that you leave
pre-emphasis turned off, because modern converters are capable of delivering linear
conversions that produce far fewer errors than de-emphasis filters.
Note: WaveBurner only supports pre-emphasis so that old digital recordings (that were
processed with a pre-emphasis algorithm) can be marked as such. WaveBurner’s Preemphasis is only a flag intended for the CD player, and does not change the way that
the audio is processed when you burn a CD.
To turn on pre-emphasis, do one of the following:
m Click the PE checkbox in the Track list.
m Click the Pre-Emphasis checkbox in the General tab of the CD Track Info window.
Chapter 4 Working With Tracks 41
Page 42

Bouncing Tracks
You can bounce a track. As with bouncing a region, bouncing a track has two benefits:
it lets you save a processed version of the track, including plug-ins and so on, and it
can help conserve processing power.
To bounce a track:
1 In the Track list, select the track.
2 Choose Disc > Bounce CD Track.
3 Choose a save location and name for the track in the Save dialog, then click OK.
42 Chapter 4 Working With Tracks
Page 43

5 Working With Markers
Markers are integral to the Red Book CD format standard.
You can use markers to indicate a specific point in time on the CD.
Types of Markers
WaveBurner uses the following types of markers:
 Track start markers: Indicate the start of a track—they appear as track numbers on
the CD player’s display, and are used for navigation with the forward, back, or track
number controls of a CD player.
5
Track start markers are comprised of the actual track start marker (a purple flag
pointing to the right) and the pause start point (a purple flag pointing to the left).
The pause start point indicates the pause before the track start point.
 Index markers: Indicate the position of index points—these are additional
submarkers within a track. Not all CD players can recognize and locate index points.
43
Page 44

Inserting and Deleting Markers
When you add an audio file to a project, a track start marker is inserted at the
beginning of the region. The track start marker is tied to a pause start point that is
inserted at the end of the preceding region (including the first region in the project).
The default pause length—the amount of time that elapses between the pause start
point and track start markers—initially depends on the Default Pause Length
parameter, defined in the General Preferences tab. For information about setting the
default pause length, see “General Preferences” on page 59. You can use the default
placement of markers, or move them to adjust the pause length.
Note: The Disc > Set Pause Length function allows you to change the existing pauses
of selected tracks in the Track list. If you check Ignore Tracks without Gap, title borders
without pauses will not be changed. If this is unchecked, the new pause length is
applied to all title borders. If you check Shift Regions, the regions will be moved by the
pause length change.
You can insert track start markers manually. Inserted track start markers are always
accompanied by a corresponding pause start point.
To insert a track start marker:
1 Click the Track Start Marker button (the purple marker button to the left of the
Transport buttons).
Track Start Marker
button
2 Click the marker bar (above or below the region) at the position you want to insert the
track start marker.
A track start marker and corresponding pause start point are inserted at the clicked
position. To change the length of the pause that precedes the track start point, move
the left portion of the marker (pause start point) to the left.
Index markers indicate submarkers, which are specific time positions within a track. You
should note that not all CD players can recognize index points.
44 Chapter 5 Working With Markers
Page 45

To insert an index marker:
1 Click the Index Marker button (the orange marker button to the left of the Transport
buttons).
Index Marker button
2 Click the marker bar (above or below the region) at the position you want to insert the
index marker.
Markers are always “attached” to a region. This ensures that markers retain their relative
positions. In other words, if the position of a region on the CD is moved at some later
stage, markers attached to that region are moved along with it; markers attached to
the previous region retain their absolute position on the CD. If you insert a marker at a
location where two regions overlap, you can determine which region you want to
attach the marker to by placing it in the appropriate marker bar (above/below) in the
Wave View area.
To toggle between marker pointers:
m While pointing at the marker bar, press Command to alternate between the track and
index marker pointers.
To delete a marker:
m Click the track or index marker to select it, then press the Delete key.
To select more than one marker, you can either:
m Hold Shift while clicking the markers in the Track list.
m Click-hold on the background of the marker row and rubber-band select a group of
markers.
Chapter 5 Working With Markers 45
Page 46
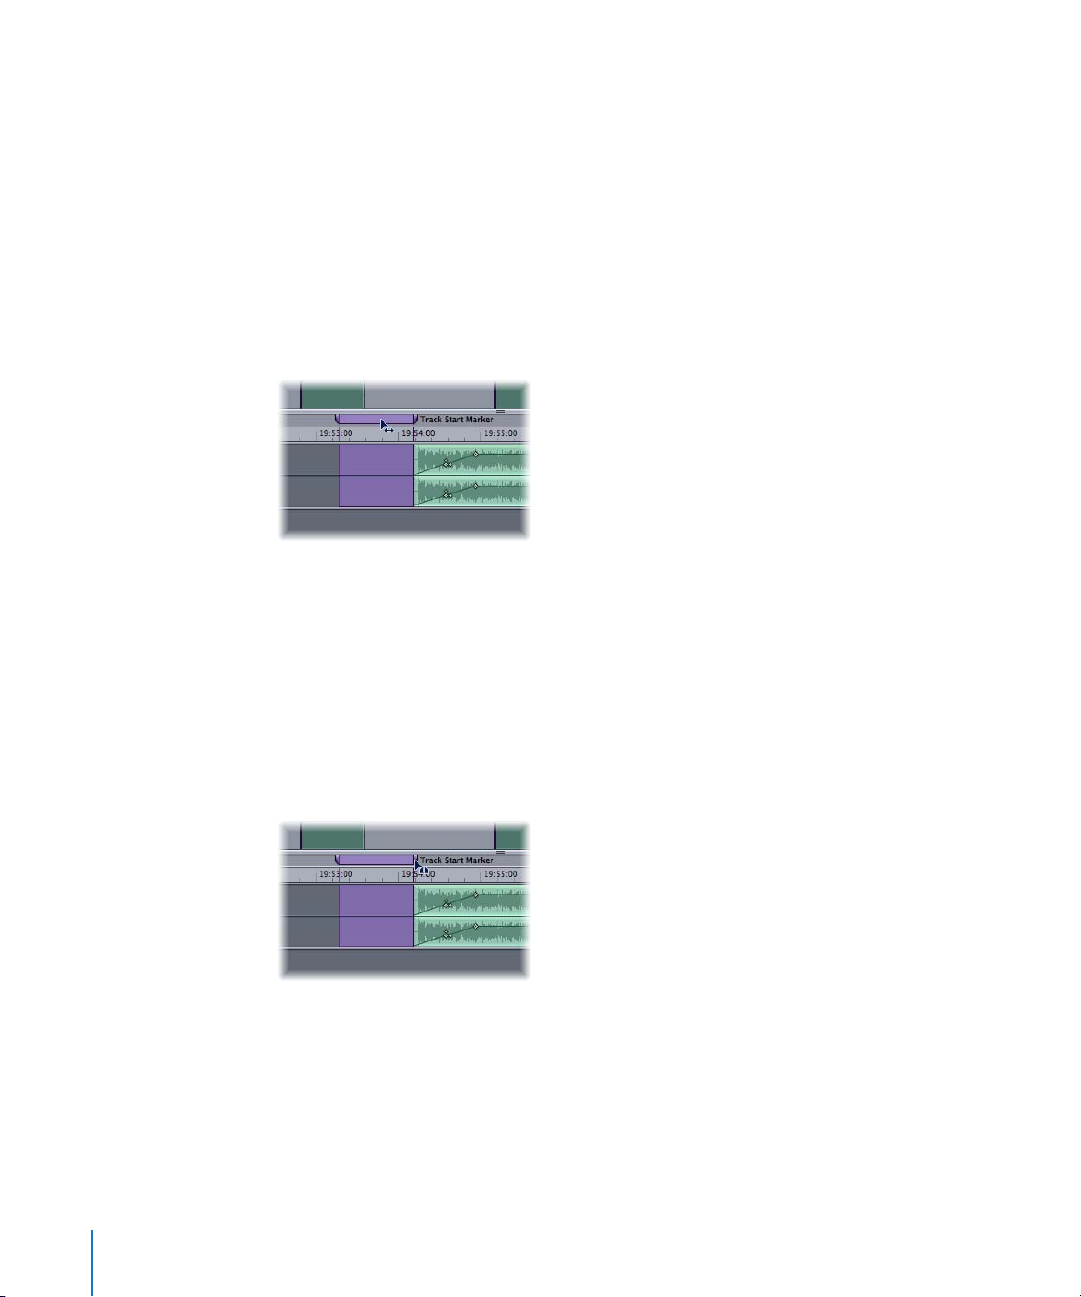
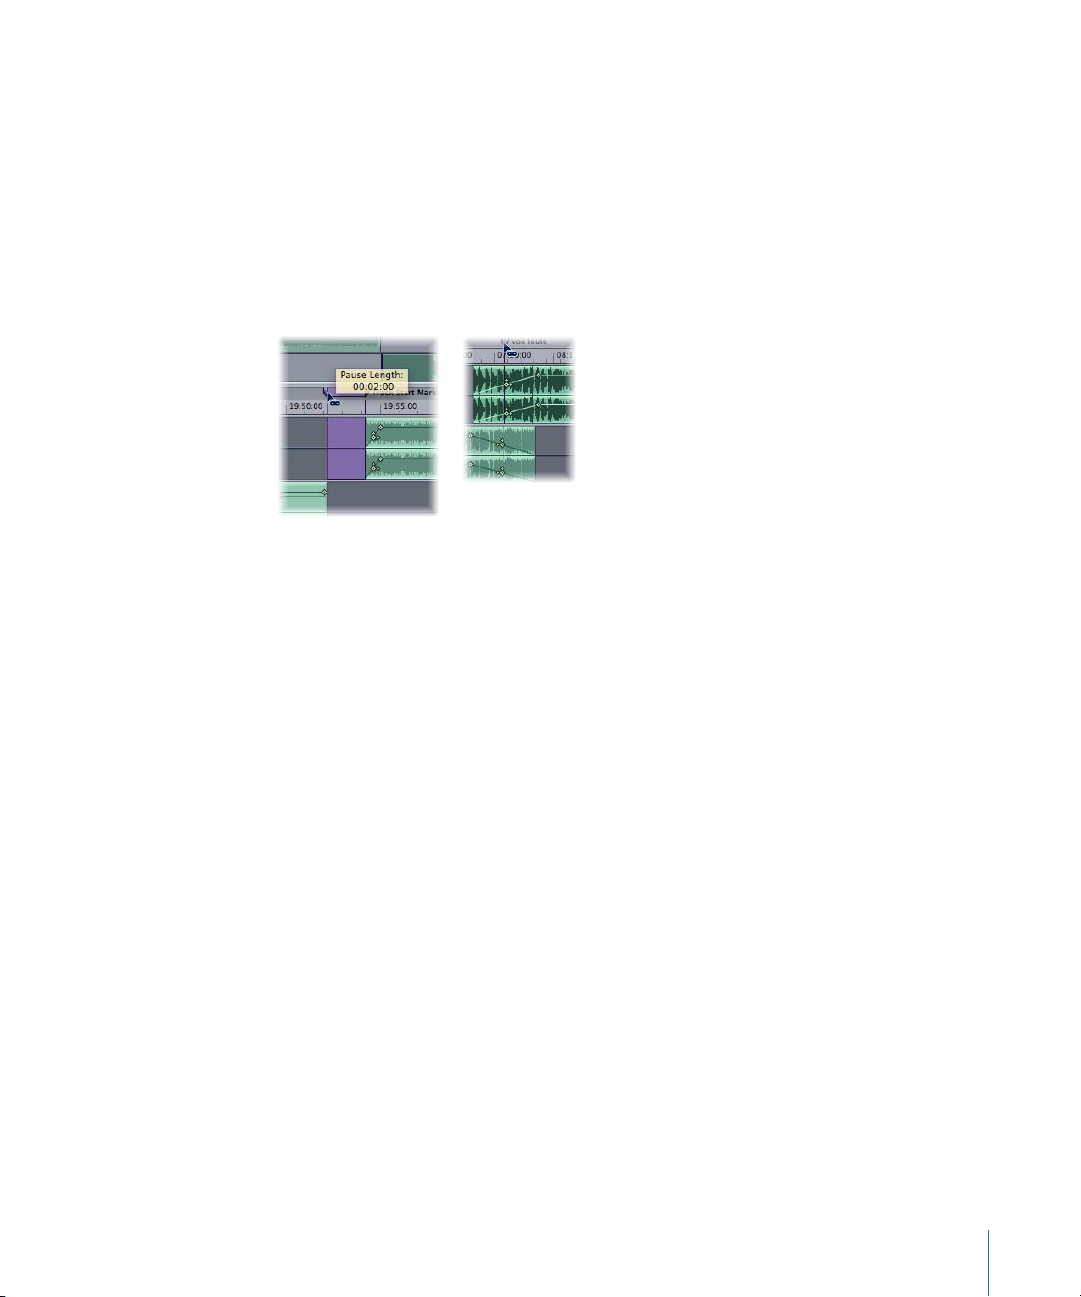
Moving Markers
You can move track start and index markers in the Wave View area. The track start
marker and pause start point can be moved together, or separately.
Moving the Track Start Marker and Pause Start Point Together
You can simultaneously move the track start marker and pause start point—to change
the track start time, while preserving the pause length.
To move both track start marker and pause start point:
1 Place the pointer between the pause start point and the track start mark.
The pointer changes to a left-right arrow.
2 Drag the markers to the desired position.
Moving the Track Start Marker and Pause Start Point Separately
You can move the track start marker and pause start point separately, thereby
changing the pause length in the process.
To move a track start and pause start point separately:
1 Place the pointer directly over the portion of the track marker that you want to move.
The pointer changes to a split track marker symbol.
2 Drag the marker portion—either track or pause—to the desired position.
Note: As long as there is no pause set (in other words, the track marker is still in one
piece), moving the right portion of the marker will move both. In this situation, move
the left portion to the left; this will split the track marker and create a pause. Following
this split of the track marker, either portion can be moved separately.
46 Chapter 5 Working With Markers
Page 47
Automatic Positioning of Track Start Markers
Track start markers are repositioned automatically when regions are moved: In
overlapping regions, these are located at the center of the overlapping sequence. In
non-overlapping regions, a pause start is located at the end of the first region, and a
track start at the beginning of the second region.
If you manually change the marker positions, the automatic function is switched off.
If you have edited a track start marker manually, and want to move it to the automatic
position, release it as soon as a “chain” icon appears in place of the mouse cursor.
If you want to move a track start marker near to the chain position, but don’t want it to
be positioned automatically, press and hold Option.
Chapter 5 Working With Markers 47
Page 48

Page 49

6 Working With Effects
6
You can add effects to individual regions or to the overall
project mix. Effects let you modify and shape the sound of
regions or projects in a variety of ways.
You add effects to your project with plug-ins. WaveBurner includes a complete set of
professional-quality effect plug-ins that can be used to master a CD. You can also add
Audio Unit format effect plug-ins, including those developed by third-party vendors.
You can freely adjust the parameters of effect plug-ins to attain the precise sound
you’re after.
Effects Plug-ins Included With WaveBurner
WaveBurner includes a full suite of effects for use in your projects. The effects bundled
with WaveBurner include:
 Amp Modeling: Bass Amp, Guitar Amp Pro
 Delay effects: Delay Designer, Sample Delay, Stereo Delay, Tape Delay
 Distortion effects: Bitcrusher, Clip Distortion, Distortion, Distortion II, Overdrive, Phase
Distortion
 Dynamics: Adaptive Limiter, Compressor, DeEsser, Enveloper, Expander, Limiter,
Multipressor, Noise Gate, Silver Compressor, Silver Gate
 Equalization: Channel EQ, DJ EQ, Fat EQ, High Cut, High Pass Filter, High Shelving,
Linear Phase EQ, Low Cut, Low Pass Filter, Low Shelving, Match EQ, Parametric EQ,
Silver EQ
 Filter: AutoFilter, EVOC 20 Filterbank, Fuzz-Wah, Spectral Gate
 Imaging: Direction Mixer, Stereo Spread
 Metering: BPM Counter, Correlation Meter, Level Meter, Multimeter, and Tuner
 Modulation: Chorus, Ensemble, Flanger, Microphaser, Modulation Delay, Phaser,
RingShifter, Rotor Cabinet, Scanner Vibrato, Spreader, Tremolo
 Pitch: Pitch Correction, Pitch Shifter II, Vocal Transformer
 Reverb: AVerb, Enverb, GoldVerb, PlatinumVerb, SilverVerb, Space Designer
49
Page 50

 Specialized: Denoiser, Exciter, Speech Enhancer, SubBass
 Utility: Gain
Please see the Logic Studio Instruments and Effects manual for a full description of each
effect.
Using Audio Units Effects Plug-ins
In addition to the included effects plug-ins, you can add plug-ins in the Audio Units
format. Audio Units plug-ins are available from Apple and third-party manufacturers.
When adding third-party plug-ins to your computer, be sure to read the documentation
including any Read Me and installation files that came with the plug-in.
Apple Audio Unit plug-ins appear in the Apple submenu of the Add Plug-In pop-up
menu. Third-party Audio Unit plug-ins appear in submenus featuring the
manufacturer’s name in the Add Plug-In pop-up menu.
You add Audio Unit plug-ins in the same way as the included effects, by choosing the
plug-in from the appropriate submenu of the Add Plug-In menu. You adjust Audio Unit
plug-in parameters, view plug-in windows, and delete plug-ins just as you would with
the included plug-ins.
Using the Audio Units Manager
WaveBurner uses the Apple AU Validation Tool to ensure that only plug-ins which fully
comply with the Audio Unit specification are used. This minimizes problems that may
be caused by third-party Audio Unit plug-ins when running WaveBurner.
,
The validation process takes place automatically when:
 WaveBurner is first opened.
 WaveBurner is updated.
 You install new Audio Unit plug-ins, or update existing ones.
You can see the results of the scan in the Audio Units Manager.
To open the Audio Units Manager:
m Choose WaveBurner > Audio Units Manager.
The results of the test are shown in the Compatibility column. Audio Unit plug-ins that
“failed” the validation test, can be enabled—but be aware that these plug-ins can
cause problems. Use of plug-ins that have failed the validation can negatively affect the
test results of subsequently scanned plug-ins, can cause WaveBurner to quit
unexpectedly, or even lead to data loss (destroyed project files).
It is strongly recommended that you check the manufacturer’s website for updated
versions of Audio Unit plug-ins which fail validation.
50 Chapter 6 Working With Effects
Page 51

The Audio Units Manager also allows you to disable Audio Units plug-ins that you don’t
want to use in WaveBurner, even if they pass validation. Simply uncheck the
corresponding checkbox in the Use column to disable any plug-in. You can store your
choice of Audio Unit plug-ins by clicking OK.
Click the Reset & Rescan All button to run another validation test, after installing plugins/updaters or moving components in the Finder, while WaveBurner or the Audio
Units Manager are open.
Note: If you press Control-Shift while launching WaveBurner, AU Safe Mode is
used: Only plug-ins that pass the validation test will be available; manually activated
plug-ins that failed the validation test will not be available.
Adding and Deleting Plug-ins
You add plug-ins to selected regions in the Region Plug-Ins list, and add plug-ins to the
overall project in the Mix Plug-Ins list.
To add a plug-in to a region:
1 Click the Region Plug-Ins tab to show the Region Plug-Ins list.
2 In the Region list, click the target region that you want to add the plug-in to.
3 Choose the category of plug-in you want to add from the Add Plug-In pop-up menu,
then choose the plug-in from the submenu.
The plug-in appears in the Region Plug-Ins list, below any plug-ins already added to
the region.
To add a plug-in to the overall project:
1 Click the Mix Plug-Ins tab to show the Mix Plug-Ins list.
2 Choose the category of plug-in you want to add from the Add Plug-In pop-up menu,
then choose the plug-in from the submenu.
The plug-in appears in the Mix Plug-Ins list, below any plug-ins already added to the
project.
If you no longer want to use a plug-in, you can delete it from the list.
To delete a plug-in:
m Select the plug-in in either the Region Plug-Ins or Mix Plug-Ins list, then press the
Delete/Backspace key.
Note: Plug-ins can be copied by Option-click-dragging the name of the desired plug-in
to the bottom of the Plug-In list.
Chapter 6 Working With Effects 51
Page 52

Bypassing Plug-ins
You can bypass a plug-in in order to hear the region or project without the plug-in,
without losing the changes you’ve made to the plug-in’s parameters.
To bypass a plug-in:
m Click the checkbox to the right of the desired row in the Plug-In list. Click the checkbox
again to hear the plug-in.
Adjusting Plug-in Parameters
Each plug-in contains a set of parameters which control the way the plug-in shapes the
sound. You can view and adjust a plug-in’s parameters in either the Plug-In list or the
plug-in window.
To access plug-in parameters in the Plug-In list:
m Click the triangle to the left of the plug-in name in the Plug-In list. This will expose all
plug-in parameter settings. Individual parameter values can be altered by clickdragging on the value shown in the Setting column.
Note: You may load existing plug-in settings by clicking on the name shown in the first
Setting column of a plug-in. This will open a pop-up menu, allowing you to load and
save plug-in settings.
To access plug-in parameters in the plug-in window:
m Double-click the name of the plug-in in the Plug-In list.
The plug-in window will open. You can adjust plug-in parameters by moving the sliders
or knobs, typing in the fields, or clicking the buttons.
The arrow menu to the right of the Plug-In list window enables you to quickly open or
close all plug-in windows.
Note: Any changes made to plug-in parameter values in either the plug-in window or
the parameter list (shown in the Setting column) are reflected in the other.
52 Chapter 6 Working With Effects
Page 53

Changing the Plug-in Order
Changing the order of plug-ins can radically change the sound of the region or mix
being processed. Feeding a region through a reverb → chorus → delay chain delivers
very different tonal results to feeding the same region through a delay → chorus →
reverb, even when identical settings are used for all three effects. This difference in tone
is due to particular frequencies in your region being emphasized/de-emphasized by
each effect, and then magnified or suppressed, by the ensuing processes.
To change the plug-in order in the Plug-In lists:
m Click-hold on the plug-in name, and drag it up or down to the desired position.
Using Plug-in Chains
You can save plug-in chains that you have set up in the Plug-In lists. You can also load
previously saved plug-in chains. Simply select the appropriate function from the PlugIn Chain menu, beside the Add Plug-In menu.
Using the Level Meter
You can monitor the audio output levels of your projects with the Level Meter. As a
project plays back, the levels in each stereo channel change constantly. The Level Meter
shows these changes as blue bars that run from left to right; the farther right, the
higher the level for that channel. Momentary peaks are shown as thin yellow bars in
each channel.
The bars in the Level Meter turn red past the 0 dB mark, acting as clipping indicators.
You can check your project for clipping.
To check a project for clipping:
m Choose Disc > Check Disc for Clipping.
Chapter 6 Working With Effects 53
Page 54

Page 55

7 Burning a Project to a CD
7
When your project is complete, you can burn the project to a
CD.
The resulting audio CD conforms to Red Book standard and can be played on any
audio CD player.
Getting Ready to Burn a CD
Before burning your project to a CD, there are several things you should do to prepare:
 Check that the CD burner is connected, turned on, and working.
 Check that WaveBurner recognizes the CD burner.
 Set Disc Options for the project.
 Preview the transitions between tracks.
Supported CD Burners
WaveBurner works with all CD burners supported by Mac OS X, including SuperDrives
and external third-party CD burners.
Setting Disc Options
You can set many disc options for a project, including the following:
 Adding a UPC/EAN code
 Setting offsets for start points, end points, and indexes
 Setting the default pause length
 Adding a period of silence at the end of the CD
 Adding CD TEXT information, including title, performer, songwriter, composer, and
arranger information, and a text message
55
Page 56

Adding a UPC/EAN Code
Commercially produced CDs typically include a Universal Product Code (UPC) and a
European Article Number (EAN). These contain information about the record company
producing the CD, and may contain additional information.
To add a UPC/EAN code:
1 Choose Disc > Disc Options, then click the General tab if necessary.
2 Type the code in the UPC/EAN Code field.
3 When you are finished, click OK.
Setting Offsets
You can globally change the position of start point, end point, and index markers by
setting an offset. The value unit for offsets is one CDDA frame (1/75th of a second).
When you set an offset, the markers are moved immediately before the project is
burned to a CD, then moved back to their original positions after the CD is burned.
The purpose of offsets is to compensate for inaccurate timing in some CD players,
particularly older units.
The Disc Options window includes offset fields for the first start point, other start
points, end points, and index points, allowing you to offset any, or all, of these markers.
The first start point is a special case, because the Red Book standard stipulates that
there must be a two to three second pause before the first track begins. Typing a value
greater than 0 (zero) in the First Start Point field inserts a corresponding period of
silence before the first track. All subsequent tracks are shifted by the amount of time
required to maintain this period of silence. The overall length of the CD is increased by
the number of CDDA frames required to maintain the initial period of silence.
To set offsets:
1 Choose Disc > Disc Options, then click the General tab if necessary.
2 Type the offsets you want to set in the First Start Point, Other Start Points, Stop Points,
and Indexes fields. (in CDDA frames)
3 When you are finished, click OK.
Saving Mastering Notes
You can add mastering information notes for your project in WaveBurner, in case you
need to refer to it later. You can save details on the session, the client, the plug-ins and
dithering used, and information about each track.
 Session Info includes the Session ID, date and time, company, studio, engineer,
source media, bit depth, and sample rate.
 Client Info includes the disc title, client, artist, producer, and copyright.
 Comments allows you to add notes and information about a session.
56 Chapter 7 Burning a Project to a CD
Page 57

To add mastering information to a project:
1 Choose Disc > Mastering Notes to show the Mastering Notes window.
2 Click the Session or Client tab, as applicable.
3 Type the desired information in the appropriate field.
4 Click Apply.
Previewing Transitions
Before burning a CD, it’s advisable to preview transitions—to ensure that everything is
as you want it.
To preview all track transitions:
1 Open the Preview tab of the Preferences window and set the number of seconds to be
played at the beginning (Pre-Roll) and end (Post-Roll) of a title.
2 Select Disc > Preview Disc. The beginnings and ends of all tracks on the CD will be
played.
Note: Disc > Preview Track allows you to preview the beginning and end of a track
chosen in the Track list.
Burning the CD
After completing the steps outlined in “Getting Ready to Burn a CD” on page 55, you
are ready to burn the project to a CD.
To burn a project to a CD, do the following:
1 Choose File > Burn.
The Burn dialog appears, with the name of the CD burner listed in the dialog. If you
have not previously inserted a blank CD-R in the tray of the CD burner, the Burn dialog
prompts you to insert a blank CD-R.
2 Insert a blank CD-R in the CD burner tray, if you have not already done so.
Note: The CD-R must be blank. WaveBurner does not support burning to a CD-R disc
that contains other CDDA sessions, as this would not comply with the Red Book
standard.
3 In the Burn dialog, click Burn.
The Burn dialog displays the progress of the burn process. When the burn process is
complete, the CD is ejected.
Chapter 7 Burning a Project to a CD 57
Page 58

Page 59

8 Setting WaveBurner Preferences
8
You can set preferences for various aspects of WaveBurner in
the Preferences window.
Some preferences apply to the current project, and others apply when you create a
new project. You may want to set several preferences before working on projects.
To open the Preferences window:
m Choose WaveBurner > Preferences (or press Command-comma).
General Preferences
 At Startup: Sets the default behavior when you open WaveBurner. You can choose
Create New Document (which creates a new, blank project), Open Document (which
displays an Open dialog), Open Last Document (opens the document you were
working on when WaveBurner was last closed), or Do Nothing.
 Default Pause Length: Sets the default pause length which is inserted when you add a
region. Changing the Default Pause Length does not affect the currently open
document(s). It only applies to documents opened after setting a new value.
 Zoom To Position Line: When turned on, the position line remains centered in the
Wave View area when zooming.
 Set Time Format Globally: When active, changing the time format in the Region list,
Track list or Wave View area will change the format in all other views.
59
Page 60
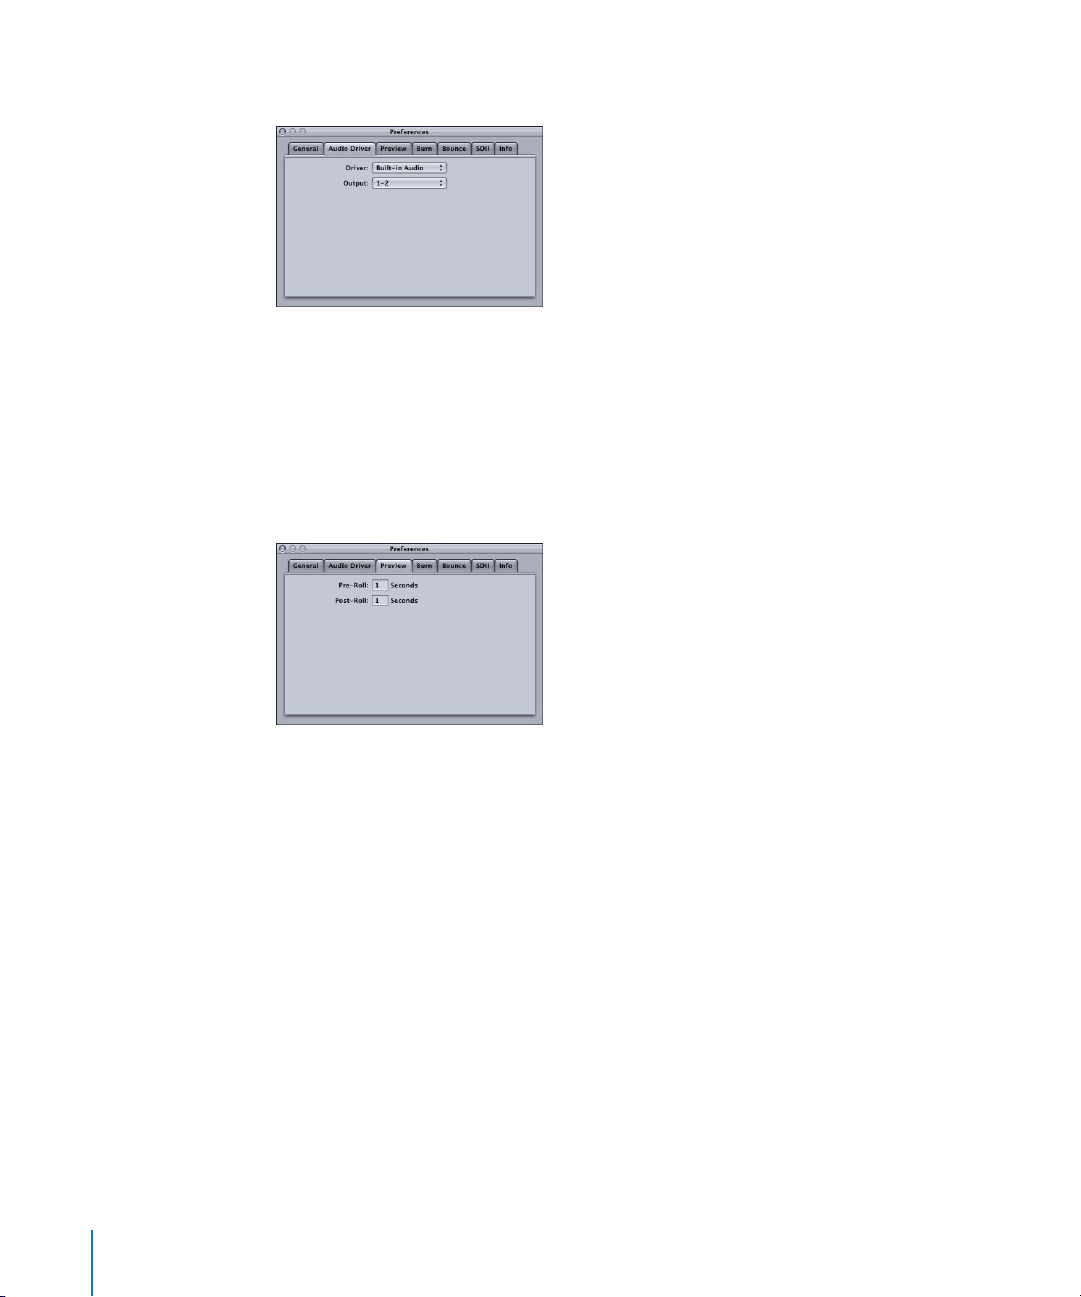
Audio Driver Preferences
 Driver: Choose the (output) audio device from the pop-up menu.
 Output: Choose the output channel, or channels, from the pop-up menu. The
number of channels available depends on the device selected in the Driver pop-up
menu.
Preview Preferences
If the preview function is active (Disc > Preview Disc or Preview Track) WaveBurner
plays a short audio segment surrounding each track marker—in consecutive order.
 Pre-Roll: Playback time (in seconds) that precede a track pause marker (playback of
the last x seconds of the preceding track).
 Post-Roll: Playback time (in seconds) that follow a track start marker (playback of the
first x seconds of the following track).
60 Chapter 8 Setting WaveBurner Preferences
Page 61
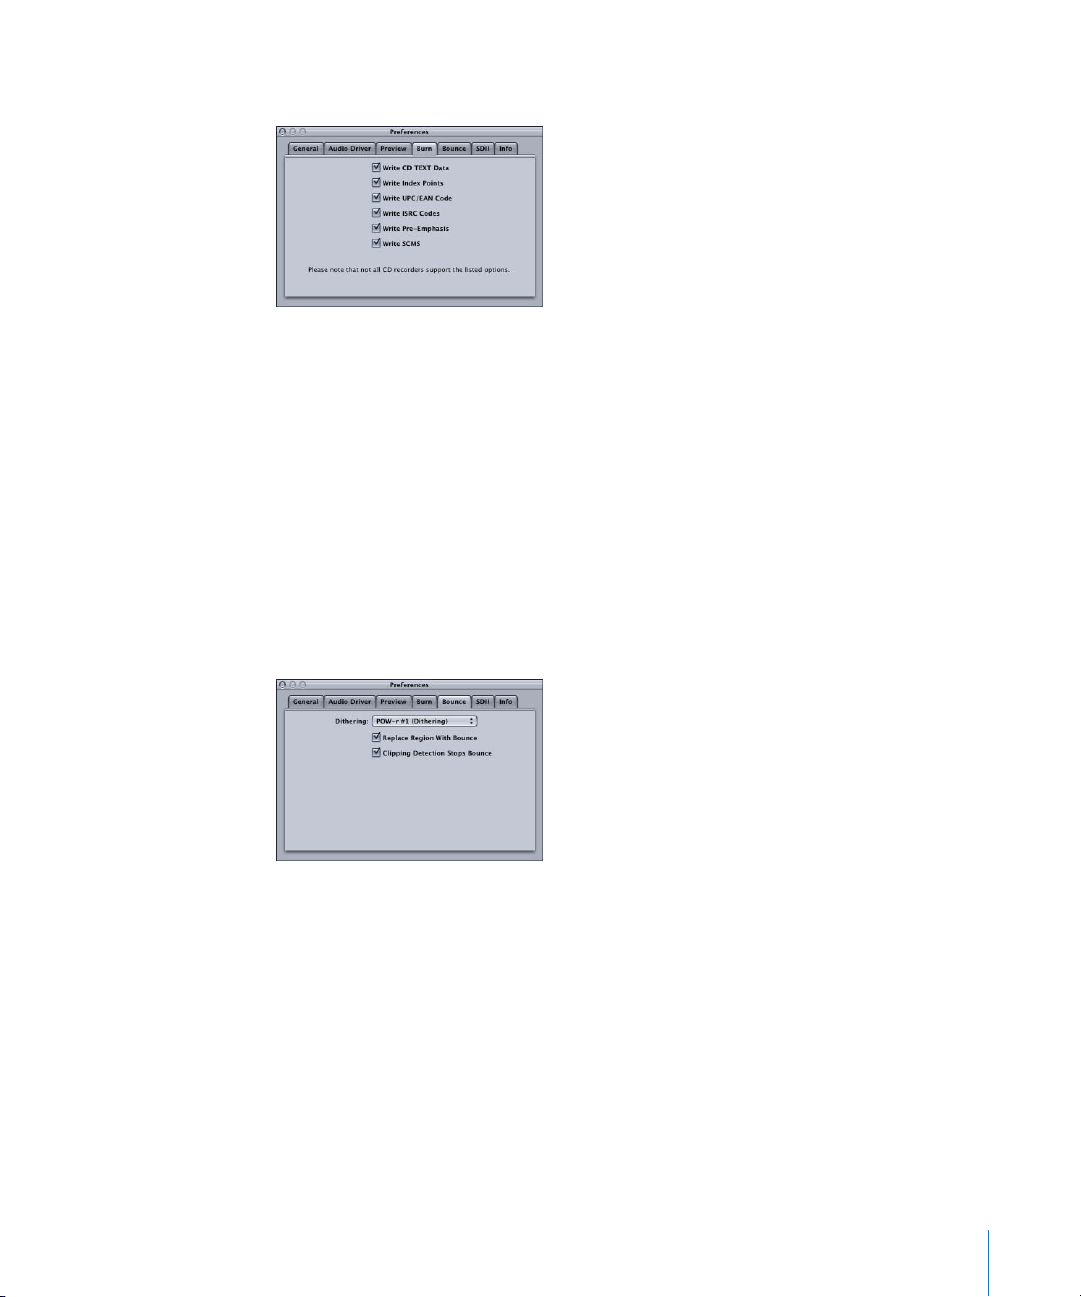
Burn Preferences
 Write CD TEXT Data: Turn on to include CD TEXT on the CD.
 Write Index Points: Turn on to include index point information on the CD.
 Write UPC/EAN Code: Turn on to include UPC/EAN code on the CD.
 Write ISRC Codes: Turn on to include ISRC codes on the CD.
 Write Pre-Emphasis: Turn on to include pre-emphasis flags on the CD.
 Write SCMS: Turn on to include SCMS on the CD.
Note: CD TEXT can only be written to your disk if your CD burner supports CD TEXT.
Only CD TEXT compatible CD players will display CD Text.
Bounce Preferences
 Dithering: This pop-up menu allows you to choose the type of dithering that is
applied when the project is bounced or burned. The choices are: POW-r #1
(Dithering), POW-r #2 (Noise Shaping), POW-r #3 (Noise Shaping) and No Dithering.
For information about when to use dithering, and the differences between the
dithering types, see the Logic Pro 8 User Manual.
 Replace Region with Bounce: When turned on, the new audio file created by choosing
Region > Bounce Region replaces the original region (this does not work if the
original file is in stereo and the bounced audio file is in mono—as information would
be lost when the stereo file was replaced by the mono file).
 Clipping Detection Stops Bounce: When turned on, the bounce process is stopped
when clipping is detected—in the region or project being bounced.
Chapter 8 Setting WaveBurner Preferences 61
Page 62

SDII Preferences
WaveBurner can import files and regions in SDII (Sound Designer II) format. The SDII
preferences determine how WaveBurner handles the import.
 Add SDII Regions As WaveBurner Regions: If turned off, an SDII file will be imported as
a single WaveBurner region. Switch on to add multiple SDII regions to WaveBurner. If
the SDII file does not contain region definitions, a dialog will ask if you want to add
the whole file as one region.
 Adopt Pause Lengths from SDII Regions: Turn on to use the pause lengths of the
(original file’s) SDII regions for your CD.
 Import SDII Markers As: You can choose to use SDII markers as either index markers or
track start markers.
 Show SDII Import Dialog: If you enable this option, the SDII Import dialog appears
every time you import an SDII region, allowing you to change the SDII import
preferences. If the Show SDII Import Dialog preference is disabled, the import dialog
does not appear. The files are imported as specified by the preferences. Enabling the
Don’t Show Again option in the SDII Import dialog deactivates the Show SDII Import
Dialog preference.
Info Preferences
This preference tab allows you to set the types of CD Track information that should be
included in the mastering information. You can switch on/off the start time, track name,
track length, track stop, track pause, copy prohibit, pre-emphasis, ISRC code, track
comments, and index points.
62 Chapter 8 Setting WaveBurner Preferences
Page 63
WaveBurner Keyboard Shortcuts
File Commands
Function Keyboard shortcut
New Command-N
Open Command-O
Close Command-W
Save Command-S
Save As Command-Shift-S
Import Audio File Command-F
Burn Disc Command-B
Editing Commands
Appendix
Function Keyboard shortcut
Undo Command-Z
Redo Command-Shift-Z
Cut Command-X
Copy Command-C
Paste Command-V
Select All Command-A
Disc Operations
Function Keyboard shortcut
Preview Disc Command-D
Preview Track Command-K
CD Track Info Command-T
Index Point Info Command-I
Eject Disc Command-E
63
Page 64

Region Commands
Function Keyboard shortcut
Region Info Command-R
View Commands
Function Keyboard shortcut
Zoom In Down Arrow
Zoom Out Up Arrow
Maximum Zoom Out Option–Down Arrow
Maximum Zoom In Option–Up Arrow
Transport Operations
Function Keyboard shortcut
Start/Stop Playback Space bar, Enter
Return to the Disc Start Return
Go to Next Track Start Right Arrow
Go to Previous Track Start Left Arrow
Go to Next Index Marker Option–Right Arrow
Go to Previous Index Marker Option–Left Arrow
Go to Next Region Option–Shift–Right Arrow
Go to Previous Region Option–Shift–Left Arrow
64 Appendix WaveBurner Keyboard Shortcuts
Page 65

Wave View Area Commands
Function Keyboard shortcut
Toggle between Scissor and Pointer tool Command when mouse pointer is over region
Toggle between Track and Index Marker
pointer
Insert track start marker at position line T
Insert index marker at position line I
Go to next marker Option–Right Arrow
Go to previous marker Option–Left Arrow
Move track start without moving pause
start mark when track marker is closed
Trim region end without the subsequent
regions following
Trim Region Start without the subsequent
regions following
Command when mouse pointer is over marker bar
Command-drag track start mark to the right
Option-drag region end
Option-drag region start
Window Commands
Function Keyboard shortcut
Minimize Command-M
Open Level Meter Command-L
Help Commands
Function Keyboard shortcut
WaveBurner Help Command-? (question mark)
Appendix WaveBurner Keyboard Shortcuts 65
 Loading...