

Page 1

Macintosh
User’s Guide
Congratulations on your adoption of i-clicker, the easiest-to-use classroom
response system available! The following guide will enable you to quickly start
using i-clicker’s fundamental applications, as well as options to use some of the
more advanced software tools.
Want to learn more about i-clicker software through live training? Visit us at
http://iclicker.webex.com to sign up for a training session, where we review the
software in its entirety. Or email us at sales@iclicker.com to schedule a session.
Have a specific technical question and need help? Email us at
support@iclicker.com or call us (toll free) at 866-209-5698.
Based on user feedback and reviews, we have made a number of changes to i>clicker and
i>grader that are designed to make your experience more robust and more intuitive.
The software upgrade:
• Is not required. If you prefer to use the classic/original software, you can find that
software still on the web site.
• Impacts both the PC and Macintosh
• Is heavily focused on user interface and course management support
• Won’t affect the data in the MyCourse folders
We’ve highlighted and included all of the upgrade features in this User Guide. You may
also consult the “Software Upgrade Conversion Guide” (on our web site and on the flash
drive) for more information.
1
Questions? Contact us at support@iclicker.com or call toll-free at 1-866-209-5698.
Page 2

i>clicker User Guide (Macintosh Application)
(08/08)
Table of Contents
Section One – Using I>Clicker: How To Poll Your Students In Class ........................................ 5
• Setting Up Your Course Folders ……………………………………………………………..5
• Displaying a graph (or histogram) of responses ............................................................ 7
• Keynote Tips .................................................................................................................. 7
• Comparing two graphs ................................................................................................... 8
• Designating the correct answer in the graph ................................................................. 9
• New Floating Menu Bar options.................................................................................... 10
• Asking a Question on the Fly........................................................................................ 10
Section Two – Registering Your Students: How To Give Your Students Credit ........................12
• Settings and Preferences: Determining Your Roster File Format .................................12
• The Roster.txt file ......................................................................................................... 13
• Registration Troubleshooting Tips………………………………………………………… 13
• Registering students:
o In Class (or “Roll Call”) Registration .......................................................... 14-15
o Web Registration ............................................................................................. 16
o In Class “Individual” Registration .................................................................... 16
Permanent registration ....................................................................... 17
Loaning a clicker..................................................................................18
Section Three – Using i>grader After Class: Assigning Credit For Sessions And Questions .. 19
• Synchronizing Web Registrations ................................................................................ 20
o Managing un-registered students and remotes...........................................21-23
• i>grader functions
o Editing a student ............................................................................................. 24
o Setting Session Scores .............................................................................. 25-26
Participation/Attendance points ..........................................................26
Performance points ............................................................................ 26
Deleting a Question .............................................................................27
o Reporting
Run/Update Reports Feature ............................................................. 27
Term/Summary Session Review ................................................... 27-28
Student Voting Data ...................................................................... 29-30
o Exporting Grade Data
Exporting Selected Sessions ............................................................. 32
Export Term Summary ....................................................................... 33
Section Four – Assigning Preferences And Settings: Customizing –i-clicker and i-grader ...... 34
• General Settings/Preferences
o Enter Your Course Name ................................................................................ 35
o Setting a Frequency Code .............................................................................. 35
o Floating iclicker Bar Size ................................................................................. 36
o Designating an Instructors Remote ................................................................. 37
• Registration/Export
o Roll Call options............................................................................................... 38
2
Questions? Contact us at support@iclicker.com or call toll-free at 1-866-209-5698.
Page 3

o CMS (Course Management System) in Use ................................................... 38
o Web Registration...............................................................................................39
• Question and Polling Settings and Preferences
o Set Polling Timer ............................................................................................. 39
o Chart Display Options ..................................................................................... 40
o Voting Grid Results Grid ................................................................................. 40
o Voting Grid Display Options ............................................................................ 40
o Question Pop-up Default Option ..................................................................... 41
• Scoring Settings and Preferences
o Participation/Attendance ................................................................................. 42
Number of Participation/Attendance Points per session ....................42
Participation Requirement .................................................................. 42
o Performance .................................................................................................... 43
Number of Performance Points for each question ............................. 43
Additional points for correct answer ................................................... 43
Cap performance points ..................................................................... 43
Section Five – Resuming Your Last Session ............................................................................ 44
Section Six – Updating the i-clicker and i-grader software ....................................................... 45
• WebUpdate .................................................................................................................. 45
Section Seven – Pre-Assigning Question Titles and Correct Answers .................................... 46
• Creating a questionlist.csv file in Microsoft Excel ........................................................ 46
• Creating a questionlist.csv file in TextEdit ................................................................... 47
3
Questions? Contact us at support@iclicker.com or call toll-free at 1-866-209-5698.
Page 4
Section One-Using i>clicker: How to Poll Your Students in Class
1. Connect the i-clicker receiver (or base) to your computer through the USB port. The LCD screen on
the receiver will light up. If it doesn’t, be sure to plug the receiver directly into the computer (and not
through the keyboard or a non-powered USB hub). Your computer should tell you that it has
recognized new hardware and inform you when it is ready to use it (this takes a few seco nds).
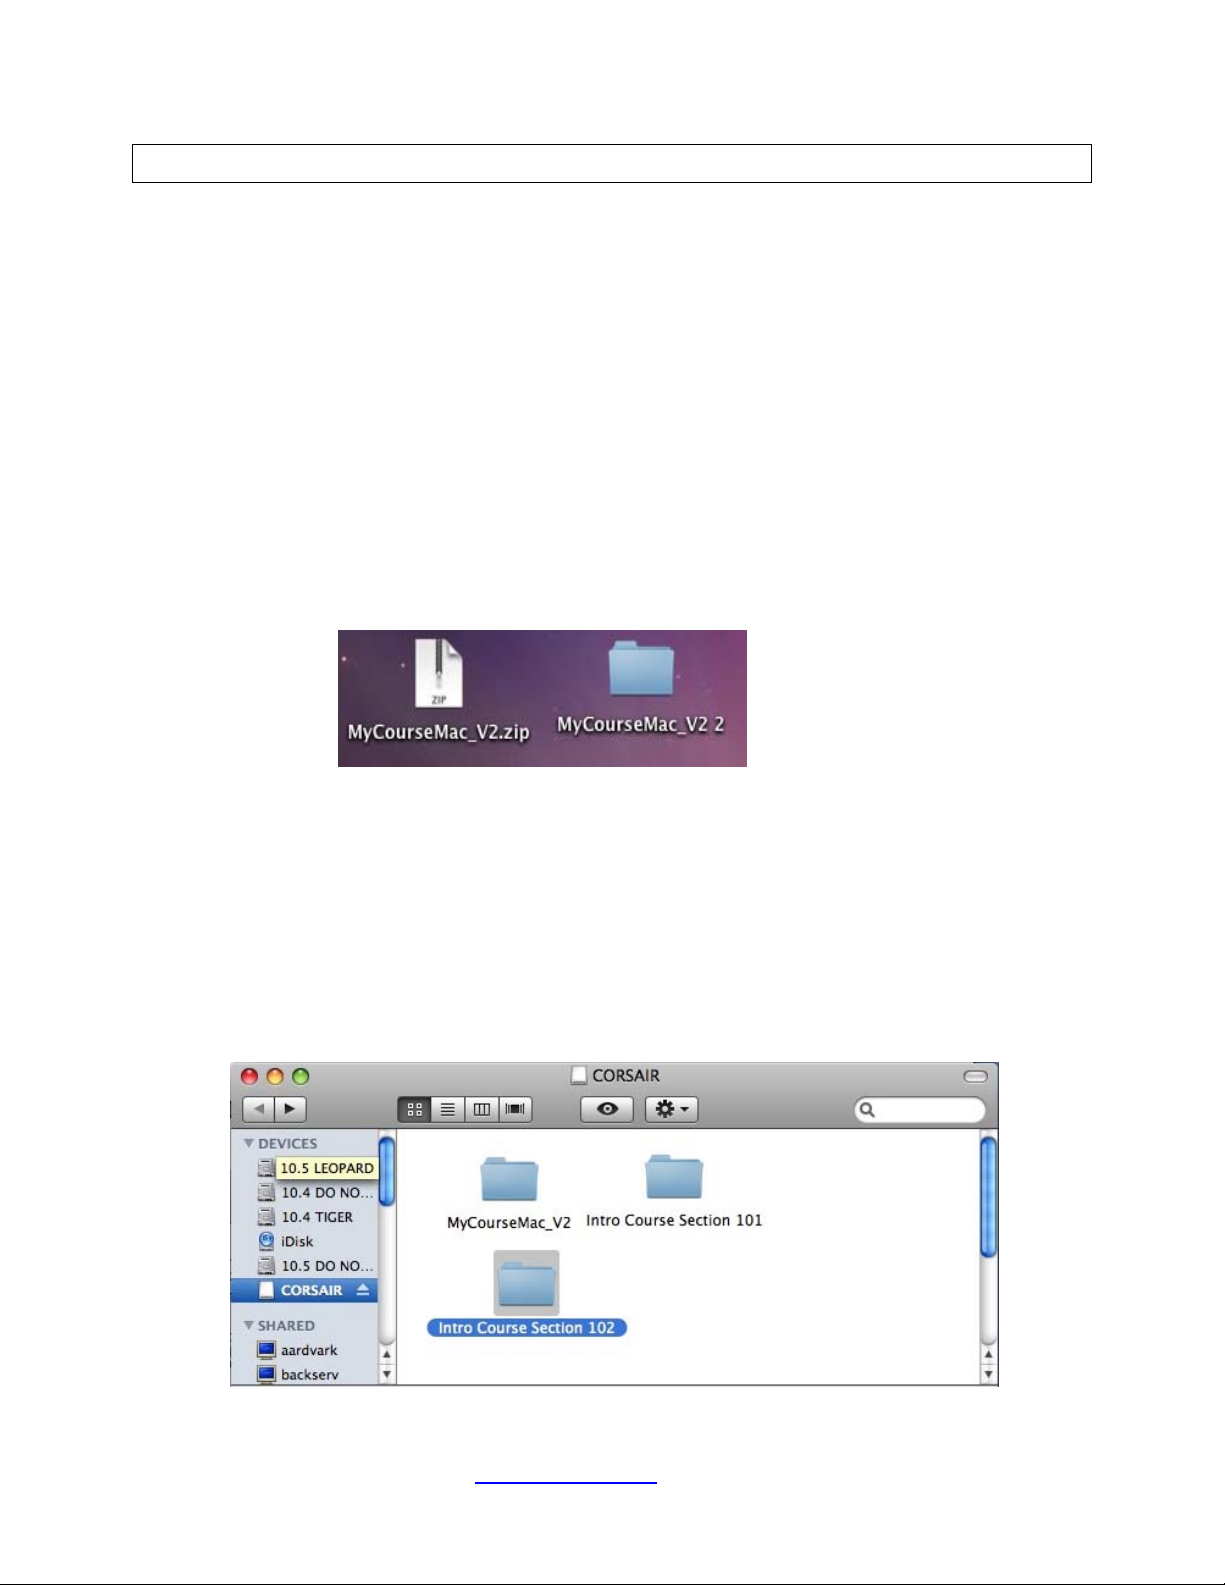
2. Place your i-clicker flash drive (a.k.a. memory stick or thumb drive) in the USB slot on the back of the
receiver. (Your flash drive should arrive with your shipment of the i-clicker receiver.)
3. Locate the flash drive on the Desktop, and double-click on it (often called SanDisk256). The flash
drive will contain folders called MyCoursePC and MyCourseMac. These folders contain course
templates and application software for PC and Mac users respectively.
Note: You can also download the software from the downloads section of the i-clicker web site. If
you use both Windows and Mac computers, you will need to download the zipped files MyCoursePC and
MyCourseMac from the Web site. To download the software, click the Mac Software link and save the file
to your hard drive in an easy-to-remember location. The files will be compressed, in an archive (.ZIP)
format. Double click the icon to un-archive the files. When this process is complete, the uncompressed
files will be displayed with a folder icon like the one shown below, on the right. This folder can be
dragged or copied to the flash drive or to the location where you will run the i-clicker program (see Step 5
and Tip below).
4. The “MyCourse” folders contain course templates and application software for PC and Mac users
respectively. You will need to make a copy of the MyCourseMac folder for each clas s or section for
which you are using i-clicker and rename each new folder with the name (or section) of the course.
Do not delete, rename, or modify the MyCoursePC or MyCourseMac folders – these are templates
that you will need when you create more courses.
5. To copy the folders, control-click on the MyCourseMac folder and select Duplicate (or highlight the
MyCourseMac folder, hold down the Apple key and press D). This will make a copy of the
MyCourseMac folder (“MyCourseMac Copy”). Rename the folder with your course/section name. If
you were teaching two sections of an Introductory Course, for example, your flash drive might look
like this:
4
Questions? Contact us at support@iclicker.com or call toll-free at 1-866-209-5698.
Page 5
Tip: i-clicker software can be copied to another computer (or computers) rather than residing only on
your flash drive. For example, many institutions are placing i-clicker on the college network drive (or H
drive) and a number of individual professors are placing the i-clicker software on their laptop computers.
The benefit of the flash drive is that the i-clicker software is fully portable; just insert the flash drive
into any computer to access your course folder. We suggest you store any files associated with your
lectures (your PowerPoint slides, for example) in the course folder on your flash drive – it’s a great
way to keep everything organized. However, you may copy the course folder to any location as long
as you have easy access to that location during your lectures. You must be able to access the
same i-clicker course folder from this location, each time you start polling in class, in order to
track your class’s voting data.
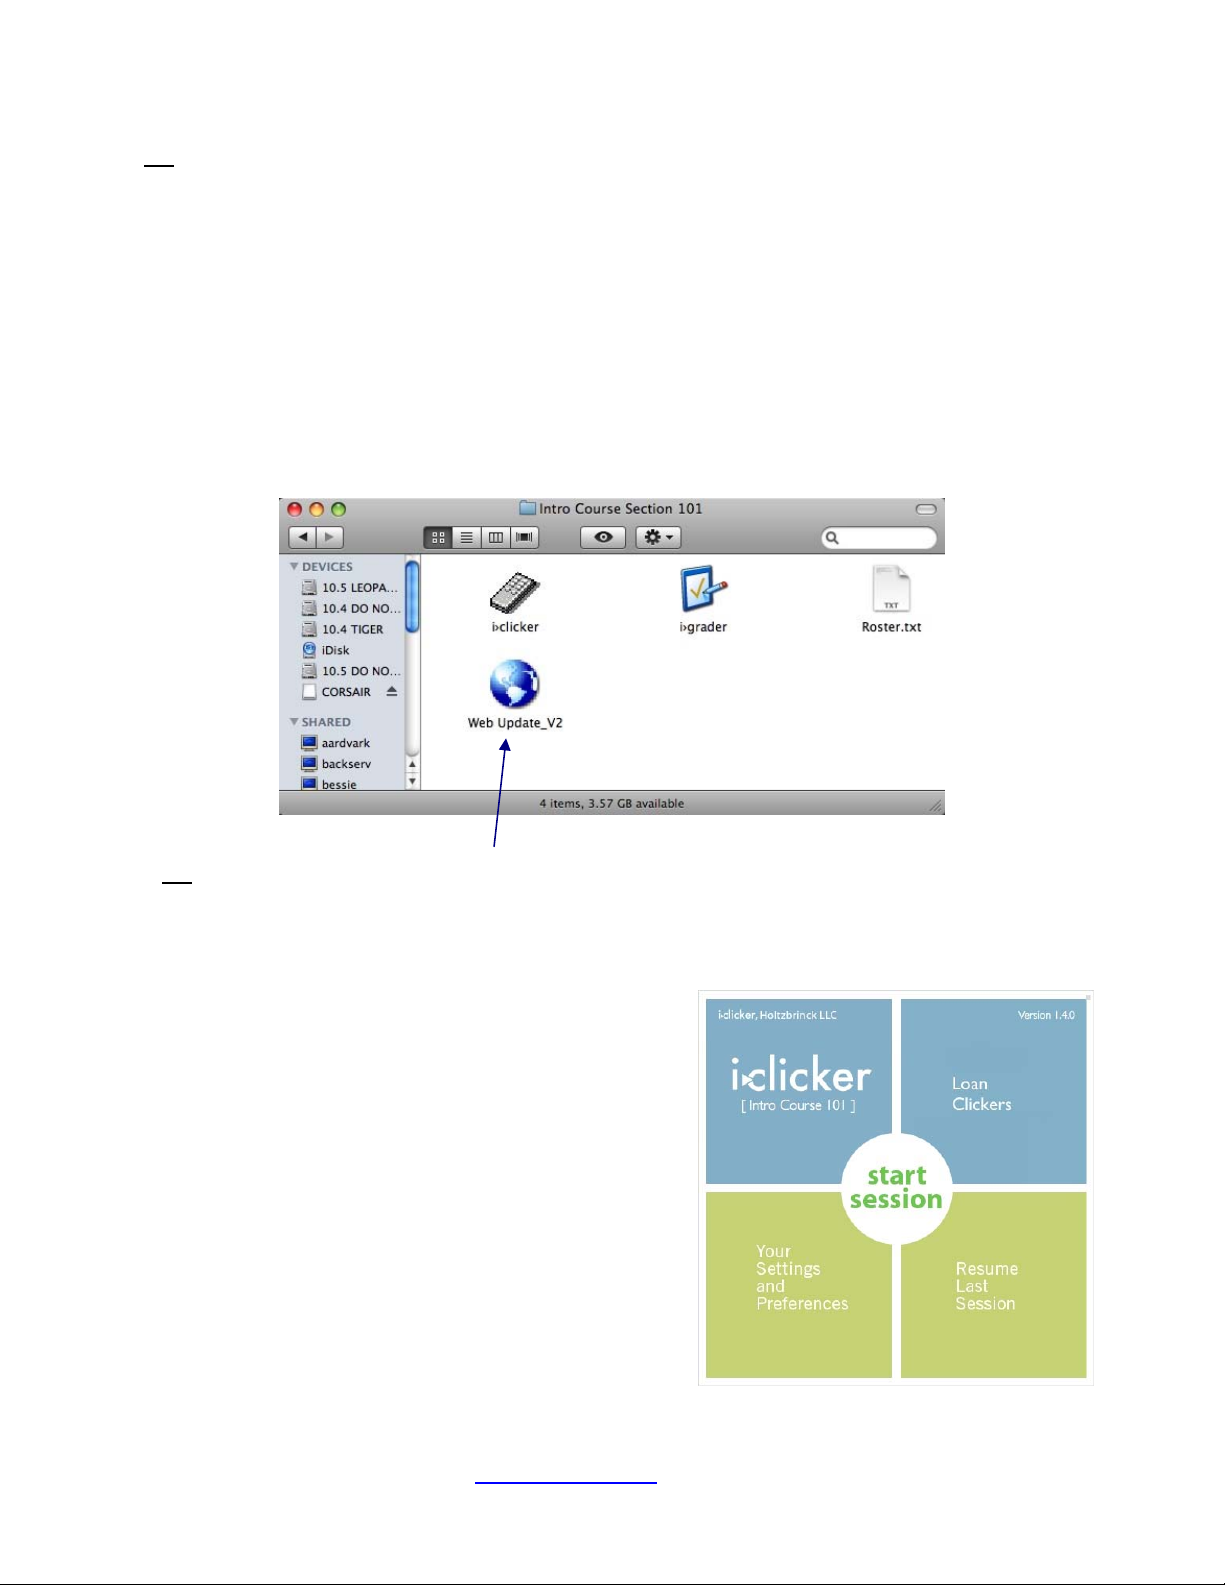
5. Double-click on the folder for the course/section in which you are about to use i-clicker and you will
see the following:
Tip: You can easily check for new updates to i-clicker and i-grader via the WebUpdate tool. These
updates will not override your current course data but will provide you with key functional
enhancements to the polling/grading software. We highly recommend you check for revisions and
updates to the software on a regular basis. For more about using WebUpdate, please see Section 6 on
page 45.
6. Double-click the i-clicker icon in your course folder to
start the i-clicker classroom application.
When you open the i-clicker application, you will see
the following Welcome Screen (though the version
number displayed at the top may be different).
New upgrade! i-clicker can now include your course
name (and section number, if you so choose) on the
opening welcome screen. You may title your course
through Settings and Preferences (see pages 34-35 for
detailed instructions). You may also manually loan i-
clicker remotes right from the welcome screen (before
launching the i-clicker program).
5
Questions? Contact us at support@iclicker.com or call toll-free at 1-866-209-5698.
Page 6

7. Click on Start Session in the center of the Welcome Screen. The Welcome Screen will disappear
and you will see the following floating menu bar appear in the top left corner of your computer
desktop. You can move the menu bar anywhere you choose on your desktop.
Start/Stop
Close
Polling
Minimize
Results Graph
New Options Tool Display/Hide
New upgrade! The overall menu bar is smaller and also has a minimize option. It has also been revised
and has three functions: start/stop, hide/display, and “options” (marked with an arrow so the toolbar is
smaller).
This floating menu bar indicates that i-clicker is active and running. It allows you to operate i-clicker
with your presentation application(s). For example, if you use PowerPoint, open a presentation and
select “View Slide Show.” Both your PowerPoint presentation and the i-clicker menu bar will be
activated (example below).
Tip:
A screen shot is captured each time you poll your students. These screen captures are saved and
are accessible from i-grader. If you select a presentation application and display each question at the
time you begin polling, your questions will be saved for review along with scoring and polling information.
The screen shot below shows i-clicker floating above a PowerPoint slide. It would similarly float above
any other application, such as Keynote, Word, Adobe, Mathematica, etc. If you are not worried about
capturing the question for later review and points assignment, then you don’t need to worry about
displaying the question on your screen.
6
Questions? Contact us at support@iclicker.com
or call toll-free at 1-866-209-5698.
Page 7
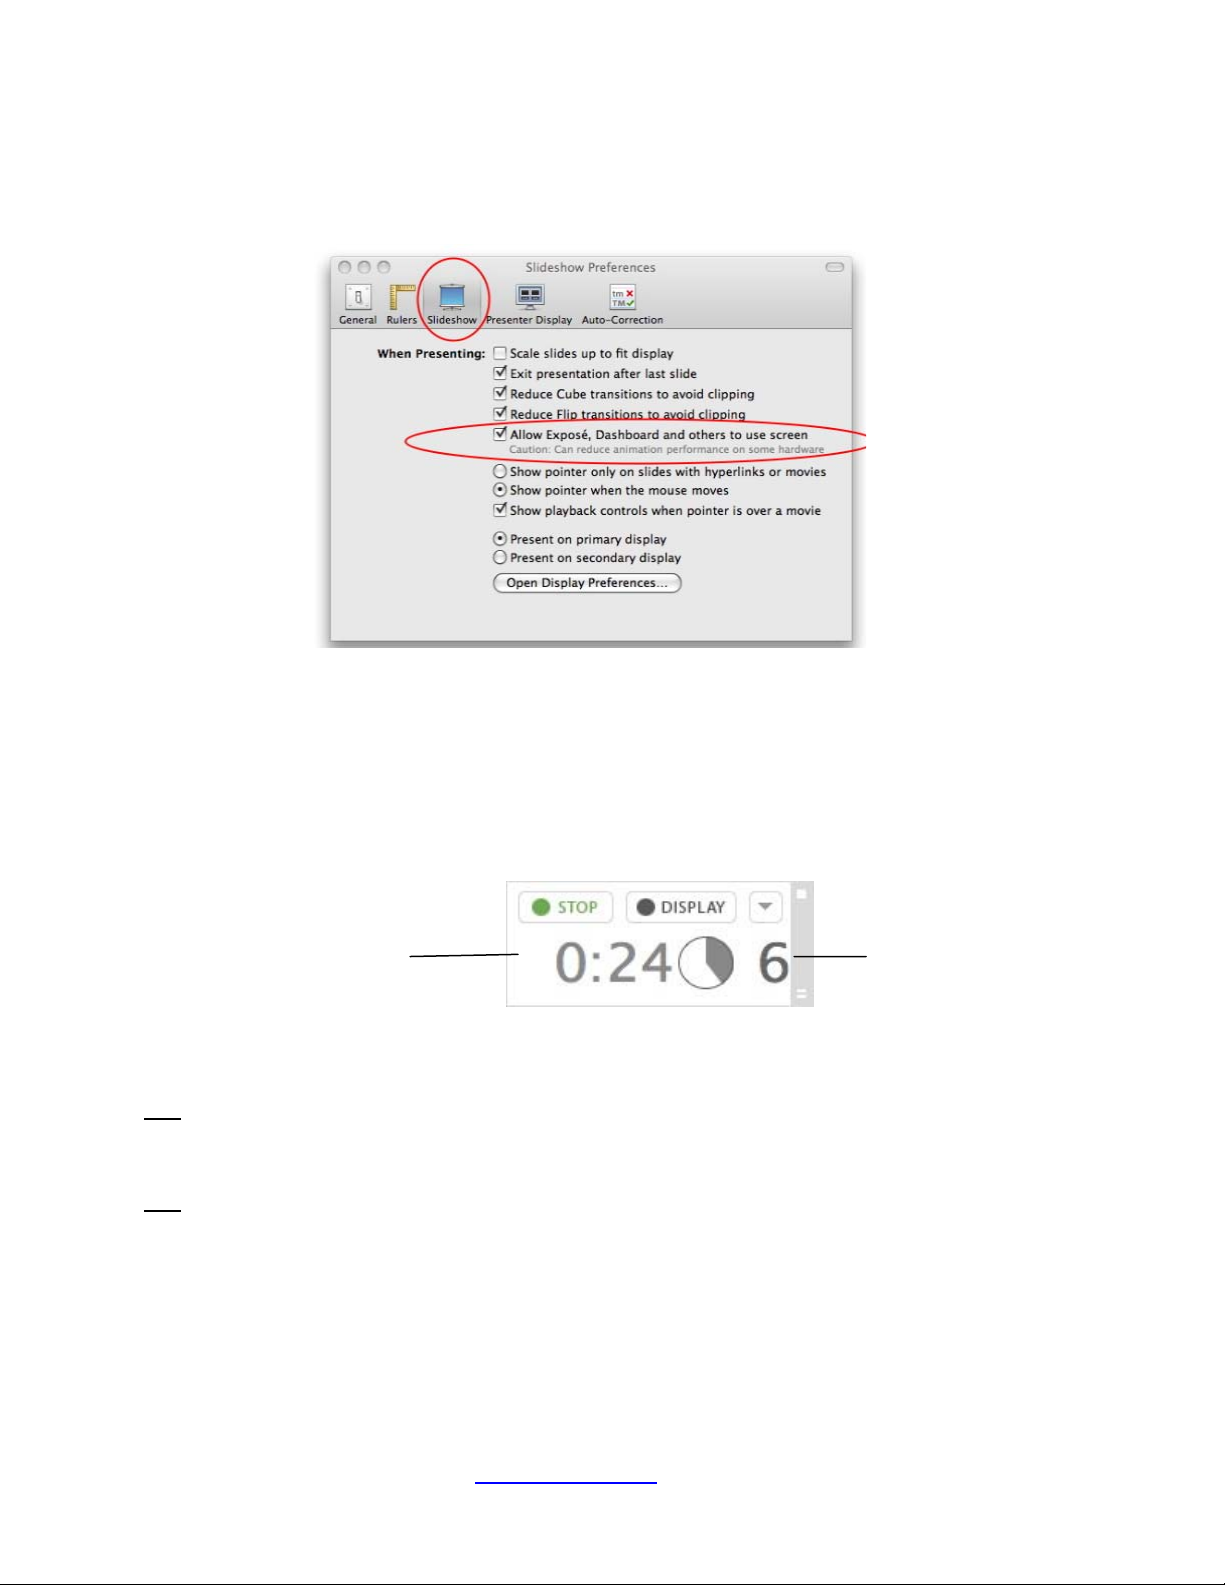
Tip for Keynote users: In order for the i-clicker menu bar to float over your presentation, be sure
Keynote is set to allow other programs to share the screen. In the Keynote Preferences menu, please
follow the below steps:
New upgrade! By default, the i-clicker floating menu bar appears in the top left hand corner of your
screen. However, if you move the bar, the system will now remember its placement and retain the new
location until you change it again—for the rest of the session and from session-to-session. This new
feature gives you more flexibility to organize and design your questions (or slides) so that the floating
menu bar never obstructs your question text or images.
8. Select the START button on the menu bar when you are ready to ask students to vote on a question.
On the left, a timer will
appear on the menu bar and
timing will start. This
indicates polling is now
active.
On the right, a counter will
display how many students
have voted thus far.
Tip: You can easily enable the major functions of i-clicker without having to stand near your computer by
using the instructor’s remote feature. This makes it easy to move around the room and lecture while still
using i-clicker. See page 37 for instructions on enabling this function.
Tip:
Students can turn on their i-clickers and vote any time while a question is active (i.e. as long as
you’ve selected Start to begin polling) by pressing the On/Off button on the remote. We recommend
students keep their remotes on during the lecture. (This is particularly important if a frequency other than
the default AA is in use. More details regarding this on page 34.) The remotes will automatically shut off
after 90 minutes of inactivity to save battery power.
7
Questions? Contact us at support@iclicker.com or call toll-free at 1-866-209-5698.
Page 8
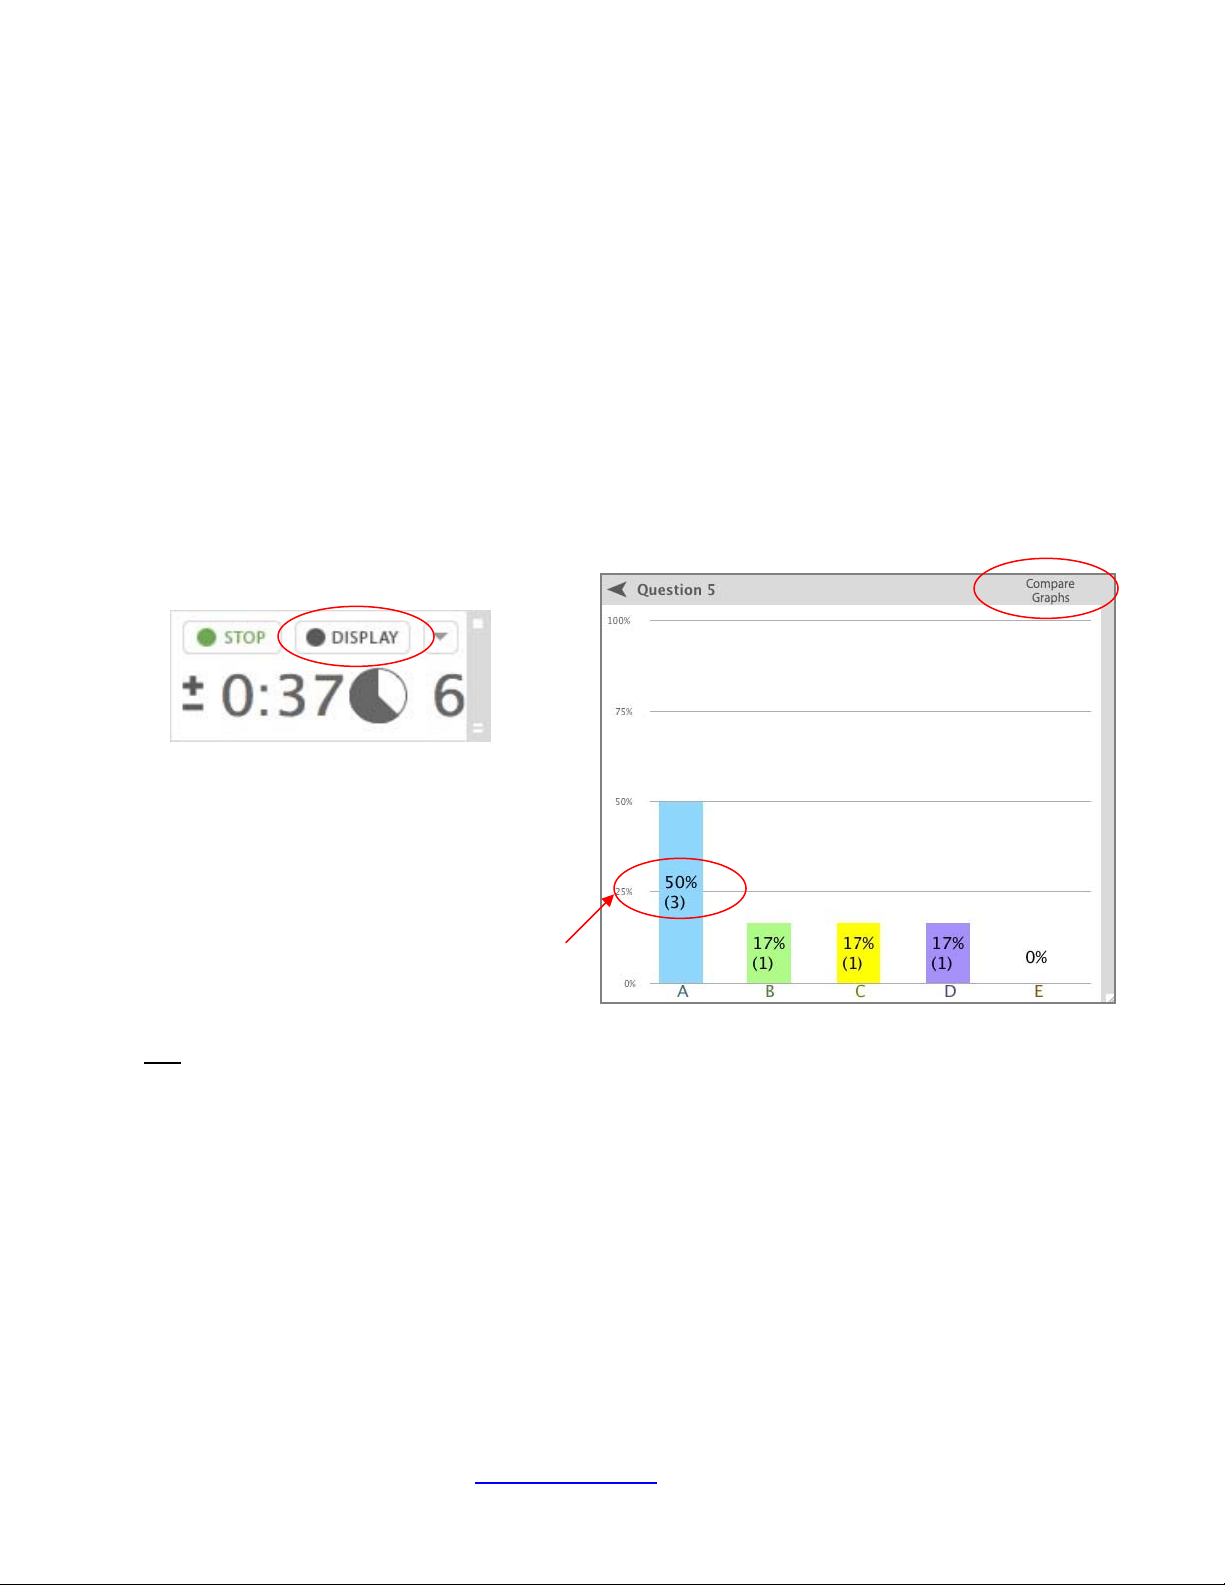
9. Click on the STOP button on the menu bar when you feel that enough time has elapsed.
New upgrade! The floating menu bar will be restored to the smaller size after polling has stopped. The
counter and timer will disappear so the floating menu bar will become less obtrusive.
Note: i-clicker will only begin collecting your students’ votes after you’ve clicked Start and will stop
collecting votes after you’ve clicked Stop. If you have not selected Start, the i-clicker will not accept or
record any votes.
Once you select Start from the floating menu bar, students may vote. A green Vote Status light on your
students’ remotes indicates their vote has been successfully recorded. After you’ve selected Stop, votes
for each question will no longer be accepted. If your students vote before you’ve clicked Start (or after
you’ve clicked Stop), the Vote Status light on their remotes will flash red three times, indicating their votes
were not received.
10. You can click on the DISPLAY button at any time on the i-clicker menu bar to see a graph (or
histogram) of student responses for the current question. The graph displays both the percentage and
number of votes for each choice.
New upgrades!
The graph is now resizable. To resize the
graph, simply drag the bottom right corner
of the graph.
The graph also displays the both the exact
count and percentage of the votes.
If you move the graph, the system
remembers its placement and retains that
location until you change it again.
Tip:
You may also display two graphs (the current graph and any previous graphs) side-by-side by
clicking on Compare Graphs in the graph window. The second graph will display underneath your
current graph. You may select Previous or Next to toggle between graphs in choosing your second
graph to display. So, for example, if you wanted to compare the graph from Question 4 with the graph
from Question 1, you would simply need to use the Previous button to move back to the graph from
Question 1. To close the comparison graph, click on the Compare Graphs link again.
8
Questions? Contact us at support@iclicker.com or call toll-free at 1-866-209-5698.
Page 9
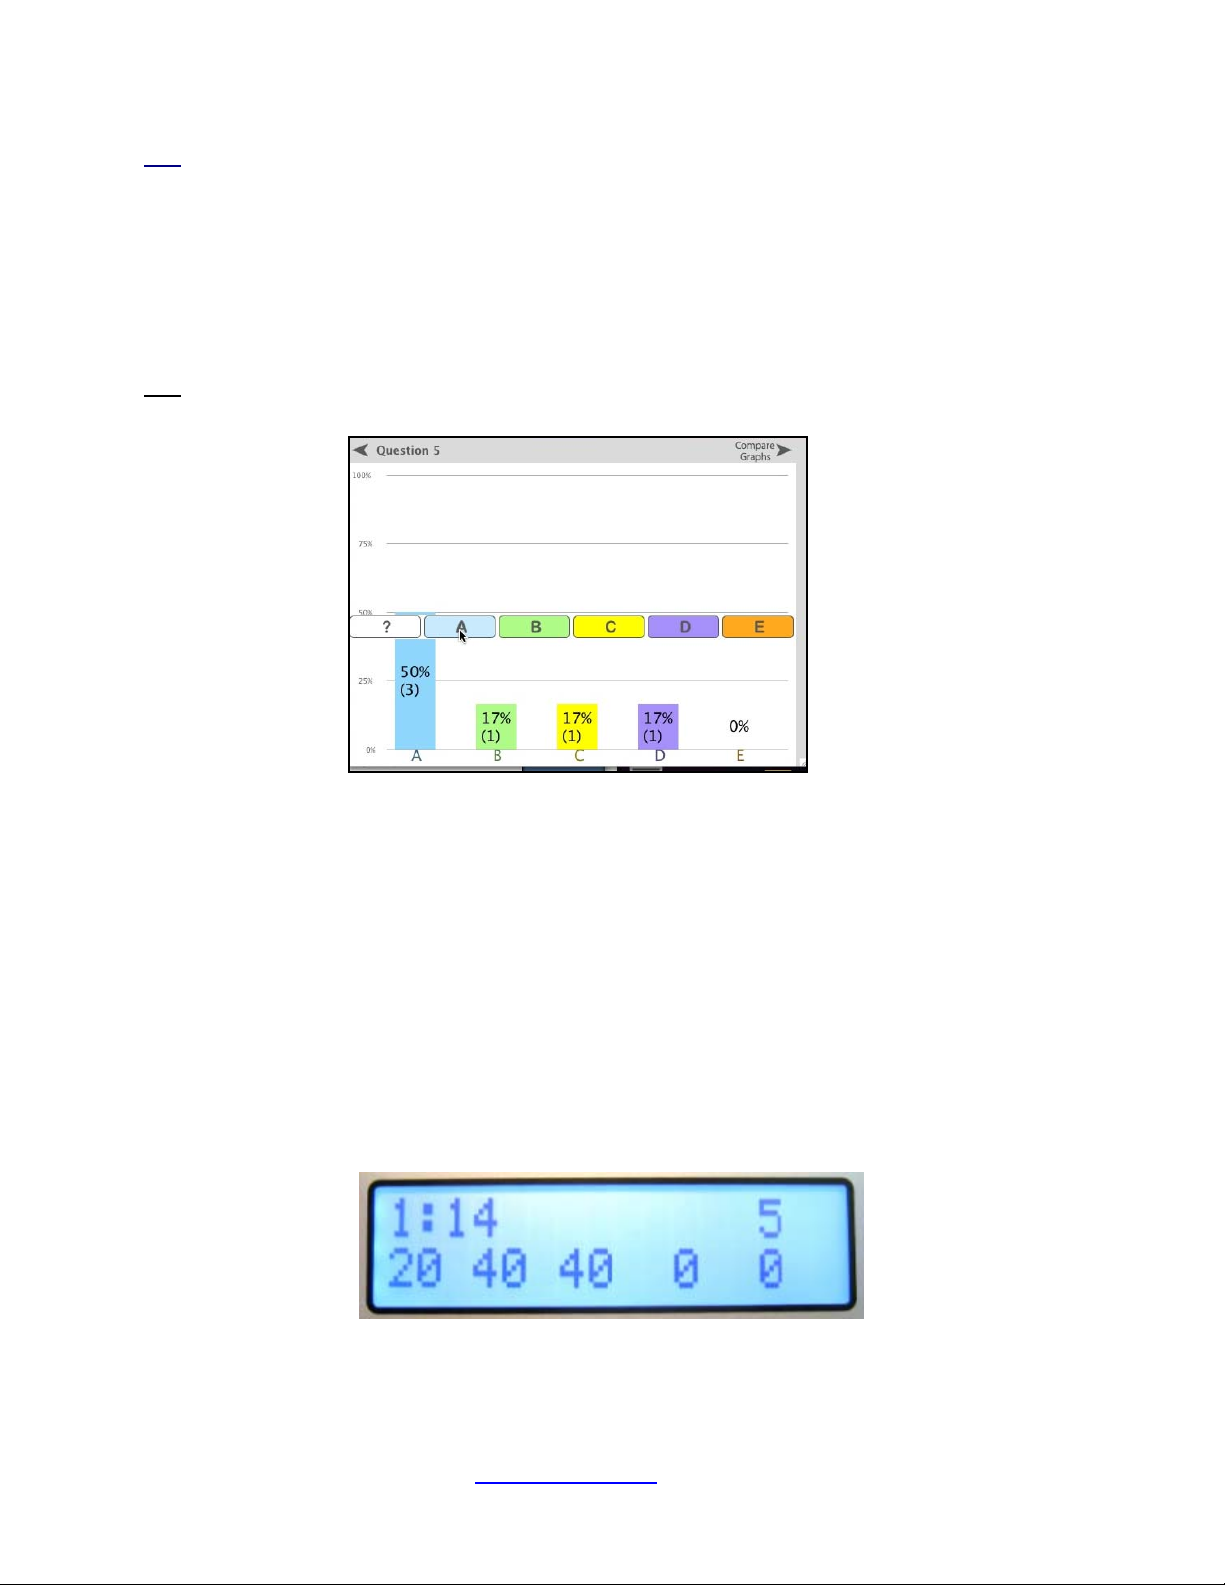
Tip: You may designate one answer in the graph as correct by simply pointing your mouse to and clicking
on the correct letter that appears when you mouse-over the graph. This will change your sele cted bar (i.e.
the answer you’ve designated as correct) to green and the remaining bars to red to clearly delineate the
question’s ‘correct’ answer. See the example below. Similarly, clicking the “?” on the far left will clear the
correct answer selection and the display will return to the default mode. ALSO, you can designate a
correct answer by cycling through the choices with the "E" button on the Instructor's Remote.
Your designated correct answer will then be saved into i-grader (and all points adjusted accordingly, if
you have chosen to award students points for answering questions ‘correctly.’)
Tip:
You can also designate a correct answer by cycling through the choices with the “E” button on the
instructor’s remote.
New upgrade! You can designate a correct answer now for any letter, even if no student selected that
choice. The letter and percentage will become green and all other choices will turn red. So, even if none
of your students voted for the correct answer, you can still designate the correct choice on the graph (and
it will be recorded in i-grader).
To stop displaying the graph, simply click on the Display button on the menu bar (which now says Hide).
The same information (for the current question only) is also displayed on the LCD screen of the i-clicker
base (see below), which is a useful tool to monitor student voting progress and choices without displaying
the graph to the whole class. Information is updated every second, and includes the timer (on the upper
left), the total vote count (on the upper right), and the distribution (by percentage) of votes across the 5
choices is displayed across the bottom.
11. Repeat steps 9 and 10 (and 11 if you want to display the results) for each question you ask in class.
9
Questions? Contact us at support@iclicker.com or call toll-free at 1-866-209-5698.
Page 10
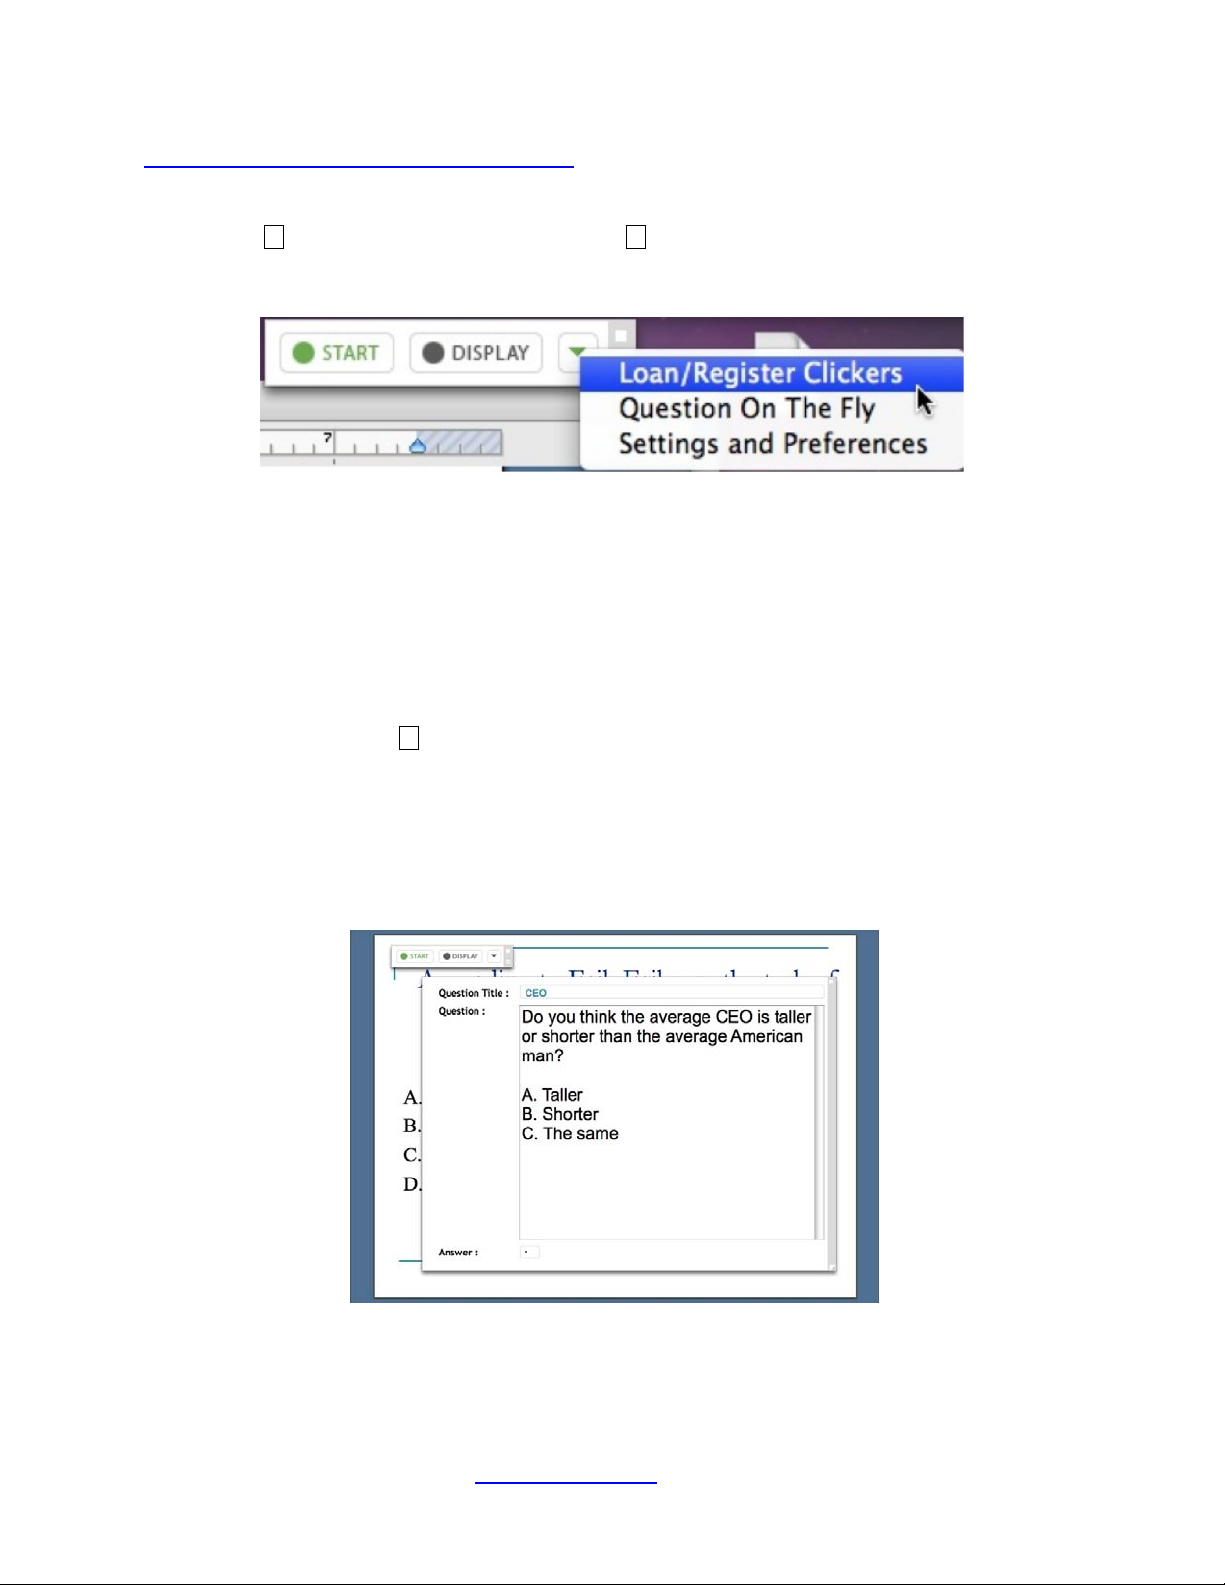
New upgrade! Floating Menu bar OPTIONS
The floating menu bar now is revised to have three functions: start/stop, hide/display, and OPTIONS
(marked with ). Roll your mouse over and select the to review and use the menu bar OPTIONS.
Currently, there are three options you may access:
1. By selecting Loan/Register Clickers, you can manually register an individual clicker (permanently or
for just one session) or start In-Class/Roll-Call registration. For more information on in-class and
manual registration options, see pages 11-16 of this Guide.
2. By selecting “Question On the Fly,” you can ask a question spontaneously (“on the fly”) and have it
recorded in a screen capture, without closing out of your presentation application. For example, you
could be using PowerPoint in slide show mode, decide to ask an unplanned question mid-lecture, and
ask it using the “On the Fly” option without ever having to exit or close your PowerPoint slide show.
To use this feature, hit the key from the floating menu bar, select Question On The Fly and a
textbox will appear. Type in a question title in the “Question Title” field, your question in the “Question”
field, and if so desired, the “correct” answer in the “Answer” field. Select “Start” from either the floating
menu bar or using your instructor’s remote.
A screenshot will be taken when polling begins and will be saved in i-grader, along with the question
title and the correct answer (if you chose to designate one). Hit the “Close” button at the bottom of the
textbox to close the question.
3. By selecting Settings and Preferences, you may return to the program’s Settings/Preferences
screens so you can edit your preferences directly from i-clicker. For more information about these
options, see pages 34-45 of this Guide.
10
Questions? Contact us at support@iclicker.com
or call toll-free at 1-866-209-5698.
Page 11

When your class is over, click on the small white square at the top right corner of the menu bar to exit iclicker. You will be asked if you really want to quit i-clicker and, if so, click on OK. Each student’s
response to each question will be saved in your course folder. Remember: You must run the i-clicker
program from the same folder each time in order to keep a complete record of your students’
responses.
Tip: The next time you begin i-clicker, click the “Start New Session” button to begin a new session. If you
want the data for two sessions to be stored together, or if you accidentally close the program, use
“Resume Last Session” instead.
The rest of this manual will tell you how to assign grades based on the responses of your
students as well as outlining the many other features and options available to you.
11
Questions? Contact us at support@iclicker.com or call toll-free at 1-866-209-5698.
Page 12
Section Two - Registering Your Students: How To Give Your
Students Credit
The i-clicker system may be used as a simple tool to give you instant, anonymous feedback in
class, in which case no registration is ne cessary. However, if you (like most instructors) want to go
a bit further and give credit to your students for class participation and/or performance, you will
need to:
1. Associate each of your students with the unique serial number on their i-clicker remotes (i.e.
Registration).
2. Decide on the grading details for each session of your class (see Section 3 on i-grader).
Note: Students do not need to be registered in order for i-clicker to collect votes. For
unregistered students, responses will be stored in your course folder and associated with the
unique serial ID number on the student’s remote. After students register, all their previo usly
recorded responses will be retroactively assigned to them.
You can elect to use i-clicker as a completely anonymous system, but you may have a difficult
Tip:
time with student compliance if you don’t assign even a few points for participation. We’ve found that
making i-clicker an option but not tying it to any points/grading results in very few students using iclicker in class.
IMPORTANT: Course Management Systems (CMS) Integration
If you wish to integrate i-clicker voting data with your CMS system, such as Blackboard or
ANGEL, you will not use a Roster.txt file. You may need to perform some additional steps not
outlined in this document. The exact steps will vary depending on the version of your CMS. Please
read and follow the directions located in the documentation for your course management system
(available on
registration data is consistent with your course management system.
www.iclicker.com). This will eliminate potential future confusion and ensure your
Registration:
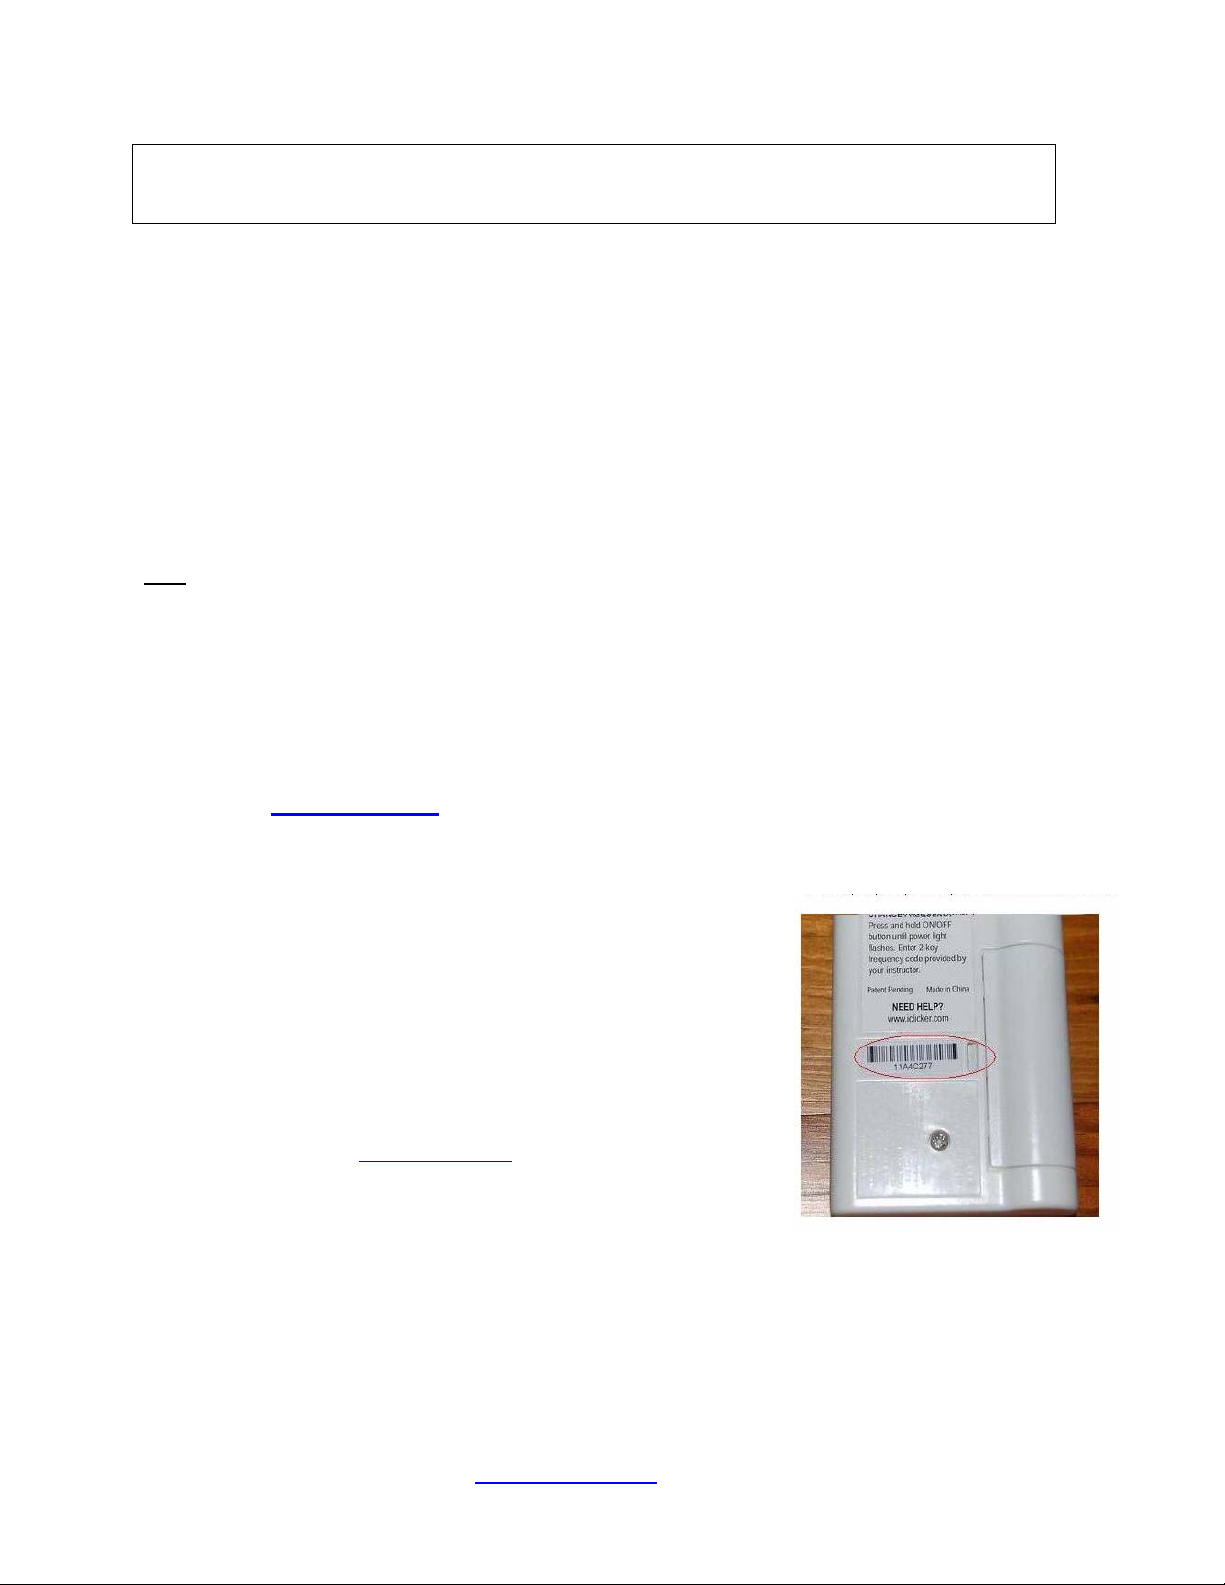
Each student remote has a unique serial number printed on the back.
This number is referred to as the remote ID. The association (or
registration) of a student with the remote ID is required before a
student can receive individual credit for voting in class. To register your
students, you must first create a file containing student information in
your course folder. If you are not planning to integrate voting data with
your course management system (CMS), you will need to create a text
file named Roster.txt. Please note that various Course Management
systems require different file names and types. Please refer to the
CMS documentation on
The Roster file must have one line for each student in your class, with
each line containing the student’s Last Name, First Name, and Student
ID, separated by commas. The Student ID may be a college ID number, email alias, or any other easily
readable text string—as long as it is guaranteed to be unique for each student. We recommend that you
use an ID number or naming convention that you currently use (personally or as required by your
institution) to record your students’ other grades, for easiest import of i-grader data into your course
grade book.
Questions? Contact us at support@iclicker.com or call toll-free at 1-866-209-5698.
www.iclicker.com for more information.
12
Page 13

The TextEdit.app application (or any other plain text editor) can be used to easily create the Roster.txt
file. To create a txt file using TextEdit:
1. Go to the “Applications” folder and open“TextEdit.”
2. Enter the student information, or Copy and Paste it from an existing roster file into TextEdit. Note: If
you copy/paste the file, you may still need to modify the contents so that each line contains student
information in the correct format.
3. Save this as “Roster.txt” within your course folder.
You will need to do this for each section or course in which you are using i-clicker. A sample Roster.txt
file is provided in your class folder. You may wish to simply edit this file rather than creating a new one.
Tip: The most common registration mistake involves students entering the wrong student ID (as
many institutions have 1-3 different IDs). To avoid this mistake, please consider the following
steps:
• Add i-clicker instructions to your syllabus so your students follow the proper registration protocol (and
will understand why they are purchasing the clickers). We have provided sample text below.
• Decide upon a policy for students who cannot or do not register their clickers successfully. Do you
want them to find you after class? In your office hours? Email you their remote ID and student ID for
manual registration? Inevitably, a small percentage of students will struggle with the registration
process; to save yourself aggravation, you may want to include some directions in your syllabus to
anticipate this problem and avoid a lot of manual work on your end.
Sample Syllabus Inserts:
FOR ROLL CALL/in-class REGISTRATION:
"You are required to purchase an i>clicker remote for in-class participation. i>clicker is a response
system that allows you to respond to questions I pose during class; you will be graded on that feedback
and/or participation. In order to receive this credit, you will need to register your i>clicker remote in class.
I will project a Registration screen with 3 steps to follow (look for your [student ID], which will
alphabetically scroll down the screen). Once your remote is registered, your [student ID] will no longer
appear on that scrolling list and you are registered for the entire semester. If for some reason, you can’t
follow these steps, I will need to register you by [alternative policy] by [date]. i>clicker will be used every
day in class, and you are responsible for bringing your remote daily." (Note to the instructor: [student ID]
= the type of student ID that you have chosen to use, as noted in the instructions in step #10.)
FOR WEB REGISTRATION:
"You are required to purchase an i>clicker remote for in-class participation. i>Clicker is a response
system that allows you to respond to questions I pose during class, and you will be graded on that
feedback and/or participation. In order to receive this credit, you will need to register your i>clicker
remote online within the first [amount of time set by instructor] of class. You must have come to class at
least once and voted on at least one question, in order to complete this registration properly. Once you
have voted on a question in my class, go to www.iclicker.com/registration. Complete the fields with your
first name, last name, student ID, and remote ID. Your student ID should be [student ID]. The remote ID
is the series of numbers and sometimes letters found on the bottom of the back of your i>clicker remote.
The i>clicker response system will be used every day in class, and you are responsible for bringing your
remote daily." (Note to the instructor: [student ID] = the type of student ID that you have chosen to use,
as noted in step #10.)
13
Questions? Contact us at support@iclicker.com or call toll-free at 1-866-209-5698.
Page 14
i-clicker offers you three straightforward registration options: an in-class option (for your entire
class), a manual option (for individual students), and an “online/web” option. Minimal information is
required of your students and all registration options are tied to your class roster. There are no site
license or registration fees for i-clicker software.
Tip: In-class and online registrations are not mutually exclusive, and both can be used to regi ster
students in one class. For a small class, roll call is recommended, while a combination (or on-line
exclusively) is recommended for larger classes.
Option One -In Class (or “Roll Call”) Registration:
To use Roll Call, your computer screen needs to be projected so all students can easily see it.
Open i-clicker by double-clicking the iclicker application icon in your course folder and selecting “start
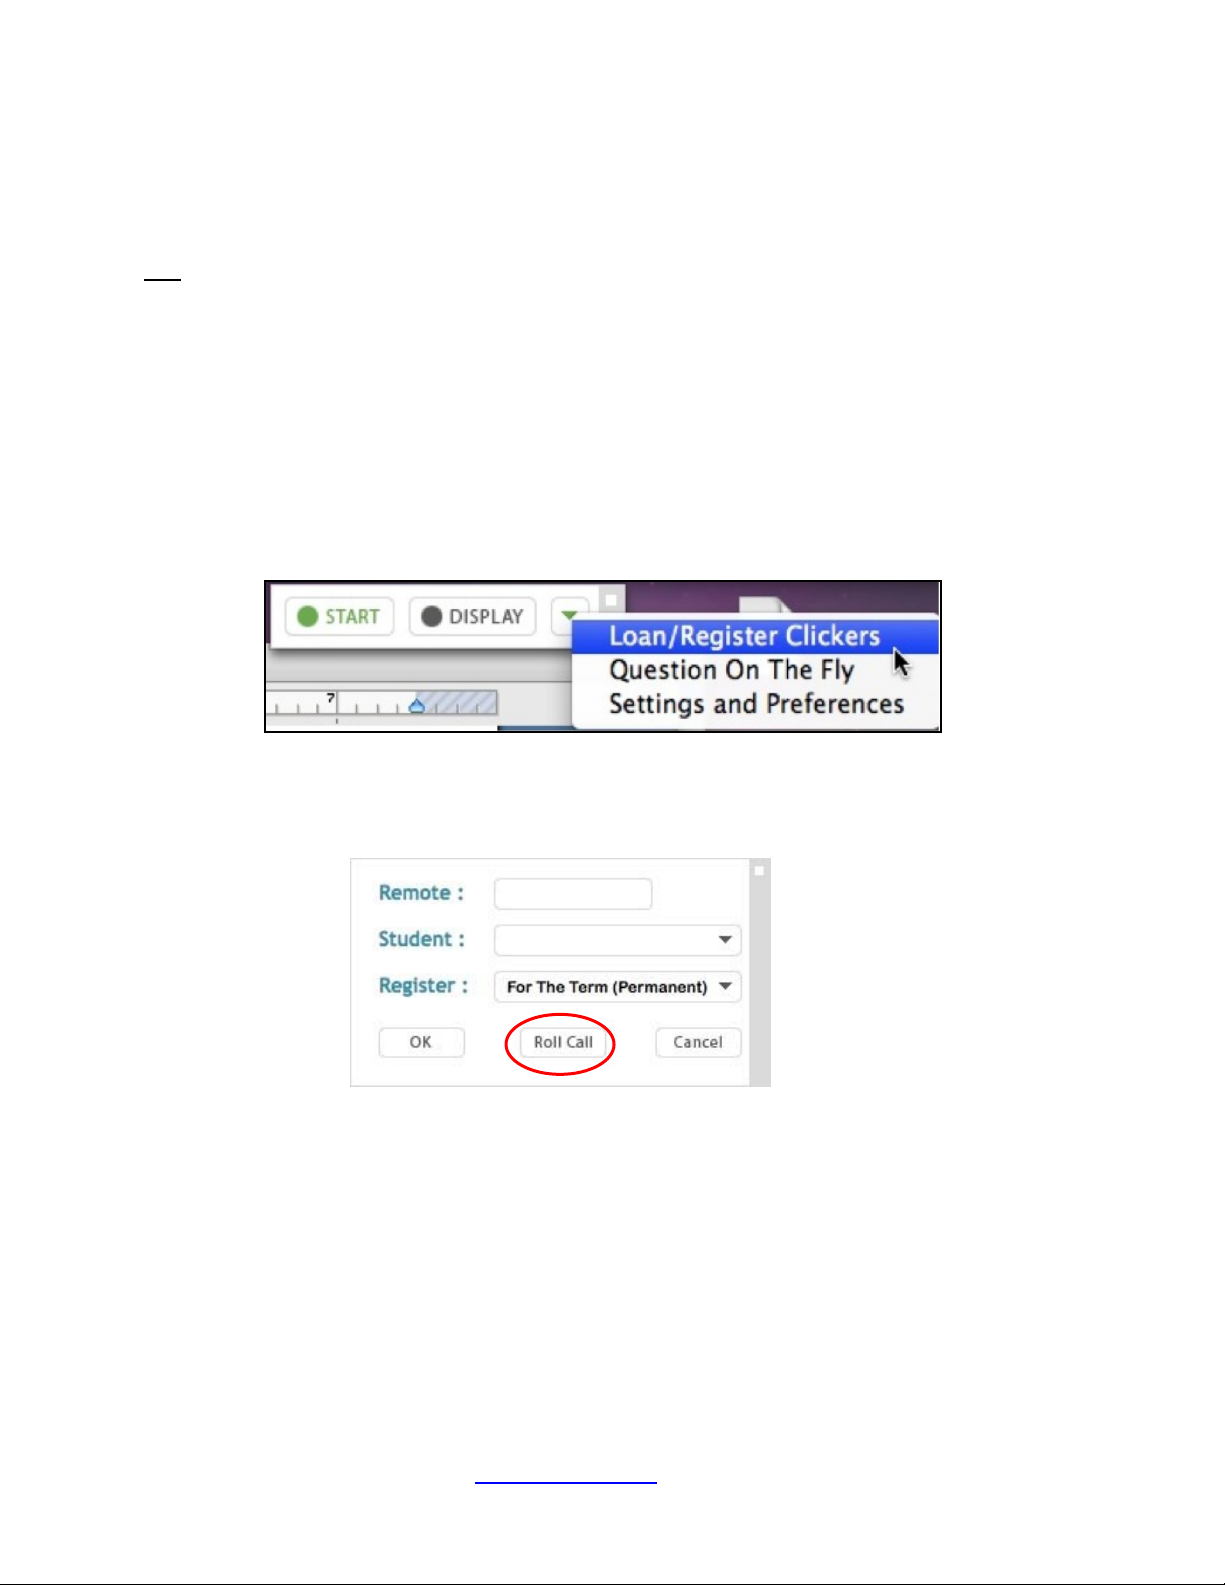
session” from the Welcome Screen. From your floating menu bar, click on the down arrow to open the
Options menu and select “Loan/Register Clickers.”
From the Loan/Register Clickers window, select Roll Call.
14
Questions? Contact us at support@iclicker.com or call toll-free at 1-866-209-5698.
Page 15
The ROLL CALL screen will appear as below. Your student’s information (from the Roster.txt file you
have placed into your course folder) will begin scrolling as shown below:
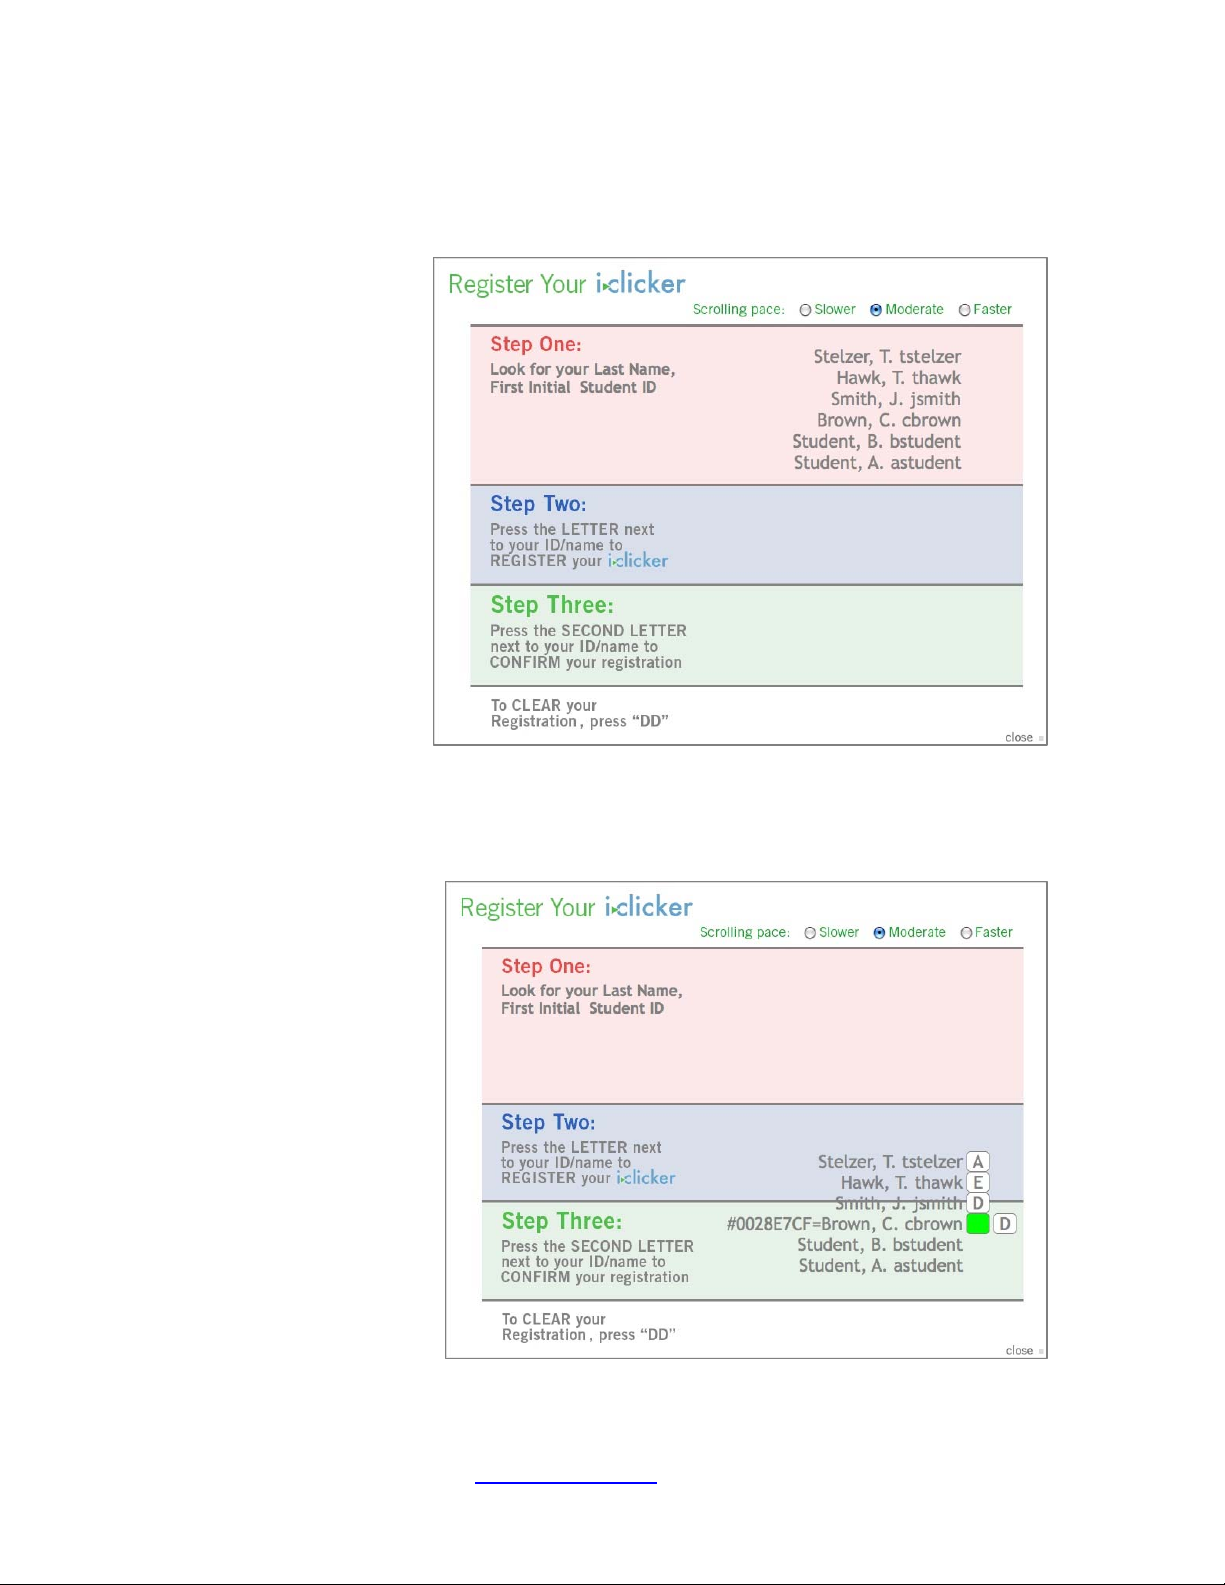
The instructions for students to register are outlined on the screen and are easy to follow.
1. Step One: The student
locates his/her name or ID
as read from the
Roster.txt file.
2. Step Two: The student
must wait until his/her ID
has scrolled down into the
central blue region of the
Step Two screen. A letter
will then appear to the
right of his/her ID or
name. The student must
press the displayed letter
on his/her i-clicker remote,
at which point a second
(different) letter appears to
the right of his/her name
or ID.
3. Step Three: The student should press the second letter on their keypad to complete the registration
process. This is the final step in tying each individual student to his/her unique remote. Once the second
letter is selected, the boxes to the right of the name disappear and the student is registered for the
duration of the course. His/her name will no longer appear on the scrolling roster list.
In the example shown here, the
student C Brown has pushed
the first button and is now being
prompted to push the second
button (letter D.) Once the
student has pressed “D,” her
student ID and her i-clicker
remote ID/serial number
(#0028ECF, shown to the left of
her name) will be tied together
for the rest of the course.
If a student’s name scrolls off
the screen before completing
Steps 2 or 3, s/he should simply
wait for his/her name to appear
again. Names will continue to
scroll on the screen until you
click on the Close button (on
the bottom right screen) or until
all students have registered.
15
Questions? Contact us at support@iclicker.com or call toll-free at 1-866-209-5698.
Page 16

Tip: If a student accidentally registers his/her clicker to the wrong name, s/he should push the D button
on his/her i-clicker remote twice
to clear the incorrect registration and restart the registration process.
Option Two -Web Registration:
Your students can also register through a simple Web registration pro ce ss. To do this, send your students
to the following web site: www.iclicker.com/registration.
Once your students have arrived at the site, each student must:
1. Enter his/her First Name and Last Name in the appropriate fields.
2. Enter his/her student ID (the same one that is in your Roster.txt file)
3. Tip: When using Web registration, the key to success is deciding what student ID will be used
and sharing those directions with students before they register their clickers online. You may want
to add registration ID instructions to your syllabus so your students follow the proper registration
protocol.
4. Enter his/ her i-clicker remote ID (this is the unique set of numbers and letters located on the
bottom of the back of their remote).
5. Enter the security/verification code that appears on the screen. This verification image will appear
as a slightly distorted series of numbers and/or letters (and is used to keep spam bots from
submitting the form).
6. Click “Enter.” The student will see an on-screen message confirming that registration was
successful. The student’s ID is now tied to his/her unique i-clicker remote ID.
Once your students have registered online, you will need to synchronize the relevant information from the
Web server with your i-grader application. This updates the student registration information in your class
folder. This is one of the functions built into i-grader, which is described in the next section.
Note: If a student has not voted with their i-clicker remote, the online registration will not synchronize
with your i-grader application. The student must vote at least once in class. As such, we recommend you
ask at least one clicker question (for example, an attendance polling question) on the first day of class to
capture remote IDs before requiring your students to register.
16
Questions? Contact us at support@iclicker.com or call toll-free at 1-866-209-5698.
Page 17

Tip: Students can use one i-clicker remote for multiple classes, and only need to register on the web
once. If the student makes a mistake they can simply register a second time.
Tip: i>clicker offers institutions the option to host their own registration site or use their own LDAP
authentication with our national database; we can provide the requisite scripts and administration support.
If your institution has standardized on i-clicker, your registration may already be hosted locally. Check
with your administrator for more information. If you think locally hosted registration or authentication
would be of interest to your campus or department, contact us at
sales@iclicker.com for details.
Option Three -In Class “Individual” Registration:
If only a few students need to register (for example, a new student joins your class after you’ve completed
Roll Call registration), an individual registration option is available.
1. From the i-clicker floating menu bar, click on the down arrow to open the Options ¶ menu and
select “Loan/Register Clickers.” Be sure that “For the Term (Permanent)” is selected from the
“Register” drop down menu
2. Now enter the student’s Remote ID (the number on the back of their i-clicker). This can be done
by just typing it into the Remote field, or by having the student hold the On/Off button on his/her
remote until the blue light starts flashing (around two seconds) and pushing the A button twice.
This will send the clicker ID to the computer and the Remote ID will appear in the Remote field as
if you had typed it.
3. Select the student’s ID from the drop down menu labeled Student. The names in this list are
taken from your Roster.txt file. Click OK. The student’s ID will be associated with the
corresponding i-clicker remote ID.
The procedure described above permanently assigns the remote to the student. In the example above,
Remote ID 0028E7CF is permanently assigned to Jane Smith with ID jsmith.
Note:
Only one student at a time can register via this option.
17
Questions? Contact us at support@iclicker.com or call toll-free at 1-866-209-5698.
Page 18

Loaning a clicker (Temporary Registration)
If a student forgets his/her i-clicker remote, you can loan one for a single lecture. To associate the loaned
clicker with a student for one lecture only, you should perform a temporary (or loaner) registration.
To do this, follow the exact same steps as outlined above for an individual registration, BUT make sure to
select the “For one Session (Loan)” option from the Register drop down menu (as shown here).
If this option is used, the assignment of the i-clicker remote ID is tied to that student for one lecture only.
This temporarily overrides any permanent registration. The student will receive credit for any votes during
that lecture and these will be synchronized with existing scores. In subsequent classes, the student can
resume using his/her regular clicker.
18
Questions? Contact us at support@iclicker.com or call toll-free at 1-866-209-5698.
Page 19

Section Three -Using i>grader After Class: Assigning Credit
for Sessions and Questions
Note: You may want to take the time right before starting i-grader to check for updates to the software.
This process is quick and free of charge, and can be done by using the WebUpdate application in your
course folder. Please see Section Six of this guide for more information on Web Update.
Before opening i-grader, always make sure to exit the i-clicker application. Then open the course folder
on your flash drive or computer, and double-click the i-grader icon.
The i-grader application will start and you will see a screen similar to this one:
A list of students will display in the left-
most column, and a list of voting
sessions you have held will display in the
top row. You will see all students as
listed in your Roster.txt file (or other CMS
file if you have chosen to use i-clicker
with your course management system).
You may view the students by Student ID
or by last name, by clicking on the arrow
on the heading of the column of students.
Registered students will appear in blue
type and unregistered student names or
IDs appear in red. The recorded votes of
your students who have not yet
registered are stored under their i-clicker
remote ID. The remote ID numbers
appear in red at the end of the student
list.
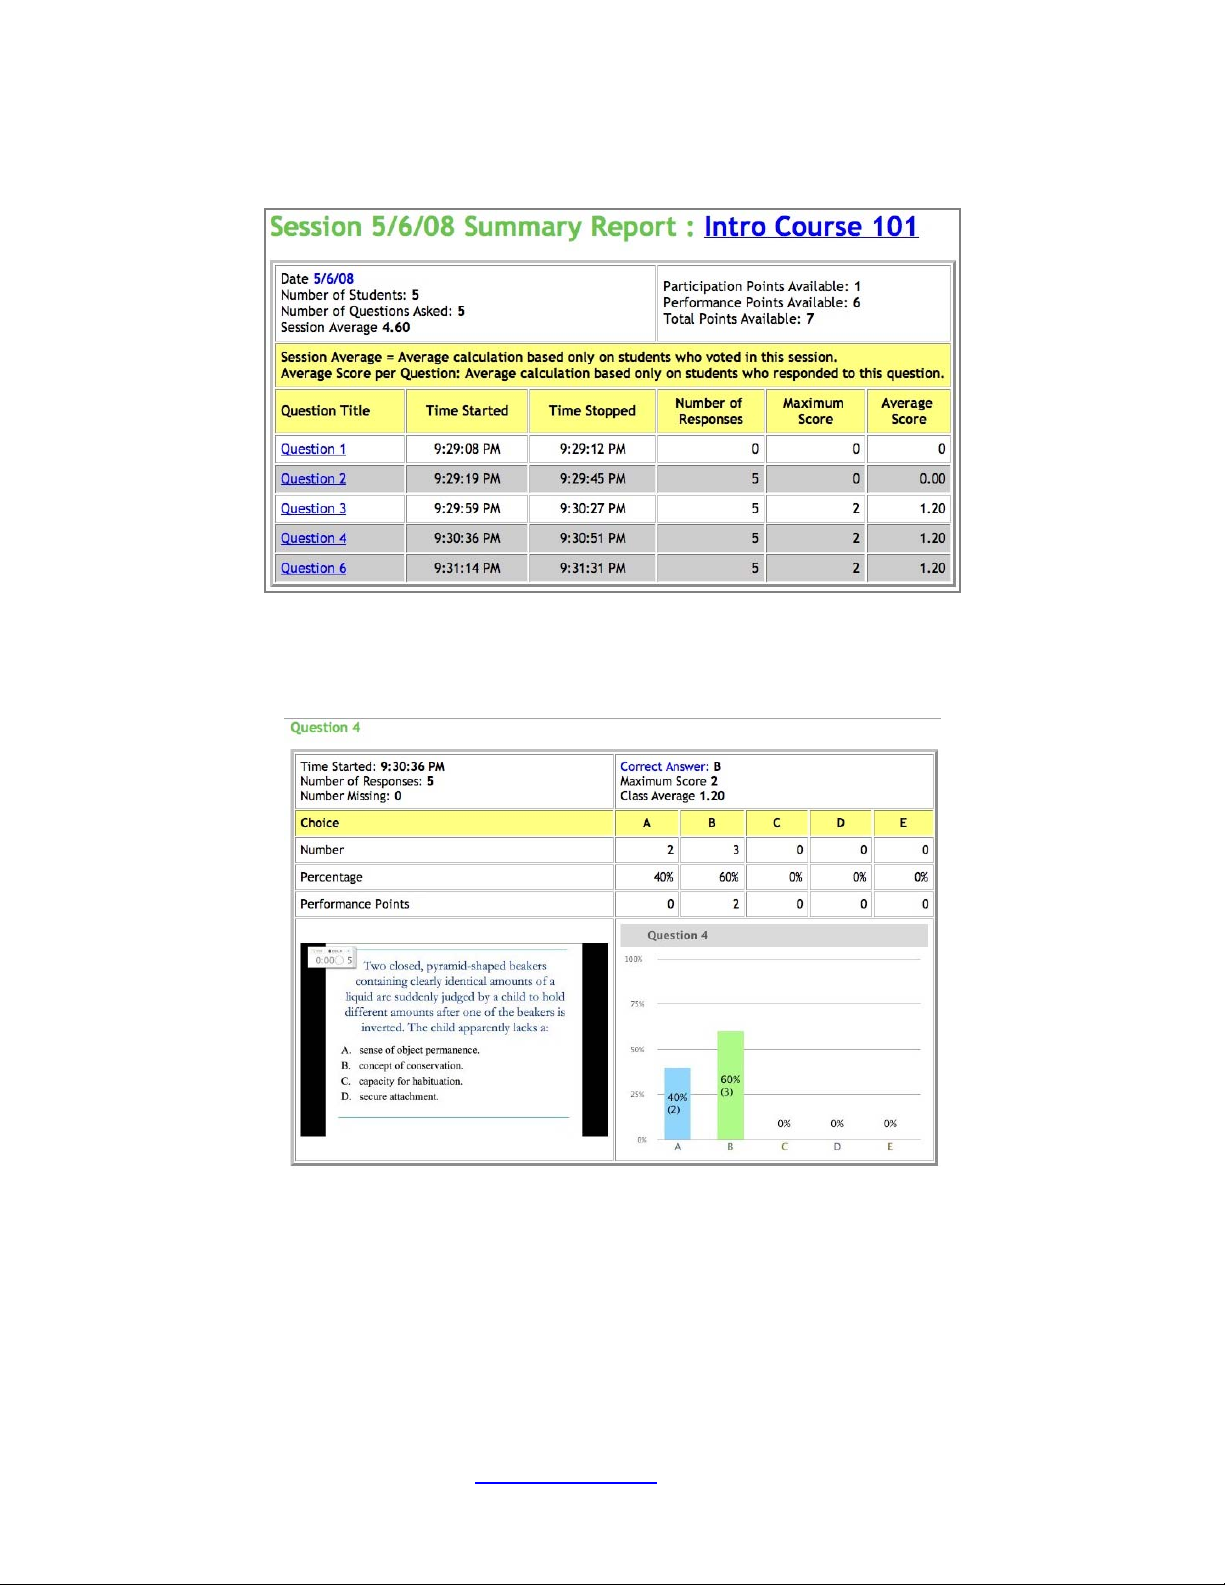
Each lecture (by default) is labeled with the date of the session. If you start two sessions on the same day
(in the same course), those two sessions will be shown separately on the main i-grader screen. The
example screen shown above indicates that clickers were used in just one lecture to date (on May 6,
2008) and two sessions were held during this lecture. Of the student names app earing on the screen,
three have registered their clickers while the other two have not. Note that the students who have not
registered have no grades attached to their names—the grades are tied to the remote IDs at the end of
the list and will be attached to the student names once they have registered. The remote serial ID
#11A03A8B at the bottom of the list belongs to one of the unregistered students who participated in the
sessions.
19
Questions? Contact us at support@iclicker.com
or call toll-free at 1-866-209-5698.
Page 20

Tip: If you choose Resume Last Session from the Welcome Screen, your additional polling data will be
included in the previous session (thereby eliminating the second se ssion in our example).
Synchronizing Web Registrations
Let’s suppose you have chosen to have your students register through the Web site registration option.
Once your students have submitted the registration form and you have held at least one i-clicker
session, you may now update your course registration information using the Synchronize Web
Registrations feature.
NOTE: You will need to be connected to the Internet to synchronize web registrations.
Simply click on the button labeled Synchronize Web Registrations from the main i-grader page.
A pop-up window will appear, and you will be prompted to click Continue to pull down clicker registrations
from the server. Click the Continue button.
After you click on Continue, your list of registered students is updated using the information from the
Web server. A software feature will alert you to any discrepancies between your roster and the web
registrations.
Possible discrepancies include students entering an incorre ct student ID or having a student vote in your
class without being in your roster (e.g. if they just added the course). In these cases, the system will notify
you of the discrepancy. If i-grader needs your input for any reason, you will see a window like the one
below. There are three ways to resolve any discrepancy:
1. Ignore the Registration, which does not associate any registration information for that particular
student.
2. Accept the Registration, which allows the student ID to be included in i-grader, and associates the
student with the correct clicker remote ID.
3. Cancel the Registration, which exits the registration process and leaves i-grader as it was
originally.
20
Questions? Contact us at support@iclicker.com or call toll-free at 1-866-209-5698.
Page 21

Example: In the screen below, a student tried to register his i-clicker online (remote ID 11AA6BD0) with a
student ID (bstudent001) which was not in your Roster.txt file. You realize that the student likely mistyped
some information. As a result, you select the correct student from the list of students in the roster (on the
right), and click the “Accept” button to associate “bstudent” with i-clicker remote ID 11AA6BD0.
Tip: Students can register multiple times without affecting the web synchronization process. If you are not
sure if a web registration matches the student information in your roster, you can always ignore the
registration, ask your student to register online again, and run another Web Sync proces s at a later time.
New upgrade!
your students are registering their clickers either via www.iclicker.com/registration or through your locally
hosted registration). Both of these changes will improve your web synchronization experience (and will result in
fewer prompts to accept or ignore a registration):
• If the clicker is not registered to any student in your roster with the same last name or same student ID,
the software will ignore the registration (instead of manually prompting you to ignore the registration).
• If the clicker ID is exactly matched to a student last name and student ID, the system will automatically
accept the registration (the system currently prompts you to decide).
In response to user feedback, we’ve applied the following rules to web synchronization (when
At this point i-grader will finish synchronizing the information from this student and any others that
registered online. A box similar to the one below will appear:
21
Questions? Contact us at support@iclicker.com or call toll-free at 1-866-209-5698.
Page 22

If any unassociated clicker ID’s remain after this step (i.e. if you continue to see any red clicker ID
numbers in the left column), they likely belong to students who have not yet registered online. Check with
your students and synchronize again later. If there are problems synchronizing only one or two students
who have registered online, you can also run a Roll Call registration or register these students manually.
You can repeat these steps as often as necessary.
Tip:
We suggest setting a deadline (however loose or long) for Web registration. This will allow you to
confirm all students are registered and assist you with classroom and i-clicker management.
New upgrade! New i-grader tools allow you to search for and delete batches of unregistered clicker
records, and to generate reports of unregistered students.
To use these tools, click on the eyeglasses icon next to the dropdown menu at the top of the column of
students:
You will see the following window appear. You will have the option to toggle between two screens: View
and Select Unregistered Clickers, and View and Export Unregistered Students.
22
Questions? Contact us at support@iclicker.com or call toll-free at 1-866-209-5698.
Page 23

The View and Select Unregistered Clickers screen allows you to quickly see votes from only those
clickers that have not been registered to any student in your roster. You may see votes from unregistered
clickers if students have not yet registered successfully, if students accidentally brought a friend or
roommate’s i-clicker remote to class with them, or if students voted in only a few sessions and then
dropped the class.
Tip: If you have a very large class or if your class deadline for registration has not yet passed, you may
have a large number of unregistered clickers in i-grader. To help you manage your course information,
use the Advanced Settings option to filter the results list. The advanced settings screen is shown below:
The Advanced Settings search features allow you to select unregistered remote IDs meeting specific
criteria. For example, let’s say that several students voted only once or twice before dropping your class,
and never registered. You can use the Advanced Settings options to search for unregistered remotes with
averages or total points in a very low range (such as between 0 and 10 total points). When you click
“Select,” the Advanced Settings window will disappear and all remotes matching your criteria will have a
check in the “Select” column to the right of the ID number.
To use another example, a student may email you and tell you that the remote ID number on the back of
his i-clicker remote has partially rubbed off and as a result he can’t complete the web regist ration. You
can search for the remote ID using the “Remote ID containing” filter and find it in your records.
The View and Export Unregistered Students
tool allows you to export a list of students who
have not yet registered.
From this screen, you have the option to export
the list of unregistered students in several
formats: Comma-Separated (.csv), Text (.txt), or
Excel (.xls). Choosing any of these options will
create a file named “Un Registered Student List”
in your course folder.
Note While you can create three separate files
using this tool, exporting the same type of file
more than once will overwrite your data. For
example, if you have previously exported this list
to Excel, then clicking Export to Excel will
overwrite the existing file, but clicking Export to
Text will not.
23
Questions? Contact us at support@iclicker.com or call toll-free at 1-866-209-5698.
Page 24

i-grader Functions
From the main screen of i-grader, you can edit student registrations as well as session and scoring
information.
Editing a Student
This feature allows you to modify which remote IDs are associated with a particular student/student ID.
1. Locate and click on the student ID or name
that you wish to modify. You will see the pop
up dialog shown here.
2. To remove the association of a particular
clicker to that student, highlight the clicker
remote ID in the pop up, and then click
Remove. (This will remove the student/remote
ID association, but the remote ID and its data,
will stay in i-grader)
3. To associate a new remote ID with this
student, click Add. You will see an additional
pop up prompt to add a new remote ID. Enter the new remote ID and click “OK.” The ID will then
appear in the list of Registered Clickers tied to that student. Highlight the new clicker ID and click
Add.
4. Click Save and then OK on the final confirmation
message.
24
Questions? Contact us at support@iclicker.com
or call toll-free at 1-866-209-5698.
Page 25

Setting Session Scores
i-grader scoring tools allow you to designate correct answers and set scoring options for each individual
session. However, you can save time by setting default scoring settings for all sessions in your course
using the i-clicker Settings and Preferences, described in Section Four. If you do not modify these
settings, i-grader will automatically assign point values based on the default settings in i-clicker. You can
still make adjustments to individual settings using the i-grader tools described on the following page.
To assign credit and establish the points for any given polling session, locate the session and click on the
session title. That session’s information will appear and be available for editing.
The screen to your right allows you to
delete and modify question data and
award Participation/Attendance Points
and Performance Points for this lecture.
New upgrade!
• The Set Scores screen has been
redesigned and is larger and easier to
use.
• The Help text now provides more
explanation of the different point
categories and guidance on assigning
points values.
• Individual questions can now be
deleted from sessions. You can easily
restore the question if you change
your mind, and participation and
attendance points will be recalculated
to match your most current session
information.
In the example shown here, detailed
information is displayed for a question in
the session held on 5/6/2008. The
Session Summary on the top part of the screen gives the course name, date and time of the session,
and indicates that five students participated and six questions were asked during the lecture. From here,
you also have the ability to edit your Session Name. There is a 10 character limit on session names.
If questions are deleted from the session, the Number of Questions value will change, but you can still
view the deleted questions by using the Previous/Next controls on the bottom right of the screen (bel ow
the thumbnail image). The Deleted questions will be marked as deleted on the thumbnail image, and the
“Delete this question” box will be checked.
25
Questions? Contact us at support@iclicker.com
or call toll-free at 1-866-209-5698.
Page 26

Participation/Attendance Points are used to credit students for attending class and for participating in
the voting activities. Participation points are not given for answering the questions correctly; the stude nt
only needs to place a vote for least the minimum number of questions to receive these points. These
points are awarded by session, not by question—the student either answers the minimum number of
questions and receives all participation points, or does not and receives zero participation points.
In the Settings and Preferences area of the i-clicker program (explained below) you can set a
participation requirement by percentage of questions answered. The minimum number of responses will
be automatically calculated for you. From the Set Scores screen shown here, you can modify the
minimum number of questions your students must answer in order to receive participation points. You
also determine the total number of participation points possible for that session. The minimum number of
questions required will be adjusted each time you delete and restore questions from your session.
Tip:
We strongly encourage you to utilize the participation/attendance feature. This objective of i-clicker
is to promote student engagement and teacher-student interaction.
Performance Points
performance points to reward “correct” answers. Performance points (if any) are assigned to each
question individually. If you have already set a point value for correct answers in i-clicker Settings and
Preferences, you may simply designate the correct answer in the Performance Points area and that
answer choice will automatically be awarded the correct number of points. You may also assign credit or
partial credit for multiple answers by manually adding point values in any of the five boxes above the
answer choices (A, B, C, D, E). A detailed example is shown here.
Note: Since you may not
remember the details of
each question you asked in
lecture, i-clicker takes a
screen capture for you
every time you begin
polling. To bring up the
screen capture in i-grader,
click on View Screenshot.
Click the button again (it
will now say Hide
Screenshot). The screen
shot function allows you to
ask on-the-fly questions
easily by providing you with
an automatic record of your
lecture questions.
In the above example, Total Performance points currently appears as zero, because no correct answers
have been designated yet. The correct answer is D. To give partial credit for another answer, you can
enter 2 points in the box for D and 1 point in the box for answer A. The “Correct Answer” field can also be
used to assign the default number of performance points (as set in the Settings and Preferences menu in
i-clicker) to the selected answer. To scroll through the questions, click on “Previous” or “Next. ” Once you
have assigned points values for each question, use the Set and Close button in the bottom right corner.
All points allocations will be saved and you will return to the main i-grader window.
Questions? Contact us at support@iclicker.com or call toll-free at 1-866-209-5698.
are awarded to students by question for specific answers. Many professors use
26
Page 27

You will now see the following adjusted scores:
Notice that i-grader has updated the summary for this lecture and the column of averages.
Deleting a Question:
To delete a question, open the session (by
clicking the session name or date) containing
the questions you wish to delete. Use the
Previous and Next arrows to review your
questions/screen shots. When you’ve located
the question you wish to delete, select “Yes” in
answer to the question “Delete this Question?”
under the question title. The question will no
longer be calculated in your participation
requirements and student scores for the
session. It will remain visible in the scoring
screen. At any time, you may restore the
deleted question by returning to the session, finding the question in this screen, and changing the “Delete
this Question?” option to No.
i>grader Reporting: HTML Reporting Tools
The Run/Update HTML Reports feature (located from the main i-grader screen) creates summary
information in an easily readable and printable HTML format. Clicking the Run/Update HMTL report s
button generates the HTML reports listed below:
The Term/Session Summary and Review report provides a breakdown of polling data, both for your
term to date and for individual sessions. No individual student scores or votes are included in this report,
making it ideal to share with your class as a post-lecture study guide. The linked Summary Review
reports contain individual question statistics, the screenshots taken when you began polling (which should
contain each individual question), and the voting results graphs for each session.
27
Questions? Contact us at support@iclicker.com or call toll-free at 1-866-209-5698.
Page 28

The Student Voting Data report contains grades for your individual students, by sessi on and by
question. From here you can also access a report of Cumulative Scores, which provides you with a
review of each student’s performance for each i-clicker session.
When you select the Run/Update HTML
Reports button, you will see a Report
Summary window appear with links to
these three reports.
The reports are accessible from the links
shown here. They can be opened and
printed using any web browser.
The Term/Session Summary and
Review report and the Student Voting
Data report are both placed directly in
your main course folder. You may access
and open them from that location at any
time. All other reports (Summary and
Question Data for single sessions, and
Student Score reports) are linked from one
of these two reports, or accessible from
the Reports folder within the main course
folder.
Tip: You can Update Reports as often as you need to – the old reports are simply over-written with your
most recent data.
Your Term/Session Summary and Review report will contain general information about each session as
shown below.
28
Questions? Contact us at support@iclicker.com or call toll-free at 1-866-209-5698.
Page 29
To view more detailed session information, click on Session Summary and Question Data for any
session, to display the Session Summary report.
The Session Summary data is displayed at the top of this report, followed by information about individual
questions. Scroll down, or click a question title, to jump to the question information (including the question
screen shot and histogram of your students’ results).
Click on your Course Title to return to the main Term Summary report.
Tip: The Session Summary reports are ideal to share with your students after class. The HTML file can
be uploaded to a course web site and then viewed by your students. These reports can be found in the
Reports folder within your i-clicker course folder. They will be titled “SessionSummary_X,” where X is the
number of the session you want to share with your students. Or, if you don’t want to search through the
Reports folder, you can simply use the File > Save As command from your web browser to save a copy of
the Session Summary report.
29
Questions? Contact us at support@iclicker.com or call toll-free at 1-866-209-5698.
Page 30

Please note that when you copy or upload a report to a new location using this method, the links to other
report pages will no longer work. You will need to be sure that any data you wish to share is on the report
page you are viewing.
Your Student Voting
Data report will be very
similar to the Term
Summary Report.
Instead of links to
individual Session
Summary reports, you
will now see links to a
detailed report of
student responses for
each session. These
Student Reports provide
you with an easily
printable overview of
your students’ entire
performance with
i>clicker, and are
particularly helpful for struggling students.
New upgrade! Before creating your HTML reports, the system will now ask you what student information
you’d like to include in the Student Reports. You may include your students’ last name, first name,
student ID in any combination. Your customizations will affect how individual student data will be
displayed in the Student Voting Data and Cumulative Student Score reports.
The Cumulative Student Scores link will bring you to
the Student Term Report, shown here.
Here you will see the students listed with the total
number of points they have earned for the term. You
will also see the student’s term average and the
number of points received for each individual
session.
Tip: Clicking on any of the Session Titles (in this
example, these are titled “5/6/08” and “5/6/08-2”) will
bring you to the same report as the “Student
Reponses” link for that session in the Student Data
report.
In this example, to view student responses for the
first session held, you would click the “Student
Responses” link from the Student Voting Data report,
or the session title at the top of the session column in
the Cumulative Student Scores report.
30
Questions? Contact us at support@iclicker.com or call toll-free at 1-866-209-5698.
Page 31

Tip: If you are using Internet Explorer to view the HTML reports, you can right-click (control click) on any
blank space within the table in your report and select “Export to Microsoft Excel” (provided Excel is
installed on your machine). This will open an Excel worksheet containing information from the table you
selected. To export information from more than one table in the report, click on a blank space outside of
the report itself and you will be prompted to select tables to export to Excel.
The table shown here would appear, listing each student’s answer to each question. Clicking the
Question titles in this report will show you the relevant information from the Session Summary and
Question Data report described above.
New upgrade! If you have designated a correct answer for any of the questions, they will appear in this
report in GREEN and incorrect answers will appear in RED. If you did not designate a correct answer, the
voting choices will appear in black.
Exporting i>grader Polling Data
You can export student grade data, for the term to date or for selected sessions, in .CSV files. .CSV
(comma separated value) is a simple file type that can be read by nearly all text editors, spreadsheet and
database programs, including Microsoft Excel. You can choose to export the file in a simple “General”
format or in a format that is ready to upload into your course management system. The General format is
discussed below. For details on specific course management systems’ exports please se e the
related course management system documentation.
There are two i-grader buttons available for exporting grades, available at the bottom left of the main igrader screen:
1. Export Selected Session as CSV (Excel) file
2. Export Term Summary as CSV (Excel) file
31
Questions? Contact us at support@iclicker.com or call toll-free at 1-866-209-5698.
Page 32

Export Selected Session(s):
This function allows you to select specific sessions to export. In the below example, Lecture 1 has been
selected by checking the box to the left of that session’s name.
Tip: Remember that session names can be edited from the top of the Set Scores screen for each session
in i-grader.
You may select just one session or multiple sessions.
New feature! When you export sessions, you will be prompted to select the student information that you
would like to include along with the scores. Please note that this option only applies if your selected
CMS is set to General and you are using a Roster.txt file. Files exported for use with specific
Course Management Systems must be exported in a format specific to the CMS.
When you click the Export Selected Session(s) button, you will see a message that the scores have
been saved to a file. The Export feature creates a file, named UploadFile.csv, in your course folder.
Below is a sample file, opened with Microsoft Excel:
32
Questions? Contact us at support@iclicker.com
or call toll-free at 1-866-209-5698.
Page 33

Note that you can include additional student information or your file may be saved/named slightly
differently if you are using i-clicker with your campus course management system (and have followed the
steps required to enable i-clicker files to be formatted for your particular course management system).
Tip:
Each time a file is exported, the same filename (UploadFile.csv) is used. This will overwrite any
existing files of the same name from previous exports. If you wish to keep more than one file, simply
rename the first one something different, or move the file out of your course folder, before using the
Export option again. This will avoid the second report overwriting the first.
Export Term Summary (All Sessions)
This option also creates a file named UploadFile.csv, in the course folder.
While similar to Exporting Selected
Sessions, Export Term Summary
includes a column for every session you
have held to date and a column for each
student’s total number of points earned to
date.
Note: Please see the course management documentation for detailed
instructions on integrating i-clicker and i-grader with Blackboard, Blackboard
Enterprise System (formerly WebCT), ANGEL, Moodle, Desire2Learn and Sakai.
Section Four -Assigning Preferences and Settings:
Customizing i-clicker and i-grader
33
Questions? Contact us at support@iclicker.com or call toll-free at 1-866-209-5698.
Page 34

To customize our system to meet your specific teaching goals/needs, locate and select Your Settings
and Preferences from the main i-clicker
Welcome Screen.
The default settings for both the i-clicker and
i-grader applications are chosen to make this
classroom response system easy to learn and
use.
However, you may alter the default timer
settings, graph display, point values, and many
other features to best meet your individual
needs.
Tip:
You have the option to save your
Preferences for only one polling session or for
the entire term. You may save some
preferences for the duration of the course and
others for only a single session.
New upgrade! The Settings and Preferences screen is now available from the i-clicker floating menu
bar as well. This is useful if you have started or are about to start a session and realize that you need to
make a last-minute change to your settings.
To open the Settings and Preferences menu from the i-clicker menu bar, click on the “Options” or down
arrow button on the menu bar, then from the drop down select Settings and Preferences.
After you select Settings and Preferences from the Welcome Screen or menu bar, you will be taken to the
Settings and Preferences screen. This screen has four settings tabs: General, Registratio n/Export,
Question and Polling, and Scoring. Below is an overview of each subsection for each tab in Your
Settings and Preferences.
General Settings/Preferences
34
Questions? Contact us at support@iclicker.com or call toll-free at 1-866-209-5698.
Page 35
1. Enter Your Course Name: The course name you enter here is used in i-grader, HTML reports
and on the Welcome Screen of the i-clicker program. It does not have to match the name of your iclicker course folder. (Note: Entering a new course name is not the same as creating new i-clicker
folders for each course or section. Remember that you will need a separate copy of the “MyCoursePC”
folder for each section or course for which you are using i-clicker.)
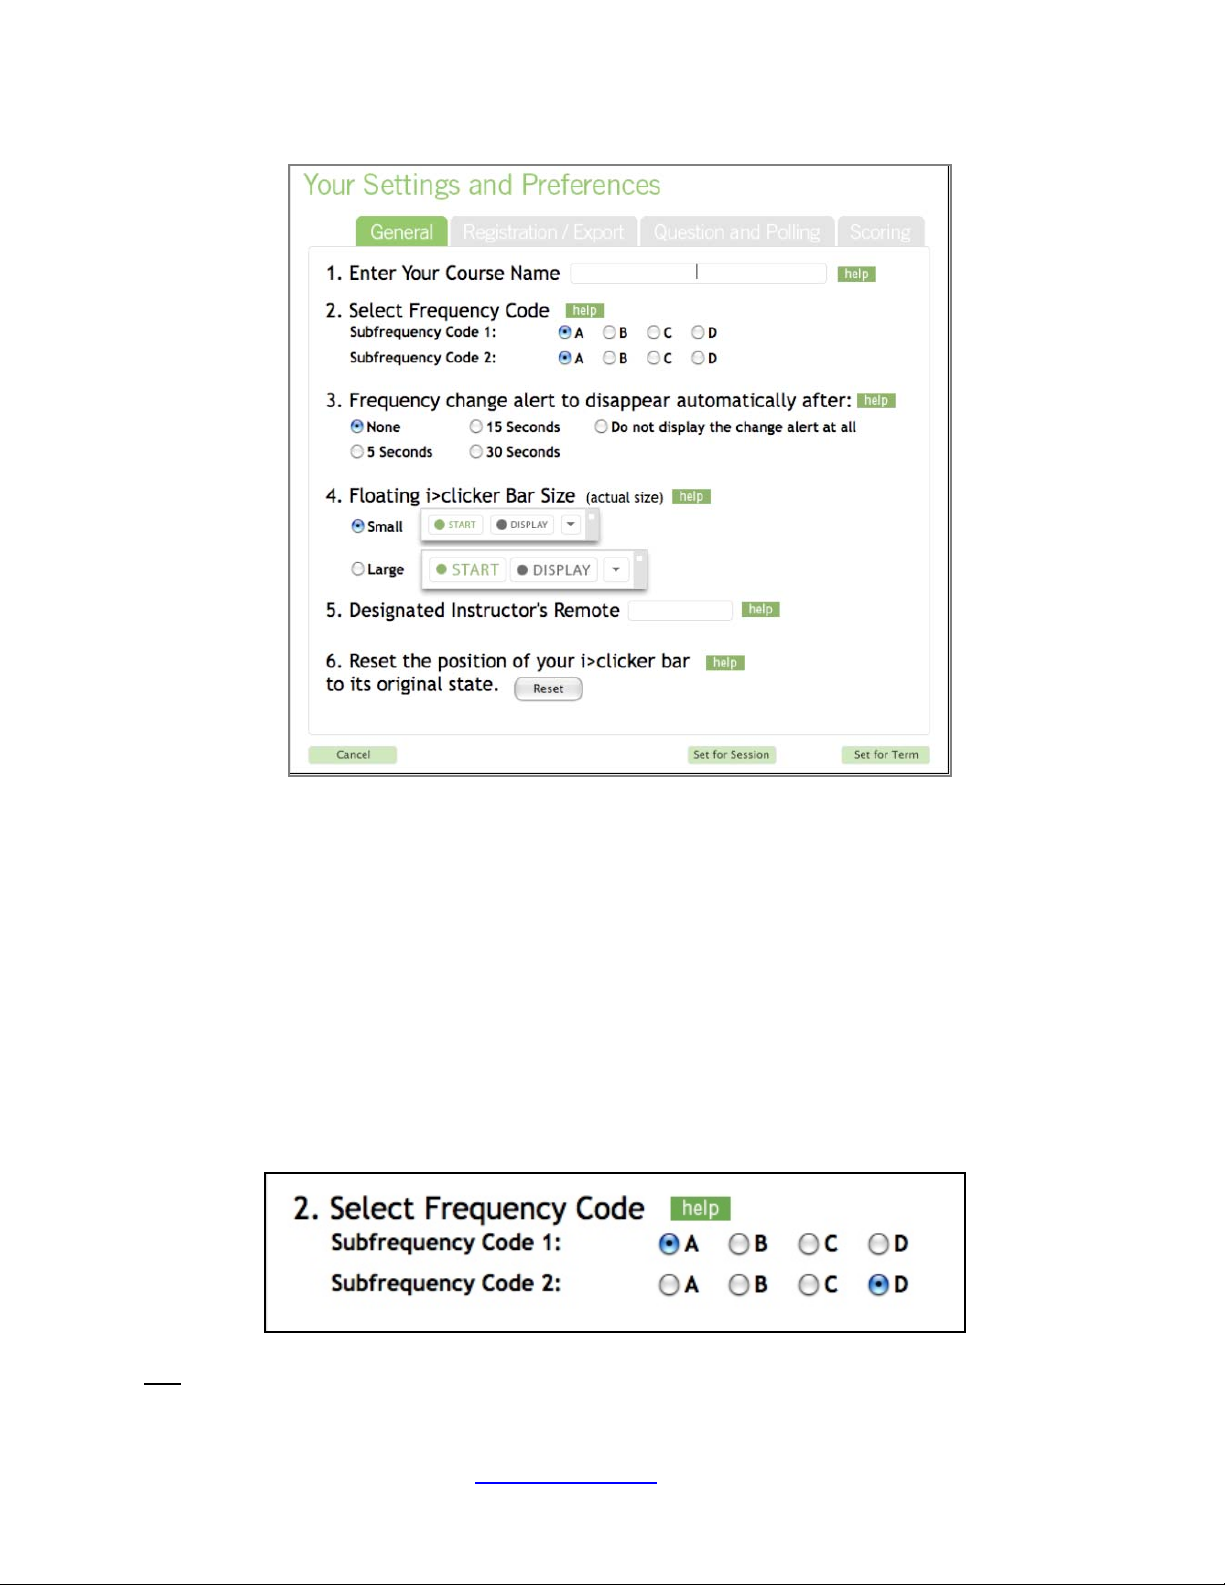
2. Setting a Frequency Code: The i-clicker 2-way radio frequency student response system
operates on one of 16 channels in the 915 MHz frequency range.
The default frequency channel for both the base and the student remotes is AA. If you are the only
professor using i-clicker at a given time you should not modify this frequency. However, if someone else
is using i-clicker in close proximity, one of you will want to use a different channel (such as AD, as in the
example below). i-clicker has sixteen different frequencies available (AA, AB, AC, AD, BA, BB, BC, BD,
CA, CB, CC, CD, DA, DB, DC, and DD).
Tip:
If you know you will be using i-clicker near another professor using i-clicker for the entire term, we
recommend you set your default frequency for the entire term. If i-clicker is in use across your institution,
35
Questions? Contact us at support@iclicker.com or call toll-free at 1-866-209-5698.
Page 36

you may also need to coordinate frequencies with your IT administrator. They may have already assigned
channels to each classroom.
If you change your frequency from the default, your
students will need to change their remote frequency at the
beginning of each session. When you begin polling, an alert
will appear with instructions for your students. They will
need to:
A. Press and hold the On/Off (power) button on their i-
clicker until the blue Power light begins flashing.
B. Press the new two-letter code (that you’ve designated in
your Settings/Preferences). In our example, that new code
is AD. A green Vote Status light will indicate your students
have successfully reset their remote frequency.
This remote frequency will be set for as long as the remote is
on. Students will need to repeat this procedure for every
session. If the remote is accidentally shut off during the session
the student will need to repeat the process when the remote is turned on again.
3. New upgrade! Controlling the Frequency Change Display Options. You may alter the
length of time that this warning appears on your screen, or you may choose to disable the
warning/change alert completely (so that it never displays).
If you prefer that the warning remain on the screen until you click the Close button at the lower right
corner of the alert, simply choose the option to “Close Manually.” If you do not want to see the warning
appear before each question in the session (but do want the alert to appear the very first time you ask a
question), wait for the pop-up alert to appear and then un-check the option “Warn again on next question”
below the frequency instructions.
Note: The receiver must be plugged in and the i-clicker application must be running to enable students
to perform this procedure.
4. Floating i-clicker Bar Size: This allows you to choose the size of the floating menu bar that will
sit on top of your presentation materials. The default size of the floating menu bar is small as it is the least
obtrusive/distracting when projected on screen. However, if you have a very large lecture hall
(auditorium), the larger menu bar projects the timer and vote count more easily. The actual size of the bar
with each option selected is shown in the Settings and Preferences screen.
5. Designated Instructor’s Remote: You may designate one remote (any i-clicker remote will
do) as the Instructor’s Remote, for your own use in class. The instructor’s remote controls polling and
36
Questions? Contact us at support@iclicker.com
or call toll-free at 1-866-209-5698.
Page 37

moves between slides in your presentation software, allowing you freedom to move around the room
while conducting i-clicker polling sessions. Rather than counting the five choices (A, B, C, D, E,) as
student votes, the buttons control certain functions of the i-clicker polling software. The image below
illustrates each selection’s functionality on an Instructor’s Remote.
Tip/Upgrade!
Your Instructor’s Adopter Kit included the base, flash drive with software, USB cable, and
two blue remotes. It now includes an Instructor’s Remote sticker (and explanatory handout) as
well for your convenience. You can affix the sticker to one of your instructor’s remotes (blue remotes)
and it will serve as a reminder for each of the instructor functions listed above.
We recommend you designate one of the blue remotes in your Instructor’s Adopter Kit as your
Instructor’s Remote. There are no technical differences between a blue “instructor’s remote” and a
white student remote. The color is designed to make it easier for you to keep track of your individual
and loaner remotes.
To activate the Instructor’s Remote, enter the clicker’s serial ID (located on the bottom of the back of
your i-clicker) in the Designated Instructor’s Remote field (below) in General Settings and Preferences.
If you plan to use the Instructor’s Remote regularly, we recommend you set the code for the entire
course (or term).
Tip:
To use the C and D functions on the instructor’s remote (advance/back up slide s in your
presentation software), your presentation software (such as PowerPoint) must be the “active”
application on your PC. i-clicker will still float above your presentation software. However, if i-clicker
becomes the “active” program (for example, if you click on an i-clicker program window such as the
voting graphs), you will need to click once on your PowerPoint (or other) screen to make it the active
application again and use the C/D buttons on the instructor’s remote.
37
Questions? Contact us at support@iclicker.com
or call toll-free at 1-866-209-5698.
Page 38

Registration/Export: Settings and Preferences
1. Roll Call / In Class Registration: This setting modifies the way that student names appear on
the Roll Call screen for in class registration. This option does not modify the format of your roster or
Gradebook file. For more information about the Roll Call feature please see pages 14-15.
2. Roster/Export – Course Management System in Use: If you plan to record/report i-
clicker grades using your school’s course management system, select the system here. This will
modify the format of the exported CSV files from i-grader so that they can be imported into your CMS.
If you are not planning to integrate i-clicker with a CMS, leave the default option “None (General)”
selected.
Note: WebCT has been acquired by Blackboard, and WebCT systems have been re-named nationally
to “Blackboard Learning Systems.” However, these course management systems are still p owered by
the WebCT architecture, and for i-clicker purposes “WebCT” is still used in Settings/Preferences.
New upgrade! i-clicker now includes support for Moodle, Desire2Learn, Sakai, Blackboard 8, as well
as new versions of WebCT and ANGEL. For a brief description of the files needed for integrating each
CMS with i-clicker, hover your mouse over the name of your CMS to see additional help text. For more
help, contact support@iclicker.com.
If you are using i-clicker with your CMS, it is important to read and follow the directions located in
the course management system documentation (available on
eliminate potential future confusion and ensure your registration data is consistent with your
course management system.
www.iclicker.com). This will
38
Questions? Contact us at support@iclicker.com or call toll-free at 1-866-209-5698.
Page 39

3. Web Registration: Earlier versions of i-clicker required instructors to request and enter a code
specific to their institution. This requirement has been phased out of the software. If your students are
registering in class or on
if your students are registering via a locally hosted web site that is set up specifically for
students at your institution. In this case, you will be given a security code or URL by your campus IT.
If you are interested in campus hosted registration for i-clicker, please contact
learn more.
www.iclicker.com, leave this space blank. The security code is only needed
support@iclicker.com to
Questions and Polling: Settings and Preferences
1. Set Polling Timer: When you pose a question in i-clicker (i.e. when you click Start), the
software automatically starts a timer (which remains active while you are polling). The default i-clicker
setting counts upwards, beginning with zero. In the default setting, you must select “Stop” to end the
polling period.
Through Settings/Preferences, you may choose instead to enter a pre-set amount of time, in
increments of 15 seconds, for the i-clicker timer to count down. The timer will automatically stop at
zero and end the polling period.
New upgrade! The timer now allows you to select countdown time in 15 second increments, for any
length of time from 15 seconds to 4 minutes.
39
Questions? Contact us at support@iclicker.com or call toll-free at 1-866-209-5698.
Page 40

Tip: In the countdown mode, the “+” and “-" buttons to the left of the timer allow you to add or subtract
20 seconds as needed. You can still stop polling (even if you selected the “count down” option) by
pressing STOP on the floating menu bar.
2. Chart Display Options: During polling, a graph is generated showing the results of each
question in your session. The graphs can be displayed by clicking the “Display” button on the i-clicker
floating menu bar or by using B on the Instructor’s Remote. This setting allows you to select whether
the graph should be displayed as multi-color, monochrome, or a pie chart.
Tip:
For any display option, if you designate a correct answer choice and display the graph, the bar will
appear in green and the remaining bars will turn red. See the example below (the left example is the
pie chart without a correct answer designated; the right example is the same chart with a correct
answer of C):
To return the graph to the default multicolored mode, mouse over the graph so that the answer choices
appear and select the ?, or if you are using the Instructor’s Remote function to toggle a correct answer,
toggle through all options until the graph returns to multicolored.
3. Voting Results Grid: This option allows you to display (or hide) a grid of your students’ voting
entries each time you ask a question. The voting results grid gives students an additional opportunity to
confirm their votes were received. (Note that the “Vote Status” light on each clicker flashes green each
time a vote is received by the i-clicker base, so your students can confirm that their votes were
recorded without displaying this grid.)
Tip: While this is a comfort to students, the voting results grid can be distracting from lecture if used
extensively. We recommend you use this only in the beginning of the term if students need reassurance
that their votes are being collected. You may also minimize the voting results grid during a polling
session by clicking on the
⌧ on the top right corner of the grid.
4. Voting Grid Display Options: There are two ways to display the voting results grid. Confirmed
Vote Receipt Only allows students to see their vote was received but doe sn’t indicate their choice, while
Confirmed Vote Receipt and Vote Selection allows students to see both their vote receipt and last
received response on the screen.
40
Questions? Contact us at support@iclicker.com or call toll-free at 1-866-209-5698.
Page 41

Confirmed Vote Receipt Only (shown below) displays the ID of each participating clicker.
The color automatically changes from blue to green each time a vote is changed. So, in the
example below, remote ID 0028E7CF has voted but has also changed his/her vote, while remote
ID 11AE05BA has voted once.
Confirmed Receipt and Vote Selection displays both the students i-clicker remote ID and a different
color depending on their last received response. As in the example below, a key will appear at the top
of the grid to let you know which colors correspond to which answer choices. The student with remote
ID 02671277 answered “B” for this question, while students with remotes 0268 CAA0 and 005EFCA2
answered “C.”
Tip: During polling, your students can freely change their votes at any time until you select STOP (their
last vote is recorded). Students may use the color coding in this Vote Selection grid to quickly identify
the most popular answer and change their vote in response. This behavior could both skew your
question data and also impact your performance points assignments. If you are assigning performance
points for a correct answer in your sessions, you may not want to choose the Confirmed Vote Receipt
and Vote Selection option.
5. Question Pop-Up: If you select “Yes” here, a pop-up window will appear each time you initiate a
question in i-clicker, allowing you to title the question (the default titles are Question 1, Question 2, etc)
and assign a correct answer. The correct answer will not display in the “Answer” field; your students
will only see an asterisk (*) regardless of the letter choice you enter.
Tip: If you have selected this option, you may type in the titles and answers during the session or you
may assign titles and correct answers to your questions ahead of time by setting up a file and adding it
to your course folder. For instructions on how to set up this file, please see Section 7 on page 48.
41
Questions? Contact us at support@iclicker.com or call toll-free at 1-866-209-5698.
Page 42

Scoring Settings and Preferences
In this section, you can to establish the point values students can earn for actively participating in cla ss
and for answering questions correctly. You may choose to set these preferences for the entire term
(course) or session. Your choices and selections on the Scoring Options page will appear in the igrader Set Session Scoring window for subsequent lecture(s).
Tip: Setting points values here, prior to using i-clicker in class will save you significant time in post-lecture
work and grading.
Participation points are
awarded to students who attend
and vote during lecture
(encouraging student
engagement). Participation
points are awarded by overall
session activity, not by individual
question.
Performance points are earned
for answering a specific question
or questions. Students can earn
performance points without
earning participation points, or
vice versa, depending upon your
preference. For more about
different types of points, please
see page 23.
Participation/Attendance Points
1. Number of Participation/Attendance Points per session: This field allows you to enter
the number of points students earn in any given session for meeting the participation requirement, as
defined in #2. Participation Requirement, below.
42
Questions? Contact us at support@iclicker.com or call toll-free at 1-866-209-5698.
Page 43

2. Participation Requirement: To earn the point value established above, students must
respond to a certain percentage of questions in a session.
New upgrade! Two new levels have been added to the Participation Requirement; you may now
choose levels of Very Lenient (one question answered) and Very Strict (all questions answered).
Depending upon the total number of questions, i-clicker will automatically calculate the minimum
number of responses needed.
Example: If you enter “10” points in Number of Participation/Attendance Points per session and
there are 10 questions in a session, a student must respond to 9 of the 10 questions in the “Strict” level
to earn the 10 points. In the “Lenient” level, the student must respond to a minimum of 5 questions to
earn 10 points.
Performance Points
1. Number of performance points for each question: This field allows you to enter the
default number of points students are awarded for any answer. These are different from participation
points in that they reward students for performance by question
students for participation by session.
2. Additional points for each correct answer: This field allows you to reward students for
choosing the correct answer
simply answering the question. In this example, students are given one point simply for answering the
question (even if their answer is not correct), plus an additional 4 points for getting the answer right.
for each question, in addition to any performance points you award in for
3. Cap Session Points: Here, you can cap the number of total performance points a student can
earn in a single session. Example: If your maximum is capped at ten points, and you hold a 15
question session with each question worth one point, even if a student answers all 15 questions
correctly, the most she can earn for that session is 10 performance points.
43
Questions? Contact us at support@iclicker.com or call toll-free at 1-866-209-5698.
, whereas participation points reward
Page 44

Section Five -Resuming Your Last Session
In addition to “Your Settings and Preferences” on the main Welcome Screen, you also have the option to
“Resume Last Session.” This allows you to resume a lecture, rather than starting a new one. This option
is useful if you accidentally exit the i-clicker application or your computer crashed.
44
Questions? Contact us at support@iclicker.com or call toll-free at 1-866-209-5698.
Page 45

Section Six –WebUpdater: Updating Your Software
Occasionally, we will make improvements made to the Macintosh software. These updated versions can
be downloaded free of charge using the WebUpdate application which you will find in each of your course
folders (see below).
Simply double-click on the WebUpdate_V2 icon in your class folder, making sure the computer you are
using has access to the internet. This application checks the i-clicker website for the version numbers of
the latest available i-clicker and i-grader applications and compares these to what is found in your
course folder(s). If either or both of your applications are not the latest available you will be given the
opportunity to update. Click the View Report button to view details about the upgrade:
Note
: WebUpdate only updates the i-clicker and i-grader applications that are in the same class
folder as the WebUpdate application. If you are teaching more than one class you will need to run the
WebUpdate application in each of your class folders to confirm all of your applications are updated.
These updates will not override your current course data but will provide you with key
functional enhancements to the polling/grading software. We highly recommend you check for
revisions and updates to the software on a regular basis.
45
Questions? Contact us at support@iclicker.com or call toll-free at 1-866-209-5698.
Page 46

Section Seven -Pre-Assigning Question Titles and Correct
Answers: Questionlist.csv
If you’d like to assign titles to your questions (and the correct answer) before your lecture (instead of
the default Q1, Q2 assignments given by i-clicker), you may create a Questionlist file and save it in
your course folder. If you are teaching multiple sections or courses, you will need to include a
questionlist.csv file in each course folder.
Tip: i-clicker can only identify and utilize one questionlist.csv file at a time. If you want to create
multiple files at once (i.e. one for each lecture), or if you want to save these files for later use, create
the files and save them using different file names that provide you with more information (e.g.
questionlist0716.csv, or Week 1 Lecture.csv). Do not save these files within your i-clicker folder.
When you are ready to use a file for your lecture, copy the file to your i-clicker course folder and
rename it to questionlist.csv. When you are finished with the lecture you can delete the copy in your
course folder.
The file must be in the format “question title, answer” with one question on each line. In the example
below, the questions are titled Question 1, Question 2, and Question 3, and the correct answers are
A, B, and B:
Question 1, A
Question 2, B
Question 3, B
Creating a questionlist.csv in
Microsoft Excel
1. Open Microsoft Excel.
2. In column A, enter the title of each
question.
3. In column B, enter the corresponding
correct answer.
4. Go to File, locate/select “Save As” and
name your document questionlist in the
Save As:” field.
5. In the “Format:” field/pull-down, locate
“CSV” or comma delimited as the file
type from the drop-down menu and
select that option.
6. Before clicking “Save,” make sure you are saving the questionlist file in your course folder (i.e. the
folder in which your i-clicker and i-grader applications reside).
7. If a previous questionlist file exists, you will be asked if you wish to replace it. Select “Replace.”
Tip:
Do not name your questionlist as questionlist.csv in the File Name field. If you do this and save the
file as a CSV file, it will not work properly with your i-clicker application.
46
Questions? Contact us at support@iclicker.com or call toll-free at 1-866-209-5698.
Page 47
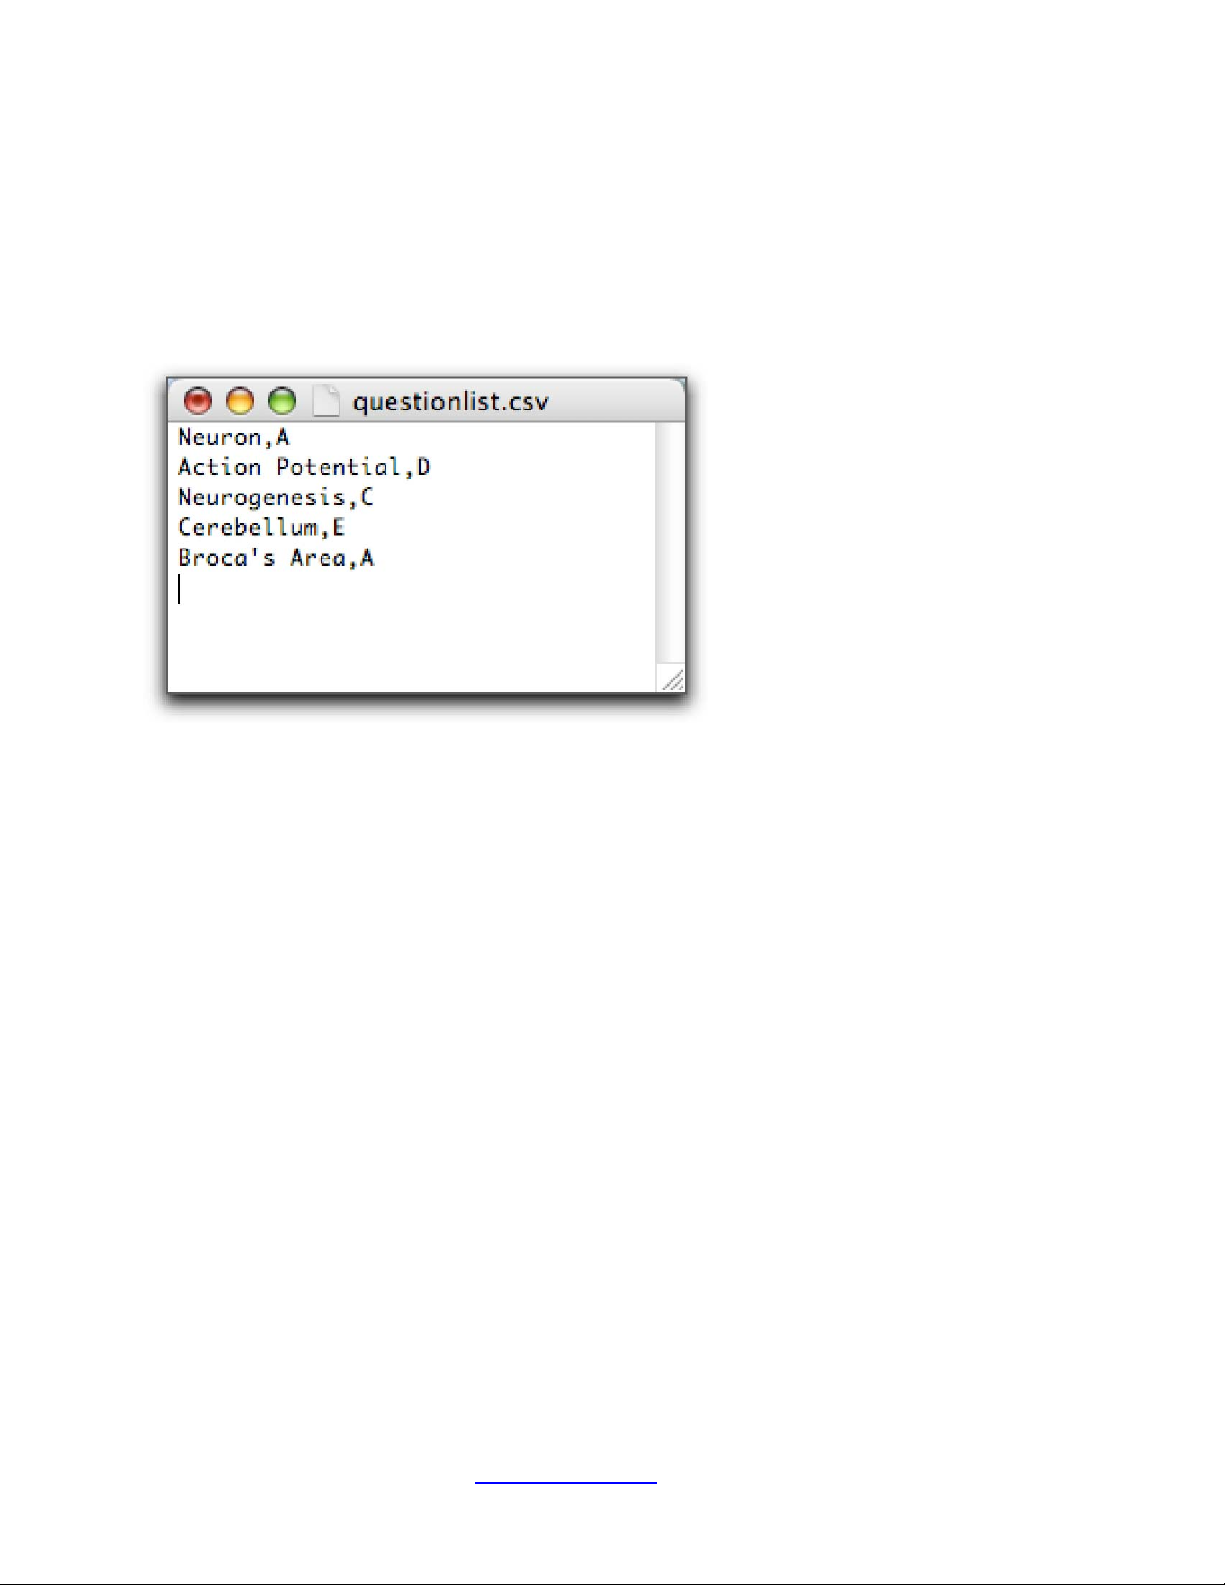
Creating a Questionlist.csv in TextEdit
1. From the Applications folder, locate and open TextEdit.
2. Enter the title of the question followed by a comma and then the correct answer.
3. Select “Save As” and name the file “questionlist.csv.”
4. Under “File Type,” select “All Files” and click Save.
5. If you are not able to save the file in CSV format, cancel the Save and go to the Format menu. Select
the option “Make Plain Text.”
For both options, you must save the file within the i-clicker course folder so the software is able
to recognize it and apply the values you defined in the file to i-grader.
47
Questions? Contact us at support@iclicker.com or call toll-free at 1-866-209-5698.
 Loading...