

Page 1

iPad
User Guide
For iOS 7.1 Software
Page 2

Contents
7 Chapter 1: iPad at a Glance
7 iPad Overview
9 Accessories
9 Multi-Touch screen
10 Sleep/Wake button
10 Home button
11 Volume buttons and the Side Switch
11 SIM card tray
12 Status icons
13 Chapter 2: Getting Started
13 Set up iPad
13 Connect to Wi-Fi
14 Apple ID
14 Set up mail and other accounts
14 Manage content on your iOS devices
15 iCloud
16 Connect iPad to your computer
17 Sync with iTunes
17 Your iPad name
17 Date and time
18 International settings
18 View this user guide on iPad
19 Chapter 3: Basics
19 Use apps
21 Customize iPad
23 Type text
26 Dictation
27 Search
28 Control Center
28 Alerts and Notication Center
29 Sounds and silence
29 Do Not Disturb
30 AirDrop, iCloud, and other ways to share
30 Transfer les
31 Personal Hotspot
31 AirPlay
32 AirPrint
32 Bluetooth devices
32 Restrictions
33 Privacy
2
Page 3

33 Security
35 Charge and monitor the battery
36 Travel with iPad
37 Chapter 4: Siri
37 Use Siri
38 Tell Siri about yourself
38 Make corrections
38 Siri settings
39 Chapter 5: Messages
39 iMessage service
39 Send and receive messages
40 Manage conversations
41 Share photos, videos, and more
41 Messages settings
42 Chapter 6: Mail
42 Write messages
43 Get a sneak peek
43 Finish a message later
43 See important messages
44 Attachments
44 Work with multiple messages
45 See and save addresses
45 Print messages
45 Mail settings
46 Chapter 7: Safari
46 Safari at a glance
47 Search the web
47 Browse the web
48 Keep bookmarks
48 Share what you discover
49 Fill in forms
49 Avoid clutter with Reader
50 Save a reading list for later
50 Privacy and security
51 Safari settings
52 Chapter 8: Music
52 iTunes Radio
53 Get music
53 Browse and play
55 Playlists
55 Genius—made for you
56 Siri
56 iTunes Match
57 Music settings
Contents 3
Page 4

58 Chapter 9: FaceTime
58 FaceTime at a glance
59 Make and answer calls
59 Manage calls
60 Chapter 10: Calendar
60 Calendar at a glance
61 Invitations
61 Use multiple calendars
62 Share iCloud calendars
62 Calendar settings
63 Chapter 11: Photos
63 View photos and videos
64 Organize your photos and videos
64 iCloud Photo Sharing
65 My Photo Stream
66 Share photos and videos
66 Edit photos and trim videos
67 Print photos
67 Import photos and videos
67 Photos settings
68 Chapter 12: Camera
68 Camera at a glance
69 Take photos and videos
69 HDR
69 View, share, and print
70 Camera settings
71 Chapter 13: Contacts
71 Contacts at a glance
72 Add contacts
73 Contacts settings
74 Chapter 14: Clock
74 Clock at a glance
75 Alarms and timers
76 Chapter 15: Maps
76 Find places
77 Get more info
77 Get directions
78 3D and Flyover
78 Maps settings
79 Chapter 16: Videos
79 Videos at a glance
80 Add videos to your library
80 Control playback
81 Videos settings
Contents 4
Page 5

82 Chapter 17: Notes
82 Notes at a glance
83 Share notes in multiple accounts
84 Chapter 18: Reminders
85 Scheduled reminders
85 Location reminders
85 Reminders settings
86 Chapter 19: Photo Booth
86 Take photos
87 Manage photos
88 Chapter 20: Game Center
88 Game Center at a glance
89 Play games with friends
89 Game Center settings
90 Chapter 21: Newsstand
90 Newsstand at a glance
91 Chapter 22: iTunes Store
91 iTunes Store at a glance
92 Browse or search
92 Purchase, rent, or redeem
93 iTunes Store settings
94 Chapter 23: App Store
94 App Store at a glance
94 Find apps
95 Purchase, redeem, and download
96 App Store settings
97 Chapter 24: iBooks
97 Get iBooks
97 Read a book
98 Interact with multimedia
98 Study notes and glossary terms
99 Organize books
99 Read PDFs
100 iBooks settings
101 Chapter 25: Podcasts
101 Podcasts at a glance
102 Get podcasts
102 Control playback
103 Organize your podcasts
103 Podcasts settings
104 Appendix A: Accessibility
104 Accessibility features
104 Accessibility Shortcut
Contents 5
Page 6

105 VoiceOver
115 Siri
115 Zoom
115 Invert Colors
115 Speak Selection
116 Speak Auto-Text
116 Large, bold, and high-contrast text
116 Reduced screen motion
116 On/o switch labels
116 Hearing aids
117 Subtitles and closed captions
117 Mono audio and balance
117 Assignable tones
117 Guided Access
118 Switch Control
121 AssistiveTouch
122 Widescreen keyboards
122 Accessibility in OS X
123 Appendix B: iPad in Business
123 iPad in the enterprise
123 Mail, Contacts, and Calendar
123 Network access
123 Apps
125 Appendix C: International Keyboards
125 Use international keyboards
126 Special input methods
128 Appendix D: Safety, Handling, & Support
128 Important safety information
130 Important handling information
130 iPad Support site
131 Restart or reset iPad
131 Reset iPad settings
131 An app doesn’t ll the screen
132 Onscreen keyboard doesn’t appear
132 Get information about your iPad
132 Usage information
132 Disabled iPad
132 VPN settings
133 Proles settings
133 Back up iPad
134 Update and restore iPad software
134 Cellular settings
135 Sound, music, and video
136 Sell or give away iPad?
136 Learning more, service, and support
137 FCC compliance statement
137 Canadian regulatory statement
138 Disposal and recycling information
139 Apple and the environment
Contents 6
Page 7

iPad at a Glance
Multi-Touch
display
FaceTime
HD camera
Home
App icons
Status bar
Lightning connector
Speakers
Headset jack
Sleep/Wake button
Sleep/Wake button
iSight
camera
Volume
buttons
Nano-SIM
tray (cellular
models)
Side Switch
Microphones
This guide describes iOS 7.1 for iPad 2, iPad (3rd generation and 4th generation), iPad Air,
iPad mini, and iPad mini with Retina display.
iPad Overview
iPad mini with Retina display
1
Status bar
App icons
Home
iSight
camera
Side Switch
Volume
buttons
FaceTime
HD camera
Multi-Touch
display
Headset jack
Microphones
Speakers
Nano-SIM
tray (cellular
7
models)
Lightning connector
Page 8
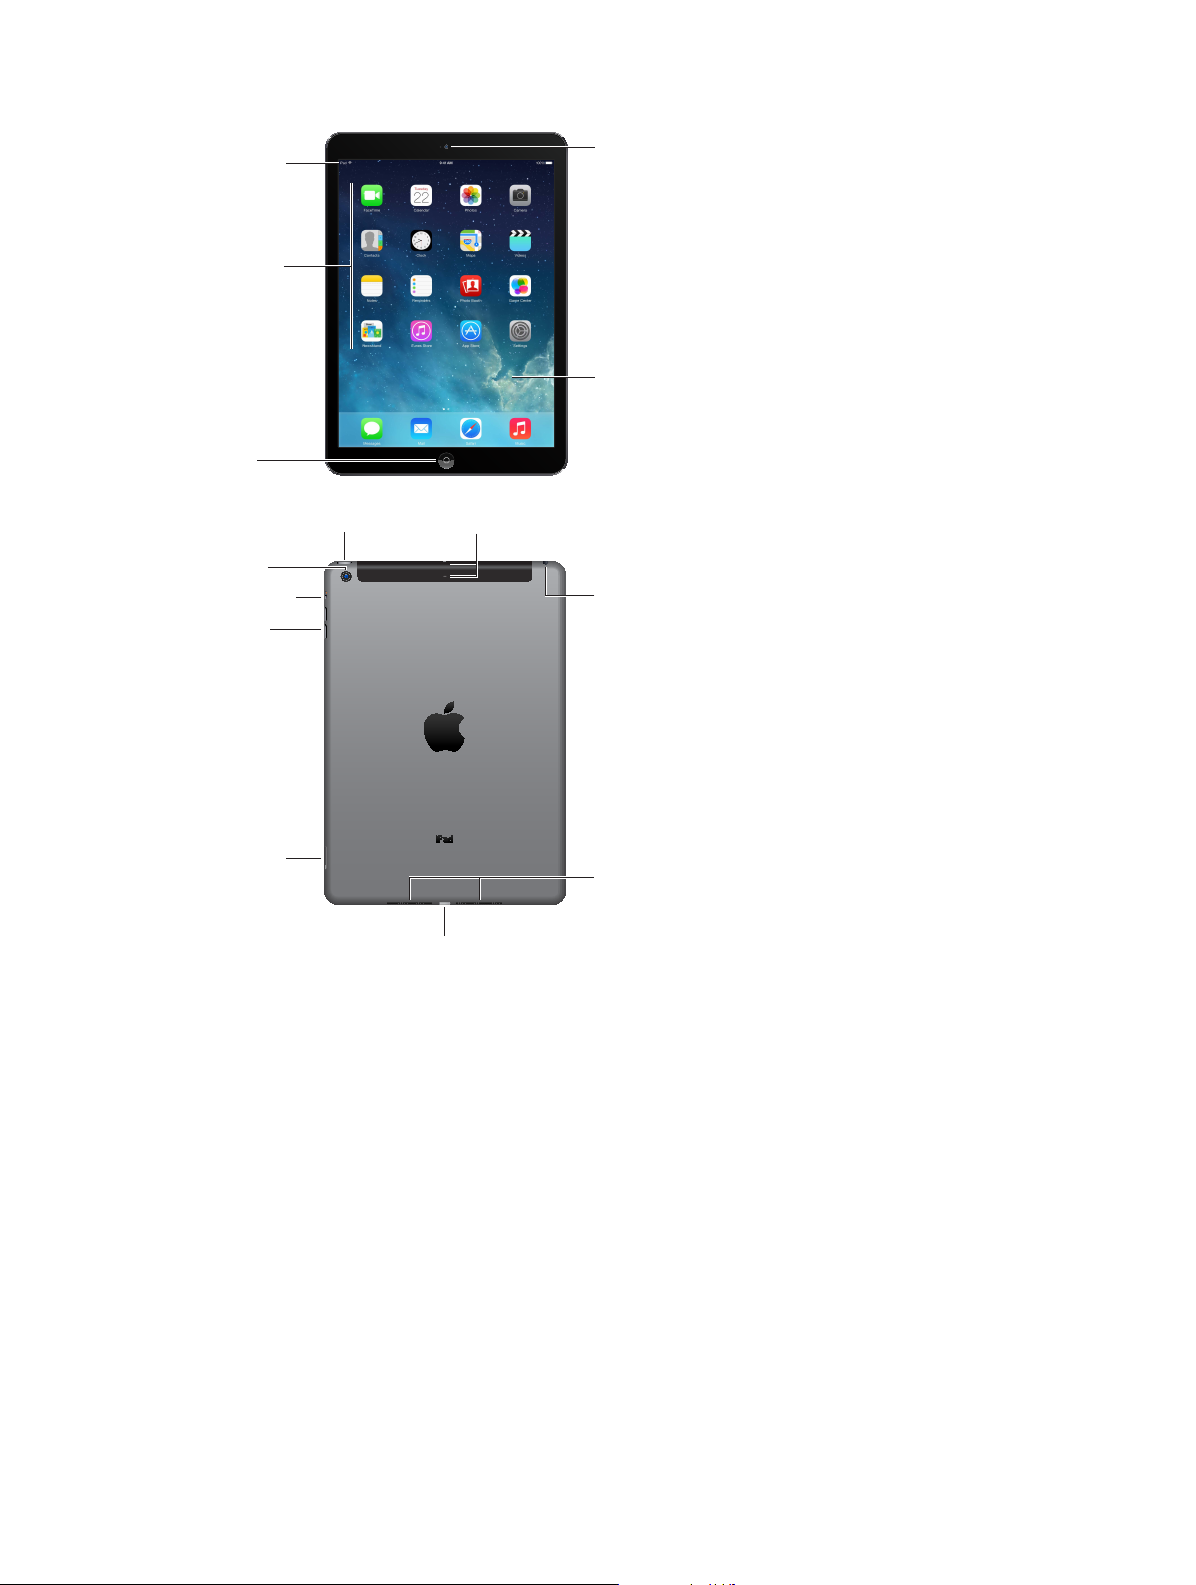
iPad Air
Multi-Touch
display
FaceTime
HD camera
Home
App icons
Status bar
Lightning connector
Microphones
Headset jack
Nano-SIM
tray (cellular
models)
Sleep/Wake
button
Sleep/Wake
iSight
camera
Volume
buttons
Side Switch
Speakers
Status bar
App icons
Home
iSight
camera
Side Switch
Volume
buttons
button
FaceTime
HD camera
Multi-Touch
display
Microphones
Headset jack
Nano-SIM
tray (cellular
models)
Lightning connector
Speakers
Your features and apps may vary depending on the model of iPad you have, and on your
location, language, and carrier. To nd out which features are supported in your area, see
www.apple.com/ios/feature-availability.
Chapter 1 iPad at a Glance 8
Page 9
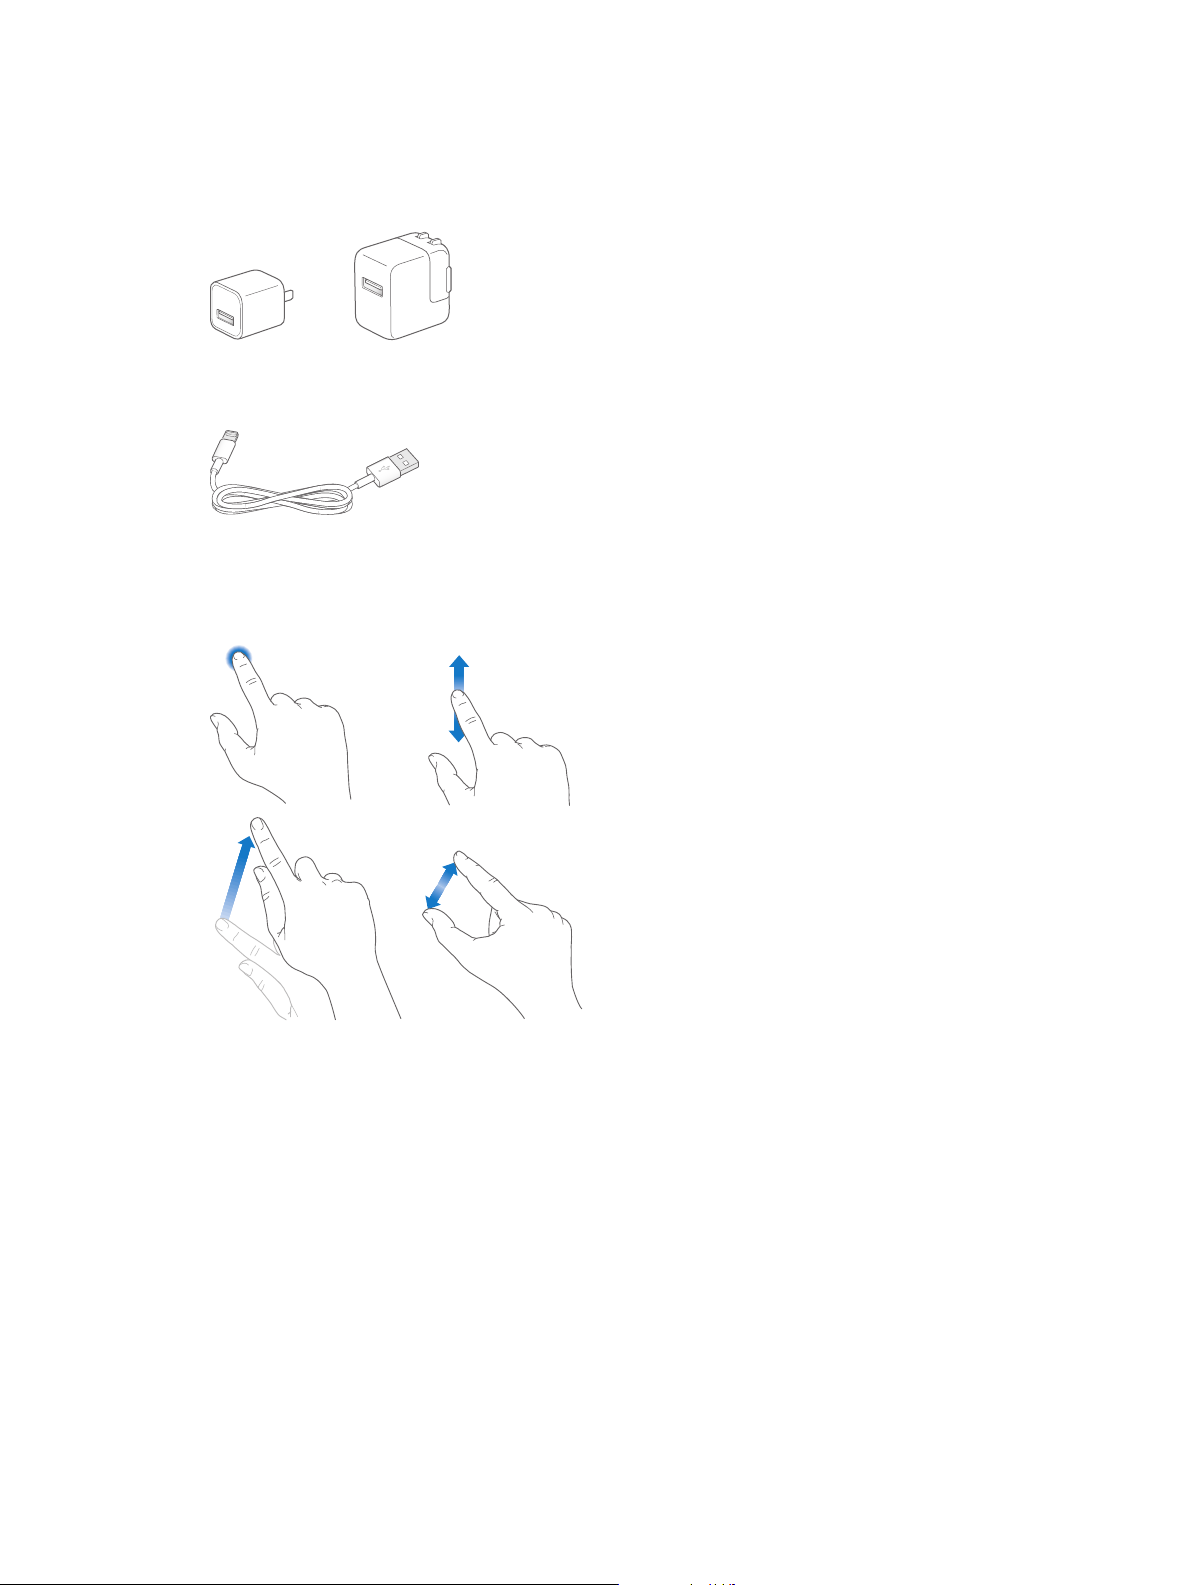
Accessories
The following accessories are included with iPad:
USB power adapter. Use the included adapter to power iPad and charge the battery. Your
adapter looks like one shown below, depending on the iPad model and your region.
Lightning to USB Cable. Use this to connect iPad (4th generation or later) or iPad mini to the
USB power adapter or to your computer.
Multi-Touch screen
A few simple gestures—tap, drag, swipe, and pinch—are all you need to use iPad and its apps.
Chapter 1 iPad at a Glance 9
Page 10

Sleep/Wake button
Sleep/Wake
button
You can lock iPad and put it to sleep when you’re not using it. When iPad is locked,
nothing happens if you touch the screen, but music continues playing and you can use the
volume buttons.
Sleep/Wake
button
Lock iPad. Press the Sleep/Wake button.
Unlock iPad. Press the Home button or the Sleep/Wake button, then drag the slider that
appears onscreen.
Turn iPad on. Hold down the Sleep/Wake button until the Apple logo appears.
Turn iPad o. Hold down the Sleep/Wake button for a few seconds until the slider appears
onscreen, then drag the slider.
If you don’t touch the screen for two minutes, iPad locks itself. You can change how long iPad
waits to lock itself, or set a passcode to unlock iPad.
Set the auto-lock time. Go to Settings > General > Auto-Lock.
Set a passcode. Go to Settings > Passcode.
An iPad Smart Cover or iPad Smart Case, sold separately, can lock or unlock iPad for you (iPad 2
or later).
Set your iPad Smart Cover or iPad Smart Case to lock and unlock iPad. Go to Settings >
General, then turn on Lock/Unlock.
Home button
The Home button takes you back to the Home screen at any time. It also provides other
convenient shortcuts.
Go to the Home screen. Press the Home button.
On the Home screen, tap an app to open it. See Start from home on page 19.
See apps you’ve opened. Double-click the Home button when iPad is unlocked, then swipe left
or right.
Use Siri (iPad 3rd generation or later). Press and hold the Home button. See Use Siri on page 37.
Chapter 1 iPad at a Glance 10
Page 11
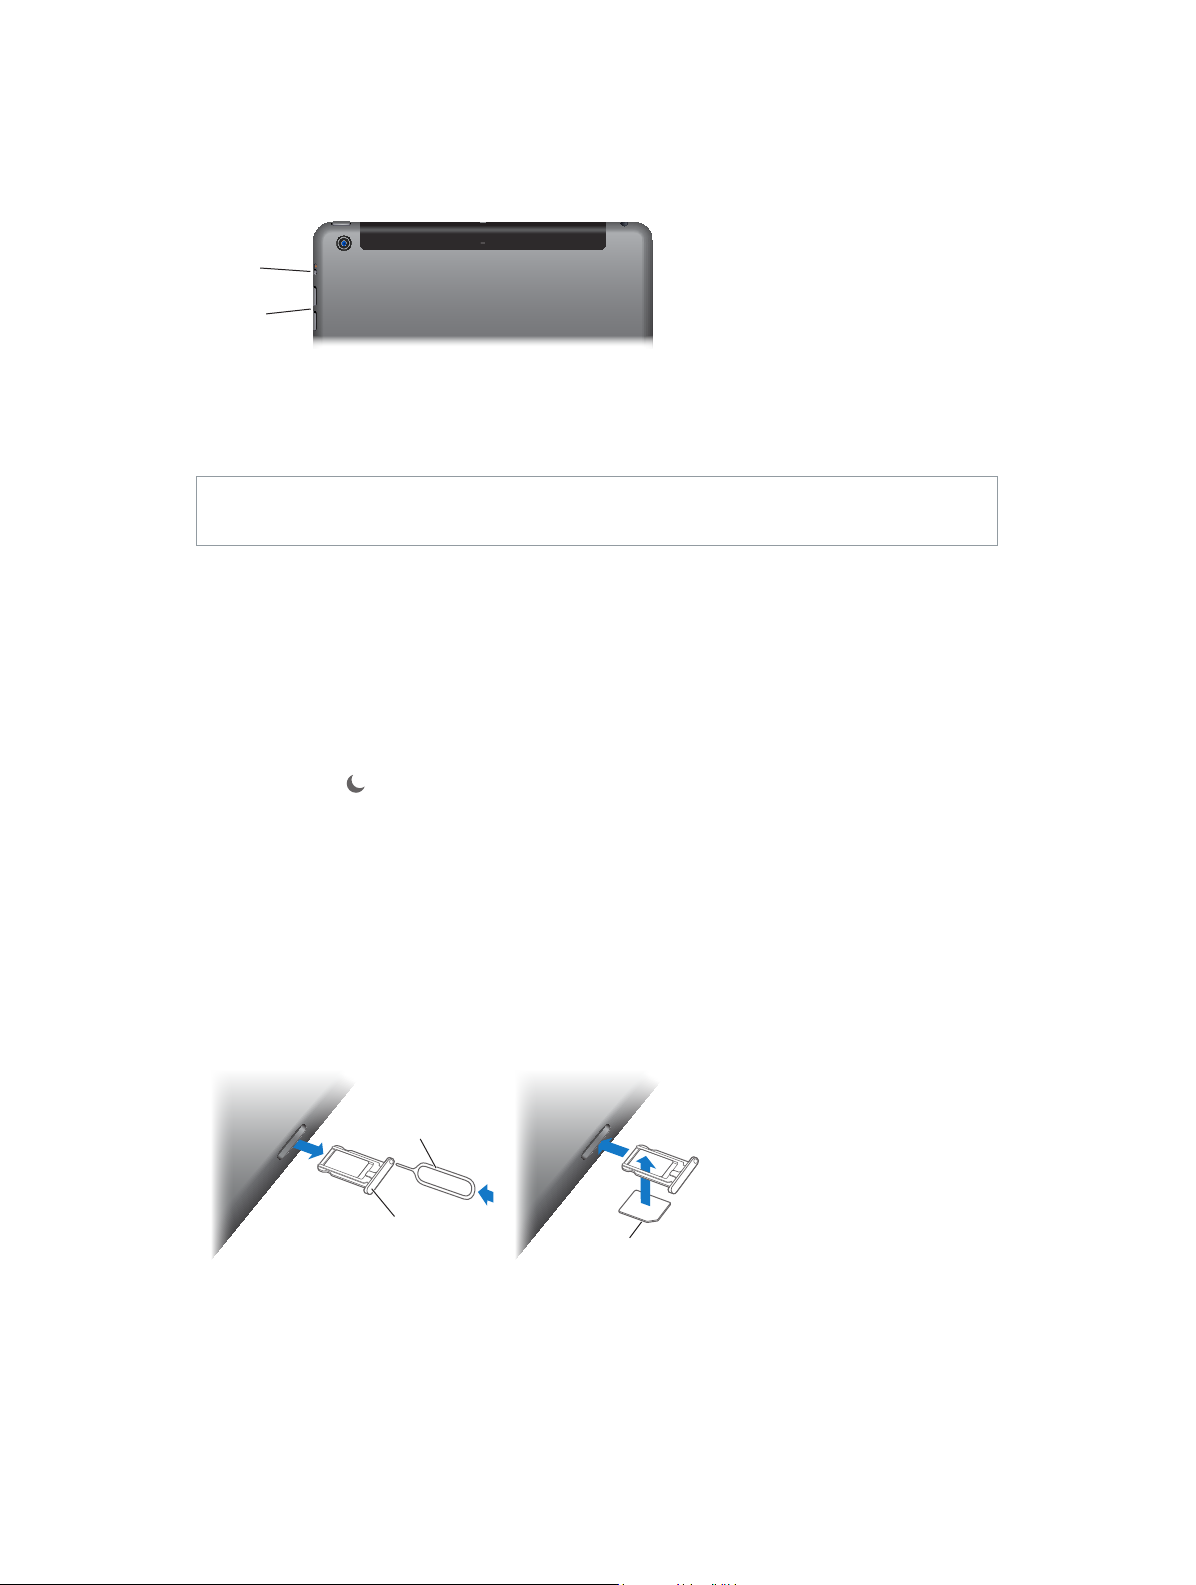
Volume buttons and the Side Switch
Volume
buttons
Side
Switch
Nano-SIM
card
SIM
tray
SIM eject
tool
Use the Volume buttons to adjust the volume of songs and other media, and of alerts and sound
eects. Use the Side Switch to silence audio alerts and notications. Or, set it to prevent iPad
from switching between portrait and landscape orientation.
Side
Switch
Volume
buttons
Adjust the volume. Press the Volume buttons.
•
Mute the sound: Press and hold the Volume Down button.
•
Set a volume limit: Go to Settings > Music > Volume Limit.
WARNING: For important information about avoiding hearing loss, see Important safety
information on page 128 .
Mute notications, alerts, and sound eects. Slide the Side Switch toward the Volume buttons.
The Side Switch doesn’t mute the audio from music, podcasts, movies, and TV shows.
Use the Side Switch to lock the screen orientation. Go to Settings > General, then tap
Lock Rotation.
You can also use Do Not Disturb to silence FaceTime calls, alerts, and notications.
Set iPad to Do Not Disturb: Swipe up from the bottom edge of the screen to open Control
Center, then tap . Do Not Disturb keeps alerts and notications from making any sounds or
lighting up the screen when the screen is locked. Alarms, however, still sound. If the screen is
unlocked, Do Not Disturb has no eect.
To schedule quiet hours, allow FaceTime calls from specic people, or allow repeated FaceTime
calls to ring through, go to Settings > Do Not Disturb. See Do Not Disturb on page 29.
SIM card tray
The SIM card in iPad Wi-Fi + Cellular models is used for your cellular data connection. If your SIM
card isn’t installed or if you change carriers, you may need to install or replace the SIM card.
SIM eject
tool
SIM
tray
Nano-SIM
card
Open the SIM tray. Insert a SIM eject tool into the hole on the SIM tray, then press rmly and
push the tool straight in until the tray pops out. Pull out the SIM tray to install or replace the SIM
card. If you don’t have a SIM eject tool, try the end of a small paper clip.
For more information, see Cellular settings on page 13 4 .
Chapter 1 iPad at a Glance 11
Page 12
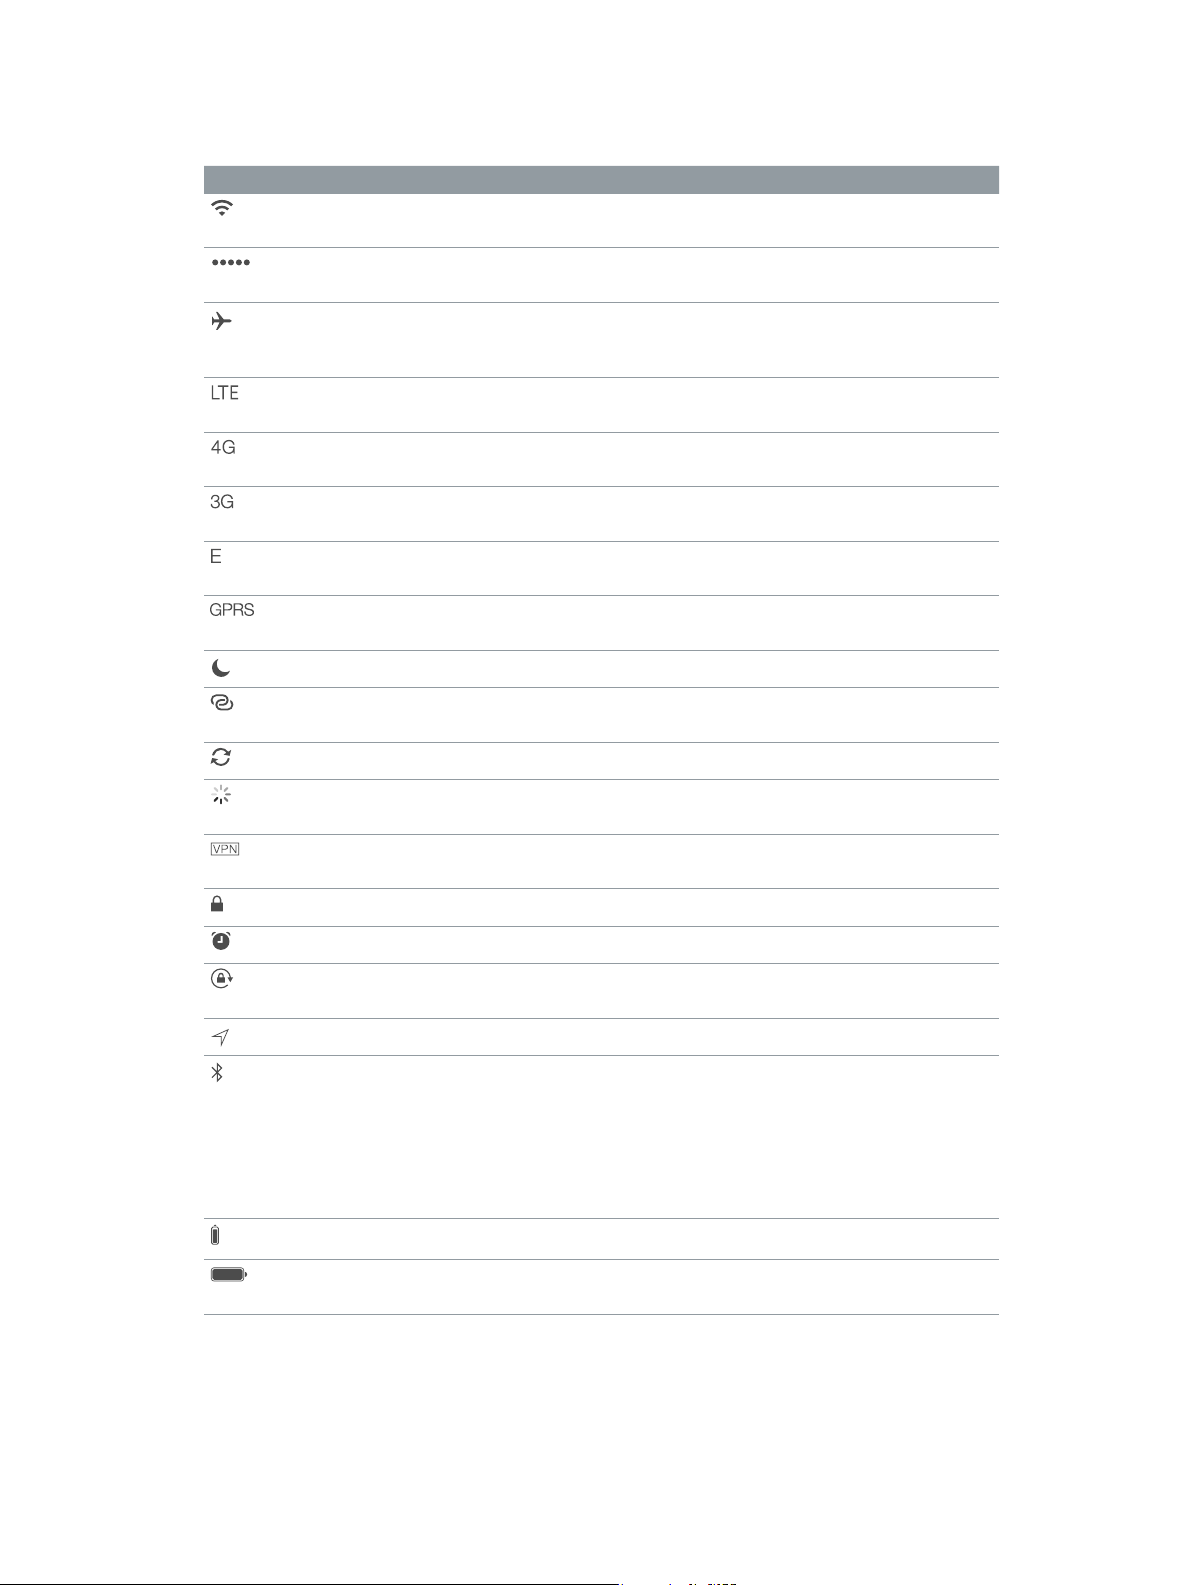
Status icons
The icons in the status bar at the top of the screen give information about iPad:
Status icon What it means
Wi-Fi iPad has a Wi-Fi Internet connection. The more bars, the stronger the
connection. See Connect to Wi-Fi
Cell signal iPad (Wi-Fi + Cellular models) is in range of the cellular network. If
there’s no signal, “No service” appears.
Airplane Mode Airplane Mode is on—you can’t access the Internet, or use
Bluetooth® devices. Non-wireless features are available. See Travel
with iPad
LTE iPad (Wi-Fi + Cellular models) is connected to the Internet over a
4G LTE network.
4G iPad (Wi-Fi + Cellular models) is connected to the Internet over a
4G network.
3G iPad (Wi-Fi + Cellular models) is connected to the Internet over a
3G network.
EDGE iPad (Wi-Fi + Cellular models) is connected to the Internet over an
EDGE network.
GPRS iPad (Wi-Fi + Cellular models) is connected to the Internet over a
GPRS network.
Do Not Disturb Do Not Disturb is turned on. See Do Not Disturb on page 29.
on page 36.
on page 13.
Personal Hotspot iPad is providing a Personal Hotspot for other iOS devices. See
Personal Hotspot
Syncing iPad is syncing with iTunes. See Sync with iTunes on page 17.
Activity There is network or other activity. Some third-party apps use this
icon to show app activity.
VPN iPad is connected to a network using VPN. See Network access on
page 123.
Lock iPad is locked. See Sleep/Wake button on page 10.
Alarm An alarm is set. See Chapter 14, Clock, on page 74.
Screen orientation
lock
Location Services An app is using Location Services. See Privacy on page 33.
Bluetooth® Blue or White icon: Bluetooth is on and paired with a device, such as
Bluetooth battery Shows the battery level of a supported paired Bluetooth device.
Battery Shows the battery level or charging status. See Charge and monitor
Screen orientation is locked. See Change the screen orientation
page 21.
a headset or keyboard.
Gray icon: Bluetooth is on and paired with a device, but the device is
out of range or turned o.
No icon: Bluetooth is not paired with a device.
See Bluetooth devices
the battery
on page 31.
on
on page 32.
on page 35.
Chapter 1 iPad at a Glance 12
Page 13

Getting Started
Read this chapter to learn how to set up iPad, set up mail accounts, use iCloud, and more.
2
·
WARNING: To avoid injury, read Important safety information on page 12 8 before using iPad.
Set up iPad
Set up iPad. Turn on iPad and follow the Setup Assistant.
The Setup Assistant guides you through the setup process, including:
•
Connecting to a Wi-Fi network
•
Signing in with or creating a free Apple ID
•
Entering a passcode
•
Setting up iCloud and iCloud Keychain
•
Turning on recommended features, such as Location Services and Find My iPad
During setup, you can copy your apps, settings, and content from another iPad by restoring from
an iCloud backup or from iTunes. See Back up iPad on page 133 .
If you don’t have access to a Wi-Fi Internet connection during setup, you can use your computer’s
Internet connection—just connect iPad to your computer when prompted by the Setup
Assistant. For help connecting iPad to your computer, see Connect iPad to your computer on
page 16.
Connect to Wi-Fi
If appears at the top of the screen, you’re connected to a Wi-Fi network, and iPad reconnects
anytime you return to the same location.
Join a Wi-Fi network or adjust Wi-Fi settings. Go to Settings > Wi-Fi.
•
Choose a network: Tap one of the listed networks and enter the password, if asked.
•
Ask to join networks: Turn on Ask to Join Networks to be prompted when a Wi-Fi network
is available. Otherwise, you must manually join a network when a previously used network
isn’t available.
•
Forget a network: Tap next to a network you’ve joined before. Then tap Forget this Network.
•
Join other network: Tap Other, then enter the name of the network. You need to know the
network name, security type, and password.
Set up your own Wi-Fi network. If you have a new or uncongured AirPort base station turned
on and within range, you can use iPad to set it up. Go to Settings > Wi-Fi and look for “Set up an
AirPort base station.” Tap your base station and the Setup Assistant does the rest.
13
Page 14

Manage your AirPort network. If iPad is connected to an AirPort base station, go to Settings >
Wi-Fi, tap next to the network name, then tap Manage this Network. If you haven’t yet
downloaded AirPort Utility, tap OK to open the App Store and download it (this requires an
Internet connection).
Apple ID
Your Apple ID is the user name for a free account that lets you access Apple services, such as the
iTunes Store, the App Store, and iCloud. You need only one Apple ID for everything you do with
Apple. There may be charges for services and products that you use, purchase, or rent.
If you have an Apple ID, use it when you rst set up iPad, and whenever you need to sign in to
an Apple service. If you don’t already have an Apple ID, you can create one when you’re asked to
sign in.
Create an Apple ID. Go to Settings > iTunes & App Stores and tap Sign In. (If you’re already
signed in and want to create another Apple ID, rst tap your Apple ID, then tap Sign Out.)
For more information, see support.apple.com/kb/he37.
Set up mail and other accounts
iPad works with iCloud, Microsoft Exchange, and many of the most popular Internet-based mail,
contact, and calendar services.
If you don’t already have a mail account, you can set up a free iCloud account when you set up
iPad, or set one up later in Settings > iCloud. See iCloud on page 15.
Set up an iCloud mail account. Go to Settings > iCloud.
Set up another account. Go to Settings > Mail, Contacts, Calendars.
You can add contacts using an LDAP or CardDAV account, if your company or organization
supports it. See Add contacts on page 72.
For information about setting up a Microsoft Exchange account in a corporate environment, see
Mail, Contacts, and Calendar on page 12 3 .
Manage content on your iOS devices
You can transfer information and les between iPad and your other iOS devices and computers,
using either iCloud or iTunes.
•
iCloud stores content such as music, photos, calendars, contacts, documents, and more, and
wirelessly pushes it to your other iOS devices and computers, keeping everything up to date.
See iCloud on page 15.
•
iTunes syncs music, video, photos, and more between your computer and iPad. Changes
you make on one device are copied to the other when you sync. You can also use iTunes to
copy a le to iPad for use with an app, or to copy a document you’ve created on iPad to your
computer. See Sync with iTunes on page 17.
You can use iCloud or iTunes, or both, depending on your needs. For example, you can use
iCloud Photo Stream to automatically push photos you take on iPad to your other devices, and
use iTunes to sync photo albums from your computer to iPad.
Chapter 2 Getting Started 14
Page 15

Important: To avoid duplicates, keep contacts, calendars, and notes in sync using iCloud or
iTunes, but not both.
You can also choose to manually manage content from iTunes by selecting that option in the
iPad Summary pane. Then you can drag songs or videos from your iTunes library to iPad in
iTunes. This is useful if your iTunes library contains more items than can t on your iPad.
Note: If you use iTunes Match, you can manually manage only video.
iCloud
iCloud stores your content, including music, photos, contacts, calendars, and supported
documents. Content stored in iCloud is pushed wirelessly to your other iOS devices and
computers set up with the same iCloud account.
iCloud is available on:
•
iOS devices with iOS 5 or later
•
Mac computers with OS X Lion v10.7.2 or later
•
PCs with the iCloud Control Panel for Windows (Windows 7 or Windows 8 is required)
Note: iCloud may not be available in all areas, and iCloud features may vary by area. For more
information, go to www.apple.com/icloud.
iCloud features include:
•
Apps and Books—Download previous App Store and iBooks Store purchases for free, anytime.
•
Mail, Contacts, Calendars—Keep your mail contacts, calendars, notes, and reminders up to date
across all your devices.
•
Documents in the Cloud—For iCloud-enabled apps, keep documents and app data up to date
across all your devices.
•
iTunes in the Cloud—Download previous iTunes music and TV show purchases to iPad for free,
anytime.
•
Find My iPad—Locate your iPad on a map, display a message, play a sound, lock the screen, or
remotely wipe the data. See Find My iPad on page 35.
•
Photos—Use My Photo Stream to send photos you take with your iPad to your other devices,
automatically. Use iCloud Photo Sharing to share photos and videos with just the people
you choose, and let them add photos, videos, and comments. See iCloud Photo Sharing on
page 64 and My Photo Stream on page 65.
•
Backup—Back up iPad to iCloud automatically when connected to power and Wi-Fi. See Back
up iPad on page 133 .
•
Find My Friends—Keep track of your family and friends (when connected to a Wi-Fi or cellular
network) using the Find My Friends app. Download the free app from the App Store.
•
iTunes Match—With an iTunes Match subscription, all your music, including music you’ve
imported from CDs or purchased somewhere other than iTunes, appears on all your devices
and can be downloaded and played on demand. See iTunes Match on page 56.
•
iCloud Tabs—See the webpages you have open on your other iOS devices and OS X
computers. See Chapter 7, Safari, on page 46.
•
iCloud Keychain—Keep your saved passwords and credit card information up to date on your
devices. See iCloud Keychain on page 34.
Chapter 2 Getting Started 15
Page 16
With iCloud, you get a free mail account and 5 GB of storage for your mail, documents, and
backups. Your purchased music, apps, TV shows, and books, as well as your Photo Stream, don’t
count against your free space.
Sign in, create an iCloud account, or set iCloud options. Go to Settings > iCloud.
Buy more iCloud storage. Go to Settings > iCloud > Storage & Backup, then tap Buy More
Storage or Change Storage Plan. For information about purchasing iCloud storage, see
help.apple.com/icloud.
Turn on Automatic Downloads for music, apps, or books. Go to Settings > iTunes & App Store.
View and download previous purchases.
•
iTunes Store: You can access your purchased songs and videos in the Music and Videos apps.
Or, in iTunes Store, tap Purchased .
•
App Store: Go to App Store, then tap Purchased .
•
iBooks Store: Go to iBooks, tap Store, then tap Purchased .
Find your iPad. Go to www.icloud.com, sign in with your Apple ID, then open Find My iPhone.
Use it to nd an iPad or iPod touch, too.
Important: Find My iPad must rst be turned on in Settings > iCloud.
For more information about iCloud, see www.apple.com/icloud. For support information, see
www.apple.com/support/icloud.
Connect iPad to your computer
Use the included USB cable to connect iPad to your computer. Connecting iPad to your
computer lets you sync information, music, and other content with iTunes. You can also sync with
iTunes wirelessly. See Sync with iTunes on page 17. To use iPad with your computer, you need:
•
A Mac with a USB 2.0 or 3.0 port, or a PC with a USB 2.0 port, and one of the following
operating systems:
•
OS X version 10.6.8 or later
•
Windows 8, Windows 7, Windows Vista, or Windows XP Home or Professional with Service
Pack 3 or later
•
iTunes, available at www.itunes.com/download
Unless iPad is actively syncing with your computer, you can disconnect it at any time. Look
at the top of the iTunes screen on your computer or on iPad to see if syncing is in progress. If
you disconnect iPad while it’s syncing, some data may not get synced until the next time you
connect iPad to your computer.
Chapter 2 Getting Started 16
Page 17

Sync with iTunes
Syncing with iTunes copies information from your computer to iPad, and vice versa. You can sync
by connecting iPad to your computer with the included USB cable, or you can set up iTunes to
sync wirelessly using Wi-Fi. You can set iTunes to sync music, photos, videos, podcasts, apps, and
more. For information about syncing iPad, open iTunes on your computer, then select iTunes
Help from the Help menu.
Sync wirelessly. Connect iPad to your computer using the included USB cable. In iTunes on your
computer, select iPad, click Summary, then turn on “Sync with this iPad over Wi-Fi.”
When Wi-Fi syncing is turned on, iPad syncs when it’s connected to a power source, both
iPad and your computer are connected to the same wireless network, and iTunes is open on
the computer.
Tips for syncing with iTunes on your computer
Connect iPad to your computer, select it in iTunes, and set options in the dierent panes.
•
In the Summary pane, you can set iTunes to sync iPad automatically when it’s attached to your
computer. To temporarily override this setting, hold down Command and Option (Mac) or Shift
and Control (PC) until you see iPad appear in the iTunes window.
•
If you want to encrypt the information stored on your computer when iTunes makes a backup,
select “Encrypt iPad backup” in the Summary pane. Encrypted backups are indicated by a
lock icon , and a password is required in order to restore the backup. If you don’t select this
option, other passwords (such as those for mail accounts) aren’t included in the backup and
you’ll have to reenter them if you use the backup to restore iPad.
•
When you sync mail accounts in the Info pane, only the settings are transferred from your
computer to iPad. Changes you make to an account on iPad don’t sync to your computer.
•
In the Info pane, click Advanced to select options that let you replace the information on iPad
with the information from your computer during the next sync.
•
In the Photo pane, you can sync photos and videos from a folder on your computer.
Your iPad name
The name of your iPad is used by iTunes and iCloud.
Change the name of your iPad. Go to Settings > General > About > Name.
Date and time
The date and time are usually set for you based on your location—take a look at the Lock screen
to see if they’re correct.
Set whether iPad updates the date and time automatically. Go to Settings > General >
Date & Time, then turn Set Automatically on or o. If you set iPad to update the time
automatically, it gets the correct time over the network and updates it for the time zone you’re
in. Some networks don’t support network time, so in some areas iPad may not be able to
automatically determine the local time.
Set the date and time manually. Go to Settings > General > Date & Time, then turn o
Set Automatically.
Set whether iPad shows 24-hour time or 12-hour time. Go to Settings > General > Date & Time,
then turn 24-Hour Time on or o. (24-Hour Time may not be available in all areas.)
Chapter 2 Getting Started 17
Page 18

International settings
Go to Settings > General > International to set:
•
The language for iPad
•
The keyboards you use
•
The region format (for dates, times, and telephone numbers)
•
The calendar format
View this user guide on iPad
You can view the iPad User Guide on iPad in Safari, and in the free iBooks app.
View the user guide in Safari. In Safari, tap , then tap the iPad User Guide bookmark. Or go to
help.apple.com/ipad.
Add an icon for the user guide to the Home screen. Tap , then tap Add to Home Screen.
View the user guide in iBooks. If you haven’t installed iBooks, open the App Store, then search
for and install iBooks. Open iBooks and tap Store. Search for “iPad User Guide,” then select and
download the user guide.
For more information about iBooks, see Chapter 24, iBooks, on page 97.
Chapter 2 Getting Started 18
Page 19
Basics
Drag an app
up to close it.
3
Use apps
All the apps that come with iPad—as well as the apps you download from the App Store—are
on the Home screen.
Start from home
Tap an app to open it.
Press the Home button anytime to return to the Home screen. Swipe left or right to see
other screens.
Multitasking
iPad lets you run many apps at the same time.
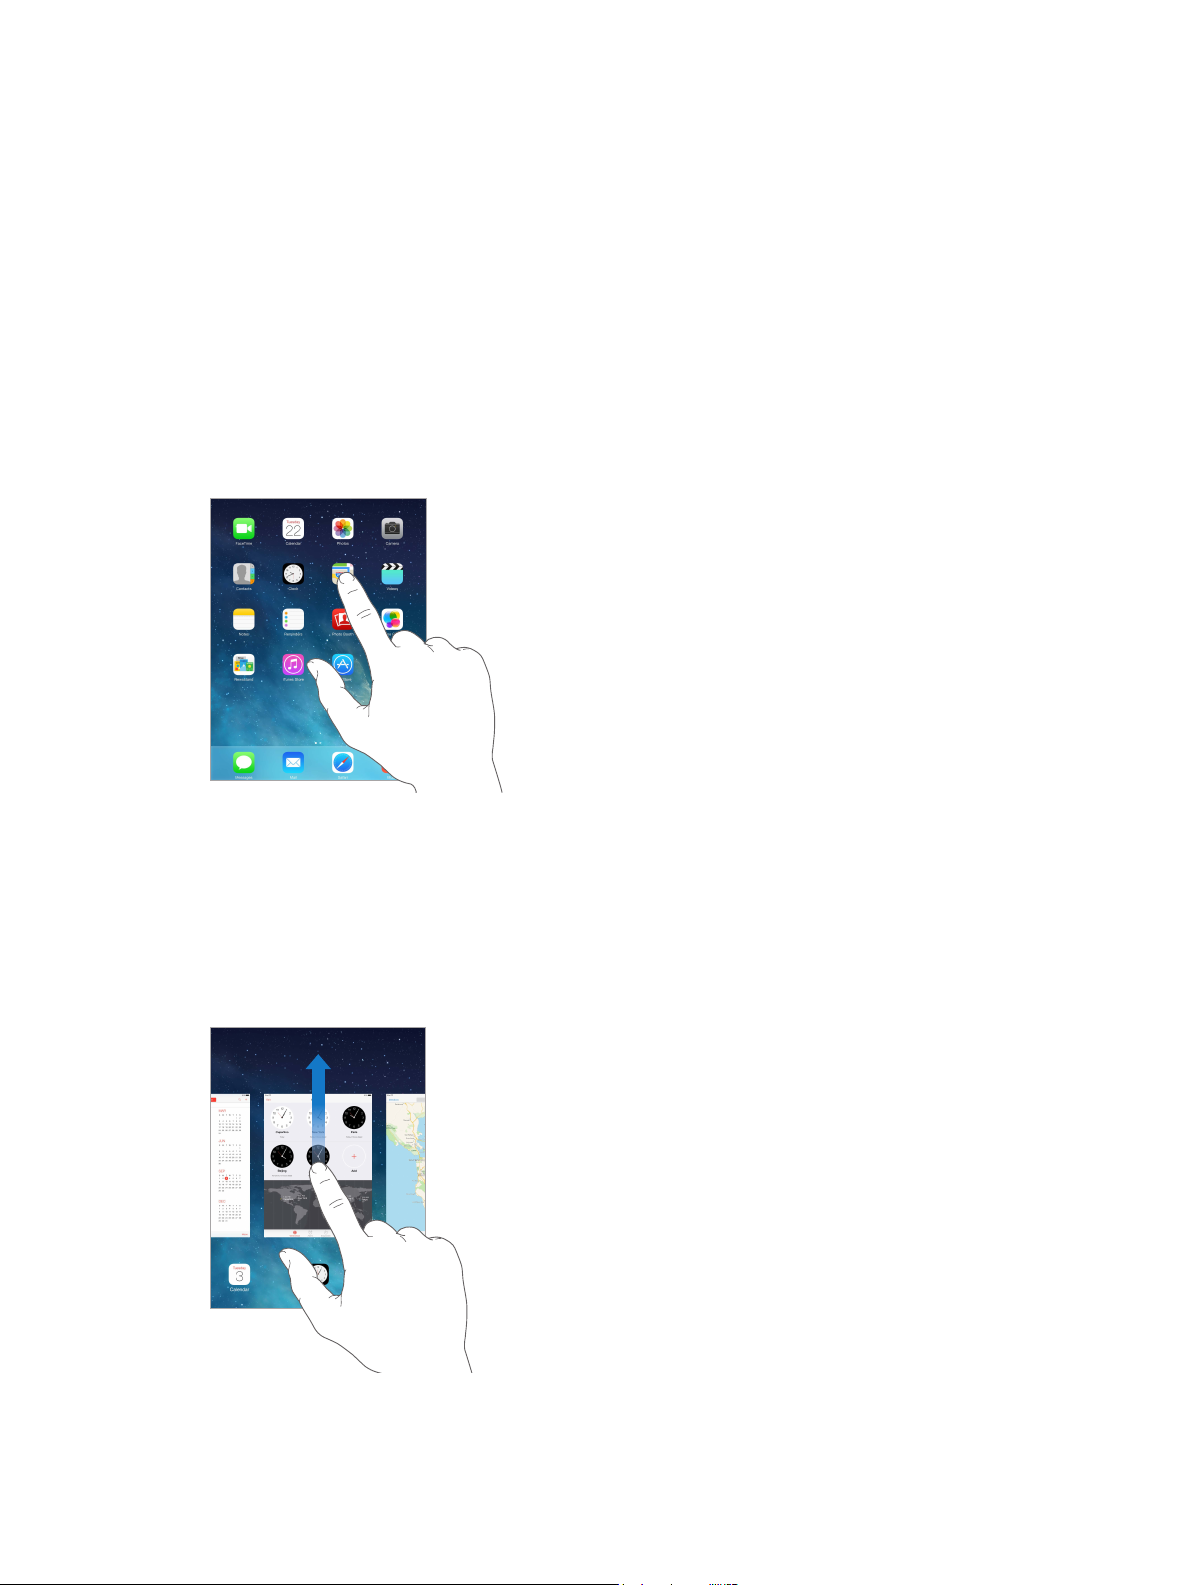
View running apps. Double-click the Home button to reveal the multitasking screen. Swipe left
or right to see more. To switch to another app, tap it.
Drag an app
up to close it.
19
Page 20
Close an app. If an app isn’t working properly, you can force it to quit. Drag the app up from the
multitasking screen. Then try opening the app again.
If you have lots of apps, you can use Spotlight to nd and open them. Pull down the center of
the Home screen to see the search eld. See Search on page 27.
Look around
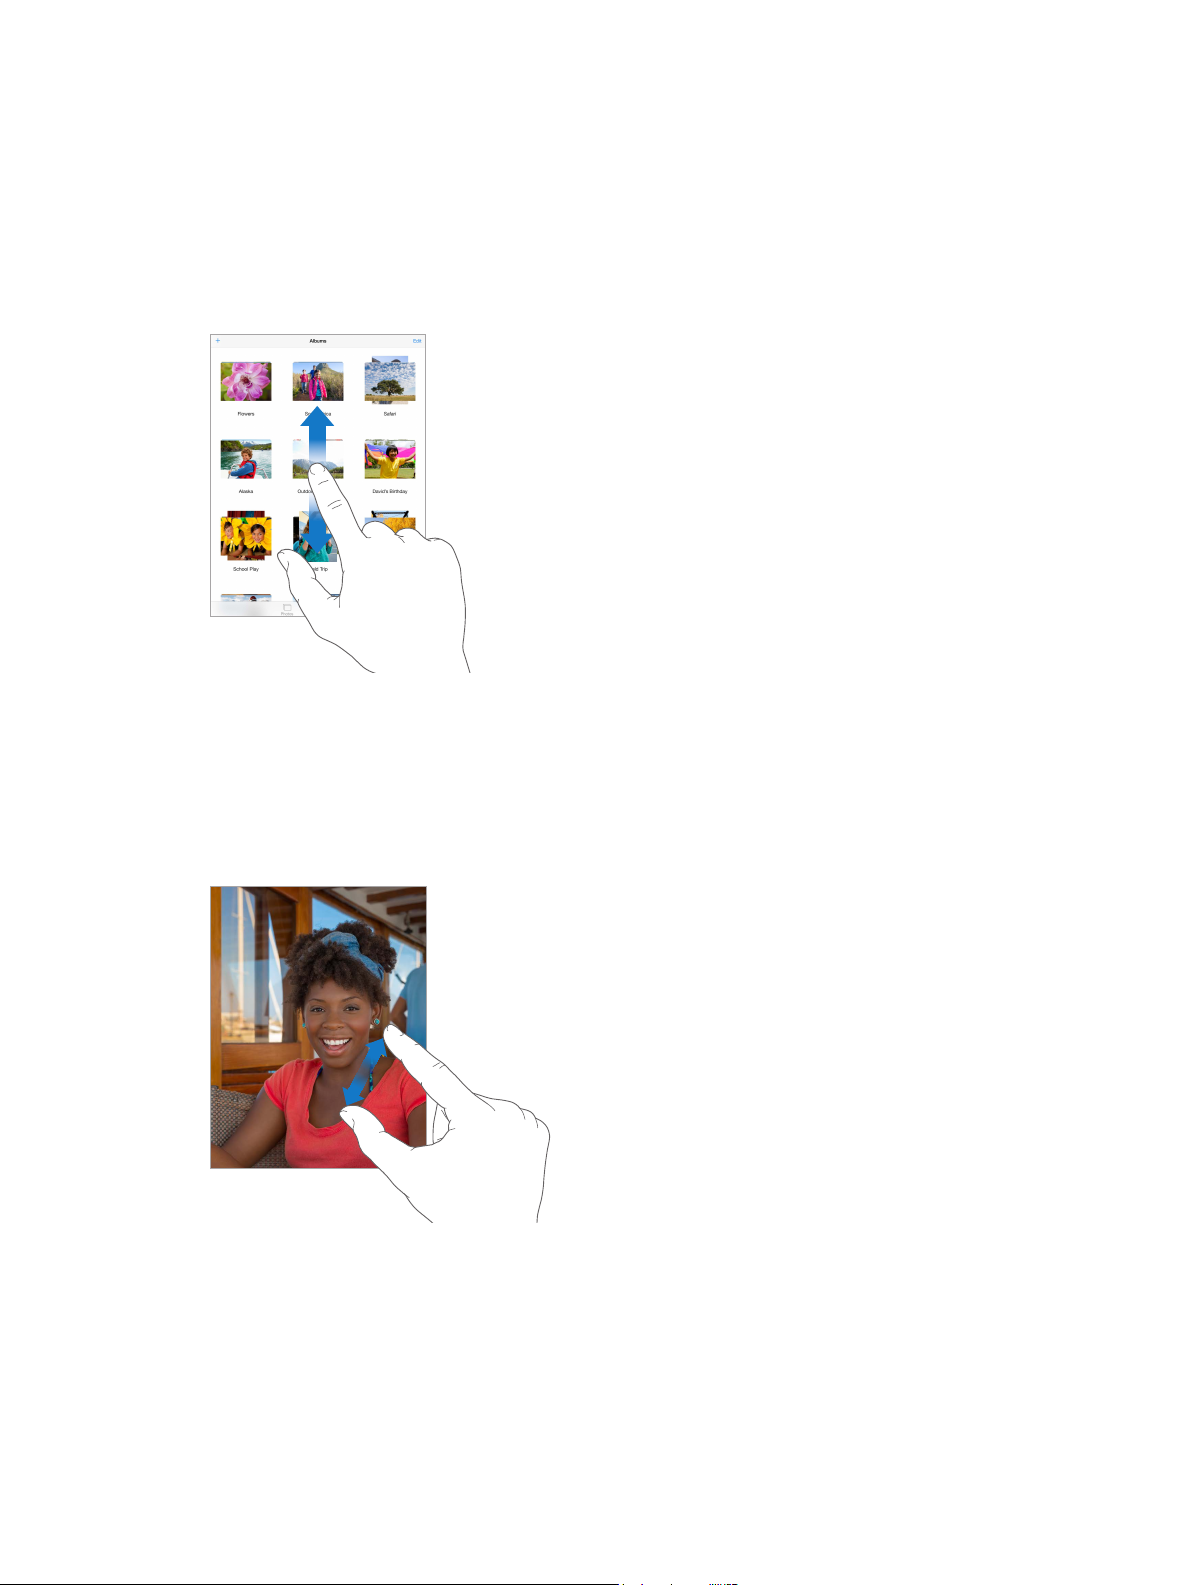
Drag a list up or down to see more. Swipe to scroll quickly; touch the screen to stop it. Some lists
have an index—tap a letter to jump ahead.
Drag a photo, map, or webpage in any direction to see more.
To quickly jump to the top of a page, tap the status bar at the top of the screen.
Zoom in or out
Stretch a photo, webpage, or map for a close-up—then pinch to zoom back out. In Photos, keep
pinching to see the collection or album the photo’s in.
Or double-tap a photo or webpage to zoom in, and double-tap again to zoom out. In Maps,
double-tap to zoom in and tap once with two ngers to zoom out.
Chapter 3 Basics 20
Page 21
Multitasking gestures
You can use multitasking gestures on iPad to return to the Home screen, reveal the multitasking
display, or switch to another app.
Return to the Home screen. Pinch four or ve ngers together.
Reveal the multitasking display. Swipe up with four or ve ngers.
Switch apps. Swipe left or right with four or ve ngers.
Turn multitasking gestures on or o. Go to Settings > General > Multitasking Gestures.
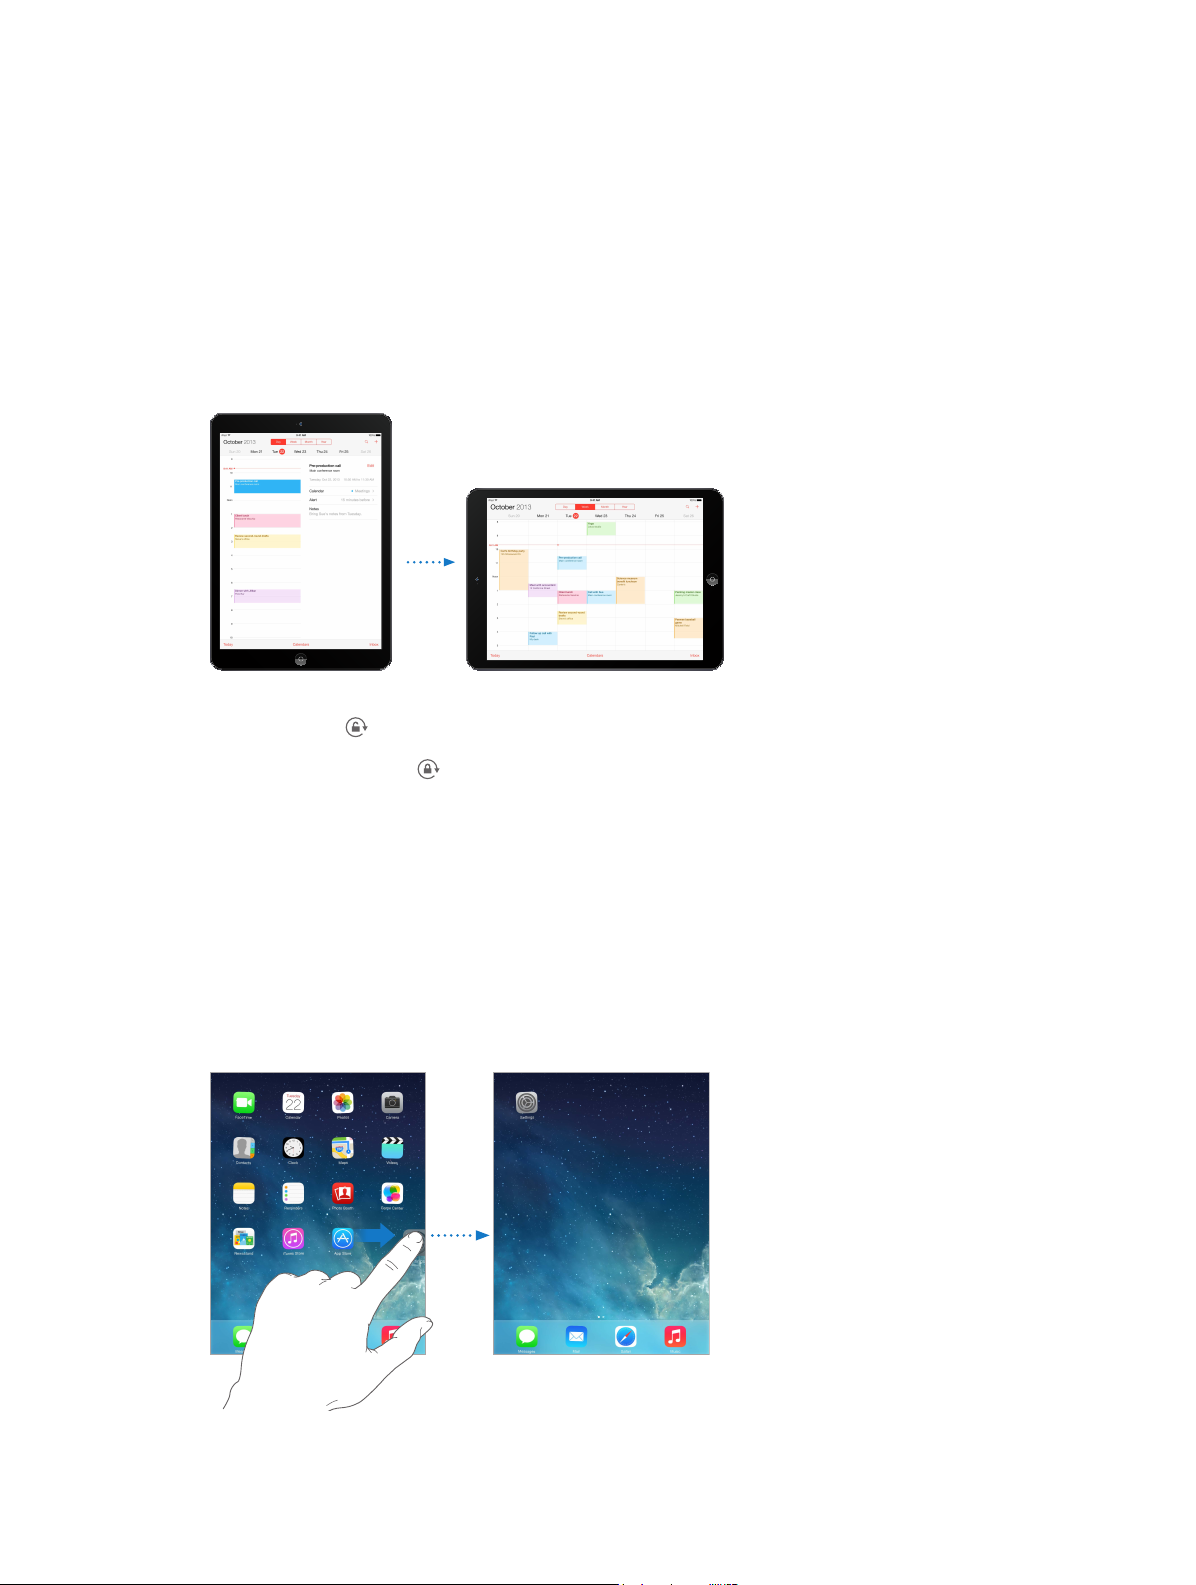
Change the screen orientation
Many apps give you a dierent view when you rotate iPad.
Lock the screen orientation. Swipe up from the bottom edge of the screen to open Control
Center, then tap .
The orientation lock icon appears in the status bar when the screen orientation is locked.
You can also set the Side Switch to lock the screen orientation instead of silencing sound eects
and notications. Go to Settings > General, and under “Use Side Switch to,” tap Lock Rotation.
Customize iPad
Arrange your apps
Arrange apps. Touch and hold any app on the Home screen until it jiggles, then drag apps
around. Drag an app to the edge of the screen to move it to a dierent Home screen, or to the
Dock at the bottom of the screen. Press the Home button to save your arrangement.
Chapter 3 Basics 21
Page 22
Create a new Home screen. While arranging apps, drag an app to the right edge of the
rightmost Home screen. The dots above the Dock show which of your Home screens
you’re viewing.
When iPad is connected to your computer, you can customize the Home screen using iTunes. In
iTunes, select iPad, then click Apps.
Start over. Go to Settings > General > Reset, then tap Reset Home Screen Layout to return the
Home screen and apps to their original layout. Folders are removed and the original wallpaper
is restored.
Organize with folders
Create a folder. While arranging apps, drag one app onto another. Tap the name of the folder to
rename it. Drag apps to add or remove them. Press the Home button when you nish.
You can have multiple pages of apps in a folder.
Delete a folder. Drag out all the apps—the folder is deleted automatically.
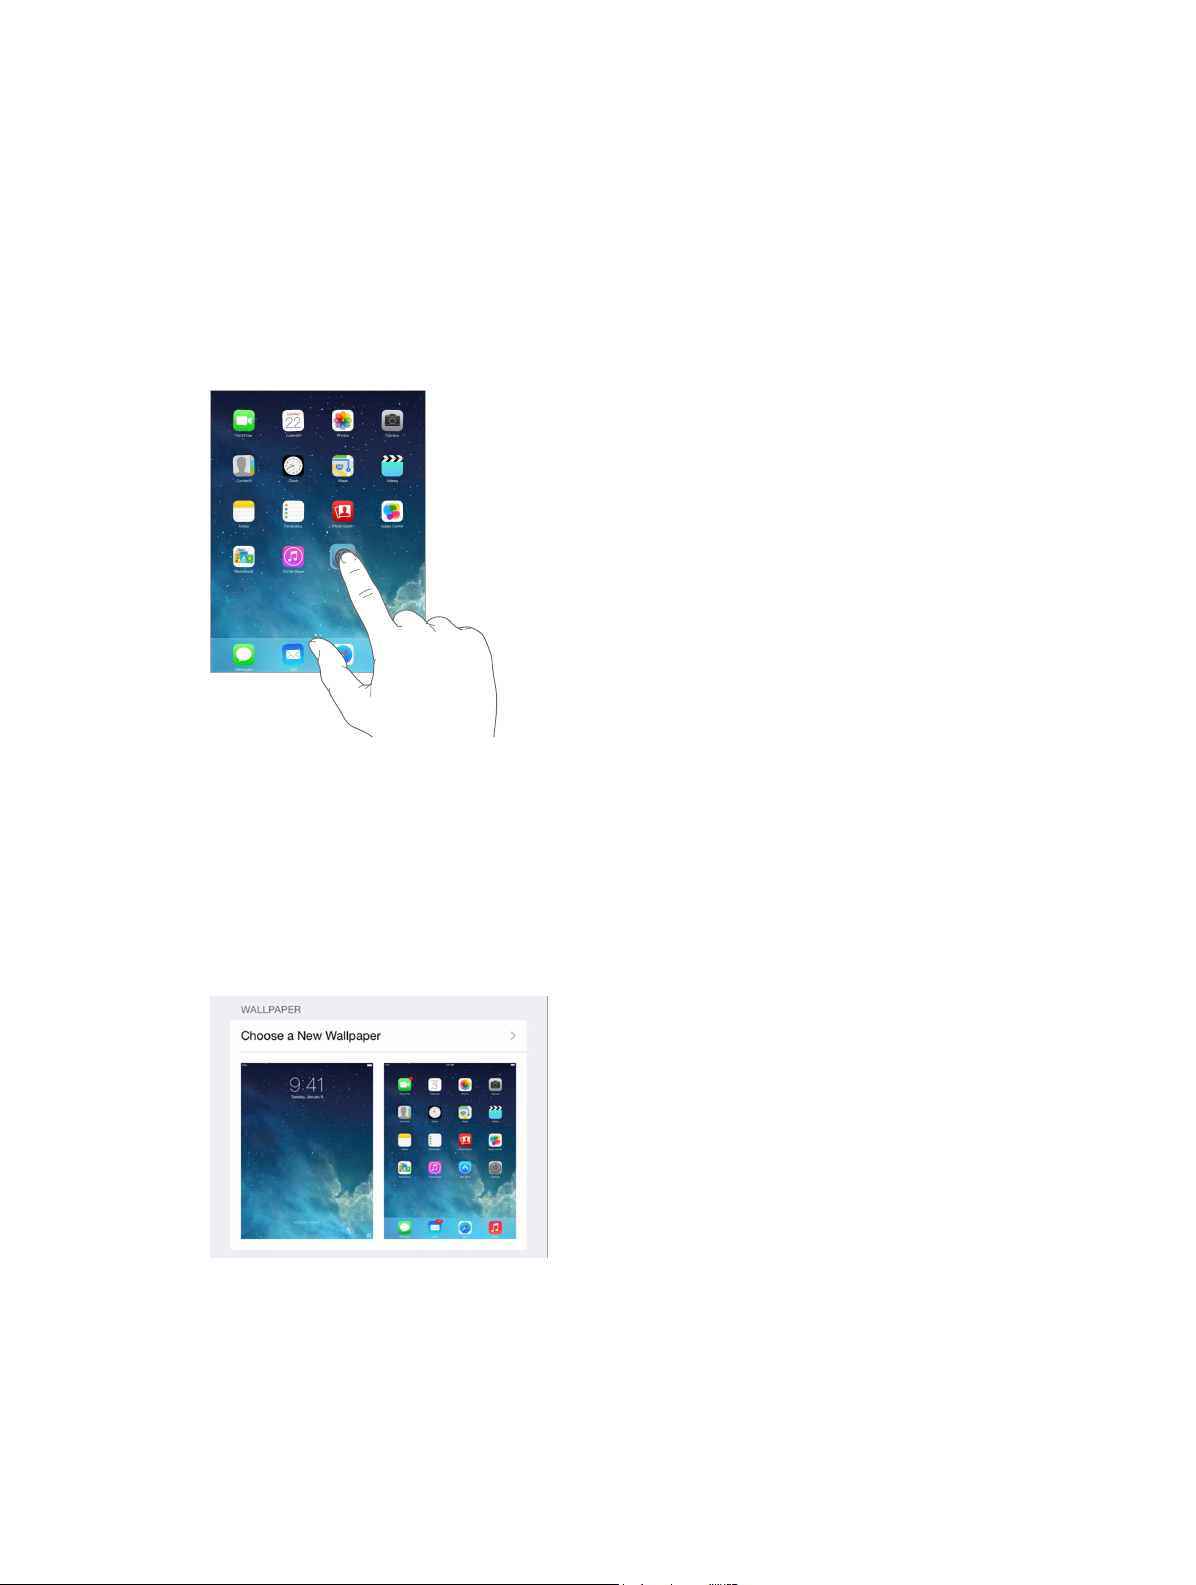
Change the wallpaper
Wallpaper settings let you set an image or photo as wallpaper for the Lock screen or Home
screen. You can choose from dynamic and still images.
Change the wallpaper. Go to Settings > Wallpapers & Brightness > Choose a New Wallpaper.
Chapter 3 Basics 22
Page 23
Turn perspective zoom on or o. When choosing an image for new wallpaper, tap the
Perspective Zoom button. For wallpaper you already set, go to the Wallpapers & Brightness
setting and tap the image of the Lock screen or Home screen to display the Perspective
Zoom button. The Perspective Zoom setting determines whether the selected wallpaper is
zoomed automatically.
Note: The Perspective Zoom button doesn’t appear if Reduce Motion is turned on in Accessibility
settings. See Reduced screen motion on page 116 .
Adjust the screen brightness
Adjust the screen brightness. Go to Settings > Wallpapers & Brightness and drag the slider. If
Auto-Brightness is on, iPad adjusts the screen brightness for current light conditions using the
built-in ambient light sensor.
You can also adjust the screen brightness in Control Center.
Type text
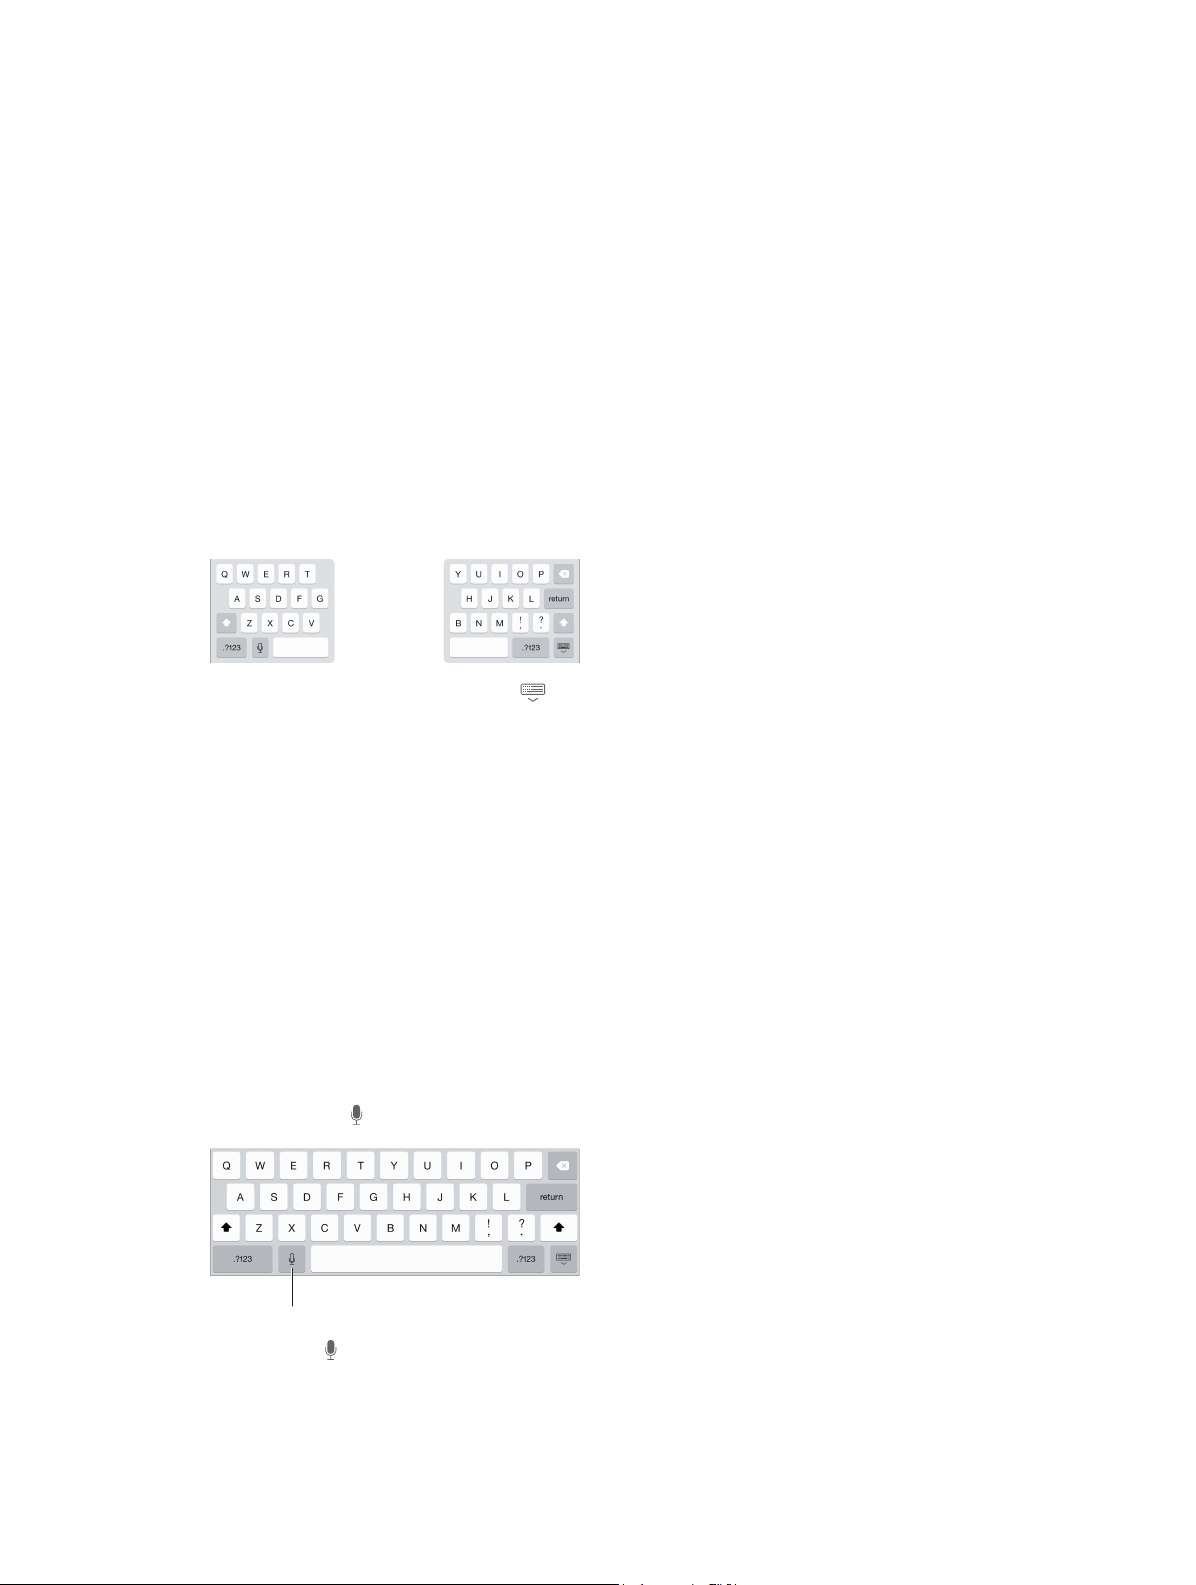
The onscreen keyboard lets you enter text when needed.
Enter text
Tap a text eld to see the onscreen keyboard, then tap letters to type.
You can also use an Apple Wireless Keyboard to type. See Use an Apple Wireless Keyboard on
page 25. To use dictation instead of typing, see Dictation on page 26.
Chapter 3 Basics 23
Page 24
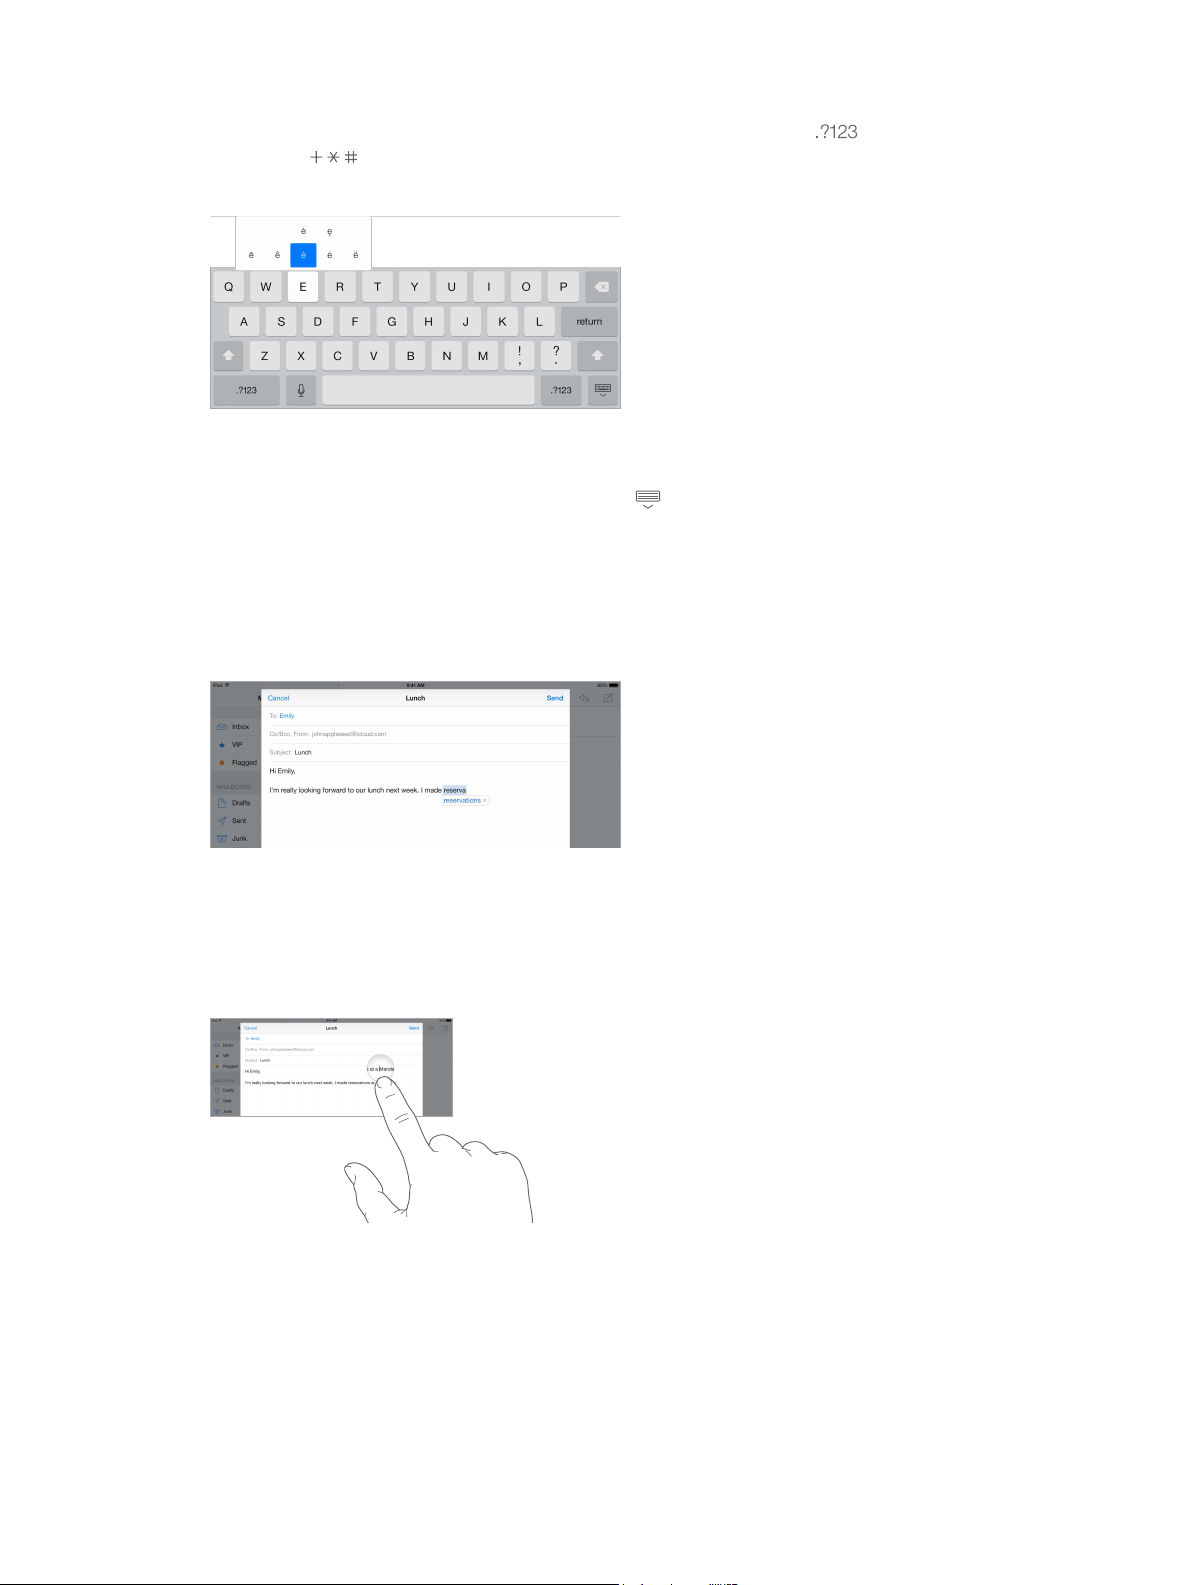
Tap Shift to type uppercase, or touch the Shift key and slide to a letter. Double-tap Shift for
caps lock. To enter numbers, punctuation, or symbols, tap the Number key or the
Symbol key . To quickly end a sentence with a period and a space, just double-tap
the space bar.
Enter accented letters or other alternate characters. Touch and hold a key, then slide to choose
one of the options.
Hide the onscreen keyboard. Tap the Keyboard key .
Depending on the app and language you’re using, iPad may correct misspellings and anticipate
what you’re typing. Accept a suggestion by entering a space or punctuation, or by tapping
return. To reject a suggestion, tap the “x.” If you reject the same suggestion a few times, iPad
stops suggesting it. If you see a word underlined in red, tap it to see suggested corrections. If the
word you want doesn’t appear, type the correction.
Set options for typing. Go to Settings > General > Keyboard.
Edit text
Revise text. Touch and hold the text to show the magnifying glass, then drag to position the
insertion point.
Chapter 3 Basics 24
Page 25
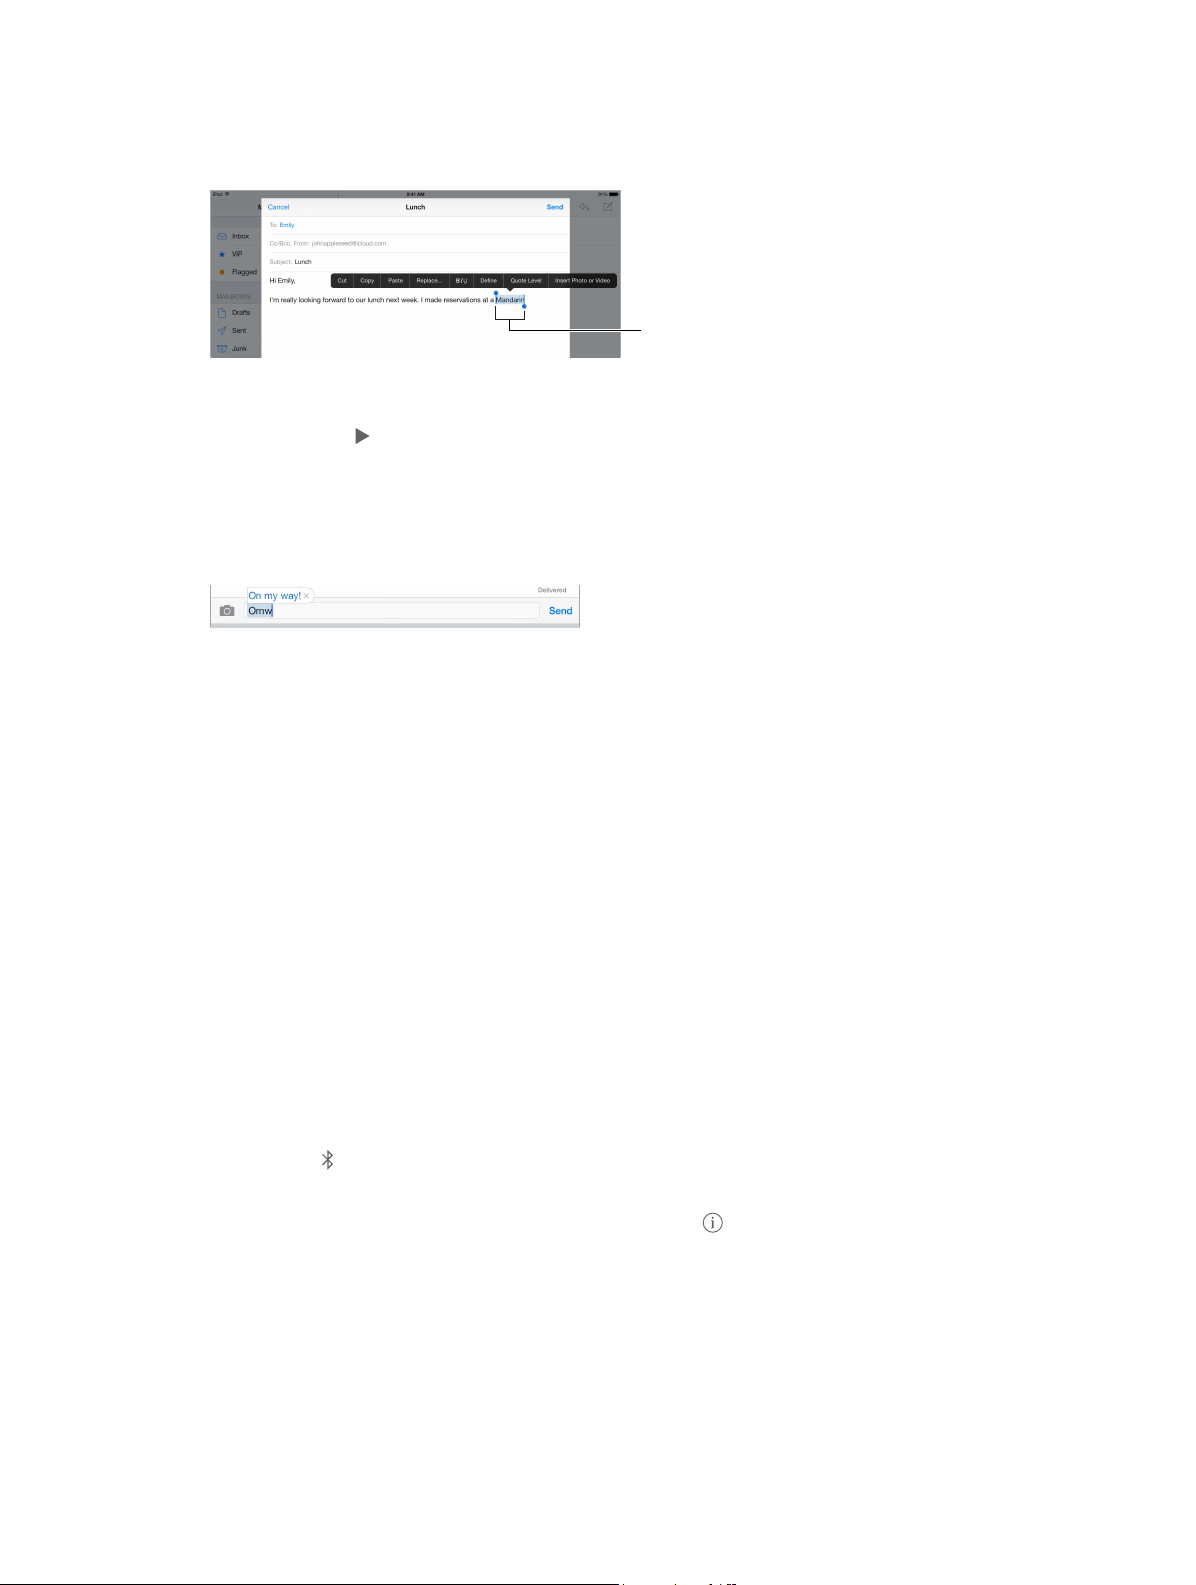
Select text. Tap the insertion point to display the selection options. Or double-tap a word
Grab points
to select it. Drag the grab points to select more or less text. In read-only documents, such as
webpages, touch and hold to select a word.
Grab points
You can cut, copy, or paste over selected text. With some apps, you can also get bold, italic, or
underlined text (tap B/I/U); get the denition of a word; or have iPad suggest an alternative. You
may need to tap to see all the options.
Undo the last edit. Shake iPad, then tap Undo.
Justify text. Select the text, then tap the left or right arrow (not always available).
Save keystrokes
A shortcut lets you enter a word or phrase by typing just a few characters. For example, type
“omw” to enter “On my way!” That one’s already set up for you—to add more, go to Settings >
General > Keyboard.
Create a shortcut. Go to Settings > General > Keyboard, then tap Add New Shortcut.
Have a word or phrase you use and don’t want it corrected? Create a shortcut, but leave the
Shortcut eld blank.
Use iCloud to keep your personal dictionary up to date on your other devices. Go to Settings >
iCloud, then turn on Documents & Data.
Use an Apple Wireless Keyboard
You can use an Apple Wireless Keyboard (available separately) to enter text on your iPad. The
keyboard connects via Bluetooth, so you must rst pair it with iPad.
Pair an Apple Wireless Keyboard with iPad. Turn on the keyboard, go to Settings > Bluetooth
and turn on Bluetooth, then tap the keyboard when it appears in the Devices list.
Once it’s paired, the keyboard reconnects to iPad whenever it’s in range—up to about 30 feet
(10 meters). When it’s connected, the onscreen keyboard doesn’t appear.
Save your batteries. Turn o Bluetooth and the wireless keyboard when not in use. You can turn
o Bluetooth
green light goes o.
Unpair a wireless keyboard. Go to Settings > Bluetooth, tap next to the keyboard name, then
tap “Forget this Device.”
See Bluetooth devices on page 32.
in Control Center. To turn o the keyboard, hold down the On/o switch until the
Chapter 3 Basics 25
Page 26
Add or change keyboards
Tap to begin dictation.
You can turn typing features, such as spell checking, on or o; add keyboards for writing in dierent
languages; and change the layout of your onscreen keyboard or Apple Wireless Keyboard.
Set typing features. Go to Settings > General > Keyboard.
Add a keyboard for another language. Go to Settings > General > Keyboard > Keyboards >
Add New Keyboard.
Switch keyboards. If you’ve set up keyboards for other languages in Settings > General >
International > Keyboards, you can switch among them by pressing Command-Space.
For information about international keyboards, see Use international keyboards on page 12 5 .
Change the keyboard layout. Go to Settings > General > Keyboard > Keyboards, select a
keyboard, then choose a layout.
Keyboard layouts
On iPad, you can type with a split keyboard that’s at the bottom of the screen, or undocked and
in the middle of the screen.
Adjust the keyboard. Touch and hold , then:
•
Use a split keyboard: Slide your nger to Split, then release. Or spread the keyboard apart from
the middle.
•
Move the keyboard to the middle of the screen: Slide your nger to Undock, then release.
•
Return to a full keyboard: Slide your nger to Dock and Merge, then release.
•
Return a full keyboard to the bottom of the screen: Slide your nger to Dock, then release.
Turn Split Keyboard on or o. Go to Settings > General > Keyboard > Split Keyboard.
Dictation
On an iPad that supports it, you can dictate instead of typing. Make sure Siri is turned on (in
Settings > General > Siri) and iPad is connected to the Internet.
Note: Dictation may not be available in all languages or in all areas, and features may vary.
Cellular data charges may apply.
Dictate text. Tap on the iPad keyboard, then speak. When you nish, tap Done.
Tap to begin dictation.
Add text. Tap again and continuing dictating. To insert text, tap to place the insertion point
rst. You can also replace selected text by dictating.
Chapter 3 Basics 26
Page 27
Add punctuation or format text. Say the punctuation or format. For example, “Dear Mary
comma the check is in the mail exclamation mark” becomes “Dear Mary, the check is in the mail!”
Punctuation and formatting commands include:
•
quote … end quote
•
new paragraph
•
new line
•
cap—to capitalize the next word
•
caps on … caps o—to capitalize the rst character of each word
•
all caps—to make the next word all uppercase
•
all caps on … all caps o—to make the enclosed words all uppercase
•
no caps on … no caps o—to make the enclosed words all lowercase
•
no space on … no space o—to run a series of words together
•
smiley—to insert :-)
•
frowny—to insert :-(
•
winky—to insert ;-)
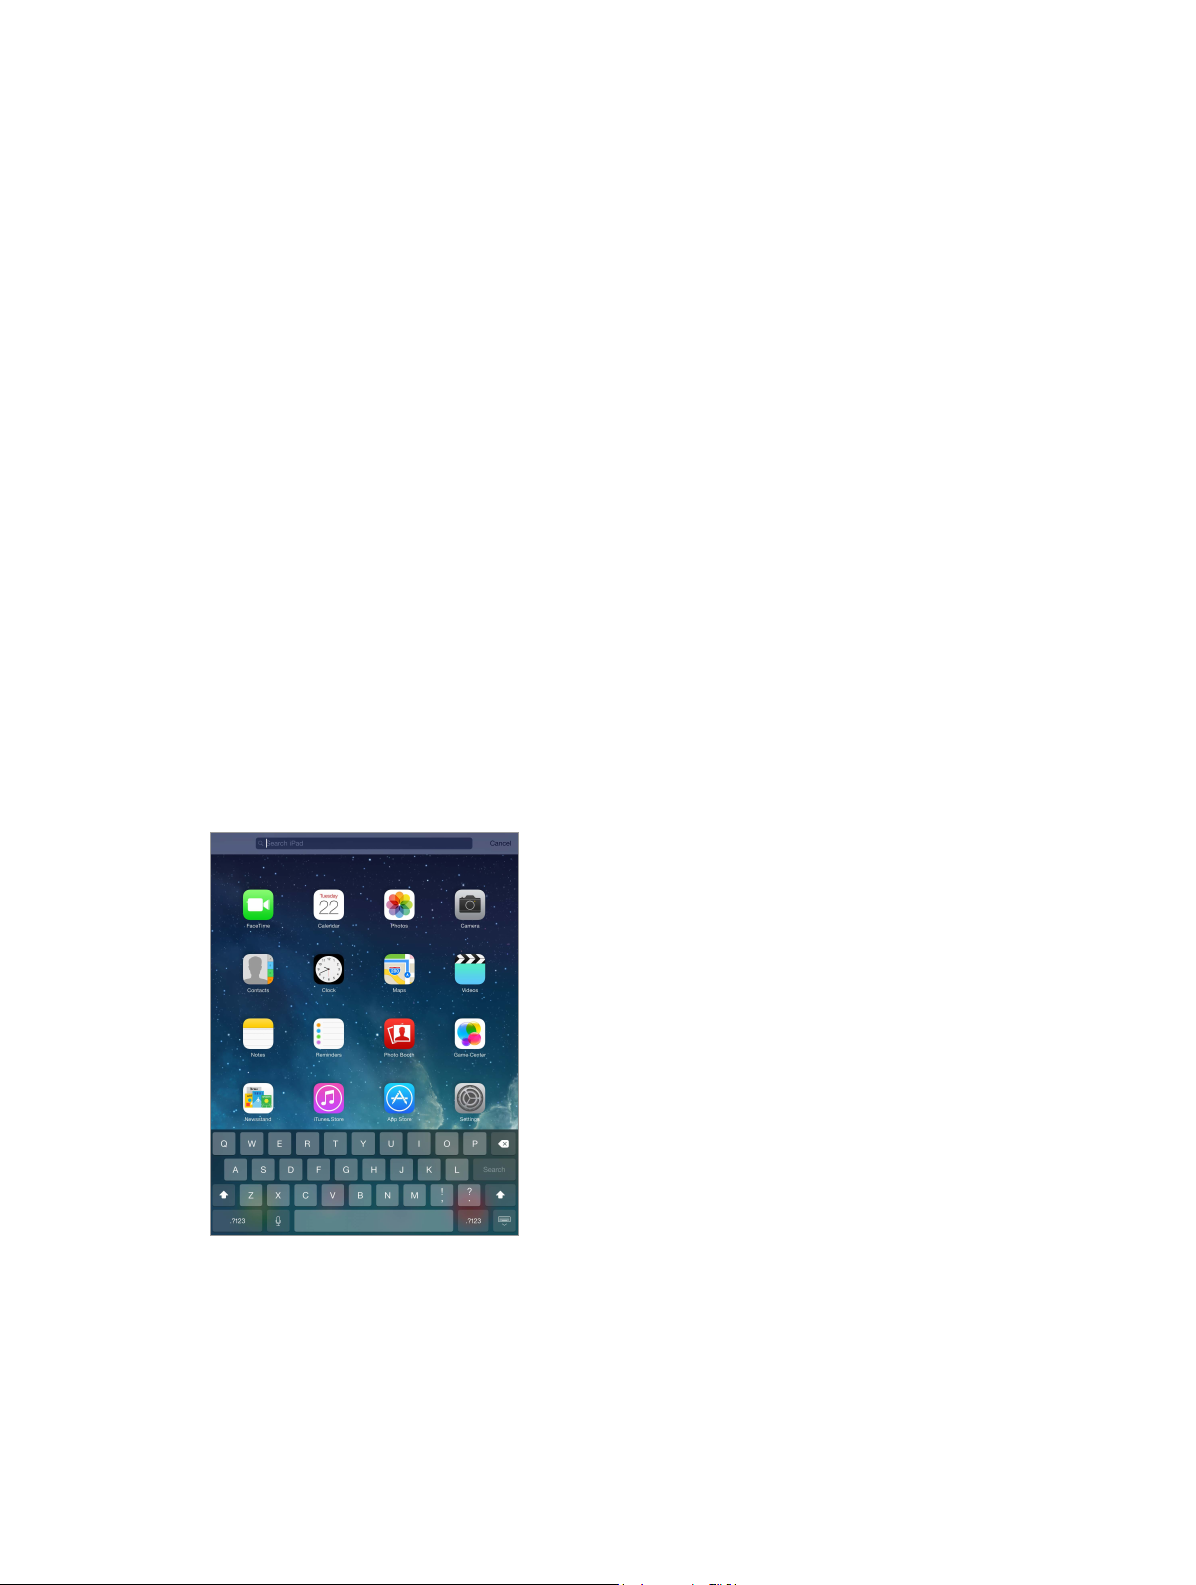
Search
Many apps include a search eld you can type in to nd something that the app knows about.
With Spotlight Search, you can search all your apps at once.
Search iPad. Drag down the middle of any Home screen to reveal the search eld. Results occur
as you type; to hide the keyboard and see more results on the screen, tap Search. Tap an item in
the list to open it.
You can use Spotlight Search to nd and open apps, too.
Choose which apps and content are searched. Go to Settings > General > Spotlight Search. You
can also change the search order.
Chapter 3 Basics 27
Page 28

Control Center
Control Center gives you instant access to the camera, AirDrop, AirPlay, timer, audio playback
controls, and other handy features. You can adjust the brightness, lock the screen orientation, turn
wireless services on or o, and turn on AirDrop to exchange photos and other items with nearby
iOS 7 devices that support AirDrop. See AirDrop, iCloud, and other ways to share on page 30.
Open Control Center. Swipe up from the bottom edge of any screen (even the Lock screen).
Open the currently playing audio app. Tap the song title.
Close Control Center. Swipe down, tap the top of the screen, or press the Home button.
Turn o access to Control Center in apps or on the Lock screen. Go to Settings > Control Center.
Alerts and Notication Center
Alerts
Alerts let you know about important events. They can appear briey at the top of the screen, or
remain in the center of the screen until you acknowledge them.
Some apps may include a badge on their Home screen icon, to let you know how many new
items await—for example, the number of new email messages. If there’s a problem—such as a
message that couldn’t be sent—an exclamation mark appears on the badge. On a folder, a
numbered badge indicates the total number of notications for all the apps inside.
Alerts can also appear on the Lock screen.
Respond to an alert when iPad is locked. Swipe the alert from left to right.
Silence your alerts. Go to Settings > Do Not Disturb.
Set sounds. Go to Settings > Sounds.
Notication Center
Notication Center collects your notications in one place, so you can review them whenever
you’re ready. Review all your alerts, or just the ones you missed. Or tap the Today tab for a
summary of the day’s events—such as the weather forecast, appointments, birthdays, stock
quotes, and even a quick summary of what’s coming up tomorrow.
Chapter 3 Basics 28
Page 29

Open Notication Center. Swipe down from the top edge of the screen.
Set notication options. Go to Settings > Notication Center. Tap an app to set its notication
options. You can also tap Edit to arrange the order of app notications. Touch and drag it to
a new position.
Close Notication Center. Swipe up, or press the Home button.
Sounds and silence
You can change or turn o the sounds iPad plays when you get a FaceTime call, text message,
email, tweet, Facebook post, reminder, or other event.
Set sound options. Go to Settings > Sounds for options such as alert tones and ringtones, and
ringer and alert volumes.
If you want to temporarily silence incoming FaceTime calls, alerts, and sound eects, see the
following section.
Do Not Disturb
Do Not Disturb is an easy way to silence iPad, whether you’re going to dinner or to sleep. It keeps
FaceTime calls and alerts from making any sounds or lighting up the screen.
Turn on Do Not Disturb. Swipe up from the bottom edge of the screen to open Control Center,
then tap . When Do Not Disturb is on, appears in the status bar.
Note: Alarms still sound, even when Do Not Disturb is on. To make sure iPad stays silent, turn it o.
Congure Do Not Disturb. Go to Settings > Do Not Disturb.
You can schedule quiet hours, allow FaceTime calls from your Favorites or groups of contacts, and
allow repeated FaceTime calls to ring through for those emergency situations. You can also set
whether Do Not Disturb silences iPad only when it’s locked, or even when it’s unlocked.
Chapter 3 Basics 29
Page 30
AirDrop, iCloud, and other ways to share
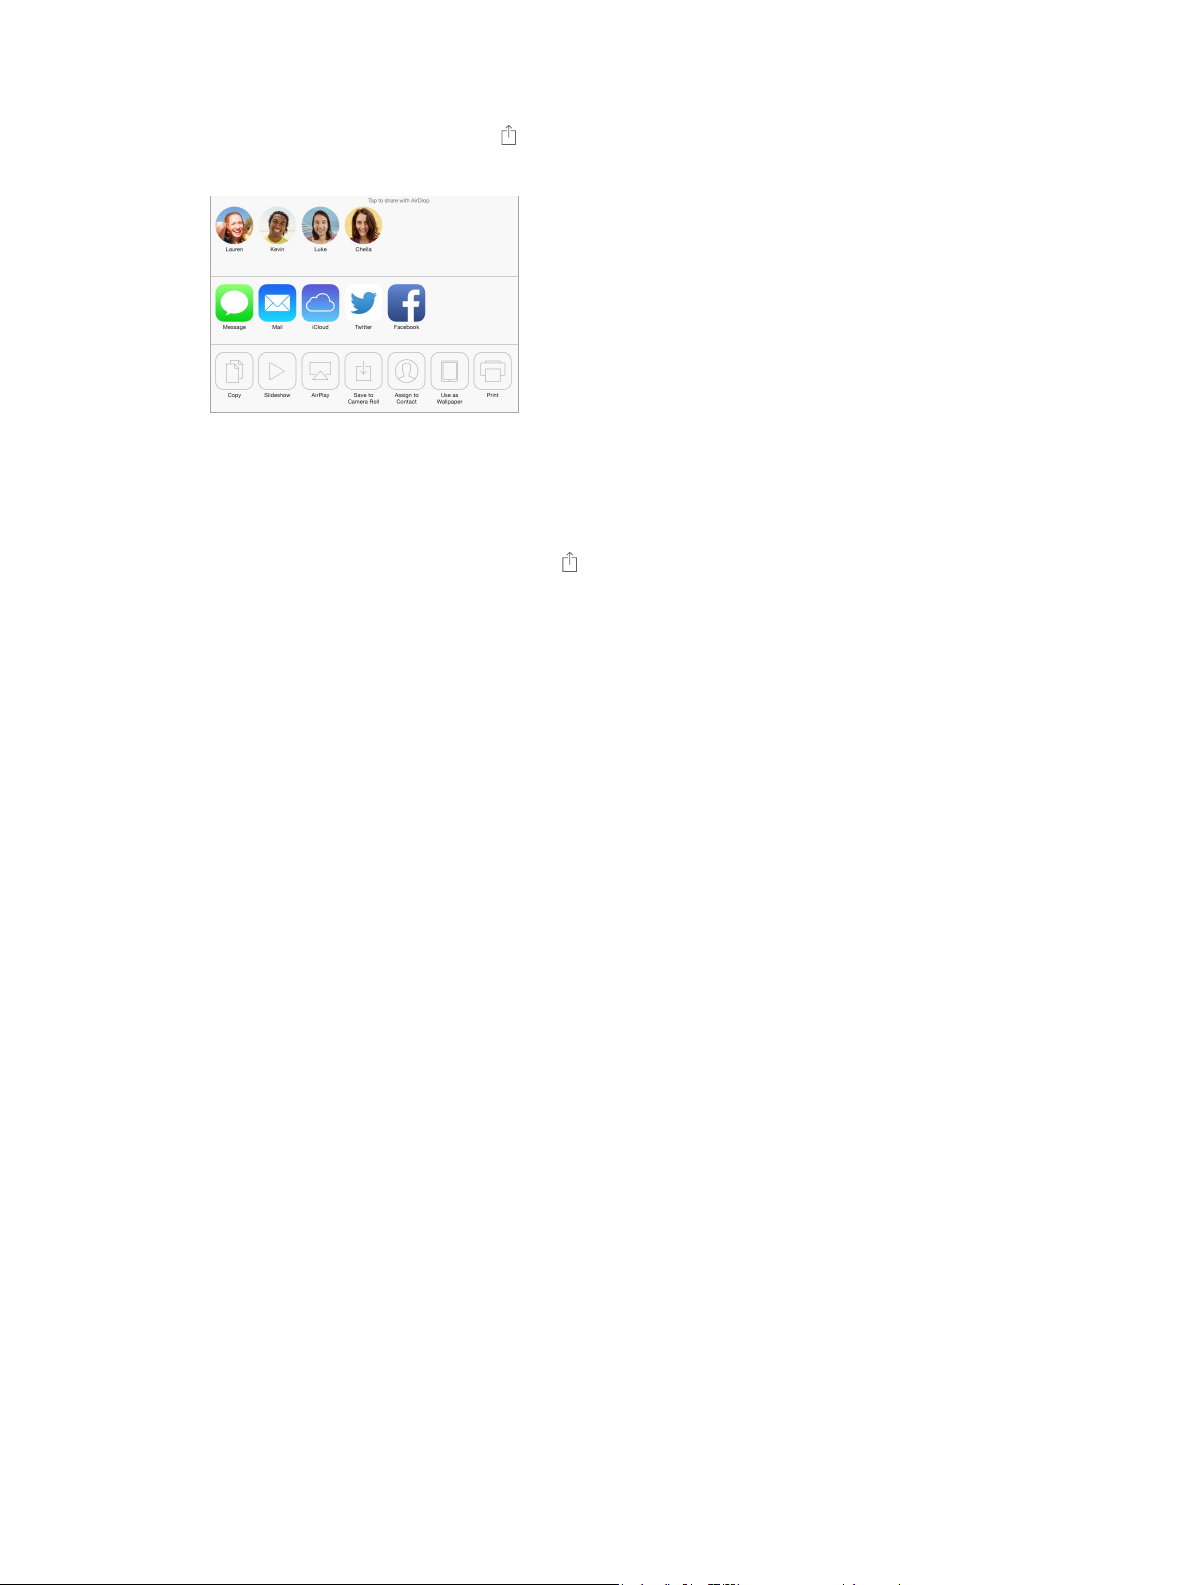
In many apps, you can tap Share or to see sharing and other options. The options vary
depending on the app you’re using.
AirDrop lets you share your photos, videos, websites, locations, and other items wirelessly with
other nearby iOS 7 devices that support AirDrop. AirDrop requires an iCloud account, and
transfers info using Wi-Fi and Bluetooth. You must be on the same Wi-Fi network, or within
approximately 30 feet (10 meters) of the other device. Transfers are encrypted for security.
Share an item using AirDrop. Tap Share or , then tap AirDrop and tap the name of a nearby
AirDrop user. AirDrop is also available in Control Center—just swipe up from the bottom edge of
the screen.
Receive AirDrop items from others. Swipe up from the bottom edge of the screen to open
Control Center. Tap AirDrop, then choose to receive items from Contacts only or from Everyone.
You can accept or decline each request as it arrives.
Add photo or video to a shared stream. Tap iCloud (a sharing option in the Photos app), choose
a stream (or create a new one), then tap Post.
Use Twitter, Facebook, Flickr, or Vimeo. Sign in to your account in Settings. The Twitter, Facebook,
Flickr, and Vimeo sharing buttons take you to the appropriate setting if you’re not yet signed in.
Note: While you’re composing a tweet, the number in the lower-right corner shows the number
of characters remaining. Attachments use some of a tweet’s 140 characters.
Transfer les
There are several ways to transfer les between iPad and your computer or other iOS device. If
you have an app that works with iCloud on multiple devices, you can use iCloud to automatically
keep the app’s documents up to date across your devices. See iCloud on page 15.
Transfer les using iTunes. Connect iPad to your computer using the included cable. In iTunes on
your computer, select iPad, then click Apps. Use the File Sharing section to transfer documents
between iPad and your computer. Apps that support le sharing appear in the Apps list. To
delete a le, select it in the Documents list, then press the Delete key.
You can also view les received as email attachments on iPad.
Some apps may share content using AirDrop. See AirDrop, iCloud, and other ways to share on
page 30.
Chapter 3 Basics 30
Page 31

Personal Hotspot
Use Personal Hotspot to share your iPad (Wi-Fi + Cellular models) Internet connection.
Computers can share your Internet connection using Wi-Fi, Bluetooth, or a USB cable. Other iOS
devices can share the connection using Wi-Fi. Personal Hotspot works only if iPad is connected to
the Internet over the cellular data network.
Note: This feature may not be available with all carriers. Additional fees may apply. Contact your
carrier for more information.
Share an Internet connection. Go to Settings > Cellular and tap Set Up Personal Hotspot—if it
appears—to set up the service with your carrier.
After you turn on Personal Hotspot, other devices can connect in the following ways:
•
Wi-Fi: On the device, choose your iPad in the list of available Wi-Fi networks.
•
USB: Connect your iPad to your computer using the cable that came with it. In your
computer’s Network preferences, choose iPad and congure the network settings.
•
Bluetooth: On iPad, go to Settings > Bluetooth and turn on Bluetooth. To pair and connect iPad
with your device, refer to the documentation that came with your computer.
Note: When a device is connected, a blue band appears at the top of the iPad screen. The
Personal Hotspot icon appears in the status bar of iOS devices using Personal Hotspot.
Change the Wi-Fi password for iPad. Go to Settings > Personal Hotspot > Wi-Fi Password, then
enter a password of at least eight characters.
Monitor your cellular data network usage. Go to Settings > Cellular. See Cellular settings on
page 134 .
AirPlay
Use AirPlay to stream music, photos, and video wirelessly to Apple TV and other AirPlay-enabled
devices on the same Wi-Fi network as iPad.
Display the AirPlay controls. Swipe up from the bottom edge of the screen to open Control
Center, then tap .
Stream content. Tap , then choose the device you want to stream to.
Switch back to iPad. Tap , then choose iPad.
Mirror the iPad screen on a TV. Tap , choose an Apple TV, then tap Mirroring. A blue bar
appears at the top of the iPad screen when AirPlay mirroring is turned on.
You can also connect iPad to a TV, projector, or other external display using the appropriate
Apple cable or adapter. See support.apple.com/kb/HT4108.
Chapter 3 Basics 31
Page 32

AirPrint
Use AirPrint to print wirelessly to an AirPrint-enabled printer, from apps such as Mail, Photos, and
Safari. Many apps available on the App Store also support AirPrint.
iPad and the printer must be on the same Wi-Fi network. For more information about AirPrint,
see support.apple.com/kb/HT4356.
Print a document. Tap or (depending on the app you’re using).
See the status of a print job. Double-click the Home button, then tap Print Center. The badge on
the icon shows how many documents are in the queue.
Cancel a job. Select it in the Print Center, then tap Cancel Printing.
Bluetooth devices
You can use Bluetooth devices with iPad, such as stereo headphones or an Apple Wireless
Keyboard. For supported Bluetooth proles, go to support.apple.com/kb/HT3647.
WARNING: For important information about avoiding hearing loss and avoiding distraction
while driving, see Important safety information on page 128.
Note: The use of certain accessories with iPad may aect wireless performance. Not all iPhone
and iPod touch accessories are fully compatible with iPad. Turning on airplane mode may
eliminate audio interference between iPad and an accessory. Reorienting or relocating iPad and
the connected accessory may improve wireless performance.
Turn on Bluetooth. Go to Settings > Bluetooth.
Connect to a Bluetooth device. Tap the device in the Devices list, then follow the onscreen
instructions to connect to it. See the documentation that came with the device for information
about Bluetooth pairing. For information about using an Apple Wireless Keyboard, see Use an
Apple Wireless Keyboard on page 25.
iPad must be within about 30 feet (10 meters) of the Bluetooth device.
Return audio output to iPad. Turn o or unpair the device, turn o Bluetooth in Settings >
Bluetooth, or use AirPlay to switch audio output to iPad. See AirPlay on page 31. Audio output
returns to iPad if the Bluetooth device moves out of range.
Unpair a device. Go to Settings > Bluetooth, tap next to the device, then tap “Forget this
Device.” If you don’t see the Devices list, make sure Bluetooth is on.
Restrictions
You can set restrictions for some apps, and for purchased content. For example, parents can
restrict explicit music from appearing in playlists, or disallow changes to certain settings. Use
restrictions to prevent the use of certain apps, the installation of new apps, or changes to
accounts or the volume limit.
Turn on restrictions. Go to Settings > General > Restrictions, then tap Enable Restrictions. You’ll
be asked to dene a restrictions passcode that’s necessary in order to change the settings you
make. This can be dierent than the passcode for unlocking iPad.
Important: If you forget your restrictions passcode, you must restore the iPad software. See
Restore iPad on page 134 .
Chapter 3 Basics 32
Page 33

Privacy
Privacy settings let you see and control which apps and system services have access to Location
Services, and to contacts, calendars, reminders, and photos.
Location Services lets location-based apps such as Maps, Weather, and Camera gather and
use data indicating your location. Your approximate location is determined using available
information from local Wi-Fi networks, if you have Wi-Fi turned on. The location data collected
by Apple isn’t collected in a form that personally identies you. When an app is using Location
Services, appears in the menu bar.
Turn Location Services on or o. Go to Settings > Privacy > Location Services. You can turn it o
for some or for all apps and services. If you turn o Location Services, you’re prompted to turn it
on again the next time an app or service tries to use it.
Turn Location Services o for system services. Several system services, such as location-based
iAds, use Location Services. To see their status, turn them on or o, or show in the menu
bar when these services use your location, go to Settings > Privacy > Location Services >
System Services.
Turn o access to private information. Go to Settings > Privacy. You can see which apps and
features have requested and been granted access to the following information:
•
Contacts
•
Calendar
•
Reminders
•
Photos
•
Bluetooth Sharing
•
Microphone
•
Twitter
•
Facebook
You can turn o each app’s access to each category of information. Review the terms and privacy
policy for each third-party app to understand how it uses the data it’s requesting.
Security
Security features help protect the information on your iPad from being accessed by others.
Use a passcode with data protection
For better security, you can set a passcode that must be entered each time you turn on or wake
up iPad.
Set a passcode. Go to Settings > Passcode and set a 4-digit passcode.
Setting a passcode turns on data protection, using your passcode as a key to encrypt Mail
messages and attachments stored on iPad, using 256-bit AES encryption. (Other apps may also
use data protection.)
Increase security. Turn o Simple Passcode and use a longer passcode. To enter a passcode that’s
a combination of numbers and letters, you use the keyboard. If you prefer to unlock iPad using
the numeric keypad, set up a longer passcode using numbers only.
Chapter 3 Basics 33
Page 34

Allow access to features when iPad is locked. Go to Settings > Passcode. Optional features include:
•
Siri (if enabled; see Siri settings on page 38)
Allow access to Control Center when iPad is locked. Go to Settings > Control Center. See Control
Center on page 28.
Erase data after ten failed passcode attempts. Go to Settings > Passcode and tap Erase Data.
After ten failed passcode attempts, all settings are reset, and all your information and media are
erased by removing the encryption key to the data.
If you forget your passcode, you must restore the iPad software. See Restore iPad on page 134 .
iCloud Keychain
iCloud Keychain keeps your website user names and passwords, and credit card information
that you set up with Safari, up to date on iPad and your other iOS devices and Macs running
OS X Mavericks.
iCloud Keychain works with Safari Password Generator and AutoFill. When you’re setting up a
new account, Safari Password Generator suggests unique, hard-to-guess passwords. You can
use AutoFill to have iPad enter your user name and password info, making login easy. See Fill in
forms on page 49.
Note: Some websites do not support AutoFill.
iCloud Keychain works on all your approved iOS 7 devices and Macs running OS X Mavericks.
iCloud Keychain is secured with 256-bit AES encryption during storage and transmission, and
cannot be read by Apple.
Set up iCloud Keychain. Go to Settings > iCloud > Keychain. Turn on iCloud Keychain and
follow the onscreen instructions. If you’ve set up iCloud Keychain on other devices, you need to
approve use of iCloud Keychain from one of those devices, or use your iCloud Security Code.
Important: Your iCloud Security Code cannot be retrieved by Apple. If you forget your security
code, you’ll have to start over and set up your iCloud Keychain again.
Set up AutoFill. Go to Settings > Safari > Passwords & AutoFill. Make sure Names and Passwords,
and Credit Cards, are turned on (they’re on by default). To add credit card info, tap Saved
Credit Cards.
The security code for your credit card is not saved—you have to enter that manually.
To automatically ll in names, passwords, or credit card info on sites that support it, tap a text
eld, then tap AutoFill.
To protect your personal information, set a passcode if you turn on iCloud Keychain and AutoFill.
Limit Ad Tracking
Restrict or reset Ad Tracking. Go to Settings > Privacy > Advertising. Turn on Limit Ad Tracking
to prevent apps from accessing your iPad advertising identier. For more information, tap
Learn More.
Chapter 3 Basics 34
Page 35

Find My iPad
Find My iPad can help you locate and secure your iPad using the free Find My iPhone app
(available in the App Store) on another iPad, iPhone, or iPod touch, or using a Mac or PC web
browser signed in to www.icloud.com/nd. Find My iPhone includes Activation Lock, which
makes it more dicult for anyone else to use or sell your iPad if you ever lose it. Your Apple ID
and password are required in order to turn o Find My iPad or to erase and reactivate your iPad.
Turn on Find My iPad. Go to Settings > iCloud.
Important: To use these features, Find My iPad must be turned on before your iPad is lost. iPad
must be able to connect to the Internet for you to locate and secure the device.
Use Find My iPhone. Open the Find My iPhone app on an iOS device, or go to
www.icloud.com/nd on your computer. Sign in and select your device.
•
Play Sound: Play a sound for two minutes.
•
Lost Mode: You can immediately lock your missing iPad with a passcode and send it a message
displaying a contact number. iPad also tracks and reports its location, so you can see where it’s
been when you check the Find My iPhone app.
•
Erase iPad: Erase all the information and media on your iPad and restore it to its original
factory settings.
Note: Before selling or giving away your iPad, you should erase it completely to remove all of
your personal data and turn o Find My iPad Activation Lock. Go to Settings > General > Reset >
Erase All Content and Settings. See Sell or give away iPad? on page 13 6 .
Charge and monitor the battery
iPad has an internal, lithium-ion rechargeable battery. For more information about the battery—
including tips for maximizing battery life—see www.apple.com/batteries.
WARNING: For important safety information about the battery and charging iPad, see
Important safety information on page 12 8 .
Charge the battery. The best way to charge the iPad battery is to connect iPad to a power outlet
using the included cable and USB power adapter.
iPad may also charge slowly when you connect it to a USB 2.0 port on your computer. If your
Mac or PC doesn’t provide enough power to charge iPad, a “Not Charging” message appears in
the status bar.
Important: The iPad battery may drain instead of charge if iPad is connected to a computer
that’s turned o or is in sleep or standby mode, to a USB hub, or to the USB port on a keyboard.
Chapter 3 Basics 35
Page 36

The battery icon in the upper-right corner of the status bar shows the battery level or
charging status.
Display the percentage of battery charge. Go to Settings > General > Usage and turn on
Battery Percentage.
Important: If iPad is very low on power, it may display an image of a nearly depleted battery,
indicating that iPad needs to charge for up to twenty minutes before you can use it. If iPad is
extremely low on power, the display may be blank for up to two minutes before the low-battery
image appears.
Rechargeable batteries have a limited number of charge cycles and may eventually need to be
replaced. The iPad battery isn’t user replaceable; it can be replaced only by an authorized service
provider. See www.apple.com/batteries/replacements.html.
Travel with iPad
Your airline carrier may let you keep your iPad turned on if you switch to Airplane Mode—listen
for an announcement after boarding, or ask a member of the crew. Wi-Fi and Bluetooth are
turned o in Airplane Mode, so you can’t make or receive FaceTime calls or use features that
require wireless communication. You can listen to music, play games, watch videos, or use other
apps that don’t require Internet access. If your airline allows it, you can turn Wi-Fi or Bluetooth
back on, even while in Airplane Mode.
Turn on Airplane Mode. Swipe up from the bottom edge of the screen to open Control Center,
then tap . You can also turn Airplane Mode on or o in Settings. When airplane mode is on,
appears in the status bar at the top of the screen.
You can also turn Wi-Fi and Bluetooth on or o in Control Center. See Control Center on page 28.
Chapter 3 Basics 36
Page 37

Siri
Tap to speak to Siri.
Siri’s response
Use Siri
The power of Siri is yours for the asking.
Summon Siri. Press and hold the Home button, until Siri beeps.
Note: To use Siri, iPad must be connected to the Internet. See Connect to Wi-Fi on page 13.
Cellular charges may apply.
Ask Siri anything, from “set the timer for 3 minutes” to “what movies are showing tonight?”
Open apps, and turn features on or o, like Bluetooth, Do Not Disturb, and Accessibility. Siri
understands natural speech, so you don’t have to learn special commands or keywords.
Siri’s response
4
Tap to speak to Siri.
For hints, ask Siri “what can you do,” or tap .
Siri often displays helpful info on your screen. Tap the info to open a related app or get
more details.
Manually control when Siri listens. As an alternative to letting Siri automatically notice when
you stop talking, you can hold down the Home button while you speak, and release it when
you’re done.
Change Siri’s voice gender. Go to Settings > General > Siri (may not be available in all areas).
Talk to Siri using a headset. Connect the headset, then press and hold the center or call button.
37
Page 38

Tell Siri about yourself
If you let Siri know who you are, you can get personalized service—like, “tell me how to get home.”
Tell Siri who you are. Fill out your contact card in Contacts, then go to Settings > General > Siri >
My Info and tap your contact card.
Be sure to include your home and work addresses, and your relationships.
Note: Location information isn’t tracked or stored outside iPad. If you don’t want to use Location
Services, go to Settings > Privacy > Location Services to turn it o. You can still use Siri, but Siri
won’t be able to do anything that requires knowing your location.
Make corrections
Want to cancel that last command? Say “cancel,” tap the Siri icon, or press the Home button.
If Siri doesn’t get something right, you can tap to edit your request.
Or tap again and clarify your request. For example, “I meant Boston.” Don’t bother saying what
you didn’t mean.
Siri settings
To set options for Siri, go to Settings > General > Siri. Options include:
•
Turning Siri on or o
•
Language
•
Voice gender (may not be available in all areas)
•
Voice feedback
•
My Info card
Prevent access to Siri when iPad is locked. Go to Settings > Passcode. You can also disable Siri
by turning on restrictions. See Restrictions on page 32.
Chapter 4 Siri 38
Page 39

Messages
Tap the compose button to
start a new conversation.
Tap the compose button to
Tap the Attach Media
button to include a
photo or video.
5
iMessage service
With the Messages app and the built-in iMessage service, you can send unlimited text messages
over Wi-Fi using iOS 5 or later, or using OS X Mountain Lion or later. Messages can include
photos, videos, and other info. You can see when people are typing, and let them know when
you’ve read their messages. iMessages are displayed on all of your iOS devices logged in to the
same account, so you can start a conversation on one device and continue it on another. For
security, iMessages are encrypted before they’re sent.
WARNING: For important information about avoiding distractions while driving, see Important
safety information on page 128 .
Note: Cellular data charges or additional fees may apply for you, and for the iPhone and iPad
users you exchange messages with over their cellular data network.
Send and receive messages
start a new conversation.
Tap the Attach Media
button to include a
photo or video.
39
Page 40

Start a text conversation. Tap , then enter a phone number or email address, or tap and
choose a contact.
Note: An alert appears if a message can’t be sent. Tap the alert in a conversation to try
sending the message again.
Resume a conversation. Tap the conversation in the Messages list.
Hide the keyboard. Tap in the lower-right corner.
Use picture characters. Go to Settings > General > Keyboard > Keyboards > Add New Keyboard,
then tap Emoji to make that keyboard available. Then while typing a message, tap to bring up
the Emoji keyboard. See Special input methods on page 126.
See what time a message was sent or received. Drag any bubble to the left.
Make a FaceTime call to the person you’re texting. Tap Contact at the top of the screen, then
tap .
See a person’s contact info. Tap Contact at the top of the screen, then tap . Tap info items to
perform actions, such as making a FaceTime call.
See earlier messages in the conversation. Tap the status bar to scroll to the top. Tap Load Earlier
Messages, if necessary.
Send messages to a group. Tap , then enter multiple recipients.
Block unwanted messages. On a contact card, tap Block this Caller. To see someone’s contact
card while viewing a message, tap Contact, then tap . You can also block callers in Settings >
FaceTime > Blocked. You won’t receive FaceTime calls or text messages from blocked callers. For
more information about blocking calls, see support.apple.com/kb/HT5845.
Manage conversations
Conversations are saved in the Messages list. A blue dot indicates unread messages. Tap a
conversation to view or continue it.
View the Messages list. Swipe to the right.
Forward a conversation. Select the conversation, touch and hold a message, tap More, select the
parts to include, then tap .
Delete a message. Touch and hold a message or attachment, tap More, select more if desired,
then tap . To delete all text and attachments without deleting the conversation, tap Delete All.
Delete a conversation. In the Messages list, swipe the conversation from right to left, then
tap Delete.
Search conversations. In the Messages list, tap the top of the screen to display the search eld,
then enter the text you’re looking for. You can also search conversations from the Home screen.
See Search on page 27.
Chapter 5 Messages 40
Page 41

Share photos, videos, and more
You can send photos, videos, locations, contact info, and voice memos. The size limit of
attachments is determined by your service provider—iPad compresses photo and video
attachments if necessary.
Send a photo or video. Tap . You can choose an existing photo or video on iPad, or take a
new one.
See full-size photos or video. Tap the photo or video. To see other photos and videos in the
conversation, tap . Tap to return to the conversation.
Send items from another app. In the other app, tap Share or , then tap Message.
Share, save, or print an attachment. Tap the attachment, then tap .
Copy a photo or video. Touch and hold the attachment, then tap Copy.
Add someone to your contacts. In a conversation, tap Contact, then tap Create New Contact.
Save contact info. Tap Contact at the top of the screen, tap , then tap Create New Contact or
Add to Existing Contact.
Messages settings
Go to Settings > Messages, where you can:
•
Turn iMessage on or o
•
Notify others when you’ve read their messages
•
Specify phone numbers, Apple IDs, and email addresses to use with Messages
•
Show the Subject eld
•
Block unwanted messages
Manage notications for messages. See Notication Center on page 28.
Set the alert sound for incoming text messages. See Sounds and silence on page 29.
Chapter 5 Messages 41
Page 42

Mail
Compose a
message.
Change mailboxes
or accounts.
Delete, move, or mark
multiple messages.
Search for
messages.
Change the preview length in
Settings > Mail, Contacts, Calendars.
Write messages
Mail lets you access your email accounts, on the go.
Change mailboxes
or accounts.
6
Search for
messages.
Change the preview length in
Settings > Mail, Contacts, Calendars.
Insert a photo or video. Tap the insertion point, then tap Insert Photo or Video. Also see Edit
text on page 24.
Delete, move, or mark
multiple messages.
Compose a
message.
Quote some text when you reply. Tap the insertion point, then select the text you want to
include. Tap , then tap Reply. You can turn o the indentation of the quoted text in Settings >
Mail, Contacts, Calendars > Increase Quote Level.
Send a message from a dierent account. Tap the From eld to choose an account.
Change a recipient from Cc to Bcc. After you enter recipients, you can drag them from one eld
to another or change their order.
42
Page 43

Get a sneak peek
See a longer preview. Go to Settings > Mail, Contacts, Calendars > Preview. You can show up to
ve lines.
Is this message for me? Turn on Settings > Mail, Contacts, Calendars > Show To/Cc Label. If
the label says Cc instead of To, you were just copied. You can also use the To/Cc mailbox, which
gathers all mail addressed to you. To show it, tap Edit while viewing the Mailboxes list.
Finish a message later
Save it, don’t send it. If you’re writing a message and want to nish it later, tap Cancel, then tap
Save Draft.
Finish a saved draft. Touch and hold Compose. Pick the draft from the list, then nish it up and
send, or save it again as a draft.
Show draft messages from all of your accounts. While viewing the Mailboxes list, tap Edit, tap
Add Mailbox, then turn on the All Drafts mailbox.
Delete a draft. In the Previous Drafts list, swipe left across a draft, then tap Delete.
See important messages
Gather important messages. Add important people to your VIP list, and their messages all
appear in the VIP mailbox. Tap the sender’s name in a message, then tap Add to VIP. To show
the VIP mailbox, tap Edit while viewing the Mailboxes list.
Get notied of important messages. Notication Center lets you know when you
receive messages in favorite mailboxes or messages from your VIPs. Go to Settings >
Notication Center > Mail.
Chapter 6 Mail 43
Page 44

Flag a message so you can nd it later. Tap while reading the message. You can change the
appearance of the agged message indicator in Settings > Mail, Contacts, Calendars > Flag Style.
To see the Flagged smart mailbox, tap Edit while viewing the Mailboxes list, then tap Flagged.
Search for a message. Scroll to or tap the top of the message list to reveal the search eld.
Searching looks at the address elds, the subject, and the message body. To search multiple
accounts at once, search from a smart mailbox, such as All Sent.
Search by timeframe. Scroll to or tap the top of the message list to reveal the search eld,
then type something like “February meeting” to nd all messages from February with the
word “meeting.”
Search by message state. To nd all agged, unread messages from people in your VIP list, type
“ag unread vip.” You can also search for other message attributes, such as “attachment.”
Junk be gone! Tap while you’re reading a message, then tap Move to Junk to le it in the Junk
folder. If you accidentally move a message, shake iPad immediately to undo.
Make a favorite mailbox. Favorite mailboxes appear at the top of the Mailboxes list. To add a
favorite, view the Mailboxes list and tap Edit. Tap Add Mailbox, then select the mailbox to add.
You’ll also get push notications for your favorite mailboxes.
Attachments
Save a photo or video to your Camera Roll. Touch and hold the photo or video until a menu
appears, then tap Save Image.
Use an attachment with another app. Touch and hold the attachment until a menu appears,
then tap the app you want to open the attachment with.
See messages with attachments. The Attachments mailbox shows messages with attachments
from all accounts. To add it, view the Mailboxes list and tap Edit.
Work with multiple messages
Delete, move, or mark multiple messages. While viewing a list of messages, tap Edit. Select
some messages, then choose an action. If you make a mistake, shake iPad immediately to undo.
Chapter 6 Mail 44
Page 45

Organize your mail with mailboxes. Tap Edit in the mailboxes list to create a new one, or
rename or delete one. (Some built-in mailboxes can’t be changed.) There are several smart
mailboxes, such as Unread, that show messages from all your accounts. Tap the ones you want
to use.
Recover a deleted message. Open the message in the account’s Trash mailbox, then tap and
move the message. Or, if you just deleted it, shake iPad to undo. To see deleted messages in all
your accounts, add the Trash smart mailbox. To add it, tap Edit in the mailboxes list and select it
from the list.
Archive instead of delete. Instead of deleting messages, you can archive them so they’re still
around if you need them. Select Archive Mailbox in Settings > Mail, Contacts, Calendars >
account name > Account > Advanced. To delete a message instead of archiving it, touch and
hold , then tap Delete.
Deal with a message without opening it. Swipe left on a message, then tap Trash or Archive.
Or tap More to move, forward, reply, ag, mark as read, or move it to the Junk folder.
Stash your trash. You can set how long deleted messages stay in the Trash mailbox. Go to
Settings > Mail, Contacts, Calendars > account name > Account > Advanced.
See and save addresses
See who received a message. While viewing the message, tap More in the To eld.
Add someone to Contacts or make them a VIP. Tap the person’s name or email address.
Print messages
Print a message. Tap , then tap Print.
Print an attachment or picture. Tap to view it, then tap and choose Print.
See AirPrint on page 32.
Mail settings
Go to Settings > Mail, Contacts, Calendars, where you can:
•
Create a dierent mail signature for each account
•
Add mail accounts
•
Bcc yourself on every message you send
•
Turn on Organize by Thread to group related messages together
•
Turn o conrmation for deleting a message
•
Turn o Push delivery of new messages, to save on battery power
•
Temporarily turn o an account
Chapter 6 Mail 45
Page 46

Safari
Tap to enter a search
item or web address.
Share or save.
Revisit recent pages.
Your open tabs
See pages open
on other devices.
See your bookmarks,
reading list, browsing
history, and tweeted links.
Open a new tab.
7
Safari at a glance
Use Safari on iPad to browse the web. Use Reading List to collect webpages to read later. Add
page icons to the Home screen for quick access. Use iCloud to see pages you have open on other
devices, and to keep your bookmarks and reading list up to date on your other devices.
Tap to enter a search
Revisit recent pages.
item or web address.
Share or save.
Open a new tab.
Your open tabs
See pages open
on other devices.
See your bookmarks,
reading list, browsing
history, and tweeted links.
46
Page 47

Search the web
Or tap a suggestion.
Enter what you’re searching
for, then tap Go.
Enter what you’re searching
Tap to search the current page.
Touch and hold a link
to see these options.
for, then tap Go.
Or tap a suggestion.
Tap to search the current page.
Search the web. Enter a URL or search terms in the smart search eld at the top of the page.
Then tap a search suggestion, or tap Go on the keyboard to search for exactly what you typed. If
you don’t want to see suggested search terms, go to Settings > Safari > Smart Search Field and
turn o Search Engine Suggestions.
Have your favorites top the list. Select them at Settings > Safari > Favorites.
Search the page. Scroll to the bottom of the suggested results list and tap the entry under
On This Page. Tap in the bottom left to see the next occurrence on the page. To search the
page for a dierent term, enter it in the eld at the bottom of the page. To continue browsing,
tap Done.
Choose your search tool. Go to Settings > Safari > Search Engine.
Browse the web
Look before you leap. To see the URL of a link before you go there, touch and hold the link.
Open a link in a new tab. Touch and hold the link, then tap Open in New Tab. If you’d like to switch
to a new tab when you open it, go to Settings > Safari and turn o Open New Tabs in Background.
Switch tabs. Tap a tab at the top of the page.
Close a tab. Tap on the tab.
Pick up where you left o. Tap to view a list of tabs that you left open on your other devices.
If the list is empty, make sure you turn on Safari in Settings > iCloud.
Get back to the top. Tap the top edge of the screen to quickly return to the top of a long page.
Touch and hold a link
to see these options.
See more. Turn iPad to landscape orientation.
See the latest. Tap next to the address in the search eld to update the page.
Chapter 7 Safari 47
Page 48

Keep bookmarks
Shared links
Reading list
Bookmarks
Bookmarks
Tap to share with
someone nearby
using AirDrop.
Other sharing
options
Shared links
Reading list
Bookmark the current page. Tap , then tap Bookmark. To revisit the page, tap , then tap
the bookmark.
Get organized. To create a folder for bookmarks, tap , then tap Edit.
Choose which favorites appear when you tap the search eld. Go to Settings > Safari > Favorites.
Bookmarks bar on your Mac? Turn on Settings > iCloud > Safari if you want items from the
bookmarks bar in Safari on your Mac to appear in Favorites on iPad.
Save an icon for the current page on your Home screen. Tap , then tap Add to Home Screen.
The icon appears only on the device where you create it.
Share what you discover
Tap to share with
someone nearby
using AirDrop.
Other sharing
options
Spread the news. Tap .
See who’s tweeting what. Go to Settings > Twitter and sign in, then tap and look under to
see links tweeted by your friends and others you follow.
Chapter 7 Safari 48
Page 49

Fill in forms
Tap AutoFill instead of
typing your contact info.
Tap to view the page in Reader.
Tap to view the page in Reader.
Whether you’re logging in to a website, signing up for a service, or making a purchase, you can
ll in a web form using the onscreen keyboard or have Safari ll it in for you using AutoFill.
Tap AutoFill instead of
typing your contact info.
Tired of always having to log in? When you’re asked if you want to save the password for the
site, tap Yes. The next time you visit, your user name and password will be lled in for you.
Fill in a form. Tap any eld to bring up the onscreen keyboard. Tap or above the keyboard to
move from eld to eld.
Fill it in automatically. Go to Settings > Safari > Passwords & Autoll and turn on Use Contact
Info. Then, tap AutoFill above the onscreen keyboard when you’re lling in the form. Not all
websites support AutoFill.
Enter your credit card information. Go to Settings > Safari > Passwords & Autoll and save your
credit card information (or accept Safari’s oer to save it for you when you make a purchase), then
look for the AutoFill Credit Card button above the onscreen keyboard whenever you’re in a credit
card eld. Your card’s security code isn’t stored, so you still enter that yourself. If you’re not using a
passcode for iPad, you might want to start; see Use a passcode with data protection on page 33.
Submit the form. Tap Go, Search, or the link on the webpage.
Avoid clutter with Reader
Use Safari Reader to focus on a page’s primary content.
Focus on content. Tap at the left end of the address eld. If you don’t see the icon, reader isn’t
available for the page you’re looking at.
Share just the good stu. To share just the article text and a link to it, tap while viewing the
page in Reader.
Return to the full page. Tap the reader icon in the address eld again.
Chapter 7 Safari 49
Page 50

Save a reading list for later
Save interesting items in your reading list so you can return to them later. You can read pages in
your reading list even when you’re not connected to the Internet.
Add the current page to your reading list. Tap , then tap Add to Reading List.
Add a linked page without opening it. Touch and hold the link, then tap Add to Reading List.
View your reading list. Tap , then tap .
Delete something from your reading list. Swipe left on the item in your reading list.
Don’t want to use cellular data to download reading list items? Turn o Settings > Safari >
Use Cellular Data.
Privacy and security
You can adjust Safari settings to keep your browsing activities to yourself and protect yourself
from malicious websites.
Want to keep a low prole? Turn on Settings > Safari > Do Not Track. Safari will ask websites you
visit to not track your browsing, but beware—a website can choose not to honor the request.
Control cookies. Go to Settings > Safari > Block Cookies. To remove cookies already on iPad, go
to Settings > Safari > Clear Cookies and Data.
Let Safari create secure passwords and store them for you. Tap the password eld when
creating a new account and Safari will oer to create a password for you.
Erase your browsing history and data from iPad. Go to Settings > Safari > Clear History, and
Settings > Safari > Clear Cookies and Data.
Chapter 7 Safari 50
Page 51

Visit sites without making history. Tap Private while viewing your open pages or bookmarks.
Sites you visit will no longer be added to History on your iPad.
Watch for suspicious websites. Turn on Settings > Safari > Fraudulent Website Warning.
Safari settings
Go to Settings > Safari, where you can:
•
Choose your search engine
•
Provide AutoFill information
•
Choose which favorites are displayed when you search
•
Have new tabs open in the background
•
Display your Favorites at the top of the page
•
Block pop-ups
•
Tighten privacy and security
•
Clear your history, cookies, and data
Chapter 7 Safari 51
Page 52

Music
Create, share, fine-tune,
rename, or delete a station.
Create, share, fine-tune,
Play more like this song, never
play it, or add it to your wish list.
Skip to the
next song.
Options for browsing your music library
8
iTunes Radio
Featured stations provide a great way to explore and enjoy new music in a variety of genres. You
can also create your own custom stations, based on your pick of artist, song, or genre. See iTunes
Match on page 56.
WARNING: For important information about avoiding hearing loss, see Important safety
information on page 128 .
Note: iTunes Radio may not be available in all areas. For more information about iTunes Radio,
see support.apple.com/kb/HT5848.
rename, or delete a station.
Play more like this song, never
play it, or add it to your wish list.
Skip to the
next song.
Options for browsing your music library
When you pick a station and play a song, the Now Playing screen shows the album art and the
playback controls. Tap to nd out more, create a new station, ne-tune the station, or share it.
See AirDrop, iCloud, and other ways to share on page 30.
Create a station based on an artist, genre, or song. Tap New on the iTunes Radio screen. Or tap
Create when browsing or playing music from your library.
52
Page 53

Edit your stations. Tap Edit. You can include or exclude other artists, songs, or genres, or delete
a station.
Inuence upcoming song selections. Tap , then tap Play More Like This or Never Play This
Song. You can also add the song to your iTunes Wish List.
Skip to the next song. Tap . You can skip a limited number of songs per hour.
See the songs you’ve played, or view your wishlist. Tap History, then tap Played or Wishlist. You
can purchase songs for your library. Tap a song to preview it.
Purchase songs for your personal library. Tap the price button.
Share a station you created. While playing the station, tap , then tap Share Station.
Listen to iTunes Radio ad free. Subscribe to iTunes Match and turn it on. See iTunes Match on
page 56.
Get music
Get music and other audio content onto iPad:
•
Purchase and download from the iTunes Store: In Music, tap Store. See Chapter 22, iTunes
Store, on page 91.
•
iTunes in the Cloud: When you’re signed in to the iTunes Store, all of your previous purchases
automatically appear in Music. See iCloud on page 15.
•
Sync content with iTunes on your computer: See Sync with iTunes on page 17.
•
Use iTunes Match to store your music library in iCloud: See iTunes Match on page 56.
Browse and play
Browse your music by playlist, artist, song, or other category. For additional browse options, tap
More, if it appears in the lower-right corner. Tap any song to play it.
You can listen to audio from the built-in speaker, from headphones attached to the headset jack,
or from wireless Bluetooth stereo headphones paired with iPad. If headphones are attached or
paired, no sound comes from the speaker.
Rearrange the browse buttons. Tap More (if it’s visible), then tap Edit and drag a button onto the
one you want to replace.
Chapter 8 Music 53
Page 54

The Now Playing screen provides playback controls and shows you what’s playing.
Volume
Playhead
Tap to create a
Genius Playlist or an
iTunes Radio station.
Back
Back
Track list
Track list
Tap to create a
Genius Playlist or an
iTunes Radio station.
Playhead
Volume
Skip to any point in a song. Drag the playhead. Slow down the scrub rate by sliding your nger
down the screen.
Shue. Tap Shue on the Now Playing screen to play your tunes in random order.
See all tracks from the album containing the current song. Tap . To play a track, tap it.
Search music. While browsing, tap the status bar to reveal the search eld at the top of the
screen, then enter your search text. You can also search audio content from the Home screen. See
Search on page 27.
Rate a song for smart playlists in iTunes. Tap the screen to reveal the rating dots, then tap a dot
to assign a rating.
Get audio controls from the Lock screen or when using another app. Swipe up from the
bottom edge of the screen to open Control Center. See Control Center on page 28.
Play music on AirPlay speakers or Apple TV. Open Control Center, then tap . See AirPlay on
page 31.
Chapter 8 Music 54
Page 55

Playlists
Create playlists to organize your music. View Playlists, tap New Playlist near the top of the list,
then enter a title. Tap to add songs or videos.
Edit a playlist. Select the playlist, then tap Edit.
•
Add more songs: Tap .
•
Delete a song: Tap , then tap Remove. Deleting a song from a playlist doesn’t delete it from iPad.
•
Change the song order: Drag .
New and changed playlists are copied to your iTunes library the next time you sync iPad with
your computer, or through iCloud if you’ve subscribed to iTunes Match.
Clear or delete a playlist you created on iPad. Select the playlist, then tap Clear or Delete.
Remove a song from iPad. Tap Songs, swipe the song, then tap Delete. The song is deleted from
iPad, but not from your iTunes library on your Mac or PC, or from iCloud.
Genius—made for you
A Genius playlist is a collection of songs from your library that go together. Genius is a free
service, but it requires an Apple ID.
A Genius Mix is a selection of songs of the same kind of music, recreated from your library each
time you listen to the mix.
Use Genius. Turn on Genius in iTunes on your computer, then sync iPad with iTunes.
Genius Mixes are synced automatically, unless you manually manage your music. You can
also sync Genius playlists.
Browse and play Genius Mixes. Tap Genius (tap More rst, if Genius isn’t visible). Swipe to view
additional mixes. To play a mix, tap .
Make a Genius playlist. View Playlists, then tap Genius Playlist and choose a song. Or from the
Now Playing screen, tap Create, then tap Genius Playlist.
•
Replace the playlist using a dierent song: Tap New and pick a song.
•
Refresh the playlist: Tap Refresh.
•
Save the playlist: Tap Save. The playlist is saved with the title of the song you picked, and
marked by .
Chapter 8 Music 55
Page 56

Genius playlists created on iPad are copied to your computer when you sync with iTunes.
Note: Once a Genius playlist is synced to iTunes, you can’t delete it directly from iPad. Use iTunes
to edit the playlist name, stop syncing, or delete the playlist.
Delete a saved Genius playlist. Tap the Genius playlist, then tap Delete.
Siri
You can use Siri (iPad 3rd generation or later) to control music playback. See Use Siri on page 37.
Use Siri to play music. Press and hold the Home button.
•
Play or pause music: Say “play” or “play music.” To pause, say “pause,” “pause music,” or “stop.”
You can also say “next song” or “previous song.”
•
Play an album, artist, or playlist: Say “play,” then say “album,” “artist,” or “playlist” and the name.
•
Shue the current playlist: Say “shue.”
•
Find out more about the current song: Say “what’s playing,” “who sings this song,” or “who is this
song by.”
•
Use Genius to play similar songs: Say “Genius” or “play more songs like this.”
iTunes Match
iTunes Match stores your music library in iCloud—including songs imported from CDs—and lets
you play your collection on iPad and your other iOS devices and computers. iTunes Match also
lets you listen to iTunes Radio ad-free (see iTunes Radio on page 52). iTunes Match is oered as a
paid subscription.
Note: iTunes Match may not be available in all areas. See support.apple.com/kb/HT5085.
Subscribe to iTunes Match in iTunes on your computer. Choose Store > Turn On iTunes Match,
then click the Subscribe button.
Once you subscribe, iTunes adds your music, playlists, and Genius Mixes to iCloud. For more
information, see www.apple.com/itunes/itunes-match.
Turn on iTunes Match. Go to Settings > Music. Turning on iTunes Match removes synced music
from iPad.
Songs are downloaded to iPad when you play them. You can also download songs and albums
manually—while browsing, tap .
Note: When iTunes Match is on, downloaded music is automatically removed from iPad as space
is needed, starting with the oldest and least-played songs. An iCloud icon ( ) appears next to
removed songs and albums, indicating that the songs and albums are still available through
iCloud but not stored locally on iPad.
Remove a song that’s been downloaded. Swipe left, then tap Delete.
Just show music that’s been downloaded from iCloud. Go to Settings > Music, then turn o
Show All Music.
Remove iPad from your list of “iTunes in the Cloud” devices. In iTunes on your computer, choose
Store > View Account. Sign in, then click Manage Devices in the “iTunes in the Cloud” section.
Chapter 8 Music 56
Page 57

Music settings
Go to Settings > Music to set options for Music, including:
•
Sound Check (to normalize the volume level of your audio content)
•
Equalization (EQ)
Note: EQ settings aect all sound output, including the headset jack and AirPlay. These
settings generally apply only to music played from the Music app.
The Late Night setting compresses the dynamic range of the audio output, reducing the
volume of loud passages and increasing the volume of quiet passages. You might want to use
this setting when listening to music on an airplane or in some other noisy environment. The
Late Night setting applies to all audio output—video as well as music.
•
Grouping by album artist
Set the volume limit. Go to Settings > Music > Volume Limit.
Note: In some European Union (EU) countries, iPad may indicate when you’re setting the volume
above the EU recommended level for hearing safety. To increase the volume beyond this level,
you may need to briey release the volume control. To limit the maximum headset volume
to this level, go to Settings > Music > Volume Limit and turn on EU Volume Limit. To prevent
changes to the volume limit, go to Settings > General > Restrictions.
Prevent changes to the volume limit. Go to Settings > General > Restrictions > Volume Limit
and tap Don’t Allow Changes.
Chapter 8 Music 57
Page 58

FaceTime
Drag your image
to any corner.
Switch between cameras.
Mute (you can hear
and see; the caller
can see but not hear).
9
FaceTime at a glance
Use FaceTime to make video or audio calls to other iOS devices or computers that support
FaceTime. The FaceTime camera lets you talk face-to-face; switch to the rear iSight camera to
share what you see around you.
Note: FaceTime may not be available in all areas. On iPad Wi-Fi + Cellular models, you can make
FaceTime calls over a cellular data connection. Cellular data charges may apply. See Cellular
settings on page 134 .
Drag your image
to any corner.
Switch between cameras.
Mute (you can hear
and see; the caller
can see but not hear).
With a Wi-Fi connection and an Apple ID, you can make and receive FaceTime calls (rst sign in
using your Apple ID, or create a new account).
58
Page 59

Make and answer calls
Tap an icon to start
a FaceTime call.
Set up a reminder to return the call later.
Send the caller
a text message.
Make a FaceTime call. Make sure FaceTime is turned on in Settings > FaceTime, then in FaceTime,
tap Contacts and choose a contact. Tap to make a video call, or tap to make an audio call.
Tap an icon to start
a FaceTime call.
Use your voice to start the call. Press and hold the Home button, then say “FaceTime,” followed
by the name of the person to call.
Want to call again? Tap Recents, then choose a name or number.
Can’t take a call right now? When a FaceTime call comes in, you can answer, decline, or choose
another option.
Set up a reminder to return the call later.
Send the caller
a text message.
See the whole gang. Rotate iPad to use FaceTime in landscape orientation. To avoid unwanted
orientation changes, lock iPad in portrait orientation. See Change the screen orientation on
page 21.
Manage calls
Multitask during a call. Press the Home button, then tap an app icon. You can still talk with
your friend, but you can’t see each other. To return to the video, tap the green bar at the top of
the screen.
Take advantage of Favorites. Tap Favorites. To add a favorite, Tap , then choose a contact and
add to Favorites as FaceTime Audio or FaceTime. To call a favorite, tap a name in the list. Make
sure phone numbers for contacts outside your region include the country code and area code.
Juggle calls. FaceTime calls aren’t forwarded. If another call comes in while you’re on a FaceTime
call, you can either end the FaceTime call and answer the incoming call, decline the incoming
call, or reply with a text message.
Block unwanted callers. Go to Settings > FaceTime > Blocked > Add New. You won’t receive
FaceTime calls or text messages from blocked callers. For more information about blocking calls,
see support.apple.com/kb/HT5845.
Other options in Settings let you turn FaceTime on or o, specify a phone number, Apple ID, or
email address to use with FaceTime, and set your caller ID.
Chapter 9 FaceTime 59
Page 60

Calendar
Change calendars or accounts.
Change views.
View invitations.
Search for events.
Calendar at a glance
10
Change views.
Change calendars or accounts.
Search for events. Tap , then enter text in the search eld. The titles, invitees, locations, and
notes for the calendars you’re viewing are searched.
Change your view. Tap Day, Week, Month, or Year. Tap to view upcoming events as a list.
Search for events.
View invitations.
Change the color of a calendar. Tap Calendars, then tap next to the calendar and choose a
color from the list. For some calendar accounts, such as Google, the color is set by the server.
Adjust an event. Touch and hold the event, then adjust the grab points, or drag it to a new time.
60
Page 61

Invitations
Turn on Facebook
events in Settings >
Facebook.
Select which
calendars to view.
If you have an iCloud account, a Microsoft Exchange account, or a supported CalDAV account,
you can send and receive meeting invitations.
Invite others to an event. Tap an event, tap Edit, then tap Invitees. Type names, or tap to pick
people from Contacts.
RSVP. Tap an event you’ve been invited to, or tap Inbox and tap an invitation. If you add
comments (which may not be available for all calendars), your comments can be seen by the
organizer but not by other attendees. To see events you’ve declined, tap Calendars, then turn on
Show Declined Events.
Schedule a meeting without blocking your schedule. Tap the event, then tap Availability and
tap “free.” If it’s an event you created, tap “Show As” and then tap “free.” The event stays on your
calendar, but it doesn’t appear as busy to others who send you invitations.
Use multiple calendars
Select which
calendars to view.
Turn on Facebook
events in Settings >
Facebook.
Turn on iCloud, Google, Exchange, or Yahoo! calendars. Go to Settings > Mail, Contacts,
Calendars, tap an account, then turn on Calendar.
Subscribe to a calendar. Go to Settings > Mail, Contacts, Calendars, then tap Add Account. Tap
Other, then tap Add Subscribed Calendar. Enter the URL of the .ics le to subscribe to. You can
also subscribe to an iCalendar (.ics) calendar by tapping a link to the calendar.
Add a CalDAV account. Go to Settings > Mail, Contacts, Calendars, tap Add Account, then tap
Other. Under Calendars, tap Add CalDAV Account.
View the Birthdays calendar. Tap Calendars, then tap Birthdays to include birthdays from
Contacts with your events. If you’ve set up a Facebook account, you can also include your
Facebook friends’ birthdays.
View the Holidays calendar. Tap Calendars, then tap Holidays to included national holidays with
your events.
See multiple calendars at once. Tap Calendars, then select the calendars you want to view.
Move an event to another calendar. Tap the event, tap Edit, then select a calendar to move it to.
Chapter 10 Calendar 61
Page 62

Share iCloud calendars
You can share an iCloud calendar with other iCloud users. When you share a calendar, others can
see it, and you can let them add or change events. You can also share a read-only version that
anyone can view.
Create an iCloud calendar. Tap Calendars, tap Edit, then tap Add Calendar in the iCloud section.
Share an iCloud calendar. Tap Calendars, tap Edit, then tap the iCloud calendar you want to
share. Tap Add Person and enter a name, or tap to browse your Contacts. Those you invite
receive an email invitation to join the calendar, but they need an iCloud account in order
to accept.
Change a person’s access to a shared calendar. Tap Calendars, tap Edit, tap the shared calendar,
then tap the person. You can turn o their ability to edit the calendar, resend the invitation to
join the calendar, or stop sharing the calendar with them.
Turn o notications for shared calendars. When someone modies a shared calendar, you’re
notied of the change. To turn o notications for shared calendars, go to Settings > Mail,
Contacts, Calendars > Shared Calendar Alerts.
Share a read-only calendar with anyone. Tap Calendars, tap Edit, then tap the iCloud calendar
you want to share. Turn on Public Calendar, then tap Share Link to copy or send the URL for your
calendar. Anyone can use the URL to subscribe to the calendar using a compatible app.
Calendar settings
There are several settings in Settings > Mail, Contacts, Calendars that aect Calendar and your
calendar accounts. These include:
•
Syncing of past events (future events are always synced)
•
Alert tone played for new meeting invitations
•
Default calendar for new events
•
Default time for alerts
•
Time zone support, to show dates and times using a dierent time zone
•
Which day starts the week
Chapter 10 Calendar 62
Page 63

Photos
Select a photo to view.
Edit the photo.
Delete the photo.
Share the photo, play a slideshow,
assign it to a contact, print it, and more.
Tap the screen to
display the controls.
11
View photos and videos
Photos lets you view your:
•
Camera Roll—photos and videos you took on iPad, or saved from an email, text message,
webpage, or screenshot
•
Shared photos and videos—Photos and videos that you’ve shared with iCloud Photo Sharing
or that other have shared with you (see iCloud Photo Sharing on page 64)
•
Photos and videos synced from your computer (see Sync with iTunes on page 17 )
Edit the photo.
Tap the screen to
display the controls.
Select a photo to view.
Delete the photo.
Share the photo, play a slideshow,
assign it to a contact, print it, and more.
View your photos and videos. Tap Photos. Photos automatically organizes your photos and
videos by year, by collection, and by moment. To quickly browse the photos in a collection or
year, touch and hold for a moment, then drag.
By default, Photos displays a representative subset of your photos when you view by year
or by collection. To see all your photos, go to Settings > Photos & Camera and turn o
Summarize Photos.
View by events or by faces. Albums you sync with iPhoto 8.0 or later, or Aperture v3.0.2 or later,
can be viewed by events or by faces. Tap Albums, then scroll to nd Events or Faces.
63
Page 64

View by location. While viewing by year or by collection, tap . Photos and videos that include
location information appear on a map, showing where they were taken.
While viewing a photo or video, tap to show and hide the controls. Swipe left or right to go
forward or backward.
Zoom in or out. Double-tap, or pinch and stretch a photo. When you zoom in, you can drag to
see other parts of the photo.
Play a video. Tap . To toggle between full-screen and t-to-screen, double-tap the display.
Play a slideshow. While viewing a photo, tap , then tap Slideshow. Select options, then tap
Start Slideshow. To stop the slideshow, tap the screen. To set other slideshow options, go to
Settings > Photos & Camera.
To stream a slideshow or video to a TV, see AirPlay on page 31.
Organize your photos and videos
Create a new album. Tap Albums, tap , enter a name, then tap Save. Select photos and videos
to add to the album, then tap Done.
Note: Albums created on iPad aren’t synced back to your computer.
Add items to an existing album. While viewing thumbnails, tap Select, select items, tap Add To,
then select the album.
Manage albums. While viewing your album list, tap Edit.
•
Rename an album: Select the album, then enter a new name.
•
Rearrange albums: Touch, then drag the album to another location.
•
Delete an album: Tap .
Only albums created on iPad can be renamed or deleted.
iCloud Photo Sharing
Share streams of photos and videos with people you choose. Friends you’ve chosen who have an
iCloud account—and iOS 6 or later or OS X Mountain Lion or later—can join your stream, view
the photos you add, and leave comments. If they have iOS 7 or OS X Mavericks, they can add
their own photos and videos to the stream. You can also publish your stream to a website for
anyone to view.
Note: To use iCloud Photo Sharing, iPad must be connected to the Internet.
Turn on iCloud Photo Sharing. Go to Settings > iCloud > Photos.
Create a shared stream. While viewing a photo or video, or when you’ve selected multiple
photos or videos, tap , tap iCloud, tap Stream, then tap New Shared Stream. You can invite
people to view your stream using their email address or the mobile phone number they use
for iMessage.
Enable a public website. Select the shared stream, tap People, then turn on Public Website. Tap
Share Link to announce the site, if desired.
Chapter 11 Photos 64
Page 65

Add items to a shared stream. View a shared stream, tap , select items, then tap Done. You can
add a comment, then tap Post. You can also add items to a shared stream when you’re viewing
photos or albums. Tap , tap iCloud, tap Stream, then select the shared stream or create a new
one. Add a comment if you like, then tap Post.
Delete photos from a shared stream. Select the photo stream, tap Select, select the photos or
videos you want to delete, then tap . You must be the owner of the stream, or the owner of
the photo.
Delete comments from a shared stream. Select the photo or video that contains the comment.
Touch and hold the comment, then tap Delete. You must be the owner of the stream, or the
owner of the comment.
Rename a photo stream. While viewing Shared Streams, tap Edit, then tap the name and enter a
new one.
Add or remove subscribers, or turn Notications on or o. Select the photo stream, then
tap People.
Subscribe to a shared stream. When you receive an invitation, tap the Shared tab ( ), then tap
Accept. You can also accept an invitation in an email.
Add items to a shared stream you subscribed to. View the shared stream, then tap , select
items, then tap Done. You can add a comment, then tap Post.
My Photo Stream
View the photos you take with iPad on your other devices, automatically. Turn on My Photo
Stream in Settings > Photos & Camera. You can also turn on My Photo Stream in Settings >
iCloud > Photos.
Photos you take are automatically added to My Photo Stream when you leave the Camera app
and iPad is connected to the Internet via Wi-Fi. All photos added to your Camera Roll—including
screen shots and photos saved from email, for example—appear in My Photo Stream.
Photos added to My Photo Stream on your other devices also appear in My Photo Stream on
iPad. iOS devices can keep up to 1000 of your most recent photos in My Photo Stream; your
computers can keep all My Photo Stream photos permanently.
Note: Photos uploaded to My Photo Stream don’t count against your iCloud storage.
Manage My Photo Stream contents. In your My Photo Stream album, tap Select.
•
Save your best shots to an album on iPad: Select the photos, then tap Add To.
•
Share, print, copy, or save photos to your Camera Roll album: Select the photos, then tap .
•
Delete photos: Select the photos, then tap .
Note: Although deleted photos are removed from My Photo Stream on all your devices, the
original photos remain in the Camera Roll on the device where they were originally taken.
Photos that you save to another album on a device or computer are also not deleted. To delete
photos from My Photo Stream, you need iOS 5.1 or later on iPad and on your other iOS devices.
See support.apple.com/kb/HT4486.
Chapter 11 Photos 65
Page 66

Share photos and videos
You can share photos and videos in email, text messages, and tweets, and on Facebook and
Flickr. Videos can be shared in email and text messages, and on YouTube, Facebook, and Vimeo.
You can also share photos and videos using Photo Sharing, described above.
Share or copy a photo or video. View a photo or video, then tap . If you don’t see , tap the
screen to show the controls.
The size limit of attachments is determined by your service provider. iPad may compress photo
and video attachments, if necessary.
You can also copy a photo or video, and then paste it into an email or text message.
Share or copy multiple photos and videos. While viewing by moment, tap Share.
Save or share a photo or video you receive.
•
Email: Tap to download it if necessary, then touch and hold the item to see sharing and
other options.
•
Text message: Tap the item in the conversation, then tap .
Photos and videos that you receive in messages or save from a webpage are saved to your
Camera Roll album.
Edit photos and trim videos
You can edit photos right on iPad. While viewing a photo full-screen, tap Edit, then tap one of
the tools.
•
Auto-enhance improves a photo’s exposure, contrast, saturation, and other qualities.
•
Photo lters lets you apply dierent color eects, including black & white.
•
With the Remove Red-eye tool, tap each eye that needs correcting.
•
Crop by dragging the corners of the grid.
Don’t like the results? Tap the tool again to return to the original.
Trim a video. Tap the screen to display the controls, drag either end of the frame viewer, then
tap Trim.
Important: If you choose Trim Original, the trimmed frames are permanently deleted from
the original video. If you choose “Save as New Clip,” a new trimmed video clip is saved in your
Camera Roll album and the original video is unaected.
Chapter 11 Photos 66
Page 67

Print photos
Print to an AirPrint-enabled printer:
•
Print a single photo: Tap , then tap Print.
•
Print multiple photos: While viewing a photo album, tap Select, select the photos, tap , then
tap Print.
See AirPrint on page 32.
Import photos and videos
You can import photos and videos directly from a digital camera, from another iOS device
with a camera, or from an SD memory card. For iPad (4th generation or later) or iPad mini, use
the Lightning to SD Card Camera Reader or the Lightning to USB Camera Adapter (both sold
separately). For earlier iPad models, use the iPad Camera Connection Kit (sold separately), which
includes both an SD card reader and a camera connector.
Import photos:
1 Insert the SD card reader or camera connector into the iPad Lightning connector or 30-pin
dock connector.
•
Use an SD memory card: Insert the card in the slot on the SD card reader. Don’t force the card
into the slot; it ts only one way.
•
Connect a camera or iOS device: Use the USB cable that came with the camera or iOS device,
and connect it to the USB port on the camera connector. If you’re using an iOS device, make
sure it’s turned on and unlocked. To connect a camera, make sure the camera is turned on and
in transfer mode. For more information, see the documentation that came with the camera.
2 Unlock iPad.
3 The Photos app opens and displays the photos and videos available for importing.
4 Select the photos and videos to import.
•
Import all items: Tap Import All.
•
Import just some items: Tap the items you want to import (a checkmark appears for each), tap
Import, then tap Import Selected.
5 After the photos are imported, keep or delete the photos and videos on the card, camera, or
iOS device.
6 Disconnect the SD card reader or camera connector.
A new event in the Last Import album contains all the photos you just imported.
To transfer the photos to your computer, connect iPad to your computer and import the images
with a photo application such as iPhoto or Adobe Elements.
Photos settings
Settings for Photos are in Settings > Photos & Camera. These include:
•
My Photo Stream and Photo Sharing
•
Photos tab
•
Slideshow
Chapter 11 Photos 67
Page 68

Camera
View the photos and
videos you’ve taken.
Take a photo.
Turn on HDR.
Switch between cameras.
12
Camera at a glance
Quick! Get the camera! Swipe up from the bottom edge of the screen to open Control Center,
then tap .
With iPad, you can take both still photos and videos using the front FaceTime camera or the
back camera.
Switch between cameras.
Turn on HDR.
Take a photo.
View the photos and
videos you’ve taken.
A rectangle briey appears where the exposure is set. When you photograph people, face
detection (iPad 3rd generation or later) balances the exposure across up to 10 faces. A
rectangle appears for each face detected. With the iSight camera, the focus is set in addition to
the exposure.
68
Page 69

Take photos and videos
Drag up or down to choose the Camera mode for still photos, square-format photos, or videos.
Take a photo. Choose Photo, then tap the shutter button or press either volume button.
A rectangle briey appears where the exposure is set. When you photograph people, face
detection (iPad 3rd generation or later) balances the exposure across up to 10 faces. A rectangle
appears for each face detected.
Exposure is automatic, but you can set the exposure manually for the next shot by tapping an
object or area on the screen. With an iSight camera, tapping the screen sets the focus as well as
the exposure. Face detection is temporarily turned o. To lock the exposure and focus until you
tap the screen again, touch and hold until the rectangle pulses.
Zoom in or out. (iSight camera) Stretch or pinch the image on the screen. With iPad Air and
iPad mini with Retina display, zooming works in video mode as well as photo mode.
Shoot some video. Choose Video, then tap the Shutter button or press either volume button to
start and stop recording.
If Location Services is turned on, photos and videos are tagged with location data that can be
used by apps and photo-sharing websites. See Privacy on page 33.
Make it better. You can edit photos (to rotate, auto-enhance, apply a lter, remove red-eye, or
crop) and trim videos, right on iPad. See Edit photos and trim videos on page 66.
Want to capture what’s displayed on your screen? Simultaneously press and release the
Sleep/Wake and Home buttons. The screenshot is added to your Camera Roll.
HDR
HDR (high dynamic range) helps you get great shots, even in high-contrast situations. The best
parts of three quick shots, taken at dierent exposures (long, normal, and short), are blended
together into a single photo.
Use HDR. (iSight camera on iPad 3rd generation or later) Tap HDR. For best results, keep both
iPad and the subject still.
Keep the normal photo in addition to the HDR version. Go to Settings > Photos and Camera.
HDR versions of photos in your Camera Roll are marked with “HDR” in the corner.
View, share, and print
Photos and videos you take are saved in your Camera Roll. With Photo Stream, new photos also
appear in My Photo Stream on iPad and your other iOS devices and computers. See My Photo
Stream on page 65.
View your Camera Roll. Tap the thumbnail image, then swipe left or right. You can also view your
Camera Roll in the Photos app.
Tap the screen to show or hide the controls.
Get sharing and printing options. Tap . See AirDrop, iCloud, and other ways to share on
page 30.
Chapter 12 Camera 69
Page 70

Upload photos and videos to your computer. Connect iPad to your computer to upload items
to iPhoto or another supported application on your Mac or PC. If you delete photos or videos in
the process, they’re removed from your Camera Roll album.
Sync photos and videos to iPad from your Mac. Use the Photos settings pane in iTunes. See
Sync with iTunes on page 17.
Camera settings
Go to Settings > Photos & Camera for camera options, which include:
•
Photo streams
•
Slideshow
•
Grid
Adjust the volume of the shutter sound with the Ringer and Alerts settings in Settings > Sounds.
Or mute the sound using the Ring/Silent switch. (In some countries muting is disabled.)
Chapter 12 Camera 70
Page 71

Contacts
Open in
Messages.
Open in
FaceTime.
Open in Maps.
13
Contacts at a glance
iPad lets you access and edit your contact lists from personal, business, and other accounts.
Open in
Messages.
Open in
FaceTime.
Open in Maps.
Set your My Info card for Safari, Siri, and other apps. Go to Settings > Mail, Contacts, Calendars,
then tap My Info and select the contact card with your name and information.
Let Siri know who’s who. While editing your My Info card, tap Add Related Name to dene
relationships you want Siri to know about, so you can say things like “send a message to my
sister.” You can also add relationships using Siri. Say, for example, “John Appleseed is my brother.”
Find a contact. Use the search eld at the top of the contacts list. You can also search your
contacts using Spotlight Search (see Search on page 27).
Share a contact. Tap a contact, then tap Share Contact. See AirDrop, iCloud, and other ways to
share on page 30.
71
Page 72

Change a label. If a eld has the wrong label, such as Home instead of Work, tap Edit. Then tap
the label and choose one from the list, or tap Custom Field to create one of your own.
Delete a contact. Go to the contact’s card, then tap Edit. Scroll down, then tap Delete Contact.
Add contacts
Besides entering contacts, you can:
•
Use your iCloud contacts: Go to Settings > iCloud, then turn on Contacts.
•
Import your Facebook Friends: Go to Settings > Facebook, then turn on Contacts in the “Allow
These Apps to Use Your Accounts” list. This creates a Facebook group in Contacts.
•
Use your Google contacts: Go to Settings > Mail, Contacts, Calendars, then tap your Google
account and turn on Contacts.
•
Access a Microsoft Exchange Global Address List: Go to Settings > Mail, Contacts, Calendars, then
tap your Exchange account and turn on Contacts.
•
Set up an LDAP or CardDAV account to access business or school directories: Go to Settings >
Mail, Contacts, Calendars > Add Account > Other. Then tap “Add LDAP Account” or “Add
CardDAV Account” and enter the account information.
•
Sync contacts from your computer, Yahoo!, or Google: In iTunes on your computer, turn on
contact syncing in the device info pane. For information, see iTunes Help.
•
Import contacts from a vCard: Tap a .vcf attachment in an email or message.
Search a directory. Tap Groups, tap the GAL, CardDAV, or LDAP directory you want to search,
then enter your search. To save the info to your contacts, tap Add Contact.
Show or hide a group. Tap Groups, then select the groups you want to see. This button appears
only if you have more than one source of contacts.
Update your contacts with Twitter. Go to Settings > Twitter, then tap Update Contacts. Twitter
matches email addresses and phone numbers in order to add Twitter user names and photos to
your contact cards.
When you have contacts from multiple sources, you might have multiple entries for the same
person. To keep redundant contacts from appearing in your All Contacts list, contacts from
dierent sources that have the same name are linked and displayed as a single unied contact.
When you view a unied contact, the title Unied Info appears.
Unify contacts. If two entries for the same person aren’t linked automatically, you can unify them
manually. Edit one of the contacts, then tap Link Contact and choose the other contact to link to.
Linked contacts aren’t merged. If you change or add information in a unied contact, the
changes are copied to each source account where that information already exists.
If you link contacts with dierent rst or last names, the names on the individual cards won’t
change, but only one name appears on the unied card. To choose which name appears when
you view the unied card, tap Edit, tap the linked card with the name you prefer, then tap Use
This Name For Unied Card.
Chapter 13 Contacts 72
Page 73

Contacts settings
To change Contacts settings, go to Settings > Mail, Contacts, Calendars, where you can:
•
Change how contacts are sorted
•
Display contacts by rst or last name
•
Change how long names are shortened in lists
•
Set a default account for new contacts
•
Set your My Info card
Chapter 13 Contacts 73
Page 74

Clock
Add a clock.
View clocks, set an alarm,
time an event, or set a timer.
Delete clocks or
change their order.
14
Clock at a glance
The rst clock displays the time based on your location when you set up iPad. Add other clocks
to show the time in other major cities and time zones.
Delete clocks or
change their order.
View clocks, set an alarm,
time an event, or set a timer.
Add a clock.
74
Page 75

Alarms and timers
Add an alarm.
Turn the alarm on/off.
Selected alarm
Additional alarm
View and change alarms.
View and change alarms.
Want iPad to wake you? Tap Alarm, then tap . Set your wake-up time and other options, then
give the alarm a name (like “Soccer practice”).
Add an alarm.
Turn the alarm on/off.
Selected alarm
Additional alarm
Keep track of time. Use the stopwatch to keep time, record lap times, or set a timer to alert you
when time’s up. If you’re soft boiling an egg, just tell Siri to “Set the timer for 3 minutes.”
Want to fall asleep to music or a podcast? Tap Timer, then tap When Timer Ends and choose
Stop Playing at the bottom.
Get quick access to clock features. Swipe up from the bottom edge of the screen to open
Control Center, then tap . You can access alarms in Control Center even when iPad is locked.
Chapter 14 Clock 75
Page 76

Maps
Get more info.
Tap a pin to display the
info banner.
Print, show traffic, list
results, or choose the view.
Get directions.
Get directions.
Enter a search.
Enter a search.
Show your current location.
Quick driving directions
Double-tap to zoom in;
tap with two fingers to
zoom out. Or pinch.
Flyover (3D in standard view)
15
Find places
WARNING: For important information about navigating safely and avoiding distraction while
driving, see Important safety information on page 128.
Quick driving directions
Get more info.
Tap a pin to display the
info banner.
Double-tap to zoom in;
tap with two fingers to
zoom out. Or pinch.
Flyover (3D in standard view)
Print, show traffic, list
Show your current location.
Important: Maps, directions, Flyover, and location-based apps depend on data services. These
results, or choose the view.
data services are subject to change and may not be available in all areas, resulting in maps,
directions, Flyover, or location-based information that may be unavailable, inaccurate, or
incomplete. Some Maps features require Location Services. See Privacy on page 33.
Move around Maps by dragging the screen. To face a dierent direction, rotate with two ngers.
To return to north, tap the compass in the upper right.
Zoom in or out. Double-tap with one nger to zoom in and tap with two ngers to zoom out—
or just pinch and stretch. The scale appears in the upper-left while zooming. To change how
distance is shown (miles or kilometers), go to Settings > Maps.
76
Page 77

You can search for a location in dierent ways:
•
Intersection (“8th and market”)
•
Area (“greenwich village”)
•
Landmark (“guggenheim”)
•
Zip code
•
Business (“movies,” “restaurants san francisco ca,” “apple inc new york”)
If Maps guesses where you’re headed while you’re entering a search, tap that location in the list
below the search eld.
Find the location of a contact, or of a bookmarked or recent search. Tap Bookmarks.
Choose your view. Tap , then choose Standard, Hybrid, or Satellite.
Manually mark a location. Touch and hold the map until the dropped pin appears.
Get more info
Get info about a location. Tap a pin to display its banner, then tap . Info might include Yelp
reviews and photos, a webpage link, directions, and more.
Tap Share to share the location. See AirDrop, iCloud, and other ways to share on page 30.
Get directions
Note: To get directions, iPad must be connected to the Internet. To get directions involving your
current location, Location Services must also be on.
Get driving directions. Tap Directions, enter the starting and ending locations, then tap Route.
Or, choose a location or a route from the list, if available. If multiple routes appear, tap the one
you want to take.
•
Hear turn-by-turn directions (iPad Wi-Fi + Cellular): Tap Start.
Maps follows your progress and speaks turn-by-turn directions to your destination. To show or
hide the controls, tap the screen.
If iPad auto-locks, Maps stays onscreen and continues to announce instructions. You can also
open another app and continue to get turn-by-turn directions. To return to Maps, tap the
banner across the top of the screen.
With turn-by-turn directions, night mode automatically adjusts the screen image for easier
viewing at night.
•
View turn-by-turn directions (iPad Wi-Fi only): Tap Start, then swipe left to see the
next instruction.
•
Return to the route overview: Tap Overview.
•
View the directions as a list: Tap .
•
Stop turn-by-turn directions: Tap End.
Get driving directions from your current location. Tap on the banner of your destination. If
you’re a walker, set your directions preference to Walking in Settings > Maps.
Get walking directions. Tap Directions, then tap . Enter the starting and ending locations, then
tap Route. Or choose a location or a route from the list, if available. Tap Start, then swipe left to
see the next instruction.
Chapter 15 Maps 77
Page 78

Get public transit directions. Tap Directions, then tap . Enter the starting and ending locations,
then tap Route. Or choose a location or a route from the list, if available. Download and open the
routing apps for the transit services you want to use.
Find out about trac conditions. Tap , then tap Show Trac. Orange dots show slowdowns,
and red dots show stop-and-go trac. To see an incident report, tap a marker.
Report a problem. Tap , then tap Report a Problem.
3D and Flyover
On iPad 3rd generation or later, you can see three-dimensional views and even y over many of
the world’s major cities.
Use 3D or Flyover. Zoom in until or becomes active, then tap the button. Or, drag two
ngers up. To switch between 3D and Flyover, tap the lower-right corner and change views.
Adjust the camera angle. Drag two ngers up or down.
Maps settings
Go to Settings > Map. Settings include:
•
Navigation voice volume (iPad Wi-Fi + Cellular)
•
Distances in miles or kilometers
•
Map labels always appear in the language specied in Settings > General > International >
Language
•
Preferred directions by driving or walking
Chapter 15 Maps 78
Page 79

Videos
This video hasn’t been
downloaded to iPad.
Tap to play.
Choose a category.
Add to your library.
16
Videos at a glance
Open the Videos app to watch movies, TV shows, and music videos. To watch video podcasts,
install the free Podcasts app from the App Store—see Podcasts at a glance on page 101. To watch
videos you record using Camera on iPad, open the Photos app.
Add to your library.
WARNING: For important information about avoiding hearing loss, see Important safety
information on page 128 .
Choose a category.
Tap to play.
This video hasn’t been
downloaded to iPad.
79
Page 80

Add videos to your library
Select audio
language,
subtitles,
or closed
captions.
Drag to adjust
the volume.
Drag to adjust
Drag to skip
forward or back.
Drag to skip
Tap to show
or hide the
controls.
Watch on a
TV with
Apple TV.
42 is available on iTunes.
42 © 2013 Legendary Pictures Funding, LLC.
Buy or rent videos on the iTunes Store. Tap Store in the Videos app, or open the iTunes Store
app on iPad and tap Movies or TV Shows. Videos you purchase are available on iPad and on your
other iOS devices or computers using the same Apple ID. The iTunes Store is not available in all
areas. See Chapter 22, iTunes Store, on page 91.
Transfer videos from your computer. Connect iPad, then sync videos from iTunes on your
computer. See Sync with iTunes on page 17.
Stream videos from your computer to iPad. Turn on Home Sharing in iTunes on your computer.
Then, on iPad, go to Settings > Videos and enter the Apple ID and password you use for Home
Sharing on your computer. Then open Videos on iPad and tap Shared at the top of the list
of videos.
Convert a video to work with iPad. If you try to sync a video from iTunes and a message
says the video can’t play on iPad, try converting the video. Select the video in iTunes on your
computer and choose File > Create New Version > Create iPad or Apple TV Version. Then sync the
converted video to iPad.
Delete a video from iPad. Tap Edit in the upper right of your collection, then tap on the video
thumbnail. If you don’t see the Edit button, look for on your video thumbnails—those videos
haven’t been downloaded to iPad, so you can’t delete them. To delete an individual episode of a
series, tap the series, then swipe left on the episode in the Episodes list.
Deleting a video (other than a rented movie) from iPad doesn’t delete it from the iTunes library
on your computer or from your purchased videos in iCloud, and you can sync the video or
download it to iPad again later. If you don’t want to sync a deleted video back to iPad, set iTunes
to not sync the video. See Sync with iTunes on page 17.
Important: If you delete a rented movie from iPad, it’s deleted permanently and cannot be
transferred back to your computer.
Control playback
the volume.
42 is available on iTunes.
42 © 2013 Legendary Pictures Funding, LLC.
Scale the video to ll the screen or t to the screen. Tap or . Or double-tap the video. If
you don’t see the scaling controls, your video already ts the screen perfectly.
forward or back.
Tap to show
or hide the
controls.
Select audio
language,
subtitles,
or closed
captions.
Watch on a
TV with
Apple TV.
Chapter 16 Videos 80
Page 81

Start over from the beginning. If the video contains chapters, drag the playhead along the
scrubber bar all the way to the left. If there are no chapters, tap .
Skip to the next or previous chapter. Tap or . You can also press the center button or
equivalent on a compatible headset two times (skip to next) or three times (skip to previous).
Rewind or fast-forward. Touch and hold or . Or drag the playhead left or right. Move your
nger toward the bottom of the screen as you drag for ner control.
Select a dierent audio language. If the video oers other languages, tap , then choose a
language from the Audio list.
Show subtitles or closed captions. Tap . Not all videos oer subtitles or closed captions.
Customize the appearance of closed captions. Go to Settings > General > Accessibility >
Subtitles & Captioning.
Want to see closed captions and subtitles for the deaf and hard of hearing? Go to Settings >
General > Accessibility > Subtitles & Captioning and turn on Closed Captions + SDH.
Watch the video on a TV. Tap . For more about AirPlay and other ways to connect, see
AirPlay on page 31.
Videos settings
Go to Settings > Videos, where you can:
•
Choose where to resume playback the next time you open a video
•
Choose to show only videos on iPad
•
Log in to Home Sharing
Chapter 16 Videos 81
Page 82

Notes
Tap a note to view it.
Delete the note.
Add a
new note.
Tap the text
to edit it.
Print or share the note.
17
Notes at a glance
Type notes on iPad, and iCloud makes them available on your other iOS devices and Mac
computers. You can also read and create notes in other accounts, such as Gmail or Yahoo!.
Tap a note to view it.
See your notes on your other devices. If you use icloud.com, me.com, or mac.com for iCloud, go
to Settings > iCloud and turn on Notes. If you use Gmail or another IMAP account for iCloud, go
to Settings > Mail, Contacts, Calendars and turn on Notes for the account. Your notes appear on
all your iOS devices and Mac computers that use the same Apple ID.
See just the note. Use iPad in portrait orientation. To see the notes list again in portrait
orientation, swipe from left to right.
Search for a note. Tap the Search eld at the top of the notes list and type what you’re looking
for. You can also search for notes from the Home screen—just drag down in the middle of
the screen.
Delete the note.
Print or share the note.
Add a
new note.
Tap the text
to edit it.
Share or print a note. Tap at the bottom of the note. You can share via Messages, Mail,
or AirDrop.
Delete a note. Tap , or swipe left over the note in the notes list.
82
Page 83

Share notes in multiple accounts
Share notes with other accounts. You can share notes with other accounts, such as Google,
Yahoo!, or AOL. Go to Settings > Mail, Contacts, Calendars, add the account if it’s not already
there, and turn on Notes for the account.
Create a note in a specic account. Tap Accounts and select the account, then tap . If you
don’t see the Accounts button, tap the Notes button rst.
Choose the default account for new notes. Go to Settings > Notes.
See all the notes in an account. Tap Accounts at the top of the notes list, then choose
the account.
Chapter 17 Notes 83
Page 84

Reminders
Scheduled items
Add a reminder.
Mark the reminder
as completed.
Add a list.
Reminders lets you keep track of all the things you need to do.
Mark the reminder
as completed.
Scheduled items
Add a reminder.
18
Add a list.
Add a reminder. Tap a list, then tap a blank line.
Delete a list. While viewing a list, tap Edit, then tap Delete List.
Delete a reminder. Swipe the reminder left, then tap Delete.
Change the order of lists or reminders. Tap Edit, then touch and move the item.
What list was that in? When you enter text in the search eld, reminders in all lists are searched
by the reminder name. You can also use Siri to search reminders. For example say, “Find the
reminder about milk.”
Don’t bother me now. You can turn o Reminder notications in Settings > Notication Center.
To silence them temporarily, turn on Do Not Disturb.
84
Page 85

Scheduled reminders
Scheduled
reminder
Adjust the
geofence.
Find an address.
Scheduled reminders notify you when they’re due.
Scheduled
reminder
See all scheduled reminders. Tap Scheduled to show the list of reminders that have a due date.
Don’t bother me now. You can turn o Reminder notications in Settings > Notication Center.
To silence notications temporarily, turn on Do Not Disturb.
Location reminders
On iPad Wi-Fi + Cellular models, Reminders can alert you when you arrive at or leave a location.
Find an address.
Adjust the
geofence.
Be reminded when you arrive at or leave a location. While editing a reminder, tap , then
turn on “Remind me at a location.” Tap Location, then choose a location from the list or enter
an address. After you dene a location, you can drag to change the size of the geofence on the
map, which sets the approximate distance at which you’re reminded. You can’t save a location
reminder in Outlook or Microsoft Exchange calendars.
Add common locations to your My Info card. When you set a location reminder, locations in
the list include addresses from your My Info card in Contacts. Add your work, home, and other
favorite addresses to your card for easy access in Reminders.
Reminders settings
Go to Settings > Reminders, where you can:
•
Set a default list for new reminders
•
Sync past reminders
Keep your reminders up to date on other devices. Go to Settings > iCloud and turn on
Reminders. To keep up to date with Reminders on OS X, turn on iCloud on your Mac too.
Some other types of accounts, such as Exchange, also support Reminders. Go to Settings >
Mail, Contacts, Calendars and turn on Reminders for the accounts you want to use.
Chapter 18 Reminders 85
Page 86

Photo Booth
Tap an option to change the effect.
Tap the center image to
return to Normal view.
Take photos
It’s easy to take a photo with Photo Booth and spice it up with eects.
Tap an option to change the effect.
19
Tap the center image to
return to Normal view.
When you take a photo, iPad makes a shutter sound. You can use the Volume buttons on the side
of iPad to control the volume of the shutter sound, or mute it by setting the Side Switch to silent.
See Volume buttons and the Side Switch on page 11.
Note: In some regions, sound eects are played even if the Side Switch is set to silent.
Take a photo. Aim iPad and tap the shutter button.
Select an eect. Tap , then tap the eect you want.
•
Change a distortion eect: Drag your nger across the screen.
•
Alter a distortion: Pinch, swipe, or rotate the image.
What have you done? Tap the thumbnail of your last shot. To display the controls again, tap
the screen.
Switch between cameras. Tap at the bottom of the screen.
86
Page 87

Manage photos
The photos you take with Photo Booth are saved in your Camera Roll album in the Photos app
on iPad.
Delete a photo. Select a thumbnail, then tap .
Share or copy a photo. Tap a thumbnail, tap , then tap a share option (Message, Mail, iCloud,
Twitter, or Facebook) or Copy.
View photos in your Camera Roll album. In Photos, tap an album, then tap a thumbnail. To see
the next or previous photo, swipe left or right. See View photos and videos on page 63.
Upload photos to your computer. Connect iPad to your computer using the included USB cable.
•
Mac: Select the photos to upload, then click the Import or Download button in iPhoto or
other supported photo application on your computer.
•
PC: Follow the instructions that came with your photo application.
If you delete the photos from iPad when you upload them to your computer, they’re removed
from your Camera Roll album. You can use the Photos settings pane in iTunes to sync photos to
the Photos app on iPad.
Chapter 19 Photo Booth 87
Page 88

Game Center
Declare your
status or change
your photo.
See who’s the best.
See who’s the best.
Play, share,
or remove
this game.
Explore
game goals.
Is it your turn?
Invite friends to play.
Choose a game.
It’s on!
Find someone to play against.
Find someone to play against.
20
Game Center at a glance
Game Center lets you play your favorite games with friends who have an iOS device or a
Mac (OS X Mountain Lion or later). You must be connected to the Internet to use Game Center.
WARNING: For important information about avoiding repetitive motion injuries, see Important
safety information on page 128 .
Play, share,
or remove
this game.
Get started. Open Game Center. If you see your nickname at the top of the screen, you’re already
signed in. Otherwise, you’ll be asked for your Apple ID and password.
Get some games. Tap Games, then tap a recommended game. Or browse for games in the App
Store (look for Supports Game Center in the game details). Or get a game one of your friends
has; see Play games with friends on page 89.
Play! Tap Games, choose a game, tap in the upper right, then tap Play.
Sign out? No need to sign out when you quit Game Center, but if you want to, go to Settings >
Game Center and tap your Apple ID.
Declare your
status or change
your photo.
Explore
game goals.
Is it your turn?
It’s on!
Choose a game.
Invite friends to play.
88
Page 89

Play games with friends
Invite friends to a multiplayer game. Tap Friends, choose a friend, choose a game, then tap
in the upper right. If the game allows or requires additional players, choose the players to invite,
then tap Next. Send your invitation, then wait for the others to accept. When everyone is ready,
start the game. If a friend isn’t available or doesn’t respond, you can tap Auto-Match to have
Game Center nd another player for you, or tap Invite Friend to invite someone else.
Send a friend request. Tap Friends, tap , then enter your friend’s email address or Game Center
nickname. To browse your contacts, tap . (To add several friends with one request, type Return
after each address.) Or, tap any player you see anywhere in Game Center.
Challenge someone to outdo you. Tap one of your scores or achievements, then tap
Challenge Friends.
What are your friends playing and how are they doing? Tap Friends, tap your friend’s name,
then tap the Games or Points bubble.
Want to purchase a game your friend has? Tap Friends, then tap your friend’s name. Tap their
Games bubble, tap the game in the list, then tap in the upper right.
Make new friends. To see a list of your friend’s friends, tap Friends, tap your friend’s name, then
tap their Friends bubble.
Unfriend a friend. Tap Friends, tap the friend’s name, then tap in the upper right.
Keep your email address private. Turn o Public Prole in your Game Center account settings.
See Game Center settings on page 89.
Turn o multiplayer activity or friend requests. Go to Settings > General > Restrictions and turn
o Multiplayer Games or Adding Friends. If the switches are grayed, tap Enable Restrictions at the
top rst.
Keep it friendly. To report oensive or inappropriate behavior, tap Friends, tap the person’s name,
tap in the upper right, then tap Report a Problem.
Game Center settings
Go to Settings > Game Center, where you can:
•
Sign out (tap your Apple ID)
•
Allow invites
•
Let nearby players nd you
•
Edit your Game Center prole (tap your nickname)
•
Get friend recommendations from Contacts or Facebook
Specify which notications you want for Game Center. Go to Settings > Notications > Game
Center. If Game Center doesn’t appear, turn on Notications.
Change restrictions for Game Center. Go to Settings > General > Restrictions.
Chapter 20 Game Center 89
Page 90

Newsstand
Find Newsstand apps.
Touch and hold
a publication to
rearrange.
21
Newsstand at a glance
Newsstand organizes your magazine and newspaper apps, and automatically updates them
when iPad is connected to Wi-Fi.
Touch and hold
a publication to
rearrange.
Find Newsstand apps.
Note: You need an Internet connection and an Apple ID to download Newsstand apps, but you
can read downloaded content without an Internet connection. Newsstand is not available in
all areas.
Find Newsstand apps. While viewing the shelf, tap Store. When you purchase a Newsstand app,
it’s added to the shelf. After the app is downloaded, open it to view its issues and subscription
options. Subscriptions are In-App purchases, billed to your Apple ID account.
Turn o automatic updates. Apps update automatically over Wi-Fi, unless you turn o the option
in Settings > iTunes & App Store > Automatic Downloads.
90
Page 91

iTunes Store
Download
purchases
again.
Change categories.
Browse
22
iTunes Store at a glance
Use the iTunes Store to browse and add music, movies, TV shows, and audiobooks to iPad.
Browse
Download
purchases
again.
Change categories.
Note: You need an Internet connection and an Apple ID to use the iTunes Store. The iTunes Store
is not available in all areas.
91
Page 92

Browse or search
Tap a genre to
see more about it.
Browse by category or genre. Tap one of the categories (Music, Movies, TV, or Audiobooks). Tap a
genre (for example, Comedy) to rene the list. Tap More to see a list of genres to choose from.
Tap a genre to
see more about it.
View your browse history. Tap to see items you’ve viewed.
If you know what you’re looking for, tap Search. Enter info in the search eld, then tap Search
on the keyboard.
Discover great new music on iTunes Radio. When you listen to iTunes Radio and hear a song
you like, you can connect to the iTunes Store to purchase it, add it to your wish list, or discover
similar music. See iTunes Radio on page 52.
Preview a song or video. Tap it.
Purchase, rent, or redeem
Tap an item’s price (or tap Free), then tap again to buy it. If you see instead of a price, you’ve
already purchased the item and you can download it again without a charge.
Use a gift card or code. Tap a category (like Music), scroll to the bottom, then tap Redeem. To
send a gift, view the item you want to give, then tap and Gift.
Bought something on another device? Go to Settings > iTunes & App Store to set up automatic
downloads to your iPad. To see your purchased music, movies, and TV shows, in iTunes Store,
tap Purchased.
Watch your time with rentals. In some areas, you can rent movies. You have 30 days to begin
watching a rented movie. After you start watching it, you can play it as many times as you want
in the allotted time (24 hours in the U.S. iTunes Store; 48 hours in other countries). Once your
time’s up, the movie is deleted. Rentals can’t be transferred to another device; however, you can
use AirPlay and Apple TV to view a rental on your television.
Chapter 22 iTunes Store 92
Page 93

iTunes Store settings
To set options for iTunes Store, go to Settings > iTunes & App Store. You can:
View or edit your account. Tap your Apple ID, then tap View Apple ID and log in. To change your
password, tap the Apple ID eld, then tap the Password eld.
Sign in with a dierent Apple ID. Tap your account name, then tap Sign Out. You can then enter
a dierent Apple ID.
Turn on iTunes Match. If you’re a subscriber, tap iTunes Match to access your music on iPad from
anywhere. Tap “Learn more” for more information about iTunes Match.
Turn o automatic downloads. Tap Music, Books, or Updates. Content updates automatically
over Wi-Fi, unless you turn o the option in Automatic Downloads.
Chapter 22 iTunes Store 93
Page 94

App Store
Browse
Browse
Wish List
Wish List
Download
purchases again.
23
App Store at a glance
Use the App Store to browse, purchase, and download apps specically designed for iPad, or for
iPhone and iPod touch.
Download
purchases again.
Note: You need an Internet connection and an Apple ID to use the App Store. The App Store is
not available in all areas.
94
Find apps
If you know what you’re looking for, tap Search. Or tap Categories to browse by type of app.
Want to tell a friend about an app? Find the app, tap , then choose the method. See AirDrop,
iCloud, and other ways to share on page 30.
Add an app to your Wish List. To track an app you might want to purchase later, tap on the
app page, then tap Add to Wish List.
See your Wish List. After you add items to your Wish List, tap on the App Store screen. You
can purchase an app or edit your Wish List.
Page 95

What apps are being used nearby? Tap Near Me to nd out the most popular apps others around
Tap to download
or purchase.
you are using (Location Services must be on in Settings > Privacy > Location Services). Try this at a
museum, sporting event, or when you’re traveling, to dig deeper into your experience.
Tap to download
or purchase.
Purchase, redeem, and download
Tap the app’s price (or tap Free), then tap Buy to purchase it. If it’s free, tap .
If you see instead of a price, you’ve already purchased the app and you can download it again
without charge. While the app is downloading or updating, its icon appears on the Home screen
with a progress indicator.
Use a gift card or code. Tap Featured, scroll to the bottom, then tap Redeem.
Send a gift. View the item you want to give, then tap and Gift.
Restrict in-app purchases. Many apps provide extra content or enhancements for a fee. To limit
purchases that can be made from within an app, go to Settings > General > Restrictions (make
sure Restrictions is enabled), then turn o In-App Purchases. See Restrictions on page 32.
Delete an app. Touch and hold the app icon on the Home screen until the icon jiggles, then
tap . When you nish, press the Home button. You can’t delete built-in apps. Deleting an app
also deletes its data. You can download any app you’ve purchased on the App Store again, free
of charge.
For information about erasing all of your apps, data, and settings, see Reset iPad settings on
page 131.
Chapter 23 App Store 95
Page 96

App Store settings
To set options for App Store, go to Settings > iTunes & App Store. You can:
View or edit your account. Tap your Apple ID, then tap View Apple ID and log in. To change your
password, tap the Apple ID eld, then tap the Password eld.
Sign in using a dierent Apple ID. Tap your account name, then tap Sign Out. Then enter the
other Apple ID.
Turn o automatic downloads. Tap Apps in Automatic Downloads. Apps update automatically
over Wi-Fi, unless you turn o the option.
Download apps using the cellular network (Wi-Fi + Cellular models). Turn on Use Cellular Data.
Downloading apps over the cellular network may incur carrier charges. See Cellular settings on
page 134 . Newsstand apps update only over Wi-Fi.
Chapter 23 App Store 96
Page 97

iBooks
Search in book.
Bookmark
Go to a page.
Contents, bookmarks, and notes
Contents, bookmarks, and notes
24
Get iBooks
Get the iBooks app. Download iBooks for free from the App Store.
Get books from the iBooks Store. In iBooks, tap Store. You can nd books by browsing or
searching, check out the latest best sellers, get a sample of a book, and read reviews.
Read a book
Bookmark
Search in book.
Open a book. Tap the book you want to read. If you don’t see it in the Library, swipe left or right
to see other collections.
Show the controls. Tap near the center of a page. Not all books have the same controls, but
some of the things you can do include searching, viewing the table of contents, and sharing
what you’re reading.
Enlarge an image. Double-tap the image. In some books, touch and hold to display a magnifying
glass you can use to view an image.
Go to a specic page. Use the page navigation controls at the bottom of the screen. Or, tap
and enter a page number, then tap the page number in the search results.
97
Go to a page.
Page 98

Get a denition. Double-tap a word, then tap Dene in the menu that appears. Denitions aren’t
Page color
Brightness
Turn off pagination.
available for all languages.
Remember your place. Tap to add a bookmark, or tap again to remove it. You don’t need to
add a bookmark when you close the book, because iBooks remembers where you left o. You
can have multiple bookmarks—to see them all, tap , then tap Bookmarks.
Remember the good parts. Some books let you add notes and highlights. Double-tap a word to
select it, move the grab points to adjust the selection, then tap Note or Highlight in the menu
that appears. To see all the notes and highlights you’ve made, tap , then tap Notes.
Share the good parts. Tap some highlighted text, then tap . If the book is from the iBooks
Store, a link to the book is included automatically.
Share a link to a book. Tap near the center of a page to display the controls, then tap . Tap ,
then tap Share Book.
Change the way a book looks. Some books let you change the font, font size, and color of the
page. Tap . You can change justication and hyphentation in Settings > iBooks. These settings
apply to all books that support them.
Brightness
Page color
Turn off pagination.
Change the brightness. Tap . If you don’t see , tap rst.
Interact with multimedia
Some books have interactive elements, such as movies, diagrams, presentations, galleries, and
3D objects. To interact with a multimedia object, tap, swipe, or pinch it. To view an element
full-screen, spread two ngers. When you nish, pinch to close it.
Study notes and glossary terms
In books that support it, you can review all of your highlights and notes as study cards.
See all your notes. Tap . You can search your notes, or tap a chapter to see notes you’ve made
in that chapter.
Delete notes. Tap .
Review your notes as study cards. Tap Study Cards. Swipe to move between cards. Tap to
turn a card over.
Shue your study cards. Tap , then turn on Shue.
Study glossary terms. If a book includes a glossary, tap to include those words in your
study cards.
Chapter 24 iBooks 98
Page 99

Organize books
Change views.
Sort the list.
View collections.
View collections.
Download from iCloud.
Change views.
Download from iCloud.
Sort the list.
Organize your books with collections. Tap Edit and select some books to move them into a
collection. To edit or create collections, tap Collections. Some built-in collections, such as PDFs,
can’t be renamed or deleted.
View books by title or by cover. Tap or to switch between views.
Rearrange books. While viewing books by cover, touch and hold a cover then drag it to a new
location. While viewing books by title, sort the list using the buttons at the bottom of the screen.
Search for a book. Pull down to reveal the Search eld at the top of the screen. Searching looks
for the title and the author’s name.
Hide previously purchased books. To show or hide books you’ve purchased but haven’t
downloaded, go to Settings > iBooks > Show All Purchases.
Read PDFs
Sync a PDF. In iTunes on your computer, choose File > Add to Library and select the PDF. Then
sync. See iTunes Help for more info about syncing.
Add a PDF email attachment to iBooks. Open the email message, then touch and hold its PDF
attachment. Choose “Open in iBooks” from the menu that appears.
Print a PDF. With the PDF open, tap then choose Print. You’ll need an AirPrint-compatible
printer. For more about AirPrint, see AirPrint on page 32.
Email a PDF. With the PDF open, tap , then choose Email.
Chapter 24 iBooks 99
Page 100

iBooks settings
Go to Settings > iBooks, where you can:
•
Sync collections and bookmarks (including notes and current page information) with your
other devices.
•
Display online content within a book. Some books might access video or audio that’s stored
on the web.
•
Change the direction pages turn when you tap in the left margin.
Chapter 24 iBooks 100
 Loading...