

Page 1

K
Apple IP G ate way Ad ministrator’s Guide
Page 2

K Apple Computer, Inc.
This manual and the software described in it are
copyrighted, with all rights reserved. Under the copyright
laws, this manual or the software may not be copied, in
whole or part, without written consent of Apple, except in
the normal use of the software or to make a backup copy of
the software. The same proprietary and copyright notices
must be affixed to any permitted copies as were affixed to
the original. This exception does not allow copies to be
made for others, whether or not sold, but all of the material
purchased (with all backup copies) may be sold, given, or
loaned to another person. Under the law, copying includes
translating into another language or format.
You may use the software on any computer owned by
you, but extra copies cannot be made for this purpose.
The Apple logo is a registered trademark of Apple
Computer, Inc. Use of the “keyboard” Apple logo
(Option-Shift-K) for commercial purposes without the
prior written consent of Apple may constitute trademark
infringement and unfair competition in violation of
federal and state laws.
Every effort has been made to ensure that the information
in this manual is accurate. Apple is not responsible for
printing or clerical errors.
©Apple Computer, Inc., 1994
1 Infinite Loop
Cupertino, CA 95014-6299
(408) 996-1010
Apple, the Apple logo, AppleTalk, EtherTalk, LocalTalk,
LaserWriter, Macintosh, Macintosh Centris, Macintosh
Quadra, MacTCP, and TokenTalk are registered
trademarks of Apple Computer, Inc.
AppleSearch, Balloon Help, Finder, and MacSNMP are
trademarks of Apple Computer, Inc.
Adobe, Adobe Illustrator, and PostScript are trademarks
of Adobe Systems Incorporated, which may be registered
in certain jurisdictions.
Electrocomp 2000 is a trademark of Image Graphics Inc.
Helvetica, Linotronic, and Times are registered
trademarks of Linotype Company.
Microsoft and MS-DOS are registered trademarks of
Microsoft Corporation.
NuBus is a trademark of Texas Instruments.
QuarkXPress is a registered trademark of Quark, Inc.
UNIX is a registered trademark of UNIX System
Laboratories, Inc., a wholly owned subsidiary of Novell Inc.
Simultaneously published in the United States and
Canada.
Mention of third-party products is for informational
purposes only and constitutes neither an endorsement nor
a recommendation. Apple assumes no responsibility with
regard to the performance of these products.
Page 3

Con t ents
Preface: About This Guide / v
1About the Apple IP Gateway / 1
About IP networks / 2
How the gateway works / 3
How the gateway can be used / 5
Using the gateway as a stand-alone product / 5
Using the gateway with the Apple Internet Router /5
The Apple IP Gateway and the Apple Internet Router AppleTalk/IP Wide
Area Extension / 7
Using the gateway with an Apple Remote Access server / 9
The Apple IP Gateway and the AppleSearch WAIS Gateway / 11
Network management / 11
Hardware and software requirements / 12
2Installation and Setup/13
International users / 14
Installing networking software using Easy Install / 14
Installing networking software using the Customize option / 16
Installing the gateway software / 19
Using Easy Install / 19
Using Custom Install / 22
Designating software locations / 26
Designating a location for the Gateway Manager / 26
Designating a System Folder for the gateway software / 28
Setting up the gateway / 29
Configuring MacTCP / 29
Configuring the gateway / 33
Page 4

Getting users ready / 36
Hardware and software requirements / 37
MacTCP configuration requirements / 37
Configuring MacTCP for automatic addressing / 38
Configuring MacTCP for manual addressing / 42
3Operating and Monitoring the Apple IP Gateway / 47
Starting and stopping the gateway / 48
Monitoring the gateway / 49
Viewing gateway statistics / 49
Using MacSNMP / 50
Establishing gateway security / 51
Setting a password / 51
Changing or removing a password / 52
Limiting network access / 53
Changing network access restrictions / 55
Preventing unauthorized access by IP computers / 57
4Troubleshooting / 59
Appendix The Apple IP Gateway MIB / 63
iv Contents
Diagnosing and solving problems / 60
Solutions to common problems / 61
Index / 75
Page 5

Preface Ab o ut This Guide
The Apple IP Gateway is software that allows communication between an
AppleTalk network or internet and an Internet Protocol (IP) network or
internet. This guide explains how to install, configure, and operate the Apple
IP Gateway, both on its own and in conjunction with the Apple Internet Router
or with an Apple Remote Access Personal or MultiPort Server. The guide also
tells you how to prepare users to access the gateway, details several methods
for making the gateway more secure, and provides solutions to problems that
may come up.
What this guide contains
The chapters of this guide provide the following information:
m Chapter 1, “About the Apple IP Gateway,” gives a basic introduction to how
the gateway works and how it can be used.
m Chapter 2, “Installation and Setup,” covers software installation and
configuration information for both MacTCP and the gateway itself. In
addition, the chapter includes a section that covers the various options you
have in preparing users to access the gateway.
m Chapter 3, “Operating and Monitoring the Apple IP Gateway,” provides
detailed information for operating the gateway and establishing gateway
security. The chapter also covers viewing gateway statistics and monitoring
the gateway with SNMP.
m Chapter 4, “Troubleshooting,” offers solutions to problems that may come up.
m The Appendix, “The Apple IP Gateway MIB,” lists the variables that can be
monitored with SNMP.
Page 6

On-screen help
The Apple IP Gateway includes Balloon Help, featuring balloons that provide
descriptions of items on the Macintosh screen. To access Balloon Help, choose
Show Balloons from the Help (?) menu. When you point to items on the
screen, balloons appear explaining each item. To turn off Balloon Help, choose
Hide Balloons from the Help menu.
What you need to know
This guide assumes that you are familiar with basic Macintosh operations. If
you need more information, refer to the documentation that came with your
computer. In addition, the Apple IP Gateway works in coordination with
MacTCP, and, optionally, with the Apple Internet Router and the Apple
Remote Access Personal or MultiPort Servers. Although much of the
information that you’ll need is repeated here, you’ll find it helpful to have a
thorough understanding of these products. To get that understanding, refer to
the documentation supplied with each application program. Finally, a
Macintosh SNMP agent is installed with the Apple IP software; to utilize this
agent, you will need to install MacSNMP software, which is supplied with
either the AppleTalk Administration for Macintosh or the TCP/IP
Administration for Macintosh products. The MacSNMP Administrator’s
Guide, included with both Administration products, provides a basic
introduction to network management with SNMP as well as detailed
instructions for configuring the agent software.
vi Preface
For more information
The Apple IP Gateway provides access to services on IP networks, including
the Internet. An introduction to Internet services is beyond the scope of this
guide. There are, however, numerous books available if you want to learn
more. Any of the following would provide a good introduction. There are
literally hundreds of others, with more coming out each week.
Page 7

Falk, Bennet, The Internet Roadmap, Sybex, San Francisco, 1994. A general
introduction to Internet basics, covering how to use USENET, how to send Email, how to access the World-Wide Web, and how to master the most
common Internet tools, such as FTP and Gopher.
Gaffin, Adam, Big Dummy’s Guide to the Internet, MIT Press, Cambridge,
1994. A printed version of a widely used online guide.
Kehoe, Brendan P., Zen and the Art of the Internet, Prentice-Hall, Englewood
Cliffs, New Jersey, 1993. Subtitled “A Beginner’s Guide,” this is a short
treatment of Internet services and how to access them.
Krol, Ed, The Whole Internet User’s Guide and Catalog, O’Reilly and
Associates, Sebastapol, California, 1992. An all-in-one introduction, covering
history and technical basics, plus detailed coverage of services available.
Lambert, Steve and Howe, Walt, Internet Basics, Random House, New York,
1993. A general introduction to history, use, and available services.
LaQuey, Tracey and Ryer, Jeanne C., The Internet Companion, Addison-
Wesley, Reading, Massachusetts, 1993. A short and nontechnical introduction
featuring a foreword by Vice-President Al Gore.
Preface vii
Page 8

Page 9

1 About the Apple IP Gateway
The Apple IP Gateway provides Macintosh computers on an AppleTalk
network access to services on an Internet Protocol (IP) network—even if the
computers themselves are on an AppleTalk system that does not directly
support IP. Thus the gateway is particularly useful for Macintosh computers
connected by LocalTalk cabling or through Apple Remote Access.
The Apple IP Gateway can be installed on a wide range of Macintosh
computers. It can be used on its own or in conjunction with an Apple Remote
Access MultiPort or Personal Server or with the Apple Internet Router. This
chapter gives an overview of how the gateway works and explains the various
options for its use.
Page 10

About IP networks
The Internet Protocol (IP) and its companion, the Transmission Control
Protocol (TCP), were first developed as part of a United States defense
research effort some twenty years ago. Since then, TCP/IP has become the
international standard for heterogeneous networking, in which many different
computer types can interoperate and share information and services.
TCP/IP can be used for local area networking, in which, for example, clients
access data from a UNIX
composed of hundreds of local networks linked by a wide variety of
communications methods. The best known of these giants is the Internet, which
is often regarded as the prototype of the Information Superhighway. Like
TCP/IP itself, the Internet began as a U.S. defense project. It has since grown
into an international web linking universities, research centers, corporations,
and, increasingly , private citizens, who are gaining access by the thousands
every month. Note that this Internet is always spelled with a capital I. A
lowercase internet can be any interconnected set of networks, whether based on
TCP/IP, AppleTalk, or some other protocol. The Apple IP Gateway provides
access to any TCP/IP network or internet, including the Internet itself.
®
host. It can also be used for giant internetworks,
2 Chapter 1 / About the Apple IP Gateway
Page 11

How the gateway w o rks
On both AppleTalk and IP networks, data is broken down into packets for
transmission. The two network types use different sets of rules—protocols—
for packet construction and for addressing packets to their correct destinations.
Data can’t ordinarily cross from one network type to the other. The Apple IP
Gateway solves this problem. Installed on a Macintosh computer that is
connected to both an IP network and an AppleTalk network, the Apple IP
Gateway makes addressing transparent on both sides, so communications can
pass freely.
IMPORTANT
Client computers may be networked by LocalTalk, Ethernet, or other AppleTalkcompatible cabling types. Both the client computers and the gateway computer
must have MacTCP software installed. This allo ws them to “talk” IP, e ven
though they are using AppleTalk as the underlying network protocol.
Users who want to access an IP service construct their requests in the
appropriate IP format. The packets have all the information necessary for
transport and reassembly on the IP side. Speaking metaphorically, the packets
are enclosed in IP “envelopes.” To get this message to the gateway, the IP
packets are encapsulated in Datagram Delivery Protocol (DDP) packets; DDP
is the AppleTalk standard for data transport. The IP envelope, in other words,
is put inside a DDP envelope for shipment to the gateway. On arrival, the
gateway strips off the DDP envelope and sends the IP packet on its way.
When the IP host sends back a reply, the process is reversed. The gateway
encapsulates the IP data in a DDP envelope and transmits it to the client
over AppleTalk.
Figure 1 shows how the gateway makes it possible to move data from an
AppleTalk network to an IP network.
The gateway computer must be connected to IP by Ethernet cabling.
How the gateway works 3
Page 12
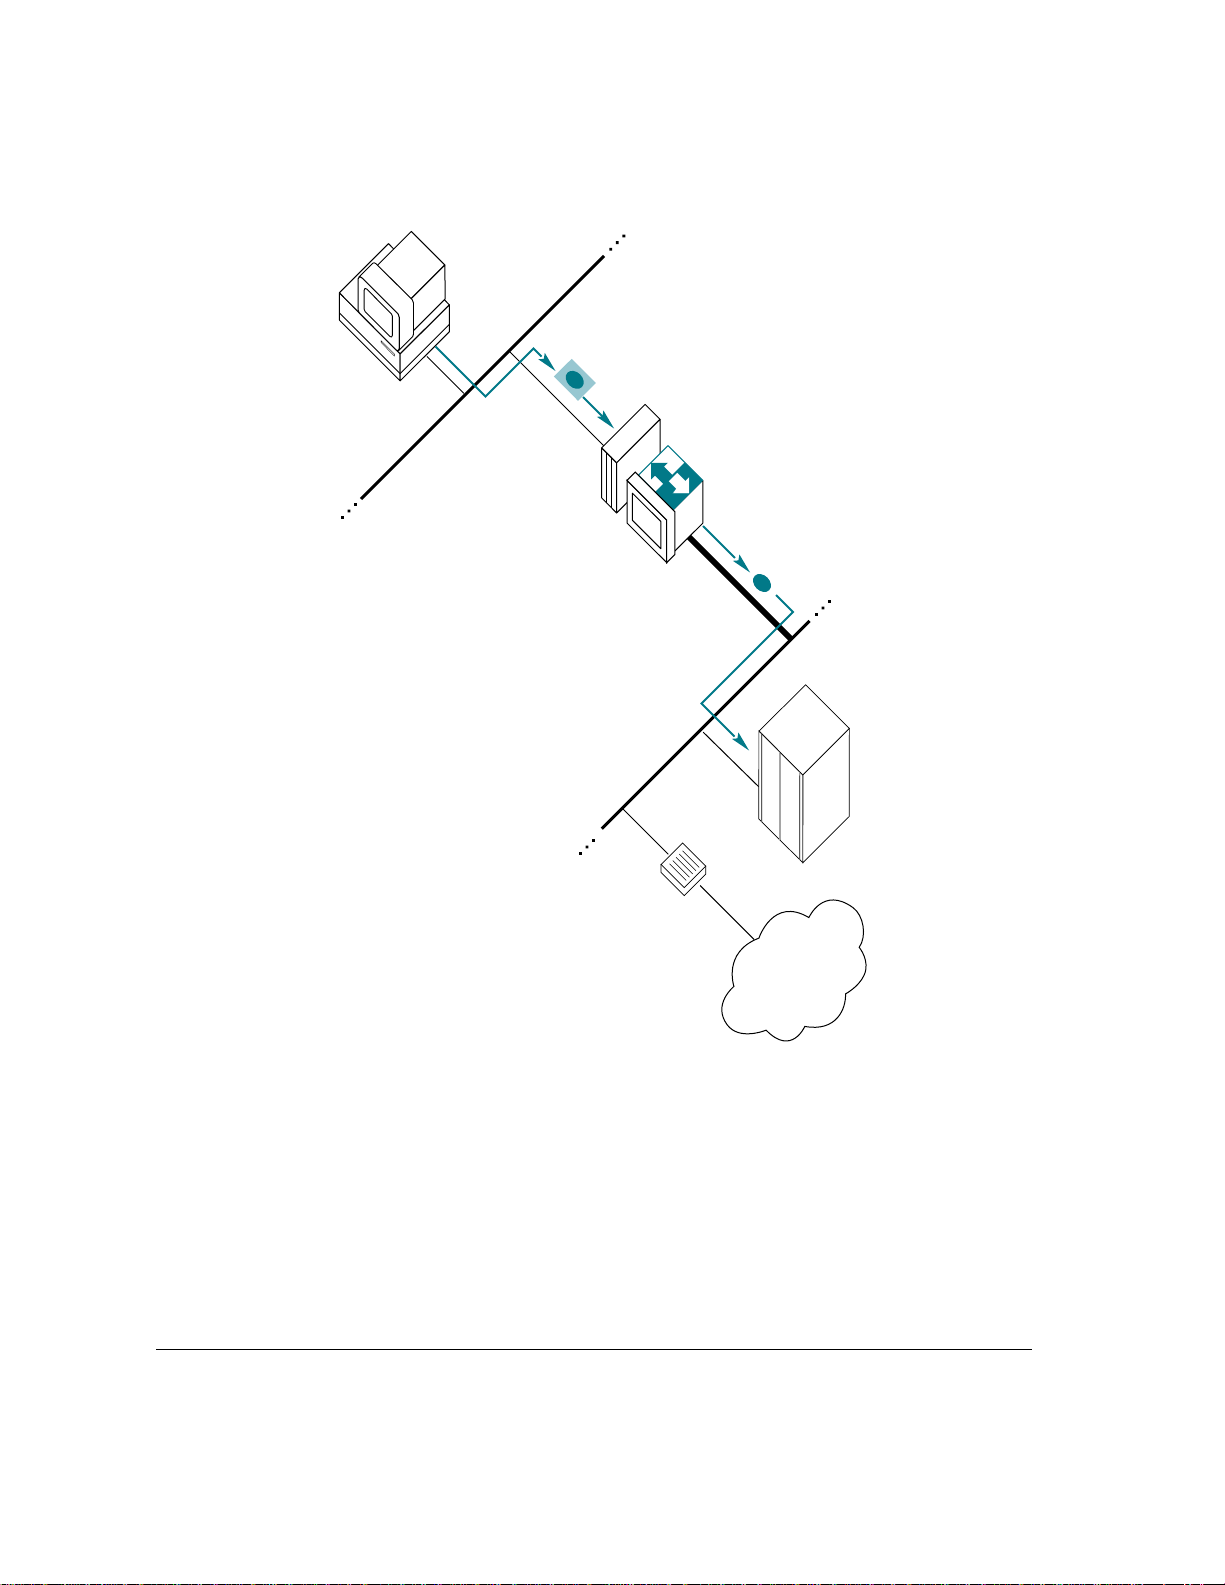
Client Macintosh
running MacTCP
AppleTalk network
1. Client sends IP packets enclosed in
Datagram Delivery Protocol “envelope.”
2. Gateway strips off
DDP envelope.
Macintosh running
the Apple IP Gateway
and MacTCP
Ethernet cable
IP network
Figure 1 How the Apple IP Gateway works
3. IP packets continue on
to the IP network.
Local IP host
IP router
IP internet
4 Chapter 1 / About the Apple IP Gateway
Page 13

How the gateway can be used
Depending on the type of AppleTalk network you are working with and the
needs of your network users, you can run the gateway as a stand-alone
product, or you can use the software in conjunction with either the Apple
Internet Router or an Apple Remote Access Personal or MultiPort Server.
Using these options is covered in detail in Chapter 3, “Operating and
Monitoring the Apple IP Gateway.” The descriptions that follow give you an
idea of overall functionality.
Using th e gat e way as a stand-alone product
When the Apple IP Gateway is installed on a Macintosh computer that is
properly connected to both an IP and an AppleTalk network, any Macintosh
computer on the AppleTalk network can access the IP internet through the
gateway. All that is necessary is that the client computer have both MacTCP
and any appropriate IP software installed.
Using t he g a t e way wit h the Apple Internet Router
If the gateway is installed on a Macintosh computer that is also running the
Apple Internet Router software, the gateway’s power is greatly expanded. Now
any Macintosh computer on any AppleTalk network that is part of the router’s
internet can use the Apple IP Gateway to access the IP network. Figure 2
shows how the router works with the gateway.
How the gateway can be used 5
Page 14
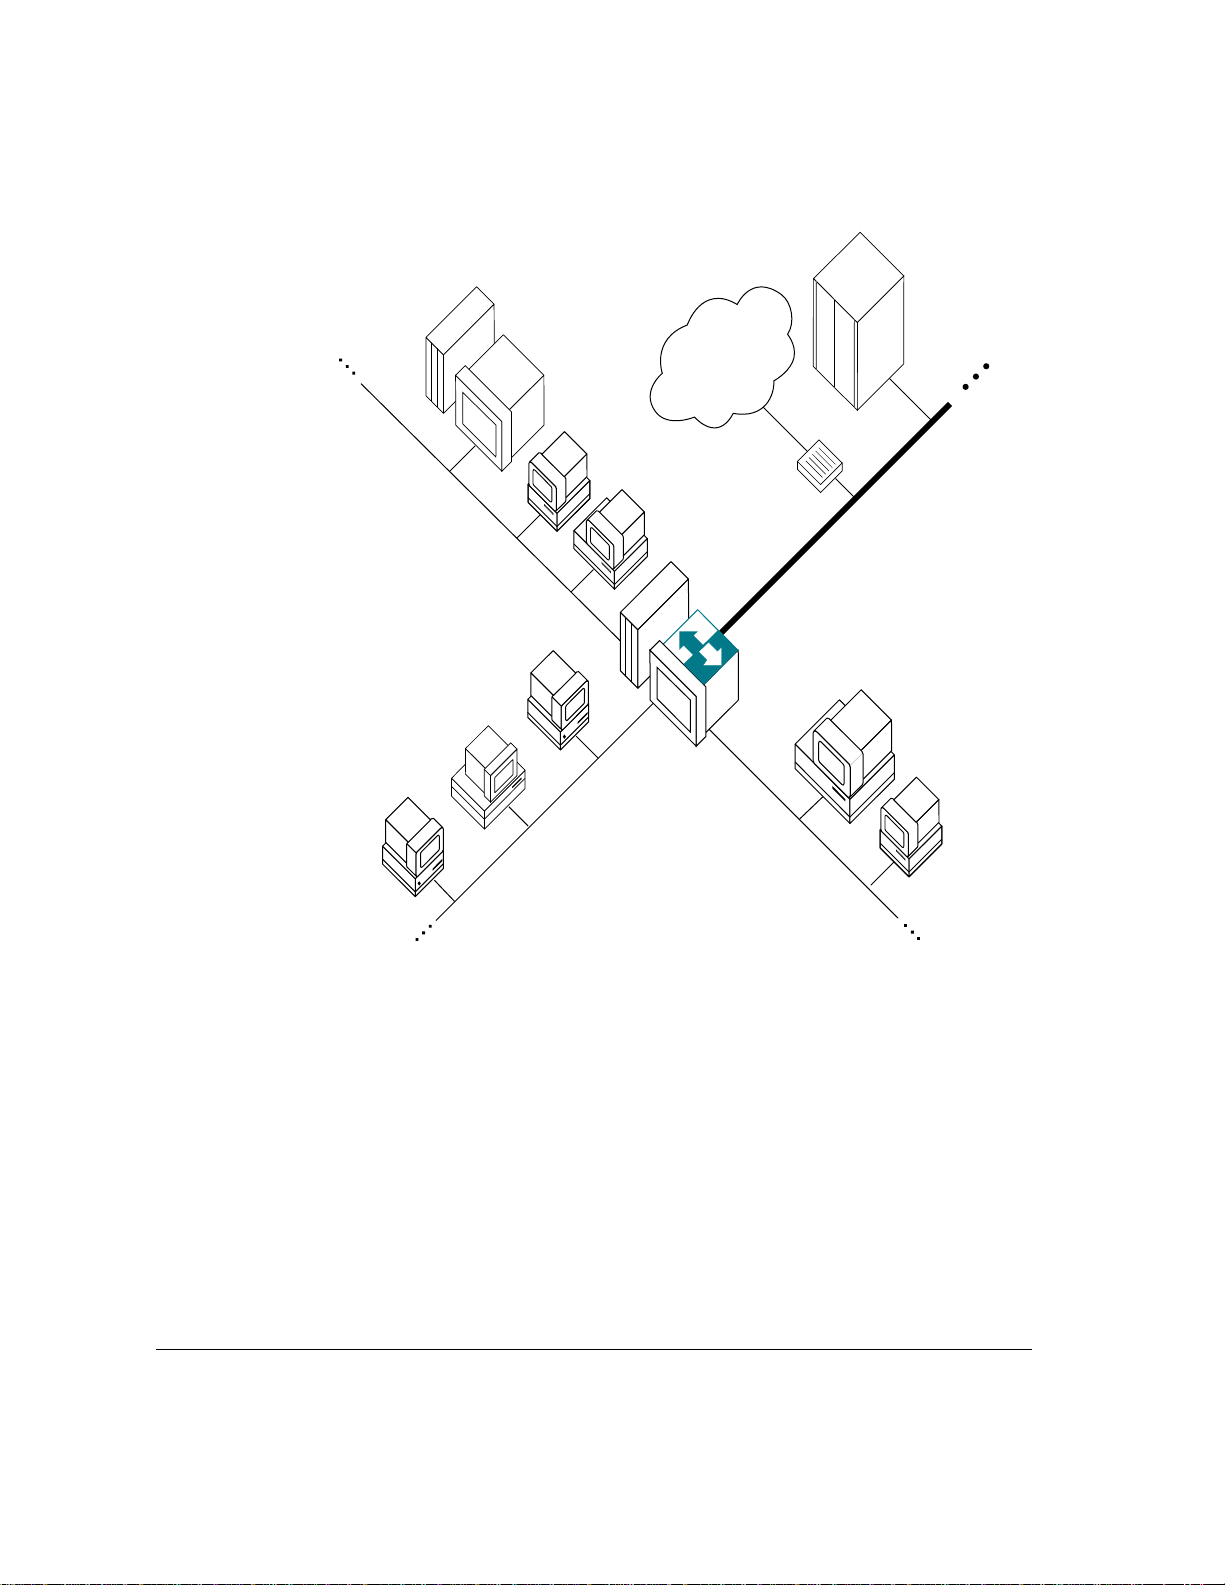
Any Macintosh that
is part of the router’s
internet can access
the IP network.
Local IP host
IP internet
IP router
Ethernet cable
Macintosh running
Apple Internet Router
and Apple IP Gateway
Figure 2 Combining an Apple Internet Router with the Apple IP Gateway lets
you offer gateway services to all Macintosh computers served by the router.
The Apple Internet Router and the Apple IP Gateway software can run on the
same computer, although they do not have to. Putting the two programs on the
same computer is usually the convenient and cost-effective choice. One
machine provides both services; the software is physically located where the
cabling comes together; and there is only one place for something to go
wrong, so errors are easier to find and correct.
6 Chapter 1 / About the Apple IP Gateway
Page 15

The Apple IP Gateway and the Apple Internet Router
AppleTalk/IP Wide Area Extension
Although it is easy to confuse the Apple IP Gateway and Apple Internet
Router AppleTalk/IP Wide Area Extension, the two software programs
actually provide two completely different services.
The Apple IP Gateway allows Macintosh computers on an AppleTalk network
to communicate with computers of many different types on an IP network. The
AppleTalk/IP Wide Area Extension allows Macintosh computers on an
AppleTalk network to communicate with other Macintosh computers on
another AppleTalk network located, figuratively speaking, on the other side of
an IP internet.
The extension is based on a software file called IPTunnel, so named because it
builds a tunnel between the two AppleTalk networks through the IP internet.
Because IP internets span the globe, the AppleTalk/IP Wide Area Extension
provides a fast, powerful, and cost-effective way for widely separated localarea AppleTalk networks to link up. The extension does not, however, provide
access to IP services. That is the job of the Apple IP Gateway. The two
programs can run on a single computer, offering users the full potential of
both. Figure 3 shows their capabilities in graphic form.
How the gateway can be used 7
Page 16
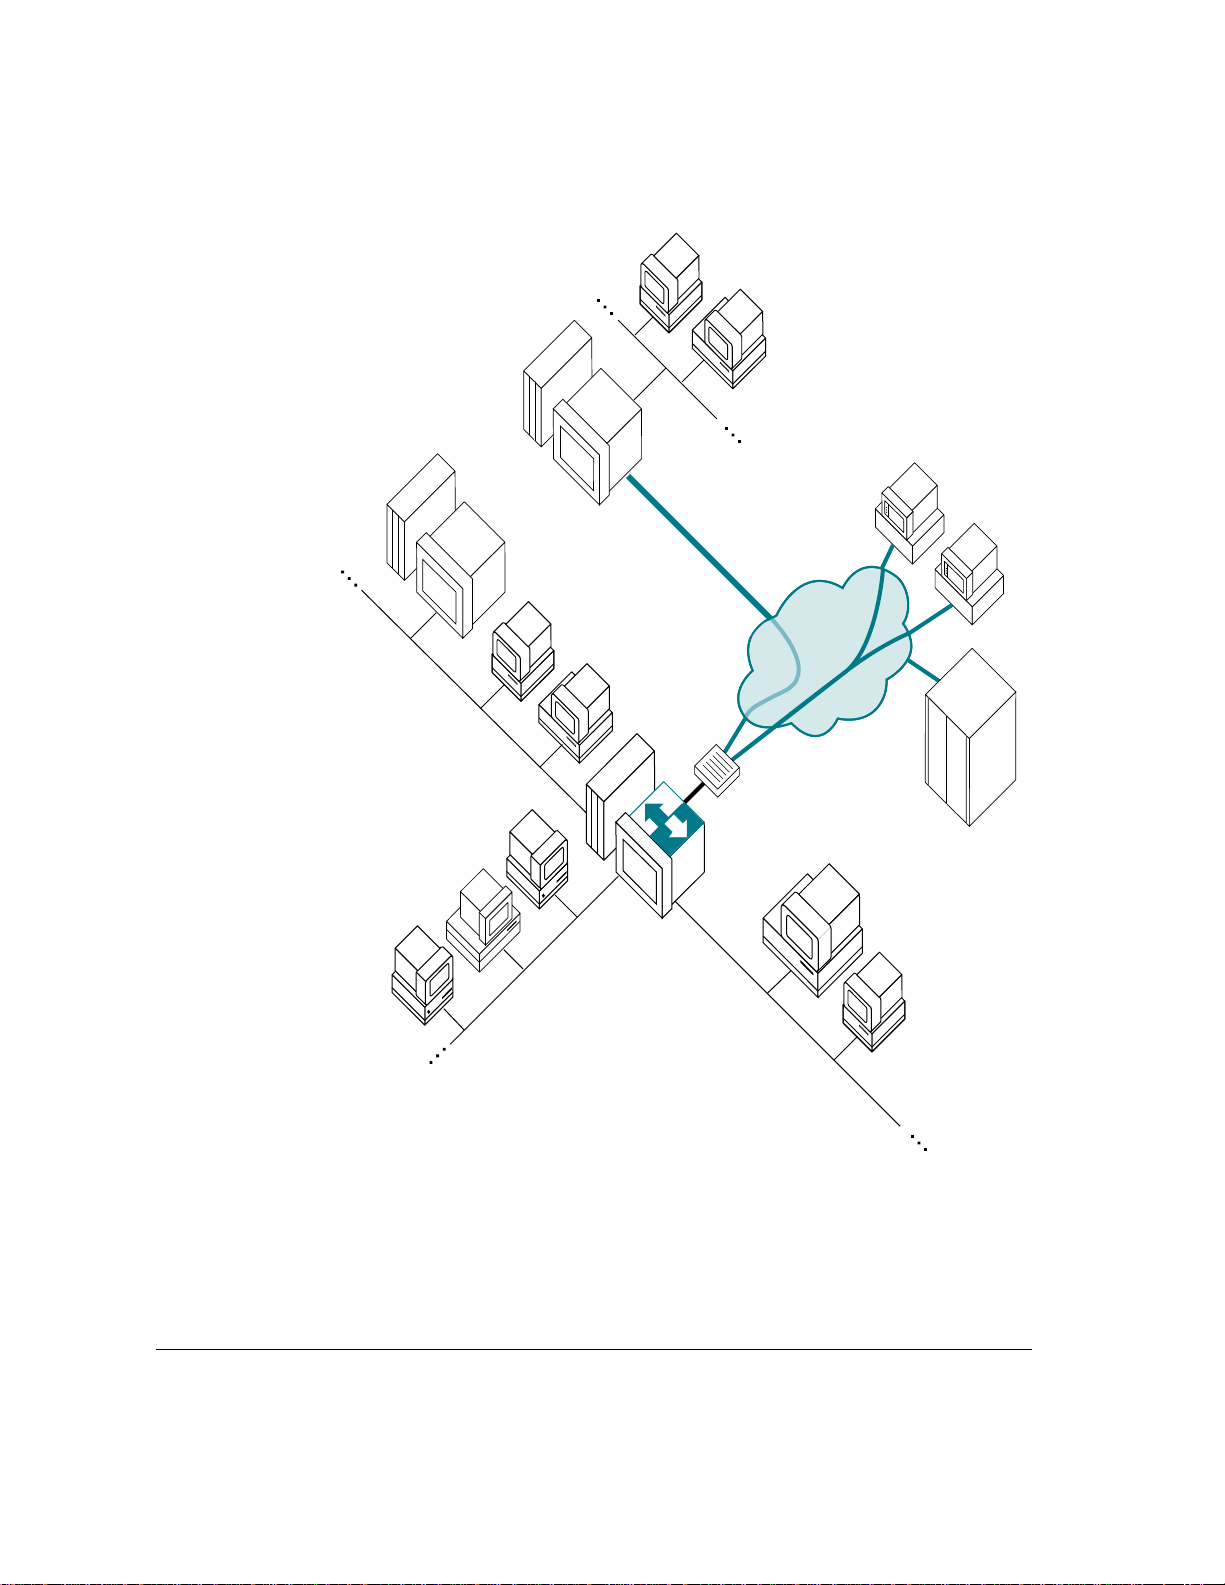
Macintosh running
AppleTalk/ IP Extension
Macintosh running
AppleTalk/IP Extension
and Apple IP Gateway
IP internet
IP router
Figure 3 The Apple IP Gateway provides communication with IP computers; the Apple Internet
Router AppleTalk/IP Wide Area Extension creates a tunnel through the IP internet, through
which Macintosh computers can communicate.
8 Chapter 1 / About the Apple IP Gateway
Page 17

Using the gateway with an Apple Remote Access server
Apple Remote Access software creates a remote extension of an AppleTalk
network, with packets transmitted over telephone lines rather than over
dedicated cables. Users who dial into an AppleTalk network through an Apple
Remote Access Personal or MultiPort Server can access all network services
as though they were locally connected. If the Apple Remote Access server
computer has access to the Apple IP Gateway, server users can also access IP
services, again as though they were locally connected.
Note: Remote users must be authorized to use the gateway by the Apple
Remote Access server administrator. See your Apple Remote Access
documentation for details on controlling network access.
Adding the remote-access option greatly extends the reach of the gate way, but
setup and operation are essentially the same as for the stand-alone en vironment.
Note that, as with the Apple Internet Router, it is often simplest and most costeffective to install both software programs on a single computer, but this is not
strictly necessary if it is more conv enient for you to use two machines.
Figure 4 shows how Apple Remote Access clients use the gateway to access IP
services.
How the gateway can be used 9
Page 18
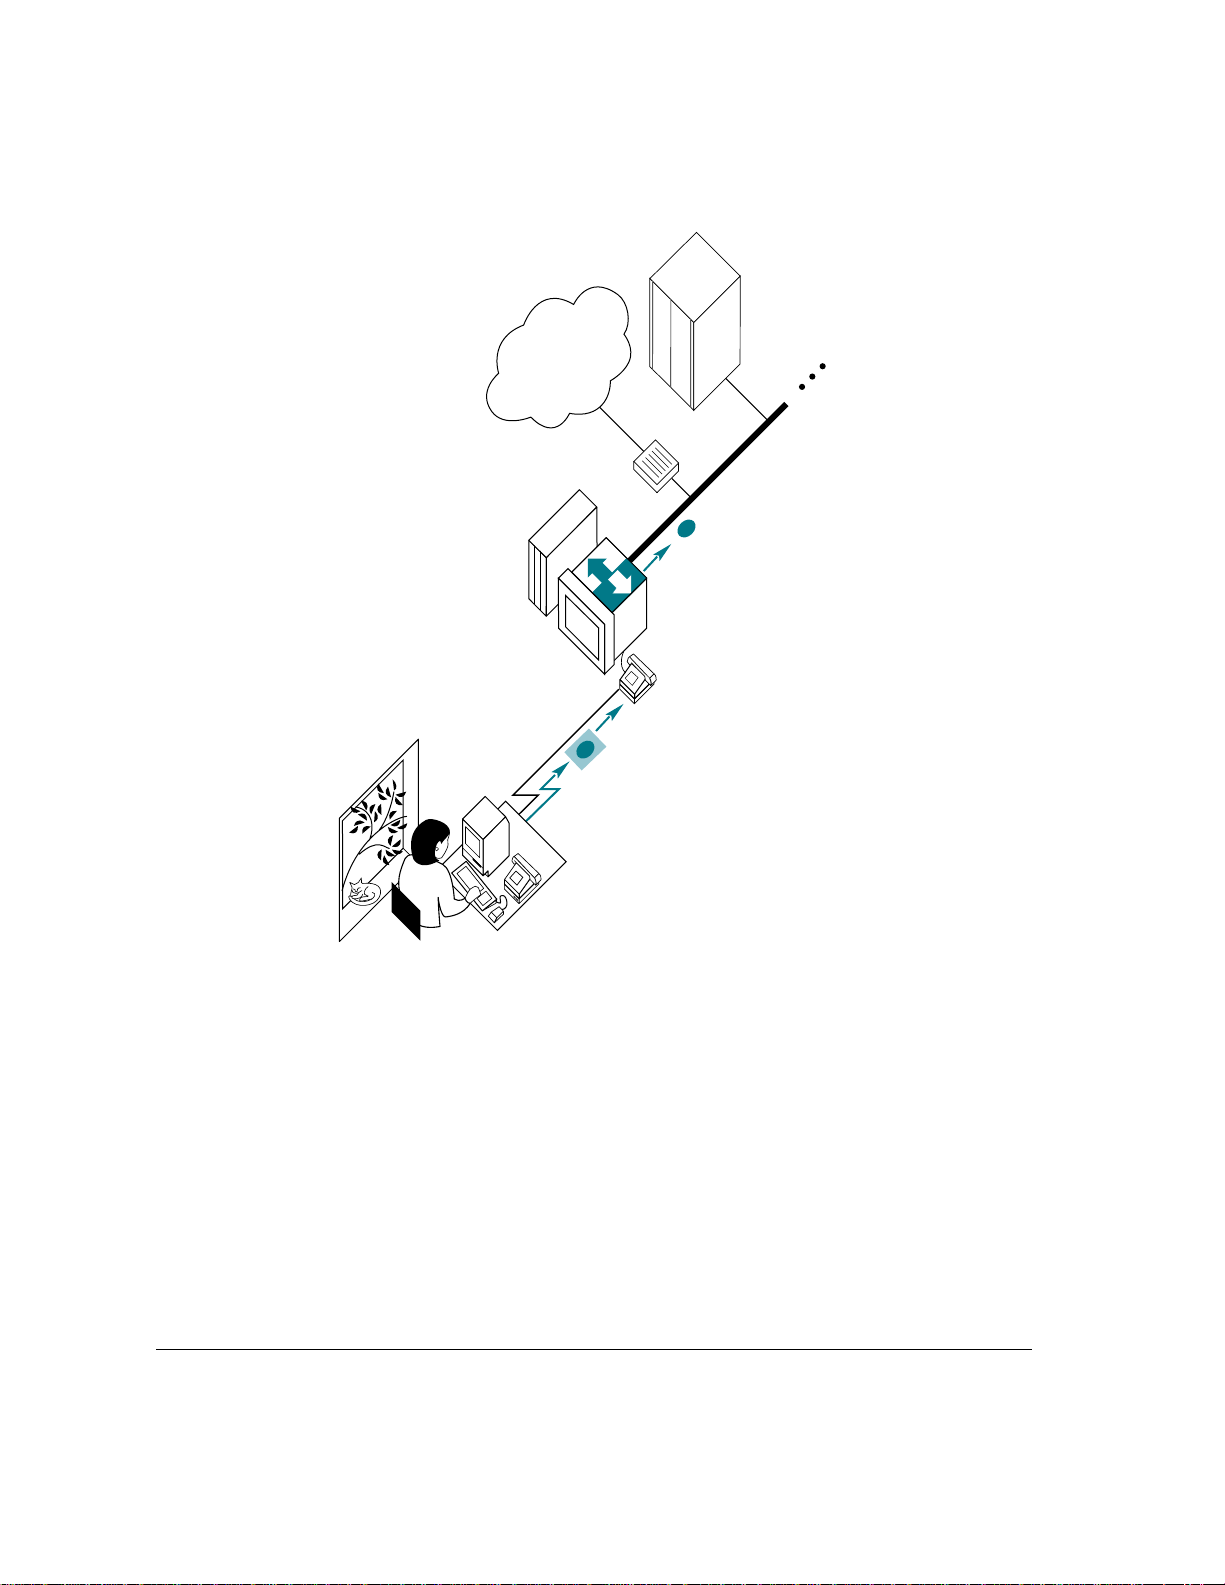
IP internet
Local IP host
IP router
Ethernet cable
Macintosh with Apple IP Gateway
running MacTCP and ARA
Remote Macintosh
running ARA and MacTCP
Figure 4 Apple Remote Access (ARA) client access to IP services
10 Chapter 1 / About the Apple IP Gateway
Page 19

The Apple IP Gateway and the AppleSearch WAIS Gateway
AppleSearch 1.5 includes a WAIS Gateway that allows AppleSearch clients to
search WAIS (wide area information server) computers on the Internet. Like
the Apple IP Gateway, the WAIS Gateway requires a Macintosh with both
AppleTalk and IP connections. The two gateways can run on the same
machine, thus giving users the benefits of both approaches. However the
benefits are different and should not be confused. The Apple IP Gateway is a
general-purpose IP access tool that does not require the AppleSearch software.
The WAIS Gateway is a specialized access tool that does.
Network management
The Apple IP Gateway is supplied with an SNMP IP Gateway Agent and
related SNMP software that allow a set of variables (called a Management
Information Base, or MIB) to be viewed. These variables are listed in the
Appendix, “The Apple IP Gateway MIB.”
SNMP stands for Simple Network Management Protocol, and it is the standard
mechanism for managing nodes, such as routers, hubs, and host computers, on
a TCP/IP network. An SNMP agent may be thought of as a reporting device
that supplies information about a particular MIB.
You can view the Apple IP Gateway MIB locally by installing either the
MacSNMP Client or the MacSNMP Administration software. These programs
are provided with the AppleTalk Administration for Macintosh and the TCP/IP
Administration for Macintosh products.
If you want to view the MIB remotely, you’ll need a network-management
console. Such consoles are available from a number of vendors.
Exploring these network-management options is beyond the scope of this
book. The MacSNMP Administrator’s Guide, supplied with the MacSNMP
software, provides information on using MacSNMP itself and also points you
in the right direction if you wish to implement full network management. See
your Apple-authorized reseller for more information.
How the gateway can be used 11
Page 20

Hardware and software requirements
The Apple IP Gateway may be installed on any Macintosh II or later
Macintosh computer that is equipped with
m Ethernet on the IP side
If the gateway computer does not support NuBus™, it must have built-in
Ethernet, a processor-direct slot (PDS) card, or a SCSI adapter. See the
documentation supplied with the card or adapter for full information on
installation, setup, and operation.
m any AppleTalk link, such as LocalTalk, EtherTalk, or Apple Remote Access,
on the AppleTalk side
See the documentation supplied with the cabling or with the Remote Access
software for full information on installation, setup, and operation.
m at least 4 megabytes of random-access memory (RAM)
m System 7.1 or later
MacTCP version 2.0.4, AppleTalk version 58.1.3, the MacSNMP agents, and
other required networking software are all installed with the gateway. This
software is discussed in “Installing the Gateway Software” in Chapter 2.
If the gateway computer is also supporting either the Apple Internet Router or
an Apple Remote Access server, it must meet all hardware and software
requirements for those products. You may need to increase RAM to provide
adequate memory to run all services simultaneously. See the Apple Internet
Router Administrator’s Guide, the Apple Remote Access MultiPort Server
Administrator’s Guide, or the Apple Remote Access Personal Server User’s
Guide for full information.
12 Chapter 1 / About the Apple IP Gateway
Page 21

2 Installation and Setup
This chapter covers all available options for installation of the Apple IP
Gateway and describes the procedures for each. Proper setup varies according
to network administrator preference and the kind of access you want to offer
network users. Setup procedures require coordination between the Apple IP
Gateway software itself and the MacTCP software on the gateway computer.
This chapter shows you how to make them work together to achieve the
desired result. Finally, the chapter tells you how to get users ready to access
the gateway.
Page 22

International u sers
If you are installing the Apple IP Gateway on a non–United States Macintosh
computer, you should run the Network Software Installer (NSI) before
proceeding with the rest of the installation process. The NSI installs the latest
international versions of all networking software. The Network Software
Installer disk is supplied in your Apple IP Gateway package.
Before running the NSI, you should make a backup copy of its disk. Put the
original aside for safekeeping, and use the backup for installation.
Installing n etworking software using Easy Install
To run the NSI using Easy Install:
1 Insert the backup copy of the
floppy disk drive and double-click the disk icon to open it.
The Installer icon is in the window that appears.
2 Double-click the Installer icon to open the Installer program.
An informational dialog box appears:
Network Software Installer
disk into your computer’s
14 Chapter 2 / Installation and Setup
Page 23
3 Click OK.
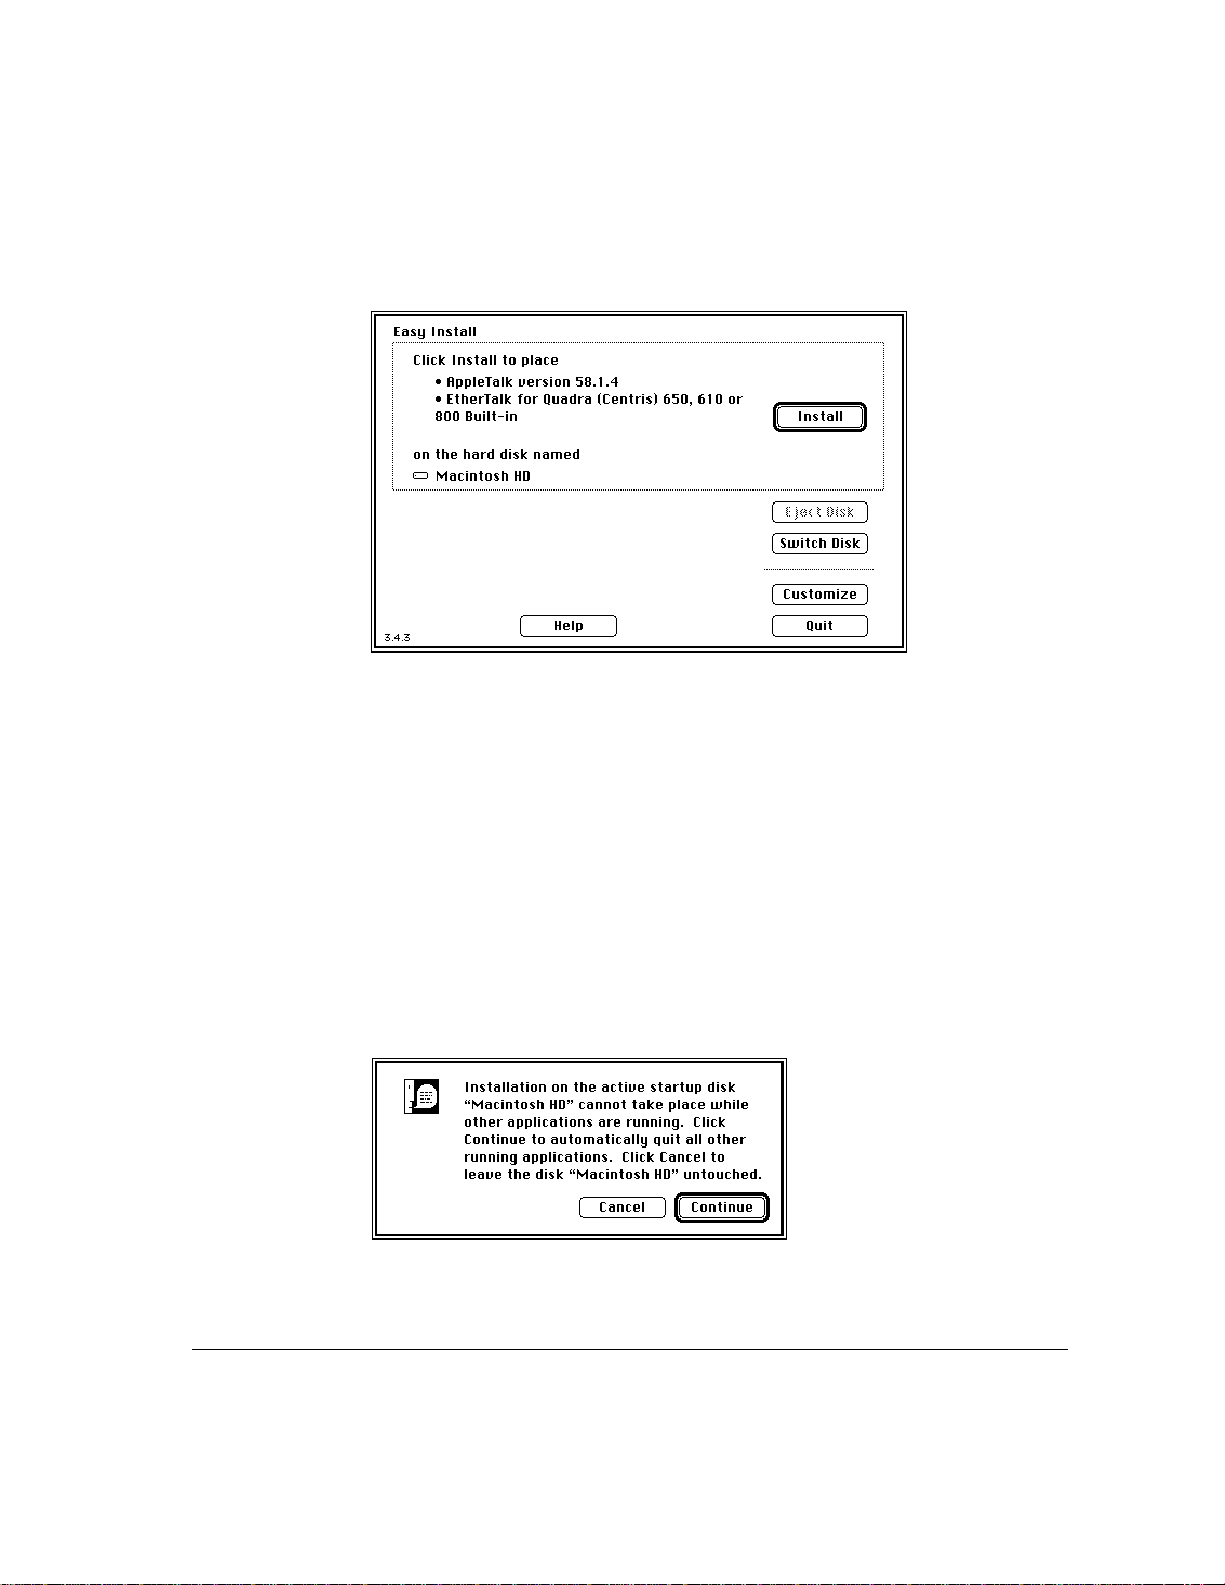
The Easy Install dialog box appears:
4 If necessary, click Switch Disk until the name of the disk you want to install on appears.
The Easy Install process is preset to install all the networking software
contained on the Network Software Installer disk onto your current startup
disk. By switching disks, you can install the networking software on any hard
disk that has a System Folder.
IMPORTANT
You must install the networking software on the same disk as the
Apple IP Gateway.
5 Click Install to place the networking software on your hard disk.
If other programs are currently running on your computer, the following dialog
box appears:
International users 15
Page 24

Clicking Continue automatically quits all open programs and begins the
installation. Clicking Cancel quits the Installer and leaves your hard disk
unchanged.
The Installer begins the installation process, with on-screen messages
reporting its progress. You can cancel the installation at any time, leaving the
hard disk unchanged.
6 When you see a message reporting that installation was successful, click Restart.
After you restart your computer, you can proceed to the section “Installing the
Gateway Software,” later in this chapter.
Installing n etworking software u sing th e Customize option
The Customize option lets you pick and choose from the networking software
contained on the NSI disk. It is particularly useful if disk space is at a premium
and if you know there are software files you w on’t need.
To use the Customize option:
1 Follow steps 1 through 3 in the preceding section, “Installing Networking Software Using
Easy Install.”
The Easy Install dialog box appears.
16 Chapter 2 / Installation and Setup
Page 25
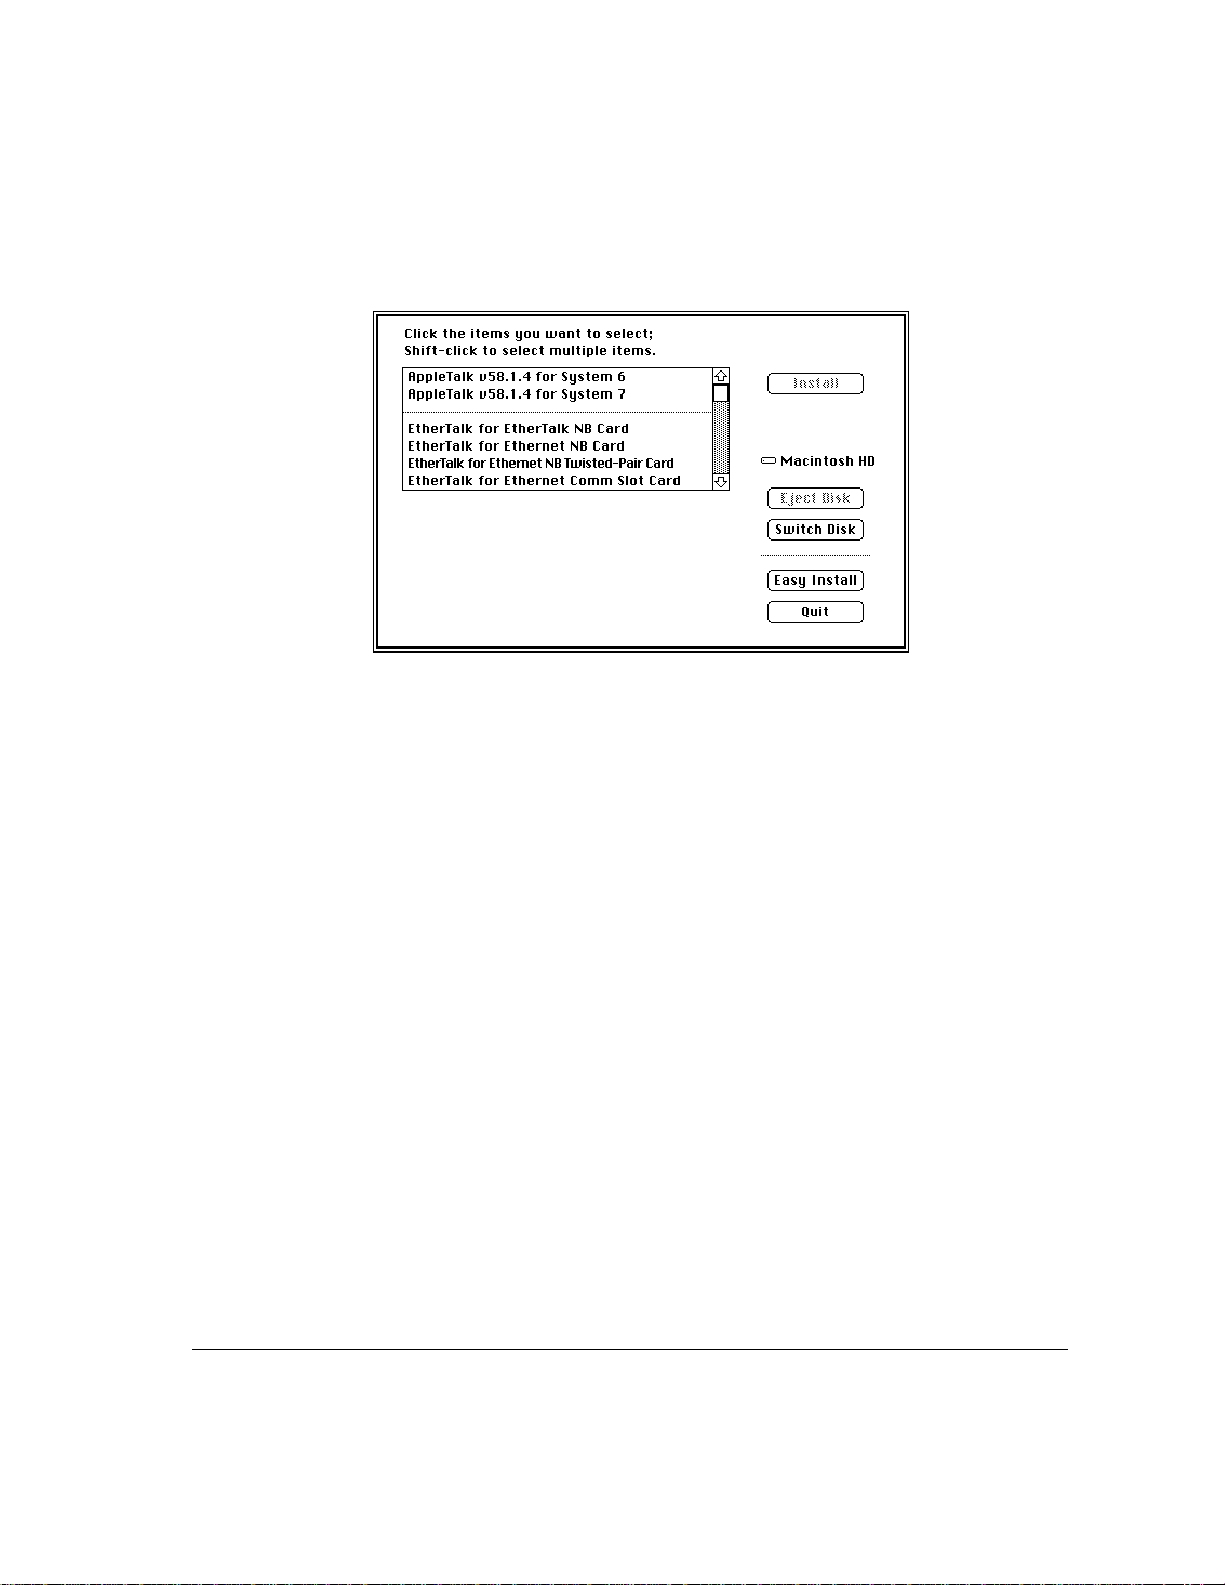
2 Click Customize.
The Customize dialog box appears:
3 If necessary, click Switch Disk until the name of the disk you want to install on appears.
The Customize option is preset to install the designated networking software
onto your current startup disk. By switching disks, you can install the
networking software on any hard disk that has a System Folder.
IMPORTANT
You must install the networking software on the same disk as the
Apple IP Gateway.
4 Select the software you want to install.
Select an item by clicking its name; select multiple items by Shift-clicking.
n You must select AppleTalk for System 7.
n You don’t need AppleTalk for System 6.
You may or may not need the rest of the networking software. To be sure, it
may be necessary to review your system or to ask for help from your
network administrator.
International users 17
Page 26

5 Click Install to place the networking software on your hard disk.
If other programs are currently running on your computer, the following dialog
box appears:
Clicking Continue automatically quits all open programs and begins the
installation. Clicking Cancel quits the Installer and leaves your hard disk
unchanged.
The Installer begins the installation process, with on-screen messages
reporting its progress. You can cancel the installation at any time, leaving the
hard disk unchanged.
6 When you see a message reporting that installation was successful, click Restart.
After you restart your computer, you can proceed to the next section,
“Installing the Gateway Software.”
18 Chapter 2 / Installation and Setup
Page 27

Installin g t he ga teway software
Before installing your gateway software, you should make a backup copy of
the installation disks, the Apple IP Gateway Installer 1 and Apple IP Gateway
Installer 2, which you will find in the Apple IP Gateway package. Put the
originals aside for safekeeping, and use the backups for installation.
This section describes the Easy Install procedure that Apple recommends as
well as the Custom Install procedure that you may want to use instead. The
section also shows you how to specify locations for software installation if you
don’t want to use the default locations for which the Installer is set.
Using Easy Install
Easy Install places all the software Apple recommends in the appropriate
locations on your startup disk. This includes
m the Gateway Manager
m the MacTCP control panel
m all necessary system extensions
m SNMP network-management software
m AppleTalk version 58.1.3 (for United States users)
Note: International users can use Easy Install. All software installed with the
Network Software Installer will be retained.
To install this software:
1 Insert the backup copy of the
floppy disk drive and double-click the Apple IP Gateway icon to open it.
The Installer icon is in the window that appears.
Apple IP Gateway Installer 1
disk into your computer’s
Installing the gateway software 19
Page 28

2 Double-click the Installer icon to open the Installer program.
An informational dialog box appears.
3 Click Continue.
The Installer dialog box appears, set for Easy Install.
When you click Install, the Installer automatically creates a folder on your
startup disk called Apple IP Gateway and installs the Gateway Manager in that
folder. It also automatically installs all other gateway software in the System
Folder on your current startup disk. If you want to use those default locations,
20 Chapter 2 / Installation and Setup
Page 29

proceed to step 4. If you want to install the Gateway Manager in an alternate
location, or if you want to install the gateway extensions into a different
System Folder, you should now follow the procedures in “Designating
Software Locations,” later in this chapter. When you have completed those
procedures, return here and go on to step 4.
4 Click Install to place the Apple IP Gateway software on your hard disk.
If other programs are currently running on your computer, the following dialog
box appears:
Clicking Continue automatically quits all open programs and begins the
installation. Clicking Cancel quits the Installer and leaves your hard disk
unchanged.
The Installer begins the installation process, with on-screen messages
reporting its progress. You will be prompted to switch disks when necessary.
You can cancel the installation at any time, leaving the hard disk unchanged.
5 When you see a message reporting that installation was successful, click Restart.
Installing the gateway software 21
Page 30

Using C ustom Install
Custom Install allows you to pick and choose which files you want for
installation. The following software is the minimum necessary for the gateway
to run successfully:
m the Apple IP Gateway software, including the Gateway Manager and
MacTCP version 2.0.4 or later
m AppleTalk version 58.1.3 or later
You may want to use Custom Install if:
m you have all necessary software drivers
m you don’t want to install any unnecessary drivers
IMPORTANT
MacTCP is included with the Apple IP Gateway software under
Custom Install. If you have a later version of MacTCP already installed, the
Installer will automatically use those later files. You do not have to consider
MacTCP in a custom installation. In addition, the Installer will not install
AppleTalk version 58.1.3 over a later version of AppleTalk.
To use Custom Install:
1 Insert the backup copy of the
and double-click the Apple IP Gateway icon to open it.
Apple IP Gateway Installer 1
disk into a floppy disk drive
The Installer icon is in the window that appears.
2 Double-click the Installer icon to open the Installer program.
An informational dialog box appears.
22 Chapter 2 / Installation and Setup
Page 31

3 Click Continue.
The Installer dialog box appears, set for Easy Install.
4 Choose Custom Install from the pop-up menu at the top of the Installer dialog box.
Note: The Custom Remove option allows you to remove installed files should
this ever prove necessary.
Installing the gateway software 23
Page 32

The Custom Install dialog box appears.
The Installer is set to create a folder on your startup disk called Apple IP
Gateway and to install the Gateway Manager in that folder. It automatically
installs all other gateway softw are in the System Folder on your current startup
disk. If you want to use those default locations, proceed to step 5. If you want to
install the Gateway Manager in an alternate location, or if you w ant to install
the gateway extensions into a different System Folder, you should now follow
the procedures in “Designating Software Locations,” later in this chapter. When
you have completed those procedures, return here and go on to step 5.
5 Click the checkboxes to select those items you wish to install.
To understand more about any item, click the small i on the far right of the list.
This opens an informational window, as shown by the following example, that
tells you what each piece of software does and what subitems, if any, are
included in the main listing.
24 Chapter 2 / Installation and Setup
Page 33

Click OK when you’re done reviewing the informational window.
6 Click Install to place the selected software on your hard disk.
If other programs are currently running on your computer, the following dialog
box appears:
Clicking Continue automatically quits all open programs and begins the
installation. Clicking Cancel quits the Installer and leaves your hard disk
unchanged.
The Installer begins the installation process, with on-screen messages
reporting its progress. You will be prompted to switch disks when necessary.
You can cancel the installation at any time, leaving the hard disk unchanged.
Installing the gateway software 25
Page 34

7 When you see a message reporting that installation was successful, click Restart.
Designating software locations
The Installer automatically installs the Gateway Manager on the current
startup disk in a folder called Apple IP Gateway. The Installer places all other
gateway software in the System Folder of the current startup disk. You can
change these automatic locations using the Destination Folder section of either
the Easy Install or the Custom Install dialog box.
You can install the Gateway Manager in any folder on any hard disk. You can
install the rest of the gateway software in any System Folder on any hard disk.
IMPORTANT
If you do install the gateway System Folder software in the
System Folder of any disk that is not the current startup disk, you will need to
make that disk the current startup disk before you can run the gateway.
Designating a location for the Gateway Manager
You can designate a folder for the Gateway Manager using the following
procedure:
1 Click Select Folder in the Destination Folder section of the Installer dialog box, shown in
the following figure.
26 Chapter 2 / Installation and Setup
Page 35

Note: The process is the same whether the Installer is set for Easy Install or
Custom Install.
The Folder Selection dialog box appears:
2 Using standard folder navigation techniques, locate the folder and hard disk for installation.
If you have any questions about folder navigation, see the documentation that
came with your Macintosh computer. You can navigate to any folder or
connected hard disk.
Installing the gateway software 27
Page 36

3 Designate a folder for the Gateway Manager installation.
You can select any folder on any hard disk, or you can create a new folder
using the following procedure:
a. Click the New Folder ( ) button on the right side of the dialog box. The
New Folder dialog box appears:
b. Type the name of the new folder.
c. Click Create.
4 Click the Select “<name of folder>” button at the bottom of the dialog box.
When you click Install, the Gateway Manager will be installed in this folder.
Designating a System Folder for the gateway software
The gateway software, exclusive of the Gateway Manager, must be installed in
a System Folder. It does, not, however, have to be installed in the System
Folder on the active startup disk, although you will have to use the chosen disk
as the active startup disk when you run the gateway. To choose a System
Folder for the gateway software:
1 Holding down the Option key, click System Disk in the Destination Folder section of the
Installer dialog box, shown in the following figure:
28 Chapter 2 / Installation and Setup
Page 37

Note: The process is the same whether the Installer is set for Easy Install or
Custom Install.
The System Disk dialog box appears:
2 Choose a system disk from the pop-up menu.
3 Click OK.
The gateway software will be installed on the designated system disk.
Setting up the gateway
To set up the Apple IP Gateway, you first configure your MacTCP software,
after which you configure the gateway itself.
Configuring MacTCP
You can access the MacTCP control panel from the Gateway Manager or
directly from the Apple () menu in the Finder. To access the control panel
from the Gateway Manager:
1 Double-click the Gateway Manager icon to open the program.
The Gateway Manager icon looks like the illustration shown here:
Setting up the gateway 29
Page 38

After you double-click the icon, the Gateway Information window and
menus appear.
2 Choose “Set up MacTCP” from the Control menu.
Alternatively, choose Control Panels from the Apple menu and double-click
the MacTCP control panel icon in the window that appears.
30 Chapter 2 / Installation and Setup
Page 39

With either method, the MacTCP control panel opens.
3 Click an Ethernet icon in the upper section of the control panel.
If you have multiple Ethernet connections, select the one that is connected to
the IP network. The gateway will not run if you select EtherTalk or any other
type of AppleTalk network connection.
4 Click More.
The Administrator dialog box appears.
Setting up the gateway 31
Page 40

5 Click Manually in the Obtain Address section of the dialog box, then click OK to return to
the MacTCP control panel.
6 Enter the IP address of the gateway computer in the lower section of the control panel.
Obtain this address from your network administrator and type it exactly as
specified.
7 Click More.
The Administrator dialog box reappears, with the following information now
included:
m the IP address itself
m an address class indicated in the Class pop-up menu
m a network identifier
m a host (node) identifier
The address class and the network identifier are assigned to any network that
accesses the Internet by the Internet’s central authority, the Network
Information Center. Classes range from A, for very large internets, to C, for
small local area networks. Host identifiers are locally set.
8 If your network requires subnetwork addressing, set the subnet mask and subnet
address by dragging the Subnet Mask slider.
Subnetwork addressing is a technique that allows groups of networks on an
internet to share a single network number, in much the same manner as a large
group of postal addresses share a zip code. Obtain the correct settings from
your network administrator. When you slide the bar, the Subnet field fills in
and the Node field changes. The Net field stays the same.
9 Fill out the Domain Name Server Information section of the dialog box.
The domain name system was created so that users could work with relatively
easy-to-remember symbolic names instead of more opaque numerical
addresses. A domain name server keeps a record of names assigned to
networks and matches them to their numeric equivalents. Obtain the domains
and IP addresses of your available domain name servers, as well as the correct
server to use as the default setting, from your network administrator.
32 Chapter 2 / Installation and Setup
Page 41

10 Enter the gateway address in the Routing Information section of the dialog box.
This is the address of the IP router that routes packets from your local IP
subnet to other IP subnets. Don’t confuse this with the Apple IP Gateway
itself. Obtain the address from your network administrator.
11 Click OK.
The Administrator dialog box closes and the MacTCP control panel reappears.
12 Click the control panel close box.
If you are setting up MacTCP for the first time, the control panel closes. If you
changed the configuration, and have used MacTCP with another configuration
and have not restarted the computer since then, you will see a dialog box
informing you that you will need to restart the computer to put your changes
into effect.
13 Restart the computer if necessary.
Configuring the gateway
To configure the gateway, it’s important to understand the types of addressing
options available. All options refer to the type of address a user’s computer
must have when accessing the gateway.
n Automatic addressing means computers are assigned addresses by the
gateway computer each time they access the gateway.
n Manual addressing means computers use preassigned addresses when they
access the gateway.
n Both means either manual or automatic addresses are acceptable.
Setting up the gateway 33
Page 42

With either automatic or manual addressing, you specify a range of IP
addresses that the gateway can provide, either dynamically or permanently.
Automatic addressing allows you to limit the number of clients that can access
the server at any one time. Manual addressing allows you to limit both the
number of clients and the specific group of clients who have access. If you use
both manual and automatic addressing at the same time, you must specify two
separate ranges, one for each type.
IMPORTANT
Manual addressing can only add security to the gateway if users
agree to protect the addresses you assign. If the addresses are made available,
either accidentally or by design, anyone can use them.
To configure the gateway:
1 Double-click the Gateway Manager icon to open the program.
The Gateway Information window appears.
2 Choose “Set up Gateway” from the Control menu.
The Gateway Setup dialog box appears.
34 Chapter 2 / Installation and Setup
Page 43

3 Click the radio button that represents your addressing choice.
You can configure for automatic addressing, manual addressing, or both.
4 Specify the number of addresses.
m If you are configuring for automatic addressing only, enter a value from 1 to
253 in the upper “Number of addresses” text box.
m If you are configuring for manual addressing only, enter a value from 1 to
253 in the lower “Number of addresses” text box.
m If you are configuring for both automatic and manual addressing, enter a
value from 1 to 253 in each of the “Number of addresses” text boxes.
5 Enter the first address.
m If you are configuring for automatic addressing only, enter the first address
in the upper “Start of IP range” text box.
m If you are configuring for manual addressing only, enter the first address in
the lower “Start of IP range” text box.
m If you are configuring for both automatic and manual addressing, enter a
first address in each of the “Start of IP range” text boxes.
Setting up the gateway 35
Page 44

Obtain these addresses from the network administrator. The end of the range is
automatically determined by adding the number of addresses permitted to the
starting address.
You can perform steps 4 and 5 in either order. The result is the same.
IMPORTANT
that the address ranges do not overlap. The Apple IP Gateway cannot manage
automatic and manual addresses from the same range.
6 If you want the gateway to start automatically when you start up the computer, click the
“Activate gateway at Macintosh startup” box.
IMPORTANT
discussed in detail in the section “Establishing Gateway Security” in
Chapter 3, “Operating and Monitoring the Apple IP Gateway.”
7 Click OK.
The Gateway Setup dialog box closes and the Gateway Information window
reappears. The gateway is now fully configured and will begin operation when
you click Start.
Getting users ready
To get users ready you will need to
m ensure that users have the minimum hardware and software required
If you are using both manual and automatic addressing, be sure
Ignore the “Use network restrictions” checkbox for now. This is
m ensure that users have MacTCP correctly configured
m supply users with manual addresses if necessary
Users may also need various Internet access software programs or server
accounts to accomplish their goals. These requirements, however, are too
individualized to cover here. See any of the Internet introductions listed in the
Preface for more information.
36 Chapter 2 / Installation and Setup
Page 45

Hardware and software requirements
Most Macintosh computers in current use are adequate for accessing the Apple
IP Gateway. Minimum requirements are:
m any Macintosh Plus or later Macintosh computer
m a minimum of 2 megabytes of RAM
m system software version 6.0.5 or later
m MacTCP version 1.1 or later
m AppleTalk version 57.0 or later
Users connecting remotely also need Apple Remote Access software in any
version that is compatible with the Apple Remote Access Personal or MultiPort
Server that the Apple IP Gateway is using. These users will also have to meet
the hardware and software requirements for their Remote Access program.
MacTCP configuration requirements
If your users already have MacTCP installed, or if they are responsible for
obtaining and installing MacTCP on their own, you can simply tell them the
configuration information outlined in this section.
If you intend to supply users with MacTCP, Apple recommends that you
obtain the TCP/IP Administration for Macintosh product along with its
companion, TCP/IP Connection for Macintosh. TCP/IP Connection for
Macintosh is primarily a licensing vehicle, and it is available in a range of
licensing denominations. The MacTCP Administrator’s Guide, supplied with
TCP/IP Administration for Macintosh, contains full information on
configuring and distributing MacTCP client software. TCP/IP Administration
for Macintosh also contains the MacSNMP Admin software and the
MacSNMP Administrator’s Guide, so you will also need the product if you are
planning to take advantage of network management.
See your Apple-authorized reseller for information about TCP/IP Connection
and Administration products and software licensing.
IMPORTANT
accordance with the distribution license that you purchase. This license is only
available with the TCP/IP Connection for Macintosh.
You are legally obligated to limit distribution of MacTCP in
Getting users ready 37
Page 46

The following configuration information can serve as your guide if you are
planning to distribute configured software. If users will be configuring their
own software, you may find it convenient to photocopy one or both of these
sets of directions and hand them out as appropriate.
Configuring MacTCP for automatic addressing
To configure the software for automatic addressing:
1 Choose Control Panels from the Apple (
) menu.
The Control Panels window opens.
2 Double-click the MacTCP control panel to open it.
The following window appears:
38 Chapter 2 / Installation and Setup
Page 47

3 Click the AppleTalk connection icon in the upper-left corner to select it (if it isn’t selected
already).
This icon indicates the connection method that your computer is currently
using. The connection method is set in the Network control panel, shown in
the following figure, and the MacTCP setting is determined by that setting.
Note: If your computer has only one connection method, you may not have a
Network control panel. In this case, only one icon appears in the MacTCP
control panel window.
When the icon is selected, a pop-up menu of zones appears beneath it. (On
some LocalTalk networks there are no zones and no menu. If this is the case,
you can skip step 4.)
IMPORTANT
Remote Access clients need to be connected to the Apple Remote
Access server for the zone menu to appear.
4 Choose the zone containing the Apple IP Gateway from the pop-up menu, as shown on
the following page.
Getting users ready 39
Page 48

You do not need to enter an address.
5 Click More.
The Administrator dialog box appears.
40 Chapter 2 / Installation and Setup
Page 49

6 Click Server in the upper-left section of the dialog box.
You do not need to enter a gateway address or any address class or subnet
information.
7 If necessary, enter the domain name server information in the lower-right section of the
dialog box.
If you do not enter information, the gateway computer will supply it to your
computer. If you want to use more than one domain name server, it is useful to
enter the domains and addresses. Obtain this information from your network
administrator.
8 Click OK.
The Administrator dialog box closes and the MacTCP control panel reappears.
9 Click the control panel close box.
If you are setting up MacTCP for the first time, the control panel closes. If you
changed the configuration, and have used MacTCP with another configuration
and have not restarted the computer since then, you will see a dialog box
informing you that you will need to restart the computer to put your changes
into effect.
10 Restart the computer if necessary.
MacTCP is now ready for use or for distribution.
Getting users ready 41
Page 50

Configuring MacTCP for manual ad dressing
To configure the software for manual addressing:
1 Choose Control Panels from the Apple (
) menu.
The Control Panels window opens.
2 Double-click the MacTCP control panel to open it.
The following window appears:
3 Click the AppleTalk connection icon in the upper-left corner.
The icon indicates the connection method that your computer is currently
using. The connection method is set in the Network control panel, shown in
the following figure, and the MacTCP setting is determined by that setting.
42 Chapter 2 / Installation and Setup
Page 51

Note: If your computer has only one connection method, you may not have a
Network control panel. In this case, only one icon appears in the MacTCP
control panel window.
When you select the icon, a pop-up menu of zones appears beneath it. (On some
LocalTalk networks there are no zones. If this is the case, you can skip step 4.)
IMPORTANT
Remote Access clients need to be connected to the Apple Remote
Access server for the zone menu to appear.
4 Choose the zone containing the Apple IP Gateway from the pop-up menu.
You do not need to enter an address yet.
Getting users ready 43
Page 52

5 Click More.
The Administrator dialog box appears.
6 Click Manually in the upper-left section of the dialog box, and then click OK.
The MacTCP control panel reappears.
7 Type the assigned address for this client in the IP Address text box.
The address must be one of the addresses in the designated manual range.
8 Click More.
The Administrator dialog box reappears, with address and class information
now filled in.
9 If your network requires subnetwork addressing, set the subnet mask and subnet
address by dragging the Subnet Mask slider.
Obtain the correct settings from your network administrator.
10 Fill out the Domain Name Server Information section of the dialog box.
Obtain this information from your network administrator.
44 Chapter 2 / Installation and Setup
Page 53

11 Click OK.
The Administrator dialog box closes and the MacTCP control panel reappears.
12 Click the control panel close box.
If you are setting up MacTCP for the first time, the control panel closes. If you
changed the configuration, and have used MacTCP with another configuration
and have not restarted the computer since then, you will see a dialog box
informing you that you will need to restart the computer to put your changes
into effect.
13 Restart the computer if necessary.
MacTCP is now ready for use or for distribution.
Getting users ready 45
Page 54

Page 55

3 Operating and Monitoring the Apple IP Gateway
Once the Apple IP Gateway and MacTCP have been successfully configured,
operation is straightforward, whether the gateway is used on its own or in
conjunction with the Apple Internet Router or an Apple Remote Access
MultiPort or Personal Server. There are, of course, problems that can come up.
These are covered in Chapter 4, “Troubleshooting.” This chapter explains how
to start and stop the gateway, how to monitor its operation, and, if necessary,
how to make it more secure.
Page 56

Starting and stop ping the gateway
You start and stop the Apple IP Gateway from the Gateway Manager program.
To start the gateway:
1 Open the Gateway Manager program.
The Gateway Information window opens.
2 Click Start or choose Start Gateway from the Control menu.
The gateway automatically begins to run. You can see the level of activity
from the Gateway Information window. The information in the window is
discussed later in the next section, “Monitoring the Gateway.”
IMPORTANT
It is not necessary to keep the Gateway Manager open while the
gateway is running. If you want to close the Gateway Manager, choose Quit
from the File menu. This does not stop the gateway. If the Gateway Manager is
shut down, the gate way may be running, but there is no visible sign of it. If you
want to make sure that the gateway is running, open the Gateway Manager. The
text next to the Stop/Start b utton will confirm the gateway’s status.
To stop the gateway:
1 Open the Gateway Manager program.
2 Click Stop or choose Stop Gateway from the Control menu.
48 Chapter 3 / Operating and Monitoring the Apple IP Gateway
Page 57

Monitoring th e gateway
There are two main ways to monitor the gateway: with the statistics gathered
in the Gateway Information window and with SNMP.
View in g ga t e way st atistic s
The Gateway Manager window presents a dynamic picture of the gateway
in operation.
From the top section of the window you can determine:
m the number of automatic addresses available for assignment
m the number of automatic addresses already assigned
m the number of connected users
m the current level of gateway activity
m the current level of invalid or illegal packets received by the gateway
Note that manual addresses are not tracked, because they are, by definition, not
available for automatic distribution.
The lower section of the window is a table of connected users, listing their
names, AppleTalk and IP addresses, packets forwarded, and idle time. To sort
this table by any of its fields, click on that field’s heading. The field currently
being used for sorting is underlined.
Monitoring the gateway 49
Page 58

The window monitors the gateway continuously. If you want to see its operation
from a particular moment, choose Reset Statistics from the Control menu.
This sets all activity values to zero, including any variables monitored with
SNMP, and begins counting them again.
Using MacSNMP
The Apple IP Gateway Installer automatically installs an SNMP agent on the
gateway computer. If you install MacTCP on client computers using the
TCP/IP Administration for Macintosh and TCP/IP Connection for Macintosh
products, you have the option of installing SNMP agents on those computers
as well.
The Administration product includes the MacSNMP Client and MacSNMP
Administration software, which allow for agent configuration and local
monitoring. Interested readers are referred to the MacSNMP Administrator’s
Guide, supplied with TCP/IP Administration for Macintosh.
The agents installed with the Apple IP Gateway and the TCP/IP
Administration include an Apple IP agent and a Macintosh agent. For a
complete list of all variables that can be monitored with the Apple IP agent,
see the Appendix, “The Apple IP Gateway MIB.” The Macintosh agent
monitors the following information:
m all files in the System Folder
m all programs on the computer
m types of NuBus cards installed
m SCSI devices attached
m all services being managed on the computer
50 Chapter 3 / Operating and Monitoring the Apple IP Gateway
Page 59

m details about all mounted volumes
m details about the currently selected printer
If you want to institute remote monitoring, you will need to purchase an
SNMP console, available from a number of vendors. Again, interested readers
are referred to the MacSNMP Administrator’s Guide, and especially to the
technical references listed therein.
Establishing g a teway security
There are three basic elements of gateway security:
m preventing unauthorized use of the Gateway Manager
m preventing access by unauthorized AppleTalk clients
m preventing unauthorized access from the IP side of the gateway
The first two elements can be set in place with the Apple IP Gateway. The
third must be approached from the IP side, and so specific instructions cannot
be provided here.
Note: One of the simplest and yet most powerful security measures is to use
manual addressing only. A manual address stays with a specific client, and,
unless that client gives it away, it cannot be used by anyone else. See
“Configuring the Gateway” and “Getting Users Ready” in Chapter 2 for more
information on manual addressing.
Setting a password
To prevent unauthorized access to the Gateway Manager and therefore to the
gateway software itself, you can set a password.
1 Open the Gateway Manager program.
2 Choose Set Password from the Control menu.
The Gateway Manager Password dialog box appears, as shown on the
following page.
Establishing gateway security 51
Page 60

3 Type a password in the “New password” text box.
The password appears as dots rather than text. The password can be up to eight
characters long, and it can include any combination of upper- or lowercase
letters, numbers, or symbols. As with all passwords, the one you choose
should be easy to remember and hard to guess.
4 Type the password again in the “Retype new password” text box.
5 Click OK.
You will be prompted for the password each time you launch the Gateway
Manager.
Changing or removing a p assword
You can change your password at any time, and you can also remove password
protection if you feel it is unnecessary.
To change a password, follow exactly the same procedure given earlier in “Setting a
m
Password.”
m
To remove password protection, follow exactly the same procedure given earlier in
“Setting a Password,” leaving both the “New password” and the “Retype new password”
text boxes blank.
52 Chapter 3 / Operating and Monitoring the Apple IP Gateway
Page 61

Limiting network access
You can control which networks the gateway will accept users from with the
network restrictions feature in the Gateway Setup dialog box.
1 Open the Gateway Manager program.
2 Stop the gateway if it is running.
You cannot make changes to gateway setup while the gateway is running.
When you click Stop the following dialog box appears:
3 Click OK.
4 Choose “Set up Gateway” from the Control Menu.
The Gateway Setup dialog box appears.
Establishing gateway security 53
Page 62

5 Click the “Use network restrictions” checkbox to select it, and then click Set Up.
The Network Restrictions dialog box appears.
6 Choose the restriction method you want to use.
You can choose to hide IP services from only those AppleTalk networks listed
or from all AppleTalk networks not listed. The first method is more practical
when you want to exclude a small number of networks on your AppleTalk
internet from access to IP services. The second is better when you want to
extend IP services to just a few.
7 Enter the network number of the first network you wish to include or exclude in the
Network Range text boxes at the bottom of the dialog box.
LocalTalk networks have a single network number. EtherTalk and TokenTalk
networks have a network range, with a starting and ending number.
m For a LocalTalk network, enter the single network number in both text boxes.
m For an EtherTalk or TokenTalk network, enter the starting range number in the
left text box, and the ending range number in the right text box.
You can learn a network’s number either directly from the routing table
maintained by your routing software or from a network log maintained by your
network administrator.
IMPORTANT
You are not restricted to the actual network range numbers. If you
enter range numbers that cover several contiguous networks, for example, you
can give them all the same restrictions simultaneously. By entering a LocalTalk
network number in the left box and a later number in the right box, you set
54 Chapter 3 / Operating and Monitoring the Apple IP Gateway
Page 63

restrictions for all LocalTalk networks in that set of numbers. You can also pick
range numbers that cover only a part of a network.
8 Click Add.
The network number appears in the Network List at the top of the dialog box.
9 Repeat steps 7 and 8 until you have listed all networks you want to include or exclude.
10 Click OK.
The dialog box closes. When you restart the gateway, your restrictions will be
in effect.
Changing network access restrictions
You can add or remove restricted networks at any time, using a variation on
the procedure described in the previous section, “Limiting Network Access.”
1 Open the Gateway Manager program.
2 Stop the gateway if it is running.
You cannot make changes to gateway setup while the gateway is running.
3 Choose “Set up Gateway” from the Control Menu.
4 Click the “Use network restrictions” checkbox to select it, and then click Set Up.
5 If you want to add networks to the Network List, enter their numbers in the Network
Range text boxes at the bottom of the dialog box.
Establishing gateway security 55
Page 64

6 Click Add after each addition.
When you click Add, the network is added to the Network List.
7 Click OK when you’re finished.
8 If you want to remove networks from the Network List, click their numbers in the
Network List.
Shift-click for multiple selections.
9 Click Remove.
When you click Remove, the network is deleted from the Network List.
56 Chapter 3 / Operating and Monitoring the Apple IP Gateway
Page 65

10 Click OK.
The dialog box closes. When you restart the gateway, your changes will be
in effect.
Preventing unauthorized access by IP computers
The Apple IP Gateway works in both directions. Just as clients on the
AppleTalk side have access to the IP network, IP computers have access to
Macintosh computers on AppleTalk networks. Restricting this access cannot
be done from the AppleTalk side. It can, however, be accomplished with most
IP routers. See your IP router documentation to arrive at a suitable method.
Establishing gateway security 57
Page 66

Page 67

4 Troubleshooti ng
The Apple IP Gateway links two complex network systems. Therefore
operational errors are inevitable. This chapter suggests a basic approach to
troubleshooting problems. Following that, the chapter lists some of the most
common problems, along with ways to remedy them. Be aware, though, that if
you are using the Apple Internet Router or an Apple Remote Access server
with the gateway, the problem may lie with that software, rather than with the
gateway itself. The Apple Internet Router Administrator’s Guide, the Apple
Remote Access MultiPort Server Administrator’s Guide, and the Apple Remote
Access Personal Server User’s Guide all contain detailed troubleshooting
sections that may help you solve problems when you’re using the gateway
with other software.
Page 68

Diagnosing and solving problems
The following steps outline a troubleshooting strategy that you can use to
isolate and solve problems as they come up.
1 Determine the symptoms.
Gather information from users to define the nature of the problem. If users are
reporting multiple problems, handle each one separately.
2 Determine whether the network is the source of the problem.
The network is almost certainly the source of the problem if one or more of
these conditions exists:
m Users cannot access a network service.
m Network access is intermittent.
m Devices cannot communicate.
m Network performance slows down.
The network is unlikely to be the source of the problem if one or more of these
conditions exists:
m You can reproduce the problem after a device has been disconnected from
the network.
m The problem is limited to a specific program.
m A hardware device has failed.
m A procedure has been performed incorrectly.
3 Determine the scope and location of the problem.
Examine progressively smaller network components to isolate the problem.
m Identify which networks are affected.
m If several networks are affected, determine if they are connected.
m If only one network is affected, determine if multiple devices are involved.
m Determine if the amount of traffic through the gateway is excessive.
m Determine whether a network exceeds the maximum cable length or
number of devices.
60 Chapter 4 / Troubleshooting
Page 69

m Determine whether the gateway Macintosh is the source of the problem.
m Determine whether the Apple IP Gateway software is the source of the
problem.
4 Identify the cause the problem.
Once you’ve isolated the problem to a specific device:
m Verify that all cables are undamaged and connected correctly.
m Verify that all software is of the correct version number and has been
installed correctly.
Solutions to commo n problems
The following sentences in boldface indicate symptoms or problems you may
encounter when running the gateway. After each symptom or problem, a possible
cause is presented, followed by a suggestion for solving the problem.
A user gets an error on startup of an IP program indicating that the client does not have
an IP address.
m The gateway is not configured to assign IP addresses automatically. Stop the
gateway and configure it to assign IP addresses automatically.
m The gateway is out of IP addresses as indicated by the Gateway Information
window text “Addresses available: 0.” Stop the gateway and configure it to
have a larger range of automatic addresses.
m The user is on a restricted network. Remove (or add) the user’s network
number to the Network List in the Network Restrictions dialog box.
A computer with a manual address is not accessible from the IP network.
m The computer has not yet communicated with the gateway and therefore the
gateway does not know how to find the computer to send packets to it. Have
the user initiate an IP connection so that the gateway knows where the client
is.
Note: This problem should occur only when the gateway and the client are in
different zones. If possible, put all clients in the same zone as the gateway.
Solutions to common problems 61
Page 70

A user who has previously accessed the gateway can no longer do so.
m The client’s IP address has been assigned to another client by the gateway.
Have the user restart the Macintosh to get another address.
Note: This will only happen when the gateway is in a different zone than the
client and the gateway is restarted after the client is assigned an address. The
gateway loses the information about the previously assigned addresses when it is
restarted, and it cannot find the client computer because it is in a different zone.
The Gateway Information window indicates an address conflict, and the gateway will not
assign that address to a user.
m A node on the IP netw ork is using the IP ad dress listed. Find the node and
change its address or use an automatic range that does not include that address.
62 Chapter 4 / Troubleshooting
Page 71

Appendix The Apple IP Gateway MIB
This appendix includes the Management Information Base (MIB) for the
Apple IP Gateway. The MIB includes a list of all variables that can be
monitored and managed with MacSNMP.
Page 72

MacIP-MIB DEFINITIONS ::= BEGIN
IMPORTS
mgmt, experimental, Counter
FROM RFC1155-SMI
OBJECT-TYPE
FROM RFC1212-MIB;
-- This MIB module uses the extended OBJECT-TYPE macro
-- as defined in RFC1212
-- MacIP MIB
mib-2 OBJECT IDENTIFIER ::= { mgmt 1 }
appletalk OBJECT IDENTIFIER ::= { mib-2 13 }
apple OBJECT IDENTIFIER ::= { enterprises 63 }
macip OBJECT IDENTIFIER ::= { apple ?? }
macipNumStaticAddresses OBJECT-TYPE
SYNTAX INTEGER
ACCESS read-write
STATUS mandatory
DESCRIPTION
"The number of static addresses configured on
the gateway."
::= { macip 1 }
macipStaticRangeStart OBJECT-TYPE
SYNTAX IpAddress
ACCESS read-write
STATUS mandatory
DESCRIPTION
"The first IP address in the range of static IP
addresses configured on the gateway."
::= { macip 2 }
64 Appendix / The Apple IP Gateway MIB
Page 73

macipNumDynamicAddresses OBJECT-TYPE
SYNTAX INTEGER
ACCESS read-write
STATUS mandatory
DESCRIPTION
"The number of dynamic addresses configured on
the gateway."
::= { macip 3 }
macipDynamicRangeStart OBJECT-TYPE
SYNTAX IpAddress
ACCESS read-write
STATUS mandatory
DESCRIPTION
"The first IP address in the range of dynamic
IP addresses configured on the gateway."
::= { macip 4 }
macipUseIdleTimeOut OBJECT-TYPE
SYNTAX INTEGER {
true(1),
false(2)
}
ACCESS read-write
STATUS mandatory
DESCRIPTION
"If true(1), the idle time out value will be
used to time out dynamic addresses."
::= { macip 5 }
Continued on following page
.
The Apple IP Gateway MIB 65
Page 74

macipUseNBPConfirmTimeOut OBJECT-TYPE
SYNTAX INTEGER {
true(1),
false(2)
}
ACCESS read-write
STATUS mandatory
DESCRIPTION
"If true(1), the NBP Confirm time out value
will be used to time out dynamic addresses."
::= { macip 6 }
macipUsePINGTimeOut OBJECT-TYPE
SYNTAX INTEGER {
true(1),
false(2)
}
ACCESS read-write
STATUS mandatory
DESCRIPTION
"If true(1), the PING time out value will be
used to time out dynamic addresses."
::= { macip 7 }
macipIdleTimeOut OBJECT-TYPE
SYNTAX INTEGER
ACCESS read-write
STATUS mandatory
DESCRIPTION
"Dynamic addresses will be made available to be
reassigned after they have been idle for this
length of time in minutes."
::= { macip 8 }
66 Appendix / The Apple IP Gateway MIB
Page 75

macipNBPConfirmTimeOut OBJECT-TYPE
SYNTAX INTEGER
ACCESS read-write
STATUS mandatory
DESCRIPTION
"Dynamic addresses will be made available to be
reassigned after they have not answered
NBPConfirm for this length of time in minutes."
::= { macip 9 }
macipPINGTimeOut OBJECT-TYPE
SYNTAX INTEGER
ACCESS read-write
STATUS mandatory
DESCRIPTION
"Dynamic addresses will be made available to be
reassigned after they have not answered ICMP
Echo (PING) for this length of time in
minutes."
::= { macip 10 }
macipUseNetworkRestrictions OBJECT-TYPE
SYNTAX INTEGER {
true(1),
false(2)
}
ACCESS read-write
STATUS mandatory
DESCRIPTION
"If true(1), the network restrictions list will
be used to restrict access to the gateway."
::= { macip 11 }
Continued on following page
.
The Apple IP Gateway MIB 67
Page 76

macipAddressesInUse OBJECT-TYPE
SYNTAX INTEGER
ACCESS read-only
STATUS mandatory
DESCRIPTION
"The number of dynamic addresses that have been
assigned."
::= { macip 12 }
macipNumClientsConnected OBJECT-TYPE
SYNTAX INTEGER
ACCESS read-only
STATUS mandatory
DESCRIPTION
"The total number of clients (dynamic and
static) that are currently using the gateway."
::= { macip 13 }
macipPacketsForwardedIP OBJECT-TYPE
SYNTAX Counter
ACCESS read-only
STATUS mandatory
DESCRIPTION
"The number of packets forwarded to the IP
internet. This number includes unknown IP
errors."
::= { macip 14 }
macipPacketsForwardedAppleTalk OBJECT-TYPE
SYNTAX Counter
ACCESS read-only
STATUS mandatory
DESCRIPTION
"The number of packets forwarded to the
AppleTalk internet. This number includes
unknown AppleTalk errors."
::= { macip 15 }
68 Appendix / The Apple IP Gateway MIB
Page 77

macipAssignRequestsRefusedErrs OBJECT-TYPE
SYNTAX Counter
ACCESS read-only
STATUS mandatory
DESCRIPTION
"The number of times an attempt to get a
dynamic address failed due to the address table
being full."
::= { macip 16 }
macipInvalidIPAddressErrs OBJECT-TYPE
SYNTAX Counter
ACCESS read-only
STATUS mandatory
DESCRIPTION
"The number of packets encountered from a
client with an unknown or invalid IP address."
::= { macip 17 }
macipUnknownIPErrs OBJECT-TYPE
SYNTAX Counter
ACCESS read-only
STATUS mandatory
DESCRIPTION
"The number of times the gateway failed to
successfully forward an IP packet to the
destination IP address."
::= { macip 18 }
macipUnknownAppleTalkErrs OBJECT-TYPE
SYNTAX Counter
ACCESS read-only
STATUS mandatory
DESCRIPTION
"The number of times the gateway failed to
successfully forward an IP packet to the
destination AppleTalk address."
::= { macip 19 }
Continued on following page
.
The Apple IP Gateway MIB 69
Page 78

macipRunAtStartup OBJECT-TYPE
SYNTAX INTEGER {
true(1),
false(2)
}
ACCESS read-write
STATUS optional
DESCRIPTION
"If true(1), the gateway will run when the
Macintosh starts up."
::= { macip 20 }
macipStatus OBJECT-TYPE
SYNTAX INTEGER {
enabled(1),
disabled(2)
}
ACCESS read-only
STATUS optional
DESCRIPTION
"The current status of the gateway."
::= { macip 21 }
macipNetRestrictionsTable OBJECT-TYPE
SYNTAX SEQUENCE OF netRestrictionsEntry
ACCESS not-accessible
STATUS optional
DESCRIPTION
"The list of networks being restricted from or
allowed to use the gateway."
::= { macip 22 }
70 Appendix / The Apple IP Gateway MIB
Page 79

netRestrictionsEntry OBJECT-TYPE
SYNTAX NetRestrictionsEntry
ACCESS not-accessible
STATUS optional
DESCRIPTION
"The description of one of the gateway's
network restrictions."
INDEX { netRestrictionsRangeStart }
::= { macipClientInfoTable 1 }
NetRestrictionsEntry ::= SEQUENCE {
netRestrictionsRangeStart ATNetworkNumber,
netRestrictionsRangeEnd ATNetworkNumber,
netRestrictionsMode INTEGER
}
netRestrictionsRangeStart OBJECT-TYPE
SYNTAX ATNetworkNumber
ACCESS read-write
STATUS optional
DESCRIPTION
"The start of the range of networks to be
restricted from using or allowed to use the
gateway."
::= { netRestrictionsEntry 1 }
netRestrictionsRangeEnd OBJECT-TYPE
SYNTAX ATNetworkNumber
ACCESS read-write
STATUS optional
DESCRIPTION
"The end of the range of networks to be
restricted from using or allowed to use the
gateway."
::= { netRestrictionsEntry 2 }
Continued on following page
.
The Apple IP Gateway MIB 71
Page 80

netRestrictionsMode OBJECT-TYPE
SYNTAX INTEGER {
allow(1),
restrict(2)
}
ACCESS read-write
STATUS optional
DESCRIPTION
"If allow(1), nodes on this network are allowed
to use the gateway. If restrict(2), nodes on
this network are restricted from using the
gateway."
::= { netRestrictionsEntry 3 }
macipClientInfoTable OBJECT-TYPE
SYNTAX SEQUENCE OF clientInfoEntry
ACCESS not-accessible
STATUS optional
DESCRIPTION
"The list of clients currently using this
gateway."
::= { macip 23 }
clientInfoEntry OBJECT-TYPE
SYNTAX ClientInfoEntry
ACCESS not-accessible
STATUS optional
DESCRIPTION
"The description of one of the clients using
this gateway."
INDEX { dynamicAddrIPAddr }
::= { macipClientInfoTable 1 }
72 Appendix / The Apple IP Gateway MIB
Page 81

ClientInfoEntry ::= SEQUENCE {
clientInfoIPAddr IpAddress,
clientInfoAppleTalkAddr DdpNodeAddress,
clientInfoOwnerName OCTET STRING,
clientInfoPacketsForwarded Counter,
clientInfoIdleTime INTEGER
}
clientInfoIPAddr OBJECT-TYPE
SYNTAX IpAddress
ACCESS read-only
STATUS optional
DESCRIPTION
"The IP address assigned to the client."
::= { clientInfoEntry 1 }
clientInfoAppleTalkAddr OBJECT-TYPE
SYNTAX DdpNodeAddress
ACCESS read-only
STATUS optional
DESCRIPTION
"The AppleTalk address of the client."
::= { clientInfoEntry 2 }
clientInfoOwnerName OBJECT-TYPE
SYNTAX OCTET STRING
ACCESS read-only
STATUS optional
DESCRIPTION
"The client's owner name."
::= { clientInfoEntry 3 }
Continued on following page
.
The Apple IP Gateway MIB 73
Page 82

clientInfoPacketsForwarded OBJECT-TYPE
SYNTAX Counter
ACCESS read-only
STATUS optional
DESCRIPTION
"The number of packets forward to the IP
internet for this client plus the number of
packets forwarded to the client."
::= { clientInfoEntry 4 }
clientInfoIdleTime OBJECT-TYPE
SYNTAX INTEGER
ACCESS read-only
STATUS optional
DESCRIPTION
"The length of time in seconds that the client
has been idle."
::= { clientInfoEntry 5 }
74 Appendix / The Apple IP Gateway MIB
Page 83

Index
A
access to network, restrictions on. See network
restrictions
adding networks to Network List 55–56
addressing. See also automatic addressing; manual
addressing
options 33–34
subnetwork addressing 32
troubleshooting problems with 61–62
Administrator dialog box 31, 32, 40, 44
Apple Internet Router vi
with Apple IP Gateway 6
with Apple Remote Access Personal or
MultiPort Server 9
diagram for using 6
gateway used with 5
Apple Internet Router AppleTalk/IP Wide Area
Extension 7
diagram of use 8
Apple IP Gateway
Apple Internet Router with 6
configuring 33–36
diagram of 4
folder for 24
IP hosts, communication with 8
setting up 29–36
Apple Remote Access (ARA) 9–10, 12
for users 37
Apple Remote Access Personal or MultiPort Server
vi, 1, 9
for users 37
AppleSearch WAIS Gateway 11
AppleTalk/IP Wide Area Extension. See Apple
Internet Router AppleTalk/IP Wide Area
Extension
AppleTalk links 12
AppleTalk Network List. See Network List
automatic addressing 33–34
MacTCP configured for 38–41
tracking of 49
B
Balloon Help vi
C
changing network access restrictions 55–56
changing passwords 52
configuring. See also configuring MacTCP
gateway 33–36
configuring MacTCP 29–33
automatic addressing, configuring for 38–41
manual addressing, configuring for 42–45
users, configuring for 37–38
Custom Install
gateway software installation 22–26
for NSI installation 16–18
Custom Remove option 23
D
Datagram Delivery Protocol (DDP) packets 3
designating software locations 26
Domain Name Server Information section
(Administrator dialog box) 32, 41
Page 84

E
Easy Install
gateway software installation 19–21
NSI installation 14–16
Ethernet 12, 31
cabling 3
EtherTalk 12, 31
restricting access 54
F
folder navigation 27
Internet Protocol (IP) networks 1,2
IP envelopes 3
IP hosts
communication with 8
preventing unauthorized access by 57
IPTunnel 7
L
limiting network access 53–55
LocalTalk 3, 12
restricting access 54
G
Gateway Manager
Custom Install for 24
designating location for 26–28
icon for 29
installation of 20–21
MacTCP, access to 29
opening program 48
stopping the gateway 48
System Folder, installation in 28–29
H
hardware requirements 12
for users 37
help, Balloon Help vi
hosts. See also IP hosts
UNIX hosts 2
I, J, K
icon for Gateway Manager 29
installation. See also Custom Install; Easy Install
designating software locations 26
Gateway Manager 20–21
gateway software 19–21
international users 14
international users, installation for 14
Internet 2
address class for 32
AppleSearch WAIS Gateway with 11
services, information on vi–vii
M
MacSNMP
agent vi
Management Information Base (MIB) variables
63–74
software vi
software 11
use of 50–51
MacTCP vi. See also configuring MacTCP
automatic addressing, configuring for 38–41
configuring MacTCP 29–33
manual addressing, configuring MacTCP
for 42–45
software 3
users, configuration requirements for 37–39
Management Information Base (MIB) 11
appendix information on 63–74
manual addressing 33–34
MacTCP configured for 42–45
security in using 51
tracking of 49
troubleshooting problems with 61
memory. See RAM for Apple IP Gateway
monitoring the gateway 49–51
N
navigation through folders 27
Network Information Center 32
Network List (Network Restrictions dialog
box) 55–56
76 Index
Page 85

Network Range text boxes (Network Restrictions
dialog box) 54–55
network restrictions 53–55
changing restrictions 55–56
preventing access by IP computers 57
networks
management 11
troubleshooting network problems 60
Network Software Installer (NSI) 14–16
Customize option for installation 16–18
NuBus 12
O
Obtain Address section (Administrator dialog
box) 32
opening Gateway Manager program 48
setting up
Apple IP Gateway 29–36
MacTCP 30
SNMP IP Gateway Agent 11
software requirements 12
for users 37
stand-alone product, gateway as 5
starting the gateway 48
startup errors 61
statistics of gateway, viewing the 49–50
stopping the gateway 48
subnet mask 32
subnetwork addressing 32
System Folder
designating folder for gateway software 28–29
installation in 26
P, Q
packets for transmission 3
passwords 51–52
problems, troubleshooting for 59–62
processor-direct slot (PDS) card 12
protocols for packet construction 3
R
RAM for Apple IP Gateway 12
removing networks from Network List 55–57
removing passwords 52
restrictions on network access. See network
restrictions
Routing Information section (Administrator dialog
box) 33
S
SCSI adapter 12
security for gateway 51–57. See also network
restrictions
changing network access restrictions 55–56
limiting network access 53–55
passwords 51–52
preventing unauthorized access by IP hosts 57
T
TCP/IP 2
TCP/IP Administration for Macintosh 37
TCP/IP Connection for Macintosh 37
TokenTalk 54
Transmission Control Protocol (TCP) 2
troubleshooting 59–62
addressing problems 61–62
network problems 60
U
UNIX hosts 2
users
preparation of 36
tracking connected users 49
V
viewing gateway statistics 49–50
W, X, Y, Z
WAIS (wide area information server) 11
Index 77
Page 86

The Apple Publishing System
Apple IP Gateway Administrator’s Guide was written, edited,
and composed on a desktop publishing system using Apple
Macintosh computers, an AppleTalk network system, Microsoft
Word, and QuarkXPress. Line art was created with Adobe
Illustrator. Proof pages were printed on Apple LaserWriter
printers. Final pages were output directly to 70-mm separated
film on an Electrocomp 2000 Electron Beam Recorder.
PostScript™, the LaserWriter page-description language, was
developed by Adobe Systems Incorporated.
Text type is Times®, display type is Helvetica®Narrow, and
cover type is AppleGaramond, Apple’s corporate font.
Ornaments are custom symbols designed for Apple Computer.
Some elements, such as computer voice, are set in Apple
Courier, a fixed-width font.
Page 87

Apple Computer, Inc.
1 Infinite Loop
Cupertino, California 95014-6299
(408) 996-1010
TLX 171-576
030-6291-A
Printed in U.S.A.
 Loading...