


X-310PRO USER MANUAL
English • Français • Deutsch •
2010 Antari Lighting and Effects Ltd.
1
2
Congratulations on the purchase of your new ANTARI X-310PRO Fazer
-Introduction
Thank you forchoosing an ANTARI X-310PROFazer. You nowown aruggedand powerful state-of-the-art machine.Besides itsabilityto operate silently,this new model isuser-friendly in terms of controlling and operating. In addition,for AntariX-310PROit isW-DMX compatible.Prior to use, we suggest that you carefullyread allof theinstructions. Byfollowing the suggestions found in this user manual, you can look forward to thereliable and satisfactory performance of your ANTARIFazerMachine for years to come.
-Important Safeguards
-Danger of Electric Shock
Keep thisdevice dry.
For inside use only. Not designed for outside use.
For allmodels, machınemust be earthed. Priorto use take care to determine that the unit is installed at the rated voltage.
Always unplug your ANTARI FogMachine before filling itstank.
Keep fog machine upright.
Unplugthe machine when not in use.
Thismachineis not wateror splash-proof. If moisture, water, or fogliquidgets inside the housing, immediatelyunplugthe unit and wipe off the moisture and keep it dry.
-Danger of Burns
Structuralmodification inside the machine is not allowed at anytime.Please do not attempt to modifythe machine by removingthe cover, otherwise burns mayresult.
Foradult use only. Never leave the unit runningunattended.
3
Neveraim the output nozzle directly at people.
Machine will warm up when operating, locate the fogmachine in a well-ventilated area. Nevercover the unit's vents. In orderto guarantee adequate ventilation, allow a free airspace of at least 30 cm around the sides and top of the unit.
Neveraim the output nozzle at open flames.
Always allow your ANTARIX-310PROFazerto cool down before attempting to clean or service it.
-Danger of Explosion
Neveradd flammable liquids of any kind (oil, gas,perfume)to the fog liquid.
Use onlythe high-quality, water-based ANTARI recommended FLGfog liquid. Otherfog liquids may cause cloggingor damage the internalparts.
Always make sure there is sufficient liquid in the fog liquid tank. Operatingthisunit without liquid will cause overheating.
If your ANTARI FogMachine fails to work properly, discontinue useimmediately.Drain allfog liquid from the tank, pack the unit securely(preferably in the originalpacking material), and return it to your ANTARIdealer for service.
Always drain tank before mailing or transporting this unit.
Neverdrink fog liquid.If itis ingested, call adoctor immediately.If fogliquid comesin contact with skin or eyes,rinse thoroughly with water.
-Unpacking & Inspection
Open the shipping carton and verifythat all equipment necessary to operate the system has arrived intact.
Before beginning initialsetup of your ANTARI Fazer Machine,make sure that there isno evident damage causedby transportation. In the event that the unit'shousingor cable isdamaged,do not plug it in and do not attempt to use it until after contacting yourANTARIdealer for assistance.
-Packaging
The shipping carton should include the following items:
1.X-310PROFazer machine with power cable
2.X-10PROControl module
3.Fluid tank
4.User manual
4
OptionalAccessories:
1. X-30PROWireless Control Module
2.FX-310 X-310PROFlightcase
-Setup
1.Remove allpacking materials from shippingbox. Check that allfoam and plastic padding is removed,especially in the nozzle area.
2.Place fog machine on a flat surface and remove fog liquid tank cap.
3.Fill with only Antari FogFluid. Antari X-310PROFazer only works with uncontaminated Antari
FLG FogFluid. Other fluids may cause spitting and seriouscloggingproblem and could result in the production of an unhealthfulfog. The use of otherfluids will void the warranty of the Antari X-310PROFazer.When filled,place cap back on liquid tank.
-Operation
1.The plugis at a position that isaccessible when the machine isin use.
2. Plugpower cord into agrounded electrical outlet. Turn power switch on rear of unit to " ON" position. Warm-up is complete after approx.8 minutes when the display on the control module indicates "Ready to Fazer”.
3.To emit fog,please set thedesired settingson your X-10PROControlModule for interval,
duration,and press the 
 appropriatebutton on the control module forthe desired length of time.
4.The controlunit'sdisplay will cycle "Warming up"and"Ready to Fazer" while the machine re-heatsto the proper operatingtemperature.
5.When the fluid isrunning low, the LED inside the tank chamber startsblinking fortwo minutes and then stopsthe operation to protect the pump from runningdry.
6.The “Fanleaf” design can be adjusted by the pump-type screws on both sidesto position the faze output angle. In general,the haze produced from the X-310PROFazer is semi-transparent due tofan spread. Thus,it isbest to position it on the low ground and let it produce haze upwardlyto have ideal coverage.
7.Forfurther information on operating your ANTARIX-310PROFazer,see thesection titled, "Control Module Operation"on page 4.
Important:
Always monitortankfluid level as you are fogging. Running a fogmachine with no fluid can permanently damage the pump.
If you experience low output, pump noise or no output at all, unplug immediately. Check fluid level, the externalfuse, controlmodule connection,and powerfrom thewall. If all of the above appears to beO.K.,plugthe unit in again. If fogdoes not come out afterholdingthe  button down for
5
30 seconds, check the hose attached to the tank to make sure there is fluid going through the hose. If you are unable todetermine the cause of the problem,do not simply continue pushingthe control module button,as thismay damage the unit. Return the machine to your ANTARI dealer immediately.
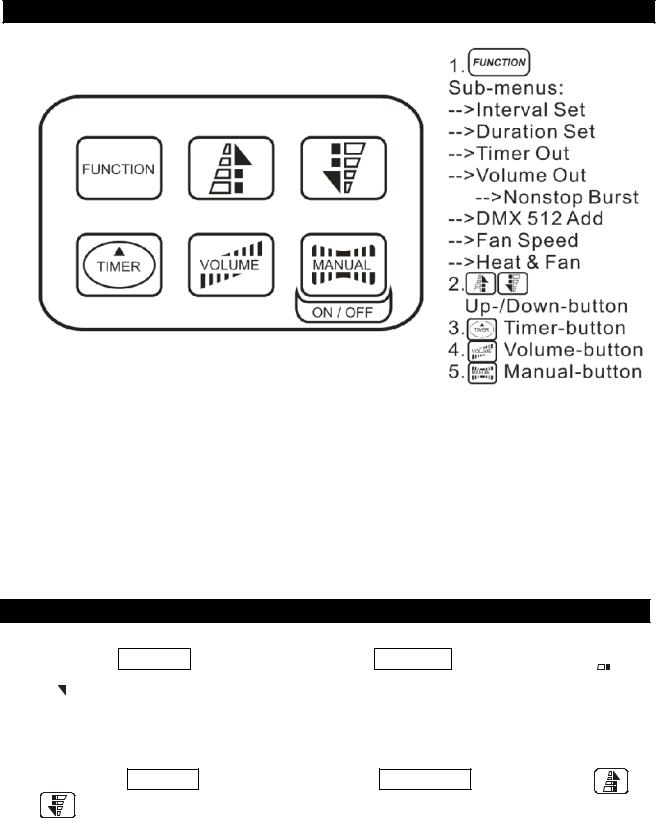
-Antari X-10PRO Control Module Operation
X-10PRO: The X-PROisa 2-meter wired multifunction remotecontrol module with 5-pin XLR connectorfor ANTARI X-PROseries modelX-310PRO. Its LCD paneldisplays all operation statuses of the fogmachine. The interface allows the operatorto customize fog machine functionsbyadjustingthefoggingduration, interval, volume,fan and heater as well asthe DMXaddress . There are sixbuttonson the controlboard.All current operatingparameters are automatically stored in non-volatile memory, allowingthe machine to be powered down without losingfunctionsettings.
-Menu Settings With The Button FUNCTION
Setting time intervals for timer operation
Pressthe button FUNCTION untilthe display indicates» Interval Set « . Use the buttons  UP and
  DOWN to adjust the intervalsbetween the individualfog outputs in timer mode within the range of 1 and 200 seconds.
Setting the output duration for timer operation
- Pressthe button FUNCTION untilthe displayindicates» Duration Set «.Usethe buttons |
UP |
|
and |
DOWN to adjust theduration of the fog outputs in timer modewithin the range of 1 |
|
and 200 seconds. |
|
|
6
Setting the fog output volume for timer operation
- Pressthe button |
FUNCTION |
untilthe displayindicates» |
Timer Out |
«. Use the buttons |
UP |
and  DOWN to adjust thefog output volume in timer mode within the range of 1 % and 100 %.
Setting the fog output volume for continuous operation
-Pressthe button FUNCTION untilthe displayindicates» Volume Out«.Use the buttons  UP and
  DOWN to adjust the fog output volume in continuous mode within the range of 1 % and 100 %.
-To set the unit to continuousfogoutput,select» NON STOP BURST « below a value of 1 % or above a value of 100 %.
Setting the DMX512 address
-Pressthe FUNCTION until the display indicates » DMX 512 Add «. Use the buttons UP and

 DOWN,to set the machine to the same address as on your DMX controller. Please referto the chapter DMX512 settings for more information on DMX operation.
Setting the fan speed
-Pressthe FUNCTION until the display indicates» LOW>HI «. Use the buttons  UP and
  DOWN,to adjust the fanspeed.
Turning the fan and heater on or off
- Pressthe FUNCTION until the display indicates» Heater & Fan Open «. Use the button  MANUAL, to switchthe fan and the heateron oroff.
Continuous operation
- Pressthe button VOLUME , to activate continuos fogoutput. The displayindicates » Volume « followed bythe value that was set in menu item » Volume Out « or» NON STOP BURST « when maximum fog volume was selected. To stop the fog output,pressthe button VOLUME once again.
Manual operation
- For immediate fogoutput at the maximum volume of fog, keep the button  MANUAL pressed.The display indicates» Manual 100 % «. As soon as you releasethe button,the fog output will stop. The manualoperation willtake priority over the continuous operation and the timeroperation.Even if one of these operating modesis activated,the fogmachine will always emit the maximum volume of fog when the button
  MANUAL is pressed.
Timer operation
- In the time mode,the fog machine will automatically emit fog. The time intervals,duration and
7
fog volume depend on the correspondingmenu settings. Pressthe button TIMER , to activate the timer mode. Thedisplay indicatesthe set time interval. The unit counts down to 0 secondsand emitsfog. To deactivate the timer mode, press the button TIMER again.
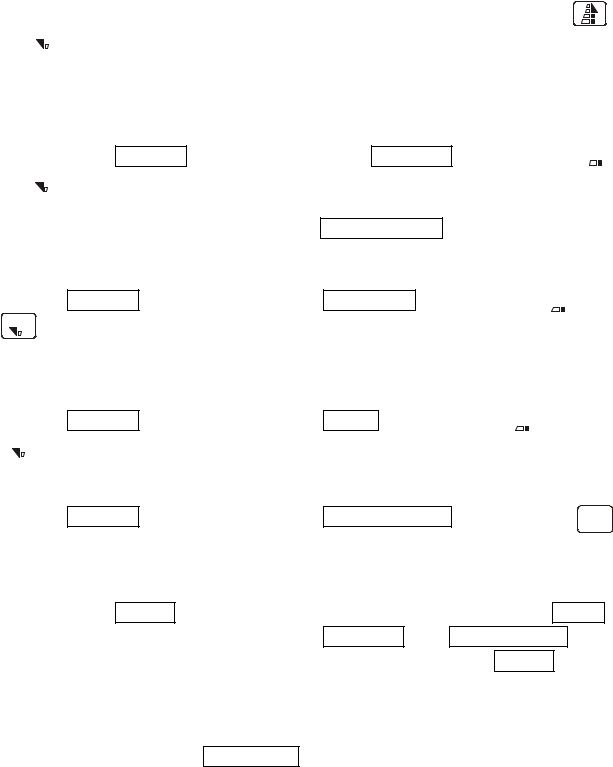
X-10PRO REMOTE CONTROL EXTERNAL VIEW |
01.Thumb Screws |
02.L.C.D Screen |
03.Function Keypad |
04.Cable For Remote |
Control (2m/5-pin) |
-Antari X-30PRO Control Module Operation
X-30PRO Wireless Control Module Operation
All the X-10PRO featuresplus wireless capability.
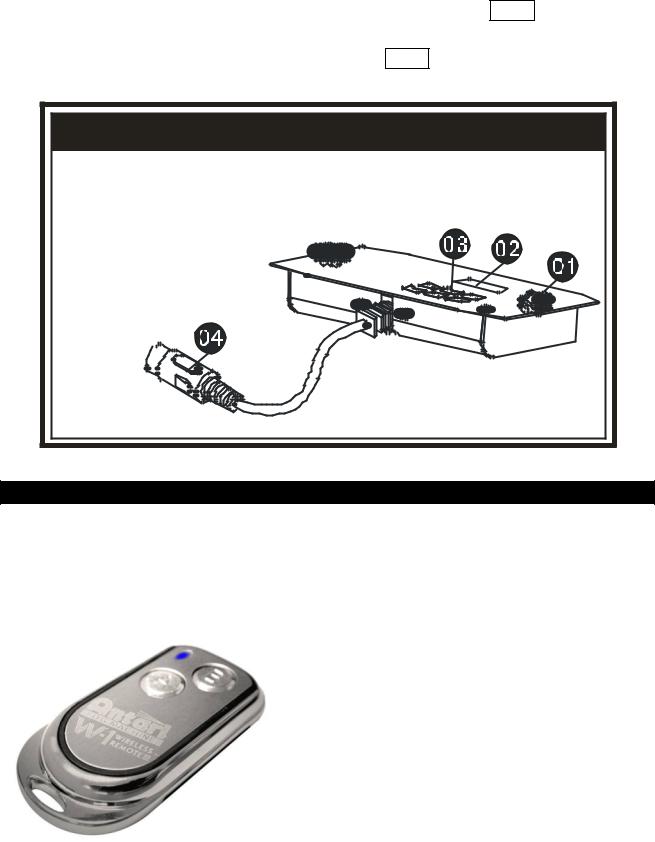
The wireless controlmoduleX-30PROconsists of a transmitter equipped with two buttonsforfog on and off, and a receiver pre-attached to the panel of eachX-30PRO.
* Transmitter:
With the transmitter it ispossible to emit fog viaradio overadistance of up to 50 meters. The transmitteris compatible to anyreceiver of the X-30PROand can controlan unlimited number of machinesin parallel.
8

Pressthe button “A”,to emit fog. The button “A” has the same function asthe button VOLUME on the controlpanel, i.e.the fogoutput depends on the setting of menu item »Volume Out«.The display indicates»Volume« followed by the defined value or »NON STOP BURST« when continuous fog output was selected.To stop the fog output,pressthe button “B”.
* Receiver:
The receiver istested and pre-attached to the panel of eachZ-30PRO. Please do not try to remove it. The receiver respondsto up to 5 different transmittersthat are registered with the machine.The included transmitter hasbeen registered to the machine before shipment.It can be directly operated without any start-up setting.
-Registering transmitters
To operate the machine with a different transmitter than the included one, or to operate it with up to 5 differenttransmitters, each transmittermust be registered first.For this purpose,turn on the machine. When the display indicates »Wireless Setup«,pressthe button “A” 1 second on each transmitter.Thus the previous transmitters are cleared from the memory of the receiver.The setting must be completed within 15 seconds after switchingon the machine. Then the machine will automatically exit the transmitter setting mode. The display shows »Wireless Setup OK«. At thispoint,no further transmitter can be added.
If no transmitter isregistered when the machine is switched on,the memory of the receiver will keep the record of the previousoperation.
Setting Example 1:
In order to register several transmitters with a machine,turn on the machine. When the display indicates »Wireless Setup«, pressthe button “A” 1 second on each transmitter within 15 seconds to establish the signaltransmission.
Setting Example 2:
9
In order to use 1 transmitterto control2 or more machines,turn on the machinesrespectively. When the displays indicate »Wireless Setup«,press the button “A” 1 second on the transmitter within 15 secondsto establish the signaltransmission.
-Battery change on the transmitter
If the range of the transmitterdecreases,the battery is probablyexhausted and must be replaced. For thispurpose,take off the housing coverand remove the used battery. Insert a fresh DC 12V battery as indicated in the battery compartment and refit the housingcover.
Switching the wireless function on and off
Pressthe button FUNCTION untilthe display indicates »Wireless On«. Use the buttons UP and DOWN to deactivate the wirelessfunction (indication »Wireless Off«) and to reactivate it (indication »Wireless On«).
Note: When warming-up process is completed and wireless function is activated the LCD screen indicates “Ready To Faze W”. (“W” means Wireless) On the contrary, when the wireless function is deactivated the LCD screen shows “Ready To Faze” (Without “W”).
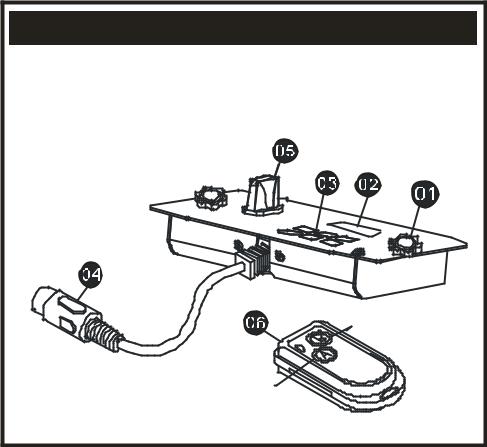
X-30PRO REMOTE CONTROL EXTERNAL VIEW |
01.Thumb Screws |
02.L.C.D Screen |
03.Function Keypad |
04.Cable For Remote Control |
(2m / 5-pin) |
05.Receiver |
06.Transmitter |
OFF |
ON |
10 |
-ANTARI On-Board DMX Module Settings
There are 3-pin and 5-pin male/female DMX control sockets forconnecting your selection located at the rearpanelof theX-310PROfazer.TheX-310PROFazer has on-board DMX control.This model usestwo channelsto control Volume output and Fan speed.Whatever channelyou select on the unit, the channelnext to it will automatically be selected for fan volume control.The X-310PROfan has three fan speeds: Slow, Medium, and Fast. If the machine was assigned to the DMXaddress 124 e.g., Channel A would correspond to DMX address 124 and channel125 will automatically be selected for fan control.
Please note: YourX-310PROFazer and its liquid tank and tube were thoroughly tested and cleaned. When operatingthe unitfor the time,please press the button MANUAL for3 to 5 secondsto let the unit circulate. Please do not try to set the timer function on your first operation. In addition, it isnormalfor the machine toproduce some pumping sound for about 3 to 5 seconds. Afterthe machine is operating smoothly you can start to set the desired operatingfunctions. In future, it is stronglyrecommended to emptythe liquid tankbefore transporting and follow the methods mentioned above for machine circulation after each transportation.
Channel A (Fan speed)
Value |
Function |
|
|
0-85 |
SLOW |
|
|
86-170 |
MEDIUM |
|
|
171-255 |
FAST |
|
|
In general,fan speed and fogdensity are in reverse propotion. Forexample, if you are operating at 100% fog output, and fan speed isslow, heavyfog is beingproduced. When fan speed is high, fogdensity is consequently lighter/more transparent.
Channel B (Volume control)
Value |
Function |
|
|
0-5 |
OFF(0%) |
6-255 |
Volume Control (5 % - 100 %) |
|
|
If Channel Bhas avalue from 0 to 5,the unit is OFF.
Between the values 6 to255 the volume of fog output isregulated.With 6 beingthe minimum volume of fogproduced and 255 the maximum. The volume output rises as the DMXvalue is increased. The AntariX-310PROFazer can produce maximum continuousoutput.
-Maintenance & Storage
Do not allowthe fogliquid to become contaminated. Always replace the caps on the fog liquid
11

container and the fogmachine liquid tank immediately afterfilling.Do notoperate the fog machine without liquid at anytime.
Clean with adry cloth only. Storedry. Cleaning your fog machine regularlywill help reduce costly replacement and repair charges.
Note: All fogmachinesare prone to clogging due to the thick consistency of fogliquid and the high temperature at which it vaporizes. It is strongly recommended that after2,000hours of operation,do regularmaintenance andservices. A properlymaintained fog machine shouldprovide years of reliable use.
It is stronglyrecommended to test-run the machine on a monthlybasis in order to achieve its best foggingcondition. A test-run consistsof warming up the machine followedbyafew minutesof emission. Then please cooldown themachine.
-Performance Notes
It is recommended that you set Fan output to 100% and FogVolume output between 15 to 20%. Thissettingwill guarantee continuousoutput of very fine haze effect.Press button to set your desired fog effect.
Wheneverenormouseffect isrequired,press  Manual key to emit faze at 100% output instantly.
-Specifications
MODEL |
X-310PRO |
Power |
100/120 VAC, 230/240 V AC |
|
50-60 Hz |
Heater |
1,000W |
Fog Output |
10,000 cu.ft./min |
Output Pressure |
0.686 pa |
First Heat-up Time |
10 min |
Fluid Consumption Rate |
45 min/liter, 2 hr. /Liter |
|
(100% output, 30% output) |
Tank Capacity |
2.4 Liter |
Weight |
18 kg |
Dimensions(mm) |
L635 W275 H281 |
Please read and save these instructions.
12

13
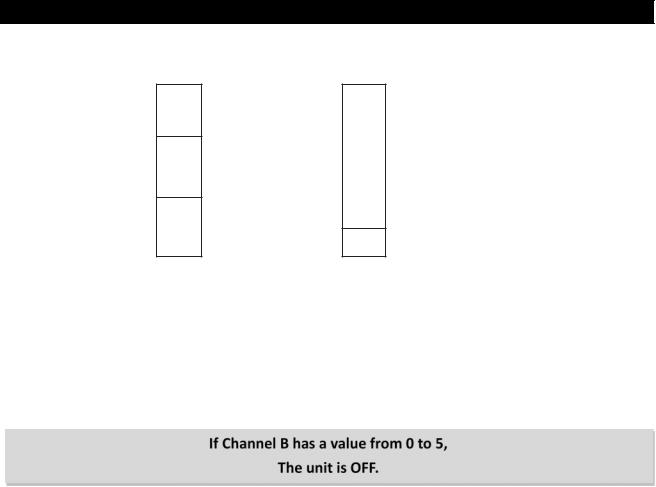
-ANTARI X-310PRO on-board DMX settings
Channel A |
Channel B |
Fan Speed |
Volume output |
171-255 (FAST)
6-255 (5%-100%)
86-170 (MEDIUM)
0-85 (SLOW)
0-5 (OFF)
The X-310PROFazerhason-board DMX control.This modeluses2 channels to controlVolume output operation and Fan operation. Whateverchannel you select on theunit, the channelnext to it will be automatically selected for fan volume control. Each channelhasa value range of 0 to 255. Timer functions such asduration and interval can be programmed usingthe DMX controller or the DMX controlsoftware being usedby lightingandeffects operator.
Between the values 6 to 255 the volume of fog output is regulated. With6 beingthe minimum volume of fogproduced and 255 approachingthe maximum. The volumeoutput rises asthe DMX value is increased.
Note: If the machine wasassigned to the DMXaddress 124 e.g., ChannelA would correspond to DMX address 124 and channel125 will automatically be selected for fan control.
The Nonstop Burst Function (continuousfogoutput) cannot be controlledor set viaDMX.
14

ANTARILIMITED WARRANTY
Thank you for purchasingan Antariproductfrom an authorized Antaridealer. We take great pride in the highest qualityand reliability of our products. Please follow properoperation and storage procedures outlined inyour accompanyinguser manual.Shall yourequire any furtherassistance, please kindly contact sales@antari.com
Warranty shall be valid only if the product ispurchased from Antari’sauthorized distributorsor dealers. For warranty service, send the product in originalpackaging to anauthorized distributor or dealer.
All warrantiesare void if the product hasbeen modified in any manner; if the product hasbeen repaired or serviced byunauthorized personnel; or the product isdamaged due to improper use or maintenance as set forth in the instruction manual.
This isnot a service contract and doesnot include standard maintenanceor cleaning. All
expendablesare not covered bythiswarranty.
Additional warrantiesprovided at the discretion of the distributordealers shallremain the sole
obligation of the distributor or dealer.
15

Nous vousfélicitonspour l'achat devotre nouvelle machine à fume
ANTARI X-310PRO.
-Introduction
Nous vousremercionsd'avoir choisiune machine à fumée d'ANTARI X-310PRO. Vous êtes en possession d'un produit robuste et puissant. En vue d'utiliser correctement votre nouvel appareil, veuillez lire attentivement ce mode d'emploi. Si vous respectez lesinstructions suivantes,vous profiterez d'une performance solide et convaincante de votre machine à fumée ANTARIpour de nombreuses années.
-Instructions de sécurité
-Risques d'électrocution
Protéger de l'humidité.
L'appareil a été conçu pour un emploidansdeslocaux clos. Ne pas utiliserà l'extérieur.
Pour touts les modèles,utilisez uniquement desprises de courant àterre à3 broches. Avant la première mise en marche, assurez vousque l'appareil soit branché àl'alimentation correcte.
Débranchez l'appareil avant de remplir le réservoir.
Assurez vousd'installer la machine à fumée toujours droit.
Eteignez l'appareilou débranchez-le du secteur, quand il Est hors d'usage.
Si de l'humidité,du liquide ou du liqide à fuméedevait penétrer à l'intérieur de l'appareil,
débranchez immédiatement l'appareil et essuyez-le.
-Danger d'incendie
Pour des raisons leésà la sécurité de l’appareil,latransformation ou lamodification de
16
 Loading...