

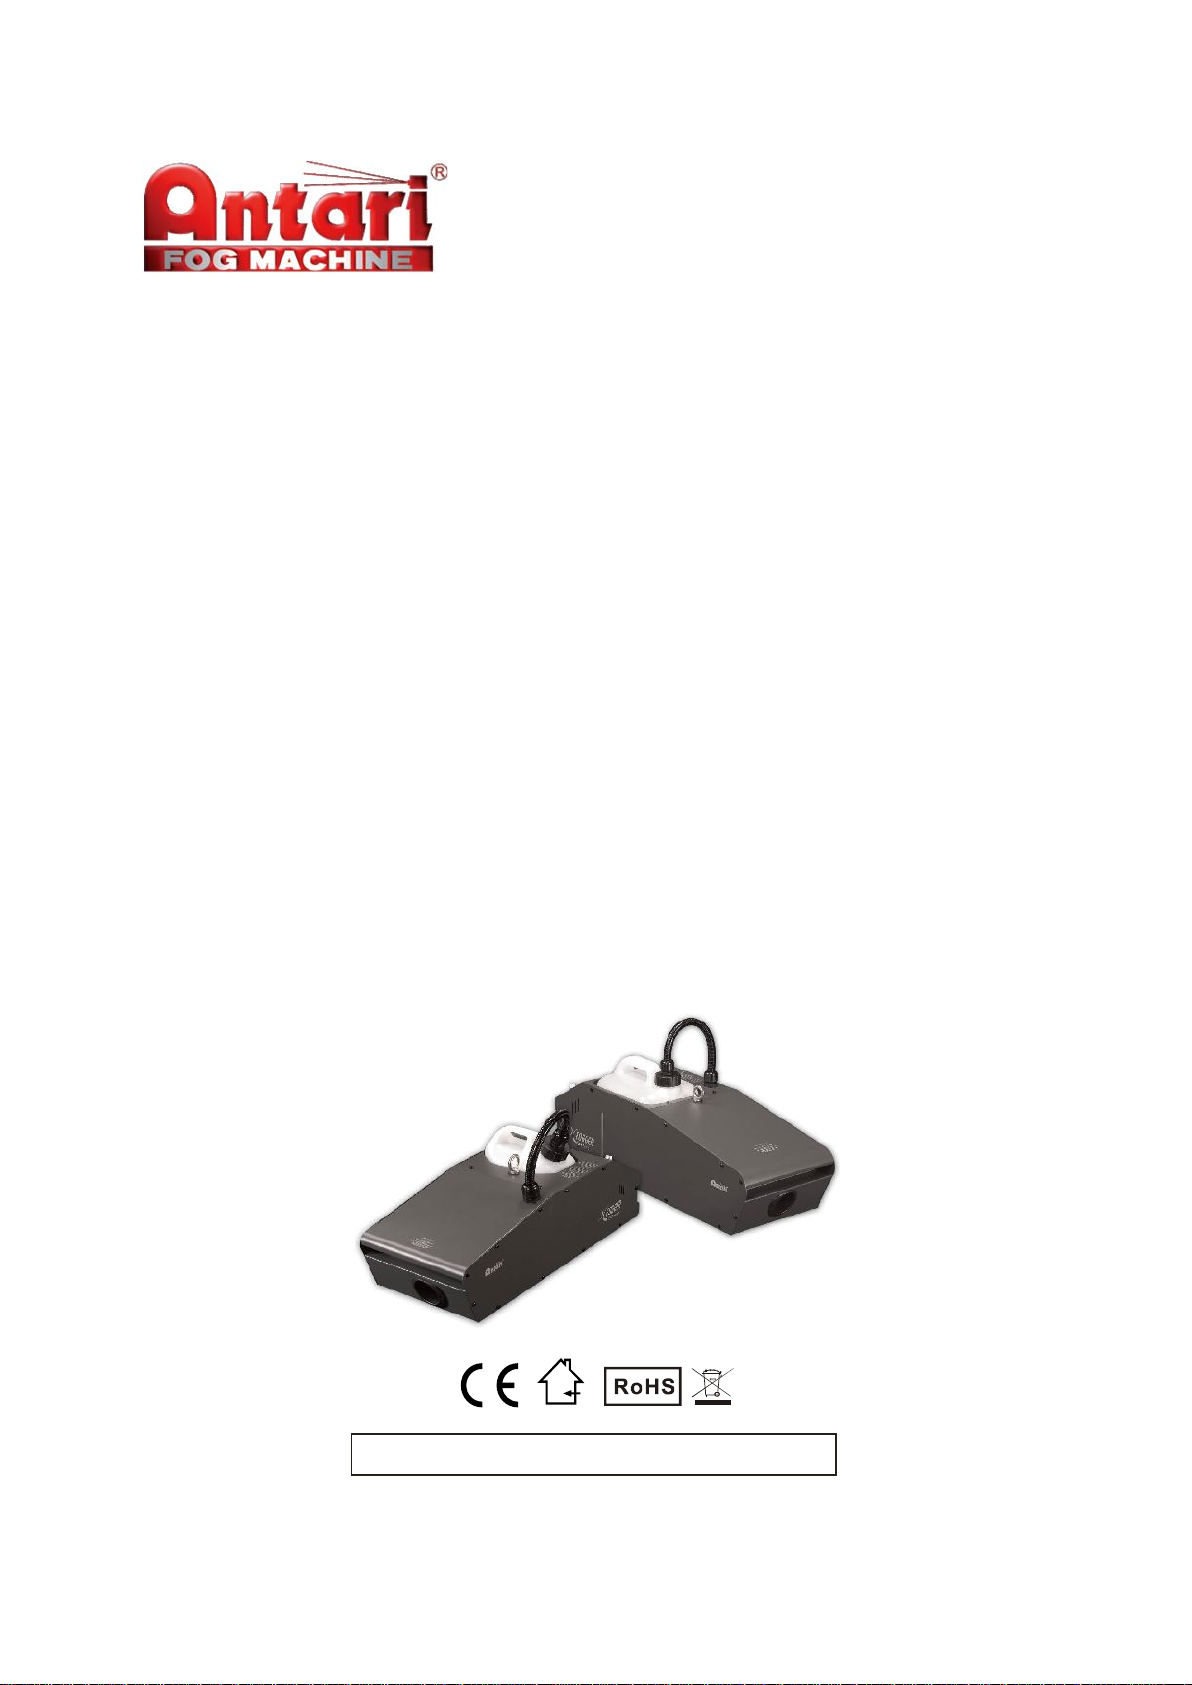
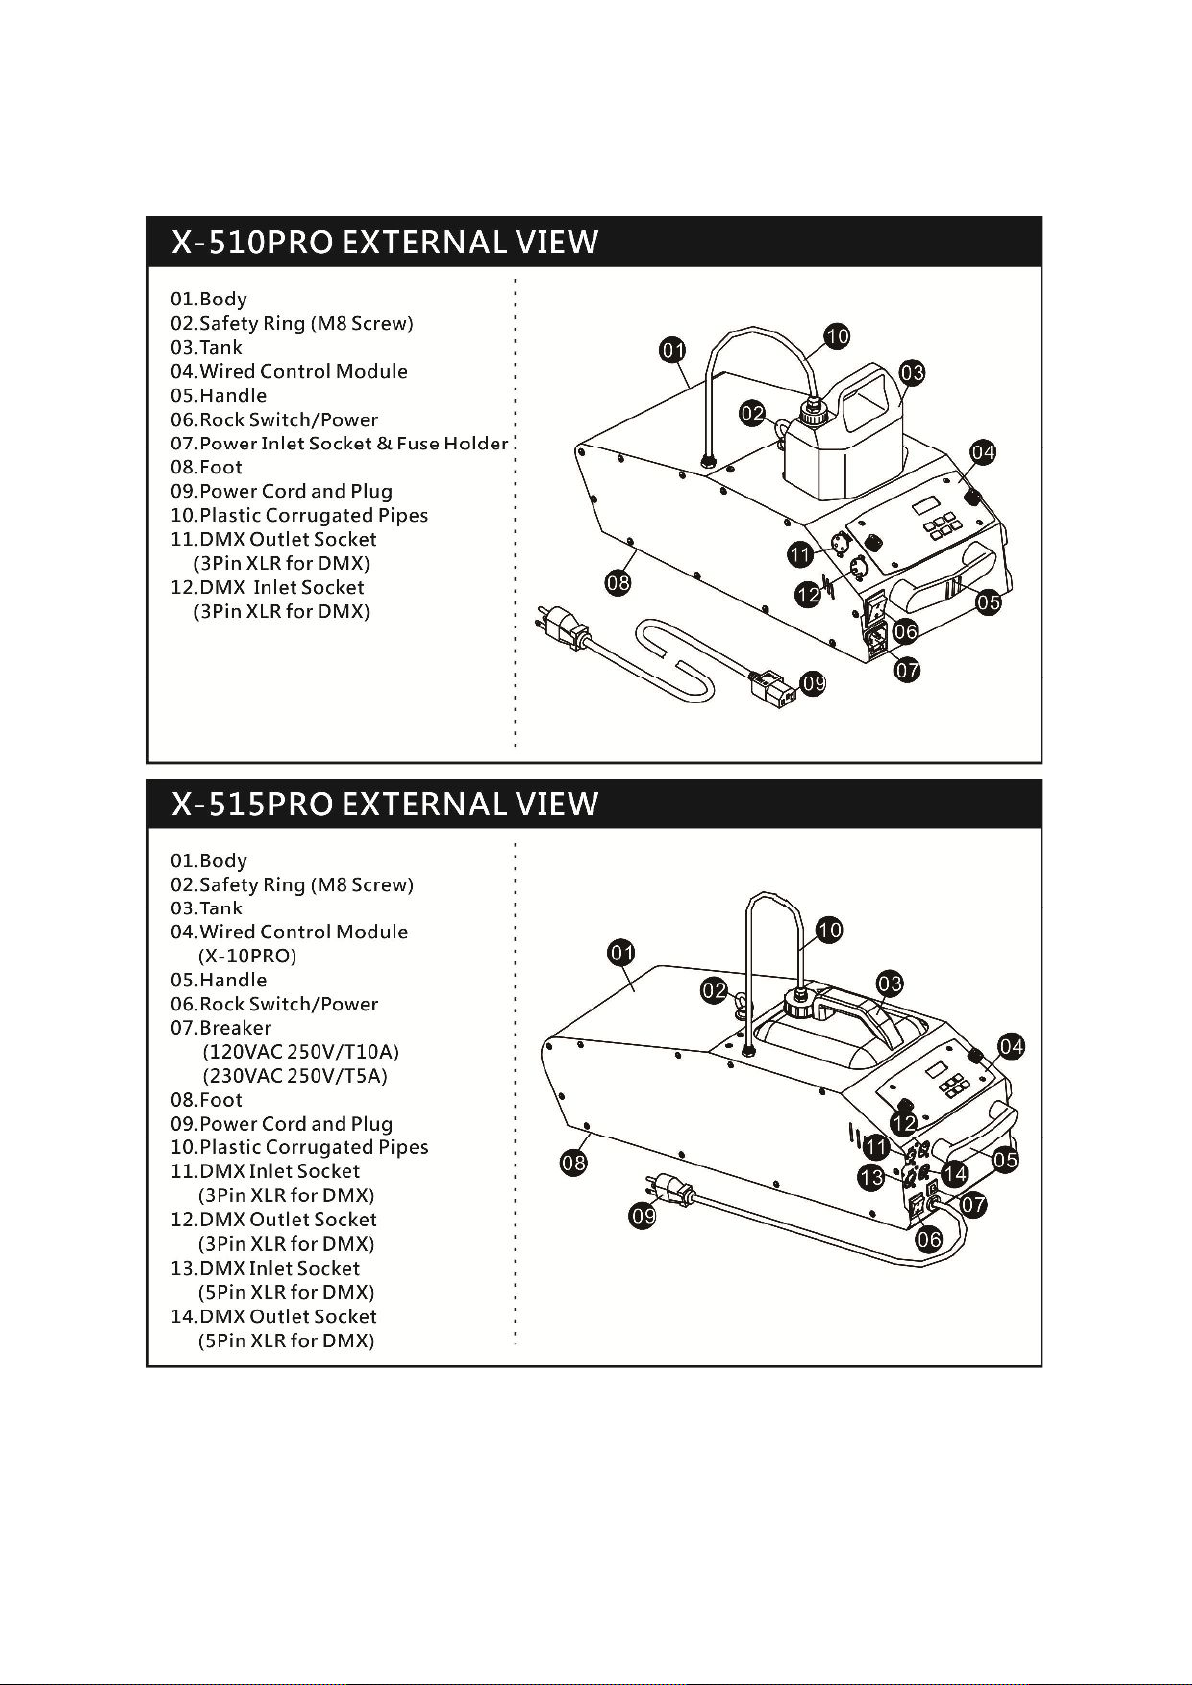
X-510PRO / X-515PRO
English Français Deutsch • • • 中文
Fog Machine User Manual
© 2014 Antari Lighting and Effects Ltd.
1

2
Congratulations on the purchase of your new
Cautions
Risk of electric shock. Disconnect the appliance from the electric
supply before removing the cover.
Note: There are no user serviceable parts inside.
!
ANTARI X-PRO SERIES Fogger
Introduction
Thank you for choosing an ANTARI Fogger of the X-PRO SERIES. There are two models available:
the X-510PRO (1000W) and the X-515PRO (1500W). Both units are rugged and powerful
state-of-the-art machines. Besides their ability to operate silently, these new models are user-friendly
in terms of controlling and operating. For Antari X-515PRO fog machine, an optional W-DMX function
(W-DMX) is available. Prior to use, we suggest that you carefully read all of the instructions. By
following the suggestions found in this user manual, you can look forward to the reliable and
satisfactory performance of your ANTARI Fog Machine for years to come.
Important Safeguards
-Danger of Electric Shock
* Keep this device dry.
* For inside use only. Not designed for outside use.
* For all models, use 3-prong grounded electrical outlet only. Prior to use take care to
determine that the unit is installed at the rated voltage.
* Always unplug your ANTARI Fog Machine before filling its tank.
* This machine is not water-or splash-proof. If moisture, water, or fog liquid gets inside the housing,
immediately unplug the unit and wipe off the moisture and keep it dry.
Danger of Burns
* Structural modification inside the machine is not allowed at anytime. Please do not attempt to
modify the machine by removing the cover, otherwise burns may result.
* For adult use only. Never leave the unit running unattended.
3

* Never aim the output nozzle directly at people.
Important:
Pay attention to all warning labels and instructions printed on the exterior of
your ANTARI X-PRO SERIES Fogger.
!
* Machine will warm up when operating, locate the fog machine in a well-ventilated area. Never
cover the unit's vents. In order to guarantee adequate ventilation, allow a free air space of at
least 30 cm around the sides and top of the unit.
* Never aim the output nozzle at open flames.
* The output nozzle becomes very hot during operation (200°C). Keep flammable materials at
least 50 cm away from the nozzle.
* Always allow your ANTARI X-PRO SERIES Fogger to cool down before attempting to clean or
service it.
Danger of Explosion
* Never add flammable liquids of any kind (oil, gas, perfume) to the fog liquid.
* Use only the high-quality, water-based ANTARI recommended FLG / FLR fog liquid. Other fog
liquids may cause clogging or damage to internal parts.
* Always make sure there is sufficient liquid in the fog liquid tank. Operating this unit without liquid
will cause overheating.
* If your ANTARI fog machine fails to work properly, discontinue use immediately. Drain all fog
liquid from the tank, pack the unit securely (preferably in the original packing material), and return
it to your ANTARI dealer for service.
* Always drain tank before mailing or transporting this unit.
* Never drink fog liquid. If it is ingested, call a doctor immediately. If fog liquid comes incontact with
skin or eyes, rinse thoroughly with water.
- Unpacking & Inspection
Open the shipping carton and verify that all equipment necessary to operate the system has arrived
intact.
The shipping carton should include the following items:
1. One unit with power cable of the X-PRO SERIES series: X-510PRO or X-515PRO
2. X-10PRO Control Module with cables
3. Fluid tank
4. User manual
4

Optional Accessories:
WARNING
Use of any fluid other than ANTARI fog fluid or modification or attempt to unauthorized
repair of the X-Seies PRO Fogger will immediately invalidate the warranty.
!
1. Hanging bracket
2. Drip tray
3. X-30PRO Wireless Control Module
4. FX-510, FX-515 Flightcase
Before beginning with the initial setup of your X-PRO SERIES Fogger, make sure that there is no
evident damage caused by transportation. In the event that the unit's housing or cable is damaged,
do not plug it in and do not attempt to use it after having contacted your Antari dealer for assistance.
Setup
1. Remove all packing materials from shipping box. Check that all foam and plastic padding is
removed, especially in the nozzle area.
2. Place fog machine on a flat surface and remove fog liquid tank cap.
3. Fill unit about 3/4 full. Use Antari Fog Fluid only. Antari X-510PRO and X-515PRO Foggers only
work with uncontaminated Antari FLG/FLR Fog Fluid. Other fluids may cause possible clogging
problems and could result in the production of unhealthful fog. The use of other fluids will void the
warranty of the Antari X-510PRO and X-515PRO. When filled, place cap back on liquid tank.
Operation
* The plug is at a position that is accessible when the machine is in use.
Plug power cord into a grounded electrical outlet. Turn power switch on the rear of unit to “ON”
position. Warm-up is completed when the display on control module shows “Ready to Fog”.
* To emit fog, press the appropriate button on the X-10PRO Control Module for the desired length
of time.
* The Control Module’s display will cycle “Warming up” and “Ready to Fog” while the machine
re-heats to the proper operating temperature.
* When the fluid is running low, the LED inside the tank chamber starts blinking until the tank is
refilled again.
* Always monitor liquid level to prevent interrupted operation.
Caution: “Visibility during operation is reduced”.
5
Hanging Bracket
Important
Always monitor tank fluid level when you are fogging. Running a fog machine with no
fluid can permanently damage the unit.
!
The unit may be installed at floor level or suspended overhead via the hanging bracket. If the unit is to
be mounted using the bracket, it is important that the fog does not shoot directly at any one's face.
Whatever installation method you choose, do not allow the unit to have more than a 15° angle of
inclination.
If you experience low output, pump noise or no output at all, unplug immediately. Check fluid level, the
external fuse, control module connection, and power from the wall. If all of the above appears to be
O.K., plug the unit in again. If fog does not come out after holding the control module button MANUAL
down for 30 seconds, check the hose attached to the tank to make sure there is fluid going
through the hose. If you are unable to determine the cause of the problem, do not simply continue
pushing the control module button, as this may damage the unit. Return the machine to your ANTARI
dealer.
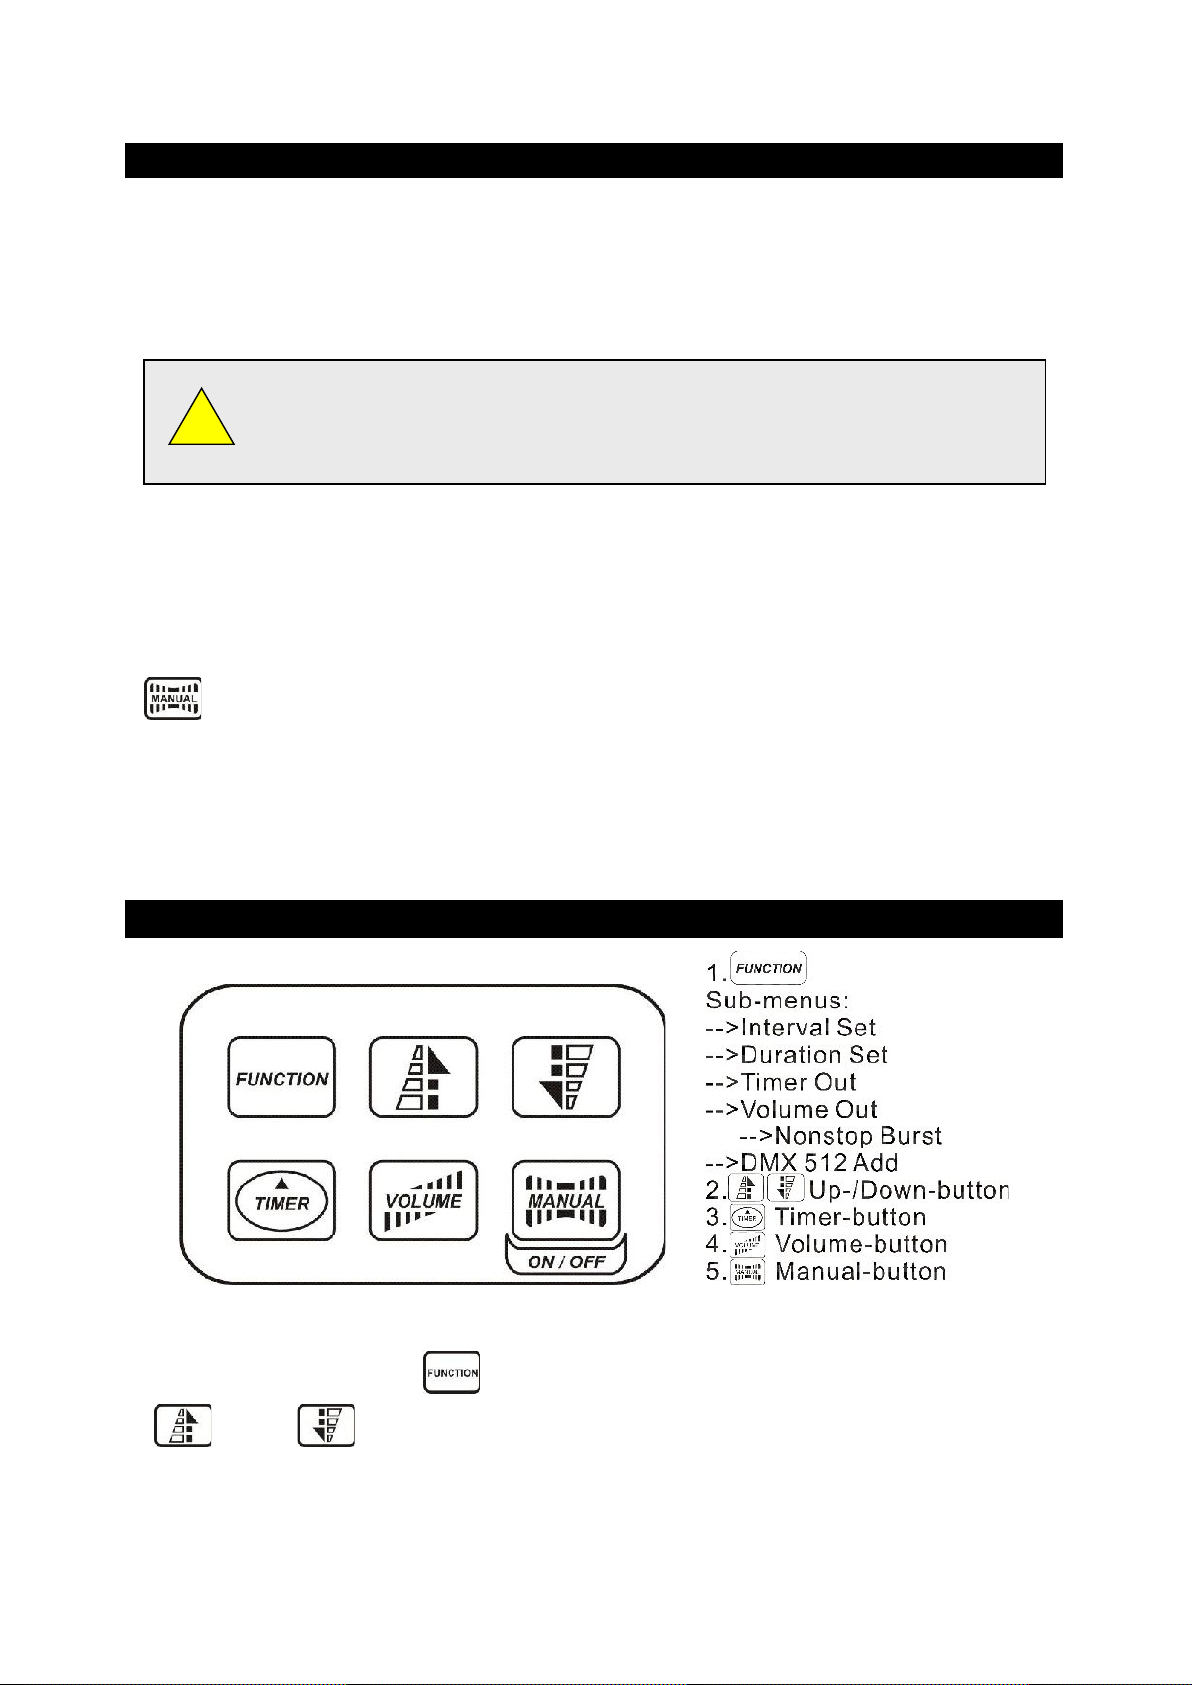
Menu Settings With The Button FUNCTION
Setting time intervals for timer operation
Press the button FUNCTION until the display indicates「Interval Set」. Use the buttons
UP and DOWN to adjust the intervals between the individual fog outputs in timer
mode within the range of 1 and 200 seconds.
6

Setting the output duration for timer operation
- Press the button FUNCTION until the display indicates「Duration Set」. Use the buttons
UP and DOWN to adjust the duration of the fog outputs in timer mode within the range
of 1 and 200 seconds.
Setting the fog output volume for timer operation
- Press the button FUNCTION until the display indicates「Timer Out」. Use the buttons
UP and DOWN to adjust the fog output volume in timer mode within the range of 1 % and 100
%.
Setting the fog output volume for continuous operation
- Press the button FUNCTION until the display indicates「Volume Out」. Use the buttons
UP and DOWN to adjust the fog output volume in continuous mode within the range of
1 % and 100 %.
- To set the unit tocontinuous fog output, select 「NON STOP BURST」below a value of 1 % or above
a value of 100 %.
Setting the DMX512 address
Press the FUNCTION until the display indicates「DMX 512 Add」. Use the buttons UP
and DOWN, to set the machine to the same address as on your DMX controller. Please refer
to the chapter DMX512 settings for more information on DMX operation.
Turning the heater on or off
Press the FUNCTION until the display indicates「 Heater On」. Use the button
MANUAL, to switch the heater on or off.
7
Continuous operation
Press the button VOLUME , to activate continuos fog output. The display indicates「Volume」
followed by the value that was set in menu item「Volume Out」 or 「NON STOP BURST」. To stop
the fog output, press the button VOLUME once again.`
Manual operation
For immediate fog output at the maximum volume of fog, keep the button MANUAL pressed.
The display indicates「Manual Output」. As soon as you release the button, the fog output will stop.
The manual operation will take priority over the continuous operation and the timer operation. Even if
one of these operating modes is activated, the fog machine will always emit the maximum volume of
fog when the button MANUAL is pressed.
Timer operation
In the timer mode, the fog machine will automatically emit fog. The time intervals, duration and fog
volume depend on the corresponding menu settings. Press the button TIMER , to activate the
timer mode. The display indicates the set time interval. The unit counts down to 0 seconds and emits
fog. To deactivate the timer mode, press the button TIMER again.
8
Antari X-30PRO Control Module Operation
X-30PRO Wireless Control Module Operation
All the X-10PRO features plus wireless capability.
The wireless control module X-30PRO consists of a transmitter equipped with two buttons for fog on
and off, and a receiver pre-attached to the panel of each X-30PRO.
* Transmitter:
With the transmitter it is possible to emit fog via radio over a distance of up to 50 meters. The
transmitter is compatible to any receiver of the X-30PRO and can control an unlimited number of
machines in parallel.
Press the button “A”, to emit fog. The button “A” has the same function as the button VOLUME on the
control panel, i.e. the fog output depends on the setting of menu item »Volume Out«. The display
indicates 「Volume」 followed by the defined value or 「NON STOP BURST」 when continuous fog
output was selected. To stop the fog output, press the button “B”.
* Receiver:
The receiver is tested and pre-attached to the panel of each X-30PRO. Please do not try to remove it.
The receiver responds to up to 5 different transmitters that are registered with the machine. The
included transmitter has been registered to the machine before shipment. It can be directly operated
without any start-up setting.
9

-Registering transmitters
To operate the machine with a different transmitter than the included one, or to operate it with up to 5
different transmitters, each transmitter must be registered first. For this purpose, turn on the machine.
When the display indicates 「Wireless Setup」, press the button “A” 1 second on each transmitter.
Thus the previous transmitters are cleared from the memory of the receiver. The setting must be
completed within 15 seconds after switching on the machine. Then the machine will automatically exit
the transmitter setting mode. The display shows 「Wireless Setup OK」. At this point, no further
transmitter can be added.
If no transmitter is registered when the machine is switched on, the memory of the receiver will keep
the record of the previous operation.
Setting Example 1:
In order to register several transmitters with a machine, turn on the machine. When the display
indicates 「Wireless Setup」, press the button “A” 1 second on each transmitter within 15 seconds to
establish the signal transmission.
Setting Example 2:
In order to use 1 transmitter to control 2 or more machines, turn on the machines respectively. When
the displays indicate「Wireless Setup」, press the button “A” 1 second on the transmitter within 15
seconds to establish the signal transmission.
- Battery change on the transmitter
If the range of the transmitter decreases, the battery is probably exhausted and must be replaced. For
this purpose, take off the housing cover and remove the used battery. Insert a fresh battery as
indicated in the battery compartment and refit the housing cover.
- Switching the wireless function on and off
Press the button FUNCTION until the display indicates 「Wireless On」. Use the buttons UP and
DOWN to deactivate the wireless function (indication 「Wireless Off」) and to reactivate it (indication
「Wireless On」).
* Note: When warming-up process is completed and wireless function is activated the LCD screen
indicates “Ready To Fog W”. (“W” means Wireless) On the contrary, when the wireless function is
deactivated the LCD screen shows “Ready To Fog” (Without “W”).
10

Prior to shipment, the X-510PRO (1000W) and X-515PRO (1500W) Foggers are fully tested and
the liquid in the tank and the liquid tube are fully cleaned in-house. When operating the unit for
the first time, please press the button MANUAL for 3 to 5 seconds to let the unit circulate.
Please do not try to set the Timer function on your first operation. It is normal for the machine to
produce some pumping sound for about 3 to 5 seconds. After the machine operates smoothly
you can start to set the desired operating functions. In addition, it is recommended to clean the
liquid tank and follow the steps mentioned above after each transport.
- The X-510PRO and X-515PRO Foggers have a recycling period after long bursts
(X-510PRO: approx. 35 seconds, X- 515PRO: approx. 45 seconds). The machine will shut
itself down for a short period (about 100 seconds) in order to heat up again. During this time,
no fog can be produced.
It is a normal situation to see some residual fog spurt (1~2 times) after the machine has
stopped producing fog. This is due to natural vaporization when there is remaining liquid
residue inside the liquid tube and when the machine is still at a high temperature.
11

Maintenance & Storage
MODEL
X-510PRO
X-515PRO
POWER
AC100V/120V/230V, 50-60Hz
HEATER
1,000W
1,500W
OUTPUT
10,000 cu.ft/min 350m3/min
20,000 cu.ft/min 710m3/min
OUTPUT PRESSURE
68.6 kpa
49 kpa
HEAT UP TIME
11 min
8.5 min
FLUID CONSUMPTION
RATE
17 min/liter (100% output)
8.5 min./liter (100% output)
TANK CAPACITY
2.8 liter
6 liter
WEIGHT
11.5 kg
13.2 kg
DIMENSIONS(MM)
L552 W230 H155
L646 W240 H190
Do not allow the fog liquid to become contaminated. Always put the caps back on the fog liquid
container and the fog machine liquid tank immediately after filling. Do not operate the fog
machine without liquid at any time.
Clean with a dry cloth only. Store dry. Cleaning your fog machine regularly will help reduce costly
replacement and repair charges.
Note: All fog machines are prone to clogging due to the thick consistency of fog liquid and the
high temperature at which it vaporizes. It is strongly recommended to clean the fogger by running
with distilled water after every 2000 hours of operation. A properly maintained fog machine
should provide years of reliable use.
It is strongly recommended to test-run the machine on a monthly basis in order to achieve its best
fogging condition. A test-run consists of warming up the machine followed by a few minutes of
emission. Then please cool down the machine.
Specifications
Please read and save these instructions.
12
13
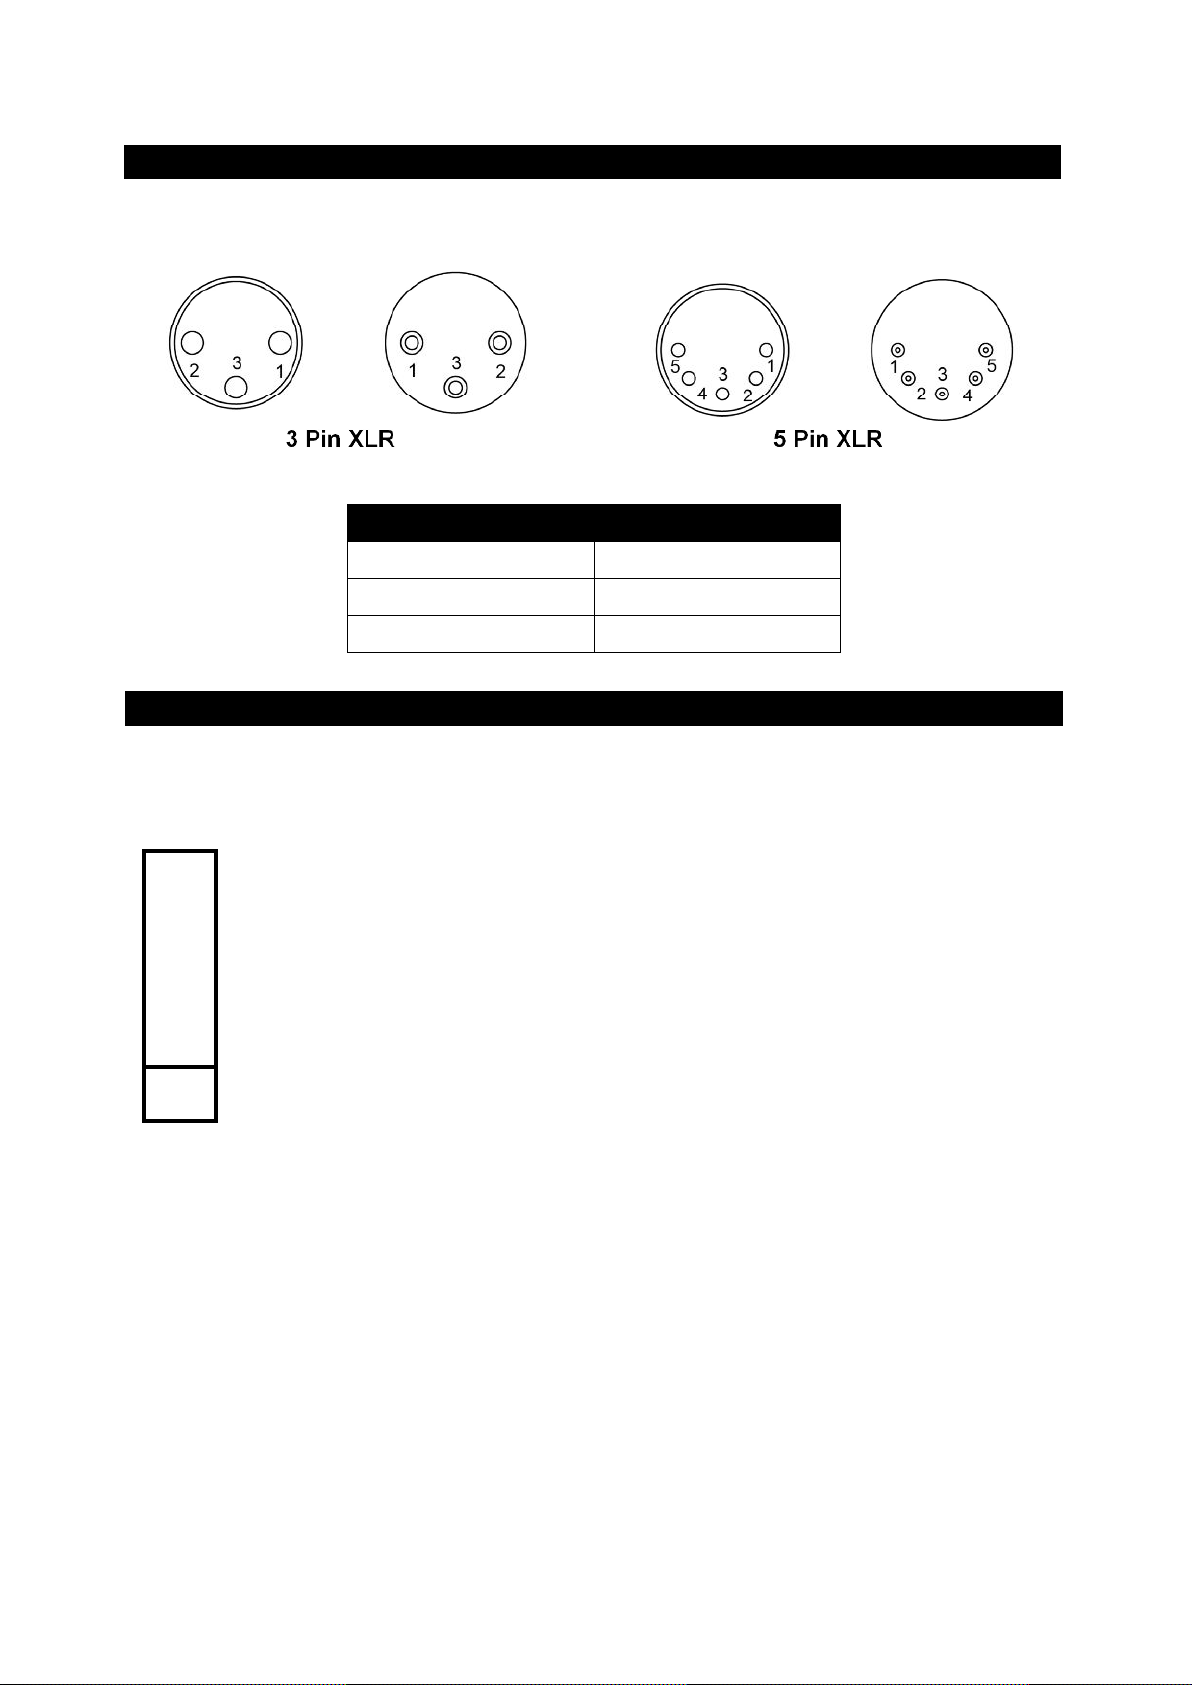
DMX Connector Pin Assignment
Pin
Function
1
Ground
2
Data-
3
Data+
The machine provide 3 or 5 pin XLR connector for DMX connection. Diagram below indicate pin
assignment information
Antari X-510PRO / X-515PRO on-board DMX settings
Channel A
Volume output
6-255 (5%-100%)
0-5 (OFF)
The X-510PRO and X-515PRO Fog Machines have on-board DMX control. These models use 1
channel to control volume output operation. This channel has a value range of 0 to 255. Timer
functions such as duration and interval can be programmed using the DMX controller or the DMX
control software used by the lighting and effects operator.
If Channel A has a value from 0 to 5, the unit is OFF.
Between the values 6 to 255 the volume of fog output is regulated. With 6 being the minimum volume
of fog produced and 254 approaching the maximum. The volume output rises as the DMX value is
increased.
14

Note: If the unit is assigned to DMX address 124 e.g., Channel A corresponds to DMX address
124.
In general, Antari fog machines of the X-PRO SERIES series with on-board DMX conform to the
following performance specifications:
1. Average operating temperature = 250ºC
2. X-510PRO and X-515PRO’s Non Stop Burst function can be selected in the main
FUNCTION 5th sub-menu of “Volume Out”. Please refer to page 4/5 for control module
operation.
15

ANTARI LIMITED WARRANTY
Thank you for purchasing an Antari product from an authorized Antari dealer. We take great pride in
the highest quality and reliability of our products. Please follow proper operation and storage
procedures outlined in your accompanying user manual. Shall you require any further assistance,
please kindly contact sales@antari.com
Warranty shall be valid only if the product is purchased from Antari’s authorized distributors or dealers.
For warranty service, send the product in original packaging to an authorized distributor or dealer.
All warranties are void if the product has been modified in any manner; if the product has been
repaired or serviced by unauthorized personnel; or the product is damaged due to improper use or
maintenance as set forth in the instruction manual.
This is not a service contract and does not include standard maintenance or cleaning. All
expendables are not covered by this warranty.
Additional warranties provided at the discretion of the distributor dealers shall remain the sole
obligation of the distributor or dealer.
NOTE: USE OF ANY FLUID OTHER THAN ANTARI FOG FLUID WILL VOID WARRANTY.
16
Nous vous félicitons pour l'achat de votre nouvelle
ATTENTION!
Risques d'électrocution. Protéger de l'humidité. Débrancher avant d'ouvrier le boîtier!
L'intérieur de l'appareil ne contient pas de parties nécessitant un entretien. L'entretien et
les réparations sont à faire effectuer par un revendeur autorisé.
!
machine à fumée ANTARI X-PRO.
Introduction
Nous vous remercions d'avoir choisi une machine à fumée ANTARI X-510PRO ou X-515PRO. Vous
êtes en possession d'un produit robuste et puissant. En vue d'utiliser correctement votre nouvel
appareil, veuillez lire attentivement ce mode d'emploi. Si vous respectez les instructions suivantes,
vous profiterez d'une performance solide et convaincante de votre machine à fumée ANTARI pour de
nombreuses années.
Pour assurer la longévité et le bon fonctionnement de votre machine à fumée, veuillez lire
attentivement les instructions suivantes concernant le maniement, la sécurité et l'entretien.
Instructions de sécurité
Risques d'électrocution
• Protéger de l'humidité.
• L'appareil a été conçu pour un emploi dans des locaux clos. Ne pas utiliser à l'extérieur.
• Utilisez uniquement des prises de courant à terre à 3 broches.Avant la première mise enmarche,
assurez vous que l'appareil soit branché à l'alimentation correcte.
• Débranchez l'appareil avant de remplir le réservoir.
• Assurez vous d'installer la machine à fumée toujours droit.
• Eteignez l'appareil ou débranchez-le du secteur, quand il est hors d'usage.
Si de l'humidité, du liquide ou du liqide à fumée devait penétrer à l'intérieur de l'appareil,
débranchez immédiatement l'appareil et contactez un technicien ou votre revendeur ANTARI
avant de le réutiliser.
17

Danger d'incendie
ATTENTION!
Veuillez suivre toute instruction de sécurité appliquée sur le boîtier de votre machine à
fume ANTARI.
!
• Pour des raisons leés à la sécurité de l’appareil, la transformation ou la modification de l’appareil
par l’utilisateur sont interdites. L’appareil ne doit être ni ouvert.
• L'appareil n'est prévu que pour l'usage par des personnes adultes. Installez-le hors de l'atteinte
des enfants. Ne jamais faire marcher sans surveillance.
• Ne jamais braquer le bec de l'appareil directement sur des Personnes.
• Installez l'appareil à un endroit bien aéré. Ne jamais couvrir les orifices d'aération. Pour garantir
une aération suffisante, laissez libre un espace de 30 cm autour et au-dessus de l'appareil.
• Ne jamais braquer le bec de la machine sur des flammes.
• Le bec de la machine devient très chaud (200° C) pendant son fonctionnement. Pour cela, tenez
écarté de matériaux enflammables au bec de la machine à une distance minimum de 50 cm.
• Laissez refroidir la machine à fumée ANTARI avant toute manipulation.
Risques d'explosion
• Ne jamais entremêler des liquides enflammables à composants gazeuz ou huileux au liquide à
fumée.
• Employez uniquement des liquides à fumée de haute qualité à base d'eau recommandés par
votre revendeur. Autres liquides à fumée pourraient causer des problèmes d'encrassage ou des
crachotements.
• Faites attention qu'il y ait toujours suffisamment de liqude à fumée au réservoir. Un emploi sans
liquide pourrait endommager la pompe ou provoquer la surchauffe de l'élément de chauffage.
• Si votre machine à fumée ANTARI ne devait plus travailler correctement, l'éteignez
mmédiatement. Videz complètement le réservoir, emballez soigneusement l'appareil (au mieux
dans son emballage d'origine) et l'envoyez-le à votre revendeur ANTARI.
• Toujours vider le réservoir avant d'envoyer ou transporter l'appareil.
• Ne jamais avaler le liquide à fumée. Si c'était tout de même le cas, consultez un médecin
immédiatement. En cas de contact avec la peau ou les yeux, rincer à grande eau.
Déballage & inspection
Ouvrez le carton d'extérieur et assurez vous que tous les parts n'aient subi aucun dommage durant
leur transport. Assurez-vous que le carton d'expédition contient les articles suivants:
1. Une unité de machine de fumée X-510PRO ou X-515PRO avec câble secteur
2. X-10PRO module de contrôle
18

3. Réservoir de liquide
Important
Quand utiliser autres liquids comme mentionnés dans ce mode d'emploi, la garantie
s'éteint. L'entretien et les réparations doivent être effectués uniquement par du personnel
de service compétent!
!
4. Mode d’emploi
Accessoire optionnel:
1. Lyre de fixation
2. Bac collecteur
3. X-30PRO module de contrôle sans fil
4. FX-510, FX-515 Flight Case
Avant de faire fonctionner votre machine à fumée, vérifier bien qu'il n'y ait eu aucun dommage dû au
transport. Si l'appareil ou un câble était endommagé, ne branchez pas la machine et n'essayez pas de
l'utiliser sans avoir au préalable contacter votre revendeur ANTARI après-vente du magasin.
Installation
1. Enlevez tout matériau d'emballage. Assurez vous d'avoir enlevé toute la mousse et le
rembourrage en plastique, sûrtout au bec de la machine.
2. Placez la machine à fumée sur une surface plane et dévissez le couvercle du réservoir du liquide
à fumée.
3. Remplissez le réservor de liquide à fumée ANTARI ou d'un autre liquide à fumée de haute qualité
à base d'eau. Refermez le réservoir.
Maniement
• Branchez la fiche d'alimentation de la machine à fumée dans une prise de courant avec terre.
Mettez le commutateur d'alimentation à l'arrière de l'appareil à "ON". Le temps de préchauffage
est terminé, dès que l'affichage indique "Ready to Fog".
• Pour déclencher le jet de fumée, pressez le bouton correspondant sur la élécommande.
Continuez à appuyer Sur le bouton jusqu'à ce que le débit désiré soit atteint.
• “Warming up“ sera inscrit sur la affichage LCD à chaque fois que la machine se réchauffe pour
atteindre la température de fonctionnement nécessaire. A ce omnet là, “Ready to fog“ s'inscrira.
• Quand il reste peu de liquide à fumée, la LED à l'interieur du réservoir clignote pendant 2
minutes, puis la machine s'arrête afin d'éviter qu'elle tourne à vide.
• Surveillez toujours le niveau de liquide à fumée dans le réservoir pendant les jets de fumée. Un
emploi sans liquide à fumée peut endommager la machine.
19

Pour des informations complémentaires concernant le maniement de votre machine à
Important
La visibilité est réduite pendant l'utilisation.
!
Important
Observez toujours le niveau de liquide à fumée au réservoir pendant les jets de
fumée. Un emploi sans liquide à fumée peut endommager la machine.
!
fumée ANTARI, voir la partie intitulée "Maniement avec module de control".
Lyre de fixation
Les modèles disposant d'un ceintre de fixation peuvent être fixés au plafond. Lors de cette installation,
faites attention que la fumée ne s'évapore pas directement en direction de visages de personnes.
Quelle que soit la méthode d'installation que vous choississez, respectez que l'angle d'inclinaison ne
soit pas supérieure à 15°.
Si vous apercevez un débit trop faible, un bruit de la pompe ou la manque totale de débit, débranchez
immédiatement votre machine. Vérifiez le niveau de liquide, la fusible externe, la connection à la
télécommande et l'alimentation au secteur. Si tout apparaît être correct, branchez de nouveau. S'il n'y
a aucune production de fumée après que vous avez pressé le bouton MANUAL sur la
télécommande pendant 30 secondes, vérifiez si le liquide passe par le disperseur qui est attaché au
réservoir. Si vous n'arrivez pas á déterminer la cause du problème, ne ontinuez pas à presser le
bouton de la télécommande. Cela pourrait endommager votre machine. Envoyez la machine à retour
à votre revendeur d'ANTARI.
20

Maniement avec module de control X-10PRO
1. Affichage LCD
2. Touche FUNCTION
Sous-menus:
-->Interval Set
-->Duration Set
-->Timer Out
-->Volume Out
-->Nonstop Burst
-->DMX 512 Add
3. Touche UP/DOWN
4. Touche TIMER
5. Touche VOLUME
6. Touche MANUAL
- Réglage de l'intervalle pour le fonctionnement timer
Appuyez sur le bouton FUNCTION jusqu'à l'écran indique 「Interval Set」 [réglage de
l'intervalle]. Utilisez les boutons UP et DOWN pour ajuster les intervalles entre les
dégagements individuels de fumée pour le fonctionnement timer (plage de réglage : 1 à 200
secondes).
- Réglage de la durée pour fonctionnement timer
Appuyez sur le bouton FUNCTION jusqu'à l'écran indique 「Duration Set」[réglage de la
durée]. Utilisez les boutons UP et DOWN pour ajuster la durée de chaque
dégagement de fumée entre 1 à 200 secondes.
- Réglage de la volume de fumée pour le fonctionnement timer
Appuyez sur le boutonFUNCTION jusqu'à l'écran indique 「Timer Out」[réglage du volume
de fumée]. Utilisez les boutons UP et DOWN pour ajuster le volume de fumée pour
le fonctionnement timer entre 1 % à 100 %.
21

- Réglage de la volume de fumée pour le fonctionnement continu
- Appuyez sur le boutonFUNCTION jusqu'à l'écran indique 「Volume Out」[réglage du
volume de fumée]. Utilisez les boutons UP et DOWN pour ajuster le volume de
fumée pour le fonctionnement continu entre 1 % à 100%.
- Pour choisir fumée continu, choisissez 「NON STOP BURST」 sous un valeur de 1 % ou au
dessus d'un valeur de 100 %.
- Réglage de l'adresse DMX512
Appuyez sur le bouton FUNCTION jusqu'à l'écran indique 「 DMX 512 Add 」 [Réglage de
l'adresse DMX512]. Utilisez les boutons UP et DOWN pour régler l'adresse DMX de
l'appareil. Veuillez vous référer au chapitre sur la configuration DMX512.
-Mettant l'élément de chauffage en/hors marche
Appuyez sur le bouton FUNCTION jusqu'à l'écran indique「Heater On」. Utilisez le bouton
MANUAL pour mettre l'élément de chauffage en ou hors marche.
-Fonctionnement continu
Pour activer le mode continu, appuyez sur le bouton Volume . En mode continu, l'appareil
dégage tout le temps de la fumée. L'écran indique la valeur ajustée ou Nonstop Burst au menu
「Volume Out」[réglage du volume de fumée]. Pour désactiver le débit de fumée, appuyez sur le
bouton Volume autre fois.
- Fonctionnement manuel
Pour dégager immédiatement manuellement la fumée avec quantité maximale, appuyez et
maintenez le bouton MANUAL. L'écran indique 「Manual Output」«. En lâcher le bouton, le
dégagement de fumée est arrêté. Le fonctionnement manuel est prioritaire sur le mode continu et le
22

mode timer. Lorsque un des modes de maniement est activé, la machine à fumée dégage tout le
temps de la fumée avec volume de débit maximal quand vous presser le bouton MANUAL.
- Fonctionnement timer
En mode timer, l'appareil dégage automatiquement de la fumée. Les intervalles, la durée et le
volume de fumée dépend des paramètres individuels du menu. Pour activer le mode timer, appuyez
sur le bouton Timer. L'écran indique la alors l'intervalle ajusté et l'appareil compte les secondes à
partir de 0. Pour désactiver le mode timer, appuyez sur le bouton Timer autre fois.
X-30PRO module de contrôle sans fil
X-30PRO: La contrôleur sans fil X-30PRO compose d'un transmetteur avec deux boutons pour activer
le débit de fumée et un récepteur fixé sur chaque modelé de X-30PRO
* Transmetteur:
23

Avec le transmetteur, il est possible de débiter de fumée dedans un rayon d'action de 50 mètres. Le
transmetteur est compatible avec chaque récepteur de X-30PRO et peut contrôler des machines
illimitée en mémé temps.
Pour dégager la fumée, appuyez sur la bouton “A”. Le volume de fumée dépend de l'ajustement sous
l'entrée de menu 「Volume Out」 [réglage du volume de fumée].L'écran indique 「Volume Out」 et
la valeur ajustée ou「Non Stop Burst」quand fumée continu est ajusté.Comme contrôle additionnel,
la LED bleu et allumée. Pour désactiver le débit de fumée, appuyez sur la bouton “B”.
* Récepteur :
Le récepteur est testé et fixé sur chaque modèle de X-30PRO. S'il vous plaît ne pas essayer de le
détacher. Le récepteur réagit à jusqu'à 5 transmetteurs différents registrés avec la machine. Le
transmetteur inclus est registré avec la machine avant la livraison.Il est possible de l'utiliser
directement sans réglage initiale.
-Registrer transmetteurs
Pour le fonctionnement de la machine avec un transmetteur différent comme livré, ou avec jusqu'à 5
transmetteurs différents, chaque transmetteur doit être registré premièrement. Veuillez mettre la
machine en service. Quand l'écran indique 「Wireless Setup」 [réglage sans fil], pressez le bouton
“A” 1 seconde sur chaque transmetteur. Les transmetteurs avant sont éteint de la mémoire du
récepteur. L'ajustement doit être fini dedans 15 secondes après de mettre la machine en service. En
24

ce cas, la machine va quitter le mode d'ajuster le transmetteur automatiquement. L'écran indique
「Wireless Setup OK」 [réglage sans fil OK]. Maintenant, il n'est plus possible d'ajouter plus de
transmetteurs.
Quand vous ne registrez pas d'un transmetteur quand la machine est mis en service, la mémoire du
récepteur contient l'opération avant.
Ajuster exemple 1 :
Veuillez mettre la machine en service pour registrer un ou plusieurs de transmetteurs. Quand l'écran
indique 「Wireless Setup」, pressez le bouton “A” 1 seconde sur chaque transmetteur entre 15
secondes pour commencer la transmission du signal.
Ajuster exemple 2 :
Pour utiliser un transmetteur pour contrôler deux ou plus machines, veuillez mettre les machines en
service respectivement. Quand l'écran indique 「Wireless Setup」, pressez le bouton “A” 1 seconde
sur le transmetteur entre 15 secondes pour commencer la transmission du signal.
-Changer la pile du transmetteur
Quand le rayon d'action du transmetteur cesse, la pile est probablement vide et doit être remplacée.
Veuillez ouvrier le couvercle et quitter la pile vide. Insérez une pile nouveau 12V comme indiqué dans
le compartiment de pile et replacez le couvercle.
-Mettant la fonction sans fil en/hors marche
Appuyez sur le bouton FUNCTION jusqu'à l'écran indique 「Wireless On」 [sans fil en marche].
Utilisez les boutons UP et DOWN pour désactiver la fonction sans fil (indication 「Wireless Off」 et
pour réactiver la fonction (indication 「Wireless On」).
Remarque : l'écran indique 「W」 pour transmetteur sans fil quand cette fonction est activée.
25

Attention: La machine à fumée X-510PRO/X-515PRO ainsi que le réservoir à liquides et le tuyau à
liquides ont été testés et nettoyés. Quand vous mettez-la en service pour la première fois, appuyez
sur la touche MANUAL de 3 à 5 secondes. N'essayez pas encore à activer le fonction Timer. En
outre, c'est normal si l'appareil fait les bruits de pompe pour environs 5 secondes. Si la machine
fonctionne correctement, vous pouvez utiliser toutes les fonctions. Il est recommandé de vider le
réservoir à liquides avant un transport et de répéter la procédure ci-dessus après un transport.
• Les machines de fumée X-PRO SERIES ont une période de réutilisation (100 sec.) après que de
longs éclats (X-510PRO 35 sec. / X-515PRO 45 sec.) quand la machine se fermera pour avaler
pendant une période courte afin de rechauffer encore. Pendant ce temps aucun fumée ne peut
être produit.
• Toutes les machines de fumée peuvent pulvériser un peu de fumée de temps en temps lors du
fonctionnement et pendant une minute ou ainsi après avoir été éteint.
L'entreposage et maintien
• Faites toujours attention de ne pas polluer le liquide à fumée. Après avoir rempli de liquide à
fumée, refermez toujours immédiatement les couvercles du bidon de liquide et du réservoir de la
machine. Un emploi sans liquide à fumée peut endommager la machine.
• Nettoyez le boîtier de la machine seulement avec un chiffon sec. L'appareil est à stocker au sec.
Un nettoyage régulier de votre machine à fumée aidera à éviter les réparations ou le
remplacement de parties.
26
Remarque: Dû à la consistence visqueuse du liquide à fumée et à la haute température avec
MODELS
X-510PRO
X-515PRO
Tension d’alimentation
AC100V/120V/230V, 50-60Hz
Corps de chauffe
1,000W
1,500W
Volume d’émission
10,000 cu.ft/min
350m3/min
20,000 cu.ft/min
710m3/min
Pression d’émission
68.6 kpa
49 kpa
Temps de chauffage
11 min
8.5 min
Consommation de
liquide
17 min/liter
(emission 100%)
8.5 min./liter (emission
100%)
Contenu de reservoir
2.8 liters
6 liters
Poids
11.5 kg
13.2 kg
Dimensions (mm)
L:552 I:230 H:155
L:646 I:240 H:190
laquelle la fumée s'évapore, toutes les machines à fumée ont tendance à encrasser.
Après une utilisation continue de 2,000 heures, il est recommandé de procéder à un nettoyage
de l'appareil pour éviter une accumulation de résidus dans l'élément de chauffage. Le maintien
régulier de la machine aranti cependant son usage solide pour de nombreuses années.
• Il est recommandé de tester la machine mensuellement. C'est consiste en un temps de
chauffage et un débit de brouillard de quelques minutes. Puis Laissez-la refroidir.
Caracteristiques Techniques
Lisez et gardez ces instructions.
27

28

Configuration de la connexion DMX
Contact
Fonction
1
Masse
2
Signal-
3
Signal+
La machine possède fiches XLR 3 pôles et 5 pôles pour connecter un contrôleur DMX. Le graphique
ci-dessous montre la configuration des fiches.
Antari X-510PRO / X-515PRO réglages DMX
Canal A
Réglage du debit
6-255 (5% - 100%)
0-5 (arrêt)
Les machines à fumée X-510PRO et X-515PRO possèdent un contrôle DMX. Tous les modèles
peuvent être réglés par un canal DMX en ce qui concerne le débit de fumée. Chaque canal varie entre
les valeurs DMX 0 à 255. Des fonctions Timer comme la durée de fumée et intervalle peuvent être
programmés par le contrôleur DMX ou par le logiciel DMX via la fenêtre d'effets lumineux.
Entre les valeurs 0 et 5 du canal de contrôle A, la machine est en arrêt.
Le débit de fumée est réglé entre les valeurs 6 à 255. Dans ce contexte, la valeur 6 concerne le
débit de fumée minimal et 255 concerne le débit de fumée maximal. Le débit de fumée augmente
29

avec une valeur DMX accroissante.
Si la machine était codée sur l'adresse initiale DMX 124, pour exemple, le canal A correspond
exactement à cette adresse initiale DMX.
En général, les machines à fumée Antari X-PRO SERIES contrôlés par DMX sont les données de
puissance suivantes:
1. Température de fonctionnement moyenne = 250ºC
2. Pour fumée constant, vous deviez choisier “Volume Out“, “Non Stop Burst” (voir la partie i ntitulée
“Maniement avec module de control").
30

Wir beglückwünschen Sie zum Kauf Ihres neuen
ACHTUNG!
Stromschlaggefahr. Vor Feuchtigkeit und Nässe schützen.
Vor Öffnen des Geräts vom Netz trennen.
Keine zu wartenden Teile im Geräteinneren. Wenden Sie sich an den autorisierten
Fachhandel für Wartungs- und Servicearbeiten.
!
ANTARI X-PRO SERIES NEBELGERÄTES.
Einleitung
Vielen Dank, dass Sie sich für ein ANTARI X-PRO SERIES Nebelgerät entschieden haben. Sie sind
nun im Besitz eines robusten und leistungsstarken Nebelgerätes. Die Modelle X-510PRO und
X-515PRO arbeiten geräuscharm und sind überaus benutzerfreundlich in Punkto Steuerung und
Bedienung. Zusätzlich ist für beide Modelle das Funksteuermodul X-30PRO mit DMX-Funktion
(W-DMX) erhältlich. Vor Benutzung des Geräts bitte unbedingt diese Bedienungsanleitung sorgfältig
lesen. Wenn Sie die Hinweise in dieser Bedienungsanleitung beachten, können Sie sich in den
nächsten Jahren auf eine zuverlässige und überzeugende Leistung Ihres ANTARI Nebelgerätes
freuen.
Bitte beachten Sie die folgenden Hinweise im Bezug auf Bedienung, Sicherheit und Wartung, um eine
lange Lebensdauer und einen sicheren Betrieb Ihres Nebelgerätes sicherzustellen.
Sicherheitshinweise
Stromschlaggefahr
• Vor Nässe schützen.
• Nur innerhalb geschlossener Räume betreiben. Nicht für den Betrieb im Freien geeignet.
• Für die 110V Modelle verwenden Sie bitte ausschließlich 3-adrige, geerdete Steckdosen. Vor
Inbetriebnahme darauf achten, dass das Gerät an die richtige Spannung angeschlossen wird.
• Vor Befüllen des Tankes ist Ihr ANTARI Nebelgerät immer vom Netz zu trennen.
• Achten Sie darauf, dass das Nebelgerät stets aufrecht installiert ist.
• Wird das Gerät außer Betrieb genommen, ist das Gerät auszuschalten oder vom Netz zu trennen.
• Dieses Gerät ist nicht wasser- oder spritzwassergeschützt.
31

Sollte Feuchtigkeit, Flüssigkeit oder Nebelfluid in das Geräteinnere eindringen, trennen Sie bitte
ACHTUNG!
Bitte beachten Sie alle auf dem Gehäuse Ihres ANTARI NEBELGERÄTES
angebrachten Warnhinweise und Anweisungen.
!
das Nebelgerät sofort vom Netz und verständigen Sie einen Servicetechniker oder Ihren
ANTARI-Händler, bevor Sie das Gerät wieder in Betrieb nehmen.
Brandgefahr
• Eigenmächtige Veränderungen am Gerät sind aus Sicherheitsgründen verboten. Öffnen Sie nie
das Gehäuse um Veränderungen am Gerät vorzunehmen. Verbrennungs-gefahr.
Nur für Erwachsene. Das Nebelgerät muß außerhalb der Reichweite von Kindern installiert werden.
Betreiben Sie das Gerät niemals unbeaufsichtigt.
• Richten Sie die Nebelaustrittsdüse niemals direkt auf Personen.
• Installieren Sie das Nebelgerät an einem gut belüfteten Ort. Niemals die Lüftungsschlitze
verdecken. Um eine ausreichende Belüftung zu gewährleisten, halten Sie bitte einen
Mindestabstand von 30 cm um und über dem Gerät ein.
• Richten Sie die Austrittsdüse niemals auf offene Flammen.
• Die Austrittdüse wird während des Betriebes sehr heiß (200° C). Für leicht entflammbare
Materialien muß ein Mindestabstand von 50 cm zur Austrittsdüse eingehalten werden.
• Lassen Sie Ihr ANTARI Nebelgerät vor Reinigungs- und Wartungsarbeiten abkühlen.
Explosionsgefahr
• Mischen Sie niemals entzündliche Flüssigkeiten jeglicher Art (Öl, Gas, Duftstoffe) unter das
Nebelfluid.
• Verwenden Sie ausschließlich hochwertige und von Ihrem Händler empfohlene Nebelfluide auf
Wasserbasis. Andere Nebelfluide können zum Verstopfen oder Tropfen des Gerätes führen.
• Achten Sie unbedingt darauf, dass sich immer eine ausreichende Menge Nebelfluid im Tank
befindet. Der Betrieb ohne Nebelfluid führt zu Pumpenschäden und zur Überhitzung des
Heizelementes.
• Sollte Ihr ANTARI Nebelgerät einmal nicht mehr ordnungsgemäß arbeiten, schalten Sie es bitte
sofort ab. Entleeren Sie den Tank vollständig, verpacken Sie das Gerät sorgfältig (am besten in der
Originalverpackung) und schicken Sie es bei Ihrem ANTARI-Händler ein.
• Entleeren Sie den Tank immer, bevor Sie das Gerät verschicken oder transportieren.
• Trinken Sie niemals Nebelfluid. Sollte es dennoch einmal verschluckt werden, konsultieren Sie
bitte sofort einen Arzt. Sollte die Haut oder die Augen einmal mit Nebelfluid in Berührung kommen,
bitte sorgfältig mit Wasser auswaschen.
32

Auspacken & auf Transportschäden untersuchen
WARNUNG
Bei Verwendung anderer als in der Bedienungsanleitung empfohlenen Fluide erlischt
die Garantie. Wartungs- und Servicearbeiten sind ausschließlich dem autorisierten
Fachhandel vorbehalten.
!
Öffnen Sie den Außenkarton und stellen Sie sicher, dass alle Teile, die für den Betrieb des Systems
notwendig sind, in einem einwandfreien Zustand eingetroffen sind.
Der Versandkarton die folgenden Artikel enthalten:
1. Ein Nebelgerät X-510PRO oder X-515PRO mit Netzkabel
2. X-10PRO Steuermodul mit Anschlusskabeln
3. Fluidtank
4. Bedienungsanleitung
Erhältliches Zubehör:
1. Hängebügel
2. Tropfwanne
3. X-30PRO Funk-Steuermodul
4. FX-510 und FX-515 Flightcase
Bitte vergewissern Sie sich vor der ersten Inbetriebnahme Ihres ANTARI Nebelgerätes, dass kein
schwerwiegender Transportschaden vorliegt. Sollte das Gehäuse oder das Netzkabel beschädigt sein,
Gerät nicht an das Netz anschließen und einschalten, sondern Ihren ANTARI-Händler um Rat fragen.
Inbetriebnahme
1. Entfernen Sie jegliches Verpackungsmaterial vom Versandkarton. Vergewissern Sie sich, dass alle
Schaumstoff- und Plastikeinlagen entfernt wird, insbesondere in der Nähe der Austrittsdüse.
2. Installieren Sie das Nebelgerät auf einer ebenen Ober- fläche und schrauben Sie den Deckel des
Fluidtanks ab.
3. Füllen Sie den Tank zu 3/4 voll mit ANTARI Nebelflüssigkeit oder anderen hochwertigen Nebelfluids
auf Wasserbasis. Alle anderen Fluidarten können Beschädigungen am Gerät zur Folge haben.
Nach dem Befüllen verschließen Sie den Tank bitte wieder mit dem Deckel.
Bedienung
• Stecken Sie den Netzstecker in eine geerdete Schukosteckdose ein. Wenn notwendig, schalten
Sie den Netzschalter auf der Rückseite des Gerätes auf "ON" (An). Die Aufheizzeit ist beendet,
33

sobald "Ready to Fog" (Nebelbereit) auf der Anzeige der Fernbedienung aufleuchtet.
HINWEIS
Während des Nebelns immer auf die Fluidtankanzeige achten. Der Betrieb eines
Nebelgerätes ohne Fluid kann zu irreparablen Schäden Ihres Gerätes führen.
!
• Um den Nebelausstoß auszulösen, drücken Sie bitte den entsprechenden Knopf auf der
Fernbedienung. Halten Sie den Knopf solange gedrückt, bis der gewünschte Ausstoß erreicht ist.
• Während der Aufheizphase erscheint auf der Anzeige “Warming up” (Aufwärmen) und “Ready to
Fog” (Nebelbereit) bis das Gerät die optimalen Betriebstemperatur erreicht hat.
• Geht das Nebelfluid zur Neige, blinkt die LED in der Tankkammer für 2 Minuten bevor das Gerät
abschaltet um die Pumpe vor Schaden zu bewahren.
• Während des Nebelns immer auf die Fluidtankanzeige achten um eine Unterbrechung
des Nebeausstoßes zu vermeiden.
Weitere Informationen zum Betrieb Ihres ANTARI
Nebelgerätes finden Sie unter "Bedienung des Steuermoduls".
Achtung! Eingeschränkte Sicht während des Betriebs!
Hängebügel
Das Gerät kann auf dem Boden oder mit Hilfe des Hängebügels hängend installiert werden. Wird das
Gerät hängend installiert, achten Sie bitte darauf, dass der Nebel niemals direkt in das Gesicht einer
Person ausgestoßen wird. Welche Installationsmethode Sie auch wählen, achten Sie darauf, dass der
Neigungswinkel niemals 15° überschreitet.
Sollten Sie einen verminderten Ausstoß, Pumpgeräusche oder überhaupt keinen Ausstoß feststellen,
sofort vom Netz trennen. Kontrollieren Sie den Fluidstand, die externe Sicherung, den Anschluß zur
Fernbedienung und die Stromversorgung. Sollte nach 30 Sekunden permanenten Drückens der Taste
MANUAL immer noch kein Ausstoß erfolgen, überprüfen Sie bitte den Verbindungsschlauch
zum Tank und vergewissern Sie sich, dass Fluid hindurchfließen kann. Wenn Sie die Ursache des
Problems nicht feststellen können, drücken Sie bitte nicht weiter die Fernbedienungstaste, da dies zu
Schäden am Gerät führen kann. Schicken Sie das Gerät bei Ihrem ANTARI-Händler ein.
34

Menüeinstellungen mit der Taste FUNCTION
1. LCD-Anzeige
2. Function-Taste
Untermenüs:
-->Interval Set
-->Duration Set
-->Timer Out
-->Volume Out
-->Nonstop Burst
-->DMX 512 Add
3. Up-/Down-Taste
4. Timer-Taste
5. Volume-Taste
6. Manual-Taste
- Zeitintervalle für den Timer-Betrieb einstellen
- Nebeldauer für den Timer-Betrieb einstellen
- Nebelmenge für den Timer-Betrieb einstellen
Drücken Sie die Taste FUNCTION , bis auf der Anzeige 「Interval Set」[Intervall einstellen]
erscheint. Verwenden Sie die Tasten UP und DOWN, um die Zeitintervalle (d.h. die
Pausen zwischen den einzelnen Nebelausstößen) für den Timer-Betrieb zwischen 1 und 200
Sekunden einzustellen.
Drücken Sie die TasteFUNCTION , bis auf der Anzeige「Duration Set」[Zeitdauer einstellen]
erscheint. Verwenden Sie die Tasten UP und DOWN, um die Zeitdauer der
Nebelausstöße im Timer-Betrieb zwischen 1 und 200 Sekunden einzustellen.
Drücken Sie die TasteFUNCTION , bis auf der Anzeige「Timer Out」[Nebelmenge einstellen]
erscheint. Verwenden Sie die Tasten UP und DOWN, um einen Wert zwischen 1 %
und 100 % für die Nebelmenge im Timer-Betrieb einzustellen.
35

- Nebelmenge für den Dauerbetrieb einstellen
- Drücken Sie die Taste FUNCTION , bis auf der Anzeige 「Volume Out」 [Nebelmenge
einstellen] erscheint. Verwenden Sie die Tasten UP und DOWN, um einen Wert
zwischen 1 % und 100 % für die Nebelmenge im Dauerbetrieb einzustellen.
- Um die maximale Nebelmenge im Dauerbetrieb ausstoßen zu können, wählen Sie die
Einstellung 「NON STOP BURST」. Diese lässt sich unter einem Wert von 1 % oder über einem
Wert von 100 % anwählen.
- DMX512-Adresse einstellen
Drücken Sie die TasteFUNCTION , bis auf der Anzeige「DMX 512 ADD」 [DMX512-Adresse
einstellen] erscheint. Verwenden Sie die Tasten UP und DOWN, um die
Nebelmaschine auf die DMX-Adresse Ihres DMX-Steuergeräts einzustellen. Bitte beachten Sie
KapitelDMX 512-Einstellungen für weiterführende Informationen zum DMX-Betrieb.
- Heizelement ein- und ausschalten
Drücken Sie die Taste FUNCTION , bis auf der Anzeige 「 Heater On」 erscheint.
Verwenden Sie die Taste MANUAL , um das Heizelement ein- [Anzeige 「On」 ] und
auszuschalten [Anzeige 「Off」].
- Dauerbetrieb
Drücken Sie die Taste VOLUME , um einen dauerhaften Nebelausstoß auszulösen. Auf dem
Display erscheint 「 Volume」 gefolgt von dem Wert, der im Menüpunkt 「 Volume Out 」
[Nebelvolumen einstellen] eingestellt wurde oder bei der maximalen Nebelmenge 「NON STOP
BURST」. Um den Nebelausstoß zu stoppen, drücken Sie erneut die Taste VOLUME .
- Manueller Betrieb
36

Für sofortigen Nebelausstoß mit maximaler Nebelmenge, halten Sie die Taste MANUAL
gedrückt. Auf dem Display erscheint 「Manual Output」. Sobald Sie die Taste wieder lösen, wird der
Nebelausstoß gestoppt. Der manuelle Betrieb hat Vorrang vor dem Dauerbetrieb und dem
Timer-Betrieb. Selbst wenn eine dieser Betriebsarten eingestellt ist, stößt die Nebelmaschine immer
die maximale Nebelmenge beim Drücken der Taste MANUAL aus.
-Timer-Betrieb
Im Timer-Betrieb stößt das Gerät automatisch Nebel aus. Die Zeitintervalle, die Nebeldauer und das
Nebelvolumen richten sich nach den jeweiligen Menüeinstellungen. Drücken Sie die Taste TIMER
, um den Timer-Modus zu aktivieren. Auf dem Display erscheint das eingestellte Zeitintervall.
Das Gerät zählt rückwärts bis auf 0 Sekunden und löst den Nebelausstoß aus. Zum Ausschalten des
Timer-Betriebs drücken Sie erneut die Taste TIMER .
37

X-30PRO Funk-Steuermodul
X-30PRO: Das Funkfernsteuersystem X-30PRO besteht aus einer Sendeeinheit mit zwei Tasten für
den Nebelausstoß und einer Empfängereinheit, die an jedem Modell der X-30PRO vorinstalliert ist.
* Sendeeinheit:
Mit der Sendeeinheit lässt sich der Nebelausstoß per Funkübertragung über eine Distanz von bis zu
50 Metern auslösen. Die Sendeeinheit ist kompatibel zu allen Empfängern der X-30PRO und kann
eine unbegrenzte Anzahl von Maschinen parallel steuern.
Drücken Sie die Taste “A”, um den Nebelausstoß auszulösen. Die Taste “A” hat die gleiche Funktion
wie die Taste VOLUME am Bedienfeld, d. h. der Nebelausstoß richtet sich nach der Einstellung im
Menüpunkt「Volume Out」[Nebelvolumen einstellen]. Auf dem Display erscheint「Volume」 gefolgt
von dem festgelegten Wert oder bei der maximalen Nebelmenge 「NON STOP BURST」. Als
zusätzliche Kontrolle, leuchtet die blaue LED. Um den Nebelausstoß zu stoppen, drücken Sie die
Taste “B”.
* Empfänger:
Der Empfänger wird getestet und an den X-30PRO vorinstalliert. Versuchen Sie nicht, den Empfänger
zu entfernen. Der Empfänger kann von bis zu 5 Sendeeinheiten gesteuert werden, die auf die
Maschine adressiert sind. Die mitgelieferte Sendeeinheit ist vor der Auslieferung adressiert worden.
Sie erfordert keine Konfiguration und kann sofort verwendet werden.
38

-Sendeeinheiten adressieren
Um eine andere Sendeeinheit als die mitgelieferte zur Steuerung der Maschine zu verwenden oder um
die Maschine mit bis zu 5 verschiedenen Sendeeinheiten zu steuern, muss jede Sendeeinheit zuvor
adressiert werden. Schalten Sie dazu die Maschine ein. Drücken Sie die Taste “A” 1 Sekunde auf
jeder Sendeeinheit, wenn auf der Anzeige 「Wireless Setup」 erscheint. Dadurch werden alle zuvor
adressierten Sendeeinheiten aus dem Speicher des Empfängers gelöscht. Die Adressierung muss
innerhalb von 15 Sekunden nach dem Einschalten der Maschine erfolgen. Danach wird der
Einstellmodus automatisch beendet. Auf der Anzeige erscheint 「 Wireless Setup OK 」
[Funkeinstellungen OK]. Es kann keine weitere Sendeeinheit hinzugefügt werden.
Wird keine neue Sendeeinheit nach dem Einschalten der Maschine adressiert, bleibt die Einstellung
aus dem vorhergehenden Betrieb im Empfänger erhalten.
Adressierungsbeispiel 1:
Sollen mehrere Sendeeinheiten auf eine Maschine adressiert werden, schalten Sie die Maschine ein.
Drücken Sie die Taste “A” 1 Sekunde an jeder Sendeeinheit, wenn auf der Anzeige「Wireless Setup」
erscheint, um die Steuerverbindung herzustellen (innerhalb von 15 Sekunden).
Adressierungsbeispiel 2:
Soll eine Sendeeinheit zur Steuerung von zwei oder mehr Maschinen verwendet werden, müssen die
Maschinen beziehungsweise eingeschaltet werden. Drücken Sie die Taste “A” 1 Sekunde auf der
Sendeeinheit, wenn auf der Anzeige 「 Wireless Setup」 erscheint, um die Steuerverbindung
herzustellen.
-Batteriewechsel an der Sendeeinheit
Lässt die Reichweite der Sendeeinheit nach, ist wahrscheinlich die Batterie verbraucht und muss
ausgewechselt werden. Lösen Sie dazu die Gehäuseabdeckung und entfernen Sie die verbrauchte
Batterie. Legen Sie eine frische 12-V-Batterie wie im Batteriefach angegeben ein und bringen Sie die
Gehäuseabdeckung wieder an.
Funkfunktion an- und ausschalten
Drücken Sie die TasteFUNCTION, bis auf der Anzeige 「Wireless On」 [Funkfunktion An] erscheint.
Verwenden Sie die Tasten UP und DOWN, um die Funkfunktion zu deaktivieren [Anzeige 「Wireless
Off」] und wieder zu aktivieren [Anzeige 「Wireless On」].
HINWEIS: Zusätzlich wird ein 「W」 für Wireless [Funk] angezeigt, wenn dieser Funktion aktiviert ist.
39

Die Nebelgeräte X-510PRO und X-515PRO sowie der Tank und Schlauch wurden vor der
Auslieferung im Werk gründlich getestet und gereinigt. Wenn Sie das Gerät zum ersten Mal in Betrieb
nehmen, drücken Sie bitte 3 bis 5 Sekunden die Taste Manual . Versuchen Sie noch nicht die
Timer-Funktion zu aktivieren. Darüberhinaus ist es völlig normal, wenn das Gerät für ca. 5 Sekunden
Pumpgeräusche verursacht. Wenn das Gerät ordnungsgemäß funktioniert, können Sie alle
Funktionen verwenden. Es wird empfohlen, den Tank vor einem Transport zu entleeren und nach dem
Transport die oben beschriebene Prozedur zu wiederholen.
Die Nebelgeräte benötigen nach langen Nebelintervallen (ca. 35 - 45 Sekunden) eine Aufheizphase.
Die Geräte schalten dazu selbstständing für ca. 100 Sekunden ab. Währendessen kann kein Nebel
produziert werden.
Alle Nebelgeräte können unmittelbar nach dem Betrieb noch etwas Nebel ausstoßen.
Reinigung und Wartung
Achten Sie darauf, dass das Nebelfluid nicht verunreinigt wird. Setzen Sie sofort nach Befüllen des
Tanks den Deckel des Tanks sowie des Kanister wieder auf. Betreiben Sie Ihr Nebelgerät nie ohne
Flüssigkeit.
• Reinigen Sie das Gerät nur mit einem trockenen Tuch. Trocken lagern. Reinigen Sie Ihr Nebelgerät
regelmäßig, um teure Ersatzteile und hohe Reparaturkosten zu sparen.
Bitte beachten Sie: Alle Nebelgeräte sind aufgrund der Dickflüssigkeit des Nebelfluids und der
hohen Verdampfungstemperatur anfällig für Verstopfungen.
Reinigen Sie daher das Gerät nach ca. 2,000 Betriebsstunden. Nichtsdestotrotz sollte ein
40

regelmäßig gewartetes Nebelgerät Ihnen jahrelang treue Dienste leisten.
MODELL
X-510PRO
X-515PRO
Spannungsversorgung
AC100V/120V/230V, 50-60Hz
Gesamtanschlusswert
1,000W
1,500W
Ausstoßvolumen
350m3/min
710m3/min
Ausstoßdruck
68.6 kpa
49 kpa
Aufwärmzeit
11 min
8.5 min
Fluidverbrauch
17 min/l
(100% Ausstoß)
8.5 min./l (100% Ausstoß)
Tankinhalt
2.8 liter
6 liter
Gewicht
11.5 kg
13.2 kg
Maße (mm)
L:552 B:230 H:155
L:646 B:240 H:190
• Wir empfehlen Ihnen monatlich an der Maschine einen Testlauf durchzuführen, der aus einer
Aufwärmzeit besteht, einigen Minuten Nebelausstoß und einer Abkühlphase.
Technische Daten
Bitte bewahren Sie diese Anleitung gut auf.
41

42

Belegung der DMX-Anschlüsse
Kontakt
Funktion
1
Masse
2
Signal-
3
Signal+
Die Maschine verfügt über 3-polige und 5-polige XLR-Anschlüsse für den Anschluss an einen
DMX-Controller. Die nachfolgende Grafik zeigt die Belegung der Buchsen.
ANTARI X-510PRO / X-515PRO DMX-Einstellungen
Kanal A
6-255 (5%-100%)
0-5 (Aus)
Die Nebelgeräte X-510PRO, X-515PRO verfügen über DMX-Ansteuerung. Sie lassen sich über einen
DMX-Kanal im Ausstoß regulieren. Der DMX-Kanal bewegt sich innerhalb der Werte 0 bis 255.
Timer-Funktionen wie Nebeldauer und Intervall können über den DMX-Controller oder die
DMX-Software über das Lichteffektfenster programmiert werden.
Zwischen den Werten 0 und 5 von Steuerkanal A ist das Gerät aus.
Zwischen den Werten 6 bis 255 wird der Nebelausstoß reguliert. Dabei bezieht sich der Wert 6 auf
den minimalen Nebelausstoß und 255 auf den maximalen Nebelausstoß. Der Nebelausstoß steigt mit
zunehmendem DMX-Wert.
43

Bitte beachten Sie: Wird das Gerät z.B. auf die DMX-Startadresse 124 kodiert, entspricht Kanal A
genau dieser DMX-Startadresse
Die Antari Nebelgeräte X-510PRO und X-515PRO verfügen über folgende Leistungsdaten:
1. Durchschnittliche Betriebstemperatur = 250º C
2. Dauernebel kann nicht über DMX-Steuerung ausgelöst werden sondern nur mit den
Steuermodulen X-10PRO oder X-30PRO (siehe Kapitel Bedienung des Steuermoduls).
44
歡迎您成為 ANTARI X-PRO SERIES 專業煙霧機的使用者
注意!小心觸電
為避免觸電,在打開機殼前,請先移除電源。
!
感謝您選用Antari X- 系列第二代專業煙霧機,此系列煙霧機型為X-510PRO (1000W)
& X-515PRO (1500W) ,除了在使用時非常靜音以外,更增加了人性化及易控性的
優點,能選擇搭配無線 DMX 控制器,增添無限便利性。使用煙霧機之前,我們建議您
先仔細閱讀此說明書,依照使用說明書中的說明,讓您在使用 Antari 專業煙霧機時非
常安全﹐輕易的達到最滿意的煙霧效果﹐也使的機器的使⽤壽命更為延⻑。
重要安全準則
- 避免觸電的安全使用方式:
請保持機器乾燥,僅於室內使用,本產品非為室外使用所設計。
使用前請小心判定電壓級數,伏特及機型,所有機種並應配合接地型插座使用。
填充煙霧油至油桶前,請先拔掉電源插頭。
不使⽤時請關機﹐⻑時間不使⽤時請拔掉電源插頭。
本產品之設計為不防水,遇潮濕或浸水或煙霧油滲出時請即刻拔掉插頭並擦乾機
體。
- 避免燃燒的安全使用方式
45

機器內部並無⼀般使⽤者可變動之結構,請勿任意打開上蓋及作任何更改的動
作,否則可能造成起火的危險!
機器僅限成人使用,安裝煙霧機之地點應避免兒童可觸及之處,請於外出離去時
關閉電源。
請勿將機器噴嘴對著人體及動物直射。
請將煙霧機放置於通風良好的地方,請勿遮蓋機器散熱部分,為確保適度通風,
機器的上方及周圍請預留 30CM 空間。
請勿將機器噴嘴對準火焰。
當機器運作時,噴嘴輸出部分之溫度高達攝氏 200 度,請勿將任何物品放置於機
器前方 50CM 內。
清潔、從事維護及收納機器時,請先確認機器已經完全冷卻。
- 避免爆炸的安全使用方式
請勿將任何可燃性液體( 例如油脂, 瓦斯, 香水),放置於煙霧油槽中,並請使用前
詳細閱讀說明書。
請使用 Antari 代理商所推薦的 FLR 或 FLG 高品質水性煙霧油,任意使用其他
煙霧油產品,可能導致堵管現象甚至造成內部零件腐蝕。
請確認煙霧油槽中有足夠的煙霧油,以免造成煙霧輸出中斷。
若您的 Antari 機器有任何不當運轉情況時,請即刻停止使用並請聯絡 Antari 經
銷商,如需送回經銷點維修時請倒出煙霧油,待機器冷卻後,仔細包好本產品(建
46

議以原包裝) 送至代理商或經銷商處維修。
建議: 在使⽤本機之前﹐詳細的閱讀⼀次印刷在機器上蓋板及後背板的警語標⽰。
!
請記得在運送或郵寄本產品前,確定完全傾倒出所有在油桶中的煙霧油。
拆除包裝及檢視機器
請打開包裝確認機器運作的所有設備齊全,並檢查是否有任何在運送過程中造成的損
傷,如果有發現損壞,請勿插電使用,並請立即向 Antari 經銷商聯絡。另外也請確認
您所購買的機型應包括之項目,倘若有缺少任何項目,請即刻聯絡 Antari 經銷商。 機
器出廠時應包含以下物件:
1. X-510PRO 或 X-515PRO 煙霧機⼀部附含電源線⼀條
2. X-10PRO 多功能控制器附含連結線⼀套
3. 煙霧油桶⼀個
4. 說明書⼀份
選擇性配件
1. 吊架(當使用吊架時,請同時配合標準鋼索穿過機器上馬達安全吊環使用)
2. 滴水盤
3. X-30PRO 液晶螢幕無線控制器
47

4. FX-510 及 FX-515 煙霧機專用飛行箱
警告:
使用其他廠牌的煙霧油或將機器交由未授權之維修人員做變更機器設計或更換零件之動
作,將會立即喪失保固的服務。
!
安裝機器
1. 拆開包裝,小心的移除所有的 PE 墊片,特別是機器噴嘴的部分。
2. 將煙霧機平放,取下裝置煙霧油容器的蓋子,並仔細移除輸油管及油量偵測器上的
包膜(此煙霧油管及油量偵測器是設定好的⼀個組件﹐請勿任意將兩者分離或拆
除)。
3. 注入 Antari 高品質的 FLR 淡煙霧油或 FLG 特效煙霧油至八分滿,並仔細蓋上油蓋。
非 Antari 原厰煙霧油可能會導致煙霧機堵管或油量偵測器腐蝕的問題,甚至其輸
出的煙霧可能會造成人體健康的危害。因使用其他煙霧油所造成的損壞不在保固範
圍之內。
操作機器
1. 將電源線插在有接地的插座上,再將機身後方之電源開關打開至「ON」,暖機直
至控制器上顯示螢幕正確的顯示 「Ready to Fog」 (噴煙準備就緒) 為止。
2. 設定 X-10PRO 遙控器上適當的按鍵以調整需要的噴煙時間、煙量大小及噴煙間
距。
48

3. 控制器上的顯示螢幕會依機器運轉溫度循環顯示「Warming up」 (加溫準備) 以
關於 Antari X-510PRO 和 X-515PRO 的控制器操作,
請參考此說明書的”控制器的操作”內容。
注意:煙霧機動作時,會造成能見度降低,請依場所需求適當使用。
!
及「Ready to Fog」(準備就緒) 。
4. 當油桶中的煙霧油量過低時,機器內建的藍色 LED 會開始持續閃爍直至油桶再次
加滿油。因此請隨時檢視油桶中的煙油量以避免動作中斷。
重要說明
使用煙霧機時,請隨時檢視油桶中的煙油量。在沒有煙油的情況下繼續讓煙霧機動作可
能會造成機器幫浦的永久性損壞。
如果您發現煙霧機的輸出低於您的設定值、幫浦發出雜音或是完全無法輸出動作,請立
即將電源插頭拔出停止操作。檢查油桶中的油量、外部保險絲、控制器的連接以及外部
的電源供應,若以上部分均無問題,請重新插上電源插頭,等待加熱完成並按下控制器
上的 MANUAL 鍵 30 秒,若煙霧機仍然不能正常動作,請檢查連接油桶的油管
中是否有抽到煙霧油。如您無法確認問題的所在,請勿繼續使用,以避免造成更嚴重的
損壞與危險,並立刻聯絡 Antari 經銷商。
49

X-10PRO 液晶顯示控制器
X-10PRO : 控制器:為⼀配有 10 公尺⻑連接線和 5 芯的 XLR 連接器的多功能搖控
器,適用於 Antari X-PRO 系列煙霧機 X-510PRO/X-515PRO。
其操控介面可以讓操作者藉由調整噴煙動作的間隔時間,連續動作時間和輸出煙霧量來
隨心所欲創造各種所需的效果。而其液晶顯示螢幕和內鍵記憶體可以自動記憶您上次的
設定,而不會因為因關機而遺失。
-操作說明如下:
1. 透過 「FUNCTION」 功能鍵,您可以藉由次選項頁來設定需要的功能。
按⼀下功能鍵﹐液晶螢幕會顯⽰「INTERVAL SET」(噴煙間隔時間),在此功能下,
可以調整每次噴煙動作的間隔時間(利用 UP/DOWN 上 / 下調整
鍵,可以將間隔時間設定於 1 至 200 秒之間)。
按二下功能鍵,液晶螢幕會顯示「DURATION SET」(持續噴煙時間),在此功能
下,可以調整每次噴煙動作的持續時間(利用 UP/DOWN 上 / 下調
整鍵,可以將持續噴煙時間設定於 1 至 200 秒之間)。
50

按功能鍵三次,液晶螢幕會顯示「TIMER OUT」(計時器模式下煙量輸出)在此功
能下,您可以利用 UP/DOWN 上 / 下 調整鍵,來設定煙霧機處於
計時器模式下的煙量輸出。再按功能鍵⼀下﹐您會進入「VOLUME OUT」 (煙量
輸出設定模式),在此模式下,您可以利用 UP/DOWN 上 / 下調整
鍵,來對煙霧機的輸出做 1%至 100%的線性調整。
另外,在 100% 和 1% 的輸出之間,您可以找到「NON STOP BURST」 此功
能鍵﹐在此模式下﹐煙霧機會持續噴煙不停。再按功能鍵⼀下﹐選單會顯⽰ 「DMX
512 ADD」 在此模式下,可以利用 UP/DOWN 上 / 下調整鍵來
設定 DMX 位址⽽達到控制或同步化煙霧機動作的⽬的。最後﹐再按⼀次功能
鍵,會顯示「HEATER ON」 在此模式下,您可以利用 MANUAL 鍵,來
控制電熱管的開關。
2. 按下 TIMER 鍵,可以啟動計時器,而機器會根據之前在功能鍵下對計時器
模式所做的設定來動作。如果要停止計時器功能,僅需再按 TIMER 鍵⼀下
即可。
3. 按下 VOLUME 鍵,可以立刻使機器根據先前在「VOLUME OUT」模式下
設定的輸出煙量來動作﹐再按⼀下 VOLUME 即可停止噴煙動作。
4. 按下 MANUAL 鍵,可以手動來使煙霧機做 100% 的輸出動作,此功能會
優先於所有動作,而放開此鍵,就可以停止噴煙動作。
51

X-30PRO 無線控制器使用說明
* 發射器:
- 發射器: 使用 DC 12V 電池
- 接收距離: 50 公尺的開放空間(無障礙物)
- 發射器都可與任⼀組接收器搭配使⽤。
* 接收器:
- 接收器在經過測試之後會固定在每組 X-30PRO 上,請勿嘗試將它拔除。
52

* 設定功能:
1. 所有的接收器都能接收任何已完成對頻的發射器。
2. 每個接收器都能記憶五組發射器的訊號。
3. 每個發射器在出廠前都已經完成設定,使用者可以不用重新設定即可使用。最初的
設定為按 A 按鈕可以啓動機器,按 B 按鈕則可以停止機器運作。
4. 若使用者希望透過其他發射器來控制機器(除了原來配備的發射器之外),需要在
機器開啓的 15 秒內完成設定,否則機器會在 15 秒之後自動離開設定模式。
設定範例 (1):
若使⽤者希望設定三組發射器對⼀台機器﹐當機器啓動且 LCD螢幕顯示「Wireless
Setup」(無線設定),請在 15 秒內分別按下這三組發射器的 A 鈕,即可完成設定
配對。
請注意若 LCD 螢幕顯示「Wireless Setup OK」時,則表示 15 秒的時間已到,
機器已離開無線設定的模式,之後將無法再新增配對任何控制器。
53

設定範例 (2):
若使⽤者想⽤⼀個發射器配對兩台、或多台機器使用,可將希望控制的機器個別
打開電源,當 LCD 螢幕顯示「Wireless Setup」(無線設定)時,在 15 秒之內按
下控制器的 A 鈕來完成設定配對。
5. 機器具有記憶功能,若在機器啓動也完成設定之後,沒有再設定其他組控制器時,
機器可自動記憶最後設定的控制器組,在機器下次使用開機時,請勿按壓任何控制
器的按鈕,經過 15 秒的設定時間之後,即可以上次所記憶的控制器組來控制機器。
6. 請注意當有新的發射器要與機器對頻時,無論先前有幾組完成設定的控制器都會被
洗掉。
註 1:
若希望關閉或重啟無線控制功能,可將 LCD 液晶螢幕選擇至「Wireless On-Off」
此頁面,然後利用 Up (上) 或 Down (下)鍵來關閉或重啟無線控制功能。
當煙霧機加熱完成,處於待機狀態時,無線功能的狀態在 LCD 液晶螢幕表示如下:
無線功能開啟時,LCD 液晶螢幕會顯示「Ready To Fog W」 (W 意指 Wireless)
而當無線功能關閉時,LCD 液晶螢幕則只顯示「Ready To Fog」。
註 2:
當無線控制距離變短時,有可能是電池沒電了,此時,請將發射器外殼打開,更換⼀
個全新的 DC 12V 電池,換好後,再將外殼鎖回。
54

請注意:
X- 510PRO (1000W) & X-515PRO (1500W) 煙霧機在新機器出廠時,油桶及油管
中的油依安全運輸要求都已被清空,在首次使用機器加熱完畢時,建議先按壓機器
右下方的 MANUAL 按鍵讓機器吸取煙霧油煙順利的在機器內跑⼀次內循
環,約 3 ~ 5 秒即可﹐不要急於設定輸出量及時間。第⼀次的輸出﹐機器會發⽣非
常短暫約 3~ 5 秒空管抽油的聲響,這是正常的情況,在機器順暢的噴出煙霧之後
再進行設定所希望的運轉模式。往後機器在進行搬運或大幅度移動之前,建議清空
油桶,再重新啟用。
X- 510PRO (1000W) & X-515PRO (1500W) 煙霧機在連續噴煙 35 和 45 秒之
後,機器會自動停止輸出約 100 秒,這是為了讓電熱管再次加熱動作,在此期間機
器無法產生煙霧。
煙霧機在停止輸出後,會有 1~ 2 次短促煙霧跟隨吐出,此為油管內的殘餘煙霧油,
因機器溫度仍高,所產生的自然氣化現象。
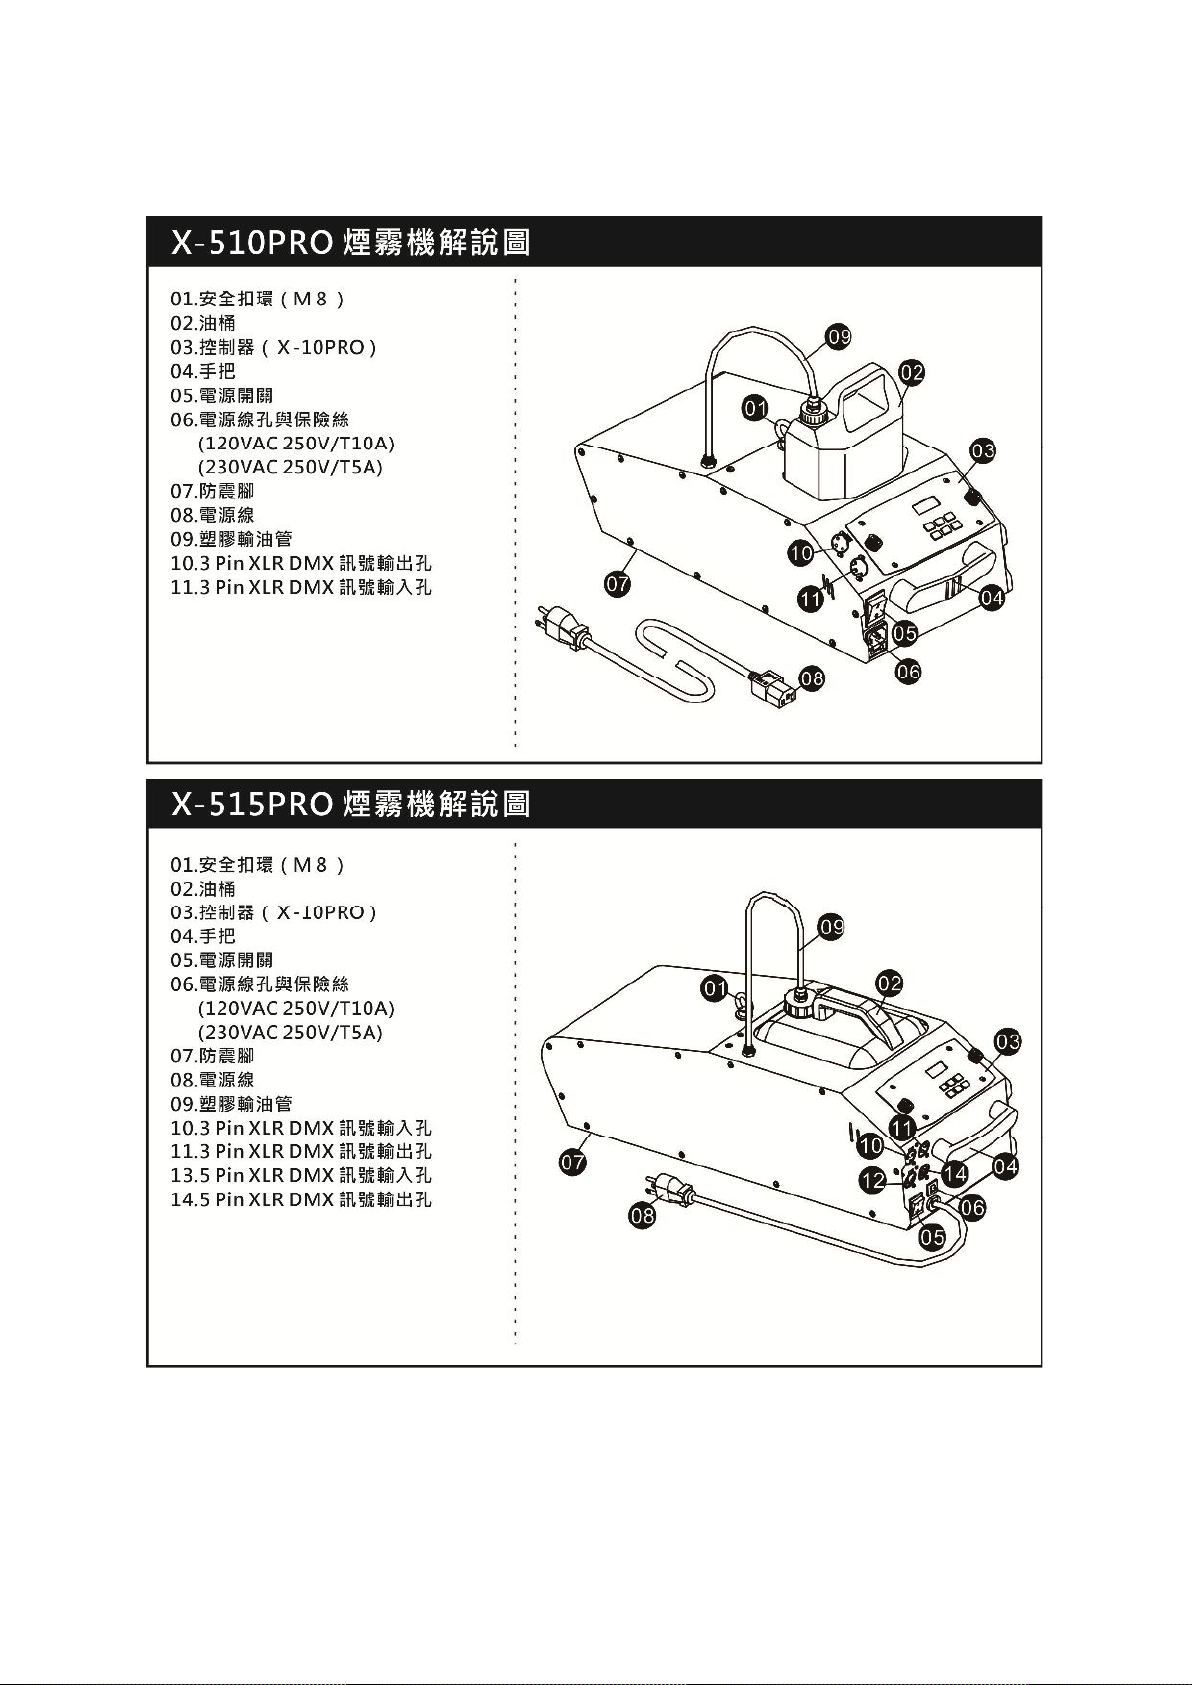
DMX 連接 PIN 的接點說明
本機提供 3 Pin 或 5 PIN XLR 的 DMX 連接。下方為 Pin 的接點說明:
55

Pin
功能
1
接地
2
數據-
3
數據+
X-510PRO 和 X-515PRO 內建 DMX 功能設定
DMX 數 值
功 能
0-5
機器停止動作
6-255
煙量輸出控制
(可以線性控制煙霧輸出從 5%-100%的範圍, 6 為 5%而
255 為 100%)
Antari X-510PRO 煙 霧機煙霧機有內建有 1 組 3Pin DMX 公 ⺟連 接座 ﹐
X-515PRO 機型內建有 2 組 3 Pin 及 5 Pin DMX 連結座,兩型機器都是利⽤⼀
個頻道來控制煙霧的輸出量,每個頻道均有 0 至 255 的數值範圍。計時器功能如持
續噴煙時間和噴煙間隔時間,可以利用 DMX 控制器或 DMX 控制軟體來完成想要
的設定。
Antari X-510PRO & X-515PRO 煙霧機有持續輸出的特性。
維護保養您的煙霧機
請定期的清潔您的煙霧機,將可有效的協助您降低零件更換率或維修的費用。
56

請勿污染煙霧油,隨時蓋上油桶的瓶蓋及煙霧機上所裝置煙霧油桶的蓋子。
型 號
X-510PRO
X-515PRO
電 源
AC100V/120V/230V, 50-60Hz
電熱管功率
1,000 瓦
1,500 瓦
煙霧輸出量
350 立方英呎/每分鐘
710 立方英呎/每分鐘
輸出壓力
68.6 kpa
49 kpa
電熱管加熱時間
11 分鐘
8.5 分鐘
煙霧由消耗功率
17 分鐘/每公升
(100%輸出)
8.5 分鐘/每公升
(100%輸出)
煙霧油桶容量
2.8 公升
6 公升
重 量
11.5 公斤
13.2 公斤
尺寸(mm)
⻑:552 寬:230 高:155
⻑:646 寬:240 高:190
注意:
由於煙霧油黏稠的特性和高溫的汽化過程,很難完全避免機器堵管的情況發生,然而,因
此強烈建議請於 2,000 個⼩時運轉⼯作後做定期的適當保養﹐如此⼀來可以確保機器更穩
定的⼯作及更⻑的壽命。
!
無論何時,請勿在空油桶的情況下,啟動煙霧機。
儲放注意事項
為了使煙霧機保持在最佳使用狀況,若⻑期不使⽤﹐請⾄少⼀個⽉將煙霧機做⼀次測試噴煙的動作﹐將
煙霧機暖機後並持續噴煙幾分鐘後,冷卻後再行儲放。
規格說明
請妥善保存此說明書
57
585960


C08XPRO11
 Loading...