


SW-250 Wireless Control
High Output Snow Machine
User Manual
English • Français • Deutsch •
© 2014 Antari Lighting and Effects Ltd.
1
2
ANTARI SW-250 SNOW MACHINE
INTRODUCTION
Thank you for choosing Antari SW-250 Snow Machine. Prior to use, it is suggested to read the instructions carefully and thoroughly. By following the instructions listed in this user manual, you can look forward to the best haze effect and the most reliable performance of your Antari SW-250Snow Machine for years to come.
Please follow these operation and safety instructions to ensure a long and safe life for your ! SW-250.
DANGER OF ELECTRIC SHOCK
▪Keep this device dry.
▪For indoor use only. Not designed for outside use.
▪Use grounded electrical outlet. Prior to use, make sure that the unit is installed at the rated voltage.
▪Always unplug the machine before filling snow fluid.
▪Turn off or unplug when not in use.
▪This machine is not water or splash proof. If moisture, water, or snow fluid gets inside the housing, immediately unplug the unit. After unplugging, wipe the unit with dry clothe and leave the unit stand still for a while. If any problem while use again, please contact a service technician or your ANTARI dealer.
DANGER OF BURN
▪No user serviceable and modifiable parts inside. Do not disassemble the housing and do any modification; otherwise damage of the device or danger of burn may be caused.
▪For adult use only. The machine must be installed out of the reach of children. Never leave the unit running unattended.
▪Position the machine in well-ventilated area. Please leave at least 20cm spaces surrounding the machine.
▪Never add flammable liquids of any kind (oil, gas, perfume) to the snow fluid.
▪Use only dealer recommended genuine Antari snow fluid SL-5(A). Please do not use any other liquid which may cause erosion of inner parts.
▪If your Antari SW-250 Snow Machine fails to work properly, stop using immediately. Contact you’re your Antari dealer first. Pack the unit securely (preferably with the original packing material) and return it to your ANTARI dealer for service.
Pay attention to all warning labels, signs and instructions printed on the exterior of your
!Antari Snow Machine.
UNPACKING & INSPECTION
3

Open the shipping carton and check that all equipment necessary to operate the machine have arrived intact.
The shipping carton should contain the following items:
1.Snow machine with power cable
2.W-1 wireless transmitter (Only for SW-250 model)
3.Fluid tank
4.Hanging bracket
5.Screw set and user manual
Before beginning initial setup of your ANTARI SW-250 Snow Machine, make sure that there is no evident damage caused by transportation. In the event of that the unit's housing or cable is damaged, do not plug it nor use it until contacting your Antari dealer for assistance.
SETUP and POWER ON
1.Remove all packing materials from shipping box. Check that all foam and plastic paddings are removed.
2.Place the machine on a flat surface and follow steps below.
3.Assemble the hanging bracket on the machine, use the M8 screws to position the hanging bracket with the machine, the tightening screws are for adjusting the machine’s angle when in the air.
M8
Washer |
4.Fill with ANTARI SL-5(A) snow fluid. Any other types of fluid can damage the unit. When filled, place cap
4
back on liquid tank.
5.Plug the power cable into a grounded electrical outlet and switch the power switch at the rear of the machine for powering on.
TRANSMITTER REGISTRATION
ONLY FOR SW-250 MODEL
After powering on, the LCD screen will show sequentially “Antari SW-250” and then “Wireless Setup…”. Press button “A” on the transmitter(s) to register when see “Wireless Setup…” is on. There are totally 15 seconds for finishing the registration of the transmitter(s). Once registration is completed, the LCD screen will blink and beep. The LCD screen will finally show “Wireless Setup.OK” once the 15 seconds ends. Up to 5 transmitters are allowed to be registered with one SW-250. The included transmitter has been registered with the machine before shipment and can be directly operated without any start-up setting. Therefore, the registration is only needed before use of new W-1.
Note: All transmitter(s) registration must be completed within 15 seconds or SW-250 has to be power on again for next registration.
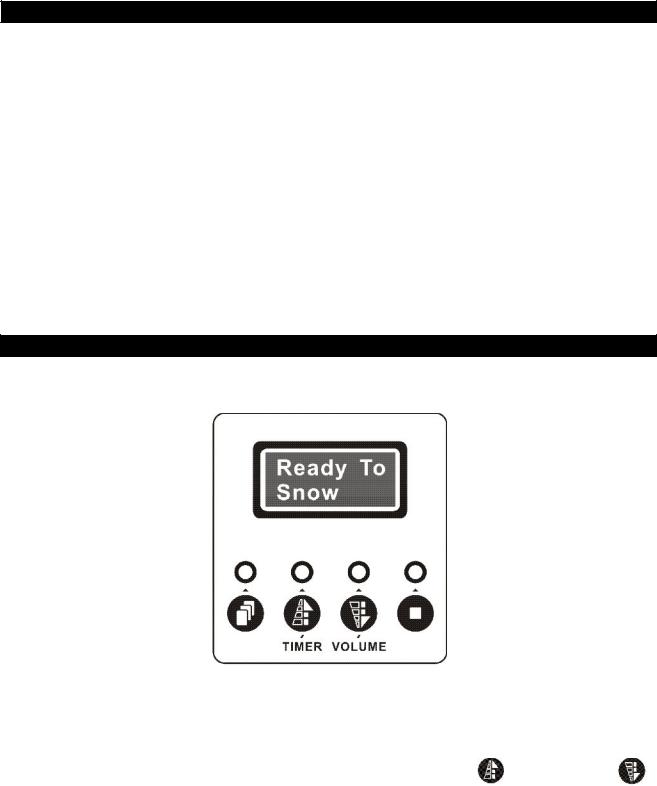
LCD CONTROL OPERATION
After transmitter(s) registration time ends, LCD screen will then show “Ready To Snow”. Now the machine is ready for operating.
FUNCTIONS SETTING
Press  Menu button for setting different functions per sequence as below.
Interval Set |
To set the interval time under timer mode by pressing |
Up/Timer and |
Down/Volume buttons (20 to 2000 seconds).
5

Duration Set |
To set the duration time under timer mode by pressing |
Up/Timer |
and |
|
Down/Volume buttons (10 to 200 seconds). |
|
|
Timer Out |
To set the output volume under timer mode by pressing |
Up/Timer |
and |
|
Down/Volume buttons (1 to 100 %). |
|
|
Volume Out |
To set the output volume under continuous mode by pressing |
Up/Timer and |
|
|
Down/Volume buttons (1 to 100 %). |
|
|
DMX512 Add. |
To set the DMX channel under DMX control mode by pressing |
Up/Timer and |
|
|
Down/Volume buttons (1 to 512 channels). |
|
|
Wireless ON |
To activate/terminate the wireless control system by pressing |
Up/Timer and |
|
|
Down/Volume buttons (ON/OFF). When wireless control system is activated, letter “W” will |
||
|
be showed under main screen display “Ready To Snow”. Once the wireless control system is |
||
|
terminated then the letter “W” will disappear accordingly. |
|
|
Quick Start |
To activate / terminate quick start function by pressing |
Up/Timer |
and |
Down/Volume buttons (ON/OFF). Once Quick Start function is on, the output job under timer
or continuous output (LCD/W-1/DMX) mode terminated by power off will be directly resumed after power on again. When the unit is power off not under output mode then the LCD screen will resume to “Ready To Snow” main screen display directly.
OUTPUT UNDER TIMER MODE
Press  Up/Timer button to execute the interval/duration timing set and press
  Stop to stop.
OUTPUT UNDER CONTINUOUS OUTPUT MODE
Press  Down/Volume button to output continuously until
  Stop button is pressed.
AIR VOLUME SETTING
6
There’s a small button “AIR VOLUME” located at rear of the machine used for adjusting the fan output volume.
In general, when the fan output is increased the snow flakes produced are smaller. In contrast, when the fan
output is decreased, bigger snow flakes will be produced. However, the snow output volume will not be
affected.
Note: When the machine senses no fluid in the fluid pipe, LCD screen will blink and show “No Fluid”.
Meanwhile, the machine is locked and not able to output for preventing machine from further ineffective work. Check immediately if the snow fluid in tank has been run out. To unlock the LCD screen, press  Stop for
2 seconds and the machine will try to pump again the snow fluid. When the fluid pipe is full of snow fluid then
the machine will be functional again.
REMOTE CONTROL OPERATION
ONLY FOR SW-250 MODEL
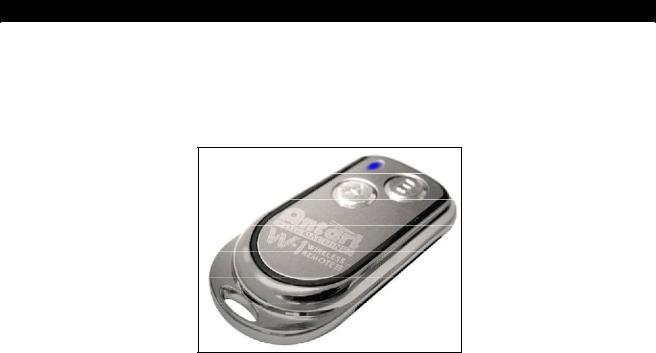
W-1: The wireless remote control W-1 consists of a transmitter equipped with two buttons for output on and off, and a receiver pre-attached to SW-250.
* Transmitter
With the transmitter it is possible to output via radio over a distance of up to 50 meters. The transmitter is compatible to any receiver of SW-250 and can control an unlimited number of machines in parallel. Press the button “A”, to ouput. As control, the LED on the transmitter is lit. To stop the output, press the button “B”.
* Receiver
7

The receiver is tested and built in SW-250. Please do not try to remove it. The receiver responds to up to 5 different transmitters that are registered with the machine. The included transmitter has been registered with the machine before shipment. It can be directly operated without any start-up setting.
Battery change on the transmitter
If the range of the transmitter decreases, the battery is probably exhausted and must be replaced. For this purpose, take off the housing cover and remove the used battery. Insert a fresh 12 V battery, and refit the housing cover.
SC-2 (Optional): 25 ft. wired ON/OFF and volume remote controller with 4 pin XLR plug.
Red Switch – ON/OFF
To output, switch to ON. To stop, switch to OFF.
Volume Knob
Adjust the output volume from 10% to 100% by turning the knob.
Red LED Indicator
When the remote is connected to the machine, the red LED will be on.
Green LED Indicator
When red switch is switched to ON, the green LED will be on.
8
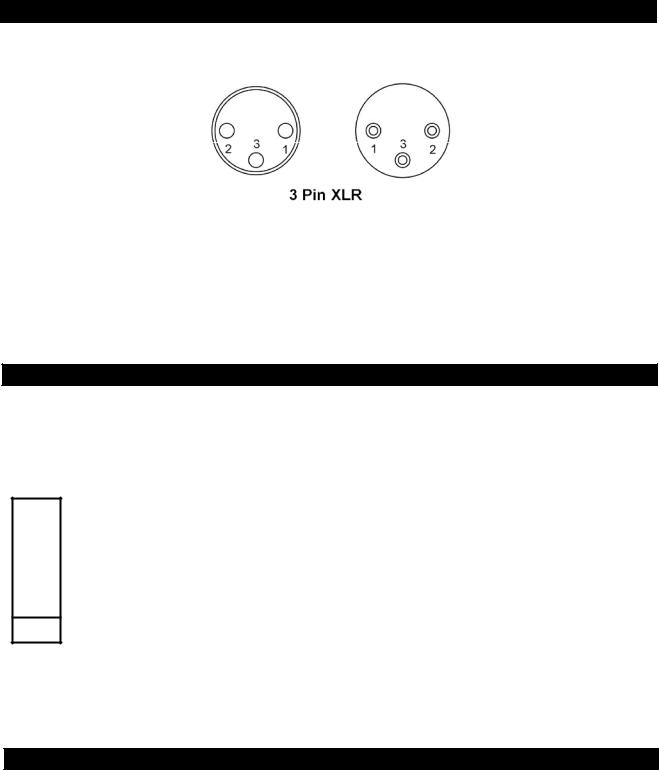
DMX Connector Pin Assignment
The machine provide 3 pin XLR connector for DMX connection. Diagram below indicate pin assignment information
|
Pin |
|
|
Function |
|
|
|
|
|
||
|
|
|
|
|
|
1 |
|
|
Ground |
||
|
|
|
|
||
2 |
|
|
Data- |
||
|
|
|
|
||
3 |
|
|
Data+ |
||
|
|
|
|
|
|
DMX CONTROL OPERATION
SW-250 has on-board DMX control and the addressing is via LCD control panel. SW-250 uses 1 channel to control output on/off and volume. The channel has a value range from 0 to 255. The on/off function can also be programmed with a DMX controller or DMX control software used by lighting and effects operator.
Channel A
11-255 = ON (1%-100%)
0-10 = OFF
If the value of channel A is set between 0 to 10, the unit is off. While the value is set between 11 to 255, the unit is on.
Note: Once DMX cable is connected to the unit, then the LCD control panel, W-1 transmitter and HC-1 controller connected cannot be used.
MAINTENANCE
1.Do not allow the snow liquid to become contaminated. Always replace the caps on the liquid container and the snow machine liquid tank immediately after filling.
2.Before storing away after each operation, rinse the system with pure water and let it pump for at least 1or 2 minutes. This step helps to ensure a longer life-span of the motor and the nozzle.
3.It is strongly recommended to regularly clean the dust/residue around snow machines' vent holes (on both sides of the machine). Simply use a small brush, a toothbrush for example, and gently brush in the direction from top to bottom. This step helps to ensure that minimal debris will get into the machine or
9

causes clogging.
CAUTION
-Never drink snow fluid. If it is ingested and feel sick in any case, call the doctor immediately.
!If haze fluid comes in contact with skin or eyes, rinse thoroughly with cold water.
-If you have followed the above operation steps, and you still experience low output, mechanical noise or no output at all, unplug the unit immediately from the mains. Check the fluid level, the external fuse, the remote control connection, and the power cable from the wall. If all of the above appears to be O.K., plug again. If the machine is still not functional, discontinue operating otherwise it may result in permanent damage to the unit. Return the machine to your Antari dealer.
SNOW FLUID
Antari SL-5/SL-5(A) fluid was designed for the use with Antari snow machines. Antari SL-5(A) is a non-toxic solution that produces fast-dissipating snow.
TECHNICAL SPECIFICATIONS
Model |
SW-250 |
||
|
|
|
|
Power Supply |
110~120V AC / 50~60Hz |
|
220~240V AC / 50~60Hz |
|
|
|
|
Power Consumption |
600W (Min Output) , 1290 W (Max Output) |
||
|
|
||
Output Volume |
250ml / min |
||
|
|
|
|
Tank Capacity |
|
5 liters |
|
|
|
||
Fluid Consumption Rate |
4mins / liter |
||
|
|
||
Weight |
12.6 kgs |
||
|
|
||
Dimension (LxWxH) mm |
L 544 / W 276 / H 228 |
||
|
|
|
|
Approval
This product is in accordance with the R&TTE directive (Radio and Telecommunication Technical Equipment) of the European Union and falls into equipment Class 1. In all EU member countries, the operation of this wireless system is generally approved by the national telecom regulatory authority. The system is license-free. In some countries outside the EU, the operation of this wireless system may needs to be approved by the national telecoms regulatory authority.
Please save this user manual carefully
10
Antari SW-250 Machine à Neige
INTRODUCTION
Nous vous félicitons pour l'achat de votre nouvelle Antari SW-250 Machine à Neige. En vue d'utiliser correctement votre nouvel appareil, veuillez lire attentivement ce mode d'emploi. Si vous respectez les instructions suivantes, vous profiterez d'une performance solide et convaincante de votre machine à neige Antari pour de nombreuses années.
Pour assurer la longévité et le bon fonctionnement de votre machine à neige, veuillez lire attentivement les instructions suivantes concernant le maniement, la sécurité et l'entretien.
RISQUES D'ELECTROCUTION
▪Protéger de l'humidité.
▪L'appareil a été conçu pour un emploi dans des locaux clos. Ne pas utiliser à l'extérieur.
▪Utilisez uniquement des prises de courant à terre à 3 broches. Avant la première mise en marche, assurez-vous que l'appareil soit branché à l'alimentation correcte.
▪Débranchez l’appareil avant de remplir le réservoir.
▪Mettre la machine hors de service quand vous n'utilisez pas la machine.
▪L’appareil a été conçu pour un emploi dans des locaux clos. Si de l'humidité, du liquide ou du liquide à neige devait pénétrer à l'intérieur de l'appareil, débranchez le immédiatement. Veuillez nettoyer la machine avec une toile sèche et attendez quelque minutes. Contactez un technicien ou votre revendeur Antari avant de le réutiliser.
Danger d'Incendie
▪A l'intérieur de l'appareil, il n'y a aucune partie qui ait besoin d'être révisée. S’il vous plaît, n’essayez pas de démonter le boîtier ou faire des modifications; sinon danger d’endommager l’appareil ou d’incendie.
▪L'usage de cet appareil n'est prévu que pour les adultes. Installez le hors de portée des enfants. Ne jamais faire marcher sans surveillance.
▪Installez l'appareil à un endroit bien aéré. Pour garantir une aération suffisante, laissez un espace libre ▪ de 20 cm tout autour de l’appareil.
▪Ne jamais mélanger des liquides inflammables gazeux ou huileux avec le liquide à neige.
▪Utilisez uniquement du liquide à neige Antari SL-5(A) ou liquides recommandée par votre revendeur. S’il vous plaît, n’utilisez pas d’autres liquides. Ceux-ci pourraient mener à l’usure des parts à l’intérieur de la machine.
▪Si votre machine à neige Antari ne devait plus fonctionner correctement, éteignez le immédiatement.
S'il vous plaît contactez votre revendeur Antari. Videz complètement le réservoir, emballez le
11

soigneusement (au mieux dans son emballage d'origine) et l'envoyez-le à votre revendeur Antari.
Veuillez suivre toute instruction de sécurité appliquée sur le boîtier de votre machine à neige Antari.
DÉBALLAGE & INSPECTION
Ouvrez le carton extérieur et assurez vous que toutes les pièces n'aient subi aucun dommage durant leur transport.
Assurez-vous que le carton d'expédition contient le articles suivants:
1.Machine à neige avec câble d'alimentation
2.W-1 transmetteur sans fil (Uniquement pour SW-250 modèle)
3.Réservoir de liquide
4.Lyre de fixation
5.Vis de fixation et mode d'emploi
Avant de mettre votre machine à neige Antari en service, assurez-vous qu’elle n'ait subi aucun dommage évident pendant le transport. En cas de livraison endommagée ou incomplète, toujours contactez immédiatement votre revendeur Antari.
MISE EN MARCHE
1.Enlevez tout matériau d'emballage. Assurez vous d'avoir enlevé toute la mousse et le rembourrage en plastique, sûr tout au bec de la machine.
2.Placez la machine à neige sur une surface plane.
Obt urat eur |
|
Filt re |
Réservoir |
L'adapteur et l'écrou doivent |
|
être connecter solidem ent . |
|
3.Installez le lyre de fixation sur la machine. Utilisez des vis M8 pour ajuster la position du lyre. Ajustez l'angle de la machine avec les vis de fixation.
12
 Loading...