

Page 1
AMANO
Time Guardian
Time and Attendance System
Version 3.5 User’s Guide
®
®
Page 2

Amano Cincinnati Inc. reserves the right to make equipment changes and improvements that
may not be reflected in this document. Portions of this document may have been updated to
include the latest hardware or firmware version, if applicable.
We recommend that this document be read in its entirety before any attempt is made to operate
the equipment.
Proprietary Notice
This document contains proprietary information and such information may not be reproduced in
whole or in part without written permission from:
Amano Cincinnati, Inc.
140 Harrison Avenue
Roseland, NJ, 07068
For more information about Amano’s complete line of products, visit our web site at:
www.amano.com
Licenses and Trademarks
Time Guardian is a registered trademark of Amano Cincinnati, Inc.
Windows and MS-DOS are registered trademarks of Microsoft Corporation.
Adobe Acrobat and Acrobat Reader are registered trademarks of Adobe Systems Incorporated.
All other trademark names used in this documentation are the sole property of their respective
owners.
Page 3

Table of Contents
Chapter 1: Introduction ...........................................................................................................1-1
Features and Requirements...................................................................................................1-1
Features..............................................................................................................................1-1
Requirements......................................................................................................................1-2
Chapter 2: General Installation Guidelines ...........................................................................2-1
Time Guardian Software Installation ......................................................................................2-1
Time Guardian Wizards..........................................................................................................2-2
Time Guardian Wizard Worksheets........................................................................................2-3
Time Guardian Registration ...................................................................................................2-3
Time Guardian Basic Customer Support................................................................................2-3
On-Line Help.......................................................................................................................2-3
E-Mail Support ....................................................................................................................2-3
Time Guardian One-on-One Technical Support Options .......................................................2-4
Software Upgrades.................................................................................................................2-4
Time Guardian User’s Guide..................................................................................................2-4
Time Guardian Hardware .......................................................................................................2-4
Chapter 3: Working with Time Guardian ...............................................................................3-1
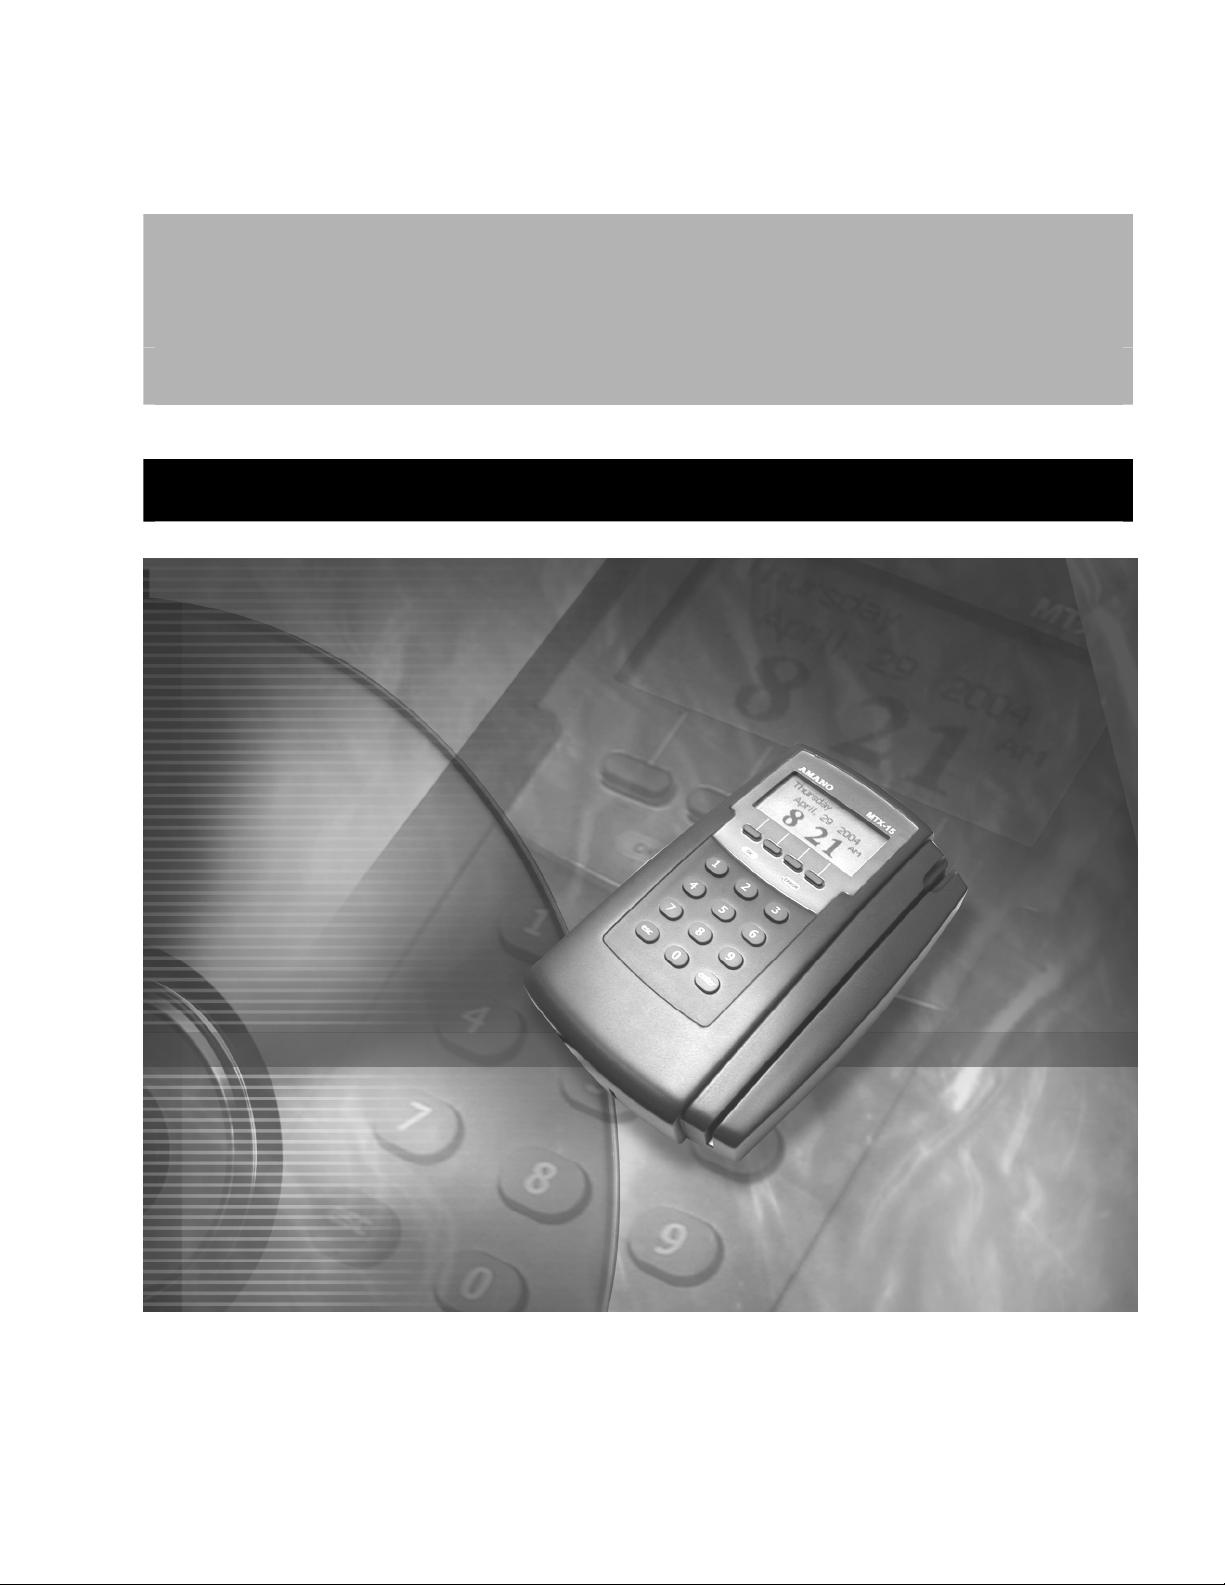
Recording Punches at the Terminal (Punching In and Out)...................................................3-1
One-Minute Swipe Rule .........................................................................................................3-1
Time Guardian Layout............................................................................................................3-1
Main Dropdown Menus .......................................................................................................3-2
File Menu ..................................................................................................................3-2
Employee Menu ........................................................................................................3-2
Display Menu ............................................................................................................3-3
Communication Menu ...............................................................................................3-3
Setup Menu...............................................................................................................3-4
Grid Display Menu.....................................................................................................3-5
Help Menu.................................................................................................................3-5
Custom Toolbar ..................................................................................................................3-6
Report and Payroll Toolbars ...............................................................................................3-7
Report Sizing and Scrolling Toolbars........................................................................3-7
Payroll Interface Toolbar ...........................................................................................3-7
Grid Display Toolbar ...........................................................................................................3-9
Reports and Payroll List....................................................................................................3-10
Report and Payroll View ...................................................................................................3-11
Report View.............................................................................................................3-11
Payroll View ............................................................................................................3-11
Employee List ...................................................................................................................3-12
Hours Grid View................................................................................................................3-13
Adding, Editing and Deleting Employee Punches...................................................3-15
Assigning Reasons to Exception Flags...................................................................3-15
Editing Punches During Daylight Saving Time........................................................3-16
Time Guardian v3.5 User’s Guide i
Page 4

Editing Employee Total Hours, Tips and Bonuses, and Rates (Wages).................3-16
Editing Overtime Authorization................................................................................3-17
Authorizing Non-Scheduled Hours..........................................................................3-18
Pay Period Hours, Wages and Dollar Totals ....................................................................3-18
Module Toolbar.................................................................................................................3-19
Chapter 4: Using the Wizard ................................................................................................... 4-1
Basic Setup Wizard ................................................................................................................4-2
General Tab........................................................................................................................4-2
Pay Policy Tab ....................................................................................................................4-3
Login Tab (Profile Definition) ..............................................................................................4-5
Advanced Setup Wizard.........................................................................................................4-7
General Tab........................................................................................................................4-7
Department Tab..................................................................................................................4-8
Pay Policy Tab ....................................................................................................................4-9
Rounding Rules Tab – Pay Policy...........................................................................4-12
Meal Rules Tab – Pay Policy ..................................................................................4-13
Advanced Overtime Tab – Pay Policy.....................................................................4-14
Pay Code Tab ...................................................................................................................4-17
Exceptions Tab .................................................................................................................4-19
Schedule Tab (Schedule Administration)..........................................................................4-20
Employee Tab (Employee Administration)........................................................................4-22
Importing Employees...............................................................................................4-23
Adding Employees ..................................................................................................4-24
Personal Tab Fields - Employee .............................................................................4-25
Salary Pay Tab Fields - Employee ..........................................................................4-26
Wages Tab Fields - Employee ................................................................................4-26
Deleting Employees ................................................................................................4-27
Editing Employees...................................................................................................4-27
Loading Employees.................................................................................................4-28
Clock Tab (Communication Settings) ...............................................................................4-28
Location Tab - Clock ...............................................................................................4-29
MTX Commands Tab - Clock..................................................................................4-31
MTX-15 Commands Tab - Clock.............................................................................4-32
HP Commands Tab – Clock....................................................................................4-33
Terminal Tab - Clock...............................................................................................4-35
Assignments Tab - Clock ........................................................................................4-36
Creating and Assigning Door Access and Bell Schedules......................................4-36
Advanced Setup Wizard Login Tab (Profile Definition).....................................................4-38
Payroll Interface Creation.....................................................................................................4-40
Power Pay.........................................................................................................................4-41
Peachtree..........................................................................................................................4-42
QuickBooks.......................................................................................................................4-42
QuickBooks Integration with Time Guardian...........................................................4-43
QuickBooks Synchronization...................................................................................4-46
QuickBooks Compatibility........................................................................................4-46
Excel .................................................................................................................................4-46
ADP (For DOS and Windows) ..........................................................................................4-47
Paychex PayLink ..............................................................................................................4-48
Paychex Preview ..............................................................................................................4-51
CBS Payroll.......................................................................................................................4-52
GevityHR...........................................................................................................................4-52
ii Time Guardian v3.5 User’s Guide
Page 5

PAYDAY of AMERICA ......................................................................................................4-53
Chapter 5: Time Guardian System Backup ...........................................................................5-1
Chapter 6: Reporting Functions ............................................................................................. 6-1
Department Report.................................................................................................................6-2
Employee Report....................................................................................................................6-2
Time Card Report...................................................................................................................6-3
Presence Report ....................................................................................................................6-4
Audit Trail Report ...................................................................................................................6-4
Hours Worked Report.............................................................................................................6-5
Exception Report....................................................................................................................6-6
Hours Summary Report.......................................................................................................... 6-7
Historical Report.....................................................................................................................6-7
Chapter 7: Troubleshooting Calculations .............................................................................7-1
Time Simulation......................................................................................................................7-1
Hours Simulation ....................................................................................................................7-2
Chapter 8: XML Data Export Utility ........................................................................................8-1
Chapter 9: Quick Steps (QS)...................................................................................................9-1
QS 1: Creating a Custom Toolbar ..........................................................................................9-1
Adding an Icon....................................................................................................................9-2
Removing an Icon ...............................................................................................................9-2
QS 2: Modifying the Employee List Box .................................................................................9-2
Sorting Employees in the Employee List Box .....................................................................9-3
QS 3: Adding, Deleting and Modifying Departments..............................................................9-3
Adding Departments ...........................................................................................................9-3
Deleting Departments .........................................................................................................9-4
Modifying Departments .......................................................................................................9-4
QS 4: Adding, Deleting and Modifying the Time Guardian Backup Schedule........................9-5
Adding a Backup Schedule................................................................................................. 9-5
Deleting a Backup Schedule............................................................................................... 9-5
Modifying a Backup Schedule.............................................................................................9-6
QS 5: Adding, Deleting and Modifying Login Profiles............................................................. 9-6
Adding a Login Profile.........................................................................................................9-6
Deleting a Login Profile.......................................................................................................9-7
Modifying a Login Profile.....................................................................................................9-7
Changing the Language of a Login Profile..........................................................................9-8
QS 6: Adding, Deleting and Modifying Schedules.................................................................. 9-9
Adding Employee Schedules ..............................................................................................9-9
Deleting Employee Schedules..........................................................................................9-10
Modifying Employee Schedules:.......................................................................................9-10
Time Guardian v3.5 User’s Guide iii
Page 6

QS 7: Printing Time Guardian Documentation .....................................................................9-11
QS 8: Creating, Deleting, Modifying, Assigning and Downloading Door Access and Bell
Schedules.............................................................................................................................9-11
Creating Relay Schedules ................................................................................................9-12
Deleting Relay Schedules.................................................................................................9-14
Modifying Relay Schedules...............................................................................................9-14
Assigning Relay Schedules To The Terminal ...................................................................9-14
Downloading Relay Schedules .........................................................................................9-15
QS 9: Using On-line Help .....................................................................................................9-16
Chapter 10: Glossary and Vocabulary ................................................................................. 10-1
iv Time Guardian v3.5 User’s Guide
Page 7

Chapter 1: Introduction
Welcome to Time Guardian, the all in one, easy to use Time and Attendance system. Time
Guardian allows you to track and manage your employees’ time and attendance directly from
your PC and makes the collecting, reporting and the transferring of employees’ hours to payroll
companies easier and quicker than ever before.
If this is your first time working with a time and attendance package, there may be terms that
are new to you such as Salary, Hourly, Pay Policy, Pay Code, Wages, Unit and Point. A
detailed Glossary, located in the back of this User Guide, has been provided to assist you as
you navigate through Time Guardian.
Should you have any comments on Time Guardian and the materials provided we ask that you
e-mail them to TimeGuardian@amano.com
and will help us provide a better product to you, our customer.
We thank you for selecting Time Guardian and welcome you to the Amano Cincinnati family of
Time Solution products.
Features and Requirements
. All feedback is welcome and greatly appreciated,
Features
• Standard one hundred (100) Employee Capacity (not including inactive employees), with
available upgrade to a 250 employee capacity maximum.
• Eleven (11) Built-In Payroll Interfaces, with full QuickBooks integration.
• Unlimited Number of Schedules.
• Unlimited Number of Departments.
• Time Rounding Capability Based on Company-Defined Pay Policies (Customizable
Rounding).
• Nine (9) Predefined Pay Codes for Hours Allocation with Pay Code Multipliers.
• Rates for Wages calculation.
• Two (2) Pay Codes for Tips and Bonuses.
• Nine (9) Predefined Exception Flags for Employee Punch Tracking.
• Nine (9) On Demand Reports.
• Automatic Backup of Database Files.
• Automatic Polling of Data Collection Terminal.
• Door Access and Bell Schedule Capabilities.
• Flash Filer Database to Reduce Program Conflicts, Minimize Space Requirements and
Increase Speed.
• Several Built-In Utilities for Maintenance of the System.
• Extensive On-Line Help.
Time Guardian v3.5 User’s Guide 1-1
Page 8

Requirements
• Windows 95/98/2000/NT/ME/XP/Vista.
• One Available USB Port.
• CD-ROM Drive.
• 32 MB of RAM (64 MB preferred).
• 100 MB of Free Hard Disk Space.
• Screen Display 1024 x 768 small font.
1-2 Time Guardian v3.5 User’s Guide
Page 9
Chapter 2: General Installation Guidelines
1. Refer to the Software Installation Manual (AMX-40090X).
2. Install the terminal first, using the appropriate installation guide.
3. Install the Time Guardian software.
Time Guardian Software Installation
There are three documents available to assist you in the use and setup of Time Guardian: This
Time Guardian User’s Guide, the Basic and Advanced Wizard Worksheets, and the Software
Installation Manual. These documents can be printed from the Time Guardian Welcome screen
that appears after the software installation is complete. They are also located in the Time
Guardian/Documentation/Software folder. For a complete description of the Time Guardian
installation see the "Software Installation Manual". An overview of the installation steps is as
follows:
1. Insert the Time Guardian CD into your CD-ROM drive, and Time Guardian will automatically
launch the Installshield™ Wizard.
2. When asked for your Time Guardian Serial Number, it can be found on a label on the
outside of your Time Guardian box.
3. When asked if you would like the installation to create a Desktop icon for your Time
Guardian system, it is recommended that you select “Yes.” Desktop icons can be added
later by creating a new shortcut to the Timeguardian.exe file, located in the Time Guardian
program folder.
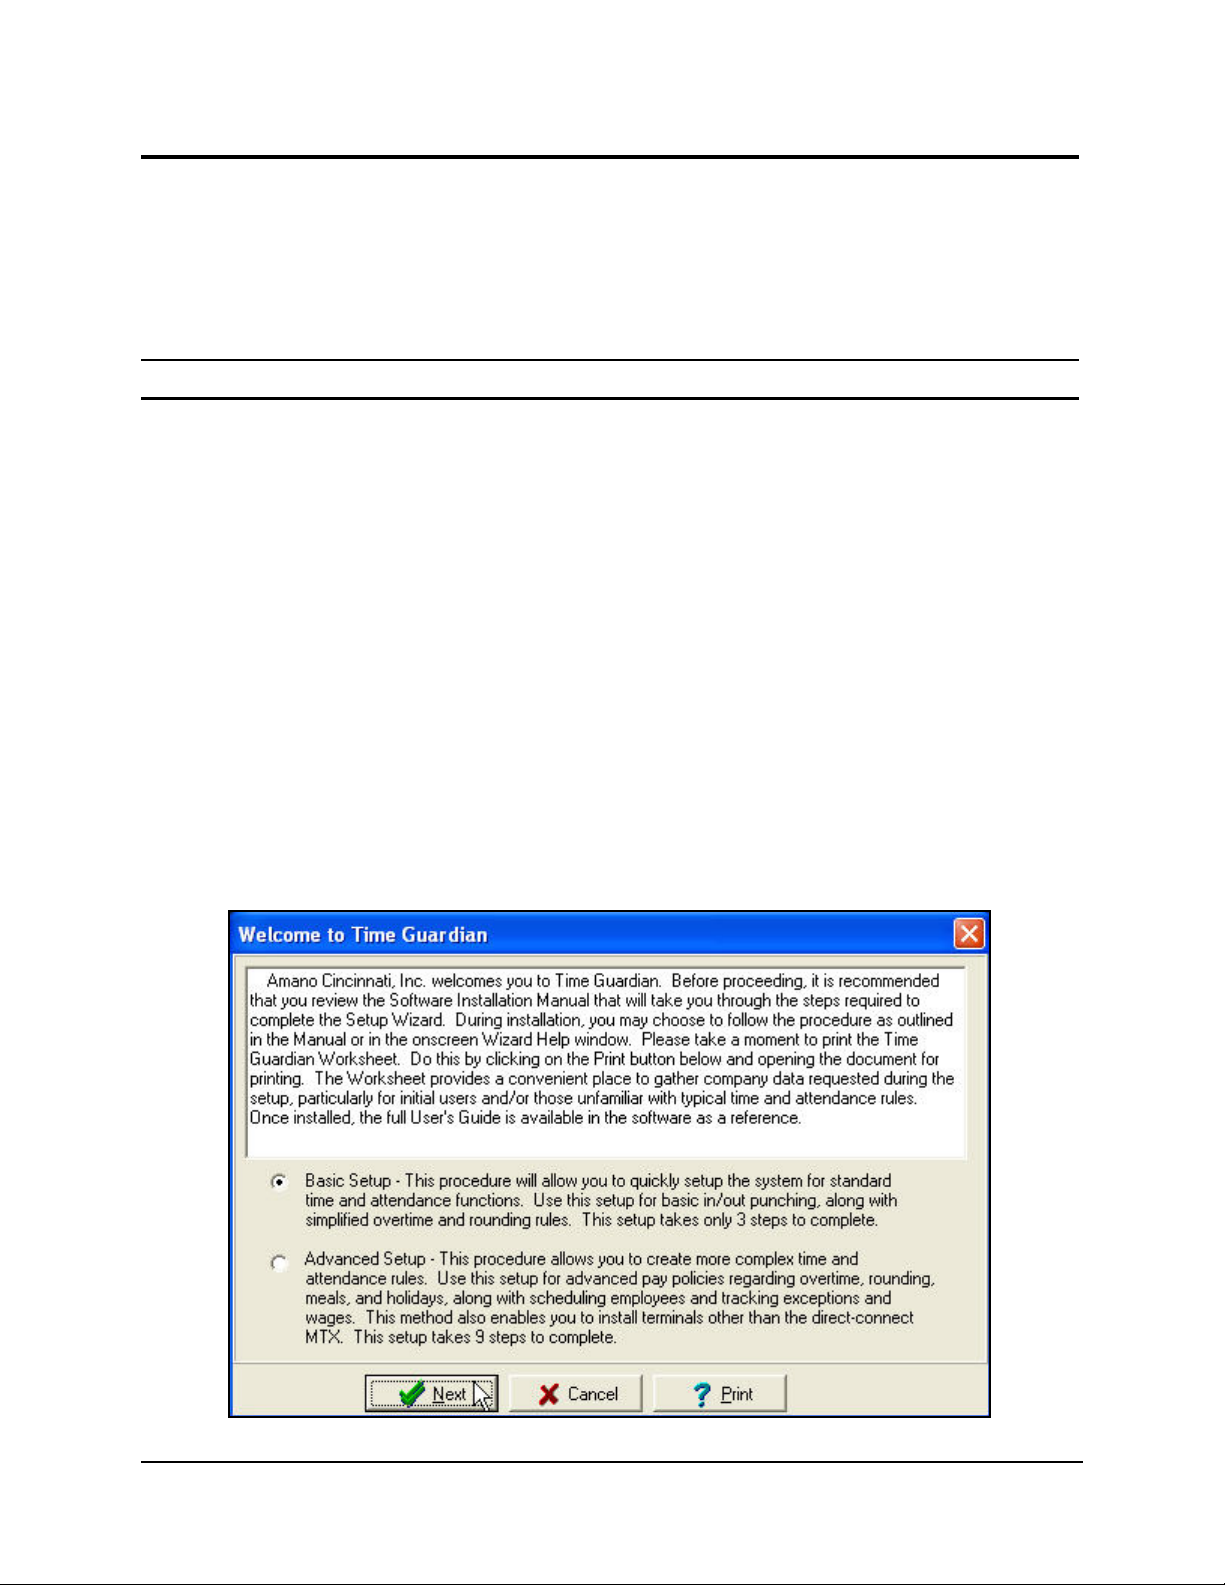
4. When Time Guardian initially begins, the following screen will prompt the user to select
Basic or Advanced Setup selection:
Time Guardian v3.5 User’s Guide 2-1
Page 10

5. There are three options: Next, Cancel, and Print. Before proceeding, it is recommended to
print the appropriate worksheet by pressing the Print button.
6. Time Guardian, by default will install to support 100 employees. If you have more than 100
employees, select Upgrade Time Guardian from the File Menu, follow the instructions to
obtain an upgrade (access number) for 250 employees.
Note: If employee capacity above 250 is needed, call Amano Cincinnati Inc. or your Amano
dealer for information on upgrading to Time Guardian Pro, which offers unlimited
employee capacity.
Time Guardian Wizards
The Time Guardian Basic and Advanced Setup Wizards will allow you to perform a seamless
basic or advanced setup when used with the appropriate Wizard on-line help and Wizard
Worksheet. The Basic Setup Wizard is designed for a 3-step rapid installation and configuration
of an easy-to-use time and attendance system. While the Advanced Setup Wizard is designed
as a 9-step process to configure a more complex time and attendance system with detailed pay
policy rules.
The three (3) steps of the Basic Setup Wizard are:
STEP 1: General Setup
• Company Name – must define
• Payroll Interface
• Time Format
• Hours Display
STEP 2: Pay Policy Setup – must define at least one (1) pay policy
STEP 3: Login Setup – must create an administrator profile
The nine (9) steps of the Advanced Setup Wizard are:
STEP 1: General Setup
• Company Profile
• Payroll Interface
• Time Format
• Hours Display
STEP 2: Department Setup
STEP 3: Pay Policy Setup
• Overtime Authorization
• Pay Code Type
• Overtime Rules
• Rounding Rules
• Meal Rules
• Advanced Overtime
2-2 Time Guardian v3.5 User’s Guide
Page 11

STEP 4: Pay Code Setup
• Pay Code Types
• Overtime and Absence Rules
• Wages Rules
STEP 5: Exception Setup
STEP 6: Schedule Setup
STEP 7: Employee Setup
STEP 8: Clock Setup
STEP 9: Login Setup – must create an administrator profile
The Finish button will only be active when all of the required information is provided. If
you have missed one of these fields, the “Finish” icon will be grayed out and you must go back
and complete the missing information. Once the initial setup is complete, The Wizard can be
used to make modifications to your setup. For instructions on how to do this, please refer to
Chapter 4: Using the Wizard.
Time Guardian Wizard Worksheets
The Time Guardian Basic and Advanced Worksheets provide you with a place to record your
company information and rules prior to starting the Basic or Advanced setup Wizards. Should
you find it necessary to make changes to your system, we encourage you to note them on the
Worksheet for future reference.
Time Guardian Registration
Please return the enclosed warranty registration card or Register Product from Customer
Service online at:
http://www.amano.com
Time Guardian Basic Customer Support
On-Line Help
Can be accessed through the main menu in the software and is searchable by topic. See
Chapter 9, QS 7: Printing Time Guardian Documentation for more detailed help information.
E-Mail Support
Support is provided via e-mail at TGSupport@amano.com. A zip file with your settings should
be sent to Time Guardian support to resolve any problems.
Time Guardian v3.5 User’s Guide 2-3
Page 12

Time Guardian One-on-One Technical Support Options
Toll Free support number is: 1(800) 253-9836.
• The first 30 days of support is provided free of charge, however this only applies to
installation and set up questions, and requires the user complete the warranty registration
card.
• After 30 days, users requiring phone support will be charged a fee per incident or the user
can purchase a support contract.
• A Support Contract (contact support for fee) includes hardware and software support for
one year and also includes free software updates.
Software Upgrades
• With Time Guardian, you can purchase an upgrade access number to expand the employee
capacity from 100 to 250 employees via the Toll Free support number.
• Should you require a product with more than 250 employees, you can expand your system
to an unlimited capacity with Time Guardian Pro.
• Time Guardian Pro protects your initial investment in Time Guardian, as terminals,
databases, and employee information created in Time Guardian is compatible with Time
Guardian Pro.
• Please contact Amano at our Toll Free number above to provide you with one of our
Authorized Time Guardian Pro dealers in your area.
Time Guardian User’s Guide
The Time Guardian User’s Guide was designed to assist you in the daily operation of your
system and to provide you with a comprehensive understanding of the software. The User’s
Guide has a complete Glossary with vocabulary for easy word reference and an index to locate
specific areas of interest.
If you are not connected to an E-mail server or do not know the information required (zip file),
please contact your computer support person. This is not a feature that is supported by Time
Guardian Support. If no access is available, upload the SupportData.zip file (located in the
TEMP directory in the Time Guardian folder) to our ftp site at ftp.amano.com
Time Guardian/Support/Incoming folder.
and place it in the
Time Guardian Hardware
Please refer to the information provided in the original packaging for hardware warranty
information. Each clock comes with a one year limited warranty from the date of purchase. For
additional information, please e-mail TGSupport@amano.com
.
2-4 Time Guardian v3.5 User’s Guide
Page 13
Chapter 3: Working with Time Guardian
Recording Punches at the Terminal (Punching In and Out)
One of the main reasons for purchasing a time and attendance system is to accurately track the
hours worked by an employee and present this information to managers, payroll personnel and
the employees themselves.
In order to gather this information, employees must be trained to use the terminal. Rules
governing the use of the terminal will vary from company to company, however, it is important to
get all employees in the habit of punching the clock at the start and end of their workday, and for
meals (if required). Time Guardian comes with 25 pre-numbered employee badges that can be
assigned to employees. Once the clock is plugged in and wired, simply swipe the card through
the reader and wait for the confirmation beep. If an employee’s card is unable to be read by the
terminal due to damage, replacement cards can be ordered by contacting our Parts Center at 1800-253-9836. An employee’s badge number can be changed if the badge is lost or damaged.
In this instance, the Employee Number will remain the same to ensure the historical accuracy of
the employee’s records.
One-Minute Swipe Rule
To prevent duplicate punches from being recorded, the Time Guardian terminal comes with a
built-in “One Minute Rule”. This feature prevents the terminal from recording more than one
punch per employee, per minute. If the employee attempts to punch twice during the same
minute, they will receive two beeps indicating that the punch has not been accepted. Once the
one-minute time interval has passed, the employee’s punch will be accepted.
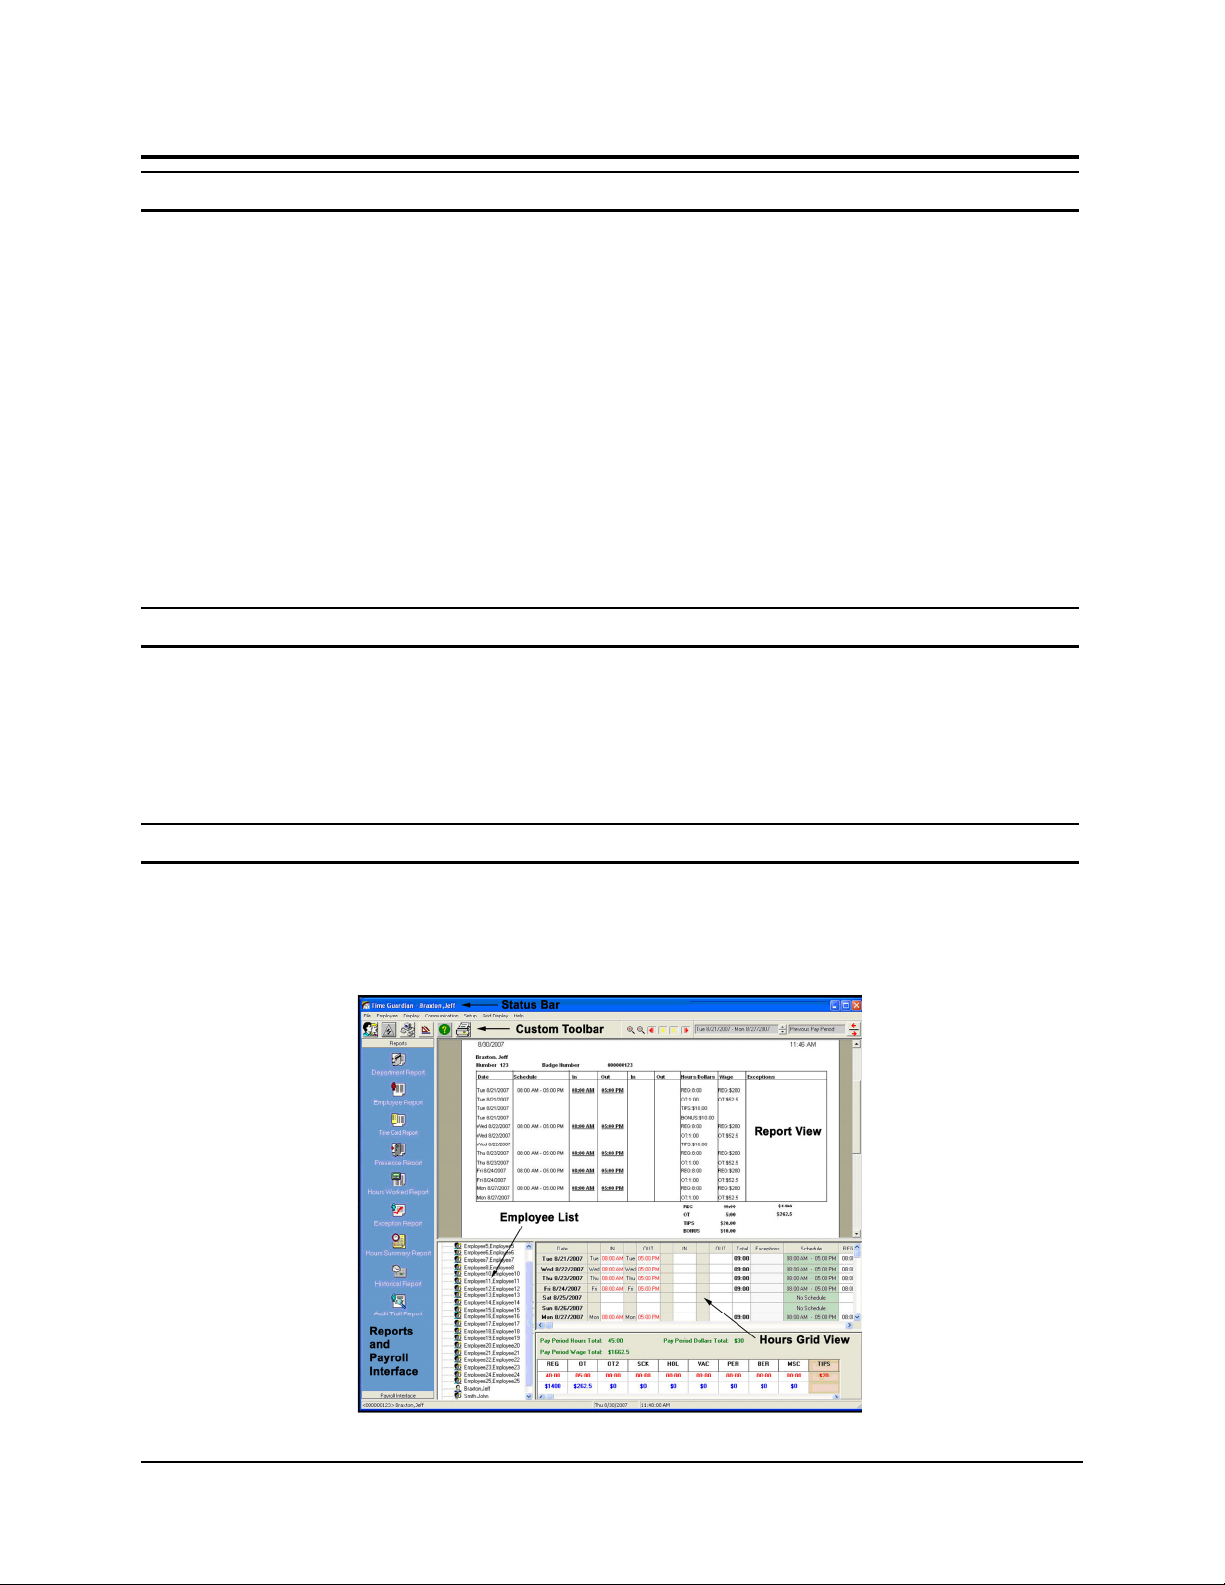
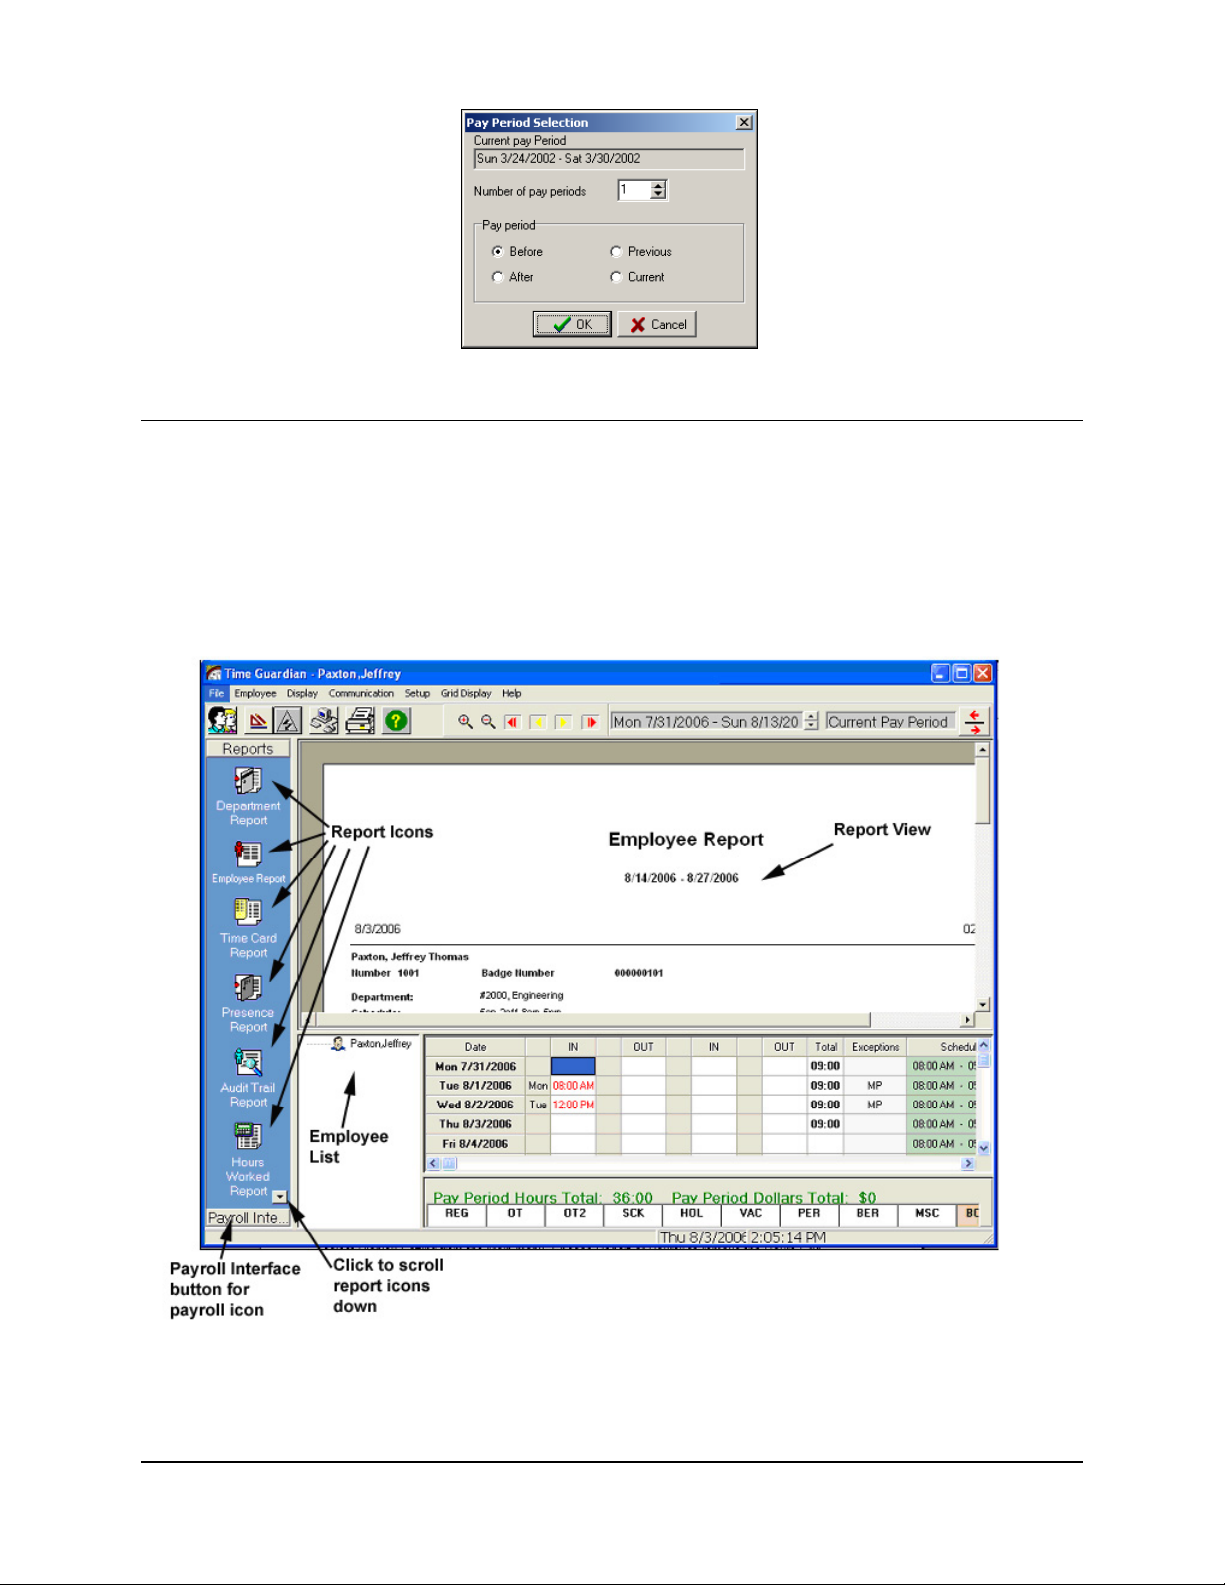
Time Guardian Layout
The following screenshot displays the default main view of Time Guardian and identifies its
various sections. This view can be modified based on the selection made in the Display menu.
The Status Bar at the top of the screen contains the software name, the active employee name
and the screen icons that will allow you to minimize, resize or close the software.
Time Guardian v3.5 User’s Guide 3-1
Page 14
Main Dropdown Menus
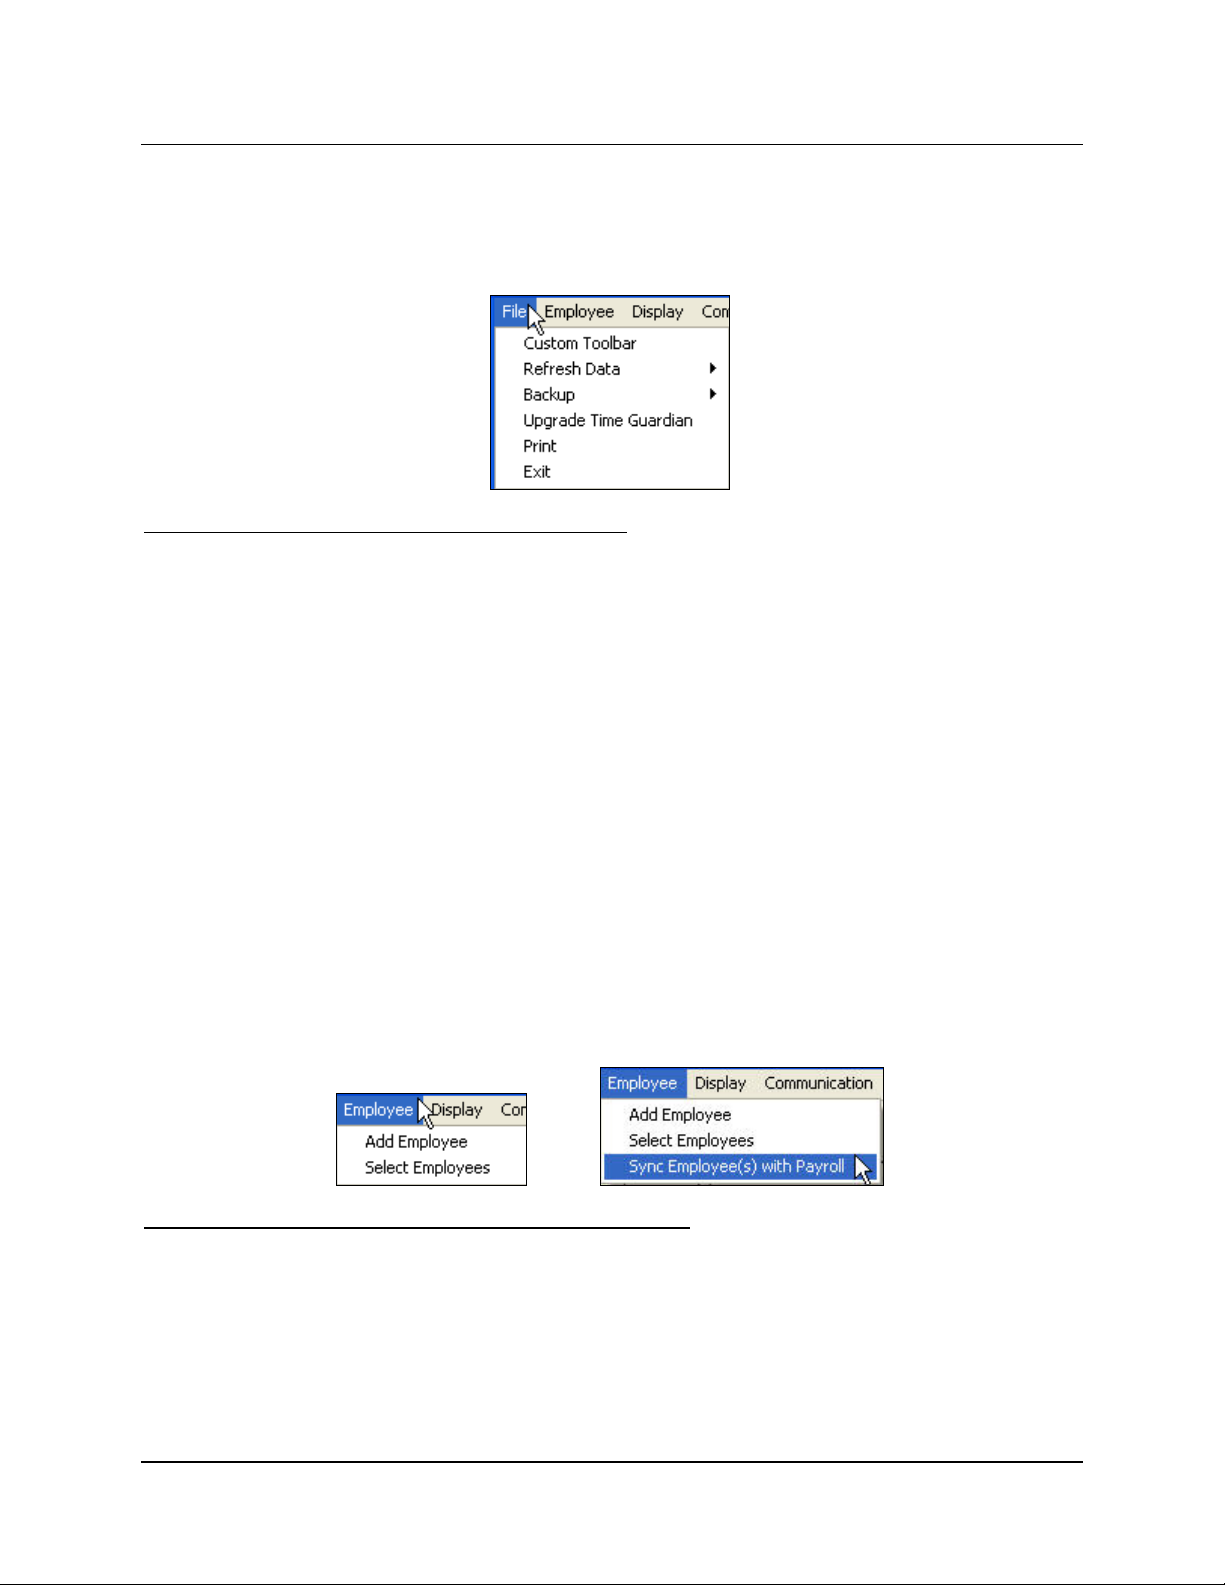
File Menu
The “File” menu allows you to create custom toolbar settings, refresh data, backup data, print
reports, and exit the application. Click on File from the main Time Guardian screen view and
the following dropdown menu will appear:
Descriptions of the File submenu functions follow:
• Custom Toolbar: Can be used to customize the Time Guardian toolbar by adding or
removing buttons.
• Refresh Data: Updates information for the currently selected employee or all the
employees currently being displayed in the employee list box.
• Backup: This has the following two submenu choices:
a. Run Backup: Creates a backup file on demand.
b. Setup Backup: This allows you to configure an automatic backup.
• Upgrade Time Guardian: Allows you to upgrade from a capacity of 100 to 250 employees.
• Print: Used to print Time Guardian Reports.
• Exit: Used to exit the Time Guardian application.
Employee Menu
The “Employee” menu allows you to add an employee or select an employee. Click on
Employee from the main Time Guardian screen view and the first dropdown menu will appear.
If the QuickBooks Payroll Interface has been selected (see Payroll Interface Creation).
Descriptions of the Employee submenu functions follow:
• Add Employee: this option allows you to add a new employee to your Time Guardian
system.
• Select Employees: this option allows you to limit the employees being seen in the
Employee List box based on selections made on the Department or All Employees filter.
• Sync Employee(s) with Payroll: If QuickBooks is installed on the local PC and the
QuickBooks application is running, this option synchronizes the selected employee(s) Time
Guardian information with QuickBooks.
3-2 Time Guardian v3.5 User’s Guide
Page 15
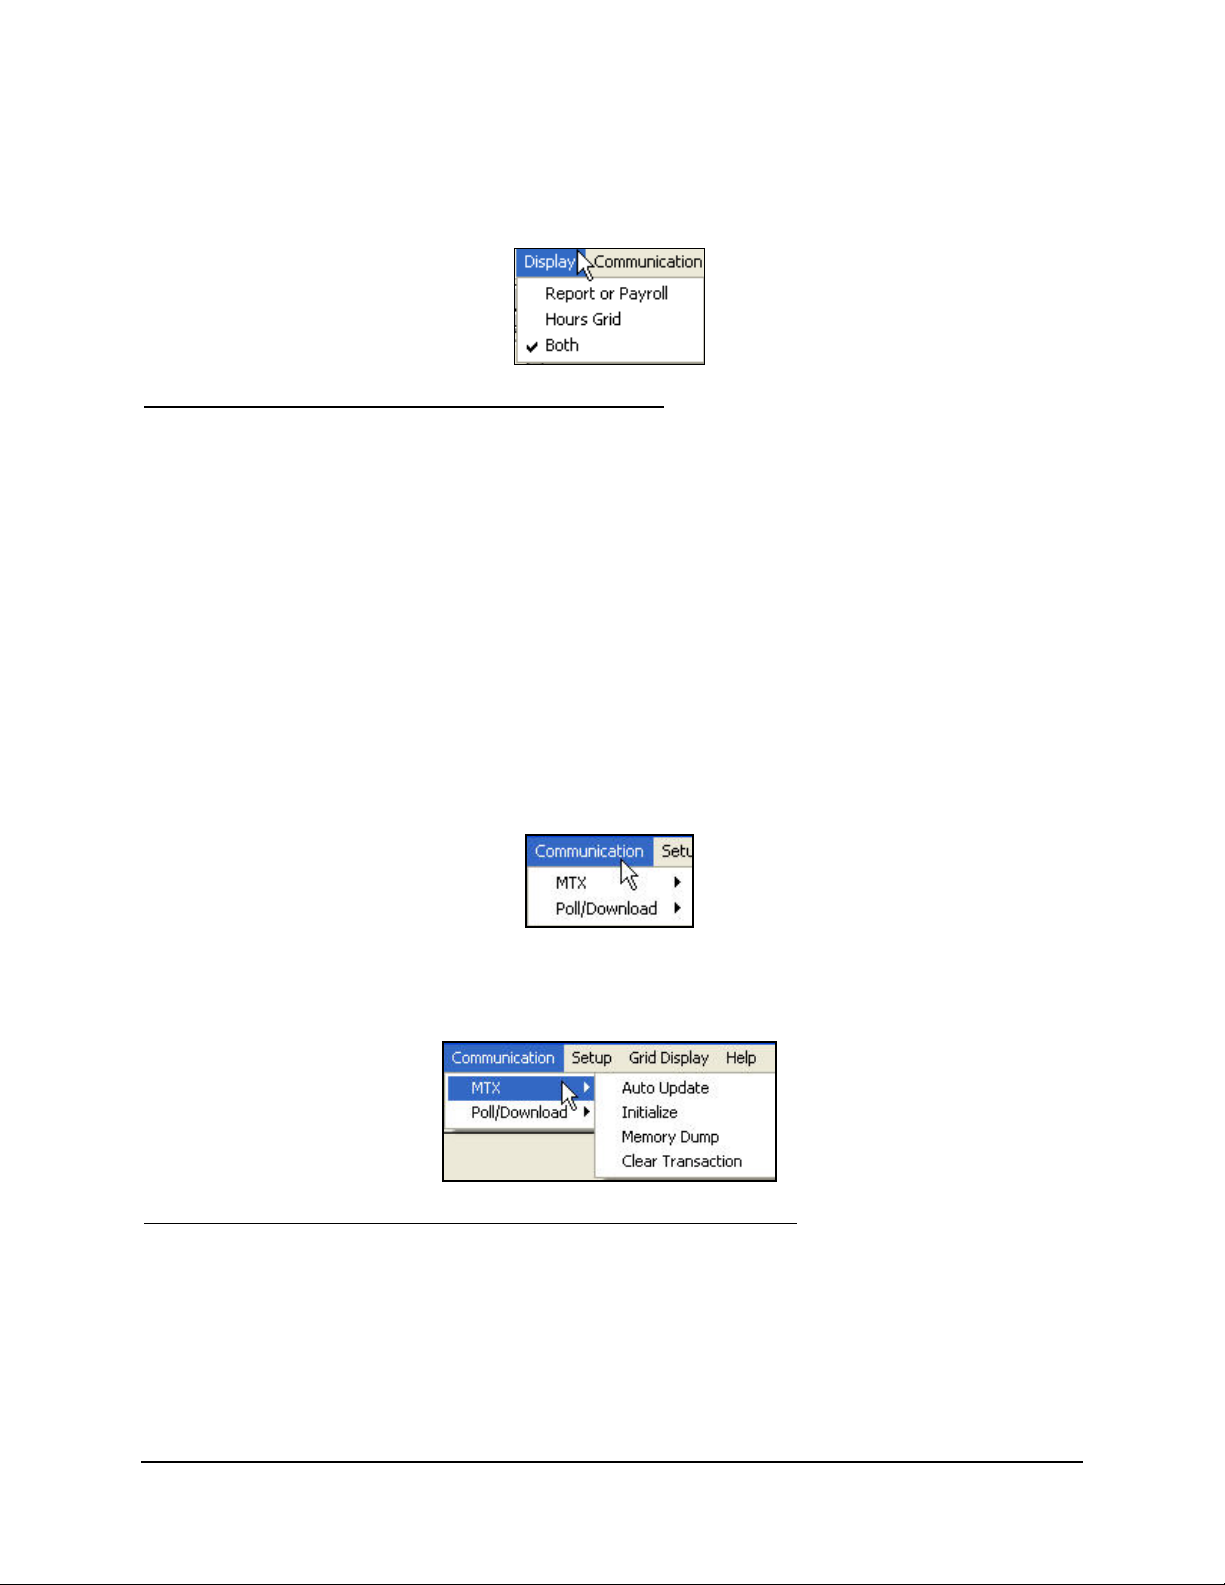
Display Menu
The “Display” menu allows you to select how you want information presented to you on the
main screen. Click on Display from the main Time Guardian screen view and the following
dropdown menu will appear:
Descriptions of the Display submenu functions follow:
• Report or Payroll: Selecting this option will hide the Hours Grid and maximize the view of
the Report or Payroll being displayed.
• Hours Grid: Selecting this option will hide the Report or Payroll section in the main view and
maximize the view of the Hours Grid.
• Both: This is the default setting and it displays both the Hours and Report information in the
main view.
Communication Menu
The Communication menu is used to remotely perform functions on active terminals from the
Host PC. It is divided into two groups, those functions distinct to Time Guardian terminals and
for polling and downloading to the Time Guardian and HandPunch (HP) terminals. For more
information on an HandPunch Terminal purchase, call or email Time Guardian support. Click on
Communication from the main Time Guardian screen view and the following dropdown menu
will appear:
The MTX submenu selection allows you to perform the following operations on all active Time
Guardian terminals. Click on MTX submenu from the Communication menu and the following
pop up menu will appear:
Descriptions of the Communication/MTX submenu functions follow:
• Auto Update: Confirms that the clock and the Host PC are communicating, assigns a
terminal number and the Daylight Saving Time settings to the terminal including Door
Access and Bell Schedule. This action will also set the time display of the terminal as
determined by the PC settings.
• Initialize: This function will reset the terminal back to factory settings and clear the memory.
You should wait one minute between performing this operation and punching at the
terminal. After performing Initialize function, you will have to perform Auto Update function
again.
Time Guardian v3.5 User’s Guide 3-3
Page 16
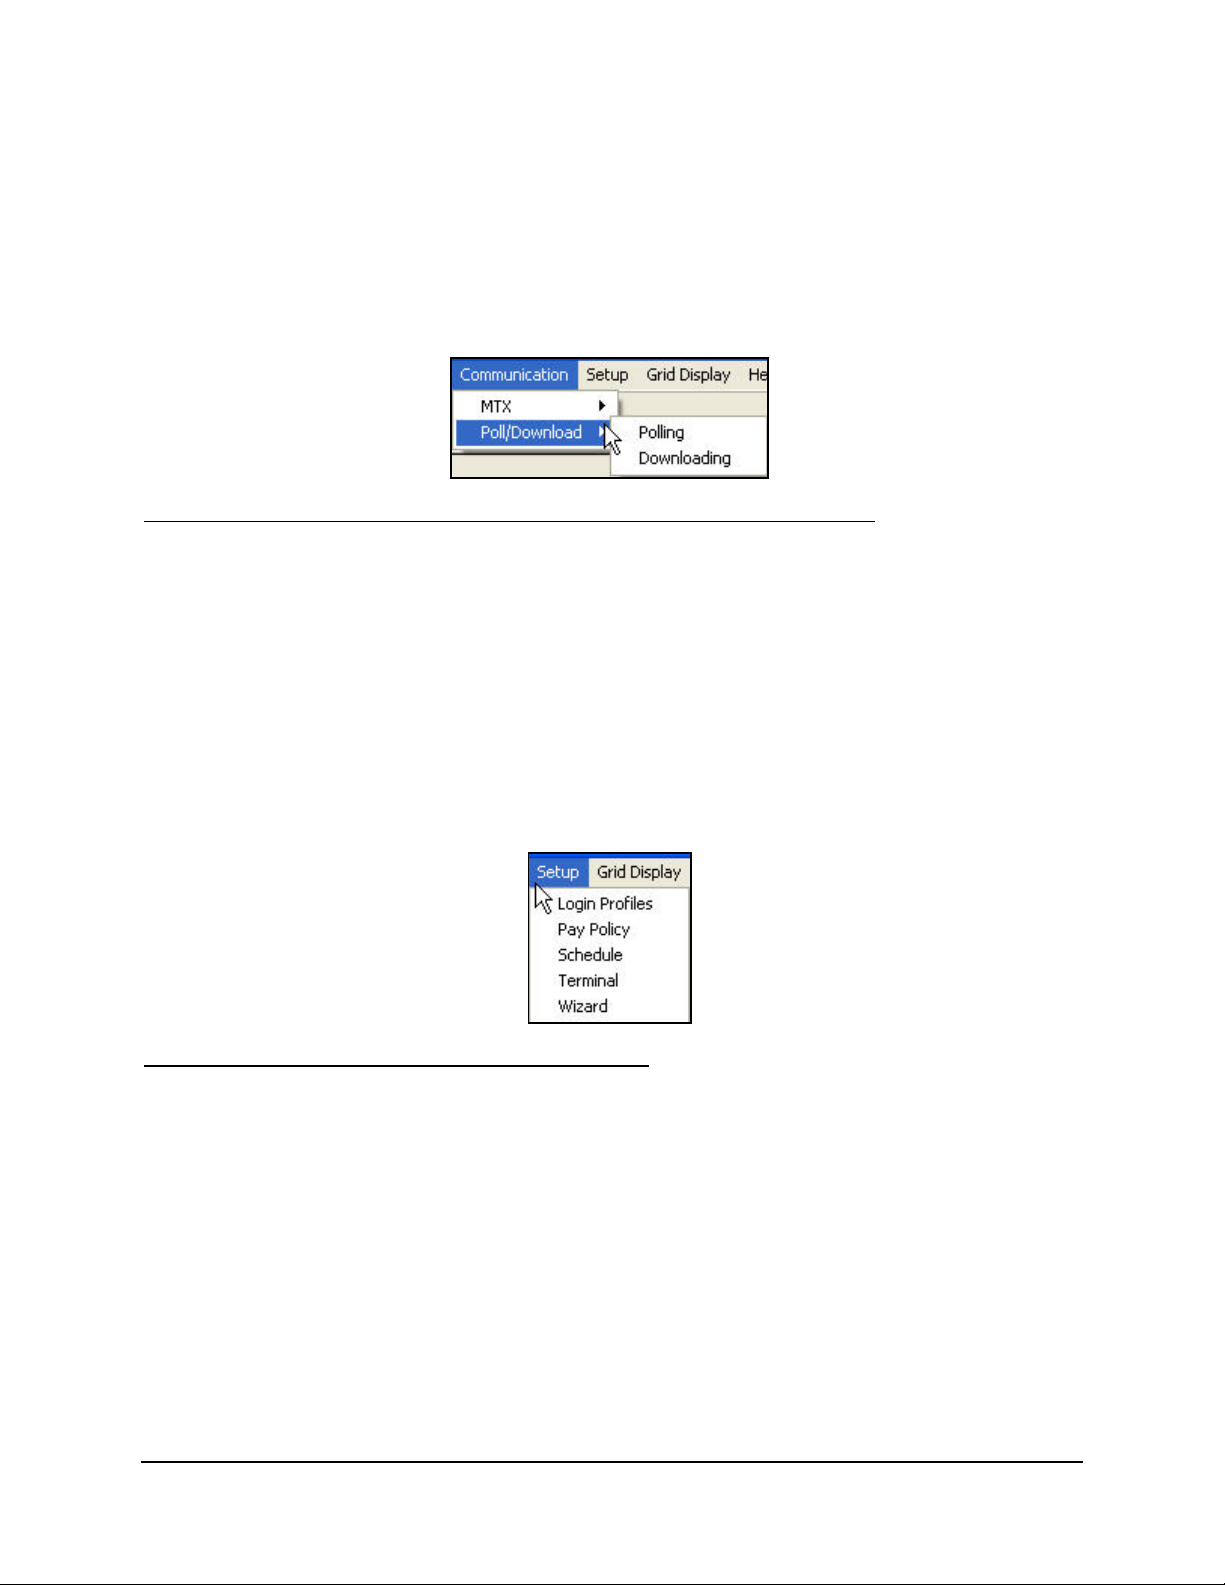
• Memory Dump: Uploads all the punch data currently at the terminal to the PC and resets
the memory pointer to the start. This function is useful should there be a catastrophic data
loss. If this function is performed with active data, duplicate punches may be created.
• Clear Transaction: This will clear the entire memory of the terminal and reinitialize it to
factory settings.
The Poll/Download submenu selection allows you to perform the following operations on all
active Time Guardian and HandPunch terminals. Click on Poll/Download submenu from the
Communication menu and the following pop up menu will appear:
Descriptions of the Communications/MTX and HandPunch functions follow:
• Polling: This operation collects the most recent data from the terminal. When checked,
Time Sync. performs time synchronization between the Host PC and the terminal including
Daylight Saving settings.
• Downloading: Sends Daylight Saving Time (DST) settings, employee assignments and
Bell and Door Schedules to the terminal.
Setup Menu
The “Setup” menu provides access to four modules, which are: the Terminal Setup, Schedule
Setup, Wizard, and Login Profiles. Click on Setup from the main Time Guardian screen view
and the following dropdown menu will appear:
Descriptions of the Setup submenu functions follow:
• Login Profiles: This option allows you to add, modify and delete administrator, user profiles
for Time Guardian.
• Pay Policy: This option allows you to add, modify and delete pay policies for Time
Guardian. For more information, refer to Chapter 4: Using the Wizard
• Schedule Setup: Allows you to add, edit of delete Employee Schedules. For more
information see Schedule Tab (Schedule Administration).
• Terminal Setup: Enables Time Guardian to communicate with your terminal(s). This is
where you can configure terminals and/or locations. For more information see Clock Tab
(Communication Settings).
3-4 Time Guardian v3.5 User’s Guide
Page 17
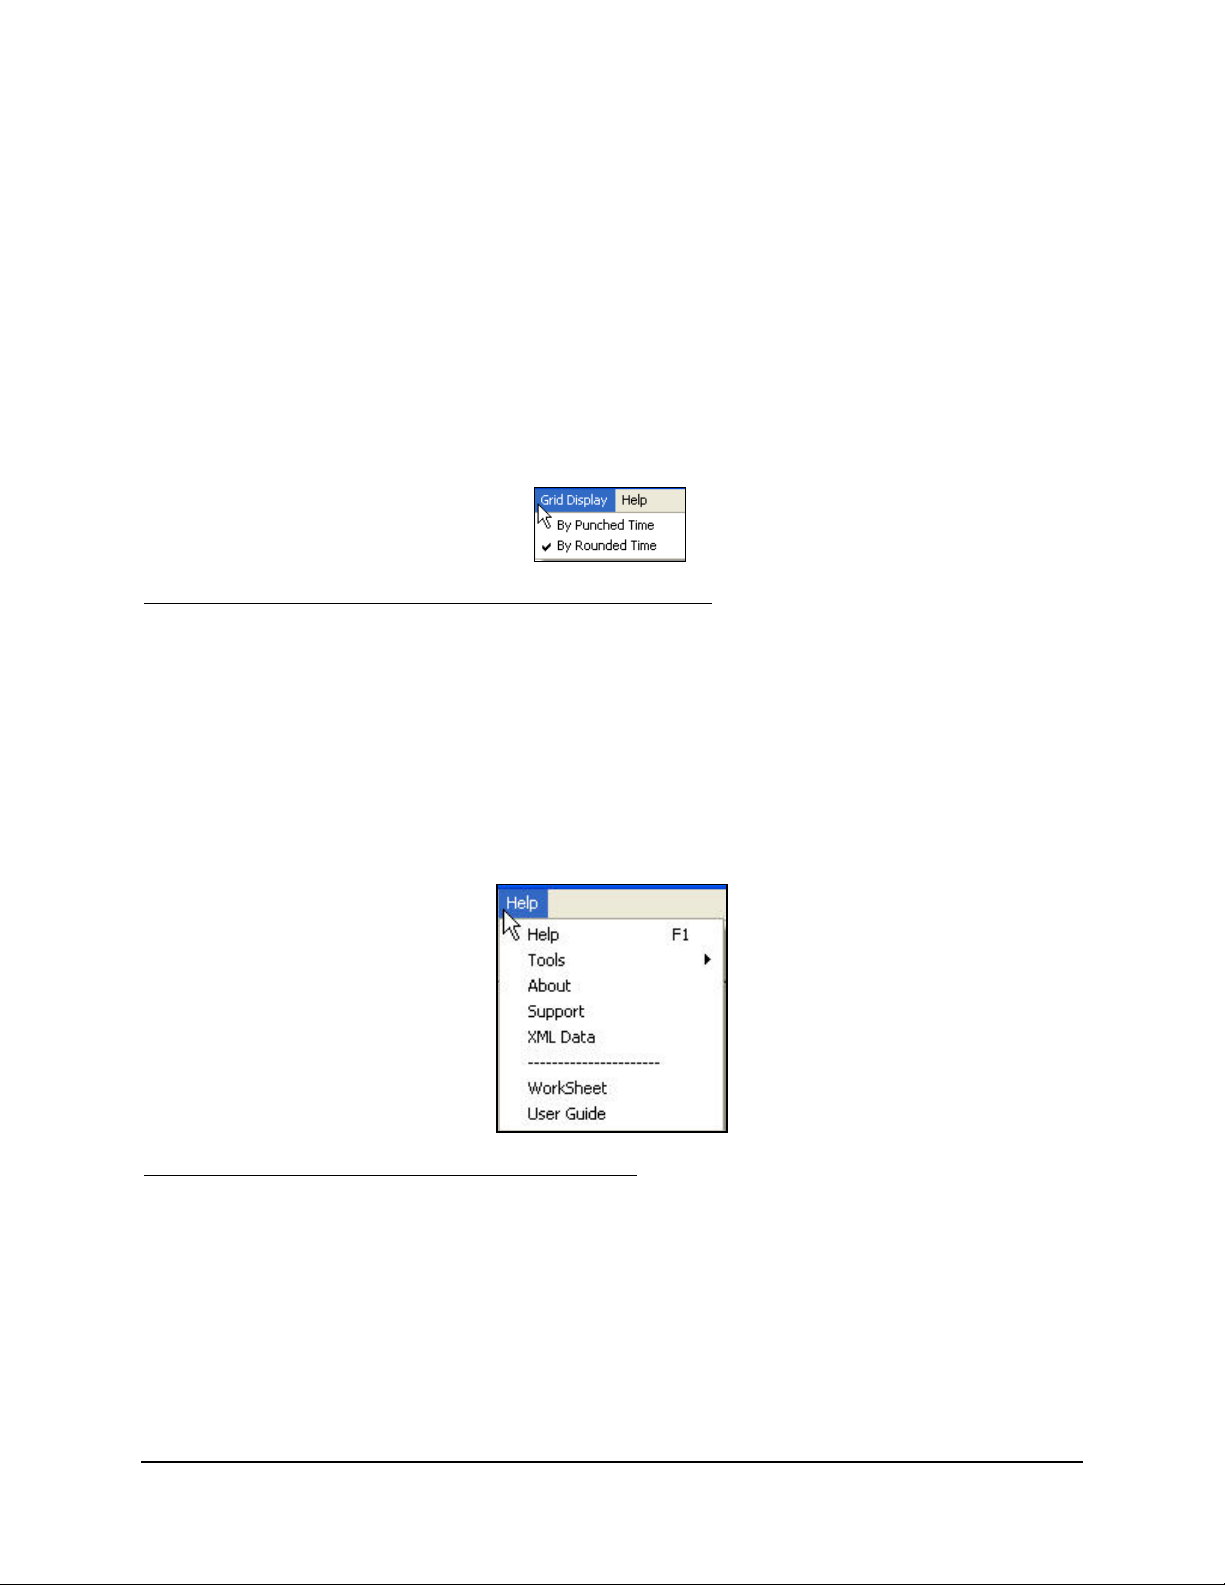
• Wizard: Basic: Contains three (3) tabs, including: General, Pay Policy, and Login. The
Wizard is the only place that changes can be made. For more information, refer to Chapter
4: Using the Wizard.
Advanced: Contains nine (9) tabs, including: General, Department, Pay Policy, Pay Code,
Exception, Schedule, Employee, Clock, and Login. The Wizard is the only place that
changes can be made to Pay Policy, Pay Code, Exceptions Tracking, Payroll Setup, and
Time and Hours Display format. For more information, refer to Chapter 4: Using the Wizard.
Grid Display Menu
The “Grid Display” menu allows you to select the way that punch information is presented in the
“IN” and “OUT” columns of the employee data field. Click on Grid Display from the main Time
Guardian screen view and the following dropdown menu will appear:
Descriptions of the Grid Display submenu functions follow:
• By Punched Time: Displays the employee’s actual punch as recorded at the terminal.
• By Rounded Time: Displays the employee’s time using the rounding rules of the Pay Policy
that the employee is assigned to.
Help Menu
The “Help” menu provides several options that will assist you in your use of the Time Guardian
software. Click on Help from the main Time Guardian screen view and the following dropdown
menu will appear:
Descriptions of the Help submenu functions follow:
• Help F1: Selecting this option will provide access to the entire User’s Guide, with searching
capabilities for better navigation. See Chapter 9, QS 9: Using On-Line Help of this guide for
more detailed Help information.
• Tools: Time Guardian comes with two built-in tools to assist you in the calculation functions.
These tools are Time Simulation and Hours Simulation. For further information on both of
these options, please refer to Chapter 7: Troubleshooting Calculations of this guide.
• About: This selection will provide you with the version of Time Guardian that you are
currently using. This information is required when placing a support call.
Time Guardian v3.5 User’s Guide 3-5
Page 18

• Support: This selection will automatically create a zipped backup of your data and allow
you to send it directly to Time Guardian Support. For more information on this option, refer
to Chapter 2: General Installation Guidelines, and the section Time Guardian Basic
Customer Support in this Guide.
• XML Data: this selection will export payroll information for selected employees into a XML
file.
• WorkSheet: This selection will launch Adobe Acrobat and the appropriate PDF WorkSheet
file (Basic or Advanced).
• User Guide: This selection will launch Adobe Acrobat and the PDF User Guide file.
Custom Toolbar
Time Guardian’s Custom Toolbar is located below the Main Menu. This toolbar can be
customized according to your personal preferences by selecting the “Custom Toolbar” option
from the “File” menu (see the following figure). Once open, you have the option to add and
delete icons by dragging and dropping your selection to and from the toolbar. Select “OK” to
save your settings.
The following figure displays the default icon “Select Employee” on the far left, which is used to
filter the employees displayed in the Employee List. The figure also displays all the other
options available for the toolbar, which are: Communications (Polling and Downloading), Setup
(Wizard), Help (Help Menu) and Reports (Print Icon). For detailed instructions on creating a
Custom Toolbar, please refer to Chapter 9: QS 1: Creating a Custom Toolbar.
3-6 Time Guardian v3.5 User’s Guide
Page 19
Report and Payroll Toolbars
Depending on what is active in the Report/Payroll View, one of the following toolbars will be
displayed to the right of the “Custom Toolbar.” When this area is blank, no report or payroll is
active. Below is a detailed description of the each of these toolbars.
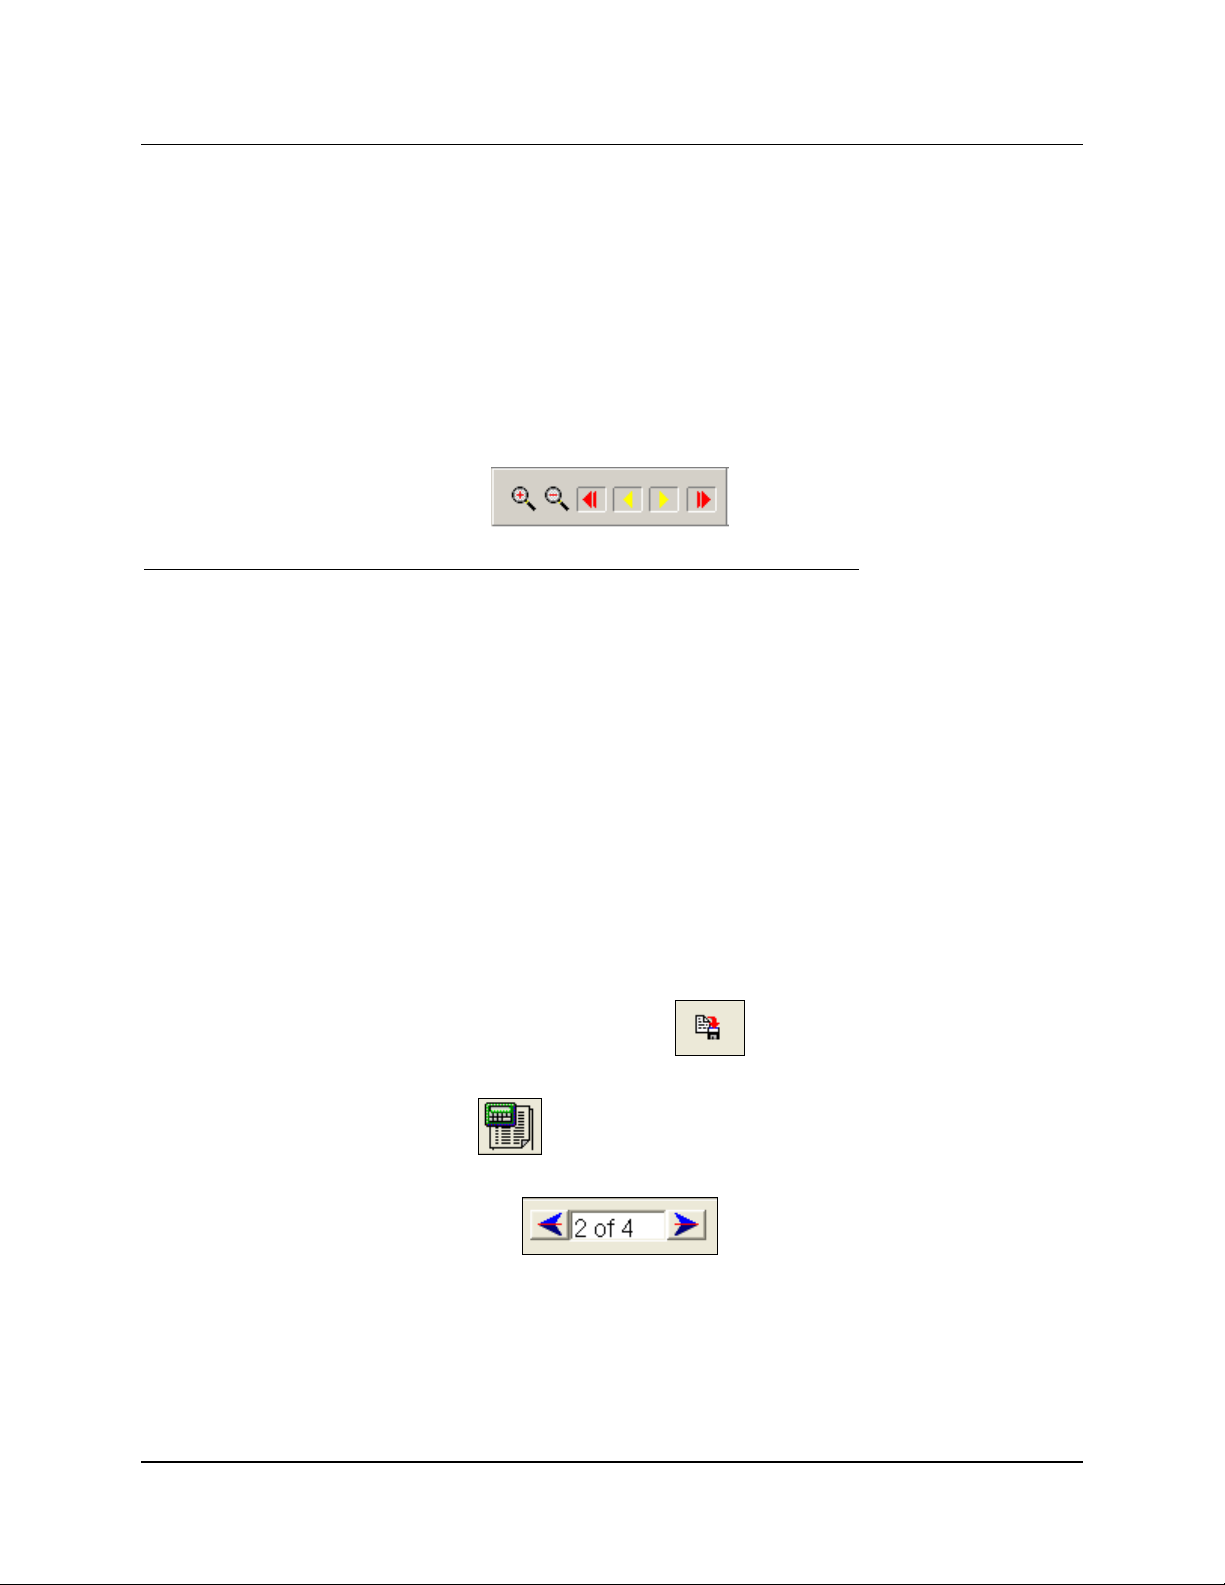
Report Sizing and Scrolling Toolbars
The following icons will only be active when a report is being displayed in the Report/Payroll
view and are helpful when viewing a report with multiple employees. The plus and minus
magnifying glasses allow you to increase and decrease the view of a report from 1 – 11, the
default view (size) is 5. The scroll arrows allow you to move from employee to employee. The
icons will appear alongside the custom toolbar as:
The following is a description of these icons seen above, from left to right:
• Enlarge: Selecting the magnifying glass with the Plus sign will maximize the view of the
current report.
• Decrease: Selecting the magnifying glass with the Minus sign will return the view of the
current report to the default setting.
• Left Red Arrow: Selecting this icon will take you to the first record of the current report.
• Left Yellow Arrow: Selecting this icon will take you back one record in the current report.
• Right Yellow Arrow: Selecting this icon will take you forward one record in the current report.
• Right Red Arrow: Selecting this icon will take you to the last record of the current report.
Payroll Interface Toolbar
The following icons will only be active when a payroll file is being displayed in the
Report/Payroll view. They are, from left to right:
• Save Payroll Settings: The Save Payroll Settings
for the selected payroll company.
icon saves all data entry made
• Run Payroll: The Run Payroll
icon creates the export file for the active pay period.
This file will be saved to the directory indicated in the payroll settings.
• Payroll Pages: The Payroll Pages
icons allow you to navigate through
each of the payroll settings. For example, the following are four pages of payroll settings for
QuickBooks interface:
Time Guardian v3.5 User’s Guide 3-7
Page 20
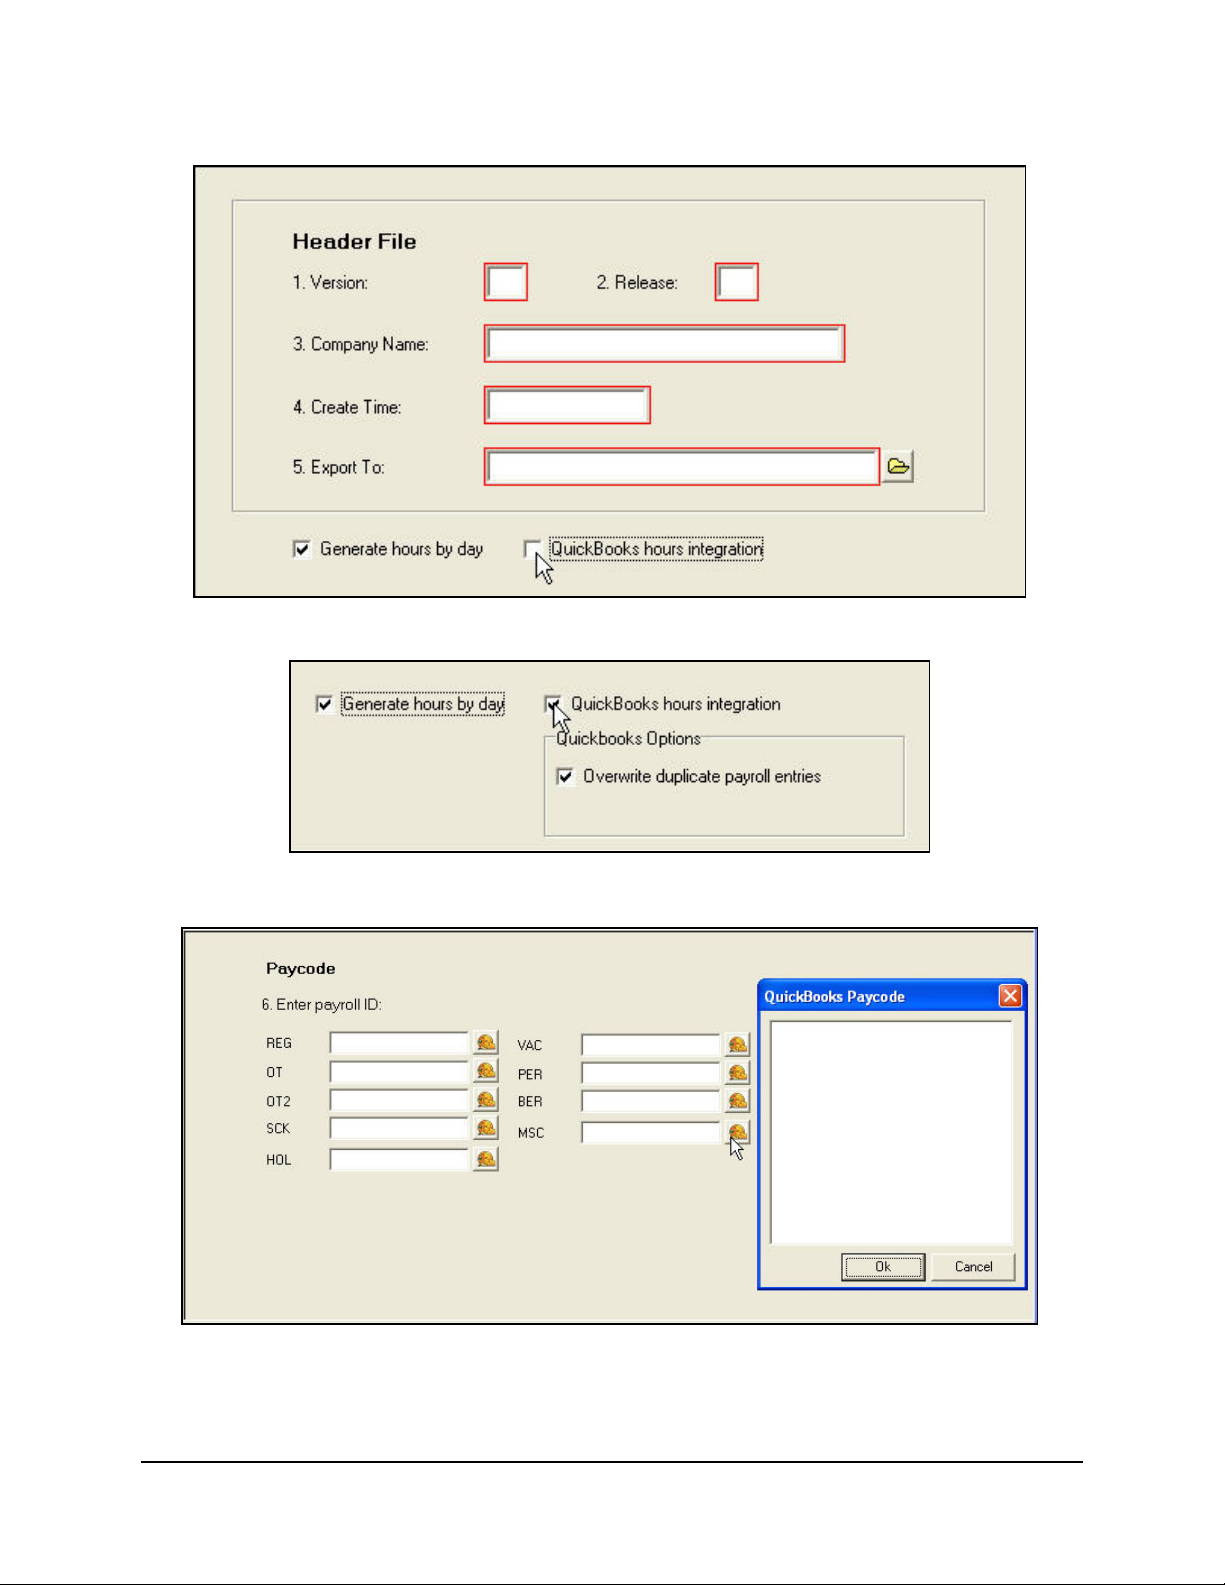
Page 1 of 4
Upon clicking "QuickBooks hours integration", the following will appear:
Page 2 of 4
3-8 Time Guardian v3.5 User’s Guide
Page 21
Page 3 of 4
Page 4 of 4
Grid Display Toolbar
Time Guardian allows you to change the data displayed in the Report/Payroll view, Hours Grid,
and the Employee Totals. This two-part view displays the date range of the pay period currently
being displayed and its relative pay period. Use the red arrows to advance or scroll backward
through the data.
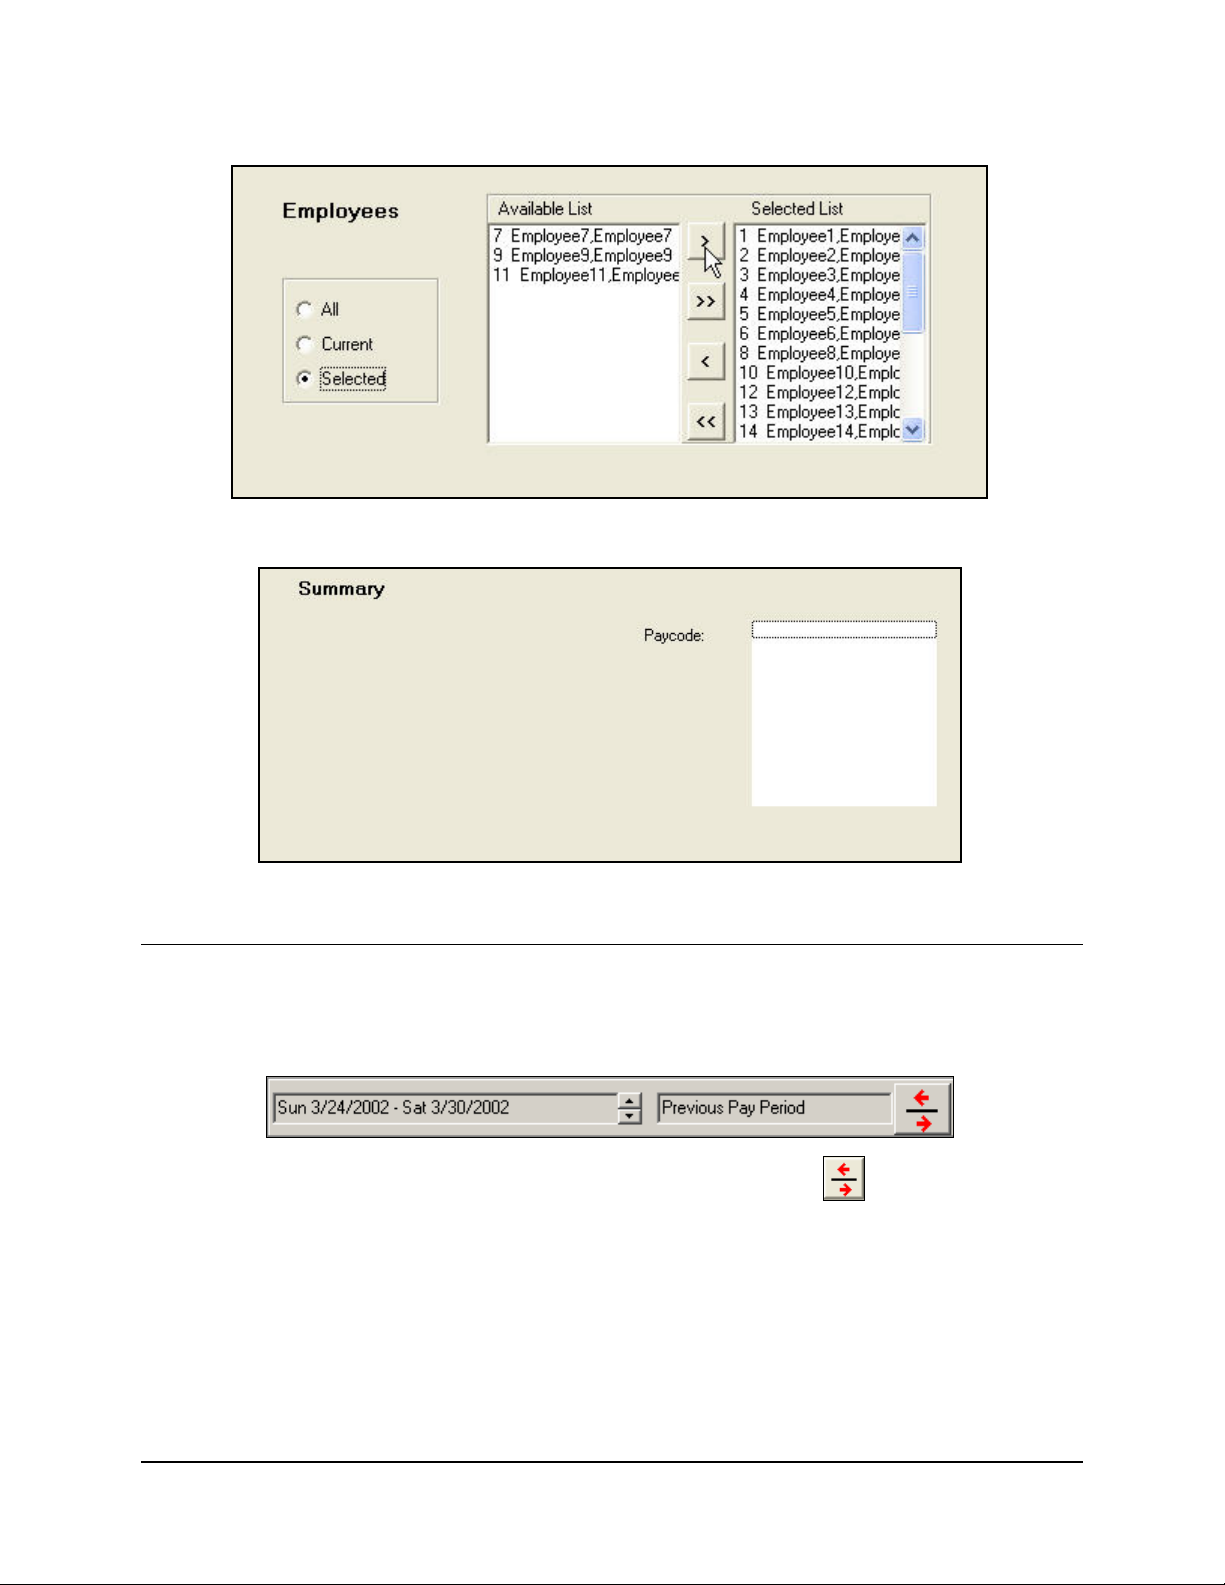
You can also left mouse click on the Current Pay Period arrow button to open the Pay
Period Selection menu as illustrated below. This menu will allow you to choose the direction
(before, after, previous, current) and number of pay periods to move the Current Pay Period
date.
Time Guardian v3.5 User’s Guide 3-9
Page 22
Reports and Payroll List
Located to the left of the Main view, the Reports and Payroll List box displays icons of the nine
reports available, and the Payroll Interface icon. To select a report, click on the icon and the
report will be displayed in the Report view of the Main screen. The Payroll Interface can be
launched in the same manner. For more information about Reports and the Payroll List, please
refer to Chapter 6: Reporting Functions.
The following illustrates how the Reports and Payroll Icon List appears:
3-10 Time Guardian v3.5 User’s Guide
Page 23
Report and Payroll View
Located to the right of the Report List and below the Icon menus, the Report/Payroll view
displays the currently selected Report or Payroll. If no report or payroll is selected, this section
will be blank. By default, both the Hours and Reports/Payroll windows are displayed. To view
only the Report/Payroll, select Display from the Main menu, and then choose the submenu
Report or Payroll to remove the Hours Grid Display from the view. Use the Report Sizing and
Scrollbar icons to move throughout the selected report. For more information about Reports,
please refer to Chapter 6: Reporting Functions. The following are examples of the Report and
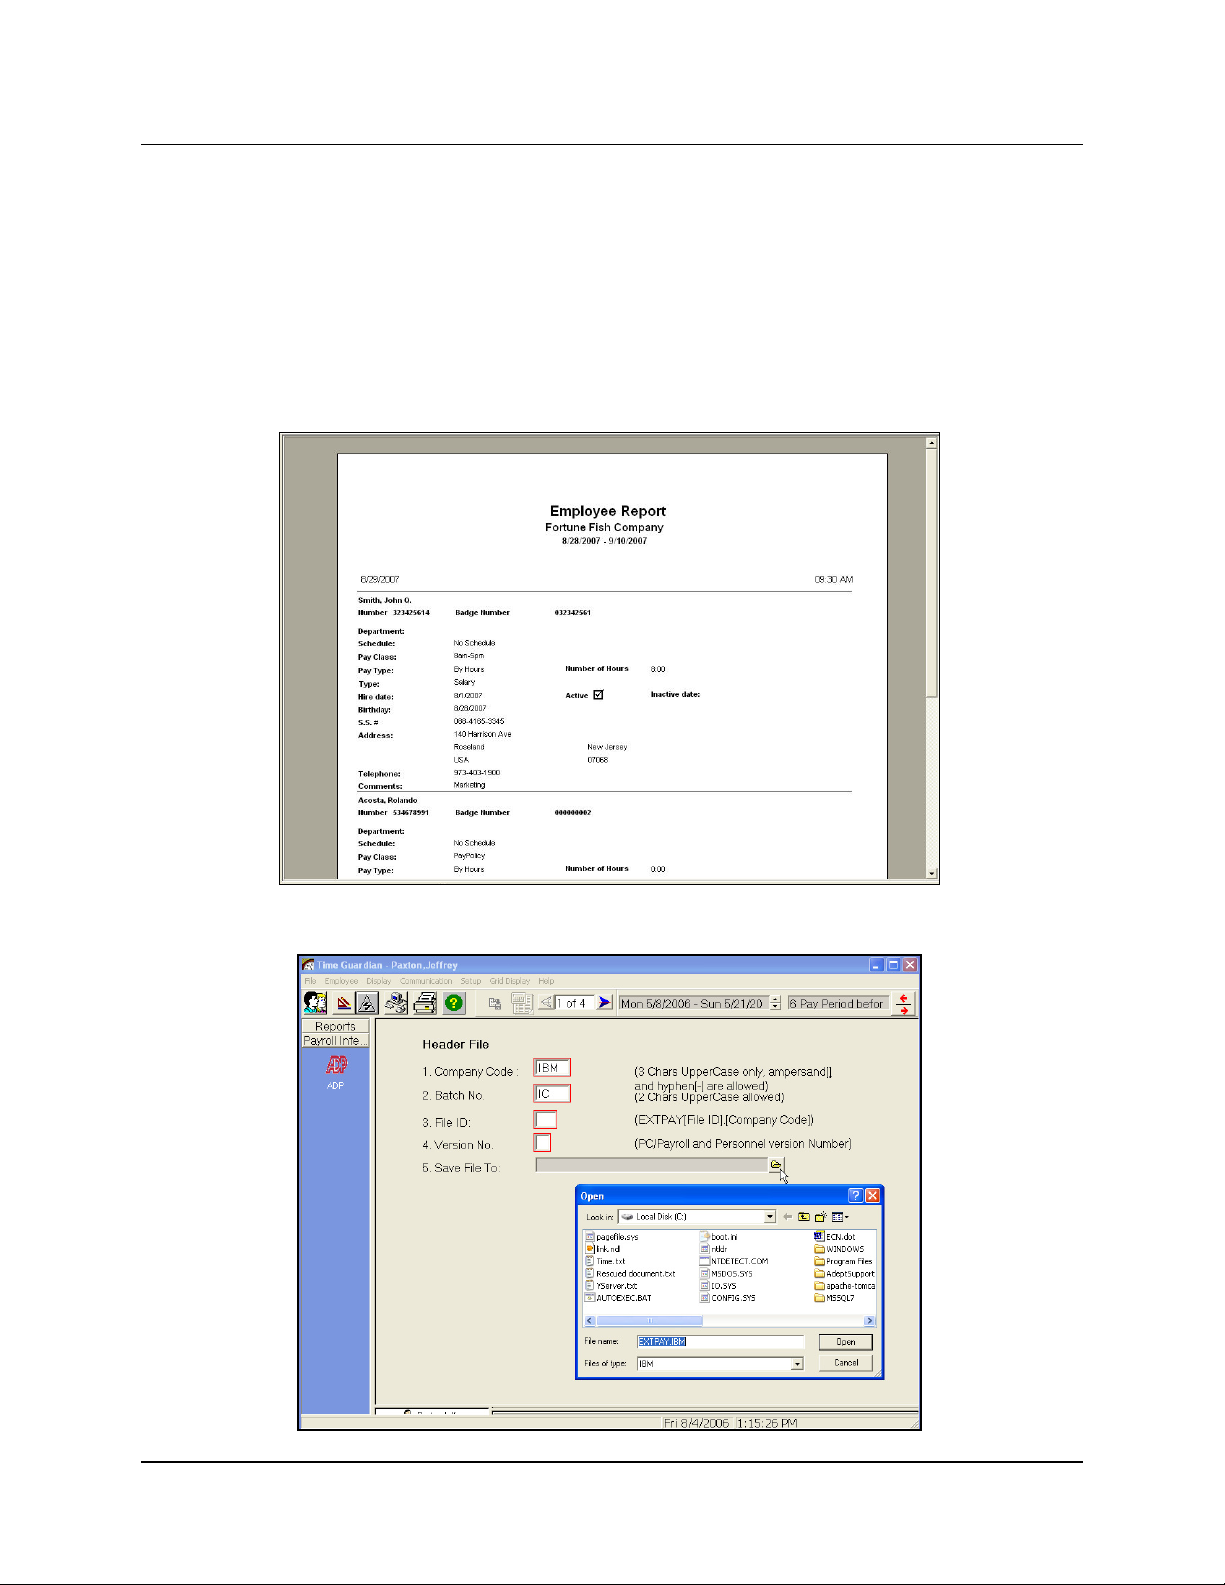
Payroll views located on the Main screen:
Report View
Payroll View
Time Guardian v3.5 User’s Guide 3-11
Page 24

Employee List
The Employee List is Located below the Report/Payroll View and to the left of the Hours Grid
View. The Employee List displays all of the employees currently in the system or employees
that were selected using the Select Employee sort function. As seen in the example, the icon
for the selected employee changes from multiple heads to a single head, indicating that this is
the active employee. The name and badge number will also be displayed on the Status Bar at
the bottom of the screen.
To move from one employee to another, left mouse click on the desired employee. To open an
employee’s record, double click on that employee’s name.
Right mouse clicking inside the Employee List will display a dropdown menu (see above
example) that will allow you to select one of the following operations:
• Add Employee: Allows you to add a new employee.
• Delete Employee: Allows you to delete the selected employee.
Rather than deleting an employee, it is recommended that you make them inactive so that
data can be referred to for historical purposes.
• Employee: Opens the Employee Maintenance screen.
• Department: Allows you to add, edit, and delete departments.
• Schedule: Allows you to add, edit, and delete schedules.
• Sort By: This option allows you to select the sorting method of the Employee List. The
following options are available: Employee Number, Badge Number, Last Name, First Name,
or Department.
3-12 Time Guardian v3.5 User’s Guide
Page 25
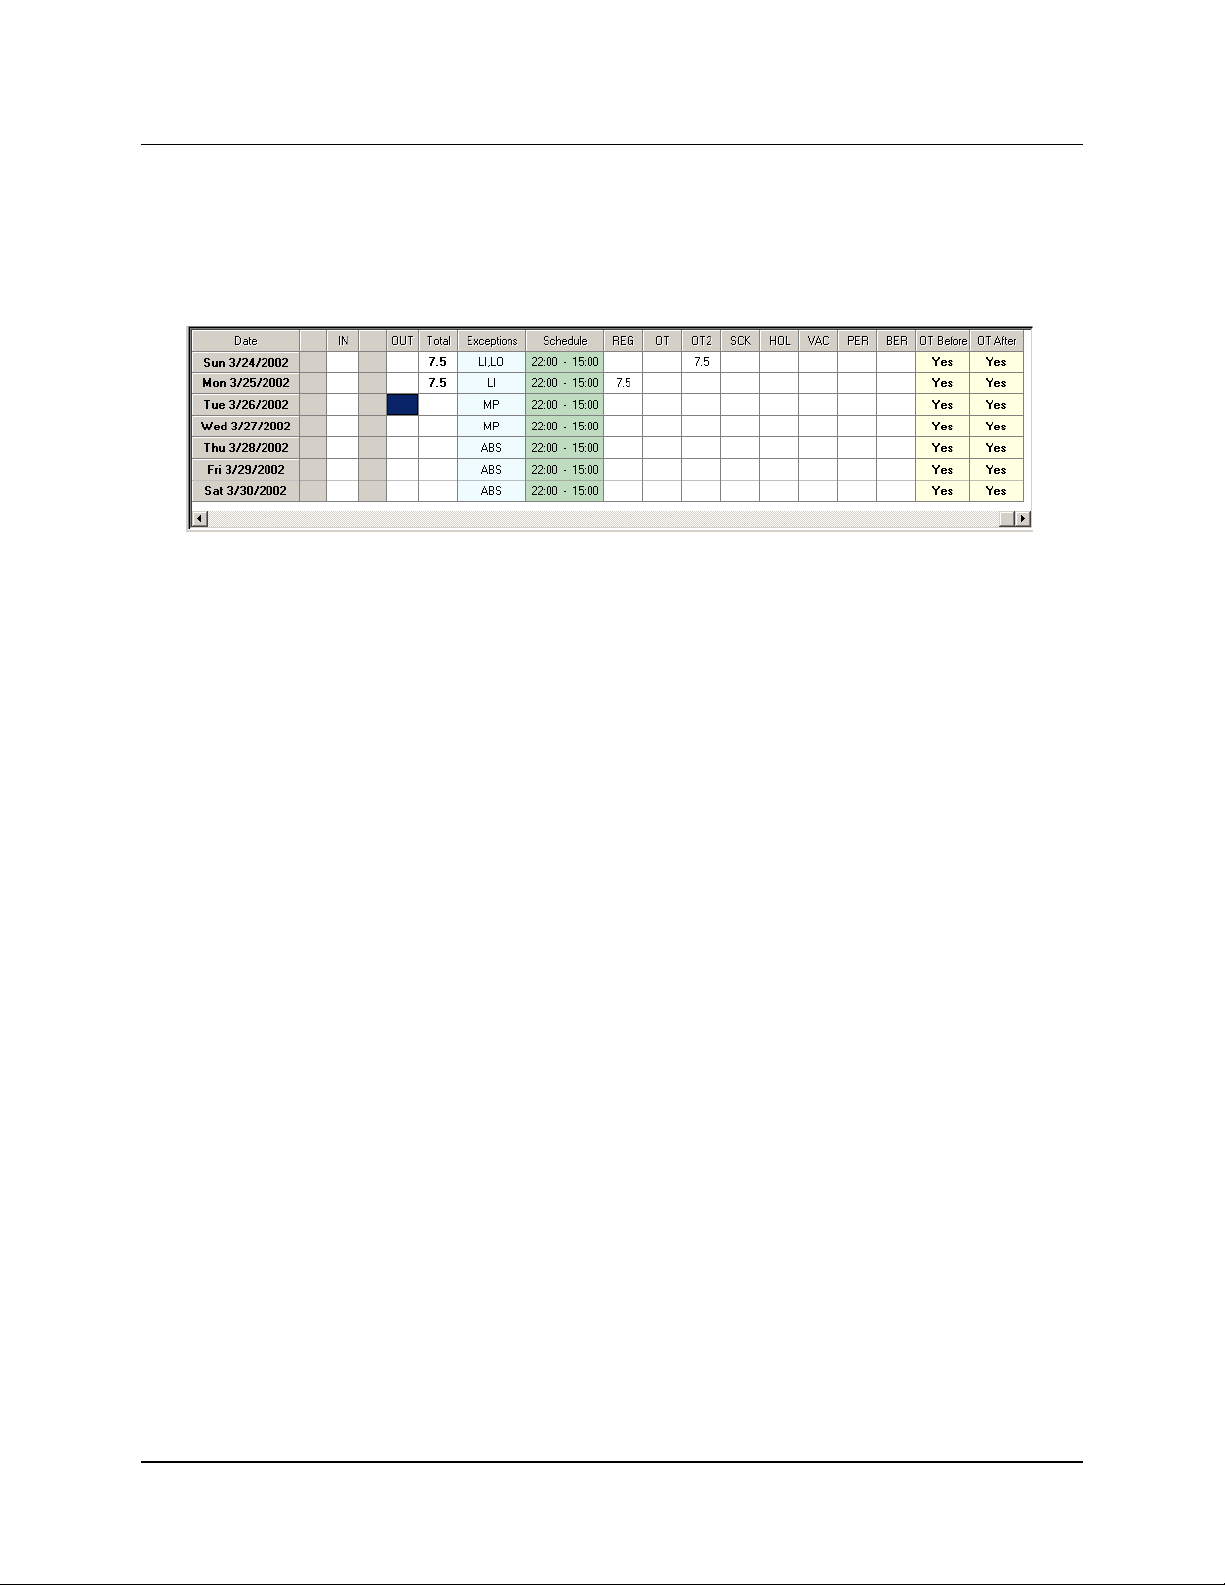
Hours Grid View
The Hours Grid displays all of the information pertaining to the currently selected employee as
shown in the following example. The scroll bars will allow you to scroll through data that does
not fit on the screen. A consistent reference point is the date column, which is fixed as the first
column starting from left to right. All other data may vary depending on where you are in the
Hours Grid. The information displayed in the grid can also be varied based on the selections
made during the setup Wizard.
The following is a detailed description of the Hours Grid columns:
• Date: A fixed heading displaying the dates of the active pay period.
• Blank: A blank column will appear before each IN and OUT punch. These fields will indicate
the date that the punch was recorded on.
• IN: By default, Time Guardian displays two IN columns. However, if more than four punches
are entered on a day, an additional row will be automatically added to accommodate the
punches.
• OUT: By default, Time Guardian displays two OUT columns. However, if more than four
punches are entered on a day, an additional row will be automatically added to
accommodate the punches.
The time displayed in the IN and OUT columns can vary based on selections made during
the setup Wizard. The Grid View option of the Main menu will allow you to modify how the
time is displayed. The default display is Rounded Time.
• Total: This column will display the total number of hours worked in a day.
• Exceptions: If you select Exception Tracking in your setup, this field will display the flags.
• Schedule: This column will display the scheduled IN and OUT time assigned to an
employee. If no schedule is found for the employee, “No Schedule” will be entered as a
default.
• Pay Code Breakout: Time Guardian has nine Pay Codes to choose from and selections
made during setup will determine what Codes are displayed. Employee hours will be
displayed accordingly.
• Tip/Bonuses Pay Codes: Time Guardian allows you to track Tips and/or Bonuses based
on selections made during setup. For more information on these Pay Codes, please refer to
Editing Employees, page 4-27.
• OT Before: As determined by your initial setup, overtime hours must either be authorized or
are automatically calculated. This field displays the default selection for your system. For
information on editing this column, please refer to Employee Tab (Employee Administration,
page 4-22.
• OT After: As determined by your initial setup, overtime hours must either be authorized or
are automatically calculated. This field displays the default selection for your system. For
information on editing this column, please refer to the Employee Tab (Employee
Administration, page 4-22).
Time Guardian v3.5 User’s Guide 3-13
Page 26
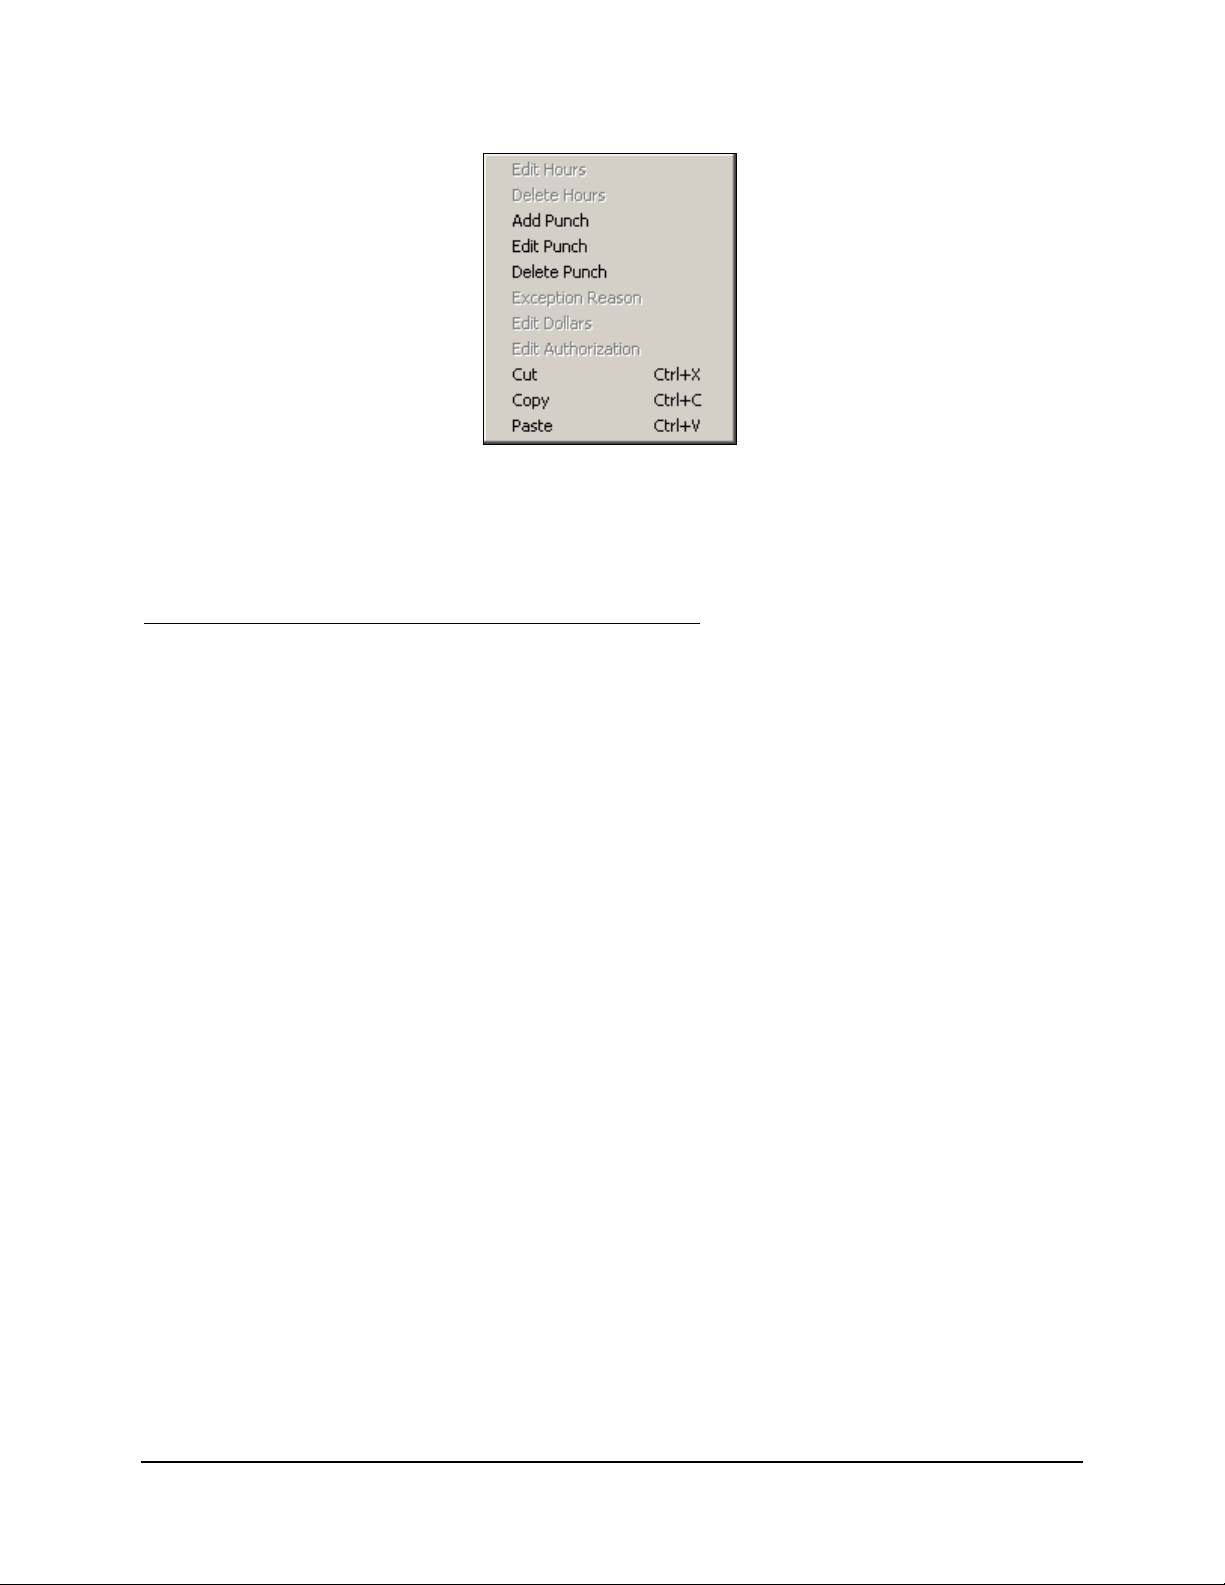
Right mouse clicking anywhere in the Hours Grid will display the following dropdown list:
The location of the cursor when you right mouse click will determine the highlighted options
available to you.
Edit menus can also be entered by double clicking in the field (the fields must contain data
to be edited) you wish to edit.
The following options for the Edit menus are listed below:
• Edit Hours: This option is active when the cursor is in any of the “Hour Pay Codes” areas.
This selection allows you to add employee hours. All edits are displayed in red.
• Delete Hours: This option is active when the cursor is in any of the “Hour Pay Codes”
areas. This selection allows you to delete employee hours.
• Add Punch: This option is active when the cursor is in any of the “IN” or “OUT” columns.
This selection will allow you to add a punched time in an area where a punch is missing. All
added punches are displayed in red.
• Edit Punch: This option is active when the cursor is in any of the “IN” or “OUT” columns.
This selection will allow you to edit an existing punch. All edited punches are displayed in
red.
• Delete Punch: This option is active when the cursor is in any of the “IN” or “OUT” columns.
This selection will allow you to delete an existing punch.
• Exception Reason: This option is active when the cursor is in the “Exception” column. This
selection will allow you to add reasons to explain existing exception flags.
• Edit Dollars: This option is active when the cursor is in any of the “Dollar Pay Codes”
areas. This selection allows you to add or modify the dollar amount assigned to any
employee for that day.
• Edit Authorization: This option is active when the cursor is in either the “OT Before” or “OT
After” columns. This selection allows you approve Overtime on a daily or weekly basis.
• Cut: This feature allows you to remove data from a field. CTL+X is the shortcut for this
feature.
• Copy: This feature allows you to copy data from one field to another. CTL+C is the shortcut
for this feature.
• Paste: Once data has been Cut or Copied, this function allows that data to be placed in
different fields by using the Paste function. CTL+V is the shortcut.
3-14 Time Guardian v3.5 User’s Guide
Page 27

Adding, Editing and Deleting Employee Punches
The following is an example of the Add, Edit, and Delete Punch screens in a side-by-side view.
This is done to demonstrate the similarities in these functions. Each screen displays the
Employee Name, Punch Date, Punch Day and Punch Time.
Add Punch
The Add Punch module is accessed by double clicking on the desired IN or OUT punch field or
right mouse clicking in the field to reveal the dropdown menu and selecting Add Punch. Enter
the time in the Punch Time field and select Save to close the module.
Added or Edited punches or hours will be displayed in red.
Edit Punch
The Edit Punch module is accessed by double clicking on the desired IN or OUT punch field or
right mouse clicking in the field to reveal the dropdown menu and selecting Edit Punch. The
current time will be highlighted in the Punch Time field. Edit the punch and select Save to close
the module.
Added or Edited punches or hours will be displayed in red.
Delete Punch
The Delete Punch module can only be accessed from the “Delete Punch” option of the
dropdown menu. Right mouse click on the punch to be removed to display the dropdown
menu, and select Delete Punch. The current time will be highlighted in the Punch Time field.
Select the Delete button to remove the punch and automatically close the module.
Once deleted, the only record of the original punch will be in the Audit Trail Report.
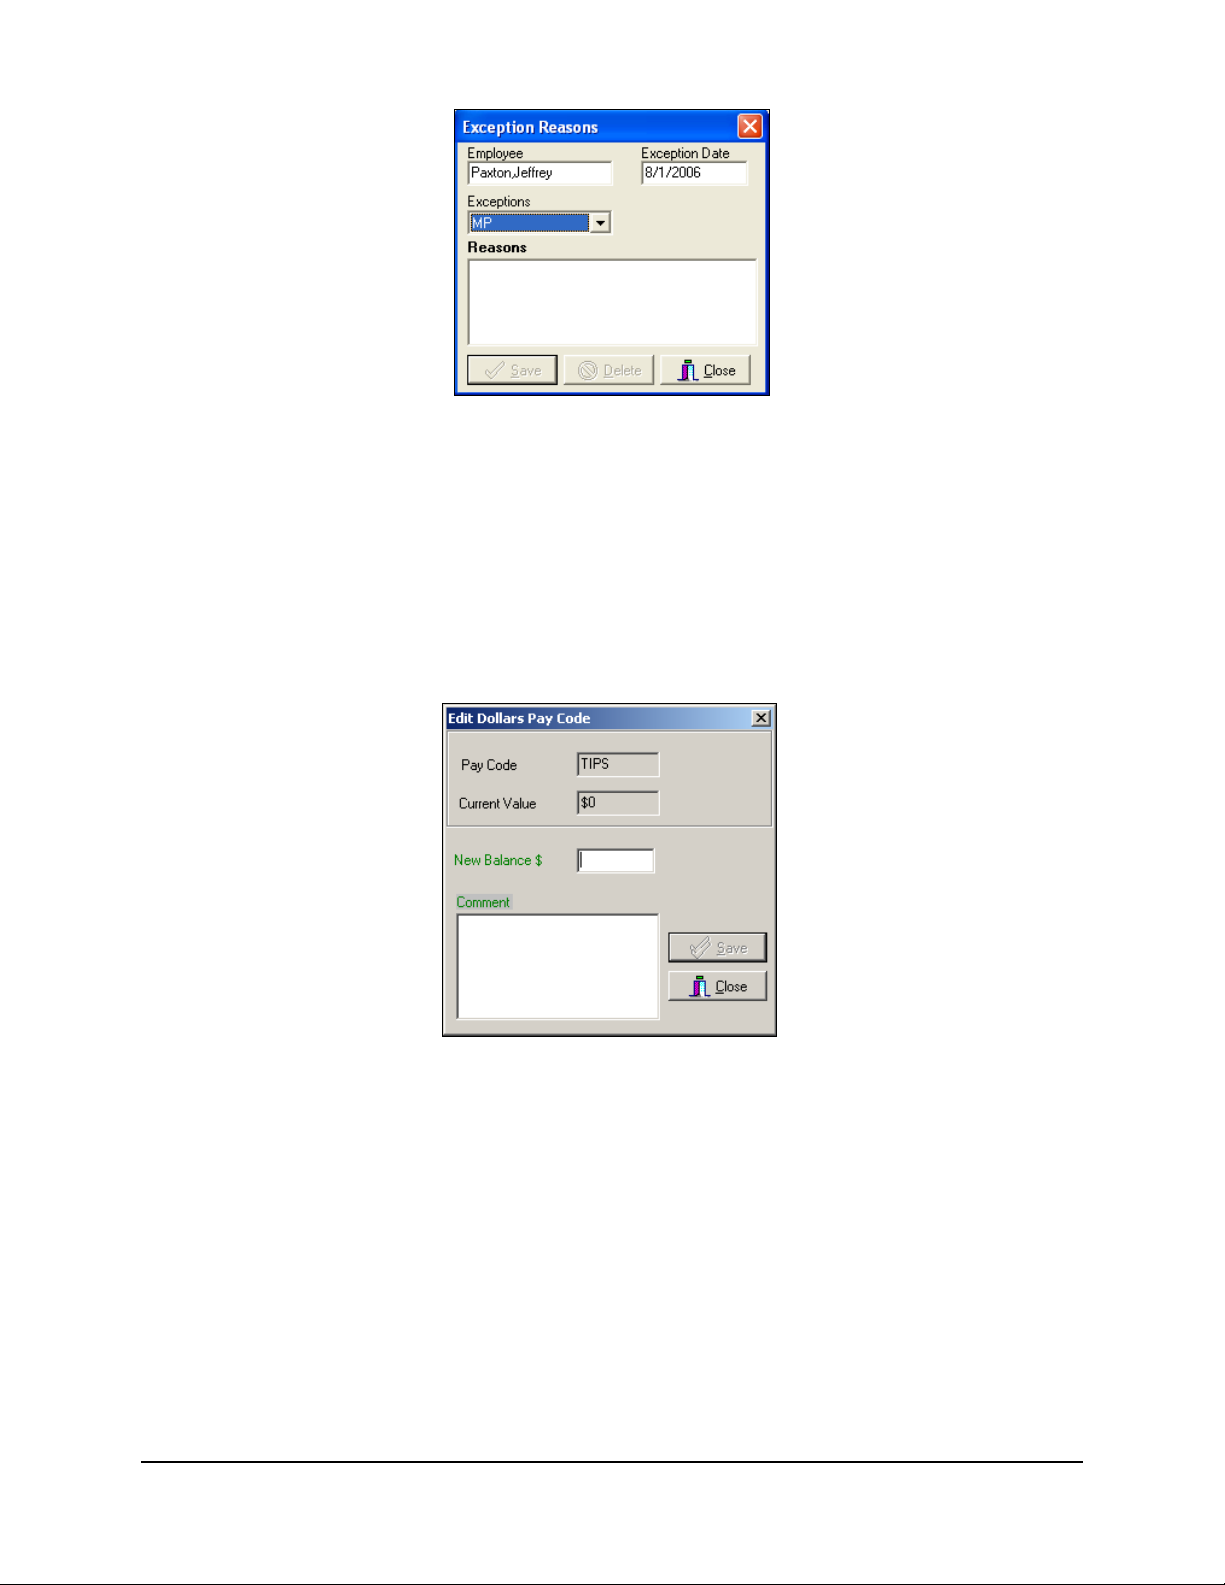
Assigning Reasons to Exception Flags
Exceptions are displayed in the Exceptions column of the Hours Grid. Exceptions flags will vary
depending on the selections made during the setup Wizard. When an Exception appears for an
employee, Time Guardian allows you to associate a reason for that flag which will be displayed
as part of the Exception Report. Double clicking on the desired field accesses this module (see
the following figure for an example). You can also right mouse-click in the field and select the
Exception Reason option from the dropdown menu. The Employee Name, Exception Date and
a list of the exceptions for the day will be displayed. The cursor will appear in the Reasons field
where you can enter the desired comments for the reason. Select Save to exit.
Time Guardian v3.5 User’s Guide 3-15
Page 28
Editing Punches During Daylight Saving Time
During Daylight Saving periods, edited punches are displayed in red. Edited Daylight Saving
Time punches will be displayed in green, and punches adjusted by Time Guardian for Daylight
Saving Time are displayed in blue.
Editing Employee Total Hours, Tips and Bonuses, and Rates (Wages)
The following figure is an example of an Edit Dollars Pay Code box for Tips/Bonuses. Each
view box displays the Employee Name, Punch Date and Punch Day.
The Edit Pay Codes Balance module is accessed by double clicking on the desired field or right
mouse clicking in the field to reveal the dropdown menu. Edit Pay Code is used in two ways: to
edit a pay code balance for adjustment purposes or to add hours for an employee who may be
on vacation or absent.
Each pay code being used by your system has a separate pay code column. Once open, enter
the desired amount in the New Balance field, along with comments associated with the
changes in the Comment field. Select Save to close the module.
When entering a Tip or Bonus code for the first time, the Current Value field will be blank. When
editing an existing code, this field will contain the current value. In both cases, enter the desired
amount in the New Balance $ field along with the comments associated with this action and
select Save to update and close the module. Even though this field contains a dollar value, the
only time a decimal is needed is when entering a number like 5.25.
Added or Edited punches or hours will be displayed in red.
3-16 Time Guardian v3.5 User’s Guide
Page 29
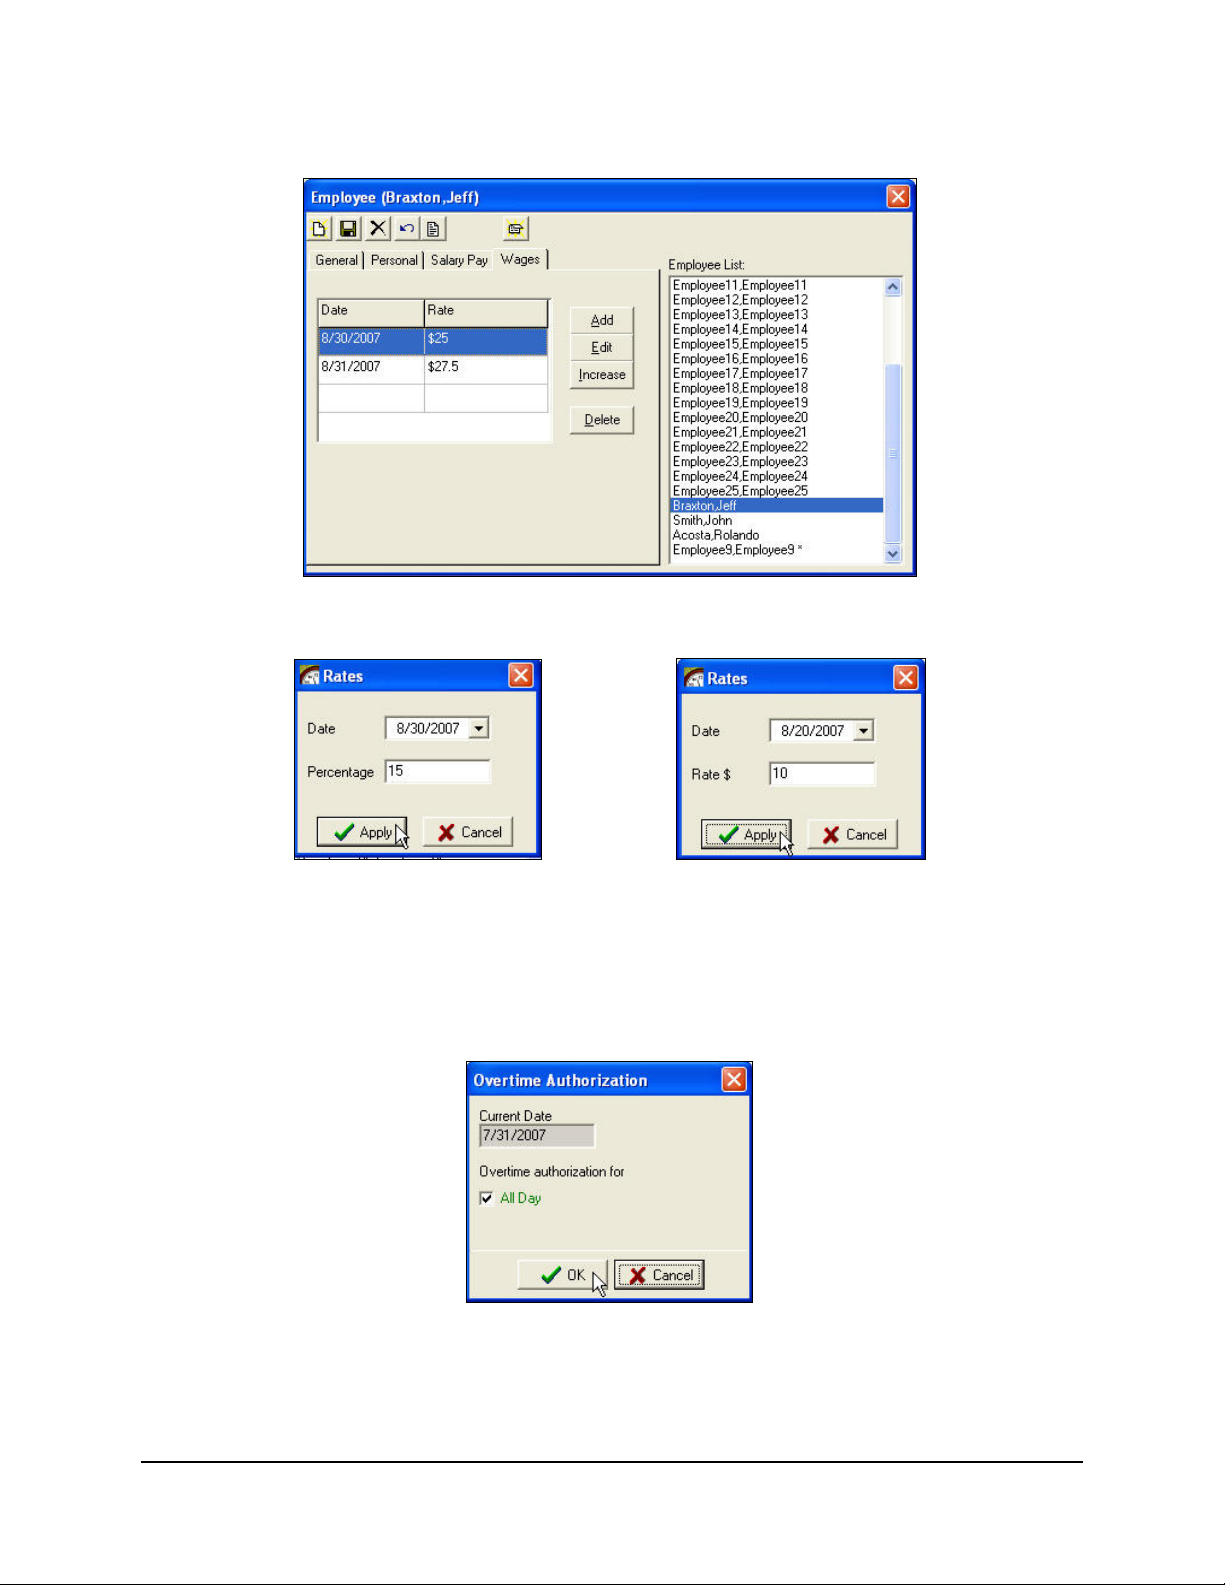
The following figure is an example of a Wages box for Employee Wages. Each Employee
Wages box displays the Employee Name, Date (effective date), and Rate.
You can Add, Edit, or Increase (by percentage) Wages from the following Rates screens:
Editing Overtime Authorization
The following is an example of the Overtime Authorization module for a scheduled employee.
Double clicking on the desired field or right mouse clicking in the field accesses the Edit
Authorization module. A dropdown menu will be displayed, allowing you to select Edit
Authorization.
Time Guardian allows you to select “Yes” or “No” for authorization for a given day. To apply
authorization for the entire week, select “Applies for all days in Pay Period” box. Once your
selection has been made, select OK button to close the module.
Time Guardian v3.5 User’s Guide 3-17
Page 30

Authorizing Non-Scheduled Hours
To authorize hours for an employee who has worked on a Non-Schedule day, double click in
either of the OT fields. The following Overtime Authorization screen will appear with the “All
Day” check box. Select the OK button to have Time Guardian calculate hours for that day.
Note: If you answered yes to the question “Do hours worked on an unassigned schedule
require authorization?” in the setup wizard, this option will make it easier to authorize
hours for the employee. Until the hours are authorized, no hours will be calculated for the
employee.
Pay Period Hours, Wages and Dollar Totals
The Main view displays the Hour, Wage, and Dollar totals for the selected Pay Period of the
currently selected employee. The totals are sorted by pay code. As seen in the following
example illustration, the number of Pay Codes displayed will vary based on your configuration.
3-18 Time Guardian v3.5 User’s Guide
Page 31
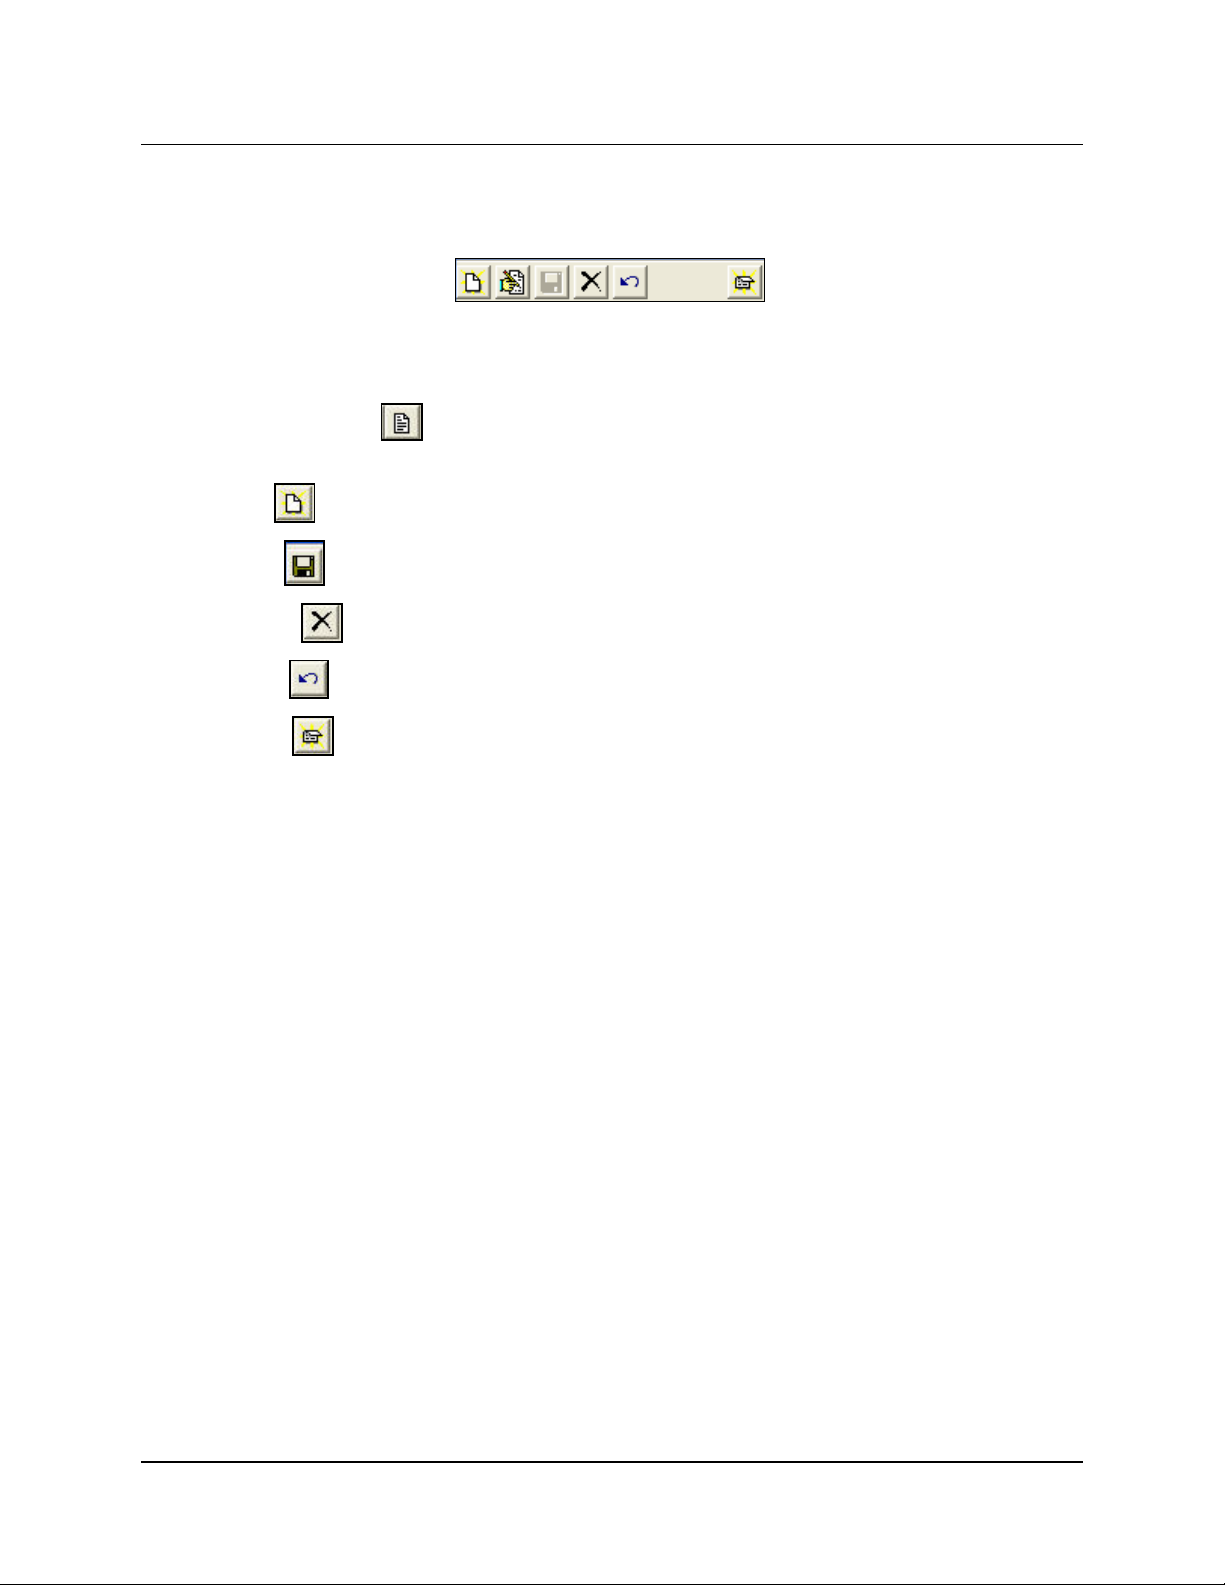
Module Toolbar
Once a module has been opened, a toolbar will be displayed at the top of the screen. The icons
will become active as needed depending upon the screen selected. The following figures
display all of the currently available icons.
For the above toolbar example, the icons are, from left to right:
• New icon: Allows you to create a new record in the module.
• Global Assign icon
employees (Only available from the Employee information module).
• Edit icon
• Save icon
• Delete
• Undo icon
• Close icon
icon : Allows you to delete the currently selected record.
: After selecting a record from the list, click on this icon to make edits.
: Allows you to save changes made to new or edited records.
: Allows you to undo the last command.
: Allows you to close and exit the module.
: This feature allows you to assign the same profile to selected
Time Guardian v3.5 User’s Guide 3-19
Page 32

This page intentionally left blank.
3-20 Time Guardian v3.5 User’s Guide
Page 33
Chapter 4: Using the Wizard
The Wizard (Basic and Advanced) is used to set up Time Guardian. It is also the only place to
change the following items:
• Hours Display
• Minutes Display
• Payroll Setup
• Pay Policy including Rounding, Meals and Overtime settings
• Exceptions
• Pay Codes
• Auto Polling
• Door Access and Bell Schedules
• Backup Schedule
• Department List
• Employee List
• Schedules
• Wages
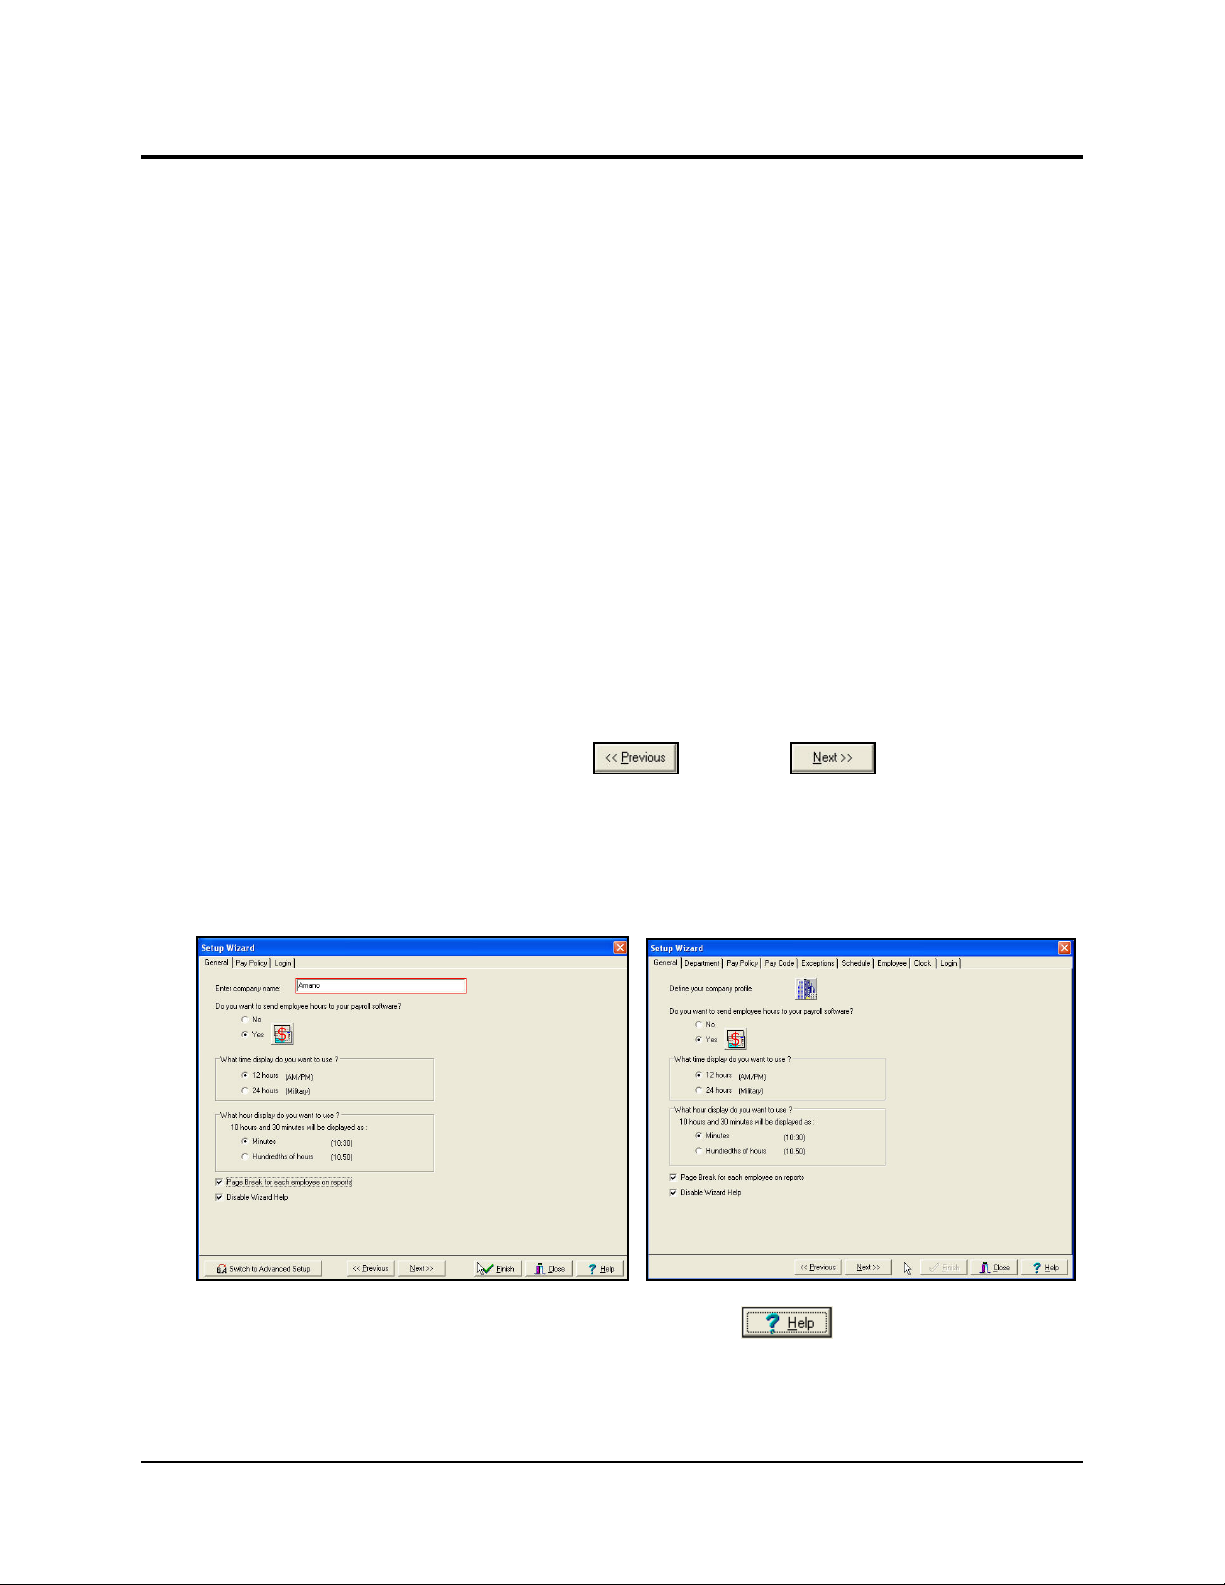
As shown in the following Figures, the Basic Setup Wizard screen contains three tabs:
General, Pay Policy, and Login. While the Advanced Setup Wizard contains nine tabs:
General, Department, Pay Policy, Pay Code, Exceptions, Schedule, Employee, Clock, and
Login. For both Wizards, use the <<Previous
between the tabs or click on the desired tab. Once modifications have been made, be sure to
save your changes, select “Finish” button and Close button to exit Wizard. Please refer to this
Chapter and subsequent Chapters in this User’s Guide for references to these tabs. It is also
recommended that any changes be recorded in the appropriate Time Guardian Wizard
Worksheet for historical purposes and easy reference.
or Next>> buttons to navigate
Note: If “Disable Wizard Help” is checked, click on the Help
to popup Help screen.
Time Guardian v3.5 User’s Guide 4-1
button while in any tab
Page 34
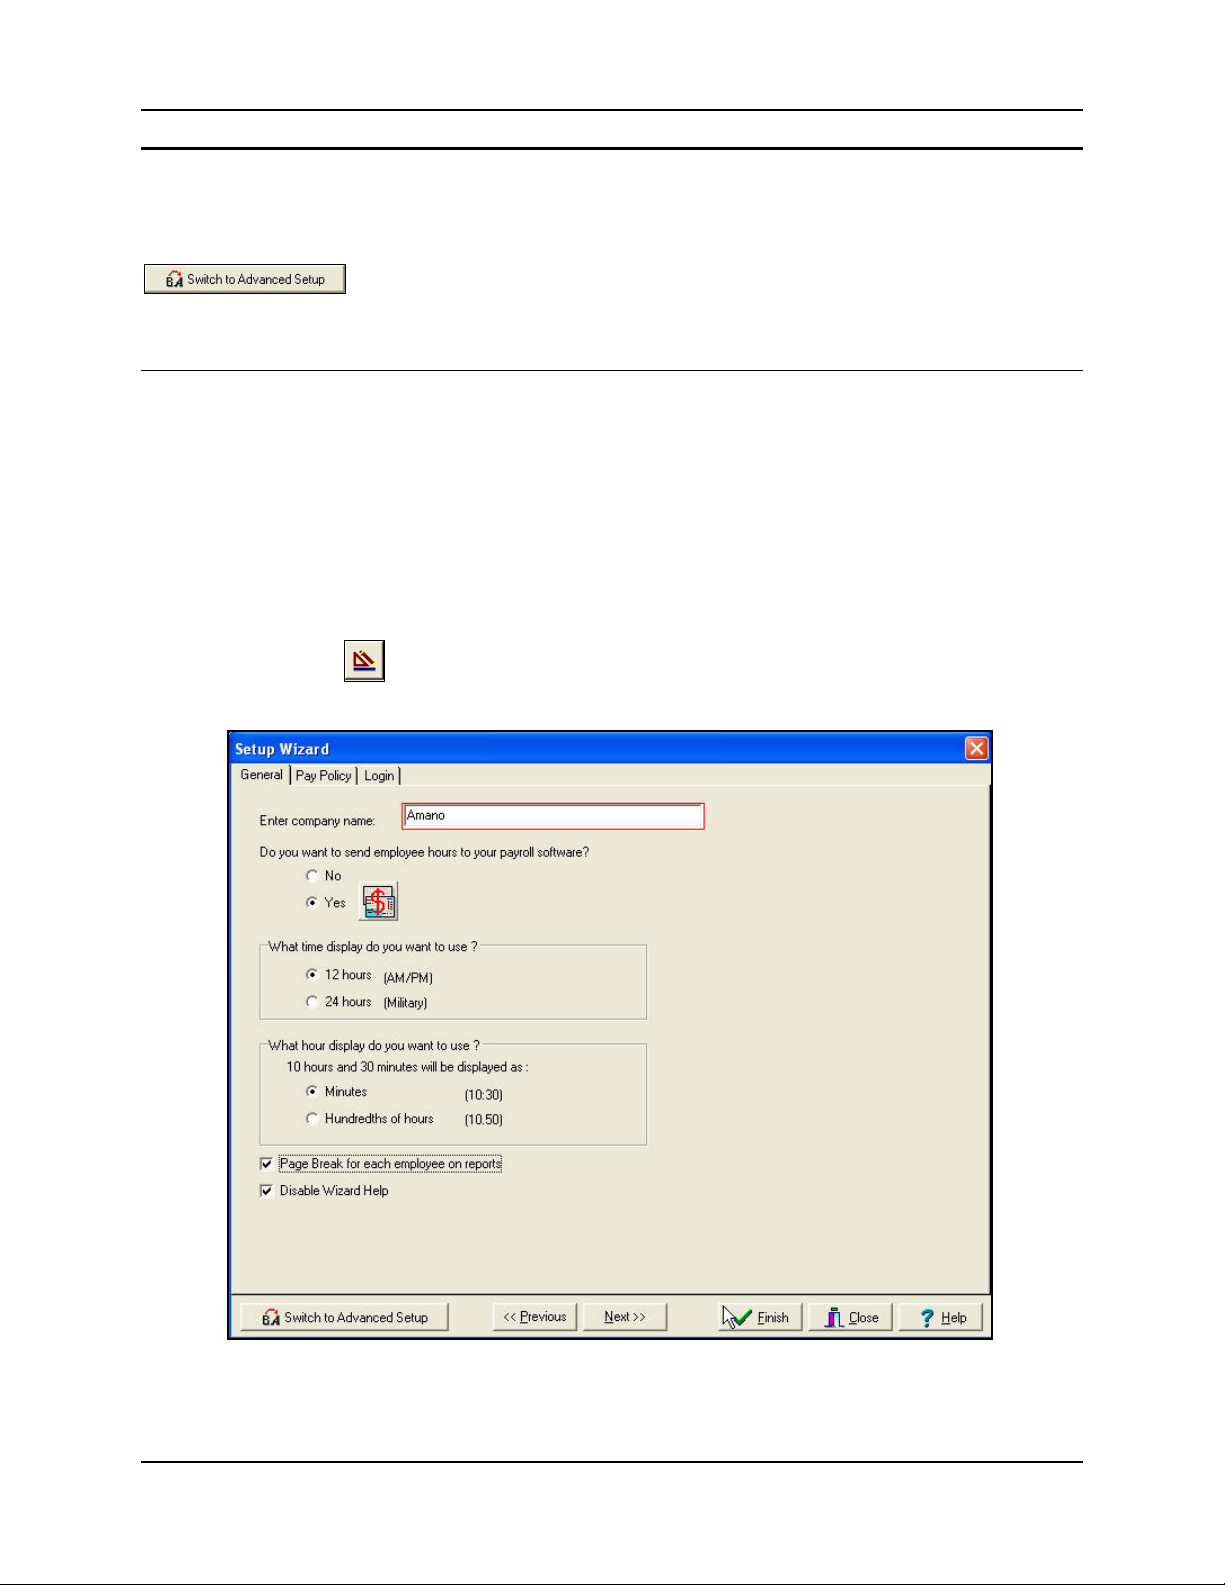
Basic Setup Wizard
Select the Basic Setup Wizard to provide an easy-to-use quick configuration of Time Guardian
for a standard non-complex Time and Attendance system. This wizard does not provide
employee wages/salary pay and/or complex rounding/overtime rules. However, after
completion, you can switch to the Advanced Set Wizard at any time by pressing the
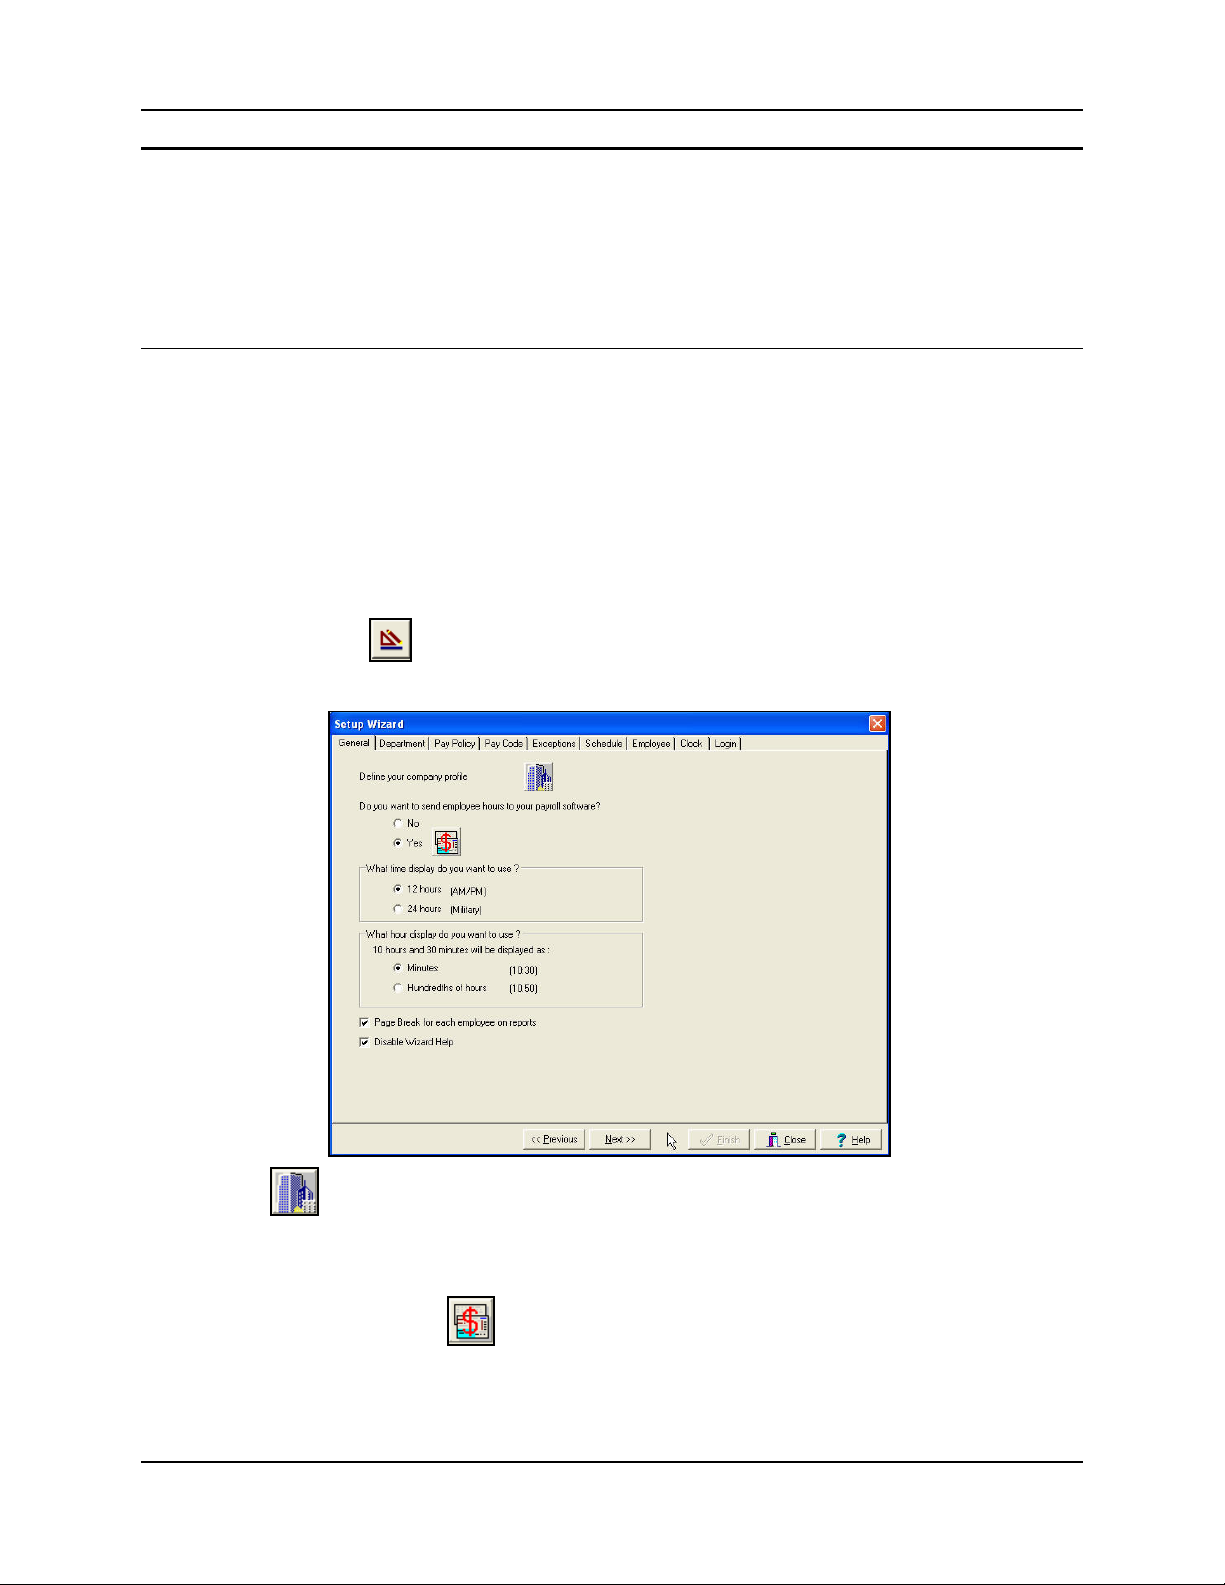
General Tab
This option allows you to define basic company information for Time Guardian such as:
• Company name
• Payroll software (select payroll system to interface directly with employee hour hours)
• Type of time display (12 or 24 hour clock)
• Hour display format
• Employee report format
1. To access this module, select Setup menu from the main menu and Wizard submenu, or
button.
click the Wizard
the General tab, and the following General screen will appear:
icon on the Custom Toolbar. From the Setup Wizard screen, select
2. Enter and/or modify company Name.
4-2 Time Guardian v3.5 User’s Guide
Page 35
3. Select Yes or No to the question: Do you want to send employee hours to your payroll
software? If yes, select the
icon and the Payroll Software window will open allowing
you to select one of the following payroll software systems: ADP for DOS, ADP for
Windows, CBS PAYROLL, EXCEL, GevityHR, PAYCHEX PAYLINK, PAYCHEX PREVIEW,
PAYDAY of AMERICA, PEACHTREE, POWER PAY, and QUICKBOOKS.
4. Select ⓪ 12 Hours (AM/PM) or ⓪ 24 Hours (Military) to the question, What time display
do you want to use?
5. Select ⓪ Minutes or ⓪ Hundreds of hours to the question, What hour display do you
want to use?
6. Check ❑ “Page break for each employee on reports”, if you want page breaks before each
employee.
7. Check ❑ “Disable Wizard Help”, if you want popup Wizard Help Screen to be disabled. If
disabled, click the Help
button to popup help.
Pay Policy Tab
This option allows you to define pay policy. To access this module, select Setup menu from the
main menu and Wizard submenu, or click the Wizard icon on the Custom Toolbar. From the
Setup Wizard screen, select the Pay Policy tab, and the following Pay Policy screen will
appear:
The following options are available from the interval field dropdown menu:
• Weekly: Employees are paid every week.
• Bi-Weekly: Employees are paid every two weeks.
• Semi-Monthly: Employees are paid twice a month.
• Monthly: Employees are paid once a month.
A Start Date for the Pay Period is also required. Click the down arrow to display the calendar,
and double click on the desired date to populate the field.
Time Guardian v3.5 User’s Guide 4-3
Page 36

Overtime
Time Guardian Basic Setup Wizard was designed to accommodate a set variety of overtime
rules. Depending on your setup, the following settings may need to be configured:
• Type of overtime:
a. Daily overtime will award overtime after the assigned number of hours has been worked
in a day [enter number for hours/min].
b. Weekly overtime will award overtime after the assigned number of hours has been
worked in a week [enter hours and min].
Note: Placing a checkmark in front of both of these options will have Time Guardian calculate
Overtime based on the hours entered in Daily Overtime, and then the hours entered in
Weekly Overtime.
• Overtime is reset on a specific day of the week
This is especially useful if an employee is assigned to a Bi-Weekly, Semi-Monthly or
Monthly Pay Period and the Overtime rules are based on a seven-day cycle starting on
a specific day.
Punch Rounding
The Rounding Rules utilized in the Basic Setup Wizard were designed to simply accommodate
a set variety of overtime rules. Depending on your setup, the following choices are available for
punch rounding:
• No Rounding – default setting
• Nearest quarter (15/7)
• Nearest tenths (6/3)
• Split rounding – where IN punch will round to next 15 min, interval at 5 min. OUT
punch will round to next 15 min, interval at 10 min.
The Rounding for the Basic Setup Wizard can be seen in the following table:
Unit 15/Point 7
Punch Time
8:15 8:15 8:15 8:18 8:15 8:15 8:15 8:15
8:16 8:15 8:16 8:18 8:16 8:15 8:16 8:15
8:17 8:15 8:17 8:18 8:17 8:15 8:17 8:15
8:18 8:15 8:18 8:18 8:18 8:15 8:18 8:15
8:19 8:15 8:19 8:18 8:19 8:15 8:19 8:15
8:20 8:15 8:20 8:18 8:20 8:30 8:20 8:15
8:21 8:15 8:21 8:24 8:21 8:30 8:21 8:15
8:22 8:30 8:22 8:24 8:22 8:30 8:22 8:15
8:23 8:30 8:23 8:24 8:23 8:30 8:23 8:15
8:24 8:30 8:24 8:24 8:24 8:30 8:24 8:15
8:25 8:30 8:25 8:24 8:25 8:30 8:25 8:30
8:26 8:30 8:26 8:24 8:26 8:30 8:26 8:30
8:27 8:30 8:27 8:30 8:27 8:30 8:27 8:30
8:28 8:30 8:28 8:30 8:28 8:30 8:28 8:30
8:29 8:30 8:29 8:30 8:29 8:30 8:29 8:30
8:30 8:30 8:30 8:30 8:30 8:30 8:30 8:30
Rounded
Time
Unit 6/Point 3
Punch Time
Rounded
Time
Unit 15/Point 5
Split Rounding IN
Punch Time
Split Rounding
Rounded
Time
Unit 15/Point 10
Split Rounding OUT
Punch Time
Rounded
Time
4-4 Time Guardian v3.5 User’s Guide
Page 37

Login Tab (Profile Definition)
There are three possible levels of Access Rights, controlled by the two check boxes marked
Administrator and Read-Only. The following describes the access rights given to users based
upon checkbox selection:
• Administrator Checkbox selected: Grants the full ability to add, modify and edit any data
contained in the system, including all employee and Time Guardian user login data.
Note: Only administrator's can view employee wages.
• No Checkboxes Selected: The user has the same access as an Administrator with regard
to employee data (except wages), but cannot access or modify the Time Guardian user
login data.
• Read-Only: Can view all data (except wages) in the system but cannot modify any data or
add any new data.
Note: During Basic Wizard setup at least one Administrator profile will be created.
Additional Profiles can be added, and/or existing Profiles can be modified using the following
three different methods:
1. Open the Login Profile module. This can be done by using either of the three following
methods:
st
method: Selecting Setup from the Main Menu, and clicking the Login Profiles
a. 1
submenu.
nd
b. 2
method: Selecting Setup from the Main Menu, and clicking the Wizard submenu.
From the Setup Wizard screen click the Login tab and the Login Profile screen will
appear.
rd
c. 3
method: Clicking on the Wizard icon in the Custom Toolbar to display the Setup
Wizard screen, selecting the Login tab, and the following Login Information screen will
appear:
2. Select Login Profiles from the Setup Menu and the Login Profile screen (see the following
figure) will appear:
Time Guardian v3.5 User’s Guide 4-5
Page 38

3. click on the
button. From the Login Profile screen, you must select “Add”
before a new Profile can be created, and the “Add New Profile” window will appear:
4. Enter the Name of the user in the Add New Profile window (see the above figure).
5. Enter and confirm the password.
6. Select Language from drop down menu.
7. Select if the profile will have Administrator or Read Only access. Press the “Save” button. At
this point if neither box is checked a plain User is created (see "No checkboxes" above).
8. Select the “Advanced Password” tab to configure password expiration options and the
following screen will appear:
9. When finished, the new profile will be created and added to the Authorized Users list.
Highlighting a name on the list and selecting the “Default User” box will make that user the
default name and it will appear each time the software is opened.
All Profiles are case and space sensitive. If you have a problem accessing the software,
confirm the login information and try again.
4-6 Time Guardian v3.5 User’s Guide
Page 39
Advanced Setup Wizard
Select the Advanced Setup Wizard to provide a more detailed configuration of Time Guardian
for a complex Time and Attendance system. This wizard provides employee wages/salary pay
and/or complex rounding/overtime rules. However, after selection, you cannot revert back to the
Basic Setup Wizard.
General Tab
This option allows you to define general company information for Time Guardian such as:
• Company profile
• Payroll software (select payroll system to interface directly with employee hour hours)
• Type of time display (12 or 24 hour clock)
• Hour display format
• Employee report format
1. To access this module, select Setup menu from the main menu and the Wizard submenu,
or click the Wizard
the General tab, and the following General screen will appear:
2. Click the
information such as: Name, Address, City, State, Zip, Country, Phone, and Comments.
icon to display the Company Profile screen to enter and/or modify company
icon on the Custom Toolbar. From the Setup Wizard screen, select
3. Select ⓪ Yes or ⓪ No to the question, Do you want to send employee hours to your payroll
software? If yes, select the
you to select one of the following payroll software systems: ADP for DOS, ADP for
Windows, CBS PAYROLL, EXCEL, GevityHR, PAYCHEX PAYLINK, PAYCHEX PREVIEW,
PAYDAY of AMERICA, PEACHTREE, POWER PAY, and QUICKBOOKS.
Time Guardian v3.5 User’s Guide 4-7
icon and the Payroll Software window will open allowing
Page 40
4. Select ⓪ 12 Hours (AM/PM) or ⓪ 24 Hours (Military) to the question, What time display
do you want to use?
5. Select ⓪ Minutes or ⓪ Hundreds of hours to the question, What hour display do you
want to use?
6. Check ❑ “Page break for each employee on reports”, if you want page breaks before each
employee.
7. Check ❑ “Disable Wizard Help”, if you want popup Help Screen to be disabled. If disabled,
click the Help
button to popup help.
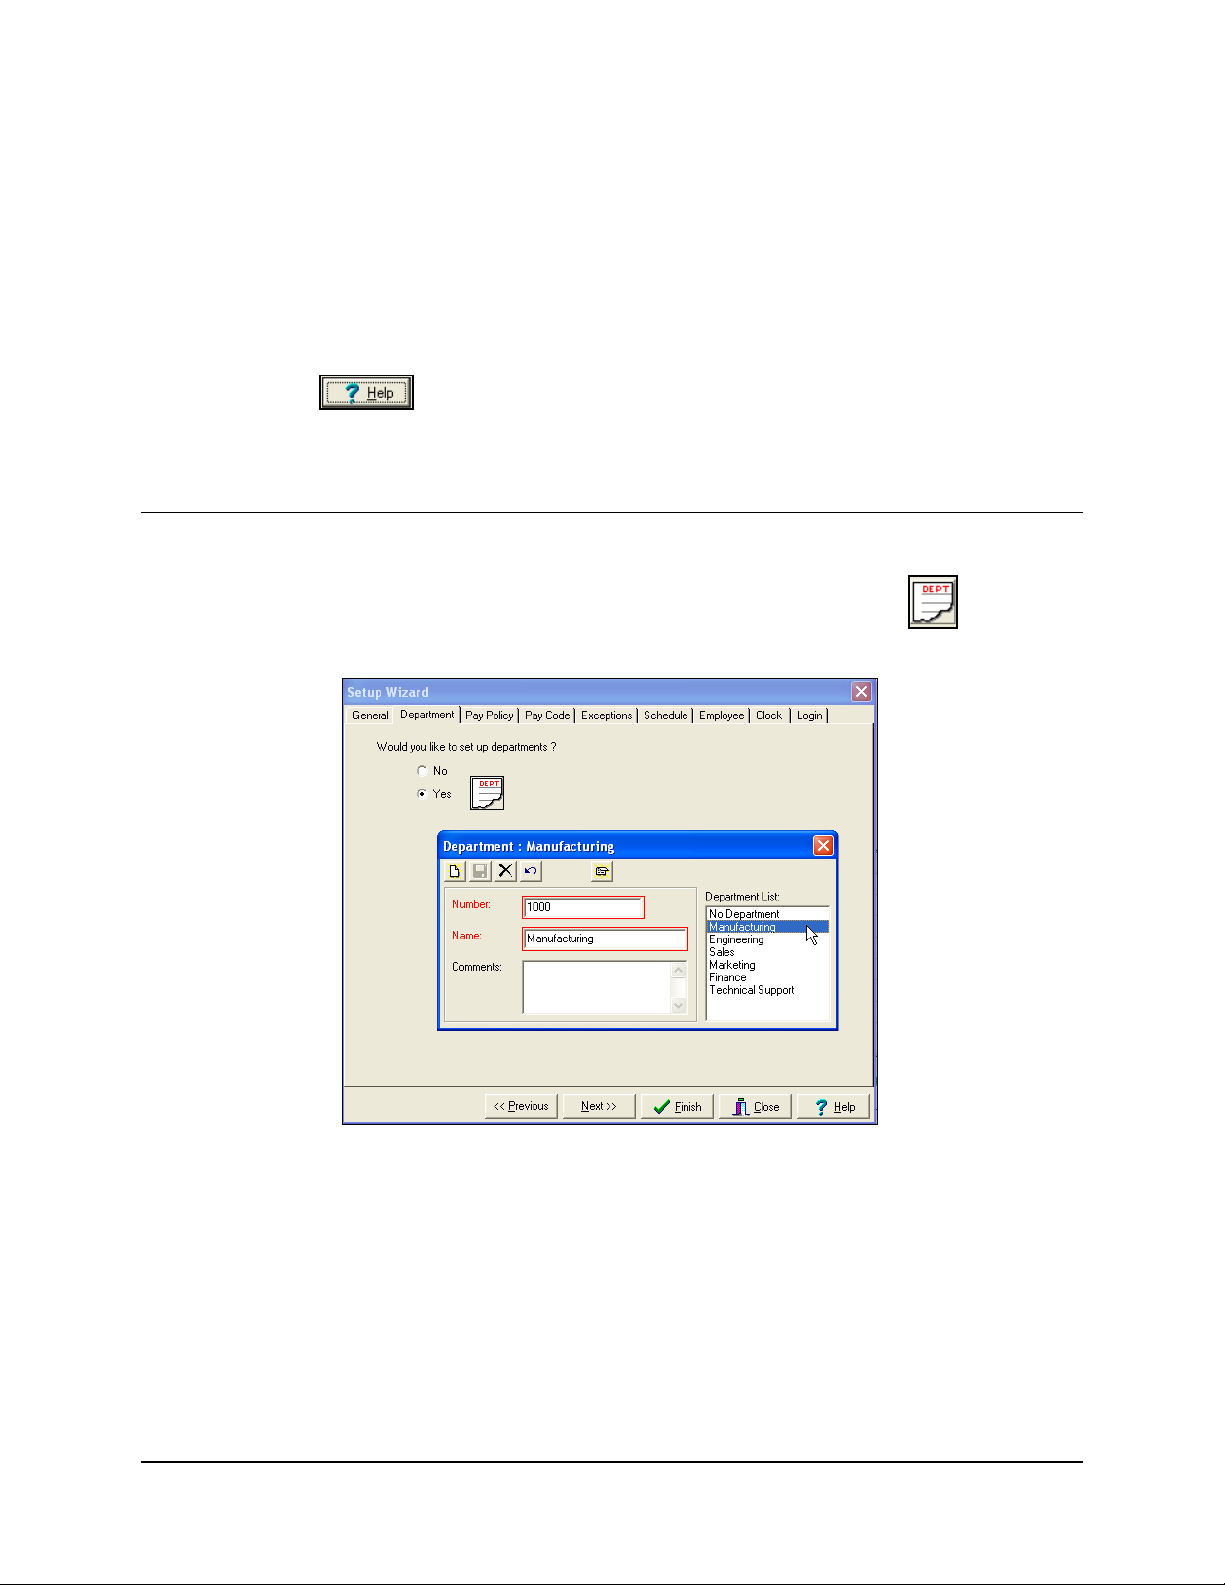
Department Tab
This option allows you to add or edit Departments. To access this module, select Setup menu
from the main menu and Wizard submenu, or click the Wizard icon on the Custom Toolbar.
From the Setup Wizard screen, select the Department tab, select Yes or click
the following Department screen will appear:
icon, and
Once a department has been added or edited, click the save icon to save changes before
closing the module.
The Department module consists of four areas. The following describes each of these areas:
• Number: A mandatory field that can only contain numeric values.
• Name: A mandatory field that will be displayed throughout the software to describe the
Department.
• Comments: An optional field used to enter specific comments about the Department.
• Department List: This list box will display all the Departments created for your system.
4-8 Time Guardian v3.5 User’s Guide
Page 41
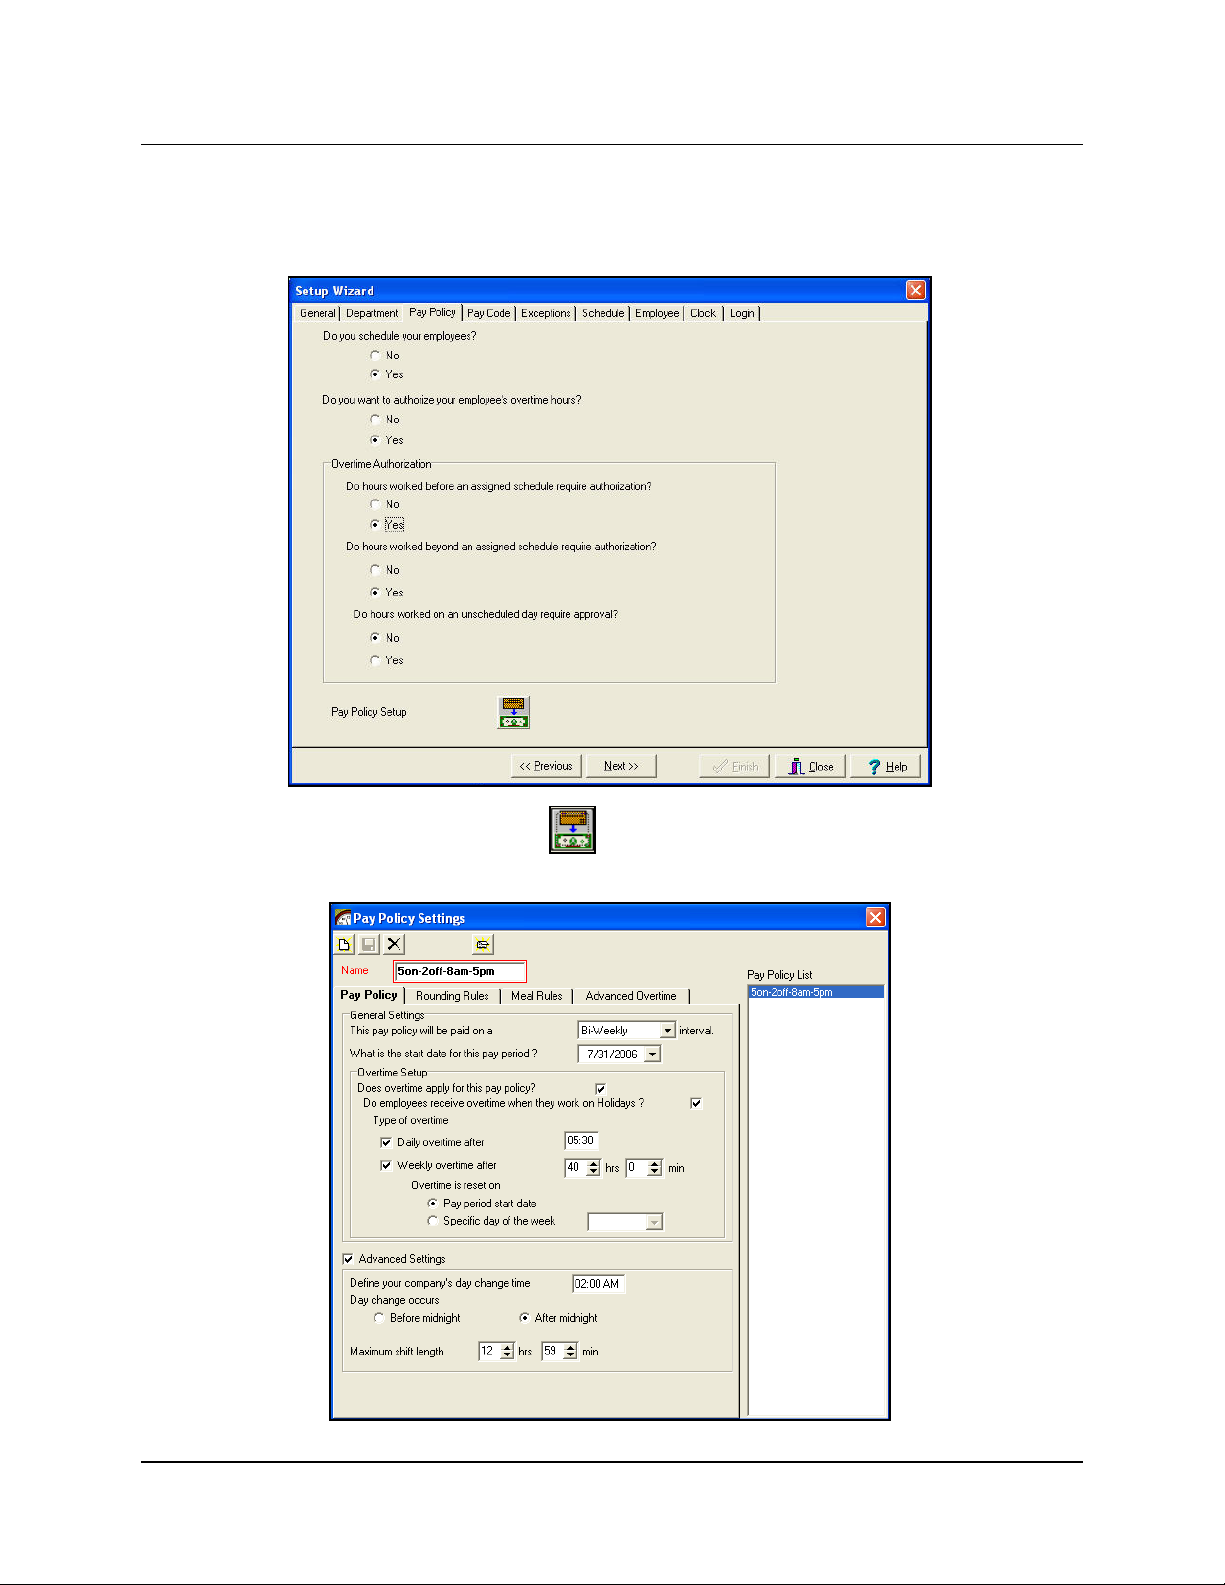
Pay Policy Tab
This option allows you to define pay policy. To access this module, select Setup menu from the
main menu and Wizard submenu, or click the Wizard icon on the Custom Toolbar. From the
Setup Wizard screen, select the Pay Policy tab, and the following Pay Policy screen will
appear:
From the Pay Policy screen, click on the icon, and the following Pay Policy Settings
screen will appear:
Time Guardian v3.5 User’s Guide 4-9
Page 42

The following options are available from the interval field dropdown menu:
• Weekly: Employees are paid every week.
• Bi-Weekly: Employees are paid every two weeks.
• Semi-Monthly: Employees are paid twice a month.
• Monthly: Employees are paid once a month.
A Start Date for the Pay Period is also required. Click the down arrow to display the calendar,
and double click on the desired date to populate the field.
Time Guardian was designed to accommodate a wide variety of overtime rules. You can cancel
all authorized overtime by clicking No to the question; Do you want to authorize your
employee's hours? Depending on your setup, the following settings may need to be
configured:
• Does overtime apply for this pay policy?
a. Overtime may be awarded daily after an employee works the defined number of hours.
b. Overtime may also be awarded weekly after an employee works the defined number of
hours.
• Do employees receive overtime when they work on holidays?
• Type of overtime:
b. Daily overtime after [enter number for hours/min]
c. Weekly overtime after [enter hours and min]
• Overtime is reset on:
a. At the start of a pay period
b. On a specific day of the week
This is especially useful if an employee is assigned to a Bi-Weekly, Semi-Monthly or
Monthly Pay Period and the Overtime rules are based on a seven-day cycle starting on
a specific day.
This setting is most common when an employee is assigned to a Weekly Pay Policy.
Also on the Pay Policy Settings screen is the “Advanced Settings” check box. Selecting this will
display the following screen:
Advanced Settings should only be changed if employees are scheduled to start work after
02:00 AM and you want those hours applied to the current day.
Midnight (00:00) marks the start of a new day. However, there are times when an employee is
scheduled to start on one day and end on another (i.e. start work at 10:00 PM Sunday and
leave work at 6:00 AM Monday).
4-10 Time Guardian v3.5 User’s Guide
Page 43

Advanced Settings allow Time Guardian to account for a midnight day-change time and
calculate the number of hours correctly, placing the punches on the current day.
Using the example above, there are two scenarios where the hours can either be applied to
Sunday or Monday.
Scenario #1
If you want the hours applied to Sunday, then Sunday becomes the Current day and the hours
from Monday are shifted backwards to Sunday.
Scenario #2
If you want the hours applied to Monday, then Sunday becomes the Previous day and the
hours from Sunday are shifted forwards to Monday.
In either scenario, the Day Change Time must be configured. The exception to this rule is when
a punch occurs after the day change time, but falls within the Maximum shift length. The
Maximum shift length (window) is the period of time that punches will be calculated for a
schedule that crosses day change time: 12 –13 hours is a recommended number for this field.
This allows all lunch or break punches to be applied to the correct schedule.
In the examples below, 2:00 AM will be used for the Day Change Time. Once defined, you must
determine if this time is to start Before or After midnight. When Before midnight is selected, all
hours from 00:00 – 2:00 AM will be recognized by Time Guardian as part of the Previous day.
Anything after 2:00 AM will be applied to the Current or New Day.
When After midnight is selected, all hours from 00:00 – 2:00 AM will be seen by Time Guardian
as part of the Current day and anything beyond 2:00 AM will be applied to the Next day.
Examples of “Before” and “After” midnight settings:
2:00 AM Before Midnight means that all punches up to 2:00 AM will be applied to the
Previous day and any punch after 2:00 AM will be applied to the Current day.
2:00 AM After Midnight means that all punches up to 2:00 AM will be applied to the
Current day and any punch after 2:00 AM will be applied to the Next day.
10:00 PM Before Midnight means that all punches up to 10:00 PM will be applied to the
Previous day and any punch after 10:00 PM will be applied to the Current day.
10:00 PM After Midnight means that all punches up to 10:00 PM will be applied to the
Current day and any punch after 10:00 PM will be applied to the Next day.
• The following timeline illustrates an employee punching in at 8:00 PM and punching out at
4:00 AM.
• The day change time is set to 2:00 AM.
• The Day Change is configured to Before Midnight, with a maximum shift length of 12 hours
and 59 minutes.
Even though two of the punches (2:30 AM and 4:00 AM) occur after day change time, they are
within the maximum shift length and are calculated on the same day (the day the IN punch
occurs).
Time Guardian v3.5 User’s Guide 4-11
Page 44

Rounding Rules Tab – Pay Policy
Rounding was created so that employers could define rules that would allow employees’
punched time to be rounded to a defined unit. The time that the employees’ punches move
forward or backward is based on a defined point. This allows all of the hours to be better
managed for payroll purposes. Time Guardian allows you to apply the defined Unit and Point to
individual punches (Punch Rounding) or the daily total of hours worked by an employee (Daily
Rounding). For Punch Rounding, you must specify the Unit and Point individually for both the
IN and OUT punches. A Time Simulation tool has been included in Time Guardian to test your
settings. See Troubleshooting Calculations, page 7-1 for more detailed information.
The example table below is provided to give you a visual example of where a defined Unit
starts and ends. Time Guardian only allows the Unit to be one of the following numbers: 1, 3, 6,
15 or 30. Selecting 1 would be minute to minute, thus no example is shown.
3 Unit 6 Unit 15 Unit 30 Unit
00:00 (First Unit Start) 00:00 (First Unit Start) 00:00 (First Unit Start) 00:00 (First Unit Start)
00:01 00:01 00:01 00:01
00:02 00:02 00:02 00:02
00:03 (Next Unit Start) 00:03 00:03 00:03
00:04 00:04 00:04 00:04
00:05 00:05 00:05 00:05
00:06 (Next Unit Start) 00:06 (Next Unit Start) 00:06 00:06
00:07 00:07 00:07 00:07
00:08 00:08 00:08 00:08
00:09 (Next Unit Start) 00:09 00:09 00:09
00:10 00:10 00:10 00:10
00:11 00:11 00:11 00:11
00:12 (Next Unit Start) 00:12 (Next Unit Start 00:12 00:12
00:13 00:13 00:13 00:13
00:14 00:14 00:14 00:14
00:15 (Next Unit Start) 00:15 00:15 (Next Unit Start) 00:15
4-12 Time Guardian v3.5 User’s Guide
Page 45

3 Unit 6 Unit 15 Unit 30 Unit
00:16 00:16 00:16 00:16
00:17 00:17 00:17 00:17
00:18 (Next Unit Start) 00:18 (Next Unit Start) 00:18 00:18
00:19 00:19 00:19 00:19
00:20 00:20 00:20 00:20
00:21 (Next Unit Start) 00:21 00:21 00:21
00:22 00:22 00:22 00:22
00:23 00:23 00:23 00:23
00:24 (Next Unit Start) 00:24 (Next Unit Start) 00:24 00:24
00:25 00:25 00:25 00:25
00:26 00:26 00:26 00:26
00:27 (Next Unit Start) 00:27 00:27 00:27
00:28 00:28 00:28 00:28
00:29 00:29 00:29 00:29
00:30 (Next Unit Start) 00:30 (Next Unit Start) 00:30 (Next Unit Start) 00:30 (Next Unit Start)
This pattern will repeat itself throughout the entire day.
The following is an example of the Rounding Rules tab in the Pay Policy Settings module. This
menu will allow you to customize your rounding rules.
Meal Rules Tab – Pay Policy
The following is an example the Meal Rules tab located in the Pay Policy Settings module. This
tab will allow you to define the Meal rules for a group of employees. Start by selecting Yes to
the question "Do you want time deducted for a meal?" Next enter the Minimum hours that an
employee must work before the Meal rule will be applied, followed by the length of the Meal
deduction.
Time Guardian v3.5 User’s Guide 4-13
Page 46

Once a meal deduction is defined, you have the option of whether the employee will punch out
during the meal period. If so, you must define whether rounding will apply to these meal period
punches. When an employee punches IN and OUT for their meal, the window that these
punches occur in must be defined so that the meal will not be deducted twice. To prevent meal
punches from being deducted twice, check the box next to the question “Do employees punch
at meal time?”
The concepts for meal rounding are the same as those used in the Rounding Rules tab. If
rounding is to be used for meal punches, enter the desired Unit and Point. You must also enter
the number of hours an employee must work before the meal period in the “Hours to work
before start of meal window” field.
For example, if the scheduled start time is 9:00 AM, and the Hours to work is set to 3:00, then
the meal window for this employee would start at 12:00 PM. If the scheduled start time is 7:00
AM, and the hours to work is set to 3:00, then the meal window for this employee would start at
10:00 AM.
Enter the Length of Meal window. This is the length of time between an employee's meal
punches that will be applied toward the meal rule.
Enter in the Meal Grace. This is the number of minutes that an employee can return late from a
meal before additional time is deducted.
Advanced Overtime Tab – Pay Policy
This tab is used to set the overtime rules for Pay Policies that have multiple settings for Daily,
Weekly, Consecutive Day, and Weekend overtime. The options displayed for Daily and Weekly
Overtime 1 or 2 are displayed only if they are enabled and the initial number of hours that must
be worked for each are defined in the Pay Policy tab. The following is an example of the
Advanced Overtime tab:
4-14 Time Guardian v3.5 User’s Guide
Page 47

Daily Overtime Tab – Advanced Overtime
To configure the Daily Overtime options, click on the Daily Overtime checkbox. The Daily
Overtime 1 setting is displayed here as read-only, since it was configured in the Pay Policy tab,
and must be assigned to a pay code to be awarded. The Daily Overtime 2 setting is added by
entering the number of hours that must be worked and assigning the pay code to be awarded.
Please note that Daily overtime levels are not used in the Weekly overtime calculation.
Weekly Overtime Tab – Advanced Overtime
Time Guardian v3.5 User’s Guide 4-15
Page 48
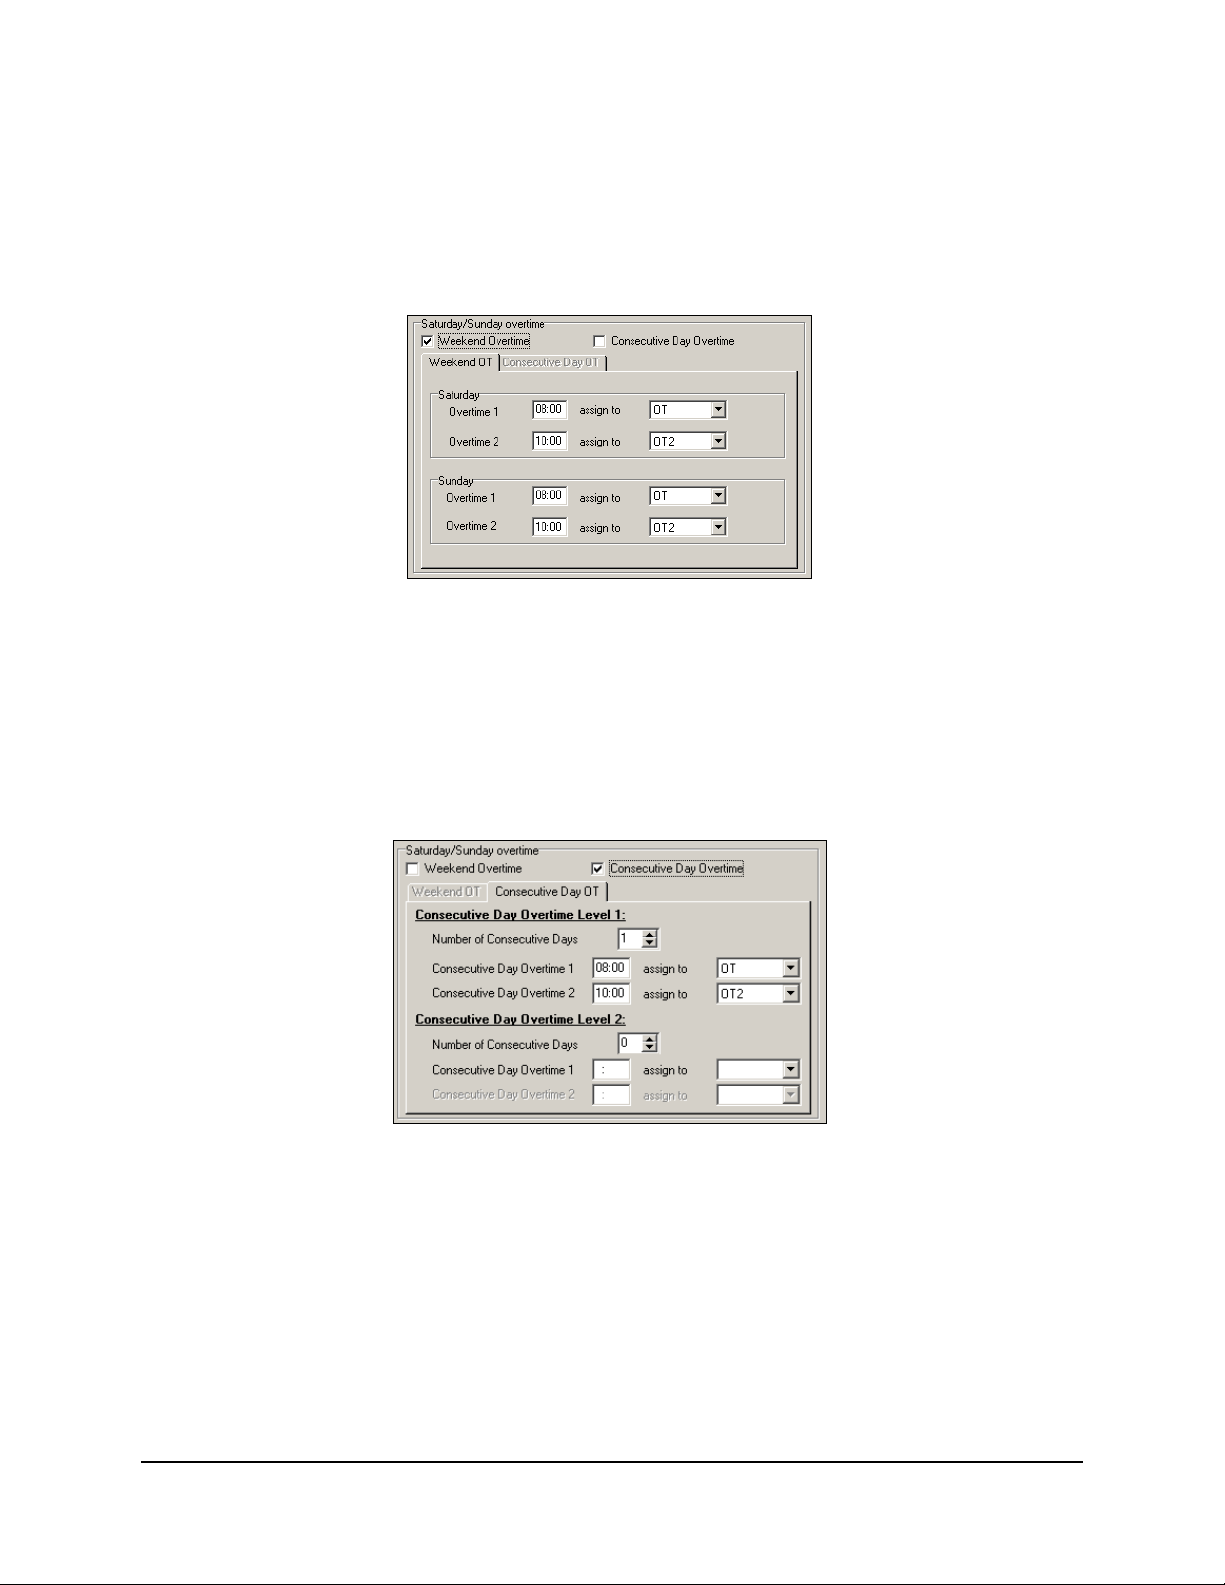
To configure the Weekly Overtime options, click on the Weekly Overtime checkbox. The
Weekly Overtime 1 setting is displayed here as read-only, since it was configured in the Pay
Policy tab, and must be assigned to a pay code to be awarded. The Weekly Overtime 2 setting
is added by entering the number of hours that must be worked and assigning the pay code to
be awarded.
Weekend Overtime Tab – Advanced Overtime
To configure the Weekend Overtime options, click on the Weekend Overtime checkbox. Up to
two levels of overtime can be assigned for Saturday and Sunday. For each day, enter in the
number of hours that must be worked and assign the pay code to be awarded for each level
(Overtime 1 and Overtime 2). If Overtime 1 is to be used for all hours worked on either
Saturday or Sunday, 00:00 must be entered in the hours field for the corresponding day, and
the overtime hours awarded must be assigned to the OT or OT2 pay code.
Consecutive Day Overtime Tab – Advanced Overtime
Consecutive Day Overtime awards overtime based on the qualifying number of consecutive
days worked. If an employee fails to work the number of consecutive days needed to qualify, no
overtime is awarded.
Up to two levels of overtime can be set for Consecutive Day Overtime calculations. Each level
consists of two settings, Consecutive Day Overtime 1 and 2. To enable this option, click on the
Consecutive Day Overtime checkbox.
For Level 1, select the number of consecutive days (up to 7), then enter the number of hours
that must be worked and assign the pay code to be awarded for each setting (Consecutive Day
Overtime 1 and 2). If Consecutive Day Overtime 1 is to be used for all hours worked, 00:00
must be entered in the hours field for the corresponding day and the overtime hours awarded
must be assigned to the OT or OT2 pay code.
4-16 Time Guardian v3.5 User’s Guide
Page 49

For Level 2, select the number of consecutive days (up to 7), then enter the number of hours
that must be worked and assign the pay code to be awarded for each setting (Consecutive Day
Overtime 1 and 2). If Consecutive Day Overtime 1 is to be used for all hours worked, 00:00
must be entered in the hours field for the corresponding day and the overtime hours awarded
must be assigned to the OT or OT2 pay code.
Pay Code Tab
Pay Codes are initially selected during the Setup Wizard. They determine how an employee’s
hours will be categorized and displayed throughout the system. The Pay Code module is also
where company holidays are entered. Modifications made to this module can only be done
through the Wizard.
The following illustrates an overview of this module, which is divided into four sections:
The first section requires you to select the Pay Codes that will be used to allocate employee
hours. Your options are: Regular, Overtime, Overtime2, Sick, Holiday, Vacation, Personal,
Bereavement, and Miscellaneous. Placing a check mark in front of the code(s) to be used for
your system will allow them to be displayed in the Employee Data and Total Grids located on
the Main view.
Once the Pay Codes have been selected, the decision must be made as to whether or not each
Pay Code will count toward OT (Overtime) and/or Count towards their daily attendance. When
a Pay Code counts toward OT, hours assigned to that Pay Code are counted toward the weekly
overtime requirement as set in the Pay Policy module.
“Counts towards Daily Attendance” is used when tracking absences for employees who have
an assigned schedule. By awarding an employee hours assigned to a Pay Code that counts
towards their daily attendance, the Absent Exception will be eliminated for the employee.
Time Guardian v3.5 User’s Guide 4-17
Page 50

The second section of the Pay Code module allows you to select whether or not your
employees will be receiving Tips and/or Bonuses. Click on the
icon, and the following
screen will appear:
Totals for these Pay Codes will appear in the Employee Totals section of the Main View.
To use either of these Pay Codes, place a check mark in front of the box. Tips and Bonuses are
given to an employee by double clicking the desired field in the Hours Grid.
The third section
by clicking on the
of the Pay Code module allows you to add, edit or delete company holidays
icon and the following Holiday Setup screen will appear. Since the dates
of holidays change from year to year, this section must be updated yearly to ensure accuracy. It
is also suggested that the Holiday Pay Code be selected prior to adding your holidays. If it has
not been selected, you will be unable to assign holiday hours to the Holiday Pay Code.
As seen in the figure above, the Holiday Setup module consists of two tabs. The one to the left
is the Holiday Setting tab, where information is entered about the specific holiday. To the right
is the Pay Policy Assign tab, where the created holidays are assigned to a specific Pay Policy.
The Holiday Setting tab is comprised of the following areas:
• Name: A mandatory field that contains the name of the holiday.
• Date: A mandatory field that allows you to enter the date of the holiday.
• Pay Code: A mandatory field that allows you to select the Pay Code that will be awarded for
that holiday.
• Hours: A mandatory field that allows you to specify the number of hours to be awarded for
the holiday.
4-18 Time Guardian v3.5 User’s Guide
Page 51

• Comments: An optional field used to enter specific comments about the holiday.
• Holiday List: This list box will display all of the holidays created for your system.
If a salaried employee punches in on a holiday, they will only receive holiday hours.
However, if an hourly employee punches in on a holiday, they will receive both the hours
worked and the holiday hours.
The Pay Policy Assign tab is divided into two sections. The Holiday area contains a list of all the
user-created Holidays. The Pay Policy area contains all of the Pay Policies. To add a holiday to
a pay policy, highlight the holiday name and select the Assign button. The holiday will then
appear under the desired Pay Policy. To remove an assigned holiday, highlight the name under
the Pay Policy and hit the delete key on your keyboard.
The fourth section
will be tracking Wages. Click on the
of the Pay Code module allows you to select whether or not your employees
icon, and the following Pay code rate multiplier screen
will appear:
Totals for these Pay Codes using these multipliers will appear in the Employee Totals section of
the Main View.
To show wages information (calculation) on Timecard, Hours Worked, and Summary Reports,
place a check mark in front of the box. See Reporting Functions for an example of wages on
reports.
Exceptions Tab
Time Guardian has nine (9) Exceptions that can be made active or inactive by adding or
removing check marks (see the following figure).
When selected, Exceptions are displayed in the Exception column of the Employee Grid and
used to flag the selected criteria for attendance purposes. Exceptions and Exception Reasons
are displayed in the Exception Report.
If an employee has a MP Exception, no other Exceptions will appear until the missing
punch is added. At that point, all additional Exceptions will be displayed.
Time Guardian v3.5 User’s Guide 4-19
Page 52
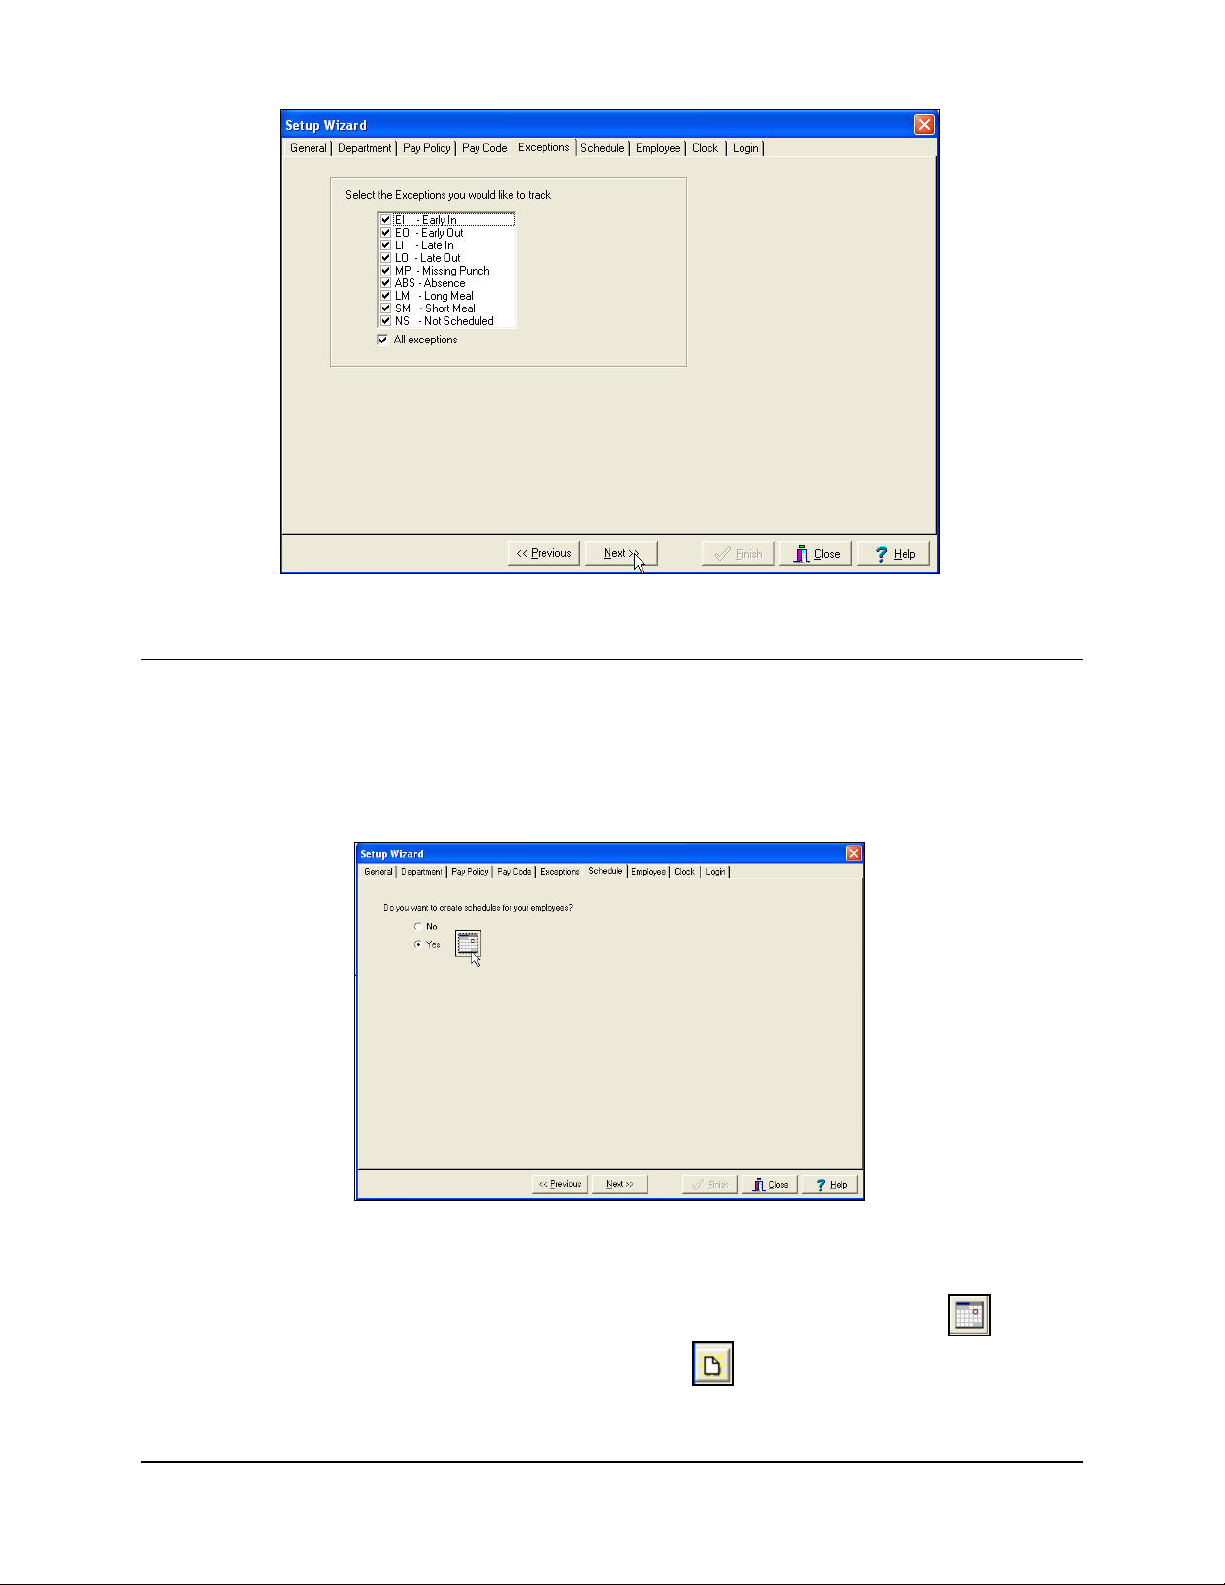
Schedule Tab (Schedule Administration)
This option allows you to add, edit or delete Employee Schedules. To access this module,
select the Setup menu from the main menu, and Wizard submenu, or click the Wizard icon on
the Custom Toolbar and select the Schedule tab (see the following figure). At least one
schedule must be created for employees that have been designated as ‘salaried’. Hourly
Employees do not need schedules. Once the Schedule has been added or edited, click on the
“Close” icon to save the settings and exit the module.
To add a new schedule, follow these steps:
1. From the Schedule tab in the Setup Wizard screen, click Yes to the question, Do you want
to create schedules for your employees?, and click the Schedule Information
display the Schedule screen. Next, click on the New
icon and enter the name for the
icon to
schedule in the Schedule Name field.
2. Hit enter or tab keys to display the schedule setup fields.
4-20 Time Guardian v3.5 User’s Guide
Page 53

3. Will the schedule cross midnight? If “No” is selected, then the basic schedule setup is
displayed.
4. Enter the Start and End time for the schedule and select the active days.
5. Click the ‘Ok’ button when finished.
The Schedule View section will display the schedule created.
Different start times can be applied to one schedule by selecting a day for the first start time
and selecting OK. Edit the schedule, select additional days and enter another start time.
The following is an example of the schedule setup module:
To ensure that an employee’s hours are awarded on the correct day for a Schedule that
crosses Midnight, you must define the Start and End times. The options for the Start Time are:
Previous Day, or Current Day. The options for End Time are: Current Day, and Next Day.
Previous: Previous is selected when an employee punches in on the night before the
scheduled day and you want the hours applied to the current day. Example: An
employee that starts working on Sunday will have those hours applied to Monday.
Current: When a schedule crosses midnight, this setting is used to indicate the actual day
that you want the punches applied to. At least one punch must be Current.
Next: Next is selected when an employee punches out after midnight and you want those
punches from the next day applied to the current day. Example: An employee starts
work on Monday night and doesn’t punch out until Tuesday morning but those hours
should be applied to Monday.
Time Guardian v3.5 User’s Guide 4-21
Page 54

The following is an example of a schedule that ends on the current day:
The Start and End times only have to be entered once and will be applied to all days with check
marks. Time can be entered in military or AM/PM format depending on your settings. Below is
an example of the Start and End times that would need to be entered for a schedule from 9 AM
to 5 PM:
Once created, schedules will appear in a list box. To edit, double click on the desired schedule
and make the necessary changes. Click the Save icon to exit and Save.
Employee Tab (Employee Administration)
The Employee Administration menu can be accessed from the following locations in Time
Guardian:
• From the “Employee” option on the main menu.
• From the Setup Wizard (Advanced) module on the main menu.
• By right mouse clicking anywhere in the Employee List section of the Main view, and once
open, the dropdown menu shown below will appear:
4-22 Time Guardian v3.5 User’s Guide
Page 55
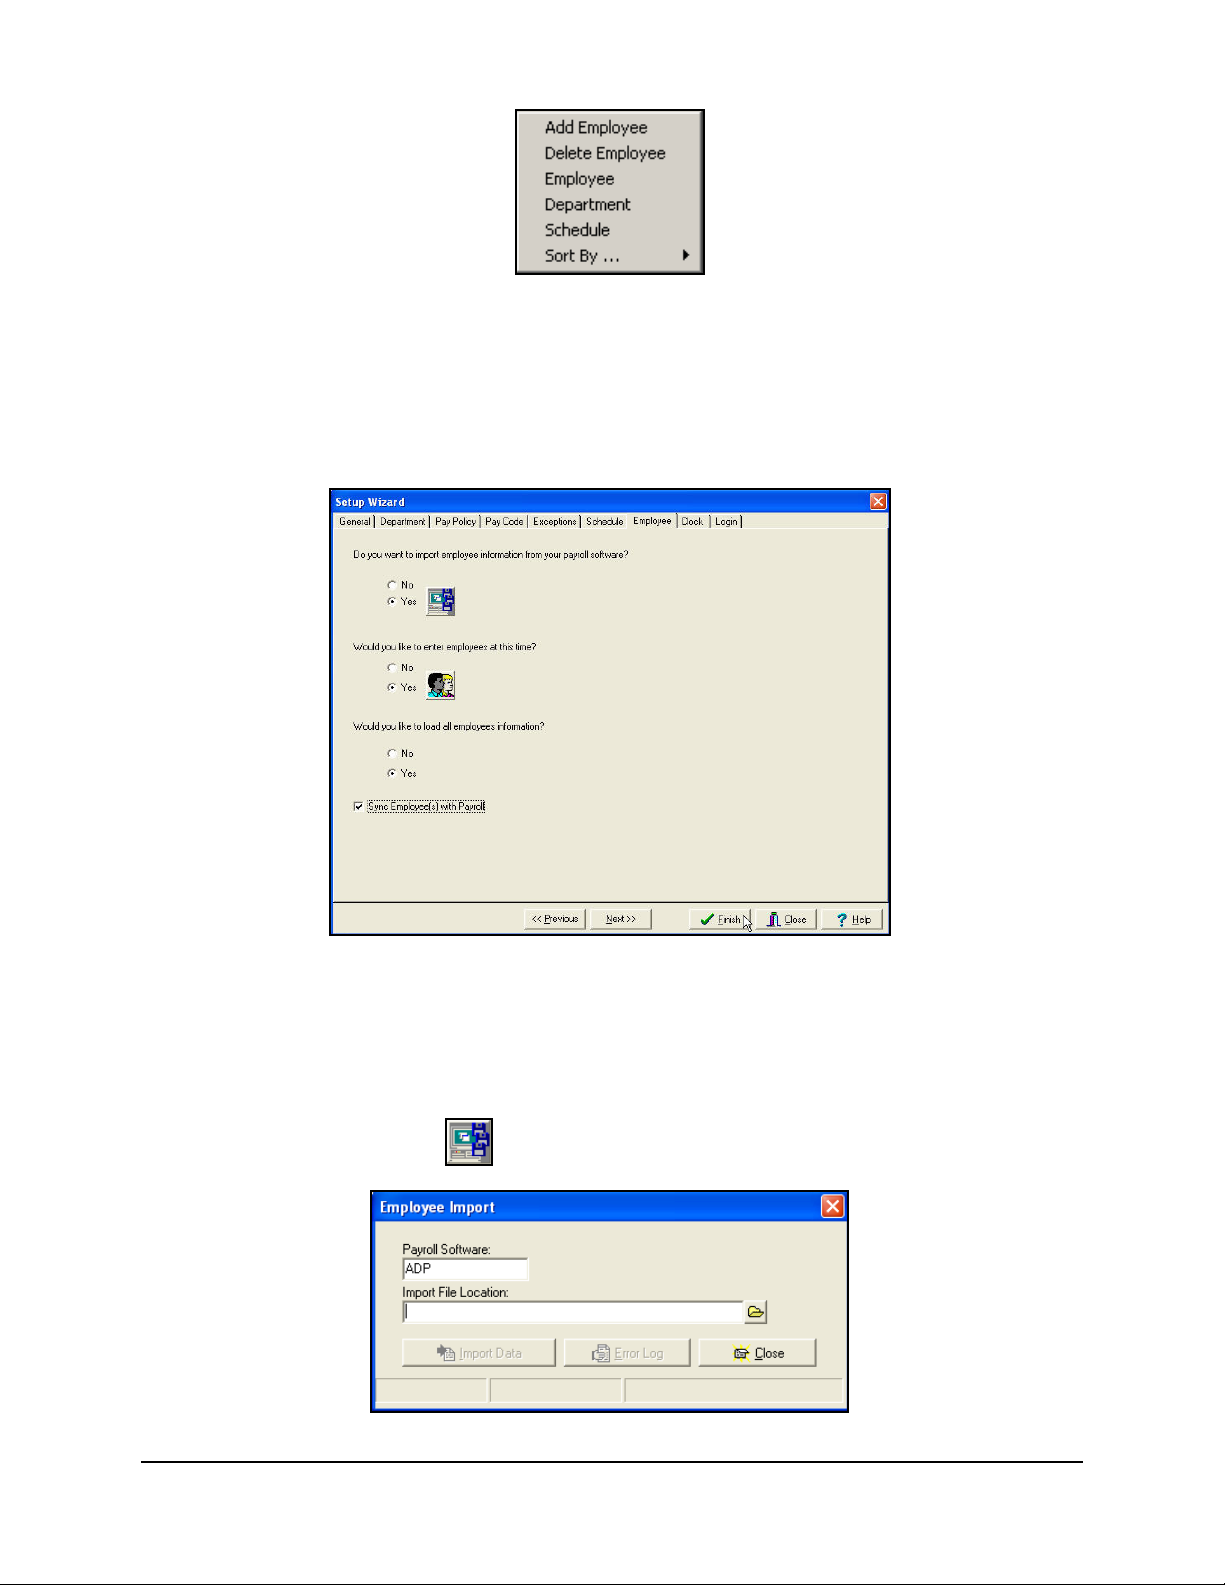
From this list you can administer employees, add departments or schedules, and select sorting
criteria.
The Employee tab allows you to define employees. To access this module, select the Setup
menu from the main menu and Wizard submenu, or click the Wizard icon on the Custom
Toolbar. From the Setup Wizard screen, select the Employee tab, and the following Employee
screen will appear:
Note: Sync Employee(s) with Payroll provides automatic integration with QuickBooks. This
selection only appears if QuickBooks was selected as your payroll software.
Importing Employees
If you want to import employee(s) information from your payroll data, click Yes to the question,
Do you want to import employee information from your payroll software? and if you have to,
click on the Import Employee icon, and the following Employee Import dialog will appear:
Time Guardian v3.5 User’s Guide 4-23
Page 56

Adding Employees
From the Employee tab screen, click Yes to the question, Would you like to enter employees at
this time? Click on the Employee Information
Information screen will appear:
Note: All fields outlined in Red are mandatory.
icon, and the following Employee
The Employee Information module consists of four tabs: General, Personal, Salary Pay, and
Wages. Below is an overview of each of these tabs including field names and definitions. The
fields outlined in red are mandatory and no record can be saved without the proper information
being entered. Time Guardian can easily accommodate employees with the same first or last
name, however the Employee Number must be unique since it is the primary sorting key. Badge
Numbers can be changed or reused should an employee lose the badge or become inactive.
Each tab also has an Employee List and double clicking a selected employee on this list will
cause their information to become active in all fields.
There are two options for “Type of Employee”: Hourly or Salary. By Time Guardian standards,
an Hourly employee is one who punches daily at the clock and may or may not have an
assigned schedule. Salary employees are not required to punch and therefore, they must have
an assigned schedule for each day they are expected to work. When Salary is selected, the
Salary Pay tab will become active. In this tab, you must identify how the salaried employee is to
be paid.
The options for Salary Pay Type are:
• By Hours: A set number of hours are entered, and this amount will be awarded for each
day scheduled.
• By Schedule: This option will calculate the amount of time contained in the assigned
schedule and award that number for each day scheduled. If no schedule is assigned, and
the employee does not punch IN or OUT, they will receive no hours for that day.
Once the employee has been added or edited, click on the “Close” icon to save the settings and
exit. Below is a description of all of these fields:
4-24 Time Guardian v3.5 User’s Guide
Page 57

General Tab Fields - Employee
• Last Name: A mandatory field for each employee containing his or her last name.
• Middle Name: An optional field containing the employee’s middle name.
• First Name: A mandatory field for each employee containing his or her first name.
• Employee Number: A mandatory field for each employee containing his or her unique
employee number.
• Badge Number: A mandatory field for each employee containing his or her unique badge
number or PIN.
• Type of Employee: There are two options to identify your employees: Salary and Hourly
(Default).
• Department: The default field is “No Department,” however, if you have chosen to create
departments for your system, the dropdown list will display additional options.
• Schedule: The default for this field is “No Schedule,” however if you have chosen to create
schedules for your employees, the dropdown list will display additional options.
• Pay Policy: A mandatory field for each employee. The dropdown list will display all options
available for your system.
• Hire Date: This field defaults to the date that the employee was added, and can be modified
by clicking on the down arrow to display a calendar. Double-click on the desired date to
close the box and populate the field.
• Holiday Eligibility Date: This field defaults to the date that the employee was added, and
can be modified by clicking on the down arrow to display a calendar. Double-click on the
desired date to close the box and populate the field.
In addition to the above information, there are two check boxes at the bottom of the “General”
tab:
• Inactive: When selected, the employee will be considered inactive and will no longer be
displayed on reports or count towards your employee total.
• Not Eligible for Holidays: When selected, the employee will not be awarded holidays as
defined in Pay Code setup.
Personal Tab Fields - Employee
The optional fields in the section are:
• Address: The place to enter an employee’s address.
• City: The place to enter an employee’s city.
• State: The place to enter an employee’s state.
• Country: The place to enter an employee’s country.
• Zip Code: The place to enter an employee’s zip code.
• Phone: The place to enter an employee’s phone number.
• DOB: The place to enter an employee’s date of birth.
• SS#: The place to enter an employee’s social security number.
Time Guardian v3.5 User’s Guide 4-25
Page 58

• Gender: The place to specify the gender of an employee.
• Comments: The place to enter specific comments about an employee.
Salary Pay Tab Fields - Employee
This tab is only available when “Salary” has been selected as the Type of Employee.
• By Hours: Enter the number of hours that the employee will be awarded for each day
scheduled. The default for this setting is 8.
• By Schedule: Time Guardian will calculate the amount of time in an assigned schedule
and subtract mealtime if applicable and award the employee the appropriate amount of
hours for each day scheduled.
Wages Tab Fields - Employee
This tab is used to add, edit, increase, or delete Employee Wages (see the following figure).
• Add: Select the Add button to create a wage rate for an employee for on a specific date
(see the following figure). The created wage will remain in effect from that date until it is
altered.
• Edit: Select the Edit button to modify the wage rate and/or date for the employee (see
the following figure). The edited wage will remain in effect from that date until it is altered
again.
Note: You can only have one rate per employee per day.
4-26 Time Guardian v3.5 User’s Guide
Page 59
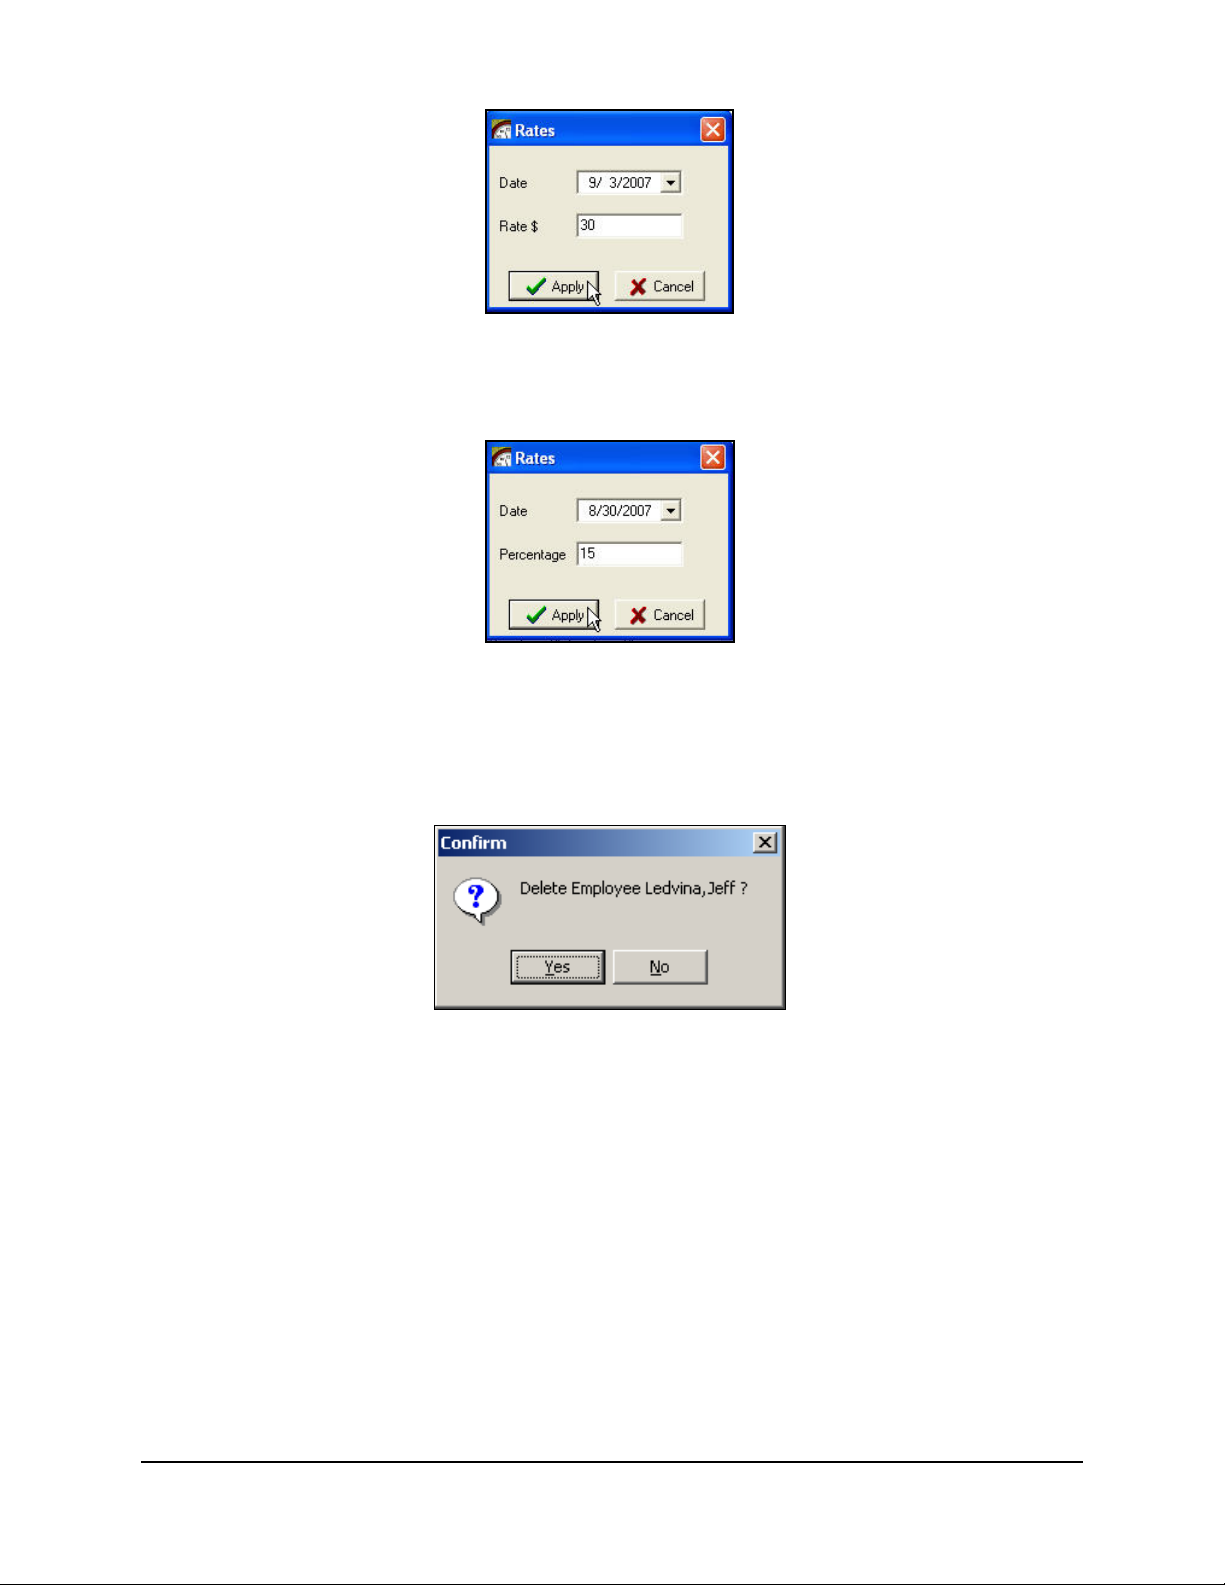
• Increase: Select the Increase button to incrementally increase a wage rate by a
percentage for an employee on a specific date (see the following figure). The increased
wage will remain in effect from that date until it is altered.
• Delete: Select the Delete button to remove the wage rate on that date for the employee.
Deleting Employees
Selecting this option will display the following confirmation box:
If you respond, “Yes,” the employee will be instantly removed from the database and cannot be
retrieved. A record of this action will be recorded in the Audit Trail Report for historical
reference.
It is suggested that instead of deleting an employee, you can simply inactivate them by
selecting the Inactive box and a valid Inactive date at the bottom of the General tab of the
Employee Information module. This will allow you to keep a historical record of the
employee and not have them count towards your employee total.
Editing Employees
To edit an employee, select the Employee option from the dropdown menu. The same screen
for adding employees will appear, and the fields will be populated with employee information.
Once open, make the desired edits and close the menu. The information contained in the
“General” information tab can be printed using the Employee Report. For more information on
printing this report, please refer to Chapter 6: Reporting Functions.
Double-clicking on a highlighted employee can also open the Employee Information screen.
Time Guardian v3.5 User’s Guide 4-27
Page 60

Loading Employees
If you want to load employee(s) information from your data, click Yes to the question, Would
you like to Load all employees information? If No is selected, only the last employee selected
prior to closing Time Guardian will have their hours and exceptions updated with the latest
information each time the software is opened. If Yes is selected, Time Guardian will calculate
hours and exceptions for all employees. The difference is your preference in time, when Yes is
selected their may be a slight time delay while Time Guardian updates each record before
opening. If No is selected, Time Guardian will have to update each new employee as they are
selected from the employee list.
Clock Tab (Communication Settings)
This option allows you to add or edit terminal(s) and configure terminals. To access this
module, select the Setup menu from the main menu, and Wizard submenu, or click the Wizard
icon on the Custom Toolbar and select the Clock tab. The following is an example of the basic
clock setup module:
To configure terminals connected to the system, click on the button, and the
Communications settings screen will appear. If you are configuring a networked Ethernet
terminal, obtain the correct IP address from your network administrator to enter the IP address
in the Location tab screen.
4-28 Time Guardian v3.5 User’s Guide
Page 61

Location Tab - Clock
A Location tab on the Communication Settings screen enables Time Guardian to communicate
with your terminals. Only one terminal type can be used per Location. If you have more than
one terminal type, you must configure multiple Locations.
To create a new Location, click on the New Location button, and enter the following:
• Location Name: Enter a unique name that will be used to describe the area or site where a
terminal or a group of terminals is located.
• Terminal Type: Select the terminal you are using. The choices are: MTX-15, MTX-5
(previous Time Guardian), HandPunch 1000/50e, HandPunch 2000, 3000, or 4000 (can use
other HandPunches but must use a similar predefined one as a template).
• Connection Type: If you answered, “Yes” to the question, “Do you have Terminal(s) other
than direct-connect MTX?” in the Clock tab of the Wizard, you must configure those
terminals for remote operation. Active MTX-15 (Time Guardian) or HandPunch terminals
can communicate with your PC via a direct connection (RS-232C or RS-485C), remotely
using the optional modem, or via Ethernet (network) connections (IP address required).
Note: It is not recommended to mix the MTX-5 and the MTX-15 terminals on the same
communication line.
If you selected a Connection Type of Direct, you must complete the following:
Time Guardian v3.5 User’s Guide 4-29
Page 62

• Time Zone Offset: This should be used if your PC and the Location (terminals) are located
in different time zones. The default value is 0:00. Use the dropdown lists to configure the
offset.
• Com Port: Select the Com Port of the PC that will communicate with the terminals.
• Active: When checked, the Location will begin sending and receiving data.
If you selected a Connection Type of Modem, you must complete the following:
• Phone Number: The telephone number of the terminal’s modem. (Include 1 + (Area Code)
+ 7 digit phone number, when applicable).
• Device Name: The name/manufacturer/type of the modem installed on your PC that will be
used to communicate with the terminal.
• Max Attempts: The maximum number of attempts to successfully connect to the terminal.
• Retry Wait: The time interval (in seconds) to connect to the terminal after an unsuccessful
attempt.
• Time Zone Offset: This should be used if your PC and the Location (terminals) are located
in different time zones. The default value is 0:00. Use the dropdown lists to configure the
offset.
• Com Port: Select the Com Port of the PC that will communicate with the terminals.
• Active: When checked, the Location will begin sending and receiving data.
If you selected a Connection Type of Non-Hayes (Modem), you must complete the following:
• Phone Number: The telephone number of the terminal’s modem. (Include 1 + (Area Code)
+ 7 digit phone number, when applicable).
• Time Zone Offset: This should be used if your PC and the Location (terminals) are located
in different time zones. The default value is 0:00. Use the dropdown lists to configure the
offset.
• Com Port: Select the Com Port of the PC that will communicate with the terminals.
• Active: When checked, the Location will begin sending and receiving data.
If you selected Network as the Connection Type, enter the IP Address in the spaces provided.
• IP Address: The IP Address of the terminal(s). May have to obtain from network
administrator. Also, see appropriate Terminal Installation manual (i.e., MTX-15 Installation
Manual) for Ethernet configuration.
• Time Zone Offset: This should be used if your PC and the Location (terminals) are located
in different time zones. The default value is 0:00. Use the dropdown lists to configure the
offset.
• Active: When checked, the Location will begin sending and receiving data.
To clear any information entered, click on the Cancel button. This will reset the fields.
After you entered the correct information, click on the Save button. The Location Name will
appear in the Location List.
To delete a Location, select the desired Location from the Location List and click on the Delete
button. A message will appear to confirm your selection.
To exit the Communication Settings dialog, click on the Close button.
4-30 Time Guardian v3.5 User’s Guide
Page 63
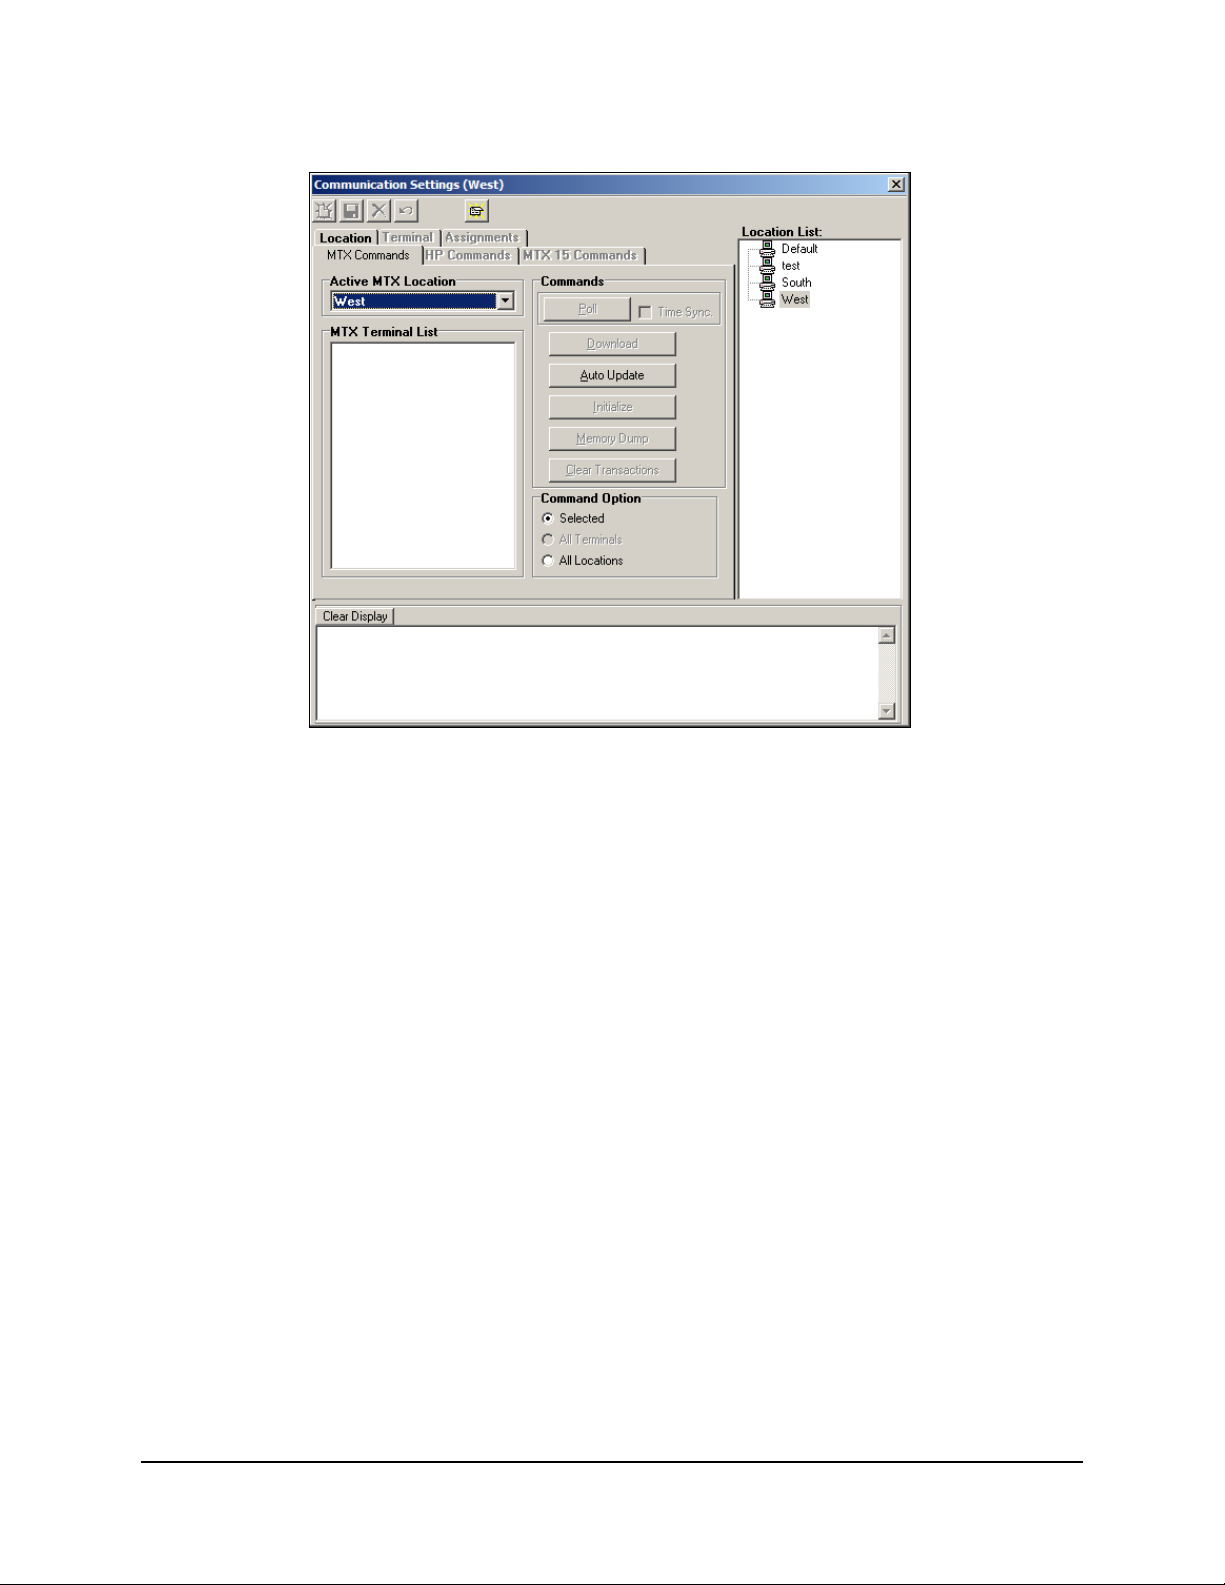
MTX Commands Tab - Clock
This tab allows you to perform the following functions with MTX-5 Time Guardian terminals:
• Polling: This operation collects the most recent data from the terminal. When checked,
Time Sync. performs time synchronization between the Host PC and the terminal including
Daylight Saving settings.
• Download: Sends Daylight Saving Time settings, employee assignments and Bell and
Door Schedules to the terminal.
• Auto Update: Performs the following functions:
− Confirms that the clock and the Host PC are communicating
− Assigns a terminal number
− Sends Daylight Saving Time settings
− Sends the Door Access and Bell Schedule
− Sets the time display of the terminal according to the PC settings
• Initialize: This function will reset the terminal back to factory settings and clear the memory.
It is recommended that you wait one minute between performing this operation and
punching at the terminal.
• Memory Dump: Uploads all the punch data currently at the terminal to the PC and resets
the memory pointer to the start. This function is useful should there be a catastrophic data
loss.
Warning: If this function is performed with active data, duplicate punches may be created.
The Command Options dialog box allows you perform these operations on either the Selected
terminals, All Terminals or All Locations.
Time Guardian v3.5 User’s Guide 4-31
Page 64
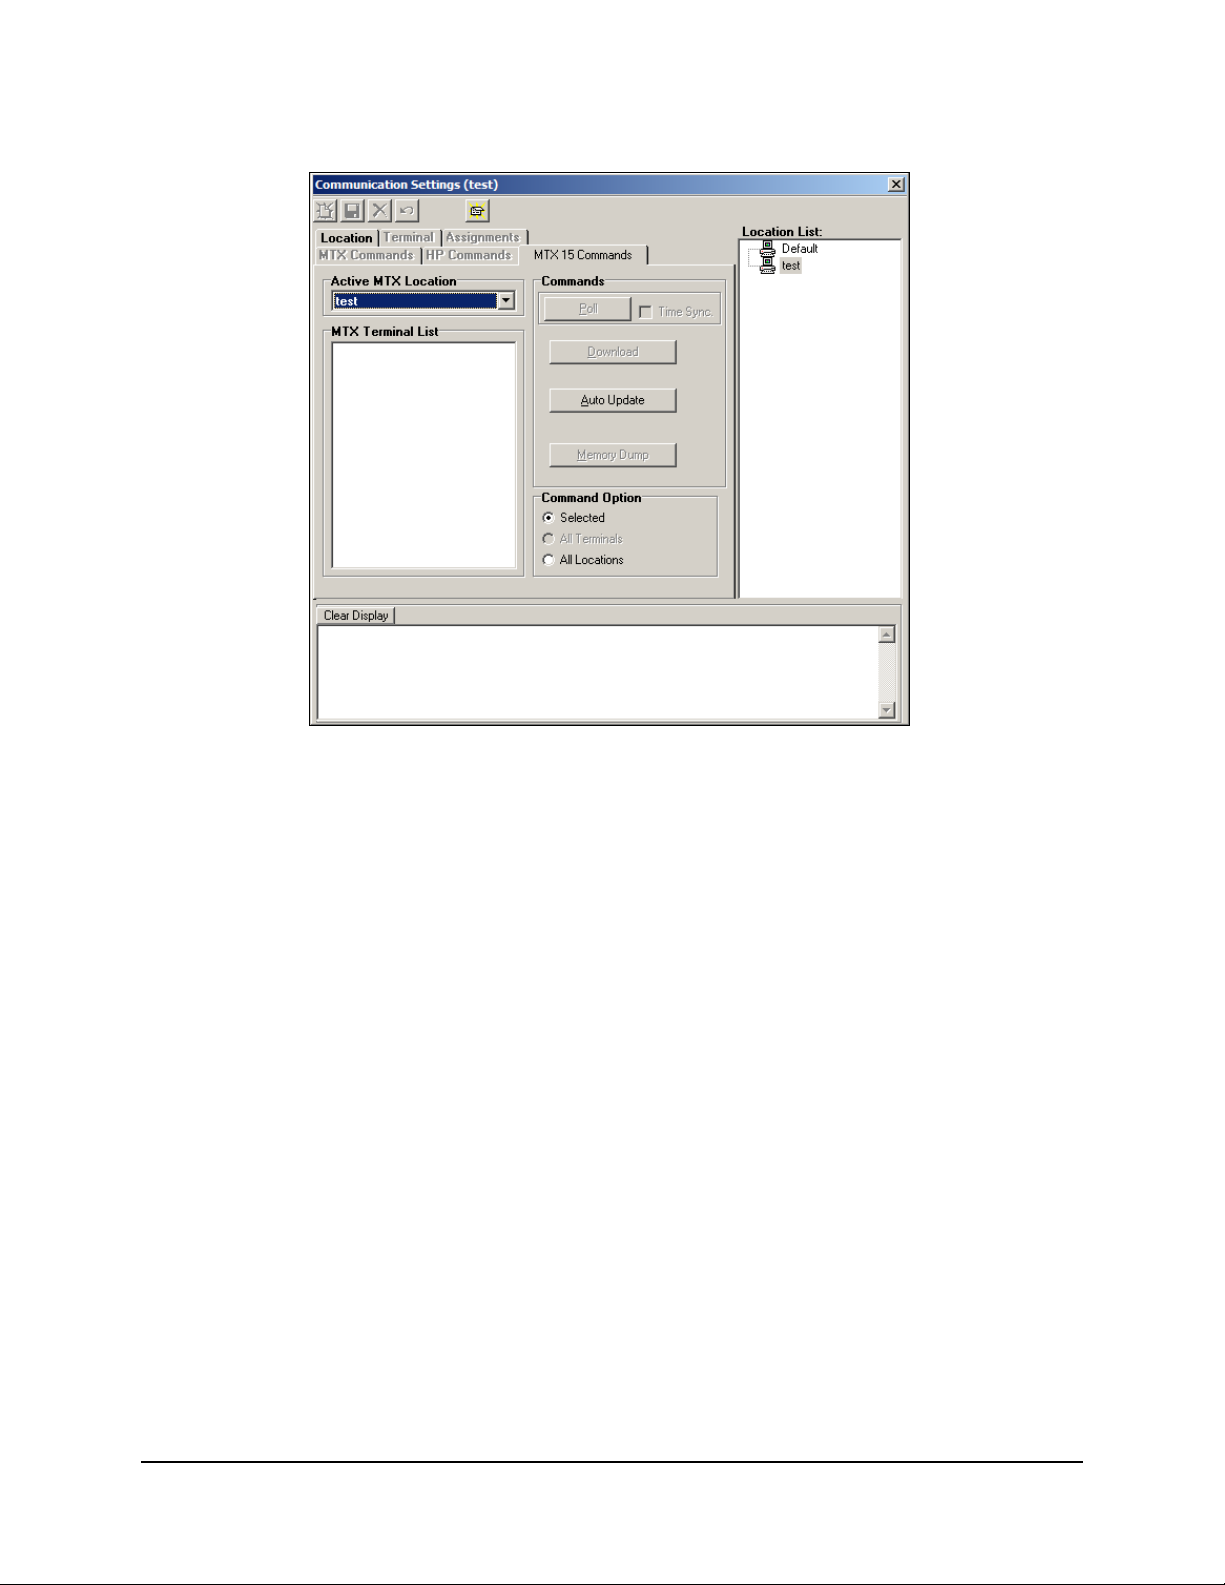
MTX-15 Commands Tab - Clock
This tab allows you to perform the following functions on MTX-15 Time Guardian terminals:
• Polling: This operation collects the most recent data from the terminal. When checked,
Time Sync. performs time synchronization between the Host PC and the terminal. This
includes Daylight Saving Time settings.
• Download: Sends Daylight Saving Time settings, employee assignments and Bell and
Door Schedules to the terminal.
• Auto Update: Performs the following functions:
• Confirms that the clock and the Host PC are communicating
• Assigns a terminal number
• Sends Daylight Saving Time settings
• Sends the Door Access and Bell Schedule
• Sets the time display of the terminal according to the PC settings
• Memory Dump: Uploads all the punch data currently at the terminal to the PC and resets
the memory pointer to the start. This function is useful should there be a catastrophic data
loss.
Warning: If this function is performed with active data, duplicate punches may be created.
The Command Options dialog box allows you perform these operations on either the Selected
terminals, All Terminals, or All Locations.
4-32 Time Guardian v3.5 User’s Guide
Page 65

HP Commands Tab – Clock
This tab allows you to perform the following functions with HandPunch terminals:
• Polling: This operation collects the most recent data from the terminal. When checked,
Time Sync. performs time synchronization between the Host PC and the terminal including
Daylight Saving settings.
• Download: Sends Daylight Saving Time settings, employee assignments and Bell and
Door Schedules to the terminal.
Biometric Maps: The terminal must be polled before performing the following operations.
Polling the terminals will save biometric hand templates for newly enrolled employees,
automatically update the database with templates for employees who have punched at the
terminal, and create terminal assignments for employees that have not yet been enrolled in the
database.
Note: If a newly enrolled employee does not exist in the employee database, then the template
in the terminal will not be saved. If the template data is inadvertently lost, it must be
reassigned to the terminal through the Assignments tab.
Each time an employee punches at the terminal, their hand template will automatically be
updated in the employee database
with the most recent template from the terminal. This feature
is for maintaining accurate hand templates. However, if the employee does not exist in the
employee database, then a message will be displayed in the message window at the bottom of
the tab.
Once an employee is added to the Employee database, their template will not automatically be
uploaded unless the employee is removed and re-enrolled at the terminal, or a punch is
received from the terminal. Once this is done, however, the employee’s template will be saved
and an assignment will automatically be created.
Time Guardian v3.5 User’s Guide 4-33
Page 66
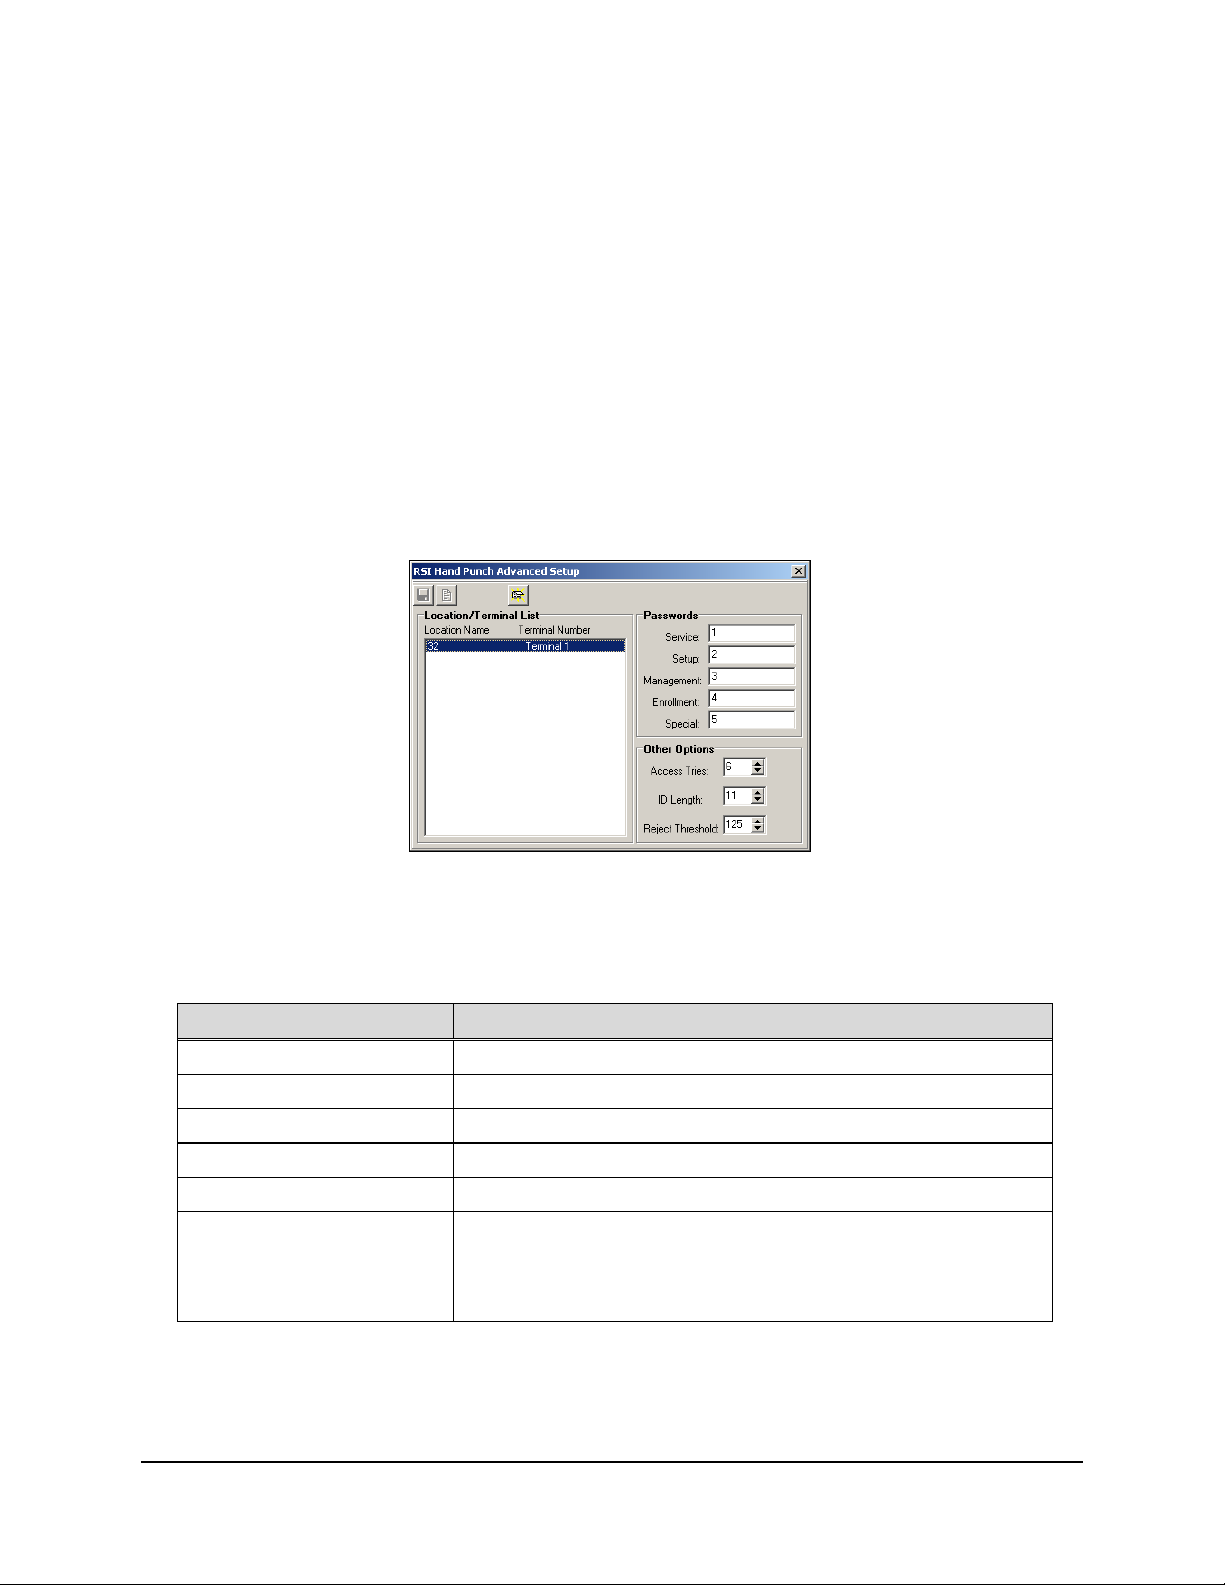
• Send Maps: This command will download biometric hand templates from the employee
database to the selected terminals. Only templates assigned to the terminals will be
downloaded. Employees are assigned to terminals in the Assignments tab, or by polling.
Because the download operation consists of first clearing all templates from the terminal
and then downloading assigned employee templates, a confirmation dialog box will appear
before this command executes.
• Receive Maps: This command will upload employee templates from the selected terminals
and save them in the database. Only templates assigned to the terminals will be uploaded.
Employees are manually assigned to terminals in the Assignments tab.
• Clear Terminal: This will clear (delete) all employee templates from the selected terminals.
A confirmation dialog box will appear before this command executes to prevent the
unwanted deletion of employee templates. Click on the Yes button to continue or No to
cancel the operation.
Advanced Setup: This dialog box enables you to remotely set the following parameters of
HandPunch terminals: This dialog can be used with one or more selected terminals.
• Passwords: This box allows you to assign an Authority Level or Command Mode Group to
the employee. These groups allow access to commands in the RSI HandPunch for
employee enrollments, system management, and service operations. Refer to the
HandPunch documentation for more detailed information.
Command Mode Group Description
None
Service
Setup
Management
Enrollment
No Command Mode Group.
Access to service and diagnostic functions.
Set the baud rate and number of the terminal.
General system management operations.
Enroll and remove users.
Allows people who are unable to use the Hand Punch
Special
because of a disability or other infirmity to be enrolled.
Enrolling employees through this Command Group
disables the hand reading checks in the Hand Punch.
• Access Tries: The number of times a user can attempt to use the terminal before being
rejected.
• ID Length: The field length of the User or Employee ID.
4-34 Time Guardian v3.5 User’s Guide
Page 67
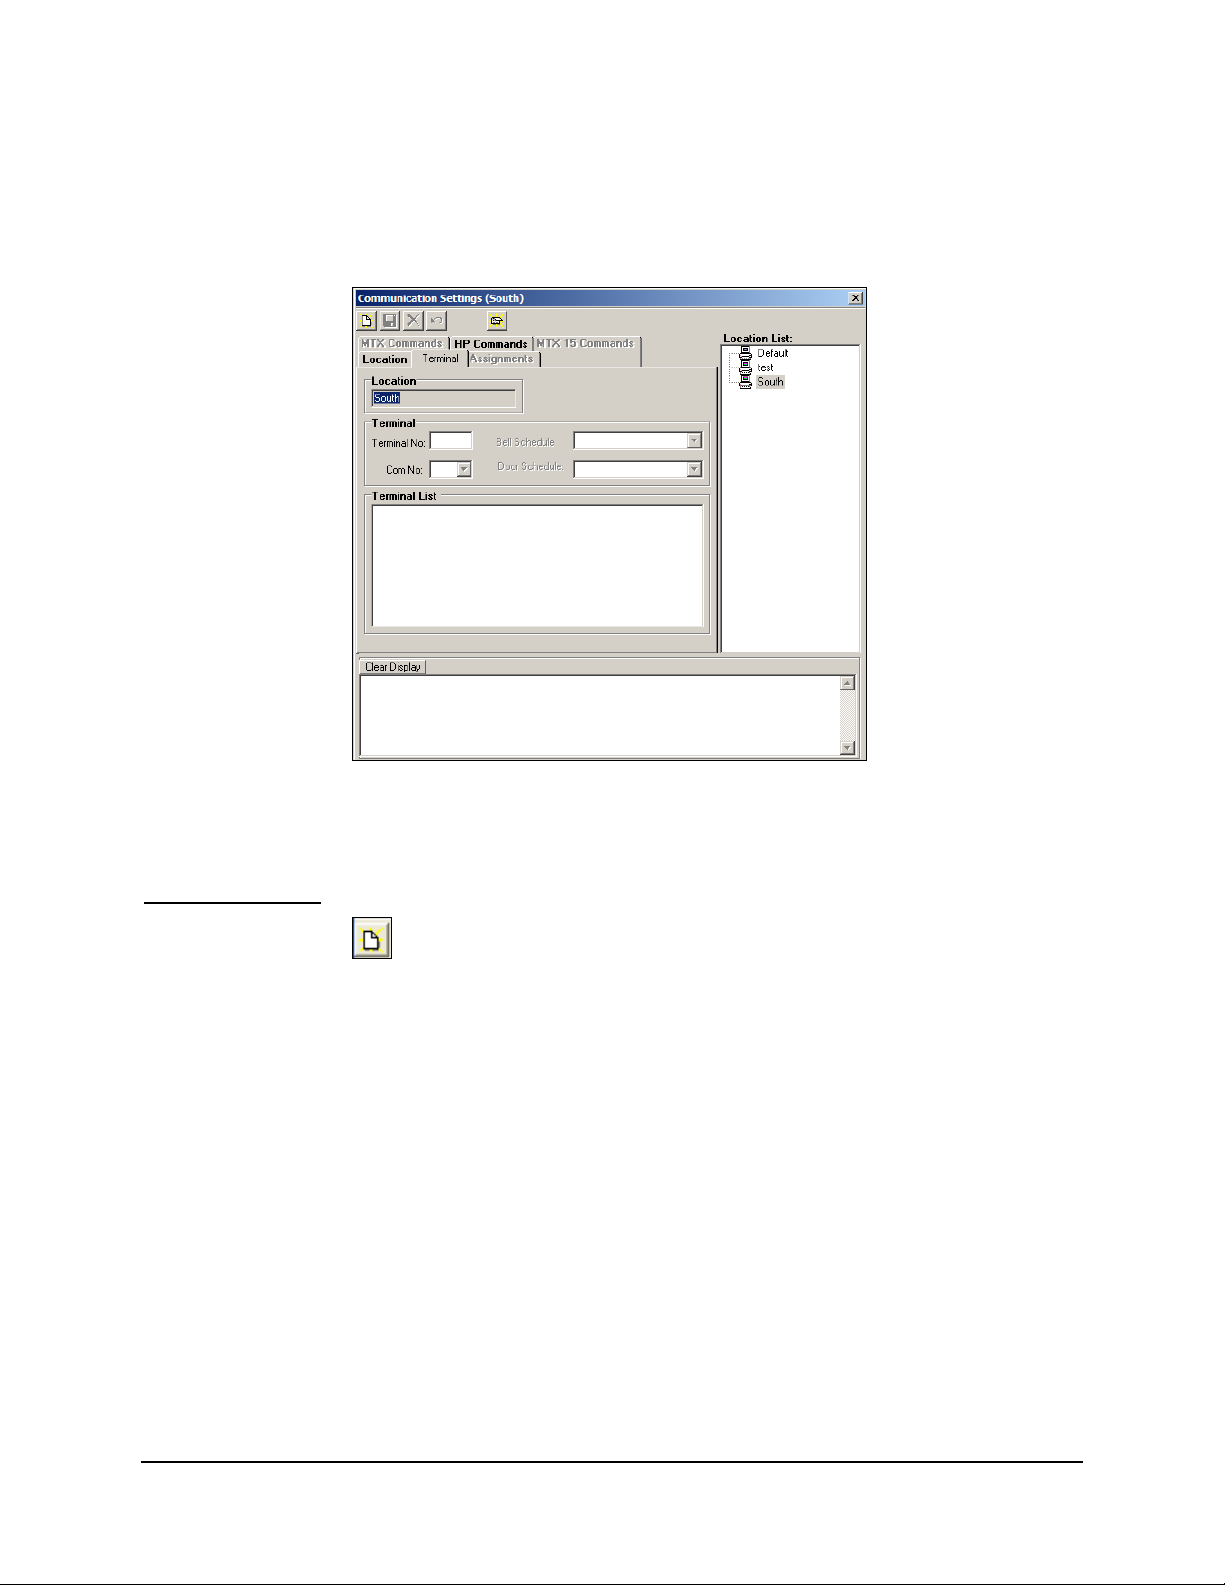
• Reject Threshold: The sensitivity of the terminal to the employee’s hand geometry. The
default value is 125, but it can be set to a value between 30 and 250. A lower number
indicates high sensitivity.
Terminal Tab - Clock
The Terminal tab is used to manually add or remove terminals in a Location, and assign Bell
and Door Schedules to terminals. Each terminal in an Location is defined by its terminal
number.
To add a terminal:
1. Click on the New
button.
2. Select a Location from the Location List
3. Enter the terminal number in the Terminal Number field. The terminal number is the same
as the address assigned to the terminal during installation. Valid values are 1 through 31.
Each location may have up to 31 terminals connected together in a “daisy chain”. Refer to
your terminal’s specific documentation for assigning addresses and network connections.
4. If you wish to assign a Relay or Door Schedule to a terminal, select one from the dropdown
list.
5. Click on the Save button. The terminal number will appear in the Terminal List and a
terminal icon will be placed underneath the Location in the Location List.
Note: Time Guardian terminals can be automatically added to a Location by selecting the Auto
Update command in the MTX or using the MTX-15 Commands tab.
To change or delete a Relay or Door Schedule, select a terminal from the Terminal List and use
the dropdown menu to assign a different schedule. Select a blank schedule to delete the
schedule. When finished, click on the Save button.
To delete or remove a terminal, select a terminal from the list and click on the Delete button,
and a confirmation message will appear.
Time Guardian v3.5 User’s Guide 4-35
Page 68

Assignments Tab - Clock
The Assignments tab is used to manually assign employees/users to a terminal or a group of
terminals. If employees’ records already exist in the database, polling a terminal will
automatically create employee terminal assignments.
The Assignments tab consists of Locations/Terminals and Employees lists. The
Locations/Terminal list displays all the Locations in the system and their terminals. Selecting
one or more of the terminals allows the user to assign employees to the selection. When a
terminal is selected, the employees assigned to it will be displayed in the Employees window. If
multiple terminals are selected, only those employees common to all selected terminals will be
displayed.
Creating and Assigning Door Access and Bell Schedules
Door Access and Bell Schedules can be created from the Setup wizard. However, a schedule
can only be assigned and downloaded when Time Guardian detects a clock. Select “Yes” to the
question “Do you want to create door access or bell schedules?” and click on the Bells
icon to open the module. This module allows you to create both Door Access and Bell
Schedules, however, only one schedule can be assigned per terminal. Once the schedule has
been created and assigned, the last step is to select Communication from the Main Menu, pull
down and select submenu MTX and HandPunch, and Downloading. This will automatically
download the new schedules to the assigned terminals.
The following example displays a split screen with a Door Schedule to the left and a Bell
Schedule to the right. In both cases, you begin by assigning a schedule name in the Name
field. Next, select the type of schedule: Door or Bell.
• A Door schedule requires you to enter the amount of time a door will remain open after
each swipe. This is entered in the Relay Duration field.
4-36 Time Guardian v3.5 User’s Guide
Page 69

• A Bell schedule requires you to enter the duration, time of day, and weekly schedule for the
bell to ring. Multiple entries can be made for Bell schedules with different duration and day
assignments.
Once all schedules have been created and saved, the “Assign Relay Schedule” tab will become
active. This tab is divided into two sections. To the left, the Relay Name list contains all of the
schedules. To the right, the Terminal Number List contains all terminals currently active in the
system as shown in the following example:
To assign a schedule to a terminal, highlight the schedule name and select the Assign button.
That schedule will then appear under the terminal. To remove an assigned schedule, highlight
the name under the terminal and hit the delete key on the keyboard.
Time Guardian v3.5 User’s Guide 4-37
Page 70
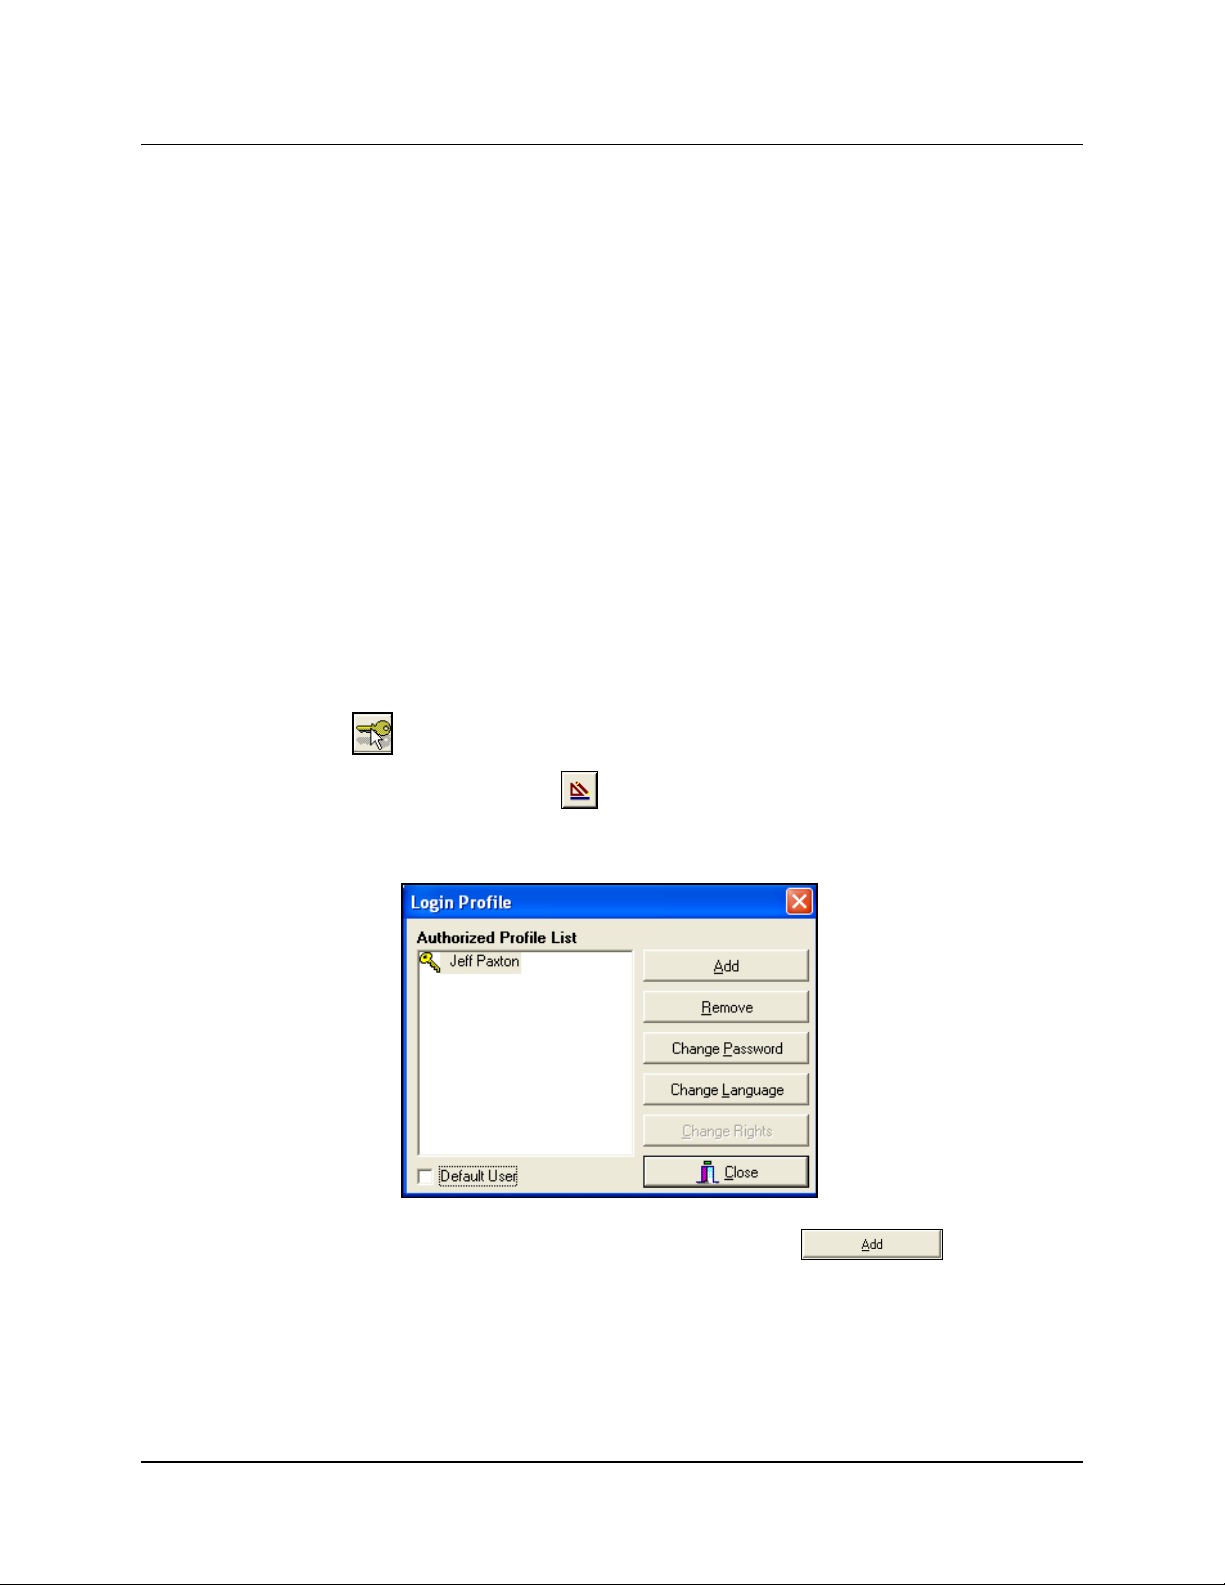
Advanced Setup Wizard Login Tab (Profile Definition)
There are three possible levels of Access Rights, controlled by the two check boxes marked
Administrator and Read-Only. The following describes the access rights given to users based
upon checkbox selection:
• Administrator Checkbox selected: Grants the full ability to add, modify and edit any data
contained in the system, including all employee and Time Guardian user login data.
• No Checkboxes Selected: The user has the same access as an Administrator with regard
to employee data, but cannot access or modify the Time Guardian user login data.
• Read-Only: Can view all data in the system but cannot modify any data or add any new
data.
Note: During Advanced Wizard setup at least one Administrator profile should be created.
Additional Profiles can be added, and existing Profiles can be modified using three different
methods:
1. Open the Login Profile module. This can be done by using either of the three following
methods:
st
method: Selecting Setup from the Main Menu, and clicking the Login Profiles
a. 1
submenu.
nd
b. 2
method: Selecting Setup from the Main Menu, and clicking the Wizard submenu.
From the Setup Wizard screen click the Login tab, and then click on the Login
Information
rd
c. 3
method: Clicking on the Wizard icon in the Custom Toolbar to display the Setup
button and the Login Profile screen will appear.
Wizard screen, selecting the Login tab, and then click on the Login Information button
and the following Login Profile screen will appear:
2. From the Login Profile screen (as illustrated above) click on the button. From
the Login Profile menu, you must select “Add” before a new Profile can be created, and the
following “Add New Profile” window will appear:
4-38 Time Guardian v3.5 User’s Guide
Page 71

3. Enter the Name of the user (see screen above on right).
4. Enter and confirm the password.
5. Select Language from drop down menu.
6. Select if the profile will have Administrator or Read Only access. Press the Save button.
7. Select the “Advanced Password” tab to configure password expiration options and the
following screen will appear:
8. When finished, the new profile will be created and added to the Authorized Users list.
Highlighting a name on the list and selecting the “Default User” box will make that user the
default name and it will appear each time the software is opened.
All Profiles are case and space sensitive. If you have a problem accessing the software,
confirm the login information and try again.
Time Guardian v3.5 User’s Guide 4-39
Page 72

Payroll Interface Creation
Time Guardian currently provides interfaces to the following payroll software companies: ADP
for DOS, ADP for Windows, Excel, QuickBooks, Peachtree, Power Pay, Paychex Paylink,
Paychex Preview, CBS Payroll, GevityHR, and PAYDAY of AMERICA. If selected during the
initial Setup Wizard, the Payroll Interface will be displayed at the bottom of the Report List.
Clicking on the Payroll Interface will display the Payroll software selected from the Setup
Wizard. Only one Payroll company can be used at a time. Select Setup from the main menu,
pull down to the Wizard submenu. From the General tab view, click on the
icon to display
the Payroll Software selection screen to change your selection. Each payroll company has a
different setup process, which are detailed in the following paragraphs.
Note: If QuickBooks was selected as your Payroll software, Time Guardian will integrate
directly to QuickBooks. QuickBooks must be installed on the same PC as Time
Guardian and open during installation. Upon completion of Time Guardian Wizard
setup, QuickBooks will download up to 100 employees. Time Guardian can be
synchronized at any time with QuickBooks by issuing the "Sync Employee(s) with
payroll" command.
To perform payroll setup process:
1. Press Payroll Interface in the Reports/Payroll Interface view (left-hand side). See the
following figure for an example.
2. Click on the Payroll icon when it appears in the top left-hand window (see the following
figure for an example).
4-40 Time Guardian v3.5 User’s Guide
Page 73

3. Navigate through the payroll pages icon when it appears in the top left-hand window (see
the above figure for an example). The following sections detail the setup process for payroll
pages 1 thru 4 information for each payroll system.
Power Pay
The setup process to create an export file for Power Pay is as follows:
1. Select Yes or No for the question; Do you want to import the Company Information?.
2. If Yes, choose the location and file name of the export file. This information is entered in the
select path field.
Example: C:\ProgramFiles\Time Guardian\Export.txt.
3. Visit Http://www.PowerPay.com on the web and download the required PDM information.
This will create a file named “today’s date”pdm.txt.
Example: 12-12-2000pdm.txt
The breakout of this file is as follows:
001, 24034 (Company Number), 001(Site Code), 12(Sequence Number) 002,809,D2, Direct
deposit fixed.
3. Enter the Company Number. This can be found in the second section of the PDM
information as displayed in step 2.
4. Enter the Site Code. This can be found in the third section of the PDM information as
displayed in Step 2.
5. Enter the Pay Period start date. This is the date on which this Pay Period begins.
6. Enter the Payroll end date. This is the date on which the Pay Period ends.
7. Enter the effective check date. This is an optional field that represents the date printed on
the check.
8. Run # for information purposes only.
9. Select how hours for Time Guardian are to be transferred to Power Pay. Assigning a Payroll
Field ID to the Pay Codes in Time Guardian does this, and the Power Pay payroll field IDs
are located in the PDM file. The payroll field id is the number after the first comma for any
line that begins with 002.
Example:
Time Guardian Pay Code Power Pay Payroll Field ID
REG 1307
HOL 1304
OT 1270
9. From page 5 of 6, select the employees to be included in the payroll file. Your options are:
• All: Every employee entered in Time Guardian will be included in the payroll file.
• Current: Only the employee currently highlighted in the Employee List box will be
included in the payroll file.
• Selected: Only the employee displayed in the Employee List box will be included in the
payroll export file.
Time Guardian v3.5 User’s Guide 4-41
Page 74
10. The last screen (pg 6 of 6) shows a summary of the information contained in the payroll
export file.
11. Select the Save Payroll Settings
icon and then select the Run Payroll icon to
generate the export file.
Peachtree
The setup process to create an export file for Peachtree is as follows:
1. The Ticket number is for informational purposes only.
2. Choose the location and file name for the export file. This information is entered in the select
path field.
Example: C:\ProgramFiles\Time Guardian\Time.cvs
3. Select how hours for Time Guardian are to be transferred to Peachtree. Assigning a Payroll
Field ID to the Pay Codes in Time Guardian does this. Peachtree payroll field IDs are 1 for
straight time and 2 for time and a half.
Example:
Time Guardian Pay Codes Peachtree Payroll Field ID
REG 1
HOL 1
VAC 1
SCK 1
OT 2
4. From page 3 of 4, select the employees to be included in the payroll file. Your options are:
• All: Every employee entered in Time Guardian will be included in the payroll file.
• Current: Only the employee currently highlighted in the Employee List box will be
included in the payroll file.
• Selected: Only the employee displayed in the Employee List box will be included in the
payroll export file.
5. The last screen (pg 4 of 4) shows a summary of the information contained in the payroll
export file.
6. Select the Save Payroll Settings
icon and then select the Run Payroll icon to
generate the export file.
QuickBooks
The setup process to create a QuickBooks export file is as follows:
1. Enter the version number of the QuickBooks package you are using. This information can
be obtained in QuickBooks from the Help|About menu.
2. Enter the release number of the QuickBooks package you are using. This information can
also be obtained in QuickBooks from the Help|About menu.
3. Enter the Company Name from QuickBooks.
4-42 Time Guardian v3.5 User’s Guide
Page 75
4. Enter the Create Time. This number can be obtained in QuickBooks from the File|Time
Activities|Explorer List for Time menu. Click OK and type a file name for the file.
5. Open the Windows Note Pad by selecting Start|Programs|Accessories|Note Pad. From the
main menu, select File|Open. Locate the file created in the previous step. Once the file is
open, locate the create time. It is the last number on the second line. Close Note Pad.
6. Choose the location and file name for the export file. This information is entered in the
select path field.
Example: C:\ProgramFiles\Time Guardian\filename
7. Select how hours for Time Guardian are to be transferred to QuickBooks. Assigning a
Payroll Field ID to the Pay Codes in Time Guardian does this. QuickBooks payroll field IDs
are located in the QuickBook’s payroll items.
Example:
Time Guardian Pay Codes QuickBooks Payroll Field ID
REG Regular Pay
HOL Holiday Pay
8. From page 3 of 4, select the employees to be included in the payroll file. Your options are:
• All: Every employee entered in Time Guardian will be included in the payroll file.
• Current: Only the employee currently highlighted in the Employee List box will be
included in the payroll file.
• Selected: Only the employee displayed in the Employee List box will be included in the
payroll export file.
9. The last screen (pg 4 of 4) shows a summary of the information contained in the payroll
export file.
10. Select the Save Payroll Settings
icon and then select the Run Payroll icon to
generate the export file.
QuickBooks Integration with Time Guardian
QuickBooks must be selected as your Payroll software and installed on the same PC to enable
Time Guardian to synchronize directly. The following procedure describes how to setup Time
Guardian for QuickBooks integration/synchronization.
1. Click on the Payroll Interface
(see the following figure).
button to display the QuickBooks Payroll icon
Time Guardian v3.5 User’s Guide 4-43
Page 76

2. Click on the QuickBooks Payroll icon and page 1 of 4 for the QuickBooks setup screen will
appear (see the following figure). Select the checkbox options to Generate hours by day
and QuickBooks Integration (must select for integration). If you do not want entries to be
duplicated when transferring an employee, select the Overwrite duplication payroll
entries.
3. Navigate to page 2 of 4 for the QuickBooks setup screen to display the Paycode setup (see
the following figure). In the Paycode setup screen, you must map each of the fields in Time
Guardian to the appropriate field in QuickBooks. Select from a list of QuickBooks entries by
clicking on a QuickBooks icon to the right of the fields.
Note: QuickBooks must be installed and on the same PC as Time Guardian, and running. If it
is not, you will be notified with a warning message when synchronization is attempted.
4. When you click on a QuickBooks icon the following QuickBooks Paycode screen will
appear. Map the Time Guardian Paycode to the desired QuickBooks Paycode and click OK.
4-44 Time Guardian v3.5 User’s Guide
Page 77

5. From page 3 of 4, select the employees to be included in the payroll file. Your options are:
• All: Every employee entered in Time Guardian will be included in the payroll file.
• Current: Only the employee currently highlighted in the Employee List box will be
included in the payroll file.
• Selected: Only the employee displayed in the Employee List box will be included in the
payroll export file.
6. The last screen (pg 4 of 4) shows a summary of the information contained in the payroll
export file.
7. Select the Save Payroll Settings
icon and then select the Run Payroll icon to
generate the export file.
8. When Time Guardian attempts to synchronize employees or transfer payroll information to
QuickBooks, the following dialog will appear:
9. In the selection that asks, Do you want to allow this application to read and modify this
company file? You must
select Yes, always; allow access even if QuickBooks is not
running. Also, the check box at the bottom of the dialog captioned; Allow this application to
access personal data such as Social Security Numbers and customer credit card
information must
be checked as Time Guardian appends/modifies personal data (employee
information, payroll entries).
Time Guardian v3.5 User’s Guide 4-45
Page 78

Note: If this is not setup correctly, Time Guardian will fail to synchronize employees and
payroll information.
QuickBooks Synchronization
From Time Guardian, click on the Employee menu, and select Sync Employee(s) with
Payroll. A warning dialog box will appear if QuickBooks is not running.
An alternate method would be to click on the Setup menu, and select the Wizard sub-menu.
Select the Employee Tab from the Setup Wizard screen and click in the box alongside Sync
Employee(s) with Payroll.
QuickBooks Compatibility
Time Guardian is compatible with the following versions of QuickBooks:
• QuickBooks 2007 and Enterprise 7.0
• QuickBooks 2006 and Enterprise 6.0
• QuickBooks 2005 and Enterprise 5.0 (R5 and later)
• QuickBooks 2005 and Enterprise 5.0
• QuickBooks 2004 and Enterprise 3.0 (R7 and above)
• QuickBooks 2003
• QuickBooks 2002 (R2 and above)
• QuickBooks 2002
Excel
The setup process to create an export file for Excel is as follows:
1. Select whether or not to:
Show employees with no hours
Separate records by day
Pass wages
2. Enter the Payroll Number from the dropdown menu. Your choices are: Employee Number,
Badge Number, or Social Security Number.
2. Enter the Date Format from the dropdown menu. Your choices are: MM/dd/yyyy,
yyyy/MM/dd, or dd MM yyyy.
3. Enter the Hours Format from the dropdown menu. Your choices are: Hundredths, Minutes,
or Hours:Minutes.
4. Choose the location and file name for the CSV export file. This information is entered in the
select path field.
Example: C:\ProgramFiles\Time Guardian\ filename
5. Select the paycodes from the dropdown menus.
6. Select the employees to be included in the payroll file. Your options are:
• All: Every employee entered in Time Guardian will be included in the payroll file.
4-46 Time Guardian v3.5 User’s Guide
Page 79
• Current: Only the employee currently highlighted in the Employee List box will be
included in the payroll file.
• Selected: Only the employee displayed in the Employee List box will be included in the
payroll export file.
7. The last screen (pg 4 of 4) shows a summary of the information contained in the payroll
export file.
8. Select the Save Payroll Settings
icon and then select the Run Payroll icon to
generate the export file.
ADP For Windows
Note: ADP for Windows provides access to ADP "Pay Expert", which is ADP's web-based
assistant.
The setup process to create an export file for ADP for Windows is as follows:
1. You must specify your Company Code. For ADP, this is a three-character upper-case code
identifying the company that the payroll is for.
2. You must specify your Batch No. For ADP, this is a two-character upper-case code
identifying the batch no. that the payroll is for.
3. Choose the location and file name for the export file. This information is entered in the
select path field. Specify the drive and directory where ADP for Windows is installed on the
PC. The file name will be Extpay99.
Example: C:\ADP\ADPDATA\Extpay99
4. Select how hours for Time Guardian are to be transferred to ADP. Assigning a Payroll Field
ID to the Pay Codes in Time Guardian (page 2 of 4) does this. ADP uses categories for their
Hour Codes, they are as follows:
Hour Category Time Guardian Payroll Field ID Equitant
Regular 012
Overtime 013
Hours 3 016AA
Hours 3 017AA
Hours 4 018AA
Hours 4 019AA
Earnings Code 3* 020
Earnings Code 3* 021
Earnings Code 4* 022
Earnings Code 4* 023
Earnings Code 5* 024
Earnings Code 5* 025
*Used only if using Dollar Pay Codes in Time Guardian.
AA is a two-character identifier for categories other than Regular and Overtime. If it is only
one character, you must put a space before the character. The following table provides
examples of some of the possible Payroll Field ID's for ADP categories:
Time Guardian v3.5 User’s Guide 4-47
Page 80

Time Guardian Pay Code ADP Category Time Guardian Payroll Field ID
Reg-Regular Regular 012
OT-Overtime Overtime 013
Vac-Vacation Hours 3 016_V, 016VA, 017_V, 017VA
Sck-Sick Hours 4 018_S, 018SC, 019_S, 019SC
Bon-Bonus Earnings Code 3 020, 021
Tip- Tips Earnings Code 4 022, 023
5. ADP for Windows must be setup to accept the interface file from Time Guardian. This is
done by logging into ADP for Windows and selecting Setup|Company from the main menu.
Highlight the company name and click OK. A dialog box will appear at the bottom of the
dialog box.
6. Click on the tab that states “Page 2.” There should be a check box labeled Total Time or ETime. Click on the box to check it and Save changes.
7. Select the employees to be included in the payroll file (pg 3 of 4). Your options are:
• All: Every employee entered in Time Guardian will be included in the payroll file.
• Current: Only the employee currently highlighted in the Employee List box will be
included in the payroll file.
• Selected: Only the employee displayed in the Employee List box will be included in the
payroll export file.
8. The last screen (pg 4 of 4) shows a summary of the information contained in the payroll
export file.
9. Select the Save Payroll Settings
icon and then select the Run Payroll icon to
generate the export file.
ADP For DOS
The setup process to create an export file for ADP for DOS is as follows:
1. You must specify your Company Code. For ADP, this is a three-character upper-case code
identifying the company that the payroll is for.
2. You must specify your Batch No. For ADP, this is a two-character upper-case code
identifying the batch no. that the payroll is for.
3. Choose the location and file name for the export file. This information is entered in the
select path field.
ADP DOS: Specify the drive and directory where ADP for DOS is installed on the PC. The
file name will be Extpay01.
Example: C:\PCPERS\Extpay01
4. You must specify your Version No. For ADP, this is a one-numeric code identifying the
PC/Payroll and personnel version number.
5. Select how hours for Time Guardian are to be transferred to ADP. Assigning a Payroll Field
ID to the Pay Codes in Time Guardian does this. ADP uses categories for their Hour Codes,
they are as follows:
4-48 Time Guardian v3.5 User’s Guide
Page 81
Hour Category Time Guardian Payroll Field ID Equitant
Regular 012
Overtime 013
Hours 3 016AA
Hours 3 017AA
Hours 4 018AA
Hours 4 019AA
Earnings Code 3* 020
Earnings Code 3* 021
Earnings Code 4* 022
Earnings Code 4* 023
Earnings Code 5* 024
Earnings Code 5* 025
*Used only if using Dollar Pay Codes in Time Guardian.
AA is a two-character identifier for categories other than Regular and Overtime. If it is only
one character, you must put a space before the character. Below are examples of some of
the possible Payroll Field ID's for ADP categories:
Time Guardian Pay Code ADP Category Time Guardian Payroll Field ID
Reg-Regular Regular 012
OT-Overtime Overtime 013
Vac-Vacation Hours 3 016_V, 016VA, 017_V, 017VA
Sck-Sick Hours 4 018_S, 018SC, 019_S, 019SC
Bon-Bonus Earnings Code 3 020, 021
Tip- Tips Earnings Code 4 022, 023
6. Click on the tab in ADP that states “Page 2.” There should be a check box labeled Total
Time or E-Time. Click on the box to check it and Save changes.
7. Select the employees (pg 3 of 4) to be included in the payroll file. Your options are:
• All: Every employee entered in Time Guardian will be included in the payroll file.
• Current: Only the employee currently highlighted in the Employee List box will be
included in the payroll file.
• Selected: Only the employee displayed in the Employee List box will be included in the
payroll export file.
8. The last screen (pg 4 of 4) shows a summary of the information contained in the payroll
export file.
9. Select the Save Payroll Settings
icon and then select the Run Payroll icon to
generate the export file.
Time Guardian v3.5 User’s Guide 4-49
Page 82

Paychex PayLink
The setup process to create an export file for Paychex PayLink is as follows:
1. The Version number is for informational purposes only.
2. Enter the Site Number for Paychex.
Example: Site Number: 001
3. Enter the Office Number for Paychex. This range is from 0001 to 1295.
4. Enter the Client Number for Paychex. This is a four-character number.
5. Enter the Sequence Number for Paychex.
Example: Sequence Number: 000
6. For Save To: choose the location and file name for the export file. This information is
entered in the select path.
Example: C:\Paylink\Import
7. Select how hours for Time Guardian are to be transferred to Paychex. Assigning a Payroll
Field ID to the Pay Codes in Time Guardian does this. Paychex uses two codes to identify
Hours: Pay Type and Hours Type.
• Pay Type identifies hours as Salary, Rate 1, Vacation and Sick.
• Hours Type identifies hours by Regular (straight pay) or Overtime (time and a half pay).
The combination of the Pay Type and Hours Type form the Payroll Field ID. Below is a list of
the Pay and Hours types:
Pay Type Name Pay Type Hours Type Name Hours Type
Salary SA Regular Hours 0A
Rate 1 R1 Overtime Hours 0C
Rate 2 R2
Rate 3 R3
Non-Qualified Sick Pay NS
Qualified Sick Pay QS
Vacation VA
Holiday HO
Miscellaneous MI
The following are some examples of possible Payroll Field ID’s for Paychex.
4-50 Time Guardian v3.5 User’s Guide
Page 83

Pay Code Description Field ID
REG Rate 1 Regular Hours, Rate 2 Regular Hours, Rate 3 Regular Hours
OT
SCK Qualified Sick Regular Hours, Non-Qualified Sick Regular Hours QS0A, NS0A
HOL Holiday Regular Hours HO0A
VAC Vacation Regular Hours VA0A
MSC Miscellaneous Regular Hours MI0A
Rate 1 Overtime Hours, Rate 2 Overtime Hours, Rate 3 Overtime
Hours
R10A, R20A,
R30A
R10C, R20C,
R30C
8. Select the employees to be included in the payroll file. Your options are:
• All: Every employee entered in Time Guardian will be included in the payroll file.
• Current: Only the employee currently highlighted in the Employee List box will be
included in the payroll file.
• Selected: Only the employee displayed in the Employee List box will be included in the
payroll export file.
9. The last screen (pg 4 of 4) shows a summary of the information contained in the payroll
export file.
10. Select the Save Payroll Settings
icon and then select the Run Payroll icon to
generate the export file.
Paychex Preview
The setup process to create an export file for Paychex Preview is as follows:
1. Enter Client number (Maximum of 6 digits).
2. Select the file path. (Where the file is to be created).
3. Select if you want to generate hours by day.
4. Enter payroll ID Use a two character code, the first character is an E.
Example: Reg=1 the payroll ID for this Pay Code would be E1
5. Select the employees to be included in the payroll file. Your options are:
• All: Every employee entered in Time Guardian will be included in the payroll file.
• Current: Only the employee currently highlighted in the Employee List box will be
included in the payroll file.
• Selected: Only the employee displayed in the Employee List box will be included in the
payroll export file.
6. The last screen (pg 4 of 4) shows a summary of the information contained in the payroll
export file.
7. Select the Save Payroll Settings
icon and then select the Run Payroll icon to
generate the export file.
Time Guardian v3.5 User’s Guide 4-51
Page 84

CBS Payroll
The setup process to create an export file for CBS Payroll is as follows:
1. Enter Company Code.
2. Enter the File Name.
3. Browse to and enter the File Location.
4. Enter Payroll IDs for each Pay Code being used. The Payroll Field ID is a maximum of 4
digits and consists of the following:
• N-Normal Hours
• V-Vacation Hours
• H-Holiday Hours
• S-Sick Hours
In the second position, select which area to categorize the hours:
• 1-Regular Hours
• 2-Overtime Hours1
• 3-Overtime Hours2
• 4-Overtime Hours3
5. Select the employees to be included in the payroll file. Your options are:
• All: Every employee entered in Time Guardian will be included in the payroll file.
• Current: Only the employee currently highlighted in the Employee List box will be
included in the payroll file.
• Selected: Only the employee displayed in the Employee List box will be included in the
payroll file.
6. The last screen (pg 4 of 4) shows a summary of the information contained in the payroll
export file.
7. Select the Save Payroll Settings
generate the export file.
icon and then select the Run Payroll icon to
GevityHR
The setup process to create an export file for GevityHR is as follows:
1. Enter Company Number (Code) from information provided by GevityHR.
2. Enter the File Name from information provided by GevityHR.
3. Browse to and enter the File Location.
4. Select Payroll IDs from the dropdown box for each Pay Code being used.
5. Select the employees to be included in the payroll file. Your options are:
• All: Every employee entered in Time Guardian will be included in the payroll file.
• Current: Only the employee currently highlighted in the Employee List box will be
included in the payroll file.
• Selected: Only the employee displayed in the Employee List box will be included in the
payroll export file.
4-52 Time Guardian v3.5 User’s Guide
Page 85

6. The last screen (pg 4 of 4) shows a summary of the information contained in the payroll
export file.
7. Select the Save Payroll Settings
icon and then select the Run Payroll icon to
generate the export file.
PAYDAY of AMERICA
The setup process to create an export file for PAYDAY of America is as follows:
1. Enter Company Number (Code) from information provided by PAYDAY of AMERICA.
2. Enter the File Name from information provided by PAYDAY of AMERICA.
3. Browse to and enter the File Location.
4. Select Payroll IDs from the dropdown box for each Pay Code being used.
5. Select the employees to be included in the payroll file. Your options are:
• All: Every employee entered in Time Guardian will be included in the payroll file.
• Current: Only the employee currently highlighted in the Employee List box will be
included in the payroll file.
• Selected: Only the employee displayed in the Employee List box will be included in the
payroll export file.
6. The last screen (pg 4 of 4) shows a summary of the information contained in the payroll
export file.
7. Select the Save Payroll Settings
generate the export file.
icon and then select the Run Payroll icon to
Time Guardian v3.5 User’s Guide 4-53
Page 86

This page intentionally left blank.
4-54 Time Guardian v3.5 User’s Guide
Page 87

Chapter 5: Time Guardian System Backup
Time Guardian provides an automatic backup that can be activated at the time of installation or
added at a later date by selecting the Setup menu from the Main menu, and selecting the
Wizard submenu. From the Setup Wizard click the Login tab and click the Backup
Information
icon and the following Backup Information screen will appear:
Backups are automatically created in the “Backup” folder located under the program directory
unless designated otherwise. Backup files are archived .zip format and can be extracted back
to the Time Guardian folder should corruption occur.
When the Time Guardian Backup is created on the local PC, it is advised that a copy of the
Backup be saved to floppy disk, network drive or another medium to protect against
catastrophic computer failure.
Each file will be named “backup”, along with the date the file was created.
As seen in the figure above, a Backup requires you to select the “Backup Start Day.” Your
options are: Sunday through Saturday. It also requires you to enter “Number of Backup Files to
be rotated.” This number is currently limited to twenty-five (25) files. From that day forward to
the first day of the next period, Time Guardian will automatically create a new Backup file. Time
Guardian will create seven files every week, each being overwritten until the last day of the
week.
Time Guardian v3.5 User’s Guide 5-1
Page 88

Using the settings below, Time Guardian will create the first Backup on Monday and append
this record every time the software is opened, until the following Monday. A new Backup record
will then be created. This process will continue until seven weeks of Backup records have been
created. At this time, the next Backup to be created will replace the first Backup record
completely. The process will then repeat itself.
In the case above, the Backup folder will contain a maximum of seven files. This Backup
process was specially designed to ensure that a corrupted file could not contaminate the entire
Backup process. Should further assistance be needed, please refer to the Time Guardian
Support section of this Guide for direct support options.
5-2 Time Guardian v3.5 User’s Guide
Page 89
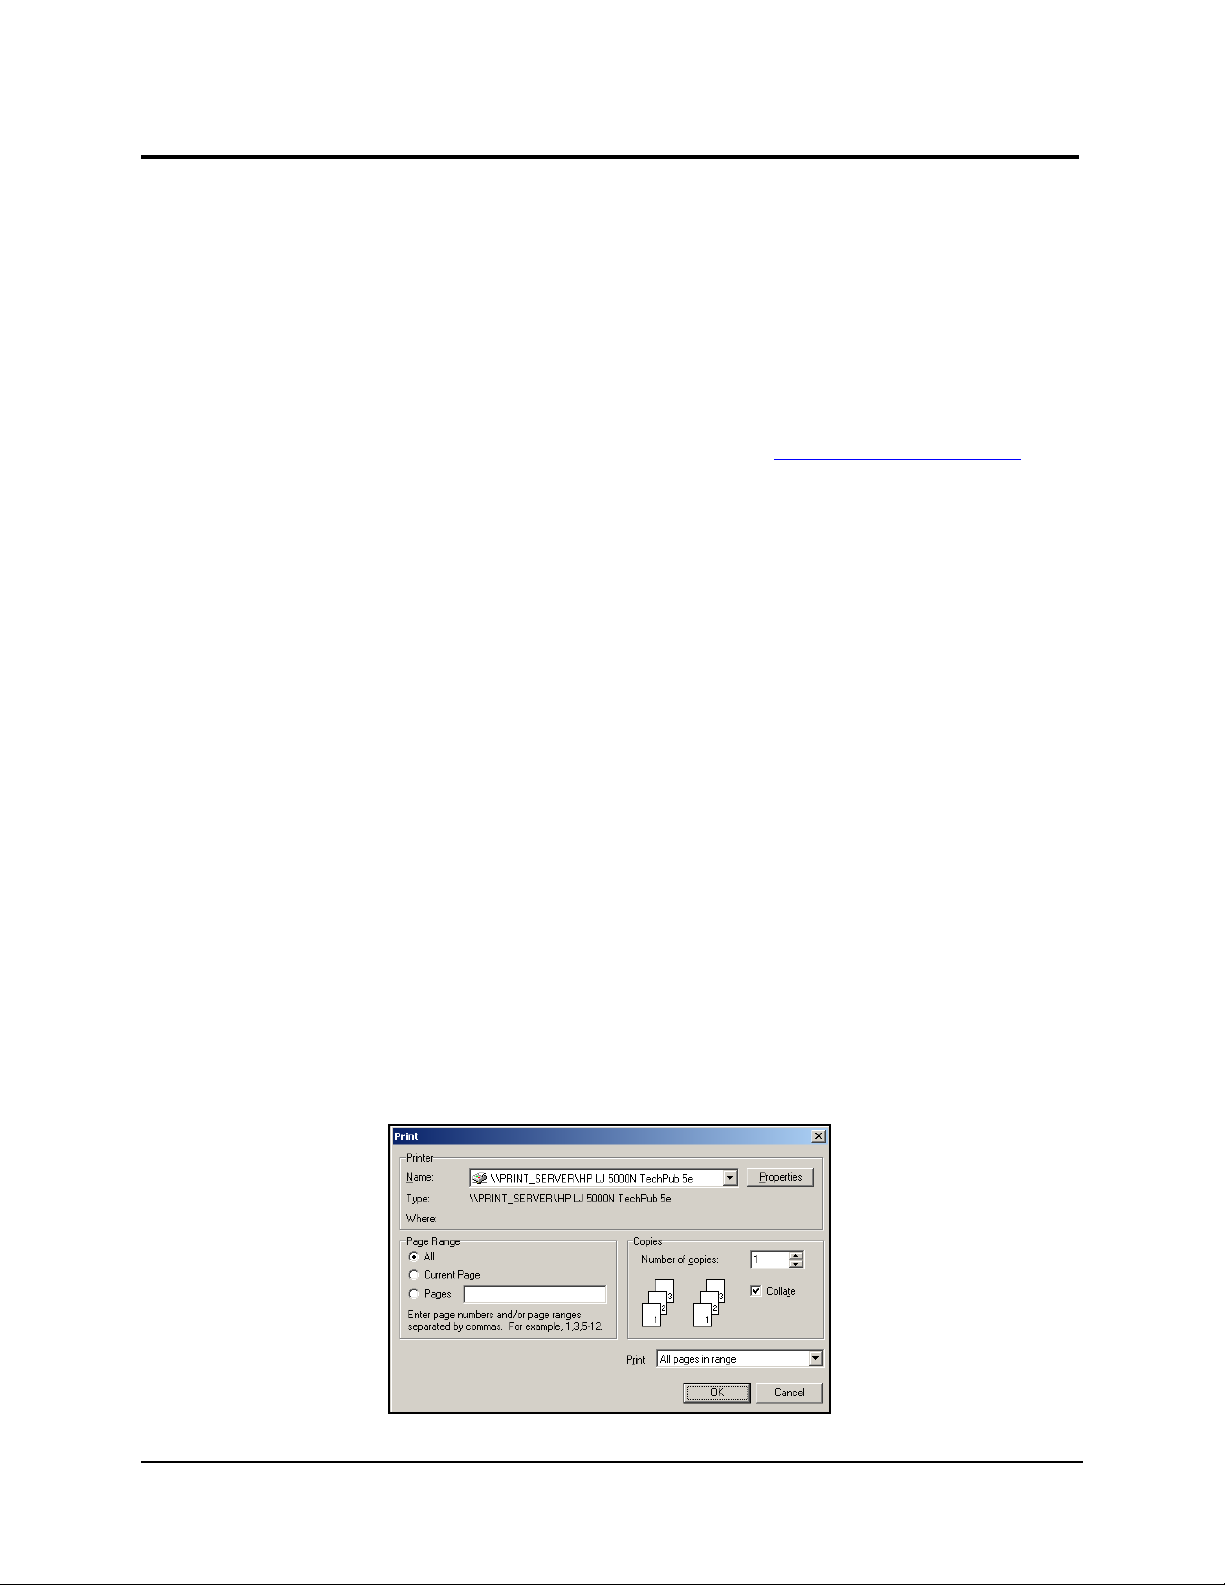
Chapter 6: Reporting Functions
Time Guardian includes nine (9) different reporting options: Department, Employee, Time Card,
Presence, Audit Trail, Hours Worked, Exception, Hours Summary, and Historical Report. These
reports are listed in the left hand column of the Main window and can be rearranged by left
mouse clicking on the report icon and dragging the icon to the desired location.
Left mouse clicking once on the report icon generates a report that will be displayed in the
Report View section of the Main window. Reports can only be generated for the Pay Period
displayed in the “Grid View Selection Options”. The cumulative reporting is the same as
historical reporting in Time Guardian. To produce a cumulative history, a report must be run for
each Pay Period. There is, however, a Historical Report Settings module (see Historical Report
for more detailed information) that will allow you to run reports based upon a specific date
range. For more information about on reporting, please contact: TGSupport@Amano.com
Report appearances will vary depending on the criteria selected during the setup. To display a
Report for a specific employee, highlight the employee in the Employee List section, and drag
the employee record to the Report View section. This action will cause the selected employee
information to be displayed. However, a report must be visible for this to work. To view multiple
records in a Report, click on the scroll bar using the up or down arrows or use the “PgUp” and
“PgDn” keys on your keyboard.
How employees are listed on reports is based on the selection made in the Sort By…. Option in
the employee administration area. The default is Employee Number, and your other options
are: Badge Number, Last Name, First Name, and Department. When department is selected,
employees will be listed by their department and sorted by their employee number.
Printing and Closing Reports
Reports can be printed using three different methods:
st
• 1
Method: Select the Print option from the File Menu in the main menu.
nd
• 2
Method: Right mouse click in the Report view section of the Main menu to display the
drop down list. Select Print.
rd
• 3
Method: The final option is only available if the Print icon has been added to the Custom
Toolbar. For instructions on how to customize the Toolbar, please refer Chapter 9: Quick
Steps (QS), QS 1.
Once the Print command has been selected, the Print command window will be displayed.
Select the printer for the Report, along with the page range and number of copies. The
following is an example of the print drop down list and the print command window:
Time Guardian v3.5 User’s Guide 6-1
Page 90
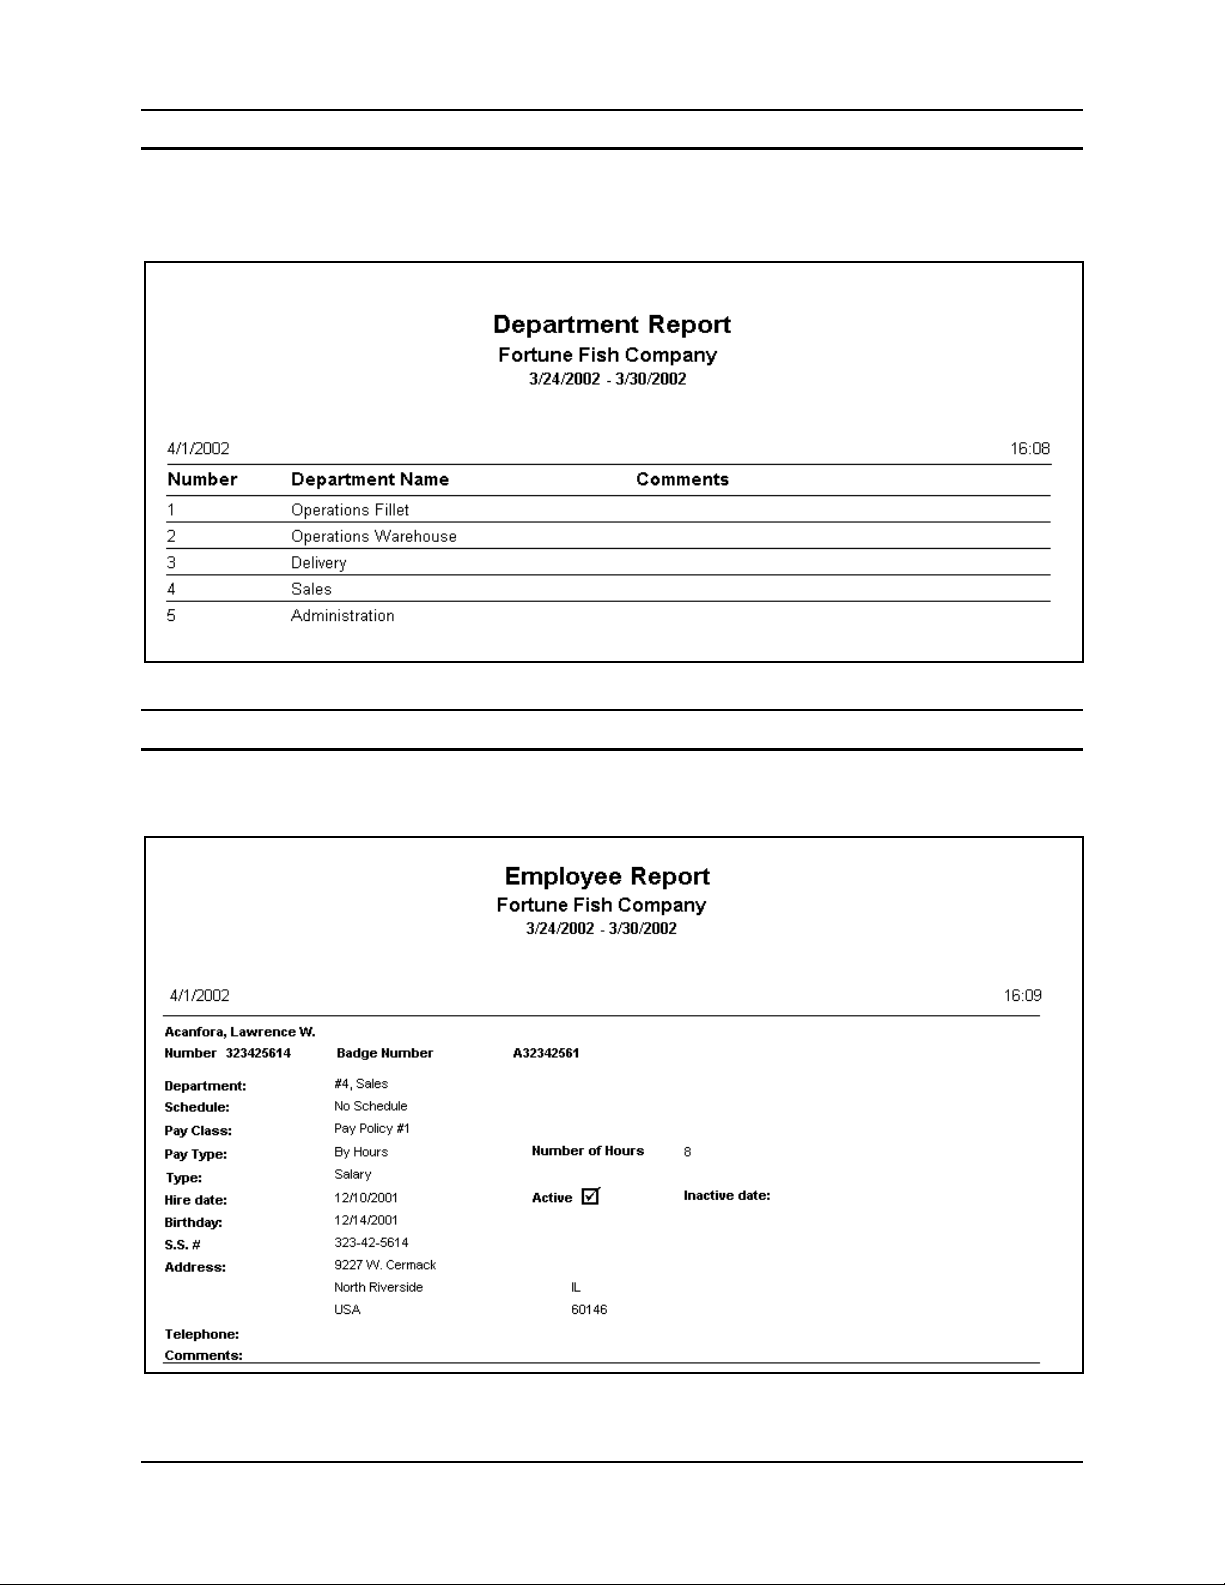
Department Report
As seen in the following example, the Department Report will provide you with a list of
Departments by Number, Department Name, and Comments. If you have chosen not to create
Departments for your company, this report will be blank.
Employee Report
As seen in the following example, the Employee Report provides a list of employees, including
all of the information contained in the General tab of the Employee Setup module.
6-2 Time Guardian v3.5 User’s Guide
Page 91
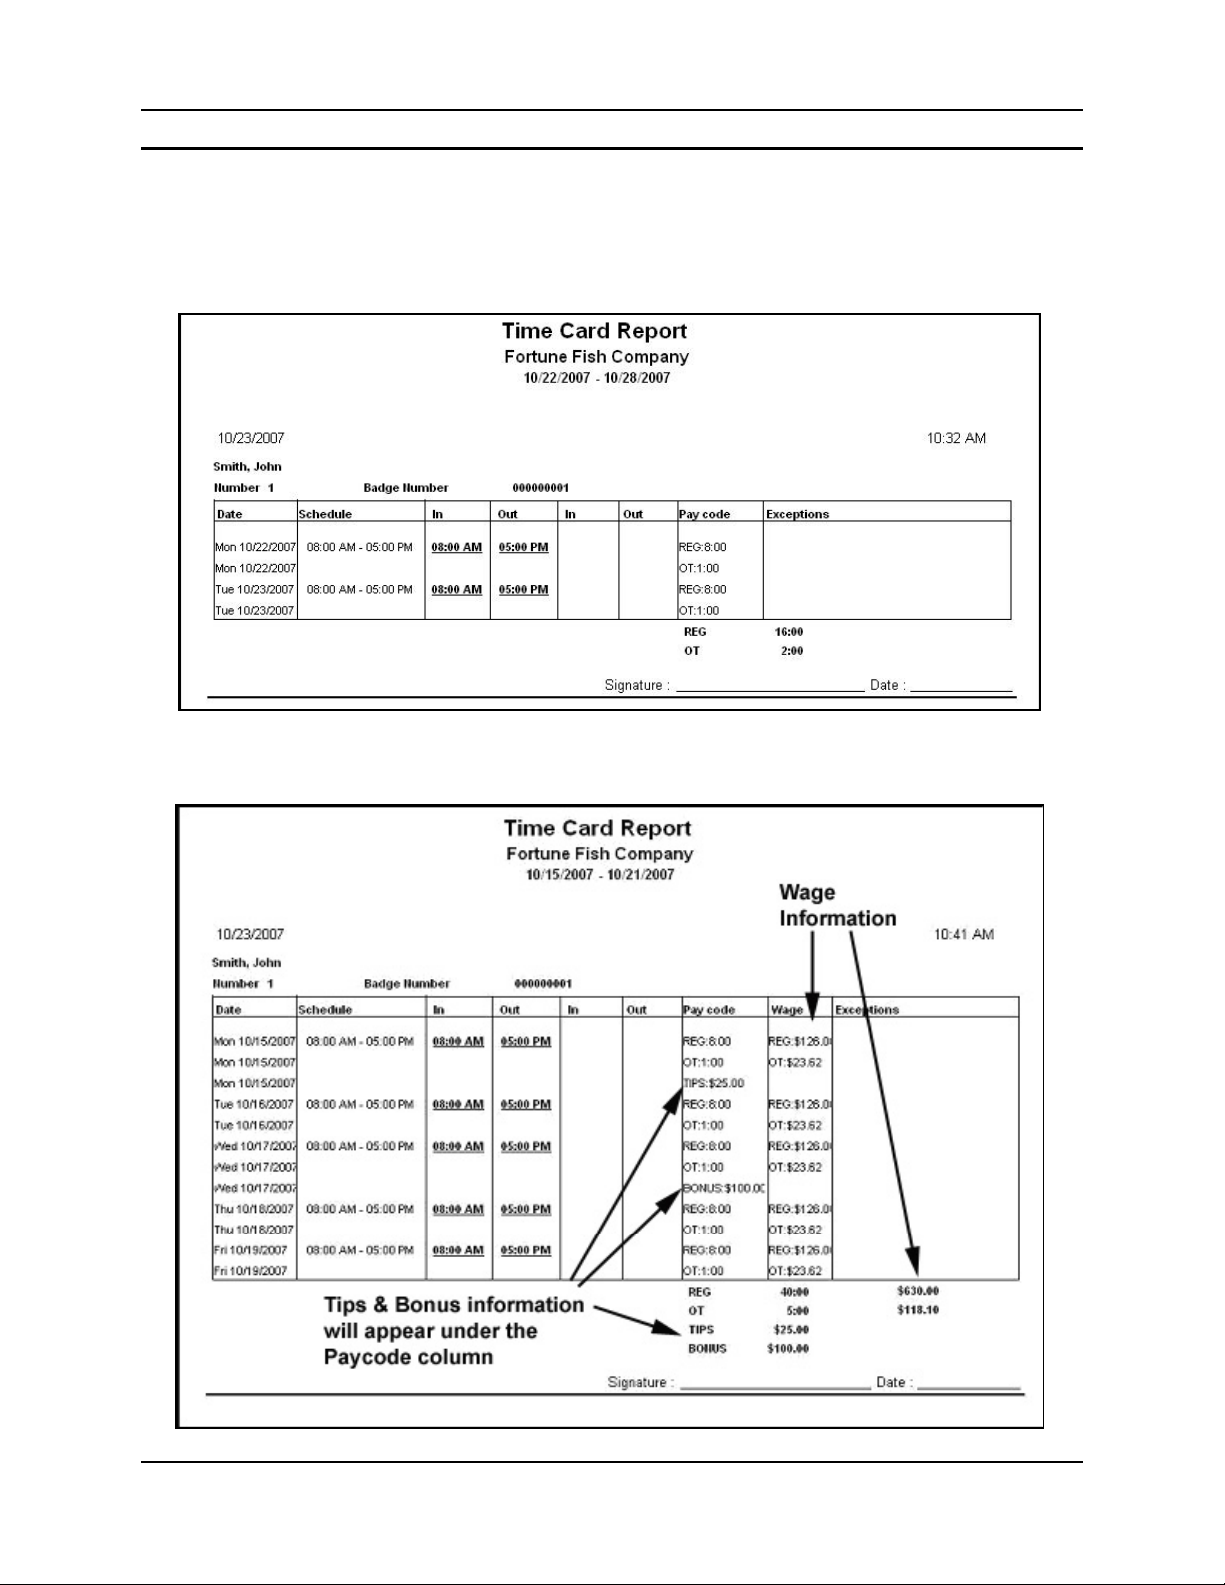
Time Card Report
As seen in the following examples, the Time Card Report provides a complete and detailed
account of employees’ punch times, totals, wages, and exceptions for a specified period of
time. Information will vary based on your company’s Setup selections. Wages will only be
displayed if enabled to be displayed on reports on the Pay Code tab from the Setup Wizard.
Without Wages Example
With Wages Example
Time Guardian v3.5 User’s Guide 6-3
Page 92

Presence Report
As seen in the following example, the Presence Report provides a list of employees currently
punched IN at the terminal. This report will only be accurate if the terminal is polled regularly.
Audit Trail Report
As seen in the following example, the Audit Trail Report records every change made in Time
Guardian. This includes changes made to an employee’s punch, and the addition or deletion of
a Department, or any other modifications made to the program. This invaluable report also
provides the date, day and time the modification was made, including the Login name of the
user who made the change. Events will be listed in chronological order, starting with the first
edit and continuing through to the last, with a line separating activities for each date. This report
will record all punch transaction records and warnings of undefined data.
6-4 Time Guardian v3.5 User’s Guide
Page 93
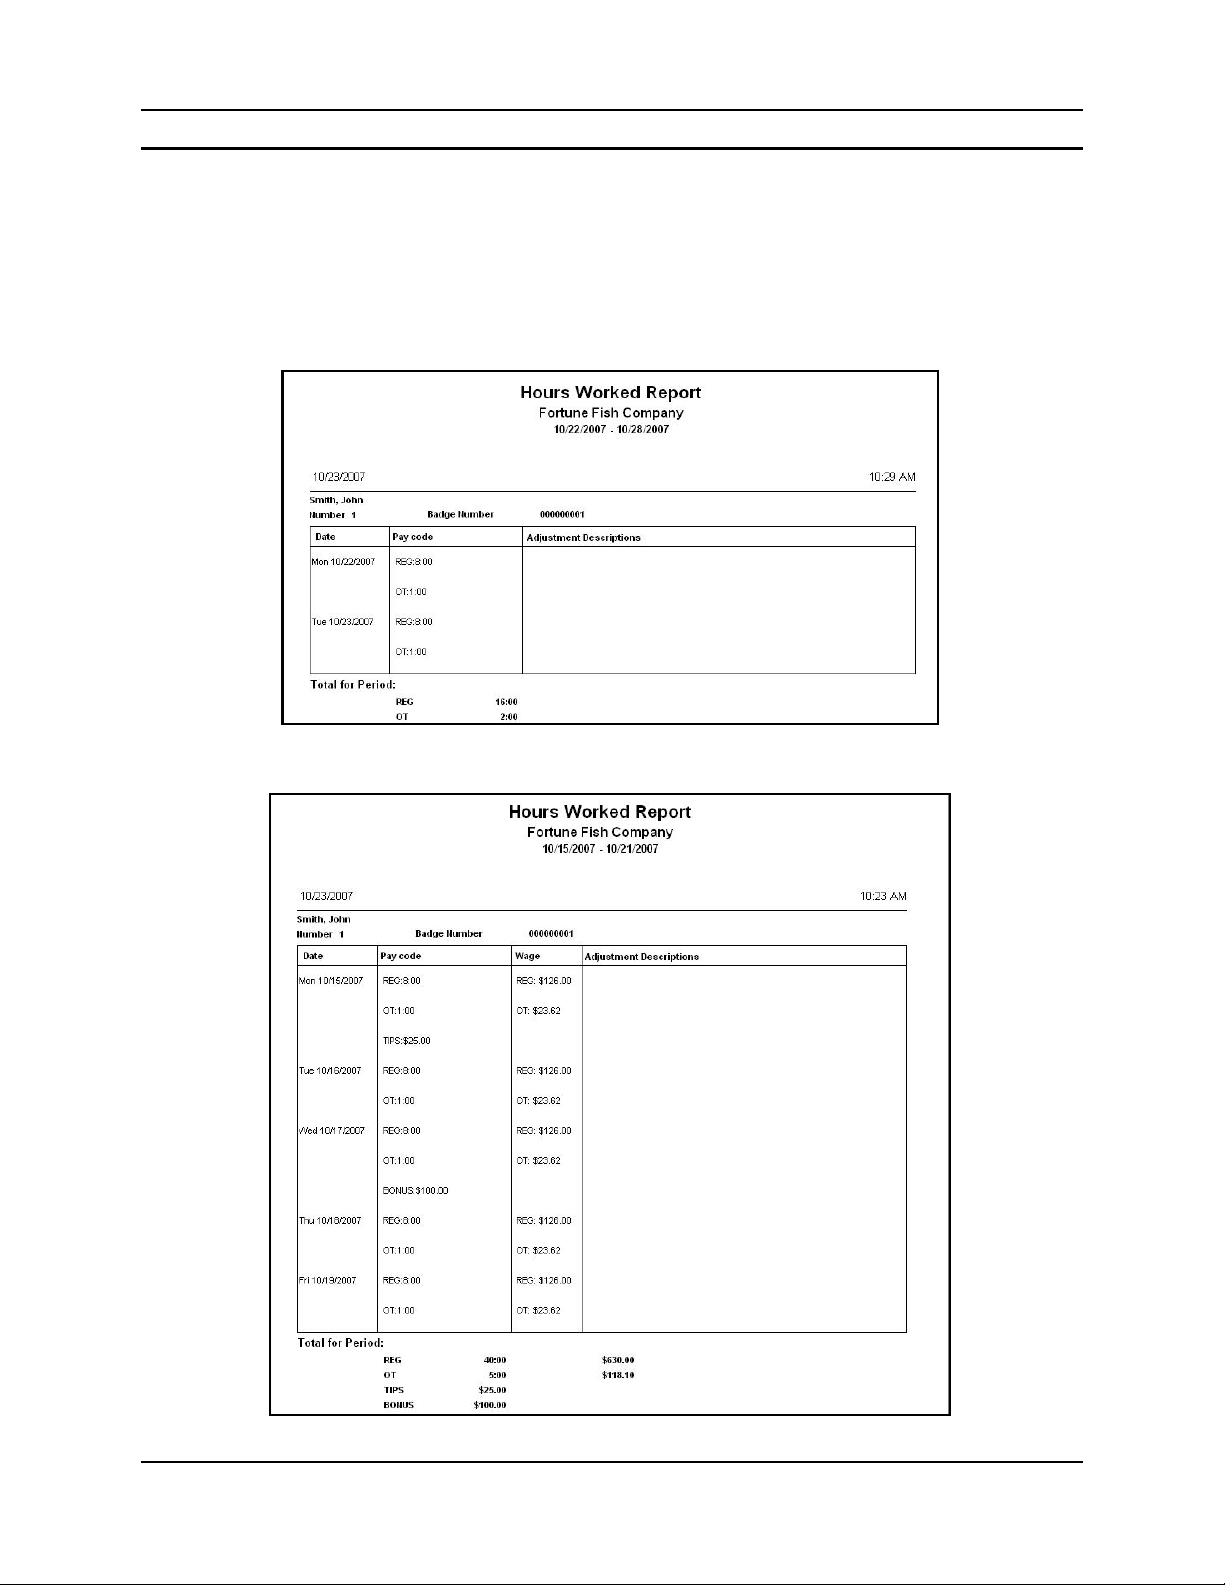
Hours Worked Report
As seen in the following example, the Hours Worked Report includes the Name, Employee
Number, and Badge Number, and provides a compact total of Wages and Hours/Dollars for
both the day and pay period, along with any adjustment comments. This report will display
Department totals when the employee list in the Hours grid is sorted by Department. Wages will
only be displayed if enabled to be displayed on reports on the Pay Code tab from the Setup
Wizard.
Without Wages Example
With Wages Example
Time Guardian v3.5 User’s Guide 6-5
Page 94
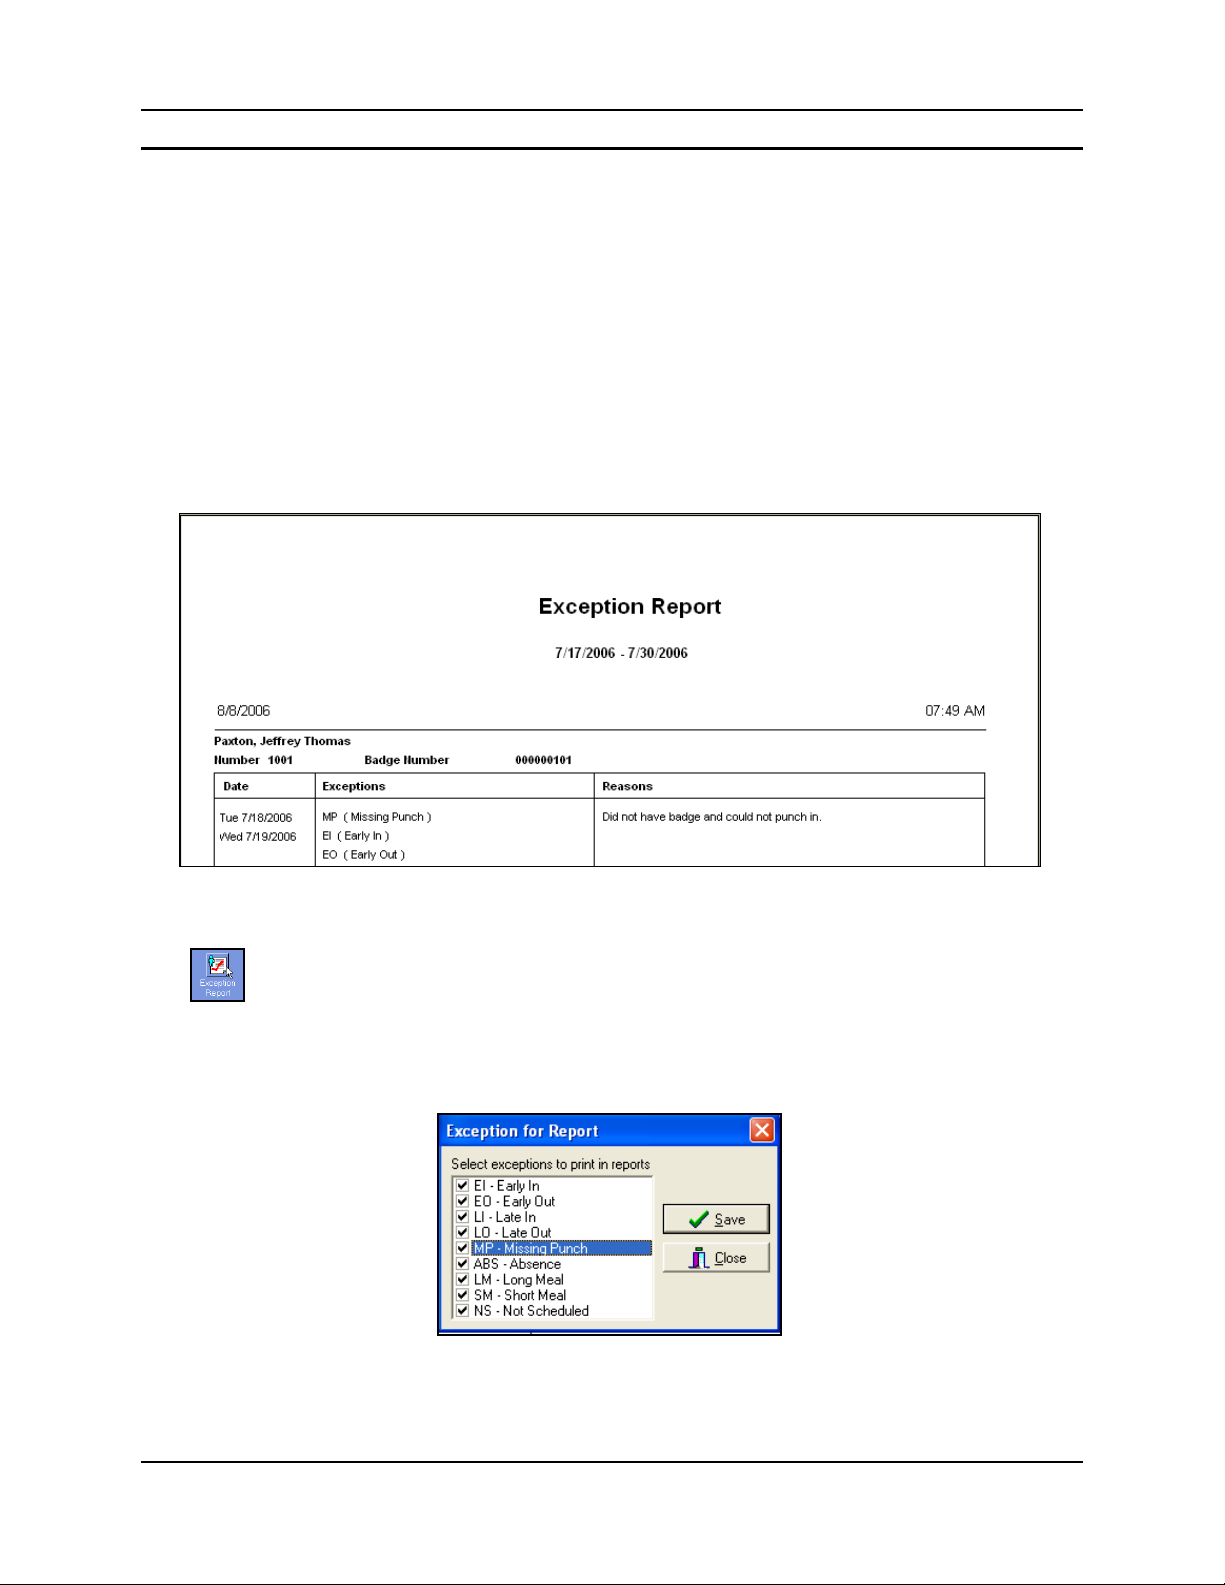
Exception Report
The flagging of Exceptions is a valuable piece of information that can be provided by Time
Guardian. These flags provide managers with a key piece of feedback as to when, how, and if
an employee is punching properly. If you did not choose to use Exceptions during the initial
installation, they can be modified at any time by opening the Wizard and selecting the
“Exceptions” tab. Select the exceptions you wish to track [see below for additional method].
As seen in the following example, the Exception Report includes the Name, Employee
Number, and Badge Number. It provides a list of the Exceptions that were generated based on
the settings selected in the Exceptions section of the Wizard. The report also includes reasons
provided in the Main operations window. Employees may have multiple Exceptions for the
same day, depending on the settings provided. If no exceptions were selected during the setup
Wizard, then this report will be blank. To add additional exception codes to your system, refer to
Exception Tab, page 4-19.
By default, all Exception codes are selected during the setup wizard and are included in the
report. Alternatively, to modify the exceptions displayed, right click on the Exception Report
icon
and a list of available exceptions will be displayed in the following Exception for
Report view. To add an exception to the report, click on the box next to the exception code to
place a checkmark. To remove an exception from the report, remove the checkmark. Click the
Save button to retain changes.
Note: This sets the default criteria. You must repeat the process to add or remove exceptions.
6-6 Time Guardian v3.5 User’s Guide
Page 95
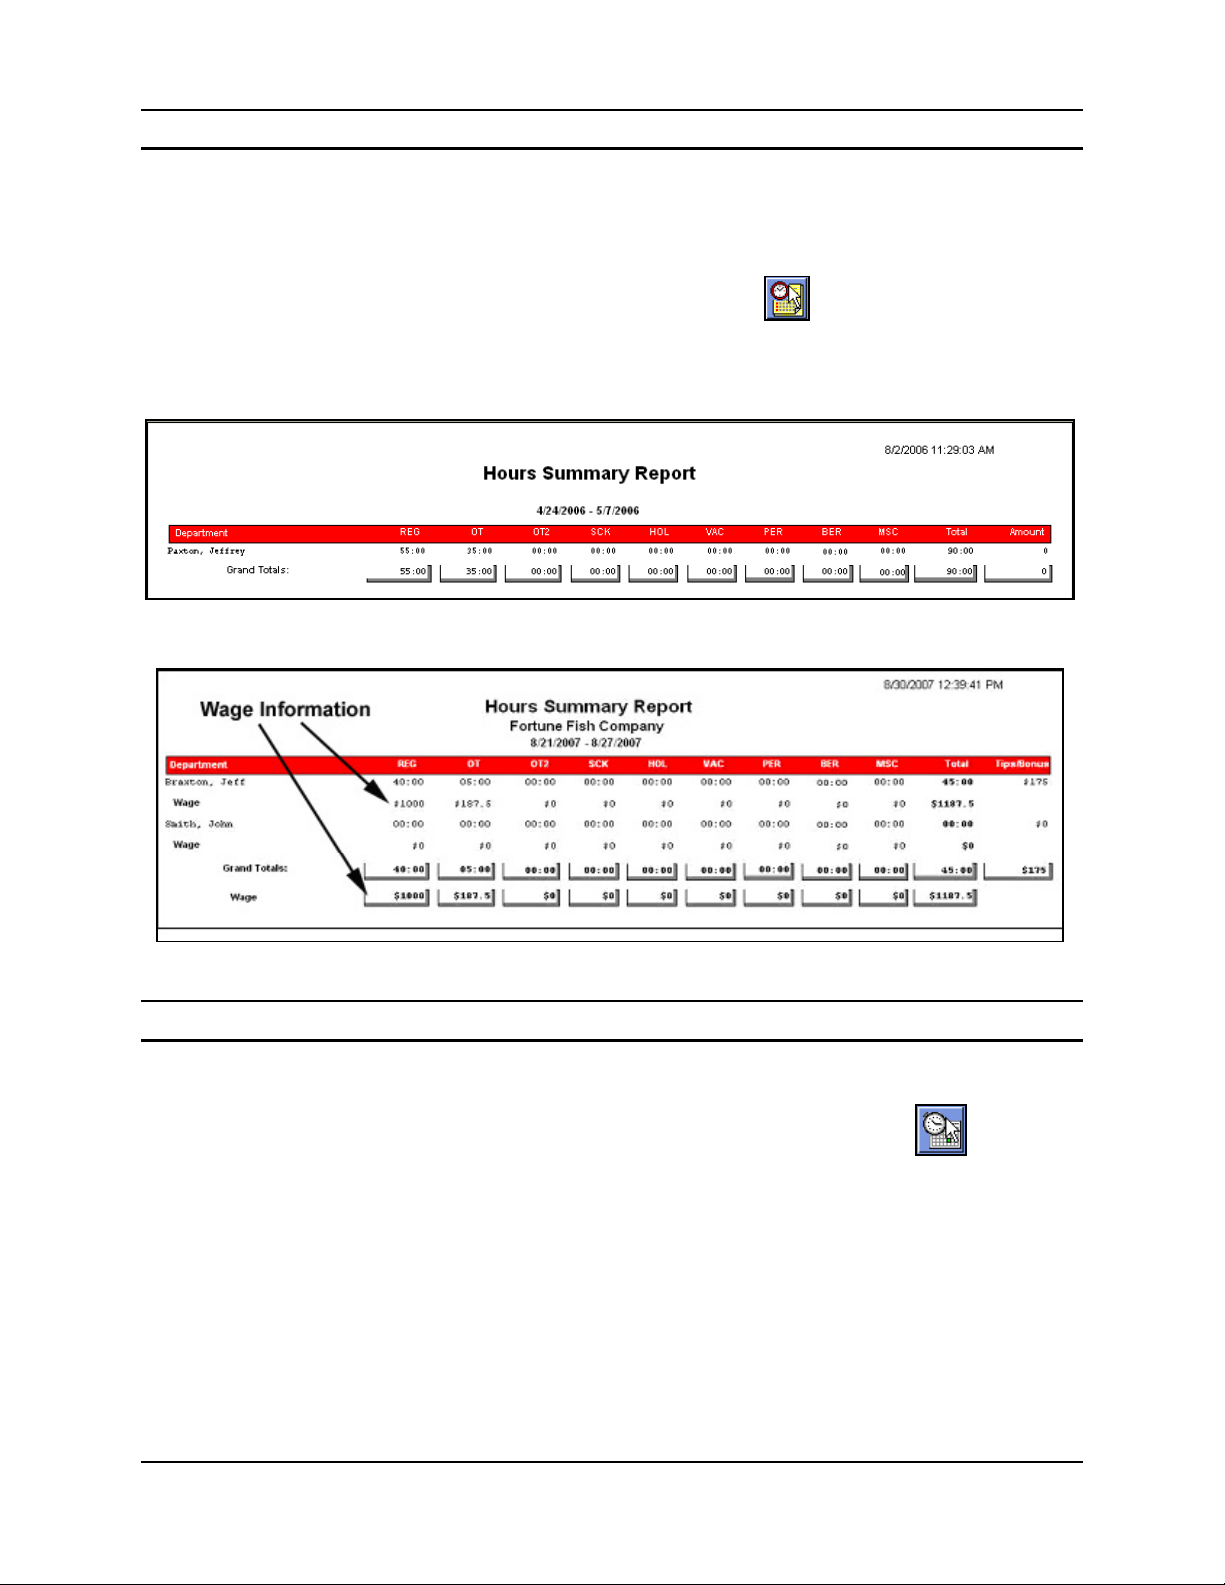
Hours Summary Report
This report provides a one line total for each employee, displaying pay codes, wages, and total
hours. This can also provide totals by department, when the selected employee is sorted by
department. Wages will only be displayed if enabled to be displayed on reports on the Pay
Code tab from the Setup Wizard.
From the main view, click on the Hours Summary Report icon
report screen will appear:
Without Wages Example
With Wages Example
and the following type of
Historical Report
This report displays all of the historical data of an employee for a defined length of time,
including exceptions, absences, and pay code information.
To configure the Historical Report settings, right-click on the Historical Report
following dialog box will be displayed:
Time Guardian v3.5 User’s Guide 6-7
Icon. The
Page 96

1. Select a Start Date and End Date using the dropdown boxes.
2. Select the Pay code(s) and Exceptions (must have at least one exception selected) to be
included in the report. Placing a checkmark next to All Pay Codes or All Exceptions will
include all available Pay codes/Exceptions in the report.
3. For each Exception selected (excluding Missing Punch, Absence, and Not Scheduled), you
must specify a qualification (in minutes) or mark (underline) for the Exception. If the
Exception is less than the range specified, it will not appear on the report. For example, if an
employee punches in 9 minutes later than the scheduled time, and the Late In (LI) Exception
is set to “Display if greater than” 10 minutes, that Exception will not appear in the report. If
the LI was 10 minutes or greater, it will appear in the report. Likewise, if you set the “Mark if
greater than” 10 minutes, the time will be displayed in the report and underlined in red.
4. To include a tabulated summary of Exceptions for each day of the week, select “Yes” to the
question, “Display the number of exceptions per day of week?”.
5. Click on the Save button to save your settings.
6. To exit the Historical Report Settings dialog box, click on the Close button.
7. To run the report, left-click on the Historical Report Icon. A Historical Report will appear on
screen for each selected employee as illustrated by the following example. To print the
report, select the Print command from the File Menu.
6-8 Time Guardian v3.5 User’s Guide
Page 97

Time Guardian v3.5 User’s Guide 6-9
Page 98

This page left intentionally blank.
6-10 Time Guardian v3.5 User’s Guide
Page 99

Chapter 7: Troubleshooting Calculations
When times and/or hours calculated for an employee do not match what you believe to be the
correct total, the first thing that must be taken into account is the Pay Policy that the employee
has been assigned to. To determine the Pay Policy assigned to an employee, right mouse click
on the employee and select Employee from the dropdown list. To view the rules of the Pay
Policy, select the Setup Wizard from the Main menu. Once open, select the “Pay Policy” tab,
and click the Pay Policy
way employee hours are calculated are:
• Overtime Rules
• Rounding Rules, including Unit and Point settings
• Meal Rules, including Unit and Point settings
In addition, the length of the time assigned for the Meal will impact the way an employee’s
hours are calculated.
It is recommended that you record this information on an Employee Calculation worksheet and
confirm that all rules have been taken into consideration. If the calculations are still not correct,
please refer to Time Guardian Basic Customer Support, page 2-3.
icon to view the settings. Some of the key areas that impact the
Time Simulation
The Time Simulation utility can be launched from the Main window by selecting Tools => Time
Simulation submenu selections from the Help Menu as illustrated here:
By entering the Unit and Point assigned to the employee’s Pay Policy, and then entering the
Punch Time for the employee, Time Guardian will display the calculated rounded time when the
“Simulation” button is pressed. As seen in the example below, if the Unit is 15 and the Point is
7, and the employee punches IN at 12:07, then the time will be moved forward to 12:15.
Time Guardian v3.5 User’s Guide 7-1
Page 100

Hours Simulation
The Hours Simulation utility can be launched from the Main window by selecting Tools =>
Hours Simulation submenu selections from the Help Menu as illustrated here:
Select the type of simulation you would like to perform by choosing either "Minutes to
Hundreds" or "Hundreds to Minutes." Next, enter the employee’s time. The calculated time in
Hundreds or Minutes will be displayed when the “Simulation” button is pressed. An example of
each of these calculations is shown here:
7-2 Time Guardian v3.5 User’s Guide
 Loading...